

Page 1
Assembly Instructions
Seating the Way You Want It
Lesro Industries, Inc.
1 Grifn Road South
Bloomeld, CT
06002
Phone
860.243.3226
Fax
860.243.5392
www.lesro.com
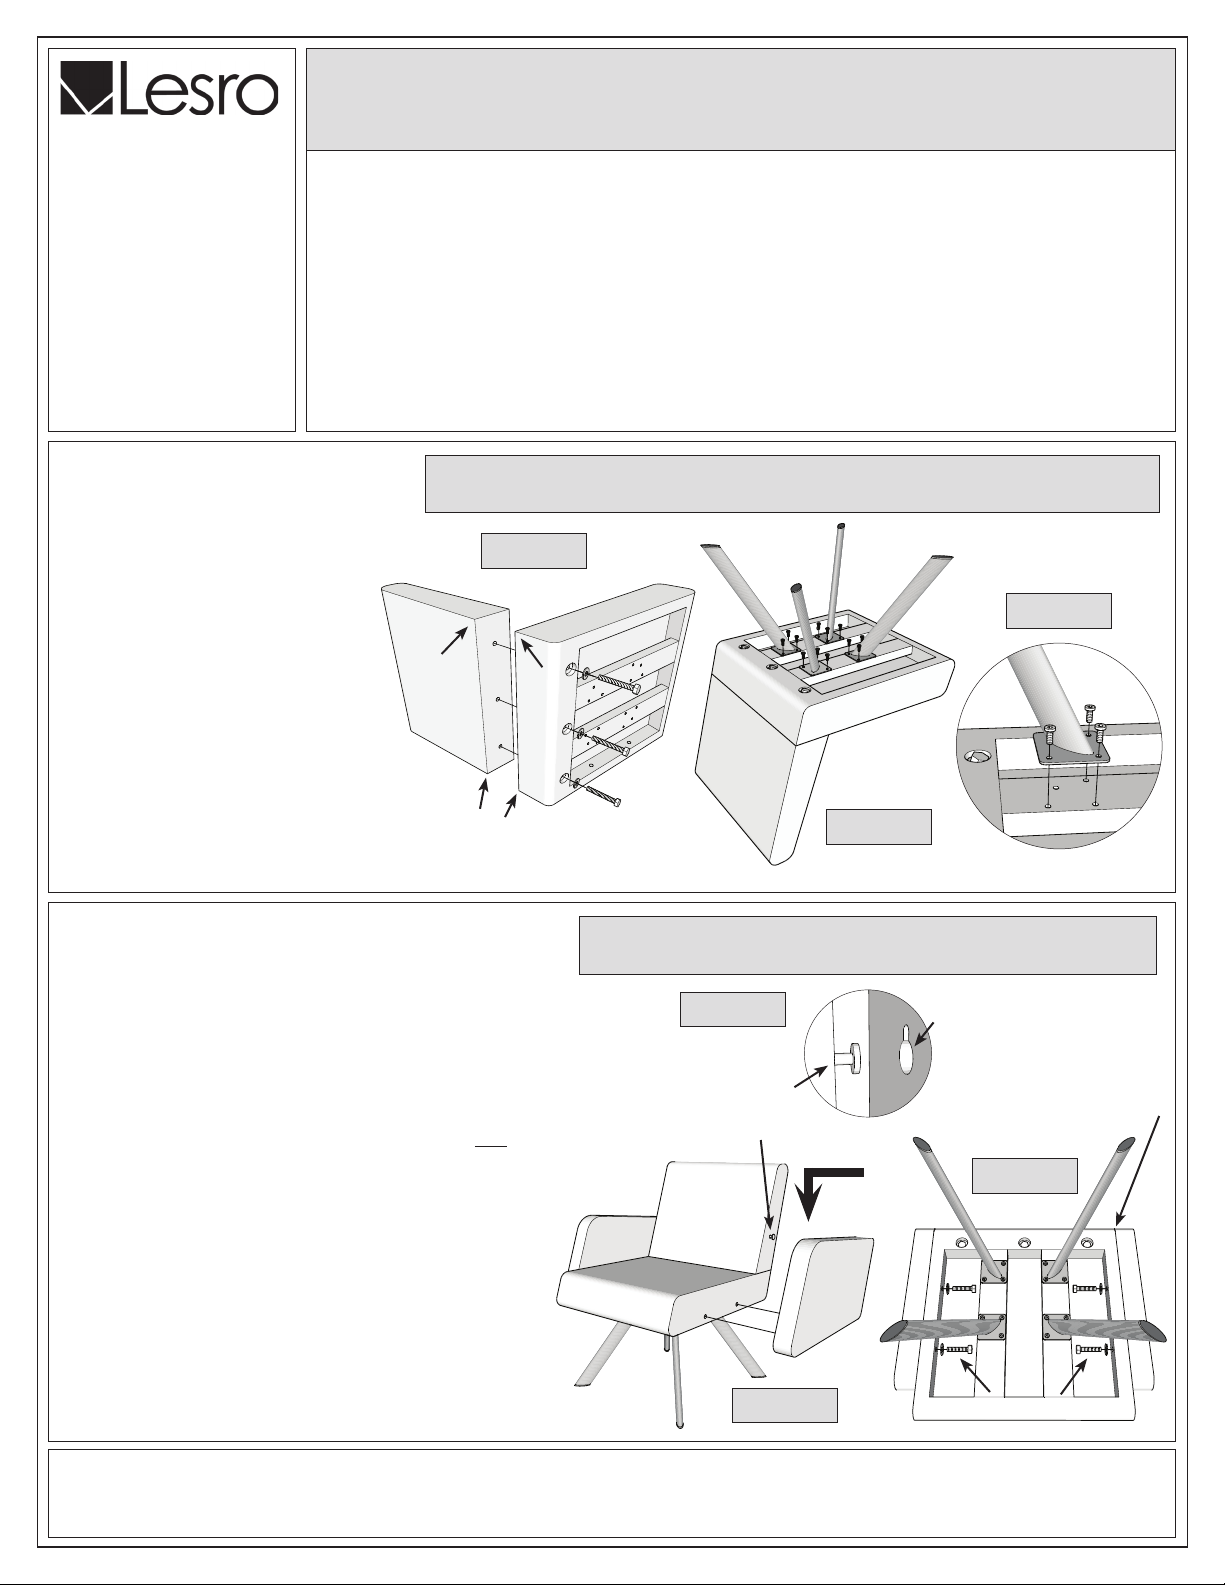
1. Unpack and identify all parts.
2. Attach back to seat using 5” hex
bolts and washers into threaded
inserts, as shown in gure 1.
Keep bolts slightly loose.
3. Carefully align edges of seat with
edges of back and tighten bolts
securely.
4. Attach legs to bottom of seat
using ½” Allen bolts into threaded
inserts, as shown in gures 2 and
3. Only 3 bolts per leg. Tighten
very securely.
5. If your chair is armless, it is fully
assembled and ready to use.
Otherwise, proceed to next section
to attach arms.
Tools required: 9/16” ratchet and Allen wrench (Allen wrench included in hardware pack)
Note: These instructions are intended for various models and congurations. Your products may not
look exactly as those shown in the diagrams.
Important: The assembly process requires that some hardware be kept loose until later in the
sequence. Follow these instructions closely to ensure correct assembly.
Recommendation: Retighten all bolts on a seasonal basis to ensure your product remains strong and
stable for many years of use.
Weight Capacities: Guest chairs in this series have a weight capacity of 400 lbs., Bariatric and
Loveseat 600 lbs., and sofa 700 lbs., unless otherwise stated.
For Willow Guest, Bariatric, Loveseat and Sofa
Section 1 - Willow Seating without Arms
Figure 1
Figure 3
Align edges when
tightening bolts
Figure 2
1. Follow steps in Section 1 to attach back and legs to
seat.
2. The arms attach to the back assembly using a post-andkeyhole system, as shown in gure 4
3. With the chair in the upright position, attach arm panels
by inserting post into keyhole slot, as shown in gure
5. With posts fully inserted, press arm panel down until
post “bottoms out” in the keyhole slot.
4. Important: Thick fabric can make it difcult to fully
insert the posts into the keyhole slots. If this problem
occurs, press the arm tightly against the back to
compress the fabric. This will enable the post to drop
deep enough into the keyhole slot.
5. Once post is fully inserted and correctly positioned
inside slot, use 2” hex bolts and washers into threaded
inserts, as shown in gure 6. Start each bolt rst, until
both have caught a few threads, then nger tighten only.
6. Carefully align bottom and back edges of arm with seat
and back edges, then tighten bolts securely.
7. Your seating is now assembled and ready to use.
Section 2 - Seating with Arms
Figure 4
Post in
Back
Cushion
Figure 5
Keyhole
Slot in Arm
Panels
Figure 6
2” Hex Bolts and Washers
tightening
Thank you for purchasing a Lesro product.
Need assistance with assembly? Call Lesro customer service 1-800-275-7545.
© 2020 Lesro Industries, Inc. Jan 2020
Visit us on-line at www.lesro.com
Align
edges
when
bolts
 Loading...