

Page 1
Leaders in Reception Seating
Tools required: Rubber mallet (Standard hammer is not recommended)
Note: These instructions are intended for various models and congurations, with and without arms.
Your products may not look exactly as those shown in the diagrams.
Important: The assembly process requires all interlocking wedge hardware be kept loose until later
in the sequence. Once all parts are properly connected, it is then safe to tighten and secure hardware.
Follow these instructions closely to ensure your product remains strong and stable for many years of use.
Weight Capacity: All chairs in these series have a weight capacity of 275 lbs. per seat, unless
otherwise stated.
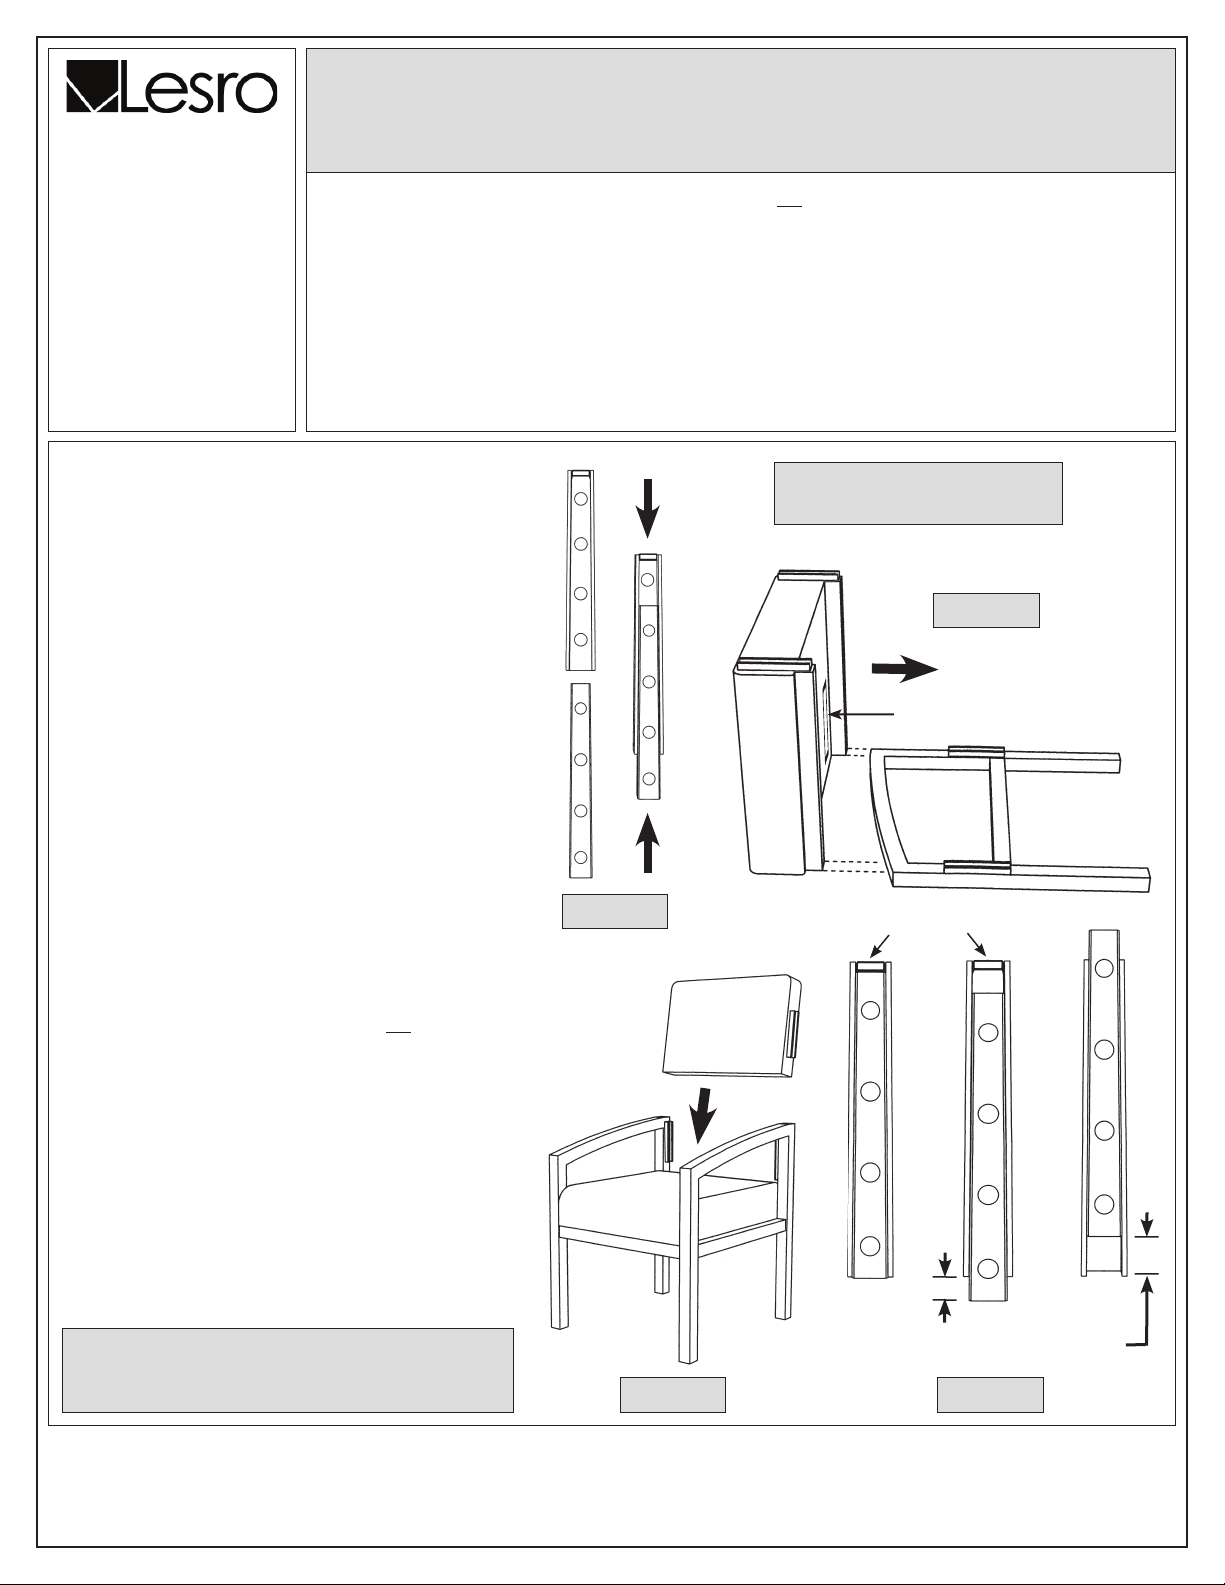
1. Unpack and identify all parts. Important: The white
label on the bottom of the seat goes in the back.
2. This chair is held together by use of interlocking
wedge hardware, as shown in gure 1.
3. Attach the seat cushion to one leg frame by aligning
the interlocking wedges and sliding them together
simultaneously, as shown in gure 2. Important:
Keep these wedge connections loose for now.
4. Repeat step 3 to attach the second leg frame to the
seat cushion. Keep these connections loose for now
as well.
5. Stand the chair upright and slide the back cushion
between the leg frames, as shown in gure 3. Use
care that the wedges on both sides are properly
aligned and connected simultaneously. Do not
attempt to insert one side ahead of the other. Keep
these wedge connections loose for now.
6. With the chair upright on a level surface, use your
hands to apply pressure to the seat and back
cushions a little at a time. You should feel the
wedges slide together and tighten.
7. With scrap cardboard or other protective material
over the fabric, use a rubber mallet (not a standard
hammer) to gently tap the seat and back cushions
until the interlocking wedges are “locked” together.
Important: Wedges are correctly “locked” when
the inner wedge comes into contact with the top
ap of the outer wedge, and the bottom edges
align, as shown in gure 4. Avoid excessive
force or damage to the wedges may occur.
8. Wedge connections must be visually inspected
before use to ensure all are correctly set and locked.
9. Your product is now assembled and ready to use.
Hartford, Lenox, Madison, Tempe, and Weston Series
For Amherst, Ashford, Chelsea, Classic, Contour, Franklin,
Assembly Instructions
Single Chairs
Figure 2
White label goes in the back
Figure 1
Top Flap
TROUBLESHOOTING TIP: If chair does not
sit level on the oor, check that all wedges
are correctly “locked,” as shown in gure 4.
Correctly
“locked”
Not in far
enough
Figure 3 Figure 4
In too
far
Page 2
Assembly Instructions
Leaders in Reception Seating
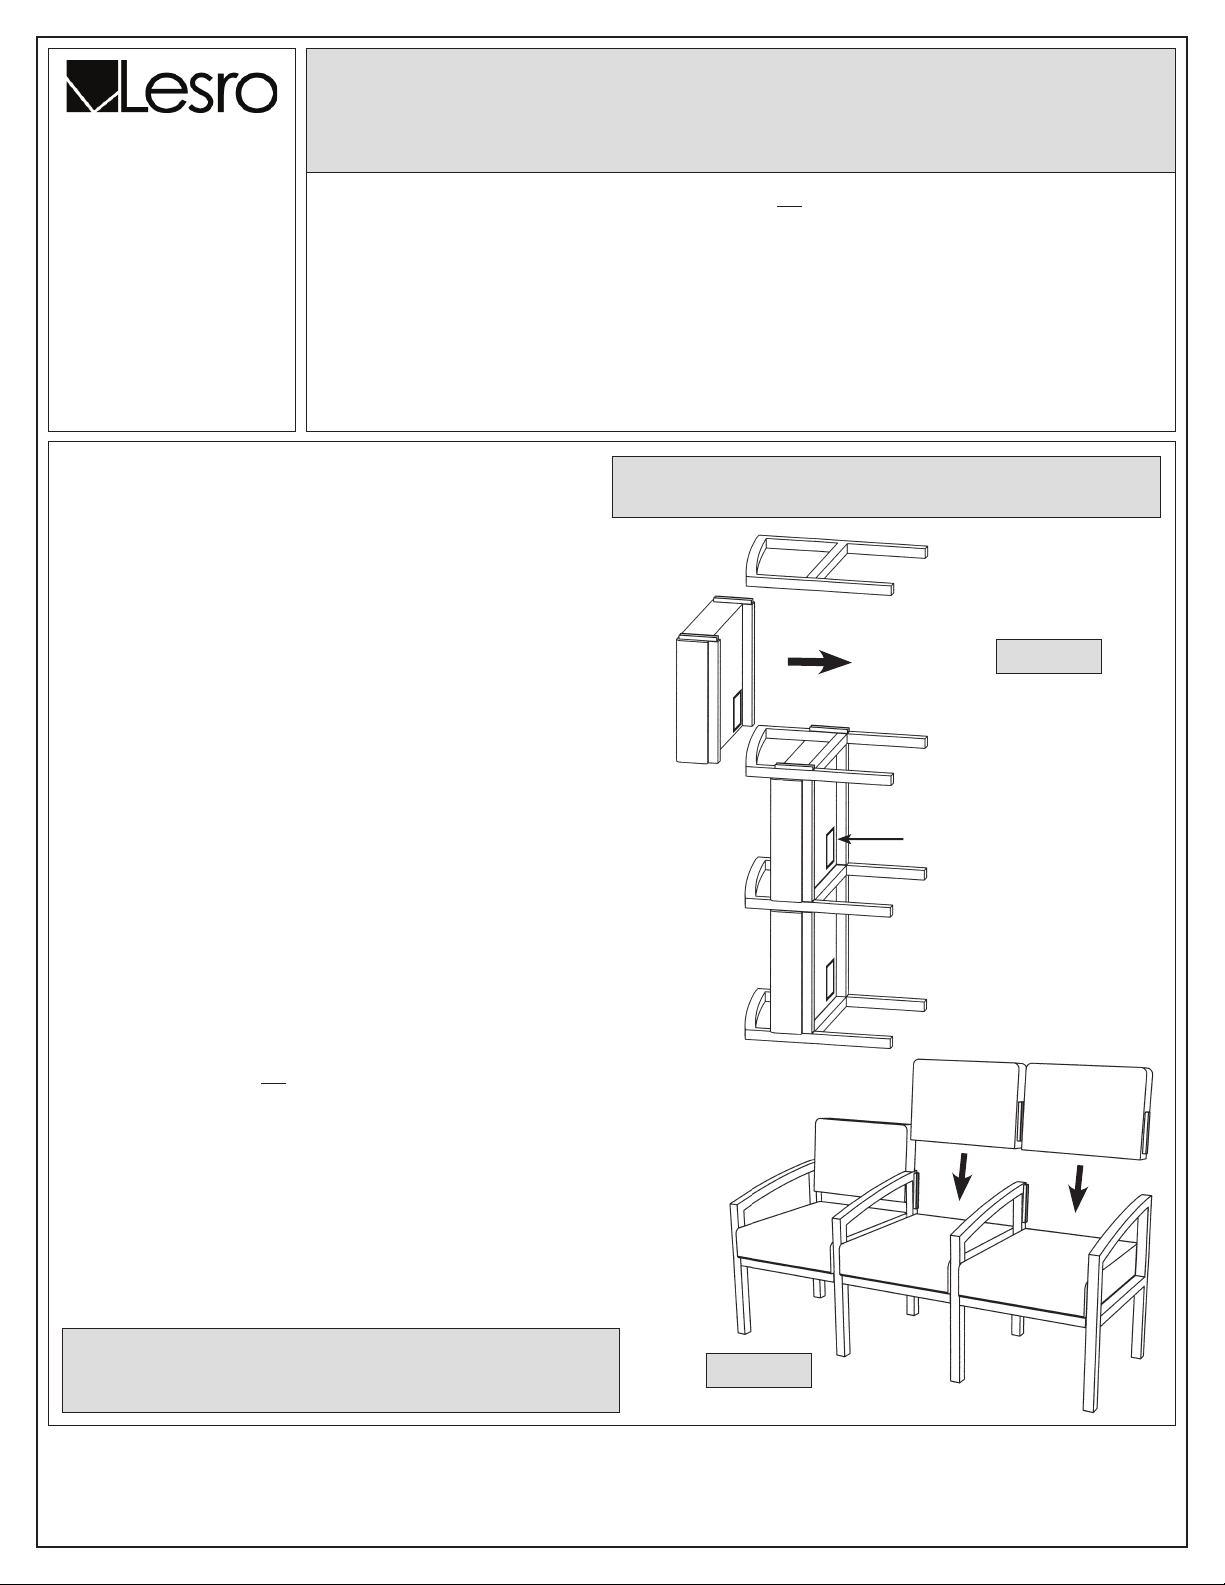
1. Unpack and identify all parts. Center legs have wedge
hardware on both sides. Left and right legs have wedge
hardware on one side only. Important: The white label
on the bottom of each seat cushion goes in the back.
2. These chairs are held together by use of interlocking wedge
hardware, as shown in gure 1 on opposite side of this sheet.
3. Start with the right leg frame to assemble the rst chair and follow
steps 3 and 4 on the opposite side of this sheet. Important:
keep all wedge hardware connections loose for now and do
not attach back cushions at this time.
4. Continue attaching seat cushions and leg frames until entire
set is assembled, as shown in gure 5. Again, keep all wedge
hardware connections loose.
5. Once all seat cushions and leg frames have been connected,
place entire assembly upright on a level surface.
6. Slide back cushions between the leg frames as shown in
gure 6. Use care that the wedges on both sides are properly
aligned and connected simultaneously. Do not attempt to insert
one side ahead of the other. Keep these wedge connections
loose until all back cushions are in place.
7. With the assembly upright on a level surface, use your hands to
apply pressure to each seat and back cushion a little at a time.
You should feel the wedges slide together and tighten.
8. With scrap cardboard or other protective material over the fabric,
use a rubber mallet (not a standard hammer) to gently tap the
seat and back cushions until the interlocking wedges are “locked”
together. Refer to gure 4 on opposite side of this sheet.
Important: Wedges are correctly “locked” when the inner
wedge comes into contact with the top ap of the outer
wedge, and the bottom edges align, as shown in gure 4.
Avoid excessive force or damage to the wedges may occur.
9. Wedge connections must be visually inspected before use to
ensure all are correctly set and locked.
10. Your product is now assembled and ready to use.
For Amherst, Ashford, Chelsea, Classic, Contour, Franklin,
Hartford, Lenox, Madison, Tempe, and Weston Series
Tools required: Rubber mallet (Standard hammer is not recommended)
Note: These instructions are intended for various models and congurations, with and without arms.
Your products may not look exactly as those shown in the diagrams.
Important: The assembly process requires all interlocking wedge hardware be kept loose until later
in the sequence. Once all parts are properly connected, it is then safe to tighten and secure hardware.
Follow these instructions closely to ensure your product remains strong and stable for many years of use.
Weight Capacity: All chairs in these series have a weight capacity of 275 lbs. per seat, unless
otherwise stated.
Connecting Chairs & Sofas
Left Leg
Frame
Figure 5
Center
Leg Frame
White labels go in the back
Center
Leg Frame
Right Leg
Frame
TROUBLESHOOTING TIP: If chairs do not sit level on
the oor, check that all wedges are correctly “locked”
as shown in gure 4 on opposite side of this sheet.
Figure 6
 Loading...