


LeEco 2.1 Channel
Sound Bar with Wireless Subwoofer
User Guide
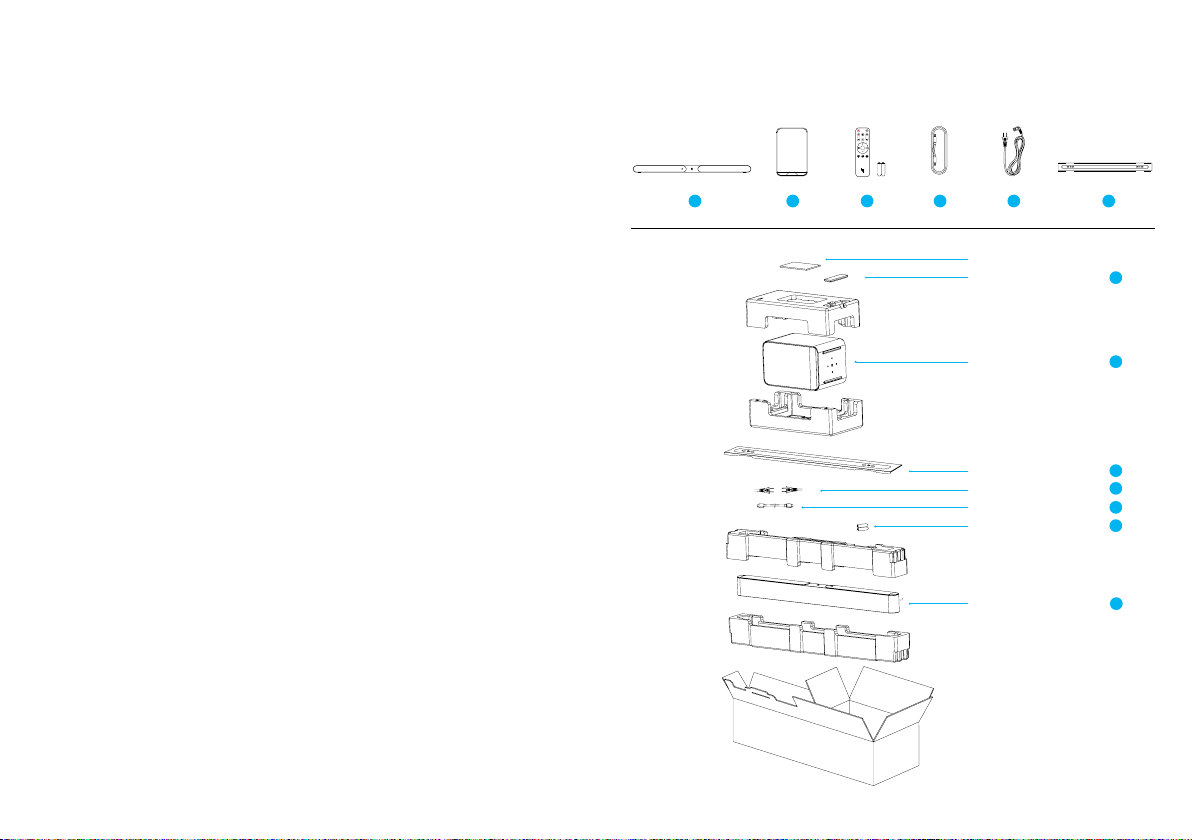
Product Layout
1 2 3 4 5 6
User Guide
Remote Control
3
Wireless Subwoofer
Wall Mount Bar
Power Cord x2
HDMI Cable
Battery
Sound Bar
*Il lus tra tio ns ar e fo r ref ere nce o nly
2
6
5
4
3
1

Product Overview Remote Control Buttons and Functions
Sound Bar
1
1
AUX
2
USB
Source
HDMI ARC
OPT
3
5
1
Buttons
Top View
Rear View
2
3
4
LED
Indicator
2
Printing
3
Connections
Subwoofer
Indicator
AC IN USBSPDIF IN HDMI(ARC) AUX
Link
Power Button
AC IN
1
Select the 3 .5m m connector
2
Select the US B drive (or po rtab le
hard disk) and read the list o f track s
3
Switch bet ween sources:
Bluetooth/USB/OPT/AUX/ARC
4
Select the HDMI (AR C) conn ector
5
Select the SPDIF (optical) connec tor
One Key Playback
Equalizer
Virtual Surround
Playba ck music content directly
6
from US B drive
7
Bass and Treble adjustments
(for deta ils ple ase refe r to Soun d
Bar Op erations)
8
Turn virtu al surro und e ect on a nd o
7
6
8

Sound Bar Operations
Initi al confi guration
• After yo u connect the sound b ar and the subwoofer to powe r suppl y, the syste m
will turn on autom atica lly after conn ection.
• The sound bar and the subwoofer has been paired. No pairing is needed .
• The recommended connection from the sound bar to the TV is HDMI(ARC).
HDMI cable is inclu ded to provide optimal au dio experience with th is system.
System operations
1. Sur roun d soun d mode
• Press th e “
on or o.
2. Adj usti ng volu me
• Press the Volume +/- buttons on the remote control to increase/decrease the volume.
• Press th e Mute button to mute vo lume . To unmute, press the mute but ton again or
press Volume +/- button .
3. Equ aliz ier Adj ustment
• Adjust t he bass: press the “
adjus tment . Please make su re the 3 lef t-mos t indicator LE Ds on the s ound bar
flashe s 3 times simultaneo usly to confirm that the bass adju stment has be en
enabled. Use the Volume +/- to adjust to a djust the bass up or down .
• Adjust t he treble: press the “
adjus tment . Please make su re the 3 rig ht-most indic ator LED s on the sound ba r
flashe s 3 times simultaneo usly to confirm that the treble adj ustment has been
enabled. Use the Volume +/- to adjust to a djust the treble up or down.
• Note: Please refer to the LE D Indicator Light Over view fo r more details to
understan d when bass or tre ble ad justm ents are enab led.
4. Play a udio v ia Blu etoot h
• Connect the s ound b ar to an exte rnal B luetooth devic e (such as iPad/iPhone/
Android phon e) via Bluetooth and enjoy mu sic on th e connected device usi ng
the sound bar.
• Press th e Bluetooth but ton on th e sound bar or re mote control to turn o n
Blueto oth and e nter pairing state. Th e Bluetooth indicator (white) on the sound
bar will fl ash quickly.
• Turn on Bluetooth on the exter nal device, an d search for and s elec t “LHT-V16S ”.
” button o n the rem ote control to turn th e surround sou nd ee ct
” Equalizer button on the re mote to enable ba ss
” Equalizer button on the re mote to enable tre ble
• Note : Conn ec tin g th e soun d bar to the TV via Bl uetooth is not recomm en de d
as it will not p rovi de t he opti ma l au dio exp er ien ce . We s tro ngl y re comme nd
using HDMI (ARC) connection with your TV.
• When th e Blue tooth indicator on the so und ba r is glowing white, the connecti on
is established.
5. Auto standby mod e
• If the sound bar stays idl e and receives no signal for 30 minutes, it will
automatically enter standby m ode. (Please note: af ter entering a uto standby
mode , press the power key to wake up)
6. Pairing with the s ubwoo fer
• When you turn on the sound bar and subwoofer, they will pair automatically.
• Please pair the subwoof er man ually if n o soun d is coming from th e subwoo fer.
• Press and hold the “Li nk” b utton on the bac k of the subwoofer for more than
3 secon ds, to enter the pa iring s tate.
• Then press the “ Blu etooth” and the “Source” butto ns on the s ound b ar
simult aneo usly for more than 2 seconds. T he sound bar and the subwoofer
will connect wireles sly.
• Note: Du ring th e pairi ng process, the indicator light on the sound b ar will change
accordingly. Please refer to the LE D Indicator Light Over view for more details .
7. Restoring factory settings
• To reset the sound bar, press and hold the Source, Volume + and Volume -
buttons for more than 2 seconds, and the sound bar will automatic ally shut
down and restart.

LED Indicator Lights Overview
Indicator
Lights
BT
USB
AUX
HDMI
ECO
Optical
Status Display Status Display an d Descripti onLED
White lig ht on with sounds
Light o
White lig ht flash ing qui ckly
White lig ht flash ing slowly
White lig ht on
White lig ht o
White lig ht flash ing slowly
White lig ht flash ing qui ckly
White lig ht on
White lig ht o
White lig ht on
White lig ht o
White lig ht on
White lig ht o
White lig ht on
White lig ht o
Status Desc ription
Blueto oth connecti on active
Blueto oth connecti on o
Sound bar in Bluetooth pairi ng mod e.
Enter pairing mode on th e device
to be conn ected. Select “LHT-V16S”
and pair.
Not connecte d or connecti on failed
USB source selected
USB source des elec ted
Loadin g USB data
USB dat a load ed, waiting for “Play ”
button to b e press ed
AUX sourc e selected
AUX sourc e deselected
HDMI source selected
HDMI source d eselected
No audio and sound bar inactive
Active au dio
Optical source selected
Optical source deselected
LED
Indicator
Lights
Pairing with
subwoofer
Adjusting
the bass
Adjusting
the tre ble
Surro und sound
• When pairing with othe r device s, all 6 L EDs will flash on e by one
in sequ ence
• When pairing succeeds, all 6 LEDs will stay on for 3 seco nds
• If pairing fails, all 6 L EDs will flash 3 tim es
• Press th e equa lizer button once to get into b ass adjustment
mode . The 3 lef t LEDs on the so und bar will flash 3 times a t the
same ti me (press the Equalizer b utton on the remote control to
enable bass a djustment mode).
• One LED will turn on w hen you press the Volu me + bu tto n,
and one LE D wi ll t urn o e ac h time you p res s th e Vol um e –
button.
• If you do not press Volume + / – bu tton within 5 seconds, the
indic ator LED s will turn o and re turn to their ori ginal s tatus .
• Press th e equa lizer button twi ce to get into treble a djustment
mode . The 3 rig ht LEDs o n the sound bar will flash 3 times at the
same ti me. (press the Equalize r butto n on the re mote control to
enable the treble adj ustment mod e).
• One LED will turn on e ach time you p res s th e Vol um e +
but ton , and o ne LED wil l tu rn o each tim e yo u pr ess the
Volu me – b ut ton .
• If you do not press Volume + / – bu tton within 5 seconds, the
indic ator LED s will turn o and re turn to their ori ginal s tatus .
• When tu rning o the sur round s ound e ect: LEDs 3 an d 4 will
flash 3 tim es, th en retu rn to thei r original state.
• When tu rning on the surround sound e ect : LEDs 1 , 3, 4 and 6
will flas h 3 times , then return to th eir ori ginal s tate.

Specifications
Important Safety Instructions
Product
Sound Bar
Subwoofer
Compatible TV
Remote Control
Ambient
Sound
Feature
Enhancem ent
Amplifier Rated Output
Connection
HDMI (ARC) outp ut
USB 2.0
SPDIF (optical) in
AUX in (3.5mm Stereo Audio)
* Le Eco 2 .1 Chan nel So und Ba r wit h Wirel ess Sub woo fer is i dea l fo r tel evi sio ns 4 3” o r large r.
Wall mou nting r eco mme nded fo r soun d ba r wh en p airing wit h Su pe r4 X43 Pro eco tv.
W x H x D: 35. 4” x 2.4” x 3.5” (900mm x 60 mm x9 0mm)
Weight: 5 .6 lbs (2 .56kg)
W x H x D: 8.1 ” x 12.4” x 8.1 ” (205 mm x 315mm x 20 5mm)
Weight: 1 0.5 l bs (4.76kg)
40”(1016 mm)* TV an d above
Yes
Temperat ure: 32 ° F - +113 °F
Humid ity: 2 0% - 80%
Virtual Surround
Dolby Audio & DTS
Bass & Treble
Sound Bar: 40W/CH x 2
S
ubwoofe r: 80W
1
1
1
1
1. Please read, kee p and follow these i nstr uctions. Keep this Gu ide fo r reference .
2. Do not u se this appa ratus near water.
3. Clean only with dry cloth .
4. Do not blo ck any ve ntilation o peni ngs.
Install in a ccord ance with the manufacture’s i nstr ucti ons.
5. Do not install nea r any he at sources such as r adia tors, heat registers, stoves ,
or other app arat us (in c
6. Do not defeat th e safety purpose of the p olar ized or groun ding plug . A pol arized
plug h as two b lades with o ne wid er than the other. A ground ing pl ug has two
blade s and a third groun ding prong. The wide blade or the third p rong is provided
for you r safety. If th e provided plug do es not fit into yo ur outlet, consu lt an
elec trici an for repla cement of th e obsolete outlet .
7. Protect
8. Only use atta chme nts/accessorie s spe cifie d by the m anuf acturer.
9. Unplug during lightnin g storms or when u nused for long perio ds of time.
10. Refer all ser vici ng to qualified per sonn el. Se rvicing is requ ired whe n the appa ratus
WARNING: To reduce the risk of fire or electric shock, do not expose this apparatus to
rain or moisture. The apparatus shall not be exposed to dripping or splashing and that
objects filled with liquids, such as vases, shall not be placed on
WARNING: Th e mains plug/appliance coupler/direct plug- in adapter is used as
disconnect device, the disconnect device shall remain readily operable .
WARNING: Th e battery (bat tery or batteries or battery pack) shall not be exposed to
excessive heat such as sunsh ine, fire or the like.
WARNING: Please refer the information on ex terior bottom e nclosure for el ectrical
and safety info rmation before insta lling or op
this equipme nt in a confined o r building-in space such as a book case or similar unit,
and remain a well ve ntilation conditions at open site. The ve ntilation sho uld not b e
impeded by cover ing the ve ntilation ope nings with items such as newspaper, table cloths , curt ains etc .
WARNING: To prevent injury, this apparatus must be securely attached to the floor/
wall in accordance with the installation instr uction.
the power cord from being wa lked on o r pinch ed particularly at the plugs,
conveni ence receptacles, a nd at the p oint wh ere they exit from th e apparatus.
has be en da maged in any way, su ch as power s uppl y cord or pl
liqui d has be en spi lled or obje cts have fall en into th e appa ratus has be en exposed
to rain o r mois ture, does not op erate n ormally, or h as been dropped .
luding amp lifiers) that p rodu ce heat.
ug is da maged,
apparatus .
eratin g the app aratu s. Do not insta ll

Caution
Electric Shock Do Not Open
Caution : to reduce the r isk of ele ctric shock, do not rem ove cover (or back).
No user-serviceable parts inside. Refer servicing to qualified service personnel.
The l ight ning flas h with arrow hea d sym bol , within an equ ilateral tria ngl e
is in tended to al ert the use r to t he p resence of u nin sulated dan ger ous volt age
withi n the prod uct ’s enclo sure that m ay be of suc ient mag nitu de to c ons titute
a risk of el ectri c shock.
The exclamation po int within an equil ateral triang le is intended to alert the user
to the presence of im por tan t ope rating and ma inte nan ce (ser vic ing) i nstr uct ions in
the literature accompanying the appliance.
Certification Information
For DTS patents, see http://patents.dts.com. Manuf actured und er lice nse fro m DTS
Licensing Lim ited. DTS , the Sym bol, DTS in combination with the Symbol, and DTS
2.0 Channel are registered tr adem arks o r trade mark s of DTS, In c. in th e United States
and/or oth er countries . © DTS, In c. All R ights R eser ved.
Manufactu red und er license fro m Dolby L aboratories. Dol by, Dolby Aud io and th e
doubl e-D symbo l are trademarks of Dolby Laboratories.
CAUTION: RISK OF ELECTRIC SHOCK-DO NOT OPEN
CAUTION: To prevent e lec tric shock do n ot us e thi s pol arized pl ug with an
extension cord, receptacle or other outlet unless the blades can be fully inserted
to prevent blade exposu re.
CAUTION: These serv icin g ins tru ctio ns are for use by qual ifie d service pe rsonnel
only. To reduc e the risk of electr ic sh ock , do n ot perform a ny servicing o ther tha n
that contained in the operating instructions unless you are qualified to do so.
HDMI, High-Definition Multimedia Interface and the HDMI logo are trademarks or registered trademarks of H DMI Licensi ng, LLC in the United States a nd/or oth er countries .
ENERGY STAR® is a joint program of the U.S . Enviro nmen tal Prote ction Agency
and the U .S. Departme nt of Ene rgy helping us a ll save money and p rotect th e environme nt throu gh ene rgy ecient pro duct s and pr atices .
This pro duct m eets E NERGY S TAR® guidelines for e nergy ecie ncy. ENERGY STAR
and the E NERGY STAR mark are registe red U. S. ma rks. ENERGY STAR is a regis tered
mark own ed by the U.S. government.
The Bluetooth word mark a nd log os are reg istere d trademark s owned by B luetooth
SIG, Inc. a nd any use of such marks by [Le S hi Zhi Xi n Electronic Technolog y (Tia n
jin) Limited ] is unde r license. oth er trademarks and t rade names are those of their
respective owners.

FCC Certification
This e quip ment has be en tes ted an d foun d to comply with th e limi ts for a C lass B
digit al device, p ursuant to Pa rt 15 of the FCC Rul es. T hese limit s are design ed to
provid e reasonable prote ctio n agains t harm ful in terference in a residential in stalla tion. This e quip ment generates, uses and can ra diate radio f requen cy energy a nd,
if not installed and use d in acc ordance with the instructio ns, m ay cau se harmful
inter ference to ra dio commun ications . Howeve
ence will not occur in a par ticula r inst allation. If this equipme nt doe s cau se harmful
inter ference to ra dio or television re ceptio n, wh ich can b e determined by turni ng
the eq uipm ento and on, the us er is encou rage d to try to corre ct the inter fere nce by
one of the foll owing m easu res:
• Reor ient o r relo cate th e rece ivin g antenna.
• Increas e the separation bet ween the eq uipm ent a nd receiver.
• Connect the eq uipm e
the rec eiver is connecte d.
• Consult the de aler or an experienced ra dio/ TV te chnician fo r hel p.
Changes or modifications not expressly approved by th e party re sponsible for
compliance co uld void the user’s auth ority to operate the equipme nt.
NOTE: TH E MANUFACTURER IS NOT RESPONSI BLE FOR ANY R ADI O OR
TV INTERFERENCE C AUSED BY U NAUTHORIZED MODIFICATIO NS TO THI S
EQUI PMEN T.SUC H MODIFI CATION S COULD VOID THE USE R’S AU THORIT
TO OPER ATE THE EQU IPM ENT.
FCC Radiation Exposure Statement:
The equipment complies with FCC RF exposure limits set forth for an uncontrolled
environment. This equipment must be installed and operated with a separation distance
of at least 20 cm from all persons.
The antenna(s) used for this transmitter must not be co-located or operating in
conjunction with any other antenna or transmitter.
nt into an outlet on a circuit di erent from th at to whi ch
r, there is n o guarantee that in terfer-
Y
One-Year Limited Warranty
LeEco warrants th e incl uded hardware pro duct and ac cessories against defe cts
in materials and workmanship for one year from the origin al retail purchase. LeEco
does not wa rrant agains t nor mal wear a nd tear, or damage cause d by acci dent
or abuse . For se rvice, contact us at +1 (855) 3 43. 668 8. Sh ippi ng cha rges m ay app ly.
You may be re quired to provide proof of purcha se in su bmission of your wa rranty
claim . If you submit a va
repai r your d evice or replace it with a new or refurbished device subject to th e full
warra nty terms an d cond itions loc ated at www.le mall .com/us /warr anty and any
applicable s erv ice po licie s at www.lemal l.co m. Th is warrant y is in addition to rig hts
provid ed under loca l cons umer laws.
lid cla im under this wa rran ty, LeEc o will at it s option

LeEco & Le Eco 2.1 C hann el Soun d Bar w ith Wire less Su bwoofer a re the m arks
and reg istered tradem arks of LeEco or its a liates . Other names , trad emark s or log os
are the m arks o r registe red tra demar ks of the ir resp ective h older s.
7 2 - TV16 US- QSGB2
 Loading...