

Le Panyol 83 Assembly Instructions Manual
ASSEMBLY INSTRUCTIONS
Le Panyol model 83
November 2015
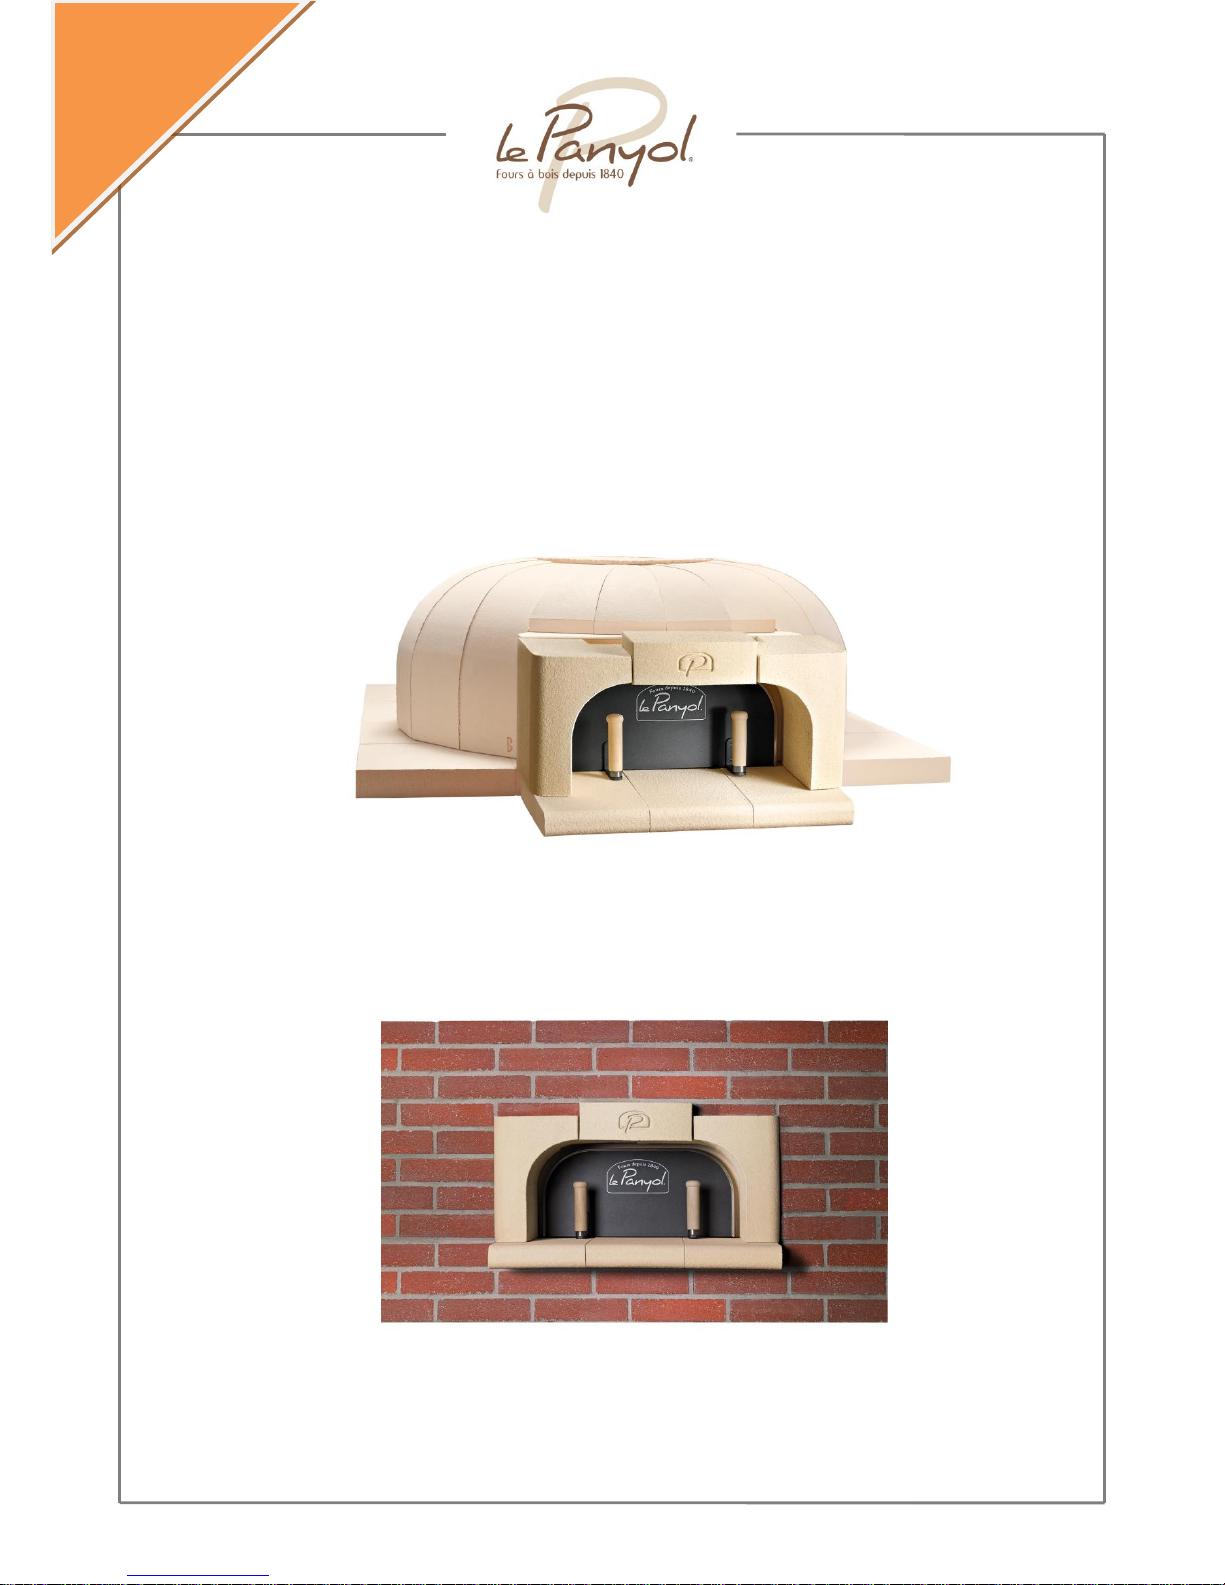
Bare oven with no insulation or surround
Finished oven with insulation and surround
(Sample presentation)
FR
EN

Assembly instructions Le Panyol wood fired oven– Model 83 Page 2
FOREWORD
• Le Panyol ovens are made exclusively of Refractory White Earth, a 100% natural clay from
our own quarry.
• As the material is irregular by nature and the production methods are based partly on craft
skills, you may find that there are gaps between the parts when it comes to assembling
them. These will be filled in when you apply the refractory mortar.
• These gaps allow the oven to expand.
• The keystone may be slightly higher or lower than the dome of the oven.
• The edges of the parts may crumble slightly if they are handled repeatedly.
THESE DIFFERENCES WILL IN NO WAY IMPAIR THE OPERATION OF YOUR OVEN
OR SHORTEN ITS LIFE
The oven must be built under cover.
THE KEY STAGES OF ASSEMBLY
0. Choose a site for the oven
1. Build a base on which to sit the oven
2. Insulate the base
3. Assemble the oven floor
4. Assemble the oven dome
5. Build an enclosing wall around the hearth – If the final shape of the “traditional” oven
6. Insulate the oven dome
7. Connect the oven to a chimney pipe
8. Surround / decorate the oven

Assembly instructions Le Panyol wood fired oven– Model 83 Page 3
CHOOSING A SITE
Before you start to assemble the oven, you’ll need to decide where you’re going to place it and work
out exactly how much space you’ll need to install it.
Check in particular that the floor can bear the weight of the finished oven (base + oven + insulation +
surround + roof). The floor must be flat and should not subside under the weight of the construction.
The oven may be installed indoors or outdoors, stand-alone or incorporated into an existing building,
near the pool, under a veranda or in the kitchen. A wide range of installations are possible. See our
“Gallery” page on our website or ask the retailer in your region.
Outdoor Installation
The Le Panyol oven must be protected against bad weather by a roof wide enough to prevent the
oven and hearth tiles from getting wet. It must be kept dry in winter as, if it absorbs water, frost
would make it unusable. If the oven is stand-alone, the pipe must be approximately 1m long.
However, if the oven is backed on to a wall or built into the home, the pipe must be long enough to
go 40cm beyond the roof ridge (in accordance with DTU standard 24.1).
Indoor Installation
The Le Panyol oven must be connected to an existing or future-build chimney pipe, in accordance
with DTU standard 24.1 (Unified Technical Document). Do not connect more than one apparatus to
the same chimney pipe.
The pipe should be:
• 180 mm in diameter (the stainless steel smoke adaptor supplied with the oven is 180mm in
diameter)
• Made up of a maximum of 2 x 45° bends
• Removable
• With a double skin if an indoor installation
To prevent moisture and rainwater from getting into the pipe, you’ll need to fit a rain cap on the top
of the stack.
Assembly instructions Le Panyol wood fired oven– Model 83 Page 4
BUILDING A BASE TO SUPPORT THE OVEN
Materials
• Generally 2 breeze-block pillars and 1 reinforced concrete slab 10 cm thick.
• The base could also be a sufficiently strong steel table.
Base width and depth
The size of the base will vary according to 2 criteria:
1/ The final shape of the oven:
o Traditional shape (fairly cubic): you’ll need to include the thickness of the surrounding wall
in your size calculations.
o Rounded shape: here there’s no need to build a surrounding wall– see “Advice on insulation
and surrounds for a rounded-shape oven” which you can download from
www.lepanyol.com/documentation
2/ The surround materials : the thickness varies depending on whether it is a rendering, decorative
brickwork or natural stone. You’ll need to include this thickness in your size calculations.
The instructions are based on the following sizes:
Surrounding walls : 10 cm thick (for the sides and back of the oven) and 7 cm thick for the front of
the oven.
Surround : rendering (i.e. a few millimetres thick)
If the surround material is more than 2 cm thick and you have planned to use it to surround the
whole oven (base + oven), you must build the surround on the base before you assemble the oven.
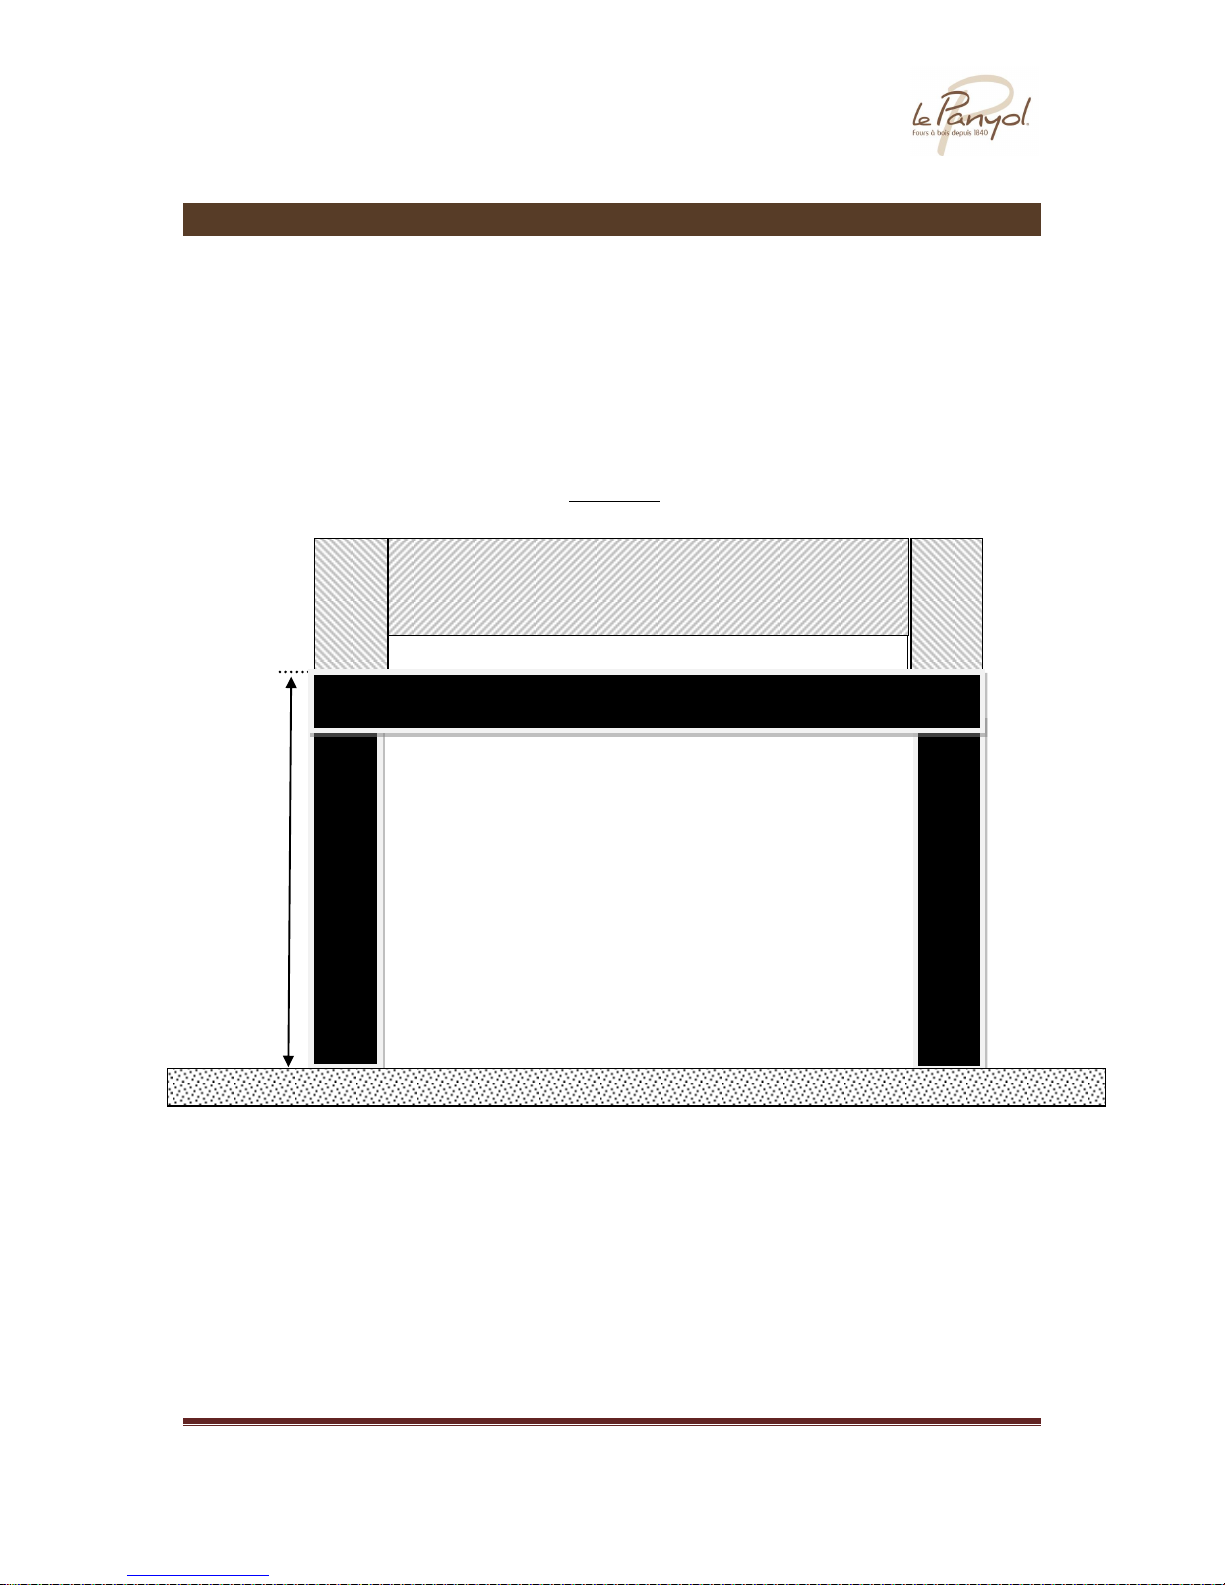
Height of the base
• The oven floor (where the fire will be laid and the cooking done) is generally between 100
and 120 cm high, depending on the user’s height and comfort requirements.
• As the hearth tiles in the oven are 6 cm thick and the insulation under the hearth is
approximately 7 cm thick, subtract approximately 13 cm to obtain the height of the base (see
diagram on page 8).
Assembly instructions Le Panyol wood fired oven– Model 83 Page 5
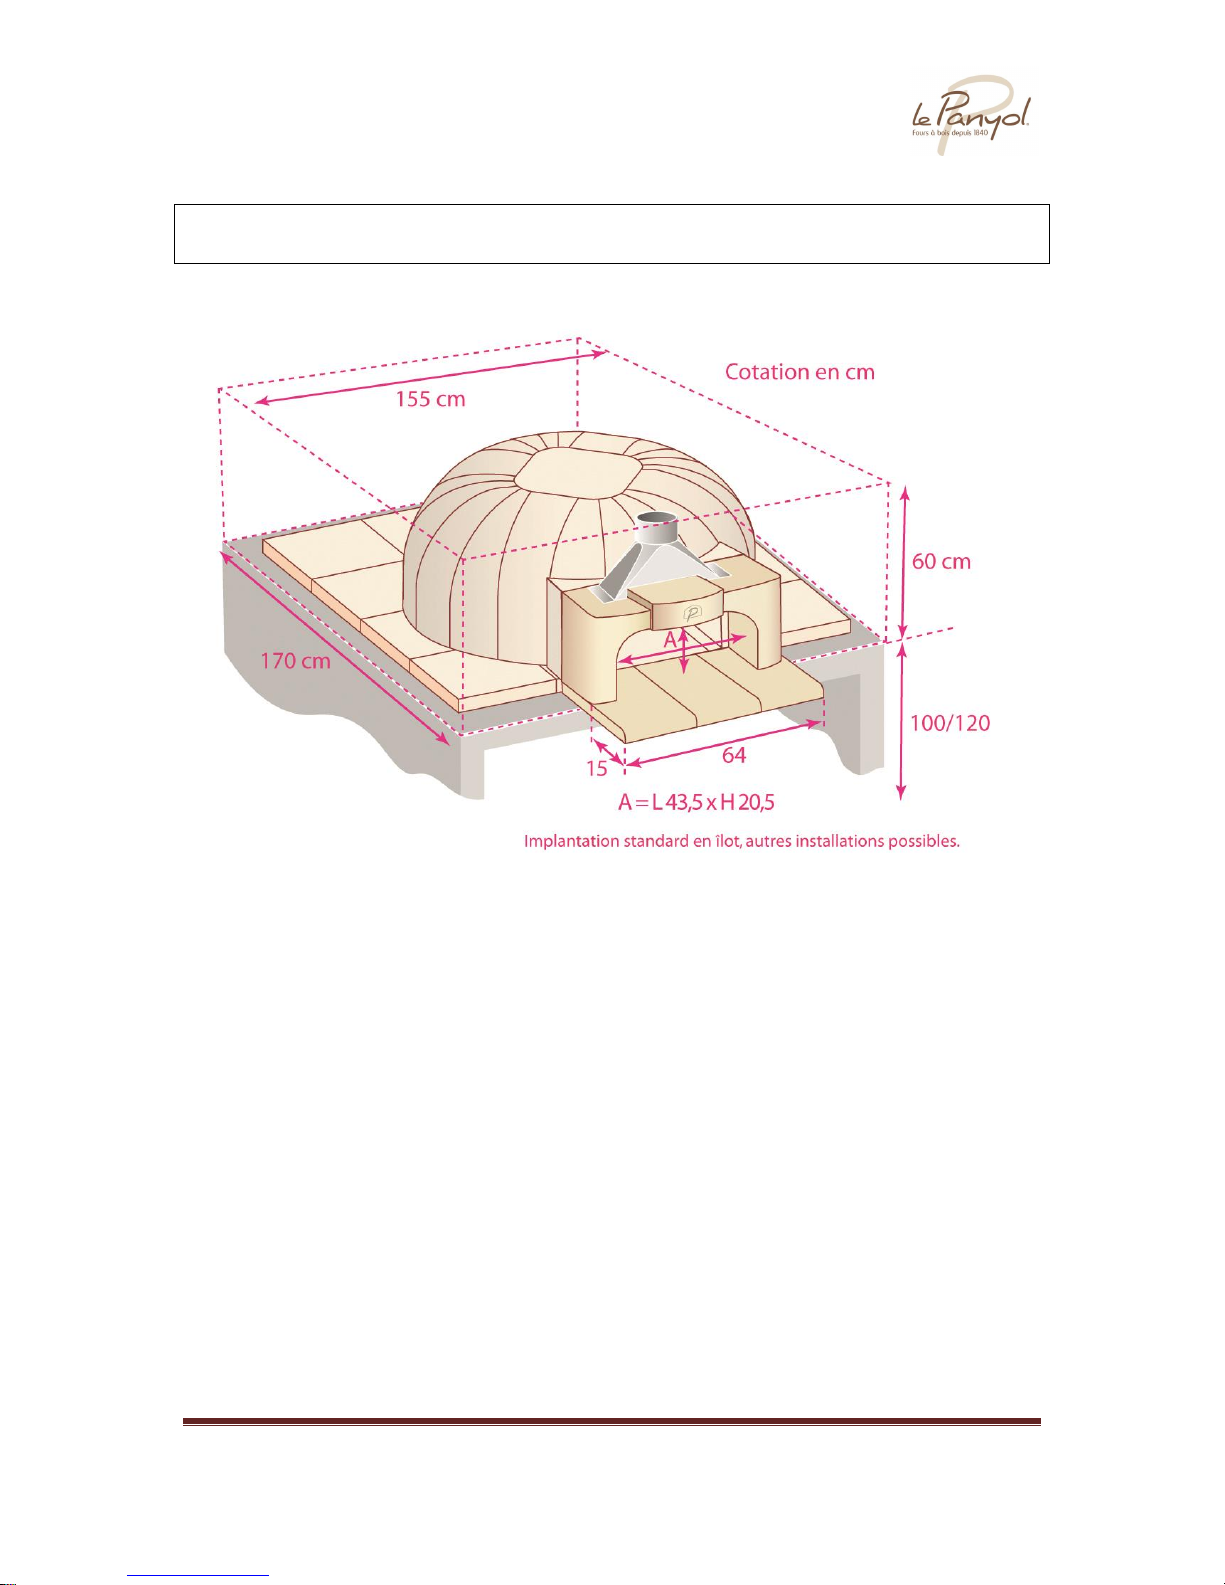
For the 83 model, the recommended base size for a standard installation is:
Width : 155 cm - Depth : 170 cm - Height : 107 cm
Once you have built the base, build up one level (20 cm) of surrounding wall on the sides and at the
back using Siporex-type insulation blocks 10 cm thick on which the decorative material will be fixed
(diagram page 5).
Note: you may also build a surrounding wall using other materials, e.g. bricks 22x22x5.5cm.
Measurement in cm
Standard construction on a standalone platform
(Other types of installation are possible)
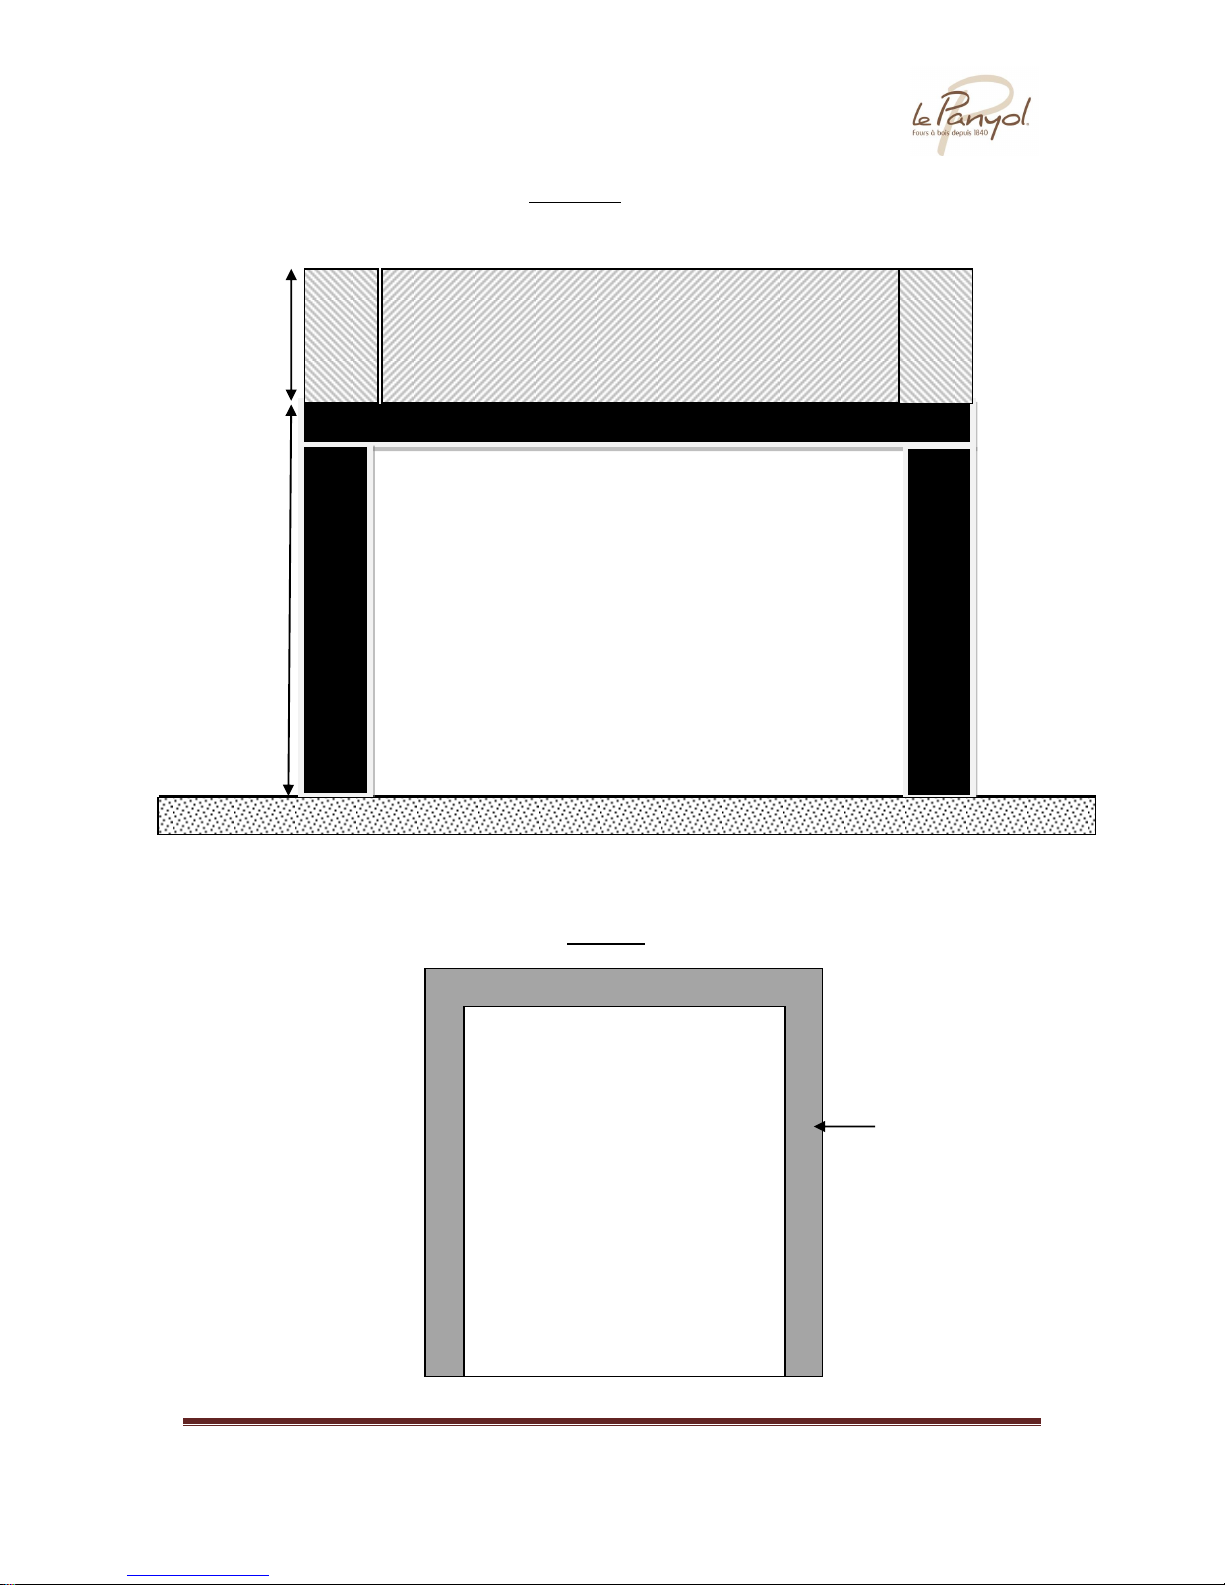
Assembly instructions Le Panyol wood fired oven– Model 83 Page 6
Reinforced concrete slab – 10 cm thick
FLOOR
Surrounding
wall : side
Surrounding
wall : side
Reinforced concrete slab
Surrounding
wall
Top view
107 cm - adapt to the user’s requirements
20 cm
Surrounding wall : back
Front view
Assembly instructions Le Panyol wood fired oven– Model 83 Page 7
INSULATING THE BASE
Good floor insulation is essential if you’re to get the best use out of your oven.
Once you’ve built the base, insulate the reinforced concrete slab using dry Siporex-type insulation
blocks 5 cm thick.
107 cm
FLOOR
Siporex-type insulation block 5 cm
Surrounding
wall : side
Surrounding
wall : side
Surrounding wall : back
Front view
Reinforced concrete slab – 10 cm thick
 Loading...