

Page 1

L-PAD SPACE III S
TABLET 7”
MANUAL DE USUARIO / USER MANUAL
Versión 1.4
Page 2

2
ESPAÑOL
Estimado Cliente:
Gracias por haber elegido este producto LEOTEC. Esperamos que sea de su total agrado y lo
pueda disfrutar durante mucho tiempo. Esta Tablet con sistema operativo Android™ le permitirá
descargar muchísimas aplicaciones (Apps) y aprovechar al máximo todo el potencial de Internet
(navegar por la red, enviar y recibir e mails, bajar widget s, etc.) , tal y como lo harí a en un portát il u
ordenador de sobremesa. Podrá disfrutar viendo videos o escuchando música, comunicarse a
través de Internet con cualquier aplicación de mensajería instantánea o incluso leer o editar
documentos de oficina (d ocumentos de texto, planillas de cal culo, presentaciones, etc.).
Toda la información incluida en este manual es correcta en el momento de su publica ci ón. Ahor a
bien, al estar actualizando y mejorando constantemente nuestros productos, la apariencia o el
software de su dispositivo pueden variar con respecto a lo descrito en este manual. Podrá
obtener actualizacione s a t r avés de nuestra pagina web www.leotec.com
Atención
Este manual contiene importante información acerca del correcto uso y medidas de seguridad
para evitar accidentes. Asegúrese de leer este manual cuidadosamente antes de usar el
producto.
- Por favor no use y/o guarde el dispositivo en lugares húmedos, de alta temperatura o con
mucho polvo.
- No deje expuesto el dispositivo a altas temperaturas, especialmente en verano no deje el
dispositivo dentro del coche con las ventanas cerradas .
- Evite caídas o golpes del dispositivo. No exponga la pantalla a violentos temblores, puede
causar que la pant alla falle o se dañe.
- Por favor, elija un apropiado volumen de sonido. Si usa auriculares no debería usar el
volumen demasiado alto. Si siente un zumbido baje el v olumen o deje de usarlo.
- Por favor cargue la batería del disp ositivo en las siguientes condic io nes:
o El icono indicador de batería muestr a baj o nivel de carga.
o El dispositivo se apaga automát icamente enseguida de ence nderse.
o Los boto nes de operación no responden.
o La pantalla muestra icono s en r ojo en el borde superior derecho.
- No apague repentinament e el dispos itiv o cuan do se est a desc arga ndo o actua l izando al gún
archivo.
- Para los casos donde por reparaciones, daños u otras causa s se perdier a el contenido de la
memoria, el fabricante no se hace responsable por los daños causados.
- No desmonte el producto. No use alcohol, disolvente, benzina ni ningún producto similar
para limpiar el prod uct o.
- No use el dispositivo en lugares donde se pro híbe e l uso de equip amient o electr ónico (ta l es
el caso de los aviones)
- No utilice el dispositivo mientras conduce o camina.
Page 3

3
La empresa se reserva el derecho de modificar el producto, cambiar las especificaciones y
diseño. La información contenida en este manual u otros medios (tales como página web, etc.)
está sujeta a cambios si n pr evio aviso.
NOT A: Todas las imágenes de este manual so n solo de r eferencia. Las imáge nes está n sujetas a
cambios sin previo aviso. Téngase en cuenta que este dispositivo utiliza un sistema operativo
Android
TM
de licencia libre y gratuita por lo que puede haber diferencias sustanciales en las
instrucciones de este manual con respecto a las encontradas en su dispositivo, así como
también diferencia s en el idio ma de las opc iones mostradas d ebido a actua lizac iones del s istema
operativo.
INTRODUCCIÓN
Utilización por primera vez
Carga de la batería
Antes de utilizar su L-Pad LEOTEC por primera vez, cargue completamente la batería. Conecte
el adaptador/cargador suministrado. Atención: Utilice ÚNICAMENTE el cargador/adaptador
LEOTEC suministrado con su dispositivo o un modelo compatible con exactamente las mismas
especificaciones. La Tablet LEOTEC se encenderá y empez ar á a cargarse. El icono de batería
de la interfaz principal le indicara cuando este totalmente cargado el dispositivo. Si no está
conectado a un adaptador de aliment ación, el ic ono mo strar á e l porcentaje de batería disponib le.
Configuración
Le recomendamos que la primera vez que utilice la Tablet L-Pad LEOTEC configure los valores
principales tales como Idioma, ubicación, Fecha, Hora, las opciones de seguridad y de copia de
seguridad encontradas en la sección de Ajustes.
Page 4

4
V-
V+
AURICULAR
CÁMARA
MIC
TF/ Micro SD
1. Aparienci a y botones:
USB/OTG
DC 5V
ENCENDIDO
1.1 Panel Táctil
Panel táctil capacitiva de 7” multipunto: para operar, hacer clic o arrastrar en el panel táctil.
1.2 Encendido / Apagado
Encendido: Mantenga presionado el botón de encendido hasta que aparezca la primer
pantalla, entonces comenzara a cargar el sistema operativo y aparecerá la interfaz
principal.
Apagado: En l a interfaz principal, presione el botón de encendido durante 5 segundos para
apagar el dispositiv o. El s istema le ofrecerá la opción de apagado o de descanso. Elija la opción
deseada. El sistema le pedir á confirmación.
Bloquear pantalla: Presione brevemente el botón de encendido para bloquear o desbloquear
la pantalla.
Nota:
1. Cuando la batería esté descargada el sistema se apa gará automáticamente .
2. Un apagado brusco del sistema, r eset , etc., puede provocar que el sistema tome largo
tiempo en arrancar nuevamente con la consecuente pér did a de información.
1.3 Tecla HOME / V-
Pulsación corta v olverá a la Interfaz principal.
Pulsación larga baja Volumen audio
1.4 T e cla MENU / V+
Muestra las opciones de me nú en función de la aplicación donde s e esté.
Pulsación larga sube Volumen audio
Page 5

5
1.5 Auricular
Conexión de auricular estándar de 3.5 mm.
1.6 Lector tarjeta MicroSD / TF
Ampliación de memoria a través de interfaz de tarjeta tipo Micr oSD / TF.
1.7 Mini USB
Mini USB jack: puede usar esta conexión para transmisión de datos a/desde un ordenador,
carga de la batería (usar c abl e USB A a mini) o bien para conectar un pendr iv e USB o un
periférico externo (teclado, ratón, disco duro externo, etc. )
1.8 RESET: permite reiniciar el s ist ema en caso de bloqueo.
Observación: No use el RESET a menos que no pueda a pagar el dispositivo por los medios
normales. Puede dañar el dispositivo.
1.9 DC
Conexión del cargador de batería. Atención: SOLO UTILIZAR EL CARGADOR
SUMINISTRADO POR EL FABRICANTE o ALGUNO HOMOLOGADO POR EL MISMO.
Carga de la Batería:
Antes del primer uso del dispositivo, por f avor cargue la batería al 100% dur ant e al m enos 6
horas las primeras 2 veces , las si gui ent es veces solo bastará con 4 horas.
Nota: Este dispositivo tiene una batería inter na de Litio. La carga debe ser realiz ada c on un
adaptador estándar homologado por el fabricante (Entrada: CA110~240V 50/ 60Hz Max:180Ma..
Salida: DC 5.0~5.5V/1.5A~2.0A). Este disposit iv o puede ser cargado tambié n a través de USB
con un adaptador de al m enos 1. 5A de corriente 5V DC.
Para prolongar la vida útil de la b at er í a sugerimos dejar descargar la batería mediante su uso en
forma habitual.
Observaciones:
1. Si no usa el dispositivo por un peri odo largo de t iemp o suger imos cargar la baterí a al men os
una vez al mes.
2. Si el dispositivo se apaga aut omátic ament e como resu ltad o de descar ga tot al de la bater ía,
sugerimos cargar la batería por algún tiempo antes de volver a usarlo.
3. El tiempo de carga de la batería será aun mayor si se esta utilizando mientras se realiza la
carga.
2. Conexión con el ordenador ( PC)
Use el cable USB (mini to US B A) para conectar el dispositivo a un PC.
Una vez conectado haga clic sobre el icono de USB que aparecerá en la parte inferior
derecha de la pant al la:
El dispositivo permitirá acceder a la pantalla para activar el almacenamiento por USB tal
como muestra la pantalla sigu iente:
Page 6

6
En el modo de carga, se pueden copiar y borrar archivos en el dispositivo y en la tarjeta de
memoria.
3. Interfaz de operación
3.1 Interfaz principal
Después del arranque entrará en la interfaz principal.
La interfaz principal, podemos dividirla en 5 par t es, cada una de las esquinas y el cuerpo
principal de la pantalla.
En el cuerpo principa l de l a pantalla se alojan los iconos y Widgets que el usuario desee
pudiéndose desplazar hacia la izquierda (2 pant allas) o la derecha (2 pantallas) con lo que se
tiene un total de 5 pantallas en las que se pueden añadir accesos directos, m ar cadores y
Widgets.
La esquina superior izquie r da:
permite o bien rea l i zar una
búsqueda en Google es cribiendo lo que se desea buscar o bien haciendo una búsqueda por voz
Page 7

7
(en cualquiera de los casos debe estar conectad o a I nt er net).
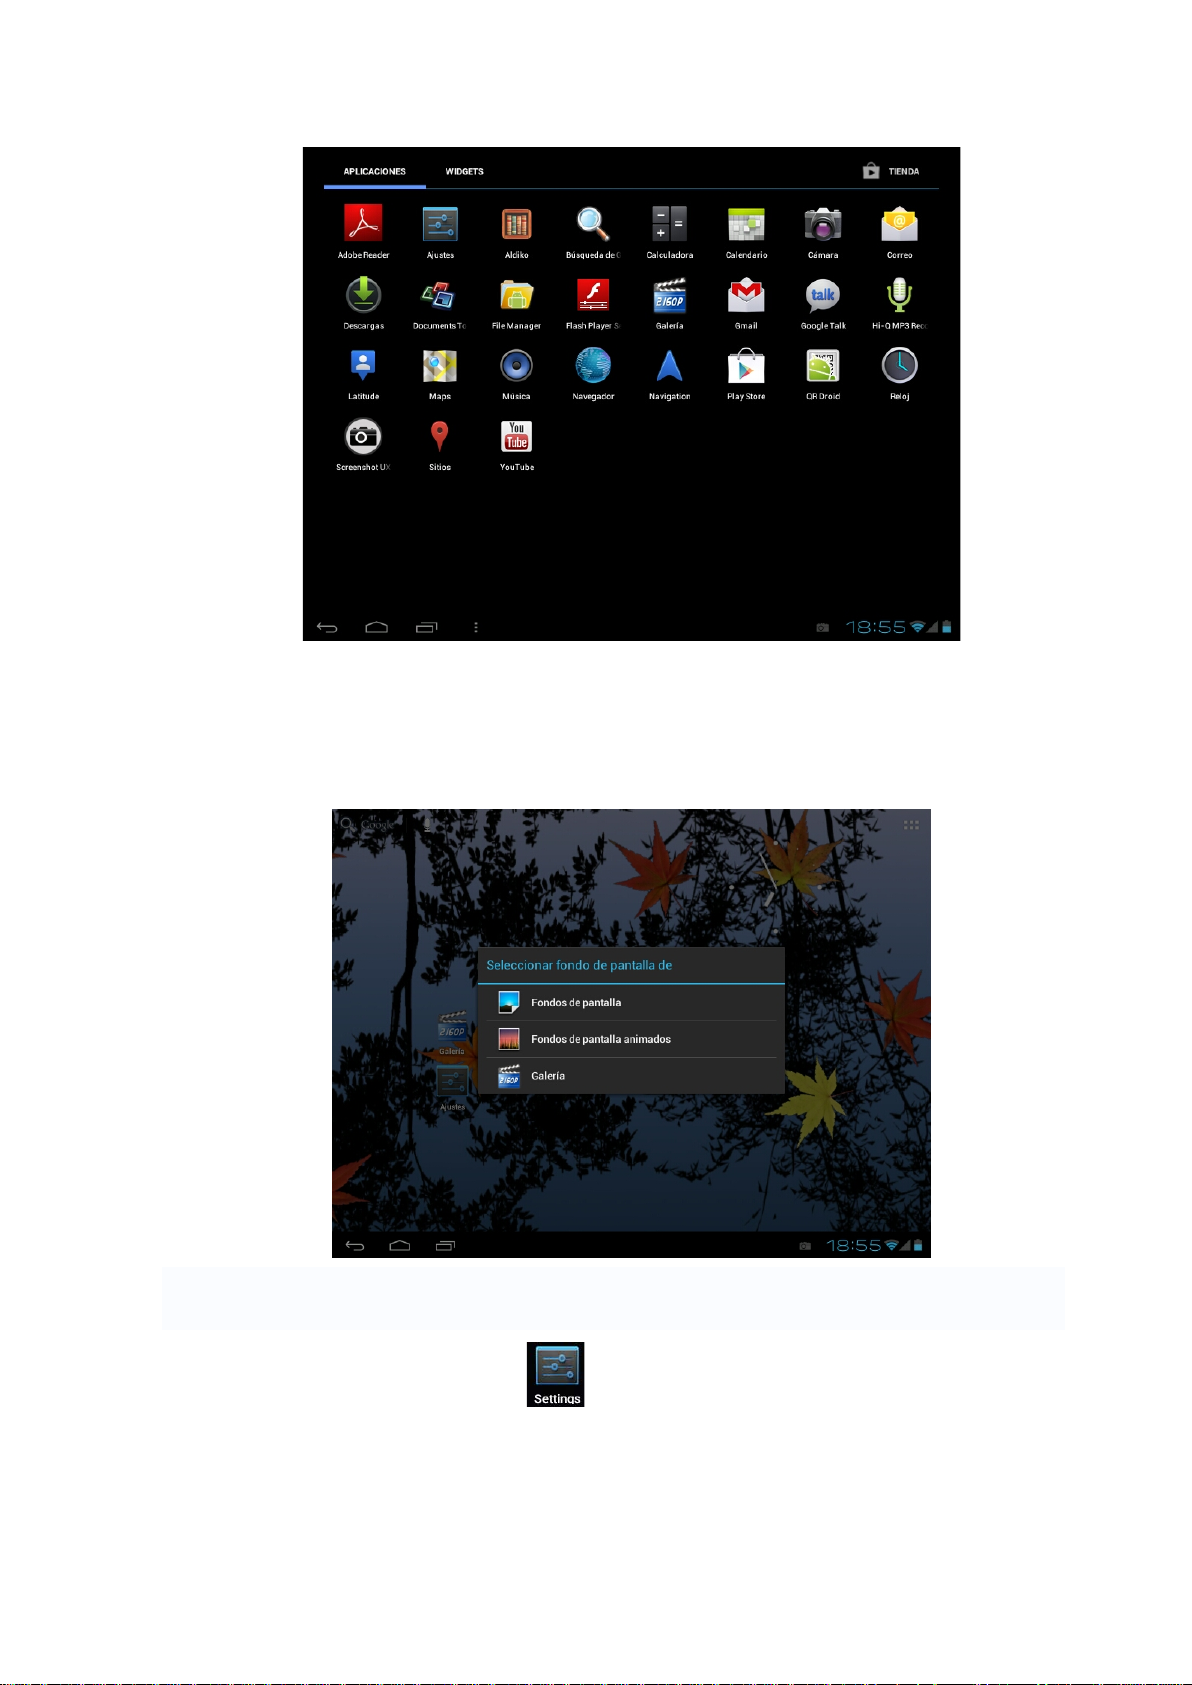
La esquina superior derec ha
permite acceder a la s aplicaciones y los Widgets
instalados.
Las aplicaciones son prog r am as que se ejecutan cuando el usuario lo desea y dejan de
funcionar cuando el usuario sale de la aplicación. Pueden ser instalados des cargándolos a
través de la aplicación 1Mobi le Market o través de páginas web que ofrezcan aplicaciones
Android.
Los Widgets son pequ eños programas que se ejecutan en forma continua y de fácil a cceso que
se ubican en cualquiera d e las pantallas princ ipales. Por ejemplo uno de los Widgets que ya
vienen instalados y ejecutándose es el reloj analógico:
La esquina inferior izquierda tiene 4 iconos:
.
Permite volver atrás.
Ir a la pantalla principal. La misma función que el botón V- de la parte superior de la
Tablet.
Ver y seleccionar las aplicacio nes que se están corriendo actualmente.
Permite acceder a l menú en función de la aplicación que se esta utilizando. Si se
encuentra en la interfaz principal aparecerá un m enú que permite cambiar el fondo d e pantalla,
administrar las aplicacio nes o acceder a los ajustes del sist ema. La misma función que el botón
V+ de la parte superior de la Tablet.
En la esquina inferior derecha s e encuentra la zona de estado:
, donde
muestra la hora actual, e l est ado de la batería, la conexi ón wifi, al armas y d iferentes mensajes de
estado. Haciendo c lic s e puede acceder a algunos ajustes rápidos.
Accediendo a la zona de apli caciones y W idget s se pu ede gestio nar los pri ncip ales iconos
de la interfaz: Manteniendo pulsado un icono 3 seg undos, después de que el icono se agrande,
puede arrastrarlo a cualqu ier lu gar de la interfaz
Page 8
8
Eliminar iconos: Mantener pulsado un icono 3 segundos, arrást r elo h as ta el icono de la
papelera de reciclaje, una vez que se vuelva rojo, suélt elo para eliminar el icono
Si toca la pantall a pr in cipal unos segundos aparecerá el cuadro de diálogo "Añadir a pantalla de
inicio", como se muestra a continuación:
4. Ajustes básicos
Ajustes: Clic en el icono de Ajustes , accede al interfaz de configuración.
4.1 Wi-Fi: Permite encender el Wi-Fi y conectarse a cualquier red Wi-Fi que se
encuentre dentro del área de cobertura.
Page 9

9
4.2 Uso de datos: Permite deshabilitar o limitar e l acceso a datos móviles asi como muestra el
volumen de datos descargados.
4.3 Mas..: Habilita el modo Avión (utilizado cuando se esta a bordo de un aeronave), y ajustes
avanzados tanto para redes Ethernet, creaci ón de VPNs y redes móviles.
Page 10

10
4.4 Sonido: Permite modificar el volumen por defecto de la música, juegos y otros archivos
multimedia, de notificaciones y alarmas, distintas melodías para notificaciones, activar sonido al
tocar y también el sonido del bloqueo de la pantalla.
4.5 Pantalla: ajustar propiedades, cambiar fondos, cambiar t amaño de letra, etc.
Page 11

11
4.6 Almacenamiento: Muestra la utilización de la memoria de los diferentes medios de
almacenamiento.
4.7 Batería: Muestra el us o ac t ual de la batería.
Page 12

12
4.8 Aplicaciones: Muestra las aplicaciones descargadas en la memoria pri ncipal o en la
ampliación (tarjeta SD), así como las aplicacione s en ejecución.
4.9
Una forma de instalar nuevas aplicaciones es a través de tie ndas o Markets disponibles e n
internet. Un ejemplo es www.1mobile.com
, que ya viene pre-instalada en su Tablet L-Pad de
LEOTEC, acceda a través del icono “1Mobile Market ” disponible en la pantalla de Aplicac iones y
podrá disfrutar de miles d e pr ogr amas y juegos.
AVISO
El fabricante no garantiza la compatibilidad de la versión Android instalada en el dispositiv o
con todas las aplicaciones disponibles para esta plataforma.
El fabricante no se responsabilizará de los daños produc ido s al d ispositivo de ningún
software malicioso, gus ano, t royano o v irus co mo consecu encia de la insta lación, ej ecución o
descarga de programas.
Page 13

13
El fabricante no se responsabilizará del uso indebido que e l usu ar io haga con el dispositivo
así como de la descarga e insta lación de programas protegidos sin autorización del
propietario.
¿Como desinstalar una aplicación?
(1). Entrar en
“Ajustes”>”Apl icaci ón”>” Ad ministrar aplica ciones” y se mostr ará la lista de
programas instalados
(2). Clic en los iconos que quiera d esinstalar, entrará en la siguiente interfaz
(3). Clic en Desinstalar, entonces puede eliminar la aplicación
Algunas de las aplicaciones permiten ser movidas a la memor ia externa (tarjeta S D) y de
esta forma no ocupar toda la memoria princip al de la Tablet.
4.10 Cuentas y si ncronizació n: Per mite a d ministrar l as cuent as de las dist int a s aplicac iones de
correo, Skype etc., las qu e podr án ser sincronizadas en tie mp o r eal o no.
4.10 Servicios de ubicac i ón: Permite que aplicaciones como Google utilicen sus datos para
determinar su ubicación geográfica.
Page 14

14
4.11 Seguridad: distintos ajustes de se gur idad como bloqueo de pa ntalla, que las contraseñas
sean mostradas o no, etc.
Fuentes desconocidas: Clic en “Fuentes desconocidas” y seguido “OK” para permitir la
instalación de aplicaciones de origen desconocido (es decir aplicaciones no certificadas por
Google, lo que no significa que no sean de fuentes confiables).
4.12. Idioma y tecl ado: Permite cambiar el idiom a de uso de la Tablet, establecer la correcc ión
ortográfica automática, el tipo de teclado, etc.
Page 15

15
Selección de Idioma : 54 idio mas dispon ib les
Nota: AndroidTM soporta 54 idiomas, pero la interfaz principa l soporta 14 idiomas,
T eclad o Andr oid
TM
: configuración del teclado AndroidTM
Sonido: en la pulsación de tecla
Auto-mayúsculas
Mostrar sugerencias : Mostrar las palabras s ugeridas mientras se escri be
Auto-completar: la barra espaciador a y la puntuación insertan automáticamente las palabras
resaltada
4.13 Copia de Seguridad: Permite hacer copia de seguridad automática de datos de las
aplicaciones, contraseñas y otros ajustes de forma tal que si se restablece el sistema operativo
y/o las aplicaciones se puedan recuperar en las condiciones anteriores. En esta opción de los
ajustes se puede r
establecer datos originales de fábrica.
4.14 Ajust ar fecha y hora
Establecer la fecha y hora, seleccionar la zona horaria y seleccionar el formato de la fecha
Page 16

16
4.15 Accesibilidad : Diferentes opcio nes para facilitar la accesibilidad de la Tablet.
4.16 Opciones de desarrol l o: Op cio nes par a desar rollador es.
4.17 Acerca del aparato: Muest r a in formación acerca de la Tablet y del sistema operativo.
Page 17

17
5. Solución de problemas
La tablet no inicia o no muestra imagen?
Verifique la carga de la batería. Conecte el cargador de corriente al conector DC de su
dispositivo y espere. Si la batería está totalmente agotada, cargando 4-5 horas será suficiente
para tomar autonomía.
No consigue cargar la bat er í a de l a tablet con el cargador DC?
La mayoría de tablets LEOTEC permiten la carga de batería conectadas al puerto USB de un
ordenador mediante el cable suministrado. Consulte si su modelo lo permite en la tabla
comparativa que puede encontrar en la web de LEO TE C.
Ha olvidado la co ntraseña o p a t r ón de desbloqueo?
Entre en la web de LEOTEC y en la zona de descargas busque el Firmware original y la guía de
actualización de su modelo de tablet ( Ej: LETAB909 ) para restaurar desde el ordenador su
sistema Android.
No consigue reproducir videos que sí puede ver en su ordenador?
Del mismo modo que en un ordenador precisamos instalar codecs para poder reproducir según
que extensiones y form atos de v ideo, en la ta blet suc ede lo mis mo. Acced a al Mar ket y loca lice la
aplicación de codecs que má s le interese.
La tablet inicia y se queda con la palabra Android pero no consigue llegar al menú de
desbloqueo?
Es posible que alguna apl icaci ón instalada recienteme nte n o se ajust e p ara ser usada e n t ab let o
bien esté consumiendo demasiada memoria de trabajo. Entre en la web de LEOTEC y en la
zona de descargas busque el Firmware original y la guía de su modelo de tablet para restaurar
desde el ordenador su sis t ema Andro id.
Page 18

18
Tiene otro tipo de problema, estará el dispositivo defectuoso?
Si tiene algún otro problema acceda a nuestra sección de soporte en nuestra página web
www.leotec.com
Allí encontrará una lista de las preguntas y respuestas más frequentes que
podrán serle de ayuda.
6. Especificaciones
Pantalla: 7” TFT Cap ac it iv a tác til mu lt ip unt o
Resolución: 800*480
Sistema operativo: Android 4.0
RAM: DDRIII 512MB
CPU: Boxchip A13 (Cortex -A8) 1.2GHZ
Memoria:
4GB
Tarjeta Micro SD (TF): 128MB-32GB
USB: USB Host OTG
Sensor gravitacion al 3D
Grabación: micrófono integrado
Video: AVI H.264, DIVX, DIVX, XVID, rm, rmvb, WMV, MOV, MP4 H.264, MPEG, DIVX, XVID),
DAT VCD), VOB DVD), MPEG, MPG, FLV H.263 H.264), ASF, TS, TP, 3GP, MPG etc
Audio: MP3/WMA/APE/FLAC/OGG/WAV/AAC
Foto: JPG, JPEG, GIF, BMP, PNG
Ebook: TXT , EPUB, PDF, WORD, EXCEL, POWERPOINTS
Batería y capacidad: r ecargable Li Polymer 2800 mAh 3,7V
Tamaño: 182mm ×121mm×11mm
Peso: 312g
Garantía y responsabilidad
Todos los productos LEOTEC tienen una garantía de 24 meses a partir de la fecha de factura a
cliente final excepto en los accesorios incluídos. El fabricante garantiza al consumidor que sus
productos se encuentran libres de defecto en materiales y mano de obra en el momento de su
compra.
Las baterías dispondrán de 6 meses de garantía. Se consideran defectuosas aquellas baterías
que dentro de ese periodo su máx i m a capacidad de carga sea ig ual o inferior al 50%.
La garantía ofrecida únicamente cubre los defectos de fabricación o de materiales que el
producto pudiera tener. Quedan excluidos los defectos o fallos ocasionados por un uso
inadecuado, rotura, desgaste. Anularán la garantía la manipulación del producto por personal
ajeno al servicio técnico de LEOTEC, actualizaciones de software no proporcionadas por
LEOTEC, así como todos los fallos o averías ocasionados por catástrofes naturales.
Page 19

19
La garantía será válida siempre y cuando el usuario disponga del ticket o factura de compra y
este se encuentre dentro de pl azo.
Soporte y Servicio t écnico
Para cualquier consulta técnica puede acudir a su punto de venta o contactar con el
servicio técnico de LEOTEC.
Visite nuestra web y manténgase siempre actualizado en la sección de descargas de su
producto.
Más información disponi bl e en el sitio web: www.leotec.co m o
mediante el e-mail: soporte@leotec.com
Page 20

20
DECLARACIÓN DE CONFORMIDAD
Marca: LEOTEC
Nombre del suministrador: World Driver S.A.
Dirección: Ctra de l'Hospitalet 66 - 68
08940 - Cornellà de Llobregat – Barcelona
Tel: +34 93 267 66 04
NIF: A62589130
Web: www.leotec.com
Declaramos bajo nuestra exclusiva responsabilidad la conformidad del producto:
L-PAD Space III S LETAB705
País de fabricación: China
Al que se refiere esta declaración, con la(s) norma(s) u otros documento(s) normativo(s)
de acuerdo con las disposiciones de la Directiva 93/68/CEE, del Parlamento Europeo y
del Consejo de 22 de julio de 1993, transpuesta a la legislación española mediante el Real
Decreto 1950/1995, de 1 de Diciembre de 1995.
El símbolo de ref erencia ta nto en el producto com o en su manual de usuario, indica qu e al
final de la vida út il de los aparatos eléctricos y/o electrónicos, éstos deberán reciclarse por
separado
de sus residuos dom ésticos. Existen medios adecuad os para recoger este tipo de material
para su correcto reciclaje. Para obtener más información, póngase en contacto con la
autoridad local o a su distribuidor donde adquirió el producto.
Nota: El dispositivo LETAB705 puede contener enlac e s a sit ios o paginas web operados por terc eros
ajenos a LEOTEC y/o World Driver S.A.. Es tos enlace s le son incorp orados y están ac cesibles para
su información, LEOTEC y/o World Driver S.A. no se hacen responsables de su disponibilidad,
contenido, adecuaci ón o exactitud. Dich as páginas externas pueden cont ener o hacer referencia a
marcas, patentes, inform ación registrada, tecn ologías, productos, proces os, u otros derechos de l a
propiedad pertenecie ntes a otras personas. Todos los derechos reservados son pr opiedad de sus
respectivos dueños.
Page 21

21
ENGLISH
Dear customer:
Thank you for choosing this LEOTEC product. We hope it will satisfy you totally and will work
perfectly for a long time. This Tablet with Android ™ operating system allows you to download
many app lica ti ons ( Apps) and take full advantage of all the Internert potential (surf the net, send
and receive emails, download widgets, etc.), as you would on a laptop or desktop computer.
Enjoy watching videos or listening to music, communicate over Internet with any instant
messaging application or even read or edit office documents (text documents, spreadsheets,
presentations, etc.)
The LEOTEC team
All information in this manual is correct at the time of publication. Now, to be updating and
improving our products, the appear ance or the device software may differ from those described in
this manual. You can get updates through our website www.leotec.com
Attention:
This handbook contains important security me asures and the correct use of the product
information, in order to avoid accidents. Please make sure to reading the manual carefully before
use the device.
- Please don’t be in high temperat ure, moisture or very dust place
- Please don’t be in high temperat ure, especially in summer do n't put the device in the car
when Windows closed.
- Avoid fall or Violent collision of the device, don’t ma ke t he TFT display scr een were violent
tremor, This could cause TFT display scr een abnormal or damage.
- Please choose the appro pr iate volume, Use headphones should not be too big volume, If
feel tinnitus, Lower the v olume or s t op using it please charge In the following condition,
o The battery power ICONS show s have no power
o The system automatical ly shut off, startup after power off soon
o Operation buttons no resp onse
o The machine that the top right cor ner show red icons
- When the device in the format or ongoing upload and download file, please don't su
ddenly disconnect, This could cause application error.
- For those who because of damage to the product, repair, or ot her c auses of erased the
memory, The comp a ny sh all not b e liab le for any res ponsib ility, please follow the user manua l
for the standardized operation to use the device.
- Don’t disassemble the product, don’t use alcohol、Thinner or benzene to scrubbing
products
- Don't use the device one of the pl ac e of prohibit to use electronic eq ui pment in regional
(such as the plane)
- Please don't using the Tablet PC when you in driving or walking down the street,
- USB just only be used for data transmission
Page 22

22
The company reserves the right to improve product, products specification and design hav
eany change, The information is subject to changes without prior notice.
Note that this device uses an operating system license AndroidTM free of charge so there can be
substantial dif f er ences in the instructions in this manual regarding to thos e found in your device,
as well as difference s in the language o f the dis played optio ns due to operating sys tem upgrad es.
Remark All pictures in this manual is just for your reference. products specification and design
have any change, Th e in f or m ation is subject to changes with out pr ior notice.
INTRODUCTION
First time use
Battery charge
Before using your LEOTEC L-Pad for the fi rst time, fully c harge the battery. Plug the adapter /
charger. Caution: Use ONLY the charger / adapter supplied with your device LEOTEC or a
compatibl e model with exactly the same specifications.
The LEOTEC Tablet will turn on and
start charging. The battery icon in the main interface will indicate when the device is fully
charged. If not connected t o a power adapter, the icon displays the percen tage of available
battery.
Configuration
We recommend that th e f irs t time you use the L-Pad Tablet LEOTEC configure core values
such as language, location, date, t ime, security options and backup found in the Settings
section
Page 23

23
V-
V+
POWER
EARPHONE
CAMERA
MIC
TF CARD
USB/OTG
1. Appearance and button:
DC 5V
1.1 Touch p a nel
9” Capacitive touch panel: In the Oper at ion, t o cl ic, dragging on the touch panel
1.2 POWER
Start up: Long Press and hold the power but t on, t hen it w il l lo ad t he operating system and
display the main interfac e.
Shutdown: In the main menu interface, Press the power button about 5 second to shutdown,
The system can hint "power off" option, Clic ”ok”. you can safely shut down.
Lock screen: Short press Power button to lock scr een or unlock screen.
Remark 1.When power is em pt y, system will shut down automatically.
2.Illegal turn off the d evice, restart will scan and restore the disk, it may t ake longer time
to enter into system
1. 3 HOME key V-
Short press to return to main interface.
Long press to decrease volum e.
1.4 MENU key V+
Show menu options dependi ng on t he current app
Long press to increase volume
1.5 Earphone jack
3.5 mm standard earp hone jack
1.6 TF card
Memory expand through TF-CARD slot: external T -FLASH card
Page 24

24
1.7 Mini USB
Mini USB jack: you can use it to connect the computer for data t r ansmission, charging and
external connection USB f lash drive
1.8 RESET
Remark: unless unable to shutdown, otherwise d on’ t us e t he r eset , s uggest you to shutdown by
normal, or it will easy to damage the machine system.
1.9 DC
Connecting the battery charger.
Attention: ONLY USE THE CHARGER SUPPLIED BY THE MANUFACTURER or ANY
APPROVED BY THE SAME.
First use - Battery management and charge
Before first use, please se t t he device's battery is fully charged
Just need to connect the adaptor or USB interface, then you can charge
The first two times charging please keep about 6 hours, af t er t hat you just need 4 hours to
charge.
Remark: This tablet using Built-in type polymer battery, Charge must be t o choose standard
adaptor (Input: AC110~240V 50/60Hz Max:180MA.. O ut put: DC5.0~5.5V/1.5A), this dev ice
without supply DC chargin g, US B interface can charge, Choose U SB i nt erface to charger
During the charging, the battery icon will scroll
When finished charging, b attery icon will become green an d stop rolling
In order to prolong the service life of the mach ine, suggest use out battery power before char ge it
Remark:
1 If you long time don’t to use this Tablet, ,in order to avoid power consumption c aused
damage, Please charg e/play the battery once a month.
2 After low battery shut down, connect DC adaptor, device will remind low battery, charging,
need to wait some time until the battery is enough power to ent er into main menu.
3 Device charging should be in standby status for r each normal charging time.
Because with device and scr een consumption, it may cause longer charging time.
2. Connection with PC
Use USB cable to connect device to PC, device will pop up the USB connection window,
clic Tur n on USB storage to connect t o PC
Once connected click on the USB icon that appears at the bottom right of the screen:
The device enables users to access the screen to activate the USB storage as shown in
the following screen:
Page 25

25
Into the load mode, you can copy, delete the file on the device and the file on t he m emory card.
3. Equipment operation interface
3.1 Main interface describe
After startup will enter the main interface
The main interface, can be divided int o 5 parts, each of the corners and the main body of the
screen. In the main of the screen are housed icons and widgets that the user want s , capable of
being moved to the left (2 screens) or right (2 screens) thus has a total of 5 screens that can be
added shortcuts, boo km arks and Widgets
The upper left corner:
can either perform a Google search by
typing the desired look or do a search for voice (in either case must be connected to the Internet )
The upper right corner:
access to applications and installed Widgets.
Applications are programs that run when the user wis hes and stop working when the user exits
Page 26

26
the application. They c an be installed by downloading the application 1Mobile Market or through
websites that off er Android applications.
Widgets are small easy access programs that run continuously, they are located in any of the
main screens. For example one of the widgets t hat ar e already installed and r unning is the
analogue clock
The lower left corner has 4 icons:
The same function as the V- button on the top of the Tablet.
applications that are cur r ently running.
Allows to go b ack Go to the main screen.
View and select the
Access the menu depending on the application
you are using. If you are in the main interface will pop up a menu that lets you change the
wallpaper, manage applications or access the sy st em setti ngs. The same function as the V+
button on the top of the ta blet .
In the lower right corner is the status area:
showing the current t i me,
battery status, wireless connection, different alarms and status messa ges. By clicking you can
access some quick adjustments.
Accessing the area of applications and widgets you can manage the main interface icons:
Press and hold an icon 3 seconds after the icon is enlarged, you can drag it anyw her e on the
interface
Page 27

27
Delete icons: long press the icons 3 second, drag the icons to the Recycle Bin icon,onc
e it become red, Loosen your hand, after that you can delete icon
You touch the screen keep a time, appear the dialog box” Add you Home screen” as shown
below:
4. Basic settings
Setting: Clic setting icons
, enter setting interface
4.1 Wi-Fi: Turns on the Wi-Fi and connects to any Wi-Fi that is within the coverage area
4.2 Data Usage: Allows you to disable or limit access to mobile data as well as shows t
he volume of data downloaded.
Page 28

28
4.3: More ..: Enables Airplane mode (used when you ar e aboard a plane), and advanced settings
for both Ethernet networks, creation of VPNs and mobile networks
4.4 Sound: You can change the default volume of music, games and other media files,
notifications and alarms, different melodies for service, enable sound to play and also the sound
of the lock screen.
Page 29

29
4.5 Screens: adjust properties, change backgrounds, change font size, etc.
4.6 Storage: Show s t he memory usage in the dif fe rent storage media
4.7 Battery: Displays curr ent use of the battery
Page 30

30
4.8 Applications: Displays applications downloaded to main memory or the memory card (SD)
as wella as the currently running applications.
One way to install new applications is through Markets or stores available online. An example is
www.1mobile.com, which comes pre-installed on your Tablet LEOTEC L-Pad, access via the
"1Mobile Market" available in the Applications screen and enjoy thousands of programs and
games.
WARNING
The manufacturer does not guarantee the compatib ility of the version installed on your Android
device with all the applicat ions available for this plat f or m.
The manufacturer is not liable for damage to the device for any malware, worm, trojan or virus as
a result of the installation, implementation, or downloading pr ograms.
The manufacturer is not liable for the misuse by a user with the device and download and
installation of proprietary software without authorizat i on from the owner.
How to uninstall?
(1). Enter
“setting”>”App lic at ion”>”Manage application” And then there will be installed
the program list
(2). Clic you want to uninst all icons, will enter the following interface
(3). Clic Uninstall, then you can delete the application
Page 31

31
Some applications allow to be moved to external memory (SD card) to not fill the entire main
memory of the Tablet
4.9 Accounts and synchronization : Allows you to manage the accounts of different mail
applications, Skype etc., Which can be synchronized in real time or not.
4.10 Location Services: allows applications such as Google use your data to determine your
location
Page 32

32
4.11 Security: various security settings like screen lock, displayed or hidden passwords, etc.
Unknown sources: Click "Unknown sources" and followed by "OK" to allow installation of
unknown origin applications (applications not certif i ed by Google, which does not me an t hey are
not reliable sources)
4.12 Language a nd Key boar d : Change the language to use the Tablet, set the automatic spell
correction, keyboard type, etc.
Select Language: 54 la nguages are available
Remark: Android system can su ppor t 54 kind of language, now main interface just support
14 kind of language,
Android key boar d: Android keyboard setting
Sound on Key-press
Auto-capitalization
Show suggestions: Display suggested words while ty ping
Auto-complete: Spacebar and punctuatio n aut omatically insert highlighted word
Page 33

33
4.13 Backup: Allows automatic backup of application data, p asswords and other settings so that
if you reset the operating system applications can be recovered under the above conditions. In
this option settings can be restored original factory data.
4.14 Date & time setting: Set date, set time, Select t ime zone and select date format
4.15 Accessibility: Different options to facilitate the accessibility of the Tablet
Page 34

34
4.16 Developme nt options: Options for developers.
4.17 A bout the unit: Disp lay s information about the Tablet and the OS
5. Problem solution
The tablet does not sta r t or does not show i m age?
Check battery. Connect the char ger DC power connector of your device and wait. If the battery is
completely depleted, charging 4-5 hours will be enough t o take autonomy.
Can’t get to charge the tablet’s battery with the DC charger?
Most LEOTEC tablets allow battery charge connected to the USB port of a computer usin
g the supplied cable. See if your model allows it on the comparison chart that can be fou
nd on the LEOTEC website.
Did you forget your passwor d or unlock p at ter n ?
Enter the LEOTEC site’s download area and locate the original firmware upgrade guide for your
tablet model (eg LETAB904) to restore your system Android from your computer.
Page 35

35
Can’t play v i de os t ha t you can actually play on your comput er?
Just as we need to install codecs in a computer to reproduce some extensions and video
formats, the tablet works the same way. Access Market and locate the codec application
you’re interested in.
The tablet boots and freezes with the word Android on screen but doesn’t get to the
unlock menu?
It is possible that some recently installed application isn’t ready to be used in the tablet or it may
be consuming too much w or k m emory. Enter the download area in LEOTEC website and look for
the original firmware and your model’s guide to restore your Android system from your computer.
Have you any got other kind of problem? Is the device defective?
If you have any other problems go to our support section on our website www.leotec.com There
you will find a list of the most frequent questions and answers that may be helpful.
6. Specifications
Display screen: 7” TFT Capacitive touch ,
Resolution: 800*480
Operation System: Android 4.0
RAM: DDRIII 512MB
CPU processor speed: Bo xchip A13 (Cortex -A8) 1.2GHZ
Memory: 4GB
TF card: 128M-32G
USB: USB Host OTG
G-sensor 3D
Record: built-in microphone
Video: AVI H.264, DIVX, DIVX, XVID, rm, rmvb, WMV, MOV, MP4 H.264, MPEG, DIVX, XVID),
DAT VCD), VOB DVD), MPEG, MPG, FLV H.263 H.264), ASF, TS, TP, 3GP, MPG etc
Audio: MP3/WMA/APE/FLAC/OGG/WAV/AAC
Photo: JPG, JPEG, GIF, BMP, PNG
Ebook: TXT, EPUB, PDF, WORD, EXCEL, POWERPOINTS
Battery and capacity : r echargeable Built-in type polymer battery, 2800MAH 3,7V
Size: 182mm ×121mm×11mm
Weight: 312g
Page 36

36
Guarantee and responsibility
All LEOTEC products have a 24 month warranty from the invoice date to the end customer,
except in the included acces sories. The m anufacturer guarantees the consum er that its products are
free from defects in materials and workmanship at the time of purchase.
The batteries have 6 m onths warranty. Batteries whose max imum load capacity is equal to or less
than 50% within that period are considered defective.
The warranty offered onl y covers defects in workmanship or mater ials that the product could have.
Defects or failures caused by misuse, breakage, wear are excluded.
Manipulating of the product by anyone other LEOTEC technical service, software updates not
provided by LEOTEC and all faults or defects caused by natural disasters will void the warranty.
The warranty is valid only when the user has the ticket or proof of purchase and it is within the deadline
Support and Technical Service
For any technical consultation you can go to the place of purchase or contact the technical
service of LEOTEC.
Visit our website and st ay always updated in the do wnload section of your pro duct
There is more available information in the website: www.leotec.com or by means of the e-mail:
support@leotec.com
Page 37

37
DECLARATION OF CONFORMITY
Brand: LEOTEC
Supplier name: World Driver S.A.
Address: Ctra de l'Hospitalet 66 - 68
08940 - Cornellà de Llobre gat – Barcelona
Tel: +34 93 267 66 04
NIF: A62589130
Web: www.leotec.com
We declare under our sole responsibility that the product:
L-PAD Space III S LETAB705
Country of manufacture: China
Referred to this statem ent, with the standard (s) or other document (s) policy (s) in accordance with
the provisions of Directi ve 93/68/EEC, the Europe an Parliament and of the C ouncil of 22 July 1993,
transposed into Spanish law by Ro yal Decree 1950/1995, of December 1, 1995.
Reference symbol both in the product and its user manual, indicates th at at the end of life
electrical and / or electronic, the y should be rec ycled separately from your house hold waste.
There are adequate means to collect this material for proper rec ycling. For more information,
contact the local authority or your retailer where you purchased the product.
Note: T he device LETAB705 may contain link s to web sites or pages operated b y parties other than
LEOTEC and / or World Driver SA. These link s are included and are available for your information,
LEOTEC and / or World Driver SA not responsible for their availability, content, adequacy or accuracy.
These external sites may contain or reference trademarks, patents, proprietary information,
technologies, products, processes, or other property rights belonging to others. All copyrights are
property of their respec t iv e o wners .
 Loading...