

Leopard Imaging LI-USB30-V034, LI-USB30-AR0330ICP, LI-USB30-P031, LI-USB30-V024STEREO, LI-USB30-C570 User Manual
...Page 1

USB 3.0 Camera User’s Guide
Rev 1.2
Leopard Imaging Inc.
Mar, 2014
Page 2

USB 3.0 Camera User’s Guide
2
Preface
Congratulations on your purchase of this product. Read this manual carefully and
keep it in a safe place for any future reference.
About this manual
This user manual has been designed to help you make the most of your IP camera
and its many features and functions. Information in this document has been
carefully checked for accuracy; however, no guarantee is given to the correctness
of the contents. The information in this document is subject to change without
notice.
Copyright © Copyright 2011
This manual contains proprietary information, protected by copyright. All rights
reserved.
Contact Information
Leopard Imaging Inc.
1130 Cadillac CT
Milpitas, CA 95035
Phone: (408) 263-0988
Fax: (408) 217-1960
Email: [email protected]
Technical Support: [email protected]
Web site: www.leopardimaging.com
Page 3

USB 3.0 Camera User’s Guide
3
Contents
Introduction ................................................................................................................................... 4
Package contents ........................................................................................................................... 4
1. Product Introduction ............................................................................................................ 5
1.1 Product outline .................................................................................................................. 5
1.2 Key features ....................................................................................................................... 5
1.3 Applications ....................................................................................................................... 6
1.4 Device Requirements ........................................................................................................ 6
1.5 Temperature and Humidity ............................................................................................. 6
2. Technical Specs ...................................................................................................................... 7
2.1 Main Board ........................................................................................................................ 7
2.2 Sensor Boards .................................................................................................................... 7
2.3 Product Dimensions ........................................................................................................ 13
3. Driver Installation ................................................................................................................ 14
4. Run Camera ........................................................................................................................ 15
4.1 USB 3.0 Camera Tool ...................................................................................................... 15
4.2 AMcap .............................................................................................................................. 15
4.3 GraphEdit ........................................................................................................................ 16
4.4 Other Video Software ..................................................................................................... 17
5. Update Firmware ................................................................................................................ 18
6. Trigger Pin ........................................................................................................................... 19
Page 4

USB 3.0 Camera User’s Guide
4
Introduction
This section covers unpacking your new USB 3.0 camera, its key features,
Applications and basic technical information about the Sensor boards. Refer to
later chapters for information on setting up and configuring the product in more
detail.
Package contents
The package should contain all the following contents. If anything is missing or
appears damaged, contact your dealer immediately.
1. USB 3.0 Camera (1)
2. User’s Guide (1)
3. Certificate and Warranty Card (1)
Page 5

USB 3.0 Camera User’s Guide
5
1. Product Introduction
1.1 Product outline
Leopard Imaging USB 3.0 camera is new generation super speed USB Video
camera which supports more than 3G video bandwidth to stream 1080p
30fps video without compression, it provides sharper and high quality
images for scientific and medical industries, Global shutter camera can
support high speed conveyor line for machine vision application, lossless
image quality and low latency streaming is great for video conference
camera industry.
1.2 Key features
USB 3.0 Super Speed support
Support Wide range of sensors:
o M9V024 sensor: Stereo camera for 3-D camera
o MT9V034 sensor: WVGA Global Shutter RAW data camera
o MT9M031 sensor: 720p HD Global Shutter RAW data camera
o MT9M034 sensor: 720p HD WDR camera (YUV with ISP)
o AR0330 sensor: 1080p30fps camera (YUV with ISP)
o MT9P031 sensor: 5M RAW data camera
o Sony ICX285 CCD sensor: CCD Monochrome Camera
o C570 sensor: e2v EV76C570 2M pixels Sensor
o C661 sensor: e2v EV76C661 1.3M pixels Sensor
o AR1820 sensor: Aptina AR1820 18Mp CMOS Sensor
YUV or RAW data output without compression
UVC compliance
USB 2.0 backwards compatible
Support either CS or M12 lens
Provide customization services
USB +5VDC powered device
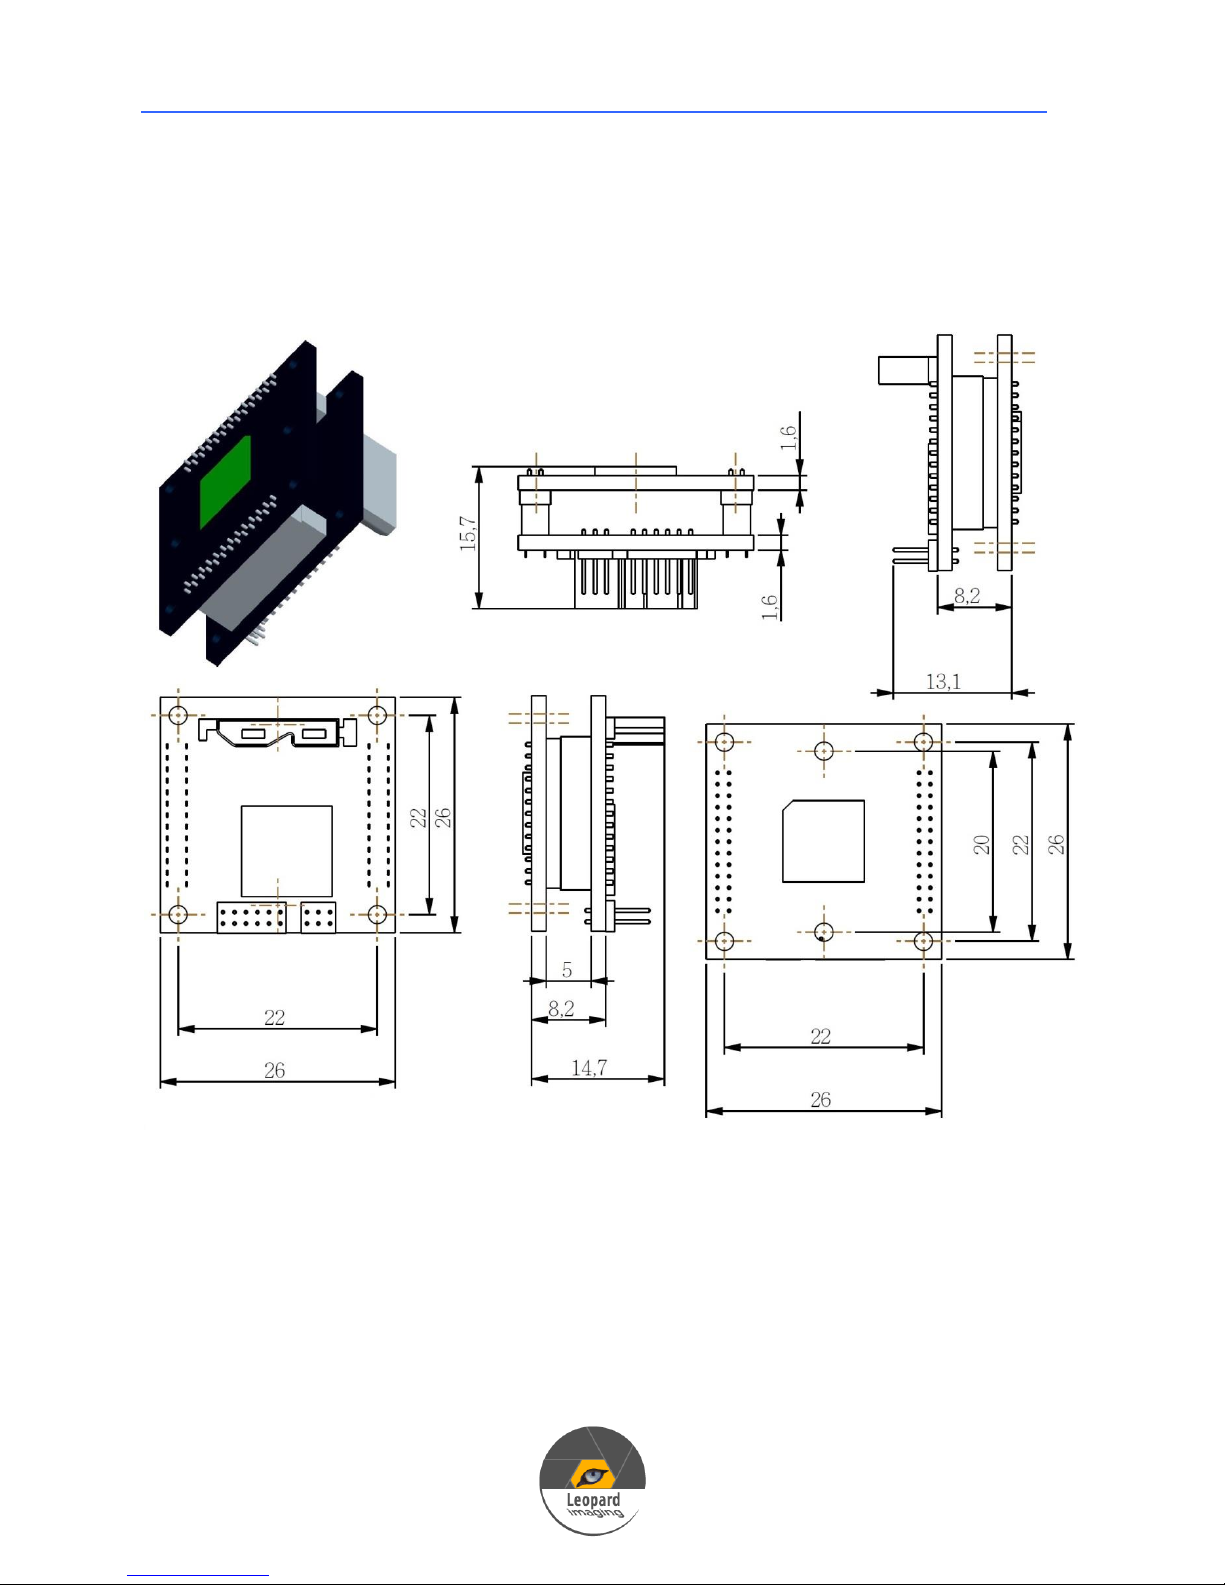
Compact Size: 26mmx26mm
2 Boards are stacked
Page 6

6
1.3 Applications
Computer
With USB 3.0 Port. The port can be realized via a
mainboard-based host adapter or via a separately
installed host adapter card
USB cable for USB 3.0
Micro-B Port
Operation System
32 bit / 64 bit Microsoft Windows XP SP3
32 bit / 64 bit Microsoft Windows 7
32 bit / 64 bit Microsoft Windows 8 / 8.1
Software
Leopard Imaging Camera Tool
GraphEdit
AMcap
Other video capture software
Machine Vision
Video Conference Camera
Medical Camera
Scientific Camera
3-D Gesture camera
1.4 Device Requirements
USB 3.0 Camera User’s Guide
1.5 Temperature and Humidity
Housing temperature during operation: 0 °C ~ 50 °C (32 °F~ 122 °F)
Humidity during operation: 20 % ~80 %, relative, non-condensing
Storage temperature: -20 °C ~80 °C (-4 °F~176 °F)
Storage humidity: 20 %~ 80 %, relative, non-condensing
Page 7
USB 3.0 Camera User’s Guide
7
2. Technical Specs
2.1 Main Board
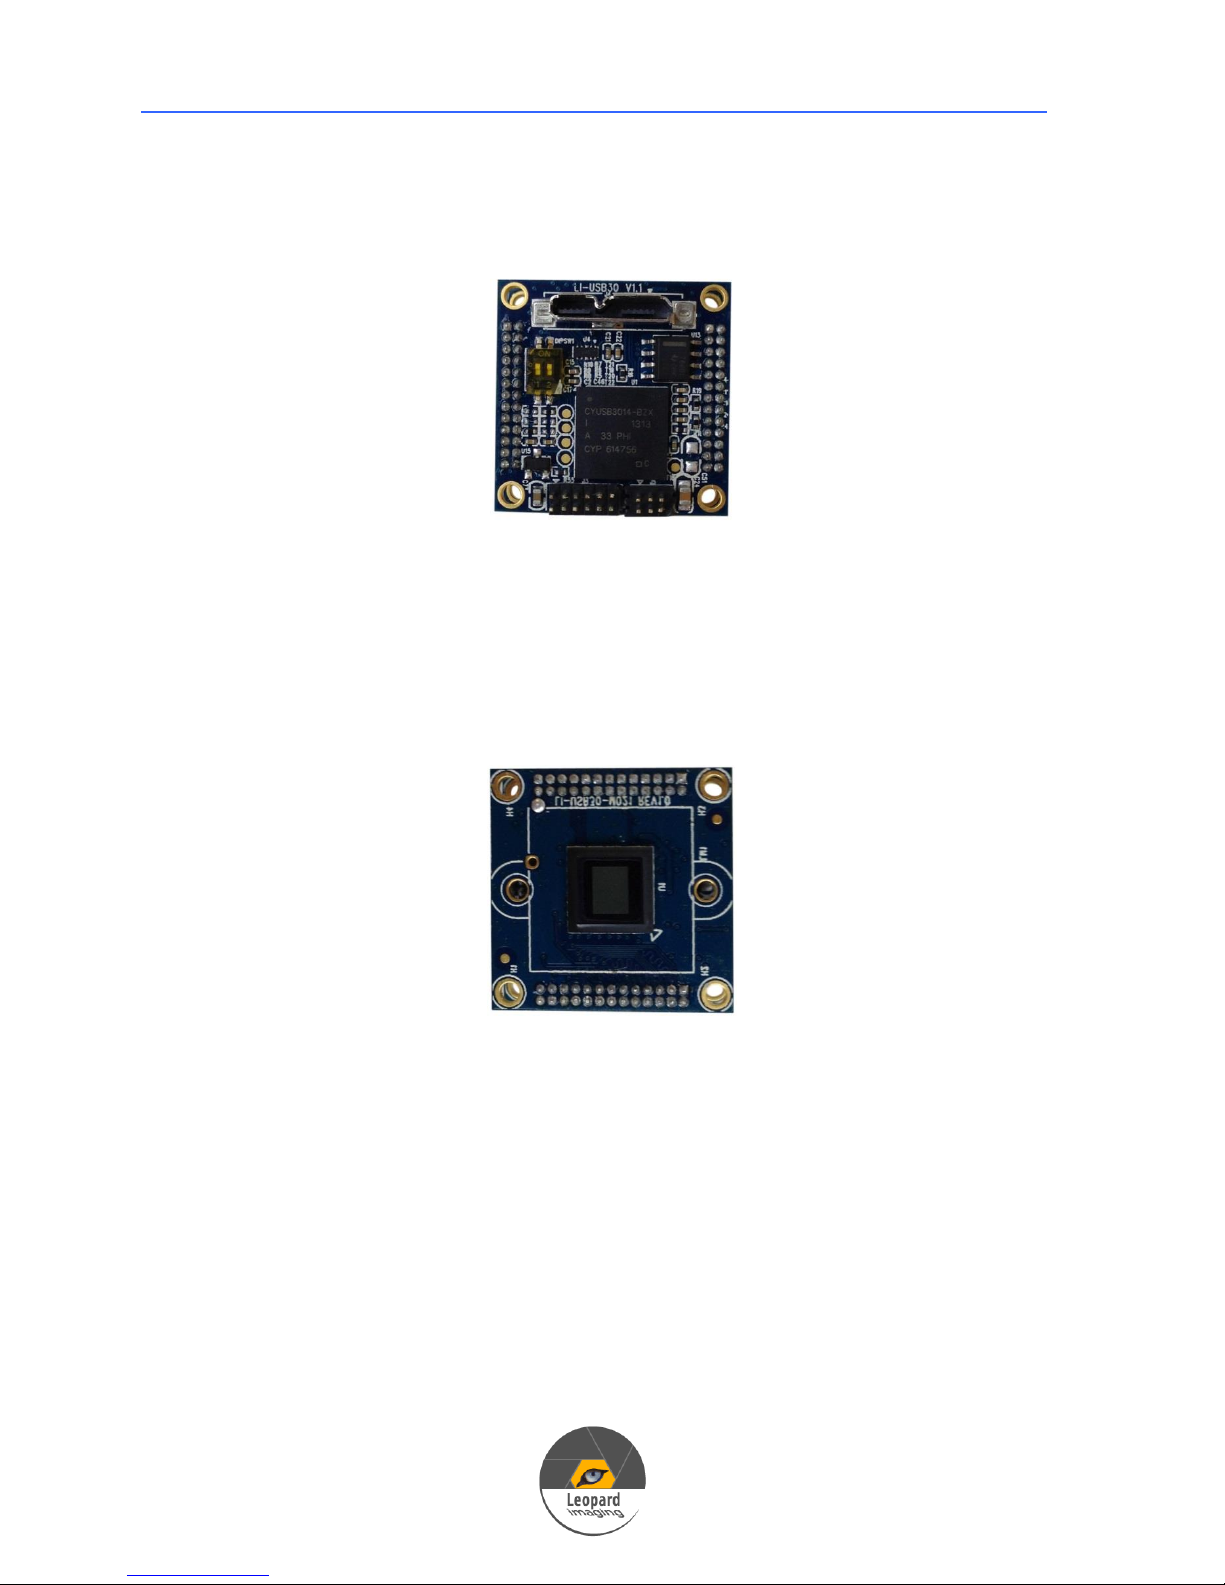
Figure 1: Main Board
Main board mainly includes FX3 USB 3.0 Controller, Power Management, USB
3.0 connector interface, Dual 26-PIN 1.27mm socket for Sensor board interface.
2.2 Sensor Boards
Leopard Imaging USB 3.0 Camera supports different sensor boards from different
manufacturers.
Figure 2: Sensor Board
Page 8

8
LI-USB30-V034
Sensor
Aptina MT9V034 Global Shutter WVGA Sensor
Active Pixels
752H x 480V
Optical format
1/3"
Pixel size
6.0 um x 6.0 um
Resolution
VGA (640 x 480)
Streaming
Support VGA 60fps video streaming
Global Shutter
For high speed application
Color
Monochrome
Data type
RAW data USB 3.0 real time streaming
Lens
CS / M12 lens mount support (Default: M12 lens)
Interface
USB 3.0 interface
Power
USB 3.0 +5VDC power source
Compact size
26mmx26mm
Part#
LI-USB30-V034
Application
Machine Vision
Medical Camera
Scientific Camera
LI-USB30-M021
Sensor
Aptina MT9M021 Global Shutter 720p HD Sensor
Active pixel
1280H x 960V
Optical format
1/3"
Pixel size
3.75 um x 3.75 um
Resolution
720P, VGA (640 x 480)
Streaming
Support 720p, VGA 30fps video streaming
Global Shutter
For high speed application
Data type
RAW data USB 3.0 real time streaming
Lens
CS / M12 lens mount support (Default: M12 lens)
Interface
USB 3.0 interface
Power
USB 3.0 +5VDC power source
Compact size
26mmx26mm
Part#
LI-USB30-M021
Application
Machine Vision
Medical Camera
Scientific Camera
Technical Specs:
USB 3.0 Camera User’s Guide
Page 9

USB 3.0 Camera User’s Guide
9
LI-USB30-M034WDR
Sensor
Aptina MT9M034 720p HD Sensor
Active pixel
1280H x 960V
Optical format
1/3"
Pixel size
3.75 um x 3.75 um
Resolution
960P, 720P, VGA (640 x 480)
Streaming
Support 720p 55fps video streaming
Support 960P, VGA 30 fps streaming
WDR
Support WDR (Wide Dynamic Range)
Data type
Tuned YUV data USB 3.0 real time streaming
Lens
CS / M12 lens mount support (Default: M12 lens)
Interface
USB 3.0 interface
Power
USB 3.0 +5VDC power source
Compact size
26mmx26mm
Part#
LI-USB30-M034WDR
Application
Machine Vision
Medical Camera
Video Conference
Scientific Camera
LI-USB30-AR0330ICP
Sensor
Aptina AR0330 3Mega-pixel Sensor
Active pixel
2304H x 1536V
Frame rate
30fps
Optical format
1/3"
Pixel size
2.2 um x 2.2 um
Resolution
2304 x 1536, 1080P, 720P, VGA (640 x 480)
Streaming
Support 1080p, 720p, VGA 30fps video streaming
Support 2304 x 1536 full resolution 18 fps streaming
Data type
Tuned YUV data USB 3.0 real time streaming
Lens
CS / M12 lens mount support (Default: M12 lens)
Interface
USB 3.0 interface
Power
USB 3.0 +5VDC power source
Compact size
26mmx26mm
Part#
LI-USB30-AR0330ICP
Application
Machine Vision
Medical Camera
Video Conference
Scientific Camera
Page 10

USB 3.0 Camera User’s Guide
10
LI-USB30-P031
Sensor
Aptina MT9P031 5M pixels Sensor
Active pixel
2592H x 1944V
Optical format
1/2.5"
Pixel size
2.2 um x 2.2 um
Resolution
2592 x 1944, 1080P, VGA (640 x 480)
Streaming
Support 1080p, VGA 30fps video streaming
Support 2592 x 1944 9fps video streaming
Data type
RAW data USB 3.0 real time streaming
Lens
CS / M12 lens mount support (Default: M12 lens)
Interface
USB 3.0 interface
Power
USB 3.0 +5VDC power source
Compact size
26mmx26mm
Part#
LI-USB30-P031
Application
Machine Vision
Medical Camera
Scientific Camera
LI-USB30-V024STEREO
Sensor
Aptina MT9V034 Global Shutter WVGA Sensor
Active Pixels
752H x 480V
Frame rate
60fps stereo output
Optical format
1/3"
Pixel size
6.0 um x 6.0 um
Global Shutter
For high speed application
Color
Monochrome
Data type
RAW data USB 3.0 real time streaming
Lens
CS / M12 lens mount support (Default: M12 lens)
Interface
USB 3.0 interface
Power
USB 3.0 +5VDC power source
Compact size
26mmx80mm, Sensor distance: 50 mm
Part#
LI-USB30-V024STEREO
Application
Machine Vision
Medical Camera
Scientific Camera
3-D Gesture camera
LI-USB30-C570
Sensor
e2v EV76C570 2M pixels Sensor
Active pixel
1600H x 1200V
Page 11

USB 3.0 Camera User’s Guide
11
Optical format
1/1.8"
Pixel size
4.5 um x 4.5 um
Resolution
1600 x 1200
Streaming
Support 1600 x 1200 38fps video streaming
Global Shutter
For high speed application
Data type
RAW data USB 3.0 real time streaming
Lens
CS / M12 lens mount support (Default: M12 lens)
Interface
USB 3.0 interface
Power
USB 3.0 +5VDC power source
Compact size
26mmx26mm
Part#
LI-USB30-C570
Application
Machine Vision
Medical Camera
Scientific Camera
LI-USB30-C661
Sensor
e2v EV76C661 1.3M pixels Sensor
Active pixel
1280H x 1024V
Optical format
1/1.8"
Pixel size
5.3 um x 5.3 um
Resolution
1280 x 1024
Streaming
Support 1280 x 1024 38fps video streaming
Global Shutter
For high speed application
Data type
RAW data USB 3.0 real time streaming
Lens
CS / M12 lens mount support (Default: M12 lens)
Interface
USB 3.0 interface
Power
USB 3.0 +5VDC power source
Compact size
26mmx26mm
Part#
LI-USB30-C661
Application
Machine Vision
Medical Camera
Scientific Camera
LI-USB30-AR1820
Sensor
Aptina AR1820 18M pixels Sensor
Active pixel
4912H x 3684V
Optical format
1/2.3"
Pixel size
1.25 um x 1.25 um
Resolution
4912 x 3684, 1920 x 1080
Page 12

USB 3.0 Camera User’s Guide
12
Streaming
Support 4912 x 3684 4 fps video streaming
Support 1920 x 1080 30 fps video streaming
Data type
RAW data USB 3.0 real time streaming
Lens
CS / M12 lens mount support (Default: M12 lens)
Interface
USB 3.0 interface
Power
USB 3.0 +5VDC power source
Compact size
26mmx26mm
Part#
LI-USB30-AR1820
Application
Machine Vision
Medical Camera
Scientific Camera
LI-USB30-CCD285
Sensor
Sony ICX285 Progressive Scan CCD Image Sensor
Active Pixels
1360H x 1024V
Optical format
2/3"
Pixel size
6.45 um x 6.45 um
Resolution
1360 x 1024
Streaming
Support 1360 x 1024 60fps video streaming
CCD
For high speed application
Color
Monochrome
Data type
RAW data USB 3.0 real time streaming
Lens
CS lens mount support
Interface
USB 3.0 interface
Power
USB 3.0 +5VDC power source
Compact size
32mmx32mm
Part#
LI-USB30-CCD285
Application
Machine Vision
Medical Camera
Scientific Camera
Page 13
USB 3.0 Camera User’s Guide
13
2.3 Product Dimensions (mm)
Page 14
14
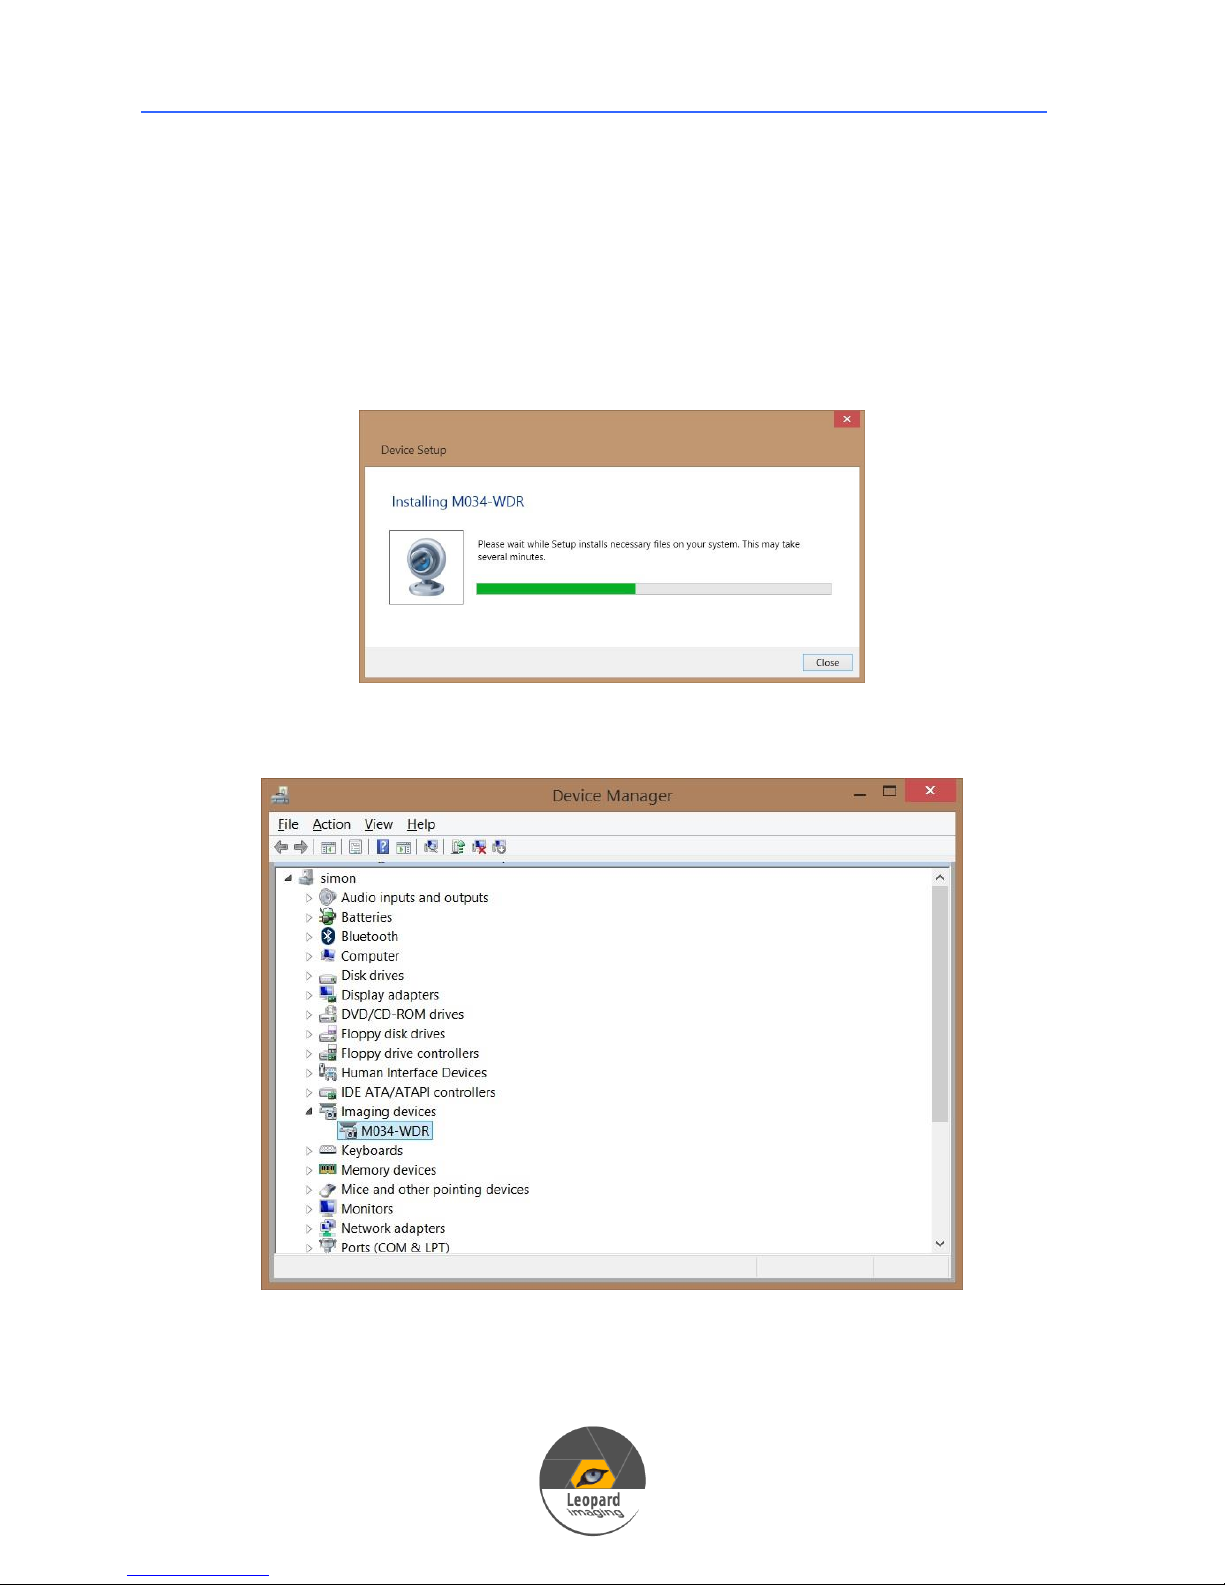
3. Driver Installation
1) Connect the USB 3.0 cable to camera.
2) Plug the USB into USB 3.0 port on PC.
3) PC will search and install driver automatically.
USB 3.0 Camera User’s Guide
4) After install the driver, you can find it in Device Manager.
Page 15
15
4. Run Camera
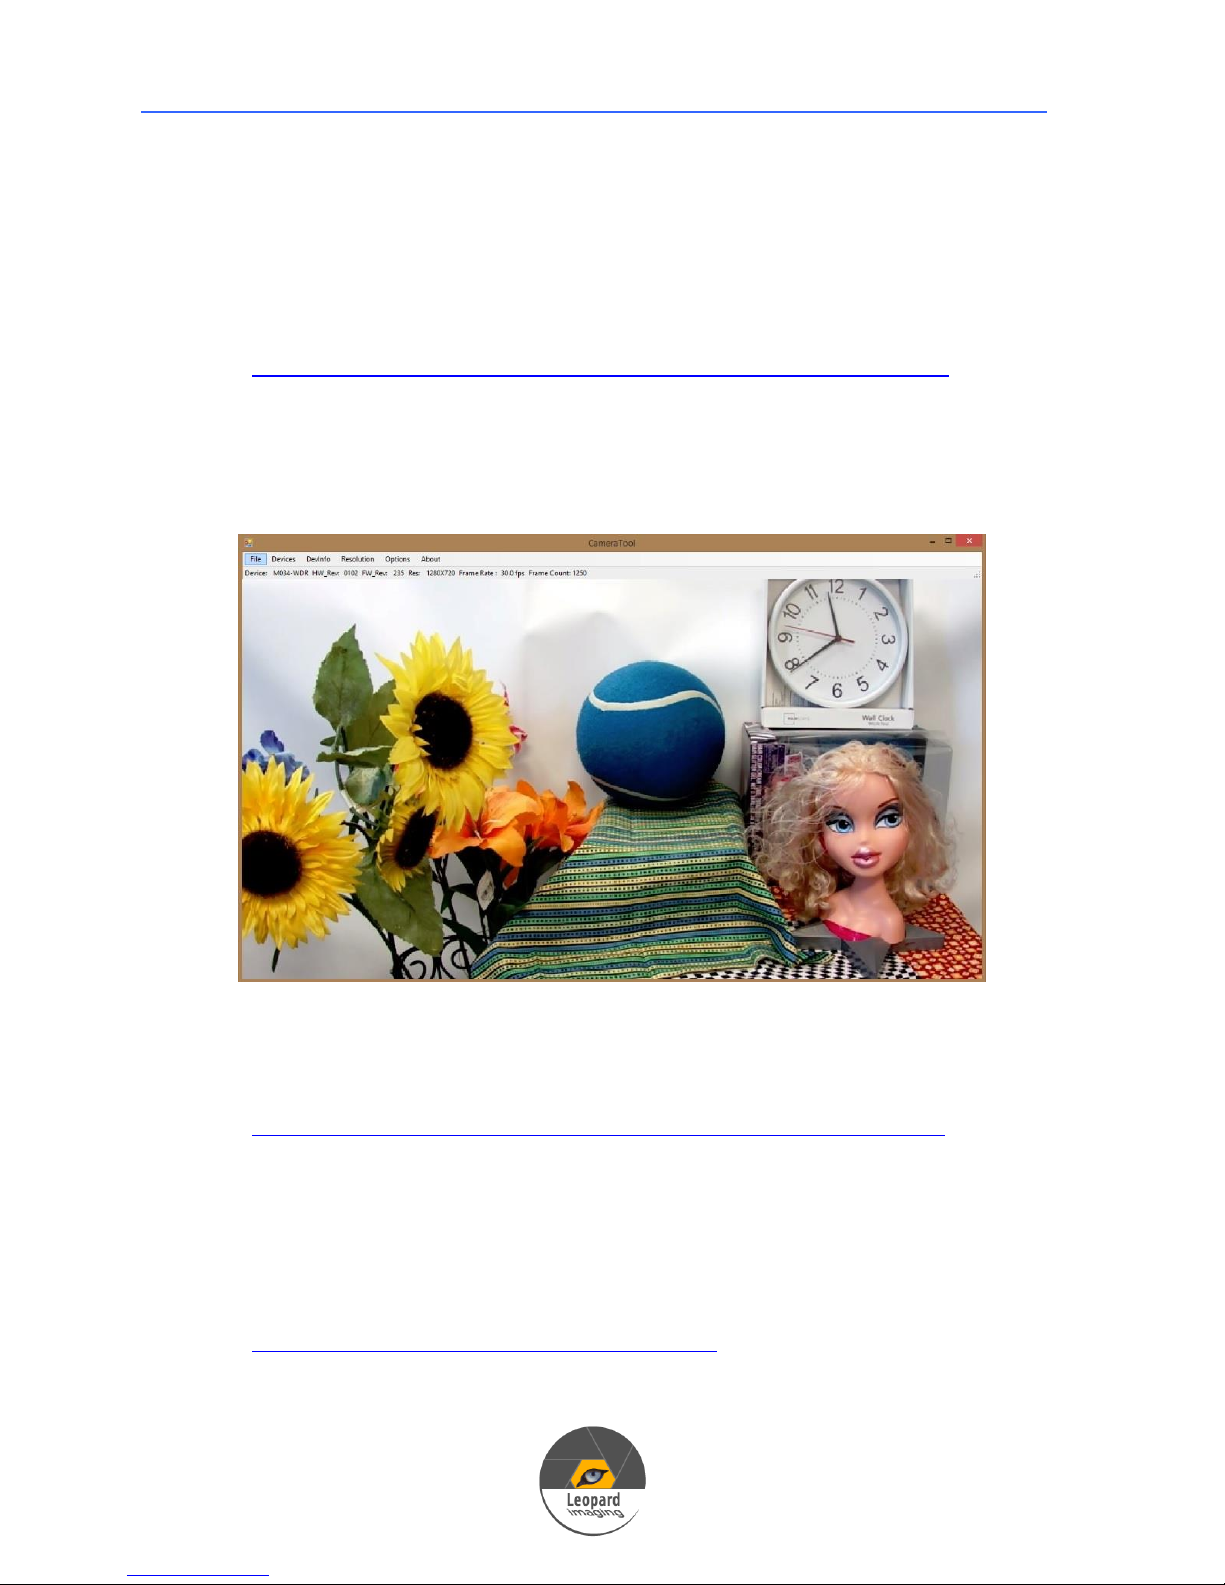
4.1 USB 3.0 Camera Tool
1) Download CameraUSB30.zip from link:
https://www.dropbox.com/sh/ypy5zjdxhowb7bq/gwlh4ANxdr
2) Uncompress the package.
3) Connect the camera to PC.
4) Open “CameraTool.exe”.
USB 3.0 Camera User’s Guide
Note: We also have the SDK for the camera tool software. Please
download it from the link below if needed.
https://www.dropbox.com/sh/49cpwx0s70fuich/2e0_mFTJY_
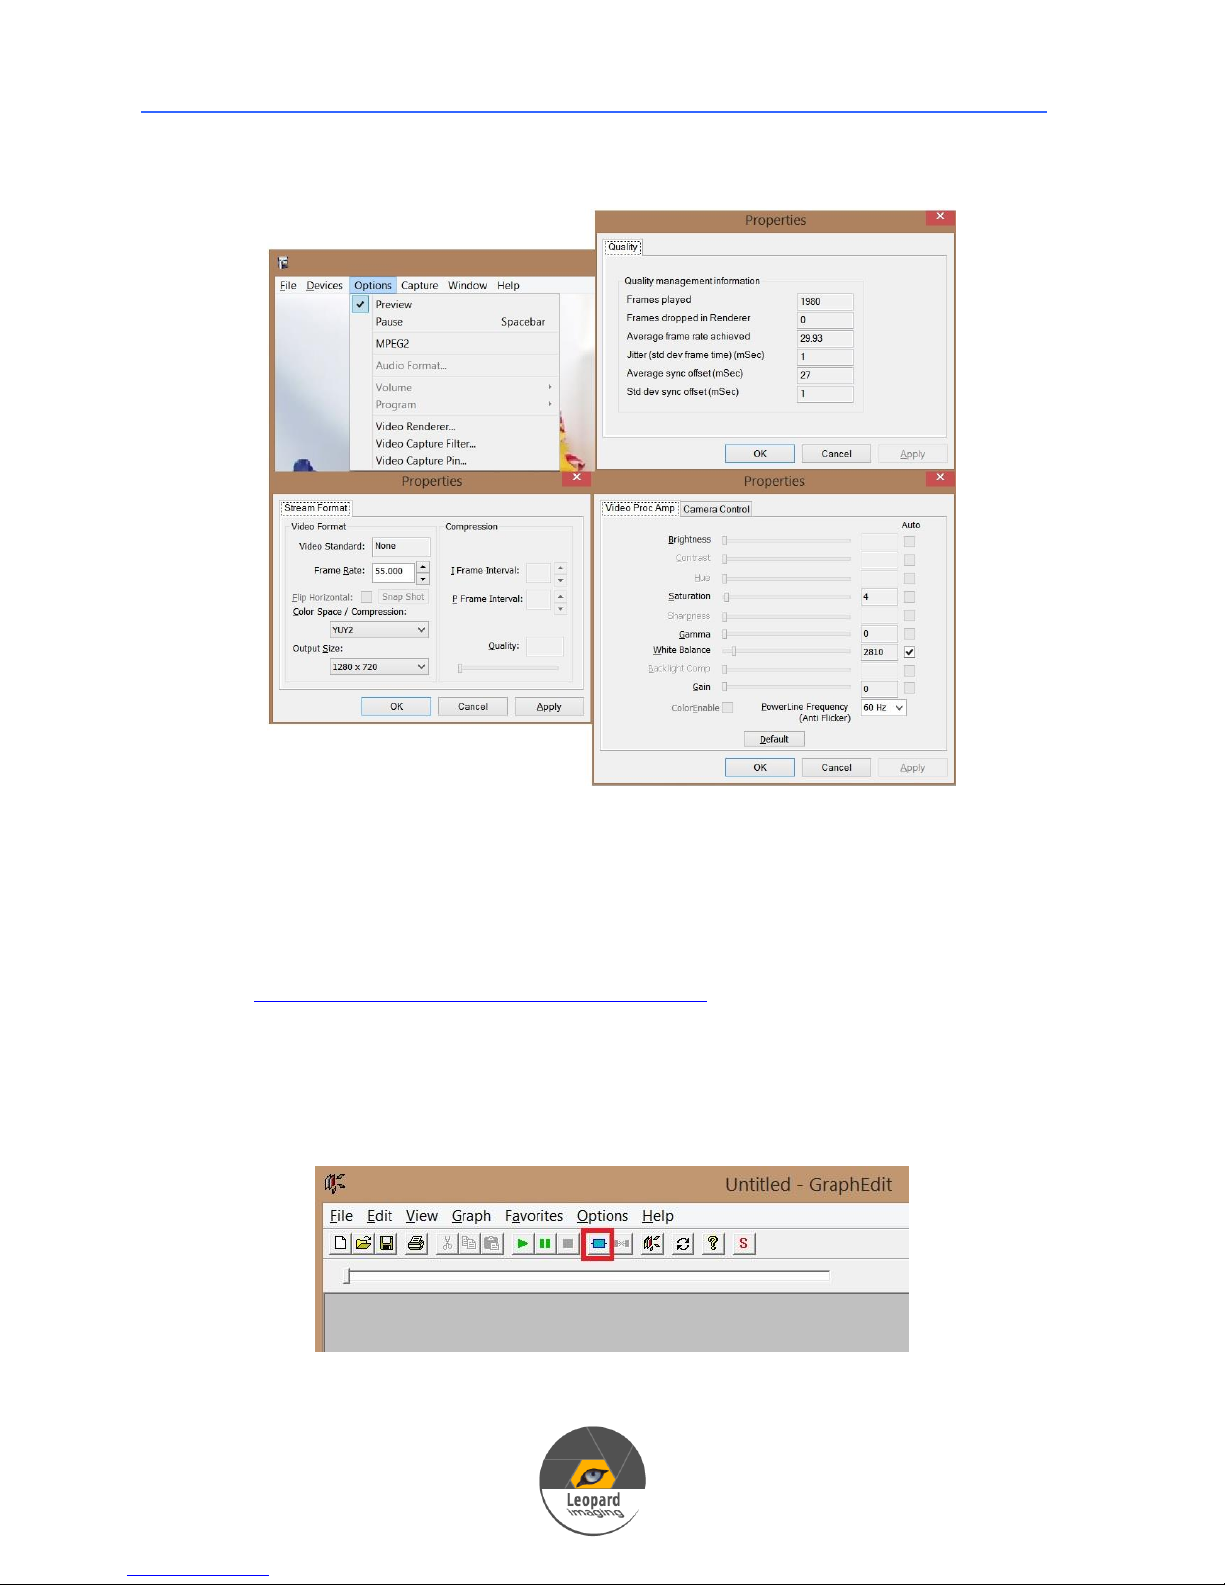
4.2 AMcap
1) Download AMcap from link below.
http://noeld.com/programs.asp?cat=video
2) Install AMcap.
Page 16
USB 3.0 Camera User’s Guide
16
3) Run AMcap after connecting the camera to PC.
4.3 GraphEdit
1) Download GraphEdit from link below.
http://www.videohelp.com/tools/GraphEdit
2) Uncompress the package.
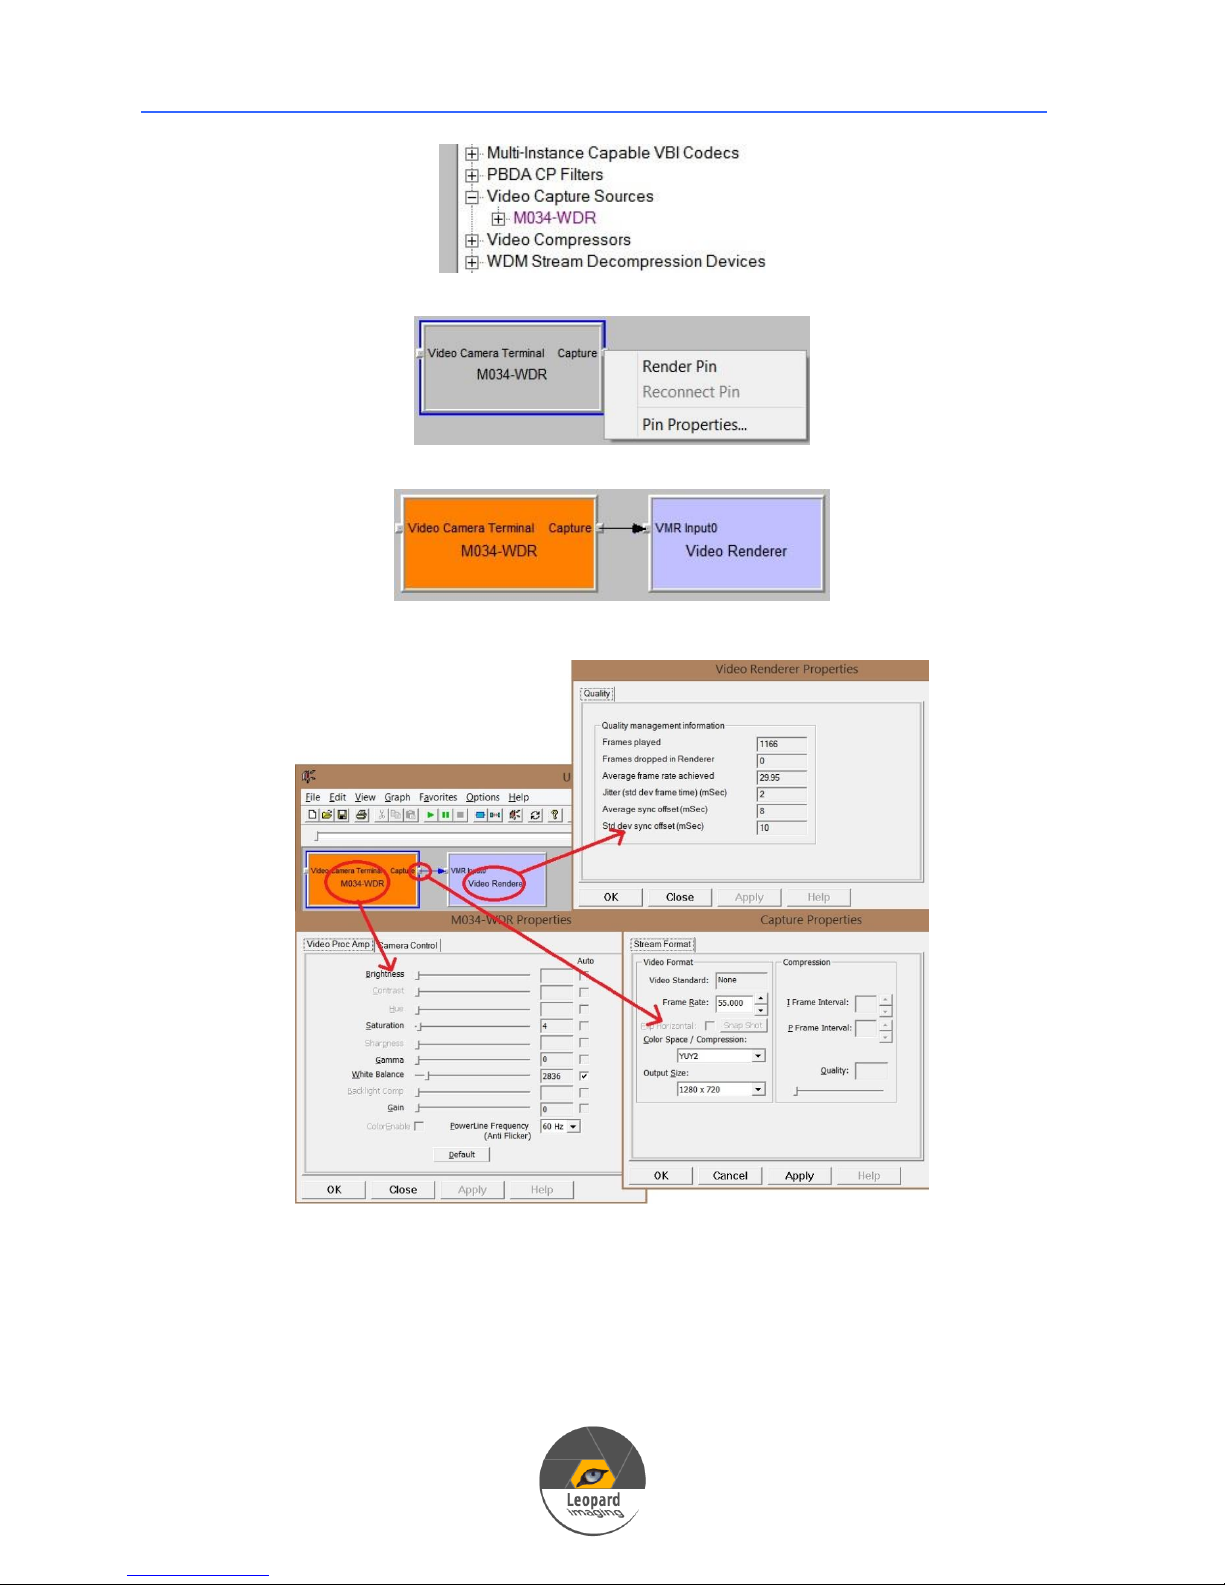
3) Open GraphEdit after connecting the camera to PC. And click“Insert a
filter”.
4) Select the camera device and click “inset filter”.
Page 17
USB 3.0 Camera User’s Guide
17
5) Right click “Capture”, then click “Pin Properties” to choose a resolution.
6) Right click “Capture”, then click “Render Pin”.
7) Click “Play the graph”. Video window will pop up.
4.4 Other video software
Our USB 3.0 cameras are UVC compliant devices and would be
compatible with most of the video capture software (Windows or Linux)
which can be downloaded online.
Page 18
USB 3.0 Camera User’s Guide
18
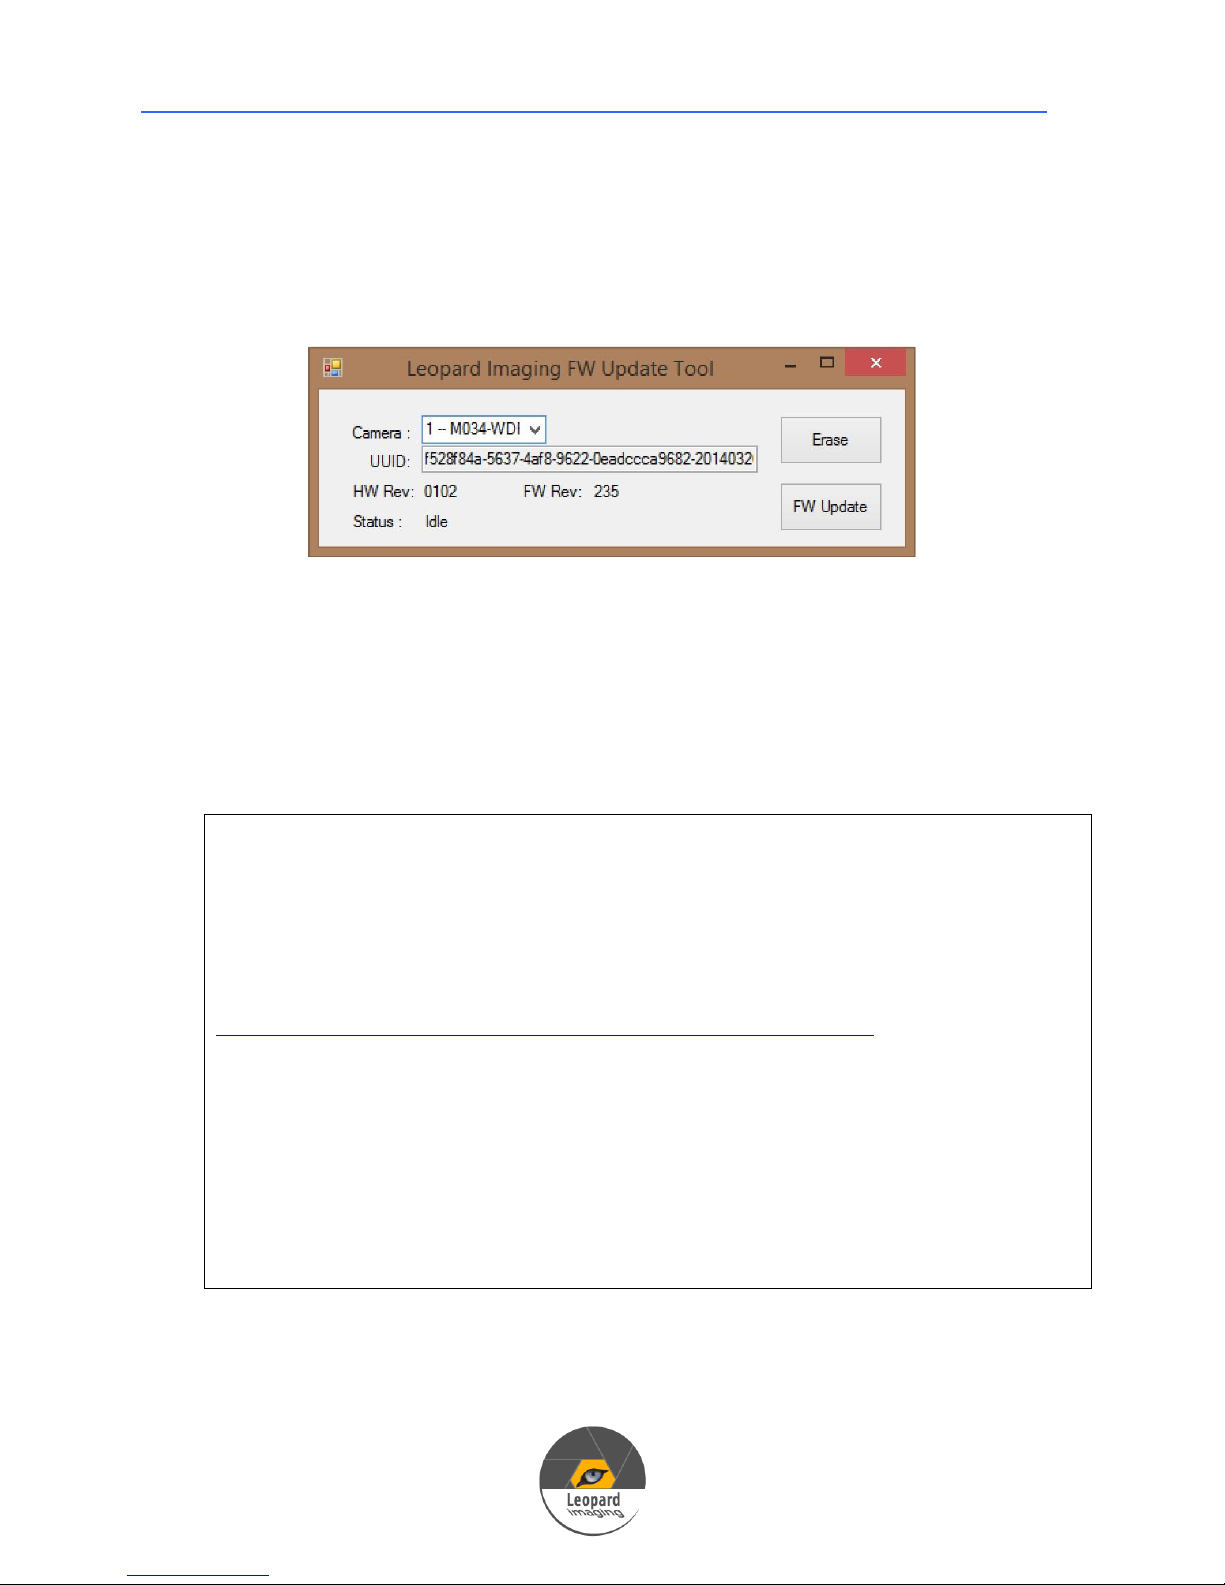
5. Firmware Update
1) Re-connect the USB camera.
2) Open “LP_USB3_FirmwareUpdateTool.exe” which is in the
CameraUSB30_x_x.zip package.
3) Click “FW Update” and select the .lif file.
4) Normally the update will complete in around 20 seconds. While the
application is updating firmware, you can see the update status in the
application window. Once the Firmware update is completed, the status will
be updated as “Program Succeeded”. Please re-plug the camera before
viewing the streaming.
Note: If the driver installation is not successful or if the Status shows as
“No Camera”, please check whether there’s a “WestBridge” under
device manager. The driver of “WestBridge” can be downloaded from
the link below and updated manually. After the driver is installed
correctly, please replug the camera and repeat steps 2) to 4
https://www.dropbox.com/s/2tq036z766ct60f/WestBridge_driver.zip
To update the driver manually:
a. right click on “WestBridge” and select Update Driver Software
b. Choose Browse my computer for driver software
c. Click Browse, locate the driver at the downloaded and unzipped folder
(C:\temp\driver\bin\ for example)
d. Click next and complete the installation process.
Page 19
19
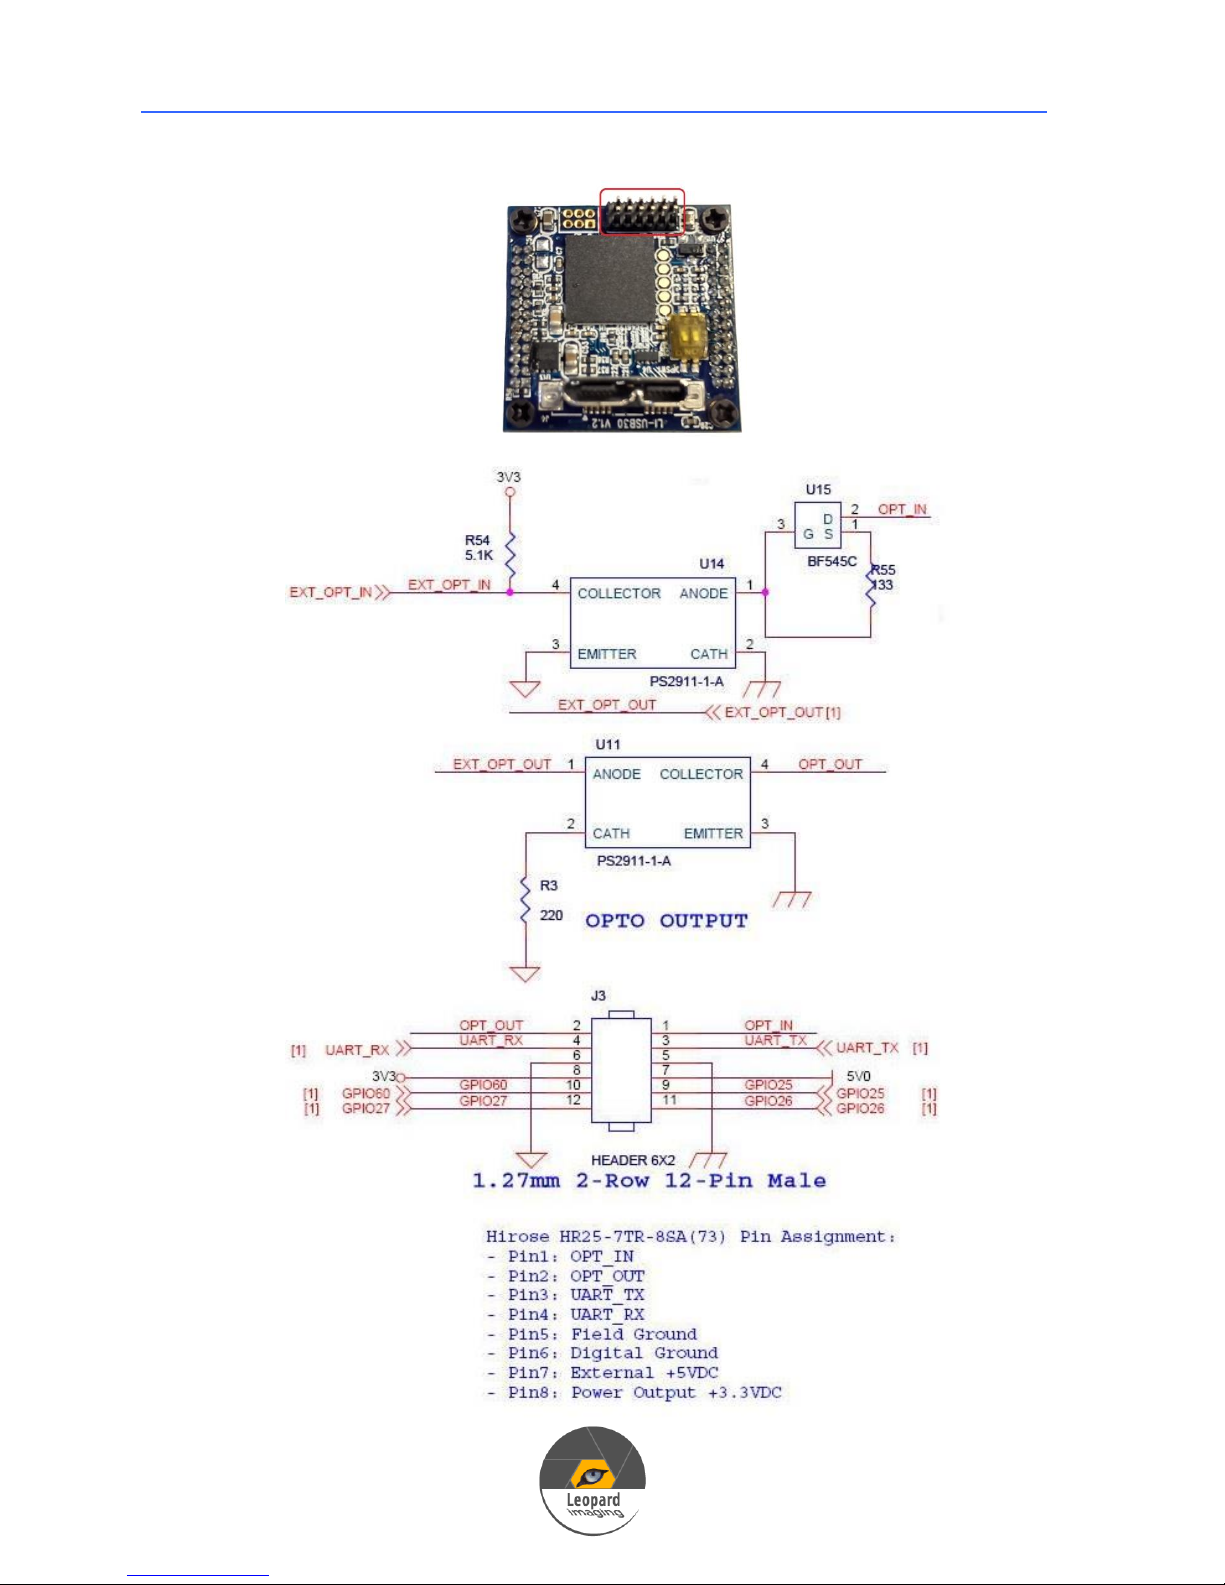
6. Trigger Pin
USB 3.0 Camera User’s Guide
 Loading...