

Page 1
®
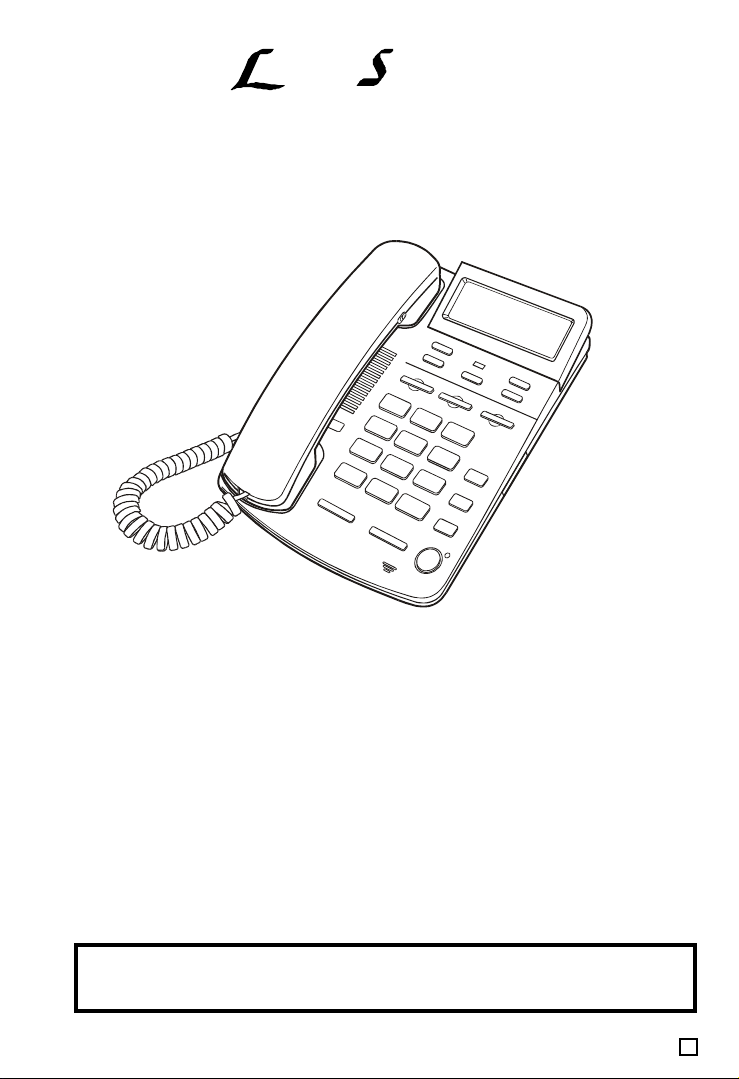
13 MEMORY CALL WAITING CALLER ID
SPEAKER TELEPHONE
MODEL PH-549
OPERATING INSTRUCTIONS
CALL WAITING CALLER ID FUNCTION*
70 NAME & NUMBER CALLER ID MEMORY
HANDS-FREE SPEAKERPHONE
TONE/PULSE SWITCHABLE DIALING
AUTOMATIC TIME & DATE DISPLAY
ONE-TOUCH CALLER ID CALL BACK
3 ONE-TOUCH SPEED DIAL BUTTONS
10 TWO-TOUCH SPEED DIAL MEMORY LOCATIONS
WALL/DESK USABLE
REQUIRES 4 AA BATTERIES OR AC ADAPTOR
(BOTH NOT INCLUDED)
TO USE THE CALLER ID AND CALL WAITING FEATURES OF THIS PHONE,
*
YOU MUST SUBSCRIBE TO CALL WAITING CALLER ID SERVICE FROM
YOUR PHONE COMPANY, AND REMEMBER TO INSTALL BATTERIES
NOTE: READ AND FOLLOW THESE INSTRUCTIONS BEFORE USING YOUR TELEPHONE
PH-549042100RTTv.2 E
Page 2

TABLE OF CONTENTS
Important Safety Instructions 1
Battery Safety Instructions 2
Important Telephone Company & FCC Information 3
Location of Controls 4
○○○○○○○○○○○○○○○○○○○○○○○○○○○
Getting Started
Step 1: Checking the Package Contents 5
Step 2: Powering the Phone 6
Step 3: Telephone Installation 7
Step 4: Setting up the Telephone 7
(Reset the phone) 8
Basics
Choosing Tone or Pulse Dialing 8
Making and Receiving Calls 8
Hands-Free (Speakerphone) Operation 9
Volume Control and Ringer Setting 9
Last Number Redialing and Pause Function 9
Telephone Features
Memory Dialing 10
○○○○○○○○○○○○○○○○○○○○○○○○○○○○○
Storing Phone Numbers into Memory 10
Making Calls with 3 One-Touch Speed Dialing Buttons 10
Making Calls with 10 Two-Touch Speed Dialing Memory Buttons 10
○○○○○○○○○○○○○○○○○○○○○○○
○○○○○○○○○○○○○○○○○○○○○○○○
○○○○○○○○○○○
○○○○○○○○○○○○○○○○○
○○○○○○○○○○○○○○○○○○○○○○○
○○○○○○○○○○○○○○○○○○○○○○
○○○○○○○○○○○○○○○○○○○○○
○○○○○○○○○○○○○○○○○○○○○○○
○○○○○○○○○○○○○○○○○○○○○
○○○○○○○○○○○○○○○○○○○○○○○
○○○○○○○○○○○○○○○○○
○○○○○○○○○○○○○○○○○○○○
○○○○○○○○○○○○○○○
○○○○○○○○○○○○○○○○○○○
○○○○○○○○○○
○○○○○○
Caller ID Features
Understanding the Caller ID Service 11
When you Receive a Call 11
Call Waiting 11
○○○○○○○○○○○○○○○○○○○○○○○○○○○○○○
Viewing the Caller ID List 11
○○○○○○○○○○○○○○○○○○○○○○○○
○○○○○○○○○○○○○○○○○○○○○○○○
Calling back from the Caller ID List 12
Storing the Phone Numbers from the Caller ID List 12
Deleting the Data from the Caller ID List 12
Using Message Waiting/Mailbox 12
Wall Mounting 13
Trouble Shooting 15
Limited Warranty 17
○○○○○○○○○○○○○○○○○○○○○○○○○○○○○○○
○○○○○○○○○○○○○○○○○○○○○○○○○○○○○
○○○○○○○○○○○○○○○○○○○○○○○○○○○○○
○○○○○○○○○○○○○○○○○○○
○○○○○○○○○○○○○○○○○○○
○○○○○○○○○○○○
○○○○○○○○○○○○○○○○○
○○○○○○○○○○○○○○○○○○○○○
PH-549042100RTTv.2 E
Page 3

IMPORTANT SAFETY INSTRUCTIONS
When using your telephone equipment, basic safety precautions should always be followed
to reduce the risk of fire, electric shock and personal injury, including the following:
1. Read and follow all instructions and warnings.
2. Unplug this product from the wall outlet before cleaning. Do not use liquid cleaners or
aerosol cleaners. Use a slightly dampened cloth only.
3. Do not use this product near water, for example, near a bathtub, wash bowl, kitchen
sink, or laundry tub, in a wet basement, or near a swimming pool.
4. Do not place this product on an unstable cart, stand or table. The product may fall,
causing serious damage to the phone.
5. Slots and openings in back or bottom of the phone are for ventilation, and should not
be blocked or covered. The openings should never be blocked by placing the product
on the bed, sofa, rug, or other similar surface. This product should never be placed near
or over a radiator, heat register or a built-in installation such as a bookcase or cabinet
unless proper ventilation is provided.
6. Never push objects of any kind into this product through cabinet slots as they may
touch dangerous voltage points or short out parts that could result in risk of fire or
electric shock. Never spill liquid of any kind on the product.
7. To reduce the risk of electric shock, do not take this telephone apart. When service or
repair work is required, take it to a qualified service representative, Opening or
removing covers may expose you to dangerous voltage or other risks. Incorrect
reassembly can cause electric shock when the appliance is subsequently used.
8. Unplug this product from the wall outlet and refer servicing to qualified service
personnel under the following conditions:
A. When the cord or plug is damaged or frayed.
B. If liquid has been spilled into the product.
C. If the product has been exposed to rain or water.
D. If the product does not operate normally by following the operating instructions.
Adjust only those controls that are covered by the operating instructions because
improper adjustment of other controls may result in damage and will often require
extensive work by a qualified technician to restore the product to normal operation.
E. If the product has been dropped or the cabinet has been damaged.
F. If the product exhibits a distinct change in performance.
9. Avoid using a telephone (other than a cordless type) during an electrical storm. There
may be a remote risk of electric shock from lightning.
10 . Do not use the telephone to report a gas leak in the vicinity of the leak.
11. Do not allow anything to rest on the telephone cord. Do not locate this product where
the cord will be damaged by persons walking on it.
12 . Never install telephone wiring during a lightning storm.
13 . Never install telephone jacks in wet locations unless the jack is specially designed for
wet locations.
14 . Never touch uninsulated telephone wires or terminals, unless the telephone line has
been disconnected at the network interface.
15 . Be careful when installing or modifying telephone lines.
SAVE THESE INSTRUCTIONS
For customer service
Dial 1-800-315-5885 (MONDAY - THURSDAY 9:00 AM - 5:00 PM, FRIDAY 9:00 AM - 1:00 PM EST)
or Visit Our Website: http://www.lenoxx.com
1
PH-549042100RTTv.2 E
Page 4

BATTERY SAFETY INSTRUCTIONS
CAUTION: TO REDUCE THE RISK OF FIRE OR PERSONAL INJURY, READ AND
1. Use only the following type and size of batteries: 4 size AA alkaline batteries (not
included).
2. Do not dispose of the batteries into a fire. The cells may explode. Check with local
codes for possible special disposal instructions.
3. Do not open or mutilate the batteries. Released electrolyte is corrosive and may
cause damage to the eyes or skin. It may be toxic if swallowed.
4. Exercise care in handling batteries in order not to short the battery with conducting
materials such as rings, bracelets and keys. The battery or conductor may over
heat and cause burns.
5. Do not attempt to recharge the batteries that are used with this product. The
batteries may leak corrosive electrolyte or explode.
6. Do not attempt to rejuvenate the batteries identified for use with this product by
heating them. Sudden release of the battery electrolyte may cause burns or
irritation to eyes or skin.
7. All batteries should be replaced at the same time. Mixing fresh and discharged
batteries could increase internal cell pressure and rupture the batteries.
8. When inserting batteries into this product, the proper polarity or direction must be
observed. Reverse insertion of batteries may result in leakage or explosion.
9. Remove the batteries from this product if the product will not be used for a long
period of time (several months or more) since during this time the batteries could
leak, damaging the product.
10. Discard weak or dead batteries as soon as possible since they are more likely to
leak in the product. Batteries should be replaced when the display gets dim or if the
Low Battery Indicator appears in the display.
11. Do not store this product in high temperature areas. Batteries that are stored in a
freezer or refrigerator for the purpose of extending shelf life should be protected
from condensation during storage and defrosting. Batteries should be stabilized at
room temperature prior to use after cold storage.
12. If this product does not operate normally, see TROUBLE SHOOTING on pages 15
and 16. If you cannot resolve the problem, or if the product is damaged, refer to the
LENOXX WARRANTY INFORMATION on the last page. Opening or removing
covers may expose you to dangerous voltages or other risks. Incorrect
reassembly can cause electric shock when the appliance is subsequently used.
13. Installation of batteries should only done by an adult.
FOLLOW THESE INSTRUCTIONS.
SAVE THESE INSTRUCTIONS
2
PH-549042100RTTv.2 E
Page 5

IMPORTANT TELEPHONE COMPANY & FCC INFORMATION
CAUTION : TO REDUCE THE RISK OF FIRE, ELECTRIC SHOCK
AND PERSONAL INJURY, DO NOT OPEN CABINET.
WE SUGGEST THAT YOU REVIEW THE FOLLOWING INFORMATION PROVIDED BY THE FCC (FEDERAL COMMUNICATIONS COMMISSION).
FCC REGISTRATION
This telephone set is registered with the FCC based upon compliance with Part 68 of its rules. Connection of this telephone to the nationwide telecommunications network must be through a standard network
jack (RJ11W or RJ11C) which you can order from your telephone company, if not already installed.
NOTE : FCC registration does not constitute an expressed or implied guarantee of performance. Only
the Lenoxx warranty in this booklet covers the performance of this telephone set.
IMPORTANT FCC INFORMATION
In the event that terminal equipment causes harm to the telephone network, the telephone company should
notify the customer, if possible, that service may be stopped. However, where prior notice is impractical,
the company may temporarily cease service providing that they:
1. Promptly notify the customer.
2. Give the customer an opportunity to correct the problem with their equipment.
3. Inform the customer of the right to bring a complaint to the Federal Communications Commission
pursuant to procedures set out in FCC Rules and Regulations Subpart E of Part 68.
The telephone company may make changes in its communications facilities, equipment, operations or
procedures, where such action is reasonably required in the operation of its business and is not inconsistent with the rules and regulations in FCC Part 68. If such changes can be reasonably expected to
render any customer terminal equipment incompatible, the customer shall be given adequate notice in
writing, to allow the customer an opportunity to maintain uninterrupted service.
RINGER EQUIVALENCE NO. (REN)
The REN is useful to determine the quantity of devices you may connect to your telephone line and still
have all of those devices ring when your telephone number is called. In most, but not all areas, the sum
of the RENs of all devices connected to one line should not exceed five (5.0). To be certain of the number
of devices you may connect to your line, as determined by the REN, you should contact your local
telephone company to determine the maximum REN for your calling area.
NOTE :
This equipment has been tested and found to comply with the limits for a Class B digital device, pursuant
to Part 15 of the FCC Rules. These limits are designed to provide reasonable protection against harmful
interference in a residential installation. This equipment generates, uses, and can radiate radio frequency energy and, if not installed and used in accordance with the instructions, may cause harmful
interference to radio communications. However, there is no guarantee that interference will not occur in
a particular installation. If this equipment does cause harmful interference to radio or television reception,
try the following:
1. Reorient or relocate the receiving antenna.
2. Increase the separation between the equipment and receiver.
3. Connect the equipment into an outlet on a circuit different from that to which the receiver is connected.
4. Consult the dealer or an experienced radio/TV technician for assistance.
GENERAL
The FCC prohibits customer-provided terminal equipment to be connected to party lines or to be used in
conjunction with coin telephone service.
This phone is hearing aid compatible.
3
PH-549042100RTTv.2 E
Page 6
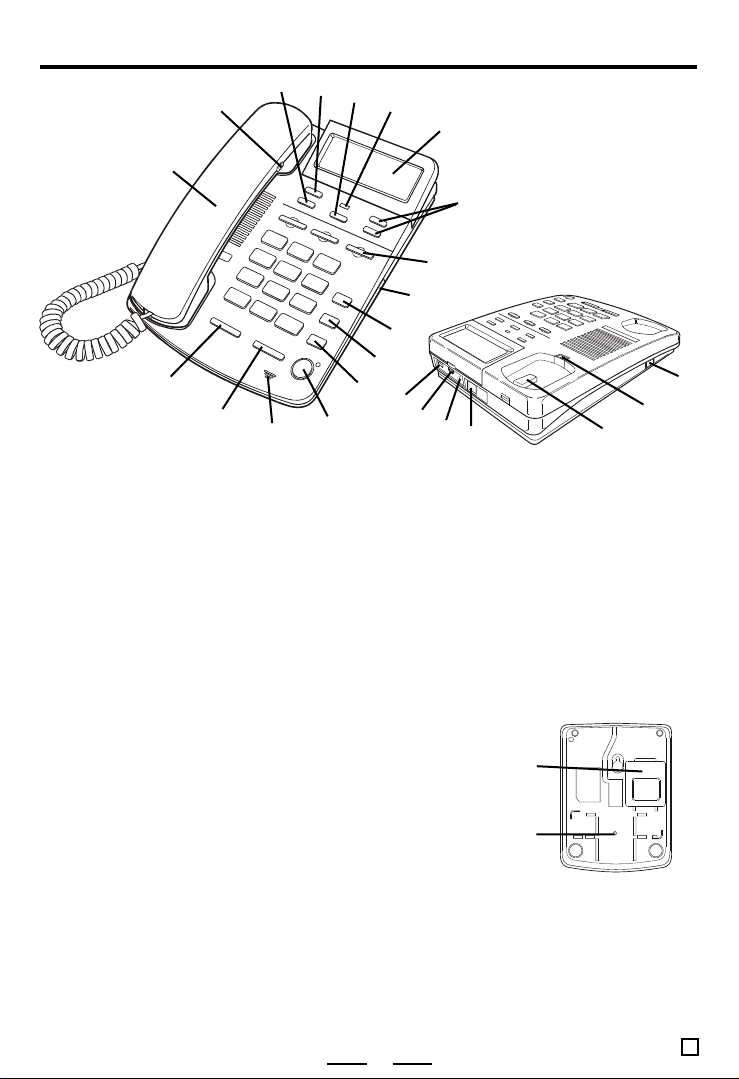
LOCATION OF CONTROLS
3
4
5
13
12
4
18
6
7
8
9
10
11
24
19
20
21
23
22
25
26
BACK OF THE PHONE
PH-549042100RTTv.2 E
2
1
17
16
1. COMFORTABLE ROUNDED HANDSET - for comfortable use even during long calls.
2. HANDSET VOLUME CONTROL - adjusts the volume of handset receiver.
3. DIAL BUTTON - dials the number currently displayed.
4. OPTION BUTTON - used for dialing the correct number of digits (7-digits, 10-digits or 11-digits).
5. DELETE BUTTON - erases an individual record or all records from the Caller ID Memory, also used to
accept time, date, and area code during initial setup.
6. NEW CALL INDICATOR - flashes when new calls have come in.
7. CALLER ID DISPLAY - shows the callers name, number, and calling time & date (and more).
8. UP/DOWN BUTTONS - reviews all calls received.
9. ONE-TOUCH SPEED DIAL BUTTONS - allows you to store numbers and quickly dial them from memory.
10. SPEAKERPHONE VOLUME CONTROL - adjusts the volume of the speaker.
11. STORE (MEMORY) BUTTON - used for storing numbers into the one-touch or two-touch Speed Dial memories.
12. AUTO (MEMORY) BUTTON - allows you to store & dial numbers from 10 two-touch memory locations.
13. MUTE BUTTON - allows you to hear the other party without them hearing you (while pressed).
14. SPEAKERPHONE - allows you to make or receive a call without lifting the handset.
15. SPEAKERPHONE MICROPHONE - for speakerphone use.
16. REDIAL (PAUSE) BUTTON - get a new dial tone, then press this
button to dial the last dialed number (also if you need a pause for PABX).
17. FLASH BUTTON - press to switch calls for call waiting or to get
a new dial tone.
18. TONE/PULSE SWITCH - selects the desired dialing mode.
19. RINGER ON/OFF SWITCH - normally on, allows you to turn the
ringer off for undisturbed privacy.
20. AC ADAPTOR JACK - allows you to use home AC power supply
(6V AC adaptor not included).
21. LINE CORD JACK - insert one end of the telephone line cord here when connecting the telephone.
22. HOOK SWITCH - press down to release the line, hold it down and then release it to get a new dial tone
or for call waiting.
23. HANDSET CLIP - holds the Handset in place when the telephone is mounted on a wall.
24. COILED CORD JACK - Insert COILED CORD from HANDSET here.
25. BATTERY COMPARTMENT - place 4 size AA alkaline batteries inside according to the polarities as
shown on the bottom of the phone.
26. RESET SWITCH - to reset your phone by inserting a pin into the small hole on the bottom of the phone.
15
14
Page 7

IMPORTANT
1. To use the Call Waiting Caller ID feature, you must call your local phone company and tell
them you want Call Waiting Caller ID service. After the phone company sets up your
line properly, you will be able to see who is calling you before you decide to switch your
call to the new caller.
2. If you have regular Caller ID with regular Call Waiting, the Caller ID will only show you the
first callers information, even though your call waiting service works properly.
3. You must tell the phone company you want Call Waiting Caller ID service (both together)
in order to have this phone display the second caller even during your conversation to
the first caller.
As of todays date most phone companies provide 4 kinds of service:
A. CALLER ID - This shows you who is calling
B. CALL WAITING - This allows you to switch calls when you hear a beep or click.
C. CALLER ID AND CALL WAITING - This will give you Caller ID and also Call
Waiting, but your phone will not display the call waiting callers information.
NOTE: You do not want this service.
D. CALL WAITING CALLER ID COMBINED (or DELUXE) is what you want your phone
company to set up for you, so that you can see the call waiting callers information.
GETTING STARTED
Step 1: Checking the Package Contents
Congratulations for purchasing a Lenoxx Sound telephone. Your new PH-549 Caller ID
telephone has all the features of a 13 memory telephone plus Caller ID display and call
waiting functions.
As you unpack this set, make sure you have the following items in the package.
COILED HANDSET CORD
SHORT STRAIGHT WALL CORD
(for wall mounting use)
HANDSET
STRAIGHT TELEPHONE LINE CORD
WALL MOUNT ADAPTOR (attach to
the back of the base for wall mounting)
TELEPHONE BASE
5
PH-549042100RTTv.2 E
Page 8

GETTING STARTED
Step 2: Powering the Phone
1. USING BATTERIES
Before you connect the phone cords, follow these steps to install the batteries:
1. Insert a flat blade screwdriver or coin like a quarter into the slot and pry out (lift) the
battery door (FIG. 1).
2. Insert 4 size AA alkaline batteries as shown inside the battery compartment (FIG. 2).
3. Replace the battery door and snap it shut (FIG. 3).
FIG. 1
CAUTION
Replace the batteries when the low battery indicator
When the batteries are dead, the display will not show. You can still make or receive calls,
but you cant use the Caller ID or memory dialing.
When the batteries are dead, your data and settings could be erased.
FIG. 2
appears on the display.
FIG. 3
2. USING AC OUTLET POWER (AC Adaptor is optional, not included)
This phone may be powered from any household 120V AC outlet using a 6V AC adaptor
(not included). Insert the adaptors small connector plug into the DC 6V Jack marked
NOTE: If the AC Adaptor is connected, and regular batteries are installed, the phone
CAUTION:
To prevent electric shock, do not use the AC Adaptor with an extension cord or outlet,
unless it can be fully inserted without exposing any part of the blades.
on the rear of the phone, and plug the adaptor into an AC outlet.
automatically switches to the AC Adaptor power and the batteries are not used.
OPTIONAL
AC ADAPTOR
6
PH-549042100RTTv.2 E
Page 9

GETTING STARTED
Step 3: Telephone Installation
CONNECTING THE TELEPHONE
1. Connect the handset coiled cord to the HANDSET
and side of the phone.
2. Connect the straight telephone line cord to the LINE
CORD jack (back of phone) and telephone outlet
on the wall.
If your telephone outlet is not modular, contact your
telephone company for assistance.
(If you want to mount the telephone on the wall, see
Wall Mounting on page 13.)
WALL JACK
BACK OF THE
TELEPHONE
HANDSET
Step 4: Setting up the Telephone
SETTING UP LCD CONTRAST, LANGUAGE, AREA CODE, TIME AND DATE
You may need to set up the LCD contrast level, language, area code, time and date for your
telephone when you power your phone for the first time or when you move to an area that
has a different area code. This is necessary because the phone must distinguish local or
long distance calls to properly dial calls from the Caller ID list.
Press and hold the DELETE button down, then press the DOWN button, the following will
show in the display (FIG. 1). Release the DELETE button, press the UP or DOWN button
to choose the LCD contrast level (1-4). Press the DELETE button to confirm and accept.
Then the display will come to the language setting.
The default language E (E = English; F = French; S = Spanish) will flash (FIG 2).
FIG. 1 FIG. 2 FIG. 3
Press the UP or DOWN button to choose your desired language (flashing). Press the
DELETE button to confirm and accept. If you do not press the DELETE button within 15
seconds, English will be selected automatically.
Then the display will ask you to set your Area Code:
While the first digit is flashing, you should:
1. Press the UP button till the first digit of your area code is
displayed (flashing).
2. Press the DELETE button to accept and go to the next digit.
3. Repeat steps 1 and 2 above to set the 2nd and 3rd digits of
your area code.
NOTE: At any time during setup, you may just pick up the
handset or press the SPEAKER button to dial or
receive a call.
NOTE: If you make a mistake, you can just do it over again or
call customer service for help.
7
AREA CODE EXAMPLE: 718
Press UP & DELETE to set
Press UP & DELETE to set
Press UP & DELETE to set
PH-549042100RTTv.2 E
Page 10

GETTING STARTED
Step 4: Setting up the Telephone (Continued)
SETTING UP LANGUAGE, AREA CODE, TIME AND DATE (Continued)
Your phone will now go to the Time and Date mode, press the UP and DOWN buttons to get
to the correct number and the DELETE button to accept.
You do not have to set up the Time and Date because the telephone company will automatically update this with your Caller ID when your phone rings (twice or more). To get back
to the standby mode (for dialing), press the DELETE button until the normal display shows
(see below for example):
(Example: 10:53 a.m. On June 18th)
TO RESET THE PHONE
In the rare case of abnormal telephone line interference, your phone may not work properly
and may need to be reset. Make sure the phone is hung up, use a pointed object like a
straightened paper clip and stick it into the small hole at the bottom of the phone (marked
RESET) for 2 seconds. The display will return to the setup mode.
You will need to reprogram the memory numbers you stored.
BASICS
Choosing Tone or Pulse Dialing
Select the type of dialing that you desire or that your telephone system requires by setting
the TONE/PULSE switch.
TONE - The set will operate using tone dialing.
PULSE - The set will dial using rotary dial type pulses (clicking sounds).
If you are not sure of your dialing system, make a trial call with the switch set to TONE. If the
call connects, leave the switch as it is; otherwise, set it to PULSE.
NOTE: To use caller ID service, you will probably need TONE dialing.
Even when your phone is set to pulse service, this phone can be switched to temporary
tone for access to services that require tone signaling including Telephone Banking. Just
press the TONE
tone signaling for this call only.
button after dialing in pulse and your buttons can now be used for
Making and Receiving Calls
MAKING A CALL
1. Pick up the handset to get a dial tone. The hook icon will show in the display.
2. Dial the phone number. The dialed number appears on the display.
3. When you finished talking, replace the handset into the base.
RECEIVING A CALL
1. Pick up the handset when the phone rings. The hook icon will show.
2. After a few seconds, the Count up timer will start.
3. When you finished talking, replace the handset into the base.
8
PH-549042100RTTv.2 E
Page 11

Hands-Free (Speakerphone) Operation
ANSWERING CALLS WITH THE SPEAKERPHONE
1. After the phone rings twice, press the SPEAKER button, the SPEAKERPHONE
INDICATOR will light, and the hook icon
2. The display will show the Count Up Call Timer after a few seconds.
3. Adjust the speakerphone volume by sliding the SPEAKER VOLUME control on the right
side of the phone.
4. To end the call, press the SPEAKER button again.
5. The SPEAKERPHONE INDICATOR will go off and the display will return to Time and
Date mode.
will show in the display.
MAKING CALLS WITH THE SPEAKERPHONE
1. Press the SPEAKER button to get a dial tone - no need to lift the handset.
2. The SPEAKERPHONE INDICATOR will light and the hook icon will show in the
display, the Count Up Timer will start after a few seconds.
3. Adjust the speakerphone volume by sliding the SPEAKER VOLUME control on the right
side of the phone.
4. Dial your call.
5. To end the call, press the SPEAKER button again.
6. The SPEAKERPHONE INDICATOR will go off and the display will return to Time and Date
mode.
NOTE: When pick up the HANDSET or press the SPEAKER button, the hook icon will
show in the display. If this icon shows in the display while the phone is not in use,
remember to check if the HANDSET is replaced properly or the SPEAKER button is
pressed to off.
Volume Control and Ringer Setting
Slide the HANDSET VOLUME control (LOUD or NORMAL).Adjust the handset volume
Adjust the ringer ON
or OFF
If you have subscribed to the Caller ID service, the callers number and/or name appears on
the display when you received a call (see page 11).
Set RINGER ON/OFF switch.
ON - Normal setting, the phone rings on incoming calls.
OFF - To turn off the ringer, for undisturbed privacy.
NOTE: Only this phone will not ring, other phones on the
same line will continue to ring normally.
Last Number Redialing and Pause Function
1. Pick up the HANDSET or press the SPEAKERPHONE button. The hook icon
show in the display.
2. Press the REDIAL button. The last dialed number appears in the display and is
automatically dialed.
TO CHECK THE LAST PHONE NUMBER DIALED
While the handset is on the base, press the REDIAL button. The number appears in the
display for 3 seconds.
NOTE: If the last dialed number exceeds 16 digits, only 16 digits will be displayed.
PAUSE FUNCTION
(Example: In an office where you need to dial a 9 first to get an outside line), dial the
number 9 and press REDIAL button, and then dial the phone number. You will see a
displayed for pause. You may also store this into memory.
9
PH-549042100RTTv.2 E
will
Page 12

TELEPHONE FEATURES
Memory Dialing
You can quickly dial the numbers you stored into the 3 one-touch speed dial buttons or
10 two-touch speed dial memories.
STORING PHONE NUMBER INTO MEMORY
1. Press the STORE button. (short for programming) appears on the display.
2. Dial the phone number you want to store. You can store up to 22 digits (including a
TONE ( ) and a PAUSE (
3. For 3 one-touch dialing: For 10 two-touch dialing:
Press one of the 3 one-touch
speed dial buttons (M1 to M3).
4. The stored number and the location will be shown in the display.
5. Press the STORE button or wait 3 seconds to resume normal display.
6. Repeat steps 1 to 5 to store numbers into other memory locations.
NOTE
When the batteries are dead or removed for more than five minutes, the stored
numbers may be erased.
TIP: If you entered a wrong number, you may press the STORE button, then start from
the beginning.
To store a number to be dialed via Private Branch Exchange (PABX)
Before entering a phone number in Step 2 in Storing phone number into memory, do as
follows:
1. Enter the outside line access digit (e.g., 9).
2. Press REDIAL button (for a pause).
To check the stored number
While the handset is on the base, press the desired one-touch speed dial button, or press
the AUTO button and the desired two-touch memory number (0 to 9).
The stored number appears on the display for 3 seconds.
To change a stored number
Just store a new number, as described above, the old number will be erased automatically.
REDIAL
), each of which is counted as one digit).
Press AUTO button, and then press one of the
dialing keys (0 to 9) to store a phone number in.
MAKING CALLS WITH 3 ONE-TOUCH SPEED DIALING
BUTTONS
1. Pick up the handset or press the SPEAKER button.
2. Press one of the one-touch speed dial buttons (M1 to M3).
3. The phone will dial the numbers you stored into it.
MAKING CALLS WITH 10 TWO-TOUCH SPEED DIALING
LOCATIONS
1. Pick up the handset or press the SPEAKERPHONE button.
2. Press the AUTO button first.
3. Press the desired two-touch memory number (0 to 9).
10
PH-549042100RTTv.2 E
Page 13

CALLER ID FEATURES
Understanding the Caller ID Service
Caller ID allows the callers phone number to be shown on the display after the second ring
of the call, also in most cases, the callers name, and calling time and date. This information
will be stored automatically.
In order to use this feature, you must first subscribe to Caller ID service (see page 5).
To use the call back feature, be sure to enter your area code (see page 7), and press
the OPTION button for correct digits.
When You Received a Call
The phone number appears on the display with the date
and time as shown in the example here.
If your Caller ID service includes the callers name, the callers name also appears on the
display (up to 16 letters), as well as time & date of the call (this varies by region).
NOTE
The callers phone number and/or name will not appear in the following cases:
- The call is made through a telephone company which does not offer Caller ID
service (including international calls). The display will show
AVAILABLE .
- The call is blocked. For privacy reasons, many states allow callers the option to prevent
his or her telephone data from being displayed on the other partys Caller ID display.
The display will show
- You have picked up the phone before second ring.
- If the call is from an office which uses multiple lines, the displayed phone number
may not match the number you use to call that extension.
PRIVATE CALL.
OUT OF AREA
or
UN-
Call Waiting
This feature allows you to read from the LCD display the incoming call information while you
are using the telephone. If you are using the telephone when a new call comes in, CW
will be flashing on the LCD, and the phone number of the new caller will appear on the
LCD. By pressing the FLASH button on your telephone, you will put on hold the party you
are having the conversation with and you will be able to talk to the new caller, and the CW
icon disappears from the LCD. After you finish the conversation with the 2nd caller, press
FLASH to return to the 1st call (you may also press the HOOK switch for 2 seconds).
NOTE
Remember to subscribe to CALL WAITING CALLER ID service from your telephone company (see page 5).
Viewing the Caller ID List
The phone stores the data of the last 70 calls received including
UNAVAILABLE
not answered (for example, if you are not at home).
You can look through the data in the Caller ID list to check the numbers and names of the
calls received.
1. Press the DOWN button to view your calls from the newest call.
2. Press the UP button to view calls from older calls to newer ones.
When you have reached the last (newest) data by pressing UP button,
LIST
When you have reached the first (oldest) data by pressing DOWN button,
LIST
(newest) call.
You can view the Caller ID list during conversation also by following the steps above.
NOTE: If your telephone is powered by batteries, when the batteries are weak, the low
and
PRIVATE CALL
appears. If you press UP button again, the display will show the first (oldest) call.
appears. If you press DOWN button again, the display will show the last
battery indicator
otherwise the Caller ID list may be erased.
calls. It keeps track of all calls received, even if they were
is displayed. Change the batteries as soon as possible;
11
OUT OF AREA
END OF
END OF
PH-549042100RTTv.2 E
or
Page 14

CALLER ID FEATURES
Calling Back From the Caller ID List
1. Display the phone number you want to call back using the UP or DOWN button.
2. Press the DIAL button, the phone number will show on the display.
3. Press the OPTION button to choose the number of call-back digit to be dialled out
(7 digits - phone number by itself, or 10 digits - area code + phone number, or 11 digits
- 1 + area code + phone number), different parts of the country have different dialing
systems even for local calls.
4. Pick up the HANDSET or press the SPEAKERPHONE button.
5. Press the DIAL button, the phone will dial the number displayed.
Storing the Phone Numbers from the Caller ID List
As the phone keeps the data of up to 70 calls, if the 71st call comes in, the phone deletes
the oldest data automatically.
To prevent important data from being deleted, you can store them into the 13 speed dial
memories (3 one-touch or 10 two-touch).
1.Display the phone number you want to store (by pressing UP or DOWN button).
2.Press STORE button. The call number is repeated in the display.
3.Press the OPTION button to change the memory dial digit (7-digit, 10-digit or 11- digit).
4.
For one-touch memory
Press a one-touch speed dial button
(M1 to M3).
The phone number is now stored in that memory button (NOTE: Only the number will be
stored, not the name).
NOTE:
1. Do not allow more than 3 seconds to elapse between each step of the procedure.
2. If the phone is connected to a Private Branch Exchange (PABX), you may need to add
an outside line access digit or a pause, see page 10.
For two-touch memory
Press the AUTO button, and then one
of the speed dial memories (0 to 9).
Deleting the Data from the Caller ID List
To delete the Caller ID memory one by one
1. Display the Callers ID you want to delete (by pressing UP or DOWN button).
2. Press the DELETE button quickly twice, the display changes to show the next or
previous call, and the data is deleted.
To delete ALL the Caller ID memories
1. Press the UP or DOWN button to display any call, make sure the display does not
show
2. Press and hold the DELETE button down for 6 seconds. Display changes to
END OF LIST
CALLS
and all the Caller ID memories are deleted.
.
NO
Using Message Waiting/Mailbox
To use the Message Waiting indication feature, you must subscribe to this service if available from your local telephone company.
Your PH-549 will only respond to FSK type of message delivery.
1. If the message is sent by the telephone company which is preceded by a ring, the message
waiting symbol
2. After you have retrieved your message(s), the telephone company will send a clear signal
(by a ring) to your phone. The message waiting symbol
INDICATOR will turn off, and display shows
3. Sometimes the telephone company will not send a message clear signal to you,
and you have to clear the message waiting record manually. Just press and hold the
DELETE button down and then press the UP button, the message will be cleared. The
message waiting symbol
will appear on the display, and the NEW CALL INDICATOR will flash.
MSG WAITING OFF
and NEW CALL INDICATOR will be off.
12
and the NEW CALL
.
PH-549042100RTTv.2 E
Page 15

WALL MOUNTING
Your PH-549 can be mounted on a wall phone plate. If you do not have a modular wall
phone plate installed, please consult with your phone company or installer to get one, or
see next page for installation without a wall plate.
1. HANDSET CLIP - When the phone is mounted on the wall, the HANDSET CLIP must be
adjusted so it will hold the HANDSET.
A. SLIDE OUT B. REVERSE C. REPLACE INTO PHONE
2. To use as a wall phone, you must use the
plastic (box shape) WALL MOUNT ADAPTOR.
3. Use the SHORT STRAIGHT WALL CORD,
and plug one end into the rear of the
phone. Route the cord into the channel at
the phone bottom.
4. Plug the other end of the SHORT
STRAIGHT WALL CORD into the WALL
JACK.
5. Put the phone over the WALL PLATE,
make sure both posts fit into slots on the
back of the phone. Then slide the phone
down to lock the phone onto the WALL
PLATE.
FOR WALL USE, PUT ADAPTOR HERE
13
PH-549042100RTTv.2 E
Page 16

WALL MOUNTING (continued)
Wall Mounting Without A Modular Wall Phone Plate
Follow these instructions to mount the phone on the
wall without a wall plate:
1. Locate a wall stud. If it is possible to utilize a wall
Drill one hole
stud for mounting, dry wall expanders or a similar
type fastener is recommended. Consult your local
hardware stores for details.
2. Drill 2 holes 3
3. Put a screw into each hole and leave
of the head exposed to mount the phone (screws
15
/16" (100 mm) apart.
3
/16" (5mm)
Make sure space
between holes is
100 mm
are not included).
4. Connect the straight cord to the phone and jack.
5. Place the TELEPHONE BASE on the 2 mounting
screws and gently push down to lock into place.
Drill other hole
IMPORTANT
Before mounting the phone onto the wall, select a wall area with sufficient strength. If mounting
on the wallboard or in an area of questionable strength, locate a stud for maximum support of your
telephone.
Installation on Masonry
1. Use a 1/4" masonry drill bit and drill the 2 holes (spaced as above).
2. Insert plastic anchors and install the 2 screws.
3. Leave 3/16" (5 mm) of the screws exposed to mount the phone.
4. Place the TELEPHONE BASE on the 2 mounting screws and gently push down to lock
into place (anchors and screws are not included).
3 15/16
(100 MM)
MOUNTING AREA
ANCHOR
LEAVE 3/16 (5 MM) SCREW EXPOSED
DRILL HOLE WITH 1/4 MASONRY BIT
MOUNTING SCREW
3
/16 (5 MM)
14
PH-549042100RTTv.2 E
Page 17

TROUBLE SHOOTING
PROBLEMS CHECK
The Caller ID unit will not function until you have sub-
The Caller ID display does not
show the callers information
No dial tone
Phone does not work
Phone does not ring
Cannot dial
Display showing erroneous
OR
figures
No dial tone or low dial tone OR
Can not dial out
Cannot store numbers into
memory
Caller ID does not work
The Caller ID display gets dim
Or is blank
Static noise on line or cannot hear
calling party or calling party cannot
hear you
REDIAL does not work
Feedback or squealing when
using SPEAKERPHONE
NOTE: This phone will also work on regular (not Call Waiting) Caller ID service or if you dont
like Caller ID service, you may use this as a regular telephone.
scribed the Caller ID service from your local telephone
company. Call your local telephone company to have
Call Waiting Caller ID service installed on your phone
line. Check your phone line connections. Also, fresh
batteries MUST be installed. Make sure all your phone
line connections are secure and corrected.
If it is a private call or a blocked call, the callers name
and/or phone number will not appear on the display.
(You will see time & date of call plus some dashes or the
words
OUT OF AREA , UNAVAILABLE
Is any plug disconnected from the modular phone
plug?
Is any jack improperly wired? Use another phone to
test the jack.
Are all cords connected properly ? Are all 4 AA
batteries installed? Make sure they are installed according to the polarity shown.
RINGER switch may be set to OFF?
Slide the switch to ON position.
Check the TONE/PULSE switch setting.
You may only have PULSE service. Set the TONE/
PULSE switch to PULSE position.
Reset the phone. Make sure the phone has hung up,
use a pointed object like a straightened paper clip and
stick it into the small hole on the bottom of the phone
(marked RESET) for 2 seconds. After that reset the
language and Area Code as shown in Page 7.
No batteries are installed or batteries are weak or
installed up-side-down.
Make sure the Caller ID service is active.
Check if the phone is connected to a working wall jack.
Check if all line cord connections are correct and secure.
Reset the contrast level of the LCD display.
Check if batteries are properly installed.
Check if you have received the first Caller ID record.
If you have received the first Caller ID record, your
batteries may be weak.
Make sure the handset cords connected properly. Or,
replace the COILED HANDSET CORD. Any phone store
has these cords in different lengths. After some time the
cord may have become overstretched or damaged.
Check if shows in the display. Since the REDIAL
button has combined function (pause function), the phone
may have been paused. Just press the HOOK switch.
Volume is too high. Reduce the SPEAKERPHONE
VOLUME control setting.
15
or
PRIVATE CALL.)
PH-549042100RTTv.2 E
Page 18

TROUBLE SHOOTING (continued)
PROBLEMS
You picked up the phone before the second ring,
appears on the display
Cannot erase all records in memory
Call waiting does not show the number
Caller ID displays words like
or or or
.
Memory Dialing does not work
Handset falls out of phone base when wall
mounted
Callers information is not registered to the
Caller ID memory
Call Waiting or Message Waiting does not
work
Pressing a Memory button does not
display number
NOTE :
1. If problems with your telephone service occur later, try to determine if the trouble is with
the telephones you own or with the telephone company equipment. Unplug the telephone and try it on another jack in a different room or in a neighbors home to see if the
phone line is bad or the phone.
If the known working phone does not operate properly on that line, contact your local
telephone company for assistance.
2. If disconnection of your phone ends the problem, your phone may be the source of the
trouble and it should be tested and repaired if necessary before it is re-connected.
3. There are no user maintainable parts or adjustments on this set. Should your phone
require repairing, contact the manufacturer for instructions (except for cords which you
can buy at any phone store).
or your phone received unclear call information.
Static can cause this message.
If this condition persists, contact your local telephone company to ensure that there is no problem with your phone line.
The DELETE button must be quickly pressed twice
to erase a single call record. To erase ALL call
records, display any record using the UP or DOWN
button, then press and hold the DELETE button
for about 6 seconds.
If an extension phone was pickup up on call 1,
this phone will not decode the call waiting, Caller
ID signals, if the extension phone is not a call
waiting caller ID phone.
,
Your language is set for French or Spanish. To
reset the language, press and hold the DELETE
button down, the display will go to the contrast
level setting, press delete again then press the
DOWN button. When
LETE button to confirm. The language will be set
to English mode.
Check if you have stored the numbers correctly
by pressing that memory location button(s). Also
numbers can only be stored when fresh batteries
are installed correctly.
Handset clip was not installed properly for wall
use. See page 13 for details.
The caller may have an unlisted or blocked number to prevent Caller ID identification, or it may be
an overseas call or you may have noise on the
line during that call.
Check with your telephone company if this service
is available and if you have subscribed for it.
Your MEMORY button has no stored number.
Please store the number again. Press the STORE
button, dial the number and press the MEMORY
locations you want.
16
CHECK
is flashing, press DE-
PH-549042100RTTv.2 E
Page 19

LIMITED WARRANTY
We warrant this product to be free from defects in material and workmanship
under normal use for a period of 1 year after purchase, and we will repair it free of
charge or replace it at no charge, should it become defective under this warranty,
providing you submit proof of purchase sales slip with the set.
During the initial 1 year period after original purchase, we will service the set
that is returned to LENOXX ELECTRONICS CORP., prepaid, at no charge. After
the initial 1 year period expires, we will exchange, at no charge, any part that is
defective, but will charge for the cost of labor, return postage paid by LENOXX.
This warranty does not apply to any products which have been subject to
misuse, neglect or accident. This warranty does not cover broken cords or
cabinet. UNDER NO CIRCUMSTANCES WILL LENOXX ELECTRONICS CORP.
BE LIABLE FOR ANY INCIDENTAL OR CONSEQUENTIAL DAMAGES. Some
states do not allow the exclusion or limitation of incidental or consequential
damages, so the above exclusions or limitations may not apply to you.
This warranty gives you specific legal rights, and you may also have other
rights which vary from state to state. The following charges apply to repairs
beyond the warranty period: $12.00. Be sure to pack carefully and send postage
paid and insured with your money order (personal checks will not be accepted)
and proof of purchase date to:
LENOXX ELECTRONICS CORP., 2 GERMAK DRIVE, CARTERET, N.J. 07008
For customer service
Dial 1-800-315-5885 (MONDAY - THURSDAY 9:00 AM - 5:00 PM, FRIDAY 9:00 AM - 1:00 PM EST)
or Visit Our Website: http://www.lenoxx.com
© 2000 LENOXX ELECTRONICS CORP.
2 GERMAK DRIVE
CARTERET, N.J. 07008
MADE & PRINTED IN CHINA
17
PH-549042100RTTv.2 E
 Loading...