

Page 1
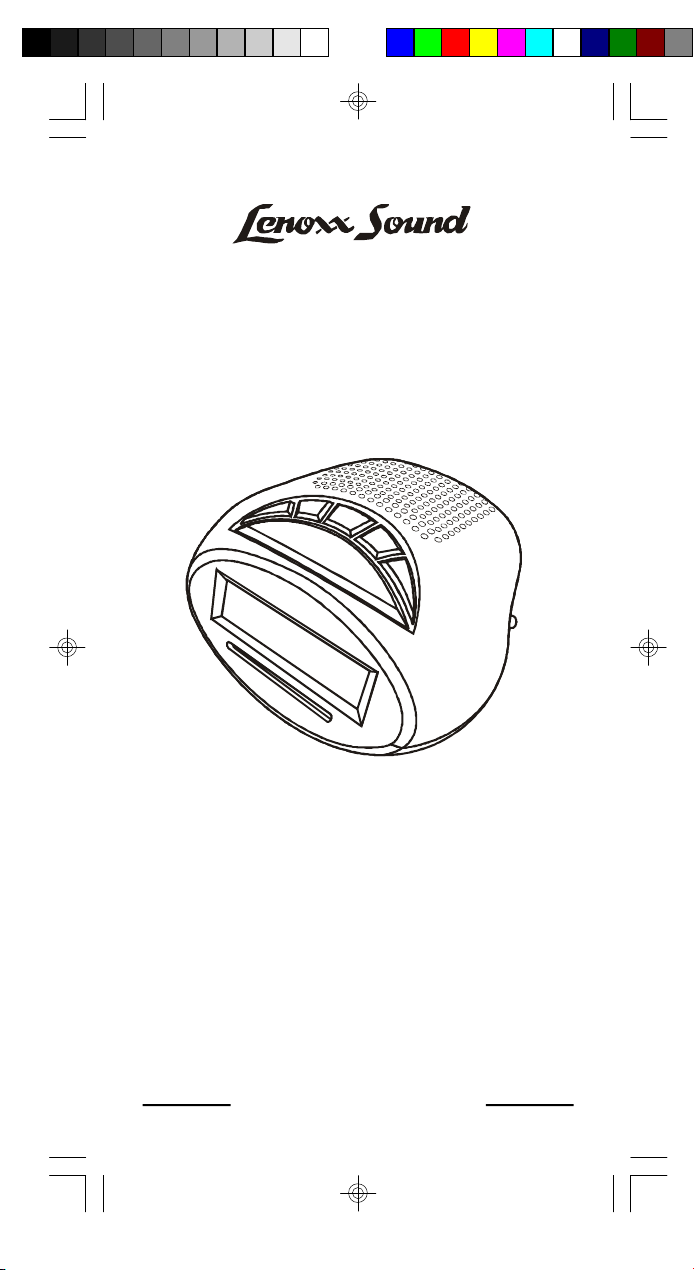
AM / FM CLOCK RADIO
®
MODEL CR-501
OPERATING INSTRUCTIONS
EASY TO SET CLOCK CONTROLS
•
RECEIVES AM/FM BROADCASTS
•
ELECTRONIC DIGITAL CLOCK
•
PM & AUTO INDICATORS
•
WAKE-UP TO RADIO OR BUZZER ALARM
•
SNOOZE FUNCTION (FOR EXTRA 9 MINUTES SLEEP)
•
SLEEP TO RADIO (WITH AUTOMATIC SHUT OFF)
•
IB-CR501-DG-E-052405.pmd 5/24/2005, 4:34 PM1
PLEASE READ CAREFULLY BEFORE USE
IB-CR501-DG-E-052405
Page 2
WARNING
TO PREVENT FIRE OR SHOCK HAZARD, DO NOT USE THE PLUG WITH AN
EXTENSION CORD, RECEPTACLE OR OTHER OUTLET UNLESS THE BLADES
CAN BE FULLY INSERTED TO PREVENT BLADE EXPOSURE. TO PREVENT
FIRE OR SHOCK HAZARD, DO NOT EXPOSE THIS APPLIANCE TO RAIN OR
MOISTURE. TO PREVENT ELECTRICAL SHOCK, MATCH WIDE BLADE PLUG
TO WIDE SLOT, FULLY INSERT.
CAUTION
RISK OF ELECTRIC SHOCK
The lightning flash with
arrowhead symbol,
within an equilateral
triangle, is intended to
alert the user to the
presence of uninsulated
“dangerous voltage”
within the product’s
enclosure that may be of
sufficient magnitude to
constitute a risk of electric
shock to persons.
DO NOT OPEN
WARNING: TO REDUCE
THE RISK OF ELECTRIC
SHOCK, DO NOT
REMOVE COVER (OR
BACK). NO USER
SERVICEABLE PARTS
INSIDE. REFER
SERVICING TO
QUALIFIED SERVICE
PERSONNEL.
The exclamation point
within an equilateral
triangle is intended to
alert the user to the
presence of important
operating and
maintenance (servicing)
instructions in the
literature accompanying
the appliance.
IMPORTANT SAFETY INSTRUCTIONS
1.Read these instructions.
2.Keep these instructions.
3.Heed all warnings.
4.Follow all instructions.
5.Do not use this apparatus near water.
6.Clean only with dry cloth.
7.Do not block any ventilation openings, install in accordance with
the manufacturer’s instructions.
8.Do not install near any heat sources such as radiators, heat
registers, stoves, or other apparatus (including amplifiers) that
produce heat.
9.Do not defeat the safety purpose of the polarized or groundingtype plug. A polarized plug has two blades with one wider than the
other. A grounding type plug has two blades and a third grounding
prong. The wide blade or the third prong are provided for your safety.
If the provided plug does not fit into your outlet, consult an electrician
for replacement of the obsolete outlet.
10.Protect the power cord from being walked on or pinched particularly
at plugs, convenience receptacles, and the point where they exit
from the apparatus.
11.Only use attachments/accessories specified by the manufacturer.
12.Unplug this apparatus during lightning storms or when unused
for long periods of time.
13.Refer all servicing to qualified service personnel. Servicing is required
when the apparatus has been damaged in any way, such as powersupply cord or plug is damaged, liquid has been spilled or objects
have fallen into the apparatus, the apparatus has been exposed to
rain or moisture, does not operate normally or has been dropped.
14.This appliance shall not be exposed to dripping or splashing water
and that no object filled with liquid such as vases shall be placed
on the apparatus.
1
IB-CR501-DG-E-052405
IB-CR501-DG-E-052405.pmd 5/24/2005, 4:34 PM2
Page 3
ADDITIONAL SAFETY INSTRUCTIONS
1. Power Sources - The appliance should be connected to a power
supply only of the type described in the operating instructions or
as marked on the appliance.
2. Wall or Ceiling Mounting - The appliance should not be mounted
to a wall or ceiling.
3. Object and Liquid Entry - Care should be taken so that objects
do not fall and liquids are not spilled into the enclosure through
openings.
4. Servicing - The user should not attempt to service the appliance
beyond that described in the operating instructions. All other
servicing should be referred to qualified service personnel.
5.Do not connect FM antenna wire to any outdoor antenna.
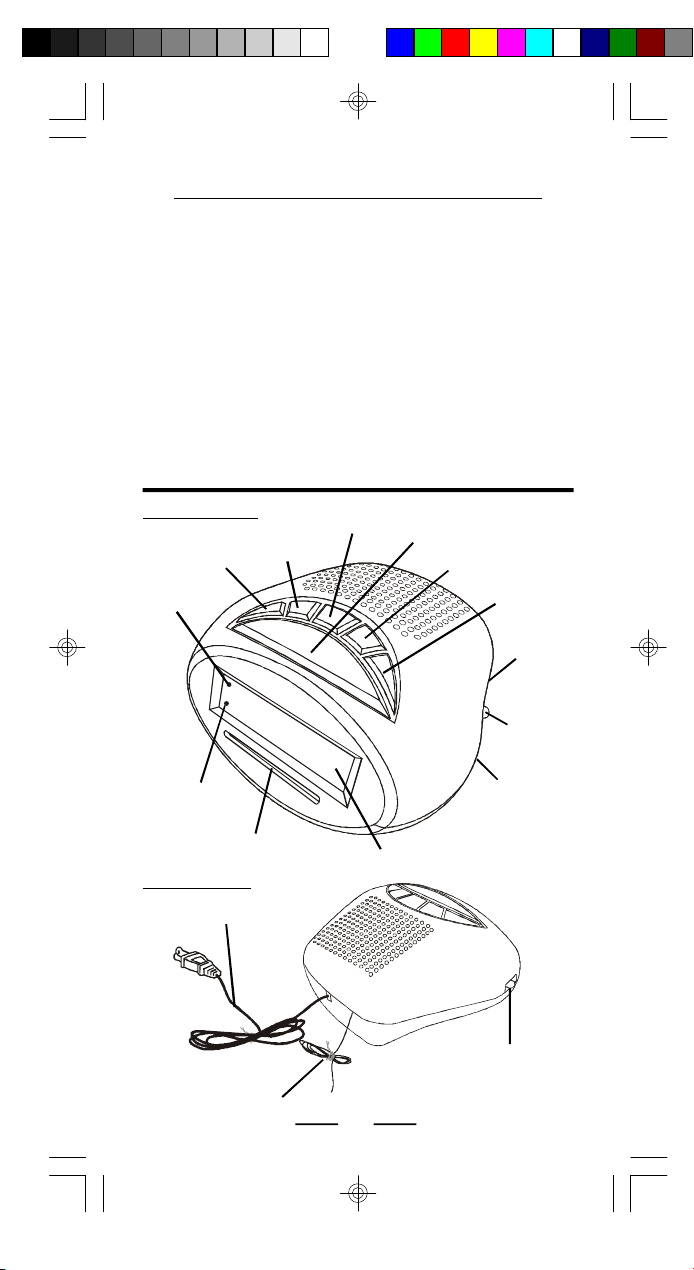
LOCATION OF CONTROLS
FRONT VIEW
MINUTE SET
BUTTON
PM
INDICATOR
HOUR SET
BUTTON
SLEEP
BUTTON
SNOOZE
BUTTON
ALARM/OFF
BUTTON
TIME SET
BUTTON
VOLUME
CONTROL
BAND
SWITCH
AUTO (ALARM)
INDICATOR
DIAL SCALE
BACK VIEW
AC POWER CORD
FM ANTENNA WIRE
IB-CR501-DG-E-052405.pmd 5/24/2005, 4:34 PM3
CLOCK DISPLAY
FUNCTION SWITCH
(ALARM/AUTO/OFF/ON)
2
TUNING
CONTROL
IB-CR501-DG-E-052405
Page 4

OPERATING INSTRUCTIONS
Powering Up
Plug the AC power cord into a 120V, 60Hz electrical outlet. The clock
display will light up and flash indicating the power is on.
NOTE: This cord is polarized. This means the cord will only fit one
way into the socket or wall outlet. If it does not fit, do not force
it, just reverse it and try again.
Setting the Clock
1.Press the TIME set button together with the HOUR set button until the
display shows the desired hour.
2.Press the TIME set button together with the MINUTE set button until
the display shows the desired minutes.
NOTE: When the PM indicator is off, the time is AM.
Setting the Alarm Time
1. Use the ALARM/OFF button to check the alarm time.
2. Press the ALARM/OFF button together with the HOUR set button
until the display shows the desired alarm hour time.
3.Press the ALARM/OFF button together with the MINUTE set button
until the display shows the correct alarm minutes.
4. Make sure the PM lamp is off if you want the clock to wake you in the
morning.
5.Release the ALARM/OFF button, the clock display will show the
normal time of day.
NOTE: Again check the PM indicator. If you want the radio to wake
you in the morning, the PM lamp should be off on alarm time
(when pressing ALARM/OFF button). To change PM to AM
time, advance time 12 hours. To have clock wake you up,
slide the FUNCTION switch to AUTO or ALARM position(s).
Playing the Radio
1. Slide the FUNCTION switch to ON position.
2. Slide the BAND switch to either AM or FM.
3. Turn the TUNING control to your desired station.
4. Adjust the VOLUME control to your favorite listening level.
5. Slide the FUNCTION switch to OFF position to shut off the radio.
GETTING BETTER RADIO RECEPTION:
For best AM reception, rotate the radio a small amount or position it
near the window.
For best FM reception, unwrap and fully extend the FM antenna wire.
WARNING: Do not connect the FM antenna to an outdoor antenna.
IB-CR501-DG-E-052405.pmd 5/24/2005, 4:34 PM4
3
IB-CR501-DG-E-052405
Page 5

OPERATING INSTRUCTIONS
Waking up to Radio (Alarm)
1.Set the alarm time as previously instructed.
2.Select your desired AM or FM broadcast by following the procedure
of Playing the Radio.
3.Make sure the VOLUME control is set loud enough to wake you up.
4.Slide the FUNCTION switch to AUTO position and the AUTO lamp
will light up.
NOTE: Your set is now ready to turn on automatically at your
selected alarm time.
5.When alarm sounds, to get 9 minutes of extra sleep, press the
SNOOZE button.
6.To shut off the alarm, press ALARM/OFF button.
Wake to Buzzer (Alarm)
1. Set the alarm time as previously instructed.
2.Slide the FUNCTION switch to ALARM position. The AUTO
indicator will light.
3.The buzzer alarm is now set to turn on automatically at the
selected alarm time.
4.When buzzer sounds, to get 9 minutes of extra sleep, press the
SNOOZE button.
5.To shut off the alarm, press ALARM/OFF button.
Snooze Control
When this set has waken you up and you wish to sleep a few minutes
more, simply press the SNOOZE button. The radio or alarm will go off
for 9 minutes and then come on again. This is repeated in a row.
Alarm Off
1.Press ALARM/OFF button. This will shut the alarm for that day only.
Next day the set will wake you again at the same time.
2.Slide the FUNCTION switch to OFF position and the alarm function
is off until you re-adjust the FUNCTION switch to AUTO or ALARM.
Sleep Control
The SLEEP control will allow the radio to play 59 minutes (or 1 hour and
59 minutes) before the radio turns itself off.
1.Press the SLEEP button, the display will show 59 minutes and the
radio will start to play.
2.Holding the SLEEP and MINUTE SET buttons down, the display
will count down. Release the buttons when the display shows your
desired amount of time you want the radio to play before shutting
itself off.
3.Pressing the SLEEP button, the HOUR set button, and the MINUTE
set button all simultaneously down, the required sleep time will be
changed to 1 hour and 59 minutes. You may reduce the sleep time
by following the above Step 2.
4.To turn the radio off before the playing time has expired,
simply press the SNOOZE button.
NOTE: The sleep function will not affect the wake-up operation of the
clock if the FUNCTION switch is in AUTO or ALARM position.
In the morning, the radio or buzzer will wake you up if FUNCTION
switch is in the AUTO or ALARM position.
4
IB-CR501-DG-E-052405
IB-CR501-DG-E-052405.pmd 5/24/2005, 4:34 PM5
Page 6

TROUBLE SHOOTING
SHOULD YOUR SET EXHIBIT A PROBLEM, CHECK THE
FOLLOWING BEFORE SEEKING SERVICE.
SYMPTOM CAUSE SOLUTION
AM or PM not set
correctly. Is alarm
Alarm does not
come on in the
morning.
FM is distorted
and weak.
Noise or weak
sound on AM
broadcasts.
No sound.
The clock is
flashing.
Clock is dead.
time set in AM range
(PM Lamp off)?
FUNCTION switch
is in OFF position. Is
the AUTO Lamp off?
FM antenna wire is
not extended.
Station not tuned in
properly.
Weak broadcast
station.
Signal is blocked.
External
interference.
FUNCTION switch is
in the OFF position.
VOLUME control set
to minimum position.
The clock is not set.
A power failure has
occurred.
The set’s AC cord is
not connected.
(Helpful Hints)
Advance the clock 12
hours.
Set the FUNCTION
switch to AUTO or
ALARM position.
Extend FM antenna
wire.
Tune to desired station
carefully.
Turn to a stronger
station.
Rotate the set to
receive better signal.
Turn the radio for better
AM reception or bring
the set near a window.
Slide the FUNCTION
switch to ON position.
Rotate VOLUME control
for desired sound.
Set the clock and alarm
time.
Reset the clock alarm
time and time of the day.
Connect the set’s AC
cord and make sure
outlet has power.
LENOXX reserves the right to make design and specification
changes for product improvement.
PROTECT YOUR FINE FURNITURE!
WE RECOMMEND A CLOTH OR OTHER PROTECTIVE MATERIAL
BE PLACED UNDER THE SET WHEN PLACING IT ON SURFACE
WITH A NATURAL OR LACQUER FINISH.
IB-CR501-DG-E-052405.pmd 5/24/2005, 4:34 PM6
5
IB-CR501-DG-E-052405
Page 7

SPECIFICATIONS
Power source: AC 120V, 60Hz
Dimensions: 5 1/2" (Length)
Frequency range:6FM 88 - 108MHz
We warrant this product to be free from defects in material
and workmanship under normal use for a period of 90 days
after purchase and we will repair it free of charge or replace
it at no charge, should it become defective under this
warranty, providing you submit proof of purchase (sales slip)
with the set.
During the initial 90 day period after original purchase,
we will service or exchange, at no charge, the set that is
returned to LENOXX ELECTRONICS CORP. After the initial
90 day period expires, and for a period of 12 months from
original purchase, we will repair the unit covering any part(s)
that need to be replaced at no charge, but will charge for the
cost of labor, return postage paid by Lenoxx.
This warranty does not apply to any products which have
been subject to misuse, neglect or accident. This warranty
does not cover broken cords or cabinet. UNDER NO
CIRCUMSTANCES WILL LENOXX ELECTRONICS CORP.
BE LIABLE FOR ANY INCIDENTAL OR CONSEQUENTIAL
DAMAGES. Some states do not allow the exclusion or
limitation of incidental or consequential damages, so the
above limitations or exclusions may not apply to you.
This warranty gives you specific legal rights, and you may
also have other rights which vary from state to state. The
following charges apply to repairs beyond the warranty
period: $3.00. Be sure to pack carefully and return postage
paid insured together with your money order (personal checks
will not be accepted) and sales receipt to:
LENOXX ELECTRONICS CORP., 2 GERMAK DRIVE,
CARTERET N.J. 07008
2 5/8" (Height)
5" (Depth)
AM 530 - 1700kHz
LIMITED WARRANTY
GOODLETTSVILLE, TN 37072-2170
MADE IN CHINA
IB-CR501-DG-E-052405.pmd 5/24/2005, 4:34 PM7
Distributed By:
DOLGENCORP, INC.
IB-CR501-DG-E-052405
 Loading...