

Page 1
Model: RB-200
MP3 Player with Amplified Speaker
Operating Instructions
Card slot for SD/MMC memory card for extra
•
storage
Deluxe stereo earphones with necklace strap
•
Preset 6 position selectable equaliser
•
128M built-in total storage space
•
Lock button prevents accidental usage
•
Includes USB cable, software disc
•
and 3.5mm plug audio cable
2 demo songs are included
•
Note: WMA Music with DRM Protection can not be supported by this audio player.
Digitally amplified speaker system
•
MP3 player powered by 1 x “LR03”
•
alkaline battery (included)
Speaker system powered by 4 x “LR6”
•
batteries (not included)
Can also be used to record and transfer
•
files as a portable media device
Requires Windows 98SE/Me/2000/
•
XP/Mac OS X 10.2.6 or above
IB-RB200-WU-E-071005
Page 2

1 - Start to Use
TABLE OF CONTENTS
1-1 Preface…………………………………………………………………………………………….2
1-2 Features…………………………………………………………………………………………….3
1-3 Device Overview………………………………………………………………………………….4
1-4 LCD Display Overview……………………………………………………………………………7
1-5 Battery Installation…………………………………………………………………………………8
2 - Software Installation
2-1 Basic System Requirements………………………………………………………………………8
2-2 Installing Software Driver and Utilities…………………………………………………………….9
2-3 Connecting the Audio Player and Computer……………………………………………………10
2-4 Using the Audio Player as a Removable Drive (USB Disk)……………………………………11
2-5 Disconnecting the Audio Player from Your Computer…………………………………………12
3 - Basic Operation of the Audio Player
3-1 Hanging the Earphones and Necklace Strap Connection……………………………………13
3-2 Player Power ON/OFF……………………………………………………………………………14
3-3 Music Playback……………………………………………………………………………………14
3-4 Adjusting the Volume………………………………………………………………………………15
3-5 Locking the Buttons………………………………………………………………………………15
3-6 Adjusting Equaliser and Play Modes………………………………………………………16
3-7 Using an External SD / MMC Memory Card………………………………………………………17
3-8 Deleting Files or Music from Your Player………………………………………………………17
3-9 Transferring Files and Music from Your Computer to the MP3 Player……………………18
3-10 Storage Information of the Player…………………………………………………………………19
4 - Operation of the Digitally Amplified Speaker System
4-1 Power Source ……………………………………………………………………………………20
4-2 Speakers Operation ……………………………………………………………………………21
5 - Using Musicmatch jukebox
5-1 Basic Information…………………………………………………………………………………22
5-2 Ripping Tracks from Music CDs…………………………………………………………………23
6 - Helpful Information
6-1 Troubleshooting…………………………………………………………………………………25
6-2 Technical Specifications…………………………………………………………………………27
6-3 Important Safety Instructions……………………………………………………………………28
6-4 Product Care………………………………………………………………………………………..29
6-5 Copyright…………………………………………………………………………………………29
6-6 Demo Songs………………………………………………………………………………………30
1
IB-RB200-WU-E-071005
Page 3

1 - Start to Use
1-1. Preface
Before you use this DURABRAND digital audio player MODEL RB-200, read all the
following materials carefully. You can play your favorite MP3 and WMA music files
with this portable player, and we hope you will enjoy this product.
Check List
This package contains:
• DURABRAND 128MB Audio MP3/WMA player
• Digitally Amplified Speaker System
• USB Cable
• CD disc for Driver (for Windows 98SE) / Instructions / Musicmatch / Adobe PDF reader
• 3.5mm plug Audio Cable
• 1 X LR03 (size “AAA”) Alkaline battery for MP3 player
• Earphones with Necklace Strap
• Quick Manual
• This booklet
NOTE: We suggest you put the Power-On for both the audio player and your PC
with Internet connection ready, before you start the software installation.
NOTE! Driver installation is only needed if your computer has the older
Windows 98SE operating system. If you have a newer operating system,
such as Windows Me or XP, you don’t need to install the driver. This MP3
Player RB-200 is “plug and play” and ready to use when you connect the
USB cable to the MP3 Player and your computer (your computer must have
a USB port).
2
IB-RB200-WU-E-071005
Page 4

1-2. Features
• Built-in 128MB flash memory (total space, including operating system files).
• Expansion SD/MMC card slot. Accepts most of the SD (Secure Digital) / MMC
(MultiMedia Card) cards (not included) for extra storage.
• Plays MP3, WMA music format files and can store any digital file.
• Upgraded stereo earphones with necklace strap.
• Digitally amplified speaker system, this set has a digital class D amplifier which
provides smooth sound from small speakers.
• 3.5mm plug audio cable included.
• 1XLR03 (size “AAA”) alkaline battery included.
• Standard Mini USB port Plug & Play (cable included).
• Supports Windows 98SE/Me/2000/XP, Mac OS X 10.2.6 or above.
• Blue momentary back-light.
• 6 EQ settings (normal, pop, rock, jazz, classic, bass).
• Playback sequence selection (normal, repeat one, repeat all and random).
• FF/REW for fast forward or backward to content of a single song or skipping to
next or previous song.
• Separate power ON/OFF button for easy operation.
• Lock button for locking all the buttons.
• USB 2.0 FULL SPEED standard interface.
NOTE: WMA Music with DRM Protection cannot be supported by this audio player.
NOTE: This display does NOT support ID3 music title display.
3
IB-RB200-WU-E-071005
Page 5
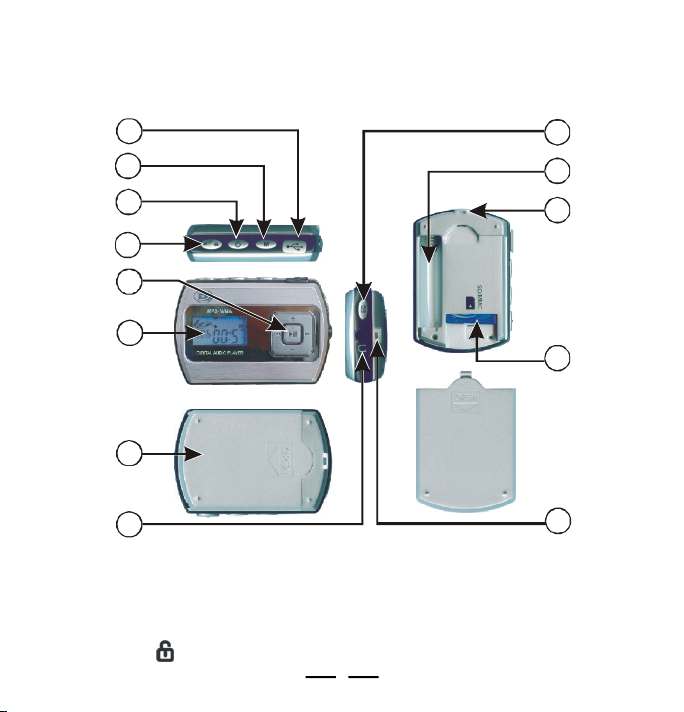
1-3. Device Overview
79101110
MP3 PLAYER
6
5
4
3
12
2
8
1
Fig. 1-3-1 MP3 player Overview
1 EARPHONES jack - Connects earphones or the digitally amplified speaker system
or a home cinema etc. with the 3.5mm stereo plug audio cable.
2 LCD screen - Displays current status of the player, details on page 7.
3 Lock button - Locks controls to prevent accidental operation.
4
IB-RB200-WU-E-071005
Page 6
4 POWER button - Turns the player on or off.
5 Memory selection / Play mode selection button - In STOP mode, press
and hold to select between internal flash memory and external SD/MMC card (if
card is inserted inside the set). Press a short time to select the 4-mode playback:
normal, repeat 1, repeat all, random (details on page 16).
6 Mini-USB port - Lift the cover and connect the player to your computer using the
supplied USB cable.
7 EQ button - Select the 6-Band Equaliser: normal, pop, rock, jazz, classic, bass.
8 Back cover - Remove the back cover to install 1XLR03 (size “AAA”) battery or
an optional SD/MMC memory card.
9 Battery compartment - Install 1 x LR03 (size “AAA”) battery (alkaline).
10 Hanging strap hole - To hang the player to the earphones and conveniently
carry these on your neck.
11 SD/MMC socket (card slot) - Insert an SD/MMC card as extra memory..
12 5-Direction control pad - Controls playback and selects menu options:
• PLAY/PAUSE (Centre button) - Start or pause playback (quick press).
• STOP (Centre button) - Stop playback by pressing and holding.
• PREV (Left button) - Skips to the previous track. Press and hold to scan
backwards.
• NEXT (Right button) - Skips to the next track. Press and hold to scan
forwards.
• VOLUME button (Up button) - Increases volume (details on page 15).
• VOLUME button (Down button) - Decreases volume (details on page 15).
5
IB-RB200-WU-E-071005
Page 7
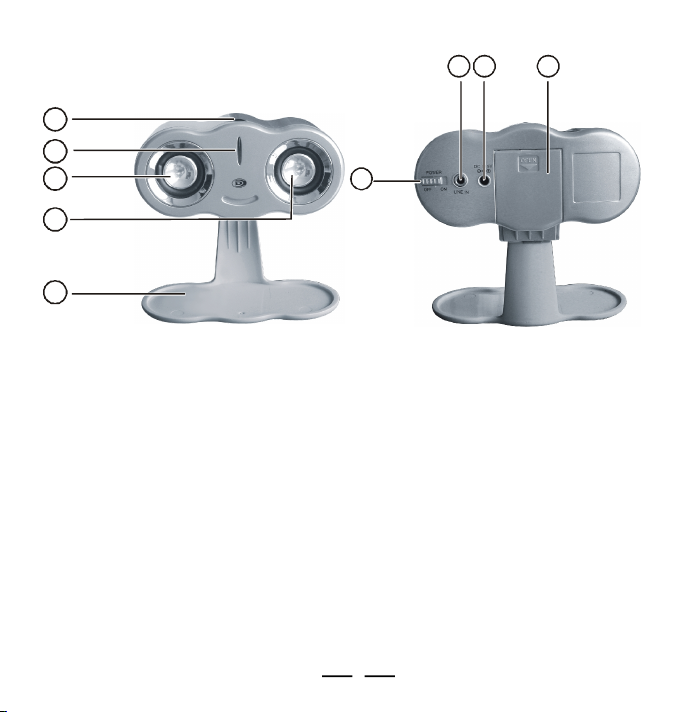
DIGITALLY AMPLIFIED SPEAKER SYSTEM
6
7
8
1
2
3
5
3
4
Fig. 1-3-2 Digitally Amplified Speaker System Overview
1.Volume control - Adjusts the volume of the speaker system.
2.Power indicator - Lights up when the power is ON.
3.Left and right speakers
4.Adjustable protective stand
5.Power switch - Turns the set on or off.
6.Line in jack - Connects the MP3 player, a portable CD player or the computer with
the included 3.5mm plug audio cable.
7.AC adaptor jack - Connects an AC adaptor (optional, not included).
8.Battery compartment - Install 4 X LR6 (size “AA”) batteries (not included).
6
IB-RB200-WU-E-071005
Page 8
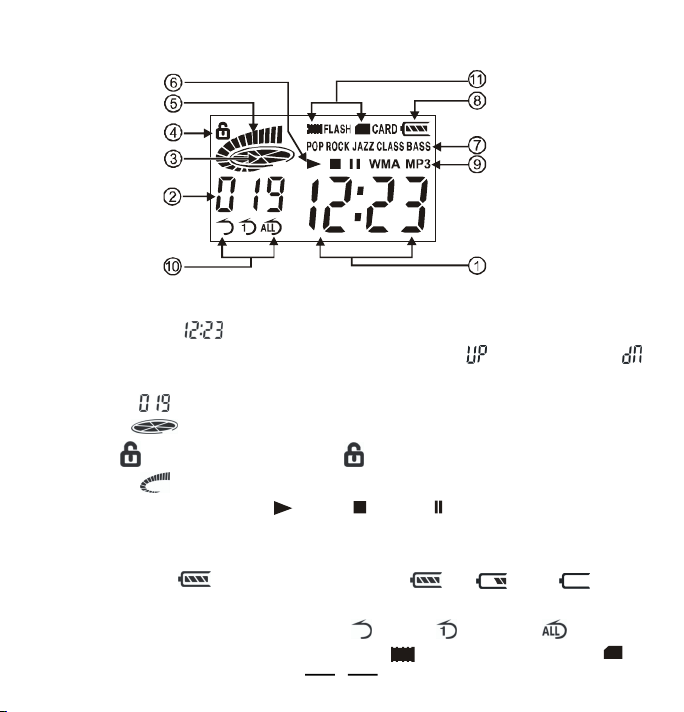
1-4. LCD Display Overview
Indicators:
1. Playing Time - Shows song’s playing time (example 12 minutes and 23
seconds) also displays Power ON/OFF, PC connection, for uploading and
for downloading.
2. Number - Shows current track number (example 19) or total number of tracks.
3. Status - Music playing status (rotates while playing music).
4. Lock - Buttons are locked when flashes in the display..
5. Volume - Volume control with 16 levels (more bars = louder volume).
6. Play status Icon - Playing / Stop / Pause .
7. EQ Setting - Displays current EQ mode (Pop, Rock, Jazz, Classic, Bass or no
display for normal).
8. Battery Level - Displays battery capacity , Full Partial Empty..
9. Music Format - Shows “MP3” / “WMA” format music.
10. Repeat Setting - Displays playing mode ( random, repeat one, repeat all).
11. Memory selecting - Internal flash memory / External SD/MMC card .
Fig. 1-4-1 LCD Display Overview
7
IB-RB200-WU-E-071005
Page 9
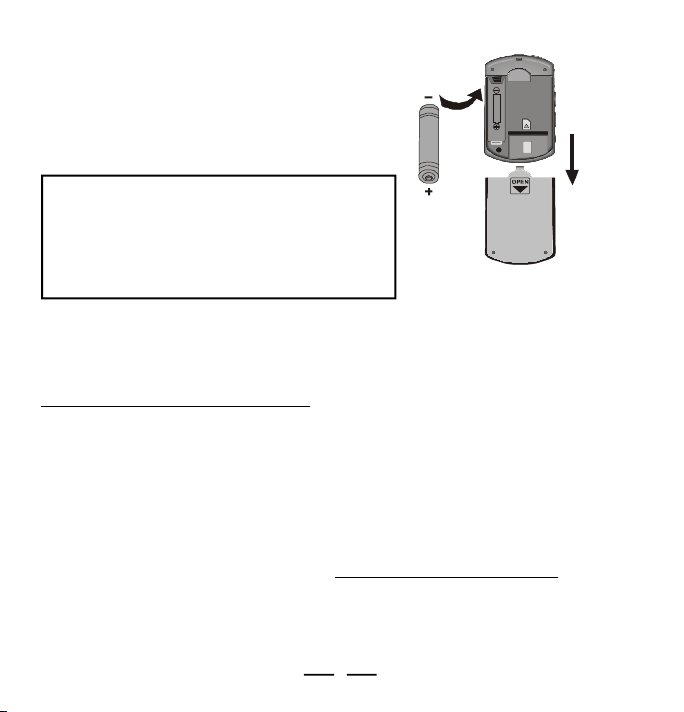
1-5. Battery Installation
1 Slide the battery cover off as shown.
2 Insert one LR03 (size “AAA”) battery,
beware of correct polarities (+ and –).
3 Put the cover back.
SD/MMC
Battery Safety
ä
Do not dispose of any battery in fire!
ä
Do not put the battery in a damp place!
ä
Please take out the battery if you don’t use
the player for a long time!
ä
Battery should be installed by adults for safety.
Fig. 1-5-1 Inserting the Battery
Slide to
open
2- Software Installation
2-1. Basic System Requirements
Intel Pentium II 300 MHz or above
128MB RAM(minimum)
150MB free space in hard drive
USB port
CD-ROM drive
Operating Systems Supported: Windows 98SE or Windows Me or Windows 2000 or
Windows XP or Mac OS X 10.2.6 or above.
NOTE:For Windows Me/2000/XP users, no driver installation is needed. The set is
fully plug and play. For older computers running on Windows 98SE, you will need to
install drivers from the supplied disc. For Windows 95 or earlier users, this setwill
not work and we recommend you upgrade your operating system and get a USB
port.
8
IB-RB200-WU-E-071005
Page 10
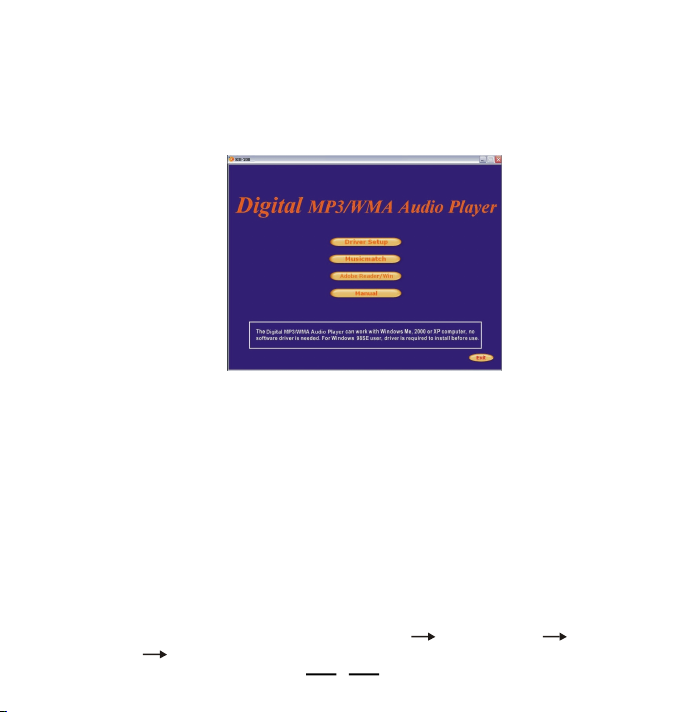
2-2. Installing Software Driver (For Windows 98SE users only) and Utilities
The software driver is for Windows 98SE only, if you have a newer system like Windows XP
or Me, no need to install it.
1 Turn on your computer and insert the Driver Setup disc to the CD-ROM drive.
2 The computer screen will display the welcome page.
3 Click “Driver Setup”, then install the driver as the instructions.
Fig. 2-2-1 Installing Software Driver and Utilities
NOTE: No driver is required for Windows Me, XP, 2000 or Mac OS X 10.2.6 or above.
4 Install Musicmatch jukebox 9.0.
If you have not installed Musicmatch jukebox 9.0 (or later) or music media player,
you will be prompted to install it or update your current version. (Details of
Musicmatch jukebox 9.0 on Pages 22-24).
5 Browse the Driver Setup disc to check out:
Driver Setup
•
Musicmatch
•
Adobe PDF Reader
•
Operating Instructions (in PDF form)
•
6 Installation is complete!
You are now ready to connect the Audio Player to your computer.
To Uninstall the Win98SE Driver, run “1. Start 2. Programs 3. Digital
music Player 4. Uninstall”.
9
IB-RB200-WU-E-071005
Page 11

2-3. Connecting the Audio Player and Computer
Both PC or Mac users must use the USB cable to connect the player and computer
before you can download or upload music files to the computer.
1 Connect the smaller plug of the USB cable to the mini-USB port on the MP3 player
as shown. Plug only fits one way, if the plug does not match the mini-USB port,
don’t force it, just reverse it and try again.
2 Connect the larger plug of the USB cable to any available USB port on your
computer. First time connection of the player to the computer
with Windows Me, 2000, or XP, the computer will detect
“New Hardware” and software drivers will be installed by
Windows automatically.
3 At the same time, the player will display the “USB” Mark on
the player’s LCD display.
4 You are now ready to copy music files or data to the player. It will display “ ”
when downloading (when you copy music files from computer to player), and displays
“ ” when uploading (when you copy files from player to computer).
Shows when uploading
Shows when downloading
Fig. 2-3-1 Connecting the Audio Player and Computer
NOTE: If you are using Windows 98SE, you must first install Windows 98SE driver, see
page 9.
Shows when USB
is connected
10
IB-RB200-WU-E-071005
Page 12

2-4. Using the Audio Player as a Removable Drive (USB Disk)
The Audio Player can also be used as a removable drive (or known as a USB flash
drive). You can drag and drop files into the player. (Up to the limit of about 128 MB
for internal memory or external card.)
1Connect the USB cable to the computer and the MP3 player.
2Click “My Computer” icon on your Windows desktop. Two “Removable Disk” icons
will show on the Windows desktop. The first “Removable Disk” icon “RB200” is the internal flash memory disk (some computer shows “Removable Disk”,
it depends on the operating system your computer has installed), the second
Removable Disk is the removable SD/MMC memory card.
Fig. 2-4-1 Using the Audio Player as a Removable Drive
11
IB-RB200-WU-E-071005
Page 13

3.Click on the “Removable Disk” icon for either the internal flash memory or the
removable SD/MMC card to browse for content.
4.Select the folders or songs or files you want to copy to your MP3 player.
5.After you have highlighted the files you want to copy, click on “edit” (next to file on
top), click on “copy to folder” (below edit).
6.Find the removable disc (such as G:) and click on it to highlight it for copying then
click on “COPY”.
7.The file that is copying to your MP3 player will show.
8.When you finished copying files, see next chapter (2-5. Disconnecting the Audio
Player from Your Computer) to safely disconnect the player.
NOTE:This player does not support DRM-protected files (such as music
Fig. 2-4-2 Using the Player as a Removable Drive
downloaded from some online music stores).
2-5. Disconnecting the Audio Player from Your Computer
For Windows Me/2000/XP users, the player can be disconnected safely as follows:
1Click the “Safely Remove Hardware” icon in the Windows Toolbar (on the right
bottom corner near the clock icon on your computer).
2From the list of Hardware Devices, select the player.
3Click “Stop” button.
4Click “OK” to confirm.
5Click “Close” after finished.
6Now, it is safe to disconnect the player.
NOTE:Do not unplug the Player while there is data transferring between the player and
the computer or some data may be lost.
12
IB-RB200-WU-E-071005
Page 14

Click on this icon to disconnect
LRL
the USB cable safely.
NOTE: Usually a small icon will appear,
clicking this icon will show the “safely
remove hardware” screen.
Fig. 2-5-1 Safely Disconnecting the Player
3 - Basic Operation of the Audio Player
3-1. Hanging the Earphones and Necklace Strap Connection
1. Slide the thin part of the
necklace strap into the hole.
5. Plug the earphones
plug into the jack
marked .
2. After it is through,
loop the lock through it.
6. Insert the earphones
in your ears.
3. Pull to close loop.
7. Please note the
earphones are marked
R and L.
Fig. 3-1-1 Using the Hanging Earphones
13
4. Insert the lock-pin
correctly.
R
8. Hang the
Player with the
necklace strap
IB-RB200-WU-E-071005
Page 15

PLAYING
PAUSE
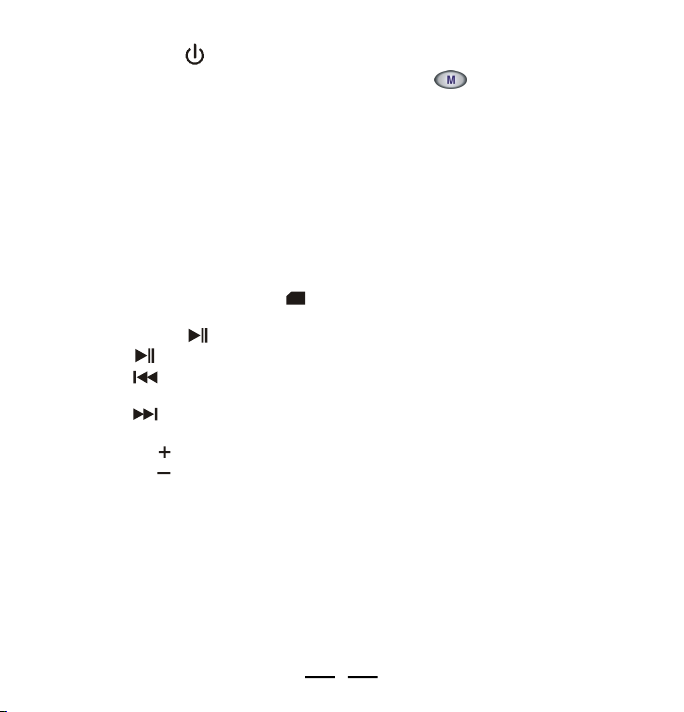
3-2. Player Power ON/OFF
PLAY/PAUSE/STOP
POWER ON/OFF
To turn on the player, press and hold the POWER button,
the set will start to play.
To turn off the player, press and hold the POWER button
again.
Shows when you press
and hold the Power
ON/OFF button to turn
on the player.
Shows when you
press and hold the
Power ON/OFF button
to shut off the power.
Fig. 3-2-1 Player Power ON/OFF
It will show if the battery is very low
or if the battery is almost empty,
please insert a fresh battery (If the
battery is completely dead, nothing
will show in the display).
It will show the full battery if the
battery is new and the set is ON.
3-3. Music Playback
NOTE: Some buttons can perform more than one function, a short time press or
long holding press may be needed to do different operations.
• To play the current track, press the PLAY/PAUSE button a short time (about
0.5 second).
• To pause playback, press the PLAY/PAUSE button a short time (about 0.5 second).
• To stop playback, press the STOP button a long time (about 1.5 seconds).
IB-RB200-WU-E-071005
14
Page 16

VOLUME +
VOLUME –
LOWERVOLUME
HIGHERVOLUME
Buttons Locked
NOTE: The player has an Auto-Power Off function to economise
PREV NEXT
STOP
your battery (it will automatically power off after 60
seconds in STOP status and 120 seconds in PAUSE
status if you don’t press the play button).
It will display the “NO -S” (NO SONG) if the Flash memory or SD/
MMC card has no music files, simply transfer files into your player.
Fig. 3-3-1 Music Playback
NOTE: Your player comes with a few demo songs, you may keep these or delete them.
To skip to the previous track (or to the start of the
•
current track), press previous button quickly..
To search back in the music, press and hold the
previous button down.
To skip to the next track, press the next button
•
quickly.
To search ahead in the music, press and hold the
next button down.
3-4. Adjusting the Volume
To adjust the volume, press VOLUME or VOLUME –.
Fig. 3-4-1 Adjusting the Volume
Fig. 3-3-2 Music Playback
3-5. Locking the Buttons
To prevent accidently turning the set on, slide the lock button to
the right, the lock icon will flash in the display and a red dot will be
visible at the left side of the slide button. All the buttons will be
locked and not working till you slide the lock button to the left (red
dot will be not showing).
IB-RB200-WU-E-071005
15
Page 17

3-6. Adjusting Equaliser and Play Modes
ROCK EQ SET
POP EQ SET
Normal
Random
Repeat 1
EQ SET
The 6-band equaliser can let you personalize your favourite sound effect of the player
during play.
When you play the music:
1.Press the Equaliser button to select from the 6-band EQ: normal (no
dislay), pop, rock, jazz, classic, bass
Fig. 3-6-1 Pressing the EQ-button to select from the 6-band EQ
2.Press the M-button a short time to select from the 4-mode playback sequence:
Normal: Plays all the songs in sequence, and the player will be automatically
turnedoff when all the songs have been played.
Repeat one: Plays one song over and over.
Repeat all: Plays all the songs then repeats them over again, until you press
STOP or OFF.
Random: Plays all the songs in random order, and the player will be automatically
turnedoff when all the songs have been played.
Repeat All
Fig. 3-6-2 Pressing the M-button a short time to select from
the 4-mode playback sequence
16
IB-RB200-WU-E-071005
Page 18

3-7. Using an External SD/MMC Memory Card (Optional - not included)
FLASH MEMORY IN USE
MEMORY CARD IN USE
Open folder to
2
1
1.Turn off the player. Open the back cover, see (1) in diagram.
2.Confirm the card is SD/MMC type and insert the card with correct direction, see
(2) in diagram.
3.Turn on the player. In the stop mode, press and hold the Memory selection
button (See Fig. 1-3-1 MP3 player Overview - (5) on page 4) to select the SD/MMC card.
4.To remove the SD/MMC card, first turn off the player, then press and remove the
SD/MMC card.
NOTE: The external SD/MMC card will need more battery current to boot, so please
change a new battery if you can’t power on when you are using the external SD/
MMC card.
Fig. 3-7-1 Using the External SD/MMC Memory Card
3-8. Deleting Files or Music from Your Player
1.Connect the USB cable to the computer and MP3 player. After a few seconds the
computer will “recognise” your player & display:
Your MP3 player
display will show:
Your computer
may show:
view files using
Windows Explorer
2.Click ok on your computer’s mouse and Windows explorer will open (or manually
open Windows explorer).
3.A listing of files on your MP3 player (usually drive E:\ or F:\ or G:\ ) will be shown.
17
IB-RB200-WU-E-071005
Page 19

4.Select the songs or files you want to delete, this can be 1 file (highlighted in a
darker colour), or many files (many are highlighted). To highlight many files, hold
down the shift button while pressing the down arrow on your computer. To select
all the files in a directory, press and hold down the Ctrl button then press the A
button, this will highlight (darken allthe files).
5.After you have highlighted the files you want to delete, press the DELETE button
on the keyboard of the computer, the computer will ask you if you are sure to
delete the selected files, select “ YES ”.
NOTE: You can delete the Demo songs which are in the MP3 player (or any songs
or files) if you don’t like them and replace them with other songs you like.
3-9. Transferring Files and Music from Your Computer to the MP3 Player
If you also want to download new files or music into your MP3 player after step 3-8,
please do the following:
1.Go to the folder that contains your files or music or by going up one level to
show all directories, then select the proper directory letter.
2.Select the folders or songs or files you want to copy to your MP3 player.
3.After you have highlighted the files you want to copy, click on edit (next to file on
top), click on copy to folder (below edit).
4.Find the removable disc (such as G:) and click on it to highlight it for copying then
click on “COPY”.
5.The file that is copying to your MP3 player will show.
6.After this, your copying is completed and your music is now copied to your player.
Fig. 3-9-1 Transferring Files and Music from your Computer to the MP3 player
18
IB-RB200-WU-E-071005
Page 20

3-10. Storage Information of the Player
To check the storage space of the player, first connect the player to the computer.
Two “Removable Disk” icons will show up in your Windows Desktop. The first
“Removable Disk” icon “RB-200” is the internal flash memory disk (some computer
shows “Removable Disk”, it depends on the operating system of your computer).
The second Removable Disk is the SD/MMC disk. Highlight the disk you want to
check. Right click on the mouse (press the mouse’s right button) and then click on
“Properties”, then you can see the storage information in this player.
Fig. 3-10-1 Storage Information of the Player
19
IB-RB200-WU-E-071005
Page 21

4 - Operation of the Digitally Amplified Speaker System
You can also hear the sound of the MP3 player through the attached digitally
amplified speaker system.
4-1. Power Source
You can power this digitally amplified speaker system by inserting 4 x LR6 (size
“AA”) fresh alkaline batteries (not included) or by connecting an AC adaptor (optional,
not included).
1. BATTERY INSTALLATION (batteries not included)
(1)Slide the battery door out.
(2)Insert 4 x LR6 (size “AA”) alkaline batteries according to the + and – markings
on the battery cover (2 batteries face up, 2 batteries face down).
(3)Put the battery cover back.
(1) (2) (3)
Fig. 4-1-1 Installing the batteries
Battery Safety
ä
Do not dispose of any battery in fire!
ä
Do not put the battery in a damp place!
ä
Do not mix old and new batteries.
ä
Do not mix alkaline, standard (Carbon-Zinc) or rechargeable batteries.
ä
Please take out the batteries if you don’t use the player for a long time!
ä
Batteries should be installed by adults for safety.
4XLR6 (SIZE “AA”)
ALKALINE BATTERIES
20
IB-RB200-WU-E-071005
Page 22

2. AC ADAPTOR (optional)
Before you buy an AC adaptor, please note, the only AC adaptor suitable for this
speaker system is DC 9V 750mA, with plus centre polarity , others may
damage the player, please check voltage & current (mA) before buying an AC
adaptor.
Insert the adaptor plug to adaptor jack of the speaker system and connect the
adaptor to power 230V/50Hz.
4-2. Digitally Amplified Speaker System Operation
1.Insert the 3.5 mm plug audio cable to the
EARPHONES jack of the MP3 player
and to the LINE IN jack on the back of
the speaker system.
2.Slide the power switch on the back of the
speaker system to the ON position, the
POWER indicator turns on.
3.Turn on the MP3 player, adjust the volume
control of the MP3 player and the
speaker system to the proper position.
4.Slide the power switch of the speaker
system to OFF position after use. The
power indicator turns off.
NOTE 1:
You can also connect this speaker system to your portable CD player, computer
•
or any other low power audio system with a 3.5 mm audio out jack.
NOTE 2:
Do not play this system at maximum volume or too close to your ears for hearing
•
safety.
This digitally amplified speaker system is a low power system, it’s suitable for your
•
MP3 player, CD player or your computer. We advise not to connect it to your home
cinema or high power devices.
Remember to slide the power switch to OFF position after use.
•
Fig. 4-2-1 Connecting the MP3
player by the 3.5 mm plug
21
audio cable
IB-RB200-WU-E-071005
Page 23

5 - Using Musicmatch jukebox
5-1. Basic Information
You can install Musicmatch jukebox 9.0 from the supplied Driver Setup disc (or it
may already be on you computer). Details of the Taskbar of Musicmatch jukebox as
below:
Fig. 5-1-1 Using the musicmatch jukebox
1. GET (On Demand, Music Store, Radio) - Get music information online.
2. PLAY
Library - Plays the music in the library, create lists and manage media files.
CD - Plays the music on the CD (remember to put the CD into the disc driver first).
Now Playing - Check / listen to currently playing media tracks.
3. COPY
Copy from CD - Copy and convert CD Audio tracks to MP3 or WMA format.
Burn to CD - Copy tracks to a recordable CD (CDR).
Portable Device - Copy tracks to your MP3 player.
22
IB-RB200-WU-E-071005
Page 24

5-2. Ripping Tracks from Music CDs
Musicmatch jukebox can also help you to build up a media library by converting your
Audio CDs to MP3 or WMA format, so that you can transfer them to your MP3 player.
WMA format condenses the files to a smaller space so that more songs can fit into
your MP3 player.
1.Insert an audio CD into your computer.
2.Click “Copy from CD”, “Recorder” window will come out.
3. Set up WMA music encoding options by: Tools > Settings > Recorder
Adjusting the recording quality will allow
more or less songs to fit into your player.
The sound will also be better if it is a larger
file (best quality) but you will fit less songs
into the player.
Fig. 5-2-1 Ripping Tracks from Music CDs - Setup the Parameters
23
Click “Tracks Directory” to select the
position you want the recorded
tracks to be placed.
IB-RB200-WU-E-071005
Page 25

4.Click the “Check Box” next to the track you want to select (for example #1, #2, #4,
and #6) for ripping into WMA format.
5.Click the “Start copy”.
Fig. 5-2-2 Ripping Tracks from Music CDs - Start copying from CD
6.After conversion, Musicmatch will automatically add new tracks to the Library.
24
IB-RB200-WU-E-071005
Page 26

6 - Helpful Information
6-1. Troubleshooting
Symptoms
MP3 PLAYER
Set does not play
normally.
MP3 Player will not
turn on.
No sound from
earphones.
Sound is distorted.
Sound skips or
is distorted.
Buttons do not work.
Can not transfer files. Memory is full.
Can not find the USB
jack on the
computer.
No display shows.
Causes
Battery is weak (it may test OK
on tester but it is weak for MP3
operation).
The type of the files is not supported on this MP3 player.
Dead or weak battery.
Lock button is on.
The external SD/MMC card will
need more battery current to boot.
VOLUME control is set to
minimum.
Weak battery.
Music is too loud.
Weak battery.
Music was not copied correctly.
The MP3/WMA file may be
corrupted or damaged.
The keys are locked. Slide the lock button to the left.
Electronic or static error caused
circuitry locked.
Some computers (older ones)
do not have a USB jack.
Battery is dead.
Solutions
Replace battery with fresh alkaline
battery. Battery life with a fresh battery is
about 12 hours for continuous play
(rechargeable battery has 1/2 of that life).
This MP3 player can only play MP3 and
WMA files. You can’t play AAC files or
DRM protected files.
Replace battery with fresh one.
Slide the lock button to OFF.
Replace battery with fresh one.
Increase the VOLUME by pressing VOL .
Replace with a fresh battery.
Lower the VOLUME control by
pressing the VOL – button.
Replace the battery with a new one.
Recopy the music using a slower speed.
Download or create the MP3/WMA file
again. Be sure to create WMA file with
no copy protection.
Remove the battery then reinsert, make
sure the battery is fresh.
Erase some files you don’t need (see
page 17).
Contact your computer maker or ask
your friend who knows computers or
call customer service.
Replace the battery.
25
IB-RB200-WU-E-071005
Page 27

Troubleshooting (Continued)
Symptoms
Only 123MB shows as
available in MP3 player.
Your computer takes
a long time to boot up.
DIGITALLY AMPLIFIED SPEAKER SYSTEM
The speaker
system has no
power.
The power indicator
blinks or gets dim.
No sound or only a
very low-level
sound from the
speakers.
Only one channel
has sound.
The sound of the
speaker is
distorted.
Causes
The MP3 operating system
occupies about 5MB of space.
MP3 player is plugged into the
computer.
Batteries are weak.
The optional AC ADAPTOR is
not connected properly.
The power switch of the speaker
system is at OFF position.
The batteries are not inserted
correctly.
The batteries are weak.
The audio cable is not
connected properly.
The input source (MP3, CD
player or computer) doesn’t
work well.
The volume control of the speaker
system or the input source is set
to low level.
Batteries are weak.
The sound of the input source is
too high.
The sound of the input source is
too high.
Batteries are weak. Replace all the batteries with fresh ones.
Solutions
This is normal for all MP3 players.
Do not keep MP3 player plugged in
while rebooting the computer.
Replace all the batteries with fresh ones.
Check AC adaptor connection at AC
outlet and the rear of the speaker system.
Slide the power switch on the back of
the speaker system to ON position.
Please make sure 4xLR6 (size “AA”)
batteries are inserted into the battery
compartment according to the + and –
markings on the battery cover.
Replace all the batteries with new ones.
Reconnect the MP3 player and the
speaker with the included audio cable.
Check the input source.
Adjust the volume control of the speaker
system and the input source.
Replace all the batteries with fresh ones.
Reduce the input source volume or the
speaker volume, then turn off the
speaker system and turn it on again.
This speaker system is suitable for low
power source.
26
IB-RB200-WU-E-071005
Page 28

6-2.Technical Specifications
MP3 PLAYER
MP3 Decoding Format ...........Constant or Variable bit rate (8~320kbps) Sampling
WMA Decoding Format ..........Constant bit rate (5~192kbps), Sampling frequencies
Internal Flash Memory............128MB
External Memory Support........Most of the SD/MMC cards (not included)
LCD Display ..........................Large size Segment LCD display
LCD Back-Light .....................Blue back-light
USB Interface .......................USB 2.0 FULL SPEED (mini-5P USB connector)
Maximum Output ...................5mW + 5mW @32 ohms
S/N Ratio ..............................>50 dB
THD .....................................0.01~5%
Frequency Range ..................20Hz~20kHz
Battery ..................................1XLR03 (size “AAA”) Alkaline Battery-included
Working Temperature..............0-45oC
Dimensions............................70x48x17 mm / 2 3/4“ x 1 7/8“ x 11/16” (LxWxD)
Weight...................................35g / 0.08 lb (without the battery)
DIGITALLY AMPLIFIED SPEAKER SYSTEM
Power Supply
AC Adaptor .......................9V, 750 mA, 230V/50Hz (not included)
DC ...................................6V, using 4XLR6 (size “AA”) Alkaline batteries (not included)
Power output ........................1.5W/channel
Dimensions............................127x64x73 mm / 5“ x 2 1/2“ x 2 7/8” (WxHxD)
Weight...................................263g / 0.58 lb (without the batteries)
frequencies 8-48 kHz
8-48 kHz
NOTE: Some of the 128MB memory is used by the
operating system. The actual memory available is
less than 128MB as in all MP3 players.
27
IB-RB200-WU-E-071005
Page 29

6-3. Important Safety Instructions
WARNINGS
The exclamation point within the triangle is a warning sign alerting the user of important instructions accompanying the product.
The lightning flash with arrowhead symbol within the triangle is
a warning sign alerting the user of “dangerous voltage” inside
the unit.
To reduce the risk of electric shock, do not remove the cover. No
user serviceable parts inside the unit. Refer all servicing to qualified
personnel.
This unit operates on PSU=230V ~ 50Hz. If the unit is not used
for a long period of time, remove the plug from the AC mains.
This unit must not be exposed to moisture or rain.
The apparatus shall not be exposed to dripping or splashing
and that no objects filled with liquids, such as vases, shall be
placed on the apparatus.
The power switch in this unit is mounted on the secondary
circuit and does not disconnect the whole unit from the mains in
OFF position.
Ensure all connections are properly made before operating the
unit.
This unit should be positioned so that it is properly ventilated.
Avoid placing it, for example, close to curtains, on the carpet or
in a built-in installation such as a bookcase.
The normal ventilation of the product shall not be impeded for
intended use.
Do not expose this unit to direct sunlight or heat radiating
sources.
28
IB-RB200-WU-E-071005
Page 30

6-4. Product Care
1.Exposure to extreme hot or cold temperatures may cause damage to the player or
cause it to malfunction. Do not expose the player to direct sunlight continuously or leave
it in a vehicle with the doors and windows closed. The case may become deformed or
discoloured or the player may malfunction. Do not use the player near an open flame.
2.If moving from a cold environment to a warm environment, let the player’s
temperature stabilise before operation.
3.Keep dirt, sand, water, dust, and moisture from entering the player. Do not use
in areas of excessive dust.
4.Do not use in places where the humidity is excessively high.
5.Do not drop or subject the player to shock.
6.If interference occurs close to radios or televisions, move the player away from them.
6-5. Copyright
© 2005 DURABRAND All rights reserved. Marketed by Wal-Mart Stores, Inc.
Bentonville, AR 72716.
DURABRAND shall not be liable for any errors contained herein or for any damages
arising out of or related to this document or the information contained herein, even
if DURABRAND has been advised of the possibility of such damages. This document
is intended for informational and instructional purposes only. DURABRAND reserves
the right to make changes in the specifications and other information contained in
this document without prior notification. DURABRAND disclaims any obligation to
update the information contained herein.
This product includes technology owned by Microsoft Corporation and cannot be
used or distributed without a license from Microsoft Licensing, Inc. Microsoft, Windows
Media, and the Windows Logo are trademarks or registered trademarks of Microsoft
Corporation in the United States and/or other countries.
All other product names may be trademarks of the companies with which they are
associated.
Warning - Use of this product is for your personal use only. Copying CDs or downloading music files for sale or other business purposes is a violation of copyright
laws. It may also be a violation of copyright law to download files without the
permission of the copyright owner.
IB-RB200-WU-E-07100529
Page 31

6-6. Demo Songs
Music provided courtesy of Balboa. http://www.BalboaNYC.com
Lillies and Stray (Instrumental) written and performed by
Loam Disher, Torello Disher, Robb Bruns and Tate Overton.
30
IB-RB200-WU-E-071005
Page 32

© 2005 PRODUCED FOR ASDA STORES LTD.
LEEDS, LS11 5AD
MADE & PRINTED IN CHINA
This symbol is known as the ‘Crossed-out Wheelie Bin Symbol’.
When this symbol is marked on a product, it means that the product
should not be disposed of with your general household waste.
Only discard electrical/electronic items in separate collection
schemes which cater for the recovery and recycling of the materials
contained within. Your co-operation is vital to ensure the success
of these schemes and for the protection of the environment.
IB-RB200-WU-E-071005
 Loading...