

Page 1
Page 2

General Safety Instructions
Read this manual thoroughly before fist use and keep it in a safe place for
future reference, along with the warranty card, purchase receipt and carton.
The safety precautions enclosed herein reduce the risk of fire, electric shock
and injury when correctly adhered to.
Important warnings and cautions
Protect from moisture: To reduce the risk of fire or electric shock, do not
expose this product to water or moisture. Do not use it where it could fall into
or get splashed by water.
Do not open: to prevent contact with high voltage components or hazardous
radiation exposure, do not attempt to open the equipment.
Charger Cord: Only use the micro USB cable that is provided with the unit.
Servicing: Refer all servicing to qualified service personnel. Servicing is
required if any of the following have occurred: the power cord or plug has
been damaged, the unit has been exposed to rain or moisture, objects have
fallen into the unit, the unit has been dropped or is not working correctly.
Electrostatic discharge: When electrostatic discharge (ESD) occurs at the front
surface or near any part or any button of this unit, there may be a possibility
that the product may stop operation and /or shut down immediately. This is a
normal condition and intended to protect the unit and internal components
against damage. In such a case, please reset the unit (by turning Off and On
the radio) to revert the unit to normal operation.
Page 3

General Safety Instructions (Cont.)
General precautions
Install the unit in accordance with the manufacturer’s instructions. Do not
install it near any heat sources such as radiators, heat registers, stoves or
other objects (including amplifiers) that produce heat.
Only use the unit with the accessories that are sold with the unit.
Avoid putting extensive stress on the micro USB cable, especially at the
connection points.
To ensure proper ventilation and operation, do not block any ventilation
openings.
Unplug the unit from the charging power source during lightning storms.
Excessive sound pressure from earphones and headphones can cause hearing
loss. For the sake of your health, always keep the volume at a low to
moderate level when using earphones/headphones.
Keep candles or other open flames away from this product at all times.
Placing this radio near a TV, refrigerator, microwave oven, amplifier or DVD
player and may adversely affect the sound quality. In such a case, move the
radio away from the device that causes the interference.
Do not install or place this radio in a bookcase, built-in cabinet or in another
confined space. Ensure the unit is well ventilated.
This product is not intended for use by persons (including children) with
reduced physical, sensory or mental capabilities, or lack of experience and
knowledge, unless they have been given supervision or instruction concerning
the use of the appliance by a person responsible for their safety.
Supervise children to ensure they do not play with the appliance.
Keep the original packaging for future transport of the radio. For maximum
protection, repack the unit as it was originally packaged.
Ensure to unplug the micro USB cable from the unit before cleaning.
Only use a soft, dry cloth for cleaning the unit and the display screen.
Do not use any type of solvent, such as thinner and benzene, as they may
cause damage to the surface of the radio.
Page 4
Product Overview
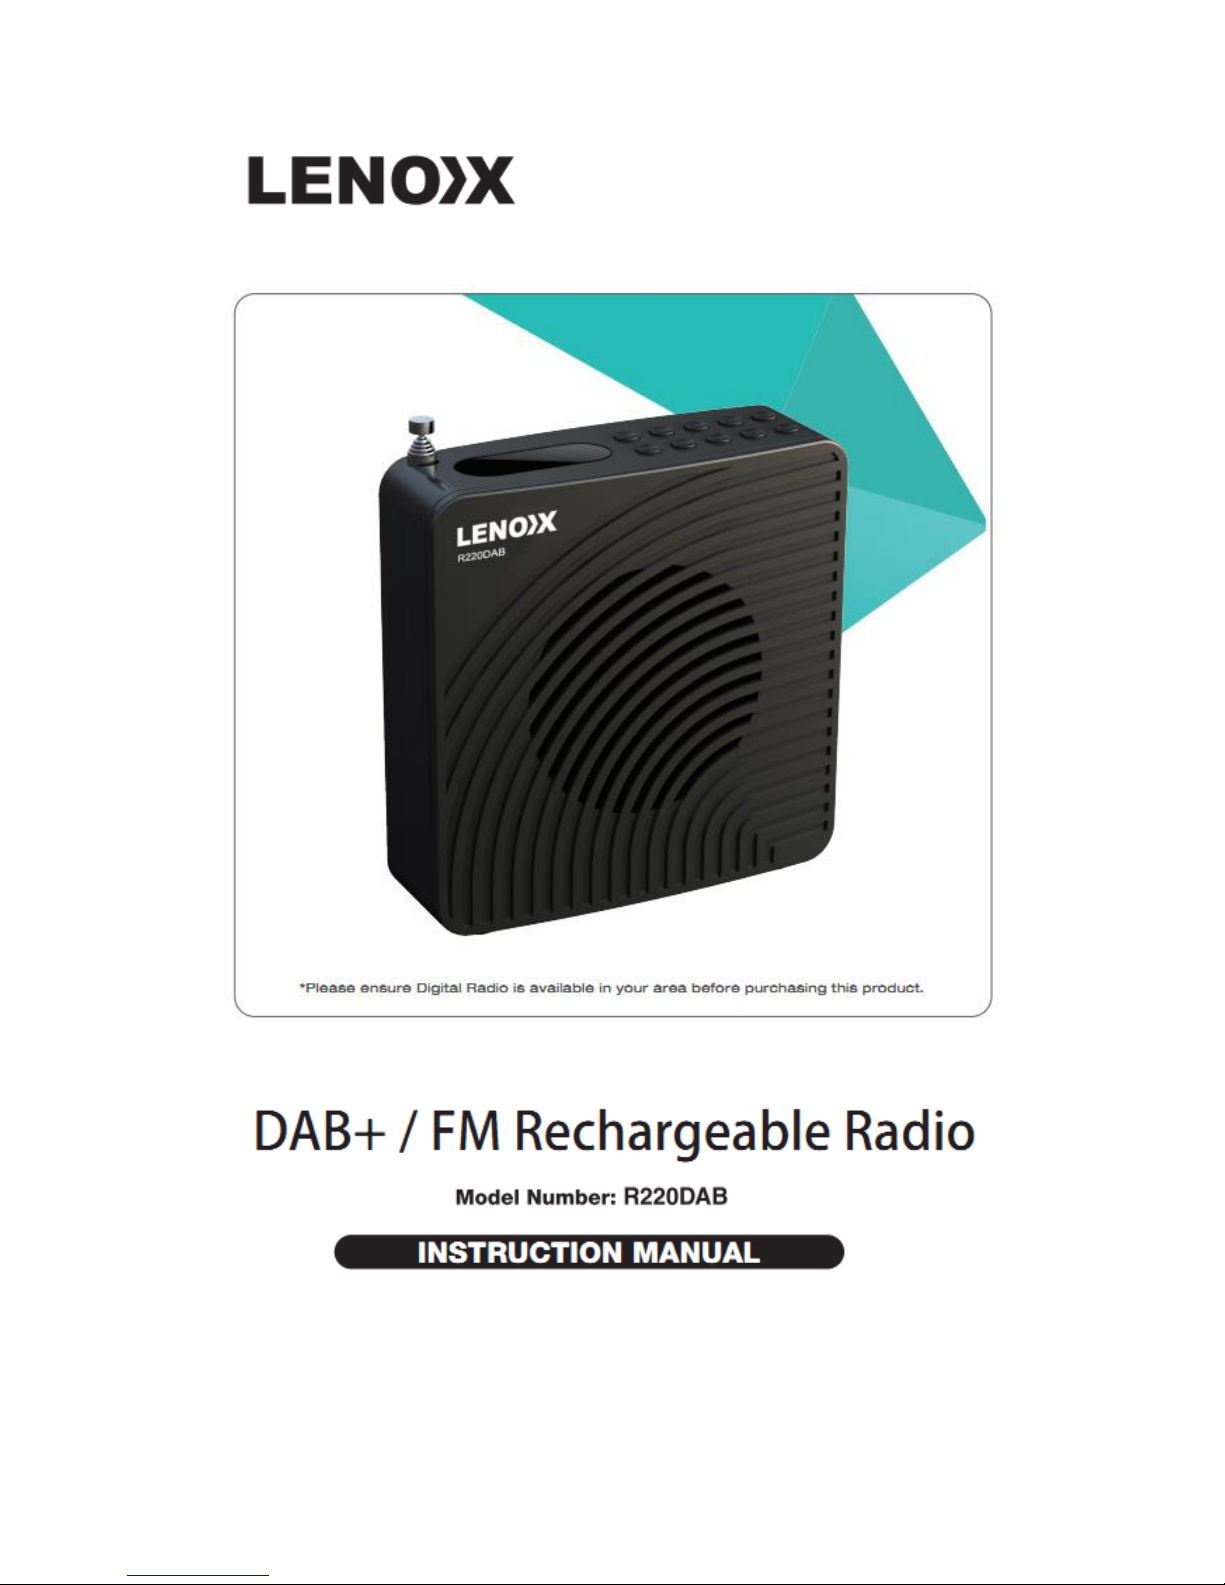
Top view
1. Press to turn on the radio from standby mode. While the
radio is on, press to switch between DAB+ and FM modes.
Press and hold to place the radio in standby.
2. Info/Menu Press and hold to access menu settings.
3. Preset Store and access up to 10 DAB+ and 10 FM station presets.
4. Vol +/- Increase/decrease the volume.
5. Alarm /Sleep Press once to access Alarm 1 info. Press twice to access
Alarm 2 info. Press and hold to set the sleep function.
6. Enter/Snooze Press to activate 9 minute snooze mode when the alarm
is sounding.
7. Scan Auto-scan all DAB+ and FM stations.
8. Prev/Next Select previous/next frequency, station, preset station or
menu option.
Page 5
Product Overview ( Cont.)
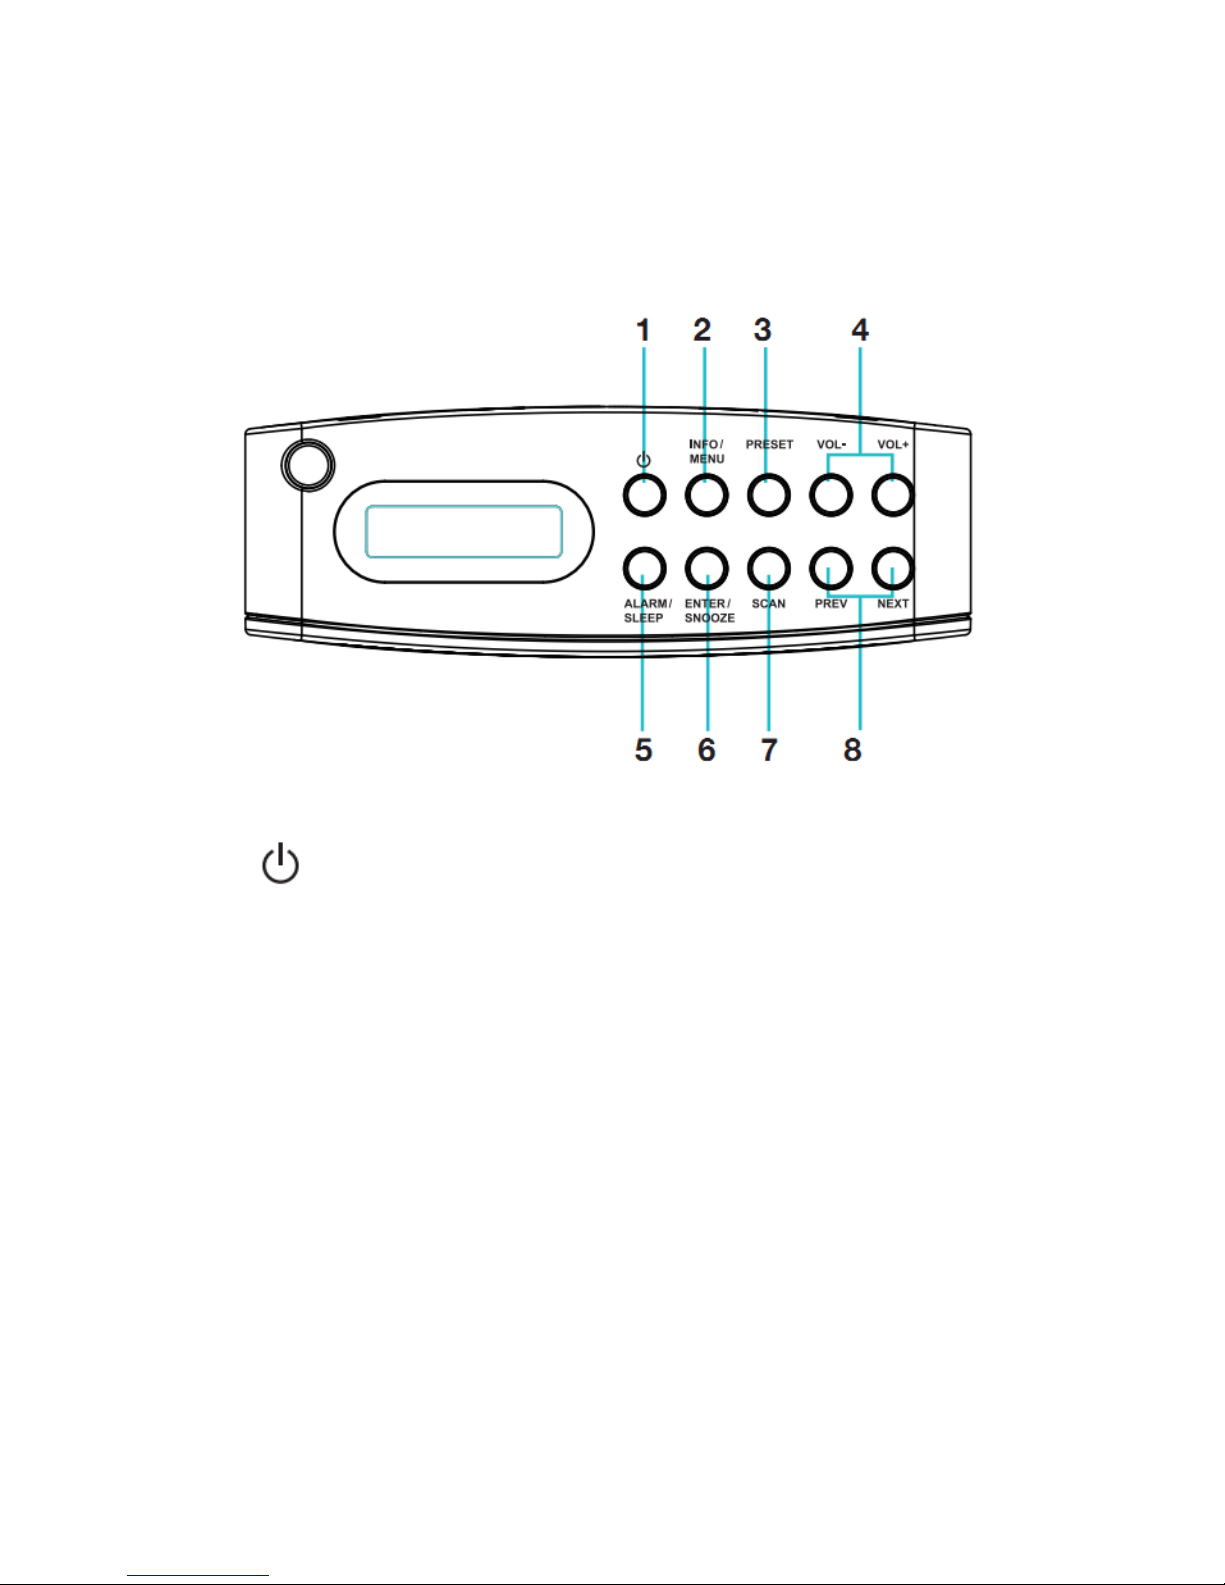
Rear view
1. Telescopic Antenna
2. Speaker
Page 6

1. On/Off Switch
2. Micro USB input
3. Charging Light Indicator
4. 3.5mm Headphone Socket
Page 7

Instructions
Before first use
Unpack the appliance but keep all packaging materials until you have made
sure your new DAB+ Radio is undamaged and in good working order. Plastic
wrapping can be a suffocation hazard for babies and young children, so
ensure all packaging materials are out of their reach.
Inspect the USB cord for damage. Do not use the product if the product or its
cord have been damaged or are not working properly.
USB Charging
Use the supplied USB cable to charge the the radio.
Connect the micro USB end to the units’s micro USB port.
Connect the USB end to the USB charging port of your PC or other USB power
adapter. (An output voltage of 5V is required).
The charging light at the back of the unit will illuminate red; it will turn blue when
the radio is fully charged.
Page 8

Instructions(Cont.)
Basic operations
Switching on your DAB+ Radio for the first time
Slide the OFF/ON switch to the ON position on the back of your DAB+ Radio to
power up the DAB+ radio.
Extend the telescopic antenna for the best reception possible.
Then press the button to turn the radio on.
When DAB+ mode is activated for the first time, a full scan will automatically
commence, or will play the last station before the unit was turned off.
Once the radio has been switched ON, press the button to switch between DAB+
and FM modes.
During scanning the screen will display a slide bar that indicates the progress of the
scan, and the amount of radio stations that have been found so far. Once the scan
has finished, the radio will select the first alphanumeric station.
Slide the ON/OFF switch to the OFF position to turn the DAB+ Radio off.
Selecting modes
When the DAB+ Radio is turned on, press the button repeatedly to switch
between DAB+ and FM modes.
Adjusting volume
Press the VOL+ or VOL- button to increase/decrease the volume.
Page 9

Instructions (Cont.)
DAB+ operation
To listen to the tuned stations press either the PREV or NEXT buttons.
Each time your press the PREV/NEXT buttons, you will skip to the previous or next
stored station.
The radio will display the station name.
Memory
When you power up the radio again after a switch off, it will automatically tune into
the same station (DAB+ or FM) that was last selected.
Storing stations
You can store up to 10 DAB+ station to the memory presets for quick and easy recall
of your favourite station.
To store a preset, you must first be listening to the station that you would like to
save. Press and hold the PRESET button. The display will show “Preset empty#”. If a
station is already stored, the display will show “(Station name)#”.
Press the PREV/NEXT buttons to select the preset station number 1-10.
To save to the selected preset station number, press the ENTER button. The display
will then show ”Preset # stored”.
Recalling a stored station
Once you have saved a station to one of the preset buttons, you can:
Press the PRESET button and press the PREV/NEXT buttons to select your desired
preset station’s number.
Press the ENTER button to recall a preset station number.
Page 10

Instructions(Cont.)
Station information on DAB+ mode
Press the INFO/MENU button repeatedly to show the different program information.
Bit Rate: The date rate which the signal is being transmitted.
Bit Error Rate(BER): Provides details of the signal error rate.
Channel and Frequency: Displays the station’s transmission channel number and
frequency.
PTY(Program Type): Shows the type and description of the program provided by the
DAB+ station.
Time and Date: Displays the time and date information provided by the broadcaster.
DAB+ indication: Indicates DAB+ mode.
Dynamic Label Segment (DLS): Display scrolling text information supplied by the
broadcaster.
FM operation
In order to switch the radio from DAB+ to FM mode, press the button oce.
Auto scan
To search for an FM station, press the SCAN button. This will start scanning up the
frequency band.
To scan down the frequency band, press and hold the SCAN button.
Once a station has been found, the scanning will stop automatically. If no station is
found, then the tuning will stop once it has cycled through the entire FM band(87.5 108 MHz).
Manual scan
To search FM stations manually, simply press the PREV/NEXT buttons repeatedly
until your desired frequency is reached.
Page 11

Instructions (Cont.)
Storing stations
You can store up to 10 FM station to the memory presets for quick and easy recall of
your favourite stations.
To store a preset, you must first be listening to the station that you would like to
save. Press and hold the PRESET button. The display will show “Preset empty#”. If a
station is already stored, the display will show “(Station frequency)#”.
Press the PREV/NEXT buttons to select the preset station number 1-10.
To save to the selected preset station number , press the ENTER button. The display
will then show” Preset # stored”.
Recalling a stored station
Once you saved a station to one of the preset buttons, you can:
Press the PRESET button and press the PREV/NEXT buttons to select your desired
preset station’s number.
Press the ENTER button to recall a preset station number.
Station information on FM mode
Press the INFO button repeatedly to show the different program information.
Program Type: Displays a description of the type of program provided by the
broadcaster.
Signal Strength: Displays a signal bar with the strength of the current station.
Time and Date: Displays the time and the date.
Frequency: Displays the station’s transmission frequency.
Audio Type: Displays the audio type of the station you are listening to. It will either
be Stereo or Mono.
Radio Text: Displays scrolling text information supplied by the broadcaster.
Page 12

Instructions(Cont.)
System Settings
With the unit turned on press and hold the INFO/MENU button. This will open the
“System Menu Settings”
Press the PREV/NEXT buttons to select your desired Sub-option between;
Setting the Time/Date
Press the ENTER button, the hour digits will flash.
Press the PREV/NEXT buttons to set the hour correctly.
Press the ENTER button to confirm.
Repeat the last two steps to set the minutes, then the date.
System Version
You can check the software version number.
Resetting the radio
Resetting the radio will delete all the tuned DAB+ stations and all the preset memory
stations in FM and DAB+ modes. To reset the radio:
Press and hold the INFO/MENU buton.
Press the NEXT button repeatedly until “Factory reset” is displayed on the screen.
Press the ENTER button and the display will show “Factory Reset?”. Use the NEXT button
until the word “YES” is flashing.
Press the ENTER button again, this will reset the radio.
Sleep setting
Press and hold Alarm/Sleep button .
Press PREV or NEXT to select OFF-120-90-60-45-30-15-5 minutes
Press ENTER button to confirm your selection.
Page 13

Instructions(Cont.)
Alarm Setting
Press the ALARM button and“Alarm 1”will be displayed .
Press the ENTER button to use Alarm 1 or press NEXT to access Alarm 2.
Press the NEXT button so the word “ON” is flashing and press ENTER to confirm.
The hour digits for the alarm ill flash, press the PREV or NEXT to change the hour
and press the ENTER button to confirm.
Press the PREV or NEXT button to change the minute and press the ENTER button to
confirm.
Press the PREV or NEXT button to change the volume and press the ENTER button to
confirm.
Press the PREV or NEXT button to change between Alarm-DAB-FM and press the
ENTER button to confirm.
To set the Alarm 2, follow the Alarm 1 instructions.
NOTE: You can press the INFO/MENU button to get back last one step when in the
process of setting the alarm.
Turning off the alarm
Press the ALARM button and select the alarm you wish to turn off using the NEXT
button.
To turn off the alarm, press the NEXT button so the word “OFF” is flashing and press
ENTER. The alarm is now OFF.
Turning off the alarm when sounding
Press the ALARM button to turn off the alarm when sounding.
Note:The alarm will keep ringing for 1hour if you do not turn off it when it is
sounding.
Snooze Function
When the alarm sounds, press the ENTER/SNOOZE button to delay the alarm for
another 9 mins. The radio will go to Standby mode.
You can press button to stop the Snooze function and then go to the operation
mode before the alarm rings.
Page 14

FAQs
Page 15

Other Useful Information
Specifications
Play Time
Your radio has a play time of around 5 hours once fully charged. This is
dependent on signal strength and volume selection of the radio.
 Loading...