

Page 1
QUICK INSTRUCTIONS
This sheet gives you basic instructions on Quick Installation and Setup of your PH-5595 13
Memory Caller ID with Call Waiting telephone.
NOTE: To use the Caller ID feature of this phone, you must subscribe to Call Waiting
Caller ID service. Call your local telephone company business office
to set up Call Waiting Caller ID . Also, you need to power your phone up with
batteries or AC adaptor (not included).
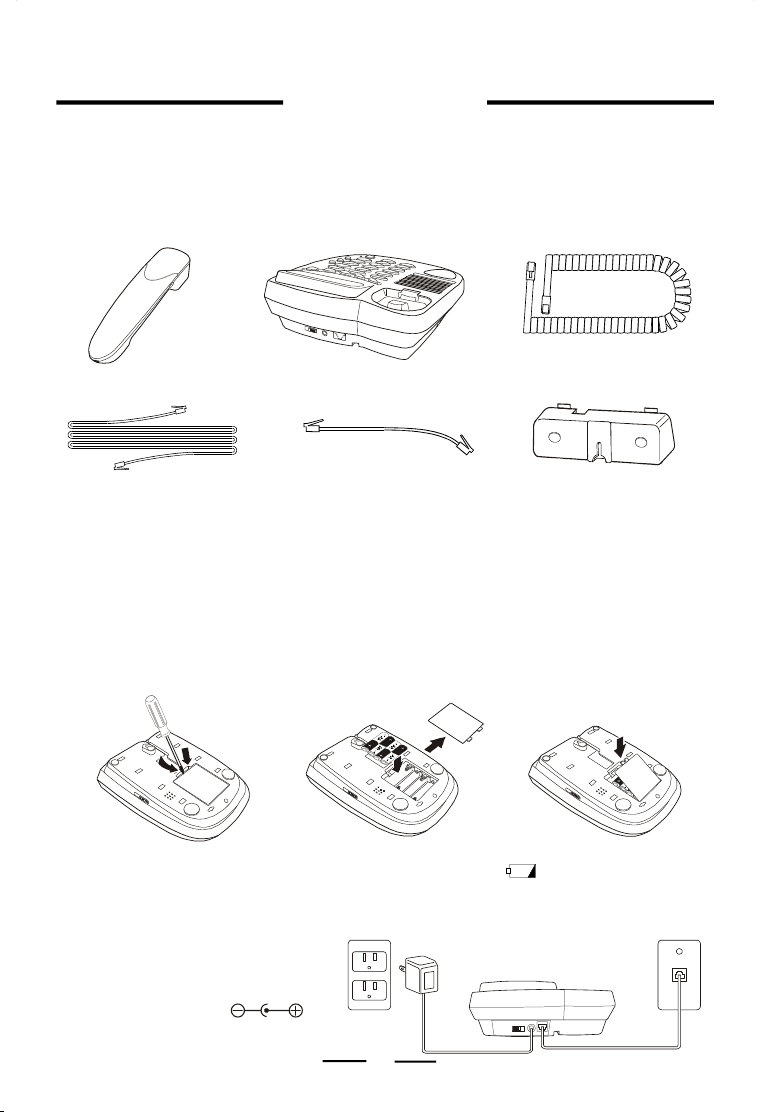
As you unpack this set, make sure you have the following items in the package.
MODEL PH-5595
HANDSET
TELEPHONE STRAIGHT CORD
TELEPHONE BASE COILED HANDSET CORD
SHORT STRAIGHT CORD
(for wall mounting)
WALL MOUNT ADAPTOR
(attached to the back of
the base for both desk use
and wall mounting)
POWER UP YOUR PHONE
You can use the batteries or AC power as a power source.
1. Using with Batteries
Before you connect the phone cords, follow these steps to install the batteries:
1.Insert a flat blade screwdriver or coin like a quarter into the slot and pry out (lift) the
battery door (FIG. 1).
2.Insert 4 size “AA” alkaline batteries as shown inside the battery compartment (FIG. 2).
3.Replace the battery door and snap it shut (FIG. 3).
NOTE: Replace the batteries when the low battery indicator
FIG. 1
FIG. 2
appears in the display..
FIG. 3
2. Using AC Outlet Power (AC Adaptor is optional, not included)
This phone may be powered from
any household 120V AC outlet
using an AC adaptor (6V DC
output, not included). Insert the
adaptor’s small connector plug into
the DC 6V Jack marked
on the rear of the phone, and plug
the adaptor into an AC outlet.
OPTIONAL
AC ADAPTOR
1
QI-PH5595-WM-E-032704
Page 2
QUICK INSTRUCTIONS
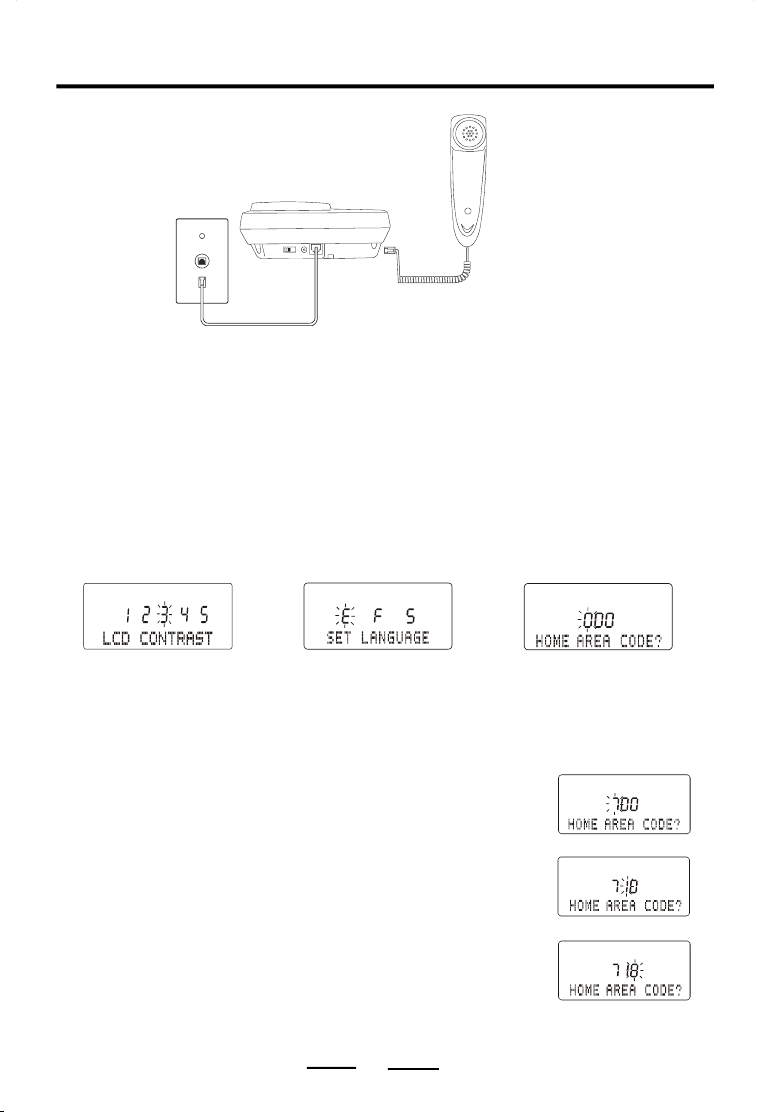
CONNECTING YOUR PHONE
REAR OF THE TELEPHONE
STRAIGHT TELEPHONE CORD
(To Telephone Wall Jack)
SETTING UP LCD CONTRAST, LANGUAGE, AREA CODE, TIME AND DATE
You may need to set up the LCD contrast level, language, area code, time and date for your
telephone when you power your phone for the first time or when you move to an area that
has a different area code. This is necessary because the phone must distinguish local or
long distance calls to properly dial calls from the Caller ID list.
Press the MENU button, “LCD CONTRAST” will show in the display. Press the MENU button
again, the following will show in the display (FIG. 1). Press UP or DOWN button to choose
the LCD contrast level (1-5). Press the MENU button to confirm and accept.
Then the display will come to the language setting.
The default language “E” (“E” = English; “F” = French; “S” = Spanish) will flash (FIG. 2).
HANDSET
COILED HANDSET CORD
FIG. 1 FIG. 2 FIG. 3
Press the UP or DOWN button to choose your desired language (flashing). Press the MENU
button to confirm and accept. If you do not press the MENU button within 15 seconds,
English will be selected automatically and will resume to the standby mode.
Then the display will ask you to set your Area Code:
AREA CODE EXAMPLE: 718
While the first digit is flashing, you should:
1.Press the UP button till the first digit of your area code is
displayed (flashing).
Press UP & MENU to set
2.Press the MENU button to accept and go to the next digit.
3.Repeat steps 1 and 2 above to set the 2nd and 3rd digits of
your area code.
2
Press UP & MENU to set
Press UP & MENU to set
QI-PH5595-WM-E-032704
Page 3

QUICK INSTRUCTIONS
TELEPHONE FEATURES
Storing Phone Numbers into Memory
1. Press the STORE button. (short for programming) appears in the display..
2. Dial the phone number you want to store. You can store up to 22 digits (including a
TONE ( ) and a PAUSE (
3. For 3 one-touch dialing: For 10 two-touch dialing:
Press one of the 3 one-touch
speed dial buttons (M1 to M3).
4.The stored number and the location will be shown in the display.
5.Repeat steps 1-4 to store numbers into other memory locations.
6.Press the STORE button or wait 3 seconds to resume normal display.
Memory Dialing
1. Pick up the handset or press the SPEAKERPHONE button. The hook icon will show
in the display.
2. For 3 one-touch dialing: For 10 two-touch dialing:
Press one of the 3 one-touch
speed dial buttons (M1 to M3).
3.The phone will dial the numbers you stored into that memory.
Answering Calls with the Speakerphone
1.After the phone rings twice, press the SPEAKERPHONE button, the SPEAKERPHONE
INDICATOR will light, and the hook icon will show in the display..
2.The display will show the Count Up Call Timer after a few seconds.
3.Adjust the speakerphone volume by sliding the SPEAKERPHONE VOLUME control on
the right side of the phone.
4.To end the call, press the SPEAKERPHONE button again.
5.The SPEAKERPHONE INDICATOR will go off and the display will return to the normal mode.
Making Calls with the Speakerphone
1.Press the SPEAKERPHONE button to get a dial tone - no need to lift the handset.
2.The SPEAKERPHONE INDICATOR will light and the hook icon will show in the display,,
the Count Up Call Timer will start after a few seconds.
3.Adjust the speakerphone volume by sliding the SPEAKERPHONE VOLUME control on
the right side of the phone.
4.Dial your call.
5.To end the call, press the SPEAKERPHONE button again.
6.The SPEAKERPHONE INDICATOR will go off and the display will return to the normal mode.
NOTE: When pick up the HANDSET or press the SPEAKERPHONE button, the hook icon
will show in the display. If this icon shows in the display while the phone is not in
use, remember to check if the HANDSET is replaced properly or the
SPEAKERPHONE button is pressed to off.
Volume Control and Ringer Setting
Adjust the handset volume
Adjust the ringer level
REDIAL/PAUSE
Press the AUTO button, and then press one of the
dialing keys (0 to 9) to store a phone number in.
Slide the HANDSET VOLUME control (LOUD or NORM).
Set RINGER HI/LOW/OFF switch.
HI - loud rings on incoming calls.
LOW - lower rings on incoming calls.
OFF - no ringing on incoming calls.
), each of which is counted as one digit).
Press the AUTO button, and then press
one of the dialing keys (0 to 9).
3
QI-PH5595-WM-E-032704
Page 4

QUICK INSTRUCTIONS
CALLER ID OPERATION
Your PH-5595 has Caller ID & Call Waiting feature and if you subscribe to Call Waiting Caller
ID service, the Caller’s telephone number (if available), Name, Time and Date of the call will
be displayed between the first and second ring of the phone. The phone stores the data
of the last 70 calls received including
all calls received, even if they were not answered.
Call Waiting
This feature allows you to read from the LCD display the incoming call information while you
are using the telephone. If you are using the telephone when a new call comes in, “CW”
(call waiting) will be flashing, and the phone number of the new caller will be shown. By
pressing the FLASH button on your telephone, you will put on hold the party you are having
the conversation with and you will be able to talk to the new caller, and the “CW” icon
disappears from the display. After you finish the conversation with the 2nd caller, press
FLASH to return to the 1st call (you may also press the HOOK switch for 2 seconds).
Viewing the Caller ID List
You can look through the data (calls) in the Caller ID list to check the numbers and names
of the calls received.
1. Press the DOWN button to view your calls from the newest call.
2. Press the UP button to view calls from older calls to newer ones.
NOTE: You may display a caller’s ID, then follow the steps to Storing Phone Numbers into
memory to store the caller’s phone number into one of the 13 speed dialing
memory buttons (M1 or Auto + 1, etc.).
Calling Back From the Caller ID List
A.When handset is on the base
1. Display the phone number you want to call back using the UP or DOWN button.
2.Press the DIAL button, “PICK UP OR ADJ” and the phone number will show in the
display.
3.Press the DIAL button again to choose the number of call-back digit to be
dialed out (7 digits - phone number by itself, or 10 digits - area code + phone number, or 11
digits - 1 + area code + phone number), different parts of the country have different dialing
systems even for local calls.
4.Pick up the HANDSET or press the SPEAKERPHONE, the phone will dial the displayed
number automatically.
B.When handset is picked up or using speakerphone
1. Display the phone number you want to call back using the UP or DOWN button.
2.Press the DIAL button, “DIALING OR ADJ” and the phone number will show in the
display.
3.Press the DIAL button again to choose the number of call-back digit to be
dialed out (7 digits - phone number by itself, or 10 digits - area code + phone number, or 11
digits - 1 + area code + phone number), different parts of the country have different dialing
systems even for local calls.
4.The phone will dial the displayed number automatically.
Deleting the Data from the Caller ID List
To delete the Caller ID memory one by one
1.Display the Caller’s ID you want to delete (by pressing UP or DOWN button).
2.Press the DELETE button, the display will show “DELETE CALL?”, press the DELETE
button once more, the display changes to show the next or previous call, and the data is
deleted.
To delete ALL the Caller ID memories
1.When the phone is not in use, press the DELETE button and hold for 3 seconds, the
display shows “DELETE ALL?”.
2.Press the DELETE button once more, the display changes to “
Caller ID memories (including the new call memories) are deleted.
“ OUT OF AREA ”
4
and
“ PRIVATE ”
calls. It keeps track of
NO CALLS ”
QI-PH5595-WM-E-032704
and all the
 Loading...