

WALL MOUNTING
WALL MOUNTING WITHOUT A MODULAR WALL PHONE PLATE
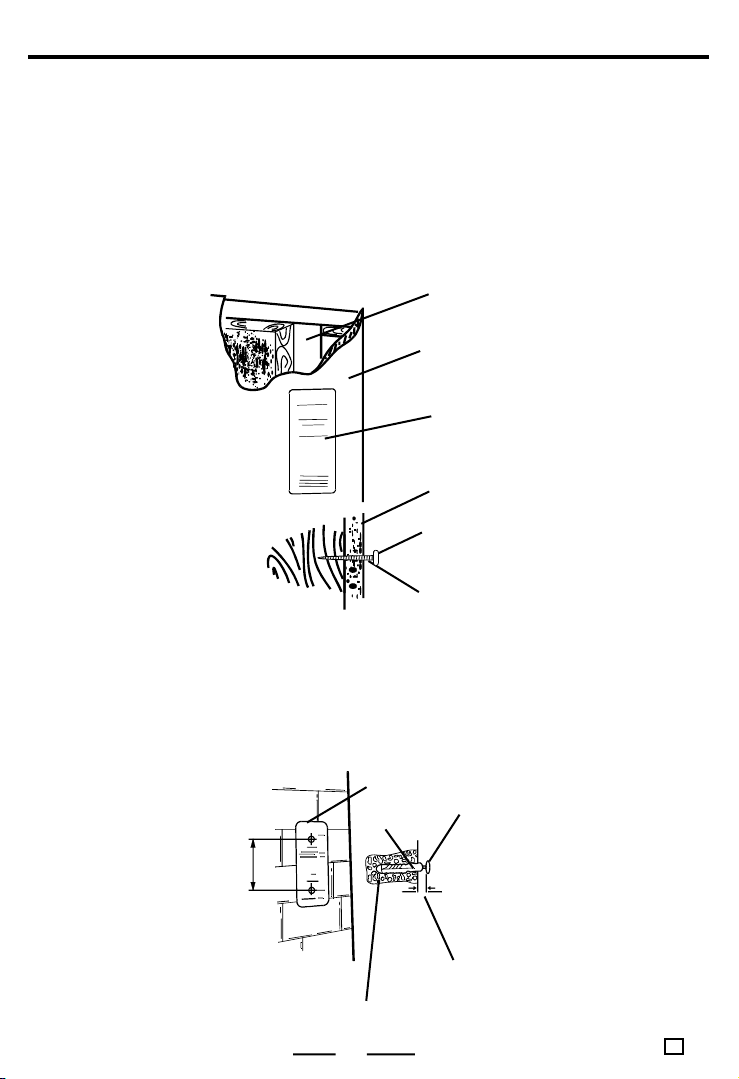
Follow these instructions to mount the phone on the wall without a wall jack:
1. Locate a wall stud. If it is possible to utilize a wall stud for mounting, dry wall expanders
or a similar type fastener is recommended. Consult your local hardware stores for details.
2. Drill 2 holes 3-15/16" (100 mm) apart.
3. Put a screw into each hole and leave 3/16 (5mm) of the head exposed to mount the
phone, we recommend you to buy #8 or #10 Pan head sheet metal screws, 2" long
(screws are not included).
4. Connect the straight cord to the phone and jack.
5. Place the Telephone Base on the 2 mounting screws and gently push down to lock into
place.
WALL STUD
DRYWALL OR PLASTER
MOUNTING AREA
WALL
MOUNTING SCREW
LEAVE 3/16 (5 MM) SCREW
EXPOSED
INSTALLATION ON MASONRY
1. Use a 1/4" masonry drill bit and drill the 2 holes.
2. Insert plastic anchors and install the 2 screws.
3. Leave 3/16" (5 mm) of the screws exposed to mount the phone.
4. Place the Telephone Base on the 2 mounting screws and gently push down to lock into
place (anchors and screws are not included).
MOUNTING AREA
MOUNTING SCREW
3/16 (5 MM)
550110998
E V.4
3 15/16
(100 MM)
ANCHOR
LEAVE 3/16 (5 MM) SCREW EXPOSED
DRILL HOLE WITH 1/4 MASONRY BIT
13
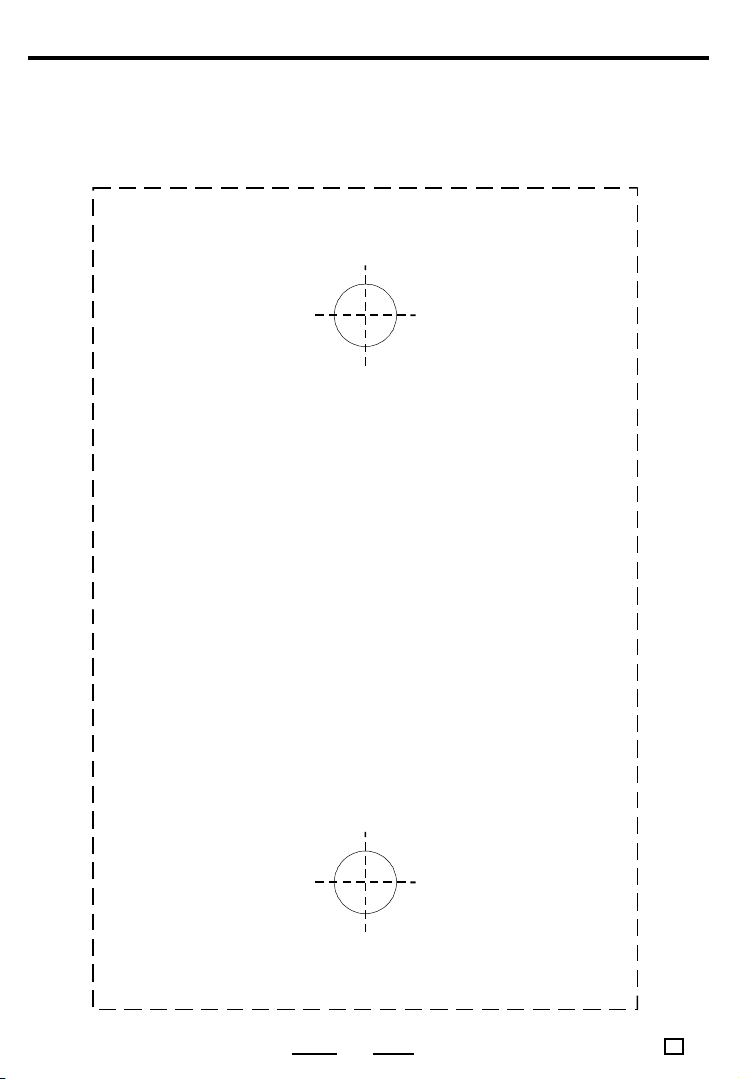
WALL MOUNT TEMPLATE
IF YOU DO NOT HAVE A WALL JACK, USE THE TEMPLATE BELOW:
SI NO TIENE UNA TOMA DE PARED USE EL TEMPLADO INFERIOR:
Drill one hole here Haga un agujero aguí
To mount your phone on wall, drill two holes 3-15/16 (100 mm)
apart and put two screws into wall, then slide phone into screws.
Before mounting, select a wall area with sufficient strength.
If mounting on the wallboard or in an area of questionable
strength, locate a stud for maximum support of your telephone.
Para montar su teléfono en la pared haga os agujeros
3-15/16" (100 mm) aparte y coloque dos tornillos en la pared,
Antes de montar, seleccione un área en la pared de
suficiente fuerza. Si la montura se hace en un panel
o en un área de fuerza cuestionable, localice un
Drill one hole here Haga un agujero aguí
WALL MOUNT TEMPLATE
IMPORTANT
TEMPLADO DE MONTURA EN PARED
luego deslice el teléfono en los tornillo.
IMPORTANTE
clavo de soporte maximo de su teléfono.
14
550110998
E V.4
TELEPHONE OPERATION
RECEIVING CALLS AS A NORMAL TELEPHONE
When the phone rings twice:
1. Lift the Handset and speak into the mouth piece of the Handset.
2. To end the call, hang up the Handset. The display will return to Time and Date settings.
MAKING CALLS AS A NORMAL TELEPHONE
1. Select the desired dialing mode with the TONE / PULSE Switch (do this only the first time
during installation).
2. Pick up the Handset to get a dial tone. The count up timer will start after a few seconds.
3. Dial your call.
4. To end the call, hang up the Handset. The display will return to Time and Date settings.
CALL WAITING
If you subscribe to call waiting service and you hear a beep during a conversation, press
the Hook Switch quickly to get the other party.
LAST NUMBER REDIAL / PAUSE
The last number you called can be redialed using the speakerphone or the normal telephone.
This is useful especially if the line is busy.
1. Get a new dial tone and press the Redial button.
2. To get a new dial tone, press the Speakerphone button or hang up the phone for 2
seconds. Then press the Redial button. This phone will remember the last number dialed
even overnight. If you do not want anyone to know which number you dialed last, pick up
the phone and press any number.
PAUSE FUNCTION
(Example: In an office where you need to dial a 9 first), dial the number 9 and press Redial, and
then dial the phone number. You will see a displayed for Pause. You may also store this
into memory.
HANDS-FREE (SPEAKERPHONE) OPERATION
ANSWERING CALLS WITH THE SPEAKERPHONE
1. After the phone rings twice, press the Speakerphone button, the Speakerphone Indicator
will light. It is not necessary to lift the Handset. We recommend you to wait for the second
ring before pressing the Speakerphone button.
2. The display will show the Count Up Call Timer and it will start after a few seconds.
3. Adjust the Speakerphone volume by sliding the Volume Control on the side of the phone.
4. To end the call, press the Speakerphone button again.
5. The Speakerphone Indicator will go off and the display will return to Time and Date settings.
MAKING CALLS WITH THE SPEAKERPHONE
1. Press the Speakerphone button to get a dial tone - no need to lift the handset.
2. The Speakerphone Indicator will light and the Count Up Timer will start after a few seconds.
3. Adjust the Speakerphone volume by sliding the Volume Control on the side of the phone.
4. Dial your call.
5. To end the call, press the Speakerphone button again.
6. The Speakerphone Indicator will go off and the display will return to Time and Date settings.
When making a call:
The number you dialed
is displayed
Count Up Call Timer advances
15
550110998
E V.4

TELEPHONE OPERATION
SPECIAL CONSIDERATIONS FOR HANDS-FREE (SPEAKERPHONE) OPERATION
1. Be sure to notify the other party that you are using the Speakerphone, the other party may
not wish anyone else to hear the conversation. To switch from the Speakerphone to the
Handset, just lift the Handset.
2. If a squealing or whistling sound is heard, reduce the volume setting. If you start your
conversation with the Handset and you want to switch to the Speakerphone mode, press
the Speakerphone button and replace the Handset.
3. Remember to hang up by pressing the Speakerphone button at the end of the
conversation.
4. If it is difficult to transmit because of a high background noise level in the other partys
environment or telephone line noise, lower the volume level.
5. In order for the Caller ID to work properly, do not press the Speakerphone button before the
second ring.
HOLD BUTTON
Your phone has a HOLD button which allows you to put any call on hold.
1. Press the Hold button and the Hold Indicator will light. (When Hold is on, the other party
cannot hear your conversation)
2. You may pick up the Handset to end the Hold function, or press the Speakerphone button
or pick up any phone in any room on that line.
TEMPORARY TONE DIALING
Temporary tone dialing is used only when you have Pulse (rotary) service. It allows you to
access to services that require tone signaling, including some Tone-Activated Computer Systems or phone-banking.
To change from Pulse (rotary) to Tone dialing during a call, do the following:
1. Dial a phone number in PULSE (TONE /PULSE Switch at PULSE position).
2. Press the TONE button, all buttons pressed after this will send only tone signals to the
computer or phone-banking system.
3. After you hang up, the phone automatically returns to Pulse (rotary) service.
MEMORY DIALING
Your PH-550 has 20 One-Touch Memory buttons (from M1 to M20) which allows you to store
frequently dialed numbers into memory. With the push of one button, the number will be dialed
automatically. This is especially useful for long-distance numbers.
STORING TELEPHONE NUMBERS INTO MEMORY (M1 TO M20)
Your PH-550 allows you to store emergency numbers or numbers that you call very often such
as your parents or best friends.
NOTE : When storing memory numbers, your phone must have batteries installed (see
INSTALLING BATTERIES on page 7 for details).
16
550110998
E V.4

TELEPHONE OPERATION
To store telephone numbers into memory, simply follow the instructions below:
EXAMPLE:
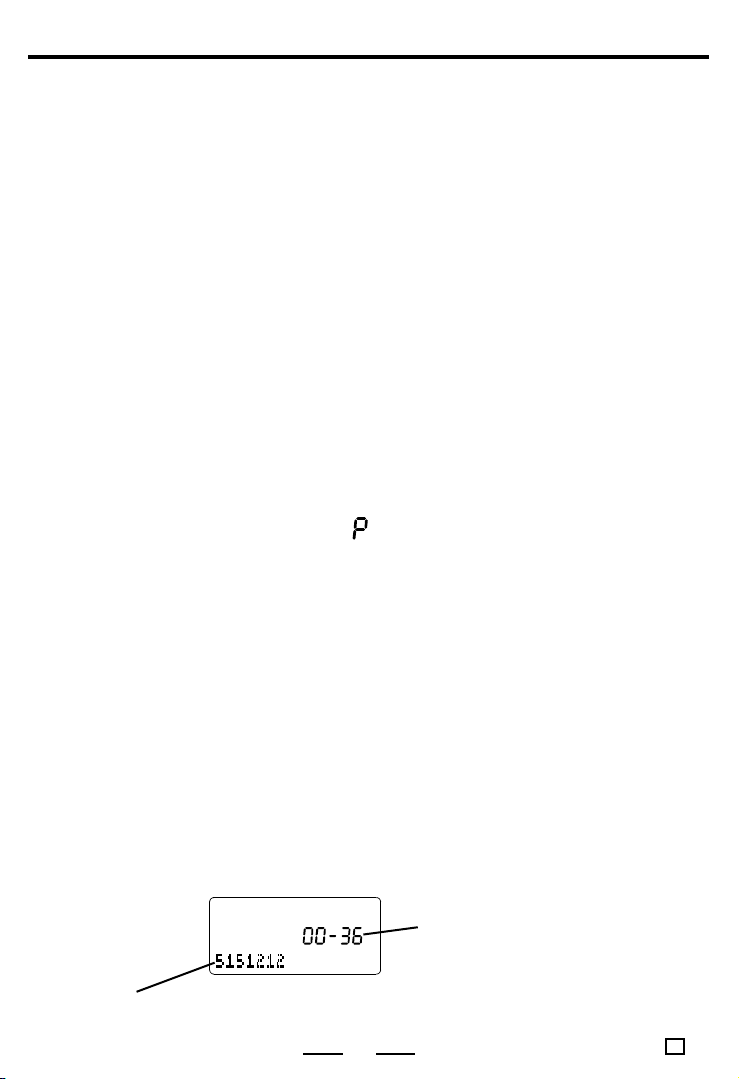
Suppose you want to store 1-800-555-1212 into M18, you should:
1. Without lifting the Handset. Press the STORE button. The display will show
(abbreviation for PROGRAMMING).
STORE
2. Dial 1-800-555-1212. The display will show the numbers you pressed.
3. Press Memory Button M18 (or any one of the buttons from M1 to M20 where you would like
the number stored). The display will show the number you just stored and the memory
location number.
M18
4. Repeat steps 1 to 3 for storing other numbers.
5. Remember to add the Area Code and the 1 if needed.
To check a number you stored into memory, press that Memory button and the number will
show on display. There is no need to lift the Handset or to press the Speakerphone button. In
case you want to change a number you stored, simply store a new number, the old one will be
erased automatically.
EXAMPLE :
Pressing M18 will show you the number you stored into M18 (1-800-555-1212).
17
550110998
E V.4

TELEPHONE OPERATION
NOTES :
1. Write the emergency numbers into the Memory Index Card in the rare case that your
memory feature loses the number. Lenoxx Electronics Corp. assumes no responsibility for
customers reliance on this feature.
2. If you move your phone to another room or disconnect the phone line, your stored numbers
will remain in the memory for a short time, so quickly re-connect it to the new jack or you
might have to re-program the phone.
3. When storing or testing emergency numbers (like 911), if the operator comes on, tell him or
her you are programming or testing a phone and you do not have an emergency. Otherwise
they might dispatch the police to your location.
4. You may program a Pause into memory. For example, if you need to dial a 9 to get an
outside line: Press STORE first, then press 9 and the REDIAL button (a will show) and
the number you want to dial, and finally press the Memory button (the REDIAL button puts
a pause into the number when pressed).
MAKING CALLS FROM THE 20 ONE-TOUCH MEMORY
Follow the instructions below to dial a number from the one-touch memory:
1. Get a dial tone (by lifting the Handset or pressing the Speakerphone button).
2. Press one of the 20 Memory buttons marked M1 through M20.
3. The number will be displayed and your call will be dialed exactly as you programmed.
NOTE : Memory dialing will only work if you first program your numbers.
TO LIST YOUR MEMORY NUMBERS
1. Slide out the Memory Index Card from under the phone.
2. Write names or numbers on the Memory Index Card (better in pencil so that you can
change them later).
NOTE : Your phone MUST have fresh batteries installed in order to program memory
numbers or operate this phone.
WHAT YOUR CALLER ID DISPLAYS AND WHAT THE BUTTONS DO ?
Shows time of day
Shows batteries are
weak and to be
replaced.
This lamp will flash
when a NEW call
comes in or if you
get a new
message.
NEW
CALL
VIEW
Shows date
LOW
Shows you have
message(s) waiting
(If you subscribe to that)
CALL #
NEW
/
PM
DOWN
UP
Call Counter
Shows the
call number
Shows incoming
phone number
Press these buttons
to review ALL calls
(new and old). Also
changes number up
or down during Setup.
Press this button to
display NEW calls that
came in.
Press this button to delete
a call(s) displayed, also
during Setup to accept a
language or number that
is flashing.
DELETE DIAL
Shows total
call(s) received.
18
Shows number of
new calls received
since your last
review.
Press this button to dial a
number shown in the
display.
550110998
E V.4

CALLER ID OPERATION
USING YOUR CALLER ID PHONE
IMPORTANT !
Subscription to Caller ID service from your local phone company is required to use the
Caller ID part of the phone. Also 4 fresh AA batteries are required to use this phone.
WHAT YOUR CALLER ID SPEAKERPHONE DISPLAYS
Callers name.
PM
CALL #
NEW
/
Callers phone number.
PM
/
Time call received.
Date call received.
Call counter.
NEW
CALL
Caller blocked Caller ID information.The display will show UNAVAILABLE or
or
Flashes every time a new call is received until the new call(s) is reviewed.
BLOCKED.
Will be displayed only if you subscribe to telephone company voice mail
and visual message waiting indication and you have received message.
Will turned off once you review your message.
LOW
Weak batteries - replace batteries.
Call information received incorrectly (error messages).
NOTES :
1. Displayed items depend on the CLASS service you subscribe to. Consult your local
telephone company for details.
2. When Caller ID memory is full, it will automatically delete the oldest calls in order to make
room for the new ID numbers.
3. Replace batteries as soon as possible when the LOW BATTERY Indicator appears
LOW
on the display or if the display gets dim.
ERROR MESSAGES
If the data received from the telephone company contains corrupted information, the display
will show .
19
550110998
E V.4
 Loading...