

Page 1
QUICK INSTRUCTIONS
MODEL PH-550
This sheet gives you basic instructions on Quick Installation and Setup of your PH-550 20 Memory Caller
ID Speakerphone. NOTE: You will need 4 size AA batteries to use this phone.
NOTE : To use the Caller ID part of this phone, you must subscribe to Caller ID service. Call your
For detailed operation and features of your telephone, please refer to your operating instructions booklet.
1. Carefully remove your telephone from its shipping box.
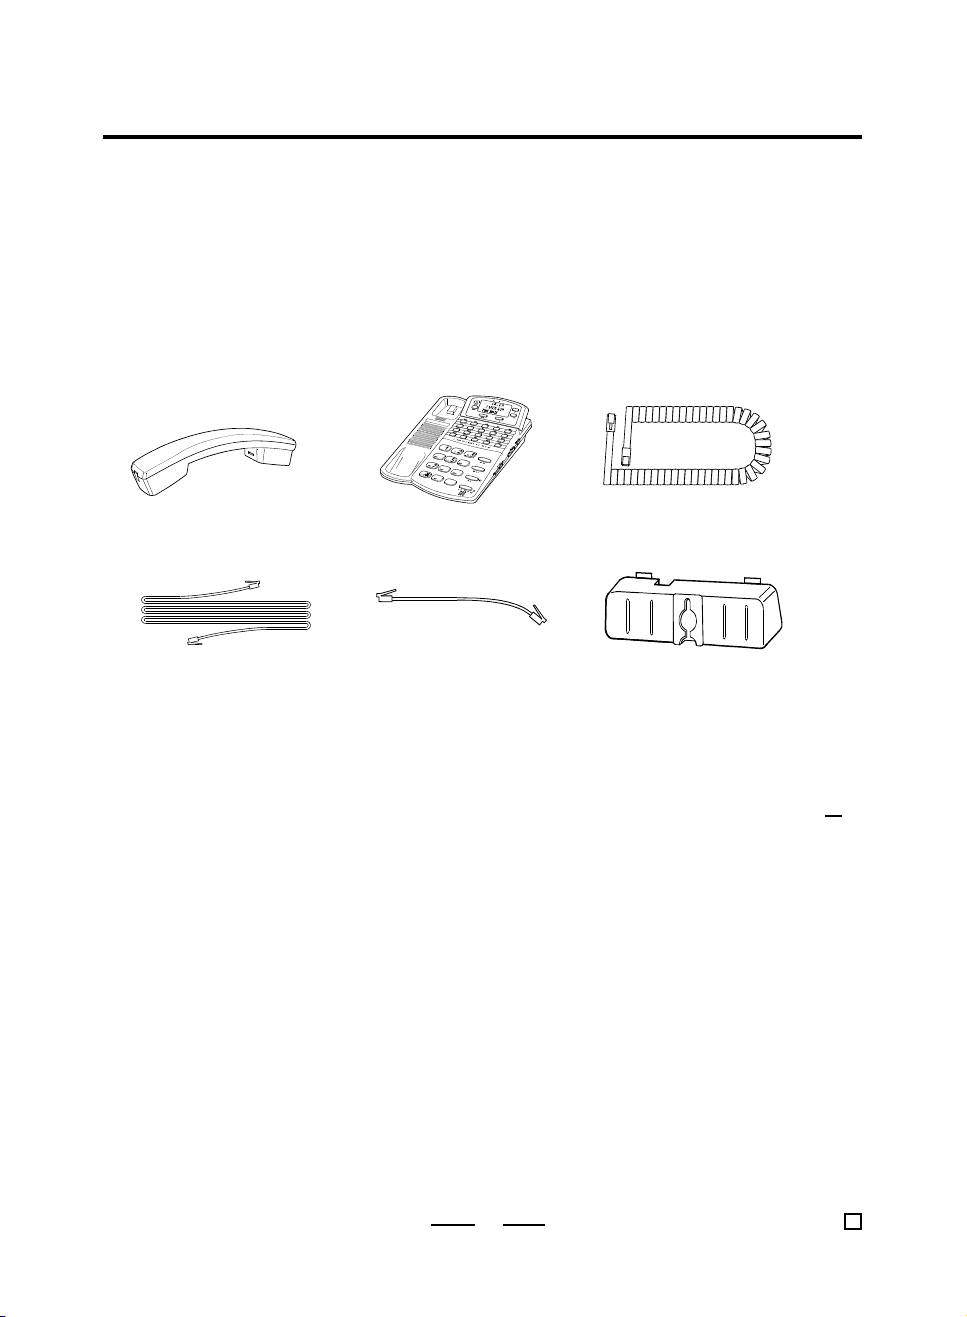
2. Make sure you have all items below that come with this telephone.
Handset Telephone Base Coiled Handset Cord
Telephone Straight Cord Short Straight Cord Wall Mount Adaptor
local telephone company business office to set up Caller ID.
for wall mounting (only needed if you want to
mount your phone on the wall)
To install this telephone, follow the steps below:
1. Open the Battery Door by inserting a flat blade screwdriver into the slot and flip door out.
2. Install 4 size AA alkaline batteries as shown in the Battery Compartment. Make sure that the ( )
negative side touches the spring.
3. Insert one end of the Coiled Handset Cord into the Handset and the other end into the modular jack
on the left side of the Base Unit.
4. Insert one end of the Telephone Straight Cord into your homes Modular Telephone Wall Jack and the
other end into the Telephone Jack at the rear of the Telephone Base.
NOTE : If you have an older 4-prong telephone jack, you will need a Telephone Jack Adaptor. The
adaptor is available at the same place you purchased your telephone.
5. If your home is equipped with touch tone dialing, set the TONE / PULSE switch to the TONE position.
If you have a PULSE (rotary) dialing system, set the TONE / PULSE switch to the PULSE system.
If you are not sure which system you have, set the TONE / PULSE switch to TONE position and lift the
Handset. When you get a dial tone, dial a number you are familiar with. If the dial tone continues, and
your call does not go through, replace the Handset and move the switch to the PULSE position. Then
lift the Handset and dial the number again (you have PULSE dialing system).
6. Set up the Caller ID to work in English (or French or Spanish if you prefer).
7. Set up your home Area Code.
8. Tie up loose cords to prevent tangling and tripping.
9. Lift the Handset to confirm that you have a dial tone. If you do not get a dial tone, please review steps
3, 4 and 5. If you still do not get a dial tone, see TROUBLE SHOOTING on page 23 of your
operating instructions booklet. Also make sure your batteries are fresh.
1
QUICKINST 550090198 E
Page 2

QUICK INSTRUCTIONS
INSTALLING BATTERIES
Install batteries into your phone as shown below :
AA SIZE
AA SIZE
AA SIZE
AA SIZE
1. Open the battery door with a flat 2. 4 size AA alkaline batteries are
blade screwdriver needed
AA SIZE
AA SIZE
S
I
Z
E
A
A
A
A
E
Z
I
S
S
AA SIZE
AA SIZE
3. Negative side touches spring 4. Replace the Battery Door and snap
it shut.
I
Z
E
A
A
A
A
E
Z
I
S
CONNECTING YOUR PHONE
STRAIGHT TELEPHONE CORD
(To Telephone Wall Jack)
TELEPHONE BASE
BACK OF PHONE
2
HANDSET
COILED HANDSET CORD
QUICKINST 550090198 E
Page 3

QUICK INSTRUCTIONS
INSTALLING CALLER ID
Put the telephone into Setup mode by inserting new batteries and pressing the DELETE button first, then
while holding down the DELETE button, press the DOWN button.
The display will show:
NOTE: Your phone may already
be in this mode upon
inserting batteries.
E will flash. If you do nothing, E will be selected automatically after a few seconds. If you want French (F) or
Spanish (S) displayed, press the UP or DOWN buttons till your desired language letter flashes. Press
the DELETE button to select the language that you want. If you do not press the DELETE button,
English will be selected automatically and the screen will ask you to set the Area Code after a few seconds.
While the first digit of the Area Code flashes,
A. Press the UP button till the first digit of your Area Code is displayed (flashing).
B. Press the DELETE button to accept and go to the next digit.
C. Repeat steps A and B to set up the second and third digits.
Example to setup Language and Area Code, do the following:
1. Press the DELETE button, and while holding it,
press the DOWN button to get into Setup mode.
2. Display will show E F S , E is flashing.
3. Press the DELETE button to accept E (English).
4. Display will show 0 0 0 (Area code) with the first 0 flashing.
To set Area Code 7 1 8, you should :
5. Press the UP button till 7 shows ( 7 0 0 ).
6. Press the DELETE button to accept.
7. Display shows 7 0 0 with the middle 0 flashing.
8. Press the UP button till a 1 shows ( 7 1 0 ).
9. Press the DELETE button to accept.
10. Display shows 7 1 0 with last 0 flashing.
11. Press the UP button till 7 1 8 shows.
12 . Press the DELETE button to accept.
3
QUICKINST 550090198 E
Page 4

QUICK INSTRUCTIONS
Your telephone will now go to the Time and Date mode, which you do not need to set up because your
telephone company will automatically set this up when your phone rings (twice or more).
Press the DELETE button four times to return your telephone to Normal mode as shown:
To set up the Time and Date manually, use the UP and DOWN buttons to get to the correct
number and the DELETE button to accept. This can only be done in the Setup mode.
IMPORTANT !
1. YOUR TELEPHONE IS NOW FULLY SET UP AND YOUR CALLER ID TELEPHONE SHOULD WORK
PROPERLY. REMEMBER TO CHANGE THE BATTERIES WHEN THE DISPLAY GETS DIM. FOR MORE
DETAILED INFORMATION, REFER TO YOUR OPERATING INSTRUCTIONS BOOKLET.
2. IF YOU CANNOT SET UP YOUR CALLER ID OR IF THE DISPLAY IS BLANK OR ERRATIC, YOU CAN
RESET YOUR PHONE BY INSERTING A POINTED OBJECT LIKE A STRAIGHTENED PAPER CLIP
INTO THE SMALL HOLE BEHIND THE DISPLAY MARKED RESET. THIS WILL ALSO CLEAR ALL
MEMORIES.
3. YOU AND YOUR ANSWERING MACHINE SHOULD ANSWER PHONE CALLS AFTER AT LEAST 2
RINGS, OR THE CALLER ID WILL NOT WORK.
OTHER FEATURES
MEMORY DIALING
Your PH-550 has 20 One-Touch Speed Dial Memories, suppose you want to store 1-800-555-1212 into
memory M2.
1. Press the STORE button. The display will show (abbreviation for PROGRAMMING).
2. Dial .
3. Press M2 button (or any of the buttons from M1 to M20 where you would like the number to be stored).
4. Repeat steps 1 to 3 for storing other numbers.
NOTE :Remember to add the Area Code for long distance numbers.
In case you want to change a number you stored, simply store a new number, the old one will
automatically be erased.
TO DIAL NUMBER FROM THE 20 ONE-TOUCH SPEED DIAL MEMORIES
1. Get a dial tone (by lifting the Handset or pressing the Speakerphone button).
2. Press one of the 20 Memory buttons marked M1 through M20. The numbers will be displayed and your
call will be dialed (exactly as you programmed it).
HANDS-FREE SPEAKERPHONE OPERATION
For hands-free dialing or answering calls, simply press the Speakerphone button and dial or answer your
call the same as with the Handset. For incoming calls, press the Speakerphone button after the second
ring.
Remember to press the Speakerphone button at the end of the conversation, to hang up.
CALLER ID OPERATION
Your PH-550 has Caller ID feature and if you subscribe to Caller ID service, the Callers telephone number
(if available), Name and Time and Date of the call will be displayed between the first and second ring of
the phone. This information is stored in your telephone (up to 70 call records) even if you do not answer
the call.
STORING A NUMBER FROM THE CALLER ID DISPLAY
To store the number of an important caller into memory M1 to M20, do the following:
1. Press the UP or DOWN button to see the calling number you want to store.
2. Press the STORE button (the number will shift to the right on the display and flash).
3. Press a Memory button from M1 to M20 (the number will be stored in the location you pressed).
DIALING NUMBERS FROM THE CALLER ID MEMORY
To dial a local or long distance number from the Caller ID memory, do the following:
1. Press the UP or DOWN button until the callers number shows.
2. Pick up the Handset or press the Speakerphone button to get a dial tone.
3. Press the Dial button under the display, the number shown will be dialed automatically.
4
QUICKINST 550090198 E
 Loading...