

Page 1

QUICK INSTRUCTIONSQUICK INSTRUCTIONS
QUICK INSTRUCTIONS
QUICK INSTRUCTIONSQUICK INSTRUCTIONS
MODEL PH-540MODEL PH-540
MODEL PH-540
MODEL PH-540MODEL PH-540
This sheet gives basic instructions on Quick Installation and Setup of your PH-540
13 Memory Caller ID Trim Phone.
Note:Note:
TT
o use the Caller ID feature of this phone, you must subscribe too use the Caller ID feature of this phone, you must subscribe to
Note:
T
o use the Caller ID feature of this phone, you must subscribe to
Note:Note:
TT
o use the Caller ID feature of this phone, you must subscribe too use the Caller ID feature of this phone, you must subscribe to
Caller ID service. Call your local telephone company to set upCaller ID service. Call your local telephone company to set up
Caller ID service. Call your local telephone company to set up
Caller ID service. Call your local telephone company to set upCaller ID service. Call your local telephone company to set up
Caller ID to your line. Also, you will need 4 size AA batteriesCaller ID to your line. Also, you will need 4 size AA batteries
Caller ID to your line. Also, you will need 4 size AA batteries
Caller ID to your line. Also, you will need 4 size AA batteriesCaller ID to your line. Also, you will need 4 size AA batteries
For detailed operation and features of your telephone, please refer to your Operat-
ing Instructions booklet.
As you unpack this set, make sure you have the following items in the package.
Telephone Straight Cord
Handset
TT
o install this telephone, follow the steps below:o install this telephone, follow the steps below:
T
o install this telephone, follow the steps below:
TT
o install this telephone, follow the steps below:o install this telephone, follow the steps below:
1. Open the Battery Door by inserting a pen point into the slot and flip door out.
2. Install 4 size AA alkaline batteries as shown in the Battery Compartment.
3. Insert one end of the
into the modular jack on the
4. Insert one end of the Telephone
phone Wall Jack and the other end into the Telephone Jack at the
the Telephone Base.
NOTENOTE
NOTE: If you do not have a modular telephone jack, consult your telephone
NOTENOTE
5. If your home is equipped with touch tone dialing, set the TONE / PULSE switch to
6. Set up the Caller ID to work in English (or French or Spanish if you prefer).
7. Set up your home Area Code.
8. Lift the Handset to confirm that you have a dial tone. If you do not get a dial
company or buy a Telephone Jack Adaptor.
the TONE position. If you have a PULSE (rotary) dialing system, set the TONE /
PULSE switch to the PULSE system.
If you are not sure which system you have, set the TONE / PULSE switch to TONE
position and try to dial a number you are familiar with. If the phone connects,
leave the switch as it is, otherwise move the switch to the PULSE position.
tone, please review steps 3, 4 and 5. If you still do not get a dial tone, see
TROUBLE SHOOTING on pages 12 & 13 of your Operating Instructions booklet.
Also make sure all 4 batteries are fresh.
Short Straight cord
(for wall mounting)
CoiledCoiled
Coiled Handset Cord into the Handset and the other end
CoiledCoiled
BOTTOMBOTTOM
BOTTOM end of the Base Unit.
BOTTOMBOTTOM
StraightStraight
Straight Cord into your homes Modular Tele-
StraightStraight
1
Coiled Handset Cord
Telephone Base
BOTTBOTT
OMOM
BOTT
OM of
BOTTBOTT
OMOM
PH-540QI051299 E
Page 2
QUICK INSTRUCTIONSQUICK INSTRUCTIONS
QUICK INSTRUCTIONS
QUICK INSTRUCTIONSQUICK INSTRUCTIONS
INSTINST
ALLING BAALLING BA
INST
ALLING BA
INSTINST
ALLING BAALLING BA
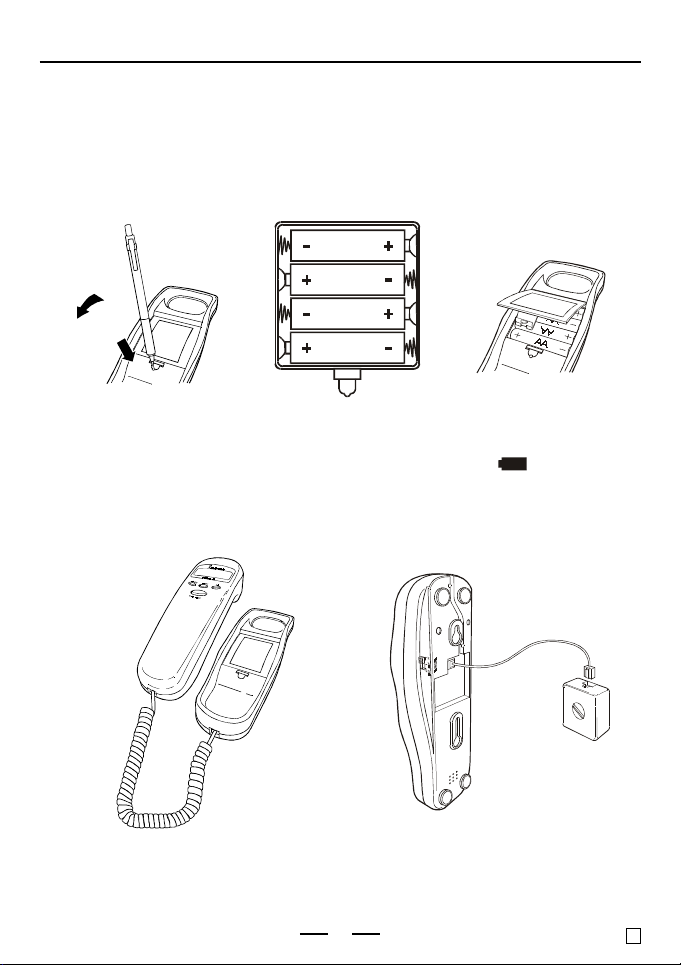
Before you connecting the phone cords, install batteries into your phone as shown
below:
1. Open the Battery Door with a pen.
2. 4 size AA alkaline batteries are needed, See the + and - markings inside the
Battery Compartment. Negative ( - ) side touches the battery spring.
3. Replace the Battery Door and snap it shut.
TTERIESTTERIES
TTERIES
TTERIESTTERIES
SIZE AA
SIZE AA
SIZE AA
SIZE AA
Fig. 1
NOTE:NOTE:
NOTE: Replace the batteries when the Low Battery Indicator
NOTE:NOTE:
CONNECTING YOUR PHONECONNECTING YOUR PHONE
CONNECTING YOUR PHONE
CONNECTING YOUR PHONECONNECTING YOUR PHONE
display or when the display gets dim.
CONNECTING THE COILED
HANDSET CORD
Fig. 2
CONNECTING THE
STRAIGHT LINE CORD
2
Fig. 3
LOW
appears in the
PH-540QI051299 E
Page 3

QUICK INSTRUCTIONSQUICK INSTRUCTIONS
QUICK INSTRUCTIONS
QUICK INSTRUCTIONSQUICK INSTRUCTIONS
INSTINST
ALLING CALLER IDALLING CALLER ID
INST
ALLING CALLER ID
INSTINST
ALLING CALLER IDALLING CALLER ID
Put the telephone into Setup mode by pressing the Delete Button first, then while
holding down the Delete Button, press the Down Button.
The display will show:
E will flash. If you do nothing within 15 seconds, E (English) will be selected
automatically after a few seconds. If you want French (F) or Spanish (S) displayed,
press the Up or Down Button till your desired language letter flashes. Press the
Delete Button to accept the language that you want. The display will show the Area
Code setting mode.
Example: Area code 718
While the first digit of the Area Code flashes,
1. Press the Up Button till the first digit of your Area
Code is displayed (flashing).
2. Press the Delete Button to accept and go to the next
digit.
3. Repeat steps 1 and 2 to set up the 2nd and 3rd digits.
Your phone will now go to the Time and Date mode, which you do not need to set
up because the telephone company will automatically update this with your Caller
ID when your phone rings (twice or more).
To set up the Time and Date manually, use the Up and Down Buttons to get to the
correct number and press the Delete Button to accept.
To get back to the standby mode (for dialing), press the Delete Button until the
normal display shows (see the following for example).
IMPORIMPOR
TT
ANTANT
IMPOR
IMPORIMPOR
1. YOUR TELEPHONE IS NOW FULLY SET UP AND YOUR CALLER ID TRIM
PHONE SHOULD WORK PROPERLY. REMEMBER TO REPLACE ALL 4 SIZE
AA BATTERIES
INFORMATION, REFER TO YOUR OPERATING INSTRUCTIONS BOOKLET.
2. IN THE RARE CASE OF ABNORMAL TELEPHONE LINE INTERFERENCE,
YOUR PHONE MAY NOT WORK PROPERLY (NO DIAL TONE OR LOW DIAL
TONE, OR CAN NOT DIAL OUT, ETC.). YOU CAN
NORMAL OPERATION BY STICKING A STRAIHTENED PAPER CLIP INTO THE
RESET HOLE FOR 30 SECONDS (MAKE SURE THE PHONE IS HUNG UP).
NOTE:NOTE:
NOTE: YOU MAY NEED TO REPROGRAM YOUR SPEED DIAL MEMORIES AND
NOTE:NOTE:
! !
T
ANT
!
TT
ANTANT
! !
WHEN THE DISPLAWHEN THE DISPLA
WHEN THE DISPLA
WHEN THE DISPLAWHEN THE DISPLA
CALLER ID AREA CODE AS IF YOUR PHONE IS BEING INSTALLED FOR
THE FIRST TIME.
AM
YY
GETS DIM GETS DIM
Y
GETS DIM. FOR MORE DETAILS
YY
GETS DIM GETS DIM
RESETRESET
RESET YOUR PHONE TO
RESETRESET
3
Press Up & Delete
Press Up & Delete
Press Up & Delete
PH-540QI051299 E
Page 4

QUICK INSTRUCTIONSQUICK INSTRUCTIONS
QUICK INSTRUCTIONS
Storing phone numbers into memoryStoring phone numbers into memory
Storing phone numbers into memory
Storing phone numbers into memoryStoring phone numbers into memory
1. Press the Store Button.
2. Dial the phone number you want to store. You can dial up to 22 digits, including
a Tone (
For 3 one-touch dialing:For 3 one-touch dialing:
3.
For 3 one-touch dialing:
For 3 one-touch dialing:For 3 one-touch dialing:
Press one of the 3 one-touch
speed dial buttons (M1 to M3).
The stored number and the location will show on the display.
4. Press the Store Button or wait 3 seconds to quit store mode.
5. Repeat steps 1-4 to store numbers into other memory locations.
Memory DialingMemory Dialing
Memory Dialing
Memory DialingMemory Dialing
1. Pick up the handset.
2.
3. The phone will dial the numbers you stored into that memory.
Caller ID OperationCaller ID Operation
Caller ID Operation
Caller ID OperationCaller ID Operation
Your PH-540 has Caller ID feature and if you subscribe to Caller ID service, the
Callers telephone number (if available), Name, Time and Date of the call will be
displayed between the first and second ring of the phone. The phone stores the
data of the last 70 calls received. It keeps track of all calls received, even if they
were not answered.
Viewing the Caller ID listViewing the Caller ID list
Viewing the Caller ID list
Viewing the Caller ID listViewing the Caller ID list
You can look through the data in the Caller ID list to check the numbers and names
of the calls received.
1. Press the Down Button. Data of the newest call appears for 15 seconds.
2.Press the Down Button to display data from new to old or the Up Button to
display from old to new.
You can view the Caller ID list during conversation also by following the steps
above.
Calling back from the Caller ID listCalling back from the Caller ID list
Calling back from the Caller ID list
Calling back from the Caller ID listCalling back from the Caller ID list
1. Display the phone number you want to call back using the Up or Down Button.
2. Pick up the handset.
3.Press the Call Back Button. The number will be repeated in the display and
dialed automatically.
Deleting the data from the Caller ID listDeleting the data from the Caller ID list
Deleting the data from the Caller ID list
Deleting the data from the Caller ID listDeleting the data from the Caller ID list
TT
o delete the Caller ID memories one by oneo delete the Caller ID memories one by one
T
o delete the Caller ID memories one by one
TT
o delete the Caller ID memories one by oneo delete the Caller ID memories one by one
1. Display the Callers ID you want to delete (by pressing the Up or Down Button).
2. Press the Delete Button twice quickly.
TT
o delete ALLo delete ALL
T
o delete ALL
TT
o delete ALLo delete ALL
1. Make sure that all new calls have been reviewed (New Call Indicator does not
2. Press the Up or Down Button to display any call, make sure the display does not
show
3. Press and hold the Delete Button down for 6 seconds. Display changes to
CALLSCALLS
CALLS
CALLSCALLS
For one-touch dialing:For one-touch dialing:
For one-touch dialing:
For one-touch dialing:For one-touch dialing:
Press one of the 3 one-touch
dial buttons (M1 to M3).
flash).
END OF LIST
and all the Caller ID memories are deleted.
QUICK INSTRUCTIONSQUICK INSTRUCTIONS
(short for programming) appears on the display.
) and a Pause
the Caller ID memories the Caller ID memories
the Caller ID memories
the Caller ID memories the Caller ID memories
.
REDIALREDIAL
(
), each of which is counted as one digit.
REDIAL
REDIALREDIAL
For 10 two-touch dialing:For 10 two-touch dialing:
For 10 two-touch dialing:
For 10 two-touch dialing:For 10 two-touch dialing:
Press Auto Button, and then press one of the
dialing keys (0 to 9) to store the number in.
For 10 two-touch dialing:For 10 two-touch dialing:
For 10 two-touch dialing:
For 10 two-touch dialing:For 10 two-touch dialing:
Press Auto Button, and then press one
of the dialing keys (0 to 9).
4
PH-540QI051299 E
NONO
NO
NONO
 Loading...