

Page 1

INSTRUCTION MANUAL
MODEL:CD117C
Nostalgia 6 in1 with Turntable, CD, AM/FM Radio,
Cassette player, Aux in and CD Recorder function
Page 2
IMPORTANT SAFETY INSTRUCTIONS
1) Read these instructions.
2) Keep these instructions.
3) Heed all warnings.
4) Follow all instructions.
5) Do not use this apparatus near water.
6) Clean only with dry cloth.
7) Do not block any ventilation openings. Install in accordance
with the manufacturer’s instructions.
8) Do not install near any heat sources such as radiators, heat
registers, stoves, or other apparatus (including amplifiers) that
produce heat.
9) Do not defeat the safety purpose of the polarized or
grounding-type plug. A polarized plug has two blades with
one wider than the other. A grounding type plug has two
blades and a third grounding prong. The wide blade or the
third prong are provided for your safety. If the provided plug
does not fit into your outlet, consult an electrician for
replacement of the obsolete outlet.
10) Protect the power cord from being walked on or pinched
particularly at plugs, convenience receptacles, and the point
where they exit from the apparatus.
11) Only use attachments/accessories specified by the
manufacturer.
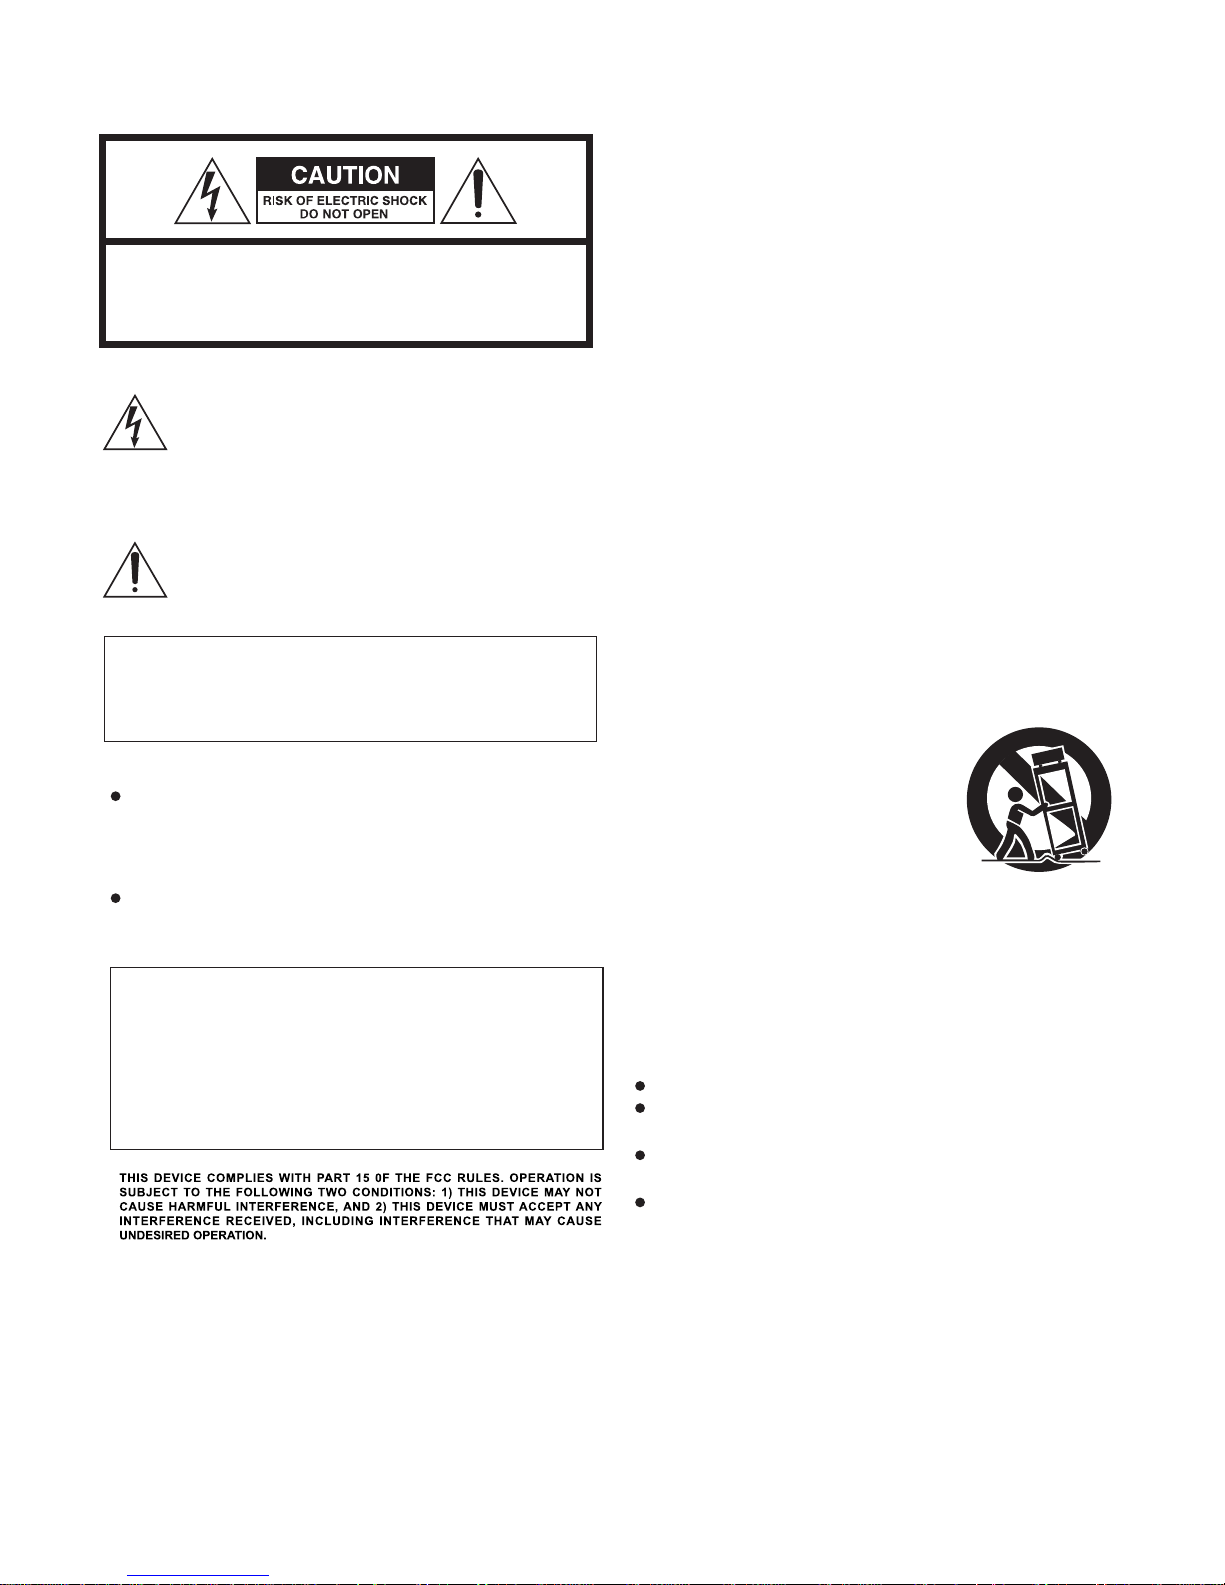
12) Use only with the cart, stand, tripod,
bracket, or table specified by the
manufacturer, or sold with the
apparatus. When a cart is used, use
caution when moving the
cart/apparatus combination to avoid
injury from tip-over.
13) Unplug this apparatus during lightning storms or when
unused for long periods of time.
14) Refer all servicing to qualified service personnel. Servicing is
required when the apparatus has been damaged in any way,
such as power-supply cord or plug is
damaged, liquid has
been spilled or objects have fallen into the apparatus, the
apparatus has been exposed to rain or moisture, does not
operate normally, or has been dropped.
Do not expose this apparatus to dripps or splashes.
Do not place any objects filled with liquids, such as vases, on
the apparatus.
Do not install this apparatus in a confined space such as a
book case or similar unit.
The apparatus draws nominal non-operating power from the
AC outlet with its POWER switch in the off position.
CAUTION: TO REDUCE THE RISK OF ELECTRIC SHOCK,
DO NOT REMOVE COVER (OR BACK). NO USERSERVICEABLE PARTS INSIDE. REFER SERVICING TO
QUALIFIED SERVICE PERSONNEL.
The lightning flash with arrowhead symbol, within an
equilateral triangle, is intended to alert the user to the
presence of uninsulated “dangerous voltage” within
the product’s enclosure that may be of sufficient
magnitude to constitute a risk of electric shock to
persons.
The exclamation point within an equilateral triangle is
intended to alert the user to the presence of important
operating and maintenance (servicing) instructions in
the literature accompanying the appliance.
CAUTION
DO NOT REMOVE THE EXTERNAL CASES OR CABINETS TO
EXPOSE THE ELECTRONICS. NO USER SERVICEABLE PARTS
ARE WITHIN!
USE OF CONTROLS OR ADJUSTMENTS OR PERFORMANCE OF
PROCEDURES OTHER THAN THOSE SPECIFIED HEREIN MAY
RESULT IN HAZARDOUS RADIATION EXPOSURE.
WARNING : TO PREVENT FIRE OR SHOCK
HAZARD, DO NOT EXPOSE THIS APPLIANCE
TO RAIN OR MOISTURE.
CAUTION
The product shall not be exposed to dripping or splashing and
that no object filled with liquids, such as vases, shall be placed
on the product.
Do not install this equipment in a confined space such as a
book case or similar unit.
CE RTIF ICATI ON: TH IS PR ODUC T COM PLIE S WITH D HHS
RU LES 21 C FR CHA PTE R 1 SUBC HAP TER J AT DATE O F
MA NUFAC TURE .
Page 3

Reorient or relocate the receiving antenna.
Increase the separation between the equipment and receiver.
Connect the equipment into an outlet on a circuit different from that to which the receiver is connected.
Consult the dealer or an experienced radio/TV technician for help.
Caution:
Changes or modifications not expressly approved by the party responsible for compliance could void the user's
authority to operate the equipment.
Page 4

Read this before attempting any operations
As the unit may become warm during operation, always leave
sufficient space around the unit for ventilation.
The voltage supplied to the unit should match the voltage as
printed on the rear panel. If you are in any doubt regarding
this matter, consult an electrician.
Choose the installation location of your unit carefully. Avoid
placing it in direct sunlight or close to a source of heat. Also
avoid locations subject to vibrations and excessive dust, heat,
cold or moisture.
Do not place the unit on an amplifier/receiver.
Do not open the cabinet as this might result in damage to the
circuitry or electrical shock. If a foreign object should get into
the unit, contact your dealer or service company.
When removing the power plug from the wall outlet, always
pull directly on the plug, never yank the cord.
To keep the laser pickup clean, do not touch it, and always
close the disc tray.
Do not attempt to clean the unit with chemical solvents as
this might damage the finish. Use a clean, dry cloth.
Keep this manual in a safe place for future reference.
DO NOT MOVE THE UNIT DURING PLAYBACK
During playback, the disc rotates at high speed. Do NOT lift or
move the unit during playback. Doing so may damage the
disc or the unit.
WHEN MOVING THIS UNIT
When changing the unit’s location or packing the unit for
moving, be sure to remove the record or disc. Moving this
unit with the record or disc loaded may result in damage to
this unit. If the unit is to be packed and moved a great
distance, it is also advisable to tighten the turntable
transport
locking screw.
1
BEFORE USING THE UNIT
Page 5
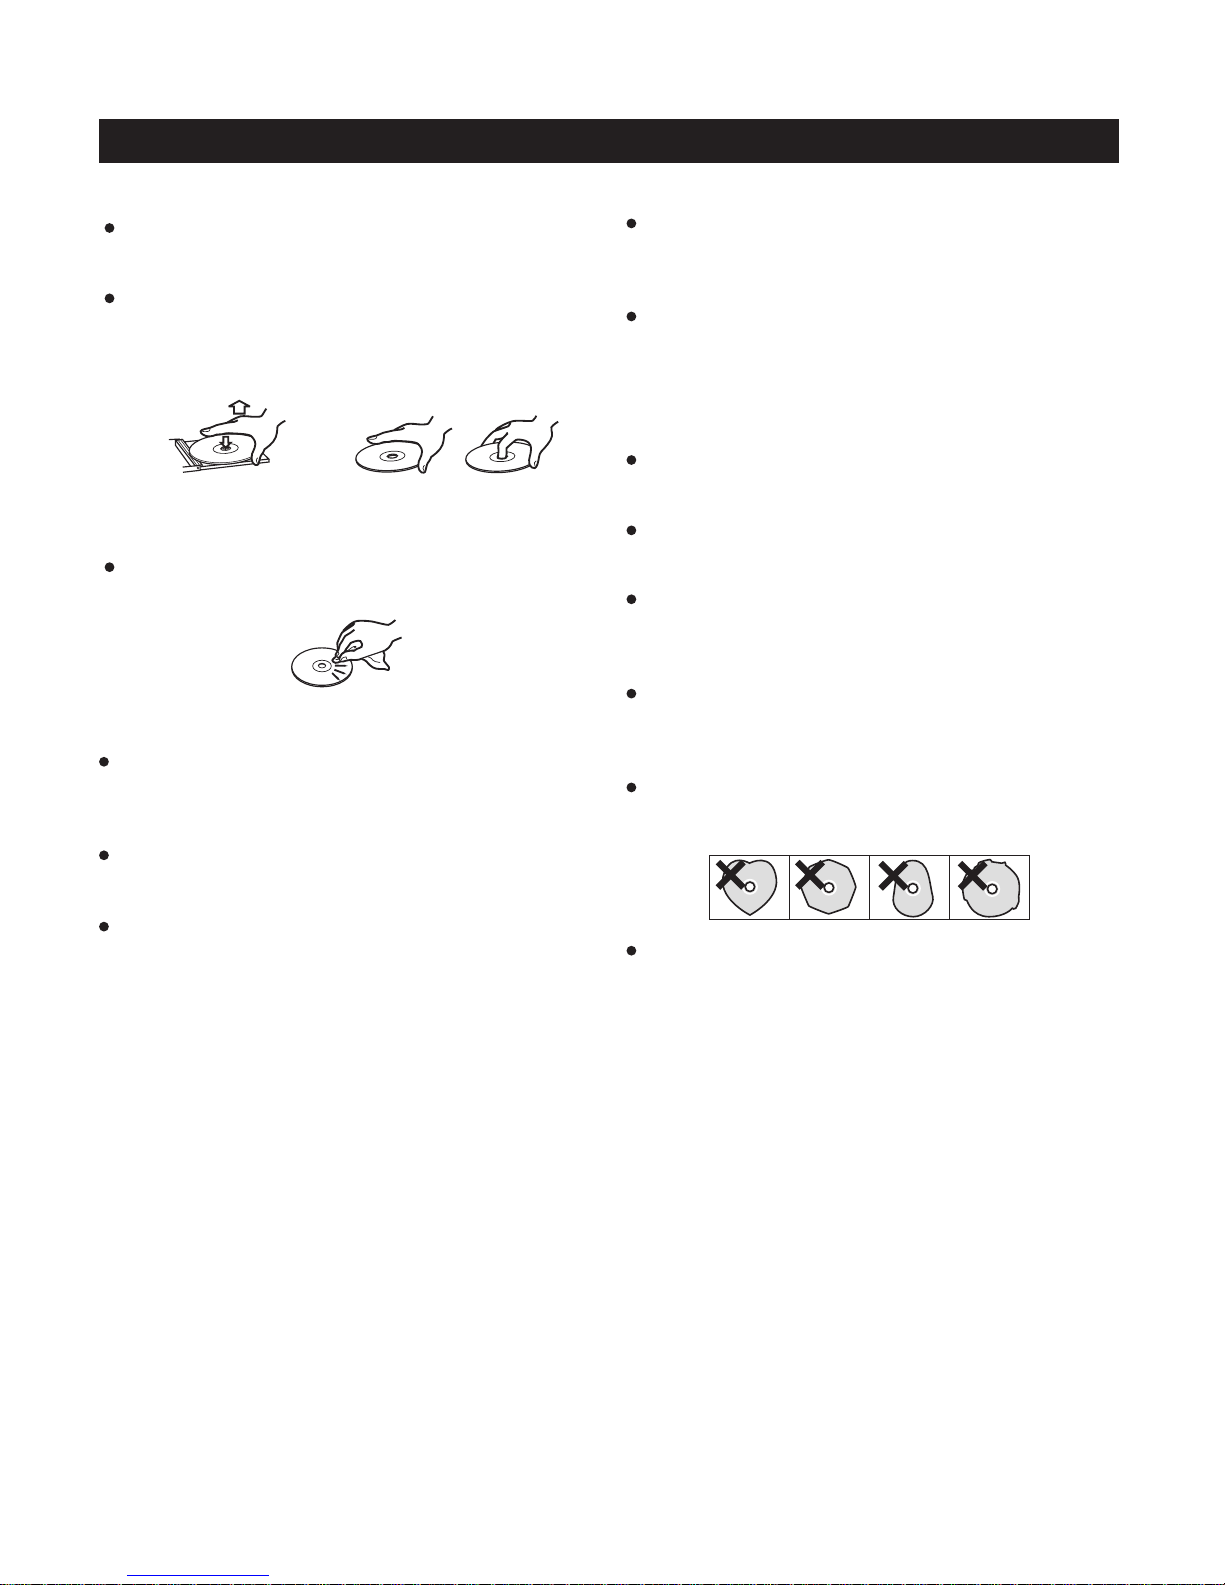
How to remove the disc How to hold the disc
Always place the disc on the disc tray with the label side up.
(Compact discs can be played or recorded only on one side.)
To remove a disc from its storage case, press down on the
center of the case and lift the disc out, holding it carefully by
the edges.
Never use such chemicals as record sprays, antistatic sprays or
fluid, benzine or thinner to clean the discs. Such chemicals
will do irreparable damage to the disc’s plastic surface.
Discs should be returned to their cases after use to avoid dust
and scratches that could cause the laser pickup to “skip.”
Do not expose discs to direct sunlight or high humidity and
temperature for extended periods. Long exposure to high
temperatures will warp the disc.
Do not play any disc that is warped, deformed or damaged.
Playing such discs may cause irreparable harm to the playing
mechanisms.
CD-R and CD-RW discs are more sensitive to the effects of
heat and ultraviolet rays than ordinary CDs. It is important
that they are not stored in a location where direct sunlight
will fall on them, and away from sources of heat such as
radiators or heat-generating electrical devices.
Printable CD-R and CD-RW discs aren’t recommended, as the
label side might be sticky and damage the unit.
Do not stick papers or protective sheets on the discs and do
not use any protective coating spray.
Use a soft oil-based felt-tipped pen to write the information
on the label side. Never use a ball-point or hard-tipped pen,
as this may cause damage to the recorded side.
Never use a stabilizer. Using commercially ava
ilable CD
stabilizers with this unit will damage the mechanisms and
cause them to malfunction.
Do not use CDs with an irregular shape (octagonal, heart
shaped, business card size, etc.). CDs of this sort can damage
the unit:
If you are in any doubt as to the care and handling of a CDR/
CD-RW disc, read the precautions supplied with the disc, or
contact the disc manufacturer directly.
Should the disc become dirty, wipe the surface radially (from
the center hole outward towards the outer edge) with a soft,
dry cloth:
2
ABOUT DISC
Page 6
3
CASSETTE TAPE
HANDLING RECORDS
Page 7
4
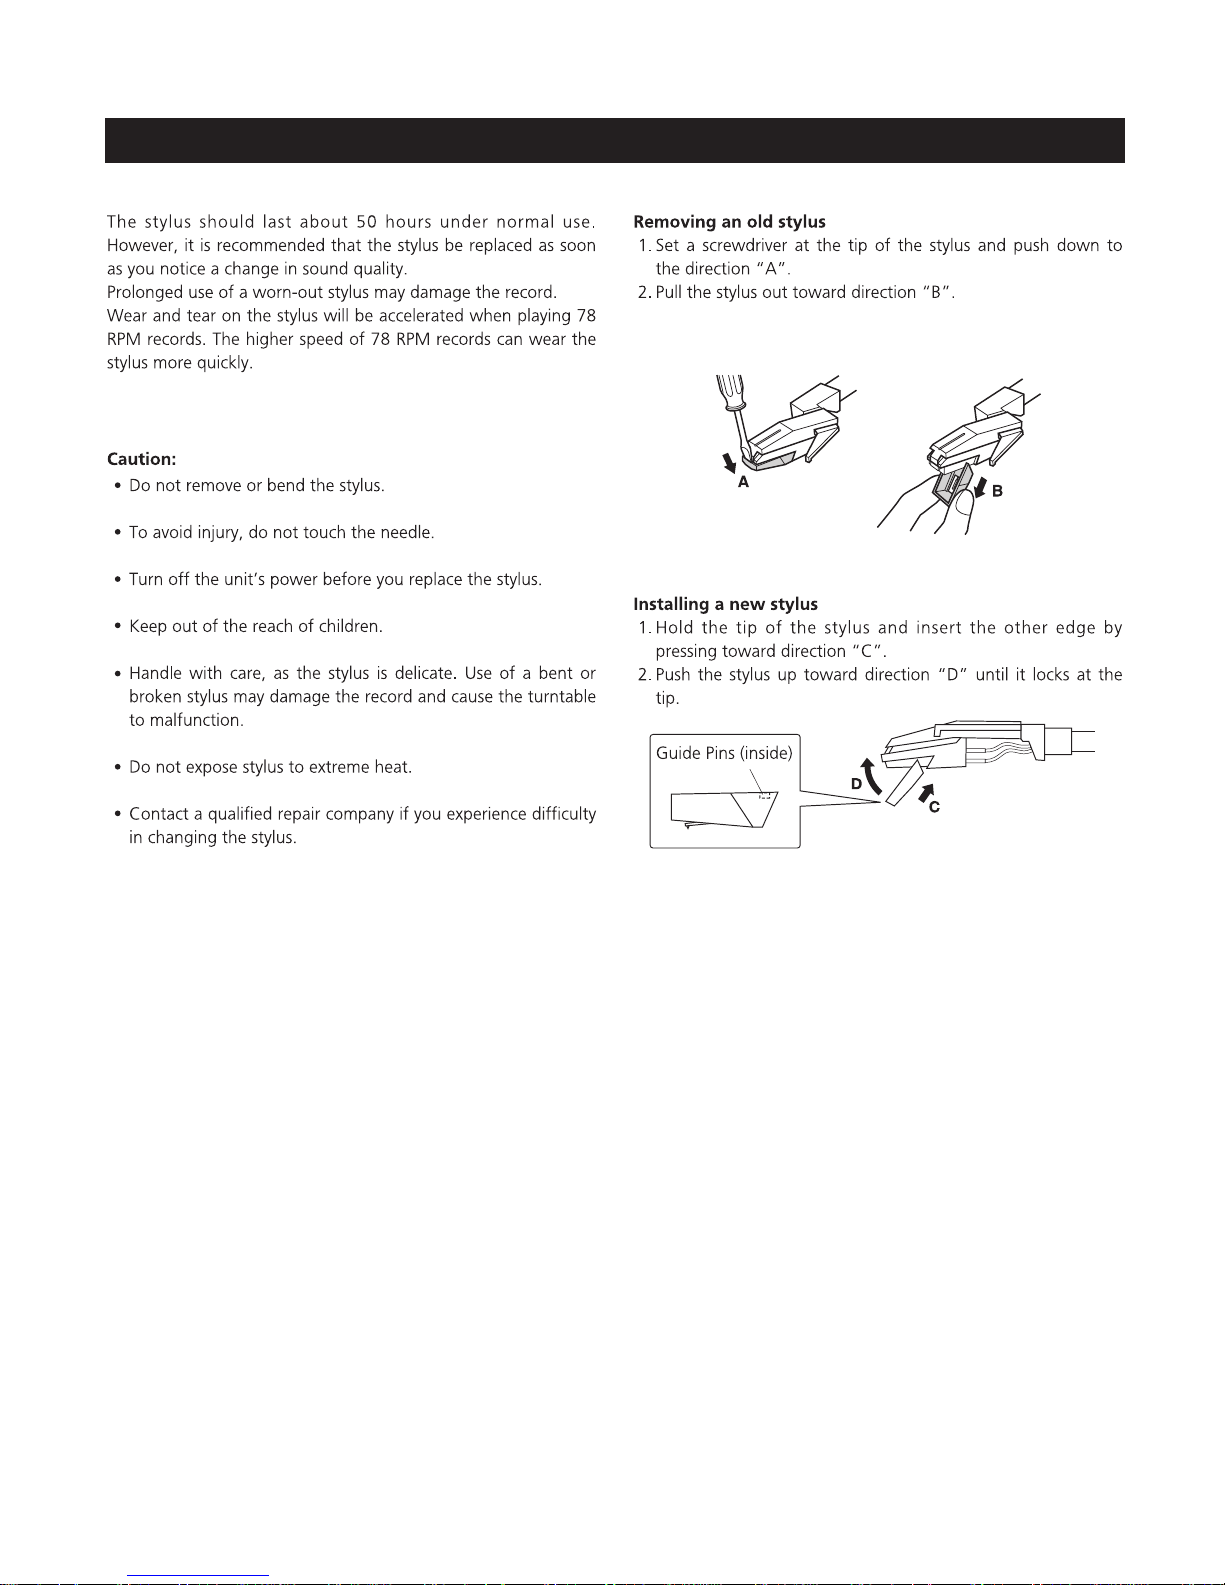
HOW TO REPLACE THE STYLUS
Page 8
3.Line Out
Power on the unit, then turn the function knob to any position to
1.FM Antenna
plug (R/L)to the Line Out (R/L)jacks on the rear of the unit, connect the other ends to the
audio in jacks on external amplifier or stereo etc.
LINE IN
LINE OUT
FM ANTENNA
1
2
3
4
play phono, CD, aux, tape or AM/FM,
then connect the RCA
While in FM mode, tune in an FM station and extend the antenna to find a position for the best reception.
This antenna may need to be respositioned if you m,ove your unit to a new location.
2.Line In
Power on the unit, then turn the function knob to any position to
audio in jacks on external music player, etc.
play phono, CD, aux, tape or AM/FM,
then connect the RCA
4.Power Cord
Insert the power plug to the 240V, 50Hz outlet.
Caution:
Switchoffthepowertoallequipmentbefore
makingconnections.
Read the instructions ofeach component
youintendtousewiththisunit.
Besuretoinserteachplugsecurely .
T
o prevent hum andnoise, avoidbundling
thesignal
interconnectioncablestogether
withtheACpowercord.
plug (R/L)to the Line Out (R/L)jacks on the rear of the unit, connect the other ends to the
5
CONNECTION
HOW TO OPEN/CLOSE THE TURNTABLE COVER
Page 9
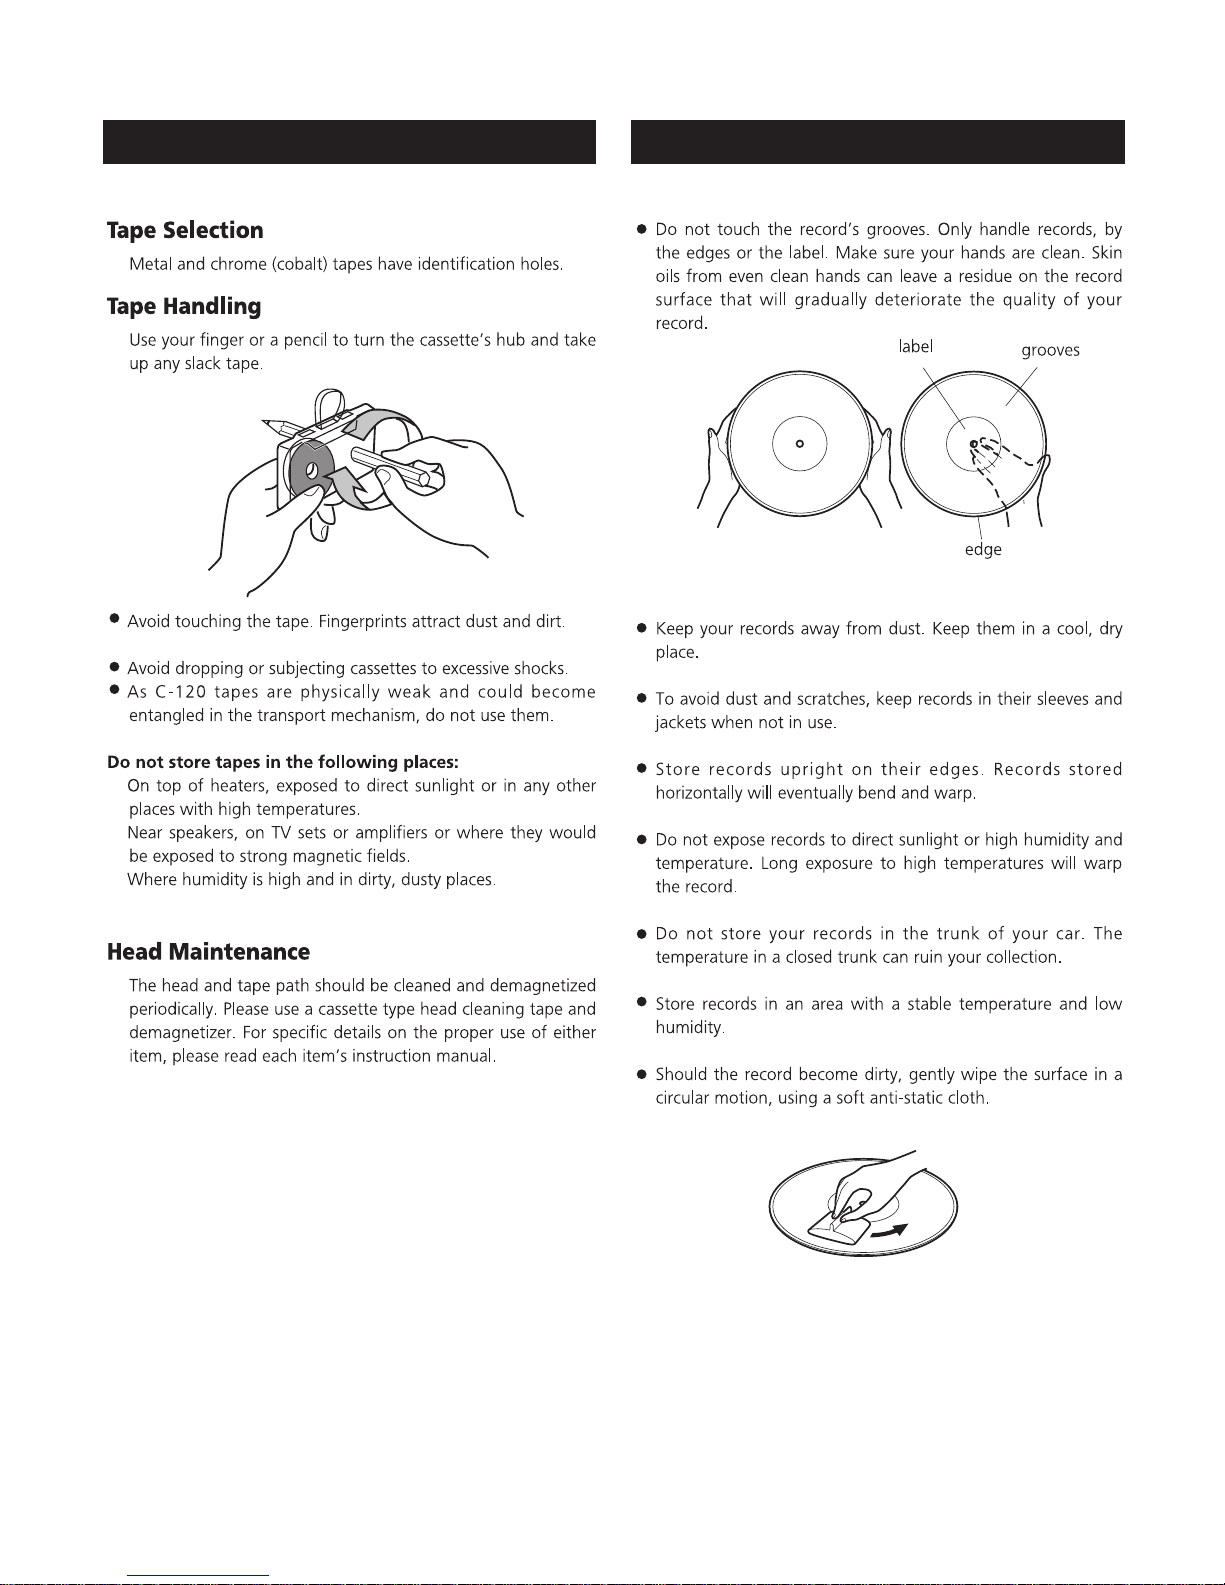
Before use, detach the stylus
guard (white plastic cover) by
pulling it straight off the front
of the cartridge in the direction
of the arrow.
turntable
screw fixing the turntable for transportation
Before use, completely loosen the screw by turning it clockwise with a coin
or screwdriver.
When you transport the unit, turn the screw counterclockwise to secure the
turntable.
cue-lever
Use this lever to lift the tone arm.
tone arm holder
tone arm
speed selector
45 RPM adaptor
F
E
D
C
B
A
A
C
D
B
F
E
G
G
6
D
G
P
Q
N
D
J
S
T
R
A
W
B
C
L
M
F
H
I
E
V
K
U
STAND BY
MUTE
OPEN/CLOSE
PHONO
CD
FINALIZE
AUX
DISPLAY
ERASE
RADIO
SHUFFLE
TRACK
INCREMENT
TAPE
CLEAR
MANUAL/
AUTO INCREMENT
REPEAT
PROGRAM
RECORD
REC
STOP
VOL+
REC
VOL-
-VOLUME+
S
K
PARTS OF TURNTABLE
REMOTE CONTROL
Page 10

SHUFFLE
DISPLAY
TRACKINCREMENT
MANUAL/AUTOINCREMENT
Record
RECVOL+/RECVOL-
FINALIZE
ERASE
Clear
PHONO
AUX
Radio
TAPE
SKIP
VOL+/VOL-
InCDmode,usethisbuttontoshuffleplayback.
InCDmode,usethisbuttontochangethedisplay.
Duringrecording,usethisbuttontodividetracks.
Usethisbuttontoselectthemodeoftracknumberassignment.
UsethisbuttontorecordCD.
Usethisbuttontoadjusttherecordvolume.
UsethisbuttontofinalizeaCD-R/CD-RWdisc.
UsethisbuttontoeraseorunfinalizeaCD-RWdisc.
InCDmode,usethisbuttontoclearprogrammedracks.
PressthePHONObuttonandselectPHONOtoplayarecord.
PresstheAUXbuttonandselectAUXtolistentotheexternalsourceconnected
totheAUXINjacks.
PresstheFM/AMbuttontolistentotheradio.
PresstheTAPEbuttontoplaycassette.
InCDmode,usethesebuttonstoskiptracks.Holddownthesebuttonstosearch
foraPartoftrack.
Usethisbuttontoadjustthevolume.
F
G
H
I
J
K
L
M
N
O
P
Q
R
S
T
STANDBY
OPEN/CLOSE
CD
REPEAT
PROGRAM
PresstheSTANDBYbutton,thedisplayislighted
duringstandbymode(butnothingshowonthedisplay);
InCD,PHONOorAUXmode,usethisbuttonto
openandclosethedisctray.Thisbuttondon`t
workinFM/AMmode.
PresstheCDbuttontoplayaCD.
InCDmode,usethisbuttontoselectarepeat
ModeofCD.
InCDmode,usethisbuttontoprogramtracks.
E
D
C
B
A
PLAY/PAUSE
STOP
MUTE
Usethisbuttontoplay/pauserecording inalizinganderasing.
Usethisbuttontostopplaybackorrecording.
Usethisbuttontostopthevolumeofplayers.
U
V
W
7
/
, f
REMOTE CONTROL
Page 11
RemoteControlUnitcanoperatetheunitfromadistance.
Whenoperatingtheremotecontrolunit,pointittowardsthefrontpaneloftheunit.
Eveniftheremotecontrolunitisoperatedwithintheeffectiverange,remotecontrol
operationmaybeimpossibleifthereareanyobstaclesbetweentheunitandtheremote
control.
Iftheremotecontrolunitisoperatednearotherapplianceswhichgenerateinfraredrays,
orifotherremoteccntroldevicesusinginfraredraysareusedneartheunit,itmay
operateincorrectly.Conversely,theotherappliancesmayoperateincorrectly.
BatteryInstallation
1.Removethebatterycompartmentcover.
2.lnserttwoAAAdrybatteries.Makesurethatthebatteriesareinseredwiththeir“”
positive+and-polespositionedcorrectly.“”“”
3.Closethecover.
BatteryReplacement
Ifthedistancerequiredbetweentheremotecontrolunitandmainunitdecreases,
thebatteriesareexhausted.Inthiscase,pleasereplacethebatterywithnewones.
Precautionsconcerningbatteries
Besuretoinsertthebatterieswithcorrectpositive+andnegative-polarities.“”“”
Usebatteriesofthesametype,neverusedifferenttypesofbatteriestogether.
Rechargeableandnon-re-chargeablebatteriescanbeused.Refertotheprecautions
ontheirlabels.
Whentheremotecontrolunitisnottobeusedforalongtime(morethanamonth),
removethebatteriesfromtheremotecontrolunittopreventthemfromleaking.If
theyleak,wipeawaytheliquidinsidethebatterycompartmentandreplacethe
batterieswithnewones.
Donotheatordisassemblebatteriesandneverdisposeofoldbatteriesbythrowing
theminafire.
1
2
8
NOTE:
UNIT FUNCTIONS
Page 12
3
4
6
7
8
9
11
12
13
14
18
19
20
21
22
23
5
10
15
24 25
17
16
2726
16
Cassette tape holder
Tape operation button
1
2
Display
RemoteSensor
Whenoperatingtheremotecontrolunit,pointittowardstheREMOTESENSOR.
Displaypanel(frequency)
Whentheunitison.thisdisplaywilllight.
3
4
5
AUTO
/MANUAL
Usethisbuttontoselectthemodeoftracknumberassignment.
TRACKINCREMENT
Duringrecording.usethisbuttontodividetracks.
6
7
ERASE
UsethisbuttontoeraseorunfinalizeaCD-RWdisc.
FINALIZE
UsethisbuttontofinalizeaCD-R/CD-RWdisc.
8
9
PHONO
PressthePHONObuttonandselectPHONOtoplayarecord.
RECORD
Usethisbuttontoenterrecordpausemode.
10
11
AUX
PresstheAUXbuttonandselectAUXtolistentotheexternalsourceconnectedtothe
AUXINjacks.
CD
PresstheCDbuttontoplayaCD.
12
13
TAPE
Pressthebuttontoplaycassette.TAPE
FM/AM
PresstheFM/AMbuttontolistentotheradio.
14
15
9
UNIT FUNCTIONS
Page 13

STOP
Usethisbuttontostopplaybackorrecording.
POWER
Pressthisbuttontoturntheunitonoroff.
NOTE:Ifyouexperiencethemalfunctionoccurredduringoperation,youmaypoweroff
Theunitandre-start.
AUXIN
JACK
UsethisAUXINjacktolistentheexternalsource.
18
19
PHON
Forprivatelistening,firstreducethevolumeleveltominimum,Theninserttheplugfrom
yourheadphonesintothePHONESjack,andadjustthevolumebyturningtheVOLUME
knob.Thesoundfromspeakerwillbecutoffwhiletheheadphonesarepluggedin.
E
JACK
21
DISCTray
20
RECLEVEL
Inrecordpausemode,usethisknobtoadjusttherecordinglevel.
17
PLAY
Usethisbuttontostartplayback,recording.finalizinganderasing.
PAUSE
Usethisbuttontopauseplaybackorrecording.
OPEN/CLOSE
InCD,PHONOorAUXmcde,usethisbuttontoopenandclosethedisctray.
Thisbuttondon`tworkinFM/AMmode.
VOLUME
Turnthisknobtoadjustthevolumesound.(NOTE:Thevolumecontrollevel
from00to31.)
TUNING
InFM/AMmode,turnthisknobtotuneinastation.
27
25
26
24
SKIP
InCDmode,usethesebuttonstoskiptracks.
Holddownthesebuttonstosearchforapartofatrack.
22
23
SKIP
InCDmode,usethesebuttonstoskiptracks.
Holddownthesebuttonstosearchforapartofatrack.
Speakers(stereo)
16
10
Page 14

PreparationforUsetothemains
BasicOperation
1.ConnecttheACpowercordtothemains.
2.Removewhiteprotectiveneedlecoverbygentlypullingtowardsfrontofunit.
3.ReleaseTONEARMbygentlypushinghold-downcliptotheright.Thiswillunlocktone
armfromitsarmrest.Re-lockthehold-downclipwhenmovingtheunittoanother
location.
1.PressthePOWERswitchtoturntheuniton.
Waituntilthe---bUSYdisappearedonthe
displaybeforenextstep.
2.Selectthesourcebypressingthe
Correspondingbutton.
3.RotatetheVOLUMEknobclockwiseorcounterclockwise
toadjustthedesiredsoundlevel.
4.ListeningthroughEarphones/Headphones
(Notincluded).
“”
11
POWER
AM/FM
VOLUME
DN
UP
PREPARATIONS AND BASIC OPERATION
Page 15

AM/FM
1.SelectFMorAMusingtheFM/AMbutton.
2.Tunetothedesiredfrequency.
TheTUNEDindicatorlightswhenastationiscorrectlytunedin.
Thevolumereading00-31butnosoundhearuntil16,thevolumewillchangealong
withthenumber.
TurnaroundtheunittofindthebestpositionforAMstations.
ExtendandturnaroundtheFMantennasothatyoucanreceivethestationclearly.
Anexternal(auxiliary)audiosource(ie, PersonalCDplayerorMp3player)canbe
connectedto
this
unit andheardthroughthespeakers.
(1)Plugoneendofcable(included)intotheAUXINsocketonthefrontoftheunit.
(2)PlugtheotherendofthecableintotheheadphoneorLineOutsocketofthe
externalsource.
Ifthereceptionispoor
AMbroadcast
FMbroadcast
12
TUNING
DN
UP
LISTENING TO THE RADIO
AUX OPERATION
Page 16

PressthePHONObutton
toselectPHONO.
Gentlyopenthedustcover.
Becarefullynottopinchyourfinger.
Puttherecordontheturntable.
Whenplayinga45RPMrecord, use theincludedadaptor.
Selectthespeed.
Gentlypushtheclampertotheright torelease thetone arm.
Transportionscrew
13
PHONO
Clamper
2
3
4
5
6
1
Power on the unit.
Adaptor
Before use, completely loosen the screw by turning it clockwise with a coin
or screwdriver.
When you transport the unit, turn the screw counterclockwise to secure the
turntable.
LISTENING TO A RECORD
Page 17

You can lower the tone arm manually if the cue lever has not been raised.
10
Turn the volume knob to adjust the volume.
VOLUME
DN
UP
9
Gently lower the tone arm by slowly move down the cue lever.
Playing records with the dust cover down will prevent dust from settling on the turnable.
14
Page 18

1.
---bUSYCDblinksforafewseconds.
Whennodiscisset,NODISCappears
2.PresstheOPEN/CLOSEbutton.
Neverplacemorethanonedisconthetray.
Thediscmustbeplacedinthecenterofthedisctray.Ifthediscisnotcorrectly
loaded,itmaynotbepossibletoopenthetrayagainonceithasclosed,soyou
shouldensurethediscisalwayscenteredonthetray.
Donotforcethetraybyhandduringopeningandclosingoperations.
4.PresstheOPEN/CLOSEbuttontoclosethetray.
Ittakesafewsecondsfortheunittoloadthedisc.Nobuttonswillworkduring
loading.
Waituntilthetotalnumberofthetracksandthetotalplaytimeofthediscare
displayed.
Thedisctypeindicatorshowsthetypeofdisccurrentlyloaded.
“”
“”
15
CD
OPEN/CLOSE
OPEN/CLOSE
Power on the unit and press the CD Button.
on the display.
3.Place a disc on the disc tray with the printed label facing up.
LISTENING TO A CD
Page 19

A
5.PressthePLAY/PAUSEbuttontostartplayback.
Tosuspendplaybacktemporarily(pausemode)
PressthePLAY/PAUSEbutton during
playback.Playbackstopsatthecurrent
position.Toresumeplayback,pressthe
PLAY/PAUSEbutton.
Toskiptothenextoraprevioustrack.
Duringplayback,repeatedlypresstheSKIPbutton untilthedesiredtrackis
found.
Theselectedtrackwillbeplayedfromthebeginning.
Inthestopmode,presstheSKIPbutton repeatedlyuntilthetrackyou
wantto
listenisfound,andpressthePLAY/PAUSEbutton tostartplayback
fromtheselectedtrack.
When the()button duringplayback,thetrackbeingplayedwillbeplayed
fromthe
beginning.Toreturntothebeginningoftheprevioustrack, pressthe()
buttontwice.
B
16
press
Searchforapartofatrack.
Tostopplayback.
PresstheSTOPbutton()tostopplayback.
C
D
During playing, holding down the SKIP Button and release to search the desired part to listen to.
Page 20

Display
17
Press DISPLAY button on remote control in play mode, the display will changes as follows:
Page 21

RepeatPlayback
EachtimetheREPEATbuttonispressed,therepeatmodeischangedasfollows:
REPEATALL(RepeatALLtheTracks)
REPEAT1(Repeatonetrack)
PresstheREPEATbuttononceduringplayback.
Allthetracksofthediscwillbeplayedrepeatedly.
PresstheREPEATbuttontwiceduringplayback.
Thetrackbeingplayedwillbeplayedrepeatedly.IfyoupresstheMUSICSKIP
buttonandselectanothertrack,thetrackyouselectwillbeplayedrepeatedly.
Itisalsopossibletoselectatracktoberepeatedinthestopmode,Pressthe
REPEATbuttontwiceandthenselectthetracknumberbypressingtheMUSICSKIP
button.PressthePLAYbuttontostartplayback.
Ifoneofthefollowingbuttonsispressed,repeatmodewillbecancelled:
OPEN/CLOSE,POWER,FM/AM,PHONO,AUX
18
REPEAT ALL
REPEAT 1
off
UnfinalizedCD-R/CD-RW,stopped
Duringrecording
Page 22

ShufflePlayback
Thetrackscanbeplayedrandomly. PresstheSHUFFLEbutton during
playback.(Inthe
stopmode,presstheSHUFFLEbuttonandthePLAYbutton)
whentheSHUFFLEplaybackofallthetrackshasbeenfinished,theunitstopsandthe
shuffleplaybackmodeiscancelled.
Ifyoupressthe()buttonduringshuffleplayback,nexttrackwillberandomly
selectedandplayed.Ifyoupressthe()button,thecurrentlyplayedtrack
willbeplayedfromthebeginning.Atrackcannotbereplayduringshuffleplayback.
Shuffleplaybackdoesn`tworkduringprogrammedplayback.
Ifoneofthefollowingbuttonsispressed,shufflemodewillbecancelled:
SHUFFLEinthestopmode,OPEN/CLOSE,POWER,FM/AM,PHONO,AUX.
19
on remote control
Press SHUFFLE Button on remote control.
ProgrammedPlayback
1.PressthePROGRAMbutton
inthestopmode.
2.Pressthe SKIPbutton (or) toselectatrack.
Upto32trackscanbeprogrammedinthedesiredorder.
InsertadiscandselectCDbeforebeginningprogramming.
Shuffleplaybackdoesnotworkduringprogrammedplayback.
Programmedplaybackworkswithfinalizeddisconly.
PROGRAMindicatorblinks,andP-01appearsonthedisplay.
“”
“”“”
on
rem
o
tecon
r
t
o
I
on
rem
o
te
c
on
r
t
o
I
Page 23

3PressthePROGRAMbutton
Thetrackisprogrammed,andP-02isdisplay.
Repeatstep2and3toprogrammoretracks.
Youcanprogramupto32tracks.
Tocanceltheprogrammode,presstheSTOPbutton()
4.Whentheselectionoftracknumbershasbeenfinished,pressthePLAYbutton()to
Startprogramplayback.
“”
20
on
rem
o
te
c
on
r
t
o
I
on remote control.
Tochecktheprogrammedorder
Toaddatracktotheendoftheprogram
Todeletethelasttrackfromtheprogram.
Tocleartheprogram
Inthestopmode,pressthe SKIPbuttonre peatedl ytoshowthetracknumbers
thathavebeenstoredinmemory.
Inthestopmode,pressthePROGRAMbutton.
SelectatracknumberbypressingtheMUSICSKIPbutton,andthenpressthe
PROGRAMbutton.
Thetrackisaddedtotheendoftheprogram.
Inthisstopmode,presstheCLEARbutton todeletethelasttrackfromtheprogram.
Ifoneofthefollowingbuttonsispressed,theprogammedcontentswillbecleared:
OPEN/CLOSE,POWER,FM/AM,PHONO,AUX,STOPinthestopmode
on remote control
Page 24

Pleaserefertothedetailedoperationinstructionsfollowed.
PleaserestarttheunitbypressingPOWERbuttonifthereisanywrong
operationresultingincrash.
LoadanemptyornonfinalizedCD-RorCD-RW
SelectAuto/ManualTrack
IncrementMode;
SetAutoTracklncrement
Sensitivity
SelectRecordingSource
ActivateRecording
TestandAdjustRecording
Level
StartRecording
TrackDivision
FinalizingRecordedDisc
21
For CD-R or CD-RW, If it is recorded and finalized, the disc is possible to to played by
ordinary CD players, if it is recorded but not finalized, the disc will not be possible to be
played by ordinary CD players.
For Recoded CD-RW
Unfinalizing
Erasing
RECORDING OPERATION STEPS
Page 25

AboutCD-RandCD-RWdiscs
AudiofromthePHONO,TAPE,AUXinorlineoutcanberecordedontheCDRecorder.
CD-Rdiscscanberecordedonceonly.Oncetheyhavebeenusedforrecoding,theycannot
orre-recorded, However, ifspace isavailableonthedisc(andthedischasnot
beenfinalized),additionalmaterialcanberecorded.
Bycontrast,aCD-RWdisccanbeusedinmuchthesamewayasaCD-Rdisc,butthelast
trackortracksrecordedcanbeerased,andthespaceonthedisccanbere-usedforother
recordings.
However,youshouldnotethatanaudioCDcreatedusingaCD-RWdiscmaynotplayback
satisfactorilyoneveryaudioCD-player.
CD-R,bycontrast,maybeplayedsatisfactorilyonthemajorityofaudioCDplayers.
A.Youhavetowaitfor20minutesandthenrecordwhenrecordingfromAM/FMto
AUX/TAPE/PHONE;PressRECORDbutton,itworksunstablyiftimeisnotenough.
Atthistime,pressSTOPbuttonandthenROCORDbuttonandPLAYbuttontorecord.
B.PressPOWERbuttontorestarttheUnitifcrashwhenrecording.
C.YouhavetowaitfortheLCDtonexttracktorecordbeforepressingPAUSE/NEXTbutton
whenrecoring.
D.PressingRECbuttoncancontrolthevolumewhen
1.Torecordarecord,selectPHONO.
2.Recordanexternalsource,presstheAUXbuttonandconnectedthecabletothe
AUXINjacksattheback,SelectAUX.
3.Torecordthecassettetape.
PresstheTAPEbutton,loadaCassetteTapeintotheunit(locatedonsideoftheunit),
PresstheRECORDbuttontorecordatape.
4.LoadarecordableCD-RorCD-RWdiscintotheunit.
22
recoring.
beerased
RECORDING
Page 26

PresstheOPEN/CLOSEbutton(),placeadisconthedisctraywiththeprinted
labelsideup,andthenpresstheOPEN/CLOSEbutton()toclosethedisctray.
ThedisplaywillshowbUSYCDandthediscisreading.waitinguntilthereadingis
completebeforenextstep.
NOTE:MakesureNOTOCandCD-R
“”
“”“”“”
“”
“”
“”
(orCD-RW)indicatorslightsonthedisplay,
ortheRECORDfunctionwillnotwork.
5.Selectthemodeoftracknumberassignment.
A.TRACKINCREMENT
Theunitdoesn`tdividetracks.
TheunitwillrecordthenexttrackwhenyoupresstheTRACKINCREMENTbuttonevery
time,Maybethecurrenttrackdoesn`tfinishtherecording,butifyoupresstheTRACK
INCREMENTbutton,theunitwillrecordthenexttrack.
B.AutoManualmode-selecttracksautomatically.
Ifyouarebusy,selecttracksautomaticallydivisionassignmentwithAUTOMANUALbutton,
whenthesoundlevelhasdroppedbelowthe-20db/-30db/-40db(recordsignal)formore
than2seconds,thecurrenttrackwillautomaticallystop,andrecordanotherone.Andyou
onlycansetasortofrecordsignaleverytime.
Recordadiscin-20dbmode;
Recordatapein-30dbmode;
Recordaexternalsourcein-40dbmode;
lntrackincrementautomaticallymode,Don`tadjusttheRECLEVELbywill,ToadjustREC
LEVELsolowerthaterrortrackincrement,ToadjustRECLEVELsohighthatcan`ttrack
increment.
23
Page 27

6.PresstheRECORDbutton.RECand()willappearonthedisplay.
Nobuttonwillworkwhilebusyisdisplayed.Waitafewsecondsuntilbusy
disappearfromthedisplay.
7.Ifnecessary,adjusttherecordinglevelusingtheRECLEVELknob,thedisplaywillshow
from00-08db
Playthesourcetoberecordedandadjusttherecordinglevelsothattheloudestsound
doesnotexceedtheOVERindicatoronthepeaklevelmeter.
8.IfPHONOisselectedinstep1,gentlylowerthetonearmontotheedgeoftherecord(or
thetracktoberecorded).
9.IfAUXselectedinstep1,playthesourcetoberecorded.
Whenyouplayorrecordtheexternalaudio,300MVisstandardoutputvoltage.
Whenthesignalismorethanstandard,pleaseadjustthesignalstrength.
Whentheplaybackofthesourcehasbeenfinished,pressthe
STOP()buttontostoprecording.
10.PressthePLAY/PAUSEbuttontostartrecording.
Whentherotationoftheturntablestops,therecordingwillstopautomatically.
Buttopreventunwantednoisefromthetonearmbeingrecorded,stoptherecording
manuallybyusingtheSTOPbutton.
LCDwillbe"--FULL” whentherecordingspaceofCD-R-RWisfull.Atthistime
,itcan notrecordanymore,pleasechangeanewemptydiscifyouneedtorecord.
“”
“”“”
“”
--FULL
24
RECORD
REC LEVEL
DN
UP
Page 28

INCREMENT
ATostoprecording
PresstheSTOPbutton()tostoprecording.
ThedisplaywillshowbUSY,afterthebUSY
isdisappear,thenpressCDbutton,thedisplay
“”“”
BTosuspendrecordingtemporarily(pausemode)
PressthePLAY/PAUSEbutton(),bUSYbrieflyappearsonthedisplay,andthe
recordingispaused.
Torestartrecording,pressthePLAY/PAUSEbutton().
YoucannotrestartrecordingwhilebUSYisdisplayed.
Rememberthateverytimerecordingispausedorstopped,anewtracknumberwill
alwaysbeassigned.Itisnotpossibletorecordintwostageswithinonetrack.
“”
“”
“”
CManualtrackdivision
Itispossibletodividetherecordingintotrackswhilerecording.
Whilerecordingistakingplace,presstheTRACKINCREMENTbutton,Thecurrenttrack
numberwillbeincrementedbyone.
TheTRACKINCREMENTbuttonworksregardlessoftheMANUAL/AUTORECsetting.
Thissectiondealswiththeactionstakenafterrecording.
Oncefinalized,CD-Rdiscsaretrulyfinal.Nomoretrackscanberecordedonthem.By
contrast,CD-RWdisccanbeunfinalized, andifthereisspace urthermaterialcan
berecordedonthem.
“”
25
TRACK
Finalizing
1.PresstheFINALIZEbuttoninthestopmode.
FiN-dappearsonthedisplay.
Tocancelthefinalizingprocess,pressthe
STOPbutton().
“”
FINALIZE
As explained before, in order to make a disc to become a standard CD, A
table of contents must be written into it. This process is known as finalizing.
, f
will show the record track time.
Page 29

2.PressthePLAY()buttontostartfinalizing.
Thedisplaywillshow---bUSYduringfinalize.
Waituntilthebusydisappeartocompletethefinalize.
Thefinalizetimeissubjecttothecontentsofrecord,
itmaytakefewminutesinsomecase.
Whentheoperationhasbeenfinished,theNOTOC
indicatorturnsoffandthedisplayreturnstothe
track/timedisplay.
Duringfinalizing,nobuttonworks.
Neverturnthepoweroffnorunplugthepowercord.
AlthoughfinalizedCD-Rdiscsmaybeblayedonordinary
CDplayers,rememberthatfinalizedCD-RWdiscmaynot
playonordinaryCDplayers.
“”
26
ltispossibletoerasethelastrecordedtrack,itisalsopossibletoeraseawholedisc.
EraseproceduresarepossibleonlyonanunfinalizedCD-RWdisc.IfaCD-RWdischas
beenfinalized,unfinalizeitpriortoerasure.Rememberthatitisnotpossibletoperform
anyEraseorunfinalizeproceduresonaCD-Rdisc.
1.PresstheCDbuttontoselectCD“”
2.LoadarecordedCD-RW.
3.PresstheERASEbuttoninthestopmode.
(1).WaituntilbUSY“”
“”
“”
disappearonthedisplay.
(2).Pressthe()buttontobeginerasethelasttrack.
(3).RepeattopressErasebuttontocontinuethenexttrack.
Erandthelasttracknumberappearwhenthedischasn`tbeenfinalized.Eachtimethe
ERASEbuttonispressed.thedisplaychangesasfollows:
Erandthenumberofthelasttrackrecordedonthedisc
Selectthistoerasethelasttrackonthedisc.
Thiswillnotappearwhenonlyonetrackisrecordedonthedisc.
CD
ERASE
Erase or Unfinalize a CD-RW
Page 30

ErAll
Selectthistoeraseallthetracks.
Tocanceltheerasingorunfinalizingprocess,presstheSTOPbutton().
4.(1).Pressandholdthe
arerecordingsthatyoureallywanttoerase.
ThecopyCD-RWdiscfromotherunitcan`tbeerasedonebyoneinthisunit.butcanbe
eraseall.
“”“”ErasebuttontillthedisplayshowlEraseAll.
(2).Pressplay()buttontobegintheerase.
(3).Displaywillshow0000000tocomfirmthediscisclear.
Theremainingtimefortheoperationappearsinthedisplay.Whentheoperationhas
beenfinlished,thedisplayreturnstothetrack/timedisplay.
Duringerasing/unfinalizing,nobuttonswillwork.
Neverturnthepoweroffnorunplugthepowercord.
Thisoperationcannotbeundone.Ifyouaregoingtoeraseatrackortracks,makesure
thatthey
Autostop
Itwillstopautomatically whenthecasset eisfinished.
Theuseofthetapeseat
1.TurnthefunctionKnobtotheTAPEposition.
2.Putthetapeintothetapeseatbyyourhand,thenitcanwork.
3.PushthetapebuttonofGrade ,itcangofasterly. WhenyoupushGrade 2,
Thetapewillcomeout.
Notice
utthetapeinto thethickerside theright.
27
1
Using the Cassette Player
t
P
to
Page 31

AMPLIFIERsection
OutputPower 5W+5W
FrequencyResponse 100to16,000Hz
FM
FrequencyRange 88to108MHz
520to1710KHz
CDPLAYERsection
FrequencyResponse 100to16,000Hz+/-4dB
Signal-to-NoiseRatio 50dB(IEC-A)
CASSETTEDECKsection
TrackSystem 4Track 2channelstereo
TapeSpeed 4.8cm/sec
WowandFlutter 0.4%(WRMS)
FrequencyResponse 125to6300Hz+/-6dB
RECORDPLAYERsection
Motor DCservomotor
DriveSystem BeltDrive
Speeds 33-1/3r pm ,45r pm and78rpm
Wow&Flutter Lessthan0.35%(WTD)
S/NRatio Morethan50dB
CartridgeType CeramicStereoCartridge
Stylus 402-M208-165
SPEAKERSYSTEMsection
Type 1-way
Impedance 8ohms
InputPower Max5W
GENERAL
PowerRequirements 100V~(50/60)Hz
PowerConsumpiton 32W
Dimensions
OperatingInstructionBooklet
45rpmAdapter
28
480 x 340 x265.5 mm
Gross Weight
9.3 Kg
Accessories
Remote Control with Batteries
AUX IN Cable
AM
FrequencyRange
............................................................................................................
.......................................................................................
.........................................................................................
.......................................................................................
............................................................................
.........................................................................................
....................................................................................
..........................................................................................................
.................................................................................................
.............................................................................
............................................................................................................
..........................................................................................................
.....................................................................................
......................................................................................
.....................................................................................................
............................................................................................................
.................................................................................
...........................................................................................................................
.................................................................................................................
................................................................................................................
......................................................................................
.......................................................................................................
..............................................................................................
................................................................................................................
Radio section
SPECIFICATION
Page 32

Page 33

 Loading...