

QUICK INSTRUCTIONS
MP-556 MP3 / WMA PLAYER
For detailed instructions, please see the full instruction manual in the
Driver Setup disc.
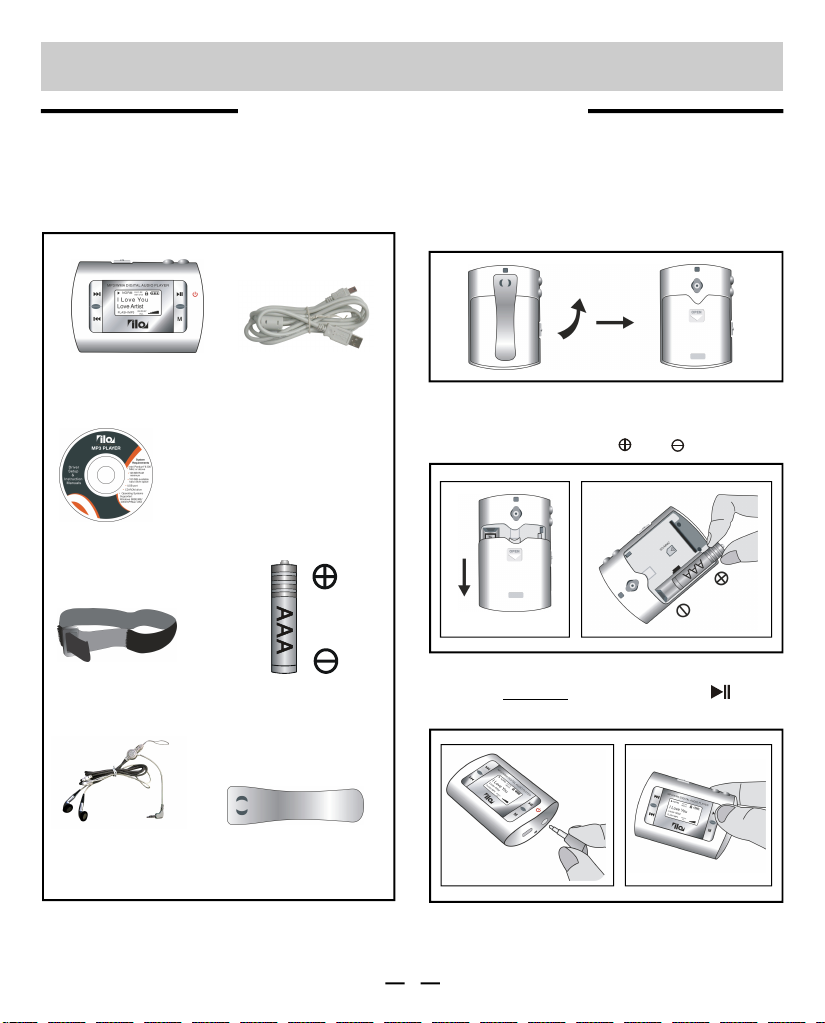
1. CHECK LIST
Digital audio MP3 player
Driver setup disc for
Installation (for older Windows
98SE), also includes Windows
Media Player 9/10, Adobe
PDF Reader, and full
instruction manual
Armband
USB 2.0 cable
1 size AAA alkaline
battery
2. GETTING STARTED
1. Remove the belt clip if you have installed it.
1
2.Open the battery door in the rear.
3.Place an AAA size battery into the battery
compartment, observe and polarities.
2 3
4.Connect the earphones to the player.
5.Press and hold the PLAY/PAUSE button
several seconds to turn on the player.
Earphones with
neck strap
NOTE: Please do not take out the battery when you stop or shut down the MP3 player. Otherwise the MP3
player will need more time to build a new file list for the tracks you stored in the MP3 player the next time
you turn on the set or when you connect the MP3 player to your computer.
Removable belt clip
4
1
5
QI-MP556-WM-E-082406
3. COPYING AND STORING MUSIC INTO THE AUDIO PLAYER
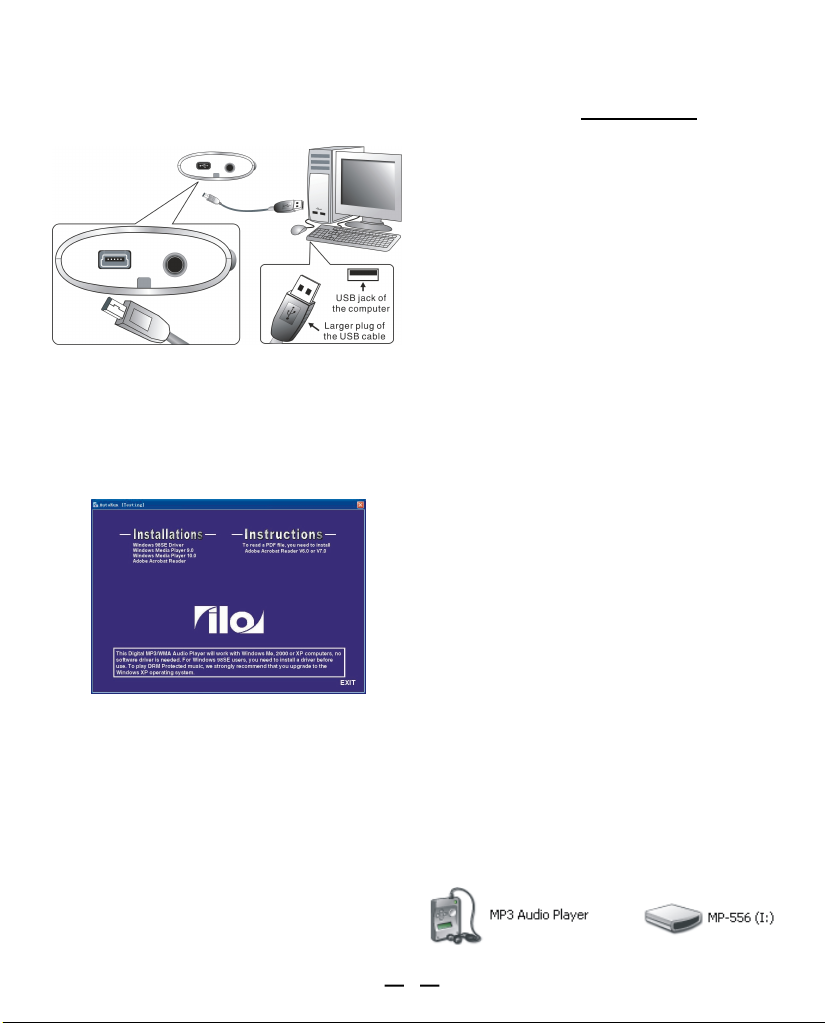
A. Connecting the MP3 player to your computer
Open the rubber USB cover on your MP3 player and
connect the USB 2.0 cable to the computer’s USB
jack and the audio player.
If your computer’s operating system is Windows
98SE, insert the driver setup disc into the CD drive
of your computer to install the software driver. (If
your computer’s operating system is Windows Me
or XP or later, there is no need to install the
software driver, go to step B.)
The computer screen will display the MP-556 menu.
•
Click “Windows 98SE Driver”, ONLY if you are
•
using Windows 98SE (Windows Me/2000/XP
doesn’t need driver installation).
Click “Windows Media Player” to install the
•
Windows Media Player on your computer.
Installation of Windows Media Player 10 is
strongly recommended for Windows XP users.
If you encounter any problem while upgrading
from Windows Media Player 9 or earlier versions,
please try again by uninstalling Windows Media
Player 9 or earlier versions from your computer
first before installing Windows Media Player 10.
Click “Adobe Acrobat Reader” to install the Adobe
•
Acrobat Reader software.
NOTE: If you have Windows 98SE system, you
will need to download Adobe Acrobat Reader
version 6.0.1 from www.adobe.com if you don’t
have that installed on your computer yet.
Windows 98SE system doesn’t support Adobe
6.0.2 or later versions.
Click “Instructions” to read or print the instruction
•
booklet on using Adobe Reader.
Click “Exit” to go back to Windows Desktop screen.
•
B. Storing Music Files onto the MP3 player
There are two transfer modes when synchronizing
music to the MP3 player: MSC (Mass Storage Class)
and MTP (Media Transfer Protocol). This will vary
among the different operating systems.
You will need to use MTP mode to transfer DRM
protected WMA files. Your computer will need
Windows XP SP2 with Windows Media Player 10
installed. The SD/MMC card must NOT be inserted
into the MP3 player when connecting to the
computer. When the player is connected to the
computer via USB cable, the player will appear on
your computer as an MTP player (see diagram below).
If your computer’s operating system is not Windows
XP SP2 or an SD/MMC card is inserted into the player,
the transfer mode will be MSC when you connect the
MP3 player to the computer. The MP3 player (and the
SD/MMC card, if installed) will be added under “My
Computer” as “Removable Disk”. You will NOT be able
to synchronize WMA files to your MP3 player. (NOTE:
Files downloaded from WAL-MART Music Downloads
are DRM encrypted. They must be synchronized using
MTP mode. They cannot be dragged and dropped or
copied into the MP3 player.)
1.Copying songs to the player or deleting songs
from the player.
Click the “My Computer” icon from the Windows
Desktop screen, the MP3 player will be added to
your computer as a removable disk or an MTP
player. When the SD/MMC card is installed, two
“Removable Disk” icons are added to your computer.
The first is the flash memory, the second is the SD/
MMC card. Drag and drop (or copy and paste) music
files to the player or delete the files by using common
Windows operation or file manager.
or
MTP player
2
QI-MP556-WM-E-082406
Removable Disk
When you have finished copying the files, in MSC
transfer mode, see page 4 to safely disconnect the
player. In MTP mode, disconnect the MP3 player
from the computer directly.
NOTE 1: If you cannot download music from the
web site to the MP3 player directly, please download
the music to the computer and then copy the music
to the MP3 player.
NOTE 2: This player can also be used as a removable
drive (also known as a USB flash drive). You can drag
and drop files into the player, if the transfer mode is
MTP, and the files you want to store are not music
files, please drag and drop them to the “Data” folder.
(Up to the limit of about 1GB for internal memory or
the capacity of the installed SD/MMC card.)
NOTE 3: If you are unable to transfer files to the SD/
MMC card and you are certain there’s available space,
try copying the files to a folder instead of the root
directory.
2.Synchronizing DRM encrypted WMA music to
the MP3 player.
The WMA music file with DRM encryption will not
play if you drag and drop them to the player, because
the license will not be moved, you must synchronize
them to the player using Windows Media Player 10.
To perform sync operation, the transfer mode must be
MTP. The operating system of your computer must be
Windows XP (SP2), and you must install “Windows
Media Player 10” on your computer. The SD/MMC
card must be removed from the MP3 player before
you connect the MP3 player to the computer.
If the transfer mode is MSC, the WMA music files
with DRM 10 encryption will not play even if you have
synchronized it onto the MP3 player.
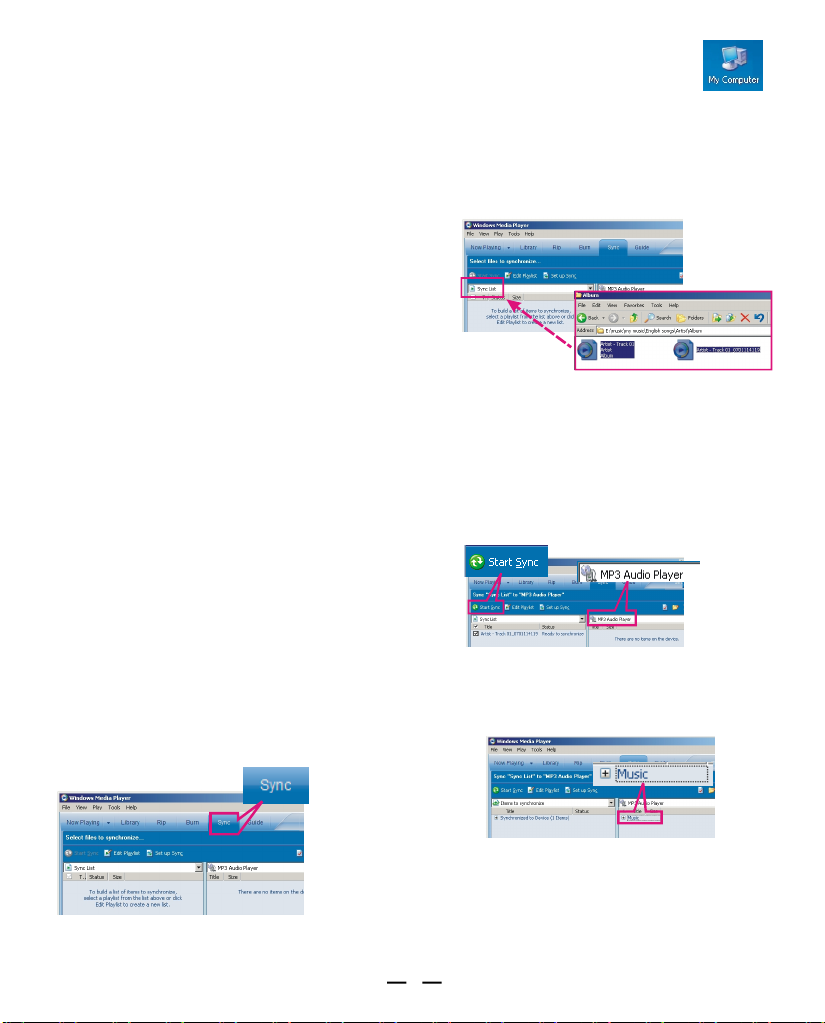
a.Run “Windows Media Player 10”.
b.Select “Sync” function.
c.Click “My Computer” icon from the
windows desktop.
d.Locate the folder on your computer where your
music files are stored.
e.Select the files you want to transfer to the MP3
player, drag and drop them to the Windows Media
Player 10 left “Sync list” window.
f.Select “MP3 Audio Player” on the right column.
NOTE: Don’t select the SD/MMC card or any
removable device, the tracks with DRM 10
protection will not be played if they are
synchronized into the SD/MMC card or the
removable device.
g.Click “Start sync” icon to start the sync operation.
h.You can check on the transferred files in the
right window by clicking on the + icon next to
Music when the operation is finished.
You can now remove the MP3 player from your
computer, and your MP3 player can play the DRM
encrypted music you synchronized.
3
QI-MP556-WM-E-082406

C. Attention Subscription Music Users
You generally have subscription music if you pay a monthly fee to download music. (Please refer to your
online music store for details.)
WAL-MART Music Downloads user, this does not apply to you, because you have purchased the individual
music files (including their licenses).
Please note the following information when you synchronize DRM 10 protected music files to the MP3 player:
1.Please ensure a fresh battery is installed in the MP3 player. The built-in clock requires constant and
continued power. DRM 10 music files that are from a monthly subscription are time sensitive and can fail
to play normally if the built-in clock power is disrupted. (Purchased songs do not need the clock function.)
2.Some DRM10 protected music files have a license expiration date or time limit. When the date or the
time limit is reached, the music cannot be played or be synchronized to the MP3 player. You can check
the license properties by using Windows Media Player 10.
3.When the battery is weak or needs to be replaced, please replace the battery within 30 minutes, otherwise
the built-in clock will reset to the original state, and some DRM 10 protected music with license expiration
dates will show “License Expired” on the LCD display. Some subscribed music files have a 24 to 48 hour
“grace period” playtime, this means that if the battery is not replaced within 30 minutes, the subscribed music
files will continue to play for only 24 to 48 hours after which “License Expired” will be displayed on the
screen.
4.If “License Expired” shows on the LCD display, please verify:
a.If the license has really expired, if yes, this music cannot be played or be synchronized anymore.
Please check with the online music store where the songs were downloaded from.
b.If the grace period playtime was reached or the battery replacement time was more than 30 minutes,
please synchronize the music files using Windows Media Player 10 in MTP mode to reset the built-in
clock and licenses.
4. DISCONNECTING THE AUDIO PLAYER FROM THE COMPUTER
For MSC transfer mode, the MP3 player can be disconnected safely by following these instructions:
1.Click the “Safely Remove Hardware” icon in the Windows Toolbar (on the bottom right corner near the
clock icon on your computer).
2.From the list of Hardware Devices, select the player.
3.Click “Stop” button.
4.Click “OK” to confirm.
5.Click “Close” after finished.
6.Now, it is safe to disconnect the player.
Click on this icon to disconnect the
USB cable safely.
CAUTION: Do not disconnect MP3 player from the computer while data transfer
is in progress, some data may be lost.
4
QI-MP556-WM-E-082406

5. HANGING THE EARPHONES AND NECK STRAP CONNECTION
1.Slide the thinner
end of the neck
strap into the hole.
5.Plug the earphones into
the jack marked .
2.After it is through,
loop the lock into
and through it.
6.Hang the Player with the neck
strap, please note the earphones
are marked R and L.
3.Pull to close the
loop.
4.Insert the lock-pin
correctly into the
earphones.
7.Insert the earphones
in your ears.
6. USING THE MP3 PLAYER WHILE EXERCISING OR PERFORMING OTHER
ACTIVITIES
If you wish to use your MP3 player while exercising or performing other activities, you can attach it to your belt
with the supplied belt clip or attach the set to your arm with the supplied adjustable armband.
A. Attaching the belt clip on the MP3 player.
1. Attach the belt clip on the MP3 player.
2. Rotate the belt clip to the left.
B. Attaching the armband to the MP3 player.
1.Slide the end of the armband through the loop on the armband, then adjust the length of the armband
to suit your arm and fix the end.
2.Attach the MP3 player with the belt clip onto the armband.
3.Insert your arm through the armband and adjust for a snug and comfortable fit.
5
QI-MP556-WM-E-082406

7. DEVICE AND LCD OVERVIEW
Love Artist
MUSIC PLAYING TIME
Normal, repeat one track,
MINI-USB PORT (UNDER RUBBER COVER)
VOLUME + BUTTON
DEVICE OVERVIEW
Increases the volume
VOLUME – BUTTON
Decreases the volume
LOCK BUTTON
Locks the controls
PLAY/PAUSE BUTTON
Controls power on/off,
play, pause and stop
LCD SCREEN
Displays current status
NEXT BUTTON
Skips to the next track
PREVIOUS BUTTON
Skips to the previous track
MODE BUTTON
Equalizer and
menu selection
BELT CLIP
Attaches the audio
player to the armband
or onto your belt
LCD OVERVIEW
& TRACK NUMBER
Current track playing time
EQ SETTING
Current EQ mode
PLAY STATUS ICON
Play/pause/stop
STEREO EARPHONES JACK
Connects to the earphones with 3.5mm plug
NECK STRAP HOLE
Insert neck strap loop here
BATTERY COMPARTMENT
Requires 1 size AAA-Alkaline battery
BELT CLIP HOLE
For attaching the belt clip
SD/MMC MEMORY SLOT
Insert an optional SD/MMC
card for extra storage
BACK COVER
Remove to install battery and SD/MMC card
Links to your PC or laptop by USB cable
LOCK INDICATOR
Shows when lock is on
BATTERY LEVEL
Battery life indicator,
more bars, more life
NORM
0:01:32
001/012
SONG TITLE
Song title display
MEMORY SELECTION
Flash or SD/MMC card
MUSIC FORMAT
Current playing format
I Love You
FLASH MP 3
REPEAT
ALL
6
VOLUME LEVEL
More steps mean
louder volume
REPEAT SETTING
repeat all, random
QI-MP556-WM-E-082406

8. START TO PLAY MUSIC
1.To turn the player on, press and hold the PLAY/PAUSE button, the set will be turned on and start
to play.
2.To turn the player off, press and hold the PLAY/PAUSE button until the player is off.
3.To adjust the volume, press the VOLUME – or VOLUME + button.
4.To play the current track, press the PLAY/PAUSE button.
5.To pause playback, press the PLAY/PAUSE button.
6.To stop playback, press and hold the PLAY/PAUSE button.
7.To skip to your favorite music during play, press the NEXT or PREVIOUS button.
8.To fast forward the music, press and hold the NEXT button.
9.To rewind the music, press and hold the PREVIOUS button.
10.Equalizer selection: Press the MODE button (M) to select from the 6-band EQ mode: Normal, Bass, Jazz,
Rock, Pop, Classical.
11.To lock the buttons, slide the lock button to the locked position and the lock icon will appear in
the display. To unlock, slide the lock button to the unlocked position .
9. PLAYING MUSIC ACCORDING TO ARTIST, ALBUM, GENRE OR ALL THE SONGS
The Music menu includes a variety of ways to browse and play your music.
1.Press and hold the MODE button to enter the SETUP menu.
2.Select “Music” option and press MODE button.
3.Press the NEXT or PREVIOUS button to select from the following options, then press the
MODE button to confirm or enter the submenu. During selection, you can press the PLAY button to
return to the previous menu.
a.All songs: Plays all songs on the player in order.
b.Artist: Lists all the artists on the player.
Select an artist, press MODE button to enter the submenu.
Select “All songs” to play all the songs by that artist, or select an Album and then press the MODE
button to view the contents of that album.
c.Album: Lists all albums on the player.
Select an album and press the MODE button to enter the submenu.
Select “All songs” to play all the songs in that album, or select a song and press MODE button to play
only that song.
d.Genre: Lists all genres on the player.
Select a genre and press the MODE button to enter the submenu.
Select “All songs” to play all the songs in that genre, or select a song and press MODE button to play
only that song.
e.Songs: Lists all the songs on the player.
Select “All songs” to play all the songs on the player, or select a song and press MODE button to play
only that song.
EXIT
LIST
Music
CARD
Music
All songs
Artist
Album
7
NOTE: Card playback does not
support file list browse function.
QI-MP556-WM-E-082406

10. OTHER OPERATIONS IN THE MENU
1. You can perform other operations in the menu by following these instructions.
a.Press and hold the MODE button to enter the SETUP menu.
b.Press the NEXT or PREVIOUS button to select the option you want.
c.Press the MODE button to confirm.
d.Press and hold the MODE button to exit.
2. The menu has many submenus and choices you may select. Here is a list of the options.
CARD/FLASH: To play the music on the SD/MMC card or on the flash (when you are currently listening
to the music on the flash memory, this option shown will be “CARD”, if you are listening to the music on
the card, this option shown will be “FLASH”).
EQ: Equalizer Setting: NORM (Normal), Bass, Jazz, Rock, Pop, Classical.
PLAY MODE: Play mode setting.
a. Normal (no mark): Plays all the songs in sequence, and the player will be automatically turned off
when all the songs have been played.
b.Repeat 1: Plays one song over and over.
c.Repeat all: Plays all the songs then repeats them over again, until you press and hold the
PLAY/PAUSE button to turn the player off.
d.Random (RND): Plays all the songs in random order, and the player will be automatically turned
off when all the songs have been played.
LANGUAGE: Setting the LCD display language (English, Spanish, French).
MEMORY INFORMATION: Viewing the memory size and the firmware version.
EXIT: Exit the menu.
Please see the operating instructions on the driver setup disc for more details.
8
QI-MP556-WM-E-082406

EIA
EST.1924
11. USING AN EXTERNAL SD/MMC MEMORY CARD (Optional - not included)
Flash
1.Turn the player off. Open the back cover
(refer to diagram on the right).
2.Confirm the card is SD/MMC type and
insert the card as indicated in the diagram
and you will hear a click, then close the
battery cover.
3.Turn the player on. Press and hold the MODE button (M) to enter the menu setup mode, select “CARD”
option, press the MODE button (M) to confirm. The player will play the songs on the SD/MMC card. The
card memory icon “CARD” will show in the display.
4.If you want to listen to the music on the built-in flash memory, press and hold
the MODE button (M) to enter the menu setup mode, select “
press the MODE button (M) to confirm, the player will play the songs on the
built-in flash memory.
NOTE: When the SD/MMC card is installed, the MP3 player will not play DRM 10 protected music as
mandated by Microsoft, but DRM 9 or non-DRM protected music will play normally.
5.To remove the SD/MMC memory card, turn off the set first, then open the battery cover, and push the
SD/MMC card, the card will pop out.
NOTE 1: The external SD/MMC card requires a fully charged or fresh battery to operate, so please change
to a new battery if you can’t power on when you are using the external SD/MMC card.
NOTE 2: Be sure to turn off the MP3 player before inserting or removing the SD/MMC card. If your set
is on, removing or inserting the SD/MMC card can cause some data to be lost or the set to freeze
or become inoperative. If this should happen, please take out the battery for 1 minute, replace it
and restart the MP3 player.
F
Flash” option,
Flash
EXIT
Flash
EQ
CAUTION
For your comfort, health and safety, be sure to observe the following
guidelines when you listen to the music using the earphones.
1.Do not play your MP3 player at a high volume. Hearing experts advise
against continuous extended play.
2.If you experience a ringing in your ears, reduce the volume or discontinue use.
3.Do not use while operating a motorized vehicle. It may create a traffic hazard and is illegal in many areas.
4.You should use extreme caution or temporarily discontinue use in potentially hazardous situations.
5.Even if your earphones are the open-air type designed to let you hear outside sounds, do not adjust the
volume too high so that you can hear what is around you.
6.Sounds can be deceiving. Over time your hearing “comfortable level” adapts to higher volumes of sound.
So what sounds “normal” can actually be loud and harmful to your hearing. Guard against this by setting
your equipment at a safe level before your hearing adapts.
TO ESTABLISH A SAFE LEVEL:
• Start your volume control at a low setting.
• Slowly increase the sound until you can hear it at a comfortable and clear level, and without distortion.
Once you have established a comfortable sound level: Leave it there.
9
QI-MP556-WM-E-082406

We warrant this product to be free from defects in material and workmanship under normal use for
a period of 90 days after purchase and we will repair it free of charge or replace it at no charge,
should it become defective under this warranty, providing you submit proof of purchase (sales slip)
with the set.
During the initial 90 day period after original purchase, we will service or exchange, at no charge,
the set that is returned to LENOXX ELECTRONICS CORP. After the initial 90 day period expires, and
for a period of 12 months from original purchase, we will repair the unit covering any part(s) that need
to be replaced at no charge, but will charge for the cost of labor, return postage paid by Lenoxx.
This warranty does not apply to any products which have been subject to misuse, neglect or accident.
This warranty does not cover broken earphones or cabinet. UNDER NO CIRCUMSTANCES WILL
LENOXX ELECTRONICS CORP. BE LIABLE FOR ANY INCIDENTAL OR CONSEQUENTIAL
DAMAGES. Some states do not allow the exclusion or limitation of incidental or consequential
damages, so the above limitations or exclusions may not apply to you.
This warranty gives you specific legal rights, and you may also have other rights which vary from
state to state. The following charges apply to repairs beyond the warranty period: $30.00. Be sure to
pack carefully and return postage paid insured together with your money order (personal checks will
not be accepted) and sales receipt to:
LENOXX ELECTRONICS CORP., 35 BRUNSWICK AVENUE, EDISON, N.J. 08817, USA
We reserve the right to make design and specification changes for product improvement.
The descriptions and characteristics given in this document are given as a general indication and not as a
guarantee. In order to provide the highest quality product possible, we reserve the right to make any improvement or modification without prior notice. The English version serves as the final reference on all
product and operation details should any discrepancies arise in other languages.
For customer service
Dial: 1-800-315-5885
(MONDAY - THURSDAY 8:00 AM - 5:00 PM, FRIDAY 8:00 AM - 1:30 PM EST)
or Visit Our Website: http://www.lenoxx.com
or Email: evergo@att.net
LIMITED WARRANTY
© 2006 LENOXX ELECTRONICS CORP.
35 BRUNSWICK AVENUE
EDISON, N.J. 08817, USA
MADE & PRINTED IN CHINA
10
QI-MP556-WM-E-082406
 Loading...