

Page 1
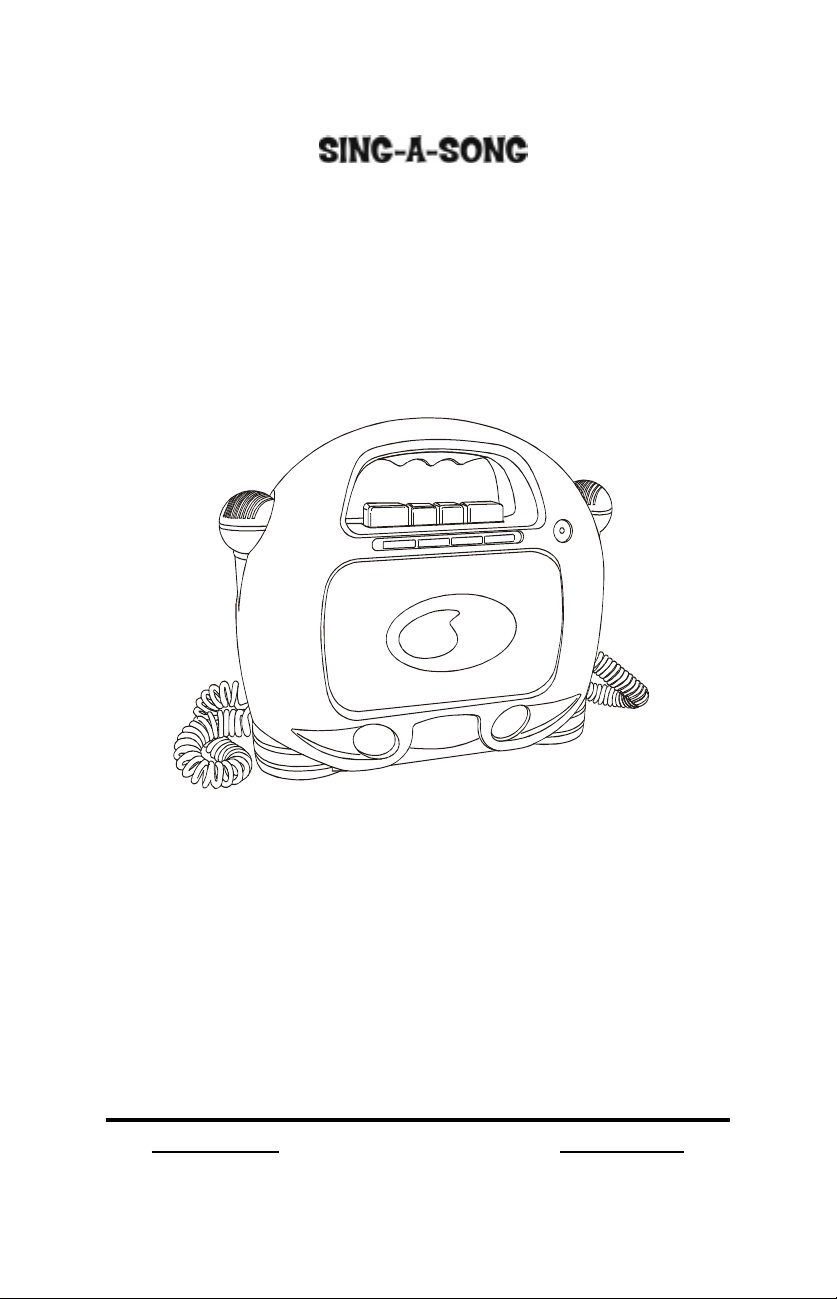
CASSETTE PLAYER WITH
DUAL MICROPHONES
OPERATING INSTRUCTIONS
MODEL CT-61
PLAYS ALL PRE-RECORDED CASSETTE TAPES
MIXES YOUR VOICE WITH YOUR MUSIC TAPE
DUAL DETACHABLE MICROPHONES WITH COIL CORD
USE AS A PA SYSTEM (PUBLIC ADDRESS SYSTEM)
COLOR CODED CONTROLS FOR EASY OPERATING
DYNAMIC SPEAKER WITH VOLUME LIMITER SWITCH
BUILT-IN POWER SAVER (AUTO STOP)
REQUIRES 4 SIZE C ALKALINE BATTERIES (NOT INCLUDED)
PLEASE READ THIS BOOKLET AND EXPLAIN TO YOUR CHILD HOW TO OPERATE THIS SET
MESSAGE TO PARENTS
IB-CT61(VITA)-E-V1
Page 2
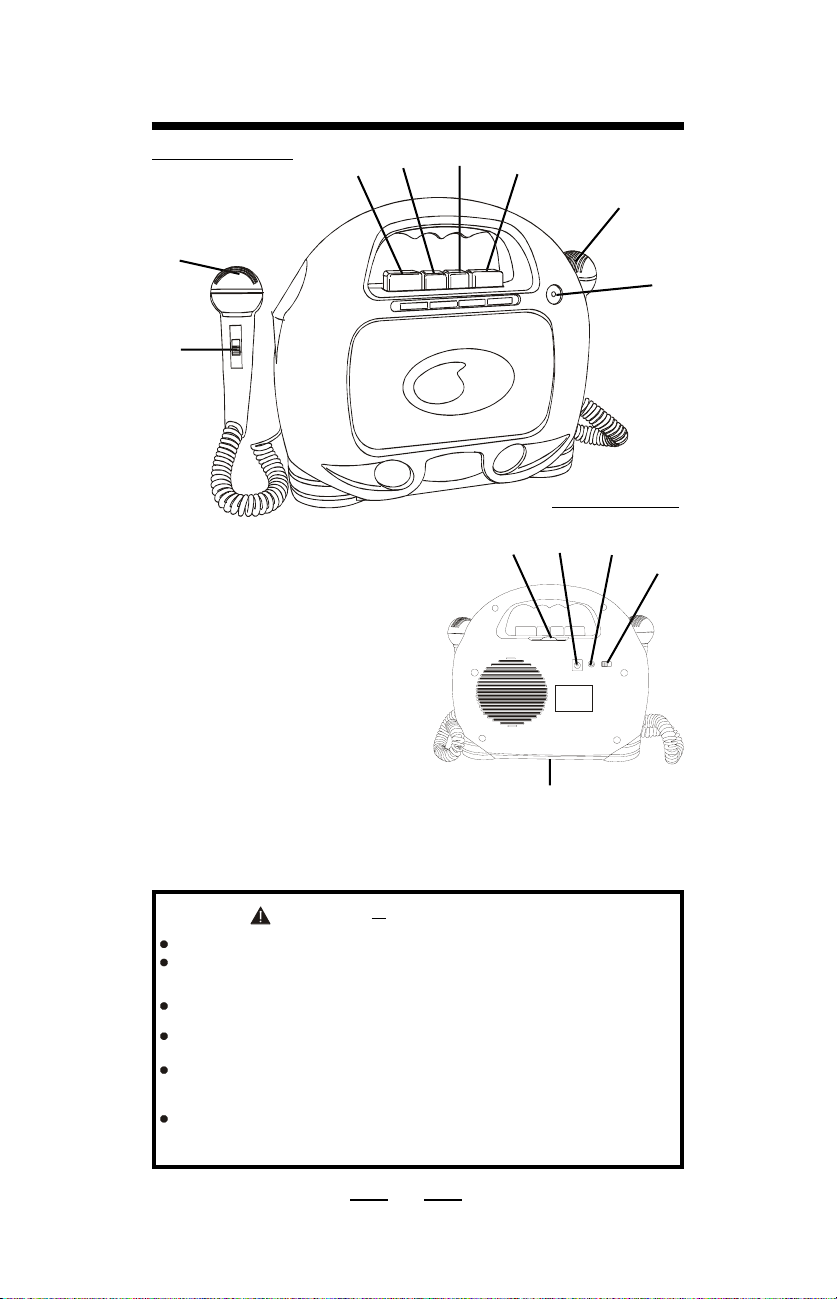
FUNCTIONAL LAYOUT & FEATURES
FRONT VIEW
4
3
2
1
1.MICROPHONE ON/OFF SWITCH
2.SING ALONG MICROPHONES
3.EJECT BUTTON
4. STOP BUTTON
5.FAST FORWARD BUTTON
6.PLAY BUTTON
7.POWER INDICATOR
8.VOLUME CONTROL
9.AC ADAPTOR JACK
(adaptor not included)
10.EARPHONE JACK
11.VOLUME LIMITER SWITCH
12.BATTERY COMPARTMENT DOOR
(located on the bottom of the set)
5
6
2
7
REAR VIEW
10
9
8
11
12
CAUTION ELECTRIC PRODUCT
This tape player is not recommended for children under 3 years of age.
Batteries should only be installed by adults.
FOR OPTIONAL AC ADAPTOR READ THE POINTS BELOW:
As with all electric products, precautions should be observed to prevent
electric shock when used with an AC adaptor.
Your tape player must not be used in bathing areas, outdoors or in
other damp areas when used with an AC adaptor.
An AC adaptor can be used with 120 volt AC household current. The
AC adaptor output must be 6 volt DC, 300mA with positive on outer
connector (negative center)
Use only a UL/CSA approved AC adaptor. If you use an AC adaptor with
output other than that specified, it could damage your set and possibly create
a hazardous condition.
1
IB-CT61(VITA)-E-V1
Page 3
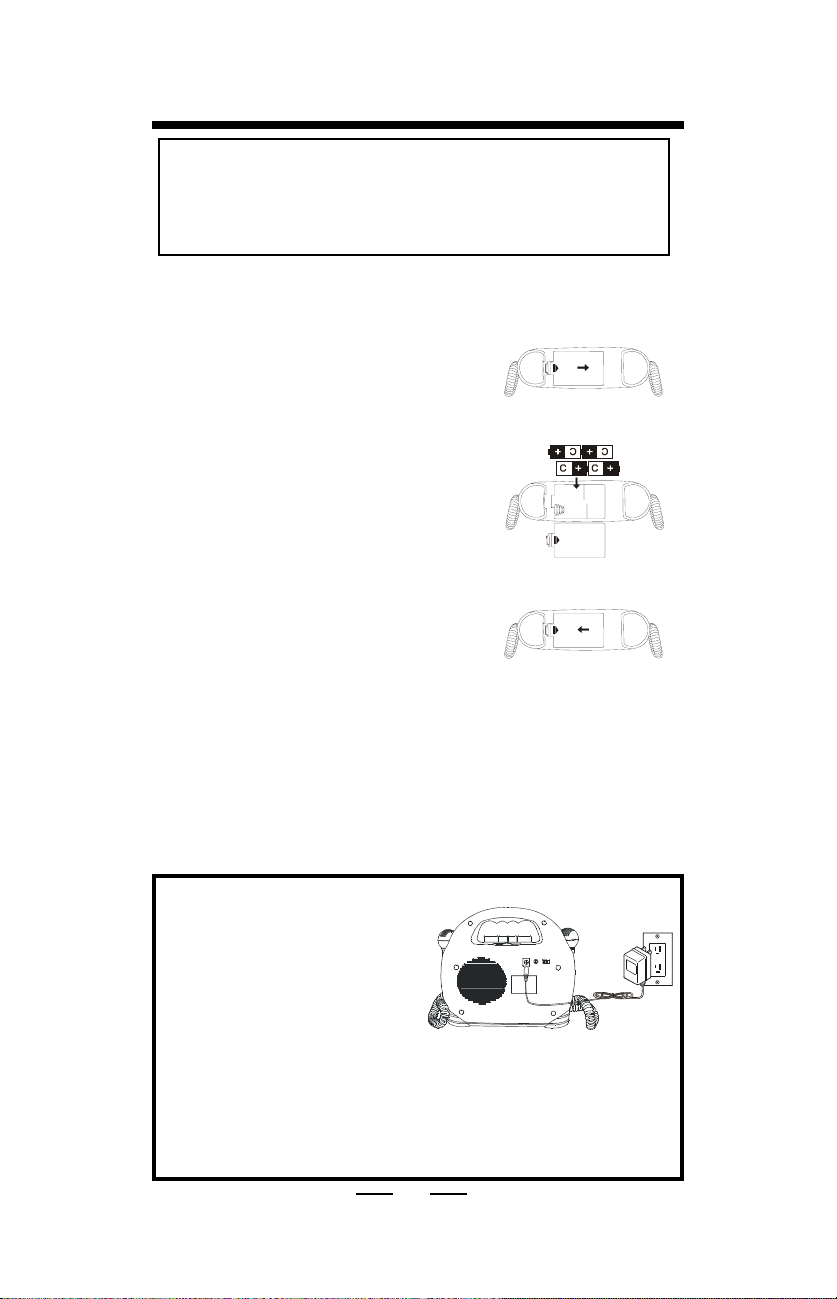
GETTING STARTED
Do not mix old and new batteries.
Do not mix alkaline, standard (carbon-zinc) or rechargeable
(nickel-cadmium) batteries.
REPLACEMENT OF BATTERIES MUST BE DONE BY ADULT
You will need 4 size C fresh alkaline batteries.
NOTE:Watch carefully the + and - polarities of the batteries. If you do
not install batteries correctly, the set will not work.
1. Push and open the battery door (on the
bottom of the set) out (Fig.1).
2. Insert 4 size C alkaline batteries as shown
on the battery door (Fig. 2).
3. Replace the battery door (Fig 3).
NOTE: If the POWER INDICATOR becomes dim or sound becomes weak
and unclear, the batteries may be weak. Replace all four
batteries at once (using only fresh alkaline batteries, not
rechargeable).
NOTE: Remove batteries if the set is not to be used for a long period of
time (about 30 days or more) to prevent battery leakage and
possible damage to the set.
INSTALLING BATTERIES
Fig.1
Fig.2
Fig.3
USING OPTIONAL AC ADAPTOR (not included)
NOTE: When you plug the AC
adaptor into the set, the
batteries are automatically
disconnected. To use
battery power, remove the
AC adaptor plug from the
set.
NOTE: Should humming noise occur, try reversing the plug of the AC
adaptor in the outlet. This set is designed to operate with a
negative center, 6V, 300mA AC adaptor only. Connecting it to
any other adaptor may damage the set. Adaptors are
available in most radio stores.
2
IB-CT61(VITA)-E-V1
Page 4

CASSETTE OPERATION
INSERT THIS WAY
Loading a Cassette into the Set
Insert cassette tape as shown below.
The cassette should be inserted into the slot in the door (not into the main
housing) with the exposed part of tape facing UP and full spool on the
RIGHT.
INTO DOOR
EMPTY
SPOOL
To Prevent Cassette Tape Tangle
The tape in the cassette may loosen and
unwind. To keep the tape from tangling,
firmly wind it with a pencil to take up
any slack before inserting it into the set.
FULL
SPOOL
3
IB-CT61(VITA)-E-V1
Page 5

CASSETTE OPERATION
To Play a Tape
1. Insert the tape as shown on page 3.
2. Turn the VOLUME control past click and the POWER INDICATOR will turn on.
3. Press the PLAY button.
3. Adjust the VOLUME control to the desired level .
4. To hear the other side of the tape, flip the tape over, insert and press
PLAY again.
5. To stop play, press the STOP button and turn the VOLUME control to OFF
position to shut power, and the POWER INDICATOR will turn off.
NOTE: Never press the EJECT button while the set is in play or fast
forward mode. Always press the STOP button first.
Fast Forward
Press FORWARD button to rapidly advance tape.
To Hear the Same Song Again
1. Remove the tape, flip it around to other side and insert it.
2. Press FORWARD button for a short time.
3. Remove tape, flip it around to original side, insert it and press PLAY button.
Automatic Stop
This set has a built-in automatic stop and the tape mechanism will stop playing
and shut off when it has reached the end of the tape. But this does not shut off
power to the set, remember to turn the VOLUME control to OFF position to shut
off the power.
Manual Stop & Power Off
The tape player can be stopped manually by pressing the STOP button. To
shut off power, turn the VOLUME control to OFF position, the POWER
INDICATOR will go off.
Sing - Along
1. Place a cassette tape into the set.
2. Turn the VOLUME control past click and the POWER INDICATOR will turn on.
3. Press the PLAY button down.
4. Slide the MICROPHONE button to ON position.
5. Speak or sing into the Microphone.
6. Adjust the VOLUME control to the desired level.
7. After speaking or singing, slide the MICROPHONE button to OFF
position, and turn the VOLUME control to OFF position to shut off power, the
POWER INDICATOR will go off.
NOTE: The two MICROPHONES can be used at the same time for two
persons.
NOTE: Remember to turn the VOLUME control to OFF position to shut off the power.
NOTE: Do not put the MICROPHONE too close to the speaker.
To Use As a PA (Public Address) System
No tape is needed, just talk through the set.
1. Turn the VOLUME control past click and the POWER INDICATOR will turn on.
2. Slide the MICROPHONE button to ON position.
3. Speak or sing into the MICROPHONE.
4. Adjust the VOLUME control to the desired level.
5. After speaking or singing, slide the MICROPHONE button to OFF
position.
6. Remember to turn the VOLUME control to OFF position when finished.
NOTE: The two MICROPHONES can be used at the same time for two persons.
4
IB-CT61(VITA)-E-V1
Page 6

CASSETTE OPERATION
Using a mono earphone
You may enjoy your music without disturbing others by using a mono
earphone (not included).
The Volume Limited Switch
Allows parents to control the maximum volume level. Slide to ON to limit
the maximum volume of the set.
VOLUME
LIMITED SWITCH
Cleaning the Magnetic Head
The tape head should be cleaned periodically with a special cleaning
tape cassette (available in music and HI-FI stores). To remove the
particles of brown oxide coating from the tapes that collect on the
head. These particles fill the gap in the head and degrade performance.
If the sound drops out or excessive noise occurs, clean the areas
indicated with a cotton swab moistened with alcohol (or use a tape
cleaner cassette).
TAPE PL AY H EA D
PINCH ROLLER
CAPSTAN
5
IB-CT61(VITA)-E-V1
Page 7

TROUBLE SHOOTING GUIDE
For any problems with your tape player, please check below.
PROBLEMS CAUSES SOLUTIONS
Set does not
play
Weak batteries
Battery placement
incorrect
Replace all four batteries with four
new size C alkaline batteries.
Remove the batteries and replace
in correctly as shown on the
BATTERY DOOR.
Distorted or
fuzzy sound
No sound,
but motor
runs or
speed is
slow
PLAY button
does not
operate
properly or
PLAY button
pops up
MICROPHONE
does not
work
Weak batteries
Dirty tape head
Weak batteries
Battery placement
incorrect
Cassette tape
improperly
inserted
MICROPHONE
switch not slided
to ON position.
Weak batteries.
Replace all four batteries with four
new size C alkaline batteries.
Clean the magnetic head as
shown on Page 5.
Replace all four batteries with four
new size C alkaline batteries.
Remove the batteries and replace
in correctly as shown on the
BATTERY DOOR.
Check cassette tape to be sure it
is properly inserted with the full
spool of tape on the right hand side.
Slide the MICROPHONE switch to
ON position. Also check VOLUME
control.
Replace all four batteries with four
new size C alkaline batteries.
6
IB-CT61(VITA)-E-V1
Page 8

LIMITED WARRANTY
We warrant this product to be free from defects in material and
workmanship under normal use for a period of 90 days after purchase
and we will repair it free of charge or replace it at no charge, should it
become defective under this warranty, providing you submit proof of
purchase (sales slip) with the set.
During the initial 90 day period after original purchase, we will
service or exchange, at no charge, the set that is returned to LENOXX
ELECTRONICS CORP. After the initial 90 day period expires, and for
a period of 12 months from original purchase, we will repair the unit
covering any part(s) that need to be replaced at no charge, but will
charge for the cost of labor, return postage paid by LENOXX.
This warranty does not apply to any products which have been
subject to misuse, neglect or accident. This warranty does not cover
broken cabinet. UNDER NO CIRCUMSTANCES WILL LENOXX
ELECTRONICS CORP. BE LIABLE FOR ANY INCIDENTAL OR
CONSEQUENTIAL DAMAGES. Some states do not allow the
exclusion or limitation of incidental or consequential damages, so the
above limitations or exclusions may not apply to you.
This warranty gives you specific legal rights, and you may also
have other rights which vary from state to state. The following charges
apply to repairs beyond the warranty period: $5.00. Be sure to pack
carefully and return postage paid insured together with your money
order (personal checks will not be accepted) and sales receipt to:
LENOXX ELECTRONICS CORP., 2 GERMAK DRIVE, CARTERET N.J.
07008
MODEL CT-61
© 2001 LENOXX ELECTRONICS CORP.
2 GERMARK DRIVE
CARTERET, N.J. 07008
http://www.lenoxx.com
MADE & PRINTED IN CHINA
7
IB-CT61(VITA)-E-V1
 Loading...