

Page 1
Model no: AF300
MULTIFUNCTIONAL AIR FRYER
Lenoxx Electronics Aust. Pty Ltd
Importers and Wholesalers of Electronics and toys
6 Oban court, Laverton North. Victoria. 3026
ABN: 97 844 321 851
PH: 03 9267 2100
FAX: 03 9267 2199
For service call: 1300 666 848
Email: lenoxx@lenoxx.com.au
www.lenoxx.com.au
Please read and save all instructions to ensure safe and effective use of this Appliance
Page 2

TABLE OF CONTENTS
Important Safety and General Instructions 3-4
Introduction 4
Parts List and Accessories 5-6
Before Using for the First Time 7
Operating your Turbo Air Fryer 8
How to use your Turbo Air Fryer 9
Cooking Food 10
Clean the Air Fryer 11-12
Trouble Shooting 12
Recipes 13-27
Important Safety and General Instructions
Please keep this user manual in a safe place along with your purchase receipt and
carton for future reference. The safety precautions enclosed herein reduce the risk of
fire, electric shock and injury when correctly adhered to.
1. Read all instructions before using the Air Fryer.
2. DO NOT touch hot surfaces. The temperature of the outer surface can get very hot
while the Air Fryer is in operation. Always use glove when handling hot materials
and allow metal parts to cool before cleaning. Allow the unit to cool thoroughly
before putting in or taking out parts. Always use the handles when moving the unit.
3. DO NOT use the Air Fryer for other than its intended use.
4. Before turning on, ensure the electrical voltage and frequency of the circuit
corresponds to those indicated on the rating label of the appliance.
5. To protect against the risk of electric shock, do not immerse this Air Fryer, cord set or
plug in water or any other liquids.
6. The Air Fryer is not intended to be operated by means of an external timer or any
type of separate remote control system.
7. The use of attachments which are not recommended or sold by the manufacturer
may cause fire, electric shock or injury.
8. This appliance is designed for indoor use only. DO NOT use outdoors.
9. DO NOT use an extension cord unless completely necessary with this product. If an
extension cord is used please ensure that it has a rating equal or exceeding the
rating of this appliance.
10. DO NOT pull or carry by cord, use cord as a handle, close a door on the cord, or pull
cord around sharp edges or corners. Keep cord away from heated surfaces.
11. DO NOT bend or damage the power cord.
12. Always unplug the Air Fryer when not in use. To disconnect from the power supply,
grip the plug and pull from the power socket. Never pull by the cord. The power
plug must be removed from the power socket before cleaning, servicing,
maintenance or moving the Air Fryer.
13. Never force the plug into an outlet.
14. DO NOT place the appliance near a hot gas or electric burner.
15. DO NOT cover the appliance whilst in use. If it is covered there is a risk of fire.
16. Improper installation may result in the risk of fire, electric shock and/or injury to
persons.
17. If the supply cord or plug is damaged, DO NOT use the appliance. Please return to
your place of purchase along with your receipt for a refund or exchange.
18. The manufacturer or retailer is not responsible for any eventual damages caused
by improper or faulty use.
2 3
Page 3
19. The unit has no user-serviceable parts contained within. Do not attempt to repair,
disassemble or modify the appliance.
20. Always operate on a dry level surface. Operating on sinks or uneven surfaces must
be avoided.
21. DO NOT clean with metal scouring pads.
22. Extreme caution must be used when moving an appliance containing hot oil or
other hot liquids.
23. DO NOT move or lift the Air Fryer while the power cord is still connected to the wall
outlet. All metal items inside the Air Fryer, such as the oven racks, can get very hot
during cooking. Please be careful when removing these items from the Air Fryer,
always use the tongs supplied.
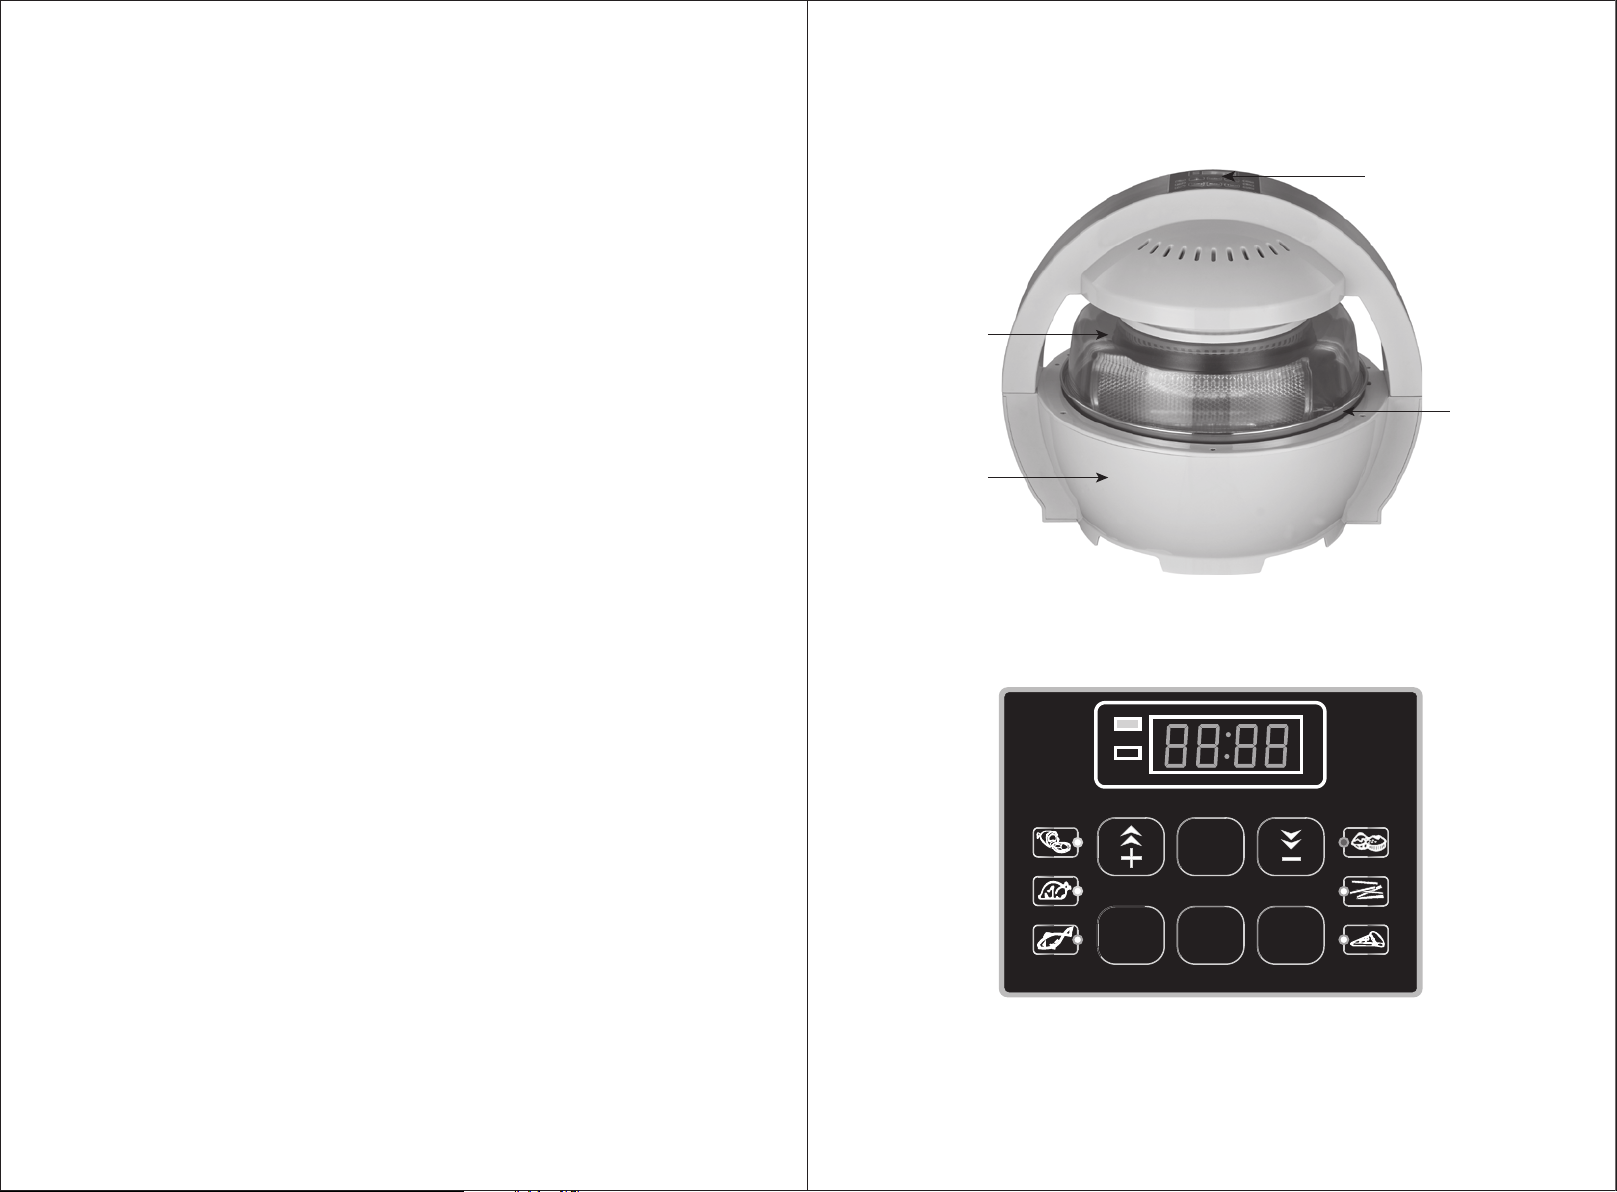
Parts List
Control Panel
Glass Lid
INTRODUCTION
THE NEXT GENERATION IN COOKING
With Air Fryer, you can prepare delicious, healthful meals in less than half the time of
traditional methods. What makes these superior results possible is our revolutionary
approach to certain time-honored cooking methods.
Professional cooks have long known that they could improve upon traditional oven
cooking by using a fan to accelerate the circulation of the Air fryer’s hot air. This
traditional oven consists of a fan mounted on one side of a metal box.
The Air Fryer improves upon traditional ovens in the following ways:
• The lid is made of glass, not metal, so that you can clearly see what you are cooking
from all sides.
• The Air Fryer combines a circular pot with a fan mounted in the lid so that hot air flows
move down over the food, around the bowl’s sides, and then back up to the fan. This
creates a tornado-like flow of constantly moving, super-heated air that cooks and
browns food quickly and thoroughly.
• The air fryer uses cooking racks that allow you to cook two levels of food at once. In
addition, when meat, poultry, or fish is cooked on the dual rack, fats and oils are blown
away through the grating. You will cook lighter, more nutritious meals.
• The Air Fryer allows the food to rotate by 360 degree; this ensures an evenly cooking
from all sides of the foods.
Base
Temp
Time
Temp
Confirm
MENU
S.S Bowl
Time
4 5
Page 4
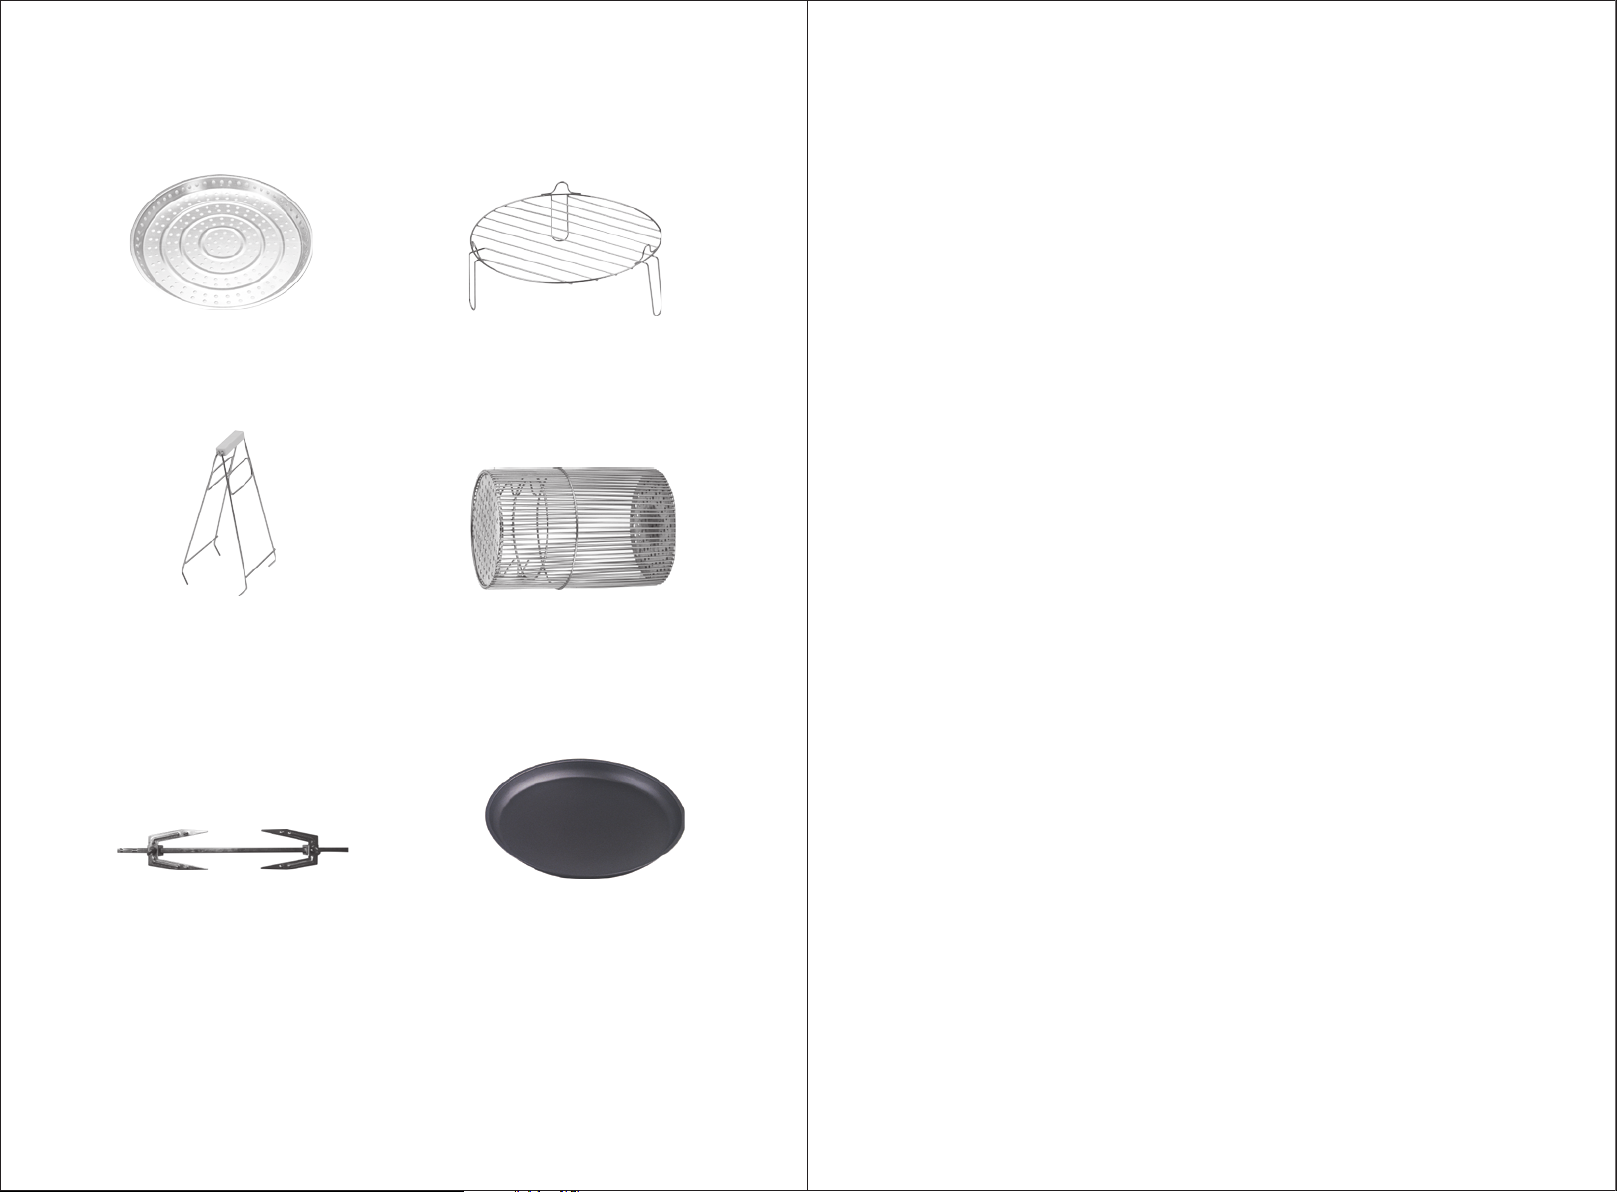
Accessory List
Before using your Air Fryer for the first time
Read the safety instructions in this manual before operating. Before using this
appliance for the first time, follow steps below:
1. Remove all packing materials and literature from the Air Fryer. Make sure that the
air fryer is in good condition and there are no missing parts or damage to the
Stainless Steel bowl.
Steamer
Used for steaming fish or vegetables.
Tongs
Use to add or remove food, plates,
and racks from the Air Fryer
Cooking Rack
Used for grilling,
toasting and dry frying
(cooks food faster)
Rotating Roast Cage
Use to make the Chips ,
meatballs, etc
2. Select a flat, heat-resistant, non-flammable surface to operate the Air Fryer on.
3. Wash the S.S bowl in warm soapy water or in the dishwasher. Dry thoroughly before
use.
4. NEVER submerge the top in water or any other liquid. Only the S.S bowl and racks are
dishwasher safe.
5. Before first use, turn on the empty Air Fryer, heating at maximum temperature for
5 minutes. This will eliminate any odours from within the Air Fryer, and also burn off
any excess lubricants that may have been used in the manufacturing process.
6. Allow the appliance to cool to room temperature.
7. Wipe the inside of the S.S bowl with a damp cloth. DO NOT use abrasive cleaners or
scouring pads.
NOTE: A slight amount of smoke and a burning smell may be emitted during the first
few uses. Do not be alarmed, this is normal.
Rotisseries
Use to roast the whole
chicken
Frying Pan
Fry your steak & meats, etc
6 7
Page 5

Selecon
Time
Temperature
Funcon (Example)
Pizza
10
200°C
Pizza/Pies
(Mins)
(°C)
Medium Prawns
6-8 min
150-180°C
Sausages
6-8 min
120-150°C
Roasted Bread
5-7 min
120-140°C
BBQ Spareribs
8-12 min
220-240°C
Fried Chicken Pieces
8-10 min
230-250 °C
Operating your Air Fryer
How to use your Air Fryer
Cooking Pre-Set Default:
For your convenience Air Fryer is fitted with a range of default settings found on the
digital control panel. Each button has been allocated a particular preset time and
temperature suitable for the food type.
Please note, the time and temperatures listed in the table below are default settings
and may need to be adjusted for various food sizes or quantity, food manufacturer
instructions, and /or individual taste. All preset default setting can be adjusted once
started by selecting the temperature and/or timer control buttons, followed by the up
and down buttons.
(Mins)
(°C)
Meat 10 250°C Roast Meat/Grilling Meat
Chicken 15 250°C Roast Meat/Grilling Meat
Fish 15 200°C Fish Fillets/Whole Fish
Cake 10 230°C Cake
French chip 18 250°C French chip
How to Roast
Fix the chicken on the Rotisseries ,with 3D heating, the food is cooked more evely both
inside and outside, without burning the foods exterior.
It is not necessary to use oil for roasting, but you may do so for foods that tend to
become dry in an oven.
Roasting time may vary depending on the type of meat or other food, type of cut,
amount of fat, thickness and/or weight of the item.
However,the cooking time of spaceship air fryer is really 50% faster than traditional oven.
How to Bake
Use any oven-proof baking dish, preferably non-stick, that will fit comfortably inside the
Air Fryer. Place it on the low rack. Take special care in baking, as desserts are especially
delicate and easy to overcook. Lower the temperature slightly and turn the baking dish
around if too much browning occurs in one area.
How to Steam
You can steam vegetables at the same time you cook your main dish by placing the
vegetables in an aluminum foil pouch: add a few drops of water and seal the pouch.
You can also add a cup of water in the bottom pot, with savory herbs and spices to
steam fish or vegetables ,but just a little water.
Additional Guide to Manual Cooking
Food Time
Potatoes &Vegetables 8-10 min 180-200°C
Chicken wings 15-20 min 150-180°C
Hot dogs 5-8 min 190-210°C
8 9
Temperature
How to Fry with Rotating Roast Cage
You can get the effect of deep-fried Chips without oil, by spraying potato strips with a
little polyunsaturated cooking oil. The excess oil will drip away while cooking for
healthier Chips!
To make delicious fried chicken, season chicken pieces firstly with batter and cooking
oil. The excess oil will drip away while cooking for healthier Chicken!
How to Defrost
You can use the spaceship Air Fryer to defrost frozen foods more evenly than
a microwave ovens, simply set the temperature at 100°C and check the food
every 5-10 minutes.
Page 6

Cooking Food
Cleaning your Air Fryer
1. Before cooking, it is suggested that you spray the inside of your Air Fryer (and rack
etc) with a little cooking oil.
2. Place the Stainless steel cooking bowl securely onto the base ensuring it is placed
centrally and sits securely.
3. Position the cooking rack in the S.S bowl. The type of rack used will be dependent
on the type of food being cooked. The high rack is best for grilling, broiling, crisping
or cooking well done cuts of meat. The low rack is best for baking, roasting etc.
4. Once the food has been placed onto the rack, place the top onto the stainless steel
bowl, ensuring the top sits inside the rim of the bowl.
5. Plug into the wall socket and switch on. The digital display will show 88:88. If you
press timer, it will show “0:30”, if you press the temperature button, it will show 60°C.
6. Choose one of the preset settings and press confirm. Or set the required temperature
and time by pressing the temperature and /or timer
7. followed by the + and - buttons to the required cooking time and temperature,
then press the confirm button to proceed to the next stage.
NOTE: The maximum temperature setting is 250°C and maximum cooking time is 30
minutes. You can adjust the cooking time or temperature at any point during
the cooking process.
8. Once the time and temperature has been selected, press the confirm button. A beep
will sound, the fan will start and the heating element will illuminate and cook the
food.
9. If you are required to pause cooking ,take the top off, The unit will stop .If you place
the top back on the base within 3 minutes, the Air Fryer will work without pressing
the confirm button.
10.If a program needs to be changed or restarted, simply hold down the Confirm
button for 2 seconds. The program will return to the default setting and you can
then restart your cooking process.
11.At the end of the cooking time, the Air Fryer will beep, cooking will cease and the
heating element will switch off. Depending on the temperature of the unit, the fan
may remain on in order to dissipate the remaining heat helping prolong the life of
the unit.
NOTE: Never immerse the top and base in liquid to clean.
ALWAYS UNPLUG THE OVEN BEFORE CLEANING.
LIGHT CLEANING
• Turn the power switch off. Unplug the Air Fryer and let cool.
• Use a sponge or dishcloth with a mild dish washing detergent and warm
water to wipe inner pot clean.
• Rinse well to remove all detergent.
NOTE: Never immerse the top in any liquid.
NORMAL CLEANING
• Turn the power switch off. Unplug Air Fryer and let cool.
• Wipe lid and fan housing using a dishcloth or damp sponge with a mild dish washing
detergent.
• Do not clean with steel wool pads or abrasive materials.
• Wash wire racks in mild dish washing detergent and water.
• Clean meat parts using a sponge or dishcloth with a mild dish washing
detergent, then wipe clean. if scrubbing is necessary, use a nylon or
polyester mesh pad.
DO NOT USE THE OVEN UNTIL IT’S COMPLETELY DRY.
DISHWASHER-SAFE INNER POT
The inner pot, Stir Frying set and wire racks may also be washed in the dishwasher.
However, never wash the top in a dishwasher or immerse it in liquid.
Remove the inner pot from the base before dish washing.
REMEMBER...
• Turn the power switch off and unplug Air Fryer before cleaning the top.
• Let Air Fryer cool before washing.
• Never immerse top in water.
• Do not let fan assembly get wet.
• If food gets stuck or burnt on to the inner pot , leave them to soak
in warm water before cleaning.
Ensure that you use the supplied tongs, heat resistant mitts or other appropriate
utensils to remove the food from the appliance. Do not touch the food or the appliance
or any of the internal accessories as they may be extremely hot.
10 11
DRYING THE Air Fryer
• The Air Fryer must always be kept dry after cleaning to avoid moisture in the lid.
• Make sure the Air Fryer is unplugged, leave lid slightly open and allow the Air Fryer to
dry thoroughly.
Page 7

TO AVOID BREAKAGE ALLOW THE GLASS LID TO COOL BEFORE CLEANING.
Recommended Recipes for Air Fryer
The stainless steel bowl can be cleaned using the self-cleanse option.
1. Add some warm water to the stainless steel bowl ensuring it is no more than a few
centimeters in depth.
2. Add a small amount of mild detergent.
3. Set the temperature to 80°C and the timer to 10 minutes.
4. Press the confirm button and the oven will start the cleaning process.
5. The fan from the Turbo Air Fryer will swirl the water and this will clean off most stains.
TROUBLE SHOOTING GUIDE
SYMPTOMS & PROCEDURES
• Check to see that the power cord is plugged into AC
outlet.
• Check to see that the AC outlet is operaonal.
Air Fryer will not turn
on
Air Fryer will not
heat up
Glass lid is cracked • Order replacement part from the service department.
When do the srring,
the food stays on the
edge of the inner pot
The food slides with
the Sr Frying set
• Check that the mer is set to desired me.
• Check that the temperature is set to desired
temperature.
NOTE: This top acts as a safety switch and will not
allow the Air Fryer to work when not close
properly.
• Check the temperature to see that it is set for
a high enough temperature.
• If it sll does not work, turn off power and
please contact your point of purchase.
• The inner pot is too full.
• The food has many states during cooking. Observe it
for a while. Use spoon to sr the food a lile bit.
• The quanty of food may be not enough for the block
to stem. Adjust the quanty.
FRENCH POTATO CHIPS
15 to 20 minutes airfryer
300-400 g frozen potato chips
1 tablespoon oil
1/3 tablespoon salt
1. Spray the oil onto the potato chips.
2. Insert the potato chips in the airfryer basket.
3. Slide the basket into the airfryer. Set the timer to 15-20 minutes and Temperature at
250 ℃ and fry the potatoes until they are crispy brown.
4. Arrange chips on a plate and sprinkle lightly with salt.
Roasted Paprika Potatoes with Greek Yoghurt
Side dish - 4 portions
20 minutes airfryer
500 g waxy potatoes
2 tablespoons olive oil
1 tablespoon spicy paprika
Freshly ground black pepper
150 ml Greek yoghurt
1. Set the airfryer to 250℃. Peel the potatoes and cut them into 2 cm cubes. Soak the
cubes in water for at least 30 minutes. Drain them thoroughly and then pat them dry
with kitchen paper.
2. In a medium-sized bowl, mix 1 tablespoon olive oil with the paprika and add pepper
to taste. Coat the potato cubes with the spicy oil.
3. Transfer the potato cubes to the fryer basket and slide the basket into the airfryer.
Set the timer to 20-22 minutes and fry the potato cubes until they are golden brown
and done.
4. Mix the Greek yoghurt in a small bowl with the remaining spoonful of olive oil and
add salt and pepper to taste. Sprinkle with paprika. Serve the yoghurt as a dip with
the potatoes.
5. Serve the potato cubes in a platter and sprinkle with salt. Delicious with a rib eye or
with kebabs.
The Sr Frying set
stops turning during
cooking
• The sr frying set is not posional correctly or stuck
by foods. Using an oven glove or tongs to adjust it
12 13
Tips
- Season your fried potato cubes with all kinds of different spices. Mix the oil with ras el
hanout or with taco seasoning, for example.
Page 8

Fried Potato Slices with Garlic
Side dish - 4 persons
20 minutes airfryer
500 g waxy potatoes
1 clove garlic, crushed
1 tablespoon fresh thyme
1 tablespoon olive oil
Sea salt
1. Set the airfryer to 250℃. Peel the potatoes and slice them into thin discs. Soak them
in water for at least 30 minutes. Drain them thoroughly and pat the tops of the slices
dry with kitchen paper.
2. Mix the garlic, thyme and olive oil in a bowl and coat the potatoes in this mixture.
3. Transfer the potato slices to the fryer basket and slide the basket into the airfryer. Set
the timer to 20-22 minutes and fry the potatoes until they are golden brown and done.
4. Put the fried potato slices on a warm platter and sprinkle with salt. Delicious with
lamb chops or cutlets.
Roast Potatoes with Tuna
Main course - 2 portions
30 minutes airfryer
4 starchy potatoes, approximately 125 g each
1/2 tablespoon olive oil
1 can of tuna in oil, drained
2 tablespoons (Greek) yoghurt
1 teaspoon chili powder
1 green onion, finely sliced into rings
Freshly ground black pepper
1 tablespoon capers
1. Soak the potatoes for at least 30 minutes and pat them dry with kitchen paper.
2. Lightly brush the potatoes with olive oil and place them in the fryer basket. Slide the
basket into the airfryer and set the timer to 30 minutes & Temperature at 230℃ to fry
the potatoes until they are deliciously crunchy and done.
3. In a bowl, finely mash the tuna and add the yoghurt and chili powder. Mix well. Stir in
half of the green onion and season to taste with salt and pepper.
4. Place the potatoes on two plates and cut the top side lengthwise. Slightly push the
potato open and spoon the tuna mixture onto the open potato. Sprinkle the filling
with chili powder and spoon the capers and the rest of the green onion on top.
Delicious with a fresh salad.
Tips
- Serve the roast potatoes as a side dish with a pat of butter or a spoonful of sour cream
on top. Sprinkle with coarse sea salt and pepper to taste.
14 15
Potato Croquettes with Parmesan Cheese
Side dish - 4 portions
30 minutes + 8 minutes airfryer
300 g starchy potatoes, peeled and cubed
1 egg yolk
50 g Parmesan cheese, grated
2 tablespoons flour
2 tablespoons chives, finely chopped
Freshly ground pepper
Nutmeg
2 tablespoons vegetable oil
50 g bread crumbs
1. Boil the potato cubes in salted water for 15 minutes until ready. Drain the potatoes
and mash them finely with a potato masher or a ricer. Allow the mashed potatoes to
cool.
2. Add the egg yolk, cheese, flour and chives to the potato puree and mix well. Season
to taste with salt, pepper and nutmeg.
3. Set the airfryer to 230℃. Mix the oil and the bread crumbs and keep stirring until the
mixture becomes loose and crumbly again.
4. Shape the potato puree into 12 croquettes and roll them through the bread crumbs
until they are completely coated.
5. Put six croquettes in the fryer basket and slide the basket into the airfryer. Set the
timer to 5-8 minutes and fry the potato croquettes until they are crispy brown. Then
fry the rest of the croquettes.
Tips
- If you wet your hands slightly before shaping the croquettes, the puree forms easily
into smooth croquettes.
- Double the croquette recipe and freeze half of the prepared unfried croquettes for
another time. You can then finish fry the frozen croquettes in the airfryer.
Rösti
Appetizer - 4 portions
10 minutes + 15 minutes airfryer
250 g waxy potatoes, peeled
1 tablespoon chives, finely chopped
Freshly ground black pepper
1 tablespoon olive oil
2 tablespoon sour cream
100 g smoked salmon
1. Preheat the airfryer to 200℃. Coarsely grate the potatoes into a bowl and add
three-quarters of the chives and salt and pepper to taste. Mix well.
Page 9

2. Grease a pizza pan with olive oil and distribute the potato mixture evenly in the pan.
Press the grated potatoes into the pan and brush the top of the potato cake with
olive oil.
3. Place the pizza pan in the fryer basket and slide the basket into the airfryer. Set the
timer to 15-18 minutes and fry the rösti until it is nicely browned on the outside and
soft and done on the inside.
4. Cut the rösti into 4 quarters and place each quarter on a plate. Garnish with a spoonful
of sour cream and put the slices of salmon on the plate next to the rösti. Sprinkle the
rest of the chives over the sour cream and add a touch of ground pepper.
Tips
- The rösti is also delicious as a side dish for 2 persons. As a side dish, add 25 grams of
ham strips to the grated potato.
Feta Triangles
Appetizer - 15 portions
20 minutes + 9 minutes airfryer
1 egg yolk
100 g feta
2 tablespoons flat-leafed parsley, finely chopped
1 green onion, finely sliced into rings
Freshly ground black pepper
5 sheets of frozen filo pastry, defrosted
2 tablespoons olive oil
1. Beat the egg yolk in a bowl and mix the feta, parsley and green onion; season with
pepper to taste.
2. Cut each sheet of filo pastry into three strips.
3. Scoop a full teaspoon of the feta mixture on the underside of a strip of pastry. Fold the
tip of the pastry over the filling to form a triangle, folding the strip zigzag until the
filling is wrapped up in a triangle of pastry. Fill the other strips of pastry with feta in the
same manner.
4. Preheat the airfryer to 220℃.
5. Brush the triangles with a little oil and place five triangles on the Wire rack. Put the wire
rack into the airfryer and set the timer to 3-5 minutes. Bake the feta triangles until they
are golden brown. Bake the other feta triangles in the same manner.
6. Serve the triangles in a platter.
Freshly ground pepper
50 g bread crumbs
2 tablespoons oil
1. Preheat the airfryer to 230℃
2. With a fork, mash up the salmon in a deep dish and mix it with the egg and herbs.
Season the mixture to taste with pepper and salt.
3. Mix the bread crumbs with the oil in another deep dish until you obtain a loose
mixture.
4. Shape the salmon mixture into eight small croquettes and coat them in the bread
crumb mixture.
5. Put the croquettes in the basket and slide the basket into the airfryer. Set the timer
to 8-10 minutes and bake the croquettes until golden brown.
Meatballs with Feta
Appetizer - 10 minutes
10 minutes + 8 minutes airfryer
150 g lamb mince or lean minced beef
1 slice of stale white bread, turned into fine crumbs
50 g Greek feta, crumbled
1 tablespoon fresh oregano, finely chopped
1/2 tablespoon grated lemon peel
Freshly ground black pepper
Round, shallow oven dish, approx. 15 cm
Tapas forks
1. Mix the mince in a bowl with the bread crumbs, feta, oregano, lemon peel and black
pepper, thoroughly kneading everything together.
2. Divide the mince into 10 equal portions and form smooth balls, using damp hands.
3. Put the balls in the oven dish and place this dish on the wire rack. Put them into the
airfryer. Set the timer to 8-10 minutes & Temperature at 250℃ and bake the mince
balls until they are nicely brown and done.
4. Serve the meatballs hot in a platter with tapas forks.
Salmon Croquettes
Appetizer - 8 portions
10 minutes + 8 minutes airfryer
1 tin of red salmon (approx. 200 g), drained
1 egg, lightly beaten
1 tablespoon fresh dill, finely chopped
2 tablespoons chives, finely chopped
Tips
- Prick the meatballs onto a tapas fork with half a black olive and a strip of roasted bell
pepper.
- Or you can use a basket to Air fry the balls.
16 17
Page 10

Ricotta Balls with Basil
Appetizer - 20 portions
15 minutes + 16 minutes airfryer
250 g ricotta
2 tablespoons flour
1 egg, separated
Freshly ground pepper
15 g fresh basil, finely chopped
1 tablespoon chives, finely chopped
1 tablespoon grated orange peel
3 slices of stale white bread
1 tablespoon olive oil
1. Mix the ricotta in a bowl with the flour, egg, yolk, 1 teaspoon salt and freshly ground
pepper. Stir the basil, chives and orange peel through the mixture.
2. Divide the mixture into 20 equal portions and shape them into balls with wet hands.
Let the balls rest for a while.
3. Grind the bread slices into fine bread crumbs with the food processor and mix with
the olive oil. Pour the mixture into a deep dish. Briefly beat the egg white in another
deep dish.
4. Preheat the airfryer to 230℃
5. Carefully coat the ricotta balls in the egg white and then in the bread crumbs.
6. Put 10 balls on the wire rack and wire rack into the airfryer. Set the timer to 8-10
minutes. Bake the balls until golden brown. Bake the rest of the balls in the same way.
7. Serve the ricotta balls in a platter.
Tips
- Mix some freshly ground chili flakes through the ricotta mixture for spicier balls. Color
the bread crumbs red in that case by adding two to three teaspoons of paprika to the
olive oil.
Mini Frankfurters in Pastry
Appetizer - approx. 20 portions
10 minutes + 20 minutes airfryer
1 tin of mini frankfurters (drained weight 220 g, approx. 20 frankfurters)
100 g (chilled of frozen, defrosted) ready-made puff pastry
1 tablespoon fine mustard
1. Preheat the airfryer to 220℃
2. Thoroughly drain the sausages on a layer of kitchen paper and dab them dry.
3. Cut the puff pastry into strips measuring 5 X 1 1/2 cm and coat the strips with a thin
layer of mustard.
4. Roll each sausage spirally into a strip of pastry.
5. Put half the sausages in pastry in the wire rack and put them into the airfryer. Set the
timer to 10-12 minutes. Bake the sausages in pastry until golden brown. Bake the
remaining sausages in the same manner.
6. Serve the sausages in a platter accompanied by a small dish of mustard.
Mini Empanadas with Chorizo
Appetizer - 20 minutes
20 minutes + 20 minutes airfryer
125 g chorizo, in small cubes
1 shallot, finely chopped
1/4 red bell pepper, diced into small cubes
2 tablespoons parsley
200 g chilled pie crust dough (pâte brisée) or pizza dough
1. Stir the chorizo with the shallot and bell pepper in a skillet and fry on low heat for 2 to
3 minutes until the bell pepper is tender. Take off the heat and stir in the parsley. Allow
the mixture to cool.
2. Preheat the airfryer to 200℃.
3. Use a glass to cut twenty 5 cm rounds from the dough. Scoop a spoonful of the chorizo
mixture onto each round. Press the edges together between thumb and index finger,
creating a scallop pattern.
4. Put 10 empanadas in the basket and slide the basket into the airfryer. Set the timer to
10-12 minutes and bake the empanadas until they are golden brown and done.
5. Bake the remaining empanadas in the same way. Serve the empanadas lukewarm.
King Prawns in Ham with Red Pepper Dip
Appetizer - 10 portions
15 minutes + 13 minutes airfryer
1 large red bell pepper, halved
10 (frozen) king prawns, defrosted
5 slices of raw ham
1 tablespoon olive oil
1 large clove garlic, crushed
18 19
Page 11

1/2 tablespoon paprika
Freshly ground black pepper
Tapas forks
4. Push a piece of goat cheese in each mini pepper and place the mini peppers next to
each other onto the wire rack. Put them into the airfryer and set the timer to 8-10
minutes. Bake the mini peppers until the cheese has melted.
5. Serve the mini peppers in small dishes as appetizers or snacks.
1. Preheat the airfryer to 230℃. Put the bell pepper in the basket and slide it into the
airfryer. Set the timer to 10 minutes. Roast the bell pepper until the skin is slightly
charred. Put the bell pepper in a bowl and cover it with a lid or cling film. Let the bell
pepper rest for 15minutes.
2. Peel the prawns, make an incision in the back and remove the black vein. Halve the
slices of ham lengthwise and wrap each prawn in a slice of ham.
3. Coat the parcels with a thin film of olive oil and put them in the basket. Slide the basket
into the airfryer and set the timer to 3-5 minutes. Fry the prawns until crispy and just
right.
4. In the meantime, peel the skin off the bell pepper halves, remove the seeds and cut
the pepper into pieces. Puree the bell pepper in the blender with the garlic, paprika
and olive oil. Pour the sauce into a dish season with salt and pepper to taste.
5. Serve the prawns in ham in a platter with tapas forks and add the small dish with red
pepper dip.
Tips
- Replace the red pepper dip with ready-made puree, mixed with garlic. Or servé the
prawns with garlic mayonnaise.
Mini Peppers with Goat Cheese
Appetizer - 8 portions
10 minutes + 8 minutes airfryer
8 mini or snack peppers
1/2 tablespoon olive oil
1/2 tablespoon dried Italian herbs
1 teaspoon freshly ground black pepper
100 g soft goat cheese, in eight pieces
1. Preheat the airfryer to 220℃.
2. Cut the top of the mini peppers and remove the seeds and membrane.
3. Mix the olive oil in a deep dish with the Italian herbs and the pepper. Toss the pieces
of goat cheese in the oil.
Tips
- The same method can be used to fill vine tomatoes. Hollow out the tomatoes first and
leave them to drain upside down on kitchen paper.
Garlic Mushrooms
Appetizer - 12 portions
10 minutes + 10 minutes airfryer
1 slice of white bread
1 clove garlic, crushed
1 tablespoon flat-leafed parsley, finely chopped
Freshly ground black pepper
1 tablespoon olive oil
12 (chestnut) mushrooms
1. Preheat the airfryer to 200℃.
2. Grind the slices of bread into fine crumbs in the food processor and mix in the garlic,
parsley and some seasoning to taste. Lastly, stir in the olive oil.
3. Cut off the mushroom stalks and fill the caps with the bread crumbs.
4. Put the mushroom caps in the basket and slide it into the airfryer. Set the timer to
10-12 minutes. Bake the mushrooms until crispy and golden.
5. Serve the mushrooms in a platter.
Tips
- Alternatively, mix the bread crumbs with strips of ham, green onion and grated cheese.
Spicy Drumsticks with Barbecue Marinade
Main course - 4 portions
5 minutes (+ 20 min to marinade) + 10 minutes airfryer
1 clove garlic, crushed
1/2 tablespoon mustard
2 teaspoons brown sugar
1 teaspoon chili powder
Freshly ground black pepper
20 21
Page 12

1 tablespoon olive oil
4 drumsticks
1. Preheat the airfryer to 220℃.
2. Mix the garlic with the mustard, brown sugar, chili powder, a pinch of salt and freshly
ground pepper to taste. Mix with the oil.
3. Rub the drumsticks completely with the marinade and leave to marinate for 20 minutes.
4. Put the drumsticks onto the wire rack and put them into the airfryer. Set the timer to
10-12 minutes. Roast the drumsticks until brown.
5. Serve the drumsticks with corn salad and French bread.
Tips
- Corn Salad
Serve the drumsticks with a refreshing corn salad. Drain a can of corn kernels (300 gram).
Cut four tomatoes into four sections and remove the seeds. Cut the flesh of the tomatoes
into cubes. Mix the corn with the tomato cubes, 1 finely sliced green onion, the juice of
half a lime, 2 tablespoons fresh, coarsely chopped coriander, and some salt and freshly
ground chili pepper to taste.
- Chicken legs
This marinade is also great for chicken legs, You can roast two chicken legs at a time in
the airfryer, first 10 minutes at 220℃ .
Roasted Asian Chicken Wings
Main course - 4 portions
5 minutes + 10 minutes airfryer
2 cloves garlic
2 teaspoons ginger powder
1 teaspoon ground cumin
Freshly ground black pepper
500 g chicken wings at room temperature
100 ml sweet chili sauce
Tips
- Serve the chicken wings as a main course with stir-fried noodles and pak choi. Boil 250g
noodles until al dente. Stir-fry 3 green onions and 1 bunch of pak choi cut in broad
strips in a wok with 2 tablespoons of oil for 2-3 minutes. Spoon in the noodles and
season to taste with soy sauce.
- The chicken wings are also very taste as a snack.
Pork Satay with Peanut Sauce
Main course - 2-3 portions
20 minutes (+15 min to marinade) + 12 minutes airfryer
2 cloves garlic, crushed
2 cm fresh ginger root, grated or 1 teaspoon ginger powder
2 teaspoons chili paste or hot pepper sauce
2-3 tablespoons sweet soy sauce
2 tablespoons vegetable oil
400g lean pork chops, in cubes of 3 cm
1 shallot, finely chopped
1 teaspoon ground coriander
200 ml coconut milk
100 g unsalted peanuts, ground
1. Mix half of the garlic in a dish with the ginger, 1 teaspoon hot pepper sauce, 1
tablespoon soy sauce, and 1 tablespoon oil. Mix the meat with the mixture and leave
to marinate for 15 minutes.
2. Preheat the airfryer to 220℃.
3. Put the marinated meat onto the wire rack and put them into the airfryer. Set the tmer
to 12-14 minutes and roast the meat until brown and done. Turn once while roasting.
4. In the meantime, make the peanut sauce: heat 1 tablespoon oil in a saucepan and
gently sauté the shallot with the remainder of the garlic. Add the coriander and fry for
a short time more.
5. Mix the coconut milk and the peanuts with 1 teaspoon hot pepper sauce and 1
tablespoon soy sauce with the shallot mixture and gently boil for 5 minutes, while
stirring. If necessary, add a little bit of water if the sauce gets too thick. Season to taste
with soy sauce and hot pepper sauce.
1. Preheat the airfryer to 220℃.
2. Mix the garlic with the ginger powder, cumin, plenty of freshly ground black pepper
and some salt. Rub the chicken wings with the herbs
3. Put the chicken wings onto the wire rack and put them into the airfryer. Set the timer
to 10-12 minutes and roast the chicken wings until they are crispy brown.
4. Serve the chicken wings with the chili sauce as a main course or a snack.
22 23
Mediterranean Chicken Nuggets
Main course - 4 portions
20 minutes + 20 minutes airfryer
2 slices stale white bread, in pieces
1 tablespoon (spicy) paprika powder
1 tablespoon olive oil
Page 13

250 g chicken fillet, in pieces
1 egg yolk + 2 egg whites
1 clove garlic, crushed
2 tablespoons red pesto
Freshly ground pepper
1 tablespoon flat-leafed parsley, finely chopped
Food processor
1. Grind the bread with the paprika powder in the food processor until you have a
crumbly mixture and mix in the olive oil. Transfer this mixture to a bowl.
2. Then purée the chicken fillet in the food processor and mix with the egg yolk, garlic,
pesto, and parsley. Add 1/2 teaspoon salt and pepper to taste.
3. Preheat the airfryer to 220℃.
4. Whisk the egg whites in a bowl. Shape the chicken mixture into 10 balls and press
them into oval nuggets. Coat the nuggets first with egg white and then with
breadcrumbs. The nuggets must be coated with crumbs all over.
5. Put five nuggets in the basket and slide it into the airfryer. Set the timer to 10-12
minutes. Fry the nuggets golden brown. Then fry the remainder of the nuggets.
Delicious with French fries and a fresh salad.
Tips
- You can make variations of these Mediterranean chicken nuggets. Make Italian nuggets
with green pesto and 25 g Parmesan cheese, or Greek nuggets with grated lemon peel,
finely chopped oregano and 25 g crumbled feta cheese.
1. Peel the mango and cut it into small cubes. Mix the mango cubes in a bowl with 1/2
teaspoon red chili paste, 1 tablespoon coriander and the juice and zest of half a lime.
2. Purée the fish in the food processor and then mix with 1 egg and 1 teaspoon salt and
the remainder of the lime zest, red chili paste and the lime juice. Mix with the
remainder of the coriander, the green onion and 2 tablespoons coconut.
3. Put the remainder of the coconut on a soup plate. Divide the fish mixture into 12
portions, shape them into round cakes and coat them with the coconut.
4. Place six fish cakes onto the wire rack and put them into the airfryer at 200℃. Set the
timer to 7-10 minutes and fry the fish cakes until they are golden brown and done. Fry
the remainder of the fish cakes in the same way.
5. Serve the fish cakes with the mango salsa. Tasty with pandan rice and stir-fried pak
choi.
Meat Loaf
Main course - 4 portions
10 minutes + 20 minutes airfryer
400 g (lean) ground beef
1 egg, lightly beaten
3 tablespoons bread crumbs
50 g salami or chorizo sausage, finely chopped
1 small onion, finely chopped
1 tablespoon (fresh) thyme
Freshly ground pepper
2 mushrooms, thick slices
1 tablespoon olive oil
Thai Fish Cakes with Mango Salsa
Main course - 4 portions
20 minutes + 14 minutes airfryer
1 ripe mango
1 1/2 teaspoons red chili paste
3 tablespoons fresh coriander or flat leaf parsley
Juice and zest of 1 lime
500 g white fish fillet (cod, tilapia, pangasius, pollack)
1 egg
1 green onion, finely chopped
50 g ground coconut
Food processor
24 25
Fixed-bottom baking pan or round oven dish,
12 cm diameter, contents 500 ml
1. Preheat the airfryer to 230℃.
2. Mix the ground meat in a bowl with the egg, bread crumbs, salami, onion, thyme, 1
teaspoon salt and a generous amount of pepper. Knead and mix thoroughly.
3. Transfer the ground meat to the pan or dish and smoothen the top. Press in the
mushrooms and coat the top with olive oil.
4. Place the pan or dish onto the wire rack and put them into the airfryer. Set the timer
to 20-25 minutes and roast the meat loaf until nicely brown and done.
5. Leave the meat loaf to stand for at least 10 minutes before serving. Then cut the loaf
into wedges. Tasty with fried potatoes and a salad.
Page 14

Courgette Stuffed with Ground Meat
Main course - 2 portions snack – 4 portions
20 minutes + 20 minutes airfryer
1 large courgette (approx. 400 g)
50 g feta cheese, crumbled
1 clove garlic, crushed
1/2 tablespoon mild paprika powder
200 g lean ground beef
Freshly ground black pepper
Shallow bowl, diameter approx. 15 cm
1. Melt the chocolate and butter together in a thick-bottom steel pan on low heat while
stirring. Allow this mixture to cool to room temperature.
2. Preheat the airfryer to 200℃.
3. In a bowl, beat the egg with the sugar, the vanilla sugar and a pinch of salt until light
and creamy. Beat in the chocolate mixture and then stir in the self-rising flour and the
nuts.
4. Line the cake pan with parchment paper and spread the batter in the cake pan.
Smooth the top.
5. Place the cake pan onto the wire rack and put them into the airfryer. Set the timer to
20-22 minutes and bake the brownie until the top is crispy. The inside should still be
nice and soft.
1. Cut the ends off the courgette and cut it into six equal parts. Set the parts upright
and carve them out with a teaspoon to 1/2 cm off the sides and 1 cm off the bottom.
Sprinkle the inside with a little salt.
2. Preheat the airfryer to 220℃.
3. Mix the ground beef with the feta cheese, garlic, paprika power and pepper to taste
and mix well. Divide the ground beef into six equal portions. Fill the hollow courgette
parts with ground beef and press in the mixture. Smooth the top with a moist hand.
4. Put the courgette in the bowl and place the bowl onto the wire rack. Put them into
the airfryer and set the timer to 20 minutes. Bake the stuffed courgette until it is
brown and done. Delicious with yellow rice and roasted cherry tomatoes.
Tips
- Roasted cherry tomatoes
Place 250 g cherry tomatoes on the vine in the basket and roast them in the airfryer for
3-4 minutes at 230℃. The tomatoes are ready when the skin breaks. Arrange one or two
clusters of tomatoes on each plate next to the stuffed courgettes.
Brownies
Pastry - 12 portions
15 minutes + 20 minutes airfryer
75 g pure chocolate, in pieces
75 g butter
1 large egg
60 g sugar
1 sachet vanilla sugar
40 g self-rising flour
25 g walnuts or hazelnuts, chopped
Small, low fixed-base cake tin or oven dish, (approx. 15 cm diameter) and
parchment paper
26 27
Salmon Quiche
Main course - 2 portions
15 minutes + 20 minutes airfryer
150 g salmon fillet, cut into small cubes
1/2 tablespoon lemon juice
Freshly ground black pepper
100 g flour
50 g cold butter, in cubes
2 eggs + 1 egg yolk
3 tablespoons whipping cream
1/2 tablespoon (tarragon) mustard
1 green onion, sliced into 1 cm pieces
Small, low quiche pan, approx. 15 cm diameter, buttered
1. Preheat the airfryer to 200℃. Mix the salmon pieces with the lemon juice and salt
and pepper to taste. Allow the salmon to rest.
2. In a bowl, mix the flour with the butter, egg yolk and 1/2 – 1 tablespoon cold water
and knead into a smooth ball.
3. On a floured work surface, roll out the dough to an 18 cm round.
4. Put the dough round in the quiche pan and press firmly along the edges. Trim the
dough closely along the edge of the pan or allow the dough to stick out roughly over
the edges of the pan.
5. Beat the eggs lightly with the cream and mustard and add salt and pepper to taste.
Pour this mixture into the quiche pan and then lay the pieces of salmon in the pan.
Distribute the green onion evenly over the contents of the quiche pan.
6. Place the quiche pan onto the rack and put them into the airfryer. Set the timer to 20
minutes and bake the quiche until golden brown and done.
 Loading...