

Page 1
OWNER’S
GUIDE
E2007 Lennox Industries Inc.
Dallas, Texas, USA
ComfortSenset 5000 Series Models L5711U
and L5732U Programmable Touch Screen
Thermostats
IMPORTANT
Read and save these instructions.
506067−01
2/2008
Page 2

Table of Contents
Thermostat Features Page 2. . . . . . . . . . . . . . . . . . . . . . . . . .
Thermostat Display Page 3. . . . . . . . . . . . . . . . . . . . . . . . . . . .
System Settings Page 5. . . . . . . . . . . . . . . . . . . . . . . . . . . . . . .
Fan Settings Page 6. . . . . . . . . . . . . . . . . . . . . . . . . . . . . . . . . .
Program Your Heating and Cooling Schedule Page 7. . . . .
Fan Schedule Page 10. . . . . . . . . . . . . . . . . . . . . . . . . . . . . . . . .
Cancel a Schedule Period Page 11. . . . . . . . . . . . . . . . . . . . . . .
Set the Time Page 12. . . . . . . . . . . . . . . . . . . . . . . . . . . . . . . . . .
Override Temperature Setting Temporary Hold Page 13. . . . .
Override Temperature Setting Permanent Hold Page 14. . . .
Override Temperature Setting Vacation Hold Page 15. . . . . .
Temperature Recovery Feature Page 16. . . . . . . . . . . . . . . . . . .
Clean the Thermostat Screen Page 17. . . . . . . . . . . . . . . . . . . .
Battery Replacement Page 18. . . . . . . . . . . . . . . . . . . . . . . . . . .
Reminder Timers Page 20. . . . . . . . . . . . . . . . . . . . . . . . . . . . . . .
Built−In Compressor Protection Page 21. . . . . . . . . . . . . . . . . . . .
Outdoor Temperature Page 22. . . . . . . . . . . . . . . . . . . . . . . . . . .
Advanced Heat Pump Features Page 22. . . . . . . . . . . . . . . . . . .
Screen Lock Page 23. . . . . . . . . . . . . . . . . . . . . . . . . . . . . . . . . .
Advanced Settings Page 25. . . . . . . . . . . . . . . . . . . . . . . . . . . . .
Troubleshooting Tips Page 29. . . . . . . . . . . . . . . . . . . . . . . . . . . .
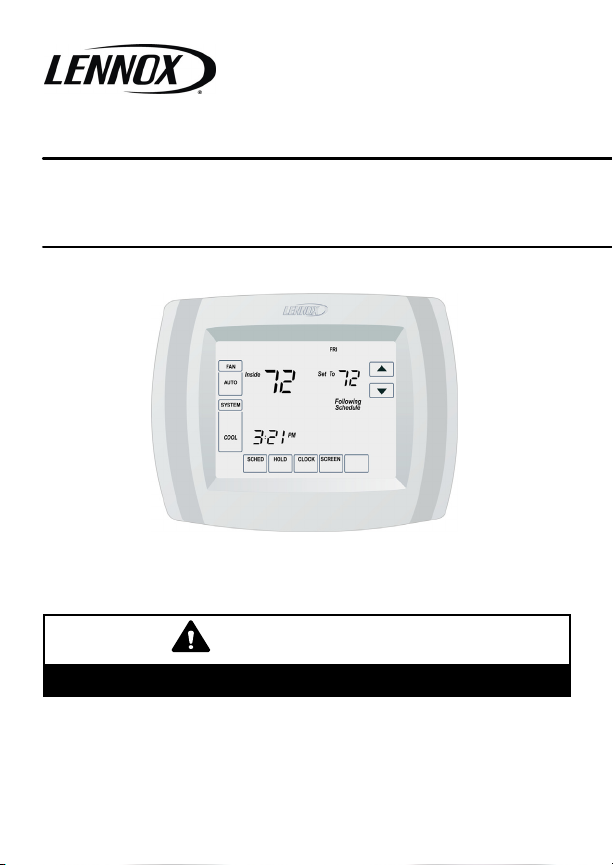
Thermostat Features
S Large, clear display with backlight shows the current tem-
perature, the current temperature setting and the time −−
even in the dark.
S Menu−driven programming makes set−up effortless.
S Touch screen interaction.
S Real−time clock keeps time during power failures and auto-
matically converts to daylight savings time.
S Saving Changes" notification assures you that changes
have been saved.
S Change / check reminders let you know when it is time to
replace filters, UV lamps, batteries, etc.
Page 2
Page 3
S Override options allow you to easily override the pro-
grammed schedule.
S Same−schedule programming allows you to program a
schedule for several days at once. No need to copy.
S Armchair programming allows you to remove the thermo-
stat from the wall while you program your schedules.
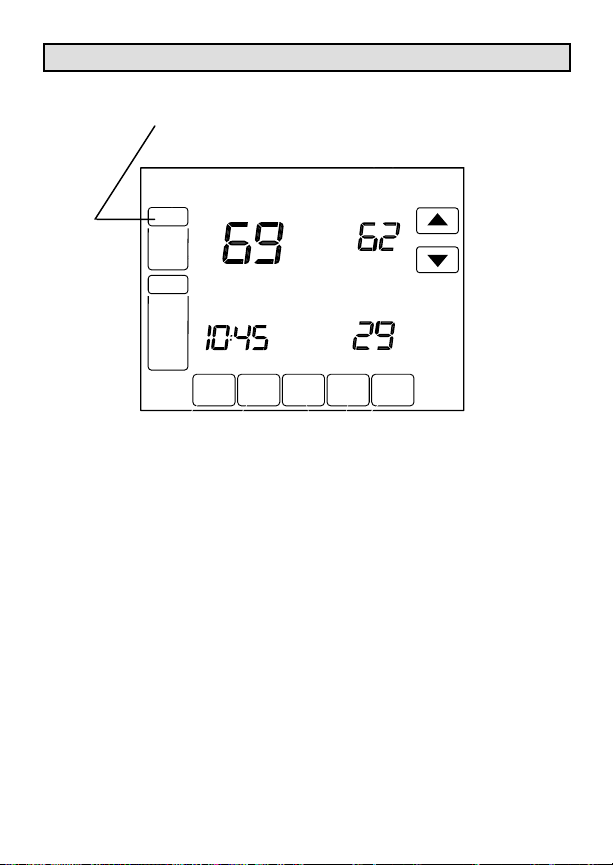
Thermostat Display
FAN
SELECT AUTO,
ON OR CIRC
FAN
AUTO
SS MY TE
HEAT
SCHED
SELECT TO
ENTER SCHEDULE MODE
HOLD
SETS A PERMANENT HOLD AND
ACTIVATES VACATION HOLD
SYSTEM
SELECT EMERGENCY HEAT,
HEAT, OFF OR COOL
AM
CLOCK
USED TO SET
TIME FORWARD
OR BACK
Se ot T
UP ARROW
RAISES
TEMPERATURE
SETTING
DOWN ARROW
LOWERS
TEMPERATURE
SETTING
MORE
SHOWS FURNACE FILTER,
UV LIGHT OR HUMIDIFIER
PAD CHANGE REMINDER
SCREEN
LOCKS TOUCH SCREEN
FOR CLEANING
Page 3
Page 4
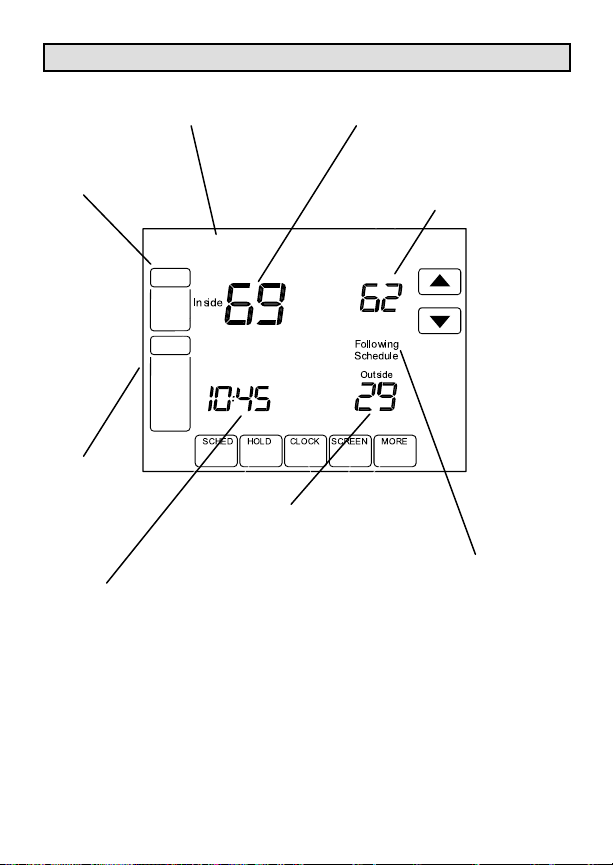
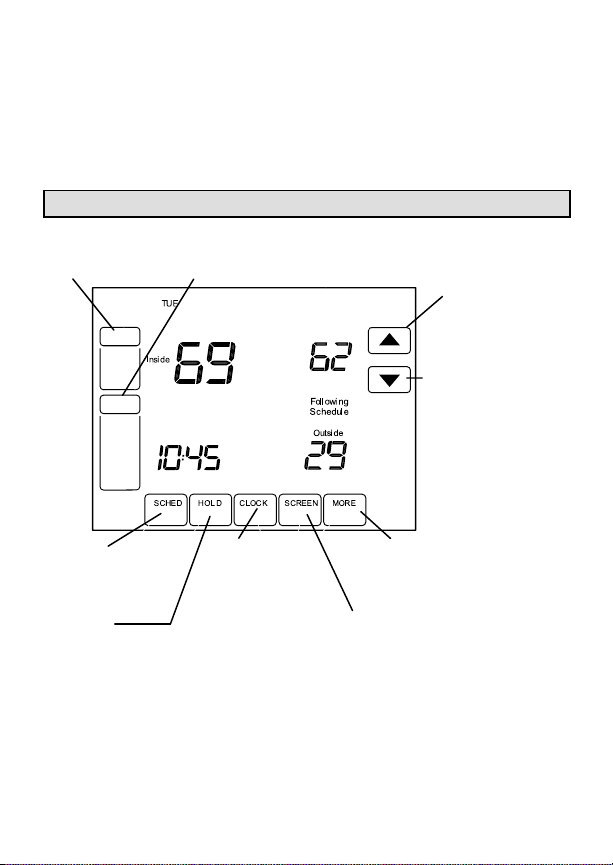
Thermostat Display (Continued)
TUE
SHOWS CURRENT
DAY OF THE WEEK
FAN
SHOWS FAN
SETTING
TUE
FAN
AUTO
SS MY TE
HEAT
SYSTEM
SHOWS
CURRENT
SYSTEM
POSITION
TIME
SHOWS CURRENT
TIME OF DAY, HOLD
TIME REMAINING OR
NUMBER OF VACATION
DAYS REMAINING
OUTSIDE
SHOWS CURRENT
OUTSIDE TEMPERATURE
(IF SYSTEM INCLUDES
OUTSIDE TEMPERATURE
SENSOR)
INSIDE
SHOWS CURRENT
INSIDE TEMPERATURE
Se ot T
AM
SET TO
SHOWS CURRENT
TEMPERATURE
SETTING
FOLLOWING
SCHEDULE
INDICATES THAT
THERMOSTAT IS
FOLLOWING THE
PROGRAMMED
SCHEDULE
Page 4
Page 5
System Settings
TUE
FAN
Inside
AUTO
SS MY TE
HEAT
SCHED HOLD CLOCK SCREEN MORE
PRESS SYSTEM
SELECT SETTING OF HEAT,
OFF, COOL OR EM HEAT
(HEAT PUMP SYSTEMS ONLY)
Se ot T
Following
Schedule
Outside
AM
SYSTEM SETTINGS
The system setting options vary based on your heating and/or
cooling type.
HEAT Thermostat controls heating system.
OFF Both heating and cooling systems are off.
COOL Thermostat controls cooling system.
AUTO The thermostat switches the system from the heat-
ing mode to the cooling mode based on temperature.
EM HEATHeat pump systems only −− Thermostat controls
emergency heat and auxiliary heat, if needed. Heat pump compressor is not operational.
Page 5
Page 6
Fan Settings
PRESS FAN.
SELECT SETTING:
ON, AUTO OR CIRC.
TUE
FAN
Inside
AUTO
SS MY TE
HEAT
SCHED HOLD CLOCK SCREEN MORE
Se ot T
Following
Schedule
Outside
AM
FAN SETTINGS
ON Fan runs continuously. Use this setting for improved
air circulation or for more efficient central air cleaning.
AUTO Fan runs only when heating or cooling system is on.
CIRC Fan runs randomly approximately 35% of the time.
Use this setting for improved air circulation or for more efficient
central air cleaning when you do not want the fan to run continuously.
Page 6
Page 7
Program Your Heating and Cooling Schedule
NOTE − The thermostat includes a battery which makes it possible for you to remove the thermostat from the wallplate during
program. See page 19.
Your thermostat can control up to four different schedule periods
per day:
Wake Time when you awaken and want your home at a
comfortable temperature.
Leave Time when you leave the home and prefer an energy−saving temperature setting.
Return Time when you return home and want your home to
return to a more comfortable temperature setting.
Sleep Time when you are asleep and prefer an energy−
saving temperature setting.
NOTE − Schedule times are in 15−minute intervals.
EDIT THE SCHEDULE:
1 − Press the SCHED key. The SCHEDULE screen will be dis-
played.
2 − Press the EDIT key. The screen will change to display the
days of the week across the top.
MON TUE WED THU FRI SUN
OK TO PICK MULTIPLE DAYS
SAT
CANCEL
Page 7
Page 8
Program Your Heating and Cooling Schedule (Cont.)
3 − Select any combination of days to edit. You may select
multiple days. These should be days that you wish to follow
the same schedule. Check marks appear next to the days
that are selected. After the first day is selected, the SCHEDULE screen returns to the display.
4 − Press the WAKE key. The WAKE key will flash to show it
is selected.
5 − Press the UP and DOWN keys to modify time and heat
and cool temperatures shown on the screen.
6 − Press LEAVE key and repeat step 5.
7 − Press RETURN key and repeat step 5.
8 − Press SLEEP key and repeat step 5.
MON TUE WED THU FRI SUN
OK TO PICK MULTIPLE DAYS
FAN
CIRC
CANCEL
PERIOD
AM
DONE WAKE LEAVE RETURN SLEEP
SAT
CANCEL
Page 8
HEAT
COOL
Page 9
Program Your Heating and Cooling Schedule (Cont.)
NOTE − The FAN setting can be programmed for ON, AUTO or
CIRC for each period selected. See following page for more information about fan setting options.
9 − Press DONE key when finished. Saving changes screen
appears to indicate that schedule changes are being saved
to the days selected.
10 − Repeat steps 1 through 9 to set a program schedule for
the remaining days of the week. Example: If Mon − Fri was
selected first, repeat steps 1 through 9 to program Sat and
Sun.
NOTE − To exit the schedule without saving changes, press
CANCEL key at any time.
MON TUEWEDTHUFRI
SAVING CHANGES
Page 9
Page 10
Fan Schedule
The FAN setting can be programmed for ON, AUTO or CIRC for
each period selected:
ON Fan runs continuously. Use this setting for improved
air circulation or for more efficient central air cleaning.
AUTO Fan runs only when heating or cooling system is on.
CIRC Fan runs randomly approximately 35% of the time.
Use this setting for improved air circulation or for more efficient
central air cleaning when you do not want the fan to run continuously.
Fan Status Display on Home ScreenIf the fan program is
scheduled, AUTO is displayed as the fan setting, along with the
particular fan setting that has been programmed. For example, if,
during the WAKE period, the Fan has been set to AUTO, then
AUTO is shown as the fan setting. However, if, during the WAKE
period, the Fan has been set to ON, both AUTO and ON are displayed. AUTO indicates that the fan has been scheduled and ON
indicates that the fan has been scheduled to be ON.
Manually Override Scheduled Fan SettingIf the fan setting
is scheduled, press the FAN key, then press the desired fan setting to manually override the scheduled fan setting. Fan operation will return to the programmed operation when the next
schedule period begins.
THU
FAN
ON
AUTO
SYSTEM
HEAT
Inside
Set To
Following
Schedule
AM
SCHED HOLD CLOCK SCREEN
Page 10
Page 11

Cancel a Schedule Period
You may wish to cancel a period to match your lifestyle. For
example, if someone is always home during the day on Tuesday, you can cancel the LEAVE and RETURN periods to
have the thermostat hold the WAKE temperature until the
SLEEP period is reached.
1 − Press the SCHED key. The SCHEDULE screen will be
displayed.
2 − Press the EDIT key. The screen will change to display the
days of the week across the top.
3 − Select the day or days of the week that are affected by
the schedule change.
4 − Press the schedule period you want to cancel: WAKE,
LEAVE, RETURN or SLEEP. Once selected the period will
flash to show it is selected.
5 − Press the CANCEL key. The time, temperature(s) and
fan settings will all dissappear from the screen. The bar
above the selected period is removed to indicate that the selected period was cancelled.
6 − Press DONE key.
NOTE − A schedule period may be reinstated at any time by
entering the schedule edit screen, selecting the period and
pressing the arrow keys to set the desired time and temperatures.
TUE WED THU FRI SAT
MON
OK TO PICK MULTIPLE DAYS
FAN
SUN
HEAT
DONE WAKE LEAVE RETURN CANCELSLEEP
Page 11
COOL
Page 12

Set the Time
1 − Press the CLOCK key. The current time setting will be dis-
played as shown below.
2 − Use the arrows to set the correct time.
3 − Press DONE key.
IMPORTANT − The current day of the week should be displayed
correctly on this screen. If not, refer to the Advanced Settings
section to correct the day of the week display.
TUE
AM
DONE
CANCEL
Page 12
Page 13

Override Temperature SettingTemporary Hold
You may use the temporary hold function to override the programmed temperature setting until the next scheduled period
or until a particular time that you wish.
1 − Press the UP or DOWN arrow next to the temperature
display to adjust the temperature as desired.
NOTE − Hold Temperature Until" appears on the screen. The
currently programmed start time of the next scheduled period
also appears, as does an additional set of arrows.
2 − Use the UP and Down arrows next to the displayed
time to set the time that you wish for the thermostat to
resume the schedule.
NOTE − The time arrows are displayed for approximately
seven seconds. Press the screen where the hold temperature
time is shown to allow the arrows to reappear.
3 − Press CANCEL or SCHED key to cancel temperature
hold and resume schedule. Following Schedule" appears
on the screen to indicate that the temporary hold has ended.
TUE
FAN
AUTO
SYSTEM
HEAT
Inside
Hold Temperature
Until
PM
Set To
SCHED HOLD CLOCK SCREEN
Page 13
CANCEL
Page 14

Override Temperature SettingPermanent Hold
The permanent hold function overrides the programmed temperature setting until the permanent hold is cancelled.
1 − Press the HOLD key.
NOTE − Permanent Hold" appears on the screen under the cur-
rent time.
2 − Use the UP and Down to adjust the temperature to the
setting that you want the thermostat to hold.
3 − Press CANCEL key to cancel permanent hold and re-
sume schedule. Following Schedule" appears on the
screen to indicate that the hold has ended.
TUE
FAN
Inside
AUTO
SYSTEM
HEAT
Permanent
Hold
SCHED HOLD CLOCK SCREEN
AM
Set To
CANCEL
Page 14
Page 15

Override Temperature SettingVacation Hold
You may use the vacation hold function to override the programmed temperature setting for a designated number of days.
1 − Press the UP or DOWN arrow next to the temperature
display to adjust the temperature as desired.
NOTE − Hold Temperature Until" appears on the screen. The
currently programmed start time of the next scheduled period
also appears, as does an additional set of arrows. This is the time
of day that the override will expire after the hold period ends.
2 − Press the HOLD key twice. Screen shows Hold Tempera-
ture Until" one day.
3 − Press the UP and DOWN arrows to adjust the number of
days you would like to override the schedule.
NOTE − Arrows used to adjust the number of days are displayed
for approximately seven seconds. Press the screen where the
number of days are shown to allow the arrows to reappear.
4 − Press the CANCEL key to cancel the vacation override
early.
NOTE − When the programmed vacation hold expires, the
screen displays Following Schedule" to indicate that the hold
has ended.
THU
FAN
Inside
AUTO
Set To
SYSTEM
Hold Temperature
HEAT
Until
SCHED CLOCK SCREEN
DAYS
CANCEL
Page 15
Page 16

Temperature Recovery Feature
Your thermostat is equipped with a feature that accommodates
recovery time to ensure your comfort.
Recovery time is the time that it takes your heating and cooling
equipment to recover from energy−saving settings programmed
during away or asleep periods. Recovery time depends on local
weather, your schedule, the contruction of your home and your
heating and/or cooling equipment.
Your thermostat tracks the time that it takes for your system to
reach your desired settings (recovery period). This allows the
thermostat to accommodate this recovery period and to ensure
your comfort at the programmed wake and return settings.
For example, your WAKE period is programmed for 6:00 a.m.
and 70°F. The thermostat activates heating in advance of 6:00
a.m. to ensure that your desired comfort setting of 70°F is
reached by the time you awake.
A recovery notice is displayed when the system is operating before the scheduled time.
TUE
FAN
Inside
AUTO
SYSTEM
HEAT
SCHED HOLD CLOCK SCREEN MORE
AM
Page 16
Se ot T
Following
Schedule
RECOVERY
Page 17

Clean the Thermostat Screen
The thermostat screen may be cleaned, if necessary.
1 − Press the SCREEN key. The thermostat locks the touch
screen for 30 seconds to allow for cleaning.
2 − Use a damp cloth slightly moistened with water or
household glass cleaner to clean the screen.
IMPORTANT − Do not spray any type of liquid directly onto the
thermostat. Spray the water or household glass cleaner on a
cloth, then use the cloth to clean the thermostat screen.
3 − Repeat the above steps as necessary.
4 − Press the DONE key to return to the home screen and
normal operation.
OK TO
CLEAN
SCREEN
DONE
Page 17
Page 18

Battery Replacement
If your thermostat has batteries, a low battery warning flashes on
the home screen for approximately 30 days.
IMPORTANT − Batteries should be replaced once per year to
prevent leakage and to prevent loss of battery back−up in a power outtage. You may also wish to replace the batteries prior to
leaving your home for more than a month.
1 − When the low battery indicator is flashing, replace the
batteries promptly with three fresh AAA alkaline batteries.
2 − Remove the thermostat from the wallplate by pulling
straight out.
WALL
Page 18
Page 19

Battery Replacement (Continued)
3 − Remove the old batteries and insert three fresh AAA al-
kaline batteries, as marked on the thermostat.
BACK OF THERMOSTAT
+
+
BATTERIES (3)
+
4 − Align the terminal screw blocks with the pins on the
back of the thermostat.
5 − Push the thermostat straight onto the wallplate until it
snaps into place.
WALLPLATE
PINS ON
BACK OF
THERMOSTAT
TERMINAL
SCREW
BLOCK
Page 19
Page 20

Reminder Timers
The reminder timers notify you when it is time to change the furnace filter, humidifier pad or ultraviolet lamp. When one of the set
timers expires, a reset key appears on the home screen.
Reset Timers
1 − Change" reminder appears on the screen when the
timer expires.
2 − Press the RESET key to restart the timer. If more than
one timer expires at the same time, press the RESET key
until all timers have been reset.
MON SUN
TUE WED THU FRI SAT
CHANGE FILTER
FAN
Inside
AUTO
SYSTEM
RESET
HEAT
PM
SCHEDHOLDCLOCKSCREENMORE
Set to
Following
Schedule
View or Reset Timer Settings Before They Expire
1 − Press the MORE key until the timer you want to modify
appears on the screen.
2 − Press the EDIT key to change the Timer Reload Value.
Use the UP or DOWN arrow keys to change the number of
run time days. See the Advanced Settings section, step 8
through 10 for more information.
3 − Press the DONE key to return to the selected timer.
4 − Press the RESET key to reset the timer to the Timer Re-
load Value.
5 − Press DONE or CANCEL key to return to home screen.
Page 20
Page 21

Built−In Compressor Protection
The thermostat provides built−in compressor protection (minimum−off timer) that prevents the compressor from restarting too
early after a shutdown.
The minimum−off timer is activated after the compressor shuts
off.
If there is a demand for compressor operation during the delay,
the thermostat displays the WAIT message.
When the minimum−off delay expires, COOL ON ( or HEAT ON in
heat pump applications) is displayed solidly on the screen and
the compressor and fan are allowed to operate to meet the demand.
UET
FAN
Inside
AUTO
SYSTEM
HEAT
AM
PM
SCHEDHOLDCLOCKSCREENMORE
Page 21
Set to
Wait Cool
Following
Schedule
Page 22

Outdoor Temperature
If an optional outdoor temperature sensor has been installed with
your thermostat, the outdoor temperature is displayed in the lower right corner of the home screen.
If the temperature is not displayed and an outdoor temperature
sensor has been installed, press the MORE key until the outside
temperature is displayed.
TUE
FAN
AUTO
Inside
Se ot T
SYSTEM
HEAT
AM
SCHED HOLD CLOCK SCREEN MORE
Following
Schedule
Outside
Advanced Heat Pump Features (Select Models)
Some thermostat models, when used in heat pump systems
which include an optional outdoor temperature sensor, provide
additional features. In these applications, the compressor and/or
back−up heat lockout may be based on the outside temperature.
Page 22
Page 23

Screen Lock
You can fully or partially lock the keys on the touch screen. See
the Advanced Settings section for more information on this feature. If the thermostat displays a Screen Locked" message, your
thermostat screen is either fully or partially locked.
Partially Locked Screen
When partially locked, all touch screen keys are locked except
the temperature up and down arrow keys and the SYSTEM key
access to the user set−up options. The Screen Locked message
is displayed for 5 to 7 seconds each time the user attempts to
press a key that is locked.
When the screen is partially locked, you will be able to adjust the
temperature setting up or down; but schedule settings will not be
accessible. The temporary temperature change lasts until the
next scheduled period. Refer to Temporary Temperature Override section. To cancel the temporary temperature override and
return to the programmed schedule, press the CANCEL key.
Fully Locked Screen
When the screen is fully locked, you will still be allowed to access
the user set−up options through the SYSTEM key; however, all
other touch screen keys are locked and are not functional. The
Screen Locked message is displayed continuously.
FAN
AUTO
SYSTEM
HEAT
TUE
Inside
PM
SCREEN LOCKED
Set To
Following
Schedule
SCHED HOLD CLOCK SCREEN MORE
Page 23
Page 24

Advanced Settings
Your thermostat has many advanced settings that can be used to
match your desired use of this important tool. These items have
been set by the installer during the installer set−up process; however, use the following information to customize the settings for
your use.
Use the following steps and the User Set−Up table on pages 25
through 27 to customize your thermostat operation.
1 − Press and release the SYSTEM key.
2 − Press and hold the center blank key for approximately five
seconds, until the screen changes.
TUE
CHANGE FILTER UV LAMP HUMIDIFIER PAD
Inside
SYSTEM
EM HEAT
OFF
Set To
Following
Schedule
PM
CANCEL
3 − Release the key when the thermostat display matches the
display below.
DONE
Page 24
Page 25

Advanced Settings (Continued)
4 − Refer to the figure below to see how the thermostat buttons
are used to make selections.
5 − Refer to the table on the following pages to make proper set−
up choices for your application.
6 − When all set−up selections have been made, press the
DONE key to save your settings. The thermostat display will
return to the main screen.
NOTE − Thermostats manufactured beginning March 2006 include program selection to accommodate 2007 daylight savings
calendar. Advanced setting number 330 must be changed to option 2 at the beginning of 2007 in areas which use the revised
DST calendar in the US and Canada.
USER
SET−UP
NUMBER
DONE
PRESS TO EXIT
INSTALLER SET−UP
RETURN TO PREVIOUS
USER SET−UP
Page 25
ADVANCE TO NEXT
USER SET−UP
CURRENT
SETTING
CHANGE THE
CURRENT
SETTING
Page 26

Advanced Settings (Continued)
User Set−
Up No.
0120 Date (Year/first)
0130 Date (Year/last)
0140 Date (Month)
0150 Date (Day)
0160
0320
Set−Up Name Selection Description
Select first two digits of current
calendar year (20 for 2007, etc.)
Select last two digits of current
calendar year (07 for 2007, etc.)
Options: 01 to 99 available.
Select number that represents
current calendar month.
Options 1 through 12.
Select number that represents
current calendar date.
Options 1 through 31.
Select the type of scheduling that
Schedule Options
Temperature
Display Scale
will be used. Options:
0− non−programmable thermostat
4− fully programmable thermostat
with 7−day scheduling
Select the temperature display to
be used. Options:
0− Fahrenheit
1− Celsius
table continued on next page
Page 26
Page 27

Advanced Settings (Continued)
User Set−
Up No.
0330
0500
0510
Daylight Savings
Filter Change
Reminder
Humidifier Pad
Replacement
Reminder
Selection DescriptionSet−Up Name
Options: 0 − Off. Thermostat time
is not automatically adjusted for
DST.
1 − On. Thermostat time is automatically adjusted for Daylight
Savings in the Fall and Spring
(using the pre−2007 DST calendar)
2 − On. Thermostat time is automatically adjusted for Daylight
Savings in Fall and Spring (using
2007 DST calendar for US and
portions of Canada)
Select option for filter change reminder timer. Options:
0 − Reminder is off
1 − 10 run time days
2 − 30 run time days
3 − 60 run time days
4 − 90 run time days
5 − 120 run time days
6 − 365 run time days
Select option for humidifier pad
replacement reminder timer. Options:
0 − Reminder is off
1 − 90 run time days
2 − 180 run time days
3 − 365 run time days
table continued on next page
Page 27
Page 28

Advanced Settings (Continued)
User Set−
Up No.
UV Lamp Re-
0520
0540
0640 Clock Format
0670
placement Reminder
Number of Periods
Screen Lock−
Out
Selection DescriptionSet−Up Name
Select option for UV lamp replacement reminder timer. Options:
0 − Reminder is off
1 − 365 run time days
Select option for number of
scheduling periods. Options:
2 − Two periods (wake and sleep)
4 − Four periods (wake, leave, return, sleep)
Select clock format. Options:
12 − 12−hour clock
24 − 24−hour clock
Select screen lockout. Options:
0 − All keys are functional;
screen is unlocked.
1 − Screen partially locked −− only
temp. up and down keys and
ability to enter installer set−up
mode and modify set−up selections are enabled.
2 − Screen fully locked −− only
ability to enter installer set−up
mode and modify set−up selections are enabled.
Page 28
Page 29

Troubleshooting Tips
If... Then...
Key to the right
of the screen
key is blank.
Display is
blank.
Temperature
settings do not
change.
Heating system
does not turn
on.
MORE key remains blank unless the Furnace
Filter Change Reminder has been turned on.
See User Set−Up Number 0500.
Check that fresh AAA alkaline batteries are
installed as marked on the thermostat.
Check that temperature settings are:
¯ Heating 40°F to 90°F (4.5°C to 32°C).
¯ Cooling 50°F to 99°F (10°C to 37°C).
¯ Press the SYSTEM key to set to heat.
¯ Check the heat temperature setting to be
sure it is set above the room temperature and
Heat On" is displayed solidly on the screen.
¯ Make sure circuit breaker is not tripped.
¯ Check the power switch at the heating
and/or cooling system to make sure it is on.
¯ Check the furnace door to make sure it is
closed securely.
¯ Wait five minutes for the heating system to
respond.
¯ If the problem has not been identified and
corrected, contact a qualified service technician.
table continued on next page
Page 29
Page 30

Troubleshooting Tips
If... Then...
Cooling system
does not turn
on.
Cannot set System setting to
Cool.
Heat On" is not
displayed on
the screen.
¯ Press SYSTEM key to set to Cool.
¯ Check the cool temperature setting to be
sure it is set below the room temperature and
Cool On" is displayed solidly on the screen.
¯ Make sure circuit breaker is not tripped.
¯ Check the power switch at the heating
and/or cooling system to make sure it is on.
¯ Check the furnace door to make sure it is
closed securely.
¯ Wait five minutes for the cooling system to
respond.
¯ If the problem has not been identified and
corrected, contact a qualified service technician.
Check Installer Set−Up Number 170: Heating
and/or Cooling Type*. Make sure the setting
matches the installed heating and/or cooling
system.
Set the System setting to Heat and set the
temperature setting above the room temperature. If Heat On" is shown solidly in the display, but the heating system does not turn on,
see Heating system does not turn on"
suggestions on the previous page.
table continued on next page
Page 30
Page 31

Troubleshooting Tips
If... Then...
Cool On" is not
displayed on
the screen.
Wait" is displayed on the
screen.
Fan does not
turn on in a call
for heat (electric furnaces
only)
Both heating
and cooling
systems are operating at the
same time.
Heating is running in Cool
mode.
Set the System setting to Cool and set the
temperature setting below the room temperature. If Cool On" is shown solidly in the display, but the cooling system does not turn on,
see Cooling system does not turn on"
suggestions at the top of this page.
Compressor minimum−off timer is activated.
Wait up to five minutes for the compressor to
turn on.
Check Installer Set−Up 0180: Fan Control in
Heating*. Make sure Electric Heat option is
selected.
Check Installer Set−Up Number 170: Heating
and/or Cooling Type*. Make sure the setting
matches the installed heating and/or cooling
system.
Check to ensure that bare portions of wires
are not touching.
Check Installer Set−Up Number 170: Heating
and/or Cooling Type*. Make sure the setting
matches the installed heating and/or cooling
system.
table continued on next page
Page 31
Page 32

Troubleshooting Tips
If... Then...
Heating system
does not turn
off and the heat
temperature
setting is set
below the room
temperature
(Heat On" is
not shown in
display.)
Red LED is lit in
the upper right
corner of the
thermostat
when the system monitor detects a possible
problem.
*Refer to Installation Instructions for access to Installer
Set−Up procedures.
Check Installer Set−Up Number 170: Heating
and/or Cooling Type*. Make sure the setting
matches the installed heating and/or cooling
system.
A system monitor is wired to the thermostat L
terminal. Refer to suggestions given in Heating or Cooling System Does Not Turn On
sections in this table.
Page 32
 Loading...