

Page 1
LENNDX
INSTALLATION
,1,_2000 Lennox Industries Inc.
Dallas, Texas, USA
HS40 condensing units use R407C which is an ozone
friendly HFC refrigerant. This unit must be installed with a
matching indoor coil and line set as outlined in the Lennox
Engineering Handbook. HS40 condensing units are de-
signed for use in expansion valve systems only. They are
not designed to be used in RFC systems. An expansion
valve and filter drier approved for use with R407C have
been shipped with the unit. These components must be
installed prior to unit operation.
A, WARNING
INSTRUCTIONS
HS40 S UNITS
CONDENSING UNITS lIE_ :.)
504,186M .LU_ Publications
11/2002 Lithe U.S.A.
Supersedes 4/2000
HS40 Condensing Unit ......................... 1
Shipping & Packing List ........................ 1
Unit Dimensions ............................... 2
General Information ............................ 3
Setting the Unit ................................ 3
Electrical ..................................... 3
Plumbing ..................................... 4
Flushing Existing Line Set and Indoor Coil ........ 4
Liquid & Suction Line Service Valves ............. 6
Leak Testing .................................. 7
Evacuation & Dehydration ...................... 7
Start-Up ...................................... 8
Charging ..................................... 8
System Operation ............................. 10
Maintenance .................................. 10
Start-Up & Performance Check List .............. 11
RETAIN THESE INSTRUCTIONS
FOR FUTURE REFERENCE
1 - Assembled HS40 condensing unit
1 - Bag assembly:
1 - Sight glass
1 - 5/16-3/8 inch adapter
1 - 45° elbow
1 - Expansion valve (approved for use with R407C)
1 - Drier (approved for use with R407C systems)
Check equipment for shipping damage. If you find any
damage, immediately contact the last carrier.
Technical
WARNING
11/02
IIIIIIIIIIIIIIIIIIIIIIIIIIIIIIIIIIIIIIll
Page 1
A, WARNING
504,186M
IIlIIIIIIIIIIIIIIIIIIIIIIIHIIIIIIIIIIIII
Page 2
INLET
©
AIR
INLET _AIR
OPTIONAL UNIT
INLET
©
AIR
SUCTION LINE
CONNECTION (162)
STAND-OFF KIT (4)_ "
(Field Installed)
COIL DRAIN OUTLETS_""_I
(Around perimeter of base)
(111)
/
INLET'_AIR
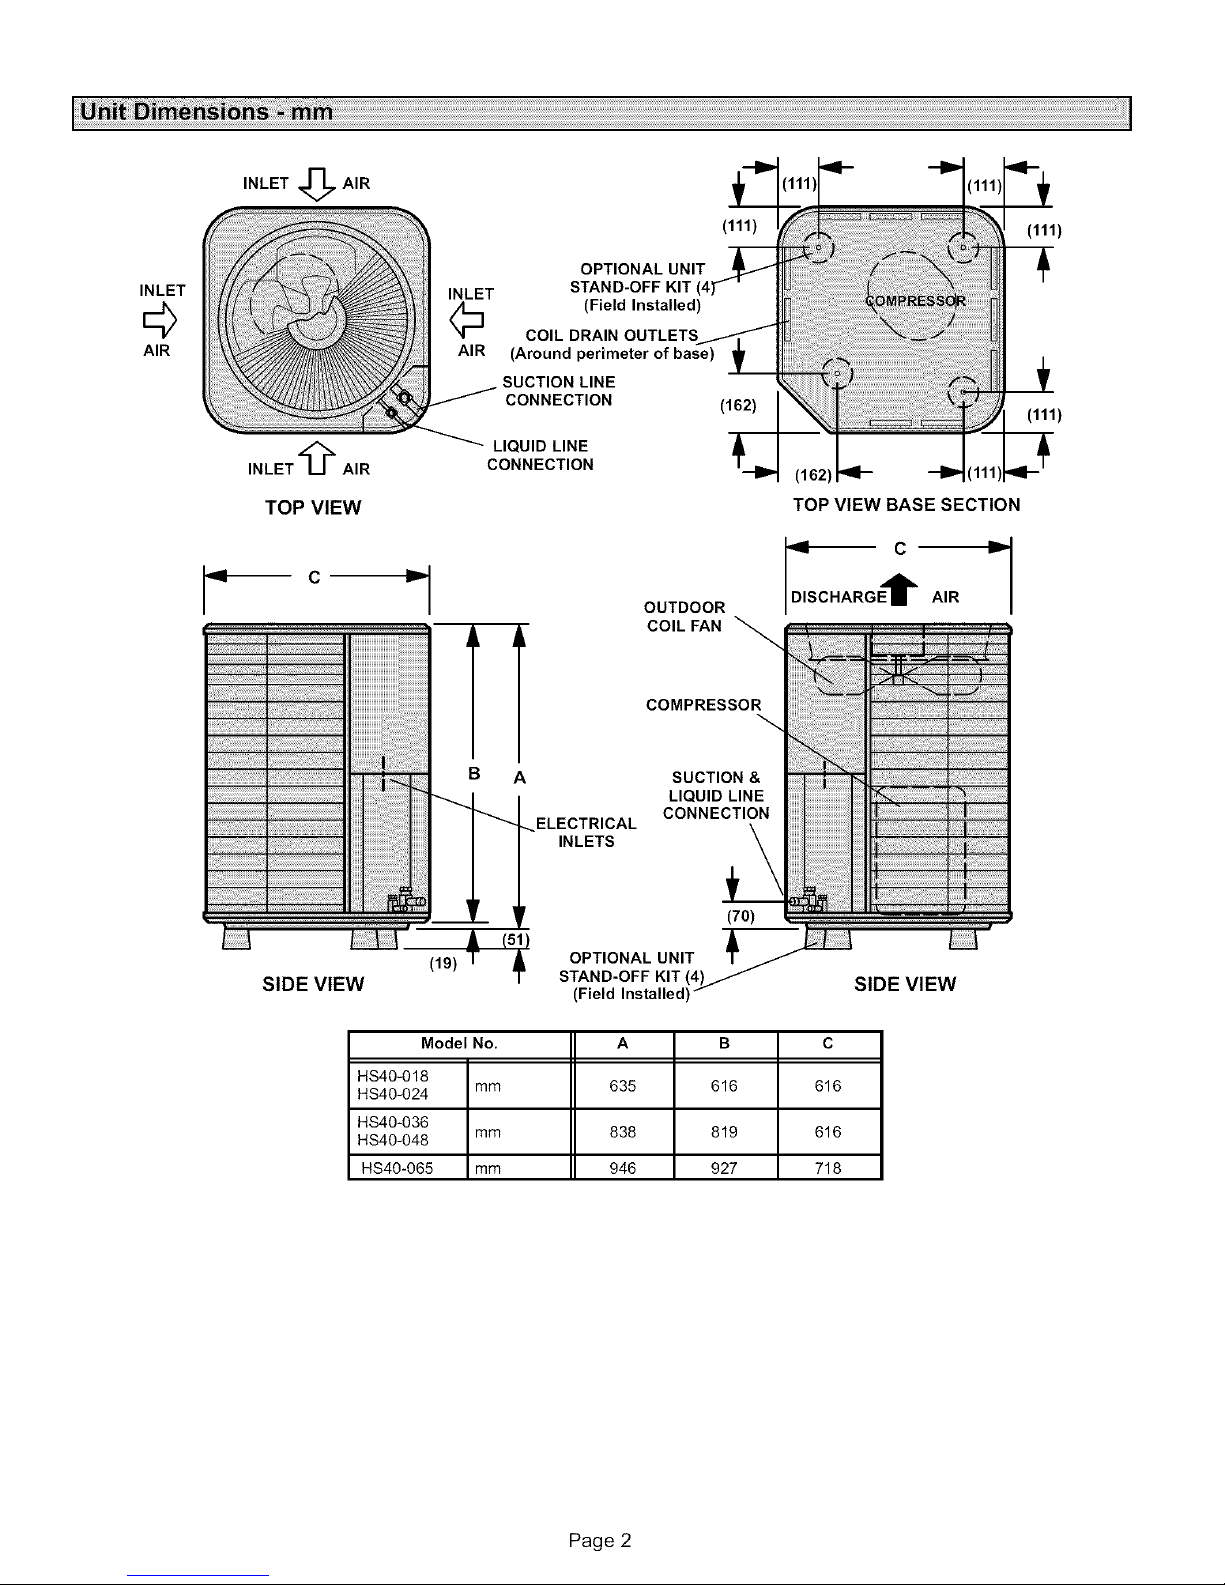
TOP VIEW
=_ C ,v
SIDE VIEW
HS40-018
HS40-024 mm 635 616 616
HS40-036
HS40-048 mm 838 819 616
HS40-065 mm 946 927 718
LIQUID LINECONNECTION
h._l
OUTDOOR
COIL FAN
COMPRESSOR
SUCTION &
LIQUID LINE
ELECTRICAL
INLETS
(19)
Model No, A B C
OPTIONAL UNIT
STAND-OFF KIT (4)_
(Field Installed) /
CONNECTION
(70)
TOP VIEW BASE SECTION
SIDE VIEW
Page 2
Page 3
Theseinstructionsareintendedasageneralguideanddo
notsupersedenationalorlocalcodesinanyway,Authorities
havingjurisdictionshouldbeconsultedbeforeinstallation,
TheHS40unitis "CEmarked"inaccordancewiththere-
quirementsd the latest European Directives for Electrical
and Machinery Safety and Electromagnetic Compatibility. In
addition HS40 units have type Approval Certification with
the Gas Appliance Directive.
A - Slab Mounting
When installing the unit at grade level, install it on a level
slab that is high enough above the grade to allow water to
drain adequately. The top of slab should be located so run-
off water from higher ground will not collect around the unit,
B - Roof Mounting
Install the unit at a minimum of 101 mm above the roof's sur-
face. Ensure that the weight of the unit is properly distributed
over roof joists and rafters. Either redwood or steel supports
are recommended.
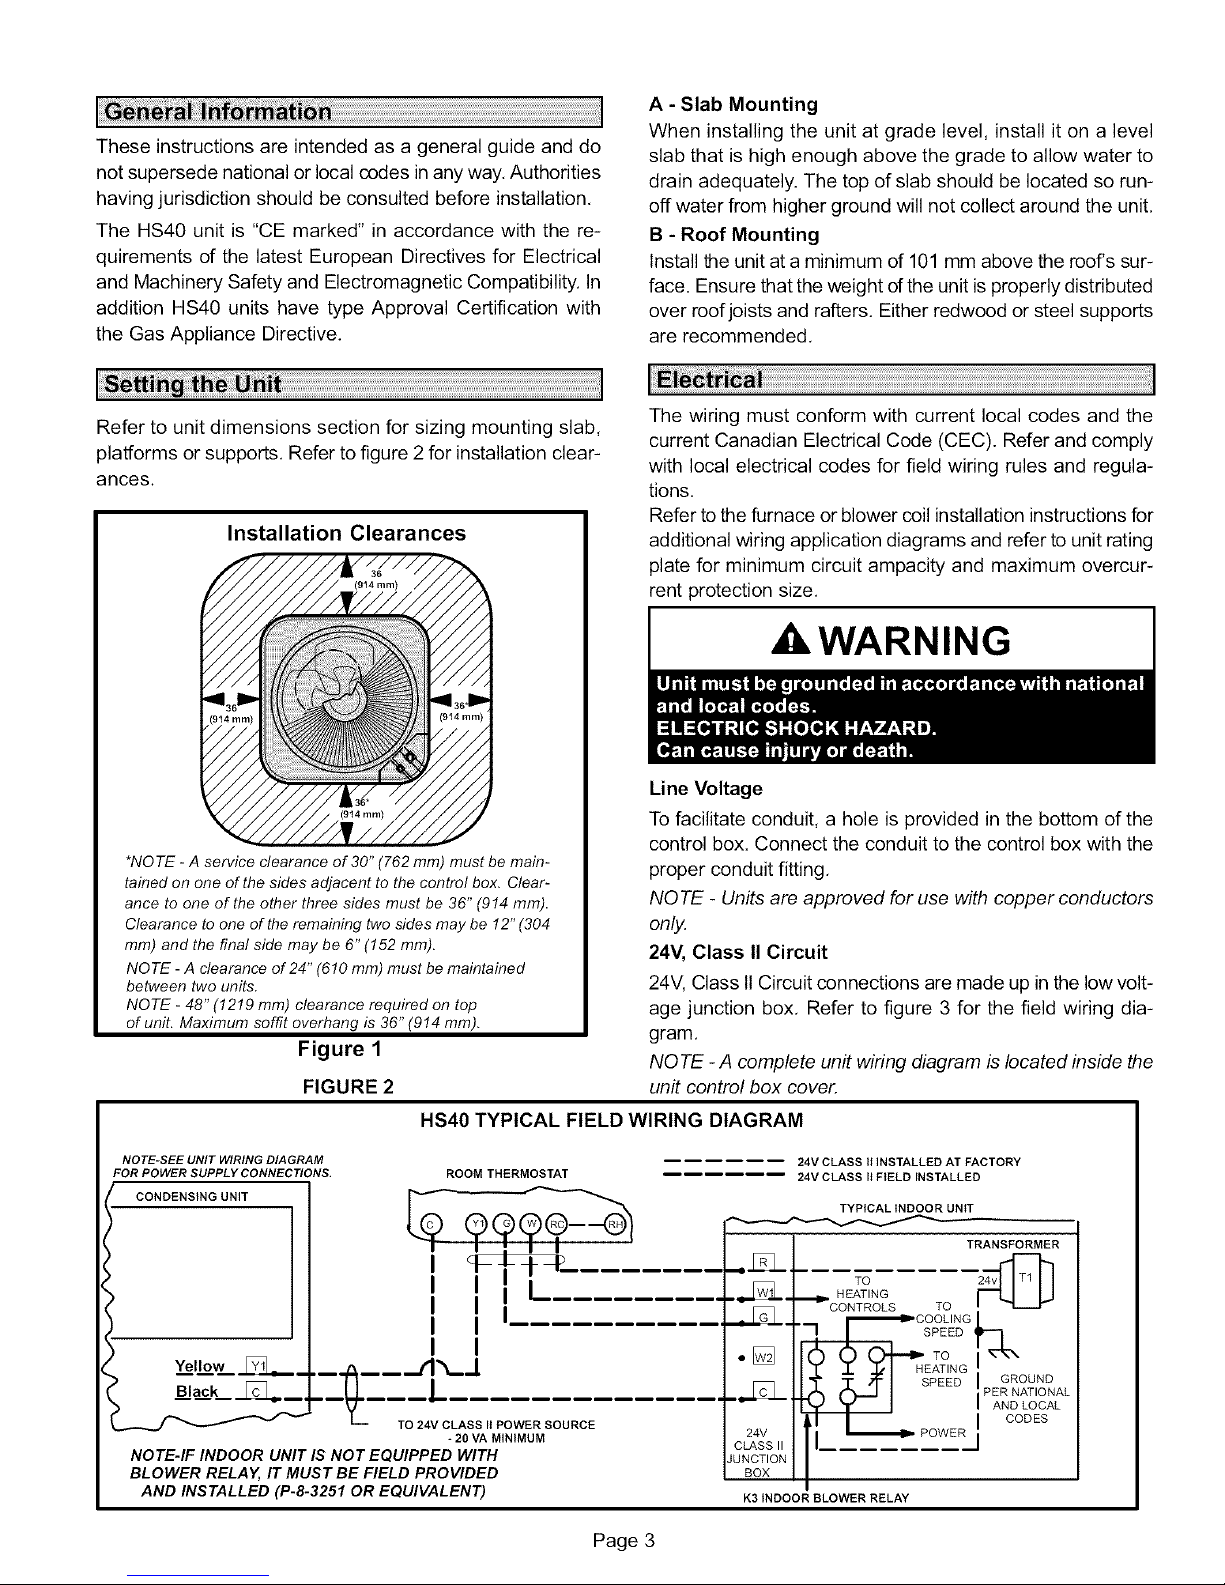
Refer to unit dimensions section for sizing mounting slab,
platforms or supports. Refer to figure 2 for installation clear-
ances.
Installation Clearances
(914 mm)
*NO TE - A service clearance of 30" (762 mm) must be main-
tained on one of the sides adjacent to the control box. Clear-
ance to one of the other three sides must be 36" (914 mm).
Clearance to one of the remaining two sides may be 12" (304
mm) and the final side may be 6" (152 mm).
NOTE - A clearance of 24" (610 mm) must be maintained
between two units.
NOTE - 48" (1219 mm) clearance required on top
of unit. Maximum soffit overhang is 36" (914 mm).
Figure 1
FIGURE 2
HS40 TYPICAL FIELD WIRING DIAGRAM
The wiring must conform with current local codes and the
current Canadian Electrical Code (CEC). Refer and comply
with local electrical codes for field wiring rules and regula-
tions.
Refer to the furnace or blower coil installation instructions for
additional wiring application diagrams and refer to unit rating
plate for minimum circuit ampacity and maximum overcur-
rent protection size.
WARNING
Line Voltage
To facilitate conduit, a hole is provided in the bottom of the
control box. Connect the conduit to the control box with the
proper conduit fitting,
NOTE- Units are approved for use with copper conductors
only,
24V, Class II Circuit
24V, Class II Circuit connections are made up in the low volt-
age junction box, Refer to figure 3 for the field wiring dia-
gram,
NOTE -A complete unit wiring diagram is located inside the
unit control box cover,
NOTE-SEE UNIT WIRING DIAGRAM
FOR POWER SUPPLY CONNECTIONS.
CONDENSING UNIT
Yellow
Black
NOTE-IF INDOOR UNIT IS NOT EQUIPPED WITH
BLOWER RELAY, IT MUST BE FIELD PROVIDED
AND INSTALLED (P-8-3251 OR EQUIVALENT)
'=_'= _124vLc_A_S It POWER SOURCE
ROOM THERMOSTAT
'
I
- 20 VA MINIMUM
Page 3
24V CLASS II INSTALLED AT FACTORY
24V CLASS It FIELD INSTALLED
TYPICAL INDOOR UNIT
TOHEATING
24V
CLASS II
JUNCTION
BOX
K3 INDOOR BLOWER RELAY
TRANSFORMER
TO
SPEED
TO I
HEATING
SPEED PER NATIONAL
GROUND
AND LOCAL
I CODES
Page 4
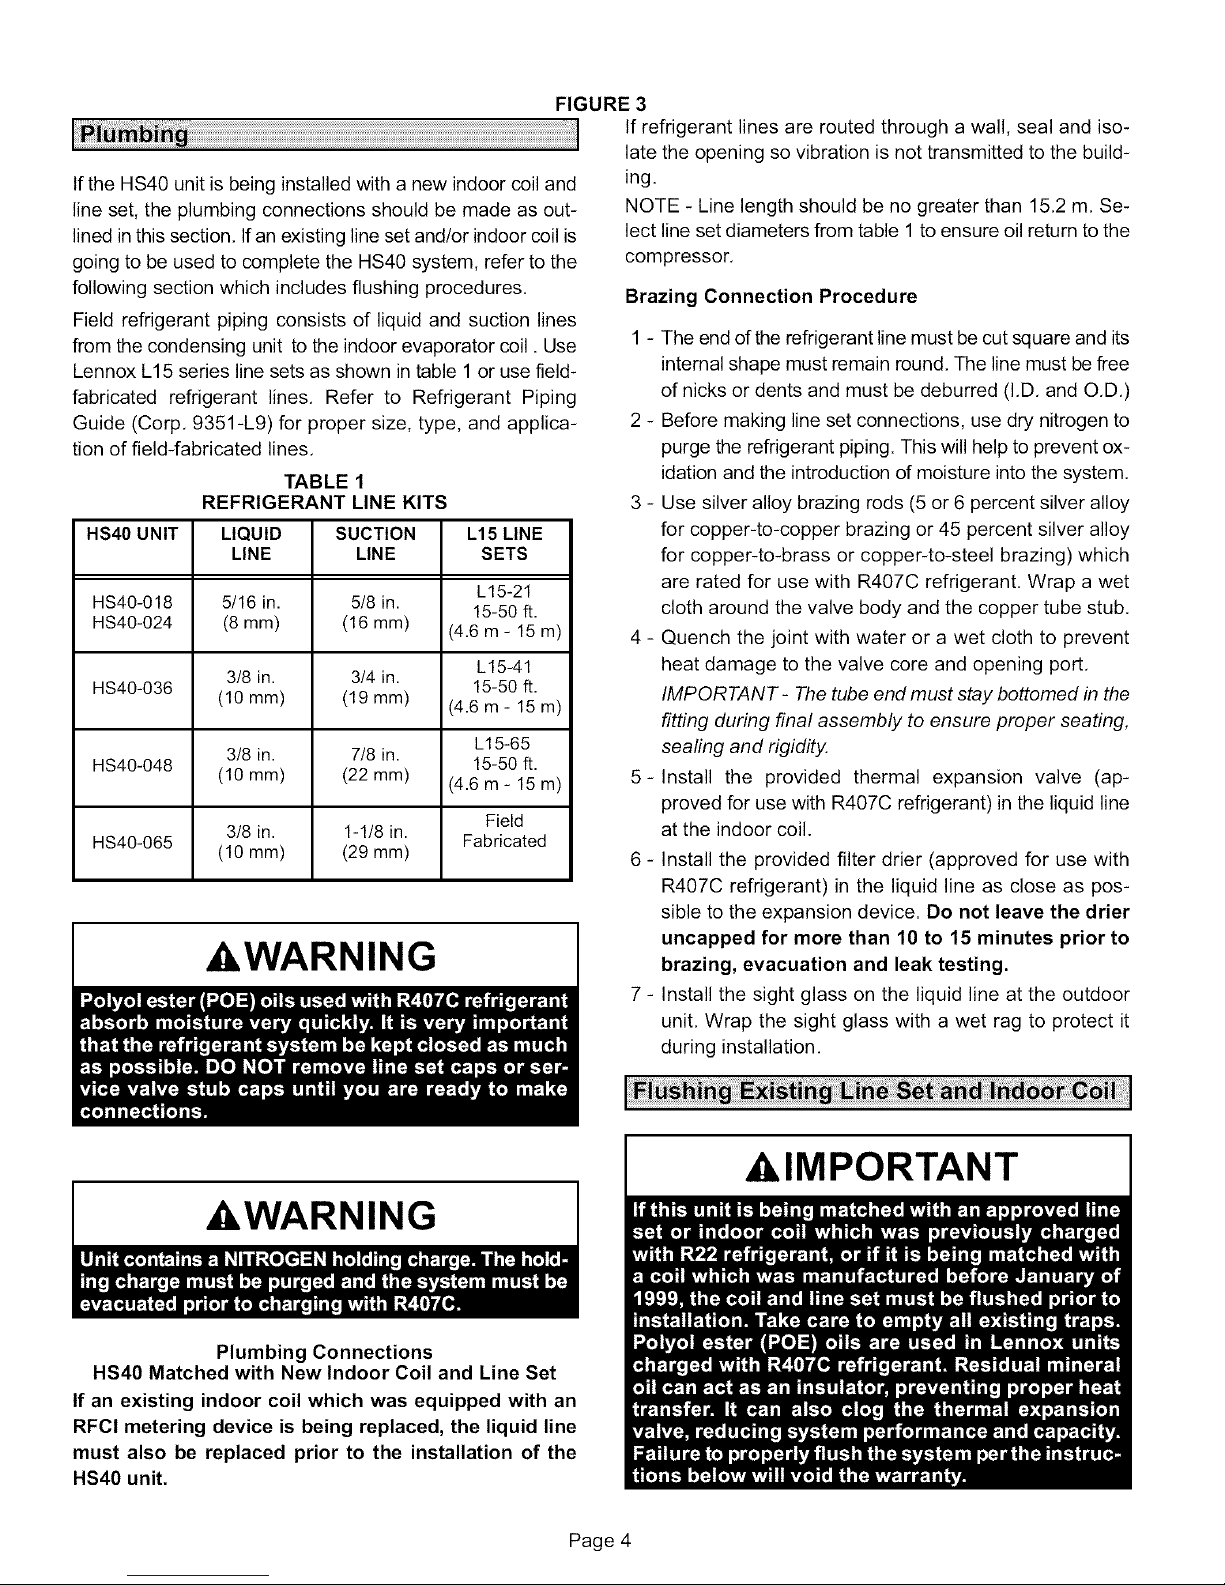
FIGURE 3
IftheHS40unitisbeinginstalledwithanewindoorcoiland
lineset,theplumbingconnectionsshouldbemadeasout-
linedinthissection.Ifanexistinglinesetand/orindoorcoilis
goingtobeusedtocompletetheHS40system,refertothe
followingsectionwhichincludesflushingprocedures.
Fieldrefrigerantpipingconsistsofliquidandsuctionlines
fromthecondensingunittotheindoorevaporatorcoil.Use
LennoxL15serieslinesetsasshownintable1orusefield-
fabricatedrefrigerantlines.Referto RefrigerantPiping
Guide(Corp.9351-L9)forpropersize,type,andapplica-
tionoffield-fabricatedlines.
TABLE 1
REFRIGERANT LINE KITS
HS40 UNIT LIQUID SUCTION L15 LINE
LINE LINE SETS
HS40-018 5/16 in. 5/8 in.
HS40-024 (8 mm) (16 mm) (4.6 m - 15 m)
3/8 in. 3t4 in.
HS40-036 (10 mm) (19 mm) (4.6 m - 15 m)
318in. 7/8 in. 15-50 ft.
HS40-048 (10 mm) (22 mm) (4.6 m - 15 m)
318in. 1-1/8 in.
HS40-065 (10 mm) (29 mm) Fabricated
L15-21
15-50 ft.
L15-41
15-50 ft.
L15-65
Field
AWARNING
If refrigerant lines are routed through a wall, seal and iso-
late the opening so vibration is not transmitted to the build-
ing.
NOTE - Line length should be no greater than 15.2 m. Se-
lect line set diameters from table 1 to ensure oil return to the
compressor.
Brazing Connection Procedure
1 - The end of the refrigerant line must be cut square and its
internal shape must remain round. The line must be free
of nicks or dents and must be deburred (I.D. and O.D.)
2 - Before making line set connections, use dry nitrogen to
purge the refrigerant piping. This will help to prevent ox-
idation and the introduction d moisture into the system.
3 - Use silver alloy brazing rods (5 or 6 percent silver alloy
for copper-to-copper brazing or 45 percent silver alloy
for copper-to-brass or copper-to-steel brazing) which
are rated for use with R407C refrigerant. Wrap a wet
cloth around the valve body and the copper tube stub.
4 - Quench the joint with water or a wet cloth to prevent
heat damage to the valve core and opening port.
IMPORTANT - The tube end must stay bottomed in the
fitting during final assembly to ensure proper seating,
sealing and rigidity.
5-Install the provided thermal expansion valve (ap-
proved for use with R407C refrigerant) in the liquid line
at the indoor coil.
6 - Install the provided filter drier (approved for use with
R407C refrigerant) in the liquid line as close as pos-
sible to the expansion device. Do not leave the drier
uncapped for more than 10 to 15 minutes prior to
brazing, evacuation and leak testing.
7 - Install the sight glass on the liquid line at the outdoor
unit. Wrap the sight glass with a wet rag to protect it
during installation.
&WARNING
Plumbing Connections
HS40 Matched with New Indoor Coil and Line Set
If an existing indoor coil which was equipped with an
RFCI metering device is being replaced, the liquid line
must also be replaced prior to the installation of the
HS40 unit.
&IMPORTANT
Page 4
Page 5

,CAUTION
Required Equipment
You will need the following equipment in order to flush the
existing line set and indoor coil: two clean R22 recovery
bottles, an oilless recovery machine with a pump down fea-
ture, and two sets of gauges (one for use with R22 and one
for use with the R407C).
3 - Remove the existing refrigerant flow control orifice or
thermal expansion valve before continuing with flush-
ing procedures. The existing devices are not approved
for use with R407C refrigerant and may prevent prop-
er flushing. Use a field-provided fitting to reconnect the
lines.
,IMPORTANT
Flushing Procedure
1 - Remove existing R22 refrigerant using the appropri-
ate procedure below.
If the existing outdoor unit is not equipped with
shut-off valves, or if the unit is not operational
AND you plan to use the existing R22 refrigerant to
flush the system -- Disconnect all power to the exist-
ing outdoor unit. Connect the existing unit, a clean re-
covery cylinder and the recovery machine according
to the instructions provided with the recovery ma-
chine. Remove all R22 refrigerant from the existing
system. Refer to gauges after shutdown to confirm
that the entire system is completely void of refrigerant.
Disconnect the liquid and suction lines from the exist-
ing outdoor unit.
If the existing outdoor unit is equipped with manu-
al shut-off valves AND you plan to use NEW R22
refrigerant to flush the system -- Start the existing
R22 system in the cooling mode and close the liquid
line valve. Pump all of the existing R22 refrigerant
back into the outdoor unit. (It may be necessary to by-
pass the low pressure switches to ensure complete re-
frigerant evacuation.) When the low side system pres-
sures reach 0 psig, close the suction line valve. Dis-
connect all power to the existing outdoor unit. Refer to
gauges after shutdown to confirm that the valves are
not allowing refrigerant to flow back into the low side d
the system. Disconnect the liquid and vapor lines from
the existing outdoor unit.
2 - Remove the existing outdoor unit. Set the new R407C
unit and follow the brazing connection procedure
which begins on the previous page to make line set
connections, DO NOT install provided R407C ex-
pansion valve at this time.
Make low voltage and line voltage connections to the
new outdoor unit. DO NOT turn on power to the unit
or open the outdoor unit service valves at this
time.
4 - Remove the pressure tap valve cores from the HS40
unit's service valves. Connect an R22 cylinder with
clean refrigerant to the suction service valve. Con-
nect the R22 gauge set to the liquid line valve and
connect a recovery machine with an empty recovery
tank to the gauge set.
5 - Set the recovery machine for liquid recovery and start
the recovery machine. Open the gauge set valves to
allow the recovery machine to pull a vacuum on the ex-
isting system line set and indoor coil.
6 - Invert the cylinder of clean R22 and open its valve to
allow liquid refrigerant to flow into the system through
the suction line valve. Allow the refrigerant to pass
from the cylinder and through the line set and the in-
door coil before it enters the recovery machine.
7 - After all of the liquid refrigerant has been recovered,
switch the recovery machine to vapor recovery so that
all of the R22 vapor is recovered. All the recovery ma-
chine to pull a vacuum on the system.
NOTE - A single system flush should remove all of the
mineral oil from the existing refrigerant lines and in-
door coil. A second flushing may be done (using clean
refrigerant) if insufficient amounts of mineral oil were
removed during the first flush. Each time the system
is flushed, you must allow the recovery machine
to pull a vacuum on the system at the end of the
procedure.
8- Close the valve on the inverted R22 drum and the
gauge set valves. Pump the remaining refrigerant out
of the recovery machine and turn the machine off.
9 - Use nitrogen to break the vacuum on the refrigerant
lines and indoor coil before removing the recovery ma-
chine, gauges and R22 refrigerant drum. Reinstall
pressure tap valve cores into HS40 service valves.
10 -Install the provided expansion valve (approved for use
with R407C refrigerant) in the liquid line at the indoor
coil.
Page 5
Page 6

FLUSHING CONNECTIONS
INVERTED R22
CYLINDER
(Contains clean
R22 to be used for
flushing)
HS40 UNIT
LOW HIGH
PRESSURE PRESSURE
CYLINDER
RECOVER_
EXISTING
INDOOR COIL
EXISTING SUCTION LINE
EXISTING LIQUID LINE
i IO TANK RETURN
_INLET
RECOVERY MACHINE
SERVICE VALVE
FIGURE 4
The liquid line and suction line service valves (figures 5 and
6) and gauge ports are accessible from outside the unit.
The service ports are used for leak testing, evacuating,
charging and checking charge.
The valves are equipped with a service port. A Schrader
valve is factory-installed. A service port cap is supplied to
protect the Schrader valve from contamination and to
serve as the primary leak seal.
To Access Schrader Port:
1 - Remove the service port cap with an adjustable wrench.
2 - Connect gauge to the service port.
3 - When testing is completed, replace the service port cap.
Tighten finger tight, then an additional 1/6 turn.
To Open Liquid or Suction Line Service Valve:
1 - Remove the stem cap with an adjustable wrench.
2 - Use a service wrench with a hex-head extension to
back the stem out counterclockwise until the valve
stem just touches the retaining ring,
SERVICE VALVE
LIQUID LINE t
OP_ENIE: AUGE MAN::I_Oo:: _
NOTE- The inverted R22 cylin-
der must contain at least the
same amount of refrigerant as
was recovered from the existing
system.
LIQUID AND SUCTION LINE SERVICE VALVES
(VALVE OPEN)
INSERT HEX
WRENCH
SERVICE
PORT
STEM CAP
©
X
UNIT SIDE
SERVICE'
PORT
CAP
SCHRADER
VALVE
FIELD SIDE
(VALVE CLOSED)
RETAINING RING
SERVICE
STEM CAP
©
INSERT HEX
,DANGER
3 - Replace the stem cap. Tighten finger tight, then tighten
an additional 1/6 turn.
Page 6
UNIT SIDE
SERVICE
PORT CAF
SCHRADER VALVE OPEP
TO LINE SET WHEN VALVE IS
CLOSED (FRONT SEATED)
FIGURE 5
FIELD SIDE
(VALVE FRONT SEATED)
Page 7

To Close Liquid or Suction Line Service Valve:
1 - Remove stem cap with an adjustable wrench,
2 - Use a service wrench with a hex-head extension to
turn the stem clockwise to seat the valve, Tighten firm-
ly,
3 - Replace the stem cap, Tighten finger tight, then tighten
an additional 1/6 turn,
Five Ton Suction Line (Bali-Type) Service Valve
A ball-type full-service valve is used on five-ton HS40-065
units only, These suction line service valves function the
same way, the differences are in the valve's construction,
Valves are not rebuildable, If a valve has failed, it must be
replaced. A ball valve valve is illustrated in figure 6.
The ball valve is equipped with a service port, A Schrader
valve is factory installed. A service port cap is supplied to
protect the Schrader valve from contamination and assure
a leak free seal,
SUCTION LINE (BALL TYPE) SERVICE VALVE
(VALVE OPEN)
USE ADJUSTABLE WRENCH
ROTATE STEM CLOCKWISE 90 _'TO CLOSE
ROTATE STEM COUNTER-CLOCKWISE 90" TO OPEN
TO OUTDOOR COIL
@ STEM CAP
STEM
BALL
SHOWN OPEN)
TO INDOOR COIL
SERVICE
PORT
CAP SERVICE
SCHRADER VALVE
FIGURE 6
After the line set has been connected to the indoor and out-
door units, the line set connections and indoor unit must be
checked for leaks.
,WARNING
Using an Electronic Leak Detector
&IMPORTANT
1 - Connect the high pressure hose of the manifold gauge
set to the suction valve service port. (Normally, the high
pressure hose is connected to the liquid line port, how-
ever, connecting it to the suction port helps to protect
the manifold gauge set from damage caused by high
pressure.)
2 - With both manifold valves closed, connect the cylinder
of R407C refrigerant, Open the valve on the R407C
cylinder (vapor only).
3 - Open the high pressure side of the manifold to allow
R407C into the line set and indoor unit, Weigh in a trace
amount of R407C, [A trace amount is a maximum of 2
ounces (57 g) refrigerant or 3 pounds (31 kPa) pres-
sure]. Close the valve on the R407C cylinder and the
valve on the high pressure side of the manifold gauge
set. Disconnect R407C cylinder.
4 - Connect a cylinder of nitrogen with a pressure regulat-
ing valve to the center port of the manifold gauge set,
5 - Adjust nitrogen pressure to 150 psig (1034 kPa), Open
the valve on the high side of the manifold gauge set in
order to pressurize the line set and the indoor coil,
6 - After a short period of time, open a refrigerant port to
make sure that an adequate amount of refrigerant has
been added for detection (refrigerant requirements
will vary with line lengths). Check all joints for leaks,
Purge nitrogen and R407C mixture, Correct any leaks
and recheck,
Evacuating the system of non-condensables is critical for
proper operation of the unit. Non-condensables are defined
as any gas that will not condense under temperatures and
pressures present during operation of an air conditioning
system. Non-condensables and water vapor combine with
refrigerant to produce substances that corrode copper pip-
ing and compressor parts.
1 -Connect the manifold gauge set to the service valve
ports as follows: low pressure gauge to suction line
service valve; high pressure gauge to liquid line ser-
vice valve.
IMPORTANT- Compliant scroll compressors (as with
any refrigerant compressor) should never be used to
evacuate a refrigeration or air conditioning system.
NOTE - A temperature vacuum gauge, mercury vacu-
um or thermocouple gauge should be used. The usual
Bourdon tube gauges are inaccurate in the vacuum
range.
Page 7
Page 8

2-The nitrogenholdingchargeintheunitmustbere-
leased.Openbothmanifoldvalvestoreleasethenitro-
genfromtheunit.Seepage5forservicevalveopera-
tion.
3-Connectthevacuumpump(withvacuumgauge)tothe
centerportofthemanifoldgaugeset.
4-Openbothmanifoldvalvesandstartvacuumpump.
5-Evacuatethelineset,condensingunit,andindoorunit
toanabsolutepressureof23mm(23,000microns)of
mercury.Duringtheearlystagesofevacuation,itisde-
sirabletoclosethemanifoldgaugevalveatleastonce
todetermineifthereisarapidriseinabsolutepres-
sure.A rapidrisein pressureindicatesa relatively
largeleak.If thisoccurs,theleaktestingprocedure
mustberepeated.
NOTE - The term absolute pressure means the total
actual pressure within a given volume or system,
above the absolute zero of pressure. Absolute pres-
sure in a vacuum is equal to atmospheric pressure mi-
nus vacuum pressure.
6 -When the absolute pressure reaches 23 mm (23,000
microns) of mercury, close the manifold gauge valves,
turn offthe vacuum pump and disconnect the manifold
gauge center port hose from vacuum pump. Attach the
manifold center port hose to a nitrogen cylinder with
pressure regulator set to 150 psig (1034 kPa) and
purge the hose. Open the manifold gauge valves to
break the vacuum in the system. Close the manifold
gauge valves.
Refer to the unit nameplate for the correct liquid charge.
If you can not measure in the total amount, refer to the
start-up section and set the final system charge accord-
ing to the charging instructions. The R407C refrigerant
cylinder should be chocolate brown.
1 - Rotate the fan to check for frozen bearings or binding.
2 - Inspect all factory and field-installed wiring for loose
connections.
3 - Check voltage supply at the disconnect switch. The
voltage must be within range listed on unit nameplate.
If not, do not start equipment until the power company
has been consulted and the voltage condition cor-
rected.
4 - Set thermostat for a cooling demand, turn on power to
blower and close condensing unit disconnect switch to
start.
5 - Recheck unit voltage with unit running. Power must be
within range shown on unit nameplate. Check amper-
age draw of unit. Refer to unit nameplate for correct
running amps.
Charge the unit with the amount of liquid R407C refrigerant
that is indicated on the unit namplate. This charge is based
on a matching indoor coil and outdoor coil with 4.6 m line
set. For varying lengths d line set, refer to table 2 for refrig-
erant charge adjustment.
TABLE 2
&WARNING
7 -Shut off the nitrogen cylinder and remove the manifold
gauge hose from the cylinder. Open the manifold
gauge valves to release the nitrogen from the system.
8-Reconnect the manifold gauge to the vacuum pump,
turn the pump on and continue to evacuate the system
until the absolute pressure does not rise above .5 mm
(500 microns) of mercury within a20-minute period after
shutting off the vacuum pump and closing the manifold
gauge valves.
9 -When the absolute pressure requirement from step 9
has been met, disconnect the manifold gauge hose
from the vacuum pump. Then, weigh in a LIQUID
charge of R407C through the liquid and suction service
valves.
Liquid Line Set Diameter
5/16 in. (8 mm)
3/8 in. (10 mm)
*If line length is greater than 4.6 m, add this amount. If line
length is less than 4.6 m, subtract this amount.
Grams per 1.5 m adjust
from 4.6 m line set*
57 g per 1.5 m
85 g per 1.5 m
&IMPORTANT
The compressor is charged with sufficient polyol ester
oil for line set lengths up to 15 m. If line set lengths lon-
ger than 15 m will be required, add I ounce (28 gm) of oil
for every additional 3 m of line set. Do not add any more
than 207 ml of oil. Copeland has approved Mobil EAL '"
Arctic 22CC and ICI EMKARATE'" RL32CF for use with
these compressors when oil must be added in the field.
The following procedure is intended as a general guide and
is for use on expansion valve systems only. For best results,
the indoor temperature must range from 21°C to 26°C. Be
sure to monitor system pressures while charging.
Page 8
Page 9

TABLE 3
R407C Saturated Liquid Temperature and Pressure Chart
Use this chart for subcooling only, not superheat
SaturatedLiquid
Temperature°C
15
16
16
17
17
18
18
19
20
20
21
21
22
22
23
23
24
25
25
26
26
27
27
28
28
29
30
30
31
31
32
32
Liquid Line Pressure Liquid Line Pressure
iii/iiiiii_i_i iiiiiil_iliii!iiiiiiii;iiiii_JJJ;_;_iii_;!_i!_i!_i_!!i!_i_i_i_i!i_ii;ili_!_i!_i_i;i¸i_!_;i_iiiiiiii!!iiiiiiiiiiii_i_!_;;¸i
iiiiiiiiiiiiiiiiiiiiiiiiiiiiiiiii_ii_iiiiiiiiiiiiiii_Ji_iJi'i'i'i'i'i'iiiii_iiiiiiiiiiiiiiiiii_;.................................,i_ii!!!i!!i!!i!!i!!i!!i!!i!i__ii__i__i_i_iii_iii_ii_i!i_!_i_ii_ii_iii_iil;ii_i!_i;_iililiiIil!!!i_!i_,:_!_ii!_i_ii_i_i_ill_i_!i_i_i_i_ii!i_ii_i_iii_ii!_!ii!_i_iiliiiiiililiiii_ii_ii_i_ii!i_i_!_i_i_ii_il_il_il_ii_il_i_!
53; (
_(_
Saturated Liquid
Temperature °C
33
33
34
35
35
36
36
37
37
38
38
39
40
40
41
41
42
42
43
43
44
45
45
46
47
47
47
48
48
51
54
57
ii/iiiiii_i_ii_i(_ i_ i _iii_!!i!!!i!iiiiiiiiiiiiii_iiii_i_iii!_!i!i;!i;ii!ii_iii_:ii_:_}_i_iiiiiiiiii_i
iiiili!_iiiiiiii_iiiliiii_!ii!!!_illiiii;!!!!!ii_i_iiiiiiiiii_ii_ii_i_i_!i_i_i_i_:;i_i_!iiii_i_i_,!:_@_i_i_iiiiii_
iiiiiiiiiiiiiiiiiiiiiiiiiiiiiiiiiiiiii_ii_i_i_ '................................................iiiiiiiiiiiiiiii!_ii_i_!_!ii_!_i_i_!_i_ii_i_!_!i_!_!i_!_!ii_!_i_!_iii_!_i_!_i!!ii!ii_i_i_i_i_i_i_i_i_i_i_i_i_i_i_ili
ii!!!liliiii!iii_ii_@__ iiii!iii!!liiiiiiiiiiiiiiiii_!i_i1_:_;_ii_@i_i_i_i_i_!;_i!_i!_i!_i!_i!_!i_i_iii_ii
....
Page 9
Page 10

Checking Unit Charge Using Subcooling when
Outdoor Temperature is >_16°C
1 - After the pressures have stabilized, attach the man-
ifold gauge hose to the liquid service port, and record
the liquid pressure. At the same time, use a digital ther-
mometer to record the liquid line temperature,
2 - Use table 3 to determine the saturation temperature
that corresponds with the liquid line pressure reading.
3 - To determine subcooling, subtract the liquid line tem-
perature from the saturation temperature (table 3):
Saturation Temperature
-Liquid Line Temperature
=Subcooling
4 - If the system is operating at subcooling values higher
than 4,4 - 5,5°C, recover refrigerant,
5 - If the system is operating at subcooling values lower
than 4,4 - 5,5°C, add refrigerant through the suction
valve in the liquid state. Some R407C cylinders are
equipped with a dip tube which allows you to draw
liquid refrigerant from the bottom of the cylinder
without turning the cylinder upside-down. The
cylinder will be marked if it is equipped with a dip
tube.
The condensing unit and the indoor blower cycle on de-
mand from room thermostat. When the thermostat blower
switch is switched to the ON position, the indoor blower op-
erates continuously,
Timed-Off Control
Units include a timed-off control which helps equalize sys-
tem pressures. The timed-off control delays compressor
start-up for five minutes on thermostat demand, This allows
the compressor to start in an unloaded condition and pre-
vents compressor short-cycling, The control is located in
the control box and is wired between thermostat terminal
"Y" and the compressor contactor,
High Pressure and Low Pressure Switches
Units include a high pressure switch and a low pressure
switch. The pressure switches are located on valve cores
in the liquid line to allow for easy access, The manually re-
set high pressure switch protects the system from high
pressure conditions which result from a fan failure or a
blocked or dirty coil. The low pressure switch (SPST, NO)
protects the system compressor from damage due to a
loss of charge. The loss of charge switch trips at 25 + 5
psig (172+ 34 kPa) and automatically resets at 55+ 5 psig
(379 + 34 kPa).
Refrigerant Sight Glass
A refrigerant sight glass is provided (in the bag assembly)
with the unit, The sight glass should be field-installed in the
liquid line to monitor the system refrigerant,
_WARNING
At the beginning of each cooling season, the system
should be checked as follows:
1- Clean and inspect condenser coil, Coil may be
flushed with a water hose. Make sure power is off be-
fore cleaning,
2 - Visually inspect connecting lines and coils for evidence
of oil leaks,
3 - Check wiring for loose connections.
4 - Check for correct voltage at unit (unit operating),
5 - Check condenser fan motor amp-draw.
Unit nameplate Actual
NOTE _If owner complains of insufficient cooling, the unit
should be gauged and refrigerant charge checked, Refer to
section on refrigerant charging in this instruction,
Evaporator Coil
1 - If necessary, clean coil.
2 - Check connecting lines and coils for evidence of oil
leaks,
3 - Check condensate line and clean, if necessary.
Indoor Unit
1 - Clean or change filters,
2 - Adjust blower speed for cooling. The pressure drop
over the coil should be measured to determine the cor-
rect blower CFM, Refer to the unit information service
manual for pressure drop tables and procedure,
3 - Belt Drive Blowers -- Check belt for wear and proper
tension,
4 - Check all wiring for loose connections
5 - Check for correct voltage at unit (blower operating).
6 - Check amp-draw on blower motor
Unit nameplate Actual
Page 10
Page 11

Job Name Job No. Date
Job Location City State
Installer
City State
Unit Model No. Serial No.
Nameplate Voltage Amps: __
Minimum Circuit Ampacity
Supply Condenser Fan
Maximum Overcurrent Protection Size
Electrical Connections Tight? I--1
Indoor Filter Clean? E1
Indoor Blower CFM
Supply Voltage (Unit Off)
s.P. Drop Over Evaporator (Dry)
COOLING SECTION
Refrigerant Lines:
Service technician
Compressor
Leak Checked? E]
Service Valves Fully Opened? I--1
Properly Insulated? [--]
Service Valve Caps Tight? [--1
Voltage With Compressor Operating
THERMOSTAT
Properly Set? [_ Level? _--_
Condenser Entering Air Temperature
Discharge Pressure _ Suction Pressure B
Refrigerant Charge Checked? [--_
Condenser Fan Checked? [_
Calibrated? [--_
Page 11
Page 12

LENNOX
Lennox Industries
RO. Box 174, Westgate Interchange,
Northampton NN5 5AG
Telephone: 01604 591159
Facsimile: 01604 587536
Page 12
 Loading...