

Lenovo USB Portable DVD Burner User Manual

Lenovo USB Portable DVD Burner
User Guide


Lenovo USB Portable DVD Burner
User Guide

Note
Before using this information and the product it supports, read Appendix B, “Service and Support,” on page 17,
Appendix C, “Lenovo Limited Warranty,” on page 23, and Appendix D, “Notices,” on page 29.
First Edition (January 2010)
© Copyright Lenovo 2010.
LENOVO products, data, computer software, and services have been developed exclusively at private expense and
are sold to governmental entities as commercial items as defined by 48 C.F.R. 2.101 with limited and restricted
rights to use, reproduction and disclosure.
LIMITED AND RESTRICTED RIGHTS NOTICE: If products, data, computer software, or services are delivered
pursuant a General Services Administration ″GSA″ contract, use, reproduction, or disclosure is subject to restrictions
set forth in Contract No. GS-35F-05925.

Contents
Online safety information resources . . v
Safety information ..........vii
Chapter 1. About the Lenovo USB
Portable DVD Burner .........1
Product description ............1
Locating the controls ...........1
Software description ............2
System requirements............2
Main features ..............3
Chapter 2. Installing and using the
Lenovo USB Portable DVD Burner . . . 5
Installing the drive ............5
Connecting the drive ..........5
Installing software ...........5
Loading media .............5
Ejecting media ..............6
Manually ejecting media ..........6
Removing the drive ............6
Maintaining the drive ...........7
Caring for the drive ...........7
Cleaning the drive ...........7
Chapter 3. Working with the Lenovo
USB Portable DVD Burner .......9
Before you begin .............9
Using media ..............9
Handling and caring for media .......9
Using DVD-RAM media .........10
Using CD and DVD media ........10
Using CD-R and CD-RW media ......10
Using DVD-R, DVD+R, DVD+RW, and DVD-RW
media ...............10
Using the software ............11
Using Creator Business Edition .......11
Using MyDVD ............11
Using Intervideo WinDVD ........11
Native operating system support ......12
Chapter 4. Troubleshooting ......13
Appendix A. Product specifications . . 15
Appendix B. Service and Support . . . 17
Online technical support ..........17
Telephone technical support .........17
Appendix C. Lenovo Limited Warranty 23
Warranty Information ...........26
Suplemento de Garantía para México ......27
Appendix D. Notices .........29
Recycling information ...........30
Trademarks ..............30
Appendix E. Electronic emission
notices...............31
Federal Communications Commission Declaration of
Conformity ..............31
Appendix F. Restriction of Hazardous
Substances Directive (RoHS) .....35
China RoHS ..............35
Turkish statement of compliance .......35
© Copyright Lenovo 2010 iii

iv Lenovo USB Portable DVD Burner User Guide
Online safety information resources
For tips to help you use your computer safely, go to:
http://www.lenovo.com/safety
Para obter dicas para ajudá-lo a usar o computador com segurança, acesse:
http://www.lenovo.com/safety
Pour obtenir des astuces pour utiliser votre ordinateur en toute sécurité, consultez le site :
http://www.lenovo.com/safety
Tipps zum sicheren Umgang mit dem Computer finden Sie unter:
http://www.lenovo.com/safety
Per suggerimenti su un utilizzo sicuro del computer, visitare il sito all’indirizzo:
http://www.lenovo.com/safety
Para obtener consejos sobre cómo utilizar el sistema de forma segura, vaya a:
http://www.lenovo.com/safety
Bilgisayarınızı güvenle kullanmanıza ilişkin ipuçları için lütfen aşağıdaki adrese bakın:
http://www.lenovo.com/safety
© Copyright Lenovo 2010 v

vi Lenovo USB Portable DVD Burner User Guide
Safety information
Before installing this product, read the Safety Information.
Antes de instalar este produto, leia as Informações de Segurança.
Antes de instalar este produto, leia as Informações sobre Segurança.
Antes de instalar este producto lea la información de seguridad.
Avant d’installer ce produit, lisez les consignes de sécurité.
Ennen kuin asennat tämän tuotteen, lue turvaohjeet kohdasta Safety Information.
Läs säkerhetsinformationen innan du installerar den här produkten.
Læs sikkerhedsforskrifterne, før du installerer dette produkt.
Lees voordat u dit product installeert eerst de veiligheidsvoorschriften.
Les sikkerhetsinformasjonen (Safety Information) før du installerer dette produktet.
Prima di installare questo prodotto, leggere le Informazioni sulla Sicurezza.
Vor der Installation dieses Produkts die Sicherheitshinweise lesen.
© Copyright Lenovo 2010 vii

viii Lenovo USB Portable DVD Burner User Guide
Chapter 1. About the Lenovo USB Portable DVD Burner
This chapter contains product description, software description, installation requirements, and main
features of the Lenovo®USB Portable DVD Burner (hereafter called the drive).
Product description
The Lenovo USB Portable DVD Burner is a portable DVD and CD recordable drive that easily attaches to
the USB 2.0 connectors on your computer through a USB Y cable. The drive conforms with industry
standard specifications for CD-R, CD-ROM, CD-RW, DVD-R, DVD-R (dual layer), DVD-RAM,
DVD-ROM, DVD-RW, DVD+R, DVD+R (double layer), and DVD+RW media.
The option package includes:
v Lenovo USB Portable DVD Burner
v USB Y cable
v Software and User Guide CD
v Lenovo USB Portable DVD Burner Quick Start Guide
v Laser Safety Manual
Contact your place of purchase if an item is missing or damaged. Be sure to retain your proof of
purchase and packing material. They might be required to receive warranty service.
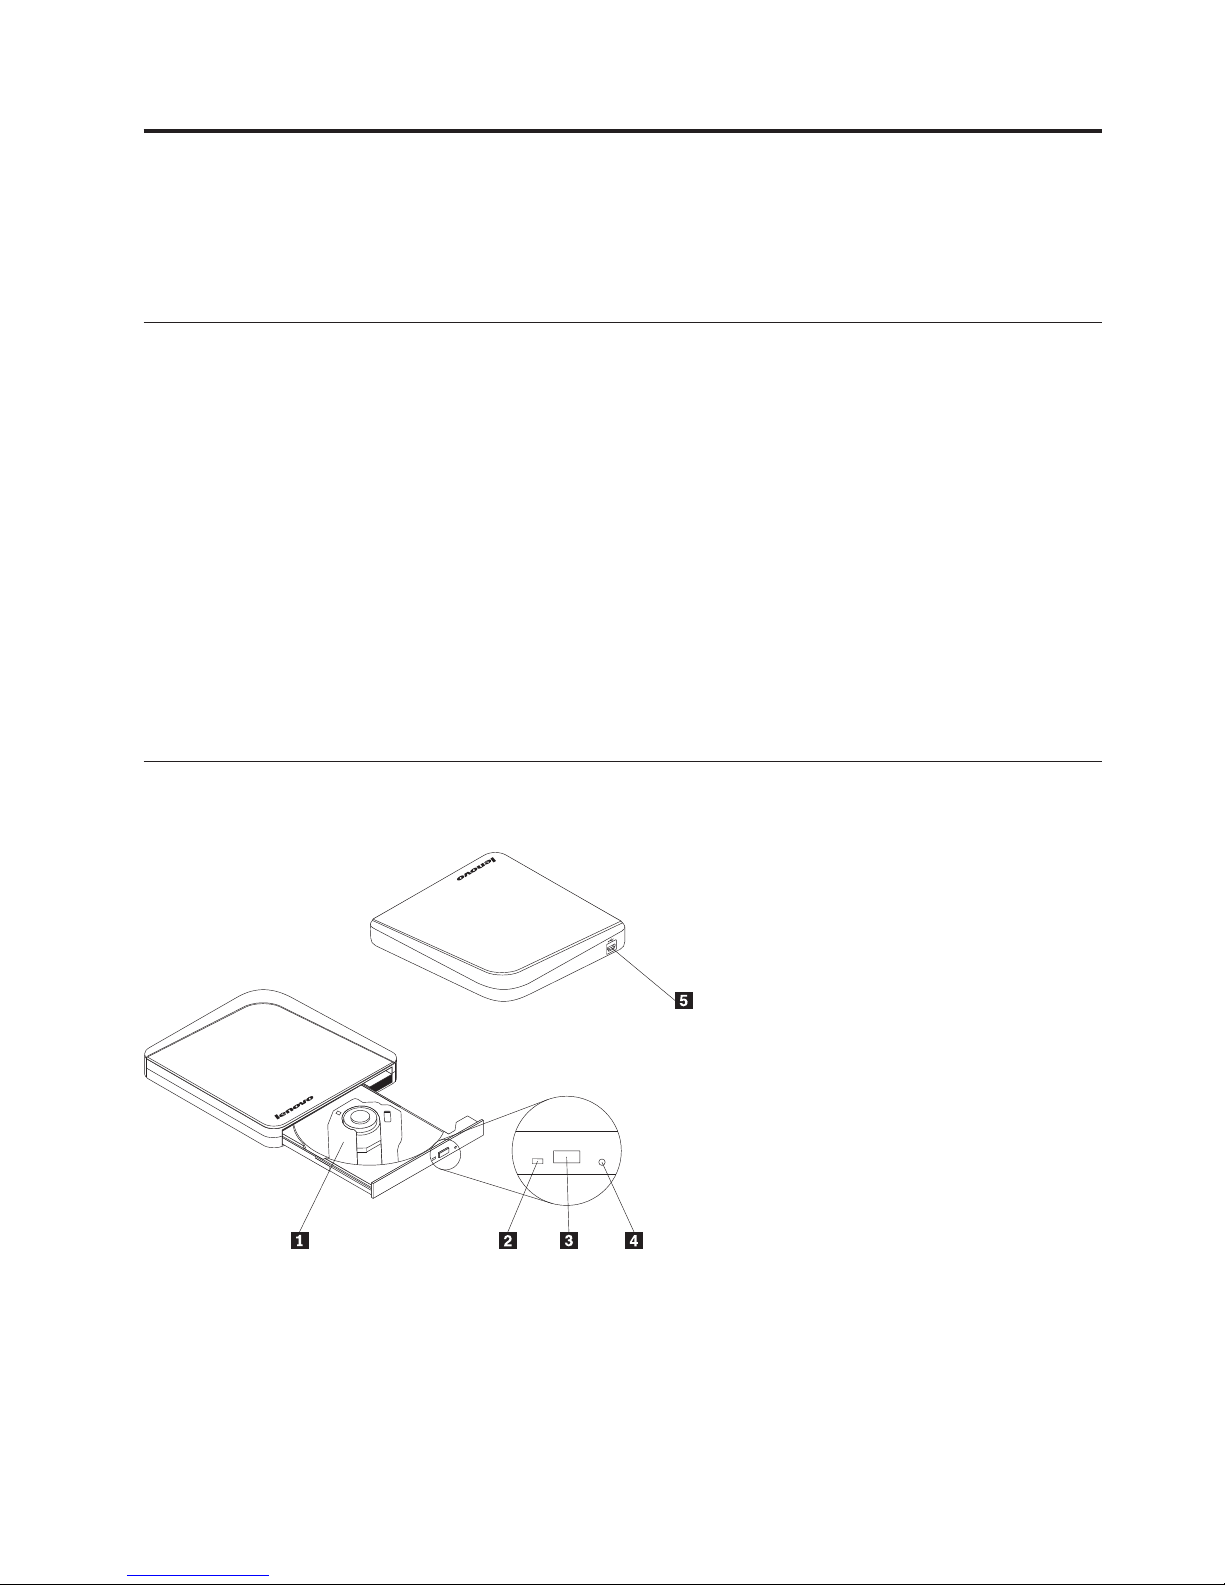
Locating the controls
The following figure shows the locations of the controls on the drive.
1 Disc tray Used to firmly seat the medium with the label facing up on the disc tray.
Attention: Push the CD/DVD medium down until it clicks and is secured in
the center.
© Copyright Lenovo 2010 1

2 LED indicator The LED indicates the status of the drive.
v LED is flashing: indicates that the drive is reading or writing.
v LED is off: indicates that the drive is not reading or writing.
3 Eject button Press this button to open the disc tray.
Attention: An electrical locking mechanism is used in this drive so that an
erroneous operation does not open the disc tray during write. Make sure that
the power is on and the drive is not in operation before pressing the Eject
button to open the disc tray.
If the disc tray cannot be opened when you press the Eject button, or if the disc
tray needs to be opened when the power is not supplied from the USB Y cable,
use the emergency eject hole4 in the front panel of the drive.
Check that nothing is placed in front of the disc tray when ejecting.
4 Emergency eject The emergency eject is used for ejecting the medium in an emergency when the
drive is powered off. Insert a paper clip into the emergency eject hole to open
the disc tray. See “Manually ejecting media” on page 6.
5 USB 2.0 Mini B receptacle
connector
Used to connect the USB Y cable.
Software description
The Software and User Guide CD contains the following software:
v MyDVD
This software enables you to create DVD-RAM, DVD-RW, DVD-R, DVD+RW, and DVD+R media that
can be played in most stand-alone DVD players. You can add your own videos and create custom
menus for DVD videos that you create. You can also use this software to edit and modify your own
video assets prior to recording. If you have an analog, USB, or IEEE 1394 capture device installed in
your computer, you can use this software to record videos from a camera.
v Creator Business Edition
This software enables you to copy CDs, create audio CDs, create MP3 CDs, and author data CDs. You
can also use Creator Business Edition to write data to DVD-RAM, DVD-RW, DVD-R, DVD-R DL,
DVD+RW, DVD+R DL, and DVD+R media for use in other computers or compatible consumer
electronics products. You can also create bootable CDs and save CD images for later recording. With
the Express Labeller that is included in Creator Business Edition, you can print paper labels.
Note: It will take approximately 30 minutes to install Creator Business Edition depending on your
system configuration.
v Intervideo WinDVD
This software enables you to play back DVD videos on your computer or to play video files from your
hard disk drive.
Note: Creator Business Edition and MyDVD are installed and uninstalled together.
System requirements
To use the drive, your computer must meet the following requirements:
v Two available USB 2.0 connectors
®
v Microsoft
Windows®XP, Microsoft Windows Vista®, or Microsoft Windows 7 operating system
2 Lenovo USB Portable DVD Burner User Guide

Main features
The main features of the drive include:
v Easy connection
The drive incorporates the interface that conforms to the USB 2.0 High Speed standard. Thus, it can
easily be connected to or disconnected from your computer when the computer is powered on.
v Conformance to media manufactured by major media manufacturers
The drive can play almost all the CD and DVD media manufactured by major media manufacturers.
Also, the media written by the drive realize a high write quality.
Note: For more information on write and read speeds, see Appendix A, “Product specifications,” on
page 15.
v Incorporation of the buffer underrun prevention function
The drive incorporates the buffer underrun prevention function, which helps to prevent buffer
underrun errors that cause a write failure on the CD and DVD media.
v Tray loading
The drive has a tray-loading mechanism that allows easy loading and ejection of a medium. The tray
can be opened manually or by using software that works with the computer.
v Power configuration
The drive operates with a USB Y cable and two available USB 2.0 connectors on the computer.
Note: Be sure that no other high power USB devices are used with this drive at the same time. High
power USB devices include USB optical disk drives, USB hard disk drives, and other devices
that draw more than 500mA from each USB connector on the computer.
Chapter 1. About the Lenovo USB Portable DVD Burner 3

4 Lenovo USB Portable DVD Burner User Guide
Chapter 2. Installing and using the Lenovo USB Portable DVD
Burner
This chapter provides information on how to install, use, remove and maintain the drive.
Installing the drive
Before installing the drive, check the locations of the controls on the drive. See “Locating the controls” on
page 1.
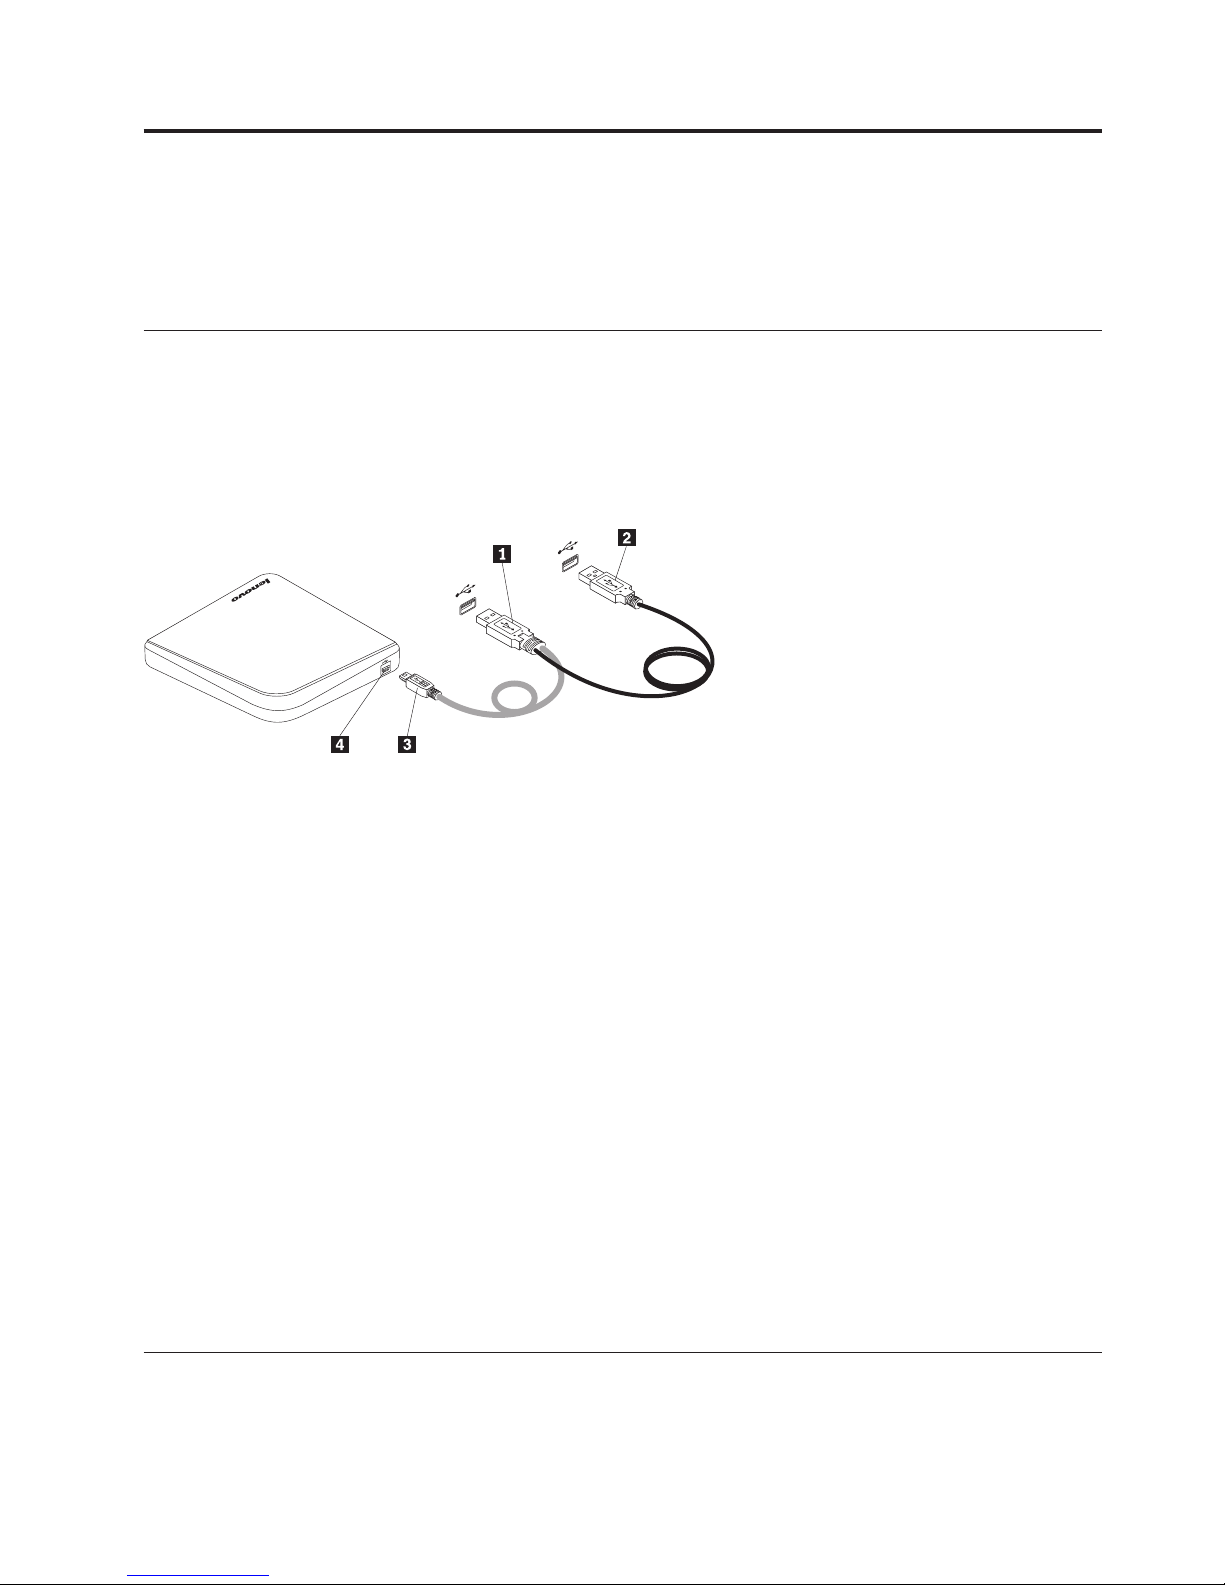
Connecting the drive
This section provides instructions to connect the drive to your computer with the provided USB Y cable.
To connect the drive to your computer , do the following:
1. Turn on your computer.
2. Connect both USB A connectors of the USB Y cable, 1 and 2, to you computer.
3. Connect the USB Mini B connector 3of the USB Y cable to the USB 2.0 Mini B receptacle connector
4on the drive.
Installing software
After you have connected the drive to your computer, you can install the software on the Software and
User Guide CD. For the detailed software descriptions, see “Software description” on page 2.
1. Save any open documents and exit all applications.
2. Insert the Software and User Guide CD and do one of the following:
v If the CD starts automatically, go to step 3.
v If the AutoPlay window opens, click Run start.bat. Then, go to step 3.
v If the CD does not start automatically, go into My Computer or Computer, browse the CD/DVD
drive, and double-click Start.bat.
®
3. At the prompt of the Internet Explorer
content.
4. Select your language.
5. On the left side of the window, click Software.
6. Follow the instructions on the screen.
warning message, click Yes to allow the CD to run active
Loading media
To load a medium into the disc tray of the drive, do the following:
1. Press the Eject button on the drive to open the disc tray.
© Copyright Lenovo 2010 5
 Loading...