

Lenovo USB 2.0 Portable Hard Disk Drive, IdeaCentre Flex 20 User Manual

Lenovo USB 2. 0 Portable
Hard Disk Drive User Guide

Note
Before using this information and the product it supports, read the information in
Appendix A, “Service and Support,” on page A-1 and Appendix B, “Lenovo
Limited Warranty,” on page B-1.
Second Edition (September 2008)
© Copyright Lenovo 2007, 2008. All rights reserved.
LENOVO products, data, computer software, and services have been developed
exclusively at private expense and are sold to governmental entities as commercial items
as defined by 48 C.F.R. 2.101 with limited and restricted rights to use, reproduction and
disclosure.
LIMITED AND RESTRICTED RIGHTS NOTICE: If products, data, computer software, or
services are delivered pursuant a General Services Administration ″GSA″ contract, use,
reproduction, or disclosure is subject to restrictions set forth in Contract No.
GS-35F-05925.

Contents
About the Lenovo USB 2.0 Portable Hard Disk Drive . . . . . . . 1-1
Product description . . . . . . . . . . . . . . . . . . . 1-1
Hardware and software requirements . . . . . . . . . . . . . 1-1
Before you begin the installation . . . . . . . . . . . . . . . 1-2
Installing the drive . . . . . . . . . . . . . . . . . . . . 1-3
Disconnecting the drive from your computer . . . . . . . . . . . 1-4
Disconnecting the drive from a docking station . . . . . . . . . . 1-4
Maintaining the drive . . . . . . . . . . . . . . . . . . . 1-4
Appendix A. Service and Support . . . . . . . . . . . . . . A-1
Registering your option . . . . . . . . . . . . . . . . . . A-1
Online technical support . . . . . . . . . . . . . . . . . A-1
Telephone technical support . . . . . . . . . . . . . . . . A-1
Appendix B. Lenovo Limited Warranty . . . . . . . . . . . . B-1
Warranty Information . . . . . . . . . . . . . . . . . . B-5
Suplemento de Garantía para México . . . . . . . . . . . . . B-7
Lenovo Limited Warranty - Customer Notice . . . . . . . . . . . B-8
Appendix C. Notices . . . . . . . . . . . . . . . . . . C-1
Recycling information . . . . . . . . . . . . . . . . . . C-2
Trademarks . . . . . . . . . . . . . . . . . . . . . . C-3
Appendix D. Electronic emission notices . . . . . . . . . . . D-1
Federal Communications Commission (FCC) Declaration of Conformity D-1
Appendix E. Important information for the European Directive
2002/96/EC . . . . . . . . . . . . . . . . . . . . . E-1
Appendix F. China RoHS . . . . . . . . . . . . . . . . . F-1
© Copyright Lenovo 2007, 2008 iii

iv Lenovo USB 2.0 Portable Hard Disk Drive User Guide

About the Lenovo USB 2.0 Portable Hard Disk Drive
This chapter contains instructions for installing and using the Lenovo® USB 2.0
Portable Hard Disk Drive (hereafter referred to as USB Hard Disk Drive).
Note: Before you install and use the option, be sure to read “Before you begin
the installation” on page 1-2.
Product description
The Lenovo USB 2.0 Portable Hard Disk Drive is a portable, lightweight,
high-speed USB hard disk drive that is compatible with the USB 2.0 standard
which enables data transfers that are up to 80 times faster than through USB
1.1 connections. The USB Hard Disk Drive can be used with mobile or desktop
computers and is also compatible with USB 1.0 and USB 1.1 connections. The
USB Hard Disk Drive operates as a plug-and-play device and is
hot-swappable; that is, you can connect and disconnect the drive while the
computer is running. See “Disconnecting the drive from your computer” on
page 1-4.
The option package includes:
v Lenovo USB 2.0 Portable Hard Disk Drive
v Primary USB cable (USB "A" to "Mini B" connection)
v Auxiliary power cable
v Lenovo USB 2.0 Portable Hard Disk Drive User Guide
v Carrying case
Hardware and software requirements
To use the option, you must have the following hardware installed on your
computer:
v Minimum 200MHz Intel® Pentium® microprocessor
v 64 MB Random Access Memory (RAM)
v USB 1.1 or 2.0 ports
To
use the option, your computer must have Microsoft
®
Windows Vista®,
Microsoft Windows® XP, or Microsoft Windows 2000 Professional operating
system installed.
© Copyright Lenovo 2007, 2008 1-1

Before you begin the installation
Be sure to review the following information before installing and using the
USB Hard Disk Drive.
Attention: Use only the cables that come with this option. You might damage
the USB Hard Disk Drive if you use a cable not included with the option
package. The option is designed for portable use without an AC power
adapter. Do not attach an AC power adapter to the option.
v To avoid damaging your USB Hard Disk Drive, handle with care. When
transporting the option or when it is not in use, place it in the carrying case
that comes with the option. For more information on correctly handling your
USB Hard Disk Drive, see “Maintaining the drive” on page 1-4.
v For reliable performance, be sure that both USB cables are attached directly
from the option to the computer USB connectors or to an AC-powered USB
hub. Do not connect the USB cables to a non-powered USB hub.
v The primary USB cable must be connected to a USB high power port. If you
experience problems, try connecting the primary USB cable to another USB
port.
v When using your USB Hard Disk Drive on a mobile computer with a USB
2.0 PCMCIA card, the primary USB cable must be inserted into the PCMCIA
card high power port. You must also connect the auxiliary power cable to
the USB port to provide adequate power.
Attention: Lenovo does not support this option if used with a third party
disk-utility that reorders or sorts the partition table.
1-2 Lenovo USB 2.0 Portable Hard Disk Drive User Guide

Installing the drive
This section provides instructions for installing the USB Hard Disk Drive.
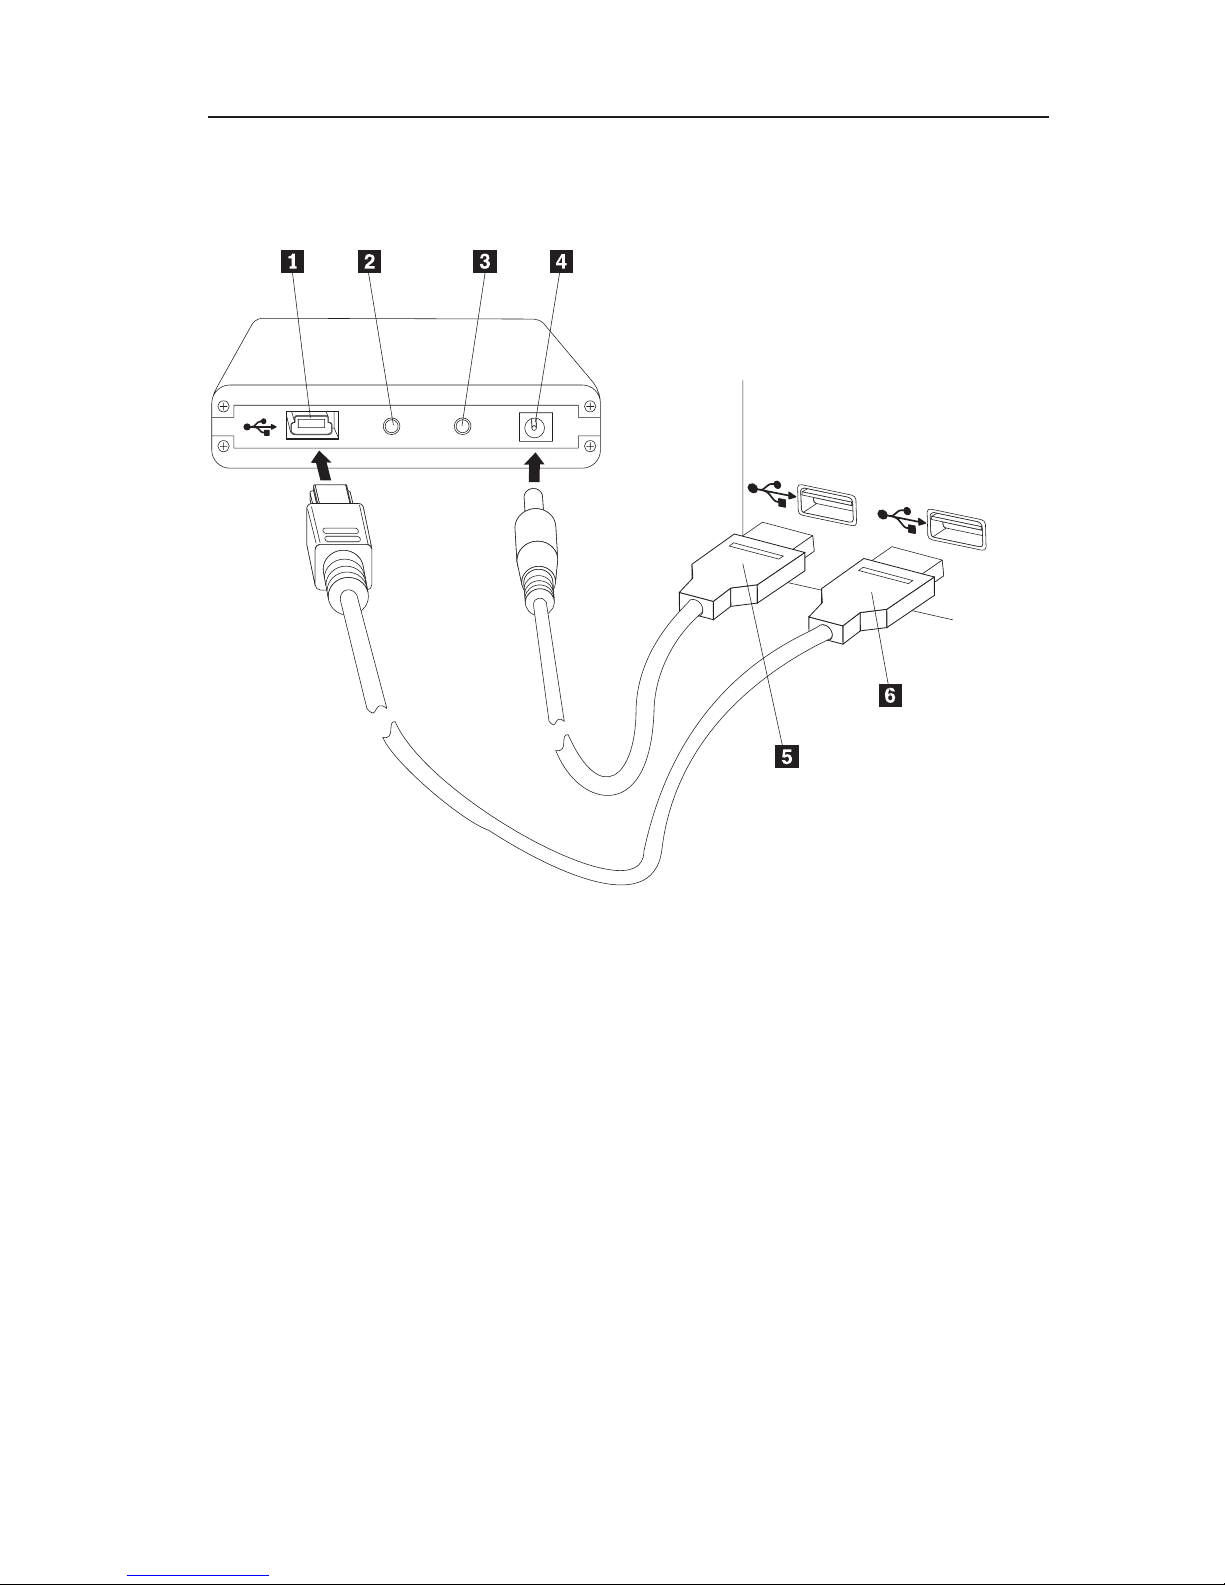
To install the drive, complete the following procedure:
1 USB port
2 Drive activity LED
3 Power LED
4 Auxiliary power port
5 Auxiliary power cable
6 Primary USB cable
1. Attach one end (DC Jack) of the auxiliary power cable 5 to the auxiliary
power port 4 on the drive.
2. Attach the other end (USB A plug) of the auxiliary power cable 5 to an
available USB port on your computer.
3. Attach one end (Mini B USB plug) of the primary USB cable 6 to the USB
port 1.
4. Attach the other end (USB A plug) of the primary USB cable 6 to an
available USB port on your computer.
About the Lenovo USB 2.0 Portable Hard Disk Drive 1-3

Your USB Hard Disk Drive is ready to use and no additional software
installation is required. To disable the USB autolaunch option, click Do not
show this again in the lower-left hand corner of the browser window,
disconnect the drive, and then reconnect the drive.
Disconnecting the drive from your computer
To disconnect the USB Hard Disk Drive from your computer, do the following:
1. Click the Safely Remove Hardware icon in the system tray.
2. Click Safely Remove USB Mass Storage Device to stop the device.
3. Disconnect the cables of the drive from your computer.
Disconnecting the drive from a docking station
Attention: When the USB Hard Disk Drive is attached to the USB ports on a
docking station, you must carefully perform one of the following two
procedures to disconnect the drive from the docking station to avoid any loss
of data.
Procedure 1
1. From the Windows desktop, click Start -> Undock Computer.
2. Disconnect the drive from the docking station.
Procedure
2
1. On a ThinkPad® computer, press Fn + F9 to access the Choose EasyEject
Action menu, and then click Stop USB Mass Storage Device (for a
computer with a Windows XP operating system) or Lenovo USB Hard
Drive USB Device (for a computer with a Windows Vista operating
system).
2. Disconnect the drive from the docking station.
Maintaining the drive
Use the following maintenance guidelines for your USB Hard Disk Drive:
v Do not drop or shock the drive.
v Do not operate or store the drive near strong magnetic fields.
v Do not expose the drive to liquids, extreme temperatures, or humidity.
v Do not use any power cables or adapters that are not included in this option
package.
1-4 Lenovo USB 2.0 Portable Hard Disk Drive User Guide

Lenovo USB 2.0 Portable Hard Disk Drive - Présentation
Le présent chapitre contient les instructions d’installation et d’utilisation de
l’unité de disque dur portable Lenovo USB 2.0 Portable Hard Disk Drive
(ci-après appelée unité de disque dur USB).
Remarque : Avant d’installer et d’utiliser l’option, veuillez prendre
connaissance des informations figurant à la section «Avant de
démarrer l’installation», à la page 1-6.
Description du produit
L’unité de disque dur portable Lenovo USB 2.0 est une unité de disque dur
USB à grande vitesse, légère et portable, compatible avec la norme USB 2.0 qui
permet des transferts de données jusqu’à 80 fois plus rapides qu’avec les
connexions USB 1.1. Cette unité peut être utilisée aussi bien avec les portables
qu’avec les ordinateurs de bureau, et elle est également compatible avec les
connexions USB 1.0 et USB 1.1. Elle fonctionne comme un périphérique prêt à
l’emploi et elle est remplaçable à chaud, ce qui signifie que vous pouvez la
connecter et la déconnecter pendant que l’ordinateur est en cours de
fonctionnement. Voir «Déconnexion de l’unité de l’ordinateur», à la page 1-8.
Le coffret de l’option contient les éléments suivants :
v Unité de disque dur Lenovo USB 2.0 Portable Hard Disk Drive
v Câble USB principal (pour la connexion entre USB ″A″ et ″Mini B″)
v Cordon d’alimentation auxiliaire
v Manuel Lenovo USB 2.0 Portable Hard Disk Drive User Guide (le présent
document)
v Mallette de transport
Configuration matérielle et logicielle requise
Pour utiliser l’option, votre ordinateur doit présenter la configuration
matérielle suivante :
v Microprocesseur Intel Pentium 200MHz au minimum
v 64 Mo de mémoire RAM
v Ports USB 1.1 ou 2.0
Le
système d’exploitation Microsoft Windows Vista, Microsoft Windows XP ou
Microsoft Windows 2000 Professionnel doit être installé sur votre ordinateur.
© Copyright Lenovo 2007, 2008 1-5

Avant de démarrer l’installation
Veuillez lire attentivement les informations suivantes avant d’installer et
d’utiliser l’unité de disque dur USB.
Avertissement : Utilisez uniquement les câbles fournis avec cette option. Vous
risquez d’endommager l’unité si vous utilisez un câble qui n’est pas inclus
dans le coffret de l’option. L’unité de disque dur USB est conçue pour être
utilisée sans boîtier d’alimentation. Ne branchez pas de boîtier d’alimentation
sur l’option.
v Pour éviter d’endommager votre unité de disque dur USB, manipulez-la
avec précaution. Lorsque vous transportez l’unité ou lorsque vous ne
l’utilisez pas, placez-la dans la mallette de transport fournie avec l’option.
Pour plus d’informations sur la manipulation correcte de l’unité de disque
dur USB, voir «Maintenance de l’unité», à la page 1-8.
v Pour obtenir des performances fiables, assurez-vous de brancher les deux
câbles USB de l’option directement sur les ports USB de l’ordinateur ou sur
un concentrateur USB alimenté. Ne connectez pas les câbles USB à un
concentrateur USB qui n’est pas équipé d’un dispositif d’alimentation.
v Le câble USB principal doit être connecté à un port USB de grande
puissance. Si vous rencontrez des difficultés, essayez de connecter le câble
USB principal à un autre port USB.
v Lorsque vous utilisez votre unité de disque dur USB dans un ordinateur
portable doté d’une carte PCMCIA USB 2.0, le câble USB principal doit être
inséré dans le port de grande puissance de la carte PCMCIA. Vous devez
également connecter le cordon d’alimentation auxiliaire au port USB afin de
fournir l’alimentation requise.
Avertissement : Lenovo n’offre aucun support pour cette option si elle est
utilisée avec un utilitaire tiers qui réorganise ou trie la table de partitions.
1-6 Lenovo USB 2.0 Portable Hard Disk Drive User Guide

Installation de l’unité
La présente section fournit les instructions d’installation de l’unité de disque
dur USB.
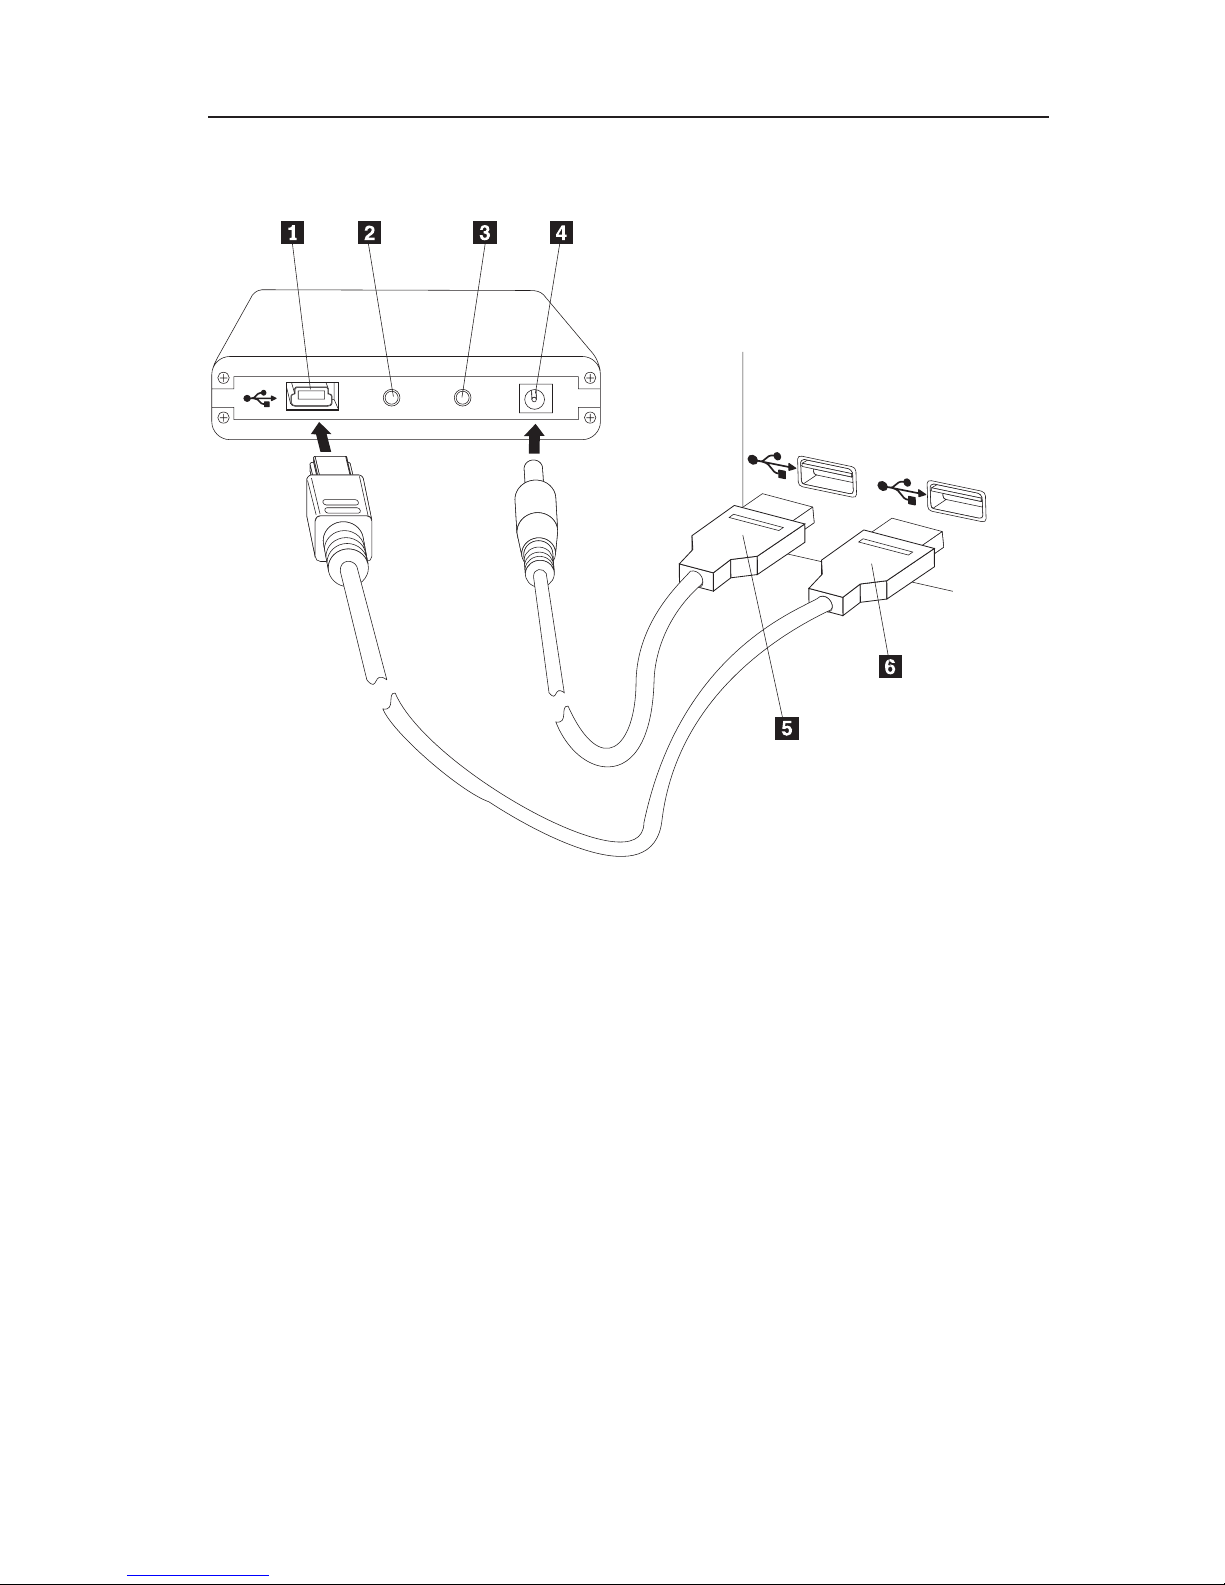
Pour installer l’unité, procédez comme suit :
1 Port USB
2 Voyant d’activité de l’unité
3 Voyant d’alimentation
4 Prise d’alimentation auxiliaire
5 Cordon d’alimentation auxiliaire
6 Câble USB principal
1. Branchez l’une des extrémités (prise DC) du cordon d’alimentation
auxiliaire 5 à la prise d’alimentation auxiliaire 4 de l’unité.
2. Branchez l’autre extrémité (prise USB A) du cordon d’alimentation
auxiliaire 5 à un port USB disponible de votre ordinateur.
3. Branchez une extrémité (prise USB mini B) du câble USB principal 6 au
port USB 1.
4. Branchez l’autre extrémité (prise USB A) du câble USB principal 6 à un
port USB disponible de votre ordinateur.
Lenovo USB 2.0 Portable Hard Disk Drive - Présentation 1-7

Votre unité est prête à être utilisée et il n’est pas nécessaire d’installer un autre
logiciel. Pour désactiver l’option de lancement automatique USB, cliquez sur
Ne plus afficher dans l’angle inférieur gauche de la fenêtre du navigateur,
déconnectez, puis reconnectez l’unité.
Déconnexion de l’unité de l’ordinateur
Pour déconnecter l’unité de disque USB de l’ordinateur, procédez comme suit :
1. Cliquez sur l’icône Retirer le périphérique en toute sécurité de la barre
d’état système.
2. Cliquez sur Retirer le périphérique de stockage de masse USB en toute
sécurité pour arrêter l’unité.
3. Débranchez les câbles de l’unité de l’ordinateur.
Déconnexion de l’unité d’une station d’accueil
Avertissement : Lorsque l’unité de disque dur USB est connectée aux ports
USB d’une station d’accueil, vous devez prendre soin d’effectuer l’une des
procédures suivantes pour la déconnecter de la station sans risquer de perdre
des données.
Procédure 1
1. Sur le bureau Windows, cliquez sur Démarrer -> Retirer l’ordinateur.
2. Déconnectez l’unité de la station d’accueil.
Procédure
2
1. Sur un ordinateur ThinkPad, appuyez sur Fn + F9 pour accéder au menu
Sélection d’une action EasyEject, puis cliquez sur Arrêter le périphérique
de stockage de masse USB (si Windows XP est installé sur votre
ordinateur) ou sur Lenovo USB Hard Drive USB Device (si Windows Vista
est installé).
2. Déconnectez l’unité de la station d’accueil.
Maintenance de l’unité
Respectez les règles de maintenance suivantes :
v Ne laissez pas tomber l’unité et ne la secouez pas.
v N’utilisez pas et ne rangez pas l’unité à proximité de forts champs
magnétiques.
v N’exposez pas l’unité à des liquides, à des températures extrêmes, ni à
l’humidité.
v N’utilisez pas de cordons d’alimentation ou d’adaptateurs non inclus dans le
coffret de l’option.
1-8 Lenovo USB 2.0 Portable Hard Disk Drive User Guide

Informazioni sull’unità disco fisso portatile USB 2.0
Lenovo
Questo capitolo contiene le informazioni per l’installazione e l’utilizzo
dell’unità disco fisso portatile USB 2.0 Lenovo® (d’ora in poi indicata come
″unità disco fisso USB″).
Nota: prima di installare e utilizzare l’opzione, leggere attentamente “Prima di
iniziare l’installazione” a pagina 1-10.
Descrizione del prodotto
L’unità disco fisso portatile USB 2.0 Lenovo è un’unità disco fisso USB
portatile, leggera e ad alta velocità, compatibile con lo standard USB 2.0 che
consente trasferimenti di dati fino a 80 volte più veloci delle connessioni USB
1.1. La suddetta unità può essere utilizzata con computer portatili o desktop ed
è inoltre compatibile con le connessioni USB 1.0 e USB 1.1. Tale unità funziona
come un’unità plug-and-play ed è sostituibile a sistema acceso, il che significa
che è possibile collegarla e scollegarla senza spegnere il computer. Consultare
la sezione “Scollegamento dell’unità dall’elaboratore” a pagina 1-12.
Il pacchetto di opzioni include:
v Unità disco fisso portatile USB 2.0 Lenovo
v Cavo USB primario (Connessione USB da "A" a "Mini B")
v Cavo di alimentazione ausiliario
v Unità disco fisso portatile USB 2.0 Lenovo - Guida per l’utente
v Custodia per il trasporto
Requisiti hardware e software
Per utilizzare l’opzione, è necessario che il seguente hardware sia installato sul
proprio computer:
v Microprocessore Intel® Pentium® da almeno 200 MHz
v 64 MB di RAM (Random Access Memory)
v Porte USB 1.1 o 2.0
Per
utilizzare l’opzione, sul computer deve essere installato il sistema operativo
Microsoft® Windows Vista®, Microsoft Windows® XP o Microsoft Windows
2000 Professional.
© Copyright Lenovo 2007, 2008 1-9

Prima di iniziare l’installazione
Accertarsi di consultare le seguenti informazioni prima di installare e utilizzare
l’unità disco fisso portatile USB.
Attenzione: utilizzare solo i cavi forniti con questa opzione. Se si utilizzano
cavi diversi da quelli forniti con il pacchetto di opzioni, si potrebbe rischiare di
danneggiare l’unità. L’opzione è concepita per un uso portatile, senza
l’adattatore di alimentazione CA. Non collegare un adattatore di alimentazione
CA all’opzione.
v Per evitare di danneggiare l’unità disco fisso USB, maneggiarla con cautela.
Durante il trasporto dell’opzione oppure quando non è in uso, inserirla nella
custodia per il trasporto fornita con l’opzione. Per ulteriori informazioni
sulla corretta gestione dell’unità disco fisso USB, consultare la sezione
“Manutenzione dell’unità” a pagina 1-12.
v Per ottenere prestazioni affidabili, verificare che entrambi i cavi USB siano
collegati direttamente dall’opzione ai connettori USB del computer o ad un
hub USB con alimentazione CA. Non collegare i cavi USB ad un hub USB
privo di alimentazione.
v E’ necessario che il cavo USB primario sia collegato ad una porta di elevata
alimentazione USB. Tentare di collegare il cavo USB primario ad un’altra
porta USB.
v Durante l’utilizzo dell’unità disco fisso USB su un computer portatile con
una scheda PCMCIA USB 2.0, è necessario che il cavo USB primario sia
inserito nella porta ad elevata alimentazione per schede PCMCIA. E’ anche
necessario collegare il cavo di alimentazione ausiliario alla porta USB, per
fornire un’adeguata alimentazione.
Attenzione: Lenovo non supporta questa opzione con un’utilità disco di terze
parti che ordina o riordina la tabella delle partizioni.
1-10 Unità disco fisso portatile USB 2.0 Lenovo - Guida per l’utente
Installazione dell’unità
Questa sezione fornisce le istruzioni sull’installazione dell’unità disco fisso
USB.
Per installare l’unità, completare la seguente procedura:
1 Porta USB
2 LED di attività dell’unità
3 LED di stato
4 Porta di alimentazione ausiliaria
5 Cavo di alimentazione ausiliario
6 Cavo USB primario
1. Collegare un’estremità del cavo di alimentazione ausiliario 5 alla relativa
porta 4 dell’unità.
2. Collegare l’altra estremità (presa USB A) del cavo di alimentazione
ausiliario 5 ad una porta USB disponibile sul proprio computer.
3. Collegare un’estremità (presa Mini B USB) del cavo USB primario 6 alla
porta USB 1.
4. Collegare l’altra estremità (presa USB A) del cavo USB primario 6 ad una
porta USB disponibile sul proprio computer.
Informazioni sull’unità disco fisso portatile USB 2.0 Lenovo 1-11

L’unità disco fisso USB è pronta per l’uso e non viene richiesta alcuna
installazione aggiuntiva del software. Per disabilitare l’opzione di avvio USB
automatico, fare clic su Non visualizzare di nuovo nell’angolo sinistro
inferiore della finestra del browser, scollegare l’unità e ricollegarla.
Scollegamento dell’unità dall’elaboratore
Per scollegare l’unità disco fisso USB dal proprio computer, procedere nel
modo seguente:
1. Fare clic su sull’icona Rimozione sicura dell’hardware nella barra delle
applicazioni.
2. Fare clic su Periferica archiviazione di massa USB per arrestare la
periferica.
3. Scollegare i cavi dell’unità dal computer.
Scollegamento dell’unità da un alloggiamento di espansione
Attenzione: Quando l’unità disco fisso USB è collegata alle porte USB su un
alloggiamento di espansione, è necessario eseguire con attenzione una delle
due procedure seguenti per scollegare l’unità dall’alloggiamento di espansione,
per impedire una possibile perdita di dati.
Procedura 1
1. Dal desktop di Windows, fare clic su Start -> Disinserisci PC.
2. Scollegare l’unità dall’alloggiamento di espansione.
Procedura
2
1. Su un computer ThinkPad®, premere Fn + F9 per accedere al menu
Seleziona azione di EasyEject e quindi fare clic su Arresta periferica di
archiviazione di massa USB (per un computer con un sistema operativo
Windows XP) o Periferica USB unità disco fisso USB Lenovo (per un
computer con un sistema operativo Windows Vista).
2. Scollegare l’unità dall’alloggiamento di espansione.
Manutenzione dell’unità
Utilizzare le seguenti istruzioni di manutenzione per la propria unità disco
fisso USB.
v Non lasciare cadere o urtare l’unità.
v Non operare o conservare l’unità presso forti campi magnetici.
v Non esporre l’unità a liquidi, temperature estreme o umidità.
v Non utilizzare i cavi di alimentazione o adattatori che non sono compresi in
questo pacchetto di opzione.
1-12 Unità disco fisso portatile USB 2.0 Lenovo - Guida per l’utente

Informationen zum Lenovo USB 2.0 Portable Hard Disk
Drive
Dieses Kapitel enthält Anweisungen zum Installieren und Verwenden des
Lenovo® USB 2.0 Portable Hard Disk Drive (im Folgenden als ″USB-Festplattenlaufwerk″
bezeichnet).
Anmerkung: Bevor Sie die Zusatzeinrichtung installieren und verwenden, soll-
ten
Sie den Abschnitt „Vorbereitung der Installation” auf Seite 1-14
lesen.
Produktbeschreibung
Das Lenovo USB 2.0 Portable Hard Disk Drive ist ein tragbares, leichtes USBHochgeschwindigkeits-Festplattenlaufwerk,
das mit dem Standard ″USB 2.0″
kompatibel ist, der Datenübertragungen ermöglicht, die bis zu 80 mal schneller
sind als bei USB-1.1-Verbindungen. Das USB-Festplattenlaufwerk kann mit
tragbaren Computern oder Desktop-Computern verwendet werden und ist
auch mit USB-1.0- und USB-1.1-Verbindungen kompatibel. Das USB-Festplattenlaufwerk
ist eine Hot-Swap-fähige Plug-and-Play-Einheit. Das heißt, Sie
können das Laufwerk im laufenden Betrieb des Computers anschließen und
wieder abziehen. Weitere Informationen hierzu finden Sie im Abschnitt „Laufwerk
vom Computer entfernen” auf Seite 1-16.
Im Lieferumfang der Zusatzeinrichtung sind folgende Komponenten enthalten:
v Lenovo USB 2.0 Portable Hard Disk Drive
v Primäres USB-Kabel (USB-Verbindung von "A" zu "Mini B")
v Zusatznetzkabel
v Benutzerhandbuch zum Lenovo USB 2.0 Portable Hard Disk Drive
v Transportbehälter
Hardware- und Softwarevoraussetzungen
Damit Sie die Zusatzeinrichtung verwenden können, muss die folgende Hardware
auf Ihrem Computer installiert sein:
v Intel® Pentium®-Mikroprozessor mit mindestens 200 MHz
v 64 MB RAM-Speicher (Random Access Memory)
v USB 1.1- oder USB 2.0-Anschluss
Damit
Sie die Zusatzeinrichtung verwenden können, muss auf dem Computer
das Betriebssystem Microsoft® Windows Vista®, Microsoft Windows® XP oder
Microsoft Windows 2000 Professional installiert sein.
© Copyright Lenovo 2007, 2008 1-13

Vorbereitung der Installation
Lesen Sie die folgenden Informationen, bevor Sie das USB-Festplattenlaufwerk
installieren und verwenden.
Achtung: Verwenden Sie nur die im Lieferumfang der Zusatzeinrichtung ent-
haltenen
Kabel. Wenn Sie ein Kabel verwenden, das nicht im Zusatzpaket ent-
halten
war, könnte das USB-Festplattenlaufwerk beschädigt werden. Die
Zusatzeinrichtung wurde für tragbare Computer ohne Netzteil entwickelt.
Schließen Sie kein Netzteil an die Zusatzeinrichtung an.
v Achten Sie auf eine vorsichtige Handhabung des USB-Festplattenlaufwerks,
um Beschädigungen zu vermeiden. Legen Sie das Laufwerk in den im Lieferumfang
enthaltenen Transportbehälter, wenn Sie das Laufwerk transpor-
tieren
oder nicht verwenden. Weitere Informationen zur richtigen Handha-
bung
des USB-Festplattenlaufwerks erhalten Sie im Abschnitt „Handhabung
des Laufwerks” auf Seite 1-16.
v Achten Sie für zuverlässige Leistung darauf, dass beide USB-Kabel direkt
von der Einheit zu den USB-Anschlüssen des Computers oder zu einem mit
Wechselstrom betriebenen USB-Hub führen. Schließen Sie die USB-Kabel
nicht an einen USB-Hub ohne Stromversorgung an.
v Sie müssen das primäre USB-Kabel an einen USB-Hauptstromanschluss
anschließen. Wenn dabei Fehler auftreten, versuchen Sie, die Fehler zu beheben,
indem Sie das primäre USB-Kabel an einen anderen USB-Anschluss
anschließen.
v Wenn Sie das USB-Festplattenlaufwerk auf einem tragbaren Computer mit
einer USB 2.0-PCMCIA-Karte verwenden, müssen Sie das primäre USB-Kabel
in den Hauptstromanschluss der PCMCIA-Karte einstecken. Außerdem
müssen Sie das Zusatznetzkabel in den USB-Anschluss einstecken, um eine
ausreichende Stromzufuhr sicherzustellen.
Achtung: Lenovo gewährt bei diesem Produkt keine Unterstützung für
Plattendienstprogramme von Fremdherstellern, die die Partitionstabelle
umordnen oder sortieren.
1-14 Lenovo USB 2.0 Portable Hard Disk Drive User Guide

Laufwerk installieren
Dieser Abschnitt enthält Anweisungen zur Installation des Laufwerks.
Gehen Sie wie folgt vor, um das Laufwerk zu installieren:
1 USB-Anschluss
2 Laufwerkbetriebsanzeige
3 Betriebsanzeige
4 Zusatznetzanschluss
5 Zusatznetzkabel
6 Primäres USB-Kabel
1. Schließen Sie ein Ende (Gleichstromanschluss) des Zusatznetzkabels 5 an
den Zusatznetzanschluss 4 am Laufwerk an.
2. Schließen Sie das andere Ende (USB-Anschluss A) des Zusatznetzkabels 5
an einen verfügbaren USB-Anschluss am Computer an.
3. Schließen Sie ein Ende (USB-Anschluss ″Mini B″) des primären USB-Kabels
6 an den USB-Anschluss 1 an.
4. Schließen Sie das andere Ende (USB-Anschluss A) des primären USB-Kabels
6 an einen verfügbaren USB-Anschluss am Computer an.
Das
USB-Festplattenlaufwerk ist funktionsbereit. Es ist keine zusätzliche
Softwareinstallation erforderlich. Soll das automatische Starten des USBFestplattenlaufwerks
inaktiviert werden, klicken Sie in der unteren linken Ecke
Informationen zum Lenovo USB 2.0 Portable Hard Disk Drive 1-15

des Browserfensters auf die Option, dass diese Meldung nicht mehr angezeigt
werden soll, und schließen Sie dann das Laufwerk wieder an.
Laufwerk vom Computer entfernen
Gehen Sie wie folgt vor, um das USB-Festplattenlaufwerk vom Computer zu
entfernen:
1. Klicken Sie in der Symbolleiste auf das Symbol zum sicheren Entfernen von
Hardware.
2. Klicken Sie auf die Option zum sicheren Entfernen der USB-Massenspeichereinheit,
um die Einheit zu stoppen.
3. Ziehen Sie die Kabel des Laufwerks vom Computer ab.
Laufwerk von einer Andockstation entfernen
Achtung: Wenn das USB-Festplattenlaufwerk an die USB-Anschlüsse einer
Andockstation angeschlossen ist, müssen Sie, damit keine Daten verloren
gehen, sorgfältig eine der beiden folgenden Prozeduren ausführen, um das
Laufwerk von der Adockstation zu entfernen.
Prozedur 1
1. Klicken Sie auf dem Windows-Desktop auf Start und dann auf die Option
zum Abdocken des Computers.
2. Entfernen Sie das Laufwerk von der Andockstation.
Prozedur
2
1. Auf einem ThinkPad® drücken Sie die Tastenkombination Fn + F9, um auf
das Menü EasyEject-Vorgänge auswählen zuzugreifen, und klicken Sie
dann auf die Option zum Stoppen der USB-Massenspeichereinheit (bei
einem Computer mit dem Betriebssystem Windows XP) oder auf die
Option für die USB-Einheit ″Lenovo USB-Festplattenlaufwerk″ (bei einem
Computer mit dem Betriebssystem Windows Vista).
2. Entfernen Sie das Laufwerk von der Andockstation.
Handhabung des Laufwerks
Beachten Sie die folgenden Richtlinien zur Handhabung des USB-Festplattenlaufwerks:
v Lassen Sie das Laufwerk nicht fallen und setzen Sie es keinen Erschütterun-
gen
aus.
v Vermeiden Sie die Verwendung oder die Aufbewahrung des Laufwerks in
der Nähe von starken magnetischen Feldern.
v Schützen Sie das Laufwerk vor Flüssigkeiten, starken Temperatur-
schwankungen
oder Feuchtigkeit.
v Verwenden Sie keine Netzkabel oder Adapter, die nicht im Lieferumfang der
Zusatzeinrichtung enthalten sind.
1-16 Lenovo USB 2.0 Portable Hard Disk Drive User Guide

Acerca de Lenovo USB 2.0 Portable Hard Disk Drive
Este capítulo contiene instrucciones para instalar y utilizar la unidad Lenovo
®
USB 2.0 Portable Hard Disk Drive (de ahora en adelante denominada unidad
de disco duro USB).
Nota: Antes de instalar y utilizar la opción, no olvide leer “Antes de empezar
la instalación” en la página 1-18.
Descripción del producto
Lenovo USB 2.0 Portable Hard Disk Drive es una unidad de disco duro USB
de gran velocidad, ligera y portátil, compatible con la normativa USB 2.0
estándar, que permite transferencias de datos hasta 80 veces más rápidas que si
se realizaran a través de conexiones USB 1.1. La unidad de disco duro USB
puede utilizarse con sistemas de sobremesa o portátiles y también es
compatible con conexiones USB 1.0 y USB 1.1. La unidad de disco duro USB
funciona como dispositivo de conectar y listo (plug-and-play) y se puede
intercambiar dinámicamente; es decir, puede conectar y desconectar la unidad
mientras el sistema está en ejecución. Consulte el apartado “Desconexión de la
unidad desde el sistema” en la página 1-20.
El paquete de la opción incluye:
v Lenovo USB 2.0 Portable Hard Disk Drive
v Cable USB principal (conexión USB "A" a "Mini B")
v Cable de alimentación auxiliar
v Guía del usuario de Lenovo USB 2.0 Portable Hard Disk Drive
v Estuche
Requisitos de hardware y software
Debe tener instalado el hardware siguiente en su máquina para poder utilizar
la opción:
v Microprocesador Intel® Pentium® con un mínimo de 200 MHz
v 64 MB de RAM (memoria de acceso aleatorio)
v Puertos USB 1.1 o 2.0
El
sistema debe tener instalado Microsoft
®
Windows Vista®, Microsoft
Windows® XP o Microsoft Windows 2000 Professional para poder utilizar la
opción.
© Copyright Lenovo 2007, 2008 1-17

Antes de empezar la instalación
No olvide revisar la información siguiente antes de instalar y utilizar la unidad
de disco duro USB.
Atención: Utilice únicamente los cables que se suministran con esta opción.
Podría dañar la unidad de disco duro USB si utiliza un cable no incluido en el
paquete de la opción. La opción se ha diseñado para utilizarla como un PC
portátil sin adaptador de alimentación de CA. No conecte un adaptador de CA
a la opción.
v Para evitar dañar la unidad de disco duro USB, manipúlela con cuidado.
Cuando transporte la unidad o cuando no la esté utilizando, colóquela en el
estuche que viene con la opción. Para obtener más información sobre la
correcta manipulación de la unidad de disco duro USB, consulte el apartado
“Mantenimiento de la unidad” en la página 1-20.
v Para obtener un rendimiento óptimo, asegúrese de que los dos cables USB
estén conectados directamente a los conectores USB del sistema o a un
concentrador USB alimentado con CA. No conecte los cables USB a un
concentrador USB sin alimentación.
v El cable USB principal se ha de conectar a un puerto USB de gran potencia.
Si detecta problemas, intente conectar el cable USB principal a otro puerto
USB.
v Cuando utilice la unidad de disco duro USB en un sistema portátil con una
tarjeta PCMCIA USB 2.0, el cable USB principal deberá insertarse en el
puerto de gran potencia de la tarjeta PCMCIA. También deberá conectar el
cable de alimentación auxiliar al puerto USB para obtener la energía
correcta.
Atención: Lenovo no da soporte a esta opción si ésta se utiliza con un
programa de utilidad de discos de otra empresa que reorganice o clasifique la
tabla de partición.
1-18 Guía del usuario de Lenovo USB 2.0 Portable Hard Disk Drive

Instalación de la unidad
Este apartado proporciona instrucciones para instalar la unidad de disco duro
USB.
Para instalar la unidad, lleve a cabo el procedimiento siguiente:
1 Puerto USB
2 LED de actividad de la unidad
3 LED de alimentación
4 Puerto de alimentación auxiliar
5 Cable de alimentación auxiliar
6 Cable USB principal
1. Conecte un extremo (conector de CC) del cable de alimentación auxiliar 5
al puerto de alimentación auxiliar 4 de la unidad.
2. Conecte el otro extremo (enchufe USB A) del cable de alimentación auxiliar
5 a un puerto USB disponible en el sistema.
3. Conecte un extremo (enchufe USB B Mini) del cable USB principal 6 al
puerto USB 1.
4. Conecte el otro extremo (enchufe USB A) del cable USB principal 6 a un
puerto USB disponible en el sistema.
Acerca de Lenovo USB 2.0 Portable Hard Disk Drive 1-19

La unidad de disco duro USB está lista para su uso y no es necesario hacer
ninguna instalación adicional de software. Para inhabilitar la opción de inicio
automático del USB, pulse No volver a mostrar en la esquina inferior izquierda
de la ventana del navegador, desconecte la unidad y vuélvala a conectar.
Desconexión de la unidad desde el sistema
Para desconectar la unidad de disco duro USB del sistema, lleve a cabo lo
siguiente:
1. Pulse el icono Quitar hardware con seguridad en la bandeja del sistema.
2. Pulse Quitar dispositivo de almacenamiento masivo USB con seguridad
para detener el dispositivo.
3. Desconecte del sistema los cables de la unidad.
Desconexión de la unidad desde una estación de
acoplamiento
Atención: Cuando la unidad de disco duro USB está conectada a los puertos
USB de una estación de acoplamiento, es necesario tomar las medidas
siguientes para desconectar la unidad de la estación sin perder ningún dato.
Procedimiento 1
1. Desde el escritorio de Windows, pulse Inicio -> Desacoplar equipo.
2. Desconecte de la estación de acoplamiento la unidad.
Procedimiento
2
1. En un sistema ThinkPad®, pulse Fn + F9 para acceder al menú Escoger
acción EasyEject y, a continuación, pulse Detener dispositivo de
almacenamiento masivo USB (desde un sistema con el sistema operativo
Windows XP) o Dispositivo USB Lenovo USB Hard Drive (desde un
sistema con el sistema operativo Windows Vista).
2. Desconecte de la estación de acoplamiento la unidad.
Mantenimiento de la unidad
Utilice las directrices de mantenimiento siguientes para su unidad de disco
duro USB.
v No deje caer ni golpee la unidad.
v No utilice ni guarde la unidad cerca de campos magnéticos potentes.
v No exponga la unidad a líquidos, temperaturas extremas o humedad.
v No utilice cables de alimentación o adaptadores distintos de los que
encontrará en el paquete de esta opción.
1-20 Guía del usuario de Lenovo USB 2.0 Portable Hard Disk Drive

Sobre o Lenovo USB 2.0 Portable Hard Disk Drive
Este capítulo contém instruções para instalar e utilizar o Lenovo® USB 2.0
Portable Hard Disk Drive (daqui por diante referido como Unidade de Disco
Rígido USB).
Nota: Antes de instalar e utilizar a opção, certifique-se de ler “Antes de Iniciar
a Instalação” na página 1-22.
Descrição do Produto
O Lenovo USB 2.0 Portable Hard Disk Drive é uma unidade de disco rígido,
USB, portátil, leve, de alta velocidade que é compatível com o padrão USB 2.0
que ativa transferências de dados que são até 80 vezes mais rápidas que
através de conexões USB 1.1. A Unidade de Disco Rígido USB pode ser
utilizada com computadores remotos ou de desktop e também é compatível
com conexões USB 1.0 e USB 1.1. A Unidade de Disco Rígido USB opera como
um dispositivo plug-and-play e é hot-swap; ou seja, você pode conectar e
desconectar a unidade enquanto o computador está em execução. Consulte o
“Desconectando a Unidade de seu Computador” na página 1-24.
O pacote do opcional inclui:
v Lenovo USB 2.0 Portable Hard Disk Drive
v Cabo USB principal (Conexão USB "A" a "Mini B")
v Cabo de alimentação auxiliar
v Guia do Usuário do Lenovo USB 2.0 Portable Hard Disk Drive
v Caixa de transporte
Requisitos de Hardware e Software
Para utilizar a opção, você deve ter o seguinte hardware instalado em seu
computador:
v Microprocessador Intel® Pentium® no mínimo de 200 MHz
v RAM (Memória de Acesso Aleatório) de 64 MB
v Portas USB 1.1 ou 2.0
Para
utilizar a opção, seu computador deve ter o sistema operacional
Microsoft® Windows Vista®, Microsoft Windows® XP ou Microsoft Windows
2000 Professional instalado.
© Copyright Lenovo 2007, 2008 1-21

Antes de Iniciar a Instalação
Certifique-se de revisar as seguintes informações antes de instalar e utilizar a
Unidade de Disco Rígido USB.
Atenção: Utilize apenas os cabos fornecidos com esta opção. Você pode
danificar a Unidade de Disco Rígido USB se utilizar um cabo não incluído com
o pacote de opcional. O opcional foi projetado para uso portátil sem um
adaptador de energia AC. Não conecte um adaptador de energia AC ao
opcional.
v Para evitar danos em sua Unidade de Disco Rígido USB, manipule com
cuidado. Ao transportar o opcional ou quando ele não estiver em uso,
coloque-o na caixa de transporte fornecida com o opcional. Para obter
informações adicionais sobre como manipular corretamente sua Unidade de
Disco Rígido USB, consulte “Fazendo a Manutenção da Unidade” na página
1-24.
v Para desempenho confiável, assegure-se de que ambos os cabos USB estejam
conectados diretamente a partir do opcional nos conectores USB do
computador ou em um hub USB com energia AC. Não conecte os cabos USB
a um hub USB sem energia.
v O cabo USB primário deve ser conectado a uma porta USB de alta energia.
Se você tiver problemas, tente conectar o cabo USB primário a uma outra
porta USB.
v Quando utilizar sua Unidade de Disco Rígido USB em um computador
remoto com um cartão PCMCIA USB 2.0, o cabo USB primário deverá ser
inserido na porta de alta energia do cartão PCMCIA. Você também deve
conectar o cabo de alimentação auxiliar à porta USB para fornecer energia
adequada.
Atenção: A Lenovo não suporta esta opção se utilizada com um utilitário de
disco de terceiros que reordena ou classifica a tabela particionada.
1-22 Lenovo USB 2.0 Portable Hard Disk Drive: Guia do Usuário
Instalando a Unidade
Esta seção fornece instruções para instalar a Unidade de Disco Rígido USB.
Para instalar a unidade, conclua o seguinte procedimento:
1 Porta USB
2 LED de atividade da unidade
3 LED de energia
4 Porta de energia auxiliar
5 Cabo de alimentação auxiliar
6 Cabo USB primário
1. Conecte uma extremidade (Tomada DC) do cabo de alimentação auxiliar
5 à porta de energia auxiliar 4 na unidade.
2. Conecte a outra extremidade (Plugue USB A) do cabo de alimentação
auxiliar 5 a uma porta USB disponível em seu computador.
3. Conecte uma extremidade (Plugue USB Mini B) do cabo USB primário 6
à porta USB 1.
4. Conecte a outra extremidade (Plugue USB A) do cabo USB primário 6 a
uma porta USB disponível em seu computador.
Sobre o Lenovo USB 2.0 Portable Hard Disk Drive 1-23

Sua Unidade de Disco Rígido USB está pronta para uso e nenhuma instalação
de software adicional é necessária. Para desativar a opção de ativação
automática de USB, clique em Não mostrar isto novamente no canto inferior
esquerdo da janela do navegador, desconecte a unidade e, em seguida,
reconecte a unidade.
Desconectando a Unidade de seu Computador
Para desconectar a Unidade de Disco Rígido USB de seu computador, faça o
seguinte:
1. Clique no ícone Remover Hardware com Segurança na bandeja do sistema.
2. Clique em Remover Dipositivo de Armazenamento em Massa USB para
parar o dispositivo.
3. Desconecte os cabos da unidade de seu computador.
Desconectando a Unidade de uma Estação de Acoplamento
Atenção: Quando a Unidade de Disco Rígido USB é conectada às portas USB
em uma estação de acoplamento, é necessário desempenhar um dos dois
procedimentos a seguir com cuidado para desconectar a unidade da estação de
acoplamento para evitar qualquer perda de dados.
Procedimento 1
1. A partir do desktop Windows, clique em Iniciar -> Desacoplar
Computador.
2. Desconecte a unidade da estação de acoplamento.
Procedimento
2
1. Em um computador ThinkPad®, pressione Fn + F9 para acessar o menu
Escolher Ação EasyEject e, em seguida, clique em Parar Dipositivo de
Armazenamento em Massa USB (para um computador com um sistema
operacional Windows XP) ou Lenovo USB Hard Drive USB Device (para
um computador com um sistema operacional Windows Vista).
2. Desconecte a unidade da estação de acoplamento.
Fazendo a Manutenção da Unidade
Utilize as seguintes diretrizes de manutenção para sua Unidade de Disco
Rígido USB:
v Não derrube ou bata a unidade.
v Não opere ou armazene a unidade próxima a fortes campos magnéticos.
v Não exponha a unidade a líquidos, temperaturas extremas ou umidade.
1-24 Lenovo USB 2.0 Portable Hard Disk Drive: Guia do Usuário

v Não utilize nenhum cabo ou adaptador de alimentação que não esteja
incluído neste pacote de opcional.
Sobre o Lenovo USB 2.0 Portable Hard Disk Drive 1-25
 Loading...