

Page 1
ThinkServerRD330
HardwareMaintenanceManual
MachineTypes:3072,3073,3074,4302,4304,and4305
Page 2

Note:
Beforeusingtheinformationandtheproductitsupports,besuretoreadandunderstandthefollowing:
•TheReadMeFirstthatcomeswithyourproduct
•“Safetyinformation”onpageiii
•AppendixA“Notices”onpage169
FirstEdition(August2012)
©CopyrightLenovo2012.
LIMITEDANDRESTRICTEDRIGHTSNOTICE:IfdataorsoftwareisdeliveredpursuantaGeneralServicesAdministration
“GSA”contract,use,reproduction,ordisclosureissubjecttorestrictionssetforthinContractNo.GS-35F-05925.
Page 3

Contents
Safetyinformation..........iii
Safetyinspectionguide............x
Groundingrequirements............xi
Chapter1.Generalinformation.....1
Introduction.................1
Serverdocumentation.............1
Chapter2.Serversetuproadmap...5
Chapter3.Productoverview......7
Serverpackage...............7
Features..................7
Specications...............11
Software.................11
ThinkServerEasyStartup.........11
ThinkServerEasyUpdateFirmwareUpdater.12
LenovoThinkServerEasyManage.....12
BIOSandTMMupdateutilities......12
RAIDcongurationutilities........12
Remotemanagementsoftware......12
LenovoRackPlanner..........12
ThinkServerSmartGridTechnology....12
Locations.................13
Machinetype,model,andserialnumber
label.................13
Frontviewoftheserver.........14
Frontpanel..............17
IntelligentDiagnosticsModule.......19
Rearviewoftheserver.........20
Servercomponents...........22
Hot-swapharddiskdrivestatusLEDs...26
RAIDcard...............26
Hot-swapharddiskdrivebackplane....28
Mini-SAStomini-SASsignalcable
connections..............30
Systemboardcomponents........32
Systemboardjumpersandswitches....35
SystemboardLEDs...........40
Chapter4.Turningonandturningoff
theserver...............43
Turningontheserver............43
Turningofftheserver............43
Chapter5.Conguringtheserver..45
UsingtheSetupUtilityprogram........45
StartingtheSetupUtilityprogram.....45
ViewinginformationintheSetupUtility
program...............45
SetupUtilityprograminterface......46
Settingthesystemdateandtime.....48
Usingpasswords............49
Selectingastartupdevice........50
ConguringtheTPMfunction.......50
SettingthemodeoftheEthernetconnector
0..................51
ExitingtheSetupUtilityprogram......51
UpdatingorrecoveringtheBIOS......51
UsingtheThinkServerEasyStartupprogram...53
FeaturesoftheThinkServerEasyStartup
program...............53
StartingtheThinkServerEasyStartup
program...............54
UsingtheThinkServerEasyStartupprogram
onaWindowsoperatingsystem......55
ConguringRAID..............56
AboutRAID..............56
ConguringRAIDusingtheThinkServer
EasyStartupprogram..........58
ConguringtheThinkServerRAID300...58
ConguringtheadvancedSATA/SAShardware
RAID.................63
ConguringtheEthernetcontrollers......64
Updatingthermware............64
UsingtheFirmwareUpdaterprogram....64
UsingtheLenovoThinkServerEasyManage
program.................65
Chapter6.Installing,removing,or
replacinghardware..........67
Guidelines................67
Precautions..............67
Handlingstatic-sensitivedevices.....68
Systemreliabilityguidelines........69
Workinginsidetheserverwiththepoweron.69
Removingtheservercover..........69
Installing,removing,orreplacinghardware...71
Removingandreinstallingtherackhandles.71
Removingandreinstallingthecooling
shroud................73
Installingorremovingamemorymodule...75
InstallingorremovingtheEthernetcard...81
InstallingorremovingtheRAIDcard....85
InstallingorremovingtheThinkServerRAID
500UpgradeKeyforAdvancedRAID....89
©CopyrightLenovo2012
i
Page 4

InstallingorremovingtheThinkServerRAID
700Battery..............93
InstallingorremovingtheThinkServerRAID
300UpgradeKeyforAdvancedRAID....96
InstallingorremovingtheThinkServer
ManagementModulePremium......100
InstallingorremovingtheThinkServerT rusted
PlatformModule............103
Installingorreplacingahot-swapredundant
powersupply.............106
Installingorreplacingaheatsink......110
Installingorreplacingthemicroprocessor..113
Installingorreplacingahot-swapharddisk
drive.................122
Installingorreplacingtheopticaldrive...126
Replacingthehot-swapharddiskdrive
backplane...............132
ReplacingtheIntelligentDiagnostics
Module................137
Replacingasystemfan.........139
Replacingthefrontpanelboard......141
Replacingtherisercardassembly1....143
Replacingthesystemboardbattery....145
Replacingthesystemboard.......147
Completingthepartsreplacement.......153
Reinstallingtheservercoverandreconnecting
cables................153
Updatingtheserverconguration.....157
Chapter7.Troubleshootingand
diagnostics.............159
Troubleshootingprocedure..........159
ViewingthestatusanddiagnosticLEDs.....159
Viewingthesystemeventlog.........159
Basictroubleshootingtables.........160
ThinkServerEasyStartupprogram
problems...............160
Opticaldriveproblems..........160
Harddiskdriveproblems.........161
Memorymoduleproblems........162
Keyboard,mouse,andUSBdevice
problems...............163
Chapter8.Gettinginformation,help,
andservice.............165
Informationresources............165
Usingthedocumentation.........165
ThinkServerWebsite..........165
LenovoSupportWebsite.........165
Helpandservice..............166
Beforeyoucall.............166
Callingforservice............166
Usingotherservices..........167
Purchasingadditionalservices......167
AppendixA.Notices.........169
Trademarks................170
Importantnotes..............170
Particulatecontamination..........170
PolyvinylChloride(PVC)cableandcordnotice..171
Recyclinginformation............171
Batteryreturnprogram..........171
Requirementforbatteriescontaining
perchlorate..............172
ImportantWEEEinformation.........172
GermanOrdinanceforWorkglossstatement...173
Exportclassicationnotice..........173
Electronicemissionnotices..........173
ENERGYSTARmodelinformation.......173
Index.................175
iiThinkServerRD330HardwareMaintenanceManual
Page 5

Safetyinformation
Note:Beforeusingtheproduct,besuretoreadandunderstandthemultilingualsafetyinstructionsonthe
documentationDVDthatcomeswiththeproduct.
Antesdeusaroproduto,leiaeentendaasinstruçõesdesegurançamultilínguesnoDVDdedocumentação
queoacompanha.
Предидаизползватетозипродукт,задължителнопрочететеивникнетевмногоезичнитеинструкции
забезопасноствDVDдискасдокументация,койтосепредоставяспродукта.
PrijeupotrebeovogproizvodaobaveznopročitajtevišejezičnesigurnosneuputekojesenalazenaDVD-us
dokumentacijomkojidobivateuzproizvod.
PředpoužitímproduktujetřebasipřečístaporozumětbezpečnostnímpokynůmuvedenýmnadiskuDVDs
dokumentací,kterýjedodávánsproduktem.
Førdubrugerproduktet,skaldusørgeforatlæseogforstådesikkerhedsforskrifter,derndespåere
sprog,pådendokumentations-dvd,derfølgermedproduktet.
LuetuotteenmukanatoimitetullaDVD-tietolevylläolevatmonikielisetturvaohjeetennentämäntuotteen
käyttöä.
Avantd'utiliserleproduit,veillezàbienlireetcomprendrelesinstructionsdesécuritémultilinguesgurant
surleDVDdedocumentationfourniavecleproduit.
Πρινχρησιμοποιήσετετοπροϊόν,βεβαιωθείτεότιέχετεδιαβάσεικαικατανοήσειτιςοδηγίεςασφάλειας,οι
οποίεςείναιδιαθέσιμεςσεδιάφορεςγλώσσεςστοDVDτεκμηρίωσηςπουσυνοδεύειτοπροϊόν.
VorVerwendungdesProduktssolltenSieunbedingtdiemehrsprachigenSicherheitsanweisungenaufder
Dokumentations-DVDlesen,dieimLieferumfangdesProduktsenthaltenist.
AtermékhasználataelőttmindenképpenolvassaelésértelmezzeatermékhezkapottdokumentációsDVD
lemezentalálható,többnyelvenelolvashatóbiztonságielőírásokat.
Primadiutilizzareilprodotto,accertarsidileggereecomprendereleinformazionisullasicurezzamultilingue
disponibilisulDVDdidocumentazionefornitoconilprodotto.
製品をご使用になる前に、製品に付属のDocumentationDVDに収録されているマルチリンガルの「安
全に正しくご使用いただくために」を読んで理解してください。
제품을사용하기전에제품과함께제공되는문서DVD의다국어안전지침을주의깊게읽어보십시오.
Voordatuhetproductgebruikt,moetuervoorzorgendatudemeertaligeveiligheidsinstructiesopde
documentatie-dvdvanhetproducthebtgelezenenbegrijpt.
©CopyrightLenovo2012
iii
Page 6

Przedskorzystaniemzproduktunależyzapoznaćsięzwielojęzycznymiinstrukcjamibezpieczeństwa
znajdującymisięnapłycieDVDzdokumentacjądostarczonąwrazzproduktem.
Antesdeutilizaroproduto,leiaatentamenteasinstruçõesdesegurançamultilinguesqueconstamno
DVDdedocumentaçãofornecidocomoproduto.
Înaintedeautilizaprodusul,asiguraţi-văcăaţicititşiînţelesinstrucţiuniledesiguranţăînmaimultelimbide
peDVD-ulcudocumentaţiecareînsoţeşteprodusul.
Førdubrukerproduktet,måduleseogforstådenerspråkligesikkerhetsinformasjonenpåDVDenmed
dokumentasjonsomfølgermedproduktet.
Преждечемиспользоватьэтотпродукт,внимательноознакомьтесьсинструкциямипотехнике
безопасностинаразныхязыках,которыеможнонайтинаDVD-дискесдокументациейвкомплектес
продуктом.
在使用本产品之前,请务必先阅读和了解产品附带的文档DVD中的多语言安全说明。
Prenegotoupotrebiteproizvodobaveznopaljivoproitajteiprouiteviejezikouputstvozabezbednostna
dokumentacionomDVD-ukojistedobiliuzproizvod.
PredpouvanmproduktusipretajteviacjazynbezpenostnpokynynadiskuDVDsdokumentcioudodanoms
produktom.
Predenzačneteuporabljatiizdelek,jepomembno,daprebereteinrazumetevečjezičnavarnostnanavodila
naDVD-juzdokumentacijo,kistegaprejeliskupajzizdelkom.
Antesdeutilizarelproducto,asegúresedeleerycomprenderlasinstruccionesdeseguridadmultilingüesdel
DVDdedocumentaciónqueseproporcionaconelproducto.
Varnogamedattläsasäkerhetsinstruktionernapådokumentations-DVD-skivansomföljermedprodukten
innandubörjaranvändaprodukten.
使用本產品之前,請務必閱讀並瞭解產品隨附的文件DVD上的多國語言版本安全資訊。
Buürünükullanmadanönce,ürünlebirliktegönderilenbelgeDVD'siüzerindekiçokdiliçerengüvenlik
yönergeleriniokuyupanladýðýnýzdaneminolun.
Передвикористаннямцьогопродуктууважноознайомтесязінструкціямизтехнікибезпекинарізних
мовах,щоможназнайтинаDVD-дискуздокументацієювкомплектізпродуктом.
Important:Thecautionanddangerstatementsinthisdocumentarelabeledwithnumbers.Eachnumber
identiesanEnglish-languagecautionordangerstatementthatreferstotranslatedversionsofthecaution
ordangerstatementintheSafetyInformationdocument.Forexample,ifadangerstatementislabeled
“Statement1,”translationsforthisdangerstatementareintheSafetyInformationdocumentunder
“Statement1.”
Ensurethatyoureadandunderstandallcautionanddangerstatementsinthisdocumentbeforeyouperform
theprocedures.Readandunderstandanyadditionalsafetyinformationthatisincludedwiththeserveror
optionaldevicebeforeyouinstall,remove,orreplacethedevice.
ivThinkServerRD330HardwareMaintenanceManual
Page 7
Statement1
DANGER
Electricalcurrentfrompower,telephone,andcommunicationcablesishazardous.
Toavoidashockhazard:
•Donotconnectordisconnectanycablesorperforminstallation,maintenance,orrecongurationofthis
productduringanelectricalstorm.
•Connectallpowercordstoaproperlywiredandgroundedelectricaloutlet.
•Connecttoproperlywiredoutletsanyequipmentthatwillbeattachedtothisproduct.
•Whenpossible,useonehandonlytoconnectordisconnectsignalcables.
•Neverturnonanyequipmentwhenthereisevidenceofre,water ,orstructuraldamage.
•Disconnecttheattachedpowercords,telecommunicationssystems,networks,andmodemsbeforeyou
openthedevicecovers,unlessinstructedotherwiseintheinstallationandcongurationprocedures.
•Connectanddisconnectcablesasdescribedinthefollowingtablewheninstalling,moving,oropening
coversonthisproductorattacheddevices.
Toconnect:Todisconnect:
1.TurneverythingOFF .
2.First,attachallcablestodevices.
3.Attachsignalcablestoconnectors.
4.Attachpowercordstooutlets.
5.TurndevicesON.
1.TurneverythingOFF .
2.First,removepowercordsfromoutlets.
3.Removesignalcablesfromconnectors.
4.Removeallcablesfromdevices.
Statement2
DANGER
Dangerofexplosionifbatteryisincorrectlyreplaced.
Whenreplacingthelithiumcoincellbattery,useonlythesameoranequivalenttypethatis
recommendedbythemanufacturer .Thebatterycontainslithiumandcanexplodeifnotproperly
used,handled,ordisposedof.
Donot:
•Throworimmerseintowater
•Heattomorethan100°C(212°F)
•Repairordisassemble
Disposeofthebatteryasrequiredbylocalordinancesorregulations.
©CopyrightLenovo2012
v
Page 8
Statement3
CAUTION:
Whenlaserproducts(suchasCD-ROMs,DVDdrives,beropticdevices,ortransmitters)are
installed,notethefollowing:
•Donotremovethecovers.Removingthecoversofthelaserproductcouldresultinexposureto
hazardouslaserradiation.Therearenoserviceablepartsinsidethedevice.
•Useofcontrolsoradjustmentsorperformanceofproceduresotherthanthosespeciedherein
mightresultinhazardousradiationexposure.
DANGER
SomelaserproductscontainanembeddedClass3AorClass3Blaserdiode.Notethefollowing:
Laserradiationwhenopen.Donotstareintothebeam,donotviewdirectlywithoptical
instruments,andavoiddirectexposuretothebeam.
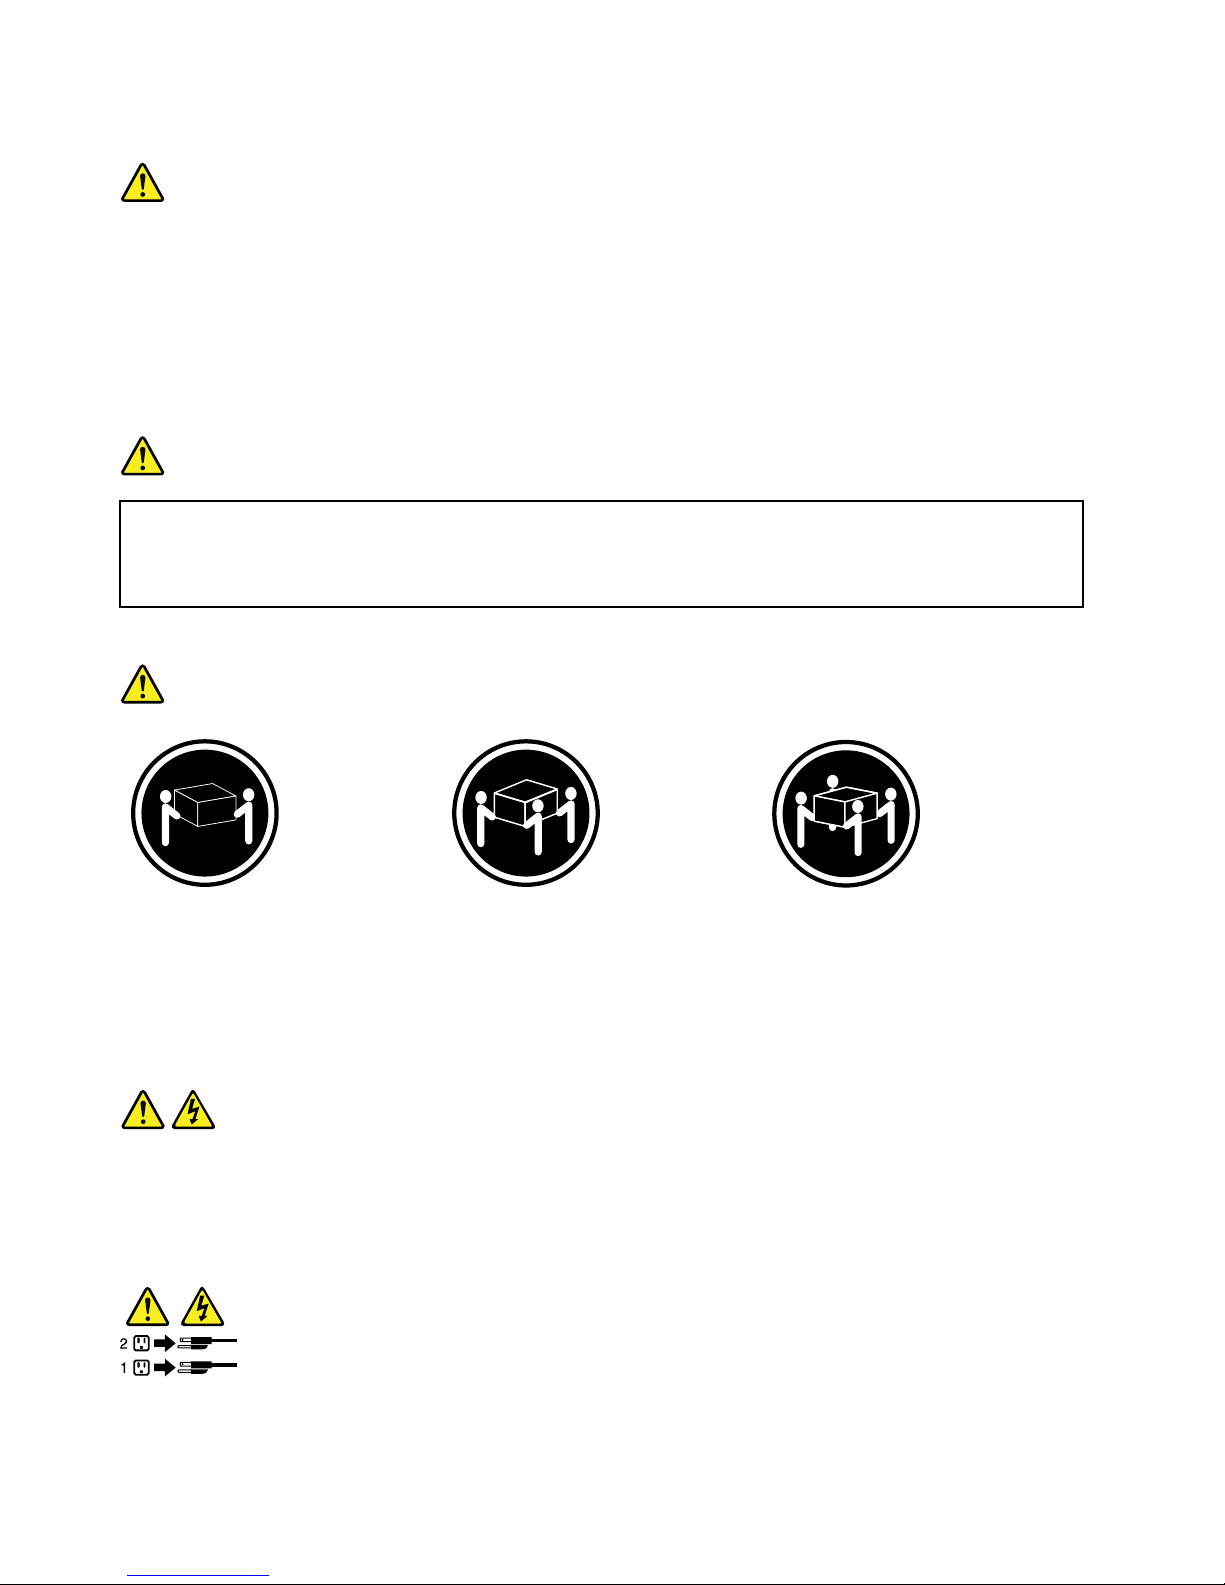
Statement4
≥18kg(39.7lb)≥32kg(70.5lb)≥55kg(121.2lb)
<32kg(70.5lb)<55kg(121.2lb)<100kg(220.5lb)
CAUTION:
Usesafepracticeswhenlifting.
Statement5
CAUTION:
Thepowercontrolbuttononthedeviceandthepowerswitchonthepowersupplydonotturnoff
theelectricalcurrentsuppliedtothedevice.Thedevicealsomighthavemorethanonepower
cord.Toremoveallelectricalcurrentfromthedevice,ensurethatallpowercordsaredisconnected
fromthepowersource.
viThinkServerRD330HardwareMaintenanceManual
Page 9
Statement6
CAUTION:
Ifyouinstallastrain-reliefbracketoptionovertheendofthepowercordthatisconnectedtothe
device,youmustconnecttheotherendofthepowercordtoapowersourcethatiseasilyaccessible
incaseitneedstobedisconnected.
Statement7
CAUTION:
Ifthedevicehasdoors,ensurethatyouremoveorsecurethedoorsbeforemovingorliftingthe
devicetoprotectagainstpersonalinjury.Thedoorswillnotsupporttheweightofthedevice.
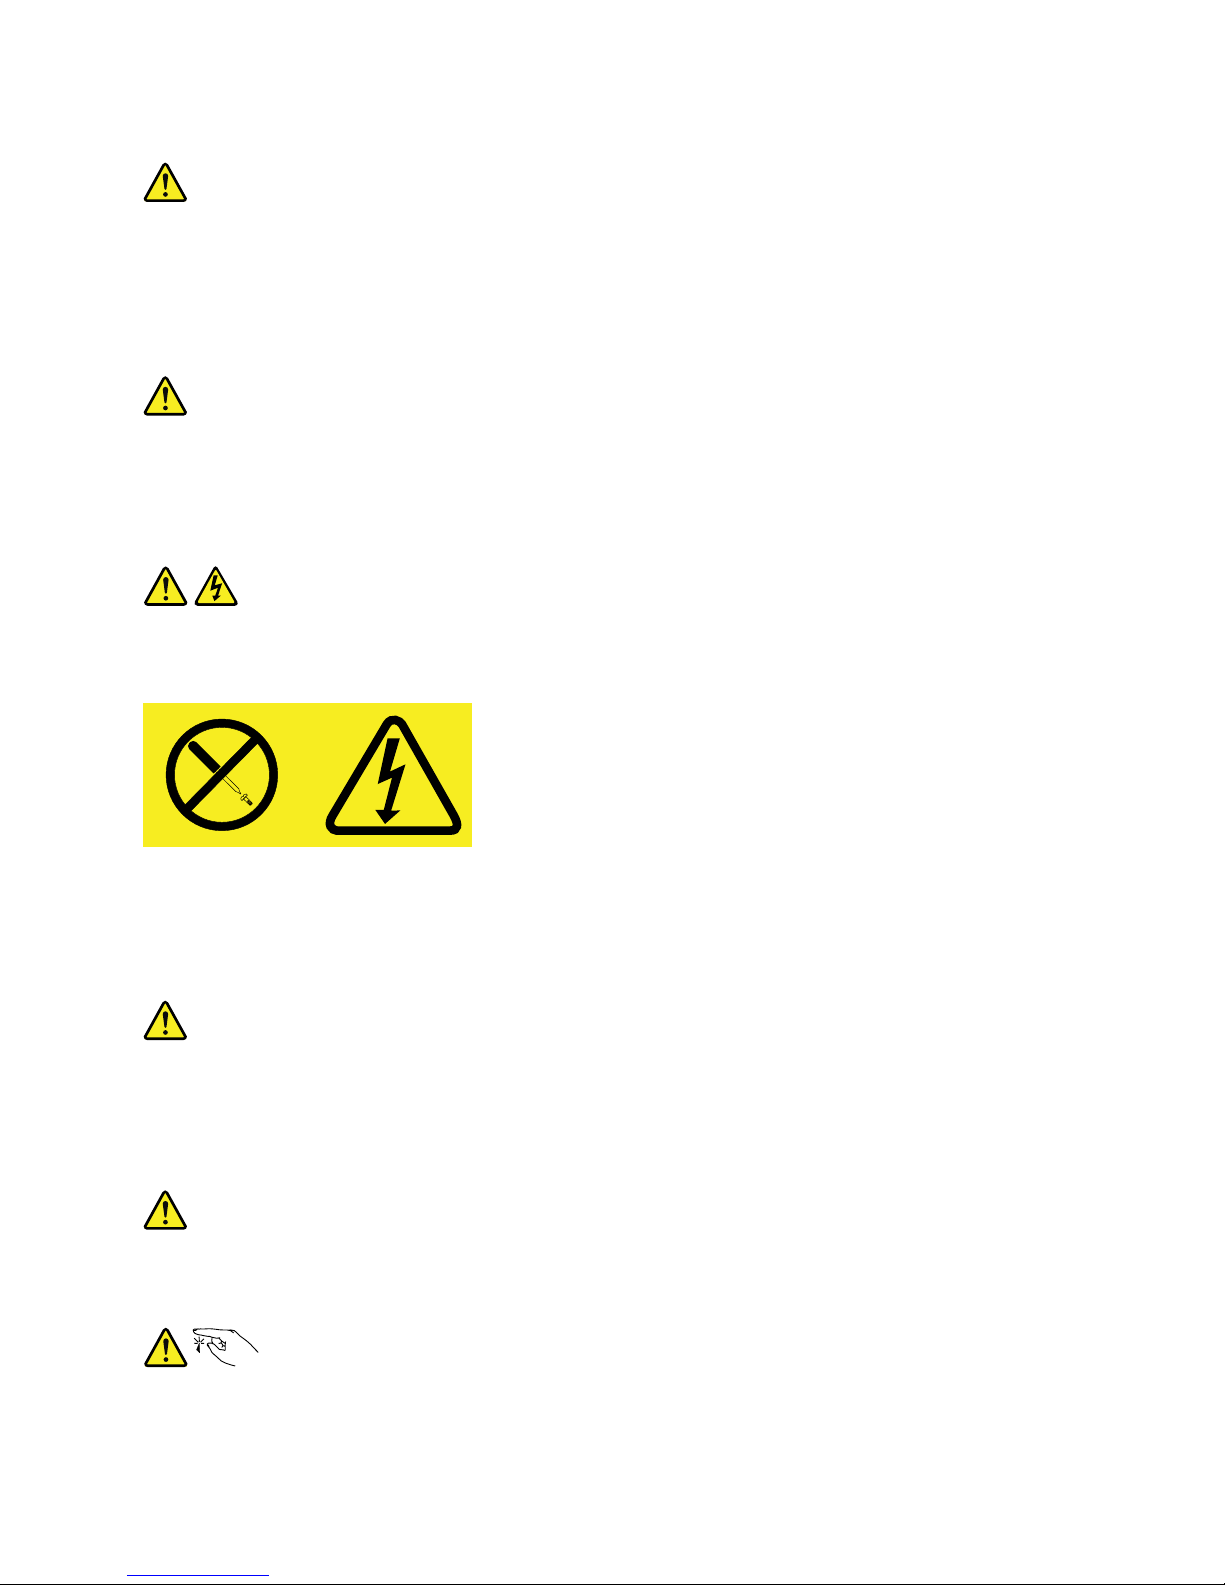
Statement8
CAUTION:
Neverremovethecoveronapowersupplyoranypartthathasthefollowinglabelattached.
Hazardousvoltage,current,andenergylevelsarepresentinsideanycomponentthathasthislabel
attached.Therearenoserviceablepartsinsidethesecomponents.Ifyoususpectaproblemwith
oneoftheseparts,contactaservicetechnician.
Statement9
CAUTION:
Disconnectthehot-swapfancablesbeforeremovingthefanfromthedevicetoprotectagainst
personalinjury.
Statement10
CAUTION:
Thefollowinglabelindicatesasharp-edgehazard.
©CopyrightLenovo2012
vii
Page 10
Statement11
CAUTION:
Thefollowinglabelindicatesapotentialheathazard.
Statement12
DANGER
Overloadingabranchcircuitisapotentialrehazardandashockhazardundercertainconditions.T o
avoidthesehazards,ensurethatyoursystemelectricalrequirementsdonotexceedbranchcurrentratings
attheinstallationsite.
Statement13
CAUTION:
Ensurethattherackissecuredproperlytoavoidtippingwhentheserverunitisextendedontherails.
Statement14
CAUTION:
SomeaccessoryoroptionboardoutputsexceedClass2orlimitedpowersourcelimits.You
mustinstalltheappropriateinterconnectingcablinginaccordancewithyourlocalelectricalcode
requirements.
Statement15
CAUTION:
Thepower-controlbuttononthedevicemayputthedeviceinstandbymodeinsteadofturningoff
thedevice.Inaddition,thedevicemighthavemultipleconnectionstodcpower.T oremoveall
electricalcurrentfromthedevice,ensurethatallconnectionstodcpoweraredisconnectedat
thedcpowerinputterminals.
viiiThinkServerRD330HardwareMaintenanceManual
Page 11
Statement16
CAUTION:
Toreducetheriskofelectricshockorenergyhazards:
•Thisequipmentmustbeinstalledbytrainedservicepersonnelinarestricted-accesslocation,as
denedbyyourlocalelectricalcodeandthelatesteditionofIEC60950.
•Connecttheequipmenttoareliablyearthedsafetyextralowvoltage(SELV)source.AnSEL V
sourceisasecondarycircuitthatisdesignedsothatnormalandsinglefaultconditionsdonot
causethevoltagestoexceedasafelevel(60Vdirectcurrent).
•Thebranchcircuitovercurrentprotectionmustberatedinaccordancewithlocalelectricalcode
requirements.
•Use1.3mm
2
or16AmericanWireGauge(AWG)copperconductoronly,notexceeding3meters
inlength.
•Torquethewiring-terminalscrewsto1.4newton-metersor12inch-pounds.
•Provideareadilyavailable,approvedandrateddisconnectdeviceintheeldwiring.
Statement17
CAUTION:
ThisproductcontainsaClass1Mlaser.Donotviewdirectlywithopticalinstruments.
Statement18
CAUTION:
Donotplaceanyobjectontopofrack-mountedproducts.
Statement19
CAUTION:
Hazardousmovingparts.Keepngersandotherbodypartsaway.
©CopyrightLenovo2012
ix
Page 12

Statement20
CAUTION:
Alithiumionbatteryisprovided.Toavoidpossibleexplosion,donotburnthebattery.Replacethe
batteryonlywiththeLenovo-approvedpart.Recycleordiscardthebatteryasinstructedbylocal
regulations.
Safetyinspectionguide
Thepurposeofthisinspectionguideistoassistyouinidentifyingpotentiallyunsafeconditions.Aseach
machinewasdesignedandbuilt,requiredsafetyitemswereinstalledtoprotectusersandservicetechnicians
frominjury.Thisguideaddressesonlythoseitems.Youshouldusegoodjudgmenttoidentifypotentialsafety
hazardsduetoattachmentofnon-ThinkServerfeaturesoroptionsnotcoveredbythisinspectionguide.
Ifanyunsafeconditionsarepresent,youmustdeterminehowserioustheapparenthazardcouldbeand
whetheryoucancontinuewithoutrstcorrectingtheproblem.
Considertheseconditionsandthesafetyhazardstheypresent:
•Electricalhazards,especiallyprimarypower(primaryvoltageontheframecancauseseriousorfatal
electricalshock)
•Explosivehazards,suchasadamagedCathodeRayTube(CRT)monitororabulgingcapacitor
•Mechanicalhazards,suchaslooseormissinghardware
Todeterminewhetherthereareanypotentiallyunsafeconditions,usethefollowingchecklistatthebeginning
ofeveryservicetask.Beginthecheckswiththepoweroff,andthepowercordsdisconnected.
Checklist:
1.Checkexteriorcoversfordamage(loose,broken,orsharpedges).
2.Powerofftheserver.Disconnectthepowercords.
3.Checkthepowercordfor:
a.Athird-wiregroundconnectoringoodcondition.Useametertomeasurethird-wireground
continuityfor0.1ohmorlessbetweentheexternalgroundpinandtheframeground.
b.Thepowercordshouldbetheauthorizedtypespeciedforyourserver.Goto:
http://www.lenovo.com/serviceparts-lookup.
c.Insulationmustnotbefrayedorworn.
4.Checkforcrackedorbulgingbatteries.
5.Removethecover.
6.Checkforanyobviousnon-ThinkServeralterations.Usegoodjudgmentastothesafetyofany
non-ThinkServeralterations.
7.Checkinsidetheunitforanyobviousunsafeconditions,suchasmetallings,contamination,wateror
otherliquids,orsignsofreorsmokedamage.
8.Checkforworn,frayed,orpinchedcables.
9.Checkthatthepower-supplycoverfasteners(screwsorrivets)havenotbeenremovedortamperedwith.
xThinkServerRD330HardwareMaintenanceManual
Page 13

Groundingrequirements
Electricalgroundingoftheserverisrequiredforoperatorsafetyandcorrectsystemfunction.Proper
groundingoftheelectricaloutletcanbeveriedbyacertiedelectrician.
©CopyrightLenovo2012
xi
Page 14

xiiThinkServerRD330HardwareMaintenanceManual
Page 15

Chapter1.Generalinformation
Thischapterprovidessomegeneralinformationaboutyourproduct.
Thischaptercontainsthefollowingitems:
•“Introduction”onpage1
•“Serverdocumentation”onpage1
Introduction
ThisHardwareMaintenanceManualforyourLenovo
®
ThinkServer
®
productcontainsinformationaboutthe
serverfeatures,specications,componentlocations,congurationinstructions,hardwarereplacement
procedures,andtroubleshootinganddiagnostics.Thismanualisintendedonlyfortrainedservicepersonnel
ofLenovo.
TheHardwareMaintenanceManualisupdatedfrequently,andthemostup-to-dateversionisalways
availableinEnglishontheLenovoWebsiteat:
http://www.lenovo.com/ThinkServerUserGuides
Thismanualcontainsinstructionsonhowtoinstall,remove,orreplacemajorFieldReplaceableUnits(FRUs),
includingself-serviceCustomerReplaceableUnits(CRUs),optional-serviceCRUs,andnon-CRUs.
Note:BeforeservicingaLenovoproduct,ensurethatyoureadandunderstand“Safetyinformation”on
pageiii
.
•ForinformationaboutmajorcomponentlocationsandCRUidentication,see“Servercomponents”
onpage22
.
•Forinformationaboutinstalling,removing,orreplacingmajorFRUs,seeChapter6“Installing,removing,
orreplacinghardware”onpage67
.
•ForacompletelistingofFRUinformation,suchasFRUpartnumbersandsupportedservermodels,goto:
http:/www.lenovo.com/serviceparts-lookup
•Forinformationaboutthetermsofwarranty,refertotheWarrantyandSupportInformationonthe
documentationDVDthatcomeswiththeserver.TheWarrantyandSupportInformationalsoisavailable
ontheLenovoWebsiteat:
http://www.lenovo.com/ThinkServerUserGuides
•Forthemostup-to-dateinformationaboutyourserver,goto:
http://www.lenovo.com/thinkserver
•LenovomaintainspagesontheWorldWideWeb,whereyoucangetthelatesttechnicalinformationand
downloaddocumentationordevicedriversandupdates.ToaccesstheLenovoSupportWebsite,goto:
http://www.lenovo.com/support
Serverdocumentation
Thistopicprovidesgeneraldescriptionsofthevariousdocumentationforyourserverandinstructionson
howtoobtainallthedocumentation.
©CopyrightLenovo2012
1
Page 16

Printeddocuments
Thefollowingdocumentsareprintedoutandcontainedinyourserverpackage.
•ReadMeFirst
Thisisamultilingualdocumentyoushouldreadrst.Thisdocumentprovidesinstructionsonhowto
accessthecompletesafety,warranty,andsupportinformationonthedocumentationDVDthatcomes
withyourserver.Thisdocumentalsoprovidesinstructionsonhowtondthemostup-to-dateinformation
ontheLenovoSupportWebsite.
•ImportantNotices
Thisdocumentincludessafetyandlegalnoticesthatyoushouldreadandunderstandbeforeusing
theserver.
•RackInstallationInstructions
Thisdocumentprovidesinstructionsonhowtoinstallyourserverintoastandardrackcabinetbyusing
therailkitshippedwiththeserver.
Note:Thisdocumentisavailableinvelanguages.AprintedEnglishversionisincludedinyourserver
package.APDFversionofFrench,German,Italian,andSpanishareprovidedonthedocumentationDVD
thatcomeswiththeserver.
DocumentationDVD
ThedocumentationDVD,whichcomeswithyourserver,containsvariousdocumentsforyourserverin
PortableDocumentFormat(PDF)andHyperTextMarkupLanguage(HTML).ThedocumentationDVDisnot
bootable.ToviewthedocumentsontheDVD,youwillneedacomputerwithaWebbrowserandtheAdobe
Readerprogram,whichisavailablefordownloadat:
http://www.adobe.com
TostartthedocumentationDVD,inserttheDVDintotheopticaldrive.TheDVDisAutoPlayenabledand
startsautomaticallyinmostMicrosoft
®
Windows
®
environments.IftheDVDfailstostartorifyouareusinga
Linux
®
operatingsystem,openthelaunch.htmlelocatedintherootdirectoryoftheDVD.
Note:LenovomaintainspagesontheWorldWideWeb,whereyoucangetthelatesttechnicalinformation
anddownloaddocumentationordevicedriversandupdates.Someinformationinthedocumentsonthe
documentationDVDmightchangewithoutnoticeaftertherstreleaseoftheDVD.Y oucanalwaysobtainall
themostup-to-datedocumentationforyourserverfromtheLenovoWebsiteat:
http://www.lenovo.com/ThinkServerUserGuides
ThefollowingdocumentsareonthedocumentationDVDthatcomeswithyourserver:
•SafetyInformation
Thisisamultilingualdocumentthatincludesallthesafetystatementsforyourproductinmorethan30
languages.Besuretoreadandunderstandallthesafetystatementsbeforeusingtheproduct.
•WarrantyandSupportInformation
ThisdocumentincludestheLenovowarrantystatement,CustomerReplaceableUnits(CRUs)information,
andinformationabouthowtocontactLenovoSupport.
•LenovoLicenseAgreement
ThisdocumentincludesthetermsandconditionsoftheLenovoLicenseAgreement.
•UserGuide
Thisdocumentprovidesdetailedinformationtohelpyougetfamiliarwithyourserverandhelpyouuse,
congure,andmaintainyourserver.
2ThinkServerRD330HardwareMaintenanceManual
Page 17

•RackInstallationInstructions
Thisdocumentprovidesinstructionsonhowtoinstallyourserverintoastandardrackcabinetbyusing
therailkitshippedwiththeserver.
•ThinkServerManagementModuleUserGuide
Thisdocumentprovidesinformationaboutserverremotemanagement.ThisdocumentisinEnglishonly.
YoumightndthisdocumentonthedocumentationDVDthatcomeswithyourserver.Ifnot,downloadit
fromtheLenovoWebsiteat:
http://www.lenovo.com/ThinkServerUserGuides
Note:Toobtainadvancedremotemanagementfunctions,installaThinkServerManagementModule
Premium(TMMPremium)ontheTMMPremiumconnectoronthesystemboard.See“Installingor
removingtheThinkServerManagementModulePremium”onpage100
.
•MegaRAIDSASSoftwareUserGuide
ThisdocumentprovidesinformationaboutRedundantArrayofIndependentDisks(RAID)andhowto
usetheutilityprogramstocongure,monitor,andmaintainyourserverRAIDandrelateddevices.This
documentisinEnglishonly.
Note:RefertothisdocumentforhardwareRAIDinformationifyouhavearequiredRAIDcardinstalledin
theserver.See“InstallingorremovingtheRAIDcard”onpage85.ForinformationabouttheThinkServer
RAID300(alsoknownastheonboardSASsoftwareRAID),see“ConguringtheThinkServerRAID
300”onpage58
.
Documentonlyfortrainedservicepersonnel
ThefollowingdocumentisintendedonlyfortrainedservicepersonnelofLenovo.
HardwareMaintenanceManual
Thisdocumentprovidesinformationaboutcomponentlocations,replacementproceduresformajorField
ReplaceableUnits(FRUs),andtroubleshootinganddiagnostics.Thisdocumentisupdatedfrequently,and
themostup-to-dateversionisalwaysavailableinEnglishontheLenovoWebsiteat:
http://www.lenovo.com/ThinkServerUserGuides
Chapter1.Generalinformation3
Page 18

4ThinkServerRD330HardwareMaintenanceManual
Page 19

Chapter2.Serversetuproadmap
Thischapterprovidesageneralroadmaptoguideyouthroughsettingupyourserver.
Theserversetupprocedurevariesdependingonthecongurationoftheserverwhenitwasdelivered.In
somecases,theserverisfullyconguredandyoujustneedtoconnecttheservertothenetworkandan
acpowersource,andthenyoucanturnontheserver.Inothercases,theserverneedstohavehardware
featuresinstalled,requireshardwareandrmwareconguration,andrequiresanoperatingsystemto
beinstalled.
Thegeneralprocedureforsettingupyourserveris:
1.Unpacktheserverpackage.See“Serverpackage”onpage7.
2.Installanyrequiredhardwareorserveroption.SeetherelatedtopicsinChapter6“Installing,removing,
orreplacinghardware”onpage67
.
3.Installyourserverintoastandardrackcabinetbyusingtherailkitshippedwiththeserver.SeeRack
InstallationInstructionsthatcomeswithyourserver.
4.ConnecttheEthernetcableandpowercordstotheserver.See“Rearviewoftheserver”onpage
20tolocatetheconnectors.
5.Turnontheservertoverifyoperation.See“Turningontheserver”onpage43.
6.ReviewtheUniedExtensibleFirmwareInterface(UEFI)settingsandcustomizeasneeded.See“Using
theSetupUtilityprogram”onpage45.
7.CongureRAIDandinstalltheoperatingsystemandbasicdrivers.See“UsingtheThinkServer
EasyStartupprogram”onpage53and“ConguringRAID”onpage56.
8.Installanyadditionaldriversneededforaddedfeatures.Refertotheinstructionsthatcomewiththe
hardwareoption.
9.CongureEthernetsettingsintheoperatingsystembyreferringtotheoperatingsystemhelp.Thisstep
isnotrequirediftheoperatingsystemwasinstalledusingtheThinkServerEasyStartupprogram.
10.Checkforrmwareanddriverupdates.See“Updatingthermware”onpage64.
11.Installotherapplications.Refertothedocumentationthatcomeswiththeapplicationsthatyouwantto
install.
©CopyrightLenovo2012
5
Page 20

6ThinkServerRD330HardwareMaintenanceManual
Page 21
Chapter3.Productoverview
Thischapterprovidesinformationabouttheserverpackage,features,specications,softwareprograms,
andcomponentlocations.
Thischaptercontainsthefollowingitems:
•“Serverpackage”onpage7
•“Features”onpage7
•“Specications”onpage11
•“Software”onpage11
•“Locations”onpage13
Serverpackage
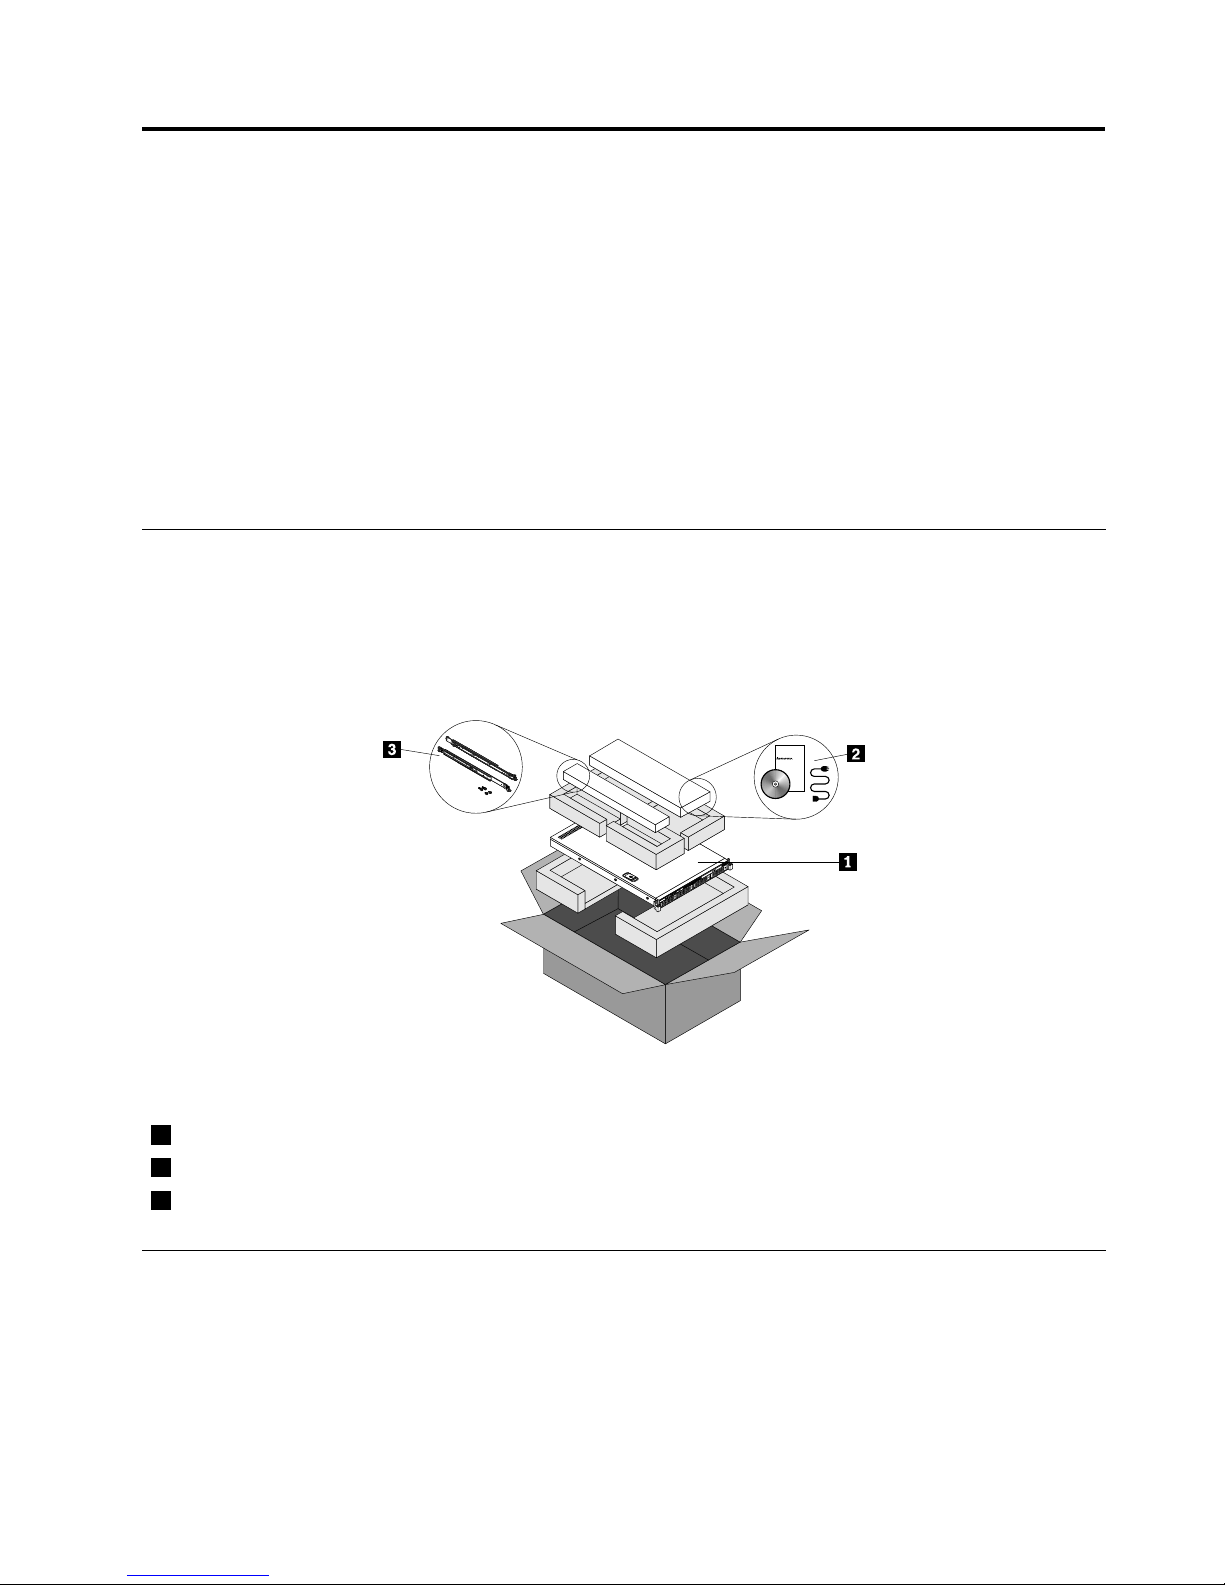
Theserverpackageincludestheserver,arailkit,powercords,printeddocumentation,adocumentation
DVD,andsoftwaremedia.
Note:Dependingonthemodel,yourservermightlookslightlydifferentfromtheillustrationinthistopic.
ID
CPU
Mem
PSU
Figure1.Serverpackage
1Server
2Materialbox,includingpowercords,printeddocumentation,adocumentationDVD,andsoftwaremedia
3Railkit
Features
Thistopicprovidesgeneralinformationabouttheserverfeaturesforavarietyofmodels.Dependingonyour
specicmodel,somefeaturesmightvaryornotbeavailable.Forinformationaboutyourspecicmodel,use
theSetupUtilityprogram.See“ViewinginformationintheSetupUtilityprogram”onpage45
.
©CopyrightLenovo2012
7
Page 22

Microprocessor
OneortwoIntel
®
Xeon
®
quad-core,hexa-core,orocta-coremicroprocessors(internalcachesizevaries
bymodel)
ForalistoftheThinkServermicroprocessoroptions,goto:
http://www.lenovo.com/thinkserver
Memory
Yourserverhas12memoryslots.Formoreinformation,see“Memorymoduleinstallationrules”onpage75.
Powersupply
Oneortwo550-watthot-swapredundantpowersupplies(Universalinputandcompliantwith80PLUSGold)
Systemfans
Youservercomeswithsixsystemfanstoprovidepropersystemcoolingandairow.
Internaldrives
Internaldrivesaredevicesthatyourserverusestoreadandstoredata.Theinternaldrivessupported
byyourservervarybymodel.
•Harddiskdrive
–Uptofour3.5-inchhot-swapSerialAdvancedTechnologyAttachment(SATA)orSerialAttachedSCSI
(SAS)harddiskdrives(SCSIistheacronymforSmallComputerSystemInterface)
–Uptosix2.5-inchhot-swapSASharddiskdrivesorSATAsolid-statedrives
Note:Theterm“2.5-inchhot-swapharddiskdrives”or“2.5-inchharddiskdrives”hereinafterreferstoall
thesupportedtypesof2.5-inchharddiskdrives,includingthesolid-statedrives.
•Opticaldrive
–OneslimSATAopticaldriveinsomemodels
Forthelocationinformationabouttheinternaldrivesordrivebays,see“Servercomponents”onpage22
.
Expansionslots
•Tworisercardassemblyslotsonthesystemboard
•OnePCIExpresscardslotontherisercardassembly1
•OnePCIExpresscardslotontherisercardassembly2
Fordetailedinformation,see“Rearviewoftheserver”onpage20.
Input/Output(I/O)features
•OneortwoVideoGraphicsArray(VGA)DB-15connectors
•Oneserialconnectorontherearpanel
•SixUSB2.0connectors(twoonthefrontpanelandfourontherearpanel)
•ThreeRJ-45Ethernetconnectorsontherearpanel(Ethernetconnector0isforsystemmanagement)
Forthelocationinformationabouttheconnectors,refertotherelatedtopicsin“Locations”onpage13
.
8ThinkServerRD330HardwareMaintenanceManual
Page 23

Videosubsystem
AnintegratedgraphicscontrollerintheThinkServerManagementModule(TMM),whichalsoisknown
astheBaseboardManagementController(BMC)chip,onthesystemboardtosupportVGAconnectors
forconnectingvideodevices
Ethernetconnectivity
ThreeRJ-45Ethernetconnectorsontherearpanelwith10megabitspersecond(Mbps),100Mbps,or
1000Mbpsnetworkconnectivity.
•OnboardIntel82574LGigabitEthernetcontrollerfordedicatedorsharedlocalareanetwork(LAN)
managementinterface(Ethernetconnector0isforsystemmanagement)
•OnboardIntelGigabitDualPortEthernetcontrollerforEthernetconnector1andEthernetconnector2
Formoreinformation,see“Rearviewoftheserver”onpage20
.
Reliability,availability,andserviceability
Reliability,availability,andserviceability(hereinafterreferredtoasRAS)arethreeimportantserverdesign
features.TheRASfeatureshelpyoutoensuretheintegrityofthedatastoredontheserver,theavailabilityof
theserverwhenyouneedit,andtheeasewithwhichyoucandiagnoseandcorrectproblems.
YourserverhasthefollowingRASfeatures:
•Securityfeatures
–Administratorpasswordanduserpasswordtohelpprotectunauthorizedaccesstotheserver(see
“Usingpasswords”onpage49)
–ThinkServerTrustedPlatformModule(TPM),whichisasecuritychip,tohelpenhanceserversecurity
Note:TheTPMisonlyavailableinsomemodels.
–Remotemonitoringorcontrolbyanadministratortoprovideprotectionorhelp
–Hot-swapredundantpowersuppliestohelpavoidsignicantinterruptiontotheoperationofthe
systemwhenapowersupplyfails
•Basicsystemmanagementfeatures
–Abilitytostorethepower-onself-test(POST)hardwaretestresults
–BIOSSetupUtilityprogram
TheBIOSSetupUtilityprogramhelpsyouviewtheserverinformationandconguretheserverinthe
pre-operatingsystemenvironment.See“UsingtheSetupUtilityprogram”onpage45
.
–TMM(alsoknownasBMC)andIntelligentPlatformManagementInterface(IPMI)2.0
ThesystemboardplatformmanagementsubsystemisbasedontheintegratedTMMfeatures.The
TMMisamanagementchipthatisintegratedonthesystemboardofyourserver.WiththeTMMchip,
nomatterwhatconditiontheserveroperatingsystemisinandnomatteriftheserverisonoroff,aslong
astheserverisconnectedtonetworkandanacpowersource,theinteractionwiththeTMM-controlled
serverscanbeachievedthroughsystemnetwork.Theusercanobtaintheserverhardwarehealth
informationandsystemeventlog(SEL),andisabletoconducttheoperationsincludingturningonor
offtheserver,restartingtheserver,lockingthepowerswitchonthefrontpanel,andsoon.Thispartof
servermanagementisindependentoftheoperatingsystemandiscalledout-of-bandmanagement.
ThesystemboardplatformmanagementsubsystemconsistsoftheintegratedTMM,communication
buses,sensors,theBIOS,andservermanagementrmware.Itisresponsibleforerrorreporting,
systempowercontrol,thermalmonitoring,systemfancontrol,andothermanagementfeatures.The
TMMprovidessystemmanagementandmonitoringfeaturesbasedontheIPMI2.0specication.IPMI
Chapter3.Productoverview9
Page 24

helpslowertheoverallcostsofservermanagement.YoucanndmoreinformationaboutIPMI2.0
fromtheWebsiteofIntel.TheTMMalsosupportssomenon-IPMIfeatures,suchastheDynamicHost
CongurationProtocol(DHCP)andthePlatformEnvironmentControlInterface(PECI),toprovide
moresystemmanagementfunctions.
Formoreinformation,refertotheThinkServerManagementModuleUserGuide,whichisavailablefor
downloadat:
http://www.lenovo.com/ThinkServerUserGuides
–Hot-swapfeature
Yourserversupportshot-swapharddiskdrivesandhot-swapredundantpowersupplies.Withthe
hot-swapfeature,youcaninstall,remove,orreplaceahot-swapdevicewithoutturningofftheserver.
–PrebootExecutionEnvironment(PXE)
TheIntelPXEtechnologyenablesyoutobootyourcomputers,loadanoperatingsystem,ordeploy
executableimagesfromaremoteserverbyusinganetworkinterface.Theoperationcanbedone
independentlyoflocaldatastoragedevices(suchasharddiskdrives)oroperatingsystems.
–RedundantArrayofIndependentDisks(RAID)
YourserversupportsThinkServerRAID300andadvancedSATA/SAShardwareRAIDcongurationsif
youhavearequiredRAIDcardinstalled.Fordetailedinformation,see“ConguringRAID”onpage56
.
–Statuslight-emittingdiodes(LEDs)anddiagnosticLEDs
FormoreinformationabouttheLEDsforyourserver,refertotherelatedtopicsin“Locations”on
page13.
–Softwareprograms
Formoreinformationaboutthesoftwareprograms,see“Software”onpage11.
–WakeonLAN
WhentheWakeonLANfeatureisenabledonacomputerthatisconnectedtoaLAN,anetwork
administratorcanremotelyturnonorwakeupthecomputerfromamanagementconsoleusingremote
networkmanagementsoftware.Besides,manyotherfunctions,suchasdatatransferandsoftware
updates,canbeperformedremotelywithoutremoteattendanceandcanbedoneafternormalworking
hoursandonweekendstosavetimeandincreaseproductivity.
•Advancedsystemmanagementfeatures
TheadvancedsystemmanagementfeaturesareonlyavailablewhentheTMMdetectsthepresenceofa
ThinkServerManagementModulePremium(TMMPremium),whichalsoisknownasintegratedkeyboard,
video,andmouse(iKVM)key.TheTMMPremiumisaremotemanagementmodule.Y oucanpurchase
aTMMPremiumfromLenovoandinstallitontheTMMPremiumconnector(alsoknownasiKVM
connector)onthesystemboardofyourservertoenabletheiKVMfunctionandactivatetheadvanced
systemmanagementfeatures.
Formoreinformationaboutadvancedsystemmanagement,refertotheThinkServerManagementModule
UserGuide,whichisavailablefordownloadat:
http://www.lenovo.com/ThinkServerUserGuides
10ThinkServerRD330HardwareMaintenanceManual
Page 25

Specications
Thistopicliststhephysicalspecicationsforyourserver.
Dimensions
Width:436mm(17.17inches)withouthandles;482.4mm(18.99inches)withhandles
Height:43.6mm(1.72inches)
Depth:720.6mm(28.37inches)withouthandles;734mm(28.90inches)withhandles
Weight
Theproductweightvariesdependingondifferentsystemcongurations.
Rangeofproductweightwithoutpackage:12kg(26.46lb)to17kg(37.48lb)
Rangeofproductweightwithpackage:15kg(33.07lb)to24kg(52.91lb)
Environment
•Airtemperature:
Operating:10°Cto35°C(50°Fto95°F)
Storage:-40°Cto70°C(-40°Fto158°F)inoriginalshippingpackage
•Altitude:0to3048m(0to10000ft)inanunpressurizedenvironment
•Humidity:
Operating:8%to80%(non-condensing)
Storagewithoutpackage:8%to80%(non-condensing)
Storagewithpackage:8%to90%(non-condensing)
Electricalinput
•Universalinput:
–Lowrange:
Minimum:100Vac
Maximum:127Vac
Inputfrequencyrange:50to60Hz
–Highrange:
Minimum:200Vac
Maximum:240Vac
Inputfrequencyrange:50to60Hz
Software
Thistopicprovidesinformationaboutthesoftwareprogramsthatyoucanusetosetup,use,andmaintain
theserver.
ThinkServerEasyStartup
TheThinkServerEasyStartupprogramsimpliestheprocessofconguringRAIDandinstallingsupported
MicrosoftWindowsandLinuxoperatingsystemsanddevicedriversonyourserver.Thisprogramisprovided
withyourserveronaself-starting(bootable)ThinkServerEasyStartupDVD.Theuserguidefortheprogram
alsoisontheDVDandcanbeaccesseddirectlyfromtheprograminterface.Fordetailedinformation,see
“UsingtheThinkServerEasyStartupprogram”onpage53
.
Chapter3.Productoverview11
Page 26

ThinkServerEasyUpdateFirmwareUpdater
TheThinkServerEasyUpdateFirmwareUpdaterprogram(hereinafterreferredtoastheFirmwareUpdater
program)enablesyoutomaintainyourserverrmwareup-to-dateandhelpsyouavoidunnecessaryserver
outages.TheFirmwareUpdaterprogramisprovidedontheLenovoSupportWebsite.Formoreinformation
aboutdownloadingandusingtheFirmwareUpdaterprogram,see“Updatingthermware”onpage64
.
LenovoThinkServerEasyManage
TheLenovoThinkServerEasyManageprogramenablesenterpriseuserstoremotelycontrolandmonitor
multipleLenovoserverswithinaLAN.
Fordetailedinformation,see“UsingtheLenovoThinkServerEasyManageprogram”onpage65.
BIOSandTMMupdateutilities
TheBIOSandTMM(alsoknownasBMC)rmwarekeepsupdatingaftertheshipmentoftheserver.
LenovomaintainspagesontheSupportWebsiteandprovidestheBIOSandTMMupdateutilitieswith
instructionsfordownloadtohelpyouupdatetheBIOSandTMMrmwareifneeded.Formoreinformation,
see“UpdatingorrecoveringtheBIOS”onpage51
and“Updatingthermware”onpage64.
RAIDcongurationutilities
WithsomeRAIDcongurationutilities,yourserversupportsThinkServerRAID300andadvancedSATA/SAS
hardwareRAIDifarequiredRAIDcardisinstalled.Fordetailedinformation,see“ConguringRAID”
onpage56.
Remotemanagementsoftware
TheintegratedTMMprovidesbasicremotemanagementfeaturesfortheserver.Theadd-onTMMPremium
optionprovidesadvancedremotemanagementfeaturesfortheserver.
Fordetailedinformationabouttheremotemanagementsoftwareandserverremotemanagement,referto
theThinkServerManagementModuleUserGuide,whichisavailablefordownloadat:
http://www.lenovo.com/ThinkServerUserGuides
LenovoRackPlanner
Racksandserversareusuallydeployedonalargescale.Whendeployingtheequipment,equipment
managersneedalotofreferenceparameterstocalculatepowerconsumptionandelectriccurrentvalues
underdifferentcongurations.TheLenovoRackPlannerprogramprovidesdatamaintenance,power
consumptionandelectriccurrentcalculations,andreportstohelpequipmentmanagerssignicantly
increaseefciencyindeployingtheequipmentandconvenientlymanagetheequipment.
TodownloadtheLenovoRackPlannerprogram,gotohttp://www.lenovo.com/driversandfollowthe
instructionsontheWebpage.
FordetailedinformationaboutusingtheLenovoRackPlannerprogram,refertothehelpsystemforthe
program.
ThinkServerSmartGridT echnology
TheThinkServerSmartGridT echnologyprogramhelpsadministratorstomonitorandmanageserver
performance,especiallythepowerconsumptionforgroupsofserversequippedwiththeIntelIntelligent
PowerNodeManagertechnology.
12ThinkServerRD330HardwareMaintenanceManual
Page 27
LenovoprovidesatrialversionoftheThinkServerSmartGridTechnologyprogramwithafree90-day
subscription.After90days,youmustrenewthelicensetocontinueusingtheprogram.Youcanpurchase
thelicensefromLenovotoactivatetheThinkServerSmartGridTechnologyprogramandexpandthe
managementcapabilityoftheprogramwhenthefreetrialends.
TodownloadtheThinkServerSmartGridTechnologyprogram,gotohttp://www.lenovo.com/driversand
followtheinstructionsontheWebpage.
FordetailedinformationaboutusingtheThinkServerSmartGridTechnologyprogram,refertothehelp
systemfortheprogram.
Locations
Thistopicprovidesinformationtohelpyoulocateyourservercomponents.
Machinetype,model,andserialnumberlabel
Thistopichelpsyoulocatethelabelthatcontainsthemachinetype,model,andserialnumberinformation
foryourserver.
WhenyoucontactLenovoforhelp,themachinetype,model,andserialnumberinformationhelpssupport
technicianstoidentifyyourserverandprovidefasterservice.
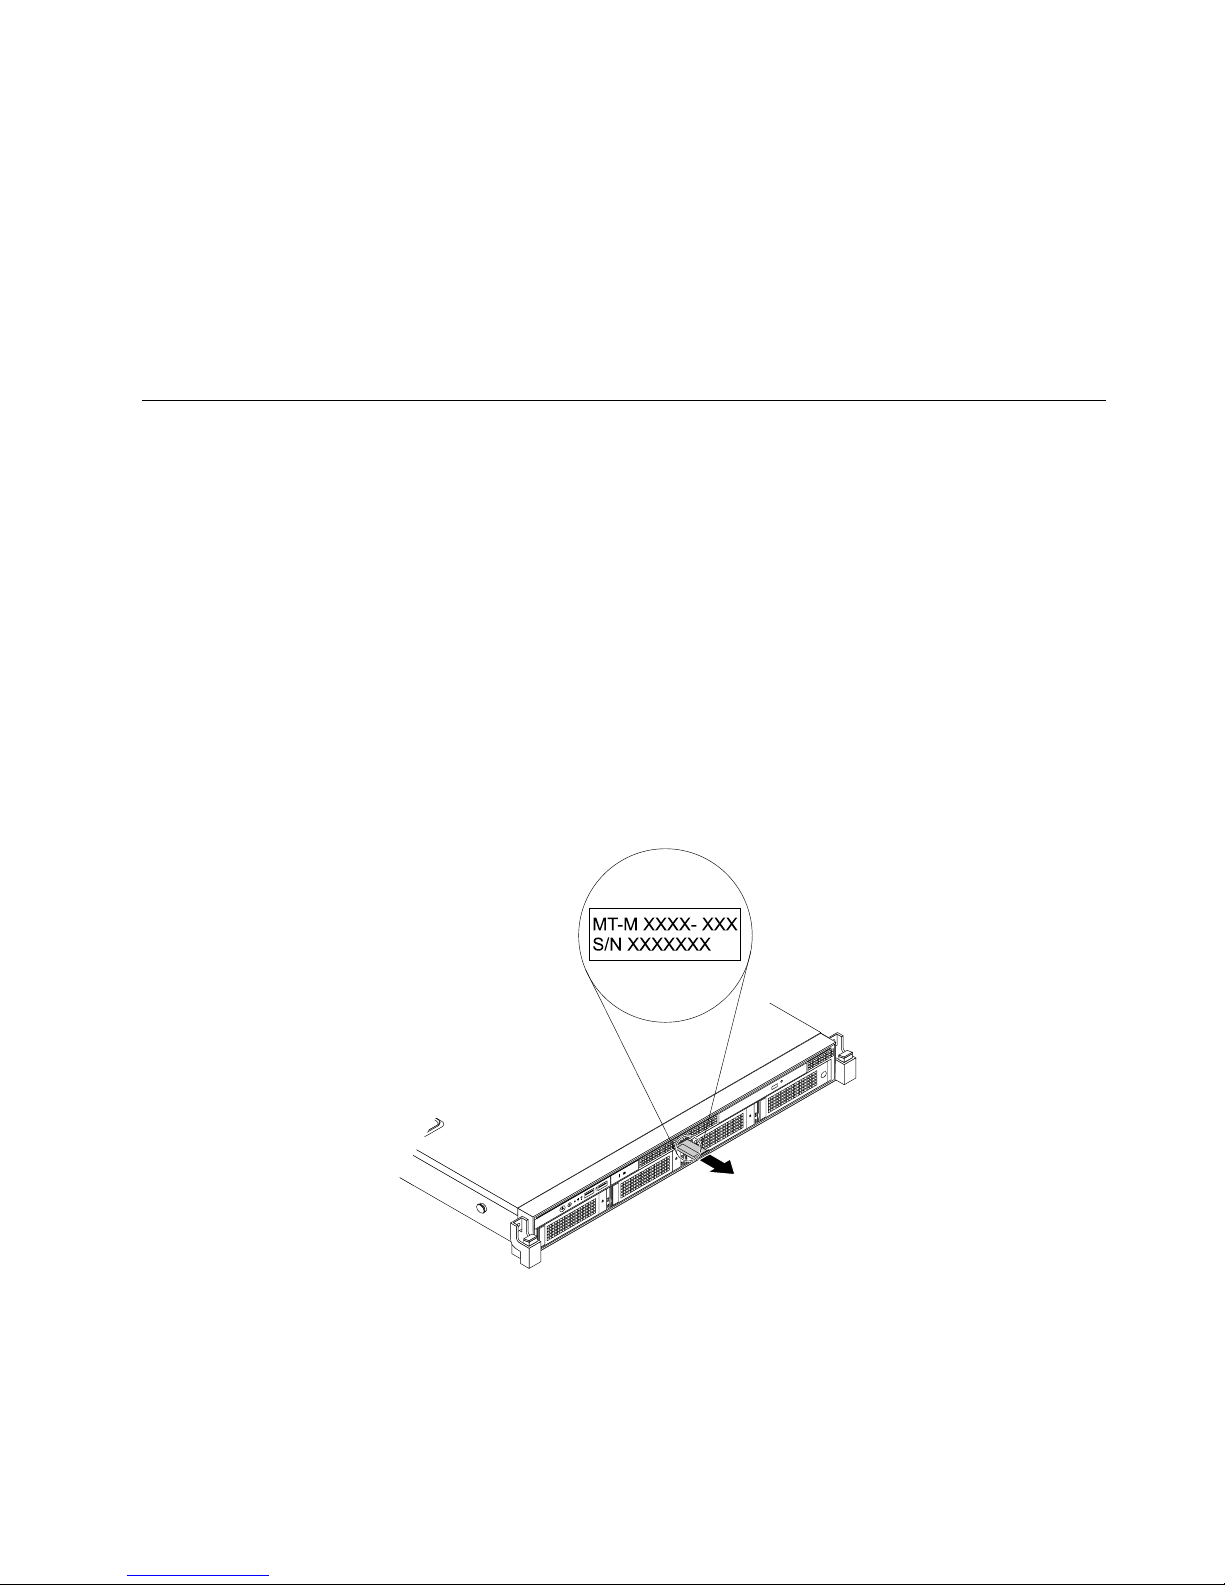
Themachinetype,model,andserialnumberlabelisattachedonthepull-outinformationcard,whichisa
smallplastictabandcanbeslidoutofthefrontofthechassis.Thefollowingillustrationsaresamplesofthe
machinetype,model,andserialnumberlabelsonservermodelswithdifferentharddiskdrivecongurations.
Note:Dependingonthemodel,yourservermightlookslightlydifferentfromtheillustrationsinthistopic.
ID
CPU
Mem
PSU
MT-M XXXX- XXX
S/N XXXXXXX
Figure2.Labelonservermodelswith3.5-inchharddiskdrives
Chapter3.Productoverview13
Page 28
PSU
Mem
CPU
ID
MT-M XXXX- XXX
S/N XXXXXXX
Figure3.Labelonservermodelswith2.5-inchharddiskdrives
Frontviewoftheserver
Thistopicprovidesinformationtohelpyoulocatethepartsonthefrontoftheserver.
Thefrontviewoftheservervariesbymodel.Theillustrationsinthistopicshowtheserverfrontviews
basedonthesupportedharddiskdrives:
•Frontviewofservermodelswith3.5-inchharddiskdrives
•Frontviewofservermodelswith2.5-inchharddiskdrives
Note:Dependingonthemodel,yourservermightlookslightlydifferentfromtheillustrationsinthistopic.
Frontviewofservermodelswith3.5-inchharddiskdrives
Thefollowingillustrationshowsthefrontviewofservermodelswith3.5-inchharddiskdrives.
CPU
MemPSU
ID
Figure4.Frontviewofservermodelswith3.5-inchharddiskdrives
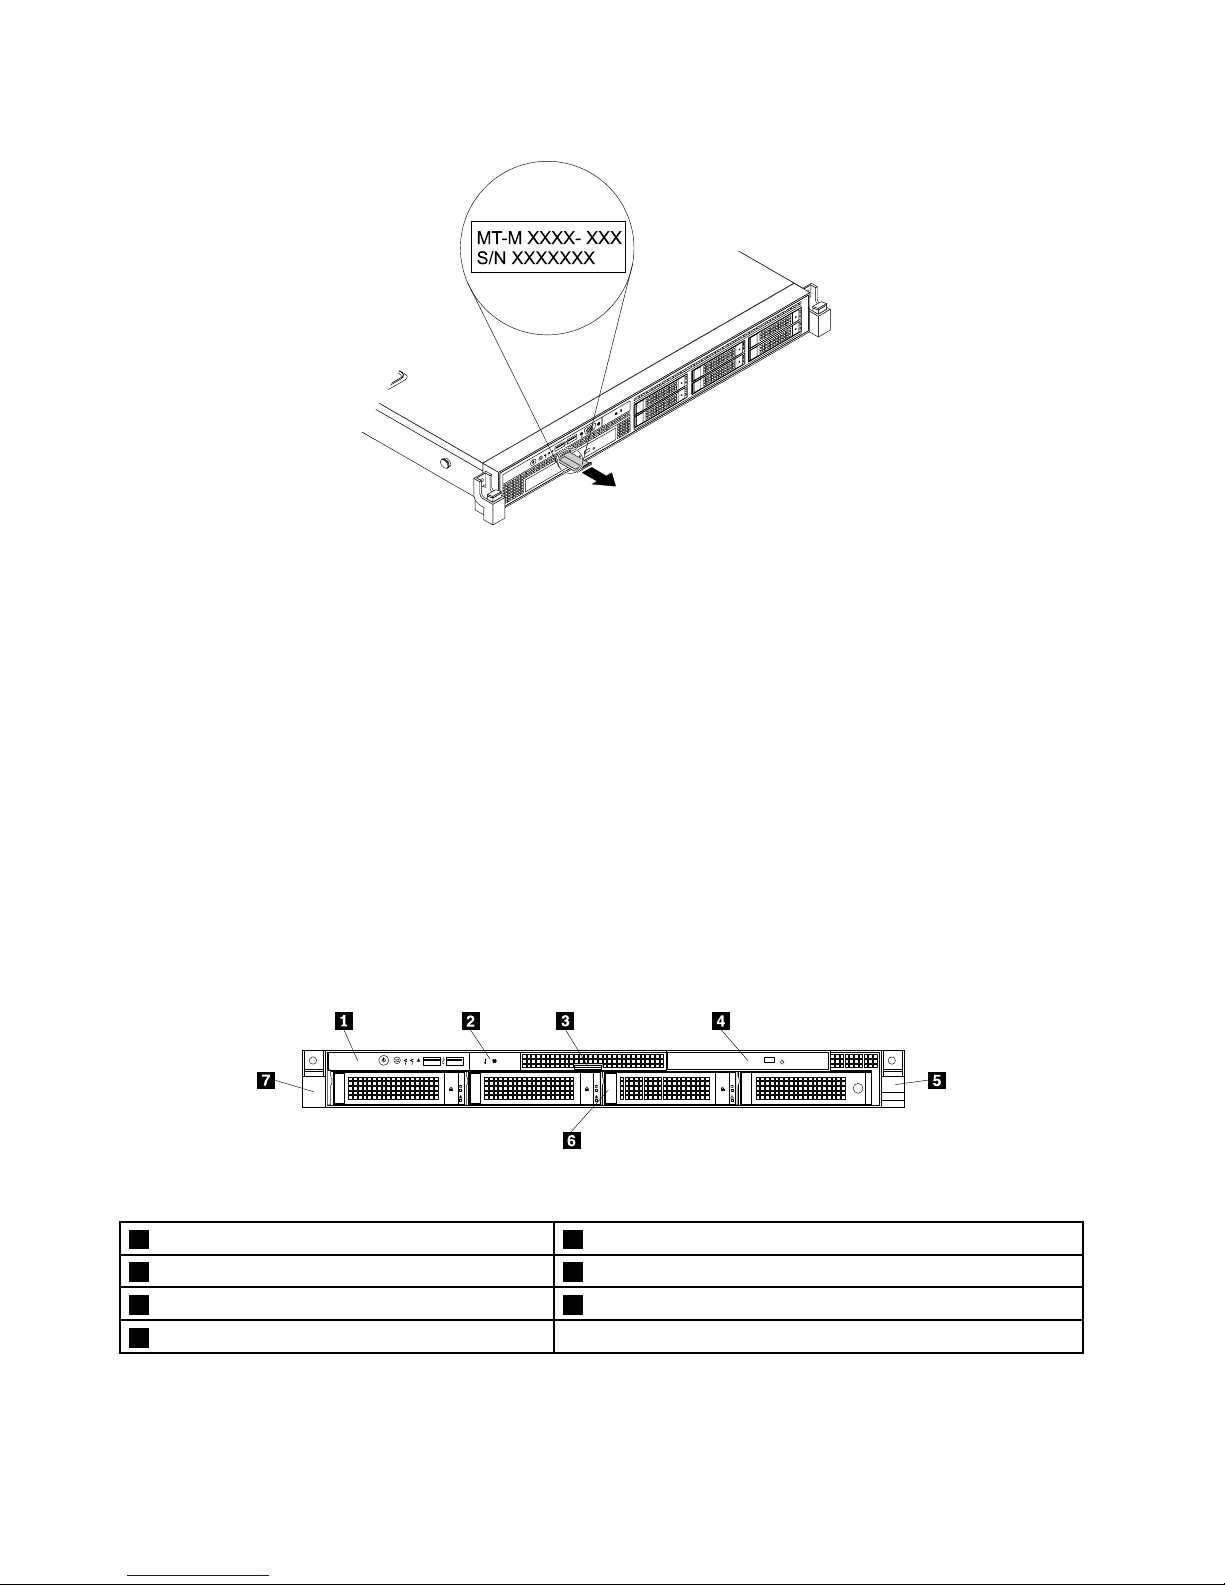
1Frontpanel5Rightrackhandle
2IntelligentDiagnosticsModule63.5-inchharddiskdrivearea
3Pull-outinformationcard7Leftrackhandle
4Slimopticaldrive(availableinsomemodels)
14ThinkServerRD330HardwareMaintenanceManual
Page 29
1Frontpanel
Fordetailedinformationaboutthecontrols,connectors,andstatusLEDsonthefrontpanel,see“Front
panel”onpage17.
2IntelligentDiagnosticsModule
Formoreinformation,see“IntelligentDiagnosticsModule”onpage19.
3Pull-outinformationcard
Themachinetype,model,andserialnumberlabeloftheserverisattachedonthepull-outinformationcard.
See“Machinetype,model,andserialnumberlabel”onpage13.
4Slimopticaldrive
SomeservermodelscomewithaslimSATAopticaldrive.
5Rightrackhandle
7Leftrackhandle
Ifyourserverisinstalledinarackcabinet,youcanusetherackhandlestoslidetheserveroutoftherack
cabinet;orusetherackhandlesandscrewstosecuretheserverintherackcabinetsothattheserver
cannotslideout,especiallyinvibration-proneareas.Formoreinformation,refertotheRackInstallation
Instructionsthatcomeswithyourserver.
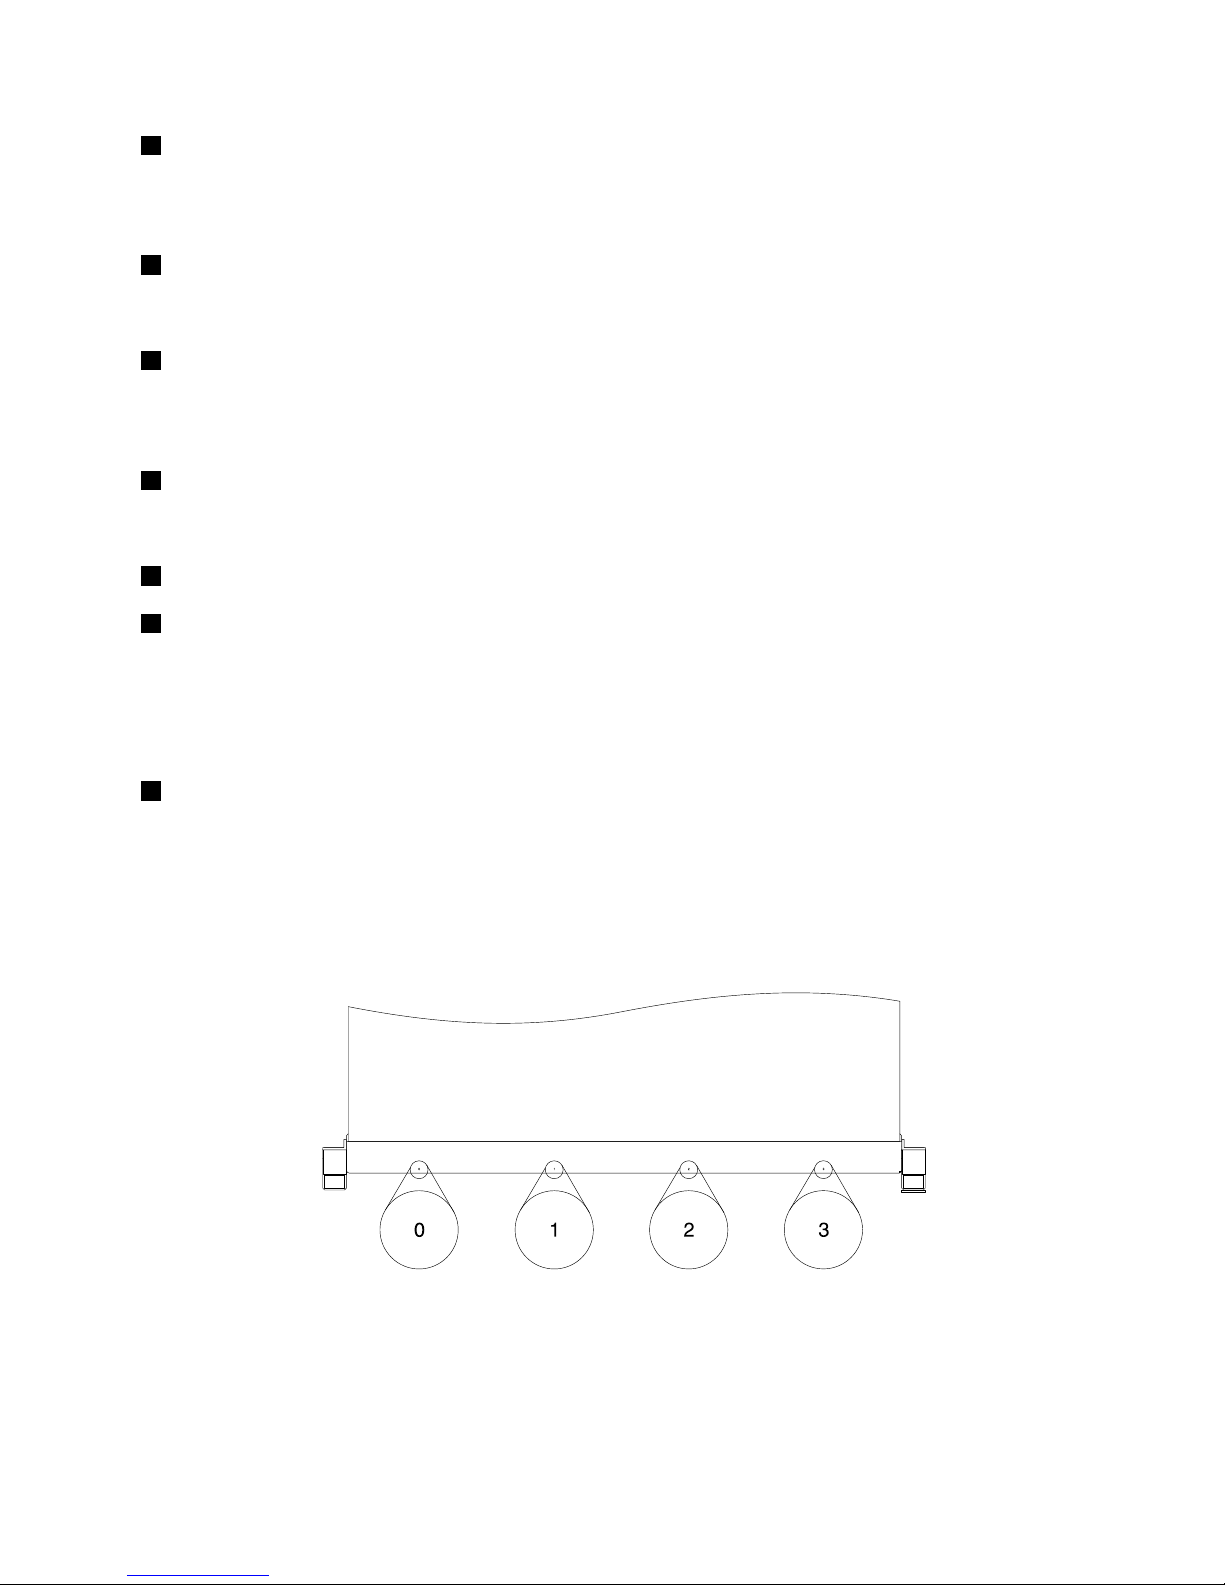
63.5-inchharddiskdrivearea
TheEMIintegrityandcoolingoftheserverareprotectedbyhavingalldrivebayscoveredoroccupied.The
numberoftheinstalledharddiskdrivesinyourservervariesbymodel.Thevacantharddiskdrivebaysare
occupiedbydummyharddiskdrivetrays.
Theharddiskdrivebaynumbersaremarkedonthetopedgeofthefrontbezel.
Figure5.3.5-inchharddiskdrivebaynumbers(topviewoftheserver)
Chapter3.Productoverview15
Page 30
Frontviewofservermodelswith2.5-inchharddiskdrives
Thefollowingillustrationshowsthefrontviewofservermodelswith2.5-inchharddiskdrives.
ID
6
CPU
MemPSU
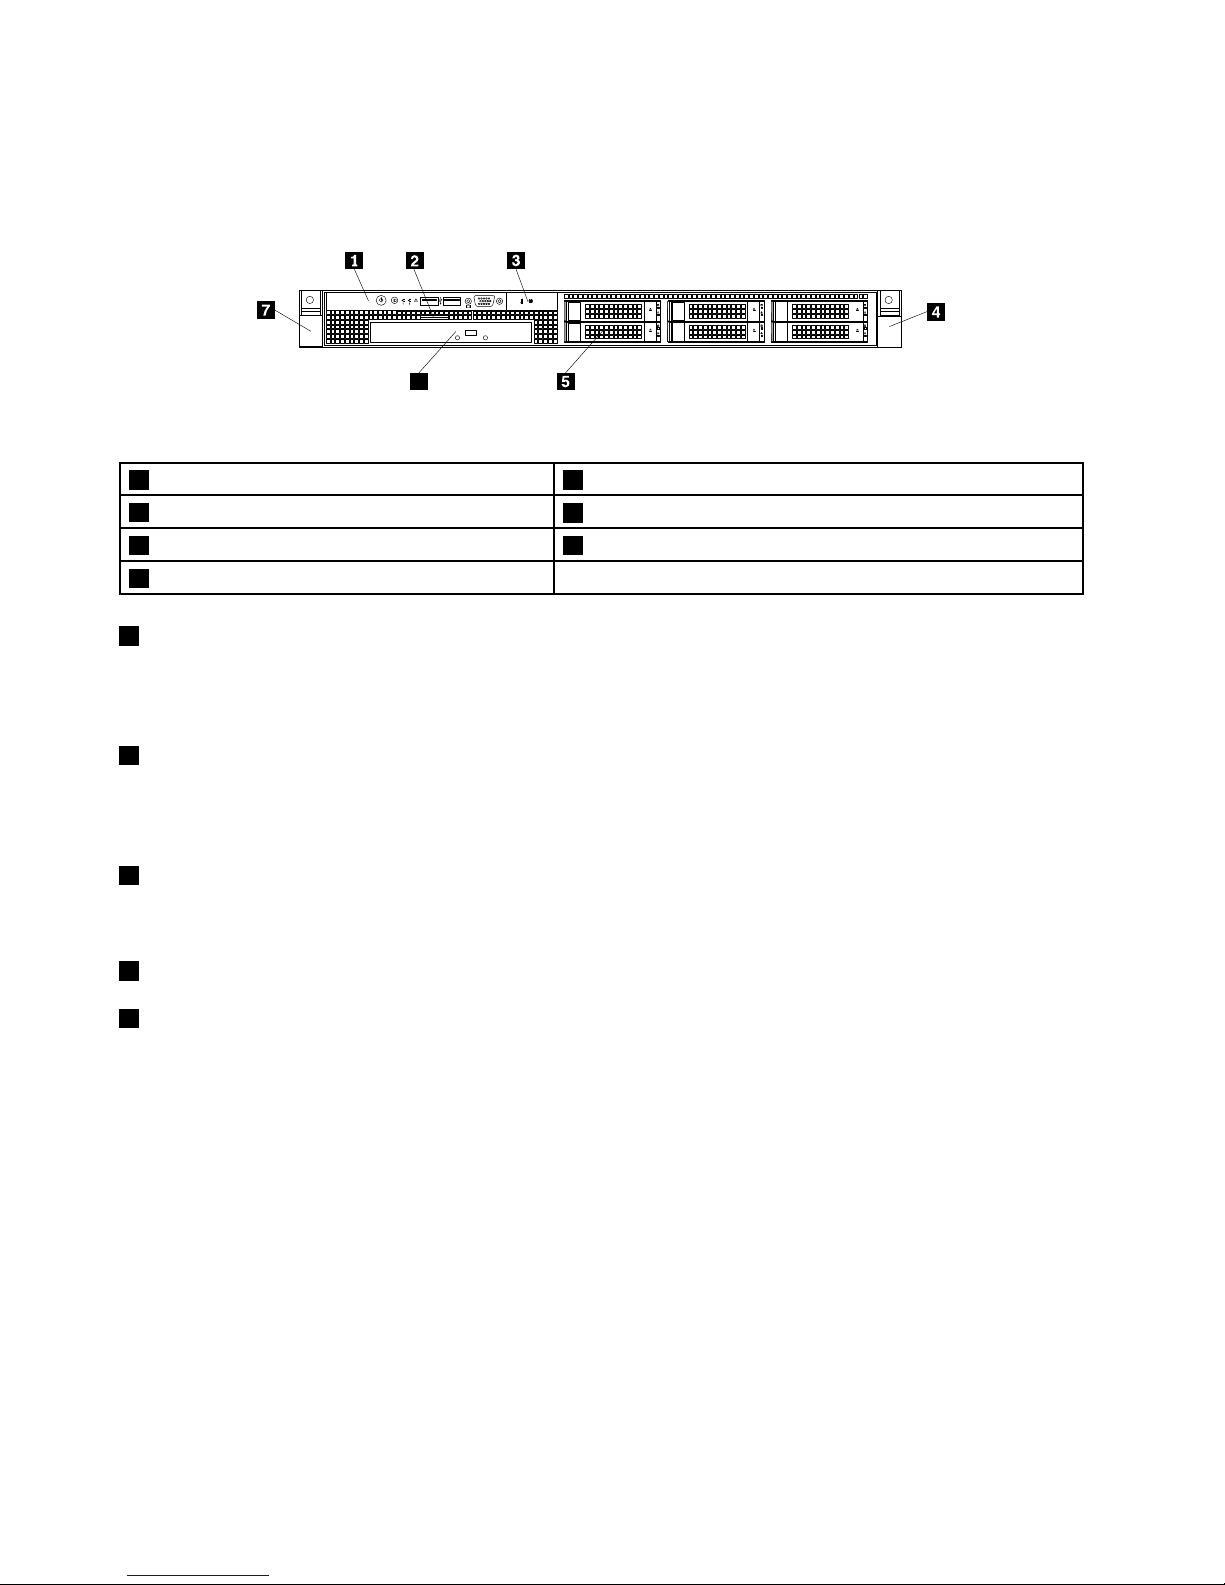
Figure6.Frontviewofservermodelswith2.5-inchharddiskdrives
1Frontpanel52.5-inchharddiskdrivearea
2Pull-outinformationcard
6Slimopticaldrive(availableinsomemodels)
3IntelligentDiagnosticsModule
7Leftrackhandle
4Rightrackhandle
1Frontpanel
Fordetailedinformationaboutthecontrols,connectors,andstatusLEDsonthefrontpanel,see“Front
panel”onpage17.
2Pull-outinformationcard
Themachinetype,model,andserialnumberlabeloftheserverisattachedonthepull-outinformationcard.
See“Machinetype,model,andserialnumberlabel”onpage13.
3IntelligentDiagnosticsModule
Formoreinformation,see“IntelligentDiagnosticsModule”onpage19.
4Rightrackhandle
7Leftrackhandle
Ifyourserverisinstalledinarackcabinet,youcanusetherackhandlestoslidetheserveroutoftherack
cabinet;orusetherackhandlesandscrewstosecuretheserverintherackcabinetsothattheserver
cannotslideout,especiallyinvibration-proneareas.Formoreinformation,refertotheRackInstallation
Instructionsthatcomeswithyourserver.
16ThinkServerRD330HardwareMaintenanceManual
Page 31
52.5-inchharddiskdrivearea
TheEMIintegrityandcoolingoftheserverareprotectedbyhavingalldrivebayscoveredoroccupied.The
numberoftheinstalledharddiskdrivesinyourservervariesbymodel.Thevacantharddiskdrivebaysare
occupiedbydummyharddiskdrivetrays.
Theharddiskdrivebaynumbersaremarkedonthetopedgeofthefrontbezel.
4
5
0
1
2
3
0
1
2
3
4
5
Figure7.2.5-inchharddiskdrivebaynumbers(topviewoftheserver)
6Slimopticaldrive
SomeservermodelscomewithaslimSATAopticaldrive.
Frontpanel
Thistopicprovidesinformationtohelpyoulocatethecontrols,connectors,andLEDsonthefrontpanelof
theserver.
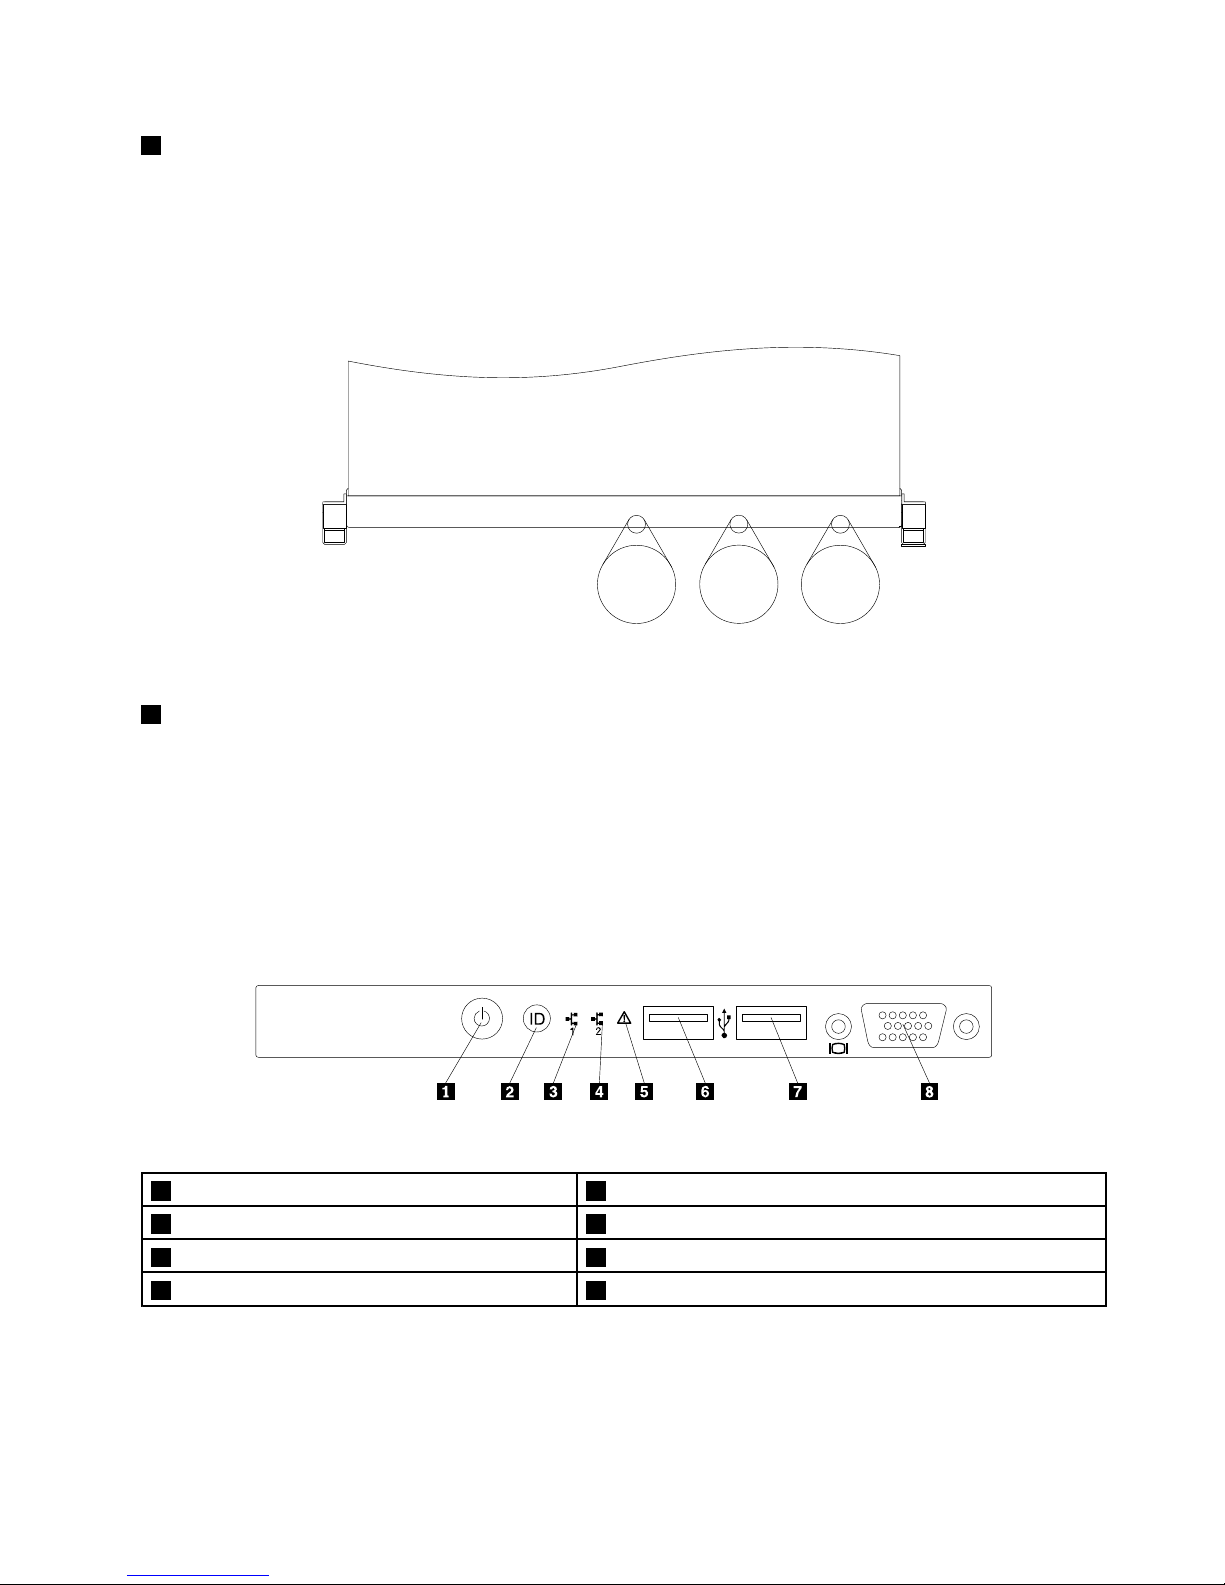
Thefollowingillustrationshowsthecontrols,connectors,andLEDsonthefrontpaneloftheserver.
ID
Figure8.Frontpanel
1PowerswitchwithpowerstatusLED
5SystemerrorLED
2IDbuttonwithIDLED
6FrontUSBconnector1
3NetworkInterfaceController(NIC)1statusLED7FrontUSBconnector2
4NIC2statusLED8FrontVGADB-15connector
Note:ThefrontVGADB-15connectorisonlyavailableinservermodelswith2.5-inchharddiskdrives.
Chapter3.Productoverview17
Page 32
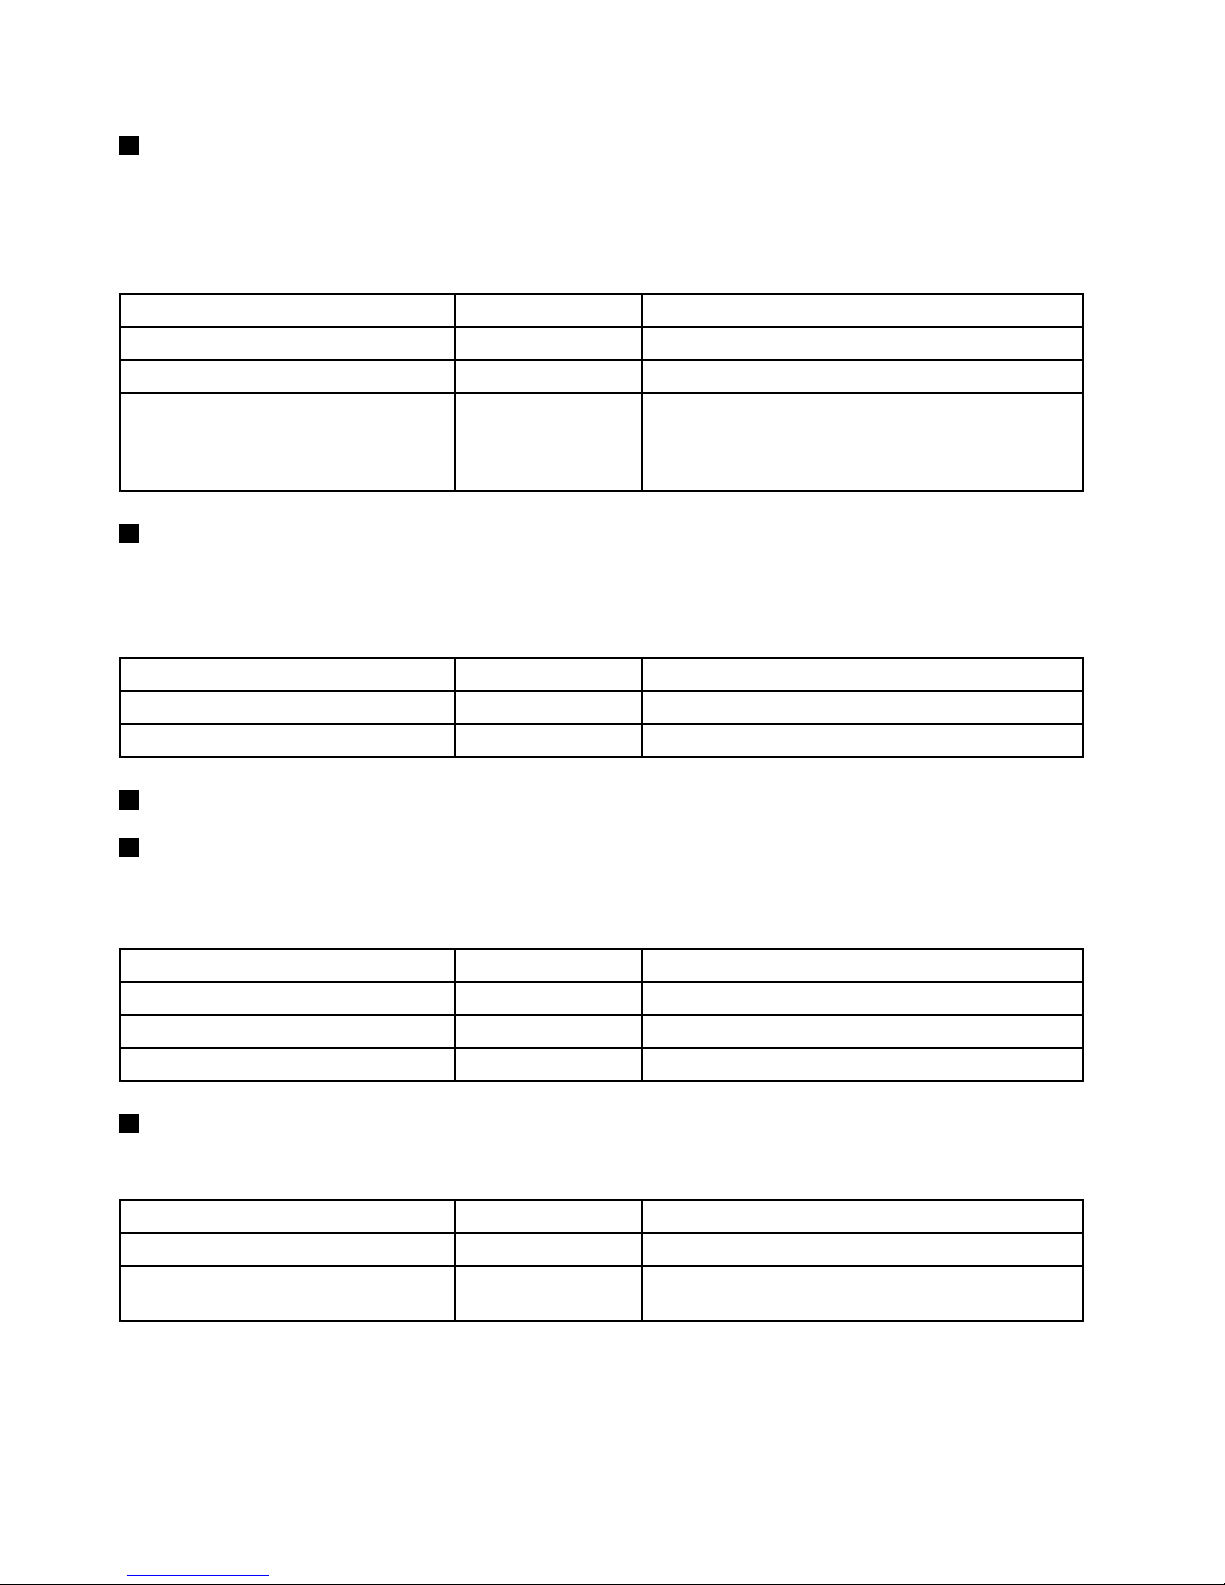
1PowerswitchwithpowerstatusLED
Youcanpressthepowerswitchtoturnontheserverwhenyounishsettinguptheserver.Y oualsocan
holdthepowerswitchforseveralsecondstoturnofftheserverifyoucannotturnitofffromtheoperating
system.SeeChapter4“T urningonandturningofftheserver”onpage43.ThepowerstatusLEDhelpsyou
todeterminethecurrentpowerstatus.
PowerstatusLED
Color
Description
OnGreen
Theserverison.
Off
None
Theserverisoff.
Blinking
GreenTheserverisinACPIS1mode,whichalsoisknown
asPowerOnSuspend(POS)mode.Inthismode,the
microprocessorisnotworkingwhileotherhardware
devicesarestillworking.
2IDbuttonwithIDLED
WhenyoupresstheIDbutton,theIDLEDsonboththefrontandrearoftheserverarelittohelpyoulocate
theserveramongotherservers.YoualsocanturnontheIDLEDsusingaremotemanagementprogram
forserverpresencedetection.
IDLED
Color
Description
On
Blue
Theserverisidentied.
Off
None
TheIDLEDisnotinuseortheserverisnotidentied.
3NIC1statusLED
4NIC2statusLED
ThetwoNICstatusLEDsindicatetheLANstatusfortheEthernetconnector1andEthernetconnector2
ontherearpaneloftheserver.
NICstatusLEDColor
Description
OnGreen
TheserverisconnectedtoaLAN.
Off
None
TheserverisdisconnectedfromaLAN.
Blinking
Green
TheLANisconnectedandactive.
5SystemerrorLED
ThesystemerrorLEDhelpsyoutodetermineifthereareanysystemerrors.
SystemerrorLEDColor
Description
On
Amber
Amaincomponenthasfailed.
Off
None
Theserverisoffortheserverisonandisworking
correctly.
18ThinkServerRD330HardwareMaintenanceManual
Page 33
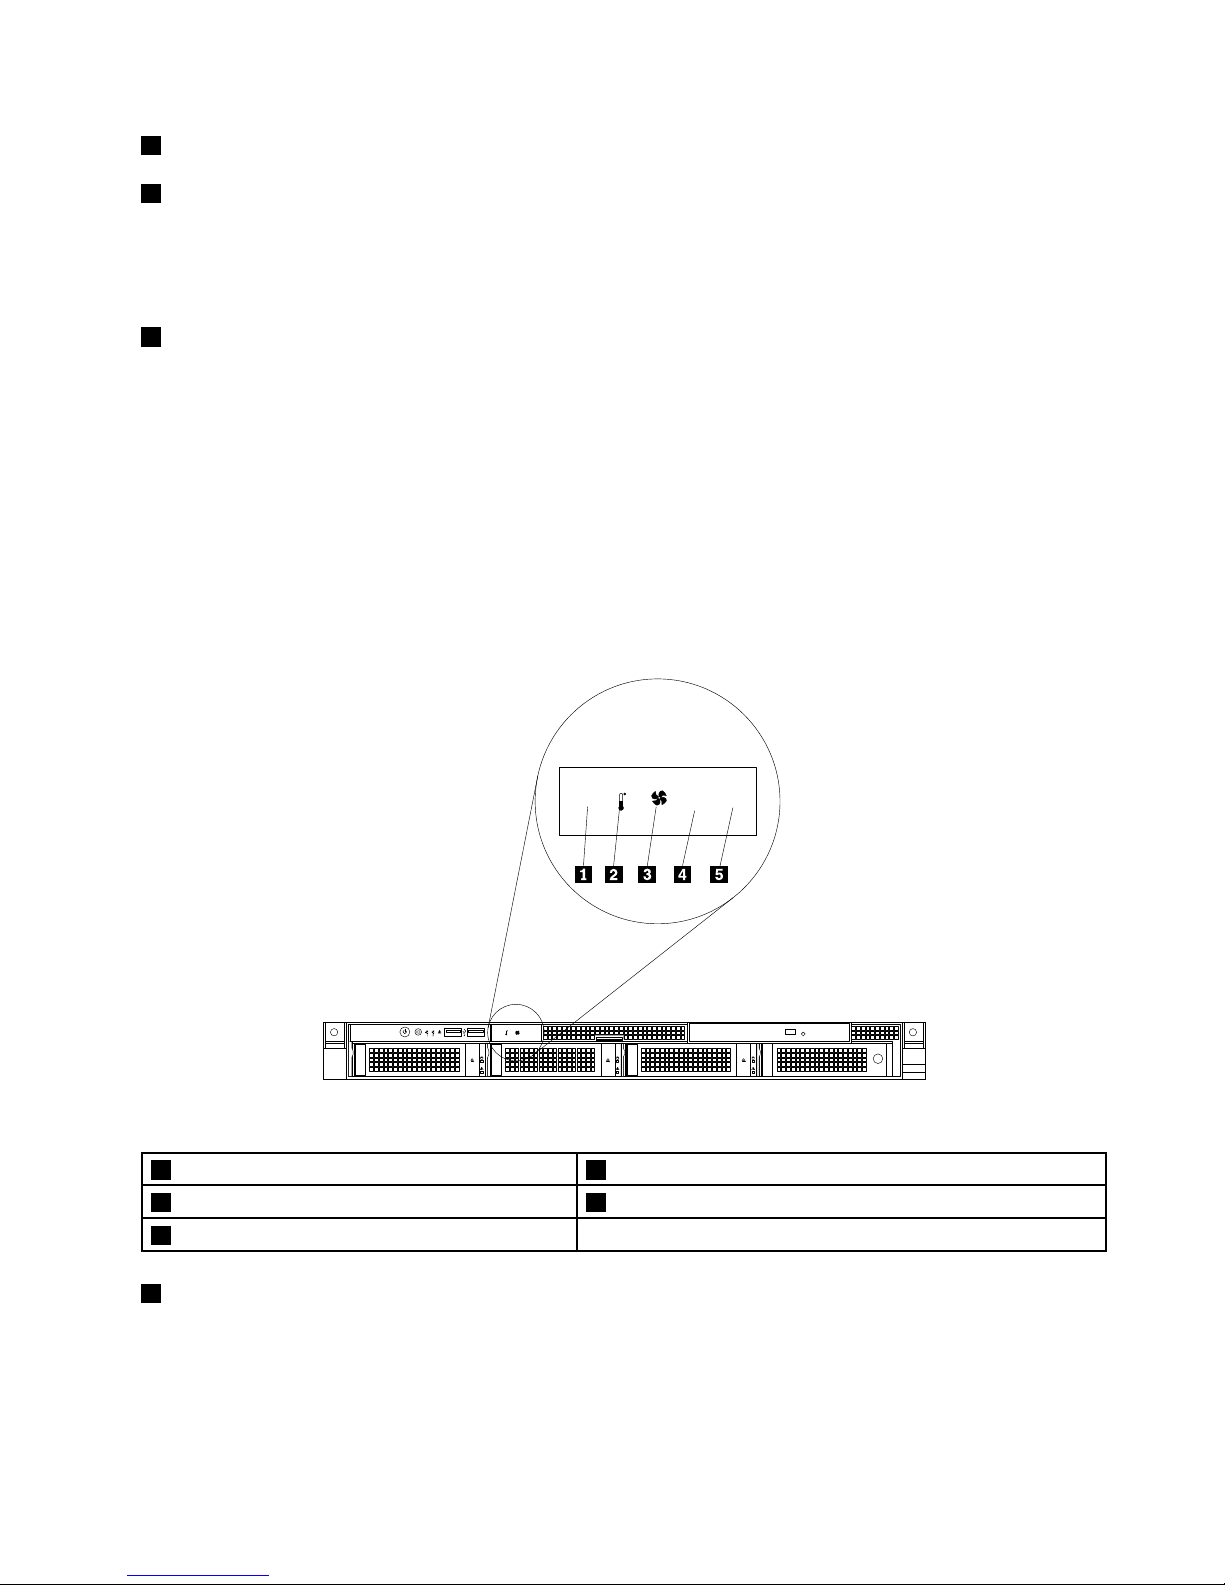
6FrontUSBconnector1
7FrontUSBconnector2
UsedtoattachaUSB-compatibledevice,suchasaUSBkeyboard,mouse,scanner,orprinter.Ifyou
havemorethansixUSBdevices,youcanpurchaseaUSBhub,whichyoucanusetoconnectadditional
USBdevices.
8FrontVGADB-15connector
UsedtoattachaVGA-compatiblevideodevice,suchasaVGAmonitor.
IntelligentDiagnosticsModule
ThistopicprovidesinformationabouttheIntelligentDiagnosticsModule(hereinafterreferredtoastheIDM)
andthediagnosticLEDsonthemodule.ManyerrorsarerstindicatedbyaliterrorLEDonthediagnostic
paneloftheserver.IfanLEDislit,oneormoreLEDselsewhereintheservermightalsobelittodirectyouto
thesourceoftheerror.See“SystemboardLEDs”onpage40
.
ThefollowingillustrationshowsthelocationoftheIDMandthediagnosticLEDsontheIDMpanel.
Dependingonthemodel,yourservermightlookslightlydifferentfromtheillustrationinthistopic.
CPU
MemPSU
ID
CPU
Mem
PSU
Figure9.IDMpanel
1PowersupplyerrorLED4MemorymodulestatusLED
2AmbienttemperaturelimitLED5MicroprocessorstatusLED
3SystemfanerrorLED
1PowersupplyerrorLED
WhenthepowersupplyerrorLEDislitinamber,itindicatesthatthereisapowersupplyproblem.Toidentify
thefailingpowersupply,checkthestatusLEDnearthepowercordconnectorontheredundantpower
supply.WhenthestatusLEDislitingreen,itindicatesthatthepowersupplyisworkingcorrectly.Whenthe
statusLEDislitinamber,itindicatesthatthepowersupplyislikelytofailorhasfailed.
Chapter3.Productoverview19
Page 34
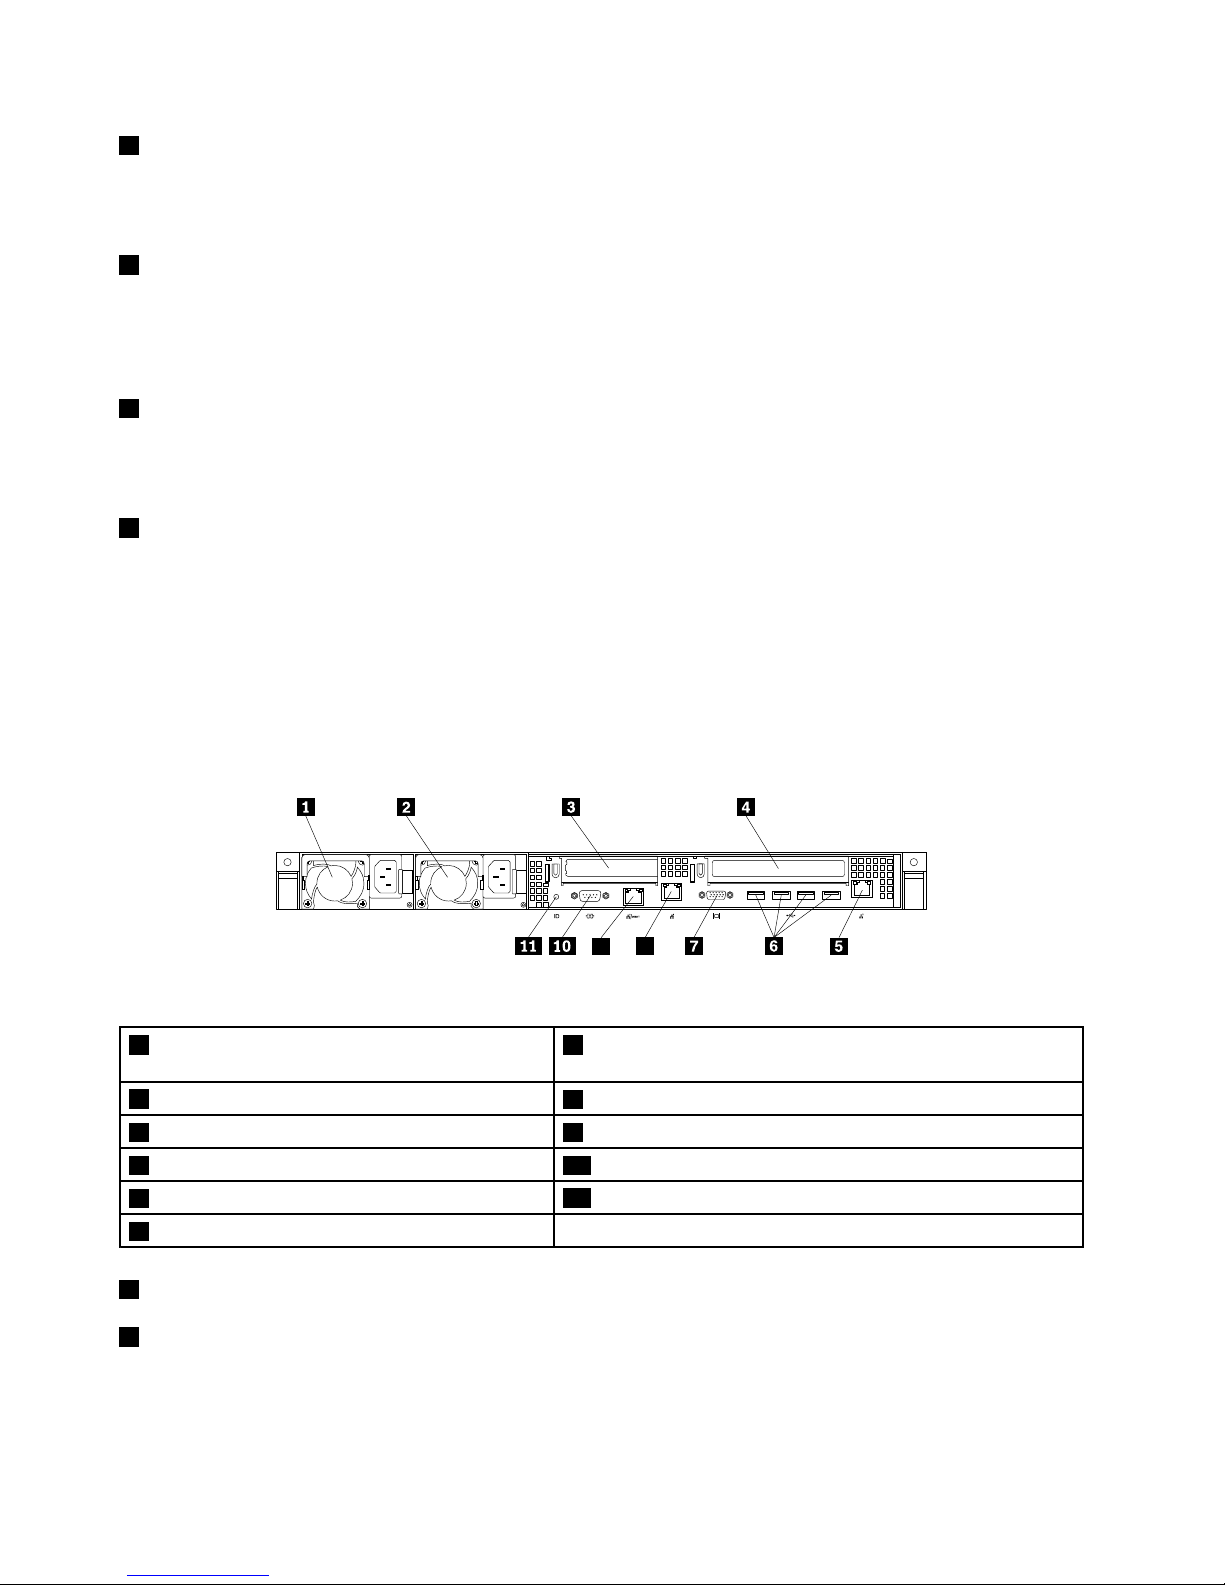
2AmbienttemperaturelimitLED
WhenthisLEDislitinamber,itindicatesthattheambienttemperatureisbelow7°C(44.6°F)orover40°C
(104°F),whichisnotproperforserveroperation.
3SystemfanerrorLED
WhenthesystemfanerrorLEDislitinamber,itindicatesthatoneormoresystemfansareoperating
slowlyorhavefailed.T oidentifythefailingsystemfans,checkthestatusLEDsonthesystemboard.
See“SystemboardLEDs”onpage40
.
4MemorymodulestatusLED
WhenthememorymodulestatusLEDislitinamber,itindicatesthatoneormorememorymodulesare
overheated.
5MicroprocessorstatusLED(alsoknownasCPUerrorLED)
WhenthemicroprocessorstatusLEDislitinamber,itindicatesthatoneormoremicroprocessorsare
overheated.
Rearviewoftheserver
Thistopicprovidesinformationtohelpyoulocatetheconnectorsandcomponentsontherearofyourserver.
Thefollowingillustrationshowstherearviewoftheserverwithtwohot-swappowersupplies.
1
0
MGMT
ID
8
9
2
Figure10.Rearviewoftheserver
1Hot-swapredundantpowersupply2(availablein
somemodels)
7VGADB-15connector
2Hot-swapredundantpowersupply1
8Ethernetconnector1(RJ-45)
3Low-prolePCIExpresscardslot9Ethernetconnector0forsystemmanagement(RJ-45)
4PCIExpresscardslot10Serialport
5Ethernetconnector2(RJ-45)
11IDLED
6USBconnectors(4)
1Hot-swapredundantpowersupply2(availableinsomemodels)
2Hot-swapredundantpowersupply1
Thehot-swapredundantpowersupplieshelpyouavoidsignicantinterruptiontotheoperationofthe
systemwhenapowersupplyfails.Y oucanpurchaseahot-swapredundantpowersupplyoptiondirectly
fromLenovoandinstallthepowersupplytoprovidepowerredundancywithoutturningofftheserver.
20ThinkServerRD330HardwareMaintenanceManual
Page 35

Oneachhot-swapredundantpowersupply,thereisastatusLEDnearthepowercordconnector.Whenthe
LEDislitingreen,itindicatesthatthehot-swapredundantpowersupplyisworkingcorrectly.WhentheLED
islitinamber,itindicatesthatthehot-swapredundantpowersupplyislikelytofailorhasfailed.
3Low-prolePCIExpresscardslot
ItisrecommendedtoattachaRAIDcardtothelow-prolePCIExpresscardslot.
PhysicallinkwidthNegotiablelinkwidth
Supportedcardlengthandheight
x8x4,x2,x1
Low-prolecard
4PCIExpresscardslot
UsedtoattachanEthernetcardoranyothersupportedPCIExpresscard.
PhysicallinkwidthNegotiablelinkwidth
Supportedcardlengthandheight
x16x16,x8,x4,x2,x1
Half-length,full-heightcard
589Ethernetconnectors(RJ-45)
UsedtoattachanEthernetcableforaLAN.EachEthernetconnectorhastwostatusLEDstohelpyou
identifytheEthernetconnectivity,activity,andconnectionspeed.
Notes:
•TheEthernetconnector0(callout
9)markedwith“MGMT”isforsystemmanagement.Ifyouwanttouse
remotemanagementfunctions,youneedtoconnectanEthernetcabletotheEthernetconnector0.
•TheEthernetconnector0forsystemmanagementis82574Lbydefault.Ifyouhaveselectedsharemode
forthe82574LEthernetconnectorintheSetupUtilityprogram,youcanuseitasanordinaryEthernet
connectorwith100Mbpsnetworkconnectivity.However,teamingwithotherEthernetconnectorsisnot
supportedifthemanagementEthernetconnectorisusedasanordinaryEthernetconnector.Fordetailed
informationaboutsettingthemodeoftheEthernetconnectorforsystemmanagement,see“Settingthe
modeoftheEthernetconnector0”onpage51
.
Figure11.EthernetstatusLEDs
EthernetstatusLED
ColorStatus
Description
Amber
On
Theconnectionspeedis1000Mbps.
GreenOn
Theconnectionspeedis100Mbps.
1Left
None
Off
Theconnectionspeedis10Mbps.
GreenOn
TheserverisconnectedtoaLAN.
None
Off
TheserverisdisconnectedfromaLAN.
2Right
Green
BlinkingTheLANisconnectedandactive.
Chapter3.Productoverview21
Page 36
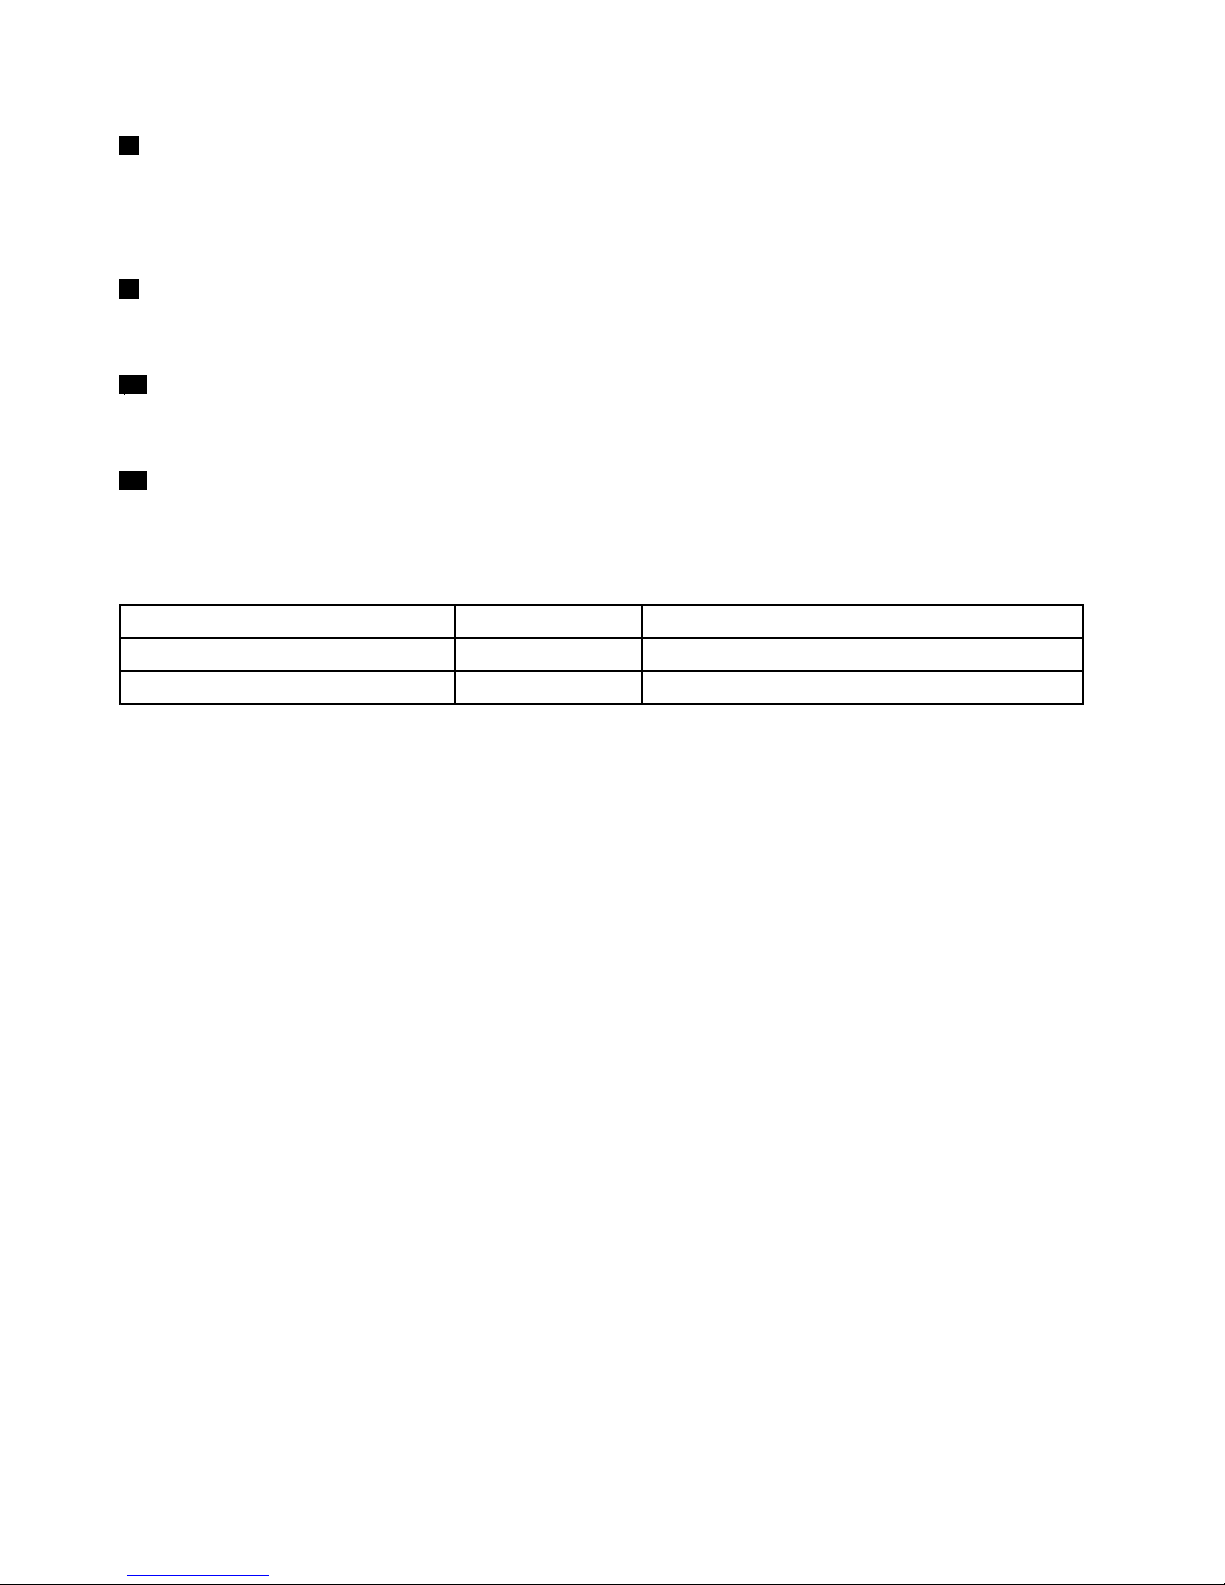
6USBconnectors(4)
UsedtoattachaUSB-compatibledevice,suchasaUSBkeyboard,mouse,scanner,orprinter.Ifyou
havemorethansixUSBdevices,youcanpurchaseaUSBhub,whichyoucanusetoconnectadditional
USBdevices.
7VGADB-15connector
UsedtoattachaVGA-compatiblevideodevice,suchasaVGAmonitor.
10Serialport
Usedtoattachadevicethatusesa9-pinserialport.
11IDLED
WhenyoupresstheIDbutton,theIDLEDsonboththefrontandrearoftheserverarelittohelpyoulocate
theserveramongotherservers.YoualsocanturnontheIDLEDsusingaremotemanagementprogram
forserverpresencedetection.
IDLED
Color
Description
On
Blue
Theserverisidentied.
Off
None
TheIDLEDisnotinuseortheserverisnotidentied.
Servercomponents
Thistopicprovidesinformationtohelpyoulocatethecomponentsofyourserver.Formoreinformation
aboutmajorcomponents,seetherelatedtopicsin“Locations”onpage13.
Toremovetheservercoverandthecoolingshroudandgainaccesstotheinsideoftheserver,see
“Removingtheservercover”onpage69and“Removingandreinstallingthecoolingshroud”onpage73.
Thechassiscongurationvariesbymodel.Thefollowingillustrationsshowthetwochassiscongurations
basedonthesupportedharddiskdrives.
•Servermodelswith3.5-inchhot-swapharddiskdrives
•Servermodelswith2.5-inchhot-swapharddiskdrives
Note:Dependingonthemodel,yourservermightlookslightlydifferentfromtheillustrationsinthistopic.
22ThinkServerRD330HardwareMaintenanceManual
Page 37
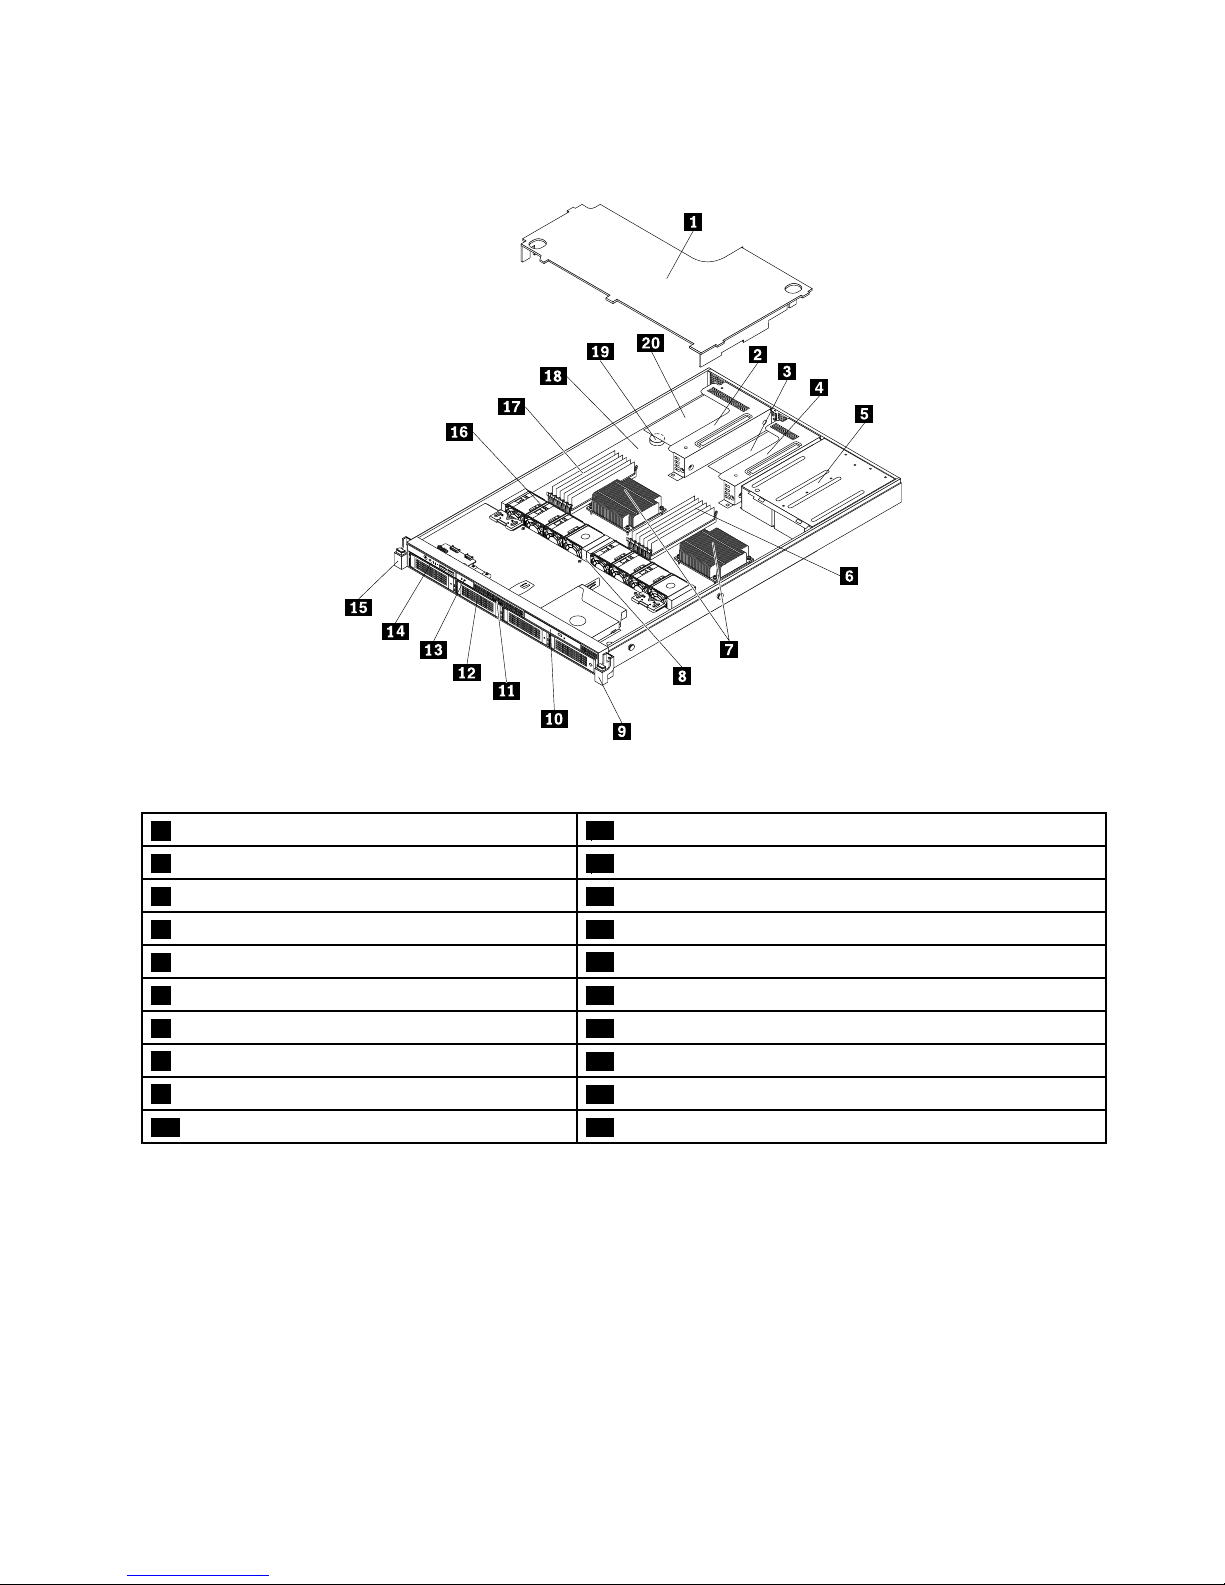
Componentsofservermodelswith3.5-inchhot-swapharddiskdrives
ID
Mem
CPU
PSU
Figure12.Componentsofservermodelswith3.5-inchhot-swapharddiskdrives
1Coolingshroud
11Pull-outinformationcard
2Risercardassembly1123.5-inchharddiskdrivebays
3PCIExpresscard(availableinsomemodels)
13IntelligentDiagnosticsModule
4Risercardassembly214Frontpanel
5Oneortwohot-swapredundantpowersupplies
15Leftrackhandle
6CPU2DIMMs(varybymodel)16Systemfans
7Heatsinks(varybymodel)17CPU1DIMMs(varybymodel)
8Backplanefor3.5-inchharddiskdrives
18Systemboard
9Rightrackhandle
19Systemboardbattery
10Slimopticaldrive(availableinsomemodels)20PCIExpresscard(availableinsomemodels)
Chapter3.Productoverview23
Page 38

Componentsofservermodelswith2.5-inchhot-swapharddiskdrives
PSU
Mem
CPU
ID
Figure13.Componentsofservermodelswith2.5-inchhot-swapharddiskdrives
1Coolingshroud
11Pull-outinformationcard
2Risercardassembly112Frontpanel
3PCIExpresscard(availableinsomemodels)
13Leftrackhandle
4Risercardassembly2
14Systemfans
5Oneortwohot-swapredundantpowersupplies15CPU2DIMMs(varybymodel)
6Backplanefor2.5-inchharddiskdrives
16CPU1DIMMs(varybymodel)
7Rightrackhandle
17Heatsinks(varybymodel)
82.5-inchharddiskdrivebays
18Systemboard
9IntelligentDiagnosticsModule
19Systemboardbattery
10Slimopticaldrive(availableinsomemodels)20PCIExpresscard(availableinsomemodels)
CRUsarepartsthatcanbeupgradedorreplacedbythecustomer.IfaCRUisdeterminedtobedefective
duringthewarrantyperiod,areplacementCRUwillbeprovidedtothecustomer.Customersareresponsible
forinstallingtheself-serviceCRUsforthisproduct.Customersalsocaninstalloptional-serviceCRUs,which
mightrequiresometechnicalskillsortools,orrequestthatatechnicianinstalltheoptional-serviceCRU
underthetermsoftheapplicablewarrantyservicetypeforyourcountryorregion.
Non-CRUsmustbereplacedonlybytrainedservicetechnicians.
Notes:
•BeforeservicingaLenovoproduct,ensurethatyoureadandunderstand“Safetyinformation”onpageiii
.
•UseonlypartsprovidedbyLenovo.
24ThinkServerRD330HardwareMaintenanceManual
Page 39

ThefollowingtableliststhemajorFRUsinyourserverandtheCRUidenticationinformation.Foracomplete
listingofFRUinformation,suchasFRUpartnumbersandsupportedservermodels,goto:
http://www.lenovo.com/serviceparts-lookup
Description
Self-serviceCRUOptional-service
CRU
Coolingshroud
YesNo
DiagnosticmoduleNoYes
FrontpanelboardNoYes
HeatsinkYesNo
Hot-swapharddiskdriveYesNo
Hot-swapharddiskdrivebackplaneNoYes
Hot-swapredundantpowersupplyYesNo
MemorymoduleYesNo
MicroprocessorNoYes
Opticaldrive(availableinsomemodels)
YesNo
PeripheralComponentInterconnect(PCI)card
YesNo
RackhandlesYesNo
RisercardassemblyYesNo
Systemboard
NoNo
Systemboardbattery
YesNo
Systemfan
YesNo
ThinkServerManagementModulePremium(availableasanoption)
YesNo
ThinkServerRAID500UpgradeKeyforAdvancedRAID(availableasan
option)
NoYes
ThinkServerRAID700Battery(availableasanoption)
NoYes
ThinkServerT rustedPlatformModule(availableasanoption)
YesNo
Chapter3.Productoverview25
Page 40
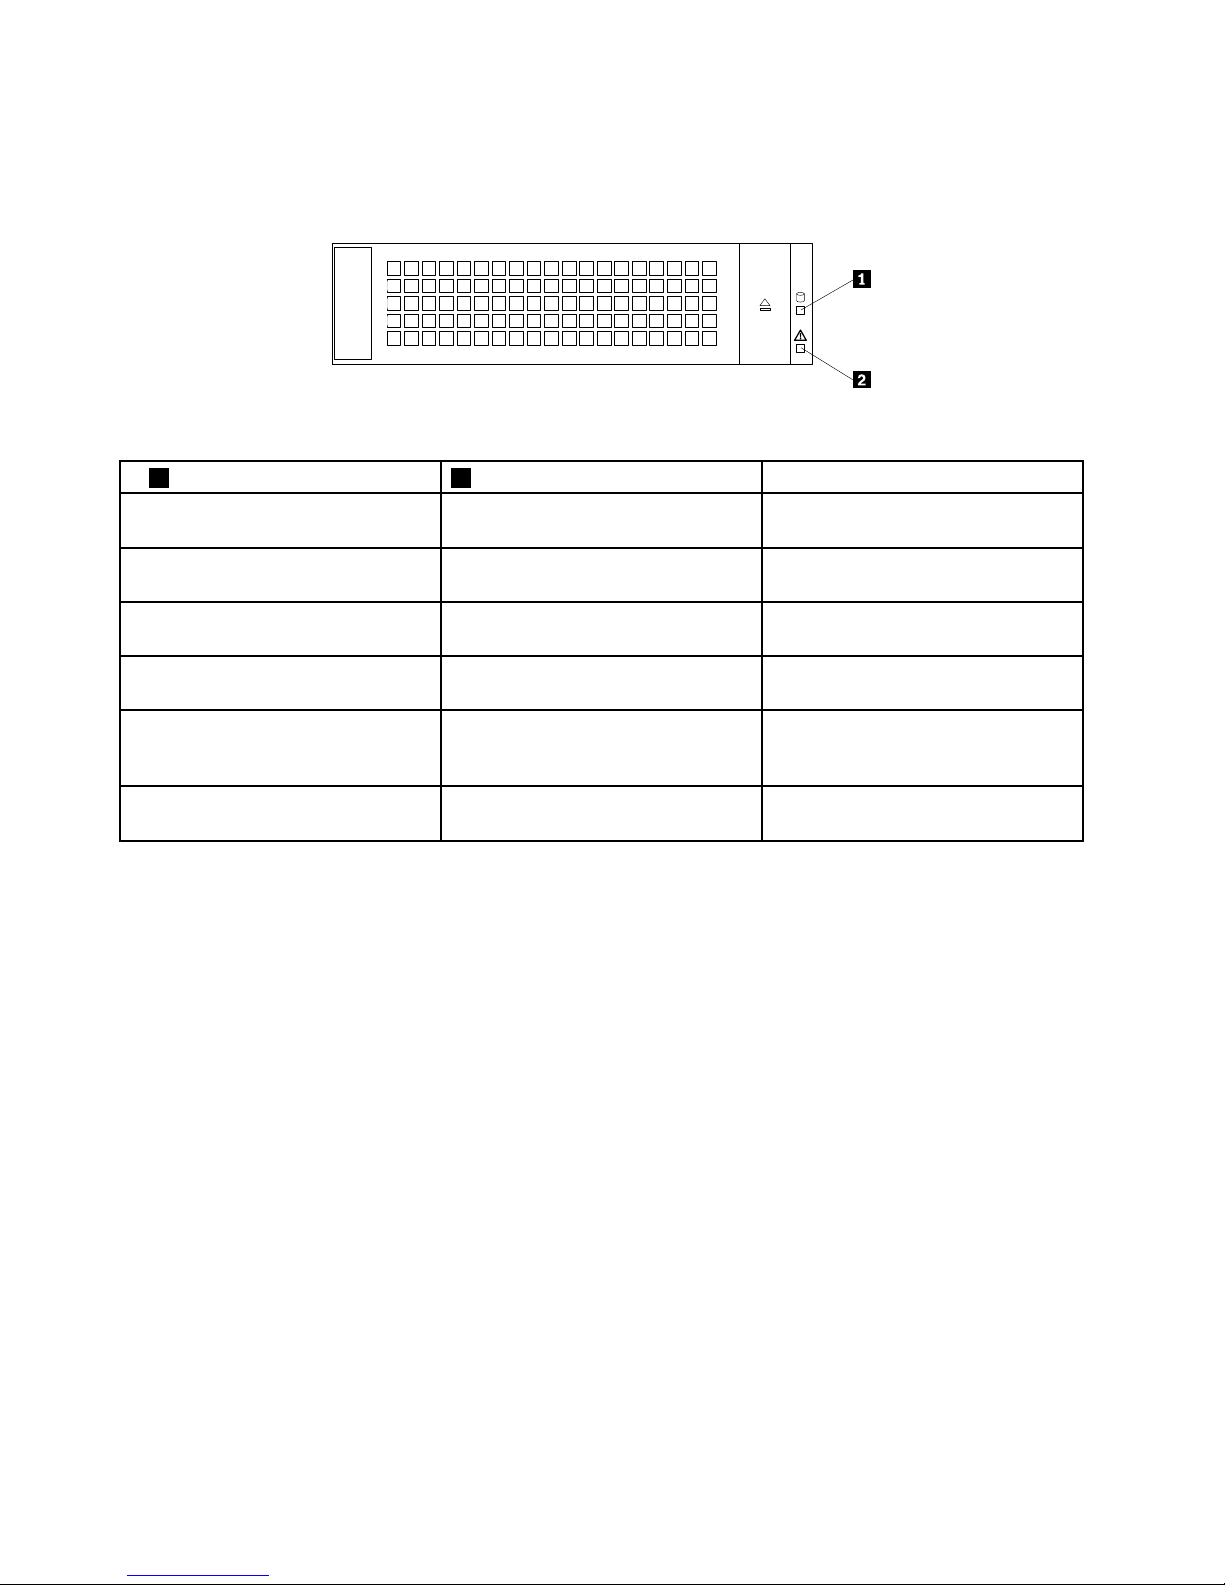
Hot-swapharddiskdrivestatusLEDs
Eachhot-swapharddiskdrivehastwostatusLEDsonthefront.
Figure14.Hot-swapharddiskdrivestatusLEDs
1HarddiskdriveactivityLED2HarddiskdriveRAIDstatusLEDDescription
OffOff
Theharddiskdrivehasfailedoris
notpresent.
On,greenOff
Theharddiskdriveispresentbutnot
inuse.
Blinking,green
Off
Theharddiskdriveisactiveanddata
isbeingtransferred.
On,greenBlinkingrapidly(aboutfourashes
persecond),amber
TheRAIDcontrollerisidentifyingthe
harddiskdrive.
On,greenOn,amber
TheRAIDarrayhasfailedandcannot
berecovered.Youneedtorecreatea
newarray.
Blinking,green
Blinkingslowly(aboutoneashper
second),amber
Theharddiskdriveisbeingrebuilt.
RAIDcard
ThistopicprovidesinformationtohelpyoulocatetheconnectorsonaRAIDcardifyouhaveoneinstalled
ontherisercardassembly2.
SomeservermodelscomewithaRAIDcardtoprovideadvancedSATA/SAShardwareRAIDfunctionstothe
server.Formoreinformation,referto“InstallingorremovingtheRAIDcard”onpage85
.
Note:TheoptionkitfortheRAIDcardisdesignedfordifferenttypesofserversandmightcontainadditional
cablesthatarenotrequiredforyourserver.
YourserversupportsthefollowingRAIDcards:
•ThinkServerRAID500Adapter(alsoknownasThinkServer9240-8iRAID0/1Adapter)
•ThinkServerRAID700Adapter(alsoknownasThinkServer9260-8iSASRAIDAdapter)
26ThinkServerRD330HardwareMaintenanceManual
Page 41
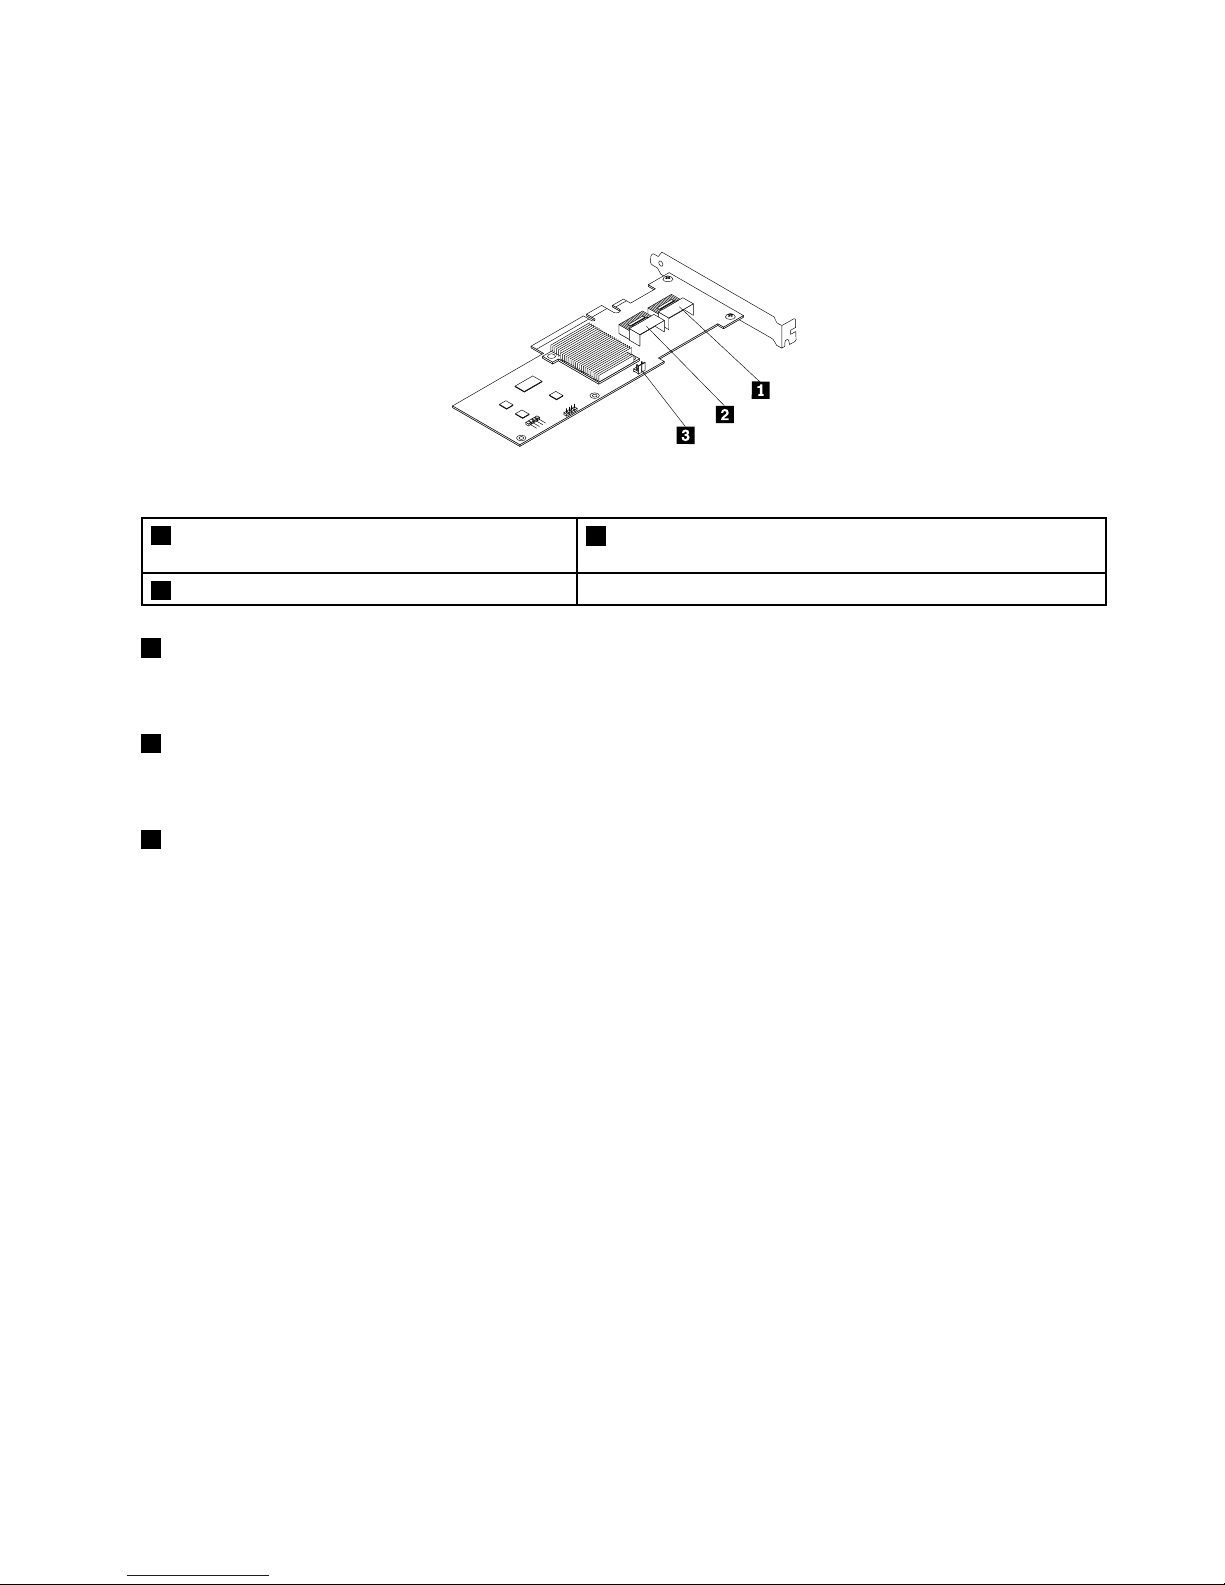
ThinkServerRAID500Adapter(alsoknownasThinkServer9240-8iRAID0/1Adapter)
ThefollowingillustrationshowstheconnectorsontheThinkServerRAID500Adapter.
Figure15.ThinkServerRAID500Adapter
1Port0
3ThinkServerRAID500UpgradeKeyforAdvancedRAID
connector
2Port1
1Port0
Usedtoconnectamini-SASsignalcable.See“Mini-SAStomini-SASsignalcableconnections”onpage30.
2Port1
Usedtoconnectamini-SASsignalcable.See“Mini-SAStomini-SASsignalcableconnections”onpage30
.
3ThinkServerRAID500UpgradeKeyforAdvancedRAIDconnector
UsedtoconnectaThinkServerRAID500UpgradeKeyforAdvancedRAID.See“Installingorremovingthe
ThinkServerRAID500UpgradeKeyforAdvancedRAID”onpage89.
Chapter3.Productoverview27
Page 42
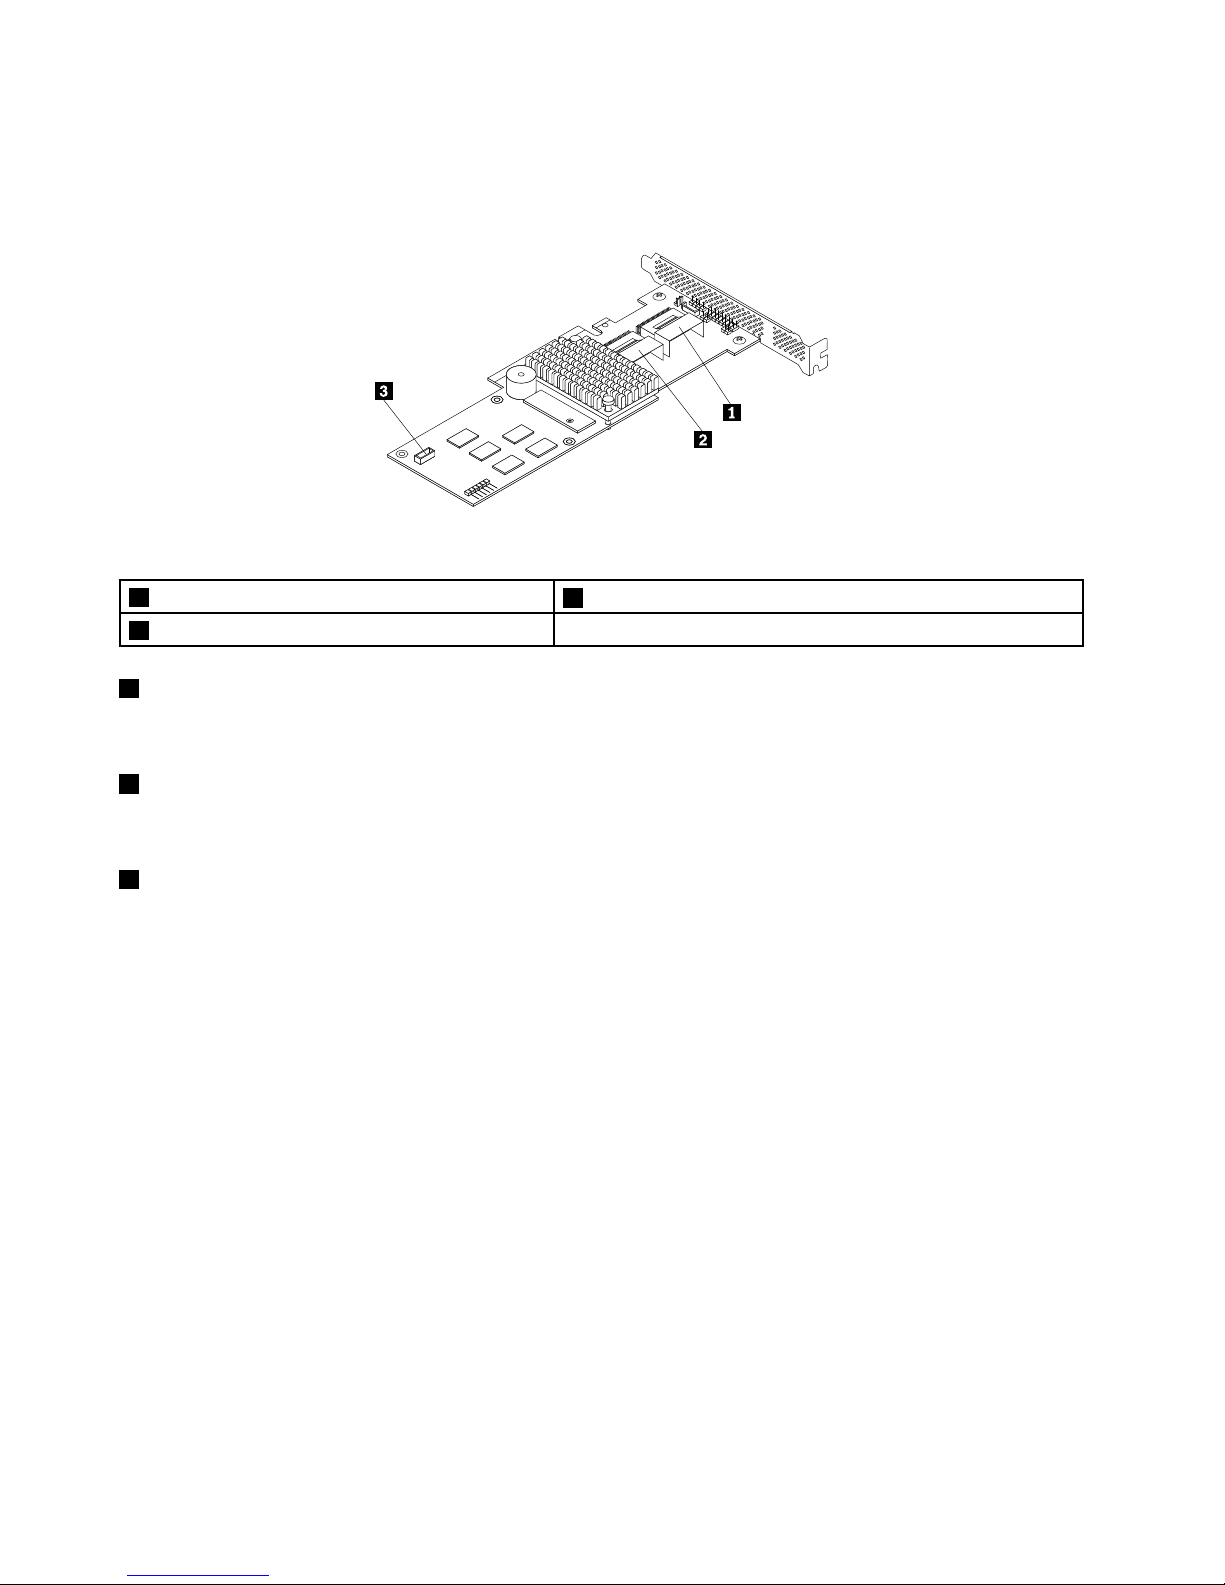
ThinkServerRAID700Adapter(alsoknownasThinkServer9260-8iSASRAIDAdapter)
ThefollowingillustrationshowstheconnectorsontheThinkServerRAID700Adapter.
Figure16.ThinkServerRAID700Adapter
1Ports7-4
3ThinkServerRAID700Batteryconnector
2Ports3-0
1Ports7-4
Usedtoconnectamini-SASsignalcable.See“Mini-SAStomini-SASsignalcableconnections”onpage30.
2Ports3-0
Usedtoconnectamini-SASsignalcable.See“Mini-SAStomini-SASsignalcableconnections”onpage30.
3ThinkServerRAID700Batteryconnector
UsedtoconnectaThinkServerRAID700Battery.See“InstallingorremovingtheThinkServerRAID700
Battery”onpage93
.
Hot-swapharddiskdrivebackplane
Yourservercomeswithoneofthefollowinghot-swapharddiskdrivebayandbackplanecongurations:
•Uptofour3.5-inchhot-swapSATAorSASharddiskdriveswithonebackplane
•Uptosix2.5-inchhot-swapSASharddiskdrivesorSATAsolid-statedriveswithonebackplane
Tolocatethebackplane,see“Servercomponents”onpage22.
Backplanefor3.5-inchharddiskdrives
Thistopicprovidesinformationtohelpyoulocatetheconnectorsonthebackplanefor3.5-inchharddisk
drives.
28ThinkServerRD330HardwareMaintenanceManual
Page 43
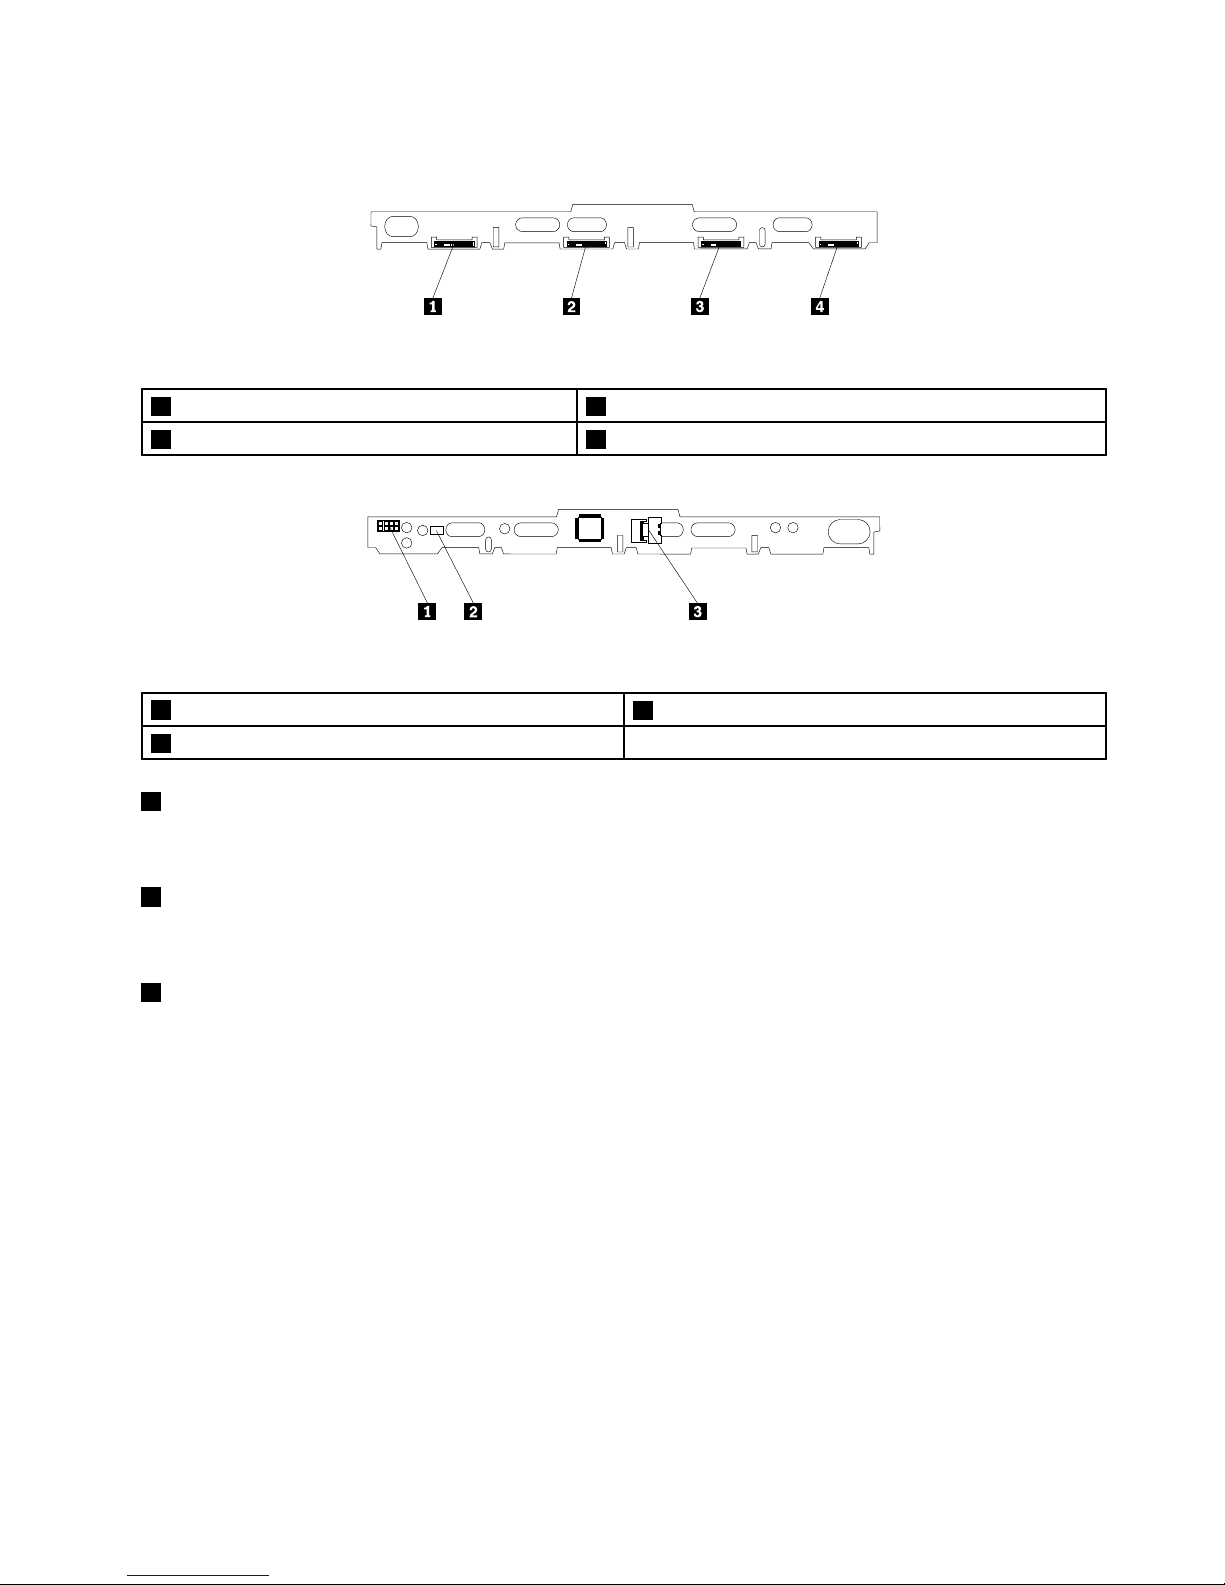
Thefollowingillustrationsshowtheconnectorsonthebackplanefor3.5-inchharddiskdrives.
Figure17.Frontviewofthebackplanefor3.5-inchharddiskdrives
1Slot0fora3.5-inchharddiskdrive3Slot2fora3.5-inchharddiskdrive
2Slot1fora3.5-inchharddiskdrive4Slot3fora3.5-inchharddiskdrive
Figure18.Rearviewofthebackplanefor3.5-inchharddiskdrives
18-pinpowerconnector
3Mini-SASports0-3
2Opticaldrivepowerconnector
18-pinpowerconnector
Usedtoconnectapowercabletoprovidepowertothebackplane.
2Opticaldrivepowerconnector
Usedtoconnectthepowercablefortheslimopticaldriveiftheserverhasoneinstalled.
3Mini-SASports0-3
Usedtoconnectthemini-SASconnectorononeendofamini-SAStomini-SASsignalcabletosupportthe
harddiskdrive0toharddiskdrive3.
Backplanefor2.5-inchharddiskdrives
Thistopicprovidesinformationtohelpyoulocatetheconnectorsonthebackplanefor2.5-inchharddisk
drives.
Chapter3.Productoverview29
Page 44
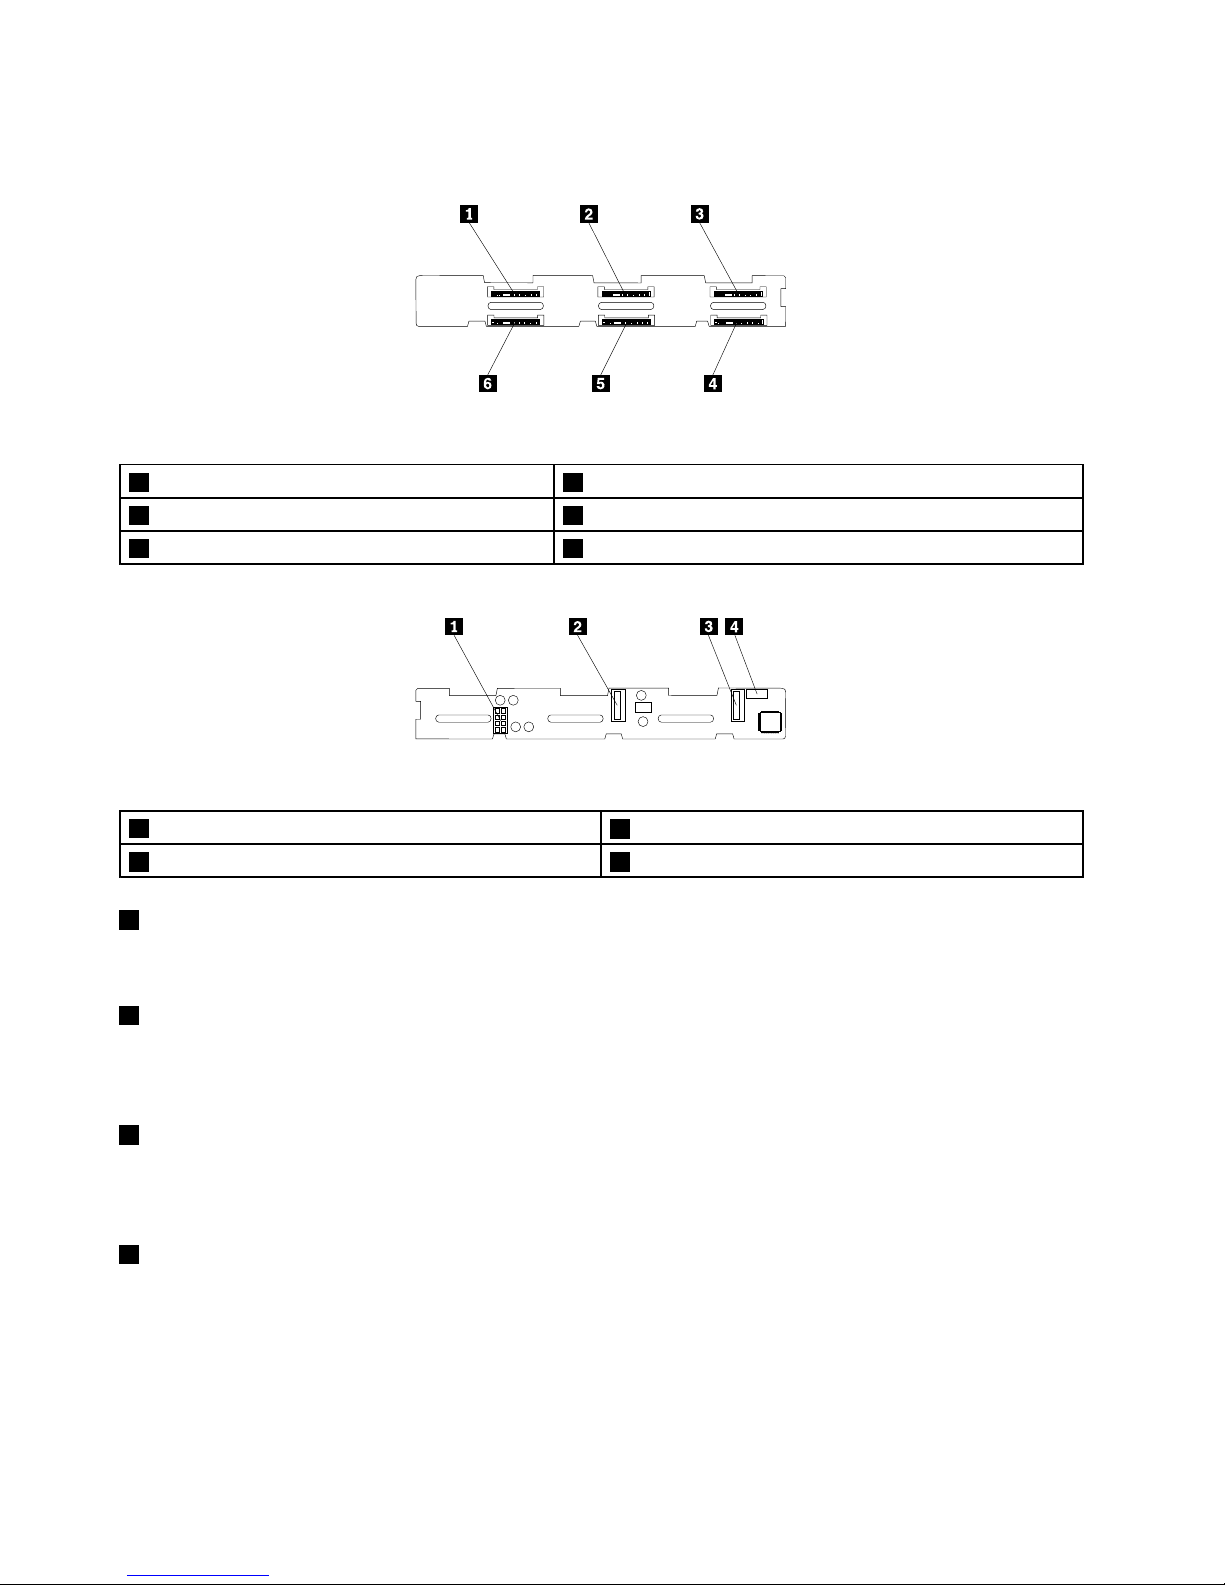
Thefollowingillustrationsshowtheconnectorsonthebackplanefor2.5-inchharddiskdrives.
Figure19.Frontviewofthebackplanefor2.5-inchharddiskdrives
1Slot0fora2.5-inchharddiskdrive4Slot5fora2.5-inchharddiskdrive
2Slot2fora2.5-inchharddiskdrive5Slot3fora2.5-inchharddiskdrive
3Slot4fora2.5-inchharddiskdrive6Slot1fora2.5-inchharddiskdrive
Figure20.Rearviewofthebackplanefor2.5-inchharddiskdrives
18-pinpowerconnector
3Mini-SASports0-3
2Mini-SASports4-54Opticaldrivepowerconnector
18-pinpowerconnector
Usedtoconnectapowercabletoprovidepowertothebackplane.
2Mini-SASports4-5
Usedtoconnectthemini-SASconnectorononeendofamini-SAStomini-SASsignalcabletosupportthe
harddiskdrive4toharddiskdrive5.
3Mini-SASports0-3
Usedtoconnectthemini-SASconnectorononeendofamini-SAStomini-SASsignalcabletosupportthe
harddiskdrive0toharddiskdrive3.
4Opticaldrivepowerconnector
Usedtoconnectthepowercablefortheslimopticaldriveiftheserverhasoneinstalled.
Mini-SAStomini-SASsignalcableconnections
Thistopicprovidesinstructionsonthefollowingmini-SAStomini-SASsignalcableconnections:
•Connectingcablesfromthesystemboardtothebackplane
30ThinkServerRD330HardwareMaintenanceManual
Page 45
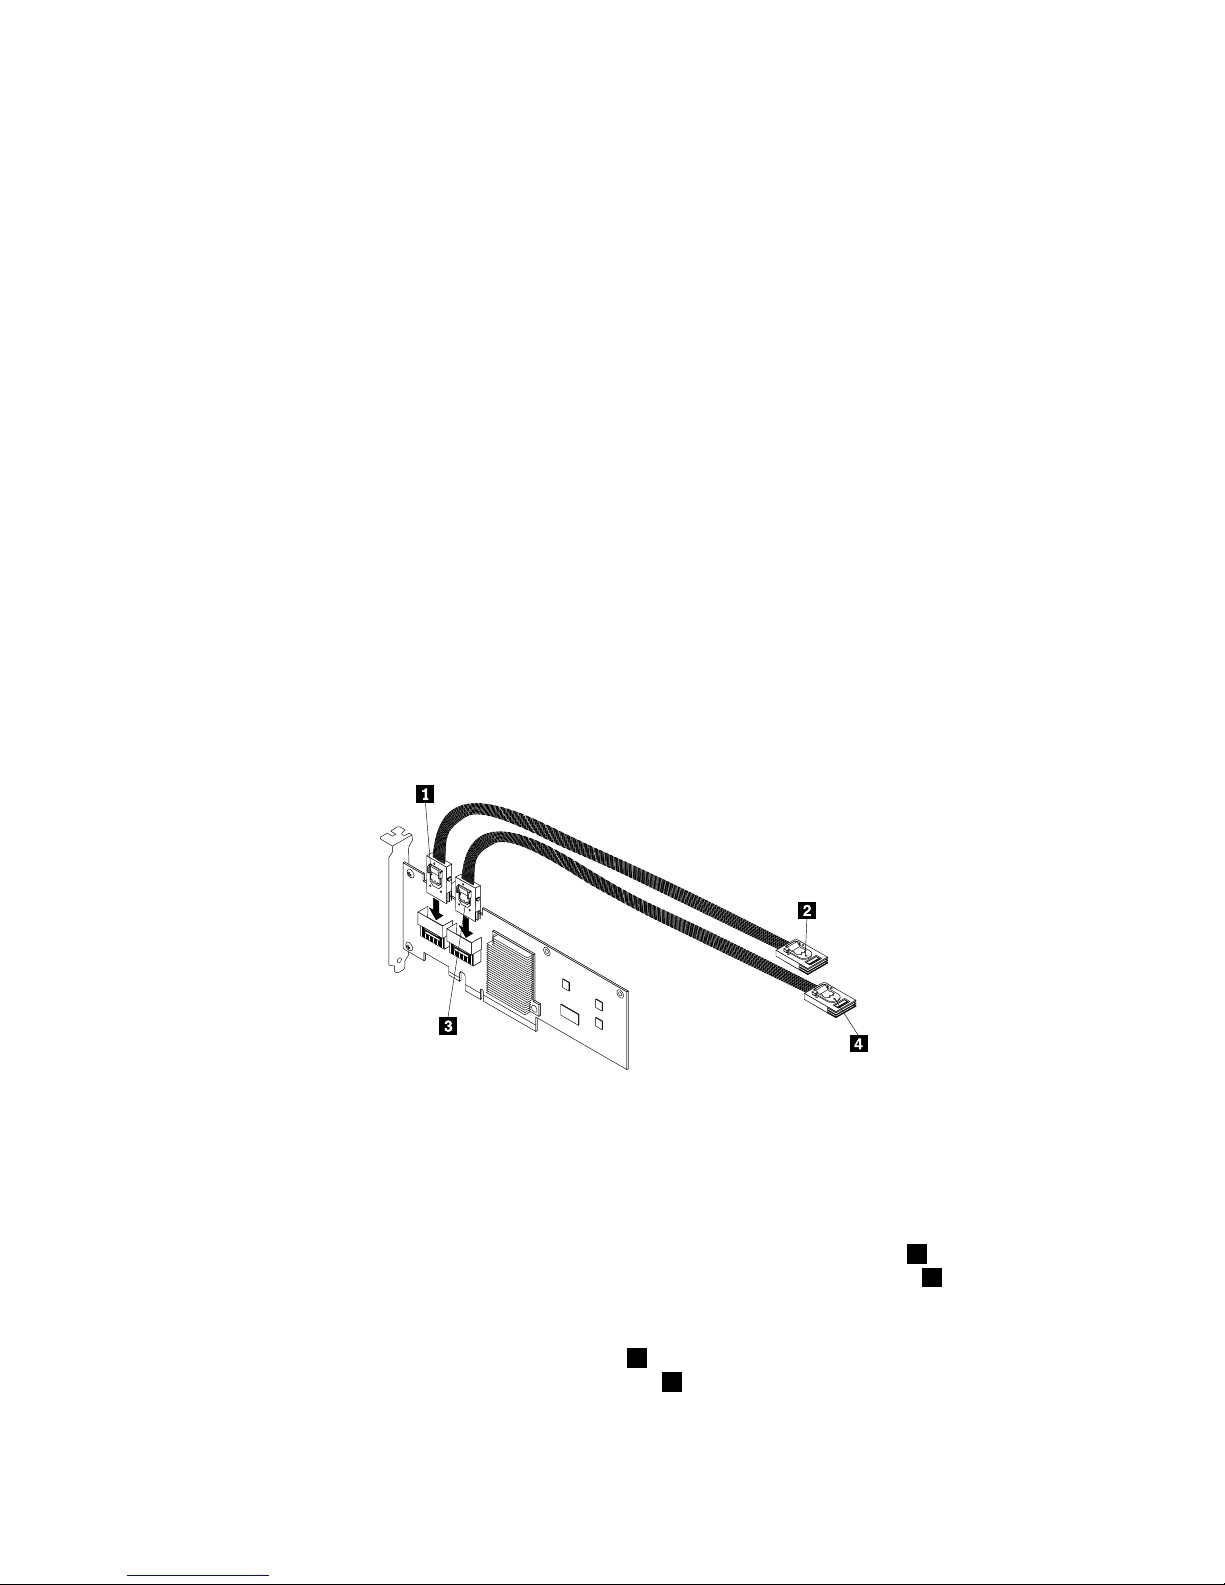
•ConnectingcablesfromtheRAIDcardtothebackplane
Connectingcablesfromthesystemboardtothebackplane
Toconnectcablesfromthesystemboardtothebackplane,dothefollowing:
1.Useonemini-SAStomini-SASsignalcable.Connectoneconnectorofthemini-SASsignalcabletothe
SASconnector0-3onthesystemboard.Then,connecttheotherconnectorofthemini-SASsignal
cabletothemini-SASports0-3onthehot-swapharddiskdrivebackplane.
2.Ifyouhavemorethanfourharddiskdrivesinstalled,usetheothermini-SAStomini-SASsignalcable.
Connectoneconnectorofthemini-SASsignalcabletotheSASconnector4-7onthesystemboard.
Then,connecttheotherconnectorofthemini-SASsignalcabletothemini-SASports4-5onthe
hot-swapharddiskdrivebackplane.
Note:Ifyouconnectthemini-SAStomini-SASsignalcablesfromthesystemboardtothebackplane,
youcancongureRAIDusingthecongurationutilityfortheThinkServerRAID300.See“Conguring
theThinkServerRAID300”onpage58.
ConnectingcablesfromtheRAIDcardtothebackplane
IfyourserverhasasupportedRAIDcardinstalled,youcanconnectcablesfromtheRAIDcardtothe
backplanetosupportuptosixharddiskdrives.Inthiscase,youcancongureRAIDfortheharddisk
drivesusingtheadvancedhardwareRAIDfunctions.
Note:TheoptionkitfortheRAIDcardisdesignedfordifferenttypesofserversandmightcontainadditional
cablesthatarenotrequiredforyourserver.
Figure21.ConnectingcablesfromtheRAIDcardtothebackplane
ToconnectcablesfromtheRAIDcardtothebackplane,dooneofthefollowingdependingonthetypeof
yourRAIDcard:
•IfyouareusingaThinkServerRAID700Adapter,dothefollowing:
1.Useonemini-SAStomini-SASsignalcable.Connectthemini-SASconnector3ononeendofthe
cabletotheports3-0ontheRAIDcard.Then,connectthemini-SASconnector4ontheotherend
ofthecabletothemini-SASports0-3onthebackplane.
2.Ifyourserverhasmorethanfourharddiskdrivesinstalled,usetheothermini-SAStomini-SAS
signalcable.Connectthemini-SASconnector1ononeendofthecabletotheports7-4onthe
RAIDcard.Then,connectthemini-SASconnector2ontheotherendofthecabletothemini-SAS
ports4-5onthebackplane.
•IfyouareusingaThinkServerRAID500Adapter,dothefollowing:
Chapter3.Productoverview31
Page 46
1.Useonemini-SAStomini-SASsignalcable.Connectthemini-SASconnector1ononeendofthe
cabletotheport0ontheRAIDcard.Then,connectthemini-SASconnector2ontheotherendof
thecabletothemini-SASports0-3onthebackplane.
2.Ifyourserverhasmorethanfourharddiskdrivesinstalled,usetheothermini-SAStomini-SAS
signalcable.Connectthemini-SASconnector3ononeendofthecabletotheport1ontheRAID
card.Then,connectthemini-SASconnector
4ontheotherendofthecabletothemini-SASports
4-5onthebackplane.
Refertothefollowingtopicsforinformationabouttheconnectorlocations:
•“Hot-swapharddiskdrivebackplane”onpage28
•“RAIDcard”onpage26
•“Systemboardcomponents”onpage32
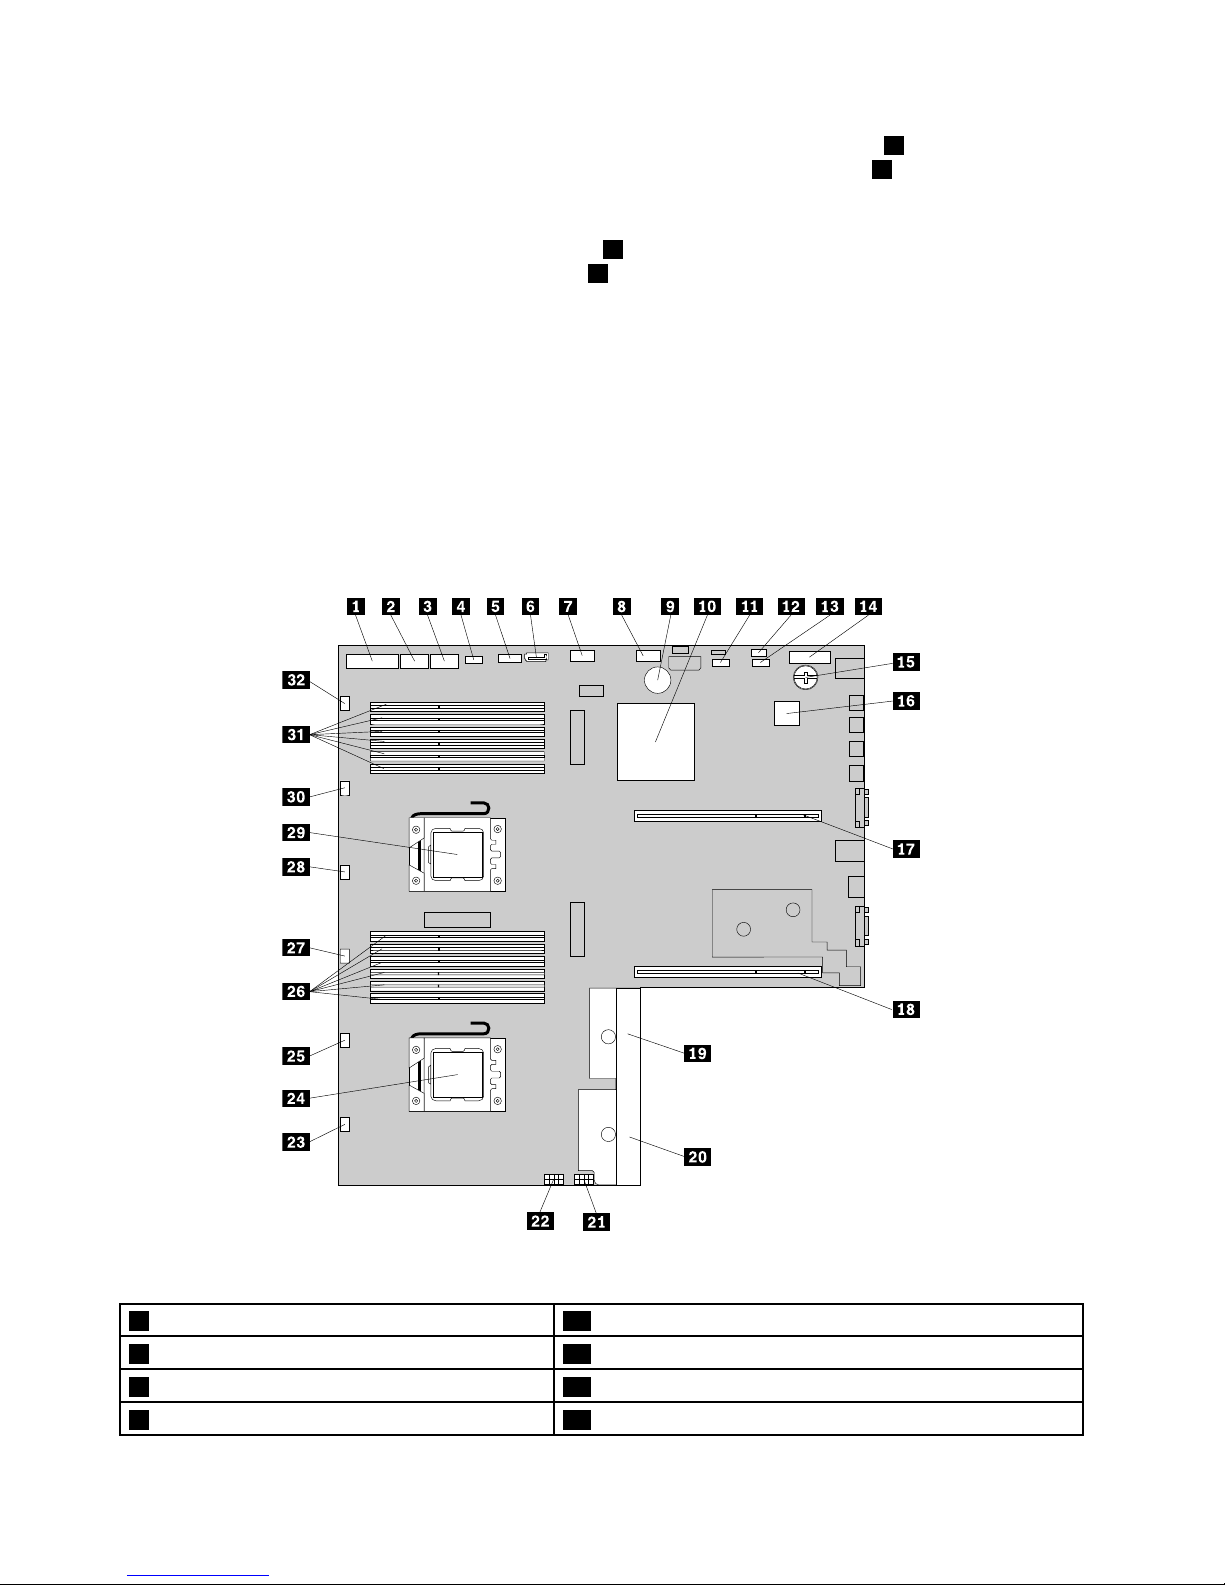
Systemboardcomponents
Thefollowingillustrationshowsthecomponentlocationsonthesystemboard.
Figure22.Systemboardcomponents
1Frontpanelconnector17Risercardassembly1slot
2InternalUSBconnector1
18Risercardassembly2slot
3InternalUSBconnector2
19Redundantpowersupplyconnector1
4IntelligentDiagnosticsModuleconnector20Redundantpowersupplyconnector2
32ThinkServerRD330HardwareMaintenanceManual
Page 47
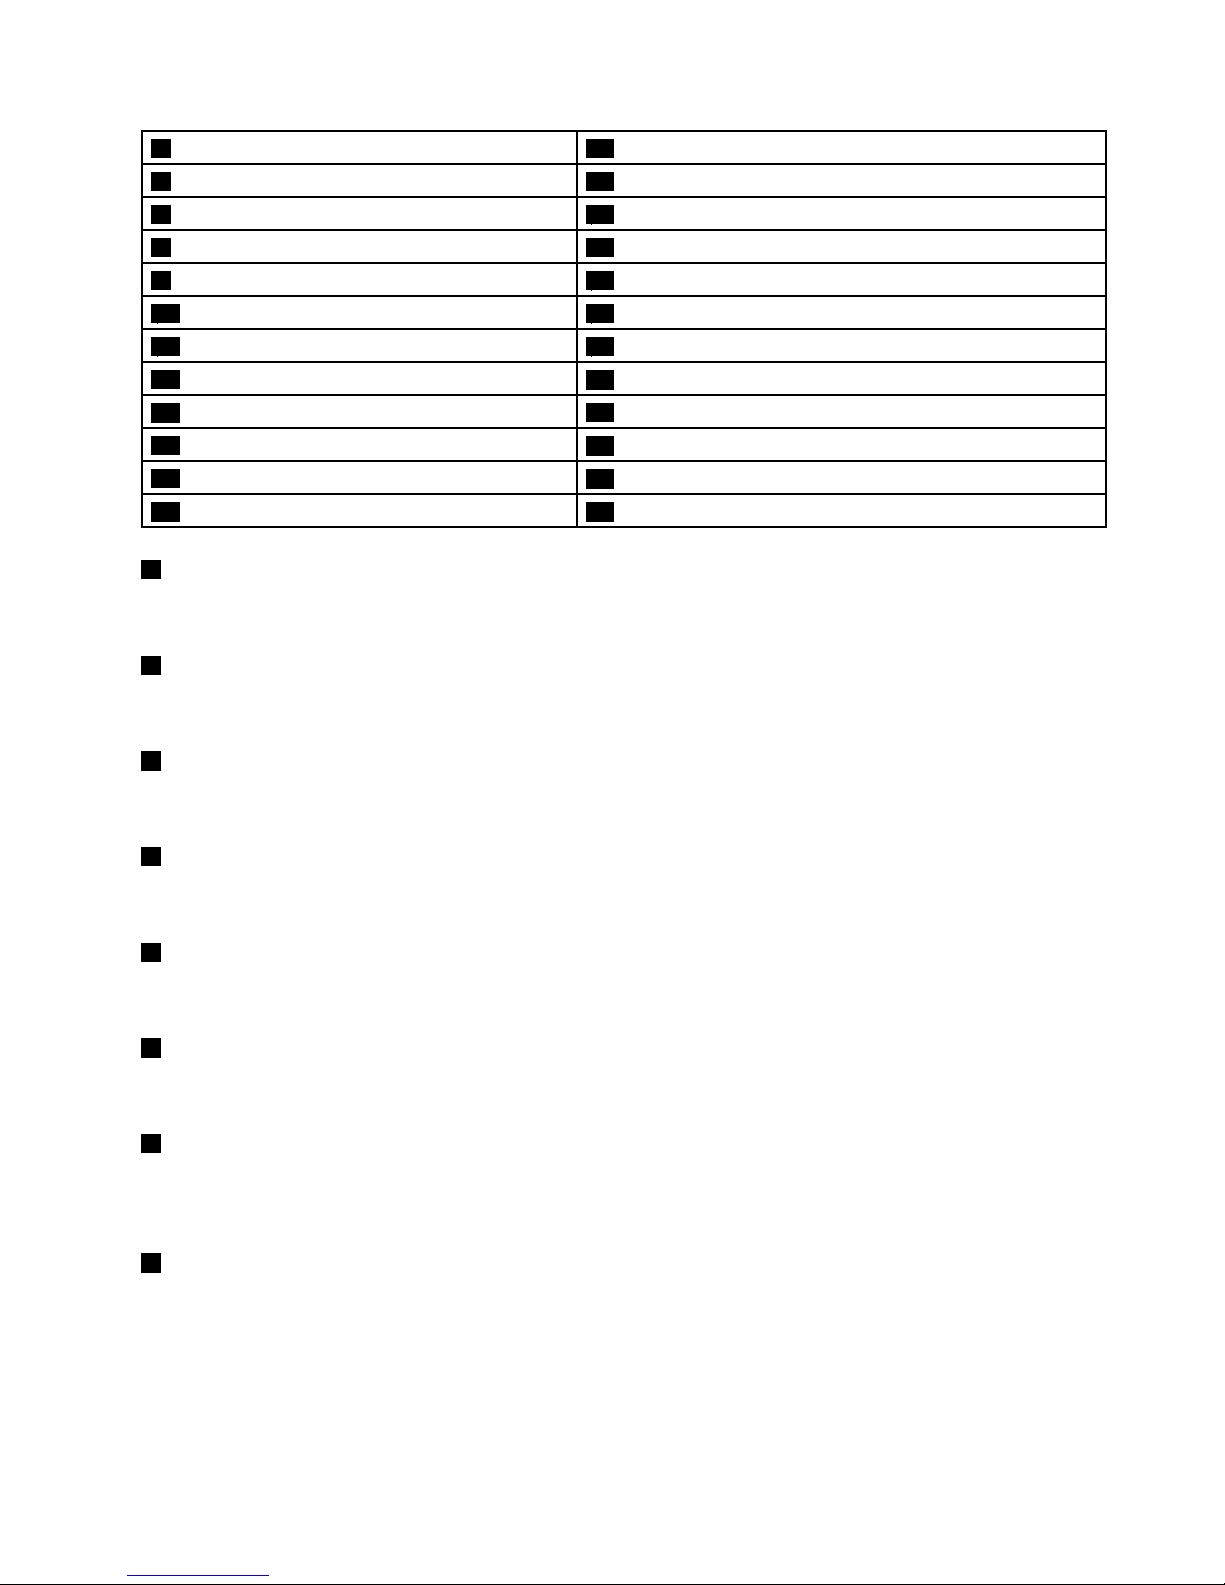
5FrontVGAconnector
21Backplanepowerconnector1
6SATAconnector0
22Backplanepowerconnector2
7SASconnector4-723Systemfan7connector
8SASconnector0-3
24Microprocessorsocket2
9Systemboardbattery25Systemfan6connector
10PlatformControllerHub(PCH)26Memoryslots(6)
11InternalUSBTypeAconnector127Systemfan5connector
12TMMPremiumconnector
28Systemfan3connector
13InternalUSBTypeAconnector2
29Microprocessorsocket1
14TPMconnector
30Systemfan2connector
15iButtonsocket
31Memoryslots(6)
16ThinkServerManagementModule32Systemfan1connector
1Frontpanelconnector
Usedtoconnectthefrontpanelcable.
2InternalUSBconnector1
UsedtoconnectthefrontpanelUSBcable.
3InternalUSBconnector2
Reservedforthemanufacturer.
4IntelligentDiagnosticsModuleconnector
UsedtoconnectthecableoftheIntelligentDiagnosticsModule.
5FrontVGAconnector
UsedtoconnectthecableofthefrontVGAconnectoronthefrontpaneloftheserver.
6SATAconnector0
Usedtoconnectthesignalcableoftheslimopticaldriveiftheserverhasoneinstalled.
7SASconnector4-7
Usedtoconnectthemini-SASconnectorononeendofamini-SAStomini-SASsignalcabletosupportthe
harddiskdrive4toharddiskdrive5.
8SASconnector0-3
Usedtoconnectthemini-SASconnectorononeendofamini-SAStomini-SASsignalcabletosupportthe
harddiskdrive0toharddiskdrive3.
Chapter3.Productoverview33
Page 48
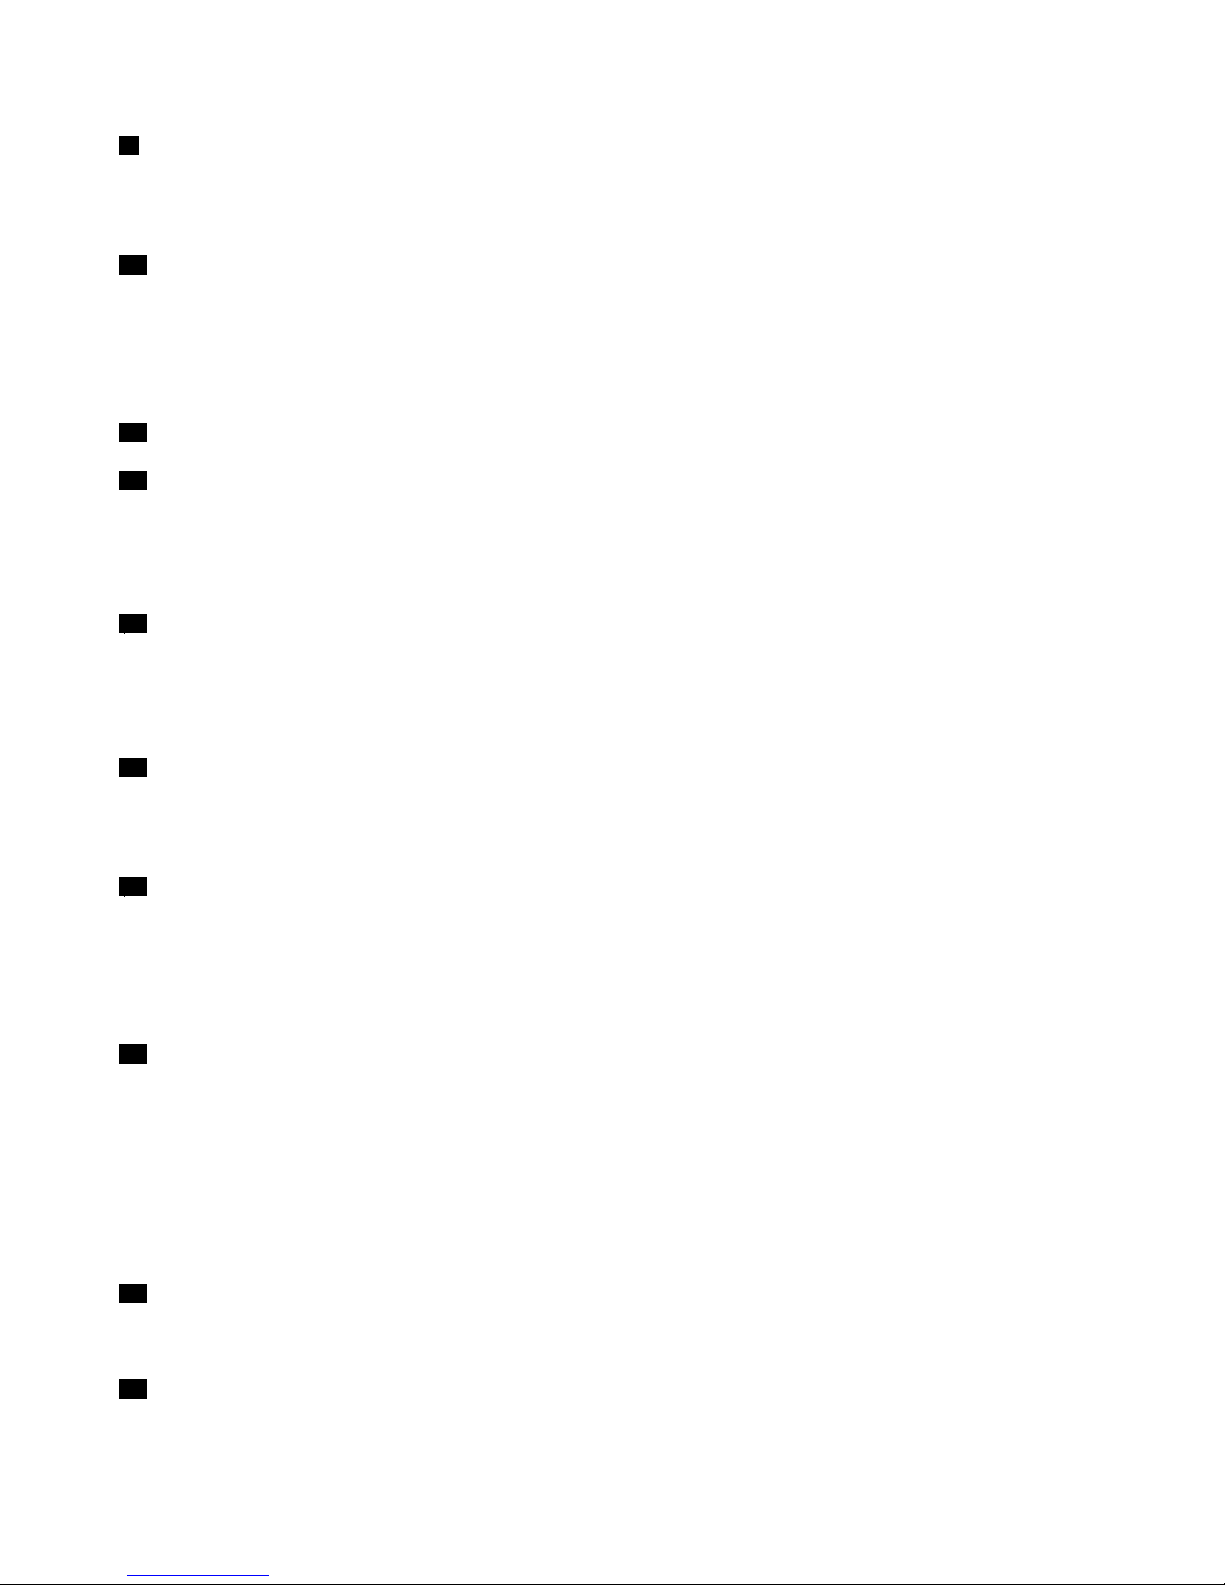
9Systemboardbattery
Yourserverhasaspecialtypeofmemorythatmaintainsthedate,time,andcongurationinformationfor
built-infeatures.Thesystemboardbatterykeepstheinformationactivewhenyouturnofftheserver.
10PlatformControllerHub(PCH)
ThischiponthesystemboardservesasaPCH,whichprovidesthedatabufferingandinterfacearbitration
requiredtoensurethatsysteminterfacesoperateefcientlyandprovidesthebandwidthnecessaryfor
thesystemtoachievepeakperformance.Thechipsupportsandprovidesmanyfeatures,includingthe
onboardSASsoftwareRAID.
11InternalUSBT ypeAconnector1
13InternalUSBT ypeAconnector2
UsedtoconnectadevicethatusesaUSBTypeAconnector.Forexample,insomesituations,youmight
wanttoconnectaUSBkeydirectlytothesystemboard.Inthiscase,youcanconnectittoaninternal
USBTypeAconnector.
12TMMPremiumconnector
UsedtoconnectaserveroptionnamedThinkServerManagementModulePremium(TMMPremium)to
enableadvancedremotemanagementfunctionsonyourserver.See“InstallingorremovingtheThinkServer
ManagementModulePremium”onpage100.
14TPMconnector
UsedtoconnectaThinkServerTrustedPlatformModule(TPM),whichisasecuritychip,toenhanceserver
security.See“InstallingorremovingtheThinkServerT rustedPlatformModule”onpage103.
15iButtonsocket
YourserversupportsThinkServerRAID300,whichincludesonboardSASsoftwareRAIDlevels0,1,and10.
YoualsocanactivateonboardSASsoftwareRAID5byinstallingaThinkServerRAID300UpgradeKeyfor
AdvancedRAIDintheiButtonsocket.Formoreinformation,see“InstallingorremovingtheThinkServer
RAID300UpgradeKeyforAdvancedRAID”onpage96.
16ThinkServerManagementModule
WiththeintegratedThinkServerManagementModule(hereinafterreferredtoastheTMM),nomatterwhat
conditiontheserveroperatingsystemisinandnomatteriftheserverisonoroff,aslongastheserver
isconnectedtonetworkandanacpowersource,theinteractionwiththeTMMcontrolledserverscanbe
achievedthroughsystemnetwork.TheusercanobtaintheserverhardwarehealthinformationandSEL,
andisabletoconducttheoperationsincludingturningonorofftheserver,restartingtheserver,locking
thepowerswitchonthefrontpanel,andsoon.Thispartoftheservermanagementisindependentofthe
operatingsystemandiscalledout-of-bandmanagement.
17Risercardassembly1slot
Usedtoinstalltherisercardassembly1.
18Risercardassembly2slot
Usedtoinstalltherisercardassembly2.
34ThinkServerRD330HardwareMaintenanceManual
Page 49
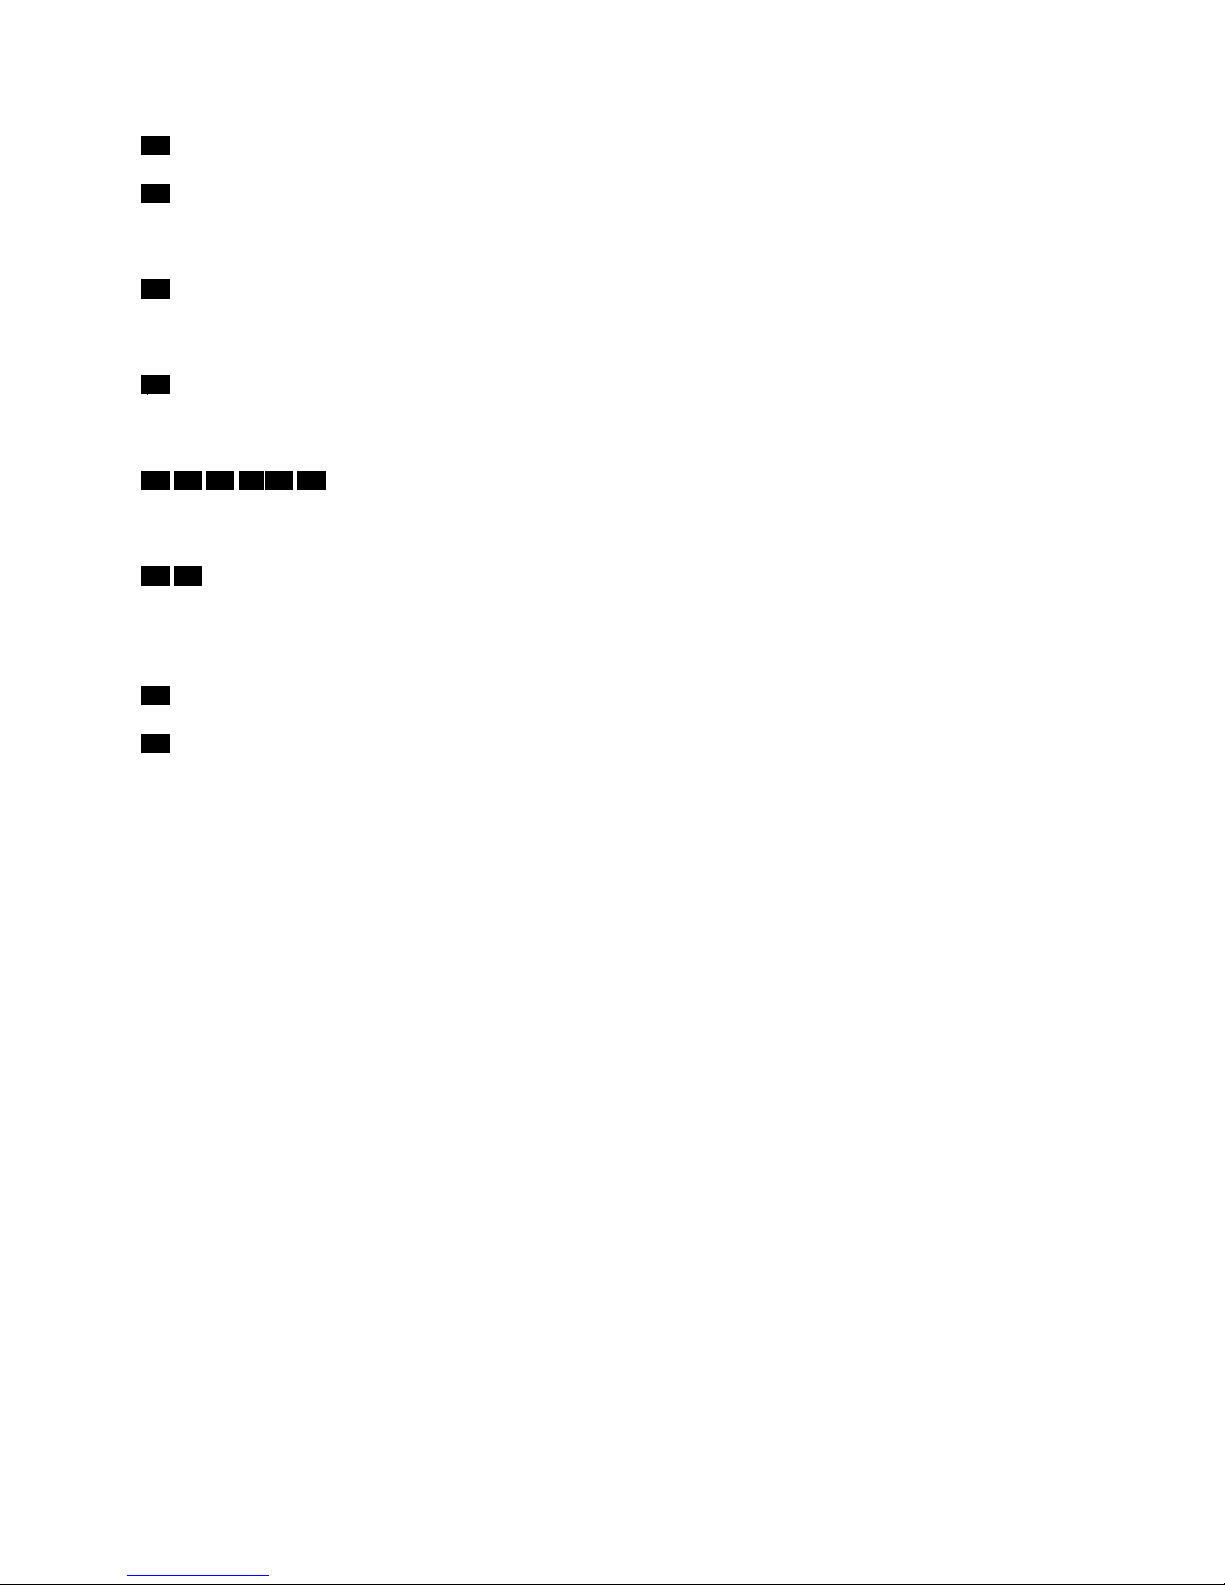
19Redundantpowersupplyconnector1
20Redundantpowersupplyconnector2
Usedtoconnectahot-swapredundantpowersupply.
21Backplanepowerconnector1
Usedtoconnectthepowercablefromthebackplane.
22Backplanepowerconnector2
Reservedforthemanufacturer.
232527283032Systemfanconnectors
Usedtoconnectthecableofthecorrespondingsystemfan.
2631Memoryslots
Thereare12memoryslotsonthesystemboard.Formoreinformation,see“Memorymoduleinstallation
rules”onpage75.
24Microprocessorsocket2
29Microprocessorsocket1
Iftheserverhastwomicroprocessors,eachofthemicroprocessorissecuredinthemicroprocessorsocket
onthesystemboardandaheatsinkisinstalledabovethemicroprocessortoprovidecooling.Iftheserver
hasonlyonemicroprocessor,themicroprocessorsocket2isprotectedbyamicroprocessorsocketcover.
Systemboardjumpersandswitches
Thistopicprovidesinformationaboutthejumpersandswitchesonthesystemboard.
Ajumperisashortlengthofconductorusedtosetuporadjustprintedcircuitboards,suchasthesystem
boardofacomputer.Ajumperusuallyisencasedinanon-conductiveblockofplasticforconvenientuse
andtoavoidanypossibledamagetoalivecircuit.Jumperpinsarrangedingroupsonthesystemboardare
calledjumperblocks.Whentwoormorejumperpinsarecappedwithajumper,anelectricalconnectionis
madebetweenthemandtheequipmentisthusinstructedtoactivatecertainsettingsaccordingly.
Chapter3.Productoverview35
Page 50
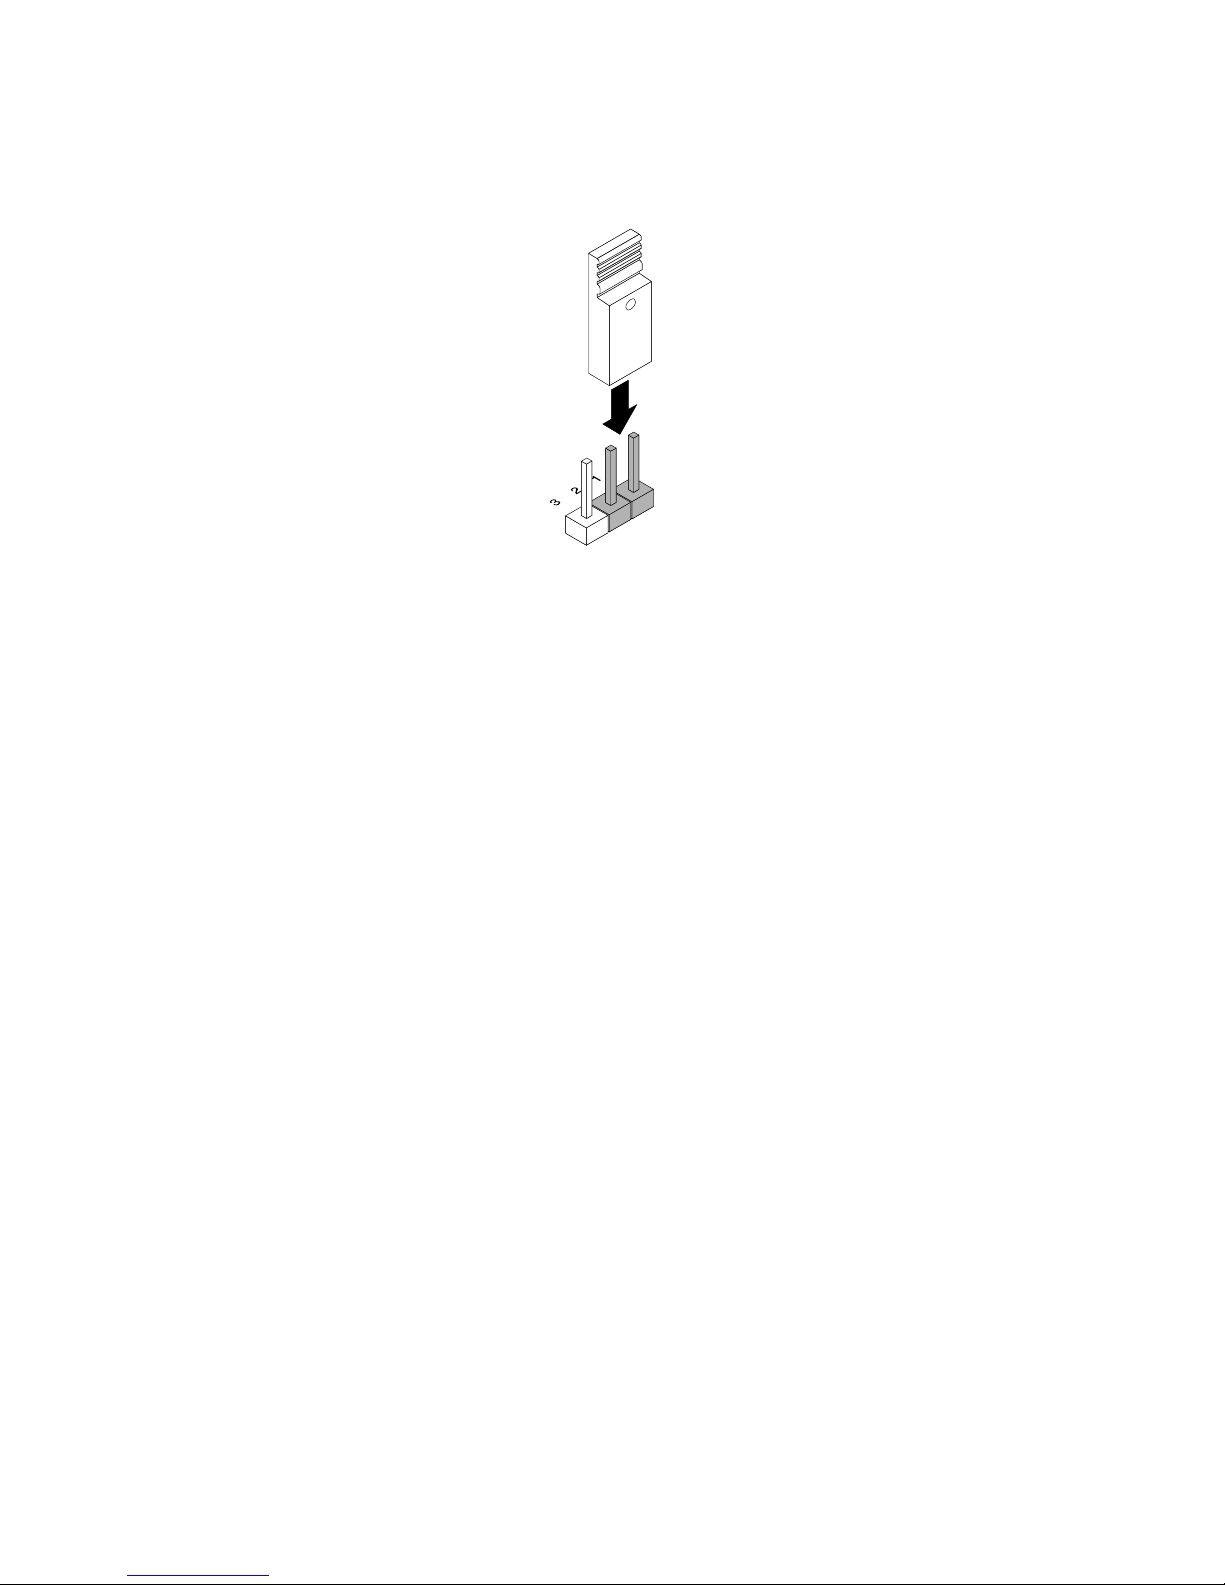
Thefollowingillustrationshowsajumperinthedefaultsettingposition(pin1andpin2).Thisisthecorrect
positionfornormaloperation.
Figure23.Defaultjumpersetting
36ThinkServerRD330HardwareMaintenanceManual
Page 51

Thefollowingillustrationshowsthestatusofthejumpersandswitchesonthesystemboardofyourserver.
Youcancongure,recover,enable,ordisablesomespecicfeaturesofthesystemboardbysettingthe
jumpersormovingtheswitches.
Figure24.Systemboardjumpersandswitches
Table1.Systemjumpers
1ClearCMOS(ComplementaryMetalOxideSemiconductor)jumper3Switches
2ThinkServerManagementModuleEnable/Disablejumper
Attention:Tosetthejumpersormoveswitches,youneedtoremovetheservercovertoaccessthesystem
board.Donotopenyourserverorattemptanyrepairbeforereadingandunderstanding“Safetyinformation”
onpageiiiand“Guidelines”onpage67.
1ClearCMOSjumper
UsedtoclearCMOSandrecoveryourservertothefactorydefaultsettings.
Note:AfterclearingCMOS,yourBIOSrecoverstothefactorydefaultsettings.
Chapter3.Productoverview37
Page 52
ToclearCMOS,dothefollowing:
1.Removeallmediafromthedrivesandturnoffallattacheddevicesandtheserver.Then,disconnectall
powercordsfromelectricaloutletsanddisconnectallcablesthatareconnectedtotheserver.
2.Iftheserverisinstalledinarackcabinet,removetheserverfromtherackcabinetandplaceitonaat,
clean,andstatic-protectivesurface.SeetheRackInstallationInstructionsthatcomeswiththeserver.
3.Removetheservercover.See“Removingtheservercover”onpage69.
4.LocatetheClearCMOSjumperonthesystemboard.Then,removeanypartsanddisconnectany
cablesthatmightimpedeyouraccesstothejumper.
5.MovetheclearCMOSjumperfromthedefaultnormalposition(pin1andpin2)totheshort-circuited
position(pin2andpin3).
6.Waitmorethanveseconds,andthenmovetheClearCMOSjumperbacktothenormalposition
(pin1andpin2).
7.Reinstallanypartsandreconnectanycables.Then,reinstalltheservercover.See“Completingthe
partsreplacement”onpage153.
8.Connecttheservertoanacpowersourceandwaitabout30seconds.Then,turnontheserver.The
BIOSrecoverstothefactorydefaultsettings.
2ThinkServerManagementModuleEnable/Disablejumper
WhentheThinkServerManagementModuleEnable/Disablejumper(hereinafterreferredtoastheTMM
Enable/Disablejumper)isinthedefaultnormalposition(pin1andpin2),theserverneedsabout30seconds
fortheTMMtoinitializewheneveryouconnecttheservertoanacpowersource.Ifyoupressthepower
switchonthefrontpanelduringthisperiod,theserverwillnotstartimmediately;itwillstartaftertheTMM
initializationnishes.TheTMMfunctionisavailableinthissituation.
IfyoumovetheTMMEnable/Disablejumpertopin2andpin3,theTMMfunctionisnotavailableandthe
serverwillbedirectlyturnedonwhenyoupressthepowerswitchwithoutwaitingfortheTMMtobeready.
38ThinkServerRD330HardwareMaintenanceManual
Page 53

3Switches
Therearefourswitchesonthesystemboardofyourserver.
Figure25.Switches
Table2.Switches
1BIOSrecoveryswitch3ManagementEngine(ME)inforceupdateswitch
2Clearpasswordswitch
4Reservedforthemanufacturer
1BIOSrecoveryswitch
UsedtorecovertheBIOSifthepowertoyourserverisinterruptedwhiletheBIOSisbeingupdatedandyour
servercannotstartcorrectly.
TorecovertheBIOS,see“RecoveringfromaBIOSupdatefailure”onpage52.
2Clearpasswordswitch
Usedtoeraseforgottenpasswords,suchastheBIOSpasswords.
Chapter3.Productoverview39
Page 54

Toclearpasswords,dothefollowing:
1.Removeallmediafromthedrivesandturnoffallattacheddevicesandtheserver.Then,disconnectall
powercordsfromelectricaloutletsanddisconnectallcablesthatareconnectedtotheserver.
2.Iftheserverisinstalledinarackcabinet,removetheserverfromtherackcabinetandplaceitonaat,
clean,andstatic-protectivesurface.SeetheRackInstallationInstructionsthatcomeswiththeserver.
3.Removetheservercover.See“Removingtheservercover”onpage69.
4.LocatetheClearpasswordswitchonthesystemboard.Then,removeanypartsanddisconnectany
cablesthatmightimpedeyouraccesstotheswitch.
5.Movetheclearpasswordswitchfromthedefaultoffpositiontotheonposition.
6.Waitmorethanveseconds,andthenmovetheclearpasswordswitchbacktotheoffposition.
7.Reinstallanypartsandreconnectanycables.Then,reinstalltheservercover.See“Completingthe
partsreplacement”onpage153
.
8.Connecttheservertoanacpowersourceandwaitabout30seconds.Then,turnontheserver.The
BIOSpasswordsareerased,includingtheadministratorpasswordanduserpassword.
9.Tosetnewpasswords,see“Usingpasswords”onpage49.
3MEinforceupdateswitch
Usedtoupdate(ash)theME.
TheMEupdatingprocessusuallyiscontainedintheBIOSupdating(ashing)process.
Note:OnlysomeBIOSversionscontaintheparametersforupdatingtheME.IfyouwanttoupdatetheME,
ensurethatyourBIOSversioncontainstherequiredparameters.
ToupdatetheME,dothefollowing:
1.Removeallmediafromthedrivesandturnoffallattacheddevicesandtheserver.Then,disconnectall
powercordsfromelectricaloutletsanddisconnectallcablesthatareconnectedtotheserver.
2.Iftheserverisinstalledinarackcabinet,removetheserverfromtherackcabinetandplaceitonaat,
clean,andstatic-protectivesurface.SeetheRackInstallationInstructionsthatcomeswiththeserver.
3.Removetheservercover.See“Removingtheservercover”onpage69.
4.LocatetheMEinforceupdateswitchonthesystemboard.Then,removeanypartsanddisconnectany
cablesthatmightimpedeyouraccesstotheswitch.
5.MovetheMEinforceupdateswitchfromthedefaultoffpositiontotheonposition.
6.Reinstallanypartsandreconnectanycables.Then,reinstalltheservercover.See“Completingthe
partsreplacement”onpage153.
7.Connecttheservertoanacpowersource.Then,updatetheBIOS.See“Updating(ashing)theBIOS”
onpage52.
8.Repeatstep1throughstep4.
9.MovetheMEinforceupdateswitchbacktotheoffposition.
10.Reinstallanypartsandreconnectanycables.Then,reinstalltheservercover.See“Completingthe
partsreplacement”onpage153.
11.Connecttheservertoanacpowersourceandturnontheserver.TheBIOSandMEhavebeen
updated.YouneedtocheckandconguretheBIOSsettingsforyourspecicneeds.See“Using
theSetupUtilityprogram”onpage45
.
SystemboardLEDs
ThistopichelpsyoulocatetheLEDsonthesystemboard.
40ThinkServerRD330HardwareMaintenanceManual
Page 55
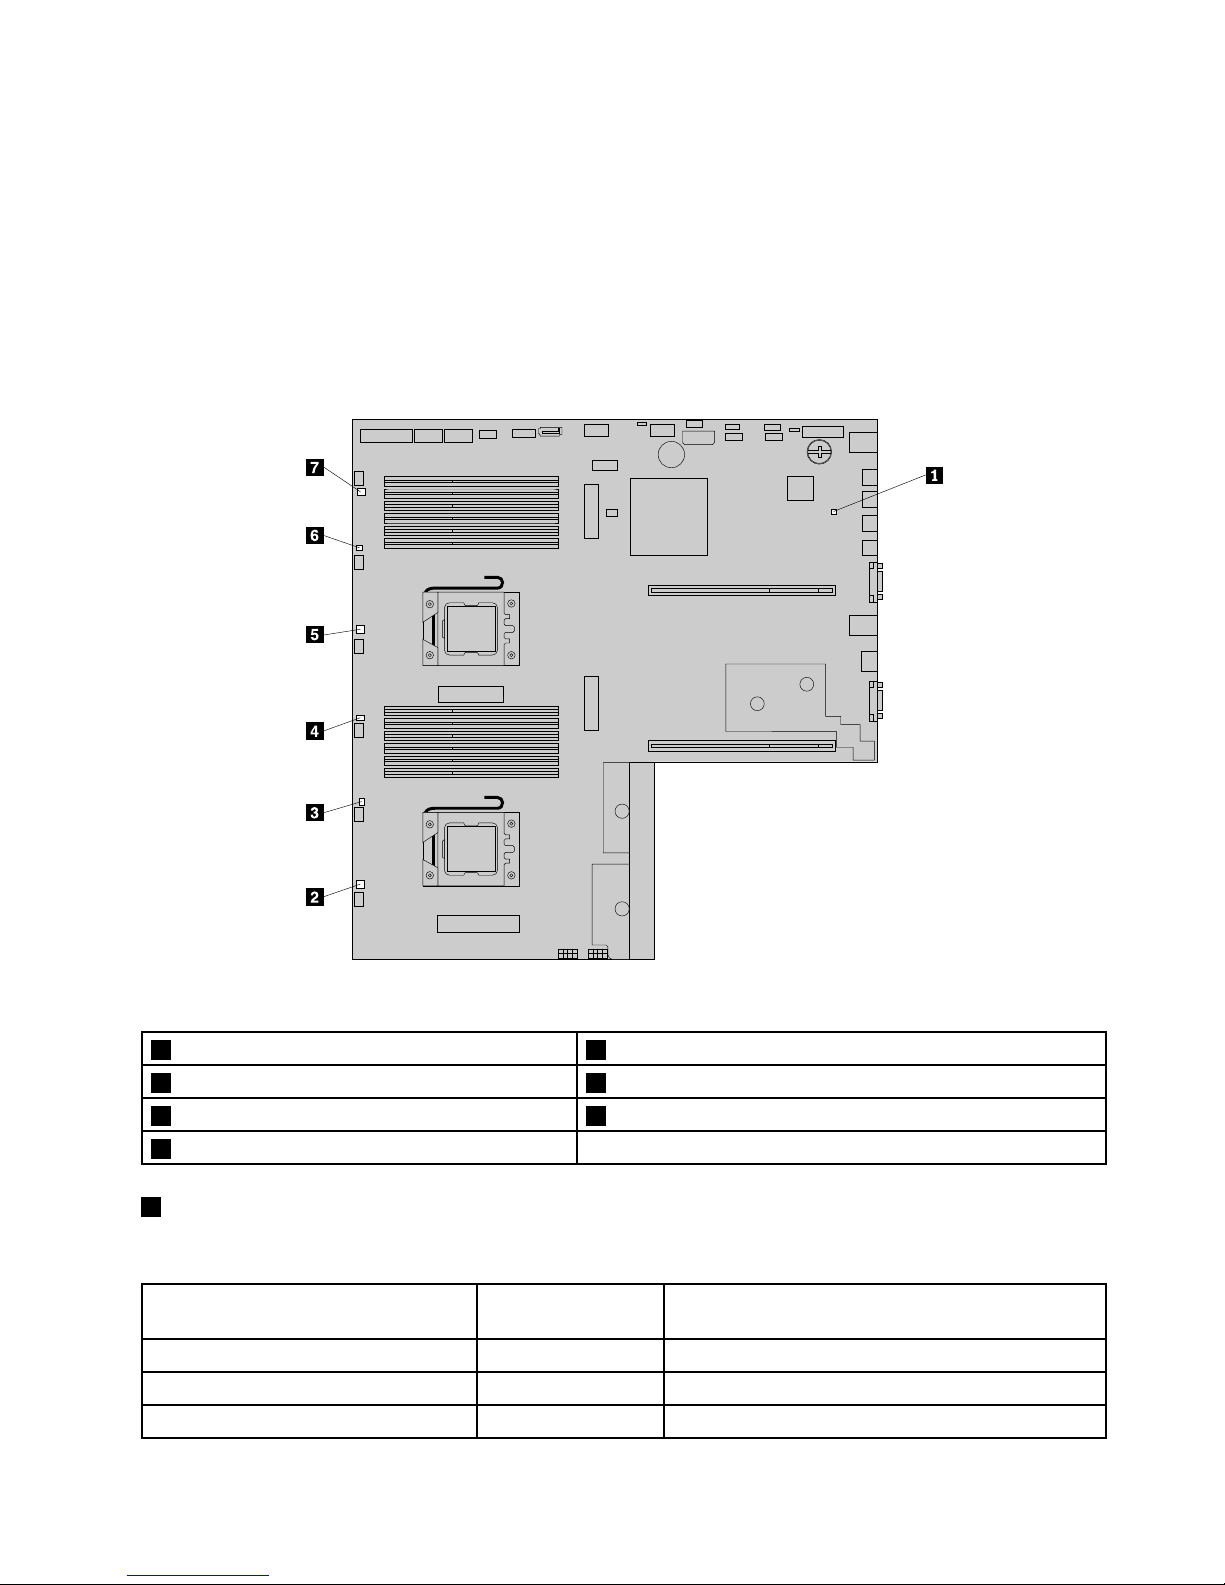
Note:Dependingonthemodel,yourservermightlookslightlydifferentfromtheillustrationinthistopic.
TheserverisdesignedsothatLEDsremainlitwhentheserverisconnectedtoanacpowersourcebutis
notturnedon,providedthatthepowersupplyisoperatingcorrectly.Thishelpsyouisolateproblems
whentheserverisnotturnedon.ManyerrorsarerstindicatedbyaliterrorLEDonthediagnosticpanel
oftheserver.IfanLEDislit,oneormoreLEDselsewhereintheservermightalsobelittodirectyouto
thesourceoftheerror.
ThefollowingillustrationshowstheThinkServerManagementModulestatusLEDandsystemfanerrorLEDs
onthesystemboard.
Figure26.SystemboardLEDs
1ThinkServerManagementModulestatusLED5Systemfan3errorLED
2Systemfan7errorLED6Systemfan2errorLED
3Systemfan6errorLED7Systemfan1errorLED
4Systemfan5errorLED
1ThinkServerManagementModulestatusLED
ThisLEDindicatesthestatusoftheonboardThinkServerManagementModule(TMM).
ThinkServerManagementModule
statusLED
Color
Description
OnGreen
TheTMMisnotready.
Off
None
TheTMMhasnopowerorhasfailed.
Blinking
Green
TheTMMisworking.
Chapter3.Productoverview41
Page 56

2-7SystemfanerrorLEDs
WhenasystemfanerrorLEDonthesystemboardislit,itindicatesthatthecorrespondingsystemfanis
operatingslowlyorhasfailed.Tosolvetheproblem,youmightneedtoreinstallorreplacethesystemfan.
See“Replacingasystemfan”onpage139.Ifitisasystemboardproblem,contacttheLenovoCustomer
SupportCenter.
42ThinkServerRD330HardwareMaintenanceManual
Page 57

Chapter4.Turningonandturningofftheserver
Thischapterprovidesinformationaboutturningonandturningofftheserver.
Turningontheserver
Theservercanbeturnedoninoneofthefollowingways:
•Afteryounishunpackingandsettinguptheserver,connectittoanacpowersource.Pressthepower
switchonthefrontpaneltoturnontheserver.See“Frontpanel”onpage17.Theserverneedsabout
30secondsfortheTMMtoinitializewheneveryouconnecttheservertoanacpowersource.Ifyou
pressthepowerswitchonthefrontpanelduringthisperiod,theserverwillnotstartimmediately;itwill
startaftertheTMMinitializationnishes.
•WhentheWakeonLANfeatureisenabledontheserverthatisconnectedtoanacpowersourceanda
LAN,anetworkadministratorcanremotelyturnonorwakeuptheserverfromamanagementconsole
usingremotenetworkmanagementsoftware.
•YoualsocanusetherelatedTMMfeaturetoremotelyturnontheserverthroughthemanagementLAN.
FormoreinformationabouttheTMM,refertotheThinkServerManagementModuleUserGuide,whichis
availablefordownloadat:
http://www.lenovo.com/ThinkServerUserGuides
Turningofftheserver
CAUTION:
Thepowercontrolbuttononthedeviceandthepowerswitchonthepowersupplydonotturnoff
theelectricalcurrentsuppliedtothedevice.Thedevicealsomighthavemorethanonepower
cord.Toremoveallelectricalcurrentfromthedevice,ensurethatallpowercordsaredisconnected
fromthepowersource.
Theservercanbeturnedoffinoneofthefollowingways:
•Turnofftheserverfromtheoperatingsystemifyouroperatingsystemsupportsthisfeature.Afteran
orderlyshutdownoftheoperatingsystem,theserverwillturnoffautomatically.Forinstructionsonhow
toshutdownyourspecicoperatingsystem,refertotherelateddocumentationorhelpsystemfor
theoperatingsystem.
•Pressthepowerswitchonthefrontpaneltostartanorderlyshutdownoftheoperatingsystemandturn
offtheserver,ifyouroperatingsystemsupportsthisfeature.
•Ifyourserverstopsrespondingandyoucannotturnitoff,pressandholdthepowerswitchonthe
frontpanelforfoursecondsormore.Ifyoustillcannotturnofftheserver,disconnectallpowercords
fromtheserver.
•IftheserverisconnectedtoaLAN,anetworkadministratorcanremotelyturnofftheserverfroma
managementconsoleusingremotenetworkmanagementsoftware.
•YoualsocanusetherelatedTMMfeaturetoremotelyturnofftheserverthroughthemanagementLAN.
FormoreinformationabouttheTMM,refertotheThinkServerManagementModuleUserGuide,whichis
availablefordownloadat:
http://www.lenovo.com/ThinkServerUserGuides
©CopyrightLenovo2012
43
Page 58

•Theservermightbeturnedoffasanautomaticresponsetoacriticalsystemfailure.
Notes:
•Whenyouturnofftheserverandleaveitconnectedtoanacpowersource,theserveralsocanrespond
toaremoterequesttoturnontheserver.Toremoveallpowerfromtheserver,youmustdisconnect
theserverfromtheacpowersource.
•Forinformationaboutyourspecicoperatingsystem,refertotherelateddocumentationorhelpsystem
fortheoperatingsystem.
44ThinkServerRD330HardwareMaintenanceManual
Page 59

Chapter5.Conguringtheserver
Thischapterprovidesthefollowinginformationtohelpyouconguretheserver:
•“UsingtheSetupUtilityprogram”onpage45
•“UsingtheThinkServerEasyStartupprogram”onpage53
•“ConguringRAID”onpage56
•“ConguringtheEthernetcontrollers”onpage64
•“Updatingthermware”onpage64
•“UsingtheLenovoThinkServerEasyManageprogram”onpage65
UsingtheSetupUtilityprogram
ThistopicprovidesinformationaboutusingtheSetupUtilityprogram.
TheSetupUtilityprogramispartoftheserverrmware.YoucanusetheSetupUtilityprogramtoviewand
changethecongurationsettingsofyourserver,regardlessofwhichoperatingsystemyouareusing.
However,theoperatingsystemsettingsmightoverrideanysimilarsettingsintheSetupUtilityprogram.
StartingtheSetupUtilityprogram
ThistopicprovidesinstructionsonhowtostarttheSetupUtilityprogram.
TostarttheSetupUtilityprogram,dothefollowing:
1.Connecttheservertoanacpowersourceandpressthepowerswitchonthefrontpaneltoturnonthe
server.See“T urningontheserver”onpage43.
2.PresstheF1keyassoonasyouseethelogoscreen.Then,waitforseveralseconds,andtheSetup
Utilityprogramopens.Ifyouhavesetapassword,youneedtotypethecorrectpasswordtoenterthe
SetupUtilityprogram.Forpasswordinformation,see“Usingpasswords”onpage49.
ViewinginformationintheSetupUtilityprogram
TheSetupUtilityprogrammenulistsvariousitemsaboutthesystemconguration.Selectadesireditem
toviewinformationorchangesettings.
WhenworkingwiththeSetupUtilityprogram,youmustusethekeyboard.Thekeysusedtoperformvarious
tasksaredisplayedontherightbottompaneofeachscreen.YoualsocanpresstheF1keyforgeneralhelp
aboutthekeys.Formostitems,thecorrespondinghelpmessageisdisplayedontherighttoppaneofthe
screenwhentheitemisselected.Iftheitemhassubmenus,youcandisplaythesubmenusbypressingEnter.
YoucanviewthefollowinginformationaboutyourspecicservermodelintheSetupUtilityprogram:
•TheMainmenulistsinformationabouttheBIOSandBMC,totalmemorysize,andsystemdateandtime.
•OntheAdvancedmenu:
–SelectProcessorCongurationandfollowtheinstructionsonthescreentoviewinformationabout
theinstalledmicroprocessoranditssupportedtechnologies.
–SelectMemoryCongurationandfollowtheinstructionsonthescreentoviewinformationaboutthe
installedmemorymodules.
©CopyrightLenovo2012
45
Page 60

–SelectSA T A/SASCongurationandfollowtheinstructionsonthescreentoviewinformationabout
theinstalledSATAorSASdevices,suchasaharddiskdriveoranopticaldrive.
•OntheServerManagementmenu,selectSystemInformationtoviewinformationaboutyoursystem.
SetupUtilityprograminterface
ThistopicprovidesgeneralinformationaboutthemenusanditemsintheSetupUtilityprogram.
DependingontheBIOSversionofyourserver,somemenuoriteminformationmightdifferslightlyfrom
theinformationinthistopic.
Notes:
•Thedefaultsettingsalreadyareoptimizedforyou.Usethedefaultvalueforanyitemyouarenotfamiliar
with.Donotchangethevalueofunfamiliaritemstoavoidunexpectedproblems.Ifyouconsider
changingtheserverconguration,proceedwithextremecaution.Settingthecongurationincorrectly
mightcauseunexpectedresults.IfyoucannotturnontheserverbecauseofincorrectBIOSsettings,
usetheClearCMOSjumpertorestoretheBIOSsettingstothefactorydefaultsettings.See“System
boardjumpersandswitches”onpage35
.
•Ifyouhavechangedanyhardwareintheserver,youmightneedtoreashtheBIOS,theBMCrmware,
andtheFRU/SensorDataRecords(SDR).
TheSetupUtilityprogrammaininterfaceconsistsofthefollowingmenus:
•“Mainmenu”onpage46
•“Advancedmenu”onpage46
•“Securitymenu”onpage47
•“ServerManagementmenu”onpage47
•“BootOptionsmenu”onpage48
•“BootManagermenu”onpage48
•“Save&Exitmenu”onpage48
LenovoprovidestheBIOSupdateutilityontheLenovoSupportWebsite.YoucandownloadtheBIOS
updateutilitytoupdatetheBIOSifthenewerBIOSversionspecicallysolvesaproblemyouhave.See
“UpdatingorrecoveringtheBIOS”onpage51.
IfthepowertoyourserverisinterruptedwhiletheBIOSisbeingupdatedandyourservercannotstart
correctly,usetheBIOSrecoveryswitchtorecoverfromaBIOSupdatefailure.See“Systemboardjumpers
andswitches”onpage35.
Mainmenu
AfterenteringtheSetupUtilityprogram,youcanseetheMainmenu,whichlistsbasicinformationabout
theBIOSandBMC,totalmemorysize,andsystemdateandtime.
TosetthesystemdateandtimeontheMainmenu,see“Settingthesystemdateandtime”onpage48
.
Advancedmenu
YoucanvieworchangevariousservercomponentsettingsontheAdvancedmenuintheSetupUtility
program.TheAdvancedmenucontainsvariouscongurationsubmenusanditems.Oneachsubmenu,
pressEntertoshowselectableoptionsandselectadesiredoptionbyusingtheupanddownarrow
keysortypedesiredvaluesfromthekeyboard.Someitemsaredisplayedonthemenuonlyiftheserver
supportsthecorrespondingfeatures.
46ThinkServerRD330HardwareMaintenanceManual
Page 61

Notes:
•Enabledmeansthatthefunctioniscongured.
•Disabledmeansthatthefunctionisnotcongured.
TheAdvancedmenucontainsthefollowingsubmenus.Formoreinformation,enterthecorresponding
submenuandrefertotheinstructionsonthescreen.
•PCIConguration:ViewandsetPCIcongurationparameters.
•ACPIConguration:ViewandsetACPIcongurationparameters.
•ProcessorConguration:Viewinformationabouttheinstalledmicroprocessorsandsetmicroprocessor
congurationparameters.
•MemoryConguration:Viewinformationabouttheinstalledmemorymodulesandsetmemory
congurationparameters.
•ChipsetConguration:Viewandsetchipsetcongurationparameters.
•SATA/SASConguration:ViewinformationabouttheinstalledSATAorSASdevicesandsetSATAor
SAScongurationparameters.
•USBConguration:ViewandsetUSBcongurationparameters,suchasenablingordisablingUSB
devices.
•SuperIOConguration:Viewandsetserialportcongurationparameters.
•SerialPortConsoleRedirection:Viewandsetcongurationparametersfortheserialportconsole
redirection.
Securitymenu
YoucansetpasswordsandconguretheTPMfunctionontheSecuritymenuintheSetupUtilityprogram.
Foreachmenuitem,pressEntertoshowselectableoptionsandselectadesiredoptionbyusingtheupand
downarrowkeysortypedesiredvaluesfromthekeyboard.Someitemsaredisplayedonthemenuonlyif
theserversupportsthecorrespondingfeatures.
Notes:
•Enabledmeansthatthefunctioniscongured.
•Disabledmeansthatthefunctionisnotcongured.
TheSecuritymenucontainsthefollowingitems:
•AdministratorPassword:Setanadministratorpasswordtoprotectagainstunauthorizedaccessto
yourserver.See“Usingpasswords”onpage49
.
•UserPassword:Setauserpasswordtoprotectagainstunauthorizedaccesstoyourserver.See“Using
passwords”onpage49
.
•TPM/TCM:ConguretheTPMfunctionifyourserverhasaTPMinstalledintheTPMconnectoronthe
systemboard.See“ConguringtheTPMfunction”onpage50.
ServerManagementmenu
YoucanviewsysteminformationandvieworchangeeventlogandBMCsettingsontheServer
ManagementmenuintheSetupUtilityprogram.Oneachsubmenu,pressEntertoviewtheinformationor
showselectableoptionsandselectadesiredoptionbyusingtheupanddownarrowkeys.Someitemsare
displayedonthemenuonlyiftheserversupportsthecorrespondingfeatures.
TheServerManagementmenucontainsthefollowingsubmenus.Formoreinformation,enterthe
correspondingsubmenuandrefertotheinstructionsonthescreen.
•EraseSEL:Erasesystemeventlog(SEL).
Chapter5.Conguringtheserver47
Page 62

•SystemInformation:Viewbasicinformationaboutyourserver.
•BMCNetworkConguration:SetBMCcongurationparameters.
BootOptionsmenu
TheBootOptionsmenuintheSetupUtilityprogramprovidesaninterfacetohelpyouvieworchangethe
serverstartupoptions,includingthestartupsequenceandbootpriorityforvariousdevices.Changesinthe
startupoptionstakeeffectwhentheserverstarts.
Thestartupsequencespeciestheorderinwhichtheserverchecksdevicestondabootrecord.Theserver
startsfromtherstbootrecordthatitnds.Forexample,youcandeneastartupsequencethatchecksa
discintheopticaldrive,thencheckstheharddiskdrive,andthenchecksanetworkdevice.Forinformation
aboutsettingthestartupsequenceorselectingastartupdevice,see“Selectingastartupdevice”onpage50
.
BootManagermenu
TheBootManagermenuintheSetupUtilityprogramlistsallthebootabledevicesinstalledinyourserver
andthelisteditemsvarydependingonyourserverconguration.Ifyouselectadesireddevicelistedonthis
menu,theserverwillstartfromthedeviceyouselect.
YoucanpressF12whenturningontheserverandselectatemporarystartupdevicefromthebootdevice
selectionwindow.See“Selectingastartupdevice”onpage50.
Save&Exitmenu
AfteryounishviewingorchangingsettingsintheSetupUtilityprogram,youcanchooseadesired
actionfromtheSave&Exitmenutosavechanges,discardchanges,orloaddefaultvalues,andexitthe
program.PressEntertoselecttheitemontheSave&Exitmenu,andthenselectYeswhenpromptedto
conrmtheaction.ForinformationaboutexitingtheSetupUtilityprogram,see“ExitingtheSetupUtility
program”onpage51
.
TheSave&Exitmenucontainsthefollowingitems:
•SaveChangesandExit:SavechangesandexittheSetupUtilityprogram.
•SaveChangesandReset:SavechangesandthencontinuewiththecongurationintheSetupUtility
program.
•DiscardChangesandExit:Discardchanges,loadpreviousvalues,andthenexittheSetupUtility
program.
•DiscardChanges:Discardchangesandloadpreviousvalues.
•RestoreDefaults:Returntotheoptimizeddefaultsettings.
•SaveasUserDefaults:Savethecurrentsettingsasuserdefaultvalues.
•RestoreUserDefaults:Restoretheuserdefaultvaluesforalltheitems.
Settingthesystemdateandtime
ThistopicprovidesinstructionsonhowtosetthesystemdateandtimeintheSetupUtilityprogram.
TosetthesystemdateandtimeintheSetupUtilityprogram,dothefollowing:
1.StarttheSetupUtilityprogram.See“StartingtheSetupUtilityprogram”onpage45.
2.OntheMainmenu,selectSystemDateorSystemTime.
3.UsetheTabkeytoswitchbetweendataelementsandtypethenumbersfromthekeyboardtosetthe
systemdateandtime.
4.PressF10tosavesettingsandexittheSetupUtilityprogram.
48ThinkServerRD330HardwareMaintenanceManual
Page 63

Usingpasswords
ByusingtheSetupUtilityprogram,youcansetapasswordtopreventunauthorizedaccesstoyourserver.
Youdonothavetosetapasswordtouseyourserver.However,usingapasswordimprovescomputing
security.Ifyoudecidetosetapassword,readthefollowingtopics.
SetupUtilityprogrampasswordtypes
ThefollowingtypesofpasswordsareavailableintheSetupUtilityprogram:
•Administratorpassword
Settinganadministratorpassworddetersunauthorizedusersfromchangingcongurationsettings.Ifyou
areresponsibleformaintainingthecongurationsettingsofseveralcomputers,youmightwanttoset
anadministratorpassword.Whenanadministratorpasswordisset,youarepromptedtotypeavalid
passwordeachtimeyoutrytoaccesstheSetupUtilityprogram.TheSetupUtilityprogramcannot
beaccesseduntilavalidpasswordistypedin.
•Userpassword
Whenauserpasswordisset,theservercannotbeuseduntilavalidpasswordistypedin.
Note:Ifboththeadministratorpasswordanduserpasswordareset,youcantypeeitherpasswordtouse
theserver.However,youmustuseyouradministratorpasswordtochangeanycongurationsettings.
Passwordconsiderations
Forsecurityreasons,itisrecommendedtouseastrongpasswordthatcannotbeeasilycompromised.
Notes:
•TheSetupUtilityprogrampasswordsarenotcasesensitive.
•TheserversupportsSetupUtilityprogrampasswordsthatconsistofthreeto20characters.
Tosetastrongpassword,usethefollowingguidelines:
•Haveatleasteightcharactersinlength
•Containatleastonealphabeticcharacterandonenumericcharacter
•Notbeyournameoryourusername
•Notbeacommonwordoracommonname
•Besignicantlydifferentfromyourpreviouspasswords
Besidesthealphabeticcharacters(a-z)andnumericcharacters(0-9),theserveralsosupportscharacters
typedusingspecialkeysonthekeyboardforapassword.Refertothehelpmessageonthescreenwhen
settingapasswordtodeterminethevalidspecialcharacters.
Setting,changing,ordeletingapassword
Thistopicprovidesinstructionsonhowtoset,change,ordeleteapasswordintheSetupUtilityprogram.
Toset,change,ordeleteapasswordintheSetupUtilityprogram,dothefollowing:
1.StarttheSetupUtilityprogram.See“StartingtheSetupUtilityprogram”onpage45.
2.OntheSecuritymenu,selectAdministratorPasswordtosetanadministratorpasswordorselect
UserPasswordtosetauserpassword.
3.See“Passwordconsiderations”onpage49.Then,followtheinstructionsonthescreentosetor
changeapassword.
Chapter5.Conguringtheserver49
Page 64

4.Ifyouwanttodeleteapassword,typeyourcurrentpassword.PressEnterwhenyouareprompted
totypeanewpassword.Then,pressEntertoconrmthenewpassword.Thepreviouspassword
willbecleared.
Note:Forsecurityreasons,itisrecommendedthatyoualwayssetapasswordforyourserver.
5.PressF10tosavesettingsandexittheSetupUtilityprogram.
Ifyouhaveforgottenthepassword,youcanusetheClearpasswordswitchonthesystemboardtoerasethe
password.See“Systemboardjumpersandswitches”onpage35.Then,setanewpasswordfortheserver.
Selectingastartupdevice
Ifyourserverdoesnotstartupfromadesireddevicesuchasthediscorharddiskdriveasexpected,doone
ofthefollowingtoselectthestartupdeviceyouwant.
Note:Notalldiscs,harddiskdrives,orotherremovabledevicesarebootable.
•Toselectatemporarystartupdevice,dothefollowing:
Note:Selectingastartupdeviceusingthefollowingmethoddoesnotpermanentlychangethestartup
sequence.
1.Turnonorrestartyourserver.
2.Whenyouseethelogoscreen,pressF10ifyourserverisconnectedtoanetworkandyouwantto
startuptheserverfromthenetwork.Otherwise,pressF12todisplaythebootmenu.Theboot
deviceselectionwindowopens.
3.Inthebootdeviceselectionwindow,usetheupanddownarrowkeysonthekeyboardtoswitch
betweentheselections.PressEntertoselectthedeviceofyourchoice.Then,theserverwillstart
upfromtheselecteddevice.
•Tovieworpermanentlychangetheconguredstartupdevicesequence,dothefollowing:
1.StarttheSetupUtilityprogram.See“StartingtheSetupUtilityprogram”onpage45.
2.OntheBootOptionsmenu,followtheinstructionsonthescreentosetthestartupdeviceforBoot
Option#1toBootOption#5dependingonyourneeds.Youalsocansetthebootpriorityforvarious
devices.See“BootOptionsmenu”onpage48.
3.PressF10tosavesettingsandexittheSetupUtilityprogram.Theserverwillfollowthestartupdevice
sequenceyouhaveseteachtimeyouturnontheserver.
ConguringtheTPMfunction
TheTPMworksasahardwaresecuritysolutiontohelpyoutoencryptdataandprotecttheserver.TheTPM
functionisonlyavailablewhenthereisaTPMinstalledinyourserver.See“InstallingtheThinkServerTrusted
PlatformModule”onpage103
.YoucanpurchaseaTPMfromLenovo.
AfterinstallingaTPM,youneedtocheckiftheTPMfunctionisenabledintheSetupUtilityprogram.
ToenabletheTPMfunctionintheSetupUtilityprogram,dothefollowing:
1.StarttheSetupUtilityprogram.See“StartingtheSetupUtilityprogram”onpage45.
2.OntheSecuritymenu,selectTPM/TCM➙TPMSupport.EnsurethatTPMSupportissettoEnabled.
3.WhenTPMSupportissettoEnabled,theTPMStateitemisdisplayed.SetTPMStatetoEnabled.
4.PressF10tosavesettingsandexittheSetupUtilityprogram.Theserverwillrestarttoenablethe
TPMfunction.
50ThinkServerRD330HardwareMaintenanceManual
Page 65

SettingthemodeoftheEthernetconnector0
TheEthernetconnector0ontherearoftheserverisforsystemmanagement.Ifyouwanttouseremote
managementfunctions,youneedtoconnectanEthernetcabletotheEthernetconnector0.See“Rear
viewoftheserver”onpage20
.
TheEthernetconnector0forsystemmanagementis82574Lbydefault.Ifyouhaveselectedsharemode
forthe82574LEthernetconnectorintheSetupUtilityprogram,youcanusetheconnectorasanordinary
Ethernetconnectorwith100Mbpsnetworkconnectivity.However,teamingwithotherEthernetconnectors
isnotsupportedifthemanagementEthernetconnectorisusedasanordinaryEthernetconnector.
TosetthemodeoftheEthernetconnector0intheSetupUtilityprogram,dothefollowing:
1.StarttheSetupUtilityprogram.See“StartingtheSetupUtilityprogram”onpage45.
2.OntheServerManagementmenu,selectBMCNetworkConguration➙BMCLANShareSetting.
3.Dooneofthefollowing:
•IfyouwanttousetheEthernetconnector0asanordinaryEthernetconnector,selectShared.
•IfyouwanttousetheEthernetconnector0asadedicatedsystemmanagementEthernetconnector,
selectDedicated.
4.PressF10tosavesettingsandexittheSetupUtilityprogram.
ExitingtheSetupUtilityprogram
Afteryounishviewingorchangingsettings,pressEsctoreturntotheSetupUtilityprogrammaininterface.
Ifyouareonanestedsubmenu,pressEscrepeatedlyuntilyoureachthemaininterface.Then,youcando
oneofthefollowingtoexittheSetupUtilityprogram:
•IfyouwanttosavethenewsettingsandexittheSetupUtilityprogram,pressF10orselectSave&Exit➙
SaveChangesandExit.Otherwise,yourchangeswillnotbesaved.
•Ifyoudonotwanttosavethenewsettings,selectSave&Exit➙DiscardChangesandExit.
•Ifyouwanttoreturntothedefaultsettings,pressF9orselectSave&Exit➙RestoreDefaults.
FormoreinformationabouttheSave&ExitmenuintheSetupUtilityprogram,see“Save&Exitmenu”
onpage48
.
UpdatingorrecoveringtheBIOS
ThistopicprovidesinstructionsonhowtoupdatetheBIOSandhowtorecoverfromaPOSTandBIOS
updatefailure.
Systemprogramsarethebasiclayerofsoftwarebuiltintoyourserver.SystemprogramsincludethePOST,
theUEFIBIOS,theSetupUtilityprogram,andtheTMMrmware.ThePOSTisasetoftestsandprocedures
thatareperformedeachtimeyouturnonyourserver.TheUEFIBIOSisalayerofsoftwarethattranslates
instructionsfromotherlayersofsoftwareintoelectricalsignalsthattheserverhardwarecanexecute.You
canusetheSetupUtilityprogramtovieworchangethecongurationsettingsofyourserver.See“Usingthe
SetupUtilityprogram”onpage45
.TheTMMrmwareprovidesremotemanagementfeatures.
LenovomightmakechangesandenhancementstotheBIOSandTMMrmware.Whenupdatesarereleased,
theyareavailablefordownloadontheLenovoWebsiteathttp://www.lenovo.com/drivers.Youcanupdate
theserverrmwarebydownloadinganupdatepackageandfollowingtheinstructionsontheWebpage.
YoualsocanusetheFirmwareUpdaterprogramtohelpyoukeeptheserverrmwareup-to-date.See
“Updatingthermware”onpage64
.
Chapter5.Conguringtheserver51
Page 66

Updating(ashing)theBIOS
Thistopicprovidesinstructionsonhowtoupdate(ash)theBIOS.
Notes:
•UpdatetheBIOSonyourserveronlyifthenewerBIOSversionspecicallysolvesaproblemyouhave.
WedonotrecommendBIOSupdatesforserversthatdonotneedthem.Youcanviewtheupdated
informationforthenewBIOSversionintheinstallationinstructionsfortheBIOSupdatepackage.
•DowngradingtheBIOStoanearlierversionisnotrecommendedandmightnotbesupported.Anearlier
BIOSversionmightnotsupportthelatestsystemcongurations.
•IfthepowertoyourserverisinterruptedwhilethePOSTandBIOSarebeingupdated,yourservermight
notrestartcorrectly.EnsurethatyouperformtheBIOSupdateprocedureinanenvironmentwitha
steadypowersupply.Besides,ensurethatyourservercanrestartsuccessfullywithoutencountering
hardwareproblems.
•IfyouhaveupdatedtheBIOSrmware,alltheBIOSsettingsbecomethedefaultsettingsoftheupdated
BIOSversion.Y ouneedtocheckandreconguretheBIOSsettingsforyourspecicneeds.Youcan
selectSaveasUserDefaultsontheSave&ExitmenuintheSetupUtilityprogramtosaveyourcurrent
BIOSsettingsasuserdefaultvaluesbeforeupdatingtheBIOS.Then,youcanselectRestoreUser
DefaultsontheSave&ExitmenuintheSetupUtilityprogramtorestoretheuserdefaultvaluesafter
updatingtheBIOS.Inthiscase,youcankeepyourpreviousBIOSsettingsanddonotneedtorecongure
thesettingsafterupdatingtheBIOS.Y oualsocannotedownyourspecicBIOSsettingsbeforeupdating
theBIOSforaneasierrecongurationinthenewBIOSversion.
Toupdate(ash)theBIOS,dothefollowing:
1.Gotohttp://www.lenovo.com/driversandfollowtheinstructionsontheWebpagetolocatetheBIOS
updatepackage.
2.DownloadtheBIOSupdatepackageandtheinstallationinstructionsinaTXTle.
3.PrinttheTXTlethatcontainstheinstallationinstructionsandfollowtheinstructionstoupdate(ash)
theBIOS.
4.DooneofthefollowingaftertheBIOSupdateprocessiscompleted:
•IfyouhavesavedyourBIOSsettingsasuserdefaultvaluesbeforeupdatingtheBIOS,selectRestore
UserDefaultsontheSave&ExitmenuintheSetupUtilityprogramtorestoretheuserdefault
values.Then,checkiftheuserdefaultvaluesmeetyourcurrentrequirements.
•CheckandreconguretheBIOSsettingsforyourspecicneedsbasedonyournoteorreferto
“UsingtheSetupUtilityprogram”onpage45.
RecoveringfromaBIOSupdatefailure
IfthepowertoyourserverisinterruptedwhiletheBIOSisbeingupdated,yourservermightnotrestart
correctly.Ifthishappens,performthefollowingproceduretorecoverfromtheBIOSupdatefailure.
Note:IftheoperatingsystemofyourserverisinstalledunderEFImode,youneedtoreinstalltheoperating
systemafterrecoveringtheBIOS.
TorecoverfromaBIOSupdatefailure,dothefollowing:
1.Gotohttp://www.lenovo.com/driversandfollowtheinstructionsontheWebpagetodownloadaBIOS
updatepackage.Then,puttheamiboot.romlecontainedinthepackageintotherootdirectoryof
abootableUSBkey.
2.Removeallmediafromthedrivesandturnoffallattacheddevicesandtheserver.Then,disconnectall
powercordsfromelectricaloutletsanddisconnectallcablesthatareconnectedtotheserver.
3.Iftheserverisinstalledinarackcabinet,removetheserverfromtherackcabinetandplaceitonaat,
clean,andstatic-protectivesurface.SeetheRackInstallationInstructionsthatcomeswiththeserver.
52ThinkServerRD330HardwareMaintenanceManual
Page 67

4.Removetheservercover.See“Removingtheservercover”onpage69.
5.LocatetheBIOSrecoveryswitchonthesystemboard.See“Systemboardjumpersandswitches”on
page35.Then,removeanypartsanddisconnectanycablesthatmightimpedeyouraccesstothe
switch.
6.MovetheBIOSrecoveryswitchfromthedefaultoffpositiontotheonposition.
7.Reinstallanypartsandreconnectanycables.Then,reinstalltheservercover.See“Completingthe
partsreplacement”onpage153.
8.Connecttheservertoanacpowersource,andthenstarttheserverfromthebootableUSBkeythat
containstheamiboot.romle.Therecoveryprocessstarts.Aftertherecoveryprocessiscompleted,
yourserverwillautomaticallyturnoff.
9.Repeatstep2throughstep5.
10.MovetheBIOSrecoveryswitchbacktotheoffposition.
11.Reinstallanypartsandreconnectanycables.Then,reinstalltheservercover.See“Completingthe
partsreplacement”onpage153.
12.Connecttheservertoanacpowersourceandturnontheserver.TheBIOSsettingsrecovertothe
factorydefaultsettings.YouneedtocheckandconguretheBIOSsettingsforyourspecicneeds.See
“UsingtheSetupUtilityprogram”onpage45
.
Note:IfyoucannotrecovertheBIOSafterusingtheinstructionsinthistopic,theBIOSread-onlymemory
(ROM)mightbedamagedandyouneedtoreplacethesystemboard.ContacttheLenovoCustomer
SupportCenter.
UsingtheThinkServerEasyStartupprogram
ThistopicprovidesinstructionsonhowtousetheThinkServerEasyStartupprogramtosetupandcongure
yourserver.
TheThinkServerEasyStartupprogramsimpliestheprocessofconguringRAIDandinstallingsupported
WindowsandLinuxoperatingsystemsanddevicedriversonyourserver.Theprogramworksinconjunction
withyourWindowsorLinuxoperatingsysteminstallationdisctoautomatetheprocessofinstallingthe
operatingsystemandassociateddevicedrivers.Thisprogramisprovidedwithyourserveronaself-starting
(bootable)ThinkServerEasyStartupDVD.TheuserguidefortheprogramalsoisontheDVDandcanbe
accesseddirectlyfromtheprograminterface.
IfyoudonothaveaThinkServerEasyStartupDVD,youalsocandownloadanISOimagefromtheLenovo
SupportWebsiteandmakeadiscbyyourself.
TodownloadtheThinkServerEasyStartupprogramimageandburnitintoadisc,dothefollowing:
1.Gotohttp://www.lenovo.com/driversandfollowtheinstructionsontheWebpagetolocatethe
ThinkServerEasyStartupprogram.
2.DownloadtheISOimagefortheThinkServerEasyStartupprogramandthereadmele.Thereadmele
containsimportantinformationabouttheThinkServerEasyStartupprogram.
3.Printthereadmeleandreaditcarefully.
4.UseanopticaldriveandanyDVDburningsoftwaretocreateabootablediscwiththeISOimage.
FeaturesoftheThinkServerEasyStartupprogram
ThistopicliststhefeaturesoftheThinkServerEasyStartupprogram.
TheThinkServerEasyStartupprogramhasthefollowingfeatures:
Chapter5.Conguringtheserver53
Page 68

•Containedinaself-starting(bootable)DVD
•Easy-to-use,language-selectableinterface
•Integratedhelpsystemanduserguide
•Automatichardwaredetection
•ContainstheRAIDcongurationutility
•Providesdevicedriversbasedontheservermodelanddetecteddevices
•DownloadsdevicedriversfromtheThinkServerEasyStartupDVDaccordingtotheoperatingsystem
oradd-ondevice
•Selectablepartitionsizeandlesystemtype
•Supportformultipleoperatingsystems
•Abilitytoinstalltheoperatingsystemanddevicedriversinanunattendedmodetosavetime
•AbilitytocreateareuseableresponselethatcanbeusedwithsimilarlyconguredLenovoserversto
makefutureinstallationsevenfaster
StartingtheThinkServerEasyStartupprogram
ThistopicprovidesinstructionsonhowtostarttheThinkServerEasyStartupprogram.Afteryoustartthe
programandenterthemaininterface,clickUserGuidefordetailedinformationabouthowtousethis
programtohelpyouconguretheserverandinstallanoperatingsystem.
TostarttheThinkServerEasyStartupprogram,dothefollowing:
1.InserttheThinkServerEasyStartupDVDintoanopticaldrive,settheopticaldriveastherststartup
device,andstartyourserverfromtheDVDintheopticaldrive.See“Selectingastartupdevice”on
page50
.
2.Waitfortheprogramtoload.Then,youwillbepromptedforthefollowingselections:
•Thelanguageinwhichyouwanttoviewtheprogram
•Thelanguageofthekeyboardlayoutyouwillbeusingwiththeprogram
Note:ThesupportedlanguagesandkeyboardlayoutsfortheThinkServerEasyStartupprogramare
Dutch,English,French,German,Italian,Japanese,Russian,Spanish,andTurkish.YourThinkServer
EasyStartupDVDmightbeEnglishonly.Inthiscase,thekeyboardlayoutshouldbeEnglish.
3.Afterselectingthelanguageandkeyboardlayout,clickOK.Then,youwillseeoneormorereminders
ormessagesaboutconguringstoragedevices.ClickNextuntilyouarepresentedwiththeLenovo
LicenseAgreement.ReadtheLenovoLicenseAgreementcarefully.Inordertocontinue,youmust
acceptthetermsbyclickingAgree.Then,theDateandtimewindowopens.
4.SetthecurrentdateandtimeandclickOK.TheStartoptionwindowopens.
5.TheStartoptionwindowprovidesthefollowingselections:
•Continuetothemaininterface.
•Installtheoperatingsystemusingapre-existingresponsele.
•CongureRAIDusingapre-existingresponsele.
Readtheexplanationsonthescreenandselectadesiredoption.Then,followtheinstructionsonthe
screen.IfthisisthersttimeyouareusingtheThinkServerEasyStartupprogram,selecttheoptionto
continuetothemaininterfaceandviewthecompatibilitynotesanduserguide.
Notes:
•FunctionalityandsupportedoperatingsystemsvarydependingontheversionoftheThinkServer
EasyStartupprogram.Fromthemaininterfaceoftheprogram,clickCompatibilitynotestoviewthe
54ThinkServerRD330HardwareMaintenanceManual
Page 69

informationabouttheRAIDcontrollers,operatingsystems,andservercongurationssupportedbythe
specicversionoftheprogram;andclickUserGuidetoviewthevariousfunctionsandlearnhowto
usetheprogram.
•BeforeusingtheThinkServerEasyStartupprogramtoinstallanoperatingsystem,ensurethatanyexternal
storagedevicesandberchannelsareconguredcorrectly.
TheThinkServerEasyStartupprogrammaininterfaceprovidesthefollowingmenusontheleftpaneof
thescreen:
•Home
Thismenuisthewelcomepagethatcontainssomegeneraldescriptionsabouttheprogramandthe
Lenovocopyrightandtrademarkstatements.
•Compatibilitynotes
ThismenuprovidesinformationabouttheRAIDcontrollers,operatingsystems,andservercongurations
supportedbytheversionoftheprogramyouareusing.
•UserGuide
Thismenuprovidesinformationaboutthefeaturesoftheprogramandinstructionsonhowtousethe
program.
•Hardwarelist
Thismenudisplaysalistofhardwaredevicesdetectedbytheprogram.
•CongureRAID
ThismenuprovidesinstructionsonhowtocongureRAIDorviewthecurrentRAIDcongurationand
makechangesifneeded.
•Installoperatingsystem
Thismenudisplaysaseriesofchoicesandpromptstocollectinformationrequiredforoperatingsystem
installation,preparestheharddiskdriveforinstallation,andtheninitiatestheinstallationprocessusing
youroperatingsysteminstallationdisc.
•Downloaddrivers
ThismenuhelpsyoudownloadtherequireddevicedriversfromtheThinkServerEasyStartupDVDtoa
removablestoragedevicesothatyoucaneasilygetthedriversforservercongurationwhenyouneed
them.
Note:Themostup-to-datedevicedriversforvariousservermodelsarealwaysavailablefordownloadon
theLenovoSupportWebsiteat:
http://www.lenovo.com/drivers
•About
Thismenuprovidestheversioninformationandlegalnotices.
UsingtheThinkServerEasyStartupprogramonaWindowsoperating
system
YoucanruntheThinkServerEasyStartupDVDonaWindowsoperatingsystemwiththeInternetExplorer
®
6.0
Webbrowseroralaterversioninstalled.EntertheoperatingsystemandinserttheThinkServerEasyStartup
DVDintoaninternalorexternalopticaldrive.TheDVDstartsautomaticallyinmostenvironments.IftheDVD
failstostart,openthelaunch.exelelocatedintherootdirectoryoftheDVD.
Notes:
•YoushouldreadandaccepttheLenovoLicenseAgreementwhenprompted.
Chapter5.Conguringtheserver55
Page 70

•OntheMicrosoftWindowsServer
®
2003operatingsystem,youmightneedtoaddtheUniformResource
Locator(URL)fortheThinkServerEasyStartupprogramWebpagetothetrustedWebsitelistsothat
thepagecanopencorrectly.
YoucandothefollowingwhenusingtheThinkServerEasyStartupprogramonaWindowsoperatingsystem.
Fordetailedinformation,refertothehelpsystem.
•ViewageneralintroductiontoyourThinkServerservermodelandthespecicserverconguration
information.
•ViewgeneralguidanceonhowtousetheThinkServerEasyStartupDVD.
•Downloadtherequireddevicedriverstoaremovablestoragedevicesothatyoucaneasilygetthe
driversforservercongurationwhenyouneedthem,especiallywhenyounishinstallinganoperating
systemwithoutusingtheThinkServerEasyStartupDVDandneedappropriatedevicedriverstocongure
yourserver.
•InstalltherequireddevicedriversdirectlyontheserveronwhichyouarerunningtheThinkServer
EasyStartupDVD.
•ViewinformationaboutallservermodelssupportedbytheThinkServerEasyStartupprogramand
informationaboutthedevicedriversforeachservermodel,includingthedriverversionsanddriver
locationsintherootdirectoryoftheThinkServerEasyStartupDVD.
Note:Themostup-to-datedevicedriversforvariousservermodelsarealwaysavailablefordownloadon
theLenovoSupportWebsiteat:
http://www.lenovo.com/drivers
ConguringRAID
ThistopicprovidesinformationaboutRAIDandtheutilityprogramsthatareavailableforyoutocongure
RAID.
Thistopiccontainsthefollowingitems:
•“AboutRAID”onpage56
•“ConguringRAIDusingtheThinkServerEasyStartupprogram”onpage58
•“ConguringtheThinkServerRAID300”onpage58
•“ConguringtheadvancedSATA/SAShardwareRAID”onpage63
AboutRAID
RAID,anacronymforRedundantArrayofIndependentDisks,isatechnologythatprovidesincreased
storagefunctionsandreliabilitythroughredundancy.Thisisachievedbycombiningmultipleharddiskdrives
intoalogicalunit,wheredataisdistributedacrossthedrivesinoneofseveralwayscalledRAIDlevels.
WhenagroupofindependentphysicalharddiskdrivesaresetuptouseRAIDtechnology,theyareina
RAIDarray.Thisarraydistributesdataacrossmultipleharddiskdrives,butthearrayappearstothehost
serverasonesinglestorageunit.CreatingandusingRAIDarraysprovideshighperformance,suchasthe
expeditedI/Operformance,becauseseveraldrivescanbeaccessedsimultaneously.
RAIDdrivegroupsalsoimprovedatastoragereliabilityandfaulttolerancecomparedwithsingle-drive
storagesystems.Datalossresultingfromadrivefailurecanbepreventedbyreconstructingmissingdata
fromtheremainingdrives.
ThefollowinglistdescribessomeofthemostcommonlyusedRAIDlevels:
56ThinkServerRD330HardwareMaintenanceManual
Page 71

•RAID0:block-levelstripingwithoutparityormirroring
SimplestripesetsarenormallyreferredtoasRAID0.RAID0usesstripingtoprovidehighdata
throughput,especiallyforlargelesinanenvironmentthatdoesnotrequirefaulttolerance.RAID0hasno
redundancyanditprovidesimprovedperformanceandadditionalstoragewithoutfaulttolerance.Any
drivefailuredestroysthearrayandthelikelihoodoffailureincreaseswithmoredrivesinthearray.RAID
0doesnotimplementerrorchecking,soanyerrorisuncorrectable.Moredrivesinthearraymeans
higherbandwidth,butgreaterriskofdataloss.
RAID0requiresaminimumnumberoftwoharddiskdrives.
•RAID1:mirroringwithoutparityorstriping
RAID1usesmirroringsothatdatawrittentoonedriveissimultaneouslywrittentoanotherdrive.Thisis
goodforsmalldatabasesorotherapplicationsthatrequiresmallcapacitybutcompletedataredundancy.
RAID1providesfaulttolerancefromdiskerrorsorfailuresandcontinuestooperateaslongasatleast
onedriveinthemirroredsetisfunctioning.Withappropriateoperatingsystemsupport,therecanbe
increasedreadperformanceandonlyaminimalwriteperformancereduction.
RAID1requiresaminimumnumberoftwoharddiskdrives.
•RAID5:block-levelstripingwithdistributedparity
RAID5usesdiskstripingandparitydataacrossalldrives(distributedparity)toprovidehighdata
throughput,especiallyforsmallrandomaccess.RAID5distributesparityalongwiththedataandrequires
alldrivesbutonetobepresenttooperate;drivefailurerequiresreplacement,butthearrayisnot
destroyedbyasingledrivefailure.Upondrivefailure,anysubsequentreadoperationscanbecalculated
fromthedistributedparitysothatthedrivefailureismaskedfromtheenduser.Thearraywillhavedata
lossintheeventofaseconddrivefailureandisvulnerableuntilthedatathatwasonthefailingdriveis
rebuiltontoareplacementdrive.Asingledrivefailureinthesetwillresultinreducedperformanceof
theentiresetuntilthefailingdrivehasbeenreplacedandrebuilt.
RAID5requiresaminimumnumberofthreeharddiskdrives.
•RAID10:acombinationofRAID0andRAID1
RAID10consistsofstripeddataacrossmirroredspans.ARAID10drivegroupisaspanneddrive
groupthatcreatesastripedsetfromaseriesofmirroreddrives.RAID10allowsamaximumofeight
spans.YoumustuseanevennumberofdrivesineachRAIDvirtualdriveinthespan.TheRAID1
virtualdrivesmusthavethesamestripesize.RAID10provideshighdatathroughputandcompletedata
redundancybutusesalargernumberofspans.
RAID10requiresaminimumnumberoffourharddiskdrivesandalsorequiresanevennumberofdrives,
forexample,sixharddiskdrivesoreightharddiskdrives.
•RAID50:acombinationofRAID0andRAID5
RAID50usesdistributedparityanddiskstriping.ARAID50drivegroupisaspanneddrivegroupin
whichdataisstripedacrossmultipleRAID5drivegroups.RAID50worksbestwithdatathatrequires
highreliability,highrequestrates,highdatatransfers,andmedium-to-largecapacity.
Note:HavingvirtualdrivesofdifferentRAIDlevels,suchasRAID0andRAID5,inthesamedrivegroupis
notallowed.Forexample,ifanexistingRAID5virtualdriveiscreatedoutofpartialspaceinanarray,the
nextvirtualdriveinthearrayhastobeRAID5only.
RAID50requiresaminimumnumberofsixharddiskdrives.
FordetailedinformationaboutRAID,referto“IntroductiontoRAID”intheMegaRAIDSASSoftwareUser
GuideonthedocumentationDVDthatcomeswithyourserver.
Chapter5.Conguringtheserver57
Page 72

ConguringRAIDusingtheThinkServerEasyStartupprogram
TheThinkServerEasyStartupprogramsimpliestheprocessofconguringsupportedRAIDandinstalling
supportedWindowsandLinuxoperatingsystemsanddevicedriversonyourserver.Theuserguideforthe
programcanbeaccesseddirectlyfromtheprograminterface.
TheThinkServerEasyStartupprogramhasthefollowingfeaturesforRAIDconguration:
•ForusewithallsupportedRAIDcontrollers
•AutomaticallydetectshardwareandlistsallsupportedRAIDcongurations
•Conguresoneormorediskarrayspercontrollerdependingonthenumberofdrivesattachedtothe
controllerandtheRAIDlevelselected
•Supportshot-sparedrives
•CreatesaRAIDresponselethatcanbeusedtocongureRAIDcontrollersonsimilarlycongured
Lenovoservers
See“UsingtheThinkServerEasyStartupprogram”onpage53andviewtheuserguidefromthemain
interfaceoftheprogram.
SomeRAIDmanagementsoftwarealsoisprovidedontheThinkServerEasyStartupDVDtohelpyoumanage
RAIDarraysandRAIDcontrollersinanoperatingsystemenvironment.Afteryouentertheoperatingsystem,
inserttheThinkServerEasyStartupDVDintotheopticaldrive.Theinstallationpackagesfortheprograms
arelocatedintheUtilitiesandOthersfolderintherootdirectoryoftheDVD.TheThinkServerEasyStartup
DVDisdesignedfordifferenttypesofserversandtheUtilitiesandOthersfoldermightcontainadditional
installationpackagesthatarenotrequiredtobeinstalledonyourserver.
ConguringtheThinkServerRAID300
TheThinkServerRAID300(alsoknownasonboardSASsoftwareRAID)isintegratedinthePCHon
thesystemboard.Ifyouconnectthemini-SAStomini-SASsignalcablesfromthesystemboardtothe
backplane,youcancongureRAIDfortheharddiskdrivesusingtheLSISoftwareRAIDCongurationUtility
program,independentlyoftheoperatingsystem.TheThinkServerRAID300supportsRAIDlevels0,1,and
10bydefault.YoualsocanactivateRAID5byinstallingaThinkServerRAID300UpgradeKeyforAdvanced
RAID.See“InstallingorremovingtheThinkServerRAID300UpgradeKeyforAdvancedRAID”onpage96
.
YoucaninstallandusetheMegaRAIDStorageManagerprogramtomanagetheRAIDarrayandRAID
controllerinanoperatingsystemenvironment.
BeforeconguringRAIDforyourserver,observethefollowingprecautions:
•Useharddiskdrivesthatareofthesametype(SATAorSAS)andhavethesamecapacitywithina
singleRAIDarray.
•ThetotaldrivecapacityoftheprimaryRAIDarraymightbelimitedto2TB.
RAIDarraystatus
Whenyouturnontheserver,theRAIDcontrollerROMversion,theRAIDarraystatus,andthelistofthe
availableharddiskdriveswillbedisplayedduringthePOST.
TheRAIDarraystatuscanbeoneofthefollowing:
•Online
Thisisthenormalstatus,whichindicatesthattheRAIDarrayisworkingcorrectly.
•Degrade
58ThinkServerRD330HardwareMaintenanceManual
Page 73

ThisstatusindicatesthatmorethanoneharddiskdriveintheRAIDarraycannotbesynchronizedorhave
failed.Youneedtoreplacethefailingharddiskdrivesandrebuildthedata.See“Installingorreplacinga
hot-swapharddiskdrive”onpage122and“Rebuildingaphysicaldrive”onpage62.
•Ofine
ThisstatusindicatesthattheRAIDarrayhasfailedandcannotberebuilt.YouneedtocreateanewRAID
array.See“Creating,adding,ordeletingaRAIDarray”onpage60.
StartingtheLSISoftwareRAIDCongurationUtilityprogram
ThistopicprovidesinstructionsonhowtostarttheLSISoftwareRAIDCongurationUtilityprogram.
TostarttheLSISoftwareRAIDCongurationUtilityprogram,dothefollowing:
1.Turnontheserver.
2.DuringthePOST,whenyouseethemessage“PressCtrl-MorEntertorunLSISoftwareRAIDSetup
Utility,”immediatelypressCtrl+MtostarttheLSISoftwareRAIDCongurationUtilityprogram.
LSISoftwareRAIDCongurationUtilityprograminterface
ThistopicprovidesinformationaboutthemenusanditemsintheLSISoftwareRAIDCongurationUtility
program.Dependingontheversionoftheprogram,somemenuoriteminformationmightdifferslightlyfrom
theinformationinthistopic.
WhenworkingwiththeLSISoftwareRAIDCongurationUtilityprogram,youmustusethekeyboard.
Thekeysusedtoperformvarioustasksaredisplayedonthebottomofeachscreen.Useupanddown
arrowkeystonavigatebetweenitems.Formostitems,thecorrespondinghelpmessageisdisplayed
onthebottomofthescreenwhentheitemisselected.Iftheitemhassubmenus,youcandisplaythe
submenusbypressingEnter.
AfterenteringtheLSISoftwareRAIDCongurationUtilityprogram,youcanseetheManagementMenuon
thescreen.TheManagementMenucontainsthefollowingmenuitems:
•Congure
ThismenucontainsitemstohelpyoucreateaRAIDarray,viewthecurrentRAIDconguration,addanew
RAIDarray,deleteanexistingRAIDarray,andselectabootvirtualdrive.
•Initialize
Thismenuhelpsyouinitializevirtualdrives.
Note:Initializingavirtualdriveerasesalldataonthevirtualdrive.Backupanydatayouwanttokeepand
ensurethattheoperatingsystemisnotinstalledonthevirtualdrivebeforetheinitialization.
•Objects
ThismenuhelpsyoucongureparametersfortheRAIDcontroller,thevirtualdrives,andthephysical
drives.
•Rebuild
ThismenuhelpsyourebuildaphysicaldriveinaRAIDarrayintheeventofaphysicaldrivefailure.
Youcanchoosetorebuildthedataonthefailingdriveifthedriveisstilloperational.Ifthedriveisnot
operational,itmustbereplacedandthedataonthefailingdrivemustberebuiltonanewdrivetorestore
thesystemtofaulttolerance.
•CheckConsistency
Thismenuhelpsyoudoconsistencycheckforthevirtualdrives.Theconsistencycheckveriesthe
correctnessofthedataonvirtualdrivesthatuseRAID1,5,and10.
Chapter5.Conguringtheserver59
Page 74

ThefollowingtableshowsthevariousmenusanditemsintheLSISoftwareRAIDCongurationUtility
program.Oneachmenu,presstheEnterkeytoshowselectableoptionsandselectadesiredoptionby
usingupanddownarrowkeysortypedesiredvaluesfromthekeyboarddirectly.
Table3.LSISoftwareRAIDCongurationUtilityprogrammenuitems
Menuitem
SubmenuitemComments
EasyCongurationCreatephysicalarrays.Anarraywill
automaticallybecomeavirtualdrive.
NewCongurationCleartheexistingcongurationand
startanewconguration.
View/AddConguration
Viewtheexistingcongurationoradda
newconguration.
ClearCongurationCleartheexistingconguration.
Congure
SelectBootDriveSelectabootvirtualdrive.
Initialize
Variesbyconguration.
Initializevirtualdrives.
Adapter
Setadapterrelatedparameters,such
asrebuildrate,consistencycheckrate,
auto-rebuild,andsoon.
VirtualDrive
Setvirtualdriveparameters.
Objects
PhysicalDrive
Setphysicaldriveparameters,suchas
creatingahot-sparedriveforthevirtual
drive,makingafailingdriveasonline,
changingadrivestate,andviewingthe
specicationsofaphysicaldrive.
Rebuild
Variesbyconguration.
Rebuildphysicaldrives.
CheckConsistency
Variesbyconguration.
Checkconsistencyofvirtualdrives.
Creating,adding,ordeletingaRAIDarray
Thistopicprovidesinstructionsonhowtocreate,add,ordeleteaRAIDarrayusingtheLSISoftwareRAID
CongurationUtilityprogram.
Note:BeforeyoucreateaRAIDarrayusingtheLSISoftwareRAIDCongurationUtilityprogram,ensurethat
theservermeetstherequiredhardwareconguration.Forexample,theserverneedstohavetherequired
numberofharddiskdrivesinstalledandconnectedtothesystemboard.See“AboutRAID”onpage56
forinformationabouttherequirednumberofharddiskdrivesforeachRAIDlevel.Ifyouwanttocreatea
RAID5arrayusingtheLSISoftwareRAIDCongurationUtilityprogram,theserveralsoneedstohavea
ThinkServerRAID300UpgradeKeyforAdvancedRAID.See“InstallingorremovingtheThinkServerRAID
300UpgradeKeyforAdvancedRAID”onpage96
.
Tocreate,add,ordeleteaRAIDarrayusingtheLSISoftwareRAIDCongurationUtilityprogram,dothe
following:
1.StarttheLSISoftwareRAIDCongurationUtilityprogram.See“StartingtheLSISoftwareRAID
CongurationUtilityprogram”onpage59.
2.Onthemaininterfaceoftheprogram,dooneofthefollowingdependingonyourneeds:
•IfyouwanttocreateaRAIDarray,selectEasyConguration,andthenfollowtheinstructionson
thescreen.
•IfyouwanttoaddasecondaryRAIDarray(ifsupportedbyyourserver),selectView/Add
Conguration,andthenfollowtheinstructionsonthescreentoviewthecurrentconguration
andaddanewRAIDarray.
60ThinkServerRD330HardwareMaintenanceManual
Page 75

•IfyouwanttodeletetheexistingRAIDarray,exittheprogramandbackupallyourdataonthe
harddiskdrives.Afterbackingupallyourdata,entertheprogrammaininterfaceandselectClear
Conguration.SelectYeswhenpromptedandfollowtheinstructionsonthescreen.
Attention:DeletinganexistingRAIDarrayerasesalldataonthearray.Ensurethatyoubackupall
databeforedeletingtheRAIDarray.IftheoperatingsystemisinstalledontheRAIDarrayyouwantto
delete,youneedtoreinstalltheoperatingsystemafterdeletingtheRAIDarray.
•IfyouwanttodeletetheexistingRAIDarrayandcreateanewRAIDarray,exittheprogramandback
upallyourdataontheharddiskdrives.Afterbackingupallyourdata,entertheprogrammain
interfaceandselectNewConguration.SelectY eswhenpromptedtoproceed,andthenfollowthe
instructionsonthescreen.
Attention:DeletinganexistingRAIDarrayerasesalldataonthearray.Ensurethatyoubackupall
databeforedeletingtheRAIDarray.IftheoperatingsystemisinstalledontheRAIDarrayyouwantto
delete,youneedtoreinstalltheoperatingsystemafterdeletingtheRAIDarray.
Initializingavirtualdrive
ThistopicprovidesinstructionsonhowtoinitializeavirtualdriveusingtheLSISoftwareRAIDConguration
Utilityprogramaftercompletingthecongurationprocess.
Virtualdriveinitializationistheprocessofwritingzerostothedataeldsofavirtualdriveand,infault-tolerant
RAIDlevels,generatingthecorrespondingparitytoputthevirtualdriveinareadystate.Initializationerases
alldataonthevirtualdrive.Drivegroupswillworkwithoutbeinginitialized,buttheycanfailaconsistency
checkbecausetheparityeldshavenotbeengenerated.
Notes:
•Ensurethatyoubackupanydatayouwanttokeepbeforeinitializingavirtualdrive.
•Ensurethattheoperatingsystemisnotinstalledonthevirtualdriveyouareinitializing.Otherwise,you
needtoreinstalltheoperatingsystemafterinitializingthevirtualdrive.
ToinitializeavirtualdriveusingtheLSISoftwareRAIDCongurationUtilityprogram,dothefollowing:
1.StarttheLSISoftwareRAIDCongurationUtilityprogram.See“StartingtheLSISoftwareRAID
CongurationUtilityprogram”onpage59.
2.Onthemaininterfaceoftheprogram,selectInitializeandfollowtheinstructionsonthescreen.
Settingahot-sparedrive
Thistopicprovidesinstructionsonhowtosetaharddiskdriveasahot-sparedriveusingtheLSISoftware
RAIDCongurationUtilityprogram.
Ahot-sparedriveisanextra,unuseddrivethatispartofthedisksubsystem.Itisusuallyinstandbymode
andreadyforserviceifaharddiskdrivefails.Fordetailedinformationabouthot-sparedrives,referto
“IntroductiontoRAID”intheMegaRAIDSASSoftwareUserGuideonthedocumentationDVDthatcomes
withyourserver.
Tosetaharddiskdriveasahot-sparedriveusingtheLSISoftwareRAIDCongurationUtilityprogram,
dothefollowing:
1.StarttheLSISoftwareRAIDCongurationUtilityprogram.See“StartingtheLSISoftwareRAID
CongurationUtilityprogram”onpage59.
2.Dooneofthefollowing:
•IfyouwanttocreateoraddanewRAIDarray,youcansetahot-sparedriveduringtheconguration
processbyfollowingtheinstructionsonthescreen.
Chapter5.Conguringtheserver61
Page 76

•Ifyouwanttosetahot-sparedriverightaftertheconguration,selectObjects➙PhysicalDrive
fromtheprogrammaininterface.Then,selecttheharddiskdrivethatyouwanttosetasahot-spare
driveandpressEnter.Asubmenuisdisplayed.SelectMakeHotSparefromthesubmenu,andthen
selectY eswhenpromptedtosettheharddiskdriveasahot-sparedrive.
Rebuildingaphysicaldrive
ThistopicprovidesinstructionsonhowtorebuildaphysicaldriveusingtheLSISoftwareRAIDConguration
UtilityprogramwhenaphysicaldriveinaRAIDarrayfails.
WhenaphysicaldriveinaRAIDarrayfails,youcanrebuildthedrivebyrecreatingthedatathatwasstored
onthedrivebeforeitfails.Ifthedriveisnotoperational,itmustbereplacedandthedataonthefailingdrive
mustberebuiltonanewdrivetorestorethesystemtofaulttolerance.
TheRAIDcontrollerrecreatesthedatausingthedatastoredonotherdrivesinthedrivegroup.Rebuilding
canbedoneonlyindrivegroupswithdataredundancy,suchasRAID1,RAID5,andRAID10arrays.For
detailedinformationaboutdiskrebuild,referto“IntroductiontoRAID”intheMegaRAIDSASSoftwareUser
GuideonthedocumentationDVDthatcomeswithyourserver.
TorebuildaphysicaldriveusingtheLSISoftwareRAIDCongurationUtilityprogramwhenaphysicaldrive
inaRAIDarrayfails,dothefollowing:
1.StarttheLSISoftwareRAIDCongurationUtilityprogram.See“StartingtheLSISoftwareRAID
CongurationUtilityprogram”onpage59
.
2.Onthemaininterfaceoftheprogram,selectRebuildandfollowtheinstructionsonthescreen.
Note:Runaconsistencycheckimmediatelyaftertherebuildcompletestoensuredataintegrityforthevirtual
drives.See“Runningaconsistencycheck”onpage62
.
Therebuildrateisthepercentageofthecomputingcyclesdedicatedtorebuildingfailingdrives.Therebuild
ratecanbeconguredbetween0percentand100percent.At0percent,therebuildisdoneonlyifthesystem
isnotdoinganythingelse.At100percent,therebuildhasahigherprioritythananyothersystemactivity.
ToconguretherebuildrateusingtheLSISoftwareRAIDCongurationUtilityprogram,dothefollowing:
Note:Usingarebuildrateof0or100percentisnotrecommended.Thedefaultvalueis30percent.
1.StarttheLSISoftwareRAIDCongurationUtilityprogram.See“StartingtheLSISoftwareRAID
CongurationUtilityprogram”onpage59
.
2.Onthemaininterfaceoftheprogram,selectObjects➙Adapter➙RebuildRate.
3.Settherebuildratebytypingadesiredvaluefromthekeyboarddirectly.
Runningaconsistencycheck
ThistopicprovidesinstructionsonhowtorunaconsistencycheckforvirtualdrivesusingtheLSISoftware
RAIDCongurationUtilityprogram.
TheconsistencycheckoperationveriesthatallstripesonavirtualdrivewitharedundantRAIDlevel(RAID
1,RAID5,andRAID10)areconsistentandthedateonthevirtualdriveiscorrect.Forexample,inasystem
withparity,checkingconsistencymeanscomputingthedataononedriveandcomparingtheresultsto
thecontentsoftheparitydrive.
Youshouldrunaconsistencycheckonfault-tolerantvirtualdrivesperiodically.Itisrecommendedthatyou
runaconsistencycheckatleastonceamonth.Youmustrunaconsistencycheckifyoususpectthatthe
virtualdrivedatamightbecorrupted.Ensurethatyoubackupthedatabeforerunningaconsistencycheck
ifyoususpectthatthedatamightbecorrupted.
62ThinkServerRD330HardwareMaintenanceManual
Page 77

TorunaconsistencycheckusingtheLSISoftwareRAIDCongurationUtilityprogram,dothefollowing:
1.StarttheLSISoftwareRAIDCongurationUtilityprogram.See“StartingtheLSISoftwareRAID
CongurationUtilityprogram”onpage59.
2.Onthemaininterfaceoftheprogram,selectCheckConsistencyandfollowtheinstructionsonthe
screen.
Theconsistencycheckrateistherateatwhichconsistencycheckoperationsarerunonasystem.The
consistencycheckratecanbeconguredbetween0percentand100percent.At0percent,theconsistency
checkisdoneonlyifthesystemisnotdoinganythingelse.At100percent,theconsistencycheckhasa
higherprioritythananyothersystemactivity.
ToconguretheconsistencycheckrateusingtheLSISoftwareRAIDCongurationUtilityprogram,do
thefollowing:
Note:Usingaconsistencycheckrateof0or100percentisnotrecommended.Thedefaultvalueis30
percent.
1.StarttheLSISoftwareRAIDCongurationUtilityprogram.See“StartingtheLSISoftwareRAID
CongurationUtilityprogram”onpage59.
2.Onthemaininterfaceoftheprogram,selectObjects➙Adapter➙ChkConstRate.
3.Settheconsistencycheckratebytypingadesiredvaluefromthekeyboarddirectly.
InstallingandusingtheMegaRAIDStorageManagerprogram
YoucaninstallandusetheMegaRAIDStorageManagerprogramtomanagetheRAIDarrayandRAID
controllerinanoperatingsystemenvironmentafterconguringRAID.
TheinstallationpackagefortheMegaRAIDStorageManagerprogramisontheThinkServerEasyStartup
DVD.Afteryouentertheoperatingsystem,inserttheThinkServerEasyStartupDVDintotheopticaldrive.
TheinstallationpackagefortheMegaRAIDStorageManagerprogramislocatedintheUtilitiesandOthers
folderintherootdirectoryoftheDVD.
ToinstallandusetheMegaRAIDStorageManagerprogram,refertothefollowingchaptersintheMegaRAID
SASSoftwareUserGuideonthedocumentationDVDthatcomeswithyourserver:
Note:SomeinformationinthesechaptersmightbeintendedfortheadvancedSATA/SAShardwareRAID
congurationsandmightnotapplytotheThinkServerRAID300congurations.
•“MegaRAIDStorageManagerOverviewandInstallation”
•“MegaRAIDStorageManagerWindowandMenus”
•“MonitoringSystemEventsandStorageDevices”
•“MaintainingandManagingStorageCongurations”
TheMegaRAIDSASSoftwareUserGuidealsoisavailableontheLenovoWebsiteat:
http://www.lenovo.com/ThinkServerUserGuides
ConguringtheadvancedSAT A/SAShardwareRAID
BeforeconguringRAIDforyourserver,observethefollowingprecautions:
•Useharddiskdrivesthatareofthesametype(SATAorSAS)andhavethesamecapacitywithina
singleRAIDarray.
•ThetotaldrivecapacityoftheprimaryRAIDarraymightbelimitedto2TB.
Chapter5.Conguringtheserver63
Page 78

SomeservermodelscomewithaRAIDcardtoprovideadvancedSATA/SAShardwareRAIDfunctions.You
alsocanpurchaseasupportedRAIDcardfromLenovoandinstallitintotheserver.See“RAIDcard”
onpage26.
TheRAIDcardprovidestheWebBIOSCongurationUtilityprogramtohelpyoucongureRAID
independentlyoftheoperatingsystem.YoualsocaninstalltheMegaRAIDStorageManagerprogramand
theMegaCLICongurationUtilityprogramtohelpyoumanagetheRAIDarrayandRAIDcontrollerinan
operatingsystemenvironment.
TheinstallationpackagesfortheMegaRAIDStorageManagerprogramandtheMegaCLIConguration
UtilityprogramareontheThinkServerEasyStartupDVD.Afteryouentertheoperatingsystem,insertthe
ThinkServerEasyStartupDVDintotheopticaldrive.Theinstallationpackagesfortheprogramsarelocatedin
theUtilitiesandOthersfolderintherootdirectoryoftheDVD.
Note:TheThinkServerEasyStartupDVDisdesignedfordifferenttypesofserversandtheUtilitiesandOthers
foldermightcontainadditionalinstallationpackagesthatarenotrequiredtobeinstalledonyourserver.
ForinstructionsonhowtocongureandmanagetheadvancedSATA/SAShardwareRAID,refertothe
MegaRAIDSASSoftwareUserGuideonthedocumentationDVDthatcomeswithyourserver.This
documentalsoisavailableontheLenovoWebsiteat:
http://www.lenovo.com/ThinkServerUserGuides
ConguringtheEthernetcontrollers
TheEthernetcontrollersareintegratedonthesystemboard.Theyprovideaninterfaceforconnectingto
a10Mbps,100Mbps,or1000Mbpsnetworkandprovidefull-duplex(FDX)capability,whichenables
simultaneoustransmissionandreceptionofdataonthenetwork.
YoudonothavetosetanyjumpersorconguretheEthernetcontrollers.However,youmustinstalladevice
drivertoenabletheoperatingsystemtorecognizethecontrollers.
TheThinkServerEasyStartupprogramsimpliestheprocessofconguringRAIDandinstallingsupported
operatingsystemsanddevicedriversonyourserver.See“UsingtheThinkServerEasyStartupprogram”
onpage53
.
ThedevicedriversforonboardEthernetcontrollersalsoareavailablefordownloadat:
http://www.lenovo.com/drivers
Updatingthermware
ThermwareintheserverisperiodicallyupdatedandisavailablefordownloadontheLenovoWebsite.
Gotohttp://www.lenovo.com/driversandfollowtheinstructionsontheWebpagetocheckforthelatest
levelofrmware,suchastheBIOSupdatesanddevicedrivers.
Whenyoureplaceadeviceintheserver,youmighthavetoeitherupdatetheserverwiththelatestversionof
thermwarethatisstoredinmemoryonthedeviceorreashtheBIOS,theTMMrmware,andtheFRU/SDR.
UsingtheFirmwareUpdaterprogram
TheFirmwareUpdaterprogramenablesyoutomaintainyoursystemrmwareup-to-dateandhelpsyou
avoidunnecessaryoutages.
ToupdateyoursystemrmwareusingtheFirmwareUpdaterprogram,dothefollowing:
64ThinkServerRD330HardwareMaintenanceManual
Page 79

Note:Beforedistributingthermwareupdatestoaserver,ensurethatyourservercanrestartsuccessfully
withoutencounteringhardwareproblems.
1.Gotohttp://www.lenovo.com/driversandfollowtheinstructionsontheWebpagetolocatethe
FirmwareUpdaterprogram.
2.DownloadtheISOimagefortheFirmwareUpdaterprogramandtheinstallationinstructionsinaTXTle.
3.UseanyCDorDVDburningsoftwaretocreateabootablediscwiththeISOimage.
4.PrinttheTXTlethatcontainstheinstallationinstructionsandfollowtheinstructionstousetheFirmware
Updaterprogramtoupdateyoursystemrmware.
UsingtheLenovoThinkServerEasyManageprogram
TheLenovoThinkServerEasyManageprogramenablesenterpriseuserstoremotelycontrolandmonitor
multipleLenovoserverswithinaLAN.Theprogramprovidesaninterfacetodisplayallseversbeing
managed,whichenablestheadministratortoconvenientlysearchfor,monitor,andmanageservers.
TodownloadtheLenovoThinkServerEasyManageprogram,gotohttp://www.lenovo.com/driversand
followtheinstructionsontheWebpage.
FordetailedinformationaboutusingtheLenovoThinkServerEasyManageprogram,refertothehelpsystem
fortheprogram.
Chapter5.Conguringtheserver65
Page 80

66ThinkServerRD330HardwareMaintenanceManual
Page 81

Chapter6.Installing,removing,orreplacinghardware
Thischapterprovidesinstructionsonhowtoinstall,remove,orreplacehardwareforyourserver.
Thischaptercontainsthefollowingitems:
•“Guidelines”onpage67
•“Removingtheservercover”onpage69
•“Installing,removing,orreplacinghardware”onpage71
•“Completingthepartsreplacement”onpage153
ForalistoftheThinkServeroptions,goto:
http://www.lenovo.com/thinkserver
Guidelines
Thistopicprovidessomeguidelinesthatyoushouldreadandunderstandbeforeusingyourserver.
Precautions
Beforeyouusetheserver,ensurethatyoureadandunderstandthefollowingprecautions:
•Beforeusingtheproduct,besuretoreadandunderstandthemultilingualsafetyinstructionsandthe
LenovoLimitedWarranty(LLW)onthedocumentationDVDthatcomeswiththeproduct.Readingand
understandingthesafetyinstructionsreducestheriskofpersonalinjuryanddamagetoyourproduct.
•Whenyouinstallyournewserver,taketheopportunitytodownloadandapplythemostrecentrmware
updates.Thisstepwillhelptoensurethatanyknownissuesareaddressedandthatyourserveris
readytofunctionatmaximumlevelsofperformance.Todownloadrmwareupdatesforyourserver,go
tohttp://www.lenovo.com/driversandfollowtheinstructionsontheWebpage.See“Updatingthe
rmware”onpage64
formoreinformation.
•Beforeyouinstalloptionalhardwaredevices,ensurethattheserverisworkingcorrectly.Iftheserver
isnotworkingcorrectly,seeChapter7“Troubleshootinganddiagnostics”onpage159todobasic
troubleshooting.Iftheproblemcannotbesolved,seeChapter8“Gettinginformation,help,andservice”
onpage165
.
•Observegoodhousekeepingintheareawhereyouareworking.Putremovedcoversandotherparts
inasafeplace.
•Ifyoumustturnontheserverwhiletheservercoverisremoved,ensurethatnooneisneartheserver
andthatnotoolsorotherobjectshavebeenleftinsidetheserver.
•Donotattempttoliftanobjectthatyouthinkistooheavyforyou.Ifyouhavetoliftaheavyobject,
observethefollowingprecautions:
–Ensurethatyoucanstandsafelywithoutslipping.
–Distributetheweightoftheobjectequallybetweenyourfeet.
–Useaslowliftingforce.Nevermovesuddenlyortwistwhenyouliftaheavyobject.
–Toavoidstrainingthemusclesinyourback,liftbystandingorbypushingupwithyourlegmuscles.
•Ensurethatyouhaveanadequatenumberofproperlygroundedelectricaloutletsfortheserver,monitor,
andotherdevices.
•Backupallimportantdatabeforeyoumakechangestodrives.
•Haveasmallat-bladescrewdriveravailable.
©CopyrightLenovo2012
67
Page 82

•Youdonothavetoturnofftheservertoinstallorreplaceahot-swapredundantpowersupply,a
hot-swapharddiskdrive,orahot-plugUSBdevice.However,youmustturnofftheserverbefore
performinganystepthatinvolvesinstalling,removing,orreplacingadaptercablesornon-hot-swap
devicesorcomponents.
•ToviewtheLEDsonthesystemboardandinternalcomponents,leavetheserverconnectedtopower.
•Whenyouarenishedworkingontheserver,reinstallallsafetyshields,guards,labels,andgroundwires.
•Whenworkinginsidetheserver,youmightndsometaskseasierifyoulaytheserveronitsside.
Handlingstatic-sensitivedevices
Attention:Donotopenthestatic-protectivepackagethatcontainsthenewpartuntilthedefectiveparthasbeen
removedfromtheserverandyouarereadytoinstallthenewpart.Staticelectricity,althoughharmlesstoyou,
canseriouslydamageservercomponentsandparts.
Anyserverpartcontainingtransistorsorintegratedcircuits(ICs)shouldbeconsideredsensitiveto
electrostaticdischarge(ESD).ESDdamagecanoccurwhenthereisadifferenceinchargebetweenobjects.
ProtectagainstESDdamagebyequalizingthechargesothatthemachine,thepart,theworkmat,andthe
personhandlingthepartareallatthesamecharge.
Notes:
•Useproduct-specicESDprocedureswhentheyexceedtherequirementsnotedhere.
•EnsurethattheESDprotectivedevicesyouusehavebeencertied(ISO9000)asfullyeffective.
Whenyouhandleserverpartsandcomponents,taketheseprecautionstoavoidstatic-electricitydamage:
•Limityourmovement.Movementcancausestaticelectricitytobuilduparoundyou.
•Alwayscarefullyhandlethepartsandothercomponents(suchasPCIExpresscards,memorymodules,
systemboards,andmicroprocessors)byedgesorframe.Donottouchsolderjoints,pins,orexposed
circuitry.
•Donotleavethedevicewhereotherscanhandleandpossiblydamagethedevice.
•Beforeyoureplaceanewpart,touchthestatic-protectivepackagecontainingthenewparttoan
unpaintedmetalpartoftheserverforatleasttwoseconds.Thisreducesstaticelectricityfromthe
packageandyourbody.
•Removethenewpartfromthestatic-protectivepackageanddirectlyinstallitintheserverwithout
placingitonanyothersurface.Ifitishardforyoutodothisinyourspecicsituation,placethe
static-protectivepackageofthenewpartonasmooth,levelsurface,andthenplacethenewparton
thestatic-protectivepackage.
•Donotplacethepartontheservercoverorothermetalsurface.
•Takeadditionalcarewhenhandlingdevicesduringcoldweather.Heatingreducesindoorhumidity
andincreasesstaticelectricity.
•Useagroundedworkmattoprovideastatic-freeworksurface.Thematisespeciallyusefulwhen
handlingESD-sensitivedevices.
•Preventthepartfromtouchingyourclothing.Mostclothingisinsulativeandretainsachargeevenwhen
youarewearingawriststrap.
•Theuseofagroundingsystemisrecommended.Forexample,itisrecommendedtowearanelectrostatic
discharge(ESD)wriststrap,ifoneisavailable.EnsurethatyouworkinanESD-safearea.Selecta
groundingsystem,suchasthoselistedbelow,toprovideprotectionthatmeetsthespecicservice
requirement.
Note:TheuseofagroundingsystemtoguardagainstESDdamageisdesirablebutnotnecessary.
68ThinkServerRD330HardwareMaintenanceManual
Page 83

–AttachtheESDgroundcliptoanyframeground,groundbraid,orgreen-wireground.
–Whenworkingonadouble-insulatedorbattery-operatedsystem,useanESDcommongroundor
referencepoint.Y oucanusecoaxorconnector-outsideshellsonthesesystems.
–Usethegroundprongoftheacplugonac-operatedservers.
Systemreliabilityguidelines
Tohelpensurepropercoolingandsystemreliability,strictlyfollowtheseguidelines:
•Eachofthedrivebayshasadriveoradummytrayinstalled.
•Iftheserversupportshot-swapredundantpowersupplies,eachofthepowersupplybayhasaredundant
powersupplyinstalled,oronebayhasaredundantpowersupplyinstalledwhiletheotherbayiscovered
byashield.
•Leaveadequatespacearoundtheservertoensurethattheservercoolingsystemworkswell.Leave
approximately50mm(2inches)ofopenspacearoundthefrontandrearoftheserver.Donotplace
objectsinfrontofthefans.Forpropercoolingandairow,installtheservercoverbeforeyouturnon
theserver.Operatingtheserverforextendedperiodsoftime(morethan30minutes)withtheserver
coverremovedmightdamageservercomponents.
•Properlyroutethecables.Forsomeoptions,suchasPCIExpresscards,followthecablinginstructions
thatcomewiththeoptionsinadditiontotheinstructionsinthismanual.
•Whenreplacingahot-swapdrive,installthenewhot-swapdrivewithintwominutesofremoval.
•Ifyourserverhasairductsorairbafes,donotremovethemwhiletheserverisrunning.Operatingthe
serverwithouttheairductsorairbafesmightcausethemicroprocessorstooverheat.
•Forserversthatsupportuptotwomicroprocessors,ensurethatthesecondmicroprocessorsocket
alwayscontainsamicroprocessororisprotectedbyamicroprocessorsocketcover.
Workinginsidetheserverwiththepoweron
Attention:Staticelectricitythatisreleasedtointernalservercomponentswhentheserveristurnedonmightcause
theservertohalt,whichmightresultinthelossofdata.Toavoidthispotentialproblem,alwaysuseanESDwriststrap
orothergroundingsystemwhenyouworkinsidetheserverwiththepoweron.
Theserversupportshot-swapdevicesandisdesignedtooperatesafelywhileitisturnedonandthecoveris
removed.Followtheseguidelineswhenyouworkinsidetheserverwiththepoweron:
•Avoidwearingloose-ttingclothingonyourforearms.Buttonlong-sleevedshirtsbeforeworkinginside
theserver;donotwearcufflinkswhileyouareworkinginsidetheserver.
•Donotallowyournecktieorscarftohanginsidetheserver.
•Removejewelry,suchasbracelets,necklaces,rings,andloose-ttingwristwatches.
•Removeitemsfromyourshirtpocket,suchaspensandpencils.Theseitemsmightfallintotheserveras
youleanoverit.
•Avoiddroppinganymetallicobjectsintotheserver,suchaspaperclips,hairpins,andscrews.
Removingtheservercover
Attention:Donotopenyourserverorattemptanyrepairbeforereadingandunderstanding“Safetyinformation”
onpageiiiand“Guidelines”onpage67.
Thistopicprovidesinstructionsonhowtoremovetheservercover.
Chapter6.Installing,removing,orreplacinghardware69
Page 84
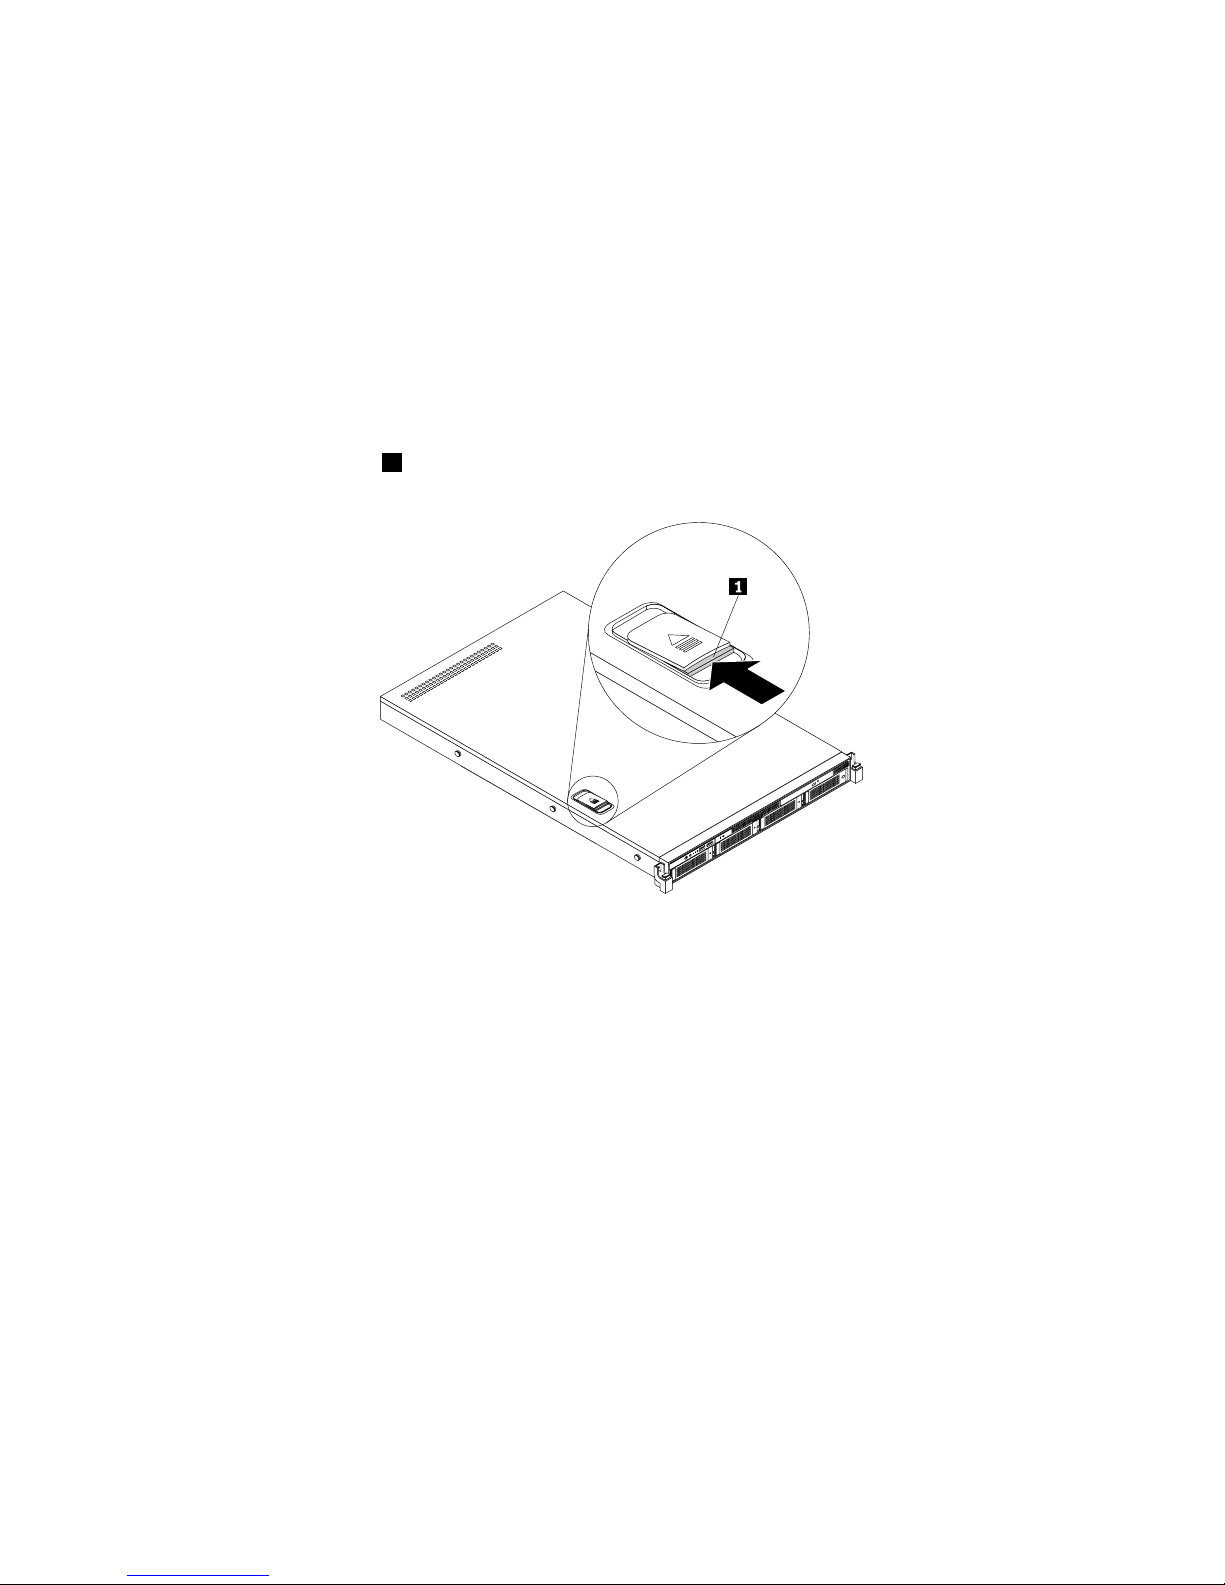
Beforeyoubegin,printalltherelatedinstructionsorensurethatyoucanviewthePDFversiononanother
computerforreference.
Note:Dependingonthemodel,yourservermightlookslightlydifferentfromtheillustrationsinthistopic.
Toremovetheservercover,dothefollowing:
1.Removeallmediafromthedrivesandturnoffallattacheddevicesandtheserver.Then,disconnectall
powercordsfromelectricaloutlets.
2.Disconnectthepowercords,Input/Output(I/O)cables,andallothercablesthatareconnectedto
theserver.
3.Iftheserverisinstalledinarackcabinet,removetheserverfromtherackcabinetandplaceitonaat,
clean,andstatic-protectivesurface.SeetheRackInstallationInstructionsthatcomeswiththeserver.
4.Pressthereleasebutton1inthedirectionasshown.
ID
CPU
Mem
PSU
Figure27.Pressingthereleasebutton
70ThinkServerRD330HardwareMaintenanceManual
Page 85
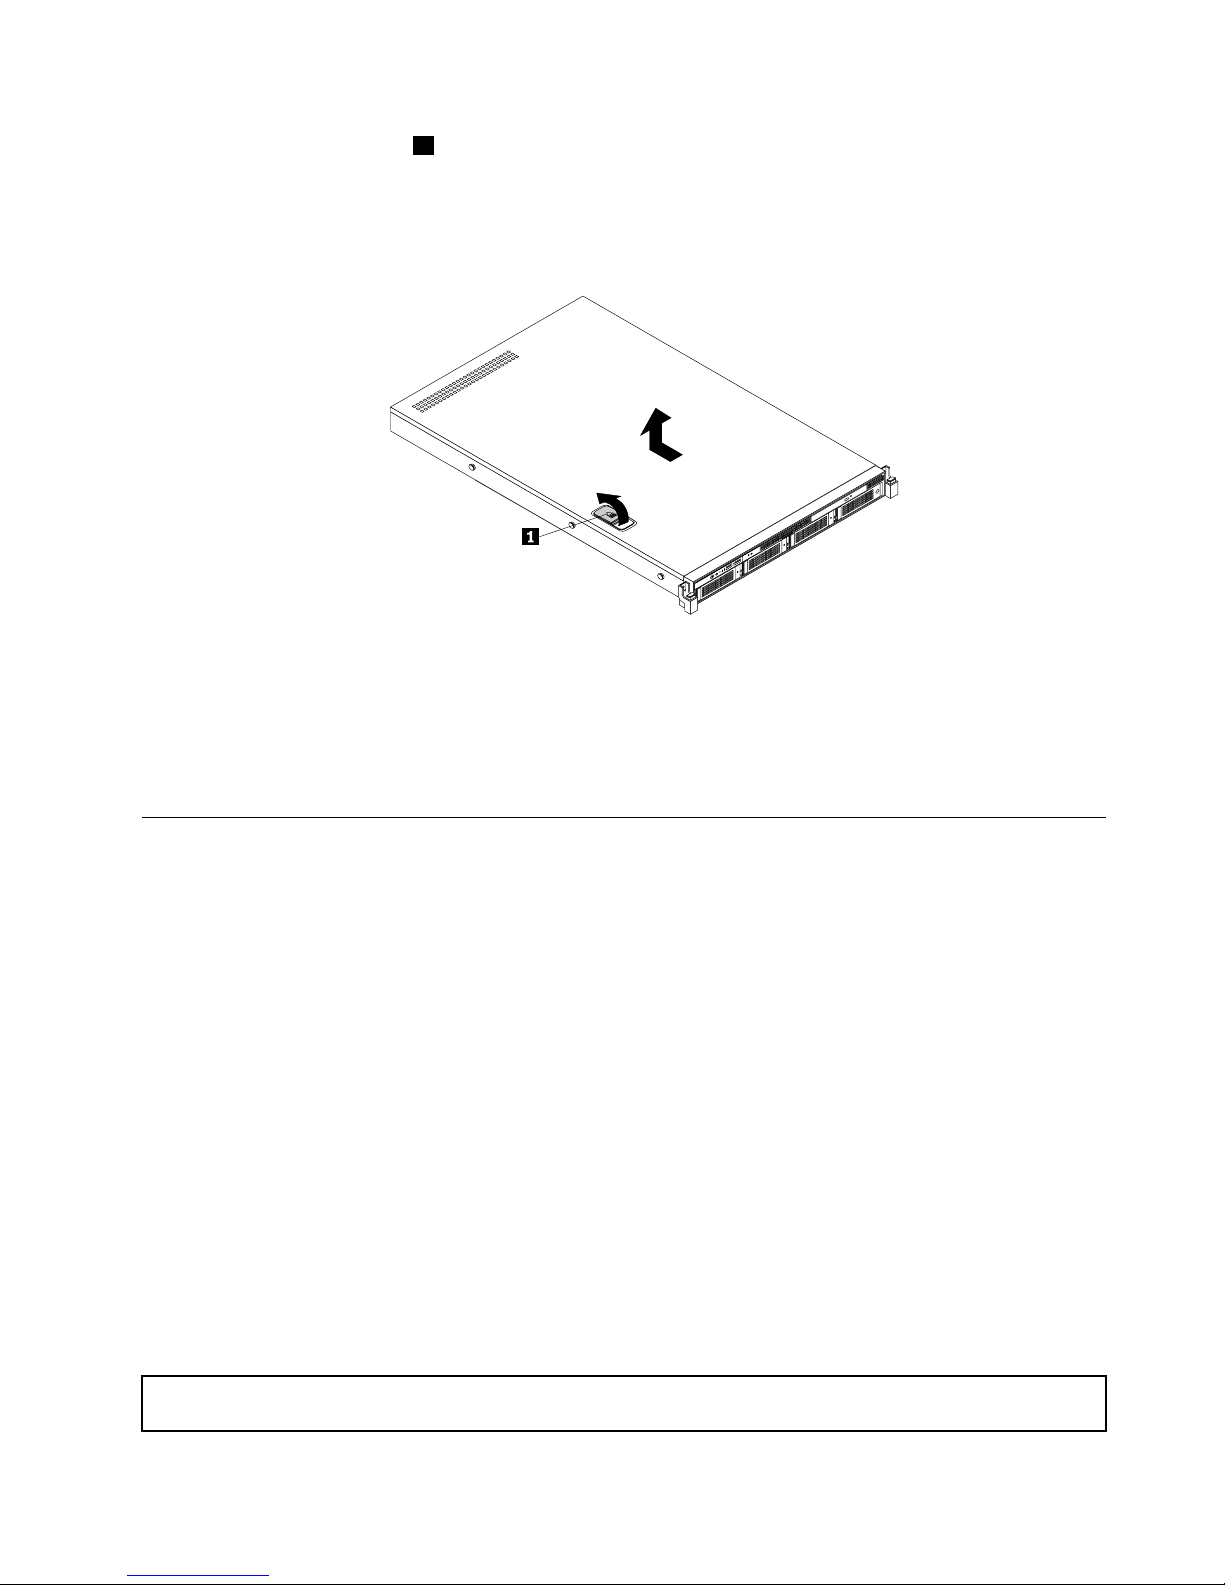
5.Fullyopenthecoverlatch1andslidetheservercovertotherearuntilitisdisengagedfromthechassis.
Then,lifttheservercoveroffthechassisandsetitaside.
Note:Itisrecommendedthatyouwaitthreetoveminutestolettheservercoolbeforeremoving
theservercover.
ID
CPU
Mem
PSU
Figure28.Removingtheservercover
Attention:Forpropercoolingandairow,installtheservercoverbeforeturningontheserver.Operatingthe
serverformorethan30minuteswiththeservercoverremovedmightdamageservercomponents.
Toreinstalltheservercover,see“Reinstallingtheservercoverandreconnectingcables”onpage153.
Installing,removing,orreplacinghardware
Thistopicprovidesinstructionsonhowtoinstall,remove,orreplacehardwareforyourserver.Y oucan
expandthecapabilitiesofyourserverbyaddingnewhardwaredevices,suchasmemorymodulesorother
serveroptions,andmaintainyourserverbyreplacingthefailinghardwaredevices.
Ifyouarehandlingaserveroption,refertotheappropriateinstallationorremovalinstructionsinthistopic
alongwiththeinstructionsthatcomewiththeoption.
Notes:
•UseonlypartsprovidedbyLenovo.
•Dependingonthemodel,yourservermightlookslightlydifferentfromtheillustrationsinthistopic.
TheEMIintegrityandcoolingoftheserverareprotectedbyhavingalldrivebaysandPCIExpresscardslots
coveredoroccupied.WhenyouinstallaninternaldriveoraPCIExpresscard,savetheEMIshieldordummy
trayfromthedrivebayorsavethePCIExpresscardslotbracketintheeventthatyoulaterremovethedevice.
Attention:AnunoccupieddrivebayorPCIExpresscardslotwithoutacover,shield,dummytray,ller,
oranyotherprotectionmightimpacttheEMIintegrityandcoolingoftheserver,whichmightresultin
overheatingorcomponentdamage.
Removingandreinstallingtherackhandles
Attention:Donotopenyourserverorattemptanyrepairbeforereadingandunderstanding“Safetyinformation”
onpageiiiand“Guidelines”onpage67.
Chapter6.Installing,removing,orreplacinghardware71
Page 86

Thistopicprovidesinstructionsonhowtoremoveandreinstalltherackhandles.
Beforeyoubegin,printalltherelatedinstructionsorensurethatyoucanviewthePDFversiononanother
computerforreference.
Note:Dependingonthemodel,yourservermightlookslightlydifferentfromtheillustrationsinthistopic.
Toremoveandreinstalltherackhandles,dothefollowing:
1.Oneachsideoftheserver,removethescrewthatsecurestherackhandle,andthenremovethe
rackhandlefromthechassis.
ID
Mem
CPU
PSU
Figure29.Removingtherackhandles
72ThinkServerRD330HardwareMaintenanceManual
Page 87
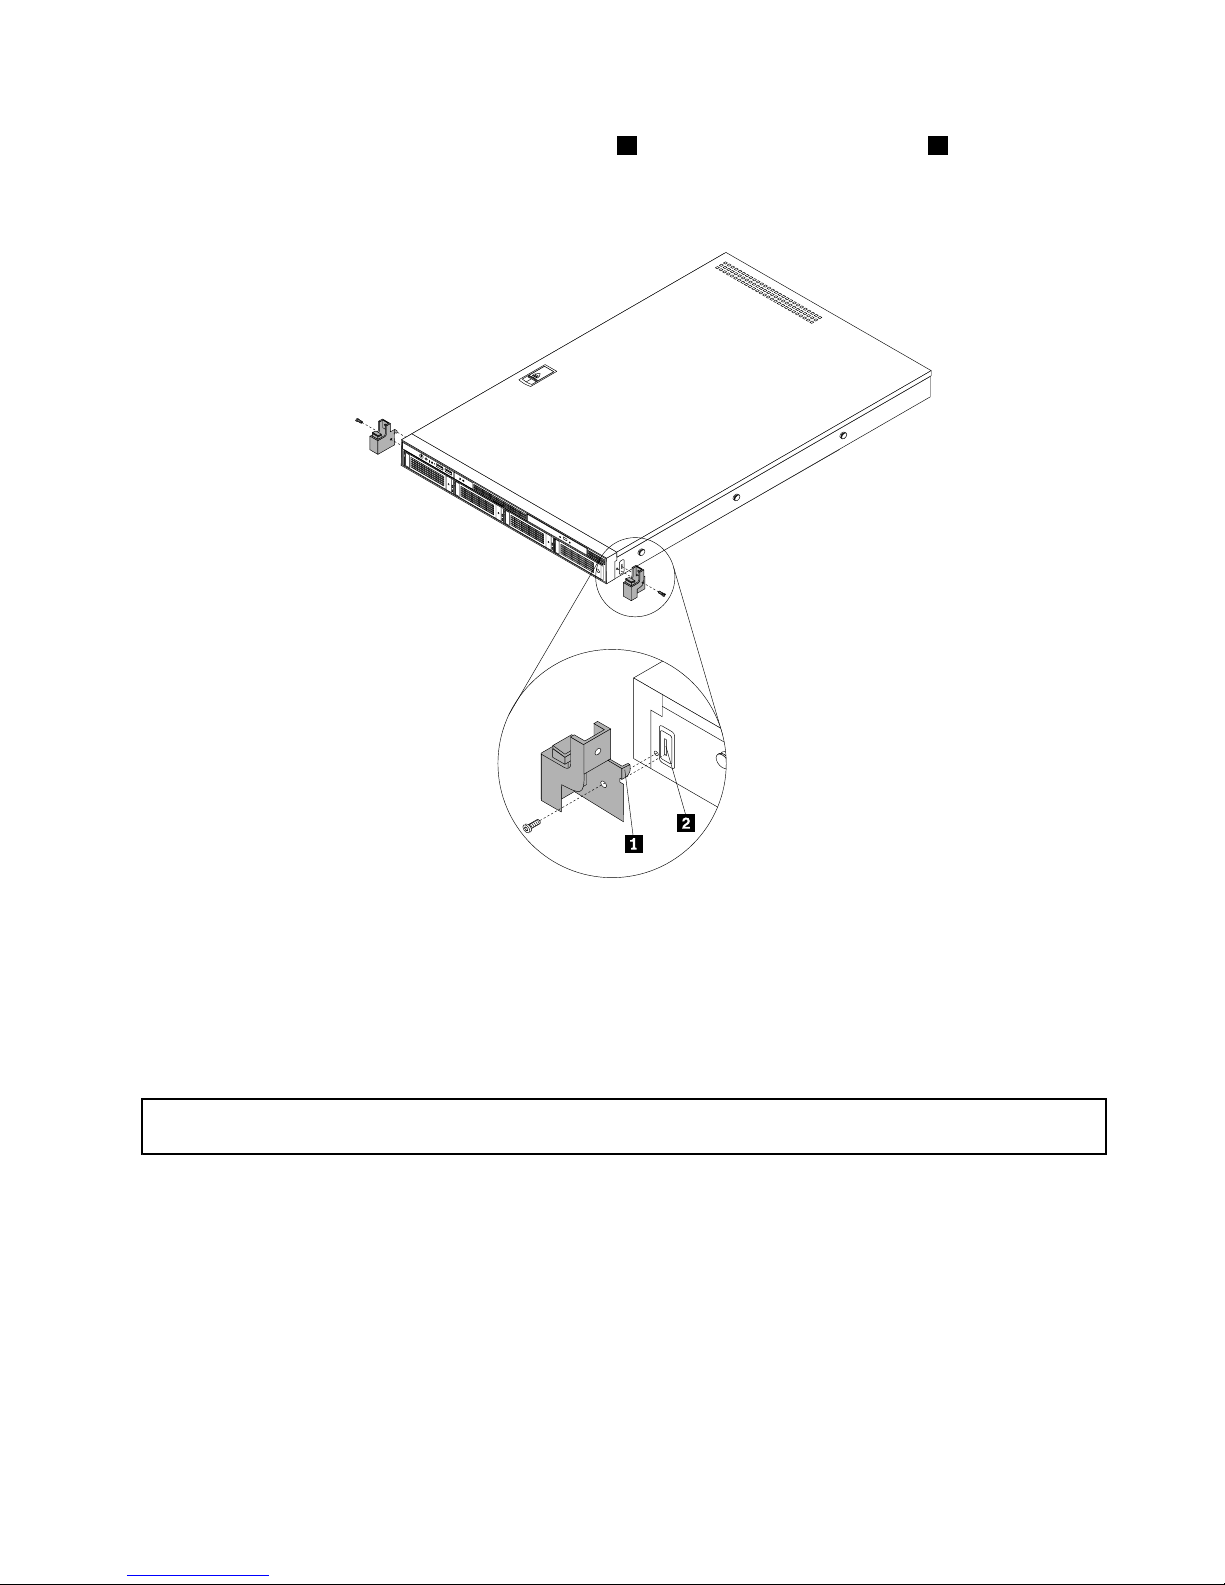
2.Toreinstalltherackhandles,insertthesmalltab1ontherackhandleintothehole2inthechassis.
Then,alignthescrewholeintherackhandlewiththecorrespondingholeinthechassisandinstallthe
screwtosecuretherackhandleoneachsideoftheserver.
ID
Mem
CPU
PSU
Figure30.Installingtherackhandles
Removingandreinstallingthecoolingshroud
Thecoolingshroudmustberemovedtoallowaccesstomostservercomponents.Thistopicprovides
instructionsonhowtoremoveandreinstallthecoolingshroud.
Removingthecoolingshroud
Attention:Donotopenyourserverorattemptanyrepairbeforereadingandunderstanding“Safetyinformation”
onpageiiiand“Guidelines”onpage67.
Thistopicprovidesinstructionsonhowtoremovethecoolingshroud.
Beforeyoubegin,printalltherelatedinstructionsorensurethatyoucanviewthePDFversiononanother
computerforreference.
Note:Dependingonthemodel,yourservermightlookslightlydifferentfromtheillustrationsinthistopic.
Toremovethecoolingshroud,dothefollowing:
1.Removeallmediafromthedrivesandturnoffallattacheddevicesandtheserver.Then,disconnectall
powercordsfromelectricaloutletsanddisconnectallcablesthatareconnectedtotheserver.
Chapter6.Installing,removing,orreplacinghardware73
Page 88
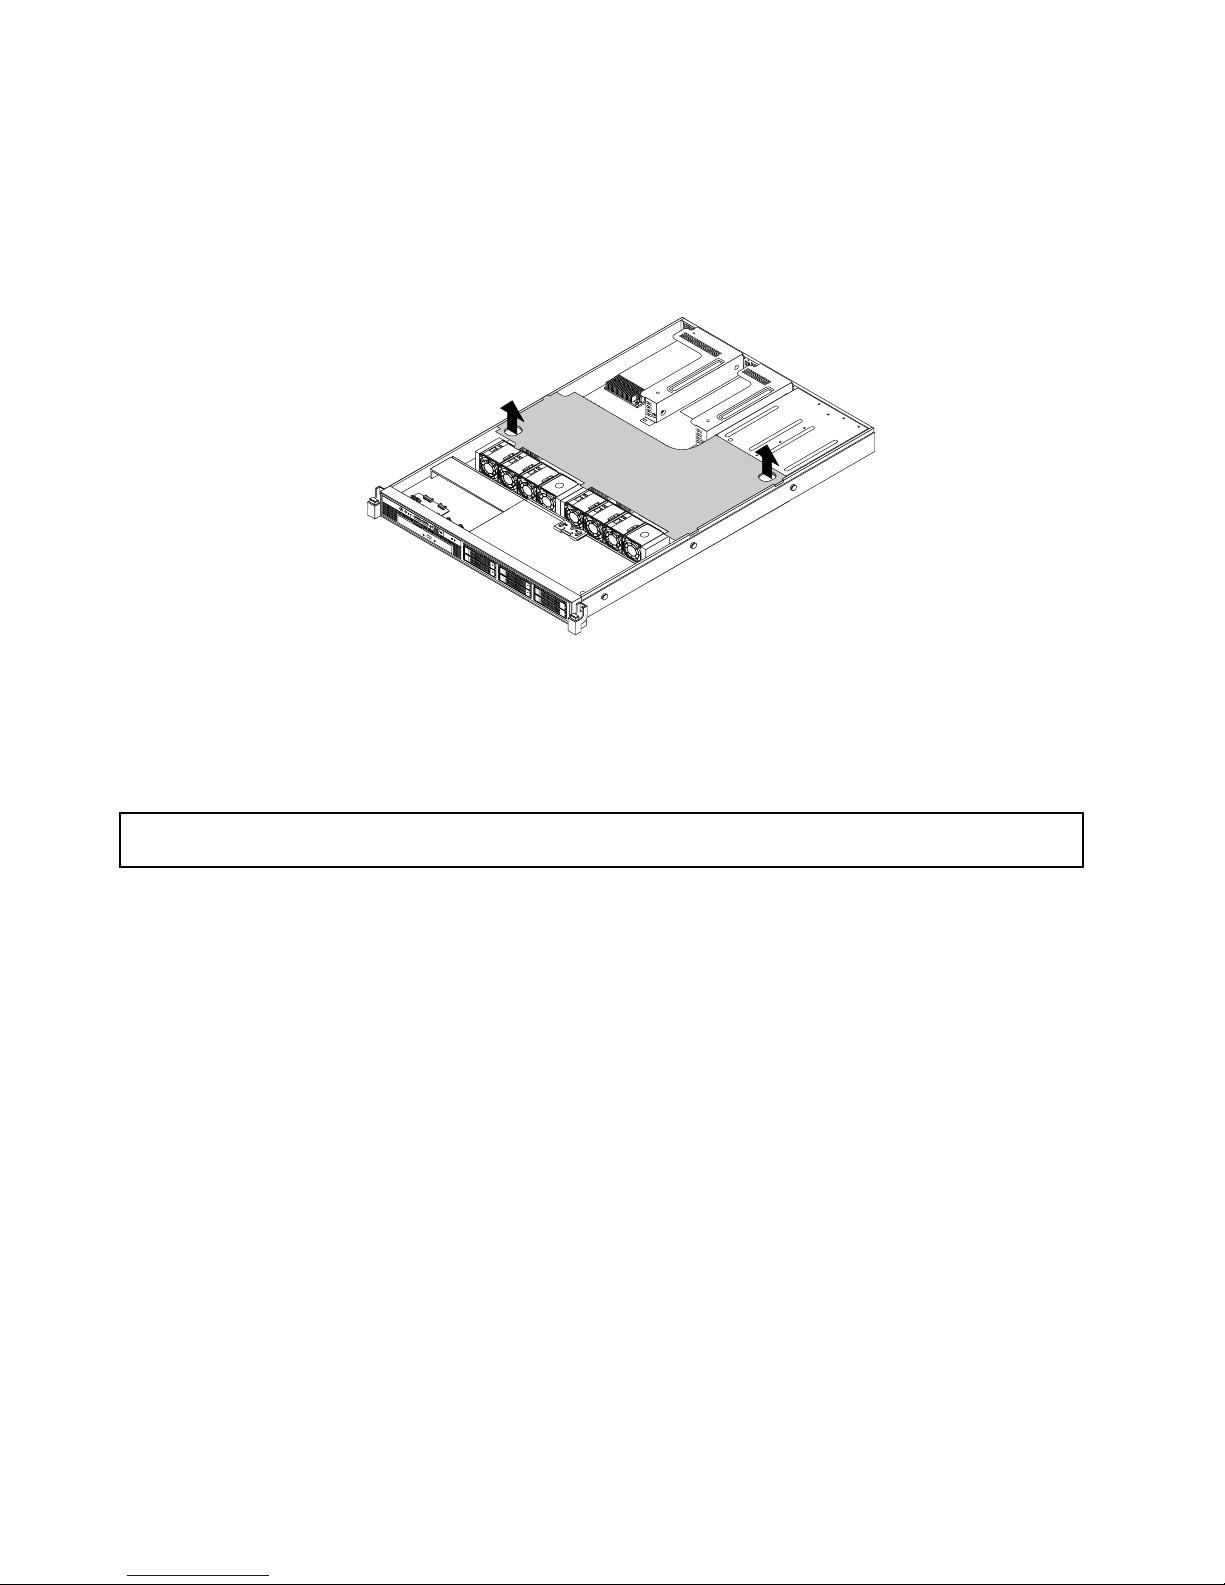
2.Iftheserverisinstalledinarackcabinet,removetheserverfromtherackcabinetandplaceitonaat,
clean,andstatic-protectivesurface.SeetheRackInstallationInstructionsthatcomeswiththeserver.
3.Removetheservercover.See“Removingtheservercover”onpage69.
4.Insertangerintoeachofthetwoholesinthecoolingshroud,andthenliftthecoolingshroudoutof
theserver.
PSU
Mem
CPU
ID
Figure31.Removingthecoolingshroud
Attention:Forpropercoolingandairow,reinstallthecoolingshroudbeforeturningontheserver.Operating
theserverformorethan30minuteswiththecoolingshroudremovedmightdamageservercomponents.
Reinstallingthecoolingshroud
Attention:Donotopenyourserverorattemptanyrepairbeforereadingandunderstanding“Safetyinformation”
onpageiiiand“Guidelines”onpage67.
Thistopicprovidesinstructionsonhowtoreinstallthecoolingshroud.
Beforeyoubegin,printalltherelatedinstructionsorensurethatyoucanviewthePDFversiononanother
computerforreference.
Note:Dependingonthemodel,yourservermightlookslightlydifferentfromtheillustrationsinthistopic.
Toreinstallthecoolingshroud,dothefollowing:
1.Ensurethatallcomponentshavebeenreassembledcorrectlyandthatnotoolsorloosescrewsare
leftinsideyourserver.
2.Ensurethatallcablesinsidetheserverhavebeenproperlyroutedsothattheywillnotinterferewith
installingthecoolingshroud.
74ThinkServerRD330HardwareMaintenanceManual
Page 89
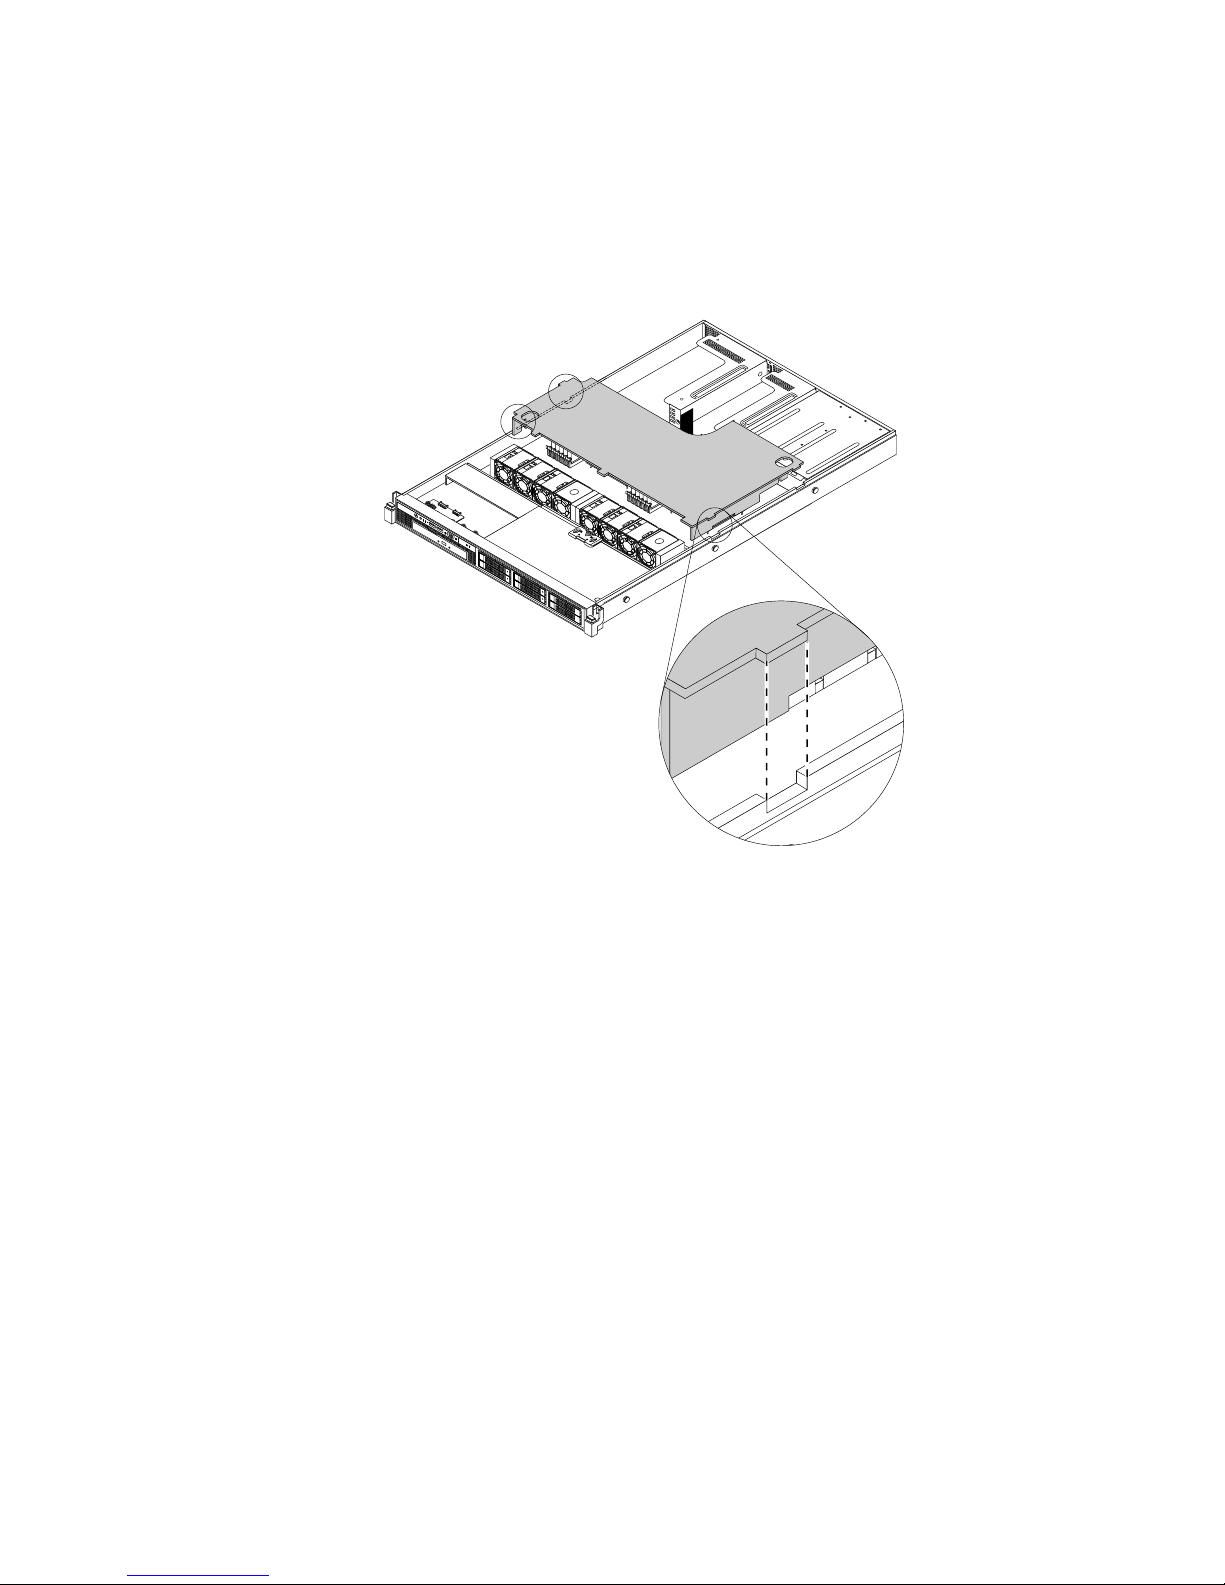
3.Notetheorientationofthecoolingshroud,andthenplaceitabovetheserversothatthetabsonboth
sidesofthecoolingshroudarealignedwiththecorrespondingholesorgapsinbothsidesofthe
chassis.Then,lowerthecoolingshroudintothechassisuntilitsnapsintoposition.
Note:Ifnecessary,gentlypressthecoolingshroudonbothsidessothatthetabsonthecoolingshroud
completelyengagewithbothsidesofthechassis.
PSU
Mem
CPU
ID
Figure32.Reinstallingthecoolingshroud
4.Goto“Reinstallingtheservercoverandreconnectingcables”onpage153.
Installingorremovingamemorymodule
Thistopicprovidesinstructionsonhowtoinstallorremoveamemorymodule.
Note:ThememorymodulesareextremelysensitivetoESD.Ensurethatyoureadandunderstand“Handling
static-sensitivedevices”onpage68rstandcarefullyperformtheoperation.
Memorymoduleinstallationrules
Yourserverhas12memoryslotsandithasthefollowingfeatures:
•Eachslotsupports4GB,8GB,and16GB1333MHzdoubledatarate3low-voltageregistereddualinline
memorymodules(DDR3LVRDIMMs).
•Eachslotsupports4GB,8GB,and16GB1333MHzDDR3RDIMMs.
•Eachslotsupports2GBand4GB1333MHzDDR3unbuffereddualinlinememorymodules(UDIMMs)
withErrorCheckingandCorrecting(ECC)technology.
•Yourserversupportsuptosixmemorymoduleswhenonemicroprocessorisinstalledandupto12
memorymoduleswhentwomicroprocessorsareinstalled.
•TheminimumsystemmemoryforRDIMMsorLVRDIMMsis4GB(onlyonemicroprocessorinstalledand
onlyone4GBRDIMMorLVRDIMMinstalledintheCPU1DIMMA1slot).
Chapter6.Installing,removing,orreplacinghardware75
Page 90
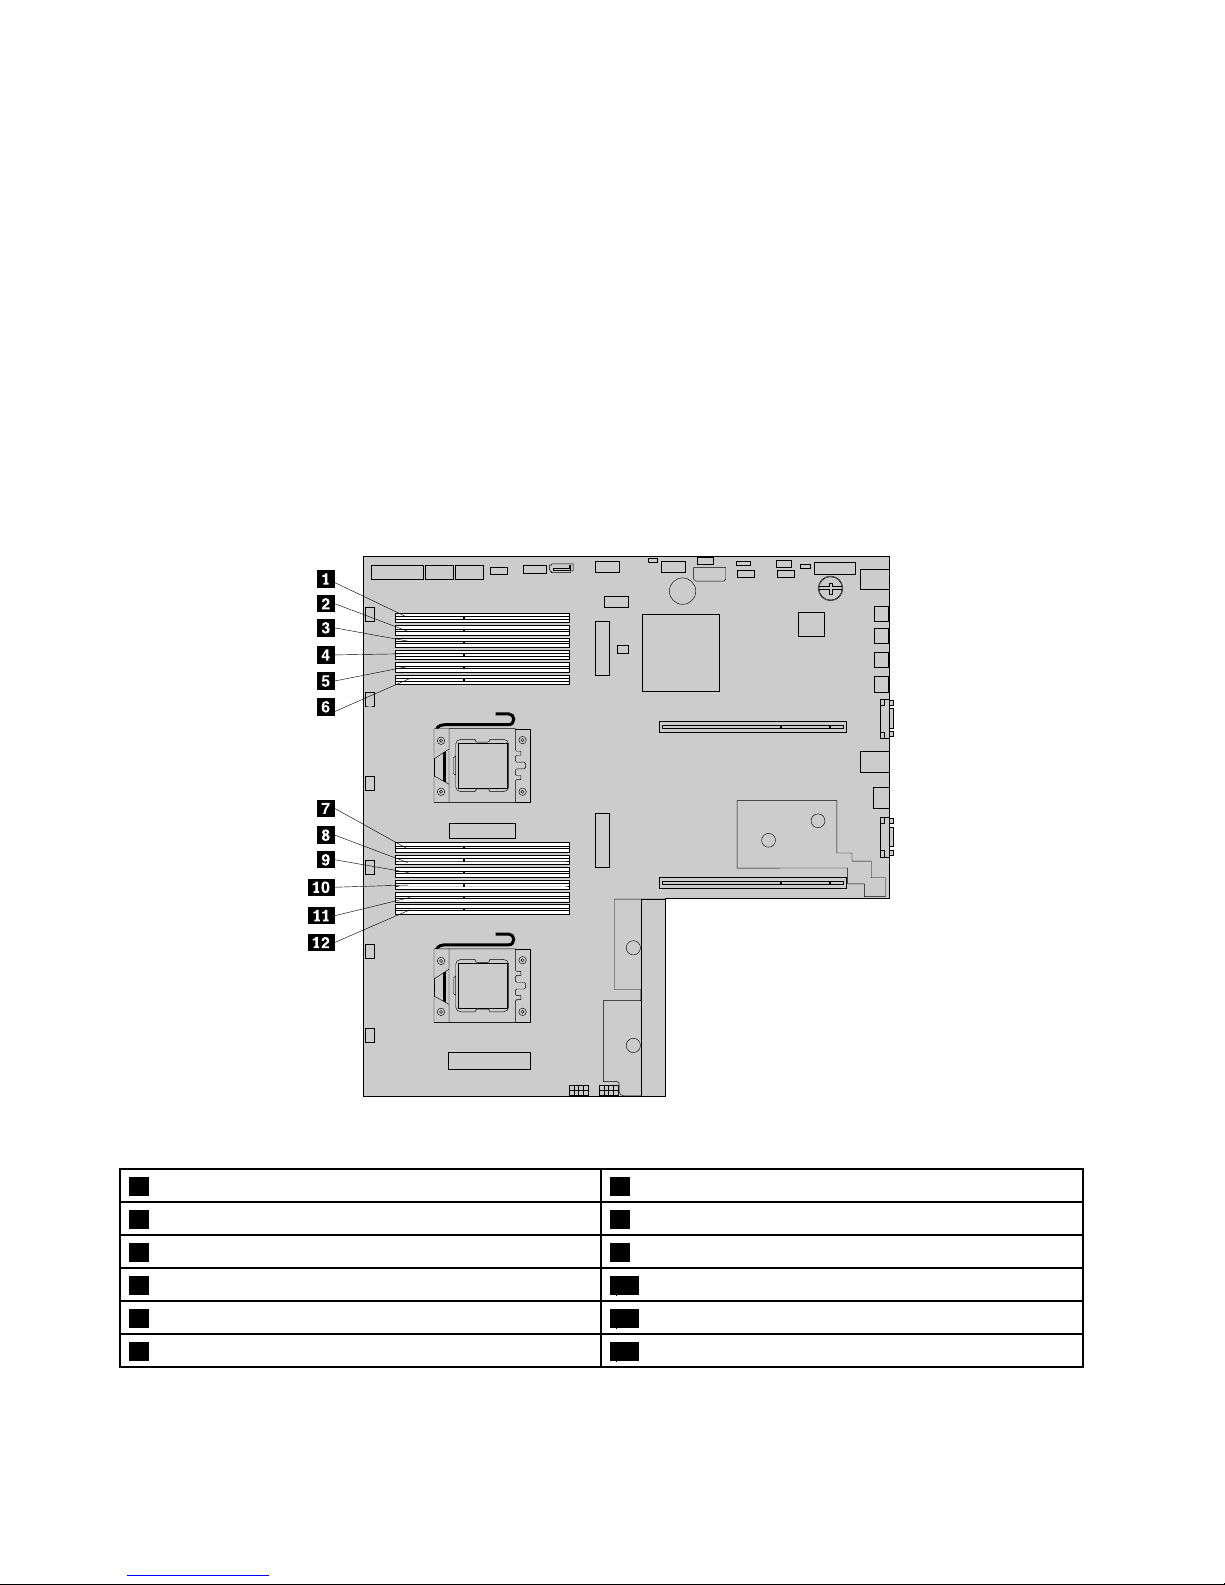
•TheminimumsystemmemoryforUDIMMsis2GB(onlyonemicroprocessorinstalledandonlyone2
GBUDIMMinstalledintheCPU1DIMMA1slot).
•ThemaximumsystemmemoryforRDIMMsorLVRDIMMsis192GB(twomicroprocessorsinstalledand
one16GBRDIMMorLVRDIMMinstalledineachofthe12memoryslots).
•ThemaximumsystemmemoryforUDIMMsis48GB(twomicroprocessorsinstalledandone4GB
UDIMMinstalledineachofthe12memoryslots).
Formoreinformationaboutthememorymodulesinyourspecicservermodel,usetheSetupUtility
program.See“ViewinginformationintheSetupUtilityprogram”onpage45.
ForalistofthesupportedThinkServermemorymoduleoptions,goto:
http://www.lenovo.com/thinkserver
Thefollowingillustrationshowsthelocationsofallmemoryslotsonasystemboardthathastwo
microprocessors(alsoknownasCPUs)installed.
Figure33.Memoryslotsonthesystemboard
1Memoryslot(CPU1DIMMA1)7Memoryslot(CPU2DIMMA1)
2Memoryslot(CPU1DIMMA2)8Memoryslot(CPU2DIMMA2)
3Memoryslot(CPU1DIMMB1)9Memoryslot(CPU2DIMMB1)
4Memoryslot(CPU1DIMMB2)10Memoryslot(CPU2DIMMB2)
5Memoryslot(CPU1DIMMC1)11Memoryslot(CPU2DIMMC1)
6Memoryslot(CPU1DIMMC2)12Memoryslot(CPU2DIMMC2)
76ThinkServerRD330HardwareMaintenanceManual
Page 91
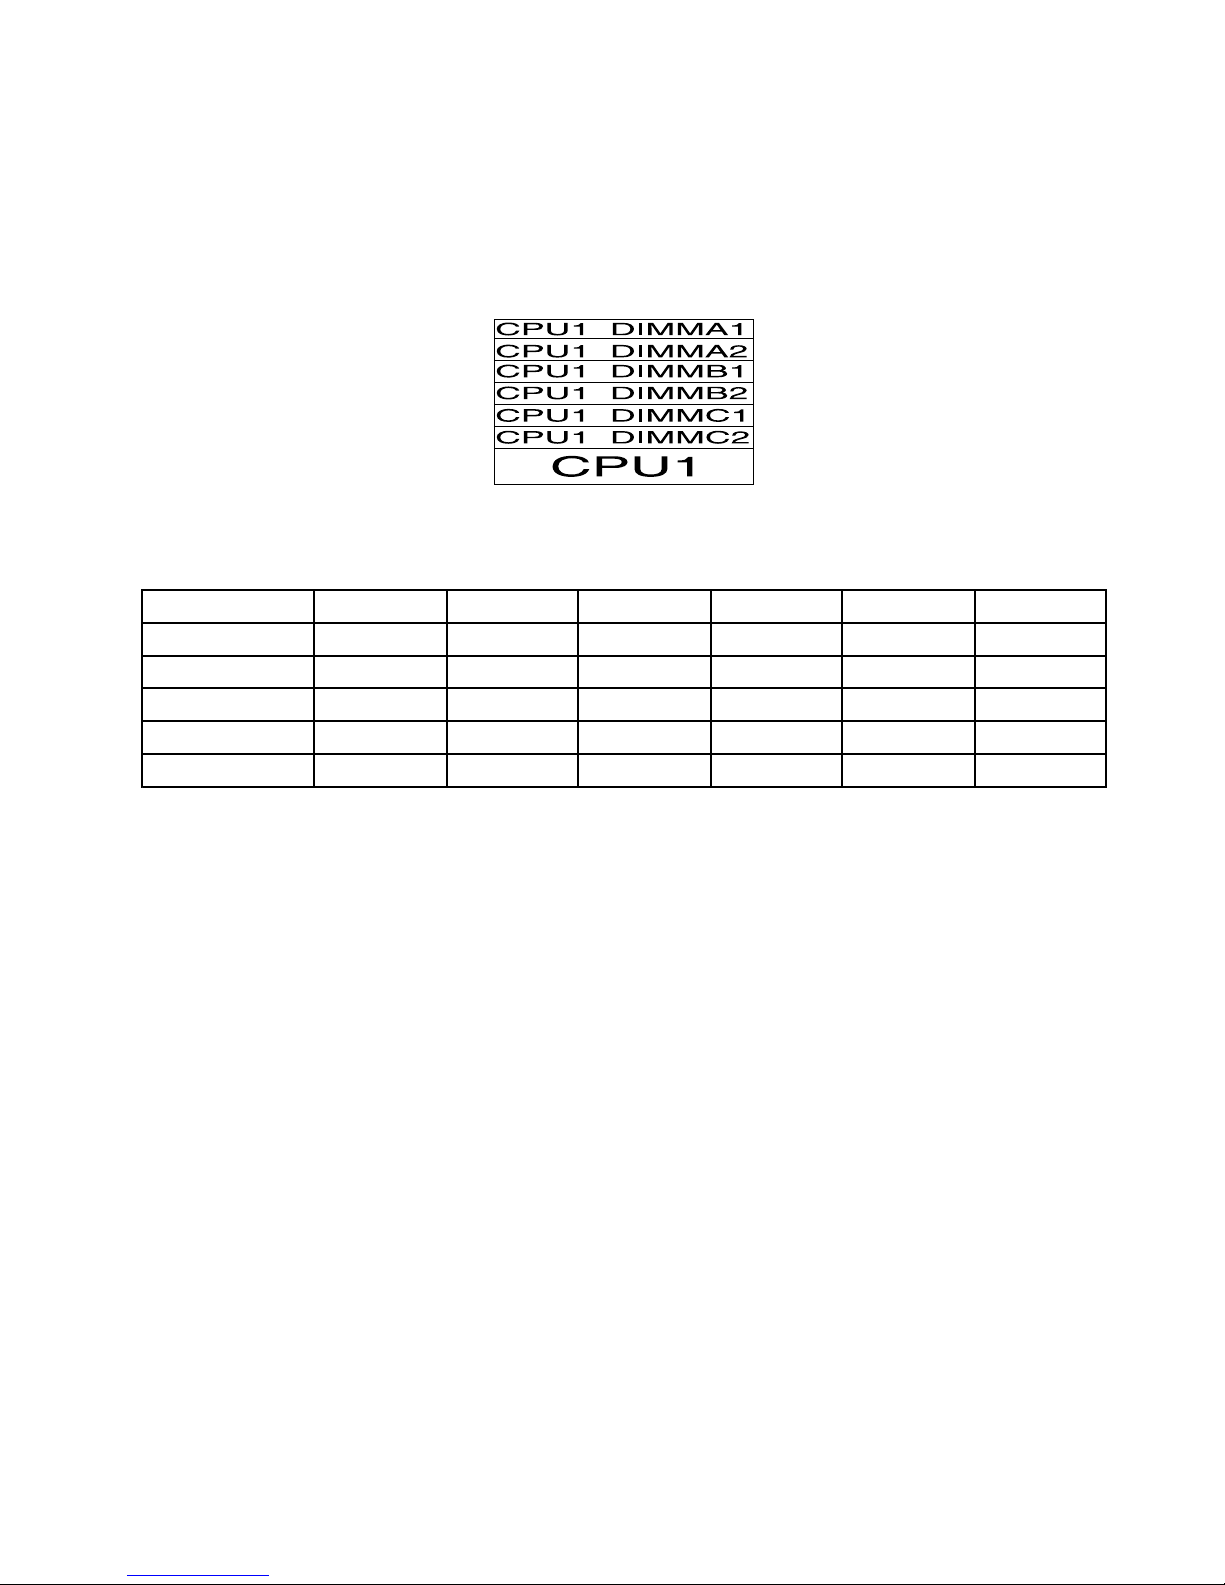
Thefollowingtableexplainsthememorymoduleinstallationrulesforserversthathaveonlyone
microprocessor(CPU1)installed.The“X”markindicatesthememoryslotsintowhichthememorymodules
shouldbeinstalledindifferentsituations.
Note:Allmemorymodulestobeinstalledonaservermustbethesametype(LVRDIMM,RDIMM,or
UDIMM)withthesamerank,voltage,andfrequency.
Figure34.CPU1DIMMs
Table4.Memorymoduleinstallationrulesforserverswithonemicroprocessor
CPU1DIMM
A1A2B1B2
C1C2
OneDIMM
X
TwoDIMMsXX
ThreeDIMMsXXX
FourDIMMsXXXX
SixDIMMs
XXXXXX
Chapter6.Installing,removing,orreplacinghardware77
Page 92

Thefollowingtableexplainsthememorymoduleinstallationrulesforserversthathavetwomicroprocessors
(CPU1andCPU2)installed.The“X”markindicatesthememoryslotsintowhichthememorymodules
shouldbeinstalledindifferentsituations.
Note:Allmemorymodulestobeinstalledonaservermustbethesametype(LVRDIMMorRDIMM)with
thesamerank,voltage,andfrequency.
Figure35.CPU1DIMMsandCPU2DIMMs
Table5.Memorymoduleinstallationrulesforserverswithtwomicroprocessors
CPU1DIMMCPU2DIMM
A1A2B1B2
C1C2
A1A2B1B2
C1C2
TwoDIMMsXX
FourDIMMsXXXX
SixDIMMs
XXXXXX
EightDIMMsXXXXXXXX
TwelveDIMMsXXXXXXXXXXXX
Installingamemorymodule
Attention:Donotopenyourserverorattemptanyrepairbeforereadingandunderstanding“Safetyinformation”
onpageiiiand“Guidelines”onpage67.
Thistopicprovidesinstructionsonhowtoinstallamemorymodule.
Beforeyoubegin,printalltherelatedinstructionsorensurethatyoucanviewthePDFversiononanother
computerforreference.
Notes:
•Tooptimizesystemperformance,ensurethatyouconsiderandfollowthememorymoduleinstallation
ruleswhenperformingtheoperation.See“Memorymoduleinstallationrules”onpage75
.
•Useanydocumentationthatcomeswiththememorymoduleandfollowthoseinstructionsinadditionto
theinstructionsinthistopic.
78ThinkServerRD330HardwareMaintenanceManual
Page 93
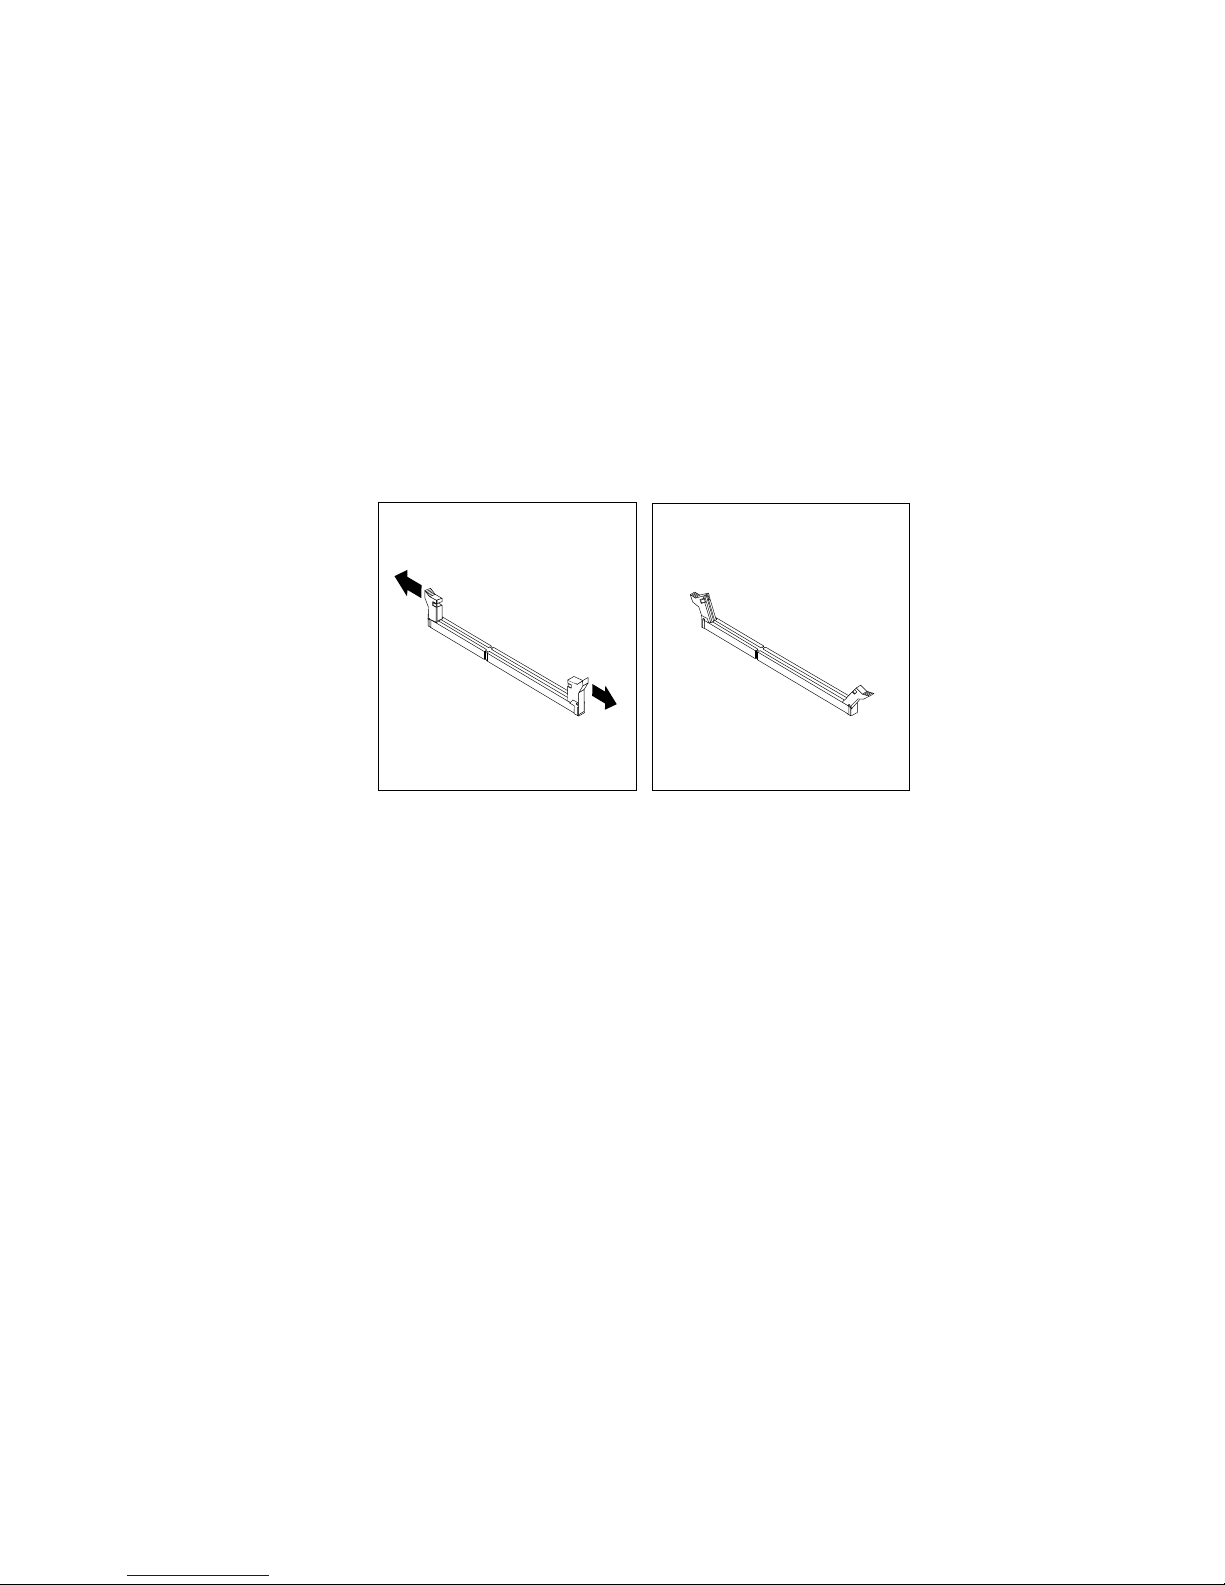
Toinstallamemorymodule,dothefollowing:
1.Removeallmediafromthedrivesandturnoffallattacheddevicesandtheserver.Then,disconnectall
powercordsfromelectricaloutletsanddisconnectallcablesthatareconnectedtotheserver.
2.Iftheserverisinstalledinarackcabinet,removetheserverfromtherackcabinetandplaceitonaat,
clean,andstatic-protectivesurface.SeetheRackInstallationInstructionsthatcomeswiththeserver.
3.Removetheservercover.See“Removingtheservercover”onpage69.
4.Removethecoolingshroud.See“Removingandreinstallingthecoolingshroud”onpage73.
5.Locatethememoryslotsonthesystemboardandreadthememorymoduleinstallationrules.See
“Memorymoduleinstallationrules”onpage75
.
6.Disconnectanycablesthatmightpreventyouraccesstothememoryslots.
7.Opentheretainingclipsoftheappropriatememoryslot.
Figure36.Openingtheretainingclipsofthememoryslots
8.Touchthestatic-protectivepackagethatcontainsthenewmemorymoduletoanyunpaintedsurfaceon
theoutsideoftheserver.Then,takethenewmemorymoduleoutofthepackage.
Note:Carefullyhandlethememorymodulebyitsedges.
Chapter6.Installing,removing,orreplacinghardware79
Page 94
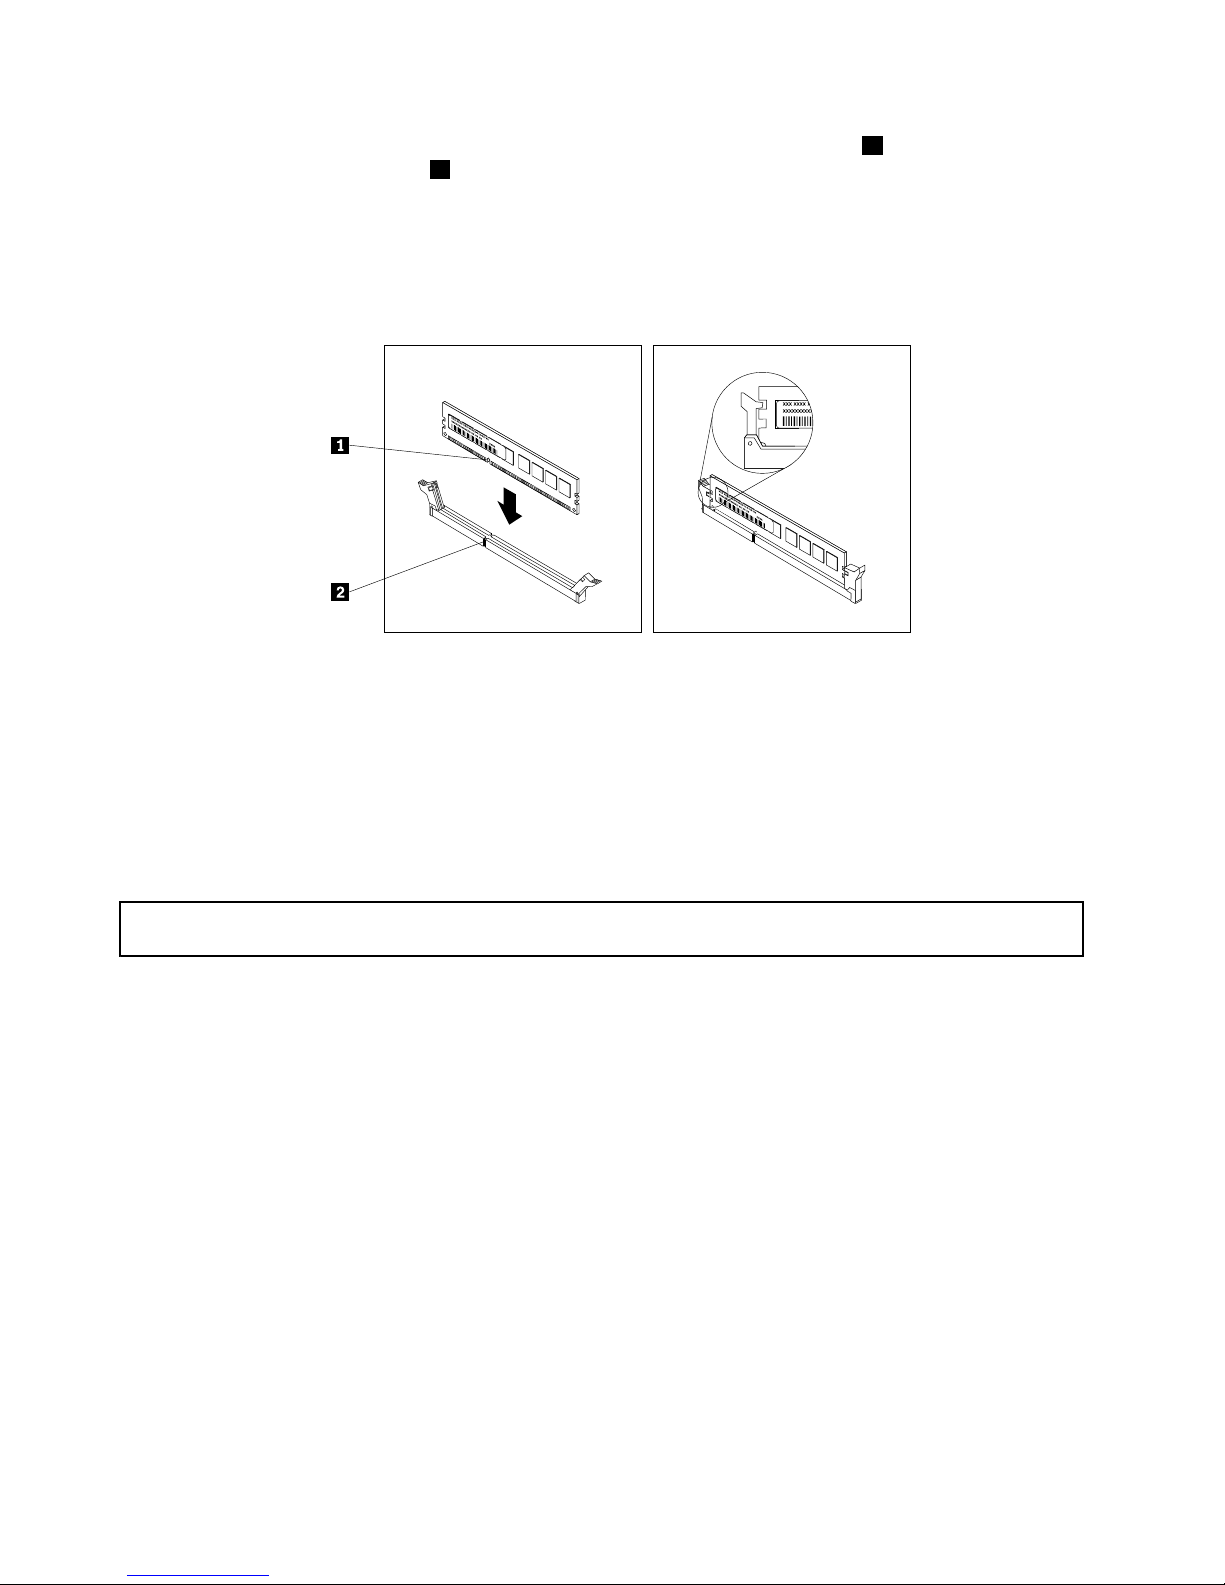
9.Positionthenewmemorymoduleoverthememoryslot.Ensurethatthenotch1onthenewmemory
moduleisalignedwiththekey2inthememoryslot.Then,pressthenewmemorymodulestraightdown
intothememoryslotuntiltheretainingclipscloseandthenewmemorymodulesnapsintoposition.
Note:Ifthereisagapbetweenthememorymoduleandtheretainingclips,thememorymodulehas
notbeeninstalledcorrectly.Opentheretainingclips,removethememorymodule,andthenreinstallit
intothememoryslotuntiltheretainingclipsarecompletelyclosed.
Figure37.Installingamemorymodule
10.Reconnectanycablesthatyouhavedisconnected.
Whattodonext:
•Toworkwithanotherpieceofhardware,gototheappropriatesection.
•Tocompletetheinstallation,goto“Completingthepartsreplacement”onpage153
.
Removingamemorymodule
Attention:Donotopenyourserverorattemptanyrepairbeforereadingandunderstanding“Safetyinformation”
onpageiii
and“Guidelines”onpage67.
Thistopicprovidesinstructionsonhowtoremoveamemorymodule.
Beforeyoubegin,printalltherelatedinstructionsorensurethatyoucanviewthePDFversiononanother
computerforreference.
Note:Tooptimizesystemperformance,ensurethatyouconsiderandfollowthememorymoduleinstallation
ruleswhenperformingtheoperation.See“Memorymoduleinstallationrules”onpage75.
Toremoveamemorymodule,dothefollowing:
1.Removeallmediafromthedrivesandturnoffallattacheddevicesandtheserver.Then,disconnectall
powercordsfromelectricaloutletsanddisconnectallcablesthatareconnectedtotheserver.
2.Iftheserverisinstalledinarackcabinet,removetheserverfromtherackcabinetandplaceitonaat,
clean,andstatic-protectivesurface.SeetheRackInstallationInstructionsthatcomeswiththeserver.
3.Removetheservercover.See“Removingtheservercover”onpage69.
4.Removethecoolingshroud.See“Removingandreinstallingthecoolingshroud”onpage73.
5.Locatethememoryslotsonthesystemboardandreadthememorymoduleinstallationrules.See
“Memorymoduleinstallationrules”onpage75
.
80ThinkServerRD330HardwareMaintenanceManual
Page 95
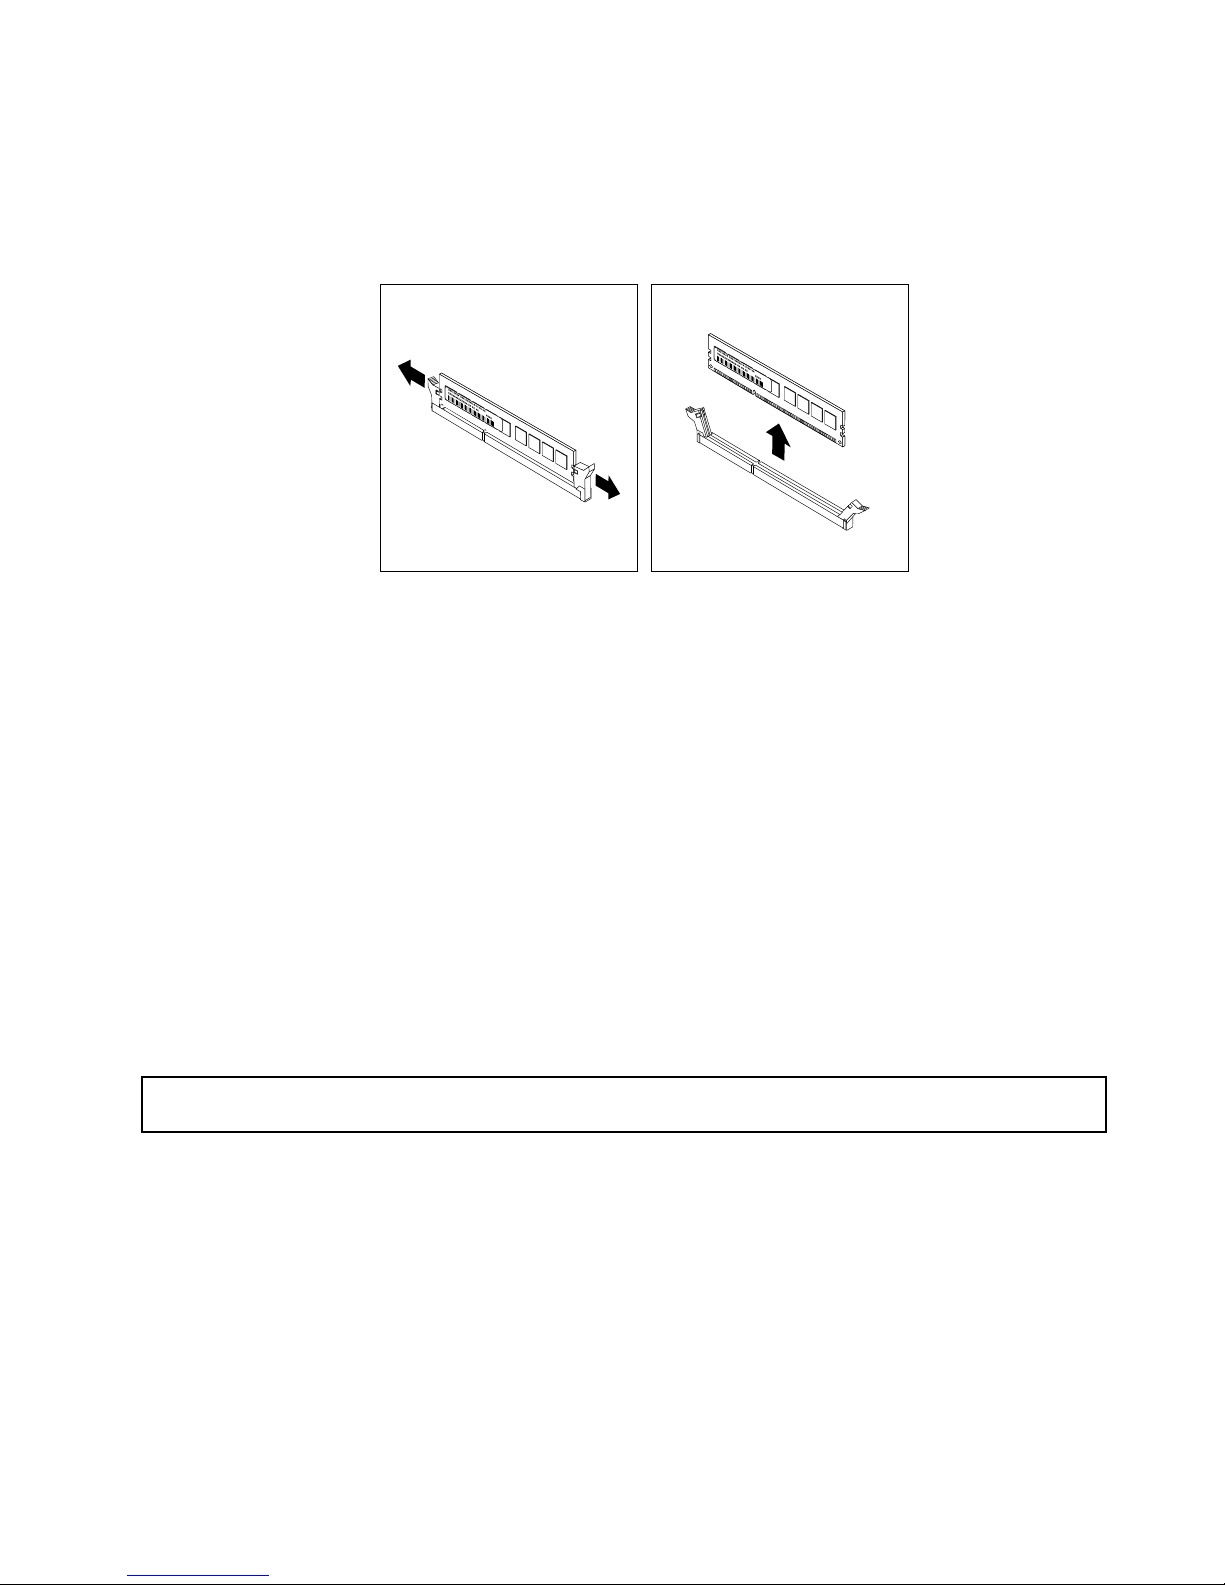
6.Disconnectanycablesthatmightpreventyouraccesstothememoryslots.
7.Locatethememorymodulethatyouwanttoremoveandopentheretainingclipsonbothendsofthe
memoryslot.Then,graspthememorymodulebyitsedgesandcarefullypullitstraightuptoremoveit
fromthememoryslot.
Figure38.Removingamemorymodule
8.Reconnectanycablesthatyouhavedisconnected.
9.Ifyouareinstructedtoreturntheoldmemorymodule,followallpackaginginstructionsanduseany
packagingmaterialsthataresuppliedtoyouforshipping.
Whattodonext:
•Toworkwithanotherpieceofhardware,gototheappropriatesection.
•Tocompletetheremovalprocedure,goto“Completingthepartsreplacement”onpage153.
InstallingorremovingtheEthernetcard
ThistopicprovidesinstructionsonhowtoinstallorremovetheEthernetcard.Ifyouareinstallingor
removinganyothertypesofsupportedPCIExpresscards,theprocedureissimilar.
Note:TheEthernetcardisextremelysensitivetoESD.Ensurethatyoureadandunderstand“Handling
static-sensitivedevices”onpage68
rstandcarefullyperformtheoperation.
InstallingtheEthernetcard
Attention:Donotopenyourserverorattemptanyrepairbeforereadingandunderstanding“Safetyinformation”
onpageiii
and“Guidelines”onpage67.
ThistopicprovidesinstructionsonhowtoinstalltheEthernetcard.
Beforeyoubegin,printalltherelatedinstructionsorensurethatyoucanviewthePDFversiononanother
computerforreference.
Notes:
•UseanydocumentationthatcomeswiththeEthernetcardandfollowthoseinstructionsinadditionto
theinstructionsinthistopic.
•Dependingonthespecictype,theEthernetcardmightlookdifferentfromtheillustrationsinthistopic.
ToinstalltheEthernetcard,dothefollowing:
Chapter6.Installing,removing,orreplacinghardware81
Page 96
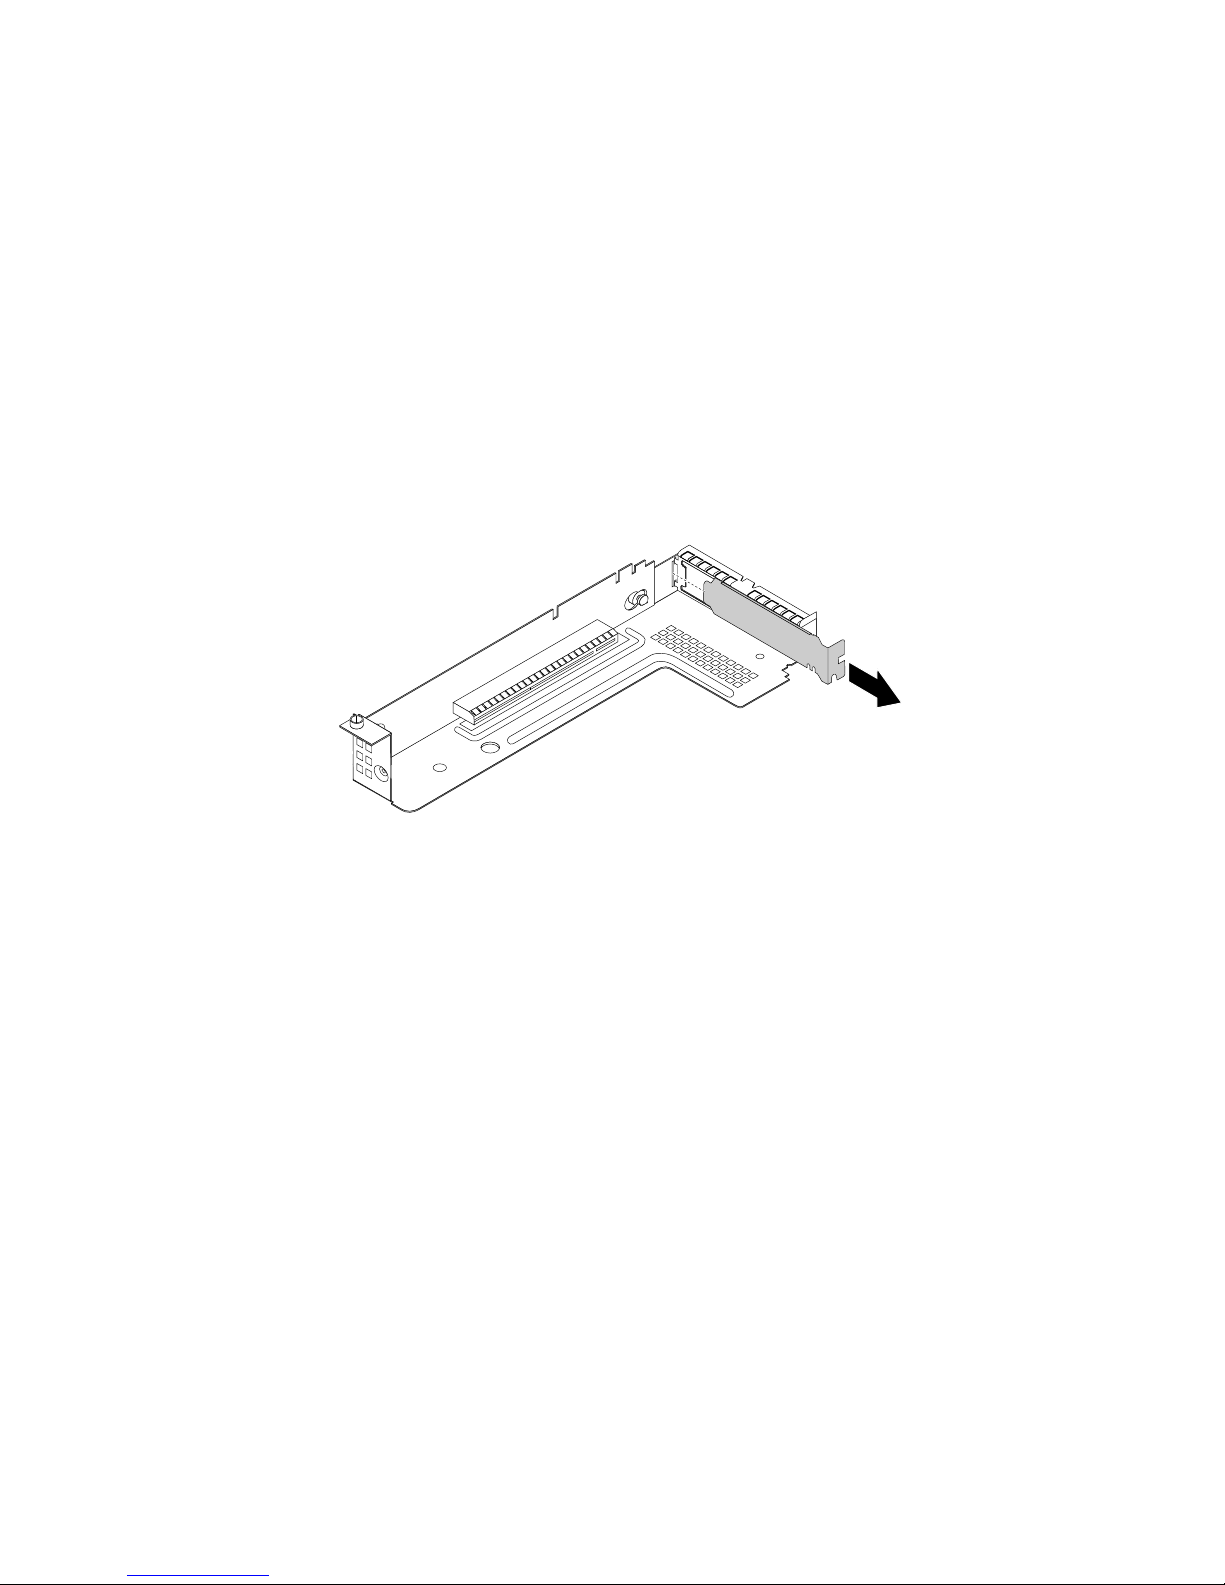
1.Removeallmediafromthedrivesandturnoffallattacheddevicesandtheserver.Then,disconnectall
powercordsfromelectricaloutletsanddisconnectallcablesthatareconnectedtotheserver.
2.Iftheserverisinstalledinarackcabinet,removetheserverfromtherackcabinetandplaceitonaat,
clean,andstatic-protectivesurface.SeetheRackInstallationInstructionsthatcomeswiththeserver.
3.Removetheservercover.See“Removingtheservercover”onpage69.
4.Removetherisercardassembly1andlayitupsidedownonaat,clean,andstatic-protectivesurface.
See“Replacingtherisercardassembly1”onpage143.
Note:UsuallyanEthernetcardisinstalledontherisercardassembly1andalsocanbeinstalledin
anyPCIExpresscardslotthatsupportsit.See“Rearviewoftheserver”onpage20toidentifythe
PCIExpresscardslotsofyourserver.
5.LocatethePCIExpresscardslotforinstallingtheEthernetcard,andthenremovethePCIExpresscard
slotbracketfromtherisercardassembly1.StorethePCIExpresscardslotbracketintheeventthat
youlaterremovetheEthernetcardandneedthebrackettocovertheplace.
Figure39.RemovingaPCIExpresscardslotbracket
6.Touchthestatic-protectivepackagethatcontainstheEthernetcardtoanyunpaintedsurfaceonthe
outsideoftheserver.Then,taketheEthernetcardoutofthepackage.
Note:CarefullyhandletheEthernetcardbyitsedges.
82ThinkServerRD330HardwareMaintenanceManual
Page 97
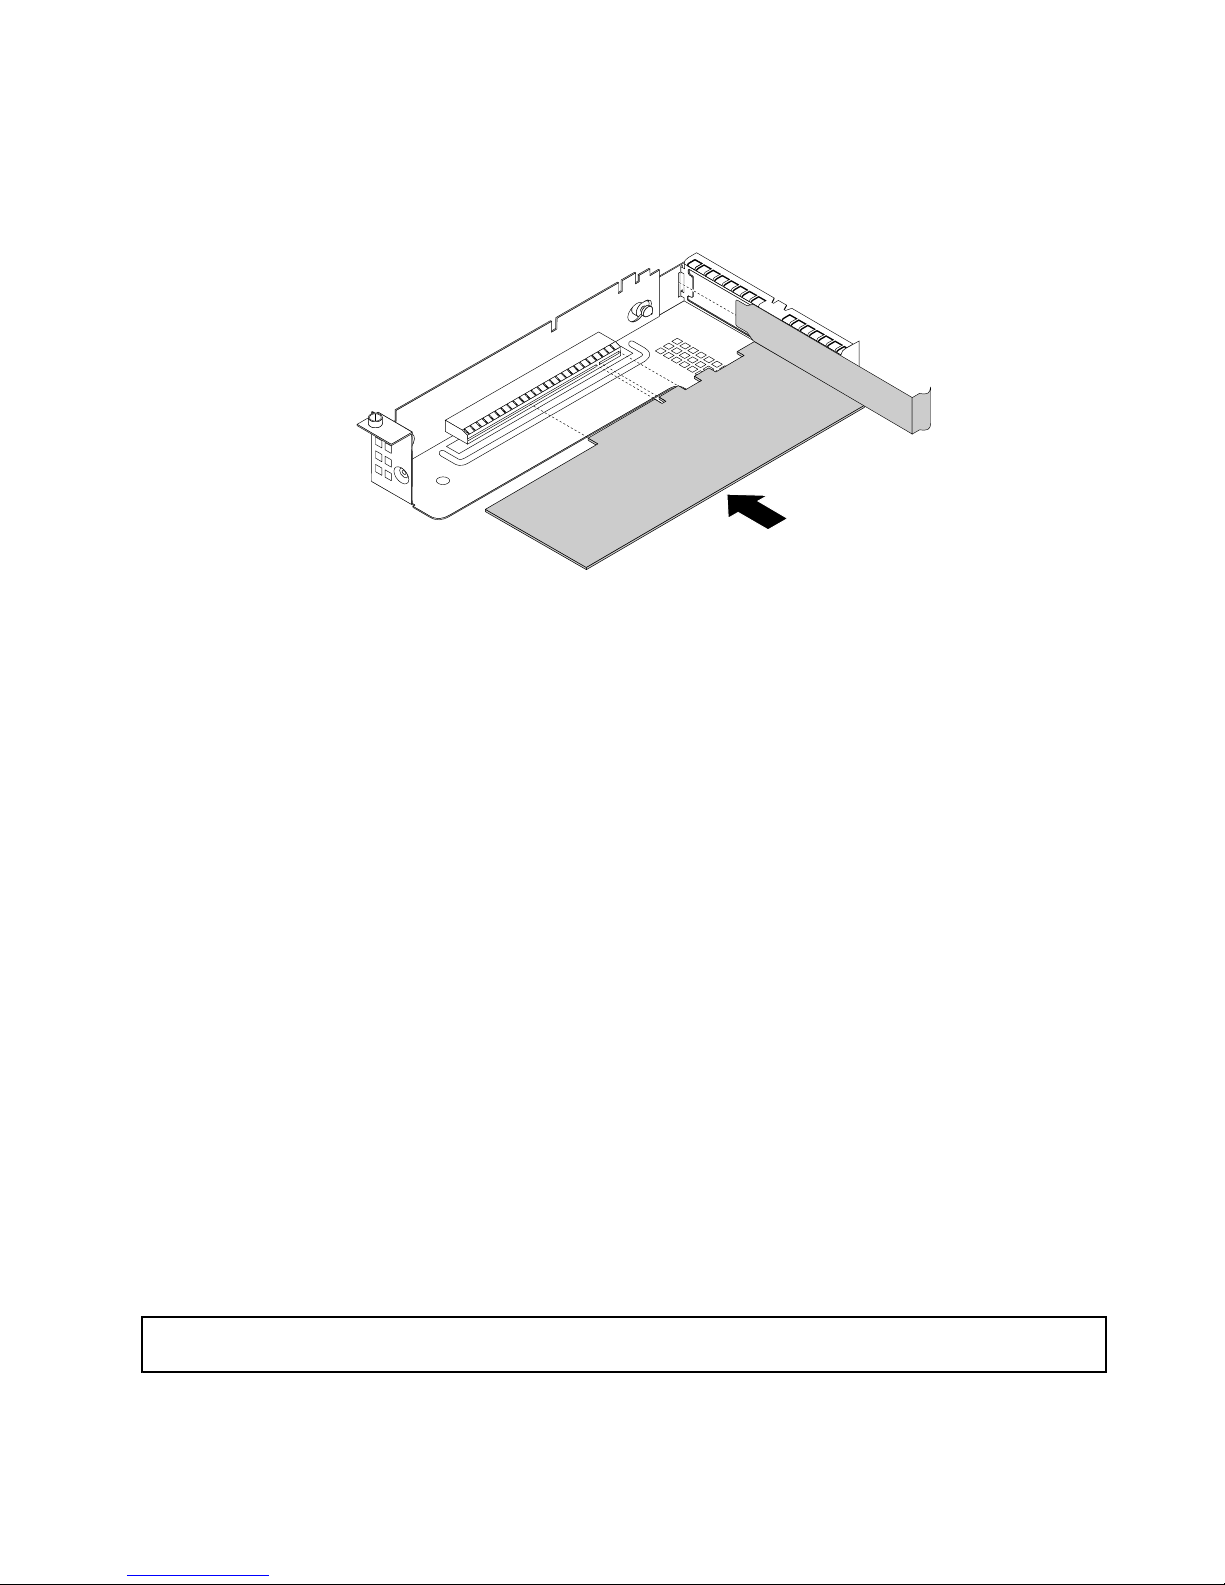
7.PositiontheEthernetcardnearthePCIExpresscardslotandalignthetaboftheEthernetcardwith
theholeintherisercardassembly1.Then,presstheEthernetcardstraightintotheslotuntilitis
securelyseatedintheslot.
Figure40.InstallingtheEthernetcard
8.DependingonthetypeoftheEthernetcard,youmightneedtoconnectanyrequiredcables.Referto
thedocumentationthatcomeswiththeEthernetcardforspecicinformation.
9.Reinstalltherisercardassembly1.See“Replacingtherisercardassembly1”onpage143.
Whattodonext:
•Toworkwithanotherpieceofhardware,gototheappropriatesection.
•Tocompletetheinstallation,goto“Completingthepartsreplacement”onpage153
.Then,continuewith
thefollowingproceduretoinstalltheEthernetcarddriverifrequired.
ToinstalltherequireddevicedriverfortheEthernetcard,dooneofthefollowing:
Note:YoudonotneedtousethedriverdiscthatmightcomewiththeEthernetcard.
•IfyouareusingaWindowsoperatingsystem,runtheThinkServerEasyStartupDVDthatcomeswith
yourserverandfollowtheinstructionsonthescreentodownloadandinstalltherequiredEthernet
carddrivertotheserver.Formoreinformation,see“UsingtheThinkServerEasyStartupprogramona
Windowsoperatingsystem”onpage55.
•IfyouareusingaLinuxoperatingsystem,runtheThinkServerEasyStartupDVDthatcomeswithyour
serveronacomputerwithaWindowsoperatingsystemanddownloadtherequiredEthernetcarddriver
toaremovablestoragedevice.Then,transfertheEthernetcarddriverfromtheremovablestoragedevice
toyourserverandrunthedriverletoinstallthedriver.
Themostup-to-datedevicedriversforvariousservermodelsarealwaysavailablefordownloadonthe
LenovoSupportWebsiteat:
http://www.lenovo.com/drivers
RemovingtheEthernetcard
Attention:Donotopenyourserverorattemptanyrepairbeforereadingandunderstanding“Safetyinformation”
onpageiii
and“Guidelines”onpage67.
ThistopicprovidesinstructionsonhowtoremovetheEthernetcard.
Chapter6.Installing,removing,orreplacinghardware83
Page 98

Beforeyoubegin,printalltherelatedinstructionsorensurethatyoucanviewthePDFversiononanother
computerforreference.
Notes:
•UseanydocumentationthatcomeswiththeEthernetcardandfollowthoseinstructionsinadditionto
theinstructionsinthistopic.
•Dependingonthespecictype,theEthernetcardmightlookdifferentfromtheillustrationinthistopic.
ToremovetheEthernetcard,dothefollowing:
1.Removeallmediafromthedrivesandturnoffallattacheddevicesandtheserver.Then,disconnectall
powercordsfromelectricaloutletsanddisconnectallcablesthatareconnectedtotheserver.
2.Iftheserverisinstalledinarackcabinet,removetheserverfromtherackcabinetandplaceitonaat,
clean,andstatic-protectivesurface.SeetheRackInstallationInstructionsthatcomeswiththeserver.
3.Removetheservercover.See“Removingtheservercover”onpage69.
4.Removetherisercardassembly1andlayitupsidedownonaat,clean,andstatic-protectivesurface.
See“Replacingtherisercardassembly1”onpage143.
Note:UsuallyanEthernetcardisinstalledontherisercardassembly1andalsocanbeinstalledin
anyPCIExpresscardslotthatsupportsit.See“Rearviewoftheserver”onpage20
toidentifythe
PCIExpresscardslotsofyourserver.
5.LocatetheEthernetcardontherisercardassembly1.DependingonthetypeoftheEthernetcard,you
mightneedtodisconnectallcablesfromtheEthernetcard.Then,grasptheEthernetcardbyitsedges
andcarefullypullitoutoftherisercardassembly1.
Note:TheEthernetcardmightttightlyintothePCIExpresscardslot.Ifnecessary,alternatemoving
eachsideoftheEthernetcardasmallandequalamountuntilitiscompletelyremovedfromtheslot.
Figure41.RemovingtheEthernetcard
6.InstallanewEthernetcardtoreplacetheoldoneorinstallaPCIExpresscardslotbrackettocoverthe
place.See“InstallingtheEthernetcard”onpage81.
7.Reinstalltherisercardassembly1.See“Replacingtherisercardassembly1”onpage143.
8.IfyouareinstructedtoreturntheoldEthernetcard,followallpackaginginstructionsanduseany
packagingmaterialsthataresuppliedtoyouforshipping.
Whattodonext:
•Toworkwithanotherpieceofhardware,gototheappropriatesection.
84ThinkServerRD330HardwareMaintenanceManual
Page 99

•Tocompletetheremovalprocedure,goto“Completingthepartsreplacement”onpage153.
InstallingorremovingtheRAIDcard
ThistopicprovidesinstructionsonhowtoinstallorremovetheRAIDcard.
SomeservermodelscomewitharequiredRAIDcardtoprovideadvancedSATA/SAShardwareRAID
functionstotheserver.YoualsocanpurchaseasupportedRAIDcardfromLenovoandinstallitintothe
server.Formoreinformation,see“RAIDcard”onpage26
and“ConguringRAID”onpage56.
Note:TheRAIDcardisextremelysensitivetoESD.Ensurethatyoureadandunderstand“Handling
static-sensitivedevices”onpage68
rstandcarefullyperformtheoperation.
InstallingtheRAIDcard
Attention:Donotopenyourserverorattemptanyrepairbeforereadingandunderstanding“Safetyinformation”
onpageiiiand“Guidelines”onpage67.
ThistopicprovidesinstructionsonhowtoinstalltheRAIDcard.
Beforeyoubegin,printalltherelatedinstructionsorensurethatyoucanviewthePDFversiononanother
computerforreference.
Notes:
•UseanydocumentationthatcomeswiththeRAIDcardandfollowthoseinstructionsinadditionto
theinstructionsinthistopic.
•Dependingonthespecictype,theRAIDcardanditsbracketmightlookdifferentfromtheillustrationsin
thistopic.
•EnsurethatyoubackupyourdatabeforeinstallingtheRAIDcardbecauseyoumightneedtorecongure
RAIDandreinstalltheoperatingsystemafterinstallingtheRAIDcard.
•IfyouwanttoinstallanyotherPCIExpresscardyourserversupportstotherisercardassembly2,refer
tothefollowinginstallationprocedure.
ToinstalltheRAIDcard,dothefollowing:
1.Removeallmediafromthedrivesandturnoffallattacheddevicesandtheserver.Then,disconnectall
powercordsfromelectricaloutletsanddisconnectallcablesthatareconnectedtotheserver.
2.Iftheserverisinstalledinarackcabinet,removetheserverfromtherackcabinetandplaceitonaat,
clean,andstatic-protectivesurface.SeetheRackInstallationInstructionsthatcomeswiththeserver.
3.Removetheservercover.See“Removingtheservercover”onpage69.
4.Removethecoolingshroud.See“Removingandreinstallingthecoolingshroud”onpage73.
5.Removetherisercardassembly2andlayitupsidedownonaat,clean,andstatic-protectivesurface.
Theprocedureissimilartothatoftherisercardassembly1.See“Replacingtherisercardassembly
1”onpage143.
Chapter6.Installing,removing,orreplacinghardware85
Page 100
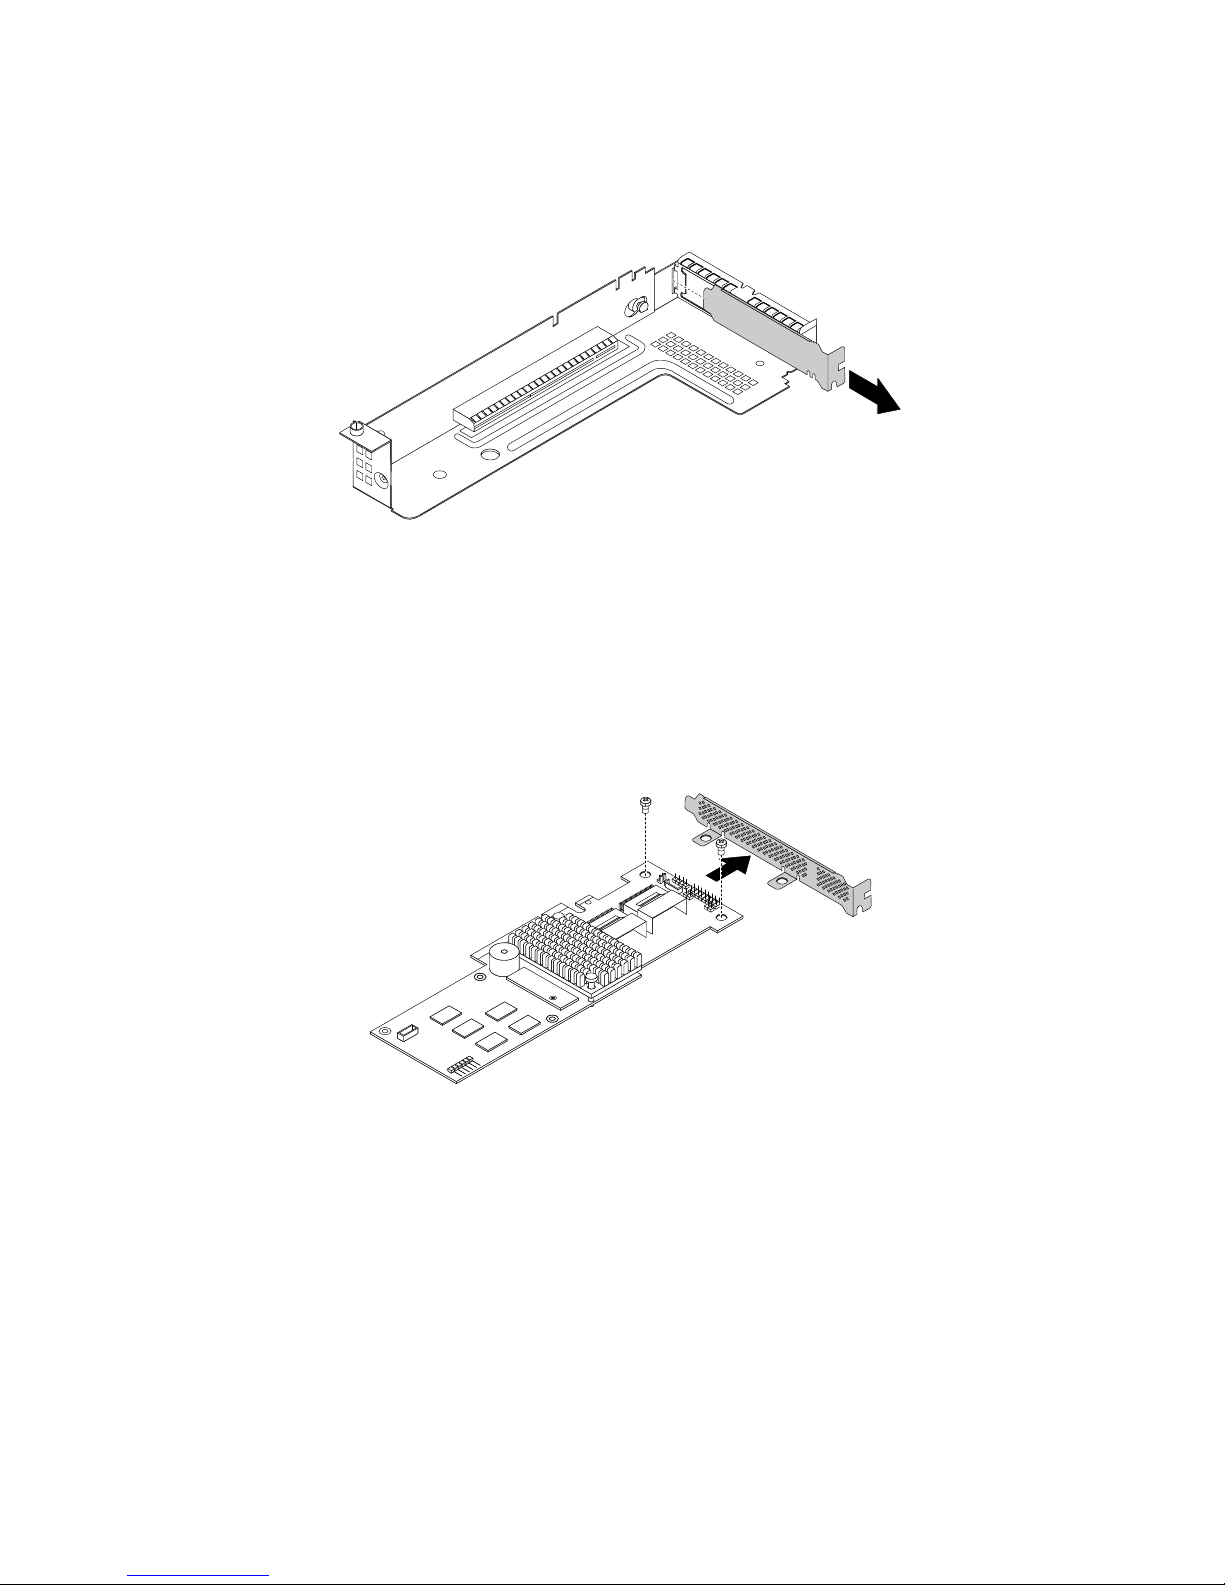
6.LocatethePCIExpresscardslotforinstallingtheRAIDcard,andthenremovethePCIExpresscardslot
bracketfromtherisercardassembly2.StorethePCIExpresscardslotbracketintheeventthatyou
laterremovetheRAIDcardandneedthebrackettocovertheplace.
Figure42.RemovingaPCIExpresscardslotbracket
7.Touchthestatic-protectivepackagethatcontainstheRAIDcardtoanyunpaintedsurfaceontheoutside
oftheserver.Then,taketheRAIDcardandthelow-prolebracketoutofthepackage.
Note:CarefullyhandletheRAIDcardbyitsedges.
8.RemovethetwoscrewsthatsecuretheRAIDcard,andthenremovethefull-heightbracketfromthe
RAIDcard.
Figure43.Removingthefull-heightbracketfromtheRAIDcard
86ThinkServerRD330HardwareMaintenanceManual
 Loading...