

Lenovo ThinkServer TD330, ThinkServer 0442, ThinkServer 1261, ThinkServer 0443, ThinkServer 1256 User Manual
...Page 1
ThinkServerTD330
HardwareMaintenanceManual
MachineTypes:0442,0443,1256,1261,1276,1283,1806,and1807
Page 2

Note:
Beforeusingtheinformationandtheproductitsupports,besuretoreadandunderstandthefollowing:
•TheReadMeFirstthatcomeswithyourproduct
•“Safetyinformation”onpageiii
•AppendixA“Notices”onpage191
SecondEdition(August2013)
©CopyrightLenovo2012,2013.
LIMITEDANDRESTRICTEDRIGHTSNOTICE:IfdataorsoftwareisdeliveredpursuantaGeneralServicesAdministration
“GSA”contract,use,reproduction,ordisclosureissubjecttorestrictionssetforthinContractNo.GS-35F-05925.
Page 3

Contents
Safetyinformation..........iii
Safetyinspectionguide............x
Groundingrequirements............xi
Chapter1.Generalinformation.....1
Introduction.................1
Serverdocumentation.............1
Chapter2.Serversetuproadmap...5
Chapter3.Productoverview......7
Serverpackage...............7
Features..................7
Specications...............11
Software.................11
ThinkServerEasyStartup.........11
ThinkServerEasyUpdateFirmwareUpdater.11
BIOSandTMMupdateutilities......12
RAIDcongurationutilities........12
LenovoThinkServerEasyManage.....12
Remotemanagementsoftware......12
Locations.................12
Machinetype,model,andserialnumber
label.................12
Frontviewoftheserver.........14
Frontpanel..............16
IntelligentDiagnosticsModule.......18
Rearviewoftheserver.........19
Serverlocks..............23
Servercomponents...........25
Hot-swapharddiskdrivestatusLEDs...31
RAIDcard...............33
Hot-swapharddiskdrivebackplane....35
Connectingthecables..........39
Systemboardcomponents........42
SystemboardjumpersandTMMstatusLED.46
Chapter4.T urningonandturningoff
theserver...............51
Turningontheserver............51
Turningofftheserver............51
Chapter5.Conguringtheserver..53
UsingtheSetupUtilityprogram........53
StartingtheSetupUtilityprogram.....53
ViewinginformationintheSetupUtility
program...............53
SetupUtilityprograminterface......54
Settingthesystemdateandtime.....56
Usingpasswords............57
Selectingastartupdevice........58
ConguringtheTPMfunction.......58
ExitingtheSetupUtilityprogram......59
UpdatingorrecoveringtheBIOS......59
UsingtheThinkServerEasyStartupprogram...61
FeaturesoftheThinkServerEasyStartup
program...............61
StartingtheThinkServerEasyStartup
program...............61
UsingtheThinkServerEasyStartupprogram
onaWindowsoperatingsystem......63
ConguringRAID..............64
AboutRAID..............64
ConguringRAIDusingtheThinkServer
EasyStartupprogram..........65
ConguringtheThinkServerRAID100orRAID
300.................66
ConguringtheadvancedSATA/SAShardware
RAID.................71
ConguringtheEthernetcontrollers......72
Updatingthermware............72
UsingtheFirmwareUpdaterprogram....72
UsingtheLenovoThinkServerEasyManage
program.................72
Chapter6.Installing,removing,or
replacinghardware..........75
Guidelines................75
Precautions..............75
Handlingstatic-sensitivedevices.....76
Systemreliabilityguidelines........77
Workinginsidetheserverwiththepoweron.77
Removingtheservercover..........77
Removingandreinstallingthefrontbezel....79
RemovingandreinstallingthePCIcardbracket
assembly.................81
Installing,removing,orreplacinghardware...84
Installingorremovingamemorymodule...85
InstallingorremovingtheEthernetcard...93
InstallingorremovingtheRAIDcard....97
InstallingorremovingtheThinkServerRAID
500UpgradeKeyforAdvancedRAID....99
InstallingorremovingtheThinkServerRAID
700Battery..............102
InstallingorremovingtheThinkServerRAID
100orRAID300upgradekeyforAdvanced
RAID.................106
©CopyrightLenovo2012,2013
i
Page 4

InstallingorremovingtheThinkServer
ManagementModulePremium......109
InstallingorremovingtheThinkServerT rusted
PlatformModule............113
InstallingorremovingtheIntelligent
DiagnosticsModule...........116
Installingorreplacinganopticaldrive....120
Installingorreplacingahot-swapharddisk
drive.................124
Installingorremovinganon-hot-swaphard
diskdrive...............128
Installingorreplacingthemicroprocessor..137
Installingorreplacingahot-swapredundant
powersupply.............145
Replacingthenon-hot-swappowersupply
assembly...............149
Replacingthehot-swapharddiskdrive
backplane...............151
Replacingthepowerdistributionboardand
cageassembly.............155
Replacingthefrontpanelboardassembly..158
Replacingthefrontsystemfan1......161
Replacingtherearsystemfan.......163
Replacingtheheatsinkandfanassembly
1..................166
Replacingthesystemboardbattery....169
Replacingthesystemboard.......171
Completingthepartsreplacement.......178
Reinstallingtheservercoverandreconnecting
cables................178
Updatingtheserverconguration.....180
Chapter7.T roubleshootingand
diagnostics.............181
Troubleshootingprocedure..........181
ViewingthestatusanddiagnosticLEDs.....181
Viewingthesystemeventlog.........181
Basictroubleshootingtables.........182
ThinkServerEasyStartupprogram
problems...............182
Opticaldriveproblems..........182
Harddiskdriveproblems.........183
Memorymoduleproblems........185
Keyboard,mouse,orUSBdeviceproblems..185
Chapter8.Gettinginformation,help,
andservice.............187
Informationresources............187
Usingthedocumentation.........187
ThinkServerWebsite..........187
LenovoSupportWebsite.........187
Helpandservice..............188
Beforeyoucall.............188
Callingforservice............188
Usingotherservices..........189
Purchasingadditionalservices......189
AppendixA.Notices.........191
Trademarks................192
Importantnotes..............192
Particulatecontamination..........192
PolyvinylChloride(PVC)cableandcordnotice..193
Recyclinginformation............193
Batteryreturnprogram..........193
Requirementforbatteriescontaining
perchlorate..............194
ImportantWEEEinformation.........195
GermanOrdinanceforWorkglossstatement...195
Exportclassicationnotice..........195
Electronicemissionnotices..........195
ENERGYSTARmodelinformation.......196
Index.................197
iiThinkServerTD330HardwareMaintenanceManual
Page 5
Safetyinformation
Note:Beforeusingtheproduct,besuretoreadandunderstandthemultilingualsafetyinstructionsonthe
documentationDVDthatcomeswiththeproduct.
Antesdeusaroproduto,leiaeentendaasinstruçõesdesegurançamultilínguesnoDVDdedocumentação
queoacompanha.
Предидаизползватетозипродукт,задължителнопрочететеивникнетевмногоезичнитеинструкции
забезопасноствDVDдискасдокументация,койтосепредоставяспродукта.
PrijeupotrebeovogproizvodaobaveznopročitajtevišejezičnesigurnosneuputekojesenalazenaDVD-us
dokumentacijomkojidobivateuzproizvod.
PředpoužitímproduktujetřebasipřečístaporozumětbezpečnostnímpokynůmuvedenýmnadiskuDVDs
dokumentací,kterýjedodávánsproduktem.
Førdubrugerproduktet,skaldusørgeforatlæseogforstådesikkerhedsforskrifter,derndespåere
sprog,pådendokumentations-dvd,derfølgermedproduktet.
LuetuotteenmukanatoimitetullaDVD-tietolevylläolevatmonikielisetturvaohjeetennentämäntuotteen
käyttöä.
Avantd'utiliserleproduit,veillezàbienlireetcomprendrelesinstructionsdesécuritémultilinguesgurant
surleDVDdedocumentationfourniavecleproduit.
Πρινχρησιμοποιήσετετοπροϊόν,βεβαιωθείτεότιέχετεδιαβάσεικαικατανοήσειτιςοδηγίεςασφάλειας,οι
οποίεςείναιδιαθέσιμεςσεδιάφορεςγλώσσεςστοDVDτεκμηρίωσηςπουσυνοδεύειτοπροϊόν.
VorVerwendungdesProduktssolltenSieunbedingtdiemehrsprachigenSicherheitsanweisungenaufder
Dokumentations-DVDlesen,dieimLieferumfangdesProduktsenthaltenist.
AtermékhasználataelőttmindenképpenolvassaelésértelmezzeatermékhezkapottdokumentációsDVD
lemezentalálható,többnyelvenelolvashatóbiztonságielőírásokat.
Primadiutilizzareilprodotto,accertarsidileggereecomprendereleinformazionisullasicurezzamultilingue
disponibilisulDVDdidocumentazionefornitoconilprodotto.
製品をご使用になる前に、製品に付属のDocumentationDVDに収録されているマルチリンガルの「安
全に正しくご使用いただくために」を読んで理解してください。
제품을사용하기전에제품과함께제공되는문서DVD의다국어안전지침을주의깊게읽어보십시오.
Voordatuhetproductgebruikt,moetuervoorzorgendatudemeertaligeveiligheidsinstructiesopde
documentatie-dvdvanhetproducthebtgelezenenbegrijpt.
©CopyrightLenovo2012,2013
iii
Page 6

Przedskorzystaniemzproduktunależyzapoznaćsięzwielojęzycznymiinstrukcjamibezpieczeństwa
znajdującymisięnapłycieDVDzdokumentacjądostarczonąwrazzproduktem.
Antesdeutilizaroproduto,leiaatentamenteasinstruçõesdesegurançamultilinguesqueconstamno
DVDdedocumentaçãofornecidocomoproduto.
Înaintedeautilizaprodusul,asiguraţi-văcăaţicititşiînţelesinstrucţiuniledesiguranţăînmaimultelimbide
peDVD-ulcudocumentaţiecareînsoţeşteprodusul.
Førdubrukerproduktet,måduleseogforstådenerspråkligesikkerhetsinformasjonenpåDVDenmed
dokumentasjonsomfølgermedproduktet.
Преждечемиспользоватьэтотпродукт,внимательноознакомьтесьсинструкциямипотехнике
безопасностинаразныхязыках,которыеможнонайтинаDVD-дискесдокументациейвкомплектес
продуктом.
在使用本产品之前,请务必先阅读和了解产品附带的文档DVD中的多语言安全说明。
Prenegotoupotrebiteproizvodobaveznopaljivoproitajteiprouiteviejezikouputstvozabezbednostna
dokumentacionomDVD-ukojistedobiliuzproizvod.
PredpouvanmproduktusipretajteviacjazynbezpenostnpokynynadiskuDVDsdokumentcioudodanoms
produktom.
Predenzačneteuporabljatiizdelek,jepomembno,daprebereteinrazumetevečjezičnavarnostnanavodila
naDVD-juzdokumentacijo,kistegaprejeliskupajzizdelkom.
Antesdeutilizarelproducto,asegúresedeleerycomprenderlasinstruccionesdeseguridadmultilingüesdel
DVDdedocumentaciónqueseproporcionaconelproducto.
Varnogamedattläsasäkerhetsinstruktionernapådokumentations-DVD-skivansomföljermedprodukten
innandubörjaranvändaprodukten.
使用本產品之前,請務必閱讀並瞭解產品隨附的文件DVD上的多國語言版本安全資訊。
Buürünükullanmadanönce,ürünlebirliktegönderilenbelgeDVD'siüzerindekiçokdiliçerengüvenlik
yönergeleriniokuyupanladýðýnýzdaneminolun.
Передвикористаннямцьогопродуктууважноознайомтесязінструкціямизтехнікибезпекинарізних
мовах,щоможназнайтинаDVD-дискуздокументацієювкомплектізпродуктом.
Important:Thecautionanddangerstatementsinthisdocumentarelabeledwithnumbers.Eachnumber
identiesanEnglish-languagecautionordangerstatementthatreferstotranslatedversionsofthecaution
ordangerstatementintheSafetyInformationdocument.Forexample,ifadangerstatementislabeled
“Statement1,”translationsforthisdangerstatementareintheSafetyInformationdocumentunder
“Statement1.”
Ensurethatyoureadandunderstandallcautionanddangerstatementsinthisdocumentbeforeyouperform
theprocedures.Readandunderstandanyadditionalsafetyinformationthatisincludedwiththeserveror
optionaldevicebeforeyouinstall,remove,orreplacethedevice.
ivThinkServerTD330HardwareMaintenanceManual
Page 7
Statement1
DANGER
Electricalcurrentfrompower,telephone,andcommunicationcablesishazardous.
Toavoidashockhazard:
•Donotconnectordisconnectanycablesorperforminstallation,maintenance,orrecongurationofthis
productduringanelectricalstorm.
•Connectallpowercordstoaproperlywiredandgroundedelectricaloutlet.
•Ensurethatallpowercordconnectorsaresecurelyandcompletelypluggedintoreceptacles.
•Connecttoproperlywiredoutletsanyequipmentthatwillbeattachedtothisproduct.
•Whenpossible,useonehandonlytoconnectordisconnectsignalcables.
•Neverturnonanyequipmentwhenthereisevidenceofre,water ,orstructuraldamage.
•Disconnecttheattachedpowercords,telecommunicationssystems,networks,andmodemsbeforeyou
openthedevicecovers,unlessinstructedotherwiseintheinstallationandcongurationprocedures.
•Connectanddisconnectcablesasdescribedinthefollowingtablewheninstalling,moving,oropening
coversonthisproductorattacheddevices.
Toconnect:Todisconnect:
1.TurneverythingOFF.
2.First,attachallcablestodevices.
3.Attachsignalcablestoconnectors.
4.Attachpowercordstooutlets.
5.TurndevicesON.
1.TurneverythingOFF.
2.First,removepowercordsfromoutlets.
3.Removesignalcablesfromconnectors.
4.Removeallcablesfromdevices.
Statement2
DANGER
Dangerofexplosionifbatteryisincorrectlyreplaced.
Whenreplacingthelithiumcoincellbattery,useonlythesameoranequivalenttypethatis
recommendedbythemanufacturer.Thebatterycontainslithiumandcanexplodeifnotproperly
used,handled,ordisposedof.
Donot:
•Throworimmerseintowater
•Heattomorethan100°C(212°F)
•Repairordisassemble
Disposeofthebatteryasrequiredbylocalordinancesorregulations.
©CopyrightLenovo2012,2013
v
Page 8
Statement3
CAUTION:
Whenlaserproducts(suchasCD-ROMs,DVDdrives,beropticdevices,ortransmitters)are
installed,notethefollowing:
•Donotremovethecovers.Removingthecoversofthelaserproductcouldresultinexposureto
hazardouslaserradiation.Therearenoserviceablepartsinsidethedevice.
•Useofcontrolsoradjustmentsorperformanceofproceduresotherthanthosespeciedherein
mightresultinhazardousradiationexposure.
DANGER
SomelaserproductscontainanembeddedClass3AorClass3Blaserdiode.Notethefollowing:
Laserradiationwhenopen.Donotstareintothebeam,donotviewdirectlywithoptical
instruments,andavoiddirectexposuretothebeam.
Statement4
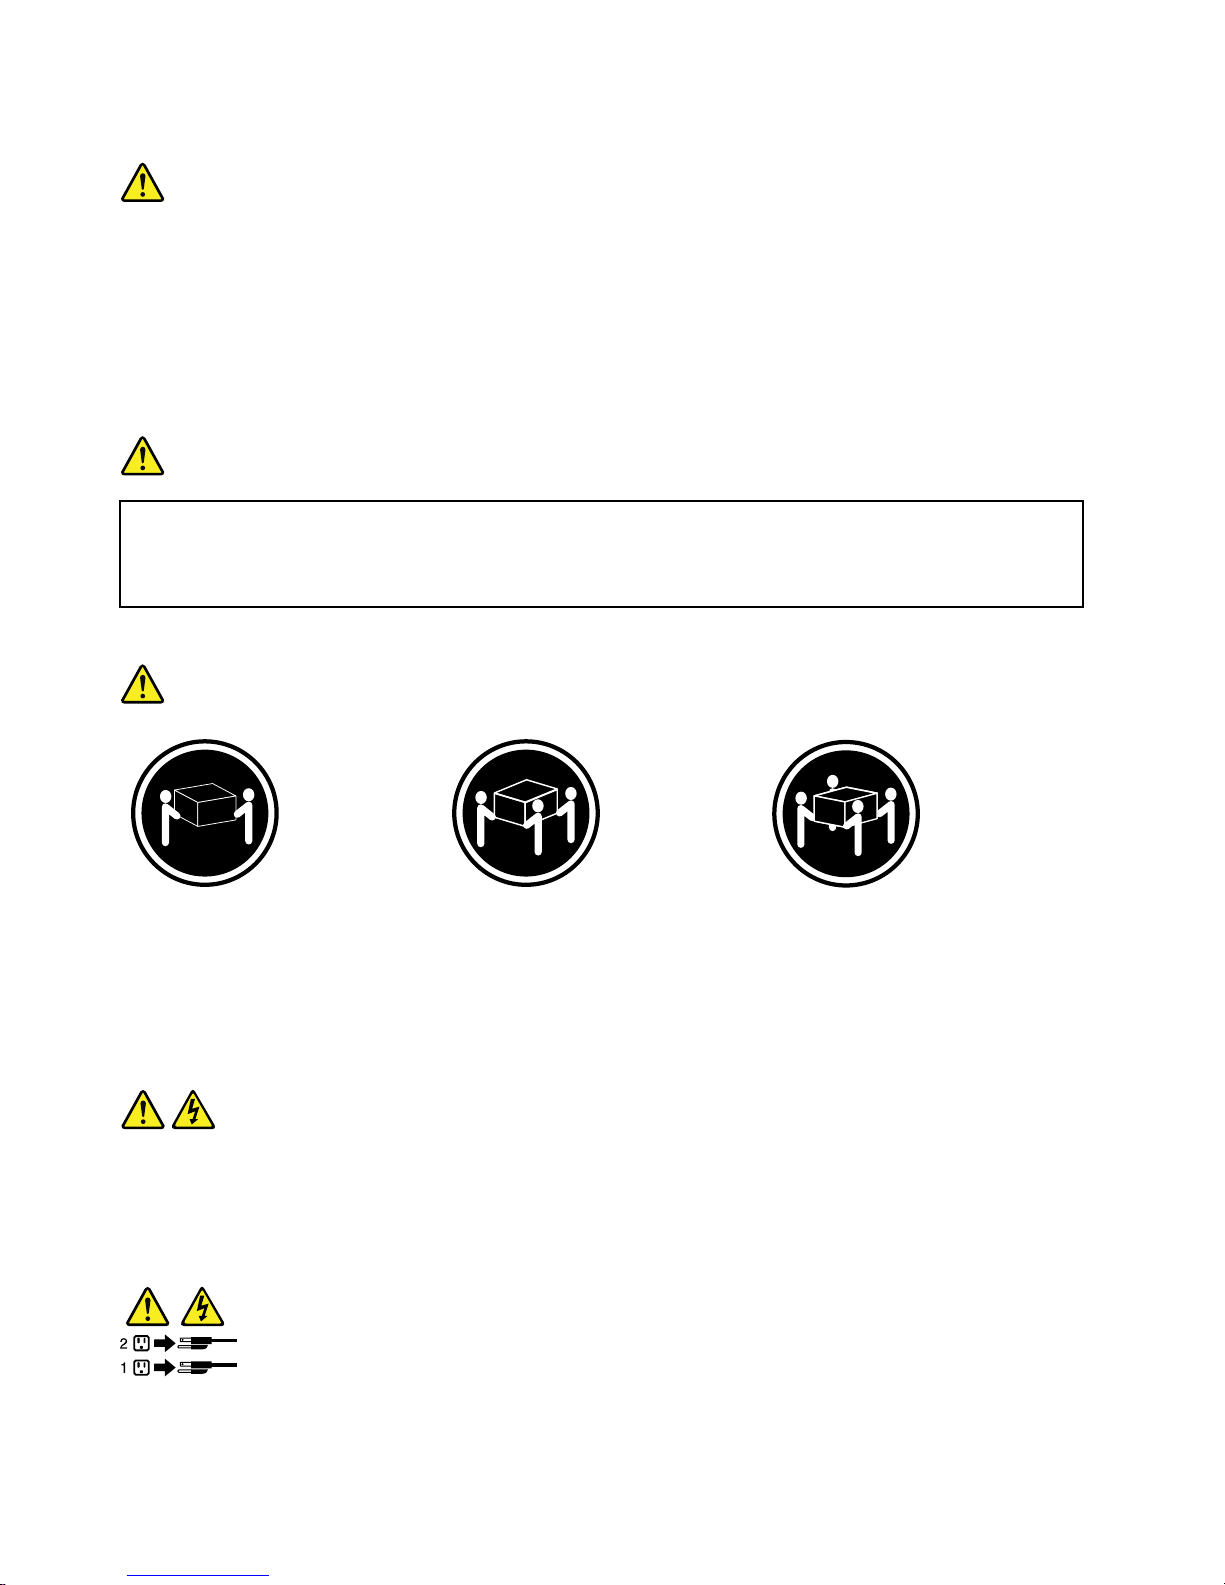
≥18kg(39.7lb)≥32kg(70.5lb)≥55kg(121.2lb)
<32kg(70.5lb)<55kg(121.2lb)<100kg(220.5lb)
CAUTION:
Usesafepracticeswhenlifting.
Statement5
CAUTION:
Thepowercontrolbuttononthedeviceandthepowerswitchonthepowersupplydonotturnoff
theelectricalcurrentsuppliedtothedevice.Thedevicealsomighthavemorethanonepower
cord.Toremoveallelectricalcurrentfromthedevice,ensurethatallpowercordsaredisconnected
fromthepowersource.
viThinkServerTD330HardwareMaintenanceManual
Page 9
Statement6
CAUTION:
Ifyouinstallastrain-reliefbracketoptionovertheendofthepowercordthatisconnectedtothe
device,youmustconnecttheotherendofthepowercordtoapowersourcethatiseasilyaccessible
incaseitneedstobedisconnected.
Statement7
CAUTION:
Ifthedevicehasdoors,ensurethatyouremoveorsecurethedoorsbeforemovingorliftingthe
devicetoprotectagainstpersonalinjury.Thedoorswillnotsupporttheweightofthedevice.
Statement8
CAUTION:
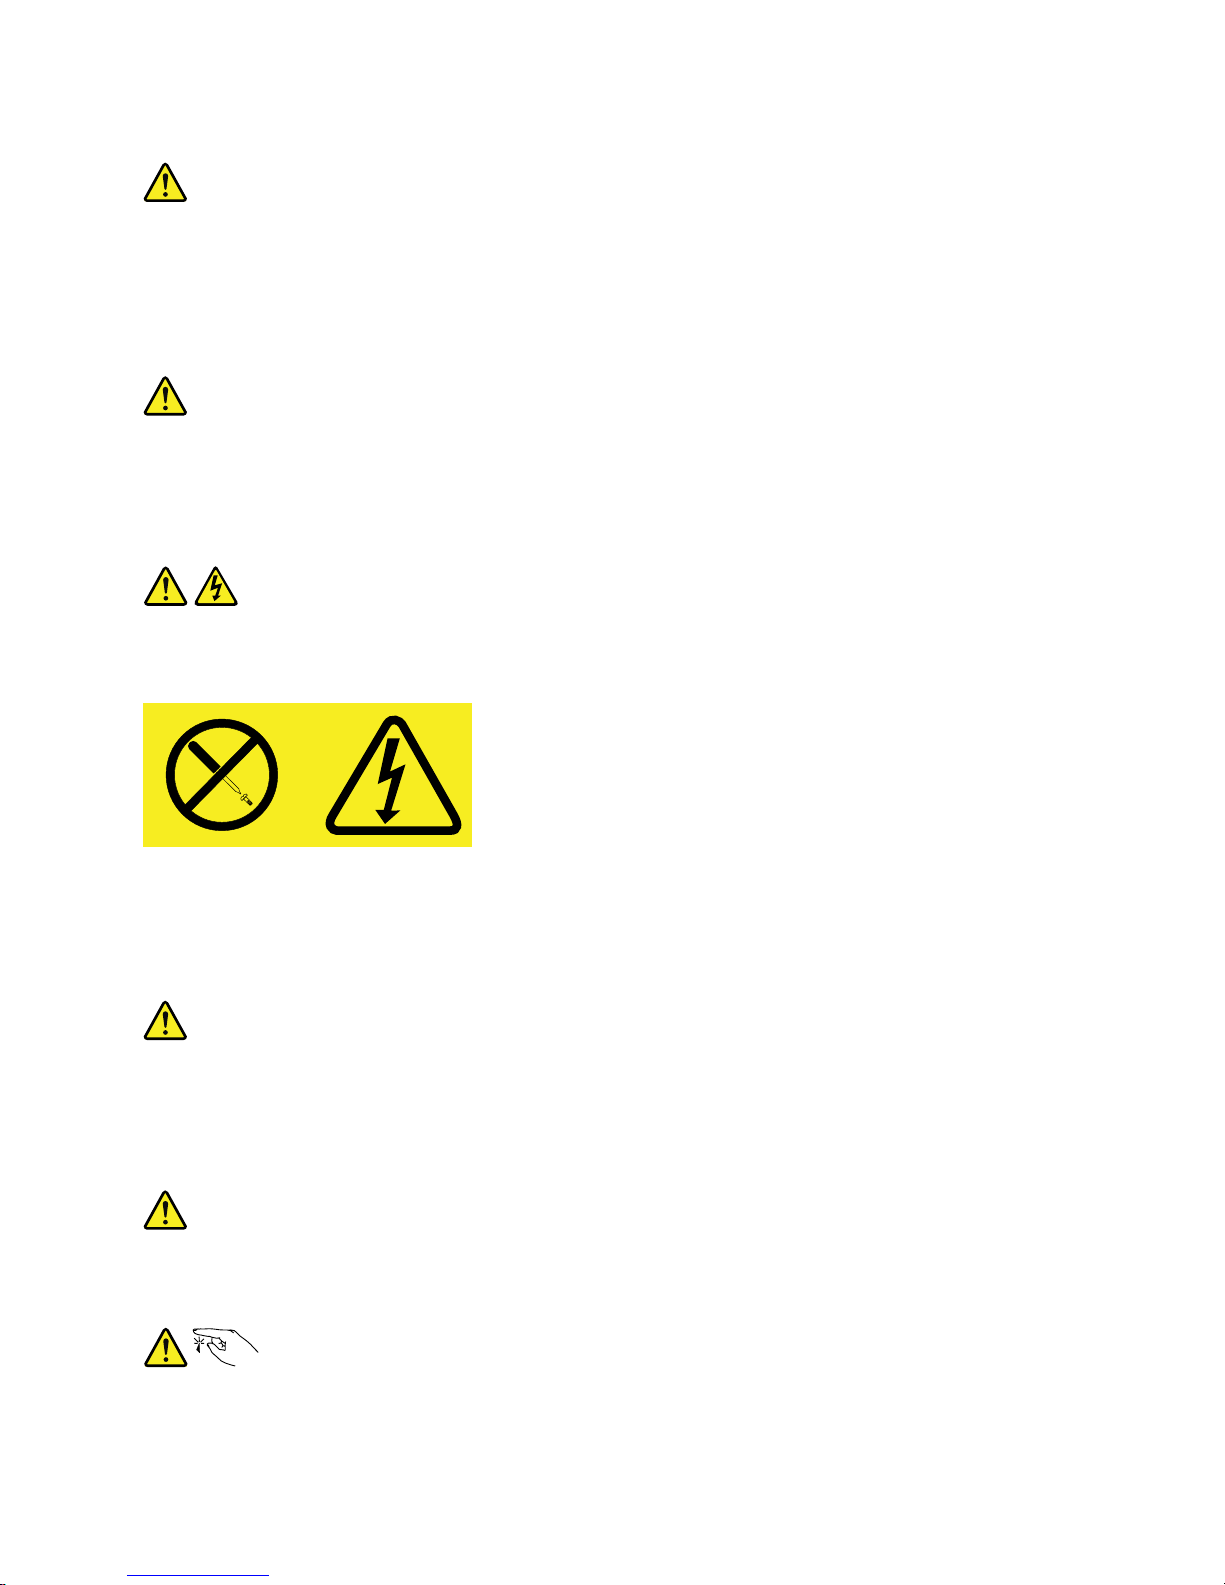
Neverremovethecoveronapowersupplyoranypartthathasthefollowinglabelattached.
Hazardousvoltage,current,andenergylevelsarepresentinsideanycomponentthathasthislabel
attached.Therearenoserviceablepartsinsidethesecomponents.Ifyoususpectaproblemwith
oneoftheseparts,contactaservicetechnician.
Statement9
CAUTION:
Disconnectthehot-swapfancablesbeforeremovingthefanfromthedevicetoprotectagainst
personalinjury.
Statement10
CAUTION:
Thefollowinglabelindicatesasharp-edgehazard.
©CopyrightLenovo2012,2013
vii
Page 10
Statement11
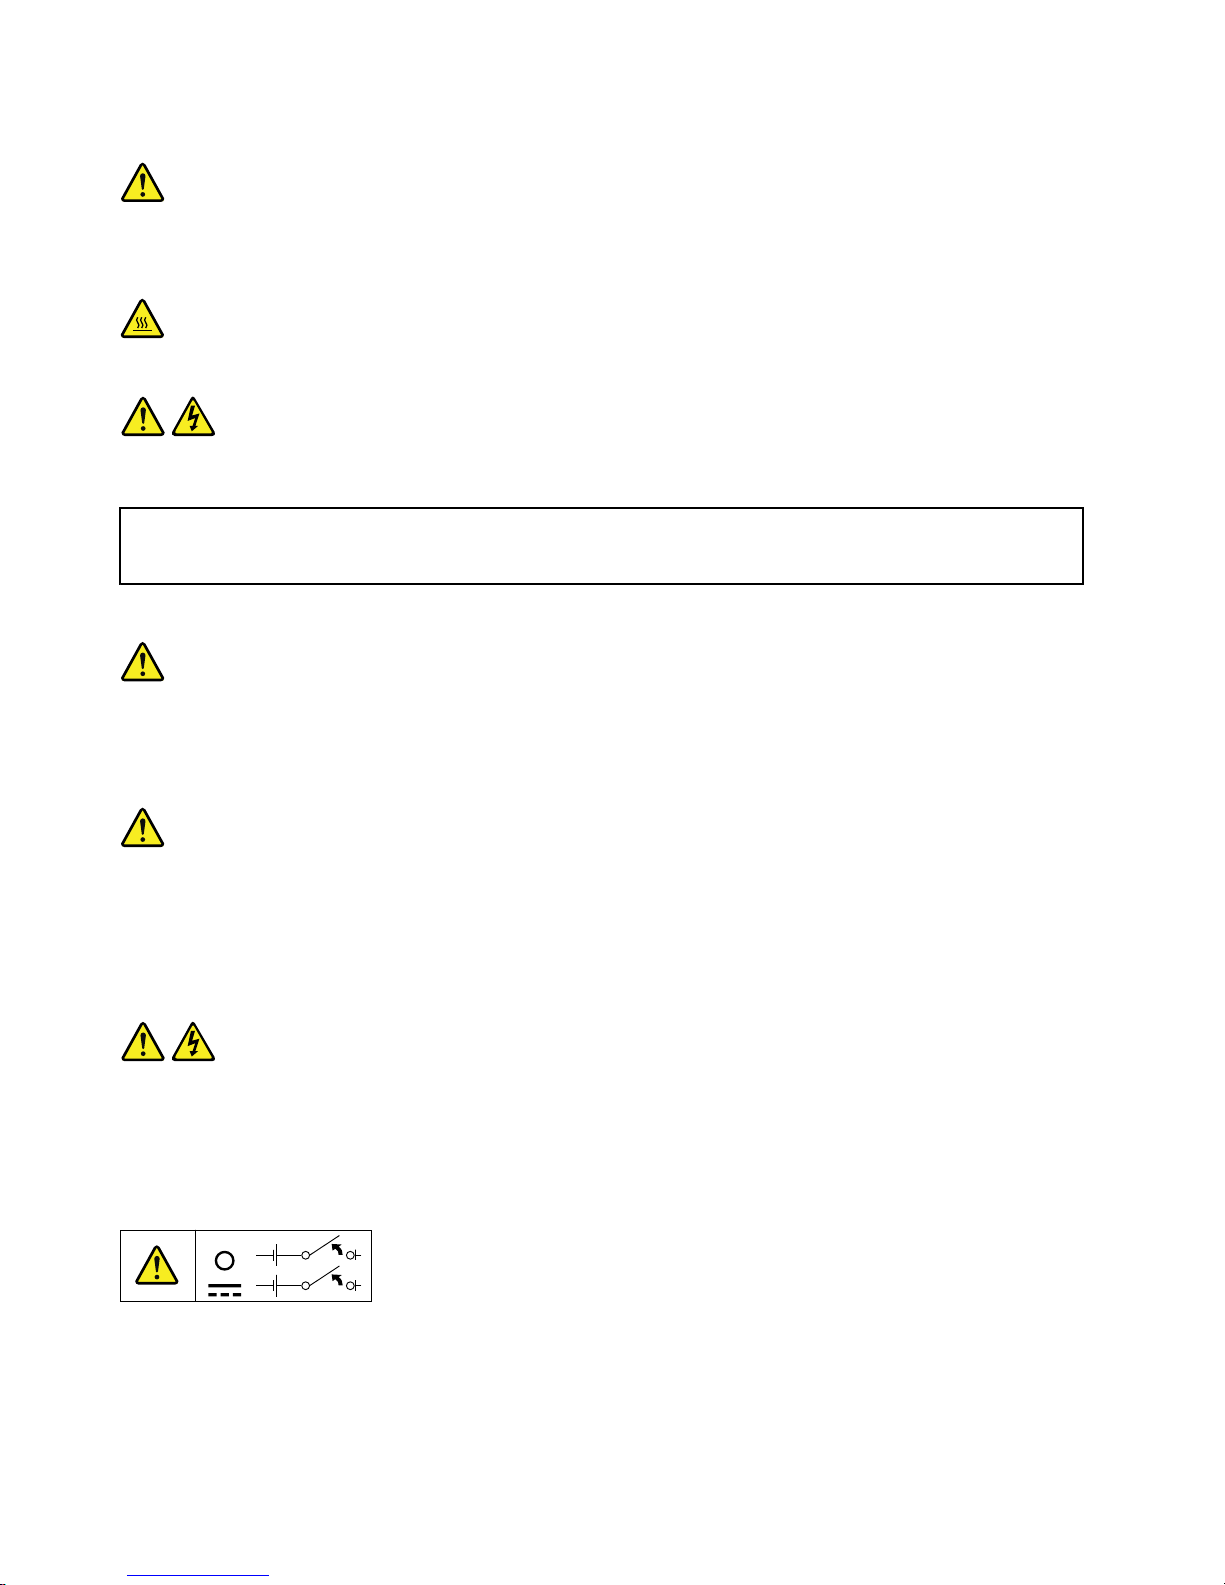
CAUTION:
Thefollowinglabelindicatesapotentialheathazard.
Statement12
DANGER
Overloadingabranchcircuitisapotentialrehazardandashockhazardundercertainconditions.T o
avoidthesehazards,ensurethatyoursystemelectricalrequirementsdonotexceedbranchcurrentratings
attheinstallationsite.
Statement13
CAUTION:
Ensurethattherackissecuredproperlytoavoidtippingwhentheserverunitisextendedontherails.
Statement14
CAUTION:
SomeaccessoryoroptionboardoutputsexceedClass2orlimitedpowersourcelimits.Y ou
mustinstalltheappropriateinterconnectingcablinginaccordancewithyourlocalelectricalcode
requirements.
Statement15
CAUTION:
Thepower-controlbuttononthedevicemayputthedeviceinstandbymodeinsteadofturningoff
thedevice.Inaddition,thedevicemighthavemultipleconnectionstodcpower.T oremoveall
electricalcurrentfromthedevice,ensurethatallconnectionstodcpoweraredisconnectedat
thedcpowerinputterminals.
viiiThinkServerTD330HardwareMaintenanceManual
Page 11
Statement16
CAUTION:
Toreducetheriskofelectricshockorenergyhazards:
•Thisequipmentmustbeinstalledbytrainedservicepersonnelinarestricted-accesslocation,as
denedbyyourlocalelectricalcodeandthelatesteditionofIEC60950.
•Connecttheequipmenttoareliablyearthedsafetyextralowvoltage(SELV)source.AnSEL V
sourceisasecondarycircuitthatisdesignedsothatnormalandsinglefaultconditionsdonot
causethevoltagestoexceedasafelevel(60Vdirectcurrent).
•Thebranchcircuitovercurrentprotectionmustberatedinaccordancewithlocalelectricalcode
requirements.
•Use1.3mm
2
or16AmericanWireGauge(AWG)copperconductoronly,notexceeding3meters
inlength.
•Torquethewiring-terminalscrewsto1.4newton-metersor12inch-pounds.
•Provideareadilyavailable,approvedandrateddisconnectdeviceintheeldwiring.
Statement17
CAUTION:
ThisproductcontainsaClass1Mlaser.Donotviewdirectlywithopticalinstruments.
Statement18
CAUTION:
Donotplaceanyobjectontopofrack-mountedproducts.
Statement19
CAUTION:
Hazardousmovingparts.Keepngersandotherbodypartsaway.
©CopyrightLenovo2012,2013
ix
Page 12

Statement20
CAUTION:
Alithiumionbatteryisprovided.Toavoidpossibleexplosion,donotburnthebattery.Replacethe
batteryonlywiththeLenovo-approvedpart.Recycleordiscardthebatteryasinstructedbylocal
regulations.
Safetyinspectionguide
Thepurposeofthisinspectionguideistoassistyouinidentifyingpotentiallyunsafeconditions.Aseach
machinewasdesignedandbuilt,requiredsafetyitemswereinstalledtoprotectusersandservicetechnicians
frominjury.Thisguideaddressesonlythoseitems.Y oushouldusegoodjudgmenttoidentifypotentialsafety
hazardsduetoattachmentofnon-ThinkServerfeaturesoroptionsnotcoveredbythisinspectionguide.
Ifanyunsafeconditionsarepresent,youmustdeterminehowserioustheapparenthazardcouldbeand
whetheryoucancontinuewithoutrstcorrectingtheproblem.
Considertheseconditionsandthesafetyhazardstheypresent:
•Electricalhazards,especiallyprimarypower(primaryvoltageontheframecancauseseriousorfatal
electricalshock)
•Explosivehazards,suchasadamagedCathodeRayTube(CRT)monitororabulgingcapacitor
•Mechanicalhazards,suchaslooseormissinghardware
Todeterminewhetherthereareanypotentiallyunsafeconditions,usethefollowingchecklistatthebeginning
ofeveryservicetask.Beginthecheckswiththepoweroff,andthepowercordsdisconnected.
Checklist:
1.Checkexteriorcoversfordamage(loose,broken,orsharpedges).
2.Powerofftheserver.Disconnectthepowercords.
3.Checkthepowercordfor:
a.Athird-wiregroundconnectoringoodcondition.Useametertomeasurethird-wireground
continuityfor0.1ohmorlessbetweentheexternalgroundpinandtheframeground.
b.Thepowercordshouldbetheauthorizedtypespeciedforyourserver.Goto:
http://www.lenovo.com/serviceparts-lookup.
c.Insulationmustnotbefrayedorworn.
4.Checkforcrackedorbulgingbatteries.
5.Removethecover.
6.Checkforanyobviousnon-ThinkServeralterations.Usegoodjudgmentastothesafetyofany
non-ThinkServeralterations.
7.Checkinsidetheunitforanyobviousunsafeconditions,suchasmetallings,contamination,wateror
otherliquids,orsignsofreorsmokedamage.
8.Checkforworn,frayed,orpinchedcables.
9.Checkthatthepower-supplycoverfasteners(screwsorrivets)havenotbeenremovedortamperedwith.
xThinkServerTD330HardwareMaintenanceManual
Page 13

Groundingrequirements
Electricalgroundingoftheserverisrequiredforoperatorsafetyandcorrectsystemfunction.Proper
groundingoftheelectricaloutletcanbeveriedbyacertiedelectrician.
©CopyrightLenovo2012,2013
xi
Page 14

xiiThinkServerTD330HardwareMaintenanceManual
Page 15

Chapter1.Generalinformation
Thischapterprovidessomegeneralinformationaboutyourproduct.
Thischaptercontainsthefollowingitems:
•“Introduction”onpage1
•“Serverdocumentation”onpage1
Introduction
ThisHardwareMaintenanceManualforyourLenovo
®
ThinkServer
®
productcontainsinformationaboutthe
serverfeatures,specications,componentlocations,congurationinstructions,hardwarereplacement
procedures,andtroubleshootinganddiagnostics.Thismanualisintendedonlyfortrainedservicepersonnel
ofLenovo.
TheHardwareMaintenanceManualisupdatedfrequently,andthemostup-to-dateversionisalways
availableinEnglishontheLenovoWebsiteat:
http://www.lenovo.com/ThinkServerUserGuides
Thismanualcontainsinstructionsonhowtoinstall,remove,orreplacemajorFieldReplaceableUnits(FRUs),
includingself-serviceCustomerReplaceableUnits(CRUs),optional-serviceCRUs,andnon-CRUs.
Note:BeforeservicingaLenovoproduct,ensurethatyoureadandunderstand“Safetyinformation”on
pageiii
.
•ForinformationaboutmajorcomponentlocationsandCRUidentication,see“Servercomponents”
onpage25
.
•Forinformationaboutinstalling,removing,orreplacingmajorFRUs,seeChapter6“Installing,removing,
orreplacinghardware”onpage75
.
•ForacompletelistingofFRUinformation,suchasFRUpartnumbersandsupportedservermodels,goto:
http:/www.lenovo.com/serviceparts-lookup
•Forinformationaboutthetermsofwarranty,refertotheWarrantyandSupportInformationonthe
documentationDVDthatcomeswiththeserver.TheWarrantyandSupportInformationalsoisavailable
ontheLenovoWebsiteat:
http://www.lenovo.com/ThinkServerUserGuides
•Forthemostup-to-dateinformationaboutyourserver,goto:
http://www.lenovo.com/thinkserver
•LenovomaintainspagesontheWorldWideWeb,whereyoucangetthelatesttechnicalinformationand
downloaddocumentationordevicedriversandupdates.ToaccesstheLenovoSupportWebsite,goto:
http://www.lenovo.com/support
Serverdocumentation
Thistopicprovidesgeneraldescriptionsofthevariousdocumentationforyourserverandinstructionson
howtoobtainallthedocumentation.
©CopyrightLenovo2012,2013
1
Page 16

Printeddocuments
Thefollowingdocumentsareprintedoutandcontainedinyourserverpackage.
•ReadMeFirst
Thisisamultilingualdocumentyoushouldreadrst.Thisdocumentprovidesinstructionsonhowto
accessthecompletesafety,warranty,andsupportinformationonthedocumentationDVDthatcomes
withyourserver.Thisdocumentalsoprovidesinstructionsonhowtondthemostup-to-dateinformation
ontheLenovoSupportWebsite.
•ImportantNotices
Thisdocumentincludessafetyandlegalnoticesthatyoushouldreadandunderstandbeforeusing
theserver.
DocumentationDVD
ThedocumentationDVD,whichcomeswithyourserver,containsvariousdocumentsforyourserverin
PortableDocumentFormat(PDF).Toviewthedocumentation,youneedtohavetheAdobeReaderprogram
installed.YoucandownloadthedesiredlanguageversionofthelatestAdobeReaderprogramfromthe
AdobeWebsiteat:
http://www.adobe.com
TostartthedocumentationDVD,inserttheDVDintotheopticaldrive.TheDVDisAutoPlayenabledand
startsautomaticallyinmostMicrosoft
®
Windows
®
environments.IftheDVDfailstostartorifyouareusinga
Linux
®
operatingsystem,openthelaunch.htmlelocatedintherootdirectoryoftheDVD.
Note:LenovomaintainspagesontheWorldWideWebwhereyoucangetthelatesttechnicalinformation
anddownloaddocumentationordevicedriversandupdates.Someinformationinthedocumentsonthe
documentationDVDmightchangewithoutnoticeaftertherstreleaseoftheDVD.Youcanalwaysobtainall
themostup-to-datedocumentationforyourserverfromtheLenovoWebsiteat:
http://www.lenovo.com/ThinkServerUserGuides
ThefollowingdocumentsareonthedocumentationDVDthatcomeswithyourserver:
•SafetyInformation
Thisisamultilingualdocumentthatincludesallthesafetystatementsforyourproductinmorethan30
languages.Besuretoreadandunderstandallthesafetystatementsbeforeusingtheproduct.
•WarrantyandSupportInformation
ThisdocumentincludestheLenovowarrantystatement,CustomerReplaceableUnits(CRUs)information,
andinformationabouthowtocontacttheLenovoCustomerSupportCenter.
•LenovoLicenseAgreement
ThisdocumentincludesthetermsandconditionsoftheLenovoLicenseAgreement.
•UserGuide
Thisdocumentprovidesdetailedinformationtohelpyougetfamiliarwithyourserverandhelpyouuse,
congure,andmaintainyourserver.
2ThinkServerTD330HardwareMaintenanceManual
Page 17

•ThinkServerManagementModuleUserGuide
Thisdocumentprovidesinformationaboutserverremotemanagement.ThisdocumentisinEnglishonly.
YoumightndthisdocumentonthedocumentationDVDthatcomeswithyourserver.Ifnot,downloadit
fromtheLenovoWebsiteat:
http://www.lenovo.com/ThinkServerUserGuides
Note:Toobtainadvancedremotemanagementfunctions,installaThinkServerManagementModule
Premium(TMMPremium)ontheiKVMconnectoronthesystemboard.See“Installingorremovingthe
ThinkServerManagementModulePremium”onpage109
.
•MegaRAIDSASSoftwareUserGuide
ThisdocumentprovidesinformationaboutRedundantArrayofIndependentDisks(RAID)andhowto
usetheutilityprogramstocongure,monitor,andmaintainyourserverRAIDandrelateddevices.This
documentisinEnglishonly.
Note:RefertothisdocumentforhardwareRAIDinformationifyouhavearequiredRAIDcardinstalledin
theserver.See“InstallingorremovingtheRAIDcard”onpage97.ForinformationabouttheThinkServer
RAID100orRAID300(alsoknownastheonboardSATA/SASsoftwareRAID),see“Conguringthe
ThinkServerRAID100orRAID300”onpage66
.
Documentfortrainedservicepersonnelonly
ThefollowingdocumentisintendedfortrainedservicepersonnelofLenovoandisonlyavailableinEnglish
ontheLenovoWebsiteat:
http://www.lenovo.com/ThinkServerUserGuides
HardwareMaintenanceManual
Thisdocumentprovidesinformationaboutcomponentlocations,replacementproceduresformajorField
ReplaceableUnits(FRUs),andtroubleshootinganddiagnostics.Thisdocumentisupdatedfrequently,and
themostup-to-dateversionisalwaysavailableinEnglishontheLenovoWebsiteat:
http://www.lenovo.com/ThinkServerUserGuides
Chapter1.Generalinformation3
Page 18

4ThinkServerTD330HardwareMaintenanceManual
Page 19

Chapter2.Serversetuproadmap
Thischapterprovidesageneralroadmaptoguideyouthroughsettingupyourserver.
Theserversetupprocedurevariesdependingonthecongurationoftheserverwhenitwasdelivered.In
somecases,theserverisfullyconguredandyoujustneedtoconnecttheservertothenetworkandan
acpowersource,andthenyoucanturnontheserver.Inothercases,theserverneedstohavehardware
featuresinstalled,requireshardwareandrmwareconguration,andrequiresanoperatingsystemto
beinstalled.
Thegeneralprocedureforsettingupyourserveris:
1.Unpacktheserverpackage.See“Serverpackage”onpage7.
2.Installanyrequiredhardwareorserveroption.SeetherelatedtopicinChapter6“Installing,removing,
orreplacinghardware”onpage75
.
3.ConnecttheEthernetcableandpowercordstotheserver.See“Rearviewoftheserver”onpage
19tolocatetheconnectors.
4.Turnontheservertoverifyoperation.See“Turningontheserver”onpage51.
5.ReviewtheUniedExtensibleFirmwareInterface(UEFI)BasicInputOutputSystem(BIOS)settingsand
customizeasneeded.See“UsingtheSetupUtilityprogram”onpage53
.
6.CongureRAIDandinstalltheoperatingsystemandbasicdrivers.See“UsingtheThinkServer
EasyStartupprogram”onpage61and“ConguringRAID”onpage64.
7.Installanyadditionaldriversneededforaddedfeatures.Refertotheinstructionsthatcomewiththe
hardwareoption.
8.CongureEthernetsettingsintheoperatingsystembyreferringtotheoperatingsystemhelp.Thisstep
isnotrequirediftheoperatingsystemwasinstalledusingtheThinkServerEasyStartupprogram.
9.Checkforrmwareanddriverupdates.See“Updatingthermware”onpage72.
10.Installotherapplications.Refertothedocumentationthatcomeswiththeapplicationsthatyouwantto
install.
©CopyrightLenovo2012,2013
5
Page 20

6ThinkServerTD330HardwareMaintenanceManual
Page 21
Chapter3.Productoverview
Thischapterprovidesinformationabouttheserverpackage,features,specications,softwareprograms,
andcomponentlocations.
Thischaptercontainsthefollowingitems:
•“Serverpackage”onpage7
•“Features”onpage7
•“Specications”onpage11
•“Software”onpage11
•“Locations”onpage12
Serverpackage
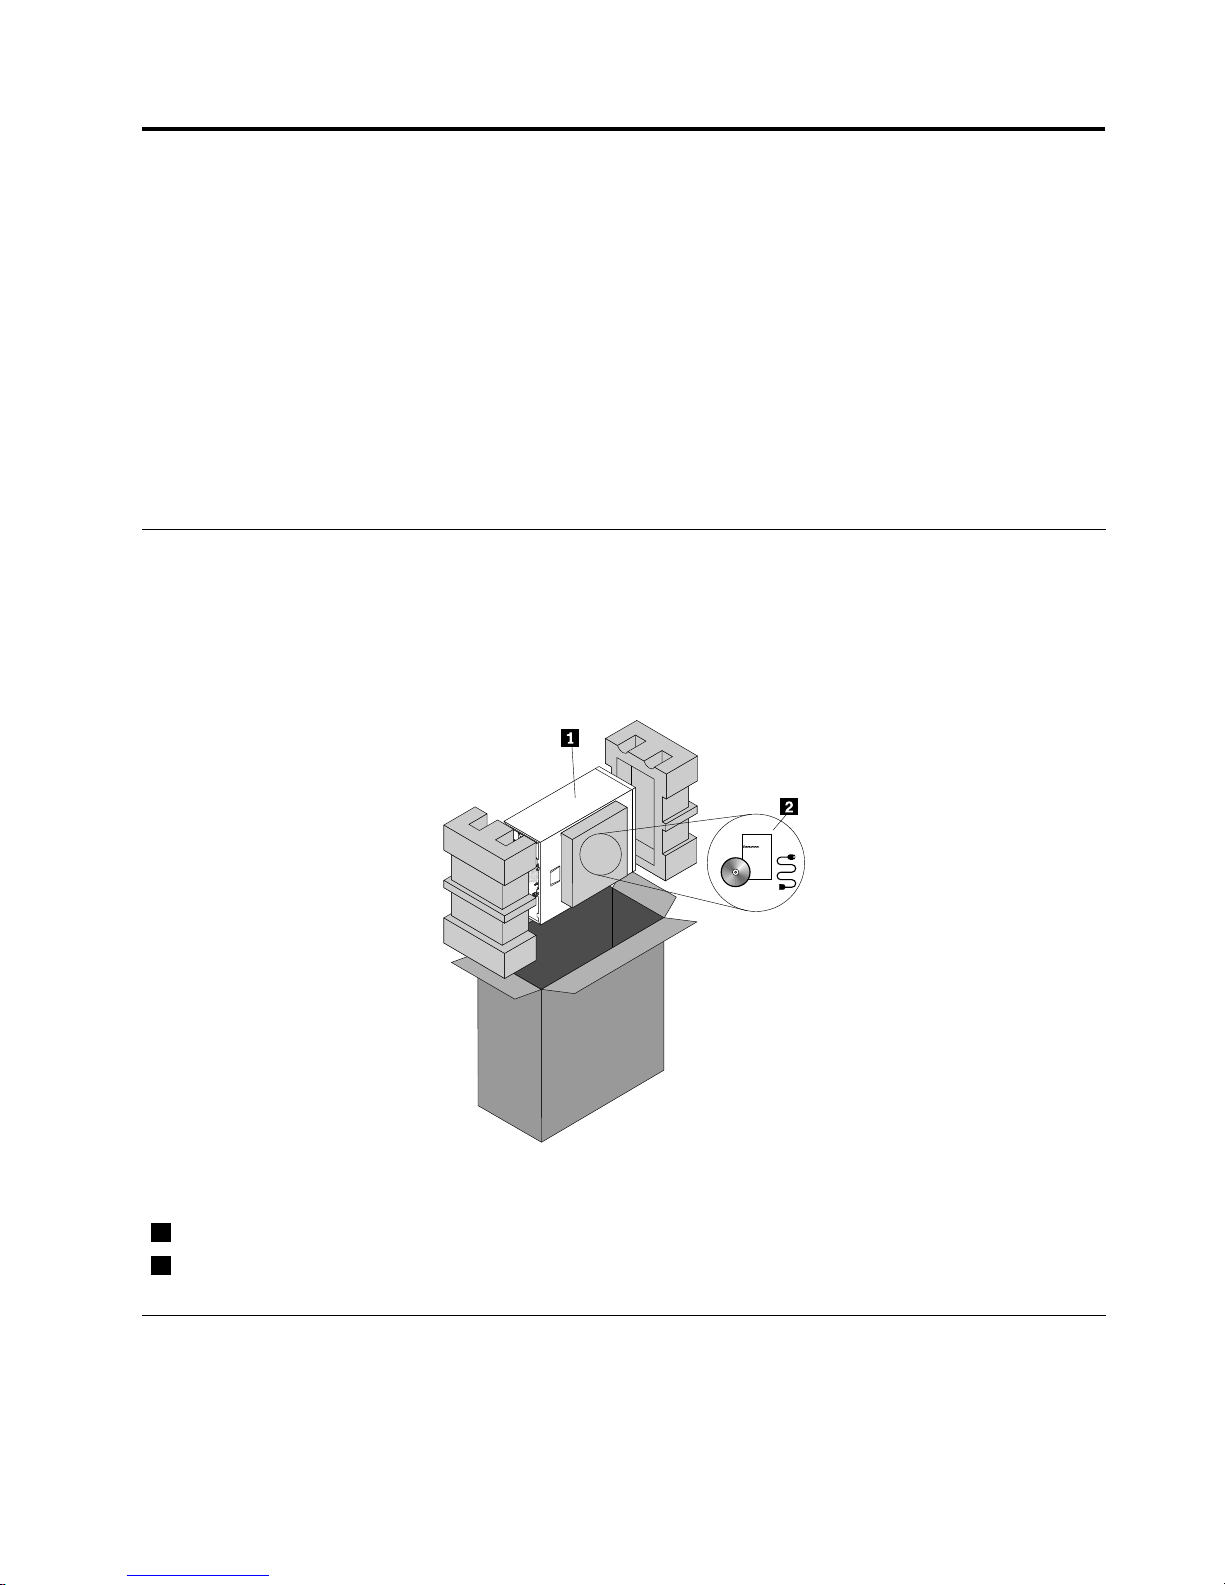
Theserverpackageincludestheserver,powercords,printeddocumentation,adocumentationDVD,and
softwaremedia.
Note:Dependingonthemodel,yourservermightlookslightlydifferentfromthefollowingillustration.
Figure1.Serverpackage
1Server
2Materialbox,includingpowercords,printeddocumentation,adocumentationDVD,andsoftwaremedia
Features
Thistopicprovidesgeneralinformationabouttheserverfeaturesforvariousmodels.Dependingonyour
specicmodel,somefeaturesmightvaryornotbeavailable.Forinformationaboutyourspecicmodel,use
theSetupUtilityprogram.See“ViewinginformationintheSetupUtilityprogram”onpage53.
©CopyrightLenovo2012,2013
7
Page 22

Microprocessor
OneortwoIntel
®
Xeon
®
quad-core,hexa-core,orocta-coremicroprocessors(internalcachesizevaries
bymodel)
ForalistofThinkServermicroprocessoroptions,goto:
http://www.lenovo.com/thinkserver
Memory
Yourserverhas12memoryslots.Formoreinformation,see“Systemboardcomponents”onpage42and
“Memorymoduleinstallationrules”onpage85.
Powersupply
Yourservercomeswithoneofthefollowingpowersupplycongurations:
•Onescrew-secured,non-hot-swap625-wattpowersupplyassembly(universalinputandcompliant
with80PLUSBronze)
•Oneortwohot-swap800-wattredundantpowersupplies(universalinputandcompliantwith80PLUS
Gold)
Systemfans
Youservercomeswiththefollowingfanstoprovidepropersystemcoolingandairow:
•Onerearsystemfan
•Twofrontsystemfans
•Twoheatsinkandfanassemblies
Internaldrives
Internaldrivesaredevicesthatyourserverusestoreadandstoredata.Theinternaldrivessupported
byyourservervarybymodel.
•Harddiskdrive
–Uptoeight3.5-inchhot-swapSerialAdvancedTechnologyAttachment(SATA)orSerialAttachedSCSI
(SAS)harddiskdrives(SCSIistheacronymforSmallComputerSystemInterface)
–Uptoeight2.5-inchhot-swapSASharddiskdrives
–Uptotwo2.5-inchhot-swapSATAsolid-statedrivesandsix2.5-inchhot-swapSASharddiskdrives
–Uptofour3.5-inchhot-swapSATAorSASharddiskdrives
–Uptofour3.5-inchnon-hot-swapSATAharddiskdrives
•Opticaldrive
–Uptotwo5.25-inchSATAopticaldrives
–Theserverhastwoopticaldrivebays.Theloweropticaldrivebayisinstalledwitha5.25-inchSATA
opticaldrive.Theupperbayisforasecondaryopticaldriveonly.Someservermodelscomewitha
secondaryopticaldriveinstalledintheupperbay.
Forthelocationinformationabouttheinternaldrivesordrivebays,see“Servercomponents”onpage25
.
8ThinkServerTD330HardwareMaintenanceManual
Page 23

Expansionslots
TheserverhassixexpansionslotsonthesystemboardforinstallingappropriatePeripheralComponent
Interconnect(PCI)cardsorPCIExpresscards.Fordetailedinformation,see“Systemboardcomponents”
onpage42.
Input/Output(I/O)features
•Oneserialconnectorontherearpanel
•OneVideoGraphicsArray(VGA)DB-15connectorontherearpanel
•SixUSB2.0connectors(twoonthefrontpanelandfourontherearpanel)
•TwoRJ-45Ethernetconnectorsontherearpanel(Ethernetconnector2isforsystemmanagement)
Forthelocationinformationabouttheconnectors,refertotherelatedtopicsin“Locations”onpage12
.
Videosubsystem
AnintegratedgraphicscontrollerintheThinkServerManagementModule(TMM),whichalsoisknownas
theBaseboardManagementController(BMC)chip,isinstalledonthesystemboardtotosupportaVGA
connectorontherearpanelforconnectingvideodevices.
Ethernetconnectivity
TheservercomeswithanintegratedIntelGigabitEthernetcontrolleraswellasanEthernetphysicallayer
(PHY)oftheOpenSystemsInterconnectionmodel(OSImodel).Theyprovidetheserverwiththeabilityto
supporttwoEthernetconnectorsontherearpanelwith10megabitspersecond(Mbps),100Mbps,or1000
Mbpsnetworkconnectivity.Formoreinformation,see“Rearviewoftheserver”onpage19.
Reliability,availability,andserviceability
Reliability,availability,andserviceability(hereinafterreferredtoasRAS)arethreeimportantserverdesign
features.TheRASfeatureshelpyoutoensuretheintegrityofthedatastoredontheserver,theavailabilityof
theserverwhenyouneedit,andtheeasewithwhichyoucandiagnoseandcorrectproblems.
YourserverhasthefollowingRASfeatures:
•Securityfeatures
–Serverlocks(see“Serverlocks”onpage23)
–Administratorpasswordanduserpasswordtohelpprotectunauthorizedaccesstotheserver(see
“Usingpasswords”onpage57)
–ThinkServerTrustedPlatformModule(TPM),whichisasecuritychip,tohelpenhanceserversecurity
Note:TheTPMisonlyavailableinsomemodels.
–Remotemonitoringorcontrolbyanadministratortoprovideprotectionorhelp
–Hot-swapredundantpowersuppliestohelpavoidsignicantinterruptiontotheoperationofthe
systemwhenapowersupplyfails(availableinsomemodels)
•Basicsystemmanagementfeatures
–Abilitytostorethepower-onself-test(POST)hardwaretestresults
–BIOSSetupUtilityprogram
TheBIOSSetupUtilityprogramhelpsyouviewtheserverinformationandconguretheserverinthe
pre-operatingsystemenvironment.See“UsingtheSetupUtilityprogram”onpage53
.
Chapter3.Productoverview9
Page 24

–TMM(alsoknownasBMC),andIntelligentPlatformManagementInterface(IPMI)2.0
ThesystemboardplatformmanagementsubsystemisbasedontheintegratedTMMfeatures.The
TMMisamanagementchipthatisintegratedonthesystemboardofyourserver.WiththeTMM
chip,nomatterwhatconditiontheserveroperatingsystemisinandnomatteriftheserverisonor
off,aslongastheserverisconnectedtonetworkandanacpowersource,theinteractionwiththe
TMM-controlledserverscanbeachievedthroughsystemnetwork.Theusercanobtaintheserver
hardwarehealthinformationandsystemeventlog(SEL),andisabletoconducttheoperations
includingturningonorofftheserver,restartingtheserver,andsoon.Thispartofservermanagement
isindependentoftheoperatingsystemandiscalledout-of-bandmanagement.
ThesystemboardplatformmanagementsubsystemconsistsoftheintegratedTMM,communication
buses,sensors,BasicInputOutputSystem(BIOS),andservermanagementrmware.Itisresponsible
forerrorreporting,systempowercontrol,thermalmonitoring,systemfancontrol,andother
managementfeatures.TheTMMprovidessystemmanagementandmonitoringfeaturesbasedonthe
IPMI2.0specication.IPMIhelpslowertheoverallcostsofservermanagement.Youcanndmore
informationaboutIPMI2.0fromtheWebsiteofIntel.TheTMMalsosupportssomenon-IPMIfeatures,
suchastheDynamicHostCongurationProtocol(DHCP)andthePlatformEnvironmentControl
Interface(PECI),toprovidemoresystemmanagementfunctions.
RefertotheRemoteManagementModuleUserGuideonthedocumentationDVDthatcomeswithyour
serverformoreinformation.
–Hot-swapfeature
Somemodelssupporthot-swapharddiskdrivesorhot-swapredundantpowersupplies.Withthe
hot-swapfeature,youcaninstall,remove,orreplaceharddiskdrivesorafailingpowersupplywithout
turningofftheserver.
–PrebootExecutionEnvironment(PXE)
TheIntelPXEtechnologyenablesyoutobootyourcomputers,loadanoperatingsystem,ordeploy
executableimagesfromaremoteserverbyusinganetworkinterface.Theoperationcanbedone
independentlyoflocaldatastoragedevices(suchasharddiskdrives)oroperatingsystems.
–RedundantArrayofIndependentDisks(RAID)
YourserversupportsonboardSATAsoftwareRAIDandadvancedSATA/SAShardwareRAID
congurationsifyouhavearequiredRAIDcardinstalled.Fordetailedinformation,see“Conguring
RAID”onpage64
.
–Statuslight-emittingdiodes(LEDs)anddiagnosticLEDs
FormoreinformationabouttheLEDsforyourserver,refertotherelatedtopicsin“Locations”on
page12.
–Softwareprograms
Formoreinformationaboutthesoftwareprograms,see“Software”onpage11
.
–WakeonLAN
WhentheWakeonLANfeatureisenabledonacomputerthatisconnectedtoalocalareanetwork
(LAN),anetworkadministratorcanremotelyturnonorwakeupthecomputerfromamanagement
consoleusingremotenetworkmanagementsoftware.Besides,manyotherfunctions,suchasdata
transferandsoftwareupdates,canbeperformedremotelywithoutremoteattendanceandcanbedone
afternormalworkinghoursandonweekendstosavetimeandincreaseproductivity.
•Advancedsystemmanagementfeatures
TheadvancedsystemmanagementfeaturesareonlyavailablewhentheTMMdetectsthepresenceof
aThinkServerManagementModulePremium(TMMPremium),whichalsoisknownastheintegrated
keyboard,video,andmouse(iKVM)key.TheTMMPremiumisaremotemanagementmodule.You
canpurchaseaTMMPremiumfromLenovoandinstallitontheTMMPremiumconnector(alsoknown
asiKVMconnector)onthesystemboardofyourservertoenabletheiKVMfunctionandactivatethe
advancedsystemmanagementfeatures.
10ThinkServerTD330HardwareMaintenanceManual
Page 25

Formoreinformationaboutadvancedsystemmanagement,refertotheThinkServerManagementModule
UserGuide,whichisavailablefordownloadat:
http://www.lenovo.com/ThinkServerUserGuides
Specications
Thistopicliststhephysicalspecicationsforyourserver.
Dimensions
Width:195mm(7.68inches)
Height:430mm(16.93inches)withoutfootstands;445mm(17.52inches)withfootstands
Depth:595mm(23.43inches)includingthefrontbezel
Weight
Theproductweightvariesdependingondifferentsystemcongurations.
Rangeofproductweightwithoutpackage:19kg(41.89lb)to29kg(63.93lb)
Rangeofproductweightwithpackage:22kg(48.50lb)to32.5kg(71.65lb)
Environment
•Airtemperature:
Operating:10°Cto35°C(50°Fto95°F)
Storage:-40°Cto60°C(-40°Fto140°F)inoriginalshippingpackage
•Altitude:0to3048m(0to10000ft)
•Humidity:
Operating:10%to80%(non-condensing)
Storage:8%to90%(non-condensing)
Electricalinput
Universalinput:
Minimum:90Vac
Maximum:264Vac
Inputfrequencyrange:47to63Hz
Software
Thistopicprovidesinformationaboutthesoftwareprogramsthatyoucanusetohelpyousetup,use,
andmaintaintheserver.
ThinkServerEasyStartup
TheThinkServerEasyStartupprogramsimpliestheprocessofconguringRAIDandinstallingsupported
MicrosoftWindowsandLinuxoperatingsystemsanddevicedriversonyourserver.Thisprogramisprovided
withyourserveronaself-starting(bootable)ThinkServerEasyStartupDVD.Theuserguidefortheprogram
alsoisontheDVDandcanbeaccesseddirectlyfromtheprograminterface.Fordetailedinformation,see
“UsingtheThinkServerEasyStartupprogram”onpage61
.
ThinkServerEasyUpdateFirmwareUpdater
TheThinkServerEasyUpdateFirmwareUpdaterprogram(hereinafterreferredtoasFirmwareUpdater)
enablesyoutomaintainyourserverrmwareuptodateandhelpsyouavoidunnecessaryserveroutages.
Chapter3.Productoverview11
Page 26

TheFirmwareUpdaterprogramisprovidedontheLenovoSupportWebsite.Formoreinformationabout
downloadingandusingtheFirmwareUpdaterprogram,see“Updatingthermware”onpage72.
BIOSandTMMupdateutilities
TheBIOSandTMM(alsoknownasBMC)rmwarekeepsupdatingaftertheshipmentoftheserver.
LenovomaintainspagesontheSupportWebsiteandprovidestheBIOSandTMMupdateutilitieswith
instructionsfordownloadtohelpyouupdatetheBIOSandTMMrmwareifneeded.Formoreinformation,
see“UpdatingorrecoveringtheBIOS”onpage59
and“Updatingthermware”onpage72.
RAIDcongurationutilities
YourserversupportsonboardSATAsoftwareRAIDandadvancedSATA/SAShardwareRAIDcongurations
ifyouhavearequiredRAIDcardinstalled.Fordetailedinformation,see“ConguringRAID”onpage64.
LenovoThinkServerEasyManage
TheLenovoThinkServerEasyManageprogramenablesenterpriseuserstoremotelycontrolandmonitor
multipleLenovoserverswithinaLAN.
Fordetailedinformation,see“UsingtheLenovoThinkServerEasyManageprogram”onpage72.
Remotemanagementsoftware
TheintegratedTMMprovidesbasicremotemanagementfeaturesfortheserver.Theadd-onTMMPremium
optionprovidesadvancedremotemanagementfeaturesfortheserver.
Fordetailedinformationabouttheremotemanagementsoftwareandserverremotemanagement,referto
theThinkServerManagementModuleUserGuide,whichisavailablefordownloadat:
http://www.lenovo.com/ThinkServerUserGuides
Locations
Thistopicprovidesinformationtohelpyoulocateyourservercomponents.
Machinetype,model,andserialnumberlabel
Thistopichelpsyoulocatethetwolabelsthatcontainthemachinetype,model,andserialnumber
informationforyourserver.Thetwolabelsarethesame.Oneisonthefrontbezelandtheotherison
thechassis.
Themachinetype,model,andserialnumberidentifyyourserver.WhenyoucontactLenovoforhelp,the
informationhelpssupporttechnicianstoidentifyyourserverandprovidefasterservice.
12ThinkServerTD330HardwareMaintenanceManual
Page 27
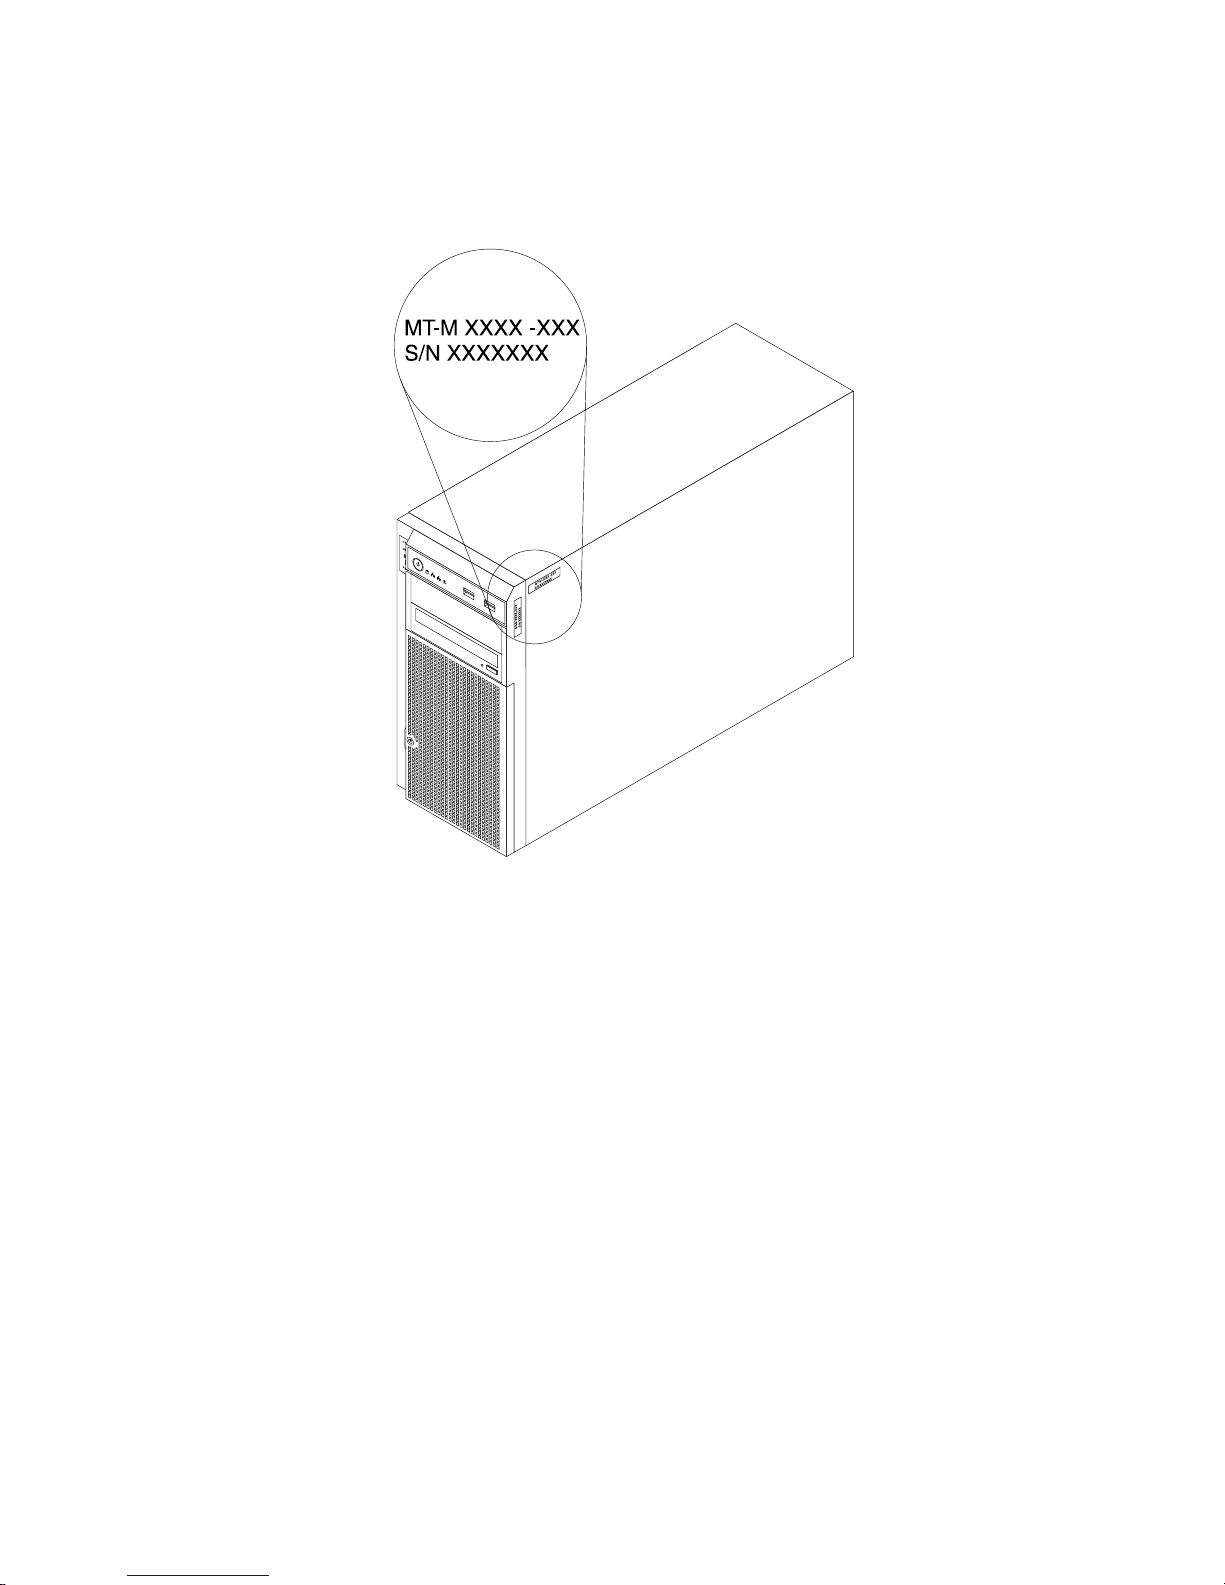
Thefollowingillustrationisasampleofthemachinetype,model,andserialnumberlabelsontheserver.
Note:Dependingonthemodeltype,yourservermightlookslightlydifferentfromthisillustration.
Figure2.Machinetype,model,andserialnumberlabels
Chapter3.Productoverview13
Page 28
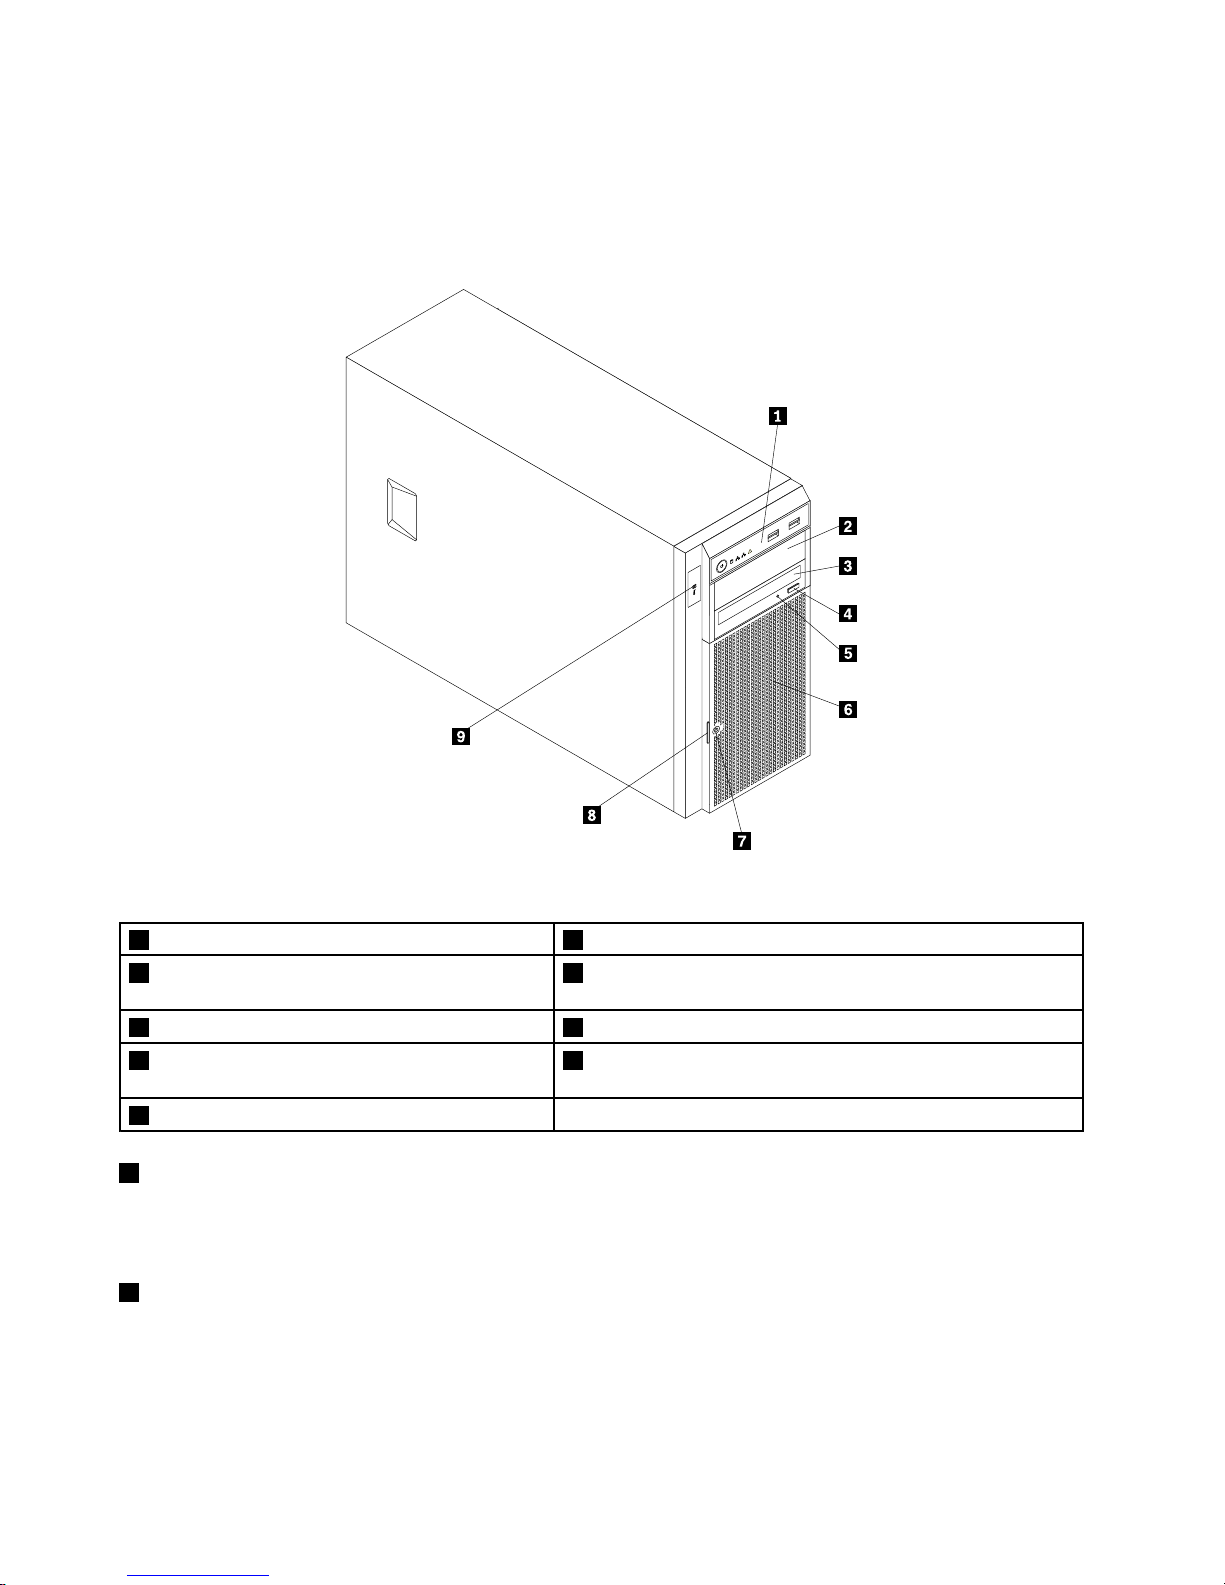
Frontviewoftheserver
Thistopicprovidesinformationtohelpyoulocatethepartsonthefrontoftheserver.
Thefollowingillustrationshowsthefrontviewoftheserver.
CPU
MEM
PSU
1
2
Figure3.Frontviewoftheserver
1Frontpanel6Frontdoor
2Opticaldrivebay2(withanopticaldriveinstalled
insomemodels)
7Frontdoorlock
3Opticaldrivebay1(withanopticaldriveinstalled)
8Frontdoorhandle
4Opticaldriveeject/closebutton9IntelligentDiagnosticsModulepanel(availableinsome
models)
5OpticaldrivestatusLED
1Frontpanel
Fordetailedinformationaboutthecontrol,connectors,andstatusLEDsonthefrontpanel,see“Front
panel”onpage16.
2Opticaldrivebay2
The5.25-inchopticaldrivebay2isforasecondaryopticaldrive.Somemodelshaveasecondaryoptical
driveinstalled.
14ThinkServerTD330HardwareMaintenanceManual
Page 29
3Opticaldrivebay1
Yourservercomeswithanopticaldriveinstalledinthe5.25-inchopticaldrivebay1.
4Opticaldriveeject/closebutton
Pressthisbuttontoejectorclosetheopticaldrivewhentheserverpowerison.
5OpticaldrivestatusLED
TheopticaldrivestatusLEDisblinkingingreenwhentheopticaldriveisworkingorinthePOSTprocess.
6Frontdoor
7Frontdoorlock
Youcanlockthefrontdoortoprotecttheharddiskdrivecagesfromunauthorizedaccess.
8Frontdoorhandle
Usethefrontdoorhandletoopenthefrontdoor.
9IntelligentDiagnosticsModulepanel
TheIntelligentDiagnosticsModulepanelisonlyavailableinmodelsthatcomewithanIntelligentDiagnostics
Module.Formoreinformation,see“IntelligentDiagnosticsModule”onpage18.
Chapter3.Productoverview15
Page 30
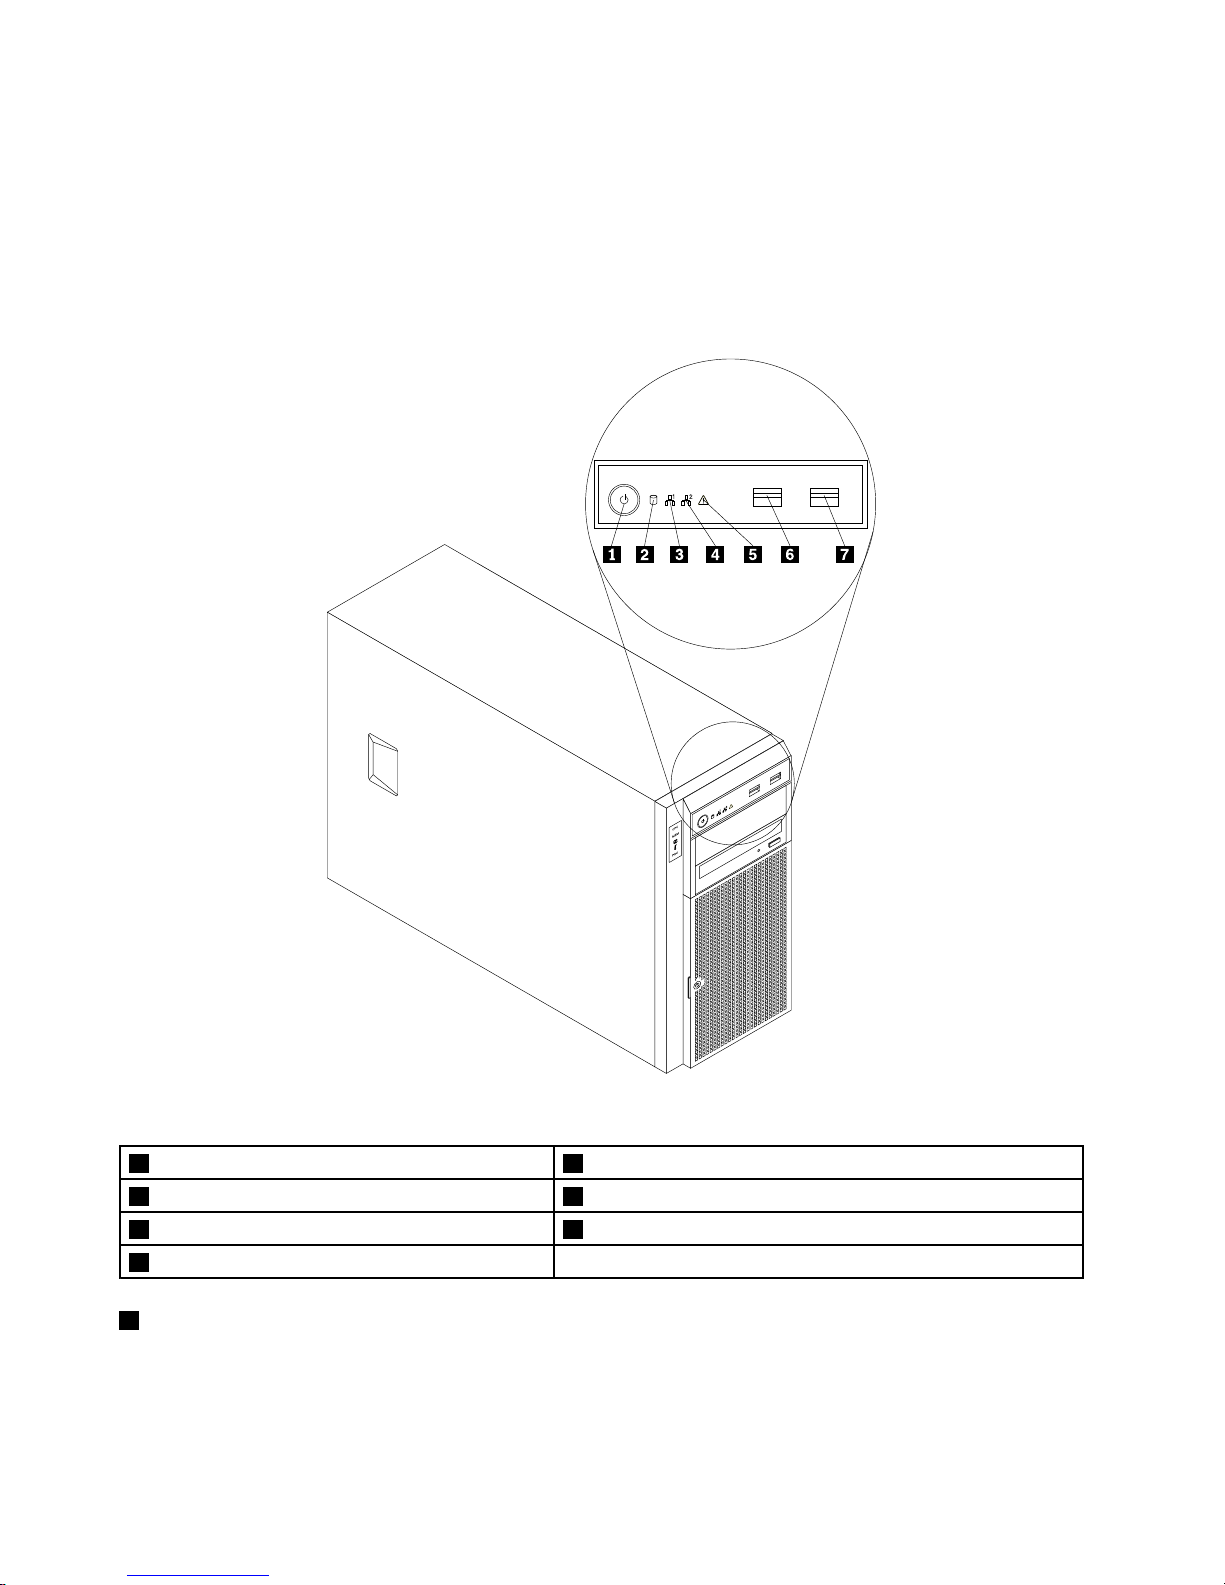
Frontpanel
Thistopicprovidesinformationtohelpyoulocatethecontrol,connectors,andLEDsonthefrontpanelof
theserver.
Thefollowingillustrationshowsthecontrol,connectors,andLEDsonthefrontpaneloftheserver.
Note:Dependingonthemodel,yourservermightlookslightlydifferentfromthisillustration.
Figure4.Frontpanel
1PowerswitchwithpowerstatusLED
5SystemstatusLED
2HarddiskdrivestatusLED
6FrontUSBconnector1
3NetworkInterfaceController(NIC)1statusLED7FrontUSBconnector2
4NIC2statusLED
1PowerswitchwithpowerstatusLED
Pressthepowerswitchtoturnontheserverwhenyounishsettinguptheserver.Holdthepowerswitch
forseveralsecondstoturnofftheserverifyoucannotturnitofffromtheoperatingsystem.SeeChapter
4“Turningonandturningofftheserver”onpage51
.ThepowerstatusLEDhelpsyoutodeterminethe
currentpowerstatus.
16ThinkServerTD330HardwareMaintenanceManual
Page 31
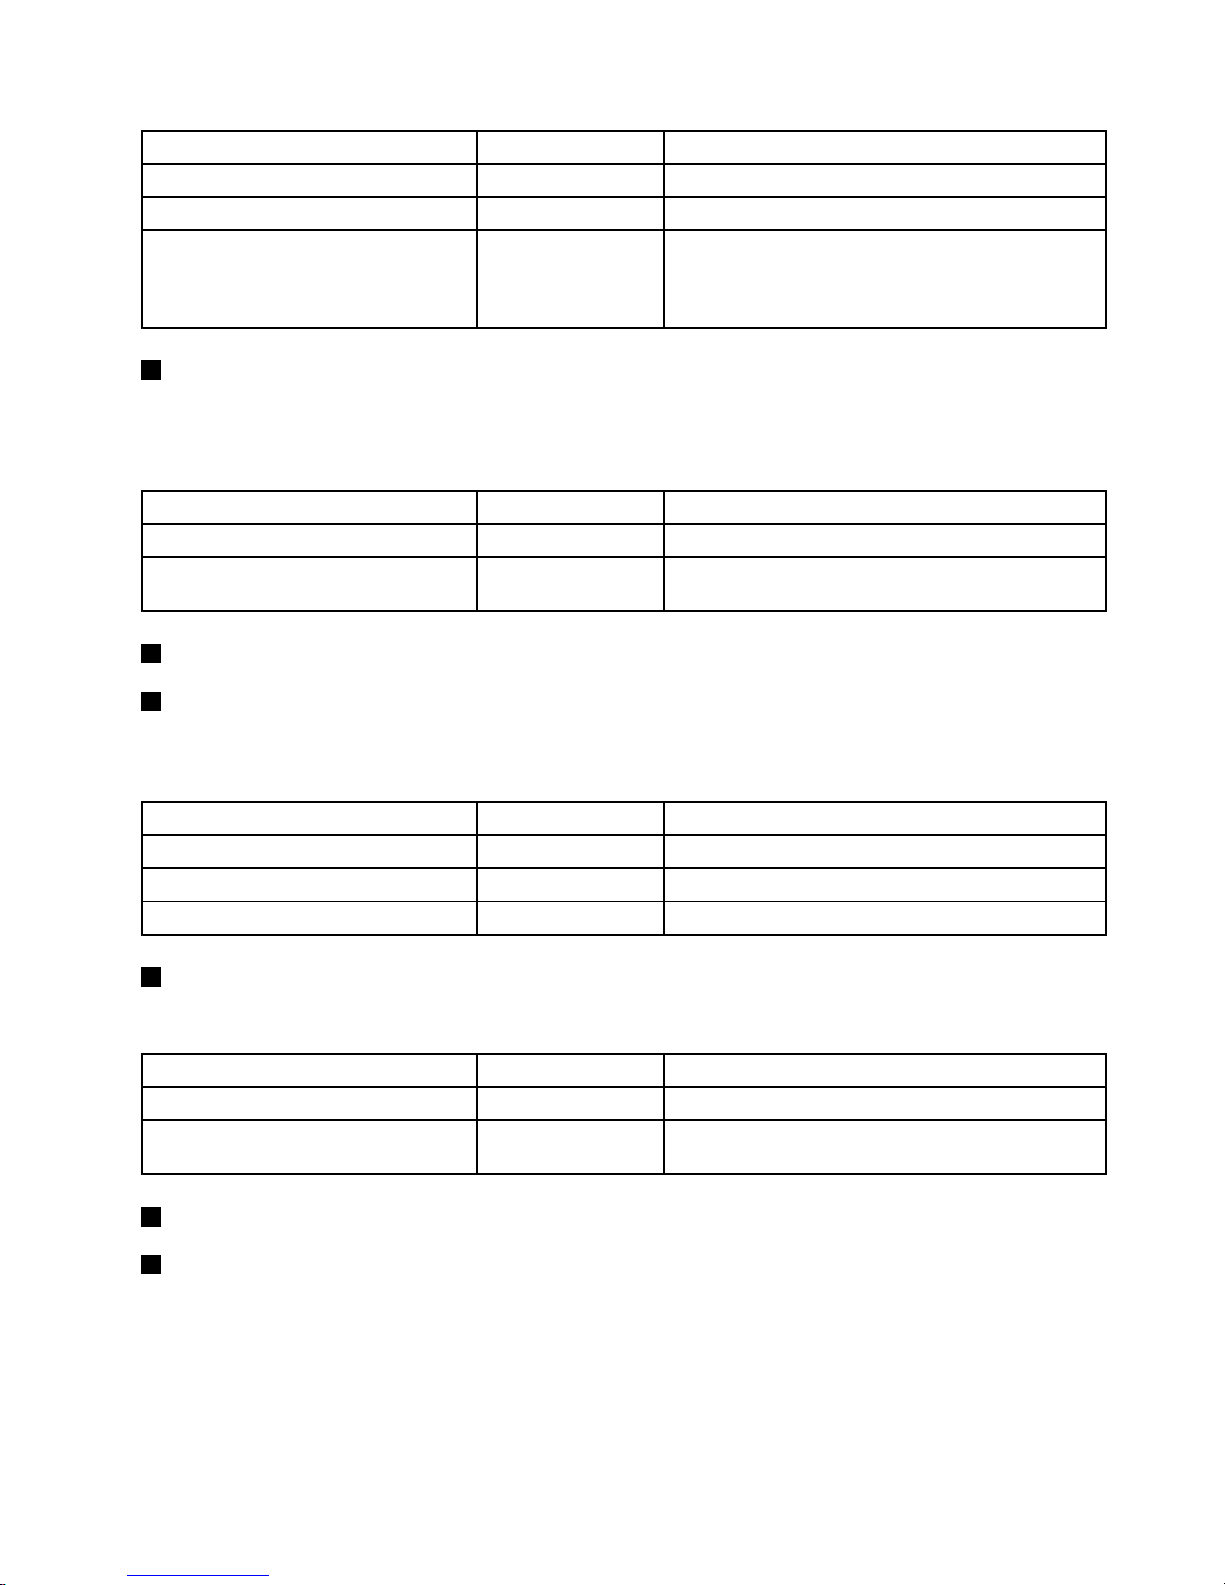
PowerstatusLED
Color
Description
On
BlueTheserverison.
Off
None
Theserverisoff.
BlinkingBlue
TheserverisinACPIS1mode,whichalsoisknown
asPowerOnSuspend(POS)mode.Inthismode,the
microprocessorisnotworkingwhileotherhardware
devicesarestillworking.
2HarddiskdrivestatusLED
TheharddiskdrivestatusLEDhelpsyoutodeterminethestatusoftheharddiskdriveactivity.
Note:TheharddiskdrivestatusLEDisonlyforservermodelswithnon-hot-swapharddiskdrives.
HarddiskdrivestatusLED
Color
Description
Off
NoneTheharddiskdriveisnotinuse.
Blinking
Green
Theharddiskdriveisactiveanddataisbeing
transferred.
3NIC1statusLED
4NIC2statusLED
ThetwoNICstatusLEDsindicatetheLANstatusfortheEthernetconnector1andEthernetconnector2
ontherearpaneloftheserver.
NICstatusLEDColor
Description
OnGreen
TheserverisconnectedtoaLAN.
Off
None
TheserverisdisconnectedfromaLAN.
Blinking
Green
TheLANisconnectedandactive.
5SystemstatusLED
ThesystemstatusLEDhelpsyoutodetermineifthereareanysystemerrors.
SystemstatusLEDColor
Description
On
AmberAsystemerrorhasoccurred.
Off
None
Theserverisoffortheserverisonandisworking
correctly.
6FrontUSBconnector1
7FrontUSBconnector2
UsedtoattachaUSB-compatibledevice,suchasaUSBkeyboard,mouse,scanner,orprinter.Ifyou
havemorethansixUSBdevices,youcanpurchaseaUSBhub,whichyoucanusetoconnectadditional
USBdevices.
Chapter3.Productoverview17
Page 32
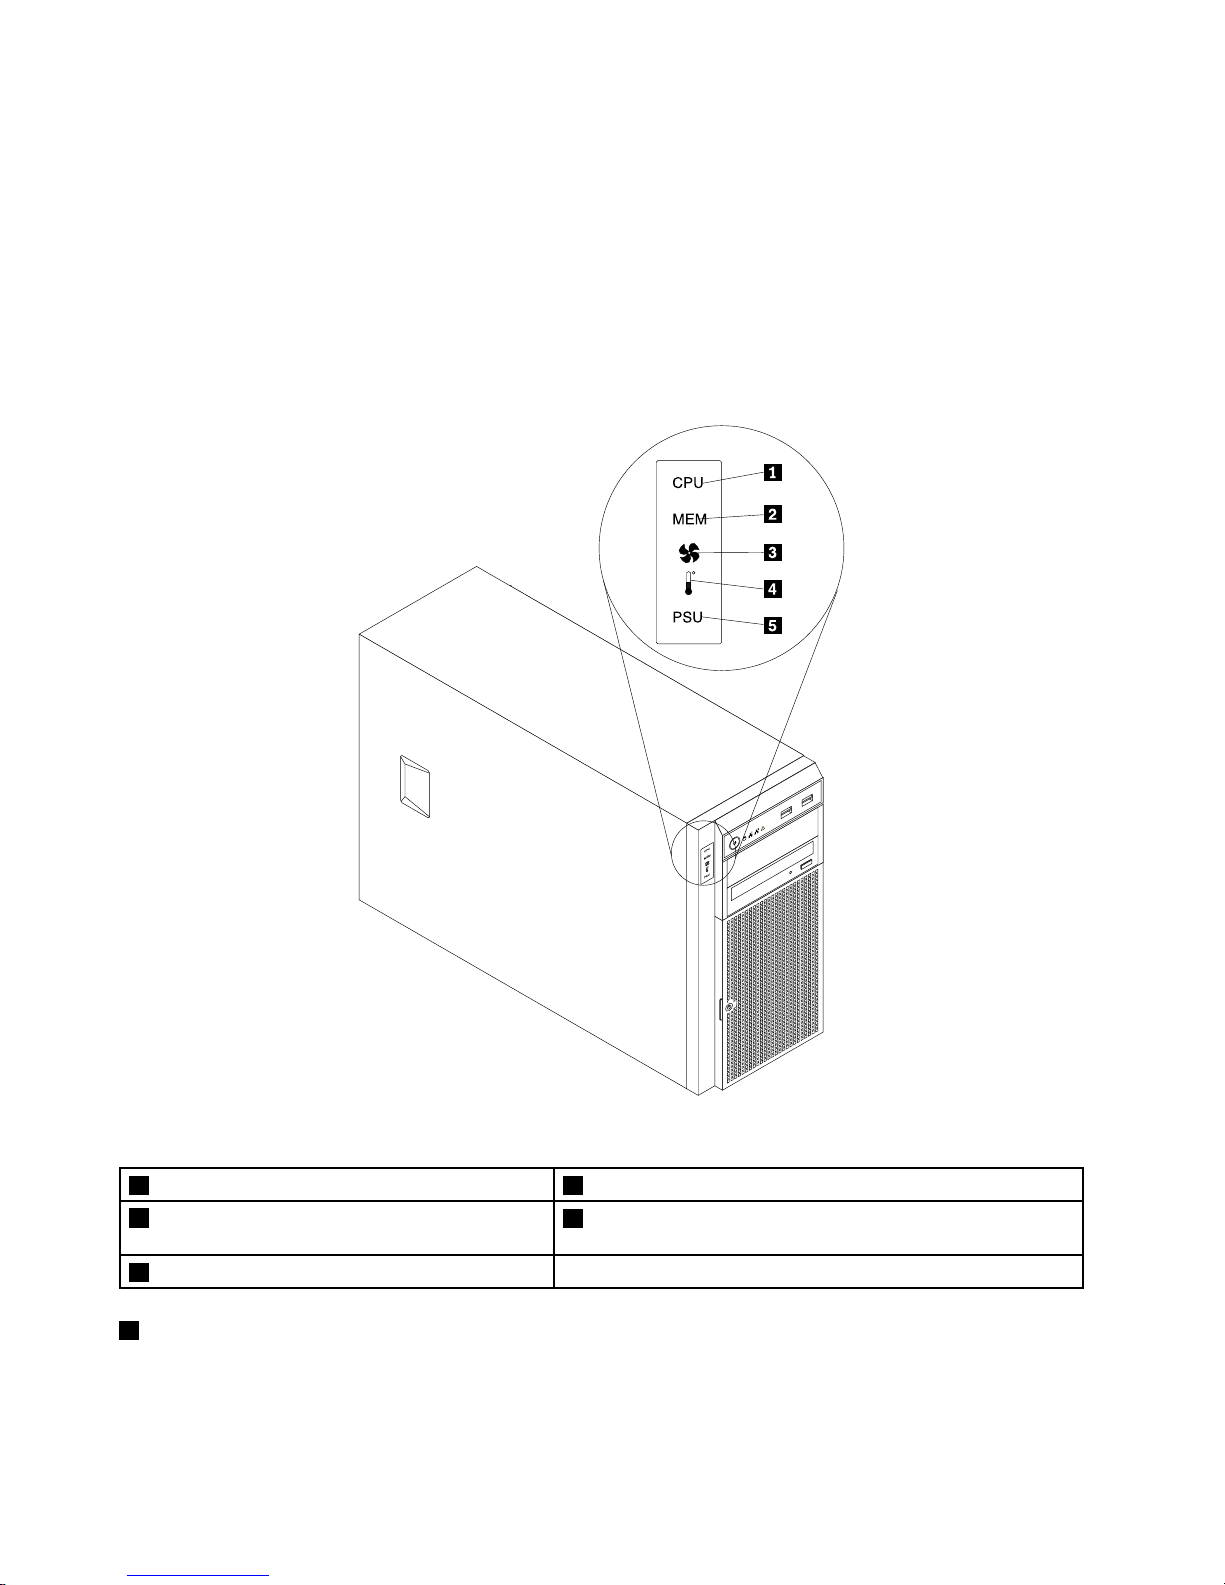
IntelligentDiagnosticsModule
ThistopicprovidesinformationabouttheIntelligentDiagnosticsModule(hereinafterreferredtoasthe
IDM)andthediagnosticLEDsontheIDMpanel.
Note:TheIDMisonlyavailableinsomemodels.
ThefollowingillustrationshowsthelocationoftheIDMandthediagnosticLEDsontheIDMpanelinthe
frontoftheserver.
Note:Dependingonthemodel,yourservermightlookslightlydifferentfromthisillustration.
Figure5.IDMpanel
1MicroprocessorstatusLED4AmbienttemperatureoverlimitLED
2MemorymodulestatusLED
5PowersupplyerrorLED(onlyavailableonmodelswith
redundantpowersupplies)
3SystemfanerrorLED
1MicroprocessorstatusLED
WhenthemicroprocessorstatusLEDislitinorange,itindicatesthatoneormoremicroprocessorsare
overheated.
18ThinkServerTD330HardwareMaintenanceManual
Page 33
2MemorymodulestatusLED
WhenthememorymodulestatusLEDislitinorange,itindicatesthatoneormorememorymodulesare
overheated.
3SystemfanerrorLED
WhenthesystemfanerrorLEDislitinorange,itindicatesthatoneormoresystemfansmighthavefailed.
4AmbienttemperatureoverlimitLED
WhenthisLEDislitinorange,itindicatesthattheambienttemperatureisover38°C(100.4°F).
5PowersupplyerrorLED(onlyavailableonmodelswithredundantpowersupplies)
WhenthepowersupplyerrorLEDislitinamber,itindicatesthatthereisapowersupplyproblem.Toidentify
thefailingpowersupply,checkthestatusLEDnearthepowercordconnectorontheredundantpower
supply.WhenthestatusLEDislitingreen,itindicatesthatthepowersupplyisworkingcorrectly.Whenthe
statusLEDislitinamber,itindicatesthatthepowersupplyislikelytofailorhasfailed.
Rearviewoftheserver
Thistopicprovidesinformationtohelpyoulocatetheconnectorsandcomponentsontherearofyourserver.
Chapter3.Productoverview19
Page 34
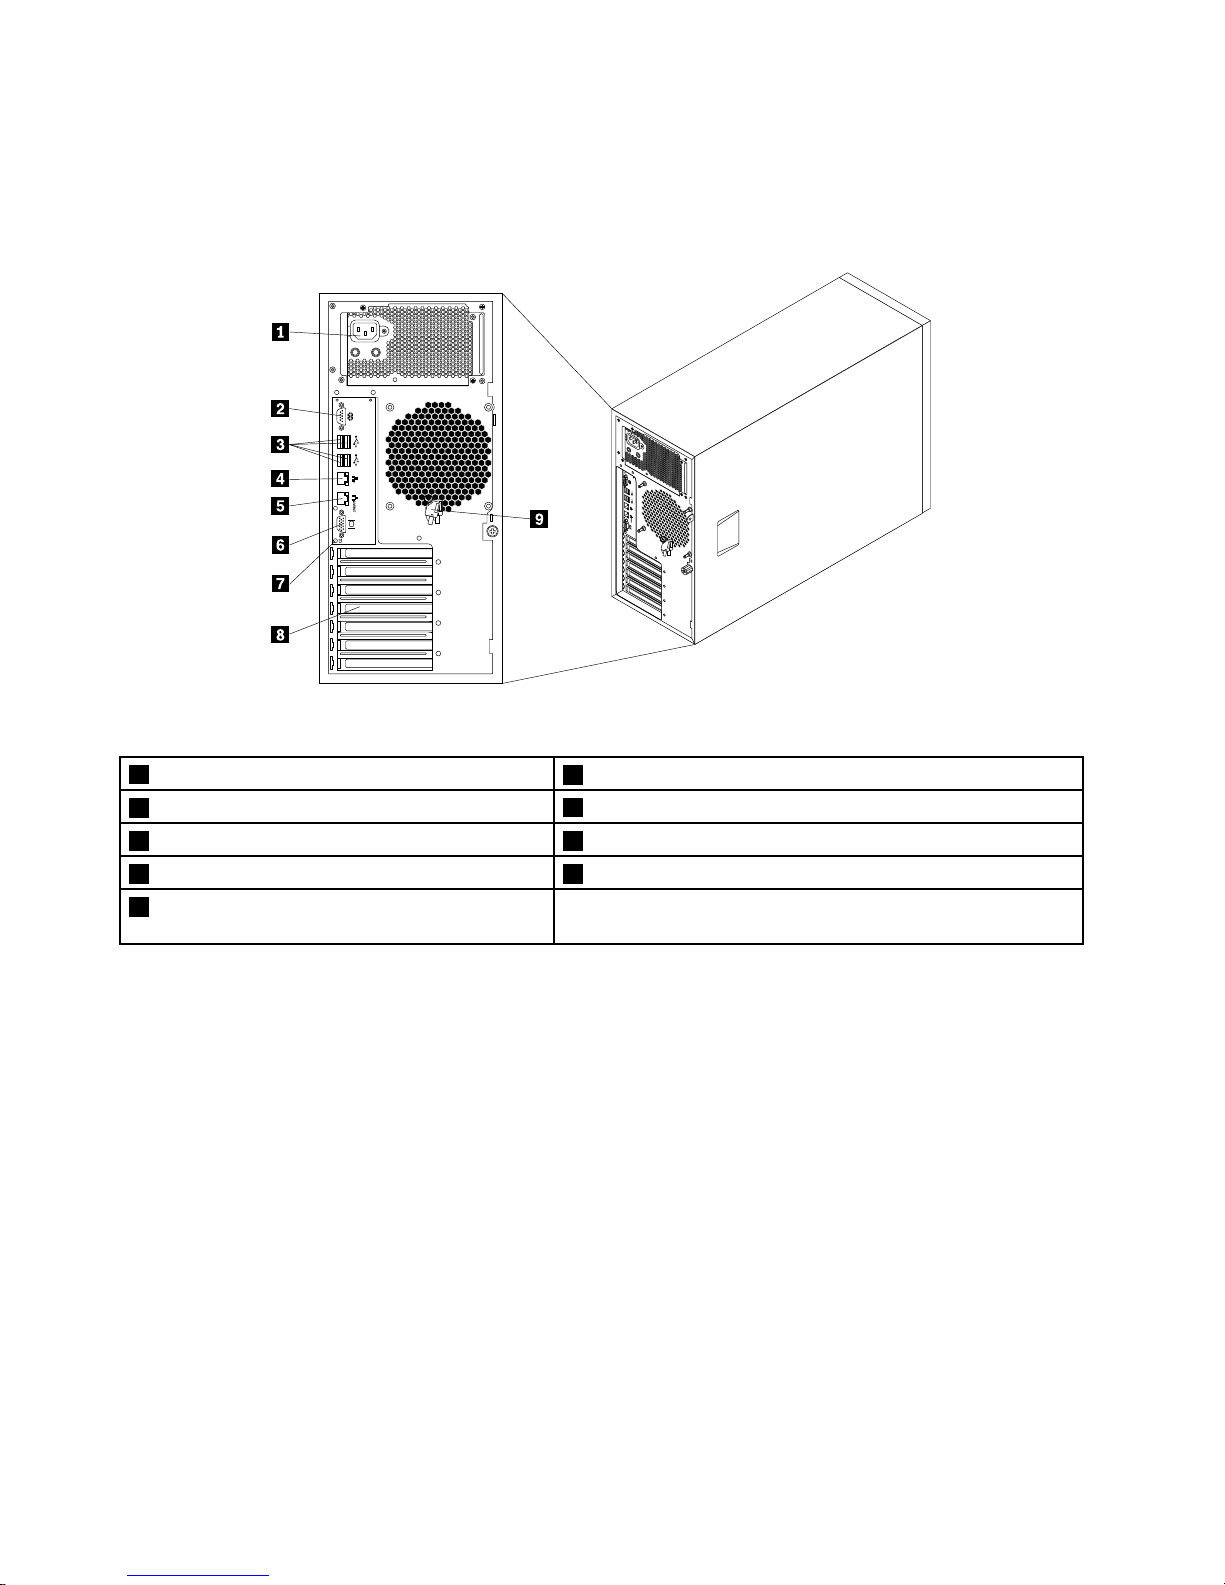
Thefollowingillustrationshowstherearviewoftheserverwithascrew-secured,non-hot-swappower
supplyassembly.
Note:Dependingonthemodel,yourservermightlookslightlydifferentfromtheillustrationsinthistopic.
Figure6.Rearviewoftheserverwithanon-hot-swappowersupplyassembly
1Powercordconnector
6VGADB-15connector
2Serialport
7IDLED
3USBconnectors(4)
8Expansioncardarea
4Ethernetconnector1(RJ-45)
9Frontdoorkey
5Ethernetconnector2forsystemmanagement
(RJ-45)
20ThinkServerTD330HardwareMaintenanceManual
Page 35
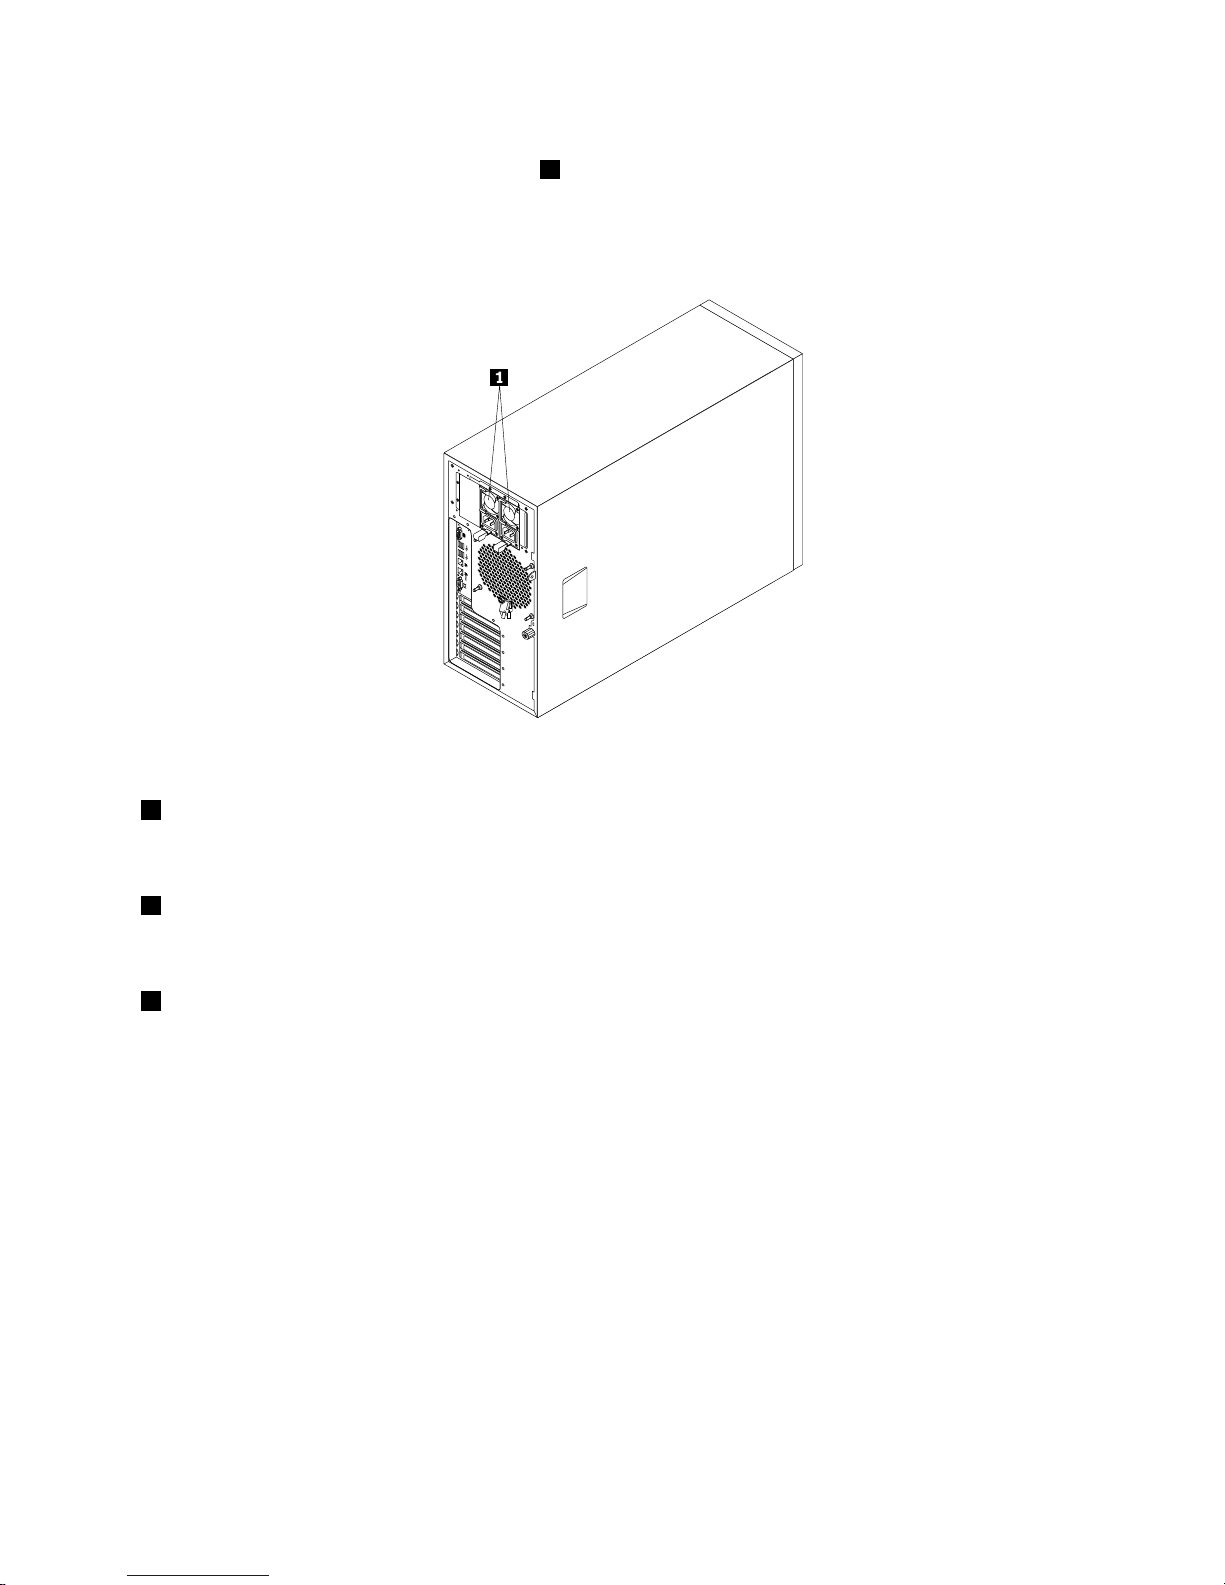
Yourservermodelmighthaveoneortwohot-swapredundantpowersupplies.Eachhot-swapredundant
powersupplyhasonepowercordconnector1ontherearoftheserver.Foreachhot-swapredundantpower
supply,theremightbeoneortwostatusLEDsonthepowersupplynearthepowercordconnector.When
theLEDislitingreen,itindicatesthatthehot-swapredundantpowersupplyisworkingcorrectly.Whenthe
LEDislitinamber,itindicatesthatthehot-swapredundantpowersupplyislikelytofailorhasfailed.
Figure7.Rearviewoftheserverwithhot-swapredundantpowersupplies
1Powercordconnectors
Usedtoconnectthepowercords.
2Serialport
Usedtoattachadevicethatusesa9-pinserialport.
3USBconnectors
UsedtoattachaUSB-compatibledevice,suchasaUSBkeyboard,mouse,scanner,orprinter.Ifyou
havemorethansixUSBdevices,youcanpurchaseaUSBhub,whichyoucanusetoconnectadditional
USBdevices.
Chapter3.Productoverview21
Page 36
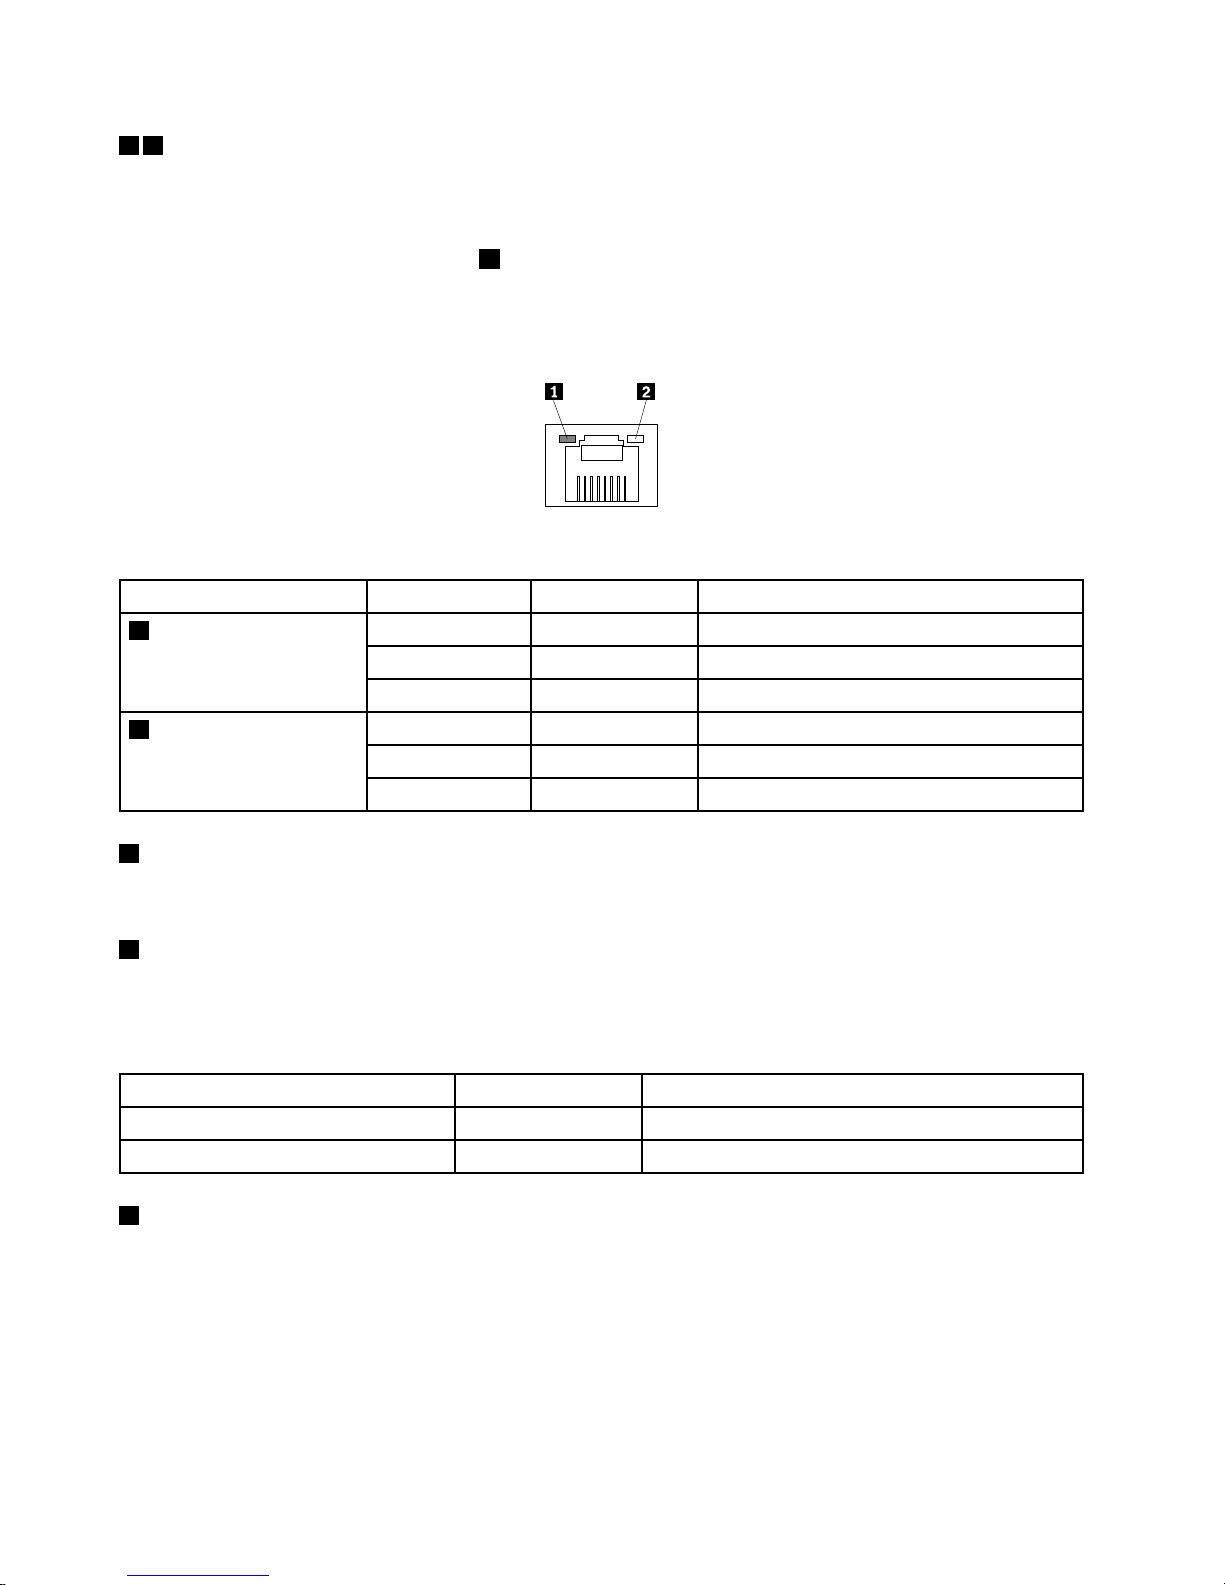
45Ethernetconnectors(RJ-45)
UsedtoattachanEthernetcableforaLAN.EachEthernetconnectorhastwostatusLEDstohelpyou
identifytheEthernetconnectivity,activity,andconnectionspeed.
Note:TheEthernetconnector2(callout
5)markedwith“MGMT”isforsystemmanagement.Ifyouwant
touseremotemanagementfunctions,youneedtoconnectanEthernetcabletotheEthernetconnector
2.TheEthernetconnector2alsosupportsteamingfunction.Iftheteamingfunctionisenabled,theTMM
managementcapabilitywillbedisabled.
Figure8.EthernetstatusLEDs
EthernetstatusLED
ColorStatus
Description
GreenOn
TheserverisconnectedtoaLAN.
None
Off
TheserverisdisconnectedfromaLAN.
1Left
Green
BlinkingTheLANisconnectedandactive.
Amber
On
Theconnectionspeedis1000Mbps.
GreenOn
Theconnectionspeedis100Mbps.
2Right
None
Off
Theconnectionspeedis10Mbps.
6VGADB-15connector
UsedtoattachaVGA-compatiblevideodevice,suchasaVGAmonitor.
7IDLED
WhenyoupresstheIDbutton,theIDLEDontherearoftheserverislittohelpyoulocatetheserveramong
otherservers.YoualsocanturnontheIDLEDusingaremotemanagementprogramforserverpresence
detection.
IDLED
Color
Description
On
Blue
Theserverisidentied.
Off
None
TheIDLEDisnotinuseortheserverisnotidentied.
8Expansioncardarea
YouserverhassixexpansionslotsonthesystemboardforyoutoinstallappropriatePCIcardsorPCI
Expresscards.Fordetailedinformation,see“Systemboardcomponents”onpage42
.
Note:IfaThinkServerHostBusAdapterisavailable,refertoitsuserguidefordetailedinformation.Theuser
guideisavailablefordownloadat:
http://www.lenovo.com/drivers
22ThinkServerTD330HardwareMaintenanceManual
Page 37
9Frontdoorkey
Usedtoopenorlockthefrontdoor.
Note:Carefullysavethefrontdoorkeytoavoidloss.
Serverlocks
Lockingtheservercoverpreventsunauthorizedaccesstotheinsideofyourserver.Lockingthefrontdoor
preventsunauthorizedaccesstotheinstalledharddiskdrives.
Note:Dependingonthemodel,yourservermightlookslightlydifferentfromtheillustrationsinthistopic.
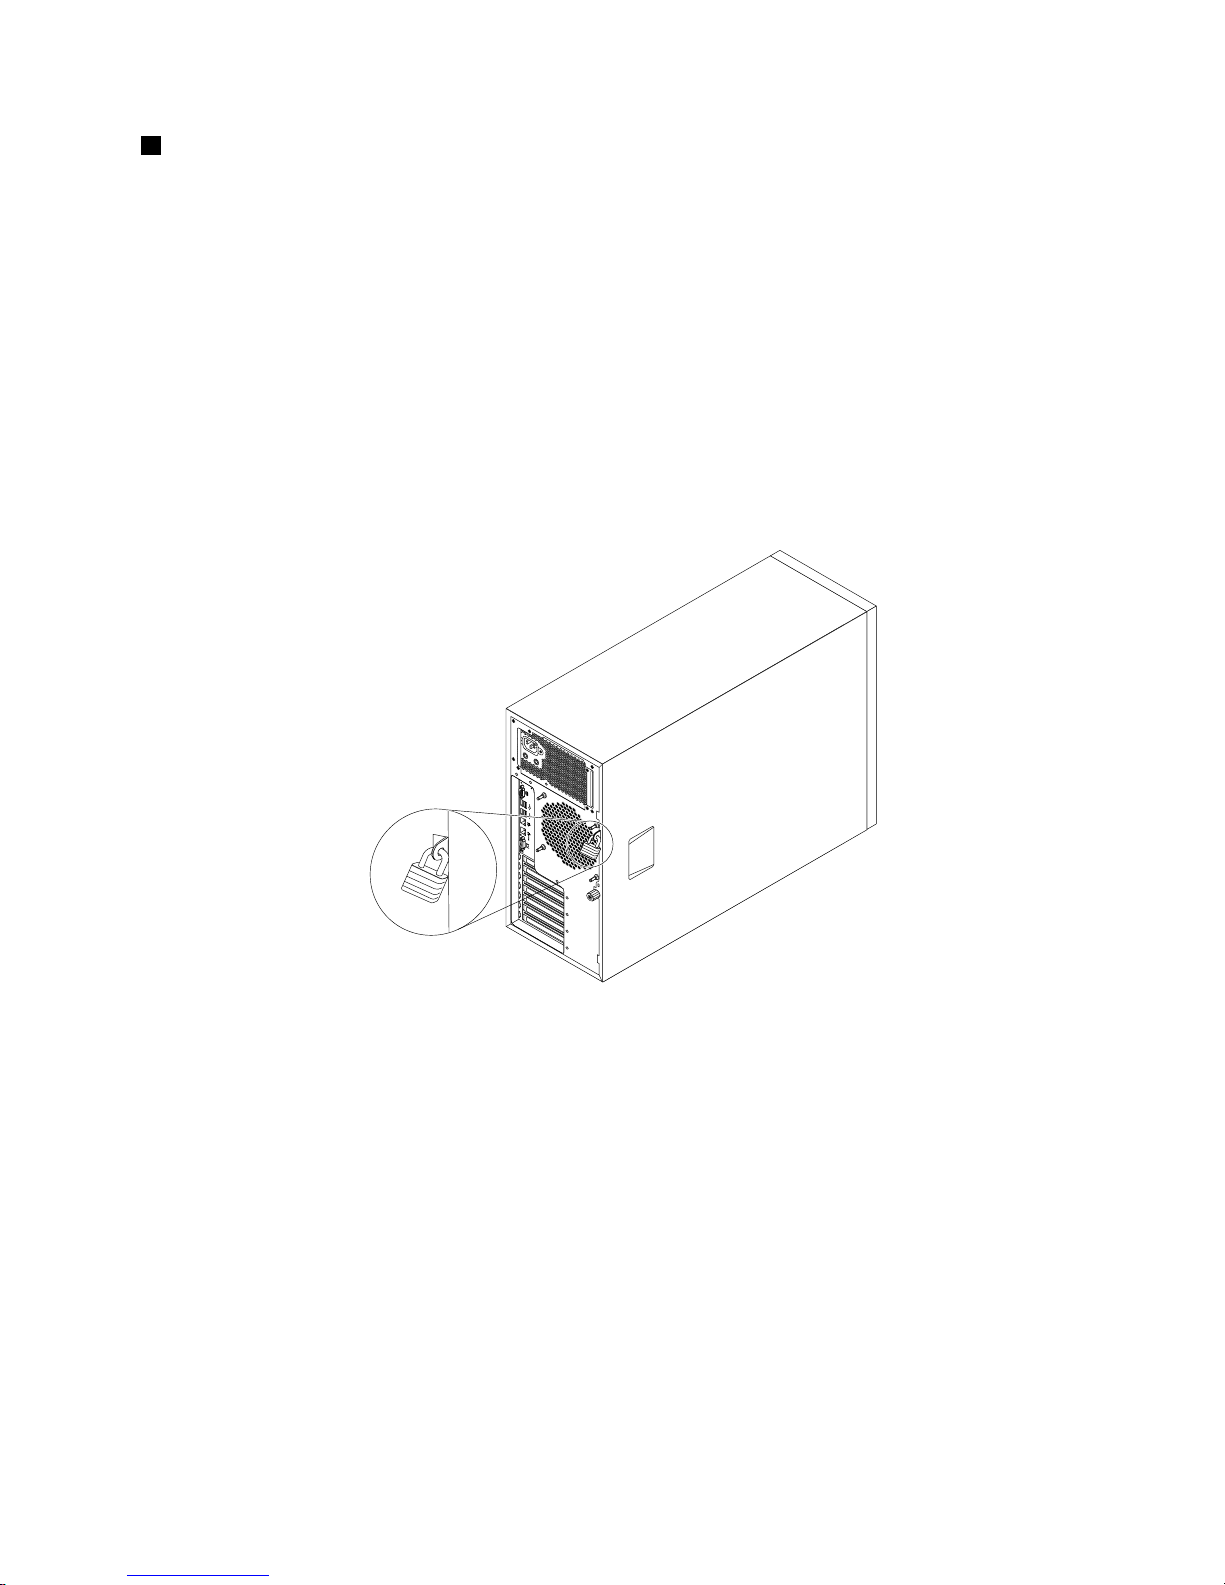
Padlock
Yourservercomeswithapadlockloop.Whenapadlockisinstalled,theservercovercannotberemoved.
Figure9.Padlock
Chapter3.Productoverview23
Page 38
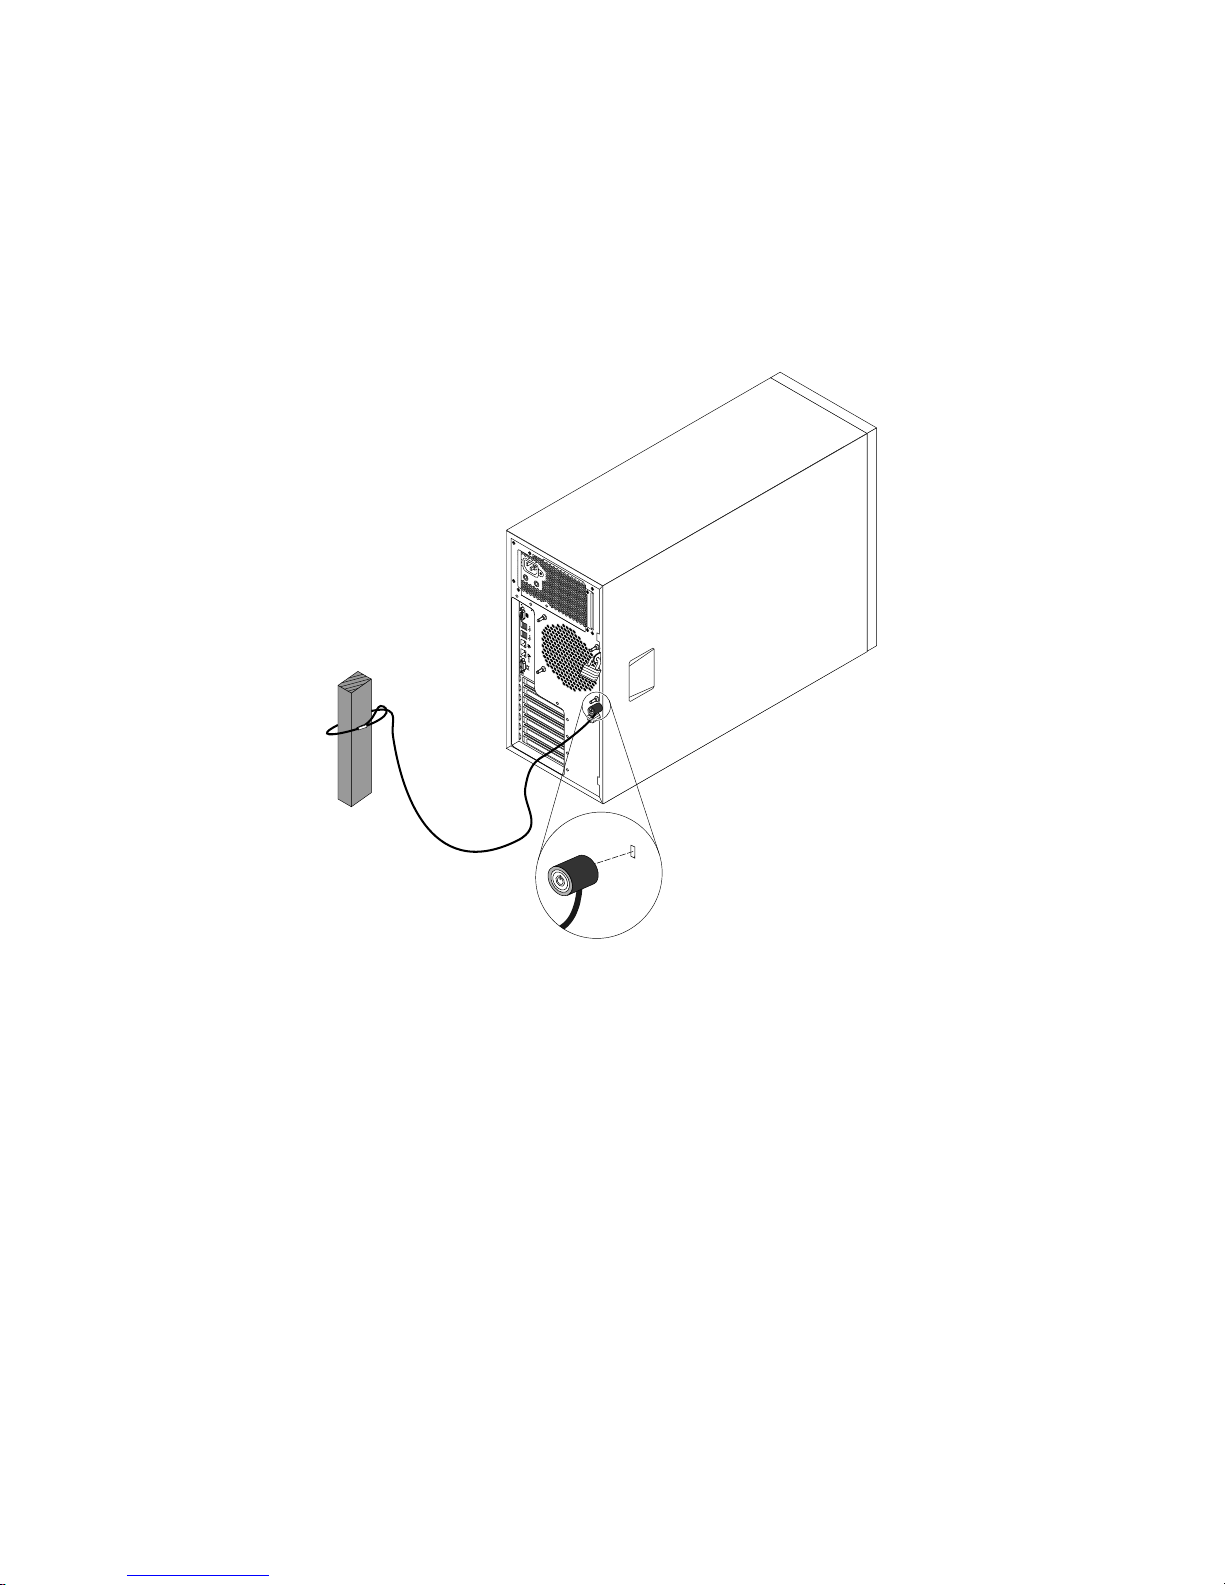
Integratedcablelock
Anintegratedcablelock,sometimesreferredtoastheKensingtonlock,canbeusedtosecureyourserverto
anon-permanentxture.Thecablelockattachestotheintegratedcablelockslotattherearofyourserver
andisoperatedwithakey.Thecablelockalsolockstheservercover.Thisisthesametypeoflockused
withmanynotebookcomputers.YoucanorderanintegratedcablelockfromLenovobysearchingfor
Kensingtonat:
http://www.lenovo.com/support
Figure10.Integratedcablelock
24ThinkServerTD330HardwareMaintenanceManual
Page 39
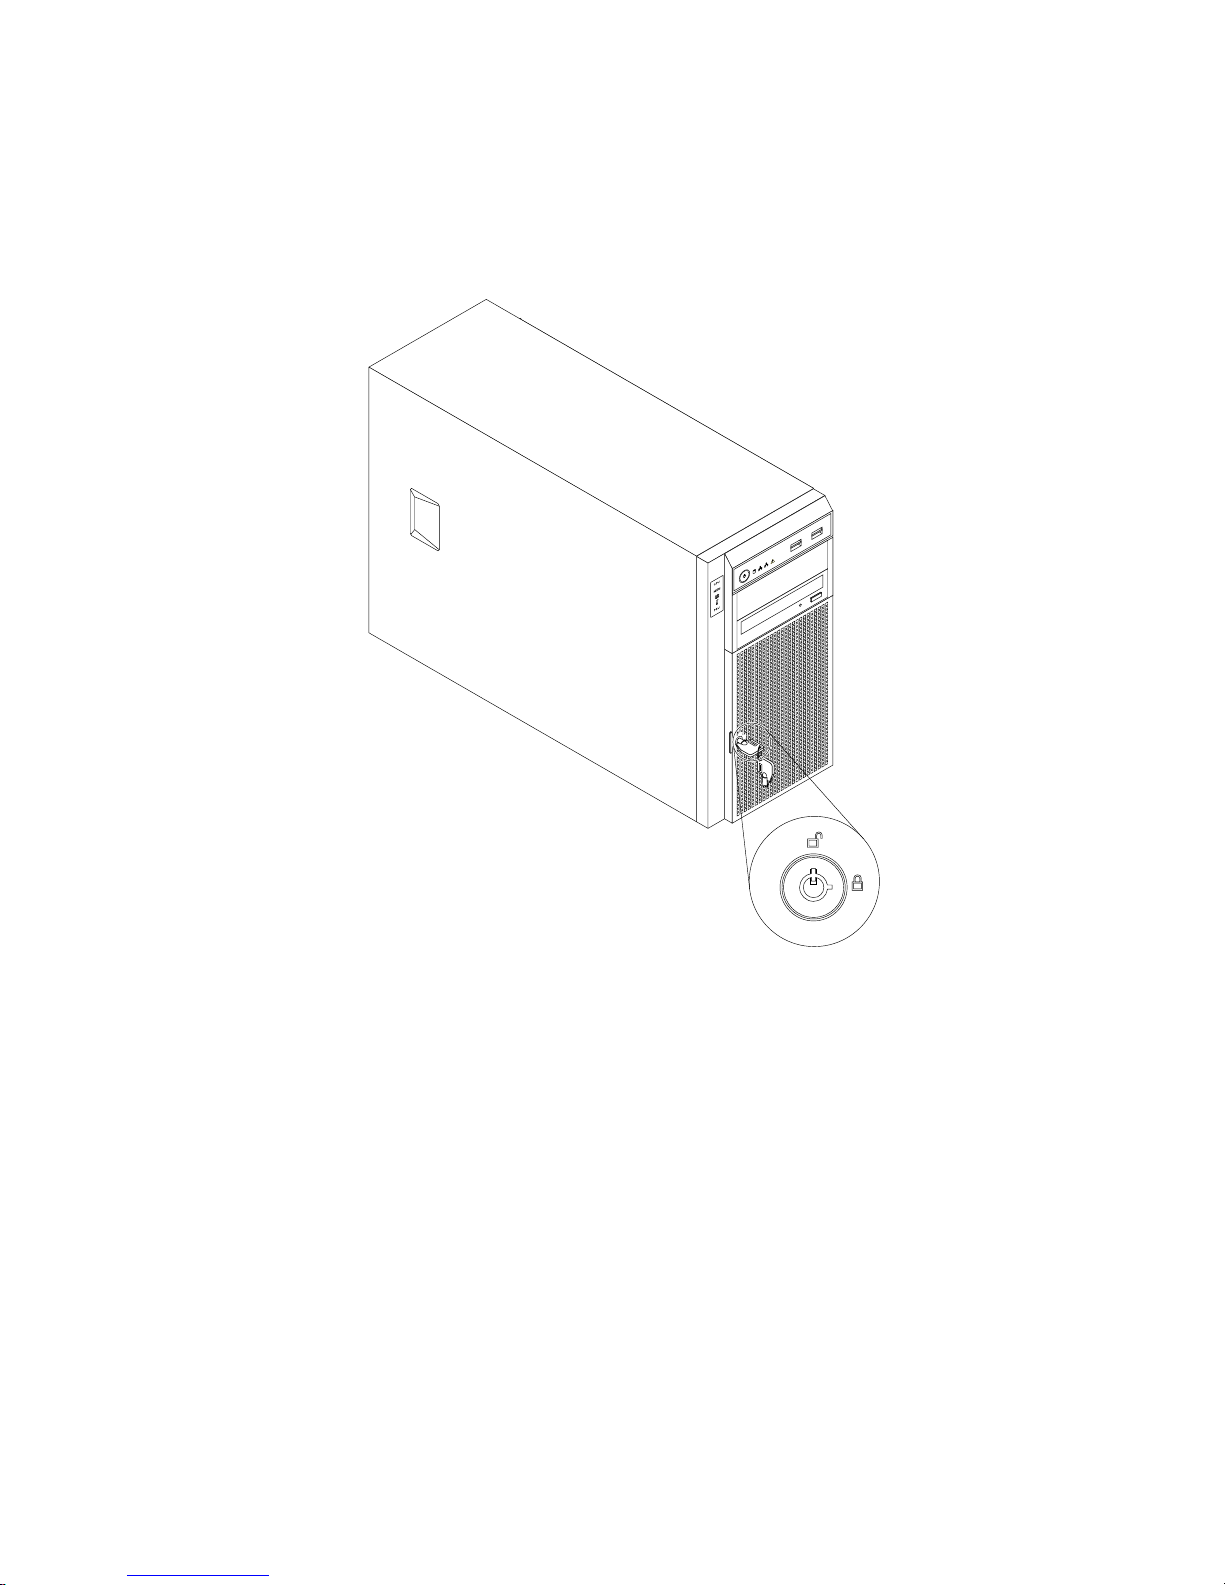
Frontdoorlock
Youcanremovethekeyattachedontherearoftheserveranduseittoopenorlockthefrontdoorofthe
server.Thefrontdoorprotectstheharddiskdrivecagesandpreventsunauthorizedaccesstotheinstalled
harddiskdrives.
Figure11.Frontdoorlock
Servercomponents
Thistopicprovidesinformationtohelpyoulocatethecomponentsofyourserver.Formoreinformation
aboutmajorcomponents,seetherelatedtopicsin“Locations”onpage12.
Toremovetheservercoverandaccesstheinsideoftheserver,see“Removingtheservercover”onpage77.
Thechassiscongurationvariesbymodel.Thefollowingillustrationsshowthethreemainchassis
congurationsbasedonthesupportedharddiskdrives.
•Servermodelswithuptoeight3.5-inchhot-swapSATAorSASharddiskdrives
•Servermodelswithuptoeight2.5-inchhot-swapSASharddiskdrives
•Servermodelswithuptofour3.5-inchnon-hot-swapSATAharddiskdrives
Notes:
•Dependingonthemodel,yourservermightlookslightlydifferentfromtheillustrationsinthistopic.
Chapter3.Productoverview25
Page 40

•TheEMIintegrityandcoolingoftheserverareprotectedbyhavingalldrivebayscoveredoroccupied.
Thenumberoftheinstalledharddiskdrivesinyourservervariesbymodel.Thevacantharddiskdrive
baysareoccupiedbydummyharddiskdrivetrays.
26ThinkServerTD330HardwareMaintenanceManual
Page 41
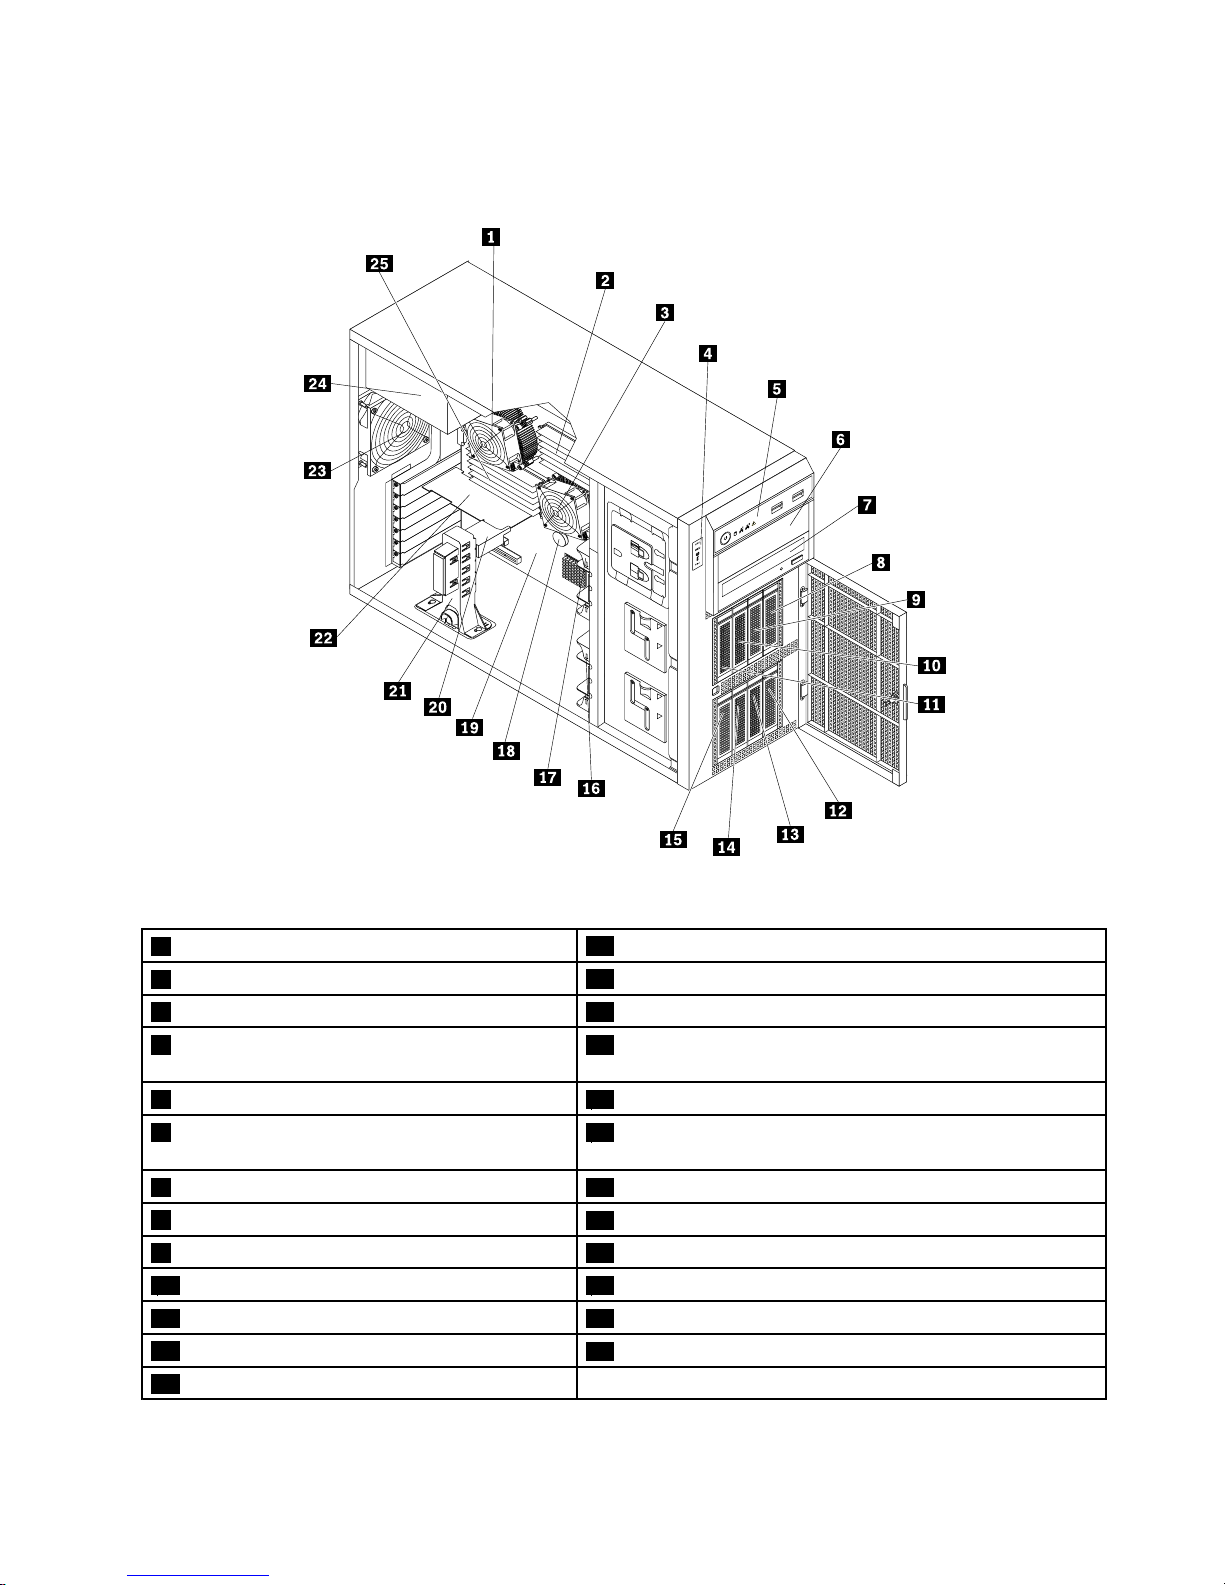
Thefollowingillustrationshowsthecomponentsofservermodelswithuptoeight3.5-inchhot-swapSATA
orSASharddiskdrives.
Figure12.Componentsofservermodelswithuptoeight3.5-inchhot-swapSA T AorSASharddiskdrives
1Heatsinkandfanassembly2
14Harddiskdrivebay1
2CPU1DIMMs(varybymodel)
15Harddiskdrivebay0
3Heatsinkandfanassembly116Frontsystemfan1
4IntelligentDiagnosticsModule(availableinsome
models)
17Frontsystemfan2
5Frontpanel
18Systemboardbattery
6Opticaldrivebay2(withanopticaldriveinstalled
insomemodels)
19Systemboard
7Opticaldrivebay1(withanopticaldriveinstalled)20Low-prolePCIcardbracket
8Harddiskdrivebay7
21MainPCIcardbracket
9Harddiskdrivebay622Expansioncard
10Harddiskdrivebay5
23Rearsystemfan3
11Harddiskdrivebay424Powersupply
12Harddiskdrivebay3
25CPU2DIMMs(varybymodel)
13Harddiskdrivebay2
Chapter3.Productoverview27
Page 42

Notes:
•Thelow-prolePCIcardbracket20andmainPCIcardbracket21areavailableinservermodelsthat
comewithaRAIDcard.
•Ifyourserverhasuptofour3.5-inchhot-swapSATAorSASharddiskdrives,thehot-swapSATAorSAS
harddiskdrivesneedtobeinstalledintotheharddiskdrivebays0,1,2,and3.
28ThinkServerTD330HardwareMaintenanceManual
Page 43
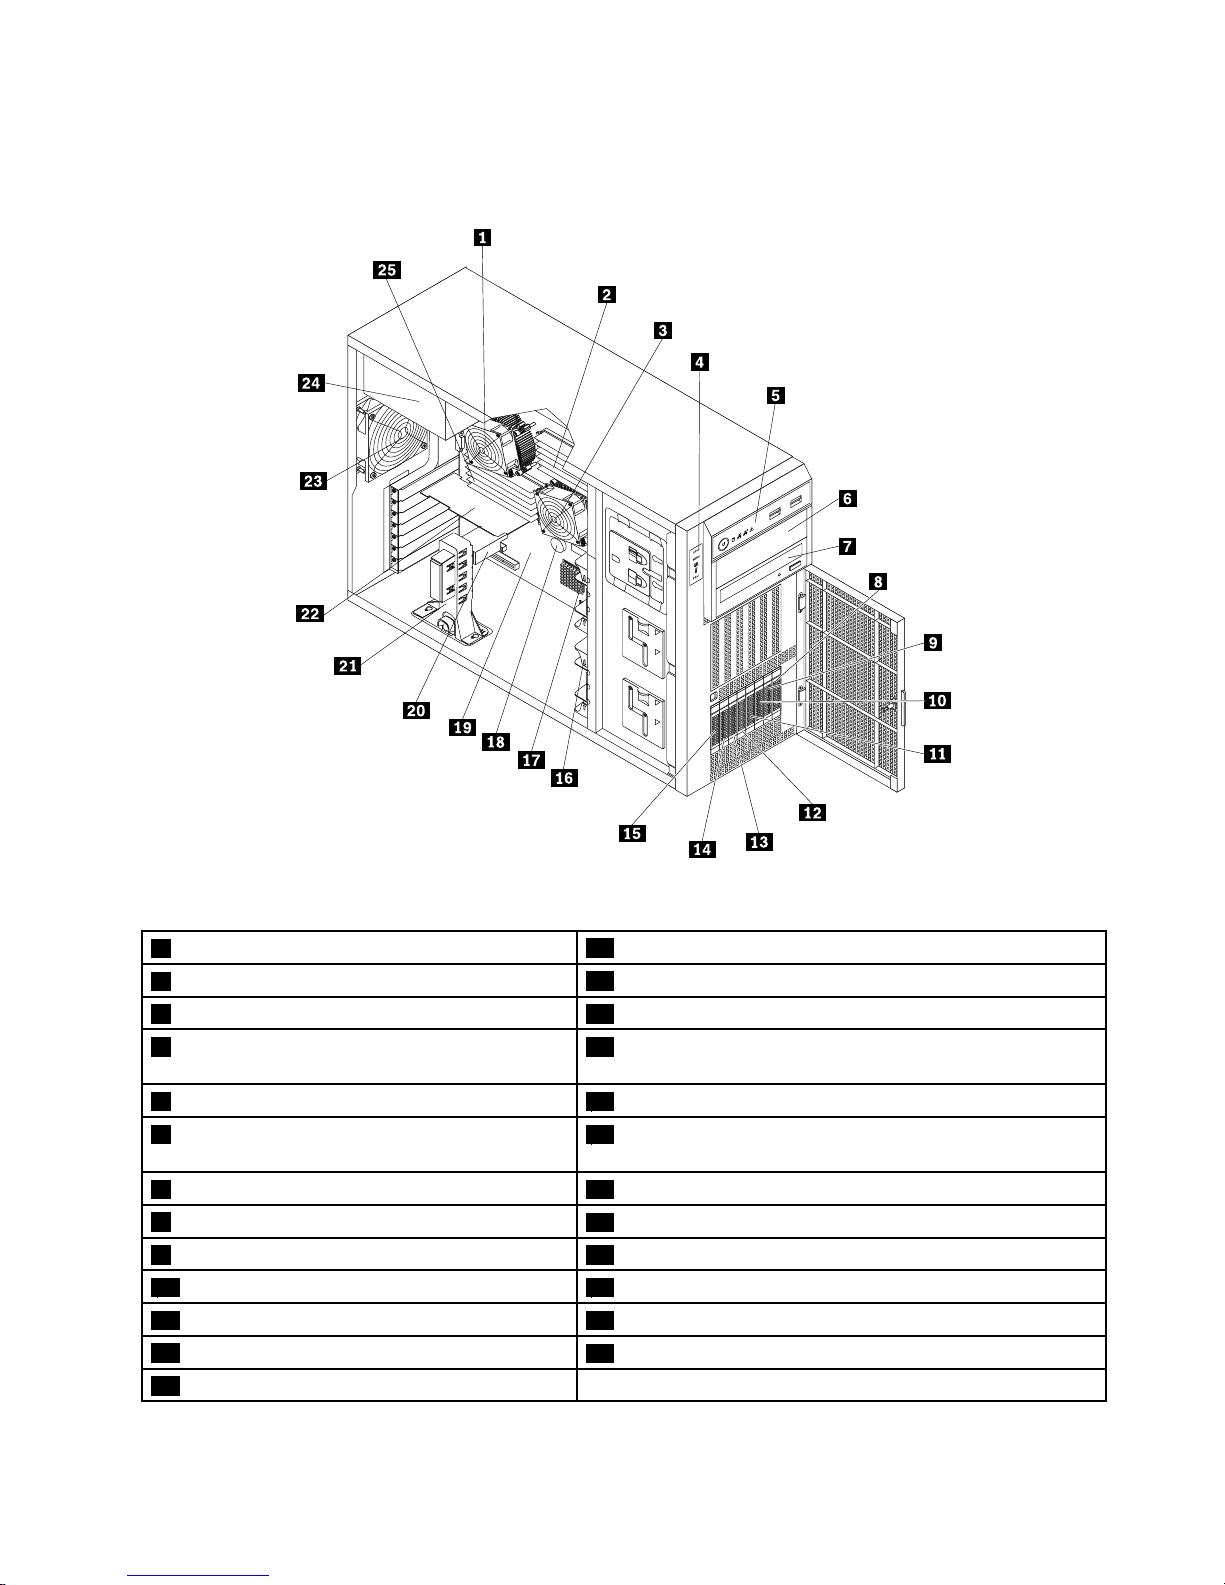
Thefollowingillustrationshowsthecomponentsofservermodelswithuptoeight2.5-inchhot-swapSAS
harddiskdrives.
Figure13.Componentsofservermodelswithuptoeight2.5-inchhot-swapSASharddiskdrives
1Heatsinkandfanassembly2
14Harddiskdrivebay1
2CPU1DIMMs(varybymodel)
15Harddiskdrivebay0
3Heatsinkandfanassembly116Frontsystemfan1
4IntelligentDiagnosticsModule(availableinsome
models)
17Frontsystemfan2
5Frontpanel
18Systemboardbattery
6Opticaldrivebay2(withanopticaldriveinstalled
insomemodels)
19Systemboard
7Opticaldrivebay1(withanopticaldriveinstalled)20Low-prolePCIcardbracket
8Harddiskdrivebay7
21MainPCIcardbracket
9Harddiskdrivebay622Expansioncard
10Harddiskdrivebay5
23Rearsystemfan3
11Harddiskdrivebay424Powersupply
12Harddiskdrivebay3
25CPU2DIMMs(varybymodel)
13Harddiskdrivebay2
Chapter3.Productoverview29
Page 44
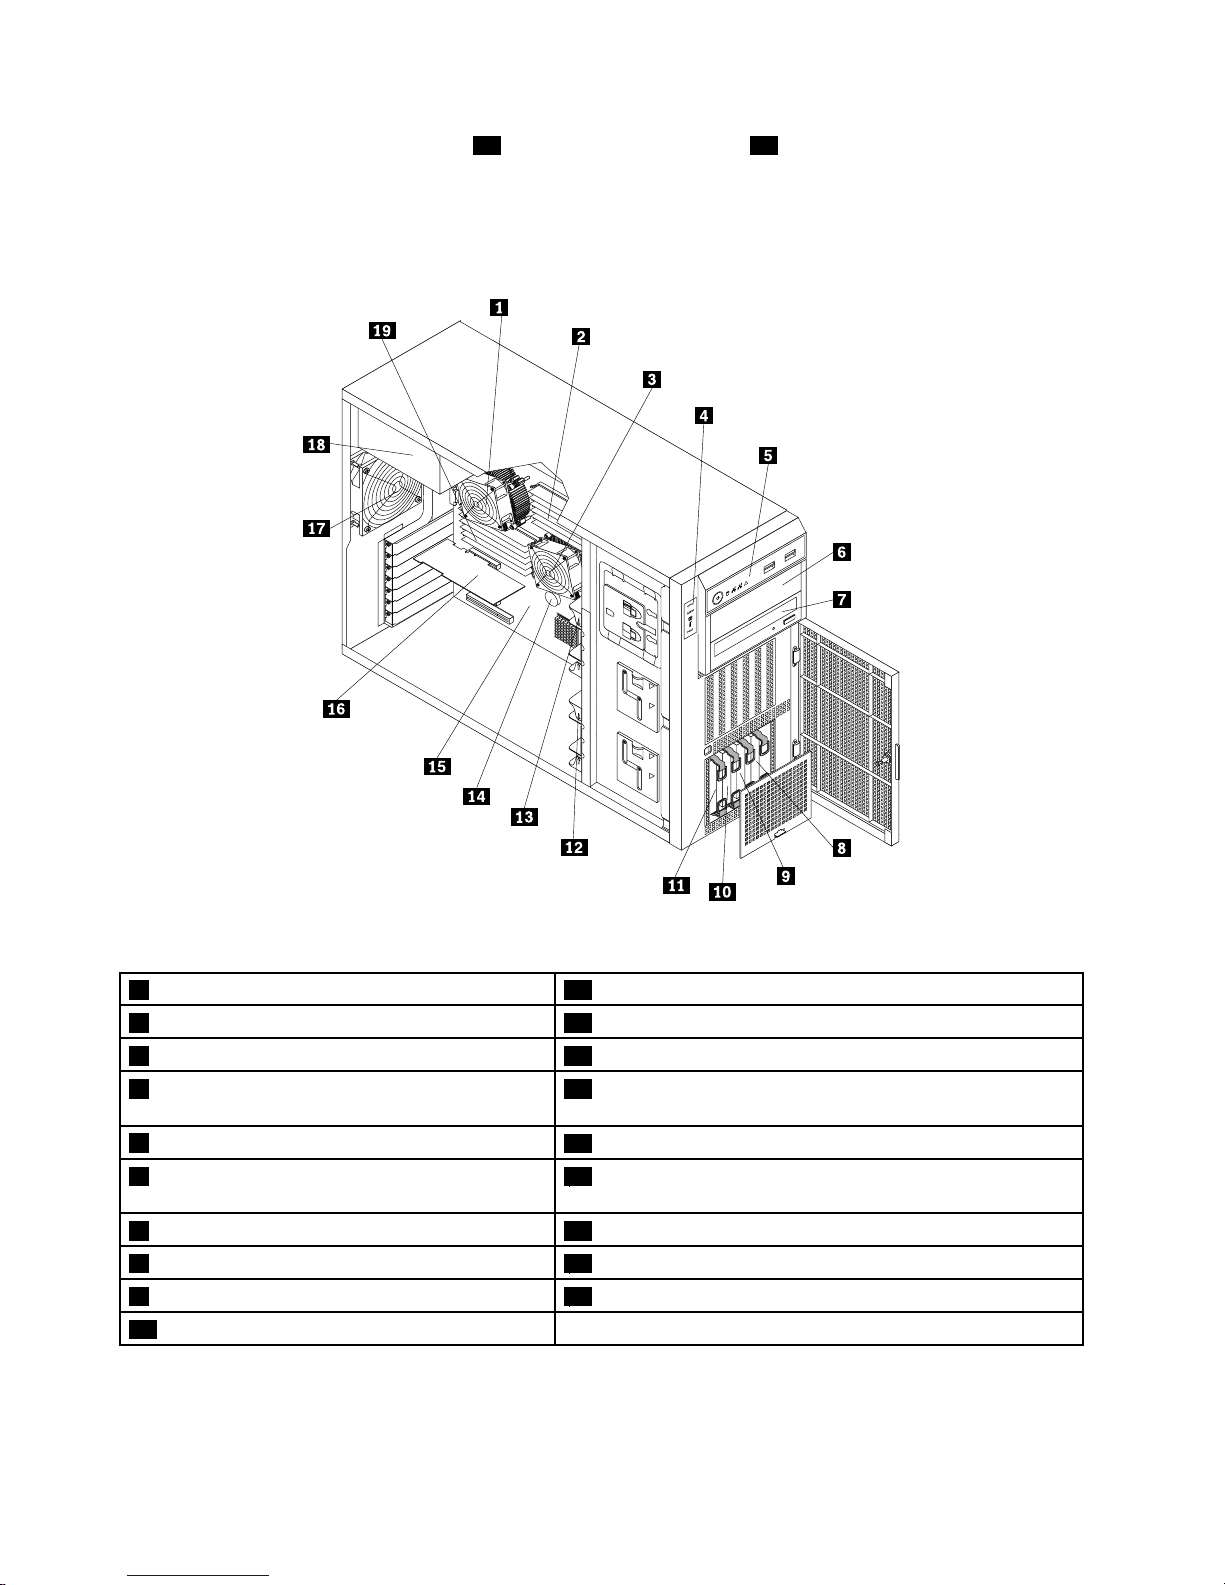
Note:Thelow-prolePCIcardbracket20andmainPCIcardbracket21areavailableinservermodels
thatcomewithaRAIDcard.
Thefollowingillustrationshowsthecomponentsofservermodelswithuptofour3.5-inchnon-hot-swap
SATAharddiskdrives.
Figure14.Componentsofservermodelswithuptofour3.5-inchnon-hot-swapSA T Aharddiskdrives
1Heatsinkandfanassembly2
11Harddiskdrivebay0
2CPU1DIMMs(varybymodel)
12Frontsystemfan1
3Heatsinkandfanassembly113Frontsystemfan2
4IntelligentDiagnosticsModule(availableinsome
models)
14Systemboardbattery
5Frontpanel
15Systemboard
6Opticaldrivebay2(withanopticaldriveinstalled
insomemodels)
16Expansioncard(variesbymodel)
7Opticaldrivebay1(withanopticaldriveinstalled)
17Rearsystemfan3
8Harddiskdrivebay318Powersupply
9Harddiskdrivebay2
19CPU2DIMMs(varybymodel)
10Harddiskdrivebay1
CRUsarepartsthatcanbeupgradedorreplacedbythecustomer.IfaCRUisdeterminedtobedefective
duringthewarrantyperiod,areplacementCRUwillbeprovidedtothecustomer.Customersareresponsible
forinstallingtheself-serviceCRUsforthisproduct.Customersalsocaninstalloptional-serviceCRUs,which
30ThinkServerTD330HardwareMaintenanceManual
Page 45

mightrequiresometechnicalskillsortools,orrequestthatatechnicianinstalltheoptional-serviceCRU
underthetermsoftheapplicablewarrantyservicetypeforyourcountryorregion.
Non-CRUsmustbereplacedonlybytrainedservicetechnicians.
Notes:
•BeforeservicingaLenovoproduct,ensurethatyoureadandunderstand“Safetyinformation”onpageiii.
•UseonlypartsprovidedbyLenovo.
ThefollowingtableliststhemajorFRUsinyourserverandtheCRUidenticationinformation.Foracomplete
listingofFRUinformation,suchasFRUpartnumbersandsupportedservermodels,goto:
http://www.lenovo.com/serviceparts-lookup
Description
Self-serviceCRUOptional-service
CRU
Frontsystemfan
YesNo
FrontpanelboardassemblyNoYes
HarddiskdriveYesNo
Heatsinkandfanassembly
YesNo
Hot-swapharddiskdrivebackplane(availableinsomemodels)
NoYes
Hot-swapredundantpowersupply(availableinsomemodels)
YesNo
Intelligentdiagnosticmodule(availableinsomemodels)
NoYes
KeyboardYesNo
MemorymoduleYesNo
MicroprocessorNoYes
MouseYesNo
Non-hot-swappowersupplyassembly(availableinsomemodels)
NoYes
Opticaldrive
YesNo
PeripheralComponentInterconnect(PCI)card(availableinsomemodels)
YesNo
Powerdistributionboardandcageassembly(availableinmodelswith
hot-swapredundantpowersupplies)
NoYes
Rearsystemfan
YesNo
Systemboard
NoNo
Systemboardbattery
YesNo
ThinkServerManagementModulePremium(availableasanoption)
YesNo
ThinkServerRAID100UpgradeKeyforAdvancedRAID(availableasan
option)
YesNo
ThinkServerRAID500UpgradeKeyforAdvancedRAID(availableasan
option)
YesNo
ThinkServerRAID700Battery(availableasanoption)
NoYes
ThinkServerTrustedPlatformModule(availableasanoption)
YesNo
Hot-swapharddiskdrivestatusLEDs
Thistopicappliesonlytoservermodelswithhot-swapharddiskdrives.
Chapter3.Productoverview31
Page 46
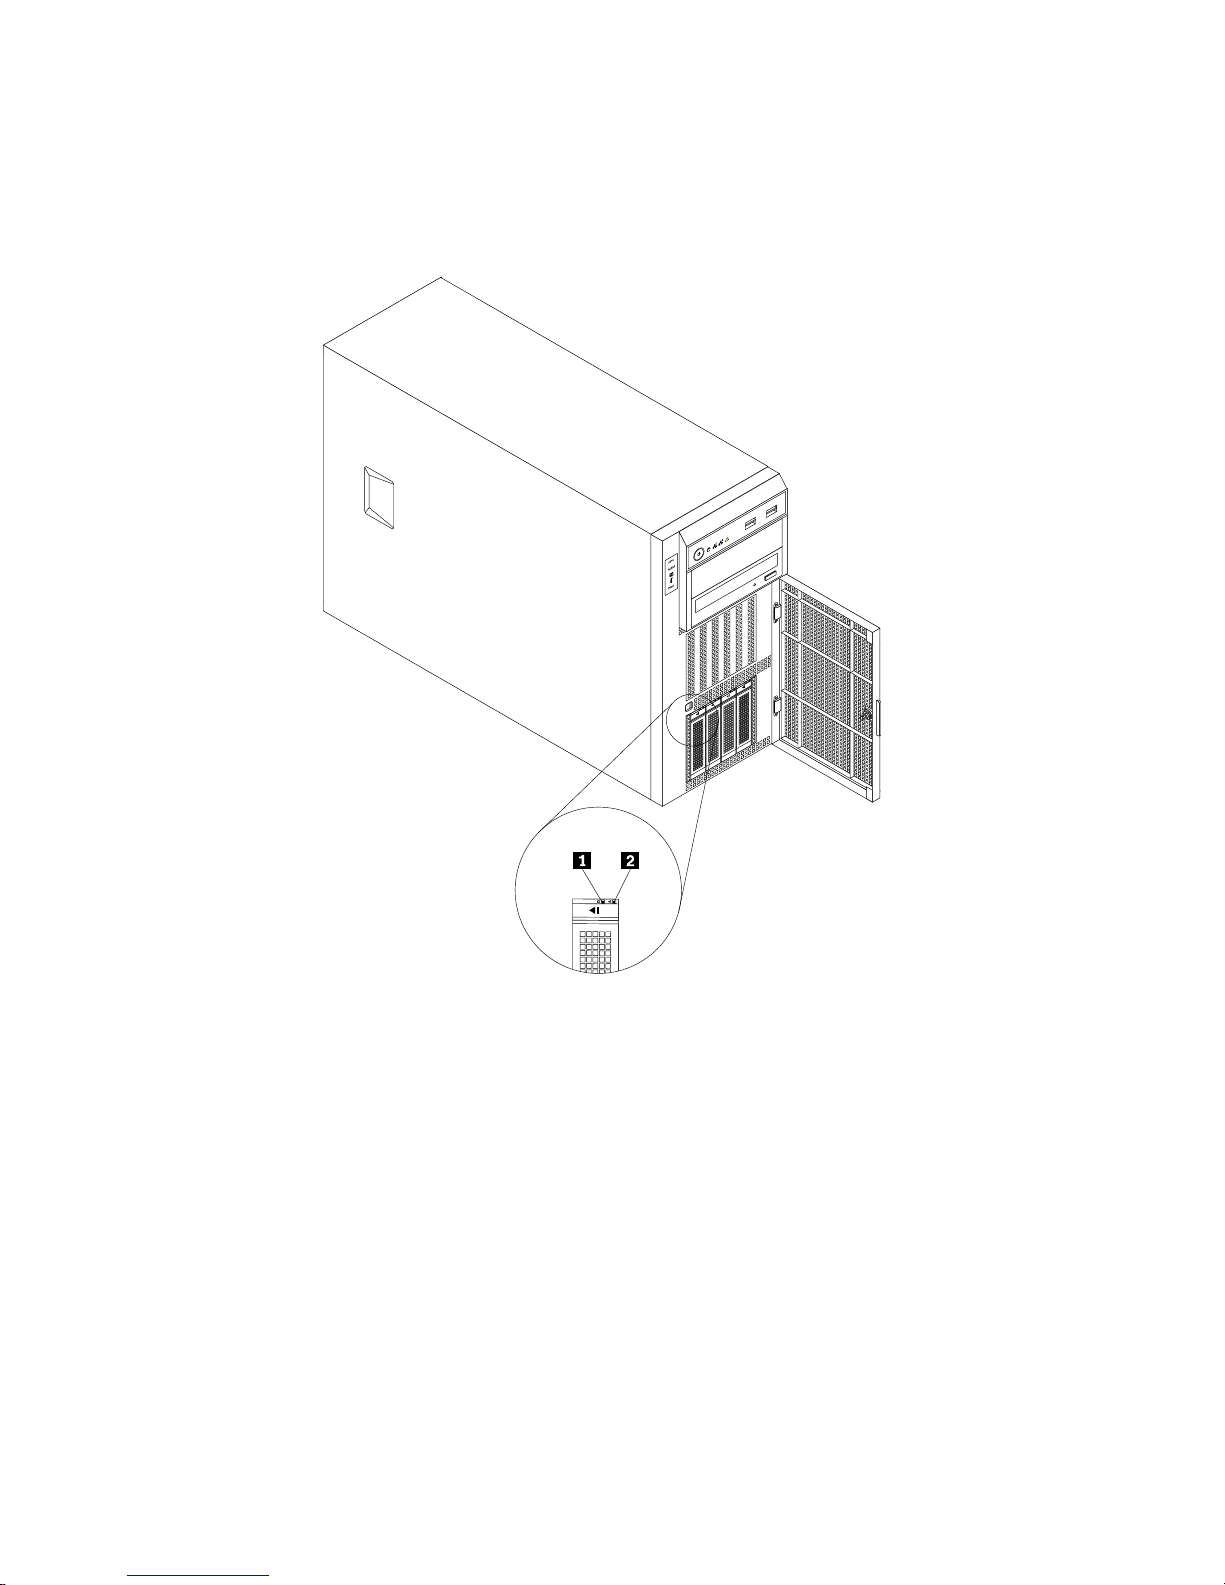
Note:Dependingonthemodel,yourservermightlookslightlydifferentfromtheillustrationsinthistopic.
Eachhot-swapharddiskdrivehastwostatusLEDsonthefront.Unlockandopenthefrontdoortoaccess
theharddiskdrivesandviewthestatusLEDs.
Figure15.3.5-inchhot-swapharddiskdrivestatusLEDs
32ThinkServerTD330HardwareMaintenanceManual
Page 47
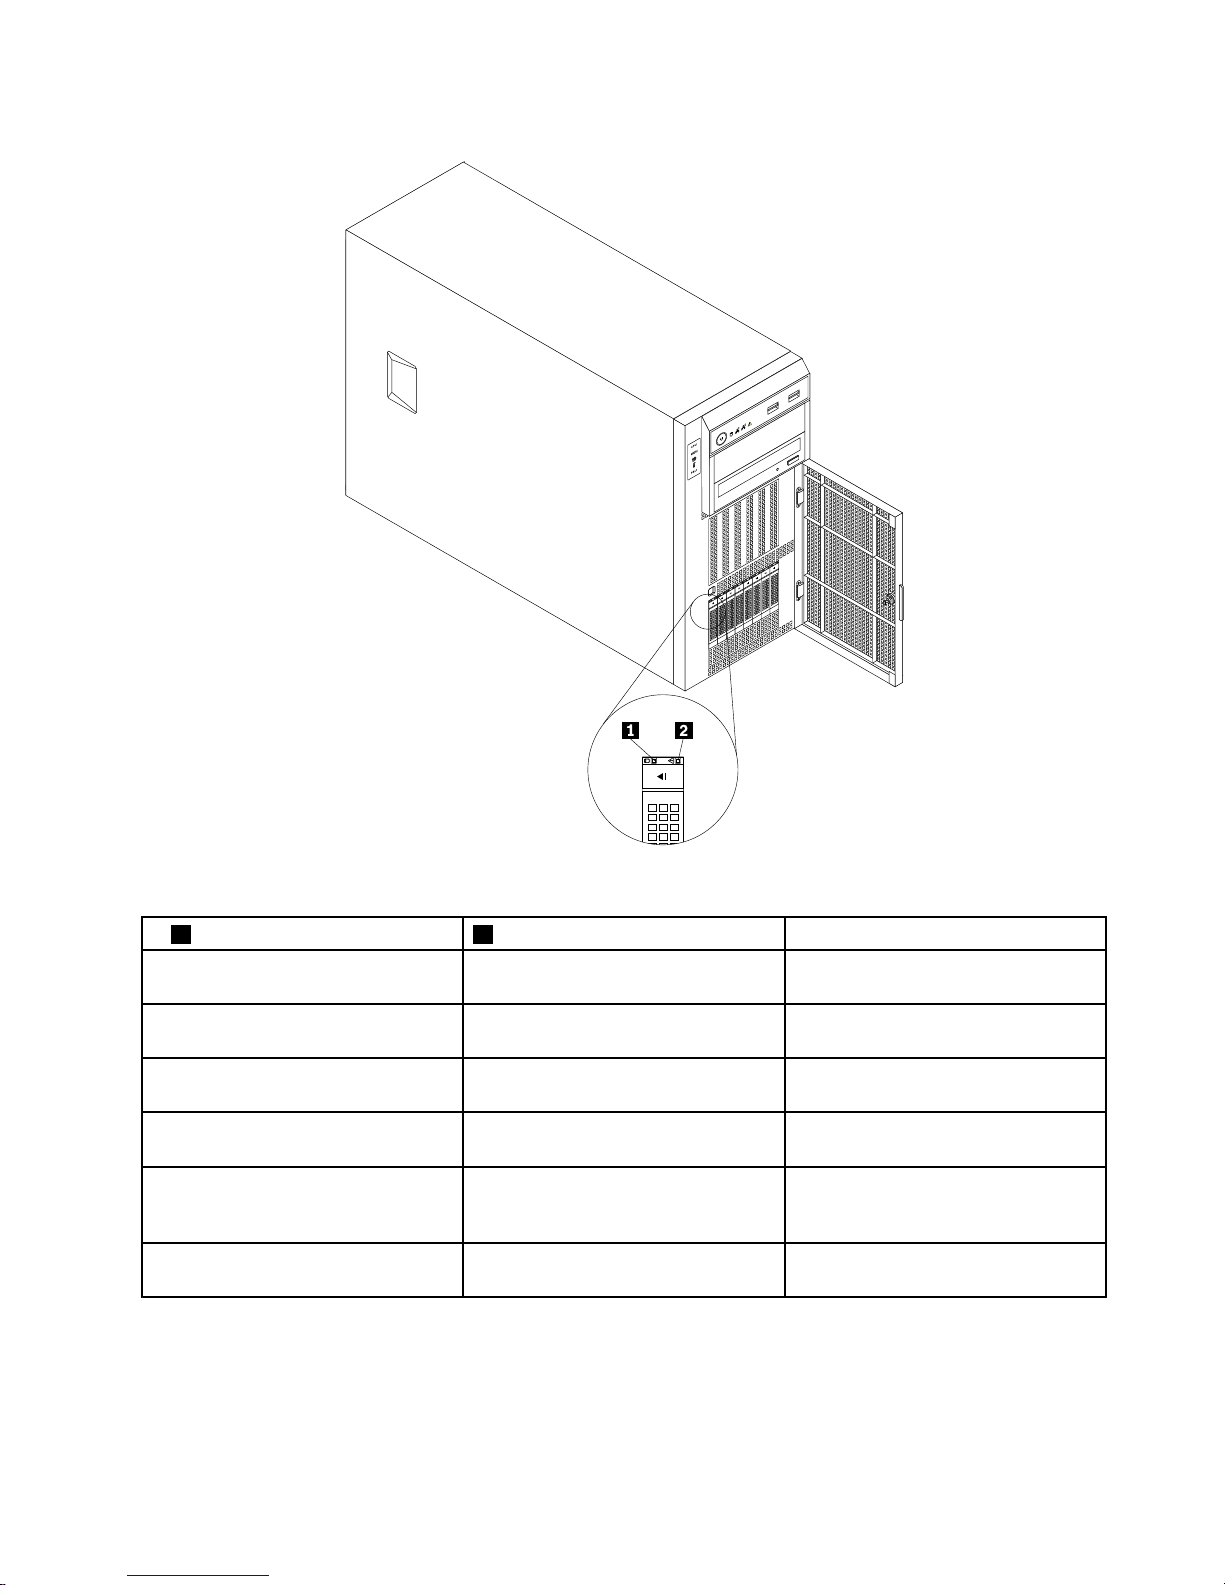
Figure16.2.5-inchhot-swapharddiskdrivestatusLEDs
1HarddiskdriveactivityLED2HarddiskdriveRAIDstatusLEDDescription
OffOff
Theharddiskdrivehasfailedoris
notpresent.
On,greenOff
Theharddiskdriveispresentbutnot
inuse.
Blinking,green
Off
Theharddiskdriveisactiveanddata
isbeingtransferred.
On,greenBlinkingrapidly(aboutfourashes
persecond),amber
TheRAIDcontrollerisidentifyingthe
harddiskdrive.
On,greenOn,amber
TheRAIDarrayhasfailedandcannot
berecovered.Youneedtorecreatea
newarray.
Blinking,green
Blinkingslowly(aboutoneashper
second),amber
Theharddiskdriveisbeingrebuilt.
RAIDcard
ThistopicprovidesinformationtohelpyoulocatetheconnectorsonaRAIDcardifyouhaveoneinstalled
onthesystemboard.Ifyourserverhasonemicroprocessorinstalled,theRAIDcardneedstobeinstalled
Chapter3.Productoverview33
Page 48
intothePCI-Eslot6.Ifyourserverhastwomicroprocessorsinstalled,theRAIDcardneedstobeinstalled
intothePCI-Eslot5.See“Systemboardcomponents”onpage42.
SomeservermodelscomewitharequiredRAIDcardtoprovideadvancedSATA/SAShardwareRAID
functionstotheserver.IfyourserverdoesnotcomewithaRAIDcard,youcanpurchaseonefromLenovo.
See“InstallingorremovingtheRAIDcard”onpage97.
Note:TheoptionkitfortheRAIDcardisdesignedfordifferenttypesofserversandmightcontainadditional
cablesthatarenotrequiredforyourserver.
YourserversupportsthefollowingRAIDcards:
•ThinkServerRAID500Adapter(alsoknownasThinkServer9240-8iRAID0/1Adapter)
•ThinkServerRAID700Adapter(alsoknownasThinkServer9260-8iSASRAIDAdapter)
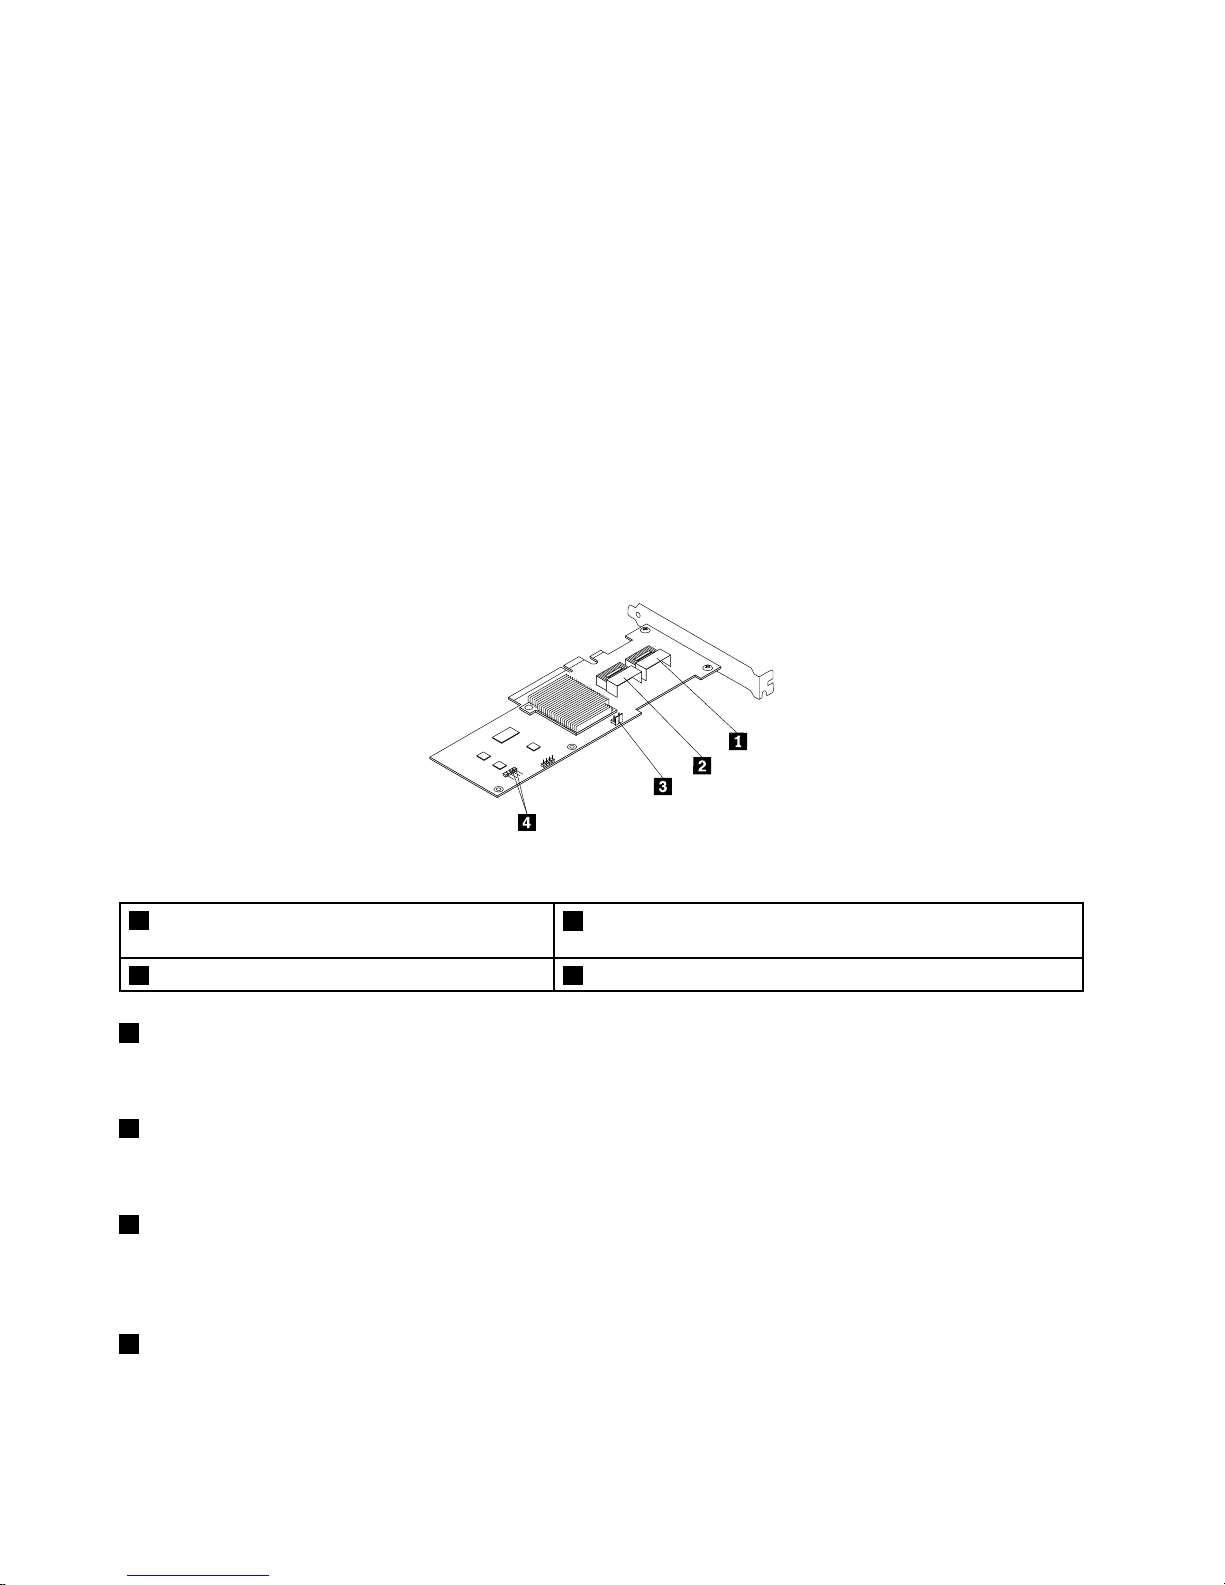
ThinkServerRAID500Adapter(alsoknownasThinkServer9240-8iRAID0/1Adapter)
ThefollowingillustrationshowstheconnectorsontheThinkServerRAID500Adapter.
Figure17.ThinkServerRAID500Adapter
1Port0
3ThinkServerRAID500UpgradeKeyforAdvancedRAID
connector
2Port14Externalconnector
1Port0
Usedtoconnectamini-SASsignalcable.See“Connectingthecables”onpage39
.
2Port1
Usedtoconnectamini-SASsignalcable.See“Connectingthecables”onpage39.
3ThinkServerRAID500UpgradeKeyforAdvancedRAIDconnector
UsedtoconnectaThinkServerRAID500UpgradeKeyforAdvancedRAID.See“Installingorremovingthe
ThinkServerRAID500UpgradeKeyforAdvancedRAID”onpage99
.
4Externalconnector
UsedtoattachthecablethatconnectsaRAIDcardtothesystemboardharddiskdriveLEDconnector.See
“Connectingthecables”onpage39
.
34ThinkServerTD330HardwareMaintenanceManual
Page 49
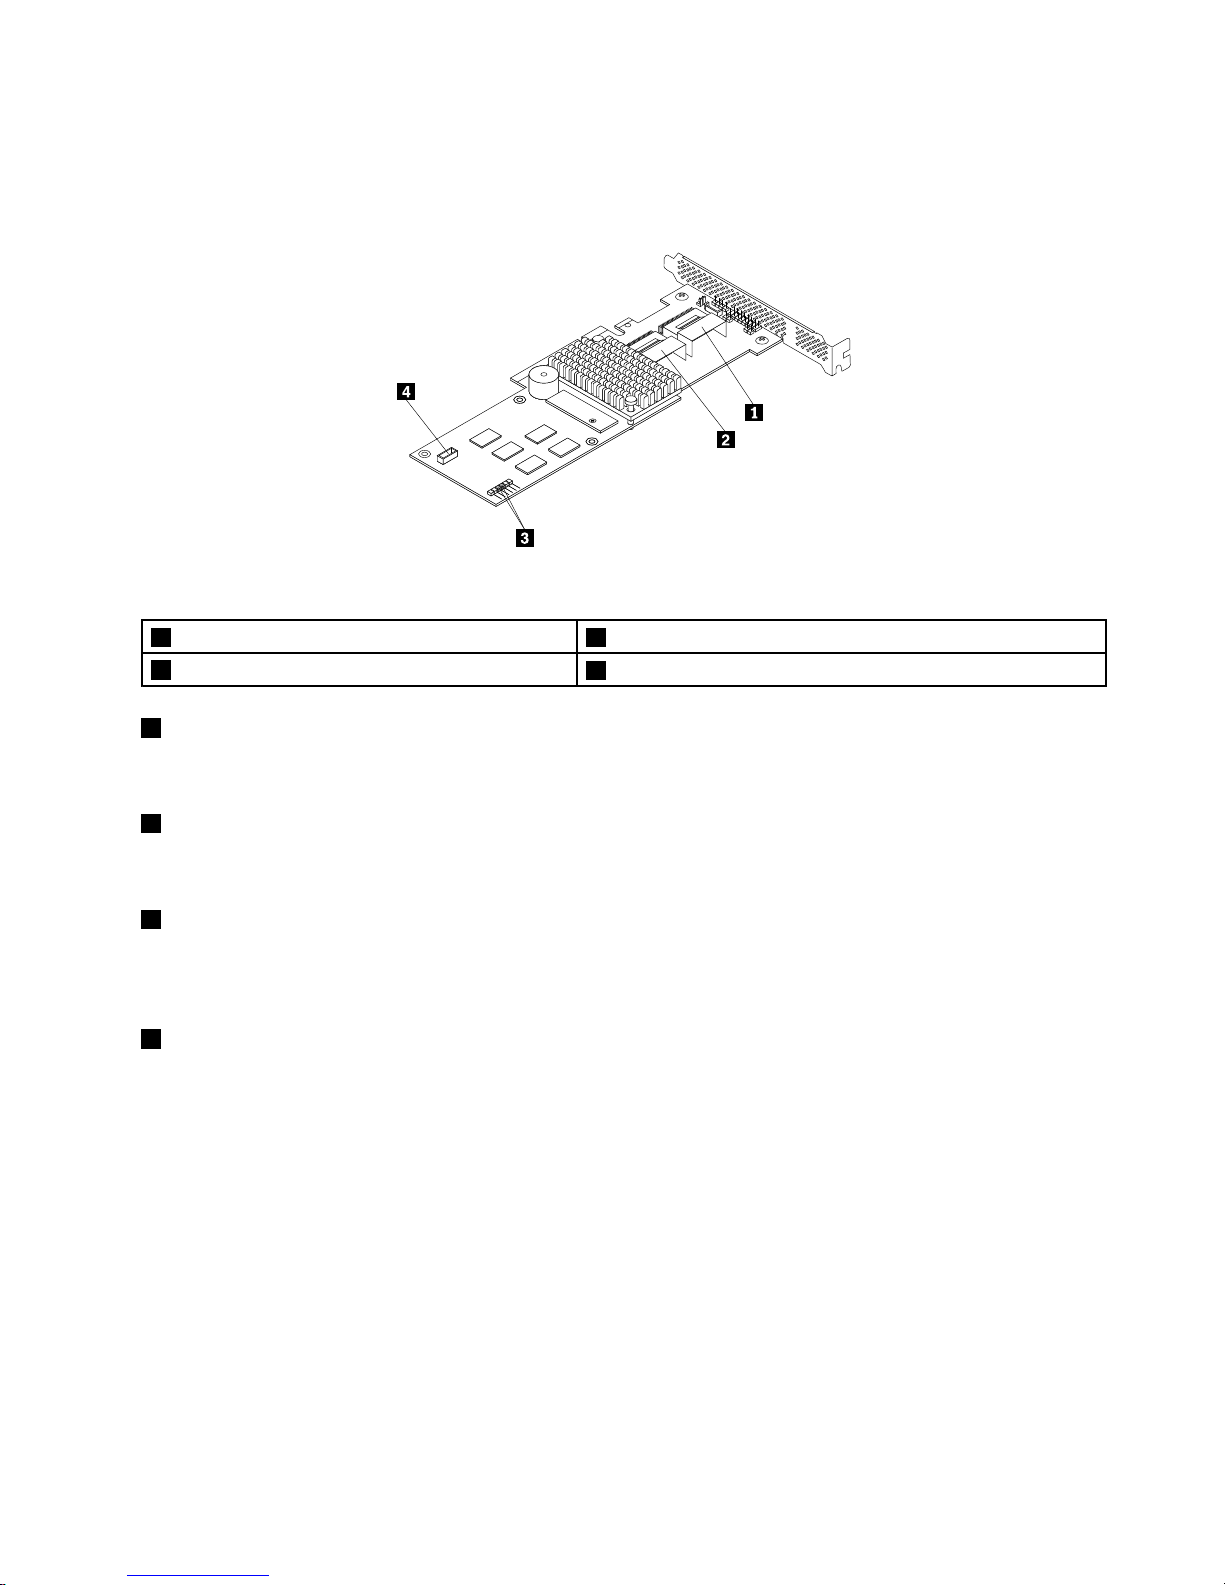
ThinkServerRAID700Adapter(alsoknownasThinkServer9260-8iSASRAIDAdapter)
ThefollowingillustrationshowstheconnectorsontheThinkServerRAID700Adapter.
Figure18.ThinkServerRAID700Adapter
1Ports7-43Externalconnector
2Ports3-0
4ThinkServerRAID700Batteryconnector
1Ports7-4
Usedtoconnectamini-SASsignalcable.See“Connectingthecables”onpage39.
2Ports3-0
Usedtoconnectamini-SASsignalcable.See“Connectingthecables”onpage39.
3Externalconnector
UsedtoattachthecablethatconnectsaRAIDcardtothesystemboardharddiskdriveLEDconnector.See
“Connectingthecables”onpage39.
4ThinkServerRAID700Batteryconnector
UsedtoconnectaThinkServerRAID700Battery.See“InstallingorremovingtheThinkServerRAID700
Battery”onpage102.
Hot-swapharddiskdrivebackplane
Yourservercomeswithoneofthefollowinghot-swapharddiskdriveandbackplanecongurations:
•Fivetoeight3.5-inchhot-swapSATAorSASharddiskdriveswithtwobackplanes
•Uptofour3.5-inchhot-swapSATAorSASharddiskdriveswithonebackplane
•Uptoeight2.5-inchhot-swapSASharddiskdriveswithonebackplane
Chapter3.Productoverview35
Page 50
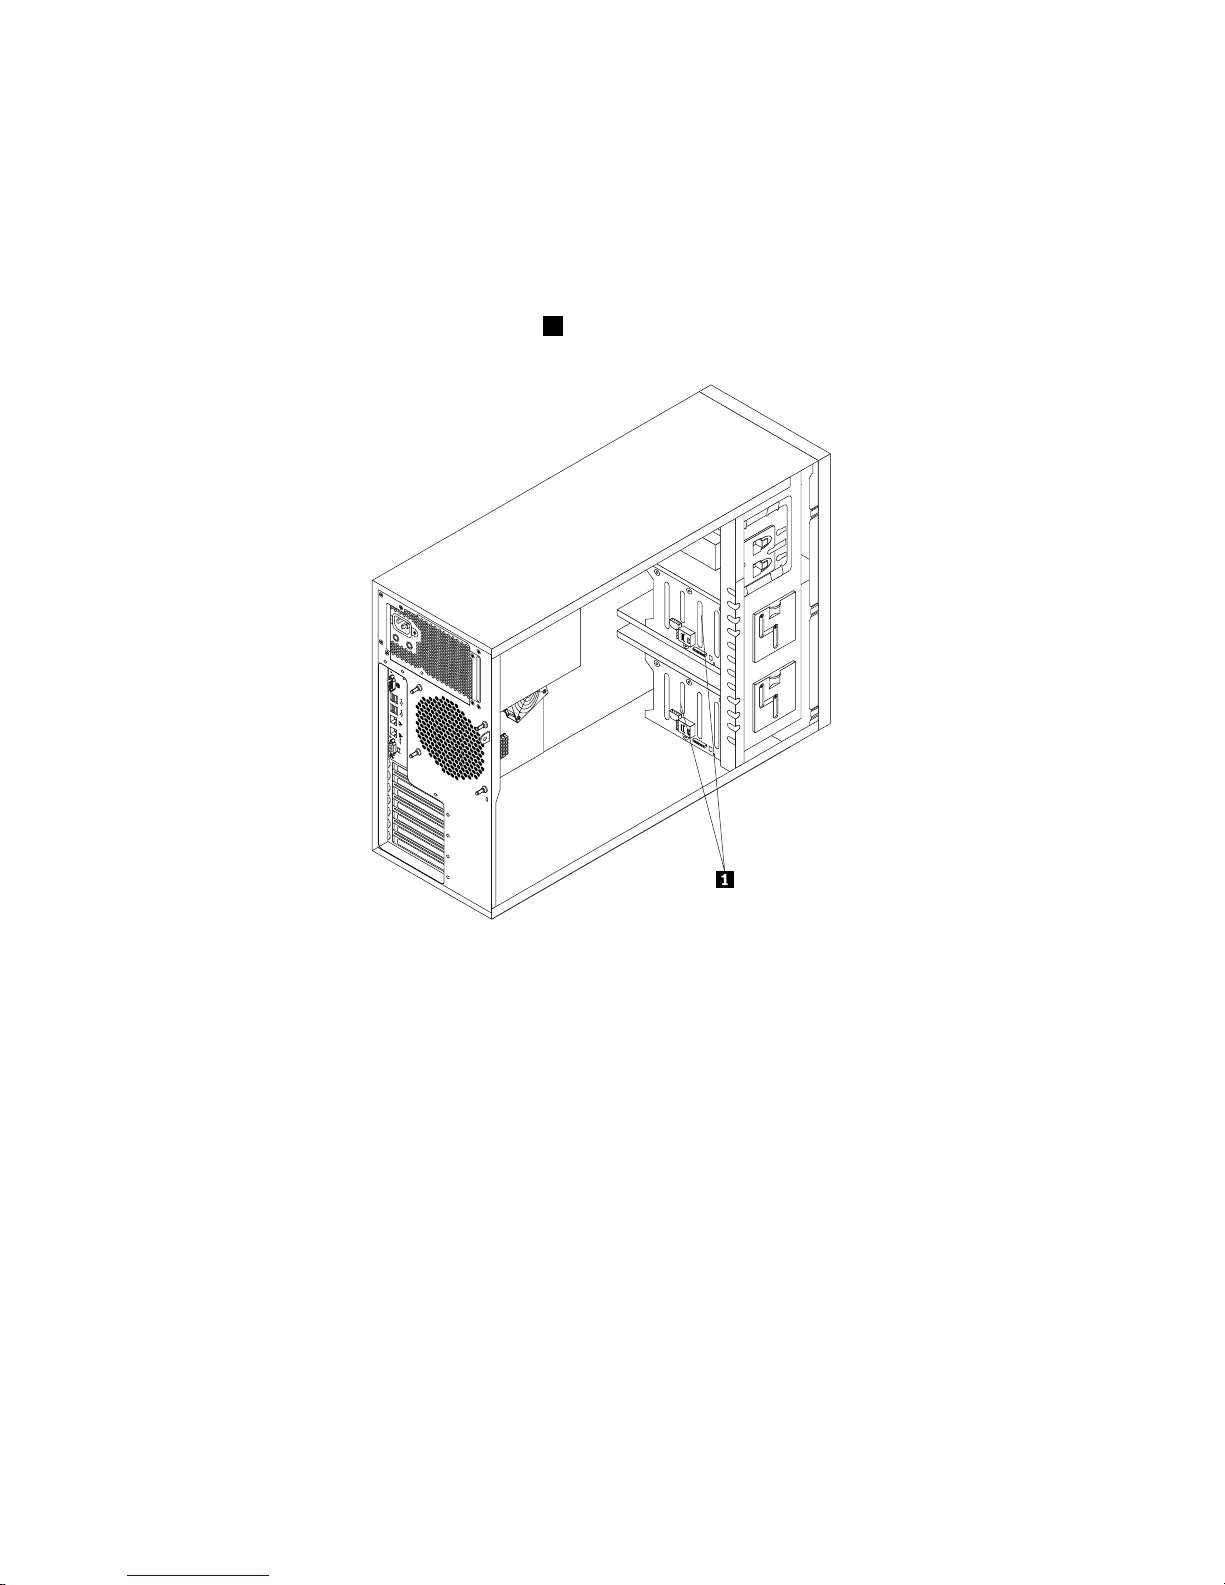
Thefollowingillustrationshowsthelocationsofthehot-swapharddiskdrivebackplanes.Youneedtoopen
theservercoverandremovethefrontsystemfanstoaccessthebackplanes.See“Removingtheserver
cover”onpage77and“Replacingthefrontsystemfan1”onpage161.
Notes:
1.Dependingonthemodel,yourservermightlookslightlydifferentfromthefollowingillustration.
2.Thefollowingillustrationisbasedonservermodelsthathavevetoeight3.5-inchhot-swapSATAor
SASharddiskdriveswithtwobackplanes1.
Figure19.Hot-swapharddiskdrivebackplanelocations
Backplanefor3.5-inchhot-swapharddiskdrives
Thistopicprovidesinformationtohelpyoulocatetheconnectorsona3.5-inchhot-swapharddiskdrive
backplane.
36ThinkServerTD330HardwareMaintenanceManual
Page 51
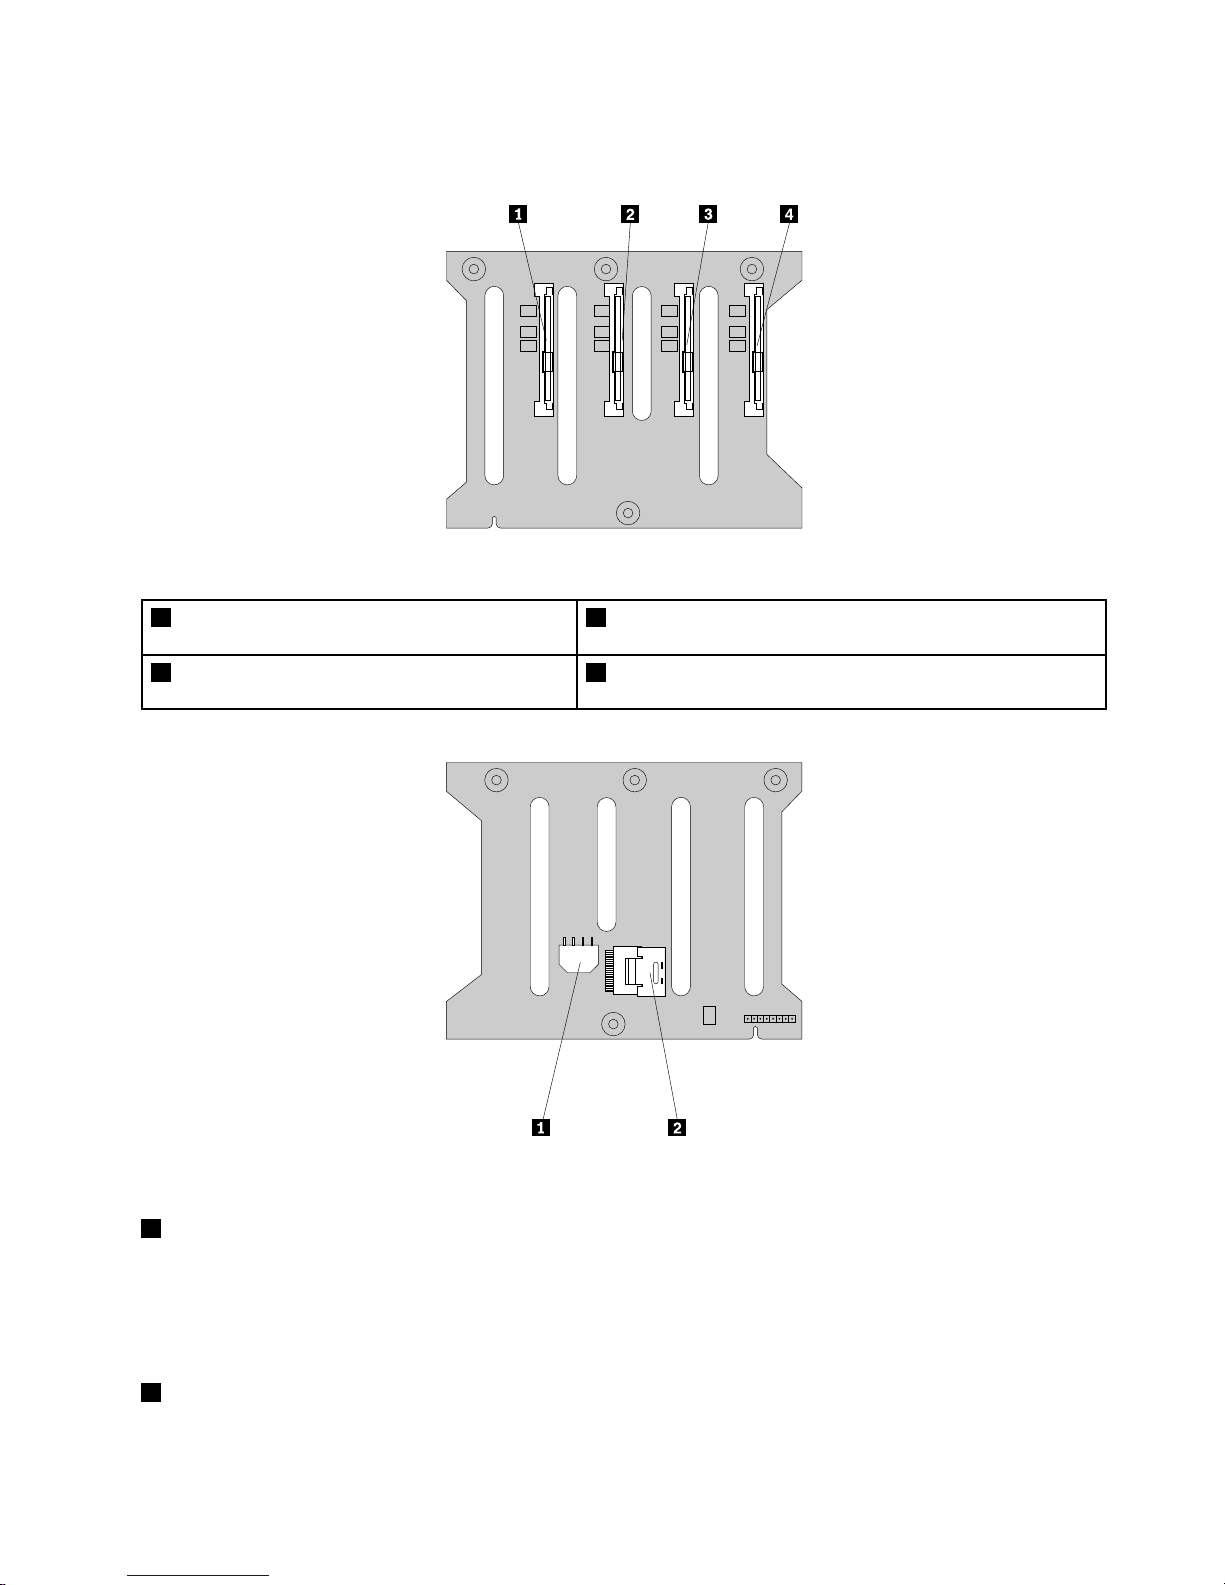
Thefollowingillustrationsshowtheconnectorsona3.5-inchhot-swapharddiskdrivebackplane.
Figure20.Frontviewofthe3.5-inchhot-swapharddiskdrivebackplane
1Slot0fora3.5-inchSATAorSAShot-swaphard
diskdrive
3Slot2fora3.5-inchSATAorSAShot-swapharddiskdrive
2Slot1fora3.5-inchSATAorSAShot-swaphard
diskdrive
4Slot3fora3.5-inchSATAorSAShot-swapharddiskdrive
Figure21.Rearviewofthe3.5-inchhot-swapharddiskdrivebackplane
18-pinpowerconnector
•Forthe3.5-inchhot-swapharddiskdrivebackplaneonthelowerharddiskdrivecage,connecttheP5
powerconnectorofthepowersupplytothe8-pinpowerconnectoronthebackplane.
•Forthe3.5-inchhot-swapharddiskdrivebackplaneontheupperharddiskdrivecage,connecttheP4
powerconnectorofthepowersupplytothe8-pinpowerconnectoronthebackplane.
2Mini-SASsignalcableconnector0
Usedtoconnectthemini-SASconnectorononeendofthemini-SASsignalcable.
Chapter3.Productoverview37
Page 52
Backplanefor2.5-inchhot-swapharddiskdrives
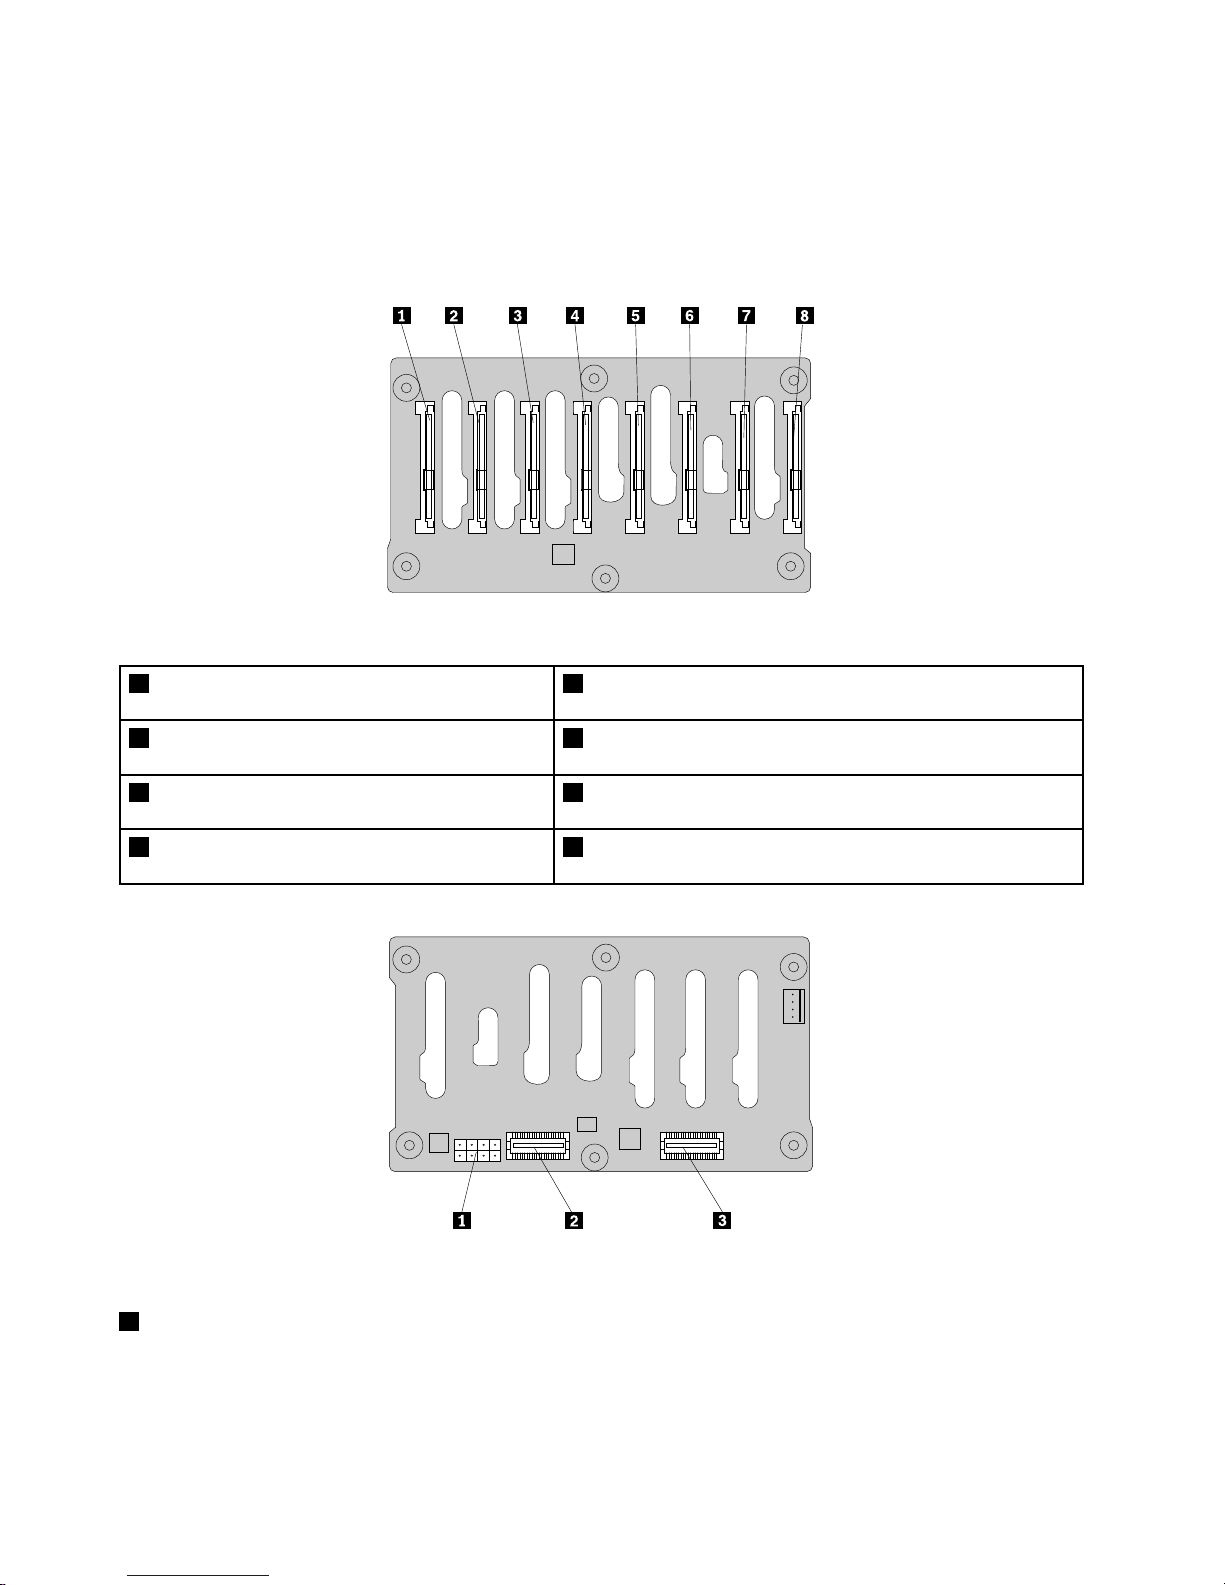
Thistopicprovidesinformationtohelpyoulocatetheconnectorsonthe2.5-inchhot-swapharddisk
drivebackplane.
Thefollowingillustrationsshowtheconnectorsonthe2.5-inchhot-swapharddiskdrivebackplane.
Figure22.Frontviewofthe2.5-inchhot-swapharddiskdrivebackplane
1Slot0fora2.5-inchSAShot-swapharddisk
drive
5Slot4fora2.5-inchSAShot-swapharddiskdrive
2Slot1fora2.5-inchSAShot-swapharddisk
drive
6Slot5fora2.5-inchSAShot-swapharddiskdrive
3Slot2fora2.5-inchSAShot-swapharddisk
drive
7Slot6fora2.5-inchSAShot-swapharddiskdrive
4Slot3fora2.5-inchSAShot-swapharddisk
drive
8Slot7fora2.5-inchSAShot-swapharddiskdrive
Figure23.Rearviewofthe2.5-inchhot-swapharddiskdrivebackplane
18-pinpowerconnector
UsedtoconnecttheP5powerconnectorofthepowersupply.
38ThinkServerTD330HardwareMaintenanceManual
Page 53
2Mini-SASsignalcableconnector1
Usedtoconnectthemini-SASconnectorononeendofthemini-SASsignalcable.
3Mini-SASsignalcableconnector0
Usedtoconnectthemini-SASconnectorononeendofthemini-SASsignalcable.
Connectingthecables
Thistopicprovidesinstructionsonthefollowingcableconnections:
•Connectingthemini-SASsignalcablesfromthesystemboardtothebackplanesforservermodelswith
hot-swapharddiskdrives.See“Connectingthemini-SASsignalcablesfromthesystemboardtothe
backplanesforservermodelswithhot-swapharddiskdrives”onpage39
.
•Connectingthemini-SASsignalcablesfromtheRAIDcardtothebackplanesforservermodelswith
hot-swapharddiskdrives.See“Connectingthemini-SASsignalcablesfromtheRAIDcardtothe
backplanesforservermodelswithhot-swapharddiskdrives”onpage40
.
•ConnectingtheSATAsignalcablesfromthesystemboardtothenon-hot-swapharddiskdrives.See
“ConnectingtheSATAsignalcablesfromthesystemboardtothenon-hot-swapharddiskdrives”on
page41.
Connectingthemini-SASsignalcablesfromthesystemboardtothebackplanesforservermodels
withhot-swapharddiskdrives
Toconnectthemini-SASsignalcablesfromthesystemboardtothebackplanes,dothefollowing:
1.Useonemini-SAStomini-SASsignalcable.Connectoneconnectorofthemini-SASsignalcabletothe
SASconnector0-3onthesystemboard.Then,connecttheotherconnectorofthemini-SASsignal
cabletothemini-SASsignalcableconnector0onthebackplanefor2.5-inchharddiskdrivesoronthe
backplanefor3.5-inchharddiskdrives.Thebackplanefor3.5-inchharddiskdrivesisinstalledonthe
lowerharddiskdrivecage.
2.Ifyouhaveuptofour3.5-inchSATAhot-swapharddiskdrivesinstalled,youalsocanusethemini-SAS
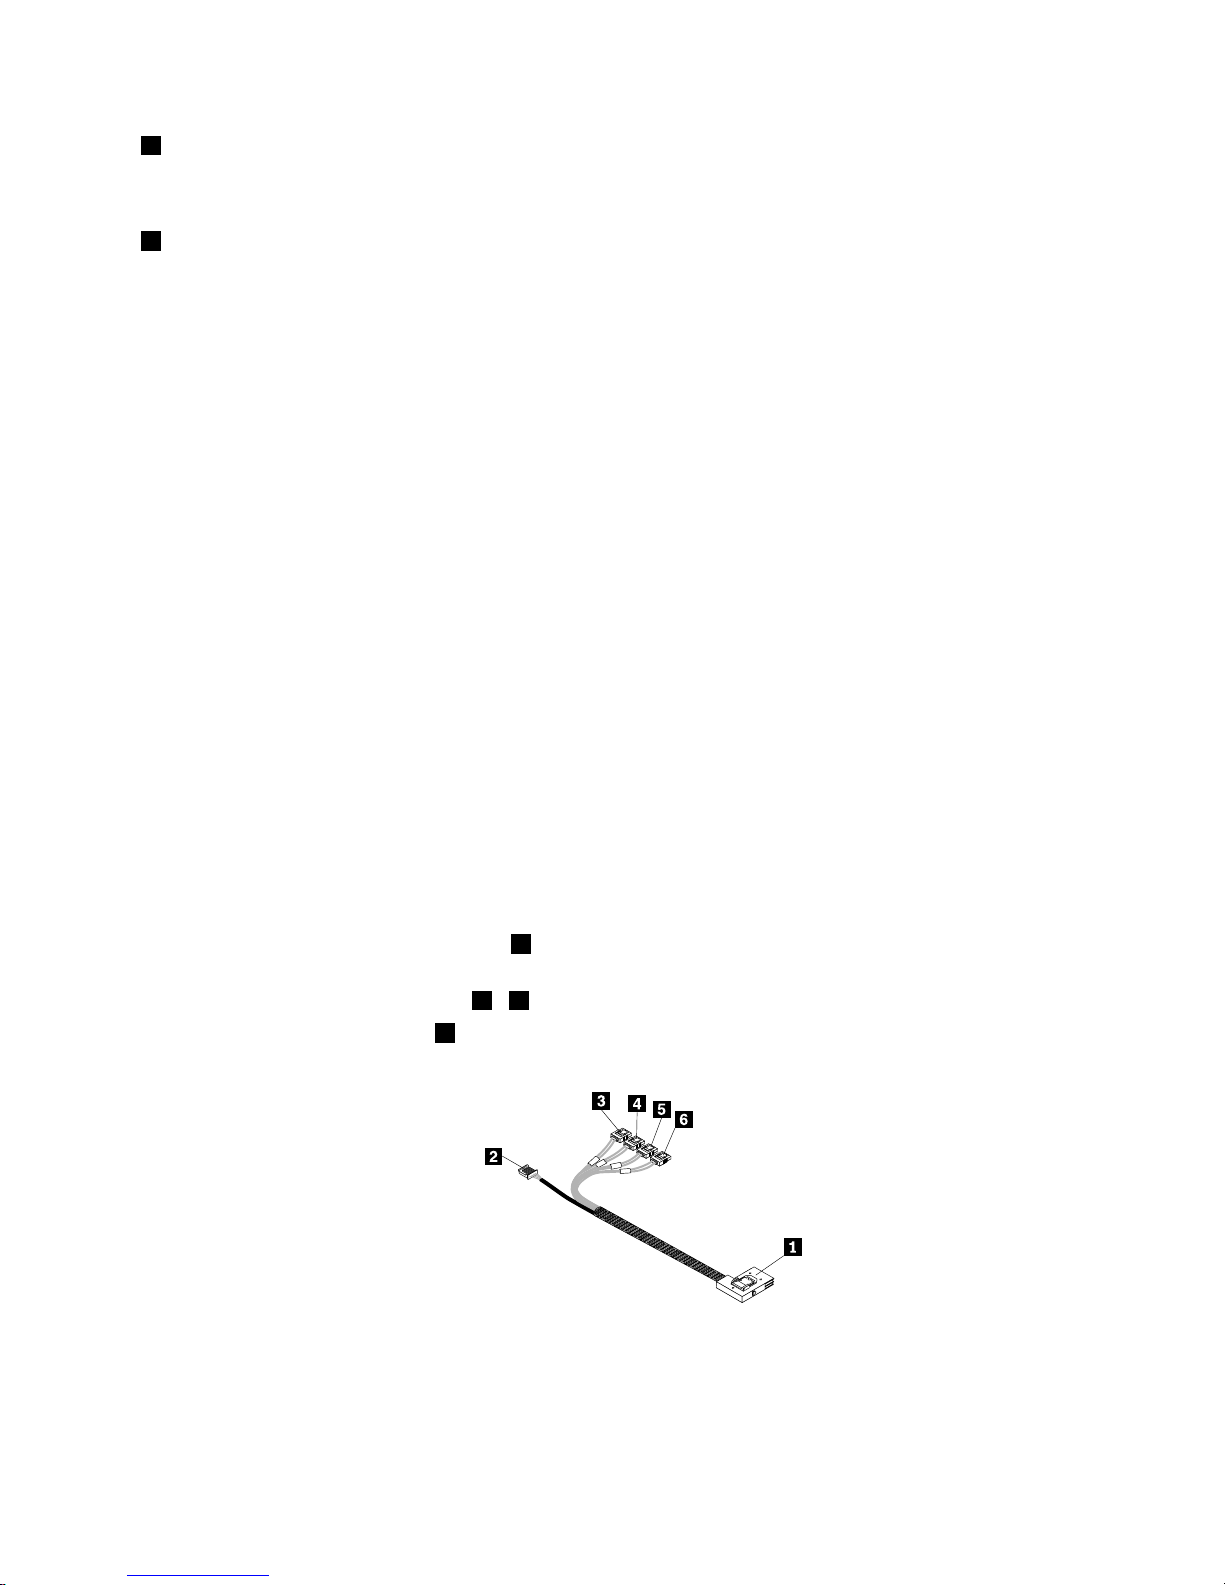
signalcablethathasfourSATAportsandoneSerialGeneralPurposeInput/Output(SGPIO)port.
a.Connectthemini-SASconnector1tothemini-SASsignalcableconnector0onthebackplanefor
3.5-inchharddiskdrives.Thebackplaneisinstalledonthelowerharddiskdrivecage.
b.ConnectthefourSATAports3-6totheSATAconnectors0-3onthesystemboard.
c.ConnecttheSGPIOport2totheSATASGPIOconnectoronthesystemboard.
Figure24.Mini-SASsignalcablewithfourSATAportsandoneSAT ASGPIOport
Chapter3.Productoverview39
Page 54
Notes:
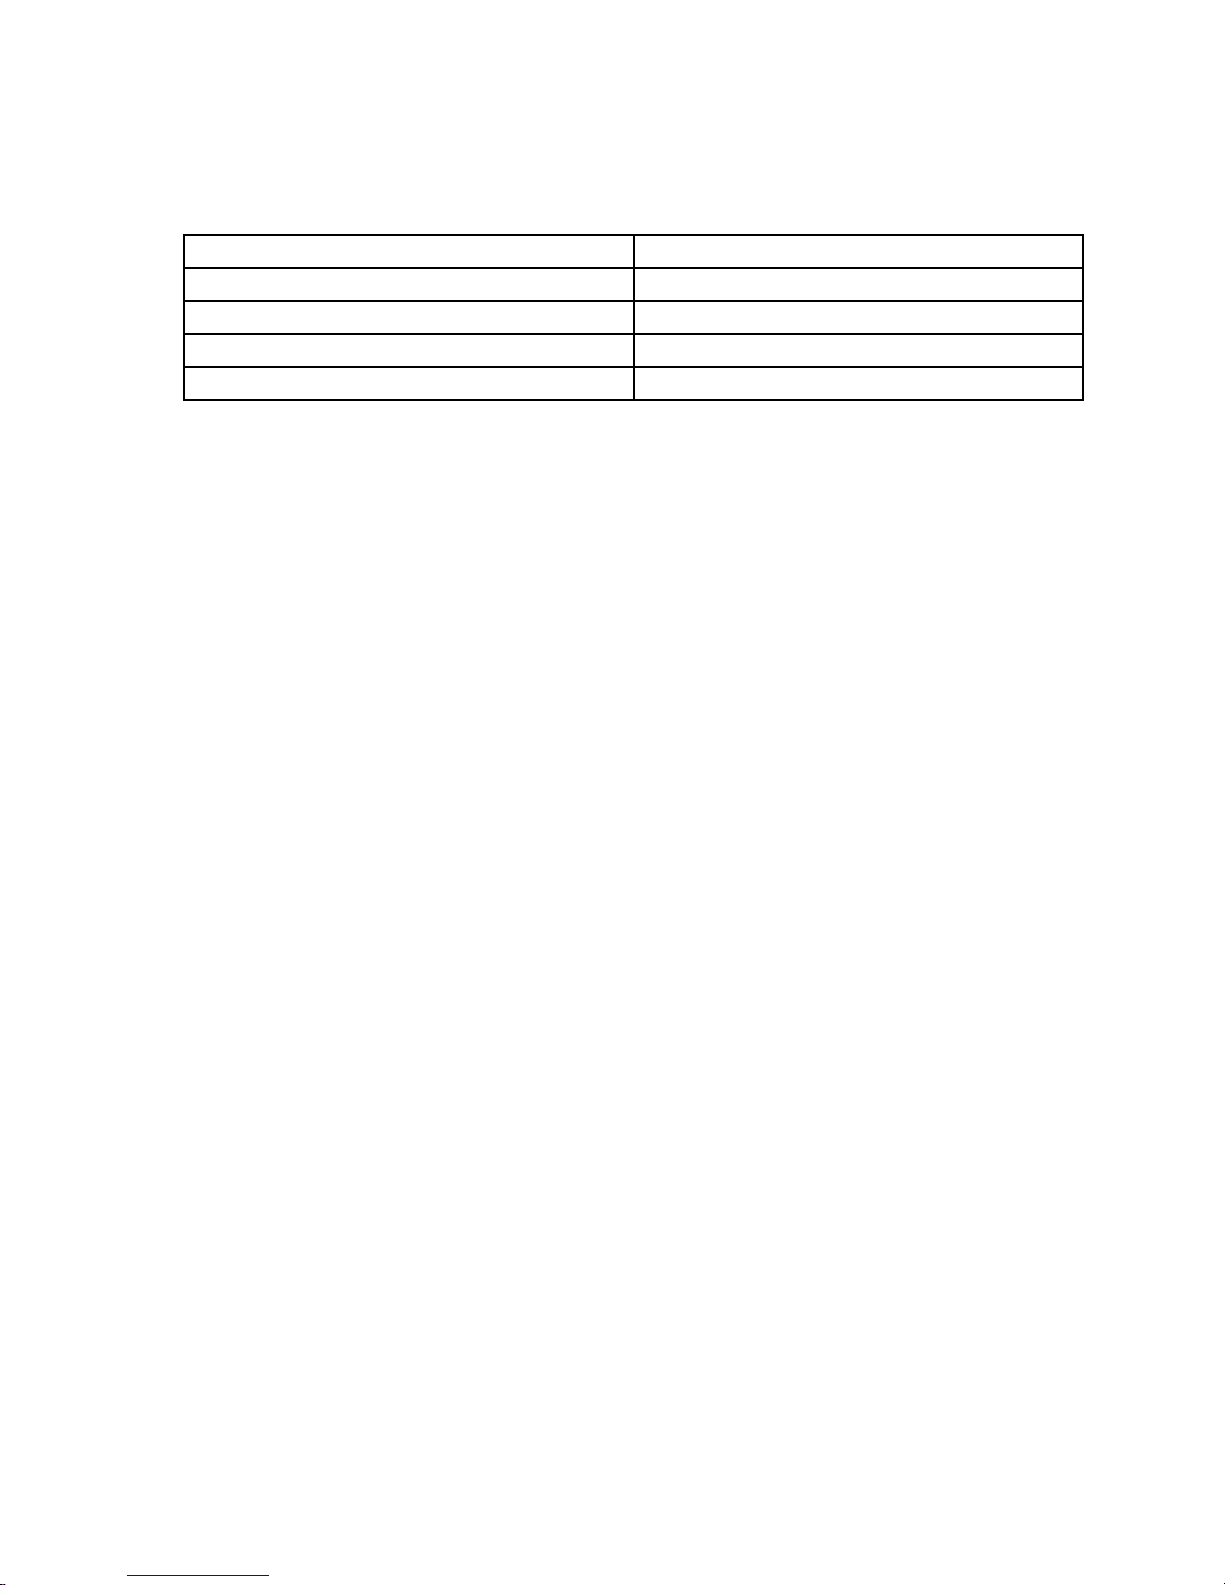
•ThenumberonthelabelforeachofthefourSATAsignalcablesindicatesthesequencetofollowwhen
youareconnectingthecablestothecorrespondingSATAconnectors(0-3)onthesystemboard.
SATAsignalcablelabelSystemboardSATAconnector
P0
SATAconnector0
P1
SATAconnector1
P2
SATAconnector2
P3
SATAconnector3
•ForinformationaboutconguringRAIDusingthecongurationutilityfortheThinkServerRAID100or
RAID300,see“ConguringtheThinkServerRAID100orRAID300”onpage66
.
3.Ifyouhavemorethanfourharddiskdrivesinstalled,usetheothermini-SAStomini-SASsignalcable.
Connectoneconnectorofthemini-SASsignalcabletotheSASconnector4-7onthesystemboard.
Then,connecttheotherconnectorofthemini-SASsignalcabletothemini-SASsignalcableconnector
1onthebackplanefor2.5-inchharddiskdrivesortothemini-SASsignalcableconnector0onthe
backplanefor3.5-inchharddiskdrives.Thebackplanefor3.5-inchharddiskdrivesisinstalledonthe
upperharddiskdrivecage.
Note:Ifyouconnectthemini-SAStomini-SASsignalcablesfromthesystemboardtothebackplanes,
youcancongureRAIDusingthecongurationutilityfortheThinkServerRAID100orRAID300.See
“ConguringtheThinkServerRAID100orRAID300”onpage66.
Connectingthemini-SASsignalcablesfromtheRAIDcardtothebackplanesforservermodelswith
hot-swapharddiskdrives
IfyourserverhasasupportedRAIDcardinstalled,youcanconnectthemini-SASsignalcablesfromthe
RAIDcardtothebackplanestosupportuptoeightharddiskdrives.Inthiscase,youcancongureRAIDfor
theharddiskdrivesusingtheadvancedhardwareRAIDfunctions.
Note:TheoptionpackagefortheRAIDcardisdesignedfordifferenttypesofserversandmightcontain
additionalcablesthatarenotrequiredforinstallation.
40ThinkServerTD330HardwareMaintenanceManual
Page 55
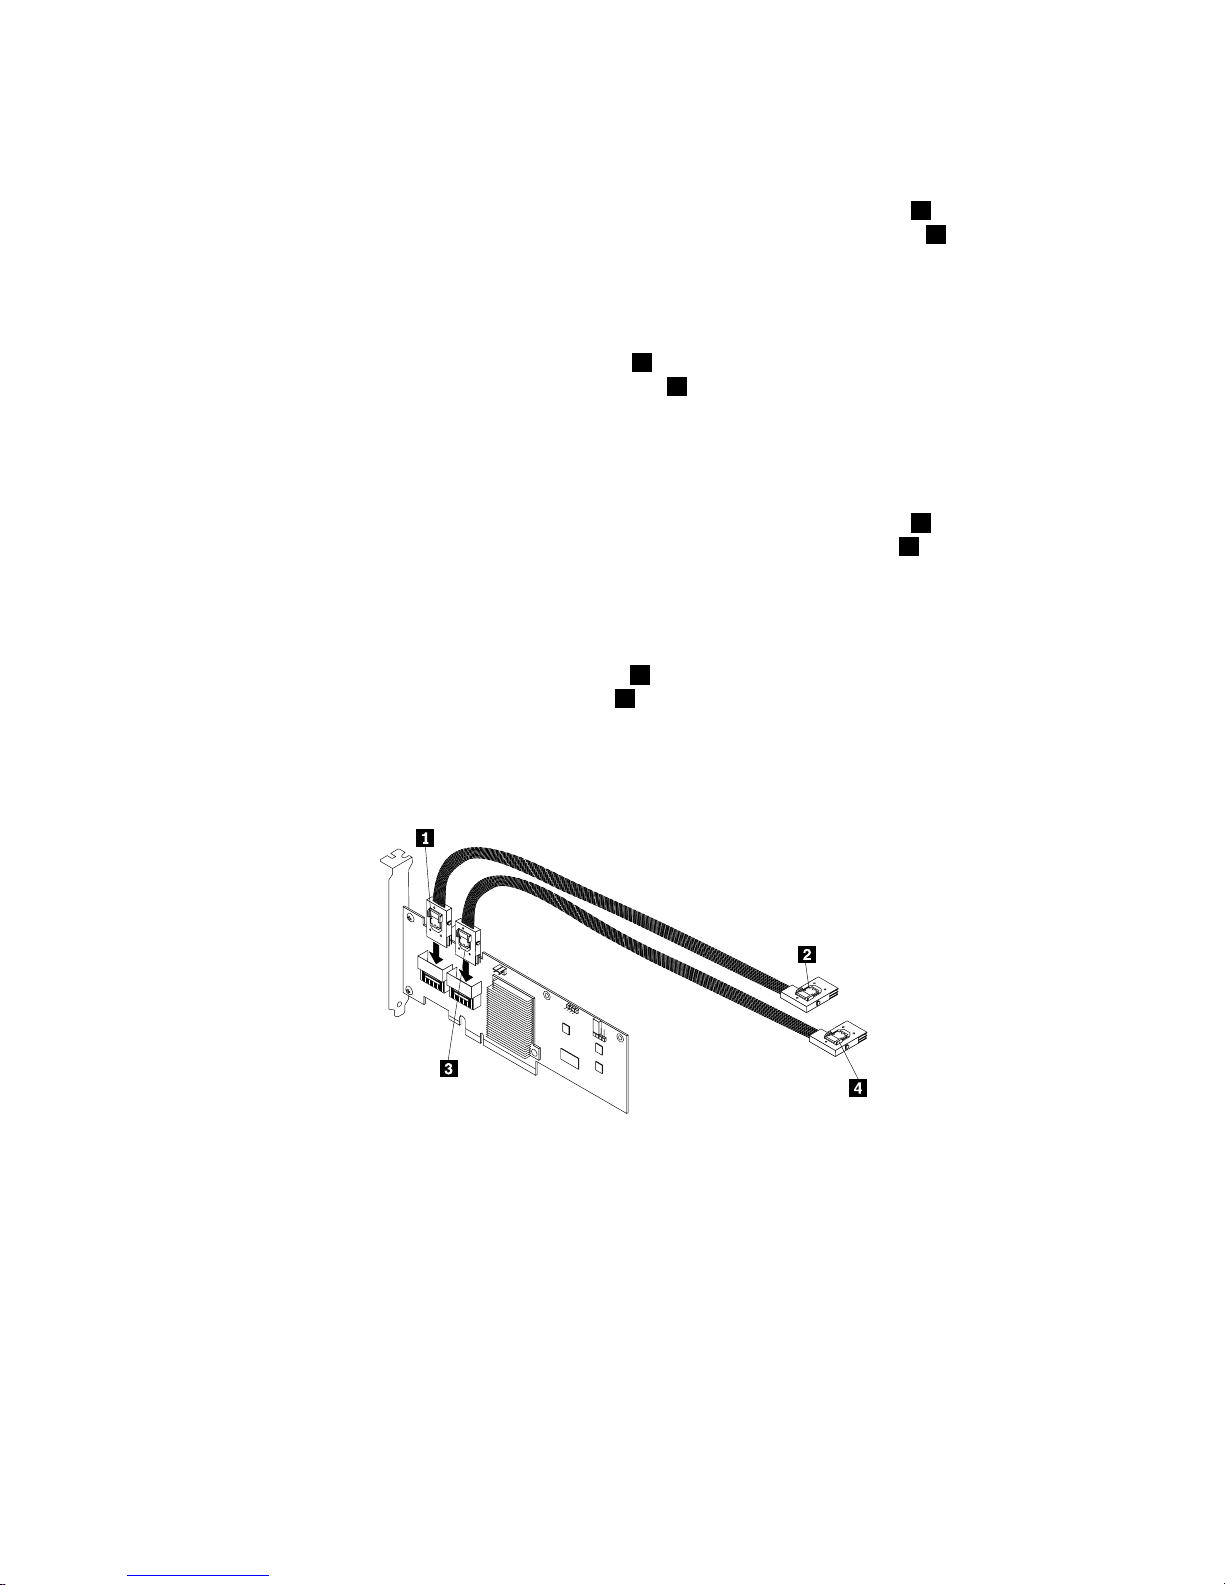
Toconnectthemini-SASsignalcablesfromtheRAIDcardtothebackplanes,dothefollowing:
1.IfyouareusingaThinkServerRAID700Adapter,dothefollowing:
a.Useonemini-SAStomini-SASsignalcable.Connectthemini-SASconnector3ononeendofthe
cabletotheports3-0ontheRAIDcard.Then,connectthemini-SASconnector
4ontheotherend
ofthecabletothemini-SASsignalcableconnector0onthebackplanefor2.5-inchharddiskdrives
oronthebackplanefor3.5-inchharddiskdrives.Thebackplanefor3.5-inchharddiskdrives
isinstalledonthelowerharddiskdrivecage.
b.Ifyourserverhasmorethanfourharddiskdrivesinstalled,usetheothermini-SAStomini-SAS
signalcable.Connectthemini-SASconnector
1ononeendofthecabletotheports7-4onthe
RAIDcard.Then,connectthemini-SASconnector2ontheotherendofthecabletothemini-SAS
signalcableconnector1onthebackplanefor2.5-inchharddiskdrivesortothemini-SASsignal
cableconnector0onthebackplanefor3.5-inchharddiskdrives.Thebackplanefor3.5-inchhard
diskdrivesisinstalledontheupperharddiskdrivecage.
2.IfyouareusingaThinkServerRAID500Adapter,dothefollowing:
a.Useonemini-SAStomini-SASsignalcable.Connectthemini-SASconnector1ononeendofthe
cabletotheport0ontheRAIDcard.Then,connectthemini-SASconnector2ontheotherendof
thecabletothemini-SASsignalcableconnector0onthebackplanefor2.5-inchharddiskdrives
oronthebackplanefor3.5-inchharddiskdrives.Thebackplanefor3.5-inchharddiskdrives
isinstalledonthelowerharddiskdrivecage.
b.Ifyourserverhasmorethanfourharddiskdrivesinstalled,usetheothermini-SAStomini-SAS
signalcable.Connectthemini-SASconnector3ononeendofthecabletotheport1ontheRAID
card.Then,connectthemini-SASconnector4ontheotherendofthecabletothemini-SASsignal
cableconnector1onthebackplanefor2.5-inchharddiskdrivesortothemini-SASsignalcable
connector0onthebackplanefor3.5-inchharddiskdrives.Thebackplanefor3.5-inchharddisk
drivesisinstalledontheupperharddiskdrivecage.
Figure25.Connectingthemini-SASsignalcablesfromtheRAIDcardtothebackplanes
FortheconnectorlocationinformationabouttheRAIDcard,hot-swapharddiskdrivebackplane,and
systemboard,refertotherelatedtopicsin“Locations”onpage12.
Forinformationaboutconnectingtheappropriatepowerconnectorofthepowersupplytothebackplane,
see“Hot-swapharddiskdrivebackplane”onpage35
.
ConnectingtheSAT Asignalcablesfromthesystemboardtothenon-hot-swapharddiskdrives
Forservermodelswithuptofour3.5-inchnon-hot-swapharddiskdrives,connectoneendoftheSATA
signalcabletotherearofthenon-hot-swapharddiskdrive.Then,connecttheotherendoftheSATAsignal
Chapter3.Productoverview41
Page 56
cabletotheappropriateSATAconnectoronthesystemboard.Youalsoneedtoconnecttheappropriate
powerconnectortotherearofthenon-hot-swapharddiskdrives.
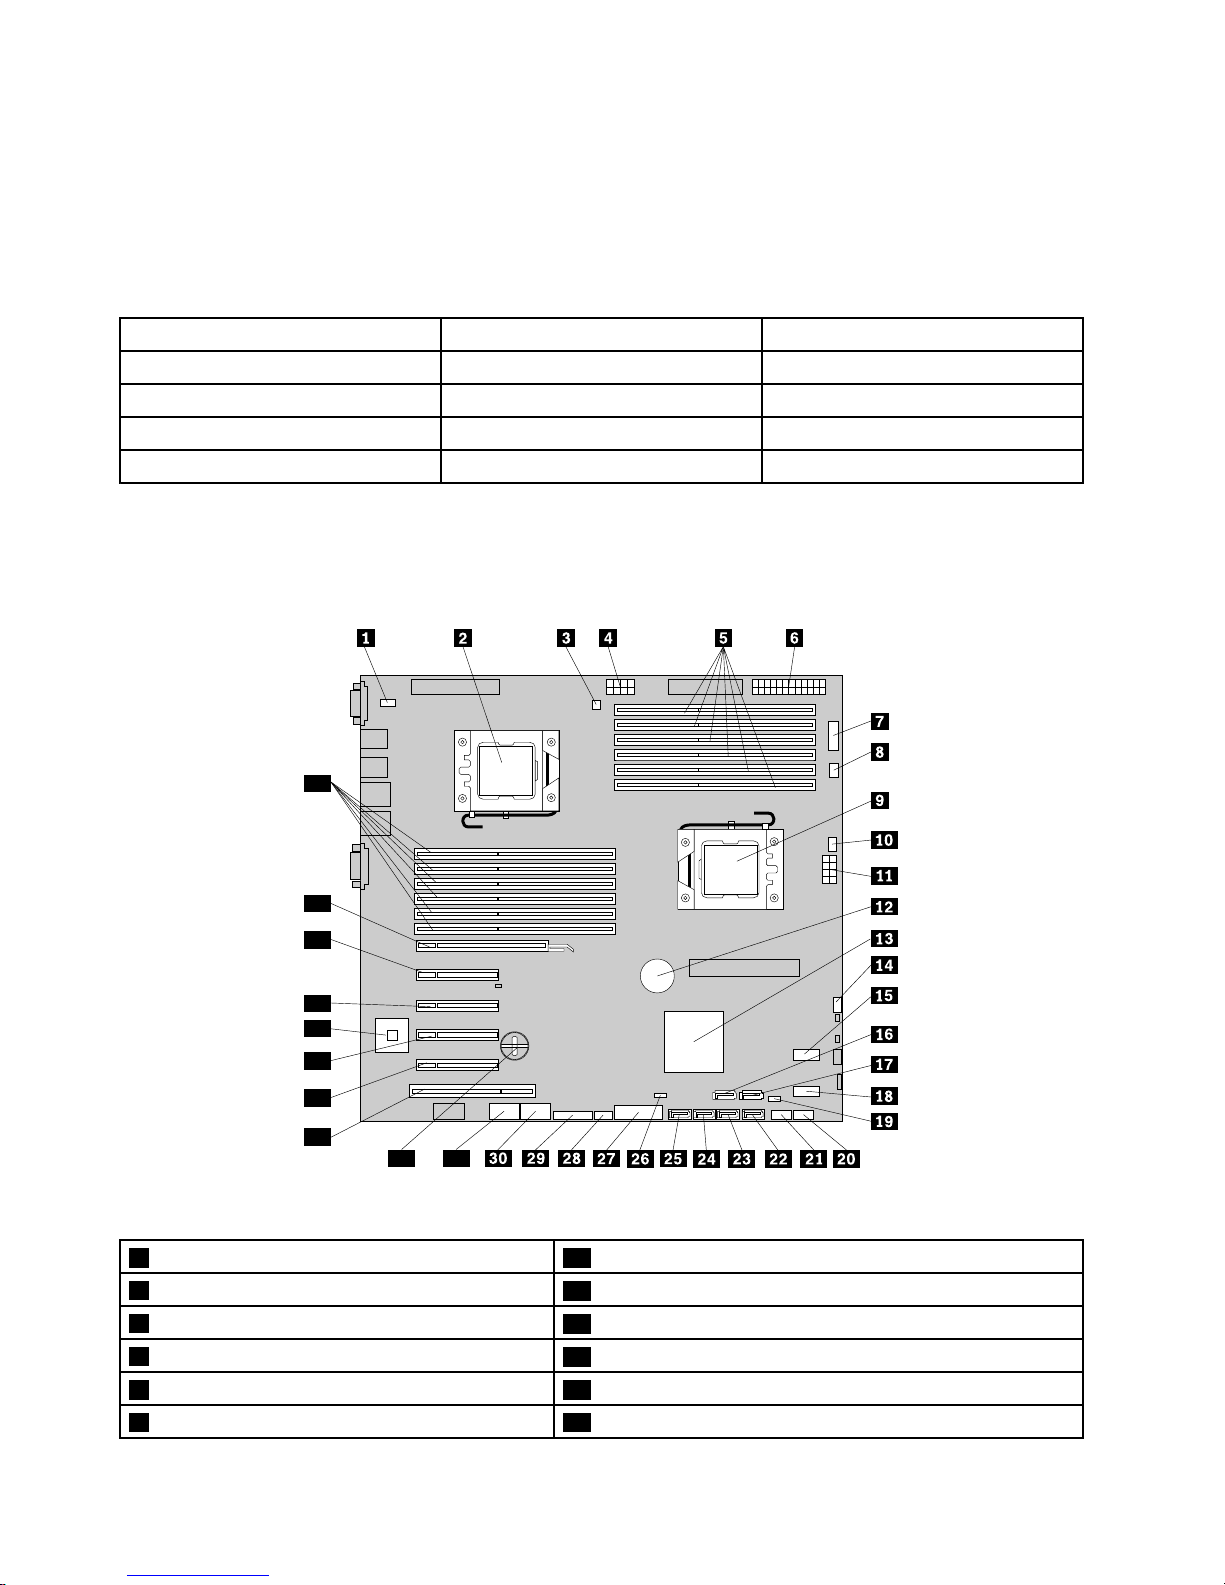
ThefollowingtableprovidesinformationabouttherecommendedpowerconnectorandsystemboardSATA
connectorforthenon-hot-swapharddiskdriveinstalledineachdrivebay.See“Servercomponents”on
page25and“Systemboardcomponents”onpage42forthelocationinformationabouttheharddiskdrive
baysandSATAconnectorsonthesystemboard.
Non-hot-swapharddiskdrivePowerconnector
SystemboardSAT Aconnector
Installedinbay0P9powerconnector
SATAconnector0
Installedinbay1P10powerconnector
SATAconnector1
Installedinbay2P7powerconnector
SATAconnector2
Installedinbay3P8powerconnector
SATAconnector3
Systemboardcomponents
Thefollowingillustrationshowsthecomponentlocationsonthesystemboard.
32 31
33
34
35
36
37
38
39
40
Figure26.Systemboardcomponents
1Systemfan3connector21InternalUSBTypeAconnector
2Microprocessorsocket2
22SATAconnector2
3Microprocessor2fanconnector
23SATAconnector3
4Microprocessor2powerconnector
24SATAconnector4
5Memoryslots(6)25SATAconnector5
6Mainpowerconnector26TMMPremiumconnector
42ThinkServerTD330HardwareMaintenanceManual
Page 57
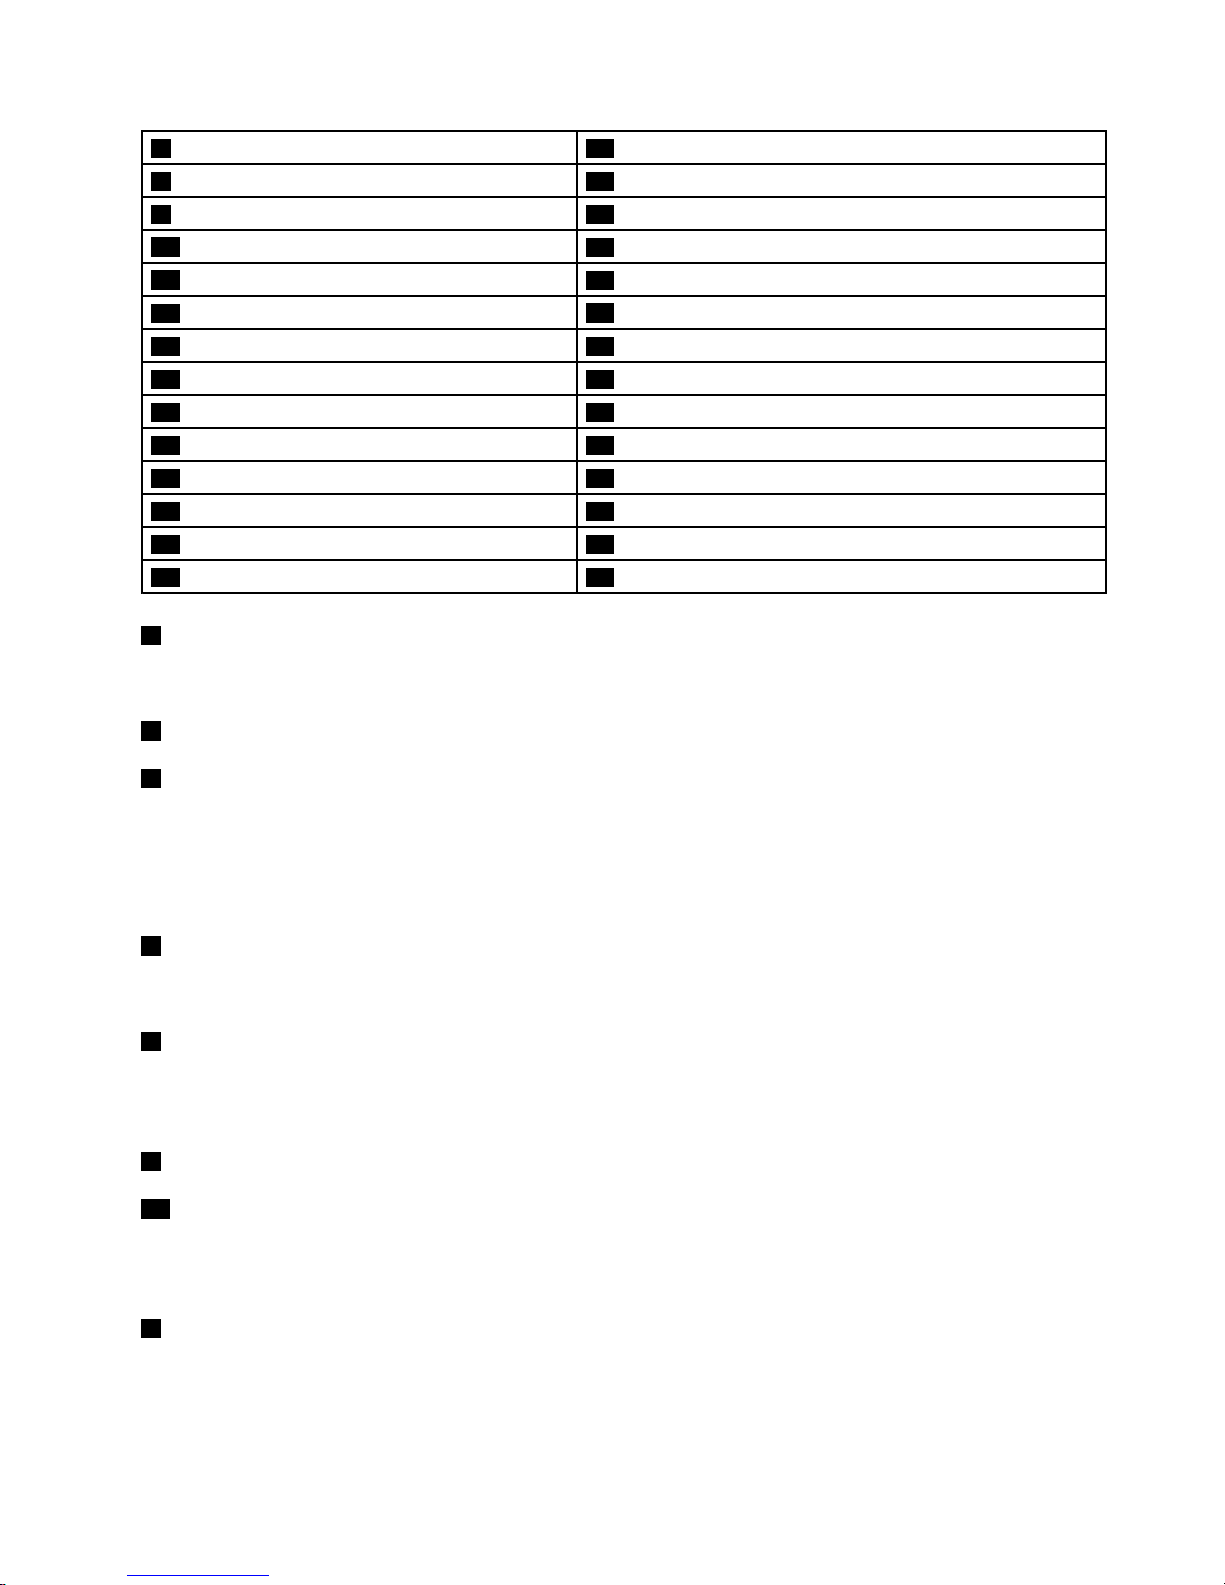
7PowerManagementBus(PMBus)connector
27TPMconnector
8Systemfan2connector
28IntelligentDiagnosticsModuleconnector
9Microprocessorsocket129Frontpanelconnector
10Microprocessor1fanconnector
30InternalUSBconnector2
11Microprocessor1powerconnector
31InternalUSBconnector1
12Systemboardbattery
32iButtonsocket
13PlatformControllerHub(PCH)33PCIcardslot(PCIslot1)
14Systemfan1connector34PCIExpressx8cardslot(PCI-Eslot2)
15SASconnector4-735PCIExpressx8cardslot(PCI-Eslot3)
16SATAconnector136ThinkServerManagementModule
17SATAconnector037PCIExpressx8cardslot(PCI-Eslot4)
18SASconnector0-338PCIExpressx8cardslot(PCI-Eslot5)
19SATASGPIOconnector39PCIExpressx16cardslot(PCI-Eslot6)
20InternalUSBTypeAconnector40Memoryslots(6)
1Systemfan3connector
Usedtoconnecttherearsystemfancable.
2Microprocessorsocket2
9Microprocessorsocket1
Iftheserverhastwomicroprocessors,eachofthemicroprocessorissecuredinthemicroprocessor
socketonthesystemboardandaheatsinkandfanassemblyisinstalledabovethemicroprocessorto
providecooling.Iftheserverhasonlyonemicroprocessor,themicroprocessorsocket2isprotectedbya
microprocessorsocketcover.
3Microprocessor2fanconnector
Usedtoconnecttheheatsinkandfanassembly2cable.
4Microprocessor2powerconnector
Usedtoconnectthepowerconnectorofthepowersupplytoprovidepowertothemicroprocessorinstalled
inthemicroprocessorsocket2.
5Memoryslots(6)
40Memoryslots(6)
Yourserversystemboardprovides12memoryslotstosupportupto12memorymodules.Formore
information,see“Memorymoduleinstallationrules”onpage85.
6Mainpowerconnector
Usedtoconnectthepowerconnectorofthepowersupplytoprovidemainpowertoyourserver.
Chapter3.Productoverview43
Page 58
7PowerManagementBus(PMBus)connector
TheThinkServerManagementModulecanreadthepowersupplystatusregisteredthroughPMBus.Youdo
notneedtoconnectanydevicetothePMBusconnector.Thisconnectoriskeptforpowermanagementin
modelswithredundantpowersupplies.ThefunctionofthePMBusconnectorisnotavailableformodels
withascrew-securednon-hot-swappowersupplyassembly.
8Systemfan2connector
Usedtoconnectthecableoftheupperfrontsystemfan(frontsystemfan2).
10Microprocessor1fanconnector
Usedtoconnecttheheatsinkandfanassembly1cable.
11Microprocessor1powerconnector
Usedtoconnectthepowerconnectorofthepowersupplytoprovidepowertothemicroprocessorinstalled
inthemicroprocessorsocket1.
12Systemboardbattery
Yourserverhasaspecialtypeofmemorythatmaintainsthedate,time,andcongurationinformationfor
built-infeatures.Thesystemboardbatterykeepstheinformationactivewhenyouturnofftheserver.
13PlatformControllerHub(PCH)
Thischipprovidesthedatabufferingandinterfacearbitrationrequiredtoensurethatsysteminterfaces
operateefcientlyandprovidesthebandwidthnecessaryforthesystemtoachievepeakperformance.The
chipalsosupportsandprovidesmanyotherfeatures,includingtheonboardSATA/SASsoftwareRAID.
14Systemfan1connector
Usedtoconnectthecableofthelowerfrontsystemfan(frontsystemfan1).
15SASconnector4-7
Usedtoconnectthemini-SASconnectorononeendofamini-SAStomini-SASsignalcabletosupportthe
harddiskdrive4toharddiskdrive7.
161722232425SA T Aconnectors
UsedtoconnectSATAsignalcablesfortheSATAharddiskdrivesorSATAopticaldrives.
18SASconnector0-3
Usedtoconnectthemini-SASconnectorononeendofamini-SAStomini-SASsignalcabletosupportthe
harddiskdrive0toharddiskdrive3.
19SA T ASGPIOconnector
UsedtoconnecttheSGPIOportofthemini-SASsignalcablethathasfourSATAportsandoneSGPIOport
toenabletheRAIDstatusLEDsforhot-swapharddiskdrives.
44ThinkServerTD330HardwareMaintenanceManual
Page 59
20InternalUSBTypeAconnector
21InternalUSBTypeAconnector
UsedtoconnectadevicethatusesaUSBTypeAconnector.Forexample,insomesituations,youmight
wanttoconnectaUSBkeydirectlytothesystemboard.Inthiscase,youcanconnectittoaninternal
USBT ypeAconnector.
26TMMPremiumconnector
UsedtoconnectaserveroptionnamedThinkServerManagementModulePremium(TMMPremium)to
enableadvancedremotemanagementfunctionsonyourserver.See“InstallingorremovingtheThinkServer
ManagementModulePremium”onpage109
.
27TPMconnector
UsedtoconnectaThinkServerTrustedPlatformModule(TPM),whichisasecuritychip,toenhanceserver
security.See“InstallingorremovingtheThinkServerTrustedPlatformModule”onpage113.
28IntelligentDiagnosticsModuleconnector
UsedtoconnectthecableoftheIntelligentDiagnosticsModule.
29Frontpanelconnector
Usedtoconnectthefrontpanelcable.
30InternalUSBconnector2
31InternalUSBconnector1
UsedtoconnectthefrontpanelUSBcables.
32iButtonsocket
Bydefault,yourserversupportsonboardSATA/SASsoftwareRAIDlevels0,1,and10.However,youcan
activateonboardSATA/SASsoftwareRAID5byinstallingaThinkServerRAID100orRAID300upgradekey
forAdvancedRAIDintheiButtonsocket.Formoreinformation,see“InstallingorremovingtheThinkServer
RAID100orRAID300upgradekeyforAdvancedRAID”onpage106
.
33PCIcardslot(PCIslot1)
Usedtoinstallastandard32-bit33MHzPCIcardwith167mm(6.57inches)inlength.
34PCIExpressx8cardslot(PCI-Eslot2)
ThisPCIcardslotsupportsaPCIExpressx8cardwith167mm(6.57inches)inlength,suchasanEthernet
card.
35PCIExpressx8cardslot(PCI-Eslot3)
ThisPCIcardslotsupportsaPCIExpressx8cardwith167mm(6.57inches)inlength,suchasanEthernet
card.
Chapter3.Productoverview45
Page 60
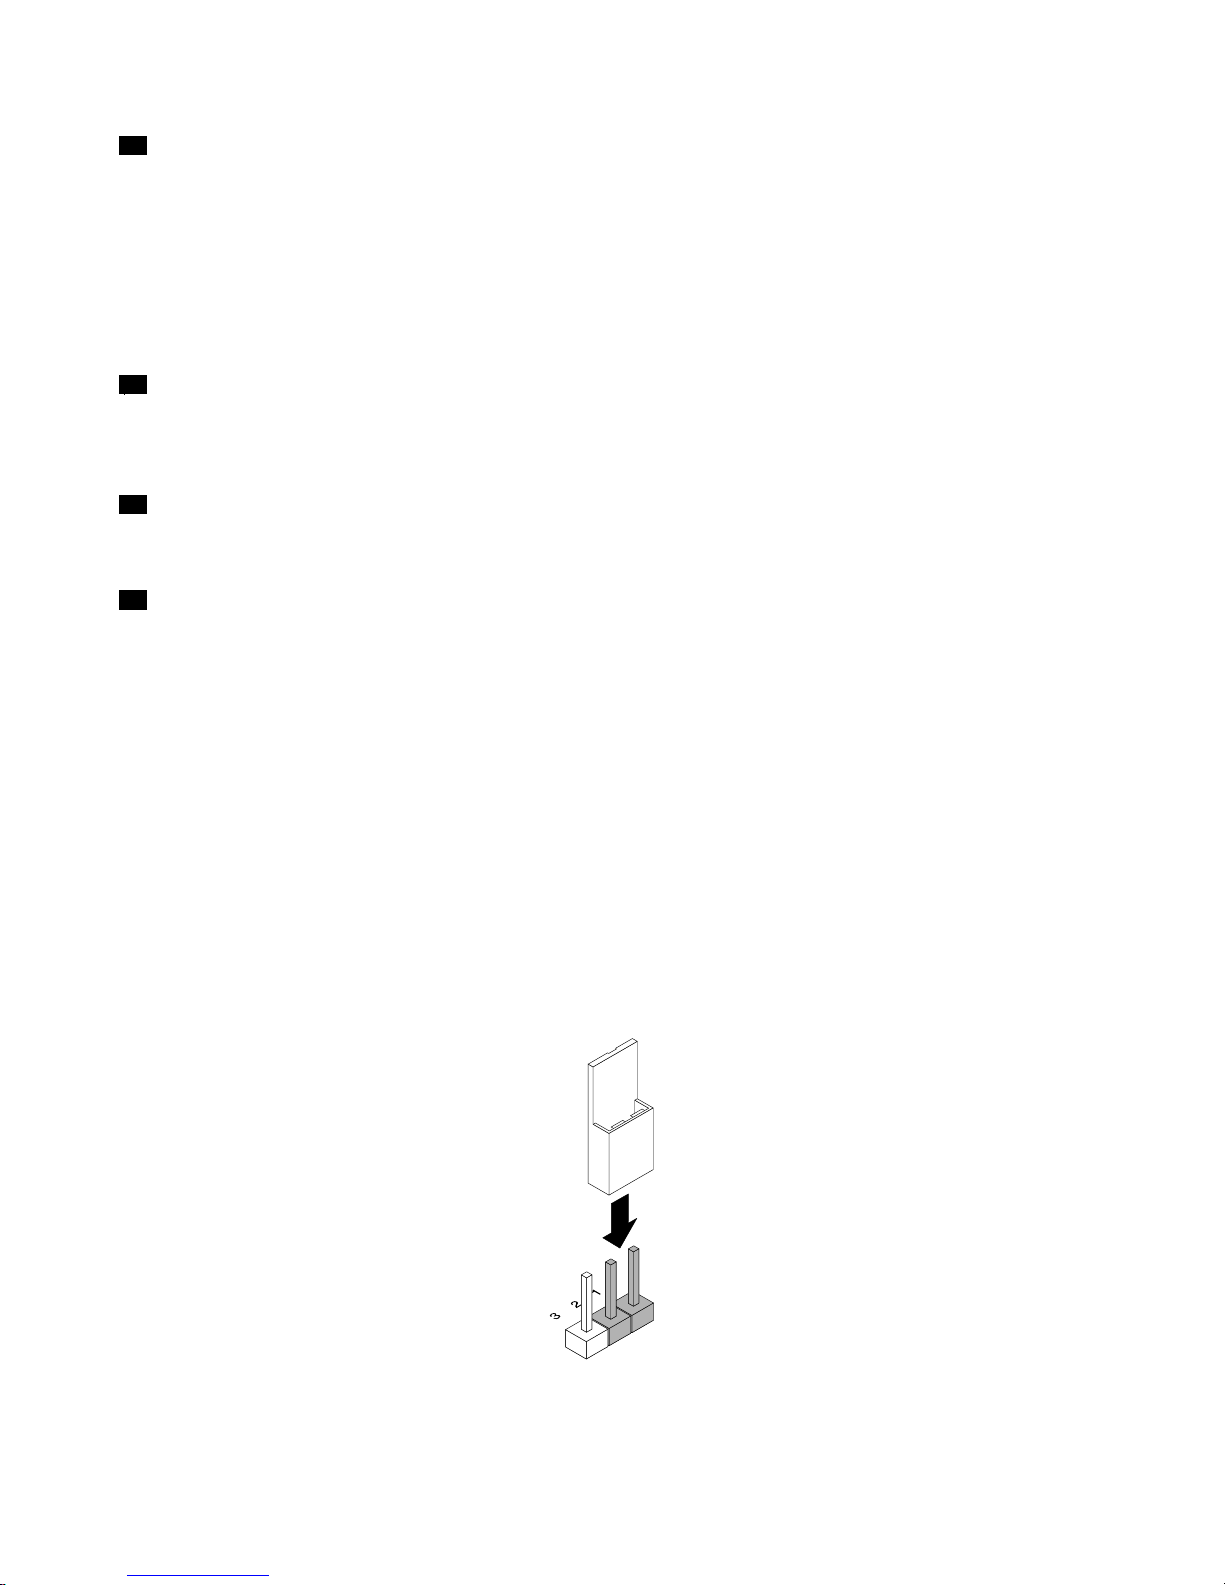
36ThinkServerManagementModule
WiththeintegratedThinkServerManagementModule(hereinafterreferredtoastheTMM),nomatterwhat
conditiontheserveroperatingsystemisinandnomatteriftheserverisonoroff,aslongastheserver
isconnectedtonetworkandanacpowersource,theinteractionwiththeTMMcontrolledserverscanbe
achievedthroughsystemnetwork.TheusercanobtaintheserverhardwarehealthinformationandSEL,
andisabletoconducttheoperationsincludingturningonorofftheserver,restartingtheserver,andso
on.Thispartoftheservermanagementisindependentoftheoperatingsystemandiscalledout-of-band
management.
37PCIExpressx8cardslot(PCI-Eslot4)
ThisPCIcardslotsupportsaPCIExpressx8cardwith167mm(6.57inches)inlength,suchasanEthernet
card.
38PCIExpressx8cardslot(PCI-Eslot5)
ThisPCIcardslotsupportsaPCIExpressx8cardwith167mm(6.57inches)inlength,suchasaRAIDcard.
39PCIExpressx16cardslot(PCI-Eslot6)
ThisPCIcardslotsupportsaPCIExpressx16cardwith167mm(6.57inches)inlength,suchasaRAIDcard.
SystemboardjumpersandTMMstatusLED
ThistopicprovidesinformationaboutthejumpersandTMMstatusLED(alsoknownasBMCstatusLED)
onthesystemboard.
Ajumperisashortlengthofconductorusedtosetuporadjustprintedcircuitboards,suchasthesystem
boardofacomputer.Ajumperusuallyisencasedinanon-conductiveblockofplasticforconvenientuse
andtoavoidanypossibledamagetoalivecircuit.Jumperpinsarrangedingroupsonthesystemboardare
calledjumperblocks.Whentwoormorejumperpinsarecappedwithajumper,anelectricalconnectionis
madebetweenthemandtheequipmentisthusinstructedtoactivatecertainsettingsaccordingly.
Thefollowingillustrationshowsajumperinthedefaultsettingposition(pin1andpin2).Thisisthecorrect
positionfornormaloperation.
Figure27.Defaultjumpersetting
46ThinkServerTD330HardwareMaintenanceManual
Page 61
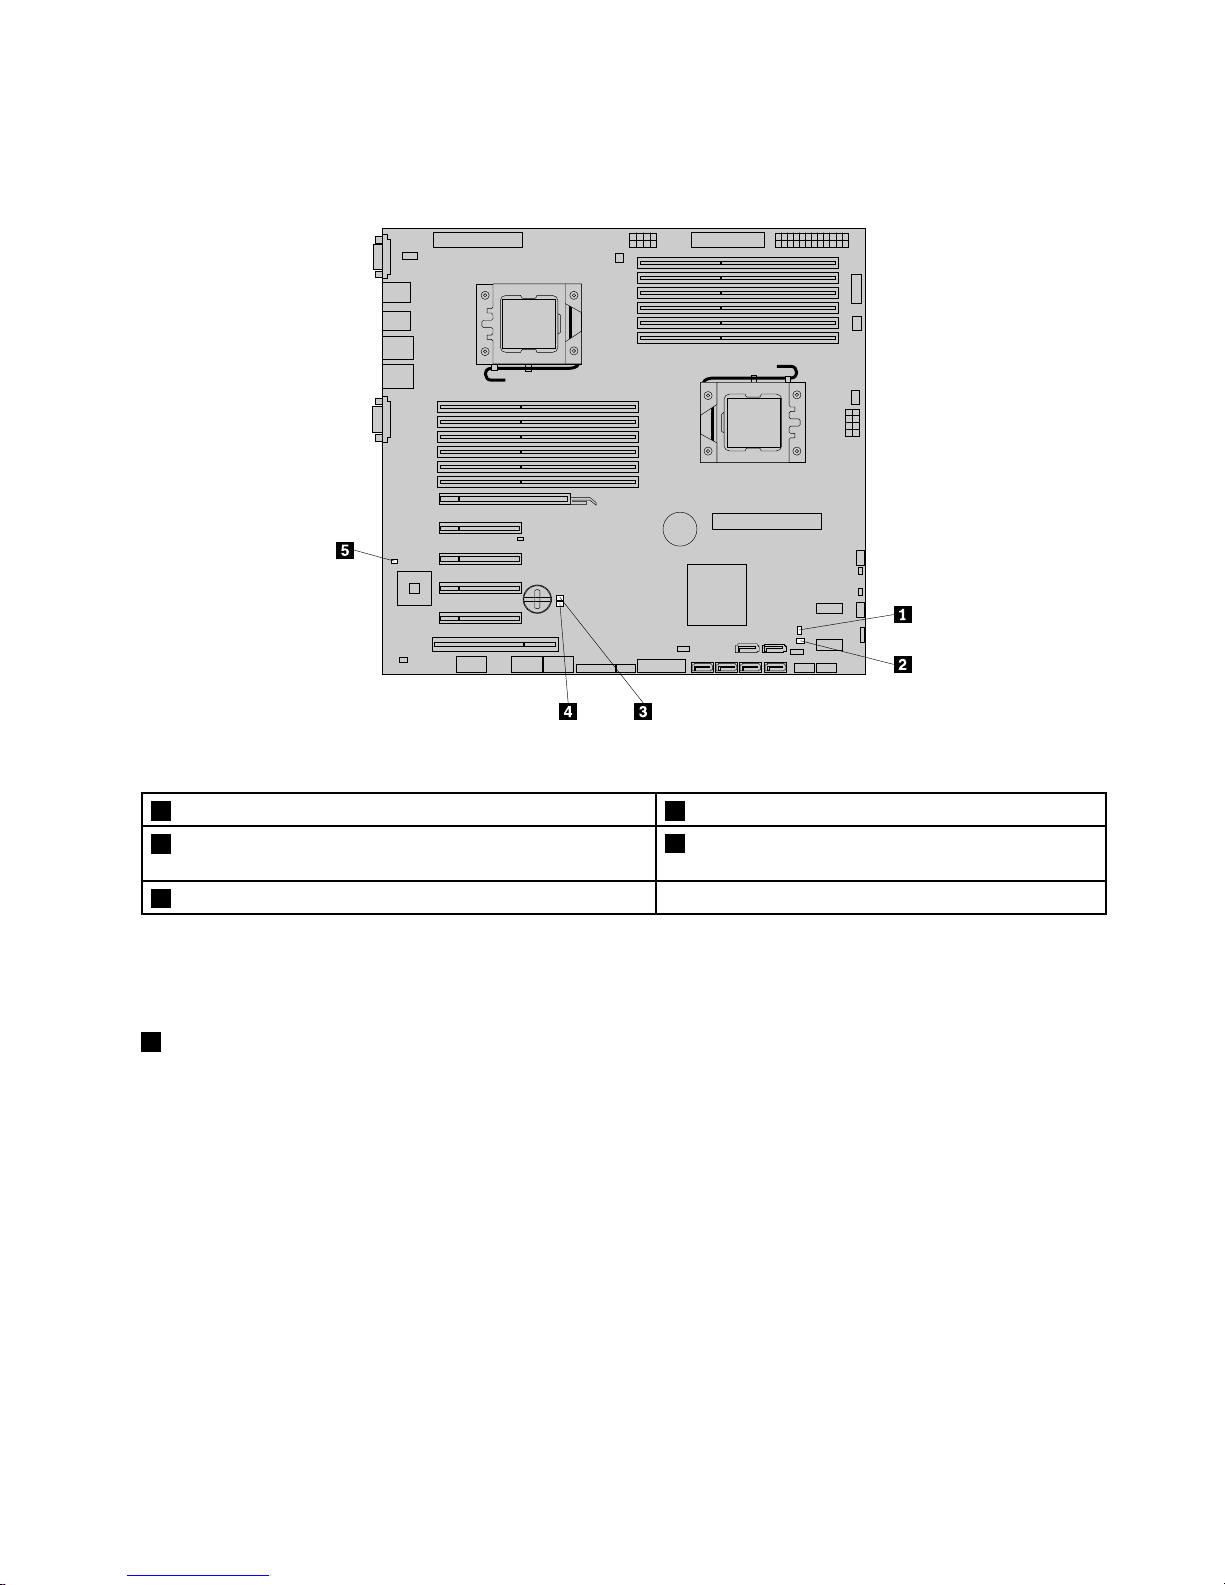
ThefollowingillustrationshowsthestatusofthejumpersandTMMonthesystemboardofyourserver.You
cancongure,recover,enable,ordisablesomespecicfeaturesofthesystemboardbysettingthejumpers.
Figure28.SystemboardjumpersandtheTMMstatusLED
1BIOSwriteprotectjumper4BIOSrecoveryjumper
2ClearCMOS(ComplementaryMetalOxideSemiconductor)
jumper
5TMMstatusLED
3ManagementEngine(ME)recoveryjumper
Attention:Tosetthejumpers,youneedtoremovetheservercovertoaccessthesystemboard.Donot
openyourserverorattemptanyrepairbeforereadingandunderstanding“Safetyinformation”onpageiii
and“Guidelines”onpage75.
1BIOSwriteprotectjumper
ToenabletheBIOSwriteprotectfunction,dothefollowing:
1.Removeallmediafromthedrivesandturnoffallattacheddevicesandtheserver.Then,disconnectall
powercordsfromelectricaloutletsanddisconnectallcablesthatareconnectedtotheserver.
2.Removetheservercover.See“Removingtheservercover”onpage77.
3.Laytheserveronitssideforeasieroperation.
4.LocatetheBIOSwriteprotectjumperonthesystemboard,andthenmovethejumperfromthedefault
normalposition(pin1andpin2)totheshort-circuitedposition(pin2andpin3).TheBIOSwrite
protectfunctionisenabled.
5.Reinstalltheservercoverandconnectthepowercords.See“Completingthepartsreplacement”on
page178.
Chapter3.Productoverview47
Page 62
2ClearCMOS(ComplementaryMetalOxideSemiconductor)jumper
UsethisjumpertoclearCMOSandrecoveryourservertothefactorydefaultsettings.
Note:AfterclearingCMOS,allyourBIOSpasswordsareerasedandtheBIOSrecoverstothefactory
defaultsettings.
ToclearCMOS,dothefollowing:
1.Removeallmediafromthedrivesandturnoffallattacheddevicesandtheserver.Then,disconnectall
powercordsfromelectricaloutletsanddisconnectallcablesthatareconnectedtotheserver.
2.Removetheservercover.See“Removingtheservercover”onpage77.
3.Laytheserveronitssideforeasieroperation.
4.LocatetheClearCMOSjumperonthesystemboard,andthenmovethejumperfromthedefaultnormal
position(pin1andpin2)totheshort-circuitedposition(pin2andpin3).
5.Waitmorethanveseconds,andthenmovetheClearCMOSjumperbacktothenormalposition
(pin1andpin2).
6.Reinstalltheservercoverandconnectthepowercords.See“Completingthepartsreplacement”on
page178.
7.Waitabout30seconds.Then,turnontheserver.TheBIOSpasswordsareerasedandtheBIOS
recoverstothefactorydefaultsettings.
2ManagementEngine(ME)recoveryjumper
UsethisjumpertorecovertheME.
TorecovertheME,dothefollowing:
1.Removeallmediafromthedrivesandturnoffallattacheddevicesandtheserver.Then,disconnectall
powercordsfromelectricaloutletsanddisconnectallcablesthatareconnectedtotheserver.
2.Removetheservercover.See“Removingtheservercover”onpage77.
3.Laytheserveronitssideforeasieroperation.
4.LocatetheMErecoveryjumperonthesystemboard,andthenmovethejumperfromthedefaultnormal
position(pin1andpin2)totheshort-circuitedposition(pin2andpin3).
5.Reinstalltheservercoverandconnectthepowercords.See“Completingthepartsreplacement”on
page178.
6.Connecttheservertoanacpowersource.Then,turnontheservertorecovertheME.
7.Turnofftheserverwhentherecoverycompletes,andthenrepeatstep1throughstep3.
8.LocatetheMErecoveryjumperonthesystemboard,andthenmovetheMErecoveryjumperbackto
thenormalposition(pin1andpin2).
9.Repeatstep5.
10.Waitabout30seconds.Then,turnontheserver.TheMEhasbeenrecovered.
4BIOSrecoveryjumper
SetthejumperandboottheserverfromaBIOSrecoveryimagetorecoveryourBIOSsettings.
TorecovertheBIOS,see“RecoveringfromaBIOSupdatefailure”onpage60
.
48ThinkServerTD330HardwareMaintenanceManual
Page 63
5TMMstatusLED
ThisLEDindicatesthestatusoftheonboardTMM.
TMMstatusLED
Color
Description
OnGreen
TheTMMisnotready.
Off
None
TheTMMhasnopowerorhasfailed.
Blinking
Green
TheTMMisworking.
Chapter3.Productoverview49
Page 64

50ThinkServerTD330HardwareMaintenanceManual
Page 65

Chapter4.Turningonandturningofftheserver
Thischapterprovidesinformationaboutturningonandturningofftheserver.
Turningontheserver
Theservercanbeturnedoninoneofthefollowingways:
•Afteryounishunpackingandsettinguptheserver,connectittoanacpowersource.Pressthepower
switchonthefrontpaneltoturnontheserver.See“Frontpanel”onpage16.Theserverneedsabout
30secondsfortheTMMtoinitializewheneveryouconnecttheservertoanacpowersource.Ifyou
pressthepowerswitchonthefrontpanelduringthisperiod,theserverwillnotstartimmediately;itwill
startaftertheTMMinitializationnishes.
•WhentheWakeonLANfeatureisenabledontheserverthatisconnectedtoanacpowersourceanda
LAN,anetworkadministratorcanremotelyturnonorwakeuptheserverfromamanagementconsole
usingremotenetworkmanagementsoftware.
•YoualsocanusetherelatedTMMfeaturetoremotelyturnontheserverthroughthemanagementLAN.
FormoreinformationabouttheTMM,refertotheThinkServerManagementModuleUserGuide,whichis
availablefordownloadat:
http://www.lenovo.com/ThinkServerUserGuides
Turningofftheserver
CAUTION:
Thepowercontrolbuttononthedeviceandthepowerswitchonthepowersupplydonotturnoff
theelectricalcurrentsuppliedtothedevice.Thedevicealsomighthavemorethanonepower
cord.Toremoveallelectricalcurrentfromthedevice,ensurethatallpowercordsaredisconnected
fromthepowersource.
Theservercanbeturnedoffinoneofthefollowingways:
•Turnofftheserverfromtheoperatingsystemifyouroperatingsystemsupportsthisfeature.Afteran
orderlyshutdownoftheoperatingsystem,theserverwillturnoffautomatically.Forinstructionsonhow
toshutdownyourspecicoperatingsystem,refertotherelateddocumentationorhelpsystemfor
theoperatingsystem.
•Pressthepowerswitchonthefrontpaneltostartanorderlyshutdownoftheoperatingsystemandturn
offtheserver,ifyouroperatingsystemsupportsthisfeature.
•Ifyourserverstopsrespondingandyoucannotturnitoff,pressandholdthepowerswitchonthe
frontpanelforfoursecondsormore.Ifyoustillcannotturnofftheserver,disconnectallpowercords
fromtheserver.
•IftheserverisconnectedtoaLAN,anetworkadministratorcanremotelyturnofftheserverfroma
managementconsoleusingremotenetworkmanagementsoftware.
•YoualsocanusetherelatedTMMfeaturetoremotelyturnofftheserverthroughthemanagementLAN.
FormoreinformationabouttheTMM,refertotheThinkServerManagementModuleUserGuide,whichis
availablefordownloadat:
http://www.lenovo.com/ThinkServerUserGuides
©CopyrightLenovo2012,2013
51
Page 66

•Theservermightbeturnedoffasanautomaticresponsetoacriticalsystemfailure.
Notes:
1.Whenyouturnofftheserverandleaveitconnectedtoanacpowersource,theserveralsocanrespond
toaremoterequesttoturnontheserver.Toremoveallpowerfromtheserver,youmustdisconnect
theserverfromtheacpowersource.
2.Forinformationaboutyourspecicoperatingsystem,refertotherelateddocumentationorhelpsystem
fortheoperatingsystem.
52ThinkServerTD330HardwareMaintenanceManual
Page 67

Chapter5.Conguringtheserver
Thischapterprovidesthefollowinginformationtohelpyouconguretheserver:
•“UsingtheSetupUtilityprogram”onpage53
•“UsingtheThinkServerEasyStartupprogram”onpage61
•“ConguringRAID”onpage64
•“ConguringtheEthernetcontrollers”onpage72
•“Updatingthermware”onpage72
•“UsingtheLenovoThinkServerEasyManageprogram”onpage72
UsingtheSetupUtilityprogram
ThistopicprovidesinformationaboutusingtheSetupUtilityprogram.
TheSetupUtilityprogramispartoftheserverrmware.YoucanusetheSetupUtilityprogramtoviewand
changethecongurationsettingsofyourserver,regardlessofwhichoperatingsystemyouareusing.
However,theoperatingsystemsettingsmightoverrideanysimilarsettingsintheSetupUtilityprogram.
StartingtheSetupUtilityprogram
ThistopicprovidesinstructionsonhowtostarttheSetupUtilityprogram.
TostarttheSetupUtilityprogram,dothefollowing:
1.Connecttheservertoanacpowersourceandpressthepowerswitchonthefrontpaneltoturnonthe
server.See“Turningontheserver”onpage51.
2.PresstheF1keyassoonasyouseethelogoscreen.Then,waitforseveralseconds,andtheSetup
Utilityprogramopens.Ifyouhavesetapassword,youneedtotypethecorrectpasswordtoenterthe
SetupUtilityprogram.Forpasswordinformation,see“Usingpasswords”onpage57.
ViewinginformationintheSetupUtilityprogram
TheSetupUtilityprogrammenulistsvariousitemsaboutthesystemconguration.Selectadesireditem
toviewinformationorchangesettings.
WhenworkingwiththeSetupUtilityprogram,youmustusethekeyboard.Thekeysusedtoperformvarious
tasksaredisplayedontherightbottompaneofeachscreen.YoualsocanpresstheF1keyforgeneralhelp
aboutthekeys.Formostitems,thecorrespondinghelpmessageisdisplayedontherighttoppaneofthe
screenwhentheitemisselected.Iftheitemhassubmenus,youcandisplaythesubmenusbypressingEnter.
YoucanviewthefollowinginformationaboutyourspecicservermodelintheSetupUtilityprogram:
•TheMainmenulistsinformationabouttheBIOSandBMC,totalmemorysize,andsystemdateandtime.
•OntheAdvancedmenu:
–SelectProcessorCongurationandfollowtheinstructionsonthescreentoviewinformationabout
theinstalledmicroprocessoranditssupportedtechnologies.
–SelectMemoryCongurationandfollowtheinstructionsonthescreentoviewinformationaboutthe
installedmemorymodules.
©CopyrightLenovo2012,2013
53
Page 68

–SelectSAT A/SASCongurationandfollowtheinstructionsonthescreentoviewinformationabout
theinstalledSATAorSASdevices,suchasaharddiskdriveoranopticaldrive.
•OntheServerManagementmenu,selectSystemInformationtoviewinformationaboutyoursystem.
SetupUtilityprograminterface
ThistopicprovidesgeneralinformationaboutthemenusanditemsintheSetupUtilityprogram.
DependingontheBIOSversionofyourserver,somemenuoriteminformationmightdifferslightlyfrom
theinformationinthistopic.
Notes:
•Thedefaultsettingsalreadyareoptimizedforyou.Usethedefaultvalueforanyitemyouarenotfamiliar
with.Donotchangethevalueofunfamiliaritemstoavoidunexpectedproblems.Ifyouconsider
changingtheserverconguration,proceedwithextremecaution.Settingthecongurationincorrectly
mightcauseunexpectedresults.IfyoucannotturnontheserverbecauseofincorrectBIOSsettings,
usetheClearCMOSjumpertorestoretheBIOSsettingstothefactorydefaultsettings.See“System
boardjumpersandTMMstatusLED”onpage46
.
•Ifyouhavechangedanyhardwareintheserver,youmightneedtoreashtheBIOS,theBMCrmware,
andtheFRU/SensorDataRecords(SDR).
TheSetupUtilityprogrammaininterfaceconsistsofthefollowingmenus:
•“Mainmenu”onpage54
•“Advancedmenu”onpage54
•“Securitymenu”onpage55
•“ServerManagementmenu”onpage55
•“BootOptionsmenu”onpage56
•“BootManagermenu”onpage56
•“Save&Exitmenu”onpage56
LenovoprovidestheBIOSupdateutilityontheLenovoSupportWebsite.YoucandownloadtheBIOS
updateutilitytoupdatetheBIOSifthenewerBIOSversionspecicallysolvesaproblemyouhave.See
“UpdatingorrecoveringtheBIOS”onpage59.
IfthepowertoyourserverisinterruptedwhiletheBIOSisbeingupdatedandyourservercannotstart
correctly,usetheBIOSrecoveryjumpertorecoverfromaBIOSupdatefailure.See“Systemboardjumpers
andTMMstatusLED”onpage46.
Mainmenu
AfterenteringtheSetupUtilityprogram,youcanseetheMainmenu,whichlistsbasicinformationaboutthe
BIOS,totalmemorysize,andsystemdateandtime.
TosetthesystemdateandtimeontheMainmenu,see“Settingthesystemdateandtime”onpage56
.
Advancedmenu
YoucanvieworchangevariousservercomponentsettingsontheAdvancedmenuintheSetupUtility
program.TheAdvancedmenucontainsvariouscongurationsubmenusanditems.Oneachsubmenu,
pressEntertoshowselectableoptionsandselectadesiredoptionbyusingtheupanddownarrow
keysortypedesiredvaluesfromthekeyboard.Someitemsaredisplayedonthemenuonlyiftheserver
supportsthecorrespondingfeatures.
54ThinkServerTD330HardwareMaintenanceManual
Page 69

Notes:
•Enabledmeansthatthefunctioniscongured.
•Disabledmeansthatthefunctionisnotcongured.
TheAdvancedmenucontainsthefollowingsubmenus.Formoreinformation,enterthecorresponding
submenuandrefertotheinstructionsonthescreen.
•ChipsetConguration:Viewandsetchipsetcongurationparameters.
•ProcessorConguration:Viewinformationabouttheinstalledmicroprocessorsandsetmicroprocessor
congurationparameters.
•MemoryConguration:Viewinformationabouttheinstalledmemorymodulesandsetmemory
congurationparameters.
•ACPIConguration:ViewandsetACPIcongurationparameters.
•SATA/SASConguration:ViewinformationabouttheinstalledSATAorSASdevicesandsetSATAor
SAScongurationparameters.
•PCI/PCIEConguration:ViewandsetPCIorPCIExpresscongurationparameters.
•USBConguration:ViewandsetUSBcongurationparameters,suchasenablingordisablingUSB
devices.
•SuperIOConguration:Viewandsetserialportcongurationparameters.
•SerialPortConsoleRedirection:Viewandsetcongurationparametersforserialportconsole
redirection.
Securitymenu
YoucansetpasswordsandconguretheTPMfunctionontheSecuritymenuintheSetupUtilityprogram.
Foreachmenuitem,pressEntertoshowselectableoptionsandselectadesiredoptionbyusingtheupand
downarrowkeysortypedesiredvaluesfromthekeyboard.Someitemsaredisplayedonthemenuonlyif
theserversupportsthecorrespondingfeatures.
Notes:
•Enabledmeansthatthefunctioniscongured.
•Disabledmeansthatthefunctionisnotcongured.
TheSecuritymenucontainsthefollowingitems:
•AdministratorPassword:Setanadministratorpasswordtoprotectagainstunauthorizedaccessto
yourserver.See“Usingpasswords”onpage57
.
•UserPassword:Setauserpasswordtoprotectagainstunauthorizedaccesstoyourserver.See“Using
passwords”onpage57
.
•TPM/TCM:ConguretheTPMfunctionifyourserverhasaTPMinstalledintheTPMconnectoronthe
systemboard.See“ConguringtheTPMfunction”onpage58.
ServerManagementmenu
YoucanviewsysteminformationandvieworchangeeventlogandBMCsettingsontheServer
ManagementmenuintheSetupUtilityprogram.Oneachsubmenu,pressEntertoviewtheinformationor
showselectableoptionsandselectadesiredoptionbyusingtheupanddownarrowkeys.Someitemsare
displayedonthemenuonlyiftheserversupportsthecorrespondingfeatures.
TheServerManagementmenucontainsthefollowingsubmenus.Formoreinformation,enterthe
correspondingsubmenuandrefertotheinstructionsonthescreen.
•IPMIFirmwareRevision:ViewtheBMCversion.
Chapter5.Conguringtheserver55
Page 70

•IPMIStatus:ViewtheBMCstatus.
•EraseSEL:Erasesystemeventlog(SEL).
•SystemInformation:Viewbasicinformationaboutyourserver.
•BMCNetworkConguration:SetBMCcongurationparameters.
BootOptionsmenu
TheBootOptionsmenuintheSetupUtilityprogramprovidesaninterfacetohelpyouvieworchangethe
serverstartupoptions,includingthestartupsequenceandbootpriorityforvariousdevices.Changesinthe
startupoptionstakeeffectwhentheserverstarts.
Thestartupsequencespeciestheorderinwhichtheserverchecksdevicestondabootrecord.Theserver
startsfromtherstbootrecordthatitnds.Forexample,youcandeneastartupsequencethatchecksa
discintheopticaldrive,thencheckstheharddiskdrive,andthenchecksanetworkdevice.Forinformation
aboutsettingthestartupsequenceorselectingastartupdevice,see“Selectingastartupdevice”onpage58
.
BootManagermenu
TheBootManagermenuintheSetupUtilityprogramlistsallthebootabledevicesinstalledinyourserver
andthelisteditemsvarydependingonyourserverconguration.Ifyouselectadesireddevicelistedonthis
menu,theserverwillstartfromthedeviceyouselect.
YoucanpressF12whenturningontheserverandselectatemporarystartupdevicefromthebootdevice
selectionwindow.See“Selectingastartupdevice”onpage58
.
Save&Exitmenu
AfteryounishviewingorchangingsettingsintheSetupUtilityprogram,youcanchooseadesired
actionfromtheSave&Exitmenutosavechanges,discardchanges,orloaddefaultvalues,andexitthe
program.PressEntertoselecttheitemontheSave&Exitmenu,andthenselectYeswhenpromptedto
conrmtheaction.ForinformationaboutexitingtheSetupUtilityprogram,see“ExitingtheSetupUtility
program”onpage59
.
TheSave&Exitmenucontainsthefollowingitems:
•SaveChangesandExit:SavechangesandexittheSetupUtilityprogram.
•SaveChangesandReset:SavechangesandthencontinuewithfurthercongurationintheSetup
Utilityprogram.
•DiscardChangesandExit:Discardchanges,loadpreviousvalues,andthenexittheSetupUtility
program.
•DiscardChanges:Discardchangesandloadpreviousvalues.
•RestoreDefaults:Returntotheoptimizeddefaultsettings.
•SaveasUserDefaults:Savethecurrentsettingsasuserdefaultvalues.
•RestoreUserDefaults:Restoretheuserdefaultvaluesforalltheitems.
Settingthesystemdateandtime
ThistopicprovidesinstructionsonhowtosetthesystemdateandtimeintheSetupUtilityprogram.
TosetthesystemdateandtimeintheSetupUtilityprogram,dothefollowing:
1.StarttheSetupUtilityprogram.See“StartingtheSetupUtilityprogram”onpage53.
2.OntheMainmenu,selectSystemDateorSystemTime.
56ThinkServerTD330HardwareMaintenanceManual
Page 71

3.UsetheTabkeytoswitchbetweendataelementsandtypethenumbersfromthekeyboardtosetthe
systemdateandtime.
4.PressF10tosavesettingsandexittheSetupUtilityprogram.
Usingpasswords
ByusingtheSetupUtilityprogram,youcansetapasswordtopreventunauthorizedaccesstoyourserver.
Youdonothavetosetapasswordtouseyourserver.However,usingapasswordimprovescomputing
security.Ifyoudecidetosetapassword,readthefollowingtopics.
SetupUtilityprogrampasswordtypes
ThefollowingtypesofpasswordsareavailableintheSetupUtilityprogram:
•Administratorpassword
Settinganadministratorpassworddetersunauthorizedusersfromchangingcongurationsettings.Ifyou
areresponsibleformaintainingthecongurationsettingsofseveralcomputers,youmightwanttoset
anadministratorpassword.Whenanadministratorpasswordisset,youarepromptedtotypeavalid
passwordeachtimeyoutrytoaccesstheSetupUtilityprogram.TheSetupUtilityprogramcannot
beaccesseduntilavalidpasswordistypedin.
•Userpassword
Whenauserpasswordisset,theservercannotbeuseduntilavalidpasswordistypedin.
Note:Ifboththeadministratorpasswordanduserpasswordareset,youcantypeeitherpasswordtouse
theserver.However,youmustuseyouradministratorpasswordtochangeanycongurationsettings.
Passwordconsiderations
Forsecurityreasons,itisrecommendedtouseastrongpasswordthatcannotbeeasilycompromised.
Notes:
•TheSetupUtilityprogrampasswordsarenotcasesensitive.
•TheserversupportsSetupUtilityprogrampasswordsthatconsistofthreeto20characters.
Tosetastrongpassword,usethefollowingguidelines:
•Haveatleasteightcharactersinlength
•Containatleastonealphabeticcharacterandonenumericcharacter
•Notbeyournameoryourusername
•Notbeacommonwordoracommonname
•Besignicantlydifferentfromyourpreviouspasswords
Besidesthealphabeticcharacters(a-z)andnumericcharacters(0-9),theserveralsosupportscharacters
typedusingspecialkeysonthekeyboardforapassword.Refertothehelpmessageonthescreenwhen
settingapasswordtodeterminethevalidspecialcharacters.
Setting,changing,ordeletingapassword
Thistopicprovidesinstructionsonhowtoset,change,ordeleteapasswordintheSetupUtilityprogram.
Toset,change,ordeleteapasswordintheSetupUtilityprogram,dothefollowing:
1.StarttheSetupUtilityprogram.See“StartingtheSetupUtilityprogram”onpage53.
Chapter5.Conguringtheserver57
Page 72

2.OntheSecuritymenu,selectAdministratorPasswordtosetanadministratorpasswordorselect
UserPasswordtosetauserpassword.
3.See“Passwordconsiderations”onpage57.Then,followtheinstructionsonthescreentosetor
changeapassword.
4.Ifyouwanttodeleteapassword,typeyourcurrentpassword.PressEnterwhenyouareprompted
totypeanewpassword.Then,pressEntertoconrmthenewpassword.Thepreviouspassword
willbecleared.
Note:Forsecurityreasons,itisrecommendedthatyoualwayssetapasswordforyourserver.
5.PressF10tosavesettingsandexittheSetupUtilityprogram.
Ifyouhaveforgottenthepassword,youcanusetheClearCMOSjumperonthesystemboardtoerasethe
password.See“SystemboardjumpersandTMMstatusLED”onpage46.Then,setanewpasswordfor
theserver.
Selectingastartupdevice
Ifyourserverdoesnotstartupfromadesireddevicesuchasthediscorharddiskdriveasexpected,doone
ofthefollowingtoselectthestartupdeviceyouwant.
Note:Notalldiscs,harddiskdrives,orotherremovabledevicesarebootable.
•Toselectatemporarystartupdevice,dothefollowing:
Note:Selectingastartupdeviceusingthefollowingmethoddoesnotpermanentlychangethestartup
sequence.
1.Turnonorrestartyourserver.
2.Whenyouseethelogoscreen,pressF10ifyourserverisconnectedtoanetworkandyouwantto
startuptheserverfromthenetwork.Otherwise,pressF12todisplaythebootmenu.Theboot
deviceselectionwindowopens.
3.Inthebootdeviceselectionwindow,usetheupanddownarrowkeysonthekeyboardtoswitch
betweentheselections.PressEntertoselectthedeviceofyourchoice.Then,theserverwillstart
upfromtheselecteddevice.
•Tovieworpermanentlychangetheconguredstartupdevicesequence,dothefollowing:
1.StarttheSetupUtilityprogram.See“StartingtheSetupUtilityprogram”onpage53.
2.OntheBootOptionsmenu,followtheinstructionsonthescreentosetthestartupdeviceforBoot
Option#1toBootOption#5dependingonyourneeds.Youalsocansetthebootpriorityforvarious
devices.See“BootOptionsmenu”onpage56
.
3.PressF10tosavesettingsandexittheSetupUtilityprogram.Theserverwillfollowthestartupdevice
sequenceyouhaveseteachtimeyouturnontheserver.
ConguringtheTPMfunction
TheTPMworksasahardwaresecuritysolutiontohelpyoutoencryptdataandprotecttheserver.TheTPM
functionisonlyavailablewhenthereisaTPMinstalledinyourserver.See“InstallingtheThinkServerTrusted
PlatformModule”onpage113
.YoucanpurchaseaTPMfromLenovo.
AfterinstallingaTPM,youneedtocheckiftheTPMfunctionisenabledintheSetupUtilityprogram.
ToenabletheTPMfunctionintheSetupUtilityprogram,dothefollowing:
1.StarttheSetupUtilityprogram.See“StartingtheSetupUtilityprogram”onpage53.
2.OntheSecuritymenu,selectTPM/TCM➙TPMSupport.EnsurethatTPMSupportissettoEnabled.
58ThinkServerTD330HardwareMaintenanceManual
Page 73

3.WhenTPMSupportissettoEnabled,theTPMStateitemisdisplayed.SetTPMStatetoEnabled.
4.PressF10tosavesettingsandexittheSetupUtilityprogram.Theserverwillrestarttoenablethe
TPMfunction.
ExitingtheSetupUtilityprogram
Afteryounishviewingorchangingsettings,pressEsctoreturntotheSetupUtilityprogrammaininterface.
Ifyouareonanestedsubmenu,pressEscrepeatedlyuntilyoureachthemaininterface.Then,youcando
oneofthefollowingtoexittheSetupUtilityprogram:
•IfyouwanttosavethenewsettingsandexittheSetupUtilityprogram,pressF10orselectSave&Exit➙
SaveChangesandExit.Otherwise,yourchangeswillnotbesaved.
•Ifyoudonotwanttosavethenewsettings,selectSave&Exit➙DiscardChangesandExit.
•Ifyouwanttoreturntothedefaultsettings,pressF9orselectSave&Exit➙RestoreDefaults.
FormoreinformationabouttheSave&ExitmenuintheSetupUtilityprogram,see“Save&Exitmenu”
onpage56.
UpdatingorrecoveringtheBIOS
ThistopicprovidesinstructionsonhowtoupdatetheBIOSandhowtorecoverfromaPOSTandBIOS
updatefailure.
Systemprogramsarethebasiclayerofsoftwarebuiltintoyourserver.SystemprogramsincludethePOST,
theUEFIBIOS,theSetupUtilityprogram,andtheTMMrmware.ThePOSTisasetoftestsandprocedures
thatareperformedeachtimeyouturnonyourserver.TheUEFIBIOSisalayerofsoftwarethattranslates
instructionsfromotherlayersofsoftwareintoelectricalsignalsthattheserverhardwarecanexecute.You
canusetheSetupUtilityprogramtovieworchangethecongurationsettingsofyourserver.See“Usingthe
SetupUtilityprogram”onpage53
.TheTMMrmwareprovidesremotemanagementfeatures.
LenovomightmakechangesandenhancementstotheBIOSandTMMrmware.Whenupdatesarereleased,
theyareavailablefordownloadontheLenovoWebsiteathttp://www.lenovo.com/drivers.Youcanupdate
theserverrmwarebydownloadinganupdatepackageandfollowingtheinstructionsontheWebpage.
YoualsocanusetheFirmwareUpdaterprogramtohelpyoukeeptheserverrmwareup-to-date.See
“Updatingthermware”onpage72.
Updating(ashing)theBIOS
Thistopicprovidesinstructionsonhowtoupdate(ash)theBIOS.
Notes:
•UpdatetheBIOSonyourserveronlyifthenewerBIOSversionspecicallysolvesaproblemyouhave.
WedonotrecommendBIOSupdatesforserversthatdonotneedthem.Youcanviewtheupdated
informationforthenewBIOSversionintheinstallationinstructionsfortheBIOSupdatepackage.
•DowngradingtheBIOStoanearlierversionisnotrecommendedandmightnotbesupported.Anearlier
BIOSversionmightnotsupportthelatestsystemcongurations.
•IfthepowertoyourserverisinterruptedwhilethePOSTandBIOSarebeingupdated,yourservermight
notrestartcorrectly.EnsurethatyouperformtheBIOSupdateprocedureinanenvironmentwitha
steadypowersupply.Besides,ensurethatyourservercanrestartsuccessfullywithoutencountering
hardwareproblems.
•IfyouhaveupdatedtheBIOSrmware,alltheBIOSsettingsbecomethedefaultsettingsoftheupdated
BIOSversion.Y ouneedtocheckandreconguretheBIOSsettingsforyourspecicneeds.Youcan
selectSaveasUserDefaultsontheSave&ExitmenuintheSetupUtilityprogramtosaveyourcurrent
Chapter5.Conguringtheserver59
Page 74

BIOSsettingsasuserdefaultvaluesbeforeupdatingtheBIOS.Then,youcanselectRestoreUser
DefaultsontheSave&ExitmenuintheSetupUtilityprogramtorestoretheuserdefaultvaluesafter
updatingtheBIOS.Inthiscase,youcankeepyourpreviousBIOSsettingsanddonotneedtorecongure
thesettingsafterupdatingtheBIOS.YoualsocanrecordyourspecicBIOSsettingsbeforeupdatingthe
BIOSforaneasierrecongurationinthenewBIOSversion.
Toupdate(ash)theBIOS,dothefollowing:
1.Gotohttp://www.lenovo.com/driversandfollowtheinstructionsontheWebpagetolocatetheBIOS
updatepackage.
2.DownloadtheBIOSupdatepackageandtheTXTlethatcontainsinstallationinstructions.
3.PrinttheTXTleandfollowtheinstructionstoupdate(ash)theBIOS.
4.CheckandreconguretheBIOSsettingsforyourspecicneedsbasedonyournoteorreferto“Using
theSetupUtilityprogram”onpage53
aftertheBIOSupdateprocessiscompleted.
RecoveringfromaBIOSupdatefailure
IfthepowertoyourserverisinterruptedwhiletheBIOSisbeingupdated,yourservermightnotrestart
correctly.Ifthishappens,performthefollowingproceduretorecoverfromtheBIOSupdatefailure.
Note:IftheoperatingsystemofyourserverisinstalledunderEFImode,youneedtoreinstalltheoperating
systemafterrecoveringtheBIOS.
TorecoverfromaBIOSupdatefailure,dothefollowing:
1.Gotohttp://www.lenovo.com/driversandfollowtheinstructionsontheWebpagetodownloadaBIOS
updatepackage.Then,puttheamiboot.romlecontainedinthepackageintotherootdirectoryof
abootableUSBkey.
2.Removeallmediafromthedrivesandturnoffallattacheddevicesandtheserver.Then,disconnectall
powercordsfromelectricaloutletsanddisconnectallcablesthatareconnectedtotheserver.
3.Removetheservercover.See“Removingtheservercover”onpage77.
4.LocatetheBIOSrecoveryjumperonthesystemboard.See“SystemboardjumpersandTMMstatus
LED”onpage46.Then,removeanypartsanddisconnectanycablesthatmightimpedeyouraccessto
thejumper.
5.MovetheBIOSrecoveryjumperfromthedefaultnormalposition(pin1andpin2)totheshort-circuited
position(pin2andpin3).
6.Reinstallanypartsandreconnectanycables.Then,reinstalltheservercover.See“Completingthe
partsreplacement”onpage178
.
7.Connecttheservertoanacpowersource,andthenstarttheserverfromthebootableUSBkeythat
containstheamiboot.romle.Therecoveryprocessstarts.Aftertherecoveryprocessiscompleted,
yourserverwillautomaticallyturnoff.
8.Repeatstep2throughstep4.
9.MovetheBIOSrecoveryjumperbacktothenormalposition(pin1andpin2).
10.Repeatstep6.
11.Connecttheservertoanacpowersourceandturnontheserver.TheBIOSsettingsrecovertothe
factorydefaultsettings.YouneedtocheckandconguretheBIOSsettingsforyourspecicneeds.See
“UsingtheSetupUtilityprogram”onpage53.
Note:IfyoucannotrecovertheBIOSafterusingtheinstructionsinthistopic,theBIOSread-onlymemory
(ROM)mightbedamagedandyouneedtoreplacethesystemboard.ContacttheLenovoCustomer
SupportCenter.
60ThinkServerTD330HardwareMaintenanceManual
Page 75

UsingtheThinkServerEasyStartupprogram
ThistopicprovidesinstructionsonhowtousetheThinkServerEasyStartupprogramtosetupandcongure
yourserver.
TheThinkServerEasyStartupprogramsimpliestheprocessofconguringRAIDandinstallingsupported
WindowsandLinuxoperatingsystemsanddevicedriversonyourserver.Theprogramworksinconjunction
withyourWindowsorLinuxoperatingsysteminstallationdisctoautomatetheprocessofinstallingthe
operatingsystemandassociateddevicedrivers.Thisprogramisprovidedwithyourserveronaself-starting
(bootable)ThinkServerEasyStartupDVD.TheuserguidefortheprogramalsoisontheDVDandcanbe
accesseddirectlyfromtheprograminterface.
IfyoudonothaveaThinkServerEasyStartupDVD,youalsocandownloadanISOimagefromtheLenovo
SupportWebsiteandmakeadiscbyyourself.
TodownloadtheThinkServerEasyStartupprogramimageandburnitintoadisc,dothefollowing:
1.Gotohttp://www.lenovo.com/driversandfollowtheinstructionsontheWebpagetolocatethe
ThinkServerEasyStartupprogram.
2.DownloadtheISOimagefortheThinkServerEasyStartupprogramandthereadmele.Thereadmele
containsimportantinformationabouttheThinkServerEasyStartupprogram.
3.Printthereadmeleandreaditcarefully.
4.UseanopticaldriveandanyDVDburningsoftwaretocreateabootablediscwiththeISOimage.
FeaturesoftheThinkServerEasyStartupprogram
ThistopicliststhefeaturesoftheThinkServerEasyStartupprogram.
TheThinkServerEasyStartupprogramhasthefollowingfeatures:
•Containedinaself-starting(bootable)DVD
•Easy-to-use,language-selectableinterface
•Integratedhelpsystemanduserguide
•Automatichardwaredetection
•ContainstheRAIDcongurationutility
•Providesdevicedriversbasedontheservermodelanddetecteddevices
•DownloadsdevicedriversfromtheThinkServerEasyStartupDVDaccordingtotheoperatingsystem
•Selectablepartitionsizeandlesystemtype
•Supportformultipleoperatingsystems
•Abilitytoinstalltheoperatingsystemanddevicedriversinanunattendedmodetosavetime
•AbilitytocreateareuseableresponselethatcanbeusedwithsimilarlyconguredLenovoserversto
makefutureinstallationsevenfaster
StartingtheThinkServerEasyStartupprogram
ThistopicprovidesinstructionsonhowtostarttheThinkServerEasyStartupprogram.Afteryoustartthe
programandenterthemaininterface,clickUserGuidefordetailedinformationabouthowtousethis
programtohelpyouconguretheserverandinstallanoperatingsystem.
TostarttheThinkServerEasyStartupprogram,dothefollowing:
Chapter5.Conguringtheserver61
Page 76

1.InserttheThinkServerEasyStartupDVDintoanopticaldrive,settheopticaldriveastherststartup
device,andstartyourserverfromtheDVDintheopticaldrive.See“Selectingastartupdevice”on
page58.
2.Waitfortheprogramtoload.Then,youwillbepromptedforthefollowingselections:
•Thelanguageinwhichyouwanttoviewtheprogram
•Thelanguageofthekeyboardlayoutyouwillbeusingwiththeprogram
Note:ThesupportedlanguagesandkeyboardlayoutsfortheThinkServerEasyStartupprogramare
Dutch,English,French,German,Italian,Japanese,Russian,Spanish,andTurkish.YourThinkServer
EasyStartupDVDmightbeEnglishonly.Inthiscase,thekeyboardlayoutshouldbeEnglish.
3.Afterselectingthelanguageandkeyboardlayout,clickOK.Then,youwillseeoneormoremessages
aboutconguringstoragedevices.ClickNextuntilyouarepresentedwiththeLenovoLicense
Agreement.ReadtheLenovoLicenseAgreementcarefully.Inordertocontinue,youmustacceptthe
termsbyclickingAgree.Then,theDateandtimewindowopens.
4.SetthecurrentdateandtimeandclickOK.TheStartoptionwindowopens.
5.TheStartoptionwindowprovidesthefollowingselections:
•Continuetothemaininterface.
•Installtheoperatingsystemusingapre-existingresponsele.
•CongureRAIDusingapre-existingresponsele.
Readtheexplanationsonthescreenandselectadesiredoption.Then,followtheinstructionsonthe
screen.IfthisisthersttimeyouareusingtheThinkServerEasyStartupprogram,selecttheoptionto
continuetothemaininterfaceandviewthecompatibilitynotesanduserguide.
Notes:
•FunctionalityandsupportedoperatingsystemsvarydependingontheversionoftheThinkServer
EasyStartupprogram.Fromthemaininterfaceoftheprogram,clickCompatibilitynotestoviewthe
informationabouttheRAIDcontrollers,operatingsystems,andservercongurationssupportedbythe
specicversionoftheprogram;andclickUserGuidetoviewthevariousfunctionsandlearnhowto
usetheprogram.
•BeforeusingtheThinkServerEasyStartupprogramtoinstallanoperatingsystem,ensurethatanyexternal
storagedevicesandberchannelsareconguredcorrectly.
TheThinkServerEasyStartupprogrammaininterfaceprovidesthefollowingmenusontheleftpaneof
thescreen:
•Home
Thismenuisthewelcomepagethatcontainssomegeneraldescriptionsabouttheprogramandthe
Lenovocopyrightandtrademarkstatements.
•Compatibilitynotes
ThismenuprovidesinformationabouttheRAIDcontrollers,operatingsystems,andservercongurations
supportedbytheversionoftheprogramyouareusing.
•UserGuide
Thismenuprovidesinformationaboutthefeaturesoftheprogramandinstructionsonhowtousethe
program.
•Hardwarelist
Thismenudisplaysalistofhardwaredevicesdetectedbytheprogram.
•CongureRAID
62ThinkServerTD330HardwareMaintenanceManual
Page 77

ThismenuprovidesinstructionsonhowtocongureRAIDorviewthecurrentRAIDcongurationand
makechangesifneeded.
•Installoperatingsystem
Thismenudisplaysaseriesofchoicesandpromptstocollectinformationrequiredforoperatingsystem
installation,preparestheharddiskdriveforinstallation,andtheninitiatestheinstallationprocessusing
youroperatingsysteminstallationdisc.
•Downloaddrivers
ThismenuhelpsyoudownloadtherequireddevicedriversfromtheThinkServerEasyStartupDVDtoa
removablestoragedevicesothatyoucaneasilygetthedriversforservercongurationwhenyouneed
them.
Note:Themostup-to-datedevicedriversforvariousservermodelsarealwaysavailablefordownloadon
theLenovoSupportWebsiteat:
http://www.lenovo.com/drivers
•About
Thismenuprovidestheversioninformationandlegalnotices.
UsingtheThinkServerEasyStartupprogramonaWindowsoperating
system
YoucanruntheThinkServerEasyStartupDVDonaWindowsoperatingsystemwiththeInternetExplorer
®
6.0
Webbrowseroralaterversioninstalled.EntertheoperatingsystemandinserttheThinkServerEasyStartup
DVDintoaninternalorexternalopticaldrive.TheDVDstartsautomaticallyinmostenvironments.IftheDVD
failstostart,openthelaunch.exelelocatedintherootdirectoryoftheDVD.
Notes:
•YoushouldreadandaccepttheLenovoLicenseAgreementwhenprompted.
•OntheMicrosoftWindowsServer
®
2003operatingsystem,youmightneedtoaddtheUniformResource
Locator(URL)fortheThinkServerEasyStartupprogramWebpagetothetrustedWebsitelistsothat
thepagecanopencorrectly.
YoucandothefollowingwhenusingtheThinkServerEasyStartupprogramonaWindowsoperatingsystem.
Fordetailedinformation,refertothehelpsystem.
•ViewageneralintroductiontoyourThinkServerservermodelandthespecicserverconguration
information.
•ViewgeneralguidanceonhowtousetheThinkServerEasyStartupDVD.
•Downloadtherequireddevicedriverstoaremovablestoragedevicesothatyoucaneasilygetthe
driversforservercongurationwhenyouneedthem,especiallywhenyounishinstallinganoperating
systemwithoutusingtheThinkServerEasyStartupDVDandneedappropriatedevicedriverstocongure
yourserver.
•InstalltherequireddevicedriversdirectlyontheserveronwhichyouarerunningtheThinkServer
EasyStartupDVD.
•ViewinformationaboutallservermodelssupportedbytheThinkServerEasyStartupprogramand
informationaboutthedevicedriversforeachservermodel,includingthedriverversionsanddriver
locationsintherootdirectoryoftheThinkServerEasyStartupDVD.
Note:Themostup-to-datedevicedriversforvariousservermodelsarealwaysavailablefordownloadon
theLenovoSupportWebsiteat:
http://www.lenovo.com/drivers
Chapter5.Conguringtheserver63
Page 78

ConguringRAID
ThistopicprovidesinformationaboutRAIDandtheutilityprogramsthatareavailableforyoutocongure
RAID.
Thistopiccontainsthefollowingitems:
•“AboutRAID”onpage64
•“ConguringRAIDusingtheThinkServerEasyStartupprogram”onpage65
•“ConguringtheThinkServerRAID100orRAID300”onpage66
•“ConguringtheadvancedSATA/SAShardwareRAID”onpage71
AboutRAID
RAID,anacronymforRedundantArrayofIndependentDisks,isatechnologythatprovidesincreased
storagefunctionsandreliabilitythroughredundancy.Thisisachievedbycombiningmultipleharddiskdrives
intoalogicalunit,wheredataisdistributedacrossthedrivesinoneofseveralwayscalledRAIDlevels.
WhenagroupofindependentphysicalharddiskdrivesaresetuptouseRAIDtechnology,theyareina
RAIDarray.Thisarraydistributesdataacrossmultipleharddiskdrives,butthearrayappearstothehost
serverasonesinglestorageunit.CreatingandusingRAIDarraysprovideshighperformance,suchasthe
expeditedI/Operformance,becauseseveraldrivescanbeaccessedsimultaneously.
RAIDdrivegroupsalsoimprovedatastoragereliabilityandfaulttolerancecomparedwithsingle-drive
storagesystems.Datalossresultingfromadrivefailurecanbepreventedbyreconstructingmissingdata
fromtheremainingdrives.
ThefollowinglistdescribessomeofthemostcommonlyusedRAIDlevels:
•RAID0:block-levelstripingwithoutparityormirroring
SimplestripesetsarenormallyreferredtoasRAID0.RAID0usesstripingtoprovidehighdata
throughput,especiallyforlargelesinanenvironmentthatdoesnotrequirefaulttolerance.RAID0hasno
redundancyanditprovidesimprovedperformanceandadditionalstoragewithoutfaulttolerance.Any
drivefailuredestroysthearrayandthelikelihoodoffailureincreaseswithmoredrivesinthearray.RAID
0doesnotimplementerrorchecking,soanyerrorisuncorrectable.Moredrivesinthearraymeans
higherbandwidth,butgreaterriskofdataloss.
RAID0requiresaminimumnumberoftwoharddiskdrives.
•RAID1:mirroringwithoutparityorstriping
RAID1usesmirroringsothatdatawrittentoonedriveissimultaneouslywrittentoanotherdrive.Thisis
goodforsmalldatabasesorotherapplicationsthatrequiresmallcapacitybutcompletedataredundancy.
RAID1providesfaulttolerancefromdiskerrorsorfailuresandcontinuestooperateaslongasatleast
onedriveinthemirroredsetisfunctioning.Withappropriateoperatingsystemsupport,therecanbe
increasedreadperformanceandonlyaminimalwriteperformancereduction.
RAID1requiresaminimumnumberoftwoharddiskdrives.
64ThinkServerTD330HardwareMaintenanceManual
Page 79

•RAID5:block-levelstripingwithdistributedparity
RAID5usesdiskstripingandparitydataacrossalldrives(distributedparity)toprovidehighdata
throughput,especiallyforsmallrandomaccess.RAID5distributesparityalongwiththedataandrequires
alldrivesbutonetobepresenttooperate;drivefailurerequiresreplacement,butthearrayisnot
destroyedbyasingledrivefailure.Upondrivefailure,anysubsequentreadoperationscanbecalculated
fromthedistributedparitysothatthedrivefailureismaskedfromtheenduser.Thearraywillhavedata
lossintheeventofaseconddrivefailureandisvulnerableuntilthedatathatwasonthefailingdriveis
rebuiltontoareplacementdrive.Asingledrivefailureinthesetwillresultinreducedperformanceof
theentiresetuntilthefailingdrivehasbeenreplacedandrebuilt.
RAID5requiresaminimumnumberofthreeharddiskdrives.
•RAID10:acombinationofRAID0andRAID1
RAID10consistsofstripeddataacrossmirroredspans.ARAID10drivegroupisaspanneddrive
groupthatcreatesastripedsetfromaseriesofmirroreddrives.RAID10allowsamaximumofeight
spans.Y oumustuseanevennumberofdrivesineachRAIDvirtualdriveinthespan.TheRAID1
virtualdrivesmusthavethesamestripesize.RAID10provideshighdatathroughputandcompletedata
redundancybutusesalargernumberofspans.
RAID10requiresaminimumnumberoffourharddiskdrivesandalsorequiresanevennumberofdrives,
forexample,sixharddiskdrivesoreightharddiskdrives.
•RAID50:acombinationofRAID0andRAID5
RAID50usesdistributedparityanddiskstriping.ARAID50drivegroupisaspanneddrivegroupin
whichdataisstripedacrossmultipleRAID5drivegroups.RAID50worksbestwithdatathatrequires
highreliability,highrequestrates,highdatatransfers,andmedium-to-largecapacity.
Note:HavingvirtualdrivesofdifferentRAIDlevels,suchasRAID0andRAID5,inthesamedrivegroupis
notallowed.Forexample,ifanexistingRAID5virtualdriveiscreatedoutofpartialspaceinanarray,the
nextvirtualdriveinthearrayhastobeRAID5only.
RAID50requiresaminimumnumberofsixharddiskdrives.
FordetailedinformationaboutRAID,referto“IntroductiontoRAID”intheMegaRAIDSASSoftwareUser
GuideonthedocumentationDVDthatcomeswithyourserver.
ConguringRAIDusingtheThinkServerEasyStartupprogram
TheThinkServerEasyStartupprogramsimpliestheprocessofconguringsupportedRAIDandinstalling
supportedWindowsandLinuxoperatingsystemsanddevicedriversonyourserver.Theuserguideforthe
programcanbeaccesseddirectlyfromtheprograminterface.
TheThinkServerEasyStartupprogramhasthefollowingfeaturesforRAIDconguration:
•ForusewithallsupportedRAIDcontrollers
•AutomaticallydetectshardwareandlistsallsupportedRAIDcongurations
•Conguresoneormorediskarrayspercontrollerdependingonthenumberofdrivesattachedtothe
controllerandtheRAIDlevelselected
•Supportshot-sparedrives
•CreatesaRAIDresponselethatcanbeusedtocongureRAIDcontrollersonsimilarlycongured
Lenovoservers
See“UsingtheThinkServerEasyStartupprogram”onpage61
andviewtheuserguidefromthemain
interfaceoftheprogram.
SomeRAIDmanagementsoftwarealsoisprovidedontheThinkServerEasyStartupDVDtohelpyoumanage
RAIDarraysandRAIDcontrollersinanoperatingsystemenvironment.Afteryouentertheoperatingsystem,
Chapter5.Conguringtheserver65
Page 80

inserttheThinkServerEasyStartupDVDintotheopticaldrive.Theinstallationpackagesfortheprograms
arelocatedintheUtilitiesandOthersfolderintherootdirectoryoftheDVD.TheThinkServerEasyStartup
DVDisdesignedfordifferenttypesofserversandtheUtilitiesandOthersfoldermightcontainadditional
installationpackagesthatarenotrequiredtobeinstalledonyourserver.
ConguringtheThinkServerRAID100orRAID300
TheThinkServerRAID100orRAID300(alsoknownasonboardSATA/SASsoftwareRAID)isintegratedin
thePCHonthesystemboard.Ifyouconnectthesignalcablesfromthesystemboardtotheharddiskdrives
orbackplane,youcancongureRAIDfortheharddiskdrivesusingtheLSISoftwareRAIDConguration
Utilityprogram,independentlyoftheoperatingsystem.TheThinkServerRAID100orRAID300supports
RAIDlevels0,1,and10bydefault.YoualsocanactivateRAID5byinstallingaThinkServerRAID100or
RAID300UpgradeKeyforAdvancedRAID.See“InstallingorremovingtheThinkServerRAID100orRAID
300upgradekeyforAdvancedRAID”onpage106
.
YoucaninstallandusetheMegaRAIDStorageManagerprogramtomanagetheRAIDarrayandRAID
controllerinanoperatingsystemenvironment.
BeforeconguringRAIDforyourserver,observethefollowingprecautions:
•Useharddiskdrivesthatareofthesametype(SATAorSAS)andhavethesamecapacitywithina
singleRAIDarray.
•ThetotaldrivecapacityoftheprimaryRAIDarrayislimitedto2TB.
RAIDarraystatus
Whenyouturnontheserver,theRAIDcontrollerROMversion,theRAIDarraystatus,andthelistofavailable
harddiskdriveswillbedisplayedduringthePOST.
TheRAIDarraystatuscanbeoneofthefollowing:
•Online
Thisisthenormalstatus,whichindicatesthattheRAIDarrayisworkingcorrectly.
•Degrade
ThisstatusindicatesthatmorethanoneharddiskdriveintheRAIDarraycannotbesynchronizedorhave
failed.Youneedtoreplacethefailingharddiskdrivesandrebuildthedata.See“Installingorreplacinga
hot-swapharddiskdrive”onpage124
and“Rebuildingaphysicaldrive”onpage69.
•Ofine
ThisstatusindicatesthattheRAIDarrayhasfailedandcannotberebuilt.YouneedtocreateanewRAID
array.See“Creating,adding,ordeletingaRAIDarray”onpage68.
StartingtheLSISoftwareRAIDCongurationUtilityprogram
ThistopicprovidesinstructionsonhowtostarttheLSISoftwareRAIDCongurationUtilityprogram.
TostarttheLSISoftwareRAIDCongurationUtilityprogram,dothefollowing:
1.Turnontheserver.
2.DuringthePOST,whenyouseethemessage“PressCtrl-MorEntertorunLSISoftwareRAIDSetup
Utility,”immediatelypressCtrl+MtostarttheLSISoftwareRAIDCongurationUtilityprogram.
LSISoftwareRAIDCongurationUtilityprograminterface
ThistopicprovidesinformationaboutthemenusanditemsintheLSISoftwareRAIDCongurationUtility
program.Dependingontheversionoftheprogram,somemenuoriteminformationmightdifferslightlyfrom
theinformationinthistopic.
66ThinkServerTD330HardwareMaintenanceManual
Page 81
WhenworkingwiththeLSISoftwareRAIDCongurationUtilityprogram,youmustusethekeyboard.
Thekeysusedtoperformvarioustasksaredisplayedonthebottomofeachscreen.Useupanddown
arrowkeystonavigatebetweenitems.Formostitems,thecorrespondinghelpmessageisdisplayed
onthebottomofthescreenwhentheitemisselected.Iftheitemhassubmenus,youcandisplaythe
submenusbypressingEnter.
AfterenteringtheLSISoftwareRAIDCongurationUtilityprogram,youcanseetheManagementMenuon
thescreen.TheManagementMenucontainsthefollowingmenuitems:
•Congure
ThismenucontainsitemstohelpyoucreateaRAIDarray,viewthecurrentRAIDconguration,addanew
RAIDarray,deleteanexistingRAIDarray,andselectabootvirtualdrive.
•Initialize
Thismenuhelpsyouinitializevirtualdrives.
Note:Initializingavirtualdriveerasesalldataonthevirtualdrive.Backupanydatayouwanttokeepand
ensurethattheoperatingsystemisnotinstalledonthevirtualdrivebeforetheinitialization.
•Objects
ThismenuhelpsyoucongureparametersfortheRAIDcontroller,thevirtualdrives,andthephysical
drives.
•Rebuild
ThismenuhelpsyourebuildaphysicaldriveinaRAIDarrayintheeventofaphysicaldrivefailure.
Youcanchoosetorebuildthedataonthefailingdriveifthedriveisstilloperational.Ifthedriveisnot
operational,itmustbereplacedandthedataonthefailingdrivemustberebuiltonanewdriveto
restorethesystemtofaulttolerance.Ifhot-sparedrivesareavailable,thefailingdrivemightberebuilt
automaticallywithoutanyuserintervention.
•CheckConsistency
Thismenuhelpsyoudoconsistencycheckforthevirtualdrives.Theconsistencycheckveriesthe
correctnessofthedataonvirtualdrivesthatuseRAID1,5,and10.
ThefollowingtableshowsthevariousmenusanditemsintheLSISoftwareRAIDCongurationUtility
program.Oneachmenu,presstheEnterkeytoshowselectableoptionsandselectadesiredoptionby
usingupanddownarrowkeysortypedesiredvaluesfromthekeyboarddirectly.
Table1.LSISoftwareRAIDCongurationUtilityprogrammenuitems
Menuitem
SubmenuitemComments
EasyCongurationCreatephysicalarrays.Anarraywill
automaticallybecomeavirtualdrive.
NewCongurationCleartheexistingcongurationand
startanewconguration.
View/AddConguration
Viewtheexistingcongurationoradda
newconguration.
ClearCongurationCleartheexistingconguration.
Congure
SelectBootDriveSelectabootvirtualdrive.
Initialize
Variesbyconguration.
Initializevirtualdrives.
Chapter5.Conguringtheserver67
Page 82
Table1.LSISoftwareRAIDCongurationUtilityprogrammenuitems(continued)
Menuitem
SubmenuitemComments
Adapter
Setadapter-relatedparameters,such
asrebuildrate,consistencycheckrate,
andsoon.
VirtualDrive
Setvirtualdriveparameters.
Objects
PhysicalDrive
Setphysicaldriveparameters,suchas
creatingahot-sparedriveforthevirtual
drive,makingafailingdriveasonline,
changingadrivestate,andviewingthe
specicationsofaphysicaldrive.
Rebuild
Variesbyconguration.
Rebuildphysicaldrives.
CheckConsistency
Variesbyconguration.
Checkconsistencyofvirtualdrives.
Creating,adding,ordeletingaRAIDarray
Thistopicprovidesinstructionsonhowtocreate,add,ordeleteaRAIDarrayusingtheLSISoftwareRAID
CongurationUtilityprogram.
Note:BeforeyoucreateaRAIDarrayusingtheLSISoftwareRAIDCongurationUtilityprogram,ensurethat
theservermeetstherequiredhardwareconguration.Forexample,theserverneedstohavetherequired
numberofharddiskdrivesinstalledandconnectedtothesystemboard.See“AboutRAID”onpage64
for
informationabouttherequirednumberofharddiskdrivesforeachRAIDlevel.IfyouwanttocreateaRAID5
arrayusingtheLSISoftwareRAIDCongurationUtilityprogram,theserveralsoneedstohaveaThinkServer
RAID100orRAID300UpgradeKeyforAdvancedRAID.See“InstallingorremovingtheThinkServerRAID
100orRAID300upgradekeyforAdvancedRAID”onpage106
.
Tocreate,add,ordeleteaRAIDarrayusingtheLSISoftwareRAIDCongurationUtilityprogram,dothe
following:
1.StarttheLSISoftwareRAIDCongurationUtilityprogram.See“StartingtheLSISoftwareRAID
CongurationUtilityprogram”onpage66.
2.Onthemaininterfaceoftheprogram,dooneofthefollowingdependingonyourneeds:
•IfyouwanttocreateaRAIDarray,selectEasyConguration,andthenfollowtheinstructionson
thescreen.
•IfyouwanttoaddasecondaryRAIDarray(ifsupportedbyyourserver),selectView/Add
Conguration,andthenfollowtheinstructionsonthescreentoviewthecurrentconguration
andaddanewRAIDarray.
•IfyouwanttodeletetheexistingRAIDarray,exittheprogramandbackupallyourdataonthe
harddiskdrives.Afterbackingupallyourdata,entertheprogrammaininterfaceandselectClear
Conguration.SelectYeswhenpromptedandfollowtheinstructionsonthescreen.
Attention:DeletinganexistingRAIDarrayerasesalldataonthearray.Ensurethatyoubackupall
databeforedeletingtheRAIDarray.IftheoperatingsystemisinstalledontheRAIDarrayyouwantto
delete,youneedtoreinstalltheoperatingsystemafterdeletingtheRAIDarray.
•IfyouwanttodeletetheexistingRAIDarrayandcreateanewRAIDarray,exittheprogramandback
upallyourdataontheharddiskdrives.Afterbackingupallyourdata,entertheprogrammain
interfaceandselectNewConguration.SelectYeswhenpromptedtoproceed,andthenfollowthe
instructionsonthescreen.
Attention:DeletinganexistingRAIDarrayerasesalldataonthearray.Ensurethatyoubackupall
databeforedeletingtheRAIDarray.IftheoperatingsystemisinstalledontheRAIDarrayyouwantto
delete,youneedtoreinstalltheoperatingsystemafterdeletingtheRAIDarray.
68ThinkServerTD330HardwareMaintenanceManual
Page 83

Initializingavirtualdrive
ThistopicprovidesinstructionsonhowtoinitializeavirtualdriveusingtheLSISoftwareRAIDConguration
Utilityprogramaftercompletingthecongurationprocess.
Virtualdriveinitializationistheprocessofwritingzerostothedataeldsofavirtualdriveand,infault-tolerant
RAIDlevels,generatingthecorrespondingparitytoputthevirtualdriveinareadystate.Initializationerases
alldataonthevirtualdrive.Drivegroupswillworkwithoutbeinginitialized,buttheycanfailaconsistency
checkbecausetheparityeldshavenotbeengenerated.
Notes:
•Ensurethatyoubackupanydatayouwanttokeepbeforeinitializingavirtualdrive.
•Ensurethattheoperatingsystemisnotinstalledonthevirtualdriveyouareinitializing.Otherwise,you
needtoreinstalltheoperatingsystemafterinitializingthevirtualdrive.
ToinitializeavirtualdriveusingtheLSISoftwareRAIDCongurationUtilityprogram,dothefollowing:
1.StarttheLSISoftwareRAIDCongurationUtilityprogram.See“StartingtheLSISoftwareRAID
CongurationUtilityprogram”onpage66.
2.Onthemaininterfaceoftheprogram,selectInitializeandfollowtheinstructionsonthescreen.
Settingahot-sparedrive
Thistopicprovidesinstructionsonhowtosetaharddiskdriveasahot-sparedriveusingtheLSISoftware
RAIDCongurationUtilityprogram.
Ahot-sparedriveisanextra,unuseddrivethatispartofthedisksubsystem.Itisusuallyinstandbymode
andreadyforserviceifaharddiskdrivefails.Fordetailedinformationabouthot-sparedrives,referto
“IntroductiontoRAID”intheMegaRAIDSASSoftwareUserGuideonthedocumentationDVDthatcomes
withyourserver.
Tosetaharddiskdriveasahot-sparedriveusingtheLSISoftwareRAIDCongurationUtilityprogram,
dothefollowing:
1.StarttheLSISoftwareRAIDCongurationUtilityprogram.See“StartingtheLSISoftwareRAID
CongurationUtilityprogram”onpage66.
2.Dooneofthefollowing:
•IfyouwanttocreateoraddanewRAIDarray,youcansetahot-sparedriveduringtheconguration
processbyfollowingtheinstructionsonthescreen.
•Ifyouwanttosetahot-sparedriverightaftertheconguration,selectObjects➙PhysicalDrive
fromtheprogrammaininterface.Then,selecttheharddiskdrivethatyouwanttosetasahot-spare
driveandpressEnter.Asubmenuisdisplayed.SelectMakeHotSparefromthesubmenu,andthen
selectYeswhenpromptedtosettheharddiskdriveasahot-sparedrive.
Rebuildingaphysicaldrive
ThistopicprovidesinstructionsonhowtorebuildaphysicaldriveusingtheLSISoftwareRAIDConguration
UtilityprogramwhenaphysicaldriveinaRAIDarrayfails.
WhenaphysicaldriveinaRAIDarrayfails,youcanrebuildthedrivebyrecreatingthedatathatwasstored
onthedrivebeforeitfails.Ifthedriveisnotoperational,itmustbereplacedandthedataonthefailingdrive
mustberebuiltonanewdrivetorestorethesystemtofaulttolerance.Ifhot-sparedrivesareavailable,the
failingdrivemightberebuiltautomaticallywithoutanyuserintervention.
TheRAIDcontrollerrecreatesthedatausingthedatastoredonotherdrivesinthedrivegroup.Rebuilding
canbedoneonlyindrivegroupswithdataredundancy,suchasRAID1,RAID5,andRAID10arrays.For
Chapter5.Conguringtheserver69
Page 84

detailedinformationaboutdiskrebuild,referto“IntroductiontoRAID”intheMegaRAIDSASSoftwareUser
GuideonthedocumentationDVDthatcomeswithyourserver.
TorebuildaphysicaldriveusingtheLSISoftwareRAIDCongurationUtilityprogramwhenaphysicaldrive
inaRAIDarrayfails,dothefollowing:
1.StarttheLSISoftwareRAIDCongurationUtilityprogram.See“StartingtheLSISoftwareRAID
CongurationUtilityprogram”onpage66.
2.Onthemaininterfaceoftheprogram,selectRebuildandfollowtheinstructionsonthescreen.
Note:Runaconsistencycheckimmediatelyaftertherebuildcompletestoensuredataintegrityforthevirtual
drives.See“Runningaconsistencycheck”onpage70.
Therebuildrateisthepercentageofthecomputingcyclesdedicatedtorebuildingfailingdrives.Therebuild
ratecanbeconguredbetween0percentand100percent.At0percent,therebuildoperationisdoneonlyif
thesystemisnotdoinganythingelse.At100percent,therebuildoperationhasahigherprioritythanany
othersystemactivity.
ToconguretherebuildrateusingtheLSISoftwareRAIDCongurationUtilityprogram,dothefollowing:
Note:Usingarebuildrateof0or100percentisnotrecommended.Thedefaultvalueis30percent.
1.StarttheLSISoftwareRAIDCongurationUtilityprogram.See“StartingtheLSISoftwareRAID
CongurationUtilityprogram”onpage66.
2.Onthemaininterfaceoftheprogram,selectObjects➙Adapter➙RebuildRate.
3.Settherebuildratebytypingadesiredvaluefromthekeyboarddirectly.
Runningaconsistencycheck
ThistopicprovidesinstructionsonhowtorunaconsistencycheckforvirtualdrivesusingtheLSISoftware
RAIDCongurationUtilityprogram.
TheconsistencycheckoperationveriesthatallstripesonavirtualdrivewitharedundantRAIDlevel(RAID
1,RAID5,andRAID10)areconsistentandthedateonthevirtualdriveiscorrect.Forexample,inasystem
withparity,checkingconsistencymeanscomputingthedataononedriveandcomparingtheresultsto
thecontentsoftheparitydrive.
Youshouldrunaconsistencycheckonfault-tolerantvirtualdrivesperiodically.Itisrecommendedthatyou
runaconsistencycheckatleastonceamonth.Youmustrunaconsistencycheckifyoususpectthatthe
virtualdrivedatamightbecorrupted.Ensurethatyoubackupthedatabeforerunningaconsistencycheck
ifyoususpectthatthedatamightbecorrupted.
TorunaconsistencycheckusingtheLSISoftwareRAIDCongurationUtilityprogram,dothefollowing:
1.StarttheLSISoftwareRAIDCongurationUtilityprogram.See“StartingtheLSISoftwareRAID
CongurationUtilityprogram”onpage66.
2.Onthemaininterfaceoftheprogram,selectCheckConsistencyandfollowtheinstructionsonthe
screen.
Theconsistencycheckrateistherateatwhichconsistencycheckoperationsarerunonasystem.The
consistencycheckratecanbeconguredbetween0percentand100percent.At0percent,theconsistency
checkisdoneonlyifthesystemisnotdoinganythingelse.At100percent,theconsistencycheckhasa
higherprioritythananyothersystemactivity.
ToconguretheconsistencycheckrateusingtheLSISoftwareRAIDCongurationUtilityprogram,do
thefollowing:
70ThinkServerTD330HardwareMaintenanceManual
Page 85

Note:Usingaconsistencycheckrateof0or100percentisnotrecommended.Thedefaultvalueis30
percent.
1.StarttheLSISoftwareRAIDCongurationUtilityprogram.See“StartingtheLSISoftwareRAID
CongurationUtilityprogram”onpage66.
2.Onthemaininterfaceoftheprogram,selectObjects➙Adapter➙ChkConstRate.
3.Settheconsistencycheckratebytypingadesiredvaluefromthekeyboarddirectly.
InstallingandusingtheMegaRAIDStorageManagerprogram
YoucaninstallandusetheMegaRAIDStorageManagerprogramtomanagetheRAIDarrayandRAID
controllerinanoperatingsystemenvironmentafterconguringRAID.
TheinstallationpackagefortheMegaRAIDStorageManagerprogramisontheThinkServerEasyStartup
DVD.Afteryouentertheoperatingsystem,inserttheThinkServerEasyStartupDVDintotheopticaldrive.
TheinstallationpackagefortheMegaRAIDStorageManagerprogramislocatedintheUtilitiesandOthers
folderintherootdirectoryoftheDVD.
ToinstallandusetheMegaRAIDStorageManagerprogram,refertothefollowingchaptersintheMegaRAID
SASSoftwareUserGuideonthedocumentationDVDthatcomeswithyourserver:
Note:SomeinformationinthesechaptersmightbeintendedfortheadvancedSATA/SAShardwareRAID
congurationsandmightnotapplytotheThinkServerRAID100orRAID300congurations.
•“MegaRAIDStorageManagerOverviewandInstallation”
•“MegaRAIDStorageManagerWindowandMenus”
•“MonitoringSystemEventsandStorageDevices”
•“MaintainingandManagingStorageCongurations”
TheMegaRAIDSASSoftwareUserGuidealsoisavailableontheLenovoWebsiteat:
http://www.lenovo.com/ThinkServerUserGuides
ConguringtheadvancedSAT A/SAShardwareRAID
BeforeconguringRAIDforyourserver,observethefollowingprecautions:
•Useharddiskdrivesthatareofthesametype(SATAorSAS)andhavethesamecapacitywithina
singleRAIDarray.
•ThetotaldrivecapacityoftheprimaryRAIDarrayislimitedto2TB.
SomeservermodelscomewithaRAIDcardtoprovideadvancedSATA/SAShardwareRAIDfunctions.You
alsocanpurchaseasupportedRAIDcardfromLenovoandinstallitintotheserver.See“RAIDcard”
onpage33.
TheRAIDcardprovidestheWebBIOSCongurationUtilityprogramtohelpyoucongureRAID
independentlyoftheoperatingsystem.YoualsocaninstalltheMegaRAIDStorageManagerprogramand
theMegaCLICongurationUtilityprogramtohelpyoumanagetheRAIDarrayandRAIDcontrollerinan
operatingsystemenvironment.
TheinstallationpackagesfortheMegaRAIDStorageManagerprogramandtheMegaCLIConguration
UtilityprogramareontheThinkServerEasyStartupDVD.Afteryouentertheoperatingsystem,insertthe
ThinkServerEasyStartupDVDintotheopticaldrive.Theinstallationpackagesfortheprogramsarelocatedin
theUtilitiesandOthersfolderintherootdirectoryoftheDVD.
Note:TheThinkServerEasyStartupDVDisdesignedfordifferenttypesofserversandtheUtilitiesandOthers
foldermightcontainadditionalinstallationpackagesthatarenotrequiredtobeinstalledonyourserver.
Chapter5.Conguringtheserver71
Page 86

ForinstructionsonhowtocongureandmanagetheadvancedSATA/SAShardwareRAID,refertothe
MegaRAIDSASSoftwareUserGuideonthedocumentationDVDthatcomeswithyourserver.This
documentalsoisavailableontheLenovoWebsiteat:
http://www.lenovo.com/ThinkServerUserGuides
ConguringtheEthernetcontrollers
TheEthernetcontrollersareintegratedonthesystemboard.Theyprovideaninterfaceforconnectingto
a10Mbps,100Mbps,or1000Mbpsnetworkandprovidefull-duplex(FDX)capability,whichenables
simultaneoustransmissionandreceptionofdataonthenetwork.
YoudonothavetosetanyjumpersorconguretheEthernetcontrollers.However,youmustinstalladevice
drivertoenabletheoperatingsystemtorecognizethecontrollers.
TheThinkServerEasyStartupprogramsimpliestheprocessofconguringRAIDandinstallingsupported
operatingsystemsanddevicedriversonyourserver.See“UsingtheThinkServerEasyStartupprogram”
onpage61
.
ThedevicedriversforonboardEthernetcontrollersalsoareavailablefordownloadat:
http://www.lenovo.com/drivers
Updatingthermware
ThermwareintheserverisperiodicallyupdatedandisavailablefordownloadontheLenovoWebsite.
Gotohttp://www.lenovo.com/driversandfollowtheinstructionsontheWebpagetocheckforthelatest
levelofrmware,suchastheBIOSupdatesanddevicedrivers.
Whenyoureplaceadeviceintheserver,youmighthavetoeitherupdatetheserverwiththelatestversionof
thermwarethatisstoredinmemoryonthedeviceorreashtheBIOS,theTMMrmware,andtheFRU/SDR.
UsingtheFirmwareUpdaterprogram
TheFirmwareUpdaterprogramenablesyoutomaintainyoursystemrmwareup-to-dateandhelpsyou
avoidunnecessaryoutages.
ToupdateyoursystemrmwareusingtheFirmwareUpdaterprogram,dothefollowing:
Note:Beforedistributingthermwareupdatestoaserver,ensurethatyourservercanrestartsuccessfully
withoutencounteringhardwareproblems.
1.Gotohttp://www.lenovo.com/driversandfollowtheinstructionsontheWebpagetolocatethe
FirmwareUpdaterprogram.
2.DownloadtheISOimagefortheFirmwareUpdaterprogramandtheTXTlethatcontainstheinstallation
instructions.
3.UseanyCDorDVDburningsoftwaretocreateabootablediscwiththeISOimage.
4.PrinttheTXTleandfollowtheinstructionstousetheFirmwareUpdaterprogramtoupdateyour
systemrmware.
UsingtheLenovoThinkServerEasyManageprogram
TheLenovoThinkServerEasyManageprogramenablesenterpriseuserstoremotelycontrolandmonitor
multipleLenovoserverswithinaLAN.Theprogramprovidesaninterfacetodisplayallseversbeing
managed,whichenablestheadministratortoconvenientlysearchfor,monitor,andmanageservers.
72ThinkServerTD330HardwareMaintenanceManual
Page 87

TodownloadtheLenovoThinkServerEasyManageprogram,gotohttp://www.lenovo.com/driversand
followtheinstructionsontheWebpage.
FordetailedinformationaboutusingtheLenovoThinkServerEasyManageprogram,refertothehelpsystem
fortheprogram.
Chapter5.Conguringtheserver73
Page 88

74ThinkServerTD330HardwareMaintenanceManual
Page 89

Chapter6.Installing,removing,orreplacinghardware
Thischapterprovidesinstructionsonhowtoinstall,remove,orreplacehardwareforyourserver.
Thischaptercontainsthefollowingitems:
•“Guidelines”onpage75
•“Removingtheservercover”onpage77
•“Removingandreinstallingthefrontbezel”onpage79
•“RemovingandreinstallingthePCIcardbracketassembly”onpage81
•“Installing,removing,orreplacinghardware”onpage84
•“Completingthepartsreplacement”onpage178
ForalistofThinkServeroptions,goto:
http://www.lenovo.com/thinkserver
Guidelines
Thistopicprovidessomeguidelinesthatyoushouldreadandunderstandbeforeusingyourserver.
Precautions
Beforeyouusetheserver,ensurethatyoureadandunderstandthefollowingprecautions:
•Beforeusingtheproduct,ensurethatyoureadandunderstandthemultilingualsafetyinstructionsandthe
LenovoLimitedWarranty(LLW)onthedocumentationDVDthatcomeswiththeproduct.Readingand
understandingthesafetyinstructionsreducestheriskofpersonalinjuryanddamagetoyourproduct.
•Whenyouinstallyournewserver,taketheopportunitytodownloadandapplythemostrecentrmware
updates.Thisstepwillhelptoensurethatanyknownissuesareaddressedandthatyourserveris
readytofunctionatmaximumlevelsofperformance.Todownloadrmwareupdatesforyourserver,go
tohttp://www.lenovo.com/driversandfollowtheinstructionsontheWebpage.See“Updatingthe
rmware”onpage72
formoreinformation.
•Beforeyouinstalloptionalhardwaredevices,ensurethattheserverisworkingcorrectly.Iftheserver
isnotworkingcorrectly,seeChapter7“Troubleshootinganddiagnostics”onpage181todobasic
troubleshooting.Iftheproblemcannotbesolved,seeChapter8“Gettinginformation,help,andservice”
onpage187.
•Observegoodhousekeepingintheareawhereyouareworking.Putremovedcoversandotherparts
inasafeplace.
•Ifyoumustturnontheserverwhiletheservercoverisremoved,ensurethatnooneisneartheserver
andthatnotoolsorotherobjectshavebeenleftinsidetheserver.
•Donotattempttoliftanobjectthatyouthinkistooheavyforyou.Ifyouhavetoliftaheavyobject,
observethefollowingprecautions:
–Ensurethatyoucanstandsafelywithoutslipping.
–Distributetheweightoftheobjectequallybetweenyourfeet.
–Useaslowliftingforce.Nevermovesuddenlyortwistwhenyouliftaheavyobject.
–Toavoidstrainingthemusclesinyourback,liftbystandingorbypushingupwithyourlegmuscles.
•Ensurethatyouhaveanadequatenumberofproperlygroundedelectricaloutletsfortheserver,monitor,
andotherdevices.
©CopyrightLenovo2012,2013
75
Page 90

•Backupallimportantdatabeforeyoumakechangestodrives.
•Haveasmallat-bladescrewdriveravailable.
•Youdonothavetoturnofftheservertoinstallorreplaceahot-swapredundantpowersupply,ahot-swap
harddiskdrive,orahot-plugUSBdevice.However,youmustturnofftheserverandremovetheac
powersources,suchashot-swapredundantpowersupplies,fromtheserverbeforeperforminganystep
thatinvolvesinstalling,removing,orreplacingadaptercablesornon-hot-swapdevicesorcomponents.
•ToviewtheLEDsonthesystemboardandinternalcomponents,leavetheserverconnectedtopower.
•Whenyouarenishedworkingontheserver,reinstallallsafetyshields,guards,labels,andgroundwires.
•Whenworkinginsidetheserver,youmightndsometaskseasierifyoulaytheserveronitsside.
Handlingstatic-sensitivedevices
Attention:Donotopenthestatic-protectivepackagethatcontainsthenewpartuntilthedefectiveparthasbeen
removedfromtheserverandyouarereadytoinstallthenewpart.Staticelectricity,althoughharmlesstoyou,
canseriouslydamageservercomponentsandparts.
Anyserverpartcontainingtransistorsorintegratedcircuits(ICs)shouldbeconsideredsensitiveto
electrostaticdischarge(ESD).ESDdamagecanoccurwhenthereisadifferenceinchargebetweenobjects.
ProtectagainstESDdamagebyequalizingthechargesothatthemachine,thepart,theworkmat,andthe
personhandlingthepartareallatthesamecharge.
Notes:
•Useproduct-specicESDprocedureswhentheyexceedtherequirementsnotedinthistopic.
•EnsurethattheESDprotectivedevicesyouusehavebeencertied(ISO9000)asfullyeffective.
Whenyouhandleserverpartsandcomponents,taketheseprecautionstoavoidstatic-electricitydamage:
•Limityourmovement.Movementcancausestaticelectricitytobuilduparoundyou.
•Alwayscarefullyhandlethepartsandothercomponents(suchasPCIExpresscards,memorymodules,
systemboards,andmicroprocessors)byedgesorframe.Donottouchsolderjoints,pins,orexposed
circuitry.
•Donotleavethedevicewhereotherscanhandleandpossiblydamagethedevice.
•Beforeyoureplaceanewpart,touchthestatic-protectivepackagecontainingthenewparttoan
unpaintedmetalpartoftheserverforatleasttwoseconds.Thisreducesstaticelectricityfromthe
packageandyourbody.
•Removethenewpartfromthestatic-protectivepackageanddirectlyinstallitintheserverwithout
placingitonanyothersurface.Ifitishardforyoutodothisinyourspecicsituation,placethe
static-protectivepackageofthenewpartonasmooth,levelsurface,andthenplacethenewparton
thestatic-protectivepackage.
•Donotplacethepartontheservercoverorothermetalsurface.
•Takeadditionalcarewhenhandlingdevicesduringcoldweather.Heatingreducesindoorhumidity
andincreasesstaticelectricity.
•Useagroundedworkmattoprovideastatic-freeworksurface.Thematisespeciallyusefulwhen
handlingESD-sensitivedevices.
•Preventthepartfromtouchingyourclothing.Mostclothingisinsulativeandretainsachargeevenwhen
youarewearingawriststrap.
•Theuseofagroundingsystemisrecommended.Forexample,itisrecommendedtowearanelectrostatic
discharge(ESD)wriststrap,ifoneisavailable.EnsurethatyouworkinanESD-safearea.Selecta
groundingsystem,suchasthoselistedbelow,toprovideprotectionthatmeetsthespecicservice
requirement.
76ThinkServerTD330HardwareMaintenanceManual
Page 91

Note:TheuseofagroundingsystemtoguardagainstESDdamageisdesirablebutnotnecessary.
–AttachtheESDgroundcliptoanyframeground,groundbraid,orgreen-wireground.
–Whenworkingonadouble-insulatedorbattery-operatedsystem,useanESDcommongroundor
referencepoint.Youcanusecoaxorconnector-outsideshellsonthesesystems.
–Usethegroundprongoftheacplugonac-operatedservers.
Systemreliabilityguidelines
Tohelpensurepropercoolingandsystemreliability,strictlyfollowtheseguidelines:
•Eachofthedrivebayshasadriveoradummytrayinstalled;orthereisanelectromagneticinterface(EMI)
protectivepanelorEMIshieldinstalledtoprotectthedrivecage.
•Iftheserversupportshot-swapredundantpowersupplies,eachofthepowersupplybayhasaredundant
powersupplyinstalled,oronebayhasaredundantpowersupplyinstalledwhiletheotherbayiscovered
byashield.
•Leaveadequatespacearoundtheservertoensurethattheservercoolingsystemworkswell.Leave
approximately50mm(2inches)ofopenspacearoundthefrontandrearoftheserver.Donotplace
objectsinfrontofthefans.Forpropercoolingandairow,installtheservercoverbeforeyouturnon
theserver.Operatingtheserverforextendedperiodsoftime(morethan30minutes)withtheserver
coverremovedmightdamageservercomponents.
•Properlyroutethecables.Forsomeoptions,suchasPCIExpresscards,followthecablinginstructions
thatcomewiththeoptionsinadditiontotheinstructionsinthismanual.
•Ensurethatyoureplaceafailingfanwithin48hours.
•Whenreplacingahot-swapdrive,installthenewhot-swapdrivewithintwominutesofremoval.
•Ifyourserverhasairductsorairbafes,donotremovethemwhiletheserverisrunning.Operatingthe
serverwithouttheairductsorairbafesmightcausethemicroprocessorstooverheat.
•Forserversthatsupportuptotwomicroprocessors,ensurethatthesecondmicroprocessorsocket
alwayscontainsamicroprocessororisprotectedbyamicroprocessorsocketcover.
Workinginsidetheserverwiththepoweron
Attention:Staticelectricitythatisreleasedtointernalservercomponentswhentheserveristurnedonmightcause
theservertohalt,whichmightresultinthelossofdata.Toavoidthispotentialproblem,alwaysuseanESDwriststrap
orothergroundingsystemwhenyouworkinsidetheserverwiththepoweron.
Theserversupportshot-swapdevicesandisdesignedtooperatesafelywhileitisturnedonandthecoveris
removed.Followtheseguidelineswhenyouworkinsidetheserverwiththepoweron:
•Avoidwearingloose-ttingclothingonyourforearms.Buttonlong-sleevedshirtsbeforeworkinginside
theserver;donotwearcufflinkswhileyouareworkinginsidetheserver.
•Donotallowyournecktieorscarftohanginsidetheserver.
•Removejewelry,suchasbracelets,necklaces,rings,andloose-ttingwristwatches.
•Removeitemsfromyourshirtpocket,suchaspensandpencils.Theseitemsmightfallintotheserveras
youleanoverit.
•Avoiddroppinganymetallicobjectsintotheserver,suchaspaperclips,hairpins,andscrews.
Removingtheservercover
Attention:Donotopenyourserverorattemptanyrepairbeforereadingandunderstanding“Safetyinformation”
onpageiii
and“Guidelines”onpage75.
Chapter6.Installing,removing,orreplacinghardware77
Page 92
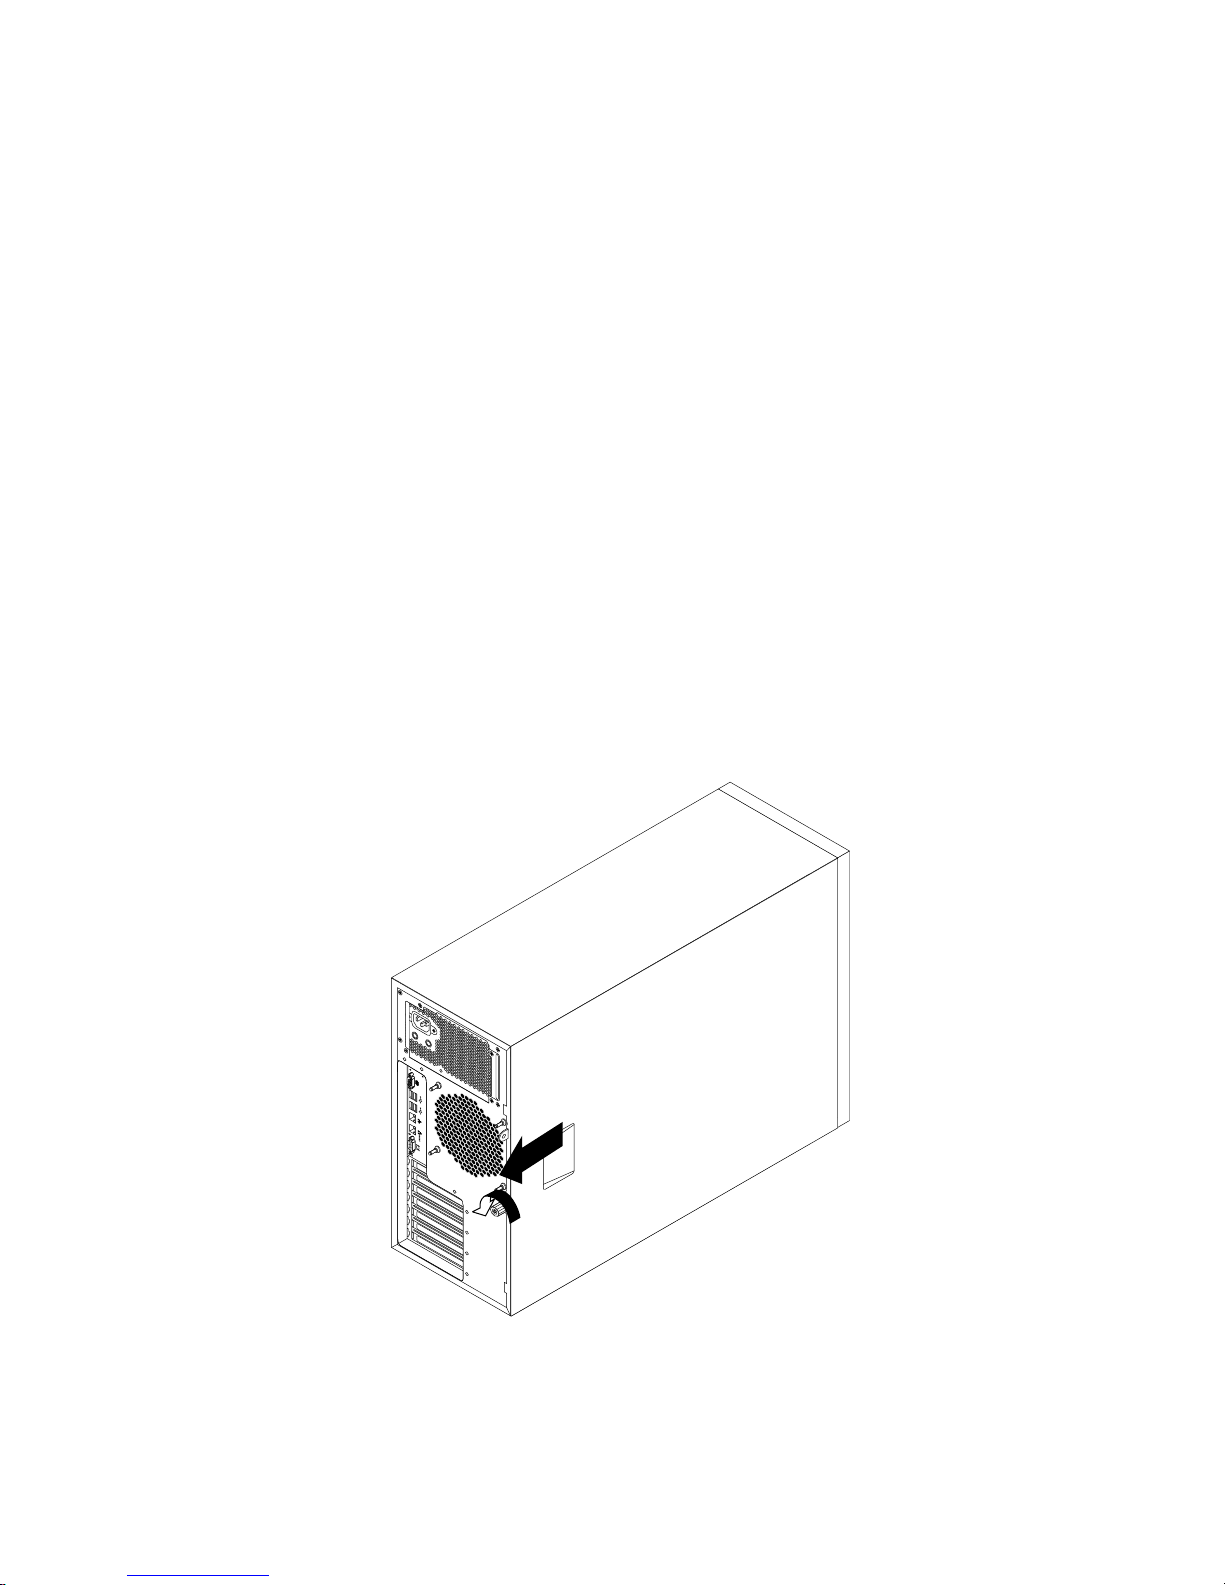
Thistopicprovidesinstructionsonhowtoremovetheservercover.
Beforeyoubegin,printalltherelatedinstructionsorensurethatyoucanviewthePDFversiononanother
computerforreference.
Note:Dependingonthemodel,yourservermightlookslightlydifferentfromtheillustrationsinthistopic.
Toremovetheservercover,dothefollowing:
1.Removeallmediafromthedrives.Then,turnoffallattacheddevicesandtheserver.
2.Disconnectallpowercordsfromelectricaloutlets.
3.Disconnectthepowercords,Input/Output(I/O)cables,andallothercablesthatareconnectedto
theserver.
4.Removeanylockingdevicethatsecurestheservercover,suchasapadlockoranintegratedcable
lock.See“Serverlocks”onpage23.
5.Loosenthethumbscrewthatsecurestheservercover,andthenslidetheservercovertotherear
untilitisstopped.
Notes:
a.Theservercoverissecurelyinstalledandyouneedtouseatool,suchasascrewdriver,toloosen
thethumbscrewthatsecurestheservercover.Thethumbscrewisanintegratedpartoftheserver
cover.Donottrytoremovethethumbscrewfromtheservercover.
b.Itisrecommendedthatyouwaitthreetoveminutestolettheservercoolbeforeremovingthe
servercover.
Figure29.Slidingtheservercovertotherear
78ThinkServerTD330HardwareMaintenanceManual
Page 93
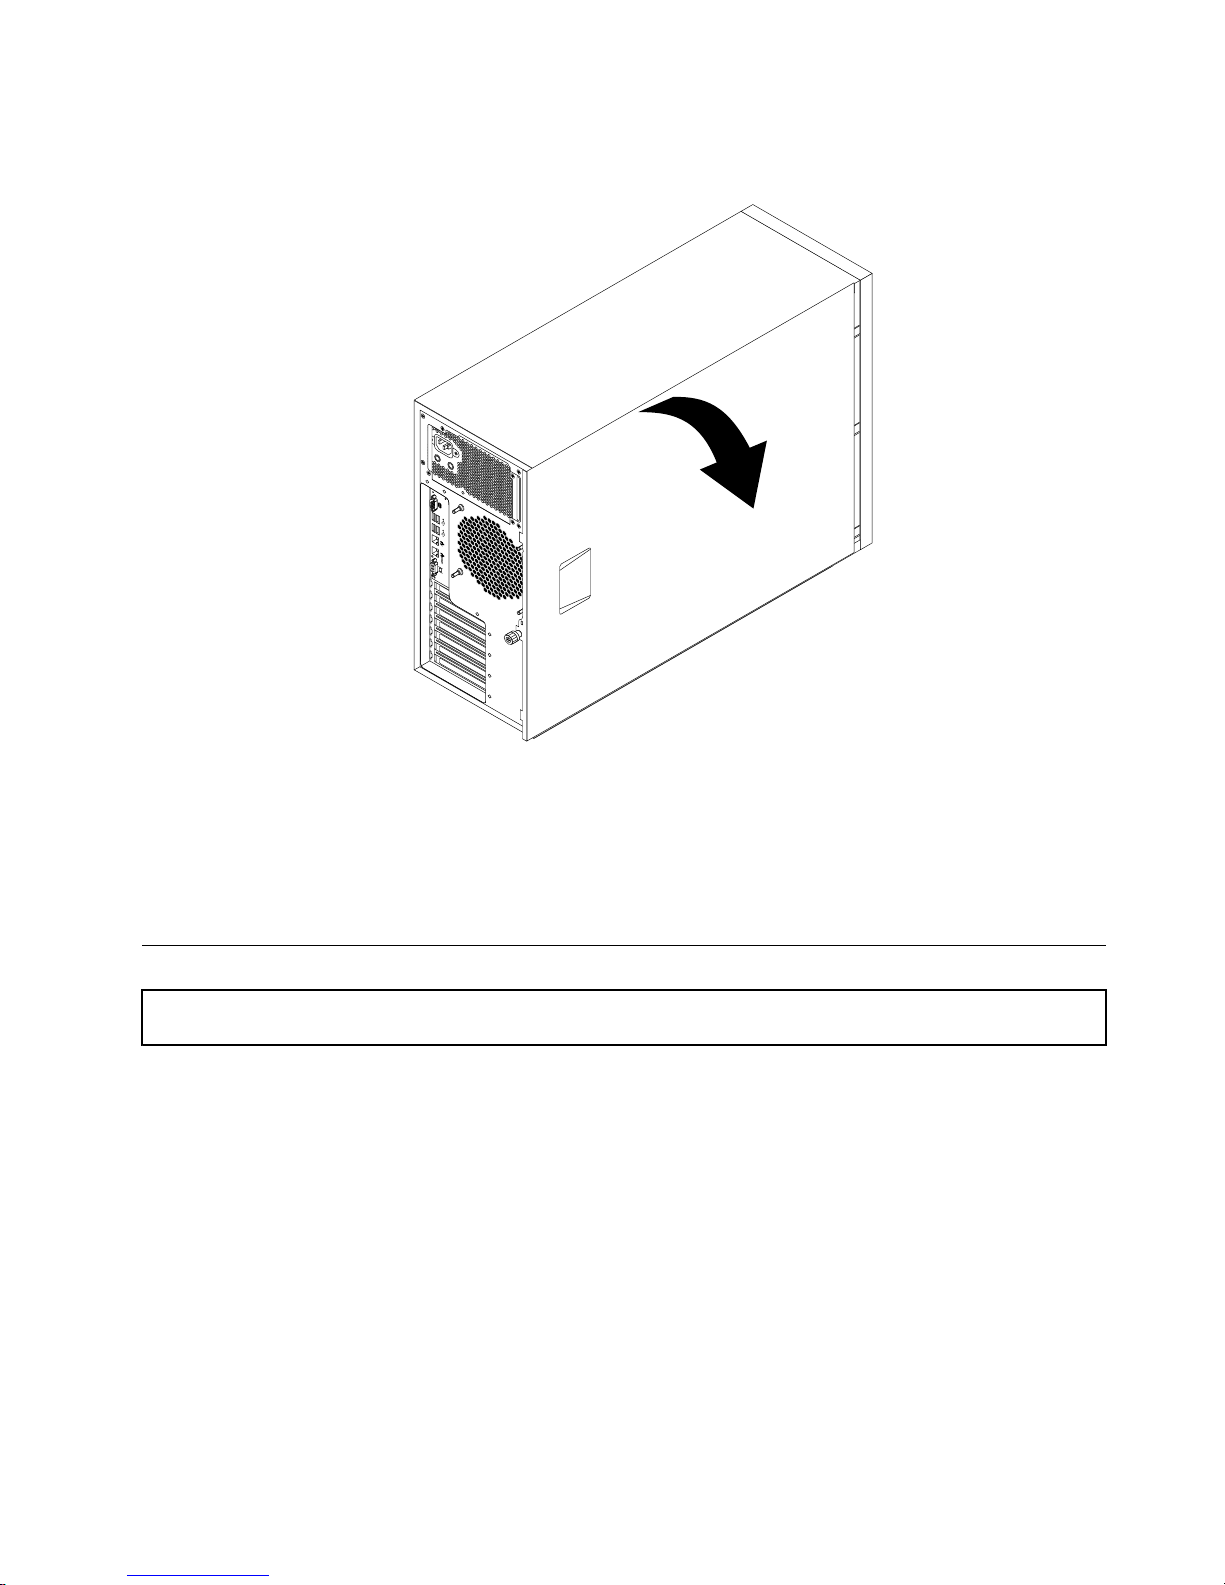
6.Pivottheservercoveroutwardtocompletelyremoveit.
Figure30.Removingtheservercover
Attention:Forpropercoolingandairow,installtheservercoverbeforeturningontheserver.Operatingthe
serverformorethan30minuteswiththeservercoverremovedmightdamageservercomponents.
Toreinstalltheservercover,see“Reinstallingtheservercoverandreconnectingcables”onpage178.
Removingandreinstallingthefrontbezel
Attention:Donotopenyourserverorattemptanyrepairbeforereadingandunderstanding“Safetyinformation”
onpageiiiand“Guidelines”onpage75.
Thistopicprovidesinstructionsonhowtoremoveandreinstallthefrontbezel.
Beforeyoubegin,printalltherelatedinstructionsorensurethatyoucanviewthePDFversiononanother
computerforreference.
Note:Dependingonthemodel,yourservermightlookslightlydifferentfromtheillustrationsinthistopic.
Toremoveandreinstallthefrontbezel,dothefollowing:
1.Removeallmediafromthedrivesandturnoffallattacheddevicesandtheserver.Then,disconnectall
powercordsfromelectricaloutletsanddisconnectallcablesthatareconnectedtotheserver.
2.Removetheservercover.See“Removingtheservercover”onpage77.
Chapter6.Installing,removing,orreplacinghardware79
Page 94
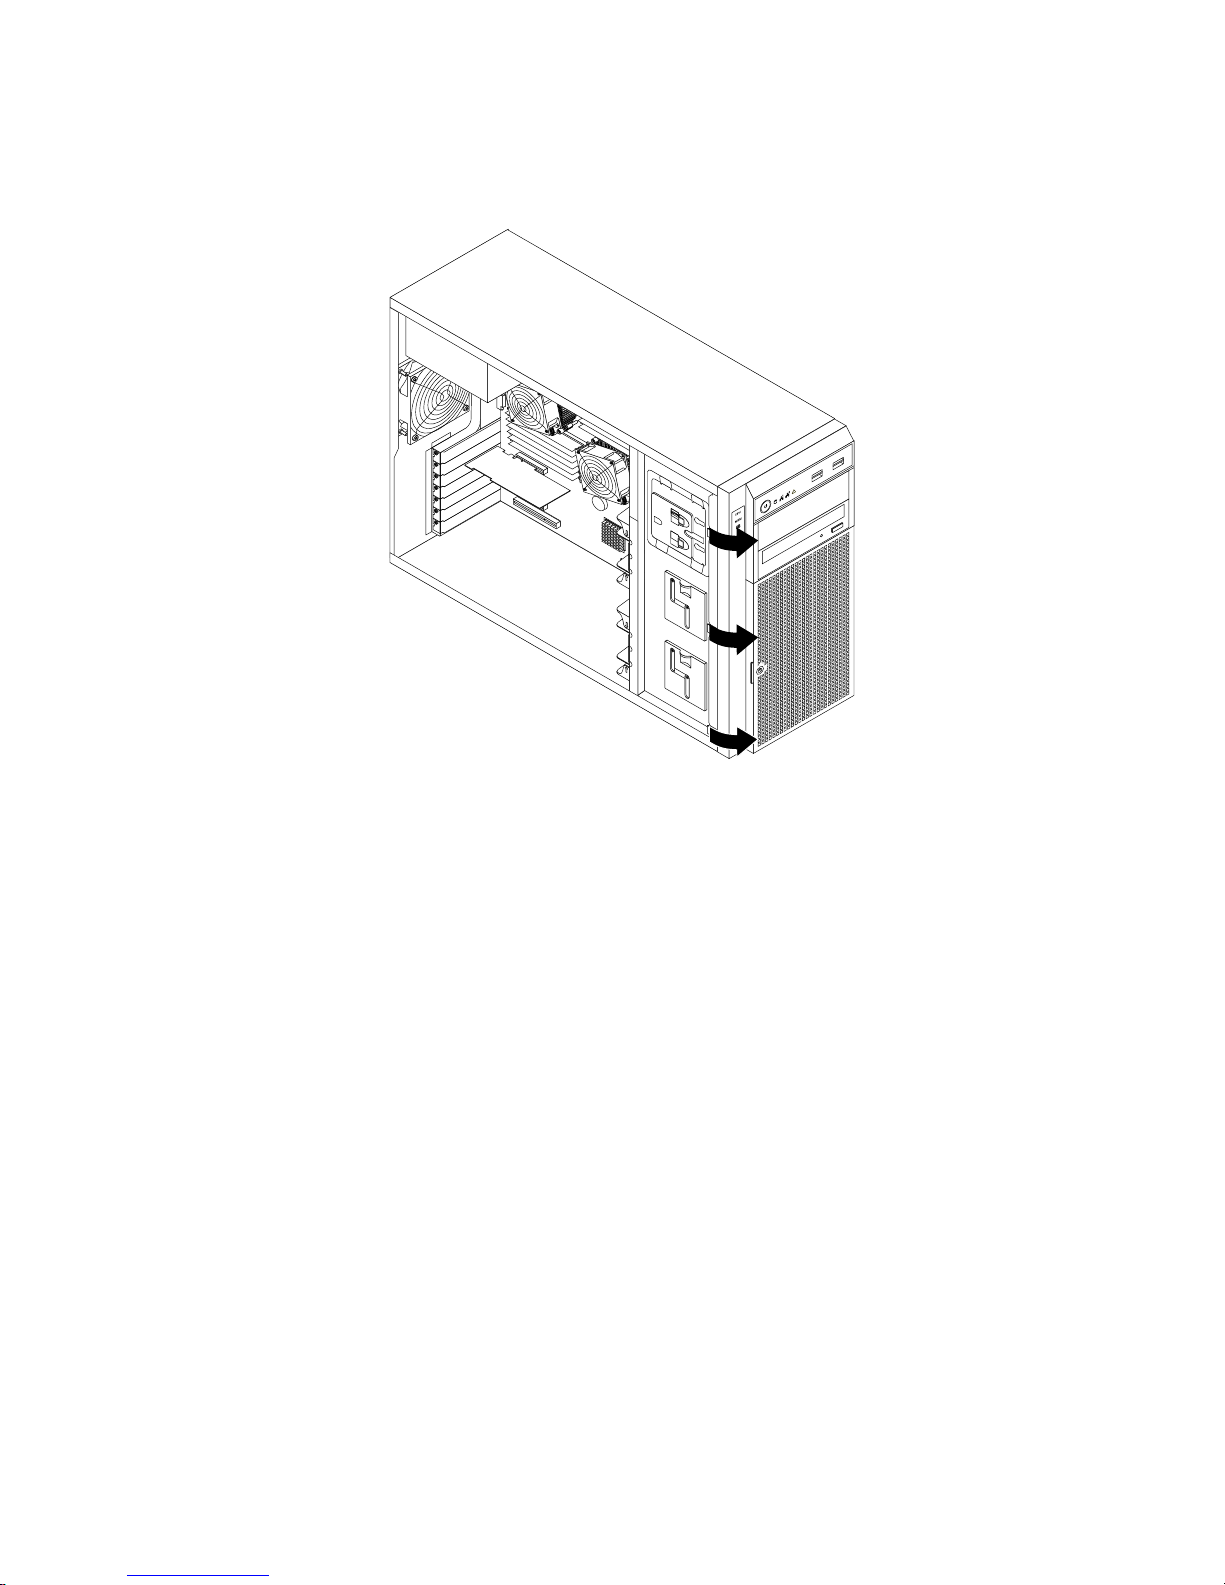
3.Removethefrontbezelbyreleasingthethreeplastictabsontheleftsideandpivotingthefrontbezel
outward.
Figure31.Removingthefrontbezel
80ThinkServerTD330HardwareMaintenanceManual
Page 95
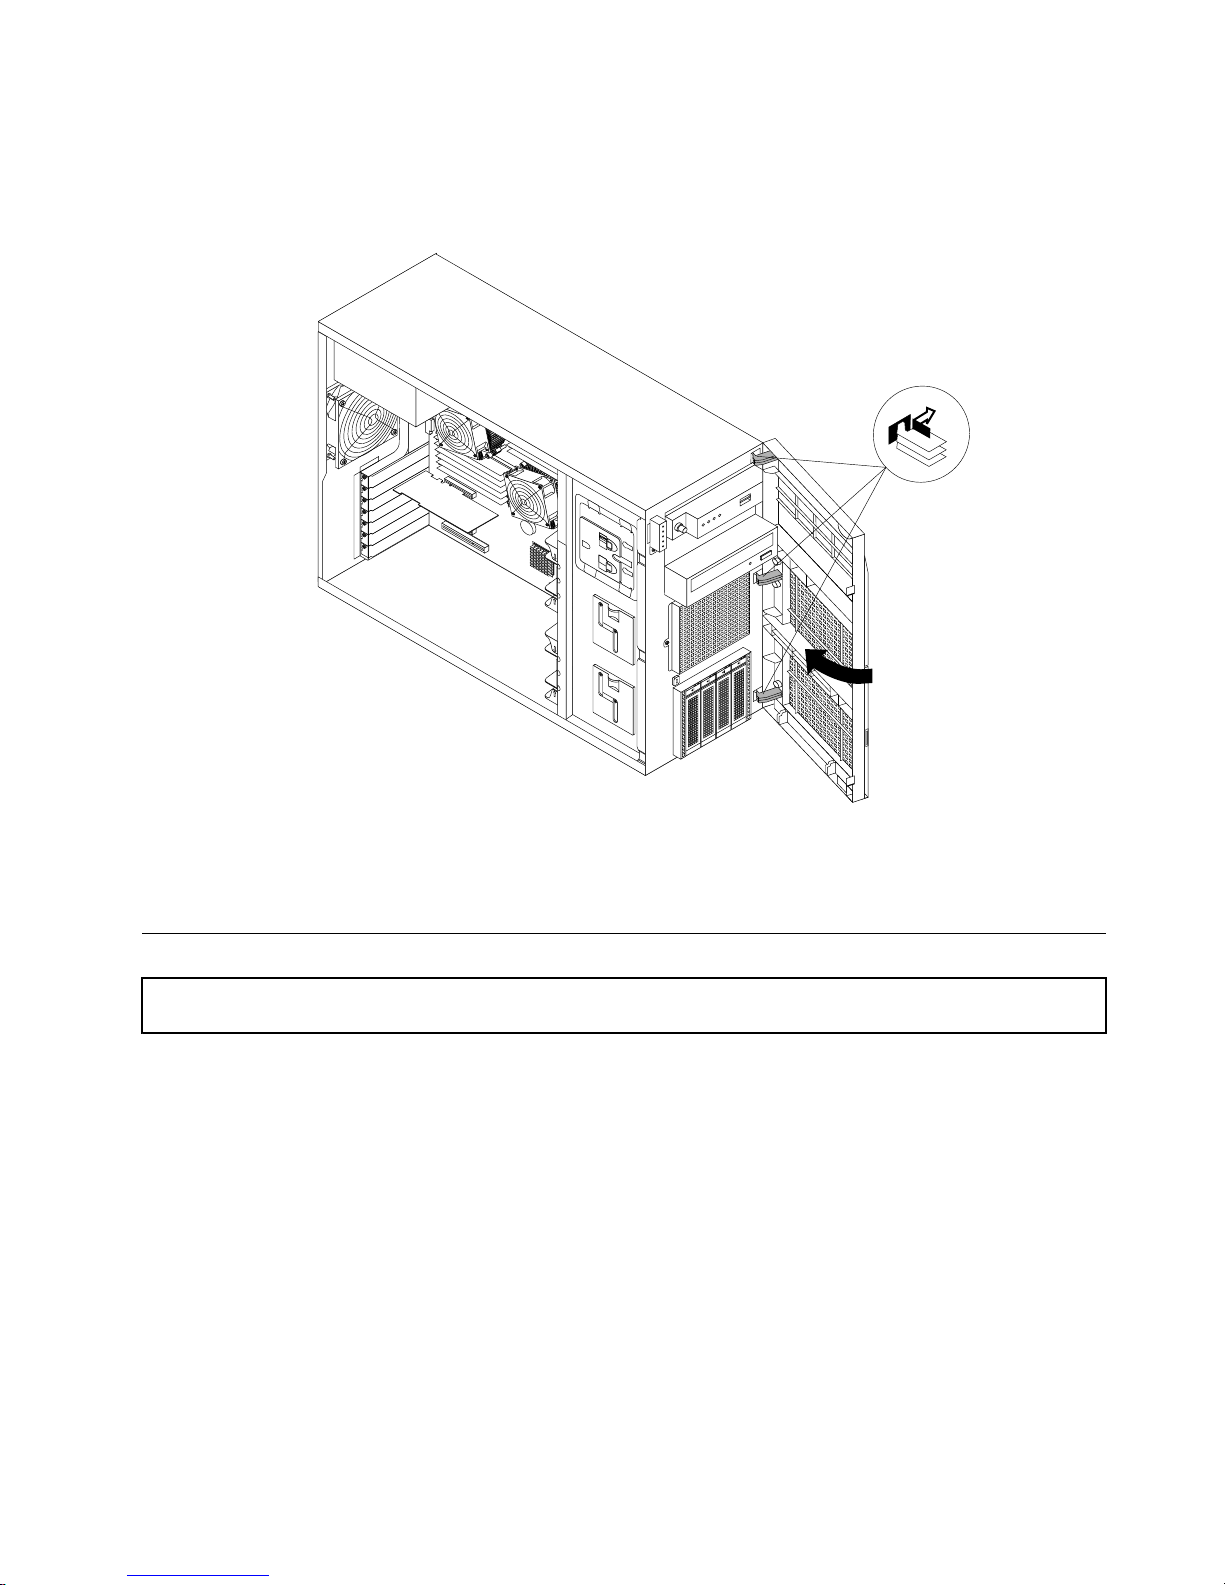
4.Toreinstallthefrontbezel,aligntheotherthreeplastictabsontherightsideofthefrontbezelwith
thecorrespondingholesinthechassis,thenpivotthefrontbezelinwarduntilitsnapsintoposition
ontheleftside.
Figure32.Installingthefrontbezel
5.Goto“Completingthepartsreplacement”onpage178.
RemovingandreinstallingthePCIcardbracketassembly
Attention:Donotopenyourserverorattemptanyrepairbeforereadingandunderstanding“Safetyinformation”
onpageiii
and“Guidelines”onpage75.
ThistopicprovidesinstructionsonhowtoremoveandreinstallthePCIcardbracketassembly.Thistopic
appliesonlytoservermodelsthathaveaRAIDcardinstalled.
Beforeyoubegin,printalltherelatedinstructionsorensurethatyoucanviewthePDFversiononanother
computerforreference.
ToremoveandreinstallthePCIcardbracketassembly,dothefollowing:
1.Removeallmediafromthedrivesandturnoffallattacheddevicesandtheserver.Then,disconnectall
powercordsfromelectricaloutletsanddisconnectallcablesthatareconnectedtotheserver.
2.Removetheservercover.See“Removingtheservercover”onpage77.
3.Laytheserveronitssideforeasieroperation.
4.RemovethePCIcardbracketassemblybydoingthefollowing:
Chapter6.Installing,removing,orreplacinghardware81
Page 96
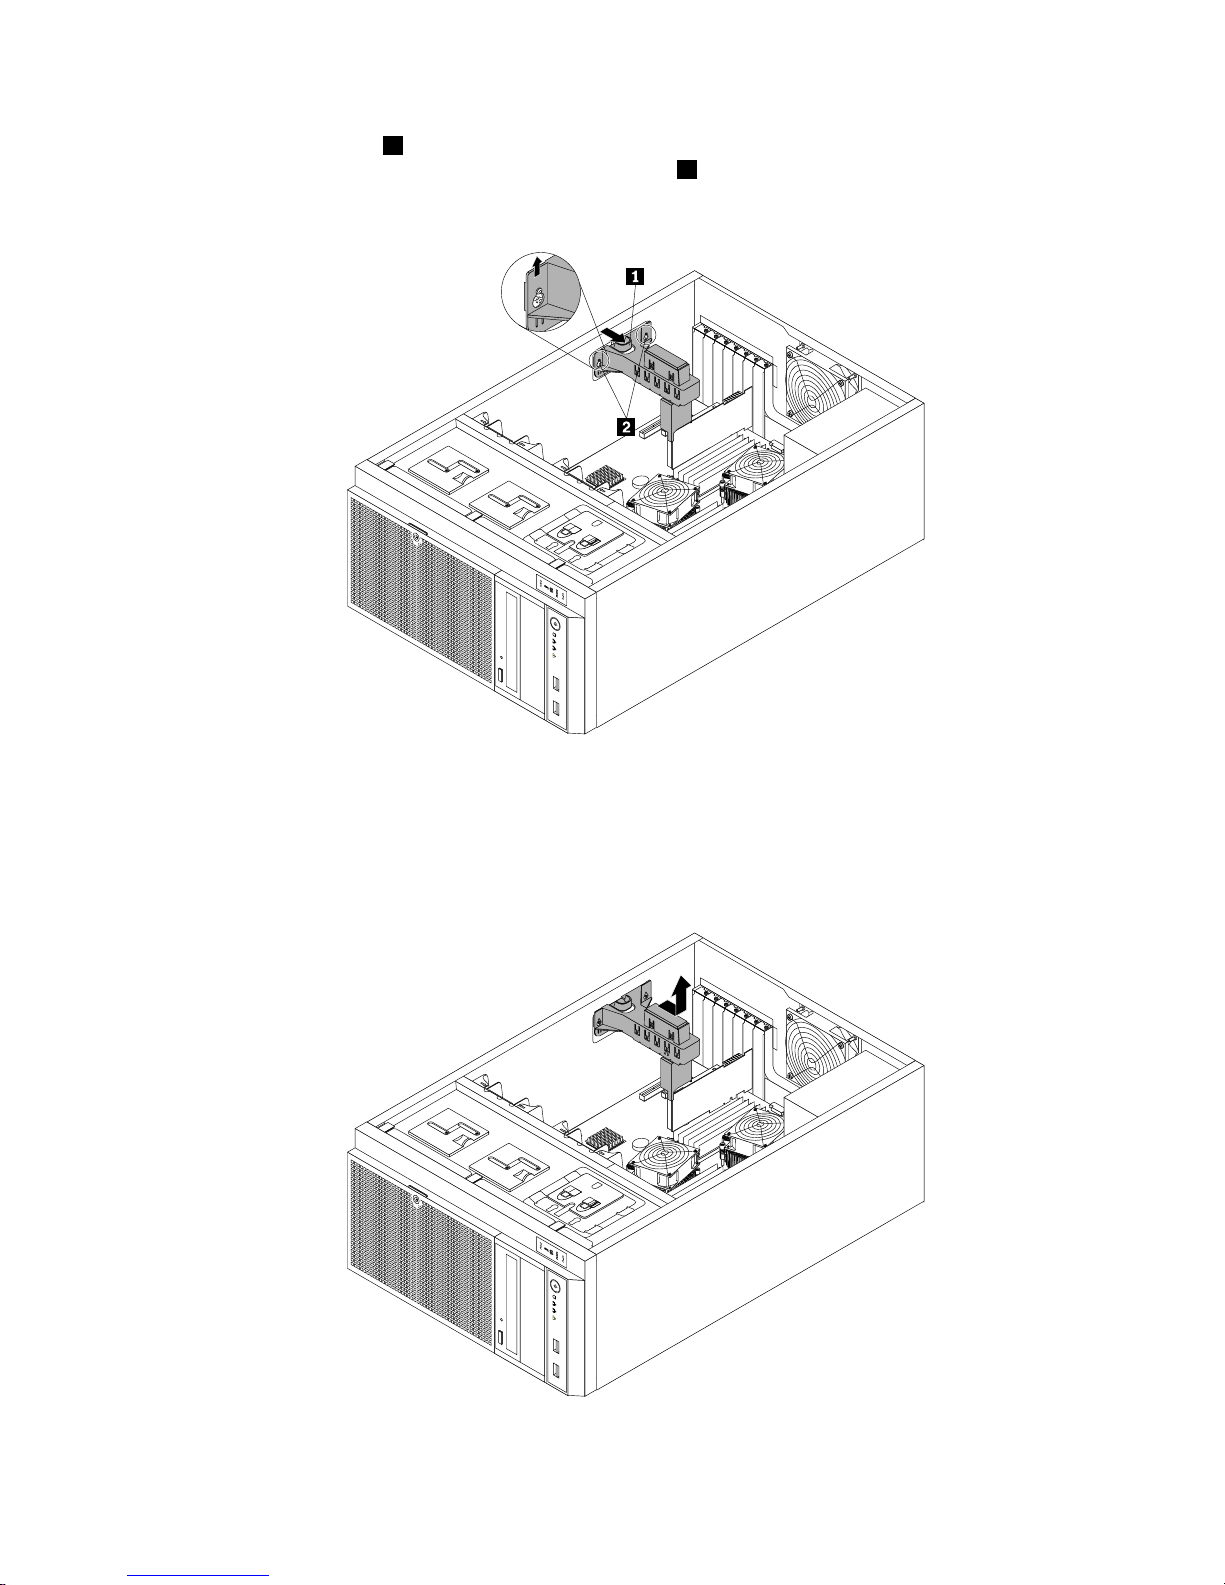
a.Pressthereleasetab1inthedirectionasshown,andthencarefullyliftthePCIcardbracket
assemblyslightlyupwarduntilthetwomountingstuds2onthechassisareinthecentralpositionof
thecorrespondingholesinthePCIcardbracketassembly.
Figure33.ReleasingthePCIcardbracketassembly
b.CarefullymovethePCIcardbracketassemblytothetopsideofthechassisuntilthePCIcard
bracketassemblyisreleasedfromthemountingstudsonthechassis.Then,liftthePCIcardbracket
assemblyoutofthechassis.
Figure34.RemovingthePCIcardbracketassembly
82ThinkServerTD330HardwareMaintenanceManual
Page 97
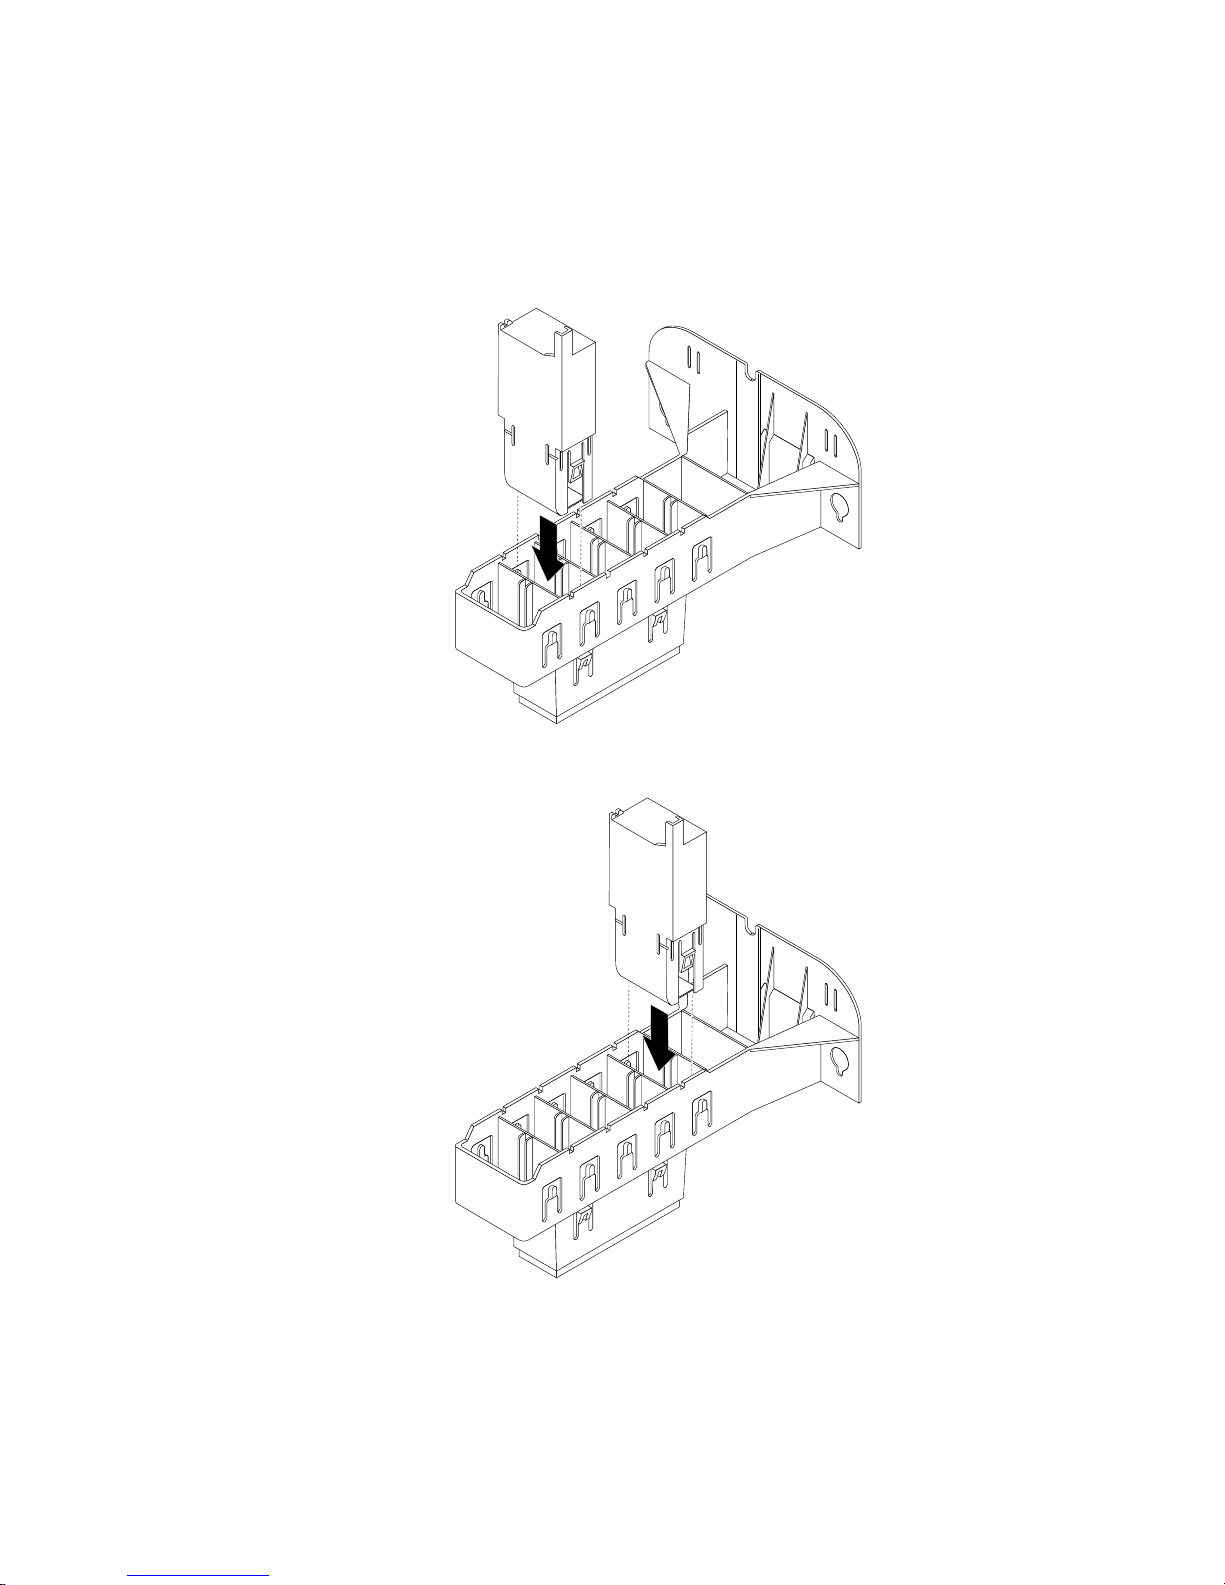
5.ReinstallthePCIcardbracketassemblybydoingthefollowing:
a.Installthesmalllow-prolePCIcardbracketintothemainPCIcardbracketusingoneofthe
followingmethods.
Method1:
Method2:
Figure35.Installingthesmalllow-prolePCIcardbracketintothemainPCIcardbracket
Chapter6.Installing,removing,orreplacinghardware83
Page 98
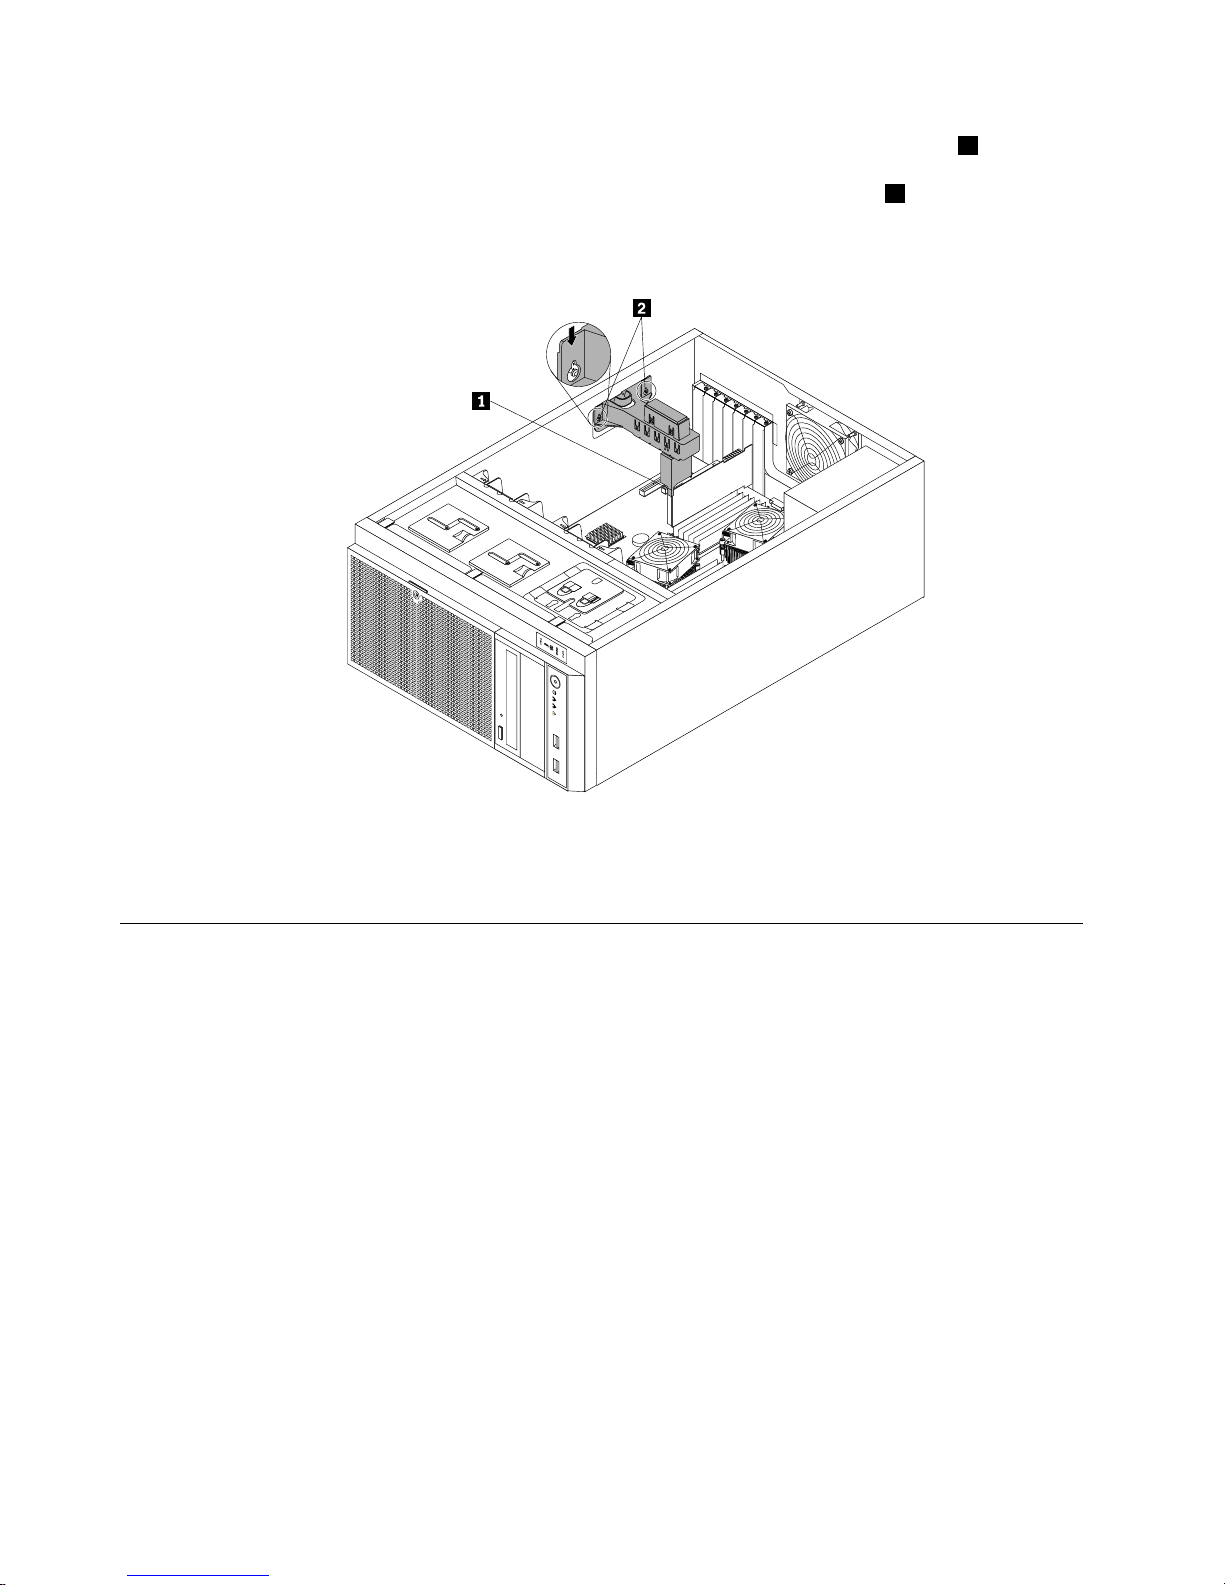
b.PlacethePCIcardbracketassemblyintothechassissothatthetwomountingstuds2onthe
bottomofthechassisareinsertedintothecorrespondingholesinthePCIcardbracketassembly.
EnsurethattheedgeoftheRAIDcardcanbesmoothlyinsertedintotheslot1inthesmall
low-prolePCIcardbracket.Then,carefullypressthePCIcardbracketassemblydownuntilitis
securelyinstalledandlockedintopositionbythetwomountingstuds.
Figure36.ReinstallingthePCIcardbracketassembly
6.Goto“Completingthepartsreplacement”onpage178.
Installing,removing,orreplacinghardware
Thistopicprovidesinstructionsonhowtoinstall,remove,orreplacehardwareforyourserver.Youcan
expandthecapabilitiesofyourserverbyaddingnewhardwaredevices,suchasmemorymodulesorother
serveroptions,andmaintainyourserverbyreplacingthefailinghardwaredevices.
Ifyouarehandlingaserveroption,refertotheappropriateinstallationandorremovalinstructionsinthis
topicalongwiththeinstructionsthatcomewiththeoption.
Notes:
1.UseonlypartsprovidedbyLenovo.
2.Dependingonthemodel,yourservermightlookslightlydifferentfromtheillustrationsinthistopic.
TheEMIintegrityandcoolingoftheserverareprotectedbyhavingalldrivebaysandPCIExpresscardslots
coveredoroccupied.WhenyouinstallaninternaldriveoraPCIExpresscard,savetheEMIshieldordummy
trayfromthedrivebayorsavethePCIExpresscardslotbracketintheeventthatyoulaterremovethedevice.
Attention:AnunoccupieddrivebayorPCIExpresscardslotwithoutacover,shield,dummytray,ller,
oranyotherprotectionmightimpacttheEMIintegrityandcoolingoftheserver,whichmightresultin
overheatingorcomponentdamage.
84ThinkServerTD330HardwareMaintenanceManual
Page 99

Installingorremovingamemorymodule
Thistopicprovidesinstructionsonhowtoinstallorremoveamemorymodule.
Note:ThememorymodulesaresensitivetoESD.Ensurethatyoureadandunderstand“Handling
static-sensitivedevices”onpage76rstandcarefullyperformtheoperation.
Memorymoduleinstallationrules
Yourserverhas12memoryslotsandithasthefollowingfeatures:
•Eachslotsupports4GB,8GB,and16GB1333MHzdoubledatarate3low-voltageregistereddualinline
memorymodules(DDR3LVRDIMMs).
•Eachslotsupports4GB,8GB,and16GB1333MHzDDR3RDIMMs.
•Eachslotsupports2GBand4GB1333MHzDDR3unbuffereddualinlinememorymodules(UDIMMs)
withErrorCheckingandCorrecting(ECC)technology.
•Yourserversupportsuptosixmemorymoduleswhenonemicroprocessorisinstalledandupto12
memorymoduleswhentwomicroprocessorsareinstalled.
•TheminimumsystemmemoryforRDIMMsorLVRDIMMsis4GB(onlyonemicroprocessorinstalledand
onlyone4GBRDIMMorLVRDIMMinstalledintheCPU1DIMMA1slot).
•TheminimumsystemmemoryforUDIMMsis2GB(onlyonemicroprocessorinstalledandonlyone2
GBUDIMMinstalledintheCPU1DIMMA1slot).
•ThemaximumsystemmemoryforRDIMMsorLVRDIMMsis192GB(twomicroprocessorsinstalledand
one16GBRDIMMorLVRDIMMinstalledineachofthe12memoryslots).
•ThemaximumsystemmemoryforUDIMMsis48GB(twomicroprocessorsinstalledandone4GB
UDIMMinstalledineachofthe12memoryslots).
Formoreinformationaboutthememorymodulesinyourspecicservermodel,usetheSetupUtility
program.See“ViewinginformationintheSetupUtilityprogram”onpage53.
ForalistofsupportedThinkServermemorymoduleoptions,goto:
http://www.lenovo.com/thinkserver
Chapter6.Installing,removing,orreplacinghardware85
Page 100
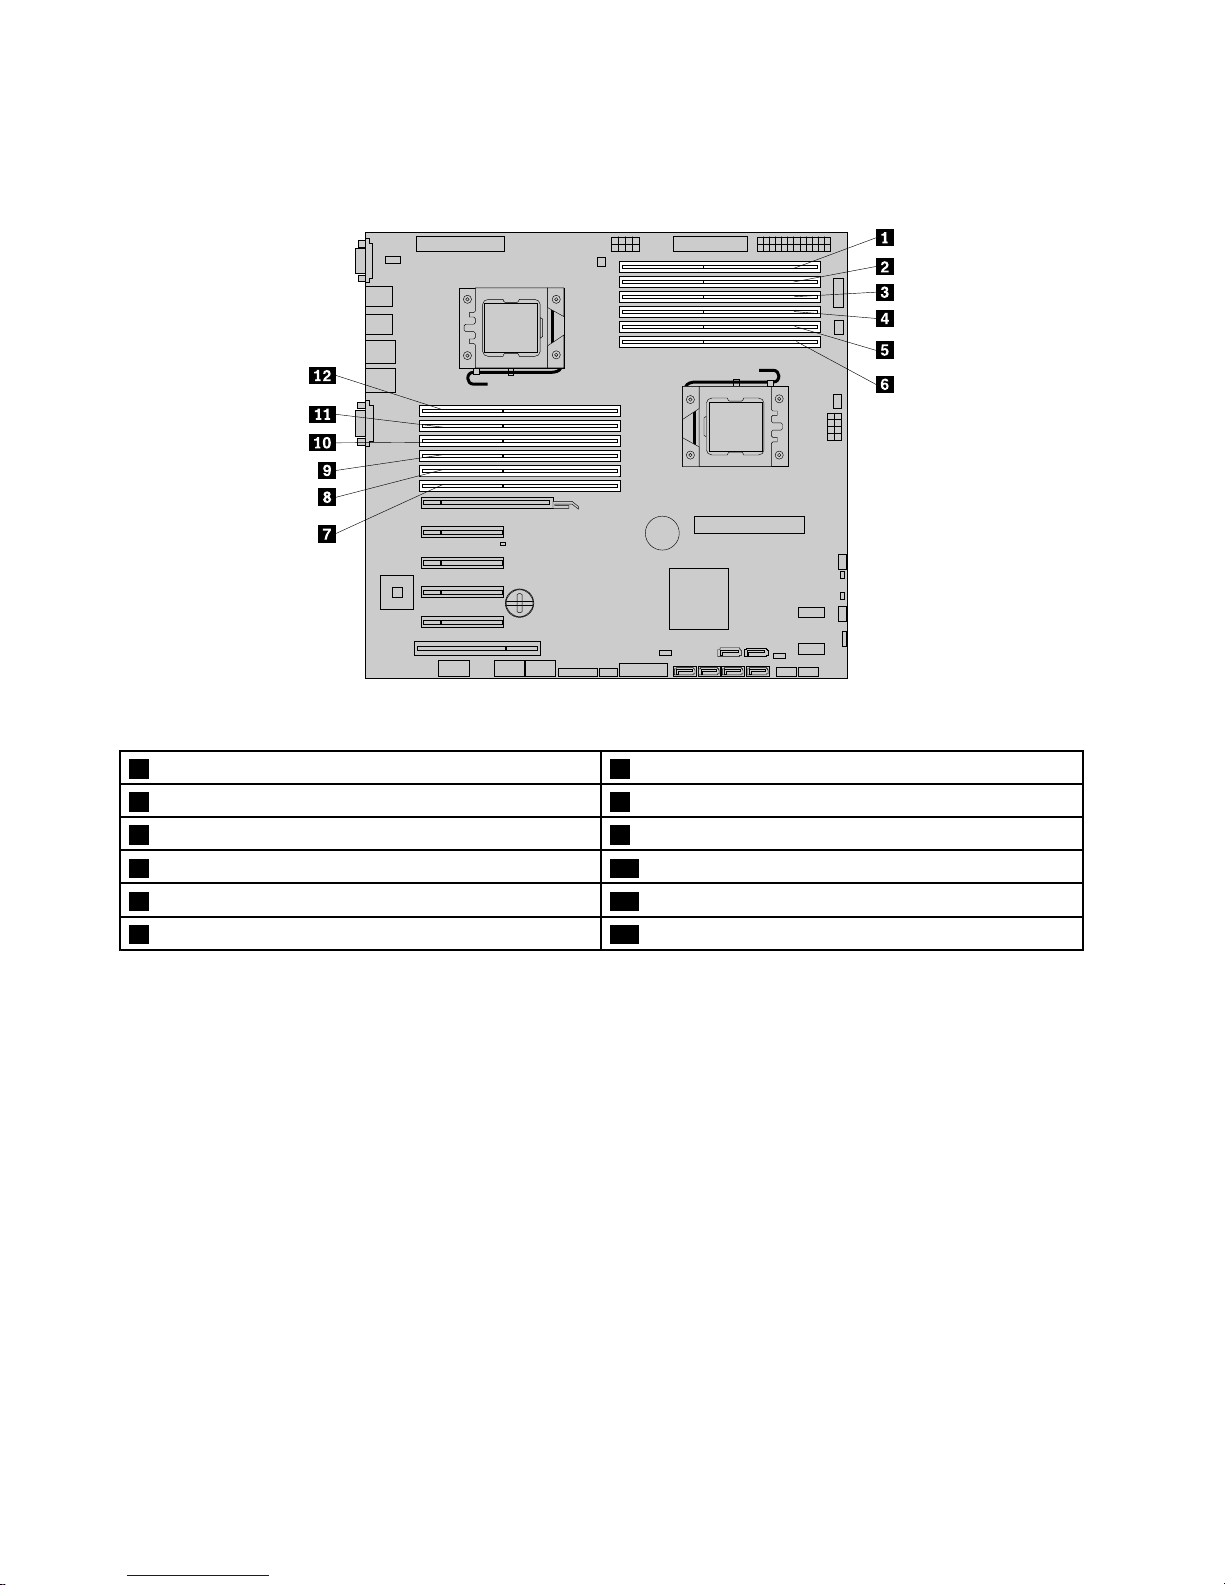
Thefollowingillustrationshowsthelocationsofallmemoryslotsonasystemboardthathastwo
microprocessors(alsoknownasCPUs)installed.
Figure37.Memoryslotsonthesystemboard
1Memoryslot(CPU1DIMMA1)7Memoryslot(CPU2DIMMA1)
2Memoryslot(CPU1DIMMA2)8Memoryslot(CPU2DIMMA2)
3Memoryslot(CPU1DIMMB1)9Memoryslot(CPU2DIMMB1)
4Memoryslot(CPU1DIMMB2)10Memoryslot(CPU2DIMMB2)
5Memoryslot(CPU1DIMMC1)11Memoryslot(CPU2DIMMC1)
6Memoryslot(CPU1DIMMC2)12Memoryslot(CPU2DIMMC2)
86ThinkServerTD330HardwareMaintenanceManual
 Loading...