

Page 1

UserGuide
ThinkPadX130e
Page 2

Notes:Beforeusingthisinformationandtheproductitsupports,besuretoreadthefollowing:
•SafetyandWarrantyGuide
•RegulatoryNotice
•“Importantsafetyinformation”onpagevi
•AppendixC“Notices”onpage165
TheSafetyandWarrantyGuideandtheRegulatoryNoticehavebeenuploadedtotheWebsite.T oreferto
them,gotohttp://www.lenovo.com/support,andthenclickUserGuides&Manuals.
Third Edition (October 2014)
© Copyright Lenovo 2011, 2014.
LIMITEDANDRESTRICTEDRIGHTSNOTICE:IfdataorsoftwareisdeliveredpursuantaGeneralServicesAdministration
“GSA”contract,use,reproduction,ordisclosureissubjecttorestrictionssetforthinContractNo.GS-35F-05925.
Page 3

Contents
Readthisrst..............v
Importantsafetyinformation..........vi
Conditionsthatrequireimmediateaction..vii
Safetyguidelines............vii
Chapter1.Productoverview......1
Locatingcomputercontrols,connectors,and
indicators..................1
Frontview................2
Right-sideview..............4
Left-sideview..............6
Bottomview...............7
Statusindicators.............8
Locatingimportantproductinformation.....10
Machinetypeandmodellabel.......11
FCCIDandICCerticationnumberlabel..11
CerticateofAuthenticitylabel......12
Features.................12
Specications...............13
Operatingenvironment...........14
ThinkVantageT echnologiesandsoftware....15
AccessingapplicationsinWindows7....15
AccessConnections..........17
ActiveProtectionSystem.........17
LenovoScreenReadingOptimizer.....17
LenovoSolutionCenter.........17
LenovoThinkVantageTools........17
LenovoThinkVantageToolbox.......18
MessageCenterPlus..........18
PasswordManager...........18
PowerManager............18
ProductRecovery...........18
PresentationDirector..........19
RescueandRecovery..........19
SimpleTap..............19
SystemUpdate............19
ThinkVantageGPS...........19
ThinkVantageProductivityCenter.....19
Chapter2.Usingyourcomputer...21
Registeringyourcomputer..........21
Frequentlyaskedquestions.........21
Specialkeysandbuttons..........22
Functionkeycombinations........22
Windowskeyandapplicationkey.....25
UsingtheUltraNavpointingdevice.......26
UsingtheTrackPointpointingdevice....27
Usingthetouchpad...........28
BehavioroftheUltraNavandanexternal
mouse................29
AddingtheUltraNavicontothesystemtray.29
Powermanagement............30
Checkingbatterystatus.........30
Usingtheacpoweradapter........30
Chargingthebattery..........31
Maximizingbatterylife..........31
Power-savingmodes..........31
Handlingthebattery...........33
Connectingtothenetwork..........34
Ethernetconnections..........34
Wirelessconnections..........34
Usingaprojectororexternalmonitor......42
Changingdisplaysettings........42
Attachinganexternalmonitor.......42
Settingupapresentation.........45
Usingacolorprole...........45
Usingaudiofeatures..........45
Usingtheintegratedcamera.......46
Usingdualdisplays...........47
Usingthemediacardreader.........49
Chapter3.Youandyourcomputer..51
Accessibilityandcomfort..........51
Ergonomicinformation..........51
Adjustingyourcomputertotyou.....52
Accessibilityinformation.........53
Travelingwithyourcomputer.........53
Traveltips...............54
Travelaccessories...........54
Chapter4.Security..........55
Attachingamechanicallock.........55
Usingpasswords..............55
Passwordsandsleep(standby)mode....56
Power-onpassword...........56
Harddiskpasswords..........57
Supervisorpassword..........59
Harddisksecurity.............61
Noticeondeletingdatafromyourharddiskdrive
orsolidstatedrive.............61
Usingandunderstandingrewalls.......62
Protectingdataagainstviruses........62
Chapter5.Recoveryoverview....63
©CopyrightLenovo2011
i
Page 4

Creatingandusingrecoverymedia......63
Creatingrecoverymedia.........64
Usingrecoverymedia..........64
Performingbackupandrecoveryoperations...65
Performingabackupoperation......65
Performingarecoveryoperation......65
UsingtheRescueandRecoveryworkspace...66
Creatingandusingarescuemedium......67
Creatingarescuemedium........67
Usingarescuemedium.........67
Reinstallingpreinstalledapplicationsanddevice
drivers..................68
Solvingrecoveryproblems..........69
UpdatingyoursystemUEFIBIOS.....117
Usingsystemmanagement..........117
Systemmanagement..........118
Settingmanagementfeatures.......118
Chapter9.Preventingproblems..121
Generaltipsforpreventingproblems......121
Makingsuredevicedriversarecurrent.....122
GettingthelatestdriversfromtheWebsite..122
GettingthelatestdriversusingSystem
Update................122
Takingcareofyourcomputer.........123
Cleaningthecoverofyourcomputer....124
Chapter6.Replacingdevices.....71
Staticelectricityprevention..........71
Replacingthebattery............71
Replacingthesolidstatedriveorharddiskdrive.73
Replacingamemorymodule.........76
Replacingthekeyboard...........79
InstallingandreplacingthePCIExpressMiniCard
forwirelessLAN/WiMAXconnection......83
InstallingandreplacingthePCIExpressMiniCard
forwirelessWANconnection.........87
ReplacingtheSIMcard...........90
Replacingthebackupbattery.........92
Chapter7.Enhancingyour
computer...............97
FindingThinkPadoptions..........97
Chapter8.Advancedconguration..99
Installinganewoperatingsystem.......99
Beforeyoubegin............99
InstallingtheWindows7operatingsystem..100
InstallingWindowsVista.........101
InstallingWindowsXP..........102
Installingdevicedrivers...........104
Installingthedriverfor4-in-1mediacard
reader................104
InstallingThinkPadMonitorFileforWindows
2000/XP/Vista/7............104
InstallingIntelChipsetSupportforWindows
2000/XP/Vista/7............105
Installingdriversandsoftware.......106
ThinkPadSetup..............106
Congmenu..............107
Date/Timemenu............107
Securitymenu.............107
Startupmenu.............108
Restartmenu.............110
ThinkPadSetupitems..........110
Chapter10.Troubleshooting
computerproblems.........127
Diagnosingproblems............127
Troubleshooting..............128
Computerstopsresponding.......128
Spillsonthekeyboard..........129
Errormessages............129
Errorswithoutmessages.........131
Beeperrors..............132
Memoryproblems...........132
Networking..............132
Keyboardandotherpointingdevices....137
Displayandmultimediadevices......138
Batteryandpower...........145
Drivesandotherstoragedevices.....148
Softwareproblems...........149
Portsandconnectors..........149
UniversalSerialBusproblems.......149
Chapter11.Gettingsupport....151
BeforeyoucontactLenovo..........151
Registeringyourcomputer........151
Downloadingsystemupdates.......151
Recordinginformation..........151
Gettinghelpandservice...........152
Usingdiagnosticprograms........152
LenovoSupportWebsite.........152
CallingLenovo.............152
Purchasingadditionalservices........153
AppendixA.Regulatory
information.............155
Wirelessrelatedinformation.........155
LocatingtheUltraConnectwireless
antennas...............156
Locatingwirelessregulatorynotices....156
Exportclassicationnotice..........157
iiUserGuide
Page 5

Electronicemissionnotices..........157
FederalCommunicationsCommission
DeclarationofConformity........157
IndustryCanadaClassBemissioncompliance
statement...............158
EuropeanUnion-Compliancetothe
ElectromagneticCompatibilityDirective...158
GermanClassBcompliancestatement...158
KoreaClassBcompliancestatement....159
JapaneseVCCIClassBstatement.....159
Japancompliancestatementforproducts
whichconnecttothepowermainswith
ratedcurrentlessthanorequalto20Aper
phase................159
Lenovoproductserviceinformationfor
Taiwan................159
Additionalregulatoryinformation.......159
AppendixB.WEEEandrecycling
statements.............161
EUWEEEstatements............161
Japanrecyclingstatements.........161
RecyclinginformationforBrazil........162
BatteryrecyclinginformationfortheEuropean
Union..................162
BatteryrecyclinginformationforTaiwan.....163
BatteryrecyclinginformationfortheUnitedStates
andCanada................163
AppendixC.Notices.........165
Trademarks................166
©CopyrightLenovo2011
iii
Page 6

ivUserGuide
Page 7
Readthisrst
Besuretofollowtheimportanttipsgivenheretocontinuetogetthemostuseandenjoymentoutofyour
computer.Failuretodosomightleadtodiscomfortorinjury,orcauseyourcomputertofail.
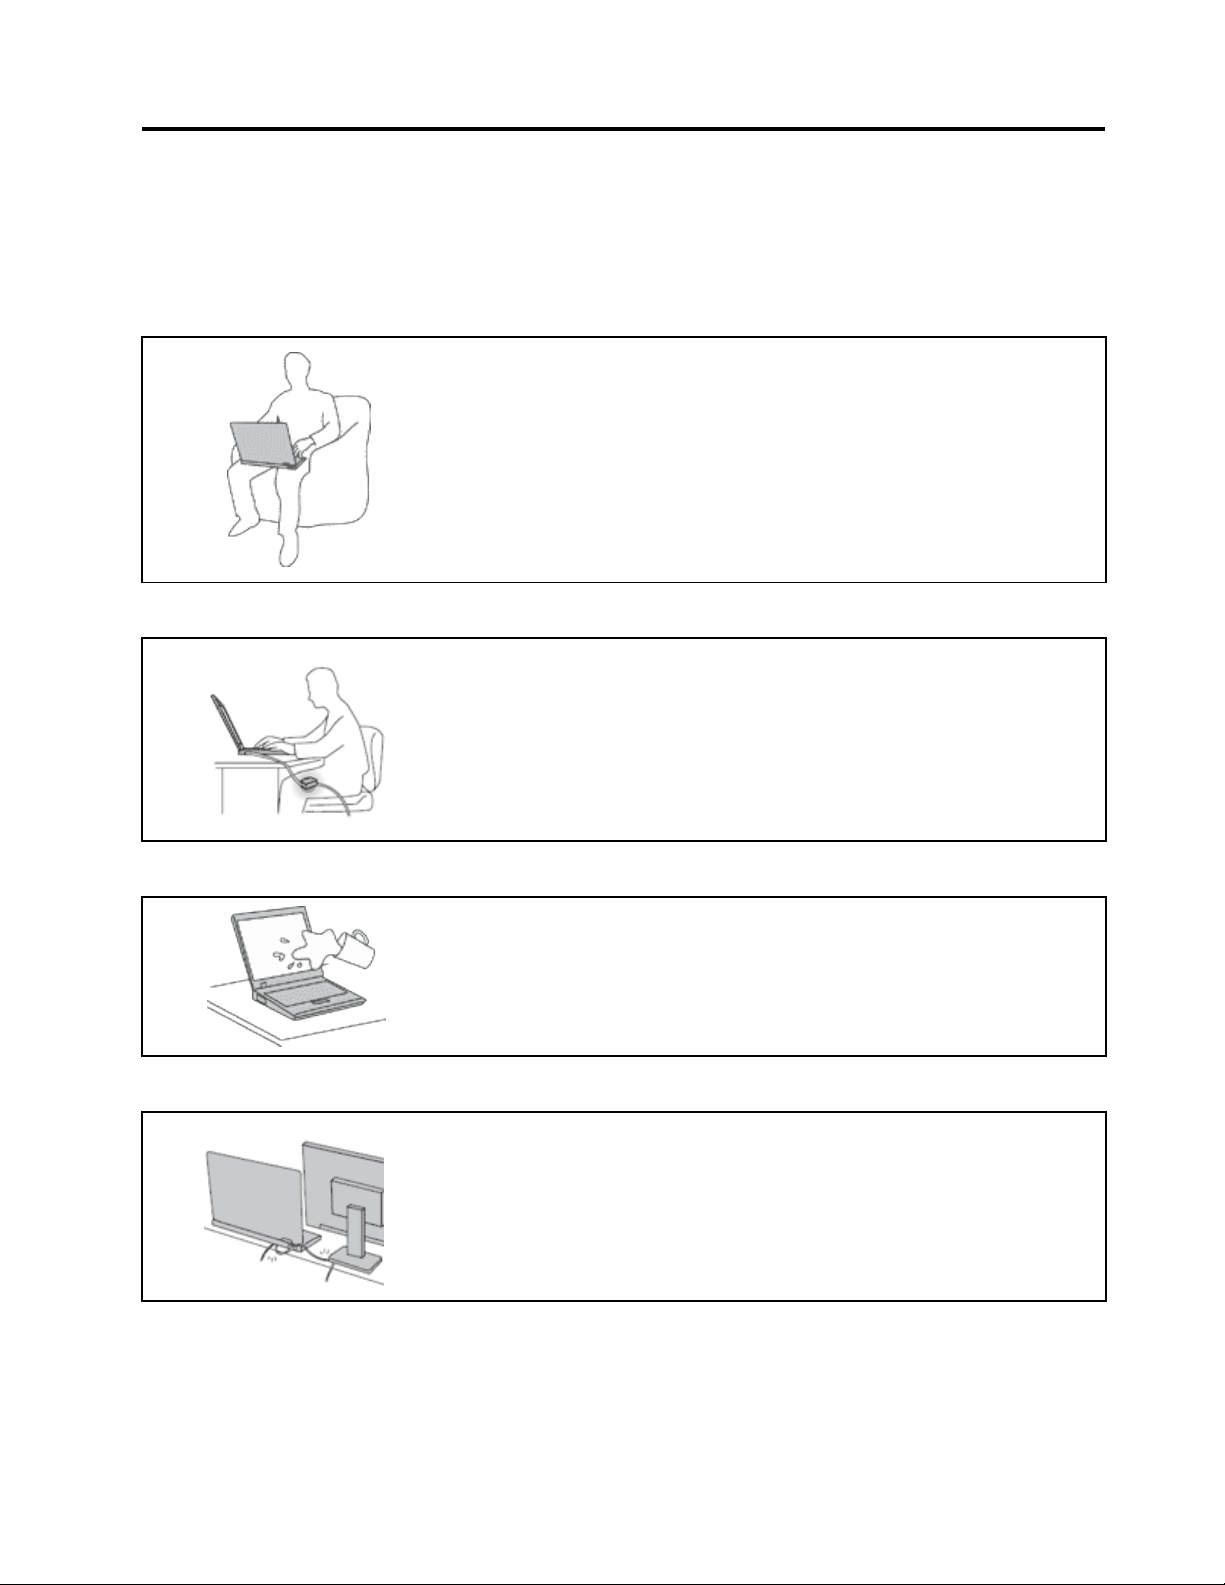
Protectyourselffromtheheatthatyourcomputergenerates.
Whenyourcomputeristurnedonorthebatteryischarging,thebase,thepalm
rest,andsomeotherpartsmaybecomehot.Thetemperaturetheyreach
dependsontheamountofsystemactivityandthelevelofchargeinthebattery.
Extendedcontactwithyourbody,eventhroughclothing,couldcause
discomfortorevenaskinburn.
•Avoidkeepingyourhands,yourlap,oranyotherpartofyourbodyin
contactwithahotsectionofthecomputerforanyextendedtime.
•Periodicallytakehandsfromusingthekeyboardbyliftingyourhandsfrom
thepalmrest.
Protectyourselffromtheheatgeneratedbytheacpoweradapter.
Whentheacpoweradapterisconnectedtoanelectricaloutletandyour
computer,itgeneratesheat.
Extendedcontactwithyourbody,eventhroughclothing,maycauseaskin
burn.
•Donotplacetheacpoweradapterincontactwithanypartofyourbody
whileitisinuse.
•Neveruseittowarmyourbody.
Preventyourcomputerfromgettingwet.
Protectthecablesfrombeingdamaged.
•Toavoidspillsandthedangerofelectricalshock,keepliquidsawayfrom
yourcomputer.
Applyingstrongforcetocablesmaydamageorbreakthem.
•Routecommunicationlines,orthecablesofanacpoweradapter,amouse,a
keyboard,aprinter,oranyotherelectronicdevice,sothattheycannotbe
walkedon,trippedover,pinchedbyyourcomputerorotherobjects,orin
anywaysubjectedtotreatmentthatcouldinterferewiththeoperationof
yourcomputer.
©CopyrightLenovo2011
v
Page 8
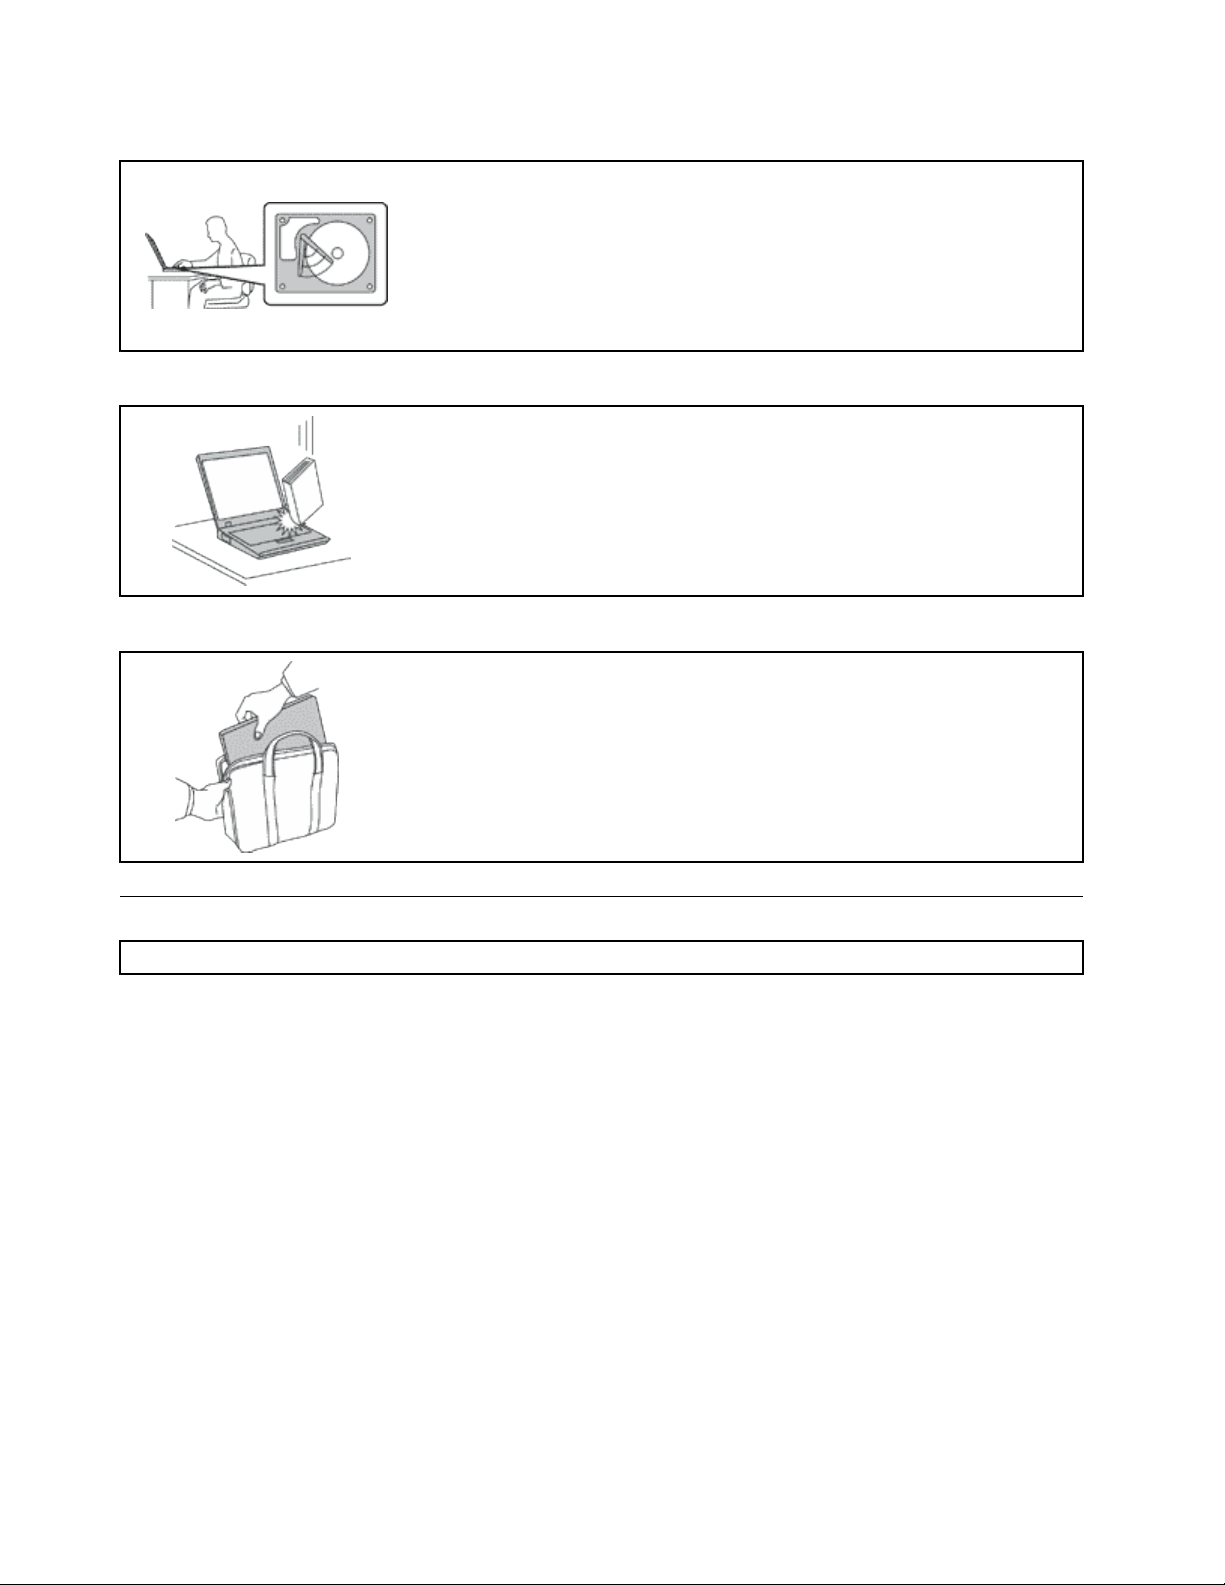
Protectyourcomputeranddatawhenmovingit.
Beforemovingacomputerequippedwithaharddiskdrive,dooneofthe
following,andmakesurethatthepowerswitchisofforisblinking:
•Turnitoff.
•Putitinsleep(standby)mode.
•Putitinhibernationmode.
Thiswillhelptopreventdamagetothecomputer,andpossiblelossofdata.
Handleyourcomputergently.
•Donotdrop,bump,scratch,twist,hit,vibrate,push,orplaceheavyobjectson
yourcomputer,display,orexternaldevices.
Carryyourcomputercarefully.
•Useaqualitycarryingcasethatprovidesadequatecushioningandprotection.
•Donotpackyourcomputerinatightlypackedsuitcaseorbag.
•Beforeputtingyourcomputerinacarryingcase,makesurethatitisoff,insleep
(standby)mode,orinhibernationmode.Donotputacomputerinacarrying
casewhileitisturnedon.
Importantsafetyinformation
Note:Readimportantsafetyinformationrst.
Thisinformationcanhelpyousafelyuseyournotebookcomputer.Followandretainallinformationincluded
withyourcomputer.Theinformationinthisdocumentdoesnotalterthetermsofyourpurchaseagreement
ortheLenovo
WarrantyGuidethatcomeswithyourcomputer.
Customersafetyisimportant.Ourproductsaredevelopedtobesafeandeffective.However,personal
computersareelectronicdevices.Powercords,poweradapters,andotherfeaturescancreatepotential
safetyrisksthatcanresultinphysicalinjuryorpropertydamage,especiallyifmisused.Toreducethese
risks,followtheinstructionsincludedwithyourproduct,observeallwarningsontheproductandinthe
operatinginstructions,andreviewtheinformationincludedinthisdocumentcarefully.Bycarefullyfollowing
theinformationcontainedinthisdocumentandprovidedwithyourproduct,youcanhelpprotectyourself
fromhazardsandcreateasafercomputerworkenvironment.
Note:Thisinformationincludesreferencestopoweradaptersandbatteries.Inadditiontonotebook
computers,someproducts(suchasspeakersandmonitors)shipwithexternalpoweradapters.Ifyouhave
suchaproduct,thisinformationappliestoyourproduct.Inaddition,computerproductscontainacoin-sized
internalbatterythatprovidespowertothesystemclockevenwhenthecomputerisunplugged,sothe
batterysafetyinformationappliestoallcomputerproducts.
®
LimitedWarranty.Formoreinformation,see“WarrantyInformation”intheSafetyand
viUserGuide
Page 9

Conditionsthatrequireimmediateaction
Productscanbecomedamagedduetomisuseorneglect.Someproductdamageisseriousenough
thattheproductshouldnotbeusedagainuntilithasbeeninspectedand,ifnecessary,repairedby
anauthorizedservicer.
Aswithanyelectronicdevice,paycloseattentiontotheproductwhenitisturnedon.Onveryrare
occasions,youmightnoticeanodororseeapuffofsmokeorsparksventfromyourproduct.Oryou
mighthearsoundslikepopping,crackingorhissing.Theseconditionsmightmerelymeanthatan
internalelectroniccomponenthasfailedinasafeandcontrolledmanner.Or,theymightindicate
apotentialsafetyissue.However ,donottakerisksorattempttodiagnosethesituationyourself.
ContacttheCustomerSupportCenterforfurtherguidance.ForalistofServiceandSupportphone
numbers,seethefollowingWebsite:
http://www.lenovo.com/support/phone
Frequentlyinspectyourcomputeranditscomponentsfordamageorwearorsignsofdanger.Ifyou
haveanyquestionabouttheconditionofacomponent,donotusetheproduct.ContacttheCustomer
SupportCenterortheproductmanufacturerforinstructionsonhowtoinspecttheproductand
haveitrepaired,ifnecessary.
Intheunlikelyeventthatyounoticeanyofthefollowingconditions,orifyouhaveanysafetyconcerns
withyourproduct,stopusingtheproductandunplugitfromthepowersourceandtelecommunication
linesuntilyoucanspeaktotheCustomerSupportCenterforfurtherguidance.
•Powercords,plugs,poweradapters,extensioncords,surgeprotectors,orpowersuppliesthatare
cracked,broken,ordamaged.
•Signsofoverheating,smoke,sparks,orre.
•Damagetoabattery(suchascracks,dents,orcreases),dischargefromabattery,orabuildupofforeign
substancesonthebattery.
•Acracking,hissingorpoppingsound,orstrongodorthatcomesfromtheproduct.
•Signsthatliquidhasbeenspilledoranobjecthasfallenontothecomputerproduct,thepowercordor
poweradapter.
•Thecomputerproduct,powercord,orpoweradapterhasbeenexposedtowater.
•Theproducthasbeendroppedordamagedinanyway.
•Theproductdoesnotoperatenormallywhenyoufollowtheoperatinginstructions.
Note:Ifyounoticetheseconditionswithaproduct(suchasanextensioncord)thatisnotmanufacturedfor
orbyLenovo,stopusingthatproductuntilyoucancontacttheproductmanufacturerforfurtherinstructions,
oruntilyougetasuitablereplacement.
Safetyguidelines
Alwaysobservethefollowingprecautionstoreducetheriskofinjuryandpropertydamage.
Formoreinformation,see“Importantsafetyinformation”intheSafetyandWarrantyGuidethatcomes
withyourcomputer.
Serviceandupgrades
DonotattempttoserviceaproductyourselfunlessinstructedtodosobytheCustomerSupportCenteror
yourdocumentation.OnlyuseaServiceProviderwhoisapprovedtorepairyourparticularproduct.
Note:Somecomputerpartscanbeupgradedorreplacedbythecustomer.Upgradestypicallyare
referredtoasoptions.ReplacementpartsapprovedforcustomerinstallationarereferredtoasCustomer
ReplaceableUnits,orCRUs.Lenovoprovidesdocumentationwithinstructionswhenitisappropriatefor
©CopyrightLenovo2011
vii
Page 10

customerstoinstalloptionsorreplaceCRUs.Youmustcloselyfollowallinstructionswheninstallingor
replacingparts.TheOffstateofapowerindicatordoesnotnecessarilymeanthatvoltagelevelsinsidea
productarezero.Beforeyouremovethecoversfromaproductequippedwithapowercord,alwaysmake
surethatthepoweristurnedoffandthattheproductisunpluggedfromanypowersource.Ifyouhave
anyquestionsorconcerns,contacttheCustomerSupportCenter.
Althoughtherearenomovingpartsinyourcomputerafterthepowercordhasbeendisconnected,the
followingwarningsarerequiredforyoursafety.
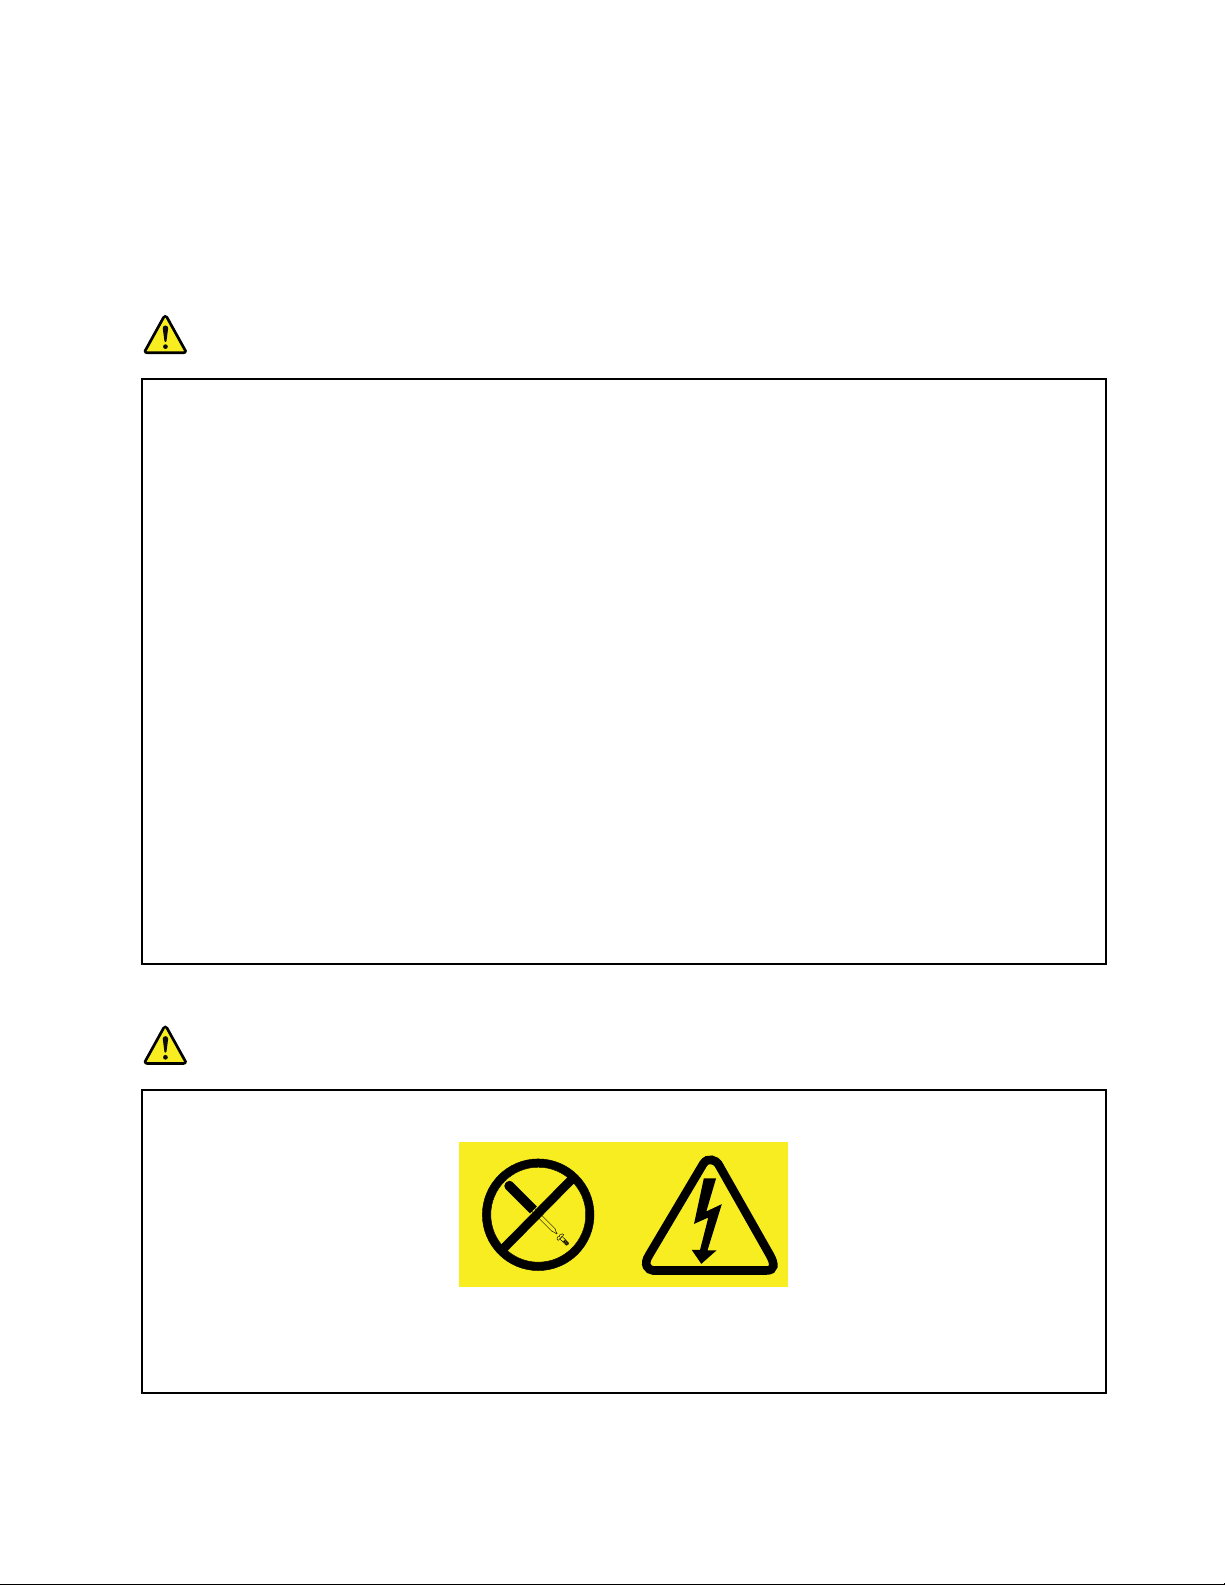
CAUTION:
Hazardousmovingparts.Keepngersandotherbodypartsaway.
CAUTION:
BeforereplacinganyCRUs,turnoffthecomputerandwaitthreetoveminutestolet
thecomputercoolbeforeopeningthecover.
Powercordsandpoweradapters
DANGER
Useonlythepowercordsandpoweradapterssuppliedbytheproductmanufacturer.
Thepowercordsshallbesafetyapproved.ForGermany,itshallbeH05VV-F,3G,0.75mm
better.Forothercountries,thesuitabletypesshallbeusedaccordingly.
Neverwrapapowercordaroundapoweradapterorotherobject.Doingsocanstressthecordin
waysthatcancausethecordtofray,crack,orcrimp.Thiscanpresentasafetyhazard.
Alwaysroutepowercordssothattheywillnotbewalkedon,trippedover,orpinchedbyobjects.
Protectpowercordandpoweradaptersfromliquids.Forinstance,donotleaveyourpowercordor
poweradapternearsinks,tubs,toilets,oronoorsthatarecleanedwithliquidcleansers.Liquids
cancauseashortcircuit,particularlyifthepowercordorpoweradapterhasbeenstressedby
misuse.Liquidsalsocancausegradualcorrosionofpowercordterminalsand/ortheconnector
terminalsonapoweradapter,whichcaneventuallyresultinoverheating.
Alwaysconnectpowercordsandsignalcablesinthecorrectorderandensurethatallpowercord
connectorsaresecurelyandcompletelypluggedintoreceptacles.
DonotuseanypoweradapterthatshowscorrosionattheACinputpinsorshowssignsof
overheating(suchasdeformedplastic)attheACinputoranywhereonthepoweradapter.
2
,or
Donotuseanypowercordswheretheelectricalcontactsoneitherendshowsignsofcorrosionor
overheatingorwherethepowercordappearstohavebeendamagedinanyway.
viiiUserGuide
Page 11
Extensioncordsandrelateddevices
Ensurethatextensioncords,surgeprotectors,uninterruptiblepowersupplies,andpowerstripsthatyouuse
areratedtohandletheelectricalrequirementsoftheproduct.Neveroverloadthesedevices.Ifpowerstrips
areused,theloadshouldnotexceedthepowerstripinputrating.Consultanelectricianformoreinformation
ifyouhavequestionsaboutpowerloads,powerrequirements,andinputratings.
Plugsandoutlets
DANGER
Ifareceptacle(poweroutlet)thatyouintendtousewithyourcomputerequipmentappearstobe
damagedorcorroded,donotusetheoutletuntilitisreplacedbyaqualiedelectrician.
Donotbendormodifytheplug.Iftheplugisdamaged,contactthemanufacturertoobtain
areplacement.
Donotshareanelectricaloutletwithotherhomeorcommercialappliancesthatdrawlargeamounts
ofelectricity;otherwise,unstablevoltagemightdamageyourcomputer,data,orattacheddevices.
Someproductsareequippedwithathree-prongedplug.Thisplugtsonlyintoagrounded
electricaloutlet.Thisisasafetyfeature.Donotdefeatthissafetyfeaturebytryingtoinsertitinto
anon-groundedoutlet.Ifyoucannotinserttheplugintotheoutlet,contactanelectricianforan
approvedoutletadapterortoreplacetheoutletwithonethatenablesthissafetyfeature.Never
overloadanelectricaloutlet.Theoverallsystemloadshouldnotexceed80percentofthebranch
circuitrating.Consultanelectricianformoreinformationifyouhavequestionsaboutpowerloads
andbranchcircuitratings.
Besurethatthepoweroutletyouareusingisproperlywired,easilyaccessible,andlocatedclose
totheequipment.Donotfullyextendpowercordsinawaythatwillstressthecords.
Besurethatthepoweroutletprovidesthecorrectvoltageandcurrentfortheproductyouare
installing.
Carefullyconnectanddisconnecttheequipmentfromtheelectricaloutlet.
Powersupplystatement
DANGER
Neverremovethecoveronapowersupplyoranypartthathasthefollowinglabelattached.
Hazardousvoltage,current,andenergylevelsarepresentinsideanycomponentthathasthislabel
attached.Therearenoserviceablepartsinsidethesecomponents.Ifyoususpectaproblemwith
oneoftheseparts,contactaservicetechnician.
©CopyrightLenovo2011
ix
Page 12

Externaldevices
CAUTION:
DonotconnectordisconnectanyexternaldevicecablesotherthanUSBcablewhilethecomputer
powerison;otherwise,youmightdamageyourcomputer.T oavoidpossibledamagetoattached
devices,waitatleastvesecondsafterthecomputerisshutdowntodisconnectexternaldevices.
Generalbatterynotice
DANGER
PersonalcomputersmanufacturedbyLenovocontainacoincellbatterytoprovidepowerto
thesystemclock.Inaddition,manymobileproducts,suchasnotebookcomputers,utilizea
rechargeablebatterypacktoprovidesystempowerwheninportablemode.Batteriessuppliedby
Lenovoforusewithyourproducthavebeentestedforcompatibilityandshouldonlybereplaced
withapprovedparts.
Neverattempttoopenorserviceanybattery.Donotcrush,puncture,orincineratebatteriesor
shortcircuitthemetalcontacts.Donotexposethebatterytowaterorotherliquids.Onlyrecharge
thebatterypackstrictlyaccordingtoinstructionsincludedintheproductdocumentation.
Batteryabuseormishandlingcancausethebatterytooverheat,whichcancausegassesorame
to“vent”fromthebatterypackorcoincell.Ifyourbatteryisdamaged,orifyounoticeany
dischargefromyourbatteryorthebuildupofforeignmaterialsonthebatteryleads,stopusingthe
batteryandobtainareplacementfromthebatterymanufacturer.
Batteriescandegradewhentheyareleftunusedforlongperiodsoftime.Forsomerechargeable
batteries(particularlyLithiumIonbatteries),leavingabatteryunusedinadischargedstatecould
increasetheriskofabatteryshortcircuit,whichcouldshortenthelifeofthebatteryandalsocan
poseasafetyhazard.DonotletrechargeableLithium-Ionbatteriescompletelydischargeorstore
thesebatteriesinadischargedstate.
xUserGuide
Page 13

Rechargeablebatterynotice
DANGER
Donotattempttodisassembleormodifythebatterypack.Attemptingtodosocancausean
explosion,orliquidleakagefromthebatterypack.Abatterypackotherthantheonespeciedby
Lenovo,oradisassembledormodiedbatterypackisnotcoveredbythewarranty.
Iftherechargeablebatterypackisincorrectlyreplaced,thereisdangerofanexplosion.Thebattery
packcontainsasmallamountofharmfulsubstances.T oavoidpossibleinjury:
•ReplaceonlywithabatteryofthetyperecommendedbyLenovo.
•Keepthebatterypackawayfromre.
•Donotexposeittowaterorrain.
•Donotattempttodisassembleit.
•Donotshort-circuitit.
•Keepitawayfromchildren.
•Donotdropthebatterypack.
Donotputthebatterypackintrashthatisdisposedofinlandlls.Whendisposingofthebattery,
complywithlocalordinancesorregulations.
Thebatterypackshouldbestoredatroomtemperature,chargedtoapproximately30to50%
ofcapacity.Werecommendthatbatterypackbechargedaboutonceperyeartoprevent
overdischarge.
Lithiumcoincellbatterynotice
DANGER
Dangerofexplosionifbatteryisincorrectlyreplaced.
Whenreplacingthelithiumcoincellbattery,useonlythesameoranequivalenttypethatis
recommendedbythemanufacturer.Thebatterycontainslithiumandcanexplodeifnotproperly
used,handled,ordisposedof.
Donot:
•Throworimmerseintowater
•Heattomorethan100°C(212°F)
•Repairordisassemble
Disposeofthebatteryasrequiredbylocalordinancesorregulations.
ThefollowingstatementappliestousersinthestateofCalifornia,U.S.A.
CaliforniaPerchlorateInformation:
ProductscontainingCR(manganesedioxide)lithiumcoincellbatteriesmigntcontainperchlorate.
PerchlorateMaterial-specialhandlingmigntapply,See
www.dtsc.ca.gov/hazardouswaste/perchlorate
©CopyrightLenovo2011
xi
Page 14

Heatandproductventilation
DANGER
Computers,acpoweradapters,andmanyaccessoriescangenerateheatwhenturnedonandwhen
batteriesarecharging.Notebookcomputerscangenerateasignicantamountofheatduetotheir
compactsize.Alwaysfollowthesebasicprecautions:
•Whenyourcomputeristurnedonorthebatteryischarging,thebase,thepalmrest,andsome
otherpartsmigntbecomehot.Avoidkeepingyourhands,yourlap,oranyotherpartofyour
bodyincontactwithahotsectionofthecomputerforanyextendedlengthoftime.Whenyou
usethekeyboard,avoidkeepingyourpalmsonthepalmrestforaprolongedperiodoftime.
Yourcomputergeneratessomeheatduringnormaloperation.Theamountofheatdependson
theamountofsystemactivityandthebatterychargelevel.Extendedcontactwithyourbody,
eventhroughclothing,couldcausediscomfortorevenaskinburn.Periodicallytakebreaks
fromusingthekeyboardbyliftingyourhandsfromthepalmrest;andbecarefulnottouse
thekeyboardforanyextendedlengthoftime.
•Donotoperateyourcomputerorchargethebatterynearammablematerialsorinexplosive
environments.
•Ventilationslots,fansand/orheatsinksareprovidedwiththeproductforsafety,comfort,and
reliableoperation.Thesefeaturesmightinadvertentlybecomeblockedbyplacingtheproducton
abed,sofa,carpet,orotherexiblesurface.Neverblock,cover,ordisablethesefeatures.
•Whentheacpoweradapterisconnectedtoanelectricaloutletandyourcomputer,itgenerates
heat.Donotplacetheadapterincontactwithanypartofyourbodywhileusingit.Neveruse
theacpoweradaptertowarmyourbody.Extendedcontactwithyourbody,eventhrough
clothing,migntcauseaskinburn.
Foryoursafety,alwaysfollowthesebasicprecautionswithyourcomputer:
•Keepthecoverclosedwheneverthecomputerispluggedin.
•Regularlyinspecttheoutsideofthecomputerfordustaccumulation.
•Removedustfromventsandanyperforationsinthebezel.Morefrequentcleaningsmightbe
requiredforcomputersindustyorhigh-trafcareas.
•Donotrestrictorblockanyventilationopenings.
•Donotoperateyourcomputerinsidefurniture,asthismightincreasetheriskofoverheating.
•Airowtemperaturesintothecomputershouldnotexceed35°C(95°F).
xiiUserGuide
Page 15

Electricalcurrentsafetyinformation
DANGER
Electriccurrentfrompower ,telephone,andcommunicationcablesishazardous.
Toavoidashockhazard:
•Donotuseyourcomputerduringalightningstorm.
•Donotconnectordisconnectanycablesorperforminstallation,maintenance,orreconguration
ofthisproductduringanelectricalstorm.
•Connectallpowercordstoaproperlywiredandgroundedelectricaloutlet.
•Connecttoproperlywiredoutletsanyequipmentthatwillbeattachedtothisproduct.
•Wheneverpossible,useonehandonlytoconnectordisconnectsignalcables.
•Neverturnonanyequipmentwhenthereisevidenceofre,water,orstructuraldamage.
•Disconnecttheattachedpowercords,batterypack,andallthecablesbeforeyouopenthe
devicecovers,unlessinstructedotherwiseintheinstallationandcongurationprocedures.
•Donotuseyoucomputeruntilallinternalpartsenclosuresarefastenedintoplace.Neveruse
thecomputerwheninternalpartsandcircuitsareexposed.
DANGER
Connectanddisconnectcablesasdescribedinthefollowingprocedureswheninstalling,moving,
oropeningcoversonthisproductorattacheddevices.
Toconnect:
1.TurneverythingOFF.
2.First,attachallcablestodevices.
3.Attachsignalcablestoconnectors.
4.Attachpowercordstooutlets.
5.TurndevicesON.
Todisconnect:
1.TurneverythingOFF.
2.First,removepowercordsfromoutlets.
3.Removesignalcablesfromconnectors.
4.Removeallcablesfromdevices.
Thepowercordmustbedisconnectedfromthewalloutletorreceptaclebeforeinstallingallother
electricalcablesconnectedtothecomputer.
Thepowercordmigntbereconnectedtothewalloutletorreceptacleonlyafterallotherelectrical
cableshavebeenconnectedtothecomputer.
Liquidcrystaldisplaynotice
CAUTION:
TheLCDismadeofglass,androughhandlingordroppingthecomputercancausetheLCDtobreak.
IftheLCDbreaksandtheinternaluidgetsintoyoureyesoronyourhands,immediatelywashthe
affectedareaswithwaterforatleast15minutes;ifanysymptomsarepresentafterwashing,get
medicalcare.
Usingheadphonesorearphones
Ifyourcomputerhasbothaheadphoneconnectorandanaudio-outconnector,alwaysusetheheadphone
connectorforheadphones(alsocalledaheadset)orearphones.
CAUTION:
Excessivesoundpressurefromearphonesandheadphonescancausehearingloss.Adjustmentof
©CopyrightLenovo2011
xiii
Page 16

theequalizertomaximumincreasestheearphoneandheadphoneoutputvoltageandthesound
pressurelevel.Therefore,toprotectyourhearing,adjusttheequalizertoanappropriatelevel.
Excessiveuseofheadphonesorearphonesforalongperiodoftimeathighvolumecanbedangerousifthe
outputoftheheadphoneorearphoneconnectorsdonotcomplywithspecicationsofEN50332-2.The
headphoneoutputconnectorofyourcomputercomplieswithEN50332-2Subclause7.Thisspecication
limitsthecomputer’smaximumwidebandtrueRMSoutputvoltageto150mV.Tohelpprotectagainst
hearingloss,ensurethattheheadphonesorearphonesyouusealsocomplywithEN50332-2(Clause7
limits)forawidebandcharacteristicvoltageof75mV.UsingheadphonesthatdonotcomplywithEN
50332-2canbedangerousduetoexcessivesoundpressurelevels.
IfyourLenovocomputercamewithheadphonesorearphonesinthepackage,asaset,thecombinationof
theheadphonesorearphonesandthecomputeralreadycomplieswiththespecicationsofEN50332-1.
Ifdifferentheadphonesorearphonesareused,ensurethattheycomplywithEN50332-1(Clause6.5
LimitationValues).UsingheadphonesthatdonotcomplywithEN50332-1canbedangerousdueto
excessivesoundpressurelevels.
Additionalsafetyinformation
DANGER
Plasticbagscanbedangerous.Keepplasticbagsawayfrombabiesandchildrentoavoiddanger
ofsuffocation.
NoticeforTabletPCusers
SafetyNoticeforusersinAustralia:
DANGER
Donotconnectphonelinewhileusingtabletmode.
NoticeforusersintheU.S.A.
ManyPCproductsandaccessoriescontaincords,cablesorwires,suchaspowercordsorcordstoconnect
theaccessorytoaPC.Ifthisproducthassuchacord,cableorwire,thenthefollowingwarningapplies:
WARNING
Handlingthecordonthisproductorcordsassociatedwithaccessoriessoldwiththisproductwillexpose
youtolead,achemicalknowntotheStateofCaliforniatocausecancer,andbirthdefectsorother
reproductiveharm.Washhandsafterhandling.
Savetheseinstructions.
xivUserGuide
Page 17

Chapter1.Productoverview
Thischapterprovidesinformationaboutthelocationsofconnectors,locatingimportantproductinformation,
computerfeatures,specications,operatingenvironment,andpreinstalledsoftwareprograms.
Thischaptercontainsthefollowingtopics:
•“Locatingcomputercontrols,connectors,andindicators”onpage1
•“Locatingimportantproductinformation”onpage10
•“Features”onpage12
•“Specications”onpage13
•“Operatingenvironment”onpage14
•“ThinkVantageTechnologiesandsoftware”onpage15
Locatingcomputercontrols,connectors,andindicators
Thissectionintroducesthecomputerhardwarefeaturestogiveyouthebasicinformationyouwillneed
tostartusingthecomputer.
Thissectionincludesthefollowingtopics:
•“Frontview”onpage2
•“Right-sideview”onpage4
•“Left-sideview”onpage6
•“Bottomview”onpage7
•“Statusindicators”onpage8
©CopyrightLenovo2011
1
Page 18
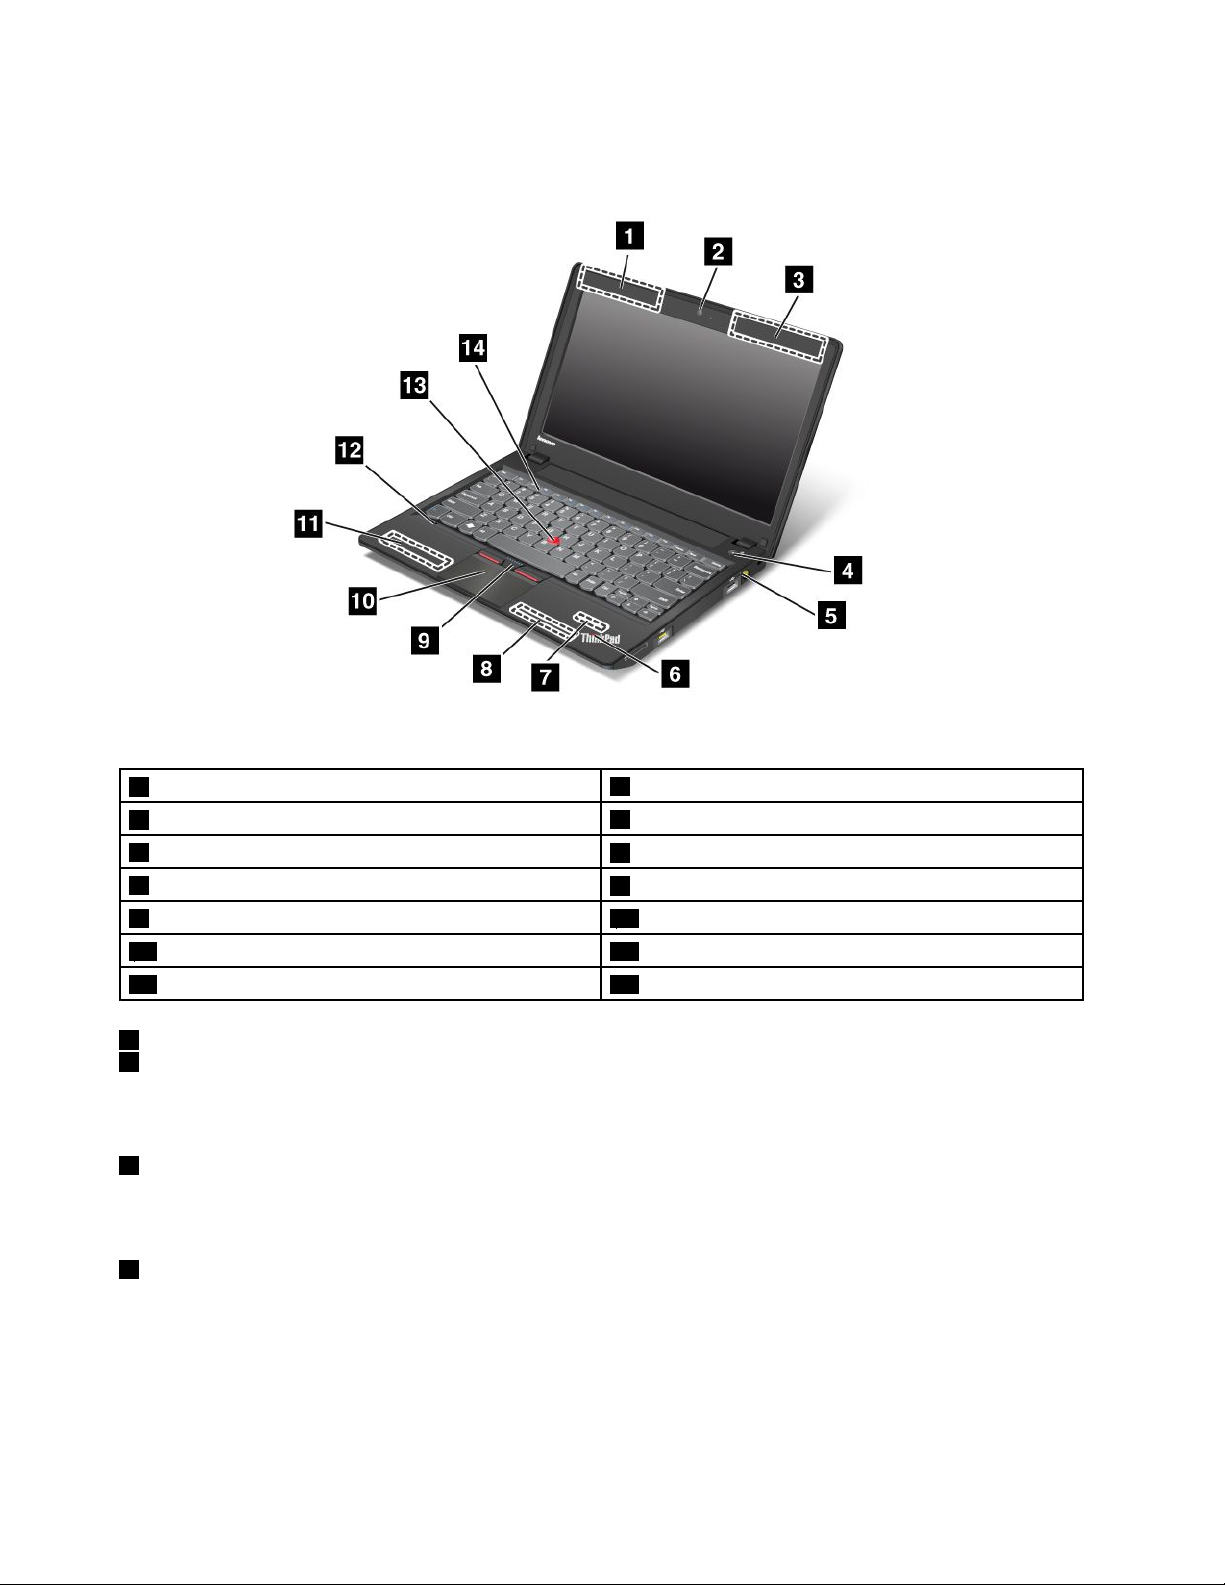
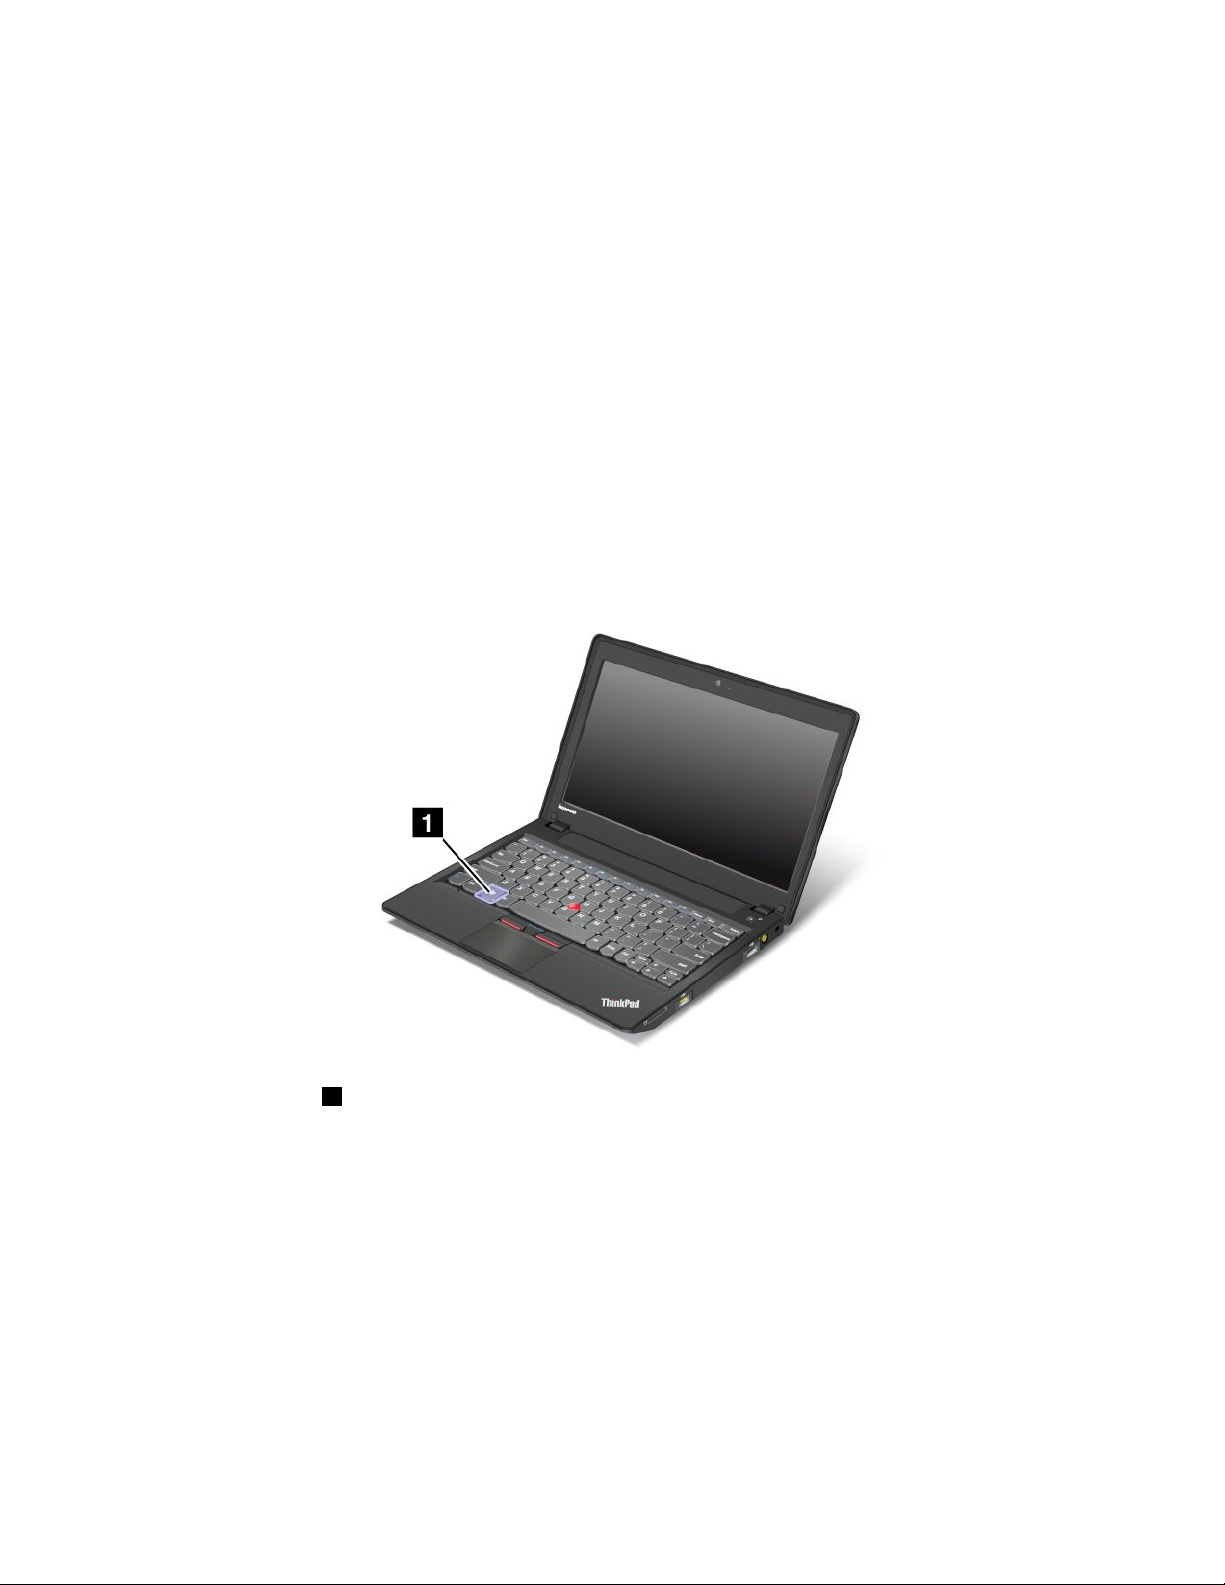
Frontview
Figure1.ThinkPadX130efrontview
1UltraConnect™wirelessantennas(left)
3UltraConnectwirelessantennas(right)
5Powerstatusindicator
7Bluetoothantenna
9T rackPoint
11Built-instereospeaker(left)
13T rackPointpointingstick14Volumecontrolbuttons
1UltraConnectwirelessantennas(left)
3UltraConnectwirelessantennas(right)
®
buttons10Touchpad
2Integratedcamera
4Powerswitch
6Systemstatusindicator
8Built-instereospeaker(right)
12Built-inmicrophone
Formoreinformationaboutthebuilt-inwirelessantennas,referto“LocatingtheUltraConnectwireless
antennas”onpage156.
2Integratedcamera
Yourcomputermighthaveanintegratedcamera.Usethiscameratotakepicturesorholdavideo
conference.Formoreinformation,referto“Usingtheintegratedcamera”onpage46.
4Powerswitch
Usethepowerswitchtoturnonthecomputer.
Toturnoffyourcomputer,usetheStartmenushutdownoption.Ifyoucannotturnoffthecomputerusing
thismethod,pressandholdthepowerswitchfortwoseconds.
Ifyourcomputerstopsresponding,andyoucannotturnitoff,pressandholdthepowerswitchforfour
secondsormore.Ifthesystemstillisnotreset,removetheacpoweradapterandthebattery.
2UserGuide
Page 19

ThepowerswitchalsocanbeprogrammedviaPowerManagertoshutdownthecomputerorputitinto
sleep(standby)orhibernationmode.
5Powerstatusindicator
Yourcomputerhasapowerstatusindicator.Forthedetails,see“Powerstatusindicator”onpage10.
6Systemstatusindicator
Yourcomputerhastwosystemstatusindicators,oneontheouterlidofyourcomputerandtheotheron
thepalmrest.Theillustrationaboveshowstheoneonthepalmrest.Fordetails,see“Systemstatus
indicators”onpage9
7Bluetoothantenna
.
Ifyourcomputerhasintegratedbluetoothfeatures,referto“UsingBluetooth”onpage36formore
information.
8Built-instereospeaker(right)
11Built-instereospeaker(left)
Fordetails,referto“Volumeandmutebuttons”onpage23.
UltraNav
9T rackPointbuttons
10T ouchpad
13T rackPointpointingstick
ThekeyboardcontainstheuniqueT rackPointpointingdevice.Pointing,selecting,anddraggingareallpart
ofasingleprocessthatyoucanperformwithoutmovingyourngersfromtypingposition.
MoveyourngertipacrosstheUltraNav
®
touchpadtomovethepointer.
TheTrackPointandTrackPointbuttonsprovidefunctionssimilartothoseofamouseanditsbuttons.
12Built-inmicrophone
Thebuilt-inmicrophonecapturessoundandvoicewhenitisusedwithanapplicationprogramcapable
ofhandlingaudio.
14Volumecontrolbuttons
Usethebuilt-involumecontrolbuttonstoquicklyadjustthevolumeormutethesoundfromyourcomputer.
Fordetails,refertotheinstructionsin“Volumeandmutebuttons”onpage23.
Chapter1.Productoverview3
Page 20

Right-sideview
Figure2.ThinkPadX130eright-sideview
1Mediacardreaderslot
3USBconnector
5Securitykeyhole
1Mediacardreaderslot
2AlwaysOnUSBconnector
4Powerjack
Dependingonthemodel,yourcomputermignthaveaMediaCardReaderslot.TheMediaCardReader
supportsthefollowingfourtypesofcards:
•SDcard
•SDHCcard
•SDXCcard
•MultiMediaCard
Note:Y ourcomputerdoesnotsupporttheCPRMfeatureforSDcards.
Fordetails,refertotheinstructionsin“Usingthemediacardreader”onpage49
2USBconnector
.
TheUniversalSerialBus(USB)connectorisusedforconnectingUSB-interface-compatibledevices,such
asaprinterordigitalcamera.
3AlwaysOnUSBconnector
UsethisconnectortoconnectdevicescompatiblewithaUSBinterface,suchasaprinteroradigitalcamera.
4UserGuide
Page 21

Bydefault,evenifyourcomputerisinsleep(standby)mode,theAlwaysOnUSBconnectorstillenables
youtochargesomedevices,suchasiPod
®
,iPhone
®
,andBlackBerry®smartphones,byattachingthe
devicestotheconnector.
However,withtheacpoweradapterattached,ifyouwanttochargethesedeviceswhenyourcomputer
isinhibernationmodeorpoweredoff,youwillneedtoopenthePowerManagerprogramandcongure
correspondingsettingstoenabletheAlwaysOnUSBconnector.FordetailsabouthowtoenabletheAlways
OnUSBconnector,refertothehelpinformationsystemofthePowerManagerprogram.
Notes:
•Yourcomputermigntlookslightlydifferentfromtheillustrations.
•YourcomputeriscompatiblewithUSB1.1and2.0.
4Powerjack
Connecttheacpoweradaptercabletothepowerjacktoprovidepowertothecomputerandcharge
thebattery.
Anindicatortotheleftofthepowerjackshowsthestatusofacpower.Whentheacpoweradapteris
connected,theindicatorison.Ifabatteryisinstalledinthecomputer,theindicatorisgreenwhenthe
batterycharges.
5Securitykeyhole
Usethesecuritykeyholeandanoptionalsecuritycablelocktosecureyourcomputertoadesk,table,or
othernon-permanentxture.
Chapter1.Productoverview5
Page 22

Left-sideview
Figure3.ThinkPadX130eleft-sideview
1Monitorconnector
3HDMIconnector
5Ethernetconnector
1Monitorconnector
2Fanlouvers(right)
4USBconnector
6Comboaudiojack
Themonitorconnectorisusedtoconnectanexternalmonitororprojectortoyourcomputer.
Fordetails,referto“Attachinganexternalmonitor”onpage42.
2Fanlouvers(right)
Theinternalfanandlouversenableairtocirculateinthecomputerandcoolthemicroprocessor.
Note:Toavoidimpedingairow,donotplaceanyobstacleinfrontofthefan.
3HDMIconnector
Usethehigh-denitionmultimediainterface(HDMI)connectortoconnectacompatibledigitalaudiodevice
orvideomonitorsuchasanHDTV.
4USBconnector
UsetheUSBconnectorstoconnectUSBdevicessuchasUSBmemorykeysorUSBharddiskdrives.
5Ethernetconnector
TheEthernetconnectorisusedtoconnectyourcomputertoaLAN.
6UserGuide
Page 23

Anindicatortotheleftoftheconnectorshowsthestatusofacpower.Whentheacpoweradapteris
connected,theindicatorison.Ifabatteryisinstalledinthecomputer,theindicatorisgreenwhenthe
batterycharges.
DANGER
Toavoidtheriskofelectricalshock,donotconnectthetelephonecabletotheEthernetconnector.
YoucanonlyconnectanEthernetcabletothisconnector.
6Comboaudiojack
Tolistentothesoundfromyourcomputer,connectaheadphoneoraheadsetthathasa3.5mm4-pole
plugtothecomboaudiojack.
Notes:
•Ifyouareusingaheadsetwithafunctionswitch,forexample,aheadsetforaniPhonemobiledigital
device,donotpressthisswitchwhileusingtheheadset.Ifyoupressit,theheadsetmicrophonewill
bedisabled,andtheinternalmicrophonewillbeenabledinstead.
•Thecomboaudiojackdoesnotsupportaconventionalmicrophone.Formoreinformationaboutthe
audiodevicessupportedbythecomboaudiojack,see“Usingaudiofeatures”onpage45.
Bottomview
Figure4.ThinkPadX130ebottomview
1Battery
3Memoryslot4WWANcardslot
5WLANcardslot6Harddiskdriveorsolidstatedriveslot
1Battery
2SIMcardslot
Useyourcomputerwithbatterypowerwheneveracpowerisunavailable.
YoucanusePowerManagertoadjustyourpowersettingasneeded.Fordetails,referto“PowerManager”
onpage18
.
Chapter1.Productoverview7
Page 24

2SIMcardslot
IfyourcomputerhasawirelessWANfeature,itmightrequireaSIM(SubscriberIdenticationModule)card
toestablishawirelessWAN(WideAreaNetwork)connection.Dependingonthecountryofdelivery,theSIM
cardmigntbealreadyinstalledintheSIMcardslot.
3Memoryslot
Youcanincreasetheamountofmemoryinyourcomputerbyinstallingamemorymoduleinthememory
slot.Memorymodulesareavailableasoptions.
4PCIExpressMiniCardslotforwirelessWAN
YourcomputermightincludeaPCIExpressMiniCardforwirelessWANinthePCIExpressMiniCard
slotforwirelessWANcommunications.
5PCIExpressMiniCardslotforwirelessLAN/WiMAX
YourcomputermightincludeaPCIExpressMiniCardforwirelessLAN/WiMAXinthePCIExpressMini
CardslotforwirelessLAN/WiMAXcommunications.
6Harddiskdriveorsolidstatedriveslot
Yourcomputermignthavealarge-capacity,customer-upgradableharddiskdrivethatcanmeetavarietyof
storagedemands.T okeepthedrivesafe,ActiveProtectionSystem™isinstalledonyourcomputer.For
details,referto“ActiveProtectionSystem”onpage17
.
Somemodelsareequippedwithasolidstatedrivetoprovideenhancedperformance,energysavings,and
reducedweight.
Note:Thehiddenservicepartitionisthereasonwhythereislessfreespacethanexpectedonyourhard
diskdriveorsolidstatedrive.Thisreductionismorenoticeableonthesolidstatedrivebecauseofits
smallercapacity.
Statusindicators
Yourcomputerhastwosystem-statusindicatorsandapower-statusindicator.Thestatusindicatorsshow
thecurrentstatusofyourcomputer.
8UserGuide
Page 25
Systemstatusindicators
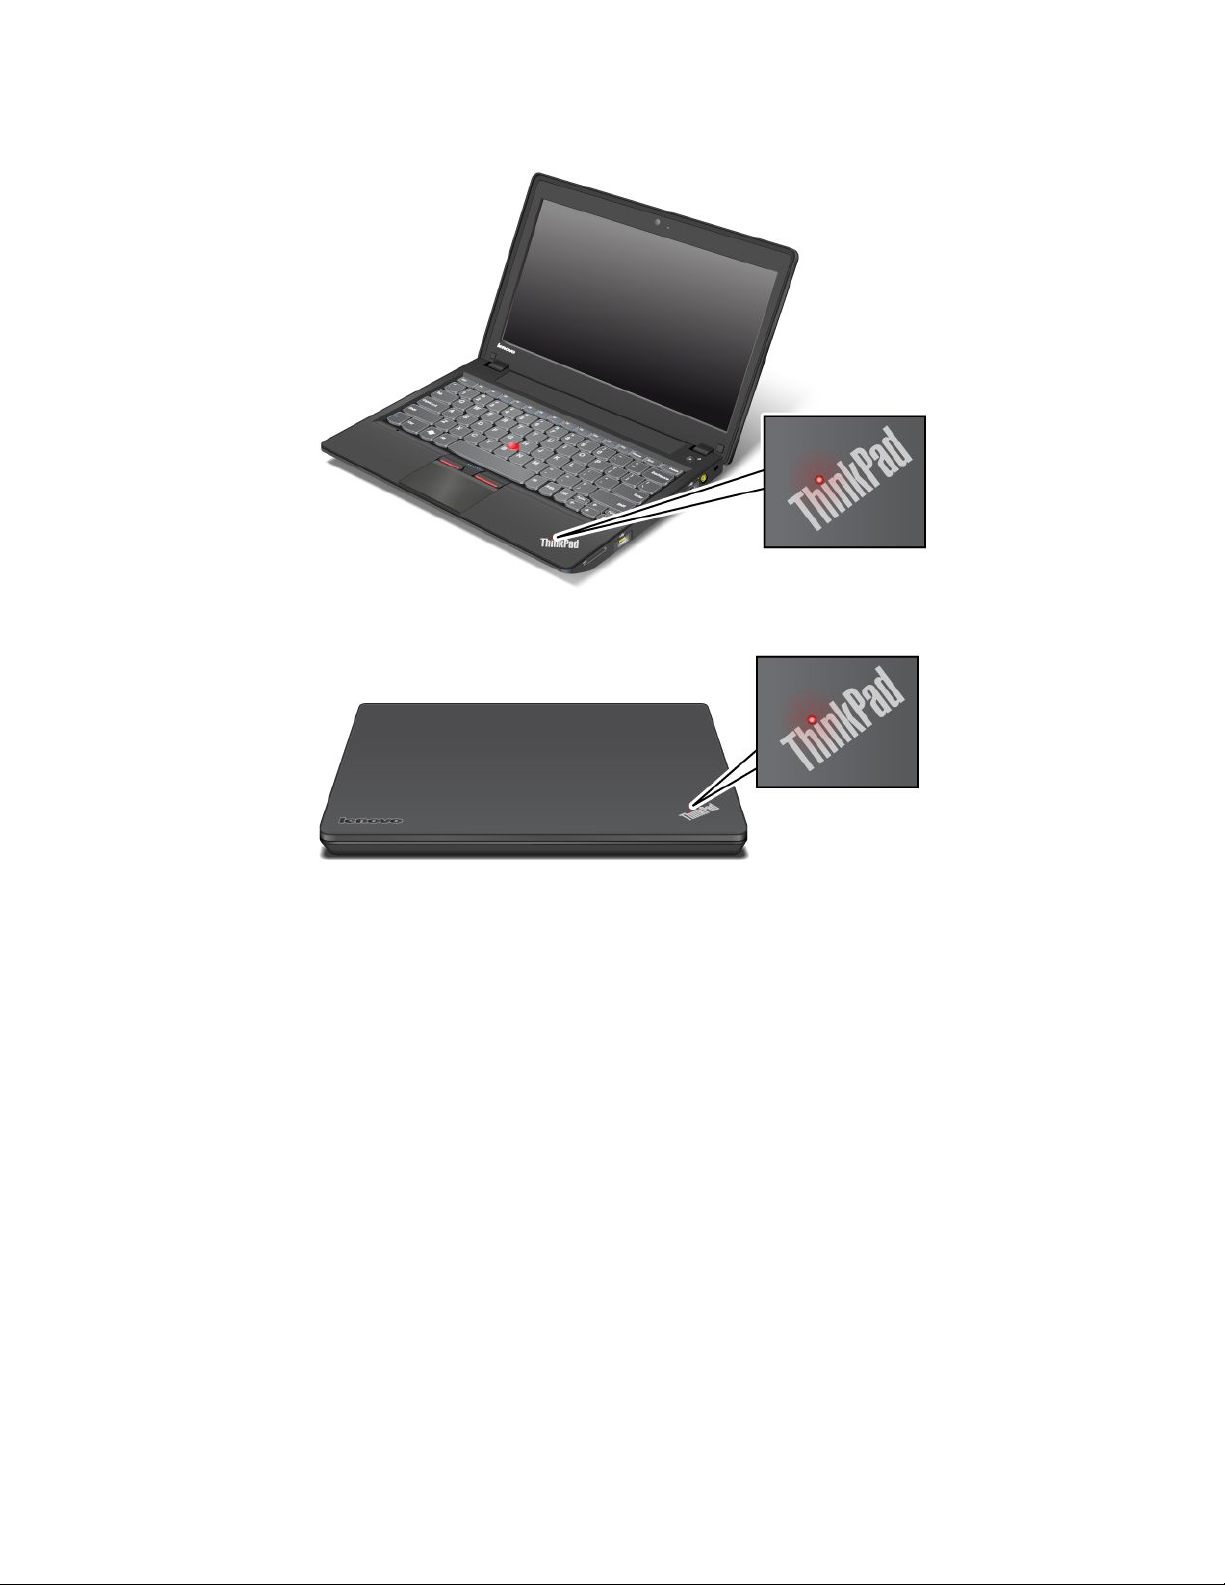
TheilluminateddotintheThinkPadlogoontheouterlidofyourcomputerandonthepalmrestworksasa
systemstatusindicator:itshowswhetherthecomputerisinsleep(standby),hibernation,ornormalmode.
Themeaningoftheindicatorisasfollows:
•Red:Thecomputerison(innormalmode).
•Fastblinkingred:Thecomputerisenteringsleep(standby)orhibernationmode.
•Slowblinkingred:Thecomputerisinsleep(standby)mode.
•Off:Thecomputerisofforinhibernationmode.
Chapter1.Productoverview9
Page 26
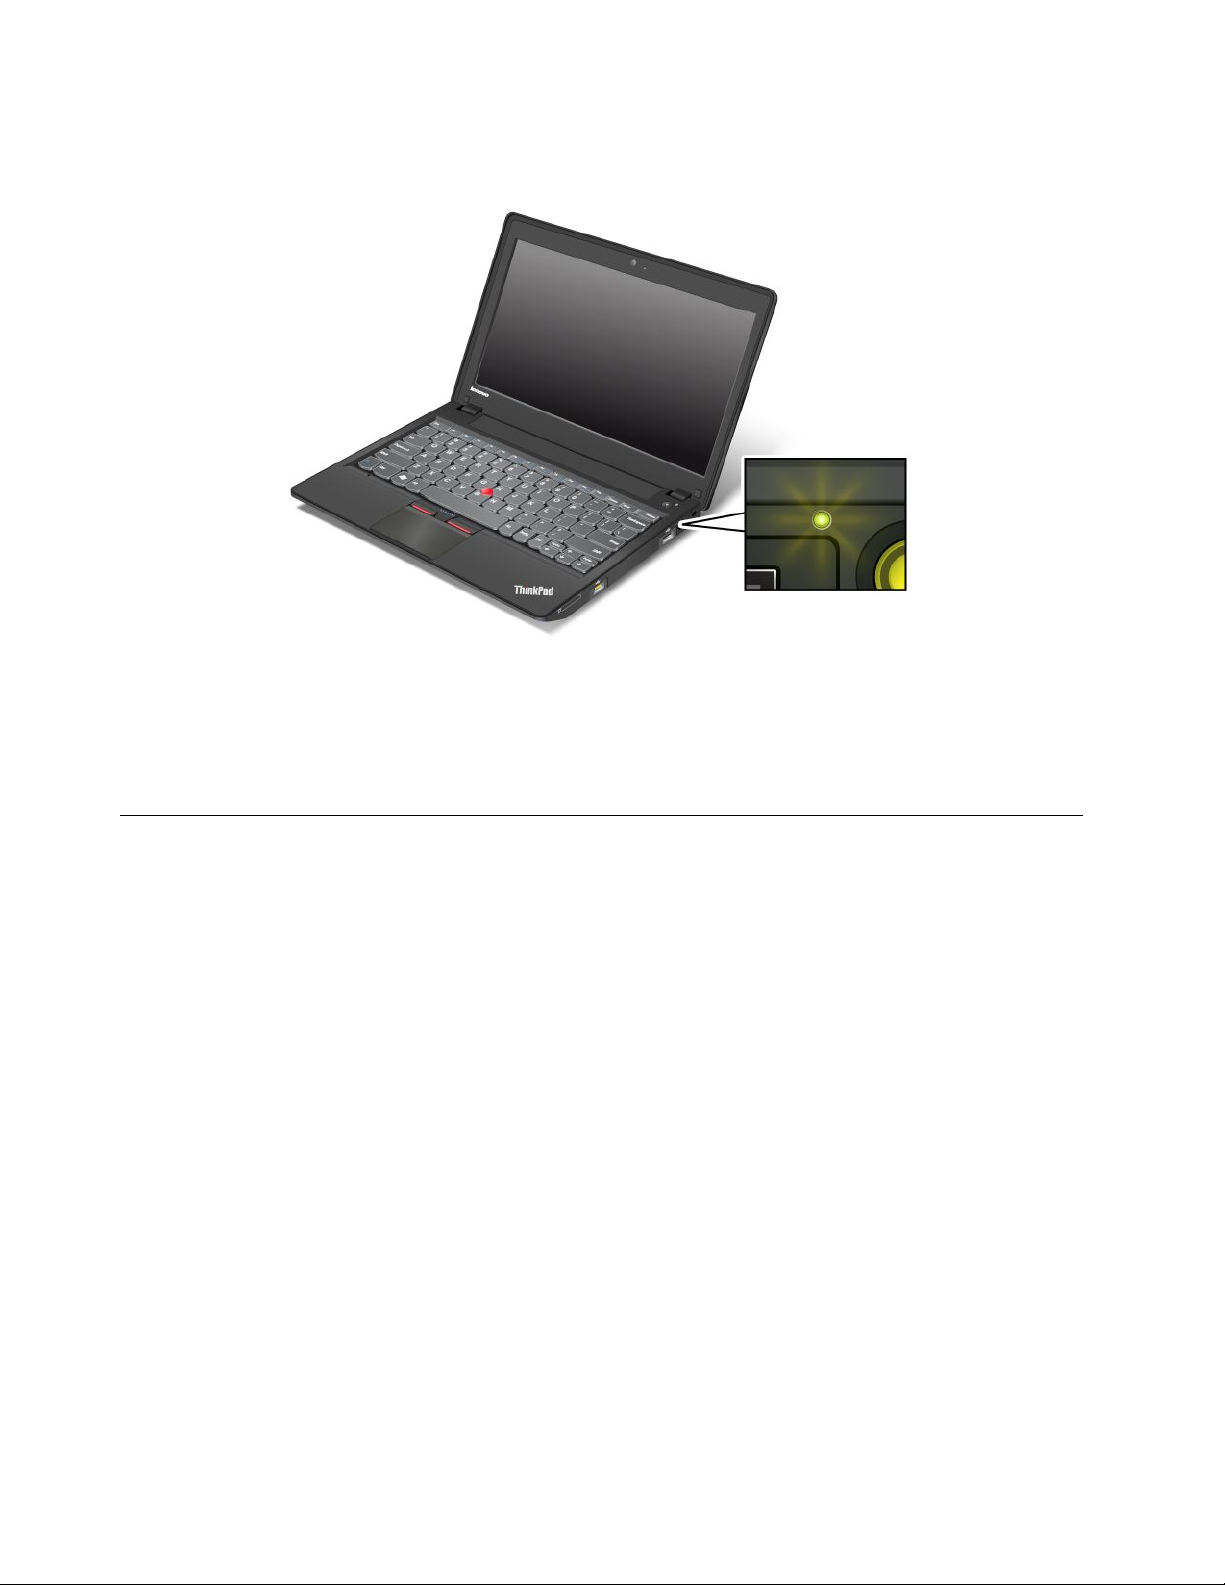
Powerstatusindicator
Yourcomputerhasanindicatorthatshowsthestatusofacpower.
Themeaningoftheindicatorisasfollows:
•Green:Theacpoweradapterisconnected.Ifabatteryisinstalledonthecomputer,theindicator
isgreenwhenitischarged.
•Off:Theacpoweradapterisnotconnected.
Locatingimportantproductinformation
Thissectionprovidesinformationtohelpyoulocateyourmachinetypeandmodellabel,FCCIDandIC
Certicationlabel,andWindows
®
CerticateofAuthenticitylabel.
10UserGuide
Page 27
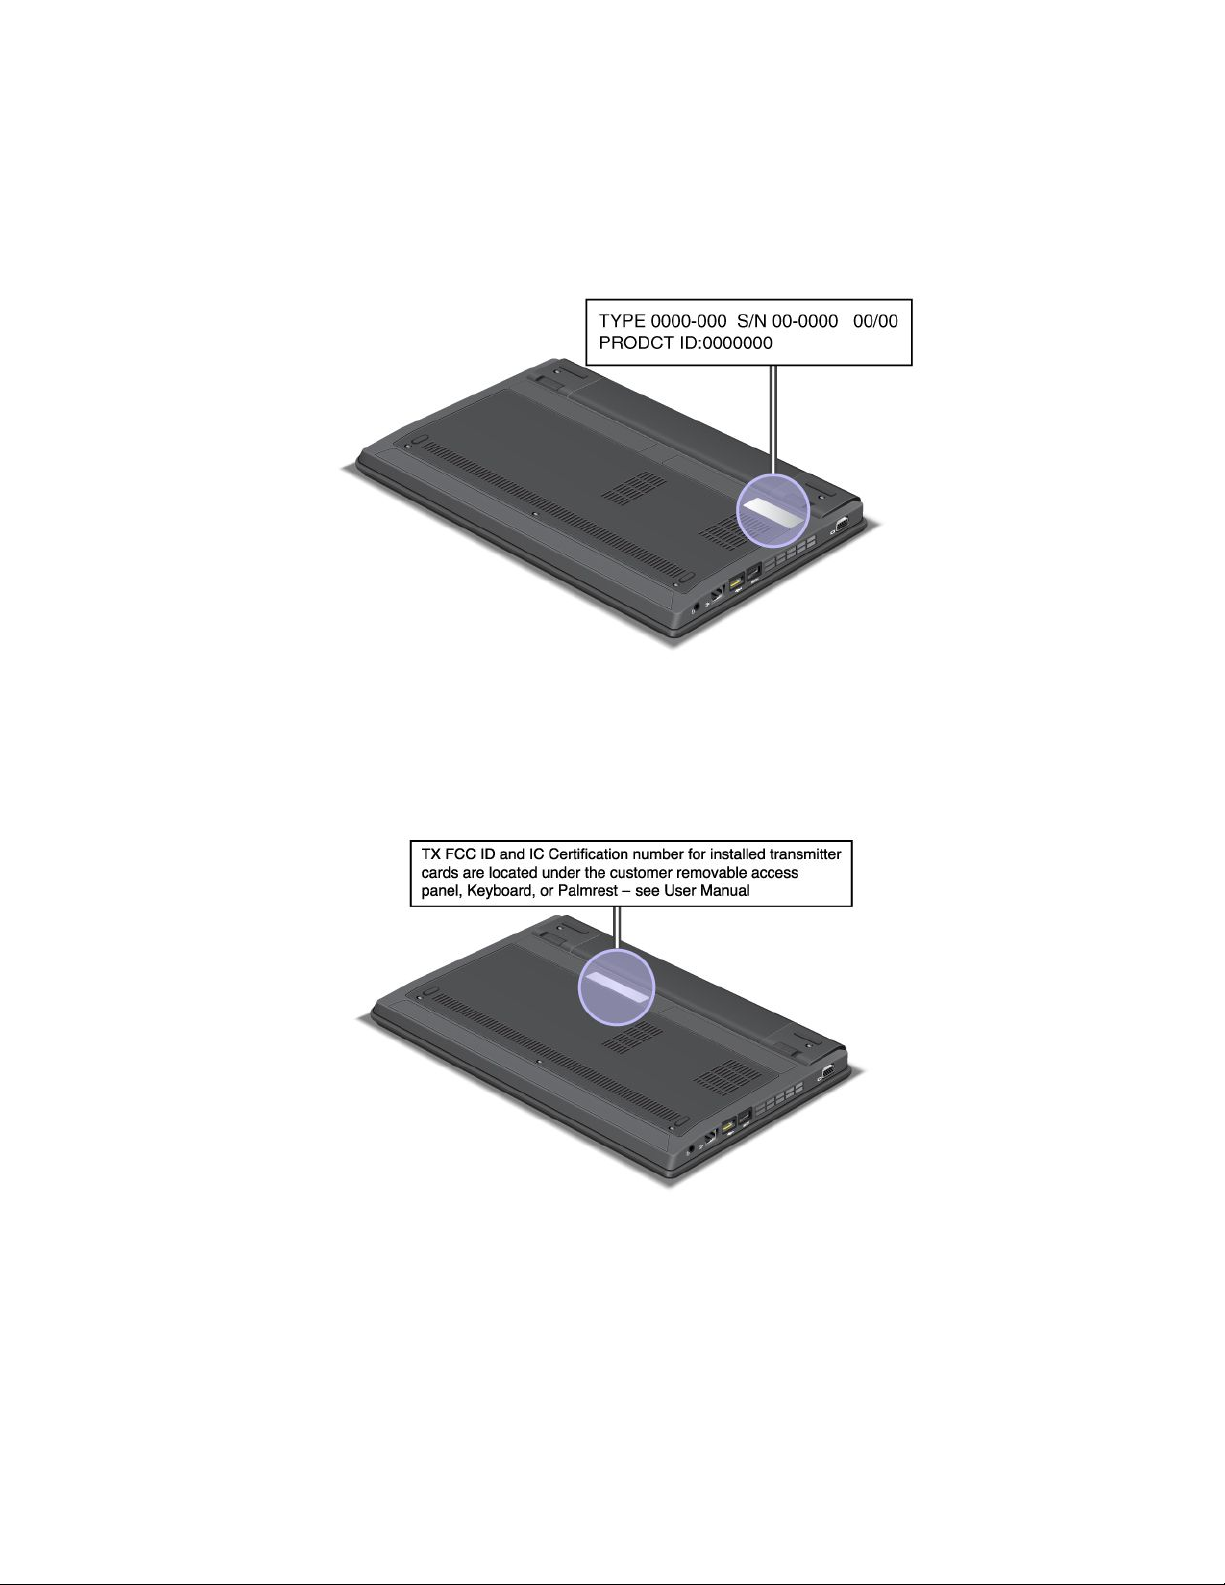
Machinetypeandmodellabel
Themachinetypeandmodellabelidentiesyourcomputer.WhenyoucontactLenovoforhelp,themachine
typeandmodelinformationhelpssupporttechnicianstoidentifyyourcomputerandprovidefasterservice.
Youcanndthemachinetypeandmodelofyourcomputerinthelabelasshownbelow:
FCCIDandICCerticationnumberlabel
ThereisnoFCCIDorICCerticationnumberforthePCIExpressMiniCardshownontheenclosureof
yourcomputer.TheFCCIDandICCerticationnumberlabelisafxedonthecardinstalledinthePCI
ExpressMiniCardslotofyourcomputer.
Chapter1.Productoverview11
Page 28

IfnointegratedwirelessPCIExpressMiniCardispreinstalledinyourcomputer,youcaninstallone.Todo
this,followtheprocedurein“InstallingandreplacingthePCIExpressMiniCardforwirelessLAN/WiMAX
connection”onpage83
onpage87.
or“InstallingandreplacingthePCIExpressMiniCardforwirelessWANconnection”
CerticateofAuthenticitylabel
TheCerticateofAuthenticitylabelforthepreinstalledoperatingsystemidentiestheproductIDandthe
productkeyinformationforyourcomputer.Recordthisinformationandkeepitinasafeplace.Youmight
needthesenumberstostartyourcomputerorreinstalltheoperatingsystem.
Thefollowingillustrationshowsthelocationofthelabel.
Features
Processor
•Toviewthesystempropertiesofyourcomputer,clickStart,right-clickComputer(inWindowsXP ,My
Computer),thenfromthepull-downmenuselectProperties.
12UserGuide
Page 29

Memory
•Doubledatarate3synchronousdynamicrandomaccessmemory(DDR3SDRAM)
Storagedevice
•2.5-inch(7mmheight)harddiskdrive
•2.5-inch(7mmheight)solidstatedrive
Display
ThecolordisplayusesTFTtechnology.
•Size:11.6inches(295mm)
•Resolution:
–LCD:upto1366-by-768,dependingonthemodel
–Externalmonitor:Upto2456-by-1538(VGA)orupto1920-by-1200(HDMI),dependingonthemodel
•Integratedcamera(onsomemodels)
Keyboard
•83–key,84–key,or88–key
•UltraNav(TrackPointpointingdeviceandtouchpad)
•Fnkeyfunction
•Volumecontrolbuttons
•Speakermutebutton
•Microphonemutebutton
•Built-inmicrophones
Interface
•Externalmonitorconnectors
•Comboaudiojack(stereoheadphoneorheadset)
•USB2.0connectors
•AlwaysOnUSB2.0connector
•RJ45Ethernetconnector
•4-in-1digitalmediacardreader
•HDMI1.4port
Wirelessfeatures
•IntegratedwirelessLAN
•IntegratedBluetooth(onsomemodels)
•IntegratedwirelessWAN(onsomemodels)
•IntegratedWiMAX(onsomemodels)
Specications
Thissectionliststhephysicalspecicationsforyourcomputer.
Size
Chapter1.Productoverview13
Page 30

•Width:293.4mm(11.6inches)
•Depth:216mm(8.5inches)
•Height:32.8mm(1.3inches)
Heatoutput
•65W(222Btu/hr)maximum
Powersource(acpoweradapter)
•Sine-waveinputat50to60Hz
•Inputratingoftheacpoweradapter:100to240Vac,50to60Hz
Batterypack
•Lithium-ion(Li-Ion)batterypack
Batterylife
•Forpercentageofremainingbatterypower,checkthePowerManagerBatteryGaugeinthetaskbar.
•ThePowerManageralsodisplaysagreen,yellowandredindication.Abatteryunderwarrantywithared
indicationiseligibleforawarrantyreplacement.
Operatingenvironment
Thissectionprovidesinformationaboutyourcomputeroperatingenvironment.
Environment
•Maximumaltitudewithoutpressurization:3048m(10,000ft)
•Temperature
–Ataltitudesupto2438m(8000ft)
–Operating:5.0°Cto35.0°C(41°Fto95°F)
–Storage:5.0°Cto43.0°C(41°Fto109°F)
–Ataltitudesabove2438m(8000ft)
–Maximumtemperaturewhenoperatingundertheunpressurizedcondition:31.3°C(88°F)
Note:Whenyouchargethebatterypack,itstemperaturemustbeatleast10°C(50°F).
•Relativehumidity:
–Operating:8%to80%
–Storage:5%to95%
Ifpossible,placeyourcomputerinawell-ventilatedanddryareawithoutdirectexposuretosunshine.
Keepelectricalappliancessuchasanelectricfan,radio,airconditioner,andmicrowaveovenawayfrom
yourcomputerbecausethestrongmagneticeldsgeneratedbytheseappliancescandamagethemonitor
anddataontheharddiskdriveorsolidstatedrive.
Donotplaceanybeveragesontopoforbesidethecomputerorotherattacheddevices.Ifliquidisspilledon
orinthecomputeroranattacheddevice,ashortcircuitorotherdamagemightoccur.
Donoteatorsmokeoveryourkeyboard.Particlesthatfallintoyourkeyboardcancausedamage.
14UserGuide
Page 31

ThinkVantageTechnologiesandsoftware
LenovopreinstallsonyourPCusefulandhelpfulsoftwareapplicationstohelpyougetstarted,tostay
productivewhileonthemoveandtokeepyouandyourcomputerworking.Lenovooffersenhancedsecurity,
wirelesscomputing,data-migrationandothersolutionsforyourcomputer.
FollowingsectionsprovideinformationaboutThinkVantage
offeredbyLenovo.
•“AccessingapplicationsinWindows7”onpage15
•“AccessConnections”onpage17
•“ActiveProtectionSystem”onpage17
•“LenovoSolutionCenter”onpage17
•“LenovoThinkVantageTools”onpage17
•“LenovoThinkVantageToolbox”onpage18
•“MessageCenterPlus”onpage18
•“PasswordManager”onpage18
•“PowerManager”onpage18
•“ProductRecovery”onpage18
•“PresentationDirector”onpage19
•“RescueandRecovery”onpage19
•“SimpleT ap”onpage19
•“SystemUpdate”onpage19
•“ThinkVantageGPS”onpage19
•“ThinkVantageProductivityCenter”onpage19
®
technologiesandothercomputingsolutions,
Note:TolearnmoreaboutThinkVantagetechnologiesandothercomputingsolutions,offeredbyLenovo,
gotohttp://www.lenovo.com/support.
AccessingapplicationsinWindows7
IfyouareusingtheWindows7operatingsystem,youcanaccessapplicationsbyfollowingoneofthe
methodsbelow:
•YoucangettheapplicationsfromtheLenovoThinkVantageTools.
ClickStart➙AllPrograms➙LenovoThinkVantageTools.Thendependingontheapplicationyou
wanttoaccess,double-clickthecorrespondingicon.
Note:IfanapplicationiconintheLenovoThinkVantageToolsapplicationnavigationwindowisdimmed,it
indicatesthatyouneedtoinstalltheapplicationmanually.Toinstalltheapplicationmanually,double-click
theapplicationicon.Then,followtheinstructionsonthescreen.Whentheinstallationprocesscompletes,
theapplicationiconwillbeactivated.
Table1.ApplicationsonLenovoThinkVantageT ools
ApplicationIconname
AccessConnectionsInternetConnection
ActiveProtectionSystem
LenovoScreenReadingOptimizerReadingOptimization
AirbagProtection
Chapter1.Productoverview15
Page 32

Table1.ApplicationsonLenovoThinkVantageTools(continued)
ApplicationIconname
LenovoThinkVantageToolbox
or
LenovoSolutionCenter
MobileBroadbandActivate
PasswordManagerPasswordVault
PowerManager
RecoveryMediaFactoryRecoveryDisks
RescueandRecoveryEnhancedBackupandRestore
SimpleTapSimpleTap
SystemUpdate
ThinkVantageGPSGPS
SystemHealthandDiagnostics
3GMobileBroadband
PowerControls
UpdateandDrivers
•YoualsocangettheapplicationsfromControlPanel.
ClickStart➙ControlPanel.Dependingontheapplicationyouwanttoaccess,clickthecorresponding
sectionandthenclickthecorrespondinggreentext.
Note:IfyoudonotndtheapplicationyouneedinControlPanel,opentheLenovoThinkVantageTools
applicationnavigationwindowanddouble-clickthedimmedicontoinstalltheapplicationyouneed.
Then,followtheinstructionsonthescreen.Whentheinstallationprocesscompletes,theapplicationicon
willbeactivated,andyoucanndtheapplicationinControlPanel.
ThesectionsinControlPanel,thegreentexts,andtheapplicationsarelistedinthefollowingtable.
Table2.ApplicationsinControlPanel
Application
AccessConnections
ActiveProtectionSystemSystemandSecurity
CommunicationsUtilityHardwareandSoundLenovo-WebConferencing
LenovoScreenReadingOptimizer
LenovoThinkVantageToolbox
or
LenovoSolutionCenter
MobileBroadbandActivateNetworkandInternet
PasswordManager
PowerManager
RecoveryMedia
RescueandRecovery
SimpleTap
ControlPanelsectionGreentextinControlPanel
NetworkandInternet
HardwareandSound
AppearanceandPersonalization
SystemandSecurityLenovo-SystemHealthand
SystemandSecurity
UserAccountsandFamilySafety
HardwareandSound
SystemandSecurity
SystemandSecurity
SystemandSecurity
Programs
Lenovo-InternetConnection
Lenovo-AirbagProtection
Lenovo-ReadingOptimization
Diagnostics
Lenovo-3GMobileBroadband
Lenovo-PasswordVault
Lenovo-PowerControls
Lenovo-FactoryRecoveryDisks
Lenovo-EnhancedBackupand
Restore
Lenovo’sSimpleT ap
16UserGuide
Page 33

Table2.ApplicationsinControlPanel(continued)
Application
SystemUpdateSystemandSecurity
ThinkVantageGPS
ControlPanelsectionGreentextinControlPanel
Lenovo-UpdateandDrivers
NetworkandInternet
SystemandSecurity
Lenovo-GPS
AccessConnections
AccessConnections™isaconnectivityassistantprogramforcreatingandmanaginglocationproles.Each
locationprolestoresallthenetworkandInternetcongurationsettingsneededforconnectingtoanetwork
infrastructurefromaspeciclocationsuchasahomeoranofce.
Byswitchingbetweenlocationprolesasyoumoveyourcomputerfromplacetoplace,youcanquicklyand
easilyconnecttoanetworkwithnoneedtorecongureyoursettingsmanuallyandrestartthecomputer
eachtime.
ActiveProtectionSystem
TheActiveProtectionSystem™protectsyourharddiskdrivewhentheshocksensorinsideyourcomputer
detectsaconditionthatcoulddamagethedrive,suchassystemtilt,excessivevibration,orshock.The
harddiskdriveislessvulnerabletodamagewhenitisnotoperating;sothesystemstopsitfromspinning,
andmightalsomovetheread/writeheadsofthedrivetoareasthatdonotcontaindata.Assoonasthe
shocksensorsensesthattheenvironmentisstableagain(minimalchangeinsystemtilt,vibration,or
shock),itturnstheharddiskdriveon.
LenovoScreenReadingOptimizer
TheLenovoScreenReadingOptimizerprogramprovidesyouaconvenientwaytouseelectronicreading
software.Itcandetecttheorientationofyourcomputerandrotatethescreenaccordingly.Italsoenables
youtoadjustthescreenbrightness.
LenovoSolutionCenter
Note:Dependingonthedatewhenyourcomputerwasmanufactured,yourcomputerispreinstalledwith
eithertheLenovoSolutionCenterprogramortheLenovoThinkVantageToolboxprogramfordiagnostic
purposes.ForadditionalinformationabouttheLenovoThinkVantageToolboxprogram,see“Lenovo
ThinkVantageToolbox”onpage18.
TheLenovoSolutionCenterprogramenablesyoutotroubleshootandresolvecomputerproblems.It
combinesdiagnostictests,systeminformationcollection,securitystatus,andsupportinformation,along
withhintsandtipsformaximumsystemperformance.Fordetailedinformation,see“Diagnosingproblems”
onpage127
TostarttheLenovoSolutionCenterprograminWindows7,see“AccessingapplicationsinWindows7”
onpage15.
.
LenovoThinkVantageTools
TheLenovoThinkVantageToolsprogramhelpsyouworkmoreeasilyandsecurelybyprovidingeasyaccess
tovarioustechnologies,suchas:
•LenovoSolutionCenterorLenovoThinkVantageToolbox(dependingonthedateofmanufacture)
•PowerManager
•RescueandRecovery
Chapter1.Productoverview17
Page 34

•SystemUpdate
ToaccesstheLenovoThinkVantageToolsprogram,clickStart➙AllPrograms➙LenovoThinkVantage
Tools.
Note:LenovoThinkVantageToolsisavailableonlyonmodelspreinstalledwiththeWindows7operating
system.IfyourWindows7modelisnotpreinstalledwiththeprogram,youcandownloaditfrom
http://www.lenovo.com/support.
LenovoThinkVantageToolbox
Note:Dependingonthedatewhenyourcomputerwasmanufactured,yourcomputerispreinstalledwith
eithertheLenovoSolutionCenterprogramortheLenovoThinkVantageToolboxprogramfordiagnostic
purposes.ForadditionalinformationabouttheLenovoSolutionCenterprogram,see“LenovoSolution
Center”onpage17.
TheLenovoThinkVantageToolboxprogramenablesyoutoviewsymptomsofcomputerproblemsandnd
solutionsforthem.Italsoincludesautomaticnoticationwhenactionisrequired,computingassistance,
advanceddiagnostics,anddiagnostichistory.
TostarttheLenovoThinkVantageToolboxprogram,dothefollowing:
•ForWindows7:See“AccessingapplicationsinWindows7”onpage15
•ForWindowsVistaandWindowsXP:ClickStart➙AllPrograms➙ThinkVantage➙Lenovo
ThinkVantageToolbox.
ForadditionalinformationabouttheLenovoThinkVantageToolboxprogram,refertothehelpinformation
systemoftheprogram.
.
MessageCenterPlus
TheMessageCenterPlusdisplaysmessagestoinformyouabouthelpfulsoftwarethathasbeenpreinstalled
onyourcomputer.Thesoftwareenablesyoutomanagewiredandwirelessconnections,protectyourdata
intheeventofaproblemandautomaticallydiagnoseandresolvepotentialproblemswithyourcomputer.
TheMessageCenterPlusalsocanprovidemessagesaboutnewupdatesavailabletokeepyourcomputer
current.
PasswordManager
ThePasswordManagerprogramenablesuserstomanageandrememberalltheirsensitiveand
easy-to-forgetapplicationandWebsitelogininformation,suchasuserIDs,passwords,andotherpersonal
information.
PowerManager
ThePowerManagerprogramprovidesconvenient,exible,andcompletepowermanagementforyour
computer.ByusingthePowerManagerprogram,youcanadjustyourpowersettingstogiveyouthebest
balancebetweenperformanceandpowersaving.
ProductRecovery
Thisprogramenablesyoutocreaterecoverymediatorestorethecontentsofthesystemdriveorharddisk
drivetothesamestateaswhenthecomputerwasoriginallyshippedfromthefactory.
Forinformationabouthowtoopenandusethisprogram,referto“Creatingandusingrecoverymedia”
onpage63
18UserGuide
.
Page 35

PresentationDirector
PresentationDirectorisadisplaycongurationutilitythatenablesyoutogivepresentationsconveniently.It
alsoenablesyoutocreateandmanagethedisplayschemes.However,bydefault,PresentationDirectorhas
somepredenedpresentationschemes.Y oucanapplythemtoyourpresentationwithnoneedtosetupa
newscheme.Toapplyapresentationscheme,youalsocanuseFn+F7.
Note:IfyourcomputerisaWindows7model,PresentationDirectorisnotsupportedbecausetheWindows
7operatingsystemhandlestheexternaldisplaysinstead.
RescueandRecovery
TheRescueandRecovery®programisaonebuttonrecoveryandrestoresolutionthatincludesasetof
self-recoverytoolstohelpyoudiagnosecomputerproblems,gethelp,andrecoverfromsystemcrashes,
evenifyoucannotstarttheWindowsoperatingsystem.ToopentheRescueandRecoveryprogram,
dothefollowing:
SimpleTap
TheSimpleTapprogramprovidesyouwithaquickwaytocustomizesomebasiccomputersettingssuchas
mutingthespeakers,adjustingthevolume,lockingthecomputeroperatingsystem,launchingaprogram,
openingaWebpage,openingale,andsoon.
TostarttheSimpleTapprogram,doanyofthefollowing:
•ClicktheSimpleT apicononthedesktop.
•Double-taponthetouchpadusingtwongers.
Note:TheSimpleTapprogramisonlyavailableoncertainmodelspreinstalledwiththeWindows7operating
system.IfyourWindows7modelisnotpreinstalledwiththeSimpleTapprogram,youcandownloadit
fromhttp://www.lenovo.com/support.
SystemUpdate
TheSystemUpdateprogramhelpsyoukeepthesoftwareonyourcomputerup-to-datebydownloadingand
installingsoftwarepackages(ThinkVantageapplications,devicedrivers,UEFIFirmwareupdates,andother
thirdpartyapplications).Someexamplesofsoftwarethatyoushouldkeepupdatedareprogramsprovided
byLenovo,suchastheRescueandRecoveryprogram.
ThinkVantageGPS
IfthePCIExpressMiniCardinstalledinyourcomputersupportsGPS,yourcomputercanreceivesignals
fromGPSsatellitesanddetermineitslocation.IfyourcomputerisconnectedtotheInternet,youcannd
yourlocationonareal-timemapprovidedbyGoogleMapsorMicrosoft
®
Bing™Maps.
ThinkVantageProductivityCenter
TheThinkVantageProductivityCenterprogramprovidesanintegrateduserinterfacetohelpyousetup,
understand,andenhanceyourcomputer.ItenablesyoutoaccessotherThinkVantageTechnologies,view
messagesfromLenovo,andperformthemostfrequentlyusedtaskssuchasdeviceconguration,wireless
networkconguration,andcomputermanagementandmaintenance.
ToopentheThinkVantageProductivityCenterprograminWindowsXPorWindowsVista,clickStart➙All
Programs➙ThinkVantage➙ProductivityCenter.
Note:TheThinkVantageProductivityCenterprogramisavailableonmodelspreinstalledwiththeWindows
XPorWindowsVistaoperatingsystem.
Chapter1.Productoverview19
Page 36

20UserGuide
Page 37

Chapter2.Usingyourcomputer
Thischapterprovidesinformationonusingsomeofthecomputercomponents.
Thischaptercontainsthefollowingtopics:
•“Registeringyourcomputer”onpage21
•“Frequentlyaskedquestions”onpage21
•“Specialkeysandbuttons”onpage22
•“UsingtheUltraNavpointingdevice”onpage26
•“Powermanagement”onpage30
•“Connectingtothenetwork”onpage34
•“Usingaprojectororexternalmonitor”onpage42
•“Usingacolorprole”onpage45
•“Usingaudiofeatures”onpage45
•“Usingtheintegratedcamera”onpage46
•“Usingthemediacardreader”onpage49
Registeringyourcomputer
Whenyouregisteryourcomputer,informationisenteredintoadatabase,whichenablesLenovotocontact
youincaseofarecallorothersevereproblem.Inaddition,somelocationsofferextendedprivilegesand
servicestoregisteredusers.
WhenyouregisteryourcomputerwithLenovo,youwillalsoreceivethefollowingbenets:
•QuickerservicewhenyoucallLenovoforhelp
•Automaticnoticationoffreesoftwareandspecialpromotionaloffers
ToregisteryourcomputerwithLenovo,gotohttp://www.lenovo.com/register.Thenfollowtheinstructions
onthescreen.
Frequentlyaskedquestions
HereareafewtipsthatwillhelpyouoptimizetheuseofThinkPadnotebook.
Toensurethatyoureceivethebestperformancefromyourcomputer,browsethefollowingWeb
pagetondinformationsuchasaidsfortroubleshootingandanswerstofrequentlyaskedquestions:
http://www.lenovo.com/support/faq.
Onthegoandneedtousebatterypowermoreeffectively?
•Toconservepower,ortosuspendoperationwithoutexitingapplicationsorsavingles,see“power-saving
modes”onpage31
•Toachievethebestbalancebetweenperformanceandpowersaving,createandapplypowerplans(in
WindowsXP,powerschemes)byuseofPowerManager.
•Ifyourcomputerwillbeturnedoffforanextendedperiodoftime,youcanpreventbatterypowerfrom
drainingbyusingtheemergencyresethole.Lookforinformationaboutthelocationoftheemergency
resetholein“Bottomview”onpage7
.
.
©CopyrightLenovo2011
21
Page 38

Concernedaboutsecurityorneedtosecurelydisposeofdatastoredonyourharddiskdriveor
solidstatedrive?
•StudytheSecuritysectiontondouthowyoucanprotectyourcomputerfromtheftandunauthorizeduse.
•ThePasswordManagerpreinstalledonyourcomputerperformsmanyofthesecuritytasksthathelp
protectit.Ifthesetupwizardruns,tokeepyoursystemsecure,besuretosetupthePasswordManager.
•Beforeyoudisposeofthedataontheharddiskdriveorthesolidstatedrive,besuretoread“Noticeon
deletingdatafromyourharddiskorsolidstatedrive”onpage61
Gettingconnectedindifferentlocationsisachallenge?
•Totroubleshootawirelessnetworkingissue,seehttp://www.lenovo.com/support/faq.
•TakeadvantageofthenetworkingfeaturesbyuseofAccessConnections.
•Tolearnmoreaboutusingthewirelessfeaturesofyourcomputer,referto“Wirelessconnections”on
page34
•Totravelmorecondently,besuretocheckthetipsin“Travelingwithyourcomputer”onpage53.
•PressFn+F5,toenableordisablethewirelessfeatures.
Needtogivepresentationsorattachanexternalmonitoroften?
.
.
•Makesurethatyoufollowtheprocedurefor“Attachinganexternalmonitor”onpage42
•WiththeExtenddesktopfunction,youcandisplayoutputonboththecomputerdisplayandanexternal
monitor.
Needtoattachorreplaceadevice?
•SeeChapter6“Replacingdevices”onpage71formoreinformationaboutreplacingthedevicesof
yourcomputer.
•SeeChapter7“Enhancingyourcomputer”onpage97formoreinformationaboutenhancingthefeatures
ofyourcomputer.
Youhavebeenusingyourcomputerforsometimealready,anditisgettingslower?
•Followthe“Generaltipsforpreventingproblems”onpage121
•YoucanDiagnoseproblemsyourselfbyusingthepreinstalledsoftware.
•CheckforrecoverysolutionsinChapter5“Recoveryoverview”onpage63.
Printthefollowingsectionsandkeepthemwithyourcomputerincaseyouareunabletoaccessthis
onlinehelpwhennecessary.
•“Installinganewoperatingsystem”onpage99
•“Computerstopsresponding”onpage128
•“Powerproblems”onpage146
.
.
Specialkeysandbuttons
Yourcomputerhasseveralspecialkeysandbuttons.
Functionkeycombinations
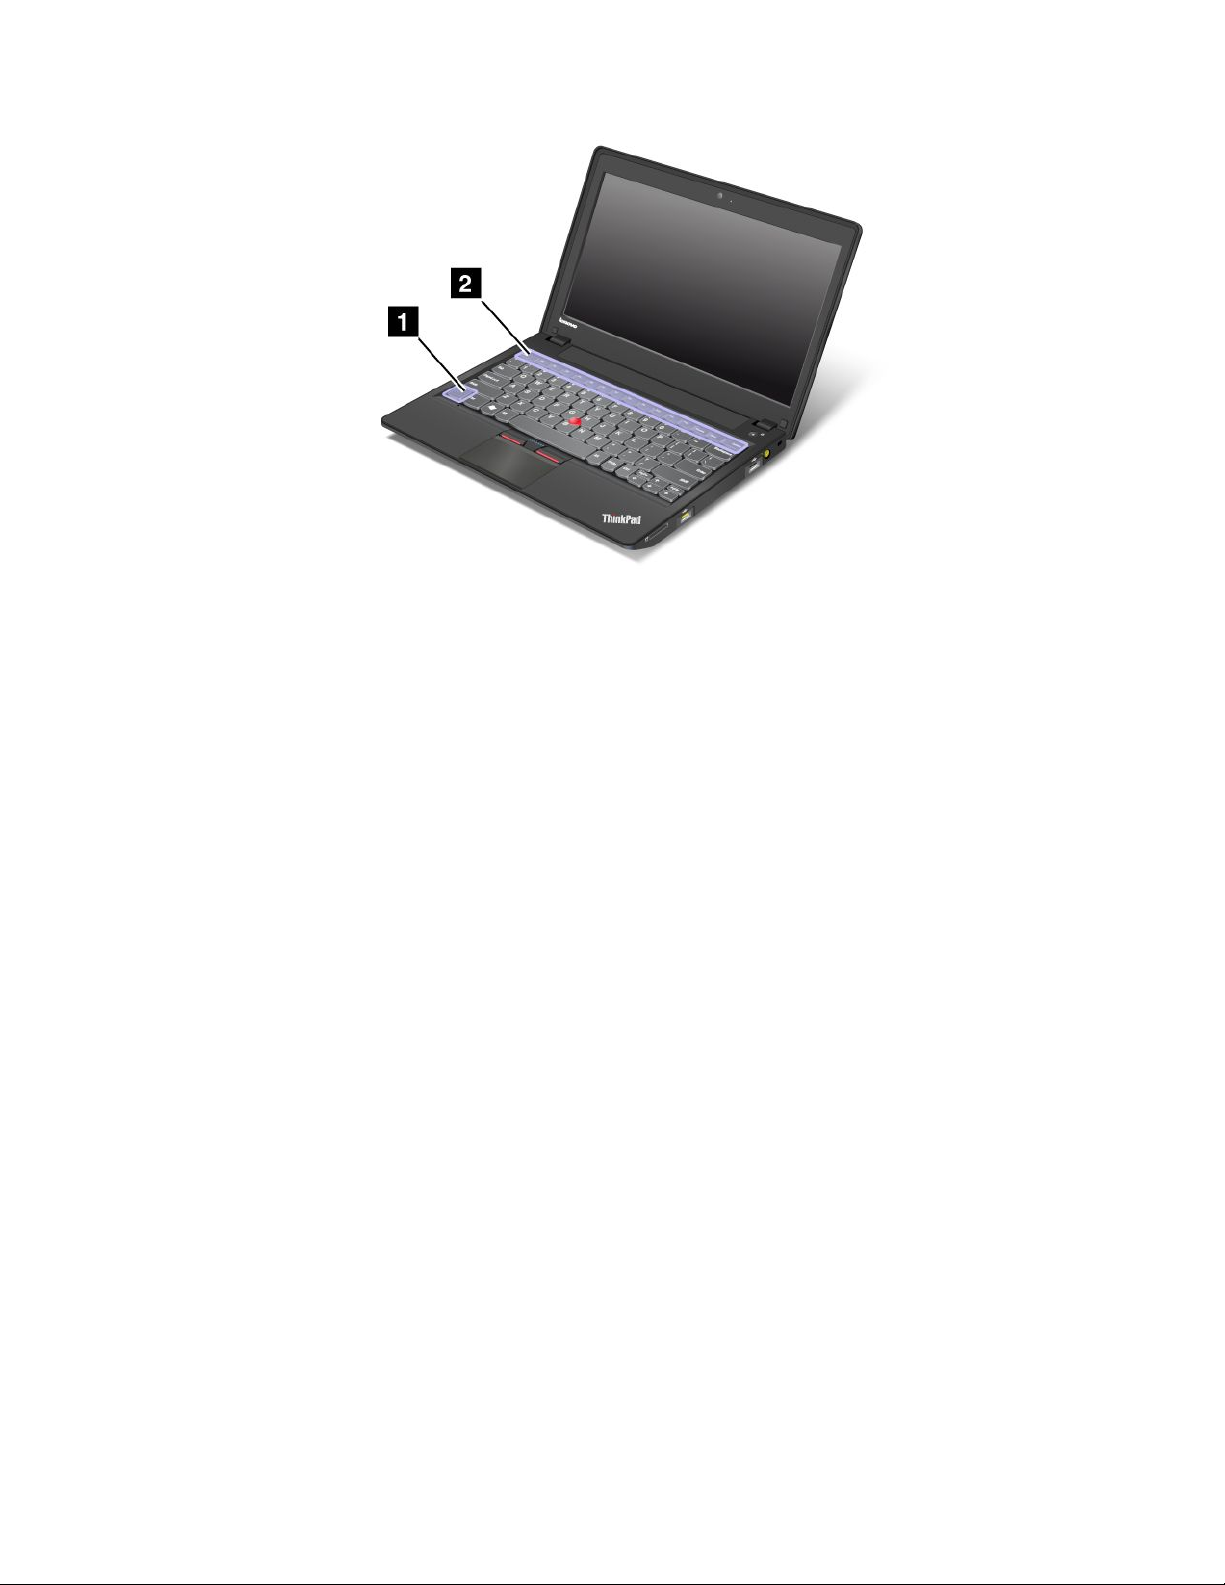
Bysettingthefunctionkeys,youcanchangeoperationalfeaturesinstantly.Tousethisfunction,pressand
holdtheFnkey1;thenpressoneofthefunctionkeys2.
22UserGuide
Page 39
Volumeandmutebuttons
•Fn+Esc:Speakermute
•Fn+F1:Speakervolumedown
•Fn+F2:Speakervolumeup
Ifyoumutethesoundandthenturnoffyourcomputer,thesoundwillremainmutedwhenyouturnon
yourcomputeragain.Toturnonthesound,presstheSpeakervolumeuporSpeakervolumedownkey.
•Fn+F3:Microphonemute
Whenyoupressthemicrophonemutekey,alloftherecordingdevicesaresetonmuteorunmute;this
isthedefaultsetting.
Powerconservation
Fn+F4
Putyourcomputerinsleep(standby)mode.T oreturntonormaloperation,presstheFnkeyonly,without
pressingafunctionkey.
Note:Ifyouwanttousethecombinationtoputthecomputerintohibernationmodeordo-nothingmode
(inWindowsXP ,shutthecomputerdownorshowthepanelforturningoffthecomputer),changethe
settingsinPowerManager.
Enablingordisablingthewirelessfeatures
•Fn+F5
Enableordisablethebuilt-inwirelessnetworkingfeatures.IfyoupressFn+F5,alistofwirelessfeaturesis
displayed.Y oucanquicklychangethepowerstateofeachfeatureinthelist.
Note:IfyouwanttouseFn+F5toenableordisablethewirelessfeatures,thefollowingdevicedrivers
mustbeinstalledonyourcomputerbeforehand:
–PowerManagementdriver
–OnScreenDisplayUtility
–Wirelessdevicedrivers
Forinformationonthewirelessfeatures,referto“Wirelessconnections”onpage34
Chapter2.Usingyourcomputer23
.
Page 40

Launchingthecameraandaudiosettings
•Fn+F6
IfyoupressFn+F6,thecameraandaudiosettingswindowisopenedandthecamerapreviewisturned
on.Fromthiswindow,youcanchangethecameraandaudiosettings.
Note:TheCamerasettingsareaonlyappearsifyourcomputerhasanintegratedcamera.Formore
information,see“Usingtheintegratedcamera”onpage46.
Applyingapresentationscheme
•Fn+F7
Applyapresentationschemedirectly,withnoneedtostartPresentationDirector.
TodisablethisfunctionandusetheFn+F7keycombinationforswitchingadisplayoutputlocation,start
PresentationDirector,andchangethesettings.
ClickStart➙AllPrograms➙ThinkVantage➙PresentationDirector.
Forinformationonapplyingapresentationscheme,referto“PresentationDirector”onpage19
.
Note:IfyourcomputerisaWindows7model,itdoesnotsupportpresentationschemes,howeverthe
Fn+F7keycombinationmigntstillbeusedtoswitchdisplayoutputlocation.
Switchingadisplayoutputlocation
•Fn+F7
ForWindows7:
Switchbetweenthecomputerdisplayandanexternalmonitor.Windowswillshowthesedisplayoptions:
–Computerdisplayonly(LCD)
–Computerdisplayandexternalmonitor(sameimage)
–Computerdisplayandexternalmonitor(extendeddesktopfunction)
–Externalmonitoronly
Note:T oswitchbetweenthecomputerdisplayandanexternalmonitor,theWin+Pkeycombination
isalsoavailable.
ForWindowsXP:
Switchbetweenthecomputerdisplayandanexternalmonitor.Ifanexternalmonitorisattached,
computeroutputisdisplayedinthefollowingthreepatternsbyturns:
–Externalmonitor(CRTdisplay)
–Computerdisplayandexternalmonitor(LCD+CRTdisplay)
–Computerdisplay
Notes:
–Thisfunctionisnotsupportedifdifferentdesktopimagesaredisplayedonthecomputerdisplayand
theexternalmonitor(theExtenddesktopfunction).
–ThisfunctiondoesnotworkwhileaDVDmovieoravideoclipisplaying.
Toenablethisfunction,startPresentationDirector,andchangethesettings.ClickStart➙AllPrograms
➙ThinkVantage➙PresentationDirector,andchangetheFn+F7Settings.
Brightnesscontrolfeatures
•Fn+F8
DisplaybrightnessdownusingFn+F8.
24UserGuide
Page 41
Thecomputerdisplaybecomesdimmer.Thepurposeofthismethodistochangethebrightnesslevel
temporarily.Tochangethedefaultbrightnesslevel,changethesettingsofthePowerOptioninthe
ControlPanelorusethePowerManager.
•Fn+F9
DisplaybrightnessupusingFn+F9.
Thecomputerdisplaybecomesbrighter.Thepurposeofthismethodistochangethebrightnesslevel
temporarily.Tochangethedefaultbrightnesslevel,changethesettingsofthePowerOptioninthe
ControlPanelorusethePowerManager.
Multimediacontrol
•Fn+F10:Previoustrack/scene
•Fn+F11:Playorpause
•Fn+F12:Nexttrack/scene
Windowskeyandapplicationkey
Windowskey
Ifyoupressthekey1,theStartmenuofWindowsisdisplayedorhidden.
Ifyoupressthiskeyandanotherkeyatthesametime,theSystemPropertieswindowortheComputer(in
WindowsXP,MyComputer)windowisdisplayed.Fordetails,refertotheHelpintheWindowsoperating
system.
OtherFunctions
•Fn+B:HavethesamefunctionastheBreakkey.
•Fn+P:HavethesamefunctionasthePausekey.
•Fn+S:HavethesamefunctionastheSysRqkey.
•Fn+C:HavethesamefunctionastheScrLKkey.
•Fn+I:HavethesamefunctionastheInsertkey.
Chapter2.Usingyourcomputer25
Page 42

UsingtheUltraNavpointingdevice
YourcomputermigntcomewiththeUltraNavpointingdevice.TheUltraNavconsistsoftheT rackPointand
thetouchpad,eachofwhichisitselfapointingdevicewithbothbasicandextendedfunctions.Youcan
congurebothdevicesbychoosingthesettingsyouprefer,asfollows:
•SetboththeT rackPointandthetouchpadaspointingdevices.
ThissettingenablestheuseofallthebasicandextendedfunctionsoftheTrackPointandthetouchpad.
•SettheTrackPointasthemainpointingdeviceandthetouchpadforextendedfunctionsonly.
ThissettingenablestheuseofallbasicandextendedfunctionswiththeTrackPointwhilelimitingtheuse
ofthetouchpadtoscrolling,tapzones,andslow-motionpointerfunctions.
•SetthetouchpadasthemainpointingdeviceandtheTrackPointfortheextendedfunctionsonly.
Thissettingenablestheuseofallbasicandextendedfunctionswiththetouchpadwhilelimitingthe
useoftheTrackPointtoscrollingandMagnifyingGlassfunctions.
•SettheTrackPointasthemainpointingdevice,anddisablethetouchpad.
•Setthetouchpadasthemainpointingdevice,anddisabletheTrackPoint.
ChangingtheUltraNavsettings
YoucanchangeyoursettingsofUltraNavintheUltraNavtaboftheMousePropertieswindow.Toopenit,
useoneofthefollowingmethods:
•UsetheStartmenuofyourcomputerasfollows:
–ForWindows7:ClickStart➙ControlPanel➙HardwareandSound➙Mouse➙UltraNav.
–ForWindowsXP:ClickStart➙ControlPanel➙PrintersandOtherHardware➙Mouse➙UltraNav.
YoualsocanchangetheUltraNavsettingsbyclickingtheUltraNavicononthesystemtray.Todisplaythe
UltraNavicononthesystemtray,see“AddingtheUltraNavicontothesystemtray”onpage29.
26UserGuide
Page 43
UsingtheTrackPointpointingdevice
TheTrackPointpointingdeviceconsistsofapointingstick1onthekeyboardandthreeclickbuttonsatthe
bottomofthekeyboard.Tomovethepointer5onthescreen,youapplypressuretothenonslipcaponthe
pointingstickinanydirectionparalleltothekeyboard;thepointingstickitselfdoesnotmove.Thespeedat
whichthepointermovesdependsonthepressureyouapplytothepointingstick.Thefunctionsoftheleft
andright2clickbuttonscorrespondtothoseoftheleftandrightmousebuttonsonaconventionalmouse.
TheTrackPointcenterbutton3,calledthescrollbar,enablesyoutoscrollWebpagesordocumentsinany
directionwithnoneedtousethegraphicscrollbarsonthesideofthewindow.
4
IfyouarenotfamiliarwiththeTrackPoint,theseinstructionswillhelpyougetstarted:
1.Placeyourhandsinthetypingposition,andpressgentlywitheitherindexngeronthepointingstickin
thedirectioninwhichyouwantthepointertomove.
Tomovethepointer,pressthepointingstickawayfromyoutomoveitup,towardyoutomoveit
down,toonesideortheothertomoveitsideways.
Note:Thepointermightdrift.Thisisnotadefect.StopusingtheTrackPointforafewseconds;the
pointerwillstopmoving.
2.T oselectanddrag,presstheleftorrightclickbuttonwitheitherthumbandmovetheTrackPoint
pointingstick.
CustomizingtheTrackPoint
YoucancustomizetheT rackPointpointingdeviceanditsbuttonsasfollows:
•Switchthefunctionsoftheleftandrightbuttons.
•ChangethesensitivityoftheTrackPoint.
•EnabletheMagnifyingGlassfunction.
•EnabletheT rackPointscrollingfunction.
•EnabletheTrackPointScrollingTips.
Chapter2.Usingyourcomputer27
Page 44
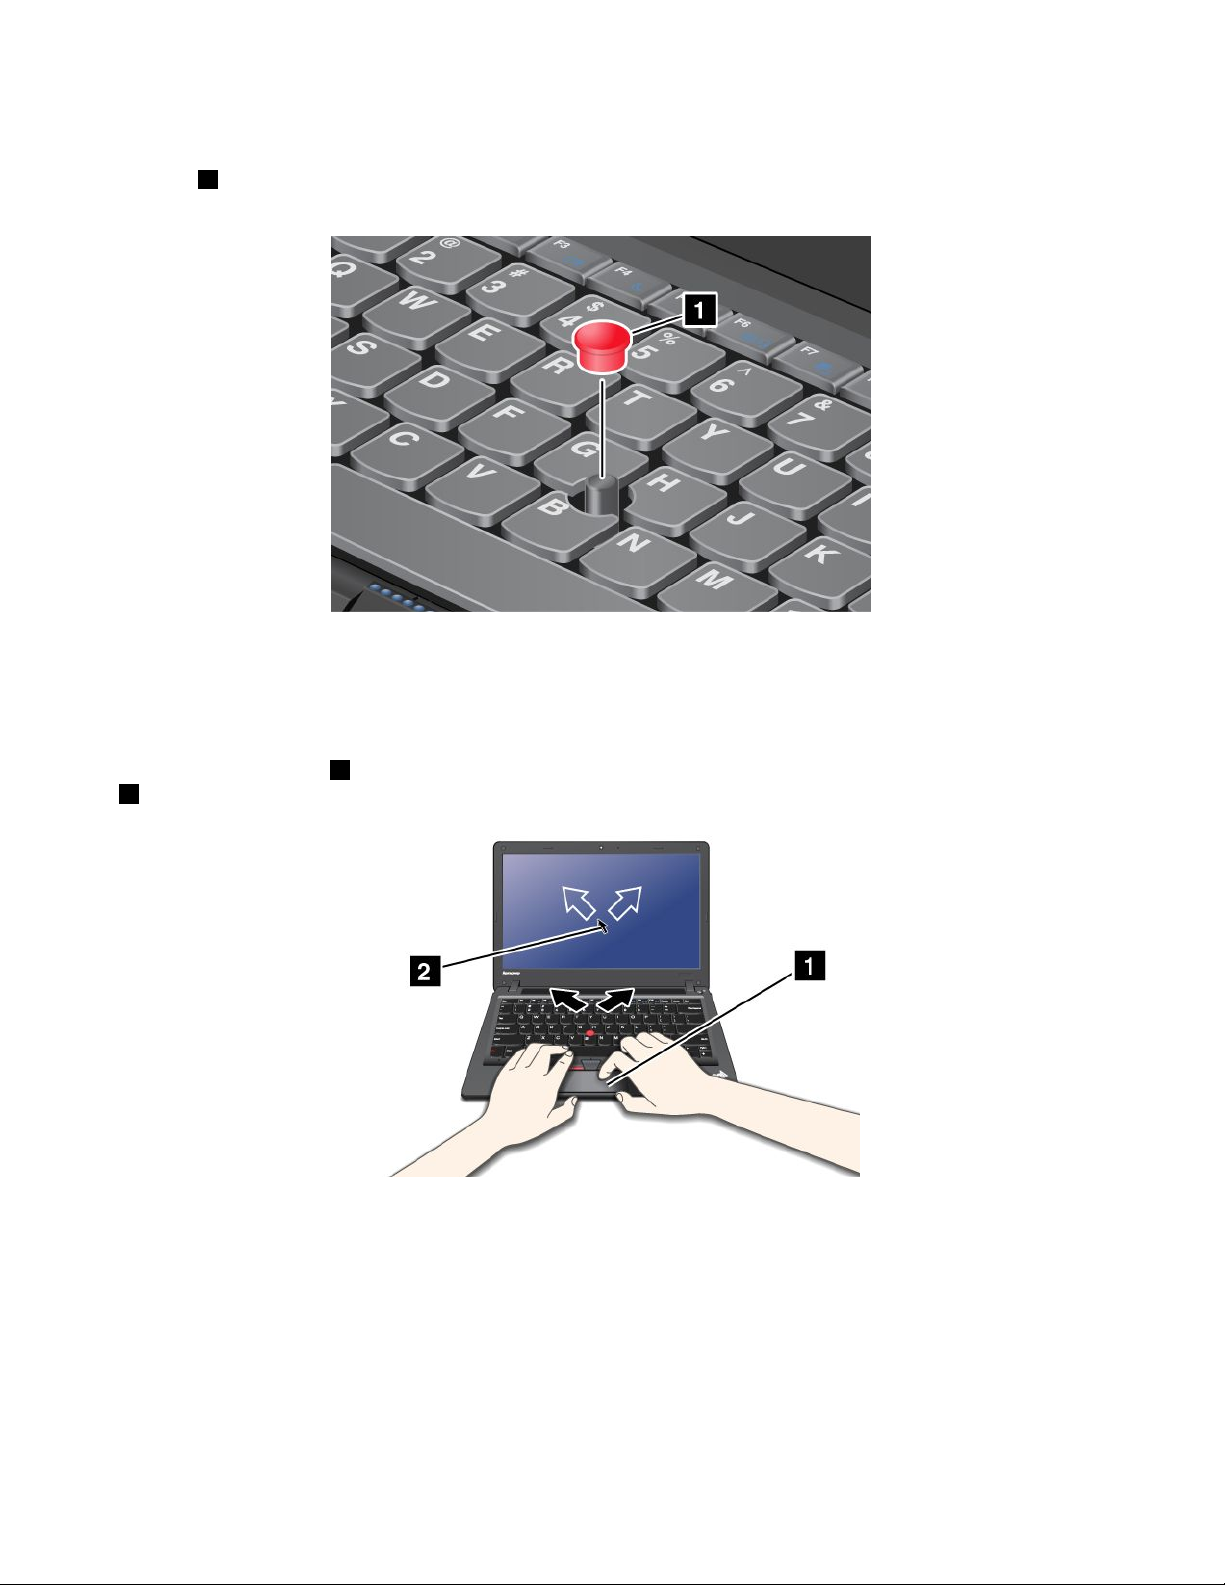
Replacingthecap
Thecap1ontheendoftheT rackPointpointingstickisremovable.Y oucanreplaceitasshownin
thedrawing.
Note:Ifyoureplacethekeyboard,anewkeyboardisshippedwiththedefaultcap.Ifyouwish,youcan
keepthecapfromyouroldkeyboardanduseitonthenewone.
Usingthetouchpad
Thetouchpadisapad1belowtheTrackPointbuttonsatthebottomofthekeyboard.Tomovethepointer
2onthescreen,slideyourngertipoverthepadinthedirectioninwhichyouwantthepointertomove.
Usingthemulti-touchtouchpad
Thetouchpadofyourcomputersupportsmulti-touchwithwhichyoucanzoomin,zoomout,scrollorrotate
onthescreenwhilebrowsingtheInternetorreadingoreditingadocument.
Fordetails,refertotheHelpinUltraNav.
Customizingthetouchpad
Tocustomizethetouchpad,doasfollows:
28UserGuide
Page 45

ForWindows7:
1.ClickStart,andthenclickControlPanel.
2.ClickHardwareandSound,andthenclickMouse.
3.ClicktheUltraNavtabandproceedtocustomizingthetouchpad.
ForWindowsXP:
1.ClickStart,andthenclickControlPanel.
2.ClickPrintersandOtherHardware,andthenclickMouse.
3.ClicktheUltraNavtabandproceedtocustomizingthetouchpad.
Fordetails,refertotheHelpintheThinkPadSetup.
BehavioroftheUltraNavandanexternalmouse
IfyouattachanexternalmousetoaUSBconnector,youcanusetheexternalmousesimultaneouslywiththe
TrackPointandthetouchpad.
DisablingtheTrackPointorthetouchpad
TodisabletheTrackPointorthetouchpad,doeitherofthefollowing:
ConguresettingsinUltraNavpropertieswindow:
ForWindows7
1.ClickStart➙ControlPanel➙HardwareandSound➙Mouse.
2.ClicktheUltraNavtab.
3.T odisabletheTrackPoint,clearthecheckboxforEnableTrackPoint.
Todisablethetouchpad,clearthecheckboxforEnabletouchpad.
4.ClickOK.
ForWindowsXP
1.ClickStart➙ControlPanel➙PrintersandOtherHardware➙Mouse.
2.ClicktheUltraNavtab.
3.T odisabletheTrackPoint,clearthecheckboxforEnableTrackPoint.
Todisablethetouchpad,clearthecheckboxforEnabletouchpad.
4.ClickOK.
Note:YoualsocanopentheUltraNavpropertieswindowbyclickingtheUltraNaviconinthetaskbar.For
details,refertotheinstructionsin“AddingtheUltraNavicontothesystemtray”onpage29.
AddingtheUltraNavicontothesystemtray
ForeasyaccesstotheUltraNavproperties,youcanaddtheUltraNavicontothesystemtray.
ToenablethedisplayoftheUltraNavicononthesystemtray,doasfollows:
ForWindows7:
1.ClickStart,andthenclickControlPanel.
2.ClickHardwareandSound,andthenclickMouse.
Chapter2.Usingyourcomputer29
Page 46

3.ClicktheUltraNavtab.
4.SelectthecheckboxforShowUltraNavicononthesystemtray.
5.ClickOKorApply.
ForWindowsXP:
1.ClickStart,andthenclickControlPanel.
2.ClickPrintersandOtherHardware,andthenclickMouse.
3.ClicktheUltraNavtab.
4.SelectthecheckboxforShowUltraNavicononthesystemtray.
5.ClickOKorApply.
YoucannowchangetheUltraNavpropertiesbyclickingtheUltraNavicononthesystemtray.
Powermanagement
Whenyouneedtouseyourcomputerawayfromelectricaloutlets,youdependonbatterypowertokeep
yourcomputerrunning.Differentcomputercomponentsconsumepoweratdifferentrates.Themoreyou
usethepower-intensivecomponents,thefasteryouconsumebatterypower.
Domore,savemoreandspendmoretimeunpluggedwithThinkPadbatteries.Mobilityhasrevolutionized
businessbyallowingyoutotakeyourworkwhereeveryougo.WithThinkPadbatteries,youwillbeableto
worklongerwithoutbeingtiedtoanelectricaloutlet.
Checkingbatterystatus
ThePowerManagerBatteryGaugeinthetasktraydisplaysthepercentageofbatterypowerremaining.
Therateatwhichyouusebatterypowerwilldeterminehowlongyoucanusethebatteryofyourcomputer
betweencharges.Becauseeachcomputeruserhasdifferenthabitsandneeds,itisdifculttopredicthow
longabatterychargewilllast.Therearetwomainfactors:
•Howmuchenergyisstoredinthebatterywhenyoubegintowork.
•Thewayyouuseyourcomputer:howoftenyouaccesstheharddiskdriveorthesolidstatedrive;how
brightyoumakethecomputerdisplay.
Usingtheacpoweradapter
Thepowertorunyourcomputercancomeeitherfromthelithium-ion(Li-ion)batterypackprovidedwithit,
orfromacpowerthroughtheacpoweradapter.Whileyouuseacpower,thebatterychargesautomatically.
Theacpoweradapterthatcomeswithyourcomputerhastwobasiccomponents:
1.Thetransformerpackthatconvertsacpoweradapterforusewiththecomputer.
2.ThepowercordthatplugsintotheACoutletandintothetransformerpack.
Attention:Usinganimproperpowercordcouldcauseseveredamagetoyourcomputer.
Connectingtheacpoweradapter
Tousetheacpoweradapter,dothefollowing.Besuretotakethesestepsintheorderinwhichtheyare
givenhere.
1.Connecttheacpoweradaptertothepowerjackofthecomputer.
2.Connectthepowercordtothetransformerpack.
30UserGuide
Page 47

3.Plugthepowercordintoanelectricaloutlet.
Tipsonusingtheacpoweradapter
Youcancheckthestatusofyourbatteryatanytimebylookingatthebatterymeteratthebottomofyour
display.
Notes:
•Whentheacpoweradapterisnotinuse,disconnectitfromtheelectricaloutlet.
•Donotbindthepowercordtightlyaroundtheacpowertransformerpackwhenitisconnectedtothe
transformer.
•Youcanchargethebatterywhentheacpoweradapterisconnectedtothecomputerandthebatteryis
installed.Youneedtochargeitinanyofthefollowingconditions:
–Ifthebatterystatusindicatorstartsblinking
–Ifthebatteryhasnotbeenusedforalongtime
Beforeyouchargethebattery,makesurethatitstemperatureisatleast10°C(50°F).
Chargingthebattery
Whenyoucheckbatterystatusandndthatthepercentageofpowerremainingisloworwhenthepower
alarmalertsyouthatremainingpowerislow,youneedtochargeyourbattery.
Ifanacoutletisconvenient,plugtheacpoweradapterintoit,andtheninsertthejackintothecomputer.
Thebatterywillbefullychargedinabout3to6hours.Thisisaffectedbythebatterysizeandthephysical
environment.
Note:Toincreasethelifeofthebattery,thecomputerdoesnotstartrechargingthebatteryiftheremaining
powerisgreaterthan95%.
Maximizingbatterylife
Tomaximizethelifeofthebattery,dothefollowing:
•Usethebatteryuntilthechargeiscompletelydepleted-untilthebatterystatusindicatorstartsblinking
orange.
•Rechargethebatterycompletelybeforeusingit.Thebatteryisfullychargedifthebatteryindicatorshows
greenwhentheacpoweradapterispluggedin.
•Foranewbatteryorabatterythatyouhavenotusedrecently,dooneofthefollowing:
1.Rechargethebatterycompletelybeforeusingit.Thebatteryisfullychargedwhentheacpower
adapterispluggedinandthebatteryindicatorisgreen.
2.Usethebatteryuntilthechargeiscompletelydepleted-untilthebatterystatusindicatorstarts
blinkingorange.
•Alwaysusepowermanagementfeaturessuchaspowermodes,screenblank,sleep(standby),and
hibernation.
Power-savingmodes
Thereareseveralmodesthatyoucanuseatanytimetoconservepower.Thissectionintroduceseach
modeandgivestipsontheeffectiveuseofthebatterypower.
Introducingthepower-savingmodes
•Screenblank.Thecomputerdisplayrequiresconsiderablebatterypower.T oturnoffpowertothe
display,doasfollows:
Chapter2.Usingyourcomputer31
Page 48

1.Right-clickthePowerManagerBatteryGaugeinthetaskbar.
2.SelectPoweroffdisplay.
•Sleep(standbyinWindowsXP).Insleep(standby)mode,yourworkissavedtomemory,andthenthe
harddiskdriveorthesolidstatedriveandthecomputerdisplayareturnedoff.Whenyourcomputer
wakesup,yourworkisrestoredwithinseconds.T oputyourcomputerintosleep(standby)mode,press
Fn+F4.Toreturnfromsleep(standby)mode,pressFnkey.
•Hibernation.Byusingthismode,youcanturnoffyourcomputercompletelywithoutsavinglesorexiting
fromanyapplicationsthatarerunning.Whenyouenterhibernation,allopenapplications,folders,and
lesaresavedtotheharddiskdrive,andthenthecomputerturnsoff.T oenterhibernation,doasfollows:
•ForWindows7:
1.ClickStart.
2.ClickthetrianglemarkontherightsideoftheShundownicon,thenselectHibernate.
•ForWindowsXP:
1.ClickStart.
2.ClickShundown,thenselectHibernate.
Enablingthewakeupfunction
Ifyouputyourcomputerintohibernationmode,andthewakeupfunctionisdisabled(thisisthedefault
setting),thecomputerdoesnotconsumeanypower.Ifthewakeupfunctionisenabled,itconsumesasmall
amountofpower.Toenablethefunction,doasfollows:
•ForWindows7:
1.ClickStart➙ControlPanel➙SystemandSecurity.
2.ClickAdministrativeTools.
3.Double-clickT askScheduler.Ifyouarepromptedforanadministratorpasswordorconrmation,
typethepasswordorprovideconrmation.
4.Fromtheleftpane,selectthetaskfolderforwhichyouwanttoenablethewakeupfunction.The
scheduledtasksaredisplayed.
5.Clickascheduledtask,andthenclicktheConditionstab.
6.UnderPower,selectthecheckboxforWakethecomputertorunthistask.
•ForWindowsXP:
1.ClickStart➙ControlPanel➙PerformanceandMaintenance.
2.ClickScheduledTasks.Thescheduledtasksaredisplayed.
3.Right-clickonascheduledtask.
4.ClickProperties.
5.ClicktheSettingstab.
6.UnderPowerManagement,selectthecheckboxforWakethecomputertorunthistask.
Enablingthebatteryalarm
Youcanprogramyourcomputersothatwhenthebatterypowerfallsbelowacertainlevel,threeevents
occur:thealarmgoesoff,amessageisdisplayed,andtheLCDisturnedoff.Doasfollows:
1.StartPowerManager.
2.ClicktheGlobalPowerSettingstab.
3.ForLowbatteryalarmorCriticallylowbatteryalarm,setthepercentageofthepowerlevelandset
theaction.
32UserGuide
Page 49

Note:Ifyourcomputerenterssleep(standby)orhibernationmodewhenthebatteryislow,butthealarm
messagehasnotyetappeared,themessagewillappearwhenthecomputerresumes.Toresumenormal
operation,pressOK.
Handlingthebattery
DANGER
Donotattempttodisassembleormodifythebatterypack.
Attemptingtodosocancauseanexplosion,orliquidleakagefromthebatterypack.
AbatterypackotherthantheonespeciedbyLenovo,oradisassembledormodiedbattery
packisnotcoveredbythewarranty.
DANGER
Iftherechargeablebatterypackisincorrectlyreplaced,thereisdangerofanexplosion.Thebattery
packcontainsasmallamountofharmfulsubstances.T oavoidpossibleinjury:
•ReplaceonlywithabatteryofthetyperecommendedbyLenovo.
•Keepthebatterypackawayfromre.
•Donotexposeittoexcessiveheat.
•Donotexposeittowaterorrain.
•Donotshort-circuitit.
•Storeitinacooldryplace.
•Keepitawayfromchildren.
Thebatterypackisaconsumablesupply.
Ifyourbatterybeginstodischargetooquickly,replacethebatterypackwithanewoneofthetype
recommendedbyLenovo.Formoreinformationonreplacingthebatterypack,contactyourCustomer
SupportCenter.
DANGER
Donotdrop,crush,puncture,orsubjecttostrongforces.Batteryabuseormishandlingcancause
thebatterytooverheat,whichcancausegassesorameto“vent”fromthebatterypackorcoin
cell.Ifyourbatteryisdamaged,orifyounoticeanydischargefromyourbatteryorthebuildup
offoreignmaterialsonthebatteryleads,stopusingthebatteryandobtainareplacementfrom
thebatterymanufacturer.
DANGER
Onlyrechargethebatterypackstrictlyaccordingtoinstructionsincludedintheproduct
documentation.
Chapter2.Usingyourcomputer33
Page 50

DANGER
Donotputthebatterypackintrashthatisdisposedofinlandlls.Whendisposingofthebattery,
complywithlocalordinancesorregulationsandyourcompany'ssafetystandards.
DANGER
Thereisadangerofanexplosionifthebackupbatteryisincorrectlyplaced.Thelithiumbattery
containslithiumandcanexplodeifitisnotproperlyhandled,ordisposedof.Replaceonlywitha
batteryofthesametype.Toavoidpossibleinjuryordeath,Donot:(1)throworimmerseintowater,
(2)allowittoheattomorethan100°C(212°F),or(3)attempttorepairordisassembleit.Disposeof
itasrequiredbylocalordinancesorregulationsandyourcompany'ssafetystandards.
Connectingtothenetwork
YourcomputerhasoneormorenetworkadaptersforconnectingtotheInternetandtoyourcompany's
wiredLANorwirelessLANnetwork.
Note:Somemodelscomewithabuilt-inwirelessWANcardenablingyoutoestablishwirelessconnections
overremotepublicorprivatenetworks.
AccessConnectionsisaconnectivityassistantprogramforcreatingandmanaginglocationproles.Each
locationprolestoresallthenetworkandInternetcongurationsettingsneededforconnectingtoanetwork
infrastructurefromaspeciclocationsuchasahomeoranofce.
ForWindows7:T ostarttheAccessConnectionswizard,see“AccessingapplicationsinWindows7”on
page15,andfollowtheinstructionsonthescreen.
ForWindowsXP:TostarttheAccessConnectionswizard,clickStart➙AllPrograms➙ThinkVantage
➙AccessConnections,andfollowtheinstructionsonthescreen.
Ethernetconnections
Youcanconnecttoyournetworkorabroadbandconnection,suchasDSLorCATV,byuseofthe
Ethernetfeaturebuiltintoyourcomputer.Dependingonthemodel,thisfeatureenablesyoutodoeither
10Mbps/100Mbpsor1Gbpshalforfullduplexdatatransmission.
ToconnecttoanetworkviaEthernet,youcanuseAccessConnections.
DANGER
YourcomputerhasanEthernetconnector.T oavoidtheriskofelectricalshock,donotconnect
thetelephonecabletotheEthernetconnector.
Wirelessconnections
Wirelessconnectionisthetransferofdatawithouttheuseofcablesbymeansofradiowavesonly.
Dependingonthefrequencyusedfordatatransmission,theareacovered,orthetypeofthedeviceusedfor
datatransfer,thefollowingcategoriesofwirelessnetworksmigntbeavailabletoyou.
34UserGuide
Page 51

WirelessLAN
Awirelesslocalareanetworkcoversarelativelysmallgeographicarea,suchasanofcebuildingorahouse.
Devicesbasedonthe802.11standardscanconnecttothisnetwork.
WirelessWAN
Awirelesswideareanetworkcoversabroadergeographicarea.Cellularnetworksareusedfordata
transmission,andaccessisprovidedbyawirelessservicecarrier.
Bluetooth
Oneofanumberoftechnologiesusedtocreateawirelesspersonalareanetwork.Bluetoothcanconnect
devicesashortdistancefromoneanother,andiscommonlyusedforconnectingperipheraldevicestoa
computer,transferringdatabetweenhand-helddevicesandPC,orremotelycontrollingandcommunicating
withdevicessuchasmobilephones.
WiMAX(WorldwideInteroperabilityforMicrowaveAccess)
Thislong-rangewirelessdatatransmissiontechnologybasedonthe802.16standard,isexpectedtoprovide
theusera“lastmile”broadbandconnectivitysimilartothatprovidedbycableorADSL,butwithouttheneed
tophysicallyconnectacabletothePC.
MakingwirelessLANconnections
Yourcomputercomeswithabuilt-inwirelessnetworkingcardandacongurationutilitytohelpyoumake
wirelessconnectionsandmonitorthestatusofyourconnection,sothatyoucanstayconnectedtoyour
networkwhileyouareintheofce,inameetingroom,orathome,withnoneedforawiredconnection.
Attention:
•IfyoucarryyourcomputerwiththewirelessLANfeatureintoanairplane,checktheserviceswiththe
airlinebeforeboardingtheairplane.
•Iftherearerestrictionsontheuseofcomputersonanairplanewiththewirelessfeature,youneedto
disableitbeforeboarding.Todisableit,refertotheinstructionsin“Enablingordisablingthewireless
feature”onpage42
Note:Youcanpurchaseawirelessnetworkingcardasanoption.Formoreinformation,referto“Finding
ThinkPadoptions”onpage97
TipsforusingthewirelessLANfeature
•PlaceyourcomputersothatthereareasfewobstaclesaspossiblebetweenthewirelessLANaccess
pointandthecomputer.
•Toachievethebestwirelessconnection,openyourcomputerdisplaytoanangleslightlygreaterthan
90degrees.
•Ifyouusethewirelessfeature(the802.11standard)ofyourcomputersimultaneouslywithaBluetooth
option,datatransmissionspeedcanbedelayedandtheperformanceofthewirelessfeaturecanbe
degraded.
Wirelessnetworkingsetup
Tousethebuilt-inwirelessnetworkingcard(the802.11standard)tocommunicate,startAccessConnections.
ForWindows7:T ostarttheAccessConnectionswizard,see“AccessingapplicationsinWindows7”on
page15
,andfollowtheinstructionsonthescreen.
.
ForWindowsXP:TostarttheAccessConnectionswizard,clickStart➙AllPrograms➙ThinkVantage
➙AccessConnections,andfollowtheinstructionsonthescreen.
Chapter2.Usingyourcomputer35
Page 52

Note:BeforeyoustartsettingupwirelessnetworkingconnectionsbyusingAccessConnections,obtaina
NetworkName(SSID)andyourencryptioninformationfromyournetworkadministrator.
AccessConnections,aconnectivityassistantprogram,caneasilyenableonenetworkadapteranddisable
theotheradaptersondemand.Aftersettingupyourwirelessnetworkingconnection,youcanusethe
programtoquicklyswitchthenetworksettings.
UsingwirelessWANconnections
WirelessWideAreaNetwork(wirelessWAN)enablesyoutoestablishwirelessconnectionsoverremote
publicorprivatenetworks.Theseconnectionscanbemaintainedoveralargegeographicalarea,suchas
acityoranentirecountry,byuseofmultipleantennasitesorsatellitesystemsmaintainedbywireless
serviceproviders.
SomeThinkPadNotebookscomewithabuilt-inwirelessWANcardintegratingsomewirelessWAN
technologies,suchas1xEV-DO,HSPA,3GorGPRS.YoucanconnecttotheInternetoryourcompany
networkwiththebuilt-inwirelessWANcardandthecongurationutilitytomakeawirelessWANconnection
andmonitoritsstatus.
Note:WirelessWANserviceisprovidedbyauthorizedserviceprovidersinsomecountries.
TousethewirelessWANfeature,startAccessConnections.
Note:AccessConnectionsdoesnotsupportconnectiontowirelessWANnetworkinChina.
ForWindows7:T ostarttheAccessConnectionswizard,see“AccessingapplicationsinWindows7”on
page15
,andfollowtheinstructionsonthescreen.
ForWindowsXP:TostarttheAccessConnectionswizard,clickStart➙AllPrograms➙ThinkVantage
➙AccessConnections.Thenfollowtheinstructionsonthescreen.
UsingBluetooth
ForWindows7:
IfyourcomputerisequippedwiththeintegratedBluetoothfeatures,youcanenableordisablethefeatures
bypressingFn+F5.WhenyoupressFn+F5,alistofwirelessfeaturesisdisplayed.Y oucanenableor
disabletheBluetoothfeatureswithasingleclick.
TocongureaBluetoothdeviceormanageconnectionsettings,useBluetoothDevicesinControlPanel.
1.ClickStart➙ControlPanel.
2.ClickHardwareandSound.
3.ClickDevicesandPrinters.
TosenddatatoaBluetooth-enableddevice,doasfollows:
1.Right-clickthedatathatyouwanttosend.
2.SelectSendTo➙BluetoothDevices.
Fordetails,refertotheWindowsonlinehelp.
Note:Ifyouusethewirelessfeature(the802.11standard)ofyourcomputersimultaneouslywithaBluetooth
option,datatransmissionspeedcanbedelayedandtheperformanceofthewirelessfeaturecanbe
degraded.
36UserGuide
Page 53

ForWindowsXP
IfyourcomputerisequippedwiththeintegratedBluetoothfeatures,youcanenableordisablethefeatures
bypressingFn+F5.
IfyoupressFn+F5,alistofwirelessfeaturesisdisplayed.YoucanenableordisabletheBluetoothfeatures
withasingleclick.
InWindowsXP,youcanuseeitherThinkPadBluetoothwithEnhancedDataRateSoftware,ortheMicrosoft
Bluetoothsoftware.
Bydefault,ThinkPadBluetoothwithEnhancedDataRateSoftwareisinstalledonyourcomputer.
UsingBluetoothforthersttimeonyourcomputer
IfthisisthersttimeBluetoothhasbeenusedonyourcomputer,useeitherofthefollowingprocedures:
1.Double-clicktheMyBluetoothPlacesicononthedesktop,ortheBluetoothiconinthetaskbar.The
StartUsingBluetoothwindowopens,andsomevirtualdevicedriversareinstalledautomatically.
2.Waituntiltheinstallationofthedriversiscomplete.
OR
1.Right-clicktheMyBluetoothPlacesicononthedesktop,ortheBluetoothiconinthetaskbar.
2.SelectStartUsingBluetooth.TheStartUsingBluetoothwindowopens,andsomevirtualdevice
driversareinstalledautomatically.
3.Waituntiltheinstallationofthedriversiscomplete.
SomeothervirtualdevicedriverswillbeinstalledondemandwhenyouusecertainBluetoothproles
forthersttime.
UsingtheMicrosoftBluetoothsoftware
IfyouareusingWindowsXPandwanttousetheMicrosoftstandardBluetoothfeatures,installthesoftware
byfollowingtheinstructionsin“InstallingtheMicrosoftBluetoothsoftwareinWindowsXP”onpage39.
ForinformationabouthowtousetheBluetoothfunction,doasfollows:
1.PressFn+F5toturnonBluetooth.
2.ClickStart➙ControlPanel.
3.ClickPrintersandOtherHardware.
4.ClickBluetoothDevices.
5.ClicktheOptionstab.
6.ClickLearnmoreaboutBluetoothSettings.
UsingThinkPadBluetoothwithEnhancedDataRateSoftware
IfThinkPadBluetoothwithEnhancedDataRateSoftwareisinstalledonyourcomputer,twoiconsare
displayedonthescreen:
•MyBluetoothPlacesonthedesktop
•BluetoothCongurationinthetaskbarnoticationarea
Chapter2.Usingyourcomputer37
Page 54

MyBluetoothPlaces
TousetheBluetoothfeatures,dothefollowing:
1.Double-clicktheMyBluetoothPlacesicononthedesktop.
2.ForWindowsXP,gotoBluetoothTasksanddouble-clickViewdevicesinrange.Alistofthedevices
onwhichBluetoothhasbeenenabledappears.
3.Clickthedevicetowhichyouwantaccess.Alistoftheservicesavailableonthatdeviceappears,
asfollows:
•Bluetoothkeyboardandmouse(Humaninterfacedevices)
•Printer(HCRP)
•Audiogateway
•Headset
•PIMsynchronization
•Fax
•Filetransfer
•PIMitemtransfer
•Dial-upnetworking
•Networkaccess
•Bluetoothserialport
•BluetoothImaging
•HandsFree
•AVprole
4.Clicktheserviceyouwant.
Formoreinformation,presstheF1keytoopentheonlinehelpforBluetooth.
BluetoothConguration
TousethecongurationfeaturesofBluetooth,right-clicktheicon.Apop-upmenuappears.Select
BluetoothSetupWizardorAdvancedConguration.
TheBluetoothSetupWizardhasthefollowingcapabilities:
•FindingallBluetooth-enableddevicesthatcanprovideservices
•FindingaspecicBluetooth-enableddevicethatyouwanttouse,andconguringtheservicesonthat
device
•ConguringtheBluetooth-enabledservicesonyourcomputerthatareprovidedforremotedevices
•Conguringthenameanddevicetypeofyourcomputer
TheAdvancedCongurationhasthefollowingfunctions:
•Conguringthenameanddevicetypeofyourcomputer
•ConguringyourcomputersettingssothatremoteBluetooth-enableddevicescanndyourcomputer
•ConguringyourcomputersettingssothatyourcomputercanndremoteBluetooth-enableddevices
•Conguring,onyourcomputer,theBluetooth-enabledservicesprovidedforremotedevices
•ConguringtheservicesonremoteBluetooth-enableddevices
•DisplayinginformationaboutBluetoothhardware
38UserGuide
Page 55

Fordetails,refertothehelpforBluetooth.T oseethehelp,double-clickMyBluetoothPlaces,andclick
HelpandthenBluetoothhelp.Anotherwaytostartthehelpistoright-clickBluetoothCongurationinthe
systemtrayofthetaskbar,andclickAdvancedCongurationandthenHelp.
InstallingtheMicrosoftBluetoothsoftwareinWindowsXP
IfyouwanttousetheMicrosoftBluetoothsoftware,doasfollows:
FirstuninstalltheThinkPadBluetoothwithEnhancedDataRateSoftware.
1.T urnBluetoothpoweroff.
2.ClickStart➙ControlPanel.
3.ClickAddorRemovePrograms.
4.SelectThinkPadBluetoothwithEnhancedDataRateSoftware;thenclickChange/Removeto
uninstallthesoftware.
5.Followtheinstructionsonthescreen.
NextinstalltheMicrosoftBluetoothsoftwareasfollows:
1.T urnBluetoothpoweron.MicrosoftBluetoothsoftwareisloadedautomatically.
2.IftheFoundNewHardwareWizardwindowpopsup,dothefollowing:
a.SelectNo,notthistime,andthenclickNext.
b.SelectInstallfromalistorspeciclocation(Advanced);thenclickNext.
c.SelectSearchforthebestdriverinthoselocations.
d.SelectIncludethislocationinthesearch:,andtypeC:\SWTOOLS\Drivers\MSBTooth,orspecifythe
locationinwhichyouplacedtheextractedINFle.ThenclickNext.
3.ClickFinish.
InstallingThinkPadBluetoothwithEnhancedDataRateSoftwareinWindowsXP
IfyouareusingtheMicrosoftBluetoothsoftwareandwanttouseThinkPadBluetoothwithEnhancedData
RateSoftwareinstead,replacetheMicrosoftBluetoothsoftwarewithThinkPadBluetoothwithEnhanced
DataRateSoftwareasfollows:
1.PressF9toturntheBluetoothpoweron.
2.ClickStart➙Run.
3.T ypeC:\SWTOOLS\Drivers\TPBTooth\Setup.exe(orspecifythefullpathtothesetup.exeleyouhave
downloadedfromhttp://www.lenovo.com/support);thenclickOK.
4.ClickNext.
5.SelectIacceptthetermsinthelicenseagreement;thenclickNext.
6.ClickNexttoselectthedefaultdestinationfolder.
Ifyouneedtochangethedestinationfolder,clickChange,selectorenterthenameofthedestination
folderintheChangecurrentdestinationfolderwindow,andclickOK.
7.ClickInstalltobegininstallation.
8.ClickOKtoacceptthedriversignature.
9.ClickFinish.
10.Restartthecomputerifnecessary.
IfyoudidnotturntheBluetoothpoweronbeforeinstallingThinkPadBluetoothwithEnhancedDataRate
Software,thatis,ifyouskippedstep1–replacetheBluetoothdriver,doasfollows:
1.ClickStart➙ControlPanel.
Chapter2.Usingyourcomputer39
Page 56

2.ClickPerformanceandMaintenance;thenclickSystem.
3.ClicktheHardwaretab;thenclickDeviceManager.
4.Double-clickBluetoothRadiostoextracttheBluetoothRadiosdevicetree.
5.Double-clicktheThinkPadBluetoothwithEnhancedDataRateicontoopenthePropertieswindow.
6.ClicktheDrivertab;thenclickUpdateDriver.
7.ClickNo,notthistime,andthenclickNext.
8.SelectInstallfromalistorspeciclocation(Advanced),andthenclickNext.
9.SelectDon'tsearch.Iwillchoosethedrivertoinstall;thenclickNext.
10.Selectthedriverthathasno“DigitalSigned”icon;thenclickNext.
11.ClickFinish.
Note:Ifyouusethewirelessfeature(the802.11standard)ofyourcomputersimultaneouslywithaBluetooth
option,datatransmissionspeedcanbedelayedandtheperformanceofthewirelessfeaturecanbe
degraded.
UsingWiMAX
SomeThinkPadNotebookscomewithabuilt-inwirelessLANcardintegratingWiMAXtechnology.
WiMAX,along-rangewirelessdatatransmissiontechnologybasedonthe802.16standard,providesyou
witha“lastmile”broadbandconnectivitysimilartothatofferedbycableorADSL,butwithouttheneedto
physicallyconnectacabletothePC.
TousetheWiMAXfeature,startAccessConnections.
ForWindows7:T ostarttheAccessConnectionswizard,seeAccessingapplicationsinWindows7,and
followtheinstructionsonthescreen.
ForWindowsXP:TostarttheAccessConnectionswizard,seeclickStart➙AllPrograms➙ThinkVantage
➙AccessConnections,andfollowtheinstructionsonthescreen.
Checkingwirelessconnectionstatus
AccessConnectionsGauge(Windows7)
IfyourcomputerisrunningWindows7,theAccessConnectionsGaugeinthetaskbardisplaysthesignal
strengthandstatusofyourwirelessconnection.
Note:TodisplayAccessConnectionsGaugeinthetaskbar,seetheHelpinAccessConnections.
Youcanndmoredetailedinformationaboutthesignalstrengthandstatusofyourwirelessconnection
byopeningAccessConnectionsorbyright-clickingtheAccessConnectionsGaugeinthetaskbarand
selectingViewStatusofWirelessConnection.
•AccessConnectionsGaugestates:wirelessLAN
–Powertothewirelessradioisoffornosignal.
–
improvesignalstrength,moveyoursystemclosertothewirelessaccesspoint.
Powertothewirelessradioison.Thesignalstrengthofthewirelessconnectionispoor.To
–Powertothewirelessradioison.Thesignalstrengthofthewirelessconnection
ismarginal.
40UserGuide
Page 57

–Powertothewirelessradioison.Thesignalstrengthofthewirelessconnectionis
excellent.
•AccessConnectionsGaugestates:wirelessWAN
–Nosignal
–Signallevel1
–Signallevel2
–
Signallevel3
Note:FormoreinformationaboutAccessConnectionsgauge,seetheHelpinAccessConnections.
AccessConnectionsiconandwirelessstatusicon
TheAccessConnectionsicondisplaysgeneralconnectionstatus.
Thewirelessstatusicondisplaysthesignalstrengthandstatusofyourwirelessconnection.
Youcanndmoredetailedinformationaboutthesignalstrengthandstatusofyourwirelessconnection
eitherbyopeningAccessConnectionsorbydouble-clickingtheAccessConnectionswirelessstatus
iconinthetaskbar.
Note:IfyourcomputerisaWindows7model,todisplaytheAccessConnectionsstatusiconandthe
wirelessstatusiconinthesystemtray,refertotheAccessConnectionson-linehelp.
•AccessConnectionsiconstates
–Nolocationproleisactiveornoneexists.
–Currentlocationproleisdisconnected.
Currentlocationproleisconnected.
–
•Wirelessstatusiconstates:wirelessLAN
–Powertothewirelessradioisoff.
–Powertothewirelessradioison.Noassociation.
–Powertothewirelessradioison.Nosignal.
Powertothewirelessradioison.Thesignalstrengthofthewirelessconnectionisexcellent.
–
–Powertothewirelessradioison.Thesignalstrengthofthewirelessconnectionismarginal.
–
Powertothewirelessradioison.Thesignalstrengthofthewirelessconnectionispoor.Toimprove
signalstrength,moveyoursystemclosertothewirelessaccesspoint.
•Wirelessstatusiconstates:wirelessWAN
PowertotheWANradioisoff
–
–Noassociation
–Nosignal
–
Signallevel1
Signallevel2
–
–Signallevel3
Note:Ifyouhavetroubleinmakingaconnection,trymovingyourcomputerclosertoyourwirelessaccess
point.
Chapter2.Usingyourcomputer41
Page 58

Enablingordisablingthewirelessfeatures
PressFn+F5tobringupthewirelessfeaturelist,suchaswirelessLANandBluetooth.Selectafeature
toenableordisableit.
Youalsocanenableordisablethefeaturesbythefollowingprocedures.
Toenablethewirelessfeature,doasfollows:
1.ClicktheAccessConnectionswirelessstatusiconinthesystemtray.
2.ClickPowerOnWirelessRadio.
Todisablethewirelessfeatures,dothefollowing:
•ClicktheAccessConnectionswirelessstatusiconinthesystemtray.
•ClickPowerOffWirelessRadio.
Note:IfyourcomputerisaWindows7model,right-clicktheAccessConnectionsGaugeandselectView
StatusofWirelessConnection.TheWirelessConnectionStatuswindowopens.ThenclickthePowerOn
WirelessRadiobuttontoenablethewirelessfeature.Todisablethewirelessfeature,clickthePowerOff
WirelessRadio.Formoreinformationabouttheicon,seetheHelpinAccessConnections.
Usingaprojectororexternalmonitor
Youcanconnectyourcomputertoaprojectortogivepresentationsoryoucanconnectyourcomputer
toanexternalmonitortoexpandyourworkspace.
Changingdisplaysettings
Youcanchangethedisplaysettings,suchasfontsize.
Changingthefontsize
Tochangethefrontsize,doasfollows:
ForWindows7:
1.Right-clickonthedesktop,andclickPersonalize.
2.ClickDisplayattheleft.
3.SelecttheMediumorLargerradiobutton.
4.ClickApply.Thechangewilltakeeffectafteryoulogoff.
ForWindowsXP:
1.Right-clickonthedesktop,andclickProperties.TheDisplayPropertieswindowopens.
2.ClicktheAppearancetab.
3.UnderFontSize,clickLargeFontsorExtraLargeFonts.
4.ClickApplytoapplythesettings.
5.ClickOK.IfyouarepromptedtorestartthecomputerafteryouclickOKorApply,thechangewill
takeeffectafterthecomputerrestarts.
Attachinganexternalmonitor
Yourcomputercansupportamaximumvideoresolutionofupto2048x1536(withanexternalmonitor
attachedtotheCRTconnector)orupto2560x1600(withanexternalmonitorattachedtotheHDMIport
42UserGuide
Page 59

connector),providedthattheexternalmonitoralsosupportsthatresolution.Formoredetails,referto
themanualsprovidedwithyourmonitor.
Youcansetanyresolutionforeitherthecomputerdisplayortheexternalmonitor.Whenyouusebothat
thesametime,theresolutionofbothisthesame.Ifyousetahigherresolutionforthecomputerdisplay,
youcanseeonlypartofthescreenatatime.Youcanseeotherpartsbymovingtheimagewiththe
TrackPointoranotherpointingdevice.
Youcanmovethedisplayoutputtothecomputerdisplay,theexternalmonitor,orbothintheDisplay
Settingswindow(inWindowsXPDisplayPropertieswindow).
Connectinganexternalmonitor
Toattachanexternalmonitor,doasfollows:
ForWindows7:
1.Connecttheexternalmonitortothemonitorconnector;thenconnectthemonitortoanelectricaloutlet
2.T urnontheexternalmonitor.
3.ChangethedisplayoutputlocationbypressingFn+F7.Thisallowsyoutoswitchbetweenviewing
outputontheexternaldisplay,thecomputerdisplay,andbothdisplays.
Note:Ifyourcomputercannotdetecttheexternalmonitor,right-clickonthedesktop,thenselectScreen
resolution.ClicktheDetectbutton.
ForWindowsXP:
1.T urnoffthecomputer.
2.Connecttheexternalmonitortothemonitorconnector;thenconnectthemonitortoanelectricaloutlet.
3.T urnontheexternalmonitorandthecomputer.
4.ChangethedisplayoutputlocationbypressingFn+F7.Thisallowsyoutoswitchbetweenviewing
outputontheexternalmonitor,thecomputerdisplay,andbothdisplays.
Notes:
•Donotchangethedisplayoutputlocationwhileamovingpictureisbeingdrawn—forexample,while
playingamovieoragame,orviewingabusinesspresentation.Closetheapplicationbeforechangingthe
displayoutputlocation,orchangethedisplaymodebeforeyouopenanMPEGletoplay.
•IfyouareattachinganexternalmonitorthatsupportsonlyVGAmode(640x480resolution),donotview
outputonboththecomputerdisplayandtheexternalmonitor.Doingsowouldcausetheexternalmonitor
screentobescrambledandtheoutputnottobedisplayed;inaddition,itcouldcausedamagetothe
screen.Usetheexternalmonitoronly.
•IftheexternalTFTmonitoryouconnecthasananaloginterface,ickersorripplesmigntappearonsome
displays,suchastheshutdownscreenofWindows.ThisiscausedbytheexternalTFTmonitor,and
cannotbexedbyadjustingtheexternalTFTmonitororthecomputersidesettings.
Settingthemonitortypes
Tosetyourmonitortype,doasfollows:
ForWindows7:
1.Connecttheexternalmonitortothemonitorconnector,andthenconnectthemonitortoanelectrical
outlet.
2.T urnontheexternalmonitor.
3.Right-clickonthedesktop,andclickScreenresolution.
Chapter2.Usingyourcomputer43
Page 60

Note:Ifyourcomputercannotdetecttheexternalmonitor,clicktheDetectbutton.
4.SetResolution.
5.ClickAdvancedSettings.
6.ClicktheMonitortab.Checkthemonitorinformationwindowtomakesurethatthemonitortypeis
correct.Ifitis,clickOKtoclosethewindow;otherwisedoasfollows.
7.Ifmorethantwomonitortypesaredisplayed,selectGenericPnPMonitororGenericNon-PnP
Monitor.
8.ClickProperties.Ifyouarepromptedforanadministratorpasswordorconrmation,typethepassword
orprovideconrmation.
9.ClicktheDrivertab.
10.ClickUpdateDriver.
11.ClickBrowsemycomputerfordriversoftware,andthenclickLetmepickfromalistofdevice
driversonmycomputer.
12.CleartheShowcompatiblehardwarecheckbox.
13.SelectManufacturerandModelforyourmonitor.Ifyoucannotndyourmonitorinthelist,stopthe
installationofthisdriverandusethedrivershippedwithyourmonitor.
14.Afterupdatingthedriver,clickClose.
15.ClickOK.
Note:Tochangethecolorsettings,right-clickonthedesktop,andclickScreenresolution.ClickAdvanced
Settings,selecttheMonitortab,thensetColors.
ForWindowsXP:
1.Connecttheexternalmonitortothemonitorconnector,andthenconnectthemonitortoanelectrical
outlet.
2.T urnontheexternalmonitorandthecomputer.
3.PressFn+F7tochangethedisplayoutputlocationtotheexternalmonitor.
4.Right-clickonthedesktop,andclickPropertiestoopentheDisplayPropertieswindow.
5.ClicktheSettingstab.
6.ClickAdvanced.
7.ClicktheMonitortab.Checkthemonitorinformationwindowtomakesurethatthemonitortypeis
correct.Ifitis,clickOKtoclosethewindow;otherwiseproceedwiththefollowingsteps.
8.Ifmorethantwomonitortypesaredisplayed,selectDefaultMonitor.
9.ClickProperties.
10.ClicktheDrivertab.
11.ClickUpdateDriver.TheHardwareUpdateWizardappears.
12.ClickNo,notthistime,andthenclickNext.
13.SelectInstallfromalistorspeciclocation(Advanced),andthenclickNext.
14.SelectDon'tsearch.Iwillchoosethedrivertoinstall,andthenclickNext.
15.CleartheShowcompatiblehardwarecheckbox.
16.SelectManufacturerandModelforyourmonitor.Ifyoucannotndyourmonitorinthelist,stopthe
installationofthisdriverandusethedrivershippedwithyourmonitor.
17.Afterupdatingthedriver,clickOKtoclosethePropertieswindow.
18.SetColorsandScreenareaintheDisplayPropertieswindow.
19.ClickOK.
44UserGuide
Page 61

Considerationsforattachinganexternalmonitor
•Wheninstallinganoperatingsystem,youmustinstallthedisplaydriverforyourmonitorthatissupplied
withthecomputer,andtheMonitorINFlethatissuppliedwiththeexternalmonitor.
•Ifyousetaresolutionhigherthantheresolutionyouareusingonthepanel,anduseapanelthatdoesnot
supportthatresolution,takeadvantageofthevirtualscreenfunction,whichenablesyoutodisplayonlya
partofthehigh-resolutionscreenimageyourcomputerproduces.Youcanseeotherpartsoftheimage
bymovingthescreenwiththeT rackPointorotherpointingdevice.
•Iftheexternalmonitoryouareusingisoutdated,theresolutionandtherefreshratemigntbelimited.
Settingupapresentation
Note:IfyourcomputerisaWindows7model,itdoesnotsupportPresentationDirector,buttheFn+F7or
Win+Pkeycombinationisavailableforswitchingdisplayoutputtoaconnectedprojector.
PresentationDirectorprovidesaneasywaytosetupyourcomputertohelpyougivepresentationswith
condence,evenwhenyouareawayfromyourofce.
UsePresentationDirectortoadjustresolutionsettingsandtemporarilydisablepowermanagementtimersto
ensureanuninterruptedpresentation.
PresentationDirectorhassomepredenedpresentationschemes.Toapplyapresentationscheme,you
canuseFn+F7.
TostartPresentationDirector,clickStart➙AllPrograms➙ThinkVantage➙PresentationDirector,and
followtheinstructionsonthescreen.
Projectingvideo
Todisplayinformationandmakepresentations,youcanattachadataprojectortoyourcomputer.Attachthe
dataprojectortothemonitorconnectoronyourcomputer.
Note:Itmignttakeseveralsecondsbeforetheprojectordisplaystheimage.Ifyoudonotseeyourdesktop
displayedafter60seconds,trypressingFn+F7toswitchbetweendifferentdisplayoutputlocations.
Playingsound
Yourprojectormighthaveoneormoreaudio-inputconnectors.Toprojectsound,youwillneedtoattachthe
comboaudiojackonyourcomputertotheseconnectors,usinganaudiocable(commerciallyavailable).
Usingacolorprole
ThedisplayprovidesacolorprolethatcanworkwiththeMicrosoftImageColorManagement(ICM)
function.IfthegraphicssoftwareyouareusingiscompatiblewithICM,youcandisplayacolorimageon
yourmonitorandmatchit,withthesamequality,onanotherdevice,suchasascanneroraprinter.
FordetailsonMicrosoftICM,refertothemanualsprovidedwiththeWindowsoperatingsystem.
Note:ThecolorproleforThinkPadLCDhasbeenpre-installedinyourcomputeralready.Ifyouneedto
installadifferentcolorprole,see“InstallingThinkPadMonitorFileforWindowsXP/7”onpage104.
Usingaudiofeatures
Yourcomputerisequippedwiththefollowing:
•Comboaudiojack,1/8inch(3.5mm)indiameter
•Built-instereospeakers
Chapter2.Usingyourcomputer45
Page 62

•Built-inanalogmicrophone
Yourcomputeralsohasanaudiochipthatenablesyoutoenjoyvariousmultimediaaudiofeatures:
•CompliantwithIntel
•RecordingandplaybackofPCMandWAVlesin16-bitor24-bitformat.
•PlaybackofaWAVleatasamplerateof44.1KHzto192KHz.
•PlaybackofMIDIlesthroughaWavetablesynthesizerunderMicrosoftWindowsoperatingsystems.
•PlaybackofMP3lesthroughtheWindowsMediaPlayerorasoftwareMP3player.
•Recordingfromvarioussoundsources,suchasaheadsetattachedtothecomboaudiojackofyour
computer.
Note:Thecomboaudiojackdoesnotsupportaconventionalmicrophone.Ifaconventionalheadphoneis
attachedtoit,theheadphonefunctionissupported.Ifaheadsetwitha3.5mm4-poleplugisattachedtoit,
bothheadphoneandmicrophonefunctionsaresupported.
Settingthevolume
Eachdevicehasvolumecontrols,whichyoucanset.
Toopenthewindowforadjustingtheoutputvolumeortherecordingvolume,dothefollowing:
•ForWindows7:
–ClickStart➙ControlPanel➙HardwareandSound➙Sound.TheSoundwindowappears.
–ClickthePlaybacktaborRecordingtab,andthenclickadevice,whichyouwanttocustomize.
–ClickthePropertiesbutton.
–ClicktheLevelstab,andthenchangethevolumebymovingtheslider.
•ForWindowsXP:
®
HighDenitionAudio.
–ClickStart➙ControlPanel➙Sounds,Speech,andAudioDevices➙SoundsandAudioDevice.
TheSoundsandAudioDevicePropertieswindowappears.
–ClicktheAudiotab,andthenclicktheVolumebuttoninSoundPlaybackorSoundRecording.
Notes:
•Youalsocangetaccesstothedesktopvolumecontrolbyusingthevolumeiconinthetaskbarat
thelowerrightofthescreen.ToopentheVolumeControlwindow,clickthevolumeicon.Tocontrol
thevolume,movethevolumecontrolsliderupordown.Toturnoffthesound,selectMutespeakers
(MuteinWindowsXP).
•Thenamesofwindowsoreldsareslightlydifferentdependingontheoperatingsystemyouuse.
•Fordetailsaboutcontrollingvolume,refertoyourWindowsonlinehelp.
Conguringforsoundrecording
Tocongurethemicrophoneforoptimizedsoundrecording,doasfollows:
ForWindows7:ClickStart➙ControlPanel➙HardwareandSound➙SmartAudio.
ForWindowsXP:ClickStart➙ControlPanel➙Sounds,Speech,andAudioDevices➙SmartAudio.
Usingtheintegratedcamera
Ifyourcomputerhasanintegratedcamera,whenyoupressFn+F6toopentheCommunicationssettings
window,thecamerawillbelaunchedandthegreencamera-in-useindicatorwillturnonautomatically.In
46UserGuide
Page 63

theCommunicationssettingswindow,youcanpreviewyourvideoimageandtakeasnapshotofyour
currentimage.
Youalsocanusetheintegratedcamerawithotherprogramsthatprovidefeaturessuchasphotographing,
videocapturing,andvideoconferencing.Tousetheintegratedcamerawithotherprograms,openoneofthe
programsandstartthephotographing,videocapturing,orvideoconferencingfunction.Then,thecamera
willstartautomaticallyandthegreencamera-in-useindicatorwillturnon.Formoreinformationaboutusing
thecamerawithaprogram,refertothedocumentationthatcamewiththeprogram.
IfyoudonotwantthecameratobelaunchedautomaticallywhenyoupressFn+F6orwhenyouusea
program,pressFn+F6toopentheCommunicationssettingswindowandclicktheHidemycameraimage
buttontodisablethecamera.
Conguringcamerasettings
Youcancongurethecamerasettingstomeetyourneeds,suchasadjustingthequalityofthevideooutput.
Tocongurethecamerasettings,dothefollowing:
1.PressFn+F6.TheCommunicationssettingswindowopens.
2.ClicktheManageSettingsbutton.TheCommunicationsUtilitywindowopens.
3.IntheCommunicationsUtilitywindow,congurethecamerasettingsdependingonyourindividual
needs.
Usingdualdisplays
UsingtheExtenddesktopfunction
YourcomputersupportsafunctionnamedtheExtenddesktop.WiththeExtenddesktopfunction,you
candisplayoutputonboththecomputerdisplayandanexternalmonitor.Youalsocandisplaydifferent
desktopimagesoneachmonitor.
YoucanusetheExtenddesktopfunctionwithoutchanginganysettings.Ifthefunctiondoesnotwork,refer
to“EnablingtheExtenddesktopfunction”onpage48
ConsiderationsforusingtheExtenddesktopfunction
•IfyouwanttoshowDOSfull-screenwhileintheExtenddesktopmode,onlytheprimarydisplayshows
DOS;theotherdisplayisblackedout.
IfyourcomputerhastheInteldisplayadapter,youcandesignatetheotherdisplayastheprimarydisplay
bydoingthefollowing:
1.PressCtrl+Alt+F12.TheIntelCUIwindowopens.
Note:ForanycombinationoftheFnkeyandafunctionkey,presstheFnkeyrst;then,whileholding
theFnkeydown,pressthedesiredfunctionkey.
2.SelectExtendedDesktop.
3.Changethesettingtodesignatetheprimarydisplay.
IfyourcomputerhastheAMD
displayasfollows.
1.Right-clickonthedesktop,thenselectScreenresolution.
2.SelectExtendthesedisplaysinMultipleDisplays.
3.Changethesettingtodesignatetheprimarydisplay.
®
displayadapter,youcandesignatetheotherdisplayastheprimary
toenableit.
Chapter2.Usingyourcomputer47
Page 64

•WhenanapplicationusingtheDirectDrawortheDirect3Displayedinfull-screenmode,itisshown
onlyontheprimarydisplay.
•YoucannotusethedisplayswitchingfunctionwhenyouareintheExtenddesktopmode.
EnablingtheExtenddesktopfunction
ToenabletheExtenddesktopfunction,doasfollows:
ForWindows7:
1.Connecttheexternalmonitortothemonitorconnector;thenconnectthemonitortoanelectricaloutlet.
2.T urnontheexternalmonitor.
3.PressFn+F7,thenselectExtend.
Tochangetheresolutionforeachmonitor,doasfollows:
1.Right-clickonthedesktop,andclickScreenresolution.
2.ClicktheMonitor-1icon(fortheprimarydisplay,thecomputerdisplay).
3.SelecttheResolutionfortheprimarydisplay.
4.ClicktheMonitor-2icon(forthesecondarydisplay,theexternaldisplay).
5.SelecttheResolutionforthesecondarydisplay.
6.Placetheiconsforthemonitorssothattheytouch.
Note:Youcansetthemonitorsinanyrelativeposition,buttheiconsmusttoucheachother.
7.ClickOKtoapplythechanges.
Note:Tochangethecolorsettings,right-clickonthedesktop,andclickScreenresolution.ClickAdvanced
Settings,selecttheMonitortab,thensetColors.
ForWindowsXP:
1.T urnoffthecomputer.
2.Connecttheexternalmonitortothemonitorconnector;thenconnectthemonitortoanelectricaloutlet.
3.T urnontheexternalmonitorandthecomputer.
4.Right-clickonthedesktop,andclickPropertiestoopentheDisplayPropertieswindow.
5.ClicktheSettingstab,andclicktheMonitor-2icon.
6.SelecttheExtendmyWindowsdesktopontothismonitorcheckboxandclickApply.(IftheMonitor
Settingswindowopens,clickYes.)
Tochangetheresolutionforeachmonitor,doasfollows:
1.ClicktheMonitor-1icon(fortheprimarydisplay,thecomputerdisplay).
2.Selectthecolorqualityandthescreenresolutionfortheprimarydisplay.
3.ClicktheMonitor-2icon(forthesecondarydisplay,theexternaldisplay).
4.Selectthecolorqualityandthescreenresolutionforthesecondarydisplay.
5.Placetheiconsforthemonitorssothattheytouch.
Note:Youcansetthemonitorsinanyrelativeposition,buttheiconsmusttoucheachother.
6.ClickOKtoapplythechanges.
48UserGuide
Page 65

Usingthemediacardreader
Ifyourcomputerhasamediacardreaderslot,itsupportsthefollowingcards:
•SDcard
•SDHCcard
•SDXCcard
•MultiMediaCard(MMC)
Notes:
•YourcomputerdoesnotsupporttheContentProtectionforRecordableMedia(CPRM)featureforSD
cards.
•Whentransferringdatatoorfromaashmediacard,suchasanSDcard,donotputyourcomputer
insleep(standby)orhibernationmodebeforethedatatransferiscomplete.Todosomightcause
damagetoyourdata.
Chapter2.Usingyourcomputer49
Page 66

50UserGuide
Page 67

Chapter3.Youandyourcomputer
Thischapterprovidesyouinformationaboutaccessibilityandtravelingwithyourcomputer.
Thischaptercontainsthefollowingtopics:
•“Accessibilityandcomfort”onpage51
•“Travelingwithyourcomputer”onpage53
Accessibilityandcomfort
Becauseyourcomputerenablesyoutoworkinsomanyplaces,itisimportantthatyouremainattentive
togoodposture,goodlightingandproperseating.Bykeepingtheseconsiderationsinmind,youcan
improveperformanceandachievegreatercomfort.
Lenovoiscommittedtoprovidingthelatestinformationandtechnologytoourcustomerswithdisabilities.
Refertoouraccessibilityinformationwhichoutlinesoureffortsinthisarea.
Ergonomicinformation
Workinginthevirtualofcemigntmeanadaptingtofrequentchangesinyourenvironment.Followingsome
simpleruleswillmakethingseasierandbringyouthemaximumbenetsofyourcomputer.Keepinginmind
suchbasicsasgoodlightingandproperseating,forexample,canhelpyouimproveyourperformance
andachievegreatercomfort.
Note:Thisexampleshowssomeoneinaconventionalsetting.Evenwhennotinsuchasetting,youcan
followmanyofthesetips.Developgoodhabits,andtheywillserveyouwell.
GeneralPosture:Belowaresomegeneralrecommendationsforassumingahealthyworkingposture.It
isbesttoperiodicallymakeminormodicationsinyourworkingposturetodetertheonsetofdiscomfort
causedbylongperiodsofworkinginthesameposition.Frequent,shortbreaksfromyourworkwillalsohelp
topreventanyminordiscomfortassociatedwithyourworkingposture.
Display:Positionthedisplaytomaintainacomfortableviewingdistanceof510-760mm(20-30inch).Avoid
glareorreectionsonthedisplayfromoverheadlightingoroutsidesourcesoflight.Keepthedisplay
©CopyrightLenovo2011
51
Page 68

screencleanandsetthebrightnesstolevelsthatenableyoutoseethescreenclearly.PressF7orF8
toadjustdisplaybrightness.
HeadPosition:Keepyourheadandneckinacomfortableandneutral(vertical,orupright)position.
Chair:Useachairthatgivesyougoodbacksupportandseatheightadjustment.Usechairadjustmentsto
bestsuityourdesiredposture.
ArmandHandPosition:Ifavailable,utilizechairarmrestsoranareaonyourworkingsurfacetoprovide
weightsupportforyourarms.Keepyourforearms,wrists,andhandsinarelaxedandneutral(horizontal)
position.Typewithasofttouchwithoutpoundingthekeys.
LegPosition:Keepyourthighsparalleltotheoorandyourfeetatontheoororonafootrest.
Whatifyouaretraveling?
Itmigntnotbepossibletoobservethebestergonomicpracticeswhenyouareusingyourcomputer
whileonthemoveorinacasualsetting.Regardlessofthesetting,trytoobserveasmanyofthetipsas
possible.Sittingproperlyandusingadequatelighting,forexample,willhelpyoumaintaindesirablelevels
ofcomfortandperformance.
Questionsaboutvision?
ThinkPadnotebook'svisualdisplayscreensaredesignedtomeetthehigheststandardsandtoprovideyou
withclear,crispimagesandlarge,brightdisplaysthatareeasytosee,yeteasyontheeyes.Ofcourse,
anyconcentratedandsustainedvisualactivitycanbetiring.Ifyouhavequestionsoneyefatigueorvisual
discomfort,consultavisioncarespecialistforadvice.
Adjustingyourcomputertotyou
Becauseyourcomputerenablesyoutoworkinsomanyplaces,itisimportantthatyouremainattentive
togoodposture,goodlightingandproperseating.Refertothefollowingtipstoimproveperformance
andachievegreatercomfort:
Activesittingandrestbreaks:Thelongeryousitandworkwithyourcomputerthemoreimportantitis
toobserveyourworkingposture.Followinggeneralrecommendationsformaintainingahealthyworking
postureandpracticing“activesitting”arethebestwaystoavoiddiscomfortassociatedwithyourworking
postures.Makingminorvoluntaryposturalchangesandtakingshortfrequentworkbreaksarethekey
ingredientsforhealthycomputing.Yourcomputerisalightandmobilesystem;rememberthatitcaneasilybe
repositionedonyourworkingsurfacetoaccommodatemanyposturemodicationsyoumightwishtomake.
Workareasetupoptions:Familiarizeyourselfwithallofyourofcefurnituresothatyouknowhowtoadjust
yourworksurface,seat,andotherworktoolstoaccommodateyourpreferencesforcomfort.Ifyourwork
areaisnotinanofcesetting,besuretotakespecialnoteofemployingactivesittingandutilizingwork
breaks.NotethattherearemanyThinkPadproductsolutionsavailabletohelpyoumodifyandexpand
yourcomputertobestsuityourneeds.AccessthefollowingWebsitetoviewsomeoftheseoptions:
http://www.lenovo.com/accessories/services/index.html.Exploreyouroptionsforexternalproductsthatcan
providetheadjustabilityandfeaturesthatyouwant.
ThinkPadfeaturesthatpromotecomfort:ThereareeasytouseThinkPadfeaturesthatcanhelpmake
yourcomputermorecomfortabletouse.
52UserGuide
Page 69

Accessibilityinformation
Lenovoiscommittedtoprovidingpeoplewithdisabilitiesgreateraccesstoinformationandtechnology.
Asaresult,thefollowinginformationprovideswaystohelpusersthathavehearing,vision,andmobility
limitationsgetthemostoutoftheircomputerexperience.
Assistivetechnologiesenableuserstoaccessinformationinthemostappropriateway.Someofthese
technologiesarealreadyprovidedinyouroperatingsystem.Otherscanbepurchasedthroughvendors,or
accessedthroughtheWorldWideWeb.
Assistivetechnologies
SomeaccessibilitytechnologiesareavailablethroughtheAccessibilityOptionsprogram.Depending
onyouroperatingsystem,thenumberofaccessibilityoptionsavailablevaries.Ingeneral,accessibility
optionsenhancethewayuserswithhearing,vision,ormobilitylimitationsnavigateandusetheircomputer.
Forexample,someusersmightnothavethenemotorskillsrequiredtouseamouseorselectkey
combinations.Otherusersmightrequirelargerfontsorhigh-contrastdisplaymodes.Insomecases,
magniersandbuilt-inspeechsynthesizersareavailable.Fordetailedinformationabouteachofthese
features,consulttheMicrosofthelpsystem.
TousetheAccessibilityOptionsprogram,doasfollows:
ForWindows7:
1.ClickStart,andthenclickControlPanel.
2.ClickEaseofAccess.
3.ClickEaseofAccessCenter.
ForWindowsXP:
1.ClickStart,andthenclickControlPanel.
2.ClickAccessibilityOptions.
ThishelpsystemsupportstheaccessibilityfeaturesprovidedbyyourWindowsoperating
system,screenreadersdesignedtooperateintheWindowsenvironment,andWindows
keyboardnavigation.ForacompletelistingofMicrosoftWindowsKeyboardGuide,visit
http://www.microsoft.com/enable/Products/altkeyboard.aspx.
Screenreadertechnologiesareprimarilyfocusedonsoftwareapplicationinterfaces,helpsystems,anda
varietyofonlinedocuments.However,inthecasewhereascreenreadercannotreaddocuments,the
documentmustrstgothroughaconversionprocess.OnesolutionconvertsAdobePDFlesintoaformat
thatisreadbythescreen-readerprograms.ThissolutionisaWeb-basedserviceprovidedbyAdobe
SystemsIncorporated.Throughhttp://access.adobe.com,AdobePDFdocumentscanbeconvertedto
HTMLorplaintextinmanylanguages.OneconversionoptionconvertsPDFdocumentsontheInternet.A
secondoptionenablesuserstosubmittheURLofanAdobePDFlethroughe-mailtoconvertittoHTMLor
ASCIItext.AdobePDFlesonalocalharddiskdrive,localCD-ROM,orlocalareanetwork(LAN)alsocan
beconvertedbyattachingtheAdobePDFletoane-mailmessage.
Travelingwithyourcomputer
Thistopicprovidesinformationtohelpyouworkwithyourcomputerwhenyouaretravellingwithyour
computerabroad.
Attendingtosomeimportantdetailsthatcanhelpforeigntravelgosmoothly:
•Traveltips
Chapter3.Youandyourcomputer53
Page 70

•Travelaccessories
Traveltips
Usethefollowingtraveltipstotravelmorecondentlyandefcientlywithyourcomputer.
1.Whileitissafetoallowyourcomputertogothroughthexraymachinesatairportsecuritystations,itis
importanttokeepyoureyesonthecomputeratalltimestopreventtheft.
2.Considerbringinganairplaneorautomobileadapterforyourcomputer.
3.Ifyoucarryanacpoweradapter,detachtheaccordfromittoavoiddamagingthecord.
Traveltipsonairplanes
Ifyoucarryyourcomputerintoanairplane,checkthetraveltips.
Attention:
•Forusingonboardcomputerorwireless(suchasInternetandBluetooth)services,checktheserviceswith
theairlinebeforeboardingtheairplane.
•Iftherearerestrictionsontheuseofcomputerswiththewirelessfeatureonanairplane,youneedto
disableitbeforeboarding.Todisableit,refertotheinstructionsin“Enablingordisablingthewireless
feature”onpage42
Followthetipsbelow:
1.Becarefulabouttheseatinfrontofyouonairplanes.Angleyourcomputerdisplaysothatitdoesnot
getcaughtwhenthepersoninfrontofyouleansback.
2.Remembertohibernateorturnoffyourcomputerwhentakingoff.
.
Travelaccessories
Hereisachecklistofthingstoconsiderpackingwhenyouaregoingtobeawayfromtheofce:
Travelessentials:
•ThinkPadacpoweradapter
•Externalmouse,ifyouareaccustomedtousingone
•Ethernetcable
•Aqualitycarryingcasethatprovidesadequatecushionandprotection
Ifyouaretravelingtoanothercountryyoumightwanttoconsidertheseitems
•Anacpoweradapterforthecountrythatyouaretravelingto
•Anadaptertoconnecttoaphonelineinthatcountry
Otheritemsyoumigntwishtoconsider
•ThinkPadAC/DCComboAdapter
•Externalstoragedevice
54UserGuide
Page 71

Chapter4.Security
Thischapterprovidesinformationabouthowtoprotectyourcomputerfromtheftandunauthorizeduse.
•“Attachingamechanicallock”onpage55
•“Usingpasswords”onpage55
•“Harddisksecurity”onpage61
•“Noticeondeletingdatafromyourharddiskdriveorsolidstatedrive”onpage61
•“Usingandunderstandingrewalls”onpage62
•“Protectingdataagainstviruses”onpage62
Attachingamechanicallock
Youcanattachamechanicallocktoyourcomputer,tohelppreventitfrombeingremovedwithoutyour
permission.
Attachamechanicallocktothekeyholeofthecomputer;thensecurethechainonthelocktoastationary
object.Refertotheinstructionsshippedwiththemechanicallock.
Note:Y ouareresponsibleforevaluating,selecting,andimplementingthelockingdevicesandsecurity
features.Lenovomakesnocomments,judgments,orwarrantiesaboutthefunction,quality,orperformance
oflockingdevicesandsecurityfeatures.
Usingpasswords
Byusingpasswords,youcanhelppreventyourcomputerfrombeingusedbyothers.Onceyouseta
password,apromptisdisplayedonthescreeneachtimeyouturnonthecomputer.Enteryourpasswordat
theprompt.Y oucannotusethecomputerunlessyoutypethecorrectpassword.
Makesurethatonlyauthorizedindividualsaccessyourcomputer.Establishingdifferentkindsofpasswords
requiresthatotherpossibleusersknowtheproperpasswordsinordertoaccessyourcomputeroryourdata.
Ifthisiconappears,enterPower-onpasswordorSupervisorpassword.
Ifthisiconappears,enterHarddiskpassword.
Ifthisiconappears,enterSupervisorpassword.
Readthefollowingtopicstondoutmoreaboutpasswordsandhowtousethemtoprotectyourcomputer.
•Passwordsandsleep(standby)mode
•Power-onpassword
•Harddisksecurity
•Supervisorpassword
©CopyrightLenovo2011
55
Page 72

Passwordsandsleep(standby)mode
Ifyouhavesetpasswordsandyouputyourcomputerintosleep(standby)mode,theprocedurefor
resumingoperationisasfollows:
•Youarenotpromptedtotypethepasswordwhenresumingoperation.
•Ifanyharddiskdriveorthesolidstatedrivehasaharddiskpassword,itisunlockedautomatically
whenyouresumeoperation.
Typingpasswords
Ifthisiconappears,typeapower-onpasswordorasupervisorpassword.
Ifthisiconappears,typeauserharddiskpassword.Ifyouwanttotypeamasterharddiskpassword,
dothefollowing:
1.PressF1.Theiconchangestothis:
2.Nowtypethemasterharddiskpassword.
Note:Toreturntothersticon,pressF1again.
Ifthisiconappears,typeasupervisorpassword.
Note:YoucanpressBackspaceifyoupressawrongkeywhileyouaretypingyourpassword.
Power-onpassword
Youcansetapower-onpasswordtohelpprotectyourcomputeragainstaccessbyunauthorizedusers.
Ifyousetapower-onpassword,thepasswordpromptisdisplayedonthescreenwheneveryouturnonthe
computer.Youmustenterthecorrectpasswordtostartusingthecomputer.
Settingapower-onpassword
1.Printtheseinstructions.
2.Saveallopenles,andexitallapplications.
3.T urnyourcomputeroffandthenturnitonagain.
4.Whenthelogoscreenisdisplayed,pressF1.TheThinkPadSetupwindowopens.
5.SelectSecurity,usingthecursordirectionalkeystomovedownthemenu.
6.SelectPassword.
7.SelectPower-onPassword.
8.Chooseyourpower-onpassword,andtypeyournewpasswordintheEnterNewPasswordeld.
Note:Y oucansettheminimumlengthofapower-onpasswordontheThinkPadSetupmenu.For
details,referto“Securitymenu”onpage107.
9.PressEnteroncetomovetothenextline.Retypethepasswordyoujustenteredtoverifyit.
10.CommityourpasswordtomemoryandpressEnter.ASetupNoticewindowisdisplayed.
56UserGuide
Page 73

Note:Youmightwanttonoteyourpower-onpasswordinasafeplace.Otherwise,ifyouforgetit,you
havetotakeyourcomputertoaLenovoreselleroramarketingrepresentativetohavethepassword
canceled.
11.PressF10toexitfromtheSetupNoticewindow.
Changingorremovingthepower-onpassword
Tochangethepower-onpassword,followthesteps1through9abovein“Settingapower-onpassword”on
page56,typingyourpasswordtogetaccesstotheThinkPadSetup.
Tochangethepassword,dothefollowing:
1.IntheEnterCurrentPasswordeld,typethecurrentpower-onpassword.
2.IntheEnterNewPasswordeld,typethenewpower-onpassword;thenretypethepasswordyoujust
enteredtoverifyitintheConrmNewPasswordeld.
3.Followstep10andstep11in“Settingapower-onpassword”onpage56tochangeyourpower-on
password.
Toremovethepassword,dothefollowing:
1.IntheEnterCurrentPasswordeld,typethecurrentpower-onpassword.
2.LeavetheEnterNewPasswordandConrmNewPasswordeldsblank.
3.Followstep10andstep11in“Settingapower-onpassword”onpage56toremoveyourpower-on
password.
Harddiskpasswords
Twotypesofharddiskpasswordshelpprotecttheinformationstoredontheharddiskdrive:
•Userharddiskpassword
•Masterharddiskpassword,whichrequiresauserharddiskpassword
Ifauserharddiskpasswordhasbeenset,butnomasterharddiskpasswordhasbeen,theusermustenter
theuserharddiskpasswordinordertogainaccesstolesandapplicationsontheharddiskdrive.
Themasterpasswordcanbesetandusedonlybyasystemadministrator.Likeamasterkey,itenablesthe
administratortogetaccesstoanyharddriveinasystem.Theadministratorsetsthemasterpassword;no
oneelseknowsit.Thentheadministratorsetsauserpasswordforeachcomputerinthenetwork,andtells
eachuserthepasswordforhisorhercomputer.Theusercanthenchangetheuserpasswordasdesired,
buttheadministratorcanstillgetaccessbyusingthemasterpassword.
Note:Whenamasterharddiskpasswordisset,onlytheadministratorcanremovetheuserharddisk
password.
Settingaharddiskpassword
1.Printtheseinstructions.
2.Saveallopenles,andexitallapplications.
3.T urnyourcomputeroffandthenonagain.
4.Whenthelogoscreenisdisplayed,pressF1.TheThinkPadSetupopens.
5.SelectSecurity,usingthecursordirectionalkeystomovedownthemenu.
6.SelectPassword.
7.SelectHardDiskxPassword,wherexisthenumberoftheharddiskdriveforwhichyouwantto
setapassword.
Chapter4.Security57
Page 74

8.ASetupConrmationwindowopens.Y ouarepromptedtoselectUserorUser+Master.SelectUserif
youwanttosetonlyoneharddiskpassword.Ifyouareanadministratororsupervisor,youcanselect
User+Mastertosettwopasswords.(Theusercanchangetheuserpasswordlater.)
9.IfyouselectUser+Master,gotostep12.
10.IfyouselectUseronly,anew-passwordwindowopens.TypeyournewpasswordintheEnterNew
Passwordeld.
Notes:
•YoucansettheminimumlengthofaharddiskpasswordintheThinkPadSetup.Fordetails,referto
“Securitymenu”onpage107
.
•Ifyousetaharddiskpasswordofoversevencharacters,theharddiskdrivecanbeusedonlywitha
computerthatcanrecognizeaharddiskpasswordofoversevencharacters.Ifyoutheninstallthe
harddiskdriveinacomputerthatcannotrecognizeaharddiskpasswordthatcontainsmorethan
sevencharacters,youcannotgetaccesstothedrive.
11.PressEnteroncetomovetothenextline.Retypethepasswordyoujustenteredtoverifyit.Goto
step18tocompletetheprocedure.
12.IfyouselectUser+Master,amessagewindowopensandpromptsyoutosetupauserharddisk
passwordrst.ClickContinue.
13.Anewharddiskuserpasswordwindowopens.T ypeyournewpasswordintheEnterNewPassword
eld.
14.PressEnteroncetomovetothenextline.Retypethepasswordyoujustenteredtoverifyit.
15.Amessagewindowopensandpromptsyoutosetthemasterharddiskpassword.ClickContinue.
16.Anewmasterhard-diskpasswordwindowopens.T ypeyournewpasswordintheEnterNew
Passwordeld.
17.PressEnteroncetomovetothenextline.Retypethepasswordyoujustenteredtoverifyit.
18.CommityourpasswordtomemoryandpressEnter.ASetupNoticewindowisdisplayed.
Attention:Youmightwanttonotedownyourpasswordsandkeeptheminasafeplace.Otherwise,
ifyouforgettheuser-onlypassword,orbothuserandmasterpasswords,Lenovocannotresetyour
passwordsorrecoverdatafromtheharddiskdrive.Y oumusttakeyourcomputertoaLenovoreseller
oramarketingrepresentativetohavetheharddiskdrivereplaced.Proofofpurchaseisrequired,
andafeewillbechargedforpartsandservice.
19.PressF10toexitfromtheSetupNoticewindow.
Thenexttimeyouturnonyourcomputer,youwillhavetotypetheuserormasterharddiskpasswordin
ordertostartyourcomputerandgetaccesstoyouroperatingsystem.
Changingorremovingaharddiskpassword
Followsteps1through7in“Settingaharddiskpassword”onpage57,typingyourpasswordtogetaccess
totheThinkPadSetup.
Tochangeorremovetheuserharddiskpassword,doasfollows:
•Tochangetheharddiskpassword,typethecurrentpasswordintheEnterCurrentPasswordeld.Then
typethenewpasswordintheEnterNewPasswordeld,andretypethepasswordyoujustenteredto
verifyitintheConrmNewPasswordeld.PressEnter,andaSetupNoticewindowisdisplayed.Press
F10toexitfromtheSetupNoticewindow.Theuserharddiskpasswordswillbechanged.
•Toremovetheharddiskpassword,typethecurrentpasswordintheEnterCurrentPasswordeld.
ThenleavetheEnterNewPasswordandConrmNewPasswordeldsblank,andpressEnter.A
58UserGuide
Page 75

SetupNoticewindowisdisplayed.PressF10toexitfromtheSetupNoticewindow.Theuserharddisk
passwordswillberemoved.
TochangeorremovetheUser+Masterharddiskpassword,selectUserHDPorMasterHDP.
IfyouchooseUserHDP,dooneofthefollowing:
•Tochangetheuserharddiskpassword,typethecurrentuserharddiskpasswordorthecurrentmaster
harddiskpasswordintheEnterCurrentPasswordeld.Thentypethenewuserharddiskpassword
intheEnterNewPasswordeld,andretypethepasswordyoujustenteredtoverifyitintheConrm
NewPasswordeld.PressEnter,andaSetupNoticewindowisdisplayed.PressF10toexitfromthe
SetupNoticewindow.Theuserharddiskpasswordwillbechanged.
•Toremovetheuserharddiskpassword,typethecurrentmasterharddiskpasswordintheEnterCurrent
Passwordeld.ThenleavetheEnterNewPasswordandConrmNewPasswordeldsblank,and
pressEnter.ASetupNoticewindowisdisplayed.PressF10toexitfromtheSetupNoticewindow.Both
theuserandmasterharddiskpasswordswillberemoved.
IfyouchooseMasterHDP,dooneofthefollowing:
•Tochangethemasterharddiskpassword,typethecurrentmasterharddiskpasswordintheEnter
CurrentPasswordeld.ThentypethenewmasterharddiskpasswordintheEnterNewPassword
eld,andretypethepasswordyoujustenteredtoverifyitintheConrmNewPasswordeld.Press
Enter,andaSetupNoticewindowisdisplayed.PressF10toexitfromtheSetupNoticewindow.The
masterharddiskpasswordwillbechanged.
•Toremovethemasterharddiskpassword,typethecurrentmasterharddiskpasswordintheEnter
CurrentPasswordeld.ThenleavetheEnterNewPasswordandConrmNewPasswordeldsblank,
andpressEnter.ASetupNoticewindowisdisplayed.PressF10toexitfromtheSetupNoticewindow.
Boththeuserandmasterharddiskpasswordswillberemoved.
Supervisorpassword
ThesupervisorpasswordprotectsthesysteminformationstoredintheThinkPadSetup.Withoutit,noone
canchangethecongurationofthecomputer.Itprovidesthefollowingsecurityfeatures:
•Ifasupervisorpasswordisset,apasswordpromptisdisplayedwhenyoutrytostarttheThinkPadSetup.
Unauthorizeduserscannotgetaccesstocongurationdata.
•Thesystemadministratorcanusethesupervisorpasswordtogetaccesstoacomputereveniftheuserof
thatcomputerhassetapower-onpassword.Thesupervisorpasswordoverridesthepower-onpassword.
•Ifbothasupervisorpasswordandapower-onpasswordareset,youcandothefollowingonlyifyou
havethesupervisorpassword:
–Deletingthepower-onpassword
–Changingordeletingthesupervisorpassword
–EnablingordisablingtheInternalNetworkOptionROMfeature
–Changingdateandtime
–EnablingordisablingtheLockUEFIBIOSSettingsfeature
–EnablingordisablingthePasswordatunattendedboot
–Specifyingtheminimumlengthforpower-onpasswordsandharddiskpasswords
–EnablingordisablingtheBootDeviceListF12Option
–EnablingordisablingtheBootOrderLock
–EnablingordisablingtheFlashBIOSUpdatingbyEnd-Usersfeature
–EnablingordisablingtheInternalNetworkdevice
Chapter4.Security59
Page 76

–EnablingordisablingtheInternalWirelessdevice
–EnablingordisablingtheInternalBluetoothdevice
–EnablingordisablingtheInternalWirelessWANdevice
–EnablingordisablingtheSecuritymode
Notes:
•ThesystemadministratorcansetthesamesupervisorpasswordonmanyThinkPadnotebookstomake
administrationeasier.
•ByenablingtheLockUEFISettingsfeatureinthePasswordmenuwhenyousetthesupervisorpassword,
youmakeitimpossibleforanyonebutyoutomakechanges.
Settingasupervisorpassword
Onlyasystemadministratorwillbeabletoapplythisprocedure.
1.Printtheseinstructions.
2.Saveallopenles,andexitallapplications.
3.T urnyourcomputeroffandthenturnitonagain.
4.Whenthelogoscreenisdisplayed,pressF1.TheThinkPadSetupopens.
5.SelectSecurity,usingthecursordirectionalkeystomovedownthemenu.
6.SelectPassword.
7.SelectSupervisorPassword.
8.Awindowopensthatpromptsyoutoenteranewpassword.
9.ChooseyoursupervisorpasswordandtypeitintheEnterNewPasswordeld;thenpressEnter.
10.PressEntertomovetothenextline.Retypethepasswordyoujustenteredtoverifyit.
11.CommityourpasswordtomemoryandpressEnter.ASetupNoticewindowisdisplayed.
Attention:Youmightwanttonotedownyourpasswordandkeepitinasafeplace.Ifyouforgetyour
supervisorpassword,Lenovocannotresetyourpassword.YoumusttakeyourcomputertoaLenovo
reselleroraLenovomarketingrepresentativetohavethesystemboardreplaced.Proofofpurchaseis
required,andafeewillbechargedforpartsandservice.
12.PressF10toexitfromtheSetupNoticewindow.
ThenexttimeyouopentheThinkPadSetup,youwillbepromptedtotypeyourpasswordtoproceed.
Changingorremovingthesupervisorpassword
Tochangeorremovethesupervisorpassword,followsteps1through8in“Settingasupervisorpassword”
onpage60,typingyourpasswordtogetaccesstotheThinkPadSetup.
Tochangethepassword,dothefollowing:
1.IntheEnterCurrentPasswordeld,typethecurrentsupervisorpassword.
2.IntheEnterNewPasswordeld,typethenewsupervisorpassword;thenretypethepasswordyoujust
enteredtoverifyitintheConrmNewPasswordeld.
3.Followstep11andstep12in“Settingasupervisorpassword”onpage60tochangeyoursupervisor
password.
Toremovethepassword,dothefollowing:
1.IntheEnterCurrentPasswordeld,typethecurrentsupervisorpassword.
2.LeavetheEnterNewPasswordandConrmNewPasswordeldsinblank.
60UserGuide
Page 77

3.Followstep11andstep12in“Settingasupervisorpassword”onpage60toremoveyoursupervisor
password.
Harddisksecurity
Toprotectpasswordsfromunauthorizedsecurityattacks,severalofthelatesttechnologiesandalgorithms
areintegratedintoUEFIBIOSandhardwaredesignofThinkPadnotebooks.
Tomaximizesecurity,dothefollowing:
1.Setapower-onpasswordaswellasaharddiskpasswordforyourinternalsolidstatedriveorharddisk
drive.Refertotheproceduresin“Power-onpassword”onpage56and“Harddiskpasswords”onpage
.Forsecurity,alongerpasswordisrecommended.
57
2.IfaDiskEncryptionharddiskdriveandEncryptionsolidstatedriveisinstalledinyourcomputer,
besuretoprotectthecontentsofyourcomputermemoryfromunauthorizedaccessbyuseofdrive
encryptionsoftware.
3.Beforeyoudisposeof,sell,orhandoveryourcomputer,besuretodeletedatastoredonit.Referto
“Noticeondeletingdatafromyourharddiskdriveorsolidstatedrive”onpage61.
Note:TheharddiskdrivecanbeprotectedbyUEFIBIOS.
DiskEncryptionharddiskdriveandEncryptionsolidstatedrive
SomemodelscontaintheDiskEncryptionharddiskdriveorEncryptionsolidstatedrive.Thisfeature
helpstoprotectyourcomputeragainstsecurityattacksonmedia,NANDashordevicecontrollersbyuse
ofahardwareencryptionchip.Fortheefcientuseoftheencryptionfeature,besuretosetaHarddisk
passwordsfortheinternalstoragedevice.
Noticeondeletingdatafromyourharddiskdriveorsolidstatedrive
Ascomputersspreadintoeverycorneroflife,theyprocessmoreandmoreinformation.Thedataonyour
computer,someofwhichissensitive,isstoredonastoragedevice,eitheraharddiskdriveorsolidstate
drive.Beforeyoudisposeof,sell,orhandoveryourcomputer,makesuretodeletedatastoredonit.
Handingyourcomputerovertosomeoneelsewithoutdeletingtheloadedsoftware,suchasoperating
systemsandapplicationsoftware,migntevenviolatelicenseagreements.Y ouareadvisedtocheckthe
termsandconditionsofthoseagreements.
Therearemethodsthatseemtodeletethedata:
•Movethedatatotherecyclebin,andthenchoosetheEmptyrecyclebincommand.
•UsetheDeletecommand.
•Formatyourharddiskdriveorsolidstatedrive,usingthesoftwareforinitializingit.
•Usingtherecoveryprogram,providedbyLenovo,bringtheharddiskdriveorthesolidstatedrivebackto
thefactorydefaultsettings.
Theseoperations,however,onlychangetheleallocationofthedata;theydonotdeletethedataitself.In
otherwords,thedataretrievalprocessingisdisabledunderanoperatingsystemsuchasWindows.The
dataisstillthere,eventhoughitseemstobelost.Thus,itissometimespossibletoreadthedatabyuseof
specialsoftwarefordatarecovery.Thereisariskthatpeopleofbadfaithmigntreadandmisusethecritical
dataonharddiskdrivesorsolidstatedrivesforunexpectedpurposes.
Topreventleakageofdata,itbecomesveryimportantthatyoutakeresponsibilityfordeletingallthedata
fromtheharddiskdriveorsolidstatedrivewhenyoudisposeof,sell,orhandoveryourcomputer.Youcan
Chapter4.Security61
Page 78

destroythedataphysicallybysmashingtheharddiskdrivewithahammer,ormagneticallybymeansof
strongmagneticpower,thusmakingthedataunreadable.Butwerecommendthatyoumakeuseofthe
software(payware)orservice(payservice)specicallydevelopedforthepurpose.
Fordisposingofdataontheharddiskdrive,LenovoprovidestheSecureDataDisposaltool.Todownload
thetool,gototheLenovoWebsiteathttp://www.lenovo.com/support.
Note:Runningtheapplicationwilltakeacoupleofhours.
Ifyouusesoftwaredesignedforusewiththeharddiskdrivetodeletedatastoredonthesolidstatedrive,it
willeraseonlydatathatisaccessiblebynormaloperation.Itmigntnoterasethehiddenareaoftheash
chip.Therefore,sometimesitmigntstillbepossibletoreadthedatabyuseofspecialequipmentora
specialtool.Topreventleakageofdatafromthesolidstatedrive,itisrecommendedthatyoudeleteall
dataontheashchipsbyuseofanapplicationprovidedbyLenovo.ThisapplicationcalledtheThinkPad
SetupMenuExtensionUtilitymakesitpossibletoeraseallthedataontheashchipsofthesolidstate
drivefromtheThinkPadSetupwithinaminute.T odownloadthisapplication,gototheLenovoWebsite
http://www.lenovo.com/support.
IfEncryptionsolidstatedriveorDiskEncryptionharddiskdriveissupportedandinstalledinyourcomputer,
youcanlogicallydisposeofallthedataonadeviceinaveryshorttimebyerasingthecryptographickey.
Thedataencryptedwiththeoldkeyisnotphysicallyerasedbutremainsonthedisk;however,itcannotbe
decryptedwithouttheoldkey.ThisfeatureisenabledbytheThinkPadSetupMenuExtensionUtilityandis
availableasamenuitemintheThinkPadSetup.
Usingandunderstandingrewalls
Ifyoursystemispreinstalledwitharewallprogram,itprotectsagainstcomputerInternetsecuritythreats,
unauthorizedaccess,intrusions,andInternetattacks.Italsoprotectsyourprivacy.
Formoreinformationabouthowtousetherewallprogram,refertotheon-linehelpthatcomeswith
theprogram.
Protectingdataagainstviruses
Yourcomputerispreinstalledwithanantivirusprogramsoyoucandetectandeliminateviruses.The
antivirusprogramisdesignedtohelpyoudetectandeliminateviruses.
Lenovoprovidesafullversionofantivirussoftwareonyourcomputerwithafree30-daysubscription.After
30days,youmustrenewthelicensetocontinuereceivingtheantivirussoftwareupdates.
Formoreinformationabouthowtouseyourantivirussoftware,refertothehelpsystemofyourantivirus
software.
62UserGuide
Page 79

Chapter5.Recoveryoverview
ThischapterprovidesinformationabouttherecoverysolutionsprovidedbyLenovo.
Note:Y oucanattachaUSBCDorDVDdrivetotheUSBconnector.
Thischaptercontainsthefollowingtopics:
•“Creatingandusingrecoverymedia”onpage63
•“Performingbackupandrecoveryoperations”onpage65
•“UsingtheRescueandRecoveryworkspace”onpage66
•“Creatingandusingarescuemedium”onpage67
•“Reinstallingpreinstalledapplicationsanddevicedrivers”onpage68
•“Solvingrecoveryproblems”onpage69
Notes:
1.Thereareavarietyofmethodstochoosefromwhenconsideringhowtorecoverintheeventofa
software-orhardware-relatedproblem.Somemethodsvarydependingonthetypeofyouroperating
system.
2.Theproductontherecoverymediamigntbeusedonlyforthefollowingpurposes:
•Restoretheproductpreinstalledonyourcomputer
•Reinstalltheproduct
•ModifytheproductusingtheAdditionalFiles
Notes:Topreventpotentialperformancerisksorunexpectedbehaviorthatmightbecausedbythenew
harddiskdrivetechnology,itisrecommendedthatyouuseoneofthefollowingback-upsoftwareprograms:
•ThinkVantageRescueandRecoveryversion4.23orlater(forWindowsXP),4.3orlater(forWindows7)
•SymantecNortonGhostversion15orlater
Notes:Tousethisprogram,dothefollowing:
1.ClickStart➙Run.TheRunwindowopens.
2.T ypecmdintheeld.ThenclickOK.
3.T ypeghost-align=1mbandpressEnter.
•AcronisTrueImage2010orlater
•ParagonBackup&Recovery10Suitorlater,ParagonBackup&Recovery10Homeorlater
Creatingandusingrecoverymedia
Youcanuserecoverymediatorestoretheharddiskdrivetothefactorydefaultsettings.Recoverymedia
areusefulifyoutransferthecomputertoanotherarea,sellthecomputer,recyclethecomputer,orputthe
computerinanoperationalstateafterallothermethodsofrecoveryhavefailed.Asaprecautionarymeasure,
itisimportanttocreaterecoverymediaasearlyaspossible.
Note:Therecoveryoperationsyoucanperformusingrecoverymediavarydependingontheoperating
systemfromwhichtherecoverymediawerecreated.Therecoverymediamightcontainabootmedium
andadatamedium.YourMicrosoftWindowslicensepermitsyoutocreateonlyonedatamedium,soitis
importantthatyoustoretherecoverymediainasafeplaceafteryouhavemadethem.
©CopyrightLenovo2011
63
Page 80

Creatingrecoverymedia
ThissectionprovidesinstructionsonhowtocreaterecoverymediaontheWindows7operatingsystem.
Note:OntheWindows7operatingsystem,youcancreaterecoverymediausingdiscsorexternalUSB
storagedevices.OntheWindowsXPoperatingsystems,youcancreaterecoverymediausingonlydiscs,so
thisoperationisalsocalled“creatingProductRecoverydiscs.”
•TocreaterecoverymediaontheWindows7operatingsystem,clickStart➙AllPrograms➙Lenovo
ThinkVantageT ools➙FactoryRecoveryDisks.Then,followtheinstructionsonthescreen.
•TocreateProductRecoverydiscsontheWindowsXPoperatingsystem,clickStart➙AllPrograms➙
ThinkVantage➙CreateRecoveryMedia.Then,followtheinstructionsonthescreen.
Usingrecoverymedia
Thissectionprovidesinstructionsonhowtouserecoverymediaondifferentoperatingsystems.
•OntheWindows7operatingsystem,youcanuserecoverymediatorestorethecomputertothefactory
defaultsettingsonly.Youcanuserecoverymediatoputthecomputerinanoperationalstateafterall
othermethodsofrecoveryhavefailed.
Attention:Whenyouuserecoverymediatorestorethecomputertothefactorydefaultsettings,allthe
lescurrentlyontheharddiskdrivewillbedeletedandreplacedbythefactorydefaultsettings.
TouserecoverymediaontheWindows7operatingsystem,dothefollowing:
1.Dependingonthetypeofyourrecoverymedia,connectthebootmedium(memorykeyorotherUSB
storagedevice)tothecomputer,orinsertthebootdiscintotheopticaldrive.
2.RepeatedlypressandreleasetheF12keywhenturningonthecomputer.WhentheStartupDevice
Menuopens,releasetheF12key.
3.SelectthedesiredstartupdeviceandpressEnter.Therestoreprocessbegins.
4.Followtheinstructionsonthescreentocompletetheoperation.
Notes:
1.Afterrestoringyourcomputertothefactorydefaultsettings,youmighthavetoreinstalldevicedrivers
forsomedevices.See“Reinstallingpreinstalledapplicationsanddevicedrivers”onpage68
2.SomecomputerscomewithMicrosoftOfceorMicrosoftWorkspreinstalled.Ifyouneedtorecover
orreinstallyourMicrosoftOfceorMicrosoftWorksapplications,youmustusetheMicrosoftOfce
CDorMicrosoftWorksCD.ThesediscsareprovidedonlywithcomputerspreinstalledwithMicrosoft
OfceorMicrosoftWorks.
•OntheWindowsXPoperatingsystem,youcanuseProductRecoverydiscstorestoreyourcomputerto
thefactorydefaultsettings,performacustomfactoryrecovery,orperformotherrescueandrecovery
operationssuchasrescuingindividualles.Y ouwillbegiventheoptiontoentertheRescueandRecovery
workspaceandchoosefromavarietyofrecoveryoperations.
Attention:WhenyouuseProductRecoverydiscstorestorethecomputertothefactorydefaultsettings,
allthelescurrentlyontheharddiskdrivewillbedeletedandreplacedbythefactorydefaultsettings.
Duringtherestoreprocess,youwillbegiventheoptiontosaveoneormorelescurrentlyonthehard
diskdrivetoothermediabeforethedataisdeleted.
TouseProductRecoverydiscsontheWindowsXPoperatingsystem,dothefollowing:
1.RepeatedlypressandreleasetheF12keywhenturningonthecomputer.WhentheStartupDevice
Menuopens,releasetheF12key.
2.Insertthebootdiscintotheopticaldrive.
.
64UserGuide
Page 81

3.SelecttheopticaldrivewiththebootdiscasthestartupdeviceandpressEnter.Afterashortdelay,
theRescueandRecoveryworkspaceopens.
4.OntheRescueandRecoverymenu,clickRestoreyoursystem.
5.Followtheinstructionsonthescreen.InserttheappropriateProductRecoverydiscwhenprompted.
Performingbackupandrecoveryoperations
TheRescueandRecoveryprogramenablesyoutobackupallyourharddiskdrivecontentsincludingthe
operatingsystem,datales,softwareprograms,andpersonalsettings.Youcandesignatewherethe
RescueandRecoveryprogramstoresthebackup:
•Inaprotectedareaofyourharddiskdrive
•Onthesecondaryharddiskdriveifasecondaryharddiskdriveisinstalledinyourcomputer
•OnanattachedexternalUSBharddiskdrive
•Onanetworkdrive
•Onrecordablediscs(arecordableopticaldriveisrequiredforthisoption)
Afteryouhavebackedupthecontentsontheharddiskdrive,youcanrestorethecompletecontentsofthe
harddiskdrive,restoreonlytheselectedles,orrestoreonlytheWindowsoperatingsystemandapplications.
Performingabackupoperation
ThissectionprovidesinstructionsonhowtoperformabackupoperationusingtheRescueandRecovery
programondifferentoperatingsystems.
•ToperformabackupoperationusingtheRescueandRecoveryprogramontheWindows7operating
system,dothefollowing:
1.FromtheWindowsdesktop,clickStart➙AllPrograms➙LenovoThinkVantageT ools➙
EnhancedBackupandRestore.TheRescueandRecoveryprogramopens.
2.IntheRescueandRecoverymainwindow,clicktheLaunchadvancedRescueandRecoveryarrow.
3.ClickBackupyourharddriveandselectbackupoperationoptions.Then,followtheinstructionson
thescreentocompletethebackupoperation.
•ToperformabackupoperationusingtheRescueandRecoveryprogramontheWindowsXPoperating
system,dothefollowing:
1.FromtheWindowsdesktop,clickStart➙AllPrograms➙ThinkVantage➙RescueandRecovery.
TheRescueandRecoveryprogramopens.
2.IntheRescueandRecoverymainwindow,clickLaunchadvancedRescueandRecovery➙Back
upyourharddrive,andselectbackupoperationoptions.
3.Followtheinstructionsonthescreentocompletethebackupoperation.
Performingarecoveryoperation
ThissectionprovidesinstructionsonhowtoperformarecoveryoperationusingtheRescueandRecovery
programondifferentoperatingsystems.
•ToperformarecoveryoperationusingtheRescueandRecoveryprogramontheWindows7operating
system,dothefollowing:
1.FromtheWindowsdesktop,clickStart➙AllPrograms➙LenovoThinkVantageT ools➙
EnhancedBackupandRestore.TheRescueandRecoveryprogramopens.
2.IntheRescueandRecoverymainwindow,clicktheLaunchadvancedRescueandRecoveryarrow.
3.ClicktheRestoreyoursystemfromabackupicon.
Chapter5.Recoveryoverview65
Page 82

4.Followtheinstructionsonthescreentocompletetherecoveryoperation.
•ToperformarecoveryoperationusingtheRescueandRecoveryprogramontheWindowsXPoperating
system,dothefollowing:
1.FromtheWindowsdesktop,clickStart➙AllPrograms➙ThinkVantage➙RescueandRecovery.
TheRescueandRecoveryprogramopens.
2.IntheRescueandRecoverymainwindow,clickLaunchadvancedRescueandRecovery.
3.ClicktheRestoreyoursystemfromabackupicon.
4.Followtheinstructionsonthescreentocompletetherecoveryoperation.
FormoreinformationaboutperformingarecoveryoperationfromtheRescueandRecoveryworkspace,see
“UsingtheRescueandRecoveryworkspace”onpage66.
UsingtheRescueandRecoveryworkspace
TheRescueandRecoveryworkspaceresidesinaprotected,hiddenareaofyourharddiskdrivethat
operatesindependentlyfromtheWindowsoperatingsystem.Thisenablesyoutoperformrecovery
operationsevenifyoucannotstarttheWindowsoperatingsystem.Youcanperformthefollowingrecovery
operationsfromtheRescueandRecoveryworkspace:
•RescuelesfromyourharddiskdriveorfromabackupTheRescueandRecoveryworkspace
enablesyoutolocatelesonyourharddiskdriveandtransferthemtoanetworkdriveorotherrecordable
media,suchasaUSBdeviceoradisc.Thissolutionisavailableevenifyoudidnotbackupyourlesorif
changesweremadetothelessinceyourlastbackupoperation.Y oualsocanrescueindividuallesfrom
aRescueandRecoverybackuplocatedonyourlocalharddiskdrive,aUSBdevice,oranetworkdrive.
•RestoreyourharddiskdrivefromaRescueandRecoverybackupIfyouhavebackedupyourhard
diskdriveusingtheRescueandRecoveryprogram,youcanrestoretheharddiskdrivefromaRescue
andRecoverybackup,evenifyoucannotstarttheWindowsoperatingsystem.
•RestoreyourharddiskdrivetothefactorydefaultsettingsTheRescueandRecoveryworkspace
enablesyoutorestorethecompletecontentsofyourharddiskdrivetothefactorydefaultsettings.Ifyou
havemultiplepartitionsonyourharddiskdrive,youhavetheoptiontorestorethefactorydefaultsettings
totheC:partitionandleavetheotherpartitionsintact.BecausetheRescueandRecoveryworkspace
operatesindependentlyfromtheWindowsoperatingsystem,youcanrestorethefactorydefaultsettings
evenifyoucannotstarttheWindowsoperatingsystem.
Attention:IfyourestoretheharddiskdrivefromaRescueandRecoverybackuporrestoretheharddisk
drivetothefactorydefaultsettings,alllesontheprimaryharddiskdrivepartition(usuallydriveC:)willbe
deletedintherecoveryprocess.Ifpossible,makecopiesofimportantles.Ifyouareunabletostartthe
Windowsoperatingsystem,youcanusetherescuelesfeatureoftheRescueandRecoveryworkspaceto
copylesfromyourharddiskdrivetoothermedia.
TostarttheRescueandRecoveryworkspace,dothefollowing:
1.Makesurethatthecomputeristurnedoff.
2.RepeatedlypressandreleasetheF11keywhenturningonthecomputer.Whenyouhearbeepsor
seealogoscreen,releasetheF11key.
3.IfyouhavesetaRescueandRecoverypassword,typeyourpasswordwhenprompted.TheRescue
andRecoveryworkspaceopensafterashortdelay.
Note:IftheRescueandRecoveryworkspacefailstoopen,see“Solvingrecoveryproblems”onpage69.
4.Dooneofthefollowing:
•Torescuelesfromyourharddiskdriveorfromabackup,clickRescuelesandfollowthe
instructionsonthescreen.
66UserGuide
Page 83

•TorestoreyourharddiskdrivefromaRescueandRecoverybackuportorestoreyourharddiskdrive
tothefactorydefaultsettings,clickRestoreyoursystemandfollowtheinstructionsonthescreen.
FormoreinformationaboutthefeaturesoftheRescueandRecoveryworkspace,clickHelp.
Notes:
1.Afterrestoringyourharddiskdrivetothefactorydefaultsettings,youmighthavetoreinstalldevice
driversforsomedevices.See“Reinstallingpreinstalledapplicationsanddevicedrivers”onpage68.
2.SomecomputerscomewithMicrosoftOfceorMicrosoftWorkspreinstalled.Ifyouneedtorecover
orreinstallyourMicrosoftOfceorMicrosoftWorksapplications,youmustusetheMicrosoftOfce
CDorMicrosoftWorksCD.ThesediscsareprovidedonlywithcomputerspreinstalledwithMicrosoft
OfceorMicrosoftWorks.
Creatingandusingarescuemedium
Witharescuemedium,suchasadiscoraUSBharddiskdrive,youcanrecoverthecomputerfromfailures
thatpreventyoufromgainingaccesstotheRescueandRecoveryworkspaceonyourharddiskdrive.
Notes:
1.Therecoveryoperationsyoucanperformusingarescuemediumvarydependingontheoperating
system.
2.Therescuedisccanbestartedinalltypesofopticaldrives.
Creatingarescuemedium
Thissectionprovidesinstructionsonhowtocreatearescuemediumondifferentoperatingsystems.
•TocreatearescuemediumontheWindows7operatingsystem,dothefollowing:
1.FromtheWindowsdesktop,clickStart➙AllPrograms➙LenovoThinkVantageT ools➙
EnhancedBackupandRestore.TheRescueandRecoveryprogramopens.
2.IntheRescueandRecoverymainwindow,clicktheLaunchadvancedRescueandRecoveryarrow.
3.ClicktheCreateRescueMediaicon.TheCreateRescueandRecoveryMediawindowopens.
4.IntheRescueMediaarea,selectthetypeoftherescuemediumyouwanttocreate.Youcancreate
arescuemediumusingadisc,aUSBharddiskdrive,orasecondaryinternalharddiskdrive.
5.ClickOKandfollowtheinstructionsonthescreentocreatearescuemedium.
•TocreatearescuemediumontheWindowsXPoperatingsystem,dothefollowing:
1.FromtheWindowsdesktop,clickStart➙AllPrograms➙ThinkVantage➙CreateRecovery
Media.TheCreateRescueandRecoveryMediawindowopens.
2.IntheRescueMediaarea,selectthetypeoftherescuemediumyouwanttocreate.Youcancreate
arescuemediumusingadisc,aUSBharddiskdrive,orasecondaryinternalharddiskdrive.
3.ClickOKandfollowtheinstructionsonthescreentocreatearescuemedium.
Usingarescuemedium
Thissectionprovidesinstructionsonhowtousetherescuemediumyouhavecreated.
•Ifyouhavecreatedarescuemediumusingadisc,usethefollowinginstructionstousetherescuemedium:
1.T urnoffyourcomputer.
2.RepeatedlypressandreleasetheF12keywhenturningonthecomputer.WhentheStartupDevice
Menuwindowopens,releasetheF12key.
Chapter5.Recoveryoverview67
Page 84

3.IntheStartupDeviceMenuwindow,selectthedesiredopticaldriveastherstbootdevice.Then,
inserttherescuediscintotheopticaldriveandpressEnter.Therescuemediumstarts.
•IfyouhavecreatedarescuemediumusingaUSBharddiskdrive,usethefollowinginstructionsto
usetherescuemedium:
1.AttachtheUSBharddiskdrivetooneoftheUSBconnectorsonyourcomputer.
2.RepeatedlypressandreleasetheF12keywhenturningonthecomputer.WhentheStartupDevice
Menuwindowopens,releasetheF12key.
3.IntheStartupDeviceMenuwindow,selecttheUSBharddiskdriveastherstbootdeviceand
pressEnter.Therescuemediumstarts.
•Ifyouhavecreatedarescuemediumusingthesecondaryinternalharddiskdrive,setthesecondary
internalharddiskdriveastherstbootdeviceinthestartupdevicesequencetostarttherescuemedium.
See“Startupmenu”onpage108
Whentherescuemediumstarts,theRescueandRecoveryworkspaceopens.Thehelpinformationfor
eachfeatureisavailablefromtheRescueandRecoveryworkspace.Followtheinstructionstocomplete
therecoveryprocess.
.
Reinstallingpreinstalledapplicationsanddevicedrivers
Yourcomputerhasprovisionsthatenableyoutoreinstallselectedfactory-installedapplicationsanddevice
drivers.
Reinstallingpreinstalledapplications
Toreinstallselectedapplicationprograms,dothefollowing:
1.T urnonyourcomputer.
2.UseWindowsExplorerorComputer(inWindowsXP,MyComputer)todisplaythedirectorystructureof
yourharddiskdrive.
3.OpentheC:\SWTOOLSfolder.
4.OpentheAPPSfolder.Initareseveralsubfoldersnamedforthevariouspreinstalledapplications.
5.Openthesubfolderfortheapplicationyouarereinstalling.
6.Double-clickSetup,andthenfollowtheon-screenstepstoreinstalltheprogram.
Reinstallingpreinstalleddevicedrivers
Attention:Whenyoureinstalldevicedrivers,youarechangingthecurrentcongurationofyourcomputer.
Reinstalldevicedriversonlywhenitisnecessarytocorrectaproblemwithyourcomputer.
Toreinstalladevicedriverforafactory-installeddevice,dothefollowing:
1.T urnonyourcomputer.
2.UseWindowsExplorerorComputer(inWindowsXP,MyComputer)todisplaythedirectorystructureof
yourharddiskdrive.
3.OpentheC:\SWTOOLSfolder.
4.OpentheDRIVERSfolder.WithintheDRIVERSfolderareseveralsubfoldersnamedforthevarious
devicesinstalledinyourcomputer(forexample,AUDIOandVIDEO).
5.Openthesubfolderforthedevice.
6.Reinstallthedevicedriverbyoneofthefollowingmethods:
•Inthesubfolderforthedevice,lookfortheexecutablele(alewiththeextension.txt).Thetextle
containsinformationonhowtoreinstallthatdevicedriver.
68UserGuide
Page 85

-OR-
•Ifthesubfolderforthedevicecontainsaleofsetupinformation(alewiththeextension.inf),you
canusetheAddNewHardwareprogram(intheWindowsControlPanel)toreinstallthedevicedriver.
Notalldevicedriverscanbereinstalledbyuseofthisprogram.IntheAddNewHardwareprogram,
whenpromptedforthedevicedriveryouwanttoinstall,clickHaveDiskandBrowse.Thenselect
thedevicedriverlefromthedevicesubfolder.
-OR-
•Inthesubfolderforthedevice,lookforthelefortheapplication(alewiththeextension.exe).
Double-clickthele,andfollowtheinstructionsonthescreen.
Attention:Ifyouneedupdateddevicedrivers,donotdownloadthemfromtheWindowsUpdateWebsite.
ObtainthemfromLenovo.Formoreinformation,see“Makingsuredevicedriversarecurrent”onpage122.
Solvingrecoveryproblems
IfyouareunabletoaccesstheRescueandRecoveryworkspaceortheWindowsenvironment,doone
ofthefollowing:
•UsearescuemediumtostarttheRescueandRecoveryworkspace.See“Usingarescuemedium”
onpage67
•Userecoverymediaifallothermethodsofrecoveryhavefailedandyouneedtorestoretheharddisk
drivetothefactorydefaultsettings.See“Usingrecoverymedia”onpage64.
Note:IfyouareunabletoaccesstheRescueandRecoveryworkspaceortheWindowsenvironment
fromarescuemediumorrecoverymedia,youmightnothavetherescuedevice(aninternalharddisk
drive,adisc,aUSBharddiskdrive,orotherexternaldevices)setastherstbootdeviceinthestartup
devicesequence.Youmustrstmakesurethatyourrescuedeviceissetastherstbootdeviceinthe
startupdevicesequenceintheThinkPadSetup.See“Startupmenu”onpage108fordetailedinformation
abouttemporarilyorpermanentlychangingthestartupdevicesequence.Formoreinformationaboutthe
ThinkPadSetup,see“ThinkPadSetup”onpage106.
.
Itisimportanttocreatearescuemediumandasetofrecoverymediaasearlyaspossibleandstorethem
inasafeplaceforfutureuse.
Chapter5.Recoveryoverview69
Page 86

70UserGuide
Page 87

Chapter6.Replacingdevices
Thischapterprovidesinformationonthefollowingtopics:
•“Staticelectricityprevention”onpage71
•“Replacingthebattery”onpage71
•“Replacingthesolidstatedriveorharddiskdrive”onpage73
•“Replacingamemorymodule”onpage76
•“Replacingthekeyboard”onpage79
•“InstallingandreplacingthePCIExpressMiniCardforwirelessLAN/WiMAXconnection”onpage83
•“InstallingandreplacingthePCIExpressMiniCardforwirelessWANconnection”onpage87
•“ReplacingtheSIMcard”onpage90
•“Replacingthebackupbattery”onpage92
Staticelectricityprevention
Staticelectricity,althoughharmlesstoyou,canseriouslydamagecomputercomponentsandoptions.
Improperhandlingofstatic-sensitivepartscancausedamagetothepart.Whenyouunpackanoption
orCRU,donotopenthestatic-protectivepackagecontainingthepartuntiltheinstructionsdirectyou
toinstallit.
WhenyouhandleoptionsorCRUs,orperformanyworkinsidethecomputer,takethefollowingprecautions
toavoidstatic-electricitydamage:
•Limityourmovement.Movementcancausestaticelectricitytobuilduparoundyou.
•Alwayshandlecomponentscarefully.Handleadapters,memorymodules,andothercircuitboardsbythe
edges.Nevertouchexposedcircuitry.
•Preventothersfromtouchingcomponents.
•Whenyouinstallastatic-sensitiveoptionorCRU,touchthestatic-protectivepackagecontainingthe
parttoametalexpansion-slotcoverorotherunpaintedmetalsurfaceonthecomputerforatleasttwo
seconds.Thisreducesstaticelectricityinthepackageandyourbody.
•Whenpossible,removethestatic-sensitivepartfromthestatic-protectivepackagingandinstallthepart
withoutsettingitdown.Whenthisisnotpossible,placethestatic-protectivepackagingonasmooth,
levelsurfaceandplacethepartonit.
•Donotplacethepartonthecomputercoverorothermetalsurface.
Replacingthebattery
Beforeyoustart,printtheseinstructions.
ThissystemmigntnotsupportbatteriesthatarenotgenuineLenovo-madeorauthorized.Thesesystems
willcontinuetoboot,butmigntnotchargeunauthorizedbatteries.
Attention:Lenovohasnoresponsibilityfortheperformanceorsafetyofunauthorizedbatteries,and
providesnowarrantiesforfailuresordamagearisingoutoftheiruse.
Toreplacethebatterywithanewone,readthefollowingprerequisites.
©CopyrightLenovo2011
71
Page 88

Prerequisitesfortheprocedure
DANGER
Iftherechargeablebatterypackisincorrectlyreplaced,thereisdangerofanexplosion.Thebattery
packcontainsasmallamountofharmfulsubstances.T oavoidpossibleinjury:
•ReplaceonlywithabatteryofthetyperecommendedbyLenovo.
•Keepthebatterypackawayfromre.
•Donotexposeittoexcessiveheat.
•Donotexposeittowaterorrain.
•Donotshort-circuitit.
•Donotdrop,crush,puncture,orsubjecttostrongforces.Batteryabuseormishandlingcan
causethebatterytooverheat,whichcancausegassesorameto“vent”fromthebattery
packorcoincell.
Replacingthebattery
Toreplacethebattery,followtheprocedurebelow.
1.T urnoffthecomputer,orenterhibernationmode.Thendisconnecttheacpoweradapterandallcables
fromthecomputer.
2.Closethecomputerdisplay,andturnthecomputerover.
3.Slideandholdthebatterylatchestotheunlockposition1,andremovethebattery2.
72UserGuide
Page 89

4.Insertafullychargedbatteryuntilitclicksintoplace1,andthenslidethebatterylatchtothelocked
position2.
5.T urnthecomputeroveragain.Reconnecttheacpoweradapterandallcables.
Replacingthesolidstatedriveorharddiskdrive
Youcanreplacethesolidstatedriveorharddiskdrivewithanewonethatcanbepurchasedfromyour
Lenovoreselleroramarketingrepresentative.Toreplacethesolidstatedriveorharddiskdrive,readthe
followingprerequisites.
Note:Replacethesolidstatedriveorharddiskdriveonlyifyouupgradeitorhaveitrepaired.Theconnectors
andslotofthesolidstatedriveorharddiskdrivewerenotdesignedforfrequentchanges,ordriveswapping.
Prerequisitesfortheprocedure
Whenreplacingthedrive,besuretofollowtheprecautions.
Attention:Whenhandlingasolidstatedriveorharddiskdrive
•Donotdropthedriveorsubjectittophysicalshocks.Putthedriveonamaterial,suchassoftcloth,that
absorbsanyphysicalshocks.
•Donotapplypressuretothecoverofthedrive.
•Donottouchtheconnector.
Thedriveisverysensitive.Incorrecthandlingcancausedamageandpermanentlossofdata.
Beforeremovingthesolidstatedriveorharddiskdrive,makeabackupcopyofalltheinformationonit,
andthenturnthecomputeroff.
Neverremovethedrivewhilethecomputerisoperating,insleep(standby)mode,orinhibernationmode.
Replacementinstructions
Toreplacethesolidstatedriveorharddiskdrive,doasfollows:
1.T urnoffthecomputer;thendisconnecttheacpoweradapterandallcablesfromthecomputer.
2.Closethecomputerdisplay,andturnthecomputerover.
Chapter6.Replacingdevices73
Page 90
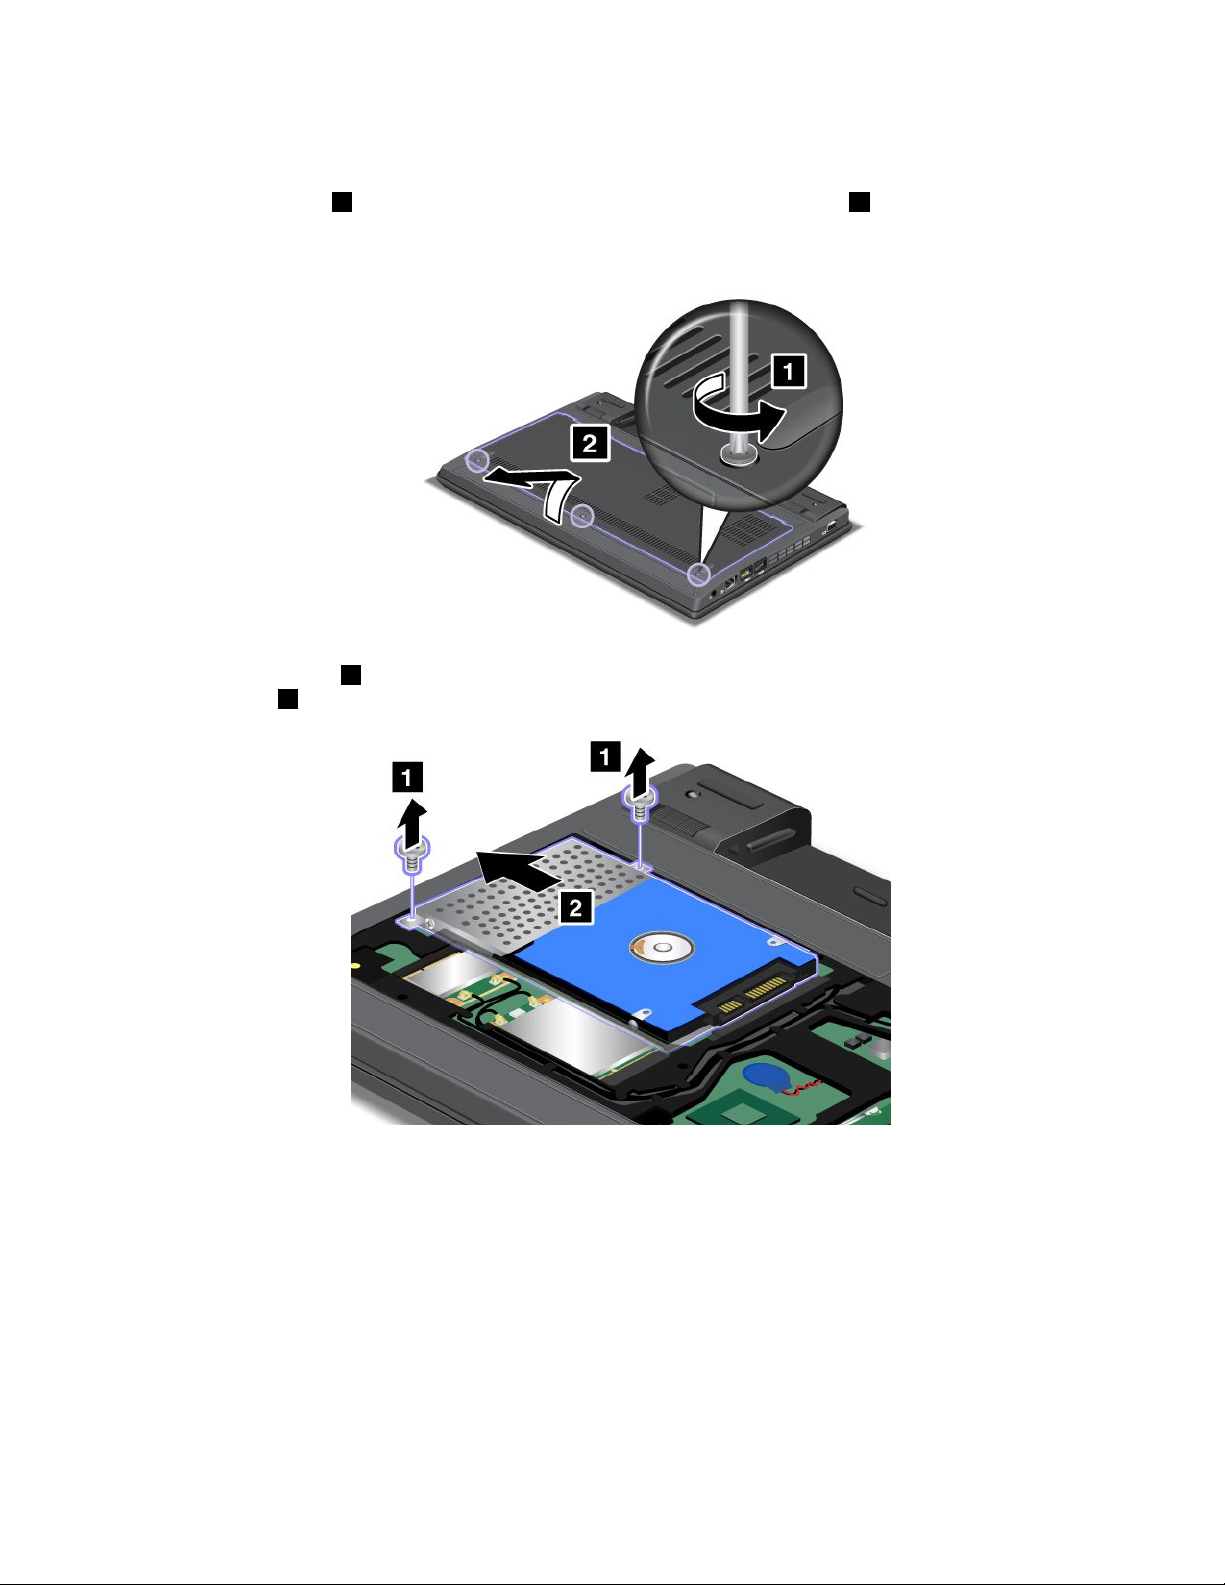
3.Removethebattery.Forinformationabouthowtoremovethebattery,referto“Replacingthebattery”
onpage71.
4.Loosenthescrews1thatsecurethesolidstatedriveorharddiskdrivedoor2,andthenremovethe
solidstatedriveorharddiskdrivedoor.
5.Removethescrews1,andthenslidethesolidstatedriveorharddiskdriveinthedirectionshown
bythearrow
2.
74UserGuide
Page 91
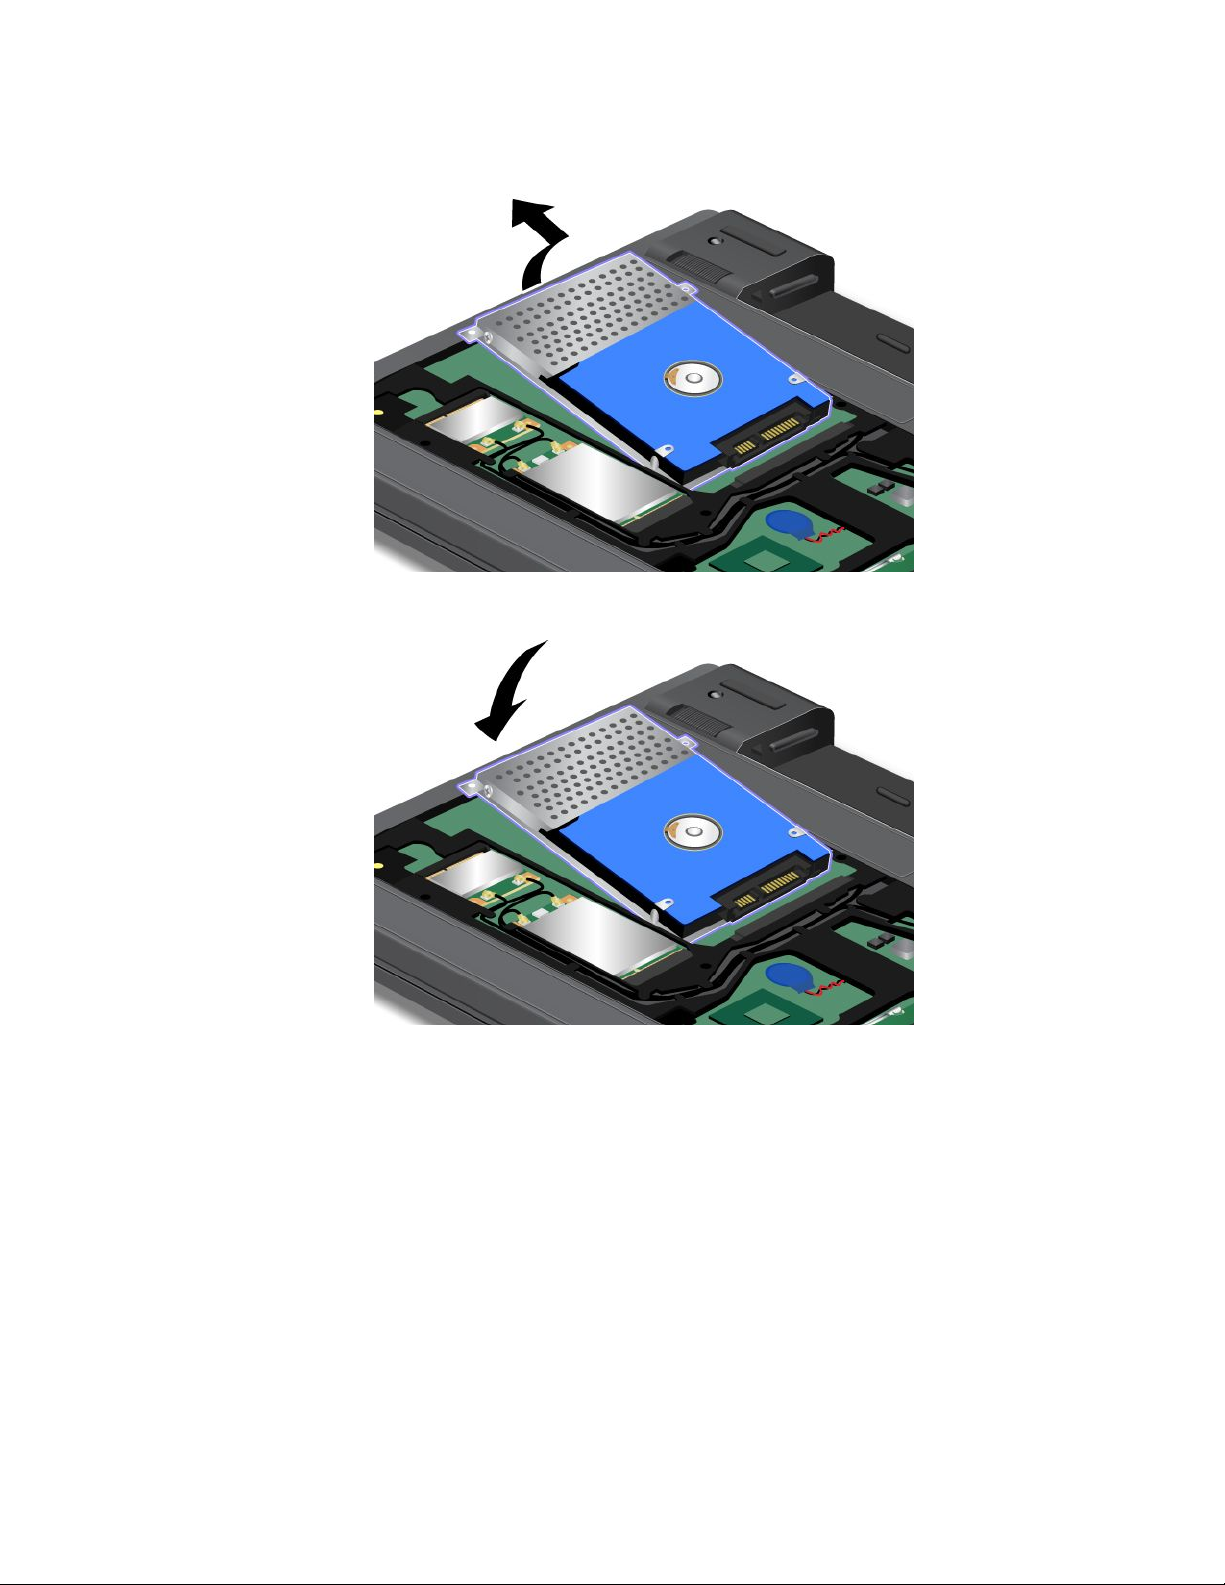
6.Removethesolidstatedriveorharddiskdrivebyliftingitsleftside.
7.Insertthenewsolidstatedriveorharddiskdriveasshowninthefollowingpicture.
Chapter6.Replacingdevices75
Page 92
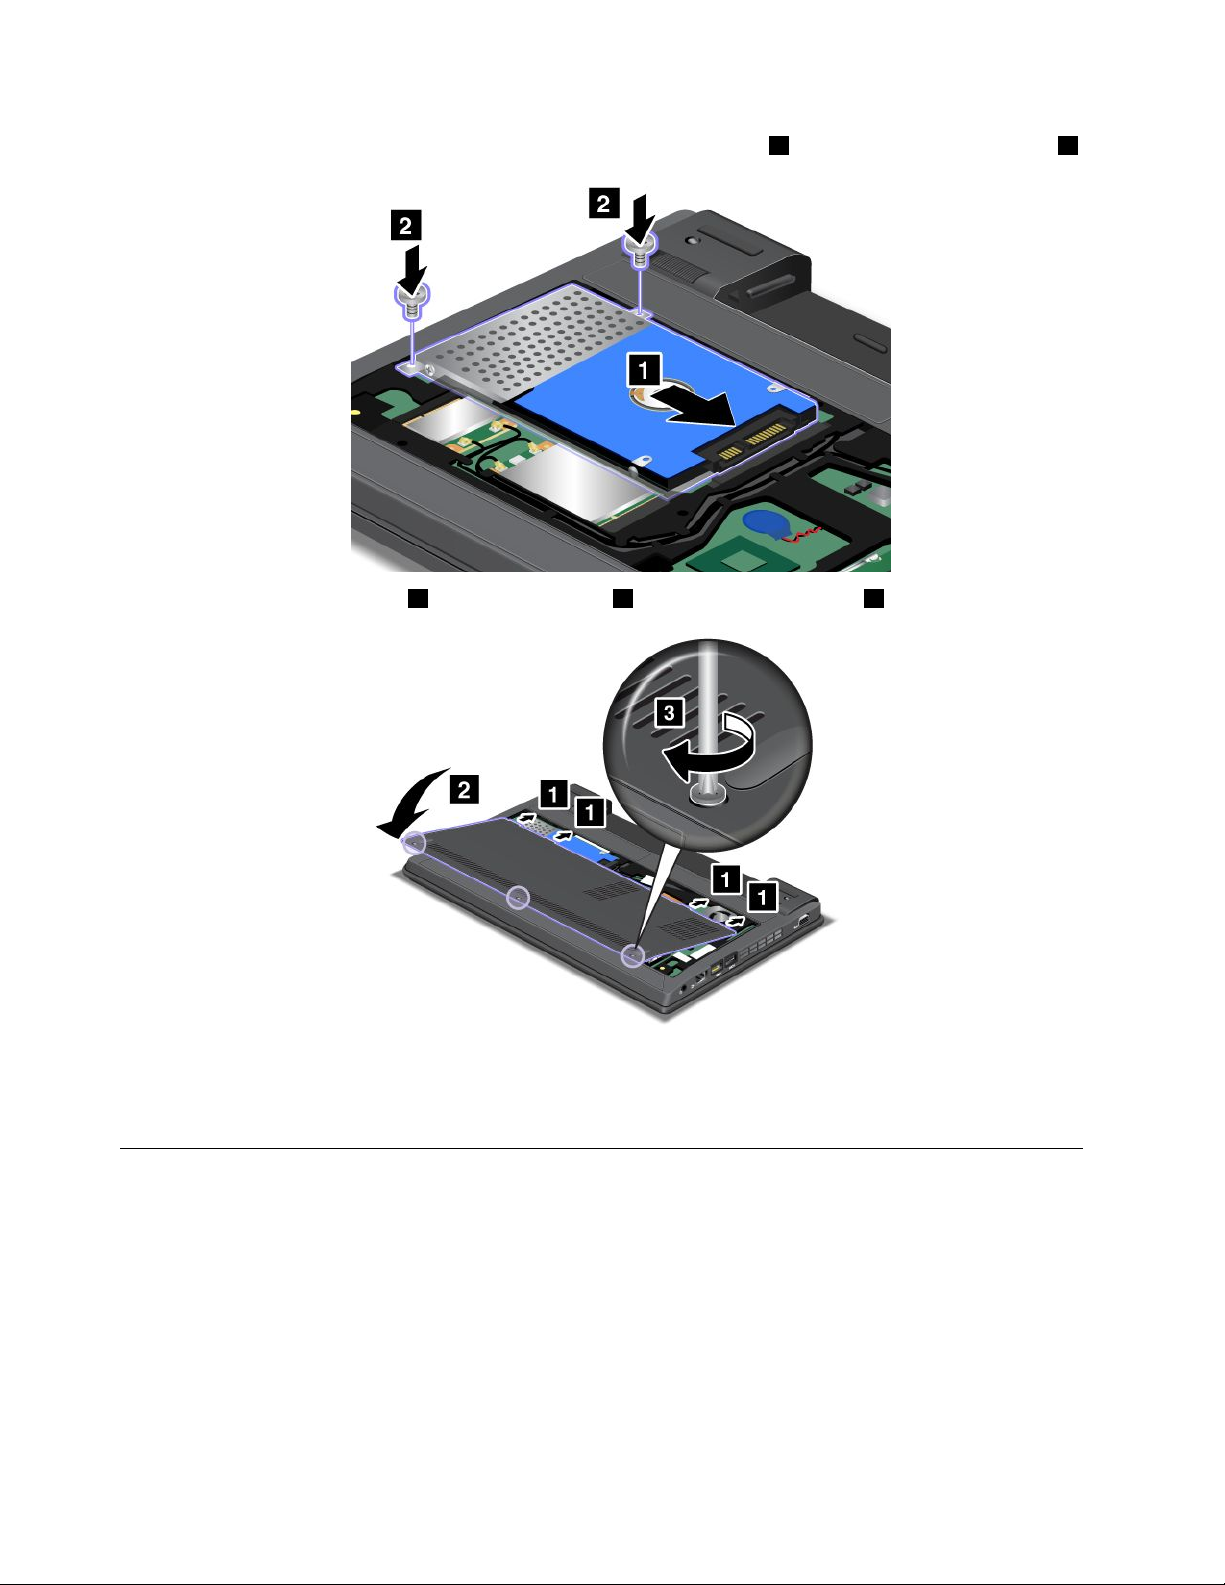
8.Slidethesolidstatedriveorharddiskdrivermlyintotheconnector1,andthenreinstallthescrews2.
9.Putthecoverbackinplace1andclosethecover2.Thentightenthescrews3.
10.Reinstallthebattery.Forinformationabouthowtoreinstallthebattery,referto“Replacingthebattery”
onpage71
11.T urnthecomputeroveragain.Reconnecttheacpoweradapterandallcables.
.
Replacingamemorymodule
Beforeyoustart,printtheseinstructions.
Toreplaceamemorymodule,readthefollowingprerequisites,andthentheinstruction.
Note:Theoperatingspeedofthememorymoduledependsonthesystemcongurationofyourcomputer
anditscombinationwiththememorymoduleinstalledonyourcomputer.Insomeconditions,thememory
moduleinyourcomputermightnotbeabletooperateatthemaximumspeed.
Attention:Beforeyoustartinstallingamemorymodule,touchametaltableoragroundedmetalobject.This
actionreducesanystaticelectricityfromyourbody.Thestaticelectricitycoulddamagethememorymodule.
76UserGuide
Page 93
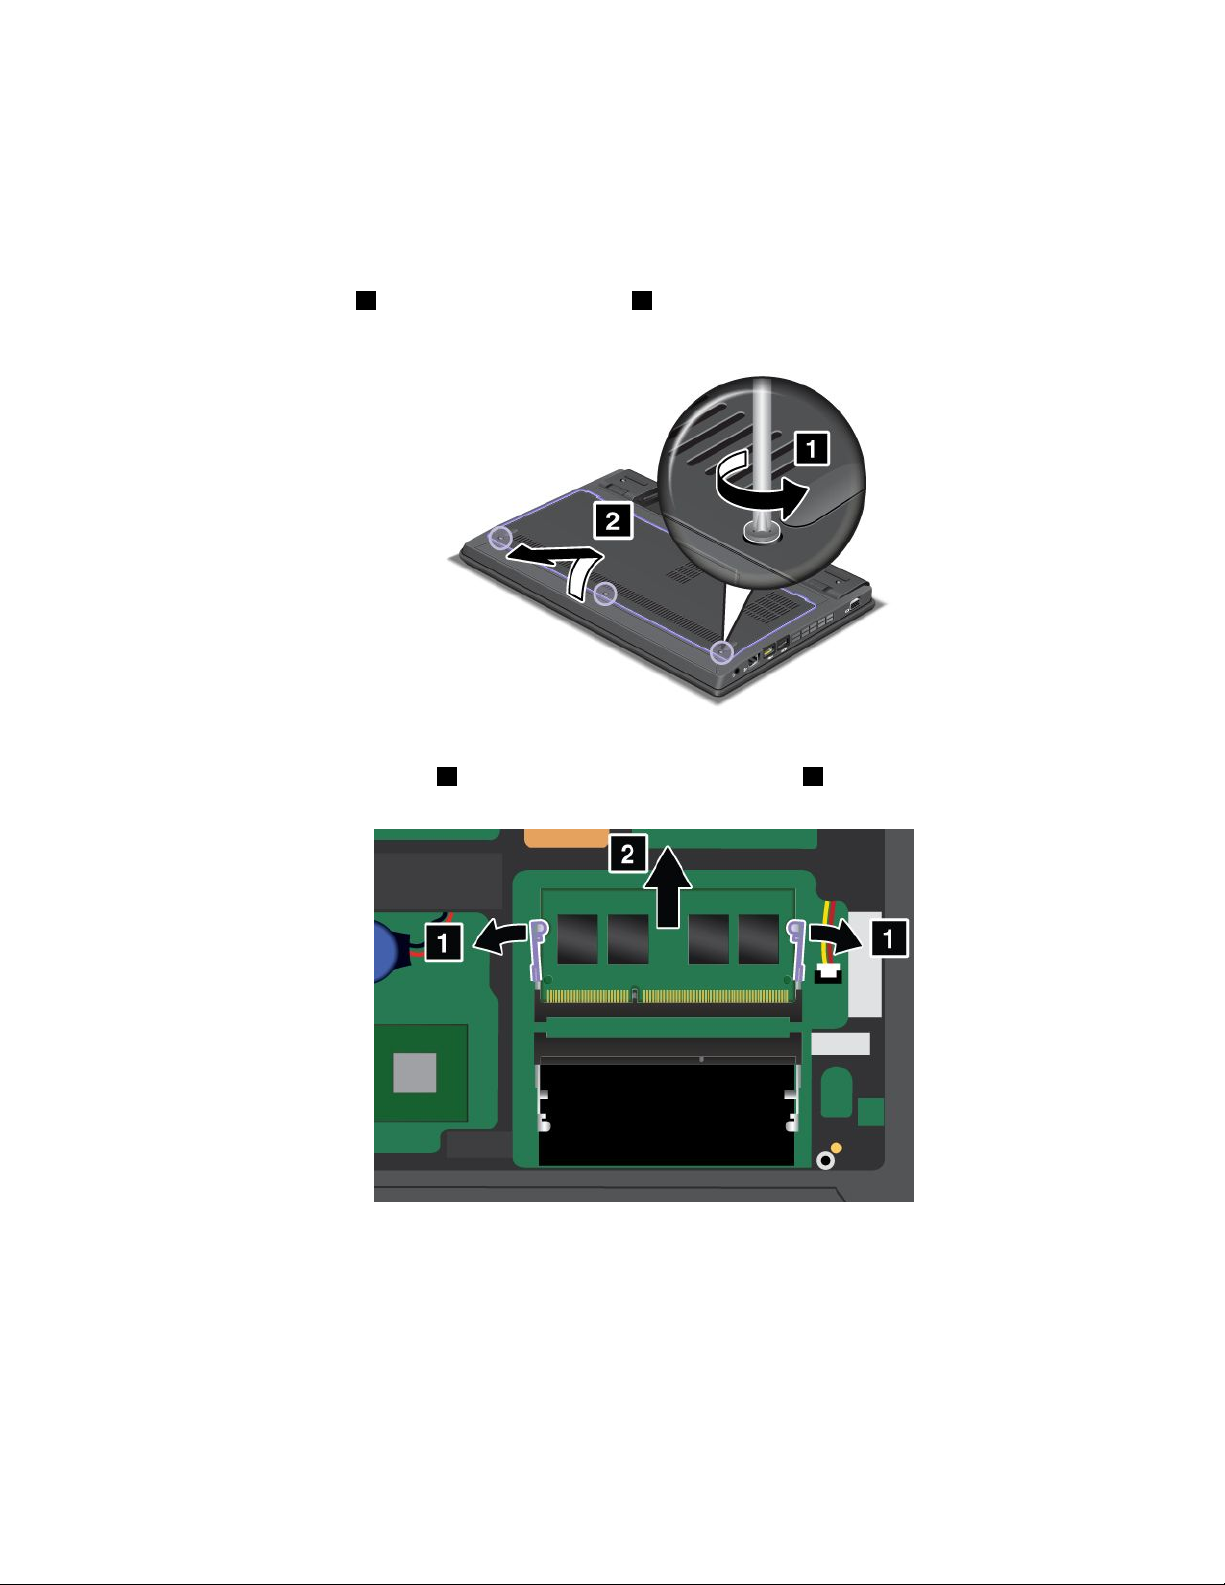
Replacingmemoryintheslotunderthekeyboard
1.T urnoffthecomputer;thendisconnecttheacpoweradapterandallcablesfromthecomputer.
2.Closethecomputerdisplay,andturnitover.
3.Removethebattery.Forinformationabouthowtoremovethebattery,referto“Replacingthebattery”
onpage71
.
4.Loosenthescrews1,andthenremovethecover2.
5.Iftwomemorymodulesarealreadyinthememoryslots,pressoutonthelatchesonbothedgesof
thesocketatthesametime1,andthenremoveanmemorymodule2tomakeroomforthenew
one.Besuretosaveitforfutureuse.
6.Findthenotchonthecontactedgesideofthememorymoduleyouareinstalling.
Attention:Toavoiddamagingthememorymodule,donottouchitscontactedge.
Chapter6.Replacingdevices77
Page 94
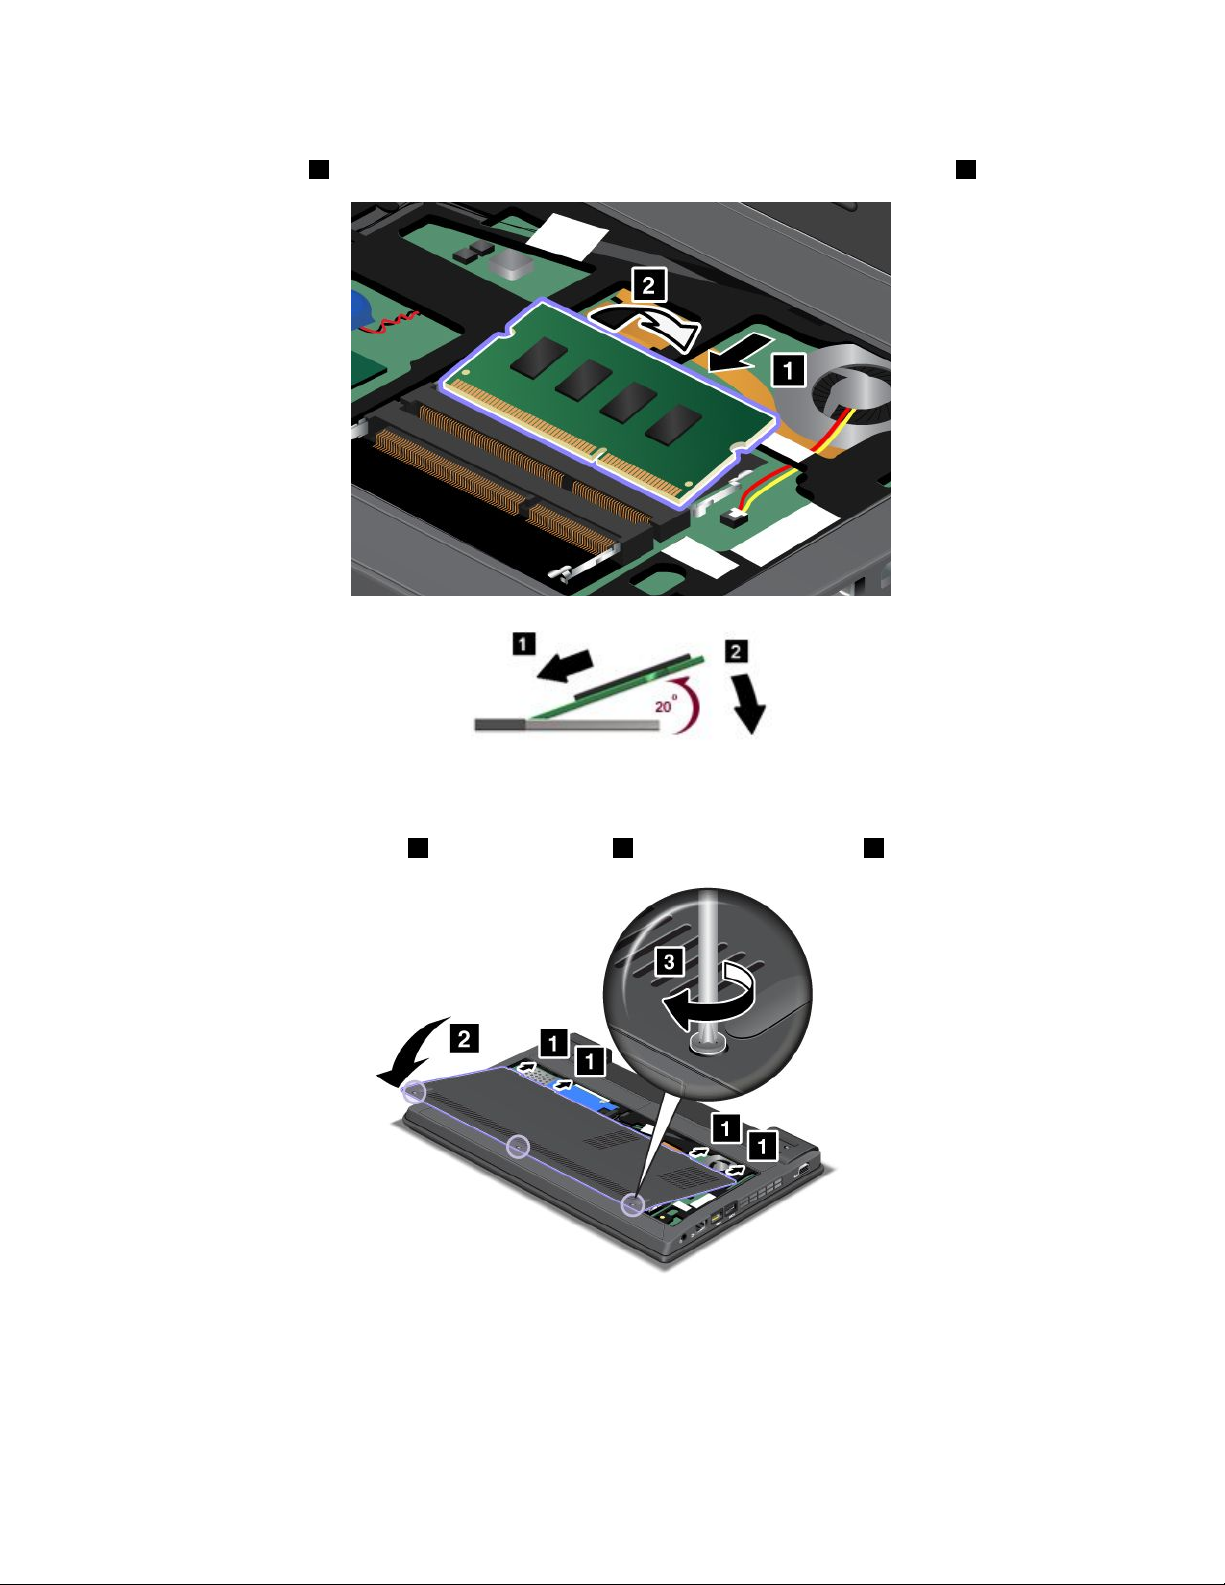
7.Withthenotchedendofthememorymoduletowardthecontactedgesideofthesocket,insertthe
memorymodule1intothesocketatanangleofabout20degrees;thenpressitinrmly2.
8.Pivotthememorymoduledownwarduntilitsnapsintoplace.
9.Makesurethatthememorymoduleisrmlyxedintheslotandcannotbemovedeasily.
10.Putthecoverbackinplace1andclosethecover2.Thentightenthescrews3.
11.Reinstallthebattery.Forinformationabouthowtoreinstallthebattery,referto“Replacingthebattery”
onpage71.
12.T urnthecomputeroveragainandreconnectthecables.
78UserGuide
Page 95

Replacingthekeyboard
Youcanusethefollowingprocedurestoreplacethekeyboardwithanewone,availableasanoption.
Prerequisitesfortheprocedure
DANGER
Duringelectricalstorms,donotconnectthecabletoordisconnectitfromthetelephoneoutlet
onthewall.
DANGER
Electriccurrentfrompower,telephone,andcommunicationcablesishazardous.Toavoidshock
hazard,disconnectthecablesbeforeopeningthecoverofthisslot.
Beforeyoustart,printtheseinstructions.
Toreplacethekeyboard,doasfollows:
Removingthekeyboard
1.T urnoffthecomputer;thendisconnecttheacpoweradapterandallcablesfromthecomputer.
2.Closethecomputerdisplay,andturnthecomputerover.
3.Removethebattery.Forinformationabouthowtoremovethebattery,referto“Replacingthebattery”
onpage71.
4.Loosenthescrews1,andthenremovethecover2.
Chapter6.Replacingdevices79
Page 96
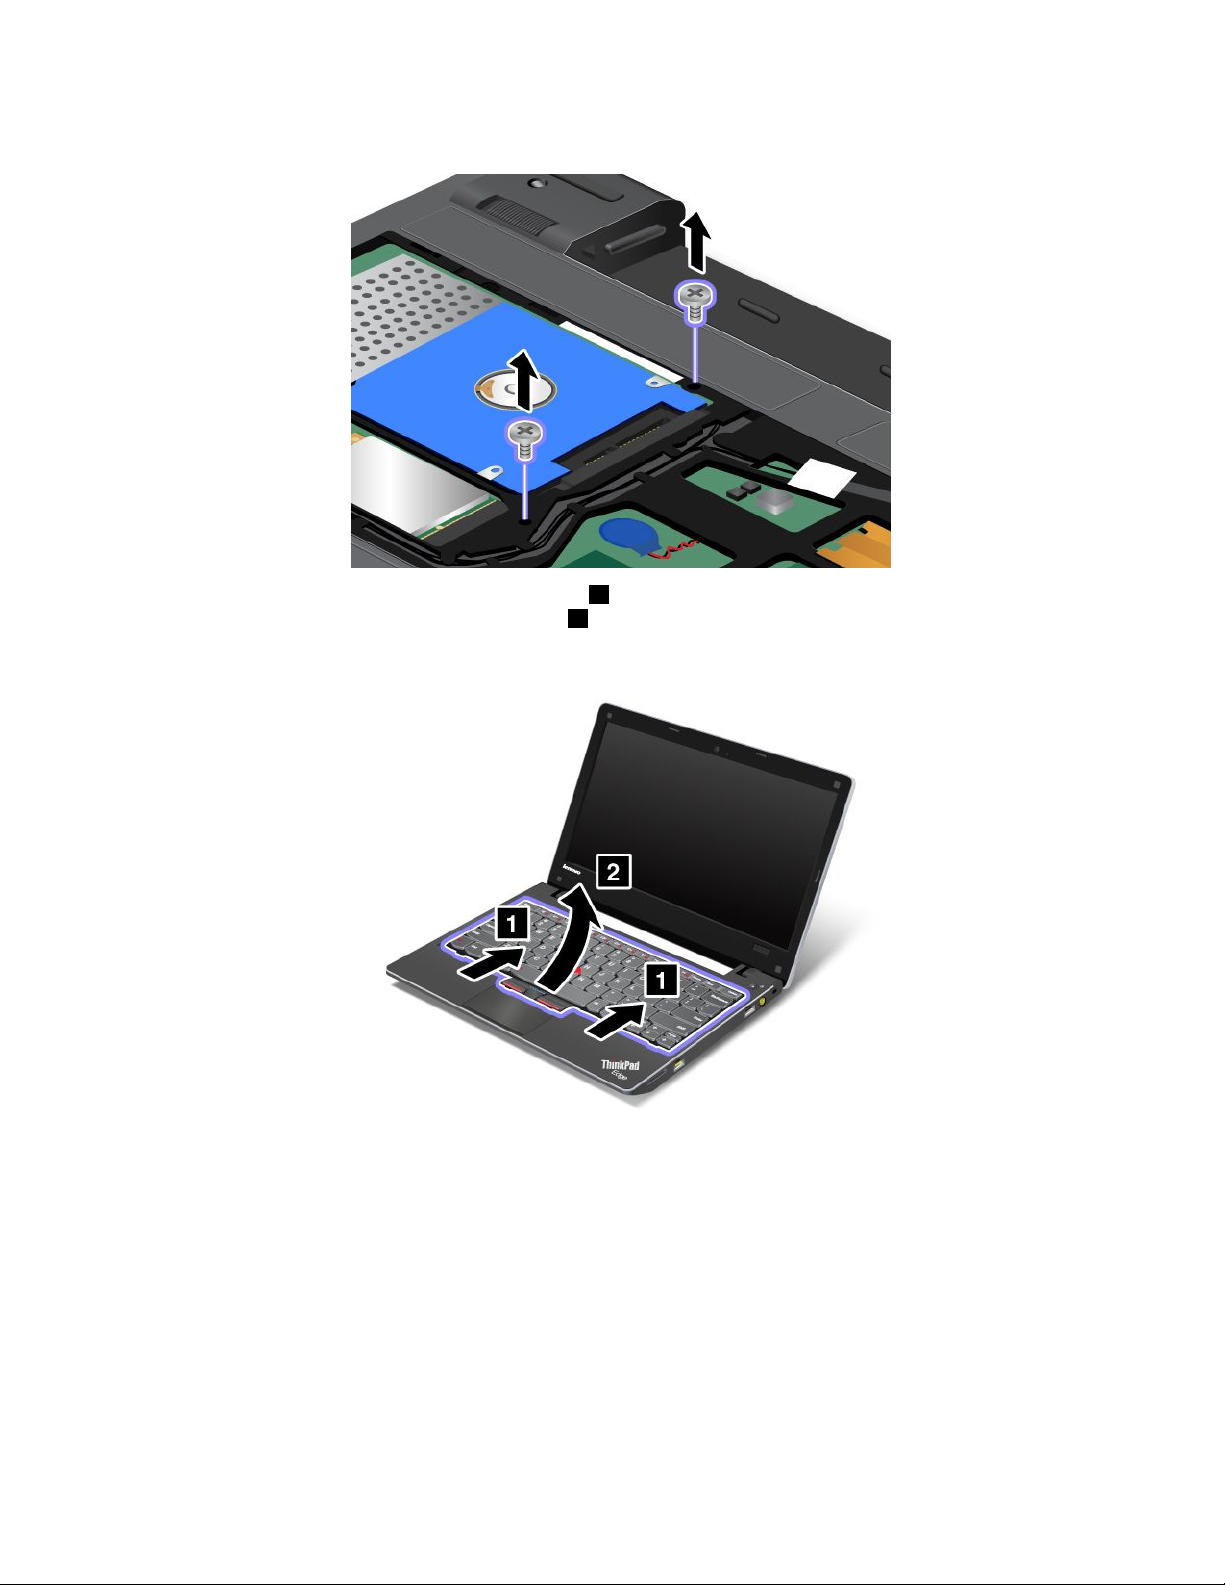
5.Removethescrews.
6.Pushhardinthedirectionshownbythearrows1inthedrawingtounlatchthefrontsideofthe
keyboard.Thekeyboardwillopenupslightly2.
80UserGuide
Page 97

7.Removethecables2and4byippingtheconnectors1and3upwards.Nowthekeyboardhas
beenremoved.
Installingthekeyboard
1.Attachthecables1and3byippingtheconnectors2and4downwards.
Chapter6.Replacingdevices81
Page 98
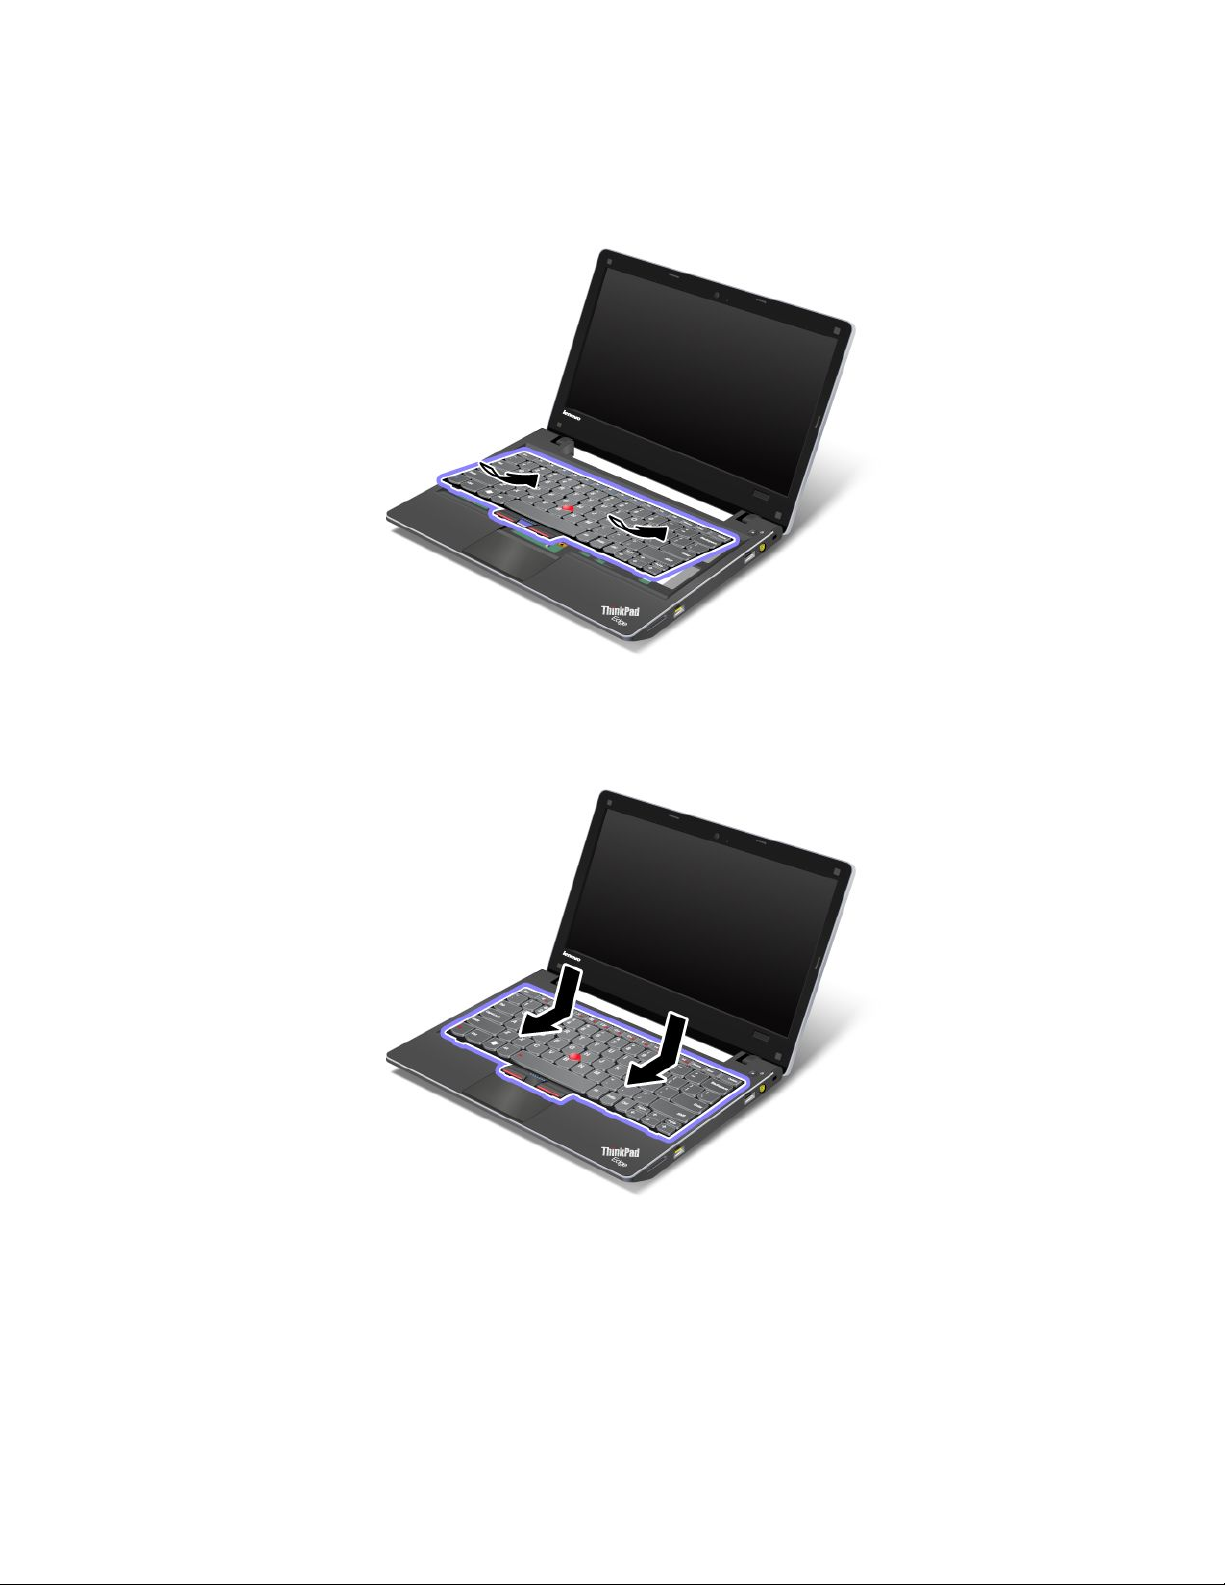
2.Insertthekeyboard.Makesurethattherearedgeofthekeyboardisundertheframe,asshownby
thearrows.
3.Slidethekeyboardasshownbythearrows.
82UserGuide
Page 99
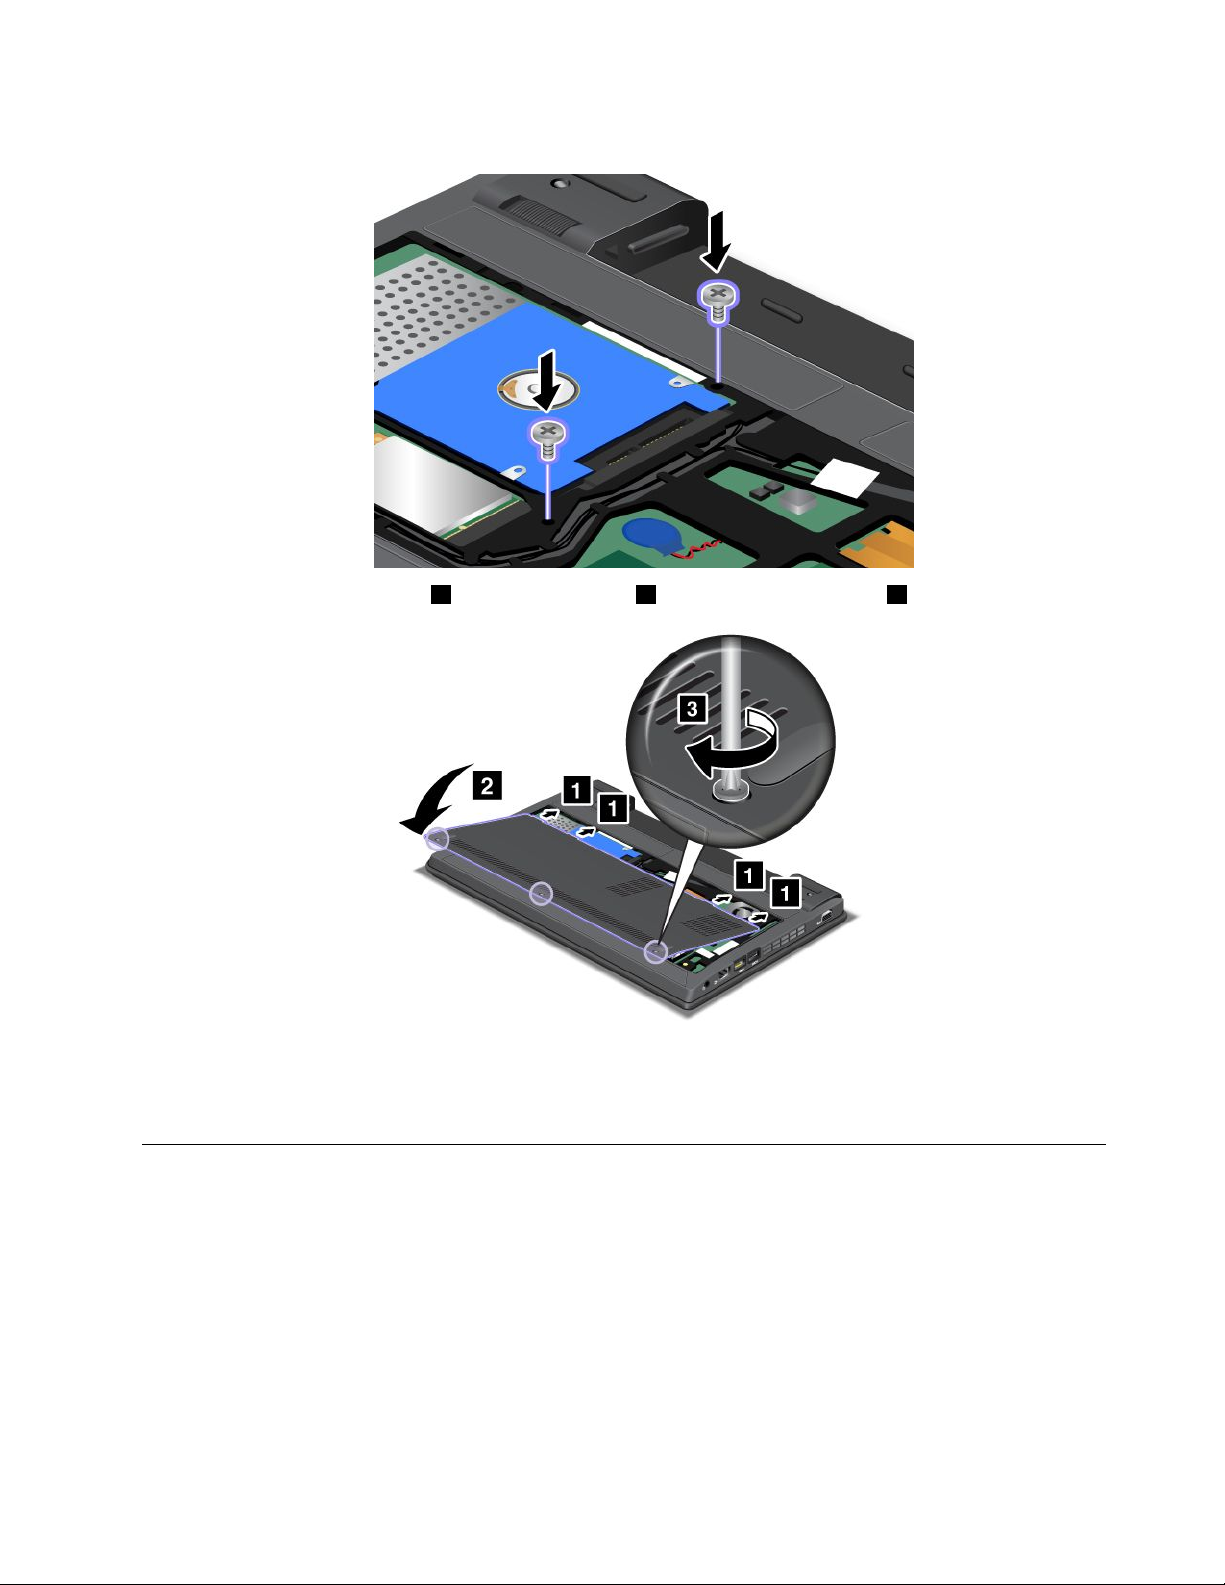
4.Reinstallthescrews.
5.Putthecoverbackinplace1andclosethecover2.Thentightenthescrews3.
6.Reinstallthebattery.Forinformationabouthowtoreinstallthebattery,referto“Replacingthebattery”
onpage71.
7.T urnthecomputeroveragain.Connecttheacpoweradapterandcablestothecomputer;thenturniton.
InstallingandreplacingthePCIExpressMiniCardforwireless LAN/WiMAXconnection
Beforeyoustart,printtheseinstructions.
YourcomputerhasaPCIExpressMiniCardslotforconnectiontoawirelessLAN/WiMAX.T oreplacethePCI
ExpressMiniCardwithanewone,readthefollowingprerequisites.
Chapter6.Replacingdevices83
Page 100

Prerequisitesfortheprocedure
DANGER
Duringelectricalstorms,donotconnectthecabletoordisconnectitfromthetelephoneoutlet
onthewall.
DANGER
Electriccurrentfrompower,telephone,andcommunicationcablesishazardous.Toavoidshock
hazard,disconnectthecablesbeforeopeningthecoverofthisslot.
Attention:BeforeyoustartinstallingaPCIExpressMiniCard,touchametaltableoragroundedmetal
object.Thisactionreducesanystaticelectricityfromyourbody.Thestaticelectricitycoulddamagethecard.
Beforeyoustart,printtheseinstructions.
YourcomputerhasaPCIExpressMiniCardslotforconnectiontoawirelessLAN/WiMAX.Toreplacethe
PCIExpressMiniCardwithanewone,followtheprocedurebelow.
1.T urnoffthecomputer;thendisconnecttheacpoweradapterandallcablesfromthecomputer.Waitfor
afewminutes,tilltheinsideofthecomputercools,beforeyoustartthefollowingprocedures.
2.Closethecomputerdisplay,andturnthecomputerover.
3.Removethebattery.Forinformationabouthowtoremovethebattery,referto“Replacingthebattery”
onpage71.
4.Loosenthescrews1,andthenremovethecover2.
84UserGuide
 Loading...