

Page 1

ThinkPad T14s Gen 5
User Guide
Page 2

Read this first
Before using this documentation and the product it supports, ensure that you read and understand the
following:
• Safety and Warranty Guide
• Setup Guide
•
Generic Safety and Compliance Notices
Second Edition (June 2024)
© Copyright Lenovo 2024.
LIMITED AND RESTRICTED RIGHTS NOTICE: If data or software is delivered pursuant to a General Services
Administration “GSA” contract, use, reproduction, or disclosure is subject to restrictions set forth in Contract No. GS35F-05925.
Page 3

Contents
Discover your Lenovo notebook. . . . . iii
Chapter 1. Meet your computer. . . . . 1
Front view . . . . . . . . . . . . . . . . . . 1
Side view . . . . . . . . . . . . . . . . . . 3
Bottom view . . . . . . . . . . . . . . . . . 5
Features and specifications . . . . . . . . . . . 6
USB specifications. . . . . . . . . . . . . 6
Chapter 2. Get started with your
computer . . . . . . . . . . . . . . . . . 9
Set up your computer . . . . . . . . . . . . . 9
Turn on the computer. . . . . . . . . . . . 9
Complete the operating system setup . . . . . 9
Access networks . . . . . . . . . . . . . . 10
Connect to Wi-Fi networks. . . . . . . . . 10
Turn on Airplane mode . . . . . . . . . . 10
Connect to the wired Ethernet . . . . . . . 10
Connect to a cellular network (for selected
models) . . . . . . . . . . . . . . . . 11
Interact with your computer . . . . . . . . . . 12
Use the keyboard shortcuts . . . . . . . . 12
Use the TrackPoint pointing device . . . . . 13
Use the Trackpad . . . . . . . . . . . . 14
Use the touch screen (for selected models) . . 18
Connect to an external display . . . . . . . 21
Chapter 3. Explore your computer . . 23
Lenovo apps . . . . . . . . . . . . . . . . 23
Lenovo Commercial Vantage. . . . . . . . 23
Lenovo View (for selected models). . . . . . 23
TrackPoint Quick Menu . . . . . . . . . . 25
Color calibration (for selected models) . . . . . . 27
Intelligent Cooling . . . . . . . . . . . . . . 27
Switch among modes . . . . . . . . . . 28
Cool and Quiet on Lap . . . . . . . . . . . . 28
Manage power . . . . . . . . . . . . . . . 28
Check the battery status . . . . . . . . . 28
Charge the computer with ac power . . . . . 28
Maximize the life of the battery . . . . . . . 29
Charge your computer with P-to-P 2.0
charging function . . . . . . . . . . . . 29
Change the power settings . . . . . . . . 30
Transfer data . . . . . . . . . . . . . . . . 30
Connect to a Bluetooth device . . . . . . . 30
Set up an NFC connection . . . . . . . . . 31
Use a smart card . . . . . . . . . . . . 31
Chapter 4. Secure your computer and
information . . . . . . . . . . . . . . . 33
Lock the computer . . . . . . . . . . . . . 33
Log in with fingerprint recognition (for selected
models) . . . . . . . . . . . . . . . . . . 33
Log in with facial recognition (for selected
models) . . . . . . . . . . . . . . . . . . 34
Lock on leave function (for selected models) . . . 34
Change the settings from the Vantage app . . 34
Change the settings from the UEFI BIOS . . . 34
Use the ePrivacy screen (for selected models) . . . 35
Use the password privacy function . . . . . 35
Protect data against power loss . . . . . . . . 35
USB-C Restricted Mode . . . . . . . . . . . 35
UEFI BIOS passwords . . . . . . . . . . . . 36
Password types . . . . . . . . . . . . . 36
Set, change, or remove a password . . . . . 37
Associate your fingerprints with passwords
(for selected models) . . . . . . . . . . . 38
FIDO (Fast Identity Online) authentication. . . . . 39
Register FIDO2 USB device in ThinkShield
Passwordless Power-On Device Manager. . . 39
Log in to the System with Passwordless
Power-On Authentication . . . . . . . . . 39
Chapter 5. Configure advanced
settings. . . . . . . . . . . . . . . . . 41
UEFI BIOS . . . . . . . . . . . . . . . . . 41
Enter the UEFI BIOS menu. . . . . . . . . 41
Navigate the UEFI BIOS menu . . . . . . . 41
Customize BIOS Defaults . . . . . . . . . 41
Reset system to factory defaults . . . . . . 42
Recover the UEFI BIOS . . . . . . . . . . 42
Detect memory retraining . . . . . . . . . 43
Cloud bare metal recovery (for selected
models) . . . . . . . . . . . . . . . . 43
Update the UEFI BIOS . . . . . . . . . . 44
Install a Windows operating system and drivers . . 44
Install device drivers . . . . . . . . . . . 45
Chapter 6. CRU replacement . . . . . 47
CRU list . . . . . . . . . . . . . . . . . . 47
Before you replace any CRU . . . . . . . . . . 47
Disable Fast Startup . . . . . . . . . . . 48
Disable the built-in battery . . . . . . . . . 48
Replace a CRU . . . . . . . . . . . . . . . 48
Base cover assembly . . . . . . . . . . . 48
© Copyright Lenovo 2024 i
Page 4

M.2 solid-state drive and M.2 solid-state drive
bracket (for selected models). . . . . . . . 50
Wireless WAN module and wireless WAN
module bracket (for selected models) . . . . 51
Chapter 7. Help and support . . . . . 55
Find your service QR code and serial number . . . 55
Frequently asked questions . . . . . . . . . . 55
Error messages . . . . . . . . . . . . . . . 58
Battery-charge LED indicator diagnosis . . . . . 58
Lenovo Memory Self Repair (for Intel models
only) . . . . . . . . . . . . . . . . . . . 60
Diagnose and troubleshoot your computer . . . . 61
Troubleshoot and diagnose at Lenovo
Support Web site . . . . . . . . . . . . 61
Hardware scan . . . . . . . . . . . . . 62
UEFI Diagnostics tool. . . . . . . . . . . 62
Recover your Windows operating system. . . . . 62
Self-help resources . . . . . . . . . . . . . 63
Windows label . . . . . . . . . . . . . . . 63
Call Lenovo . . . . . . . . . . . . . . . . 63
Before you contact Lenovo . . . . . . . . 64
Lenovo Customer Support Center . . . . . . 64
Purchase accessories or additional services . . . 65
Accessibility features. . . . . . . . . . . . . 65
Appendix A. Compliance
information . . . . . . . . . . . . . . . 69
Appendix B. Notice for USB
connector name update . . . . . . . . 73
Appendix C. Notices and
trademarks . . . . . . . . . . . . . . . 75
ii ThinkPad T14s Gen 5 User Guide
Page 5

Discover your Lenovo notebook
Thank you for choosing a Lenovo® notebook! We are dedicated to delivering the best solution to you.
Before starting your tour, please read the following information:
• Illustrations in this documentation might look different from your product.
• Depending on the model, some optional accessories, features, software programs, and user interface
instructions might not be applicable to your computer.
• Documentation content is subject to change without notice. To get the latest documentation, go to
pcsupport.lenovo.com
.
https://
© Copyright Lenovo 2024 iii
Page 6

iv ThinkPad T14s Gen 5 User Guide
Page 7
Chapter 1. Meet your computer
This chapter introduces the appearance, features and specifications of your computer.
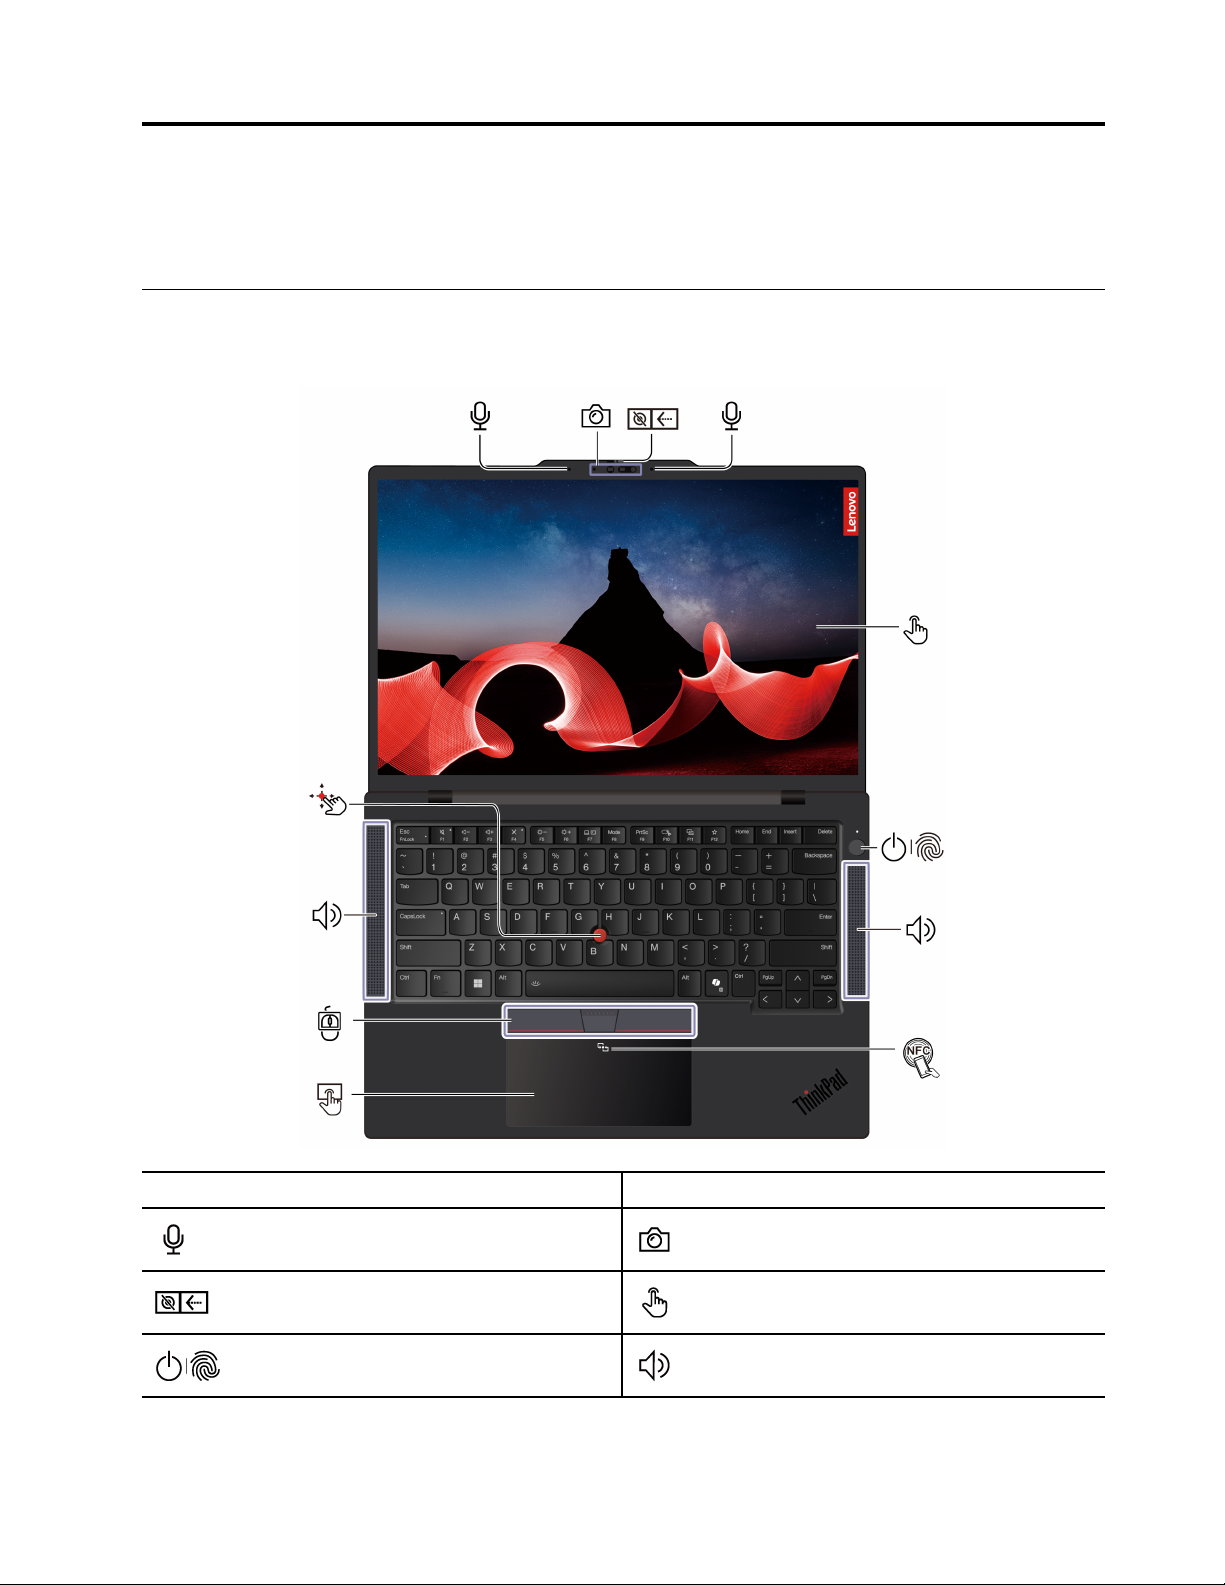
Front view
Have a quick glance at the front view of your computer.
Item
© Copyright Lenovo 2024 1
Description
Microphone*
Webcam privacy shutter*
Power button with fingerprint reader*
Item
Description
Infrared camera / Camera*
Touch screen*
Speaker
Page 8

Item
Description
Item
Description
NFC (near field communication) mark*
TrackPoint Three Buttons
Trackpad
TrackPoint® pointing stick
* for selected models
Webcam privacy shutter
Slide the webcam privacy shutter to cover or uncover the camera lens. It is designed to protect your privacy.
Related topics
• “Use the TrackPoint pointing device” on page 13
• “Use the Trackpad” on page 14
• “Use the touch screen (for selected models)” on page 18
• “Log in with fingerprint recognition (for selected models)” on page 33
• “Log in with facial recognition (for selected models)” on page 34
• “Lock on leave function” on page 34
2
ThinkPad T14s Gen 5 User Guide
Page 9
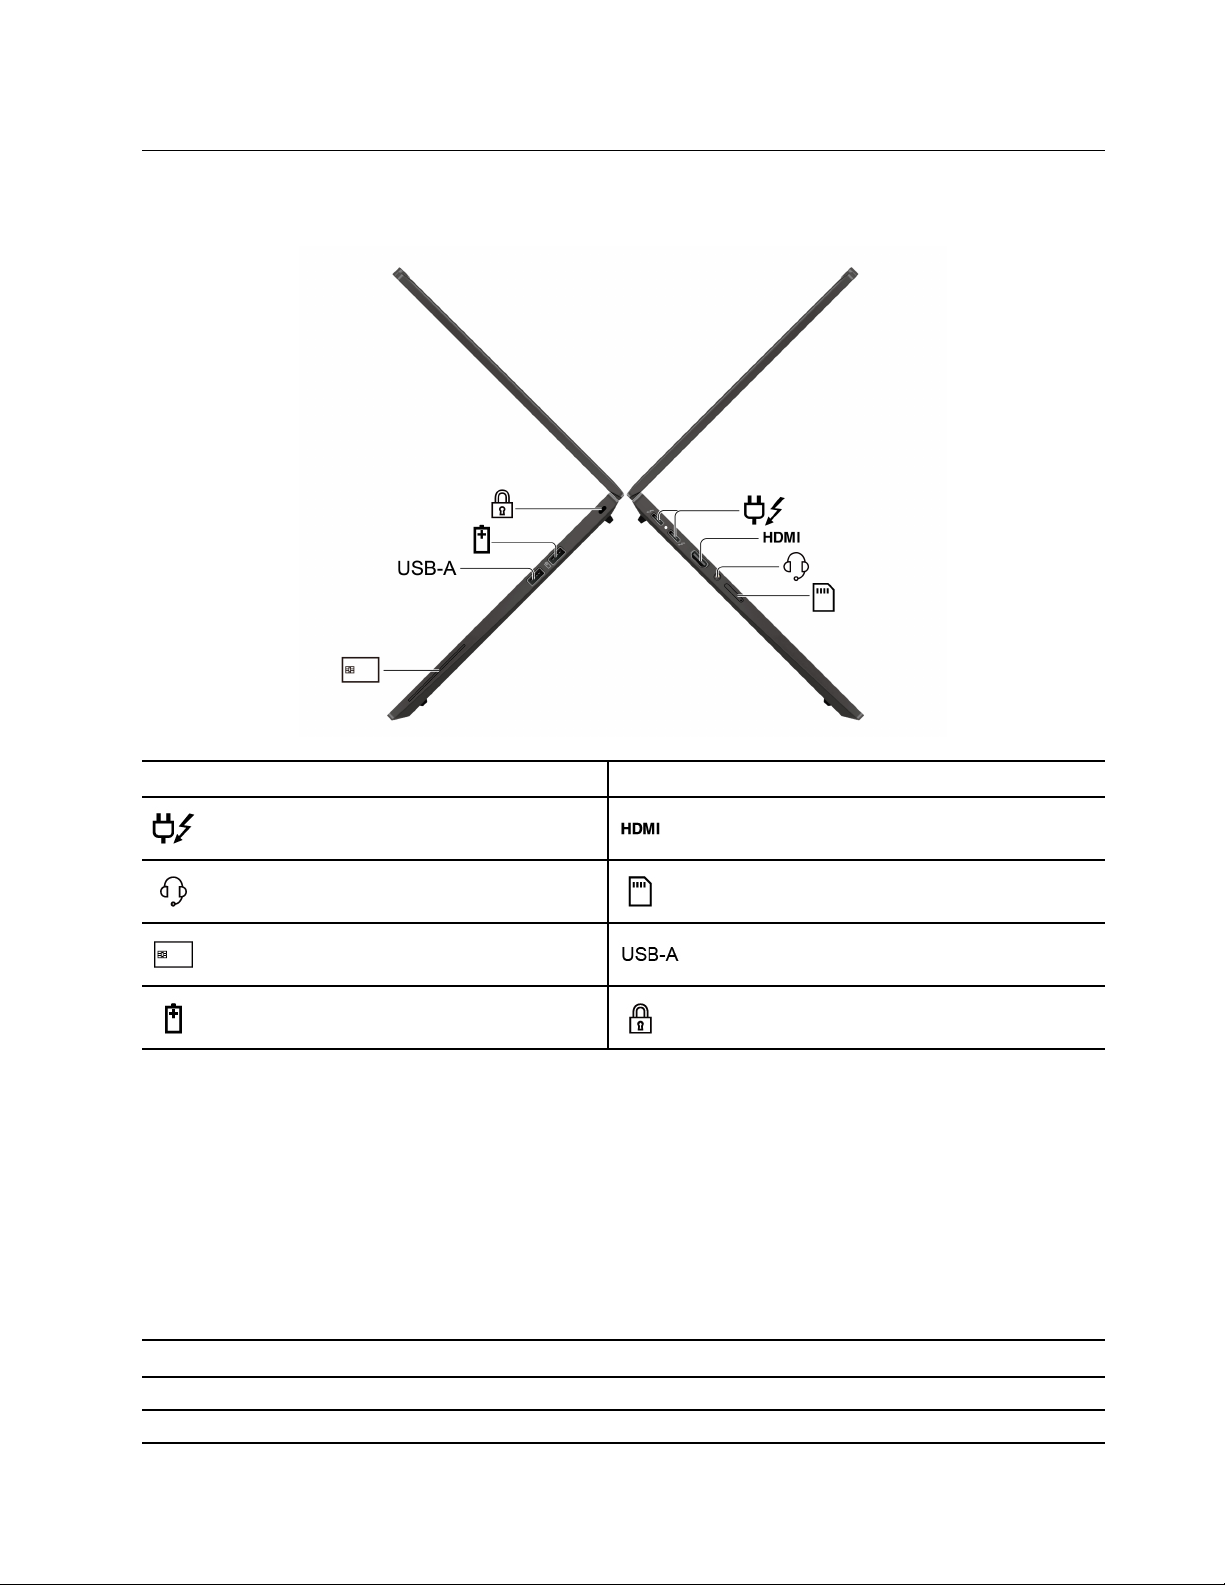
Side view
Have a quick glance at ports on both sides of your computer.
Item
Description
USB-C® power connector
(Thunderbolt™ 4)
Audio connector
Smart-card slot*
USB-A connector (USB 5Gbps, Always
On USB)
Item
Description
HDMI™ connector
Nano-SIM-card tray*
USB-A connector (USB 5Gbps)
Security-lock slot
* for selected models
Note: For more information about the USB connector name update, see Appendix B “Notice for USB
connector name update” on page 73.
Statement on USB transfer rate
Depending on many factors such as the processing capability of the host and peripheral devices, file
attributes, and other factors related to system configuration and operating environments, the actual transfer
rate using the various USB connectors on this device will vary and will be slower than the data rate listed in
the connector name or below for each corresponding device.
USB device Data rate (Gbps)
Thunderbolt 3 40
Thunderbolt 4 40
Chapter 1. Meet your computer 3
Page 10

Related topics
• “USB specifications” on page 6
• “Manage power” on page 28
• “Use a smart card” on page 31
• “Lock the computer” on page 33
4
ThinkPad T14s Gen 5 User Guide
Page 11
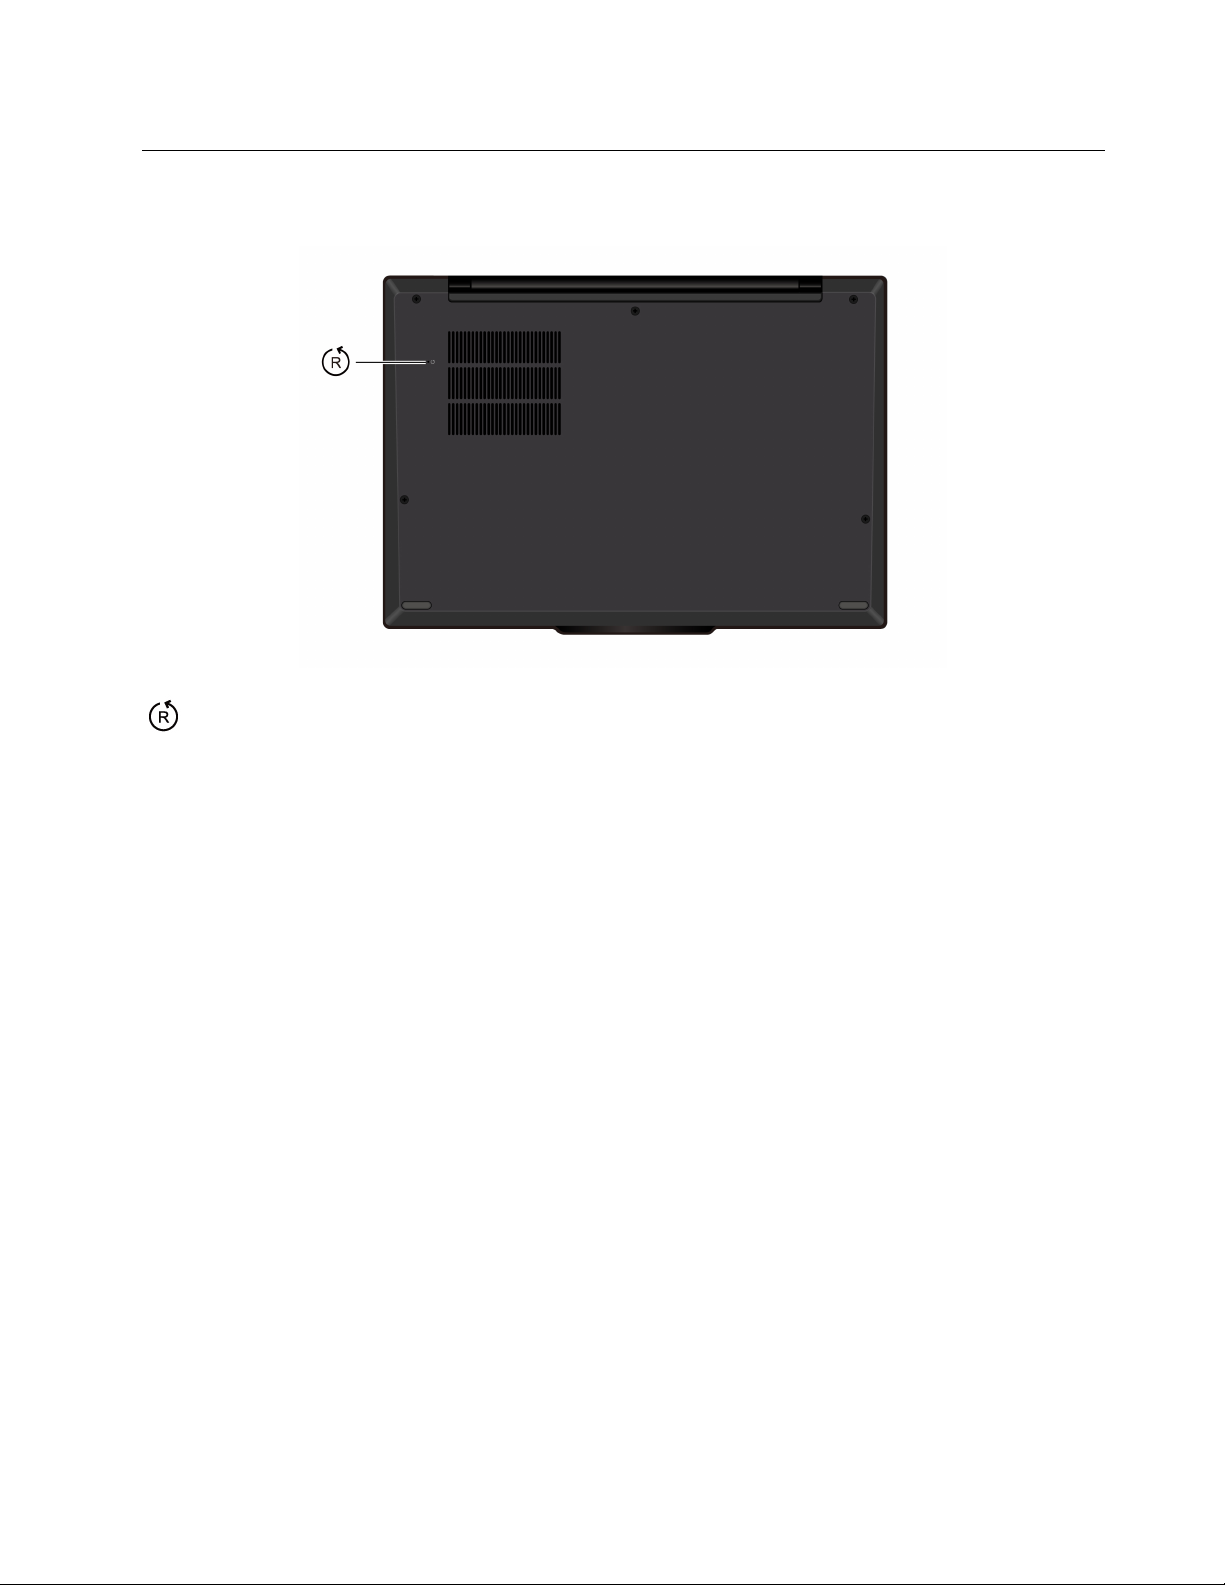
Bottom view
Have a quick glance at the bottom part of your computer.
Emergency-reset hole
Emergency-reset hole can help you to recover computer when the computer stops responding and you
cannot turn it off by pressing the power button. Do the following to reset your computer:
1. Disconnect your computer from ac power.
2. Insert a straightened paper clip into the hole to cut off power supply temporarily.
3. Connect your computer to ac power and then turn on your computer.
Note: If your computer is still no response, you can call Lenovo Customer Support Center to get further
help.
CAUTION:
When the computer is operating, it should be placed on a hard and flat surface with its bottom area
not in contact with user’s bare skin. Under normal operating conditions, the temperature of the
bottom surface will remain within an acceptable range as defined in IEC 62368-1, but such
temperatures can still be high enough to cause discomfort or harm to the user if directly touched for
over one minute at a time. As such, it is recommended that users avoid prolonged direct contact with
the bottom of the computer.
Chapter 1. Meet your computer 5
Page 12

Features and specifications
Get to know more hardware and software details of your computer.
Specification Description
Memory Low Power Double Data Rate 5X (LPDDR5X), soldered on board, up to 64 GB
Storage device
Audio
Display
Security features
• One slot, 2280 M.2 solid-state drive, up to 2 TB
• Dolby Audio
• Dolby Voice
• Color display with In-Plane Switching (IPS)*
• Color panel: Organic Light-Emitting Diode (OLED) or Light-Emitting Diode (LED)
• Display ratio: 16:10
• Display resolution: 1920 x 1200 pixels or 2880 x 1800 pixels
• Multi-touch technology*
• TUV Eye Safe*
• Face authentication*
• Lock on leave function*
• Fingerprint reader* (integrated in power button)
• Lenovo View Privacy Guard*
• Lenovo View Privacy Alert*
• ePrivacy panel*
• Trusted Platform Module (TPM)*
™ Premium
®
• Bluetooth
• NFC*
• GPS (on wireless WAN model)*
Wireless features
• Wireless LAN
• Wireless WAN (4G or 5G)*
Note: The 4G or 5G cellular service is provided by authorized mobile service
carriers in some countries or regions. You must have a cellular plan from a
service carrier to connect to the cellular network. The cellular data plan might
vary by location.
* for selected models
USB specifications
Get to know more USB specifications.
Note: Depending on the model, some USB connectors might not be available on your computer.
6
ThinkPad T14s Gen 5 User Guide
Page 13
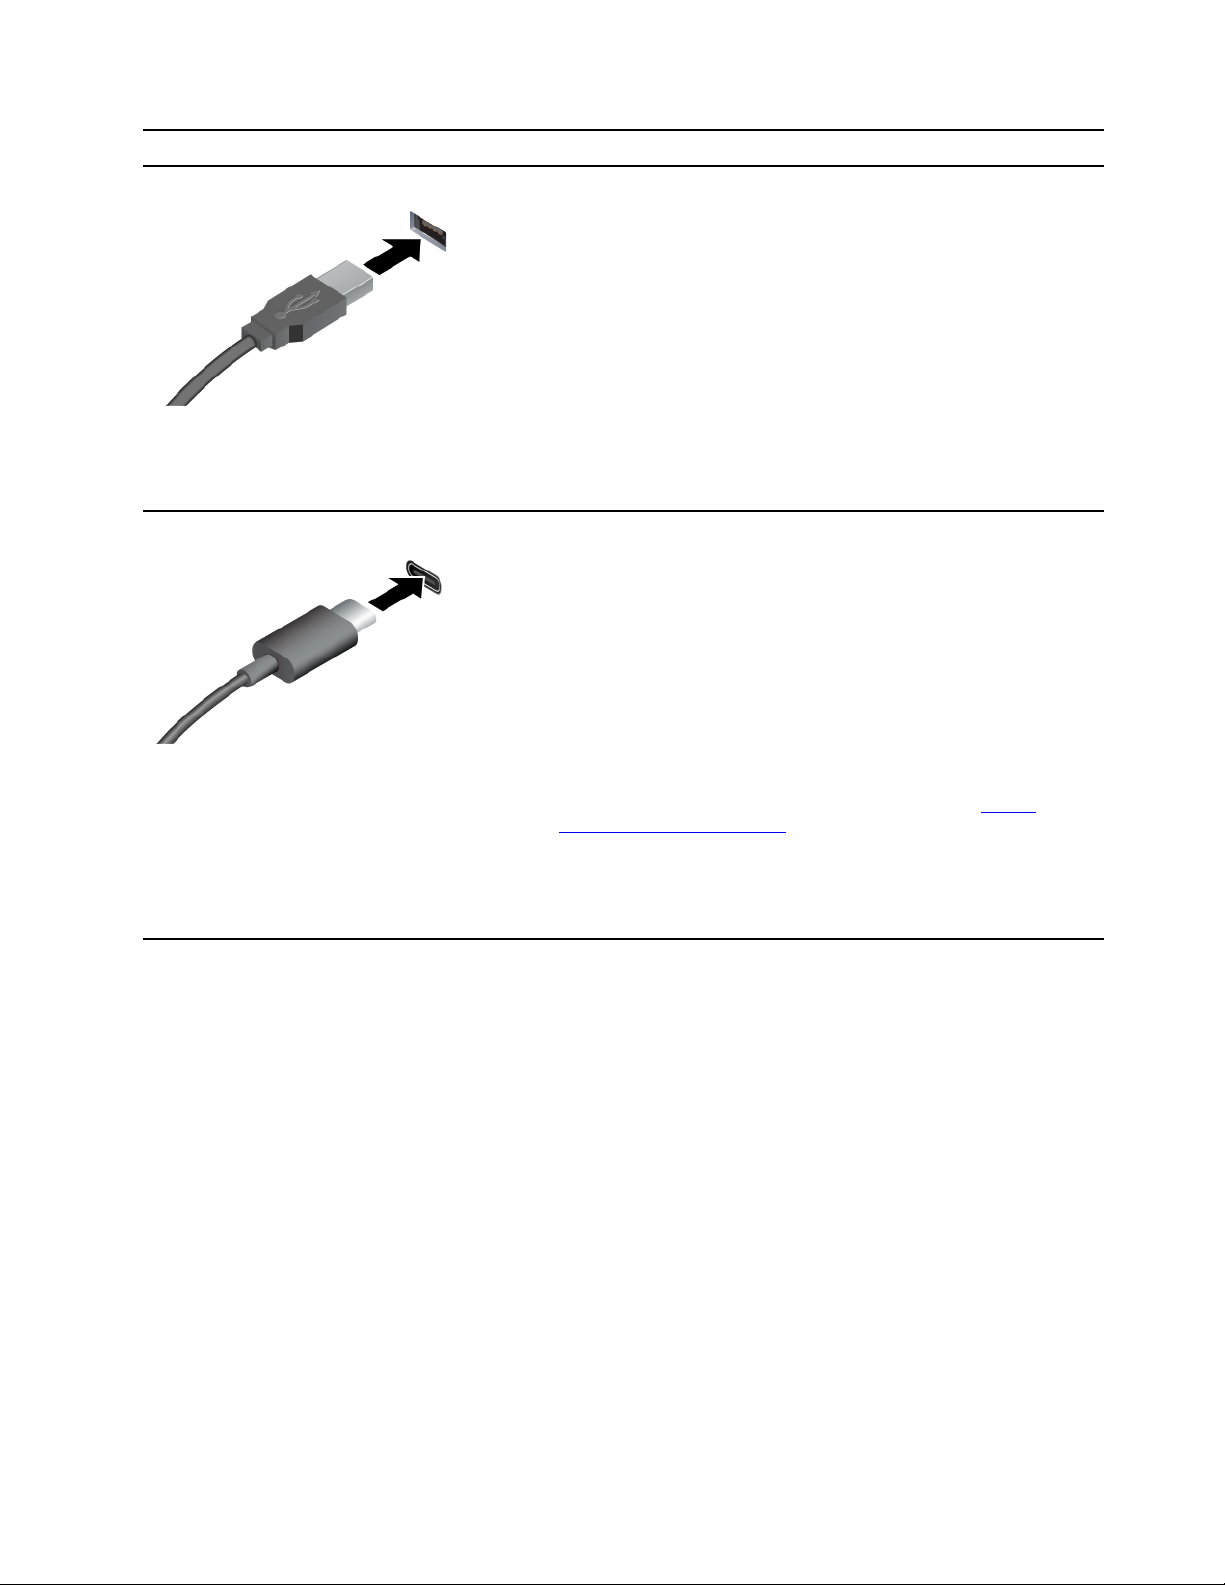
Connector name
• USB-A connector (Hi-Speed USB)
• USB-A connector (USB 5Gbps)
• USB-A connector (USB 10Gbps)
• USB-C connector (USB 5Gbps)
• USB-C connector (USB 10Gbps)
• USB-C connector (Thunderbolt 3)
• USB-C connector (Thunderbolt 4)
• USB-C connector (USB4 40Gbps)
• USB-C connector (DP Alt mode DP 2.1)
Description
Connect USB-compatible devices, such as a USB keyboard, USB
mouse, USB storage device, or USB printer.
• Charge USB-C compatible devices with the output voltage and
current of 5 V and 1.5 A.
• Connect to an external display:
– USB-C to VGA: up to 1920 x 1200 pixels, 60 Hz
– USB-C to DP: up to 5120 x 3200 pixels, 60 Hz
• Connect to USB-C accessories to help expand your computer
functionality. To purchase USB-C accessories, go to
www.lenovo.com/accessories
.
https://
Chapter 1. Meet your computer 7
Page 14

8 ThinkPad T14s Gen 5 User Guide
Page 15
Chapter 2. Get started with your computer
This chapter introduces the instructions of setting up your computer, various ways to connect to networks,
and to interact with your computer.
Set up your computer
This section helps you to set up your computer and get it ready for use.
Turn on the computer
Follow the instructions to turn on your computer.
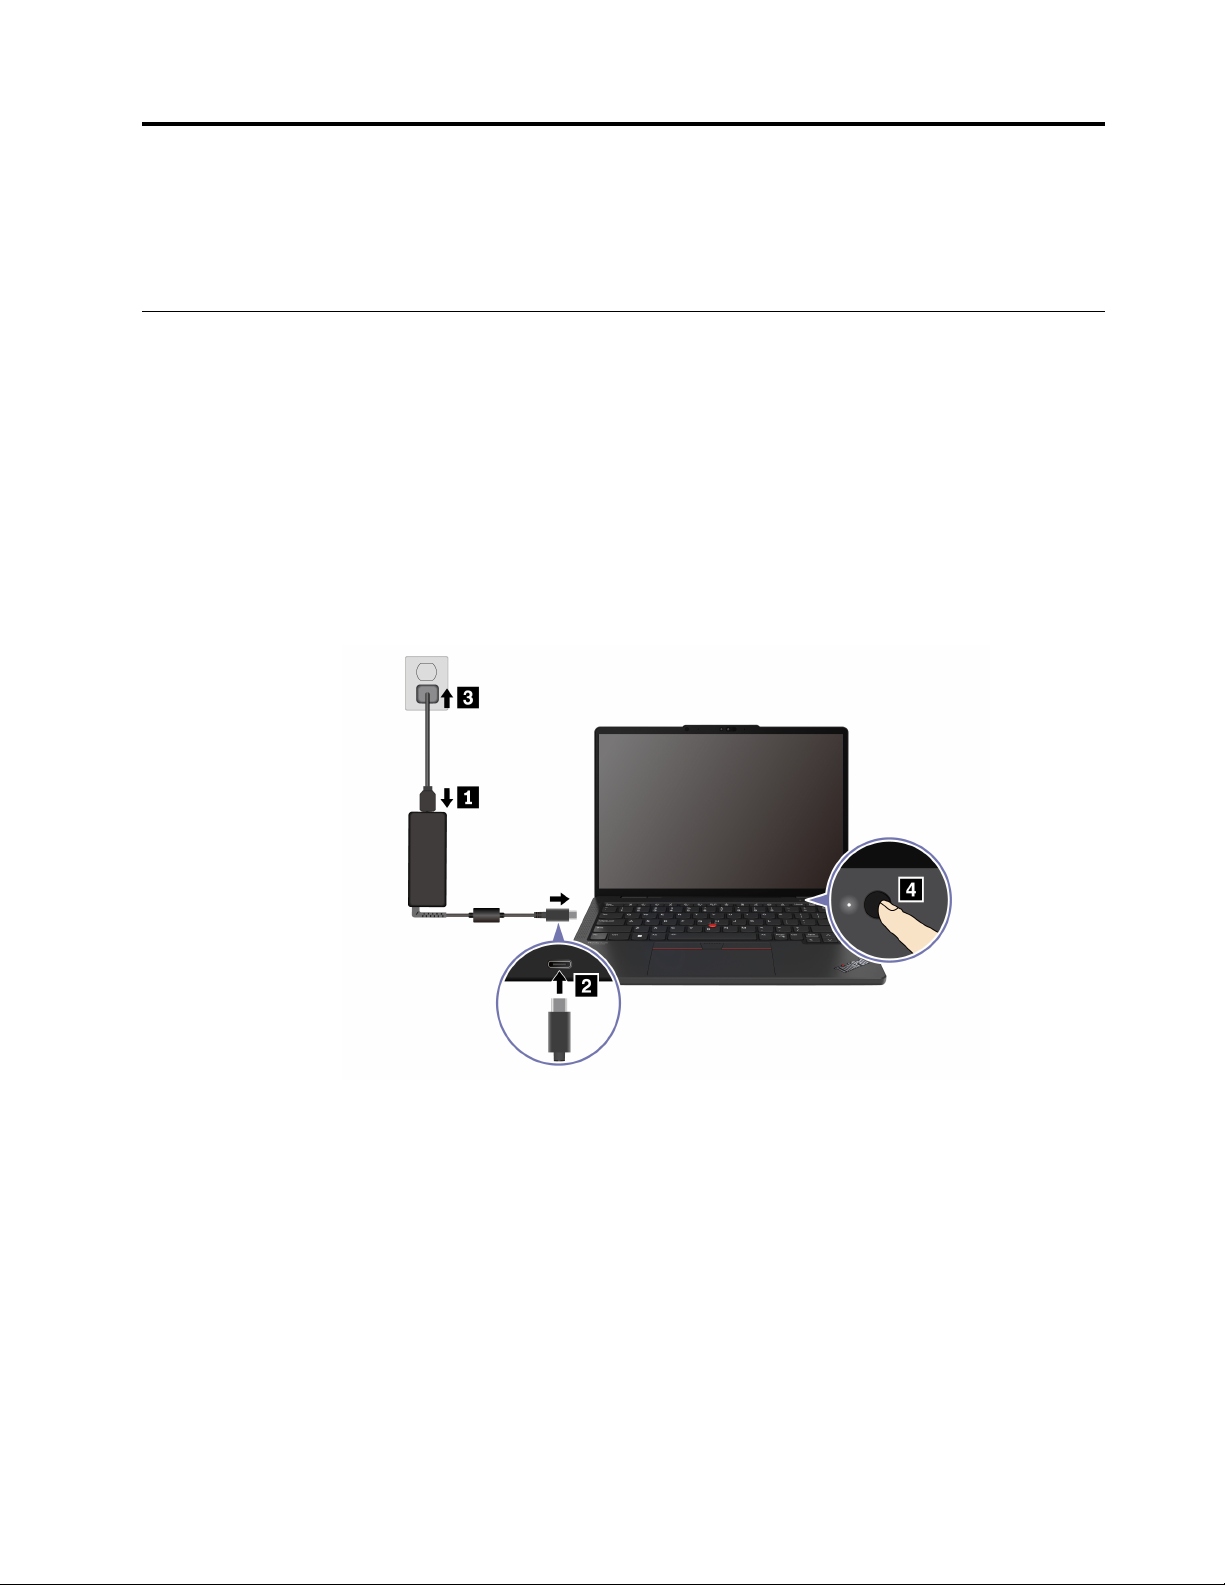
Step 1. Connect the power cord to the ac power adapter.
Step 2. Connect the power adapter to your computer.
Step 3. Plug the power cord into the ac power.
Step 4. Press the power button to turn on your computer.
Notes:
• The appearance varies depending on the computer model.
• It is recommended to fully charge the computer when using it for the first time. Click the battery status
icon at the bottom right of your desktop to check the battery status.
Related topics
• “Check the battery status” on page 28
• “Charge the computer with ac power” on page 28
Complete the operating system setup
Before exploring your computer, you need to complete the operating system setup. The setup includes but is
not limited to:
© Copyright Lenovo 2024 9
Page 16

• Select the country or region.
• Connect to an available network.
• Accept the license agreement.
• Create a Microsoft account or log in with your Microsoft account.
• Set up your password, fingerprint, or facial recognition as preferred.
• Customize your experience.
Notes:
• Depending on the model, some settings might not be available on your computer.
• Do not turn off your computer and ensure it is connected to the ac power during the whole process.
Follow the instructions to set up the operating system.
Step 1. Connect the computer to the ac power and turn it on.
Step 2. Follow the on-screen instructions to complete the operating system setup.
Related topics
• “Log in with fingerprint recognition (for selected models)” on page 33
• “Log in with facial recognition (for selected models)” on page 34
• “Set, change, or remove a password” on page 37
Access networks
This section helps you connect to a wireless or wired network.
Connect to Wi-Fi networks
Click the network icon on the bottom right of your display to connect to an available network. Provide
required information, if needed.
Note: The wireless LAN module on your computer might support different standards. For some countries or
regions, use of 802.11ax might be disabled according to local regulations.
Turn on Airplane mode
You might need to turn on Airplane mode if you board an airplane. When Airplane mode is on, all wireless
features are turned off automatically. Click the network icon
Airplane mode.
Note: You can enable Wi-Fi networks in this mode according to your actual needs.
on the bottom right of your display to turn on
Connect to the wired Ethernet
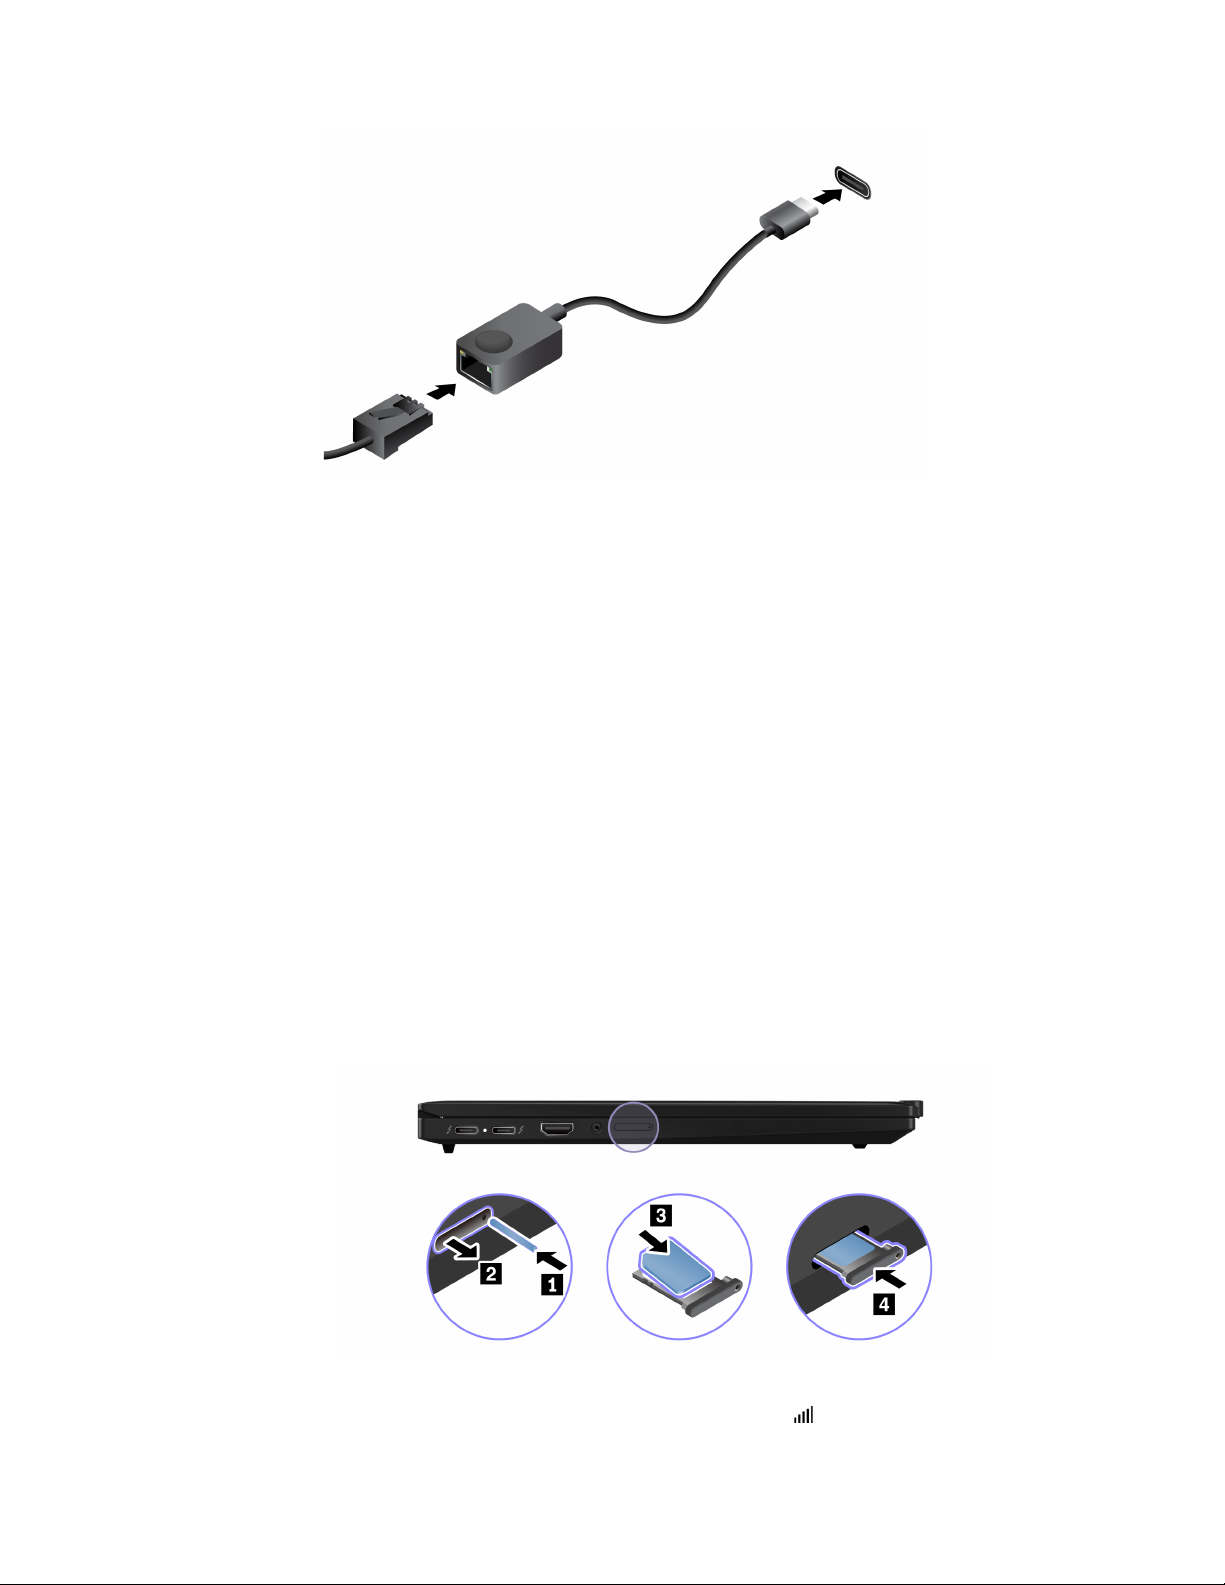
To connect your computer to a local network, you need a Lenovo USB-C to Ethernet Adapter. Lenovo USBC to Ethernet Adapter is available as an option and shipped with some computer models. You can purchase
one from Lenovo at
https://www.lenovo.com/accessories.
10
ThinkPad T14s Gen 5 User Guide
Page 17
Connect to a cellular network (for selected models)
To connect a 4G or 5G cellular data network, you must have a wireless wide area network (WWAN) module
and a nano-SIM card installed. The nano-SIM card might come with your computer by countries or regions. If
no nano-SIM card is shipped, you will need to purchase one from authorized service carriers.
Notes:
• Depending on the model, your computer might have no WWAN module installed.
• The 4G or 5G cellular service is provided by authorized mobile service carriers in some countries or
regions. You must have a cellular plan from a service carrier to connect to the cellular network. The cellular
data plan might vary by location.
• Network connection speeds might also vary by location, environment, network conditions and other
factors.
Establish a cellular connection
This section introduces how to establish a cellular connection.
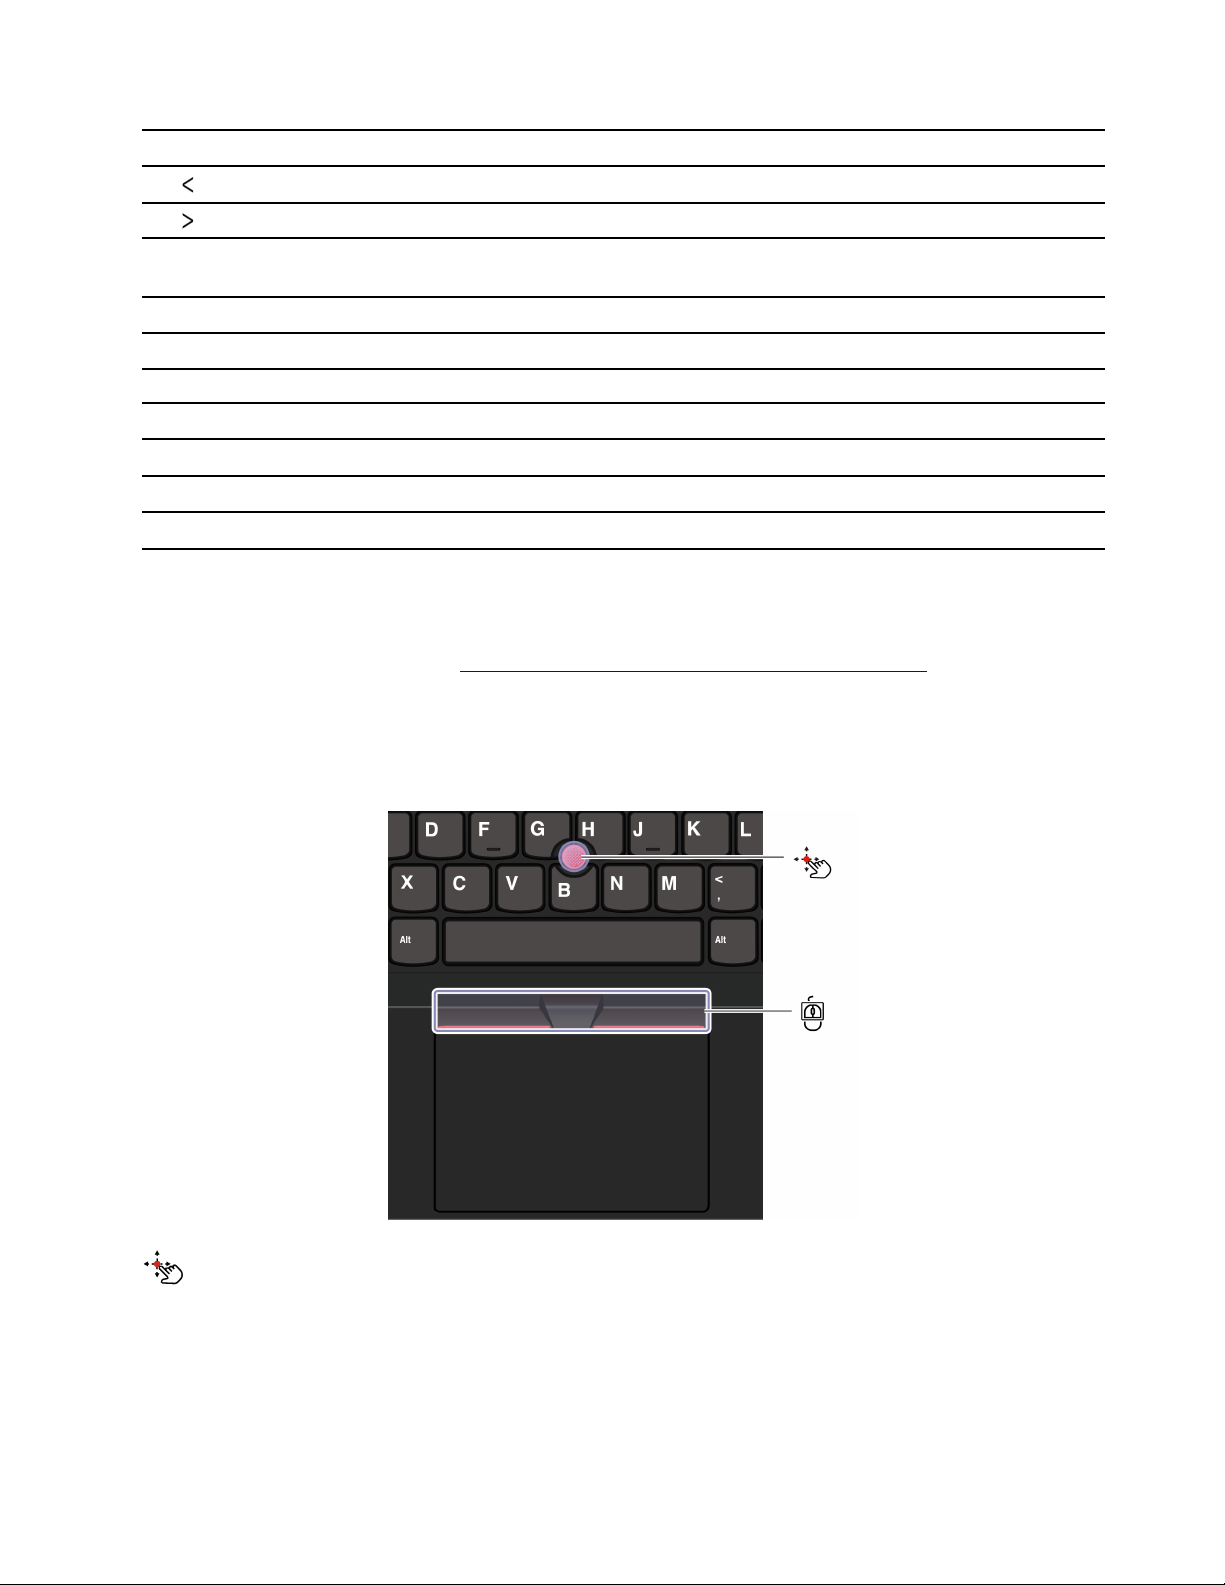
Step 1. Turn off the computer.
Step 2. Insert a straightened paper clip into the hole in the nano-SIM-card tray. The tray ejects. Install a
nano-SIM card as shown and insert the tray into the nano-SIM-card slot. Note the orientation of the
card and ensure that it is seated correctly.
Step 3. Turn on the computer.
Step 4. Click the network icon, and then select the cellular network icon
information, if needed.
Chapter 2. Get started with your computer 11
from the list. Provide required
Page 18

Interact with your computer
Explore various ways to interact with your computer.
Use the keyboard shortcuts
Keyboard shortcuts are keys or combinations of keys that provide a quick way to perform particular
functions. They help you work more efficiently.
The following tables introduce the functions of keyboard shortcuts.
FnLock and function keys
Key / Key combination Function description
Switch between the special and standard functions of the function keys (F1–F12).
Function keys provide two sets of functions: special function and standard
Fn+FnLock
function. Icons on the key denote the special function, such as
Characters on the key denote the standard function, such as F1 and F2.
LED indicator on Esc key indicates which function of the function keys is enabled:
• When the indicator is off, the special function is enabled.
• When the indicator is on, the standard function is enabled.
Mute / Unmute (Speakers).
and .
Decrease volume.
Increase volume.
Enable / Disable the microphone.
Decrease screen brightness.
Increase screen brightness.
Select and set up display devices.
Change power mode. For more information about power modes, see “Intelligent
Cooling” on page 27.
Print screen.
Open Snipping Tool.
Open Microsoft® Phone Link.
Customize the function of this key on the Vantage app.
Other general keyboard shortcuts
Key combination Function description
• Launch Copilot in Windows.
• Launch Windows Search.
Note: The function varies by countries or regions.
Fn+
Fn+
12 ThinkPad T14s Gen 5 User Guide
Open the context menu of the current active app.
Adjust the keyboard backlight.
Page 19
Key combination Function description
Fn+
Fn+
Fn+Tab
Fn+4 Enter sleep mode.
Fn+B Break operation.
Fn+K
Fn+P Pause operation.
Fn+S Send system request.
Fn+N
Fn+G Enable / Disable the tapping gesture to launch TrackPoint Quick Menu.
Go to beginning.
Go to end.
Open Magnifier.
Note: Press the Windows logo key+Esc to turn it off.
Scroll contents.
Open system information Window.
You can customize keyboard settings in Vantage app. To customize detailed settings, open the Vantage app,
and then click Device ➙ Input & Accessories.
For more keyboard shortcuts, go to
https://support.lenovo.com/solutions/windows-support.
Use the TrackPoint pointing device
The TrackPoint pointing device enables you to perform all the functions of a traditional mouse, such as
pointing, clicking, and scrolling.
TrackPoint pointing stick
Use your finger to apply pressure to the pointing-stick nonslip cap (hereafter referred to as the red cap) in any
direction parallel to the keyboard. The pointer on the screen moves accordingly. The higher the pressure
applied, the faster the pointer moves.
Chapter 2. Get started with your computer 13
Page 20
TrackPoint Three Buttons
TrackPoint left button and TrackPoint right button correspond to the left and right buttons on a traditional
mouse. Press and hold the TrackPoint center button while using your finger to applying pressure to the
pointing stick in the vertical or horizontal direction. Then, you can scroll through the document, Web site, or
apps.
Press Ctrl+TrackPoint center button+TrackPoint pointing stick at the same time to zoom in or zoom out.
Disable the TrackPoint pointing device
The TrackPoint pointing device is enabled by default. You can disable the device and change settings such
as the speed of cursor when using the TrackPoint pointing stick and the TrackPoint center button.
To change the settings, do the following:
Step 1. Type Mouse settings in the Windows search box and then press Enter.
Step 2. Click TrackPoint settings and then follow the on-screen instructions to change the settings.
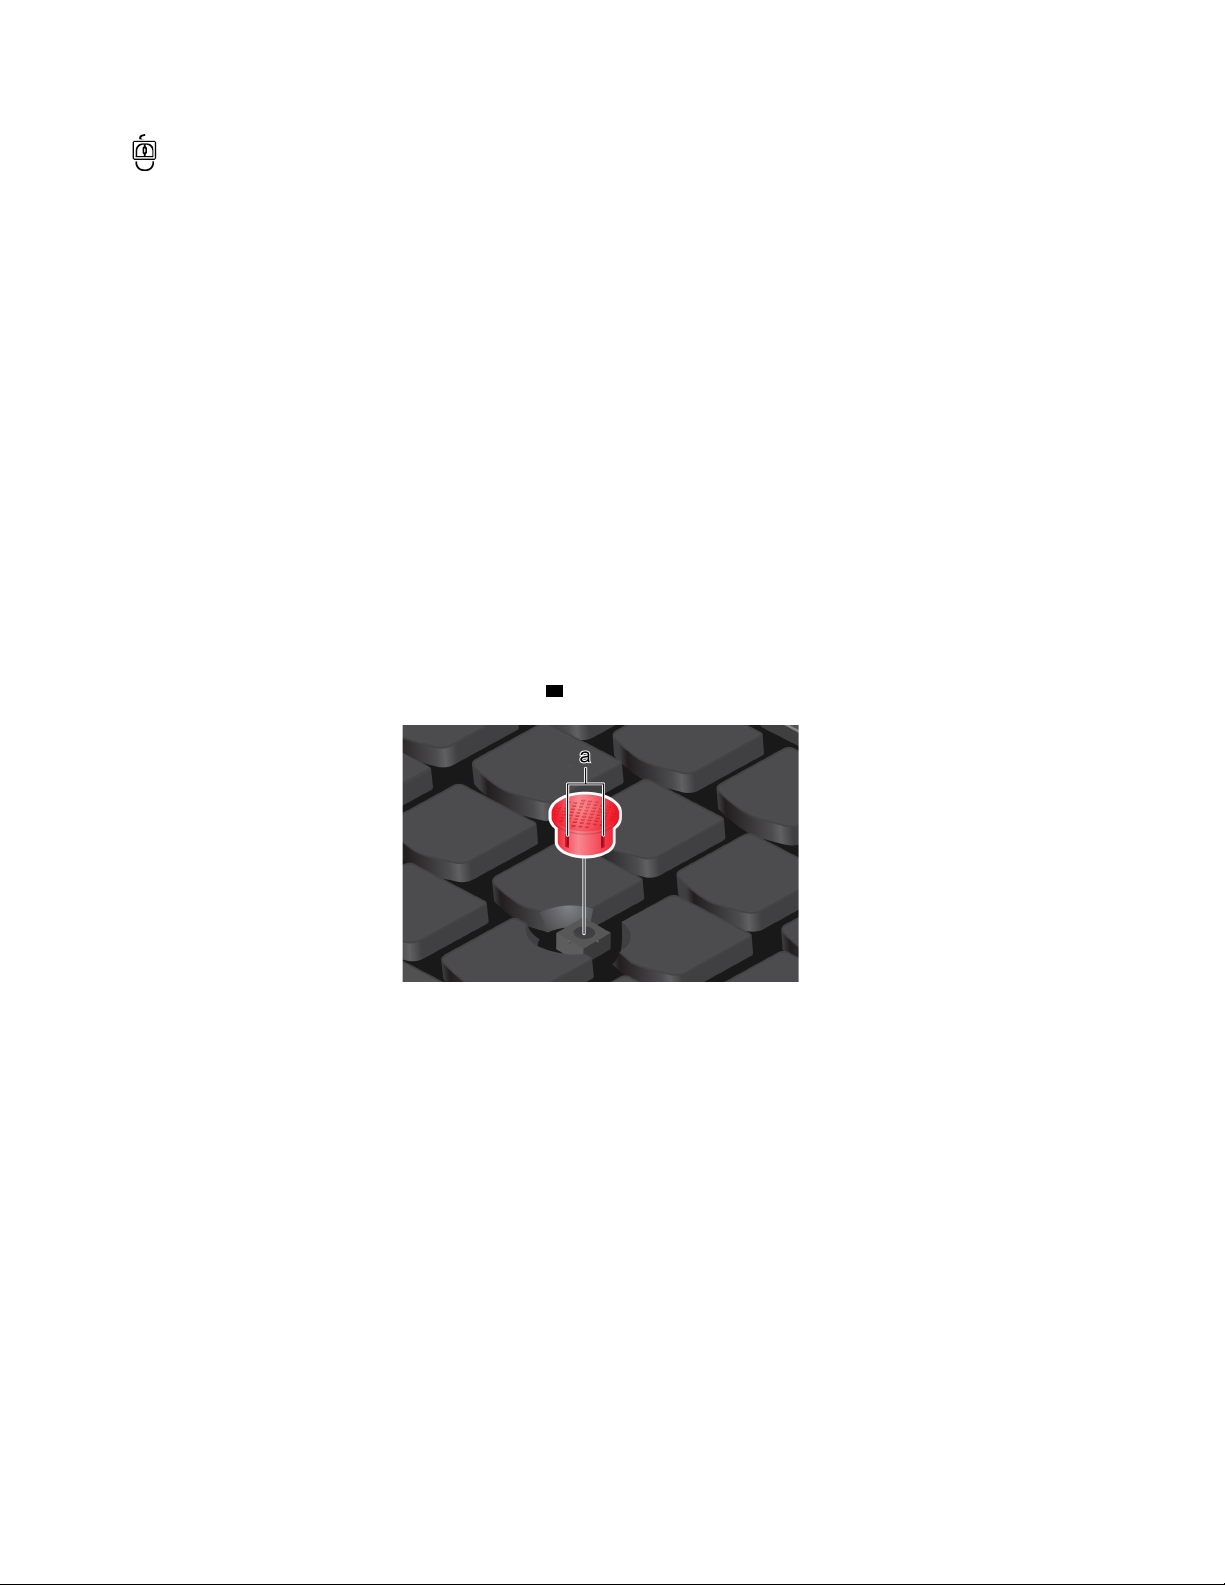
Replace the pointing-stick nonslip cap
Follow below illustration to replace the pointing-stick nonslip cap.
Note: Ensure that the new red cap has grooves
a .
Use the Trackpad
You can use the Trackpad to perform all the pointing, clicking, and scrolling functions of a traditional mouse.
It is ideal for you to use for occasions with high portability requirements, for example, business trips.
14
ThinkPad T14s Gen 5 User Guide
Page 21
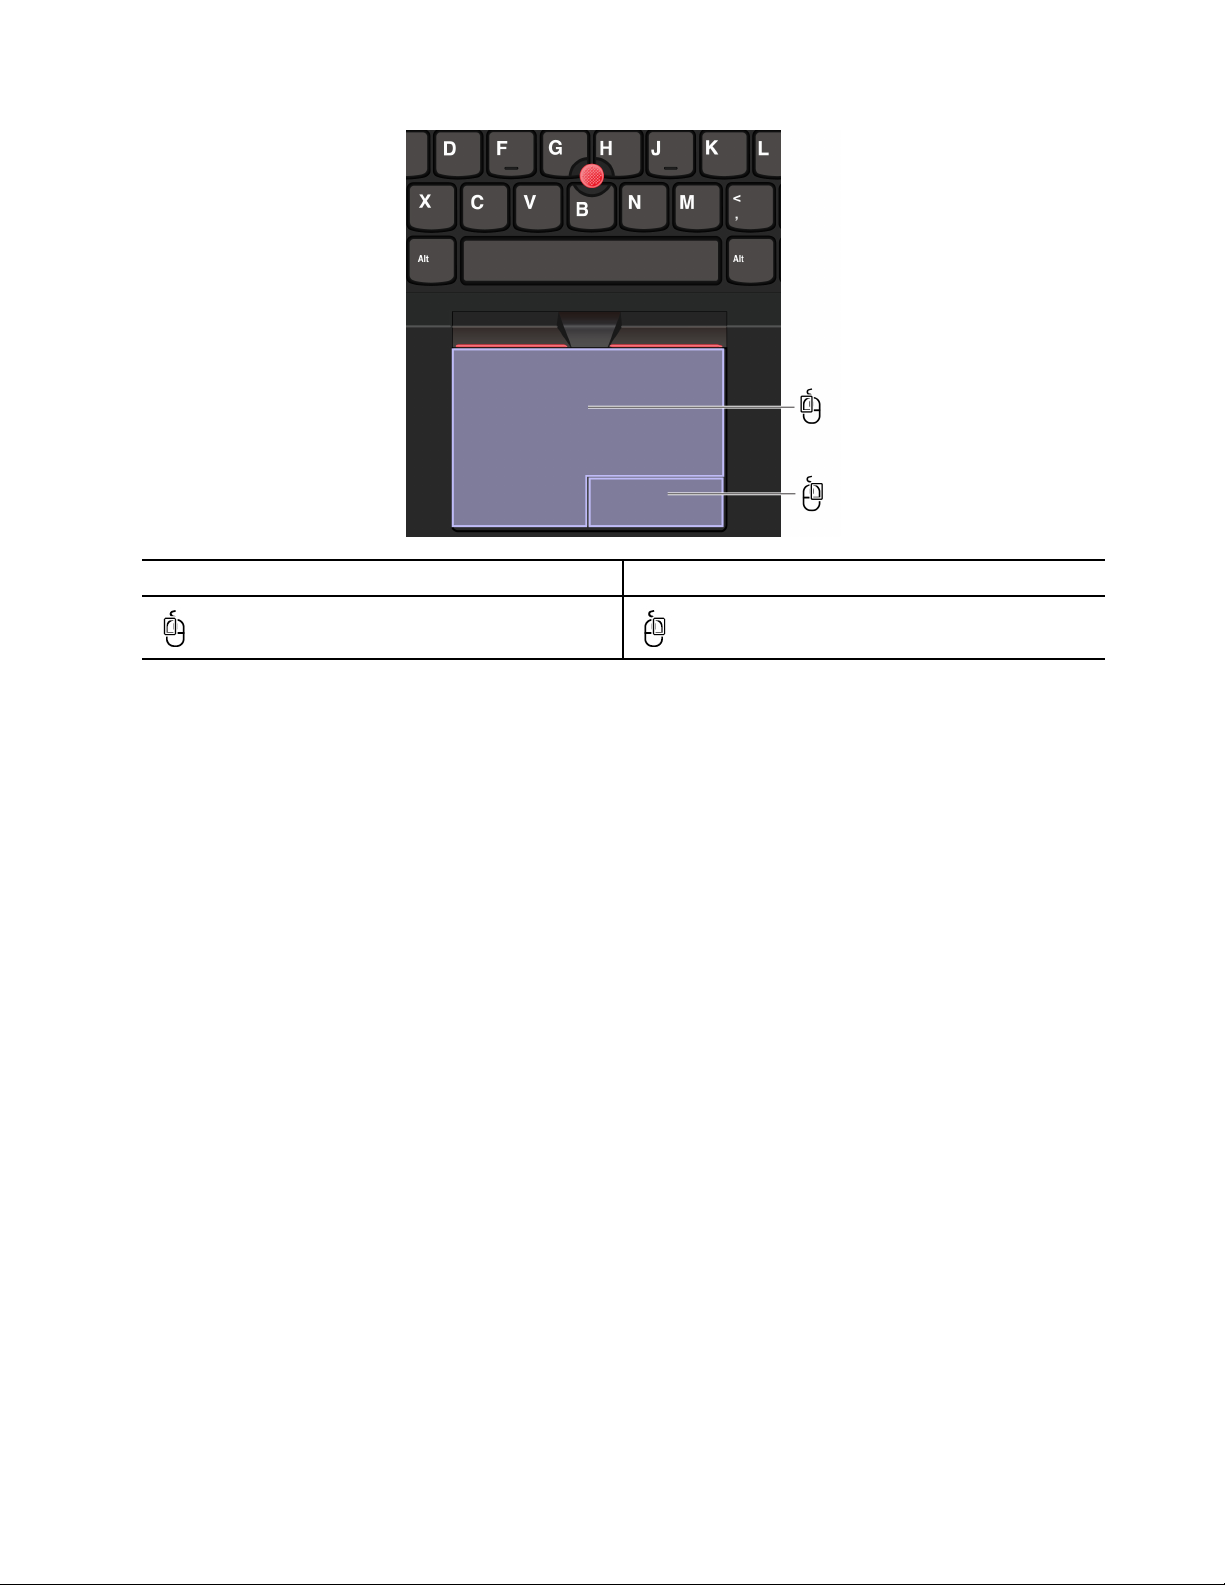
Item
Description
Item
Description
Left-click zone
Right-click zone
Notes:
• Some gestures are not available in the following cases:
– if the last action was done from the TrackPoint pointing device.
– when you are using certain apps.
– when you are using two or more fingers and your fingers are too close.
• Trackpad might be insensitive in the following cases:
– when you position your fingers too close to the edge of Trackpad.
– when you touch the Trackpad with wet fingers.
– if the Trackpad surface is stained with water or oil. Turn off the computer first. Then, gently wipe the
Trackpad surface with a soft and lint-free cloth that is moistened with lukewarm water or computer
cleaner.
Use the touch gestures
Notes:
• When using two or more fingers, ensure that you position your fingers slightly apart.
• Some gestures are not available if the last action was done from the TrackPoint pointing device.
• Some gestures are only available when you are using certain apps.
• If the Trackpad surface is stained with oil, turn off the computer first. Then, gently wipe the Trackpad
surface with a soft and lint-free cloth moistened with lukewarm water or computer cleaner.
For more gestures, see the help information of the pointing device.
Chapter 2. Get started with your computer 15
Page 22
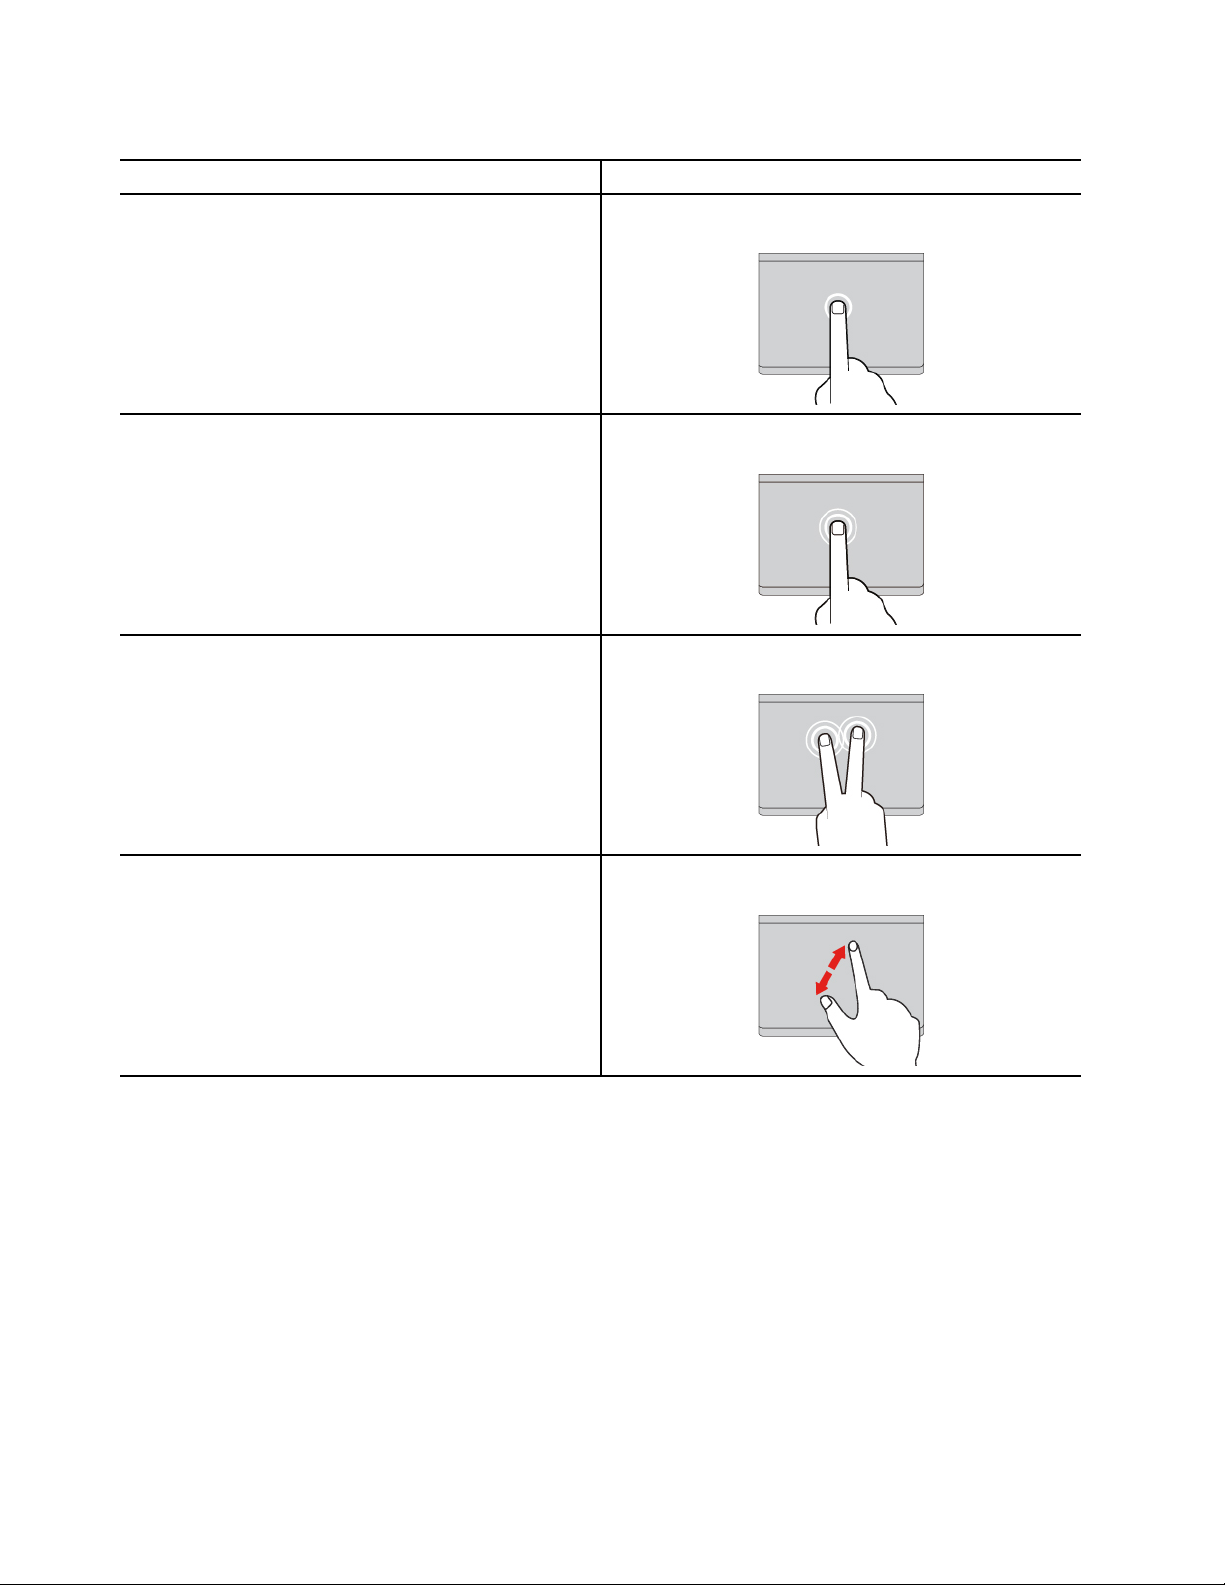
One-and-two-finger touch gestures
To do this Gesture
Select an item.
Open an item.
One finger taps once.
One finger taps twice.
Two fingers tap twice quickly.
Display a shortcut menu.
Zoom in.
Two fingers stretch out.
16 ThinkPad T14s Gen 5 User Guide
Page 23
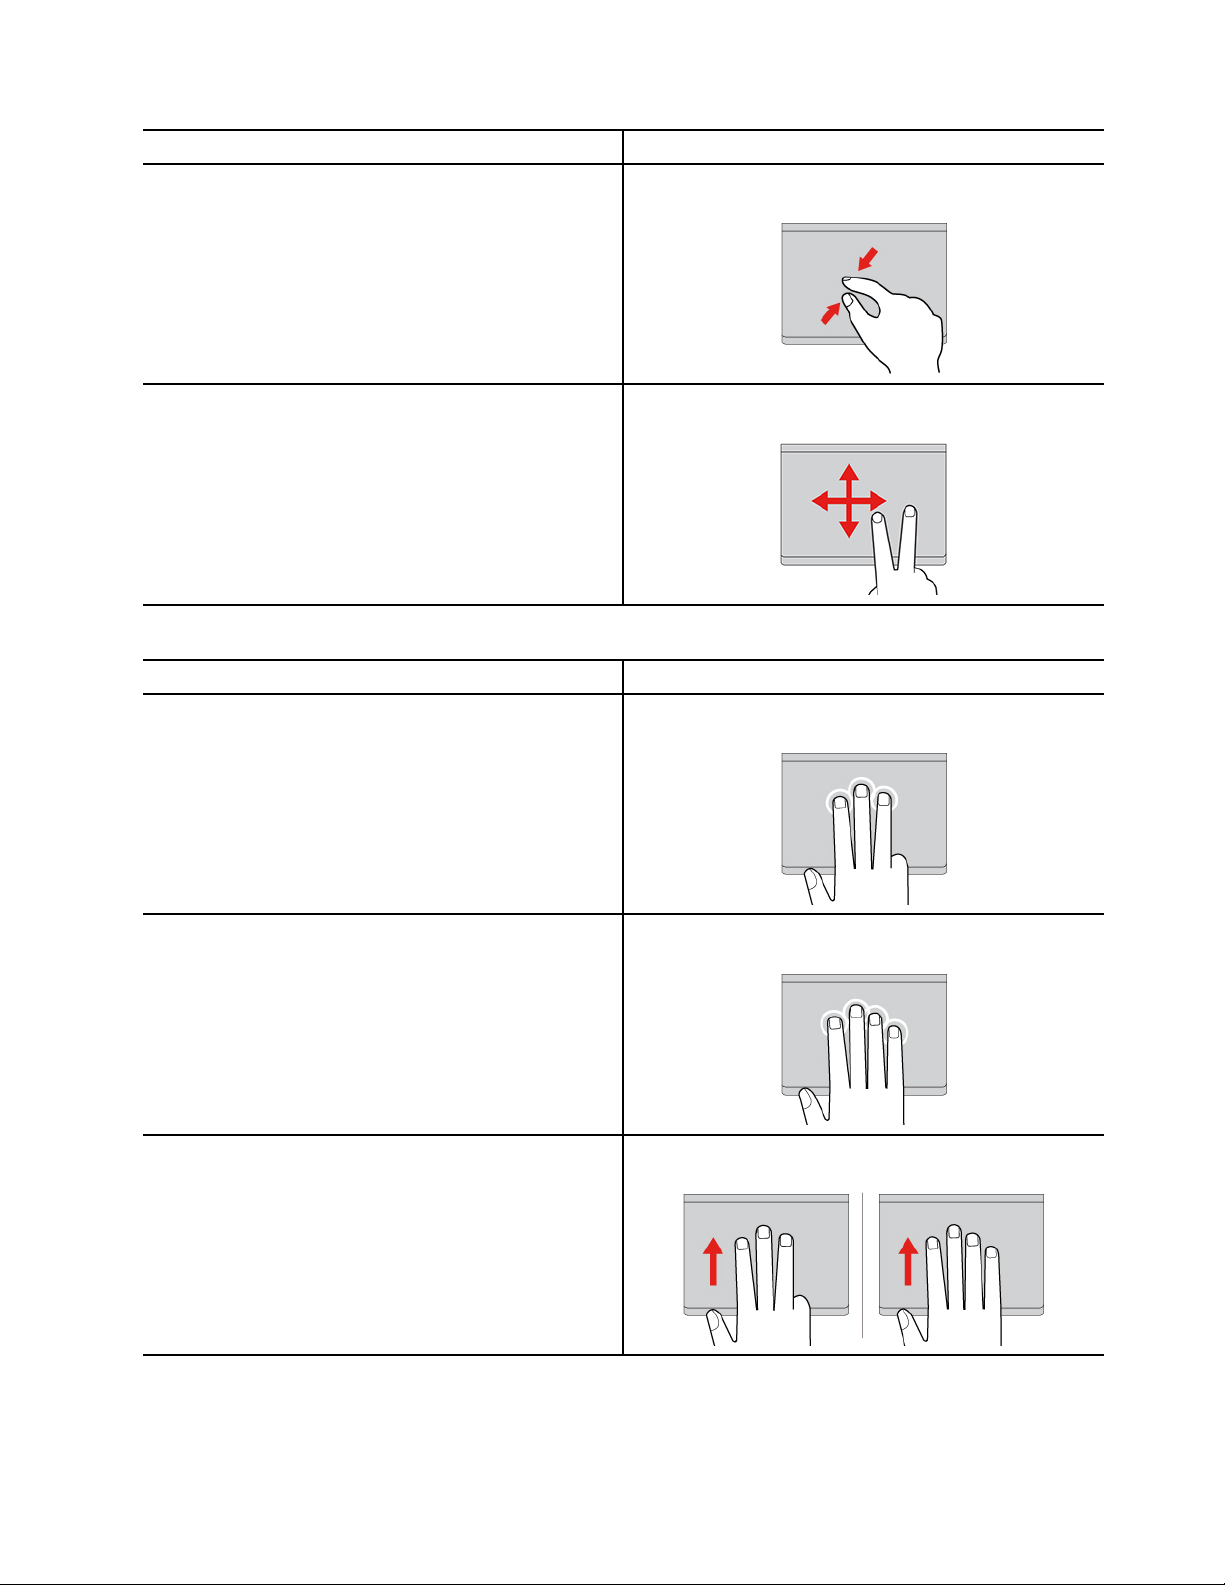
To do this Gesture
Zoom out.
Scroll through items.
Three-and-four-finger touch gestures
To do this Gesture
Two fingers pinch in.
Two fingers slide horizontally or vertically.
Three fingers tap once.
Open search window.
Open notification center.
Show all windows.
Four fingers tap once.
Three- or four-finger swipes up.
Chapter 2. Get started with your computer 17
Page 24
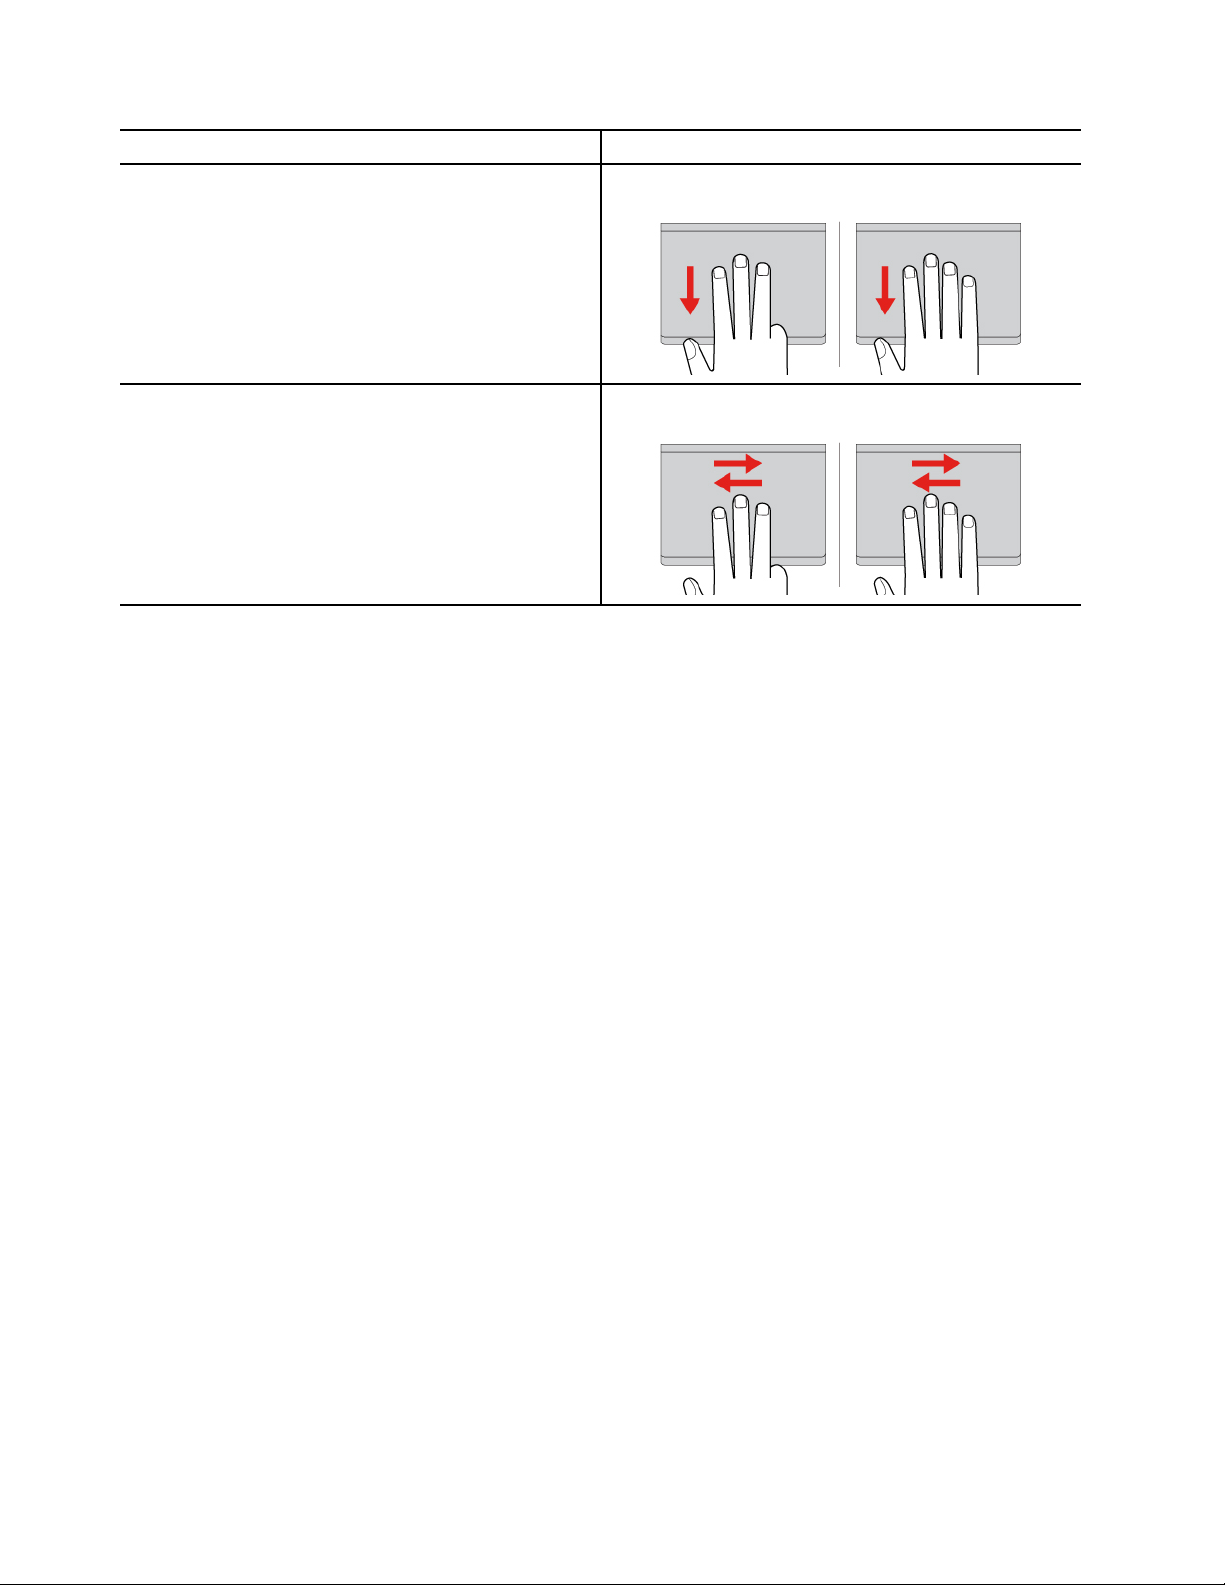
To do this Gesture
Three- or four-finger swipes down.
Show the desktop.
Three- or four-finger swipes left or right.
Switch between open apps or windows.
Disable the Trackpad
The Trackpad is enabled by default. To disable the device:
Step 1. Open the Start menu, and then click Settings ➙ Bluetooth & devices ➙ Touchpad.
Step 2. In the Touchpad section, turn off the Touchpad control.
Use the touch screen (for selected models)
For computers with a touch-enabled screen, you can touch the screen directly with your fingers and interact
with computer in a simple way. The following sections introduce frequently used touch gestures.
Notes:
• Some gestures might not be available when you are using certain apps.
• Do not use gloved fingers or incompatible pens for input on the screen. Otherwise, the touch screen might
be not sensitive or does not respond.
• The touch screen is delicate. Do not apply pressure on the screen or touch the screen with anything hard
or sharp. Otherwise, the touch panel might malfunction or get damaged.
18
ThinkPad T14s Gen 5 User Guide
Page 25
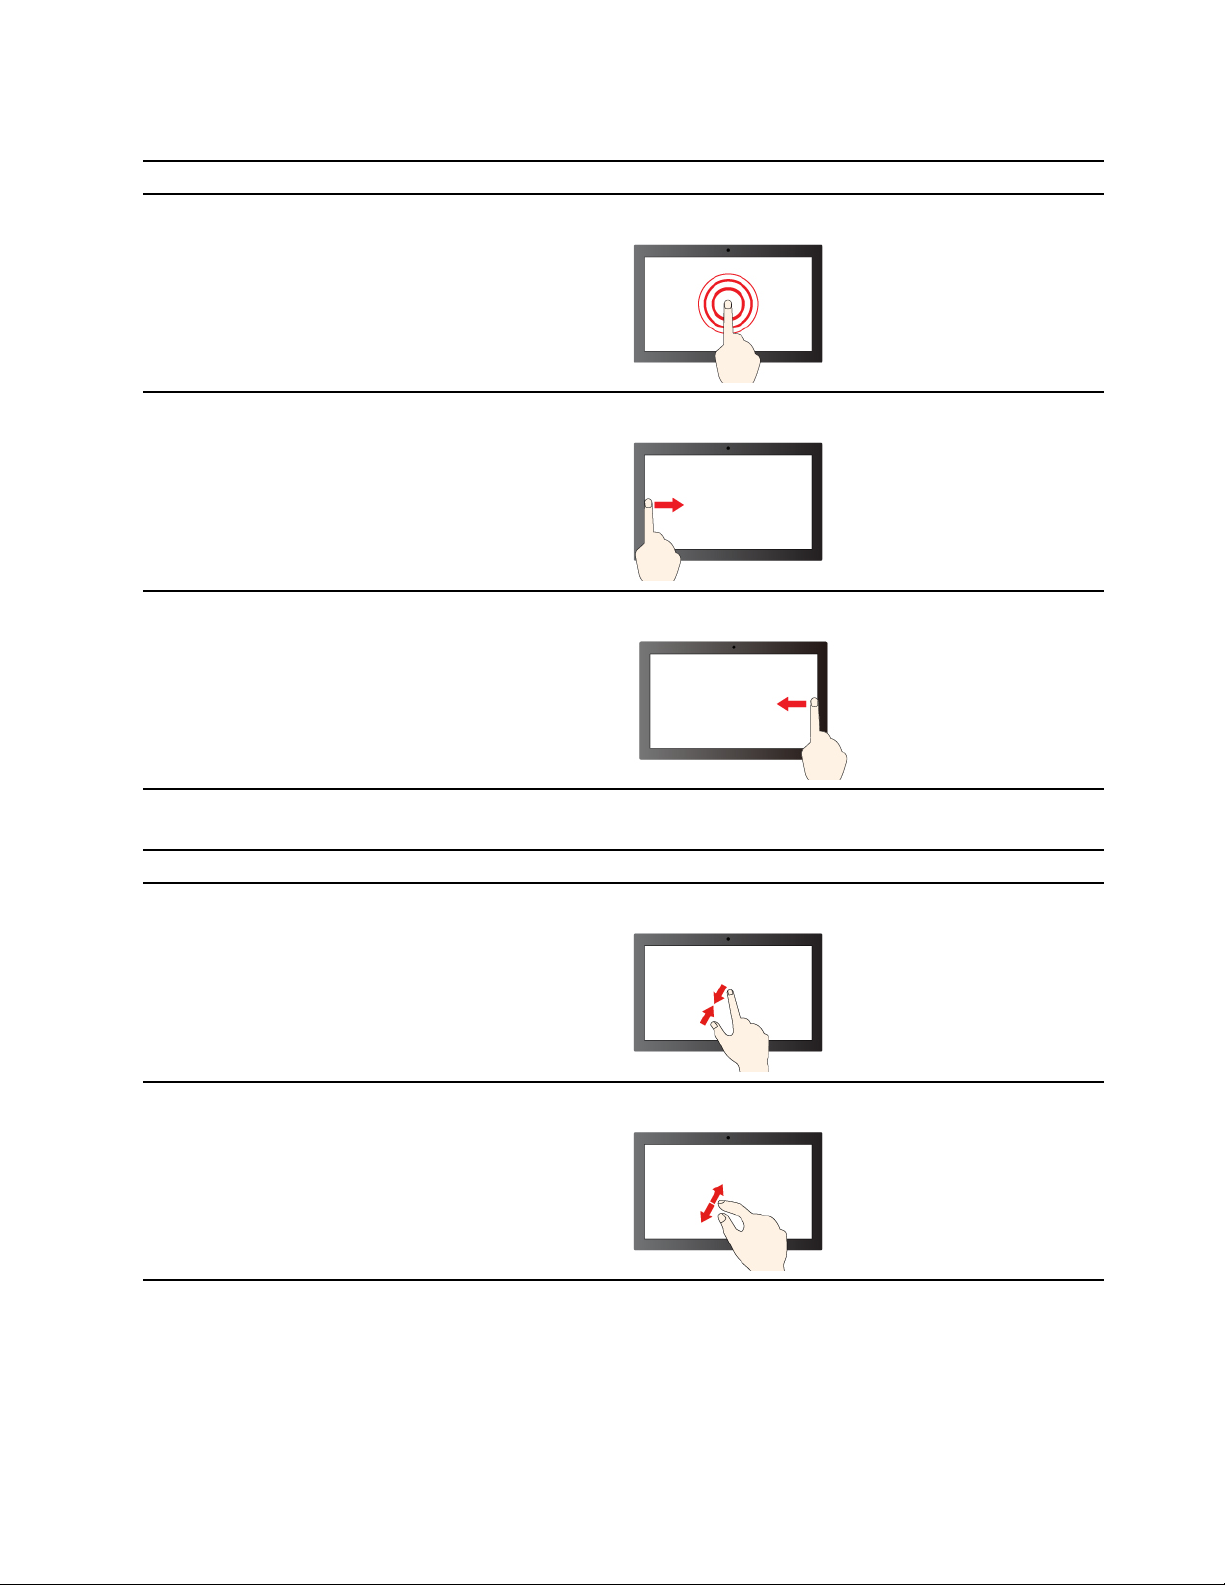
One-finger touch gesture
To do this Gesture
Tap and hold.
Open a shortcut menu.
Swipe from the left.
Open the widget panel.
Swipe from the right.
Open notification center.
Two-finger touch gesture
To do this
Zoom out.
Zoom in.
Gesture
Move two fingers towards.
Spread two fingers apart.
Chapter 2. Get started with your computer 19
Page 26
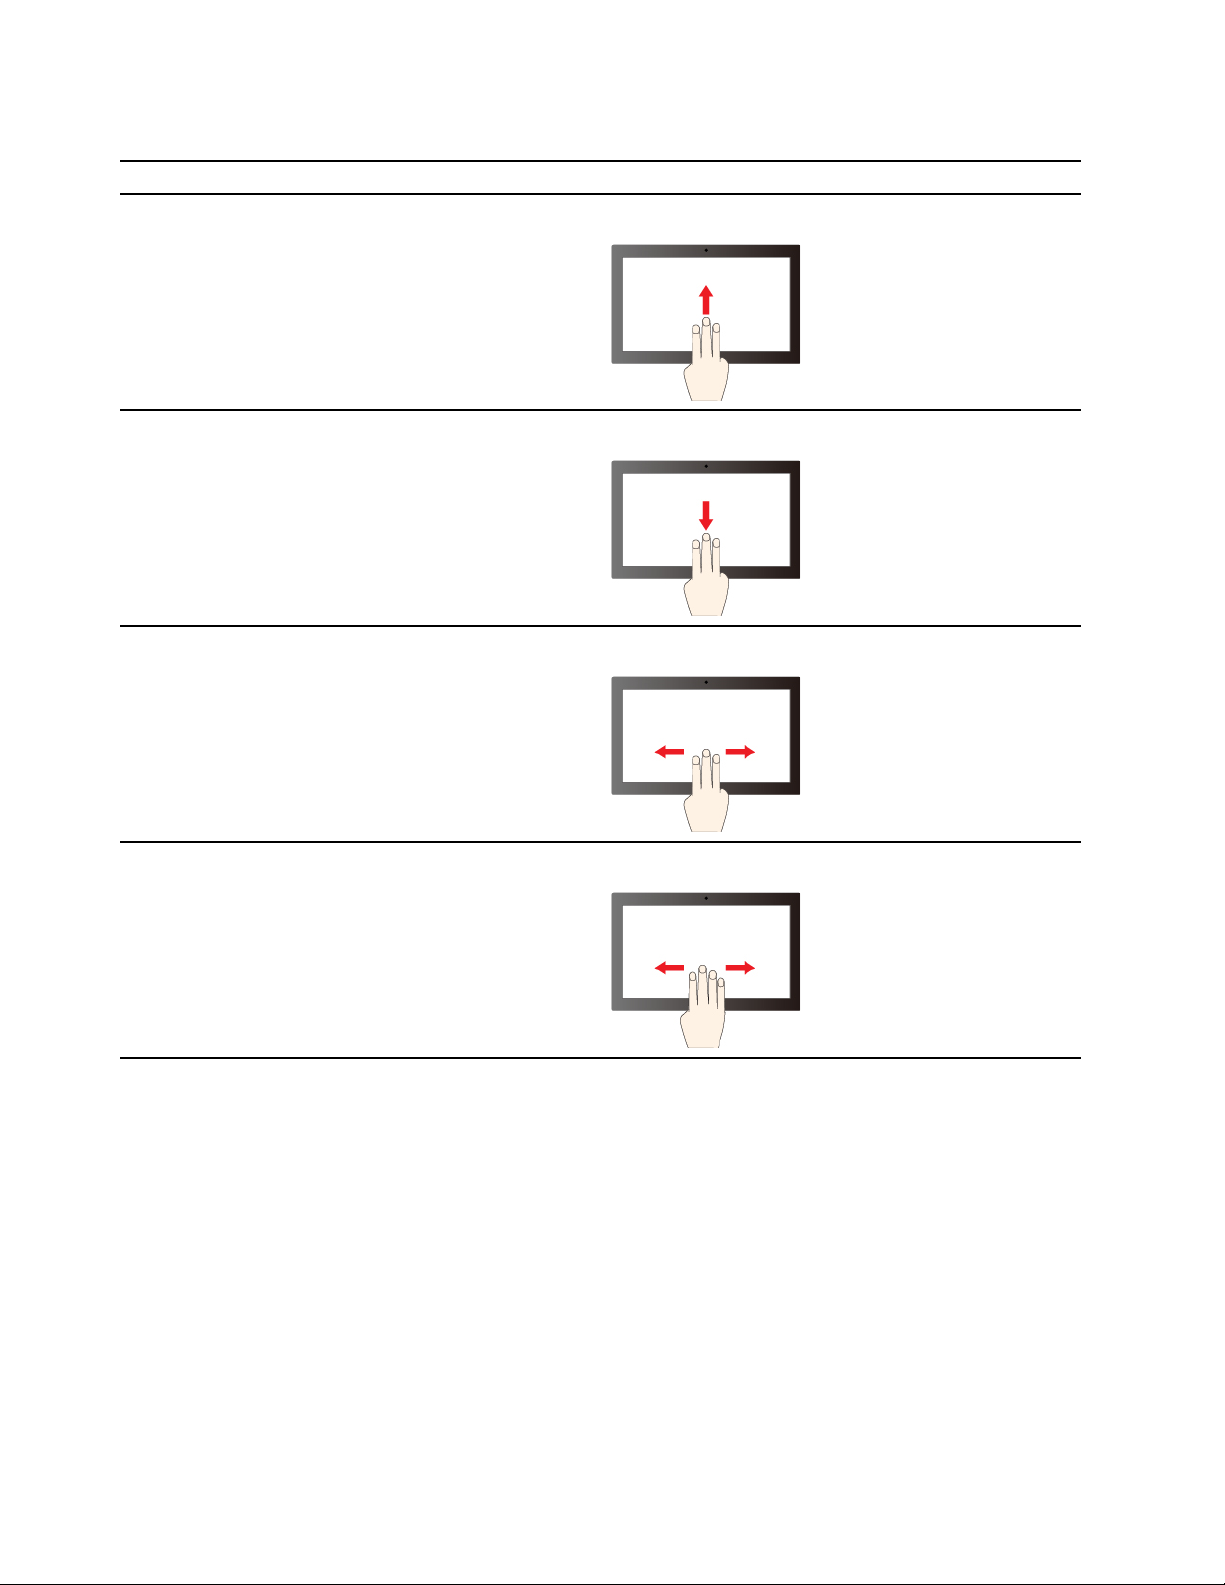
Three-and-four-finger touch gesture
To do this Gesture
Swipe with three fingers up.
Show all open windows.
Swipe with three fingers down.
Show the desktop.
Swipe with three fingers to the left or right.
Switch apps.
Swipe with four fingers to the left or right.
Switch desktops.
Enable three-and-four-finger touch gestures (for selected models)
Step 1. Type touchpad in the Windows search box and then press Enter.
Step 2. Turn on the Three-finger gestures switch or Four-finger gestures switch as you desire.
What to do if the touch screen is not sensitive or does not respond
Follow the instructions to troubleshoot the touch screen.
Step 1. Turn off the computer.
Step 2. Use a dry, soft, and lint-free cloth or a piece of absorbent cotton to remove fingerprints or dust
from the touch screen. Do not apply solvents to the cloth.
Step 3. Restart the computer and check if the touch screen works normally.
Step 4. If the touch screen cannot work normally, type Windows Update in the Windows search box and
then press Enter.
20
ThinkPad T14s Gen 5 User Guide
Page 27
Step 5. Follow the on-screen instructions to update Windows.
Step 6. After updating Windows, check if the touch screen works normally.
Step 7. If the touch screen still cannot work normally, the touch screen might get damaged. You can call
Lenovo Customer Support Center to get further help.
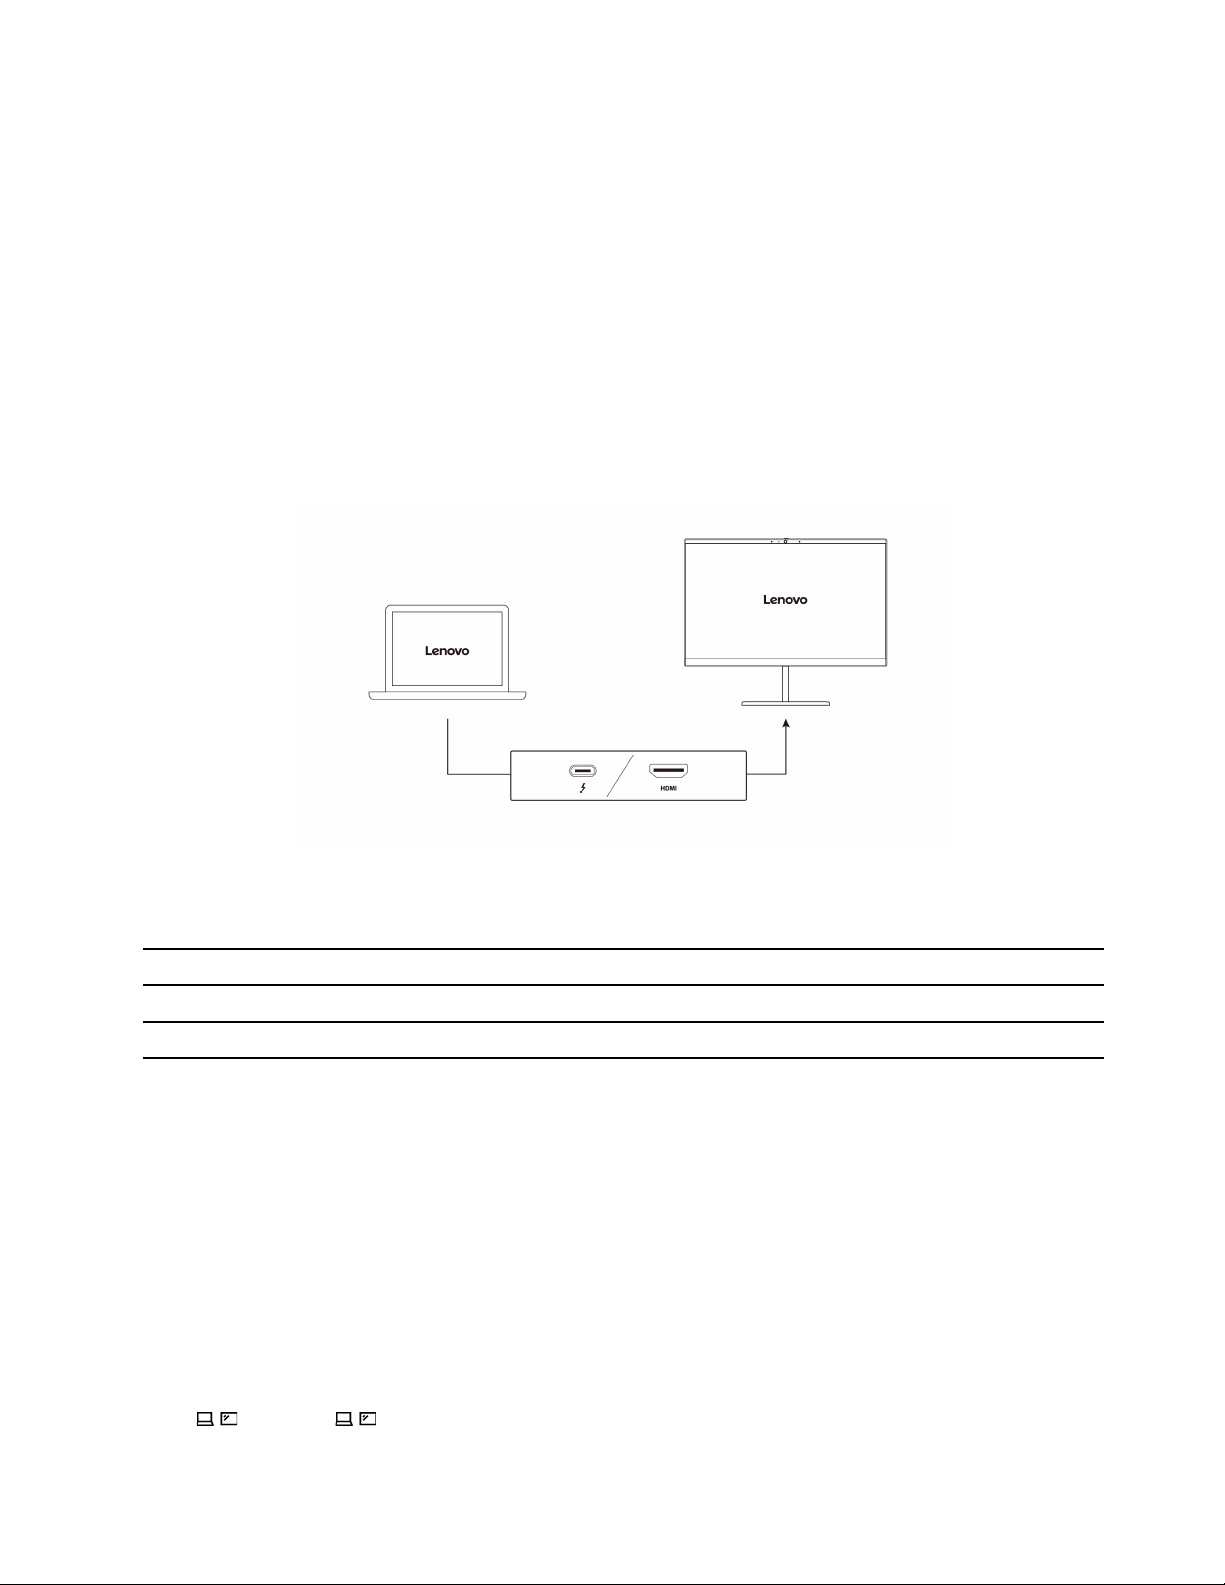
Connect to an external display
Connect your computer to a projector or a monitor to give presentations or expand your workspace.
Connect to a wired display
You can connect a wired display with your computer through the USB-C connector or HDMI connector.
If your computer cannot detect the external display, right-click a blank area on the desktop and select
Display settings. Then follow the on-screen instructions to detect the external display.
Supported resolution
The following table lists the supported maximum resolution of the external display.
Connect the external display to Supported resolution
USB-C power connector (Thunderbolt 4) Up to 8K / 60 Hz
HDMI™ connector
Note: The refresh rate higher than 60 Hz can also be supported. If you set the refresh rate higher than 60 Hz,
the maximum resolution might be limited.
The HDMI connector supports the HDMI 2.1 (up to 4K/60Hz) standard. Connect to a compatible digital audio
device or video monitor, such as an HDTV.
Up to 4K / 60 Hz
Connect to a wireless display
To use a wireless display, ensure that both your computer and the external display support the Miracast
feature.
Press Windows logo key+K and then select a wireless display to connect with.
®
Set the display mode
Press or Fn key+ and then select a display mode of your preference.
Chapter 2. Get started with your computer 21
Page 28

Change display settings
You can change the settings for both the computer display and the external display, such as the main or the
secondary display, brightness, resolution, and orientation.
To change the settings, do the following:
Step 1. Right-click a blank area on the desktop and select Display settings.
Step 2. Select the display that you want to configure and change display settings of your preference.
22
ThinkPad T14s Gen 5 User Guide
Page 29

Chapter 3. Explore your computer
This chapter helps you get full use of your computer.
Lenovo apps
This section introduces Lenovo apps that can enrich your computing experience and improve productivity.
Lenovo Commercial Vantage
The Lenovo Commercial Vantage app (hereafter referred to as Vantage app) is a customized one-stop
solution to help you maintain your computer with automated updates and fixes, configure hardware settings,
and get personalized support.
To access the Vantage app, type Lenovo Commercial Vantage in the Windows search box.
Notes:
• The available features vary depending on the computer model.
• The Vantage app makes periodic updates of the features to keep improving your experience with your
computer. The description of features might be different from that on your actual user interface. Ensure
that you use the latest version of Vantage app, and apply Windows Update to get the latest updates.
The Vantage app enables you to:
• Know the device status easily and customize device settings.
• Download and install UEFI BIOS, firmware, and driver updates to keep your computer up-to-date.
• Monitor your computer health, and secure your computer against outside threats.
• Scan your computer hardware and diagnose hardware problems.
• Look up warranty status (online).
• Access User Guide and helpful articles.
• Temporarily disable the keyboard, screen, Trackpad, and TrackPoint pointing device for cleaning.
Lenovo View (for selected models)
Lenovo View is an app that enhances camera quality and provides collaboration features for some
mainstream video call apps.
Access Lenovo View
Type Lenovo View in the Windows search box and then press Enter.
Explore key features
• Video Enhancer: Adjust relevant camera parameters (light, intensity, color) and reduce noise to improve
your video call experience.
© Copyright Lenovo 2024 23
Page 30
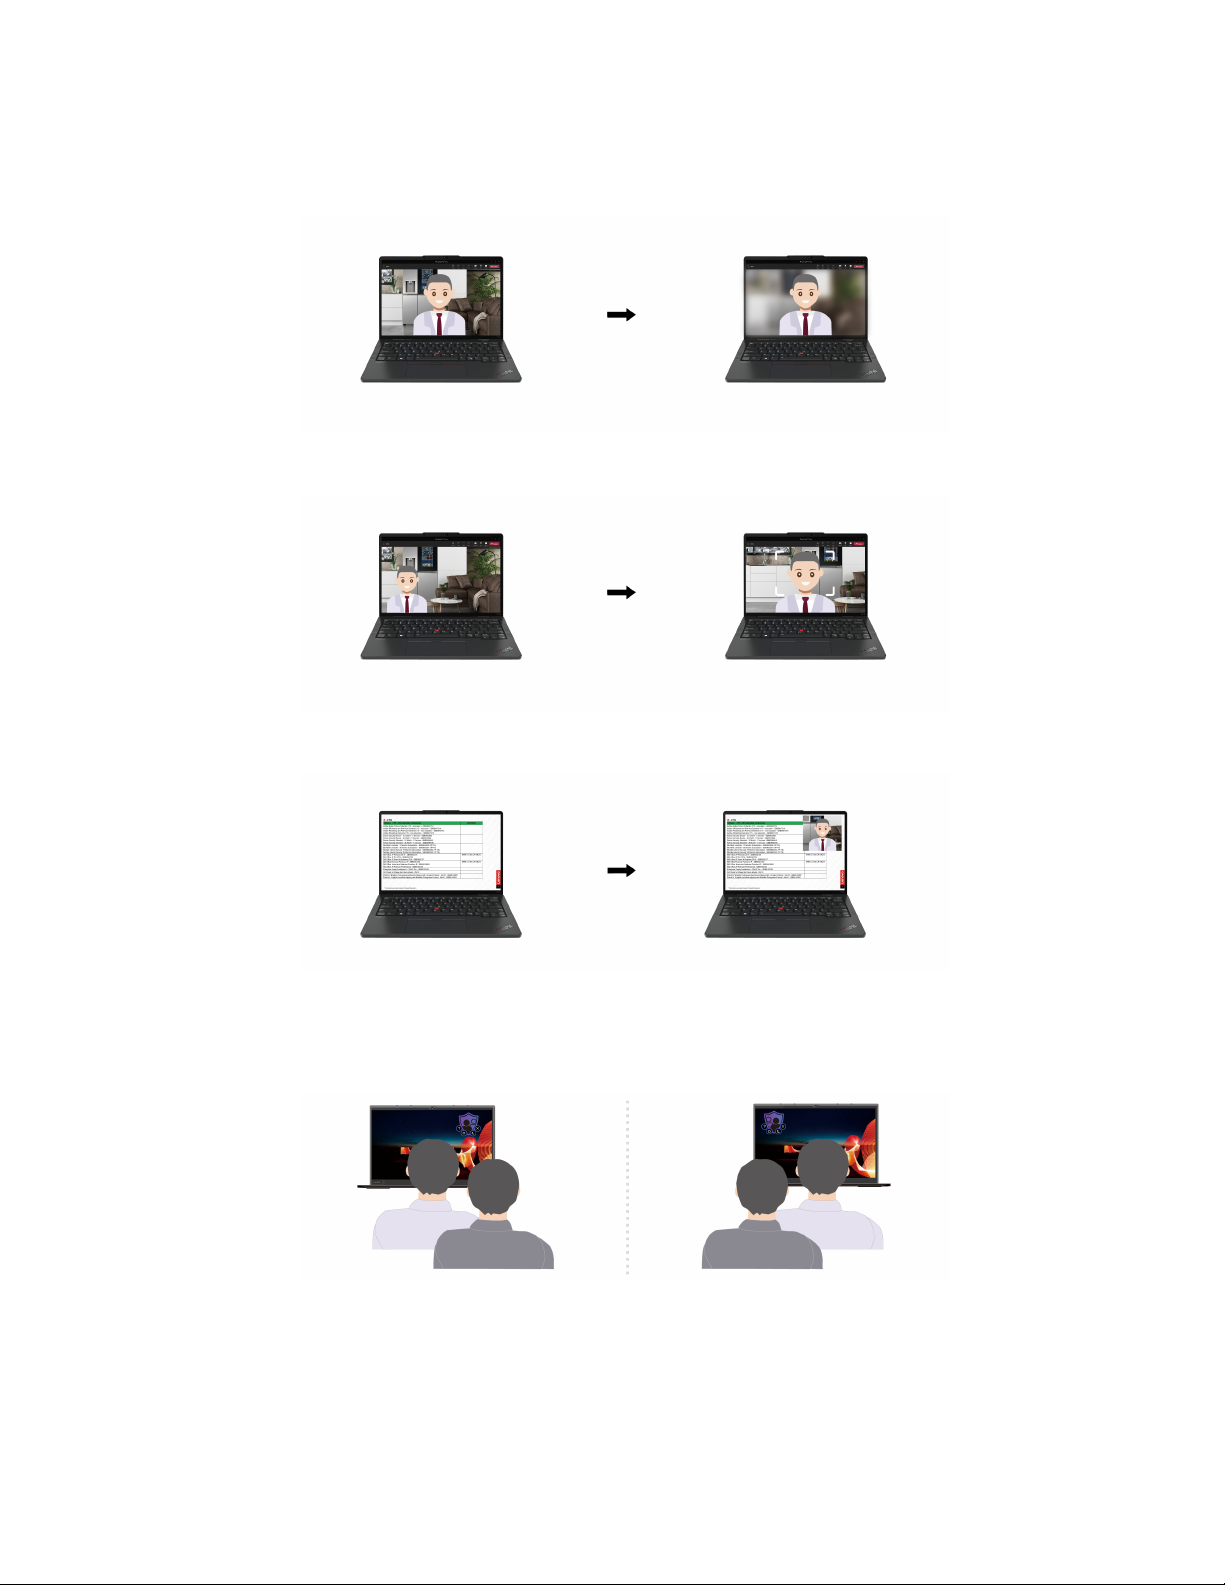
• Collaboration
– Background Removal: Conceal the background during a video call to keep the focus on you.
– Auto-framing: Automatically keep your face centered in the video call when you move around.
– Virtual presenter: Overlay your face on any materials you want to present like a presentation.
• Privacy
– Privacy Alert: An alert icon appears on your computer screen when a shoulder surfer appears behind
you.
– Privacy Guard: Your screen becomes blurred when a shoulder surfer appears behind you. Press Alt
+F2 to cancel the blur effect.
24
ThinkPad T14s Gen 5 User Guide
Page 31
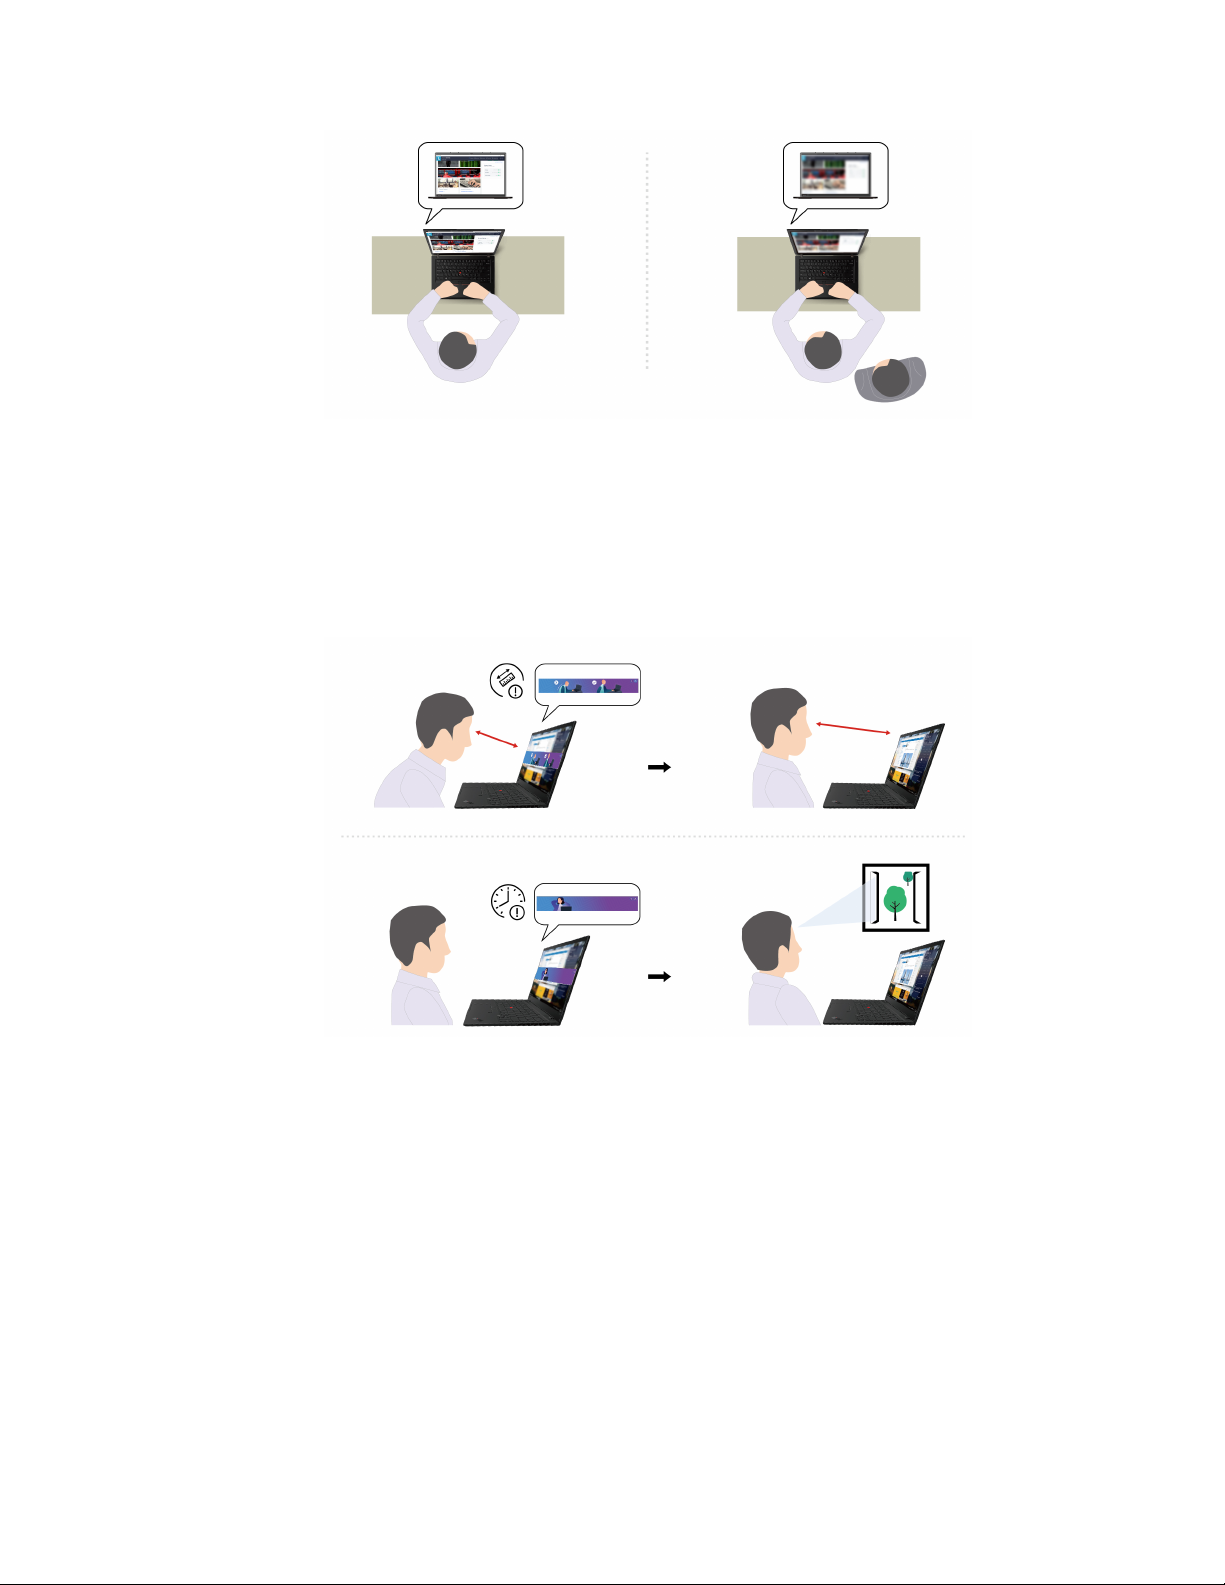
Note: For ePrivacy displays, the Privacy Guard function will be enabled automatically when a shoulder
surfer appears behind you. Press Alt+F2 to cancel the blur.
• Wellness
– Posture Warning: Remind you to adjust your posture when you hunch toward the screen.
– Eye Wellness: Remind you to look away from the screen and relax your eyes for 20 seconds every 20
minutes.
Notes:
• The available features vary depending on the computer model.
• The features only work when camera shutter is open.
• Some features might not be able to be used at the same time.
• The Lenovo View app periodically updates features to improve your camera and video call experience.
The feature description might be different from that on your actual user interface.
TrackPoint Quick Menu
TrackPoint Quick Menu is a clickable app. It offers rapid access to functions, such as camera and
microphone. You can adjust the function settings in this app.
Chapter 3. Explore your computer 25
Page 32
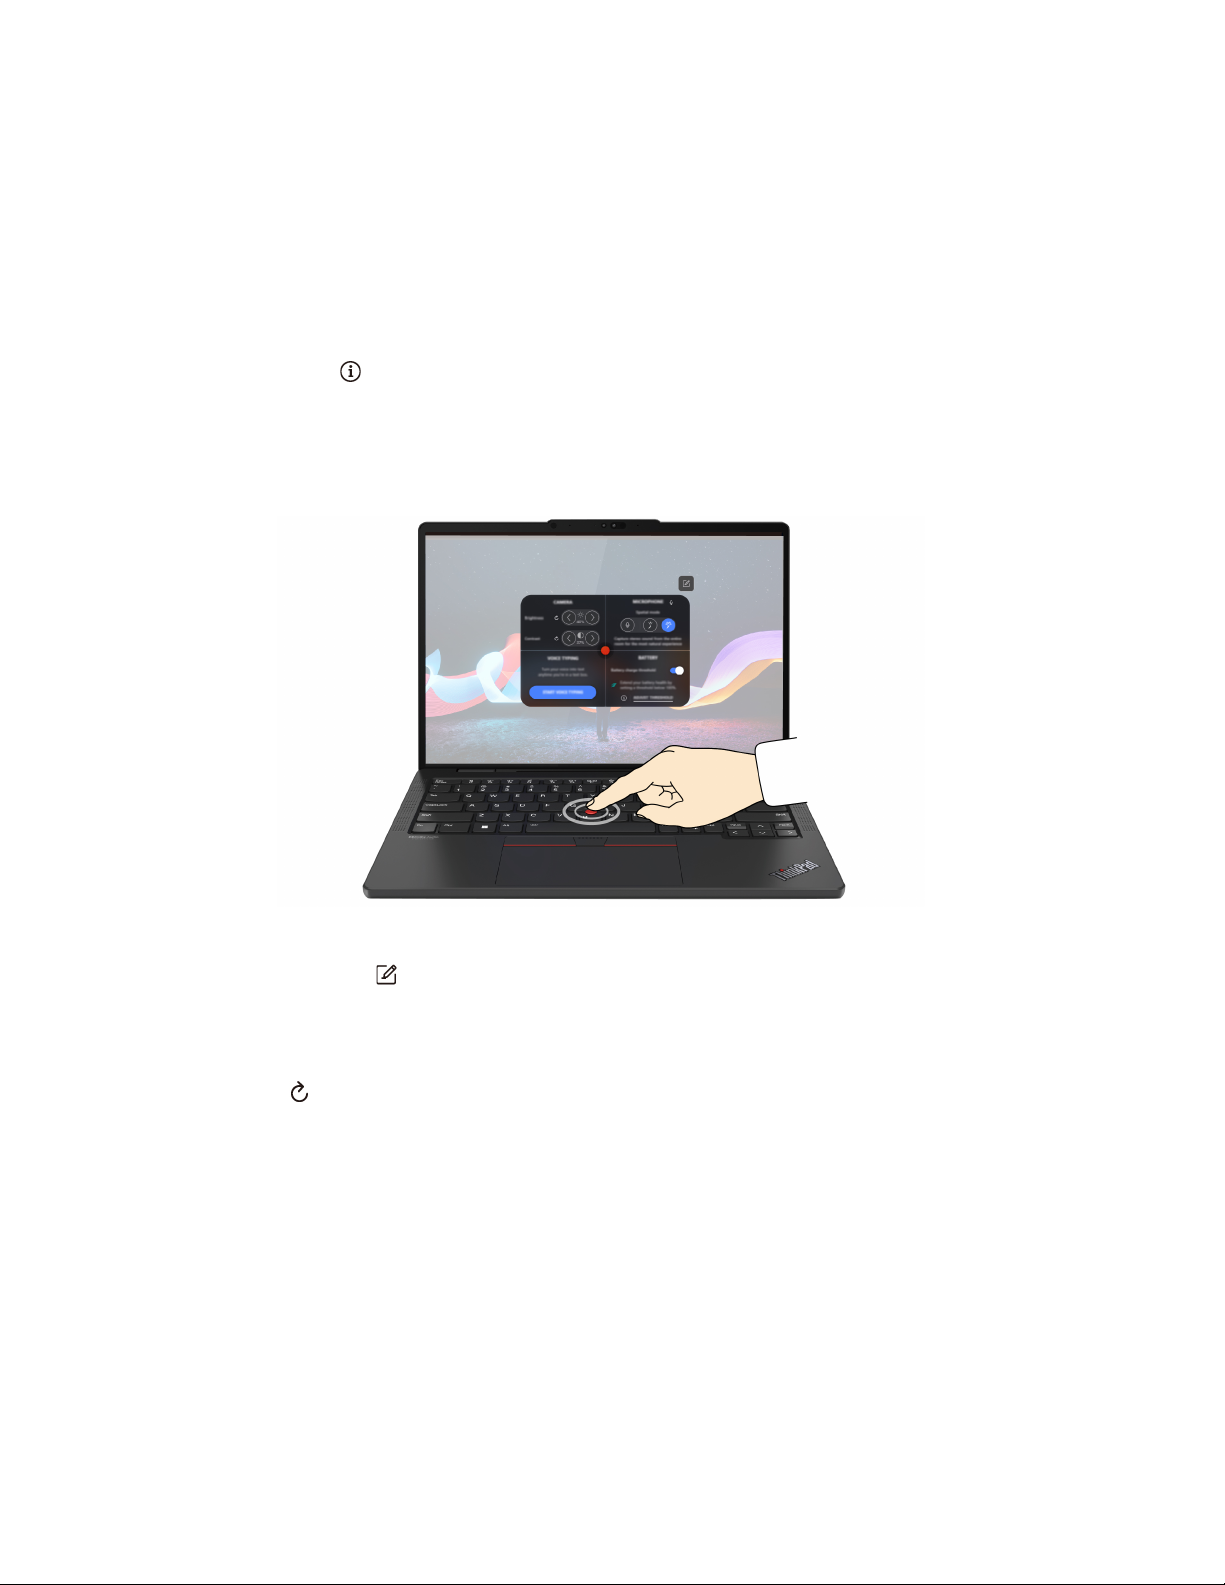
Launch the TrackPoint Quick Menu
Double-tap the TrackPoint pointing stick to launch the TrackPoint Quick Menu. You can also set singletapping as the launch gesture.
Note: If the TrackPoint Quick Menu does not pop up after you use the launch gesture, this case might be
caused by the displacement of the TrackPoint pointing stick due to too much force applied on it. Wait 15 to
30 seconds and try again.
To change the settings, do the following:
Step 1. Click the flyout
Step 2. Select Single-tapping under TrackPoint Quick Menu Launch.
The TrackPoint Quick Menu is enabled by default. Press Fn+G to disable or enable the tapping gesture.
When disabled, it cannot be launched by tapping the TrackPoint pointing stick.
and click ADVANCED SETTINGS.
Use the TrackPoint Quick Menu
You can click the edit button to rearrange the features in the preview panel, or drag and drop the features
on the right to the preview panel to customize your quick menu.
• Camera
You can adjust the brightness and contrast of the camera, and restore the settings to default by tapping
the reset button
• Microphone
You can mute your computer, and adjust the sound effect of your microphone by selecting the following
modes:
– Center mode: Capture the speaker’s voice.
– Spatial mode: Capture the speaker’s voice and the ambience.
Note: When internal microphone is not supported by Dolby or the Dolby driver is disabled, an input
device list will be displayed instead. The list provides options and one volume bar to test your
microphone.
• Voice typing
You can convert the speech to text in the text box. Click START VOICE TYPING to invoke the text box.
• Battery
26
ThinkPad T14s Gen 5 User Guide
.
Page 33

You can extend the battery lifespan and health by setting the charging threshold below 100%.
To set the threshold, enable the feature and click ADJUST THRESHOLD. Then set the charge threshold
in the Vantage app.
• Audio playback
You can select the output device of your preference and set the volume of your selected channel or mute
it.
• Noise suppression
You can suppress your own background noise and the noise from other meeting participants.
– Off: Disable noise suppression.
– Low: Suppress low-level background noise.
– High: Suppress all non-speech background noise.
Note: The feature does not work when Dolby Voice is off. Click the link in NOISE SUPPRESSION to help
you enable it.
• Quick Clean
You can temporarily disable the keyboard, screen, Trackpad, and TrackPoint pointing device to clean your
computer.
Note: The features might vary due to periodic updates. For details of the version installed on your computer,
click the flyout
at the top-right corner of the page and click LEARN MORE.
Color calibration (for selected models)
The factory color calibration feature is available on computer models with the embedded display. This
feature enables you to render color images or graphics on your display close to the original intent as much as
possible.
For computer with the factory color calibration feature, the AICCP color profiles are preinstalled. You can
switch between calibrated color profiles and non-calibrated color profiles as desired:
1. Open the Start menu, and then click Settings ➙ Display.
2. Follow the on-screen instructions to select a color profile as desired.
Note: The calibration data is stored in the embedded display nonvolatile memory. It can be restored after
you reset the computer.
Intelligent Cooling
The Intelligent Cooling feature helps you adjust power consumption, fan speed, computer temperature, and
performance.
Chapter 3. Explore your computer 27
Page 34

Mode Recommended scenario
Best power efficiency
Balanced
Best performance
• You want the computer to be quieter and cooler.
• You want to maximize the battery life.
• You plan to frequently switch between different computer tasks
over a period time.
• You prefer to balance device performance with temperature and
fan noise.
• You want the computer to achieve the best performance.
• Louder fan noise and higher temperature are acceptable to you.
Switch among modes
You can press F8 or do the following to switch among preferred modes:
Step 1. Right-click the battery icon in the quick settings area
Step 2. Click Power and sleep settings.
Step 3. Locate the Power mode section and select a preferred mode.
on the right side of the taskbar.
Cool and Quiet on Lap
Your computer can detect whether you are using it on your lap and automatically enable the Cool and Quiet
on Lap feature. The feature helps cool down your computer to avoid any discomfort caused by extended
contact with your body, even through clothing. When you are not using it on your lap, the feature will be
disabled automatically.
Manage power
Use the information in this section to achieve the best balance between performance and power efficiency.
Check the battery status
Check the battery status to help use computer properly.
Go to Settings ➙ System to check the battery status. For more details about your battery, refer to the
Vantage app.
Charge the computer with ac power
Power source of the ac power adapter:
• Power: 45 W or 65 W
• Sine-wave input at 50 Hz to 60 Hz
• Input rating of the ac power adapter: 100 V to 240 V ac, 50 Hz to 60 Hz
• Output rating of the ac power adapter: 20 V dc, 2.25 A or 3.25 A
When the battery power is low, charge your battery by connecting your computer to ac power with the
supplied power adapter. The 65 W ac power adapter supports the rapid charge function, the battery is 80%
charged in about one hour when the computer is turned off. The actual charging time depends on the battery
size, the physical environment, and whether you are using the computer.
28
ThinkPad T14s Gen 5 User Guide
Page 35
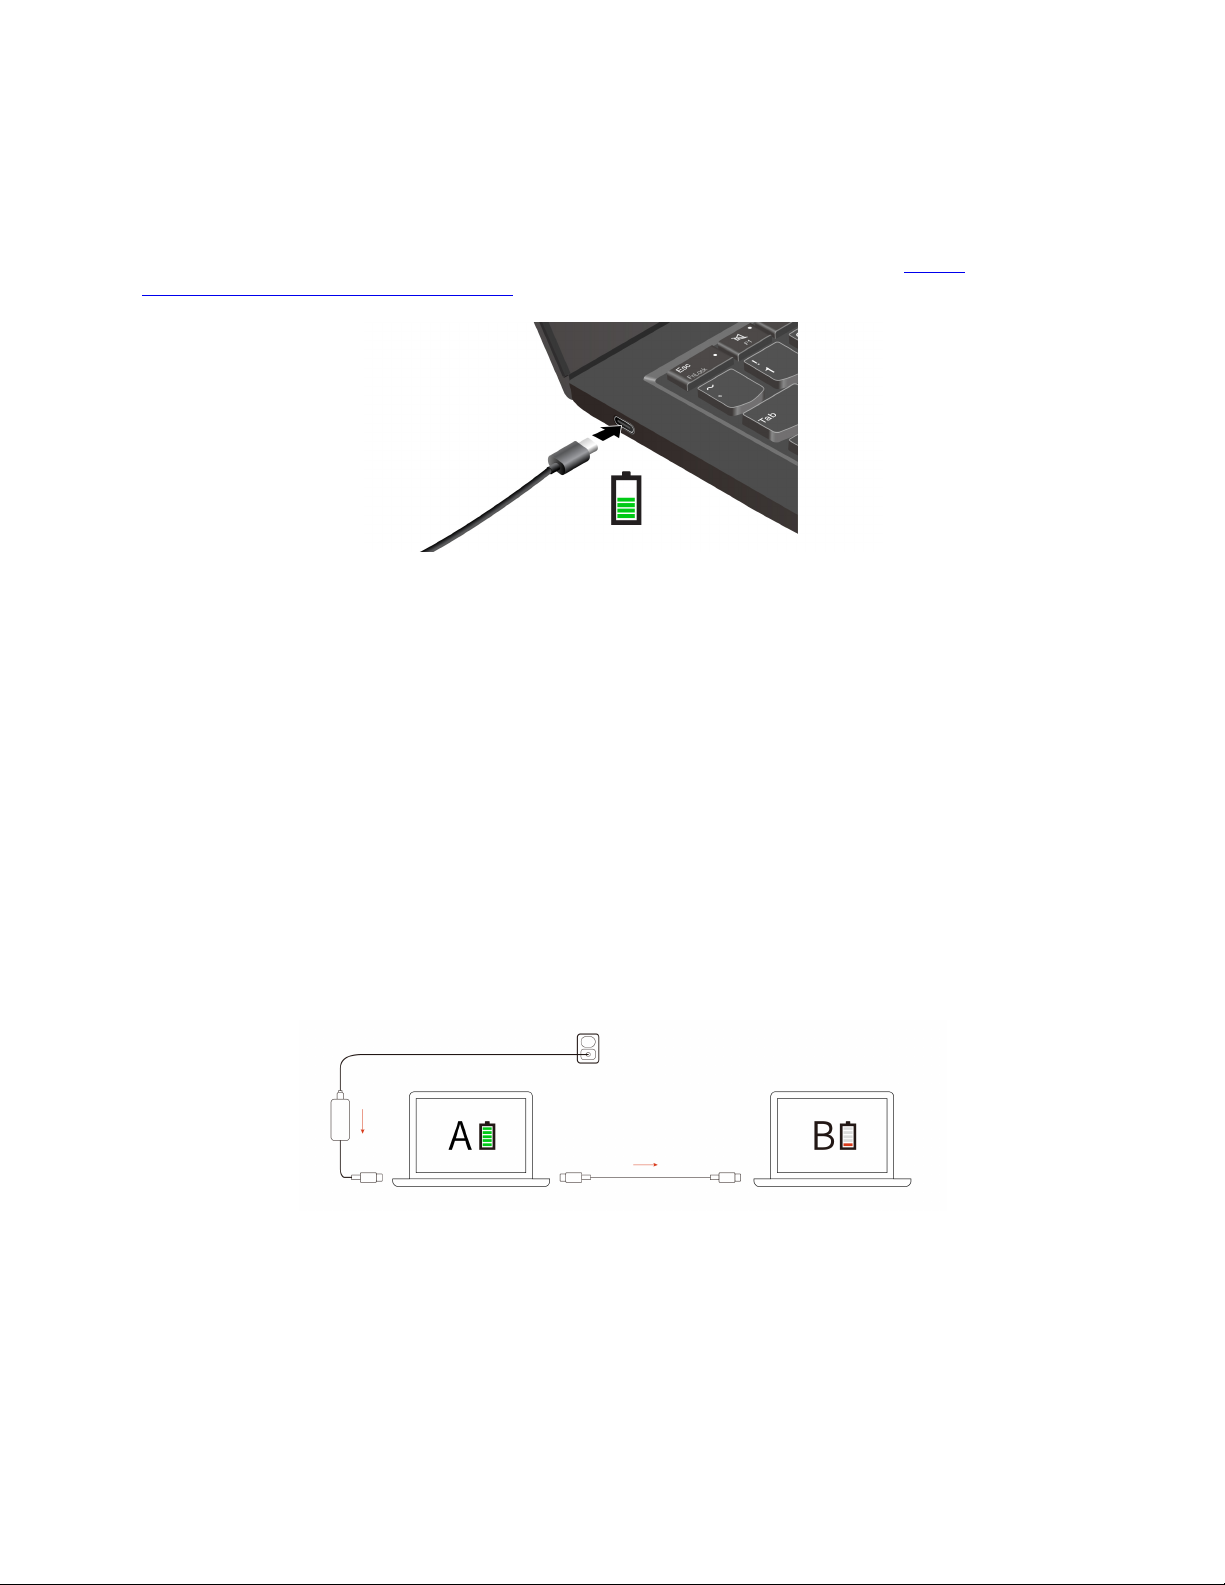
Battery charging is also affected by its temperature. The recommended temperature range for charging the
battery is between 10°C (50°F) and 35°C (95°F).
Note: Some models might not ship with ac adapters or power cords. Use only the certified adapters and
power cords provided by Lenovo that comply with the requirements of relevant national standards to charge
the product. It is recommended to use the Lenovo qualified adapters. You can refer to
www.lenovo.com/us/en/compliance/eu-doc
.
https://
Maximize the life of the battery
Follow the instructions to maximize the life of the battery.
• Use the battery until the charge is depleted and recharge the battery completely before using it. Once the
battery is fully charged, it must discharge to 94% or lower before it will be allowed to recharge again.
• Keep the battery from full charge when it is not in heavy use. For more information, refer to the Battery
settings tab in the Power section of the Vantage app.
• The battery might optimize its full charge capacity based on your usage. After prolonged periods of limited
use, full battery capacity might not be available until you discharge to as low as 20% and recharge
completely. For more information, refer to the Battery settings tab in the Power section of the Vantage
app.
Charge your computer with P-to-P 2.0 charging function
Both USB-C power connectors (Thunderbolt 4) on the computer feature the Lenovo-unique P-to-P 2.0 (Peer
to Peer 2.0) charging function.
Note: The actual charging speed of your computer depends on many factors, such as the remaining battery
power of the computers, the wattage of the ac power adapter, and whether you are using the computers.
To use the function, ensure that Always On USB and Charge in Battery Mode are enabled in UEFI BIOS of
your computers, so that the function works even when the computers are off or in hibernation mode. To
enable Always On USB and Charge in Battery Mode:
Step 1. Restart the computer. When the logo screen is displayed, press F1 to enter to the UEFI BIOS menu.
Chapter 3. Explore your computer 29
Page 36

Step 2. Click Config ➙ USB, and then to enable Always On USB and Charge in Battery Mode.
Change the power settings
Follow the instructions to change the power settings of your preference.
For ENERGY STAR
computer is on ac power and has been idle for a specified duration:
• Turn off the display: After 5 minutes
• Put the computer to sleep: After 5 minutes
To change the power plan, the power button function and other settings, do the following:
Step 1. Go to Control Panel and view by Large icons or Small icons.
Step 2. Click Power Options.
Step 3. Change the settings as you prefer.
®
compliant computers, the following power plan takes effect by default when your
Transfer data
Quickly share your files using the built-in Bluetooth or NFC technology among devices with the same
features. You also can insert a smart card to transfer data.
Connect to a Bluetooth device
You can connect all types of Bluetooth-enabled devices to your computer, such as a keyboard, a mouse, a
smartphone, or speakers. To ensure successful connection, place the devices at most 10 meters (33 feet)
from the computer.
Conventional pair
This topic helps you connect to a Bluetooth device by conventional pair.
Step 1. Type Bluetooth in the Windows search box and then press Enter.
Step 2. Turn on both the Bluetooth on your computer and the Bluetooth device. Make sure the device is
discoverable.
Step 3. Select the device when it is displayed on the Add device list, and then follow the on-screen
instructions.
Swift pair
This topic helps you connect to a Bluetooth device by swift pair.
If your Bluetooth device supports swift pair, do the following:
Step 1. Enable swift pair notification on Bluetooth settings page.
Step 2. Turn on both the Bluetooth on your computer and the Bluetooth device. Make sure the device is
discoverable.
Step 3. Click Connect when a swift pair notification appears on your computer.
What to do if the Bluetooth connection failed
Follow the instructions to reconnect a Bluetooth device.
Step 1. Type Device Manager in the Windows search box and then press Enter.
30
ThinkPad T14s Gen 5 User Guide
Page 37
Step 2. Locate the Bluetooth adapter. Right-click and select Update driver.
Step 3. Select Search automatically for drivers, and then follow the on-screen instructions.
Set up an NFC connection
Simply tap and connect your computer and another NFC-enabled device over a few centimeters or inches.
If your computer supports NFC, you will see an NFC mark or label
To turn on NFC:
Step 1. Type Airplane mode in the Windows search box and then press Enter.
Step 2. Ensure that the Airplane mode is off and turn on the NFC function.
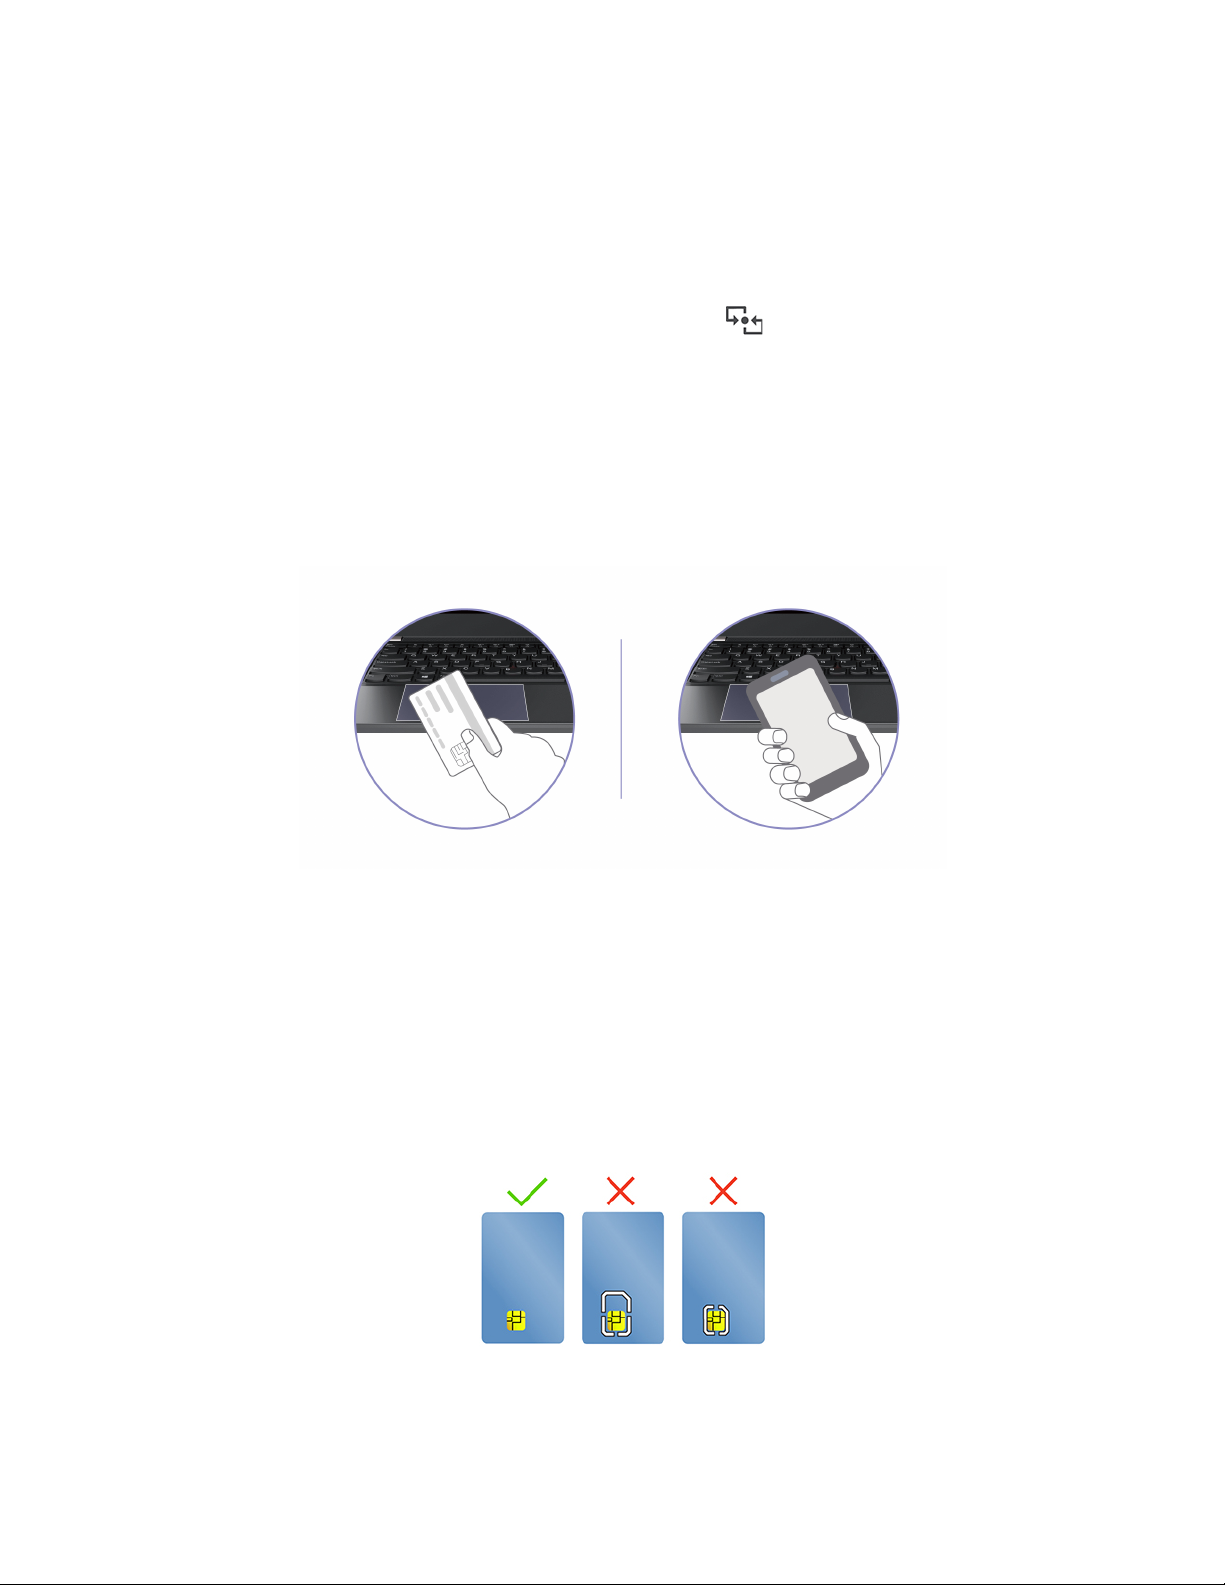
By using NFC, you can simply tap and connect your computer and another NFC-enabled device over a few
centimeters or inches. To pair with an NFC card or smartphone:
Note: Ensure that the NFC card is in NFC Data Exchange Format (NDEF), otherwise the card cannot be
detected.
around the trackpad area.
Use a smart card
You can insert a smart card to transfer data.
Supported smart card specifications: 85.60 mm (3.37 inches) x 53.98 mm (2.13 inches)
Attention: Smart cards with slits are not supported. Do not insert such a smart card into the smart-card slot
of your computer. Otherwise, the reader might get damaged.
Chapter 3. Explore your computer 31
Page 38
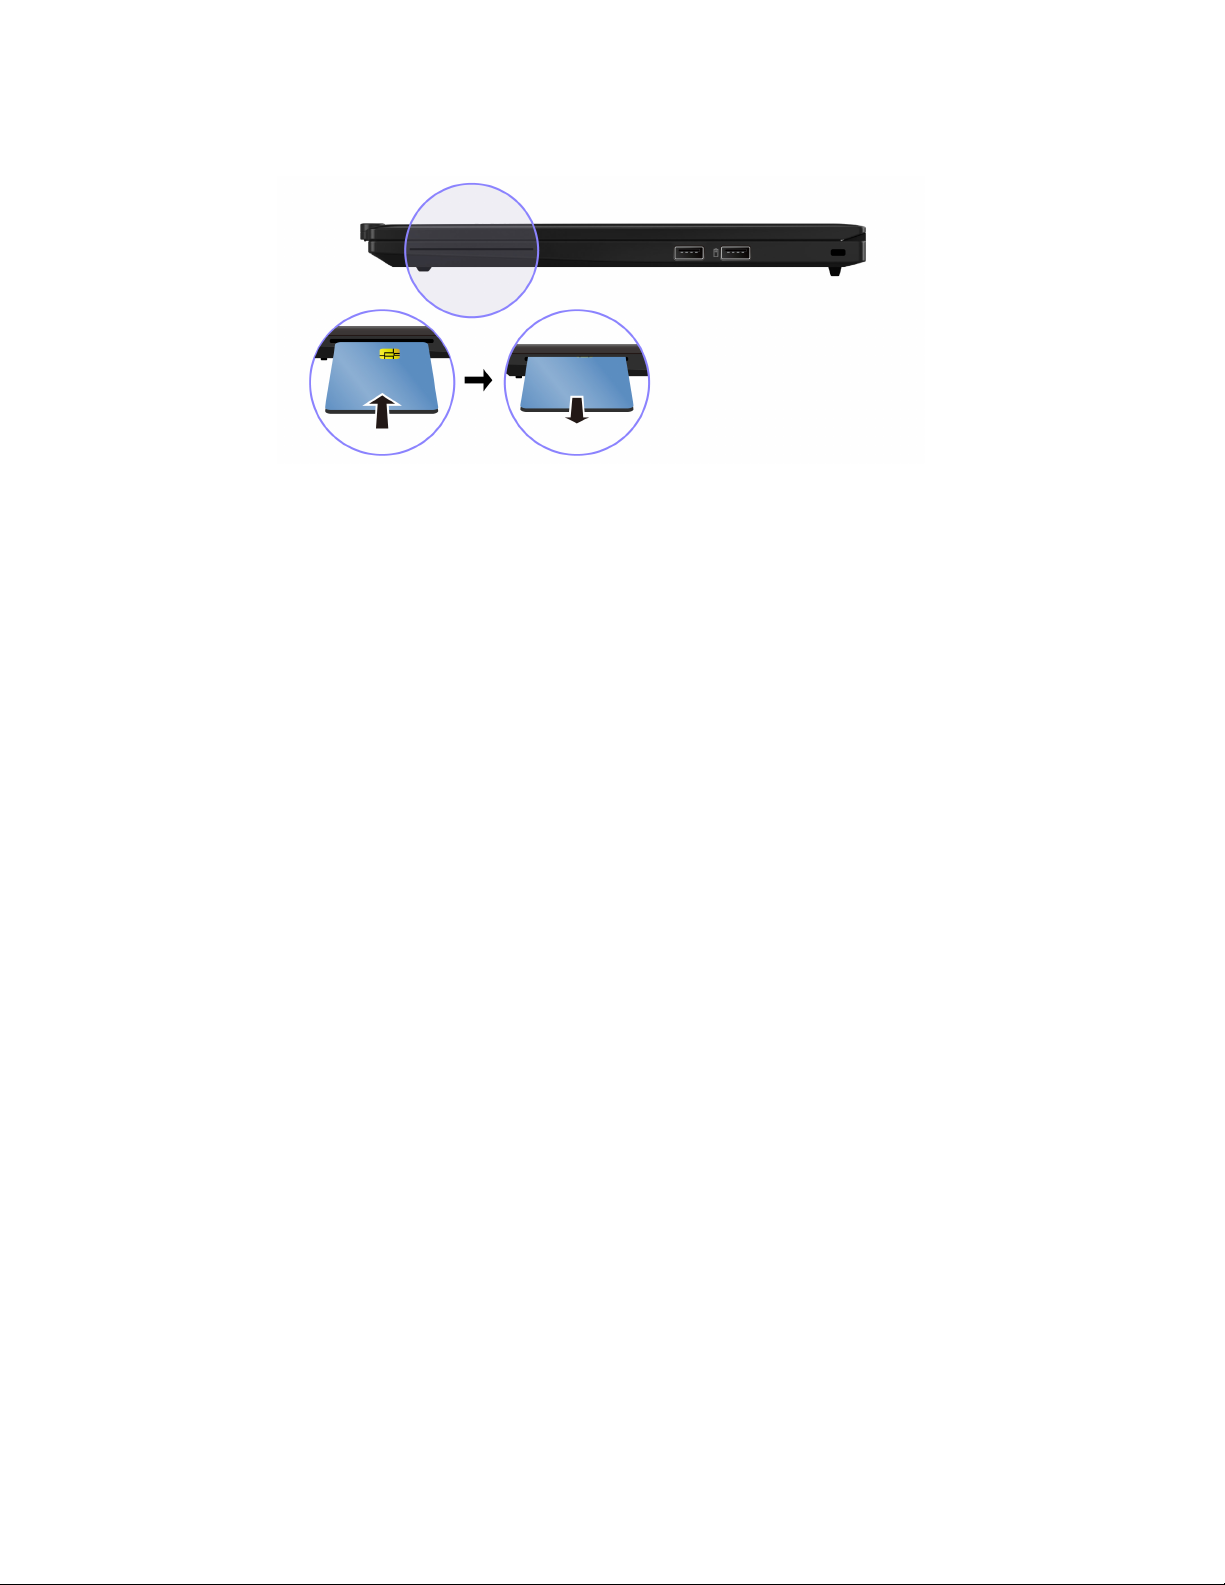
Install or remove a smart card
32 ThinkPad T14s Gen 5 User Guide
Page 39
Chapter 4. Secure your computer and information
Your computer can safeguard your privacy and information through some privacy protection functions.
Lock the computer
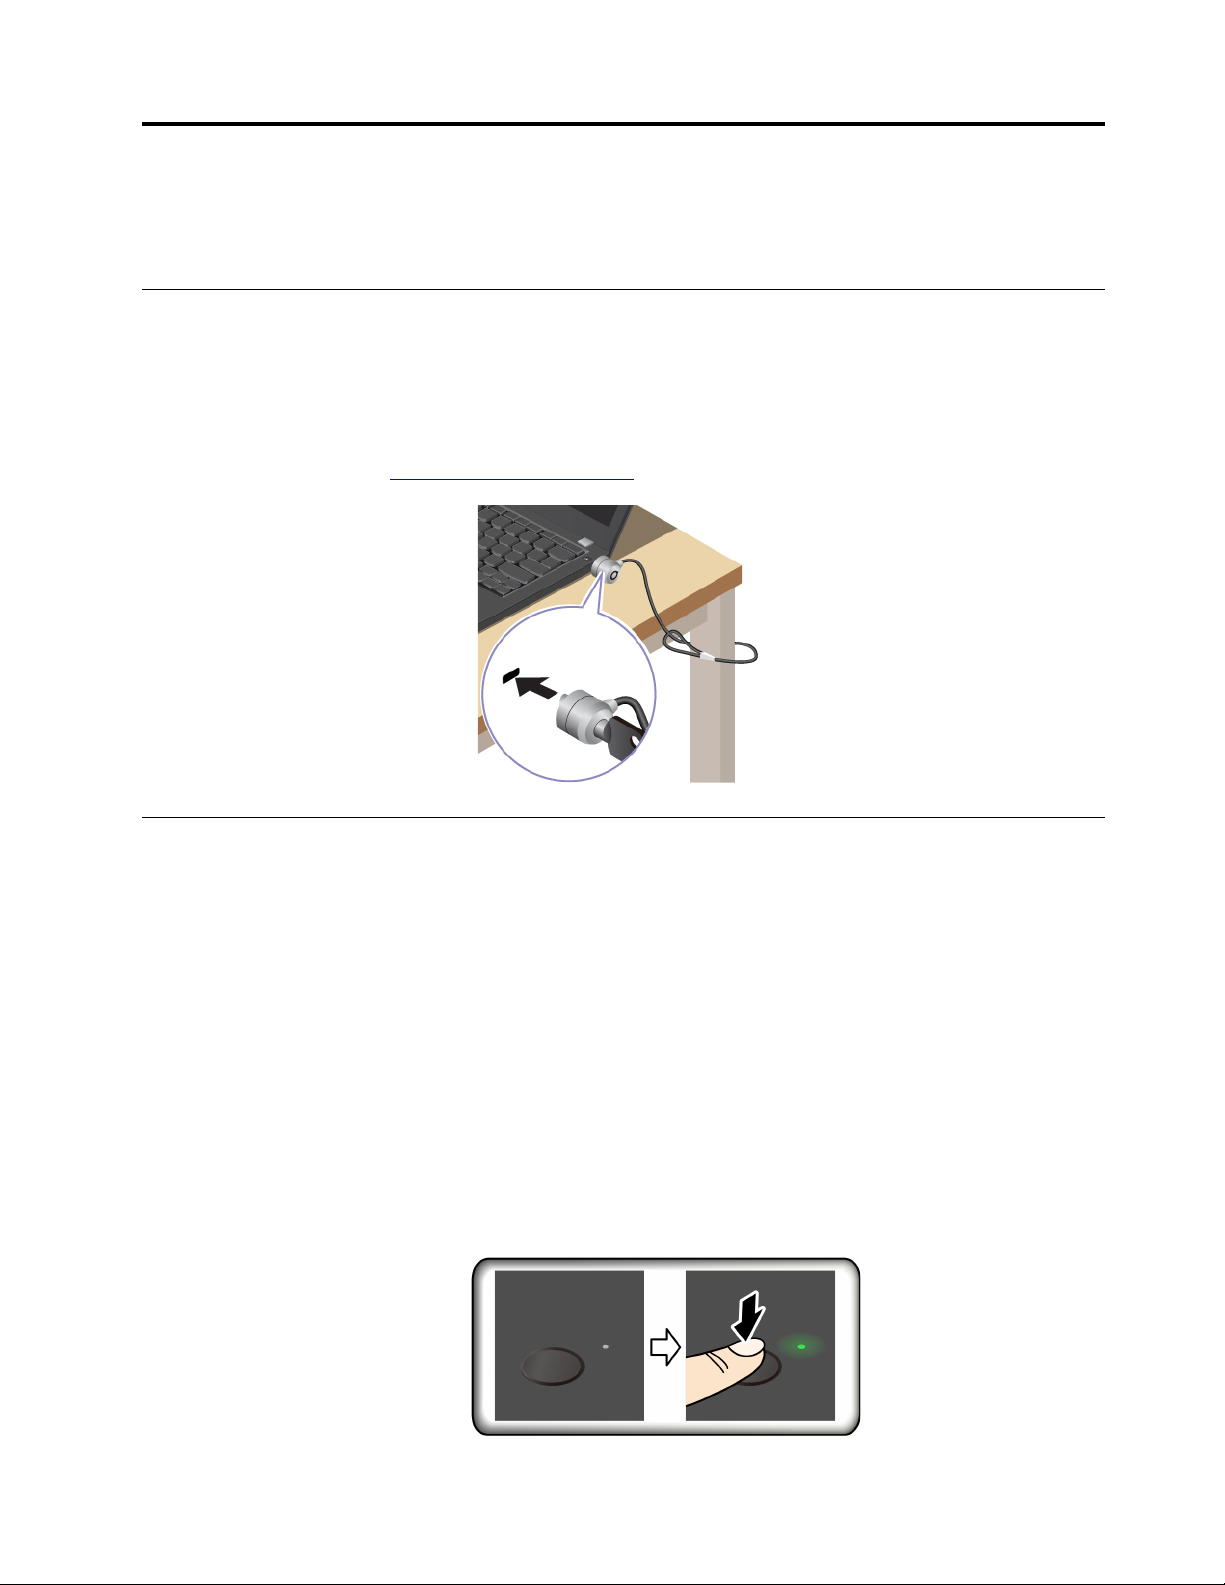
Lock your computer to a desk, table, or other fixtures through a compatible security cable lock.
®
Note: The slot supports cable locks that conform to the Kensington NanoSaver
Cleat™ locking technology. You are responsible for evaluating, selecting, and implementing the locking
device and security feature. Lenovo is not responsible for the locking device and security feature. You can
purchase the cable locks at
https://smartfind.lenovo.com.
lock standards using
Log in with fingerprint recognition (for selected models)
The fingerprint reader is integrated with the power button. You can power on and log in to the computer with
your fingerprint. It eliminates the need to enter complex passwords, saving your time and boosting your
productivity.
To enroll your fingerprints, do the following:
Step 1. Type Sign-in options in the Windows search box and then press Enter.
Step 2. Select Fingerprint recognition (Windows Hello) and then follow the on-screen instruction to
enroll your fingerprint.
Note: It is recommended that you put your finger at the center of the power button during
enrollment and enroll more than one fingerprint in case of any injuries to your fingers. After the
enrollment, the fingerprints are associated with the Windows password automatically.
Step 3. Log in with your fingerprint. When the fingerprint reader indicator is solid green, tap your finger on
the fingerprint reader for authentication.
© Copyright Lenovo 2024 33
Page 40
Note: You can associate your fingerprints with your power-on password and NVMe password. See
“Associate your fingerprints with passwords (for selected models)” on page 38.
Maintenance tips:
• Do not scratch the surface of the reader with anything hard or sharp.
• Do not use or touch the reader with a wet, dirty, wrinkled, or injured finger.
Log in with facial recognition (for selected models)
You can log in to the computer with your facial recognition. It provides precise and secure authentication.
For models come with a webcam privacy shutter, slide the webcam privacy shutter to uncover the camera
lens before using the Windows Hello face recognition.
Set up facial recognition and unlock your computer by scanning your face:
Step 1. Type Sign-in options in the Windows search box and then press Enter.
Step 2. Select Facial recognition (Windows Hello) and then follow the on-screen instruction to enroll your
facial ID.
Lock on leave function (for selected models)
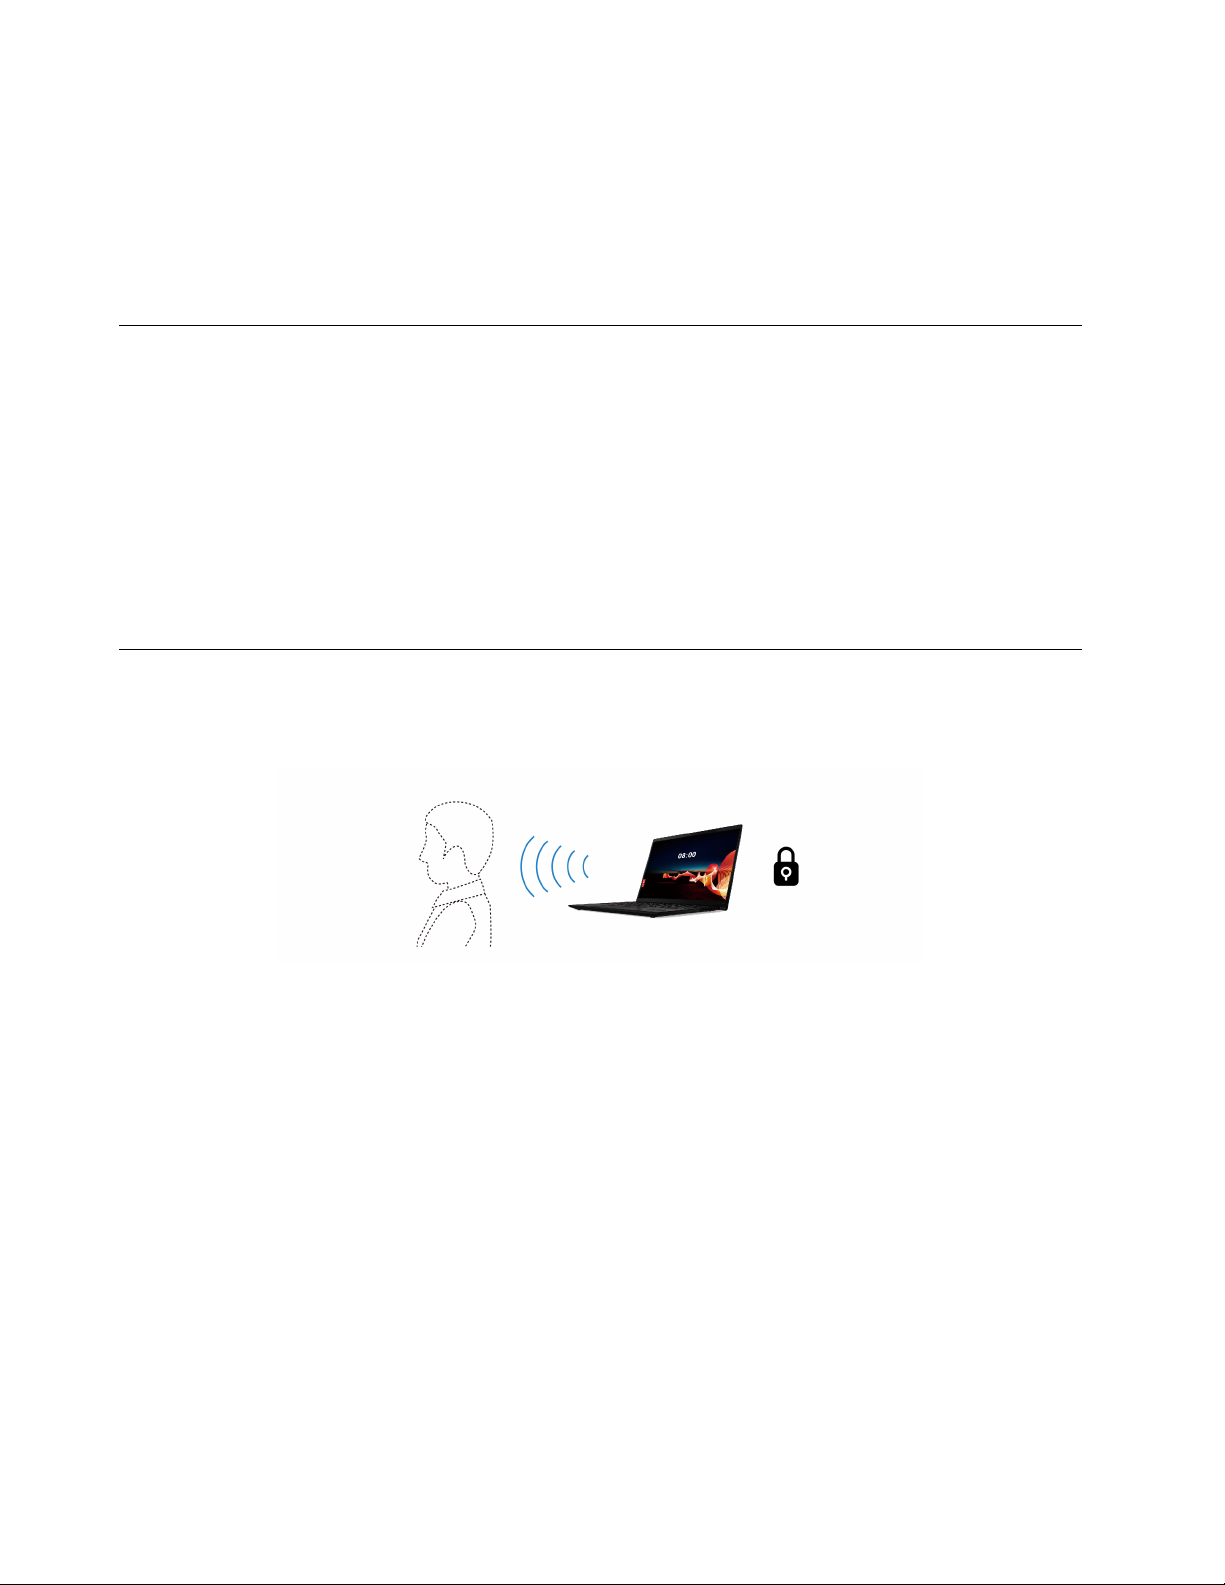
Your computer supports the lock on leave function with ultrasound-based human presence detection,
providing added security and improving battery life.
Notes:
• The lock on leave function does not work if you set the power options to never turn off the display.
• For some countries or regions, the lock on leave function might be disabled according to local regulations.
Change the settings from the Vantage app
When lock on leave function is enabled in UEFI BIOS, you can change the settings from the Vantage app:
Step 1. Open the Vantage app, and then click Device ➙ Smart Assist.
Step 2. Slide the Zero Touch Lock switch to disable or enable the function.
Change the settings from the UEFI BIOS
To enable or disable lock on leave function in UEFI BIOS menu:
Step 1. Restart the computer. When the logo is displayed, press F1 to enter the UEFI BIOS menu.
Step 2. Select Security ➙ Intelligent Security.
Step 3. Slide the User Presence Sensing switch to enable or disable the function.
34
ThinkPad T14s Gen 5 User Guide
Page 41

Use the ePrivacy screen (for selected models)
Your computer might come with an ePrivacy screen. It can reduce screen visibility from side angles to
protect screen content against visual hacking.
This function is disabled by default. You can press F12 or Fn+D to enable it. You will be prompted by the onscreen icon
or every time the function is enabled or disabled.
You can press
Note: The privacy level of this function varies depending on the screen brightness level, the contrast ratio,
and the physical environment where you are using this function. The recommended range of the screen
brightness level is 50-60.
to increase the privacy level or to decrease the privacy level.
Use the password privacy function
Once enabled, the password privacy function can be automatically activated in case that you are required to
input passwords.
To enable this function:
Step 1. Open the Vantage app, and then click Device.
Step 2. Locate the Privacy Guard option, and select Enable this feature when typing passwords to
enable this function.
Note: Once enabled, the password privacy function is available even when you disable the ePrivacy
function.
Protect data against power loss
NVMe (Non-Volatile Memory express) M.2 solid-state drive features the Lenovo-unique PLP (Power Loss
Protection) function to avoid data loss or damage.
If your computer is not responding and you might have to shut down your computer by pressing and holding
the power button for several seconds. In this case, the PLP function enables your computer data to be saved
timely. However, there is no guarantee that all data is saved in any situation.
To check the type of your M.2 solid-state drive:
Step 1. Restart the computer. When the logo screen is displayed, press F10 to enter the Lenovo
diagnostics window.
Step 2. On the TOOLS tab, select SYSTEM INFORMATION ➙ STORAGE using the arrow keys.
Step 3. Locate the Device Type section to check the information.
USB-C Restricted Mode
USB-C Restricted Mode is a security feature that allows you to disable data transfer through USB-C
connectors while the charge function of the USB-C connectors is kept. It helps prevent data from being
copied from the computer to USB storage devices connected to the computer. By enabling this feature, you
can use public USB charging stations, such as those found in cafes and hotel lobbies, without worrying
about data leakage from the USB-C connector.
Notes:
Chapter 4. Secure your computer and information 35
Page 42
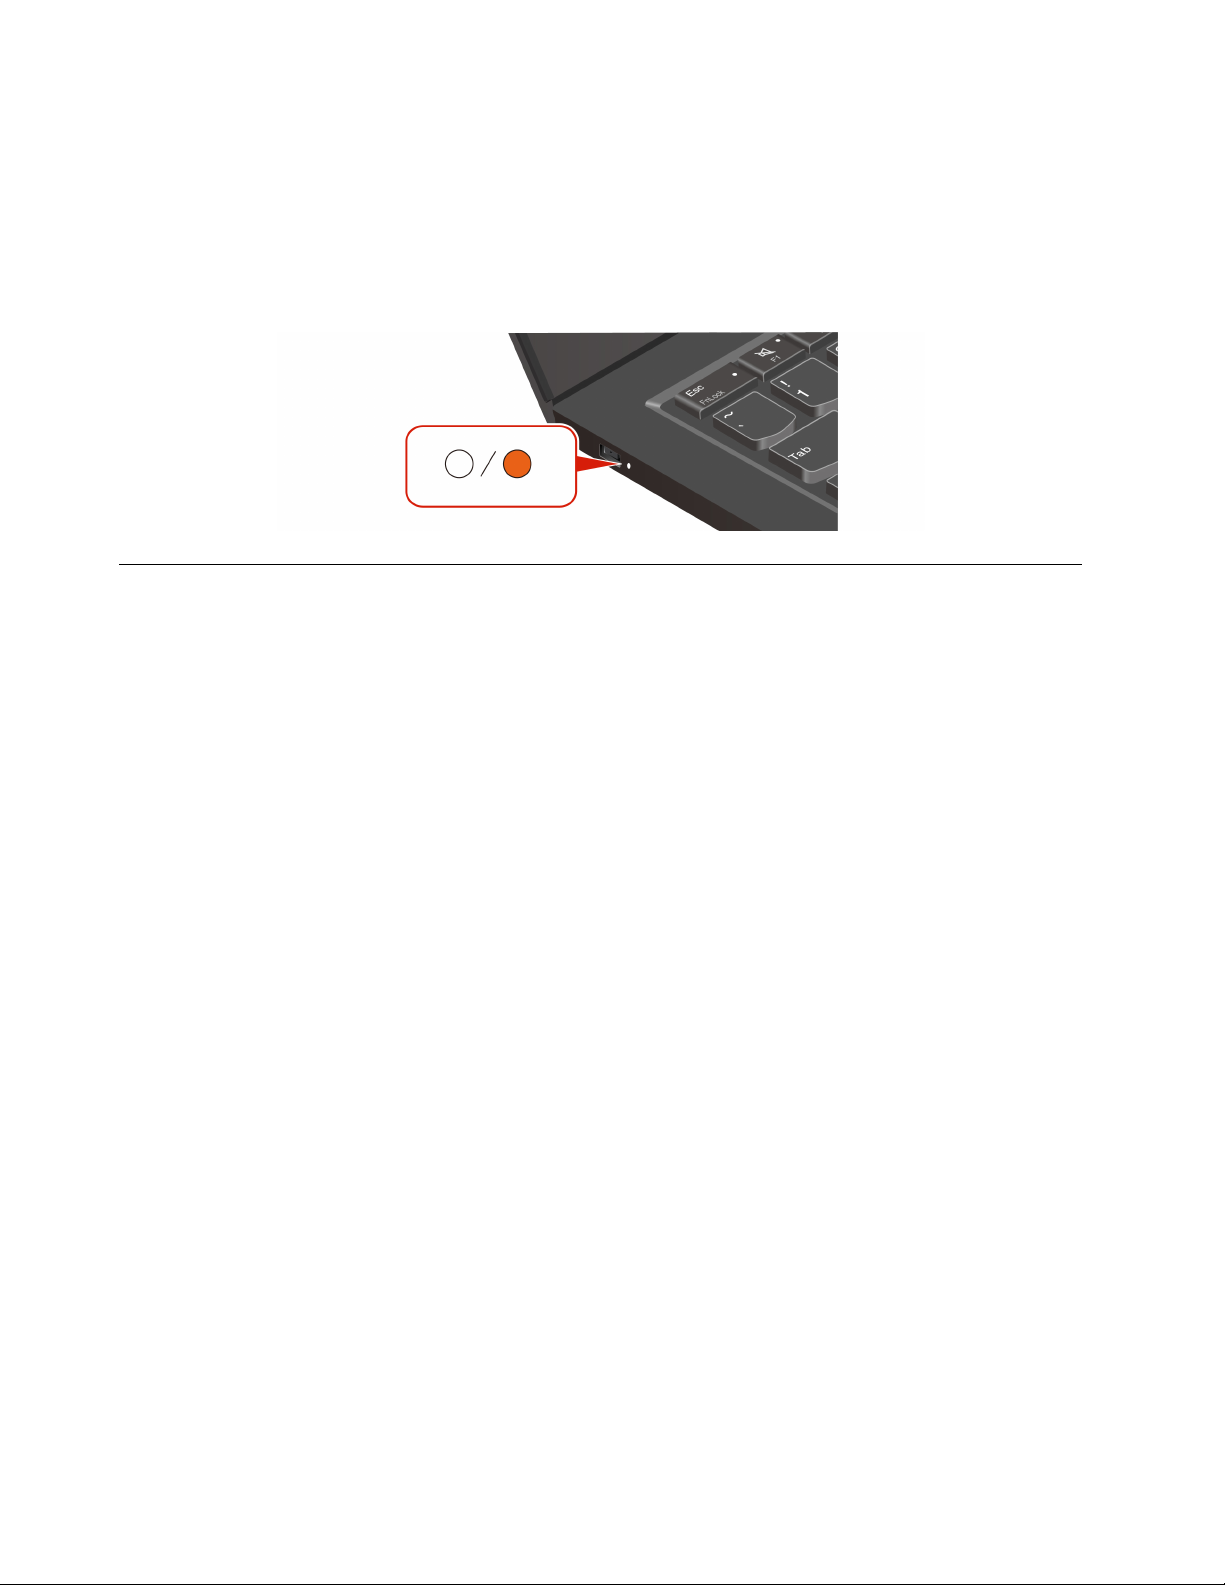
• Before using this feature, ensure that the remaining battery power is not less than 5%. Otherwise, this
feature can not be enabled.
• This feature can be enabled or disabled by key combinations only when the computer is turned on.
To enable or disable this feature, press Fn+U, and then press Fn+S.
After this feature is enabled, the LED indicator blinks briefly when a USB device is connected.
UEFI BIOS passwords
You can set passwords in UEFI (Unified Extensible Firmware Interface) BIOS (Basic Input/Output System) to
strengthen the security of your computer.
Password types
You can set a power-on password, supervisor password, system management password, or NVMe
password in UEFI BIOS to prevent unauthorized access to your computer.
However, you are not prompted to enter any UEFI BIOS password when your computer resumes from sleep
mode.
Power-on password
If you set a power-on password, a window is displayed on the screen when you turn on the computer. Enter
the correct password to use the computer.
Supervisor password
The supervisor password protects the system information stored in UEFI BIOS. When entering the UEFI
BIOS menu, enter the correct supervisor password in the window prompted. You also can press Enter to
skip the password prompt. However, you cannot change most of the system configuration options in UEFI
BIOS.
If you have set both the supervisor password and power-on password, you can use the supervisor password
to access your computer when you turn it on. The supervisor password overrides the power-on password.
NVMe passwords
The NVMe password prevents unauthorized access to the data on the storage drive. When an NVMe
password is set, you are prompted to type a correct password each time you try to access the storage drive.
• Single Password
When a Single NVMe password is set, the user must enter the user NVMe password to access files and
applications on the storage drive.
• Dual Password (User+Admin)
36
ThinkPad T14s Gen 5 User Guide
Page 43

The admin NVMe password is set and used by a system administrator. It enables the administrator to
access any storage drive in a system or any computer connected in the same network. The administrator
can also assign a user NVMe password for each computer in the network. The user of the computer can
change the user NVMe password as desired, but only the administrator can remove the user NVMe
password.
When prompted to enter an NVMe password, press F1 to switch between the admin NVMe password and
user NVMe password.
Notes: The NVMe password is not available in the following situations:
• A Trusted Computing Group (TCG) Opal-compliant storage drive and a TCG Opal management software
program are installed in the computer, and the TCG Opal management software program is activated.
• An eDrive storage drive is installed in the computer preinstalled with the Windows operating system.
System management password
The system management password can also protect the system information stored in UEFI BIOS like a
supervisor password, but it has lower authority by default. The system management password can be set
through the UEFI BIOS menu or through Windows Management Instrumentation (WMI) with the Lenovo
client-management interface.
You can enable the system management password to have the same authority as the supervisor password
to control security-related features. To customize the authority of the system management password through
the UEFI BIOS menu:
Step 1. Restart the computer. When the logo screen is displayed, press F1 to enter the UEFI BIOS menu.
Step 2. Select Security ➙ Password ➙ System Management Password Access Control.
Step 3. Follow the on-screen instructions.
If you have set both the supervisor password and the system management password, the supervisor
password overrides the system management password. If you have set both the system management
password and the power-on password, the system management password overrides the power-on
password.
Set, change, or remove a password
Follow the instructions to set, change or remove a password.
Before you start, print these instructions.
Step 1. Restart the computer. When the logo screen is displayed, press F1 to enter the UEFI BIOS menu.
Step 2. Select Security ➙ Password by using the arrow keys.
Step 3. Select the password type. Then, follow the on-screen instructions to set, change, or remove a
password.
You should record all your passwords and store them in a safe place. If you forget any of your passwords,
any potential repair actions required are not covered under warranty.
What to do if you forget your power-on password
Follow the instructions to remove the power-on password if you forget your power-on password.
If you have set a supervisor password or a system management password and remember it:
Step 1. Restart the computer. When the logo screen is displayed, immediately press F1.
Chapter 4. Secure your computer and information 37
Page 44

Step 2. Type the supervisor password or the system management password to enter the UEFI BIOS menu.
Step 3. Select Security ➙ Password ➙ Power-On Password by using the arrow keys.
Step 4. Type the current supervisor password or the system management password in the Enter Current
Password field. Then, leave the Enter New Password field blank, and press Enter twice.
Step 5. In the Changes have been saved window, press Enter.
Step 6. Press F10 to save changes and exit the UEFI BIOS menu.
If you have not set a supervisor password or a system management password, contact a Lenovo-authorized
service provider to have the power-on password removed.
What to do if you forget your supervisor password
Follow the instructions to remove the supervisor password if you forget your supervisor password.
There is no service procedure to remove the password. You can contact a Lenovo-authorized service
provider to have the system board replaced. A fee will be charged for parts and service.
What to do if you forget your NVMe password
Follow the instructions to remove the NVMe password if you forget your NVMe password.
If you forget your NVMe password (Single password) or both user and admin NVMe passwords (Dual
password), Lenovo cannot reset your passwords or recover data from the storage drive. You can contact a
Lenovo-authorized service provider to have the storage drive replaced. A fee will be charged for parts and
service. If the storage drive is a CRU (Customer Replaceable Unit), you can also contact Lenovo to purchase
a new storage drive to replace the old one by yourself. To check whether the storage drive is a CRU and the
relevant replacement procedure, see “CRU list” on page 47.
What to do if you forget your system management password
Follow the instructions to remove the system management password if you forget your system management
password.
If you have set a supervisor password and remember it:
Step 1. Restart the computer. When the logo screen is displayed, immediately press F1.
Step 2. Type the supervisor password to enter the UEFI BIOS menu.
Step 3. Select Security ➙ Password ➙ System Management Password by using the arrow keys.
Step 4. Type the current supervisor password in the Enter Current Password field. Then, leave the Enter
New Password field blank, and press Enter twice.
Step 5. In the Changes have been saved window, press Enter.
Step 6. Press F10 to save changes and exit the UEFI BIOS menu.
If you have not set a supervisor password, contact a Lenovo-authorized service provider to have the system
management password removed.
Associate your fingerprints with passwords (for selected models)
You can associate the fingerprints with passwords to get quick access to the computer and the data on the
storage drive without entering the power-on password or NVMe password.
Do the following to associate your fingerprints with the power-on password and NVMe password:
Step 1. Turn off and then turn on the computer.
38
ThinkPad T14s Gen 5 User Guide
Page 45

Step 2. When prompted, scan your finger on the fingerprint reader.
Step 3. Enter your power-on password, NVMe password, or both as required. The association is
established.
When you start the computer again, you can use your fingerprints to log in to the computer without entering
your Windows password, power-on password, or NVMe password. To change settings, press F1 to enter the
UEFI BIOS menu, and then select Security ➙ Fingerprint.
Attention: If you always use your fingerprint to log in to the computer, you might forget your passwords.
Write down your passwords, and keep them in a safe place.
FIDO (Fast Identity Online) authentication
Your computer supports FIDO (Fast Identity Online) authentication feature. This feature works as an
alternative to password-based authentication to achieve passwordless authentication.
This feature only works when a power-on password is set in UEFI BIOS and the FIDO2 USB device is
registered in ThinkShield™ Passwordless Power-On Device Manager. With this feature, you can input the
power-on password or use the registered FIDO2 USB device to power on your computer.
Register FIDO2 USB device in ThinkShield Passwordless Power-On Device Manager
Follow the instructions to register FIDO2 USB device in ThinkShield Passwordless Power-On Device
Manager.
Step 1. Turn on the computer.
Step 2. Press F12 during the power-on process.
Step 3. If you set a power-on password, you are prompted to enter the correct password.
Step 4. Select App Menu ➙ ThinkShield Passwordless Power-On Device Manager and press Enter
Step 5. Insert the FIDO2 USB device to register the device by following steps:
a. Select the available FIDO2 USB device that you want to register in the Discovered Devices
field.
b. Click Yes in the displayed window to confirm the device you selected
c. If you set a power-on password, you are prompted to enter the correct password.
d. The User operation request window is displayed. You are prompted to press the button on
the connected FIDO2 USB device, and then follow the on-screen instructions to close the
window.
e. Press Esc to exit and restart your computer.
Notes:
• If you want to unregister your devices, click the available FIDO2 USB device that you want to unregister in
the My Device field and enter the correct power-on password for verification.
• If you use more than one FIDO2 USB device with a common identifier for registration, only one device is
available.
Log in to the System with Passwordless Power-On Authentication
Follow the instructions to log in to the System with Passwordless Power-On Authentication.
Step 1. Restart the computer.
Chapter 4. Secure your computer and information 39
Page 46

Step 2. ThinkShield Passwordless Power-On Authentication window is displayed.
Step 3. Insert your registered FIDO2 USB device for detection.
Step 4. Then follow the on-screen instructions to press the button on your FIDO2 USB device for
verification.
Step 5. After your device is verified, the power-on process continues.
Note: You should insert the FIDO2 USB device or enter the power-on password within 60
seconds. Otherwise, your computer will shut down automatically.
40
ThinkPad T14s Gen 5 User Guide
Page 47

Chapter 5. Configure advanced settings
UEFI BIOS
UEFI BIOS is the first program that the computer runs. When the computer turns on, the UEFI BIOS performs
a self test to make sure that various devices in the computer are functioning properly.
Enter the UEFI BIOS menu
Turn on or restart the computer. When the logo screen is displayed, press F1 repeatedly to enter the UEFI
BIOS menu.
Navigate the UEFI BIOS menu
Follow the on-screen instructions to navigate in the UEFI BIOS menu.
The table below introduces some available settings of the UEFI BIOS menu. To know more about the UEFI
BIOS, for example, BIOS Event log, you can go to
search box.
Note: The UEFI BIOS menu might vary depending on system configurations.
Menu Introduction
Main
This category displays the general product-related information, such as UEFI BIOS version,
machine type, system serial number, preinstalled OS license, and BIOS Event log.
https://pcsupport.lenovo.com and then type UEFI BIOS in
Config This category enables you to update configurations relating to system settings such as
network, USB, keyboard, display, CPU, and power.
Date/Time
Security This category enables you to configure security settings related to such as password,
Startup
Restart This category enables you to save or discard changes before exiting.
You can go to Lenovo BIOS Simulator Center https://download.lenovo.com/bsco/index.html to explore the
detailed settings by your product name.
Note: The Lenovo BIOS Simulator Center makes periodic updates of the settings. The UEFI BIOS simulator
interface and description of settings might be different from that on your actual user interface.
This category enables you to set computer date and time in this category.
fingerprint, and I/O accessibility.
This category enables you to manage settings relevant to booting up.
Customize BIOS Defaults
The feature provides a solution to backup your preferred BIOS Setup settings.
It helps you to save the BIOS Setup settings as customized BIOS default settings, load them to current BIOS
settings when needed, and reset the settings to Setup Defaults.
Save the customized settings configuration
Follow the instructions to save the customized settings configuration.
Step 1. Restart the computer. When the logo screen is displayed, press F1 to enter the UEFI BIOS menu.
© Copyright Lenovo 2024 41
Page 48

Step 2. Select Restart ➙ Save Custom Defaults.
Step 3. Click Yes to save the settings configuration you customized.
Load the customized settings configuration
Follow the instructions to load the customized settings configuration.
Step 1. Restart the computer. When the logo screen is displayed, press F1 to enter the UEFI BIOS menu.
Step 2. Select Restart ➙ Load Custom Defaults.
Step 3. Click Yes to load the customized settings configuration you saved.
You can also press F9 and click Custom Defaults to load the customized settings configuration.
Note: Load Custom Defaults is unavailable if no customized BIOS default settings are saved.
Reset the settings configuration to Setup Defaults
Follow the instructions to reset the settings configuration to Setup Defaults.
Step 1. Restart the computer. When the logo screen is displayed, press F1 to enter the UEFI BIOS menu.
Step 2. Select Restart ➙ Load Factory Defaults.
Step 3. Click Yes to reset the settings configuration to Setup Defaults.
You can also press F9 and click Factory Defaults to reset the settings configuration to Setup Defaults.
Reset system to factory defaults
This feature enables you to reset the UEFI BIOS to the factory default settings, including all UEFI BIOS
settings and internal system data. It helps you wipe user data in case that you want to dispose of or reuse
your computer.
Step 1. Restart the computer. When the logo screen is displayed, press F1 to enter the UEFI BIOS menu.
Step 2. Select Security ➙ Reset System to Factory Defaults and press Enter.
Step 3. Several warning windows might be displayed. Do the following before resetting the system to the
factory default settings:
a. Deactivate the Absolute Persistence Module.
b. Remove the NVMe password if your have set one.
Step 4. For computer models with RAID settings, a window is displayed to remind you of data damage.
Select Yes to proceed.
Step 5. A window is displayed to confirm all UEFI BIOS settings will be reset. Select Yes to proceed.
Note: If the Intel AMT control and Absolute Persistence(R) Module are permanently disabled,
these settings cannot be reset successfully.
Step 6. Enter the supervisor password, system management password or power-on password in the
window prompted.
Your computer will restart immediately. It takes a few minutes to complete the initialization process. Your
computer screen might be blank during this process. This is normal and you should not interrupt it.
Recover the UEFI BIOS
If the UEFI BIOS is corrupted or maliciously attacked, it can self-recover and restore your computer from the
last uncorrupted and secure backup. This function protects your computer data.
42
ThinkPad T14s Gen 5 User Guide
Page 49

During the UEFI BIOS self-recovery, the screen might be blank. You can check the progress based on
blinking modes of the LED indicators on Esc, F1, and F4. For details, refer to the following table.
Note: Do not press the power button to interrupt the progress. Wait a few minutes until the logo screen is
displayed.
Blinking modes
LED indicator on Esc blinks 0% to 32%
LED indicators on Esc and F1 blink simultaneously 33% to 65%
LED indicators on Esc, F1 and F4 blink simultaneously 66% to 100%
Self-recovery progress
Detect memory retraining
Memory retraining is a process to initialize the memory module and run diagnostic tests for the memory
module in your computer.
The memory retraining might occur during POST if any of the following situations is detected:
• Memory module replacement
• Total Memory Encryption setting change in the UEFI BIOS
• Memory Reference Code (MRC) change when the UEFI BIOS updates
When memory retraining occurs, the screen might be blank. You might see the LED indicators on Esc, F1,
and F4 blinking sequentially to indicate the progress. Do not press the power button to interrupt the process.
Wait a few minutes until the logo screen is displayed.
Cloud bare metal recovery (for selected models)
This feature enables you to remove all user files on your computer and restore the Windows operating
system from Cloud (Microsoft
information.
®
Connected System Recovery). Before using this feature, read the following
Notes:
• This feature will restore your computer to the Windows operating system preinstalled at the factory. Do
not use this feature if a customized operating system is installed on your computer, otherwise the
customized functions or applications cannot be restored.
• This feature only works with wired network (connected via the Ethernet connector on your computer) and
wireless network (WPA2 personal only).
Restore the Windows operating system
Follow the instructions to restore the Windows operating system.
Step 1. Restart the computer. When the logo screen is displayed, press F1 to enter the UEFI BIOS menu.
Step 2. Select Config ➙ Reinstall Windows from Cloud. Follow the on-screen instructions to enable this
feature.
Step 3. Press F10 to save changes and exit.
Step 4. The computer will restart automatically. When the logo screen is displayed, press F12.
Step 5. Select App Menu ➙ Reinstall Windows from Cloud, and then follow the on-screen instructions.
If the recovery process fails, you still have other options to restore the Windows operating system. For more
information, refer to “Recover your Windows operating system” on page 62.
Chapter 5. Configure advanced settings 43
Page 50

Update the UEFI BIOS
When you install a new program, device driver, or hardware component, you might need to update the UEFI
BIOS.
Download and install the latest UEFI BIOS update package by one of the following methods:
Note: During the UEFI BIOS update process, MRC change might cause memory retraining. Memory
retraining is a process to initialize the memory module and run diagnostic tests for the memory module in
your computer. When memory retraining occurs, the screen might be blank. You might see the LED
indicators on Esc, F1, and F4 blinking sequentially to indicate the progress. Do not press the power button to
interrupt the process. Wait a few minutes until the logo screen is displayed.
From the Vantage app
Follow the instructions to update the UEFI BIOS from the Vantage app.
Step 1. Open the Vantage app, and then click Device ➙ System Update.
Step 2. If the latest UEFI BIOS update package is available, follow the on-screen instructions to download
and install the package.
From the Lenovo Support Web site
Follow the instructions to update the UEFI BIOS from the Lenovo Support Web site.
Step 1. Go to
Step 2. Click Drivers & Software ➙ Manual Update ➙ BIOS/UEFI.
Step 3. Follow the on-screen instructions to download and install the latest UEFI BIOS update package.
https://pcsupport.lenovo.com and select the entry for your computer.
From the Windows Update
Follow the instructions to update the UEFI BIOS from the Windows Update.
Step 1. Type Settings in the Windows search box and press Enter.
Step 2. Click Windows Update ➙ Check for updates.
Step 3. If a BIOS update package appears in your update list, click Download or Install to initiate the
update.
Install a Windows operating system and drivers
Follow the instructions to install a Windows operating system and device drivers.
Microsoft
Windows version, check the compatibility list for the Windows version. For details, go to
support.lenovo.com/solutions/windows-support
Attention:
• It is recommended that you update your operating system through official channels. Any unofficial update
might cause security risks.
• The process of installing a new operating system deletes all the data on your internal storage drive,
including the data stored in a hidden folder.
®
constantly makes updates to the Windows operating system. Before installing a particular
https://
.
Before you install a Windows operating system, do the following:
44
ThinkPad T14s Gen 5 User Guide
Page 51

1. For models with a Trusted Platform Module, if you are using the Windows BitLocker® Drive Encryption
feature, ensure that you have disabled the feature. You can re-enable the feature after the operating
system installation is complete.
2. Ensure that the security-related features (Security Chip, Virtualization, and Secure Boot) are enabled.
To access the security-related features in the UEFI BIOS menu:
a. Restart the computer. When the logo screen is displayed, press F1 to enter the UEFI BIOS menu.
b. Select Security and select the security-related features. Then, press Enter. Ensure that the security-
related features are enabled.
c. Press F10 to save the settings and exit.
3. Network connection is required to the installation of Windows 11.
Step 1. Connect the drive that contains the operating system installation program to the computer. To
create the installation media, refer to
Step 2. Restart the computer. When the logo screen is displayed, press F1 to enter the UEFI BIOS menu.
Step 3. Select Startup ➙ Boot to open the Boot Priority Order submenu.
Step 4. Change the startup sequence:
a. Select the drive that contains the operating system installation program, such as USB HDD.
Then, press Esc.
b. Press F10 to save the setting and exit.
Attention: After you change the startup sequence, ensure that you select the correct device
during a copy, save, or format operation. If you select the wrong device, the data on that
device might be erased or overwritten.
https://support.microsoft.com/windows.
Note: If the system cannot boot from the selected drive, disable Secure Boot and try again.
Ensure that you re-enable the feature after the operating system installation is complete.
Step 5. Follow the on-screen instructions to install the device drivers and necessary programs.
Install device drivers
You should download the latest driver for a component when you notice poor performance from that
component or when you added a component. This action might eliminate the driver as the potential cause of
a problem. Download and install the latest driver by one of the following methods.
• Open the Vantage app to check the available update packages. Select the update packages you want,
and then follow the on-screen instructions to download and install the packages.
• Go to
• Apply Windows Update to get the latest updates, such as the security patches. Then, follow the on-screen
https://pcsupport.lenovo.com and select the entry for your computer. Then, follow the on-screen
instructions to download and install necessary drivers and software.
instructions to download and install the necessary updates.
Chapter 5. Configure advanced settings 45
Page 52

46 ThinkPad T14s Gen 5 User Guide
Page 53

Chapter 6. CRU replacement
This section provides instructions on how to replace Customer Replaceable Units (CRUs).
Customer Replaceable Units (CRUs) are parts that can be replaced by the customer. The computers contain
the following types of CRUs:
• Self-service CRUs: Refer to parts that can be replaced easily by customer themselves or by trained
service technicians at an additional cost.
• Optional-service CRUs: Refer to parts that can be replaced by customers with a greater skill level.
Trained service technicians can also provide service to replace the parts under the type of warranty
designated for the customer’s machine.
If you intend on installing a CRU, Lenovo will ship the CRU to you. CRU information and replacement
instructions are shipped with your product and are available from Lenovo at any time upon request. You
might be required to return the defective part that is replaced by the CRU. When return is required: (1) return
instructions, a prepaid shipping label, and a container will be included with the replacement CRU; and (2) you
might be charged for the replacement CRU if Lenovo does not receive the defective CRU within thirty (30)
days of your receipt of the replacement CRU. For full details, see the Lenovo Limited Warranty
documentation at
CRU list
The following is a list of CRUs of your computer.
https://www.lenovo.com/warranty/llw_02.
Self-service CRUs
• ac power adapter*
• Power cord*
• Nano-SIM-card tray*
Optional-service CRUs
• Base cover assembly
• M.2 solid-state drive
• M.2 solid-state drive bracket*
• Wireless WAN module*
• Wireless WAN module bracket*
* for selected models
Note: Replacement of any parts not listed above, including the built-in rechargeable battery, should be done
by a qualified repair technician or by ensuring that you carefully follow all instructions provided by Lenovo.
You can also find Lenovo-authorized repair facilities by going to
more information.
https://support.lenovo.com/partnerlocator for
Before you replace any CRU
Before replacing any CRU, ensure that you disable Fast Startup first and then disable the built-in battery.
© Copyright Lenovo 2024 47
Page 54

Disable Fast Startup
Follow the instructions to disable Fast Startup.
Step 1. Go to Control Panel and view by Large icons or Small icons.
Step 2. Click Power Options, and then click Choose what the power buttons do on the left pane.
Step 3. Click Change settings that are currently unavailable at the top.
Step 4. If prompted by User Account Control (UAC), click Yes.
Step 5. Clear the Turn on fast startup check box, and then click Save changes.
Disable the built-in battery
Follow the instructions to disable the built-in battery.
Step 1. Restart your computer. When the logo screen is displayed, immediately press F1 to enter the UEFI
BIOS menu.
Step 2. Select Config ➙ Power. The Power submenu is displayed.
Step 3. Select Disable Built-in Battery and press Enter.
Step 4. Select Yes in the Setup Confirmation window.
The built-in battery is disabled and the computer turns off automatically.
Wait three to five minutes to let the computer cool.
Note: If your computer cannot enter the UEFI BIOS menu, you cannot disable the built-in battery. To ensure
safety when you replace a CRU, it is recommended to do the following:
• For the built-in battery connected to the system board with cables: Disconnect the battery cables.
• For the CRUable built-in battery connected to the system board with comb connectors: Remove the
battery. For the removal procedure, refer to the built-in battery replacement instructions in this
documentation.
• For the non-CRUable built-in battery connected to the system board with comb connectors: Call Lenovo
Customer Support Center for help.
To check whether the built-in battery on your computer is a CRU, see the CRU list in Chapter 6 “CRU
replacement” on page 47.
Replace a CRU
Follow the instructions to replace a CRU.
Base cover assembly
Follow the instructions to replace the base cover assembly.
Before you start, read
Note: Do not remove the base cover assembly when your computer is connected to ac power. Otherwise,
there might be a risk of short circuits.
Generic Safety and Compliance Notices and print the following instructions.
For access, do the following:
1. Disable the built-in battery. See “Disable the built-in battery” on page 48.
48
ThinkPad T14s Gen 5 User Guide
Page 55
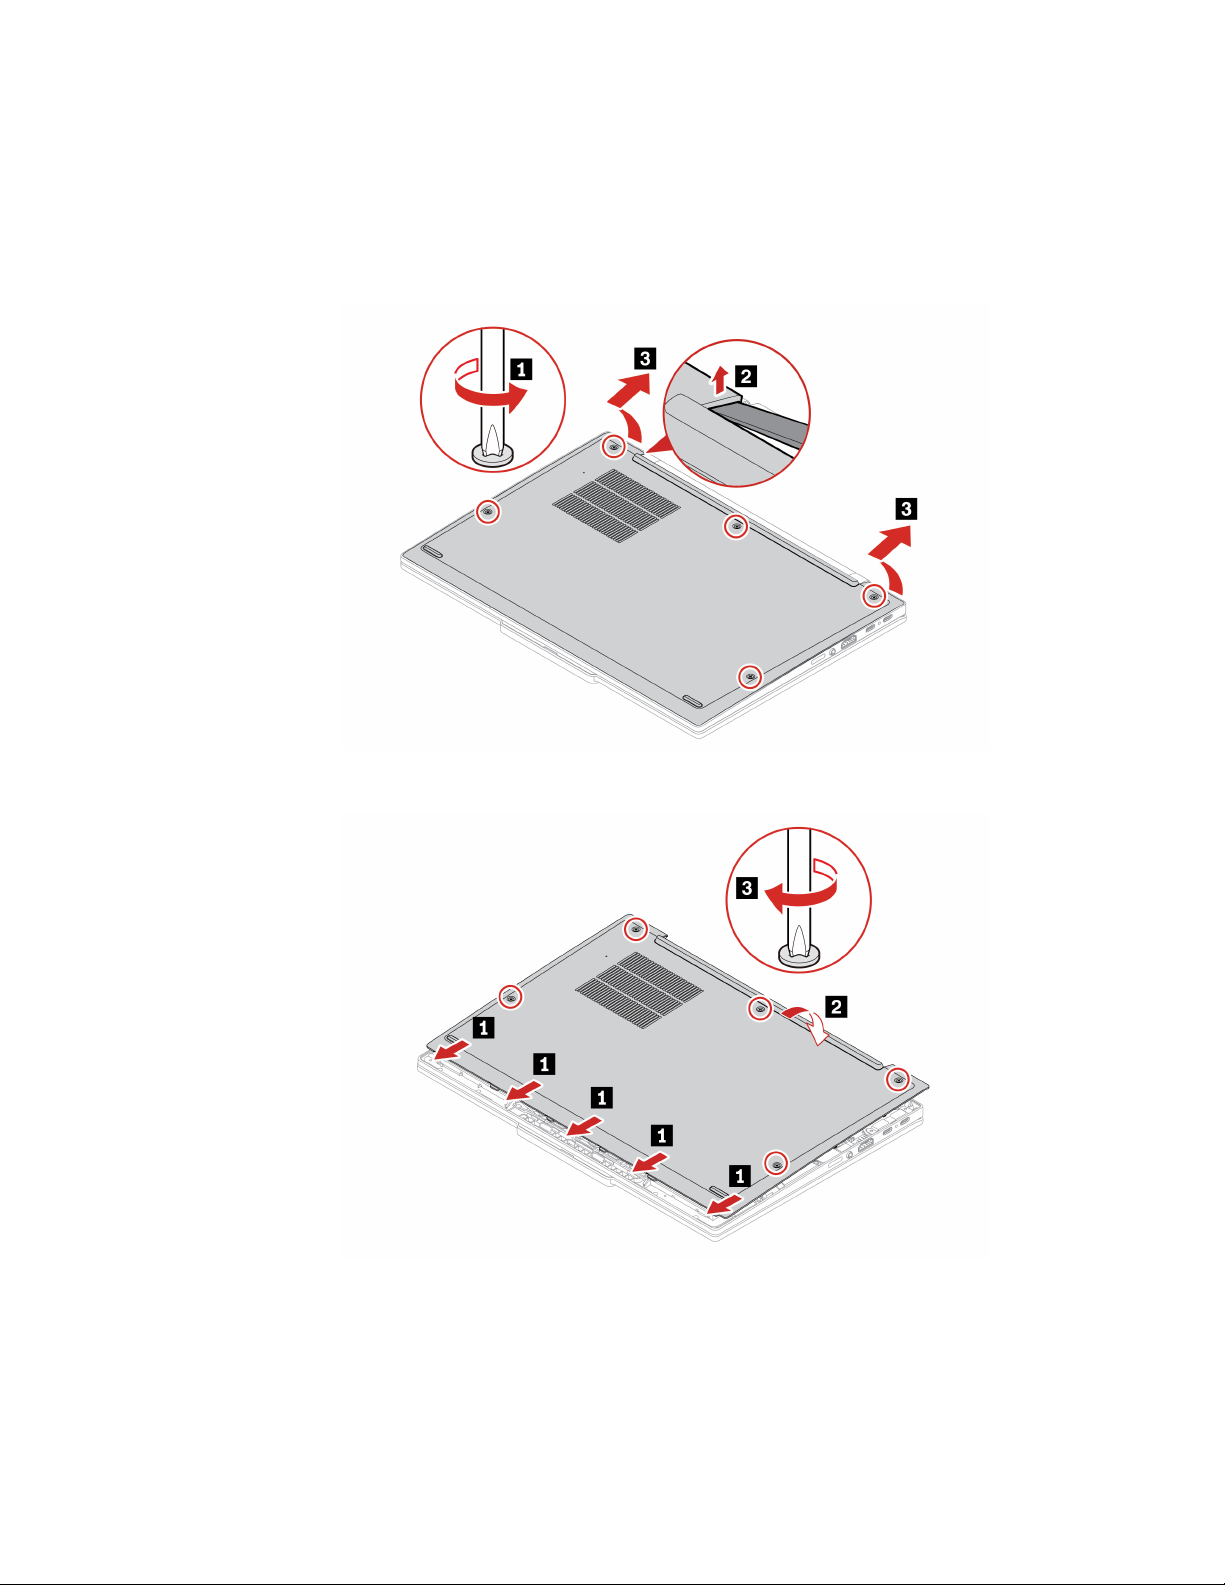
2. Turn off the computer and disconnect the computer from ac power and all connected cables.
3. Close the computer display and turn over the computer.
Step 1. Remove the base cover assembly as shown below.
Note: Prepare a pry tool to release the hooks.
Step 2. Install the base cover assembly as shown below.
If the computer does not start up after you reinstall the base cover assembly, disconnect the ac power
adapter and then reconnect it to the computer.
Chapter 6. CRU replacement 49
Page 56

M.2 solid-state drive and M.2 solid-state drive bracket (for selected models)
Follow the instructions to replace the M.2 solid-state drive.
Before you start, read
Attention:
• If you replace a M.2 solid-state drive, you might need to install a new operating system. For details on how
to install a new operating system, see “Install a Windows operating system and drivers” on page 44.
• If your computer is installed with the color profiles, you need to reinstall the color profiles after installing a
new operating system, see “Color calibration (for selected models)” on page 27.
The M.2 solid-state drive is sensitive. Inappropriate handling might cause damage and permanent loss of
data.
When handling the M.2 solid-state drive, observe the following guidelines:
• Replace the M.2 solid-state drive only for repair. The M.2 solid-state drive is not designed for frequent
changes or replacement.
• Before replacing the M.2 solid-state drive, make a backup copy of all the data that you want to keep.
• Do not apply pressure to the M.2 solid-state drive.
• Do not touch the contact edge or circuit board of the M.2 solid-state drive. Otherwise, the M.2 solid-state
drive might get damaged.
• Do not subject the M.2 solid-state drive to physical shocks or vibration. Put the M.2 solid-state drive on a
soft material, such as cloth, to absorb physical shocks.
For access, do the following:
1. Disable the built-in battery. See “Disable the built-in battery” on page 48.
2. Turn off the computer and disconnect the computer from ac power and all connected cables.
3. Close the computer display and turn over the computer.
4. Remove the base cover assembly. See “Base cover assembly” on page 48.
Generic Safety and Compliance Notices and print the following instructions.
Type 1
Step 1. Remove the M.2 solid-state drive as shown below.
50
ThinkPad T14s Gen 5 User Guide
Page 57
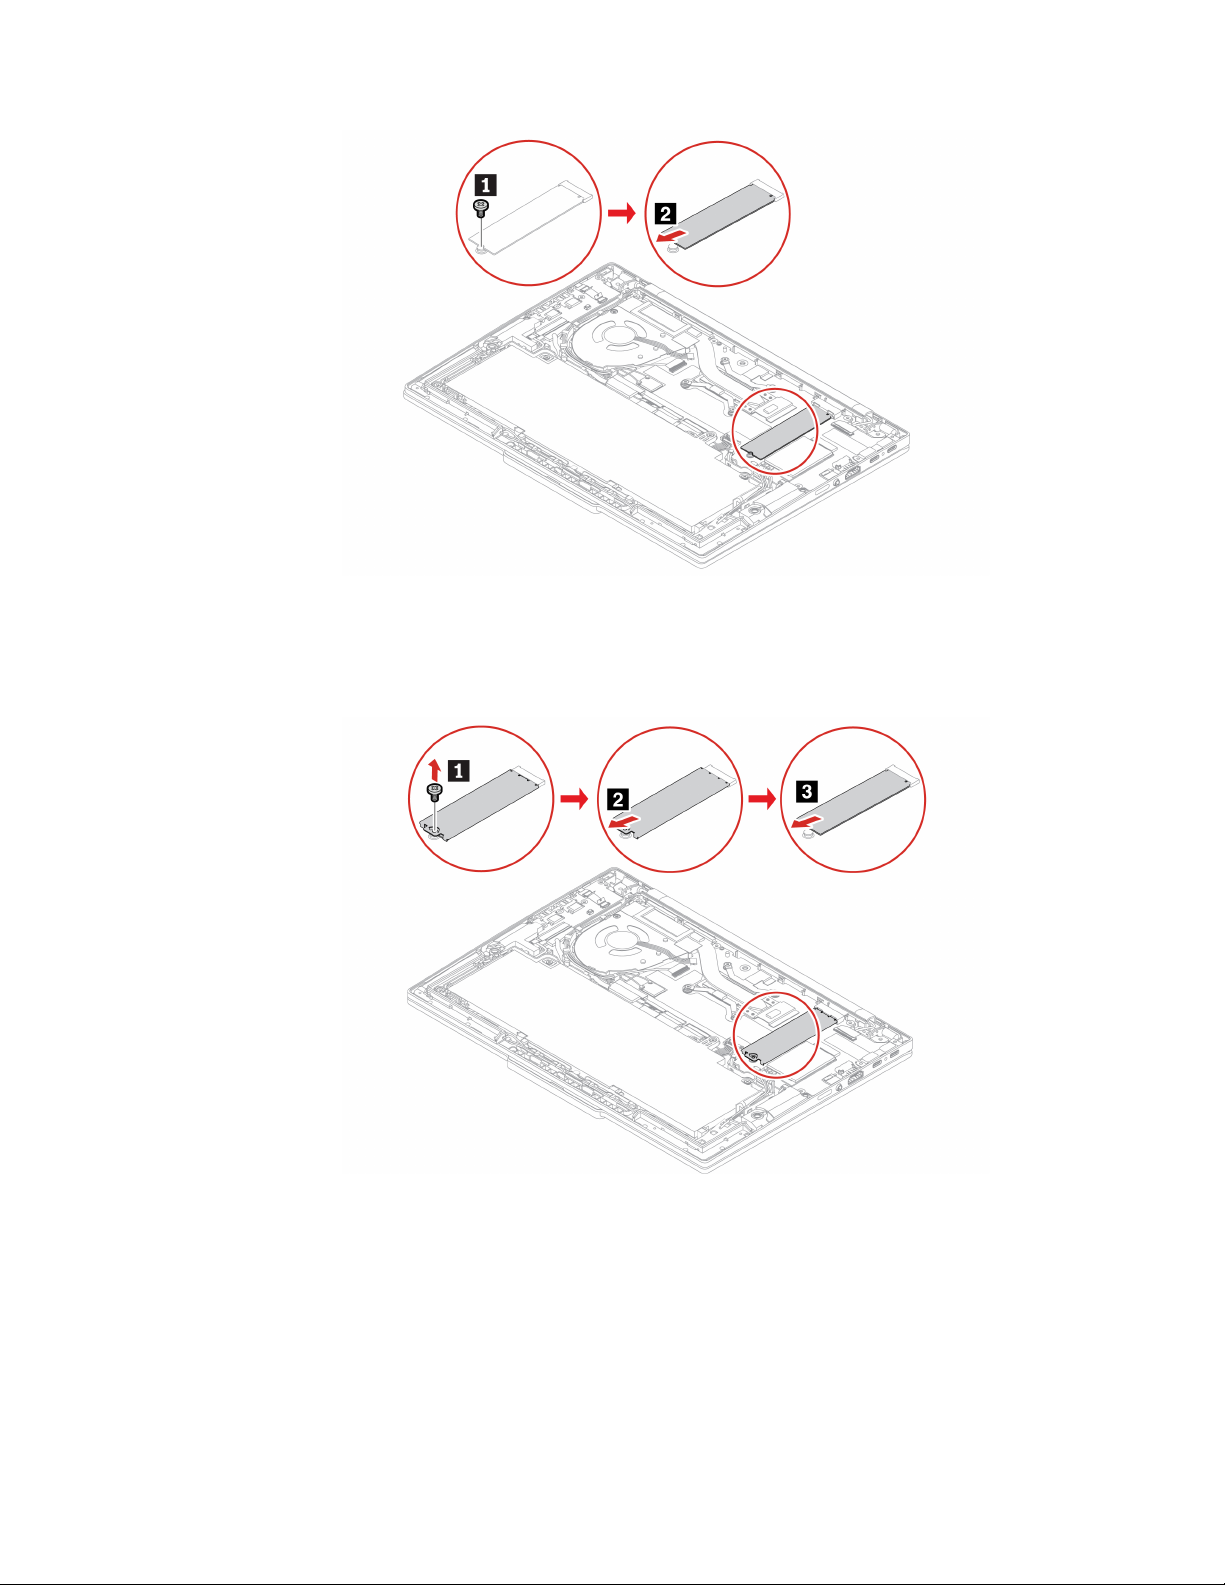
Step 2. Install the M.2 solid-state drive in reverse order.
Type 2
Step 1. Remove the M.2 solid-state drive and M.2 solid-state drive bracket as shown below.
Step 2. Install the M.2 solid-state drive and M.2 solid-state drive bracket in reverse order.
Wireless WAN module and wireless WAN module bracket (for selected models)
Follow the instructions to replace the Wireless WAN module and WAN module bracket.
The following information is only for the computer with user-installable modules. Ensure that you use only a
Lenovo-authorized wireless module specifically tested for this computer model. Otherwise, the computer will
generate an error-code beep sequence when you turn on the computer.
Chapter 6. CRU replacement 51
Page 58
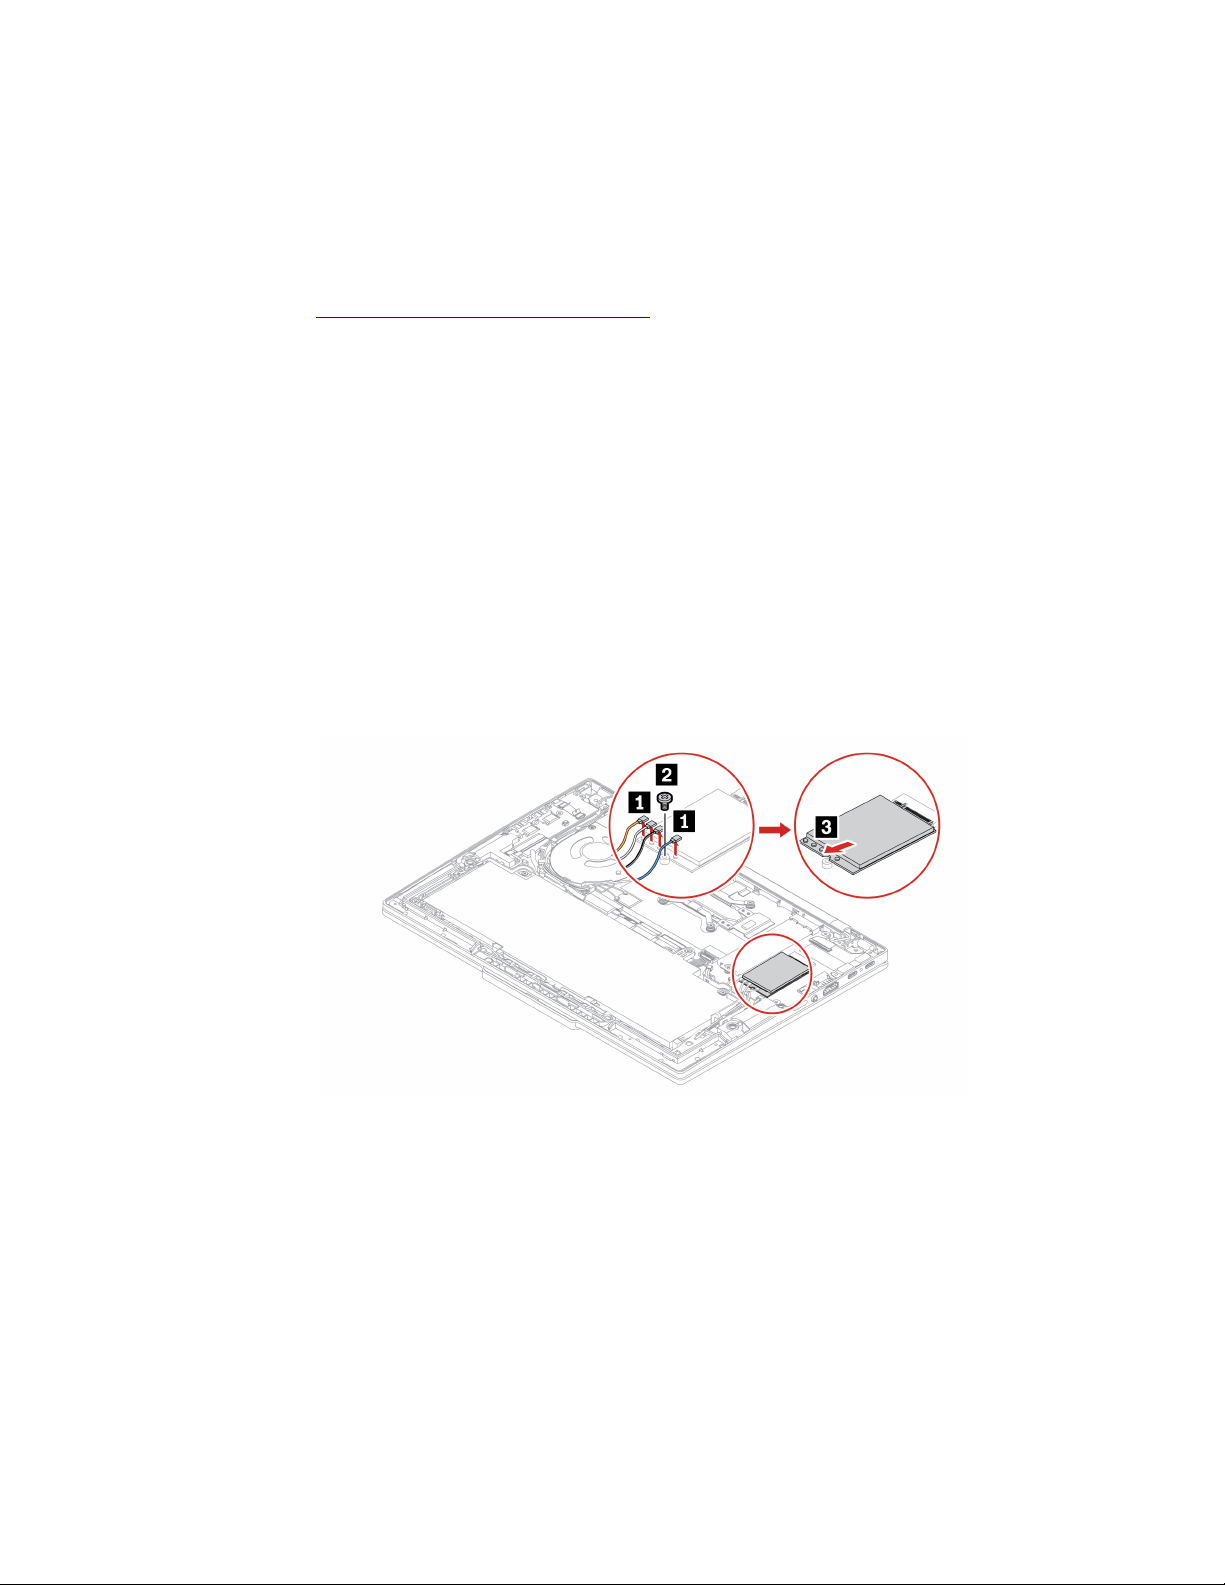
Notes:
• Wireless WAN ready model identifies that product has preinstalled wireless WAN antennas and allows a
user-installable wireless WAN module.
• Only wireless WAN model or wireless WAN ready model is allowed to install the optional Lenovo wireless
WAN module.
Before you start, read
Attention: Do not touch the contact edge of the wireless WAN module. Otherwise, the wireless WAN
module might get damaged.
For access, do the following:
1. Disable the built-in battery. See “Disable the built-in battery” on page 48.
2. Turn off the computer and disconnect the computer from ac power and all connected cables.
3. Close the computer display and turn over the computer.
4. Remove the base cover assembly. See “Base cover assembly” on page 48.
Generic Safety and Compliance Notices and print the following instructions.
5G models
Step 1. Remove the Wireless WAN module as shown below.
Note: A Mylar film might cover the wireless WAN module. To access the wireless WAN module,
peel off the film first.
Step 2. Install the Wireless WAN module in reverse order.
4G models
Step 1. Remove the Wireless WAN module and wireless WAN module bracket as shown below.
Note: A Mylar film might cover the wireless WAN module. To access the wireless WAN module,
peel off the film first.
52
ThinkPad T14s Gen 5 User Guide
Page 59
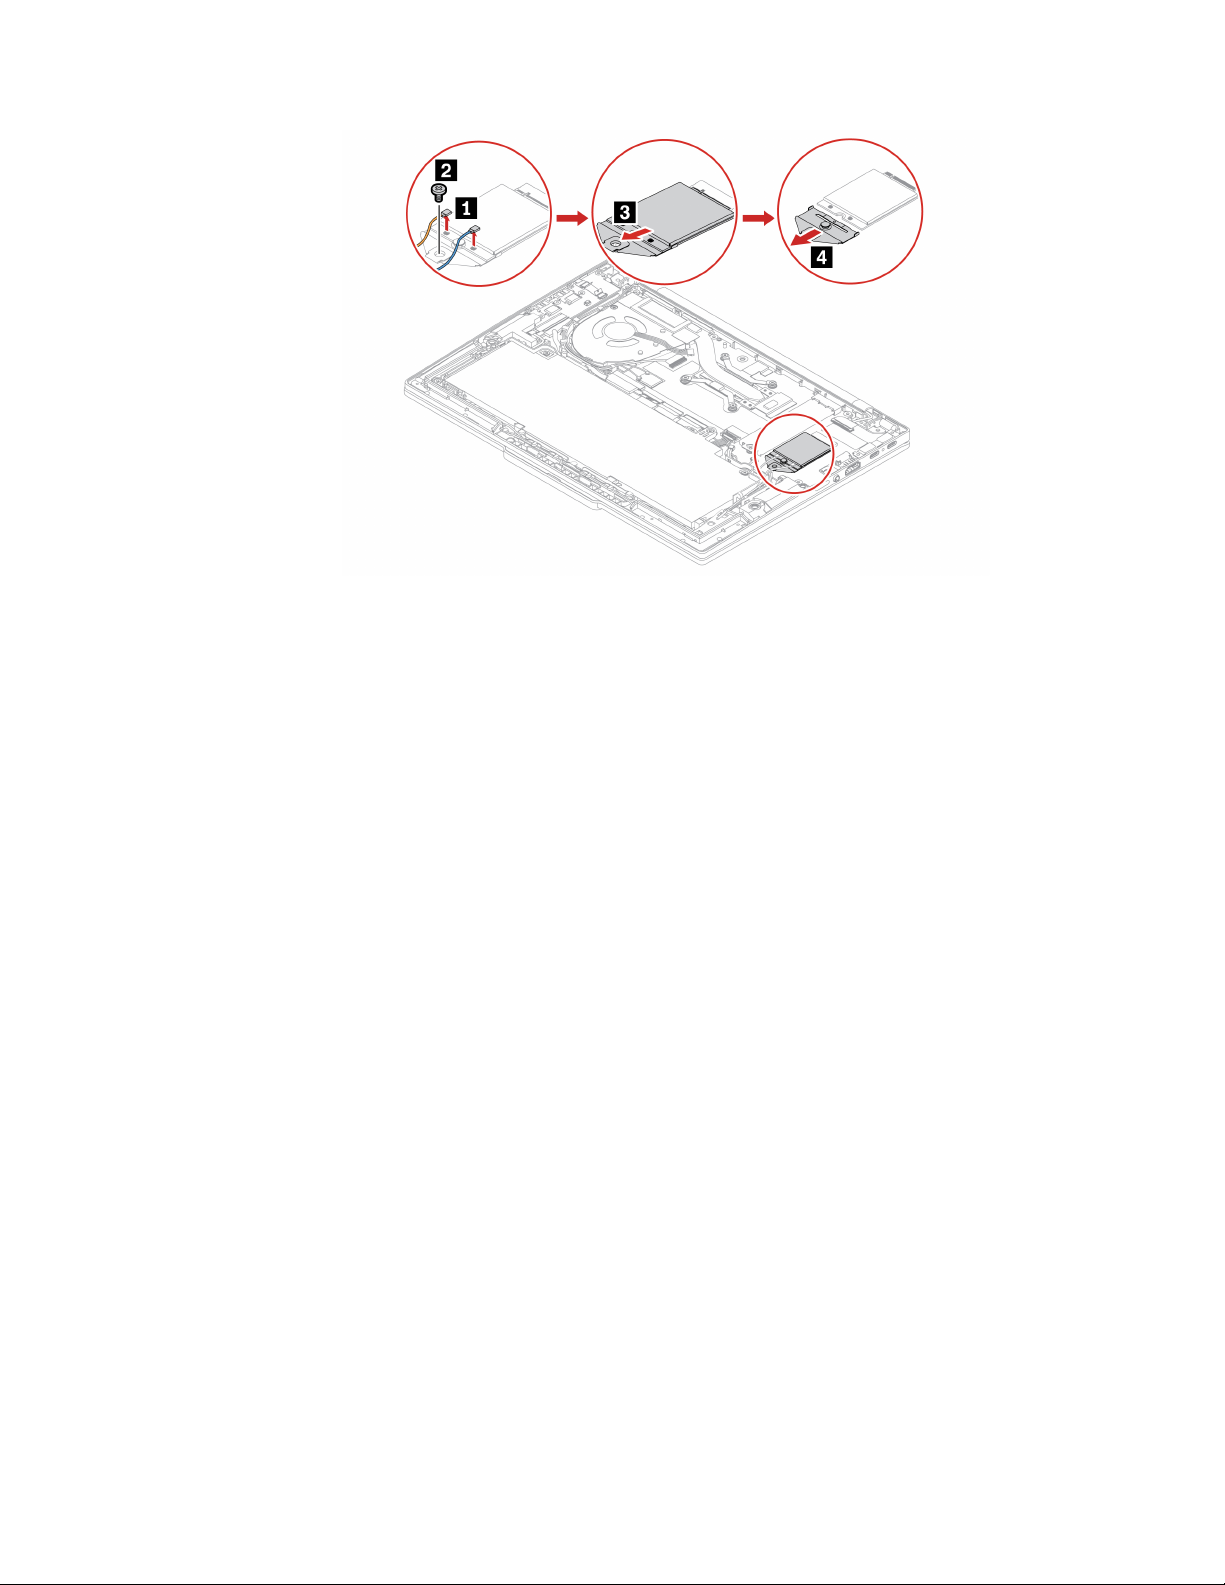
Step 2. Install the Wireless WAN module and wireless WAN module bracket in reverse order.
Note: During installation, ensure that you connect the cables with different colors to the corresponding
connectors on the module according to the illustrations above: the orange cable to the connector labeled
ORANGE, the blue cable to the connector labeled BLUE, the white and grey cable to the connector labeled
WHITE GREY, and the black and grey cable to the connector labeled BLACK GREY.
Chapter 6. CRU replacement 53
Page 60

54 ThinkPad T14s Gen 5 User Guide
Page 61
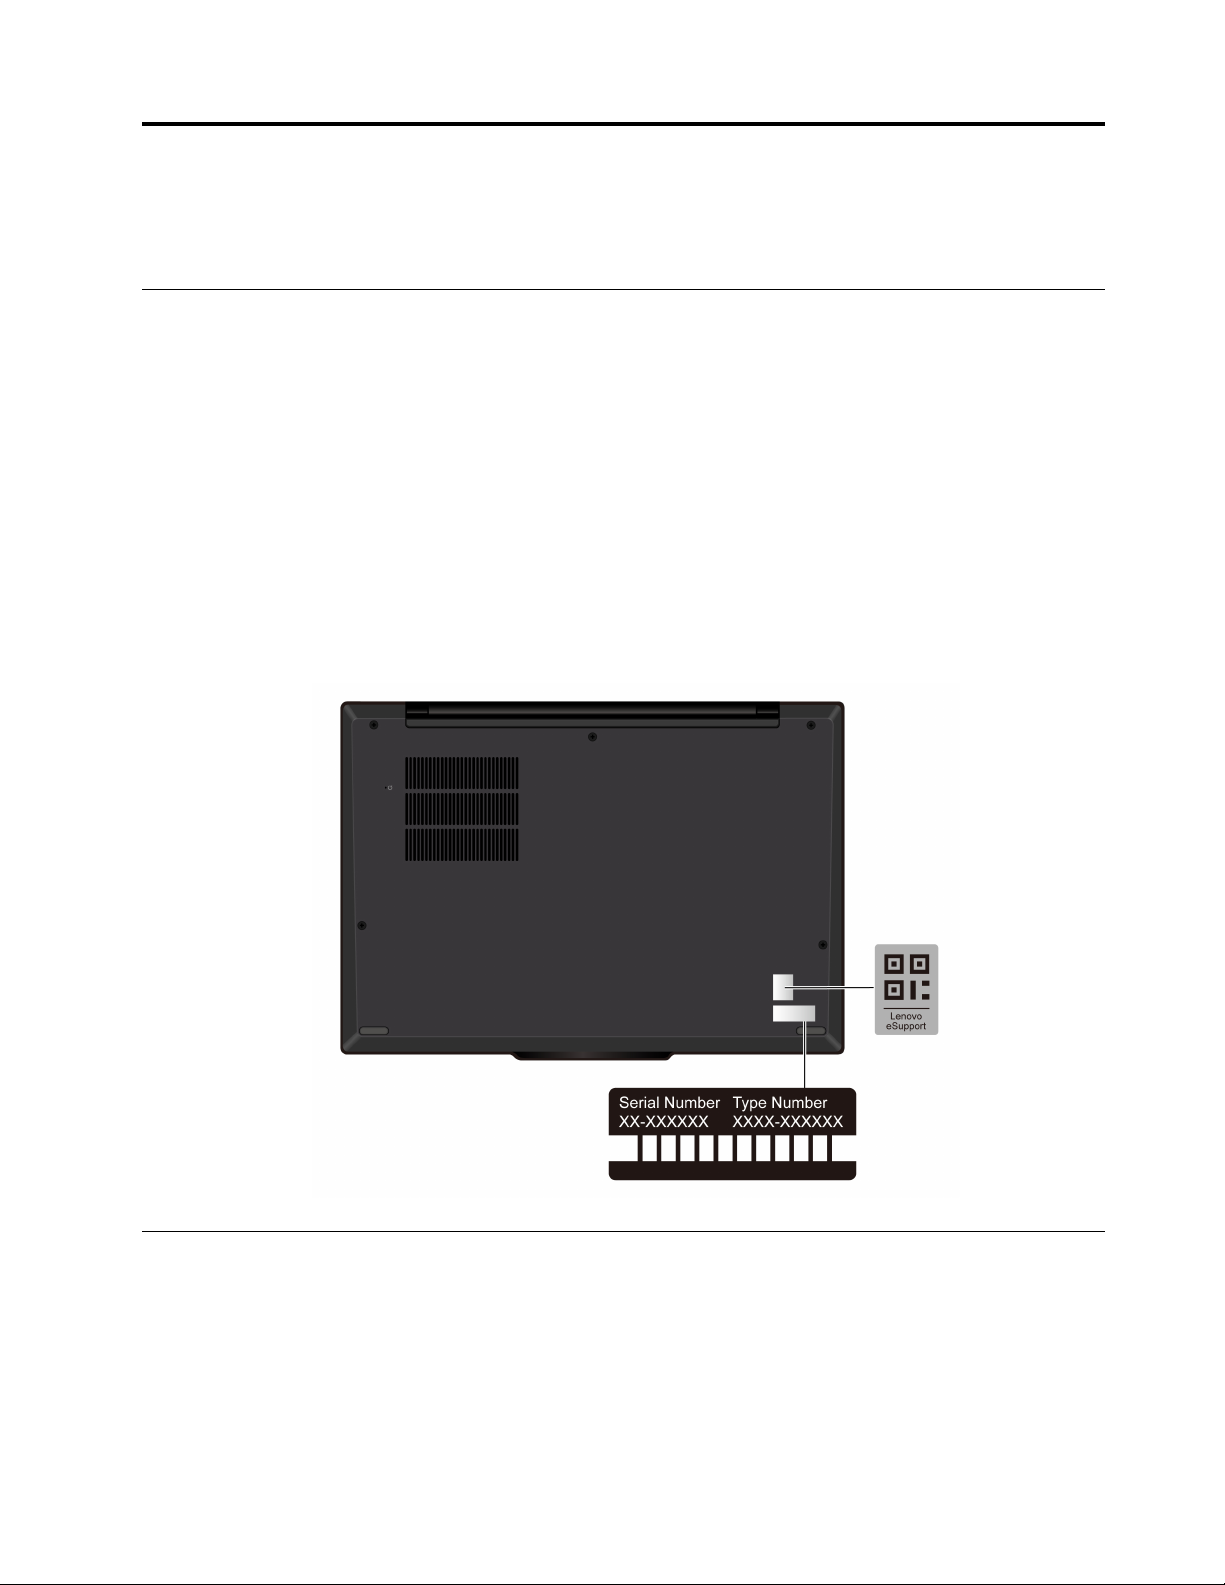
Chapter 7. Help and support
This chapter provides solutions to some hardware and software issues.
Find your service QR code and serial number
This topic helps you find service QR code and serial number.
Scan the QR code on the base cover assembly to view the following information:
• Your product information and warranty status
• The latest Lenovo-verified drivers and software
• Troubleshooting and diagnosing solutions when hardware or software issue is encountered
• Customer support center and e-ticket entry for professional support
You can find your serial number via:
• Dashboard or Device in the Vantage app
• Serial-number label of your computer (shown as below illustration)
Frequently asked questions
Browse through these FAQs to find answers to commonly raised questions.
© Copyright Lenovo 2024 55
Page 62

Question
Solution
How do I check my repair status?
How do I check my warranty
status?
How do I access Control Panel?
How do I turn off my computer?
How do I partition my storage
drive?
What do I do if my computer
stops responding?
1. Go to Lenovo Support Web site at
https://pcsupport.lenovo.com.
2. Search by the product name, and navigate to the Repair Status section.
3. Enter the serial number to check the repair status.
• Go to Lenovo Support Web site at
warrantylookup#/
.
https://pcsupport.lenovo.com/
• From the Vantage app.
Type Control Panel in the Windows search box and then press Enter.
Open the Start menu and click
https://support.lenovo.com/solutions/ht503851
Power. Then, click Shut down.
1. Press and hold the power button until the computer turns off. Then, restart
the computer.
2. If step 1 does not work:
• For models with an emergency reset hole: Insert a straightened paper clip
into the emergency reset hole to cut off power supply temporarily. Then,
restart the computer with ac power connected.
• For models without an emergency reset hole:
– For models with the removable battery, remove the removable battery
and disconnect all power sources. Then, reconnect to ac power and
restart the computer.
– For models with the built-in battery, disconnect all power sources.
Press and hold the power button for about seven seconds. Then,
reconnect to ac power and restart the computer.
What do I do if I spill liquid on the
computer?
How do I enter the UEFI BIOS
menu?
1. Carefully unplug the ac power adapter and turn off the computer immediately.
The more quickly you stop the current from passing through the computer the
more likely you will reduce damage from short circuits.
Attention: Although you might lose some data or work by turning off the
computer immediately, leaving the computer on might make your computer
unusable.
2. Wait until you are certain that all the liquid is dry before turning on your
computer.
CAUTION:
Do not try to drain out the liquid by turning over the computer. If your
computer has keyboard drainage holes on the bottom, the liquid will be
drained out through the holes.
Restart the computer. When the logo screen is displayed, press F1 to enter the
UEFI BIOS menu.
56 ThinkPad T14s Gen 5 User Guide
Page 63

Question
Where can I get the latest device
drivers and the UEFI BIOS?
What do I do if the LCD goes
black when I turn on the
computer?
Solution
• From the Vantage app: Open the Vantage app, and then click Device ➙
System Update.
• From the Lenovo support Web site:
1. Go to
https://pcsupport.lenovo.com and select the entry for your computer.
2. Click Driver & Software ➙ Manual Update.
• From the Windows Update:
1. Type Settings in the Windows search box and press Enter.
2. Click Windows Update ➙ Check for updates.
If update package is available, follow the on-screen instructions to download and
install the package.
1. Run the LCD Self-Test.
a. Ensure that the computer is connected to the ac power adapter.
b. Press the power button for about seven seconds to turn off the computer.
c. Press Fn, left Ctrl, and the power button at the same time.
d. Check if the computer displays five solid colors in sequence across the
entire screen:
• If yes, the LCD functions normally.
• If no, the LCD malfunctions.
e. The test lasts for about 20 seconds and then exits automatically. You also
can press the power button to exit the test.
2. Contact Lenovo for support and provide the test result. See “Call Lenovo” on
page 63.
Chapter 7. Help and support 57
Page 64

Error messages
An error message is displayed for each error detected in POST or system operation. Refer to the error
messages in the table below to solve your computer problems.
If you see a message that is not included in the following table, record the error message first, then shut
down the computer and call Lenovo for help. See “Lenovo Customer Support Center” on page 64.
Message
0190: Critical low-battery error
0191: System Security - Invalid
remote change requested
0199: System Security - Security
password retry count exceeded.
0271: Check Date and Time
settings.
210x/211x: Detection/Read error
on HDDx/SSDx
Error: The non-volatile system
UEFI variable storage is nearly
full.
Solution
The computer turned off because the battery power is low. Connect the ac power
adapter to the computer and charge the batteries.
The system configuration change has failed. Confirm the operation and try again.
This message is displayed when you enter a wrong supervisor password more
than three times. Confirm the supervisor password and try again.
The date or the time is not set in the computer. Enter the UEFI BIOS menu and set
the date and time.
The storage drive is not working. Reinstall the storage drive. If the problem still
exists, replace the storage drive.
Note:
This error indicates that the operating system or programs cannot create, modify,
or delete data in the non-volatile system UEFI variable storage due to insufficient
storage space after POST.
The non-volatile system UEFI variable storage is used by the UEFI BIOS and by
the operating system or programs. This error occurs when the operating system
or programs store large amounts of data in the variable storage. All data needed
for POST, such as UEFI BIOS setup settings, chipset, or platform configuration
data, are stored in a separate UEFI variable storage.
Press F1 after the error message is displayed to enter the UEFI BIOS menu. A
dialog asks for confirmation to clean up the storage. If you select “Yes”, all data
that were created by the operating system or programs will be deleted except
global variables defined by the Unified Extensible Firmware Interface
Specification. If you select “No”, all data will be kept, but the operating system or
programs will not be able to create, modify, or delete data in the storage.
If this error happens at a service center, Lenovo-authorized service personnel will
clean up the non-volatile system UEFI variable storage using the preceding
solution.
Battery-charge LED indicator diagnosis
The battery-charge LED indicator (hereafter referred to as LED indicator) blinks to help you diagnose and
solve some computer problems.
58 ThinkPad T14s Gen 5 User Guide
Page 65
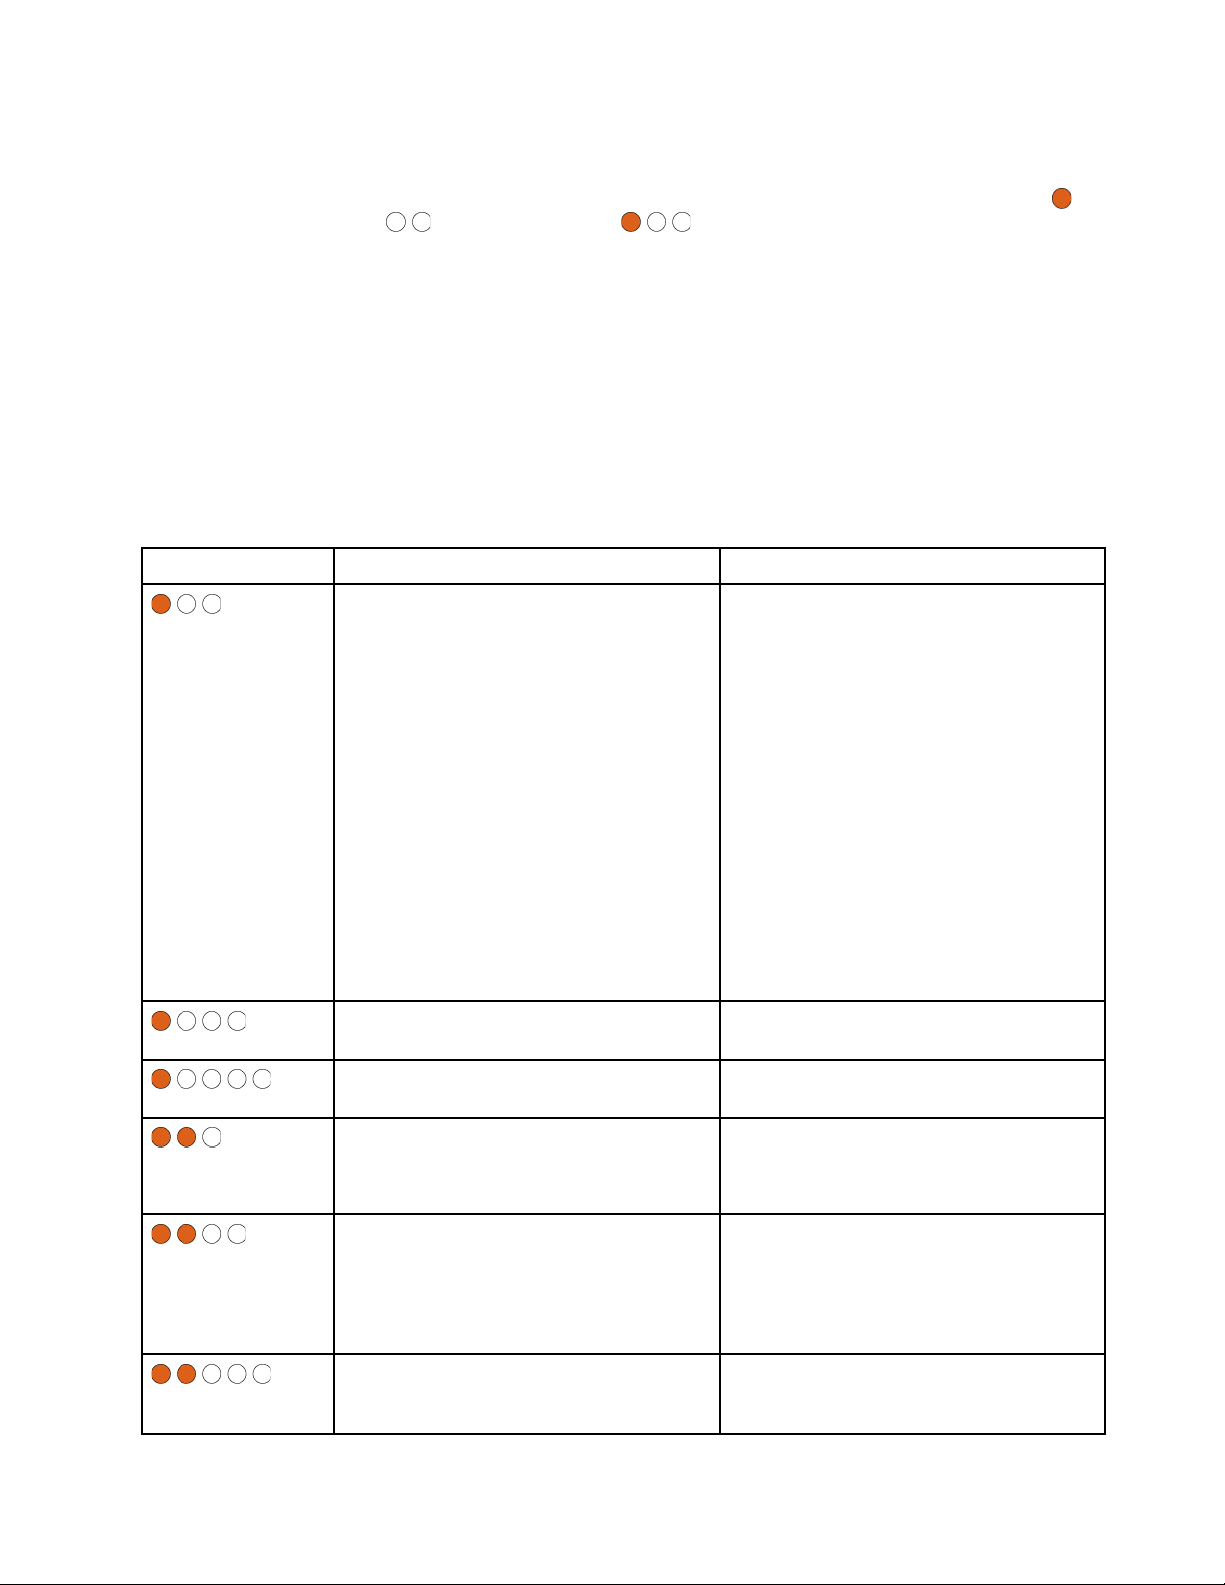
Indicator blinking patterns
The LED indicator blinks amber first and then white continually, consisting of different blinking patterns. Each
blinking pattern corresponds to an error code. For example, when the LED indicator blinks amber once
and then blinks white twice , the blinking pattern corresponds to error code 0001.
Notes:
• The LED indicator blinks automatically only when the error in the following table occurs.
• The LED indicator blinks continually until the computer turns off. If you need to interrupt the process,
press power button for a few seconds.
• We recommend that you speak to our Customer Support Center before attempting to service the
computer yourself so that you can be directed to the correct documentation and repair information. It
might be recommended to have a Lenovo-authorized service provider repair your computer depending on
the complexity of the error or fault.
Refer to the blinking patterns and error codes in the table below to solve your computer problems.
Blinking patterns Error codes Solutions
0001: Reset error (platform reset not deasserted)
0002: Internal bus error
0003: Non-Volatile Memory programming
error in system power circuit
0282: Memory module error
1. Remove the ac power adapter and the
removable battery if your computer has
one. Then, reset the computer by doing
one of the following:
• For models with the emergency-reset
hole, insert a straightened paper clip
into the emergency reset hole to cut
off power supply temporarily. Then,
restart the computer with ac power
connected.
• For models without the emergency-
reset hole, press and hold the power
button for about seven seconds.
Then, reconnect to all power
resources and restart the computer.
2. If step 1 does not work, replace the
system board (service provider only).
Replace the system board (service provider
only).
Replace the system board (service provider
only).
1. Reinstall or replace the memory module.
2. If step 1 does not work, replace the
system board (service provider only).
0283: PCI resource error
0284: TCG-compliant functionality-related
error (might be the BIOS code validation
failure)
1. Remove PCIe devices (the M.2 card,
PCIe card, and so on) (service provider
only).
2. If step 1 does not work, replace the
system board (service provider only).
Replace the system board (service provider
only).
Chapter 7. Help and support 59
Page 66
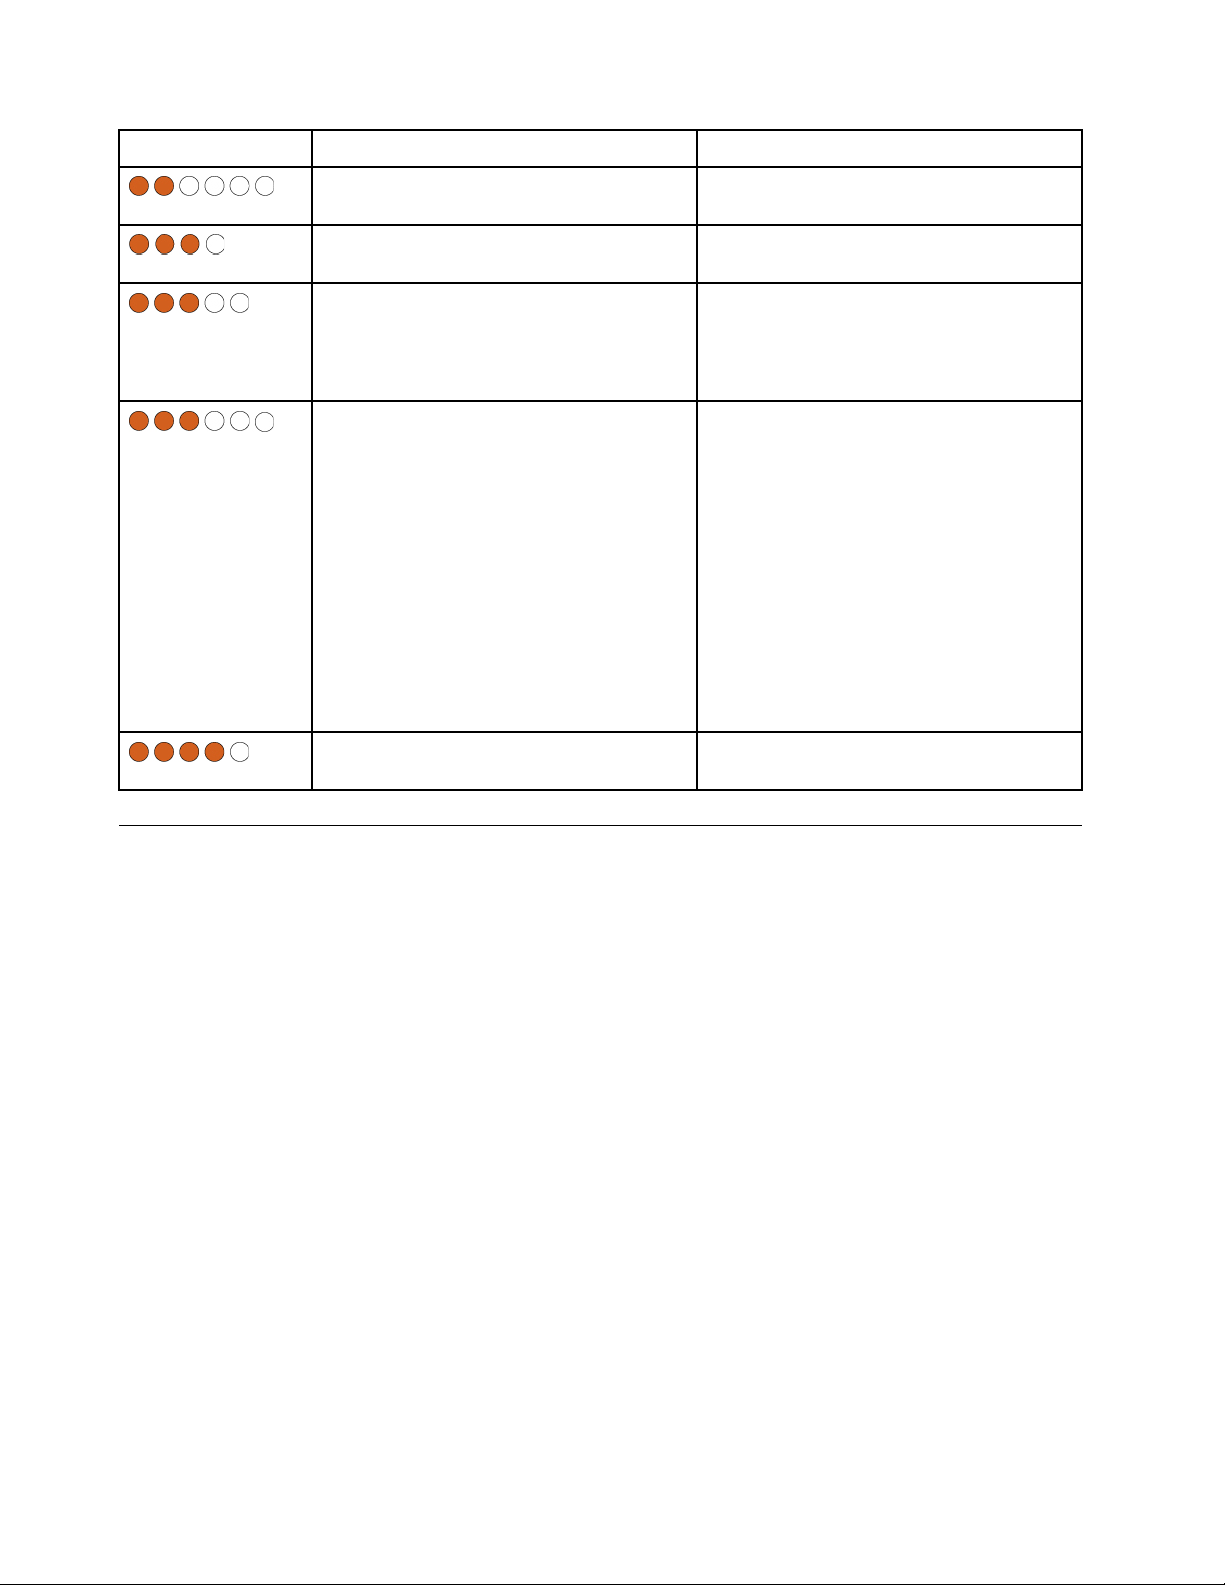
Blinking patterns Error codes Solutions
0285: TCG-compliant functionality-related
error (might be the TPM initialization failure)
0286: Integrated graphics error Replace the system board (service provider
0287: Discrete graphics error
0288: Computer display error
0281: General embedded controller error Replace the system board (service provider
Replace the system board (service provider
only).
only).
1. Reinstall or replace the discrete graphics
card (service provider only).
2. If step 1 does not work, replace the
system board (service provider only).
1. Reconnect the display cable on both the
system board side and the computer
display side (service provider only) and
check the LCD panel.
2. If step 1 does not work, connect an
external display to your computer and
check the status (customer or service
provider).
• If the external display works, replace
the LCD panel (service provider only).
• If the external display does not work,
replace the system board (service
provider only).
only).
Lenovo Memory Self Repair (for Intel models only)
Lenovo Memory Self Repair (hereafter referred to as repair tool) enables you to repair memory single-bit or
single-row failure with internal redundant resources.
It is recommended that you use the repair tool in the following situations:
• The operating system is unstable, such as having blue screen error or system crash.
• Any application operates abnormally, such as crashing or quitting unexpectedly.
• Any test result indicates memory-related errors.
Note: The repair tool can be used only when your computer can be turned on normally.
Step 1. Restart the computer.
Step 2. When the logo screen is displayed, trigger the repair tool by one of the following methods:
• Press F4.
• Press Enter to enter Startup Interrupt Menu, and then press F4.
• Press F12 to enter App Menu, and then select Lenovo Memory Self Repair.
Step 3. Read through the important information in the displayed window and click Yes to run the tool.
Step 4. Check the repair result on the pop-up dialog box. There are three types of results.
• Memory Repaired: it means that the memory failure is detected and repaired.
• Memory failure detected but repair was unsuccessful: it means that the memory failure is
detected but cannot be repaired.
60
ThinkPad T14s Gen 5 User Guide
Page 67

• No failure detected: it means that no memory failure is detected.
If the issue persists, you can try again or contact Lenovo for additional support.
Step 5. Click Continue to turn on the computer.
Related topics
“Call Lenovo” on page 63
Diagnose and troubleshoot your computer
This section provides introduction to a set of diagnostics and troubleshooting tools at Lenovo Support Web
site, the Vantage app, and in your computer. They can help you diagnose common software and hardware
issues.
The following table lists these diagnostics tools and the recommended conditions for each tool.
Diagnostics tool
Troubleshoot and diagnose at Lenovo Support Web site
Hardware scan
UEFI Diagnostics tool
Recommended scenario
You want to have an online troubleshooting or scan of
hardware and drivers on your computer.
• Your computer is installed with the Vantage app.
• You want to perform basic examinations of the
hardware components.
• You cannot log in to the operating system.
• Your computer cannot connect to the network.
Troubleshoot and diagnose at Lenovo Support Web site
Lenovo provides two different diagnosing options to help you identify and resolve problems on your
computer.
Step 1. Go to
Step 2. Click Troubleshoot & Diagnose and select from the following two options depending on your
https://www.pcsupport.lenovo.com/ and enter your product name in the search box.
needs.
If you are unsure of the problem with your computer, it is recommended that you select Easy and
follow on-screen instructions to get your firmware updated and obtain the hardware status.
If you have identified the problem on your computer, you can select Custom and follow on-screen
instructions to resolve the problem.
Notes:
• Before launching any automatic diagnosing process, a pop-up window will prompt you to install
Lenovo Service Bridge. Lenovo Service Bridge helps to connect your computer with Lenovo
diagnosing tools.
• Lenovo Support Web site makes periodic updates of the sections to keep improving your
experience with your computer. The Web site interface and descriptions of sections might be
different from that on your actual interface.
If solutions cannot resolve problems on your computer, you can follow on-screen instructions to submit an eticket or contact Lenovo for professional assistance.
Chapter 7. Help and support 61
Page 68

Hardware scan
Hardware scan is an effective hardware testing tool to help you identify existing hardware issues.
To run the Hardware scan:
Step 1. Type Vantage in the Windows search box and then press Enter.
Step 2. Click Hardware scan or Support ➙ Hardware scan.
Step 3. Select QUICK SCAN or CUSTOMIZE and then follow the on-screen instructions to run the
hardware scan.
Notes:
• The Quick Scan tool contains a pre-selected suite of tests that performs basic examinations of
the hardware components found in the system. The Customize tool enables you to select one or
several hardware components to perform the examinations.
• Before selecting QUICK SCAN, click Refresh Modules to ensure that the list of hardware
components is the components currently available for the computer.
Step 4. If any hardware failure is detected, the result varies depending on the warranty status and varies by
country or region. Follow the on-screen instructions to resolve the issue.
UEFI Diagnostics tool
UEFI Diagnostics tool enables you to view system information and identify hardware issues when you cannot
log in to the operating system, or the computer cannot connect to the network.
To use the UEFI Diagnostics tool:
Step 1. Connect your computer to ac power.
Step 2. Turn on your computer, and press F10 immediately to enter the UEFI Diagnostics tool.
Step 3. Follow the on-screen instructions to run the test.
Step 4. Press Esc to exit the tool. Your computer will restart immediately.
Step 5. If any hardware failure is detected and you are unable to locate and resolve the problem, you can
call Lenovo Customer Support Center. See “Call Lenovo” on page 63.
Recover your Windows operating system
When you encounter some unexpected issues with your operating system, you can choose to recover your
operating system by yourself or call Lenovo Customer Support Center.
Note: Microsoft constantly makes updates to the Windows operating system. Before installing a particular
Windows version, check the compatibility list for the Windows version. For details, go to
support.lenovo.com/solutions/ht512575
To recover your operating system
to...
Factory defaults Refer to the instructions in
.
See...
https://support.lenovo.com/
HowToCreateLenovoRecovery
https://
A previous system point Refer to the instructions in Popular Topics:
solutions/ht118590
62 ThinkPad T14s Gen 5 User Guide
https://support.lenovo.com/
Page 69

Self-help resources
Use the following self-help resources to learn more about the computer and troubleshoot problems.
Resources How to access?
Lenovo Support Web Site
https://pcsupport.lenovo.com
Tips
Lenovo Community
Accessibility information
Windows help information
https://www.lenovo.com/tips
https://forums.lenovo.com
https://www.lenovo.com/accessibility
• Open the Start menu and click Get Help.
• Use Windows Search or the Cortana
• Microsoft support Web site:
https://support.microsoft.com
®
personal assistant.
Windows label
Windows Genuine Microsoft label indicates the edition of Windows preinstalled on your computer and
whether the device is preinstalled with or licensed for genuine Windows.
Your computer might have a Windows Genuine Microsoft label affixed to its cover depending on the
following factors:
• Your geographic location
• Edition of Windows that is preinstalled
Go to
https://www.microsoft.com/howtotell/Hardware.aspx for illustrations of the various types of Genuine
Microsoft labels.
• In the People’s Republic of China, the Genuine Microsoft label is required on all computer models
preinstalled with any edition of the Windows operating system.
• In other countries and regions, the Genuine Microsoft label is required only on computer models licensed
for Windows Pro editions.
The absence of a Genuine Microsoft label does not indicate that the preinstalled Windows version is not
genuine. For details on how to tell whether your preinstalled Windows product is genuine, refer to the
information provided by Microsoft at
https://www.microsoft.com/howtotell/default.aspx.
There are no external, visual indicators of the Product ID or Windows version for which the computer is
licensed. Instead, the Product ID is recorded in the computer firmware. Whenever a Windows product is
installed, the installation program checks the computer firmware for a valid, matching Product ID to complete
the activation.
In some cases, an earlier Windows version might be preinstalled under the terms of the Windows Pro edition
license downgrade rights.
Call Lenovo
If you have tried to correct the problem yourself and still need help, you can call Lenovo Customer Support
Center.
Chapter 7. Help and support 63
Page 70

Before you contact Lenovo
Prepare the needed information before you contact Lenovo.
1. Record the problem symptoms and details:
• What is the problem? Is it continuous or intermittent?
• Any error message or error code?
• What operating system are you using? Which version?
• Which software applications were running at the time of the problem?
• Can the problem be reproduced? If so, how?
2. Record the system information:
• Product name.
• Machine type and “serial number” on page 55.
Lenovo Customer Support Center
During the warranty period, you can call Lenovo Customer Support Center for help.
Telephone numbers
For a list of the Lenovo Support phone numbers for your country or region, go to
pcsupport.lenovo.com/supportphonelist
for the latest phone numbers.
https://
Note: Phone numbers are subject to change without notice. If the number for your country or region is not
provided, contact your Lenovo reseller or Lenovo marketing representative.
Services available during the warranty period
• Problem determination - Trained personnel are available to assist you with determining if you have a
hardware problem and deciding what action is necessary to fix the problem.
• Lenovo hardware repair - If the problem is determined to be caused by Lenovo hardware under warranty,
trained service personnel are available to provide the applicable level of service.
• Engineering change management - Occasionally, there might be changes that are required after a product
has been sold. Lenovo or your reseller, if authorized by Lenovo, will make selected Engineering Changes
(ECs) that apply to your hardware available.
Services not covered
• Replacement or use of parts not manufactured for or by Lenovo or nonwarranted parts
• Identification of software problem sources
• Configuration of UEFI BIOS as part of an installation or upgrade
• Changes, modifications, or upgrades to device drivers
• Installation and maintenance of network operating systems (NOS)
• Installation and maintenance of programs
For the terms and conditions of the Lenovo Limited Warranty that apply to your Lenovo hardware product,
go to:
•
https://www.lenovo.com/warranty/llw_02
• https://pcsupport.lenovo.com/warrantylookup
64 ThinkPad T14s Gen 5 User Guide
Page 71

Purchase accessories or additional services
This topic provides instructions on how to purchase accessories or additional services.
Accessories
Lenovo has a number of hardware accessories and upgrades to help expand the functionality of your
computer. Accessories include memory modules, storage devices, network cards, power adapters,
keyboards, mice, and so on. You can purchase Lenovo accessories at
Additional services
During and after the warranty period, you can purchase additional services from Lenovo at
pcsupport.lenovo.com/warrantyupgrade
Service availability and service names might vary by country or region.
.
https://www.lenovo.com/accessories.
https://
Accessibility features
Lenovo is committed to making information technology accessible to everyone, including those with hearing,
vision, or mobility limitations. Lenovo supports accessibility features in the following ways to help all users
better engage with Lenovo products.
Accessible documentation
Lenovo documentation is designed to meet users' accessibility needs. Users can read the documentation
with assistance as needed. For example:
• Text and images are in high contrast. Color contrast can enhance the visual experience. In this mode, all
contents are highlighted to be more visible.
• Text is logical and readable. Images are also readable with alternative text provided. A screen reader can
enhance the hearing or listening experience. In this mode, all contents are clearer and easier to
understand.
• Text is large and clear, making it easier to read. A magnifier can enlarge the text to improve readability.
For more information, watch the video at:
https://support.lenovo.com/docs/pc_pub_accessibility
Accessible product design
Lenovo product design also supports accessibility features.
Note: The accessibility features vary by product. Depending on the product model, some accessibility
features listed below might not be applicable to the product. To get the most up-to-date accessibility
information for the product, go to
users can find phone numbers for their country or region from
• Keyboards
Lenovo keyboards support various accessibility features. For example:
– Tactile markings on some keys for easier identification
Tactile markings provide all users with a way to find keys without looking at the keyboard. Lenovo
provides bumps for the following keys:
https://www.lenovo.com/accessibility. For additional support from Lenovo,
https://support.lenovo.com/supportphonelist.
– Function keys: F2 and F3
– Control keys: Fn and Insert
Chapter 7. Help and support 65
Page 72
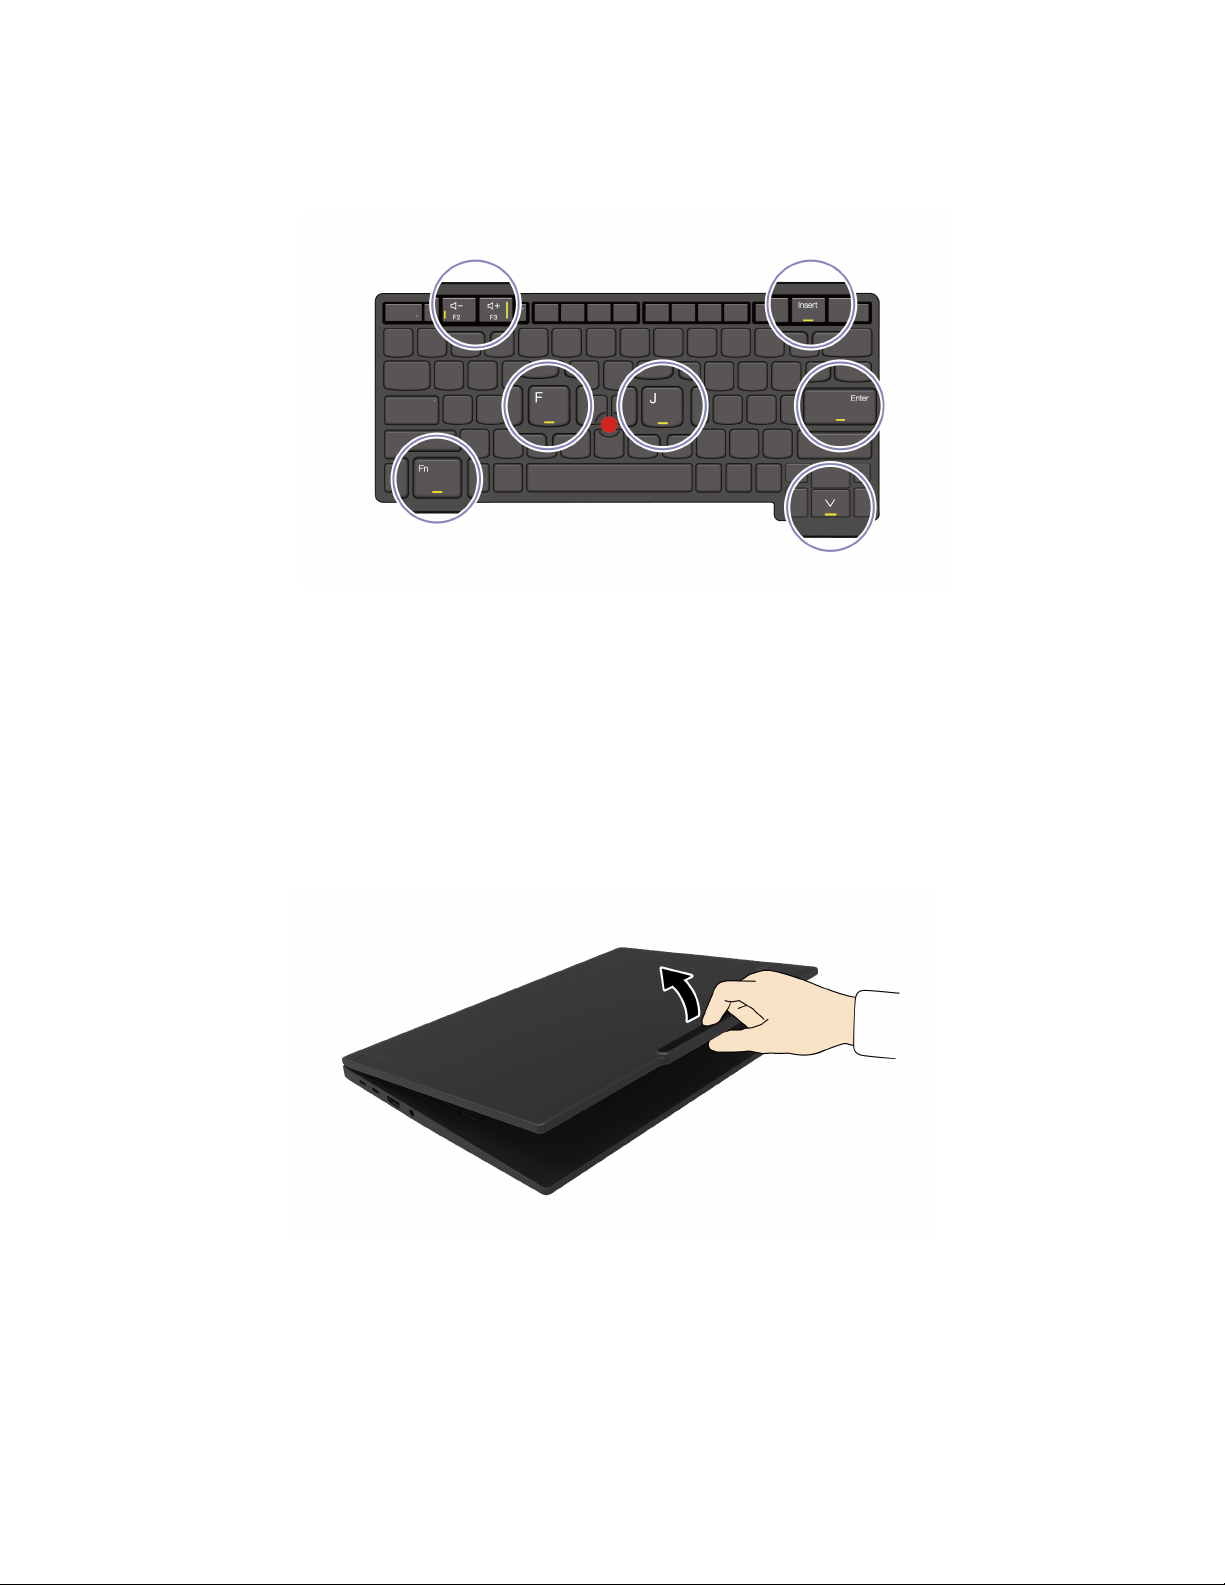
– Typing keys: F, J, and Enter
– Navigation key: Down arrow
– Consistent layout of keyboards for easier use
– Appropriate spacing between keys for typing efficiency
– Sufficient contrast of keys, controls, and labels for better visibility
– On-screen notification or lighted notification for some keys for ease of use
– Keys and controls that can be reached and operated using one hand and require minimal dexterity for
ease of use
• Prominent Communication Bar
As a welcome addition to your computer, the communication bar incorporates front facing camera options
and microphone with 360-degree coverage. It helps you orient computer and open laptop easily.
• Alternative TrackPoint pointing device
The TrackPoint pointing device comes with TrackPoint pointing stick and TrackPoint Three Buttons. It's a
useful alternative for users to interact with the computer without using a traditional mouse. To learn how to
use the TrackPoint pointing device, see “Use the TrackPoint pointing device” on page 13
• Industry-standard connectors
The industry-standard connectors on Lenovo products enable better compatibility with peripheral
devices.
66
ThinkPad T14s Gen 5 User Guide
Page 73

• Operating systems
The accessibility features of the operating systems can be configured to assist users in the following
ways:
– Vision features, such as text size and visual effect settings, make the screen contents easier to see.
– Hearing features, such as audio and caption settings, make the screen contents easier to hear.
– Interaction features, such as speech and eye-control settings, make the product easier to control.
To access the accessibility features of the Windows 11 operating system, go to Start ➙ Settings ➙
Accessibility.
Chapter 7. Help and support 67
Page 74

68 ThinkPad T14s Gen 5 User Guide
Page 75

Appendix A. Compliance information
This chapter provides the compliance information of your computer.
For compliance information, refer to Regulatory Notice at
and Compliance Notices at
https://pcsupport.lenovo.com/docs/generic_notices.
https://pcsupport.lenovo.com and Generic Safety
Certification-related information
This section provides certification-related information, such as product name and machine type.
Product name
• ThinkPad T14s Gen 5
• ThinkPad T14s Gen 5 5G
1
for mainland China only
1
Further compliance information related to your product is available at
Compliance ID Machine type(s)
TP00152A 21LS and 21LT
https://www.lenovo.com/compliance.
Locate the UltraConnect wireless antennas
Your computer has an UltraConnect™ wireless antenna system. You can enable wireless communication
wherever you are.
© Copyright Lenovo 2024 69
Page 76
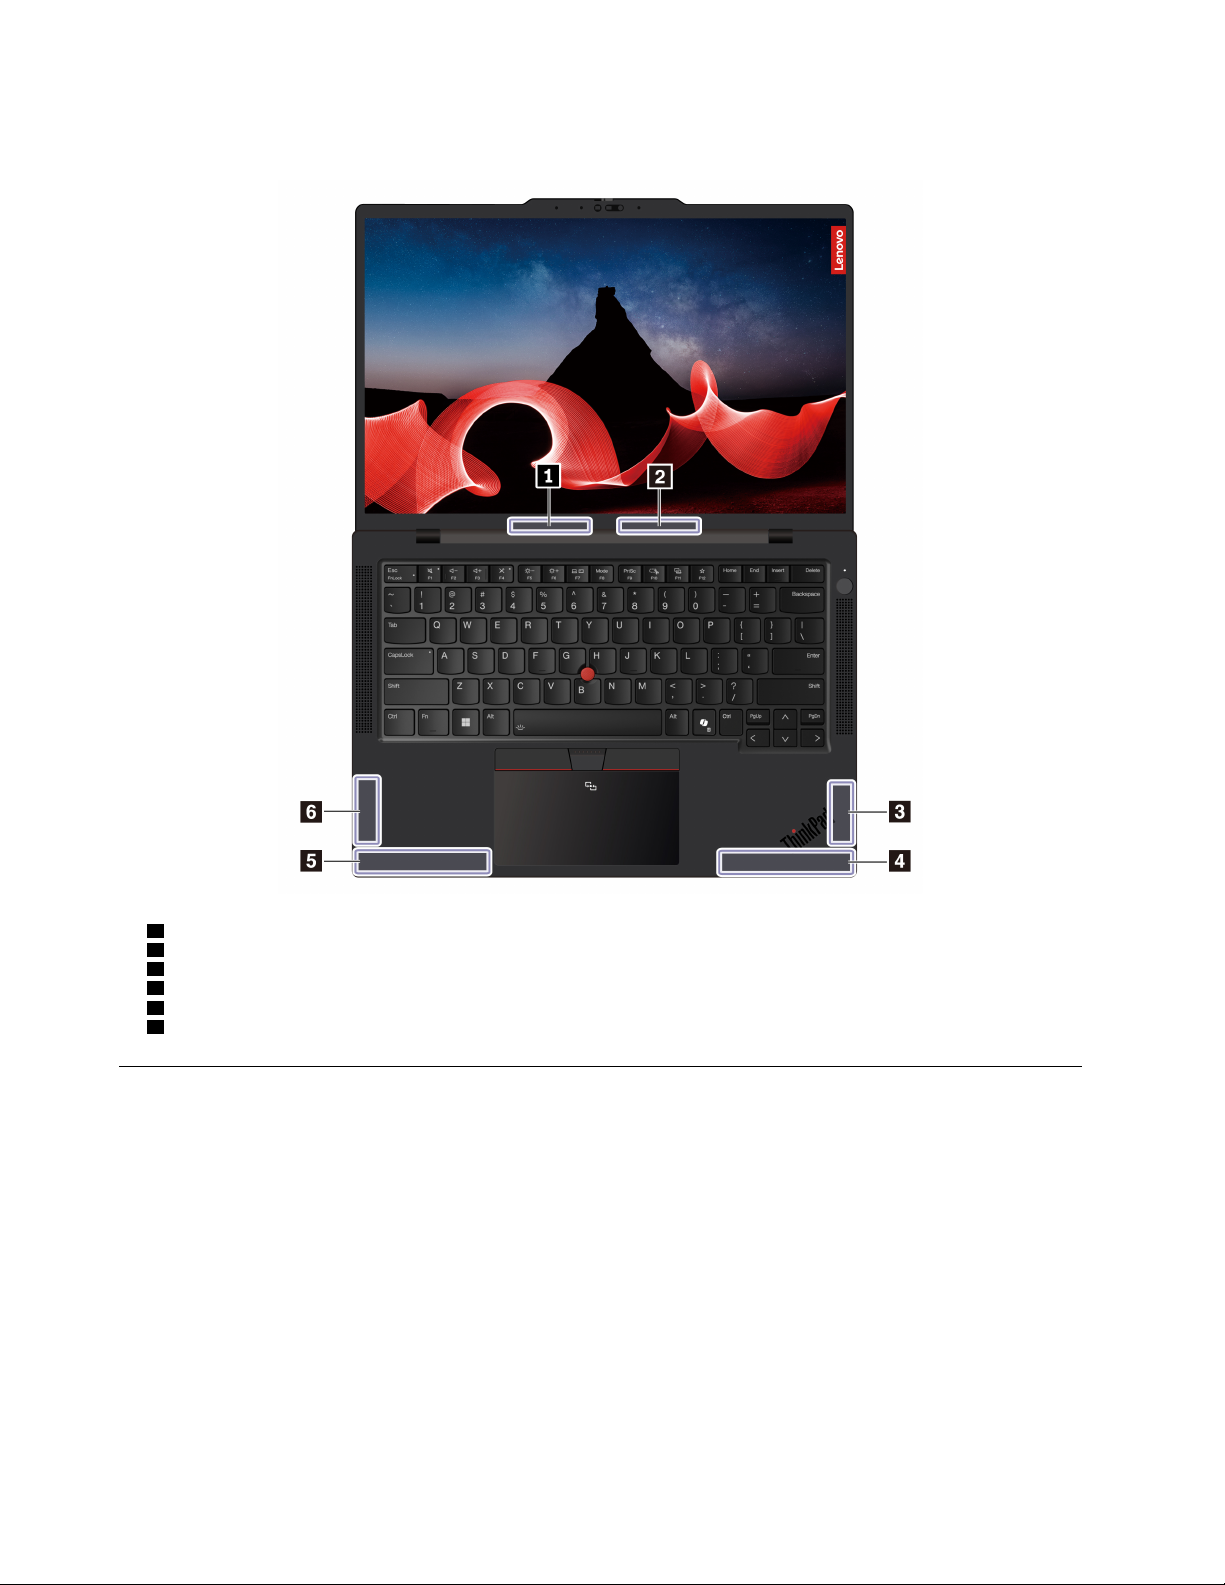
The following illustration shows the antenna locations on your computer:
1 Wireless LAN antenna (auxiliary)
2 Wireless LAN antenna (main)
3 Wireless WAN antenna (MIMO1, for selected models)
4 Wireless WAN antenna (main, for selected models)
5 Wireless WAN antenna (auxiliary, for selected models)
6 Wireless WAN antenna (MIMO2, for selected models)
Operating environment
This section provides information about the operating environment of your computer.
Maximum altitude (without pressurization)
3048 m (10 000 ft)
Temperature
• Operating: 5°C to 35°C (41°F to 95°F)
• Storage and transportation in original shipping packaging: -20°C to 60°C (-4°F to 140°F)
• Storage without packaging: 5°C to 43°C (41°F to 109°F)
Note: When you charge the battery, its temperature must be no lower than 10°C (50°F).
70
ThinkPad T14s Gen 5 User Guide
Page 77

Relative humidity
• Operating: 8% to 95% at wet-bulb temperature 23°C (73°F)
• Storage and transportation: 5% to 95% at wet-bulb temperature 27°C (81°F)
Appendix A. Compliance information 71
Page 78

72 ThinkPad T14s Gen 5 User Guide
Page 79

Appendix B. Notice for USB connector name update
The USB Implementers Forum published a revision of the guideline for USB connector names in September,
2022. Lenovo follows the revised guideline and updates USB connector names accordingly. You can refer to
the table below for naming update details.
Current name Previous name
USB-A connector (Hi-Speed USB) USB-A 2.0 connector
USB-A connector (USB 5Gbps) USB-A 3.2 Gen 1 connector
USB-A connector (USB 10Gbps) USB-A 3.2 Gen 2 connector
USB-A connector (USB 5Gbps, Always On USB) Always on USB-A 3.2 Gen 1 connector
USB-A connector (USB 10Gbps, Always On USB) Always on USB-A 3.2 Gen 2 connector
USB-C connector (USB 5Gbps) USB-C (3.2 Gen 1) connector
USB-C connector (USB 10Gbps) USB-C (3.2 Gen 2) connector
USB-C connector (USB 20Gbps) USB 3.2 Gen 2x2
USB-C connector (USB4 20Gbps) USB 4 Gen 2x2
USB-C connector (USB4 40Gbps) USB-C (USB 4) connector
USB-C connector (Thunderbolt 3) USB-C (Thunderbolt 3) connector
USB-C connector (Thunderbolt 4) USB-C (Thunderbolt 4) connector
© Copyright Lenovo 2024 73
Page 80

74 ThinkPad T14s Gen 5 User Guide
Page 81

Appendix C. Notices and trademarks
Notices
Lenovo may not offer the products, services, or features discussed in this document in all countries. Consult
your local Lenovo representative for information on the products and services currently available in your
area. Any reference to a Lenovo product, program, or service is not intended to state or imply that only that
Lenovo product, program, or service may be used. Any functionally equivalent product, program, or service
that does not infringe any Lenovo intellectual property right may be used instead. However, it is the user's
responsibility to evaluate and verify the operation of any other product, program, or service.
Lenovo may have patents or pending patent programs covering subject matter described in this document.
The furnishing of this document does not give you any license to these patents. You can send license
inquiries, in writing, to:
Lenovo (United States), Inc.
8001 Development Drive
Morrisville, NC 27560
U.S.A.
Attention: Lenovo Director of Licensing
LENOVO PROVIDES THIS PUBLICATION "AS IS" WITHOUT WARRANTY OF ANY KIND, EITHER EXPRESS
OR IMPLIED, INCLUDING, BUT NOT LIMITED TO, THE IMPLIED WARRANTIES OF NON-INFRINGEMENT,
MERCHANTABILITY OR FITNESS FOR A PARTICULAR PURPOSE. Some jurisdictions do not allow
disclaimer of express or implied warranties in certain transactions, therefore, this statement may not apply to
you.
Changes are made periodically to the information herein; these changes will be incorporated in new editions
of the publication. To provide better service, Lenovo reserves the right to improve and/or modify the
products and software programs described in the manuals included with your computer, and the content of
the manual, at any time without additional notice.
The software interface and function and hardware configuration described in the manuals included with your
computer might not match exactly the actual configuration of the computer that you purchase. For the
configuration of the product, refer to the related contract (if any) or product packing list, or consult the
distributor for the product sales. Lenovo may use or distribute any of the information you supply in any way it
believes appropriate without incurring any obligation to you.
The products described in this document are not intended for use in implantation or other life support
applications where malfunction may result in injury or death to persons. The information contained in this
document does not affect or change Lenovo product specifications or warranties. Nothing in this document
shall operate as an express or implied license or indemnity under the intellectual property rights of Lenovo or
third parties. All information contained in this document was obtained in specific environments and is
presented as an illustration. The result obtained in other operating environments may vary.
Lenovo may use or distribute any of the information you supply in any way it believes appropriate without
incurring any obligation to you.
Any references in this publication to non-Lenovo Web sites are provided for convenience only and do not in
any manner serve as an endorsement of those Web sites. The materials at those Web sites are not part of the
materials for this Lenovo product, and use of those Web sites is at your own risk.
© Copyright Lenovo 2024 75
Page 82

Any performance data contained herein was determined in a controlled environment. Therefore, the result
obtained in other operating environments may vary significantly. Some measurements may have been made
on development-level systems and there is no guarantee that these measurements will be the same on
generally available systems. Furthermore, some measurements may have been estimated through
extrapolation. Actual results may vary. Users of this document should verify the applicable data for their
specific environment.
This document is copyrighted by Lenovo and is not covered by any open source license, including any
®
Linux
agreement(s) which may accompany software included with this product. Lenovo may update this
document at any time without notice.
For the latest information or any questions or comments, contact or visit the Lenovo Web site:
https://pcsupport.lenovo.com
Trademarks
Lenovo, Lenovo logo, ThinkPad, ThinkPad logo, and TrackPoint are trademarks of Lenovo. Intel and
Thunderbolt are trademarks of Intel Corporation or its subsidiaries in the U.S. and/or other countries. Linux is
the registered trademark of Linus Torvalds in the U.S. and other countries. Microsoft, Windows, Windows
Hello, BitLocker,
, and Cortana are trademarks of the Microsoft group of companies. Dolby, Dolby Voice,
Dolby Vision, and Dolby Audio are trademarks of Dolby Laboratories Licensing Corporation. The terms HDMI
and HDMI High-Definition Multimedia Interface are trademarks or registered trademarks of HDMI Licensing
LLC in the United States and other countries. USB-C
®
are registered trademarks of USB Implementers
Forum. Wi-Fi and Miracast are registered trademarks of Wi-Fi Alliance. All other trademarks are the property
of their respective owners.
76
ThinkPad T14s Gen 5 User Guide
 Loading...