

Page 1

UserGuide
ThinkPadT420andT420i
Page 2

Notes:Beforeusingthisinformationandtheproductitsupports,besuretoreadthefollowing:
•SafetyandWarrantyGuide
•RegulatoryNotice
•“Importantsafetyinformation”onpagevi
•AppendixC“Notices”onpage249
TheSafetyandWarrantyGuideandtheRegulatoryNoticehavebeenuploadedontheWebsite.T oreferto
them,gotohttp://www.lenovo.com/support,andthenclickUserguides&manuals.
SecondEdition(October2011)
©CopyrightLenovo2011.
LIMITEDANDRESTRICTEDRIGHTSNOTICE:IfdataorsoftwareisdeliveredpursuantaGeneralServicesAdministration
“GSA”contract,use,reproduction,ordisclosureissubjecttorestrictionssetforthinContractNo.GS-35F-05925.
Page 3

Contents
Readthisrst..............v
Importantsafetyinformation..........vi
Conditionsthatrequireimmediateaction..vii
Safetyguidelines............vii
Chapter1.ProductOverview......1
Locatingcomputercontrols,connectors,and
indicators..................1
Frontview................2
Right-sideview..............5
Left-sideview..............7
Bottomview...............8
Rearview...............10
Statusindicators............11
Locatingimportantproductinformation.....13
Machinetypeandmodellabel.......13
FCCIDandICCerticationnumberlabel..14
CerticateofAuthenticitylabel......15
Features.................16
Specications...............17
Operatingenvironment...........18
ThinkVantageT echnologiesandsoftware....18
AccessingapplicationsinWindows7....19
AccessConnections..........20
ActiveProtectionSystem.........21
ClientSecuritySolution.........21
FingerprintSoftware...........21
LenovoSolutionCenter.........22
LenovoThinkVantageTools........22
LenovoThinkVantageToolbox.......22
MessageCenterPlus..........22
PasswordManager...........23
PowerManager............23
PresentationDirector..........23
ProductRecovery...........23
RescueandRecovery..........23
SimpleTap..............24
SystemUpdate............24
ThinkVantageGPS...........24
ThinkVantageProductivityCenter.....24
Chapter2.Usingyourcomputer...25
Registeryourcomputer...........25
Frequentlyaskedquestions.........25
Specialkeysandbuttons..........27
ThinkVantagebutton..........27
Numerickeypad............27
Functionkeycombinations........28
Volumeandmutebuttons........32
WindowskeyandApplicationkey.....33
UsingtheUltraNavpointingdevice.......34
UsingtheTrackPointpointingdevice....34
Usingthetouchpad...........36
BehavioroftheUltraNavandanexternal
mouse................37
AddingtheUltraNavicontothesystemtray.37
Powermanagement............38
Checkingbatterystatus.........38
Usingtheacpoweradapter........38
Chargingthebattery..........39
Maximizingbatterylife..........39
Managingyourbatterypower.......39
Power-savingmodes..........39
Handlingthebattery...........41
Connectingtothenetwork..........42
Ethernetconnections..........42
Wirelessconnections..........43
Usingthebuilt-inmodem.........50
Usingaprojectororexternaldisplay......69
Changingdisplaysettings........69
Connectingaprojectororexternaldisplay..70
Settingupapresentation.........74
Usingdualdisplays...........75
UsingtheNVIDIAOptimusGraphicsfeature...76
Usingaudiofeatures............77
Usinganintegratedcamera.........78
UsingtheThinkLightfeature.........78
Usingtheopticaldrive...........79
Usingthemediacardreader.........79
InsertinganExpressCard,aashmediacard,
orasmartcard.............79
RemovinganExpressCard,aashmediacard
orasmartcard.............80
Chapter3.Y ouandyourcomputer..83
Accessibilityandcomfort..........83
Ergonomicinformation..........83
Adjustingyourcomputertotyou.....84
Accessibilityinformation.........85
FullScreenMagnierfunction.......85
Travelingwithyourcomputer.........86
Traveltips...............86
Travelaccessories...........86
©CopyrightLenovo2011
i
Page 4

Chapter4.Security..........89
Attachingamechanicallock.........89
Usingpasswords..............89
Passwordsandsleep(standby)mode....90
Typingpasswords...........90
Power-onpassword...........90
Harddiskpasswords..........91
Supervisorpassword..........93
Harddisksecurity.............95
Settingthesecuritychip...........96
Usingangerprintreader..........97
Noticeondeletingdatafromyourharddiskdrive
orsolidstatedrive.............100
Usingandunderstandingrewalls.......100
Protectingdataagainstviruses........101
Chapter5.Recoveryoverview...103
Creatingandusingrecoverymedia......103
Creatingrecoverymedia.........104
Usingrecoverymedia..........104
Performingbackupandrecoveryoperations...105
Performingabackupoperation......105
Performingarecoveryoperation......105
UsingtheRescueandRecoveryworkspace...106
Creatingandusingarescuemedium......107
Creatingarescuemedium........107
Usingarescuemedium.........107
Reinstallingpreinstalledapplicationsanddevice
drivers..................108
Solvingrecoveryproblems..........109
Chapter6.Replacingdevices....111
Staticelectricityprevention..........111
Replacingthebattery............111
Replacingtheharddiskdrive.........115
Replacingthekeyboard...........119
Replacingmemory.............123
InstallingandreplacingthemSA TAsolidstate
drive...................127
InstallingandreplacingaPCIExpressMiniCard
forwirelessLAN/WiMAXconnection......130
InstallingandreplacingthePCIExpressMiniCard
forwirelessWAN..............137
ReplacingtheSIMcard...........142
Replacingthesolidstatedrive........143
Chapter7.Enhancingyour
computer..............149
FindingThinkPadoptions..........149
UsingtheserialUltrabayenhanced......149
Replacingthedevice..........149
Performingahotswap..........150
Performingawarmswap.........151
Insertingtheharddiskdriveintothe
adapter................153
Insertingtheharddiskdriveadapterintothe
bay.................155
ThinkPadPortReplicatorSeries3,ThinkPadMini
DockSeries3,ThinkPadMiniDockPlusSeries3,
andThinkPadMiniDockPlusSeries3(170W)..156
Frontview...............156
Rearview...............159
AttachingaThinkPadPortReplicatorSeries3,
ThinkPadMiniDockSeries3,ThinkPadMini
DockPlusSeries3,orThinkPadMiniDock
PlusSeries3(170W)..........162
DetachingaThinkPadPortReplicatorSeries
3,ThinkPadMiniDockSeries3,ThinkPad
MiniDockPlusSeries3,ortheThinkPadMini
DockPlusSeries3(170W)........164
Securityfeature............166
Usingthesystemlockkey........168
Chapter8.Advanced
conguration............169
Installinganewoperatingsystem.......169
Beforeyoubegin............169
InstallingWindows7..........170
InstallingWindowsVista.........171
InstallingWindowsXP..........172
Installingdevicedrivers...........175
Installingthedriverforthe4-in-1MediaCard
Reader................175
InstallingThinkPadMonitorFileforWindows
2000/XP/Vista/7............175
ThinkPadSetup..............177
Congmenu..............177
Dateandtimemenu...........178
Securitymenu.............178
Startupmenu.............179
Restartmenu.............181
ThinkPadSetupitems..........181
UpdatingyoursystemUEFIBIOS.....191
Usingsystemmanagement..........192
Systemmanagement..........192
Settingmanagementfeatures.......193
Chapter9.Preventingproblems..195
Generaltipsforpreventingproblems......195
Makingsuredevicedriversarecurrent.....196
GettingthelatestdriversfromtheWebsite..196
GettingthelatestdriversusingSystem
Update................196
Takingcareofyourcomputer.........196
Cleaningthecoverofyourcomputer....199
iiUserGuide
Page 5

Chapter10.T roubleshooting
computerproblems.........201
Diagnosingproblems............201
Troubleshooting..............202
Computerstopsresponding.......202
Spillsonthekeyboard..........203
Errormessages............203
Errorswithoutmessages.........205
Beeperrors..............206
Memoryproblems...........207
Modemandnetworking.........207
Keyboardandotherpointingdevices....214
Displayandmultimediadevices......215
Fingerprintreaderproblems........225
Batteryandpower...........225
Drivesandotherstoragedevices.....229
Softwareproblems...........231
Portsandconnectors..........231
UniversalSerialBusproblems.......232
Adockingstationorportreplicator
problem...............232
Chapter11.Gettingsupport....233
BeforeyoucontactLenovo..........233
Registeryourcomputer.........233
Downloadsystemupdates........233
Recordinformation...........233
Gettinghelpandservice...........234
Usingdiagnosticprograms........234
LenovoSupportWebsite.........234
CallingLenovo.............234
Purchasingadditionalservices........235
AppendixA.Regulatory
information.............237
Wirelessrelatedinformation.........237
LocationoftheUltraConnectwireless
antennas...............238
Locatingwirelessregulatorynotices....240
Exportclassicationnotice..........241
Electronicemissionnotices..........241
FederalCommunicationsCommission
DeclarationofConformity........241
IndustryCanadaClassBemissioncompliance
statement...............241
EuropeanUnion-Compliancetothe
ElectromagneticCompatibilityDirective...241
GermanClassBcompliancestatement...242
KoreaClassBcompliancestatement....242
JapaneseVCCIClassBstatement.....243
Japancompliancestatementforproducts
whichconnecttothepowermainswith
ratedcurrentlessthanorequalto20Aper
phase................243
Lenovoproductserviceinformationfor
Taiwan................243
Additionalregulatoryinformation.......243
AppendixB.WEEEandrecycling
statements.............245
ImportantWEEEInformation.........245
BatteryrecyclinginformationforJapan.....245
BatteryrecyclinginformationforBrazil.....246
BatteryrecyclinginformationforTaiwan.....246
BatteryrecyclinginformationforEuropean
Union..................247
BatteryrecyclinginformationforUnitedStatesand
Canada.................247
AppendixC.Notices.........249
Trademarks................250
AppendixD.RestrictionofHazardous
SubstancesDirective(RoHS)....251
ChinaRoHS................251
TurkishRoHS...............251
UkraineRoHS...............251
IndiaRoHS................252
©CopyrightLenovo2011
iii
Page 6

ivUserGuide
Page 7
Readthisrst
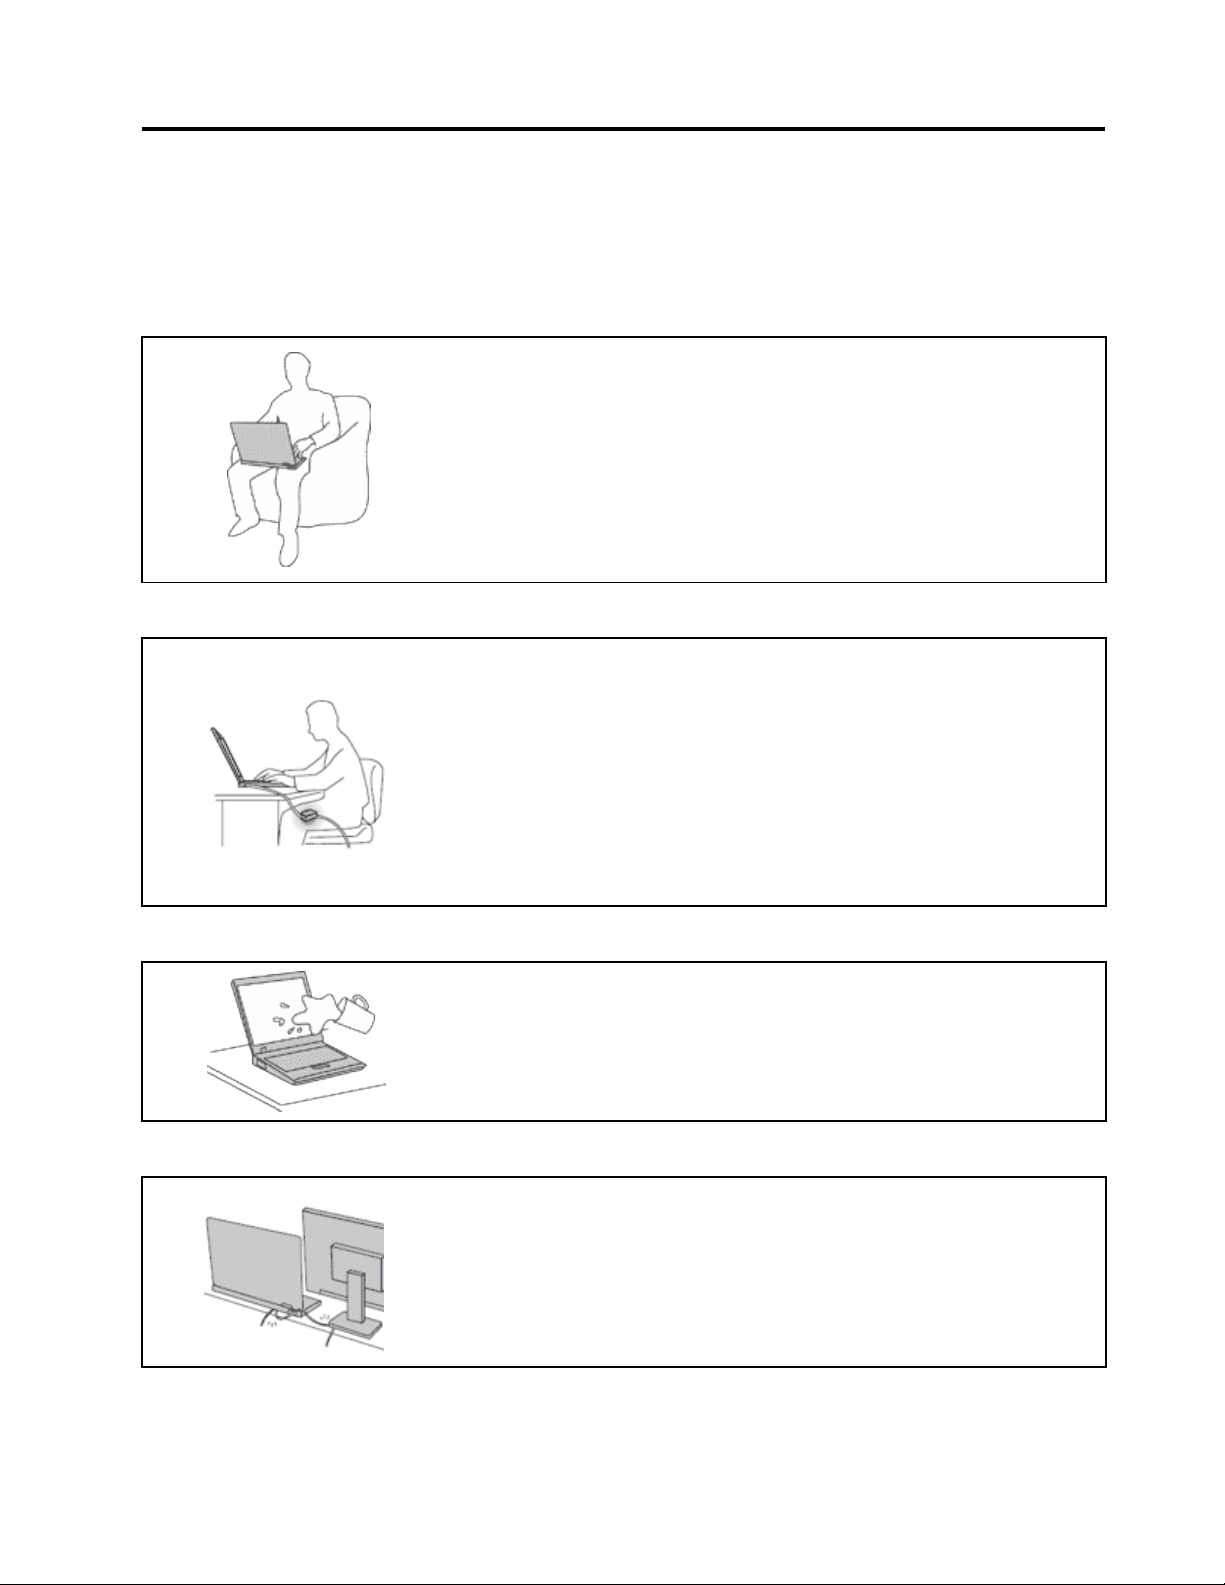
Besuretofollowtheimportanttipsgivenheretocontinuetogetthemostuseandenjoymentoutofyour
computer.Failuretodosomightleadtodiscomfortorinjury,orcauseyourcomputertofail.
Protectyourselffromtheheatthatyourcomputergenerates.
Whenyourcomputeristurnedonorthebatteryischarging,thebase,thepalm
rest,andsomeotherpartsmaybecomehot.Thetemperaturetheyreach
dependsontheamountofsystemactivityandthelevelofchargeinthebattery.
Extendedcontactwithyourbody,eventhroughclothing,couldcause
discomfortorevenaskinburn.
•Avoidkeepingyourhands,yourlap,oranyotherpartofyourbodyin
contactwithahotsectionofthecomputerforanyextendedtime.
•Periodicallytakehandsfromusingthekeyboardbyliftingyourhandsfrom
thepalmrest.
Protectyourselffromtheheatgeneratedbytheacpoweradapter.
Whentheacpoweradapterisconnectedtoanelectricaloutletandyour
computer,itgeneratesheat.
Extendedcontactwithyourbody,eventhroughclothing,maycauseaskin
burn.
•Donotplacetheacpoweradapterincontactwithanypartofyourbody
whileitisinuse.
•Neveruseittowarmyourbody.
Preventyourcomputerfromgettingwet.
Protectthecablesfrombeingdamaged.
©CopyrightLenovo2011
•Toavoidspillsandthedangerofelectricalshock,keepliquidsawayfrom
yourcomputer.
Applyingstrongforcetocablesmaydamageorbreakthem.
•Routecommunicationlines,orthecablesofanacpoweradapter,amouse,a
keyboard,aprinter,oranyotherelectronicdevice,sothattheycannotbe
walkedon,trippedover,pinchedbyyourcomputerorotherobjects,orin
anywaysubjectedtotreatmentthatcouldinterferewiththeoperationof
yourcomputer.
v
Page 8

Protectyourcomputeranddatawhenmovingit.
Beforemovingacomputerequippedwithaharddiskdrive,dooneofthe
following,andmakesurethatthepowerswitchisofforisblinking:
•Turnitoff.
•PressFn+F4toputitinsleep(standby)mode
•PressFn+F12toputitinhibernationmode.
Thiswillhelptopreventdamagetothecomputer,andpossiblelossofdata.
Handleyourcomputergently.
•Donotdrop,bump,scratch,twist,hit,vibrate,push,orplaceheavyobjectson
yourcomputer,display,orexternaldevices.
Carryyourcomputercarefully.
•Useaqualitycarryingcasethatprovidesadequatecushioningandprotection.
•Donotpackyourcomputerinatightlypackedsuitcaseorbag.
•Beforeputtingyourcomputerinacarryingcase,makesurethatitisoff,insleep
(standby)mode(Fn+F4),orinhibernationmode(Fn+F12).Donotputacomputer
inacarryingcasewhileitisturnedon.
Importantsafetyinformation
Note:Readimportantsafetyinformationrst.
Thisinformationcanhelpyousafelyuseyournotebookpersonalcomputer.Followandretainallinformation
includedwithyourcomputer.Theinformationinthisdocumentdoesnotalterthetermsofyourpurchase
agreementortheLenovoLimitedWarranty.Formoreinformation,seetheSafetyandWarrantyGuide
camewithyourcomputer.
Customersafetyisimportant.Ourproductsaredevelopedtobesafeandeffective.However,personal
computersareelectronicdevices.Powercords,poweradapters,andotherfeaturescancreatepotential
safetyrisksthatcanresultinphysicalinjuryorpropertydamage,especiallyifmisused.Toreducethese
risks,followtheinstructionsincludedwithyourproduct,observeallwarningsontheproductandinthe
operatinginstructions,andreviewtheinformationincludedinthisdocumentcarefully.Bycarefullyfollowing
theinformationcontainedinthisdocumentandprovidedwithyourproduct,youcanhelpprotectyourself
fromhazardsandcreateasafercomputerworkenvironment.
Note:Thisinformationincludesreferencestopoweradaptersandbatteries.Inadditiontonotebook
computers,someproducts(suchasspeakersandmonitors)shipwithexternalpoweradapters.Ifyouhave
suchaproduct,thisinformationappliestoyourproduct.Inaddition,computerproductscontainacoin-sized
internalbatterythatprovidespowertothesystemclockevenwhenthecomputerisunplugged,sothe
batterysafetyinformationappliestoallcomputerproducts.
viUserGuide
Page 9

Conditionsthatrequireimmediateaction
Productscanbecomedamagedduetomisuseorneglect.Someproductdamageisseriousenough
thattheproductshouldnotbeusedagainuntilithasbeeninspectedand,ifnecessary,repairedby
anauthorizedservicer.
Aswithanyelectronicdevice,paycloseattentiontotheproductwhenitisturnedon.Onveryrare
occasions,youmightnoticeanodororseeapuffofsmokeorsparksventfromyourproduct.Oryou
mighthearsoundslikepopping,crackingorhissing.Theseconditionsmightmerelymeanthatan
internalelectroniccomponenthasfailedinasafeandcontrolledmanner.Or,theymightindicate
apotentialsafetyissue.However,donottakerisksorattempttodiagnosethesituationyourself.
ContacttheCustomerSupportCenterforfurtherguidance.ForalistofServiceandSupportphone
numbers,seethefollowingWebsite:http://www.lenovo.com/support/phone.
Frequentlyinspectyourcomputeranditscomponentsfordamageorwearorsignsofdanger.Ifyou
haveanyquestionabouttheconditionofacomponent,donotusetheproduct.ContacttheCustomer
SupportCenterortheproductmanufacturerforinstructionsonhowtoinspecttheproductand
haveitrepaired,ifnecessary.
Intheunlikelyeventthatyounoticeanyofthefollowingconditions,orifyouhaveanysafetyconcerns
withyourproduct,stopusingtheproductandunplugitfromthepowersourceandtelecommunication
linesuntilyoucanspeaktotheCustomerSupportCenterforfurtherguidance.
•Powercords,plugs,poweradapters,extensioncords,surgeprotectors,orpowersuppliesthatare
cracked,broken,ordamaged.
•Signsofoverheating,smoke,sparks,orre.
•Damagetoabattery(suchascracks,dents,orcreases),dischargefromabattery,orabuildupofforeign
substancesonthebattery.
•Acracking,hissingorpoppingsound,orstrongodorthatcomesfromtheproduct.
•Signsthatliquidhasbeenspilledoranobjecthasfallenontothecomputerproduct,thepowercordor
poweradapter.
•Thecomputerproduct,powercord,orpoweradapterhasbeenexposedtowater.
•Theproducthasbeendroppedordamagedinanyway.
•Theproductdoesnotoperatenormallywhenyoufollowtheoperatinginstructions.
Note:Ifyounoticetheseconditionswithaproduct(suchasanextensioncord)thatisnotmanufacturedfor
orbyLenovo,stopusingthatproductuntilyoucancontacttheproductmanufacturerforfurtherinstructions,
oruntilyougetasuitablereplacement.
Safetyguidelines
Alwaysobservethefollowingprecautionstoreducetheriskofinjuryandpropertydamage.
Formoreinformation,seetheSafetyandWarrantyGuidecamewithyourcomputer.
Serviceandupgrades
DonotattempttoserviceaproductyourselfunlessinstructedtodosobytheCustomerSupportCenteror
yourdocumentation.OnlyuseaServiceProviderwhoisapprovedtorepairyourparticularproduct.
Note:Somecomputerpartscanbeupgradedorreplacedbythecustomer.Upgradestypicallyare
referredtoasoptions.ReplacementpartsapprovedforcustomerinstallationarereferredtoasCustomer
ReplaceableUnits,orCRUs.Lenovoprovidesdocumentationwithinstructionswhenitisappropriatefor
customerstoinstalloptionsorreplaceCRUs.Youmustcloselyfollowallinstructionswheninstallingor
replacingparts.TheOffstateofapowerindicatordoesnotnecessarilymeanthatvoltagelevelsinsidea
©CopyrightLenovo2011
vii
Page 10

productarezero.Beforeyouremovethecoversfromaproductequippedwithapowercord,alwaysmake
surethatthepoweristurnedoffandthattheproductisunpluggedfromanypowersource.Ifyouhave
anyquestionsorconcerns,contacttheCustomerSupportCenter.
Althoughtherearenomovingpartsinyourcomputerafterthepowercordhasbeendisconnected,the
followingwarningsarerequiredforyoursafety.
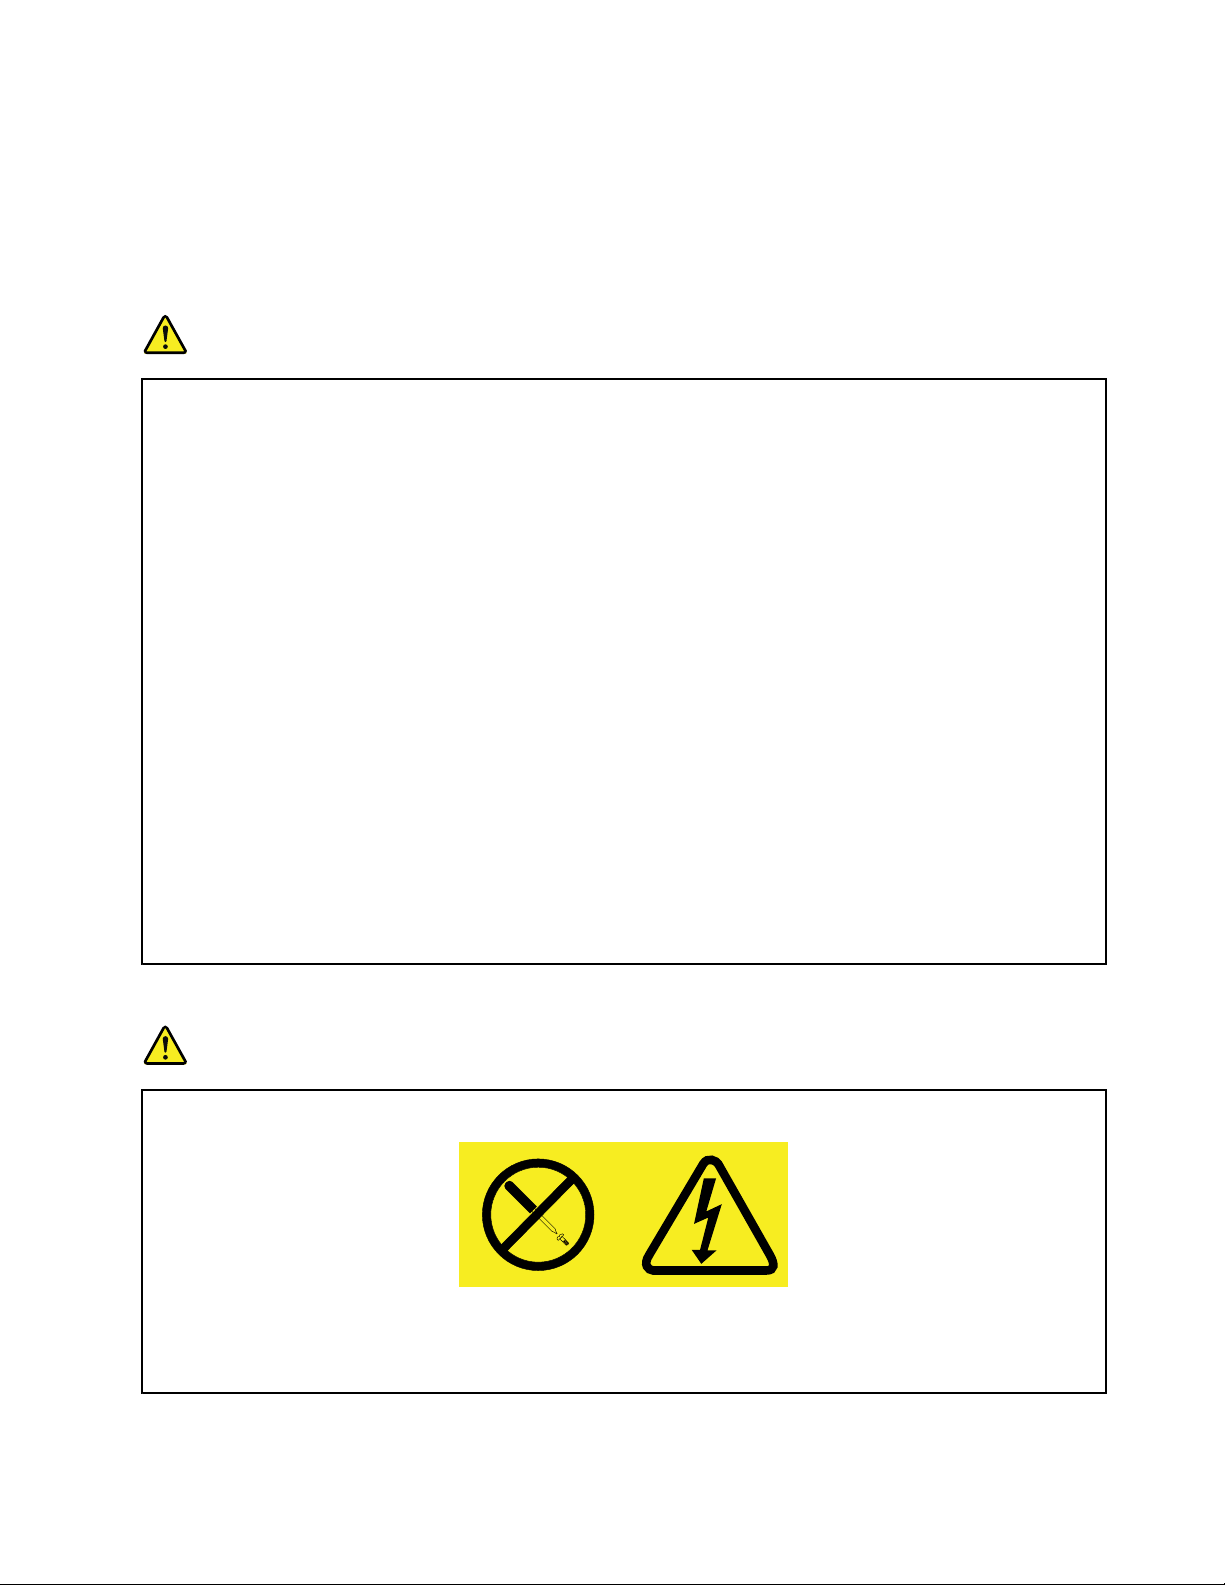
CAUTION:
Hazardousmovingparts.Keepngersandotherbodypartsaway.
CAUTION:
BeforereplacinganyCRUs,turnoffthecomputerandwaitthreetoveminutestoletthecomputer
coolbeforeopeningthecover.
Powercordsandpoweradapters
DANGER
Useonlythepowercordsandpoweradapterssuppliedbytheproductmanufacturer.
Thepowercordsshallbesafetyapproved.ForGermany,itshallbeH05VV-F ,3G,0.75mm
better.Forothercountries,thesuitabletypesshallbeusedaccordingly.
Neverwrapapowercordaroundapoweradapterorotherobject.Doingsocanstressthecordin
waysthatcancausethecordtofray,crack,orcrimp.Thiscanpresentasafetyhazard.
Alwaysroutepowercordssothattheywillnotbewalkedon,trippedover,orpinchedbyobjects.
Protectpowercordandpoweradaptersfromliquids.Forinstance,donotleaveyourpowercordor
poweradapternearsinks,tubs,toilets,oronoorsthatarecleanedwithliquidcleansers.Liquids
cancauseashortcircuit,particularlyifthepowercordorpoweradapterhasbeenstressedby
misuse.Liquidsalsocancausegradualcorrosionofpowercordterminalsand/ortheconnector
terminalsonapoweradapter,whichcaneventuallyresultinoverheating.
Alwaysconnectpowercordsandsignalcablesinthecorrectorderandensurethatallpowercord
connectorsaresecurelyandcompletelypluggedintoreceptacles.
DonotuseanypoweradapterthatshowscorrosionattheACinputpinsorshowssignsof
overheating(suchasdeformedplastic)attheACinputoranywhereonthepoweradapter.
2
,or
Donotuseanypowercordswheretheelectricalcontactsoneitherendshowsignsofcorrosionor
overheatingorwherethepowercordappearstohavebeendamagedinanyway.
viiiUserGuide
Page 11
Extensioncordsandrelateddevices
Ensurethatextensioncords,surgeprotectors,uninterruptiblepowersupplies,andpowerstripsthatyouuse
areratedtohandletheelectricalrequirementsoftheproduct.Neveroverloadthesedevices.Ifpowerstrips
areused,theloadshouldnotexceedthepowerstripinputrating.Consultanelectricianformoreinformation
ifyouhavequestionsaboutpowerloads,powerrequirements,andinputratings.
Plugsandoutlets
DANGER
Ifareceptacle(poweroutlet)thatyouintendtousewithyourcomputerequipmentappearstobe
damagedorcorroded,donotusetheoutletuntilitisreplacedbyaqualiedelectrician.
Donotbendormodifytheplug.Iftheplugisdamaged,contactthemanufacturertoobtain
areplacement.
Donotshareanelectricaloutletwithotherhomeorcommercialappliancesthatdrawlargeamounts
ofelectricity;otherwise,unstablevoltagemightdamageyourcomputer,data,orattacheddevices.
Someproductsareequippedwithathree-prongedplug.Thisplugtsonlyintoagrounded
electricaloutlet.Thisisasafetyfeature.Donotdefeatthissafetyfeaturebytryingtoinsertitinto
anon-groundedoutlet.Ifyoucannotinserttheplugintotheoutlet,contactanelectricianforan
approvedoutletadapterortoreplacetheoutletwithonethatenablesthissafetyfeature.Never
overloadanelectricaloutlet.Theoverallsystemloadshouldnotexceed80percentofthebranch
circuitrating.Consultanelectricianformoreinformationifyouhavequestionsaboutpowerloads
andbranchcircuitratings.
Besurethatthepoweroutletyouareusingisproperlywired,easilyaccessible,andlocatedclose
totheequipment.Donotfullyextendpowercordsinawaythatwillstressthecords.
Besurethatthepoweroutletprovidesthecorrectvoltageandcurrentfortheproductyouare
installing.
Carefullyconnectanddisconnecttheequipmentfromtheelectricaloutlet.
Powersupplystatement
DANGER
Neverremovethecoveronapowersupplyoranypartthathasthefollowinglabelattached.
Hazardousvoltage,current,andenergylevelsarepresentinsideanycomponentthathasthislabel
attached.Therearenoserviceablepartsinsidethesecomponents.Ifyoususpectaproblemwith
oneoftheseparts,contactaservicetechnician.
©CopyrightLenovo2011
ix
Page 12

Externaldevices
CAUTION:
DonotconnectordisconnectanyexternaldevicecablesotherthanUniversalSerialBus(USB)and
1394cableswhilethecomputerpowerison;otherwise,youmightdamageyourcomputer.T oavoid
possibledamagetoattacheddevices,waitatleastvesecondsafterthecomputerisshutdownto
disconnectexternaldevices.
Batteries
DANGER
PersonalcomputersmanufacturedbyLenovocontainacoincellbatterytoprovidepowerto
thesystemclock.Inaddition,manymobileproducts,suchasnotebookcomputers,utilizea
rechargeablebatterypacktoprovidesystempowerwheninportablemode.Batteriessuppliedby
Lenovoforusewithyourproducthavebeentestedforcompatibilityandshouldonlybereplaced
withapprovedparts.
ThissystemdoesnotsupportbatteriesthatarenotgenuineLenovo-madeorauthorized.The
systemwillcontinuetoboot,butmaynotchargeunauthorizedbatteries.Attention:Lenovohasno
responsibilityfortheperformanceorsafetyofunauthorizedbatteries,andprovidesnowarranties
forfailuresordamagearisingoutoftheiruse.
Neverattempttoopenorserviceanybattery.Donotcrush,puncture,orincineratebatteriesor
shortcircuitthemetalcontacts.Donotexposethebatterytowaterorotherliquids.Onlyrecharge
thebatterypackstrictlyaccordingtoinstructionsincludedintheproductdocumentation.
Batteryabuseormishandlingcancausethebatterytooverheat,whichcancausegassesorame
to“vent”fromthebatterypackorcoincell.Ifyourbatteryisdamaged,orifyounoticeany
dischargefromyourbatteryorthebuildupofforeignmaterialsonthebatteryleads,stopusingthe
batteryandobtainareplacementfromthebatterymanufacturer.
Batteriescandegradewhentheyareleftunusedforlongperiodsoftime.Forsomerechargeable
batteries(particularlyLithiumIonbatteries),leavingabatteryunusedinadischargedstatecould
increasetheriskofabatteryshortcircuit,whichcouldshortenthelifeofthebatteryandcanalso
poseasafetyhazard.DonotletrechargeableLithium-Ionbatteriescompletelydischargeorstore
thesebatteriesinadischargedstate.
Rechargeablebatterynotice
DANGER
Donotattempttodisassembleormodifythebatterypack.Attemptingtodosocancausean
explosion,orliquidleakagefromthebatterypack.Abatterypackotherthantheonespeciedby
Lenovo,oradisassembledormodiedbatterypackisnotcoveredbythewarranty.
Iftherechargeablebatterypackisincorrectlyreplaced,thereisdangerofanexplosion.Thebattery
packcontainsasmallamountofharmfulsubstances.Toavoidpossibleinjury:
•ReplaceonlywithabatteryofthetyperecommendedbyLenovo.
•Keepthebatterypackawayfromre.
•Donotexposeittowaterorrain.
•Donotattempttodisassembleit.
•Donotshort-circuitit.
xUserGuide
Page 13

•Keepitawayfromchildren.
•Donotdropthebatterypack.
Donotputthebatterypackintrashthatisdisposedofinlandlls.Whendisposingofthebattery,
complywithlocalordinancesorregulations.
Thebatterypackshouldbestoredatroomtemperature,chargedtoapproximately30to50%
ofcapacity.Werecommendthatbatterypackbechargedaboutonceperyeartoprevent
overdischarge.
Lithiumcoincellbatterynotice
DANGER
Dangerofexplosionifbatteryisincorrectlyreplaced.
Whenreplacingthelithiumcoincellbattery,useonlythesameoranequivalenttypethatis
recommendedbythemanufacturer.Thebatterycontainslithiumandcanexplodeifnotproperly
used,handled,ordisposedof.
Donot:
•Throworimmerseintowater
•Heattomorethan100°C(212°F)
•Repairordisassemble
Disposeofthebatteryasrequiredbylocalordinancesorregulations.
ThefollowingstatementappliestousersinthestateofCalifornia,U.S.A.
CaliforniaPerchlorateInformation:
ProductscontainingCR(manganesedioxide)lithiumcoincellbatteriesmaycontainperchlorate.
PerchlorateMaterial-specialhandlingmayapply.See
http://www.dtsc.ca.gov/hazardouswaste/perchlorate.
Heatandproductventilation
DANGER
Computers,acpoweradapters,andmanyaccessoriescangenerateheatwhenturnedonandwhen
batteriesarecharging.Notebookcomputerscangenerateasignicantamountofheatduetotheir
compactsize.Alwaysfollowthesebasicprecautions:
•Whenyourcomputeristurnedonorthebatteryischarging,thebase,thepalmrest,andsome
otherpartsmaybecomehot.Avoidkeepingyourhands,yourlap,oranyotherpartofyour
bodyincontactwithahotsectionofthecomputerforanyextendedlengthoftime.Whenyou
usethekeyboard,avoidkeepingyourpalmsonthepalmrestforaprolongedperiodoftime.
Yourcomputergeneratessomeheatduringnormaloperation.Theamountofheatdependson
theamountofsystemactivityandthebatterychargelevel.Extendedcontactwithyourbody,
eventhroughclothing,couldcausediscomfortorevenaskinburn.Periodicallytakebreaks
©CopyrightLenovo2011
xi
Page 14

fromusingthekeyboardbyliftingyourhandsfromthepalmrest;andbecarefulnottouse
thekeyboardforanyextendedlengthoftime.
•Donotoperateyourcomputerorchargethebatterynearammablematerialsorinexplosive
environments.
•Ventilationslots,fansand/orheatsinksareprovidedwiththeproductforsafety,comfort,and
reliableoperation.Thesefeaturesmightinadvertentlybecomeblockedbyplacingtheproducton
abed,sofa,carpet,orotherexiblesurface.Neverblock,cover,ordisablethesefeatures.
•Whentheacpoweradapterisconnectedtoanelectricaloutletandyourcomputer,itgenerates
heat.Donotplacetheadapterincontactwithanypartofyourbodywhileusingit.Neverusethe
acpoweradaptertowarmyourbody.Extendedcontactwithyourbody,eventhroughclothing,
maycauseaskinburn.
Foryoursafety,alwaysfollowthesebasicprecautionswithyourcomputer:
•Keepthecoverclosedwheneverthecomputerispluggedin.
•Regularlyinspecttheoutsideofthecomputerfordustaccumulation.
•Removedustfromventsandanyperforationsinthebezel.Morefrequentcleaningsmightbe
requiredforcomputersindustyorhigh-trafcareas.
•Donotrestrictorblockanyventilationopenings.
•Donotoperateyourcomputerinsidefurniture,asthismightincreasetheriskofoverheating.
•Airowtemperaturesintothecomputershouldnotexceed35°C(95°F).
Electricalcurrentsafetyinformation
DANGER
Electriccurrentfrompower ,telephone,andcommunicationcablesishazardous.
Toavoidashockhazard:
•Donotuseyourcomputerduringalightningstorm.
•Donotconnectordisconnectanycablesorperforminstallation,maintenance,orreconguration
ofthisproductduringanelectricalstorm.
•Connectallpowercordstoaproperlywiredandgroundedelectricaloutlet.
•Connecttoproperlywiredoutletsanyequipmentthatwillbeattachedtothisproduct.
•Wheneverpossible,useonehandonlytoconnectordisconnectsignalcables.
•Neverturnonanyequipmentwhenthereisevidenceofre,water,orstructuraldamage.
•Disconnecttheattachedpowercords,batterypack,andallthecablesbeforeyouopenthe
devicecovers,unlessinstructedotherwiseintheinstallationandcongurationprocedures.
•Donotuseyoucomputeruntilallinternalpartsenclosuresarefastenedintoplace.Neveruse
thecomputerwheninternalpartsandcircuitsareexposed.
xiiUserGuide
Page 15

DANGER
•Connectanddisconnectcablesasdescribedinthefollowingprocedureswheninstalling,
moving,oropeningcoversonthisproductorattacheddevices.
Toconnect:
1.TurneverythingOFF.
2.First,attachallcablestodevices.
3.Attachsignalcablestoconnectors.
4.Attachpowercordstooutlets.
5.TurndevicesON.
Todisconnect:
1.TurneverythingOFF.
2.First,removepowercordsfromoutlets.
3.Removesignalcablesfromconnectors.
4.Removeallcablesfromdevices.
Thepowercordmustbedisconnectedfromthewalloutletorreceptaclebeforeinstallingallother
electricalcablesconnectedtothecomputer.
Thepowercordmaybereconnectedtothewalloutletorreceptacleonlyafterallotherelectrical
cableshavebeenconnectedtothecomputer.
Modemsafetyinformation
DANGER
ForNorthAmericaType:
CAUTION:
Toreducetheriskofre,useonlyNo.26AWGorlarger(forexample,No.24AWG)
telecommunicationlinecordlistedbyUnderwritersLaboratories(UL)orcertiedbytheCanadian
StandardsAssociation(CSA).
Toreducetheriskofre,electricalshock,orinjurywhenusingtelephoneequipment,always
followbasicsafetyprecautionsasthefollowing:
•Donotconnectthecabletoordisconnectitfromthetelephoneoutletonthewallduringa
lightningstorm.
•Donotinstalltelephonejacksinwetlocations.Donotuseyourcomputernearwater.
•Donottouchuninsulatedtelephonewiresorterminalsunlessthetelephonelinehasbeen
disconnectedatthenetworkinterface.
•Usecautionwheninstallingormodifyingtelephonelines.
•Donotuseyourcomputerwiththetelephonecableconnectionduringanelectricalstorm.There
maybearemoteriskofelectricshockfromlightning.
•Donotuseatelephone(otherthanacordlesstype)duringanelectricalstorm.
•Donotusethetelephonetoreportagasleakinthevicinityoftheleak.
•DonotconnectthetelephonecabletotheEthernetconnector.
Lasercompliancestatement
CAUTION:
Whenlaserproducts(suchasCD-ROMs,DVDdrives,beropticdevices,ortransmitters)are
installed,notethefollowing:
•Donotremovethecovers.Removingthecoversofthelaserproductcouldresultinexposureto
hazardouslaserradiation.Therearenoserviceablepartsinsidethedevice.
©CopyrightLenovo2011
xiii
Page 16

•Useofcontrolsoradjustmentsorperformanceofproceduresotherthanthosespeciedherein
mightresultinhazardousradiationexposure.
DANGER
SomelaserproductscontainanembeddedClass3AorClass3Blaserdiode.Notethefollowing.
Laserradiationwhenopen.Donotstareintothebeam,donotviewdirectlywithoptical
instruments,andavoiddirectexposuretothebeam.
Liquidcrystaldisplay(LCD)notice
CAUTION:
Forproductswithmercury-containinguorescentlamps(i.e.,non-LED)
•Theuorescentlampintheliquidcrystaldisplaycontainsmercury;disposeaccordingtolocal,
state,orfederallaws.
•TheLCDismadeofglass,androughhandlingordroppingthecomputercancausetheLCDto
break.IftheLCDbreaksandtheinternaluidgetsintoyoureyesoronyourhands,immediately
washtheaffectedareaswithwaterforatleast15minutes;ifanysymptomsarepresentafter
washing,getmedicalcare.
Usingheadphonesorearphones
Ifyourcomputerhasbothaheadphoneconnectorandanaudio-outconnector,alwaysusetheheadphone
connectorforheadphones(alsocalledaheadset)orearphones.
CAUTION:
Excessivesoundpressurefromearphonesandheadphonescancausehearingloss.Adjustmentof
theequalizertomaximumincreasestheearphonesandheadphonesoutputvoltageandthereforethe
soundpressurelevel.
Excessiveuseofheadphonesorearphonesforalongperiodoftimeathighvolumecanbedangerousifthe
outputoftheheadphoneorearphoneconnectorsdonotcomplywithspecicationsofEN50332-2.The
headphoneoutputconnectorofyourcomputercomplieswithEN50332-2Subclause7.Thisspecication
limitsthecomputer’smaximumwidebandtrueRMSoutputvoltageto150mV.Tohelpprotectagainst
hearingloss,ensurethattheheadphonesorearphonesyouusealsocomplywithEN50332-2(Clause7
limits)forawidebandcharacteristicvoltageof75mV.UsingheadphonesthatdonotcomplywithEN
50332-2canbedangerousduetoexcessivesoundpressurelevels.
IfyourLenovocomputercamewithheadphonesorearphonesinthepackage,asaset,thecombinationof
theheadphonesorearphonesandthecomputeralreadycomplieswiththespecicationsofEN50332-1.
Ifdifferentheadphonesorearphonesareused,ensurethattheycomplywithEN50332-1(Clause6.5
LimitationValues).UsingheadphonesthatdonotcomplywithEN50332-1canbedangerousdueto
excessivesoundpressurelevels.
Additionalsafetyinformation
DANGER
Plasticbagscanbedangerous.Keepplasticbagsawayfrombabiesandchildrentoavoiddanger
ofsuffocation.
NoticeforTabletPCusers
SafetyNoticeforusersinAustralia:
xivUserGuide
Page 17

DANGER
Donotconnectphonelinewhileusingtabletmode.
NoticeforusersintheU.S.A.
ManyPCproductsandaccessoriescontaincords,cablesorwires,suchaspowercordsorcordstoconnect
theaccessorytoaPC.Ifthisproducthassuchacord,cableorwire,thenthefollowingwarningapplies:
WARNING
Handlingthecordonthisproductorcordsassociatedwithaccessoriessoldwiththisproductwillexpose
youtolead,achemicalknowntotheStateofCaliforniatocausecancer,andbirthdefectsorother
reproductiveharm.Washhandsafterhandling.
Savetheseinstructions.
©CopyrightLenovo2011
xv
Page 18

xviUserGuide
Page 19

Chapter1.ProductOverview
Thischapterprovidesinformationaboutthelocationsofconnectors,locatingimportantproductinformation,
computerfeatures,specications,operatingenvironment,andpreinstalledsoftwareprograms.
Thischaptercontainsthefollowingtopics:
•“Locatingcomputercontrols,connectors,andindicators”onpage1
•“Locatingimportantproductinformation”onpage13
•“Features”onpage16
•“Specications”onpage17
•“Operatingenvironment”onpage18
•“ThinkVantageTechnologiesandsoftware”onpage18
Locatingcomputercontrols,connectors,andindicators
Thissectionintroducesyoutothehardwarefeaturesofyourcomputer,andthengivesyouthebasic
informationyou'llneedtostarttakingadvantageofitsfunctions.
•“Frontview”onpage2
•“Right-sideview”onpage5
•“Left-sideview”onpage7
•“Rearview”onpage10
•“Bottomview”onpage8
•“Statusindicators”onpage11
©CopyrightLenovo2011
1
Page 20
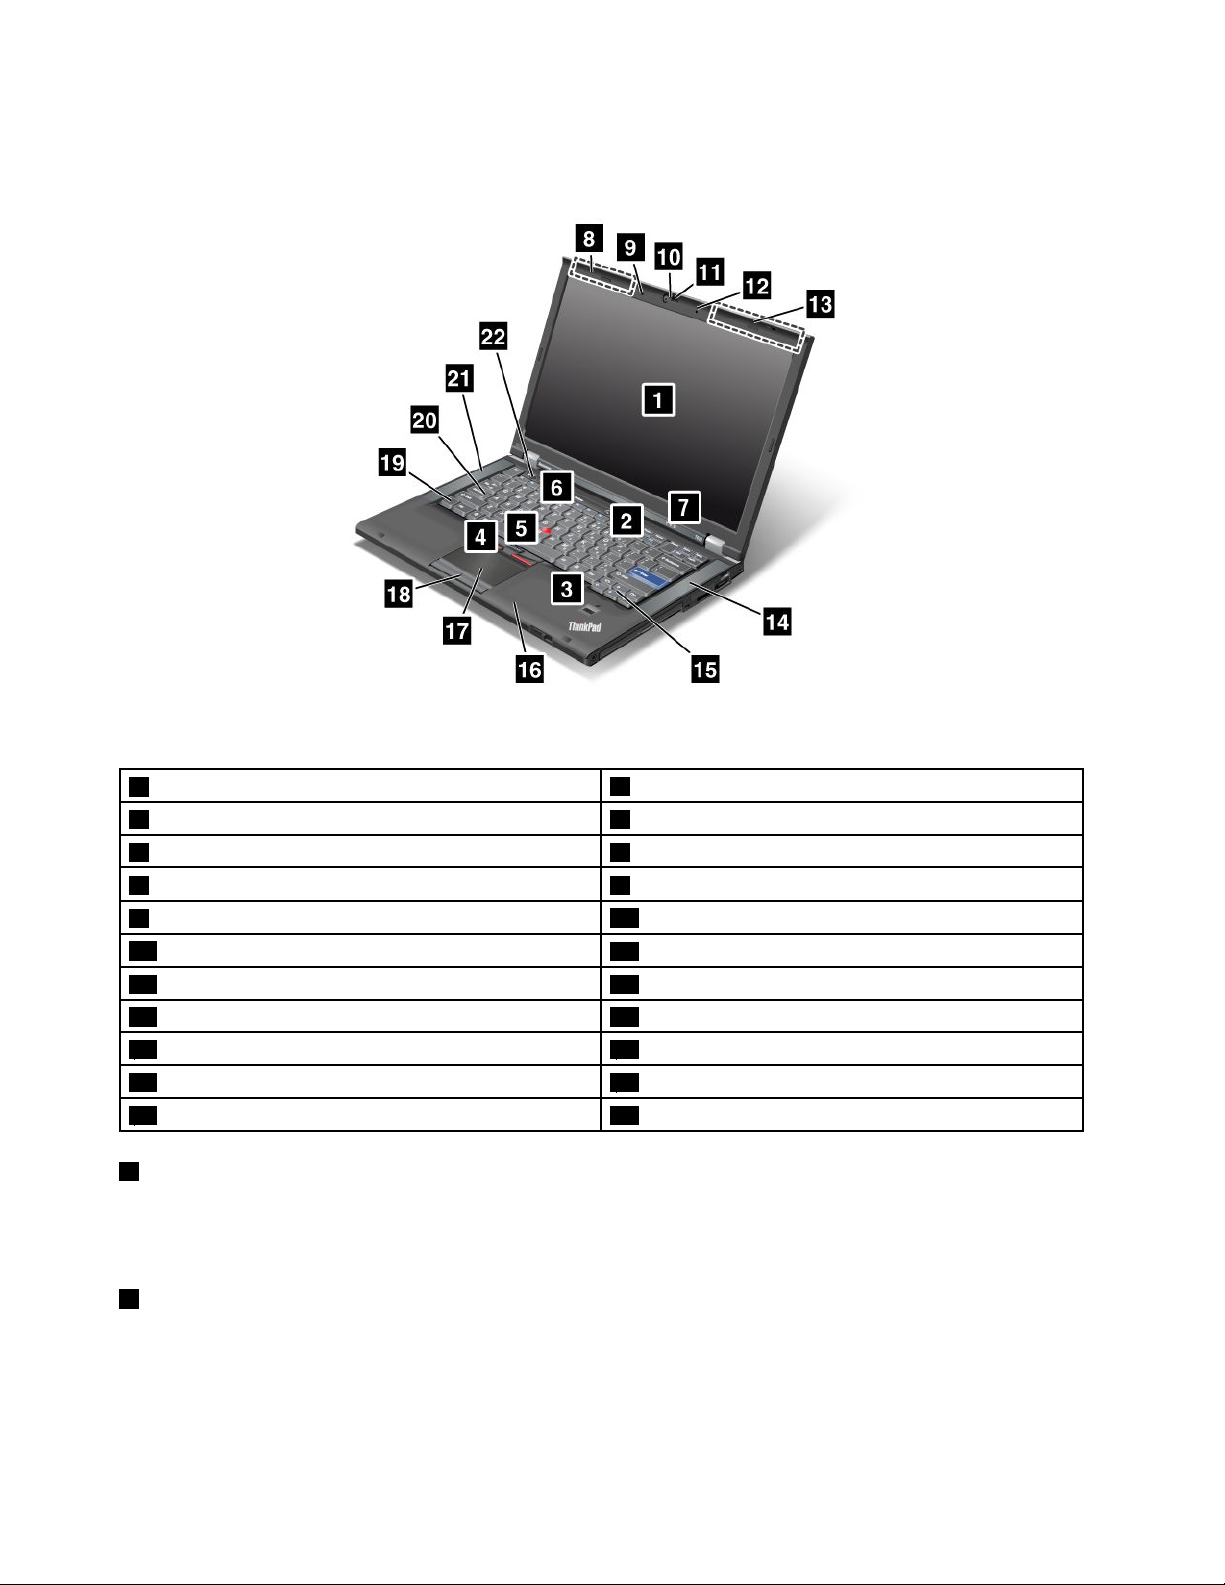
Frontview
Figure1.ThinkPadT420/T420ifrontview
1Computerdisplay
3Fingerprintreader4TrackPointbuttons
5TrackPointpointingstick6ThinkVantagebutton
7Systemandpower-statusindicators8UltraConnectwirelessantennas(left)
9Built-inmicrophone(left)
11ThinkLight
13UltraConnectwirelessantennas(right)14Built-instereospeaker(left)
15ForwardandBackkeys16Bluetoothantenna
17Touchpad18Touchpadbuttons
19Fnkey
21Built-instereospeaker(left)
1Computerdisplay
2Powerswitch
10Integratedcamera
12Built-inmicrophone(right)
20CapsLockkeyindicator
22Volumecontrolbuttons
Thehigh-resolution,thin-lmtransistor(TFT)displayprovidesclearandbrillianttextandgraphics.
Fordetails,refertotheinstructionsin“Changingdisplaysettings”onpage69.
2Powerswitch
Usethepowerswitchtoturnonthecomputer.Toturnoffyourcomputer,usetheStartmenushutdown
options.
Ifyoucannotturnoffthecomputerbythismethod,pressandholdthepowerswitchfor2seconds.
2UserGuide
Page 21

Ifyourcomputerstopsresponding,andyoucannotturnitoff,pressandholdthepowerswitchfor4seconds
ormore.Ifthesystemisstillnotreset,removetheacpoweradapterandthebattery.
3Fingerprintreader
Somemodelshaveangerprintreader.Thengerprintauthenticationtechnologyenablesyoutouseyour
ngerprinttostartthecomputerandentertheThinkPadSetup.
Fordetails,refertotheinstructionsin“Usingangerprintreader”onpage97.
UltraNav
4T rackPointbuttons
5T rackPointpointingstick
17T ouchpad
18Touchpadbuttons
ThekeyboardcontainstheuniqueTrackPoint
®
®
pointingdevice.Pointing,selecting,anddraggingareallpart
ofasingleprocessthatyoucanperformwithoutmovingyourngersfromtypingposition.
MoveyourngertipacrosstheUltraNavtouchpadtomovethepointer.
TheTrackPointandtouchpadbuttonsprovidefunctionssimilartothoseofamouseanditsbuttons.
6ThinkVantagebutton
PresstheThinkVantagebuttontolaunchtheSimpleTapprogram(forWindows
ProductivityCenterprogram(forWindowsXPandWindowsVista
®
).
®
7)ortheThinkVantage
Note:Dependingonthedatewhenyourcomputerwasmanufactured,yourcomputermighthavethe
LenovoThinkVantageToolboxprogrampreinstalledinsteadoftheSimpleT approgramortheThinkVantage
ProductivityCenterprogram.
YoualsocanusetheThinkVantagebuttontointerruptthestartupsequenceofyourcomputerandstartthe
RescueandRecovery®workspace.Formoreinformation,see“ThinkVantagebutton”onpage27
.
7Systemandpower-statusindicators
Yourcomputerhasthesystemstatusindicatorsandthepowerstatusindicators.Forthedetailedinformation
aboutthelocationandmeaningofeachindicator,see“System-statusindicators”onpage11
“Power-statusindicators”onpage12
8UltraConnect™wirelessantennas(left)
13UltraConnectwirelessantennas(right)
.
and
Thebuilt-inantennasforthewirelesscommunicationarelocatedatthetopleftandthetoprightportionsof
yourcomputerdisplay.
Forthespeciclocationsofeachantenna,referto“LocationoftheUltraConnectwirelessantennas”on
page238
9Built-inmicrophone(left)
12Built-inmicrophone(right)
.
Thebuilt-inmicrophonecapturessoundandvoicewhenitisusedwithanapplicationprogramcapable
ofhandlingaudio.
Chapter1.ProductOverview3
Page 22

10Integratedcamera
Somemodelshaveanintegratedcamera.Byusingthiscamera,youcantakepicturesorholdavideo
conference.
Formoreinformationabouthowtousethecamera,referto“Usinganintegratedcamera”onpage78.
11ThinkLight
Youcanuseyourcomputerunderlessthanperfectlightingconditions.
Toilluminatethekeyboard,turnontheThinkLight
®
bypressingFn+PgUp.Toturnitoff,pressFn+PgUp
again.
14Built-instereospeaker(right)
21Built-instereospeaker(left)
Thestereospeakersarebuiltintoyourcomputer.
Fordetails,refertotheinstructionsin“Volumeandmutebuttons”onpage32
15ForwardandBackkeys
.
TheForwardandBackkeysonyourkeyboardnearthecursor-controlkeysareusedwithyourInternet
browser,suchasInternetExplorer
®
.Theyfunctionliketheforwardandbackarrowsinthebrowserthat
moveyoubackandforwardtopagesyouhaveviewedintheorderthatyouopenedthem.
16Bluetoothantenna
Ifyourcomputerhasintegratedbluetoothfeatures,referto“UsingBluetooth”onpage44formore
information.
19Fnkey
UsetheFnkeytotakeadvantageofThinkPad
®
functions,suchasturningontheThinkLight.Touse
ThinkPadfunctions,pressFn+therequiredfunctionkeymarkedinblue.
20CapsLockkeyindicator
TheindicatorofCapsLockislocatedontheCapsLockkey.
FormoreinformationaboutCapsLockindicator,see“System-statusindicators”onpage11.
22Volumecontrolbuttons
Thebuilt-involumebuttonsenableyoutoquicklyadjustthevolumeormutethesoundfromyourcomputer.
Fordetails,refertotheinstructionsin“Volumeandmutebuttons”onpage32.
4UserGuide
Page 23
Right-sideview
Figure2.ThinkPadT420/T420iright-sideview
1Securitykeyhole2USBconnector
3eSATA/USBcomboconnector4ExpressCardslot
5Mediacardreaderslot6Wirelessradioswitch
7SerialUltrabayenhanced8Comboaudiojack
1Securitykeyhole
Yourcomputercomeswithasecuritykeyhole.Youcanpurchaseasecuritycableandlocktotthiskeyhole.
2USBconnector
TheUniversalSerialBusconnectorisusedforconnectingdevicescompatiblewithaUSBinterface,suchas
aprinteroradigitalcamera.
Note:Y ourcomputeriscompatiblewithUSB1.1and2.0.
3eSATA/USBcomboconnector
TheUniversalSerialBusconnectorsareusedforconnectingdevicescompatiblewithaUSBinterface,
suchasaprinteroradigitalcamera.
Note:Y ourcomputeriscompatiblewithUSB1.1and2.0.
YoucanalsoconnectanexternalSATAdevice,suchasanexternalharddiskdrive,tothisconnector
onsomemodels.
Note:Toavoiddamagingtheconnector,becarefulwhenyouattachacablefromtheexternalSATAdevice
totheconnector.
4ExpressCardslot
YourcomputerhastheExpressCardslotfora34mm-widecard.
Chapter1.ProductOverview5
Page 24

Fordetails,refertotheinstructionsin“Usingthemediacardreader”onpage79.
5Mediacardreaderslot
Dependingonthemodel,yourcomputermayhaveamediacardreaderslot.Themediacardreader
supportsthefollowingcards:
•SDcard
•SDHCcard
•SDXCcard
•MultiMediaCard
Note:Y ourcomputerdoesnotsupportCPRMfeatureforSDcard.
Fordetails,refertotheinstructionsin“Usingthemediacardreader”onpage79.
6Wirelessradioswitch
Youcanquicklyturnthewirelessfeaturesofyourcomputeronandoffusingthisswitch.
7SerialUltrabayenhanced
YourcomputerhasabayforserialUltrabay™enhanceddevices.Anopticaldriveisinstalledinthebay.
Note:Y oucaninstalla9.5-mm-thickserialUltrabayslimora12.7-mm-thickserialUltrabayenhanced
deviceintheserialUltrabayenhanced.
8Comboaudiojack
Tolistentothesoundfromyourcomputer,connectaheadphoneoraheadsetthathasa3.5mm4-pole
plug,tothecomboaudiojack.
Notes:
•Ifyouareusingaheadsetwithafunctionswitch,forexample,aheadsetforaniPhone
®
mobiledigital
device,donotpressthisswitchwhileusingtheheadset.Ifyoupressit,theheadsetmicrophonewill
bedisabled,andtheinternalmicrophonewillbeenabledinstead.
•Thecomboaudiojackdoesnotsupportaconventionalmicrophone.Formoreinformationaboutthe
audiodevicessupportedbythecomboaudiojackofyourcomputerandtheaudiojacksofThinkPadMini
DockSeries3andThinkPadMiniDockPlusSeries3,andThinkPadMiniDockPlusSeries3(170W),
see“Usingaudiofeatures”onpage77
.
6UserGuide
Page 25

Left-sideview
Figure3.ThinkPadT420/T420ileft-sideview
1Fanlouvers(left)
3Ethernetconnector4DisplayPortconnector
5USBconnector(left)6Smartcardslot
1Fanlouvers(left)
2Monitorconnector
Theinternalfanandlouversenableairtocirculateinthecomputerandcoolthecentralprocessor.
Note:T oavoidimpedingairow,donotplaceanyobstacleinfrontofthefan.
2Monitorconnector
Youcanattachanexternalmonitororaprojectortoyourcomputertodisplaycomputerinformation.
Note:IfyouattachyourcomputertotheThinkPadPortReplicatorSeries3,ThinkPadMiniDockSeries
3,ThinkPadMiniDockPlusSeries3,andThinkPadMiniDockPlusSeries3(170W)anduseamonitor
connector,usethemonitorconnectorontheThinkPadPortReplicatorSeries3,ThinkPadMiniDockSeries
3,ThinkPadMiniDockPlusSeries3,andThinkPadMiniDockPlusSeries3(170W),nottheoneonthe
computer.
Fordetails,refertotheinstructionsin“Attachinganexternalmonitor”onpage70
3Ethernetconnector
.
ConnectyourcomputertoaLANwiththeEthernetconnector.
DANGER
Toavoidtheriskofelectricalshock,donotconnectthetelephonecabletotheEthernetconnector.
YoucanonlyconnectanEthernetcabletothisconnector.
Chapter1.ProductOverview7
Page 26

Twoindicators,tothelowerrightandleftoftheconnector,showthestatusofthenetworkconnection.When
yourcomputerconnectstoaLANandasessionwiththenetworkisavailable,thelowerrightindicatoris
solidgreen.Whiledataisbeingtransmitted,thelowerleftindicatorblinksyellow.
Fordetails,refertotheinstructionsin“AccessConnections”onpage20.
Note:IfyouattachyourcomputertotheThinkPadPortReplicatorSeries3,ThinkPadMiniDockSeries
3,ThinkPadMiniDockPlusSeries3,andThinkPadMiniDockPlusSeries3(170W)anduseanEthernet
connector,usetheEthernetconnectorontheThinkPadPortReplicatorSeries3,ThinkPadMiniDock
Series3,ThinkPadMiniDockPlusSeries3,andThinkPadMiniDockPlusSeries3(170W),nottheone
onthecomputer.
4DisplayPortconnector
YourcomputersupportstheDisplayPort,anext-generationdigitaldisplayinterfacethatconnectsa
compatibleprojector,externalmonitor,orHDTVtoyourcomputer.
5USBconnector(left)
TheUniversalSerialBusconnectorsareusedforconnectingdevicescompatiblewithaUSBinterface,
suchasaprinteroradigitalcamera.
Note:Y ourcomputeriscompatiblewithUSB1.1and2.0.
6Smartcardslot
YourcomputerhastheSmartcardslot.
Fordetails,refertotheinstructionsin“Usingthemediacardreader”onpage79
Bottomview
Figure4.ThinkPadT420/T420ibottomview
.
8UserGuide
Page 27

1SIMcardslot
3Dockingconnector4Memory-upgradeslot
5Harddiskdriveorsolidstatedrive
1SIMcardslot
2Battery
6PCIExpressMiniCardslotforwirelessWANcardor
mSATAsolidstatedrive
IfyourcomputerhasawirelessWANfeature,itmayrequireaSIM(SubscriberIdenticationModule)cardto
establishawirelessWAN(WideAreaNetwork)connections.Dependingonthecountryofdelivery,theSIM
cardmaybealreadyinstalledintheSIMcardslot.
2Battery
Useyourcomputerwithbatterypowerwheneveracpowerisunavailable.
Byinstallingasecondbattery,availableasanoption,intheserialUltrabayslim,youcanextendtheoperating
timeofthecomputer.YoucanalsousePowerManagertoadjustyourpowersettingasneeded.
Fordetails,refertotheinstructionsin“PowerManager”onpage23.
3Dockingconnector
WithaThinkPadPortReplicatorSeries3,ThinkPadMiniDockSeries3,ThinkPadMiniDockPlusSeries
3,andThinkPadMiniDockPlusSeries3(170W),youcanextendthecomputercapabilitieswhenyou
areinyourofceorathome.
4Memory-upgradeslot
Youcanincreasetheamountofmemoryinyourcomputerbyinstallingamemorymoduleinthememory
bay.Memorymodulesareavailableasoptions.
5Harddiskdriveorsolidstatedrive
Yourcomputermayhavealarge-capacity,customer-upgradableharddiskdrivethatcanmeetavarietyof
storagedemands.Tokeepthedrivesafe,ActiveProtectionSystem™isinstalledonyourcomputer.For
details,referto“ActiveProtectionSystem”onpage21.
Ifyouwish,youcanpurchaseanotherharddiskdriveandinstallitintheserialUltrabayslim.
WithLenovo
®
technologiesadvancingtoprovideyouwiththebestengineeredsystems,somemodels
areequippedwithasolidstatedrivefordatastorage.Thiscutting-edgetechnologyenablesnotebook
computerstobelighter,smallerandfaster.
Note:Thehiddenservicepartitionisthereasonwhythereislessfreespacethanexpectedonyourhard
diskdriveorsolidstatedrivedrive.Thisreductionismorenoticeableonthesolidstatedrivedrivebecause
ofitssmallercapacity.
6PCIExpressMiniCardslotforwirelessWANcardormSAT Asolidstatedrive
YourcomputermightincludeaPCIExpressMiniCardinthePCIExpressMiniCardslotwhichenables
wirelessWANcommunications.
WithLenovotechnologiesadvancingtoprovideyouwiththebestengineeredsystems,somemodelsare
equippedwithamSATAsolidstatedrivefordatastorage.
Chapter1.ProductOverview9
Page 28
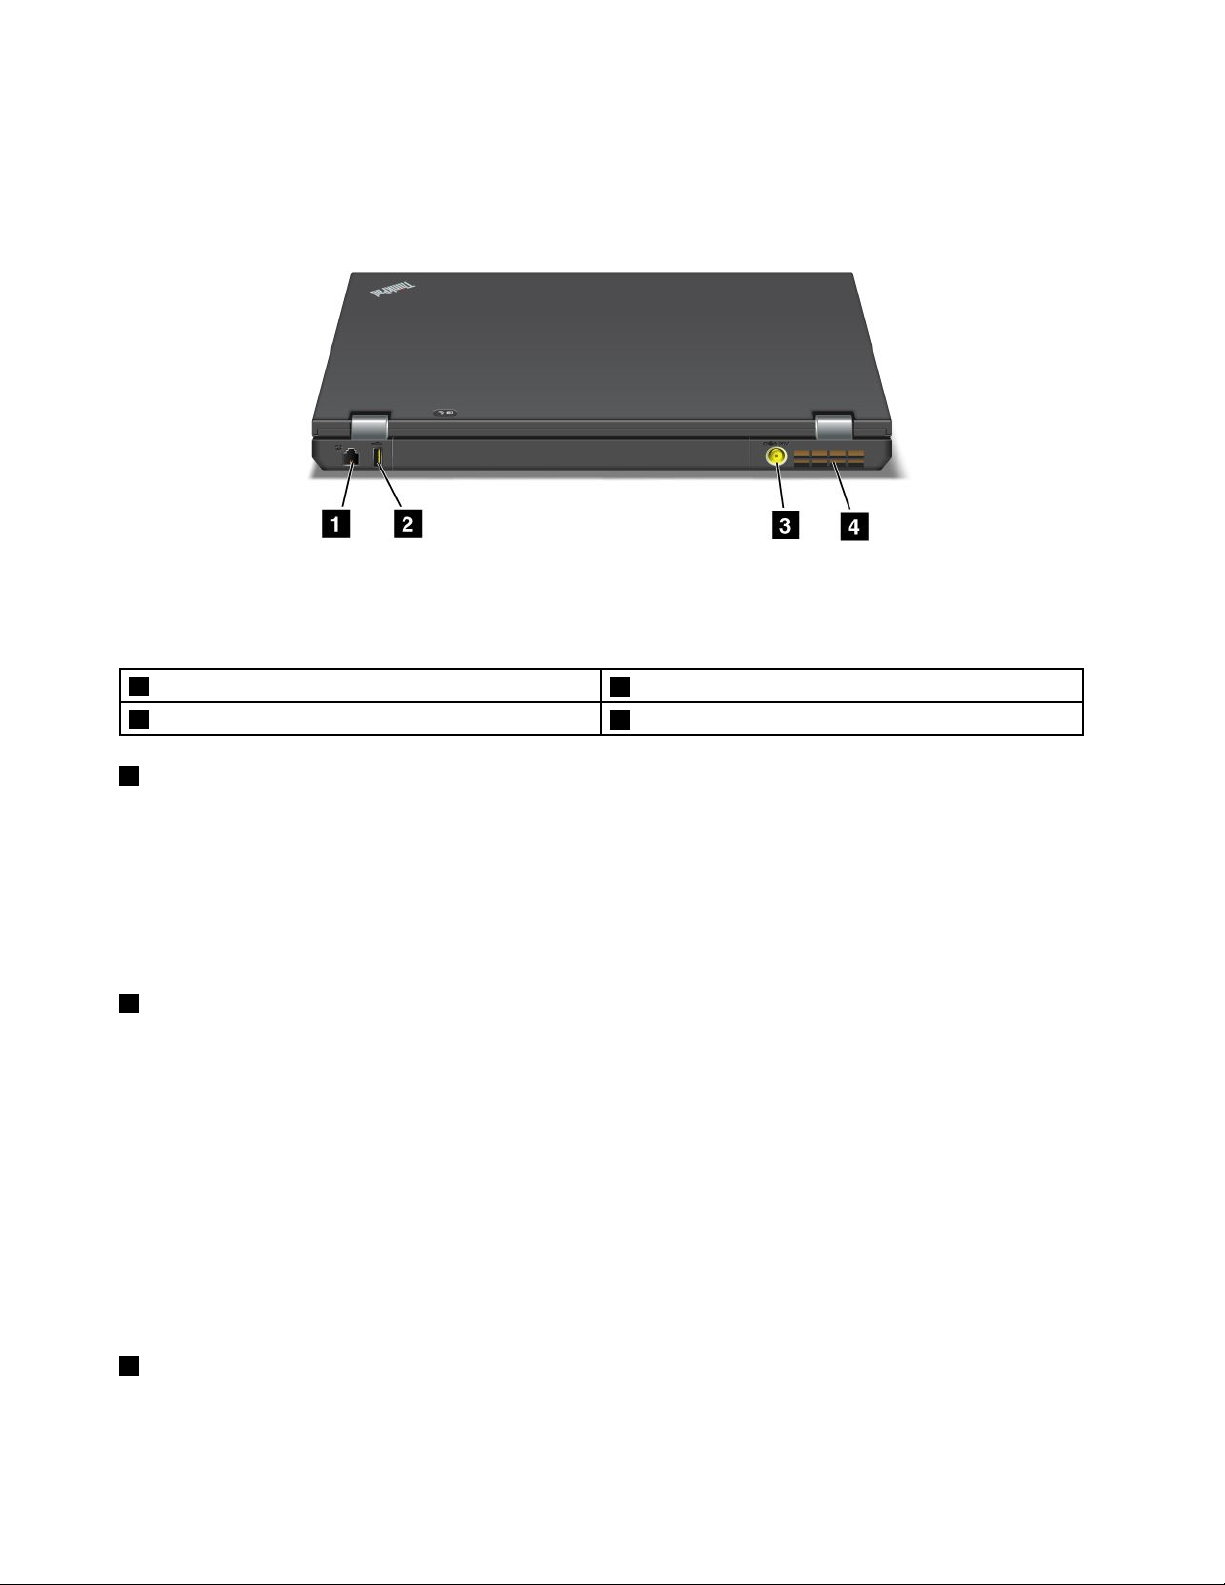
Rearview
Figure5.ThinkPadT420/T420irearview.
1ModemconnectororIEEE1394
3Powerjack
1ModemconnectororIEEE1394
2AlwaysOnUSBconnector(rear)
4Fanlouvers(rear)
•Ifyourcomputerhasamodemconnector,connectyourcomputertoatelephonelinewiththemodem
connector.Fordetails,refertotheinstructionsin“Dialupconnections”onpage68.
•IfyourcomputerhasanIEEE1394connector,whichisusedforconnectingdevicesthatarecompatible
withtheIEEE1394interface,suchasdigitalvideocamerasandexternalharddiskdrives.
Note:Dependingonyourmodel,yourcomputermighthaveneithermodemconnectornorIEEE1394
connector.
2AlwaysOnUSBconnector(rear)
TheAlwaysOnUniversalSerialBusconnectorisusedforconnectingdevicescompatiblewithaUSB
interface,suchasaprinteroradigitalcamera.
Bydefault,evenifyourcomputerisinsleep(standby)mode,theAlwaysOnUSBconnectorstillenables
youtochargesomedevices,suchasiPod
®
,iPhone,andBlackBerry®smartphones,byattachingthe
devicestotheconnector.
However,withtheacpoweradapterattached,ifyouwanttochargethesedeviceswhenyourcomputer
isinhibernationmodeorpoweredoff,youwillneedtoopenthePowerManagerprogramandcongure
correspondingsettingstoenabletheAlwaysOnUSBconnectorfunction.Fordetailsabouthowtoenable
theAlwaysOnUSBconnectorfunction,refertotheon-linehelpofthePowerManagerprogram.
Note:Y ourcomputeriscompatiblewithUSB1.1and2.0.
3Powerjack
Theacpoweradaptercableconnectstothecomputerpowerjacktoprovidepowertothecomputerand
chargethebattery.
10UserGuide
Page 29

4Fanlouvers(rear)
Theinternalfanandlouversenableairtocirculateinthecomputerandcoolthecentralprocessor.
Note:T oavoidimpedingairow,donotplaceanyobstacleinfrontofthefan.
Statusindicators
Thestatusindicatorsshowthecurrentstatusofyourcomputer.
System-statusindicators
1DeviceAccess
Aharddiskdriveoranoptionaldrive,suchasadriveintheUltrabay,isbeingusedtoreadorwritedata.
Whenthisindicatorisblinking,donotputthecomputerintosleep(standby)mode,removethe
devicefromthebay,orturnoffthecomputer.
2PowerOn
Thepowerswitchstayslitwheneverthecomputerison,blinkswhenthecomputerisinsleep(standby)
mode,andisoffwhenthecomputerisoff.
3CapsLock
CapsLockmodeisenabled.Youcanenterallalphabeticcharacters(A-Z)inuppercasewithoutpressing
theShiftkey.
4Numericlock
Bydefault,whenthenumericlockison,thenumericlockindicatorisdisplayedonthescreen.Tochangethe
settingsofthenumericlockindicator,see“Changingdisplaysettings”onpage69.
Note:Anothermodeavailableforyourcomputer,thoughthereisnoindicatorforit,isScrollLockmode.
Whenthismodeisenabled,thearrowkeyscanbeusedasfunctionkeysforscreen-scrolling,butnotfor
Chapter1.ProductOverview11
Page 30

movingthecursor.Toenableordisablethismode,pressScrLk.Notallapplicationprogramssupport
thisfunction.
Power-statusindicators
Thecomputerhasstatusindicatorsthatshowthemode(sleep/standby,hibernation,ornormal),acpower
status,thestatusofthebattery.Thefollowingshowsthelocationandthemeaningoftheindicators:
1Sleep(standbyinWindowsXP)status
•Green:Thecomputerisinsleep(standby)mode.
•Blinkinggreen:Thecomputerisenteringsleep(standby)orhibernationmode,orisresumingnormal
operation.
2Batterystatus
•Green:Thebatteryhasmorethan20%charge.
•Orange:Thebatteryhasbetween5%and20%charge
•Fastblinkingorange:Thebatteryhaslessthan5%charge.
Note:Thebatterymaybecharging.
•Slowblinkingorange:Thebatteryisbeingcharged.Whenitreaches20%,theblinkingcolorchangesto
green.
•Slowblinkinggreen:Thebatteryhasbetween20%and80%charge,andchargingiscontinuing.
Whenthebatteryreaches80%charge,blinkingstops,butthechargingmaycontinueuntilthebatteryis
100%charged.
Note:Ifthecomputerisoperatingonbatterypower,theBatterystatusindicatordoesnotworkwhilethe
computeristurnedofforisinsleep(standby)modeorhibernationmode.
•Quickblinkingorange:Anerrorhasbeenoccurredinthebattery.
•Thebatterystatusindicatorblinksthreetimes:Theacpoweradapterisattachedtothecomputer.
•Thebatterystatusindicatorisoff:Thebatteryisfullychargedorthebatteryisdetached.
12UserGuide
Page 31

IfyourcomputerisshippedwithaBluetoothfeature,awirelessLANfeature,awirelessWANfeature,anda
WiMAXfeature,youcanusethefollowingindicators:
3Bluetoothstatus
•Green:Thefeatureison,andtheradiolinkisreadyforuse,orthedataisbeingtransmitted.
•Off:TheBluetoothfeatureisdisabled.
4WirelessLAN/WirelessWAN/WiMAXstatus
•Green:ThewirelessLANfeature(the802.11b/gStandard,802.11a/b/gor802.11ndraft2.0),wireless
WANfeatureorWiMAXfeatureison,andtheradiolinkisreadyforuse,orthedataisbeingtransmitted.
•Off:Wirelessnetworkdevicesaredisabledortheradioisturnedoff.
Locatingimportantproductinformation
Thissectionprovidesinformationtohelpyoulocateyourmachinetypeandmodellabel,FCCIDandIC
Certicationlabel,andtheMicrosoft
®
CerticateofAuthenticity(COA)label.
Machinetypeandmodellabel
Themachinetypeandmodellabelidentiesyourcomputer.IfyoucontactLenovoforhelp,themachine
typeandmodelnumberwillenablesupporttechnicianstoidentifyyourcomputerandprovidethehighest
levelofservice.
Chapter1.ProductOverview13
Page 32

Youcanndthemachinetypeandmodelofyourcomputerinthelabelasshownbelow:
FCCIDandICCerticationnumberlabel
ThereisnoFCCIDorICCerticationnumberforthePCIExpressMiniCardshownontheenclosureof
yourcomputer.TheFCCIDandICCerticationnumberlabelisafxedonthecardinstalledinthePCI
ExpressMiniCardslotofyourcomputer.
14UserGuide
Page 33

IfnointegratedwirelessPCIExpressMiniCardhasbeenpreinstalledinyourcomputer,youcaninstall
one.Todothis,followtheprocedurein“InstallingandreplacingaPCIExpressMiniCardforwireless
LAN/WiMAXconnection”onpage130
WAN”onpage137.
or“InstallingandreplacingthePCIExpressMiniCardforwireless
CerticateofAuthenticitylabel
TheCerticateofAuthenticitylabelforthepreinstalledoperatingsystemisattached.Printedonthislabelare
theproductIDandtheproductkeyinformationforyourcomputer.Recordthisinformationandkeepitina
safeplace.Y oumightneedthesenumberstostartyourcomputerorreinstalltheoperatingsystem.
Chapter1.ProductOverview15
Page 34

TheCerticateofAuthenticityofyourcomputerisshownasbelow:
Features
Processor
•Toseethesystempropertiesofyourcomputer,clickStart,right-clickComputer(inWindowsXP,My
Computer);thenfromthepulldownmenuselectProperties.
Memory
•Doubledatarate3(DDR3)synchronousdynamicrandomaccessmemory
Storagedevice
•2.5-inch(7mmheight)solidstatedriveor2.5-inch(7mmor9.5mmheight)harddiskdrive
•mSATAsolidstatedrive(onsomemodels)
Display
ThecolordisplayusesTFTtechnology:
•Size:14.0inch(355.6mm)
•Resolution:
–LCD:Upto1600-by-900,dependingonthemodel
–Externalanalogmonitor:Upto2048-by-1536,dependingonthemodel
–Externaldigitalmonitor:Upto2536-by-1600,dependingonthemodel
•Brightnesscontrol
•ThinkLight
•Integratedcamera(onsomemodels)
•Built-inmicrophones(onsomemodels)
Keyboard
•89-key,90-key,or94-key
•UltraNav(TrackPointandmulti-touchtouchpad)
•Fnkeyfunction
•ThinkVantagebutton
•Volumecontrolbuttons
16UserGuide
Page 35

•Speakermutebutton
•Microphonemutebutton
Interface
•Externalmonitorconnectors(VGAandDisplayPort)
•Comboaudiojack(stereoheadphoneorheadset)
•2UniversalSerialBus(USB)connectors
•1AlwaysOnUSBconnector
•1eSATA/UniversalSerialBus(USB)connector(onsomemodels)
•IEEE1394connector(onsomemodels)
•RJ11Modemconnector(onsomemodels)
•RJ45Ethernetconnector
•SerialUltrabayenhanced
•ExpressCardslot
•4-in-1digitalmediacardreader(SD/SDHC/SDXC/MMC)
•Smartcardreader(onsomemodels)
•Dockingconnector
Opticaldrive
•Multi-Burnerdrive
Wirelessfeatures
•IntegratedwirelessLAN
•IntegratedBluetooth(onsomemodels)
•IntegratedwirelessWAN(onsomemodels)
•IntegratedWiMAX(onsomemodels)
Securityfeatures
•Fingerprintreader(onsomemodels)
Specications
Size
•Width:340.5mm(13.4inch)
•Depth:233mm(9.05inch)
•Height:30.1to30.5mm(1.18to1.20inch)
Heatoutput
•65W(222Btu/hr)maximum,90W(307Btu/hr)maximum,135W(460Btu/hr)maximum,or170W
(580Btu/hr)maximum(dependingonthemodel)
Powersource(ACadapter)
•Sine-waveinputat50to60Hz
•InputratingoftheACadapter:100to240VAC,50to60Hz
Chapter1.ProductOverview17
Page 36

Batterypack
•Lithium-ion(Li-Ion)batterypack
Batterylife
•Forpercentageofremainingbatterypower,seethePowerManagerBatteryGaugeinthetaskbar.
•ThePowerManageralsodisplaysagreen,yellowandredindication.Abatteryunderwarrantywithared
indicationiseligibleforawarrantyreplacement.
Operatingenvironment
Thissectionprovidesinformationaboutyourcomputeroperatingenvironment.
Environment:
•Maximumaltitudewithoutpressurization:3048m(10,000ft)
•Temperature
–Ataltitudesupto2438m(8000ft)
–Operating:5.0°Cto35.0°C(41°Fto95°F)
–Storage:5.0°Cto43.0°C(41°Fto109°F)
–Ataltitudesabove2438m(8000ft)Maximumtemperaturewhenoperatingundertheunpressurized
condition:31.3°C(88°F)
Note:Whenyouchargethebatterypack,itstemperaturemustbeatleast10°C(50°F).
•Relativehumidity:
–Operating:8%to80%
–Storage:5%to95%
Ifpossible,placeyourcomputerinawell-ventilatedanddryareawithoutdirectexposuretosunshine.
Keepelectricalappliancessuchasanelectricfan,radio,high-poweredspeakers,airconditioner,and
microwaveovenawayfromyourcomputerbecausethestrongmagneticeldsgeneratedbythese
appliancescandamagethemonitoranddataontheharddiskorsolidstatedrive.
Donotplaceanybeveragesontopoforbesidethecomputerorotherattacheddevices.Ifliquidisspilledon
orinthecomputeroranattacheddevice,ashortcircuitorotherdamagemightoccur.
Donoteatorsmokeoveryourkeyboard.Particlesthatfallintoyourkeyboardcancausedamage.
ThinkVantageTechnologiesandsoftware
LenovopreinstallsonyourPCusefulandhelpfulsoftwareapplicationstohelpyougetstarted,tostay
productivewhileonthemoveandtokeepyouandyourcomputerworking.Lenovooffersenhancedsecurity,
wirelesscomputing,data-migrationandothersolutionsforyourcomputer.
FollowingsectionsprovideinformationaboutThinkVantagetechnologiesandothercomputingsolutions,
offeredbyLenovo.
•“AccessingapplicationsinWindows7”onpage19
•“AccessConnections”onpage20
18UserGuide
Page 37

•“ActiveProtectionSystem”onpage21
•“ClientSecuritySolution”onpage21
•“FingerprintSoftware”onpage21
•“LenovoThinkVantageTools”onpage22
•“LenovoThinkVantageToolbox”onpage22
•“MessageCenterPlus”onpage22
•“PasswordManager”onpage23
•“PowerManager”onpage23
•“PresentationDirector”onpage23
•“ProductRecovery”onpage23
•“RescueandRecovery”onpage23
•“SystemUpdate”onpage24
•“ThinkVantageGPS”onpage24
Note:TolearnmoreaboutThinkVantagetechnologiesandothercomputingsolutions,offeredbyLenovo,go
to:
http://www.lenovo.com/support
AccessingapplicationsinWindows7
IfyouareusingtheWindows7operatingsystem,youcanaccessapplicationsbyfollowingoneofthe
methodsbelow:
•YoucangettheapplicationsfromtheLenovoThinkVantageTools.
ClickStart➙AllPrograms➙LenovoThinkVantageTools.Thendependingontheapplicationyou
wanttoaccess,double-clickthecorrespondingicon.
Note:IfanapplicationiconintheLenovoThinkVantageToolsapplicationnavigationwindowisdimmed,it
indicatesthatyouneedtoinstalltheapplicationmanually.Toinstalltheapplicationmanually,double-click
theapplicationicon.Then,followtheinstructionsonthescreen.Whentheinstallationprocesscompletes,
theapplicationiconwillbeactivated.
Table1.ApplicationsonLenovoThinkVantageT ools
ApplicationIconname
AccessConnectionsInternetConnection
ActiveProtectionSystem
FingerprintSoftware
LenovoThinkVantageToolbox
or
LenovoSolutionCenter
MobileBroadbandActivate
PasswordManagerPasswordVault
PowerManager
RecoveryMediaFactoryRecoveryDisks
RescueandRecoveryEnhancedBackupandRestore
SimpleTapSimpleTap
AirbagProtection
FingerprintReader
SystemHealthandDiagnostics
3GMobileBroadband
PowerControls
Chapter1.ProductOverview19
Page 38

Table1.ApplicationsonLenovoThinkVantageTools(continued)
ApplicationIconname
SystemUpdate
ThinkVantageGPSGPS
UpdateandDrivers
•YoucanalsogettheapplicationsfromtheControlPanel.
ClickStart➙ControlPanel.Dependingontheapplicationyouwanttoaccess,clickthecorresponding
sectionandthenclickthecorrespondinggreentext.
Note:IfyoudonotndtheapplicationyouneedinControlPanel,opentheLenovoThinkVantageTools
applicationnavigationwindowanddouble-clickthedimmedicontoinstalltheapplicationyouneed.
Then,followtheinstructionsonthescreen.Whentheinstallationprocesscompletes,theapplicationicon
willbeactivated,andyoucanndtheapplicationinControlPanel.
ThesectionsinControlPanel,thegreentexts,andtheapplicationsarelistedinthefollowingtable.
Table2.ApplicationsonControlPanel
Application
AccessConnections
ActiveProtectionSystemSystemandSecurity
CommunicationsUtilityHardwareandSoundLenovo-CommunicationsUtility
FingerprintSoftwareSystemandSecurity
LenovoThinkVantageToolbox
or
LenovoSolutionCenter
MobileBroadbandActivateNetworkandInternet
PasswordManager
PowerManager
RecoveryMedia
RescueandRecovery
SimpleTap
SystemUpdateSystemandSecurity
ThinkVantageGPS
ControlPanelsectionGreentextontheControlPanel
NetworkandInternet
HardwareandSound
HardwareandSound
SystemandSecurityLenovo-SystemHealthand
SystemandSecurity
UserAccountsandFamilySafety
HardwareandSound
SystemandSecurity
SystemandSecurity
SystemandSecurity
Programs
NetworkandInternet
SystemandSecurity
Lenovo-InternetConnection
Lenovo-AirbagProtection
Lenovo-FingerprintReader
or
Lenovo-NotebookFingerprint
Reader
Diagnostics
Lenovo-3GMobileBroadband
Lenovo-PasswordVault
Lenovo-PowerControls
Lenovo-FactoryRecoveryDisks
Lenovo-EnhancedBackupand
Restore
Lenovo’sSimpleT ap
Lenovo-UpdateandDrivers
Lenovo-GPS
AccessConnections
AccessConnections™isaconnectivityassistantprogramforcreatingandmanaginglocationproles.Each
locationprolestoresallthenetworkandInternetcongurationsettingsneededforconnectingtoanetwork
infrastructurefromaspeciclocationsuchasahomeoranofce.
20UserGuide
Page 39

Byswitchingbetweenlocationprolesasyoumoveyourcomputerfromplacetoplace,youcanquicklyand
easilyconnecttoanetworkwithnoneedtorecongureyoursettingsmanuallyandrestartthecomputer
eachtime.
ToopentheAccessConnectionsprogram,dothefollowing:
•ForWindows7:See“AccessingapplicationsinWindows7”onpage19.
•ForWindowsVista
Connections.
®
andWindowsXP:ClickStart➙AllPrograms➙ThinkVantage➙Access
ActiveProtectionSystem
TheActiveProtectionSystemprotectsyourharddiskdrivewhentheshocksensorinsideyourcomputer
detectsaconditionthatcoulddamagethedrive,suchassystemtilt,excessivevibration,orshock.Thehard
diskdriveislessvulnerabletodamagewhenitisnotoperating;sothesystemstopsitfromspinning,and
mayalsomovetheread/writeheadsofthedrivetoareasthatdonotcontaindata.Assoonastheshock
sensorsensesthattheenvironmentisstableagain(minimalchangeinsystemtilt,vibration,orshock),it
turnstheharddiskdriveon.
ToopenActiveProtectionSystem,dothefollowing:
•ForWindows7:See“AccessingapplicationsinWindows7”onpage19
•ForWindowsVistaandWindowsXP:ClickStart➙AllPrograms➙ThinkVantage➙ActiveProtection
System.
.
ClientSecuritySolution
TheClientSecuritySolutionhelpsprotectyourcomputerandyourpersonalinformationsothatyouknowthat
yoursensitivedataissecure.Itcanalsohelpmanageyourpasswords,helprecoveraforgottenpassword,
orhelpyoumonitorsecuritysettingsonyourcomputerandsuggesthowtoenhanceyourcomputersecurity.
Theseconvenientfeaturesaremademoresecurebyabuilt-insecuritychip,apowerfulcomputerchip
dedicatedtothesecurityfunctionsofyourcomputer.
TostarttheClientSecuritySolution,clickStart➙AllPrograms➙ThinkVantage➙ClientSecurity
Solution.
Fordetails,refertotheHelpfortheprogram.
YoucandownloadthelatestClientSecuritySolutionfromthefollowingWebsiteat:
http://www.lenovo.com/support
Note:IfyourcomputerisaWindows7model,ClientSecuritySolutionisnotpreinstalledonit.
FingerprintSoftware
Ifyoursystemcomeswithangerprintreader,theFingerprintSoftwareprogramenablesyoutoenrollyour
ngerprintandassociateitwithyourWindowspassword.Asaresult,thengerprintauthenticationcan
replaceyourpasswordandenablesimpleandsecureuseraccess.
Toopenthengerprintsoftware,dothefollowing:
•ForWindows7:See“AccessingapplicationsinWindows7”onpage19
•ForWindowsVistaandWindowsXP:ClickStart➙AllPrograms➙ThinkVantage➙ThinkVantage
FingerprintSoftware.
.
Chapter1.ProductOverview21
Page 40

LenovoSolutionCenter
Note:Dependingonthedatewhenyourcomputerwasmanufactured,yourcomputerispreinstalledwith
eithertheLenovoSolutionCenterprogramortheLenovoThinkVantageToolboxprogramfordiagnostic
purposes.ForadditionalinformationabouttheLenovoThinkVantageToolboxprogram,see“Locating
computercontrols,connectors,andindicators”onpage1
TheLenovoSolutionCenterprogramenablesyoutotroubleshootandresolvecomputerproblems.It
combinesdiagnostictests,systeminformationcollection,securitystatus,andsupportinformation,along
withhintsandtipsformaximumsystemperformance.Fordetailedinformation,see“Diagnosingproblems”
onpage201
TostarttheLenovoSolutionCenterprograminWindows7,see“AccessingapplicationsinWindows7”
onpage19.
.
.
LenovoThinkVantageT ools
TheLenovoThinkVantageToolsprogramhelpsyouworkmoreeasilyandsecurelybyprovidingeasyaccess
tovarioustechnologies,suchas:
•LenovoSolutionCenterorLenovoThinkVantageToolbox(dependingonthedateofmanufacture)
•PowerManager
•RescueandRecovery
•SystemUpdate
ToaccesstheLenovoThinkVantageToolsprogram,clickStart➙AllPrograms➙LenovoThinkVantage
Tools.
Note:LenovoThinkVantageToolsisavailableonlyonmodelspreinstalledwiththeWindows7operating
system.IfyourWindows7modelisnotpreinstalledwiththeprogram,youcandownloaditfrom
http://support.lenovo.com.
LenovoThinkVantageT oolbox
Note:Dependingonthedatewhenyourcomputerwasmanufactured,yourcomputerispreinstalledwith
eithertheLenovoSolutionCenterprogramortheLenovoThinkVantageToolboxprogramfordiagnostic
purposes.ForadditionalinformationabouttheLenovoSolutionCenterprogram,see“LenovoSolution
Center”onpage22.
TheLenovoThinkVantageToolboxprogramenablesyoutoviewsymptomsofcomputerproblemsandnd
solutionsforthem.Italsoincludesautomaticnoticationwhenactionisrequired,computingassistance,
advanceddiagnostics,anddiagnostichistory.
TostarttheLenovoThinkVantageToolboxprogram,dothefollowing:
•ForWindows7:See“AccessingapplicationsinWindows7”onpage19.
•ForWindowsVistaandWindowsXP:ClickStart➙AllPrograms➙ThinkVantage➙Lenovo
ThinkVantageToolbox.
ForadditionalinformationabouttheLenovoThinkVantageToolboxprogram,refertothehelpinformation
systemoftheprogram.
MessageCenterPlus
TheMessageCenterPlusdisplaysmessagestoinformyouabouthelpfulsoftwarethathasbeenpreinstalled
onyourcomputer.Thesoftwareenablesyoutomanagewiredandwirelessconnections,protectyourdata
22UserGuide
Page 41

intheeventofaproblemandautomaticallydiagnoseandresolvepotentialproblemswithyourcomputer.
TheMessageCenterPluscanalsoprovidemessagesaboutnewupdatesavailabletokeepyourcomputer
current.
PasswordManager
ThePasswordManagerprogramenablesuserstomanageandrememberalltheirsensitiveand
easy-to-forgetapplicationandWebsitelogininformation,suchasuserIDs,passwords,andotherpersonal
information.
ToopenPasswordManager,dothefollowing:
•ForWindows7:See“AccessingapplicationsinWindows7”onpage19
•ForWindowsVistaandWindowsXP:ClickStart➙AllPrograms➙ThinkVantage➙Password
Manager.
.
PowerManager
ThePowerManagerprogramprovidesconvenient,exible,andcompletepowermanagementforyour
computer.ByusingthePowerManagerprogram,youcanadjustyourpowersettingstogiveyouthebest
balancebetweenperformanceandpowersaving.
ToopenPowerManager,dothefollowing:
•ForWindows7:See“AccessingapplicationsinWindows7”onpage19
•ForWindowsVistaandWindowsXP:ClickStart➙AllPrograms➙ThinkVantage➙PowerManager.
.
PresentationDirector
PresentationDirectorisadisplaycongurationutilitythatenablesyoutogivepresentationsconveniently.It
alsoenablesyoutocreateandmanagethedisplayschemes.However,bydefault,PresentationDirectorhas
somepredenedpresentationschemes.Y oucanapplythemtoyourpresentationwithnoneedtosetupa
newscheme.Toapplyapresentationscheme,youcanalsouse“Functionkeycombinations”onpage28
ToopenPresentationDirector,clickStart➙AllPrograms➙ThinkVantage➙PresentationDirector.
Note:IfyourcomputerisaWindows7model,PresentationDirectorisnotsupportedbecausetheWindows
7operatingsystemhandlestheexternaldisplaysinstead.
.
ProductRecovery
Thisprogramenablesyoutocreaterecoverymediatorestorethecontentsofthesystemdriveorharddisk
drivetothesamestateaswhenthecomputerwasoriginallyshippedfromthefactory.
Forinformationabouthowtoopenandusethisprogram,referto“Creatingandusingrecoverymedia”on
page103.
RescueandRecovery
TheRescueandRecoveryprogramisaonebuttonrecoveryandrestoresolutionthatincludesasetof
self-recoverytoolstohelpyoudiagnosecomputerproblems,gethelp,andrecoverfromsystemcrashes,
evenifyoucannotstarttheWindowsoperatingsystem.
•ForWindows7:See“AccessingapplicationsinWindows7”onpage19
•ForWindowsVistaandWindowsXP:ClickStart➙AllPrograms➙ThinkVantage➙Rescueand
Recovery.
.
Chapter1.ProductOverview23
Page 42

SimpleTap
TheSimpleTapprogramprovidesyouwithaquickwaytocustomizesomebasiccomputersettingssuchas
mutingthespeakers,adjustingthevolume,lockingthecomputeroperatingsystem,launchingaprogram,
openingaWebpage,openingale,andsoon.
TostarttheSimpleTapprogram,doanyofthefollowing:
•ClicktheSimpleT apicononthedesktop.
•Double-taponthetouchpadusingtwongers.
•PresstheblueThinkVantagebutton.
Note:TheSimpleTapprogramisonlyavailableoncertainmodelspreinstalledwiththeWindows7operating
system.IfyourWindows7modelisnotpreinstalledwiththeSimpleTapprogram,youcandownloadit
fromhttp://support.lenovo.com.
SystemUpdate
TheSystemUpdateprogramhelpsyoukeepthesoftwareonyourcomputerup-to-datebydownloadingand
installingsoftwarepackages(ThinkVantageapplications,devicedrivers,UEFIBIOSupdates,andotherthird
partyapplications).Someexamplesofsoftwarethatyoushouldkeepupdatedareprogramsprovidedby
Lenovo,suchastheRescueandRecoveryprogram.
ToopentheSystemUpdate,dothefollowing:
•ForWindows7:See“AccessingapplicationsinWindows7”onpage19
•ForWindowsVistaandWindowsXP:ClickStart➙AllPrograms➙ThinkVantage➙SystemUpdate.
.
ThinkVantageGPS
IfthePCIExpressMiniCardinstalledinyourcomputersupportsGPS,yourcomputercanreceivesignals
fromGPSsatellitesanddetermineitslocation.IfyourcomputerisconnectedtotheInternet,youcannd
yourlocationonareal-timemapprovidedbyGoogleMapsorMicrosoftBing™Maps.
ToopenThinkVantageGPS,dothefollowing:
•ForWindows7:See“AccessingapplicationsinWindows7”onpage19.
•ForWindowsVistaandWindowsXP:ClickStart➙AllPrograms➙ThinkVantage➙ThinkVantageGPS.
ThinkVantageProductivityCenter
TheThinkVantageProductivityCenterprogramprovidesanintegrateduserinterfacetohelpyousetup,
understand,andenhanceyourcomputer.ItenablesyoutoaccessotherThinkVantageTechnologies,view
messagesfromLenovo,andperformthemostfrequentlyusedtaskssuchasdeviceconguration,wireless
networkconguration,andcomputermanagementandmaintenance.
ToopentheThinkVantageProductivityCenterprograminWindowsXPorWindowsVista,presstheblue
ThinkVantagebutton.
Note:TheThinkVantageProductivityCenterprogramisavailableonmodelspreinstalledwiththeWindows
XPorWindowsVistaoperatingsystem.
24UserGuide
Page 43

Chapter2.Usingyourcomputer
Yourcomputerispowerfulandisloadedwithfeaturesandapplications.Useittoaccomplishanything,
anyday,anytime.
•“Registeryourcomputer”onpage25
•“Frequentlyaskedquestions”onpage25
•“Specialkeysandbuttons”onpage27
•“UsingtheUltraNavpointingdevice”onpage34
•“Powermanagement”onpage38
•“Connectingtothenetwork”onpage42“Usingaprojectororexternaldisplay”onpage69
•“UsingtheNVIDIAOptimusGraphicsfeature”onpage76
•“Usingaudiofeatures”onpage77
•“Usinganintegratedcamera”onpage78
•“UsingtheThinkLightfeature”onpage78
•“Usingtheopticaldrive”onpage79
•“Usingthemediacardreader”onpage79
Registeryourcomputer
Whenyouregisteryourcomputer,informationisenteredintoadatabase,whichenablesLenovotocontact
youincaseofarecallorothersevereproblem.Inaddition,somelocationsofferextendedprivilegesand
servicestoregisteredusers.
WhenyouregisteryourcomputerwithLenovo,youwillalsoreceivethefollowingbenets:
•QuickerservicewhenyoucallLenovoforhelp
•Automaticnoticationoffreesoftwareandspecialpromotionaloffers
Note:Whenyouarereadytoregisterbymodem,youwillneedaphoneconnectiontoyourcomputerand
accesstotheWorldWideWeb.
ToregisteryourcomputerwithLenovo,gotohttp://www.lenovo.com/register.Thenfollowtheinstructions
onthescreen.
Frequentlyaskedquestions
HereareafewtipsthatwillhelpyouoptimizetheuseofThinkPadnotebook.
Toensurethatyoureceivethebestperformancefromyourcomputer,browsethefollowingWebpagetond
informationsuchasaidsfortroubleshootingandanswerstofrequentlyaskedquestionsat:
http://www.lenovo.com/support/faq
CanIgetmyuserguideinanotherlanguage?
•Todownloadtheuserguideinanotherlanguage,gotohttp://www.lenovo.com/support.Thenfollow
theinstructionsonthescreen.
Onthegoandneedtousebatterypowermoreeffectively?
©CopyrightLenovo2011
25
Page 44

•Toconservepower,ortosuspendoperationwithoutexitingapplicationsorsavingles,see“Power-saving
modes”onpage39.
•Toachievethebestbalancebetweenperformanceandpowersaving,createandapplypowerplans(in
WindowsXP,powerschemes)byuseofPowerManager.
•Ifyourcomputerwillbeturnedoffforanextendedperiodoftime,youcanpreventbatterypowerfrom
drainingbyremovingthebattery.Formoreinformationaboutusingthebattery,see“Powermanagement”
onpage38
.
Concernedaboutsecurityorneedtosecurelydisposeofdatastoredonyourharddiskorsolid
statedrive?
•RefertoChapter4“Security”onpage89
tolearnhowyoucanprotectyourcomputerfromtheftand
unauthorizeduse.
•TheClientSecuritySolutionprogrampreinstalledonyourcomputerperformsmanyofthesecuritytasks
thathelpprotectit.Ifthesetupwizardruns,tokeepyoursecure,besuretosetuptheClientSecurity
Solution.
Note:IfyourcomputerisaWindows7model,ClientSecuritySolutionisnotpreinstalledonit.
•Beforeyoudisposeofthedataontheharddiskdriveorthesolidstatedrive,besuretoread“Noticeon
deletingdatafromyourharddiskdriveorsolidstatedrive”onpage100
.
Gettingconnectedindifferentlocationsisachallenge?
•Totroubleshootawirelessnetworkingissue,seehttp://www.lenovo.com/support/faq.
•TakeadvantageofthenetworkingfeaturesbyuseofAccessConnections.
•Tolearnmoreaboutusingthewirelessfeaturesofyourcomputer,referto“Wirelessconnections”on
page43.
•Ifyourcomputerhasamodem,see“Usingthebuilt-inmodem”onpage50.
•Totravelmorecondently,besuretocheckthetipsin“Travelingwithyourcomputer”onpage86
•PressFn+F5,orusethewirelessradioswitchtoenableordisablethewirelessfeatures.
Needtogivepresentationsorattachanexternalmonitoroften?
•UsePresentationDirectortosetupapresentation.
.
Note:IfyourcomputerisaWindows7model,itdoesnotsupportPresentationDirector,howeverthe
“Fn+F7”onpage30keycombinationmaystillbeusedtoswitchdisplayoutputlocation.
•Makesurethatyoufollowtheprocedurein“Attachinganexternalmonitor”onpage70.
•WiththeExtenddesktopfunction,youcandisplayoutputonboththecomputerdisplayandanexternal
monitor.
Needtoattachorreplaceadevice?
•SeeChapter6“Replacingdevices”onpage111
formoreinformationaboutreplacingthedevicesof
yourcomputer.
•SeeChapter7“Enhancingyourcomputer”onpage149formoreinformationaboutenhancingthe
featuresofyourcomputer.
You'vebeenusingyourcomputerforsometimealready,anditisgettingslower?
•Followthe“Generaltipsforpreventingproblems”onpage195
.
•Youcandiagnosetheproblemyourselfbyusingthepreinstalledsoftware.See“Diagnosingproblems”on
page201.
26UserGuide
Page 45

•Alsorecoverytoolisprovidedonyourcomputerharddiskorsolidstatedrive.Formoreinformation,
seeChapter5“Recoveryoverview”onpage103.
Printthefollowingsectionsandkeepthemwithyourcomputerincaseyouareunabletoaccessthis
onlinehelpwhennecessary.
•“Installinganewoperatingsystem”onpage169
•“Computerstopsresponding”onpage202
•“Powerproblems”onpage226
Specialkeysandbuttons
Yourcomputerhasseveralspecialkeysandbuttons.
ThinkVantagebutton
TheblueThinkVantagebuttoncanhelpyouinmanysituationswhenyourcomputerisworkingnormally,
andevenwhenitisnot.
Whenyourcomputerisworkingnormally,presstheblueThinkVantagebuttontolaunchtheSimpleTap
program(forWindows7)ortheThinkVantageProductivityCenterprogram(forWindowsXPandWindows
Vista).
Note:Dependingonthedatewhenyourcomputerwasmanufactured,yourcomputermighthavethe
LenovoThinkVantageToolboxprogrampreinstalledinsteadoftheSimpleT approgramortheThinkVantage
ProductivityCenterprogram.
YoualsocanusetheThinkVantagebuttontointerruptthestartupsequenceofyourcomputerandstartthe
RescueandRecoveryworkspace,whichrunsindependentlyoftheWindowsoperatingsystemandishidden
fromit.IftheWindowsoperatingsystemisnotrunningproperly,theRescueandRecoveryworkspace
canhelpyoudothefollowing:
•Getthecurrentsysteminformation.
•RescuealefromyourWindowsenvironmentorrestoreback-uples,providedyouhavemadebackups
byuseoftheRescueandRecoveryprogram.
•CongureyourcomputerorstarttheThinkPadSetup.
ToaccesstheRescueandRecoveryworkspace,turnonthecomputer;then,whilethe“Tointerruptnormal
startup,presstheblueThinkVantagebutton”messageisdisplayedatthelower-leftofthescreen,pressthe
ThinkVantagebutton.TheRescueandRecoveryscreenopens.Foradditionalinformation,see“Usingthe
RescueandRecoveryworkspace”onpage106
.
Numerickeypad
Thekeyboardhaskeysthat,whenenabled,workasa10-keynumerickeypad.
Toenableordisablethenumerickeypad,pressandholdShiftorFnandthenpressNmLk(ScrLk).
Note:Thenextdrawingshowsthelocationsofthekeysthatserveasthe10-keynumerickeypad.The
locationsofthesekeysarethesameoneverykeyboard,thoughforcomputersusingdifferentlanguages,
differentcharactersareprintedonthekeytops.
Chapter2.Usingyourcomputer27
Page 46

Ifthenumerickeypadisenabled,pressandholdShifttousethecursor-andscreen-controlkeystemporarily.
Note:Thefunctionsofthecursor-andscreen-controlkeysarenotprintedonthekeys.
Functionkeycombinations
Bysettingthefunctionkeys,youcanchangeoperationalfeaturesinstantly.Tousethisfunction,pressand
holdtheFnkey(1);thenpressoneofthefunctionkeys(2).
28UserGuide
Page 47

Powerconservation
•Fn+F3
Selectapowerplan(inWindowsXP ,powerscheme)thathasbeencreatedbyPowerManager,oradjust
thepowerlevelbyusingtheslidercontrol.Whenyoupressthiscombinationofbuttons,apanelfor
selectingapowerplan(inWindowsXP,powerscheme)oradjustingthepowerlevelappears.
Note:IfyouhaveloggedonwithanadministratoruserIDinWindowsXP,andyoupressFn+F3,thepanel
forselectingapowerschemeappears.IfyouhaveloggedonwithanotheruserIDinWindowsXP,
andyoupressFn+F3,thepaneldoesnotappear.
•Fn+F4
Putyourcomputerinsleep(standby)mode.Toreturntonormaloperation,presstheFnkeyonly,without
pressingafunctionkey.
Note:Ifyouwanttousethecombinationtoputthecomputerintohibernationmodeordo-nothingmode
(inWindowsXP ,shutthecomputerdownorshowthepanelforturningoffthecomputer),changethe
settingsinPowerManager.
•Fn+F12
Putyourcomputerinhibernationmode.T oreturntonormaloperation,pressthepowerbuttonforless
thanfourseconds.
Notes:
–ThoughthescreenfadesoutimmediatelyafterFn+F12arepressed,thecomputerdoesnotenterthe
hibernationmodeimmediately.Donotmovethesystemuntilthesleep(standby)statusindicatorstops
blinking.Movingthecomputerwhenitisenteringhibernationmaycausecorruptionoftheharddrive.
–TouseFn+F3,Fn+F4,andFn+F12keycombinations,youmusthavetheThinkPadPMdevicedriver
installedonyourcomputer.
Forinformationonthepowermanagementfunction,referto“Powermanagement”onpage38
.
Applyingapresentationscheme
•Fn+F7
Chapter2.Usingyourcomputer29
Page 48

Applyapresentationschemedirectly,withnoneedtostartPresentationDirector.
TodisablethisfunctionandusetheFn+F7keycombinationforswitchingadisplayoutputlocation,start
PresentationDirector,andchangethesettings.
ClickStart➙AllPrograms➙ThinkVantage➙PresentationDirector.
Note:IfyourcomputerisaWindows7model,itdoesnotsupportpresentationschemes,howeverthe
Fn+F7keycombinationmaystillbeusedtoswitchdisplayoutputlocation.
Switchingadisplayoutputlocation
•Fn+F7
ForWindows7:
Switchbetweenthecomputerdisplayandanexternalmonitor.Windowswillshowthesedisplayoptions:
–Computerdisplayonly(LCD)
–Computerdisplayandexternalmonitor(sameimage)
–Computerdisplayandexternalmonitor(extendeddesktopfunction)
–Externalmonitoronly
Note:T oswitchbetweenthecomputerdisplayandanexternalmonitor,theWin+Pkeycombination
isalsoavailable.
ForWindowsVistaandWindowsXP:
Switchbetweenthecomputerdisplayandanexternalmonitor.Ifanexternalmonitorisattached,
computeroutputisdisplayedinthefollowingthreepatternsbyturns:
–Externalmonitor
–Computerdisplayandexternalmonitor
–Computerdisplay
Notes:
–Thisfunctionisnotsupportedifdifferentdesktopimagesaredisplayedonthecomputerdisplayand
theexternalmonitor(theExtenddesktopfunction).
–ThisfunctiondoesnotworkwhileaDVDmovieoravideoclipisplaying.
Toenablethisfunction,startPresentationDirector,andchangethesettings.ClickStart➙AllPrograms
➙ThinkVantage➙PresentationDirector,andchangetheFn+F7Settings.
Note:MultipleuserscanlogontoasingleoperatingsystembyusingdifferentuserIDs.Eachuser
needstodothefollowing:
Enablingordisablingthewirelessfeatures
•Fn+F5
Enableordisablethebuilt-inwirelessnetworkingfeatures.IfyoupressFn+F5,alistofwirelessfeaturesis
displayed.Y oucanquicklychangethepowerstateofeachfeatureinthelist.
Note:IfyouwanttouseFn+F5toenableordisablethewirelessfeatures,thefollowingdevicedrivers
mustbeinstalledonyourcomputerbeforehand:
–PowerManagementdriver
–OnScreenDisplayUtility
–Wirelessdevicedrivers
Forinformationonthewirelessfeatures,referto“Wirelessconnections”onpage43.
30UserGuide
Page 49

Launchingthecameraandaudiosettings
•Fn+F6
IfyoupressFn+F6,thecameraandaudiosettingswindowisopenedandthecamerapreviewisturnedon.
Fromthiswindow,youcanchangethecameraandaudiosettings.
Note:TheCamerasettingsareaonlyappearsifyourcomputerhasanintegratedcamera.Formore
information,see“Usinganintegratedcamera”onpage78.
Otherfunctions
•Fn+PgUp:TurntheThinkLighton.Toturnitoff,pressFn+PgUpagain.
Note:ThisfunctionissupportedonlyontheThinkPadnotebooksthathavetheThinkLight.Theonoroff
statusoftheThinkLightisshownonthescreenforafewsecondswhenyoupressFn+PgUp.
•Fn+Home:Thecomputerdisplaybecomesbrighter.
Thepurposeofthismethodistochangethebrightnessleveltemporarily.OnWindowsVista,thedefault
brightnesslevelisloadedaftersleep(standby),hibernation,reboot,ordetachingorattachinganac
poweradapter.Tochangethedefaultbrightnesslevel,changethesettingsofthePowerOptioninthe
ControlPanelorusePowerManager.
•Fn+End:Thecomputerdisplaybecomesdimmer.
Thepurposeofthismethodistochangethebrightnessleveltemporarily.OnWindowsVista,thedefault
brightnesslevelisloadedaftersleep(standby),hibernation,reboot,ordetachingorattachinganac
poweradapter.Tochangethedefaultbrightnesslevel,changethesettingsofthePowerOptioninthe
ControlPanelorusePowerManager.
•Fn+Spacebar:EnabletheFullScreenMagnierfunction.
•Fn+F2:Lockyourcomputer.
•Fn+F8:ChangethesettingsoftheUltraNavpointingdevice.
•Fn+PrtSc:HavethesamefunctionastheSysRqkey.
•Fn+ScrLk:Enableordisablethenumerickeypad.Theindicatorofnumericlockisdisplayedonthe
screen.
•Fn+Pause:HavethesamefunctionastheBreakkey.
•Fn+cursorkeys:ThesekeycombinationsareforusewithWindowsMediaPlayer.Theyhavethe
followingfunctions:
–Fn+downarrowkey:PlayorPause
–Fn+uparrowkey:Stop
–Fn+rightarrowkey:NextTrack
–Fn+leftarrowkey:PreviousT rack
Chapter2.Usingyourcomputer31
Page 50

Volumeandmutebuttons
Youcanadjustthesoundlevelofthebuilt-inspeakersbyusingthefollowingthreebuttons:
1Speakermutebutton
2Volumecontrolbutton
3Microphonemute
Ifyoumutethesoundandthenturnoffyourcomputer,thesoundwillremainmutedwhenyouturnonyour
computeragain.Toturnonthesound,presstheplus(+)orminus(-)button.
Settingthevolume
Eachdevicehasvolumecontrols,whichyoucanset.
Toopenthewindowforadjustingtheoutputvolumeortherecordingvolume,dothefollowing:
ForWindows7andWindowsVista:
1.ClickStart➙ControlPanel➙HardwareandSound➙Sound.TheSoundwindowappears.
2.ClickthePlaybacktaborRecordingtab,andthenclickadevice,whichyouwanttocustomize.
3.ClickthePropertiesbutton.
4.ClicktheLevelstab,andthenchangethevolumebymovingtheslider.
ForWindowsXP:
1.ClickStart➙ControlPanel➙Sounds,Speech,andAudioDevices➙SoundsandAudioDevice.
TheSoundsandAudioDevicePropertieswindowappears.
2.ClicktheAudiotab,andthenclicktheVolumebuttoninSoundPlaybackorSoundRecording.
Notes:
•Youcanalsogetaccesstothedesktopvolumecontrolbyusingthevolumeiconinthetaskbaratthe
lowerrightofthescreen.ToopentheVolumeControlwindow,clickthevolumeicon.Tocontrolthe
32UserGuide
Page 51

volume,movethevolumecontrolsliderupordown.Toturnoffthesound,selectMutespeakers(in
WindowsVistaandWindowsXP ,Mute).
•Thenamesofwindowsoreldsareslightlydifferentdependingontheoperatingsystemyouuse.
•Fordetailsaboutcontrollingvolume,refertoyourWindowsonlinehelp.
SettingthemicrophonemutebuttoninWindows7andWindowsVista
Bydefault,youcantoggleallofyourrecordingdevicesbetweenthemutestateandtheun-mutestateby
pressingthemicrophonemutebutton.
Ifyouwanttotoggleoneoftherecordingdevicesbetweenthemutestateandtheun-mutestate,do
thefollowing:
1.PressFn+F6.TheCommunicationssettingswindowopens.
2.ClicktheManageSettingsbutton.TheCommunicationsUtilitywindowopens.
3.OntheVoIPCallSettingstab,clickMicrophonemutebuttonsettings.TheSettingforMicrophone
Mutewindowopens.
4.SelectOnlytherecordingdeviceselectedbelow:.Thenselecttherecordingdevicefromthe
drop-downlistbox.
5.ClickOK.
WindowskeyandApplicationkey
Thefollowingtwokeysareonyourcomputerkeyboard:
1Windowskey
Ifyoupressthiskey,theStartmenuofWindowsisdisplayedorhidden.
Ifyoupressthiskeyandanotherkeyatthesametime,theSystemPropertieswindowortheComputer(in
WindowsXP,MyComputer)windowisdisplayed.Fordetails,refertotheHelpinWindowsoperatingsystem.
Chapter2.Usingyourcomputer33
Page 52

2Applicationkey
Todisplaytheshortcutmenuforanobject,selecttheobjectonthedesktoporwithinanapplicationand
thenpressthiskey.
UsingtheUltraNavpointingdevice
YourcomputermaycomewiththeUltraNavpointingdevice.TheUltraNavconsistsoftheTrackPointand
thetouchpad,eachofwhichisitselfapointingdevicewithbothbasicandextendedfunctions.Youcan
congurebothdevicesbychoosingthesettingsyoupreferasfollows:
•SetboththeT rackPointandthetouchpadaspointingdevices.
ThissettingenablestheuseofallthebasicandextendedfunctionsoftheTrackPointandthetouchpad.
•SettheTrackPointasthemainpointingdeviceandthetouchpadforextendedfunctionsonly.
ThissettingenablestheuseofallbasicandextendedfunctionswiththeTrackPointwhilelimitingtheuse
ofthetouchpadtoscrolling,tapzones,andslow-motionpointerfunctions.
•SetthetouchpadasthemainpointingdeviceandtheTrackPointfortheextendedfunctionsonly.
Thissettingenablestheuseofallbasicandextendedfunctionswiththetouchpadwhilelimitingthe
useoftheTrackPointtoscrollingandMagnifyingGlassfunctions.
•SettheTrackPointasthemainpointingdevice,anddisablethetouchpad.
•Setthetouchpadasthemainpointingdevice,anddisabletheTrackPoint.
ChangingtheUltraNavsettings
YoucanchangeyoursettingsofUltraNavintheUltraNavtaboftheMousePropertieswindow.T oopenit,
useoneofthefollowingmethods:
•PressFn+F8,andtheUltraNavDeviceSettingswindowisdisplayed.Inthiswindow,clickManage
Settings.Amousepropertieswindowisdisplayed.ClicktheUltraNavtab.
•UsetheStartmenuofyourcomputerasfollows:
–ForWindows7andWindowsVista:ClickStart➙ControlPanel➙HardwareandSound➙Mouse
➙UltraNavtab.
–ForWindowsXP:ClickStart➙ControlPanel➙PrintersandOtherHardware➙Mouse➙
UltraNavtab.
YoucanalsochangetheUltraNavsettingsbyclickingtheUltraNavicononthesystemtray.Todisplaythe
UltraNavicononthesystemtray,see“AddingtheUltraNavicontothesystemtray”onpage37.
UsingtheT rackPointpointingdevice
TheTrackPointpointingdeviceconsistsofapointingstick(1)onthekeyboardandthreeclickbuttonsatthe
bottomofthekeyboard.Tomovethepointer(5)onthescreen,youapplypressuretothenonslipcaponthe
pointingstickinanydirectionparalleltothekeyboard;thepointingstickitselfdoesnotmove.Thespeedat
whichthepointermovesdependsonthepressureyouapplytothepointingstick.Thefunctionsoftheleft(4)
andright(2)clickbuttonscorrespondtothoseoftheleftandrightmousebuttonsonaconventionalmouse.
TheTrackPointcenterbutton(3),calledthescrollbar,enablesyoutoscrollWebpagesordocumentsinany
directionwithnoneedtousethegraphicscrollbarsonthesideofthewindow.
34UserGuide
Page 53

IfyouarenotfamiliarwiththeTrackPoint,theseinstructionswillhelpyougetstarted:
1.Placeyourhandsinthetypingposition,andpressgentlywitheitherindexngeronthepointingstickin
thedirectioninwhichyouwantthepointertomove.
Tomovethepointer,pressthepointingstickawayfromyoutomoveitup,towardyoutomoveit
down,toonesideortheothertomoveitsideways.
Note:Thepointermightdrift.Thisisnotadefect.StopusingtheTrackPointforafewseconds;the
pointerwillstopmoving.
2.T oselectanddragasrequiredbyyoursoftware,presstheleftorrightclickbuttonwitheitherthumb
andmovetheTrackPointpointingstick.
ByenablingPress-to-Select,youcanmaketheTrackPointpointingstickfunctionthesameasthe
leftorrightclickbutton.
CustomizingtheTrackPoint
YoucancustomizetheT rackPointpointingdeviceanditsbuttonsasfollows:
•Switchthefunctionsoftheleftandrightbuttons.
•ChangethesensitivityoftheTrackPoint.
•EnablethePress-to-Selectfunction.
•EnabletheMagnifyingGlass.
•EnabletheT rackPointscrollingfunction.
•EnabletheTrackPointScrollingTips.
TocustomizetheTrackPoint,doasfollows:
1.PressFn+F8.ApanelforUltraNavDeviceSettingspopsup.
2.ClickManageSettingstoopentheMousepropertieswindow.
3.ClicktheUltraNavtab.UnderTrackPoint,proceedtochangingthesettings.
Fordetails,refertotheHelpintheUtility.
Changingthecap
Thecap(1)ontheendoftheTrackPointpointingstickisremovable.Youcanreplaceitasshowninthe
drawing.
Chapter2.Usingyourcomputer35
Page 54

Note:Ifyoureplacethekeyboard,anewkeyboardisshippedwiththedefaultcap.Ifyouwish,youcan
keepthecapfromyouroldkeyboardanduseitonthenewone.
Usingthetouchpad
Thetouchpadconsistsofapad(1)andtwoclickbuttonsbelowtheTrackPointbuttonsatthebottomofthe
keyboard.Tomovethepointer(4)onthescreen,slideyourngertipoverthepadinthedirectioninwhich
youwantthepointertomove.Thefunctionsoftheleft(3)andright(2)clickbuttonscorrespondtothoseof
theleftandrightmousebuttonsonaconventionalmouse.
Usingthemulti-touchtouchpad
Thetouchpadofyourcomputersupportsmulti-touchwithwhichyoucanzoomin,zoomout,scrollorrotate
onthescreenwhilebrowsingtheInternetorreadingoreditingadocument.
Fordetails,refertotheHelpintheUltraNav.
Customizingthetouchpad
Tocustomizethetouchpad,doasfollows:
1.PressFn+F8.ApanelforUltraNavDeviceSettingspopsup.
36UserGuide
Page 55

2.ClickManageSettingstoopentheMousepropertieswindow.
3.ClicktheUltraNavtabandproceedtocustomizingthetouchpad.
Fordetails,refertotheHelpintheUtility.
BehavioroftheUltraNavandanexternalmouse
Bydefault,theTrackPointandthetouchpadaresettoEnabled.
Note:IfyouwanttoattachanexternalmousetoaUSBconnector,select“Disabled.”
DisablingtheTrackPointorthetouchpad
IfyouwanttodisabletheTrackPointorthetouchpad,doeitherofthefollowing:
UsetheFn+F8keycombination:
1.PressFn+F8.ApanelforUltraNavDeviceSettingspopsup.
2.T odisabletheTrackPoint,selectEnabletouchpadonly(disableTrackPoint).
Todisablethetouchpad,selectEnableTrackPointonly(disabletouchpad).
3.ClickClose.
ConguresettingsinUltraNavpropertieswindow:
ForWindows7andWindowsVista
1.ClickStart➙ControlPanel➙HardwareandSound➙Mouse.
2.ClickUltraNavtab.
3.T odisabletheTrackPoint,clearthecheckboxforEnableT rackPoint.
Todisablethetouchpad,clearthecheckboxforEnabletouchpad.
4.ClickOK.
ForWindowsXP
1.ClickStart➙ControlPanel➙PrintersandOtherHardware➙Mouse.
2.ClickUltraNavtab.
3.T odisabletheTrackPoint,clearthecheckboxforEnableT rackPoint.
Todisablethetouchpad,clearthecheckboxforEnabletouchpad.
4.ClickOK.
Note:YoucanalsoopentheUltraNavpropertieswindowbyclickingtheUltraNaviconinthetaskbar.For
details,refertotheinstructionsin“AddingtheUltraNavicontothesystemtray”onpage37
.
AddingtheUltraNavicontothesystemtray
ForeasyaccesstotheUltraNavproperties,youcanaddtheUltraNavicononthesystemtray.
ToenablethedisplayoftheUltraNavicononthesystemtray,doasfollows:
1.PressFn+F8.ApanelheadedUltraNavDeviceSettingspopsup.
2.ClickManageSettingstoopentheMousepropertieswindow.
3.ClicktheUltraNavtab.
4.SelectthecheckboxforShowUltraNavicononthesystemtray.
Chapter2.Usingyourcomputer37
Page 56

5.ClickOKorApply.
6.IfyourcomputerisaWindows7model,clickShowhiddeniconsinthetaskbar.TheUltraNaviconis
displayed.Toaddittothetaskbarpermanently,clickCustomizeandproceedtocustomizethesettings.
YoucannowchangethepropertiesofUltraNavbyclickingtheUltraNavicononthesystemtray.
Powermanagement
Whenyouneedtouseyourcomputerawayfromelectricaloutlets,youdependonbatterypowertokeep
yourcomputerrunning.Differentcomputercomponentsconsumepoweratdifferentrates.Themoreyou
usethepower-intensivecomponents,thefasteryouconsumebatterypower.
Domore,savemoreandspendmoretimeunpluggedwithThinkPadbatteries.Mobilityhasrevolutionized
businessbyallowingyoutotakeyourworkwhereeveryougo.WithThinkPadbatteries,youwillbeableto
worklongerwithoutbeingtiedtoanelectricaloutlet.
Checkingbatterystatus
ThePowerManagerBatteryGaugeinthetasktraydisplaysthepercentageofbatterypowerremaining.
Therateatwhichyouusebatterypowerwilldeterminehowlongyoucanusethebatteryofyourcomputer
betweencharges.Becauseeachcomputeruserhasdifferenthabitsandneeds,itisdifculttopredicthow
longabatterychargewilllast.Therearetwomainfactors:
•Howmuchenergyisstoredinthebatterywhenyoubegintowork.
•Thewayyouuseyourcomputer:howoftenyouaccesstheharddiskdriveorthesolidstatedrive,how
brightyoumakethecomputerdisplay.
Usingtheacpoweradapter
Thepowertorunyourcomputercancomeeitherfromthelithium-ion(Li-ion)batterypackprovidedwithit,
orfromacpowerthroughtheacpoweradapter.Whileyouuseacpower,thebatterychargesautomatically.
Theacpoweradapterthatcomeswithyourcomputerhastwobasiccomponents:
1.Thetransformerpackthatconvertsacpoweradapterforusewiththecomputer.
2.ThepowercordthatplugsintotheACoutletandintothetransformerpack.
Attention:Usinganimproperpowercordcouldcauseseveredamagetoyourcomputer.
Tousetheacpoweradapter,dothefollowing.Besuretotakethesestepsintheorderinwhichtheyare
givenhere.
1.Connecttheacpoweradaptertothepowerjackofthecomputer.
2.Connectthepowercordtothetransformerpack.
3.Plugthepowercordintoanelectricaloutlet.
Youcancheckthestatusofyourbatteryatanytimebylookingatthebatterymeteratthebottomofyour
display.
Notes:
•Whentheacpoweradapterisnotinuse,disconnectitfromtheelectricaloutlet.
•Donotbindthepowercordtightlyaroundtheacpowertransformerpackwhenitisconnectedtothe
transformer.
38UserGuide
Page 57

•Youcanchargethebatterywhentheacpoweradapterisconnectedtothecomputerandthebatteryis
installed.Youneedtochargeitinanyofthefollowingconditions:
–Whenyoupurchaseanewbattery
–Ifthebatterystatusindicatorstartsblinking
–Ifthebatteryhasnotbeenusedforalongtime
Beforeyouchargethebattery,makesurethatitstemperatureisatleast10°C(50°F).
Chargingthebattery
Whenyoucheckbatterystatusandndthatthepercentageofpowerremainingisloworwhenthepower
alarmalertsyouthatremainingpowerislow,youneedtochargeyourbatteryorreplaceitwithacharged
battery.
Ifanacoutletisconvenient,plugtheacpoweradapterintoit,andtheninsertthejackintothecomputer.The
batterywillchargeinabout3to6hours.Thisisaffectedbythebatterysizeandthephysicalenvironment.
Thebatterystatusindicatorwillletyouknowthatthebatteryischarging,andwillalsonotifyyouwhenthe
batteryisfullycharged.
Note:Toincreasethelifeofthebattery,thecomputerdoesnotstartrechargingthebatteryiftheremaining
powerisgreaterthan95%.
Maximizingbatterylife
Tomaximizethelifeofthebattery,dothefollowing:
•Usethebatteryuntilthechargeiscompletelydepleted-untilthebatterystatusindicatorstartsblinking
orange.
•Rechargethebatterycompletelybeforeusingit.Thebatteryisfullychargedifthebatteryindicatorshows
greenwhentheacpoweradapterispluggedin.
•Foranewbatteryorabatterythatyouhavenotusedrecently,dooneofthefollowing:
1.Rechargethebatterycompletelybeforeusingit.Thebatteryisfullychargedwhentheacpower
adapterispluggedinandthebatteryindicatorisgreen.
2.Usethebatteryuntilthechargeiscompletelydepleted-untilthebatterystatusindicatorstarts
blinkingorange.
•Alwaysusepowermanagementfeaturessuchaspowermodes,screenblank,sleep(standby),and
hibernation.
Managingyourbatterypower
WithPowerManager,youcanadjustyourpowersettingstogiveyouthebestbalancebetweenperformance
andpowersaving.
Tostarttheutilityprogram,doasfollows:
•ForWindows7:See“AccessingapplicationsinWindows7”onpage19.
•ForWindowsVistaandWindowsXP:ClickStart➙AllPrograms➙ThinkVantage➙PowerManager.
FormoreinformationaboutthePowerManagerprogram,refertotheon-linehelpoftheprogram.
Power-savingmodes
Thereareseveralmodesthatyoucanuseatanytimetoconservepower.Thissectionintroduceseach
modeandgivestipsontheeffectiveuseofthebatterypower.
Chapter2.Usingyourcomputer39
Page 58

Introducingthepower-savingmodes
•Screenblank.Thecomputerdisplayrequiresconsiderablebatterypower.Toturnoffpowertothe
display,doasfollows:
1.PressFn+F3.Apanelforselectingapowerplan(inWindowsXP ,powerscheme)appears.
2.SelectPoweroffdisplay(keepcurrentpowerplan)(inWindowsXP,keepcurrentpowerscheme).
Notes:Y oucanalsoturnoffthecomputerdisplayasfollows:
1.PressFn+F3.Apanelforselectingapowerplan(inWindowsXP ,powerscheme)appears.
2.SelectFn+F3Settings.
3.SelectPoweroffdisplay.
4.ClickOK.ThenexttimeyoupressFn+F3,youcanturnoffthecomputerdisplay.
•Sleep(standbyinWindowsXP).Insleep(standby)mode,yourworkissavedtomemory,andthenthe
solidstatedriveortheharddiskdriveandthecomputerdisplayareturnedoff.Whenyourcomputer
wakesup,yourworkisrestoredwithinseconds.
Toputyourcomputerintosleep(standby)mode,pressFn+F4.Toreturnfromsleep(standby)mode,
presstheFnkey.
•Hibernation.Byusingthismode,youcanturnoffyourcomputercompletelywithoutsavinglesor
exitingfromanyapplicationsthatarerunning.Whenyouenterhibernation,allopenapplications,folders,
andlesaresavedtotheharddisk,andthenthecomputerturnsoff.Toenterhibernation,pressFn+F12.
Toresumeyoursession,pressthepowerbuttonfornomorethan4seconds.
Whenyouarenotusingthewirelessfeatures,suchasBluetoothorwirelessLAN,turnthemoff.Thiswill
helpconservepower.Toturnoffthewirelessfeatures,pressFn+F5.
Enablingthewakeupfunction
Ifyouputyourcomputerintohibernationmode,andthewakeupfunctionisdisabled(thisisthedefault
setting),thecomputerdoesnotconsumeanypower.Ifthewakeupfunctionisenabled,itconsumesasmall
amountofpower.Toenablethefunction,doasfollows:
ForWindows7andWindowsVista:
1.ClickStart➙ControlPanel➙SystemandSecurity(inWindowsVista,SystemandMaintenance).
2.ClickAdministrativeTools.
3.ClickT askScheduler.Ifyouarepromptedforanadministratorpasswordorconrmation,typethe
passwordorprovideconrmation.
4.Fromtheleftpane,selectthetaskfolderforwhichyouwanttoenablethewakeupfunction.The
scheduledtasksaredisplayed.
5.Clickascheduledtask,andthenclicktheConditionstab.
6.UnderPower,selectthecheckboxforWakethecomputertorunthistask.
ForWindowsXP:
1.ClickStart➙ControlPanel➙PerformanceandMaintenance.
2.ClickScheduledTasks.Thescheduledtasksaredisplayed.
3.Right-clickonascheduledtask.
4.ClickProperties.
5.ClicktheSettingstab.
6.UnderPowerManagement,selectthecheckboxforWakethecomputertorunthistask.
40UserGuide
Page 59

Enablingthebatteryalarm
Youcanprogramyourcomputersothatwhenthebatterypowerfallsbelowacertainlevel,threeevents
occur:thealarmgoesoff,amessageisdisplayed,andtheLCDisturnedoff.Doasfollows:
1.StartPowerManager.
2.ClicktheGlobalPowerSettingstab.
3.ForLowbatteryalarmorCriticallylowbatteryalarm,setthepercentageofthepowerlevelandset
theaction.
Note:Ifyourcomputerenterssleep(standby)orhibernationmodewhenthebatteryislow,butthealarm
messagehasnotyetappeared,themessagewillappearwhenthecomputerresumes.Toresumenormal
operation,pressOK.
Handlingthebattery
DANGER
Donotattempttodisassembleormodifythebatterypack.
Attemptingtodosocancauseanexplosion,orliquidleakagefromthebatterypack.
AbatterypackotherthantheonespeciedbyLenovo,oradisassembledormodiedbattery
packisnotcoveredbythewarranty.
DANGER
Iftherechargeablebatterypackisincorrectlyreplaced,thereisdangerofanexplosion.Thebattery
packcontainsasmallamountofharmfulsubstances.Toavoidpossibleinjury:
•ReplaceonlywithabatteryofthetyperecommendedbyLenovo.
•Keepthebatterypackawayfromre.
•Donotexposeittoexcessiveheat.
•Donotexposeittowaterorrain.
•Donotshort-circuitit.
•Storeitinacooldryplace.
•Keepitawayfromchildren.
Thebatterypackisaconsumablesupply.
Ifyourbatterybeginstodischargetooquickly,replacethebatterypackwithanewoneofthetype
recommendedbyLenovo.Formoreinformationonreplacingthebatterypack,contactyourCustomer
SupportCenter.
DANGER
Donotdrop,crush,puncture,orsubjecttostrongforces.Batteryabuseormishandlingcancause
thebatterytooverheat,whichcancausegassesorameto“vent”fromthebatterypackorcoin
cell.Ifyourbatteryisdamaged,orifyounoticeanydischargefromyourbatteryorthebuildup
offoreignmaterialsonthebatteryleads,stopusingthebatteryandobtainareplacementfrom
thebatterymanufacturer.
Chapter2.Usingyourcomputer41
Page 60

DANGER
Onlyrechargethebatterypackstrictlyaccordingtoinstructionsincludedintheproduct
documentation.
DANGER
Donotputthebatterypackintrashthatisdisposedofinlandlls.Whendisposingofthebattery,
complywithlocalordinancesorregulationsandyourcompany'ssafetystandards.
DANGER
Thereisadangerofanexplosionifthebackupbatteryisincorrectlyplaced.Thelithiumbattery
containslithiumandcanexplodeifitisnotproperlyhandled,ordisposedof.Replaceonlywitha
batteryofthesametype.Toavoidpossibleinjuryordeath,Donot:(1)throworimmerseintowater,
(2)allowittoheattomorethan100°C(212°F),or(3)attempttorepairordisassembleit.Disposeof
itasrequiredbylocalordinancesorregulationsandyourcompany'ssafetystandards.
ThissystemdoesnotsupportbatteriesthatarenotgenuineLenovo-madeorauthorized.Thesystemwill
continuetoboot,butmaynotchargeunauthorizedbatteries.
Attention:Lenovohasnoresponsibilityfortheperformanceorsafetyofunauthorizedbatteries,and
providesnowarrantiesforfailuresordamagearisingoutoftheiruse.
Connectingtothenetwork
YourcomputerhasoneormorenetworkadaptersforconnectingtotheInternetandtoyourcompany's
wiredLANorwirelessLANnetwork.
YourmodemenablesyoutoconnecttoyournetworkortheInternetfromalmostanywhere.Ifyournetwork
hasaphonelineorlinesdedicatedtodial-upclients,youcanuseamodemtoestablishaconnectiontothe
LAN.Ifyournetworkdoesnothavedial-upnetworkingcapability(andmanydonot),youmightbeableto
accesssomeinformationande-mailovertheInternet.
Note:Somemodelscomewithabuilt-inwirelessWANcardenablingyoutoestablishwirelessconnections
overremotepublicorprivatenetworks.
AccessConnectionsisaconnectivityassistantprogramforcreatingandmanaginglocationproles.Each
locationprolestoresallthenetworkandInternetcongurationsettingsneededforconnectingtoanetwork
infrastructurefromaspeciclocationsuchasahomeoranofce.
Ethernetconnections
Youcanconnecttoyournetworkorabroadbandconnection,suchasDSLorCATV ,byuseoftheEthernet
featurebuiltintoyourcomputer.Thisfeatureenablesyoutodo1Gbpshalforfullduplexdatatransmission.
ToconnecttoanetworkviaEthernet,youcanuseAccessConnections.
Note:YourcomputermighthavebothamodemconnectorandanEthernetconnector.Besuretoconnect
yourcabletothecorrectone.
42UserGuide
Page 61

Wirelessconnections
Wirelessconnectionisthetransferofdatawithouttheuseofcablesbymeansofradiowavesonly.
Dependingonthefrequencyusedfordatatransmission,theareacovered,orthetypeofthedeviceusedfor
datatransfer,thefollowingcategoriesofwirelessnetworksmaybeavailabletoyou:
WirelessLAN
Awirelesslocalareanetworkcoversarelativelysmallgeographicarea,suchasanofcebuildingorahouse.
Devicesbasedonthe802.11standardscanconnecttothisnetwork.
WirelessWAN
Awirelesswideareanetworkcoversabroadergeographicarea.Cellularnetworksareusedfordata
transmission,andaccessisprovidedbyawirelessservicecarrier.
Bluetooth
Oneofanumberoftechnologiesusedtocreateawirelesspersonalareanetwork.Bluetoothcanconnect
devicesashortdistancefromoneanother,andiscommonlyusedforconnectingperipheraldevicestoa
computer,transferringdatabetweenhand-helddevicesandPC,orremotelycontrollingandcommunicating
withdevicessuchasmobilephones.
WiMAX(WorldwideInteroperabilityforMicrowaveAccess)
Thislong-rangewirelessdatatransmissiontechnologybasedonthe802.16standardisexpectedtoprovide
theusera“lastmile”broadbandconnectivitysimilartothatprovidedbycableorADSL,butwithouttheneed
tophysicallyconnectacabletothePC.
MakingwirelessLANconnections
Yourcomputercomeswithabuilt-inwirelessnetworkingcardandacongurationutilitytohelpyoumake
wirelessconnectionsandmonitorthestatusofyourconnection,sothatyoucanstayconnectedtoyour
networkwhileyouareintheofce,inameetingroom,orathome,withnoneedforawiredconnection.
Attention:
•IfyoucarryyourcomputerwiththewirelessLANfeatureintoanairplane,checktheserviceswiththe
airlinebeforeboardingtheairplane.
•Iftherearerestrictionsontheuseofcomputersonanairplanewiththewirelessfeature,youneedto
disableitbeforeboarding.Todisableit,refertotheinstructionsin“Enablingordisablingthewireless
feature”onpage49
Note:Y oucanpurchaseawirelessnetworkingcardasanoption.Formoreinformation,referto“Finding
ThinkPadoptions”onpage149
TipsforusingthewirelessLANfeature
•PlaceyourcomputersothatthereareasfewobstaclesaspossiblebetweenthewirelessLANaccess
pointandthecomputer.
•ForthebestconnectionofthewirelessLANfeature,openyourcomputerdisplaytoanangleofslightly
morethan90degrees.
•Ifyouusethewirelessfeature(the802.11standard)ofyourcomputersimultaneouslywithaBluetooth
option,datatransmissionspeedcanbedelayedandtheperformanceofthewirelessfeaturecanbe
degraded.
.
.
Wirelessnetworkingsetup
Tousethebuilt-inwirelessnetworkingcard(the802.11standard)tocommunicate,startAccessConnections.
Chapter2.Usingyourcomputer43
Page 62

Note:BeforeyoustartsettingupwirelessnetworkingconnectionsbyusingAccessConnections,obtaina
NetworkName(SSID)andyourencryptioninformationfromyournetworkadministrator.
AccessConnections,aconnectivityassistantprogram,caneasilyenableonenetworkadapteranddisable
theotheradaptersondemand.Aftersettingupyourwirelessnetworkingconnection,youcanusethe
programtoquicklyswitchthenetworksettings.
WirelessupgradeableThinkPadmodels
Yourcomputercanbewirelessupgradeable.Thismeansthatyourcomputerhasanantennathatcan
supportwirelessLANaccesswhenwirelessLANaccesspointsareavailable.Wirelessdevicesareavailable
fromLenovo.Formoreinformation,referto“FindingThinkPadoptions”onpage149.
UsingwirelessWANconnections
WirelessWideAreaNetwork(wirelessWAN)enablesyoutoestablishwirelessconnectionsoverremote
publicorprivatenetworks.Theseconnectionscanbemaintainedoveralargegeographicalarea,suchas
acityoranentirecountry,byuseofmultipleantennasitesorsatellitesystemsmaintainedbywireless
serviceproviders.
SomeThinkPadnotebookscomewithabuilt-inwirelessWANcardintegratingsomewirelessWAN
technologies,suchas1xEV-DO,HSPA,3GorGPRS.YoucanconnecttotheInternetoryourcompany
networkwiththebuilt-inwirelessWANcardandthecongurationutilitytomakeawirelessWANconnection
andmonitoritsstatus.
Note:WirelessWANserviceisprovidedbyauthorizedserviceprovidersinsomecountries.
TondthelocationofthewirelessWANantennaonyourcomputer,referto“LocationoftheUltraConnect
wirelessantennas”onpage238
TousethewirelessWANfeature,startAccessConnections.
.
UsingBluetooth
ForWindows7andWindowsVista
IfyourcomputerisequippedwiththeIntegratedBluetoothfeatures,youcanenableordisablethefeatures
bypressingFn+F5.IfyoupressFn+F5,alistofwirelessfeaturesisdisplayed.Youcanenableordisablethe
Bluetoothfeatureswithasingleclick.
TocongureaBluetoothdeviceormanageconnectionsettings,youcanuseBluetoothDevicesinControl
Panel.
1.ClickStart➙ControlPanel.
2.ClickHardwareandSound.
3.ClickDevicesandPrinters(inWindowsVista,BluetoothDevices).
TosenddatatoaBluetooth-enableddevice,doasfollows:
1.Right-clickdatathatyouwanttosend.
2.SelectSendTo➙BluetoothDevices.
Fordetails,refertotheWindowsonlinehelp.
Note:Ifyouusethewirelessfeature(the802.11standard)ofyourcomputersimultaneouslywithaBluetooth
option,datatransmissionspeedcanbedelayedandtheperformanceofthewirelessfeaturecanbe
degraded.
44UserGuide
Page 63

ForWindowsXP
IfyourcomputerisequippedwiththeIntegratedBluetoothfeatures,youcanenableordisablethefeatures
bypressingFn+F5.
IfyoupressFn+F5,alistofwirelessfeaturesisdisplayed.YoucanenableordisabletheBluetoothfeatures
withasingleclick.
InWindowsXP,youcanuseeitherThinkPadBluetoothwithEnhancedDataRateSoftware,ortheMicrosoft
Bluetoothsoftware.Bydefault,ThinkPadBluetoothwithEnhancedDataRateSoftwareisinstalledonyour
computer.
UsingBluetoothforthersttimeonyourcomputer
IfthisisthersttimeBluetoothhasbeenusedonyourcomputer,followeitherofthefollowingprocedures:
1.Double-clicktheMyBluetoothPlacesicononthedesktop,ortheBluetoothiconinthetaskbar.The
StartUsingBluetoothwindowopens,andsomevirtualdevicedriversareinstalledautomatically.
2.Waituntiltheinstallationofthedriversiscomplete.
OR
1.Right-clicktheMyBluetoothPlacesicononthedesktop,ortheBluetoothiconinthetaskbar.
2.SelectStartUsingBluetooth.TheStartUsingBluetoothwindowopens,andsomevirtualdevice
driversareinstalledautomatically.
3.Waituntiltheinstallationofthedriversiscomplete.
SomeothervirtualdevicedriverswillbeinstalledondemandwhenyouusecertainBluetoothproles
forthersttime.
UsingtheMicrosoftBluetoothsoftware
IfyouareusingWindowsXPandwanttousetheMicrosoftstandardBluetoothfeatures,installthesoftware
byfollowingtheinstructionsin“InstallingtheMicrosoftBluetoothsoftwareinWindowsXP”onpage47
.
ForinformationabouthowtousetheBluetoothfunction,doasfollows:
1.PressFn+F5toturnonBluetooth.
2.ClickStart➙ControlPanel.
3.ClickPrintersandOtherHardware.
4.ClickBluetoothDevices.
5.ClicktheOptionstab.
6.ClickLearnmoreaboutBluetoothSettings.
UsingThinkPadBluetoothwithEnhancedDataRateSoftware
IfThinkPadBluetoothwithEnhancedDataRateSoftwareisinstalledonyourcomputer,twoiconsare
displayedonthescreen:
•MyBluetoothPlacesonthedesktop
•BluetoothCongurationinthesystemtrayofthetaskbar
TousetheBluetoothfeatures,dothefollowing:
1.Double-clicktheMyBluetoothPlacesicononthedesktop.
Chapter2.Usingyourcomputer45
Page 64

2.ForWindowsXP,gotoBluetoothTasksanddouble-clickViewdevicesinrange.Alistofthedevices
onwhichBluetoothhasbeenenabledappears.
3.Clickthedevicetowhichyouwantaccess.Alistoftheservicesavailableonthatdeviceappears
asfollows:
•Bluetoothkeyboardandmouse(Humaninterfacedevices)
•Printer(HCRP)
•Audiogateway
•Headset
•PIMsynchronization
•Fax
•Filetransfer
•PIMitemtransfer
•Dial-upnetworking
•Networkaccess
•Bluetoothserialport
•BluetoothImaging
•HandsFree
•AVprole
4.Clicktheserviceyouwant.
Formoreinformation,presstheF1keytoopentheonlinehelpforBluetooth.
BluetoothConguration
TousethecongurationfeaturesofBluetooth,right-clicktheicon.Apop-upmenuappears.Select
BluetoothSetupWizardorAdvancedConguration.
TheBluetoothSetupWizardhasthefollowingcapabilities:
•FindingallBluetooth-enableddevicesthatcanprovideservices
•FindingaspecicBluetooth-enableddevicethatyouwanttouse,andconguringtheservicesonthat
device
•ConguringtheBluetooth-enabledservicesonyourcomputerthatareprovidedforremotedevices
•Conguringthenameanddevicetypeofyourcomputer
TheAdvancedCongurationhasthefollowingfunctions:
•Conguringthenameanddevicetypeofyourcomputer
•ConguringyourcomputersettingssothatremoteBluetooth-enableddevicescanndyourcomputer
•ConguringyourcomputersettingssothatyourcomputercanndremoteBluetooth-enableddevices
•Conguring,onyourcomputer,theBluetooth-enabledservicesprovidedforremotedevices
•ConguringtheservicesonremoteBluetooth-enableddevices
•DisplayinginformationaboutBluetoothhardware
Fordetails,refertothehelpforBluetooth.T oseethehelp,double-clickMyBluetoothPlaces,andclick
HelpandthenBluetoothhelp.Anotherwaytostartthehelpistoright-clickBluetoothCongurationinthe
systemtrayofthetaskbar,andclickAdvancedCongurationandthenHelp.
46UserGuide
Page 65

InstallingtheMicrosoftBluetoothsoftwareinWindowsXP
IfyouwanttousetheMicrosoftBluetoothsoftware,doasfollows:
FirstuninstalltheThinkPadBluetoothwithEnhancedDataRateSoftware.
1.T urnBluetoothpoweroff.
2.ClickStart➙ControlPanel.
3.ClickAddorRemovePrograms.
4.SelectThinkPadBluetoothwithEnhancedDataRateSoftware;thenclickChange/Removeto
uninstallthesoftware.
5.Followtheinstructionsonthescreen.
NextinstalltheMicrosoftBluetoothsoftwareasfollows:
1.T urnBluetoothpoweron.MicrosoftBluetoothsoftwareisloadedautomatically.
2.IftheFoundNewHardwareWizardwindowpopsup,dothefollowing:
a.SelectNo,notthistime,andthenclickNext.
b.SelectInstallfromalistorspeciclocation(Advanced);thenclickNext.
c.SelectSearchforthebestdriverinthoselocations.
d.SelectIncludethislocationinthesearch:,andtypeC:\SWTOOLS\Drivers\MSBTooth,orspecifythe
locationinwhichyouplacedtheextractedINFle.ThenclickNext.
3.ClickFinish.
InstallingThinkPadBluetoothwithEnhancedDataRateSoftwareinWindowsXP
IfyouareusingtheMicrosoftBluetoothsoftwareandwanttouseThinkPadBluetoothwithEnhancedData
RateSoftwareinstead,replacetheMicrosoftBluetoothsoftwarewithThinkPadBluetoothwithEnhanced
DataRateSoftwareasfollows:
1.PressFn+F5toturntheBluetoothpoweron.
2.ClickStart➙Run.
3.T ypeC:\SWTOOLS\Drivers\TPBTooth\Setup.exe(orspecifythefullpathtothesetup.exeleyouhave
downloadedfromhttp://www.lenovo.com/support);thenclickOK.
4.ClickNext.
5.SelectIacceptthetermsinthelicenseagreement;thenclickNext.
6.ClickNexttoselectthedefaultdestinationfolder.
Ifyouneedtochangethedestinationfolder,clickChange,selectorenterthenameofthedestination
folderintheChangecurrentdestinationfolderwindow,andclickOK.
7.ClickInstalltobegininstallation.
8.ClickOKtoacceptthedriversignature.
9.ClickFinish.
10.Restartthecomputerifnecessary.
IfyoudidnotturntheBluetoothpoweronbeforeinstallingThinkPadBluetoothwithEnhancedDataRate
Software,thatis,ifyouskippedstep1-replacetheBluetoothdriverasfollows:
1.ClickStart➙ControlPanel.
2.ClickPerformanceandMaintenance;thenclickSystem.
3.ClicktheHardwaretab;thenclickDeviceManager.
Chapter2.Usingyourcomputer47
Page 66

4.Double-clickBluetoothRadiostoextracttheBluetoothRadiosdevicetree.
5.Double-clicktheThinkPadBluetoothwithEnhancedDataRateicontoopenthePropertieswindow.
6.ClicktheDrivertab;thenclickUpdateDriver.
7.ClickNo,notthistime,andthenclickNext.
8.SelectInstallfromalistorspeciclocation(Advanced),andthenclickNext.
9.SelectDon'tsearch.Iwillchoosethedrivertoinstall;thenclickNext.
10.Selectthedriverthathasno“DigitalSigned”icon;thenclickNext.
11.ClickFinish.
Note:Ifyouusethewirelessfeature(the802.11standard)ofyourcomputersimultaneouslywithaBluetooth
option,datatransmissionspeedcanbedelayedandtheperformanceofthewirelessfeaturecanbe
degraded.
UsingWiMAX
SomeThinkPadnotebookscomewithabuilt-inwirelessLANcardintegratingWiMAXtechnology.
WiMAX,along-rangewirelessdatatransmissiontechnologybasedonthe802.16standard,providesyou
witha“lastmile”broadbandconnectivitysimilartothatofferedbycableorADSL,butwithouttheneedto
physicallyconnectacabletothePC.
TousetheWiMAXfeature,startAccessConnections.
ForWindows7:TostarttheAccessConnectionswizard,see“AccessingapplicationsinWindows7”on
page19,andfollowtheinstructionsonthescreen.
ForWindowsVistaandWindowsXP:TostarttheAccessConnectionswizard,clickStart➙AllPrograms➙
ThinkVantage➙AccessConnections.Thenfollowtheinstructionsonthescreen.
Checkingwirelessconnectionstatus
AccessConnectionsGauge(Windows7)
IfyourcomputerisrunningWindows7,theAccessConnectionsGaugeinthetaskbardisplaysthesignal
strengthandstatusofyourwirelessconnection.
Note:TodisplayAccessConnectionsGaugeinthetaskbar,seetheHelpinAccessConnections.
Youcanndmoredetailedinformationaboutthesignalstrengthandstatusofyourwirelessconnection
byopeningAccessConnectionsorbyright-clickingtheAccessConnectionsGaugeinthetaskbarand
selectingViewStatusofWirelessConnection.
•AccessConnectionsGaugestates:wirelessLAN
–
–Powertothewirelessradioison.Thesignalstrengthofthewirelessconnectionispoor.To
improvesignalstrength,moveyoursystemclosertothewirelessaccesspoint.
Powertothewirelessradioisoffornosignal.
–
ismarginal.
–
excellent.
•AccessConnectionsGaugestates:wirelessWAN
48UserGuide
Powertothewirelessradioison.Thesignalstrengthofthewirelessconnection
Powertothewirelessradioison.Thesignalstrengthofthewirelessconnectionis
Page 67

–Nosignal
–
–Signallevel2
–Signallevel3
Note:FormoreinformationaboutAccessConnectionsGauge,seetheHelpinAccessConnections.
AccessConnectionsiconandwirelessstatusicon
TheAccessConnectionsicondisplaysgeneralconnectionstatus.
Thewirelessstatusicondisplaysthesignalstrengthandstatusofyourwirelessconnection.
Youcanndmoredetailedinformationaboutthesignalstrengthandstatusofyourwirelessconnection
eitherbyopeningAccessConnectionsorbydouble-clickingtheAccessConnectionswirelessstatus
iconinthetaskbar.
Note:IfyourcomputerisaWindows7model,todisplaytheAccessConnectionsstatusiconandthe
wirelessstatusiconinthesystemtray,refertotheAccessConnectionson-linehelp.
•AccessConnectionsiconstates
–
–Currentlocationproleisdisconnected.
–Currentlocationproleisconnected.
•Wirelessstatusiconstates:wirelessLAN
Signallevel1
Nolocationproleisactiveornoneexists.
–Powertothewirelessradioisoff.
–Powertothewirelessradioison.Noassociation.
Powertothewirelessradioison.Nosignal.
–
–Powertothewirelessradioison.Thesignalstrengthofthewirelessconnectionisexcellent.
–Powertothewirelessradioison.Thesignalstrengthofthewirelessconnectionismarginal.
–Powertothewirelessradioison.Thesignalstrengthofthewirelessconnectionispoor.Toimprove
signalstrength,moveyoursystemclosertothewirelessaccesspoint.
•Wirelessstatusiconstates:wirelessWAN
–PowertotheWANradioisoff
–Noassociation
–Nosignal
–Signallevel1
–Signallevel2
–Signallevel3
Note:Ifyouhavetroubleinmakingaconnection,trymovingyourcomputerclosertoyourwirelessaccess
point.
Enablingordisablingthewirelessfeature
Toenableordisablethewirelessfeature,pressFn+F5.Alistofwirelessfeaturesisdisplayed.Y oucanturn
thefeatureonandoffwithasingleclick.
Chapter2.Usingyourcomputer49
Page 68

Youcanalsoenableordisablethefeaturebythefollowingprocedures.
Toenablethewirelessfeature,doasfollows:
1.ClicktheAccessConnectionswirelessstatusiconinthesystemtray.
2.ClickPowerOnWirelessRadio.
Todisablethewirelessfeature,doasfollows:
•ClicktheAccessConnectionswirelessstatusiconinthesystemtray.
•ClickPowerOffWirelessRadio.
Notes:
•Youcanusethewirelessradioswitchtodisablethewirelessradioofallthewirelessdevicesonyour
computer.
•IfyourcomputerisaWindows7model,todisplaytheAccessConnectionsstatusiconandthewireless
statusiconinthesystemtray,refertotheAccessConnectionson-linehelp.
Usingthebuilt-inmodem
Ifyourcomputerhasamodemfeature,youcansendorreceivedataandfaxesoveratelephoneline.This
modemusesadigitalsignalprocessor(DSP),anditssoftwarecanbeupgraded,allowinggreatexibility.
Youcanusethemodemonlyonapublic-switchedtelephonenetwork(PSTN).Youcannotuseaprivate
branchexchange(PBX)orsomeothertypeofdigitaltelephoneextensionline.Ifyouconnectthemodemto
alineotherthanPSTN,anerrormessageappears,preventingyoufromusingtheline.Ifyouarenotsure
whichkindofphonelineyouareusing,contactyourtelephonecompany.
DANGER
Toavoidshockhazard,donotconnectthecabletoordisconnectthecablefromthetelephone
outletonthewallduringelectricalstorms.
Note:YourcomputermighthaveboththemodemconnectorandtheEthernetconnector.Besureto
connectyourcabletothecorrectone.
Telephonyfeatures
Thebuilt-inmodemhasthefollowingtelephonyfeatures:
Industrystandardmodemsupportupto56Kbps:
Dataprotocols
•Bell103(300bps)
•Bell212A(1200bps)
•V.21(300bps)
•V.22bis(2400bps)
•V.34bis(33600,31200bps)
•V.34(28800,26400,24000,21600,19200,16800,14400,12000,9600,7200,4800bps)
•V.90(56000bpsdownstreamonly)
Errorcorrection/Datacompressionprotocols
50UserGuide
Page 69

•MNP2-4(Microcomerrorcorrection)
•V.42(error-correctingproceduresforDCEsusingasynchronousautomaticdialingandcontrol)
Datacompressionprotocols
•V.42bis(DCEdatacompression)
•V.44
•MNP5(Microcomdatacompression)
Miscellaneousprotocols
•V.8(startupsequence)
•V.80(videophone)
•FastConnect
Note:ThisfunctioncanworkonlyifthephonelineandserverequipmentatyourISP(InternetService
Provider)accesspointarecompatiblewithit.CheckwithyourtelephonecompanyandISP .
•ModemonHold
Note:Thisfunctioncanbeusedonlyincertaincountriesorregions,becauseitreliesonthespecications
oftheCallWaitingfunctionandCallerIDfunction,whicheachcountryorregionsetsindependently.Ithas
beentestedandshowntoworkintheUnitedStatesandCanada.Inaddition,thefunctioncanworkonlyif
itiscompatiblewiththeserverequipmentatyourISP.
Industrystandardfaxsupportupto14.4Kbps:
Faxprotocols
•V.21Ch2(300-bpsfax)
•V.17(upto14.4-Kbpsfax)
•V.29(9600-bpsfax)
•V.27ter(4800-bpsfax)
Computertelephonyfunctionsupport:
•DTMFandpulsedialing
•DetectingDTMFdigitsreceivedfromthephoneline
•Callprogressmonitoring
•Anauto-dialingfeature
•TelephonyAPI(TAPI)
Modemcommands
ThissectionprovidesinformationontheATmodemcommands,incaseyouneedtooperateyourmodem
fromterminalsoftware.
Runningcommands
Yourmodemisincommandmodeatpower-onandisreadytoreceiveandrunATcommands.Itremainsin
commandmodeuntilitconnectswitharemotemodem.Y oucansendcommandstothemodemfroman
attachedterminaloraPCrunningacommunicationprogram.
ThemodemisdesignedtooperateatcommonDTEspeedsrangingfrom115.2Kbps(or57.6Kbps)to300
Kbps.AllcommandsanddatamustbeissuedtothemodematoneofthevalidDTEspeeds.
Chapter2.Usingyourcomputer51
Page 70

Commandformat
AllcommandsexceptA/ A/
A/
mustbeginwiththeprexAT,followedbythecommandletter,andmustendwith
theEnterkey.Spacesareallowedinthecommandstringtoincreasereadability,butthemodemignores
themwhileexecutingacommand.Allcommandsmaybetypedineitheruppercaseorlowercase,butnotin
mixedcase.Acommandissuedwithoutaparameterisconsideredtohaveparameter“0”.
Examples:A AATL[Ent TL[Ent
TL[Ent
er]
er] er]
Thiscommandcausesyourmodemtolowerthevolumefromitsspeaker.
RefertothefollowingtablesofATcommandsandextendedATcommands.
Table3.Modemcommandlist
Command
Z
Z Z
+FCLASS
+FCLASS +FCLASS
+VCID
+VCID +VCID
+VRID
+VRID +VRID
\N
\N \N
Description
Resettodefault
conguration
SelectActiveService
Class
CallerID
ReportRetrievedCallerID
OperatingMode
Syntax
Z
Z Z
+F +F+FCL CLCLAS ASASS SS=<Mode><Mode>
+VC
+VC +VC
ID IDID=<pmode><pmode>
+VRID
+VRID +VRID
=<pmode><pmode>
\N \N\N<mode><mode>
Values
0:SelectDataMode
1:SelectFacsimileClass1
Mode
1.0:SelectFacsimileClass1.0
Mode
8:SelectVoiceMode
0:DisableCallerIDreporting
1:EnablesCallerIDwith
formattedpresentationtothe
DTE.
2:EnablesCallerIDwith
unformattedpresentationtothe
DTE.
0:ReportsCallerIDwith
formattedpresentationtothe
DTE.
1:ReportsCallerIDwith
unformattedpresentationtothe
DTE.
0:Selectsnormalspeed
bufferedmode(disables
error-correctionmode)
andforces&Q6(selects
asynchronousoperationin
normalmode.)
1:Sameas0.
2:Selectsreliable(error
correction)modeandforces
&Q5(themodemwilltryto
negotiateanerrorcorrected
link).Themodemwillrst
52UserGuide
Page 71

Table3.Modemcommandlist(continued)
&F
&F &F
SettoFactoryDened
Conguration
&T
&T &T
LocalAnalogLoopback
Test
I
I I
RequestIdentication
Information
&F
&F &F
&T &T&T[<value>]
I II[<value>]
attemptaLAPMconnectionand
thenMNPconnection.Failure
tomakeareliableconnection
resultsinthemodemhanging
up.
3:Selectsautoreliablemode
andforces&Q5(themodem
willtrytonegotiateanerror
correctedlink).Thisoperates
thesameas\N2exceptfailure
tomakeareliableconnection
resultsinthemodemfallingback
tothespeedbufferednormal
mode.
4:SelectLAPMerror-correction
modeandforces&Q5(the
modemwilltrytonegotiatean
errorcorrectedlink).Failureto
makeanLAPMerror-correction
connectionresultinthemodem
hangingup.
5:SelectsMNPerror-correction
modeandforces&Q5(the
modemwilltrytonegotiatean
errorcorrectedlink).Failureto
makeanMNPerror-correction
connectionresultsinthemodem
hangingup.
<value>
0:T erminatestestinprogress.
1:Initiateslocalanalog
loopback,V54Loop3.Ifa
connectionexistswhenthis
commandisissued,themodem
hangsup.TheCONNECTXXXX
messageisdisplayedupthe
startofthetest.
<value>
0:Reportsproductcode.
1:Reportsthelatestsignicant
byteofthestoredchecksumin
decimal.
2:ReportsOK.
3:Reportsidenticationcodes.
4:Reportsproductdescription
fromthe.INFle.
5:ReportsCountryCode
parameter.
6:Reportsmodemdatapump
modelandinternalcoderevision.
Chapter2.Usingyourcomputer53
Page 72

Table3.Modemcommandlist(continued)
+GMI
+GMI +GMI
+GMM
+GMM +GMM
+GMR
+GMR +GMR
+GSN
+GSN +GSN
+GOI
+GOI +GOI
+GC
AP
+GC +GC
AP AP
+GCI
+GCI +GCI
E
E E
Q
Q Q
V
V V
W
W W
RequestManufacturer
Information
RequestModel
Information
RequestRevision
Information
RequestProductSerial
NumberIdentication
RequestGlobalObject
Identication
RequestComplete
CapabilitiesList
CountryofInstallation
EchoCommand
QuietResultsCodes
Control
ResultCodeForm
ConnectMessageControl
+GMI
+GMI +GMI
+GMM
+GMM +GMM
+GMR
+GMR +GMR
+GSN
+GSN +GSN
+GO
I
+GO +GO
I I
+GCAP
+GCAP +GCAP
+GC
+GC +GC
I II=<country_code><country_code>
E EE[<value>]
Q QQ[<value>]
V VV[<value>]
W WW[<value>]
7:Reportsmodemdatapump
modelandinternalcoderevision.
8:Reportsthedateandthetime
ofthemodemdriverbuild.
9:ReportsCountry.
8-bitcountrycode.Thevalueis
thehexadecimal.
<value>
0:Disablescommandecho.
1:Enablescommandecho.
<value>
0:Enableresultcodestothe
DTE.
1:Disableresultcodestothe
DTE.
<value>
0:Enablesshort-formresult
codes.
1:Enableslong-formresult
codes.
<value>
0:Uponconnection,themodem
reportsonlytheDTEspeed.
Subsequentresponsesare
disabled.
1:Uponconnection,themodem
reportsthelinespeed,the
errorcorrectionprotocol,and
theDTEspeed,respectively.
Subsequentresponsesare
disabled.
2:Uponconnection,the
modemreportstheDCEspeed.
Subsequentresponsesare
disabled.
54UserGuide
Page 73

Table3.Modemcommandlist(continued)
X
X X
&C
&C &C
&D
&D &D
ExtendedResultCodes
RLSDBehavior
DTRBehavior
X XX<value><value>
&C &C&C[<value>]
&D &D&D[<value>]
3:Uponconnection,themodem
reportsDCEspeedandtheerror
correctionprotocol.
0:CONNECTresultcodeis
givenuponenteringonline
datastate.Dialtoneandbusy
detectionreportingaredisabled.
1:CONNECT<text>resultcode
isgivenupononlinedatastate.
Dialtoneandbusydetection
reportingaredisabled.
2:CONNECT<text>resultcode
isgivenuponenteringonline
datastate.Dialtonedetection
reportingisenabled,andbusy
detectionreportingisdisabled.
3:CONNECT<text>resultcode
isgivenuponenteringonline
datastate.Dialtonedetection
reportingisdisabled,andbusy
detectionreportingisenabled.
4:CONNECT<text>resultcode
isgivenuponenteringonline
datastate.Dialtoneandbusy
detectionreportingareboth
enabled.
<value>
0:RLSDisalwaysON.
1:RLSDfollowsthestateofthe
carrier.
<value>
0:ModemignoresDTR.
1:Uponanon-to-offtransition
ofDTR,themodementersonline
commandstateandissuesan
OKresultcode;thecallremains
connected.
2:Uponanon-toofftransition
ofDTR,themodeminstructsthe
underlyingmodemtoperform
anorderlycleardownofthecall.
Thedispositionofanydatainthe
modempendingtransmissionto
theremotemodemiscontrolled
bythe+ETBMparameter;
otherwise,thisdataissent
beforethecalliscleared,unless
theremotemodemclearsthe
callrst(inwhichcasepending
dataisdiscarded).Themodem
disconnectsfromtheline.
Chapter2.Usingyourcomputer55
Page 74

Table3.Modemcommandlist(continued)
&K
&K &K
&M
&M &M
&Q
&Q &Q
+IPR
+IPR +IPR
+IFC
+IFC +IFC
FlowControl
Asynchronousor
SynchronousMode
Selection
SyncorAsyncMode
FixedDTERate
DTE-ModemLocalFlow
Control
&K &K&K[<value>]
&M &M&M[<value>]
&Q &Q&Q[<value>]
+IPR
+IPR +IPR
=<rate>
+IF
+IF +IF
C CC=[<modem_by_DTE>
[,<DTE_by_modem>]]
Automaticanswerisdisabled
whileDTRremainsoff.
<value>
0:Disablesowcontrol.
3:EnablesRTSorCTSow
control.
4:EnablesXONorXOFFow
control.
5:Includedforcompatibility
onlyandhasnoeffectotherthan
returninganOKresultcode.
6:Includedforcompatibility
onlyandhasnoeffectotherthan
returninganOKresultcode.
<value>
0to3:Includedforcompatibility
onlyandhasnoeffectotherthan
returninganOKresultcode.
<mode>
0-3,6:Selectasynchronous
operationinnormalmode.
(speedbuffering)
5:Selectasynchronous
operationinerrorcorrection.
<rate>
0(autodetect),2400,4800,
9600,19200,38400,57600,
115200
<modem_by_DTE>
0:None.
1:XONorXOFFontransmitted
data;donotpassXONor
XOFFcharacterstotheremote
modem.
2:Circuit133.
+ILRR
+ILRR +ILRR
56UserGuide
DTE-ModemLocalRate
Reporting
+ILRR
+ILRR +ILRR
=<value><value>
<DTE_by_modem>
0:None.
1:XONorXOFFonreceived
data.
2:CTSorRTS.
0:Disablereportingoflocalport
rate.
1:Enablereportingoflocalport
rate.
Page 75

Table3.Modemcommandlist(continued)
D
D D
T
T T
P
P P
A
A A
H
H H
O
O O
DialD DD<modier><modier>
SetToneDialDefault
SetPulseDialDefault
Answer
Disconnect(Hang-Up)
ReturntoOn-LineData
Mode
L
L L
SpeakerVolume
T
T T
P
P P
A
A A
H HH[<value>]
O OO[<value>]
L LL[<value>]
0-9:DTMFdigits0to9.
A-D:DTMFdigitsAtoD.
L:Rediallastnumber.
P:Selectpulsedialing.
T:Selecttonedialing.
W:Waitfordialtone.
*:The“star”digit.
#:The“gate”digit.
!:Flash.
@:Waitforsilence.
$:Waitforcreditcarddialing
tonebeforecontinuingwiththe
dialstring.
&:Waitforcreditcarddialing
tonebeforecontinuingwiththe
dialstring.
,:Dialpause.
;:Returntocommandstate.
^:Togglecallingtoneenableor
disable.
(),-,<space>:Ignored.
<value>
0:Themodemwillreleasethe
lineifthemodemiscurrently
on-line.
1:Ifon-hook,themodem
willgooff-hookandremainin
commandmode.
<value>
0:Enteron-linedatamodefrom
theon-linecommandmode
withoutaretrain.
1:Performsaretrainthenenter
on-linedatamodefromthe
on-linecommandmode.
<value>
0:Off
1:Lowvolume
2:Mediumvolume
3:Highvolume
Chapter2.Usingyourcomputer57
Page 76

Table3.Modemcommandlist(continued)
M
M M
&G
&G &G
&P
&P &P
&V
&V &V
&W
&W &W
*B
*B *B
*D
*D *D
#UD
#UD #UD
+PCW
+PCW +PCW
+PMH
+PMH +PMH
SpeakerControl
SelectGuardTone
SelectPulseDialMakeor
BreakRatio
DisplayCurrent
CongurationandStored
Prole
StoreCurrent
Conguration
DisplayBlacklisted
Numbers
DisplayDelayedNumbers
LastCallStatusReport
CallWaitingEnable
Modem-on-HoldEnable+PMH +PMH
M MM[<value>]
&G &G&G[<value>]
&P &P&P[<value>]
&V
&V &V
&W
&W &W
*B
*B *B
*D
*D *D
#UD
#UD #UD
+P +P+PCW CWCW=<value><value>
+PMH
=<value><value>
<value>
0:Speakeroff.
1:Speakeronduringcall
establishment,butoffwhen
receivingcarrier.
2:Speakeron.
3:Speakerisoffwhenreceiving
carrierandduringdialing,buton
duringanswering.
<value>
0to2:Includedforcompatibility
onlyandhasnoeffectotherthan
returninganOKresultcode.
<value>
0:Selects39%-61%makeor
breakratioat10pps.
1:Selects33%-67%makeor
breakratioat10pps.
2:Selects39%-61%makeor
breakratioat20pps.
3:Selects33%or67%makeor
breakratioat20pps.
0:Requestmodem-onholdif
enabledby+PMHandcollect
callerIDinformationifenabled
by+VRID.ToggleV.24circuit
125.
1:Hang-up.
2:Ignorecallwaiting.
0:Modem-on-Holdenabled.
1:Disabledmodem-on-hold.
58UserGuide
Page 77

Table3.Modemcommandlist(continued)
+PMHT
+PMHT +PMHT
+PMHR
+PMHR +PMHR
+PMHF
+PMHF +PMHF
Modem-on-HoldTimer+PMHT +PMHT
InitiateModem-on-Hold
Modem-on-HoldHook
Flash
+PQC
+PQC +PQC
ShortenedPhase1/2
control
+PMHT
=<value><value>
+PMHR
+PMHR +PMHR
+PMHF
+PMHF +PMHF
+P +P+PQC QCQC=<value><value>
0:Denymodem-on-hold
Request.
1:GrantMOHwith10sec.
timeout.
2:GrantMOHwith20sec.
timeout.
3:GrantMOHwith30sec.
timeout.
4:GrantMOHwith40sec.
timeout.
5:GrantMOHwith1min.
timeout.
6:GrantMOHwith2min.
timeout.
7:GrantMOHwith3min.
timeout.
8:GrantMOHwith4min.
timeout.
9:GrantMOHwith6min.
timeout.
10:GrantMOHwith8min.
timeout.
11:GrantMOHwith12min.
timeout.
12:GrantMOHwith16min.
timeout.
13:GrantMOHwithindenite
timeout.
0:EnableShortPhase1and
ShortPhase2.
1:EnableShortPhase1only.
2:Notsupported.
3:DisableShortPhase1and
ShortPhase2.
Chapter2.Usingyourcomputer59
Page 78

Table3.Modemcommandlist(continued)
+PSS
+PSS +PSS
-QCPC
-QCPC -QCPC
-QCPS
-QCPS -QCPS
UseShortSequence
ForceFullStartup
ProcedureNext
Connection
EnableQuickConnect
ProleSave
+P +P+PS SSS SS=<value><value>
-QCP
C
-QCP -QCP
C C
-QCP
-QCP -QCP
S SS=<value><value>
0:Themodemdecideswhether
ornottousetheshortstartup
procedures.
1:Reserved.
2:Forcetheuseofthefull
startupproceduresonthenext
andsubsequentconnections
independentofthesettingofthe
+PQCcommand.
0:Donotallowthequick
connectproletobesaved.
1:Allowthequickconnect
proletobesaved.
Modemresultcodes
Thefollowingtableliststhebasiccodesthatthemodemsendstoyourcomputerinresponsetothe
commandsyouenter.Theyarecalledresultcodes.
Table4.Modemresultcodes
NumericResultcodeDescription
+F4
0
1
2
3
+FCERROR
OK
CONNECT
RING
NOCARRIER
Highspeedfaxdata(V.27,V.29,V.33,orV .17)isexpectedbutaV.21
signalisreceived.
Acommandlinehasbeenexecuted.
ForXcommandvaluesspecifyingnospeedreporting,themodem
hasconnectedtothelineandeitherthelinespeedis300bpsand
linespeedisenabled,ortheDTEspeedis300bpsandDTEspeed
reportingisenabled.
Anincomingringsignalisdetectedontheline.Whatqualiesas
aringsignalisdeterminedbycountry-dependentparameters,
modiablethroughCongurACE.Whencellularinterfaceisselected,
RINGindicatesthatthecellularphoneisreceivinganincomingcall.
Sentwhenattemptingtoestablishacallif:Ringbackisdetected
andlaterceasesbutnocarrierisdetectedwithintheperiodoftime
determinedbyregisterS7,or
1.Noringbackisdetectedwithintheperiodoftimedetermined
byregisterS7.
2.Alsosentwhenthemodemauto-disconnectsduetolossof
carrier.
ForX0,sentforthefollowingconditions:
1.Ifbusytonedetectionisenforced,busyorcircuitbusyhas
beendetected.
2.Ifdialtonedetectionisenforcedorselected,dialtonehas
notbeendetected.
60UserGuide
Page 79

Table4.Modemresultcodes(continued)
4
5
6
7
8
9
10
11
12
13
14
15
16
17
18
19
22
ERROR
CONNECT1200
NODIAL TONE
BUSY
NOANSWER
CONNECT600
CONNECT2400
CONNECT4800
CONNECT9600
CONNECT7200
CONNECT12000
CONNECT14400
CONNECT19200
CONNECT38400
CONNECT57600
CONNECT115200
CONNECT75TX/1200RX
Sentduringanattempttoexecuteacommandlineifanyofthe
followingconditionsoccur:
1.Thecommandlinecontainsasyntaxerror.
2.Themodemcannotexecuteacommandcontainedinthe
commandline,i.e.,thecommanddoesnotexistorisnot
supported.
3.Acommandparameterwithinthecommandlineisoutside
thepermittedrange.
ForX0,X1,X2,andX3,thismessageissentinsteadofDELAYED
andBLACKLISTED.
Themodemhasconnectedtothelineandeitherthelinespeedis
1200bpsandDCEspeedreportingisenabled,ortheDTEspeedis
1200bpsandDTEspeedreportingisenabled.
ForX2andX4,themodemhasbeeninstructedtowaitfordialtone
duringdialingbutnoneisreceived.Whencellularphoneinterfaceis
selected,indicatesthatcellularserviceisnotcurrentlyavailable.
ForX3andX4,ifbusytonedetectionisenforced,thebusy(engaged)
signalisdetectedonthelinewhenthemodemisattemptingto
originateacall.
Themodemisattemptingtooriginateacallifacontinuousringback
signalisdetectedonthelineuntiltheexpirationofthetimerS7.
Themodemhasconnectedtotheline,theDTEspeedis600bps,
andDTEspeedreportingisenabled.
Themodemhasconnectedtothelineandeitherthelinespeedis
2400bpsandDCEspeedreportingisenabled,ortheDTEspeedis
2400bpsandDTEspeedreportingisenabled.
Themodemhasconnectedtothelineandeitherthelinespeedis
4800bpsandDCEspeedreportingisenabled,ortheDTEspeedis
4800bpsandDTEspeedreportingisenabled.
Themodemhasconnectedtothelineandeitherthelinespeedis
9600bpsandDCEspeedreportingisenabled,ortheDTEspeedis
9600bpsandDTEspeedreportingisenabled.
Themodemhasconnectedtothelineat7200bpsandDCEspeed
reportingisenabled.
Themodemhasconnectedtothelineat12000bpsandDCEspeed
reportingisenabled.
Themodemhasconnectedtothelineat14400bpsandDCEspeed
reportingisenabled.
Themodemhasconnectedtothelineandeitherthelinespeedis
19200bpsandDCEspeedreportingisenabled,ortheDTEspeedis
19200bpsandDTEspeedreportingisenabled.
Themodemhasconnectedtotheline,theDTEspeedis38400bps,
andDTEspeedreportingisenabled.
Themodemhasconnectedtotheline,theDTEspeedis57600bps,
andDTEspeedreportingisenabled.
Themodemhasconnectedtotheline,theDTEspeedis115200
bps,andDTEspeedreportingisenabled.
ThemodemhasestablishedaV.23originateconnectionandline
speedreportingisenabled.
Chapter2.Usingyourcomputer61
Page 80

Table4.Modemresultcodes(continued)
23
24
32
33
35
40
44
45
46
47
48
49
50
51
52
53
54
55
56
57
58
59
61
62
CONNECT1200TX/75RX
DELAYED
BLACKLISTED
FAX
DATA
+MRR:300
+MRR:1200/75
+MRR:75/1200
+MRR:1200
+MRR:2400
+MRR:4800
+MRR:7200
+MRR:9600
+MRR:12000
+MRR:14400
+MRR:16800
+MRR:19200
+MRR:21600
+MRR:24000
+MRR:26400
+MRR:28800
CONNECT16800
CONNECT21600
CONNECT24000
ThemodemhasestablishedaV.23answerconnectionandline
speedreportingisenabled.
ForX4,sentwhenacallfailstoconnectandthenumberdialedis
considered“delayed”duetocountryblacklistingrequirements.
ForX4,sentwhenacallfailstoconnectandthenumberdialedis
considered“blacklisted.”
Afaxmodemconnectionisestablishedinafacsimilemode.
Adatamodemconnectionisestablishedinafacsimilemode.
Themodemhasconnectedtothelineat300bpsandcarrier
reportingisenabled.(SeeS95andXn.)
TheV.23backwardchannelcarrierisdetectedandcarrierreporting
isenabled.(SeeS95andXn.)
TheV.23forwardchannelcarrierisdetectedandcarrierreportingis
enabled.(SeeS95andXn.)
Themodemhasconnectedtothelineat1200bpsandcarrier
reportingisenabled.(SeeS95andXn.)
Themodemhasconnectedtothelineat2400bpsandcarrier
reportingisenabled.(SeeS95andXn.)
Themodemhasconnectedtothelineat4800bpsandcarrier
reportingisenabled.(SeeS95andXn.)
Themodemhasconnectedtothelineat7200bpsandcarrier
reportingisenabled.(SeeS95andXn.)
Themodemhasconnectedtothelineat9600bpsandcarrier
reportingisenabled.(SeeS95andXn.)
Themodemhasconnectedtothelineat12000bpsandcarrier
reportingisenabled.(SeeS95andXn.)
Themodemhasconnectedtothelineat14400bpsandcarrier
reportingisenabled.(SeeS95andXn.)
Themodemhasconnectedtothelineat16800bpsandcarrier
reportingisenabled.(SeeS95andXn.)
Themodemhasconnectedtothelineat19200bpsandcarrier
reportingisenabled.(SeeS95andXn.)
Themodemhasconnectedtothelineat21600bpsandcarrier
reportingisenabled.(SeeS95andXn.)
Themodemhasconnectedtothelineat24000bpsandcarrier
reportingisenabled.(SeeS95andXn.)
Themodemhasconnectedtothelineat26400bpsandcarrier
reportingisenabled.(SeeS95andXn.)
Themodemhasconnectedtothelineat28800bpsandcarrier
reportingisenabled.(SeeS95andXn.)
Themodemhasconnectedtotheline,theDTEspeedis16800bps
andDTEspeedreportingisenabled.
Themodemhasconnectedtotheline,theDTEspeedis21600bps
andDTEspeedreportingisenabled.
Themodemhasconnectedtotheline,theDTEspeedis24000bps
andDTEspeedreportingisenabled.
62UserGuide
Page 81

Table4.Modemresultcodes(continued)
63
64
66
67
69
70
77
78
79
80
83
84
91
134
135
136
137
138
139
140
141
142
CONNECT26400
CONNECT28800
+DR:ALT
+DR:V.42B
+DR:NONE
+ER:NONE
+ER:LAPM
+MRR:31200
+MRR:33600
+ER:ALT
LINEINUSE
CONNECT33600
CONNECT31200
+MCR:B103
+MCR:B212
+MCR:V21
+MCR:V22
+MCR:V22B
+MCR:V23
+MCR:V32
+MCR:V32B
+MCR:V34
Themodemhasconnectedtotheline,theDTEspeedis26400bps
andDTEspeedreportingisenabled.
Themodemhasconnectedtothelineandeitherthelinespeedis
28800bpsandDCEspeedreportingisenabled,ortheDTEspeedis
28800bpsandDTEspeedreportingisenabled.
ThemodemhasconnectedtothelineinMNPClass5and+DR:
messagereportingisenabled.(SeeS95,Wn,andXn.)
ThemodemhasconnectedtothelineinV.42bisand+DR:message
reportingisenabled.(SeeS95,Wn,andXn.)
Themodemhasconnectedtothelinewithoutdatacompressionand
+DR:messagereportingisenabled.(SeeS95,Wn,andXn.)
Themodemhasconnectedtothelinewithoutanyformoferror
correctionandthe+ER:messagereportinghasbeenenabled.(See
S95,Wn,andXn.)
ThemodemhasconnectedtothelineinV .42LAPMerrorcorrection
modeand+ER:messagereportinghasbeenenabled.(SeeS95,
Wn,andXn.)
Themodemhasconnectedtothelineat31200bpsandcarrier
reportingisenabled.(SeeS95andXn.)
Themodemhasconnectedtothelineat33600bpsandcarrier
reportingisenabled.(SeeS95andXn.)
SentwhenthemodemhasconnectedintheMNPmodeoferror
correction,and+ER:messagereportinghasbeenenabled.(See
S95,Wn,andXn.)
Themodemattemptedtogooff-hookwhenanextensionwas
alreadyoccupyingtheline.
Themodemhasconnectedtotheline,theDTEspeedis33600bps
andtheDTEspeedreportingisenabled.
ThemodemhasconnectedtothelineDTEspeedis31200bpsand
themodemistoreporttheDTEspeeduponconnecting.
ThemodemhasconnectedtothelinewithBell103modulationand
modulationreportingisenabled.(See+MR,S95andXn.)
ThemodemhasconnectedtothelinewithBell212modulationand
modulationreportingisenabled.(See+MR,S95andXn.)
ThemodemhasconnectedtothelinewithITU-TV.21modulation
andmodulationreportingisenabled.(See+MR,S95andXn.)
ThemodemhasconnectedtothelinewithITU-TV.22modulation
andmodulationreportingisenabled.(See+MR,S95andXn.)
ThemodemhasconnectedtothelinewithITU-TV .22bismodulation
andmodulationreportingisenabled.(See+MR,S95andXn.)
ThemodemhasconnectedtothelinewithITU-TV.23modulation
andmodulationreportingisenabled.(See+MR,S95andXn.)
ThemodemhasconnectedtothelinewithITU-TV.32modulation
andmodulationreportingisenabled.(See+MR,S95andXn.)
ThemodemhasconnectedtothelinewithITU-TV .32bismodulation
andmodulationreportingisenabled.(See+MR,S95andXn.)
ThemodemhasconnectedtothelinewithITU-TV.34modulation
andmodulationreportingisenabled.(See+MR,S95andXn.)
Chapter2.Usingyourcomputer63
Page 82

Table4.Modemresultcodes(continued)
145
150
151
152
153
154
155
156
157
158
159
160
161
162
165
166
167
168
169
170
171
172
173
+MCR:V90
+MRR:32000
+MRR:34000
+MRR:36000
+MRR:38000
+MRR:40000
+MRR:42000
+MRR:44000
+MRR:46000
+MRR:48000
+MRR:50000
+MRR:52000
+MRR:54000
+MRR:56000
CONNECT32000
CONNECT34000
CONNECT36000
CONNECT38000
CONNECT40000
CONNECT42000
CONNECT44000
CONNECT46000
CONNECT48000
ThemodemhasconnectedtothelinewithITU-TV.90modulation
andmodulationreportingisenabled.(See+MR,S95andXn.)
Themodemhasconnectedtothelineat32000bpsandcarrier
reportingisenabled.(SeeS95andXn.)
Themodemhasconnectedtothelineat34000bpsandcarrier
reportingisenabled.(SeeS95andXn.)
Themodemhasconnectedtothelineat36000bpsandcarrier
reportingisenabled.(SeeS95andXn.)
Themodemhasconnectedtothelineat38000bpsandcarrier
reportingisenabled.(SeeS95andXn.)
Themodemhasconnectedtothelineat40000bpsandcarrier
reportingisenabled.(SeeS95andXn.)
Themodemhasconnectedtothelineat42000bpsandcarrier
reportingisenabled.(SeeS95andXn.)
Themodemhasconnectedtothelineat44000bpsandcarrier
reportingisenabled.(SeeS95andXn.)
Themodemhasconnectedtothelineat46000bpsandcarrier
reportingisenabled.(SeeS95andXn.)
Themodemhasconnectedtothelineat48000bpsandcarrier
reportingisenabled.(SeeS95andXn.)
Themodemhasconnectedtothelineat50000bpsandcarrier
reportingisenabled.(SeeS95andXn.)
Themodemhasconnectedtothelineat52000bpsandcarrier
reportingisenabled.(SeeS95andXn.)
Themodemhasconnectedtothelineat54000bpsandcarrier
reportingisenabled.(SeeS95andXn.)
Themodemhasconnectedtothelineat56000bpsandcarrier
reportingisenabled.(SeeS95andXn.)
Themodemhasconnectedtothelineat32000bpsandDCEspeed
reportingisenabled.
Themodemhasconnectedtothelineat34000bpsandDCEspeed
reportingisenabled.
Themodemhasconnectedtothelineat36000bpsandDCEspeed
reportingisenabled.
Themodemhasconnectedtothelineat38000bpsandDCEspeed
reportingisenabled.
Themodemhasconnectedtothelineat40000bpsandDCEspeed
reportingisenabled.
Themodemhasconnectedtothelineat42000bpsandDCEspeed
reportingisenabled.
Themodemhasconnectedtothelineat44000bpsandDCEspeed
reportingisenabled.
Themodemhasconnectedtothelineat46000bpsandDCEspeed
reportingisenabled.
Themodemhasconnectedtothelineat48000bpsandDCEspeed
reportingisenabled.
64UserGuide
Page 83

Table4.Modemresultcodes(continued)
174
175
176
177
178
180
181
182
183
184
185
186
187
188
189
190
191
192
193
194
195
196
197
CONNECT50000
CONNECT52000
CONNECT54000
CONNECT56000
CONNECT230400
CONNECT28000
CONNECT29333
CONNECT30667
CONNECT33333
CONNECT34667
CONNECT37333
CONNECT38667
CONNECT41333
CONNECT42667
CONNECT45333
CONNECT46667
CONNECT49333
CONNECT50667
CONNECT53333
CONNECT54667
+MRR:28000*
+MRR:29333*
+MRR:30667*
Themodemhasconnectedtothelineat50000bpsandDCEspeed
reportingisenabled.
Themodemhasconnectedtothelineat52000bpsandDCEspeed
reportingisenabled.
Themodemhasconnectedtothelineat54000bpsandDCEspeed
reportingisenabled.
Themodemhasconnectedtothelineat56000bpsandDCEspeed
reportingisenabled.
Themodemhasconnectedtotheline,theDTEspeedis230400
bps,andDTEspeedreportingisenabled.
Themodemhasconnectedtothelineat28000bpsandDCEspeed
reportingisenabled.
Themodemhasconnectedtothelineat29333bpsandDCEspeed
reportingisenabled.
Themodemhasconnectedtothelineat30667bpsandDCEspeed
reportingisenabled.
Themodemhasconnectedtothelineat33333bpsandDCEspeed
reportingisenabled.
Themodemhasconnectedtothelineat34667bpsandDCEspeed
reportingisenabled.
Themodemhasconnectedtothelineat37333bpsandDCEspeed
reportingisenabled.
Themodemhasconnectedtothelineat38667bpsandDCEspeed
reportingisenabled.
Themodemhasconnectedtothelineat41333bpsandDCEspeed
reportingisenabled.
Themodemhasconnectedtothelineat42667bpsandDCEspeed
reportingisenabled.
Themodemhasconnectedtothelineat45333bpsandDCEspeed
reportingisenabled.
Themodemhasconnectedtothelineat46667bpsandDCEspeed
reportingisenabled.
Themodemhasconnectedtothelineat49333bpsandDCEspeed
reportingisenabled.
Themodemhasconnectedtothelineat50667bpsandDCEspeed
reportingisenabled.
Themodemhasconnectedtothelineat53333bpsandDCEspeed
reportingisenabled.
Themodemhasconnectedtothelineat54667bpsandDCEspeed
reportingisenabled.
Themodemhasconnectedtothelineat28000bpsandcarrier
reportingisenabled.(SeeS95andXn.)
Themodemhasconnectedtothelineat29333bpsandcarrier
reportingisenabled.(SeeS95andXn.)
Themodemhasconnectedtothelineat30667bpsandcarrier
reportingisenabled.(SeeS95andXn.)
Chapter2.Usingyourcomputer65
Page 84

Table4.Modemresultcodes(continued)
198
199
200
201
202
203
204
205
206
207
208
209
+MRR:33333*
+MRR:34667*
+MRR:37333*
+MRR:38667*
+MRR:41333*
+MRR:42667*
+MRR:45333*
+MRR:46667*
+MRR:49333*
+MRR:50667*
+MRR:53333*
+MRR:54667*
Themodemhasconnectedtothelineat33333bpsandcarrier
reportingisenabled.(SeeS95andXn.)
Themodemhasconnectedtothelineat34667bpsandcarrier
reportingisenabled.(SeeS95andXn.)
Themodemhasconnectedtothelineat37333bpsandcarrier
reportingisenabled.(SeeS95andXn.)
Themodemhasconnectedtothelineat38667bpsandcarrier
reportingisenabled.(SeeS95andXn.)
Themodemhasconnectedtothelineat41333bpsandcarrier
reportingisenabled.(SeeS95andXn.)
Themodemhasconnectedtothelineat42667bpsandcarrier
reportingisenabled.(SeeS95andXn.)
Themodemhasconnectedtothelineat45333bpsandcarrier
reportingisenabled.(SeeS95andXn.)
Themodemhasconnectedtothelineat46667bpsandcarrier
reportingisenabled.(SeeS95andXn.)
Themodemhasconnectedtothelineat49333bpsandcarrier
reportingisenabled.(SeeS95andXn.)
Themodemhasconnectedtothelineat50667bpsandcarrier
reportingisenabled.(SeeS95andXn.)
Themodemhasconnectedtothelineat53333bpsandcarrier
reportingisenabled.(SeeS95andXn.)
Themodemhasconnectedtothelineat54667bpsandcarrier
reportingisenabled.(SeeS95andXn.)
Notes:
1.SeeVnforresultcodeselection,i.e.,shortform(resultcode)orverbose/extended(resultmessage).
2.SeeWnforextendedconnectmessagecontrol.
3.SeeS95forextendedresultcodeenablingoptions(whichoverridesomeWncommands).
4.SeeXnforextendedresultcodesubsetenablingoptions.
5.See+MRformodulationreportingcontrol.
Sregisters
Sregistersareinformationstorageareasinsidethemodem.TheATcommandsetusestheSregistersto
conguremodemoptions.SomeSregistershavedefaultsettings.Theseareusuallyadequatefornormal
modemoperations.Inspecialcircumstances,however,youmayneedtochangesomedefaults.
ToreadorchangethevalueofanSregister,beginthecommandwiththelettersAT.
ToreadthevalueofanSregister,usethecommandA AAT TTSr? Sr?
toreadthevalueofSregister0,typeATS0?andpressEnter.
TochangethevalueofanSregister,usethecommandA AAT TTSr=n Sr=n
nisthenewvalueyouwanttoassign.Forexample,tochangethevalueofS0registerto20rings,type
ATS0=20andpressEnter.
RefertothefollowingtableofSregisters:
Sr?
whererisaregisternumber0-110.Forexample,
Sr=n
whererisaregisternumber0-110,and
66UserGuide
Page 85

Table5.Sregisters
RegisterDescriptionRangeUnits
S0
NumberofRingstoAutomatic
0-255Rings
Answer.
S1RingCounter
0-255Rings
S2EscapeCharacter0-255ASCIIDecimalASCII
S3LineTerminationCharacter0-127ASCIIDecimalASCII
S4
ResponseFormatting
0-127ASCIIDecimalASCII
Character
S5CommandLineEditing
0-32ASCIIDecimalASCII
Character
S6
WaitTimeforDialT oneBefore
2-255
BlindDialing,orAfter“W”Dial
Modier
S7WaitTimeforCarrierAfter
1-255
Dial,forSilence,orforDial
ToneAfter“W”Modier
S8
PauseTimeforDialDelay
0-255
Modier(,)
S10CarrierLossDisconnectTime
S11
S12
S18
DTMFToneDuration50-2550.001s
EscapePromptDelay0-2550.02s
TestTimer0-255
S29FlashDialModierTime(!)
S30
DisconnectInactivityTimer0-25510s
1-2550.1s
0-25510ms
S46DataCompressionControl136(nocompression)or138
(compression)
S95ResultCodeMessages
Control:
Bit0CONNECTresult
codeindicatesDCEspeed
insteadofDTEspeed.
Bit1Reserved.
Bit2Enable
+MCR:XXXXresultcode
(XXXX=modulation)and
+MRR:XXXXresultcode
(XXXX=rate).(See+ER.).
Bit3Enable
+ER:XXXXresultcode
(XXXX=protocolidentier).
(See+ER.).
Bit4Reserved.
Bit5Enable+DRresult
code(XXXX=compression
type).(See+DR.).
Bits6-7Reserved.
s
s
s
s
Chapter2.Usingyourcomputer67
Page 86

Usingdialupconnection
Ifyousometimeshavetodialintooneormorenetworksfromremotesites,suchashotelsorofces,youwill
needtostartbysettingupinyourcomputeraproleforeachsiteyoudialfromandaproleforeachnetwork
youdialinto.Fordetailsonsettingupnetworkanddial-upconnections,refertoWindowsonlinehelp.
Dialupconnections
Tousethebuilt-inmodem,startAccessConnections.
ForWindows7:TostarttheAccessConnectionswizard,see“AccessingapplicationsinWindows7”on
page19,andfollowtheinstructionsonthescreen.
ForWindowsVistaandWindowsXP:TostarttheAccessConnectionswizard,clickStart➙AllPrograms➙
ThinkVantage➙AccessConnections,andfollowtheinstructionsonthescreen.
Notes:BeforeyoustartsettingupdialupconnectionsbyusingAccessConnections,obtaineitherofthe
followingfromyourInternetserviceprovider(ISP)ornetworkadministrator.
•DialerprogramprovidedbyyourISP
OR
•Phonenumbertotheaccesspoint
•Usernameandpassword
AccessConnections,aconnectivityassistantprogram,caneasilyenableonenetworkadapteranddisable
theotheradaptersondemand.Aftersettingupyourdialupconnection,youcanusetheprogramtoquickly
switchthenetworksettings.
Dialingmanually
IfyourcomputerisrepeatedlyunabletoconnecttoyourISPortoaLAN,itiseasiertodialanaccessnumber
manually.Fordetails,refertoyourWindowsonlinehelp.
Note:Youwillneedtohaveadualjacktothesamephonelineora“Y”splitterforyourphonelinesothat
yourcomputerandyourtelephonecansharealine.
Modemuseabroad
Differentcountriesandregionsfollowdifferentproceduresandregulationsregardingmodemuse.Besureto
checkwithyourhotelfrontdeskorwiththelocaltelephoneutilitytolearntheproperprocedureforplugging
inandunpluggingyourmodemandpowercord.
DANGER
Toavoidshockhazard,donotconnectthecabletoordisconnectthecablefromthetelephone
outletonthewallduringelectricalstorms.
Aroundtheworldtherearedozensofplugsandjacksforphoneconnections.Y oucanusuallypurchasean
adapterwhileindestinationcountry,butadapterkitsareavailableinyourhomecountrypriortoyourtrip.
Somecountriessupportpulsedialingratherthantonedialing.T ochangedialingmethods,refertoyour
Windowsonlinehelp.
Note:Inmanyregions,youcannotusethebuilt-inmodemfunctionuntilLenovohasreceivedapprovalfrom
theproperauthorities.
68UserGuide
Page 87

Yourbuilt-inmodemisaworldwidemodemandcanbeusedinanyregionwherePostalTelegraphand
Telephone(PTT)typeapprovalhasbeenobtained.Youcanchangethemodemsettingasneededfor
theregionwhereyouusethemodem.
Formoreinformationontheuseofthebuilt-inmodeminaspecicregion,contacttheCustomerSupport
Centerinthatregion.
Usingaprojectororexternaldisplay
Yourcomputercomeswithmanyfeaturestoincreasetheenjoymentofyourcomputerandhelpyougive
presentationswithcondence.
Changingdisplaysettings
Youcanchangethedisplaysettings,suchasfontsizeorcolormodeornumericlock.
Fontsize
Tomakeafontsizelarger,doasfollows:
ForWindows7:
1.Right-clickonthedesktop,andclickPersonalize.
2.ClickDisplayattheleft.
3.SelecttheMediumorLargerradiobutton.
4.ClickApply.Thechangewilltakeeffectafteryoulogoff.
ForWindowsVista:
1.Right-clickonthedesktop,andclickPersonalize.
2.ClickAdjustfontsize(DPI)underTasksattheleft.Ifyouarepromptedforanadministratorpassword
orconrmation,typethepasswordorprovideconrmation.
3.SelecttheLargerscale(120DPI)-maketextmorereadablecheckbox.
4.ClickOK.Thechangewilltakeeffectafterthecomputerrestarts.Youarepromptedtorestartthe
computerafteryouclickOKorApply.
ForWindowsXP:
1.Right-clickonthedesktop,andclickProperties.TheDisplayPropertieswindowopens.
2.ClicktheAppearancetab.
3.UnderFontSize,clickLargeFontsorExtraLargeFonts.
4.ClickApplytoapplythesettings.
5.ClickOK.IfyouarepromptedtorestartthecomputerafteryouclickOKorApply,thechangewill
takeeffectafterthecomputerrestarts.
Numericlock
Tochangethenumericlocksetting,doasfollows:
ForWindows7:
1.Right-clickonthedesktop,andclickPersonalize.
2.ClickDisplayattheleft.
3.ClickChangedisplaysettings.
Chapter2.Usingyourcomputer69
Page 88

4.ClickAdvancedsettings,selecttheOnScreenDisplaytab,andthenclickNumLockSettings.
5.Thesettingwindowopens.
6.Followtheinstructionsonthescreen.
ForWindowsVista:
1.Right-clickonthedesktop,andclickPersonalize.
2.ClickDisplaySettings.
3.ClickAdvancedSettings,selecttheOnScreenDisplaytab,andthenclickNumLockSettings.
4.Thesettingwindowopens.
5.Followtheinstructionsonthescreen.
ForWindowsXP:
1.Right-clickonthedesktop,andclickProperties.TheDisplayPropertieswindowopens.
2.ClicktheSettingstab.
3.ClickAdvanced,selecttheOnScreenDisplaytab,andthenclickNumLockSettings.
4.Thesettingwindowopens.
5.Followtheinstructionsonthescreen.
Connectingaprojectororexternaldisplay
Attachinganexternalmonitor
Yourcomputercansupportamaximumvideoresolutionofupto2048x1536(withanexternalmonitor
attachedtotheCRTconnector)orupto2560x1600(withanexternalmonitorattachedtotheDisplayPort
connector),providedthattheexternalmonitoralsosupportsthatresolution.Formoredetails,referto
themanualsprovidedwithyourmonitor.
Youcansetanyresolutionforeitherthecomputerdisplayortheexternalmonitor.Whenyouusebothat
thesametime,theresolutionofbothisthesame.Ifyousetahigherresolutionforthecomputerdisplay,
youcanseeonlypartofthescreenatatime.Youcanseeotherpartsbymovingtheimagewiththe
TrackPointoranotherpointingdevice.
Youcanmovethedisplayoutputtothecomputerdisplay,theexternalmonitor,orbothintheDisplay
Settingswindow(inWindowsXP,DisplayPropertieswindow).
Connectinganexternalmonitor
Toattachanexternalmonitor,doasfollows:
ForWindows7:
1.Connecttheexternalmonitortothemonitorconnector;thenconnectthemonitortoanelectricaloutlet
2.T urnontheexternalmonitor.
3.ChangethedisplayoutputlocationbypressingFn+F7.Thisallowsyoutoswitchbetweenviewing
outputontheexternaldisplay,thecomputerdisplay,andbothdisplays.
Note:Ifyourcomputercannotdetecttheexternalmonitor,right-clickonthedesktop,thenselectScreen
resolution.ClicktheDetectbutton.
ForWindowsVista:
1.Connecttheexternalmonitortothemonitorconnector;thenconnectthemonitortoanelectricaloutlet.
70UserGuide
Page 89

2.T urnontheexternalmonitor.
3.Ifthisisthersttimetheexternalmonitorhasbeenconnected,theNewDisplayDetecteddialogbox
opens.Selectoneofthefollowing,andthenclickOK.
•Duplicatemydesktoponalldisplays(mirrored)
•Showdifferentpartsofmydesktoponeachdisplay(extended)
•Showmydesktopontheexternalmonitoronly
Note:Ifyourcomputercannotdetecttheexternalmonitor,theNewDisplayDetecteddialogboxdoes
notopen.Fordetails,refertotheWindowsonlinehelp.
ForWindowsXP:
1.T urnoffthecomputer.
2.Connecttheexternalmonitortothemonitorconnector;thenconnectthemonitortoanelectricaloutlet.
3.T urnontheexternalmonitorandthecomputer.
4.ChangethedisplayoutputlocationbypressingFn+F7.Thisallowsyoutoswitchbetweenviewing
outputontheexternaldisplay,thecomputerdisplay,andbothdisplays.
Notes:
•Donotchangethedisplayoutputlocationwhileamovingpictureisbeingdrawn--forexample,while
playingamovieoragame,orviewingabusinesspresentation.Closetheapplicationbeforechangingthe
displayoutputlocation,orchangethedisplaymodebeforeyouopenanMPEGletoplay.
•IfyouareattachinganexternalmonitorthatsupportsonlyVGAmode(640x480resolution),donotview
outputonboththecomputerdisplayandtheexternalmonitor.Doingsowouldcausetheexternalmonitor
screentobescrambledandtheoutputnottobedisplayed;inaddition,itcouldcausedamagetothe
screen.Usetheexternalmonitoronly.
•IftheexternalTFTmonitoryouconnecthasananaloginterface,ickersorripplesmayappearonsome
displays,suchastheshutdownscreenofWindows.ThisiscausedbytheexternalTFTmonitor,and
cannotbexedbyadjustingtheexternalTFTmonitororthecomputersidesettings.
Settingthemonitortypes
Tosetyourmonitortype,doasfollows:
ForWindows7:
1.Connecttheexternalmonitortothemonitorconnector,andthenconnectthemonitortoanelectrical
outlet.
2.T urnontheexternalmonitor.
3.Right-clickonthedesktop,andclickScreenresolution.
Note:Ifyourcomputercannotdetecttheexternalmonitor,clicktheDetectbutton.
4.SetResolution.
5.ClickAdvancedSettings.
6.ClicktheMonitortab.Checkthemonitorinformationwindowtomakesurethatthemonitortypeis
correct.Ifitis,clickOKtoclosethewindow;otherwisedoasfollows.
7.Ifmorethantwomonitortypesaredisplayed,selectGenericPnPMonitororGenericNon-PnP
Monitor.
8.ClickProperties.Ifyouarepromptedforanadministratorpasswordorconrmation,typethepassword
orprovideconrmation.
9.ClicktheDrivertab.
Chapter2.Usingyourcomputer71
Page 90

10.ClickUpdateDriver.
11.ClickBrowsemycomputerfordriversoftware,andthenclickLetmepickfromalistofdevice
driversonmycomputer.
12.CleartheShowcompatiblehardwarecheckbox.
13.SelectManufacturerandModelforyourmonitor.Ifyoucannotndyourmonitorinthelist,stopthe
installationofthisdriverandusethedrivershippedwithyourmonitor.
14.Afterupdatingthedriver,clickClose.
15.ClickOK.
Note:Tochangethecolorsettings,right-clickonthedesktop,andclickScreenresolution.ClickAdvanced
Settings,selecttheMonitortab,thensetColors.
ForWindowsVista:
Note:IfyouselectShowdifferentpartsofmydesktoponeachdisplay(extended),referto“Usingthe
Extenddesktopfunction”onpage75.
1.Connecttheexternalmonitortothemonitorconnector,andthenconnectthemonitortoanelectrical
outlet.
2.T urnontheexternalmonitor.
3.PressFn+F7tochangethedisplayoutputlocationtotheexternalmonitor.
4.Right-clickonthedesktop,andclickPersonalize.
5.ClickDisplaySettings.TheDisplaySettingswindowopens.
6.ClickAdvancedSettings.
7.ClicktheMonitortab.Checkthemonitorinformationwindowtomakesurethatthemonitortypeis
correct.Ifitis,clickOKtoclosethewindow;otherwisedoasfollows.
8.Ifmorethantwomonitortypesaredisplayed,selectGenericPnPMonitororGenericNon-PnP
Monitor.
9.ClickProperties.Ifyouarepromptedforanadministratorpasswordorconrmation,typethepassword
orprovideconrmation.
10.ClicktheDrivertab.
11.ClickUpdateDriver.
12.ClickBrowsemycomputerfordriversoftware,andthenclickLetmepickfromalistofdevice
driversonmycomputer.
13.CleartheShowcompatiblehardwarecheckbox.
14.SelectManufacturerandModelforyourmonitor.Ifyoucannotndyourmonitorinthelist,stopthe
installationofthisdriverandusethedrivershippedwithyourmonitor.
15.Afterupdatingthedriver,clickClose.
16.SetResolutionandColorsintheDisplaySettingswindow.
17.ClickOK.
ForWindowsXP:
1.Connecttheexternalmonitortothemonitorconnector,andthenconnectthemonitortoanelectrical
outlet.
2.T urnontheexternalmonitorandthecomputer.
3.PressFn+F7tochangethedisplayoutputlocationtotheexternalmonitor.
4.Right-clickonthedesktop,andclickPropertiestoopentheDisplayPropertieswindow.
72UserGuide
Page 91

5.ClicktheSettingstab.
6.ClickAdvanced.
7.ClicktheMonitortab.Checkthemonitorinformationwindowtomakesurethatthemonitortypeis
correct.Ifitis,clickOKtoclosethewindow;otherwisedoasfollows.
8.Ifmorethantwomonitortypesaredisplayed,selectDefaultMonitor.
9.ClickProperties.
10.ClicktheDrivertab.
11.ClickUpdateDriver.TheHardwareUpdateWizardappears.
12.ClickNo,notthistime,andthenclickNext.
13.SelectInstallfromalistorspeciclocation(Advanced),andthenclickNext.
14.SelectDon'tsearch.Iwillchoosethedrivertoinstall,andthenclickNext.
15.CleartheShowcompatiblehardwarecheckbox.
16.SelectManufacturerandModelforyourmonitor.Ifyoucannotndyourmonitorinthelist,stopthe
installationofthisdriverandusethedrivershippedwithyourmonitor.
17.Afterupdatingthedriver,clickOKtoclosethePropertieswindow.
18.SetColorsandScreenareaintheDisplayPropertieswindow.
19.ClickOK.
Considerationsforattachinganexternalmonitor
•Wheninstallinganoperatingsystem,youmustinstallthedisplaydriverforyourmonitorthatissupplied
withthecomputer,andtheMonitorINFlethatissuppliedwiththeexternalmonitor.
•Ifyousetaresolutionhigherthantheresolutionyouareusingonthepanel,anduseapanelthatdoesnot
supportthatresolution,takeadvantageofthevirtualscreenfunction,whichenablesyoutodisplayonlya
partofthehigh-resolutionscreenimageyourcomputerproduces.Y oucanseeotherpartsoftheimage
bymovingthescreenwiththeT rackPointorotherpointingdevice.
•Iftheexternalmonitoryouareusingisoutdated,theresolutionandtherefreshratemaybelimited.
UsingtheDVImonitor
Ifyourcomputerhasoneoftheoptionalexpansionunits,aThinkPadMiniDockPlusSeries3,aThinkPad
MiniDockSeries3,oraThinkPadMiniDockPlusSeries3(170W),youcanusetheDigitalVisualInterface
(DVI)monitorthroughtheDVIconnectorofthatunit.
Notes:
•ThescreenmodethatcanbeuseddependsonthespecicationsoftheDVImonitor.
•BeforeyouattachtheDVImonitor,makesurethatthecomputerisattachedtotheexpansionunitand
thesystemworksproperly.
ToattachtheDVImonitor,doasfollows:
1.T urnoffthecomputer.
2.ConnecttheDVImonitortotheDVIconnectoroftheexpansionunit,andthenconnectthemonitor
toanelectricaloutlet.
3.T urnontheDVImonitorandthecomputer.Thesystemstarts.
IfthecomputeroutputdoesnotappearontheDVImonitor,doasfollows:
ForacomputerthatsupportsNVIDIAOptimusGraphics:
1.SwitchtheGraphicsProcessingUnit(GPU)toHighPerformanceGraphics.
Note:IfyourcomputerisrunningWindowsXP ,youcannotswitchtheGPU.
Chapter2.Usingyourcomputer73
Page 92

2.Right-clickonthedesktopandselectNVIDIAControlPanel.TheNVIDIAControlPanelopens.
3.IntheSelectaTasknavigationpaneatleftunderDisplay,clickSetupmultipledisplays.
4.InWindows7andWindowsVista,right-clickontheVerifyyourdisplayconguration,andthenselect
eithertheCloneModeorthePrimary.InWindowsXP,selectamulti-displaymode.
5.ClickOK.
ForacomputerthathastheInteldisplayadapter:
1.PressCtrl+Alt+F12.TheIntelGraphicsMediaAcceleratorDriverformobilewindowappears.
2.SelectDigitalDisplay,IntelDualDisplayClone,orExtendedDesktop.IfyouselectDigitalDisplay,
thecomputeroutputappearsontheDVImonitoronly.IfyouselectIntelDualDisplayCloneor
ExtendedDesktop,theoutputappearsbothonthecomputerdisplayandontheDVImonitor.
3.ClickOK.
ConsiderationsforattachingaDVImonitor
ConnecttheDVImonitortotheexpansionunit,andturnitonbeforeyouturnonthecomputer.Otherwise
thesystemcannotrecognizethatthemonitorisconnected.IftheoptionforenablingtheDVImonitorinthe
DisplayPropertieswindowdoesnotappear,tryclosingthewindowandopeningitagain.Iftheoptionstill
doesnotappear,makesurethattheconnectorofthemonitorisattachedrmly,andrepeattheprocedure
forattachingthemonitor.
UsingtheDisplayPortconnector
YourcomputerhasaDisplayPortconnector,thelatestdigitaldisplayinterfaceforconnectiontovarious
externaldevices,suchasCRTmonitors,projectors,orevenHDTV.Thiscompactconnectorenablesa
plug-and-playsetupandsupportsadaptorsthatcanplugintoDVI,VGA,orHDMIports.
TheDisplayPortconnectorofyourcomputersupportsaudioaswellasvideostreaming.
Settingupapresentation
Note:IfyourcomputerisaWindows7model,itdoesnotsupportPresentationDirector,buttheFn+F7or
Win+Pkeycombinationisavailableforswitchingdisplayoutputtoaconnectedprojector.
PresentationDirectorprovidesaneasywaytosetupyourcomputertohelpyougivepresentationswith
condence,evenwhenyouareawayfromyourofce.
UsePresentationDirectortoadjustresolutionsettingsandtemporarilydisablepowermanagementtimersto
ensureanuninterruptedpresentation.
PresentationDirectorhassomepredenedpresentationschemes.Toapplyapresentationscheme,you
canusetheFn+F7keycombination.
TostartPresentationDirector,clickStart➙AllPrograms➙ThinkVantage➙PresentationDirector,and
followtheinstructionsonthescreen.
Projectingvideo
Todisplayinformationandmakepresentations,youcanattachadataprojectortoyourcomputer.Attachthe
dataprojectortothemonitorconnectoronyourcomputer.
Note:Itmaytakeseveralsecondsbeforetheprojectordisplaystheimage.Ifyoudonotseeyourdesktop
displayedafter60seconds,trypressingFn+F7toswitchbetweendifferentdisplayoutputlocations.
74UserGuide
Page 93

YoucancreateapresentationschemebyfollowingtheinstructionsofthePresentationDirector,withthe
projectorattachedtoyourcomputer.Youcansavetheschemeforafuturepresentationwiththesame
equipment.
Playingsound
Yourprojectormighthaveoneormoreaudio-inputconnectors.Toprojectsound,youwillneedtoattachthe
comboaudiojackonyourcomputertotheseconnectors,usinganaudiocable(commerciallyavailable).
Usingdualdisplays
UsingtheExtenddesktopfunction
YourcomputersupportsafunctionnamedtheExtenddesktop.WiththeExtenddesktopfunction,you
candisplayoutputonboththecomputerdisplayandanexternalmonitor.Y oucanalsodisplaydifferent
desktopimagesoneachmonitor.
YoucanusetheExtenddesktopfunctionwithoutchanginganysettings.Ifthefunctiondoesnotwork,refer
to“EnablingtheExtenddesktopfunction”onpage75toenableit.
ConsiderationsforusingtheExtenddesktopfunction
•IfyouwanttoshowDOSfull-screenwhileintheExtenddesktopmode,onlytheprimarydisplayshows
DOS;theotherdisplayisblackedout.
IfyourcomputerhastheInteldisplayadapter,youcandesignatetheotherdisplayastheprimarydisplay
bydoingthefollowing:
1.PressCtrl+Alt+F12.TheIntelCUIwindowopens.
2.SelectExtendedDesktop.
3.Changethesettingtodesignatetheprimarydisplay.
•WhenanapplicationusingtheDirectDrawortheDirect3Displayedinfull-screenmode,itisshown
onlyontheprimarydisplay.
•YoucannotusethedisplayswitchingfunctionwhenyouareintheExtenddesktopmode.
EnablingtheExtenddesktopfunction
ToenabletheExtenddesktopfunction,doasfollows:
ForWindows7:
1.Connecttheexternalmonitortothemonitorconnector;thenconnectthemonitortoanelectricaloutlet.
2.T urnontheexternalmonitor.
3.PressFn+F7,thenselectExtend.
Tochangetheresolutionforeachmonitor,doasfollows:
1.Right-clickonthedesktop,andclickScreenresolution.
2.ClicktheMonitor-1icon(fortheprimarydisplay,thecomputerdisplay).
3.SelecttheResolutionoftheprimarydisplay.
4.ClicktheMonitor-2icon(forthesecondarydisplay,theexternaldisplay).
5.SelecttheResolutionofthesecondarydisplay.
6.Placetheiconsforthemonitorssothattheytouch.
Note:Youcansetthemonitorsinanyrelativeposition,buttheiconsmusttoucheachother.
Chapter2.Usingyourcomputer75
Page 94

7.ClickOKtoapplythechanges.
Note:Tochangethecolorsettings,right-clickonthedesktop,andclickScreenresolution.ClickAdvanced
Settings,selecttheMonitortab,thensetColors
ForWindowsVista:
1.Connecttheexternalmonitortothemonitorconnector;thenconnectthemonitortoanelectricaloutlet.
2.T urnontheexternalmonitor.
3.Ifthisisthersttimetheexternalmonitorhasbeenconnected,theNewDisplayDetecteddialogbox
opens.SelectShowdifferentpartsofmydesktoponeachdisplay(extended),andthenclickOK.
Tochangetheresolutionforeachmonitor,doasfollows:
1.Right-clickonthedesktop,andclickPersonalize.
2.ClickDisplaySettings.TheDisplaySettingswindowopens.
3.ClicktheMonitor-1icon(fortheprimarydisplay,thecomputerdisplay).
4.SelecttheResolutionandtheColorsoftheprimarydisplay.
5.ClicktheMonitor-2icon(forthesecondarydisplay,theexternaldisplay).
6.SelecttheResolutionandtheColorsofthesecondarydisplay.
7.Placetheiconsforthemonitorssothattheytouch.
Note:Youcansetthemonitorsinanyrelativeposition,buttheiconsmusttoucheachother.
8.ClickOKtoapplythechanges.
ForWindowsXP:
1.T urnoffthecomputer.
2.Connecttheexternalmonitortothemonitorconnector;thenconnectthemonitortoanelectricaloutlet.
3.T urnontheexternalmonitorandthecomputer.
4.Right-clickonthedesktop,andclickPropertiestoopentheDisplayPropertieswindow.
5.ClicktheSettingstab,andclicktheMonitor-2icon.
6.SelecttheExtendmyWindowsdesktopontothismonitorcheckboxandclickApply.(IftheMonitor
Settingswindowopens,clickYes.)
Tochangetheresolutionforeachmonitor,doasfollows:
1.ClicktheMonitor-1icon(fortheprimarydisplay,thecomputerdisplay).
2.Selectthecolorqualityandthescreenresolutionoftheprimarydisplay.
3.ClicktheMonitor-2icon(forthesecondarydisplay,theexternaldisplay).
4.Selectthecolorqualityandthescreenresolutionofthesecondarydisplay.
5.Placetheiconsforthemonitorssothattheytouch.
Note:Youcansetthemonitorsinanyrelativeposition,buttheiconsmusttoucheachother.
6.ClickOKtoapplythechanges.
UsingtheNVIDIAOptimusGraphicsfeature
SomeThinkPadnotebookssupportNVIDIAOptimusGraphics.
76UserGuide
Page 95

NVIDIAOptimusGraphicsenablesadynamicswitch,thatis,aswitchwithnoneedtorestartyourcomputer
betweenHighPerformanceandEnergySavingGraphics.
Note:T ousetheDisplayPortfeatureorDVImonitoronthedockingstation,youneedtoswitchtoHigh
PerformanceGraphics.
SwitchingtheGraphicsProcessingUnit
IfyourcomputersupportsNVIDIAOptimusGraphics,theGraphicsProcessingUnitisswitchedautomatically
dependingonthesettingsofthepowerplanyouuse.
Note:IfyourcomputerisrunningWindowsXP,youcannotswitchtheGPU.
Usingaudiofeatures
Yourcomputerisequippedwiththefollowing:
•Comboaudiojack,1/8inch(3.5mm)indiameter
•Built-instereospeakers
•Built-indualarraydigitalmicrophone
Yourcomputeralsohasanaudiochipthatenablesyoutoenjoyvariousmultimediaaudiofeatures:
•CompliantwithIntelHighDenitionAudio.
•RecordingandplaybackofPCMandWAVlesin16-bitor24-bitformat.
•PlaybackofaWAVleatasamplerateof44.1KHzto192KHz.
•PlaybackofMIDIlesthroughaWavetablesynthesizerunderMicrosoftWindowsoperatingsystems.
•PlaybackofMP3lesthroughtheWindowsMediaPlayerorasoftwareMP3player.
•Recordingfromvarioussoundsources,suchasaheadsetattachedeithertothecomboaudiojackof
yourcomputerortothemicrophonejackoftheThinkPadMiniDockSeries3,theThinkPadMiniDock
PlusSeries3,ortheThinkPadMiniDockPlusSeries3(170W).
Note:Thecomboaudiojackdoesnotsupportaconventionalmicrophone.
Thefollowingtableshowswhichfunctionsoftheaudiodevicesattachedtothejacksonyourcomputeror
dockingstationaresupported.
Table6.Audiofeaturelist
Comboaudiojack
Headphonejackofthe
dockingstation
Microphonejackofthe
dockingstation
Headsetwitha3.5mm
4-poleplug
Headphoneand
microphonefunctions
supported
Onlyheadphonefunction
supported
Microphonefunctionnot
supported
NotsupportedNotsupported
ConventionalheadphoneConventionalmicrophone
Headphonefunction
supported
Headphonefunction
supported
Notsupported
Notsupported
Microphonefunction
supported
Chapter2.Usingyourcomputer77
Page 96

BeamFormingfeature
Abuilt-indualarraydigitalmicrophoneismountedatthetopofthedisplay.Whereasaconventional
single-elementmicrophonecapturessoundsfromallaround,thebuilt-indualarraydigitalmicrophoneis
designedtocapturethesoundfromanexceptionallylimitedangle,throughthecombinationofaspecialized
microphonearraywithacapabilityofdigitalsignalprocessing.Thereforethemicrophonecapturessounds
fromtheareainfrontofthesystemclearly,butblocksoutalmostallthesoundsfromoutsidethecapturing
range.Thusthespeechofausersittinginfrontofthesystemisinputtothesystemwithoutinterference
fromnoiseinthesurroundingarea.Torecordyourspeechmostclearly,youshouldspeakdirectlyinfront
ofthecomputer.
Conguringforsoundrecording
Tocongurethemicrophoneforoptimizedsoundrecording,opentheSmartAudiowindowasfollows:
ForWindows7andWindowsVista:ClickStart➙ControlPanel➙HardwareandSound➙SmartAudio.
TheSmartAudiowindowopens.
ForWindowsXP:ClickStart➙ControlPanel.SwitchtoClassicViewandclickSmartAudio.The
SmartAudiowindowopens.
Usinganintegratedcamera
Ifyourcomputerhasanintegratedcamera,whenyoupressFn+F6toopentheCommunicationssettings
window,thecamerawillbelaunchedandthegreencamera-in-useindicatorwillturnonautomatically.In
theCommunicationssettingswindow,youcanpreviewyourvideoimageandtakeasnapshotofyour
currentimage.
Youcanalsousetheintegratedcamerawithotherprogramsthatprovidefeaturessuchasphotographing,
videocapturing,andvideoconferencing.Tousetheintegratedcamerawithotherprograms,openoneofthe
programsandstartthephotographing,videocapturing,orvideoconferencingfunction.Then,thecamerawill
startautomaticallyandthegreencamera-in-useindicatorwillturnon.Formoreinformationaboutusingthe
camerawithaprogram,refertothedocumentationthatcamewiththeprogram.
IfyoudonotwantthecameratobelaunchedautomaticallywhenyoupressFn+F6orwhenyouusea
program,pressFn+F6toopentheCommunicationssettingswindowandclicktheHidemycameraimage
buttontodisablethecamera.
Conguringcamerasettings
Youcancongurethecamerasettingstomeetyourneeds,suchasadjustingthequalityofthevideooutput.
Tocongurethecamerasettings,dothefollowing:
1.PressFn+F6.TheCommunicationssettingswindowopens.
2.ClicktheManageSettingsbutton.TheCommunicationsUtilitywindowopens.
3.IntheCommunicationsUtilitywindow,congurethecamerasettingsdependingonyourindividual
needs.
UsingtheThinkLightfeature
Becauseyourcomputercantravelwithyou,youmightneedtouseitinlessthanperfectlightingconditions.
Toilluminatethekeyboardbyturningonyourcomputer,pressFn+PgUp.
78UserGuide
Page 97

Note:Avoidusingyourcomputerindarkconditionsforprolongedperiods.Itisbadforyoureyes.
Usingtheopticaldrive
Note:Y ourcomputersupportonlytheMultiBurnerdriver.
MultiBurnerdrive
ThisdrivecanreadDVD-ROMdiscs,DVD-Rdiscs,DVD-RAMdiscs,DVD-RWdiscs,andalltypesofCDs,
suchasCD-ROMdiscs,CD-RWdiscs,CD-Rdiscs,andaudioCDs.Inaddition,itcanrecordonDVD-R
discs,DVD-RWdiscs,typeIIDVD-RAMdiscs,CD-RWstandardandhighspeeddiscs,andCD-Rdiscs.
Usingthemediacardreader
Dependingonthemodel,yourcomputermayhaveanExpressCardslotfora34mm-widecard,amedia
cardreaderslot,orasmartcardreaderslot.
Ifyourcomputerhasamediacardreaderslot,itsupportsthefollowingcards:
•SDcard
•SDHCcard
•SDXCcard
•MultiMediaCard(MMC)
Notes:
•YourcomputerdoesnotsupporttheCPRMfeaturefortheSDcard.
•Whentransferringdatatoorfromaashmediacard,suchasanSDcard,donotputyourcomputer
insleep(standby)orhibernationmodebeforethedatatransferiscomplete.Todosomightcause
damagetoyourdata.
FormoreinformationonExpressCards,smartcards,andashmediacards,refertoanyofthefollowing
topics:
•“InsertinganExpressCard,aashmediacard,orasmartcard”onpage79
•“RemovinganExpressCard,aashmediacardorasmartcard”onpage80
InsertinganExpressCard,aashmediacard,orasmartcard
Attention:
•DonotinsertanExpressCardwhilethecomputerisinsleep(standby)modeorhibernationmode.Ifyou
do,thecomputermaynotrespondwhenyoutrytoresumeusingit.
•Beforeyoustartinstallinganyofthefollowingcards,touchametaltableoragroundedmetalobject.This
actionreducesanystaticelectricityfromyourbody.Thestaticelectricitycoulddamagethecard.
–34mm-wideExpressCard
–Flashmediacard,suchasanSDcard,anSDHCcard,anSDXCcard,andaMultiMediaCard
–Smartcard
Chapter2.Usingyourcomputer79
Page 98

ForinformationaboutthelocationoftheExpressCardslot,ashmediacardreaderslot,andsmartcardslot,
see“Locatingcomputercontrols,connectors,andindicators”onpage1.
Toinserta34mm-wideExpressCardintotheExpressCardslot,dothefollowing:
•Makesurethatthecardiscorrectlyoriented.
•Pushtheslotcover,andinsertthecardintotheslotwiththenotchededgefacingupward.Thenpressthe
cardrmlyintotheconnector.
Toinsertaashmediacardintothe4-in-1mediacardreaderslot,dothefollowing:
•Makesurethatthecardiscorrectlyoriented.
•Insertthecardrmlyintothe4-in-1mediacardreaderslot.Thecardmaystopbeforeitiscompletely
installedintotheslot.
Toinsertasmartcardintothesmartcardslot,dothefollowing:
•Makesurethatthecardiscorrectlyoriented.
•Insertthecardsothatthemetalliccontactisupandgoesinrst.Insertthecardrmlyintotheslot.
IftheExpressCard,ashmediacard,orsmartcardisnotPlugandPlay,dothefollowing:
•ForWindows7:
1.OpenControlPanel.
2.ClickHardwareandSound.
3.ClickDeviceManager.Ifyouarepromptedforanadministratorpasswordorconrmation,typethe
passwordorprovideconrmation.
4.FromtheActionmenu,selectAddlegacyhardware.TheAddHardwareWizardstarts.
5.Followtheinstructionsonthescreen.
•ForWindowsVistaandWindowsXP:
–OpenControlPanelandswitchtoClassicview.
–Double-clicktheAddHardwareicon.TheAddHardwareWizardstarts.
–Followtheinstructionsonthescreen.
RemovinganExpressCard,aashmediacardorasmartcard
Attention:
•BeforeremovingastorageExpressCard,suchasaashmemoryExpressCard,asolidstateExpressCard,
oramemorycardreaderExpressCard,fromanExpressCardslot,youmuststoptheExpressCard.
Otherwise,dataontheExpressCardmightbecorruptedorlost.
•DonotremoveanExpressCardwhilethecomputerisinsleep(standby)modeorhibernationmode.Ifyou
do,thesystemwillnotrespondwhenyoutrytoresumeoperation.
ForinformationaboutthelocationoftheExpressCardslot,ashmediacardreaderslot,andsmartcardslot,
see“Locatingcomputercontrols,connectors,andindicators”onpage1
ToremoveanExpressCard,aashmediacard,orasmartcard,dothefollowing:
ForWindows7:
•ClicktheShowhiddeniconsinthetaskbar.
•Right-clickSafelyRemoveHardwareandEjectMediaicon.
.
80UserGuide
Page 99

•SelectcorrespondingitemtoejectthecardfromtheWindowsoperatingsystem.
•Pressthecardtoejectitfromyourcomputer.
•Removethecardfromyourcomputerandstoreitsafelyforfutureuse.
ForWindowsVistaandWindowsXP:
•ClicktheSafelyRemoveHardwareiconinthetaskbar
•SelectcorrespondingitemtoejectthecardfromtheWindowsoperatingsystem.
•Pressthecardtoejectitfromyourcomputer.
•Removethecardfromyourcomputerandstoreitsafelyforfutureuse.
Note:IfyoudonotremovethecardfromyourcomputerafteryouejectthecardfromtheWindows
operatingsystem,thecardcannolongerbeaccessed.T oaccessthecard,youmustremoveitonce,
theninsertitagain.
Chapter2.Usingyourcomputer81
Page 100

82UserGuide
 Loading...