

Lenovo S200 User Guide [en, ko, pt, zc, zh]

LenovoS200
UserGuide
MachineTypes:10HQand10HR

Note:Beforeusingthisinformationandtheproductitsupports,besuretoreadandunderstandthe“Read
thisfirst:Importantsafetyinformation”onpageiii
andAppendixF“Notices”onpage83.
FifthEdition(October2016)
©CopyrightLenovo2015,2016.
LIMITEDANDRESTRICTEDRIGHTSNOTICE:IfdataorsoftwareisdeliveredpursuanttoaGeneralServices
Administration“GSA”contract,use,reproduction,ordisclosureissubjecttorestrictionssetforthinContractNo.
GS-35F-05925.

Contents
Readthisfirst:Importantsafety
information..............iii
Beforeusingthismanual............iii
Serviceandupgrades.............iii
Staticelectricityprevention...........iv
Powercordsandpoweradapters........iv
Extensioncordsandrelateddevices.......v
Plugsandoutlets...............v
Externaldevices...............v
Heatandproductventilation..........v
Operatingenvironment............vi
Lasercompliancestatement..........vi
Powersupplystatement...........vii
Cleaningandmaintenance..........vii
Chapter1.Productoverview......1
Hardwarelocations..............1
Frontview................1
Rearview................3
Computercomponents..........5
Partsonthesystemboard.........6
Machinetypeandmodellabel........7
Features..................7
Specifications...............10
Programs.................10
Accessingaprogramonthecomputer...10
AnintroductiontoLenovoprograms....11
Chapter2.Usingyourcomputer...13
Registeringthecomputer..........13
Settingthecomputervolume.........13
AddinganicontotheWindowsnotificationarea.13
Usingadisc................13
Guidelinesaboutusingtheopticaldrive...14
Handlingandstoringadisc........14
Playingandremovingadisc.......14
Recordingadisc............15
Connectingtoanetwork...........15
ConnectingtoanEthernetLAN......15
ConnectingtoawirelessLAN.......15
ConnectingtoaBluetooth-enableddevice..16
Chapter3.Y ouandyourcomputer..17
Arrangingyourworkspace..........17
Glareandlighting............17
Aircirculation.............17
Electricaloutletlocationsandcablelengths.17
Comfort...............17
Accessibilityinformation...........18
Cleaningthecomputer...........21
Maintenance...............21
Basicmaintenancetips.........21
Goodmaintenancepractices.......21
Keepingthecomputercurrent.......22
Movingthecomputer............22
Chapter4.Security..........25
Lockingthecomputer............25
Lockingthecomputercover.......25
AttachingaKensington-stylecablelock...26
Viewingandchangingsecuritysettingsinthe
SetupUtilityprogram............26
Preventingunauthorizedaccesstothecomputer.26
Usingandunderstandingfirewalls.......27
Protectingdataagainstviruses........27
Chapter5.Advancedconfiguration..29
UsingtheSetupUtilityprogram........29
StartingtheSetupUtilityprogram.....29
Enablingordisablingadevice.......29
EnablingordisablingtheAutomaticPowerOn
features...............29
EnablingordisablingtheErPLPScompliance
mode................30
UsingBIOSpasswords.........30
Selectingastartupdevice........32
ExitingtheSetupUtilityprogram......33
UpdatingtheBIOS.............33
Chapter6.T roubleshooting,
diagnostics,andrecovery......35
Basicprocedureforresolvingcomputer
problems.................35
Troubleshooting..............35
Startupproblems............35
Audioproblems............36
CDproblems.............37
DVDproblems.............37
Intermittentproblems..........38
Storagedriveproblems.........38
Networkingproblems..........39
Performanceproblems..........41
Serialconnectorcannotbeaccessed....42
USBdeviceproblems..........42
Softwareanddriverproblems.......42
©CopyrightLenovo2015,2016
i

Diagnostics................43
LenovoSolutionCenter.........43
Recoveryinformation............43
RecoveryinformationforWindows7....43
RecoveryinformationforWindows10....44
Chapter7.Installingorreplacing
hardware...............47
Handlingstatic-sensitivedevices.......47
Installingorreplacinghardware........47
Installingexternaloptions........47
Replacingtheacpoweradapter......48
Removingthecomputercover.......48
Replacingthefrontbezel.........49
Replacingthepowerbuttonboard.....51
Replacingtheopticaldrive........53
Replacingthestoragedrive........54
Replacingthecoin-cellbattery......56
Replacingthememorymodule......57
Replacingtheheatsinkandfanassembly..58
ReplacingthePCIExpresscard......59
ReplacingtheWi-Ficard.........61
Completingthepartsreplacement.....63
Chapter8.Gettinginformation,help,
andservice..............65
Informationresources............65
Accessingtheuserguideinvarious
languages...............65
Windowshelpsystem..........65
Safetyandwarranty...........65
LenovoWebsite............65
LenovoSupportWebsite.........66
Frequentlyaskedquestions........66
Helpandservice..............66
Callingforservice............66
Purchasingadditionalservices......67
AppendixA.Regulatory
information..............69
Exportclassificationnotice..........69
Electronicemissionsnotices.........69
FederalCommunicationsCommission
DeclarationofConformity........69
Eurasiancompliancemark..........71
Brazilaudionotice.............71
Mexicowireless-radiocomplianceinformation..71
Additionalregulatoryinformation.......72
AppendixB.WEEEandrecycling
information..............73
ImportantWEEEinformation.........73
RecyclinginformationforJapan........73
RecyclinginformationforBrazil........74
BatteryrecyclinginformationforTaiwan.....74
BatteryrecyclinginformationfortheEuropean
Union..................75
AppendixC.RestrictionofHazardous
Substances(RoHS)Directive.....77
EuropeanUnionRoHS...........77
ChinaRoHS................77
TurkishRoHS...............77
UkraineRoHS...............78
IndiaRoHS................78
TaiwanRoHS...............78
AppendixD.ChinaEnergyLabel...79
AppendixE.ENERGYSTARmodel
information..............81
AppendixF .Notices..........83
Trademarks................84
iiLenovoS200UserGuide
Readthisfirst:Importantsafetyinformation
CAUTION:
Beforeusingthecomputer,besuretoreadandunderstandalltherelatedsafetyinformationforthis
product.RefertothesafetyinformationinthissectionandintheSafetyandWarrantyGuidethatyou
receivedwiththisproduct.Readingandunderstandingallthesafetyinformationreducestheriskof
personalinjuryanddamagetoyourproduct.IfyounolongerhaveacopyoftheSafetyandWarranty
Guide,youcanobtainaPortableDocumentFormat(PDF)versionfromtheLenovo
siteathttp://www.lenovo.com/UserManuals.
Beforeusingthismanual
CAUTION:
Beforeusingthismanual,besuretoreadandunderstandalltherelatedsafetyinformationforthis
product.RefertotheinformationinthissectionandthesafetyinformationintheSafetyandWarranty
Guidethatyoureceivedwiththisproduct.Readingandunderstandingthissafetyinformationreduces
theriskofpersonalinjuryanddamagetoyourproduct.
®
SupportWeb
IfyounolongerhaveacopyoftheSafetyandWarrantyGuide,youcanobtainaPortableDocumentFormat
(PDF)versionfromtheLenovo
®
SupportWebsiteathttp://www.lenovo.com/UserManuals.
Serviceandupgrades
DonotattempttoserviceaproductyourselfunlessinstructedtodosobytheCustomerSupportCenteror
yourdocumentation.OnlyuseaServiceProviderwhoisapprovedtorepairyourparticularproduct.
Note:Somecomputerpartscanbeupgradedorreplacedbythecustomer.Upgradestypicallyare
referredtoasoptions.ReplacementpartsapprovedforcustomerinstallationarereferredtoasCustomer
ReplaceableUnits,orCRUs.Lenovoprovidesdocumentationwithinstructionswhenitisappropriatefor
customerstoinstalloptionsorreplaceCRUs.Youmustcloselyfollowallinstructionswheninstallingor
replacingparts.TheOffstateofapowerindicatordoesnotnecessarilymeanthatvoltagelevelsinsidea
productarezero.Beforeyouremovethecoversfromaproductequippedwithapowercord,alwaysensure
thatthepoweristurnedoffandthattheproductisunpluggedfromanypowersource.Ifyouhaveany
questionsorconcerns,contacttheCustomerSupportCenter.
Althoughtherearenomovingpartsinthecomputerafterthepowercordhasbeendisconnected,the
followingwarningsarerequiredforyoursafety.
CAUTION:
Hazardousmovingparts.Keepfingersandotherbodypartsaway.
CAUTION:
©CopyrightLenovo2015,2016
iii

Beforeyouopenthecomputercover,turnoffthecomputerandwaitseveralminutesuntilthe
computeriscool.
Staticelectricityprevention
Staticelectricity,althoughharmlesstoyou,canseriouslydamagecomputercomponentsandoptions.
Improperhandlingofstatic-sensitivepartscancausedamagetothepart.Whenyouunpackanoption
orCRU,donotopenthestatic-protectivepackagecontainingthepartuntiltheinstructionsdirectyou
toinstallit.
WhenyouhandleoptionsorCRUs,orperformanyworkinsidethecomputer,takethefollowingprecautions
toavoidstatic-electricitydamage:
•Limityourmovement.Movementcancausestaticelectricitytobuilduparoundyou.
•Alwayshandlecomponentscarefully.Handleadapters,memorymodules,andothercircuitboardsbythe
edges.Nevertouchexposedcircuitry.
•Preventothersfromtouchingcomponents.
•Whenyouinstallastatic-sensitiveoptionorCRU,touchthestatic-protectivepackagecontainingthe
parttoametalexpansion-slotcoverorotherunpaintedmetalsurfaceonthecomputerforatleasttwo
seconds.Thisreducesstaticelectricityinthepackageandyourbody.
•Whenpossible,removethestatic-sensitivepartfromthestatic-protectivepackagingandinstallthepart
withoutsettingitdown.Whenthisisnotpossible,placethestatic-protectivepackagingonasmooth,
levelsurfaceandplacethepartonit.
•Donotplacethepartonthecomputercoverorothermetalsurface.
Powercordsandpoweradapters
Useonlythepowercordsandpoweradapterssuppliedbytheproductmanufacturer.Donotusetheac
powercordforotherdevices.
Thepowercordsshallbesafetyapproved.ForGermany,itshallbeH03VV-F,3G,0.75mm
connectedtothepoweradapter),H05VV-F,3G,0.75mm
supplyassembly),orbetter.Forothercountries,thesuitabletypesshallbeusedaccordingly.
Neverwrapapowercordaroundapoweradapterorotherobject.Doingsocanstressthecordinwaysthat
cancausethecordtofray,crack,orcrimp.Thiscanpresentasafetyhazard.
Alwaysroutepowercordssothattheywillnotbewalkedon,trippedover,orpinchedbyobjects.
Protectpowercordandpoweradaptersfromliquids.Forinstance,donotleaveyourpowercordorpower
adapternearsinks,tubs,toilets,oronfloorsthatarecleanedwithliquidcleansers.Liquidscancausea
shortcircuit,particularlyifthepowercordorpoweradapterhasbeenstressedbymisuse.Liquidsalsocan
causegradualcorrosionofpowercordterminalsand/ortheconnectorterminalsonapoweradapter,
whichcaneventuallyresultinoverheating.
Ensurethatallpowercordconnectorsaresecurelyandcompletelypluggedintoreceptacles.
Donotuseanypoweradapterthatshowscorrosionattheacinputpinsorshowssignsofoverheating(such
asdeformedplastic)attheacinputoranywhereonthepoweradapter.
2
(thepowercordconnectedtotheinternalpower
2
(thepowercord
Donotuseanypowercordswheretheelectricalcontactsoneitherendshowsignsofcorrosionor
overheatingorwherethepowercordappearstohavebeendamagedinanyway.
ivLenovoS200UserGuide

Extensioncordsandrelateddevices
Ensurethatextensioncords,surgeprotectors,uninterruptiblepowersupplies,andpowerstripsthatyouuse
areratedtohandletheelectricalrequirementsoftheproduct.Neveroverloadthesedevices.Ifpowerstrips
areused,theloadshouldnotexceedthepowerstripinputrating.Consultanelectricianformoreinformation
ifyouhavequestionsaboutpowerloads,powerrequirements,andinputratings.
Plugsandoutlets
Ifareceptacle(poweroutlet)thatyouintendtousewiththecomputerequipmentappearstobedamagedor
corroded,donotusetheoutletuntilitisreplacedbyaqualifiedelectrician.
Donotbendormodifytheplug.Iftheplugisdamaged,contactthemanufacturertoobtainareplacement.
Donotshareanelectricaloutletwithotherhomeorcommercialappliancesthatdrawlargeamountsof
electricity;otherwise,unstablevoltagemightdamagethecomputer,data,orconnecteddevices.
Someproductsareequippedwithathree-prongedplug.Thisplugfitsonlyintoagroundedelectricaloutlet.
Thisisasafetyfeature.Donotdefeatthissafetyfeaturebytryingtoinsertitintoanon-groundedoutlet.If
youcannotinserttheplugintotheoutlet,contactanelectricianforanapprovedoutletadapterortoreplace
theoutletwithonethatenablesthissafetyfeature.Neveroverloadanelectricaloutlet.Theoverallsystem
loadshouldnotexceed80percentofthebranchcircuitrating.Consultanelectricianformoreinformation
ifyouhavequestionsaboutpowerloadsandbranchcircuitratings.
Besurethatthepoweroutletyouareusingisproperlywired,easilyaccessible,andlocatedclosetothe
equipment.Donotfullyextendpowercordsinawaythatwillstressthecords.
Besurethatthepoweroutletprovidesthecorrectvoltageandcurrentfortheproductyouareinstalling.
Carefullyconnectanddisconnecttheequipmentfromtheelectricaloutlet.
Externaldevices
DonotconnectordisconnectanyexternaldevicecablesotherthanUniversalSerialBus(USB)cableswhile
thecomputerpowerison;otherwise,youmightdamagethecomputer.Toavoidpossibledamageto
connecteddevices,waitatleastfivesecondsafterthecomputerisshutdowntodisconnectexternaldevices.
Heatandproductventilation
Computers,poweradapters,andmanyaccessoriescangenerateheatwhenturnedonandwhenbatteries
arecharging.Alwaysfollowthesebasicprecautions:
•Donotleavethecomputer,poweradapter,oraccessoriesincontactwithyourlaporanypartofyour
bodyforanextendedperiodwhentheproductsarefunctioningorwhenthebatteryischarging.The
computer,poweradapter,andmanyaccessoriesproducesomeheatduringnormaloperation.Extended
contactwiththebodycouldcausediscomfortor,potentially,askinburn.
•Donotchargethebatteryoroperatethecomputer,poweradapter,oraccessoriesnearflammable
materialsorinexplosiveenvironments.
•Ventilationslots,fans,andheatsinksareprovidedwiththeproductforsafety,comfort,andreliable
operation.Thesefeaturesmightinadvertentlybecomeblockedbyplacingtheproductonabed,sofa,
carpet,orotherflexiblesurface.Neverblock,cover,ordisablethesefeatures.
©CopyrightLenovo2015,2016
v

Inspectyourdesktopcomputerfordustaccumulationatleastonceeverythreemonths.Beforeinspecting
thecomputer,turnoffthepowerandunplugthecomputer'spowercordfromtheelectricaloutlet;then
removeanydustfromventsandperforationsinthebezel.Ifyounoticeexternaldustaccumulation,then
examineandremovedustfromtheinsideofthecomputerincludingheatsinkinletfins,powersupplyvents,
andfans.Alwaysturnoffandunplugthecomputerbeforeopeningthecover.Ifpossible,avoidoperatingthe
computerwithintwofeetofhigh-trafficareas.Ifyoumustoperatethecomputerinornearahigh-traffic
area,inspectand,ifnecessary,cleanthecomputermorefrequently.
Foryoursafetyandtomaintainoptimumcomputerperformance,alwaysfollowthesebasicprecautions
withyourdesktopcomputer:
•Keepthecoverclosedwheneverthecomputerispluggedin.
•Regularlyinspecttheoutsideofthecomputerfordustaccumulation.
•Removedustfromventsandanyperforationsinthebezel.Morefrequentcleaningsmightberequiredfor
computersindustyorhigh-trafficareas.
•Donotrestrictorblockanyventilationopenings.
•Donotstoreoroperatethecomputerinsidefurniture,asthismightincreasetheriskofoverheating.
•Airflowtemperaturesintothecomputershouldnotexceed35°C(95°F).
•Donotinstallairfiltrationdevices.Theymayinterferewithpropercooling.
Operatingenvironment
Theoptimalenvironmentinwhichtousethecomputeris10°C–35°C(50°F–95°F)withhumidityranging
between35%and80%.Ifthecomputerisstoredortransportedintemperatureslessthan10°C(50°F),allow
thecoldcomputertoriseslowlytoanoptimaloperatingtemperatureof10°C–35°C(50°F–95°F)beforeuse.
Thisprocesscouldtaketwohoursinextremeconditions.Failuretoallowthecomputertorisetoanoptimal
operatingtemperaturebeforeusecouldresultinirreparabledamagetothecomputer.
Ifpossible,placethecomputerinawell-ventilatedanddryareawithoutdirectexposuretosunshine.
Keepelectricalappliancessuchasanelectricfan,radio,high-poweredspeakers,airconditioner,and
microwaveovenawayfromthecomputerbecausethestrongmagneticfieldsgeneratedbytheseappliances
candamagethemonitoranddataonthestoragedrive.
Donotplaceanybeveragesontopoforbesidethecomputerorotherconnecteddevices.Ifliquidisspilled
onorinthecomputeroraconnecteddevice,ashortcircuitorotherdamagemightoccur.
Donoteatorsmokeoveryourkeyboard.Particlesthatfallintoyourkeyboardcancausedamage.
Lasercompliancestatement
CAUTION:
Whenlaserproducts(suchasCD-ROMs,DVDdrives,fiberopticdevices,ortransmitters)are
installed,notethefollowing:
•Donotremovethecovers.Removingthecoversofthelaserproductcouldresultinexposureto
hazardouslaserradiation.Therearenoserviceablepartsinsidethedevice.
•Useofcontrolsoradjustmentsorperformanceofproceduresotherthanthosespecifiedherein
mightresultinhazardousradiationexposure.
viLenovoS200UserGuide
DANGER
SomelaserproductscontainanembeddedClass3AorClass3Blaserdiode.Notethefollowing:
Laserradiationwhenopen.Donotstareintothebeam,donotviewdirectlywithoptical
instruments,andavoiddirectexposuretothebeam.
Powersupplystatement
Neverremovethecoveronapowersupplyoranypartthathasthefollowinglabelattached.
Hazardousvoltage,current,andenergylevelsarepresentinsideanycomponentthathasthislabelattached.
Therearenoserviceablepartsinsidethesecomponents.Ifyoususpectaproblemwithoneoftheseparts,
contactaservicetechnician.
Cleaningandmaintenance
Keepthecomputerandworkspaceclean.Shutdownthecomputerandthendisconnectthepower
cordbeforecleaningthecomputer.Donotsprayanyliquiddetergentdirectlyonthecomputeroruse
anydetergentcontainingflammablematerialtocleanthecomputer.Spraythedetergentonasoftcloth
andthenwipethecomputersurfaces.
©CopyrightLenovo2015,2016
vii

viiiLenovoS200UserGuide
Chapter1.Productoverview
Thischapterprovidesinformationaboutthefollowingtopics:
•“Hardwarelocations”onpage1
•“Features”onpage7
•“Specifications”onpage10
•“Programs”onpage10
Hardwarelocations
Thissectionprovidesinformationaboutthelocationsofthecomputerhardware.
Note:Thecomputerhardwaremightlookslightlydifferentfromtheillustrations.
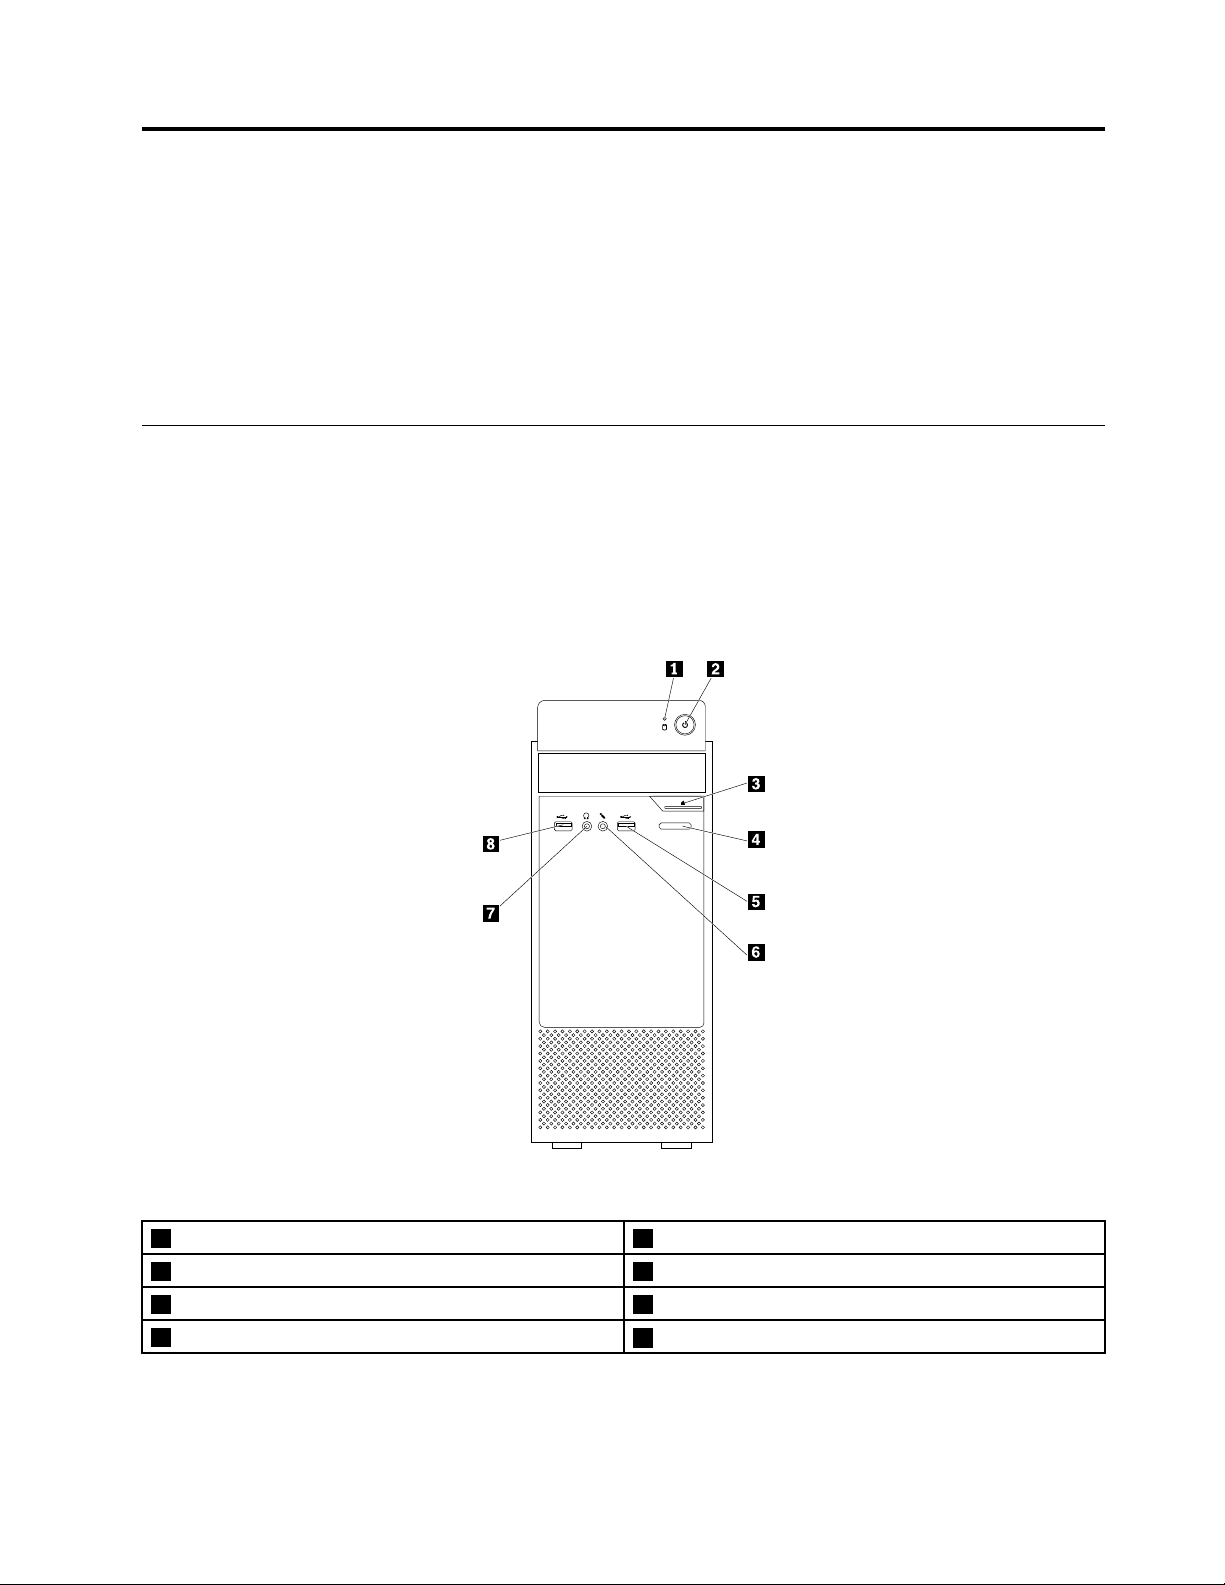
Frontview
Figure1.Frontview
1Storagedriveactivityindicator
3Opticaldriveeject/closebutton(optional)4Cardreaderslot(optional)
5USB2.0connector
7Headphoneconnector
2Powerbutton
6Microphoneconnector
8USB2.0connector
•Cardreaderslot
Usedtoholdacard-shapedstoragemediumsothatthecardreadercanreadthedataonthestorage
medium.
©CopyrightLenovo2015,2016
1

•Headphoneconnector
Usedtoconnectheadphonestoyourcomputer.
•Microphoneconnector
Usedtoconnectamicrophonetoyourcomputer.Y oucanusethemicrophonetorecordsoundsoruse
speech-recognitionsoftware.
•Opticaldriveeject/closebutton
Usedtoejectthetrayoftheopticaldrivefromthedrive.Afteryouinsertadiscintothetray,press
theeject/closebuttontoclosethetray.
•Powerbutton
Usedtoturnonyourcomputer.Y oualsocanusethepowerbuttontoturnoffyourcomputeronlywhen
youcannotuseanyMicrosoft
®
Windows
®
shutdownproceduretoturnoffyourcomputer.
•Storagedriveactivityindicator
Whentheindicatorison,thestoragedrivesareinuse.
•USB2.0connector
UsedtoconnectadevicethatrequiresaUSB2.0connection,suchasakeyboard,amouse,ascanner,a
printer,orapersonaldigitalassistant(PDA).
2LenovoS200UserGuide

Rearview
Figure2.Rearview
1HDMI
3USB3.0connectors(4)
5Audioline-outconnector6Microphoneconnector
7acpoweradapterconnector8acpoweradaptercableloop
9PCIExpresscardarea(differentcardsprovidedifferent
connectors)
11Padlockloop
13Ethernetconnector
TM
connector
2VGAconnector
4Audioline-inconnector
10Security-lockslot
12RearWi-Fiantennacover(optional)
Note:AdiscretegraphicscardmightbeinstalledinthePeripheralComponentInterconnect(PCI)Express
cardarea.Ifsuchacardisinstalled,ensurethatyouusetheconnectorsonthecardinsteadofthe
correspondingconnectorsonthecomputer.
•acpoweradaptercableloop
Usedtosecuretheacpoweradaptercable.
•acpoweradapterconnector
Usedtoconnecttheacpoweradaptertoyourcomputerforpowersupply.
•Audioline-inconnector
Usedtoreceiveaudiosignalsfromanexternalaudiodevice,suchasastereosystem.Whenyouattach
anexternalaudiodevice,acableisconnectedbetweentheaudioline-outconnectorofthedevice
andtheaudioline-inconnectorofthecomputer.
Chapter1.Productoverview3

•Audioline-outconnector
Usedtosendaudiosignalsfromthecomputertoexternaldevices,suchaspoweredstereospeakers,
headphones,ormultimediakeyboards.Toattachastereosystemorotherexternalrecordingdevice,a
cableisconnectedbetweentheaudioline-inconnectorofthedeviceandtheaudioline-outconnector
ofthecomputer.
Note:Ifyourcomputerhasbothanaudioline-outconnectorandaheadsetconnectororheadphone
connector,alwaysusetheheadsetconnectororheadphoneconnectorforearphones,headphones,ora
headset.However,aheadphoneconnectordoesnotsupportthemicrophoneofaheadset.
•Ethernetconnector
UsedtoconnectanEthernetcableforalocalareanetwork(LAN).
Note:TooperatethecomputerwithinFederalCommunicationsCommission(FCC)ClassBlimits,usea
Category5eorbetterEthernetcable.
•HDMIconnector
Usedtodeliveruncompressedhigh-definitionvideoandmultichanneldigitalaudiosignalsthrougha
singlecable.Ahigh-performancemonitor,adirectdrivemonitor,oranotheraudioorvideodevicethat
usesaHigh-DefinitionMultimediaInterface(HDMI)connectorcanbeattachedtothisHDMIconnector.
•Microphoneconnector
Usedtoconnectamicrophonetoyourcomputerwhenyouwanttorecordsoundorifyouuse
speech-recognitionsoftware.
•Padlockloop
Forinformation,see“Lockingthecomputercover”onpage25.
•PCIExpresscardarea(differentcardsprovidedifferentconnectors)
Toimprovetheoperatingperformanceofyourcomputer,youcanconnectPCIExpresscardsintothis
area.Dependingonyourcomputermodel,theconnectorsinthisareamightvary.
•RearWi-Fiantennacover
UsedtoprotecttherearWi-Fiantennathatisoptional.
•Security-lockslot
Forinformation,see“AttachingaKensington-stylecablelock”onpage26
.
•USB3.0connector
UsedtoconnectadevicethatrequiresaUSB2.0orUSB3.0connection,suchasakeyboard,amouse,a
scanner,aprinter,oraPDA.
•VGAconnector
Usedtoconnectavideographicsarray(VGA)monitororotherdevicesthatuseaVGAconnector.
4LenovoS200UserGuide
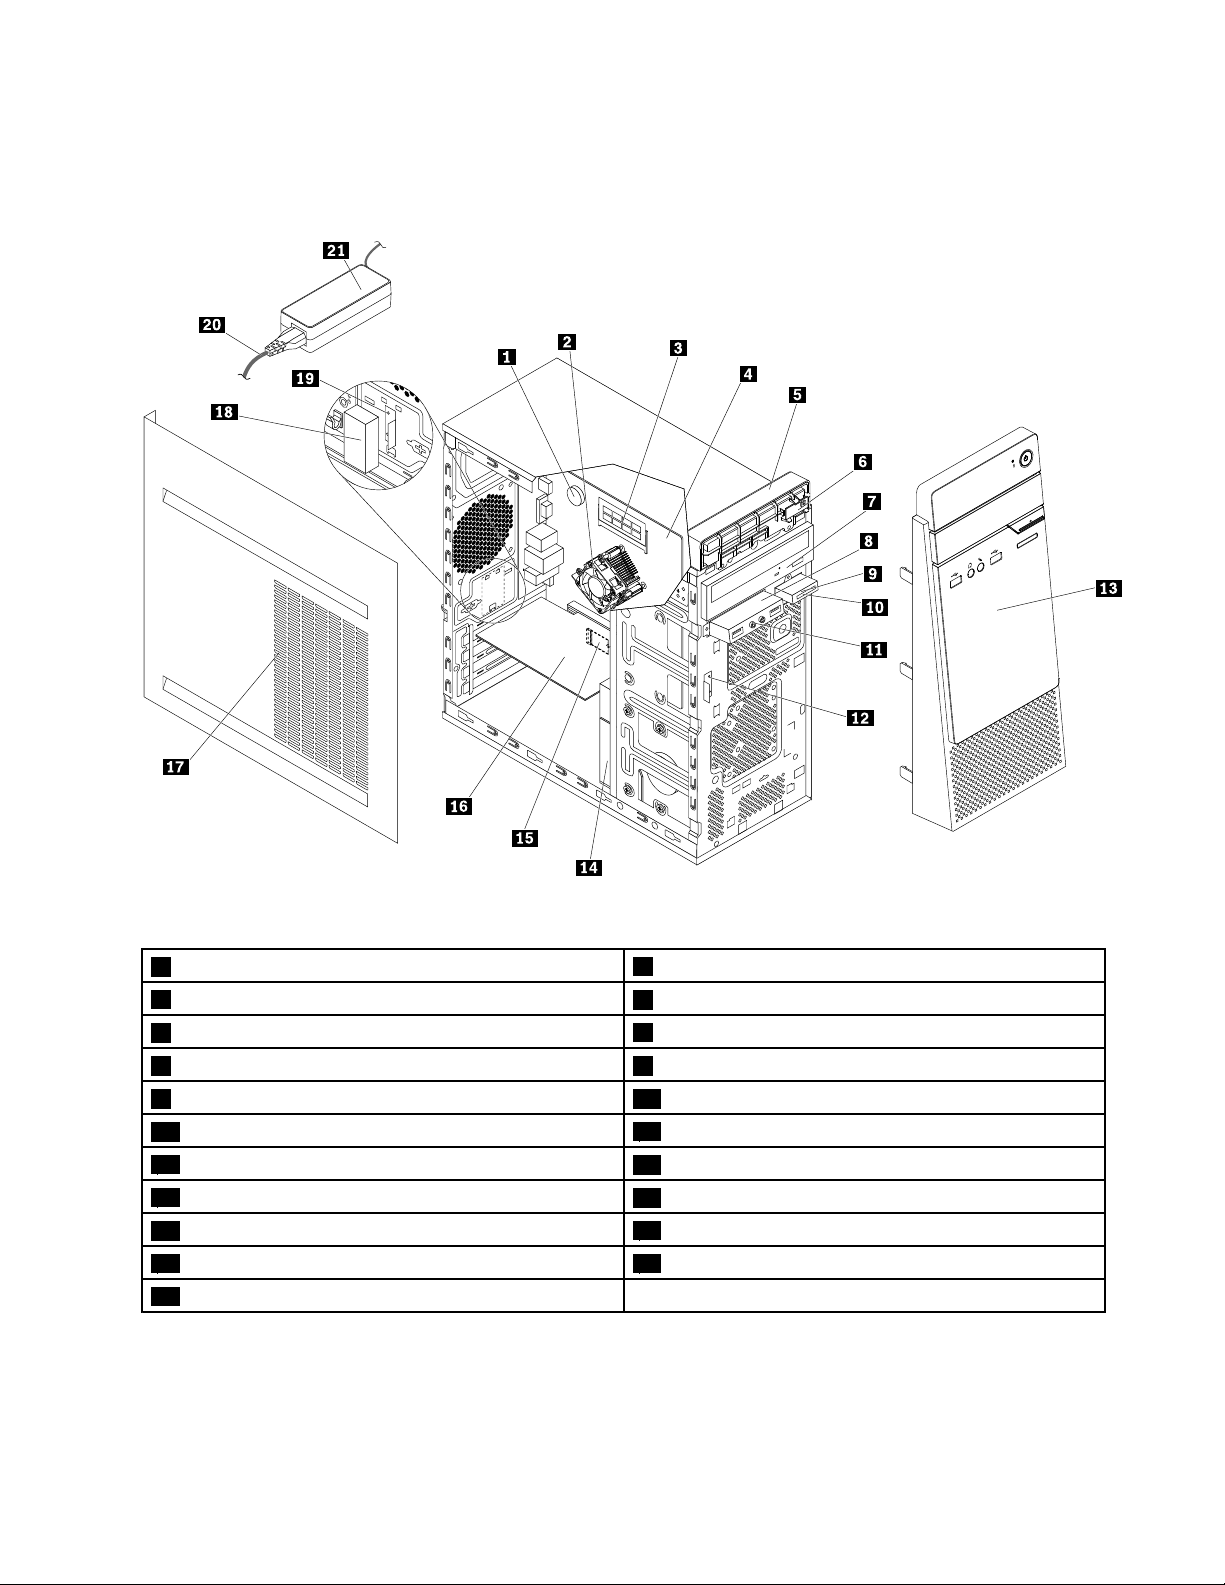
Computercomponents
Note:Someofthefollowingcomponentsareoptional.
Figure3.Computercomponents
1Coin-cellbattery
3Memorymodule
5Computerhandle
7Opticaldrive8FrontaudioandUSBassemblybracket
9Cardreaderbracket10Cardreader
11FrontaudioandUSBassembly
13Frontbezel
15Wi-Ficard
17Computercover
19RearWi-Fiantenna20Powercord
21acpoweradapter
2Heatsinkandfanassembly
4Systemboard
6Powerbuttonboard
12FrontWi-Fiantenna
14Storagedrive
16PCIExpresscard
18RearWi-Fiantennacover
Chapter1.Productoverview5
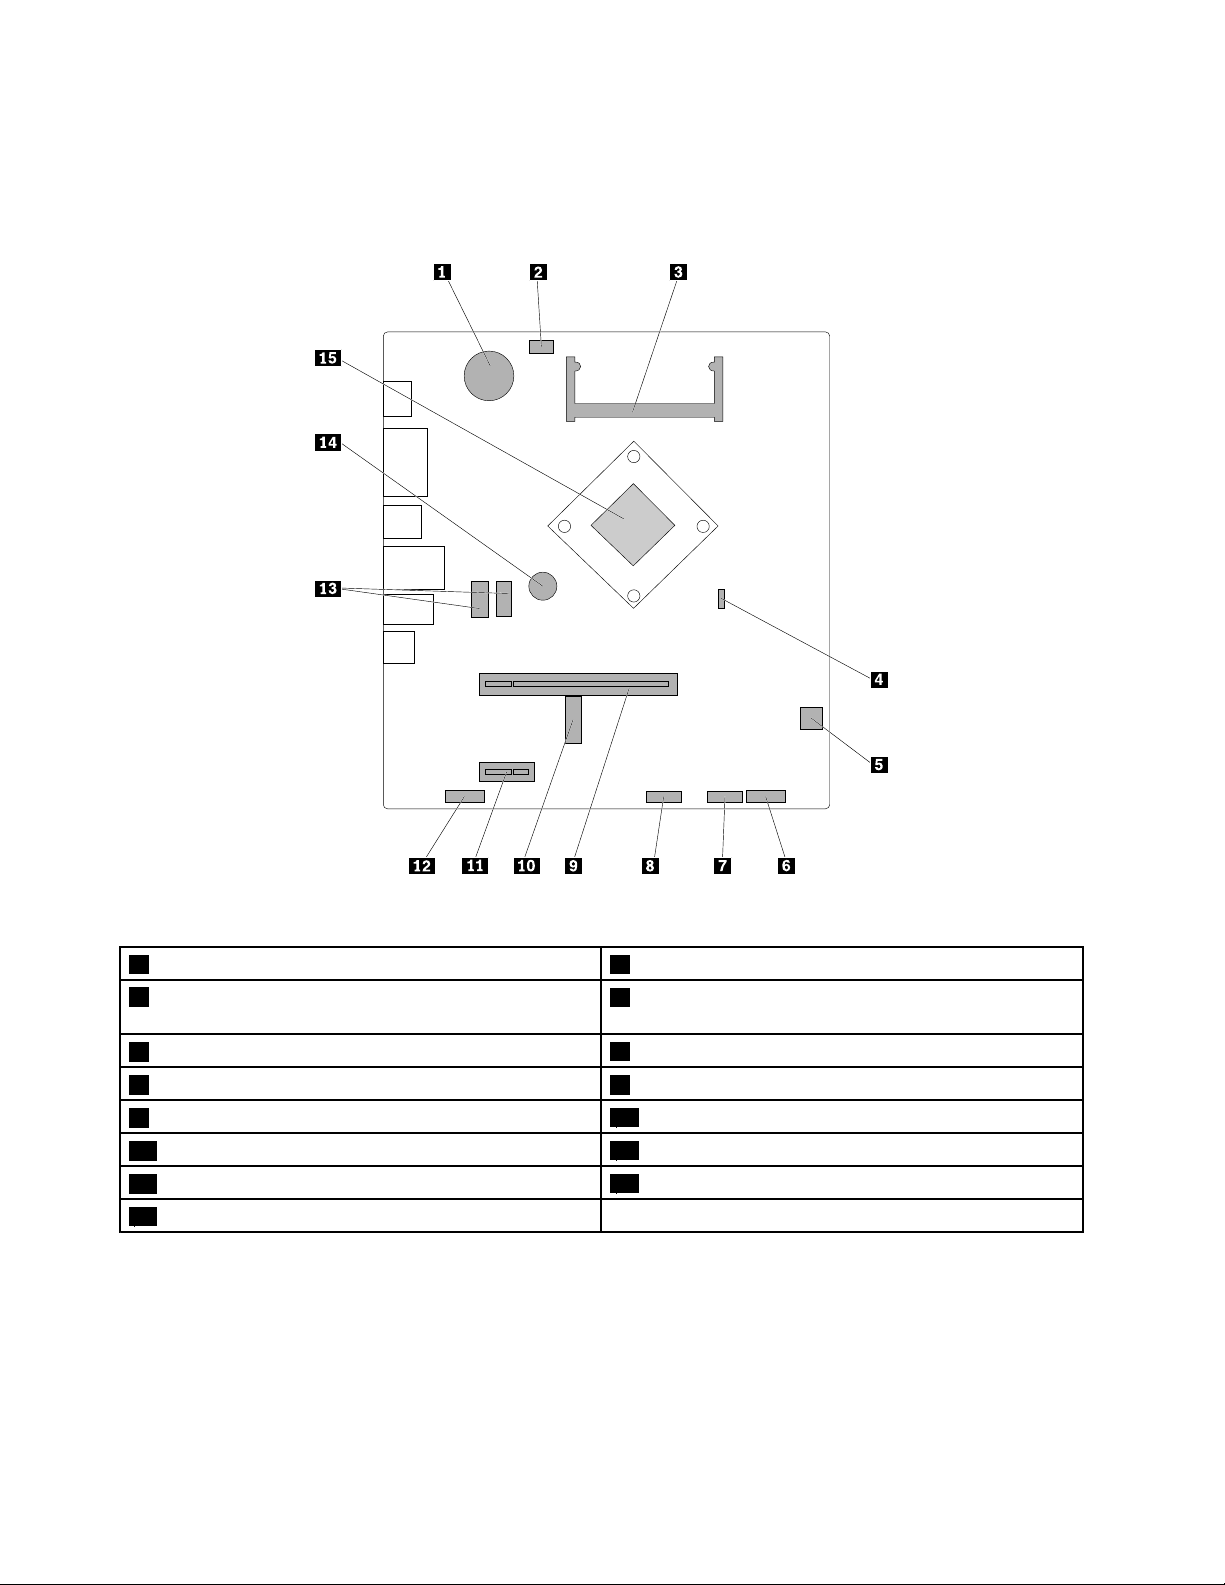
Partsonthesystemboard
Note:Forthepartsthataredisplayedonthefollowingfigurebutnotintroducedinthefollowingtable,see
“Frontview”onpage1and“Rearview”onpage3.
Figure4.Partsonthesystemboard
1Coin-cellbattery
3Memoryslot
2Microprocessorfanconnector
4ClearCMOS(ComplementaryMetalOxide
Semiconductor)/Recoveryjumper
5Storagedrivepowerconnector
7FrontUSBconnector8Cardreaderconnector
9PCIExpressx16graphicscardslot
11PCIExpressx1cardslot
13SATAconnectors(2)
15Microprocessor
6Powerbuttonboardconnector
10M.2Wi-Ficardslot
12Frontaudioconnector
14Buzzer
6LenovoS200UserGuide
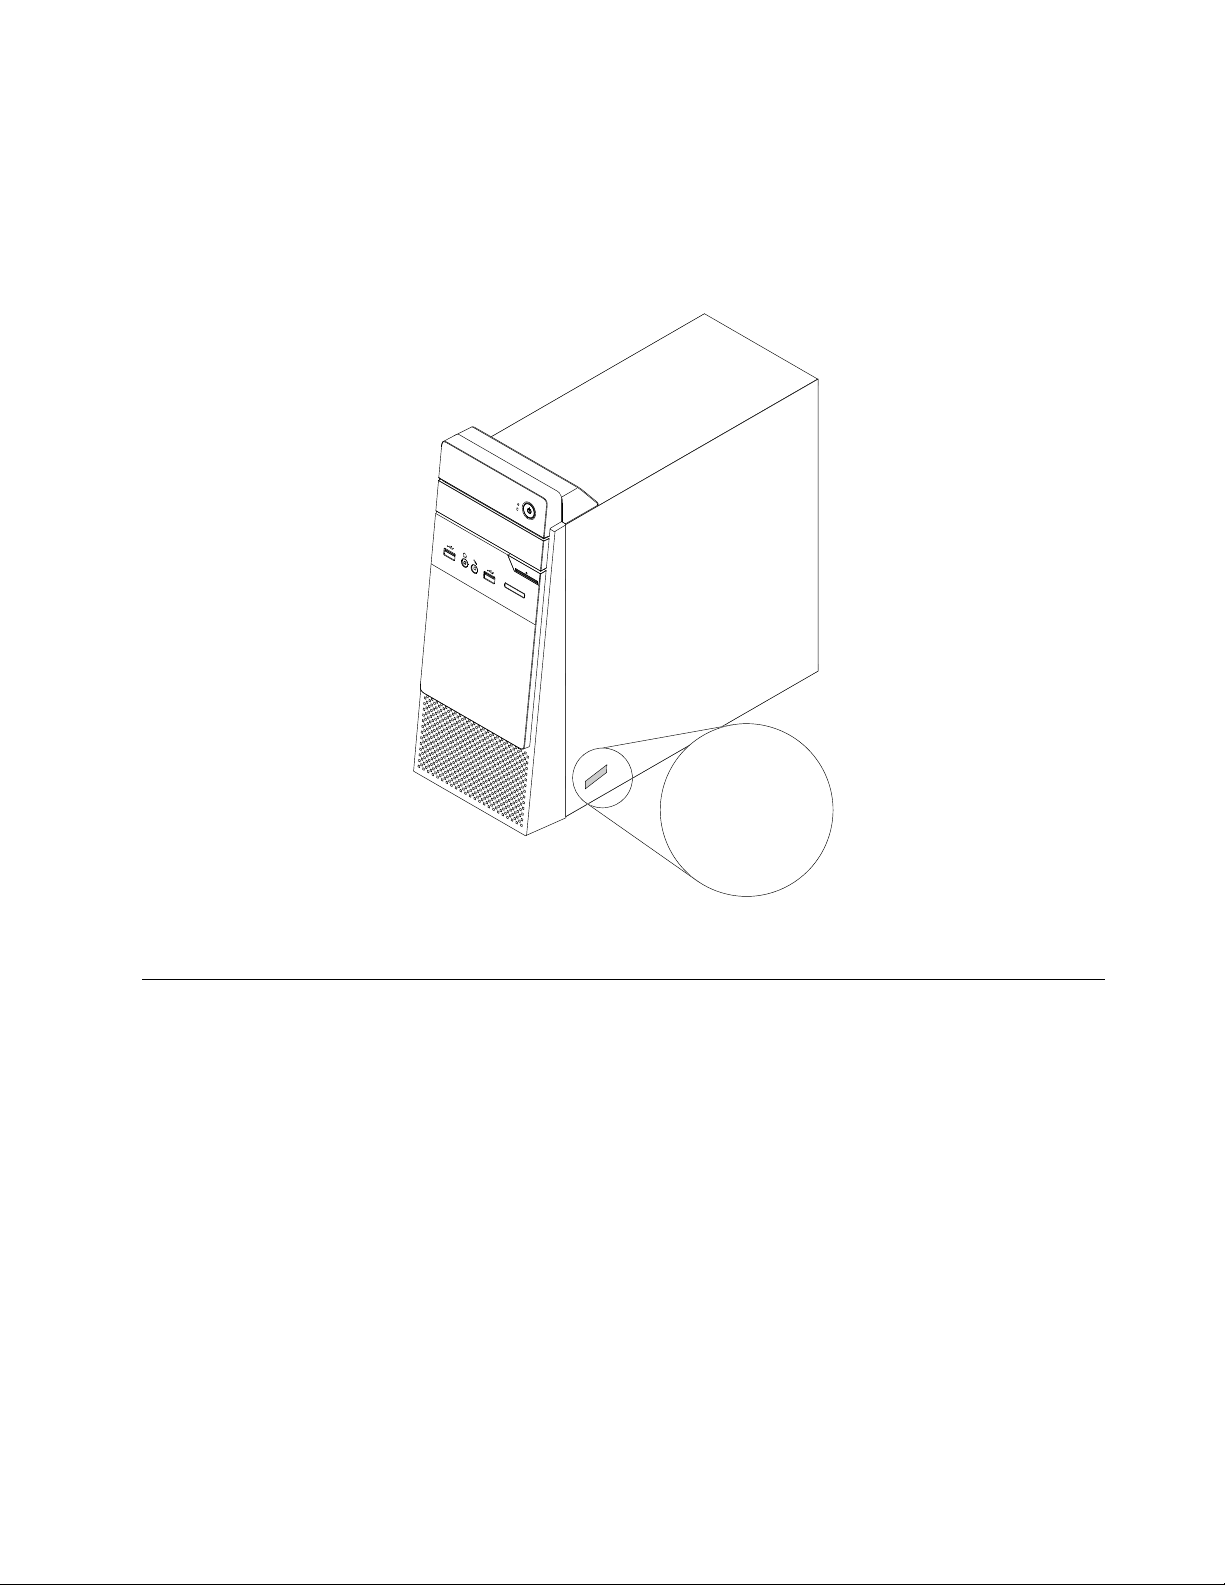
Machinetypeandmodellabel
MT-M XXXX-XXXXXX
S/N XXXXXXXX
Themachinetypeandmodellabelidentifiesyourcomputer.WhenyoucontactLenovoforhelp,themachine
typeandmodelinformationhelpssupporttechnicianstoidentifyyourcomputerandprovidefasterservice.
Themachinetypeandmodellabelisattachedonthesideofyourcomputerasshown.
Figure5.Machinetypeandmodellabel
Features
Thecomputerfeaturesintroducedinthissectionapplytovariousmodels.
Informationaboutyourcomputer
•Toviewbasicinformation(suchasmicroprocessorandmemoryinformation)aboutyourcomputer,
dothefollowing:
1.ClicktheStartbuttontoopentheStartmenu.
2.DependingonyourWindowsversion,dooneofthefollowing:
–ForWindows7:Right-clickComputer,andthenclickProperties.
–ForWindows10:ClickSettings➙System➙About.
•Toviewdetailedinformationaboutthedevices(suchastheopticaldriveandnetworkadapters)onyour
computer,dothefollowing:
1.DependingonyourWindowsversion,dooneofthefollowing:
–ForWindows7:ClicktheStartbuttontoopentheStartmenu.Right-clickComputer,andthen
clickProperties.
Chapter1.Productoverview7

–ForWindows10:Right-clicktheStartbuttontoopentheStartcontextmenu.
2.ClickDeviceManager.Typetheadministratorpasswordorprovideconfirmationifprompted.
Preinstalledoperatingsystem
YourcomputerispreinstalledwithWindows7orWindows10operatingsystem.Additionaloperating
systemsmightbeidentifiedbyLenovoascompatiblewithyourcomputer.Todetermineifanoperating
systemhasbeencertifiedortestedforcompatibility,checktheWebsiteoftheoperatingsystemprovider.
Powersupply
Dependingonyourcomputermodel,youshouldselectoneofthefollowingacpoweradapters:
•Ifadiscretegraphicscardisnotinstalledonyourcomputer,selectthe65-wattacpoweradapter.
•Ifadiscretegraphicscardisinstalledonyourcomputer,selectthe90-wattacpoweradapter.
Memory
Yourcomputersupportsuptoonedoubledatarate3unbuffereddualinlinememorymodule(DDR3UDIMM).
Storagedrives
Yourcomputersupportsuptoonestoragedrive.
Toviewtheamountofstoragedrivespace,dothefollowing:
1.DependingonyourWindowsversion,dooneofthefollowing:
•ForWindows7:ClicktheStartbuttontoopentheStartmenu.Right-clickComputer,andthenclick
Manage.
•ForWindows10:Right-clicktheStartbuttontoopentheStartcontextmenu.
2.ClickDiskManagement.
Videofeatures
•Theintegratedgraphicscardsupportsthefollowingdisplayconnectorsonyourcomputer:
–HDMIconnector
–VGAconnector
•Thediscretegraphicscard,whichisoptional,providesenhanceddisplaycapabilityandexperience.
Audiofeatures
Theintegratedaudiocardsupportsthefollowingaudioconnectorsanddevicesonyourcomputer:
•Audioline-inconnector
•Audioline-outconnector
•Headphoneconnector
•Microphoneconnectors
Input/Output(I/O)features
•Audioconnectors(audioline-inconnector,audioline-outconnector,headphoneconnector,and
microphoneconnectors)
•Cardreaderslot
•Displayconnectors(HDMIconnectorandVGAconnector)
•Ethernetconnector
•USBconnectors
8LenovoS200UserGuide

Expansion
•Cardreader(optional)
•Memoryslot
•Opticaldrive(optional)
•PCIExpressx1cardslot
•PCIExpressx16graphicscardslot
•Storagedrivebay
Networkfeatures
•EthernetLAN
TheintegratednetworkinterfacecardsupportstheEthernetconnectoronyourcomputer.
•WirelessLAN(optional)
•Bluetooth(optional)
Securityfeatures
Formoreinformation,seeChapter4“Security”onpage25.
Systemmanagementfeatures
•Abilitytostorepower-onself-test(POST)hardwaretestresults
•DesktopManagementInterface(DMI)
DesktopManagementInterfaceprovidesacommonpathforuserstoaccessinformationaboutall
aspectsofacomputer.Theinformationincludesprocessortype,installationdate,connectedprintersand
otherperipherals,powersources,maintenancehistory,andsoon.
•ErPLPScompliancemode
Theenergy-relatedproductsdirective(ErP)lowestpowerstate(LPS)compliancemodereducesthe
consumptionofelectricitywhenyourcomputerisinsleeporoffmode.Formoreinformation,see
“EnablingordisablingtheErPLPScompliancemode”onpage30.
•PrebootExecutionEnvironment(PXE)
PrebootExecutionEnvironmentenablescomputerstostartthroughanetworkinterfaceindependentof
datastoragedrives(suchasharddiskdrives)orinstalledoperatingsystems.
•SystemManagement(SM)BasicInput/OutputSystem(BIOS)andSMsoftware
TheSMBIOSspecificationdefinesdatastructuresandaccessmethodsthatcanbeusedtoread
managementdatastoredintheBIOSofacomputer.
•WakeonRing
WakeonRing,sometimesreferredtoasWakeonModem,isaspecificationthatallowssupported
computersanddevicestoresumefromsleeporhibernationmode.
•WindowsManagementInstrumentation(WMI)
WindowsManagementInstrumentationisasetofextensionstotheWindowsDriverModel.Itprovidesan
operatingsysteminterfacethroughwhichinstrumentedcomponentsprovideinformationandnotification.
Chapter1.Productoverview9

Specifications
Thissectionliststhephysicalspecificationsforyourcomputer.
Dimensions
Width:160mm(6.3inches)
Height:394mm(15.5inches)
Depth:424mm(16.7inches)
Weight
Maximumconfigurationasshipped:6.8kg(15lb)
Environment
•Airtemperature:
Operating:From10°C(50°F)to35°C(95°F)
Storageinoriginalshippingpackage:From-40°C(-40°F)to60°C(140°F)
Storagewithoutpackage:From-10°C(14°F)to60°C(140°F)
•Humidity:
Operating:20%–80%(non-condensing)
Storage:20%–90%(non-condensing)
•Altitude:
Operating:From-15.2m(-50ft)to3048m(10000ft)
Storage:From-15.2m(-50ft)to10668m(35000ft)
Electricalinput
Inputvoltage:From100Vacto240Vac
Inputfrequency:50/60Hz
Programs
Thissectionprovidesinformationabouttheprogramsonthecomputer.
Accessingaprogramonthecomputer
Toaccessaprogramonthecomputer,dooneofthefollowing:
•FromWindowsSearch:
1.DependingonyourWindowsversion,dooneofthefollowing:
–ForWindows7:ClicktheStartbuttontoopentheStartmenu,andthentypetheprogramname
intothesearchbox.
–ForWindows10:TypetheprogramnameintothesearchboxnexttotheStartbutton.
2.Inthesearchresults,clickthenameofthedesiredprogramtolaunchtheprogram.
•FromtheStartmenuorControlPanel:
1.ClicktheStartbuttontoopentheStartmenu.
2.DependingonyourWindowsversion,dooneofthefollowing:
–ForWindows7:ClickAllProgramstodisplaytheprogramlist.Fromthelistorafolderinthelist,
clickthenameofthedesiredprogramtolaunchtheprogram.
10LenovoS200UserGuide

–ForWindows10:Fromtheprogramlistorafolderinthelist,clickthenameofthedesiredprogram
tolaunchtheprogram.
3.IftheprogramnameisnotdisplayedontheStartmenu,dooneofthefollowing:
–ForWindows7:ClickControlPanelontheStartmenu.
–ForWindows10:Right-clicktheStartbuttontoopentheStartcontextmenu,andthenclick
ControlPanel.
4.ViewControlPanelusinglargeiconsorsmallicons,andthenclickthenameofthedesiredprogram
tolaunchtheprogram.
AnintroductiontoLenovoprograms
ThissectionprovidesinformationaboutthemajorLenovoprogramsonyouroperatingsystem.
Note:Dependingonyourcomputermodel,someofthefollowingprogramsmightnotbepreinstalled.
•ForWindows10only:
–LenovoCompanion
Yourcomputer’sbestfeaturesandcapabilitiesshouldbeeasytoaccessandunderstand.WithLenovo
Companion,theyare.UseLenovoCompaniontodothefollowing:
–Optimizeyourcomputer’sperformance,monitoryourcomputer’shealth,andmanageupdates.
–Accessyouruserguide,checkwarrantystatus,andviewaccessoriescustomizedforyourcomputer.
–Readhow-toarticles,exploreLenovoforums,andstayup-to-dateontechnologynewswitharticles
andblogsfromtrustedsources.
LenovoCompanionisfilledwithexclusiveLenovocontenttohelpyoulearnmoreaboutwhatyou
candowithyourcomputer.
•ForWindows7andWindows10:
–DriverandApplicationInstallation
–ForWindows7:TheDriverandApplicationInstallationprogramprovidesregularaccesstodevice
driverandsoftwareupdatesforyourcomputer.TheprogramgathersinformationfromtheLenovo
HelpCenteraboutnewupdatesforyourcomputer,thensortsanddisplaystheupdatesfor
downloadandinstallation.Youhavecompletecontrolofwhichupdatestodownloadandinstall.
–ForWindows10:TheDriverandApplicationInstallationprogramonlyenablesyoutoinstallor
reinstalldevicedriversandprogramslocally.
–LenovoBluetoothLock
TheLenovoBluetoothLockprogramenablesyoutouseaBluetoothdevice(suchasyoursmartphone)
asaproximity-basedunitforlockingorunlockingyourcomputerautomatically.Bydetectingthe
distancebetweenyourcomputerandthepredefinedBluetoothdevicethatyouarecarrying,theLenovo
BluetoothLockprogramautomaticallylocksyourcomputerwhenyouwalkawayandunlocksyour
computerwhenyoucomeback.Thisisasimplewaytoprotectyourcomputeragainstunauthorized
accessincasethatyouforgettolockyourcomputer.
–LenovoRescueSystem
TheLenovoRescueSystemprogramisaone-buttonrecoveryandrestoresolution.Itincludesaset
ofself-recoverytoolstohelpyoudiagnosecomputerproblems,gethelp,andrecoverfromsystem
crashes,evenifyoucannotstarttheWindowsoperatingsystem.
–LenovoSolutionCenter
TheLenovoSolutionCenterprogramenablesyoutotroubleshootandresolvecomputerproblems.It
combinesdiagnostictests,systeminformationcollection,securitystatus,andsupportinformation,
alongwithhintsandtipsformaximumsystemperformance.
Chapter1.Productoverview11

12LenovoS200UserGuide

Chapter2.Usingyourcomputer
Thischaptercontainsthefollowingtopics:
•“Registeringthecomputer”onpage13
•“Settingthecomputervolume”onpage13
•“Usingadisc”onpage13
•“Connectingtoanetwork”onpage15
Registeringthecomputer
WhenyouregisterthecomputerwithLenovo,youenterrequiredinformationintoaLenovodatabase.The
informationenablesLenovotocontactyouwhenthereisarecallorothersevereproblemandprovide
quickerservicewhenyoucallLenovoforhelp.Inaddition,somelocationsofferextendedprivilegesand
servicestoregisteredusers.
ToregisterthecomputerwithLenovo,ensurethatthecomputerisconnectedtotheInternet.Then,goto
http://www.lenovo.com/registerandfollowtheinstructionsonthescreen.
Settingthecomputervolume
Tosetthecomputervolume,dothefollowing:
1.ClickthevolumeiconintheWindowsnotificationareaonthetaskbar.
Note:IfthevolumeiconisnotdisplayedintheWindowsnotificationarea,addtheicontothe
notificationarea.See“AddinganicontotheWindowsnotificationarea”onpage13.
2.Followtheinstructionsonthescreentoadjustthevolume.Clickthespeakericontomutetheaudio.
AddinganicontotheWindowsnotificationarea
ToaddanicontotheWindowsnotificationarea,dothefollowing:
1.Clickthearrownexttothenotificationareatoviewhiddenicons.Then,clickthedesirediconand
dragittothenotificationarea.
2.Iftheiconisnotdisplayed,turnontheicon.
a.ClicktheStartbuttontoopentheStartmenu.
b.DependingonyourWindowsversion,dooneofthefollowing:
•ForWindows7:ClickControlPanel.ViewControlPanelusinglargeiconsorsmallicons,and
thenclickNotificationAreaIcons➙T urnsystemiconsonoroff.
•ForWindows10:ClickSettings➙Personalization➙T askbar➙Turnsystemiconsonoroff.
c.Turnonthedesiredicon.
3.IftheiconisstillnotdisplayedintheWindowsnotificationarea,repeatstep1.
Usingadisc
Thissectionprovidesinformationaboutusingadiscandtheopticaldrive.
©CopyrightLenovo2015,2016
13

Guidelinesaboutusingtheopticaldrive
Whenusingtheopticaldrive,followtheseguidelines:
•Donotplacethecomputerinalocationwherethedriveisexposedtoanyofthefollowingconditions:
–Hightemperature
–Highhumidity
–Excessivedust
–Excessivevibrationorsuddenshock
–Aninclinedsurface
–Directsunlight
•Donotinsertanyobjectotherthanadiscintothedrive.
•Donotinsertdamageddiscsintothedrive.Warped,scratched,ordirtydiscscandamagethedrive.
•Beforemovingthecomputer,removethediscfromthedrive.
Handlingandstoringadisc
Whenhandlingandstoringadisc,followtheseguidelines:
•Holdthediscbyitsedges.Donottouchthesurfaceofthesidethatisnotlabeled.
•Toremovedustorfingerprints,wipethediscwithaclean,softclothfromthecentertotheoutside.Wiping
thediscinacirculardirectionmightcauselossofdata.
•Donotwriteorstickpaperonthedisc.
•Donotscratchormarkthedisc.
•Donotplaceorstorethediscindirectsunlight.
•Donotusebenzene,thinners,orothercleanerstocleanthedisc.
•Donotdroporbendthedisc.
Playingandremovingadisc
Toplayadisc,dothefollowing:
1.Withthecomputeron,presstheeject/closebuttononthefrontoftheopticaldrive.Thetrayslides
outofthedrive.
2.Insertadiscintothetray.Someopticaldrivehasasnaphubinthecenterofthetray.Ifyourdrivehasa
snaphub,supportthetraywithonehandandthenpushcenterofthediscuntilitsnapsintoplace.
3.Presstheeject/closebuttonagainorgentlypushthetrayforwardtoclosethetray.Thediscplayer
programstartsautomatically.Formoreinformation,refertothehelpsystemofthediscplayerprogram.
Toremoveadiscfromtheopticaldrive,dothefollowing:
1.Withthecomputeron,presstheeject/closebuttononthefrontoftheopticaldrive.Thetrayslides
outofthedrive.
2.Carefullyremovethediscfromthetray.
3.Presstheeject/closebuttonagainorgentlypushthetrayforwardtoclosethetray.
Note:Ifthetraydoesnotslideoutofthedrivewhenyoupresstheeject/closebutton,turnoffthecomputer.
Then,insertastraightenedpaperclipintotheemergency-ejectholeadjacenttotheeject/closebutton.
Usetheemergencyejectonlyinanemergency.
14LenovoS200UserGuide

Recordingadisc
Ifyouropticaldrivesupportsrecording,youcanrecordadisc.
RecordingadiscusingWindowstools
TorecordadiscusingWindowstools,dooneofthefollowing:
•BurnadiscusingtheAutoPlaywindow.
1.Ensurethatthediscisplayedautomatically.
a.ClicktheStartbuttontoopentheStartmenu.
b.DependingonyourWindowsversion,dooneofthefollowing:
–ForWindows7:ClickControlPanel.ViewControlPanelusinglargeiconsorsmallicons,
andthenclickAutoPlay.
–ForWindows10:ClickSettings➙Devices➙AutoPlay.
c.SelectorturnonUseAutoPlayforallmediaanddevices.
2.Insertarecordablediscintotheopticaldrivethatsupportsrecording.TheAutoPlaywindowopens.
3.Followtheinstructionsonthescreen.
•BurnadiscusingWindowsMedia
1.Insertarecordablediscintotheopticaldrivethatsupportsrecording.
2.OpenWindowsMediaPlayer.See“Accessingaprogramonthecomputer”onpage10.
3.Followtheinstructionsonthescreen.
•BurnadiscfromanISOfile.
1.Insertarecordablediscintotheopticaldrivethatsupportsrecording.
2.Double-clicktheISOfile.
3.Followtheinstructionsonthescreen.
®
Player.
Connectingtoanetwork
Thissectionprovidesinformationaboutconnectingtoanetwork.Ifyoucannotconnectthecomputertoa
network,see“Networkingproblems”onpage39.
ConnectingtoanEthernetLAN
YoucanconnectthecomputertoanEthernetLANbyconnectinganEthernetcabletotheEthernetconnector.
DANGER
Toavoidtheriskofelectricalshock,donotconnectthetelephonecabletotheEthernetconnector.
ConnectingtoawirelessLAN
YoucanconnectthecomputertoawirelessLANwithouttheuseofanEthernetcablebutbymeansof
radiowavesonly.
Note:ThewirelessLANfeatureisoptional.
Toestablishawireless-LANconnection,dothefollowing:
1.EnsurethatawirelessLANisavailableandthewirelessLANfeatureonthecomputerisworking.
Chapter2.Usingyourcomputer15

2.Clickthewireless-network-connection-statusiconintheWindowsnotificationareatodisplayavailable
wirelessnetworks.
Note:Ifthewireless-network-connection-statusiconisnotdisplayedintheWindowsnotificationarea,
addtheicontothenotificationarea.See“AddinganicontotheWindowsnotificationarea”onpage13.
3.ClickawirelessLAN,andthenclickConnecttoconnectthecomputertoit.Providerequired
informationifneeded.
ConnectingtoaBluetooth-enableddevice
Bluetoothisashort-rangewirelesscommunicationstechnology.UseBluetoothtoestablishawireless
connectionbetweenthecomputerandanotherBluetooth-enableddevicewithinadistanceofabout10
m(32.8ft).
Note:TheBluetoothfeatureisoptional.
ToconnecttoaBluetooth-enableddevice,dothefollowing:
1.EnsurethattheBluetoothfeatureonthecomputerisworkingandtheBluetooth-enableddeviceis
locatedwithinadistanceofabout10m(32.8ft)fromthecomputer.
2.ClicktheBluetoothiconintheWindowsnotificationareaonthetaskbar.Then,clickAddaDeviceand
followtheinstructionsonthescreen.
Note:IftheBluetoothiconisnotdisplayedintheWindowsnotificationarea,addtheicontothe
notificationarea.See“AddinganicontotheWindowsnotificationarea”onpage13.
16LenovoS200UserGuide

Chapter3.Y ouandyourcomputer
Thischaptercontainsthefollowingtopics:
•“Arrangingyourworkspace”onpage17
•“Accessibilityinformation”onpage18
•“Cleaningthecomputer”onpage21
•“Maintenance”onpage21
•“Movingthecomputer”onpage22
Arrangingyourworkspace
Arrangeyourworkspacetosuityourneedsandthekindofworkyoudo.Thissectionprovidesinformation
aboutthefactorsthataffectthewayyouarrangeyourworkspace.
Glareandlighting
Positionthemonitortominimizeglareandreflectionsfromoverheadlights,windows,andotherlightsources.
Reflectedlightfromshinysurfacescancauseannoyingreflectionsonyourscreen.Whenpossible,place
themonitoratrightanglestowindowsandotherlightsources.Ifnecessary,reduceoverheadlighting
byturningofflightsorusinglowerwattagebulbs.Ifyouinstallthemonitornearawindow,usecurtains
orblindstoblockthesunlight.Y oucanadjustthebrightnessandcontrastcontrolsonthemonitorasthe
roomlightingchangesthroughouttheday.
Whereitisimpossibletoavoidreflectionsortoadjustthelighting,anantiglarefilterplacedoverthescreen
mightbehelpful.However,thesefiltersmightaffecttheclarityoftheimageonthescreen;trythemonlyafter
youhaveexhaustedothermethodsofreducingglare.
Aircirculation
Thecomputerproducesheat.Thecomputerhasafanthatpullsinfreshairandforcesouthotairthrough
theairvents.Blockingtheairventscancauseoverheating,whichmightresultinamalfunctionordamage.
Positionthecomputersothatnothingblockstheairvents;usually,51mm(2inches)ofairspaceissufficient.
Ensurethattheventedairisnotblowingonpeople.
Electricaloutletlocationsandcablelengths
Thefollowingfactorsmightdeterminethefinalplacementofthecomputer:
•Locationsofelectricaloutlets
•Lengthofpowercordsorpoweradapters
•Lengthofthecablesthatareconnectedtootherdevices
Formoreinformationaboutpowercordsorpoweradapters,see“Powercordsandpoweradapters”on
pageiv
.
Comfort
Althoughnosingleworkingpositionisidealforeveryone,hereareafewguidelinestohelpyoufindaposition
thatsuitsyoubest.Thefollowingfiguresetsanexampleforyourreference.
©CopyrightLenovo2015,2016
17
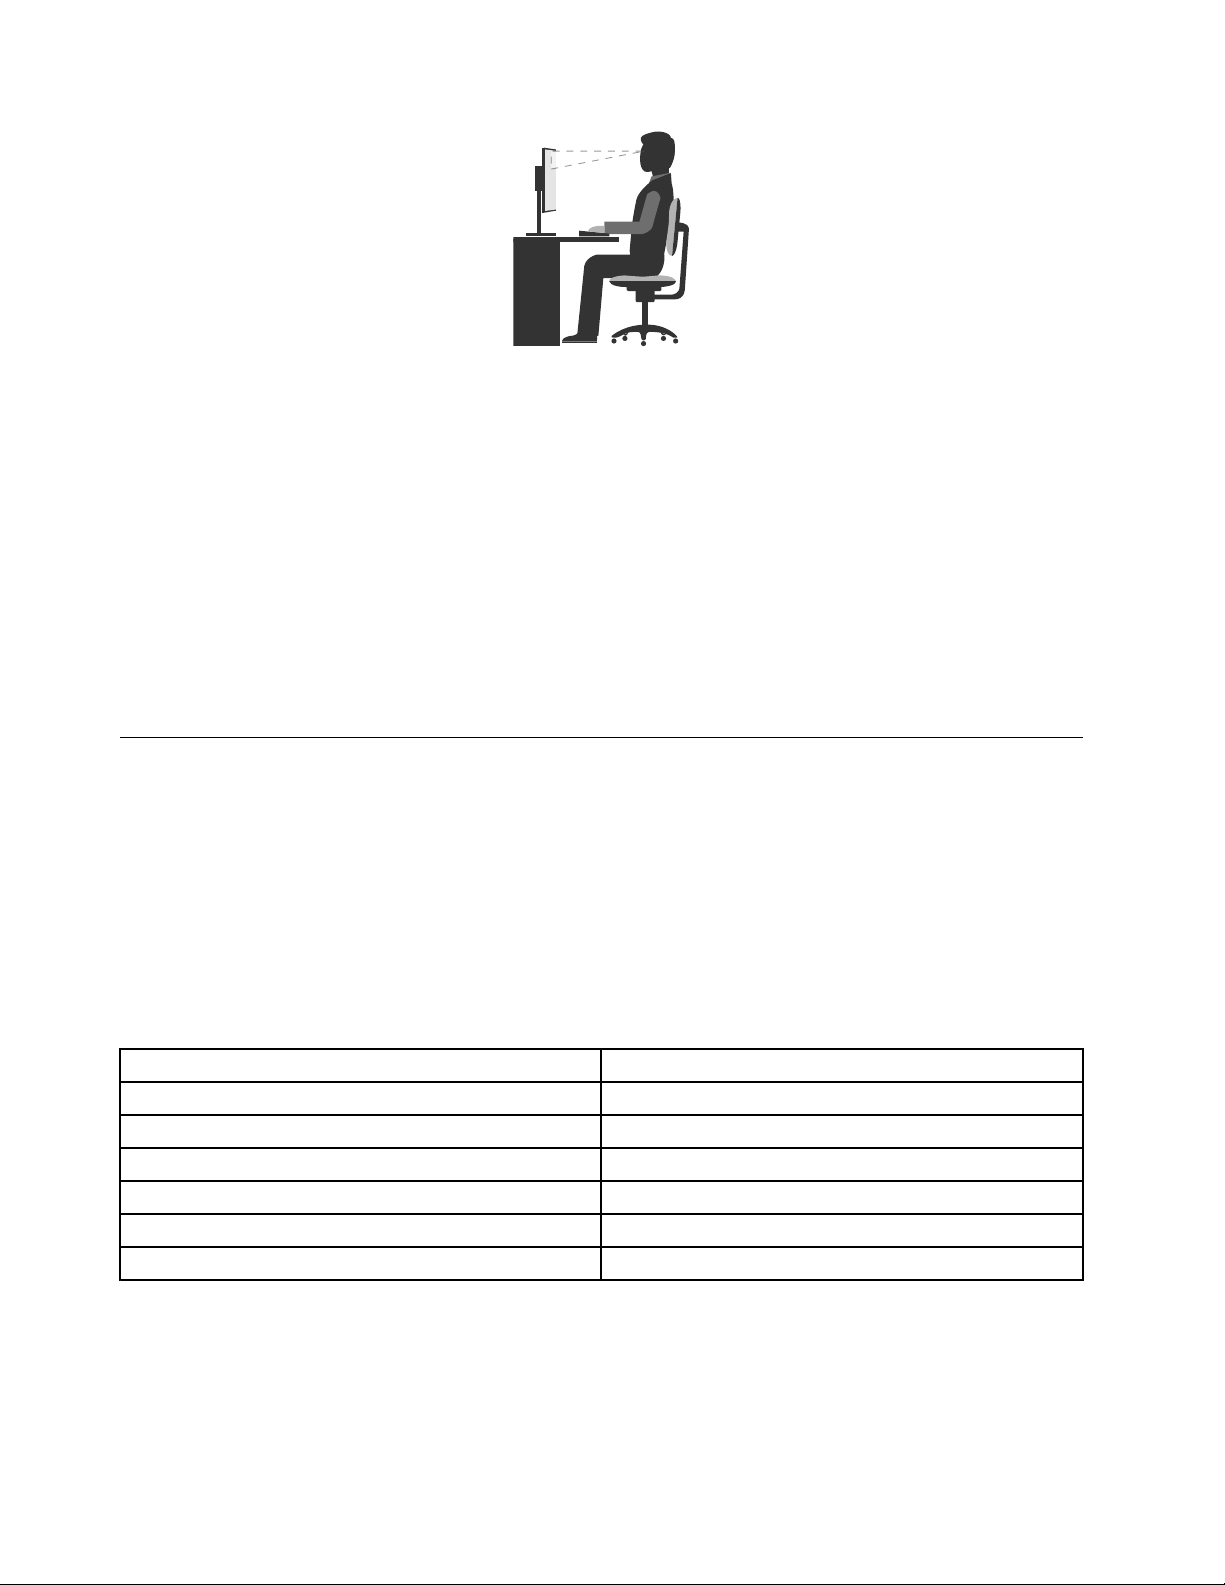
•Screenposition:Keepthescreenatacomfortableviewingdistance,usually51-61cm(20-24inches).
Then,adjustthescreensothatthetopofthescreenisatorslightlybeloweyelevelandyoucanviewit
withouttwistingyourbody.
•Chairposition:Useachairthatgivesyougoodbacksupportandseatheightadjustment.Usechair
adjustmentstobestsuityourdesiredposture.
•Headposition:Keepyourheadandneckinacomfortableandneutral(verticalorupright)position.
•Armandhandpositions:Keepyourforearms,wrists,andhandsinarelaxedandneutral(horizontal)
position.T ypewithasofttouchwithoutpoundingthekeys.
•Legposition:Keepyourthighsparalleltothefloorandyourfeetflatonthefloororonafootrest.
Makeminormodificationsinyourworkingposturetodetertheonsetofdiscomfortcausedbylongperiodsof
workinginthesameposition.Frequent,shortbreaksfromyourworkalsohelptopreventminordiscomfort
associatedwithyourworkingposture.
Accessibilityinformation
Lenovoiscommittedtoprovidinguserswhohavehearing,vision,andmobilitylimitationswithgreater
accesstoinformationandtechnology.Thissectionprovidesinformationaboutthewaystheseuserscanget
themostoutoftheircomputerexperience.Youalsocangetthemostup-to-dateaccessibilityinformation
fromthefollowingWebsite:
http://www.lenovo.com/accessibility
Keyboardshortcuts
Thefollowingtablecontainskeyboardshortcutsthatcanhelpmakethecomputereasiertouse.
Note:Dependingonyourkeyboard,someofthefollowingkeyboardshortcutsmightnotbeavailable.
KeyboardshortcutFunction
Windowslogokey+U
RightShiftforeightseconds
ShiftfivetimesTurnonorturnoffStickyKeys
NumLockforfivesecondsTurnonorturnoffToggleKeys
LeftAlt+LeftShift+NumLock
LeftAlt+LeftShift+PrtScn(orPrtSc)TurnonorturnoffHighContrast
OpenEaseofAccessCenter
TurnonorturnoffFilterKeys
TurnonorturnoffMouseKeys
Formoreinformation,gotohttp://windows.microsoft.com/,andthenperformasearchusinganyofthe
followingkeywords:keyboardshortcuts,keycombinations,shortcutkeys.
18LenovoS200UserGuide

EaseofAccessCenter
EaseofAccessCenterontheWindowsoperatingsystemenablesuserstoconfiguretheircomputersto
suittheirphysicalandcognitiveneeds.
TouseEaseofAccessCenter,dothefollowing:
1.ClicktheStartbuttontoopentheStartmenu.
2.DependingonyourWindowsversion,dooneofthefollowing:
•ForWindows7:ClickControlPanel.ViewControlPanelusinglargeiconsorsmallicons,and
thenclickEaseofAccessCenter.
•ForWindows10:ClickSettings➙EaseofAccess.
3.Choosetheappropriatetoolbyfollowingtheinstructionsonthescreen.
EaseofAccessCentermainlyincludesthefollowingtools:
•Magnifier
Magnifierisausefulutilitythatenlargestheentirescreenorpartofthescreensothatyoucansee
theitemsbetter.
•Narrator
Narratorisascreenreaderthatreadsaloudwhatisdisplayedonthescreenanddescribeseventssuchas
errormessages.
•On-ScreenKeyboard
Ifyouprefertotypeorenterdataintothecomputerusingamouse,joystick,orotherpointingdevice
insteadofaphysicalkeyboard,youcanuseOn-ScreenKeyboard.On-ScreenKeyboarddisplaysavisual
keyboardwithallthestandardkeys.
•HighContrast
HighContrastisafeaturethatheightensthecolorcontrastofsometextandimagesonyourscreen.Asa
result,thoseitemsaremoredistinctandeasiertoidentify.
•Personalizedkeyboard
Adjustkeyboardsettingstomakeyourkeyboardeasiertouse.Forexample,youcanuseyourkeyboard
tocontrolthepointerandtypecertainkeycombinationseasier.
•Personalizedmouse
Adjustmousesettingstomakeyourmouseeasiertouse.Forexample,youcanchangethepointer
appearanceandmakeiteasiertomanagewindowswiththemouse.
SpeechRecognition
SpeechRecognitionenablesyoutocontrolthecomputerbyvoice.
Usingonlyyourvoice,youcanstartprograms,openmenus,clickobjectsonthescreen,dictatetextinto
documents,andwriteandsende-mails.Everythingyoudowiththekeyboardandmousecanbedonewith
onlyyourvoice.
TouseSpeechRecognition,dothefollowing:
1.DependingonyourWindowsversion,dooneofthefollowing:
•ForWindows7:ClicktheStartbuttontoopentheStartmenu.
•ForWindows10:Right-clicktheStartbuttontoopentheStartcontextmenu.
2.ClickControlPanel.ViewControlPanelusinglargeiconsorsmallicons,andthenclickSpeech
Recognition.
Chapter3.Youandyourcomputer19
 Loading...