

Lenovo MORFFGOO, MORFFHL-D Important Information Manual
Important Information about Lenovo® Optical Wireless Mouse
http://www.lenovo.com/safety
Note:
Note: Note:
Note: Before installing the product, be sure to read the warranty information in Appendix B “Lenovo Limited
Warranty”
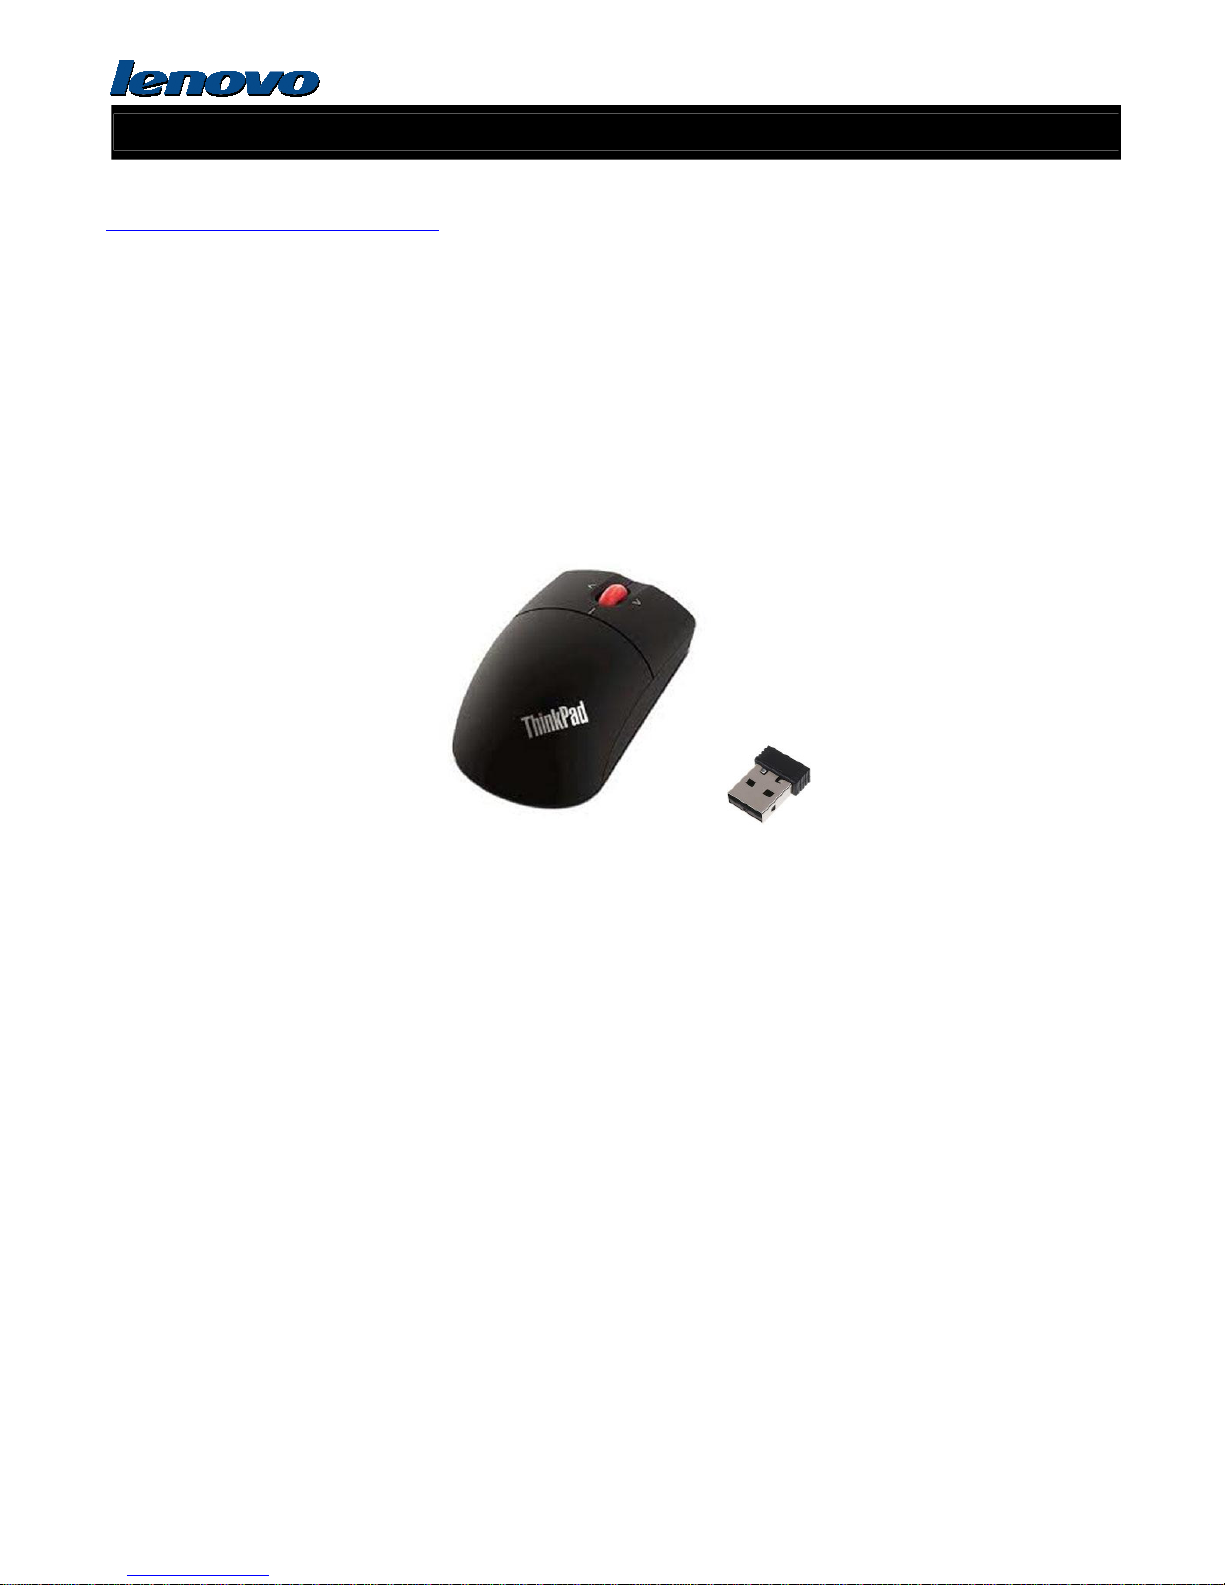
Lenovo Precision Wireless Mouse
无线蓝光鼠标
Mouse Model 鼠标型号: MORFFGOO
Dongle Model 接收器型号: MORFFHL-D
Eighth Edition (November 2011)
Eighth Edition (November 2011)Eighth Edition (November 2011)
Eighth Edition (November 2011)
© Copyright Lenovo 2005, 2011.
Copyright Lenovo 2005, 2011.Copyright Lenovo 2005, 2011.
Copyright Lenovo 2005, 2011.
LIMITED AND RESTRICTED RIGHTS NOTICE: If data or software is delivered pursuant a General Services Administration

Important Information about Lenovo® Optical Wireless Mouse
“GSA” contract, use, reproduction, or disclosure is subject to restrictions set forth in Contract No. GS-35F-05925.

Important Information about Lenovo® Optical Wireless Mouse
Product description
Product descriptionProduct description
Product description
The Lenovo Wireless Optical Mouse enable you to control vertical and horizontal scrolling using the tilt wheel. For the other
two mice, you can use the scrolling wheel to control vertical scrolling.
Note:
Note: Note:
Note: You need to install the Lenovo Mouse Suite software before using the horizontal scrolling function.
Each mouse can be connected to any enabled Universal Serial Bus (USB) connector on your computer.
Each mouse is supported on the following operating systems:
• Microsoft® Windows® XP (32-bit)
• Microsoft Windows Vista® (32-bit or 64-bit)
• Microsoft Windows 7 (32-bit or 64-bit)
Each option package includes a mouse and the following:
• Software and User Guide CD
• Laser Safety Manual
• Warranty poster
Installing the software
Installing the softwareInstalling the software
Installing the software
The Software and User Guide CD contains the Lenovo Mouse Suite software for the mouse. It is recommended that you
install the Lenovo Mouse Suite software to customize advanced settings before you use the mouse.
Note:
Note: Note:
Note: It is recommended that you uninstall any previously installed mouse software before installing the Lenovo Mouse
Suite software.
To install the Lenovo Mouse Suite software, do the following:
1. Save any open documents and exit all applications.
2. Insert the Software and User Guide CD and do one of the following:
• If the CD starts automatically, go to step 3.
• If the AutoPlay window opens, click Run start.bat
Run start.batRun start.bat
Run start.bat. Then, go to step 3.
• If the CD does not start automatically, go into My Computer
My Computer My Computer
My Computer or Computer
ComputerComputer
Computer, browse the CD/DVD drive, and double-click
Start.bat
Start.batStart.bat
Start.bat.
3. Follow the instructions on the screen.
Note:
Note: Note:
Note: In the Hardware Interface Selection window, select USB (Universal Serial Bus) Interface
USB (Universal Serial Bus) InterfaceUSB (Universal Serial Bus) Interface
USB (Universal Serial Bus) Interface.
4. When prompted, restart your computer.
Installing the mouse
Installing the mouseInstalling the mouse
Installing the mouse
This topic contains information about installing the mouse.

Important Information about Lenovo® Optical Wireless Mouse
To install the mouse, connect the mouse to an available USB connector on your computer. The New Hardware Found
window opens, and the Windows operating system will automatically install the proper device driver for the mouse. Then,
the mouse is ready for use.
Using the software
Using the softwareUsing the software
Using the software
Each mouse has multiple functions and features such as zooming and auto-scrolling, which help you increase your
productivity. You also can assign frequently used functions or shortcuts to the mouse buttons using the Lenovo Mouse
Suite software.
To use the Lenovo Mouse Suite software, do the following:
1. Click Start
Start Start
Start ➙ All Programs
All Programs All Programs
All Programs ➙ Lenovo Mouse Suite
Lenovo Mouse Suite Lenovo Mouse Suite
Lenovo Mouse Suite ➙ Mouse Suite
Mouse SuiteMouse Suite
Mouse Suite.
2. The main window opens with several tabs. Click each tab to view related settings. On each tab there are four buttons:
• OK
OKOK
OK: Save your settings and close the window.
• Cancel
CancelCancel
Cancel: Exit the window without saving.
• Apply
ApplyApply
Apply: Have your changes take effect without closing the window.
• Help
HelpHelp
Help: View the help information system.
Note:
Note: Note:
Note: The Lenovo USB Laser Mouse supports the mouse resolution from 400 dots per inch (DPI) to 2000 DPI. By default,
the mouse resolution setting is 1600 DPI. The ThinkPad USB Laser Mouse supports the mouse resolution from 400 DPI to
1600 DPI. By default, the mouse resolution setting is 1200 DPI. To change the resolution setting, do the following:
1. Click Start
Start Start
Start ➙ All Programs
All Programs All Programs
All Programs ➙ Lenovo Mouse Suite
Lenovo Mouse Suite Lenovo Mouse Suite
Lenovo Mouse Suite ➙ Mouse Suite
Mouse SuiteMouse Suite
Mouse Suite.
2. In the Mouse Properties window, click the Lenovo
Lenovo Lenovo
Lenovo tab. Then, click Advanced Properties
Advanced PropertiesAdvanced Properties
Advanced Properties.
3. In the Resolution Adjustment Setup
Resolution Adjustment Setup Resolution Adjustment Setup
Resolution Adjustment Setup area, select the corresponding radio button to set the preferred mouse resolution.
4. To confirm your setting, click Apply
ApplyApply
Apply. For more information about the setting, click Help
HelpHelp
Help.
Troubleshooting
TroubleshootingTroubleshooting
Troubleshooting
This topic contains troubleshooting information for the mice. If you encounter any of the following problems when using the
mice, refer to the corresponding answers.
Problem:
Problem: Problem:
Problem: The mouse is not recognized by the operating system.
Solution:
Solution: Solution:
Solution: To solve the problem, perform one of the following procedures:
Procedure A:
Procedure A:Procedure A:
Procedure A:
Check the following:
• Install the mouse again.
• Access your computer Basic Input/Output System (BIOS) Setup Utility program during the startup process and make
sure that all the USB connectors on your computer are enabled.
Notes:
Notes:Notes:
Notes:
– For information about how to access or use the BIOS Setup Utility program on your computer, see the documentation
that came with your computer.

Important Information about Lenovo® Optical Wireless Mouse
– If all USB connectors on your computer do not work, probably the computer BIOS does not support them. To solve this
problem, go to http://www.lenovo.com/support to download the latest BIOS updates, or go to
http://www.lenovo.com/support/phone to find the Lenovo technical support for your country or region.
Procedure B:
Procedure B:Procedure B:
Procedure B:
1. Click Start
Start Start
Start ➙ Control Panel
Control PanelControl Panel
Control Panel.
2. Depending on your Control Panel mode, double-click System
System System
System or click Performance and Maintenance
Performance and MaintenancePerformance and Maintenance
Performance and Maintenance ➙ System
SystemSystem
System.
3. Click the Hardware
Hardware Hardware
Hardware tab.
4. Click Device Manager
Device ManagerDevice Manager
Device Manager.
5. Scroll down until you find Mice and other pointing devices
Mice and other pointing devicesMice and other pointing devices
Mice and other pointing devices. Then, expand the Mice and other
Mice and otherMice and other
Mice and other pointing devices
pointing devices pointing devices
pointing devices category.
6. Right-click HID
HIDHID
HID----compliant mouse
compliant mousecompliant mouse
compliant mouse, and then select Uninstall
UninstallUninstall
Uninstall. A warning will be displayed, prompting you that you are
going to remove a device from the operating system.
7. Click OK
OKOK
OK.
8. Right-click Mice and other pointing devices
Mice and other pointing devicesMice and other pointing devices
Mice and other pointing devices, and then select Scan for hardware changes
Scan for hardware changes Scan for hardware changes
Scan for hardware changes to re-detect the hardware.
Note:
Note: Note:
Note: You might be asked to insert the Windows installation CD.
Problem:
Problem: Problem:
Problem: The mouse pointer cannot move.
Solution:
Solution: Solution:
Solution: To solve the problem, do the following:
• Ensure that you have followed all installation procedures.
• Reinstall the Lenovo Mouse Suite software.
• Clean the mouse lens with a soft cotton swab. Do not use any other liquid or solvent to clean the mouse lens as this
might cause damage to the lens.
• Put a mouse pad under the mouse. If the mouse is moving on a highly reflective surface, especially a glass or mirror
surface, the mouse might not be able to work.
Problem:
Problem: Problem:
Problem: The horizontal scrolling speed cannot be changed on the Wheel
Wheel Wheel
Wheel tab in the Mouse Properties window.
Solution:
Solution: Solution:
Solution: To solve the problem, customize the horizontal scrolling speed setting by doing the following:
1. Click Start
Start Start
Start ➙ All Programs
All Programs All Programs
All Programs ➙ Lenovo Mouse Suite
Lenovo Mouse Suite Lenovo Mouse Suite
Lenovo Mouse Suite ➙ Mouse Suite
Mouse SuiteMouse Suite
Mouse Suite.
2. In the Mouse Properties window, click the Lenovo
Lenovo Lenovo
Lenovo tab. Then, click Advanced Properties
Advanced PropertiesAdvanced Properties
Advanced Properties.
3. In the Advanced Properties window, click the Wheel
Wheel Wheel
Wheel tab.
4. In the Horizontal Scrolling
Horizontal Scrolling Horizontal Scrolling
Horizontal Scrolling area, move the slider right to increase or left to decrease the horizontal scrolling speed.
Caring for the mouse
Caring for the mouseCaring for the mouse
Caring for the mouse
Always disconnect the mouse before cleaning. Keep beverages away from the mouse working area and
avoid any spills. The maintenance of your mouse will ensure longer life and minimize the chances of causing
damage to your mouse and computer. There are no user serviceable parts.
Product description
Product descriptionProduct description
Product description
The ThinkPad Wireless Optical Mouse has a tilt wheel to control vertical and horizontal scrolling. It uses the Wireless
Important Information about Lenovo® Optical Wireless Mouse
technology to connect to the operating system.
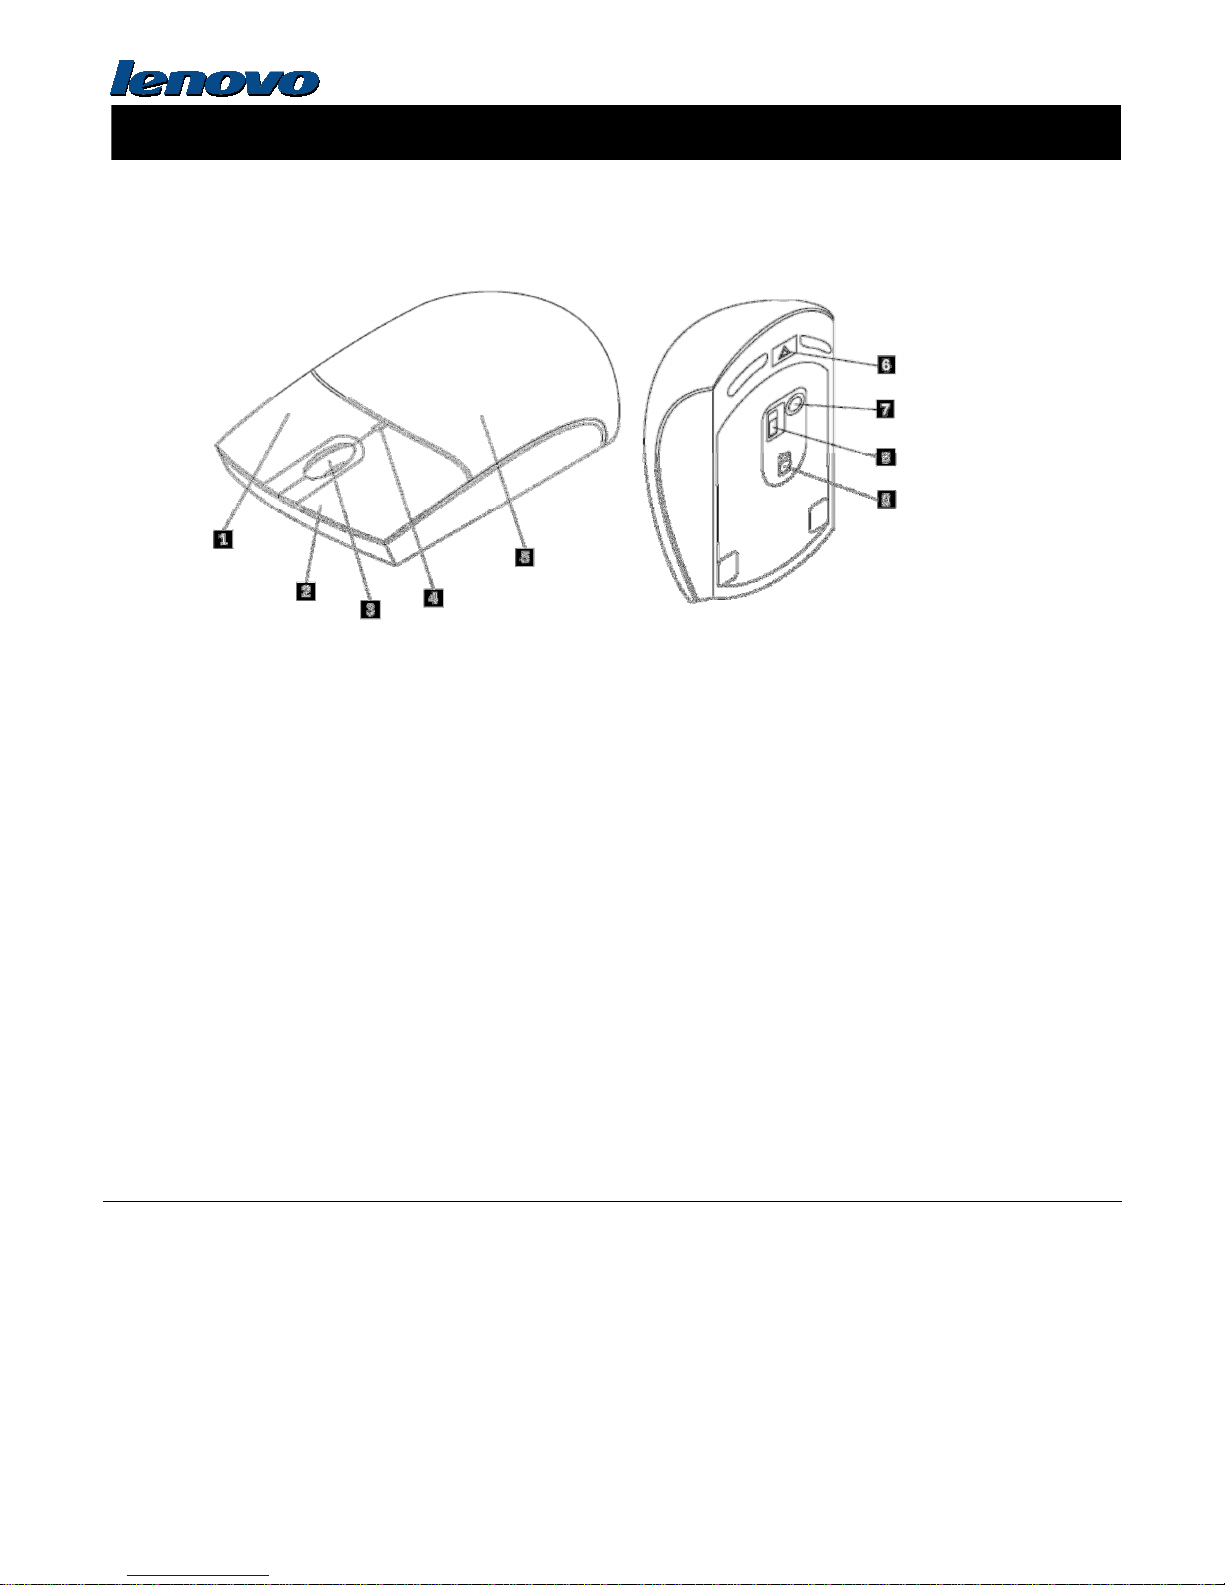
The following figure shows the front view and rear view of the ThinkPad Wireless Optical Mouse
Figure 1. Front view and rear view of the mouse
1. Right button
2. Left button
3. Scrolling wheel
4. LED indicator
5. Battery compartment cover
6. Battery compartment release button
7. Wireless connection button
8. Power switch
9. Optical output
The mouse is supported on the following operating systems:
• Microsoft Windows XP (32-bit)
• Microsoft Windows Vista (32-bit or 64-bit)
• Microsoft Windows 7 (32-bit or 64-bit)
Your option package includes the following:
• ThinkPad Bluetooth Laser Mouse
• Two AA batteries
• Software and User Guide CD
• Laser Safety Manual
• Warranty poster
Installing the software
The Software and User Guide CD contains the Lenovo Mouse Suite software for the mouse. It is recommended that you
install the Lenovo Mouse Suite software to customize advanced settings before you use the mouse.
Notes:
Notes:Notes:
Notes:
• It is recommended that you uninstall any previously installed mouse software before installing the Lenovo Mouse Suite
software.
• Turn on the Bluetooth radio in your computer before installing the Lenovo Mouse Suite software.
To install the Lenovo Mouse Suite software, do the following:
 Loading...