

Page 1

ix2 Network Storage
with LifeLine 4.0
User Guide
Page 2

© 2013 LenovoEMC, Ltd. All rights reserved.
Lenovo and the Lenovo logo are registered trademarks of Lenovo in the United States, other countries, or
both. The EMC logo is a registered trademark of EMC Corporation in the United States and/or other
countries. LenovoEMC and LifeLine are registered trademarks or trademarks of LenovoEMC, Ltd. in the
United States, other countries, or both. Windows is a trademark of the Microsoft group of companies. Mac
is a trademark of Apple Inc., registered in the United States and other countries. Linux® is the registered
trademark of Linus Torvalds in the U.S. and other countries. Certain other product names, brand names,
and company names may be trademarks or designations of their respective owners.
Page 3

CONTENTS
Setting up Your ix2 Network Storage 1
Setup Overview 2
Set up my ix2 Network Storage if it's not discovered 3
Discovering with LenovoEMC Storage Manager 3
Discovering the ix2 without the Internet 3
Setup Page 4
Network Connection 5
Connecting the ix2 Network Storage to Your Network 5
Connecting the ix2 6
Network Settings 6
Manually Configuring Network Settings 7
Naming Your ix2 Network Storage 8
Configuring Your ix2 Network Storage to Use Active Directory 9
Enabling Active Directory Trusted Domains 9
Customizing the Access to Features on Your ix2 Network Storage 11
Enabling the Display of Features 11
Enabling Access Permissions to Features 11
Non-Administrator User Log In 12
Obtaining Alerts About Your ix2 Network Storage 13
Tracing Events on Your ix2 Network Storage 14
Downloading the complete event log file 14
Obtaining System Status for Your ix2 Network Storage 15
Space Usage 15
Control Panel 15
Device Information 15
Using Your ix2 Network Storage in Various Time Zones 16
Setting the Display Language for Your ix2 Network Storage 17
Printing Documents 18
Setting up Personal Cloud, Security, and File Sharing 19
Sharing Files 21
Sharing Overview 22
Interfaces for Sharing 22
Shares 23
iii
Page 4

What are Shares and How Do I Organize Content with Them? 23
Adding Shares 23
Managing Shares 24
Deleting Shares 25
Using Protocols to Share Files 26
What Are Protocols and How Do I Use Them to Share Files? 26
AFP File Sharing for Macs 26
Bluetooth File Sharing 26
FTP File Sharing 27
NFS File Sharing 27
rsync: Synchronizing Files with Another Storage Device or Other Computers 28
TFTP 28
Monitoring Your Device with an SNMP Management Tool 28
Managing File Sharing with Web Access (http/https) 29
WebDAV: Managing Files Using HTTP or HTTPS 29
Windows DFS: Creating a Distributed Windows File System 30
Windows File Sharing 30
Sharing Content through the Home Page 31
Sharing Your Content with the World 31
Adding a Custom Home Page 31
Automatically Sending Content to Multiple People at Once 33
How to Set Up an Email Distribution Active Folder 33
Sharing Content Using Social Media: Overview 34
Managing Your Content 35
Transferring Content to and from Your ix2 Network Storage with Copy Jobs 36
Copy Jobs Limitations 36
Getting Content from a USB External Storage Device 37
Safely removing external storage 37
iSCSI: Creating IP-Based Storage Area Networks (SAN) 39
iSCSI Overview 40
Adding iSCSI Drives 41
Enabling iSCSI Drives 41
Connecting to iSCSI Drives 41
Managing iSCSI Drives 42
Adding CHAP User Access to an iSCSI Drive 42
Deleting iSCSI Drives 43
iv
Page 5

Drive Management 45
Managing Drives 46
Setting Write Caching 46
Applying Global Drive Management Settings 46
Drive Status 47
Backing up and Restoring Your Content 49
Backup and Restore Overview 50
Backup of Data through RAID Protection 50
Backing up to and Restoring from Your ix2 Network Storage 51
Backing up Macs with Time Machine 51
Copy Jobs Overview 51
Backing up Your ix2 Network Storage 52
Copy Jobs 52
From: Settings 53
To: Settings 54
Setting a Schedule 54
Backing up with Mozy Backup 55
Restoring Files with Mozy Backup 56
Registering with Avamar for Backup and Restore 56
Backing up with Amazon S3 57
Restoring Files with Amazon S3 57
Backing up with LenovoEMC Personal Cloud 57
Restoring Files with Personal Cloud 57
Securing Your ix2 Network Storage and Contents 59
What Is Security and Do I Need It? 60
Enabling Security and Creating an Administrator User 61
Disabling Security 61
Limiting Access to Your Content by Creating Users 62
Users 63
Users and Groups Overview 63
Adding Users 63
Managing Users 64
Deleting Users 65
Groups 66
v
Page 6

Groups Overview 66
Adding Groups 66
Managing Groups 66
Deleting Groups 67
Using Active Directory Domain to Manage Users and Groups 68
Active Directory Users and Groups Overview 68
Managing Users and Groups with Active Directory 68
Deleting Active Directory Users and Groups 69
Managing Your ix2 Network Storage with Local and Active Directory Users 70
Managing Your ix2 Network Storage with Local and Active Directory Users 70
Personal Cloud: Accessing Your LenovoEMC Personal Cloud From Anywhere in the
World 73
What Is LenovoEMC Personal Cloud ? 74
LenovoEMC Personal Cloud Key Terms 74
Is My Content Secure? 75
LenovoEMC Personal Cloud Setup Overview 76
Creating LenovoEMC Personal Cloud 77
Configuring Router Port Forwarding for Personal Cloud 78
Router Port Forwarding 78
Configuring Your LenovoEMC Personal Cloud 79
Enabling Internet Access to the ix2 79
Changing Personal Cloud Settings 79
Inviting People onto Your LenovoEMC Personal Cloud 80
Joining a Trusted Device to LenovoEMC Personal Cloud 81
Managing Trusted Devices on a Personal Cloud 82
Disconnecting Trusted Devices 82
Deleting Trusted Devices 82
Using Copy Jobs with a LenovoEMC Personal Cloud 83
Disabling or Deleting Your LenovoEMC Personal Cloud 84
Accessing Content Using Your LenovoEMC Personal Cloud 85
Informing Users What to Do with LenovoEMC Personal Cloud 86
Sharing Content Using Social Media 87
Sharing Content Using Social Media: Overview 88
Facebook 89
Flickr 90
vi
Page 7

YouTube 91
Share Content through LenovoEMC Personal Cloud 92
Media Management 93
Media Management Overview 94
Scanning for media content 94
Media Services Capabilities and Limitations 95
Sharing Media Content over the Internet 96
Enabling Internet Access from the Media Server Page 96
Media Aggregation 97
Enabling Media Aggregation 97
Social Media Sharing 98
Streaming Music, Movies, and Pictures 99
Example: Setting up iTunes 99
Example: Setting up Xbox 360 99
Photos 100
Photos Overview 100
Streaming Pictures 100
Creating a Slideshow on the Device Home Page 100
Automatically Resizing Your Photos 100
Getting Pictures from Your Camera 101
Getting Pictures from Your Camera 101
Music 102
Music Overview 102
Streaming Music 102
Torrents 103
Torrent Overview 103
Enabling Torrent Downloads 103
Deleting torrent jobs 103
Configuring Your Router for Torrent Downloads 103
Torrent Active Folders 104
Configuring a Torrent Active Folder 104
Videos 106
Video Capabilities Overview 106
Streaming Movies 106
Video Surveillance 106
Name 107
vii
Page 8

Space 107
Model 107
Action 107
Adding Applications to Your ix2 Network Storage 111
Application Overview 112
Application Installation 113
Application Manager 114
Starting or stopping an application 114
Adding applications 114
Removing applications 114
Upgrading Your ix2 Network Storage 115
Software Updates 116
Auto-update process: installing a device software update 116
Manual update process: installing a device software update 116
Backing up and Recovering Your ix2 Network Storage Settings 119
Backing Up Your ix2 Network Storage Settings 120
Backing up Device Configuration 120
Restoring a Configuration Backup 120
Hardware Management 121
About the ix2 Network Storage Components 122
Front Panel 122
Rear Panel 123
Energy Saving 124
Power Down Drives 124
Brightness 124
Factory Reset 125
UPS Management 126
Troubleshooting Routers 127
Enabling the DMZ 127
Configuring Port Forwarding on Double NAT Networks 128
viii
Bridging the Secondary Router 128
Bridging the Primary Router 128
Page 9

Additional Support 131
How to Get Help 132
Support 133
Legal 135
Safety Information 136
Open Source 137
Warranty Information 138
Limited Warranty Notice 138
Limited Warranty for Iomega Products 138
Regulatory Information 139
Federal Communications Commission (FCC) Statement 139
Canadian Verification 139
European Union - Compliance to the Electromagnetic Compatibility Directive 140
Important WEEE Information 140
European Union RoHS 140
India RoHS 140
Lithium Battery – California Perchlorate Information 140
Polyvinyl Chloride (PVC) Cable and Cord Notice 141
Recycling and environmental information 141
Export classification notice 141
Copyright and Trademark Information 142
ix
Page 10

x
Page 11

CHAPTER 1
Setting up Your ix2 Network Storage
Setting up Your ix2 Network Storage 1
Page 12

Setting up Your ix2 Network Storage
Setup Overview
Setup with your ix2 Network Storage is easy. Remove it from the box, connect it to your network switch or
hub, and then power it up. Launch a web browser and enter the setup URL identified in the Quick Start
Guide. LenovoEMC Setup launches and displays a message that your ix2 is online and ready to use.
You then can install client software that includes:
● LenovoEMC Storage Manager
● Twonky Media Server for media aggregation
LenovoEMC Storage Manager is a management tool that helps you discover your ix2 on your network to
simplify access to content on your ix2 from your computer. It also allows you to add your computer as a
trusted device to a LenovoEMC Personal Cloud. Refer to LenovoEMC Storage Manager online help for
additional information. Twonky Media Server consolidates all media files on devices on your network and
presents them in a unified view.
From LenovoEMC Setup, you can optionally create a Personal Cloud or begin using your ix2 by clicking
Manage My Device.
By default, the ix2 will attempt to acquire an IP address from DHCP, If there is not a DHCP
server available on the network, the ix2 will use an IP address in the self-assigned APIPA range
(169.254.x.x).
2 Setup Overview
Page 13

Setting up Your ix2 Network Storage
Set up my ix2 Network Storage if it's not discovered
If your ix2 is not discovered when you enter the URL identified in your Quick Start Guide, you have two
ways of discovering it.
Discovering with LenovoEMC Storage Manager
You can install LenovoEMC Storage Manager from the Setup Portal, which helps you discover your ix2 on
your network.
Discovering the ix2 without the Internet
You can access your ix2 device without internet access as described by these methods for Windows PCs
or Macs:
● Windows 7 and Vista — Click Start, Computer, Network. You should see your ix2 listed under
Other Devices. You can then double-click the device icon to access the ix2 Management
Console.
● Windows XP — If you have not enabled UPnP Discovery, click Start, Help and Support. In the
Help and Support browser, search for UPnP and follow the steps from “Install the UPnP
framework”. After UPnP is enabled, open Windows Explorer and in the Folders view, expand My
Network Places. You should see your ix2 listed. You can then double-click the device icon to
access the ix2 Management Console.
● Mac — Browse to your ix2 through Finder, Shared, All and use Go, Connect to Server to
connect to Shares on your ix2.
Set up my ix2 Network Storage if it's not discovered 3
Page 14

Setting up Your ix2 Network Storage
Setup Page
The Setup page opens when you first access the ix2 Network Storage from the Home Page or the
LenovoEMC Storage Manager. On this page, you can configure some basic device features by clicking the
appropriate link. The current setting of the feature displays above the link. You can also configure all
features shown on the Setup page by accessing the specific features directly.
4 Setup Page
Page 15
Network Connection
Connecting the ix2 Network Storage to Your Network
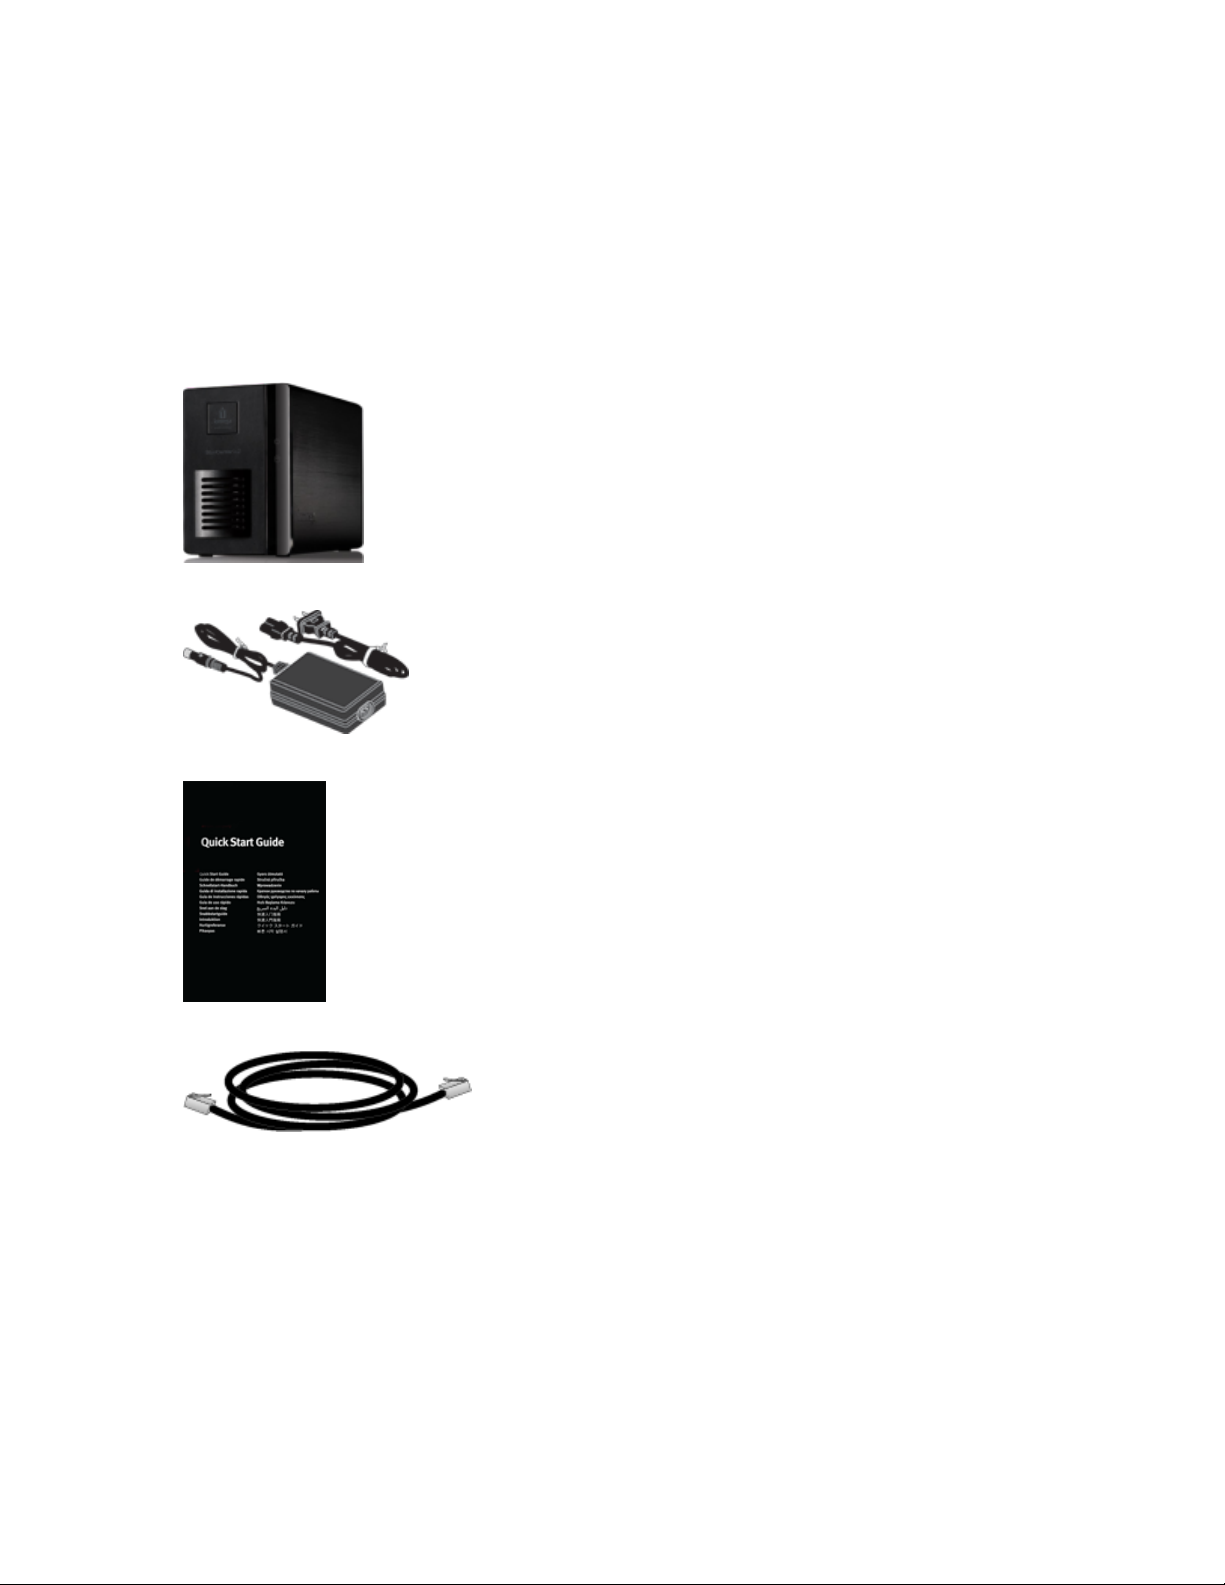
First, check the package contents.
Verify that the box contains the following items:
1. ix2 (models may vary)
2. Power Adapter and Cord
Setting up Your ix2 Network Storage
3. Quick Start Guide
4. Ethernet Cable
Package contents may vary.
Network Connection 5
Page 16
Setting up Your ix2 Network Storage
Connecting the ix2
Initial Setup
If you have purchased more than one ix2, complete all steps on one device before setting up additional
devices.
1. Use the included network cable to connect the ix2 to your network router, switch or directly to a
computer.
2. Connect the included power adapter to the back of the ix2 and a power socket or Uninterruptible
Power Supply (UPS).
3. Your ix2 should power on automatically.
4. From a computer on your network, open a web browser and go to http://setup.lenovoemc.com to
set up your ix2 on your network. For best results, use a computer that is connected to the same
subnet or network segment as the ix2.
You can access the ix2 Management Console directly by entering the IP address or model name
of your ix2 in your computer’s web browser. To use the model name on a Mac, add .local after the
name in the browser (for example, ix2.local).
5. OPTIONAL: if desired, install the LenovoEMC Storage Manager and Media Aggregation software.
If you install LenovoEMC Storage Manager, its icon will appear in the System Tray (Windows) or
Menu Bar (Mac). The LenovoEMC Storage Manager will automatically scan your network and
connect to available Shares.
If you receive a message from your operating system's firewall alerting you of network activity, be
sure to unblock communications.
Mac Users: Shares on the ix2 will mount and appear on the Mac Desktop.
PC Users: Shares on the ix2 will automatically be assigned a drive letter and will be available in
the Network Drives section under My Computer.
Network Settings
The Network page of your ix2 is where you make changes to set up network connectivity. The Network
page displays your current network settings and enables those settings to be modified. On this page, you
can identify your DNS servers and WINS servers and how your system's IP address is determined. Most
system IP addresses and other network settings can normally be configured automatically.
Manually Configuring Your Network
If you are comfortable with network technology and want to configure the network, refer to Manually
Configuring Network Settings.
Enabling Jumbo Frames for Each NIC
You can enable jumbo frames for each NIC in your ix2 by expanding the Information section for a NIC and
entering a jumbo frame size in the Jumbo Frame field. If you do not want jumbo frame support, leave the
field blank. Jumbo frame support is useful for transferring large files, such as multimedia files, over a
network. Jumbo frame support increases transfer speed by placing large files in fewer data packets. It also
reduces the demand on the device hardware by having the CPU process more data in fewer data packets.
Connecting
6
the ix2
Page 17

Setting up Your ix2 Network Storage
Jumbo frame support should only be enabled if you are sure your network is jumbo-frame compatible and
all network devices have been configured to support jumbo frames. It is recommended that you confirm all
network interface cards (NICs) are configured to support jumbo frames before enabling this feature.
Manually Configuring Network Settings
There are various settings in the network setup that you can manually configure.
1. Click Modify network settings.
2. Uncheck Automatically configure DNS, WINS, and all IP addresses (DHCP).
3. DNS Servers — enter the IP addresses of the DNS (Domain Name System) servers. DNS is
used for translating the domain name to IP addresses.
4. WINS Servers — enter the IP addresses of the WINS server.
5. To connect your ix2 to a proxy server, check Use proxy settings and enter proxy IP address, port
number, and the proxy username and password.
6. Click Apply to save your settings.
7. If a DHCP server is unavailable for a network interface card (NIC), the device could auto-assign
an IP address, or you can uncheck the Automatically acquire network address (DHCP)
checkbox found in the Information section of a NIC.
8. You can change the following settings in the Information section:
● IP Address — the static IP address of the ix2. Use an available IP address in the range used
by the LAN.
● Subnet Mask — the subnet that the IP address belongs to. The default value is 255.255.255.0.
● Gateway — enter the gateway IP address in this field.
9. Click Apply to save your settings.
Connecting
the ix2
7
Page 18

Setting up Your ix2 Network Storage
Naming Your ix2 Network Storage
You can provide a meaningful name for your ix2 using the Device Identification page. This page in the ix2
Management Console enables you to change the Storage Device Name, the Storage Device Descriptive
Name, and the Workgroup Name.
Change any of these by editing the text fields. Click Apply to save your changes.
● Device Name: Enter a name for the ix2 device. Use a name that will help you identify it on your
network.
● Device Descriptive Name: Enter a descriptive name for the ix2 device. This name can provide
additional detail that identifies the device. If you leave this field blank, the default device name is
used.
● Workgroup Name: Enter a workgroup name for the ix2 device if you need to change the default
name. The workgroup name identifies a group of computers that share information with each
other. Change the workgroup name only if you explicitly define a workgroup on your network.
Most users won't need to change the workgroup name, unless they have explicitly defined a
different workgroup on their other computers.
Renaming the ix2 will require a device restart.
8 Naming Your ix2 Network Storage
Page 19

Setting up Your ix2 Network Storage
Configuring Your ix2 Network Storage to Use Active Directory
If you have an existing Active Directory user organization, you can incorporate it into the ix2 Management
Console. Your ix2 can work in a high availability environment, which means it can work with multiple
AD servers should one server fail or go offline.
When you configure Active Directory, you enable security on your ix2.
1. To configure Active Directory, manually add the ix2 to your DNS server. Set the ix2 DNS setting
to point to your DNS server. On the Network page, uncheck Automatically configure all
network settings, type the IP address of your DNS Server in the text box, and click Apply to
save your settings.
2. Configure the ix2 to join the Active Directory domain. Open the Domain Management page from
Network or System and click ON to enable Active Directory.
3. Provide the following connectivity information for the existing AD user organization that you want
to incorporate into the ix2:
● Domain Name — the actual name of your Active Directory domain, for example, sohoad.com.
● Preferred Server — the actual name or IP address of your Active Directory Server, for
example, ad-server.sohoad.com or 10.14.50.12.
● Organizational Unit — an optional predefined subset of directory objects within an Active
Directory domain.
● Administrator Username — the Active Directory username with domain administrator
privilege.
● Administrator Password — the Active Directory password for the specified Active Directory
username.
● Users/Groups Refresh Interval — how often the ix2 should refresh the list of available users
and groups from the Active Directory server.
● Local Network Encryption (SSL) — enforces encryption on your local network.
● Remote Network Encryption (SSL) — enforces encryption outside your local network, such
as through the internet. Choices for both encryption types are Not required and Always
(encryption is always enforced). Always encrypting communication is safest, but can impact
performance.
● Enable trusted domains — enables your ix2 to allow access to other domains.
4. Click Apply to save your settings.
Enabling Active Directory Trusted Domains
By enabling Active Directory trusted domains on your ix2, you enable the importing of users and groups
from other trusted domains to your ix2 device. Those users and groups from other domains will then have
access to features on your ix2, including accessing folders and documents in Shares, and joining any
Personal Cloud of which the device is a member.
Configuring Your ix2 Network Storage to Use Active Directory 9
Page 20

Setting up Your ix2 Network Storage
Now that you have enabled access to all trusted domains, you can add users and groups from those
trusted domains to your ix2. For more information, refer to Managing Users and Groups with Active
Directory.
10 Configuring Your ix2 Network Storage to Use Active Directory
Page 21
Setting up Your ix2 Network Storage
Customizing the Access to Features on Your ix2 Network Storage
An administrator user can customize the look of the ix2 Management Console using Feature Selection
(FS). Using FS, an admin can enable the display of certain features and disable others. In addition, an
admin can provide non-administrator users access to certain features by setting permissions for those
users.
Access permission to a feature can be given only to non-administrator users, since admin users
always have access to all features. Setting access permissions for non-admin users requires that
security is enabled on your ix2 Network Storage and an administrator user is created. See
Enabling Security and Creating an Administrator User.
Enabling the Display of Features
1. Open the Feature Selection page.
All the features of your ix2 display on the page with a status that indicates whether the feature is
enabled or disabled.
2. To enable a feature, expand the desired feature name, and click the switch to On. For example, to
enable Amazon S3, expand the Amazon S3 feature, and click the switch to On.
3. To disable a feature, click the switch to Off.
You can set the display of applications on the Feature Selection page, provided an application has
that capability. For more information on installing features, refer to the Application Manager.
Enabling Access Permissions to Features
You can configure access permissions for non-administrator users with certain features. Expand the
feature on the Feature Selection page to determine if it supports feature access permissions.
1. If not already enabled, enable security on your ix2 and create users and groups.
2. Open the Feature Selection page.
3. To enable access to an enabled feature, expand the desired feature name, and click Add
access permissions.
4. In the pop-up window, select one or more users to provide them access. If you have created
groups, you can also limit access for them in this way.
5. Click Apply to save your changes.
The list of users with access is displayed under the feature. To remove user access, uncheck the
access box next to the user, and click Apply to save your changes.
You can enable access permissions for applications on the Feature Selection page, provided an
application has that capability. For more information on installing features, refer to the Application
Manager.
Customizing the Access to Features on Your ix2 Network Storage 11
Page 22

Setting up Your ix2 Network Storage
Non-Administrator User Log In
Non-administrator users can log in to a ix2 with feature access enabled. When these non-admin users
access a ix2, they first see the Login screen where they enter their login credentials. After logging in, the
ix2 Management Console displays with those features to which a non-admin user has access.
12 Customizing the Access to Features on Your ix2 Network Storage
Page 23
Setting up Your ix2 Network Storage
Obtaining Alerts About Your ix2 Network Storage
You can configure your ix2 to send email alerts when problems are detected. This is done through the
email notification feature. Email notification provides a destination for emails sent by the ix2 when
problems are detected. To provide a destination email address, enter the following information:
● Destination Email Addresses — enter a valid email address or addresses. This email address
provides a destination for messages sent by the ix2 when problems are detected by the system.
You can add multiple email addresses by separating them with commas, spaces or semicolons.
● Check Send a test email message to confirm that email notification is working properly.
● Check Configure custom SMTP settings only if your network blocks SMTP traffic, requiring
additional credentials, such as a corporate firewall.
Most users will not need to check this option. If checked, enter the following additional information
to identify your SMTP server:
● Email Server (SMTP) — enter the address of your SMTP server.
● Sender Email Address — enter an email address for the ix2 to use as the From address when
it creates messages.
● Email Login — enter the username used to log into the email account you entered above.
● Email Password — enter the password for the email account.
● Confirm Password — confirm the password for the email account. It must match the
password provided above.
If your email application uses a SPAM blocker, it is recommended that you add a sender email
address to your safe list. If you do not define additional credentials, the default sender email is:
sohostorage@emc.com
Click Apply to save your changes.
Obtaining Alerts About Your ix2 Network Storage 13
Page 24

Setting up Your ix2 Network Storage
Tracing Events on Your ix2 Network Storage
The Event Log page displays only the 1000 most recent events logged to the ix2. A complete event log,
however, is available for download.
The following icons indicate the severity of each status message:
● INFORMATION
Identifies that a change has been made to the state of your ix2 device, usually by a user, such as
attaching a peripheral.
● WARNING
Identifies that there is a problem with your ix2 device that requires your attention, but your device
will continue to operate normally for now.
● ERROR
Identifies an urgent problem with your ix2 device that may result in data loss and requires your
immediate attention.
You can sort the displayed list by Date, User, or Event by clicking the column headers.
Downloading the complete event log file
Click Download to download a comma-separated event log file. A new page is opened with a link to the
event log file. Click the event log file link to download or open the file.
The downloaded file contains 5 columns: Number, Date, User, Severity, Message.
14 Tracing Events on Your ix2 Network Storage
Page 25
Setting up Your ix2 Network Storage
Obtaining System Status for Your ix2 Network Storage
The System Status page displays space usage information and status information about your ix2 Network
Storage. It also provides a control panel that enables you to:
● Blink the lights
● Restart
● Shut down
Space Usage
The Space Usage section graphically represents the amount of space used by Shares on the ix2. The
exact space used displays in a ToolTip when you mouse over each Share.
Control Panel
The Control Panel displays commands for the ix2:
● Blink the lights
To help identify a specific ix2when there is more than one device configured on your network,
blink the lights on the front of the ix2by clicking:
● Restart
Restart the ix2.
● Shut down
Shut down the ix2.
Before shutting down the ix2, be sure you have access to the physical device to turn it on. It is
recommended that you always use the power button to shut down the device.
Device Information
The Device Information section displays various hardware, software, and status details.
Status
The Status Information section displays changes to or issues with your ix2. If an issue requires user action
to resolve, such as a warning or error message, the ix2 Management Console displays a link in the status
message.
The following types of messages can display:
INFORMATION Identifies that a change has been made to the state of your ix2, usually by a user,
such as attaching a peripheral.
WARNING Identifies that there is a problem with your ix2 that requires your attention, but your
device will continue to operate normally for now.
ERROR Identifies an urgent problem with your ix2 that may result in data loss and requires
your immediate attention.
Obtaining System Status for Your ix2 Network Storage 15
Page 26

Setting up Your ix2 Network Storage
Using Your ix2 Network Storage in Various Time Zones
You can set the date and time used on your ix2, so that it can appear to be in one time zone, when it
actually may be in a different one. This can help your users have the correct date and time if they live and
work in a location different from your ix2. You can set the date, time, and time zone through the Date and
Time feature.
When an Active Directory Domain is in use, the storage device synchronizes time with the
domain controller.
1. To change time zones, select a Time Zone from the drop-down menu, and then select how time
will be set for the ix2:
● Internet Time Server — By default, Automatically synchronize with an internet time server
and Use the default time server are selected. To specify a time server, select Specify the time
server and type the URL of the internet time server you wish to use in the text box that
displays.
● Manual — Select Manually set date and time. To set the current date and time, click the
appropriate icon for calendar and clock settings.
2. Click Apply to save your changes.
16 Using Your ix2 Network Storage in Various Time Zones
Page 27

Setting up Your ix2 Network Storage
Setting the Display Language for Your ix2 Network Storage
You can set the display language for your ix2 through the Languages page.
The Languages page allows you to change the language used in email notification messages.
The language used by the ix2 Management Console is based on the preferences configured in your
browser. You can change the language used in this program by modifying your browser's preferred
language settings.
Click Apply to save your changes.
Setting the Display Language for Your ix2 Network Storage 17
Page 28
Setting up Your ix2 Network Storage
Printing Documents
Printing documents from your ix2 Network Storage is simple after you have attached a compatible printer
to the ix2. The Printers page displays a table of printers that are attached to the ix2. The table contains for
each printer the name, model, status, and number of documents waiting.
To attach a printer, simply plug a supported printer's USB cable to a USB port on the ix2. Once attached,
the printer will appear in the table. When the cable is unplugged, the printer will be removed from the table.
For best results, use a printer without multi-function features (for example, scanner, copier, fax,
modem).
18 Printing Documents
Page 29

Setting up Your ix2 Network Storage
Setting up Personal Cloud, Security, and File Sharing
After you have configured some basic features of your ix2 Network Storage, you may also want to set up a
LenovoEMC Personal Cloud, security, or file sharing.
You can set up a Personal Cloud to allow invited users access to content on your ix2. This content can be
in private Shares that are exclusive to the users who join the Personal Cloud, which adds an additional
layer of security. In addition, you may want to join other trusted devices to the Personal Cloud, so that
content on those devices can be made available to Personal Cloud users. For more information about
Personal Cloud, refer to the Personal Cloud overview.
You can enable security so you can secure Shares, create users, and allow selected features to be
enabled. With security enabled, you can create users and set access privileges for those users to limit
data access on secured Shares. For more information on security, refer to What Is Security and Do I Need
It?
It is recommended to set up file sharing so that content can be added to your ix2, and that content can be
made available in a wide variety of ways, including content features such as Active Folders and media
sharing. For more information, refer to the Sharing Overview.
Setting up Personal Cloud, Security, and File Sharing 19
Page 30

Setting up Your ix2 Network Storage
20 Setting up Personal Cloud, Security, and File Sharing
Page 31

CHAPTER 2
Sharing Files
Sharing Files 21
Page 32

Sharing Files
Sharing Overview
Your ix2 Network Storage is set up for storing, retrieving, and accessing files among users, client
computers, and applications.
File sharing is accomplished by creating Shares; setting up security, which includes creating
users; setting up media services; and configuring Active Folders.
Interfaces for Sharing
Your ix2 has three separate interfaces for file sharing:
● ix2 Management Console
You manage the creation of Shares through the ix2 Management Console.
● LenovoEMC Storage Manager
Optionally installed on your local computer, LenovoEMC Storage Manager discovers any
LifeLine-based network storage devices on your subnet, maps device Shares to computers, and
provides local access to your content. It provides access to Shares through your computer's file
management program, such as Windows Explorer or Mac Finder, allowing you to drag and drop
many files between your computer and your ix2 device. Installing LenovoEMC Storage Manager
is optional.
● Home Page
The Home page serves as a web-accessible interface to your ix2 device. The Home page content
is configured using the ix2 Management Console. The Home page displays any unsecured
Shares. It can also display secured Shares accessible only to users who log in to the ix2 device.
You can access the Home page of your ix2 device by entering the device name or IP address
directly in your browser. If security is enabled and you are an administrator user, you can access
the ix2 Management Console from the Home page by clicking .
22 Sharing Overview
Page 33

Shares
What are Shares and How Do I Organize Content with Them?
Shares are folders that contain all types of content, including documents, pictures, and music files. Shares
can be unsecured, which means that anyone who has access to your network can access the content in
these Shares. Shares can also be secured, which means access to content in them is limited to select
users and groups.
All Shares on the ix2 are displayed on the Shares page. The Shares page displays a table that contains
folders, connected drives, and any cloud storage to which your ix2 is connected. The Properties column
displays the features that are enabled for each Share.
Share Information
The Information section displays the Share name, graphically displays the space usage of the Share, and
allows you to view the content using the web-based content viewer.
To view the content of a Share, click View Content to open the Content Viewer.
To learn how to modify your Share information, refer to Managing Shares on next page.
Access Permissions
Sharing Files
The Access Permissions section contains a list of users who currently have access to that Share. Access
Permissions displays when the ix2 is secured, otherwise the section is not shown. If "Everyone" has
access to a Share, it means content on the Share can be viewed by anyone with access to your network
without needing to log into the ix2.
To learn how to modify Access Permissions on a Share, refer to Managing Shares on next page.
Active Folders
Follow the link to the Active Folder options for information on configuring each:
● Email Distribution
● Facebook
● Flickr
● Photo Resize
● Torrents
● YouTube
Adding Shares
1. From the ix2 Management Console, click Shares.
2. To add a new Share, click Add a Share. Type a name for the Share. All Shares must have a
name. Names cannot exceed 32 characters. The following are not valid Share names: global,
homes, printers.
3. Click Create. To modify an existing Share, click the Share row to expand the Share.
Shares 23
Page 34

Sharing Files
Managing Shares
You can change Share information, change access permissions, make a Share an Active Folder, use
Share volumes, and modify a Share volume.
If available, you can also enable NFS secured access.
The Application Data share is created automatically when you install an application that requires
data storage on the ix2 network storage device. Do not change or delete this share.
Changing Share Information
1. Modify the existing name for the Share.
2. Choose whether to enable media sharing. When Media sharing is enabled, the media server scans
this Share for any media content and makes it available to anyone with access to your network,
even if this Share is secured. If you do not want media content made available to anyone, do not
check this option. When Media sharing search is enabled, displays in the Properties for that
Share.
3. To view the content of a Share, click the View Content link to open the Content Viewer.
4. Click Apply to save your changes.
Changing Access Permissions
You should enable security on your ix2 before changing access permissions.
1. Expand Access Permissions to change user permissions to a Share. If your ix2 is not secured, all
Shares that you create are unsecured, and anyone with access to your network has read and write
permissions to a Share. If your ix2 is secured, all existing administrator users have read and write
permissions to a Share. New Shares created on a secured device will be secured by default, so
they will be accessible only by administrator users unless additional access permissions are set. A
security icon displays in the Share's properties if that Share is secured.
2. Check Allow users to change file level security to allow file and folder permissions to be set
through other programs, such as Windows Explorer, independent of the ix2. Setting this option
allows users to put additional access restrictions on individual files and folders.
3.
To limit access to this Share to a specific set of users, click Add access permissions and
choose one or more users from the pop-up window. If you have created groups, you can also limit
access for them in this way.
4. In the Access Permissions section, check Read, Write, or both to set access to this Share for
each user. To remove a user, leave both Read and Write unchecked for that user. If you grant Read
and Write permissions to Everyone, the list of users is also cleared since all users will have access
to this Share. If you have created groups, you can also limit access for them in this way.
5. Click Apply to save your changes.
24 Shares
Page 35

Enabling NFS Secured Access
1. To enable NFS, first click the switch on from the Protocols page.
2. On the Shares page, select a secure Share and expand the NFS section. You cannot apply a rule to
an unsecured Share.
3.
Click Add an NFS rule to add a Host Name for the rule. Rules are added to specify the hosts
that are allowed to access Shares using NFS. Use this table to add NFS rules to specify access for
hosts. For example, *.cs.foo.com matches all hosts in the domain cs.foo.com. To export a Share to
all hosts on an IP address or local network simultaneously, specify an IP address and netmask pair
as address/netmask where the netmask can be in dotted-decimal format, or as a contiguous mask
length. For example, either /255.255.252.0 or /22 will result in identical local networks.
4. When the rule is added, read access is automatically set to the Share. Select Write to allow users
to write to that Share. Use and to modify the rule priority for NFS access.
5. Click Apply to save your changes.
Making a Share an Active Folder
1. You can optionally enable Active Folders on a Share to allow you to associate this Share with a
specific feature that will happen automatically when files are copied to the Share. For example, you
can enable a Share as a social media active folder to upload a file to a social media site. Refer to
Sharing Content with Social Media Overview. You can only set one Active Folder option per Share.
Sharing Files
2. Expand the Active Folder section and check Enable. Select one of the following Active Folder
options and follow the link for details on configuring each:
● Email Distribution
● Facebook
● Flickr
● Photo Resize
● Torrents
● YouTube
3. Click Apply to save your changes.
Deleting Shares
To delete a Share:
1. From the ix2 Management Console, click Shares.
2. To delete an existing Share, click to expand the Share.
3. In the Information section, click Delete to delete the Share.
4. In the Delete Share confirmation pop-up window, click Yes.
5. If you do not wish to delete the Share, click Cancel to return to the Shares page.
Do not delete the Application Data share if it appears on your ix2 network device. It is required by
applications that store data on the ix2.
Shares 25
Page 36

Sharing Files
Using Protocols to Share Files
What Are Protocols and How Do I Use Them to Share Files?
Your ix2 Network Storage uses communication protocols to mount file systems and allow files to be
transferred between client computers and the ix2.
The ix2 includes the following protocols for file sharing:
● Apple Filing Protocol / Time Machine
● Bluetooth
● FTP
● TFTP
● NFS
● rsync
● SNMP
● Web Access (HTTP/HTTPS)
● WebDAV
● Windows DFS
● Windows File Sharing
AFP File Sharing for Macs
The Apple Filing Protocol (AFP) enables Apple file sharing, which is the preferred method for Mac users to
access Shares. When AFP is enabled, you can use Time Machine to back up a Mac client computer to
your ix2 Network Storage. See Backing up Macs with Time Machine for detailed instructions.
AFP is on by default. If AFP has been disabled, click the switch on to re-enable it.
Bluetooth File Sharing
Once a Bluetooth adapter is detected, files can be uploaded from a Bluetooth device to a configurable
destination Share on the ix2.
Configuring Bluetooth settings
1. To enable Bluetooth, click the switch on.
2. Once Bluetooth Transfer is enabled, check the Enable security checkbox to require Bluetooth
users to supply a unique PIN that they have defined before allowing them to transfer files to the
destination Share on the ix2.
If you have enabled security, you must define a unique PIN number, which will be supplied by
devices attempting to upload data using Bluetooth.
3. To set the destination Share, click .
4. Click Apply to save your settings.
26 Using Protocols to Share Files
Page 37

To change any Bluetooth settings, click .
FTP File Sharing
On the Protocols page, click the switch to turn on FTP (File Transfer Protocol) and allow access to your ix2
Network Storage.
Click to select either FTP or secure FTP (SFTP) or both. You must enable security to apply SFTP. If
you select and enable SFTP, you cannot have the secure rsync protocol enabled.
When you turn on FTP, you can send files to your ix2.
NFS File Sharing
On the Protocols page, click the switch to turn on NFS (Network File System). This protocol allows remote
hosts to mount file systems over a network and interact with them as though they were mounted locally to
your ix2. Your ix2 Network Storage uses NFS version 4, which improves security and performance.
Select an option to choose how users on client computers are mapped to the ix2:
Set the squashing options for NFS:
● To have all users, including root, map as guest, select Treat client users as guest (all_
squash). All files are owned by user guest, and all users accessing the ix2 have the same
access rights. If you have enabled Active Directory on your ix2, only this option is available for
mapping client computers.
Sharing Files
● To have all users map as themselves but root maps as guest, select Allow full access for client
users other than root (root_squash).
● To have all users map as themselves, including root, select Allow all client users full access.
If the ix2 is using Active Directory mode, you see the following NFS version 4 security settings:
● System security - This uses Linux system security.
● Kerberos security - Kerberos is a protocol that uses secret key cryptography for authentication
between client and server applications.
● All - Combines system security and Kerberos security.
Once enabled, add NFS access rules for each secure Share from the Managing Shares page. NFS
provides another protocol for sharing storage data with Linux hosts. When NFS is enabled, you can
configure rules for host-based access to secure Shares.
Rules can be added to secure Shares to specify the hosts that are allowed to access Shares using NFS.
For example, *.cs.foo.com matches all hosts in the domain cs.foo.com. To export a Share to all hosts on
an IP address or local network simultaneously, specify an IP address and netmask pair as
address/netmask where the netmask can be in dotted-decimal format, or as a contiguous mask length. For
example, either /255.255.252.0 or /22 will result in identical local networks.
To change any NFS settings, click .
Using Protocols to Share Files 27
Page 38

Sharing Files
Access to Shares through NFS and User Permissions
When you access your ix2 through NFS, the access permissions to content on the ix2 are controlled by
Host-Based Access Control rules on your client computer, not by user access permissions on your ix2.
This means that any valid user on the Linux computer who has access to the host (the storage device) can
access Shares on the ix2, even if not given specific user permission to those Shares on the device.
rsync: Synchronizing Files with Another Storage Device or Other Computers
When you turn on this protocol, you can enable the ix2 Network Storage as an rsync server. When the ix2
is an rsync server, it can be used as a source and/or destination device for rsync Copy Jobs. Because of
the fast and efficient nature of rsync, an rsync Copy Job can be faster than a Windows File Sharing Copy
Job. For more information on Copy Jobs, refer to Backing Up Your ix2 .
If you enable the ix2 as an rsync server, you can optionally set up a user account on the ix2 for secure
rsync Copy Jobs.
Configuring rsync server settings
1. To enable rsync server, click the switch on.
2. To create a secure user account, check Configure secure rsync credentials.
3. The username is preset as rsync. You can change this to a more meaningful user account name.
Enter a password and confirm it for the rsync user account name. When you create a secure
rsync user account on the ix2, you allow other devices to securely copy to or from it.
4. By default, rsync uses TCP port 873 for accepting requests. You can change this value to a
different port number, if desired.
5. Click Apply to save your settings.
To change any rsync server settings, click . You cannot enable rsync server if you have
already enabled SFTP.
TFTP
On the Protocols page, click the switch to turn on TFTP (Trivial File Transfer Protocol) and allow access to
your ix2 Network Storage. When you turn TFTP on, you can send files to your ix2 using FTP.
Monitoring Your Device with an SNMP Management Tool
SNMP (Simple Network Management Protocol) provides information about the state of the ix2 Network
Storageto various administrative computers, known as managers. When the SNMP protocol is enabled on
a device, SNMP agent software on the device reports information to the managers, and an administrator
user can perform some configuration of the ix2 through the manager. Information that comes from the ix2 is
called a trap. Managers and the ix2 must be running on the same network.
SNMP should be disabled unless you are specifically providing information to a management system that
requires this information.
Configuring SNMP settings
1. To enable SNMP, click the switch on.
2. Enter a unique username and password to define the community.
28 Using Protocols to Share Files
Page 39

3. Confirm your password.
4. Enter the IP address of the host in the Trap Receivers text box. To grant access to multiple
receivers, list all of them in the text box, separating each entry with a space.
5. Click Apply to save your settings.
To change any SNMP settings, click .
SNMP Traps
A ix2 can provide various traps to a manager. These traps provide information on the current state of the
ix2.
Traps include:
● A drive may have either failed or been removed
● Multiple drives may have either failed or been removed
● The device encountered a file system corruption
SNMP MIB File for the ix2
The management information base (MIB) file is a database of various device object types, which a
manager can change. Examples of MIB objects are:
Sharing Files
deviceName — the name of the LenovoEMC storage device
diskName — the name of drives on the LenovoEMC storage device
conTable — a table for the connected client count
raidStatus — a description of the RAID status. Values are Normal, Rebuilding, Degraded, RebuildFS,
and Faulted.
The MIB file is available for downloading by entering the following URL in your browser:
http://<devicename>/manage/mibs/lenovoemcmib.txt
Managing File Sharing with Web Access (http/https)
The Web Access protocol enables or disables the link to the Content Viewer from the Shares page. When
the Content Viewer is disabled, you cannot browse any Share content.
If you disable the Web Access protocol, you also disable the display of the home page on your ix2. Refer
to Sharing Your Content with the World for additional information on displaying the home page for your ix2.
WebDAV: Managing Files Using HTTP or HTTPS
WebDAV (Web-based Distributed Authoring and Versioning) is a protocol that provides web-based access
to Shares on the ix2. With WebDAV enabled on the ix2, you can view, add, or delete files through your
WebDAV client using either HTTP for unencrypted access or HTTPS for encrypted access. HTTP offers
faster performance, but is not secured. Access Shares using a URL such as
http://devicename/WebDAV/Foldername. Refer to your operating system's documentation to learn how to
access files through WebDAV.
If your ix2 has a remote access password, you must enter that password and the username
Using Protocols to Share Files 29
Page 40

Sharing Files
"webdav" to access your device. Your ix2 has a remote access password only if the device is not
secured and a Personal Cloud was created on it.
Configuring WebDAV settings
1. To enable WebDAV, click the switch on.
2. To enable WebDAV for HTTP, check Enable WebDAV Over HTTP.
3. To enable WebDAV for HTTPS, check Enable WebDAV Over HTTPS.
4. Click Apply to save your settings.
Windows DFS: Creating a Distributed Windows File System
Windows DFS (Distributed File System) organizes Shares and files on a network, such that they appear to
be all in one directory tree on a single ix2, even if the Shares reside on many devices.
Windows DFS terms
There are several terms to understand with Windows DFS.
● Namespace: A virtual Share containing other folders that are located on different devices
throughout a network.
● DFS root: An object that consolidates all the folders in your network and makes them available
through a single entry point. An example of a DFS root is \\DeviceName\DFSRootName.
● DFS link: A folder under the DFS root.
Configuring Windows DFS settings
To enable Windows DFS, click the switch on.
1. Enter a DFS root name. The DFS root name is the starting point of a DFS namespace.
After entering a DFS root name, you add DFS links, which map to folders on other devices.
2. Click Click to add a DFS link target to begin adding DFS links.
3. Enter the DFS link name, which includes the name of the host and Share to which you are linking.
4. Click Apply to save your settings, or click Cancel to discard your changes.
Windows File Sharing
Windows File Sharing allows you to work in Workgroup mode, using ix2 Management Console to create
users and manage access. To enable Windows File Sharing, click the switch on.
30 Using Protocols to Share Files
Page 41

Sharing Content through the Home Page
Sharing Your Content with the World
When you set up the Home Page of your ix2 Network Storage, you are presenting content to anyone who
accesses your ix2. That content includes a slideshow and unsecured Shares.
You can manage the look of the Home Page by using the Home Page Settings page. This page allows you
to display the slideshow, display unsecured Shares, name the Home Page, and turn the Home Page on or
off.
1. From the ix2 Management Console, click Home Page Settings.
2. Click the slider switch to On to enable the Home Page on your ix2.
3. Select Default home page settings.
4. Enter a title for the Home Page. This title displays in the top banner of the Home Page when users
access the ix2. If you leave this field blank, the default device name is used.
5. Check Display Shares to display unsecured Shares. When you select to display Shares, the
user sees all unsecured Shares on the ix2.
6. Check Display slideshows to display picture slideshows that are in folders on the ix2. Click
Manage slideshows to configure any slideshows you want to display. The slideshow location
can be any folder attached to the ix2, including a USB drive or DFS location.
Sharing Files
7. Click Apply to save your changes, or click Cancel to discard your changes.
Deleting a Slideshow
To delete a slideshow from the list of available slideshows, click . After you delete a slideshow, you
can configure a different one.
Custom Home Page Content
For information on custom home page content, refer to Adding a Custom Home Page below
Adding a Custom Home Page
You can customize the look of the home page of your ix2 Network Storage to include html pages and
client-side scripting, such as Javascript. This customized home page replaces the default home page on
the ix2. In addition, there are applications available on www.lifelineapps.com that can enhance your home
page content.
You add your custom html content to a Share on your ix2 and then specify its location on the Home Page
Settings page.
Applying the Customized Home Page
1. Click the Home Page Settings feature from the ix2 Management Console.
2. On the Home Page Settings page, select Customized home page settings.
3. In the Home Page Name field, enter the name of the start page of your custom home page. By
default, the name is index.html.
Sharing Content through the Home Page 31
Page 42

Sharing Files
4. Specify the destination Share where the start page and your html content exists on your ix2 by
clicking and navigating to the Share.
You cannot access the destination Share through the WebDAV interface. Access through
WebDAV is permanently disabled.
5. Select the Share name and click Apply.
6. Click Apply to save your settings.
When you apply a custom home page for your ix2, the icon for opening the ix2 Management
Console is no longer visible. To return to the ix2 Management Console, you must explicitly enter
the URL to the management console in your browser:
IP address/manage/management.html
32 Sharing Content through the Home Page
Page 43

Automatically Sending Content to Multiple People at Once
You can send content to multiple people at once using an email distribution active folder. You can
configure a Share as an Email Active Folder so that when you add files to that Share, they are
automatically sent to the recipients on the email distribution list. To configure a Share as an Email Active
Folder, access Shares from the ix2 Management Console, select or create a Share, and expand the Active
Folders section to enable and configure email distribution.
How to Set Up an Email Distribution Active Folder
Email Distribution lets you email your files to friends and family right from your ix2 Management
Console. Use Email Distribution to share files with an email list. To prevent email distribution list
spamming, the ix2 allows lists of 250 or fewer email recipients and sends a maximum of six
emails in a 24-hour period.
Refer to Managing Shares on page 24 for more information on managing Shares and Active Folders.
Configuring an Email Distribution Active Folder
1. From the ix2 Management Console, click Shares.
2. Select a Share to use as an Email Distribution Active Folder, and click to expand the Active
Folder section.
Sharing Files
3. Check Enable.
4. Select Email Distribution from the drop-down menu.
5. Include an email address in the Sender Email Address text box. Distribution is sent from this
email address.
6. You can add multiple email addresses in the Email To: text box by separating them with commas,
spaces, or semicolons.
7. Add a subject and email message for your recipients.
8. Check Send the file as an attachment, Send a link to the file, or both.
9. Click Apply to save your changes.
10. Once configured, all files in this Share are sent by email to your recipients. Click View Transfer
History to see the transfer activity from this Share to your account.
Automatically Sending Content to Multiple People at Once 33
Page 44

Sharing Files
Sharing Content Using Social Media: Overview
If you have an account with social media services such as Facebook, Flickr, or YouTube, you can share
content on your ix2 Network Storage with your friends and family using one or more of these social media
sites. To share your content using social media sites, create Shares called Active Folders, and connect
each Active Folder with a social media account. Refer to the help topic links below for more information on
these procedures. When you add photos and movies to an Active Folder, those files are automatically
uploaded to the social media site associated with that Active Folder. If you have photos or movies you
want to share with others, this is a great way to make your content available to people who may not have
access to your ix2.
If you have configured a Personal Cloud on your ix2, you can grant Personal Cloud users access to Shares
and Active Folders. This is useful if you want to allow users to add files to your social media sites. For
example, if your ix2 has a Flickr Active Folder, you can grant Personal Cloud users access to that Active
Folder. In this manner, when photos are added to the Flickr Active Folder, either by you or by Personal
Cloud users, those photos are uploaded automatically to your Flickr account.
Note that an Active Folder can only be associated with one social media account. For example, if you want
Active Folders for your Facebook and YouTube accounts, create two Active Folders, and assign one
Active Folder to Facebook, and one to YouTube. Using this example, any photos you add to your
Facebook Active Folder are automatically uploaded to your Facebook page, and any movies you add to
your YouTube Active Folder are automatically uploaded to your YouTube page. Not only is this a fast and
easy way to share content, but uploading content to your social media sites provides an additional backup
of your content, as the content is stored both on your ix2 and at your social media accounts.
34 Sharing Content Using Social Media: Overview
Page 45

Managing Your Content
You manage content on your ix2 Network Storage using the Content Viewer. The Content Viewer is a
graphical file browser that lets you view and manage content in the Shares on your ix2.
The Content Viewer is divided into two panes. The left pane lists the Shares on the ix2 and allows you to
delete or add a Share. If you select a Share that contains pictures, you can start a slideshow of the
pictures in that Share. The right pane lists the files and folders in a Share and allows you to delete content
or upload a file to the Share.
To delete multiple files simultaneously, hold the Ctrl key on your keyboard and select each file, or drag
your mouse over the filenames. Share content can be sorted, and you can switch between a list view and a
thumbnail view of the files. When you are looking at content in a list view and you hover your mouse over
an image, a thumbnail view of the image displays next to your mouse. If all the content cannot fit on one
page, there are pagination controls that allow you to continue browsing the content.
Sharing Files
Managing Your Content 35
Page 46

Sharing Files
Transferring Content to and from Your ix2 Network Storage with Copy Jobs
You can transfer content to and from your ix2 using the Copy Jobs feature. Copy Jobs copies files from
one storage device to another, either by a set schedule or immediately by the user. An example of a Copy
Job scenario is if you keep pictures from your digital camera on a separate USB drive, but you also want to
maintain a backup of these pictures on your ix2. Using Copy Jobs, you can create a task that copies your
photos on the USB drive to a Share on your ix2, and you can set that task to a schedule so the images
automatically copy at a specific time. This ensures that your photos are always safely backed up to your
ix2 in the event your USB device ever fails or is lost.
While a Copy Job copies all data from one NAS device to another, it does not copy permissions or
access rights from one NAS device to another.
All saved Copy Jobs display on the Copy Jobs page. From there, you can manually start and stop a Copy
Job, view Copy Job information, modify a Copy Job, check its last run status, and, if applicable, view
when the Copy Job is next scheduled to run.
When defining a Copy Job, you can copy data from or to any of the following:
● Any NAS device automatically discovered on the same subnet as your ix2
● Any NAS device that you manually add to the subnet using the LenovoEMC Storage Manager
● Any external storage device, such as a USB device, connected to your ix2
● A Windows computer that is automatically discovered on the same subnet as your ix2
When selecting what data to copy on the source storage device, you can choose a specific folder or all
folders. You can also copy from a folder on an external storage device mounted to your ix2.
When selecting the destination device, you can copy files to the top-level folder on the destination device
(the default option), or to an existing folder on this device, which adds the copied files into folders.
You can manually start or stop a Copy Job by clicking start or stop buttons on the Copy Jobs page. You
can schedule a Copy Job to run automatically at a set day and time.
Copy Jobs Limitations
● Copy Jobs does not establish a continuous replication or mirroring relationship between the
source and destination devices. You should not set up Copy Jobs for disaster recovery.
● Copy Jobs does not support transferring content from iSCSI drives.
36 Transferring Content to and from Your ix2 Network Storage with Copy Jobs
Page 47

Getting Content from a USB External Storage Device
You can transfer content to your ix2 Network Storage from external USB storage devices. The External
Storage page displays a list of externally connected storage devices. You can connect supported external
storage to your ix2 using one of the provided USB ports. When you connect external storage to your ix2,
that device content is accessible from the Shares page.
Safely removing external storage
Click to safely remove the external storage. A confirmation dialog will display. Click Yes to remove
the external storage. When the external storage has been removed from the External Storage table, it is
safe to remove, and you may unplug it from the ix2. When the external storage is safely removed, its
associated Share is removed as well.
Sharing Files
Getting Content from a USB External Storage Device 37
Page 48

Sharing Files
38 Getting Content from a USB External Storage Device
Page 49

CHAPTER 3
iSCSI: Creating IP-Based Storage Area Networks (SAN)
iSCSI: Creating IP-Based Storage Area Networks (SAN) 39
Page 50

iSCSI: Creating IP-Based Storage Area Networks (SAN)
iSCSI Overview
The iSCSI page allows you to create iSCSI drives on your ix2 Network Storage and allows the
LenovoEMC Storage Manager to communicate with those drives over a network. An iSCSI drive provides
a single place for all your storage, which you can divide as needed to support all computers in your
enterprise business. iSCSI is useful for transmitting large blocks of data over a network at a high speed.
Only one client computer can connect to an iSCSI drive at a time, so iSCSI drives are not for shared data.
If your business is clustering clients, then a cluster can access iSCSI drives. Also, you must create a list
of users who can access an iSCSI drive. These are not users who have access to other features on your
ix2.
40 iSCSI Overview
Page 51

iSCSI: Creating IP-Based Storage Area Networks (SAN)
Adding iSCSI Drives
To add an iSCSI drive:
1. From the ix2 Management Console, click iSCSI.
2. When the iSCSI page opens, click the switch to enable the feature.
3. Click Add an iSCSI drive.
4. Enter a name for the iSCSI drive.
5. Enter a size for the iSCSI drive. The size must be smaller than the free space available on your
ix2.
6. Click Create to create the iSCSI drive.
Enabling iSCSI Drives
1. Click Settings to begin configuring an iSCSI drive.
2. To set the discovery of the iSCSI drive using iSNS, check Enable discovery with iSNS.
3. Choose one of the following options:
● Use local iSNS server — the device acts as an iSNS server for the iSCSI drives.
● Use external iSNS server — you supply the IP address or host name of the external iSNS
server for the iSCSI drives.
4. To enable the Challenge Handshake Authentication Protocol (CHAP), check Enable two-way
authentication (Mutual CHAP). With Mutual CHAP enabled, the client performs an additional
check to confirm that it is using the correct device.
5. Enter an initiator secret (password) for Device Secret and then enter it again in the confirm box.
6. Click Apply to save your changes.
Connecting to iSCSI Drives
You can connect iSCSI drives on your ix2 to your computer using LenovoEMC Storage Manager or the
Microsoft software initiator. If you are using another type of software or hardware initiator, you must use
the native tools provided with your initiator to connect your iSCSI drives. Do not connect more than one
iSCSI initiator at a time to an iSCSI drive.
Attempting to connect two iSCSI initiators to the same iSCSI drive at the same time may result in
data corruption or drive damage. The ix2 Management Console prevents you from connecting two
iSCSI initiators to the same iSCSI drive at the same time, but if you connect to an iSCSI drive
using native tools, you may encounter this issue. You can use the Connected Clients section to
view a list of client computers connected to your ix2 that are running iSCSI initiator software. On
the iSCSI page, expand an iSCSI drive, then expand the Connected Clients section. If the iSCSI
drive is in use, you will see a list of connected client computers running initiator software.
Adding iSCSI Drives 41
Page 52

iSCSI: Creating IP-Based Storage Area Networks (SAN)
Managing iSCSI Drives
Adding CHAP User Access to an iSCSI Drive
After you add an iSCSI drive, you create a list of CHAP users that have access to an iSCSI drive. These
users are independent from the users you create on your ix2 when you enable security. Adding
iSCSI CHAP users does not enable security and does not require any login to allow access to an
iSCSI drive.
1. On the iSCSI page, expand an iSCSI drive, and expand iSCSI CHAP Users to add user access
to an iSCSI drive.
2. Click Add a CHAP user and enter a CHAP username and password.
3. Click Create. Continue adding as many users as needed to access the drive.
4. To delete a user, expand the user section and click Delete.
42 Managing iSCSI Drives
Page 53

iSCSI: Creating IP-Based Storage Area Networks (SAN)
Deleting iSCSI Drives
To delete an iSCSI drive:
1. From the ix2 Management Console, click iSCSI.
2. Click the iSCSI name to expand the iSCSI drive.
3. In the iSCSI Information section, click Delete to delete the iSCSI drive.
4. Click Yes in the confirmation pop-up window.
5. If you do not wish to delete the iSCSI drive, click Cancel to return to the iSCSI page.
Deleting iSCSI Drives 43
Page 54

iSCSI: Creating IP-Based Storage Area Networks (SAN)
44 Deleting iSCSI Drives
Page 55

Drive Management
Drive Management
45
Page 56

Drive Management
Managing Drives
The Drive Management page provides settings for managing storage and lets you apply global settings for
drives on your ix2 Network Storage.
Setting Write Caching
Select a value for disk write caching.
Write caching is a mechanism that attempts to separate the fast processing speed of the ix2 from the
relatively slow mechanics of actually writing data to drive.
With write caching disabled, every write to drive causes the ix2 to wait while the data is written to drive,
which can slow performance. When write caching is enabled and the ix2 sends a write request to the drive,
it writes the data to cache (which is much faster) and sends an immediate acknowledgement to the ix2
saying the write is complete. The system proceeds without waiting for the data to actually get written to
drive, which occurs in the background.
While write caching does improve performance, there are some risks. The system responds that the data
is written to drive when in fact it has only been written to cache. Should the ix2 lose power, any data not
completely written to drive is lost forever.
This is because cache memory is volatile. If you lose power, the contents of the cache are lost. Therefore,
if there were any pending writes in the cache that were not written to the drive, they will be lost forever.
Using a UPS (Uninterrupted Power Supply) can mitigate the risk associated with write caching, which is
why it is recommended to only enable this feature when a UPS is connected.
Applying Global Drive Management Settings
1. Click Settings.
2. To change the protection, choose a value from the drop-down menu:
● Mirror (RAID 10)
Uses half of the storage space for protection, leaving half for actual data.
● Striped (RAID 0)
Distributes data across several drives in a way that gives improved speed at any given
instant.
● None
Turns off data protection and leaves your data vulnerable to data loss.
3. Select a value for disk write caching.
4. Check Enable periodic consistency check to enable a monthly parity or mirror consistency
check. The check helps to prevent a single drive failure from becoming a two-drive failure,
resulting in data loss. The check runs for several hours and can affect performance of the ix2. If
you do not want to run the check, uncheck this option.
5. Click Apply to save your changes.
46 Managing Drives
Page 57

Drive Management
Drive Status
An image on the Drive Management page provides information on the drive status of your ix2. The image
displays the physical layout of drives and the drive slot numbers. If a drive has a circled letter, it is a
member of a Storage Pool. If you hover your mouse over a drive in the image, the ToolTip displays the
drive model, size, and status, including if the drive is failing.
If you hover your mouse on either a Storage Pool name in the table or on a drive in the Storage Pool image,
all drives in the Storage Pool are highlighted.
Managing Drives 47
Page 58

Drive Management
48 Managing Drives
Page 59

CHAPTER 5
Backing up and Restoring Your Content
Backing up and Restoring Your Content 49
Page 60

Backing up and Restoring Your Content
Backup and Restore Overview
Your ix2 Network Storage provides many ways to back up and restore content.
To back up content to and restore content from your ix2, you can use:
● Time Machine
● Copy Jobs
To back up and restore your ix2, you can use the following features and applications:
● Copy Jobs
● Avamar
● Amazon S3
● LenovoEMC Personal Cloud features
Backup of Data through RAID Protection
The drives in your ix2 are protected using a built-in, pre-configured technology that redundantly stores data
across the drives. This technology, known as RAID (Redundant Array of Independent Disks), enables a
series of drives to act together as a single storage system. RAID configurations that provide data
redundancy preserve data integrity on the system if a drive fails and is replaced.
While RAID technology provides fault tolerance, it is not a true backup. It is strongly
recommended to always have another copy of your data that is not stored on the ix2.
For more information, refer to Understanding How Your Content Is Stored.
50 Backup and Restore Overview
Page 61

Backing up and Restoring Your Content
Backing up to and Restoring from Your ix2 Network Storage
Backing up Macs with Time Machine
You can use Time Machine to back up a Mac client computer to the ix2 network storage device.
Follow the instructions below to set up Time Machine backups to your ix2:
1. Connect your Mac to your ix2 using Apple File Protocol (AFP). You can do this using LenovoEMC
Storage Manager for Mac or Bonjour.
2. Mount the Backup Share from the ix2 network device.
If you want to create a new Share for Time Machine backups, you can do so using the ix2
Management Console. Mount the Share you want to use before proceeding to the next step.
3. Select System Preferences... from the Apple Menu.
4. Select Time Machine (listed under System).
5. Click ON to enable Time Machine.
6. From the list of available drives, choose the desired Share on your ix2, then click Use for
Backup.
7. Time Machine will automatically create the sparsebundle image under the selected Share and
begin backing up your computer to your network storage device. After the initial backup, Time
Machine backs up files every hour.
Time Machine uses a single destination drive for backups. If you have previously set up another
drive for Time Machine backups and want to change to use the ix2 network device, click Select
Disk, then choose the desired Share on your ix2.
Copy Jobs Overview
You can back up content to and from your ix2 Network Storage using the Copy Jobs feature. Copy Jobs
copies files from one storage device to another, either by a set schedule or immediately by the user. An
example of a Copy Job scenario is if you keep pictures from your digital camera on a separate USB drive,
but you also want to maintain a backup of these pictures on your ix2. Using Copy Jobs, you can create a
task that copies your photos on the USB drive to a Share on your ix2, and you can set that task to a
schedule so the images automatically copy at a specific time. This ensures that your photos are always
safely backed up to your ix2 in the event your USB device ever fails or is lost.
For more information, refer to Backing up Your ix2 Network Storage on next page.
Backing up to and Restoring from Your ix2 Network Storage 51
Page 62

Backing up and Restoring Your Content
Backing up Your ix2 Network Storage
Copy Jobs
Transferring Content to and from Your ix2 Network Storage with Copy Jobs
You can transfer content to and from your ix2 using the Copy Jobs feature. Copy Jobs copies files from
one storage device to another, either by a set schedule or immediately by the user. An example of a Copy
Job scenario is if you keep pictures from your digital camera on a separate USB drive, but you also want to
maintain a backup of these pictures on your ix2. Using Copy Jobs, you can create a task that copies your
photos on the USB drive to a Share on your ix2, and you can set that task to a schedule so the images
automatically copy at a specific time. This ensures that your photos are always safely backed up to your
ix2 in the event your USB device ever fails or is lost.
While a Copy Job copies all data from one NAS device to another, it does not copy permissions or
access rights from one NAS device to another.
All saved Copy Jobs display on the Copy Jobs page. From there, you can manually start and stop a Copy
Job, view Copy Job information, modify a Copy Job, check its last run status, and, if applicable, view
when the Copy Job is next scheduled to run.
When defining a Copy Job, you can copy data from or to any of the following:
● Any NAS device automatically discovered on the same subnet as your ix2
● Any NAS device that you manually add to the subnet using the LenovoEMC Storage Manager
● Any external storage device, such as a USB device, connected to your ix2
● A Windows computer that is automatically discovered on the same subnet as your ix2
When selecting what data to copy on the source storage device, you can choose a specific folder or all
folders. You can also copy from a folder on an external storage device mounted to your ix2.
When selecting the destination device, you can copy files to the top-level folder on the destination device
(the default option), or to an existing folder on this device, which adds the copied files into folders.
You can manually start or stop a Copy Job by clicking start or stop buttons on the Copy Jobs page. You
can schedule a Copy Job to run automatically at a set day and time.
Copy Jobs Limitations
● Copy Jobs does not establish a continuous replication or mirroring relationship between the
source and destination devices. You should not set up Copy Jobs for disaster recovery.
● Copy Jobs does not support transferring content from iSCSI drives.
Adding Copy Jobs
The page describes how to:
● Add Copy Jobs
● Set From Information
● Set To Information
● Set a Schedule
52 Backing up Your ix2 Network Storage
Page 63

Backing up and Restoring Your Content
Adding Copy Jobs
1.
On the Copy Jobs page, click . A Copy Job is added to the top of the list and the Information
section displays.
2. Enter a name for the Copy Job.
3. The Overwrite Setting determines what happens to files in the destination location if they have the
same name as those in the source location. Select one of the following values from the Overwrite
Setting drop-down menu:
● Overwrite and don't delete — Files in the destination location are overwritten with files from
the source location. Any files in the destination location that are not in the source location are
preserved.
● Overwrite and delete — Files in the destination location are overwritten with files from the
source location. Any files in the destination location that are not in the source location are
deleted. The destination location becomes an exact copy of the source location.
● Don't overwrite — Only files in the source location that are not in the destination location are
copied. No files are overwritten in the destination location.
From: Settings
1.
In the From: section, click to select a source location. This is the location of the files you
want to copy. In the dialog, enter the Device Name or IP address in the text box, or select a device
from the list. If a connected device is not listed, click the Refresh button.
2. Click OK to save your selection or click Cancel.
3. The Protocol drop-down menu displays if the source device is different from the device you are
currently accessing; for example, it could be a separate NAS device on your network. From the
Protocol drop-down menu, choose one of the following:
● Windows File Sharing — The default value in the menu is Windows File Sharing and in most
cases you should accept the default value. For more information, refer to Windows File
Sharing on page 30.
● rsync — The rsync protocol can provide faster copying, but may not be available on all
devices. If you are able to select the rsync protocol, and you want the rsync Copy Job to be
secure, select the Use secure rsync (SSH) option. Enter the rsync username and password
for the rsync server to or from which you are copying. The rsync username and password is
set up on a different device than the device on which you are creating the Copy Job. For more
information on creating an rsync user, refer to rsync: Synchronizing Files with Another Storage
Device or Other Computers on page 28.
4. Enter a valid username and password, if applicable, for the device to provide access to its folders.
5.
To select a specific folder, click to select a source location for the What to copy: section. In
the Copy dialog box, select all Shares or a folder, and select one of the following options for the
Copy Job from the drop-down menu:
● The selected folder and its contents — copies the selected folder and its contents. If the
destination is a folder, a new folder will be created for each source folder. If the destination is
Top Level, a new top-level folder is created on the destination device for each source folder.
Backing up Your ix2 Network Storage 53
Page 64

Backing up and Restoring Your Content
● Only the contents of the selected folder — copies the contents of the selected folder; not
the folder itself. If the destination is a folder, the files and folders in the selected folder are
copied directly to it (the source folder name is not copied). If the destination is Top Level, a
new top-level folder is created on the destination device for each folder in the source folder.
6. By selecting Shares, you choose to copy All Shares, in which all files on the ix2 are copied. Any
files not contained in a folder are not copied. If the destination is a folder, a new folder will be
created for each source folder. If the destination is Top Level, a new top-level folder is created on
the destination device for each source folder.
7. Click OK to save your selection or click Cancel.
8. Click Apply to save your changes.
To: Settings
1.
In the To: section, click to select a destination location. This is the location where you want
your files copied. In the dialog, enter the Device Name or IP address in the text box. Or, from the
drop-down menu, select a device in the list. If a connected device is not listed, click the Refresh
button.
2. Click OK to save your selection or click Cancel.
3. The Protocol drop-down menu displays if the source device is different from the device you are
currently accessing; for example, it could be a separate NAS device on your network. From the
Protocol drop-down menu, choose one of the following:
● Windows File Sharing — The default value in the menu is Windows File Sharing and in most
cases you should accept the default value. For more information, refer to Windows File
Sharing on page 30.
● rsync — The rsync protocol can provide faster copying but, may not be available on all
devices. If you are able to select the rsync protocol, and you want the rsync Copy Job to be
secure, select the Use secure rsync (SSH) option. Enter the rsync username and password
for the rsync server you are copying from or to. The rsync username and password is set up on
a different device than the device on which you are creating the Copy Job. For more
information on creating an rsync user, refer to rsync: Synchronizing Files with Another Storage
Device or Other Computers on page 28.
4. Enter a valid username and password, if applicable, for the device to provide access to its folders.
5.
To select a specific folder, click to select a destination location for the Copy to here: section.
In the Copy to here dialog, select a Share or a folder from a Share to copy your files.
6. Click OK to save your selection or click Cancel.
7. Click Apply to save your changes.
Setting a Schedule
1. To set a schedule, expand the Schedule section.
2. In the Schedule section, select Enable Schedule for Copy Job.
3. Select the days you want the Copy Job to run, or select All Days to run the Copy Job every day.
4.
Click to select a start time. Click Done to save your time selection.
5. Click Apply to save your changes. The new Copy Job displays on the Copy Jobs page.
54 Backing up Your ix2 Network Storage
Page 65

Backing up and Restoring Your Content
Managing Copy Jobs
From the Copy Jobs page, you can add, start, stop, delete, or monitor Copy Jobs.
After you have added Copy Jobs, the Copy Jobs page displays a list of Copy Jobs. The information
section includes the name of each Copy Job, date and time it last ran, and its next scheduled time.
From the Copy Jobs list, you can perform the following actions:
Modifying Copy Jobs
1. In the list on the Copy Jobs page, find the Copy Job you want to modify, and click it to expand the
Information section.
2. Refer to From: Settings on page 53 for information about revising the Copy Job fields.
Deleting Copy Jobs
1. In the list on the Copy Jobs page, find the Copy Job you want to delete.
2. Click from the Actions column of the table to delete the Copy Job.
The Delete Copy Job pop-up window opens.
3. If you are sure that you want to delete the Copy Job, click Yes.
If you do not wish to delete the Copy Job, click Cancel to return to the Copy Jobs page.
Restoring Files with Copy Jobs
To restore files with Copy Jobs, create a new Copy Job that reverses the back-up Copy Job. Modify the
From and To settings to copy files from the backup location to the original source location, specify what to
restore, set overwrite settings, and choose the protocol for the Copy Job.
Refer to From: Settings on page 53 for detailed information on Copy Job settings.
Backing up with Mozy Backup
The Mozy online backup service allows you to create a Mozy account, connect your ix2 Network Storage
to the account, and back up Shares and folders to the Mozy cloud service.
Enabling Mozy Account Information
1. On the Mozy Backup page, click the switch on.
Note: If you do not have a Mozy account, click the link to open an account.
2. Enter a valid email address, password, license key, and country for your Mozy account.
3. To upgrade your Mozy account, click the link.
4. Click Apply to save your changes.
Selecting Folders to Back Up
5. Expand the Backup section and select the Shares and folders to back up in the tree. The tree
provides a way to select a Share and all its folders, or just some of the folders under a Share.
6. Click Apply to save your changes.
7. To create a scheduled backup, click Backup schedule settings.
Backing up Your ix2 Network Storage 55
Page 66

Backing up and Restoring Your Content
8. In the Mozy Backup Settings dialog box, select one of the following:
● Automatic Backup — to generate an automatic backup anytime you add a new file or change
an existing file to your selected Shares or folders.
● Scheduled Backup — to set up a scheduled backup.
9. If you are creating a scheduled backup, select the days you want the backup to run.
● Enter the start or stop times for the backup, or click to select the times.
● To prevent performance degradation on your ix2, select a speed limit for the backup.
● To schedule the time that the backup will run at the selected speed, enter start and stop times.
10. Click Apply to save your changes.
11. Click Apply to save the selected Shares and folders to back up.
12. After a backup has completed, click View log to see which files have been successfully backed
up by Mozy.
Restoring Files with Mozy Backup
To restore folders and files with Mozy Backup:
1. Click the link to restore any files and folders you back up to your Mozy account.
2. Select the desired backup from the Backup Date: drop-down menu, either the latest backup or a
previous one.
The file browser provides a way to select a Share and all its folders, or just some of the folders
under a Share.
3. Click Apply to save your changes.
The Restore section displays a table with the status of a restore, either one in progress or one that
has failed. To delete the restore task, click and confirm the deletion. When the restore
finishes, the table status clears.
Registering with Avamar for Backup and Restore
Avamar is backup and recovery server software that uses deduplication to eliminate redundant copies of
data, reducing the required storage space. For example, your ix2 Network Storage might have 100 email
messages with the same 1 MB attachment. If all those emails are backed up, that same attachment is
backed up 100 times, requiring 100 MB of storage space. With Avamar and data deduplication, only one
copy of the attachment is actually stored, so 100 MB of storage is effectively reduced to 1 MB.
When you enable Avamar on your ix2, you are registering with an Avamar server. You cannot
back up and restore from your ix2. Backup and restore operations are executed from the Avamar
server.
Registering Your ix2 with the Avamar Server
1. On the Avamar page, click the switch on.
The Avamar Settings pop-up window opens.
2. In the Avamar Settings pop-up window, enter the following information and click Apply to save
your settings:
56 Backing up Your ix2 Network Storage
Page 67

Backing up and Restoring Your Content
● Server Address — the Avamar server IP address or hostname.
● Client Domain — the registered domain name from the Avamar server.
Backing up with Amazon S3
The Amazon S3 online storage service allows you to back up your ix2 Network Storage to the cloud.
Enabling the Amazon S3 Feature
1. On the Amazon S3 page, click the switch on.
If you do not have an Amazon S3 account, click the link to create an account.
2. Enter a valid access key, secret key, and bucket name from your Amazon S3 account
information.
You can create a bucket at account setup, or you can enter a new bucket for your ix2. Your
content lives in this bucket on your Amazon S3 account.
3. Select an existing Share on your ix2 in which to copy files that are then backed up to Amazon S3.
4. Click Apply to save your changes.
Backing up Files to the Amazon S3 Cloud
After you copy files to the selected Share on your ix2, the files are automatically backed up to the Amazon
S3 cloud service. File uploads are limited to 5 GB in size. If you delete files from the selected Share on
your ix2, they are not automatically deleted from the cloud service. You can manually delete those files
from the cloud service by clicking a command on the Amazon S3 page.
Restoring Files with Amazon S3
When you want to restore files from the Amazon S3 cloud service to your ix2 Network Storage, you can
choose to restore all files or select individual files to restore.
Backing up with LenovoEMC Personal Cloud
You can back up content on your ix2 Network Storage by creating a Copy Job from the LenovoEMC
Personal Cloud hosted on the device to another LifeLine-based network storage device that is a member of
the same Personal Cloud.
Refer to LenovoEMC Personal Cloud help for additional information.
Restoring Files with Personal Cloud
You can restore content on your ix2 by creating a Copy Job from the LenovoEMC Personal Cloud on it to
another ix2 that is a member of the Personal Cloud.
Refer to LenovoEMC Personal Cloud help for additional information.
Backing up Your ix2 Network Storage 57
Page 68

Backing up and Restoring Your Content
58 Backing up Your ix2 Network Storage
Page 69

CHAPTER 6
Securing Your ix2 Network Storage and Contents
Securing Your ix2 Network Storage and Contents 59
Page 70

Securing Your ix2 Network Storage and Contents
What Is Security and Do I Need It?
Security is an optional feature you can enable on your ix2 Network Storage to secure Shares, create users,
and allow some features to be enabled. When you create users, you can limit access to your ix2 to specific
people, and when you secure Shares, you limit data access to specific users. Security adds an extra layer
of protection to your ix2 beyond whatever form of security you have on your local network. Without
security, all data on your ix2 can be accessed by anyone on your local network.
To secure your ix2:
● First enable security and create an administrator user.
● Create users.
● Create groups.
● Secure any existing or new Shares.
● Secure any existing or new iSCSI drives.
60 What Is Security and Do I Need It?
Page 71

Securing Your ix2 Network Storage and Contents
Enabling Security and Creating an Administrator User
With security turned on, only administrator users can view or change settings on the ix2, including creating
or deleting users and Shares. When you create users, you limit access to your ix2 to specific people, and
when you secure Shares, you limit data access to specific users.
1. On the Security page, click the switch on.
2. When you turn security on, you will be asked to create an administrator user. Provide a username
and password, and then confirm your password.
3. Encryption is always available when you access your ix2 using https. By setting local encryption,
you enforce encryption on your local network. By setting remote encryption, you enforce
encryption outside your local network, such as through the internet. Choices for both encryption
types are Not required, Passwords only (passwords are encrypted through https), and Always
(encryption is always enforced). Always encrypting communication is safest, but can impact
performance.
When security is turned on, browser communications with the ix2 are encrypted. Therefore, each
computer that attempts to access the ix2 may encounter a security warning, which can be safely
ignored. In addition, you may be asked to accept a signed certificate for the ix2 , which you should
accept. If you change the device name at a later date, these warnings may appear again.
4. If you have your own security certificate, you can load it by selecting Use an imported
certificate and browsing to the certificate to load it.
5. Click Apply to save your changes.
6. Click here to learn how to create users.
7. Click here to learn how to secure any existing or new Shares.
Disabling Security
Disabling security will cause all defined users to be deleted.
If you are using other features on your ix2 that require security, you cannot disable security until
those features are also disabled.
1. On the Security page, click the switch off.
2. Disabling security will cause all defined users and groups to be deleted. Check the box to disable
security.
3. Click Apply to save your changes.
Security is disabled.
Enabling Security and Creating an Administrator User 61
Page 72

Securing Your ix2 Network Storage and Contents
Limiting Access to Your Content by Creating Users
When you create users, you are selecting the specific people that have access to your ix2 Network
Storage. You can secure Shares and specify which users can read and write to the secured Shares. You
can also create additional administrator users who can manage the ix2 through the ix2 Management
Console. Administrator users can change various settings on the ix2, including adding and deleting
Shares. If you create groups, you can also limit access to your ix2 by group so you don’t have to specify
access for each individual user.
62 Limiting Access to Your Content by Creating Users
Page 73

Securing Your ix2 Network Storage and Contents
Users
Users and Groups Overview
When security is enabled, the Users & Groups page displays all users and groups on the ix2 Network
Storage and enables administrators to add and modify users and groups.
Non-administrator users can be added to limit access to Share content. Additional administrator users can
be added to allow specific users to configure the ix2.
The table displays the Usernames and Descriptive Name of each user and group. Click in a row of the
table to view or modify details about a user or group.
Adding Users
To add a user:
1. Navigate to the Users & Groups page.
2. Before you can create or modify users, you must have security enabled on your ix2 Network
Storageix2. If security is already enabled, you are ready to add users. If not, a pop-up window
appears for enabling security and create an administrator user to manage your secured ix2.
3. To add a new user, click Add a user.
4. Enter the following information:
● Username — enter the username of the user to be created. This is the username for logging
into the ix2. There is a maximum of 32 characters, and spaces are not allowed. The following
are not valid usernames: root, daemon, bin, sys, sync, mail, proxy, www-data, backup,
operator, sshd, postfix, nobody, unuser, guest, and rsync.
● Descriptive Name — add a descriptive name to identify the user. For example, if you created
a user with a Username of jsmith, you may want to add the Descriptive Name Joe Smith.
● Password — create a password for the user. The password should be at least 8 to 12
characters, and spaces are not allowed. The maximum password length is 32 characters.
● Confirm Password — confirm the password. If the text in this field does not match the text in
the Password field, an error will be returned.
● Quota Size — set a quota size by entering a value in gigabytes. This limits the amount of
storage space this user can have. To have no quota, leave this field blank.
● Administrator — check this box to allow this user to manage the ix2.
Note: An administrator does not have default access to all Shares. Access to Shares must be
granted explicitly to all users, including administrators.
● Add a secured Share for this user — check this box to create a secured Share for this user.
This Share will have the new user's name, and allows access only to that user.
● Send a Personal Cloud invitation — click this link to invite a user to join your Personal Cloud
on the ix2. This opens the Send a Personal Cloud Invitation dialog box where you create an
Users 63
Page 74

Securing Your ix2 Network Storage and Contents
invitation by entering a user's email address along with any additional comments. A user then
receives the invitation, which contains the Personal Cloud name and username and
password. A user enters that information from LenovoEMC Storage Manager. For more
information on this, refer to the online help with LenovoEMC Storage Manager. You see this
option only if a Personal Cloud has been created on the ix2.
● Allow this user to add trusted devices to my Personal Cloud — check this box to allow a
user to join a trusted device to a Personal Cloud. A trusted device is a machine, either a
computer or another ix2, that belongs to an added user. Only trusted devices that belong to
users that have been added to the ix2 can join the LenovoEMC Personal Cloud. This option
displays only if a Personal Cloud has been created on the ix2.
5. Click Create.
Managing Users
The page describes how to:
● Change User Information
● Change Access Permissions
● Set Quotas
Changing User Information
1. Modify the following information:
● Username — enter the username of the user to be created. This will be the username provided
when logging into the ix2 Network Storage. There is a maximum of 32 characters, and spaces
are not allowed. The following are not valid usernames: root, daemon, bin, sys, sync, mail,
proxy, www-data, backup, operator, sshd, postfix, nobody, unuser, guest, and rsync.
● Descriptive Name — add a descriptive name to identify the user. For example, if you created
a user with a Username of jsmith, you may want to add the Descriptive Name Joe Smith.
● Password — create a password for the user. The password should be between 8 and 12
characters, and spaces are not allowed.
● Confirm Password — confirm the password. If the text in this field does not match the text in
the Password field, an error will be returned.
● Send a Personal Cloud invitation — click this link to invite a user to join your Personal Cloud
on the ix2. This opens the Send a Personal Cloud Invitation dialog box where you create an
invitation by entering a user's email address along with any additional comments. A user then
receives the invitation, which contains the Personal Cloud name and username and
password. A user enters that information from LenovoEMC Storage Manager. For more
information on this, refer to the online help with LenovoEMC Storage Manager. You see this
option only if a Personal Cloud has been created on the ix2.
● Allow this user to add trusted devices to my Personal Cloud — check this box to allow a
user to join a trusted device to a Personal Cloud. A trusted device is a machine, either a
computer or another ix2, that belongs to an added user. Only trusted devices that belong to
users that have been added to the ix2 can join the LenovoEMC Personal Cloud. You see this
option only if a Personal Cloud has been created on the ix2.
64 Users
Page 75

Securing Your ix2 Network Storage and Contents
● Quota Size — set a quota size by entering a value in gigabytes. To have no quota, leave this
field blank.
● Administrator — check this box if you would like to allow this user to manage the ix2.
An administrator does not inherently have access to all Shares. Access to Shares must be
granted explicitly to administrators, as with other users.
2. Click Apply.
Changing Access Permissions
1. Expand Access Permissions to change Share access permissions for the selected user.
2. To give this user access to a specific set of Shares, click Add access permissions.
3. In the Add Access Permissions pop-up window, select which Shares this user can access, and
click Apply.
4. Uncheck Read or both Read and Write to limit or deny access permission to each Share for this
user.
5. Click Apply to save your changes. When both Read and Write are unchecked, the Share is
removed from the list.
Setting Quotas
You can limit the amount of space allocated to one or more users by applying quotas.
1.
Click Quota Settings to enable quotas, and set a default quota for each user.
2. In the Quota Settings pop-up window, check Enable quotas to turn on quotas for each user.
3. If desired, enter a Default Quota. This quota applies to new users only.
4. Check Set default quota for all users to apply the default quota to all users.
5. Click Apply to save your changes.
6. To set individual user quotas, expand the Information section for a user and enter a value in Quota
size. If you leave the box blank, there is no quota for that user.
7. Click Apply to save your changes.
Deleting Users
To delete a user:
1. From the ix2 Management Console, click Users.
2. To delete an existing user, click the username to expand the user.
3. In the User Information section, click Delete.
4. In the Delete User pop-up window, click Yes.
5. The user is removed from the user list.
Users 65
Page 76

Securing Your ix2 Network Storage and Contents
Groups
Groups Overview
Groups consist of one or more users, and administrators can grant each group rights to Shares on the ix2
Network Storage. Users can belong to more than one group. The Groups page enables administrators to
create one or more groups, and grant each group rights to Shares on the ix2. Security must be enabled
before you can create groups.
Refer to the Security page to enable security permissions and create an administrator account, if
you have not done so already.
By default, there are no groups defined. Once an administrator defines one or more groups, the Groups
functionality is dynamically available when creating, modifying, and viewing users, Shares, and groups.
How Access Rights Are Granted Using Groups in Workgroup Mode
When groups are defined in Workgroup mode, a user's access rights are the most rights granted to the
user and all groups to which the user belongs. For example, assume 3 Shares exist (SF1, SF2, and SF3),
two users (UserA and UserB), and three groups (Group1, Group2, Group3). When created, UserA was not
granted access rights to any Share, and UserB was granted Read rights to SF3. Group1 has Read/Write
rights to SF1, Group2 has Read/Write rights to SF2, and Group3 has Read/Write rights to SF3. If UserA is
added to Group1, UserB is added to Group2, and Group1 is added to Group3, the table below shows the
resulting access rights for each user and group defined:
Name Member of Group Access Rights
UserA Group1, Group3 SF1 - Read/Write SF3 - Read/Write
UserB Group2 SF2 - Read/Write SF3 - Read
Group1 Group3 SF1 - Read/Write SF3 - Read/Write
Group2 none SF2 - Read/Write
Group3 none SF3 - Read/Write
Adding Groups
1. On the Groups page, click Add a group. The Information section opens.
2. From the Information section, give the new group a name.
3. To add users to the group, click Add users. Select a user or users to include in the group.
Select the checkbox in the title bar to add all listed users.
4. Click Apply to save your changes.
Managing Groups
The page describes how to:
● Remove a User from a Group
● Change Access Permissions
66 Groups
Page 77

Securing Your ix2 Network Storage and Contents
Removing a User from the Group
1. Open a group to display users belonging to it.
2.
To remove a user from the group, click the next to that user. When the Remove user pop-up
window appears, click Yes to remove the user.
Changing Access Permissions
1.
To refresh the list of users, click above the table.
2. Expand Access Permissions to change group permissions to a secured Share. If iSCSI is
enabled, you can also change group permissions to secured iSCSI drives.
3.
To add permissions to a Share, click Add access permissions.
4. From the Add Access Permissions pop-up window, select a Share or Shares for the group to
access. If iSCSI is enabled, select iSCSI drives for the group to access. Select the checkbox in the
title bar to select all the Shares listed. If iSCSI is enabled, select the checkbox in the title bar to also
select all the iSCSI drives listed.
5. Click Apply to save your changes.
6. In the table listing the Shares, check Read or Write for each Share. If iSCSI is enabled, check
Read or Write for each iSCSI drive. The group can have full access by checking both Read and
Write. To grant only read access, check only Read.
NOTE: A group must have read access at a minimum. A group cannot have only write access.
7. Uncheck Read to remove all access to a Share and remove the Share from the table. If iSCSI is
enabled, uncheck Read to remove all access to an iSCSI drive and remove the iSCSI drive from
the table.
8. Click Apply to save your changes.
9. If NFS is enabled, the GID field is visible. The GID value must be the same on both the Linux client
and the ix2 Network Storagefor the client to access files. To modify the GID, type a new GID value.
Deleting Groups
To delete a group:
1. From the ix2 Management Console, click Groups.
2. To delete an existing group, click to expand the group.
3. In the Information section, click Delete to delete the group.
4. In the Delete Group confirmation pop-up window, click Yes.
5. If you do not wish to delete the group, click Cancel to return to the Groups page.
Groups 67
Page 78

Securing Your ix2 Network Storage and Contents
Using Active Directory Domain to Manage Users and Groups
Active Directory Users and Groups Overview
On the Users and Groups page, administrator users can import users and groups from an Active Directory
(AD) server and grant them access rights to Shares on the ix2 Network Storage. In addition, you can also
have both local and AD users on your ix2. See Managing Your ix2 Network Storage with Local and Active
Directory Users on page 70for more information. For more information on enabling AD on the ix2, refer to
Configuring Your ix2 Network Storage to Use Active Directory on page 9. For information on creating an
administrator user, refer to Enabling Security and Creating an Administrator User on page 61.
Managing Users and Groups with Active Directory
The page describes how to:
● Import Users and Groups from Active Directory
● Synchronize with the Active Directory Controller
● Change Access Permissions
● Set Quotas
Importing Users and Groups from Active Directory
1.
Click Import Users and Groups from Active Directory.
2. The pop-up window for Import Users and Groups from Active Directory is searchable, and you
can sort by name, descriptive name, or type. You can filter the list of users and groups by selecting
a specific user or group from the domain tree.
3. Select the checkbox next to a user or group to import that user or group to your ix2 Network Storage
from your Active Directory domain. Select the checkbox in the title bar to select all the users and
groups in your Active Directory domain.
4. Click Apply to save your changes.
Synchronizing with the Active Directory Controller
You can poll the Active Directory controller at any time to check for new users and groups on the controller,
so you can add them to your ix2. This keeps your ix2 up to date with any group changes on the controller
and indicates if any users on the controller were deleted or promoted.
● Click Synchronize with the Active Directory Controller.
Changing Access Permissions
Expand Access Permissions to change user or group permissions to a secured Share. When the ix2 is in
AD mode, AD and local users can have access to a secured Share. See "Managing Your ix2 Network
Storage with Local and Active Directory Users " on page 70.
68 Using Active Directory Domain to Manage Users and Groups
Page 79

Securing Your ix2 Network Storage and Contents
1.
To add permissions to a Share, click Add access permissions.
2. From the Add Access Permissions pop-up window, select a Share or Shares for the user or group
to access. Select the checkbox in the title bar to select all the Shares listed.
3. Click Apply to save your changes.
4. In the table listing the Shares, check Read or Write for each Share. A user or group can have full
access by checking both Read and Write. To grant only read access, check only Read.
A user or group must have read access at a minimum. A user or group cannot have only write
access.
5. Uncheck Read to remove all access to a Share and remove the Share from the table.
6. Click Apply to save your changes.
7. If NFS is enabled, the GID field is visible. The GID value must be the same on both the Linux client
and the ix2 for the client to access files. To modify the GID, type a new GID value.
Setting Quotas
1.
Click Quota settings to enable quotas and set a default quota. Quotas are only set for
individual users, and not groups.
2. In the Quota Settings dialog, click Enable quotas to turn on quotas for each user. Quotas can be
set for each user individually or set as a default value.
3. Enter a Default Quota in gigabytes. When you set a default quota, this becomes the quota size for
all new users.
4. Check Set default quota for all users to globally set the same quota size to all users. You may
overwrite this default value for individual users by setting their quota size separately in the user's
Information section.
5. Click Apply to save your changes.
Deleting Active Directory Users and Groups
To delete a user or a group:
1. From the ix2 Management Console, click Users and Groups to open the Users & Groups page.
2. To delete an existing user or group, click to expand that user or group.
3. In the Information section, click Delete. Deleting a user or group does not delete any Shares to
which the user or group has access. Click the checkbox if you want to Delete all Shares that
only this user can access.
4. In the confirmation pop-up window, click Yes.
5. If you do not wish to delete a user or group, click No to return to the Users & Groups page.
Using Active Directory Domain to Manage Users and Groups 69
Page 80

Securing Your ix2 Network Storage and Contents
Managing Your ix2 Network Storage with Local and Active Directory Users
Managing Your ix2 Network Storage with Local and Active Directory Users
You can configure your ix2 Network Storage to allow both local users and groups and Active Directory
(AD) users and groups on the device simultaneously. While in AD mode, you can have existing local users
and groups and also create new ones. In addition, both AD and local administrator users can log into and
manage the ix2. This allows hybrid authentication on your ix2 and, if desired, you can switch between AD
mode and Workgroup mode.
This topic assumes you have already created an administrator user and enabled security on your
ix2 or have enabled AD.
Enabling Active Directory after Creating Users in Workgroup Mode
After you create users in Workgroup mode, you can switch your ix2 to AD mode.
1. On the Domain Management page, select Active Directory.
2. Configure your AD settings. See Configuring your ix2 for Active Directory for more information.
3. Click Apply.
After changing to AD mode, you are required to log back in to the ix2. Your ix2 is now configured to allow
both local administrators and AD administrators to log in.
Logging in to Your ix2
When an administrator logs in to the ix2, the admin chooses between the device name or the AD domain
name.
1. At the Login screen, choose what type of user is logging in from the Active Directory Domain dropdown:
l to log in as a local user, choose the device name from the drop-down menu and enter the
username and password
l to log in as an Active Directory user, choose the Active Directory domain name from the drop-
down menu and enter the username and password
2. Click Login.
Creating Local Users and Groups in Active Directory Mode
After an AD or local administrator logs in to the ix2, that user can create additional local users and groups
on the ix2. The Users and Groups page lists all local and AD users and groups on the ix2.
1.
On the Users and Groups page, click Add users and groups...
2. In the Import Users and Groups from Active Directory page, under Local, click Users to create a
local user or Groups to create a group. You can add AD members to any local groups you create.
3. Enter the necessary credentials for the user or the group name, and click Create.
70 Managing Your ix2 Network Storage with Local and Active Directory Users
Page 81

Securing Your ix2 Network Storage and Contents
Creating Share Permissions for AD Users and Local Users
You can create access permissions for both AD and local users on any new or existing Shares on your ix2.
For more information, see adding Shares and managing Shares.
Switching to Workgroup Mode from Active Directory
You can switch your ix2 from AD mode to Workgroup.
1. On the Domain Management page, disable the button to join Workgroup mode.
2. Click Apply.
After changing to Workgroup mode, if there are any administrator users on your ix2, you are required to log
back in to the ix2. You must log in as a local user, and you do not have the choice to select an AD domain.
Also, the Users and Groups page no longer lists the AD users and groups.
If you had not enabled security on your ix2 prior to changing from Workgroup to Active Directory,
your ix2 did not have any local users. Security is automatically enabled when you configure AD.
When you switch back to Workgroup, the Switch to Workgroup Mode dialog box displays. You
must create an administrator user because security is not disabled by switching back to
Workgroup. After creating the admin user, you remain logged in to the ix2.
Managing Your ix2 Network Storage with Local and Active Directory Users 71
Page 82

Securing Your ix2 Network Storage and Contents
72 Managing Your ix2 Network Storage with Local and Active Directory Users
Page 83

CHAPTER 7
Personal Cloud: Accessing Your
LenovoEMC Personal Cloud
From Anywhere in the World
Personal Cloud: Accessing Your LenovoEMC Personal Cloud From Anywhere in the World 73
Page 84

Personal Cloud: Accessing Your LenovoEMC Personal Cloud From Anywhere inthe World
What Is LenovoEMC Personal Cloud ?
LenovoEMC Personal Cloud turns your ix2 Network Storage into a hub for sharing files and backing up
data among computers anywhere in the world. A Personal Cloud can exist on your ix2 Network Storage, or
on another LenovoEMC network device. When you create a Personal Cloud, you gain access to your ix2
from anywhere on the internet. You can also share with friends and family by inviting users to join your
Personal Cloud. You manage Personal Cloud users the same way you manage other users on your ix2, so
you control the storage and content they can access through the Personal Cloud. Trusted devices can be
added to your Personal Cloud to connect them through the internet as if they are on a common home
network with your ix2. People who join your Personal Cloud can access data, perform Copy Job
operations, stream media from your ix2 over the internet, and use remote desktop to access computers on
the local network for your ix2. If you allow a user to join their trusted devices to the Cloud, those devices
become part of the Cloud and can be accessed by other users on the Cloud.
LenovoEMC Personal Cloud Key Terms
The following are a few key terms to help get you started with a Personal Cloud:
● LenovoEMC Personal Cloud— This is a setting configured on your ix2 Management Console
that allows you to securely share storage and media capabilities with computers around the world.
● Web Access — You can use Personal Cloud information to access your ix2 from the web. Enter
myCloudName.mylenovoemc.com in a web browser, and when prompted, enter a valid username
and password for your ix2. You can also use the LenovoEMC Link, which is an application that
runs on mobile devices, by entering the Personal Cloud name and then a valid username and
password. For more information on the LenovoEMC Link, refer to its documentation.
● My Personal Cloud — When you are the administrator of your ix2, you can create a Personal
Cloud through the ix2 Management Console and then invite people to join it. You create and
manage the Personal Cloud on your ix2 Management Console through the My Personal Cloud
configuration option. The Personal Cloud that you administer is called My Personal Cloud.
● Other Personal Cloud — If you want to have your ix2 join that Personal Cloud instead of
administering your own, select the option for Other Personal Cloud. Enter the Personal Cloud
name, username and password you received when you were invited to join your ix2 as a Trusted
Device on the other Personal Cloud.
● Joining LenovoEMC Personal Cloud as a Trusted Device — To connect your computer or your
ix2 as a trusted device to a Personal Cloud, you use the username and password given to you for
that Personal Cloud. The person managing the Personal Cloud has to create you as a user on the
device hosting the Personal Cloud and give you permission to add trusted devices. You can
connect your ix2 to only one Personal Cloud at any given time, so you must select between either
My Personal Cloud or Other Personal Cloud.
An administrator should complete the following tasks to set up or join a Personal Cloud:
● Creating LenovoEMC Personal Cloud
● Inviting People onto Your LenovoEMC Personal Cloud on page 80
● Joining a Trusted Device to LenovoEMC Personal Cloud
74 What Is LenovoEMC Personal Cloud ?
Page 85

Personal Cloud: Accessing Your LenovoEMC Personal Cloud From Anywhere inthe World
Is My Content Secure?
Your content is always secure using LenovoEMC Personal Cloud. If you create a Personal Cloud with
security disabled, you are required to enter a password when accessing your ix2 remotely. Enabling
security allows you to share your ix2 with the people you choose. For example, you have photos of your
new baby you want to share with your sister, your brother, and your sister-in-law. To share your baby
photos with these family members, create a Personal Cloud, and then invite your sister, your brother, and
your sister-in-law to join your Personal Cloud. Your ix2 Network Storage provides an easy way to send
email invitations and instructions to the people you select as Personal Cloud users. In this way, your
content is never exposed and remains private. It is visible only to the individuals you invite to be Personal
Cloud users. Content of the Personal Cloud is determined by you as the Personal Cloud owner. Refer to
the help topic links below for more information on Personal Cloud.
People added to your Personal Cloud as users are not required to own or have access to your ix2.
The process of adding someone as a Personal Cloud user grants them access to your Personal
Cloud from any computer.
Is My Content Secure? 75
Page 86

Personal Cloud: Accessing Your LenovoEMC Personal Cloud From Anywhere inthe World
LenovoEMC Personal Cloud Setup Overview
You can create LenovoEMC Personal Cloud in one of two ways:
● Follow the LenovoEMC Personal Cloud setup through Setup Portal
● Create the LenovoEMC Personal Cloud through the ix2 Management Console
Creating a LenovoEMC Personal Cloud starts with providing a name for your Personal Cloud and an email
address associated with it. After creating the Personal Cloud, you can use the Personal Cloud Quick
Setup wizard to perform common tasks associated with the LenovoEMC Personal Cloud: adding Shares,
inviting people to join the Personal Cloud, and setting up Copy Jobs through the Personal Cloud.
76 LenovoEMC Personal Cloud Setup Overview
Page 87

Personal Cloud: Accessing Your LenovoEMC Personal Cloud From Anywhere inthe World
Creating LenovoEMC Personal Cloud
Before you can work with your LenovoEMC Personal Cloud, you first create a Personal Cloud and
configure the settings.
After your Personal Cloud is ready and connected to the internet as indicated by the status images, you
can invite people to join your Personal Cloud. When you invite people to join your Personal Cloud, you add
them as users on your ix2 Network Storage. The invited users receive an email invitation that includes the
username and password they must provide when connecting to the Personal Cloud from the LenovoEMC
Storage Manager on their computer.
If you have content on your ix2 that you do not want to share with members of your Personal Cloud, you
should put that content in secured Shares that are not accessible to anyone invited to your Personal Cloud.
This procedure assumes you did not create a Personal Cloud using the initial LenovoEMC, Ltd.
Setup portal. If you have already created a Personal Cloud, you do not have to follow this
procedure.
1. On the LenovoEMC Personal Cloud page, expand the Configure section.
2. Click the My Personal Cloud button to open the portal that lets you create your Personal Cloud.
After you click the My Personal Cloud button, a new website containing the portal opens. You
create a Personal Cloud on this website. After you create the Personal Cloud, you return to the ix2
Management Console.
3. If your ix2 is not secured, you are prompted to create a remote access password. This is a
password that anyone not on your local network must enter to access your device.
After completing these steps, the Personal Cloud Quick Setup Wizard opens, so you can create
Shares, invite users, or configure Copy Jobs. You can use the Quick Setup Wizard or close it and
begin using your Personal Cloud.
Creating LenovoEMC Personal Cloud 77
Page 88

Personal Cloud: Accessing Your LenovoEMC Personal Cloud From Anywhere inthe World
Configuring Router Port Forwarding for Personal Cloud
In most cases, your ix2 Network Storage attempts to automatically configure your router. However, if it
cannot, a message displays that your router is not configured for port forwarding, and you must manually
configure your router to forward a specific port to your ix2. Most routers refer to this as port forwarding,
application access, or virtual server. It is recommended that you refer to your router's documentation for
setting these values. When you set up port forwarding, you are allowing data to travel through your
Personal Cloud between your ix2 and trusted devices.
When you have selected a port value to forward for Personal Cloud, click Settings on the Personal
Cloud page, and enter your selected port number in the Personal Cloud settings dialog box. If you have
more than one Personal Cloud, you can enter a range of port values for your Personal Clouds. The range of
port values is 50500-50599. You must also port forward port 443 to enable https access to your ix2.
Router Port Forwarding
Some routers have a UPnP option. If you have a UPnP router, enabling this option allows the ix2 software
to automatically configure the correct forwarding ports. Otherwise, you must perform additional steps by
manually enabling port forwarding on your home network router. Port forwarding allows invited users to
connect remote computers or other ix2 devices outside of your local area network (LAN) as trusted
devices to the Personal Cloud on your network.
Port forwarding must be configured for both the network router on which the Personal Cloud is
configured, and any remote network from which trusted devices are accessing the Personal
Cloud.
The following steps are generic router settings. If you have never logged into your router before, you must
consult the manufacturer’s documentation to find specific details such as default IP address, default
administrator account, and password.
1. Log in to your router by entering its IP address in the browser’s URL field from your computer. If
prompted, enter administrator account name and password.
2. Navigate to the Port Forwarding configuration page. This is often related to Port Mapping,
Application, Virtual Server, or Gaming configuration options.
3. Type in the desired application or service name. This is typically a blank or drop-down field where
you can type or choose a user-specified application or service name for the port you are
forwarding. Create a new entry with a value like “LenovoEMC Personal Cloud ” in this field.
4. Enter a port number for the Personal Cloud service in the range 50500-50599 in both the port start
and port end fields. Port number 50500 is the default. It should not be necessary to change this
value, but if you do, choose the next available port; for example, 50501. If you decide to choose a
port in the higher range, note that the Media Server uses the same range of ports, numbering
backwards from 50599.
5. Repeat the previous step, using port 443 to enable https communication with your ix2.
6. Enter the IP address of your ix2 which contains the Personal Cloud. The IP address displays on
the System Status page when you log into the device's web interface.
7. Save the changed settings.
8. Reboot the router if required.
78 Configuring Router Port Forwarding for Personal Cloud
Page 89

Personal Cloud: Accessing Your LenovoEMC Personal Cloud From Anywhere inthe World
Configuring Your LenovoEMC Personal Cloud
As a LenovoEMC Personal Cloud administrator, you can manage various settings on your Personal Cloud
to ensure that it functions as efficiently as possible. Settings include specifying an email address when
sending invitations. When data is traveling through the Personal Cloud, you can control the security of that
information by specifying a Secure Communication level. Note that data stored on your ix2 through the
Personal Cloud is not encrypted, and using encryption can slow down communications.
Enabling Internet Access to the ix2
You can grant internet users, including LenovoEMC Link users, secure access to the web interface and
unrestricted access to media content on your ix2. LenovoEMC Link is an application that runs on mobile
devices, and allows access to content on your ix2. Before enabling secure access, you must first enable
security on your ix2 and create users. After enabling secure access, any internet users can access your
ix2, and view any unsecured content. Secure content is restricted to internet users who have valid
usernames and passwords for the ix2. When you enable unrestricted media content access, your media
files become available to all internet users.
Changing Personal Cloud Settings
1. In the Configure section of the Personal Cloud page, click Settings.
2. In the Personal Cloud Settings dialog box, configure the following:
● Administration Email Address — This is the sender email address used on the email
invitations.
● Port Number — Your router forwards this specific port for your Personal Cloud. This value is
automatically filled in, and you do not have to change it, unless you have more than one
Personal Cloud on your network. Refer to Configuring Router Port Forwarding for Personal
Cloud for more information.
● Secure Communication — This setting controls the security of information traveling through
the Personal Cloud.
You can also specify a Secure Communication level setting with LenovoEMC Storage
Manager. The Secure Communication setting for the ix2 Management Console sets the
minimum value. You cannot specify a setting lower than this value using LenovoEMC Storage
Manager. For information on using LenovoEMC Storage Manager, refer to its online help.
● Enable unrestricted access to media content— This setting makes all media files in media-
enabled Shares available to anyone on the internet accessing your ix2, even if those media
files are in secured Shares. For more information on making a Share media-enabled, refer to
changing Share information.
3. Click Apply to save your changes.
Configuring Your LenovoEMC Personal Cloud 79
Page 90

Personal Cloud: Accessing Your LenovoEMC Personal Cloud From Anywhere inthe World
Inviting People onto Your LenovoEMC Personal Cloud
When you invite people to join your LenovoEMC Personal Cloud, you are actually selecting from existing
users on your ix2, or adding people as users on your ix2 . In addition, you are optionally allowing them to
join a trusted device to LenovoEMC Personal Cloud. Computers are added as trusted devices through
LenovoEMC Storage Manager. Refer to its online help for more information.
1. From either the Personal Cloud Quick Setup dialog box or the LenovoEMC Personal Cloud page,
click Invite Users.
You can also send an invitation to join a Personal Cloud when you are adding users. Refer to
Adding Users on page 63 for more information.
2. In the Invite Users dialog box, select the name of an existing user or click Create New User to
add a new user. If security has not been enabled, you are prompted to enable security and create
an administrator user.
3. If the email address field is not already completed, enter an email address for the user.
4. Click Apply to send the invitation.
80 Inviting People onto Your LenovoEMC Personal Cloud
Page 91

Personal Cloud: Accessing Your LenovoEMC Personal Cloud From Anywhere inthe World
Joining a Trusted Device to LenovoEMC Personal Cloud
You can join your ix2 Network Storage to the Personal Cloud as a trusted device if you have been given
permission by the person administering the Personal Cloud.
You cannot join your trusted device to a Personal Cloud if you have not been added as a user on
the Personal Cloud.
1. On the Personal Cloud page, select the Other Personal Cloud command to join another
LenovoEMC Personal Cloud.
2. In the Add Trusted Device to Personal Cloud dialog box, enter the Personal Cloud name,
username, and password you received in the email invitation.
3. Enter a descriptive name for your trusted device in the Description field.
4. Click Apply.
After applying this information, you are automatically connected to the Personal Cloud.
Joining a Trusted Device to LenovoEMC Personal Cloud 81
Page 92

Personal Cloud: Accessing Your LenovoEMC Personal Cloud From Anywhere inthe World
Managing Trusted Devices on a Personal Cloud
As LenovoEMC Personal Cloudadministrator, you can manage trusted devices on your Personal Cloud.
Trusted devices can be disconnected, or you can completely delete a trusted device from the Personal
Cloud.
Disconnecting Trusted Devices
Click My Personal Cloud, and expand the trusted device section of the page.
To disconnect a trusted device from the Personal Cloud, disable the trusted device by clicking the switch
to Disabled, and click Yes in the confirmation pop-up window. The trusted device is not deleted and can be
reenabled at a later time.
Deleting Trusted Devices
To delete a trusted device from the Personal Cloud, click next to the device's name. The trusted
device is deleted and can only be added again by a user with trusted device privileges.
1. On the Personal Cloud page, expand the Trusted Devices section.
2. Click next to the trusted device you want to remove from the Personal Cloud.
3. Confirm the deletion.
82 Managing Trusted Devices on a Personal Cloud
Page 93

Personal Cloud: Accessing Your LenovoEMC Personal Cloud From Anywhere inthe World
Using Copy Jobs with a LenovoEMC Personal Cloud
You can create Copy Jobs that can transfer data from one trusted device to another through the Personal
Cloud. When you add a trusted device to your Personal Cloud, a Copy Jobs icon displays next to that
device in the trusted device table. Clicking the Copy Jobs button opens the Copy Jobs page to help you
configure a Copy Job between the ix2 Network Storage that is hosting the Personal Cloud and a trusted
device. For more information on setting up Copy Jobs, refer to Adding Copy Jobs.
Using Copy Jobs with a LenovoEMC Personal Cloud 83
Page 94

Personal Cloud: Accessing Your LenovoEMC Personal Cloud From Anywhere inthe World
Disabling or Deleting Your LenovoEMC Personal Cloud
When you disable your Personal Cloud, you are eliminating access to your Personal Cloud without
deleting the account information you created when you set up the Personal Cloud. Later, if you want to
reenable your Personal Cloud, you can without reentering all the account information. To completely stop
the Personal Cloud and eliminate any account information with it, delete it. If you delete your Personal
Cloud and later decide you want to recreate it, you must start the creation process again and re-invite all
users. When you delete a Personal Cloud, you lose your ownership of its name.
To disable a Personal Cloud, click Disable.
To delete a Personal Cloud, click Settings and then click Delete in the Personal Cloud Settings dialog
box.
84 Disabling or Deleting Your LenovoEMC Personal Cloud
Page 95

Personal Cloud: Accessing Your LenovoEMC Personal Cloud From Anywhere inthe World
Accessing Content Using Your LenovoEMC Personal Cloud
You can share content by inviting users to your Personal Cloud. The data in Shares can be made
accessible to all users of the Cloud, or access can be restricted to a specific set of users by setting
access permissions to Shares. Access permissions control whether users are only allowed to read files in
Shares, or if they can also write (upload) files to Shares.
Accessing Content Using Your LenovoEMC Personal Cloud 85
Page 96

Personal Cloud: Accessing Your LenovoEMC Personal Cloud From Anywhere inthe World
Informing Users What to Do with LenovoEMC Personal Cloud
Personal Cloud enables users to access your ix2 from the web. They can enter
myCloudName.mylenovoemc.com in a web browser, and when prompted, enter a valid username and
password for your ix2. After they access your ix2 Network Storage, they can view Shares, upload and
download content, and stream content. Optionally, they can install LenovoEMC Storage Manager on their
computers, and then join their computers as trusted devices to the Personal Cloud. When users join their
computer as a trusted device to the Personal Cloud, they are making their machine and its files available to
other users of the Personal Cloud. A large virtual network is created.
86 Informing Users What to Do with LenovoEMC Personal Cloud
Page 97

CHAPTER 8
Sharing Content Using Social Media
Sharing Content Using Social Media 87
Page 98

Sharing Content Using Social Media
Sharing Content Using Social Media: Overview
If you have an account with social media services such as Facebook, Flickr, or YouTube, you can share
content on your ix2 Network Storage with your friends and family using one or more of these social media
sites. To share your content using social media sites, create Shares called Active Folders, and connect
each Active Folder with a social media account. Refer to the help topic links below for more information on
these procedures. When you add photos and movies to an Active Folder, those files are automatically
uploaded to the social media site associated with that Active Folder. If you have photos or movies you
want to share with others, this is a great way to make your content available to people who may not have
access to your ix2.
If you have configured a Personal Cloud on your ix2, you can grant Personal Cloud users access to Shares
and Active Folders. This is useful if you want to allow users to add files to your social media sites. For
example, if your ix2 has a Flickr Active Folder, you can grant Personal Cloud users access to that Active
Folder. In this manner, when photos are added to the Flickr Active Folder, either by you or by Personal
Cloud users, those photos are uploaded automatically to your Flickr account.
Note that an Active Folder can only be associated with one social media account. For example, if you want
Active Folders for your Facebook and YouTube accounts, create two Active Folders, and assign one
Active Folder to Facebook, and one to YouTube. Using this example, any photos you add to your
Facebook Active Folder are automatically uploaded to your Facebook page, and any movies you add to
your YouTube Active Folder are automatically uploaded to your YouTube page. Not only is this a fast and
easy way to share content, but uploading content to your social media sites provides an additional backup
of your content, as the content is stored both on your ix2 and at your social media accounts.
88 Sharing Content Using Social Media: Overview
Page 99

Sharing Content Using Social Media
Facebook is a social network to connect with friends and family. You can configure a Share as a Facebook
Active Folder so that photos and movies added to that Share are automatically uploaded to your Facebook
account.
Refer to Managing Shares on page 24 for more information on managing Shares and Active Folders.
If you do not have a Facebook account, go to the Facebook website to open an account.
Configuring a Facebook Active Folder
1. From the ix2 Management Console, click Shares.
2. Select a Share to use as a Facebook Active Folder, and click to expand the Active Folder section.
3. Check Enable.
4. Select Facebook from the drop-down menu.
5. Click Configure Facebook account access to configure your Facebook account. You will be
taken to a Facebook page to configure your account. Follow the instructions provided by
Facebook.
6. Check Delete files after upload to delete images or movies from the Share once they are
transferred to your Facebook account.
7. Images can also be resized prior to upload. Check 800x600, 1024x768, or enter a custom
resolution for resizing images.
8. Click Apply to save your changes.
Once configured, all your images in this Active Folder will upload to your Facebook account.
9. Click View Transfer History to see the transfer activity from this Share to your account.
Facebook 89
Page 100

Sharing Content Using Social Media
Flickr
Flickr is a photo sharing network for sharing photos with friends and family. You can configure a Share as a
Flickr Active Folder so that images and albums added to that Share are automatically uploaded to your
Flickr account.
Refer to Managing Shares on page 24 for more information on managing Shares and Active Folders.
If you do not have a Flickr account, go to the Flickr website to open an account.
Configuring a Flickr Active Folder
1. From the ix2 Management Console, click Shares.
2. Select a Share to use as a Flickr Active Folder, and click to expand the Active Folder section.
3. Check Enable.
4. Select Flickr from the drop-down menu.
5. Click Configure Flickr account access to configure your Flickr account. You are taken to a
Flickr page to configure your account. Follow the instructions provided by Flickr.
6. Check Delete files after upload to delete images from the Share once they are transferred to
your Flickr account.
7. Click Apply to save your changes.
8. Once configured, all images added to this Active Folder are uploaded to your Flickr account. Click
View Transfer History to see the transfer activity from this Share to your account.
90 Flickr
 Loading...