

Page 1
IdeaTab
Quick Start Guide Y
A3000
Page 2
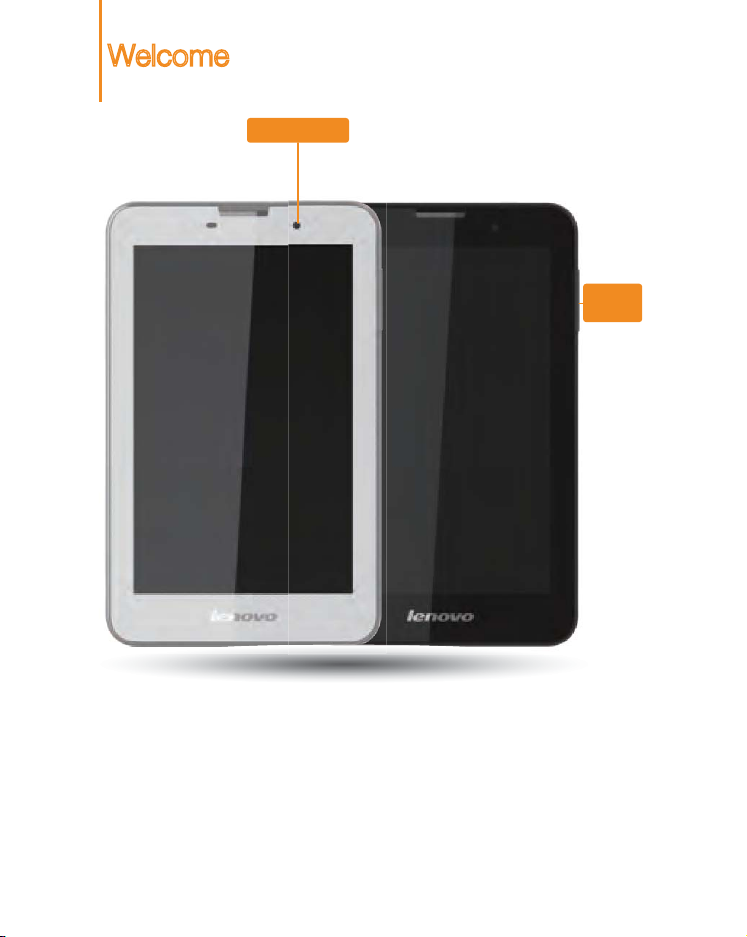
Welcome
Front camera
)URQW
Volume
button
Please read this guide carefully before using your IdeaTab. The guide will
help you learn tips on setting and using IdeaTab.
The information in this guide is based on default settings. Illustrations and
screenshots used here may differ from the actual product appearance and
screen displays.
Page 3
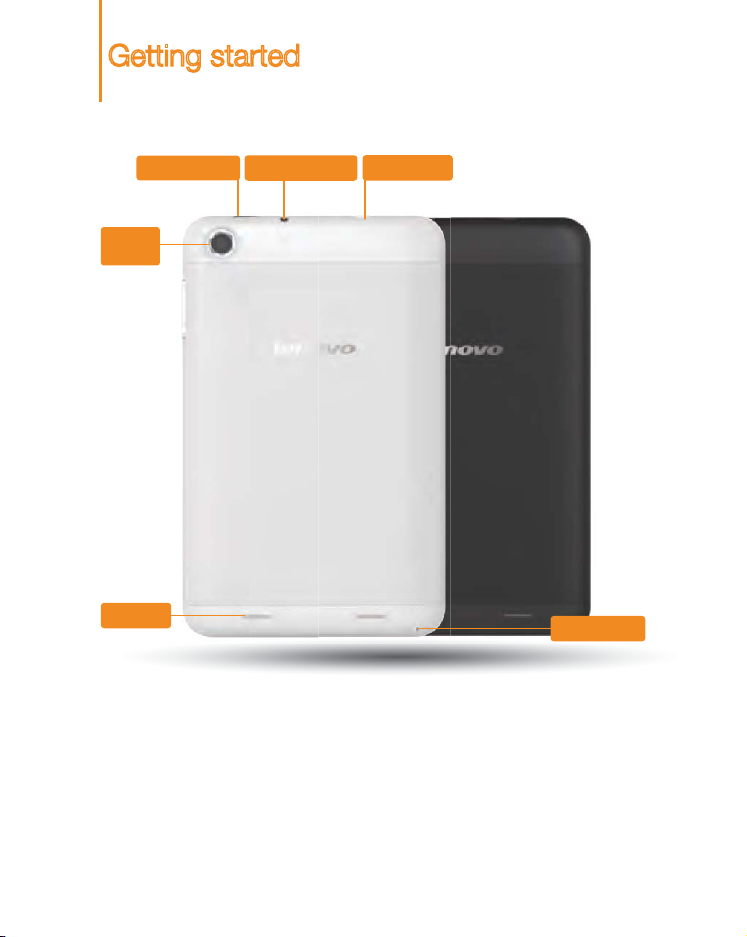
Getting started
Power button
Back
camera
Speaker
Screen lock/unlock
In standby mode, press the Power button to lock your IdeaTab.
To unlock the screen, press the Power button, and then drag the on-screen
slider to enter the interface displayed before it locks.
Sleep/Wake
If you do not touch the screen for a while, IdeaTab dims its screen to enter
sleep mode for power saving.
Turning IdeaTab off
While in standby mode, press and hold the Power button and then follow the
on-screen instructions to confirm shutdown.
Earphone jack
Micro USB
Microphone
Page 4
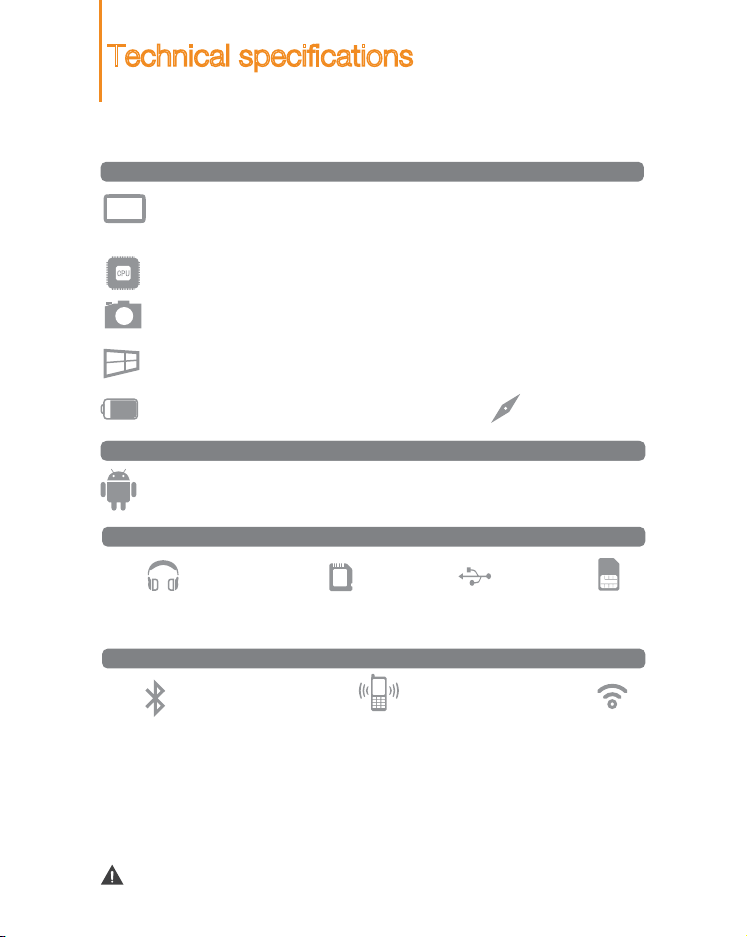
Technical specifications
Model: IdeaTab A3000-F
Version: Wi-Fi
Hardware
Dimensions/Weight/Color
L × W × H: 194mm x 120mm x 11mm
Weight: Appr. 345g
CPU
MTK MT8125/8389
Integrated camera
5.0 M (back) 0.3 M (front)
Screen
7", 16:9, 1,024 x 600 dpi
Battery
3500 mAh
Operating system
Operating system
Android 4.2
Interface
3.5 mm
earphone jack
Communication
Color: Black /White
SD card slot
64 GB (max.)
Micro USB
IdeaTab A3000-H
3G+Wi-Fi
GPS
SIMCard
*
Bluetooth 4.0
* Based on actual measurements.
3G WWAN
*
(3G data only)
Wi-Fi
Page 5

Charging IdeaTab
When the battery level falls below the threshold, IdeaTab will alert you with
a tone and the battery status icon will change into . We recommend you
plug the AC power adapter into your IdeaTab in the direction of the orange
arrow as shown above figure.
You can charge your IdeaTab whether it is on or off.
If your IdeaTab is being charged while it is on, the battery status icon
(located on the status bar of the screen) will appear as . Af ter the battery
has finished charging, the status bar will show the fully charged icon .
For more information on battery safety, see the Important Product
Information Guide.
Page 6

Inserting SD card and SIM card
SIM2
IdeaTab supports SD card and SIM card extension. To insert an
SD card and SIM card , do the following:
Step . Open the IdeaTab back cover as shown.
Step . Insert the SD card and SIM card as shown.
Close the back cover.
SIM1
SD
Keep the metal surface down for SIM card and SD card.
SIM card for 3G data only.
Page 7

Connecting IdeaTab to PC
You can connect IdeaTab to the PC's USB port with the cable provided for
battery charging or data transferring with the PC.
There are three connection methods available: USB storage, Media device
(MTP) and Camera (PTP).
Installing apps and games
Transfer the APK setup file from the PC to IdeaTab, and then open it in the
file manager on IdeaTab. The installer will run automatically.
Page 8

Customizing the desktop
Touch > WIDGETS. You can drag your favorite applications and
widgets onto the desktop.
Adding apps/widgets to the desktop
Tap and hold the icon of your desired application or widget, until the
desk top background pattern appears on the screen, and then place the
icon wherever you wish.
Editing the desktop
Tap and hold any icon on the desktop and then drag it to your preferred
location or delete it from the desktop.
Page 9

Communication
Wi-Fi connection
You can connect your tablet to the Internet using Wi-Fi. When Wi-Fi is on,
your IdeaTab will automatically scan for Wi-Fi hotspots within range. Select
the Wi-Fi hotspot you want to connect to.
Mobile networks
You can enable/disable mobile data connection and change the network
mode and access point in SIM manager or Mobile data settings.
Bluetooth connection
If your computer has an integrated Bluetooth adapter card, it can connect to
and transfer data wirelessly with other Bluetooth enabled devices, such as
notebook computers, PDAs and cell phones. You can transfer data between
these devices without cables and up to 10 meters range in open space.
The actual maximum range may vary due to interference and transmission
barriers.
Page 10

Browsing the web
Touch > Browser. Now you can browse the Web and download
applications.
Add a bookmark
Search or type a URL
Bookmarks, history and saved pages
The above functions require your IdeaTab to connect to the Internet via
Wireless network.
Page 11

Camera
Touch > Camera. Now you can record the wonder ful moments of
your life with the camera.
Touch > Gallery. Now you can view photos/videos from your IdeaTab.
Camera
The camera has following functions:photo, video, panarama, multi-angle
etc.
Album
You can zoom in/out a photo by double-tapping or moving your two fingers
apar t/together while touching the screen.
Page 12

Learn more
For more information about IdeaTab functions and useful
manuals, go to http://support.lenovo.com/. To read this manual
on your IdeaTab, please access “User Guide” from the Browser
favorites in your IdeaTab.
Getting support
For support on network service and billing, please contact your
wireless network operator. For instructions on how to use your
IdeaTab, go to http://support.lenovo.com/.
Legal notices
Lenovo, the Lenovo logo, and IdeaTab are trademarks of
Lenovo in the United States, other countries, or both.
Other company, product, or service names may be trademarks
or ser vice marks of others.
First Edition (April 2013)
© Copyright Lenovo 2013.
LIMITED AND RESTRICTED RIGHTS NOTICE: If data or
software is delivered pursuant a General Services Administration “GSA” contract, use, reproduction, or disclosure is subject
to restrictions set forth in Contract No. GS-35F-05925.
148511126
Printed in China
 Loading...