

Page 1

ideacentreAll-In-One520(22&24inch)
ComputerHardwareMaintenanceManual
MachineTypes:F0D1[AIO520-24IKL/EnergyStar]F0D2[AIO
520-24IKU/EnergyStar]/F0D3[AIO520-24AST/EnergyStar]F0D4
[AIO520-22IKL/EnergyStar]/F0D5[AIO520-22IKU/EnergyStar]
F0D6[AIO520-22AST/EnergyStar]
Page 2

Page 3

ideacentreAll-In-One520(22&24inch)
Computer
HardwareMaintenanceManual
MachineTypes:F0D1[AIO520-24IKL/EnergyStar]F0D2[AIO
520-24IKU/EnergyStar]/F0D3[AIO520-24AST/EnergyStar]F0D4
[AIO520-22IKL/EnergyStar]/F0D5[AIO520-22IKU/EnergyStar]
F0D6[AIO520-22AST/EnergyStar]
Page 4

FirstEdition(July2017)
©CopyrightLenovo2017.
LIMITEDANDRESTRICTEDRIGHTSNOTICE:IfdataorsoftwarearedeliveredpursuantaGeneralServices
Administration“GSA”contract,use,reproduction,ordisclosureissubjecttorestrictionssetforthinContractNo.
GS-35F-05925
Page 5

Contents
Chapter1.Aboutthismanual......1
ImportantSafetyInformation..........1
Chapter2.Safetyinformation......3
Generalsafety................3
Electricalsafety...............3
Safetyinspectionguide............5
Handlingelectrostaticdischarge-sensitive
devices..................5
Groundingrequirements............6
Safetynotices................6
Chapter3.Generalinformation.....9
Specifications................9
Chapter4.GeneralCheckout.....11
Chapter5.UsingtheSetupUtility...13
StartingtheLenovoBIOSSetupUtilityprogram.13
Viewingandchangingsettings........13
Usingpasswords..............13
Enablingordisablingadevice........15
Selectingastartupdevice..........16
ExitingtheLenovoBIOSSetupUtilityprogram..17
Chapter6.Symptom-to-FRUIndex..19
Harddiskdrivebooterror..........19
PowerSupplyProblems...........19
POSTerrorcodes.............20
Undeterminedproblems...........20
Chapter7.Locatingconnectors,
controlsandcomponents......21
Chapter8.Replacinghardware....31
Generalinformation.............31
Replacingthekeyboardandmouse......32
Replacingtheadapter............32
Removingthestandbase..........33
Removingtherearcover...........33
Replacingthecamera............37
Replacingtheheat-sink...........38
ReplacingtheCPU.............39
Replacingtheharddiskdrive.........42
Replacingthesystemfan..........43
Replacingtheopticaldrive..........44
Replacingthememorymodule........45
Replacingthesolidstatedrive........47
ReplacingtheWi-Ficard...........47
ReplacingthesideUSBboard........48
Replacingthemotherboard..........49
Removingthestandholder..........51
ReplacingtheMicrophonemodule.......51
Replacingthespeakersystem........52
ReplacingtheLCDpanelmodule.......53
Chapter9.FRUlists..........57
Chapter10.Generalinformation..101
AdditionalServiceInformation........101
©CopyrightLenovo2017
iii
Page 6

ivideacentreAll-In-One520(22&24inch)ComputerHardwareMaintenanceManual
Page 7
Chapter1.Aboutthismanual
ThismanualcontainsserviceandreferenceinformationforLenovoAll-In-One520seriescomputerslistedon
thecover.ItisintendedonlyfortrainedservicerswhoarefamiliarwithLenovocomputerproducts.
BeforeservicingaLenovoproduct,besuretoreadtheSafetyInformation.
ThedescriptionoftheTV-tunercardinthismanualappliesonlytocomputerswithaTV-tunercardinstalled.
ItdoesnotapplytocomputerswithoutaTV-tunercard.
ImportantSafetyInformation
BesuretoreadallCAUTIONandDANGERsectionsinthismanualbeforefollowinganyoftheinstructions.
VeuillezliretouteslesconsignesdetypeDANGERetATTENTIONduprésentdocumentavantd’exécuter
lesinstructions.
LesenSieunbedingtalleHinweisevomTyp“ACHTUNG”oder“VORSICHT”indieserDokumentation,bevor
SieirgendwelcheVorgängedurchführen
LeggereleistruzioniintrodottedaA TTENZIONEePERICOLOpresentinelmanualeprimadieseguireuna
qualsiasidelleistruzioni
Certifique-sedelertodasasinstruçõesdecuidadoeperigonestemanualantesdeexecutarqualquer
umadasinstruções
Esimportantequeleatodaslasdeclaracionesdeprecauciónydepeligrodeestemanualantesdeseguir
lasinstrucciones.
©CopyrightLenovo2017
1
Page 8

2ideacentreAll-In-One520(22&24inch)ComputerHardwareMaintenanceManual
Page 9

Chapter2.Safetyinformation
Thischaptercontainsthesafetyinformationthatyouneedtobefamiliarwithbeforeservicingacomputer.
Generalsafety
Followtheserulestoensuregeneralsafety:
•Keeptheareasaroundthecomputerclearandcleanduringandaftermaintenance.
•Whenliftinganyheavyobject:
1.Ensureyoucanstandsafelywithoutslipping.
2.Distributetheweightoftheobjectequallyacrossbothfeet.
3.Liftslowly.Nevermovesuddenlyortwistwhenyouattempttolift.
4.Liftbystandingorbypushingupwithyourlegmuscles;thisactionremovesthestrainfromthe
musclesinyourback.
Donotattempttoliftanyobjectsthatweighmorethan16kg(35lb)orobjectsthatyouthinkare
tooheavyforyou.
•Donotperformanyactionthatwouldcreateahazardforthecustomer,orwouldmakethecomputer
unsafe.
•Beforeyoustartthecomputer,ensurethatotherservicerepresentativesandcustomerpersonnelarenot
inapositionthatwouldcreateahazardforthem.
•Placeremovedcoversandotherpartsinasafeplace,awayfromallpersonnel,whileyouareservicingthe
computer.
•Keepyourtoolcaseawayfromareasthatpeoplemaywalkthroughtoensureno-onetripsoverit.
•Donotwearlooseclothingthatcanbetrappedinthemovingpartsofamachine.Ensurethatyoursleeves
arefastenedorrolledupaboveyourelbows.Ifyourhairislong,tieorfastenitback.
•Inserttheendsofyournecktieorscarfinsideclothingorfastenitwithanon-conductiveclip,
approximately8centimeters(3inches)fromtheend.
•Donotwearjewelry,chains,metal-frameeyeglasses,ormetalfastenersforyourclothing.
Remember:Metalobjectsaregoodelectricalconductors.
•Wearsafetyglasseswhenyouare:hammering,drillingsoldering,cuttingwire,attachingsprings,using
solvents,orworkinginanyotherconditionsthatmightbehazardoustoyoureyes.
•Afterservice,reinstallallsafetyshields,guards,labels,andgroundwires.Replaceanysafetydevice
thatiswornordefective.
•Reattachallcoverscorrectlybeforereturningthecomputertothecustomer.
Electricalsafety
CAUTION:
Electricalcurrentfrompower,telephone,andcommunicationcablescanbehazardous.Toavoid
personalinjuryorequipmentdamage,disconnectanyattachedpowercords,telecommunication
cables,networkcables,andmodemcablesbeforeyouopenthecomputercovers,unlessinstructed
otherwiseintheinstallationandconfigurationprocedures.
©CopyrightLenovo2017
3
Page 10

Observethefollowingruleswhenworkingonelectricalequipment.
Important:Useonlyapprovedtoolsandtestequipment.Somehandtoolshavehandlescoveredwithasoft
materialthatdoesnotinsulateyouwhenworkingwithliveelectricalcurrents.Manycustomershaverubber
floormatsneartheirequipmentthatcontainsmallconductivefiberstodecreaseelectrostaticdischarge.
•Findtheroomemergencypower-off(EPO)switch,disconnectingswitch,orelectricaloutlet.Ifanelectrical
accidentoccurs,youcanthenoperatetheswitchorunplugthepowercordquickly.
•Donotworkaloneunderhazardousconditionsornearequipmentthathashazardousvoltages.
•Disconnectallpowerbefore:
–Performingamechanicalinspection
–Workingnearpowersupplies
–RemovingorinstallingFieldReplaceableUnits(FRUs)
•Beforeyoustarttoworkonthecomputer,unplugthepowercord.Ifyoucannotunplugit,askthe
customertopower-offtheelectricaloutletthatsuppliespowertothemachineandtolocktheelectrical
outletintheoffposition.
•Ifyouneedtoworkonacomputerthathasexposedelectricalcircuits,observethefollowingprecautions:
–Ensurethatanotherperson,familiarwiththepower-offcontrols,isnearyou.
Remember:Anotherpersonmustbetheretoswitchoffthepower,ifnecessary.
–Useonlyonehandwhenworkingwithpowered-onelectricalequipment;keeptheotherhandinyour
pocketorbehindyourback.
Remember:Theremustbeacompletecircuittocauseelectricalshock.Byobservingtheaboverule,
youmaypreventacurrentfrompassingthroughyourbody.
–Whenusingatester,setthecontrolscorrectlyandusetheapprovedprobeleadsandaccessoriesfor
thattester.
–Standonsuitablerubbermats(obtainedlocally,ifnecessary)toinsulateyoufromgroundssuchas
metalfloorstripsandmachineframes.
Observethespecialsafetyprecautionswhenyouworkwithveryhighvoltages;theseinstructionsarein
thesafetysectionsofthemaintenanceinformation.Useextremecarewhenmeasuringhighvoltages.
•Regularlyinspectandmaintainyourelectricalhandtoolstoensuretheyaresafetouse.
•Donotusewornorbrokentoolsandtesters.
•Neverassumethatpowerhasbeendisconnectedfromacircuit.First,checkthatithasbeenpoweredoff.
•Alwayslookcarefullyforpossiblehazardsinyourworkarea.Examplesofthesehazardsarewetfloors,
non-groundedpowerextensioncables,conditionsthatmaycauseorallowpowersurges,andmissing
safetygrounds.
•Donottouchliveelectricalcircuitswiththereflectivesurfaceofaplasticdentalmirror.Thissurfaceis
conductive,andtouchingalivecircuitcancausepersonalinjuryanddamagetothecomputer.
•Donotservicethefollowingpartswiththepoweronwhentheyareremovedfromtheirnormaloperating
positionsinacomputer:
–Powersupplyunits
–Pumps
–Blowersandfans
–Motorgenerators
andsimilarunits.(Thispracticeensurescorrectgroundingoftheunits.)
•Ifanelectricalaccidentoccurs:
–Usecaution;donotbecomeavictimyourself.
4ideacentreAll-In-One520(22&24inch)ComputerHardwareMaintenanceManual
Page 11

–Switchoffpower.
–Sendanotherpersontogetmedicalaid.
Safetyinspectionguide
Theintentofthisinspectionguideistoassistyouinidentifyingpotentialhazardsposedbytheseproducts.
Eachcomputer,asitwasdesignedandbuilt,hadrequiredsafetyitemsinstalledtoprotectusersand
servicepersonnelfrominjury.Thisguideaddressesonlythoseitems.However,goodjudgmentshouldbe
usedtoidentifypotentialsafetyhazardsduetoattachmentoffeaturesoroptionsnotcoveredbythis
inspectionguide.
Ifanyhazardsarepresent,youmustdeterminehowserioustheapparenthazardcouldbeandwhetheryou
cancontinuewithoutfirstresolvingtheproblem.
Considerthefollowingitemsandthesafetyhazardstheypresent:
•Electricalhazards,especiallyprimarypower(primaryvoltageontheframecancauseseriousorfatal
electricalshock).
•Explosivehazards,suchasadamagedCRTfaceorbulgingcapacitor
•Mechanicalhazards,suchaslooseormissinghardware
Theguideconsistsofaseriesofstepspresentedasachecklist.Beginthecheckswiththepoweroff,and
thepowercorddisconnected.
Checklist:
1.Checkexteriorcoversfordamage(loose,broken,orsharpedges).
2.Power-offthecomputer.Disconnectthepowercord.
3.Checkthepowercordfor:
a.Athird-wiregroundconnectoringoodcondition.Useametertomeasurethird-wireground
continuityfor0.1ohmorlessbetweentheexternalgroundpinandframeground.
b.Thepowercordshouldbetheappropriatetypeasspecifiedinthepartslistings.
c.Insulationmustnotbefrayedorworn.
4.Removethecover.
5.Checkforanyobviousalterations.Usegoodjudgmentastothesafetyofanyalterations.
6.Checkinsidetheunitforanyobvioushazards,suchasmetalfilings,contamination,waterorother
liquids,orsignsoffireorsmokedamage.
7.Checkforworn,frayed,orpinchedcables.
8.Checkthatthepower-supplycoverfasteners(screwsorrivets)havenotbeenremovedortamperedwith.
Handlingelectrostaticdischarge-sensitivedevices
Anycomputerpartcontainingtransistorsorintegratedcircuits(ICs)shouldbeconsideredsensitiveto
electrostaticdischarge(ESD).ESDdamagecanoccurwhenthereisadifferenceinchargebetweenobjects.
ProtectagainstESDdamagebyequalizingthechargesothatthecomputer,thepart,theworkmat,andthe
personhandlingthepartareallatthesamecharge.
Notes:
1.Useproduct-specificESDprocedureswhentheyexceedtherequirementsnotedhere.
2.MakesurethattheESDprotectivedevicesyouusehavebeencertified(ISO9000)asfullyeffective.
WhenhandlingESD-sensitiveparts:
Chapter2.Safetyinformation5
Page 12

•Keepthepartsinprotectivepackagesuntiltheyareinsertedintotheproduct.
•Avoidcontactwithotherpeoplewhilehandlingthepart.
•Wearagroundedwriststrapagainstyourskintoeliminatestaticonyourbody.
•Preventthepartfromtouchingyourclothing.Mostclothingisinsulativeandretainsachargeeven
whenyouarewearingawriststrap.
•Usetheblacksideofagroundedworkmattoprovideastatic-freeworksurface.Thematisespecially
usefulwhenhandlingESD-sensitivedevices.
•Selectagroundingsystem,suchasthoselistedbelow,toprovideprotectionthatmeetsthespecific
servicerequirement.
Note:TheuseofagroundingsystemisdesirablebutnotrequiredtoprotectagainstESDdamage.
–AttachtheESDgroundcliptoanyframeground,groundbraid,orgreen-wireground.
–UseanESDcommongroundorreferencepointwhenworkingonadouble-insulatedor
battery-operatedsystem.Youcanusecoaxorconnector-outsideshellsonthesesystems.
–Usetheroundground-prongoftheACplugonAC-operatedcomputers.
Groundingrequirements
Electricalgroundingofthecomputerisrequiredforoperatorsafetyandcorrectsystemfunction.Proper
groundingoftheelectricaloutletcanbeverifiedbyacertifiedelectrician.
Safetynotices
TheCAUTIONandDANGERsafetynoticesinthissectionareprovidedinthelanguageofEnglish.
DANGER
Electricalcurrentfrompower,telephoneandcommunicationcablesishazardous.
Toavoidashockhazard:
•Donotconnectordisconnectanycablesorperforminstallation,maintenance,orreconfiguration
ofthisproductduringanelectricalstorm.
•Connectallpowercordstoaproperlywiredandgroundedelectricaloutlet.
•Connectanyequipmentthatwillbeattachedtothisproducttoaproperlywiredoutlet.
•Whenpossible,useonehandonlytoconnectordisconnectsignalcables.
•Neverturnonanyequipmentwhenthereisevidenceoffire,water,orstructuraldamage.
•Disconnecttheattachedpowercords,telecommunicationscables,networkcables,andmodem
cablesbeforeyouopenthedevicecovers,unlessinstructedotherwiseintheinstallationand
configurationprocedures.
•Connectanddisconnectcablesasdescribedinthefollowingtablewheninstalling,moving,or
openingcoversonthisproductorattacheddevices.
6ideacentreAll-In-One520(22&24inch)ComputerHardwareMaintenanceManual
Page 13

ToConnect
1.TurneverythingOFF .
2.First,attachallcablestodevices.
3.Attachsignalcablestoconnectors.
4.Attachpowercordstooutlet.
5.TurndeviceON.
ToDisconnect
1.TurneverythingOFF .
2.First,removepowercordsfromoutlets.
3.Removesignalcablesfromconnectors.
4.Removeallcablesfromdevices.
CAUTION:
Whenreplacingthelithiumbattery,useonlyPartNumber45C1566oranequivalenttypebattery
recommendedbythemanufacturer .Ifyoursystemhasamodulecontainingalithiumbattery,replace
itonlywiththesamemoduletypemadebythesamemanufacturer.Thebatterycontainslithiumand
canexplodeifnotproperlyused,handled,ordisposedof.
Donot:
•Throwintoorimmerseinwater
•Heattomorethan100°C(212°F)
•Repairordisassemble
Disposeofthebatteryasrequiredbylocalordinancesorregulations.
CAUTION:
Whenlaserproducts(suchasCD-ROMs,DVD-ROMdrives,fiberopticdevices,ortransmitters)are
installed,notethefollowing:
•Donotremovethecovers.Removingthecoversofthelaserproductcouldresultinexposureto
hazardouslaserradiation.Therearenoserviceablepartsinsidethedevice.
•Useofcontrolsoradjustmentsorperformanceofproceduresotherthanthosespecifiedherein
mightresultinhazardousradiationexposure.
DANGER
SomelaserproductscontainanembeddedClass3AorClass3Blaserdiode.Notethefollowing:
Thesediodesemitradiationwhenopen.Donotstareintothebeam,donotviewdirectlywith
opticalinstruments,andavoiddirectexposuretothebeam.
Chapter2.Safetyinformation7
Page 14
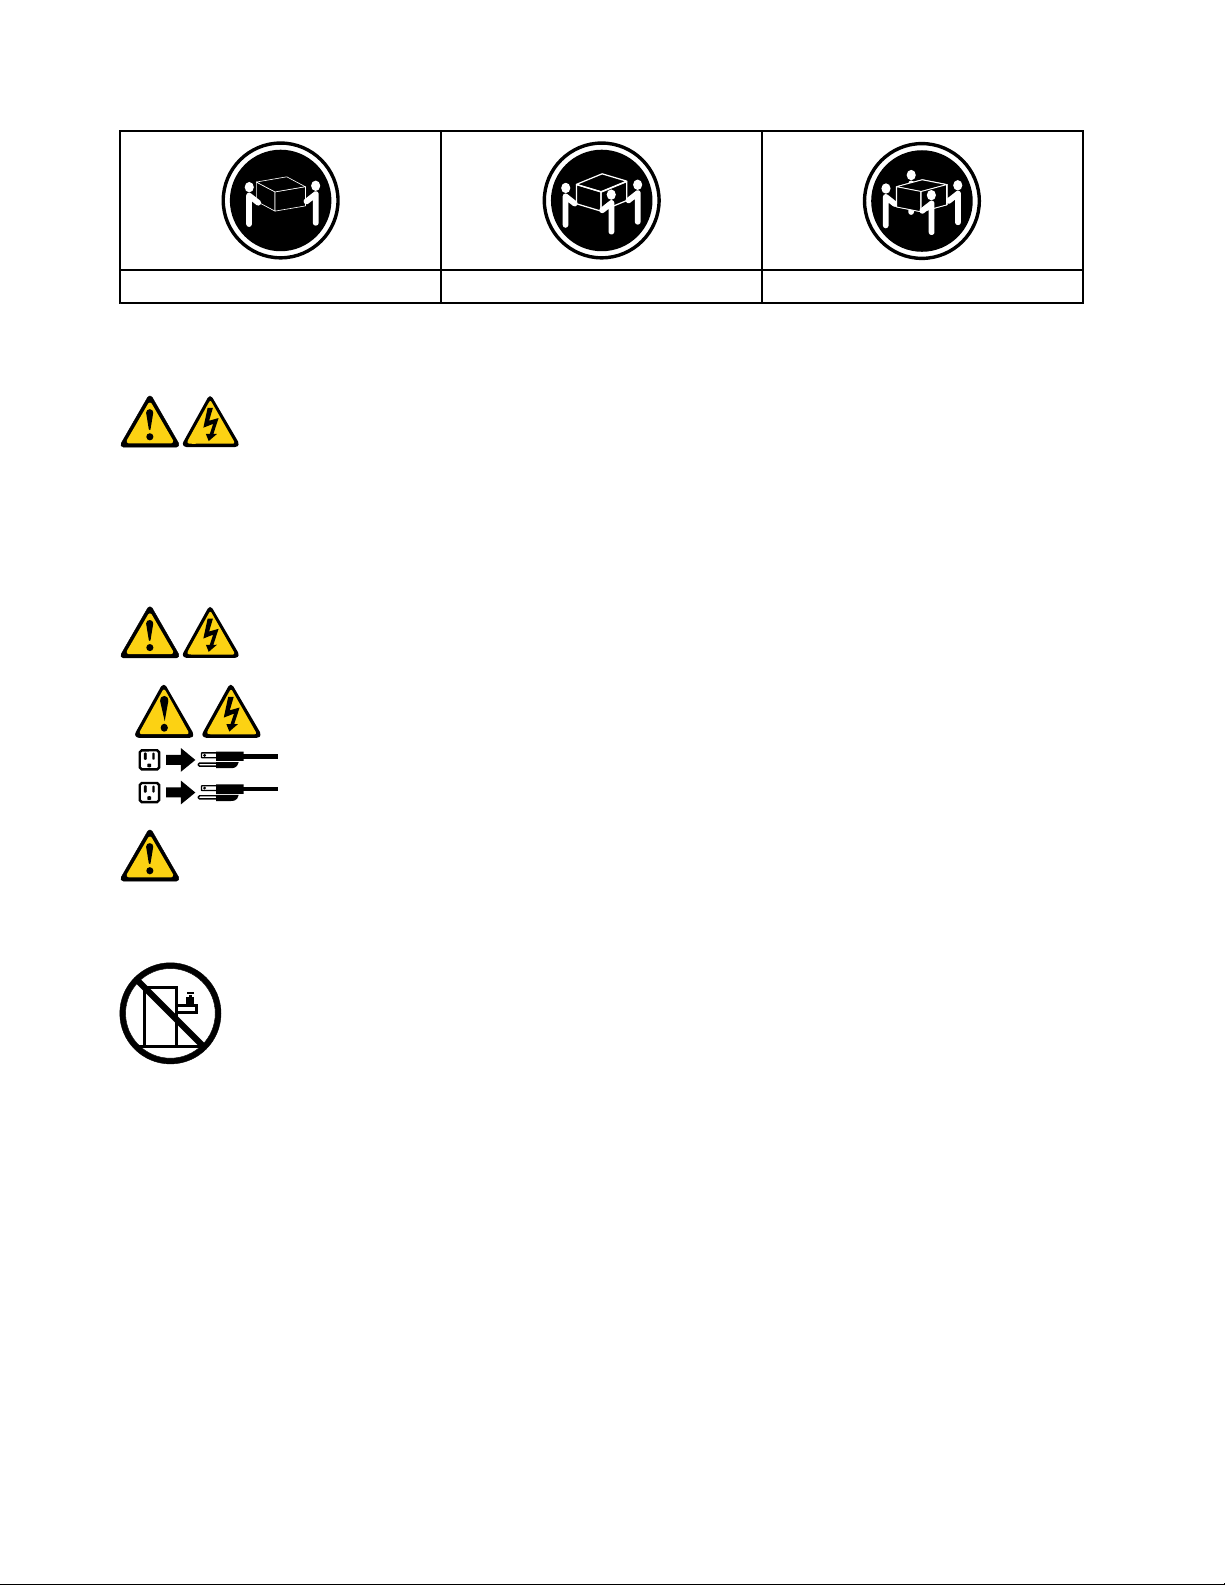
≥18kg(37lbs)≥32kg(70.5lbs)≥55kg(121.2lbs)
1
2
CAUTION:
Usesafepracticeswhenlifting.
CAUTION:
Thepowercontrolbuttononthedeviceandthepowerswitchonthepowersupplydonotturnoff
theelectricalcurrentsuppliedtothedevice.Thedevicealsomighthavemorethanonepower
cord.T oremoveallelectricalcurrentfromthedevice,ensurethatallpowercordsaredisconnected
fromthepowersource.
CAUTION:
Donotplaceanyobjectweighingmorethan82kg(180lbs.)ontopofrack-mounteddevices.
8ideacentreAll-In-One520(22&24inch)ComputerHardwareMaintenanceManual
Page 15

Chapter3.Generalinformation
Thischapterprovidesgeneralinformationthatappliestoallcomputermodelscoveredbythismanual.
Specifications
Thissectionliststhephysicalspecificationsforyourcomputer.
Thissectionliststhephysicalspecificationsforyourcomputer.
TypeLenovoAll-In-One520
Thissectionliststhephysicalspecifications.
Environment
Airtemperature:
Operating:10°to35°C
Transit:-20°to55°C
Humidity:
Operating:35%to80%
Transit:20%to90%(40°C)
Altitude:86KPato106KPa
Electricalinput:
Inputvoltage:90V-264V(AC)
Inputfrequency:47Hz-63Hz
©CopyrightLenovo2017
9
Page 16

10ideacentreAll-In-One520(22&24inch)ComputerHardwareMaintenanceManual
Page 17

Chapter4.GeneralCheckout
Attention:Thedrivesinthecomputeryouareservicingmighthavebeenrearrangedorthedrivestartup
sequencemayhavebeenchanged.Beextremelycarefulduringwriteoperationssuchascopying,saving,or
formatting.Dataorprogramscanbeoverwrittenifyouselectanincorrectdrive.
Generalerrormessagesappearifaproblemorconflictisfoundbyanapplication,theoperatingsystem,or
both.Foranexplanationofthesemessages,refertotheinformationsuppliedwiththatsoftwarepackage.
Usethefollowingproceduretohelpdeterminethecauseoftheproblem:
1.Power-offthecomputerandallexternaldevices.
2.Checkallcablesandpowercords.
3.Setalldisplaycontrolstothemiddleposition.
4.Power-onallexternaldevices.
5.Power-onthecomputer.
•Lookfordisplayederrorcodes.
•Lookforreadableinstructionsoramainmenuonthedisplay.
Ifyoudidnotreceivethecorrectresponse,proceedtostep6.
Ifyoudidreceivethecorrectresponse,proceedtostep7.
6.Ifoneofthefollowinghappens,followtheinstructiongiven:
•IfthecomputerdisplaysaPOSTerror,goto“POSTerrorcodes” .
•Ifthecomputerhangsandnoerrorisdisplayed,continueatstep7.
7.Iftheteststopsandyoucannotcontinue,replacethelastdevicetested.
©CopyrightLenovo2017
11
Page 18

12ideacentreAll-In-One520(22&24inch)ComputerHardwareMaintenanceManual
Page 19

Chapter5.UsingtheSetupUtility
TheSetupUtilityprogramisusedtoviewandchangetheconfigurationsettingsofyourcomputer,regardless
ofwhichoperatingsystemyouareusing.However,theoperatingsystemsettingsmightoverrideanysimilar
settingsintheSetupUtilityprogram.
StartingtheLenovoBIOSSetupUtilityprogram
TostarttheLenovoBIOSSetupUtilityprogram,dothefollowing:
1.Ifyourcomputerisalreadyonwhenyoustartthisprocedure,shutdowntheoperatingsystemand
turnoffthecomputer.
2.PressandholdtheF1keythenturnonthecomputer.WhentheLenovoBIOSSetupUtilityprogramis
displayed,releasetheF1key.
Note:IfaPower-OnPasswordoranAdministratorPasswordhasbeenset,theSetupUtilityprogrammenu
willnotbedisplayeduntilyoutypeyourpassword.Formoreinformation,see“Usingpasswords.”
Viewingandchangingsettings
SystemconfigurationoptionsarelistedintheLenovoBIOSSetupUtilityprogrammenu.Tovieworchange
settings,see“StartingtheSetupUtilityprogram.”
YoumustusethekeyboardwhenusingtheLenovoBIOSSetupUtilitymenu.Thekeysusedtoperform
varioustasksaredisplayedonthebottomofeachscreen.
Usingpasswords
YoucanusetheLenovoBIOSSetupUtilityprogramtosetpasswordstopreventunauthorizedpersons
fromgainingaccesstoyourcomputeranddata.See“StartingtheSetupUtilityprogram.”Thefollowing
typesofpasswordsareavailable:
•AdministratorPassword
•Power-OnPassword
Youdonothavetosetanypasswordstouseyourcomputer.However,ifyoudecidetosetpasswords,read
thefollowingsections.
Passwordconsiderations
Apasswordcanbeanycombinationoflettersandnumbersupto16characters(a-zand0-9).Forsecurity
reasons,itisagoodideatouseastrongpasswordthatcannotbeeasilycompromised.Wesuggestthat
passwordsshouldfollowtheserules:
•Forastrongpassword,use7-16charactersandamixoflettersandnumbers.
•Donotuseyournameoryourusername.
•Donotuseacommonwordoracommonname.
•Usesomethingsignificantlydifferentfromyourpreviouspassword.
Attention:AdministratorandPower-Onpasswordsarenotcasesensitive.
©CopyrightLenovo2017
13
Page 20

AdministratorPassword
SettinganAdministratorPassworddetersunauthorizedpersonsfromchangingconfigurationsettings.Y ou
mightwanttosetanAdministratorPasswordifyouareresponsibleformaintainingthesettingsofseveral
computers.
AfteryousetanAdministratorPassword,apasswordpromptisdisplayedeverytimeyouaccesstheLenovo
BIOSSetupUtilityprogram.
IfboththeAdministratorandPower-OnPasswordareset,youcantypeeitherpassword.However,youmust
useyourAdministratorPasswordtochangeanyconfigurationsettings.
Setting,changing,ordeletinganAdministratorpassword
TosetanAdministratorPassword,dothefollowing:
Note:Apasswordcanbeanycombinationoflettersandnumbersupto16characters(a-zand0-9).For
moreinformation,see“Passwordconsiderations”onpage13.
1.StarttheLenovoBIOSSetupUtilityprogram(see“StartingtheLenovoBIOSSetupUtilityprogram”on
page13).
2.FromtheSecuritymenu,selectSetAdministratorPasswordandpresstheEnterkey.
3.Thepassworddialogboxwillbedisplayed.T ypethepasswordthenpresstheEnterkey.
4.Re-typethepasswordtoconfirm,thenpresstheEnterkey.Ifyoutypedthepasswordcorrectly,
thepasswordwillbeinstalled.
TochangeanAdministratorPassword,dothefollowing:
1.StarttheLenovoBIOSSetupUtilityprogram(see“StartingtheLenovoBIOSSetupUtilityprogram”on
page13).
2.FromtheSecuritymenu,selectSetAdministratorPasswordandpresstheEnterkey.
3.Thepassworddialogboxwillbedisplayed.TypethecurrentpasswordthenpresstheEnterkey.
4.T ypethenewpassword,thenpresstheEnterkey.Re-typethepasswordtoconfirmthenewpassword.
Ifyoutypedthenewpasswordcorrectly,thenewpasswordwillbeinstalled.ASetupNoticedconfirming
thatchangeshavebeensavedwillbedisplayed.
TodeleteapreviouslysetAdministratorPassword,dothefollowing:
1.FromtheSecuritymenu,selectSetAdministratorPasswordandpresstheEnterkey.
2.Thepassworddialogboxwillbedisplayed.TypethecurrentpasswordandpresstheEnterkey.
3.T odeleteanAdministratorPassword,leaveeachnewpasswordlineitemblank,thenpresstheEnter
key.ASetupNoticeconfirmingthatchangeshavebeensavedwillbedisplayed.
4.ReturntotheLenovoBIOSSetupUtilityprogrammenuandselecttheExitoption.
5.SelectSavechangesandExitfromthemenu.
Power-OnPassword
WhenaPower-OnPasswordisset,youcannotstarttheLenovoBIOSSetupUtilityprogramuntilavalid
passwordistypedfromthekeyboard.
Setting,changing,ordeletingaPower-OnPassword
Note:Apasswordcanbeanycombinationoflettersandnumbersupto16characters(a-zand0-9).
14ideacentreAll-In-One520(22&24inch)ComputerHardwareMaintenanceManual
Page 21

TosetaPower-OnPassword,dothefollowing:
1.StarttheLenovoBIOSSetupUtilityprogram(See”StartingtheLenovoBIOSSetupUtilityprogram”on
page13.)
2.FromtheSecuritymenu,selectSetPower-OnPasswordandpresstheEnterkey.
3.Thepassworddialogboxwillbedisplayed.T ypethepassword,thenpresstheEnterkey.
4.Re-typethepasswordtoconfirm.Ifyoutypedthepasswordcorrectly,thepasswordwillbeinstalled.
TochangeaPower-OnPassword,dothefollowing:
1.StarttheLenovoBIOSSetupUtilityprogram(See”StartingtheLenovoBIOSSetupUtilityprogram”on
page13.)
2.FromtheSecuritymenu,selectSetPower-OnPasswordandpresstheEnterkey.
3.Thepassworddialogboxwillbedisplayed.TypethecurrentpasswordthenpresstheEnterkey.
4.T ypethenewpassword,thenpresstheEnterkey.Re-typethepasswordtoconfirmthenewpassword.
Ifyoutypedthenewpasswordcorrectly,thenewpasswordwillbeinstalled.ASetupNoticedconfirming
thatchangeshavebeensavedwillbedisplayed.
TodeleteapreviouslysetPower-OnPassword,dothefollowing:
1.FromtheSecuritymenu,selectSetPower-OnPasswordandpresstheEnterkey.
2.Thepassworddialogboxwillbedisplayed.TypethecurrentpasswordandpresstheEnterkey.
3.T odeletethePower-OnPassword,leaveeachnewpasswordlineitemblank,thenpressEnter.ASetup
Noticeconfirmingthatchangeshavebeensavedwillbedisplayed.
4.ReturntotheLenovoBIOSSetupUtilityprogrammenuandselecttheExitoption.
5.SelectSavechangesandExitfromthemenu.
Enablingordisablingadevice
TheDevicesoptionsisusedtoenableordisableuseraccesstothefollowingdevices:
USBFunctionsSelectwhethertoenableordisableUSB(UniversalSerial
Bus)functions.Ifthefunctionsaredisabled,noUSB
devicescanbeused.
SATAMode
OnboardAudioControllerSelectwhethertoenableordisabletheOnboard
OnboardEthernetControllerorLANBootAgentSelectwhethertoenableordisabletheOnboardEthernet
Toenableordisableadevice,dothefollowing:
1.StarttheSetupUtilityprogram(see“StartingtheSetupUtilityprogram”onpage13).
2.FromtheSetupUtilityprogrammenu,selectDevices.
3.Selectanoptionasfollows:
WhenthisfeatureissettoDisabled,alldevices
connectedtotheSATAconnectors(e.g.harddiskdrives
ortheopticaldiskdrive)aredisabledandcannotbe
accessed.
AudioController.WhenthisfeatureissettoDisabled
alldevicesconnectedtotheaudioconnectors(e.g.
headphonesoramicrophone)aredisabledandcannot
beused.
Controller,orselectwhethertoenableordisableload
onboardPXE(PrebootExecutionEnvironment).
SelectUSBSetup,presstheEnterkey,thenselectUSBFunctions.
Chapter5.UsingtheSetupUtility15
Page 22

SelectATADeviceSetup,presstheEnterkey,thenselectSAT AMode.
SelectAudioSetup,presstheEnterkey,thenselectOnboardAudioController.
SelectNetworkSetup,presstheEnterkey,thenselectOnboardEthernetSupportorLANBoot
Agent.
4.SelectDisabledorEnabledandpresstheEnterkey.
5.ReturntotheLenovoBIOSSetupUtilityprogrammenuandselecttheExitoption.
6.SelectSavechangesandExitfromthemenu.
Notes:
a.Ifyoudonotwanttosavethesettings,selectDiscardchangesandExitfromthemenu.
b.SelectIDE/AHCIMode:DevicedriversupportisrequiredforACHI.Dependingonhowtheharddisk
imagewasinstalled,changingthissettingmaypreventthesystemfrombooting.
Selectingastartupdevice
IfyourcomputerdoesnotbootfromadevicesuchastheCD/DVD-ROMdrivediskorharddiskasexpected,
followoneoftheproceduresbelow.
Selectingatemporarystartupdevice
Usethisproceduretostartupfromanybootdevice.
Note:NotallCDs,DVDsorharddiskdrivesarebootable.
1.T urnoffyourcomputer.
2.PressandholdtheF12keythenturnonthecomputer.WhentheStartupDeviceMenuappears,
releasetheF12key.
Note:IftheStartupDeviceMenudoesnotdisplayusingthesesteps,repeatedlypressandreleasethe
F12keyratherthankeepingitpressedwhenturningonthecomputer.
3.Use↑and↓arrowstoselectthedesiredstartupdevicefromtheStartupDeviceMenuandpress
theEnterkeytobegin.
Note:SelectingastartupdevicefromtheStartupDeviceMenudoesnotpermanentlychangethe
startupsequence.
Selectingorchangingthestartupdevicesequence
Tovieworpermanentlychangetheconfiguredstartupdevicesequence,dothefollowing:
1.StarttheLenovoBIOSSetupUtilityprogram(see“StartingtheLenovoBIOSSetupUtilityprogram”on
page13).
2.FromtheLenovoBIOSSetupUtilityprogrammainmenu,selecttheStartupoption.
3.PresstheEnterkey,andselectthedevicesforthePrimaryBootSequence.Readtheinformation
displayedontherightsideofthescreen.
4.Use↑and↓arrowstoselectadevice.Usethe<+>or<->keystomoveadeviceupordown.Usethe
<×>keytoexcludethedevicefromorincludethedeviceinthebootsequence.
5.ReturntotheLenovoBIOSSetupUtilityprogrammenuandselecttheExitoption.
6.SelectSavechangesandExitfromthemenu.
Notes:
16ideacentreAll-In-One520(22&24inch)ComputerHardwareMaintenanceManual
Page 23

a.Ifyoudonotwanttosavethesettings,selectDiscardchangesandExitfromthemenu.
b.Ifyouhavechangedthesesettingsandwanttoreturntothedefaultsettings,selectLoadOptimal
Defaultsfromthemenu.
ExitingtheLenovoBIOSSetupUtilityprogram
Afteryoufinishviewingorchangingsettings,presstheEsckeytoreturntotheLenovoBIOSSetupUtility
programmainmenu.YoumighthavetopresstheEsckeyseveraltimes.Dooneofthefollowing:
•Ifyouwanttosavethenewsettings,selectSavechangesandExitfromthemenu.WhentheSave&
resetwindowshows,selecttheY esbutton,andthenpresstheEnterkeytoexittheLenovoBIOS
SetupUtilityprogram.
•Ifyoudonotwanttosavethesettings,selectDiscardchangesandExitfromthemenu.Whenthe
ResetWithoutSavingwindowshows,selecttheYesbutton,andthenpresstheEnterkeytoexitthe
LenovoBIOSSetupUtilityprogram.
Chapter5.UsingtheSetupUtility17
Page 24

18ideacentreAll-In-One520(22&24inch)ComputerHardwareMaintenanceManual
Page 25
Chapter6.Symptom-to-FRUIndex
TheSymptom-to-FRUindexlistserrorsymptomsandpossiblecauses.Themostlikelycauseislistedfirst.
AlwaysbeginwithChapter4,“GeneralCheckout,”onpage11.Thisindexcanalsobeusedtohelpyou
decidewhichFRUstohaveavailablewhenservicingacomputer.Ifyouareunabletocorrecttheproblem
usingthisindex,goto“Undeterminedproblems”onpage20.
Notes:
•Ifyouhavebothanerrormessageandanincorrectaudioresponse,diagnosetheerrormessagefirst.
•Ifyoucannotrunthediagnostictestsoryougetadiagnosticerrorcodewhenrunningatestbutdid
receiveaPOSTerrormessage,diagnosethePOSTerrormessagefirst.
•Ifyoudidnotreceiveanyerrormessagelookforadescriptionofyourerrorsymptomsinthefirstpartof
thisindex.
Harddiskdrivebooterror
Aharddiskdrivebooterrorcanbecausedbythefollowing.
Error
Thestartupdriveisnotincludedinthebootsequence
configuration.
Nooperatingsystemisinstalledonthebootdrive.Installanoperatingsystemonthebootdrive.
Thebootsectoronthestartupdriveiscorrupted.
Thedriveisdefective.
FRU/Action
Checktheconfigurationandensurethestartupdriveis
inthebootsequence.
Thedrivemustbeformatted.Dothefollowing:
1.Attempttobackupthedataonthefailingharddisk
drive.
2.Usetheoperatingsystemtoformattheharddisk
drive.
Replacetheharddiskdrive.
PowerSupplyProblems
Followtheseproceduresifyoususpectthereisapowersupplyproblem.
Check/VerifyFRU/Action
Checkthatthefollowingareproperlyinstalled:
•PowerCord
•On/OffSwitchconnector
•SystemBoardPowerSupplyconnectors
•Microprocessorconnections
Checkthepowercord.PowerCord
Checkthepower-onswitch.Power-onSwitch
Reseatconnectors
©CopyrightLenovo2017
19
Page 26

POSTerrorcodes
Eachtimeyouturnthecomputeron,itperformsaseriesofteststocheckthatthesystemisoperating
correctlyandthatcertainoptionsareset.ThisseriesoftestsiscalledthePower-OnSelf-Test,orPOST.
POSTdoesthefollowing:
•Checkssomebasicmotherboardoperations
•Checksthatthememoryisworkingcorrectly
•Startsvideooperations
•Verifiesthatthebootdriveisworking
POSTErrorMessageDescription/Action
Keyboarderror
RebootandSelectproperBootdeviceorInsertBoot
MediainselectedBootdevice
Cannotinitializethekeyboard.Makesurethekeyboard
isproperlyconnectedtothecomputerandthatnokeys
areheldpressedduringPOST.T opurposelyconfigure
thecomputerwithoutakeyboard,selectKeyboardless
operationinStartupandsettheoptiontoEnabled.The
BIOSthenignoresthemissingkeyboardduringPOST.
TheBIOSwasunabletofindasuitablebootdevice.Make
surethebootdriveisproperlyconnectedtothecomputer.
Makesureyouhavebootablemediainthebootdevice.
Undeterminedproblems
1.Power-offthecomputer.
2.Removeordisconnectthefollowingcomponents(ifconnectedorinstalled)oneatatime.
a.Externaldevices(modem,printer,ormouse)
b.Extendedvideomemory
c.ExternalCache
d.ExternalCacheRAM
e.Harddiskdrive
f.Diskdrive
3.Power-onthecomputertore-testthesystem.
4.Repeatsteps1through3untilyoufindthefailingdeviceorcomponent.
Ifalldevicesandcomponentshavebeenremovedandtheproblemcontinues,replacethesystemboard.
20ideacentreAll-In-One520(22&24inch)ComputerHardwareMaintenanceManual
Page 27
Chapter7.Locatingconnectors,controlsandcomponents
Thissectionprovidesillustrationstohelplocatethevariousconnectors,controlsandcomponentsofthe
computer.
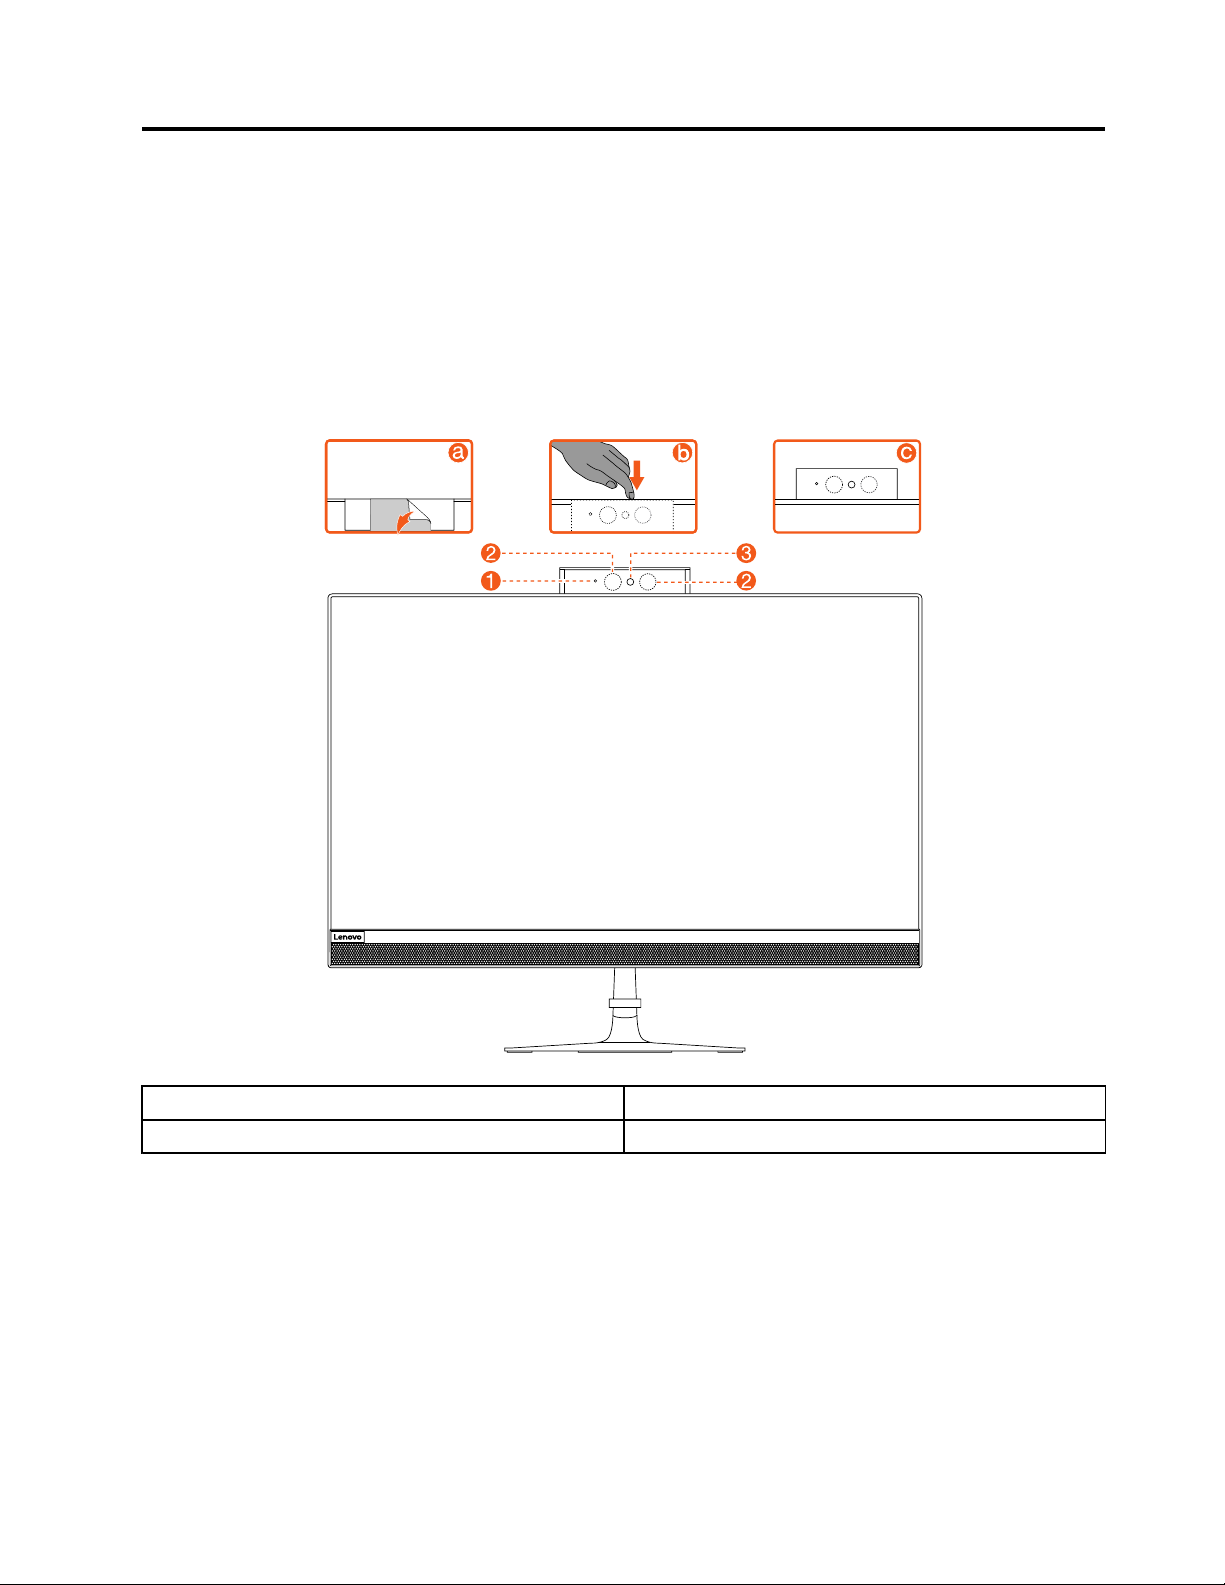
Fontview
Thefollowingillustrationshowsthelocationofcontrolsandcomponentsonthefrontofthecomputer.
Attention:Becarefulnottoblockanyairventsonthecomputer.Blockedairventscancauseoverheating.
1.CameraLEDindicator
2.InfraredLEDs(Selectedmodelsonly)
©CopyrightLenovo2017
3.Built-incamera
21
Page 28
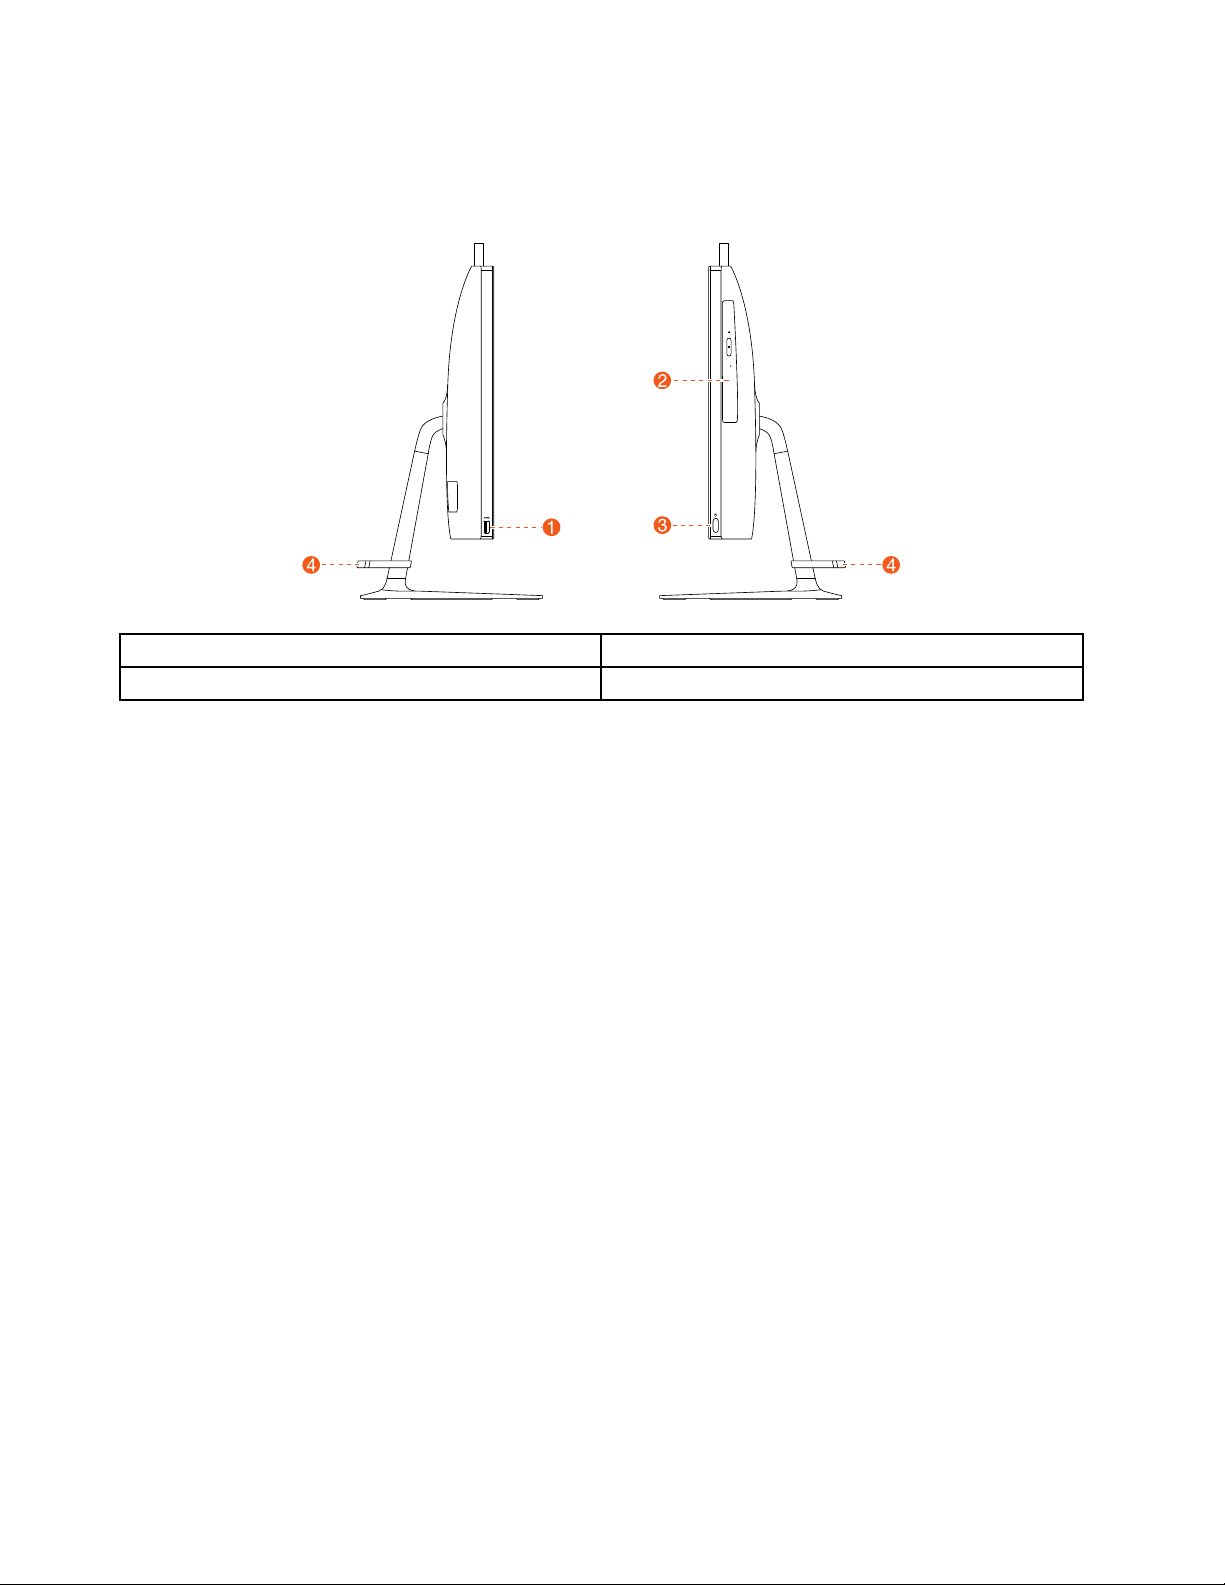
Leftandrightview
Thefollowingillustrationshowsthelocationofconnectors,controlsandcomponentsontheleftandright
sideofthecomputer.
1.USB3.0connectors
2.Opticaldrive(Optional)4.Cableclip
3.Powerbutton
22ideacentreAll-In-One520(22&24inch)ComputerHardwareMaintenanceManual
Page 29
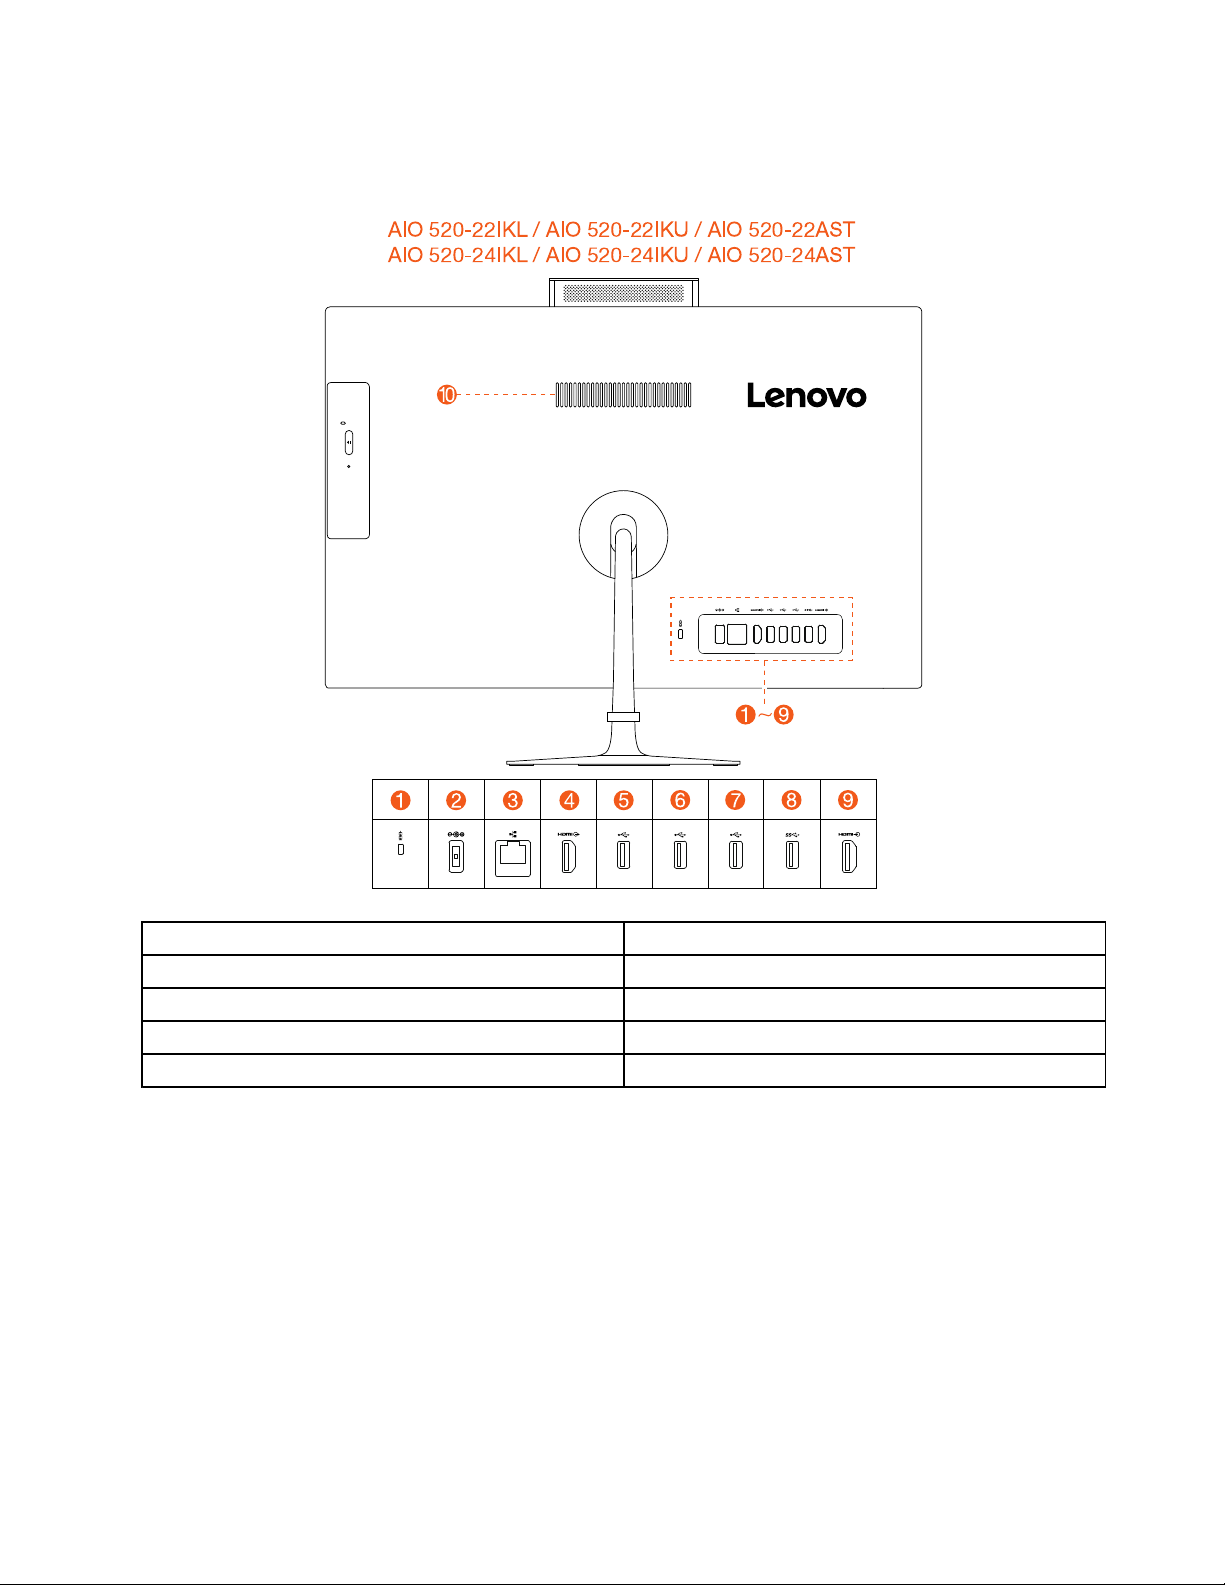
Rearview
AIO 520-22IKL / AIO 520-22IKU / AIO 520-22AST
AIO 520-24IKL / AIO 520-24IKU / AIO 520-24AST
Thefollowingillustrationshowsthelocationofconnectorsandcomponentsontherearofthecomputer.
1.Securitycableslot6.USB2.0connector
2.Powerconnector
3.Ethernetconnector
4.HDMI-outconnector
5.USB2.0connector
7.USB2.0connector
8.USB2.0connector
9.HDMI-inconnector(Optional)
10.Airvent
Chapter7.Locatingconnectors,controlsandcomponents23
Page 30
Hardwarecomponents
1
2
3
4
5
6
7
8
9
11
10
12
13
14
16
15
17
18
19
20
21
22
23
24
25
26
27
28
30
31
32
33
34
35
36
38
37
39
40
41
42
29
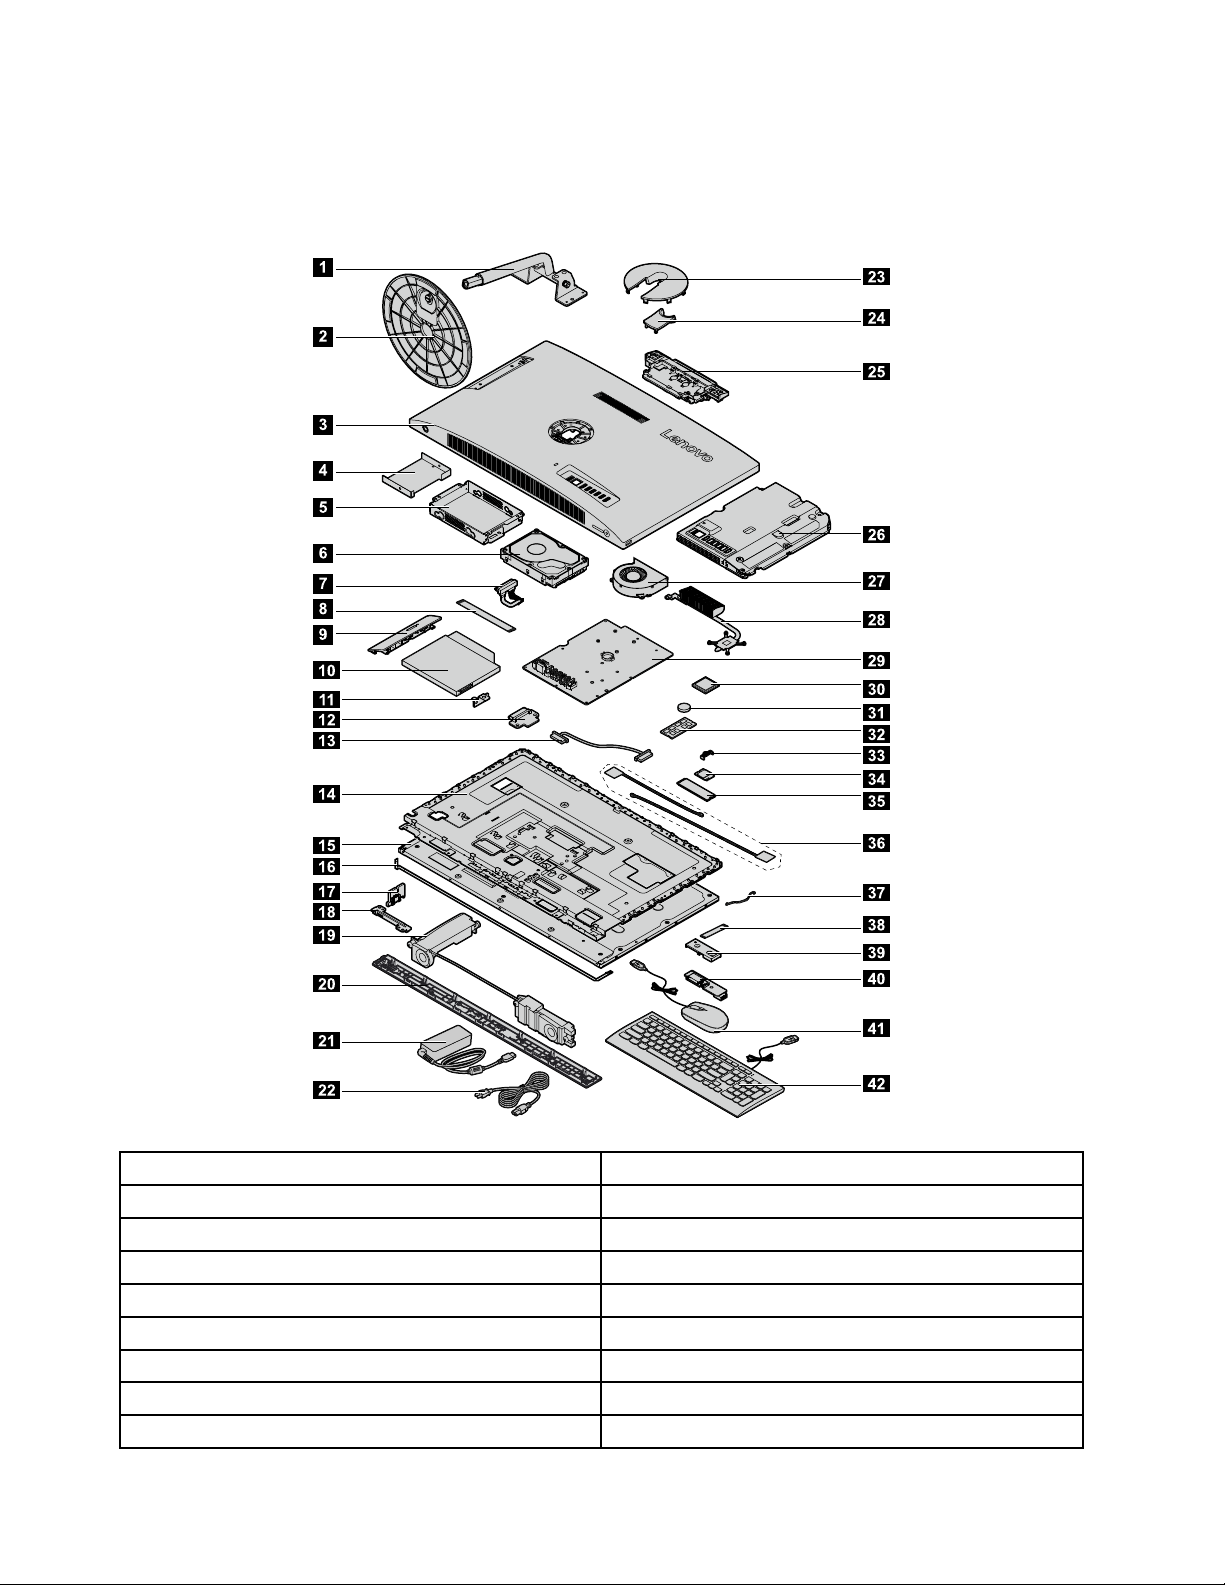
Thefollowingillustrationshowsthecomponentsthatmakeupyourcomputer.
Nonetouchmodel
1.Standholder
2.Standbase23.Hingecover(top)
3.Rearcover
4.HDDshielding
5.HDDbracket
6.Harddiskdrive
7.HDDcable28.Heatsink
8.ODDcable
9.ODDbezel30.CPU
221.Powercord
24.Hingecover(bottom)
25.Cameramodule
26.Motherboardframe
27.Systemfan
29.Motherboard
24ideacentreAll-In-One520(22&24inch)ComputerHardwareMaintenanceManual
Page 31

10.Opticaldiskdrive
11.ODDbracketwithlatchassembly
12.ODDboard
31.Battery
32.Memorycard
33.Wi-Ficover
132.LVDscable34.Wi-Ficard
14.LCDMainframe35.SSD
15.LCDpanel
36.RFAntennacables
16.LCDbacklightcable37.Cardreadercable
17.Powerswitchboard
38.USBandAudiocable
18.MicrophoneModule(withbracket)39.SideI/Oshielding
19.Speakersystem40.SideI/OUSBboard
20.Frontdeco41.Mouse
21.Poweradapter42.Keyboard
Chapter7.Locatingconnectors,controlsandcomponents25
Page 32

Touchmodel
1
2
3
4
5
6
7
8
9
11
10
12
13
14
15
16
17
18
19
20
21
22
23
24
25
26
27
29
30
31
32
33
34
35
37
36
38
39
40
41
28
1.Standholder22.Hingecover(top)
2.Standbase23.Hingecover(bottom)
3.Rearcover
4.HDDshielding
5.HDDbracket
6.Harddiskdrive27.Heatsink
24.Cameramodule
25.Motherboardframe
26.Systemfan
7.HDDcable28.Motherboard
8.ODDcable29.CPU
9.ODDbezel
10.Opticaldiskdrive
11.ODDbracketwithlatchassembly
30.Battery
31.Memorycard
32.Wi-Ficover
26ideacentreAll-In-One520(22&24inch)ComputerHardwareMaintenanceManual
Page 33

12.ODDboard
13.LVDscable
14.LCDpanelmodule
33.Wi-Ficard
34.SSD
35.RFAntennacables
15.LCDbacklightcable36.Cardreadercable
16.Powerswitchboard
37.USBandAudiocable
17.MicrophoneModule(withbracket)38.SideI/Oshielding
18.Speakersystem39.SideI/OUSBboard
19.Frontdeco40.Mouse
20.Poweradapter41.Keyboard
21.Powercord
Chapter7.Locatingconnectors,controlsandcomponents27
Page 34

Identifyingpartsonthemotherboard
1
2
3
4 5
6
7
8 9
10
11
12
13
14
15
16
17 18
19
20
21
22
23
Themotherboard(sometimescalledtheplanarorsystemboard)isthemaincircuitboardinyourcomputer.
Itprovidesbasiccomputingfunctionsandsupportsavarietyofdevicesthatarefactory-installedorthat
youcaninstalllater.Thefollowingillustrationshowsthelocationofconnectorsandcomponentsonthe
frontofthemotherboard.
AIO520–24AST/AIO520–22AST
1.Battery13.RAMconnector
2.HDDSAT Aconnecto
3.HDDpowerconnector
14.Wificonnector
15.Speakerconnector
4.DC-INconnector16.I/Oboardconnector
5.Ethernetconnector
6.HDMI-outconnector
17.I/Oboardconnector
18.SSDSATAconnector
7.USB2.0connector19.Converterconnector
8.USB2.0connector
9.USB2.0connector
20.Powerswitchboardconnector
21.4-in-1connector
10.USB3.0connector22.Systemfanconnector
11.HDMI-inconnector
23.ODDboardconnector
12.Cameraconnector
28ideacentreAll-In-One520(22&24inch)ComputerHardwareMaintenanceManual
Page 35

AIO520–24IKU/AIO520–22IKU
1
2
3
4 5
6 7 8 9
10 11
12
13
14
15 16 17
18
19
20
21
22
23
1
2
3
4 5 6 7 8
9
10
11
12
13
14
15
16 17
18
19
20
21
22
23
1.Battery13.RAMconnector
2.HDDSAT Aconnecto
3.HDDpowerconnector
14.Wificonnector
15.Speakerconnector
4.DC-INconnector16.I/Oboardconnector
5.Ethernetconnector
6.HDMI-outconnector
17.I/Oboardconnector
18.SSDSATAconnector
7.USB2.0connector19.Converterconnector
8.USB2.0connector
9.USB2.0connector
20.Powerswitchboardconnector
21.4-in-1connector
10.USB3.0connector22.Systemfanconnector
11.HDMI-inconnector
23.ODDboardconnector
12.Cameraconnector
AIO520–24IKL/AIO520–22IKL
Chapter7.Locatingconnectors,controlsandcomponents29
Page 36

1.Battery13.RAMconnector
2.HDDSAT Aconnecto
3.HDDpowerconnector
4.DC-INconnector16.I/Oboardconnector
5.Ethernetconnector
6.HDMI-outconnector
7.USB2.0connector19.Converterconnector
8.USB2.0connector
9.USB2.0connector
10.USB3.0connector22.Systemfanconnector
11.HDMI-inconnector
12.Cameraconnector
14.Wificonnector
15.Speakerconnector
17.I/Oboardconnector
18.SSDSATAconnector
20.Powerswitchboardconnector
21.4-in-1connector
23.ODDboardconnector
30ideacentreAll-In-One520(22&24inch)ComputerHardwareMaintenanceManual
Page 37

Chapter8.Replacinghardware
Attention:Donotremovethecomputercoverorattemptanyrepairbeforereadingthe“Importantsafetyinformation”
intheSafetyandWarrantyGuidethatwasincludedwithyourcomputer.ToobtaincopiesoftheSafetyandWarranty
Guide,gototheSupportWebsiteat:http://consumersupport.lenovo.com.
Note:UseonlypartsprovidedbyLenovo.
Generalinformation
Pre-disassemblyinstructions
Beforestartingthedisassemblyprocedure,makesurethatyoudothefollowing:
1.T urnoffthepowertothesystemandallperipherals.
2.Unplugallpowerandsignalcablesfromthecomputer.
3.Placethesystemonaflat,stablesurface.
©CopyrightLenovo2017
31
Page 38

Replacingthekeyboardandmouse
Note:Y ourkeyboardwillbeconnectedtoaUSBconnectorateithersideorattherearofthecomputer.
Toreplacethekeyboardandmouse:
Step1.Removeanymediafromthedrives,shutdownthecomputer,andturnoffallattacheddevices.
Step2.Unplugallpowercordsfromelectricaloutlets.
Step3.Disconnectallcablesattachedtothecomputer.Thisincludespowercords,input/output(I/O)
cables,andanyothercablesthatareconnectedtothecomputer..
Step4.Locatetheconnectorforthekeyboard.RefertoLocatingconnectors,controlsandcomponentsto
locatethevariousconnectors.
Step5.Disconnectthedefectivekeyboardcablefromthecomputerandconnectthenewkeyboardcable
tothesameconnector.
Step6.Themousecanbereplacedusingthesamemethod.
Replacingtheadapter
Attention:T urnoffthecomputerandwait3to5minutestoletitcooldownbeforeremovingthecover.
Step1.Removeanymediafromthedrives,shutdowntheoperatingsystem,andturnoffthecomputer
andallattacheddevices.
Step2.Disconnecttheadapterfromtheconnectoronthecomputer,thenunplugtheadapterfrom
electricaloutlet.
32ideacentreAll-In-One520(22&24inch)ComputerHardwareMaintenanceManual
Page 39

Step3.Connectthenewadapterasshown.
Removingthestandbase
Attention:T urnoffthecomputerandwait3to5minutestoletitcooldownbeforeremovingthecover.
Note:Itmaybehelpfultoplacethecomputerface-downonasoftflatsurfaceforthisprocedure.Lenovo
recommendsthatyouuseablanket,towel,orothersoftclothtoprotectthetouchscreenfromscratches
orotherdamage.
Step1.Removeanymediafromthedrives,shutdowntheoperatingsystem,andturnoffthecomputer
andallattacheddevices.
Step2.Unplugallpowercordsfromelectricaloutlets.
Step3.Disconnectallcablesattachedtothecomputer.Thisincludespowercords,input/output(I/O)
cables,andanyothercablesthatareconnectedtothecomputer.RefertoLocatingconnectors,
controlsandcomponentstolocatethevariousconnectors.
Step4.Twistthehandscrewringcounter-clockwiseuntilthestandbaseisloosened.a
Step5.Removethestandbasefromthestandholderandputitaside.b
Removingtherearcover
Attention:T urnoffthecomputerandwait3to5minutestoletitcooldownbeforeremovingthecover.
Note:Itmaybehelpfultoplacethecomputerface-downonasoftflatsurfaceforthisprocedure.Lenovo
recommendsthatyouuseablanket,towel,orothersoftclothtoprotectthetouchscreenfromscratches
orotherdamage.
Chapter8.Replacinghardware33
Page 40

Step1.Removeanymediafromthedrives,shutdowntheoperatingsystem,andturnoffthecomputer
andallattacheddevices.
Step2.Unplugallpowercordsfromelectricaloutlets.
Step3.Disconnectallcablesattachedtothecomputer.Thisincludespowercords,input/output(I/O)
cables,andanyothercablesthatareconnectedtothecomputer.RefertoLocatingconnectors,
controlsandcomponentstolocatethevariousconnectors.
Step4.Removethestandbase.RefertoRemovingthestandbase.
Step5.Removethehingecovers.
Step6.Removethescrewcoverrubber.
34ideacentreAll-In-One520(22&24inch)ComputerHardwareMaintenanceManual
Page 41

Step7.Rotatethescrewdriver90degreestotheright,andthenliftuptherearcoverfromtheleftside
bottom.
Chapter8.Replacinghardware35
Page 42

Step8.UnplugthecablesthatconnecttotheMotherboard.
Step9.Toreattachtherearcover:
a.Reconnectthecablestothemotherboard.
b.Aligntherearcoverwiththechassis.
c.Presstherearcoveruntilitsnapsintoposition.
36ideacentreAll-In-One520(22&24inch)ComputerHardwareMaintenanceManual
Page 43

Replacingthecamera
Note:T urnoffthecomputerandwait3to5minutestoletitcooldownbeforeremovingthecover.
Note:Itmaybehelpfultoplacethecomputerface-downonasoftflatsurfaceforthisprocedure.Lenovo
recommendsthatyouuseablanket,towel,orothersoftclothtoprotectthecomputerscreenfromscratches
orotherdamage.
Toreplacethecamera:
Step1.Removeanymediafromthedrives,shutdowntheoperatingsystem,andturnoffthecomputer
andallattacheddevices.
Step2.Unplugallpowercordsfromelectricaloutlets.
Step3.Disconnectallcablesattachedtothecomputer.Thisincludespowercords,input/output(I/O)
cables,andanyothercablesthatareconnectedtothecomputer.RefertoLocatingconnectors,
controlsandcomponentstolocatethevariousconnectors.
Step4.Removethestandbase.RefertoRemovingthestandbase.
Step5.Removetherearcover.RefertoRemovingtherearcover.
Step6.Disconnectthecameracableformthecorrespondingconnectoronthemotherboard.Referto
Locatingconnectors,controlsandcomponents.
Step7.Pressthecameratomakeitoutofthechassisandremovethesixscrews,andthenpressthe
cameraintothechassisagainandpulloutthecameramodule.
Step8.Toinstallthenewcamera:
a.CPlacethenewcameramoduleintoposition,securethemoduletothechassiswithsixscrews
b.Connectthecameracabletothemotherboard.
Chapter8.Replacinghardware37
Page 44

Step9.Reattachtherearcoverandstandbase.
Replacingtheheat-sink
Note:T urnoffthecomputerandwait3to5minutestoletitcooldownbeforeremovingthecover.
Note:Itmaybehelpfultoplacethecomputerface-downonasoftflatsurfaceforthisprocedure.Lenovo
recommendsthatyouuseablanket,towel,orothersoftclothtoprotectthecomputerscreenfromscratches
orotherdamage.
Toreplacetheheat-sink:
Step1.Removeanymediafromthedrives,shutdowntheoperatingsystem,andturnoffthecomputer
andallattacheddevices.
Step2.Unplugallpowercordsfromelectricaloutlets.
Step3.Disconnectallcablesattachedtothecomputer.Thisincludespowercords,input/output(I/O)
cables,andanyothercablesthatareconnectedtothecomputer.RefertoLocatingconnectors,
controlsandcomponentstolocatethevariousconnectors.
Step4.Removethestandbase.RefertoRemovingthestandbase.
Step5.Removetherearcover.RefertoRemovingtherearcover.
Step6.Removethecameramodule.RefertoReplacingthecamera.
Step7.Loosentheninescrewsthatsecuretheheat-sinktothemotherboard,andthenliftuptheheat-sink
andremoveit.
Attention:Placetheheat-sinkupsidedownonaflatsurfacetopreventthermalgreasefromcontaminating
othercomponents.
Attention:UseanalcoholpadtowipethethermalgreaseofftheCPU.
Step8.Toinstallthenewheat-sink:
38ideacentreAll-In-One520(22&24inch)ComputerHardwareMaintenanceManual
Page 45

a.Positionthenewheat-sinkonthemotherboardsothattheninescrewsarealignedwiththe
holesinthemotherboardandwindshielding.
b.Tightenthescrewsinnumericordertosecurethenewheat-sinktothemotherboard.
Step9.Reattachthecameramodule,rearcoverandstandbase.
ReplacingtheCPU
Note:T urnoffthecomputerandwait3to5minutestoletitcooldownbeforeremovingthecover.
Note:Itmaybehelpfultoplacethecomputerface-downonasoftflatsurfaceforthisprocedure.Lenovo
recommendsthatyouuseablanket,towel,orothersoftclothtoprotectthecomputerscreenfromscratches
orotherdamage.
ToreplacetheCPU
Step1.Removeanymedia(disks,CDs,DVDs,ormemorycards)fromthedrives,shutdowntheoperating
system,andturnoffthecomputerandallattacheddevices.
Step2.Unplugallpowercordsfromelectricaloutlets.
Step3.Disconnectallcablesattachedtothecomputer.Thisincludespowercords,input/output(I/O)
cables,andanyothercablesthatareconnectedtothecomputer.Referto“Leftandrightview”
and“Rearview”forhelpwithlocatingthevariousconnectors.
Step4.Removetheheat-sink.Referto“Replacingtheheatsink”.
Chapter8.Replacinghardware39
Page 46

Step5.Liftthesmallhandleandopentheretainer.
Step6.Liftthemicroprocessorstraightupandoutofthesocket.3
Attention:Donottouchthegoldcontactsonthebottomofthemicroprocessor.Whenhandlingthe
microprocessor,touchonlythesides.
Note:Donotdropanythingontothemicroprocessorsocketwhileitisexposed.Thesocketpinsmust
bekeptascleanaspossible.
40ideacentreAll-In-One520(22&24inch)ComputerHardwareMaintenanceManual
Page 47

Step7.Holdingthesidesofthemicroprocessorwithyourfingers,removetheprotectivecover1that
protectsthegoldcontactsonthenewmicroprocessor.
2
Step8.Holdingthesidesofthemicroprocessorwithyourfingers,positionthemicroprocessorsothatthe
notchesonthemicroprocessorarealignedwiththetabsinthemicroprocessorsocket.
Important:T oavoiddamagingthemicroprocessorcontacts,keepthemicroprocessorcompletelylevel
whileinstallingitintothesocket.
Step9.Lowerthemicroprocessorstraightdownintoitssocketonthemotherboard.
Step10.T osecurethemicroprocessorinthesocket,closethemicroprocessorretainerandlockitinto
positionwiththesmallhandle.
Step11.Useathermalgreasesyringetoplace5dropsofgreaseonthetopofthemicroprocessor.Each
dropofgreaseshouldbe0.03ml(3tickmarksonthegreasesyringe).
Step12.Reattachtheheat-sink,EMIcover,middlecover,opticaldrive,standholder,footcoverandstand
base.
Chapter8.Replacinghardware41
Page 48

Replacingtheharddiskdrive
Attention:T urnoffthecomputerandwait3to5minutestoletitcooldownbeforeremovingthecover.
Note:Itmaybehelpfultoplacethecomputerface-downonasoftflatsurfaceforthisprocedure.Lenovo
recommendsthatyouuseablanket,towel,orothersoftclothtoprotectthetouchscreenfromscratches
orotherdamage.
Step1.Removeanymediafromthedrives,shutdowntheoperatingsystem,andturnoffthecomputer
andallattacheddevices.
Step2.Unplugallpowercordsfromelectricaloutlets.
Step3.Disconnectallcablesattachedtothecomputer.Thisincludespowercords,input/output(I/O)
cables,andanyothercablesthatareconnectedtothecomputer.RefertoLocatingconnectors,
controlsandcomponentstolocatethevariousconnectors.
Step4.Removethestandbase.RefertoRemovingthestandbase.
Step5.Removetherearcover.RefertoRemovingtherearcover.
Step6.Pulltheharddiskdriveandbrackettoleft,andthenliftthemup.
Step7.Disconnectthesignalcablefromtheharddiskdrive.
Step8.Removethefourscrewsthatsecuretheharddiskdrivetothebracket.
Step9.Toinstallthenewharddiskdrive:
a.Lineupthenewharddiskdrivewiththebracketandsecureitwithfourscrews.
b.Connectthedataandpowercablestothenewharddiskdrive.
c.Slidetheharddiskdriveandbracketbackintoposition.
Step10.Reattachtherearcoverandstandbase.
42ideacentreAll-In-One520(22&24inch)ComputerHardwareMaintenanceManual
Page 49

Replacingthesystemfan
Note:T urnoffthecomputerandwait3to5minutestoletitcooldownbeforeremovingthecover.
Note:Itmaybehelpfultoplacethecomputerface-downonasoftflatsurfaceforthisprocedure.Lenovo
recommendsthatyouuseablanket,towel,orothersoftclothtoprotectthecomputerscreenfromscratches
orotherdamage.
Toreplacethesystemfan
Step1.Removeanymediafromthedrives,shutdowntheoperatingsystem,andturnoffthecomputer
andallattacheddevices.
Step2.Unplugallpowercordsfromelectricaloutlets.
Step3.Disconnectallcablesattachedtothecomputer.Thisincludespowercords,input/output(I/O)
cables,andanyothercablesthatareconnectedtothecomputer.RefertoLocatingconnectors,
controlsandcomponentstolocatethevariousconnectors.
Step4.Removethestandbase.RefertoRemovingthestandbase.
Step5.Removetherearcover.RefertoRemovingtherearcover.
Step6.Removethescrewthatsecuresthesystemfantothechassis.
Step7.Disconnectthesystemfanpowercablefromthemotherboard.
Step8.Liftthesystemfanuptoremoveit.
Step9.Toinstallthenewsystemfan:
a.Placethenewsystemfanintoposition,andthensecureittothechassiswithonescrew.
b.Connectthesystemfanpowercabletotheconnectoronthemotherboard.
Step10.Reattachtherearcoverandstandbase.
Chapter8.Replacinghardware43
Page 50

Replacingtheopticaldrive
Attention:T urnoffthecomputerandwait3to5minutestoletitcooldownbeforeremovingthecover.
Note:Itmaybehelpfultoplacethecomputerface-downonasoftflatsurfaceforthisprocedure.Lenovo
recommendsthatyouuseablanket,towel,orothersoftclothtoprotectthetouchscreenfromscratches
orotherdamage.
Step1.Removeanymediafromthedrives,shutdowntheoperatingsystem,andturnoffthecomputer
andallattacheddevices.
Step2.Unplugallpowercordsfromelectricaloutlets.
Step3.Disconnectallcablesattachedtothecomputer.Thisincludespowercords,input/output(I/O)
cables,andanyothercablesthatareconnectedtothecomputer.RefertoLocatingconnectors,
controlsandcomponentstolocatethevariousconnectors.
Step4.Removethestandbase.RefertoRemovingthestandbase.
Step5.Removetherearcover.RefertoRemovingtherearcover.
Step6.Pushtheopticaldriveoutusingascrewdriveroryourhand.
44ideacentreAll-In-One520(22&24inch)ComputerHardwareMaintenanceManual
Page 51

Step7.Pushasmallironstick(paperclip)intothesmallholeontheopticaldrivebezelsothatthedisk
springsoutasshown.
Step8.Removetheopticaldrivebezelfromtheopticaldriveasshown.12
Step9.Toinstallthenewopticaldrive:
a.Insertthetabsontheopticaldrivebezelintothecorrespondingholesinthenewopticaldrive,
andthenpushthebezelbackintoposition.
b.Gentlypushthediskforwarduntilitsnapsintoposition.
c.Slidethenewopticaldriveintothedrivebay.
Step10.Reattachtherearcoverandstandbase.
Replacingthememorymodule
Attention:T urnoffthecomputerandwait3to5minutestoletitcooldownbeforeremovingthecover.
Note:Itmaybehelpfultoplacethecomputerface-downonasoftflatsurfaceforthisprocedure.Lenovo
recommendsthatyouuseablanket,towel,orothersoftclothtoprotectthetouchscreenfromscratches
orotherdamage.
Chapter8.Replacinghardware45
Page 52

Step1.Removeanymediafromthedrives,shutdowntheoperatingsystem,andturnoffthecomputer
andallattacheddevices.
Step2.Unplugallpowercordsfromelectricaloutlets.
Step3.Disconnectallcablesattachedtothecomputer.Thisincludespowercords,input/output(I/O)
cables,andanyothercablesthatareconnectedtothecomputer.RefertoLocatingconnectors,
controlsandcomponentstolocatethevariousconnectors.
Step4.Removethestandbase.RefertoRemovingthestandbase.
Step5.Removetherearcover.RefertoRemovingtherearcover.
Step6.Pushoutthelatchesonbothsidesofthememorysockettoreleasethememorymoduleandgently
pullthememorymoduleupwardtoremoveitfromitssocket.
Step7.
Step8.Toinstallthenewmemorymodule:
a.Positionthenewmemorymoduleoverthememoryslot.Ensurethatthenotch2onthe
memorymodulealignscorrectlywiththeslotkey1inthememorysocket.Pressthememory
moduledownuntilsnapsintoposition.
b.Reinstallthememorycover.
Step9.Reattachtherearcoverandstandbase.
46ideacentreAll-In-One520(22&24inch)ComputerHardwareMaintenanceManual
Page 53

Replacingthesolidstatedrive
Attention:T urnoffthecomputerandwait3to5minutestoletitcooldownbeforeremovingthecover.
Note:Itmaybehelpfultoplacethecomputerface-downonasoftflatsurfaceforthisprocedure.Lenovo
recommendsthatyouuseablanket,towel,orothersoftclothtoprotectthetouchscreenfromscratches
orotherdamage.
Step1.Removeanymediafromthedrives,shutdowntheoperatingsystem,andturnoffthecomputer
andallattacheddevices.
Step2.Unplugallpowercordsfromelectricaloutlets.
Step3.Disconnectallcablesattachedtothecomputer.Thisincludespowercords,input/output(I/O)
cables,andanyothercablesthatareconnectedtothecomputer.RefertoLocatingconnectors,
controlsandcomponentstolocatethevariousconnectors.
Step4.Removethestandbase.RefertoRemovingthestandbase.
Step5.Removetherearcover.RefertoRemovingtherearcover.
Step6.Removethescrewthatsecurethesolidstatedrivetothemotherboard,andthenslideoutthe
solidstatedrive.3
Step7.Toinstallthenewsolidstatedrive:
a.Insertthesolidstatedriveintotheslot.
b.Securethenewsolidstatedrivetomotherboardwithonescrew.
c.Reinstallthememorycover.
Step8.Reattachtherearcoverandstandbase.
ReplacingtheWi-Ficard
Note:T urnoffthecomputerandwait3to5minutestoletitcooldownbeforeremovingthecover.
Chapter8.Replacinghardware47
Page 54

Note:Itmaybehelpfultoplacethecomputerface-downonasoftflatsurfaceforthisprocedure.Lenovo
recommendsthatyouuseablanket,towel,orothersoftclothtoprotectthecomputerscreenfromscratches
orotherdamage.
ToreplacetheWi-Ficard:
Step1.Removeanymediafromthedrives,shutdowntheoperatingsystem,andturnoffthecomputer
andallattacheddevices.
Step2.Unplugallpowercordsfromelectricaloutlets.
Step3.Disconnectallcablesattachedtothecomputer.Thisincludespowercords,input/output(I/O)
cables,andanyothercablesthatareconnectedtothecomputer.RefertoLocatingconnectors,
controlsandcomponentstolocatethevariousconnectors.
Step4.Removethestandbase.RefertoRemovingthestandbase.
Step5.Removetherearcover.RefertoRemovingtherearcover.
Step6.RemovethescrewthatsecurestheWi-Ficardtothemotherboard.
Step7.DisconnecttheantennacablesfromtheWi-Ficard.
Step8.PulltheWi-Ficardoutoftheslot.
Step9.ToinstallthenewWi-Ficard:
a.InsertthenewWi-FicardintotheWi-Ficardslot.
b.ConnecttheantennacablestothenewWi-Ficard.
c.SecurenewtheWi-Ficardtothemotherboardwiththescrew.
Step10.Reattachtherearcoverandstandbase.
ReplacingthesideUSBboard
Note:T urnoffthecomputerandwait3to5minutestoletitcooldownbeforeremovingthecover.
48ideacentreAll-In-One520(22&24inch)ComputerHardwareMaintenanceManual
Page 55

Note:Itmaybehelpfultoplacethecomputerface-downonasoftflatsurfaceforthisprocedure.Lenovo
recommendsthatyouuseablanket,towel,orothersoftclothtoprotectthecomputerscreenfromscratches
orotherdamage.
ToreplacethesideUSBboard:
Step1.Removeanymediafromthedrives,shutdowntheoperatingsystem,andturnoffthecomputer
andallattacheddevices.
Step2.Unplugallpowercordsfromelectricaloutlets.
Step3.Disconnectallcablesattachedtothecomputer.Thisincludespowercords,input/output(I/O)
cables,andanyothercablesthatareconnectedtothecomputer.RefertoLocatingconnectors,
controlsandcomponentstolocatethevariousconnectors.
Step4.Removethestandbase.RefertoRemovingthestandbase.
Step5.Removetherearcover.RefertoRemovingtherearcover.
Step6.DisconnecttheantennacablesfromthesideUSBboard.1
Step7.RemovethescrewthatsecuresthesideUSBboardtothebottomframe.
Step8.LiftupthesideUSBboard.
Step9.ToinstallthenewsideUSBboard:
a.InsertthenewsideUSBboardintothesideUSBboardslot.
b.SecurethenewsideUSBboardtothebottomframewiththescrew.
c.ConnecttheantennacablestothenewsideUSBboard.
Step10.Reattachtherearcoverandstandbase.
Replacingthemotherboard
Note:T urnoffthecomputerandwait3to5minutestoletitcooldownbeforeremovingthecover.
Chapter8.Replacinghardware49
Page 56

Note:Itmaybehelpfultoplacethecomputerface-downonasoftflatsurfaceforthisprocedure.Lenovo
recommendsthatyouuseablanket,towel,orothersoftclothtoprotectthecomputerscreenfromscratches
orotherdamage.
Toreplacethemotherboard:
Step1.Removeanymediafromthedrives,shutdowntheoperatingsystem,andturnoffthecomputer
andallattacheddevices.
Step2.Unplugallpowercordsfromelectricaloutlets.
Step3.Disconnectallcablesattachedtothecomputer.Thisincludespowercords,input/output(I/O)
cables,andanyothercablesthatareconnectedtothecomputer.RefertoLocatingconnectors,
controlsandcomponentstolocatethevariousconnectors.
Step4.Removethestandbase.RefertoRemovingthestandbase.
Step5.Removetherearcover.RefertoRemovingtherearcover.
Step6.Removethememorymodules.RefertoReplacingthememorymodule.
Step7.Removethesolidstatedrive.RefertoReplacingthesolidstatedrive.
Step8.Removetheheat-sink.RefertoReplacingtheheat-sink.
Step9.RemovetheWi-Ficard.RefertoReplacingtheWi-Ficard.
Step10.Removeallthecablesfromthemotherboard.
Step11.Removetheeightscrewsthatsecurethemotherboardtothechassis,andthenliftthemotherboard
uptoremoveit.
Step12.T oinstallthenewmotherboard:
a.Aligntheeightscrewholesinthenewmotherboardwiththescrewholesinthechassis.
b.Securethenewmotherboardtothechassiswitheightscrews.
c.Connectallthecablestothenewmotherboard.
Step13.Installthefollowingpartstothenewmotherboard:
50ideacentreAll-In-One520(22&24inch)ComputerHardwareMaintenanceManual
Page 57

•Wi-Ficard
•Heat-sink
•Solidstatedrive
•Memorymodule
Step14.Reattachtherearcoverandstandbase.
Removingthestandholder
Attention:T urnoffthecomputerandwait3to5minutestoletitcooldownbeforeremovingthecover.
Note:Itmaybehelpfultoplacethecomputerface-downonasoftflatsurfaceforthisprocedure.Lenovo
recommendsthatyouuseablanket,towel,orothersoftclothtoprotectthetouchscreenfromscratches
orotherdamage.
Step1.Removeanymediafromthedrives,shutdowntheoperatingsystem,andturnoffthecomputer
andallattacheddevices.
Step2.Unplugallpowercordsfromelectricaloutlets.
Step3.Disconnectallcablesattachedtothecomputer.Thisincludespowercords,input/output(I/O)
cables,andanyothercablesthatareconnectedtothecomputer.RefertoLocatingconnectors,
controlsandcomponentstolocatethevariousconnectors.
Step4.Removethestandbase.RefertoRemovingthestandbase.
Step5.Removetherearcover.RefertoRemovingtherearcover.
Step6.Removethesixscrews.
Step7.Toreattachthestandholder:
a.Aligntheholesinthestandholderwiththecorrespondingholesinthechassis.
b.Securethestandholdertothechassiswithscrews.
ReplacingtheMicrophonemodule
Note:T urnoffthecomputerandwait3to5minutestoletitcooldownbeforeremovingthecover.
Chapter8.Replacinghardware51
Page 58

Note:Itmaybehelpfultoplacethecomputerface-downonasoftflatsurfaceforthisprocedure.Lenovo
recommendsthatyouuseablanket,towel,orothersoftclothtoprotectthecomputerscreenfromscratches
orotherdamage.
Toreplacethespeakersystem:
Step1.Removeanymediafromthedrives,shutdowntheoperatingsystem,andturnoffthecomputer
andallattacheddevices.
Step2.Unplugallpowercordsfromelectricaloutlets.
Step3.Disconnectallcablesattachedtothecomputer.Thisincludespowercords,input/output(I/O)
cables,andanyothercablesthatareconnectedtothecomputer.RefertoLocatingconnectors,
controlsandcomponentstolocatethevariousconnectors.
Step4.Removethestandbase.RefertoRemovingthestandbase.
Step5.Removetherearcover.RefertoRemovingtherearcover.
Step6.Disconnectthemicrophonemodulecablefromtheconnectoronthemotherboard,andremovethe
screwthatsecuresthemicrophonemoduletothemotherboard.
Step7.Liftupthemicrophonemoduletoremoveit.
Step8.Toinstallthenewmicrophonemodule:
a.Securethenewmicrophonemoduletothemotherboardwiththescrew.
b.Connectthecabletothemotherboard.
Step9.Reattachrearcoverandstandbase.
Replacingthespeakersystem
Note:T urnoffthecomputerandwait3to5minutestoletitcooldownbeforeremovingthecover.
52ideacentreAll-In-One520(22&24inch)ComputerHardwareMaintenanceManual
Page 59

Note:Itmaybehelpfultoplacethecomputerface-downonasoftflatsurfaceforthisprocedure.Lenovo
recommendsthatyouuseablanket,towel,orothersoftclothtoprotectthecomputerscreenfromscratches
orotherdamage.
Toreplacethespeakersystem:
Step1.Removeanymediafromthedrives,shutdowntheoperatingsystem,andturnoffthecomputer
andallattacheddevices.
Step2.Unplugallpowercordsfromelectricaloutlets.
Step3.Disconnectallcablesattachedtothecomputer.Thisincludespowercords,input/output(I/O)
cables,andanyothercablesthatareconnectedtothecomputer.RefertoLocatingconnectors,
controlsandcomponentstolocatethevariousconnectors.
Step4.Removethestandbase.RefertoRemovingthestandbase.
Step5.Removetherearcover.RefertoRemovingtherearcover.
Step6.Disconnectthespeakersystemcablefromtheconnectoronthemotherboard,andthenslidethe
rubberscrewsofthespeakersystemoutofthescrewslots.
Step7.Liftupthespeakersystemtoremoveit.
Step8.Toinstallthenewspeakersystem:
a.Slideintherubberscrewsofthenewspeakersystemintothescrewslotsinthechassis.
b.Connectthecabletothemotherboard.
Step9.Reattachrearcover,andstandbase.
ReplacingtheLCDpanelmodule
Note:T urnoffthecomputerandwait3to5minutestoletitcooldownbeforeremovingthecover.
Chapter8.Replacinghardware53
Page 60

Note:Itmaybehelpfultoplacethecomputerface-downonasoftflatsurfaceforthisprocedure.Lenovo
recommendsthatyouuseablanket,towel,orothersoftclothtoprotectthecomputerscreenfromscratches
orotherdamage.
ToreplacetheLCDpanelmodule:
Step1.Removeanymediafromthedrives,shutdowntheoperatingsystem,andturnoffthecomputer
andallattacheddevices.
Step2.Unplugallpowercordsfromelectricaloutlets.
Step3.Disconnectallcablesattachedtothecomputer.Thisincludespowercords,input/output(I/O)
cables,andanyothercablesthatareconnectedtothecomputer.RefertoLocatingconnectors,
controlsandcomponentstolocatethevariousconnectors.
Step4.Removethestandbase.RefertoRemovingthestandbase.
Step5.Removetherearcover.RefertoRemovingtherearcover.
Step6.Removethestandholder.RefertoRemovingthestandholder.
Step7.Removethememorymodules.RefertoReplacingthememorymodule.
Step8.Removethesolidstatedrive.RefertoReplacingthesolidstatedrive.
Step9.Removetheheat-sink.RefertoReplacingtheheat-sink.
Step10.RemovetheCPU.RefertoReplacingtheCPU.
Step11.Removethemotherboard.RefertoReplacingthemotherboard.
Step12.RemovetheL VDScableandconvertercablefromtheconnectorsintheLCDpanel.
Step13.RemovethenineteenscrewsthatsecurethemainframetotheLCDpanel.
54ideacentreAll-In-One520(22&24inch)ComputerHardwareMaintenanceManual
Page 61

Step14.Liftupthemainframetoremoveit.
Step15.Ifyourdeviceisatouchcomputer,disconnectthetouchcablefromtheconnectoronthe
motherboard.Otherwise,skipthisstep.RefertoLocatingconnectors,controlsandcomponentsto
locatethetouchconnector.
Step16.T oinstallthenewtheLCDpanelmodule:
a.AlignthenewLCDpanelwiththemainframe.
b.SecurethenewLCDpaneltothemainframewithnineteenscrews.
c.Connectthetouch(touchmodelonly),LVDSandconvertercablestotheconnectorsinthe
newLCDpanel.
Step17.Reattachallotherremovedparts.
Chapter8.Replacinghardware55
Page 62

56ideacentreAll-In-One520(22&24inch)ComputerHardwareMaintenanceManual
Page 63

Chapter9.FRUlists
Thischapterliststheinformationonthefieldreplaceableunits(FRUs)forideacentreAll-In-One52022
&24inchseriesdesktopcomputers.
Attention:BesuretoreadandunderstandallthesafetyinformationbeforereplacinganyFRUs.
Table1.AIO520-24IKLFRUlist
FRUP/N
AC_ADAPTER
00PC727AC_ADAPTER,120W,100-240Vac,3P
00PC726AC_ADAPTER,90W,100-240Vac,3P
ANTENNA
00XJ122
BDPLANAR
01LM143
01LM144
01LM146
01LM145
CABLE
00XL338
00XL329
00XL341
00XL343
00XL330
00XL332
00XL331
00XL347
00XL337
CARDPOP
01LM243PowerButtonBoard
01LM246
01LM244
DISPLAY
01AG96723.8"FHDNon-TouchLGD
01AG96923.8"FHDTouchLGD
DT_KYB
00XH633
00XH945
00XH944
Description
AIO520-C5Antenna
KabyLake-SB250,UMANODPK
KabyLake-SB250,UMAWINDPK
KabyLake-SB250,R17M2GWINDPK
KabyLake-SB250,R17M2GNODPK
C.AM/B-LCD_LG_23(C5)
C.AM/B-SATA_HDD_3.5(C4C5)
C.AM/B-LVDS_MIC(C4C5)
C.AM/B-LVDS_MIC_TOUCH(C4C5
C.AFFC4P450MMM/B-PWR/B(C4C
C.AFFC18P260MMM/B-ODD(C4
C.AFFC20P32MMM/B-IO/B(C4
C.AM/B-IO/BTEFLON(C4C5)
C.AM/B-LCD_LG_TOUCH_23(C5)
CAIO520ODDBoard
IOBoard
USBCalliopeKBBKNORDIC
USBCalliopeKBSRARA
USBCalliopeKBSRENG
©CopyrightLenovo2017
57
Page 64

Table1.AIO520-24IKLFRUlist(continued)
00XH604
00XH605
00XH607
00XH598
00XH602
00XH950
00XH601
00XH971
00XH973
00XH968
00XH627
00XH626
00XH610
00XH608
00XH975
00XH982
00XH965
00XH978
00XH976
00XH967
00XH979
00XH961
00XH981
00XH959
00XH621
00XH987
00XH622
00XH964
00XH630
00XH618
00XH994
00XH992
00XH625
00XH990
00XH619
00XH962
00XH624
00XH611
00XH955
USBCalliopeKBBKHBW
USBCalliopeKBBKHUN
USBCalliopeKBBKIT A
USBCalliopeKBBKFRA
USBCalliopeKBBKGRE
USBCalliopeKBSRBUL
USBCalliopeKBBKGER
USBCalliopeKBSRPOR
USBCalliopeKBSRRUS
USBCalliopeKBSRLASPA
USBCalliopeKBBKSLV
USBCalliopeKBBKEUROENG
USBCalliopeKBBKKOR
USBCalliopeKBBKJPN
USBCalliopeKBSRSLK
USBCalliopeKBSRUKE
USBCalliopeKBSRJPN
USBCalliopeKBSRSWS
USBCalliopeKBSRSP A
USBCalliopeKBSRKOR
USBCalliopeKBSRTHAI
USBCalliopeKBSRHBW
USBCalliopeKBSRTUR
USBCalliopeKBSRGRE
USBCalliopeKBBKSWS
USBCalliopeKBSRINDENG
USBCalliopeKBBKTHAI
USBCalliopeKBSRIT A
USBCalliopeKBBKINDENG
USBCalliopeKBBKSLK
USBKBSLV_CZ-SL
USBCalliopeKBSRCANEN/FR
USBCalliopeKBBKUKE
USBCalliopeKBSRNORDIC
USBCalliopeKBBKSP A
USBCalliopeKBSRHUN
USBCalliopeKBBKTUR
USB,Calliope,KB,BK,LASPA
USBCalliopeKBSRFRA
58ideacentreAll-In-One520(22&24inch)ComputerHardwareMaintenanceManual
Page 65

Table1.AIO520-24IKLFRUlist(continued)
00XH993
00XH952
00XH594
00XH614
00XH595
00XH951
00XH948
00XH958
00XH949
00XH593
00XH591
00XH616
00XH983
00XH587
00XH984
00XH588
00XH635
USBCalliopeKBBKCZE/SLK
USBCalliopeKBSRCZE
USBCalliopeKBBKTC/ENG
USBCalliopeKBBKPOR
USBCalliopeKBBKCZE
USBCalliopeKBSRTC/ENG
USBCalliopeKBSRBELENG
USBCalliopeKBSRGER
USBCalliopeKBSRBRL
USBCalliopeKBBKBUL
USB,Calliope,KB,BK,BELENG
USBCalliopeKBBKRUS
USBCalliopeKBSREUROENG
USBCalliopeKBBKENG
USBCalliopeKBSRSLV
USBCalliopeKBBKARA
USBCalliopeKBBKCANENG/FRA
FAN
00KT209
FAN100x22mmSysFanforA7300,S
HDD_ASM
45K0623
HDD,1TB,7200,DT3,SA T A3,STD
00PC552HDD,2TB,7200,DT3,SATA3,STD
00PC551HDD,1TB,7200,DT3,SATA3,STD
45K0625
HDD,2TB,7200,DT3,SA T A3,STD
HEATSINK
01MN097
01MN096
35W+25WC4C5IntelKBL_SDISHe
35WC4C5IntelKBL_SUMAHeats
KYB_MOUSE
00XH801
00XH884
00XH885
00XH996
00XH845
00XH886
00XH797
00XH844
00XH800
00XH895
00XH873
WLKMCalliopeBKNoBATBRL
WLKMCalliopeSRUKE
WLKMCalliopeSREuroENG
2.4GSVGCZ_SL
WLKMCalliopeBKNoBATLASPA
WLKMCalliopeSRSLV
WLKMCalliopeBKARA
WLKMCalliopeBKCANENG/FRA
WLKMCalliopeBKBELENG
WLKMCalliopeSRNoBATLASPA
WLKMCalliopeSRPOR
Chapter9.FRUlists59
Page 66

Table1.AIO520-24IKLFRUlist(continued)
00XH870
00XH866
00PH144
00XH995
00XH867
00XH827
00XH869
00XH860
00XH857
00XH880
00XH830
00XH878
00XH823
00XH825
00XH877
00XH828
00XH820
00XH804
00XH842
00XH839
00XH817
00XH802
00XH807
00XH803
00XH810
00XH811
00XH851
00XH850
00XH835
00XH816
00XH813
00XH833
00XH854
00XH836
00XH847
00XH814
00XH831
00XH894
00XH834
WLKMCalliopeSRLASPA
WLKMCalliopeSRIT A
USBCalliopeMouseSR-GY
WLKMCalliopeBKCZE/SLK
WLKMCalliopeSRJPN
WLKMCalliopeBKSLK
WLKMCalliopeSRKOR
WLKMCalliopeSRGER
WLKMCalliopeSRFRA
WLKMCalliopeSRSWS
WLKMCalliopeBKSWS
WLKMCalliopeSRSP A
WLKMCalliopeBKPOR
WLKMCalliopeBKRUS
WLKMCalliopeSRSLK
WLKMCalliopeBKSP A
WLKMCalliopeBKLASPA
WLKMCalliopeBKCZE
WLKMCalliopeBKNordic
WLKMCalliopeBKINDENG
WLKMCalliopeBKJPN
WLKMCalliopeBKBUL
WLKMCalliopeBKFRA
WLKMCalliopeBKTC/ENG
WLKMCalliopeBKGER
WLKMCalliopeBKGRE/UK
WLKMCalliopeSRNoBATBRL
WLKMCalliopeSRBELENG
WLKMCalliopeBKEuroENG
WLKMCalliopeBKIT A
WLKMCalliopeBKHBW
WLKMCalliopeBKTUR
WLKMCalliopeSRCZE
WLKMCalliopeBKSLV
WLKMCalliopeSRARA
WLKMCalliopeBKHUN
WLKMCalliopeBKTHAI
WLKMCalliopeSRCANENG/FRA
WLKMCalliopeBKUKE
60ideacentreAll-In-One520(22&24inch)ComputerHardwareMaintenanceManual
Page 67

Table1.AIO520-24IKLFRUlist(continued)
00XH892
00XH819
00XH889
00XH883
00XH881
00XH853
00XH875
00XH861
00XH852
00XH863
00XH864
00XH796
00XH846
LINECORD
00XL074
00XL051
00XL090
00XL080
00XL002
00XL057
00XL067
00XL062
00XL093
00XL079
00XL063
00XL078
00XL065
00XL052
00XL089
00XL081
00XL059
00XL083
00XL066
00XL003
00XL058
00XL069
00XL084
00XL071
00XL075
WLKMCalliopeSRNordic
WLKMCalliopeBKKOR
WLKMCalliopeSRINDENG
WLKMCalliopeSRTUR
WLKMCalliopeSRTHAI
WLKMCalliopeSRTC/ENG
WLKMCalliopeSRRUS
WLKMCalliopeSRGRE/UK
WLKMCalliopeSRBUL
WLKMCalliopeSRHBW
WLKMCalliopeSRHUN
WLKMCalliopeBKENG
PrimaxRFBU712.4GSVGUS
Fru,LINECORD,IT,1M,3P,NON-LH
Fru,US/CA,1M,3P ,NON-LH
Fru,LINECORD,CN,1M,3P ,NON-LH
Fru,LINECORD,AU,1M,3P ,NON-LH
Fru,JP ,Anti-TR,1M,2P ,NON-LH
Fru,LINECORD,AR,1M,3P ,NON-LH
Fru,LINECORD,DK,1M,3P ,NON-LH
Fru,LINECORD,BR,1M,3P ,NON-LH
Fru,LINECORD,TW,1M,3P ,NON-LH
Fru,LINECORD,AU,1M,3P ,NON-LH
Fru,EU/KR,1M,3P ,NON-LH
Fru,LINECORD,AU,1M,3P ,NON-LH
Fru,EU/KR,1M,3P ,NON-LH
Fru,US/CA,1M,3P ,NON-LH
Fru,LINECORD,CN,1M,3P ,NON-LH
Fru,LINECORD,ZA,1M,3P ,NON-LH
Fru,LINECORD,AR,1M,3P ,NON-LH
Fru,LINECORD,ZA,1M,3P ,NON-LH
Fru,LINECORD,DK,1M,3P ,NON-LH
Fru,JP ,Anti-TR,1M,2P ,NON-LH
Fru,LINECORD,AR,1M,3P ,NON-LH
Fru,LINECORD,CH,1M,3P ,NON-LH
Fru,LINECORD,IL,1M,3P ,NON-LH
Fru,LINECORD,CH,1M,3P ,NON-LH
Fru,LINECORD,GB,1M,3P ,NON-LH
Chapter9.FRUlists61
Page 68

Table1.AIO520-24IKLFRUlist(continued)
00XL092
00XL094
00XL064
00XL086
00XL085
00XL097
00XL073
00XL072
00XL096
00XL053
00XL091
00XL060
00XL076
00XL070
00XL082
00XL077
00XL068
00XL061
MECH_ASM
01MN205
01MN277
01MN188
01MN187
01MN207
01MN242
01MN248
01MN241
01MN249HDDBracket
01MN185
01MN246
01MN257
01MN270
01MN269
01MN240
01MN271
01MN275
01MN276
01MN239
01MN350
Fru,LINECORD,TW,1M,3P ,NON-LH
Fru,LINECORD,IN,1M,3P ,NON-LH
Fru,EU/KR,1M,3P ,NON-LH
Fru,LINECORD,IL,1M,3P ,NON-LH
Fru,LINECORD,IL,1M,3P ,NON-LH
Fru,LINECORD,TH,1M,3P ,NON-LH
Fru,LINECORD,IT,1M,3P,NON-LH
Fru,LINECORD,IT,1M,3P,NON-LH
Fru,LINECORD,IN,1M,3P ,NON-LH
Fru,US/CA,1M,3P ,NON-LH
Fru,LINECORD,TW,1M,3P ,NON-LH
Fru,LINECORD,BR,1M,3P ,NON-LH
Fru,LINECORD,GB,1M,3P ,NON-LH
Fru,LINECORD,CH,1M,3P ,NON-LH
Fru,LINECORD,ZA,1M,3P ,NON-LH
Fru,LINECORD,GB,1M,3P ,NON-LH
Fru,LINECORD,DK,1M,3P ,NON-LH
Fru,LINECORD,BR,1M,3P ,NON-LH
GTStandArmsilverC4
MainFrame,C5
DCA70_SIDE_IO_SHIELDING
DCA70_MIC
GTStandArmblackC4
CAMERAIR,Blcak
SideIoShielding
CAMERAIR,Silver
520_HDD_BRACKET_ASSY
MBShielding,W/HDMI,INTEL
ASSYDUALMICModule
BackCvr,HDMI,Cam,I,BlKC5
BackCvr,HDMI,Cam,I,SilverC5
CAMERA720P ,Blcak
FrontBezel,Silver,C5
DUMMYODDBezelSilver,C5
DUMMYODDBezelBlack,C5
CAMERA720P ,Silver
TLStandBaseBlackC4/5
62ideacentreAll-In-One520(22&24inch)ComputerHardwareMaintenanceManual
Page 69

Table1.AIO520-24IKLFRUlist(continued)
01MN274
01EF416
01MN272
01MN273
01MN351
ODDBezelBlack,C5
ASSYShieldingforHDD
FrontBezel,Black,C5
ODDBezelSilver,C5
TLStandBaseSilverC4/5
MECHANICAL
01MN368
01MN218
01MN217
spk_w_Rubber_C4C5
GTClipblackC4/5
GTClipcolourlessC4/5
01EF469Bracket,ForWIFIAntennaKit
01MN402
01MN401
01MN281
01MN280
01MN258
01MN278
01MN279
panel_mylar_C5_S
panel_mylar_C5_T
HingecoverBottom,C5Black
HingecoverBottom,C5Silver
BracketLatch,ForODD
HingecoverT op,C5Silver
HingecoverT op,C5Black
MEMORY
01FR300
4GDDR42400SODIMM
01AG7094GBDDR42400SoDIMM
01AG7118GBDDR42400SoDIMM
01AG7014GBDDR42400SoDIMM
01FR304
01FR301
8GBDDR42400SODIMM
8GDDR42400SODIMM
01AG8104GBDDR42400SoDIMM,TIGO
01AG7084GBDDR42400SoDIMM
01AG8128GBDDR42666SoDIMM,MICRON
01AG8188GBDDR42666SoDIMM,Ramaxel
SSD
00UP455
FRU16GBM.2OptaneMemory
SSD_ASM
00UP436
00UP433
00UP448
00UP641
256G,M.2,2280,PCIe3x4,SAM,OPAL
256G,M.2,2280,PCIe3x4,INTEL,OPAL
128G,M.2,2280,PCIe3x4,SAMSG,STD
256G,M.2,2280,PCIe3x4,TOS,OPAL
SP
01AG116IntelCeleronG3930T2.7GHZ/2C/2M35W
01AG091Inteli7-7700T2.9GHZ/4C/6M/LGA35W
01AG103II5-7400T2.4GHz/4C/6M35W
Chapter9.FRUlists63
Page 70

Table1.AIO520-24IKLFRUlist(continued)
01AG113IntelCorei3-7100T3.4GHZ/2C/3M35W
01AG115IntelPentiumG4560T2.9GHZ/2C/3M35W
SCREW
01EF559
PAD
01MN363
MOUSE
00PH143
00PH131
OPT_DRIVE
45K04949.0mmDVDRambowithoutbezel
WIRELESS
00JT497
Table2.AIO520-24IKUFRUlist
ForSSD
LairdTflex3padforM.2SSD
ChiconyUSBFingerprintMCB_O
USBCalliopeMouseBlack(Orangewh
Wireless,CMB,IN,3165ac
FRUP/N
AC_ADAPTER
00PC726AC_ADAPTER,90W,100-240Vac,3P
ANTENNA
00XJ122
BDPLANAR
01LM130
01LM126MB,I3,UMA,HDMI-IN,WINDPK
01LM133
01LM129
01LM134
01LM123
01LM120MB,I5,UMA,HDMI-IN,WINDPK
01LM119
01LM124MB,4405U,UMA,HD-IN,WINDPK
01LM125
01LM135
01LM136
CABLE
00XL338
00XL329
00XL341
00XL343
00XL330
Description
AIO520-C5Antenna
MB,I5,2G,HDMI-IN,WINDPK
MB,P_4415U,2G,HDMI-IN,NODPK
MB,I5,2G,HDMI-IN,NODPK
MB,P_4415U,2G,HDMI-IN,WINDPK
MB,4415U,UMA,HDt-IN,NODPK
MB,I5,UMA,HD-IN,NODPK
MB,I3,UMA,HDMIIN,NODPK
MB,I3,2G,HDMI-IN,NODPK
MB,I3,2G,HDMI-IN,WINDPK
C.AM/B-LCD_LG_23(C5)
C.AM/B-SATA_HDD_3.5(C4C5)
C.AM/B-LVDS_MIC(C4C5)
C.AM/B-LVDS_MIC_TOUCH(C4C5
C.AFFC4P450MMM/B-PWR/B(C4C
64ideacentreAll-In-One520(22&24inch)ComputerHardwareMaintenanceManual
Page 71

Table2.AIO520-24IKUFRUlist(continued)
00XL332
00XL331
00XL347
00XL337
C.AFFC18P260MMM/B-ODD(C4
C.AFFC20P32MMM/B-IO/B(C4
C.AM/B-IO/BTEFLON(C4C5)
C.AM/B-LCD_LG_TOUCH_23(C5)
CARDPOP
01LM243PowerButtonBoard
01LM246
01LM244
CAIO520ODDBoard
IOBoard
DISPLAY
01AG96723.8"FHDNon-TouchLGD
01AG96923.8"FHDTouchLGD
DT_KYB
00XH633
00XH945
00XH944
00XH604
00XH605
00XH607
00XH598
00XH602
00XH950
00XH601
00XH971
00XH973
00XH968
00XH627
00XH626
00XH610
00XH608
00XH975
00XH982
00XH965
00XH978
00XH976
00XH967
00XH979
00XH961
00XH981
00XH959
USBCalliopeKBBKNORDIC
USBCalliopeKBSRARA
USBCalliopeKBSRENG
USBCalliopeKBBKHBW
USBCalliopeKBBKHUN
USBCalliopeKBBKIT A
USBCalliopeKBBKFRA
USBCalliopeKBBKGRE
USBCalliopeKBSRBUL
USBCalliopeKBBKGER
USBCalliopeKBSRPOR
USBCalliopeKBSRRUS
USBCalliopeKBSRLASPA
USBCalliopeKBBKSLV
USBCalliopeKBBKEUROENG
USBCalliopeKBBKKOR
USBCalliopeKBBKJPN
USBCalliopeKBSRSLK
USBCalliopeKBSRUKE
USBCalliopeKBSRJPN
USBCalliopeKBSRSWS
USBCalliopeKBSRSP A
USBCalliopeKBSRKOR
USBCalliopeKBSRTHAI
USBCalliopeKBSRHBW
USBCalliopeKBSRTUR
USBCalliopeKBSRGRE
Chapter9.FRUlists65
Page 72

Table2.AIO520-24IKUFRUlist(continued)
00XH621
00XH987
00XH622
00XH964
00XH630
00XH618
00XH994
00XH992
00XH625
00XH990
00XH619
00XH962
00XH624
00XH611
00XH955
00XH993
00XH952
00XH594
00XH614
00XH595
00XH951
00XH948
00XH958
00XH949
00XH593
00XH591
00XH616
00XH983
00XH587
00XH984
00XH588
00XH635
FAN
00XD821
HDD_ASM
45K0623
00PC552HDD,2TB,7200,DT3,SATA3,STD
00PC551HDD,1TB,7200,DT3,SATA3,STD
45K0625
USBCalliopeKBBKSWS
USBCalliopeKBSRINDENG
USBCalliopeKBBKTHAI
USBCalliopeKBSRIT A
USBCalliopeKBBKINDENG
USBCalliopeKBBKSLK
USBKBSLV_CZ-SL
USBCalliopeKBSRCANEN/FR
USBCalliopeKBBKUKE
USBCalliopeKBSRNORDIC
USBCalliopeKBBKSP A
USBCalliopeKBSRHUN
USBCalliopeKBBKTUR
USB,Calliope,KB,BK,LASPA
USBCalliopeKBSRFRA
USBCalliopeKBBKCZE/SLK
USBCalliopeKBSRCZE
USBCalliopeKBBKTC/ENG
USBCalliopeKBBKPOR
USBCalliopeKBBKCZE
USBCalliopeKBSRTC/ENG
USBCalliopeKBSRBELENG
USBCalliopeKBSRGER
USBCalliopeKBSRBRL
USBCalliopeKBBKBUL
USB,Calliope,KB,BK,BELENG
USBCalliopeKBBKRUS
USBCalliopeKBSREUROENG
USBCalliopeKBBKENG
USBCalliopeKBSRSLV
USBCalliopeKBBKARA
USBCalliopeKBBKCANENG/FRA
SysfanforQT90x15mm
HDD,1TB,7200,DT3,SA T A3,STD
HDD,2TB,7200,DT3,SA T A3,STD
66ideacentreAll-In-One520(22&24inch)ComputerHardwareMaintenanceManual
Page 73

Table2.AIO520-24IKUFRUlist(continued)
HEATSINK
01MN098
01MN099
KYB_MOUSE
00XH801
00XH884
00XH885
00XH996
00XH845
00XH886
00XH797
00XH844
00XH800
00XH895
00XH873
00XH870
00XH866
00PH144
00XH995
00XH867
00XH827
00XH869
00XH860
00XH857
00XH880
00XH830
00XH878
00XH823
00XH825
00XH877
00XH828
00XH820
00XH804
00XH842
00XH839
00XH817
00XH802
00XH807
00XH803
C4C5KBL_UUMATHERMAL
C4C5KBL_UDISTHERMAL
WLKMCalliopeBKNoBATBRL
WLKMCalliopeSRUKE
WLKMCalliopeSREuroENG
2.4GSVGCZ_SL
WLKMCalliopeBKNoBATLASPA
WLKMCalliopeSRSLV
WLKMCalliopeBKARA
WLKMCalliopeBKCANENG/FRA
WLKMCalliopeBKBELENG
WLKMCalliopeSRNoBATLASPA
WLKMCalliopeSRPOR
WLKMCalliopeSRLASPA
WLKMCalliopeSRIT A
USBCalliopeMouseSR-GY
WLKMCalliopeBKCZE/SLK
WLKMCalliopeSRJPN
WLKMCalliopeBKSLK
WLKMCalliopeSRKOR
WLKMCalliopeSRGER
WLKMCalliopeSRFRA
WLKMCalliopeSRSWS
WLKMCalliopeBKSWS
WLKMCalliopeSRSP A
WLKMCalliopeBKPOR
WLKMCalliopeBKRUS
WLKMCalliopeSRSLK
WLKMCalliopeBKSP A
WLKMCalliopeBKLASPA
WLKMCalliopeBKCZE
WLKMCalliopeBKNordic
WLKMCalliopeBKINDENG
WLKMCalliopeBKJPN
WLKMCalliopeBKBUL
WLKMCalliopeBKFRA
WLKMCalliopeBKTC/ENG
Chapter9.FRUlists67
Page 74

Table2.AIO520-24IKUFRUlist(continued)
00XH810
00XH811
00XH851
00XH850
00XH835
00XH816
00XH813
00XH833
00XH854
00XH836
00XH847
00XH814
00XH831
00XH894
00XH834
00XH892
00XH819
00XH889
00XH883
00XH881
00XH853
00XH875
00XH861
00XH852
00XH863
00XH864
00XH796
00XH846
LINECORD
00XL074
00XL051
00XL090
00XL080
00XL002
00XL057
00XL067
00XL062
00XL093
00XL079
WLKMCalliopeBKGER
WLKMCalliopeBKGRE/UK
WLKMCalliopeSRNoBATBRL
WLKMCalliopeSRBELENG
WLKMCalliopeBKEuroENG
WLKMCalliopeBKIT A
WLKMCalliopeBKHBW
WLKMCalliopeBKTUR
WLKMCalliopeSRCZE
WLKMCalliopeBKSLV
WLKMCalliopeSRARA
WLKMCalliopeBKHUN
WLKMCalliopeBKTHAI
WLKMCalliopeSRCANENG/FRA
WLKMCalliopeBKUKE
WLKMCalliopeSRNordic
WLKMCalliopeBKKOR
WLKMCalliopeSRINDENG
WLKMCalliopeSRTUR
WLKMCalliopeSRTHAI
WLKMCalliopeSRTC/ENG
WLKMCalliopeSRRUS
WLKMCalliopeSRGRE/UK
WLKMCalliopeSRBUL
WLKMCalliopeSRHBW
WLKMCalliopeSRHUN
WLKMCalliopeBKENG
PrimaxRFBU712.4GSVGUS
Fru,LINECORD,IT,1M,3P,NON-LH
Fru,US/CA,1M,3P ,NON-LH
Fru,LINECORD,CN,1M,3P ,NON-LH
Fru,LINECORD,AU,1M,3P ,NON-LH
Fru,JP ,Anti-TR,1M,2P ,NON-LH
Fru,LINECORD,AR,1M,3P ,NON-LH
Fru,LINECORD,DK,1M,3P ,NON-LH
Fru,LINECORD,BR,1M,3P ,NON-LH
Fru,LINECORD,TW,1M,3P ,NON-LH
Fru,LINECORD,AU,1M,3P ,NON-LH
68ideacentreAll-In-One520(22&24inch)ComputerHardwareMaintenanceManual
Page 75

Table2.AIO520-24IKUFRUlist(continued)
00XL063
00XL078
00XL065
00XL052
00XL089
00XL081
00XL059
00XL083
00XL066
00XL003
00XL058
00XL069
00XL084
00XL071
00XL075
00XL092
00XL094
00XL064
00XL086
00XL085
00XL097
00XL073
00XL072
00XL096
00XL053
00XL091
00XL060
00XL076
00XL070
00XL082
00XL077
00XL068
00XL061
MECH_ASM
01MN268
01MN205
01MN244
01MN277
01MN188
Fru,EU/KR,1M,3P ,NON-LH
Fru,LINECORD,AU,1M,3P ,NON-LH
Fru,EU/KR,1M,3P ,NON-LH
Fru,US/CA,1M,3P ,NON-LH
Fru,LINECORD,CN,1M,3P ,NON-LH
Fru,LINECORD,ZA,1M,3P ,NON-LH
Fru,LINECORD,AR,1M,3P ,NON-LH
Fru,LINECORD,ZA,1M,3P ,NON-LH
Fru,LINECORD,DK,1M,3P ,NON-LH
Fru,JP ,Anti-TR,1M,2P ,NON-LH
Fru,LINECORD,AR,1M,3P ,NON-LH
Fru,LINECORD,CH,1M,3P ,NON-LH
Fru,LINECORD,IL,1M,3P ,NON-LH
Fru,LINECORD,CH,1M,3P ,NON-LH
Fru,LINECORD,GB,1M,3P ,NON-LH
Fru,LINECORD,TW,1M,3P ,NON-LH
Fru,LINECORD,IN,1M,3P ,NON-LH
Fru,EU/KR,1M,3P ,NON-LH
Fru,LINECORD,IL,1M,3P ,NON-LH
Fru,LINECORD,IL,1M,3P ,NON-LH
Fru,LINECORD,TH,1M,3P ,NON-LH
Fru,LINECORD,IT,1M,3P,NON-LH
Fru,LINECORD,IT,1M,3P,NON-LH
Fru,LINECORD,IN,1M,3P ,NON-LH
Fru,US/CA,1M,3P ,NON-LH
Fru,LINECORD,TW,1M,3P ,NON-LH
Fru,LINECORD,BR,1M,3P ,NON-LH
Fru,LINECORD,GB,1M,3P ,NON-LH
Fru,LINECORD,CH,1M,3P ,NON-LH
Fru,LINECORD,ZA,1M,3P ,NON-LH
Fru,LINECORD,GB,1M,3P ,NON-LH
Fru,LINECORD,DK,1M,3P ,NON-LH
Fru,LINECORD,BR,1M,3P ,NON-LH
BackCvr,HDMI,Cam,A,BlKC5
GTStandArmsilverC4
MBShielding,W/HDMI,AMD
MainFrame,C5
DCA70_SIDE_IO_SHIELDING
Chapter9.FRUlists69
Page 76

Table2.AIO520-24IKUFRUlist(continued)
01MN187
01MN207
01MN242
01MN248
01MN241
01MN249HDDBracket
01MN185
01MN257
01MN240
01MN271
01MN275
01MN276
01MN266
01MN239
01MN350
01MN274
01EF416
01MN272
01MN273
01MN351
MECHANICAL
01MN368
01MN218
01MN217
01EF469Bracket,ForWIFIAntennaKit
01MN402
01MN401
01MN281
01MN280
01MN258
01MN278
01MN279
MEMORY
01FR300
01AG7094GBDDR42400SoDIMM
01AG7118GBDDR42400SoDIMM
01AG7014GBDDR42400SoDIMM
01FR304
01FR301
DCA70_MIC
GTStandArmblackC4
CAMERAIR,Blcak
SideIoShielding
CAMERAIR,Silver
520_HDD_BRACKET_ASSY
ASSYDUALMICModule
CAMERA720P ,Blcak
FrontBezel,Silver,C5
DUMMYODDBezelSilver,C5
DUMMYODDBezelBlack,C5
BackCvr,HDMI,Cam,A,SilverC5
CAMERA720P ,Silver
TLStandBaseBlackC4/5
ODDBezelBlack,C5
ASSYShieldingforHDD
FrontBezel,Black,C5
ODDBezelSilver,C5
TLStandBaseSilverC4/5
spk_w_Rubber_C4C5
GTClipblackC4/5
GTClipcolourlessC4/5
panel_mylar_C5_S
panel_mylar_C5_T
HingecoverBottom,C5Black
HingecoverBottom,C5Silver
BracketLatch,ForODD
HingecoverT op,C5Silver
HingecoverT op,C5Black
4GDDR42400SODIMM
8GBDDR42400SODIMM
8GDDR42400SODIMM
70ideacentreAll-In-One520(22&24inch)ComputerHardwareMaintenanceManual
Page 77

Table2.AIO520-24IKUFRUlist(continued)
01AG8104GBDDR42400SoDIMM,TIGO
01AG7084GBDDR42400SoDIMM
01AG8128GBDDR42666SoDIMM,MICRON
01AG8188GBDDR42666SoDIMM,Ramaxel
MOUSE
00PH143
00PH131
ChiconyUSBFingerprintMCB_O
USBCalliopeMouseBlack(Orangewh
SSD
00UP455
FRU16GBM.2OptaneMemory
SSD_ASM
00UP436
00UP433
00UP448
00UP641
256G,M.2,2280,PCIe3x4,SAM,OPAL
256G,M.2,2280,PCIe3x4,INTEL,OPAL
128G,M.2,2280,PCIe3x4,SAMSG,STD
256G,M.2,2280,PCIe3x4,TOS,OPAL
SCREW
01EF559
ForSSD
OPT_DRIVE
45K04949.0mmDVDRambowithoutbezel
PAD
01MN363
LairdTflex3padforM.2SSD
WIRELESS
00JT497
Wireless,CMB,IN,3165ac
Table3.AIO520-24ASTFRUlist
FRUP/N
Description
AC_ADAPTER
00PC726AC_ADAPTER,90W,100-240Vac,3P
ANTENNA
00XJ122
AIO520-C5Antenna
BDPLANAR
01LM178MB,A4,UMA,HDMI-IN,WINDPK
01LM184
01LM183
A4,R17M2G,HDMIIN,WINDPK
A4,R17M2G,HDMIIN,NODPK
01LM216MBA10UMAHDMIINWINDPK
01LM215
01LM217
01LM219
01LM220
01LM218
MBA10UMAHDMIINNODPK
MBA12UMAHDMIINNODPK
MBA102GHDMIINNODPK
MBA102GHDMIINWINDPK
MBA12R17M2GHDINWINDPK
Chapter9.FRUlists71
Page 78

Table3.AIO520-24ASTFRUlist(continued)
01LM173
01LM177
01LM179
01LM182
01LM214MB,A12,UMA,HDMI-IN,WINDPK
01LM175
01LM176MB,A6,UMA,HDMI-IN,WINDPK
01LM180
01LM181
01LM174MB,A9,UMA,HDMI-IN,WINDPK
01LM213
CABLE
00XL338
00XL329
00XL341
00XL343
00XL330
00XL332
00XL331
00XL347
00XL337
CARDPOP
01LM243PowerButtonBoard
01LM246
01LM244
DISPLAY
01AG96723.8"FHDNon-TouchLGD
01AG96923.8"FHDTouchLGD
DT_KYB
00XH633
00XH945
00XH944
00XH604
00XH605
00XH607
00XH598
00XH602
00XH950
00XH601
MB,A9,UMA,HDMI-IN,NODPK
MB,A4,UMA,HDMI-IN,NODPK
MB,A9,R17M2G,HDMIIN,NODPK
MB,A6,R17M2G,HDMIIN,WINDPK
MB,A6,UMA,HDMI-IN,NODPK
MB,A9,R17M2G,HDMIIN,WINDPK
MB,A6,R17M,2G,HDMIIN,NODPK
MB,A12,UMAHDMI-IN,NODPK
C.AM/B-LCD_LG_23(C5)
C.AM/B-SATA_HDD_3.5(C4C5)
C.AM/B-LVDS_MIC(C4C5)
C.AM/B-LVDS_MIC_TOUCH(C4C5
C.AFFC4P450MMM/B-PWR/B(C4C
C.AFFC18P260MMM/B-ODD(C4
C.AFFC20P32MMM/B-IO/B(C4
C.AM/B-IO/BTEFLON(C4C5)
C.AM/B-LCD_LG_TOUCH_23(C5)
CAIO520ODDBoard
IOBoard
USBCalliopeKBBKNORDIC
USBCalliopeKBSRARA
USBCalliopeKBSRENG
USBCalliopeKBBKHBW
USBCalliopeKBBKHUN
USBCalliopeKBBKIT A
USBCalliopeKBBKFRA
USBCalliopeKBBKGRE
USBCalliopeKBSRBUL
USBCalliopeKBBKGER
72ideacentreAll-In-One520(22&24inch)ComputerHardwareMaintenanceManual
Page 79

Table3.AIO520-24ASTFRUlist(continued)
00XH971
00XH973
00XH968
00XH627
00XH626
00XH610
00XH608
00XH975
00XH982
00XH965
00XH978
00XH976
00XH967
00XH979
00XH961
00XH981
00XH959
00XH621
00XH987
00XH622
00XH964
00XH630
00XH618
00XH994
00XH992
00XH625
00XH990
00XH619
00XH962
00XH624
00XH611
00XH955
00XH993
00XH952
00XH594
00XH614
00XH595
00XH951
00XH948
USBCalliopeKBSRPOR
USBCalliopeKBSRRUS
USBCalliopeKBSRLASPA
USBCalliopeKBBKSLV
USBCalliopeKBBKEUROENG
USBCalliopeKBBKKOR
USBCalliopeKBBKJPN
USBCalliopeKBSRSLK
USBCalliopeKBSRUKE
USBCalliopeKBSRJPN
USBCalliopeKBSRSWS
USBCalliopeKBSRSP A
USBCalliopeKBSRKOR
USBCalliopeKBSRTHAI
USBCalliopeKBSRHBW
USBCalliopeKBSRTUR
USBCalliopeKBSRGRE
USBCalliopeKBBKSWS
USBCalliopeKBSRINDENG
USBCalliopeKBBKTHAI
USBCalliopeKBSRIT A
USBCalliopeKBBKINDENG
USBCalliopeKBBKSLK
USBKBSLV_CZ-SL
USBCalliopeKBSRCANEN/FR
USBCalliopeKBBKUKE
USBCalliopeKBSRNORDIC
USBCalliopeKBBKSP A
USBCalliopeKBSRHUN
USBCalliopeKBBKTUR
USB,Calliope,KB,BK,LASPA
USBCalliopeKBSRFRA
USBCalliopeKBBKCZE/SLK
USBCalliopeKBSRCZE
USBCalliopeKBBKTC/ENG
USBCalliopeKBBKPOR
USBCalliopeKBBKCZE
USBCalliopeKBSRTC/ENG
USBCalliopeKBSRBELENG
Chapter9.FRUlists73
Page 80

Table3.AIO520-24ASTFRUlist(continued)
00XH958
00XH949
00XH593
00XH591
00XH616
00XH983
00XH587
00XH984
00XH588
00XH635
FAN
00XD821
HDD_ASM
45K0623
00PC552HDD,2TB,7200,DT3,SATA3,STD
00PC551HDD,1TB,7200,DT3,SATA3,STD
45K0625
HEATSINK
01MN100
01MN101
01MN103
01MN102
KYB_MOUSE
00XH801
00XH884
00XH885
00XH996
00XH845
00XH886
00XH797
00XH844
00XH800
00XH895
00XH873
00XH870
00XH866
00PH144
00XH995
00XH867
USBCalliopeKBSRGER
USBCalliopeKBSRBRL
USBCalliopeKBBKBUL
USB,Calliope,KB,BK,BELENG
USBCalliopeKBBKRUS
USBCalliopeKBSREUROENG
USBCalliopeKBBKENG
USBCalliopeKBSRSLV
USBCalliopeKBBKARA
USBCalliopeKBBKCANENG/FRA
SysfanforQT90x15mm
HDD,1TB,7200,DT3,SA T A3,STD
HDD,2TB,7200,DT3,SA T A3,STD
C4C5AMDSTONEYUMATHERMAL
C4C5STONEYDISTHERMAL
C4C5AMDBRISTOLDISTHERMAL
C4C5BRISTOLUMATHERMAL
WLKMCalliopeBKNoBATBRL
WLKMCalliopeSRUKE
WLKMCalliopeSREuroENG
2.4GSVGCZ_SL
WLKMCalliopeBKNoBATLASPA
WLKMCalliopeSRSLV
WLKMCalliopeBKARA
WLKMCalliopeBKCANENG/FRA
WLKMCalliopeBKBELENG
WLKMCalliopeSRNoBATLASPA
WLKMCalliopeSRPOR
WLKMCalliopeSRLASPA
WLKMCalliopeSRIT A
USBCalliopeMouseSR-GY
WLKMCalliopeBKCZE/SLK
WLKMCalliopeSRJPN
74ideacentreAll-In-One520(22&24inch)ComputerHardwareMaintenanceManual
Page 81

Table3.AIO520-24ASTFRUlist(continued)
00XH827
00XH869
00XH860
00XH857
00XH880
00XH830
00XH878
00XH823
00XH825
00XH877
00XH828
00XH820
00XH804
00XH842
00XH839
00XH817
00XH802
00XH807
00XH803
00XH810
00XH811
00XH851
00XH850
00XH835
00XH816
00XH813
00XH833
00XH854
00XH836
00XH847
00XH814
00XH831
00XH894
00XH834
00XH892
00XH819
00XH889
00XH883
00XH881
WLKMCalliopeBKSLK
WLKMCalliopeSRKOR
WLKMCalliopeSRGER
WLKMCalliopeSRFRA
WLKMCalliopeSRSWS
WLKMCalliopeBKSWS
WLKMCalliopeSRSP A
WLKMCalliopeBKPOR
WLKMCalliopeBKRUS
WLKMCalliopeSRSLK
WLKMCalliopeBKSP A
WLKMCalliopeBKLASPA
WLKMCalliopeBKCZE
WLKMCalliopeBKNordic
WLKMCalliopeBKINDENG
WLKMCalliopeBKJPN
WLKMCalliopeBKBUL
WLKMCalliopeBKFRA
WLKMCalliopeBKTC/ENG
WLKMCalliopeBKGER
WLKMCalliopeBKGRE/UK
WLKMCalliopeSRNoBATBRL
WLKMCalliopeSRBELENG
WLKMCalliopeBKEuroENG
WLKMCalliopeBKIT A
WLKMCalliopeBKHBW
WLKMCalliopeBKTUR
WLKMCalliopeSRCZE
WLKMCalliopeBKSLV
WLKMCalliopeSRARA
WLKMCalliopeBKHUN
WLKMCalliopeBKTHAI
WLKMCalliopeSRCANENG/FRA
WLKMCalliopeBKUKE
WLKMCalliopeSRNordic
WLKMCalliopeBKKOR
WLKMCalliopeSRINDENG
WLKMCalliopeSRTUR
WLKMCalliopeSRTHAI
Chapter9.FRUlists75
Page 82

Table3.AIO520-24ASTFRUlist(continued)
00XH853
00XH875
00XH861
00XH852
00XH863
00XH864
00XH796
00XH846
LINECORD
00XL074
00XL051
00XL090
00XL080
00XL002
00XL057
00XL067
00XL062
00XL093
00XL079
00XL063
00XL078
00XL065
00XL052
00XL089
00XL081
00XL059
00XL083
00XL066
00XL003
00XL058
00XL069
00XL084
00XL071
00XL075
00XL092
00XL094
00XL064
00XL086
00XL085
WLKMCalliopeSRTC/ENG
WLKMCalliopeSRRUS
WLKMCalliopeSRGRE/UK
WLKMCalliopeSRBUL
WLKMCalliopeSRHBW
WLKMCalliopeSRHUN
WLKMCalliopeBKENG
PrimaxRFBU712.4GSVGUS
Fru,LINECORD,IT,1M,3P,NON-LH
Fru,US/CA,1M,3P ,NON-LH
Fru,LINECORD,CN,1M,3P ,NON-LH
Fru,LINECORD,AU,1M,3P ,NON-LH
Fru,JP ,Anti-TR,1M,2P ,NON-LH
Fru,LINECORD,AR,1M,3P ,NON-LH
Fru,LINECORD,DK,1M,3P ,NON-LH
Fru,LINECORD,BR,1M,3P ,NON-LH
Fru,LINECORD,TW,1M,3P ,NON-LH
Fru,LINECORD,AU,1M,3P ,NON-LH
Fru,EU/KR,1M,3P ,NON-LH
Fru,LINECORD,AU,1M,3P ,NON-LH
Fru,EU/KR,1M,3P ,NON-LH
Fru,US/CA,1M,3P ,NON-LH
Fru,LINECORD,CN,1M,3P ,NON-LH
Fru,LINECORD,ZA,1M,3P ,NON-LH
Fru,LINECORD,AR,1M,3P ,NON-LH
Fru,LINECORD,ZA,1M,3P ,NON-LH
Fru,LINECORD,DK,1M,3P ,NON-LH
Fru,JP ,Anti-TR,1M,2P ,NON-LH
Fru,LINECORD,AR,1M,3P ,NON-LH
Fru,LINECORD,CH,1M,3P ,NON-LH
Fru,LINECORD,IL,1M,3P ,NON-LH
Fru,LINECORD,CH,1M,3P ,NON-LH
Fru,LINECORD,GB,1M,3P ,NON-LH
Fru,LINECORD,TW,1M,3P ,NON-LH
Fru,LINECORD,IN,1M,3P ,NON-LH
Fru,EU/KR,1M,3P ,NON-LH
Fru,LINECORD,IL,1M,3P ,NON-LH
Fru,LINECORD,IL,1M,3P ,NON-LH
76ideacentreAll-In-One520(22&24inch)ComputerHardwareMaintenanceManual
Page 83

Table3.AIO520-24ASTFRUlist(continued)
00XL097
00XL073
00XL072
00XL096
00XL053
00XL091
00XL060
00XL076
00XL070
00XL082
00XL077
00XL068
00XL061
Fru,LINECORD,TH,1M,3P ,NON-LH
Fru,LINECORD,IT,1M,3P,NON-LH
Fru,LINECORD,IT,1M,3P,NON-LH
Fru,LINECORD,IN,1M,3P ,NON-LH
Fru,US/CA,1M,3P ,NON-LH
Fru,LINECORD,TW,1M,3P ,NON-LH
Fru,LINECORD,BR,1M,3P ,NON-LH
Fru,LINECORD,GB,1M,3P ,NON-LH
Fru,LINECORD,CH,1M,3P ,NON-LH
Fru,LINECORD,ZA,1M,3P ,NON-LH
Fru,LINECORD,GB,1M,3P ,NON-LH
Fru,LINECORD,DK,1M,3P ,NON-LH
Fru,LINECORD,BR,1M,3P ,NON-LH
MECH_ASM
01MN268
01MN205
01MN244
01MN277
01MN188
01MN187
01MN207
01MN242
01MN248
01MN241
BackCvr,HDMI,Cam,A,BlKC5
GTStandArmsilverC4
MBShielding,W/HDMI,AMD
MainFrame,C5
DCA70_SIDE_IO_SHIELDING
DCA70_MIC
GTStandArmblackC4
CAMERAIR,Blcak
SideIoShielding
CAMERAIR,Silver
01MN249HDDBracket
01MN185
01MN257
01MN240
01MN271
01MN275
01MN276
01MN266
01MN239
01MN350
01MN274
01EF416
01MN272
01MN273
01MN351
520_HDD_BRACKET_ASSY
ASSYDUALMICModule
CAMERA720P ,Blcak
FrontBezel,Silver,C5
DUMMYODDBezelSilver,C5
DUMMYODDBezelBlack,C5
BackCvr,HDMI,Cam,A,SilverC5
CAMERA720P ,Silver
TLStandBaseBlackC4/5
ODDBezelBlack,C5
ASSYShieldingforHDD
FrontBezel,Black,C5
ODDBezelSilver,C5
TLStandBaseSilverC4/5
Chapter9.FRUlists77
Page 84

Table3.AIO520-24ASTFRUlist(continued)
MECHANICAL
01MN368
01MN218
01MN217
01EF469Bracket,ForWIFIAntennaKit
01MN402
01MN401
01MN281
01MN280
01MN258
01MN278
01MN279
MEMORY
01FR300
01AG7094GBDDR42400SoDIMM
01AG7118GBDDR42400SoDIMM
01AG7014GBDDR42400SoDIMM
01FR304
01FR301
01AG7084GBDDR42400SoDIMM
01AG8128GBDDR42666SoDIMM,MICRON
01AG8188GBDDR42666SoDIMM,Ramaxel
SSD_ASM
00UP436
00UP433
00UP448
00UP641
PAD
01MN363
MOUSE
00PH143
00PH131
OPT_DRIVE
45K04949.0mmDVDRambowithoutbezel
SCREW
01EF559
WIRELESS
01AX709
spk_w_Rubber_C4C5
GTClipblackC4/5
GTClipcolourlessC4/5
panel_mylar_C5_S
panel_mylar_C5_T
HingecoverBottom,C5Black
HingecoverBottom,C5Silver
BracketLatch,ForODD
HingecoverT op,C5Silver
HingecoverT op,C5Black
4GDDR42400SODIMM
8GBDDR42400SODIMM
8GDDR42400SODIMM
256G,M.2,2280,PCIe3x4,SAM,OPAL
256G,M.2,2280,PCIe3x4,INTEL,OPAL
128G,M.2,2280,PCIe3x4,SAMSG,STD
256G,M.2,2280,PCIe3x4,TOS,OPAL
LairdTflex3padforM.2SSD
ChiconyUSBFingerprintMCB_O
USBCalliopeMouseBlack(Orangewh
ForSSD
Wireless,CMB,LTN,NFA435A
78ideacentreAll-In-One520(22&24inch)ComputerHardwareMaintenanceManual
Page 85

Table4.AIO520-22IKLFRUlist
FRUP/N
Description
AC_ADAPTER
00PC727AC_ADAPTER,120W,100-240Vac,3P
00PC726AC_ADAPTER,90W,100-240Vac,3P
ANTENNA
00XJ120
AIO520-C4Antenna
BDPLANAR
01LM141
01LM140
01LM138
01LM137
01LM142
01LM139
NODPK,MB,B250,UMA,OUT,IN
WINDPK,MB,B250,R17M2G,OUT ,IN
WINDPK,MB,B250,UMA,OUT
NODPK,MB,B250,UMA,OUT
WINDPK,MB,B250,UMA,OUT ,IN
NODPK,MB,B250,R17M2G,OUT ,IN
CABLE
00XL329
00XL341
00XL343
00XL330
00XL332
00XL331
00XL347
00XL334
00XL333
C.AM/B-SATA_HDD_3.5(C4C5)
C.AM/B-LVDS_MIC(C4C5)
C.AM/B-LVDS_MIC_TOUCH(C4C5
C.AFFC4P450MMM/B-PWR/B(C4C
C.AFFC18P260MMM/B-ODD(C4
C.AFFC20P32MMM/B-IO/B(C4
C.AM/B-IO/BTEFLON(C4C5)
C.AM/B-LCD_LG_21.5(C4)
C.AM/B-LCD_LG_TOUCH_21.5(C4)
CARDPOP
01LM243PowerButtonBoard
01LM246
01LM244
CAIO520ODDBoard
IOBoard
DISPLAY
01AG958DisplayLGDLM215WF9-SSA1
01AG960DisplayLGDLM215WFA-SSA1
DT_KYB
00XH633
00XH945
00XH944
00XH604
00XH605
00XH607
00XH598
00XH602
USBCalliopeKBBKNORDIC
USBCalliopeKBSRARA
USBCalliopeKBSRENG
USBCalliopeKBBKHBW
USBCalliopeKBBKHUN
USBCalliopeKBBKIT A
USBCalliopeKBBKFRA
USBCalliopeKBBKGRE
Chapter9.FRUlists79
Page 86

Table4.AIO520-22IKLFRUlist(continued)
00XH950
00XH601
00XH971
00XH973
00XH968
00XH627
00XH626
00XH610
00XH608
00XH975
00XH982
00XH965
00XH978
00XH976
00XH967
00XH979
00XH961
00XH981
00XH959
00XH621
00XH987
00XH622
00XH964
00XH630
00XH618
00XH994
00XH992
00XH625
00XH990
00XH619
00XH962
00XH624
00XH611
00XH955
00XH993
00XH952
00XH594
00XH614
00XH595
USBCalliopeKBSRBUL
USBCalliopeKBBKGER
USBCalliopeKBSRPOR
USBCalliopeKBSRRUS
USBCalliopeKBSRLASPA
USBCalliopeKBBKSLV
USBCalliopeKBBKEUROENG
USBCalliopeKBBKKOR
USBCalliopeKBBKJPN
USBCalliopeKBSRSLK
USBCalliopeKBSRUKE
USBCalliopeKBSRJPN
USBCalliopeKBSRSWS
USBCalliopeKBSRSP A
USBCalliopeKBSRKOR
USBCalliopeKBSRTHAI
USBCalliopeKBSRHBW
USBCalliopeKBSRTUR
USBCalliopeKBSRGRE
USBCalliopeKBBKSWS
USBCalliopeKBSRINDENG
USBCalliopeKBBKTHAI
USBCalliopeKBSRIT A
USBCalliopeKBBKINDENG
USBCalliopeKBBKSLK
USBKBSLV_CZ-SL
USBCalliopeKBSRCANEN/FR
USBCalliopeKBBKUKE
USBCalliopeKBSRNORDIC
USBCalliopeKBBKSP A
USBCalliopeKBSRHUN
USBCalliopeKBBKTUR
USB,Calliope,KB,BK,LASPA
USBCalliopeKBSRFRA
USBCalliopeKBBKCZE/SLK
USBCalliopeKBSRCZE
USBCalliopeKBBKTC/ENG
USBCalliopeKBBKPOR
USBCalliopeKBBKCZE
80ideacentreAll-In-One520(22&24inch)ComputerHardwareMaintenanceManual
Page 87

Table4.AIO520-22IKLFRUlist(continued)
00XH951
00XH948
00XH958
00XH949
00XH593
00XH591
00XH616
00XH983
00XH587
00XH984
00XH588
00XH635
USBCalliopeKBSRTC/ENG
USBCalliopeKBSRBELENG
USBCalliopeKBSRGER
USBCalliopeKBSRBRL
USBCalliopeKBBKBUL
USB,Calliope,KB,BK,BELENG
USBCalliopeKBBKRUS
USBCalliopeKBSREUROENG
USBCalliopeKBBKENG
USBCalliopeKBSRSLV
USBCalliopeKBBKARA
USBCalliopeKBBKCANENG/FRA
FAN
00KT209
FAN100x22mmSysFanforA7300,S
HDD_ASM
45K0623
HDD,1TB,7200,DT3,SA T A3,STD
00PC552HDD,2TB,7200,DT3,SATA3,STD
00PC551HDD,1TB,7200,DT3,SATA3,STD
45K0625
HDD,2TB,7200,DT3,SA T A3,STD
HEATSINK
01MN097
01MN096
35W+25WC4C5IntelKBL_SDISHe
35WC4C5IntelKBL_SUMAHeats
KYB_MOUSE
00XH801
00XH884
00XH885
00XH996
00XH845
00XH886
00XH797
00XH844
00XH800
00XH895
00XH873
00XH870
00XH866
00PH144
00XH995
00XH867
WLKMCalliopeBKNoBATBRL
WLKMCalliopeSRUKE
WLKMCalliopeSREuroENG
2.4GSVGCZ_SL
WLKMCalliopeBKNoBATLASPA
WLKMCalliopeSRSLV
WLKMCalliopeBKARA
WLKMCalliopeBKCANENG/FRA
WLKMCalliopeBKBELENG
WLKMCalliopeSRNoBATLASPA
WLKMCalliopeSRPOR
WLKMCalliopeSRLASPA
WLKMCalliopeSRIT A
USBCalliopeMouseSR-GY
WLKMCalliopeBKCZE/SLK
WLKMCalliopeSRJPN
Chapter9.FRUlists81
Page 88

Table4.AIO520-22IKLFRUlist(continued)
00XH827
00XH869
00XH860
00XH857
00XH880
00XH830
00XH878
00XH823
00XH825
00XH877
00XH828
00XH820
00XH804
00XH842
00XH839
00XH817
00XH802
00XH807
00XH803
00XH810
00XH811
00XH851
00XH850
00XH835
00XH816
00XH813
00XH833
00XH854
00XH836
00XH847
00XH814
00XH831
00XH894
00XH834
00XH892
00XH819
00XH889
00XH883
00XH881
WLKMCalliopeBKSLK
WLKMCalliopeSRKOR
WLKMCalliopeSRGER
WLKMCalliopeSRFRA
WLKMCalliopeSRSWS
WLKMCalliopeBKSWS
WLKMCalliopeSRSP A
WLKMCalliopeBKPOR
WLKMCalliopeBKRUS
WLKMCalliopeSRSLK
WLKMCalliopeBKSP A
WLKMCalliopeBKLASPA
WLKMCalliopeBKCZE
WLKMCalliopeBKNordic
WLKMCalliopeBKINDENG
WLKMCalliopeBKJPN
WLKMCalliopeBKBUL
WLKMCalliopeBKFRA
WLKMCalliopeBKTC/ENG
WLKMCalliopeBKGER
WLKMCalliopeBKGRE/UK
WLKMCalliopeSRNoBATBRL
WLKMCalliopeSRBELENG
WLKMCalliopeBKEuroENG
WLKMCalliopeBKIT A
WLKMCalliopeBKHBW
WLKMCalliopeBKTUR
WLKMCalliopeSRCZE
WLKMCalliopeBKSLV
WLKMCalliopeSRARA
WLKMCalliopeBKHUN
WLKMCalliopeBKTHAI
WLKMCalliopeSRCANENG/FRA
WLKMCalliopeBKUKE
WLKMCalliopeSRNordic
WLKMCalliopeBKKOR
WLKMCalliopeSRINDENG
WLKMCalliopeSRTUR
WLKMCalliopeSRTHAI
82ideacentreAll-In-One520(22&24inch)ComputerHardwareMaintenanceManual
Page 89

Table4.AIO520-22IKLFRUlist(continued)
00XH853
00XH875
00XH861
00XH852
00XH863
00XH864
00XH796
00XH846
LINECORD
00XL074
00XL051
00XL090
00XL080
00XL002
00XL057
00XL067
00XL062
00XL093
00XL079
00XL063
00XL078
00XL065
00XL052
00XL089
00XL081
00XL059
00XL083
00XL066
00XL003
00XL058
00XL069
00XL084
00XL071
00XL075
00XL092
00XL094
00XL064
00XL086
00XL085
WLKMCalliopeSRTC/ENG
WLKMCalliopeSRRUS
WLKMCalliopeSRGRE/UK
WLKMCalliopeSRBUL
WLKMCalliopeSRHBW
WLKMCalliopeSRHUN
WLKMCalliopeBKENG
PrimaxRFBU712.4GSVGUS
Fru,LINECORD,IT,1M,3P,NON-LH
Fru,US/CA,1M,3P ,NON-LH
Fru,LINECORD,CN,1M,3P ,NON-LH
Fru,LINECORD,AU,1M,3P ,NON-LH
Fru,JP ,Anti-TR,1M,2P ,NON-LH
Fru,LINECORD,AR,1M,3P ,NON-LH
Fru,LINECORD,DK,1M,3P ,NON-LH
Fru,LINECORD,BR,1M,3P ,NON-LH
Fru,LINECORD,TW,1M,3P ,NON-LH
Fru,LINECORD,AU,1M,3P ,NON-LH
Fru,EU/KR,1M,3P ,NON-LH
Fru,LINECORD,AU,1M,3P ,NON-LH
Fru,EU/KR,1M,3P ,NON-LH
Fru,US/CA,1M,3P ,NON-LH
Fru,LINECORD,CN,1M,3P ,NON-LH
Fru,LINECORD,ZA,1M,3P ,NON-LH
Fru,LINECORD,AR,1M,3P ,NON-LH
Fru,LINECORD,ZA,1M,3P ,NON-LH
Fru,LINECORD,DK,1M,3P ,NON-LH
Fru,JP ,Anti-TR,1M,2P ,NON-LH
Fru,LINECORD,AR,1M,3P ,NON-LH
Fru,LINECORD,CH,1M,3P ,NON-LH
Fru,LINECORD,IL,1M,3P ,NON-LH
Fru,LINECORD,CH,1M,3P ,NON-LH
Fru,LINECORD,GB,1M,3P ,NON-LH
Fru,LINECORD,TW,1M,3P ,NON-LH
Fru,LINECORD,IN,1M,3P ,NON-LH
Fru,EU/KR,1M,3P ,NON-LH
Fru,LINECORD,IL,1M,3P ,NON-LH
Fru,LINECORD,IL,1M,3P ,NON-LH
Chapter9.FRUlists83
Page 90

Table4.AIO520-22IKLFRUlist(continued)
00XL097
00XL073
00XL072
00XL096
00XL053
00XL091
00XL060
00XL076
00XL070
00XL082
00XL077
00XL068
00XL061
MECHANICAL
01MN368
01MN218
01MN217
01EF469Bracket,ForWIFIAntennaKit
01MN253
01MN252
01MN404
01MN403
01MN258
01MN251
01MN254
MEMORY
01FR300
01AG7094GBDDR42400SoDIMM
01AG7118GBDDR42400SoDIMM
01AG7014GBDDR42400SoDIMM
01FR304
01FR301
01AG8104GBDDR42400SoDIMM,TIGO
01AG7084GBDDR42400SoDIMM
01AG8128GBDDR42666SoDIMM,MICRON
01AG8188GBDDR42666SoDIMM,Ramaxel
SSD
00UP455
SSD_ASM
Fru,LINECORD,TH,1M,3P ,NON-LH
Fru,LINECORD,IT,1M,3P,NON-LH
Fru,LINECORD,IT,1M,3P,NON-LH
Fru,LINECORD,IN,1M,3P ,NON-LH
Fru,US/CA,1M,3P ,NON-LH
Fru,LINECORD,TW,1M,3P ,NON-LH
Fru,LINECORD,BR,1M,3P ,NON-LH
Fru,LINECORD,GB,1M,3P ,NON-LH
Fru,LINECORD,CH,1M,3P ,NON-LH
Fru,LINECORD,ZA,1M,3P ,NON-LH
Fru,LINECORD,GB,1M,3P ,NON-LH
Fru,LINECORD,DK,1M,3P ,NON-LH
Fru,LINECORD,BR,1M,3P ,NON-LH
spk_w_Rubber_C4C5
GTClipblackC4/5
GTClipcolourlessC4/5
HingecoverBottom,C4Silver
HingecoverT op,C4Black
panel_mylar_C4_S
panel_mylar_C4_T
BracketLatch,ForODD
HingecoverT op,C4Silver
HingecoverBottom,C4Black
4GDDR42400SODIMM
8GBDDR42400SODIMM
8GDDR42400SODIMM
FRU16GBM.2OptaneMemory
84ideacentreAll-In-One520(22&24inch)ComputerHardwareMaintenanceManual
Page 91

Table4.AIO520-22IKLFRUlist(continued)
00UP436
00UP433
00UP448
00UP641
256G,M.2,2280,PCIe3x4,SAM,OPAL
256G,M.2,2280,PCIe3x4,INTEL,OPAL
128G,M.2,2280,PCIe3x4,SAMSG,STD
256G,M.2,2280,PCIe3x4,TOS,OPAL
SP
01AG116IntelCeleronG3930T2.7GHZ/2C/2M35W
01AG103II5-7400T2.4GHz/4C/6M35W
01AG113IntelCorei3-7100T3.4GHZ/2C/3M35W
01AG115IntelPentiumG4560T2.9GHZ/2C/3M35W
PAD
01MN363
LairdTflex3padforM.2SSD
MOUSE
00PH131
USBCalliopeMouseBlack(Orangewh
SCREW
01EF559
ForSSD
OPT_DRIVE
45K04949.0mmDVDRambowithoutbezel
WIRELESS
01AX709
01AX710
01AX731
00JT497
Wireless,CMB,LTN,NFA435A
Wireless,CMB,CBT,8821CE
Wireless,CMB,LTN,NFA435Aagn
Wireless,CMB,IN,3165ac
Table5.AIO520-22IKUFRUlist
FRUP/N
Description
AC_ADAPTER
00PC727AC_ADAPTER,120W,100-240Vac,3P
00PC726AC_ADAPTER,90W,100-240Vac,3P
ANTENNA
00XJ120
AIO520-C4Antenna
BDPLANAR
01LM141
01LM140
01LM138
01LM137
01LM142
01LM139
NODPK,MB,B250,UMA,OUT,IN
WINDPK,MB,B250,R17M2G,OUT ,IN
WINDPK,MB,B250,UMA,OUT
NODPK,MB,B250,UMA,OUT
WINDPK,MB,B250,UMA,OUT ,IN
NODPK,MB,B250,R17M2G,OUT ,IN
CABLE
00XL329
C.AM/B-SATA_HDD_3.5(C4C5)
Chapter9.FRUlists85
Page 92

Table5.AIO520-22IKUFRUlist(continued)
00XL341
00XL343
00XL330
00XL332
00XL331
00XL347
00XL334
00XL333
CARDPOP
01LM243PowerButtonBoard
01LM246
01LM244
DISPLAY
01AG958DisplayLGDLM215WF9-SSA1
01AG960DisplayLGDLM215WFA-SSA1
DT_KYB
00XH633
00XH945
00XH944
00XH604
00XH605
00XH607
00XH598
00XH602
00XH950
00XH601
00XH971
00XH973
00XH968
00XH627
00XH626
00XH610
00XH608
00XH975
00XH982
00XH965
00XH978
00XH976
00XH967
C.AM/B-LVDS_MIC(C4C5)
C.AM/B-LVDS_MIC_TOUCH(C4C5
C.AFFC4P450MMM/B-PWR/B(C4C
C.AFFC18P260MMM/B-ODD(C4
C.AFFC20P32MMM/B-IO/B(C4
C.AM/B-IO/BTEFLON(C4C5)
C.AM/B-LCD_LG_21.5(C4)
C.AM/B-LCD_LG_TOUCH_21.5(C4)
CAIO520ODDBoard
IOBoard
USBCalliopeKBBKNORDIC
USBCalliopeKBSRARA
USBCalliopeKBSRENG
USBCalliopeKBBKHBW
USBCalliopeKBBKHUN
USBCalliopeKBBKIT A
USBCalliopeKBBKFRA
USBCalliopeKBBKGRE
USBCalliopeKBSRBUL
USBCalliopeKBBKGER
USBCalliopeKBSRPOR
USBCalliopeKBSRRUS
USBCalliopeKBSRLASPA
USBCalliopeKBBKSLV
USBCalliopeKBBKEUROENG
USBCalliopeKBBKKOR
USBCalliopeKBBKJPN
USBCalliopeKBSRSLK
USBCalliopeKBSRUKE
USBCalliopeKBSRJPN
USBCalliopeKBSRSWS
USBCalliopeKBSRSP A
USBCalliopeKBSRKOR
86ideacentreAll-In-One520(22&24inch)ComputerHardwareMaintenanceManual
Page 93

Table5.AIO520-22IKUFRUlist(continued)
00XH979
00XH961
00XH981
00XH959
00XH621
00XH987
00XH622
00XH964
00XH630
00XH618
00XH994
00XH992
00XH625
00XH990
00XH619
00XH962
00XH624
00XH611
00XH955
00XH993
00XH952
00XH594
00XH614
00XH595
00XH951
00XH948
00XH958
00XH949
00XH593
00XH591
00XH616
00XH983
00XH587
00XH984
00XH588
00XH635
FAN
00KT209
HDD_ASM
USBCalliopeKBSRTHAI
USBCalliopeKBSRHBW
USBCalliopeKBSRTUR
USBCalliopeKBSRGRE
USBCalliopeKBBKSWS
USBCalliopeKBSRINDENG
USBCalliopeKBBKTHAI
USBCalliopeKBSRIT A
USBCalliopeKBBKINDENG
USBCalliopeKBBKSLK
USBKBSLV_CZ-SL
USBCalliopeKBSRCANEN/FR
USBCalliopeKBBKUKE
USBCalliopeKBSRNORDIC
USBCalliopeKBBKSP A
USBCalliopeKBSRHUN
USBCalliopeKBBKTUR
USB,Calliope,KB,BK,LASPA
USBCalliopeKBSRFRA
USBCalliopeKBBKCZE/SLK
USBCalliopeKBSRCZE
USBCalliopeKBBKTC/ENG
USBCalliopeKBBKPOR
USBCalliopeKBBKCZE
USBCalliopeKBSRTC/ENG
USBCalliopeKBSRBELENG
USBCalliopeKBSRGER
USBCalliopeKBSRBRL
USBCalliopeKBBKBUL
USB,Calliope,KB,BK,BELENG
USBCalliopeKBBKRUS
USBCalliopeKBSREUROENG
USBCalliopeKBBKENG
USBCalliopeKBSRSLV
USBCalliopeKBBKARA
USBCalliopeKBBKCANENG/FRA
FAN100x22mmSysFanforA7300,S
Chapter9.FRUlists87
Page 94

Table5.AIO520-22IKUFRUlist(continued)
45K0623
00PC552HDD,2TB,7200,DT3,SATA3,STD
00PC551HDD,1TB,7200,DT3,SATA3,STD
45K0625
HEATSINK
01MN097
01MN096
KYB_MOUSE
00XH801
00XH884
00XH885
00XH996
00XH845
00XH886
00XH797
00XH844
00XH800
00XH895
00XH873
00XH870
00XH866
00PH144
00XH995
00XH867
00XH827
00XH869
00XH860
00XH857
00XH880
00XH830
00XH878
00XH823
00XH825
00XH877
00XH828
00XH820
00XH804
00XH842
00XH839
HDD,1TB,7200,DT3,SA T A3,STD
HDD,2TB,7200,DT3,SA T A3,STD
35W+25WC4C5IntelKBL_SDISHe
35WC4C5IntelKBL_SUMAHeats
WLKMCalliopeBKNoBATBRL
WLKMCalliopeSRUKE
WLKMCalliopeSREuroENG
2.4GSVGCZ_SL
WLKMCalliopeBKNoBATLASPA
WLKMCalliopeSRSLV
WLKMCalliopeBKARA
WLKMCalliopeBKCANENG/FRA
WLKMCalliopeBKBELENG
WLKMCalliopeSRNoBATLASPA
WLKMCalliopeSRPOR
WLKMCalliopeSRLASPA
WLKMCalliopeSRIT A
USBCalliopeMouseSR-GY
WLKMCalliopeBKCZE/SLK
WLKMCalliopeSRJPN
WLKMCalliopeBKSLK
WLKMCalliopeSRKOR
WLKMCalliopeSRGER
WLKMCalliopeSRFRA
WLKMCalliopeSRSWS
WLKMCalliopeBKSWS
WLKMCalliopeSRSP A
WLKMCalliopeBKPOR
WLKMCalliopeBKRUS
WLKMCalliopeSRSLK
WLKMCalliopeBKSP A
WLKMCalliopeBKLASPA
WLKMCalliopeBKCZE
WLKMCalliopeBKNordic
WLKMCalliopeBKINDENG
88ideacentreAll-In-One520(22&24inch)ComputerHardwareMaintenanceManual
Page 95

Table5.AIO520-22IKUFRUlist(continued)
00XH817
00XH802
00XH807
00XH803
00XH810
00XH811
00XH851
00XH850
00XH835
00XH816
00XH813
00XH833
00XH854
00XH836
00XH847
00XH814
00XH831
00XH894
00XH834
00XH892
00XH819
00XH889
00XH883
00XH881
00XH853
00XH875
00XH861
00XH852
00XH863
00XH864
00XH796
00XH846
LINECORD
00XL074
00XL051
00XL090
00XL080
00XL002
00XL057
WLKMCalliopeBKJPN
WLKMCalliopeBKBUL
WLKMCalliopeBKFRA
WLKMCalliopeBKTC/ENG
WLKMCalliopeBKGER
WLKMCalliopeBKGRE/UK
WLKMCalliopeSRNoBATBRL
WLKMCalliopeSRBELENG
WLKMCalliopeBKEuroENG
WLKMCalliopeBKIT A
WLKMCalliopeBKHBW
WLKMCalliopeBKTUR
WLKMCalliopeSRCZE
WLKMCalliopeBKSLV
WLKMCalliopeSRARA
WLKMCalliopeBKHUN
WLKMCalliopeBKTHAI
WLKMCalliopeSRCANENG/FRA
WLKMCalliopeBKUKE
WLKMCalliopeSRNordic
WLKMCalliopeBKKOR
WLKMCalliopeSRINDENG
WLKMCalliopeSRTUR
WLKMCalliopeSRTHAI
WLKMCalliopeSRTC/ENG
WLKMCalliopeSRRUS
WLKMCalliopeSRGRE/UK
WLKMCalliopeSRBUL
WLKMCalliopeSRHBW
WLKMCalliopeSRHUN
WLKMCalliopeBKENG
PrimaxRFBU712.4GSVGUS
Fru,LINECORD,IT,1M,3P,NON-LH
Fru,US/CA,1M,3P ,NON-LH
Fru,LINECORD,CN,1M,3P ,NON-LH
Fru,LINECORD,AU,1M,3P ,NON-LH
Fru,JP ,Anti-TR,1M,2P ,NON-LH
Fru,LINECORD,AR,1M,3P ,NON-LH
Chapter9.FRUlists89
Page 96

Table5.AIO520-22IKUFRUlist(continued)
00XL067
00XL062
00XL093
00XL079
00XL063
00XL078
00XL065
00XL052
00XL089
00XL081
00XL059
00XL083
00XL066
00XL003
00XL058
00XL069
00XL084
00XL071
00XL075
00XL092
00XL094
00XL064
00XL086
00XL085
00XL097
00XL073
00XL072
00XL096
00XL053
00XL091
00XL060
00XL076
00XL070
00XL082
00XL077
00XL068
00XL061
MECHANICAL
01MN368
Fru,LINECORD,DK,1M,3P ,NON-LH
Fru,LINECORD,BR,1M,3P ,NON-LH
Fru,LINECORD,TW,1M,3P ,NON-LH
Fru,LINECORD,AU,1M,3P ,NON-LH
Fru,EU/KR,1M,3P ,NON-LH
Fru,LINECORD,AU,1M,3P ,NON-LH
Fru,EU/KR,1M,3P ,NON-LH
Fru,US/CA,1M,3P ,NON-LH
Fru,LINECORD,CN,1M,3P ,NON-LH
Fru,LINECORD,ZA,1M,3P ,NON-LH
Fru,LINECORD,AR,1M,3P ,NON-LH
Fru,LINECORD,ZA,1M,3P ,NON-LH
Fru,LINECORD,DK,1M,3P ,NON-LH
Fru,JP ,Anti-TR,1M,2P ,NON-LH
Fru,LINECORD,AR,1M,3P ,NON-LH
Fru,LINECORD,CH,1M,3P ,NON-LH
Fru,LINECORD,IL,1M,3P ,NON-LH
Fru,LINECORD,CH,1M,3P ,NON-LH
Fru,LINECORD,GB,1M,3P ,NON-LH
Fru,LINECORD,TW,1M,3P ,NON-LH
Fru,LINECORD,IN,1M,3P ,NON-LH
Fru,EU/KR,1M,3P ,NON-LH
Fru,LINECORD,IL,1M,3P ,NON-LH
Fru,LINECORD,IL,1M,3P ,NON-LH
Fru,LINECORD,TH,1M,3P ,NON-LH
Fru,LINECORD,IT,1M,3P,NON-LH
Fru,LINECORD,IT,1M,3P,NON-LH
Fru,LINECORD,IN,1M,3P ,NON-LH
Fru,US/CA,1M,3P ,NON-LH
Fru,LINECORD,TW,1M,3P ,NON-LH
Fru,LINECORD,BR,1M,3P ,NON-LH
Fru,LINECORD,GB,1M,3P ,NON-LH
Fru,LINECORD,CH,1M,3P ,NON-LH
Fru,LINECORD,ZA,1M,3P ,NON-LH
Fru,LINECORD,GB,1M,3P ,NON-LH
Fru,LINECORD,DK,1M,3P ,NON-LH
Fru,LINECORD,BR,1M,3P ,NON-LH
spk_w_Rubber_C4C5
90ideacentreAll-In-One520(22&24inch)ComputerHardwareMaintenanceManual
Page 97

Table5.AIO520-22IKUFRUlist(continued)
01MN218
01MN217
GTClipblackC4/5
GTClipcolourlessC4/5
01EF469Bracket,ForWIFIAntennaKit
01MN253
01MN252
01MN404
01MN403
01MN258
01MN251
01MN254
HingecoverBottom,C4Silver
HingecoverT op,C4Black
panel_mylar_C4_S
panel_mylar_C4_T
BracketLatch,ForODD
HingecoverT op,C4Silver
HingecoverBottom,C4Black
MEMORY
01FR300
4GDDR42400SODIMM
01AG7094GBDDR42400SoDIMM
01AG7118GBDDR42400SoDIMM
01AG7014GBDDR42400SoDIMM
01FR304
01FR301
8GBDDR42400SODIMM
8GDDR42400SODIMM
01AG8104GBDDR42400SoDIMM,TIGO
01AG7084GBDDR42400SoDIMM
01AG8128GBDDR42666SoDIMM,MICRON
01AG8188GBDDR42666SoDIMM,Ramaxel
SSD
00UP455
FRU16GBM.2OptaneMemory
SSD_ASM
00UP436
00UP433
00UP448
00UP641
256G,M.2,2280,PCIe3x4,SAM,OPAL
256G,M.2,2280,PCIe3x4,INTEL,OPAL
128G,M.2,2280,PCIe3x4,SAMSG,STD
256G,M.2,2280,PCIe3x4,TOS,OPAL
SP
01AG116IntelCeleronG3930T2.7GHZ/2C/2M35W
01AG103II5-7400T2.4GHz/4C/6M35W
01AG113IntelCorei3-7100T3.4GHZ/2C/3M35W
01AG115IntelPentiumG4560T2.9GHZ/2C/3M35W
PAD
01MN363
LairdTflex3padforM.2SSD
MOUSE
00PH131
USBCalliopeMouseBlack(Orangewh
SCREW
01EF559
ForSSD
Chapter9.FRUlists91
Page 98

Table5.AIO520-22IKUFRUlist(continued)
OPT_DRIVE
45K04949.0mmDVDRambowithoutbezel
WIRELESS
01AX709
01AX710
01AX731
00JT497
Table6.AIO520-22ASTFRUlist
Wireless,CMB,LTN,NFA435A
Wireless,CMB,CBT,8821CE
Wireless,CMB,LTN,NFA435Aagn
Wireless,CMB,IN,3165ac
FRUP/N
AC_ADAPTER
00PC726AC_ADAPTER,90W,100-240Vac,3P
ANTENNA
00XJ120
BDPLANAR
01LM208MBE2-9010UMAHIWINDPK
01LM156MBA4-9120UMAHIWINDPK
01LM155
01LM154MBA6-9220UMAHIWINDPK
01LM165
01LM159
01LM210MBE2-9010R17MHIWINDPK
01LM168MBA4-9120UMAWINDPK
01LM163
01LM164MBA9-9420UMAWINDPK
01LM209
01LM167
01LM157
01LM158MBA9-9420R17MHIWINDPK
01LM151
01LM161
01LM207
01LM160MBA6-9220R17MHIWINDPK
01LM153
01LM162MBA4-9120R17MHIWINDPK
01LM166MBA6-9220UMAWINDPK
01LM152MBA9-9420UMAHIWINDPK
01LM212MBE2-9010UMAWINDPK
01LM211
Description
AIO520-C4Antenna
MBA4-9120UMAHINODPK
MBA6-9220UMANODPK
MBA6-9220R17MHINODPK
MBA9-9420UMANODPK
MBE2-9010R17MHINODPK
MBA4-9120UMANODPK
MBA9-9420R17MHINODPK
MBA9-9420UMAHINODPK
MBA4-9120R17MHINODPK
MBE2-9010UMAHINODPK
MBA6-9220UMAHINODPK
MBE2-9010UMANODPK
92ideacentreAll-In-One520(22&24inch)ComputerHardwareMaintenanceManual
Page 99

Table6.AIO520-22ASTFRUlist(continued)
CABLE
00XL329
00XL341
00XL343
00XL330
00XL332
00XL331
00XL347
00XL334
00XL333
C.AM/B-SATA_HDD_3.5(C4C5)
C.AM/B-LVDS_MIC(C4C5)
C.AM/B-LVDS_MIC_TOUCH(C4C5
C.AFFC4P450MMM/B-PWR/B(C4C
C.AFFC18P260MMM/B-ODD(C4
C.AFFC20P32MMM/B-IO/B(C4
C.AM/B-IO/BTEFLON(C4C5)
C.AM/B-LCD_LG_21.5(C4)
C.AM/B-LCD_LG_TOUCH_21.5(C4)
CARDPOP
01LM243PowerButtonBoard
01LM246
01LM244
CAIO520ODDBoard
IOBoard
DISPLAY
01AG958DisplayLGDLM215WF9-SSA1
01AG960DisplayLGDLM215WFA-SSA1
DT_KYB
00XH633
00XH945
00XH944
00XH604
00XH605
00XH607
00XH598
00XH602
00XH950
00XH601
00XH971
00XH973
00XH968
00XH627
00XH626
00XH610
00XH608
00XH975
00XH982
00XH965
00XH978
USBCalliopeKBBKNORDIC
USBCalliopeKBSRARA
USBCalliopeKBSRENG
USBCalliopeKBBKHBW
USBCalliopeKBBKHUN
USBCalliopeKBBKIT A
USBCalliopeKBBKFRA
USBCalliopeKBBKGRE
USBCalliopeKBSRBUL
USBCalliopeKBBKGER
USBCalliopeKBSRPOR
USBCalliopeKBSRRUS
USBCalliopeKBSRLASPA
USBCalliopeKBBKSLV
USBCalliopeKBBKEUROENG
USBCalliopeKBBKKOR
USBCalliopeKBBKJPN
USBCalliopeKBSRSLK
USBCalliopeKBSRUKE
USBCalliopeKBSRJPN
USBCalliopeKBSRSWS
Chapter9.FRUlists93
Page 100

Table6.AIO520-22ASTFRUlist(continued)
00XH976
00XH967
00XH979
00XH961
00XH981
00XH959
00XH621
00XH987
00XH622
00XH964
00XH630
00XH618
00XH994
00XH992
00XH625
00XH990
00XH619
00XH962
00XH624
00XH611
00XH955
00XH993
00XH952
00XH594
00XH614
00XH595
00XH951
00XH948
00XH958
00XH949
00XH593
00XH591
00XH616
00XH983
00XH587
00XH984
00XH588
00XH635
FAN
USBCalliopeKBSRSP A
USBCalliopeKBSRKOR
USBCalliopeKBSRTHAI
USBCalliopeKBSRHBW
USBCalliopeKBSRTUR
USBCalliopeKBSRGRE
USBCalliopeKBBKSWS
USBCalliopeKBSRINDENG
USBCalliopeKBBKTHAI
USBCalliopeKBSRIT A
USBCalliopeKBBKINDENG
USBCalliopeKBBKSLK
USBKBSLV_CZ-SL
USBCalliopeKBSRCANEN/FR
USBCalliopeKBBKUKE
USBCalliopeKBSRNORDIC
USBCalliopeKBBKSP A
USBCalliopeKBSRHUN
USBCalliopeKBBKTUR
USB,Calliope,KB,BK,LASPA
USBCalliopeKBSRFRA
USBCalliopeKBBKCZE/SLK
USBCalliopeKBSRCZE
USBCalliopeKBBKTC/ENG
USBCalliopeKBBKPOR
USBCalliopeKBBKCZE
USBCalliopeKBSRTC/ENG
USBCalliopeKBSRBELENG
USBCalliopeKBSRGER
USBCalliopeKBSRBRL
USBCalliopeKBBKBUL
USB,Calliope,KB,BK,BELENG
USBCalliopeKBBKRUS
USBCalliopeKBSREUROENG
USBCalliopeKBBKENG
USBCalliopeKBSRSLV
USBCalliopeKBBKARA
USBCalliopeKBBKCANENG/FRA
94ideacentreAll-In-One520(22&24inch)ComputerHardwareMaintenanceManual
 Loading...