

Lenovo ideacentre AIO 510-22ISH, ideacentre AIO 510-22ASR, ideacentre AIO 510-23ISH, ideacentre AIO 510-23ASR Hardware Maintenance Manual [ja]
Page 1

ideacentreAll-In-One510ComputerHardware
MaintenanceManual
MachineTypes:FOCB[AIO51022-ISH/EnergyStar]/FOCC[AIO510
22-ASR/EnergyStar]/FOCD[AIO51023-ISH/EnergyStar]/FOCE[AIO
51023-ASR/EnergyStar]
Page 2

Page 3

ideacentreAll-In-One510Computer
HardwareMaintenanceManual
MachineTypes:FOCB[AIO51022-ISH/EnergyStar]/FOCC[AIO510
22-ASR/EnergyStar]/FOCD[AIO51023-ISH/EnergyStar]/FOCE[AIO
51023-ASR/EnergyStar]
Page 4

FirstEdition(July2016)14th
©CopyrightLenovo2016.
LIMITEDANDRESTRICTEDRIGHTSNOTICE:IfdataorsoftwarearedeliveredpursuantaGeneralServices
Administration“GSA”contract,use,reproduction,ordisclosureissubjecttorestrictionssetforthinContractNo.
GS-35F-05925
Page 5

Contents
Chapter1.Aboutthismanual.....1
ImportantSafetyInformation.........1
Chapter2.Safetyinformation.....3
Generalsafety...............3
Electricalsafety..............3
Safetyinspectionguide...........5
Handlingelectrostaticdischarge-sensitive
devices.................5
Groundingrequirements...........6
Safetynotices...............6
Chapter3.Generalinformation....9
Specifications...............9
Chapter4.GeneralCheckout.....11
Chapter5.UsingtheSetupUtility...13
StartingtheLenovoBIOSSetupUtilityprogram.13
Viewingandchangingsettings........13
Usingpasswords..............13
Enablingordisablingadevice........15
Selectingastartupdevice..........16
ExitingtheLenovoBIOSSetupUtilityprogram..17
Chapter6.Symptom-to-FRUIndex..19
Harddiskdrivebooterror..........19
PowerSupplyProblems...........19
POSTerrorcodes.............20
Undeterminedproblems...........20
Chapter7.Locatingconnectors,
controlsandcomponents......21
Chapter8.Replacinghardware....27
Generalinformation.............27
Replacingthekeyboardandmouse......28
Replacingtheadapter............28
Removingthestandbase..........29
Removingtherearcover...........29
Replacingtheharddiskdrive.........30
Replacingtheopticaldrive..........31
Replacingthememorymodule........33
Replacingthesolidstatedrive........34
Removingthestandholder..........35
Replacingthepowerswitchboard.......36
Removingthemiddlecover.........37
RemovingtheEMIcover...........39
ReplacingtheLCDpanelmodule.......40
ReplacingtheWi-Ficard...........43
Replacingthesystemfan..........44
Replacingtheheat-sink...........45
Replacingthemotherboard..........47
Replacingthespeakersystem........48
Replacingthecamera............50
Chapter9.FRUlists..........53
Chapter10.Generalinformation...87
AdditionalServiceInformation........87
©CopyrightLenovo2016
iii
Page 6

ivideacentreAll-In-One510ComputerHardwareMaintenanceManual
Page 7
Chapter1.Aboutthismanual
ThismanualcontainsserviceandreferenceinformationforLenovoAll-In-One510seriescomputerslistedon
thecover.ItisintendedonlyfortrainedservicerswhoarefamiliarwithLenovocomputerproducts.
BeforeservicingaLenovoproduct,besuretoreadtheSafetyInformation.
ThedescriptionoftheTV-tunercardinthismanualappliesonlytocomputerswithaTV-tunercardinstalled.
ItdoesnotapplytocomputerswithoutaTV-tunercard.
ImportantSafetyInformation
BesuretoreadallCAUTIONandDANGERsectionsinthismanualbeforefollowinganyoftheinstructions.
VeuillezliretouteslesconsignesdetypeDANGERetATTENTIONduprésentdocumentavantd’exécuter
lesinstructions.
LesenSieunbedingtalleHinweisevomTyp“ACHTUNG”oder“VORSICHT”indieserDokumentation,bevor
SieirgendwelcheVorgängedurchführen
LeggereleistruzioniintrodottedaA TTENZIONEePERICOLOpresentinelmanualeprimadieseguireuna
qualsiasidelleistruzioni
Certifique-sedelertodasasinstruçõesdecuidadoeperigonestemanualantesdeexecutarqualquer
umadasinstruções
Esimportantequeleatodaslasdeclaracionesdeprecauciónydepeligrodeestemanualantesdeseguir
lasinstrucciones.
©CopyrightLenovo2016
1
Page 8

2ideacentreAll-In-One510ComputerHardwareMaintenanceManual
Page 9

Chapter2.Safetyinformation
Thischaptercontainsthesafetyinformationthatyouneedtobefamiliarwithbeforeservicingacomputer.
Generalsafety
Followtheserulestoensuregeneralsafety:
•Keeptheareasaroundthecomputerclearandcleanduringandaftermaintenance.
•Whenliftinganyheavyobject:
1.Ensureyoucanstandsafelywithoutslipping.
2.Distributetheweightoftheobjectequallyacrossbothfeet.
3.Liftslowly.Nevermovesuddenlyortwistwhenyouattempttolift.
4.Liftbystandingorbypushingupwithyourlegmuscles;thisactionremovesthestrainfromthe
musclesinyourback.
Donotattempttoliftanyobjectsthatweighmorethan16kg(35lb)orobjectsthatyouthinkare
tooheavyforyou.
•Donotperformanyactionthatwouldcreateahazardforthecustomer,orwouldmakethecomputer
unsafe.
•Beforeyoustartthecomputer,ensurethatotherservicerepresentativesandcustomerpersonnelarenot
inapositionthatwouldcreateahazardforthem.
•Placeremovedcoversandotherpartsinasafeplace,awayfromallpersonnel,whileyouareservicingthe
computer.
•Keepyourtoolcaseawayfromareasthatpeoplemaywalkthroughtoensureno-onetripsoverit.
•Donotwearlooseclothingthatcanbetrappedinthemovingpartsofamachine.Ensurethatyoursleeves
arefastenedorrolledupaboveyourelbows.Ifyourhairislong,tieorfastenitback.
•Inserttheendsofyournecktieorscarfinsideclothingorfastenitwithanon-conductiveclip,
approximately8centimeters(3inches)fromtheend.
•Donotwearjewelry,chains,metal-frameeyeglasses,ormetalfastenersforyourclothing.
Remember:Metalobjectsaregoodelectricalconductors.
•Wearsafetyglasseswhenyouare:hammering,drillingsoldering,cuttingwire,attachingsprings,using
solvents,orworkinginanyotherconditionsthatmightbehazardoustoyoureyes.
•Afterservice,reinstallallsafetyshields,guards,labels,andgroundwires.Replaceanysafetydevice
thatiswornordefective.
•Reattachallcoverscorrectlybeforereturningthecomputertothecustomer.
Electricalsafety
CAUTION:
Electricalcurrentfrompower,telephone,andcommunicationcablescanbehazardous.T oavoid
personalinjuryorequipmentdamage,disconnectanyattachedpowercords,telecommunication
cables,networkcables,andmodemcablesbeforeyouopenthecomputercovers,unlessinstructed
otherwiseintheinstallationandconfigurationprocedures.
©CopyrightLenovo2016
3
Page 10

Observethefollowingruleswhenworkingonelectricalequipment.
Important:Useonlyapprovedtoolsandtestequipment.Somehandtoolshavehandlescoveredwithasoft
materialthatdoesnotinsulateyouwhenworkingwithliveelectricalcurrents.Manycustomershaverubber
floormatsneartheirequipmentthatcontainsmallconductivefiberstodecreaseelectrostaticdischarge.
•Findtheroomemergencypower-off(EPO)switch,disconnectingswitch,orelectricaloutlet.Ifanelectrical
accidentoccurs,youcanthenoperatetheswitchorunplugthepowercordquickly.
•Donotworkaloneunderhazardousconditionsornearequipmentthathashazardousvoltages.
•Disconnectallpowerbefore:
–Performingamechanicalinspection
–Workingnearpowersupplies
–RemovingorinstallingFieldReplaceableUnits(FRUs)
•Beforeyoustarttoworkonthecomputer,unplugthepowercord.Ifyoucannotunplugit,askthe
customertopower-offtheelectricaloutletthatsuppliespowertothemachineandtolocktheelectrical
outletintheoffposition.
•Ifyouneedtoworkonacomputerthathasexposedelectricalcircuits,observethefollowingprecautions:
–Ensurethatanotherperson,familiarwiththepower-offcontrols,isnearyou.
Remember:Anotherpersonmustbetheretoswitchoffthepower,ifnecessary.
–Useonlyonehandwhenworkingwithpowered-onelectricalequipment;keeptheotherhandinyour
pocketorbehindyourback.
Remember:Theremustbeacompletecircuittocauseelectricalshock.Byobservingtheaboverule,
youmaypreventacurrentfrompassingthroughyourbody.
–Whenusingatester,setthecontrolscorrectlyandusetheapprovedprobeleadsandaccessoriesfor
thattester.
–Standonsuitablerubbermats(obtainedlocally,ifnecessary)toinsulateyoufromgroundssuchas
metalfloorstripsandmachineframes.
Observethespecialsafetyprecautionswhenyouworkwithveryhighvoltages;theseinstructionsarein
thesafetysectionsofthemaintenanceinformation.Useextremecarewhenmeasuringhighvoltages.
•Regularlyinspectandmaintainyourelectricalhandtoolstoensuretheyaresafetouse.
•Donotusewornorbrokentoolsandtesters.
•Neverassumethatpowerhasbeendisconnectedfromacircuit.First,checkthatithasbeenpoweredoff.
•Alwayslookcarefullyforpossiblehazardsinyourworkarea.Examplesofthesehazardsarewetfloors,
non-groundedpowerextensioncables,conditionsthatmaycauseorallowpowersurges,andmissing
safetygrounds.
•Donottouchliveelectricalcircuitswiththereflectivesurfaceofaplasticdentalmirror.Thissurfaceis
conductive,andtouchingalivecircuitcancausepersonalinjuryanddamagetothecomputer.
•Donotservicethefollowingpartswiththepoweronwhentheyareremovedfromtheirnormaloperating
positionsinacomputer:
–Powersupplyunits
–Pumps
–Blowersandfans
–Motorgenerators
andsimilarunits.(Thispracticeensurescorrectgroundingoftheunits.)
•Ifanelectricalaccidentoccurs:
–Usecaution;donotbecomeavictimyourself.
4ideacentreAll-In-One510ComputerHardwareMaintenanceManual
Page 11

–Switchoffpower.
–Sendanotherpersontogetmedicalaid.
Safetyinspectionguide
Theintentofthisinspectionguideistoassistyouinidentifyingpotentialhazardsposedbytheseproducts.
Eachcomputer,asitwasdesignedandbuilt,hadrequiredsafetyitemsinstalledtoprotectusersand
servicepersonnelfrominjury.Thisguideaddressesonlythoseitems.However,goodjudgmentshouldbe
usedtoidentifypotentialsafetyhazardsduetoattachmentoffeaturesoroptionsnotcoveredbythis
inspectionguide.
Ifanyhazardsarepresent,youmustdeterminehowserioustheapparenthazardcouldbeandwhetheryou
cancontinuewithoutfirstresolvingtheproblem.
Considerthefollowingitemsandthesafetyhazardstheypresent:
•Electricalhazards,especiallyprimarypower(primaryvoltageontheframecancauseseriousorfatal
electricalshock).
•Explosivehazards,suchasadamagedCRTfaceorbulgingcapacitor
•Mechanicalhazards,suchaslooseormissinghardware
Theguideconsistsofaseriesofstepspresentedasachecklist.Beginthecheckswiththepoweroff,and
thepowercorddisconnected.
Checklist:
1.Checkexteriorcoversfordamage(loose,broken,orsharpedges).
2.Power-offthecomputer.Disconnectthepowercord.
3.Checkthepowercordfor:
a.Athird-wiregroundconnectoringoodcondition.Useametertomeasurethird-wireground
continuityfor0.1ohmorlessbetweentheexternalgroundpinandframeground.
b.Thepowercordshouldbetheappropriatetypeasspecifiedinthepartslistings.
c.Insulationmustnotbefrayedorworn.
4.Removethecover.
5.Checkforanyobviousalterations.Usegoodjudgmentastothesafetyofanyalterations.
6.Checkinsidetheunitforanyobvioushazards,suchasmetalfilings,contamination,waterorother
liquids,orsignsoffireorsmokedamage.
7.Checkforworn,frayed,orpinchedcables.
8.Checkthatthepower-supplycoverfasteners(screwsorrivets)havenotbeenremovedortamperedwith.
Handlingelectrostaticdischarge-sensitivedevices
Anycomputerpartcontainingtransistorsorintegratedcircuits(ICs)shouldbeconsideredsensitiveto
electrostaticdischarge(ESD).ESDdamagecanoccurwhenthereisadifferenceinchargebetweenobjects.
ProtectagainstESDdamagebyequalizingthechargesothatthecomputer,thepart,theworkmat,andthe
personhandlingthepartareallatthesamecharge.
Notes:
1.Useproduct-specificESDprocedureswhentheyexceedtherequirementsnotedhere.
2.MakesurethattheESDprotectivedevicesyouusehavebeencertified(ISO9000)asfullyeffective.
WhenhandlingESD-sensitiveparts:
Chapter2.Safetyinformation5
Page 12

•Keepthepartsinprotectivepackagesuntiltheyareinsertedintotheproduct.
•Avoidcontactwithotherpeoplewhilehandlingthepart.
•Wearagroundedwriststrapagainstyourskintoeliminatestaticonyourbody.
•Preventthepartfromtouchingyourclothing.Mostclothingisinsulativeandretainsachargeeven
whenyouarewearingawriststrap.
•Usetheblacksideofagroundedworkmattoprovideastatic-freeworksurface.Thematisespecially
usefulwhenhandlingESD-sensitivedevices.
•Selectagroundingsystem,suchasthoselistedbelow,toprovideprotectionthatmeetsthespecific
servicerequirement.
Note:TheuseofagroundingsystemisdesirablebutnotrequiredtoprotectagainstESDdamage.
–AttachtheESDgroundcliptoanyframeground,groundbraid,orgreen-wireground.
–UseanESDcommongroundorreferencepointwhenworkingonadouble-insulatedor
battery-operatedsystem.Y oucanusecoaxorconnector-outsideshellsonthesesystems.
–Usetheroundground-prongoftheACplugonAC-operatedcomputers.
Groundingrequirements
Electricalgroundingofthecomputerisrequiredforoperatorsafetyandcorrectsystemfunction.Proper
groundingoftheelectricaloutletcanbeverifiedbyacertifiedelectrician.
Safetynotices
TheCAUTIONandDANGERsafetynoticesinthissectionareprovidedinthelanguageofEnglish.
DANGER
Electricalcurrentfrompower,telephoneandcommunicationcablesishazardous.
Toavoidashockhazard:
•Donotconnectordisconnectanycablesorperforminstallation,maintenance,orreconfiguration
ofthisproductduringanelectricalstorm.
•Connectallpowercordstoaproperlywiredandgroundedelectricaloutlet.
•Connectanyequipmentthatwillbeattachedtothisproducttoaproperlywiredoutlet.
•Whenpossible,useonehandonlytoconnectordisconnectsignalcables.
•Neverturnonanyequipmentwhenthereisevidenceoffire,water,orstructuraldamage.
•Disconnecttheattachedpowercords,telecommunicationscables,networkcables,andmodem
cablesbeforeyouopenthedevicecovers,unlessinstructedotherwiseintheinstallationand
configurationprocedures.
•Connectanddisconnectcablesasdescribedinthefollowingtablewheninstalling,moving,or
openingcoversonthisproductorattacheddevices.
6ideacentreAll-In-One510ComputerHardwareMaintenanceManual
Page 13
ToConnect
1.TurneverythingOFF .
2.First,attachallcablestodevices.
3.Attachsignalcablestoconnectors.
4.Attachpowercordstooutlet.
5.TurndeviceON.
ToDisconnect
1.TurneverythingOFF .
2.First,removepowercordsfromoutlets.
3.Removesignalcablesfromconnectors.
4.Removeallcablesfromdevices.
CAUTION:
Whenreplacingthelithiumbattery,useonlyPartNumber45C1566oranequivalenttypebattery
recommendedbythemanufacturer.Ifyoursystemhasamodulecontainingalithiumbattery,replace
itonlywiththesamemoduletypemadebythesamemanufacturer.Thebatterycontainslithiumand
canexplodeifnotproperlyused,handled,ordisposedof.
Donot:
•Throwintoorimmerseinwater
•Heattomorethan100°C(212°F)
•Repairordisassemble
Disposeofthebatteryasrequiredbylocalordinancesorregulations.
CAUTION:
Whenlaserproducts(suchasCD-ROMs,DVD-ROMdrives,fiberopticdevices,ortransmitters)are
installed,notethefollowing:
•Donotremovethecovers.Removingthecoversofthelaserproductcouldresultinexposureto
hazardouslaserradiation.Therearenoserviceablepartsinsidethedevice.
•Useofcontrolsoradjustmentsorperformanceofproceduresotherthanthosespecifiedherein
mightresultinhazardousradiationexposure.
DANGER
SomelaserproductscontainanembeddedClass3AorClass3Blaserdiode.Notethefollowing:
Thesediodesemitradiationwhenopen.Donotstareintothebeam,donotviewdirectlywith
opticalinstruments,andavoiddirectexposuretothebeam.
Chapter2.Safetyinformation7
Page 14

≥18kg(37lbs)≥32kg(70.5lbs)≥55kg(121.2lbs)
1
2
CAUTION:
Usesafepracticeswhenlifting.
CAUTION:
Thepowercontrolbuttononthedeviceandthepowerswitchonthepowersupplydonotturnoff
theelectricalcurrentsuppliedtothedevice.Thedevicealsomighthavemorethanonepower
cord.Toremoveallelectricalcurrentfromthedevice,ensurethatallpowercordsaredisconnected
fromthepowersource.
CAUTION:
Donotplaceanyobjectweighingmorethan82kg(180lbs.)ontopofrack-mounteddevices.
8ideacentreAll-In-One510ComputerHardwareMaintenanceManual
Page 15

Chapter3.Generalinformation
Thischapterprovidesgeneralinformationthatappliestoallcomputermodelscoveredbythismanual.
Specifications
Thissectionliststhephysicalspecificationsforyourcomputer.
Thissectionliststhephysicalspecificationsforyourcomputer.
TypeLenovoAll-In-One510
Thissectionliststhephysicalspecifications.
Environment
Airtemperature:
Operating:10°to35°C
Transit:-20°to55°C
Humidity:
Operating:35%to80%
Transit:20%to90%(40°C)
Altitude:86KPato106KPa
Electricalinput:
Inputvoltage:90V-264V(AC)
Inputfrequency:47Hz-63Hz
©CopyrightLenovo2016
9
Page 16

10ideacentreAll-In-One510ComputerHardwareMaintenanceManual
Page 17

Chapter4.GeneralCheckout
Attention:Thedrivesinthecomputeryouareservicingmighthavebeenrearrangedorthedrivestartup
sequencemayhavebeenchanged.Beextremelycarefulduringwriteoperationssuchascopying,saving,or
formatting.Dataorprogramscanbeoverwrittenifyouselectanincorrectdrive.
Generalerrormessagesappearifaproblemorconflictisfoundbyanapplication,theoperatingsystem,or
both.Foranexplanationofthesemessages,refertotheinformationsuppliedwiththatsoftwarepackage.
Usethefollowingproceduretohelpdeterminethecauseoftheproblem:
1.Power-offthecomputerandallexternaldevices.
2.Checkallcablesandpowercords.
3.Setalldisplaycontrolstothemiddleposition.
4.Power-onallexternaldevices.
5.Power-onthecomputer.
•Lookfordisplayederrorcodes.
•Lookforreadableinstructionsoramainmenuonthedisplay.
Ifyoudidnotreceivethecorrectresponse,proceedtostep6.
Ifyoudidreceivethecorrectresponse,proceedtostep7.
6.Ifoneofthefollowinghappens,followtheinstructiongiven:
•IfthecomputerdisplaysaPOSTerror,goto“POSTerrorcodes” .
•Ifthecomputerhangsandnoerrorisdisplayed,continueatstep7.
7.Iftheteststopsandyoucannotcontinue,replacethelastdevicetested.
©CopyrightLenovo2016
11
Page 18

12ideacentreAll-In-One510ComputerHardwareMaintenanceManual
Page 19

Chapter5.UsingtheSetupUtility
TheSetupUtilityprogramisusedtoviewandchangetheconfigurationsettingsofyourcomputer,regardless
ofwhichoperatingsystemyouareusing.However,theoperatingsystemsettingsmightoverrideanysimilar
settingsintheSetupUtilityprogram.
StartingtheLenovoBIOSSetupUtilityprogram
TostarttheLenovoBIOSSetupUtilityprogram,dothefollowing:
1.Ifyourcomputerisalreadyonwhenyoustartthisprocedure,shutdowntheoperatingsystemand
turnoffthecomputer.
2.PressandholdtheF1keythenturnonthecomputer.WhentheLenovoBIOSSetupUtilityprogramis
displayed,releasetheF1key.
Note:IfaPower-OnPasswordoranAdministratorPasswordhasbeenset,theSetupUtilityprogrammenu
willnotbedisplayeduntilyoutypeyourpassword.Formoreinformation,see“Usingpasswords.”
Viewingandchangingsettings
SystemconfigurationoptionsarelistedintheLenovoBIOSSetupUtilityprogrammenu.T ovieworchange
settings,see“StartingtheSetupUtilityprogram.”
YoumustusethekeyboardwhenusingtheLenovoBIOSSetupUtilitymenu.Thekeysusedtoperform
varioustasksaredisplayedonthebottomofeachscreen.
Usingpasswords
YoucanusetheLenovoBIOSSetupUtilityprogramtosetpasswordstopreventunauthorizedpersons
fromgainingaccesstoyourcomputeranddata.See“StartingtheSetupUtilityprogram.”Thefollowing
typesofpasswordsareavailable:
•AdministratorPassword
•Power-OnPassword
Youdonothavetosetanypasswordstouseyourcomputer.However,ifyoudecidetosetpasswords,read
thefollowingsections.
Passwordconsiderations
Apasswordcanbeanycombinationoflettersandnumbersupto16characters(a-zand0-9).Forsecurity
reasons,itisagoodideatouseastrongpasswordthatcannotbeeasilycompromised.Wesuggestthat
passwordsshouldfollowtheserules:
•Forastrongpassword,use7-16charactersandamixoflettersandnumbers.
•Donotuseyournameoryourusername.
•Donotuseacommonwordoracommonname.
•Usesomethingsignificantlydifferentfromyourpreviouspassword.
Attention:AdministratorandPower-Onpasswordsarenotcasesensitive.
©CopyrightLenovo2016
13
Page 20

AdministratorPassword
SettinganAdministratorPassworddetersunauthorizedpersonsfromchangingconfigurationsettings.Y ou
mightwanttosetanAdministratorPasswordifyouareresponsibleformaintainingthesettingsofseveral
computers.
AfteryousetanAdministratorPassword,apasswordpromptisdisplayedeverytimeyouaccesstheLenovo
BIOSSetupUtilityprogram.
IfboththeAdministratorandPower-OnPasswordareset,youcantypeeitherpassword.However,youmust
useyourAdministratorPasswordtochangeanyconfigurationsettings.
Setting,changing,ordeletinganAdministratorpassword
TosetanAdministratorPassword,dothefollowing:
Note:Apasswordcanbeanycombinationoflettersandnumbersupto16characters(a-zand0-9).For
moreinformation,see“Passwordconsiderations”onpage13.
1.StarttheLenovoBIOSSetupUtilityprogram(see“StartingtheLenovoBIOSSetupUtilityprogram”on
page13).
2.FromtheSecuritymenu,selectSetAdministratorPasswordandpresstheEnterkey.
3.Thepassworddialogboxwillbedisplayed.T ypethepasswordthenpresstheEnterkey.
4.Re-typethepasswordtoconfirm,thenpresstheEnterkey.Ifyoutypedthepasswordcorrectly,
thepasswordwillbeinstalled.
TochangeanAdministratorPassword,dothefollowing:
1.StarttheLenovoBIOSSetupUtilityprogram(see“StartingtheLenovoBIOSSetupUtilityprogram”on
page13).
2.FromtheSecuritymenu,selectSetAdministratorPasswordandpresstheEnterkey.
3.Thepassworddialogboxwillbedisplayed.TypethecurrentpasswordthenpresstheEnterkey.
4.T ypethenewpassword,thenpresstheEnterkey.Re-typethepasswordtoconfirmthenewpassword.
Ifyoutypedthenewpasswordcorrectly,thenewpasswordwillbeinstalled.ASetupNoticedconfirming
thatchangeshavebeensavedwillbedisplayed.
TodeleteapreviouslysetAdministratorPassword,dothefollowing:
1.FromtheSecuritymenu,selectSetAdministratorPasswordandpresstheEnterkey.
2.Thepassworddialogboxwillbedisplayed.TypethecurrentpasswordandpresstheEnterkey.
3.T odeleteanAdministratorPassword,leaveeachnewpasswordlineitemblank,thenpresstheEnter
key.ASetupNoticeconfirmingthatchangeshavebeensavedwillbedisplayed.
4.ReturntotheLenovoBIOSSetupUtilityprogrammenuandselecttheExitoption.
5.SelectSavechangesandExitfromthemenu.
Power-OnPassword
WhenaPower-OnPasswordisset,youcannotstarttheLenovoBIOSSetupUtilityprogramuntilavalid
passwordistypedfromthekeyboard.
Setting,changing,ordeletingaPower-OnPassword
Note:Apasswordcanbeanycombinationoflettersandnumbersupto16characters(a-zand0-9).
14ideacentreAll-In-One510ComputerHardwareMaintenanceManual
Page 21

TosetaPower-OnPassword,dothefollowing:
1.StarttheLenovoBIOSSetupUtilityprogram(See”StartingtheLenovoBIOSSetupUtilityprogram”on
page13.)
2.FromtheSecuritymenu,selectSetPower-OnPasswordandpresstheEnterkey.
3.Thepassworddialogboxwillbedisplayed.T ypethepassword,thenpresstheEnterkey.
4.Re-typethepasswordtoconfirm.Ifyoutypedthepasswordcorrectly,thepasswordwillbeinstalled.
TochangeaPower-OnPassword,dothefollowing:
1.StarttheLenovoBIOSSetupUtilityprogram(See”StartingtheLenovoBIOSSetupUtilityprogram”on
page13.)
2.FromtheSecuritymenu,selectSetPower-OnPasswordandpresstheEnterkey.
3.Thepassworddialogboxwillbedisplayed.TypethecurrentpasswordthenpresstheEnterkey.
4.T ypethenewpassword,thenpresstheEnterkey.Re-typethepasswordtoconfirmthenewpassword.
Ifyoutypedthenewpasswordcorrectly,thenewpasswordwillbeinstalled.ASetupNoticedconfirming
thatchangeshavebeensavedwillbedisplayed.
TodeleteapreviouslysetPower-OnPassword,dothefollowing:
1.FromtheSecuritymenu,selectSetPower-OnPasswordandpresstheEnterkey.
2.Thepassworddialogboxwillbedisplayed.TypethecurrentpasswordandpresstheEnterkey.
3.T odeletethePower-OnPassword,leaveeachnewpasswordlineitemblank,thenpressEnter.ASetup
Noticeconfirmingthatchangeshavebeensavedwillbedisplayed.
4.ReturntotheLenovoBIOSSetupUtilityprogrammenuandselecttheExitoption.
5.SelectSavechangesandExitfromthemenu.
Enablingordisablingadevice
TheDevicesoptionsisusedtoenableordisableuseraccesstothefollowingdevices:
USBFunctionsSelectwhethertoenableordisableUSB(UniversalSerial
Bus)functions.Ifthefunctionsaredisabled,noUSB
devicescanbeused.
SATAMode
OnboardAudioControllerSelectwhethertoenableordisabletheOnboard
OnboardEthernetControllerorLANBootAgentSelectwhethertoenableordisabletheOnboardEthernet
Toenableordisableadevice,dothefollowing:
1.StarttheSetupUtilityprogram(see“StartingtheSetupUtilityprogram”onpage13).
2.FromtheSetupUtilityprogrammenu,selectDevices.
3.Selectanoptionasfollows:
WhenthisfeatureissettoDisabled,alldevices
connectedtotheSATAconnectors(e.g.harddiskdrives
ortheopticaldiskdrive)aredisabledandcannotbe
accessed.
AudioController.WhenthisfeatureissettoDisabled
alldevicesconnectedtotheaudioconnectors(e.g.
headphonesoramicrophone)aredisabledandcannot
beused.
Controller,orselectwhethertoenableordisableload
onboardPXE(PrebootExecutionEnvironment).
SelectUSBSetup,presstheEnterkey,thenselectUSBFunctions.
Chapter5.UsingtheSetupUtility15
Page 22

SelectATADeviceSetup,presstheEnterkey,thenselectSA T AMode.
SelectAudioSetup,presstheEnterkey,thenselectOnboardAudioController.
SelectNetworkSetup,presstheEnterkey,thenselectOnboardEthernetSupportorLANBoot
Agent.
4.SelectDisabledorEnabledandpresstheEnterkey.
5.ReturntotheLenovoBIOSSetupUtilityprogrammenuandselecttheExitoption.
6.SelectSavechangesandExitfromthemenu.
Notes:
a.Ifyoudonotwanttosavethesettings,selectDiscardchangesandExitfromthemenu.
b.SelectIDE/AHCIMode:DevicedriversupportisrequiredforACHI.Dependingonhowtheharddisk
imagewasinstalled,changingthissettingmaypreventthesystemfrombooting.
Selectingastartupdevice
IfyourcomputerdoesnotbootfromadevicesuchastheCD/DVD-ROMdrivediskorharddiskasexpected,
followoneoftheproceduresbelow.
Selectingatemporarystartupdevice
Usethisproceduretostartupfromanybootdevice.
Note:NotallCDs,DVDsorharddiskdrivesarebootable.
1.T urnoffyourcomputer.
2.PressandholdtheF12keythenturnonthecomputer.WhentheStartupDeviceMenuappears,
releasetheF12key.
Note:IftheStartupDeviceMenudoesnotdisplayusingthesesteps,repeatedlypressandreleasethe
F12keyratherthankeepingitpressedwhenturningonthecomputer.
3.Use↑and↓arrowstoselectthedesiredstartupdevicefromtheStartupDeviceMenuandpress
theEnterkeytobegin.
Note:SelectingastartupdevicefromtheStartupDeviceMenudoesnotpermanentlychangethe
startupsequence.
Selectingorchangingthestartupdevicesequence
Tovieworpermanentlychangetheconfiguredstartupdevicesequence,dothefollowing:
1.StarttheLenovoBIOSSetupUtilityprogram(see“StartingtheLenovoBIOSSetupUtilityprogram”on
page13).
2.FromtheLenovoBIOSSetupUtilityprogrammainmenu,selecttheStartupoption.
3.PresstheEnterkey,andselectthedevicesforthePrimaryBootSequence.Readtheinformation
displayedontherightsideofthescreen.
4.Use↑and↓arrowstoselectadevice.Usethe<+>or<->keystomoveadeviceupordown.Usethe
<×>keytoexcludethedevicefromorincludethedeviceinthebootsequence.
5.ReturntotheLenovoBIOSSetupUtilityprogrammenuandselecttheExitoption.
6.SelectSavechangesandExitfromthemenu.
Notes:
16ideacentreAll-In-One510ComputerHardwareMaintenanceManual
Page 23

a.Ifyoudonotwanttosavethesettings,selectDiscardchangesandExitfromthemenu.
b.Ifyouhavechangedthesesettingsandwanttoreturntothedefaultsettings,selectLoadOptimal
Defaultsfromthemenu.
ExitingtheLenovoBIOSSetupUtilityprogram
Afteryoufinishviewingorchangingsettings,presstheEsckeytoreturntotheLenovoBIOSSetupUtility
programmainmenu.YoumighthavetopresstheEsckeyseveraltimes.Dooneofthefollowing:
•Ifyouwanttosavethenewsettings,selectSavechangesandExitfromthemenu.WhentheSave&
resetwindowshows,selecttheYesbutton,andthenpresstheEnterkeytoexittheLenovoBIOS
SetupUtilityprogram.
•Ifyoudonotwanttosavethesettings,selectDiscardchangesandExitfromthemenu.Whenthe
ResetWithoutSavingwindowshows,selecttheYesbutton,andthenpresstheEnterkeytoexitthe
LenovoBIOSSetupUtilityprogram.
Chapter5.UsingtheSetupUtility17
Page 24

18ideacentreAll-In-One510ComputerHardwareMaintenanceManual
Page 25
Chapter6.Symptom-to-FRUIndex
TheSymptom-to-FRUindexlistserrorsymptomsandpossiblecauses.Themostlikelycauseislistedfirst.
AlwaysbeginwithChapter4,“GeneralCheckout,”onpage11.Thisindexcanalsobeusedtohelpyou
decidewhichFRUstohaveavailablewhenservicingacomputer.Ifyouareunabletocorrecttheproblem
usingthisindex,goto“Undeterminedproblems”onpage20.
Notes:
•Ifyouhavebothanerrormessageandanincorrectaudioresponse,diagnosetheerrormessagefirst.
•Ifyoucannotrunthediagnostictestsoryougetadiagnosticerrorcodewhenrunningatestbutdid
receiveaPOSTerrormessage,diagnosethePOSTerrormessagefirst.
•Ifyoudidnotreceiveanyerrormessagelookforadescriptionofyourerrorsymptomsinthefirstpartof
thisindex.
Harddiskdrivebooterror
Aharddiskdrivebooterrorcanbecausedbythefollowing.
Error
Thestartupdriveisnotincludedinthebootsequence
configuration.
Nooperatingsystemisinstalledonthebootdrive.Installanoperatingsystemonthebootdrive.
Thebootsectoronthestartupdriveiscorrupted.
Thedriveisdefective.
FRU/Action
Checktheconfigurationandensurethestartupdriveis
inthebootsequence.
Thedrivemustbeformatted.Dothefollowing:
1.Attempttobackupthedataonthefailingharddisk
drive.
2.Usetheoperatingsystemtoformattheharddisk
drive.
Replacetheharddiskdrive.
PowerSupplyProblems
Followtheseproceduresifyoususpectthereisapowersupplyproblem.
Check/VerifyFRU/Action
Checkthatthefollowingareproperlyinstalled:
•PowerCord
•On/OffSwitchconnector
•SystemBoardPowerSupplyconnectors
•Microprocessorconnections
Checkthepowercord.PowerCord
Checkthepower-onswitch.Power-onSwitch
Reseatconnectors
©CopyrightLenovo2016
19
Page 26
POSTerrorcodes
Eachtimeyouturnthecomputeron,itperformsaseriesofteststocheckthatthesystemisoperating
correctlyandthatcertainoptionsareset.ThisseriesoftestsiscalledthePower-OnSelf- T est,orPOST.
POSTdoesthefollowing:
•Checkssomebasicmotherboardoperations
•Checksthatthememoryisworkingcorrectly
•Startsvideooperations
•Verifiesthatthebootdriveisworking
POSTErrorMessageDescription/Action
Keyboarderror
RebootandSelectproperBootdeviceorInsertBoot
MediainselectedBootdevice
Cannotinitializethekeyboard.Makesurethekeyboard
isproperlyconnectedtothecomputerandthatnokeys
areheldpressedduringPOST.T opurposelyconfigure
thecomputerwithoutakeyboard,selectKeyboardless
operationinStartupandsettheoptiontoEnabled.The
BIOSthenignoresthemissingkeyboardduringPOST.
TheBIOSwasunabletofindasuitablebootdevice.Make
surethebootdriveisproperlyconnectedtothecomputer .
Makesureyouhavebootablemediainthebootdevice.
Undeterminedproblems
1.Power-offthecomputer.
2.Removeordisconnectthefollowingcomponents(ifconnectedorinstalled)oneatatime.
a.Externaldevices(modem,printer,ormouse)
b.Extendedvideomemory
c.ExternalCache
d.ExternalCacheRAM
e.Harddiskdrive
f.Diskdrive
3.Power-onthecomputertore-testthesystem.
4.Repeatsteps1through3untilyoufindthefailingdeviceorcomponent.
Ifalldevicesandcomponentshavebeenremovedandtheproblemcontinues,replacethesystemboard.
20ideacentreAll-In-One510ComputerHardwareMaintenanceManual
Page 27
Chapter7.Locatingconnectors,controlsandcomponents
Thissectionprovidesillustrationstohelplocatethevariousconnectors,controlsandcomponentsofthe
computer.
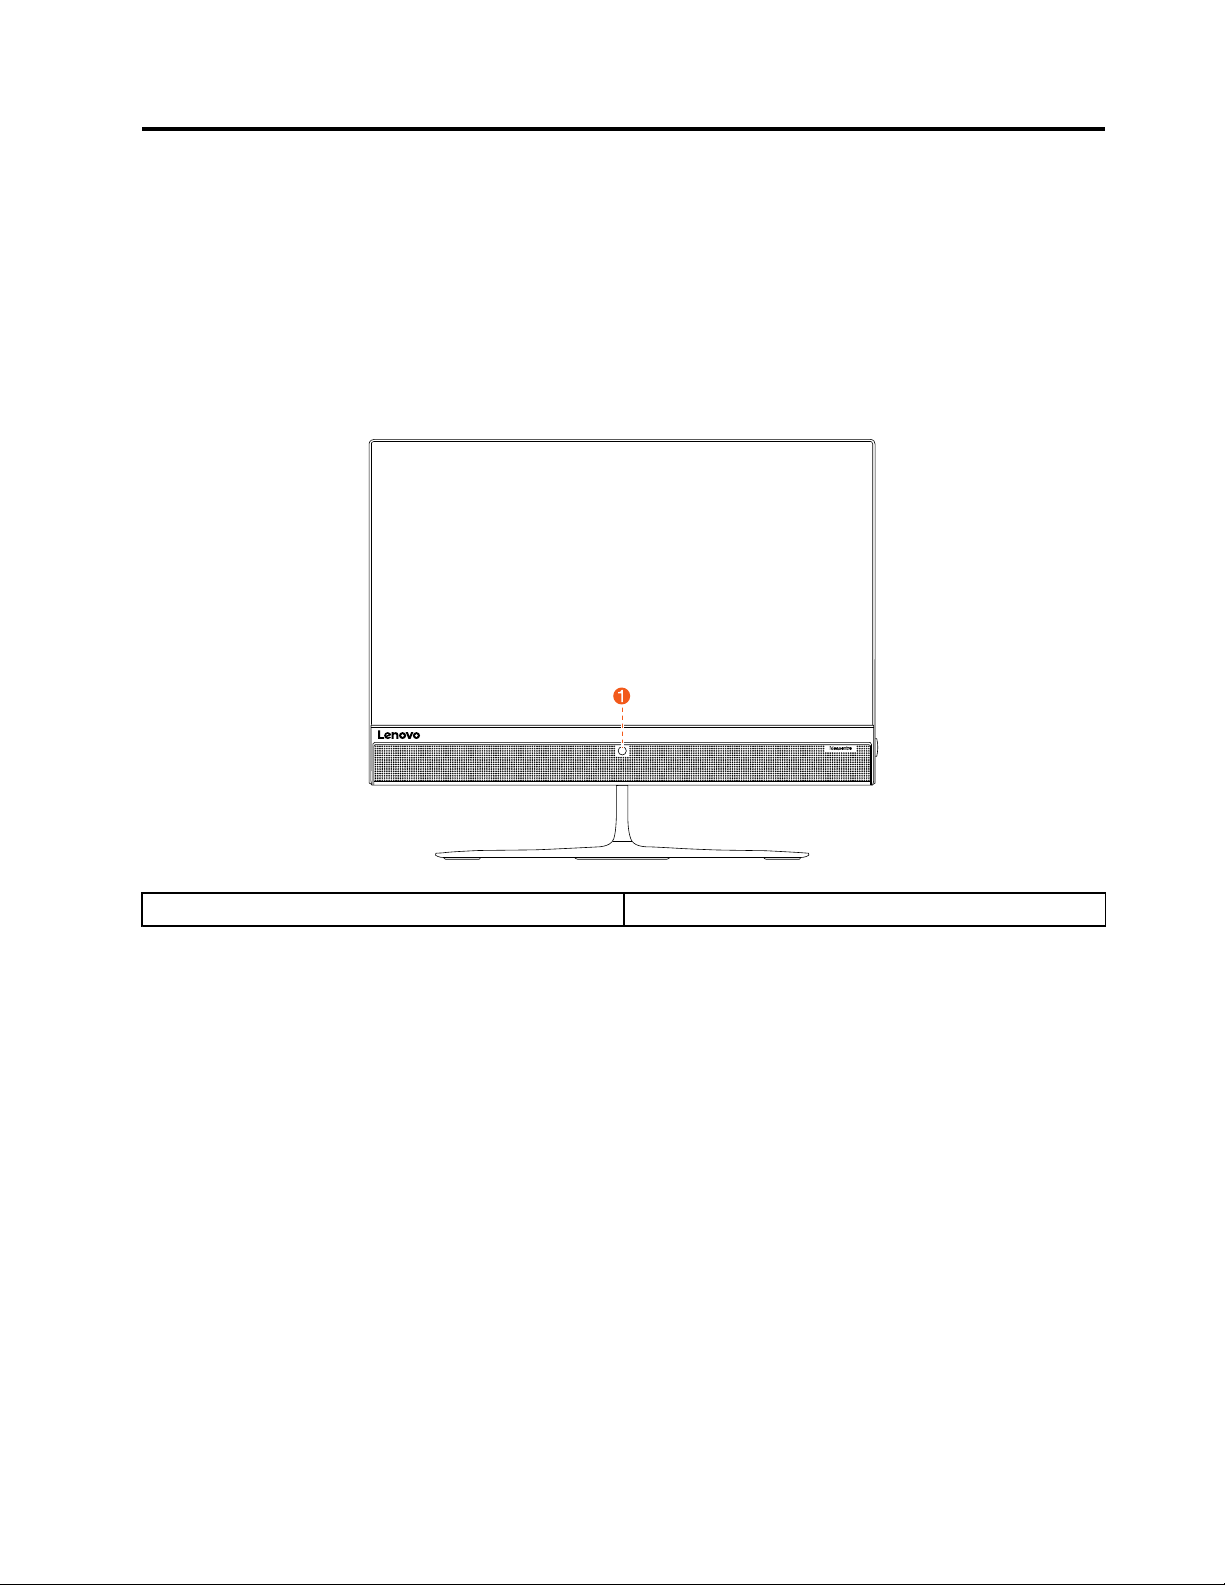
Fontview
Thefollowingillustrationshowsthelocationofcontrolsandcomponentsonthefrontofthecomputer.
Attention:Becarefulnottoblockanyairventsonthecomputer.Blockedairventscancauseoverheating.
1.Built-incamera
©CopyrightLenovo2016
21
Page 28
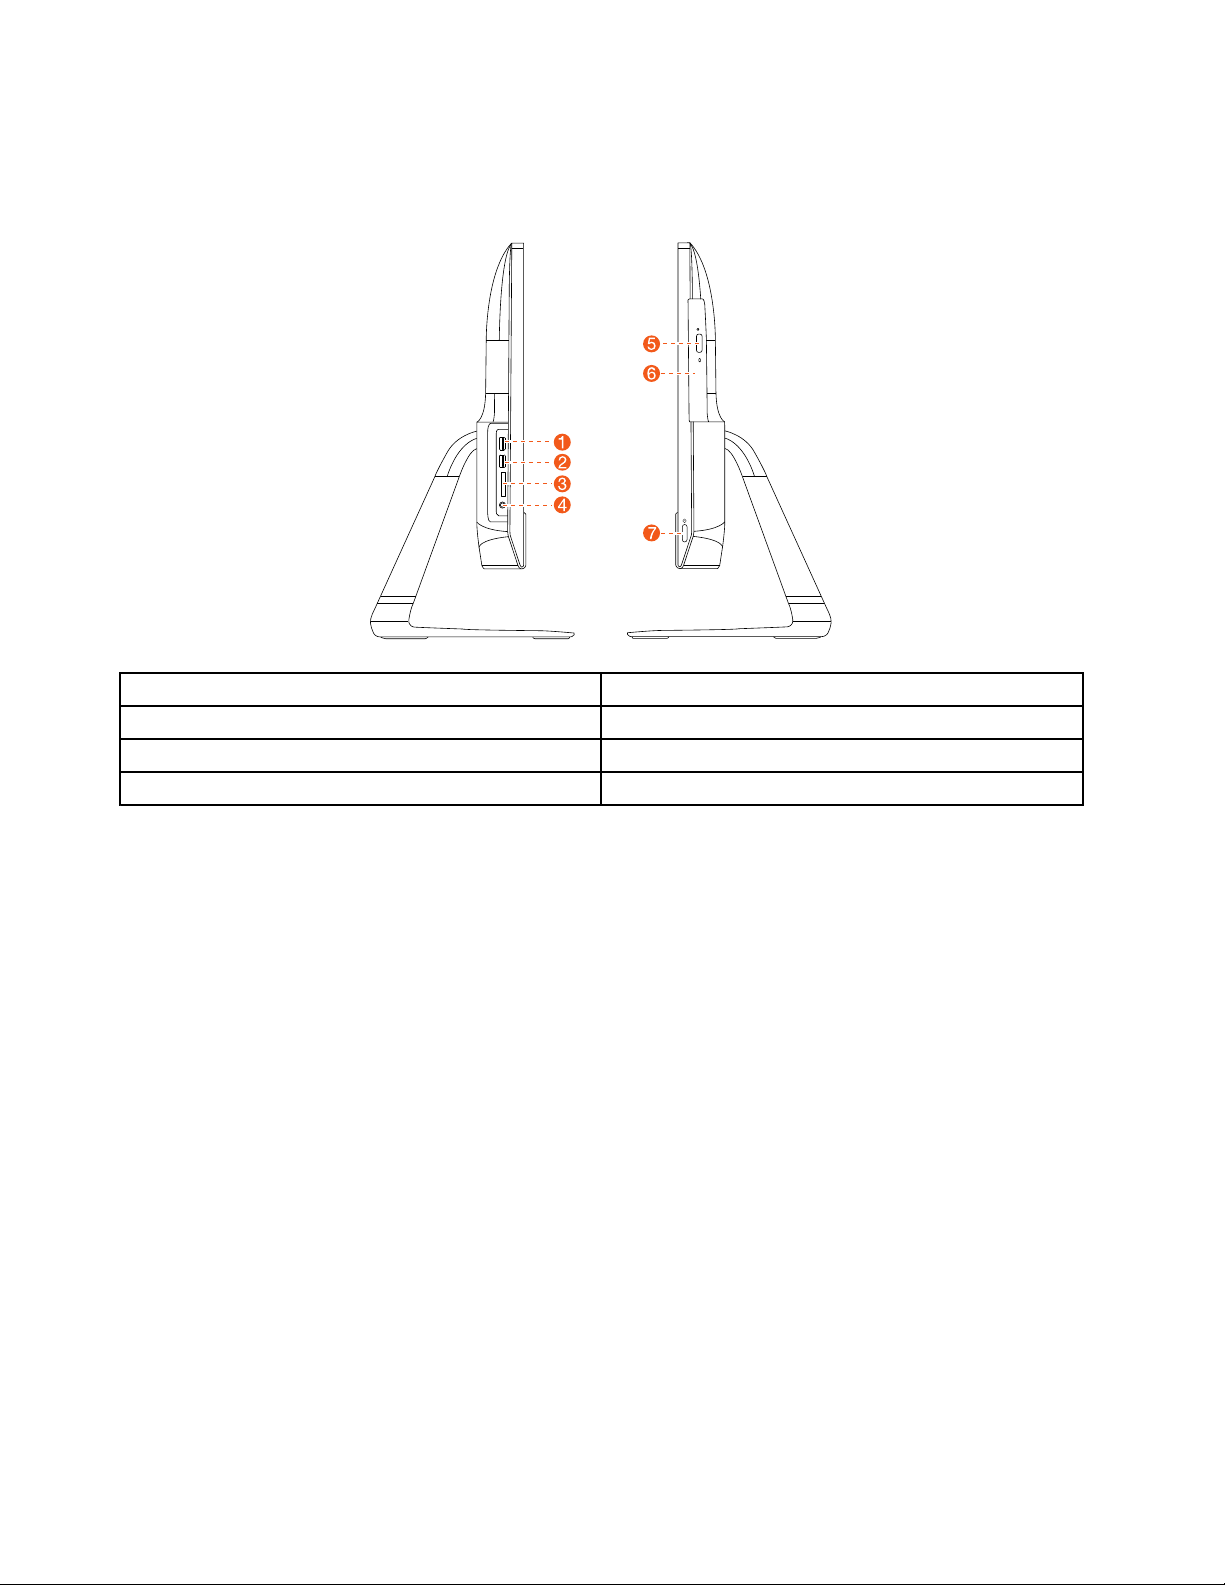
Leftandrightview
Thefollowingillustrationshowsthelocationofconnectors,controlsandcomponentsontheleftandright
sideofthecomputer.
1.USB3.0connectors5.Opticaldriveejectbutton
2.USB3.0connectors6.Opticaldrive
3.Memorycardreader7.Powerbutton
4.Comboaudiojack
22ideacentreAll-In-One510ComputerHardwareMaintenanceManual
Page 29

Rearview
Thefollowingillustrationshowsthelocationofconnectorsandcomponentsontherearofthecomputer.
1.Securitycableslot5.USB2.0connector
2.Powerconnector
3.Ethernetconnector
4.HDMI-outconnector8.HDMI-inconnector
6.USB2.0connector
7.USB2.0connector
Chapter7.Locatingconnectors,controlsandcomponents23
Page 30

Hardwarecomponents
1
2
3
4
5
8
7
6
9
12
15
16
17
18
14
11
10
13
Thefollowingillustrationshowsthecomponentsthatmakeupyourcomputer.
1.Standbase
2.Middlecover
10.Mainframe
11.LCDpanel
3.Rearcover12.Frontbezel
4.Opticaldiskdrive13.Standholder
5.Heat-sink14.Harddiskdrive
15.EMIcover
16.Mic
17.Camera
6.Systemfan
7.Speakersystem
8.Powerswitchboard
9.Powerbutton18.Motherboard
24ideacentreAll-In-One510ComputerHardwareMaintenanceManual
Page 31

Identifyingpartsonthemotherboard
Themotherboard(sometimescalledtheplanarorsystemboard)isthemaincircuitboardinyourcomputer.
Itprovidesbasiccomputingfunctionsandsupportsavarietyofdevicesthatarefactory-installedorthat
youcaninstalllater.Thefollowingillustrationshowsthelocationofconnectorsandcomponentsonthe
frontofthemotherboard.
1.Systemfanconnector
2.ODDpowerconnector
3.HDDpowerconnector
4.T ouchpanelconnector
5.ODDSA T Aconnector19.USB2.0connector
6.HDDSA T Aconnector
7.LVDSconnector
8.Battery
9.SSDSA T Aconnector23.Comboaudiojack
10.Converterconnector24.Cardreaderconnector
11.Powerswitchboardconnector
12.Cameraconnector26.USB3.0connector
15.Ethernetconnector
16.HDMI-outconnector
17.USB2.0connector
18.USB2.0connector
20.HDMI-inconnector
21.Micconnector
22.Speakerconnector
25.USB3.0connector
Chapter7.Locatingconnectors,controlsandcomponents25
Page 32

13.Wi-Ficardconnector27.Memorysocket
14.Powerconnector
28.CPUsocket
26ideacentreAll-In-One510ComputerHardwareMaintenanceManual
Page 33

Chapter8.Replacinghardware
Attention:Donotremovethecomputercoverorattemptanyrepairbeforereadingthe“Importantsafetyinformation”
intheSafetyandWarrantyGuidethatwasincludedwithyourcomputer.ToobtaincopiesoftheSafetyandWarranty
Guide,gototheSupportWebsiteat:http://consumersupport.lenovo.com.
Note:UseonlypartsprovidedbyLenovo.
Generalinformation
Pre-disassemblyinstructions
Beforestartingthedisassemblyprocedure,makesurethatyoudothefollowing:
1.T urnoffthepowertothesystemandallperipherals.
2.Unplugallpowerandsignalcablesfromthecomputer.
3.Placethesystemonaflat,stablesurface.
©CopyrightLenovo2016
27
Page 34

Replacingthekeyboardandmouse
Note:Y ourkeyboardwillbeconnectedtoaUSBconnectorateithersideorattherearofthecomputer.
Toreplacethekeyboardandmouse:
Step1.Removeanymediafromthedrives,shutdownthecomputer,andturnoffallattacheddevices.
Step2.Unplugallpowercordsfromelectricaloutlets.
Step3.Disconnectallcablesattachedtothecomputer.Thisincludespowercords,input/output(I/O)
cables,andanyothercablesthatareconnectedtothecomputer..
Step4.Locatetheconnectorforthekeyboard.RefertoLocatingconnectors,controlsandcomponentsto
locatethevariousconnectors.
Step5.Disconnectthedefectivekeyboardcablefromthecomputerandconnectthenewkeyboardcable
tothesameconnector.
Step6.Themousecanbereplacedusingthesamemethod.
Replacingtheadapter
Attention:T urnoffthecomputerandwait3to5minutestoletitcooldownbeforeremovingthecover.
Step1.Removeanymediafromthedrives,shutdowntheoperatingsystem,andturnoffthecomputer
andallattacheddevices.
Step2.Disconnecttheadapterfromtheconnectoronthecomputer,thenunplugtheadapterfrom
electricaloutlet.
28ideacentreAll-In-One510ComputerHardwareMaintenanceManual
Page 35

Step3.Connectthenewadapterasshown.
Removingthestandbase
Attention:T urnoffthecomputerandwait3to5minutestoletitcooldownbeforeremovingthecover.
Note:Itmaybehelpfultoplacethecomputerface-downonasoftflatsurfaceforthisprocedure.Lenovo
recommendsthatyouuseablanket,towel,orothersoftclothtoprotectthetouchscreenfromscratches
orotherdamage.
Step1.Removeanymediafromthedrives,shutdowntheoperatingsystem,andturnoffthecomputer
andallattacheddevices.
Step2.Unplugallpowercordsfromelectricaloutlets.
Step3.Disconnectallcablesattachedtothecomputer.Thisincludespowercords,input/output(I/O)
cables,andanyothercablesthatareconnectedtothecomputer.RefertoLocatingconnectors,
controlsandcomponentstolocatethevariousconnectors.
Step4.Removetherubber,andthentwistthehandscrewringcounter-clockwiseuntilthestandbaseis
loosened.12
Step5.Removethestandbasefromthestandholderandputitaside.3
Removingtherearcover
Attention:T urnoffthecomputerandwait3to5minutestoletitcooldownbeforeremovingthecover.
Note:Itmaybehelpfultoplacethecomputerface-downonasoftflatsurfaceforthisprocedure.Lenovo
recommendsthatyouuseablanket,towel,orothersoftclothtoprotectthetouchscreenfromscratches
orotherdamage.
Chapter8.Replacinghardware29
Page 36

Step1.Removeanymediafromthedrives,shutdowntheoperatingsystem,andturnoffthecomputer
andallattacheddevices.
Step2.Unplugallpowercordsfromelectricaloutlets.
Step3.Disconnectallcablesattachedtothecomputer.Thisincludespowercords,input/output(I/O)
cables,andanyothercablesthatareconnectedtothecomputer.RefertoLocatingconnectors,
controlsandcomponentstolocatethevariousconnectors.
Step4.Removethestandbase.RefertoRemovingthestandbase.
Step5.Liftuptherearcoverfromthetwonotchesatthebottomofthecomputer.
Step6.Toreattachtherearcover:
a.Aligntherearcoverwiththechassis.
b.Presstherearcoveruntilitsnapsintoposition.
Replacingtheharddiskdrive
Attention:T urnoffthecomputerandwait3to5minutestoletitcooldownbeforeremovingthecover.
Note:Itmaybehelpfultoplacethecomputerface-downonasoftflatsurfaceforthisprocedure.Lenovo
recommendsthatyouuseablanket,towel,orothersoftclothtoprotectthetouchscreenfromscratches
orotherdamage.
Step1.Removeanymediafromthedrives,shutdowntheoperatingsystem,andturnoffthecomputer
andallattacheddevices.
Step2.Unplugallpowercordsfromelectricaloutlets.
Step3.Disconnectallcablesattachedtothecomputer.Thisincludespowercords,input/output(I/O)
cables,andanyothercablesthatareconnectedtothecomputer.RefertoLocatingconnectors,
controlsandcomponentstolocatethevariousconnectors.
Step4.Removethestandbase.RefertoRemovingthestandbase.
Step5.Removetherearcover.RefertoRemovingtherearcover.
30ideacentreAll-In-One510ComputerHardwareMaintenanceManual
Page 37

Step6.Pulltheharddiskdriveandbrackettoleft1,andthenliftthemup.2
Step7.Disconnectthesignalcablefromtheharddiskdrive.
Step8.Removethefourscrewsthatsecuretheharddiskdrivetothebracket.3
Step9.Toinstallthenewharddiskdrive:
a.Lineupthenewharddiskdrivewiththebracketandsecureitwithfourscrews.
b.Connectthedataandpowercablestothenewharddiskdrive.
c.Slidetheharddiskdriveandbracketbackintoposition.
Step10.Reattachtherearcoverandstandbase.
Replacingtheopticaldrive
Attention:T urnoffthecomputerandwait3to5minutestoletitcooldownbeforeremovingthecover.
Note:Itmaybehelpfultoplacethecomputerface-downonasoftflatsurfaceforthisprocedure.Lenovo
recommendsthatyouuseablanket,towel,orothersoftclothtoprotectthetouchscreenfromscratches
orotherdamage.
Step1.Removeanymediafromthedrives,shutdowntheoperatingsystem,andturnoffthecomputer
andallattacheddevices.
Step2.Unplugallpowercordsfromelectricaloutlets.
Step3.Disconnectallcablesattachedtothecomputer.Thisincludespowercords,input/output(I/O)
cables,andanyothercablesthatareconnectedtothecomputer.RefertoLocatingconnectors,
controlsandcomponentstolocatethevariousconnectors.
Step4.Removethestandbase.RefertoRemovingthestandbase.
Step5.Removetherearcover.RefertoRemovingtherearcover.
Chapter8.Replacinghardware31
Page 38

Step6.Locatetheopticalremovalnotch,andthenpushtheopticaldriveoutusingascrewdriver.
Step7.Pushasmallironstick(paperclip)intothesmallholeontheopticaldrivebezelsothatthedisk
springsoutasshown.
32ideacentreAll-In-One510ComputerHardwareMaintenanceManual
Page 39

Step8.Removetheopticaldrivebezelfromtheopticaldriveasshown.12
Step9.Toinstallthenewopticaldrive:
a.Insertthetabsontheopticaldrivebezelintothecorrespondingholesinthenewopticaldrive,
andthenpushthebezelbackintoposition.
b.Gentlypushthediskforwarduntilitsnapsintoposition.
c.Slidethenewopticaldriveintothedrivebay.
Step10.Reattachtherearcoverandstandbase.
Replacingthememorymodule
Attention:T urnoffthecomputerandwait3to5minutestoletitcooldownbeforeremovingthecover.
Note:Itmaybehelpfultoplacethecomputerface-downonasoftflatsurfaceforthisprocedure.Lenovo
recommendsthatyouuseablanket,towel,orothersoftclothtoprotectthetouchscreenfromscratches
orotherdamage.
Step1.Removeanymediafromthedrives,shutdowntheoperatingsystem,andturnoffthecomputer
andallattacheddevices.
Step2.Unplugallpowercordsfromelectricaloutlets.
Step3.Disconnectallcablesattachedtothecomputer.Thisincludespowercords,input/output(I/O)
cables,andanyothercablesthatareconnectedtothecomputer.RefertoLocatingconnectors,
controlsandcomponentstolocatethevariousconnectors.
Step4.Removethestandbase.RefertoRemovingthestandbase.
Step5.Removetherearcover.RefertoRemovingtherearcover.
Chapter8.Replacinghardware33
Page 40

Step6.Removethememorycover.1
Step7.Opentheretainingclips2andgentlypullthememorymoduleoutofthememorysocket.3
Step8.Toinstallthenewmemorymodule:
a.Positionthenewmemorymoduleoverthememoryslot.Ensurethatthenotch2onthe
memorymodulealignscorrectlywiththeslotkey
moduledownuntilsnapsintoposition.
b.Reinstallthememorycover.
Step9.Reattachtherearcoverandstandbase.
1inthememorysocket.Pressthememory
Replacingthesolidstatedrive
Attention:T urnoffthecomputerandwait3to5minutestoletitcooldownbeforeremovingthecover.
Note:Itmaybehelpfultoplacethecomputerface-downonasoftflatsurfaceforthisprocedure.Lenovo
recommendsthatyouuseablanket,towel,orothersoftclothtoprotectthetouchscreenfromscratches
orotherdamage.
Step1.Removeanymediafromthedrives,shutdowntheoperatingsystem,andturnoffthecomputer
andallattacheddevices.
Step2.Unplugallpowercordsfromelectricaloutlets.
34ideacentreAll-In-One510ComputerHardwareMaintenanceManual
Page 41

Step3.Disconnectallcablesattachedtothecomputer.Thisincludespowercords,input/output(I/O)
cables,andanyothercablesthatareconnectedtothecomputer.RefertoLocatingconnectors,
controlsandcomponentstolocatethevariousconnectors.
Step4.Removethestandbase.RefertoRemovingthestandbase.
Step5.Removetherearcover.RefertoRemovingtherearcover.
Step6.Removethememorycover.1
Step7.Removethescrewthatsecurethesolidstatedrivetothemotherboard2,andthenslideoutthe
solidstatedrive.
3
Step8.Toinstallthenewsolidstatedrive:
a.Insertthesolidstatedriveintotheslot.
b.Securethenewsolidstatedrivetomotherboardwithonescrew.
c.Reinstallthememorycover.
Step9.Reattachtherearcoverandstandbase.
Removingthestandholder
Attention:T urnoffthecomputerandwait3to5minutestoletitcooldownbeforeremovingthecover.
Note:Itmaybehelpfultoplacethecomputerface-downonasoftflatsurfaceforthisprocedure.Lenovo
recommendsthatyouuseablanket,towel,orothersoftclothtoprotectthetouchscreenfromscratches
orotherdamage.
Step1.Removeanymediafromthedrives,shutdowntheoperatingsystem,andturnoffthecomputer
andallattacheddevices.
Step2.Unplugallpowercordsfromelectricaloutlets.
Step3.Disconnectallcablesattachedtothecomputer.Thisincludespowercords,input/output(I/O)
cables,andanyothercablesthatareconnectedtothecomputer.RefertoLocatingconnectors,
controlsandcomponentstolocatethevariousconnectors.
Step4.Removethestandbase.RefertoRemovingthestandbase.
Chapter8.Replacinghardware35
Page 42

Step5.Removetherearcover.RefertoRemovingtherearcover.
Step6.Removetheharddiskdrive.RefertoReplacingtheharddiskdrive.
Step7.Removethetwoscrewsthatsecurethestandholdertothechassis,andthenliftupthestand
holdertoremoveit.
Step8.Toreattachthestandholder:
a.Aligntheholesinthestandholderwiththecorrespondingholesinthechassis.
b.Securethestandholdertothechassiswithtwoscrews.
Replacingthepowerswitchboard
Note:T urnoffthecomputerandwait3to5minutestoletitcooldownbeforeremovingthecover.
Note:Itmaybehelpfultoplacethecomputerface-downonasoftflatsurfaceforthisprocedure.Lenovo
recommendsthatyouuseablanket,towel,orothersoftclothtoprotectthecomputerscreenfromscratches
orotherdamage.
Toreplacethepowerswitchboard
Step1.Removeanymediafromthedrives,shutdowntheoperatingsystem,andturnoffthecomputer
andallattacheddevices.
Step2.Unplugallpowercordsfromelectricaloutlets.
Step3.Disconnectallcablesattachedtothecomputer.Thisincludespowercords,input/output(I/O)
cables,andanyothercablesthatareconnectedtothecomputer.RefertoLocatingconnectors,
controlsandcomponentstolocatethevariousconnectors.
Step4.Removethestandbase.RefertoRemovingthestandbase.
Step5.Removetherearcover.RefertoRemovingtherearcover.
36ideacentreAll-In-One510ComputerHardwareMaintenanceManual
Page 43

Step6.Disconnectthesignalcablefromthepowerswitchboard.1
Step7.Pushthelockingpinoutwardtoreleasethepowerswitchboard2,andthenliftthepowerswitch
boarduptoremoveit.
Step8.Toinstallthenewpowerswitchboard:
a.Attachthenewpowerswitchboardtothechassisandsecureitwiththelockingpin.
b.Connectthesignalcabletothenewpowerswitchboard.
Step9.Reattachtherearcoverandstandbase.
Removingthemiddlecover
Note:T urnoffthecomputerandwait3to5minutestoletitcooldownbeforeremovingthecover.
Note:Itmaybehelpfultoplacethecomputerface-downonasoftflatsurfaceforthisprocedure.Lenovo
recommendsthatyouuseablanket,towel,orothersoftclothtoprotectthecomputerscreenfromscratches
orotherdamage.
Toremovethemiddlecover:
Step1.Removeanymediafromthedrives,shutdowntheoperatingsystem,andturnoffthecomputer
andallattacheddevices.
Step2.Unplugallpowercordsfromelectricaloutlets.
Step3.Disconnectallcablesattachedtothecomputer.Thisincludespowercords,input/output(I/O)
cables,andanyothercablesthatareconnectedtothecomputer.RefertoLocatingconnectors,
controlsandcomponentstolocatethevariousconnectors.
Step4.Removethestandbase.RefertoRemovingthestandbase.
Step5.Removetherearcover.RefertoRemovingtherearcover.
Step6.Removetheharddiskdrive.RefertoReplacingtheharddiskdrive.
Step7.Removetheopticaldrive.RefertoReplacingtheopticaldrive.
Chapter8.Replacinghardware37
Page 44

Step8.Removethestandholder.RefertoRemovingthestandholder.
Step9.Removethefourscrewsthatsecurethemiddlecovertothechassis.
38ideacentreAll-In-One510ComputerHardwareMaintenanceManual
Page 45

Step10.Liftupthemiddlecoverasshown.
Step11.T oreattachthemiddlecover:
a.Lineupthemiddlecoverwiththechassis.
b.Securethemiddlecovertothechassiswithfourscrews.
RemovingtheEMIcover
Note:T urnoffthecomputerandwait3to5minutestoletitcooldownbeforeremovingthecover.
Note:Itmaybehelpfultoplacethecomputerface-downonasoftflatsurfaceforthisprocedure.Lenovo
recommendsthatyouuseablanket,towel,orothersoftclothtoprotectthecomputerscreenfromscratches
orotherdamage.
ToreplacetheEMIcover
Step1.Removeanymediafromthedrives,shutdowntheoperatingsystem,andturnoffthecomputer
andallattacheddevices.
Step2.Unplugallpowercordsfromelectricaloutlets.
Step3.Disconnectallcablesattachedtothecomputer.Thisincludespowercords,input/output(I/O)
cables,andanyothercablesthatareconnectedtothecomputer.RefertoLocatingconnectors,
controlsandcomponentstolocatethevariousconnectors.
Step4.Removethestandbase.RefertoRemovingthestandbase.
Step5.Removetherearcover.RefertoRemovingtherearcover.
Step6.Removetheharddiskdrive.RefertoReplacingtheharddiskdrive.
Step7.Removetheopticaldrive.RefertoReplacingtheopticaldrive.
Step8.Removethestandholder.RefertoRemovingthestandholder.
Chapter8.Replacinghardware39
Page 46

Step9.Removethemiddlecover.RefertoRemovingthemiddlecover.
Step10.RemovethesixscrewsthatsecuretheEMIcovertothechassis,andthenliftitup.
Step11.T oinstallthenewEMIcover:
a.AligntheholesintheEMIcoverwiththemountingholesinthechassis.
b.SecuretheEMIcovertothechassiswithsixscrews.
ReplacingtheLCDpanelmodule
Note:T urnoffthecomputerandwait3to5minutestoletitcooldownbeforeremovingthecover.
Note:Itmaybehelpfultoplacethecomputerface-downonasoftflatsurfaceforthisprocedure.Lenovo
recommendsthatyouuseablanket,towel,orothersoftclothtoprotectthecomputerscreenfromscratches
orotherdamage.
ToreplacetheLCDpanelmodule:
Step1.Removeanymediafromthedrives,shutdowntheoperatingsystem,andturnoffthecomputer
andallattacheddevices.
Step2.Unplugallpowercordsfromelectricaloutlets.
Step3.Disconnectallcablesattachedtothecomputer.Thisincludespowercords,input/output(I/O)
cables,andanyothercablesthatareconnectedtothecomputer.RefertoLocatingconnectors,
controlsandcomponentstolocatethevariousconnectors.
Step4.Removethestandbase.RefertoRemovingthestandbase.
Step5.Removetherearcover.RefertoRemovingtherearcover.
Step6.Removetheharddiskdrive.RefertoReplacingtheharddiskdrive.
Step7.Removetheopticaldrive.RefertoReplacingtheopticaldrive.
40ideacentreAll-In-One510ComputerHardwareMaintenanceManual
Page 47

Step8.Removethestandholder.RefertoRemovingthestandholder.
Step9.Removethemiddlecover.RefertoRemovingthemiddlecover.
Step10.RemovetheEMIcover.RefertoRemovingtheEMIcover.
Step11.Removethefrontbezelasshown.
Step12.RemovethesideI/Ocover.
Chapter8.Replacinghardware41
Page 48

Step13.Disconnecttheconvertercable1andLVDScable2.
Step14.RemovethethirteenscrewsthatsecurethemainframetotheLCDpanel.
Step15.Liftupthemainframeasshowntoremoveit.
42ideacentreAll-In-One510ComputerHardwareMaintenanceManual
Page 49

Step16.Ifyourdeviceisatouchcomputer,disconnectthetouchcablefromtheconnectoronthe
motherboard.Otherwise,skipthisstep.RefertoLocatingconnectors,controlsandcomponentsto
locatethetouchconnector.
Step17.T oinstallthenewtheLCDpanelmodule:
a.AlignthenewLCDpanelwiththemainframe.
b.SecurethenewLCDpaneltothemainframewiththirteenscrews.
c.Connectthetouch(touchmodelonly),LVDSandconvertercablestotheconnectorsinthe
newLCDpanel.
Step18.ReattachthesideI/Ocover,EMIcover,middlecover,frontbezel,standholder,opticaldrive,
harddiskdrive,rearcover,andstandbase.
ReplacingtheWi-Ficard
Note:T urnoffthecomputerandwait3to5minutestoletitcooldownbeforeremovingthecover.
Note:Itmaybehelpfultoplacethecomputerface-downonasoftflatsurfaceforthisprocedure.Lenovo
recommendsthatyouuseablanket,towel,orothersoftclothtoprotectthecomputerscreenfromscratches
orotherdamage.
ToreplacetheWi-Ficard:
Step1.Removeanymediafromthedrives,shutdowntheoperatingsystem,andturnoffthecomputer
andallattacheddevices.
Step2.Unplugallpowercordsfromelectricaloutlets.
Step3.Disconnectallcablesattachedtothecomputer.Thisincludespowercords,input/output(I/O)
cables,andanyothercablesthatareconnectedtothecomputer.RefertoLocatingconnectors,
controlsandcomponentstolocatethevariousconnectors.
Step4.Removethestandbase.RefertoRemovingthestandbase.
Step5.Removetherearcover.RefertoRemovingtherearcover.
Step6.Removetheharddiskdrive.RefertoReplacingtheharddiskdrive.
Step7.Removetheopticaldrive.RefertoReplacingtheopticaldrive.
Step8.Removethestandholder.RefertoRemovingthestandholder.
Step9.Removethemiddlecover.RefertoRemovingthemiddlecover.
Step10.RemovetheEMIcover.RefertoRemovingtheEMIcover.
Chapter8.Replacinghardware43
Page 50

Step11.DisconnecttheantennacablesfromtheWi-Ficard.1
Step12.RemovethescrewthatsecurestheWi-Ficardtothemotherboard.2
Step13.PulltheWi-Ficardoutoftheslot.
Step14.T oinstallthenewWi-Ficard:
a.InsertthenewWi-FicardintotheWi-Ficardslot.
b.SecurenewtheWi-Ficardtothemotherboardwiththescrew.
c.ConnecttheantennacablestothenewWi-Ficard.
Step15.ReattachtheEMIcover,middlecover,standholder,opticaldrive,harddiskdrive,rearcover,
andstandbase.
Replacingthesystemfan
Note:T urnoffthecomputerandwait3to5minutestoletitcooldownbeforeremovingthecover.
Note:Itmaybehelpfultoplacethecomputerface-downonasoftflatsurfaceforthisprocedure.Lenovo
recommendsthatyouuseablanket,towel,orothersoftclothtoprotectthecomputerscreenfromscratches
orotherdamage.
Toreplacethesystemfan
Step1.Removeanymediafromthedrives,shutdowntheoperatingsystem,andturnoffthecomputer
andallattacheddevices.
Step2.Unplugallpowercordsfromelectricaloutlets.
Step3.Disconnectallcablesattachedtothecomputer.Thisincludespowercords,input/output(I/O)
cables,andanyothercablesthatareconnectedtothecomputer.RefertoLocatingconnectors,
controlsandcomponentstolocatethevariousconnectors.
44ideacentreAll-In-One510ComputerHardwareMaintenanceManual
Page 51

Step4.Removethestandbase.RefertoRemovingthestandbase.
Step5.Removetherearcover.RefertoRemovingtherearcover.
Step6.Removetheharddiskdrive.RefertoReplacingtheharddiskdrive.
Step7.Removetheopticaldrive.RefertoReplacingtheopticaldrive.
Step8.Removethestandholder.RefertoRemovingthestandholder.
Step9.Removethemiddlecover.RefertoRemovingthemiddlecover.
Step10.RemovetheEMIcover.RefertoRemovingtheEMIcover.
Step11.Removethescrewthatsecuresthesystemfantothechassis.
Step12.Disconnectthesystemfanpowercablefromthemotherboard.
Step13.Liftthesystemfanuptoremoveit.
Step14.T oinstallthenewsystemfan:
a.Placethenewsystemfanintoposition,andthensecureittothechassiswithonescrew.
b.Connectthesystemfanpowercabletotheconnectoronthemotherboard.
Step15.ReattachtheEMIcover,middlecover,standholder,opticaldrive,harddiskdrive,rearcover,
andstandbase.
Replacingtheheat-sink
Note:T urnoffthecomputerandwait3to5minutestoletitcooldownbeforeremovingthecover.
Note:Itmaybehelpfultoplacethecomputerface-downonasoftflatsurfaceforthisprocedure.Lenovo
recommendsthatyouuseablanket,towel,orothersoftclothtoprotectthecomputerscreenfromscratches
orotherdamage.
Chapter8.Replacinghardware45
Page 52

Toreplacetheheat-sink:
Step1.Removeanymediafromthedrives,shutdowntheoperatingsystem,andturnoffthecomputer
andallattacheddevices.
Step2.Unplugallpowercordsfromelectricaloutlets.
Step3.Disconnectallcablesattachedtothecomputer.Thisincludespowercords,input/output(I/O)
cables,andanyothercablesthatareconnectedtothecomputer.RefertoLocatingconnectors,
controlsandcomponentstolocatethevariousconnectors.
Step4.Removethestandbase.RefertoRemovingthestandbase.
Step5.Removetherearcover.RefertoRemovingtherearcover.
Step6.Removetheharddiskdrive.RefertoReplacingtheharddiskdrive.
Step7.Removetheopticaldrive.RefertoReplacingtheopticaldrive.
Step8.Removethestandholder.RefertoRemovingthestandholder.
Step9.Removethemiddlecover.RefertoRemovingthemiddlecover.
Step10.RemovetheEMIcover.RefertoRemovingtheEMIcover.
Step11.Loosentheninescrewsthatsecuretheheat-sinktothemotherboard,andthenliftuptheheat-sink
andremoveit.
Attention:Placetheheat-sinkupsidedownonaflatsurfacetopreventthermalgreasefromcontaminating
othercomponents.
Attention:UseanalcoholpadtowipethethermalgreaseofftheCPU.
Step12.T oinstallthenewheat-sink:
46ideacentreAll-In-One510ComputerHardwareMaintenanceManual
Page 53

a.Positionthenewheat-sinkonthemotherboardsothattheninescrewsarealignedwiththe
holesinthemotherboardandwindshielding.
b.Tightenthescrewsinnumericordertosecurethenewheat-sinktothemotherboard.
Step13.ReattachtheEMIcover,middlecover,standholder,opticaldrive,harddiskdrive,rearcover,
andstandbase.
Replacingthemotherboard
Note:T urnoffthecomputerandwait3to5minutestoletitcooldownbeforeremovingthecover.
Note:Itmaybehelpfultoplacethecomputerface-downonasoftflatsurfaceforthisprocedure.Lenovo
recommendsthatyouuseablanket,towel,orothersoftclothtoprotectthecomputerscreenfromscratches
orotherdamage.
Toreplacethemotherboard:
Step1.Removeanymediafromthedrives,shutdowntheoperatingsystem,andturnoffthecomputer
andallattacheddevices.
Step2.Unplugallpowercordsfromelectricaloutlets.
Step3.Disconnectallcablesattachedtothecomputer.Thisincludespowercords,input/output(I/O)
cables,andanyothercablesthatareconnectedtothecomputer.RefertoLocatingconnectors,
controlsandcomponentstolocatethevariousconnectors.
Step4.Removethestandbase.RefertoRemovingthestandbase.
Step5.Removetherearcover.RefertoRemovingtherearcover.
Step6.Removetheharddiskdrive.RefertoReplacingtheharddiskdrive.
Step7.Removetheopticaldrive.RefertoReplacingtheopticaldrive.
Step8.Removethestandholder.RefertoRemovingthestandholder.
Step9.Removethemiddlecover.RefertoRemovingthemiddlecover.
Step10.RemovetheEMIcover.RefertoRemovingtheEMIcover.
Step11.Removethememorymodules.RefertoReplacingthememorymodule.
Step12.Removethesolidstatedrive.RefertoReplacingthesolidstatedrive.
Step13.Removetheheat-sink.RefertoReplacingtheheat-sink.
Step14.RemovetheWi-Ficard.RefertoReplacingtheWi-Ficard.
Step15.Removeallthecablesfromthemotherboard.
Chapter8.Replacinghardware47
Page 54

Step16.Removethesixscrewsthatsecurethemotherboardtothechassis,andthenliftthemotherboard
uptoremoveit.
Step17.T oinstallthenewmotherboard:
a.Alignthesixscrewholesinthenewmotherboardwiththescrewholesinthechassis.
b.Securethenewmotherboardtothechassiswithsixscrews.
c.Connectallthecablestothenewmotherboard.
Step18.Installthefollowingpartstothenewmotherboard:
•Wi-Ficard
•Heat-sink
•Solidstatedrive
•Memorymodule
Step19.ReattachtheEMIcover,middlecover,standholder,opticaldrive,harddiskdrive,rearcover,
andstandbase.
Replacingthespeakersystem
Note:T urnoffthecomputerandwait3to5minutestoletitcooldownbeforeremovingthecover.
Note:Itmaybehelpfultoplacethecomputerface-downonasoftflatsurfaceforthisprocedure.Lenovo
recommendsthatyouuseablanket,towel,orothersoftclothtoprotectthecomputerscreenfromscratches
orotherdamage.
Toreplacethespeakersystem:
48ideacentreAll-In-One510ComputerHardwareMaintenanceManual
Page 55

Step1.Removeanymediafromthedrives,shutdowntheoperatingsystem,andturnoffthecomputer
andallattacheddevices.
Step2.Unplugallpowercordsfromelectricaloutlets.
Step3.Disconnectallcablesattachedtothecomputer.Thisincludespowercords,input/output(I/O)
cables,andanyothercablesthatareconnectedtothecomputer.RefertoLocatingconnectors,
controlsandcomponentstolocatethevariousconnectors.
Step4.Removethestandbase.RefertoRemovingthestandbase.
Step5.Removetherearcover.RefertoRemovingtherearcover.
Step6.Removetheharddiskdrive.RefertoReplacingtheharddiskdrive.
Step7.Removetheopticaldrive.RefertoReplacingtheopticaldrive.
Step8.Removethestandholder.RefertoRemovingthestandholder.
Step9.Removethemiddlecover.RefertoRemovingthemiddlecover.
Step10.RemovetheEMIcover.RefertoRemovingtheEMIcover.
Step11.Disconnectthespeakercablefromtheconnectoronthemotherboard1,andthenslidetherubber
screwsofthespeakersystemoutofthescrewslots.
Step12.Liftupthespeakersystemtoremoveit.2
Step13.T oinstallthenewspeakersystem:
a.Slideintherubberscrewsofthenewspeakersystemintothescrewslotsinthechassis.
b.Connectthecabletothemotherboard.
Step14.ReattachEMIcover,middlecover,standholder,opticaldrive,harddiskdrive,rearcover,and
standbase.
Chapter8.Replacinghardware49
Page 56

Replacingthecamera
Note:T urnoffthecomputerandwait3to5minutestoletitcooldownbeforeremovingthecover.
Note:Itmaybehelpfultoplacethecomputerface-downonasoftflatsurfaceforthisprocedure.Lenovo
recommendsthatyouuseablanket,towel,orothersoftclothtoprotectthecomputerscreenfromscratches
orotherdamage.
Toreplacethecamera:
Step1.Removeanymediafromthedrives,shutdowntheoperatingsystem,andturnoffthecomputer
andallattacheddevices.
Step2.Unplugallpowercordsfromelectricaloutlets.
Step3.Disconnectallcablesattachedtothecomputer.Thisincludespowercords,input/output(I/O)
cables,andanyothercablesthatareconnectedtothecomputer.RefertoLocatingconnectors,
controlsandcomponentstolocatethevariousconnectors.
Step4.Removethestandbase.RefertoRemovingthestandbase.
Step5.Removetherearcover.RefertoRemovingtherearcover.
Step6.Removetheharddiskdrive.RefertoReplacingtheharddiskdrive.
Step7.Removetheopticaldrive.RefertoReplacingtheopticaldrive.
Step8.Removethestandholder.RefertoRemovingthestandholder.
Step9.Removethemiddlecover.RefertoRemovingthemiddlecover.
Step10.RemovetheEMIcover.RefertoRemovingtheEMIcover.
Step11.Removethespeakersystem.RefertoReplacingthespeakersystem.
Step12.Disconnectthecameracableformthecorrespondingconnectoronthemotherboard.Referto
Locatingconnectors,controlsandcomponents.
50ideacentreAll-In-One510ComputerHardwareMaintenanceManual
Page 57

Step13.Pushthelockingpinoutwards1,andthenliftupthecameramodule.2
Step14.T oinstallthenewcamera:
a.Connectthecameracabletothenewcamera.
b.Pushthecameralockingpinoutwards,andthenplacethenewcameraintoposition.
Step15.Reattachthespeakersystem,EMIcover,middlecover,standholder,opticaldrive,harddisk
drive,rearcover,andstandbase.
Chapter8.Replacinghardware51
Page 58

52ideacentreAll-In-One510ComputerHardwareMaintenanceManual
Page 59

Chapter9.FRUlists
Thischapterliststheinformationonthefieldreplaceableunits(FRUs)forideacentreAll-In-One510desktop
computer.
Attention:BesuretoreadandunderstandallthesafetyinformationbeforereplacinganyFRUs.
Notes:FRUsthathavea1or2intheCRUcolumnareCustomerReplaceableUnits(CRUs).
•1–identifiespartsthatarefairlysimpletoreplace,requiringfewornotools.
•2–identifiespartsthatareslightlymoredifficulttoreplace.
•N-identifiespartsthatarenottobereplacedbythecustomer.
Table1.AIO510–22ASRFRUlist
FRUP/N
AC_ADAPTER
00PC726AC_ADAPTER,90W,100-240Vac,3P
00PC727AC_ADAPTER,120W,100-240Vac,3P
ANTENNA
00XJ086
BDPLANAR
00UW342
00UW343MB,A9,UMA,WIN,DPK
00UW344
00UW345MB,A6,UMA,WIN,DPK
00UW346
00UW347MB,E2,UMA,WIN,DPK
00UW348
00UW349
00UW350
00UW351
00UW352
00UW353MB,A9,UMA,HDMIIN,WIN,DPK
00UW354
00UW355MB,A6,UMA,HDMIIN,WIN,DPK
00UW356
00UW357MB,E2,UMA,HDMIIN,WIN,DPK
01GJ028MB,E2,M435,1G,NODPK
01GJ029MB,E2,M435,1G,WINDPK
CABLE
31032953
Description
C4C5antenna
MB,A9,UMA,NO,DPK
MB,A6,UMA,NO,DPK
MB,E2,UMA,NO,DPK
MB,A9,M435,1G,NO,DPK
MB,A9,M435,1G,WIN,DPK
MB,A6,M435,1G,NO,DPK
MB,A6,M435,1G,WIN,DPK
MB,A9,UMA,HDMIIN,NO,DPK
MB,A6,UMA,HDMIIN,NO,DPK
MB,E2,UMA,HDMIIN,NO,DPK
GSBLK1.0m3wireCCCpowercord(R)
©CopyrightLenovo2016
53
Page 60

Table1.AIO510–22ASRFRUlist(continued)
31033857
31033858
31035332
31035395
31035396
31035397
31035828
31038885
31039100
31039101
31039103
31039104
31039105
31039106
31039107
31045147
31049496
31049497
31049498
31049499
31049500
31049501
31049502
31049503
31049504
31049505
31049507
31049508
31049517
31049518
31049520
00XJ043
00XJ045
00XJ049
00XJ051
00XJ053
00XJ055
00XJ056
CAMERA
LWBLK1.0m3wireULCSApowercord(R)
VLBLK1.0m3wireULCSApowercord(R)
LWBLK1.0mVDEpowercord(R)
LWBLK1.0mIndiapowercord(R)
LWBLK1.0mUKpowercord(R)
LWBLK1.0mANZpowercord(R)
LWBLK1.0mBrazilpowercord(R)
LWBLK1.0mTaiwanC5powercord(R)
LWBLK1.0mArgentinaC5powercord(R)
LWBLK1.0mDenmarkC5powercord(R)
LWBLK1.0mSwitzerlandC5powercord(R)
LWBLK1.0mItalyC5powercord(R)
LWBLK1.0mSAC5powercord(R)
LWBLK1.0mKoreaC5powercord(R)
LWBLK1.0mIsraelC5powercord(R)
LX(ASAP)1.0MC5CCCpowercord
Volex1.0MC5UKpowercord
Volex1.0MC5EUpowercord
Volex1.0MC5KORpowercord
Volex1.0MC5TWpowercord
Volex1.0MC5ANZpowercord
Volex1.0MC5SApowercord
Volex1.0MC5ISIpowercord
Volex1.0MC5DENpowercord
Volex1.0MC5ITYpowercord
Volex1.0MC5BRpowercord
Volex1.0MC5LApowercord
Volex1.0MC5SWIpowercord
LX(ASAP)1.0MC5ULpowercord
LX(ASAP)1.0MC5EUpowercord
LX(ASAP)1.0MC5ANZpowercord
C4C5HDDSATAcable
C4ODDSATAcable
C4C5PowerboardFFC
C4LVDScable
C4C5S5Cameracable
C4C5S5MICcable
C4C5S5Touchcable
54ideacentreAll-In-One510ComputerHardwareMaintenanceManual
Page 61

Table1.AIO510–22ASRFRUlist(continued)
01AH324
COVER
01EF427
01EF428
01EF429
01EF430
DT_KYB
00UW407
00XH587
00XH588
00XH591
00XH593
00XH594
00XH595
00XH598
00XH601
00XH602
00XH604
00XH605
00XH607
00XH608
00XH610
00XH611
00XH614
00XH616
00XH618
00XH619
00XH621
00XH622
00XH624
00XH625
00XH626
00XH627
00XH630
00XH633
00XH635
00XH637
00XH638
00XH641
AIO510720PCam
RearCoverBlack,nHDMIIn,C4
RearCoverWhite,nHDMIIn,C4
RearCoverBlack,HDMIIn,C4
RearCoverWhite,HDMIIn,C4
LiteonSK-88612.4GKB(BR)-BLK
USBCalliopeKBBKENG
USBCalliopeKBBKARA
USB,Calliope,KB,BK,BELENG
USBCalliopeKBBKBUL
USBCalliopeKBBKTC/ENG
USBCalliopeKBBKCZE
USBCalliopeKBBKFRA
USBCalliopeKBBKGER
USBCalliopeKBBKGRE
USBCalliopeKBBKHBW
USBCalliopeKBBKHUN
USBCalliopeKBBKITA
USBCalliopeKBBKJPN
USBCalliopeKBBKKOR
USB,Calliope,KB,BK,LASPA
USBCalliopeKBBKPOR
USBCalliopeKBBKRUS
USBCalliopeKBBKSLK
USBCalliopeKBBKSPA
USBCalliopeKBBKSWS
USBCalliopeKBBKTHAI
USBCalliopeKBBKTUR
USBCalliopeKBBKUKE
USBCalliopeKBBKEUROENG
USBCalliopeKBBKSLV
USBCalliopeKBBKINDENG
USBCalliopeKBBKNORDIC
USBCalliopeKBBKCANENG/FRA
USB,Calliope,KB,WH,ENG
USB,Calliope,KB,WH,ARA
USB,Calliope,KB,WH,BELENG
Chapter9.FRUlists55
Page 62

Table1.AIO510–22ASRFRUlist(continued)
00XH643
00XH644
00XH645
00XH648
00XH651
00XH652
00XH654
00XH655
00XH657
00XH658
00XH660
00XH661
00XH664
00XH666
00XH668
00XH669
00XH671
00XH672
00XH674
00XH675
00XH676
00XH677
00XH680
00XH683
00XH685
01AH627
01AH628
01AH629
01AH630
01AH631
01AH632
01AH633
01AH634
01AH635
01AH636
01AH637
01AH638
01AH639
01AH640
USB,Calliope,KB,WH,BUL
USB,Calliope,KB,WH,TC/ENG
USB,Calliope,KB,WH,CZE
USB,Calliope,KB,WH,FRA
USB,Calliope,KB,WH,GER
USB,Calliope,KB,WH,GRE
USB,Calliope,KB,WH,HBW
USB,Calliope,KB,WH,HUN
USB,Calliope,KB,WH,ITA
USB,Calliope,KB,WH,JPN
USB,Calliope,KB,WH,KOR
USBCalliopeKBWHLASP A
USB,Calliope,KB,WH,POR
USB,Calliope,KB,WH,RUS
USB,Calliope,KB,WH,SLK
USB,Calliope,KB,WH,SPA
USB,Calliope,KB,WH,SWS
USB,Calliope,KB,WH,THAI
USB,Calliope,KB,WH,TUR
USB,Calliope,KB,WH,UKE
USB,Calliope,KB,WH,EURO,ENG
USB,Calliope,KB,WH,SLV
USB,Calliope,KB,WH,IND,ENG
USB,Calliope,KB,WH,NORDIC
USB,Calliope,KB,WH,CAN,ENG/FRA
Liteon2.4GBlackSK-8861US
Liteon2.4GBlackSK-8861US-MY
Liteon2.4GBlackSK-8861TW
Liteon2.4GBlackSK-8861TH
Liteon2.4GBlackSK-8861CS-SK
Liteon2.4GBlackSK-8861US-IN
Liteon2.4GBlackSK-8861RU
Liteon2.4GBlackSK-8861GB
Liteon2.4GBlackSK-8861Nordic
Liteon2.4GBlackSK-8861LA
Liteon2.4GBlackSK-8861LA-AR
Liteon2.4GBlackSK-8861SA
Liteon2.4GBlackSK-8861CH
Liteon2.4GBlackSK-8861DE
56ideacentreAll-In-One510ComputerHardwareMaintenanceManual
Page 63

Table1.AIO510–22ASRFRUlist(continued)
01AH641
01AH642
01AH643
01AH644
01AH645
01AH646
01AH647
01AH648
01AH649
01AH650
01AH651
01AH652
01AH653
01AH654
01AH655
Liteon2.4GBlackSK-8861TR
Liteon2.4GBlackSK-8861ES
Liteon2.4GBlackSK-8861SL
Liteon2.4GBlackSK-8861IT
Liteon2.4GBlackSK-8861IL
Liteon2.4GBlackSK-8861FR
Liteon2.4GBlackSK-8861GR
Liteon2.4GBlackSK-8861HU
Liteon2.4GBlackSK-8861BG
Liteon2.4GBlackSK-8861KR
Liteon2.4GBlackSK-8861JP
Liteon2.4GBlackSK-8861EN-FR
Liteon2.4GBlackSK-8861PT
Liteon2.4GBlackSK-8861BE-EN
Liteon2.4GBlackSK-8861US-EU
FAN
00XD821
SysfanforQT90x15mm
HDD_ASM
00PC550HDD,500G,7200,DT3,SA T A3,STD
00PC551HDD,1TB,7200,DT3,SA T A3,STD
45K0623
45K0629
HDD,1TB,7200,DT3,SA T A3,STD
HDD,500G,7200,DT3,SA T A3,STD
HEATSINK
01EF355FRUUMAThermalModule
01EF356
FRUDISThermalModule
KYB_MOUSE
25210987
25210988
25210989
25210990
25210991
25210992
25210993
25210994
25210995
25210996
25210997
25210998
25210999
LiteonSK-8861(US)2.4GKB-White8
LiteonSK-8861(US-MY)2.4GKB-White8
LiteonSK-8861(TW)2.4GKB-White8
LiteonSK-8861(TH)2.4GKB-White8
LiteonSK-8861(CS-SK)2.4GKB-White8
LiteonSK-8861(US-IN)2.4GKB-White8
LiteonSK-8861(RU)2.4GKB-White8
LiteonSK-8861(GB)2.4GKB-White8
LiteonSK-8861(Nordic)2.4GKB-White8
LiteonSK-8861(LA)2.4GKB-White8
LiteonSK-8861(LA-AR)2.4GKB-White8
LiteonSK-8861(SA)2.4GKB-White8
LiteonSK-8861(CH)2.4GKB-White8
Chapter9.FRUlists57
Page 64

Table1.AIO510–22ASRFRUlist(continued)
25211000
25211001
25211002
25211003
25211004
25211005
25211006
25211007
25211008
25211009
25211010
25211011
25211012
25211013
25211014
25211015
25211016
25211017
LINECORD
31503352
31503353
31503354
31503355
31503356
31503357
31503358
31503359
31503360
31503361
31503362
31503423
31503424
31503425
00XL002
00XL003
00XL051
00XL052
00XL053
00XL057
LiteonSK-8861(DE)2.4GKB-White8
LiteonSK-8861(TR)2.4GKB-White8
LiteonSK-8861(ES)2.4GKB-White8
LiteonSK-8861(SL)2.4GKB-White8
LiteonSK-8861(IT)2.4GKB-White8
LiteonSK-8861(IL)2.4GKB-White8
LiteonSK-8861(FR)2.4GKB-White8
LiteonSK-8861(GR)2.4GKB-White8
LiteonSK-8861(HU)2.4GKB-White8
LiteonSK-8861(BG)2.4GKB-White8
LiteonSK-8861(KR)2.4GKB-White8
LiteonSK-8861(JP)2.4GKB-White8
LiteonSK-8861(EN-FR)2.4GKB-White8
LiteonSK-8861(PT)2.4GKB-White8
LiteonSK-8861(BE-EN)2.4GKB-White8
LiteonSK-8861(US-EU)2.4GKB-White8
LiteonSM-8861(WW)2.4GMouseWhite
LiteonSM-88612.4GMouse(NoBattery)WTE
LX(ASAP)1.0MC5UKpowercord
LX(ASAP)1.0MC5Indiapowercord
LX(ASAP)1.0MC5T aiwanpowercord
LX(ASAP)1.0MC5SouthAfricapowercord
LX(ASAP)1.0MC5Argentinapowercord
LX(ASAP)1.0MC5Brazilpowercord
LX(ASAP)1.0MC5Koreapowercord
LX(ASAP)1.0MC5Italypowercord
LX(ASAP)1.0MC5Danmarkpowercord
LX(ASAP)1.0MC5Switzerlandpowercord
LX(ASAP)1.0MC5Israelpowercord
Longwell1.0MC52pinJapanpowercord
Volex1.0MC52pinJapanpowercord
LS1.0MC52pinJapanpowercord
Fru,JP ,Anti-TR,1M,2P ,NON-LH
Fru,JP ,Anti-TR,1M,2P ,NON-LH
Fru,US/CA,1M,3P ,NON-LH
Fru,US/CA,1M,3P ,NON-LH
Fru,US/CA,1M,3P ,NON-LH
Fru,LINECORD,AR,1M,3P ,NON-LH
58ideacentreAll-In-One510ComputerHardwareMaintenanceManual
Page 65

Table1.AIO510–22ASRFRUlist(continued)
00XL058
00XL059
00XL060
00XL061
00XL062
00XL063
00XL064
00XL065
00XL066
00XL067
00XL068
00XL069
00XL070
00XL071
00XL072
00XL073
00XL074
00XL075
00XL076
00XL077
00XL078
00XL079
00XL080
00XL081
00XL082
00XL083
00XL084
00XL085
00XL086
00XL089
00XL090
00XL091
00XL092
00XL093
00XL094
00XL096
00XL097
5L60J33143
MECH_ASM
Fru,LINECORD,AR,1M,3P ,NON-LH
Fru,LINECORD,AR,1M,3P ,NON-LH
Fru,LINECORD,BR,1M,3P ,NON-LH
Fru,LINECORD,BR,1M,3P ,NON-LH
Fru,LINECORD,BR,1M,3P ,NON-LH
Fru,EU/KR,1M,3P ,NON-LH
Fru,EU/KR,1M,3P ,NON-LH
Fru,EU/KR,1M,3P ,NON-LH
Fru,LINECORD,DK,1M,3P ,NON-LH
Fru,LINECORD,DK,1M,3P ,NON-LH
Fru,LINECORD,DK,1M,3P ,NON-LH
Fru,LINECORD,CH,1M,3P ,NON-LH
Fru,LINECORD,CH,1M,3P ,NON-LH
Fru,LINECORD,CH,1M,3P ,NON-LH
Fru,LINECORD,IT,1M,3P ,NON-LH
Fru,LINECORD,IT,1M,3P ,NON-LH
Fru,LINECORD,IT,1M,3P ,NON-LH
Fru,LINECORD,GB,1M,3P ,NON-LH
Fru,LINECORD,GB,1M,3P ,NON-LH
Fru,LINECORD,GB,1M,3P ,NON-LH
Fru,LINECORD,AU,1M,3P ,NON-LH
Fru,LINECORD,AU,1M,3P ,NON-LH
Fru,LINECORD,AU,1M,3P ,NON-LH
Fru,LINECORD,ZA,1M,3P ,NON-LH
Fru,LINECORD,ZA,1M,3P ,NON-LH
Fru,LINECORD,ZA,1M,3P ,NON-LH
Fru,LINECORD,IL,1M,3P ,NON-LH
Fru,LINECORD,IL,1M,3P ,NON-LH
Fru,LINECORD,IL,1M,3P ,NON-LH
Fru,LINECORD,CN,1M,3P ,NON-LH
Fru,LINECORD,CN,1M,3P ,NON-LH
Fru,LINECORD,TW,1M,3P ,NON-LH
Fru,LINECORD,TW,1M,3P ,NON-LH
Fru,LINECORD,TW,1M,3P ,NON-LH
Fru,LINECORD,IN,1M,3P ,NON-LH
Fru,LINECORD,IN,1M,3P ,NON-LH
Fru,LINECORD,TH,1M,3P ,NON-LH
lux0014+H03VV-F0.75/3C+0011
Chapter9.FRUlists59
Page 66

Table1.AIO510–22ASRFRUlist(continued)
01EF402
01EF403
01EF404
01EF405
01EF415
01EF416
01EF417
01EF418
01EF431
01EF432
01EF435
01EF436
01EF439
01EF440
01EF441
01EF442
01EF443
01EF444
01EF445
01EF446
01EF447
01EF471
01EF472
01EF473
MECHANICAL
01EF422Rubber,Forspeakerlock
01EF448
01EF449
01EF450
01EF457Bracket,Forkensintonlock
01EF458Bracket,Forcameramodule
01EF459
01EF469Bracket,ForWIFIAntennaKit
01EF537
MEMORY
01AG7002GBDDR42400SoDIMM
01AG7014GBDDR42400SoDIMM
01AG7042GBDDR42400SoDIMM
01AG7052GBDDR42400SoDIMM
GTStandlightsilverC4/5
GTStanddeepsilverC4/5
StronkinStandlightsilver
StronkinStanddeepsilver
HDDCAGE
ASSYShieldingforHDD
ASSYFrameforMB_ASR
MBSHIELDING,W/HDMI
ASSYMidCover,Black,C4ASR
ASSYMidCover,White,C4ASR
ASSYPanelhousing_ASR,white
ASSYPanelhousing_ASR,black
ODDBezelBlack,C4
ODDBezelWhite,C4
ASSYP ANELLGDLM215WF9-SSA1NT
ASSYP ANELBOEMV215FHM-N40,NT
ASSYP ANELLGDLM215WFA-SSA1T
FRONTCOVER,NON-CAMBlackC4
FRONTCOVER,NON-CAMWHITEC4
FRONTCOVER,W/CAMBlackC4
FRONTCOVER,W/CAMWHITEC4
DUMMYODDBezelBlack,C4
DUMMYODDBezelWhite,C4
MBSHIELDING,WO/HDMI
Cover,SideIOCover,White
Cover,SideIOCover,Black
SPONGE,ForF ronthousing,C4
Bracket,ForPanel,C5
BracketLatch,ForODD
60ideacentreAll-In-One510ComputerHardwareMaintenanceManual
Page 67

Table1.AIO510–22ASRFRUlist(continued)
01AG7062GBDDR42400SoDIMM
01AG7074GBDDR42400SoDIMM
01AG7084GBDDR42400SoDIMM
01AG7094GBDDR42400SoDIMM
01AG7108GBDDR42400SoDIMM
01AG7118GBDDR42400SoDIMM
01AG7128GBDDR42400SoDIMM
MICROPHONE
01AH402
AIO510Microphone
MOUSE
00PH131
00PH132
00UW408
01AH700
USBCalliopeMouseBlack(Orangewh
USB,Calliope,Mouse,White
LiteonSM-8861(WW)MouseBlack
LiteonSM-8861(WW)MouseBlack
OPT_DRIVE
00FC442SMD,DT,SATA,9.5mm,x8,w/obezel
SPEAKERINT
01AH925
AIO510speaker
WIRELESS
00JT482
01AX709
Wireless,CMB,CBT,8821AE
Wireless,CMB,LTN,NFA435A
Table2.AIO510–22ISHFRUlist
FRUP/N
Description
AC_ADAPTER
00PC727AC_ADAPTER,120W ,100-240Vac,3P
ANTENNA
00XJ086
C4C5antenna
BDPLANAR
00UW358
MBUMANODPK
00UW359MBUMAWINDPK
00UW360
00UW361
00UW362
00UW363
00UW364
MBM4351GNODPK
MBM4351GWINDPK
MBM4352GNODPK
MBM4352GWINDPK
MB,UMA,HDMIIN,NODPK
00UW365MB,UMA,HDMIIN,WINDPK
CABLE
31032953
GSBLK1.0m3wireCCCpowercord(R)
Chapter9.FRUlists61
Page 68

Table2.AIO510–22ISHFRUlist(continued)
31033857
31033858
31035332
31035395
31035396
31035397
31035828
31038885
31039100
31039101
31039103
31039104
31039105
31039106
31039107
31045147
31049496
31049497
31049498
31049499
31049500
31049501
31049502
31049503
31049504
31049505
31049507
31049508
31049517
31049518
31049520
00XJ043
00XJ045
00XJ049
00XJ051
00XJ053
00XJ055
00XJ056
CAMERA
LWBLK1.0m3wireULCSApowercord(R)
VLBLK1.0m3wireULCSApowercord(R)
LWBLK1.0mVDEpowercord(R)
LWBLK1.0mIndiapowercord(R)
LWBLK1.0mUKpowercord(R)
LWBLK1.0mANZpowercord(R)
LWBLK1.0mBrazilpowercord(R)
LWBLK1.0mTaiwanC5powercord(R)
LWBLK1.0mArgentinaC5powercord(R)
LWBLK1.0mDenmarkC5powercord(R)
LWBLK1.0mSwitzerlandC5powercord(R)
LWBLK1.0mItalyC5powercord(R)
LWBLK1.0mSAC5powercord(R)
LWBLK1.0mKoreaC5powercord(R)
LWBLK1.0mIsraelC5powercord(R)
LX(ASAP)1.0MC5CCCpowercord
Volex1.0MC5UKpowercord
Volex1.0MC5EUpowercord
Volex1.0MC5KORpowercord
Volex1.0MC5TWpowercord
Volex1.0MC5ANZpowercord
Volex1.0MC5SApowercord
Volex1.0MC5ISIpowercord
Volex1.0MC5DENpowercord
Volex1.0MC5ITYpowercord
Volex1.0MC5BRpowercord
Volex1.0MC5LApowercord
Volex1.0MC5SWIpowercord
LX(ASAP)1.0MC5ULpowercord
LX(ASAP)1.0MC5EUpowercord
LX(ASAP)1.0MC5ANZpowercord
C4C5HDDSATAcable
C4ODDSATAcable
C4C5PowerboardFFC
C4LVDScable
C4C5S5Cameracable
C4C5S5MICcable
C4C5S5Touchcable
62ideacentreAll-In-One510ComputerHardwareMaintenanceManual
Page 69

Table2.AIO510–22ISHFRUlist(continued)
01AH324
COVER
01EF427
01EF428
01EF429
01EF430
DT_KYB
00UW407
00XH587
00XH588
00XH591
00XH593
00XH594
00XH595
00XH598
00XH601
00XH602
00XH604
00XH605
00XH607
00XH608
00XH610
00XH611
00XH614
00XH616
00XH618
00XH619
00XH621
00XH622
00XH624
00XH625
00XH626
00XH627
00XH630
00XH633
00XH635
00XH637
00XH638
00XH641
AIO510720PCam
RearCoverBlack,nHDMIIn,C4
RearCoverWhite,nHDMIIn,C4
RearCoverBlack,HDMIIn,C4
RearCoverWhite,HDMIIn,C4
LiteonSK-88612.4GKB(BR)-BLK
USBCalliopeKBBKENG
USBCalliopeKBBKARA
USB,Calliope,KB,BK,BELENG
USBCalliopeKBBKBUL
USBCalliopeKBBKTC/ENG
USBCalliopeKBBKCZE
USBCalliopeKBBKFRA
USBCalliopeKBBKGER
USBCalliopeKBBKGRE
USBCalliopeKBBKHBW
USBCalliopeKBBKHUN
USBCalliopeKBBKITA
USBCalliopeKBBKJPN
USBCalliopeKBBKKOR
USB,Calliope,KB,BK,LASPA
USBCalliopeKBBKPOR
USBCalliopeKBBKRUS
USBCalliopeKBBKSLK
USBCalliopeKBBKSPA
USBCalliopeKBBKSWS
USBCalliopeKBBKTHAI
USBCalliopeKBBKTUR
USBCalliopeKBBKUKE
USBCalliopeKBBKEUROENG
USBCalliopeKBBKSLV
USBCalliopeKBBKINDENG
USBCalliopeKBBKNORDIC
USBCalliopeKBBKCANENG/FRA
USB,Calliope,KB,WH,ENG
USB,Calliope,KB,WH,ARA
USB,Calliope,KB,WH,BELENG
Chapter9.FRUlists63
Page 70

Table2.AIO510–22ISHFRUlist(continued)
00XH643
00XH644
00XH645
00XH648
00XH651
00XH652
00XH654
00XH655
00XH657
00XH658
00XH660
00XH661
00XH664
00XH666
00XH668
00XH669
00XH671
00XH672
00XH674
00XH675
00XH676
00XH677
00XH680
00XH683
00XH685
01AH627
01AH628
01AH629
01AH630
01AH631
01AH632
01AH633
01AH634
01AH635
01AH636
01AH637
01AH638
01AH639
01AH640
USB,Calliope,KB,WH,BUL
USB,Calliope,KB,WH,TC/ENG
USB,Calliope,KB,WH,CZE
USB,Calliope,KB,WH,FRA
USB,Calliope,KB,WH,GER
USB,Calliope,KB,WH,GRE
USB,Calliope,KB,WH,HBW
USB,Calliope,KB,WH,HUN
USB,Calliope,KB,WH,ITA
USB,Calliope,KB,WH,JPN
USB,Calliope,KB,WH,KOR
USBCalliopeKBWHLASP A
USB,Calliope,KB,WH,POR
USB,Calliope,KB,WH,RUS
USB,Calliope,KB,WH,SLK
USB,Calliope,KB,WH,SPA
USB,Calliope,KB,WH,SWS
USB,Calliope,KB,WH,THAI
USB,Calliope,KB,WH,TUR
USB,Calliope,KB,WH,UKE
USB,Calliope,KB,WH,EURO,ENG
USB,Calliope,KB,WH,SLV
USB,Calliope,KB,WH,IND,ENG
USB,Calliope,KB,WH,NORDIC
USB,Calliope,KB,WH,CAN,ENG/FRA
Liteon2.4GBlackSK-8861US
Liteon2.4GBlackSK-8861US-MY
Liteon2.4GBlackSK-8861TW
Liteon2.4GBlackSK-8861TH
Liteon2.4GBlackSK-8861CS-SK
Liteon2.4GBlackSK-8861US-IN
Liteon2.4GBlackSK-8861RU
Liteon2.4GBlackSK-8861GB
Liteon2.4GBlackSK-8861Nordic
Liteon2.4GBlackSK-8861LA
Liteon2.4GBlackSK-8861LA-AR
Liteon2.4GBlackSK-8861SA
Liteon2.4GBlackSK-8861CH
Liteon2.4GBlackSK-8861DE
64ideacentreAll-In-One510ComputerHardwareMaintenanceManual
Page 71

Table2.AIO510–22ISHFRUlist(continued)
01AH641
01AH642
01AH643
01AH644
01AH645
01AH646
01AH647
01AH648
01AH649
01AH650
01AH651
01AH652
01AH653
01AH654
01AH655
Liteon2.4GBlackSK-8861TR
Liteon2.4GBlackSK-8861ES
Liteon2.4GBlackSK-8861SL
Liteon2.4GBlackSK-8861IT
Liteon2.4GBlackSK-8861IL
Liteon2.4GBlackSK-8861FR
Liteon2.4GBlackSK-8861GR
Liteon2.4GBlackSK-8861HU
Liteon2.4GBlackSK-8861BG
Liteon2.4GBlackSK-8861KR
Liteon2.4GBlackSK-8861JP
Liteon2.4GBlackSK-8861EN-FR
Liteon2.4GBlackSK-8861PT
Liteon2.4GBlackSK-8861BE-EN
Liteon2.4GBlackSK-8861US-EU
FAN
00XD814
SysfanforMutuo_P9110x15mm
HDD_ASM
00PC550HDD,500G,7200,DT3,SATA3,STD
00PC551HDD,1TB,7200,DT3,SATA3,STD
45K0623
45K0629
HDD,1TB,7200,DT3,SA T A3,STD
HDD,500G,7200,DT3,SA T A3,STD
HEATSINK
01EF353UMAThermalModule
01EF354
DISThermalModule
KYB_MOUSE
25210987
25210988
25210989
25210990
25210991
25210992
25210993
25210994
25210995
25210996
25210997
25210998
25210999
LiteonSK-8861(US)2.4GKB-White8
LiteonSK-8861(US-MY)2.4GKB-White8
LiteonSK-8861(TW)2.4GKB-White8
LiteonSK-8861(TH)2.4GKB-White8
LiteonSK-8861(CS-SK)2.4GKB-White8
LiteonSK-8861(US-IN)2.4GKB-White8
LiteonSK-8861(RU)2.4GKB-White8
LiteonSK-8861(GB)2.4GKB-White8
LiteonSK-8861(Nordic)2.4GKB-White8
LiteonSK-8861(LA)2.4GKB-White8
LiteonSK-8861(LA-AR)2.4GKB-White8
LiteonSK-8861(SA)2.4GKB-White8
LiteonSK-8861(CH)2.4GKB-White8
Chapter9.FRUlists65
Page 72

Table2.AIO510–22ISHFRUlist(continued)
25211000
25211001
25211002
25211003
25211004
25211005
25211006
25211007
25211008
25211009
25211010
25211011
25211012
25211013
25211014
25211015
25211016
25211017
25211018
25211019
LINECORD
31503352
31503353
31503354
31503355
31503356
31503357
31503358
31503359
31503360
31503361
31503362
31503423
31503424
31503425
00XL002
00XL003
00XL051
00XL052
LiteonSK-8861(DE)2.4GKB-White8
LiteonSK-8861(TR)2.4GKB-White8
LiteonSK-8861(ES)2.4GKB-White8
LiteonSK-8861(SL)2.4GKB-White8
LiteonSK-8861(IT)2.4GKB-White8
LiteonSK-8861(IL)2.4GKB-White8
LiteonSK-8861(FR)2.4GKB-White8
LiteonSK-8861(GR)2.4GKB-White8
LiteonSK-8861(HU)2.4GKB-White8
LiteonSK-8861(BG)2.4GKB-White8
LiteonSK-8861(KR)2.4GKB-White8
LiteonSK-8861(JP)2.4GKB-White8
LiteonSK-8861(EN-FR)2.4GKB-White8
LiteonSK-8861(PT)2.4GKB-White8
LiteonSK-8861(BE-EN)2.4GKB-White8
LiteonSK-8861(US-EU)2.4GKB-White8
LiteonSM-8861(WW)2.4GMouseWhite
LiteonSM-88612.4GMouse(NoBattery)WTE
LiteonSM-88612.4GMouse(MY)White
LiteonSM-88612.4GMouse(JP)White
LX(ASAP)1.0MC5UKpowercord
LX(ASAP)1.0MC5Indiapowercord
LX(ASAP)1.0MC5T aiwanpowercord
LX(ASAP)1.0MC5SouthAfricapowercord
LX(ASAP)1.0MC5Argentinapowercord
LX(ASAP)1.0MC5Brazilpowercord
LX(ASAP)1.0MC5Koreapowercord
LX(ASAP)1.0MC5Italypowercord
LX(ASAP)1.0MC5Danmarkpowercord
LX(ASAP)1.0MC5Switzerlandpowercord
LX(ASAP)1.0MC5Israelpowercord
Longwell1.0MC52pinJapanpowercord
Volex1.0MC52pinJapanpowercord
LS1.0MC52pinJapanpowercord
Fru,JP ,Anti-TR,1M,2P ,NON-LH
Fru,JP ,Anti-TR,1M,2P ,NON-LH
Fru,US/CA,1M,3P ,NON-LH
Fru,US/CA,1M,3P ,NON-LH
66ideacentreAll-In-One510ComputerHardwareMaintenanceManual
Page 73

Table2.AIO510–22ISHFRUlist(continued)
00XL053
00XL057
00XL058
00XL059
00XL060
00XL061
00XL062
00XL063
00XL064
00XL065
00XL066
00XL067
00XL068
00XL069
00XL070
00XL071
00XL072
00XL073
00XL074
00XL075
00XL076
00XL077
00XL078
00XL079
00XL080
00XL081
00XL082
00XL083
00XL084
00XL085
00XL086
00XL089
00XL090
00XL091
00XL092
00XL093
00XL094
00XL096
00XL097
Fru,US/CA,1M,3P ,NON-LH
Fru,LINECORD,AR,1M,3P ,NON-LH
Fru,LINECORD,AR,1M,3P ,NON-LH
Fru,LINECORD,AR,1M,3P ,NON-LH
Fru,LINECORD,BR,1M,3P ,NON-LH
Fru,LINECORD,BR,1M,3P ,NON-LH
Fru,LINECORD,BR,1M,3P ,NON-LH
Fru,EU/KR,1M,3P ,NON-LH
Fru,EU/KR,1M,3P ,NON-LH
Fru,EU/KR,1M,3P ,NON-LH
Fru,LINECORD,DK,1M,3P ,NON-LH
Fru,LINECORD,DK,1M,3P ,NON-LH
Fru,LINECORD,DK,1M,3P ,NON-LH
Fru,LINECORD,CH,1M,3P ,NON-LH
Fru,LINECORD,CH,1M,3P ,NON-LH
Fru,LINECORD,CH,1M,3P ,NON-LH
Fru,LINECORD,IT,1M,3P ,NON-LH
Fru,LINECORD,IT,1M,3P ,NON-LH
Fru,LINECORD,IT,1M,3P ,NON-LH
Fru,LINECORD,GB,1M,3P ,NON-LH
Fru,LINECORD,GB,1M,3P ,NON-LH
Fru,LINECORD,GB,1M,3P ,NON-LH
Fru,LINECORD,AU,1M,3P ,NON-LH
Fru,LINECORD,AU,1M,3P ,NON-LH
Fru,LINECORD,AU,1M,3P ,NON-LH
Fru,LINECORD,ZA,1M,3P ,NON-LH
Fru,LINECORD,ZA,1M,3P ,NON-LH
Fru,LINECORD,ZA,1M,3P ,NON-LH
Fru,LINECORD,IL,1M,3P ,NON-LH
Fru,LINECORD,IL,1M,3P ,NON-LH
Fru,LINECORD,IL,1M,3P ,NON-LH
Fru,LINECORD,CN,1M,3P ,NON-LH
Fru,LINECORD,CN,1M,3P ,NON-LH
Fru,LINECORD,TW,1M,3P ,NON-LH
Fru,LINECORD,TW,1M,3P ,NON-LH
Fru,LINECORD,TW,1M,3P ,NON-LH
Fru,LINECORD,IN,1M,3P ,NON-LH
Fru,LINECORD,IN,1M,3P ,NON-LH
Fru,LINECORD,TH,1M,3P ,NON-LH
Chapter9.FRUlists67
Page 74

Table2.AIO510–22ISHFRUlist(continued)
5L60J33143
MECH_ASM
01EF402
01EF403
01EF404
01EF405
01EF415
01EF416
01EF418
01EF433
01EF434
01EF437
01EF438
01EF439
01EF440
01EF441
01EF442
01EF443
01EF444
01EF445
01EF446
01EF447
01EF464
01EF471
01EF472
01EF473
MECHANICAL
01EF422Rubber,Forspeakerlock
01EF448
01EF449
01EF450
01EF457Bracket,Forkensintonlock
01EF458Bracket,Forcameramodule
01EF459
01EF469Bracket,ForWIFIAntennaKit
01EF537
MEMORY
01AG7002GBDDR42400SoDIMM
01AG7014GBDDR42400SoDIMM
lux0014+H03VV-F0.75/3C+0011
GTStandlightsilverC4/5
GTStanddeepsilverC4/5
StronkinStandlightsilver
StronkinStanddeepsilver
HDDCAGE
ASSYShieldingforHDD
MBSHIELDING,W/HDMI
ASSYMidCover,Black,C4ISH
ASSYMidCover,White,C4ISH
ASSYPanelhousing_ISH,white
ASSYPanelhousing_ISH,black
ODDBezelBlack,C4
ODDBezelWhite,C4
ASSYP ANELLGDLM215WF9-SSA1NT
ASSYP ANELBOEMV215FHM-N40,NT
ASSYP ANELLGDLM215WFA-SSA1T
FRONTCOVER,NON-CAMBlackC4
FRONTCOVER,NON-CAMWHITEC4
FRONTCOVER,W/CAMBlackC4
FRONTCOVER,W/CAMWHITEC4
ASSYFrameforMB_ISH
DUMMYODDBezelBlack,C4
DUMMYODDBezelWhite,C4
MBSHIELDING,WO/HDMI
Cover,SideIOCover,White
Cover,SideIOCover,Black
SPONGE,ForF ronthousing,C4
Bracket,ForPanel,C5
BracketLatch,ForODD
68ideacentreAll-In-One510ComputerHardwareMaintenanceManual
Page 75

Table2.AIO510–22ISHFRUlist(continued)
01AG7042GBDDR42400SoDIMM
01AG7052GBDDR42400SoDIMM
01AG7062GBDDR42400SoDIMM
01AG7074GBDDR42400SoDIMM
01AG7084GBDDR42400SoDIMM
01AG7094GBDDR42400SoDIMM
01AG7108GBDDR42400SoDIMM
01AG7118GBDDR42400SoDIMM
01AG7128GBDDR42400SoDIMM
MICROPHONE
01AH402
AIO510Microphone
MOUSE
00PH131
00PH132
00UW408
01AH700
01AH701
01AH702
USBCalliopeMouseBlack(Orangewh
USB,Calliope,Mouse,White
LiteonSM-8861(WW)MouseBlack
LiteonSM-8861(WW)MouseBlack
LiteonSM-8861Mouse(MY)Black
LiteonSM-8861(JP)Mouse-Black
OPT_DRIVE
00FC442SMD,DT,SATA,9.5mm,x8,w/obezel
SP
00XG111IntelCorei3-6100T3.2GHz35W
00XG113IntelCeleronG3900T2.6GHz35W
00XG114IntelPentiumG4400T2.9GHz35W
01AG005II5-6400T2.2GHz/4C/6M35W
01AG047II5-6400T2.2GHz/4C/6M35W
SPEAKERINT
01AH925
AIO510speaker
SSD_ASM
00JT086
00UP420
128G,M.2,2280,SATA6G,LTON,STD
128G,M.2,2280,SATA6G,SAMSG,STD
WIRELESS
00JT482
00JT497
Wireless,CMB,CBT,8821AE
Wireless,CMB,IN,3165ac
Table3.AIO510–23ASRFRUlist
FRUP/N
Description
AC_ADAPTER
00PC726AC_ADAPTER,90W ,100-240Vac,3P
Chapter9.FRUlists69
Page 76

Table3.AIO510–23ASRFRUlist(continued)
00PC727AC_ADAPTER,120W ,100-240Vac,3P
ANTENNA
00XJ086
BDPLANAR
00UW366
00UW367MBAMDA9-941UMAWINDPK
00UW368
00UW369MBAMDA6-921UMAWINDPK
00UW370
00UW371MBAMDE2-901UMAWINDPK
00UW372
00UW373
00UW374
00UW375
CABLE
31032953
31033857
31033858
31035332
31035395
31035396
31035397
31035828
31038885
31039100
31039101
31039103
31039104
31039105
31039106
31039107
31045147
31049496
31049497
31049498
31049499
31049500
31049501
31049502
C4C5antenna
MBAMDA9-941UMANODPK
MBAMDA6-921UMANODPK
MBAMDE2-901UMANODPK
MBAMDA9-941M4352GNODPK
MBAMDA9-941M4352GWINDPK
MBAMDA6-921M4352GNODPK
MBAMDA6-921M4352GWINDPK
GSBLK1.0m3wireCCCpowercord(R)
LWBLK1.0m3wireULCSApowercord(R)
VLBLK1.0m3wireULCSApowercord(R)
LWBLK1.0mVDEpowercord(R)
LWBLK1.0mIndiapowercord(R)
LWBLK1.0mUKpowercord(R)
LWBLK1.0mANZpowercord(R)
LWBLK1.0mBrazilpowercord(R)
LWBLK1.0mTaiwanC5powercord(R)
LWBLK1.0mArgentinaC5powercord(R)
LWBLK1.0mDenmarkC5powercord(R)
LWBLK1.0mSwitzerlandC5powercord(R)
LWBLK1.0mItalyC5powercord(R)
LWBLK1.0mSAC5powercord(R)
LWBLK1.0mKoreaC5powercord(R)
LWBLK1.0mIsraelC5powercord(R)
LX(ASAP)1.0MC5CCCpowercord
Volex1.0MC5UKpowercord
Volex1.0MC5EUpowercord
Volex1.0MC5KORpowercord
Volex1.0MC5TWpowercord
Volex1.0MC5ANZpowercord
Volex1.0MC5SApowercord
Volex1.0MC5ISIpowercord
70ideacentreAll-In-One510ComputerHardwareMaintenanceManual
Page 77

Table3.AIO510–23ASRFRUlist(continued)
31049503
31049504
31049505
31049507
31049508
31049517
31049518
31049520
00XJ043
00XJ046
00XJ049
00XJ052
00XJ053
00XJ055
00XJ056
DT_KYB
00UW407
00XH587
00XH588
00XH591
00XH593
00XH594
00XH595
00XH598
00XH601
00XH602
00XH604
00XH605
00XH607
00XH608
00XH610
00XH611
00XH614
00XH616
00XH618
00XH619
00XH621
00XH622
00XH624
Volex1.0MC5DENpowercord
Volex1.0MC5ITYpowercord
Volex1.0MC5BRpowercord
Volex1.0MC5LApowercord
Volex1.0MC5SWIpowercord
LX(ASAP)1.0MC5ULpowercord
LX(ASAP)1.0MC5EUpowercord
LX(ASAP)1.0MC5ANZpowercord
C4C5HDDSATAcable
C5ODDSATAcable
C4C5PowerboardFFC
C5S5LVDScable
C4C5S5Cameracable
C4C5S5MICcable
C4C5S5Touchcable
LiteonSK-88612.4GKB(BR)-BLK
USBCalliopeKBBKENG
USBCalliopeKBBKARA
USB,Calliope,KB,BK,BELENG
USBCalliopeKBBKBUL
USBCalliopeKBBKTC/ENG
USBCalliopeKBBKCZE
USBCalliopeKBBKFRA
USBCalliopeKBBKGER
USBCalliopeKBBKGRE
USBCalliopeKBBKHBW
USBCalliopeKBBKHUN
USBCalliopeKBBKITA
USBCalliopeKBBKJPN
USBCalliopeKBBKKOR
USB,Calliope,KB,BK,LASPA
USBCalliopeKBBKPOR
USBCalliopeKBBKRUS
USBCalliopeKBBKSLK
USBCalliopeKBBKSPA
USBCalliopeKBBKSWS
USBCalliopeKBBKTHAI
USBCalliopeKBBKTUR
Chapter9.FRUlists71
Page 78

Table3.AIO510–23ASRFRUlist(continued)
00XH625
00XH626
00XH627
00XH630
00XH633
00XH635
00XH637
00XH638
00XH641
00XH643
00XH644
00XH645
00XH648
00XH651
00XH652
00XH654
00XH655
00XH657
00XH658
00XH660
00XH661
00XH664
00XH666
00XH668
00XH669
00XH671
00XH672
00XH674
00XH675
00XH676
00XH677
00XH680
00XH683
00XH685
01AH627
01AH628
01AH629
01AH630
01AH631
USBCalliopeKBBKUKE
USBCalliopeKBBKEUROENG
USBCalliopeKBBKSLV
USBCalliopeKBBKINDENG
USBCalliopeKBBKNORDIC
USBCalliopeKBBKCANENG/FRA
USB,Calliope,KB,WH,ENG
USB,Calliope,KB,WH,ARA
USB,Calliope,KB,WH,BELENG
USB,Calliope,KB,WH,BUL
USB,Calliope,KB,WH,TC/ENG
USB,Calliope,KB,WH,CZE
USB,Calliope,KB,WH,FRA
USB,Calliope,KB,WH,GER
USB,Calliope,KB,WH,GRE
USB,Calliope,KB,WH,HBW
USB,Calliope,KB,WH,HUN
USB,Calliope,KB,WH,ITA
USB,Calliope,KB,WH,JPN
USB,Calliope,KB,WH,KOR
USBCalliopeKBWHLASP A
USB,Calliope,KB,WH,POR
USB,Calliope,KB,WH,RUS
USB,Calliope,KB,WH,SLK
USB,Calliope,KB,WH,SPA
USB,Calliope,KB,WH,SWS
USB,Calliope,KB,WH,THAI
USB,Calliope,KB,WH,TUR
USB,Calliope,KB,WH,UKE
USB,Calliope,KB,WH,EURO,ENG
USB,Calliope,KB,WH,SLV
USB,Calliope,KB,WH,IND,ENG
USB,Calliope,KB,WH,NORDIC
USB,Calliope,KB,WH,CAN,ENG/FRA
Liteon2.4GBlackSK-8861US
Liteon2.4GBlackSK-8861US-MY
Liteon2.4GBlackSK-8861TW
Liteon2.4GBlackSK-8861TH
Liteon2.4GBlackSK-8861CS-SK
72ideacentreAll-In-One510ComputerHardwareMaintenanceManual
Page 79

Table3.AIO510–23ASRFRUlist(continued)
01AH632
01AH633
01AH634
01AH635
01AH636
01AH637
01AH638
01AH639
01AH640
01AH641
01AH642
01AH643
01AH644
01AH645
01AH646
01AH647
01AH648
01AH649
01AH650
01AH651
01AH652
01AH653
01AH654
01AH655
Liteon2.4GBlackSK-8861US-IN
Liteon2.4GBlackSK-8861RU
Liteon2.4GBlackSK-8861GB
Liteon2.4GBlackSK-8861Nordic
Liteon2.4GBlackSK-8861LA
Liteon2.4GBlackSK-8861LA-AR
Liteon2.4GBlackSK-8861SA
Liteon2.4GBlackSK-8861CH
Liteon2.4GBlackSK-8861DE
Liteon2.4GBlackSK-8861TR
Liteon2.4GBlackSK-8861ES
Liteon2.4GBlackSK-8861SL
Liteon2.4GBlackSK-8861IT
Liteon2.4GBlackSK-8861IL
Liteon2.4GBlackSK-8861FR
Liteon2.4GBlackSK-8861GR
Liteon2.4GBlackSK-8861HU
Liteon2.4GBlackSK-8861BG
Liteon2.4GBlackSK-8861KR
Liteon2.4GBlackSK-8861JP
Liteon2.4GBlackSK-8861EN-FR
Liteon2.4GBlackSK-8861PT
Liteon2.4GBlackSK-8861BE-EN
Liteon2.4GBlackSK-8861US-EU
FAN
00XD821
SysfanforQT90x15mm
HDD_ASM
00PC550HDD,500G,7200,DT3,SATA3,STD
00PC551HDD,1TB,7200,DT3,SATA3,STD
00PC552HDD,2TB,7200,DT3,SATA3,STD
45K0623
45K0625
45K0629
HDD,1TB,7200,DT3,SA T A3,STD
HDD,2TB,7200,DT3,SA T A3,STD
HDD,500G,7200,DT3,SA T A3,STD
HEATSINK
01EF355FRUUMAThermalModule
01EF356
FRUDISThermalModule
KYB_MOUSE
25210987
25210988
LiteonSK-8861(US)2.4GKB-White8
LiteonSK-8861(US-MY)2.4GKB-White8
Chapter9.FRUlists73
Page 80

Table3.AIO510–23ASRFRUlist(continued)
25210989
25210990
25210991
25210992
25210993
25210994
25210995
25210996
25210997
25210998
25210999
25211000
25211001
25211002
25211003
25211004
25211005
25211006
25211007
25211008
25211009
25211010
25211011
25211012
25211013
25211014
25211015
25211016
LINECORD
31503352
31503353
31503354
31503355
31503356
31503357
31503358
31503359
31503360
31503361
LiteonSK-8861(TW)2.4GKB-White8
LiteonSK-8861(TH)2.4GKB-White8
LiteonSK-8861(CS-SK)2.4GKB-White8
LiteonSK-8861(US-IN)2.4GKB-White8
LiteonSK-8861(RU)2.4GKB-White8
LiteonSK-8861(GB)2.4GKB-White8
LiteonSK-8861(Nordic)2.4GKB-White8
LiteonSK-8861(LA)2.4GKB-White8
LiteonSK-8861(LA-AR)2.4GKB-White8
LiteonSK-8861(SA)2.4GKB-White8
LiteonSK-8861(CH)2.4GKB-White8
LiteonSK-8861(DE)2.4GKB-White8
LiteonSK-8861(TR)2.4GKB-White8
LiteonSK-8861(ES)2.4GKB-White8
LiteonSK-8861(SL)2.4GKB-White8
LiteonSK-8861(IT)2.4GKB-White8
LiteonSK-8861(IL)2.4GKB-White8
LiteonSK-8861(FR)2.4GKB-White8
LiteonSK-8861(GR)2.4GKB-White8
LiteonSK-8861(HU)2.4GKB-White8
LiteonSK-8861(BG)2.4GKB-White8
LiteonSK-8861(KR)2.4GKB-White8
LiteonSK-8861(JP)2.4GKB-White8
LiteonSK-8861(EN-FR)2.4GKB-White8
LiteonSK-8861(PT)2.4GKB-White8
LiteonSK-8861(BE-EN)2.4GKB-White8
LiteonSK-8861(US-EU)2.4GKB-White8
LiteonSM-8861(WW)2.4GMouseWhite
LX(ASAP)1.0MC5UKpowercord
LX(ASAP)1.0MC5Indiapowercord
LX(ASAP)1.0MC5T aiwanpowercord
LX(ASAP)1.0MC5SouthAfricapowercord
LX(ASAP)1.0MC5Argentinapowercord
LX(ASAP)1.0MC5Brazilpowercord
LX(ASAP)1.0MC5Koreapowercord
LX(ASAP)1.0MC5Italypowercord
LX(ASAP)1.0MC5Danmarkpowercord
LX(ASAP)1.0MC5Switzerlandpowercord
74ideacentreAll-In-One510ComputerHardwareMaintenanceManual
Page 81

Table3.AIO510–23ASRFRUlist(continued)
31503362
31503423
31503424
31503425
00XL002
00XL003
00XL051
00XL052
00XL053
00XL057
00XL058
00XL059
00XL060
00XL061
00XL062
00XL063
00XL064
00XL065
00XL066
00XL067
00XL068
00XL069
00XL070
00XL071
00XL072
00XL073
00XL074
00XL075
00XL076
00XL077
00XL078
00XL079
00XL080
00XL081
00XL082
00XL083
00XL084
00XL085
00XL086
LX(ASAP)1.0MC5Israelpowercord
Longwell1.0MC52pinJapanpowercord
Volex1.0MC52pinJapanpowercord
LS1.0MC52pinJapanpowercord
Fru,JP ,Anti-TR,1M,2P ,NON-LH
Fru,JP ,Anti-TR,1M,2P ,NON-LH
Fru,US/CA,1M,3P ,NON-LH
Fru,US/CA,1M,3P ,NON-LH
Fru,US/CA,1M,3P ,NON-LH
Fru,LINECORD,AR,1M,3P ,NON-LH
Fru,LINECORD,AR,1M,3P ,NON-LH
Fru,LINECORD,AR,1M,3P ,NON-LH
Fru,LINECORD,BR,1M,3P ,NON-LH
Fru,LINECORD,BR,1M,3P ,NON-LH
Fru,LINECORD,BR,1M,3P ,NON-LH
Fru,EU/KR,1M,3P ,NON-LH
Fru,EU/KR,1M,3P ,NON-LH
Fru,EU/KR,1M,3P ,NON-LH
Fru,LINECORD,DK,1M,3P ,NON-LH
Fru,LINECORD,DK,1M,3P ,NON-LH
Fru,LINECORD,DK,1M,3P ,NON-LH
Fru,LINECORD,CH,1M,3P ,NON-LH
Fru,LINECORD,CH,1M,3P ,NON-LH
Fru,LINECORD,CH,1M,3P ,NON-LH
Fru,LINECORD,IT,1M,3P ,NON-LH
Fru,LINECORD,IT,1M,3P ,NON-LH
Fru,LINECORD,IT,1M,3P ,NON-LH
Fru,LINECORD,GB,1M,3P ,NON-LH
Fru,LINECORD,GB,1M,3P ,NON-LH
Fru,LINECORD,GB,1M,3P ,NON-LH
Fru,LINECORD,AU,1M,3P ,NON-LH
Fru,LINECORD,AU,1M,3P ,NON-LH
Fru,LINECORD,AU,1M,3P ,NON-LH
Fru,LINECORD,ZA,1M,3P ,NON-LH
Fru,LINECORD,ZA,1M,3P ,NON-LH
Fru,LINECORD,ZA,1M,3P ,NON-LH
Fru,LINECORD,IL,1M,3P ,NON-LH
Fru,LINECORD,IL,1M,3P ,NON-LH
Fru,LINECORD,IL,1M,3P ,NON-LH
Chapter9.FRUlists75
Page 82

Table3.AIO510–23ASRFRUlist(continued)
00XL089
00XL090
00XL091
00XL092
00XL093
00XL094
00XL096
00XL097
5L60J33143
MECH_ASM
01EF402
01EF403
01EF404
01EF405
01EF406
01EF407
01EF408
01EF409
01EF410
01EF411
01EF412
01EF413
01EF415
01EF416
01EF417
01EF418
01EF419
01EF420
01EF421
MECHANICAL
01EF422Rubber,Forspeakerlock
01EF451
01EF452
01EF453
01EF454
01EF455
01EF456
01EF457Bracket,Forkensintonlock
01EF458Bracket,Forcameramodule
Fru,LINECORD,CN,1M,3P ,NON-LH
Fru,LINECORD,CN,1M,3P ,NON-LH
Fru,LINECORD,TW,1M,3P ,NON-LH
Fru,LINECORD,TW,1M,3P ,NON-LH
Fru,LINECORD,TW,1M,3P ,NON-LH
Fru,LINECORD,IN,1M,3P ,NON-LH
Fru,LINECORD,IN,1M,3P ,NON-LH
Fru,LINECORD,TH,1M,3P ,NON-LH
lux0014+H03VV-F0.75/3C+0011
GTStandlightsilverC4/5
GTStanddeepsilverC4/5
StronkinStandlightsilver
StronkinStanddeepsilver
ASSYFronthousing,W
ASSYFronthousing,B
ASSYRearcover,W
ASSYRearcover,B
ASSYPanelhousing_ASR,W
ASSYPanelhousing_ASR,B
ASSYM_coverASR,C5,W
ASSYM_coverASR,C5,B
HDDCAGE
ASSYShieldingforHDD
ASSYFrameforMB_ASR
MBSHIELDING,W/HDMI
ASSYPANELLGD230W,NT
ASSYPANELBOE230FH,NT
ASSYPANELLG23WT ouch
EMI_GASKET_RearIO
EMI_GASKET_HDMI_A
EMI_GASKET_HDMI_B
SPONGE,ForFronthousing,C5
Cover,SideIOCover,White
Cover,SideIOCover,Black
76ideacentreAll-In-One510ComputerHardwareMaintenanceManual
Page 83

Table3.AIO510–23ASRFRUlist(continued)
01EF459
01EF465
01EF466
01EF467
01EF468
Bracket,ForPanel,C5
ASSYBezelwithODD,RAM,W
ASSYBezelwithODD,RAM,B
Bezel,WithoutODDWhiteC5
Bezel,WithoutODDBlackC5
01EF469Bracket,ForWIFIAntennaKit
01EF537
BracketLatch,ForODD
MEMORY
01AG7002GBDDR42400SoDIMM
01AG7014GBDDR42400SoDIMM
01AG7042GBDDR42400SoDIMM
01AG7052GBDDR42400SoDIMM
01AG7062GBDDR42400SoDIMM
01AG7074GBDDR42400SoDIMM
01AG7084GBDDR42400SoDIMM
01AG7094GBDDR42400SoDIMM
01AG7108GBDDR42400SoDIMM
01AG7118GBDDR42400SoDIMM
01AG7128GBDDR42400SoDIMM
MICROPHONE
01AH402
AIO510Microphone
MOUSE
00PH131
00PH132
01AH700
USBCalliopeMouseBlack(Orangewh
USB,Calliope,Mouse,White
LiteonSM-8861(WW)MouseBlack
OPT_DRIVE
00FC442SMD,DT,SATA,9.5mm,x8,w/obezel
SPEAKERINT
01AH925
AIO510speaker
SSD_ASM
00JT086
00JT087
00UP420
00UP422
128G,M.2,2280,SATA6G,LTON,STD
256G,M.2,2280,SATA6G,LTON,STD
128G,M.2,2280,SATA6G,SAMSG,STD
256G,M.2,2280,SATA6G,SAMSG,STD
WIRELESS
00JT482
01AX709
Wireless,CMB,CBT,8821AE
Wireless,CMB,LTN,NFA435A
Chapter9.FRUlists77
Page 84

Table4.AIO510–23ISHFRUlist
FRUP/N
AC_ADAPTER
00PC727AC_ADAPTER,120W ,100-240Vac,3P
ANTENNA
00XJ086
BDPLANAR
00UW376
00UW377
00UW378
00UW379
CABLE
31032953
31033857
31033858
31035332
31035395
31035396
31035397
31035828
31038885
31039100
31039101
31039103
31039104
31039105
31039106
31039107
31045147
31049496
31049497
31049498
31049499
31049500
31049501
31049502
31049503
31049504
31049505
31049507
Description
C4C5antenna
MBIntelSkylake-H110,UMA,HDMI
MBIntelSkylake-H110,UMA,HDMI
MBIntelSkylake-H110,940MX2G,
MBIntelSkylake-H110,940MX2G,
GSBLK1.0m3wireCCCpowercord(R)
LWBLK1.0m3wireULCSApowercord(R)
VLBLK1.0m3wireULCSApowercord(R)
LWBLK1.0mVDEpowercord(R)
LWBLK1.0mIndiapowercord(R)
LWBLK1.0mUKpowercord(R)
LWBLK1.0mANZpowercord(R)
LWBLK1.0mBrazilpowercord(R)
LWBLK1.0mTaiwanC5powercord(R)
LWBLK1.0mArgentinaC5powercord(R)
LWBLK1.0mDenmarkC5powercord(R)
LWBLK1.0mSwitzerlandC5powercord(R)
LWBLK1.0mItalyC5powercord(R)
LWBLK1.0mSAC5powercord(R)
LWBLK1.0mKoreaC5powercord(R)
LWBLK1.0mIsraelC5powercord(R)
LX(ASAP)1.0MC5CCCpowercord
Volex1.0MC5UKpowercord
Volex1.0MC5EUpowercord
Volex1.0MC5KORpowercord
Volex1.0MC5TWpowercord
Volex1.0MC5ANZpowercord
Volex1.0MC5SApowercord
Volex1.0MC5ISIpowercord
Volex1.0MC5DENpowercord
Volex1.0MC5ITYpowercord
Volex1.0MC5BRpowercord
Volex1.0MC5LApowercord
78ideacentreAll-In-One510ComputerHardwareMaintenanceManual
Page 85

Table4.AIO510–23ISHFRUlist(continued)
31049508
31049517
31049518
31049520
00XJ043
00XJ046
00XJ049
00XJ052
00XJ053
00XJ055
00XJ056
DT_KYB
00UW407
00XH587
00XH588
00XH591
00XH593
00XH594
00XH595
00XH598
00XH601
00XH602
00XH604
00XH605
00XH607
00XH608
00XH610
00XH611
00XH614
00XH616
00XH618
00XH619
00XH621
00XH622
00XH624
00XH625
00XH626
00XH627
00XH630
Volex1.0MC5SWIpowercord
LX(ASAP)1.0MC5ULpowercord
LX(ASAP)1.0MC5EUpowercord
LX(ASAP)1.0MC5ANZpowercord
C4C5HDDSATAcable
C5ODDSATAcable
C4C5PowerboardFFC
C5S5LVDScable
C4C5S5Cameracable
C4C5S5MICcable
C4C5S5Touchcable
LiteonSK-88612.4GKB(BR)-BLK
USBCalliopeKBBKENG
USBCalliopeKBBKARA
USB,Calliope,KB,BK,BELENG
USBCalliopeKBBKBUL
USBCalliopeKBBKTC/ENG
USBCalliopeKBBKCZE
USBCalliopeKBBKFRA
USBCalliopeKBBKGER
USBCalliopeKBBKGRE
USBCalliopeKBBKHBW
USBCalliopeKBBKHUN
USBCalliopeKBBKITA
USBCalliopeKBBKJPN
USBCalliopeKBBKKOR
USB,Calliope,KB,BK,LASPA
USBCalliopeKBBKPOR
USBCalliopeKBBKRUS
USBCalliopeKBBKSLK
USBCalliopeKBBKSPA
USBCalliopeKBBKSWS
USBCalliopeKBBKTHAI
USBCalliopeKBBKTUR
USBCalliopeKBBKUKE
USBCalliopeKBBKEUROENG
USBCalliopeKBBKSLV
USBCalliopeKBBKINDENG
Chapter9.FRUlists79
Page 86

Table4.AIO510–23ISHFRUlist(continued)
00XH633
00XH635
00XH637
00XH638
00XH641
00XH643
00XH644
00XH645
00XH648
00XH651
00XH652
00XH654
00XH655
00XH657
00XH658
00XH660
00XH661
00XH664
00XH666
00XH668
00XH669
00XH671
00XH672
00XH674
00XH675
00XH676
00XH677
00XH680
00XH683
00XH685
01AH627
01AH628
01AH629
01AH630
01AH631
01AH632
01AH633
01AH634
01AH635
USBCalliopeKBBKNORDIC
USBCalliopeKBBKCANENG/FRA
USB,Calliope,KB,WH,ENG
USB,Calliope,KB,WH,ARA
USB,Calliope,KB,WH,BELENG
USB,Calliope,KB,WH,BUL
USB,Calliope,KB,WH,TC/ENG
USB,Calliope,KB,WH,CZE
USB,Calliope,KB,WH,FRA
USB,Calliope,KB,WH,GER
USB,Calliope,KB,WH,GRE
USB,Calliope,KB,WH,HBW
USB,Calliope,KB,WH,HUN
USB,Calliope,KB,WH,ITA
USB,Calliope,KB,WH,JPN
USB,Calliope,KB,WH,KOR
USBCalliopeKBWHLASP A
USB,Calliope,KB,WH,POR
USB,Calliope,KB,WH,RUS
USB,Calliope,KB,WH,SLK
USB,Calliope,KB,WH,SPA
USB,Calliope,KB,WH,SWS
USB,Calliope,KB,WH,THAI
USB,Calliope,KB,WH,TUR
USB,Calliope,KB,WH,UKE
USB,Calliope,KB,WH,EURO,ENG
USB,Calliope,KB,WH,SLV
USB,Calliope,KB,WH,IND,ENG
USB,Calliope,KB,WH,NORDIC
USB,Calliope,KB,WH,CAN,ENG/FRA
Liteon2.4GBlackSK-8861US
Liteon2.4GBlackSK-8861US-MY
Liteon2.4GBlackSK-8861TW
Liteon2.4GBlackSK-8861TH
Liteon2.4GBlackSK-8861CS-SK
Liteon2.4GBlackSK-8861US-IN
Liteon2.4GBlackSK-8861RU
Liteon2.4GBlackSK-8861GB
Liteon2.4GBlackSK-8861Nordic
80ideacentreAll-In-One510ComputerHardwareMaintenanceManual
Page 87

Table4.AIO510–23ISHFRUlist(continued)
01AH636
01AH637
01AH638
01AH639
01AH640
01AH641
01AH642
01AH643
01AH644
01AH645
01AH646
01AH647
01AH648
01AH649
01AH650
01AH651
01AH652
01AH653
01AH654
01AH655
Liteon2.4GBlackSK-8861LA
Liteon2.4GBlackSK-8861LA-AR
Liteon2.4GBlackSK-8861SA
Liteon2.4GBlackSK-8861CH
Liteon2.4GBlackSK-8861DE
Liteon2.4GBlackSK-8861TR
Liteon2.4GBlackSK-8861ES
Liteon2.4GBlackSK-8861SL
Liteon2.4GBlackSK-8861IT
Liteon2.4GBlackSK-8861IL
Liteon2.4GBlackSK-8861FR
Liteon2.4GBlackSK-8861GR
Liteon2.4GBlackSK-8861HU
Liteon2.4GBlackSK-8861BG
Liteon2.4GBlackSK-8861KR
Liteon2.4GBlackSK-8861JP
Liteon2.4GBlackSK-8861EN-FR
Liteon2.4GBlackSK-8861PT
Liteon2.4GBlackSK-8861BE-EN
Liteon2.4GBlackSK-8861US-EU
FAN
00XD814
SysfanforMutuo_P9110x15mm
HDD_ASM
00PC550HDD,500G,7200,DT3,SATA3,STD
00PC551HDD,1TB,7200,DT3,SATA3,STD
00PC552HDD,2TB,7200,DT3,SATA3,STD
45K0623
45K0625
45K0629
HDD,1TB,7200,DT3,SA T A3,STD
HDD,2TB,7200,DT3,SA T A3,STD
HDD,500G,7200,DT3,SA T A3,STD
HEATSINK
01EF353UMAThermalModule
01EF354
DISThermalModule
KYB_MOUSE
25210987
25210988
25210989
25210990
25210991
25210992
LiteonSK-8861(US)2.4GKB-White8
LiteonSK-8861(US-MY)2.4GKB-White8
LiteonSK-8861(TW)2.4GKB-White8
LiteonSK-8861(TH)2.4GKB-White8
LiteonSK-8861(CS-SK)2.4GKB-White8
LiteonSK-8861(US-IN)2.4GKB-White8
Chapter9.FRUlists81
Page 88

Table4.AIO510–23ISHFRUlist(continued)
25210993
25210994
25210995
25210996
25210997
25210998
25210999
25211000
25211001
25211002
25211003
25211004
25211005
25211006
25211007
25211008
25211009
25211010
25211011
25211012
25211013
25211014
25211015
25211016
25211018
LINECORD
31503352
31503353
31503354
31503355
31503356
31503357
31503358
31503359
31503360
31503361
31503362
31503423
31503424
LiteonSK-8861(RU)2.4GKB-White8
LiteonSK-8861(GB)2.4GKB-White8
LiteonSK-8861(Nordic)2.4GKB-White8
LiteonSK-8861(LA)2.4GKB-White8
LiteonSK-8861(LA-AR)2.4GKB-White8
LiteonSK-8861(SA)2.4GKB-White8
LiteonSK-8861(CH)2.4GKB-White8
LiteonSK-8861(DE)2.4GKB-White8
LiteonSK-8861(TR)2.4GKB-White8
LiteonSK-8861(ES)2.4GKB-White8
LiteonSK-8861(SL)2.4GKB-White8
LiteonSK-8861(IT)2.4GKB-White8
LiteonSK-8861(IL)2.4GKB-White8
LiteonSK-8861(FR)2.4GKB-White8
LiteonSK-8861(GR)2.4GKB-White8
LiteonSK-8861(HU)2.4GKB-White8
LiteonSK-8861(BG)2.4GKB-White8
LiteonSK-8861(KR)2.4GKB-White8
LiteonSK-8861(JP)2.4GKB-White8
LiteonSK-8861(EN-FR)2.4GKB-White8
LiteonSK-8861(PT)2.4GKB-White8
LiteonSK-8861(BE-EN)2.4GKB-White8
LiteonSK-8861(US-EU)2.4GKB-White8
LiteonSM-8861(WW)2.4GMouseWhite
LiteonSM-88612.4GMouse(MY)White
LX(ASAP)1.0MC5UKpowercord
LX(ASAP)1.0MC5Indiapowercord
LX(ASAP)1.0MC5T aiwanpowercord
LX(ASAP)1.0MC5SouthAfricapowercord
LX(ASAP)1.0MC5Argentinapowercord
LX(ASAP)1.0MC5Brazilpowercord
LX(ASAP)1.0MC5Koreapowercord
LX(ASAP)1.0MC5Italypowercord
LX(ASAP)1.0MC5Danmarkpowercord
LX(ASAP)1.0MC5Switzerlandpowercord
LX(ASAP)1.0MC5Israelpowercord
Longwell1.0MC52pinJapanpowercord
Volex1.0MC52pinJapanpowercord
82ideacentreAll-In-One510ComputerHardwareMaintenanceManual
Page 89

Table4.AIO510–23ISHFRUlist(continued)
31503425
00XL002
00XL003
00XL051
00XL052
00XL053
00XL057
00XL058
00XL059
00XL060
00XL061
00XL062
00XL063
00XL064
00XL065
00XL066
00XL067
00XL068
00XL069
00XL070
00XL071
00XL072
00XL073
00XL074
00XL075
00XL076
00XL077
00XL078
00XL079
00XL080
00XL081
00XL082
00XL083
00XL084
00XL085
00XL086
00XL089
00XL090
00XL091
LS1.0MC52pinJapanpowercord
Fru,JP ,Anti-TR,1M,2P ,NON-LH
Fru,JP ,Anti-TR,1M,2P ,NON-LH
Fru,US/CA,1M,3P ,NON-LH
Fru,US/CA,1M,3P ,NON-LH
Fru,US/CA,1M,3P ,NON-LH
Fru,LINECORD,AR,1M,3P ,NON-LH
Fru,LINECORD,AR,1M,3P ,NON-LH
Fru,LINECORD,AR,1M,3P ,NON-LH
Fru,LINECORD,BR,1M,3P ,NON-LH
Fru,LINECORD,BR,1M,3P ,NON-LH
Fru,LINECORD,BR,1M,3P ,NON-LH
Fru,EU/KR,1M,3P ,NON-LH
Fru,EU/KR,1M,3P ,NON-LH
Fru,EU/KR,1M,3P ,NON-LH
Fru,LINECORD,DK,1M,3P ,NON-LH
Fru,LINECORD,DK,1M,3P ,NON-LH
Fru,LINECORD,DK,1M,3P ,NON-LH
Fru,LINECORD,CH,1M,3P ,NON-LH
Fru,LINECORD,CH,1M,3P ,NON-LH
Fru,LINECORD,CH,1M,3P ,NON-LH
Fru,LINECORD,IT,1M,3P ,NON-LH
Fru,LINECORD,IT,1M,3P ,NON-LH
Fru,LINECORD,IT,1M,3P ,NON-LH
Fru,LINECORD,GB,1M,3P ,NON-LH
Fru,LINECORD,GB,1M,3P ,NON-LH
Fru,LINECORD,GB,1M,3P ,NON-LH
Fru,LINECORD,AU,1M,3P ,NON-LH
Fru,LINECORD,AU,1M,3P ,NON-LH
Fru,LINECORD,AU,1M,3P ,NON-LH
Fru,LINECORD,ZA,1M,3P ,NON-LH
Fru,LINECORD,ZA,1M,3P ,NON-LH
Fru,LINECORD,ZA,1M,3P ,NON-LH
Fru,LINECORD,IL,1M,3P ,NON-LH
Fru,LINECORD,IL,1M,3P ,NON-LH
Fru,LINECORD,IL,1M,3P ,NON-LH
Fru,LINECORD,CN,1M,3P ,NON-LH
Fru,LINECORD,CN,1M,3P ,NON-LH
Fru,LINECORD,TW,1M,3P ,NON-LH
Chapter9.FRUlists83
Page 90

Table4.AIO510–23ISHFRUlist(continued)
00XL092
00XL093
00XL094
00XL096
00XL097
5L60J33143
MECH_ASM
01EF402
01EF403
01EF404
01EF405
01EF406
01EF407
01EF408
01EF409
01EF415
01EF416
01EF418
01EF419
01EF420
01EF421
01EF460
01EF461
01EF462
01EF463
01EF464
MECHANICAL
01EF422Rubber,Forspeakerlock
01EF451
01EF452
01EF453
01EF454
01EF455
01EF456
01EF457Bracket,Forkensintonlock
01EF458Bracket,Forcameramodule
01EF459
01EF465
01EF466
Fru,LINECORD,TW,1M,3P ,NON-LH
Fru,LINECORD,TW,1M,3P ,NON-LH
Fru,LINECORD,IN,1M,3P ,NON-LH
Fru,LINECORD,IN,1M,3P ,NON-LH
Fru,LINECORD,TH,1M,3P ,NON-LH
lux0014+H03VV-F0.75/3C+0011
GTStandlightsilverC4/5
GTStanddeepsilverC4/5
StronkinStandlightsilver
StronkinStanddeepsilver
ASSYFronthousing,W
ASSYFronthousing,B
ASSYRearcover,W
ASSYRearcover,B
HDDCAGE
ASSYShieldingforHDD
MBSHIELDING,W/HDMI
ASSYPANELLGD230W,NT
ASSYPANELBOE230FH,NT
ASSYPANELLG23WT ouch
ASSYPanelhousing_ISH,W
ASSYPanelhousing_ISH,B
ASSYM_coverforISH,C5,W
ASSYM_coverforISH,C5,B
ASSYFrameforMB_ISH
EMI_GASKET_RearIO
EMI_GASKET_HDMI_A
EMI_GASKET_HDMI_B
SPONGE,ForFronthousing,C5
Cover,SideIOCover,White
Cover,SideIOCover,Black
Bracket,ForPanel,C5
ASSYBezelwithODD,RAM,W
ASSYBezelwithODD,RAM,B
84ideacentreAll-In-One510ComputerHardwareMaintenanceManual
Page 91

Table4.AIO510–23ISHFRUlist(continued)
01EF467
01EF468
Bezel,WithoutODDWhiteC5
Bezel,WithoutODDBlackC5
01EF469Bracket,ForWIFIAntennaKit
01EF537
BracketLatch,ForODD
MEMORY
01AG7002GBDDR42400SoDIMM
01AG7014GBDDR42400SoDIMM
01AG7042GBDDR42400SoDIMM
01AG7052GBDDR42400SoDIMM
01AG7062GBDDR42400SoDIMM
01AG7074GBDDR42400SoDIMM
01AG7084GBDDR42400SoDIMM
01AG7094GBDDR42400SoDIMM
01AG7108GBDDR42400SoDIMM
01AG7118GBDDR42400SoDIMM
01AG7128GBDDR42400SoDIMM
MICROPHONE
01AH402
AIO510Microphone
MOUSE
00PH131
00PH132
01AH700
01AH701
USBCalliopeMouseBlack(Orangewh
USB,Calliope,Mouse,White
LiteonSM-8861(WW)MouseBlack
LiteonSM-8861Mouse(MY)Black
OPT_DRIVE
00FC442SMD,DT,SATA,9.5mm,x8,w/obezel
SP
00XG111IntelCorei3-6100T3.2GHz35W
00XG113IntelCeleronG3900T2.6GHz35W
00XG114IntelPentiumG4400T2.9GHz35W
01AG002II7-6700T2.8GHz/4C/8M35W
01AG005II5-6400T2.2GHz/4C/6M35W
01AG044IntelI7-6700T2.8GHz/4C/8M35W
01AG047II5-6400T2.2GHz/4C/6M35W
SPEAKERINT
01AH925
AIO510speaker
SSD_ASM
00JT095
00JT096
128G,M.2,2280,PCIe3x4,SAMSG,STD
256G,M.2,2280,PCIe3x4,SAMSG,STD
WIRELESS
Chapter9.FRUlists85
Page 92

Table4.AIO510–23ISHFRUlist(continued)
00JT482
00JT497
Wireless,CMB,CBT,8821AE
Wireless,CMB,IN,3165ac
86ideacentreAll-In-One510ComputerHardwareMaintenanceManual
Page 93

Chapter10.Generalinformation
Thischapterprovidesgeneralinformationthatappliestoallcomputermodelscoveredbythismanual.
AdditionalServiceInformation
Thischapterprovidesadditionalinformationthattheservicerepresentativemightfindhelpful.
Powermanagement
Powermanagementreducesthepowerconsumptionofcertaincomponentsofthecomputersuchasthe
systempowersupply,processor,harddiskdrives,andsomemonitors.
Advancedconfigurationandpowerinterface(ACPI)BIOS
AsthiscomputerhasanACPIBIOSsystem,theoperatingsystemisallowedtocontrolthepower
managementfeaturesofthecomputerandthesettingsforAdvancedPowerManagement(APM)BIOSmode
isignored.NotalloperatingsystemssupportACPIBIOSmode.
AutomaticPower-Onfeatures
TheAutomaticPower-OnfeatureswithinthePowerManagementmenuallowyoutoenableanddisable
featuresthatturnonthecomputerautomatically.
•WakeUponAlarm:Y oucanspecifyadateandtimeatwhichthecomputerwillbeturnedonautomatically.
Thiscanbeeitherasingleevent,adailyeventoraweeklyevent.
•WakeUponLAN:ThisfeatureallowsLANadaptercardtowaketheSystem.
©CopyrightLenovo2016
87
 Loading...