

Page 1

ThinkPadHelixUserGuide
MachineTypes:20CGand20CH
Page 2

Note:Beforeusingthisinformationandtheproductitsupports,besuretoreadandunderstandthefollowing:
•Safety,Warranty,andSetupGuide
•RegulatoryNotice
•“Importantsafetyandhandlinginformation”onpageiii
•AppendixE“Notices”onpage117
ThelatestSafety,Warranty,andSetupGuideandtheRegulatoryNoticeareavailableontheLenovoSupport
Websiteathttp://www.lenovo.com/UserManuals.
SecondEdition(February2015)
©CopyrightLenovo2014,2015.
LIMITEDANDRESTRICTEDRIGHTSNOTICE:IfdataorsoftwareisdeliveredpursuantaGeneralServicesAdministration
“GSA”contract,use,reproduction,ordisclosureissubjecttorestrictionssetforthinContractNo.GS-35F-05925.
Page 3

Contents
Readthisfirst.............iii
Importantsafetyandhandlinginformation.....iii
Chapter1.Productoverview......1
Tabletlayout................1
Frontviewandsideview..........1
Rearview................3
Accessories.................5
Features..................6
Specifications................7
Operatingenvironment............8
Lenovoprograms..............8
Chapter2.Usingyourtablet.....11
Initialsetupinstructions...........11
Usingthemulti-touchscreen.........11
Powermanagement............13
Chargingthebattery..........13
Extendingthebatterylifebetweencharges..14
Checkingthebatterystatus........15
UsingtheTabletDigitizerPenorThinkPadActive
Pen...................15
UsingtheOn-ScreenKeyboardorthetouch
keyboardandhandwritingpanel........17
Changingthestartupbehaviortoopeneitherthe
desktoportheStartscreen..........17
AttachinganEthernetcable.........17
Downloadinggamesandapplications.....18
Usingthefingerprintreader..........18
UsingtheThinkPadHelixQuickshotCover...21
Usingthecameras.............23
Usingthemicro-SD-cardreader........23
Usingasmartcard.............25
UsingHDMIdevices............28
Usingsynchronizationsolutions........28
UsingtheGlobalNavigationSatelliteSystem
receiver.................29
Turningoffthetablet............29
Chapter3.Wirelessnetworksand
devices................31
InstallingandremovingthemicroSIMcard...31
Determiningwhichmobilenetworkyouareusing.33
ConnectingtoaWi-Finetwork........33
Connectingtoamobilenetwork........34
SharingyourInternetconnection.......35
UsingBluetoothdevices...........35
UsingtheNFCconnection..........36
Chapter4.Youandyourtablet....41
Comfortandaccessibility..........41
Usingyourtabletmorecomfortably....41
Accessibilityinformation.........41
Gettingupdates..............44
Travelingwithyourtablet...........44
Traveltips...............44
Travelaccessories...........45
Careandmaintenance...........45
Chapter5.ThinkPadHelixoptions..47
ThinkPadHelixUltrabookKeyboard......47
OverviewoftheThinkPadHelixUltrabook
Keyboard...............47
UsingtheThinkPadHelixUltrabook
Keyboard...............48
ThinkPadHelixUltrabookProKeyboard.....53
OverviewoftheThinkPadHelixUltrabookPro
Keyboard...............53
UsingtheThinkPadHelixUltrabookPro
Keyboard...............55
ThinkPadTabletDock............65
OverviewoftheThinkPadTabletDock...65
UsingtheThinkPadTabletDock......67
Chapter6.Security..........69
Usingpasswords..............69
Typingpasswords...........69
Passwordsandsleepmode........69
Power-onpassword...........69
Supervisorpassword..........70
Harddiskpasswords..........71
Harddisksecurity...........73
Usingthesecuritychip...........74
Usingfirewalls...............74
Protectingdataagainstviruses........74
Chapter7.Advancedconfiguration..77
Installingdevicedrivers...........77
ThinkPadTabletSetup...........77
Mainmenu..............78
Configmenu..............78
Securitymenu.............80
Startupmenu.............84
Restartmenu.............85
UpdatingyoursystemUEFIBIOS.....86
Usingsystemmanagement..........86
Systemmanagement..........86
©CopyrightLenovo2014,2015
i
Page 4

Chapter8.Troubleshooting
problems...............89
Diagnosingproblems............89
Troubleshooting..............89
Recoveringfromaseveresoftwareproblem...91
Errormessages..............91
Chapter9.Recoveryinformation...93
Refreshingyourtablet............93
Resettingyourtablettothefactorydefault
settings.................93
Usingtheadvancedstartupoptions......94
RecoveringyouroperatingsystemifWindows8.1
failstostart................94
Creatingandusingrecoverymedia......94
Chapter10.Gettingsupport.....97
Locatingimportantproductinformation.....97
Lenovotechnicalsupport..........98
Lenovouserforums.............99
FindingThinkPadoptions..........99
Purchasingadditionalservices........99
AppendixA.Regulatory
information.............101
Wirelessrelatedinformation.........101
LocatingtheUltraConnect™wireless
antennas...............102
Locatingwirelessregulatorynotices....103
Certificationrelatedinformation......103
Exportclassificationnotice..........103
Electronicemissionnotices..........103
FederalCommunicationsCommission
DeclarationofConformity........103
IndustryCanadaClassBemissioncompliance
statement...............104
EuropeanUnion-Compliancetothe
ElectromagneticCompatibilityDirective...104
GermanClassBcompliancestatement...104
KoreaClassBcompliancestatement....105
JapaneseVCCIClassBstatement.....105
Japancompliancestatementforproducts
whichconnecttothepowermainswith
ratedcurrentlessthanorequalto20Aper
phase................105
Lenovoproductserviceinformationfor
Taiwan................105
Eurasiancompliancemark..........105
Brazilregulatorynotice...........105
Mexicoregulatorynotice...........105
AppendixB.WEEEandrecycling
information.............107
ImportantWEEEinformation.........107
RecyclinginformationforChina........107
RecyclinginformationforJapan........107
RecyclinginformationforBrazil........108
BatteryrecyclinginformationforTaiwan.....109
BatteryrecyclinginformationfortheUnitedStates
andCanada................109
BatteryrecyclinginformationfortheEuropean
Union..................109
ChinarecyclinginformationforWasteElectrical
andElectronicEquipment(WEEE).......110
AppendixC.RestrictionofHazardous
SubstancesDirective(RoHS)....111
EuropeanUnionRoHS...........111
ChinaRoHS................112
TurkishRoHS...............112
UkraineRoHS...............113
IndiaRoHS................113
AppendixD.ENERGYSTARmodel
information.............115
AppendixE.Notices.........117
Trademarks................118
iiThinkPadHelixUserGuide
Page 5
Readthisfirst
Besuretofollowtheimportanttipsgivenheretogetthemostuseandenjoymentoutofthetablet.Failureto
dosomightleadtodiscomfortorinjury,orcausethetablettofail.
Importantsafetyandhandlinginformation
Toavoidpersonalinjury,propertydamage,oraccidentaldamagetoyourThinkPad
calledthetablet),readalloftheinformationinthissectionbeforeusingit.
Fordetailedoperatinginstructions,refertotheThinkPadHelixUserGuide(thispublication).Y oucan
accesstheThinkPadHelixUserGuidebyusingoneofthefollowingmethods:
•Gotohttp://www.lenovo.com/UserManualsandfollowtheinstructionsonthescreen.
•OpenWindows
Foradditionaltipstohelpyouoperatethetabletsafely,goto:
http://www.lenovo.com/safety
®
HelpandSupport.ThentapLenovoUserGuide.
Handleyourtabletwithcare:
Donotdrop,bend,puncture,insertforeignobjects,orplaceheavyobjectsonyourtablet.Sensitive
componentsinsidemightbecomedamaged.
Yourtabletscreenismadeofglass.Theglassmightbreakifthetabletisdroppedonahardsurface,is
thesubjectofahighimpact,oriscrushedbyaheavyobject.Iftheglasschipsorcracks,donottouch
thebrokenglassorattempttoremoveitfromthetablet.Stopusingthetabletimmediatelyandcontact
Lenovo
®
technicalsupportforrepair,replacement,ordisposalinformation.
®
Helix(hereafter
Donotdisassembleormodifyyourtablet:
Yourtabletisasealedunit.Therearenoend-userserviceablepartsinside.Allinternalrepairsmustbedone
byaLenovo-authorizedrepairfacilityoraLenovo-authorizedtechnician.Attemptingtoopenormodifyyour
tabletwillvoidthewarranty.
Generalbatterynotice
DANGER
BatteriessuppliedbyLenovoforusewithyourproducthavebeentestedforcompatibilityand
shouldonlybereplacedwithapprovedparts.AbatteryotherthantheonespecifiedbyLenovo,ora
disassembledormodifiedbatteryisnotcoveredbythewarranty.
Batteryabuseormishandlingcancauseoverheat,liquidleakage,oranexplosion.T oavoidpossible
injury,dothefollowing:
•Donotopen,dissemble,orserviceanybattery.
•Donotcrushorpuncturethebattery.
•Donotshort-circuitthebattery,orexposeittowaterorotherliquids.
•Keepthebatteryawayfromchildren
•Keepthebatteryawayfromfire.
©CopyrightLenovo2014,2015
iii
Page 6
Stopusingthebatteryifitisdamaged,orifyounoticeanydischargeorthebuildupofforeign
materialsonthebatteryleads.
Storetherechargeablebatteriesorproductscontainingtherechargeablebatteriesatroom
temperature,chargedtoapproximately30to50%ofcapacity.Werecommendthatthebatteriesbe
chargedaboutonceperyeartopreventoverdischarge.
Donotputthebatteryintrashthatisdisposedofinlandfills.Whendisposingofthebattery,comply
withlocalordinancesorregulations.
Noticeforbuilt-inrechargeablebattery
DANGER
Donotattempttoreplacethebuilt-inrechargeablebattery.Replacementofthebatterymustbe
donebyaLenovo-authorizedrepairfacilityortechnician.
Onlyrechargethebuilt-inrechargeablebatterystrictlyaccordingtoinstructionsincludedinthe
productdocumentation.
TheLenovo-authorizedrepairfacilitiesortechniciansrecycleLenovobatteriesaccordingtolocal
lawsandregulations.
Noticefornon-rechargeablecoin-cellbattery
DANGER
Donotattempttoreplacethenon-rechargeablecoin-cellbattery.Replacementofthebatterymust
bedonebyaLenovo-authorizedrepairfacilityoraLenovo-authorizedtechnician.
Donotputthebatteryintrashthatisdisposedofinlandfills.Whendisposingofthebattery,comply
withlocalordinancesorregulations.TheLenovo-authorizedrepairfacilitiesortechniciansrecycle
Lenovobatteriesaccordingtolocallawsandregulations.
ThefollowingstatementappliestousersinthestateofCalifornia,U.S.A.
CaliforniaPerchlorateInformation:
Productscontainingmanganesedioxidelithiumcoin-cellbatteriesmaycontainperchlorate.
PerchlorateMaterial-specialhandlingmayapply,See
www.dtsc.ca.gov/hazardouswaste/perchlorate
Preventyourtabletandadapterfromgettingwet:
Donotimmerseyourtabletinwaterorleaveitinalocationwhereitcangetsaturatedwithwaterorother
liquids.
Usesupportedchargingmethodsonly:
Torechargetheinternalbatteryofyourtabletsafely,see“Chargingthebattery”onpage13.
Attention:UseonlyLenovo-approvedacpoweradaptersandpowercords.Unauthorizedacpower
adaptersandpowercordscouldseverelydamagethetablet.
ivThinkPadHelixUserGuide
Page 7

Chargingdevicesmightbecomewarmduringnormaluse.Ensurethatyouhaveadequateventilationaround
thechargingdevice.Unplugthechargingdeviceifanyofthefollowingoccurs:
•Thechargingdevicehasbeenexposedtorain,liquid,orexcessivemoisture.
•Thechargingdeviceshowssignsofphysicaldamage.
•Y ouwanttocleanthechargingdevice.
Lenovoisnotresponsiblefortheperformanceorsafetyofproductsnotmanufacturedorapprovedby
Lenovo.
Preventhearingdamage:
Yourtablethasacomboaudioconnectorthatyoucanuseforheadphones(alsocalledaheadset)or
earphones.
CAUTION:
Excessivesoundpressurefromearphonesandheadphonescancausehearingloss.Adjustmentof
theequalizertomaximumincreasestheearphoneandheadphoneoutputvoltageandthesound
pressurelevel.Therefore,toprotectyourhearing,adjusttheequalizertoanappropriatelevel.
Excessiveuseofheadphonesorearphonesforalongperiodoftimeathighvolumecanbedangerousif
theoutputoftheheadphoneorearphoneconnectorsdonotcomplywithspecificationsofEN50332-2.
TheheadphoneoutputconnectorofyourtabletcomplieswithEN50332-2Subclause7.Thisspecification
limitsthetablet'smaximumwidebandtrueRMSoutputvoltageto150mV.Tohelpprotectagainsthearing
loss,ensurethattheheadphonesorearphonesyouusealsocomplywithEN50332-2(Clause7limits)fora
widebandcharacteristicvoltageof75mV.UsingheadphonesthatdonotcomplywithEN50332-2canbe
dangerousduetoexcessivesoundpressurelevels.
Ifyourtabletcamewithheadphonesorearphonesinthepackage,asaset,thecombinationofthe
headphonesorearphonesandthetabletalreadycomplieswiththespecificationsofEN50332-1.Ifdifferent
headphonesorearphonesareused,ensurethattheycomplywithEN50332-1(Clause6.5Limitation
Values).UsingheadphonesthatdonotcomplywithEN50332-1canbedangerousduetoexcessive
soundpressurelevels.
Takecarewhenusingyourtabletinamotorvehicleoronabicycle:
Alwaysprioritizeyoursafetyandthesafetyofothers.Followthelaw.Locallawsandregulationsmight
governhowyoucanusemobileelectronicdevices,suchasyourtablet,whileyoudriveamotorvehicle
orrideabicycle.
Disposeaccordingtolocallawsandregulations:
Whenyourtabletreachestheendofitsusefullife,donotcrush,incinerate,immerseinwater,ordisposeof
yourtabletinanymannercontrarytolocallawsandregulations.Someinternalpartscontainsubstances
thatcanexplode,leak,orhaveanadverseenvironmentalaffectifdisposedofincorrectly.
SeeAppendixB“WEEEandrecyclinginformation”onpage107
foradditionalinformation.
Keepyourtabletandaccessoriesawayfromsmallchildren:
Yourtabletcontainssmallpartsthatcanbeachokinghazardtosmallchildren.Additionally,theglassscreen
canbreakorcrackifdroppedonorthrownagainstahardsurface.
©CopyrightLenovo2014,2015
v
Page 8
Protectyourdataandsoftware:
Donotdeleteunknownfilesorchangethenameoffilesordirectoriesthatwerenotcreatedbyyou;
otherwise,yourtabletsoftwaremightfailtowork.
Beawarethataccessingnetworkresourcescanleaveyourtabletvulnerabletoviruses,hackers,spyware,
andothermaliciousactivitiesthatmightdamageyourtablet,software,ordata.Itisyourresponsibilityto
ensurethatyouhaveadequateprotectionintheformoffirewalls,antivirussoftware,andanti-spyware
softwareandkeepthissoftwareuptodate.
Keepelectricalappliancessuchasanelectricfan,radio,high-poweredspeakers,airconditioner,and
microwaveovenawayfromyourtabletbecausethestrongmagneticfieldsgeneratedbytheseappliances
candamagethescreenandthedataonthetablet.
Beawareofheatgeneratedbyyourtablet:
Whenyourtabletisturnedonorthebatteryischarging,somepartsmightbecomehot.Thetemperature
thattheyreachdependsontheamountofsystemactivityandthelevelofchargeinthebattery.Extended
contactwithyourbody,eventhroughclothing,couldcausediscomfortorevenaskinburn.Avoidkeeping
yourhands,yourlap,oranyotherpartofyourbodyincontactwithahotsectionofthetabletforany
extendedtime.
Plasticbagnotice
DANGER
Plasticbagscanbedangerous.Keepplasticbagsawayfrombabiesandchildrentoavoiddanger
ofsuffocation.
PolyvinylChloride(PVC)cableandcordnotice
Manypersonalcomputerproductsandaccessoriescontaincords,cablesorwires,suchaspowercordsor
cordstoconnecttheaccessorytoapersonalcomputer.Ifthisproducthassuchacord,cableorwire,then
thefollowingwarningapplies:
WARNING:Handlingthecordonthisproductorcordsassociatedwithaccessoriessoldwiththisproduct
willexposeyoutolead,achemicalknowntotheStateofCaliforniatocausecancer,andbirthdefectsor
otherreproductiveharm.Washhandsafterhandling.
viThinkPadHelixUserGuide
Page 9
Chapter1.Productoverview
Thischapterprovidesanoverviewofthetablet,includingthelocationsofconnectorsandcontrols,tablet
features,accessories,specifications,operatingenvironment,andpreinstalledLenovoprograms.
Tabletlayout
Thistopicintroducesthetablethardwarefeaturestogiveyouthebasicinformationyouneedtostart
usingthetablet.
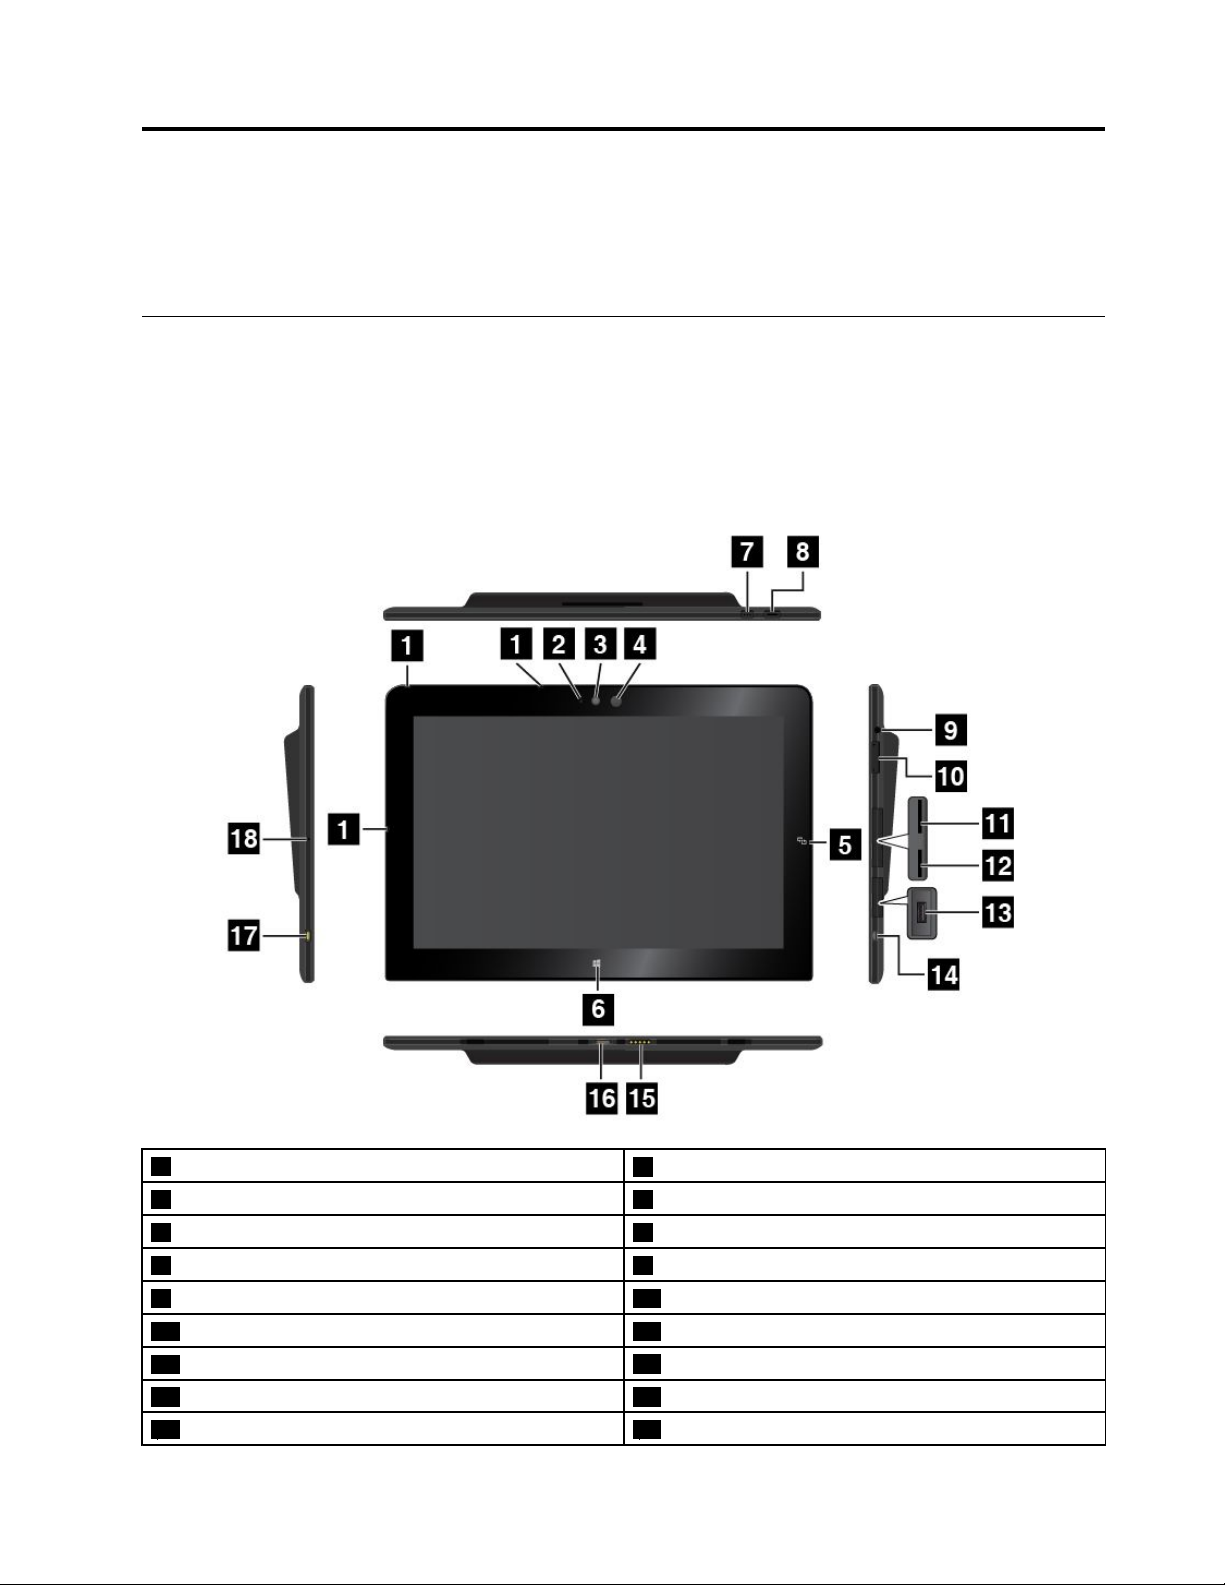
Frontviewandsideview
Note:Yourtabletmightlookslightlydifferentfromthefollowingillustration.
1Microphones
3Front-facingcamera
5NFCtouchpoint(onsomemodels)6WindowsStart-screencontrol
7Screen-rotation-lockbutton
9Audioconnector10Volume-controlbuttons
11Micro-SIM-cardslot(onsomemodels)12Micro-SD-cardslot
13USB3.0connector
15Keyboardconnector16Dockconnector
17Powerconnector18Emergency-resethole
©CopyrightLenovo2014,2015
2Camera-in-useindicator
4Ambientlightsensor
8Powerbutton
14MicroHDMI™connector
1
Page 10

1Microphones
Thebuilt-inmicrophonescapturesoundandvoicewhentheyareusedwithanapplicationcapableof
handlingaudio.
2Camera-in-useindicator
Whenyoustarteitherthefrontfacingcameraortherear-facingcamera,thecamera-in-useindicatorturns
onautomatically.
3Front-facingcamera
Yourtablethasa2-megapixelfront-facingcamera.Youcanusethecameratotakepictures,createvideos,
ormakevideocallsincollaborationwithWebapplications.Whenthecameraisstarted,thecamera-in-use
indicatorturnson.Formoreinformation,see“Usingthecameras”onpage23.
4Ambientlightsensor
Theambientlightsensordetectsthebrightnessoftheenvironment.Thescreenbrightnessautomatically
adjustsdependingontheambientlightconditionsdetectedbytheambientlightsensor.
5NFCtouchpoint(onsomemodels)
Ifyoufindanearfieldcommunication(NFC)touchpointontherightsideofthedisplay,itindicatesthat
yourtabletsupportstheNFCfeature.FormoreinformationabouttheNFCfeature,see“UsingtheNFC
connection”onpage36.
6WindowsStart-screencontrol
TaptheWindowsStart-screencontroltogototheStartscreen.
7Screen-rotation-lockbutton
Pressthebuttontoenableordisablethescreenauto-rotationfunction.
8Powerbutton
Pressthepowerbuttontoturnonthetablet.
Toturnoffthetablet,swipeinfromtherightedgeofthescreentodisplaythecharms.ThentapSettings➙
Power➙Shutdown.
Ifthetabletstopsrespondingandyoucannotturnitoff,pressandholdthepowerbuttonforfoursecondsor
more.
Youalsocanprogramthepowerbuttonsothatbypressingthepowerbuttonyoucanshutdownthetablet
orputitintosleeporhibernationmode.T oachievethis,changeyourpowerplansettings.Toaccess
powerplansettings,dothefollowing:
1.Fromthedesktop,tapthebattery-statusiconintheWindowsnotificationarea.
2.T apMorepoweroptions.
3.Inthenavigationpanel,tapChoosewhatthepowerbuttondoes.
4.Followtheinstructionsonthescreentochangethesettingsaccordingtoyourpreference.
9Audioconnector
Connectheadphonesoraheadsettolistentostereosoundfromthetablet.Youalsocanconnectaheadset
torecordaudioormakecalls.
Note:Theaudioconnectordoesnotsupportaconventionalmicrophone.
2ThinkPadHelixUserGuide
Page 11

10Volume-controlbuttons
Pressthevolume-uporvolume-downbuttontoadjustthetabletvolume.
11Micro-SIM-cardslot(onsomemodels)
OpentheprotectivecovertoaccessthemicroSubscriberIdentificationModule(SIM)cardslot.Inserta
microSIMcardtoestablishawirelesswideareanetwork(WAN)connection.Forinstructionsonhowto
installorremoveamicroSIMcard,see“InstallingandremovingthemicroSIMcard”onpage31.
12Micro-SD-cardslot
Opentheprotectivecovertoaccessthemicrosecuredigital(SD)cardreader.InsertamicroSDcardinto
themicro-SD-cardslotfordataaccessorstorage.Formoreinformation,see“Usingthemicro-SD-card
reader”onpage23.
13USB3.0connector
TheUSB3.0connectorisusedforconnectingUSB-compatibledevices,suchasaUSBprinter,USBmouse,
USBkeyboard,USBmemorykey,oradigitalcamera.
Attention:WhenyouattachaUSBcabletothisUSBconnector,ensurethattheUSBmarkisfacingupward.
Otherwisetheconnectormightgetdamaged.
14MicroHDMI
TM
connector
YourtablethasamicroHigh-DefinitionMultimediaInterface(HDMI)connector,whichisadigitalaudioand
videointerfacethatcanconnectacompatibledigitalaudiodeviceorvideodisplaysuchasahigh-definition
television(HDTV).Formoreinformation,see“UsingHDMIdevices”onpage28.
15Keyboardconnector
UsethisconnectortoconnectaThinkPadHelixUltrabook™Keyboard.Formoreinformation,see“ThinkPad
HelixUltrabookKeyboard”onpage47.
16Dockconnector
UsethisconnectortoconnectaThinkPadT abletDockandThinkPadHelixUltrabookProKeyboard.For
moreinformation,see“ThinkPadT abletDock”onpage65and“ThinkPadHelixUltrabookProKeyboard”
onpage53.
17Powerconnector
Usethisconnectorwiththesuppliedpowercordandtheacpoweradaptertochargethetabletwhen
thebatterypowerislow.
Formoreinformation,see“Chargingthebattery”onpage13.
18Emergency-resethole
Ifthetabletstopsrespondingandyoucannotturnitoffbypressingthepowerbutton,removetheacpower
adapterandinsertastraightenedpaperclipintotheemergency-resetholetoresetthetablet.
Rearview
Note:Yourtabletmightlookslightlydifferentfromthefollowingillustration.
Chapter1.Productoverview3
Page 12

1Rear-facingcamera
3System-statusindicator4Speakers
5Fingerprintreader(onsomemodels)
1Rear-facingcamera
2Smartcardslot(onsomemodels)
Yourtablethasan5-megapixelrear-facingcamera.Y oucanusethecameratotakepicturesandcreate
videos.Formoreinformation,see“Usingthecameras”onpage23.
2Smartcardslot(onsomemodels)
Yourtabletmighthaveasmartcardslot.Formoreinformation,see“Usingasmartcard”onpage25.
3System-statusindicator
TheilluminateddotintheThinkPadlogoonthebacksideofthetabletworksasasystem-statusindicator.
•Blinksthreetimes:Thetabletisconnectedtoapowersource.
•On:Thetabletisonandinuse.
•Off:Thetabletisoff,insleepmode,orinhibernationmode.
4Speakers
Theintegratedspeakersprovideaudiooutputforvideoandmusicplayback.
Note:IfthetabletisattachedtotheThinkPadHelixUltrabookProKeyboard,thespeakervolumeandmute
settingsfollowthespeakersettingoftheThinkPadHelixUltrabookProKeyboard.
5Fingerprintreader(onsomemodels)
Fingerprintauthenticationtechnologyprovidessimpleandsecureuseraccessbyassociatingyourfingerprint
withapassword.Formoreinformation,see“Usingthefingerprintreader”onpage18.
4ThinkPadHelixUserGuide
Page 13
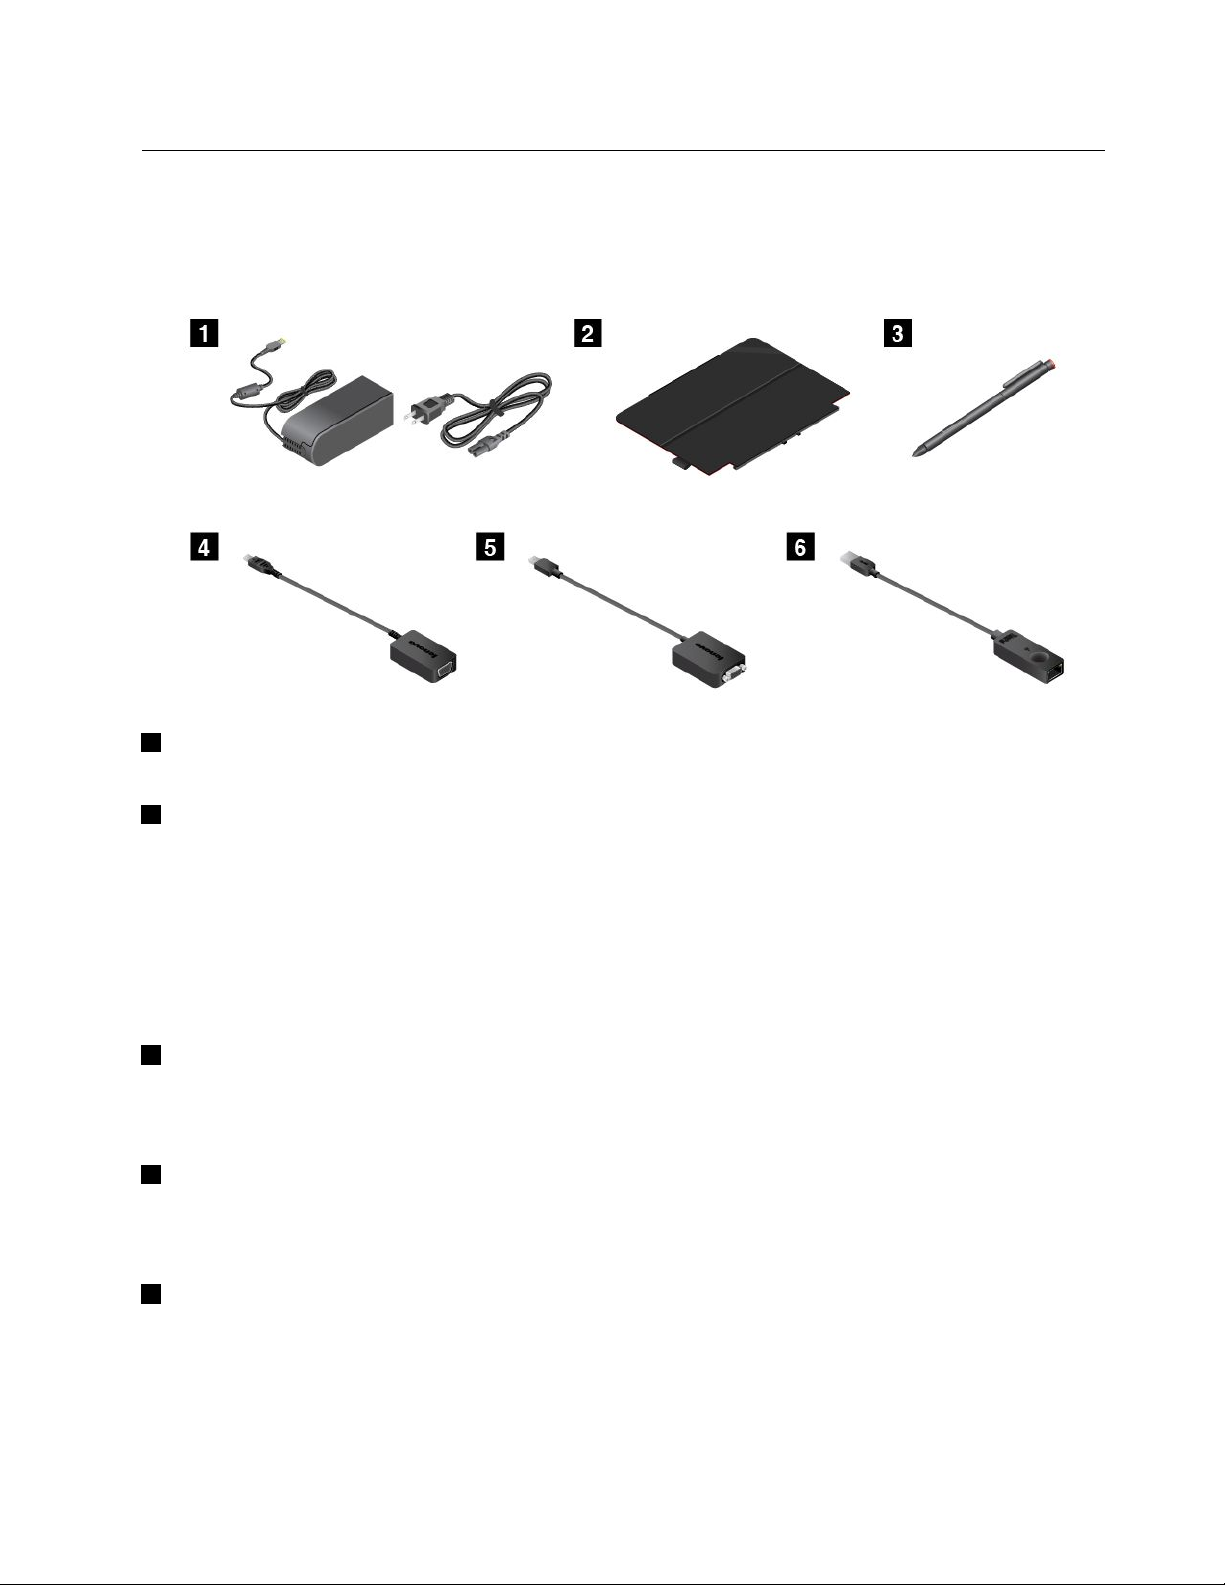
Accessories
Thefollowingaresomeexamplesofaccessoriesavailableforyourtablet.Dependingonyourtabletmodel,
someaccessoriesmightalreadybeshippedwithyourtablet.Ifyourtabletdoesnotcomewithsomeof
theaccessories,youcanpurchasethemfromtheLenovoWebsiteathttp://www.lenovo.com/essentialsor
fromaLenovoreseller.
1Powercordandacpoweradapter:Usethepowercordtogetherwiththeacpoweradaptertoprovide
acpowertoyourtabletandchargethebattery.
2ThinkPadHelixQuickshotCover(onsomemodels):YoucanattachedaThinkPadHelixQuickshot
Covertoyourtabletmagnetically.Usethecovertodothefollowing:
•Protectthetabletscreen.
•Wakeupthetabletorputthetabletintosleepmodeconveniently.
•Launchthecameraautomatically.
•Serveasastandforthetablet.
Formoreinformation,see“UsingtheThinkPadHelixQuickshotCover”onpage21
3TabletDigitizerPenorThinkPadActivePen(onsomemodels):UsetheT abletDigitizerPenor
.
ThinkPadActivePentoinputtextordrawgraphicsinanaturalmannerandperformotheroperationswithout
tappingthescreenwithyourfinger.Formoreinformation,see“UsingtheTabletDigitizerPenorThinkPad
ActivePen”onpage15
4LenovoMicroHDMIToVGAAdapter(onsomemodels):Usethisadaptertoconnectyourtablet
.
toaVGA-compatibleexternaldisplay.
Formoreinformation,see“UsingHDMIdevices”onpage28.
5LenovoMini-DisplayPorttoVGAAdapter(onsomemodels):Whenyourtabletisattachedtothe
ThinkPadHelixUltrabookProKeyboard,usethisadaptertoconnectyourtablettoaVGA-compatible
externaldisplay.
TolocatetheMiniDisplayPortconnectorontheThinkPadHelixUltrabookProKeyboard,see“Overviewof
theThinkPadHelixUltrabookProKeyboard”onpage53
.
Chapter1.Productoverview5
Page 14

6ThinkPadUSB3.0EthernetAdapter(onsomemodels):Usethisadaptertoconnectyourtablettoa
localnetworkorabroadbandconnection.
Formoreinformation,see“AttachinganEthernetcable”onpage17.
Formoreinformationaboutotheroptionsavailableforyourtablet,seeChapter5“ThinkPadHelixoptions”
onpage47.
Features
Processor
•T oviewthemicroprocessorinformationofyourtablet,gotothedesktopscreen,andthenmovethepointer
tothetop-rightorbottom-rightcornerofthescreentodisplaythecharms.ThenclickSettings➙PCinfo.
Operatingsystem
•Microsoft
Memory
•4GBor8GB
Internalstorage
•M.2solid-statedrive
®
Windows8.1
Display
•Anti-reflective,GorillaGlass
•Size:294.5mm(11.6inches)
•Screenresolution:1920x1080pixels
•Automaticbrightnesscontrol(ambientlightsensor)
•In-planeswitchingtechnologyforfastresponsetime,wideviewingangle,andhigh-qualitycolor
reproduction
•Light-emittingdiode(LED)backlighttechnology
•Multi-touchtechnology
Integratedcameras
•Front-facingcamera,2megapixels
•Rear-facingcamera,5megapixels,auto-focus
Connectorsonthetablet
•Audioconnector
•Powerconnector
•Keyboardconnector
•Dockconnector
•MicroHDMIconnector
•USB3.0connector
Connectorsonthekeyboard
•ThinkPadHelixUltrabookKeyboard:USB2.0connector
6ThinkPadHelixUserGuide
Page 15

•ThinkPadHelixUltrabookProKeyboard:AlwaysOnUSB3.0connectorandMiniDisplayPort®connector
Cardslot
•Micro-SD-cardslot
•Micro-SIM-cardslot(availableonsomemodels)
•Smartcardslot(availableonsomemodels)
Wirelessfeatures
•Bluetooth4.0
•WirelessLAN
•WirelessWAN(availableonsomemodels)
•NFC(availableonsomemodels)
•GlobalNavigationSatelliteSystem(availableonsomemodels)
Securityfeature
Fingerprintreader(availableonsomemodels)
Specifications
Tabletsize
•Width:301.1mm(11.85inches)
•Depth:192.5mm(7.58inches)
•Height:
–Formodelswithoutasmartcardslot:9.6mm(0.38inch)
–Formodelswithasmartcardslot:19.35mm(0.76inch)
ThinkPadHelixUltrabookKeyboardsize
•Width:301.1mm(11.85inches)
•Depth:215.7mm(8.49inches)
•Height:7.3mm(0.29inches)to25.4mm(1.0inches)
ThinkPadHelixUltrabookProKeyboardsize
•Width:301.1mm(11.85inches)
•Depth:213.3mm(8.4inches)
•Height:20.2mm(0.8inches)
Battery
•Forthetablet:35WhLi-Polymerbattery
•FortheThinkPadHelixUltrabookProKeyboard:26WhLi-Polymerbattery
Powersource(acpoweradapter)
•Sine-waveinputat50Hzto60Hz
•Inputratingoftheacpoweradapter:100Vacto240Vac
Chapter1.Productoverview7
Page 16

Operatingenvironment
•Maximumaltitudewithoutpressurization:5000m(16404ft)
•T emperature:
–Ataltitudesupto2438m(8000ft)
Operating:5.0°Cto35.0°C(41°Fto95°F)
Storage:5.0°Cto43.0°C(41°Fto109°F)
–Ataltitudesabove2438m(8000ft)
Maximumtemperaturewhenoperatingunderunpressurizedconditions:31.3°C(88°F)
•Relativehumidity:
–Operating:8%to95%
–Storage:5%to95%
Ifpossible,placeyourtabletinadry,well-ventilatedareawithoutdirectexposuretosunshine.Donotuseor
storeyourtabletindusty,dirtyareas,orextremelyhotorcoldareas.
Lenovoprograms
YourtabletcomeswithLenovoprogramstohelpyouworkmoreeasilyandsecurely.
ToaccessLenovoprograms,swipeinfromtherightedgeofthescreentodisplaythecharms.Thentapthe
Searchcharmtosearchforthedesiredprogram.
ThefollowingtableprovidesabriefintroductiontosomeLenovoprogramsthatmightbepreinstalledon
yourtablet.
Note:PreinstalledLenovoprogramsvarybygeographiclocationsandaresubjecttochange.
LenovoProgramDescription
LenovoCompanionYoursystem’sbestfeaturesshouldbeeasytoaccessandunderstand.WithCompanion,
theyare.
UseCompaniontoregisteryourtablet,accessyourusermanual,managesystemhealthand
update,checkthewarrantystatus,andseeaccessoriescustomizedforyourtablet.Y oualso
canreadhintsandtips,exploreLenovoforums,andstayup-to-dateontechnologynews
witharticlesandblogsfromtrustedsources.ThisappisfilledwithexclusiveLenovocontent
tohelpyoulearnaboutyournewsystem.
Lenovo
QuickControl
LenovoReachEnhanceyourcloudexperience.LenovoReachkeepsyouconnectedatalltimesandenables
LenovoSettings
SHAREitSharefileseasilyandrapidlyacrossdevicessuchascomputersandsmartphones,even
Controlyourtabletremotelythroughyoursmartphone.Forexample,controlthepointer,
changeprojectionsettings,andmanageforegroundapplicationsandwindows.
youtoaccessallyourfavoriteitemsfrompersonaltablets,smartphones,ortablets.With
LenovoReach,youcanaddyourfavoriteWebservicestoyourclouddesktop;stayloggedin
toWebsiteswiththecloudpasswordmanager;andaccess,edit,andshareyourfilesfrom
anywhere.
Enhanceyourcomputingexperiencebyconfiguringcameraandmicrophonesettings,
optimizingyourpowersettings,andcreatingandmanagingmultiplenetworkprofiles.
withoutanyInternetconnection.Y oucanconnecttoyourfriendsandsendphotos,folders,and
otherfilesthroughSHAREit.Everysharingisquickandsimple.
8ThinkPadHelixUserGuide
Page 17

LenovoProgramDescription
LenovoSolution
Center
SystemUpdate
Troubleshootandresolvetabletproblems.Itcombinesdiagnostictests,systeminformation
collection,securitystatus,andsupportinformation,alongwithhintsandtipsformaximum
systemperformance.
Keepthesoftwareonyourtabletup-to-datebydownloadingandinstallingsoftwarepackages,
includingLenovoprograms,devicedrivers,UnifiedExtensibleFirmwareInterface(UEFI)basic
input/outputsystem(BIOS)updates,andotherthird-partyprograms.
Chapter1.Productoverview9
Page 18

10ThinkPadHelixUserGuide
Page 19
Chapter2.Usingyourtablet
Thischapterprovidesinstructionsonhowtousesomebasicapplicationsandtabletfeatures.
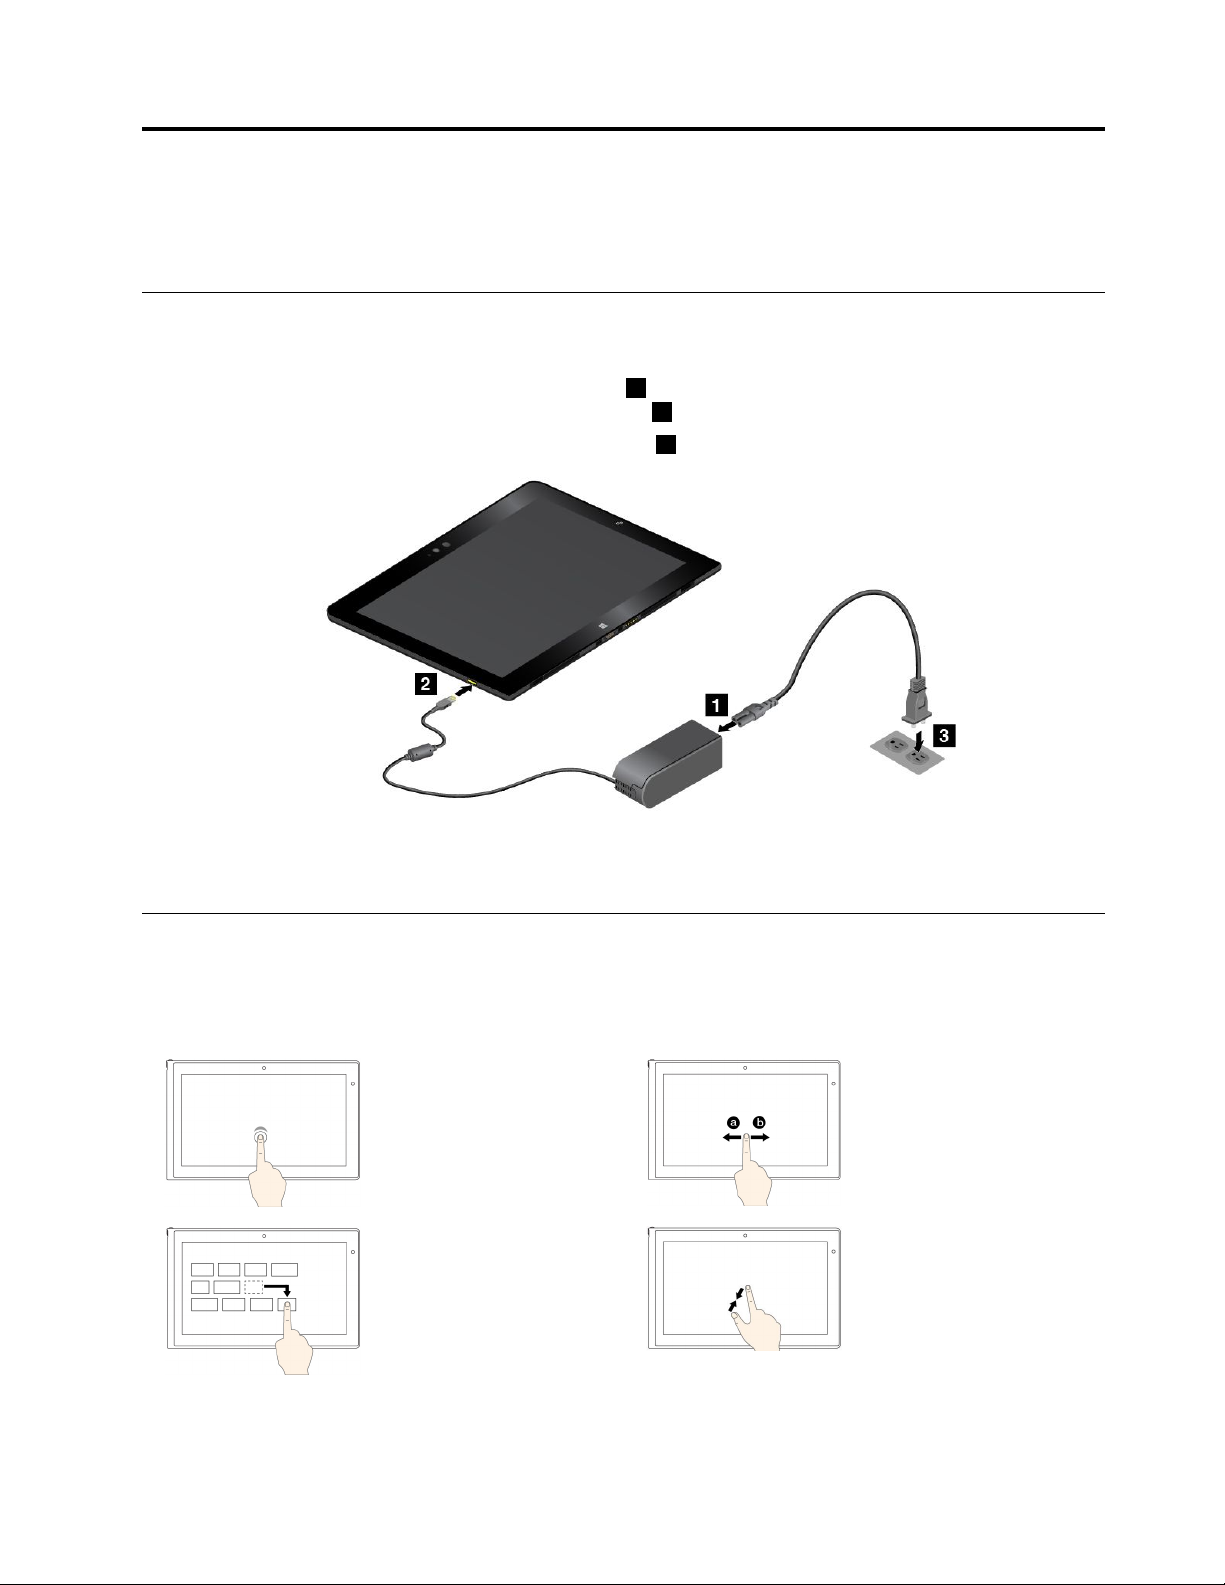
Initialsetupinstructions
Tousethetabletthefirsttimeafteryoutakeitoutofthebox,ensurethatyoufollowtheinstructionsbelow:
1.Connectthepowercordtotheacpoweradapter1.Then,connectthepowerconnectoroftheac
poweradaptertothepowerconnectoronthetablet2.
2.Plugthepowercordintoastandardacpoweroutlet3.
3.Pressandreleasethepowerbuttontoturnonthetablet.
4.Followtheinstructionsonthescreentocompletetheinitialsetup.
Usingthemulti-touchscreen
Thistopicprovidesinstructionsonhowtousethemulti-touchscreen.
Note:Yourtabletscreenmightlookdifferentfromthefollowingillustrations.
Tap
Taponthescreentoopen
anapporperformanaction
onanopenapp,suchas
Copy,Save,andDelete,
dependingontheapp.
Drag
Draganitemtothedesired
locationtomoveanobject.
Slide
Slideleftwardorrightward
onthescreentoscroll
throughitems,suchaslists,
pages,andphotos.
Zoomout
Puttwofingersonthe
screenandmovethem
closertogethertozoom
out.
©CopyrightLenovo2014,2015
11
Page 20
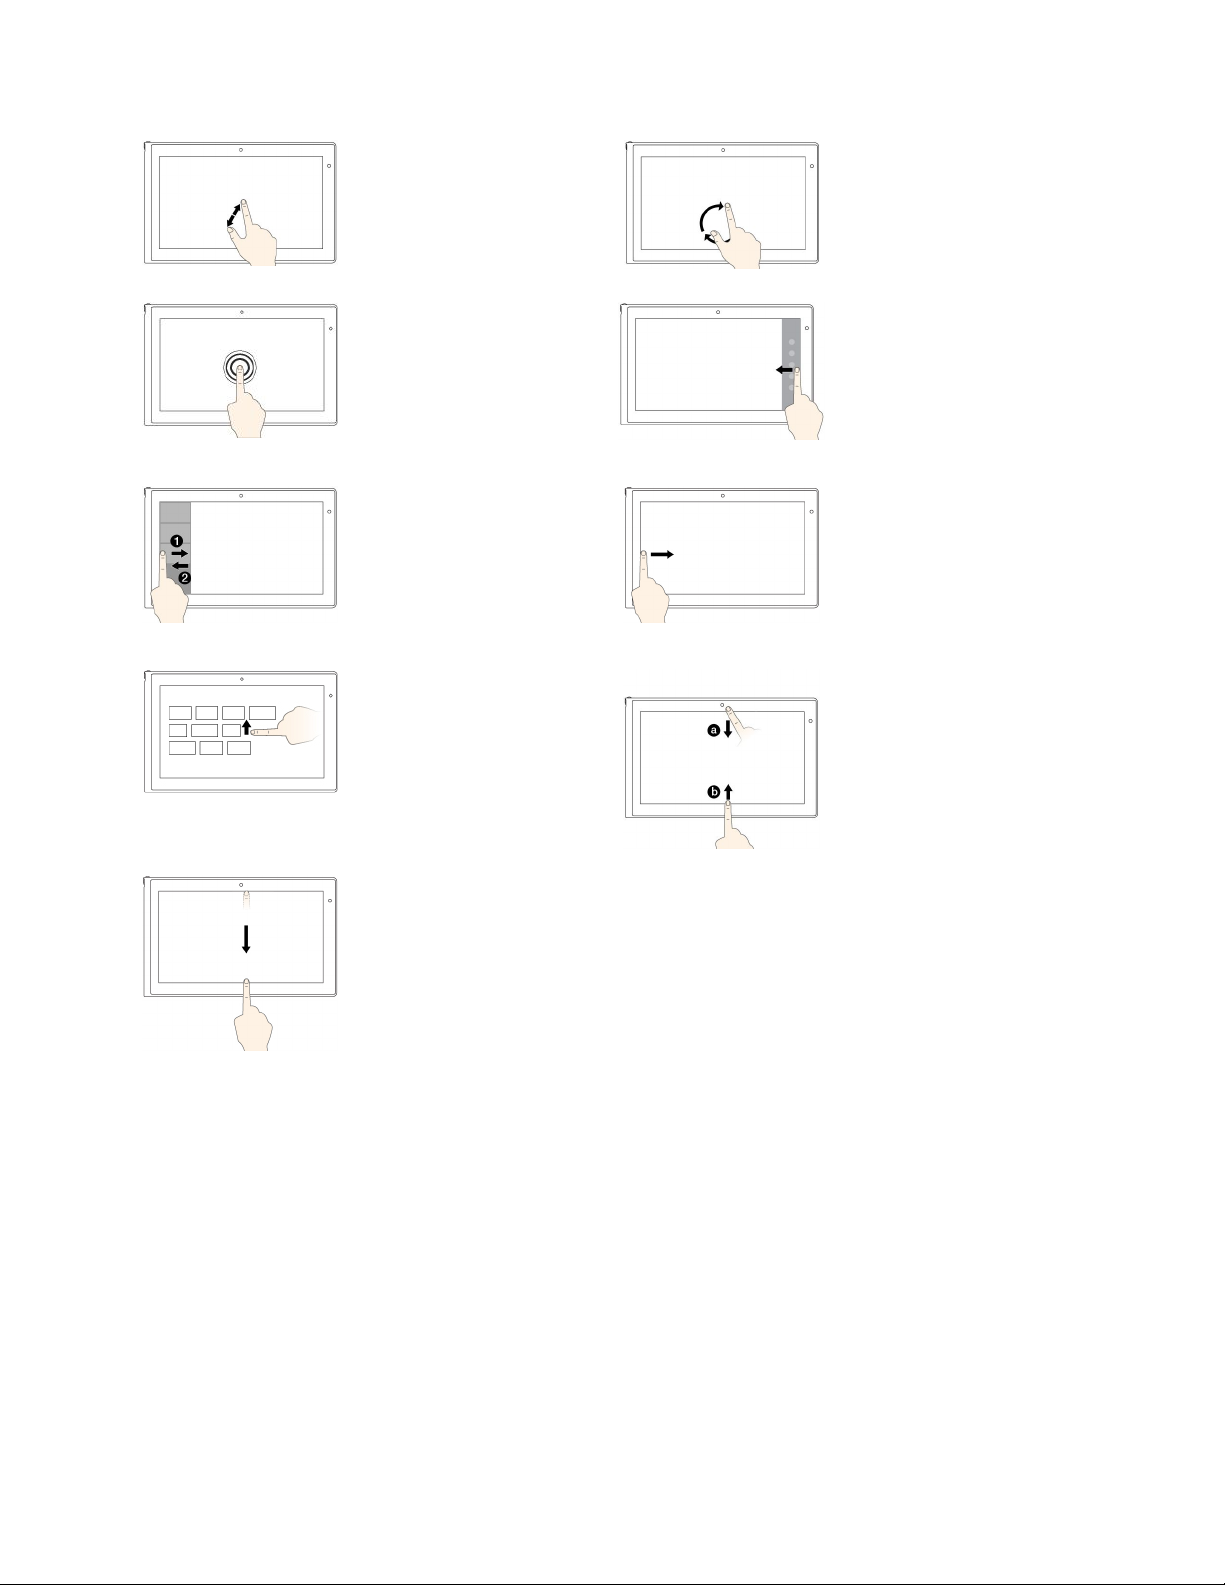
Zoomin
Rotate
Puttwofingersonthe
screenandmovethem
fartheraparttozoomin.
Tapandhold
Tapandholdonthescreen
toopenamenuwith
multipleoptions.
Swipeinandoutonthe
leftedge
Swipeinandoutontheleft
edgeofthescreentoview
therecentlyusedappsor
selectanactiveappfrom
thelist.
Swipeuptothetopedge
Swipeuptothetopedgeof
thescreentoviewallapps
ontheStartscreen.
Swipeinfromthetop
edgetothebottom
Puttwoormorefingerson
anitem,andthenrotate
yourfingersclockwiseor
counterclockwise(supported
onlyonsomeapps).
Swipefromtherightedge
Swipeinfromtherightedge
ofthescreentodisplaythe
charmsthatcontainsystem
commands,suchasStart,
Settings,Search,Share,
andDevices.
Swipefromtheleftedge
Swipeinfromtheleftedge
ofthescreentocycle
throughandswitchtoopen
apps.
Swipefromthetopor
bottomedge
Swipeinfromthetopor
bottomedgeofthescreen
toviewtheappcommands,
suchasCopy,Save,and
Delete,dependingonthe
app.
Swipeinfromthetopedge
toofthescreenthebottom
toclosethecurrentapp.
Tipsonusingthemulti-touchscreen
•Themulti-touchscreenisaglasspanelcoveredwithaplasticfilm.Donotapplypressureorplaceany
metallicobjectonthescreenthatmightdamagethetouchpanelorcauseittomalfunction.
•Donotusefingernails,glovedfingers,orinanimateobjectsotherthananapprovedT abletDigitizerPen
orThinkPadActivePenforinputonthescreen.
Tipsoncleaningthemulti-touchscreen
•T urnoffthetabletbeforecleaningthemulti-touchscreen.
•Useadry,soft,andlint-freeclothorapieceofabsorbentcottontoremovefingerprintsordustfromthe
multi-touchscreen.Donotapplysolventstothecloth.
•Gentlywipethescreenusingatop-downmotion.Donotapplyanypressureonthescreen.
12ThinkPadHelixUserGuide
Page 21
Powermanagement
Thissectionprovidesinstructionsonhowtochargethebattery,extendthebatterylifebetweencharges,
andcheckthebatterystatus.
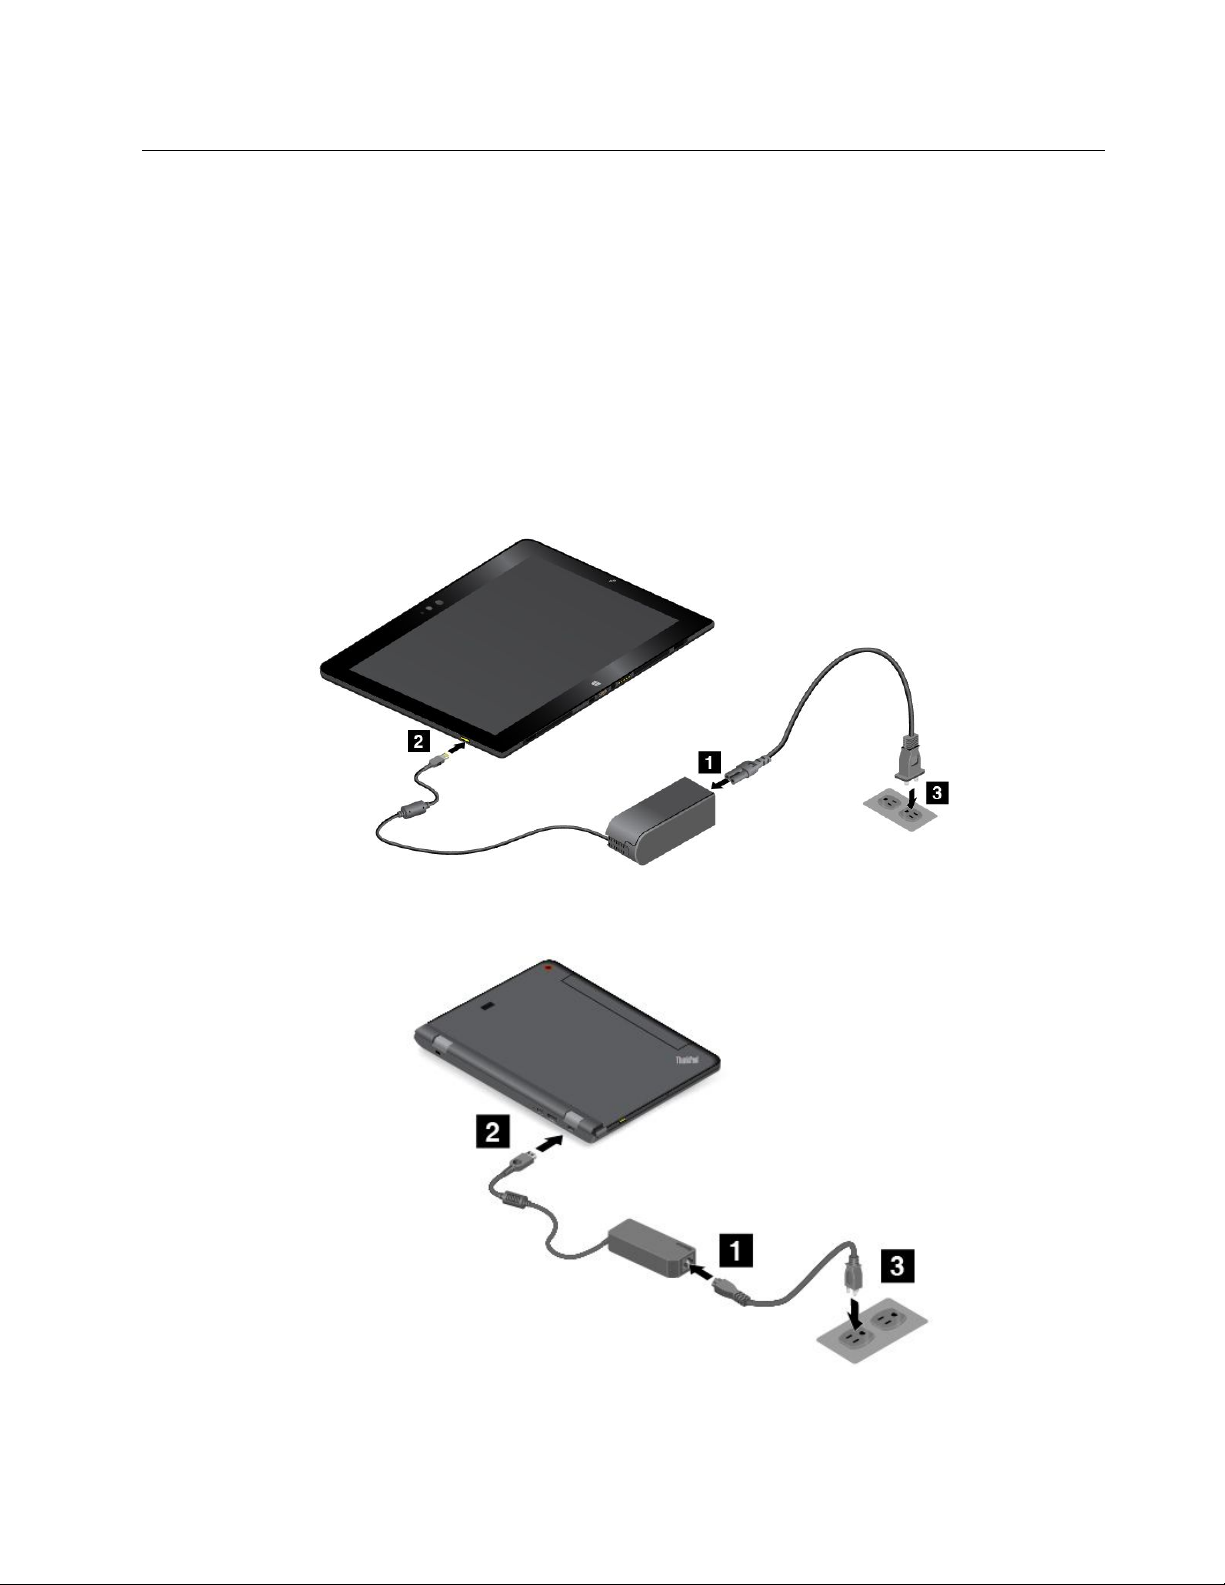
Chargingthebattery
Thetabletisshippedwithanacpoweradapterandapowercordtochargethetabletfromanystandard
acpoweroutlet.
Attention:UseonlyLenovo-approvedacpoweradaptersandpowercords.Unauthorizedacpower
adaptersandpowercordscouldseverelydamagethetablet.
Thebatteryisnotfullychargedwhenshipped.Tochargethetabletbattery,dooneofthefollowing:
•Chargethetabletbatteryasshown.
•FortabletsthatareshippedwithaThinkPadHelixUltrabookProKeyboard,chargethetabletbatteryand
keyboardbatteryasshown.
•FortabletsthatareequippedwithaThinkPadTabletDock,see“UsingtheThinkPadTabletDock”onpage
67.
Chapter2.Usingyourtablet13
Page 22

TheThinkPadTabletDockisanoptionaldevice.T opurchasetheoptionfromLenovo,goto:
http://www.lenovo.com/essentials
Extendingthebatterylifebetweencharges
Whenyouaretravelingwithyourtabletandacpowerisnotavailable,youcanextendthebatterylife
bydoingthefollowing:
•T urnoffWi-Fi,mobilenetwork,andBluetoothwhennotinuse.
ToturnoffWi-Fi,mobilenetwork,andBluetooth,dothefollowing:
1.Swipeinfromtherightedgeofthescreentodisplaythecharms.
2.T apSettings➙ChangePCsettings.
3.Inthenavigationpanel,tapNetwork➙Airplanemode.
4.IntheAirplanemodesection,slidethecontroltotherighttoturnonAirplanemodetodisable
allwirelessdevices.
•T urnoffautomaticsynchronizationifyoudonotneedit.
Toturnofftheautomaticsynchronizationfunction,dothefollowing:
1.Swipeinfromtherightedgeofthescreentodisplaythecharms.
2.T apSettings➙ChangePCsettings.
3.Inthenavigationpanel,tapOneDrive➙Syncsettings.
4.SwitchoffSyncsettingswithOneDrive.
•Lowerthebrightnesslevelofthescreen.
Tolowerthebrightnesslevelofthescreen,dooneofthefollowing:
–Ifyourtabletisattachedtoasupportedkeyboard,pressthebrightness-downkeytoturn
downthebrightness.
–Ifyoutabletisnotattachedtoasupportedkeyboard,dothefollowing:
1.Swipeinfromtherightedgeofthescreentodisplaythecharms.
2.T apSettings➙Brightness.
3.Slidethecontroldowntolowerthebrightness.
•Entersleepmodewhenthetabletistemporarilynotinuse.
Toentersleepmode,dooneofthefollowing:
–ClosetheThinkPadHelixQuickshotCover.
–GototheStartscreen,taporclickthepowericon
clickShutdown.
–T oentersleepmodefromtheoperatingsystem,dothefollowing:
1.Swipeinfromtherightedgeofthescreentodisplaythecharms.
2.T apSettings➙Power➙Sleep.
•T urnoffyourtabletifyouarenotgoingtouseitforawhile.
Toturnoffyourtablet,dooneofthefollowing:
inthetop-rightcornerofthescreen,andthen
–GototheStartscreen,taporclickthepowericoninthetop-rightcornerofthescreen,andthen
clickShutdown.
–Swipeinfromtherightedgeofthescreentodisplaythecharms,thentapSettings➙Power➙
Shutdown.
14ThinkPadHelixUserGuide
Page 23
Checkingthebatterystatus
Gettheapproximatestatusofyourbatteryatanytimebycheckingthedesktopbattery-statusiconin
theWindowsnotificationarea.
Tocheckfortheaccuratestatusandadjustyourtabletpowersettingstoachievethebestbalancebetween
performanceandpowersaving,dothefollowing:
1.FromtheStartscreen,tapLenovoSettings➙Power.
2.Checkyourbatterystatusandconfiguresettings.
UsingtheTabletDigitizerPenorThinkPadActivePen
SometabletmodelsareequippedwithaT abletDigitizerPenoraThinkPadActivePen.TheTabletDigitizer
PenorThinkPadActivePenenablesyoutoinputtextinanaturalmannerwhenyouaretakingnotes,
annotatingPortableDocumentFormat(PDF)files,ordrawinggraphicstogetherwithapplicationscapableof
editingandsketching.WhenyoudraworwritewiththeTabletDigitizerPenorThinkPadActivePen,keep
thepenperpendiculartothedisplaytoachievethebestlinequality.
UsetheTabletDigitizerPenorThinkPadActivePeninsteadofyourfingerinconditionssuchasthefollowing:
•Y ouneedpreciseanddetailedinput,suchasdrawingapictureorusingthehandwritingmode.
•T oomanyelementsarecrowdedonthescreen,forexample,whenyouareplayinggames.
•Y ouwanttokeepyourscreenfreefromsmudges.
•Y ouhavelongfingernailsanditisdifficultforyoutotype.
Notes:
•TheTabletDigitizerPenorThinkPadActivePenisnotwaterproof.Takecarenottosoakitordipitinwater.
•TheThinkPadActivePendoesnotapplytotabletmodelsequippedwiththeTabletDigitizerPen,and
viceversa.
•IfyourtabletdoesnotcomewithaTabletDigitizerPenorThinkPadActivePen,yourtabletdoesnot
supporttheuseofapen.
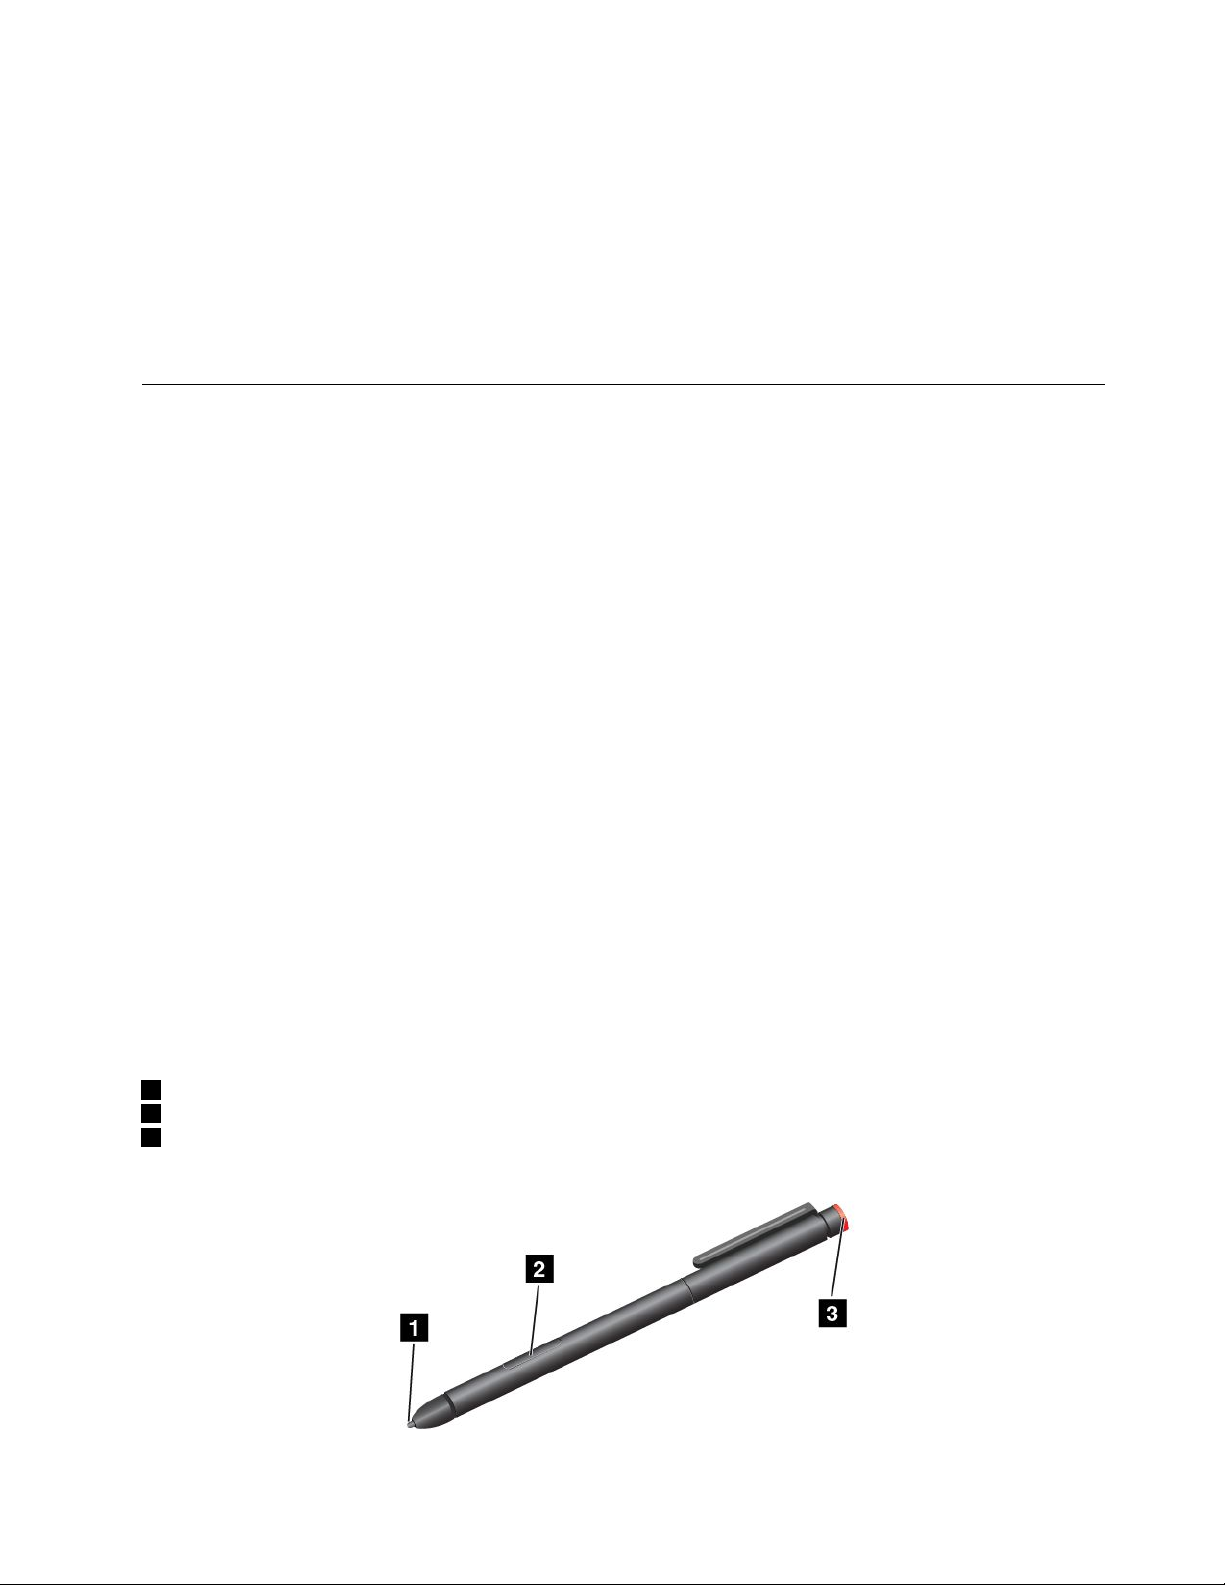
UsingtheT abletDigitizerPen
TheTabletDigitizerPenfunctionswithoutbatteries.
ThefollowingillustrationshowstheTabletDigitizerPen.
1Tip
2Clickbutton
3Erasertip
Chapter2.Usingyourtablet15
Page 24
YoucanperformthefollowingoperationswiththeTabletDigitizerPen:
•T oclickormakeaselection,tapthedisplayoncewiththepen.
•T odouble-click,taptwicewithoutpausing.
•T oright-click,tapthetiponthedisplayandholdthepenforonesecond,orpresstheclickbutton
andtapthetiponthedisplay.
•T oeraseink,pressandholdtheeraserbutton,tapthetiponthedisplay,anddragthepenacrossthe
inkyouwanttoerase.
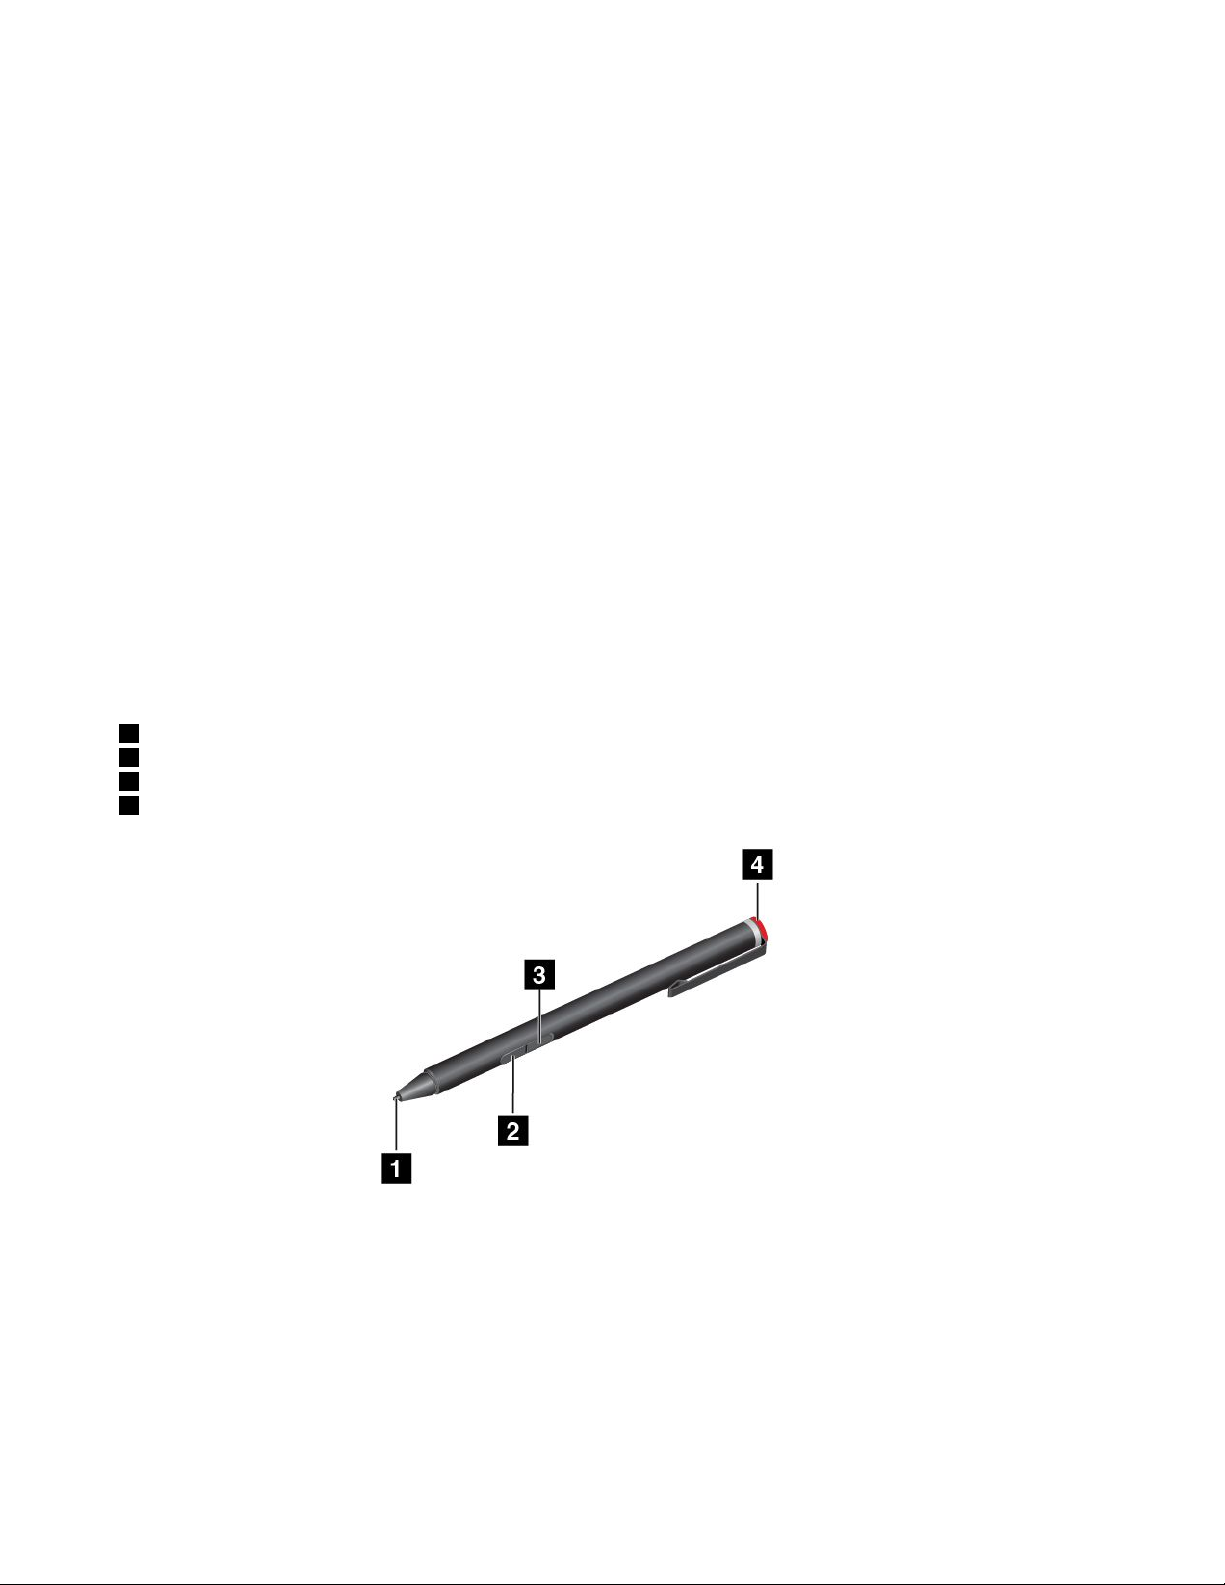
UsingtheThinkPadActivePen
TheThinkPadActivePenisbattery-poweredandusedwithoneAAAAalkalinebattery.
ToinstallabatteryintotheThinkPadActivePen,unscrewandremovetheendcapoftheThinkPadActive
Pen,insertthebatteryintothebatterycompartmentwiththenegativepolarityfacingoutward,andthen
tightentheendcapbackintoposition.
Notes:
•Ensurethatyouinstallthebatteryincorrectorientationwiththenegativepolarityfacingoutward.
•Whenthebatterypowerrunsout,theclickbuttonanderaserbuttonstopfunctioning.Inthiscase,
replacethebattery.
ThefollowingillustrationshowstheThinkPadActivePen.
1Tip
2Eraserbutton
3Clickbutton
4Endcap
YoucanperformthefollowingoperationswiththeThinkPadActivePen:
•T oclickormakeaselection,tapthedisplayoncewiththepen.
•T odouble-click,taptwicewithoutpausing.
•T oright-click,tapthetiponthedisplayandholdthepenforonesecond,orpresstheclickbutton
andtapthetiponthedisplay.
•T oeraseink,pressandholdtheeraserbutton,tapthetiponthedisplay,anddragthepenacrossthe
inkyouwanttoerase.
16ThinkPadHelixUserGuide
Page 25

UsingtheOn-ScreenKeyboardorthetouchkeyboardandhandwriting panel
UsetheOn-ScreenKeyboardorthetouchkeyboardandhandwritingpaneltotypetext,numbers,symbols,
andothercharacters.Y oualsocanusethetouchkeyboardandhandwritingpaneltoperformhandwriting.
Whenyourotatethetablet,theOn-ScreenKeyboardorthetouchkeyboardandhandwritingpanel
automaticallyrotatestothecorrespondingportraitorlandscapeview.
ToopentheOn-ScreenKeyboard,dothefollowing:
1.Swipeinfromtherightedgeofthescreentodisplaythecharms.
2.T aptheSearchcharmtosearchforOn-ScreenKeyboard.
3.T apOn-ScreenKeyboard.
Toopenthetouchkeyboardandhandwritingpanel,dooneofthefollowing:
•Onthedesktop,tapthekeyboardiconintheWindowsnotificationarea.
•OntheStartscreen,thetouchkeyboardandhandwritingpanelisdisplayedautomaticallyanytimeyou
type.
•OntheDesktoportheStartscreen,dothefollowing:
1.Swipeinfromtherightedgeofthescreentodisplaythecharms.
2.T aptheSettingscharm.
3.T apKeyboard➙Touchkeyboardandhandwritingpanel.
Toconfiguretheinputlanguage,dothefollowing:
1.Fromthedesktop,swipeinfromtherightedgeofthescreentodisplaythecharms.
2.T apSettings➙ControlPanel.
3.T apClock,Language,andRegion➙Changeinputmethods.
4.Followtheinstructionsonthescreentoconfiguretheinputlanguage.
ChangingthestartupbehaviortoopeneitherthedesktoportheStart screen
YoucansetthetablettoopeneitherthedesktoportheStartscreenbydefault.Tosetthedefaultstartup
screen,dothefollowing:
1.Onthedesktop,tapandholdonthetaskbar.Amenuisdisplayed.
2.T apProperties.TheT askbarandNavigationpropertieswindowisdisplayed.
3.OntheNavigationtab,locatetheStartscreensection,andthendooneofthefollowing:
•T osetthedesktopasyourdefaultstartupscreen,selectWhenIsigninorcloseallappsona
screen,gotothedesktopinsteadofStartsoacheckisvisible.
•T osettheStartscreenasyourdefaultstartupscreen,removethecheckfromtheWhenIsigninor
closeallappsonascreen,gotothedesktopinsteadofStartcheckbox.
4.T apOKtosavethenewsetting.
AttachinganEthernetcable
ToattachanEthernetcabletoyourtabletfornetworkconnection,youmusthaveaThinkPadUSB3.0
EthernetAdapteravailable.
Chapter2.Usingyourtablet17
Page 26
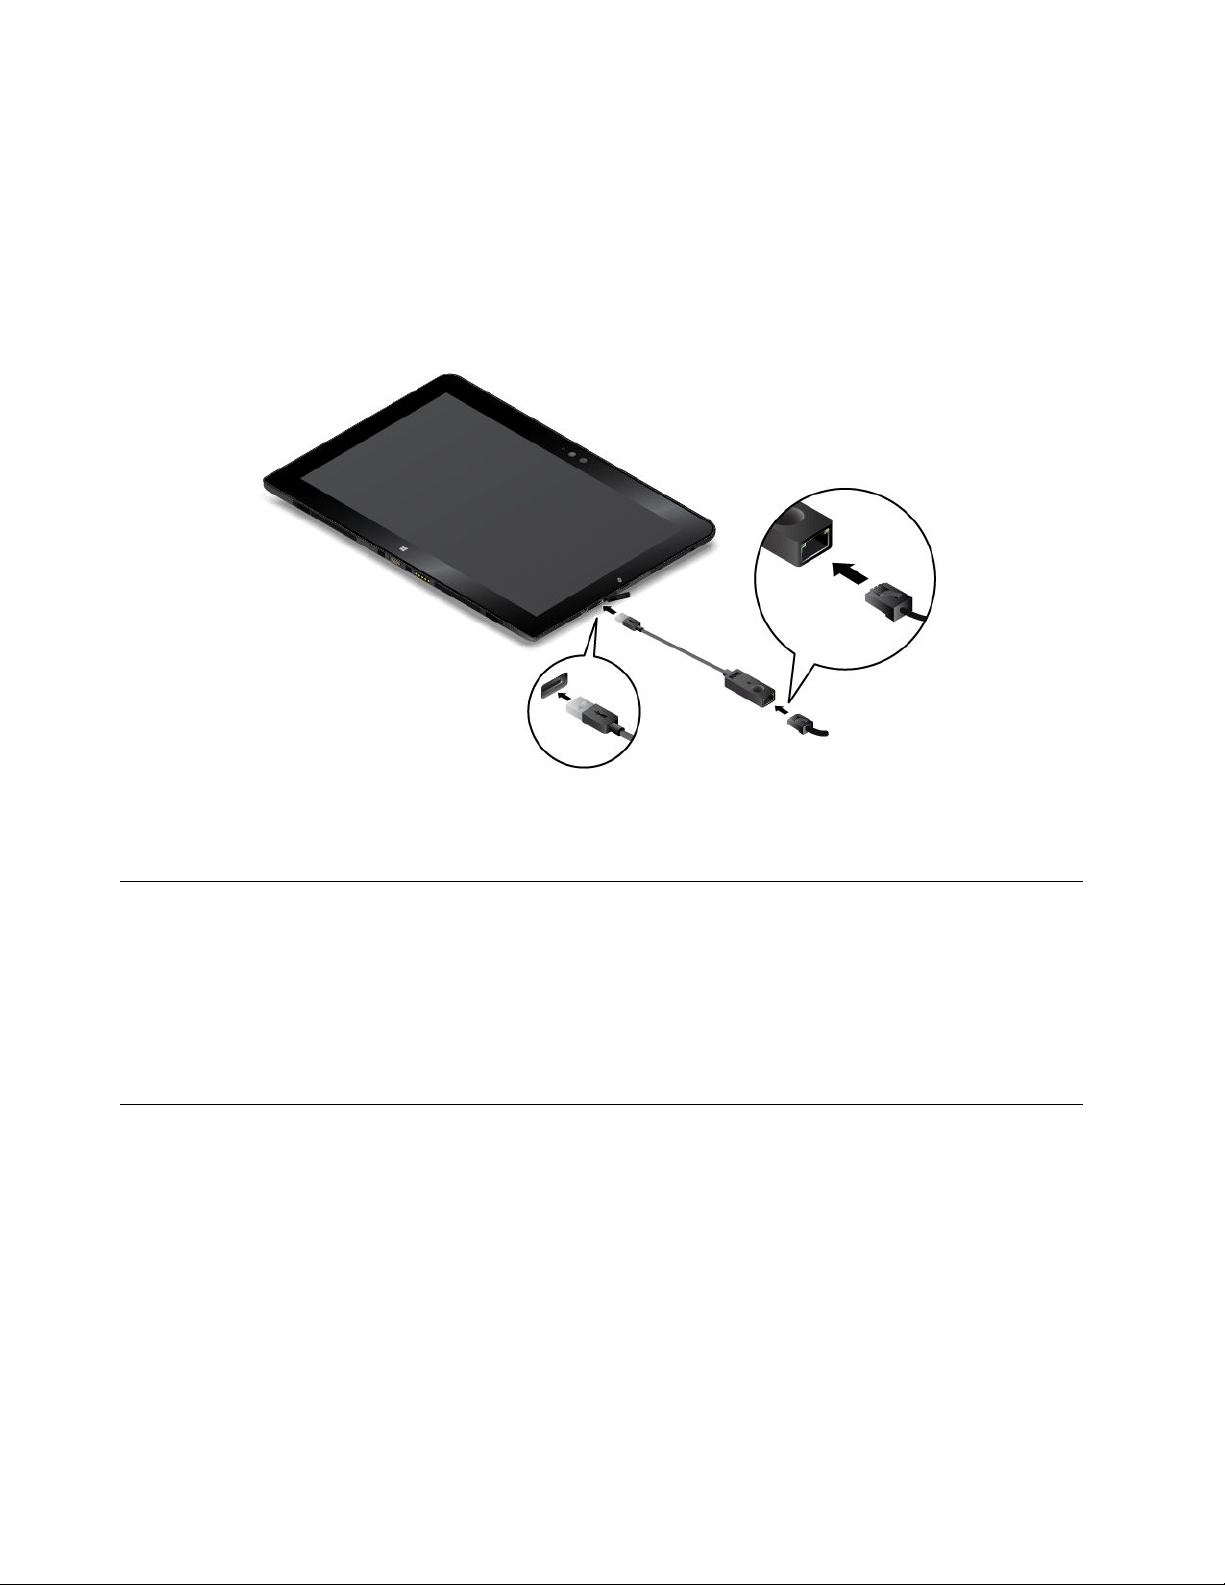
TheThinkPadUSB3.0EthernetAdapterisavailableasoptionandonlyshippedwithsomemodels.To
purchaseaThinkPadUSB3.0EthernetAdapter,goto:
http://www.lenovo.com/essentials
ThefollowingillustrationshowshowtoattachanEthernetcabletoyourtabletthroughaThinkPadUSB
3.0EthernetAdapter.
Attention:WhenyouconnecttheThinkPadUSB3.0EthernetAdaptertotheUSB3.0connectoronyour
tablet,ensurethattheUSBmarkisfacingupward.Otherwise,theconnectormightgetdamaged.
TheThinkPadUSB3.0EthernetAdapterhastwonetworkstatusindicators.Whenthegreenindicatorison,
thetabletisconnectedtoaLAN.Whentheyellowindicatorblinks,dataisbeingtransmitted.
Downloadinggamesandapplications
Toextendthefunctionalityofyourtablet,downloadandinstalladditionalapplicationsfromtheWindows
Store.TheWindowsStoreprovidesaneasyandquickwayforyoutoshopforgamesandmobile
applications.
TodownloadorbuyanapplicationoragamefromWindowsStore,tapStorefromtheStartscreen,andthen
followtheinstructionsonthescreen.
Usingthefingerprintreader
Dependingonthemodel,yourtabletmighthaveafingerprintreader.Fingerprintauthenticationcanreplace
yourWindowspassword.Inthisway,youcanlogontoyourtabletsimplyandsecurely.Toenablefingerprint
authentication,enrollyourfingerprintsfirst.
Enrollingyourfingerprints
Toenrollyourfingerprints,dothefollowing:
1.Swipeinfromtherightedgeofthescreentodisplaythecharms.
2.T apSettings➙ChangePCsettings.
3.Inthenavigationpanel,tapAccounts➙Sign-inoptions.
4.IntheFingerprintsection,tapAdd.The“Addafingerprinttothisaccount”windowisdisplayed.
18ThinkPadHelixUserGuide
Page 27
5.EntertheWindowspasswordasrequired.Thenfollowtheinstructionsonthescreentoenrollyour
fingerprint.
Note:Itisrecommendedthatyouenrollmorethanonefingerprintincaseofanyinjuriestoyourfingers.
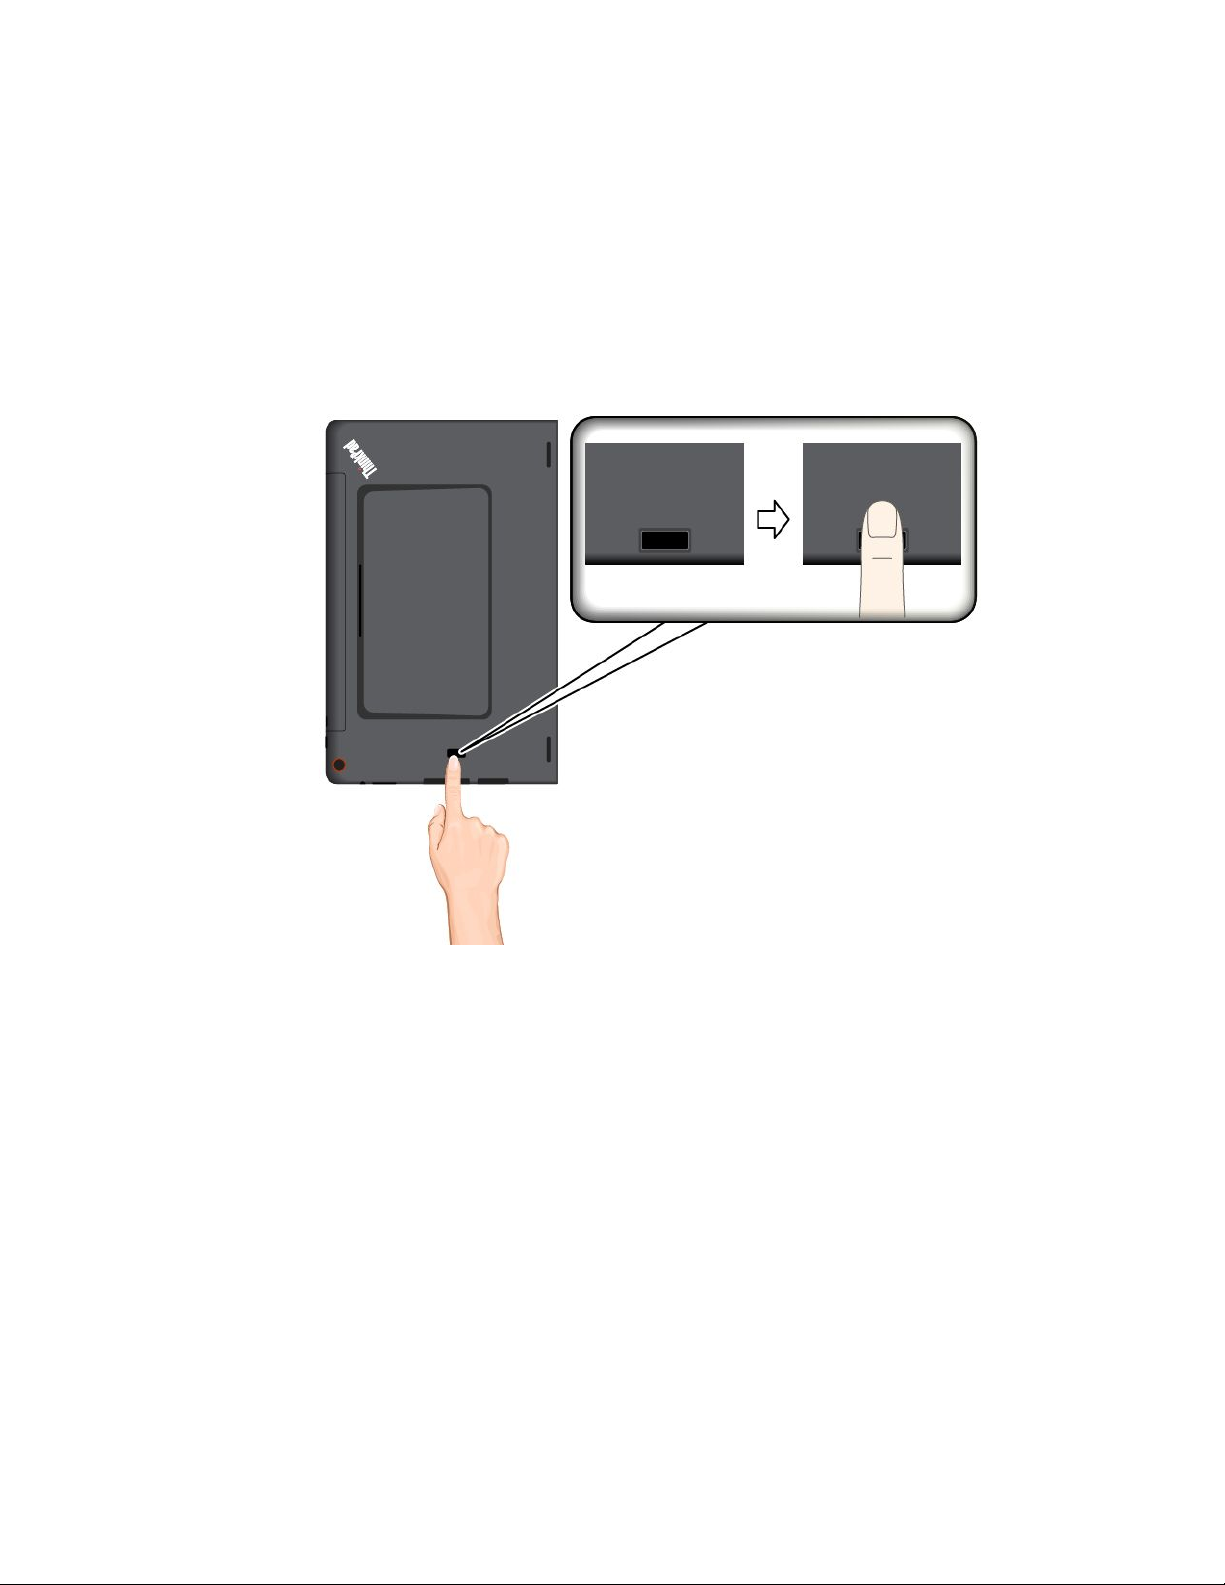
Swipingyourfingeroverthefingerprintreader
Toswipeyourfingeroverthefingerprintreader,dothefollowing:
Note:Yourtabletmightlookslightlydifferentfromtheillustrationsinthistopic.
1.Placethetopjointofyourfingeronthesensor.
Chapter2.Usingyourtablet19
Page 28
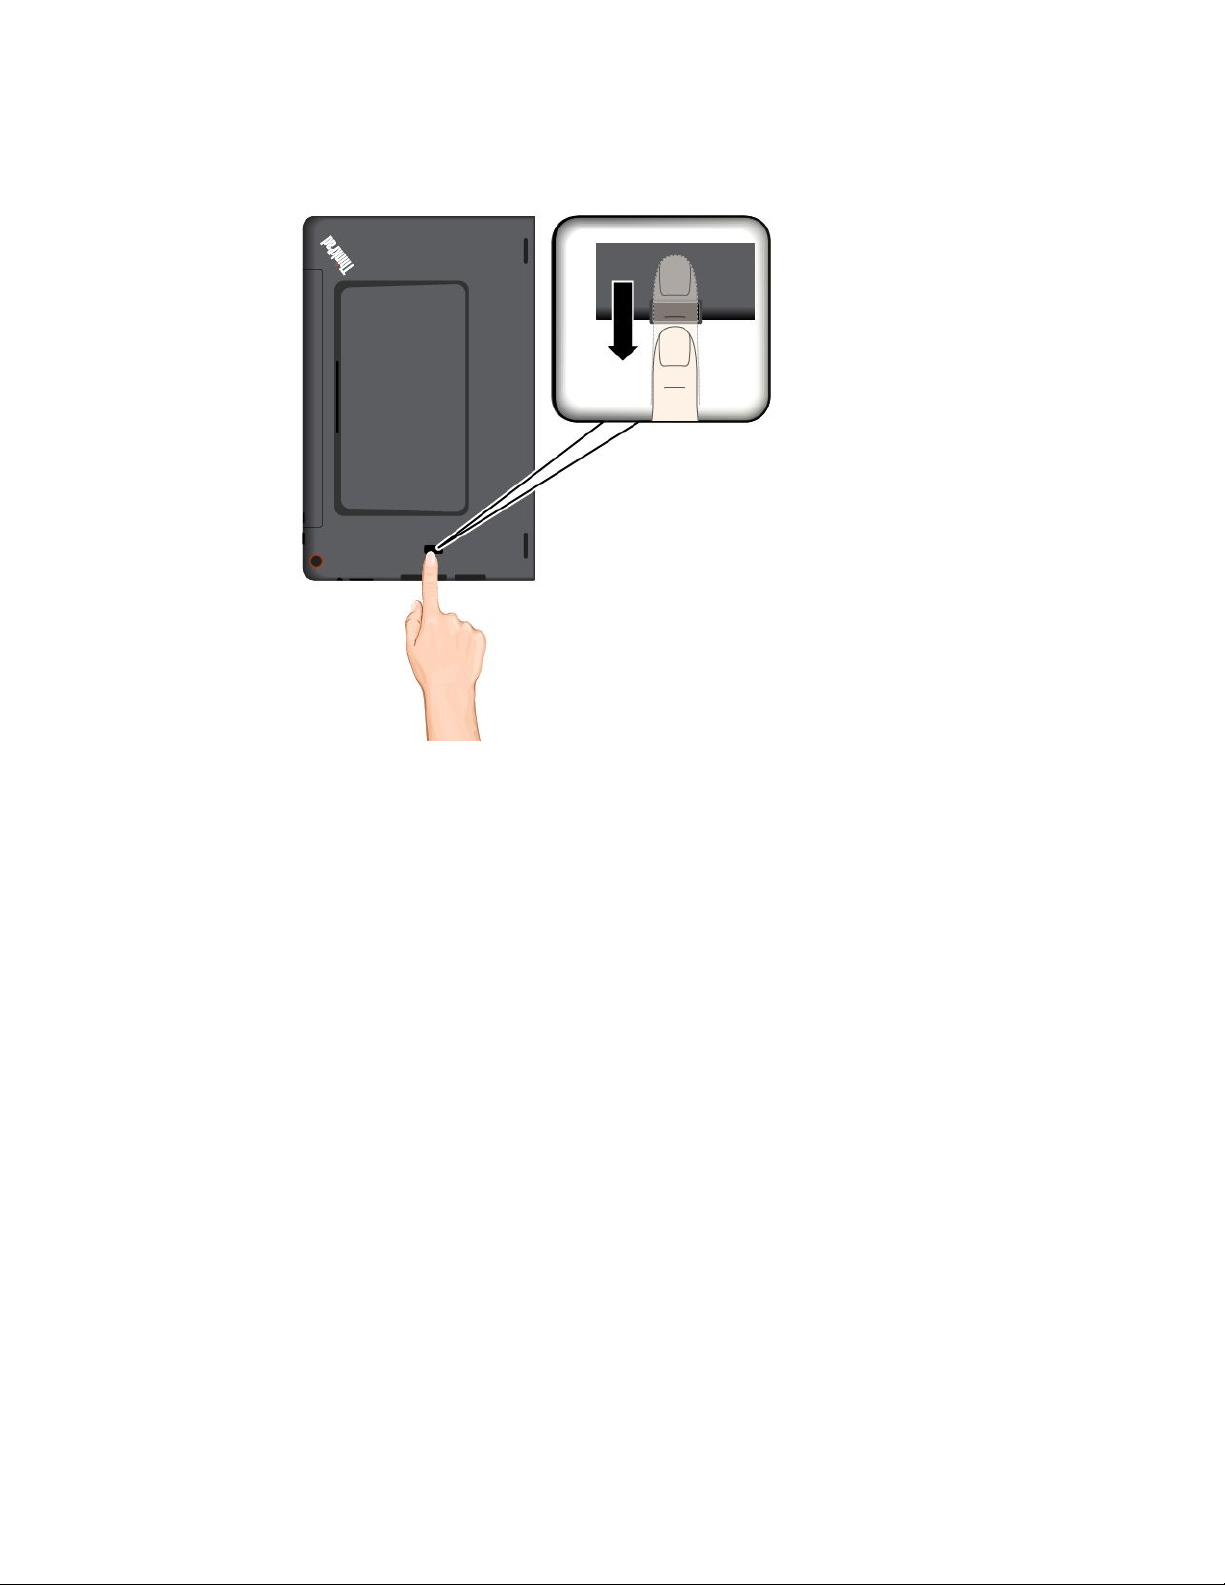
2.Applylightpressureandswipeyourfingertowardyouacrossthereaderinonesmoothmotion.Donot
liftyourfingerwhenyouareswipingit.
Maintainingthefingerprintreader
Thefollowingactionscoulddamagethefingerprintreaderorcauseitnottoworkproperly:
•Scratchingthesurfaceofthereaderwithahard,pointedobject.
•Scrapingthesurfaceofthereaderwithyourfingernailoranythinghard.
•Usingortouchingthereaderwithadirtyfinger.
Ifyounoticeanyofthefollowingconditions,gentlycleanthesurfaceofthereaderwithadry,soft,lint-free
cloth:
•Thesurfaceofthereaderisdirtyorstained.
•Thesurfaceofthereaderiswet.
•Thereaderoftenfailstoenrollorauthenticateyourfingerprint.
Ifyourfingerhasanyofthefollowingconditions,youmightnotbeabletoregisterorauthenticateit:
•Y ourfingeriswrinkled.
•Y ourfingerisrough,dry,orinjured.
•Y ourfingerisstainedwithdirt,mud,oroil.
•Thesurfaceofyourfingerisdifferentfromwhenyouenrolledyourfingerprint.
•Y ourfingeriswet.
•Afingerisusedthathasnotbeenenrolled.
Toimprovethesituation,trythefollowing:
•Cleanorwipeyourhandstoremoveanyexcessdirtormoisturefromthefingers.
20ThinkPadHelixUserGuide
Page 29
•Enrollanduseadifferentfingerforauthentication.
•Ifyourhandsaredry,applylotiontothem.
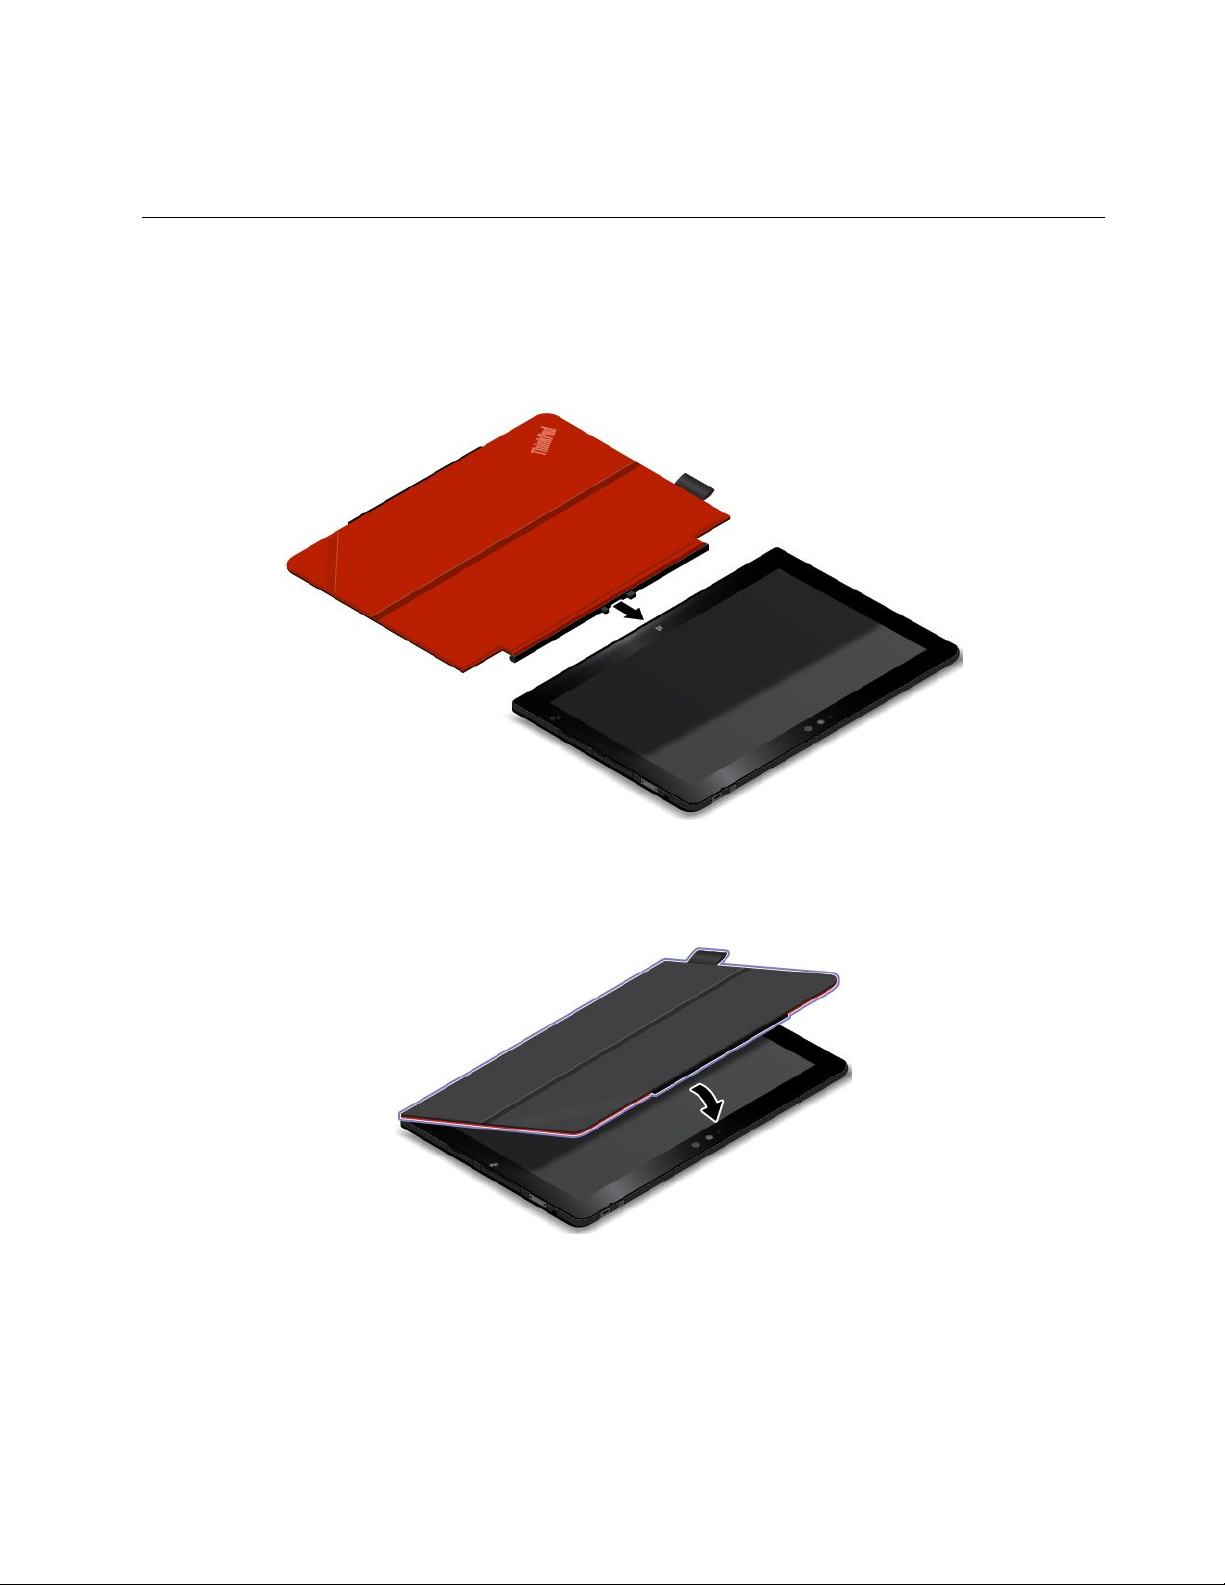
UsingtheThinkPadHelixQuickshotCover
Dependingonthemodel,yourtabletmightcomewithaThinkPadHelixQuickshotCover(hereaftercalled
thecover).Thistopicprovidesinstructionsonhowtousethecover.
Tousethecover,attachthecovertothetabletfirstasshown.Thecoverwillbeattachedtothetablet
magnetically.
Putthetabletintosleepmodeorwakeupthetablet
Ifthecoverisopenandthetabletison,thetablet,bydefault,enterssleepmodeautomaticallyafteryou
closethecover.
Chapter2.Usingyourtablet21
Page 30
Ifthecoverisclosedandthetabletisinsleepmode,thetablet,bydefault,resumesnormaloperation
whenyouopenthecover.
Youalsocanchangethesettingssothatbyclosingthecoveryoucanshutdownthetablet,putthetabletinto
hibernationmode,ordonothing.T oachievethis,youmustchangeyourlidsettingsbydoingthefollowing:
1.Fromthedesktop,swipeinfromtherightedgeofthescreentodisplaythecharms.
2.T apSettings➙ControlPanel➙HardwareandSound➙PowerOptions.
3.Inthenavigationpanel,tapChoosewhatclosingtheliddoes.
4.Followtheinstructionsonthescreentochooseanoptionaccordingtoyourpreference.
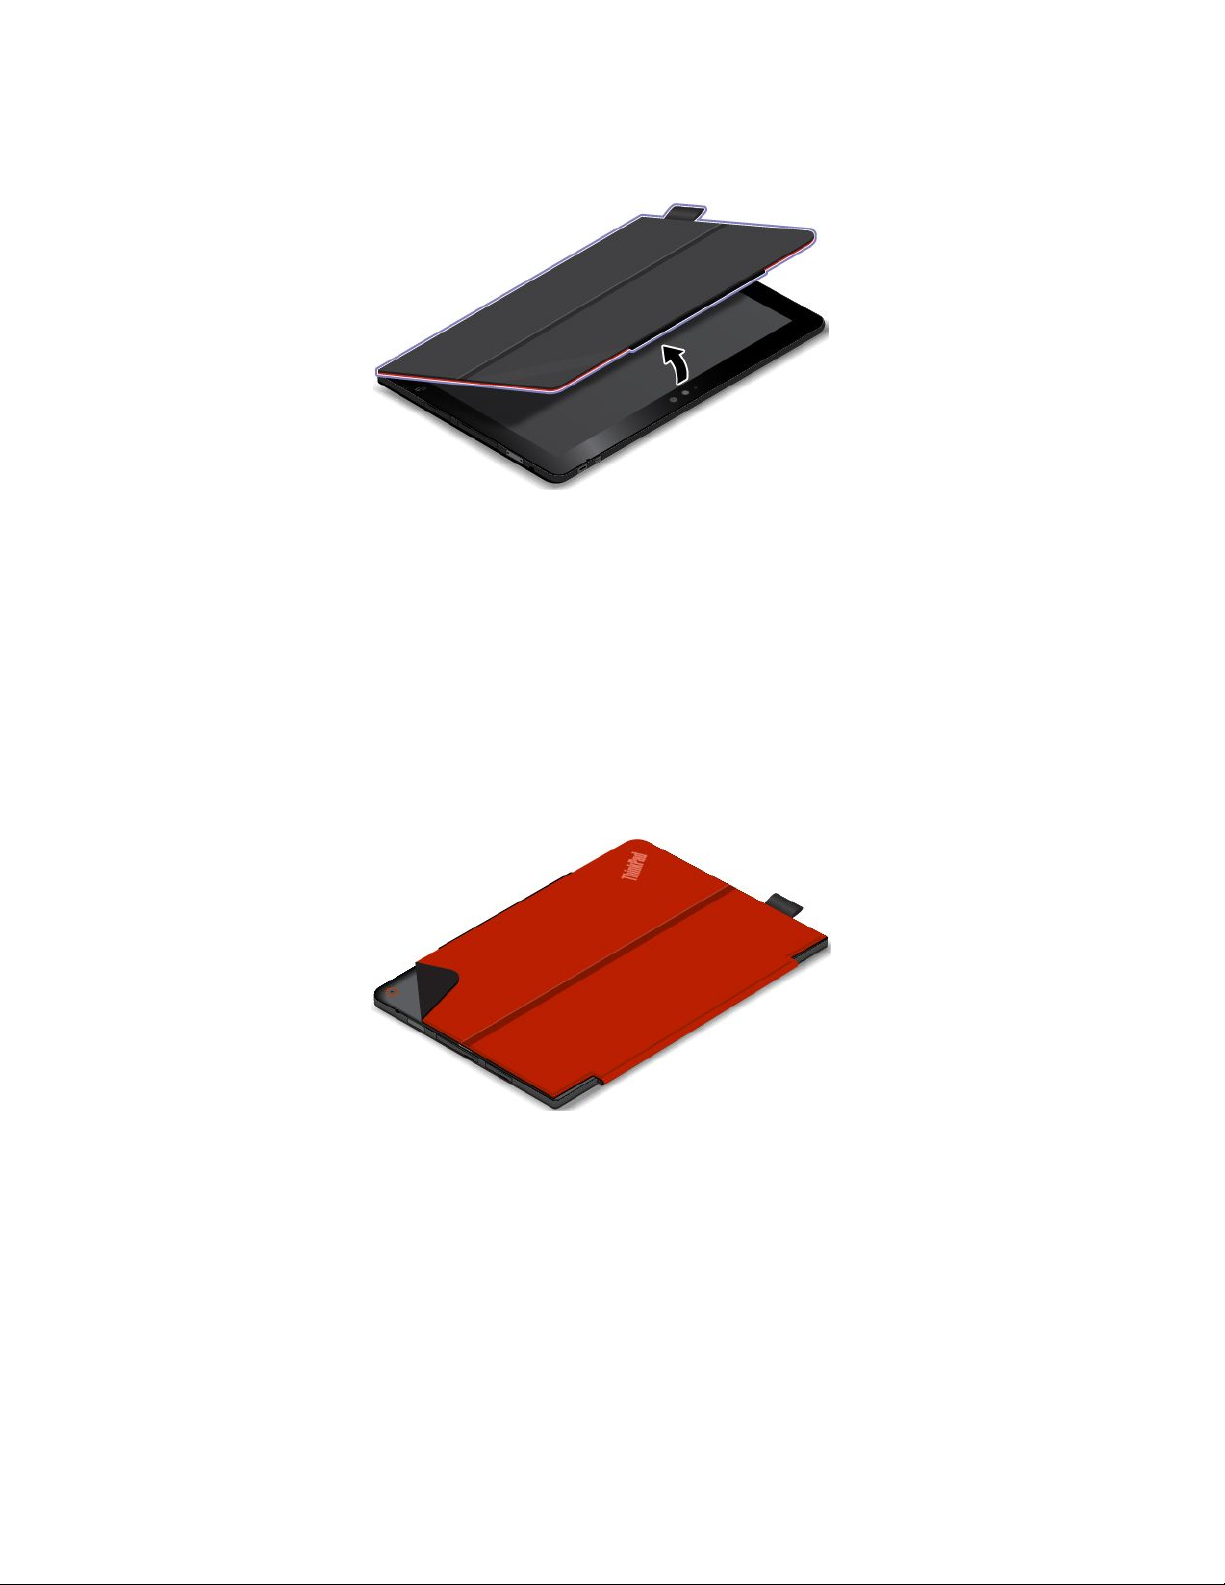
Launchthecamera
Whenyouusethetabletwiththecoveropentoanangleof360degrees,youcanflipoverthemagnetictab
ofthecoverasshowntolaunchthecameraautomatically.Thisfunctionisenabledbydefault.
Ifyouwanttodisablethisfunction,dothefollowing:
1.FromtheStartscreen,tapLenovoSettings➙Camera.
2.IntheQuickshotsection,slidethecontroltothelefttodisablethefunction.
22ThinkPadHelixUserGuide
Page 31

Serveasastandforthetablet
Thecovercanserveasastandforthetabletasshown.Inthisway,youcanusethetablettowatchmovies,
viewphotos,ormakeapresentationconveniently.
Note:Ifyourtabletisequippedwithasmartcardslotontherearside,thecovermightnotworkwellas
astandforthetablet.
Usingthecameras
Yourtablethastwocameras,afront-facingcameraandarear-facingcamera.Therear-facingcameraan
auto-focusfeaturethatenablesyoutocapturehigh-qualitypicturesandvideos.
Tolaunchacameraandconfigurethecamerasettings,dothefollowing:
1.FromtheStartscreen,tapLenovoSettings➙Camera.
2.Followtheinstructionsonthescreentoconfiguresettingsandusethecamera.
Toswitchbetweenthefront-facingcameraandtherear-facingcamera,dothefollowing:
1.FromtheStartscreen,tapLenovoSettings➙Camera.
2.IntheViewsection,selectFront-facingcameraorRear-facingcamerafromtheSelectacamera
drop-downlistboxtoswitchthecameras.
Youalsocanusethecamerawithotherapplicationsthatprovidefeaturessuchasphotographing,video
capturing,andvideoconferencing.T odownloadotherapplications,tapWindowsStorefromtheStart
screen.Thenfollowtheinstructionsonthescreen.
Usingthemicro-SD-cardreader
Yourtablethasamicro-SD-cardreaderthatprovidesamicro-SD-cardslotforyoutoinstallamicroSDcard.
Themicro-SD-cardslotsupportsthefollowingtypesofcards:
•SecureDigitaleXtended-Capacity(SDXC)card
•SecureDigital(SD)card
•SecureDigitalHigh-Capacity(SDHC)card
Installingamicro-SD-card
Attention:BeforehandlingamicroSDcard,touchametaltableoragroundedmetalobject.Thisaction
reducesanystaticelectricityfromyourbody.Staticelectricitycandamagethecard.
ToinstallamicroSDcardintothemicro-SD-cardslot,dothefollowing:
Chapter2.Usingyourtablet23
Page 32

1.Opentheprotectivecoverontherightsideofyourtablet.Thenlocatethemicro-SD-cardslota.
2.Ensurethatthemetalcontactsofthecardarefacingdownandpointingtowardthetablet.
3.Insertthecardintothemicro-SD-cardslot.Thecardmightstopbeforeitiscompletelyinstalledintothe
cardreader.Ensurethatyouinsertthecardfirmlyuntilyouhearaclick.
4.Closetheprotectivecoverandturnonyourtablet.
RemovingamicroSDcard
ToremoveamicroSDcard,dothefollowing:
1.Opentheprotectivecoverontherightsideofyourtablet.
24ThinkPadHelixUserGuide
Page 33

2.PushthemicroSDcardinwardalittleuntilyouhearaclick1.Then,releaseit.ThemicroSDcardejects.
3.Gentlyslidethecardoutofthecardslot2.
4.Closetheprotectivecover.
Usingasmartcard
Somemodelscomewithasmartcardslot.Thistopicprovidesinformationonhowtousethesmartcard.
Generally,smartcardscanprovideauthentication,datastorage,andapplicationprocessing.Smartcards
alsomightprovidestrongsecurityauthenticationforsinglesign-on(SSO)withinlargeorganizations.
Yourtabletsupportssmartcardswiththefollowingspecifications:
•Width:85.60mm(3.37inches)
•Depth:53.98mm(2.13inches)
•Height:0.76mm(0.03inch)
Chapter2.Usingyourtablet25
Page 34

Thefollowingillustrationsshowbothsidesofasmartcard.Inillustration1,themetalcontactsaofthecard
arefacingupward.Inillustration
2,themetalcontactsaofthecardarefacingdownward.
Note:Yoursmartcardmightlookslightlydifferentfromthefollowingillustrations.
Installingasmartcard
Attention:
•Beforeinstallingasmartcard,touchametaltableoragroundedmetalobject.Thisactionreducesany
staticelectricityfromyourbody.Staticelectricitycoulddamagethecard.
•Whiletransferringdatatoorfromasmartcard,donotputyourtabletintosleeporhibernationmode
beforethedatatransferfinishes;otherwise,yourdatacouldbecomedamaged.
•Dependingonthemodel,yourtabletmightalsohaveanintegratedsmart-cardreader.Ensurethat
youinsertacorrecttypeofsmartcard(asshowninfigureA)intothesmart-cardreader.Donotinsert
anon-supportcardoracardwithslits(asshowninfigureBandfigureC)intothesmart-cardreader.
Otherwise,thesmartcardreadermightgetdamaged.
Toinstallasmartcard,dothefollowing:
1.Positionyourtabletasshownandensurethatthemetalcontactsaofthecardarefacingdownward
andpointingtowardthecardslot.
26ThinkPadHelixUserGuide
Page 35

2.Insertthecardintotheslotasshown.
Iftheplug-and-playfeatureisnotenabledfortheinstalledsmartcard,dothefollowingtoenablethefeature:
1.GotoControlPanel.
2.T apHardwareandSound.
3.T apDeviceManager.Ifyouarepromptedforanadministratorpasswordorconfirmation,typethe
passwordorprovideconfirmation.
4.FromtheActionmenu,tapAddlegacyhardware.TheAddHardwareWizardstarts.
5.Followtheinstructionsonthescreen.
Removingasmartcard
Attention:
•Beforeremovingasmartcard,stopthecardfirst.Otherwise,dataonthecardmightgetdamagedorlost.
•Donotremovethesmartcardwhilethetabletisinsleepmodeorhibernationmode.Otherwise,the
systemmightnotrespondwhenyoutrytoresumeoperation.
Toremoveasmartcard,dothefollowing:
1.T apthetriangularicononthetaskbartoshowhiddenicons.Then,tapandholdtheSafelyRemove
HardwareandEjectMediaicon.
2.T aptheitemyouwanttoremovetostopthecard.
3.Pullthecardoutwardalittle,andgentlyslidethecardoutoftheslot.
Chapter2.Usingyourtablet27
Page 36

Note:IfyoudonotremovethesmartcardfromyourtabletafteryouejectthecardfromtheWindows
operatingsystem,thecardcannolongerbeaccessed.Toaccessthecard,youmustremoveitfirst,
theninsertitagain.
UsingHDMIdevices
YourtablethasamicroHDMIconnectorthatyoucanusetoconnectanexternaldisplayforvideooutput.
TolocatethemicroHDMIconnector,see“Tabletlayout”onpage1
Connectinganexternaldisplay
TheLenovoMicroHDMIToVGAAdapterisavailableasoptiononsomemodels.Ifyourtabletdoesnot
comewithaLenovoMicroHDMIT oVGAAdapter,youcanpurchaseoneat:
http://www.lenovo.com/essentials
YoucanusethisadaptertoconnectyourtablettoaVGA-compatibleexternaldisplayasshowninthe
followingillustration.
.
Note:Whenyouconnectanexternaldisplay,avideointerfacecablewithaferritecoreisrequired.
Ifyourtabletcannotdetecttheexternaldisplay,right-clickanywhereonthedesktop,thenclickScreen➙
Resolution➙Detect.
Configuringthescreensettings
Toconfigurescreensettingsfortheexternaldisplay,dothefollowing:
1.Swipeinfromtherightedgeofthescreentodisplaythecharms.
2.T aptheDevicescharm.
3.T apProject➙Secondscreen.
4.T aptoselectapresentationscheme.
Usingsynchronizationsolutions
Byusingsynchronizationsolutions,youcaneasilysynchronizesettingsbetweenyourtabletandother
personalcomputer.
28ThinkPadHelixUserGuide
Page 37

YoucansynchronizingthesettingsbyusingtheWindowssynchronizationsolution.
ToaccessWindowssynchronizationsolution,dothefollowing:
1.Swipeinfromtherightedgeofthescreentodisplaythecharms.
2.T apSettings➙ChangePCsettings.
3.Inthenavigationpanel,tapOneDrive➙Syncsettings.
4.Configuresettingsasdesired.
UsingtheGlobalNavigationSatelliteSystemreceiver
YourtabletmighthaveaGlobalNavigationSatelliteSystem(GNSS)receiverthatenablesyoutopinpoint
yourlocationdowntothestreetlevel.Uselocation-basedapplicationstofindyourcurrentlocation,get
directionstoyourdestination,andfindotherlocation-basedinformation.
Note:Bydefault,theGNSSreceiverisenabled.Foralongerbatterylife,disabletheGNSSreceiverwhen
notinuse.
TodisabletheGNSSreceiver,dothefollowing:
1.Swipeinfromtherightedgeofthescreentodisplaythecharms.
2.T apSettings➙ChangePCsettings.
3.Inthenavigationpanel,tapNetwork➙Airplanemode.
4.IntheGNSSorGPSsection,slidethecontroltothelefttodisabletheGNSSreceiver.
Turningoffthetablet
Toturnofthetablet,dooneofthefollowing:
•GototheStartscreenbytappingtheWindowsStart-screencontrol,clickthepowericoninthetop-right
cornerofthescreen,thenclickShutdown.
•Moveyourpointertothetop-rightorbottom-rightcornerofthescreentodisplaythecharms.Then
clickSettings➙Power➙Shutdown.
Note:Ifyourtabletisattachedtoasupportedkeyboard,youalsocanopentheSettingscharmbypressing
thesettingskey.
Chapter2.Usingyourtablet29
Page 38

30ThinkPadHelixUserGuide
Page 39

Chapter3.Wirelessnetworksanddevices
Yourtabletcanconnecttoavarietyofnetworksanddevices,includingmobilenetworks(3Gor4G),Wi-Fi
datanetworks,andBluetoothdevices.
Note:Sometabletmodelscanconnecttobothmobilenetworks(3Gor4G)andWi-Finetworks,whileothers
canconnecttoWi-Finetworksonly.IfyourtabletsupportsWi-Ficonnectiononly,theinformationrelated
tomobilenetworksdoesnotapplytoyourtablet.
InstallingandremovingthemicroSIMcard
Ifthetabletsupportsmobilenetworkconnection,itmightrequireamicroSIMcardtoconnecttoamobile
network.ThemicroSIMcardisshippedwithsometabletmodelsonlyandyoucanpurchaseonewhen
necessary.
Attention:WheninstallingorremovingthemicroSIMcard,donottouchthemicroSIMcardmetal
connectors.AlwaysholdthetabletinyourhandbeforeyouinstallorremovethemicroSIMcardtoavoid
electrostaticdischarges.
ToinstallthemicroSIMcard,dothefollowing:
1.T urnoffthetablet.
2.Opentheprotectivecoverontherightsideofyourtablet.Thenlocatethemicro-SIM-cardslota.
©CopyrightLenovo2014,2015
31
Page 40

3.HoldthemicroSIMcardwiththemetalcontactsfacingdown,andtheninsertitfirmlyintothe
micro-SIM-cardslotasshownuntilyouhearaclick.
4.Closetheprotectivecoverandturnonyourtablet.
ToremovethemicroSIMcard,dothefollowing:
1.T urnoffthetablet.
2.Opentheprotectivecoverontherightsideofyourtablet.
32ThinkPadHelixUserGuide
Page 41

3.PushthemicroSIMcardinwarduntilyouhearaclick1.ThemicroSIMcardejects.Gentlyslide
themicroSIMcardoutoftheslot
2.
4.Closetheprotectivecover.
Determiningwhichmobilenetworkyouareusing
Ifyouhaveconnectedtoanetwork,youcancheckthenetworknametoseewhichmobilenetworkyou
areusing.
Tocheckthenetworkname,dooneofthefollowing:
•Swipeinfromtherightedgeofthescreentodisplaythecharms.ThentaptheSettingscharm.The
networknameisdisplayedunderthenetworkicon.
•Onthedesktop,movethepointertothenetworkiconintheWindowsnotificationarea.Thenetwork
nameisdisplayed.
ConnectingtoaWi-Finetwork
Wi-Fiisawirelessnetworkingtechnologythatprovidesnetworkaccessatdistancesofupto100meters
(328feet)dependingontheWi-Firouterandyoursurroundings.
AWi-FiconnectionrequiresaccesstoafunctioningWirelessAccessPoint(WAP),alsocalledahotspot.
Somehotspotsareopentothepublic,butsomeothersimplementsecurityfeaturestolimitaccessto
specificgroupsorindividuals.
Note:TherangeandqualityoftheWi-Fisignalareaffectedbythenumberofconnecteddevices,the
infrastructure,andtheobjectsthroughwhichthesignalistransmitted.
ConnectingtoaWi-Finetwork
ToestablishaWi-Finetworkconnection,dothefollowing:
1.Swipeinfromtherightedgeofthescreentodisplaythecharms.
Chapter3.Wirelessnetworksanddevices33
Page 42

2.T aptheSettingscharm.
3.T apthenetworkicon.AlistofavailableWi-Finetworksisdisplayed.
4.T aptheIDofthenetworkyouwanttoconnect.
5.FollowtheinstructionsonthescreentoconnecttotheWi-Finetwork.
Toviewsecurity,address,andotherinformationabouttheWi-Finetworkyouareconnected,dothefollowing:
1.Swipeinfromtherightedgeofthescreentodisplaythecharms.
2.T apSettings➙ChangePCsettings.
3.Inthenavigationpanel,tapNetwork➙Connections.
4.IntheWi-Fisection,tapthenetworknametoviewtheinformation.
ThetabletsupportstheproxyfeatureforWi-Ficonnection.Theproxyfeatureenablesyoutoaccessmore
Web-basedsourceandbrowseInternetmoresecurely.Ifyouwanttoconfiguretheproxysettingswhenyou
areconnectingtoaWi-Finetwork,dothefollowing:
1.Swipeinfromtherightedgeofthescreentodisplaythecharms.
2.T apSettings➙ChangePCsettings.
3.Inthenavigationpanel,tapNetwork➙Proxy.
4.Followtheinstructionsonthescreentoconfiguretheproxysettings.
AddingaWi-Finetwork
IfyouwanttoaccessaWi-Finetworkthatdoesnotbroadcastitsnetworkname(alsocalledaserviceset
identifierorSSID),youmustaddthatWi-Finetworkbeforeyoucanconnecttoit.
ToaddaWi-Finetwork,dothefollowing:
1.Swipeinfromtherightedgeofthescreentodisplaythecharms.
2.T aptheSettingscharm.
3.T apthenetworkicon.AlistofavailableWi-Finetworksisdisplayed.
4.T apHiddennetwork.
5.FollowtheinstructionsonthescreentoaddaWi-Finetwork.
Addinganetworkprofile
EachlocationprofilestoresallthenetworkandInternetconfigurationsettingsneededforconnectingtoa
networkinfrastructurefromaspecificlocationsuchasahomeoranoffice.Byswitchingbetweenlocation
profilesasyoumoveyourtabletfromplacetoplace,youcanquicklyandeasilyconnecttoanetworkwith
noneedtoreconfigureyoursettingsmanuallyandrestartthetableteachtime.
Toaddanetworkprofile,dothefollowing:
1.FromtheStartmenu,tapLenovoSettings.
2.T apLocationAwareness.
3.Followtheinstructionsonthescreentoaddanetworkprofile.
Connectingtoamobilenetwork
AmicroSIMcardisrequiredtoconnecttoamobilenetwork.Referto“InstallingandremovingthemicroSIM
card”onpage31forinstructionsonhowtoinstallamicroSIMcard.
Note:SometabletssupportaccesstoWi-Finetworksonly.See“ConnectingtoaWi-Finetwork”onpage
33forinstructionsonconnectingtoaWi-Finetwork.
34ThinkPadHelixUserGuide
Page 43

Toconnecttothemobilenetwork,dothefollowing:
1.Swipeinfromtherightedgeofthescreentodisplaythecharms.
2.T aptheSettingscharm.
3.T apthenetworkicon.Alistofavailablenetworksisdisplayed.
4.IntheMobilebroadbandsection,slidethecontroltotherighttoturniton.
5.T apthenetworkname.Amenuisdisplayed.
6.T apConnect.
Whenyouareconnectedtothemobilenetwork,settheactivemobilenetworkasmeteredconnectionto
reducetheamountofdatayousendandreceive.
Tosettheactivemobilenetworkasmeteredconnection,dothefollowing:
1.Swipeinfromtherightedgeofthescreentodisplaythecharms.
2.T apSettings➙ChangePCsettings.
3.Inthenavigationpanel,tapNetwork➙Connections.
4.IntheMobilebroadbandsection,tapthenetworkname.Amenuisdisplayed.
5.IntheSetasameteredconnectionsection,slidethecontroltotherighttoturniton.
Afteryousetyourmobilenetworkasameteredconnection,youcandisabletheDownloadovermetered
connectionsfeaturetopreventextracharges.
TodisabletheDownloadovermeteredconnectionsfeature,dothefollowing:
1.Swipeinfromtherightedgeofthescreentodisplaythecharms.
2.T apSettings➙ChangePCsettings.
3.Inthenavigationpanel,tapPCanddevices➙Devices.
4.IntheDownloadovermeteredconnectionssection,slidethecontroltothelefttoturnitoff.
SharingyourInternetconnection
YoucanshareyourmobilebroadbandInternetconnectionwithmultipledevices.
ToshareyourInternetconnection,dothefollowing:
1.Swipeinfromtherightedgeofthescreentodisplaythecharms.
2.T apSettings➙ChangePCsettings.
3.Inthenavigationpanel,tapNetwork➙Connections.
4.IntheMobilebroadbandsection,tapthenetworkname.Amenuisdisplayed.
5.IntheSharethisconnectionsection,slidethecontroltotherighttoturniton.
UsingBluetoothdevices
Bluetoothisashort-rangewirelesscommunicationstechnology.UseBluetoothtoestablishawireless
connectionwithanotherBluetooth-enableddeviceoveradistanceofabout10m(32.8ft).
PairingwithaBluetoothdevice
ToconnectandexchangedatawithanotherBluetoothdevice,pairyourtabletwiththeBluetoothdevice
bydoingthefollowing:
1.Swipeinfromtherightedgeofthescreentodisplaythecharms.
Chapter3.Wirelessnetworksanddevices35
Page 44

2.T apSettings➙ChangePCsettings.
3.Inthenavigationpanel,tapPCanddevices➙Bluetooth.
4.Slidethecontroltotherighttoturniton.ThetabletwillsearchforBluetoothdevices.
5.WhentheBluetoothdeviceyouwanttopairisfound,taptheIDoftheBluetoothdevice.
6.T apPair.
UnpairingaBluetoothdevice
TounpairaBluetoothdevice,dothefollowing:
1.Swipeinfromtherightedgeofthescreentodisplaythecharms.
2.T apSettings➙ChangePCsettings.
3.Inthenavigationpanel,tapPCanddevices➙Bluetooth.
4.T aptheIDoftheBluetoothdeviceyouwanttounpair.
5.T apRemovedevice.Anotificationpromptisdisplayed.
6.T apY es.
UsingtheNFCconnection
Nearfieldcommunication(NFC)isahigh-frequencyandshort-rangewirelesscommunicationstechnology.
Dependingonthemodel,yourtabletmightcomewiththeNFCfeature.ByusingtheNFCfeature,youcan
establishradiocommunicationsbetweenyourtabletandanotherNFC-enableddeviceoveradistanceno
morethanafewcentimeters.
IfyourtabletisequippedwiththeNFCfeature,youcanfindtheNFCicon
Bydefault,theNFCfeatureisenabled.IftheNFCfeatureofyourtabletisdisabled,dothefollowingto
enabletheNFCfeature:
1.Swipeinfromtherightedgeofthescreentodisplaythecharms.
2.T apSettings➙ChangePCsettings➙Network➙Radiodevices.
3.SlidetheNFCcontroltotherighttoenabletheNFCfeature.
IfyoustillcannotenabletheNFCfeature,checktheNFCsettingintheThinkPadT abletSetupprogram
bydoingthefollowing:
1.StarttheThinkPadT abletSetupprogram.See“ThinkPadT abletSetup”onpage77.
2.T apSecurity➙I/OPortAccess.
3.SettheNFCoptiontoOn.
YoucanusetheNFCfeaturewithNFC-supportedprograms,suchastheLenovoQuickControlprogram.
Insomescenarios,youmightwanttouseanNFCcardoranNFC-enabledsmartphonewithyourtabletto
transferdata.ThefollowingsectionsprovideinstructionsonhowtoadjustthepositionofanNFCcardand
anNFC-enabledsmartphoneforNFCcommunication.
PositioninganNFCcard
Attention:
onthetablet.
•BeforepositioninganNFCcard,touchametaltableoragroundedmetalobject.Thisactionreducesany
staticelectricityfromyourbody.Staticelectricitycoulddamagethecard.
36ThinkPadHelixUserGuide
Page 45

•WhiletransferringdatatoorfromanNFCcard,donotputyourtabletintosleeporhibernationmode
beforethedatatransferfinishes;otherwise,yourdatacouldbecomedamaged.
Notes:
•BeforepositioninganNFCcard,ensurethatthetabletisonandtheNFCfeatureofthetabletisenabled.
•BeforepositioninganNFCcard,ensurethatthecardisinNFCDataExchangeFormat(NDEF),otherwise
thecardwillnotbesuccessfullydetectedbythetablet.
•Y ourtabletscreenandNFCcardmightlookdifferentfromtheillustrationsinthistopic.
TopositionanNFCcard,dothefollowing:
1.Positionyourtabletasshownandensurethatthefrontsideofthecardisfacingupward.Alignthe
left-sideedgeofthecardwiththeNFClogoonthetablet.
2.Movethecardleftandrightwithin5mm(0.20inch)asshown.Then,holdthecardforaboutone
seconduntilyouarepromptedthatthecardhasbeensuccessfullydetectedbythetablet.Then,you
cantransferdatatoorfromthecardthroughNFC.
FormoreinformationabouttransferringdatathroughNFC,refertothedocumentationthatcamewiththe
card.
PositioninganNFC-enabledsmartphone
Attention:WhiletransferringdatatoorfromanNFC-enabledsmartphone,donotputyourtabletintosleep
orhibernationmodebeforethedatatransferfinishes;otherwise,yourdatacouldbecomedamaged.
Chapter3.Wirelessnetworksanddevices37
Page 46

Notes:
•BeforepositioninganNFC-enabledsmartphone,ensurethatboththetabletandthesmartphoneareon
andtheNFCfeatureisenabledonboththetabletandsmartphone.
•ThescreenofyourtabletandNFC-enabledsmartphonemightlookdifferentfromtheillustrationsin
thistopic.
TopositionanNFC-enabledsmartphone,dooneofthefollowingdependingonthepositionofyour
smartphone:
•Whenthesmartphoneisinaportraitposition:
1.Positionyourtabletasshownandensurethatthescreenofthesmartphoneisfacingupward.Align
theleft-sideedgeofthesmartphonewiththeNFClogoonthetablet.
2.Movethesmartphoneleftandrightwithin5mm(0.20inch)asshown.Then,holdthesmartphonefor
aboutoneseconduntilyouarepromptedthatthesmartphonehasbeensuccessfullydetectedbythe
tablet.Then,youcantransferdatatoorfromthesmartphonethroughNFC.
FormoreinformationabouttransferringdatathroughNFC,refertothedocumentationthatcamewith
thesmartphone.
•Whenthesmartphoneisinalandscapeposition:
38ThinkPadHelixUserGuide
Page 47

1.Positionyourtabletasshownandensurethatthescreenofthesmartphoneisfacingupward.Align
theleft-sideedgeofthesmartphonewiththeNFClogoonthetablet.
2.Movethesmartphoneleftandrightwithin5mm(0.20inch)asshown.Then,holdthesmartphonefor
aboutoneseconduntilyouarepromptedthatthesmartphonehasbeensuccessfullydetectedbythe
tablet.Then,youcantransferdatatoorfromthesmartphonethroughNFC.
FormoreinformationabouttransferringdatathroughNFC,refertothedocumentationthatcamewith
thesmartphone.
Chapter3.Wirelessnetworksanddevices39
Page 48

40ThinkPadHelixUserGuide
Page 49

Chapter4.Youandyourtablet
Thischapterprovidestheaccessibilityinformationaboutyourtablet,andinstructionsontravelingwith
thetabletandmaintainingthetablet.
Comfortandaccessibility
Readthistopictolearnhowtouseyourtabletmorecomfortablyandhowtousetheaccessibilityfeatures.
Usingyourtabletmorecomfortably
Withthehelpofalltheconveniencesandpowerfulfeaturesofyourtablet,youcancarryyourtabletallday
longforworkorentertainmentatmanyplaces.Thereforeitisimportantthatyouremainattentivetogood
posture,goodlighting,andproperseatingtoachievegreatercomfortwithyourtablet.
Activesittingandrestbreaks:Thelongeryousitandworkwithyourtabletthemoreimportantitisto
observeyourworkingposture.Makeminorvoluntaryposturalchangesandtakefrequent,shortbreakswhen
youusethetabletforalongtime.Yourtabletisalightandmobilesystem;rememberthatitcaneasilybe
repositionedtoaccommodatemanyposturemodificationsyoumightwishtomake.
Workareasetupoptions:Familiarizeyourselfwithallofyourofficefurnituresothatyouknowhowtoadjust
yourworksurface,seat,andotherworktoolstoaccommodateyourpreferencesforcomfort.Ifyourwork
areaisnotinanofficesetting,besuretotakespecialnoteofemployingactivesittingandutilizingwork
breaks.NotethattherearemanyThinkPadproductsolutionsavailabletohelpyoumodifyandexpand
yourtablettobestsuityourneeds.AccesstheWebsitehttp://www.lenovo.com/essentialstoviewsome
oftheseoptions.Exploreyouroptionsfordockingsolutionsandexternalproductsthatcanprovidethe
adjustabilityandfeaturesthatyouwant.
Accessibilityinformation
Lenovoiscommittedtoprovidingpeoplewithdisabilitiesgreateraccesstoinformationandtechnology.
Sometechnologiesarealreadyprovidedinyouroperatingsystem.Otherscanbepurchasedthrough
vendors.
UsersalsocanusetheEaseofAccessCenterprovidedintheWindowsoperatingsystemtoconfiguretheir
tablettosuittheirphysicalandcognitiveneeds.TheEaseofAccessCenterisacentrallocationthatyoucan
usetoconfiguretheaccessibilitysettingsandprogramsavailableintheMicrosoftWindowsoperatingsystem.
TousetheEaseofAccessCenter,openControlPanelandtapEaseofAccess➙EaseofAccessCenter.
Thefollowinginformationprovideswaystohelpuserswhohavehearing,vision,andmobilitylimitationsget
themostoutoftheircomputerexperience.
On-screennotification
On-screennotificationhelpshearing-impairedpeoplebeawareofthestatusoftheirtablet.On-screen
notificationreplacessoundswithvisualcuesortextcaptionstoindicatethatactivityishappeningon
thetablet.Asaresult,systemalertsarenoticeableevenwhentheyarenotheard.Forexample,when
youselectoneobject,theobjectishighlighted.
Touseon-screennotification,openControlPanel,tapEaseofAccess➙EaseofAccessCenter,and
thentapUsetextorvisualalternativeforsounds.
©CopyrightLenovo2014,2015
41
Page 50

Audionotification
Audionotificationhelpsvisuallyimpairedpeopleorpeoplewithweaksightbeawareofthestatusoftheir
tablet.
Touseaudionotification,openControlPanel,tapEaseofAccess➙EaseofAccessCenter➙Usethe
computerwithoutadisplay,andthenselectTurnonAudioDescription.
Narrator
Narratorisascreenreaderthatreadstextsonthescreenaloudanddescribeseventslikeerrormessages.
ToopenNarrator,taporclicktheSearchicononthetop-rightcorneroftheStartscreenandthentype
Narratorintothedisplayedsearchbox.Ifyouareusingakeyboard,youcanjuststarttypingontheStart
screenandthenthesearchboxandsearchresultsaredisplayedautomatically.Inthelistofresults,click
Narrator.
FormoreinformationabouthowtouseandconfigureNarrator,seetheWindowsHelpandSupport
informationsystem.
Screen-readertechnologies
Screen-readertechnologiesareprimarilyfocusedonsoftwareprograminterfaces,helpinformationsystems,
andavarietyofonlinedocuments.Foradditionalinformationaboutscreenreaders,seethefollowing:
•UsingPDFswithscreenreaders:
http://www.adobe.com/accessibility.html?promoid=DJGVE
•UsingtheJAWSscreenreader:
http://www.freedomscientific.com/jaws-hq.asp
•UsingtheNVDAscreenreader:
http://www.nvaccess.org/
SpeechRecognition
SpeechRecognitionenablesyoutocontrolyourtabletbyvoice.
Usingonlyyourvoice,youcanstartprograms,openmenus,tapbuttonsandotherobjectsonthescreen,
dictatetextintodocuments,andwriteandsende-mails.
ToopenSpeechRecognition,taporclicktheSearchicononthetop-rightcorneroftheStartscreenand
thentypeSpeechRecognitionintothedisplayedsearchbox.Ifyouareusingakeyboard,youcanjust
starttypingontheStartscreenandthenthesearchboxandsearchresultsaredisplayedautomatically.
Inthelistofresults,clickSpeechRecognition.
FormoreinformationabouthowtouseandconfigureSpeechRecognition,seetheWindowsHelpand
Supportinformationsystem.
Customizabletextsize
Dependingonyourpreference,youcanchangeonlythetextsizeinsteadofchangingthesizeofeverything
onthedesktop.Tochangethetextsize,openControlPanelandtapAppearancesandPersonalization➙
Display.Then,gotoChangeonlythetextsizeandsetatextsizethatmeetsyourneeds.
Magnifier
YourtabletisequippedwiththeMicrosoftMagnifiertohelpvisuallyimpairedpeopleusethetabletmore
comfortably.Magnifierisausefulutilitythatenlargespartorallofyourscreensothatyoucanseethewords
andimagesbetter.MagnifierispartoftheEaseofAccessCenter.
42ThinkPadHelixUserGuide
Page 51

ToopenMagnifier,taporclicktheSearchicononthetop-rightcorneroftheStartscreenandthentype
Magnierintothedisplayedsearchbox.Ifyouareusingakeyboard,youcanjuststarttypingontheStart
screenandthenthesearchboxandsearchresultsaredisplayedautomatically.Inthelistofresults,click
Magnifier.
FormoreinformationabouthowtouseandconfigureMagnifier,seetheWindowsHelpandSupport
informationsystem.
Zoom
Youcanusethezoomfeaturetoenlargeorreducethesizeoftext,pictures,maps,orotherobjects.
•Zoomin:Movetwofingersfartherapartonthetouchscreentoenlargethesizeoftext,pictures,maps,
orotherobjects.
•Zoomout:Movetwofingersclosertogetheronthetouchscreentoreducethesizeoftext,pictures,
maps,orotherobjects.
Screenresolution
Youcanmakeyourdocumentseasiertoreadbyadjustingthescreenresolutionofyourtablet.Toadjust
thescreenresolution,tapandholdanywhereonthedesktop,tapScreenresolution,andthenadjustthe
settingsasyouprefer.
Note:Settingtoolowofaresolutionmightpreventsomeitemsfromfittingonthescreen.
Foralternativesonincreasingthesizeoftextandotherobjects,seethefollowing:
•“Customizabletextsize”onpage42
•“Magnifier”onpage42
•“Zoom”onpage43
On-ScreenKeyboard
On-ScreenKeyboarddisplaysavisualkeyboardwithallthestandardkeys.
ToopenOn-ScreenKeyboard,taporclicktheSearchicononthetop-rightcorneroftheStartscreenand
thentypeOn-ScreenKeyboardintothedisplayedsearchbox.Ifyouareusingakeyboard,youcanjust
starttypingontheStartscreenandthenthesearchboxandsearchresultsaredisplayedautomatically.
Inthelistofresults,clickOn-ScreenKeyboard.
FormoreinformationabouthowtouseandconfigureOn-ScreenKeyboard,see“UsingtheOn-Screen
Keyboardorthetouchkeyboardandhandwritingpanel”onpage17ortheWindowsHelpandSupport
informationsystem.
Personalizedexternalkeyboard
Thetactilebumpsontheexternalkeyboardprovideareferencepointfromwhichyoucaneasilylocateall
keysonthekeyboardwithoutvisualassistance.
Toadjustyourkeyboardsettings,openControlPanel,clickEaseofAccess➙EaseofAccessCenter,
andthenclickMakethekeyboardeasiertouse.
TodisableorenabletheFnLockfunctionintheKeyboardPropertieswindow,ratherthanpressingthe
Fn+Esckeycombination,dothefollowing:
1.GotoControlPanel.ChangetheviewofControlPanelfromCategorytoLargeiconsorSmallicons.
2.ClickKeyboard.IntheKeyboardPropertieswindow,clicktheThinkPadF1-F12keystab.
3.Selecttheoptionofyourpreference:
Chapter4.Youandyourtablet43
Page 52

•T odisabletheFnLockfunction,selectDefault.TheFnLockindicatorisoff.T oinitiatethespecial
functionprintedasanicononeachkey,pressthefunctionkeydirectly.T oinputF1-F12,press
theFnkeyandthecorrespondingfunctionkey.
•T oenabletheFnLockfunction,selectLegacy.TheFnLockindicatorturnson.ToinputF1-F12,
pressthefunctionkeysdirectly.T oinitiatethespecialfunctionprintedasanicononeachkey,press
theFnkeyandthecorrespondingfunctionkey.
Industry-standardconnectors
Yourtabletprovidesindustry-standardconnectorsthatenableyoutoconnectassistivedevices,ifneeded.
Formoreinformationonthelocationandfunctionofeachconnector,see“Tabletlayout”onpage1
Documentationinaccessibleformats
Lenovoprovideselectronicdocumentationinaccessibleformats,suchasproperlytaggedPDFfilesor
HyperTextMarkupLanguage(HTML)files.Lenovoelectronicdocumentationisdevelopedtoensure
thatvisuallyimpaireduserscanreadthedocumentationthroughascreenreader.Eachimageinthe
documentationalsoincludesadequatealternativetexttoexplaintheimagesothatvisuallyimpairedusers
canunderstandtheimagewhentheyuseascreenreader.
.
Gettingupdates
YourtabletenablesyoutoupdatetheWindowsoperatingsystemandLenovoapplications.
GettingupdatesfromLenovo
YourtabletispreinstalledwithSystemUpdate.ThisprogramenablesyoutokeeptheLenovosoftwareon
yourtabletup-to-datebydownloadingandinstallingsoftwareupdates.
TostartSystemUpdate,dothefollowing:
1.Swipeinfromtherightedgeofthescreentodisplaythecharms.
2.T aptheSearchcharmtosearchforSystemUpdate.
3.T apSystemUpdate.
4.Followtheinstructionsonthescreen.
GettingupdatesfromMicrosoft
TocheckandkeepyourWindows,programs,ordevicedriversup-to-date,seetheWindowsHelpand
Supportformoreinformation.
Travelingwithyourtablet
Thistopicprovidesinformationtohelpyouworkwithandtransportyourtabletwhileyoutraveling.
Traveltips
Usethefollowingtraveltipstotravelmoreconfidentlyandefficientlywithyourtablet:
•Whileitissafetoallowyourtablettogothroughthexraymachinesatairportsecuritystations,itis
importanttokeepyoureyesonthetabletatalltimestopreventtheft.
•Putyourtabletinaprotectivecasewhennotinusetopreventdamageorscratching.
Traveltipsonairplanes
Ifyoucarryyourtabletintoanairplane,checkthefollowingtraveltips:
44ThinkPadHelixUserGuide
Page 53

•Ifyouaregoingtousethewirelessservice,checkwiththeairlineforanyrestrictionsbeforeboarding
theairplane.
•Iftherearerestrictionsontheuseoftabletswiththewirelessfeatureonanairplane,enabletheAirplane
mode.Toenableit,dothefollowing:
1.Swipeinfromtherightedgeofthescreentodisplaythecharms.
2.T apSettings➙ChangePCsettings.
3.Inthenavigationpanel,tapNetwork➙Airplanemode.
4.SlidethecontroltotherighttoturnonAirplanemodetodisableallwirelessdevices.
•Becarefulabouttheseatinfrontofyouontheairplane.Placeyourtabletinasafepositionsothatitdoes
notgetcaughtwhenthepersoninfrontofyouleansback.
Travelaccessories
Thefollowingisachecklistofthingstoconsiderpackingwhenyouaregoingtobeawayfromyourofficeor
home:
Travelessentials:
•Theacpoweradapterthatcomeswithyourtablet
•Thepowercordthatcomeswithyourtablet
•Aqualitycarryingcasethatprovidesadequatecushionandprotection
Otheritemsyoumightwanttoconsider:
•Additionalstoragedevicesorsmartcards
•LenovoMicroHDMIT oVGAAdapter
•LenovoMini-DisplayPorttoVGAAdapter
•T abletDigitizerPen
•ThinkPadActivePen
•ThinkPadheadphones
•ThinkPadHelixQuickshotCover
•ThinkPadHelixUltrabookKeyboard
•ThinkPadHelixUltrabookProKeyboard
•ThinkPadTabletDock
•ThinkPadUSB3.0EthernetAdapter
Ifyouaretravelingtoanothercountryorregion,youmightwanttoconsiderthefollowingitems:
•AThinkPadacpoweradapterforthecountryorregiontowhichyouaretraveling
•AmicroSIMcardforthelocalmobileservicesinthatcountryorregion
Careandmaintenance
Handleyourtabletwithcaresothatyoucanenjoythisproductforalongtime.
Cleaningyourtablet
Tocleanyourtablet,unplugallcablesandturnoffthetabletbypressingandholdingthepowerbuttonfora
fewseconds.Thenwipethetabletscreenwithasoft,lint-free,dryclothtoclearstainsandsmudges.
Chapter4.Youandyourtablet45
Page 54

Note:Donotusescreencleaners,householdcleaners,aerosolsprays,solvents,alcohol,ammonia,or
abrasivestocleanyourtablet.
Protectingthescreenwithareplaceablefilm
Youcanpurchaseareplaceablefilmtoprotectthescreenfromscratchingandextendthelifeofyourtablet.
Touseareplaceablefilm,cleanthescreenfirstandthenapplythereplaceablefilmonthescreen.
Storingthetabletforextendedperiods
Ifyouarenotgoingtouseyourtabletforanextendedperiodoftime,removethemicroSIMcardfromyour
tablet,andthenpackyourtabletwithaprotectivecaseandstoreitinawell-ventilatedanddryareawithout
directexposuretosunshine.
46ThinkPadHelixUserGuide
Page 55

Chapter5.ThinkPadHelixoptions
ThefollowingoptionaldevicesaredesignedspeciallyforyourThinkPadHelixtablet:
•ThinkPadHelixUltrabookKeyboard
•ThinkPadHelixUltrabookProKeyboard
•ThinkPadTabletDock
Theseoptionsprovideconvenienceandmakeyourtableteasiertouseforwork,study,andentertainment.
Fortabletsthatdonotcomewiththeseoptionaldevices,youcanpurchasethemfromLenovoat:
http://www.lenovo.com/essentials
ThinkPadHelixUltrabookKeyboard
ThistopicprovidesanoverviewoftheThinkPadHelixUltrabookKeyboardandinstructionsonhowtouseit.
OverviewoftheThinkPadHelixUltrabookKeyboard
ThetopicintroducestheThinkPadHelixUltrabookKeyboardhardwarefeaturestogiveyouthebasic
informationyouneedtostartusingit.
12PenslotcoverandPenslot
Somemodelscomewithapenslotcover1.TostoretheTabletDigitizerPenorThinkPadActivePeninthe
penslot2,removethepenslotcoverfromtheslotfirst.
Note:Storethepenslotcoverinasafeplace.Reattachittothepenslotwhenyouarenotstoringthepen
intheslot.
3Clickpad
Theclickpadisapointer-positioningdevicethatenablesyoutopoint,select,drag,andscroll,likeyoudo
whenusingamouse.Y oualsocanusetheclickpadtoperformsomebasictouchgestures.
Formoreinformation,see“Usingtheclickpad”onpage52
©CopyrightLenovo2014,2015
.
47
Page 56

4Specialkeys
Thespecialkeysenableyoutoworkeasilyandeffectively.See“Usingthespecialkeys”onpage51.
5USB2.0connector
TheUSB2.0connectorisusedforconnectingUSB-compatibledevices,suchasaUSBprinter,USBmouse,
USBkeyboard,USBmemorykey,oradigitalcamera.
Attention:WhenyouattachaUSBcabletothisUSBconnector,ensurethattheUSBmarkisfacingupward.
Otherwisetheconnectormightgetdamaged.
UsingtheThinkPadHelixUltrabookKeyboard
ThistopicprovidesinstructionsonhowtousetheThinkPadHelixUltrabookKeyboard.
Installingorremovingthetablet
TousetheThinkPadHelixUltrabookKeyboard,installyourtabletintothekeyboardfirst.Ensurethatthe
tabletissecuredinplace.
Note:DonotdetachthetabletfromtheThinkPadHelixUltrabookKeyboardwhileusingthekeyboard.
48ThinkPadHelixUserGuide
Page 57

Ifyoudonotwanttousethetabletwiththekeyboard,youcanremoveitasshowninthefollowingillustration.
CarryingorstoringthetablettogetherwiththeThinkPadHelixUltrabookKeyboard
SometimesyoudonotneedtousetheThinkPadHelixUltrabookKeyboard,butyouwouldliketocarry
orstorethetablettogetherwiththekeyboard.Inthissituation,youmightconsiderthefollowingmethods
dependingonthemodelofyourtablet.
•Formodelsthatarenotequippedwithasmartcardslot,youcaninstallthetabletintotheThinkPadHelix
UltrabookKeyboardwiththetabletscreenfacingupward.Toachievethis,dothefollowing:
1.Positionthetabletwiththetabletscreenfacingupward.
2.Gentlyslideyourtabletasshown.ThetabletisattachedtotheThinkPadHelixUltrabookKeyboard.
TheThinkPadHelixUltrabookKeyboardisdisabledinthissituation.
•Forallmodels,youcaninstallthetabletintotheThinkPadHelixUltrabookKeyboardwiththetabletscreen
facingdownward.Toachievethis,dothefollowing:
Note:Yourtabletmightlookslightlydifferentfromthefollowingillustrations.
Chapter5.ThinkPadHelixoptions49
Page 58

1.Positionthetabletwiththetabletscreenfacingdownward.
2.Gentlyslideyourtabletasshown.ThetabletisattachedtotheThinkPadHelixUltrabookKeyboard.
TheThinkPadHelixUltrabookKeyboardisdisabledinthissituation.
StoringandremovingtheTabletDigitizerPenorThinkPadActivePen
SomemodelsareequippedwithaTabletDigitizerPenorThinkPadActivePenasastandardfeature.You
canstorethepenintheslotontherightsideoftheThinkPadHelixUltrabookKeyboard.Removethepen
slotcoverfirst1,thenpushthepengentlyintotheslotuntilyouhearaclick2.
Note:Thepenslotcoverisavailableonsomemodels.
50ThinkPadHelixUserGuide
Page 59

ToremovetheTabletDigitizerPenorThinkPadActivePenfromtheslot,pressthepengentlyintotheslot1
toreleaseit;thenpullthepenout2.
Note:TheTabletDigitizerPenorThinkPadActivePencontainspressuresensors.Donotpushthetipofthe
penforanextendedperiodoftime.Donotsubjectthepentoshockorvibration.
FormoreinformationaboutusingtheTabletDigitizerPenorThinkPadActivePen,see“UsingtheTablet
DigitizerPenorThinkPadActivePen”onpage15.
Usingthespecialkeys
TheThinkPadHelixUltrabookKeyboardhasseveralspecialkeys.Pressaspecialkeytocontrolthe
associatedfunction.
•+EnablesordisablestheFnLockfunction.
WhentheFnLockfunctionisdisabled:TheFnLockindicatorisoff.Toinitiatethespecialfunction
ofeachkey,pressthefunctionkeysdirectly.ToinputF1–F12,presstheFnkeyandthecorresponding
functionkey.
WhentheFnLockfunctionisenabled:TheFnLockindicatorison.ToinputF1–F12,pressthefunction
keysdirectly.Toinitiatethespecialfunctionofeachkey,presstheFnkeyandthecorresponding
functionkey.
Note:Alternatively,youalsocandisableorenabletheFnlockfunctionintheKeyboardProperties
window.See“Personalizedexternalkeyboard”onpage43
.
•Mutesorunmutesthespeakers.Whenthespeakersaremuted,theindicatoronthekeyison.To
turnonthesound,pressor.
•Decreasesthespeakervolume.
•
Increasesthespeakervolume.
•Mutesorunmutesthemicrophones.Whenthemicrophonesaremuted,theindicatoronthe
keyison.
•Darkensthedisplay.
•
Brightensthedisplay.
•Switchesthedisplayoutputlocationbetweenthetabletdisplayandanexternaldisplay.
Chapter5.ThinkPadHelixoptions51
Page 60

•Enablesordisablesthewirelessfeatures.
•OpenstheSettingscharm.
•OpenstheSearchcharm.
•
•
Viewsalltheprogramsthatyouhaveopened.
Viewsalltheprograms.
•Navigatetothetopwhenyouareviewinginformation,suchasadocumentoraWebpage.
•Navigatetothebottomwhenyouareviewinginformation,suchasadocumentoraWebpage.
•Fn+4:Putsthetabletintosleepmode.Toreturntonormaloperation,pressthepowerbutton.
•Fn+B:HasthesamefunctionastheBreakkeyonaconventionalkeyboard.
•Fn+K:HasthesamefunctionastheScrLKkeyontheconventionalkeyboard.
•Fn+P:HasthesamefunctionasthePausekeyontheconventionalkeyboard.
•Fn+S:HasthesamefunctionastheSysRqkeyontheconventionalkeyboard.
•Fn+End:HasthesamefunctionastheInsertkeyontheconventionalkeyboard.
Usingtheclickpad
YoucanpressFn+8toenableordisabletheclickpad.
Theright-clickareaaonthetwo-buttonclickpadworksastheright-clickbuttononaconventionalmouse.
Therestareaonthetwo-buttonclickpadworksastheleft-clickbuttononaconventionalmouse.
Youalsocanusethetwo-buttonclickpadtoperformthefollowingtouchgestures.
Tap
Tapanywhereontheclickpad
withonefingertoselectoropen
anitem.
Two-fingerscroll
Puttwofingersontheclickpad
andmovethemintheverticalor
horizontaldirection.Thisaction
enablesyoutoscrollthroughthe
document,Website,orapps.
Two-fingertap
Tapanywhereontheclickpadwith
twofingerstodisplayashortcut
menu.
Formoreinformation,refertothedocumentationthatcamewiththeThinkPadHelixUltrabookKeyboard.
52ThinkPadHelixUserGuide
Page 61

ThinkPadHelixUltrabookProKeyboard
ThistopicprovidesanoverviewoftheThinkPadHelixUltrabookProKeyboardandinstructionsonhowto
useit.
OverviewoftheThinkPadHelixUltrabookProKeyboard
ThetopicintroducestheThinkPadHelixUltrabookProKeyboardhardwarefeaturestogiveyouthebasic
informationyouneedtostartusingit.
1TrackPointpointingdevice
TheTrackPointpointingdeviceenablesyoutoperformallthefunctionsofatraditionalmouse,suchas
pointing,clicking,andscrolling.Formoreinformation,see“UsingtheT rackPointpointingdevice”onpage62.
2T rackpad
Thetrackpadisapointer-positioningdevicethatenablesyoutopoint,select,drag,andscroll,likeyoudo
whenusingamouse.Youalsocanuseittoperformsometouchgestures.Formoreinformation,see
“Usingthetrackpad”onpage63.
3Specialkeys
Thespecialkeysenableyoutoworkeasilyandeffectively.See“Usingthespecialkeys”onpage61.
4Dockconnector
UsethisconnectortoconnectthetablettotheThinkPadHelixUltrabookProKeyboard.
Chapter5.ThinkPadHelixoptions53
Page 62

5Security-lockslot
ToprotectyourThinkPadHelixUltrabookProKeyboardfromtheft,youcanpurchaseasecuritycablelock
thatfitsthesecurity-lockslottolockthekeyboardtoastationaryobject.See“Attachingamechanical
lock”onpage57
6MiniDisplayPortconnector
.
UsetheminiDisplayPortconnectortoconnectyourtablettoacompatibleprojector,externalmonitor,or
high-definitiontelevision.TheminiDisplayPortconnectorofyourtabletsupportsaudioaswellasvideo
streaming.Thiscompactconnectorenablesaplug-and-playsetupandsupportsadaptersthatcanpluginto
DVI,VGA,orHDMIconnectors.
7AlwaysOnUSB3.0connector
Bydefault,theAlwaysOnUSBconnectorenablesyoutochargesomemobiledigitaldevicesand
smartphonesinthefollowingsituations:
•Whenyourtabletisonorinsleepmode
•Whenyourtabletisinhibernationmodeoristurnedoff,butconnectedtoacpower
Ifyouwanttochargethesedeviceswhenthetabletisinhibernationmodeoristurnedoff,andthetabletis
notconnectedtoacpower,presstheWindowsStartscreencontroltogototheStartscreen.ClickLenovo
Settings➙Power.Thenfollowtheinstructionsonthescreen.
Attention:WhenyouattachaUSBcabletothisUSBconnector,ensurethattheUSBmarkisfacingupward.
Otherwisetheconnectormightgetdamaged.
8Powerconnector
UsethisconnectorwiththesuppliedpowercordandtheacpoweradaptertochargetheThinkPadHelix
UltrabookProKeyboardandthetabletwhenthebatterypowerislow.
Formoreinformation,see“Chargingthebattery”onpage13.
9Ejectbutton
PresstheejectbuttontoreleaseyourtabletfromtheThinkPadHelixUltrabookProKeyboard.
10Speakers
Theintegratedspeakersprovideaudiooutputforvideoandmusicplayback.
54ThinkPadHelixUserGuide
Page 63

Note:IfthetabletisattachedtotheThinkPadHelixUltrabookProKeyboard,thespeakervolumeandmute
settingsfollowthespeakersettingoftheThinkPadHelixUltrabookProKeyboard.
UsingtheThinkPadHelixUltrabookProKeyboard
ThistopicprovidesinstructionsonhowtousetheThinkPadHelixUltrabookProKeyboard.
Installingorremovingthetablet
TousetheThinkPadHelixUltrabookProKeyboard,installyourtabletintothekeyboardfirst.T oinstallthe
tabletforthefirsttime,dothefollowing:
1.Alignthehookholesinthebottomofthetabletwiththekeyboardhooks,then,gentlyslideyourtablet
asshown.ThetabletisattachedtotheThinkPadHelixUltrabookProKeyboard.
2.Pivotupthetablet.
Attention:Donotforcethedisplayopenbeyond125degreesfromtherelativepositionofthekeyboard.
Forcingthedisplaybeyondthispointcancausedamage.
Toremovethetabletfromthekeyboard,dothefollowing:
Chapter5.ThinkPadHelixoptions55
Page 64

1.Presstheejectbuttonontheleftsideofthekeyboard.
2.Removethetabletfromthekeyboard.
Note:DonotremovethetabletfromtheThinkPadHelixUltrabookProKeyboardwhileusingthe
keyboard.
56ThinkPadHelixUserGuide
Page 65

Thenexttimeyouwanttoreinstallthetablet,alignthehookholesinthebottomofthetabletwiththe
keyboardhooks.Then,insertthetabletintothekeyboardasshowninthefollowingillustration.
Note:DonottouchthedockconnectorontheThinkPadHelixUltrabookProKeyboard.
Attachingamechanicallock
YoucanattachasecuritycablelocktotheThinkPadHelixUltrabookProKeyboardtopreventthekeyboard
fromtheft.
Note:Youareresponsibleforevaluating,selecting,andimplementingthelockingdeviceandsecurity
feature.Lenovomakesnocomments,judgments,orwarrantiesaboutthefunction,quality,orperformance
ofthelockingdeviceandsecurityfeature.
Toattachasecuritycablelocktothekeyboard,dothefollowing:
1.Securethechainonthelocktoastationaryobject.Refertotheinstructionsshippedwiththe
mechanicallock.
2.Insertthesecuritycablelockintothesecurity-lockslotofthekeyboard.Thenturnaroundthelock
keytothelockedposition.
CarryingorstoringthetablettogetherwiththeThinkPadHelixUltrabookProKeyboard
SometimesyoudonotneedtousetheThinkPadHelixUltrabookProKeyboard,butyouwouldliketocarry
orstorethetablettogetherwiththekeyboard.Inthissituation,youmightconsiderthefollowingmethods
dependingonthemodelofyourtablet.
•Formodelsthatarenotequippedwithasmartcardslot,youcaninstallthetabletintotheThinkPadHelix
UltrabookProKeyboardwiththetabletscreenfacingupward.T oachievethis,dothefollowing:
Note:Ifthisisnotthefirsttimethatyouinstallthetabletintothekeyboard,refertotheinstallation
instructionsinthelaterpartofthistopic.
Chapter5.ThinkPadHelixoptions57
Page 66

1.Positionthetabletwiththetabletscreenfacingupward.
2.Alignthehookholesinthebottomofthetabletwiththekeyboardhooks,then,gentlyslideyourtablet
asshown.ThetabletisattachedtotheThinkPadHelixUltrabookProKeyboard.Thekeyboard
isdisabledinthissituation.
•Forallmodels,youcaninstallthetabletintotheThinkPadHelixUltrabookProKeyboardwiththetablet
screenfacingdownward.Toachievethis,dothefollowing:
Note:Yourtabletmightlookslightlydifferentfromthefollowingillustrations.
1.Positionthetabletwiththetabletscreenfacingdownward.
2.Alignthehookholesinthebottomofthetabletwiththekeyboardhooks,then,gentlyslideyourtablet
asshown.ThetabletisattachedtotheThinkPadHelixUltrabookProKeyboard.Thekeyboard
isdisabledinthissituation.
StoringandremovingtheTabletDigitizerPenorThinkPadActivePen
SomemodelsareequippedwithaTabletDigitizerPenorThinkPadActivePenasastandardfeature.You
canstorethepeninthepenholder.
TostoretheT abletDigitizerPenorThinkPadActivePen,dothefollowing:
58ThinkPadHelixUserGuide
Page 67

1.Locatethepen-holderslotaonthebottomsideoftheThinkPadHelixUltrabookProKeyboard.
Note:Dependingonthemodel,thebottomsidemightlookdifferent.Formodelsthatarenotequipped
withaTabletDigitizerPenorThinkPadActivePen,thepen-holderslotiscoveredwithadummyrubber.
2.InsertthepenholderthatcomeswiththeThinkPadHelixUltrabookProKeyboardintothepen-holder
slot.
Chapter5.ThinkPadHelixoptions59
Page 68

3.InserttheTabletDigitizerPenorThinkPadActivePenintothepenholderinthedirectionasshownby
thearrow.
ToremovetheTabletDigitizerPenorThinkPadActivePenfromthepen-holderslot,dothefollowing:
1.T aketheTabletDigitizerPenorThinkPadActivePenoutofthepenholderinthedirectionasshownby
thearrow.
60ThinkPadHelixUserGuide
Page 69

2.T akethepenholderoutofthepen-holderslot,ifnecessary.
Note:TheTabletDigitizerPenorThinkPadActivePencontainspressuresensors.Donotpushthetipofthe
penforanextendedperiodoftime.Donotsubjectthepentoshockorvibration.
FormoreinformationaboutusingtheTabletDigitizerPenorThinkPadActivePen,see“UsingtheTablet
DigitizerPenorThinkPadActivePen”onpage15
.
Usingthespecialkeys
TheThinkPadHelixUltrabookProKeyboardhasseveralspecialkeys.Pressaspecialkeytocontrolthe
associatedfunction.
•
+EnablesordisablestheFnLockfunction.
WhentheFnLockfunctionisdisabled:TheFnLockindicatorisoff.Toinitiatethespecialfunction
ofeachkey,pressthefunctionkeysdirectly.ToinputF1–F12,presstheFnkeyandthecorresponding
functionkey.
WhentheFnLockfunctionisenabled:TheFnLockindicatorison.ToinputF1–F12,pressthefunction
keysdirectly.Toinitiatethespecialfunctionofeachkey,presstheFnkeyandthecorresponding
functionkey.
Note:Alternatively,youalsocandisableorenabletheFnlockfunctionintheKeyboardProperties
window.See“Personalizedexternalkeyboard”onpage43
.
•Mutesorunmutesthespeakers.Whenthespeakersaremuted,theindicatoronthekeyison.To
turnonthesound,pressor.
•Decreasesthespeakervolume.
•Increasesthespeakervolume.
•Mutesorunmutesthemicrophones.Whenthemicrophonesaremuted,theindicatoronthe
keyison.
•
Darkensthedisplay.
•Brightensthedisplay.
•Switchesthedisplayoutputlocationbetweenthetabletdisplayandanexternaldisplay.
Chapter5.ThinkPadHelixoptions61
Page 70

•Enablesordisablesthewirelessfeatures.
•OpenstheSettingscharm.
•OpenstheSearchcharm.
•
•
Viewsalltheprogramsthatyouhaveopened.
Viewsalltheprograms.
•Navigatetothetopwhenyouareviewinginformation,suchasadocumentoraWebpage.
•Navigatetothebottomwhenyouareviewinginformation,suchasadocumentoraWebpage.
•Fn+Spacebar:Controlsthekeyboardbacklight.
Therearethreemodesforthekeyboardbacklight:Off,Low,andHigh.PressFn+Spacebartochange
themodesofthekeyboardbacklight.
•Fn+4:Putsthetabletintosleepmode.Toreturntonormaloperation,pressthepowerbutton.
•Fn+B:HasthesamefunctionastheBreakkeyonaconventionalkeyboard.
•Fn+K:HasthesamefunctionastheScrLKkeyontheconventionalkeyboard.
•Fn+P:HasthesamefunctionasthePausekeyontheconventionalkeyboard.
•Fn+S:HasthesamefunctionastheSysRqkeyontheconventionalkeyboard.
•Fn+End:HasthesamefunctionastheInsertkeyontheconventionalkeyboard.
UsingtheT rackPointpointingdevice
TheTrackPointpointingdeviceenablesyoutoperformallthefunctionsofatraditionalmouse,suchas
pointing,clicking,andscrolling.
TheT rackPointpointingdeviceconsistsofthefollowingfourcomponents:
1Pointingstick
2Left-clickbutton(primary-clickbutton)
3Right-clickbutton(secondary-clickbutton)
4Scrollbar
TousetheTrackPointpointingdevice,refertothefollowinginstructions:
Note:Placeyourhandsinthetypingpositionanduseyourindexfingerormiddlefingertoapplypressureto
thepointing-sticknonslipcap.Useeitherthumbtopresstheleft-clickbuttonorright-clickbutton.
62ThinkPadHelixUserGuide
Page 71

•Point
Usethepointingstick
1tomovethepointeronthescreen.T ousethepointingstick,applypressureto
thepointing-sticknonslipcapinanydirectionparalleltothekeyboard.Thepointermovesaccordingly
butthepointingstickitselfdoesnotmove.Thespeedatwhichthepointermovesdependsonthe
amountofpressureyouapplytothepointingstick.
•Left-click
Presstheleft-clickbutton
2toselectoropenanitem.
•Right-click
Presstheright-clickbutton3todisplayashortcutmenu.
•Scroll
Pressandholdthedottedscrollbar4whileapplyingpressuretothepointingstickintheverticalor
horizontaldirection.Thenyoucanscrollthroughthedocument,Website,orapps.
Usingthetrackpad
Theentiretrackpadissensitivetofingertouchandmovement.Youcanusethetrackpadtoperformallthe
pointing,clicking,andscrollingfunctionsofatraditionalmouse.
Thetrackpadcanbedividedintotwozonesbyitsfunction:
1Left-clickzone(primary-clickzone)
2Right-clickzone(secondary-clickzone)
Tousethetrackpad,refertothefollowinginstructions:
•Point
Slideonefingeracrossthesurfaceofthetrackpadtomovethepointeraccordingly.
•Left-click
Presstheleft-clickzone
1toselectoropenanitem.
Youalsocantapanywhereonthesurfaceofthetrackpadwithonefingertoperformtheleft-clickaction.
•Right-click
Presstheright-clickzone2todisplayashortcutmenu.
Youalsocantapanywhereonthesurfaceofthetrackpadwithtwofingerstoperformtheright-clickaction.
•Scroll
Puttwofingersonthetrackpadandmovethemintheverticalorhorizontaldirection.Thisactionenables
youtoscrollthroughthedocument,Website,orapps.Ensurethatyoupositionyourtwofingersslightly
apartfromeachother.
Chapter5.ThinkPadHelixoptions63
Page 72

Withthetrackpad,youalsocanperformavarietyoftouchgestures.Thefollowingtableintroducessome
frequentlyusedtouchgestures.
Notes:
•Whenusingtwoormorefingers,ensurethatyoupositionyourfingersslightlyapart.
•SomegesturesarenotavailableifthelastactionwasdonefromtheTrackPointpointingdevice.
•Somegesturesareonlyavailablewhenyouareusingcertainapps.
•Somegesturesarenotenabledbydefault.Tochangethesettings,see“CustomizingtheThinkPad
pointingdevice”onpage65
.
Tap
Tapanywhereonthetrackpad
withonefingertoselectoropen
anitem.
Two-fingerscroll
Puttwofingersonthetrackpad
andmovethemintheverticalor
horizontaldirection.Thisaction
enablesyoutoscrollthroughthe
document,Website,orapps.
Two-fingerzoomout
Puttwofingersonthetrackpad
andmovethemclosertogether
tozoomout.
Three-fingerswipe
Putthreefingersonthetrackpad
andmovethemlefttoshowthe
nextitem.Movethemrightto
showthepreviousitem.
Two-fingertap
Tapanywhereonthetrackpadwith
twofingerstodisplayashortcut
menu.
Two-fingerrotate
Puttwofingersonthetrackpad
androtatethemclockwiseor
counterclockwisetorotateanitem.
Two-fingerzoomin
Puttwofingersonthetrackpadand
movethemfartheraparttozoomin.
Four-fingerswipe
Putfourfingersonthetrackpad
andmovethemupwardtoviewand
choosefromopenedapps.
64ThinkPadHelixUserGuide
Four-fingerswipe
Putfourfingersonthetrackpad
andmovethemdownwardto
showthedesktop.
Swipefromthetoptothe
bottomedge
Swipefromthetoptothebottom
edgeofthetrackpadwithone
fingertoclosethecurrentapp.
Performingthisgestureonthe
desktopclosesthedesktopand
displaystheStartscreen.
Swipeinandout
Swipeinandoutfromtheright
edgeofthetrackpadwithone
fingertohidethecharms.
Swipefromthetopedge
FromtheStartscreenorthecurrent
app,swipeinfromthetopedge
ofthetrackpadwithonefingerto
displaythecommandmenu.
Swipefromtherightedge
Swipeinfromtherightedgeofthe
trackpadwithonefingertodisplay
thecharms.
Swipefromtheleftedge
Swipeinfromtheleftedgeofthe
trackpadwithonefingertoshow
thepreviouslyusedapp.
Page 73

CustomizingtheThinkPadpointingdevice
YoucancustomizetheThinkPadpointingdevicesoyoucanuseitmorecomfortablyandefficiently.For
example,youcanchoosetoenabletheTrackPointpointingdevice,thetrackpad,orboth.Y oualsocan
disableorenablethetouchgestures.
TocustomizetheThinkPadpointingdevice,dothefollowing:
1.GotoControlPanel.
2.ClickHardwareandSound➙Mouse.TheMousePropertieswindowisdisplayed.
3.IntheMousePropertieswindow,selecttheThinkPadtab.
4.Followtheinstructionsonthescreen.
Replacingthecapofthepointingstick
Thecap1ontheendofthepointingstickisremovable.Afteryouusethecapforaperiodoftime,youmight
considerreplacingthecapwithanewone.Togetanewcap,contacttheLenovoCustomerSupportCenter.
Note:Ensurethatyouuseacapwithgroovesaasshowninthefollowingillustration.
Formoreinformation,refertothedocumentationthatcomeswiththeThinkPadHelixUltrabookPro
Keyboard.
ThinkPadTabletDock
TheThinkPadTabletDock(hereaftercalledthedock)holdsyourtabletinanuprightpositionandfreesyour
handstodoothertasks.ThedockalsoprovidesyouwitheasyaccesstoconnectorsforUSBdevices,file
transfers,charging,audioinput,audiooutput,andvideooutput.
ThistopicprovidesanoverviewofThinkPadT abletDockandinstructionsonhowtouseit.
OverviewoftheThinkPadT abletDock
ThetopicintroducestheThinkPadTabletDockhardwarefeaturestogiveyouthebasicinformationyou
needtostartusingtheit.
Chapter5.ThinkPadHelixoptions65
Page 74

Frontviewandleft-sideviewofthedock
1Dockconnector
Usedtoestablishtheconnectionbetweenthedockandtabletwhenyourtabletisseatedinthedock.
2Always-onUSBconnector(USB3.0connector)
Usedtochargesomemobiledigitaldevicesandsmartphonesbydefault,nomatterwhenyourtabletis
off,insleepmode,orinhibernationmode.Formoreinformation,refertothedocumentationthatcame
withthedock.
Note:ThisconnectoriscompatiblewiththeUSB2.0standard.
3Comboaudioconnector
Usedtoconnectheadphonesoraheadsettolistentostereosoundfromthetablet.Y oualsocanconnecta
headsettorecordaudioormakecalls.
Rearviewofthedock
1USB3.0connectors
UsedtoconnectdevicesthatarecompatiblewithUSB3.0andUSB2.0.
2HDMIconnector
Usedtoconnectacompatibledigitalaudiodeviceorvideodisplay.
3Ethernetconnector
UsedtoconnectthedocktoanEthernetLAN.
4Powerconnector
Usedtoconnecttheacpoweradaptershippedwiththedocktoprovidepowertothetabletandcharge
thebattery.
66ThinkPadHelixUserGuide
Page 75

UsingtheThinkPadT abletDock
Beforeusingthedock,ensurethatyouconnectthetablettothedockandthenconnectthedocktoan
electricaloutletbydoingthefollowing:
1.Positionyourtabletwiththedockconnectorsidefacingdownward.
2.Alignthedockconnectoronthetabletwiththeoneonthedock.
3.Gentlyslideyourtabletintothedockuntilitisseatedinplace.
4.Usetheacpoweradapterandpowercordshippedwiththedocktoconnectthedocktoanelectrical
outlet.
Chapter5.ThinkPadHelixoptions67
Page 76

Afterthetabletisconnectedtothedock,youcan:
•Useyourtabletinanuprightpositionwithouthavingtoholdthetablet.
•UsethedocktoholdyourtabletuprightwhenusinganexternalUSBkeyboard.
•ConnectthedocktoyourpersonalUSBstoragedevicewithaUSBcabletotransferfiles.
•ConnectyourtablettoaHDTVthroughtheHDMIconnector.
•Connectthedocktoastereosystemorspeakersusingastereoaudiocabletoplaymusic.
•Connectthedocktoanelectricaloutletusingtheacpoweradaptershippedwiththedocktocharge
thetabletbattery.
68ThinkPadHelixUserGuide
Page 77

Chapter6.Security
Thischapterprovidesinformationabouthowtoprotecttheinformationstoredonyourtablet.
Usingpasswords
Youcanhelppreventyourtabletfromunauthorizedusebyusingpasswords.Onceyousetapassword,a
promptisdisplayedonthescreeneachtimeyouturnonthetablet.Enteryourpasswordattheprompt.Y ou
cannotusethetabletunlessyoutypethecorrectpassword.
Ifyouhavesetapower-onpassword,asupervisorpassword,oraharddiskpassword,itunlocks
automaticallywhenthetabletresumesfromsleepmode.
Note:IfaWindowspasswordhasbeenset,youwillbepromptedtoenterit.
Typingpasswords
Attachyoutablettoasupportedkeyboardbeforetypingpasswords.
Whenthisiconisdisplayed,typeapower-onpasswordorasupervisorpassword.
Whenthisiconisdisplayed,typeauserharddiskpassword.T otypeamasterharddiskpassword,
pressF1.Whentheiconchangesto,typethemasterharddiskpassword
Note:T oreturntotheicon,pressF1again.
Passwordsandsleepmode
IfyouhavesetaWindowspasswordandyouputyourtabletintosleepmode,youwillbepromptedtoenter
thepasswordwhenresumingoperation.
IfyouuseyouremailaddressasauseraccounttosignintoWindows,enteryouremailpasswordwhen
resumingoperation.
Power-onpassword
Youcansetapower-onpasswordtohelpprotectyourtabletagainstaccessbyunauthorizedusers.
Ifyousetapower-onpassword,thepasswordpromptisdisplayedonthescreenwheneveryouturnonthe
tablet.Y oumustenterthecorrectpasswordtostartusingthetablet.
Setting,changing,orremovingapower-onpassword
Toset,change,orremoveapower-onpassword,dothefollowing:
1.Printtheseinstructions.
2.Saveallopenfiles,andexitallapplications.
3.EntertheThinkPadTabletSetupprogram.See“ThinkPadTabletSetup”onpage77.
4.T apSecurity➙Password.
©CopyrightLenovo2014,2015
69
Page 78

5.T apEnternexttothePower-OnPassworditem.Awindowopens.
6.Dependingonyourneed,dooneofthefollowing:
•T osetapassword,dothefollowing:
a.IntheEnterNewPasswordfield,enteradesiredpassword.
b.IntheConfirmNewPasswordfield,reenterthepasswordandtapOK.
c.ASetupNoticemessageisdisplayed.TapContinue.
•T ochangeapassword,dothefollowing:
a.IntheEnterCurrentPasswordfield,enterthecurrentpower-onpassword.
b.IntheEnterNewPasswordfield,enteranewpower-onpassword.
c.IntheConfirmNewPasswordfield,reenterthenewpower-onpasswordandtapOK.
d.ASetupNoticemessageisdisplayed.T apContinue.
•T oremoveapassword,dothefollowing:
a.IntheEnterCurrentPasswordfield,enterthecurrentpower-onpassword.
b.LeavetheEnterNewPasswordandConfirmNewPasswordfieldsblank.T apOK.
c.ASetupNoticemessageisdisplayed.TapContinue.
Attention:Itisrecommendedthatyourecordyourpasswordandstoreitinasafeplace.Ifyouforget
yoursupervisorpassword,Lenovocannotresetyourpassword.Y oumusttakeyourtablettoaLenovo
reselleroraLenovomarketingrepresentativetohavethesystemboardreplaced.Proofofpurchaseis
required,andafeewillbechargedforpartsandservice.
7.Saveconfigurationchangesandexit.
Supervisorpassword
IfyouhavesetasupervisorpasswordintheThinkPadT abletSetupprogram,youwillbepromptedtoentera
supervisorpasswordwhenyoustarttheThinkPadT abletSetupprogram.
ThesupervisorpasswordprotectsthesysteminformationstoredinThinkPadTabletSetup.Withoutit,
noonecanchangetheconfigurationofthetablet.
Note:Thesystemadministratorcansetthesamesupervisorpasswordonmanytabletstomake
administrationeasier.
Setting,changing,orremovingasupervisorpassword
Onlyasystemadministratorcanset,change,orremoveasupervisorpassword.
Toset,change,orremoveasupervisorpassword,dothefollowing:
1.Printtheseinstructions.
2.Saveallopenfiles,andexitallapplications.
3.EntertheThinkPadTabletSetupprogram.See“ThinkPadTabletSetup”onpage77.
4.T apSecurity➙Password.
5.T apEnternexttotheSupervisorPassworditem.Awindowopens.
6.Dependingonyourneeds,dooneofthefollowing:
•T osetapassword,dothefollowing:
a.IntheEnterNewPasswordfield,enteradesiredpassword.
b.IntheConfirmNewPasswordfield,reenterthepasswordandtapOK.
70ThinkPadHelixUserGuide
Page 79

c.ASetupNoticemessageisdisplayed.TapContinue.
•T ochangeapassword,dothefollowing:
a.IntheEnterCurrentPasswordfield,enterthecurrentsupervisorpassword.
b.IntheEnterNewPasswordfield,enteranewsupervisorpassword.
c.IntheConfirmNewPasswordfield,reenterthenewsupervisorpasswordandtapOK.
d.ASetupNoticemessageisdisplayed.T apContinue.
•T oremoveapassword,dothefollowing:
a.IntheEnterCurrentPasswordfield,enterthecurrentsupervisorpassword.
b.LeavetheEnterNewPasswordandConfirmNewPasswordfieldsblank.T apOK.
c.ASetupNoticemessageisdisplayed.TapContinue.
Attention:Itisrecommendedthatyourecordyourpasswordandstoreitinasafeplace.Ifyouforget
yoursupervisorpassword,Lenovocannotresetyourpassword.Y oumusttakeyourtablettoaLenovo
reselleroraLenovomarketingrepresentativetohavethesystemboardreplaced.Proofofpurchaseis
required,andafeewillbechargedforpartsandservice.
7.Saveconfigurationchangesandexit.
ThenexttimeyouopentheThinkPadTabletSetupprogram,youwillbepromptedtoenteryourpassword
toproceed.
Harddiskpasswords
Thefollowingtwotypesofharddiskpasswordscanhelpprotecttheinformationstoredontheharddiskdrive:
•Userharddiskpassword
Ifauserharddiskpasswordhasbeenset,butnomasterharddiskpasswordhasbeen,theusermust
entertheuserharddiskpasswordtoaccessfilesandapplicationsontheharddiskdrive.
•Masterharddiskpassword
Themasterharddiskpasswordalsorequiresauserharddiskpassword.Themasterharddiskpassword
isusuallysetandusedbyasystemadministrator.Itenablestheadministratortoaccessanyharddisk
driveinasystemlikeamasterkey.Theadministratorsetsthemasterpassword;thenassignsauser
passwordforeachtabletinthenetwork.Theusercanthenchangetheuserpasswordasdesired,but
theadministratorstillcangetaccessbyusingthemasterpassword.
Whenamasterharddiskpasswordisset,onlytheadministratorcanremovetheuserharddiskpassword.
Settingaharddiskpassword
Tosetaharddiskpassword,dothefollowing:
1.Printtheseinstructions.
2.Saveallopenfiles,andexitallapplications.
3.EntertheThinkPadTabletSetupprogram.See“ThinkPadTabletSetup”onpage77.
4.T apSecurity➙Password➙Harddisk1Password.
5.T apEnternexttotheHarddisk1Passworditem.
6.Apasswordwindowisdisplayed.Y ouarepromptedtoselectUserorUser+Master.SelectUserif
youwanttosetonlyoneharddiskpassword.SelectUser+Masterifyouwanttosetauserharddisk
passwordandamasterharddiskpassword,forexampleifyouareanadministratororasupervisor.
•IfyouselectUser,dothefollowing:
a.IntheEnterNewPasswordfield,enteradesiredpassword.
Chapter6.Security71
Page 80

b.IntheConfirmNewPasswordfield,reenterthepasswordandtapOK.
c.ASetupNoticemessageisdisplayed.TapContinue.
•IfyouselectUser+Master,dothefollowing:
a.First,setauserharddiskpassword.Whenamessagewindowpromptsyoutosettheuser
harddiskpassword,tapContinue.TypeyournewuserharddiskpasswordintheEnterNew
Passwordfield.RetypethepasswordintheConfirmNewPasswordfieldandtapOK.ASetup
Noticemessageisdisplayed.TapContinue.
b.Then,setamasterharddiskpassword.Whenamessagewindowpromptsyoutosetthemaster
harddiskpassword,tapContinue.TypeyournewmasterharddiskpasswordintheEnterNew
Passwordfield.RetypethepasswordintheConfirmNewPasswordfieldandtapOK.ASetup
Noticemessageisdisplayed.TapContinue.
7.Saveconfigurationchangesandexit.
Thenexttimeyouturnonyourtablet,typetheuserormasterharddiskpasswordtostartyourtabletand
accesstheoperatingsystem.
Changingorremovingaharddiskpassword
Tochangeorremovetheharddiskpassword,dothefollowing:
•IfyouareinUser+Masterharddiskmode,youcanselecteitherUserHDPorMasterHDPtochange
thepassword,dependingonyourneeds.
–IfyouselectUserHDPmode,followthefollowingstepstochangetheuserharddiskpassword:
1.T ypethecurrentuserharddiskpasswordintheEnterCurrentPasswordfield.
2.T ypethenewpasswordintheEnterNewPasswordfield;thenretypethepasswordinthe
ConfirmNewPasswordfield.
3.T apOK.ASetupNoticemessageisdisplayed.TapContinue.Theuserharddiskpasswordis
changed.
Note:TheharddiskpasswordcannotberemovedinUserHDPmode.
–IfyouselectMasterHDPmode,followthefollowingstepstochangethemasterharddiskpassword:
1.T ypethecurrentmasterharddiskpasswordintheEnterCurrentPasswordfield.
2.T ypethenewmasterharddiskpasswordintheEnterNewPasswordfield;thenretypethenew
passwordyoujustenteredintheConfirmNewPasswordfield.
3.T apOK.ASetupNoticemessageisdisplayed.TapContinue.Theuserharddiskpasswordis
changed.
Note:IfyouleavetheEnterNewPasswordandConfirmNewPasswordfieldsblankandtapOK,
boththeuserandmasterharddiskpasswordsareremoved.
•IfyouareinUserharddiskmode,followthefollowingstepstochangetheuserharddiskpassword:
1.Followsteps1through7in“Settingaharddiskpassword”onpage71,typingyourpasswordtostart
theThinkPadTabletSetupprogram.
2.T ypethecurrentuserharddiskpasswordintheEnterCurrentPasswordfield.
3.T ypethenewpasswordintheEnterNewPasswordfield;thenretypethenewpasswordinthe
ConfirmNewPasswordfield.
4.T apOK.ASetupNoticemessageisdisplayed.T apContinue.Theuserharddiskpasswordis
changed.
Note:IfyouleavetheEnterNewPasswordandConfirmNewPasswordfieldsblankandtapOK,the
userharddiskpasswordisremoved.
72ThinkPadHelixUserGuide
Page 81

Tipsonusingtheharddiskpasswords
•Y oucansettheminimumlengthofaharddiskpasswordthroughtheSecuritymenu.
•Ifyousetaharddiskpasswordofoversevencharacters,theharddiskdrivecanbeusedonlywitha
tabletthatcanrecognizeaharddiskpasswordofoversevencharacters.Ifyoutheninstalltheharddisk
driveinatabletthatcannotrecognizeaharddiskpasswordthatcontainsmorethansevencharacters,
youcannotaccessthedrive.
•Recordyourpasswordandstoreitinasafeplace.Ifyouforgettheuserharddiskpassword,orbothuser
andmasterharddiskpasswords,Lenovocannotresetyourpasswordsorrecoverdatafromtheharddisk
drive.YoumusttakeyourtablettoaLenovoreselleroramarketingrepresentativetohavetheharddisk
drivereplaced.Proofofpurchaseisrequired,andafeewillbechargedforpartsandservice.
Notes:TheeDrivestoragedrivesorTrustedComputingGroup(TCG)Opal-compliantstoragedrivesprovide
self-encryptioncapabilitiestosecureyourdata.
•IfaTCGOpal-compliantstoragedriveandaTCGOpalmanagementsoftwareprogramareinstalled,and
theTCGOpalmanagementsoftwareprogramisactivated,theharddiskpasswordisnotavailable.
•IfaneDrivestoragedriveisinstalledinyourtablet,andyourtabletispreinstalledwiththeWindows8.1
operatingsystem,theharddiskpasswordisnotavailable.
Harddisksecurity
Toprotectpasswordsfromunauthorizedsecurityattacks,refertothefollowingtipstomaximizesecurity:
•Setapower-onpasswordaswellasaharddiskpasswordforyourinternalsolid-statedrive.Refertothe
proceduresin“Power-onpassword”onpage69and“Harddiskpasswords”onpage71.Forsecurity,
alongerpasswordisrecommended.
•T oprovidereliablesecurityfortheUEFIBIOS,usethesecuritychipandasecurityapplicationwitha
TrustedPlatformModulemanagementfeature.Referto“Usingthesecuritychip”onpage74.
•IfanEncryptionsolid-statedriveisinstalledinyourtablet,besuretoprotectthecontentsofyourtablet
memoryfromunauthorizedaccessbyuseofdriveencryptionsoftware,suchasMicrosoftWindows
BitLocker
Windows8.1operatingsystem.Referto“UsingWindowsBitLockerDriveEncryption”onpage73
•Beforeyoudisposeof,sell,orhandoveryourtablet,deletethedatastoredonit.
®
DriveEncryption,whichissupportedintheProfessionalandEnterpriseeditionsofthe
.
UsingWindowsBitLockerDriveEncryption
Tohelpprotectyourtabletagainstunauthorizedaccess,usethedriveencryptionsoftware,suchas
WindowsBitLockerDriveEncryption.
WindowsBitLockerDriveEncryptionisanintegralsecurityfeatureofWindows8.1operatingsystem.Itis
supportedintheProfessionalandEnterpriseeditionsoftheWindows8.1operatingsystem.Itcanhelpyou
protecttheoperatingsystemanddatastoredonyourtablet,evenifyourtabletislostorstolen.BitLocker
worksbyencryptingalluserandsystemfiles,includingtheswapandhibernationfiles.
BitLockerusesaTrustedPlatformModuletoprovideenhancedprotectionforyourdataandtoensureearly
bootcomponentintegrity.AcompatibleTPMisdefinedasaV1.2TPM.
TochecktheBitLockerstatus,gotoControlPanel,andclickSystemandSecurity➙BitLockerDrive
Encryption.
FormoreinformationaboutWindowsBitLockerDriveEncryption,seethehelpinformationsystemofthe
Windowsoperatingsystem,orsearchfor“MicrosoftWindowsBitLockerDriveEncryptionStep-by-Step
Guide”ontheMicrosoftWebsite.
Chapter6.Security73
Page 82

Encryptionsolid-statedrive
SomemodelscontaintheEncryptionsolid-statedrive.Thisfeaturehelpstoprotectyourtabletagainst
securityattacksonmedia,NANDflash,ordevicecontrollersbyuseofahardwareencryptionchip.Forthe
efficientuseoftheencryptionfeature,setaharddiskpasswordfortheinternalstoragedevice.
Usingthesecuritychip
Strictsecurityrequirementsareimposedonnetworkclientcomputersthattransferconfidentialinformation
electronically.Y oucansetthesecuritychipinyourtablettoenhancecomputingsecurity.Somemodels
areequippedwithonesecuritychipcalledthefirmwareTPM(displayedas“T rustedPlatformModule
2.0”inDeviceManager).SomemodelsareequippedwithtwosecuritychipscalledthediscreteTPM
(displayedas“TrustedPlatformModule1.2”inDeviceManager)andthefirmwareTPM.Formodelswithtwo
securitychips,youcanselectwhichoneyouwanttouseintheThinkPadTabletSetupprogrambyusing
theinstructionsinthistopic.
Note:EnsurethatthesupervisorpasswordhasbeensetintheThinkPadTabletSetupprogram;otherwise
anyonecanchangethesettingsforthesecuritychip.
AbouttheSecurityChipmenu
TheSecurityChipmenuprovidesthefollowingitemsforyoutoconfiguretheembeddedsecuritychip.You
canfindtheSecurityChipmenufromtheSecuritymenuoftheThinkPadT abletSetupprogram.
•SecurityChipSelection:Selectthesecuritychipyouwanttouse.Thisitemisdisplayedonlyonsome
tabletmodels.
•SecurityChip:Enableordisablethesecuritychip.
•ClearSecurityChip:Cleartheencryptionkey.Thisoptionisnotdisplayedwhenthesecuritychipis
inactiveordisabled.T oclearthesecuritychip,ensurethatyouactivateorenablethesecuritychipfirst
sothatthisoptioncanbedisplayed.
Settingthesecuritychip
TosetthesecuritychipthroughtheSecurityChipmenu,dothefollowing:
1.Printtheseinstructions.
2.Saveallopenfilesandexitallapplications.Then,turnoffyourtablet.
3.EntertheThinkPadTabletSetupprogram.See“ThinkPadTabletSetup”onpage77.
4.T apSecurity.
5.T apSecurityChip.
6.Settheitems.
7.Saveconfigurationchangesandexit.
Usingfirewalls
Yourtabletispreinstalledwithafirewallprogramaspartofantiviruspackage.Thisprogramprotectsagainst
Internetsecuritythreats,unauthorizedaccess,intrusions,andInternetattacks.Italsoprotectsyourprivacy.
Formoreinformationabouthowtousethefirewallprogram,refertotheonlinehelpthatcomeswiththe
program.
Protectingdataagainstviruses
Yourtabletispreinstalledwithanantivirusprogramsoyoucandetectandeliminateviruses.Theantivirus
programisdesignedtohelpyoudetectandeliminateviruses.
74ThinkPadHelixUserGuide
Page 83

Lenovoprovidesafullversionofantivirussoftwareonyourtabletwithafree30-daysubscription.After30
days,youmustrenewthelicensetocontinuereceivingtheantivirussoftwareupdates.
Formoreinformationabouthowtouseyourantivirussoftware,refertothehelpsystemofyourantivirus
software.
Chapter6.Security75
Page 84

76ThinkPadHelixUserGuide
Page 85

Chapter7.Advancedconfiguration
IfyouneedtoupdateyoursystemUEFIBIOS,installnewdevicedrivers,thisinformationwillhelpyouhandle
yourtabletwithpropercareandkeepitintopworkingshape.
•“Installingdevicedrivers”onpage77
•“ThinkPadT abletSetup”onpage77
•“Usingsystemmanagement”onpage86
Installingdevicedrivers
Thedevicedriversareavailableathttp://www.lenovo.com/ThinkPadDrivers.Chooseyourtabletproduct
nametoviewallthedevicedriversforyourtablet.
Attention:Alwaysgotohttp://www.lenovo.com/ThinkPadDriversforthelatestdevicedrivers.Donot
downloadthemfromtheWindowsUpdateWebsite.
ThinkPadTabletSetup
YourtabletcomeswiththeThinkPadTabletSetupprogramthatenablesyoutoviewandconfigurevarious
setupparameters.
TostarttheThinkPadT abletSetupprogram,dooneofthefollowing:
Note:Ifyouarerequiredtoenterthesupervisorpassword,enterthecorrectpassword.Y oualsocanskip
thepasswordpromptandstarttheThinkPadT abletSetupprogram.Ifyoudonotenterthepassword,you
cannotchangetheconfigurationsthatareprotectedbythesupervisorpassword.Formoreinformation,
referto“Usingpasswords”onpage69
•Restartthetablet.WhentheThinkPadlogoscreenisdisplayed,taparoundTointerruptnormalstartup,
pressEnterortaphere.TapF1onthescreentostarttheThinkPadTabletSetupprogram.
•T ostarttheThinkPadT abletSetupprogramfromtheoperatingsystem,dothefollowing:
1.Swipeinfromtherightedgeofthescreentodisplaythecharms.
2.T apSettings➙ChangePCsettings.
3.Inthenavigationpanel,tapUpdateandrecovery➙Recovery.
4.IntheAdvancedstartupsection,tapRestartnow.
5.Thetabletrestartsandamenuisdisplayed.TapTroubleshoot➙Advancedoptions➙UEFI
FirmwareSettings➙Restart.
6.ThetabletrestartsandenterstheThinkPadT abletSetupprogram.
Note:Ifyouhavesetasupervisorpassword,theThinkPadT abletSetupprogrammenuwillbedisplayed
afteryouenterthepassword.
TheThinkPadT abletSetupprogramincludesthefollowingmenus:
•Mainmenu:Viewthesysteminformationandsetthedateandtimeforyourtablet.
•Configmenu:Viewandchangetheconfigurationsofyourtablet.
•Securitymenu:Setthesupervisorpasswordandconfigureothersecurityfeaturesofyourtablet.
•Startupmenu:Changethetabletstartupsettings.
.
©CopyrightLenovo2014,2015
77
Page 86

•Restartmenu:ChooseanoptionforclosingtheThinkPadTabletSetupprogramandrestartingthe
system.
Oneachmenu,tapthedefaultvaluetoshowselectableoptionsandtapadesiredoptiontoselectit.Y ou
canfollowtheinstructionsonthescreentoconfiguresettings.Afteryouchangethesettings,tapRestart,
andthentapyourdesiredoptiontorestartthetablet.
Notes:
•Someitemsaredisplayedonthemenuonlyifthetabletsupportsthecorrespondingfeatures.
•Thedefaultconfigurationsarealreadyoptimizedforyou.Incorrectchangeoftheconfigurationsmight
causeunexpectedresults.
Mainmenu
TheMainmenuisthefirstinterfaceyouseeafteryouentertheThinkPadTabletSetupprogram.Itdisplays
thefollowingconfigurationofyourtablet:
•SystemInformation
–UEFIBIOSVersion
–UEFIBIOSDate(Year-Month-Day)
–EmbeddedControllerVersion
–MPUFirmwareVersion
–MEFirmwareVersion
–MachineTypeModel
–System-unitserialnumber
–UUID
–Systemboardserialnumber
–AssetTag
–CPUType
–CPUSpeed
–InstalledMemory
–PreinstalledOSLicense
–UEFISecureBoot
–OA3ID
•SystemDate
•SystemTime
Configmenu
Ifyouneedtochangetheconfigurationofyourtablet,tapConfigfromtheThinkPadT abletSetupprogram
mainmenu.
ThefollowingtableliststheConfigmenuitems.
Notes:
•Defaultvaluesareinboldface.
•Oneachsubmenu,tapthedefaultvaluetoshowselectableoptionsandtapadesiredoption.
•Someitemsaredisplayedonthemenuonlyifthetabletsupportsthecorrespondingfeatures.
78ThinkPadHelixUserGuide
Page 87

Table1.Configmenuitems
Note:TheitemslistedinthefollowingtablemightnotbethesameasthoseinyourThinkPadTabletSetup.
Theitemsaresubjecttochange.
Menuitem
USBAlwaysOnUSB•Off
DisplayBootDisplayDevice
Power
SubmenuitemSelectionComments
PowerOnwithAC
Attach
•On
•ThinkPadLCD
•DigitalonThinkPad
•Displayondock
•Off
•On
IfyouselectOn,theexternalUSB
devicescanbechargedthroughUSB
connectorsevenwhenthetabletis
inlow-powermode(sleep,hibernate,
orpower-off).
Note:IfyouselectOn,USBwakeup
functionisnotsupportedonAlways
OnUSBconnector.
Selectthedisplaydevicethatistobe
activatedatboottime.Thisselection
iseffectiveforboottime,password
prompt,andThinkPadT abletSetup.
DigitalonThinkPadistheMini
DisplayPortconnector.
Displayondockisdisplay
connectorsonadock.
Enableordisableafeaturethat
powersonthesystemwhentheac
poweradapterisattached.
IfyouselectEnabled,thesystem
ispoweredonwhentheacpower
adapterisattached.Whenthe
systemisinhibernatestate,the
systemresumes.
IfyouselectDisabled,thesystemis
notpoweredonnorresumedwhen
theacpoweradapterisattached.
LidOpenAction
DisableBuilt-inBattery•EnterTemporarilydisabletheinternal
•Wakeup
•DoNothing
Setthelidopenaction.
built-inbatteryforservicingthe
system.Afterselectingthisitem,the
systemwillbeautomaticallypowered
off.Thesystemisthenreadytobe
serviced.
Note:Thebatterywillbe
automaticallyre-enabledwhen
theacpoweradapterisreconnected
tothesystem.
Chapter7.Advancedconfiguration79
Page 88

Table1.Configmenuitems(continued)
Menuitem
BeepandAlarm
IntelAMT
SubmenuitemSelectionComments
PasswordBeep
KeyboardBeep
IntelAMTControl
CIRATimeout
•Off
•On
•On
•Off
•Disabled
•Enabled
•PermanentlyDisabled
0-255
Note:Thedefaultvalue
is60seconds.
Enablethisoptiontohaveabeep
soundwhenthesystemiswaitingfor
apower-on,harddisk,orsupervisor
password.Differentbeepswillsound
whentheenteredpasswordmatches
ordoesnotmatchtheconfigured
password.
Enableordisablekeyboard
beepwhenunmanageablekey
combinationsarepressed.
IfyouselectEnabled,IntelAMT
(ActiveManagementTechnology)is
configuredandadditionalsetupitems
areprovidedinMEBx(Management
EngineBIOSExtension)Setup.
IfyouselectPermanentlyDisabled,
youwillneverbeabletoenableit
again.Becautiouswhenyouwant
tousethisoption.
Note:YoucanentertheMEBxSetup
menubypressingtheCtrl+Pkey
combinationintheStartupInterrupt
Menuwindow.TodisplaytheStartup
InterruptMenuwindow,pressthe
blackbuttonorEnterkeyduringthe
power-onself-test(POST).
SetthetimeoutoptionforCIRA
connectiontobeestablished.
Selectablesecondvaluesarefrom
1to254.
Ifyouselect0,use60secondsas
thedefaulttimeoutvalue.
Ifyouselect255,thewaitingtime
forestablishingaconnectionis
unlimited.
ConsoleType•PCANSI
•VT100+
•PC-ANSI
•VT -UTF8
SelecttheconsoletypeforAMT .
Note:Thisconsoletypeshould
matchtheIntelAMTremoteconsole.
Securitymenu
Ifyouneedtosetthesecurityfeaturesofyourtablet,tapSecurityfromtheThinkPadTabletSetupmenu.
ThefollowingtableliststheSecuritymenuitems.
Notes:
80ThinkPadHelixUserGuide
Page 89

•Defaultvaluesareinboldface.Thedefaultsettingsarealreadyoptimizedforyou.Ifyouconsider
changingthetabletconfiguration,proceedwithextremecaution.Settingtheconfigurationincorrectly
mightcauseunexpectedresults.
•Ineachsubmenu,tapthedefaultvaluetoshowselectableoptionsandtapadesiredoption.
•Someitemsaredisplayedonthemenuonlyifthetabletsupportsthecorrespondingfeatures.
Table2.Securitymenuitems
Note:TheitemslistedinthefollowingtablemightnotbethesameasthoseinyourThinkPadTabletSetup.
Theitemsaresubjecttochange.
Menuitem
Password
Submenuitem
SupervisorPassword
-PasswordStatus
LockUEFIBIOSSettings•Off
PasswordatUnattended
Boot
PasswordatRestart
PasswordatBootDevice
List
Value
•Enter
•Disabled
•Enabled
•On
•Off
•On
•Off
•On
•Off
•On
Comments
See“Supervisorpassword”onpage
70.
Enableordisablethefunctionthat
protectsitemsinThinkPadTablet
Setupfrombeingchangedbyauser
whodoesnothavethesupervisor
password.Bydefault,thisisset
toOff.Ifyousetthesupervisor
passwordandenablethisfunction,
noonebutyoucanchangeanyitems
inThinkPadT abletSetup.
IfyouselectandturnonPassword
atunattendedboot,apassword
promptisdisplayedwhenthetablet
isturnedon,fromeitherapower-off
stateorhibernationstate,byan
unattendedeventsuchasaWake
onLANattempt.IfyouselectOff,
nopasswordpromptisdisplayed;
thetabletgoesaheadandloads
theoperatingsystem.Toprevent
unauthorizedaccess,settheuser
authenticationontheoperating
system.
IfyouselectandturnonPassword
atrestart,apasswordpromptis
displayedwhenyourestartthetablet.
IfyouselectOff,nopasswordprompt
isdisplayed;thetabletgoesahead
andloadstheoperatingsystem.To
preventunauthorizedaccess,setthe
userauthenticationontheoperating
system.
IftheSecuritypasswordisset,this
optionisusedtospecifywhetherthe
Securitypasswordmustbeentered
todisplaytheF12bootdevicelist.
SelectOntopromptfortheSecurity
password.SelectOfftoproceed
withoutanyuseractionrequired.
Chapter7.Advancedconfiguration81
Page 90

Table2.Securitymenuitems(continued)
Menuitem
SecurityChip
UEFIBIOSUpdate
Option
Submenuitem
PasswordCount
ExceededError
SetMinimumLength
Power-OnPassword
-PasswordStatus
HardDisk1Password•Enter
-PasswordStatus
SecurityChipSelection
SecurityChip
SecurityChip
ClearSecurityChip
PhysicalPresencefor
Clear
FlashBIOSUpdatingby
End-Users
SecureRollBack
Prevention
Value
•Off
•On
•Disabled
•xcharacters
•Enter
•Disabled
•Enabled
•Disabled
•Enabled
•IntelPTT
•DiscreteTPM
•Enabled
•Disabled
•Active
•Inactive
•Disabled
•Enter
•On
•Off
•On
•Off
•On
•Off
Comments
SelectOntoshowthePOST0199
errorandpromptfortheSecurity
password.SelectOfftohidethe
POST0199errorandproceedwithout
anyuseractionneeded.
Specifyaminimumlengthfor
power-onpasswordsandharddisk
(4≤x≤12)
passwords.Ifyousetthesupervisor
passwordandspecifyaminimum
lengthforpasswords,noonebutyou
canchangethelength.
See“Power-onpassword”onpage
69.
See“Harddiskpasswords”onpage
71.
Configurethesecuritychip.This
optionisavailableonlyonmodels
thathaveboththefirmwareTPMand
thediscreteTPM.
IfSecurityChipissettoIntelPTT.
Enableordisablesecuritychip
feature.
IfSecurityChipissettoDiscrete
TPM.Enableordisablesecuritychip
feature.
Cleartheencryptionkey.
Note:Thisitemisdisplayedonly
ifyouhaveselectedOnforthe
SecurityChipoption.
Thisoptionenablesordisablesthe
confirmationmessagewhenyou
clearthesecuritychip.
IfyouselectOn,alluserscanupdate
theUEFIBIOS.IfyouselectOff,only
thepersonwhoknowsthesupervisor
passwordcanupdatetheUEFIBIOS.
IfyouselectOff,youcanflashtothe
previousversionofUEFIBIOS.Ifyou
selectOn,youcannotflashtothe
previousversionofUEFIBIOS.
82ThinkPadHelixUserGuide
Page 91

Table2.Securitymenuitems(continued)
Menuitem
MemoryProtectionExecutionPrevention
Virtualization
I/OPortAccess
Submenuitem
IntelVirtualization
Technology
IntelVT-dFeature
WirelessLAN
WirelessWAN
Bluetooth
USBPort•On
MemoryCardSlot•On
SmartCardSlot•On
IntegratedCamera•On
Microphone
FingerprintReader
NFC•On
UltrabookKeyboard
ThinkPadTabletDock
EthernetLAN
Value
•Off
•On
Comments
Somecomputervirusesandworms
causememorybufferstooverflow.
ByselectingOnyoucanprotect
yourtabletagainstattacksbysuch
virusesandworms.Ifafterchoosing
Onyoufindthataprogramdoesnot
runcorrectly,selectOffandresetthe
setting.
•Off
•On
IfyouselectOn,aVirtualMachine
Monitor(VMM)canutilizethe
additionalhardwarecapabilities
providedbyIntelVirtualization
Technology.
•Off
•On
IntelVT -dstandsforIntelVirtualization
TechnologyforDirectedI/O.When
enabled,aVMMcanutilizethe
platforminfrastructureforI/O
virtualization.
•On
•Off
•On
•Off
•On
•Off
IfyouselectOn,youcanusethe
wirelessLANdevice.
IfyouselectOn,youcanusethe
wirelessWANdevice.
IfyouselectOn,youcanuse
Bluetoothdevices.
IfyouselectOn,youcanuseUSB
•Off
connectors.
IfyouselectOn,youcanusethe
•Off
memorycardslots.
IfyouselectOn,youcanusethe
•Off
smartcardslot.
IfyouselectOn,youcanusethe
•Off
•On
•Off
•On
•Off
integratedcamera.
IfyouselectOn,youcanusethe
microphones(internal,external,or
line-in).
IfyouselectOn,youcanusethe
fingerprintreader.
IfyouselectOn,youcanusetheNFC
•Off
•On
•Off
•On
•Off
connection.
IfyouselectOn,youcanusethe
ThinkPadHelixUltrabookKeyboard.
IfyouselectOn,youcanusethe
EthernetLANdeviceonThinkPad
TabletDock.
Chapter7.Advancedconfiguration83
Page 92

Table2.Securitymenuitems(continued)
Menuitem
Anti-Theft
SecureBoot
Submenuitem
ThinkPadTabletDock
USBPort
ComputraceModule
Activation
SecureBoot•On
PlatformMode
SecureBootMode•StandardMode
ResettoSetupMode
RestoreFactoryKeys•EnterThisoptionisusedtorestoreall
ClearAllSecureBoot
Keys
Value
•On
•Off
CurrentSetting:
•Enabled
•Disabled
•Permanently
Disabled
CurrentState:
•Notactivated
•Activated
•Off
•UserMode
•SetupMode
•CustomMode
•EnterThisoptionisusedtoclearthecurrent
•Enter
Comments
IfyouselectOn,youcanuseUSB
connectorsonThinkPadT abletDock.
EnableordisabletheUEFIBIOS
interfacetoactivatethecomputrace
module.Computraceisanoptional
monitoringservicefromAbsolute
Software.
EnableordisableUEFISecureBoot
feature.
Specifythesystemoperatingmode.
IndicatesSecureBootmodeis
standardmodeorcustommode.
platformkeyandputthesysteminto
setupmode.Y oucaninstallyour
ownplatformkeyandcustomizethe
SecureBootsignaturedatabasesin
setupmode.SecureBootmodewill
besettocustommode.
keysandcertificatesinSecureBoot
databasestofactorydefaults.Any
customizedSecureBootsettingswill
beerased,andthedefaultplatform
keywillbere-establishedalongwith
theoriginalsignaturedatabases
includingcertificateforWindows8.1
operatingsystem.
Startupmenu
Youmightneedtochangethetabletstartupsettings.T odoso,tapStartupfromtheThinkPadTablet
Setupmenu.
Attention:
•Afteryouchangeyourstartupsequence,youmustbeextremelycarefulnottospecifyawrongdevice
duringacopy,asave,oraformatoperation.Ifyouspecifyawrongdevice,yourdataandprograms
mightbeerasedoroverwritten.
•IfyouareusingtheBitLocker
driveencryptiondetectsthechangeofstartupsequenceandlocksthetabletfrombooting.
84ThinkPadHelixUserGuide
®
driveencryption,youshouldnotchangethestartupsequence.BitLocker
Page 93

Changingthestartupsequence
Tochangethestartupsequence,dothefollowing:
1.T apBoot.Thedefaultbootlistisdisplayed,showingtheorderinwhichdeviceswillbestartedup.Even
devicesthatarenotattachedtoorinstalledonyourtabletarelisted.
2.FromtheBootsubmenu,tapthemenuitemtospecifythestartupsequencethatrunswhenyouturnon
thepower.
3.Savethechangesandrestartthesystem.
ThefollowingtableliststheStartupmenuitems.
Notes:
•Defaultvaluesareinboldface.
•Fromeachsubmenu,tapthedefaultvaluetoshowselectableoptionsandselectadesiredoption.
•Someitemsaredisplayedonthemenuonlyifthetabletsupportsthecorrespondingfeatures.
Table3.Startupmenuitems
Note:TheitemslistedinthefollowingtablemightnotbethesameasthoseinyourThinkPadTabletSetup.
Theitemsaresubjecttochange.
Menuitem
StartupOption
Boot
Submenuitem
OptionKeyDisplay•On
BootDeviceListF12Option•On
BootOrderLock•On
ATAHDD
USBHDD•On
USBCD•On
USBFDD•On
NetworkAdapter
Value
•Off
•Off
•Off
•On
•Off
•Off
•Off
•Off
•On
•Off
Comments
IfyouselectOff,the“To
interruptnormalstartup,
pressEnter.”messageisnot
displayedduringthePOST.
Enableordisableboot
devicemenu.
Enableordisablebootorder
lock.
ChangetheBootorderby
dragginganddroppingthe
icon.
ChangetheBootorderby
dragginganddroppingthe
icon.
ChangetheBootorderby
dragginganddroppingthe
icon.
ChangetheBootorderby
dragginganddroppingthe
icon.
ChangetheBootorderby
dragginganddroppingthe
icon.
Restartmenu
IfyouwanttoclosetheThinkPadTabletSetupprogramandrestartthesystem,tapRestartfromthe
ThinkPadTabletSetupmainmenu.Thefollowingitemsaredisplayed:
•ExitSavingChanges:Exitsystemsetupandsavethechanges.
Chapter7.Advancedconfiguration85
Page 94

•ExitDiscardingChanges:Exitsystemsetupwithoutsavingthechanges.
•LoadSetupDefaults:Restoretothefactorydefaultsettings.
•DiscardChanges:Discardthechanges.
•SaveChanges:Savethechanges.
Note:Changesonthefollowingitemsaresavedautomaticallyduringyourconfiguration:
•AnyitemsincludedintheSecuritymenu
•Systemdateandtime
Thesechangescannotbediscardedevenyouselectanoptiontodiscardthechangesorrestoreto
thefactorydefaultsettingswhenexitingtheThinkPadTabletSetupprogram.Todiscardthechangesor
makenewchanges,youmustentertheThinkPadT abletSetupprogramagainandresetthecorresponding
itemsaccordingtoyourneeds.
UpdatingyoursystemUEFIBIOS
TheUnifiedExtensibleFirmwareInterface(UEFI)BIOSisapartofthesystemprogramsthatmakeup
thebasiclayerofsoftwarebuiltintoyourtablet.TheUEFIBIOStranslatestheinstructionsfromother
softwarelayers.
YoucanupdatetheUEFIBIOSandtheThinkPadT abletSetupprogrambystartingyourtabletwithaflash
updateapplicationrunningintheWindowsenvironment.
Insomeinstanceswhenyouaddsoftware,hardware,oradevicedriver,youmightbeinformedthatyou
needtoupdateyourUEFIBIOSinorderforthenewadditiontoworkproperly.
ToupdateyourUEFIBIOS,gotothefollowingWebsiteandfollowtheinstructionsonthescreen:
http://www.lenovo.com/ThinkPadDrivers
Usingsystemmanagement
Thissectionisintendedprimarilyfornetworkadministrators.
Yourtabletisdesignedformanageability,sothatyoucanredirectmoreofyourresourcestobettermeet
yourbusinessobjectives.
Thismanageability,or“TotalCostofOwnership”(TCO),enablesyoutoremotelyoperateclienttabletsin
thesamewayasyouoperateyourowntablet,suchasturningonaclienttablet,formattingharddisk
drive,andinstallingsoftware.
Oncethetabletisconfiguredandoperational,youcanmanageitbyuseofsoftwareandmanageability
featuresalreadyintegratedintotheclientsystemandthenetwork.
Systemmanagement
Readthistopictolearnmoreaboutfeaturesofsystemmanagement.
DesktopManagementInterface
ThesystemUEFIBIOSofyourtabletsupportsaninterfacecalledSystemManagementBIOSReference
Specification(SMBIOS)V2.6.1SMBIOSprovidesinformationaboutthehardwarecomponentsofyour
system.ItistheresponsibilityoftheBIOStosupplythisdatabasewithinformationaboutitselfandthe
devicesonthesystemboard.ThisspecificationdocumentsthestandardsforgettingaccesstothisBIOS
information.
86ThinkPadHelixUserGuide
Page 95

AssetIDEEPROM
TheAssetIDEEPROMcontainsinformationaboutthesystem,includingitsconfigurationandtheserial
numbersofkeycomponents.Italsoincludesanumberofblankfieldsinwhichyoucanrecordinformation
abouttheendusersinyournetwork.
PrebooteXecutionEnvironment
ThePrebooteXecutionEnvironment(PXE)technologymakesthetabletmoremanageablebyenabling
thetablettostartfromaserver.Forexample,withtheappropriateLANcard,yourtabletcanbestarted
fromthePXEserver.
Note:TheRemoteInitialProgramLoad(RIPLorRPL)functioncannotbeusedwithyourtablet.
Chapter7.Advancedconfiguration87
Page 96

88ThinkPadHelixUserGuide
Page 97

Chapter8.Troubleshootingproblems
Thischapterdescribesonwhattodoifyouexperienceaproblemwithyourtablet.
Diagnosingproblems
Ifyouexperienceproblemswithyourtablet,usetheLenovoSolutionCenterprogramasastartingpoint
forsolvingthem.
TheLenovoSolutionCenterprogramenablesyoutotroubleshootandresolvetabletproblems.Itcombines
diagnostictests,systeminformationcollection,securitystatus,andsupportinformation,alongwithhints
andtipsformaximumsystemperformance.
Note:TheLenovoSolutionCenterprogramcanbedownloadedfromhttp://www.lenovo.com/diags.
ToruntheLenovoSolutionCenterprogram,dothefollowing:
1.Swipeinfromtherightedgeofthescreentodisplaythecharms.
2.T aptheSearchcharmtosearchforLenovoSolutionCenter.
3.T apLenovoSolutionCenter.
Foradditionalinformation,refertotheLenovoSolutionCenterhelpsystem.
Note:Ifyouareunabletoisolateandrepairtheproblemyourselfafterrunningtheprogram,saveandprint
thelogfiles.YouwillneedthelogfileswhenyouspeaktoaLenovotechnicalsupportrepresentative.
Troubleshooting
Theproblemsandsolutionsdescribedinthissectionaremeantonlyasaguide.Theyarenotdefinitive
problemsolvingtechniques.Forsomeproblems,youmightneedhelpfromLenovo,yourreseller,oryour
serviceprovider.
Whenyouobserveaproblem,stopoperationimmediately,becausetakingfurtheractionmightresultindata
lossordamage.Takeanoteofwhatthesystemisdoingandwhatactionsyouperformedbeforetheproblem
occurred.ProvidedetailedinformationtoLenovooryourserviceproviderforquickerproblemresolution.
Internetproblem
•Problem:Unabletoconnecttothewirelessnetwork.
Suggestedsolution:Ensurethat:
–ThemicroSIMcardisvalidandworkableifyouareusingamobilenetwork(3Gor4G).
–Y ouarewithinthenetwork’sservicerangeandthesignalstrengthisgood.
–Y ourtabletisnotinAirplanemode.
Iftheproblempersists,contactLenovofortechnicalsupport.
Screenproblems
•Problem:Themulti-touchscreenrespondsslowlyorimproperly.
Suggestedsolution:Dothefollowing:
1.Ensurethatyourhandsarecleananddrywhentouchingthescreen.
2.Restartyourtablettotryagain.
©CopyrightLenovo2014,2015
89
Page 98

Iftheproblempersists,contactLenovofortechnicalsupport.
•Problem:MyscreenkeepsblankingwhenIdonotwantitto.
Solution:Y oucandisableanysystemtimers,suchastheLCDturn-offtimerortheblanktimerby
doingthefollowing:
1.Gothedesktopandtapthebattery-statusiconintheWindowsnotificationarea.
2.T apMorepoweroptions➙Balanced.
•Problem:WhenIturnonthetablet,nothingisdisplayedonthescreenandthetabletdoesnotbeep
whilestartingup.
Note:Ifyouarenotsurewhetheryouheardanybeeps,turnoffthetabletbypressingandholdingthe
powerbuttonforfoursecondsormore.Turnitonandlistenagain.
Solution:Ensurethat:
–ThetabletisconnectedtotheacpoweradapterbythesuppliedUSBcableandtheacpoweradapter
ispluggedintoaworkingelectricaloutlet.
Thetabletisturnedon.(Turnthepowerbuttononagainforconfirmation.)
Iftheseitemsarecorrectlyset,andthescreenremainsblank,havethetabletserviced.
•Problem:WhenIturnonthetablet,onlyawhitepointerisdisplayedonablankscreen.
Solution:Dothefollowing:
1.T urnoffthetablet,andthenturnitonagain.
2.Ifyoustillseeonlythepointeronthescreen,usetherecoverysolutionstorestorethesystemto
thefactorystate.
Iftheproblempersists,havethetabletserviced.
•Problem:Myscreengoesblankwhilethetabletison.
Solution:Y ourscreensaverorpowermanagementmighthavebeenenabled.Doeitherofthefollowing:
–T apthetabletscreentoexitthescreensaver.
–Pressthepowerbuttontoresumefromsleeporhibernationmode.
Batteryproblem
•Problem:Thebatterydoesnotchargecorrectly.
Suggestedsolution:Checkiftheacpoweradapterisconnectedcorrectly.Iftheconnectionisgoodbut
thebatterystilldoesnotcharge,contactLenovotoreplacewithanewbattery.
Systemproblem
•Problem:Unabletoturnthetableton.
Suggestedsolution:Connectyourtablettoanacpoweroutlettoseeiftheproblemiscaused
byadrainedbattery.Iftheproblempersists,insertaneedleorastraightenedpaperclipintothe
emergency-resethole.Tolocatetheemergency-resethole,see“Frontviewandsideview”onpage1
Iftheproblemstillpersists,contactLenovofortechnicalsupport.
Mediaproblems
•Problem:Theaudioqualityispoororthereisnosoundoutput.
Suggestedsolution:Checkandensurethat:
–Thespeakerisnotcovered.
.
90ThinkPadHelixUserGuide
Page 99

–Thespeakermutefunctionisdisabled.
–Ifyouareusingaheadset,unplugit,thenplugitinagain.
–Thevolumeisnotturnedtothelowestlevel.
Iftheproblempersists,contactLenovofortechnicalsupport.
•Problem:Asong,video,orothermediafilecannotbeplayed.
Suggestedsolution:Checkandensurethatthemediafileisnotcorrupted.
Externaldeviceconnectionproblems
•Problem:Aconnectionisnotestablishedwhenyouconnectthetablettoacomputer.
Suggestedsolution:EnsurethatthetabletUSBcableyouareusingistheonethatisshippedwith
yourtablet.
•Problem:Bluetoothdevicescannotbelocated.
Suggestedsolution:Ensurethat:
–Y ourtabletBluetoothisswitchedon.
–TheBluetoothfeatureisactivatedonthedevicetowhichyouwanttoconnect.
–Y ourtabletandtheBluetoothdevicearewithinthemaximumBluetoothrange(10m).
Iftheproblempersists,contactLenovofortechnicalsupport.
Recoveringfromaseveresoftwareproblem
Ifyourtabletstopsrespondingandyoucannotturnoffthetabletbypressingandholdingthepowerbutton,
insertaneedleorastraightenedpaperclipintotheemergency-resetholetoresetthetablet.Thenrestart
yourtablet.Tolocatetheemergency-resethole,see“Frontviewandsideview”onpage1.
Ifyoustillencounterthesameproblemafteryourestartyourtablet,resetyourtabletandrestartitagain,
youcanperformafactorydataresetoperation.Formoreinformation,referto“Resettingyourtabletto
thefactorydefaultsettings”onpage93.
Errormessages
•Message:0177:BadSVPdata,stopPOSTtask.
Solution:ChecksumofthesupervisorpasswordintheEEPROMisnotcorrect.Thesystemboardshould
bereplaced.Havethetabletserviced.
•Message:0183:BadCRCofSecuritySettingsinEFIVariable.EnterThinkPadT abletSetup.
Solution:ChecksumoftheSecuritysettingsintheEFIVariableisnotcorrect.EnterThinkPadTabletSetup
tochecksecuritysettings,andrestartthesystem.Ifyoustillhaveaproblem,havethetabletserviced.
•Message:0187:EAIAdataaccesserror.
Solution:TheaccesstoEEPROMisfailed.Havethetabletserviced.
•Message:0188:InvalidRFIDSerializationInformationArea.
Solution:TheEEPROMchecksumisnotcorrect(block#0and1).Thesystemboardshouldbereplaced,
andtheboxserialnumberneedstobereinstalled.Havethetabletserviced.
•Message:0189:InvalidRFIDconfigurationinformationarea
Solution:TheEEPROMchecksumisnotcorrect(block#4and5).Thesystemboardshouldbereplaced,
andtheuniversallyuniqueidentifier(UUID)needstobereinstalled.Havethetabletserviced.
•Message:0190:Criticallow-batteryerror
Chapter8.Troubleshootingproblems91
Page 100

Solution:Thetabletturnedoff,becausethebatterypowerislow.Connecttheacpoweradaptertothe
tabletandchargethebatteries.
•Message:0191:SystemSecurity-Invalidremotechangerequested
Solution:Thesystemconfigurationchangehasfailed.Confirmtheoperationandtryagain.Toclear
theerror,enterThinkPadTabletSetup.
•Message:0199:SystemSecurity-Securitypasswordretrycountexceeded.
Solution:Thismessageisdisplayedifyouenterawrongsupervisorpasswordmorethanthreetimes.
Confirmthesupervisorpasswordandtryagain.Tocleartheerror,enterThinkPadTabletSetup.
•Message:1802:Unauthorizednetworkcardispluggedin-Poweroffandremovethenetworkcard.
Solution:Thewirelessnetworkcardisnotsupportedonthistablet.Removeit.
•Message:1820:Morethanoneexternalfingerprintreadersareattached.
Solution:Poweroffandremoveallbutthereaderthatyousetupwithinyourmainoperatingsystem.
•Message:0270:RealTimeClockError.
Solution:SystemRealTimeClockisnotfunctional.Havethetabletserviced.
•Message:0271:CheckDateandTimesettings.
Solution:Neitherthedatenorthetimeissetinthetablet.Setthedateandtime,usingThinkPadT ablet
Setup.
•Message:2101:DetectionerroronSSD(M.2)
Solution:TheM.2SSDdeviceisnotworking.HavetheM.2SSDdeviceserviced.
•Message:2111:ReaderroronSSD(M.2)
Solution:TheM.2SSDdeviceisnotworking.HavetheM.2SSDdeviceserviced.
•Message:2200:MachineTypeandSerialNumberareinvalid.
Solution:MachineTypeandSerialNumberareinvalid.Havethetabletserviced.
•Message:2201:MachineUUIDisinvalid.
Solution:MachineUUIDisinvalid.Havethetabletserviced.
•Message:Thermalsensingerror
Solution:Thethermalsensorhasproblem.Shutdownthetabletimmediatelyandhavethetablet
serviced.
•Message:Error:TheSystemUEFIVariableStorageisnearlyfull.
Note:Thiserrorindicatesthattheoperatingsystemorapplicationscannotcreate,modify,ordeletedata
inthenon-volatilesystemUEFIvariablestorageduetoinsufficientstoragespaceafterPOST.
Thenon-volatilesystemUEFIvariablestorageisusedbytheUEFIBIOSandbytheoperatingsystemor
applications.Thiserroroccurswhentheoperatingsystemorapplicationsstorelargeamountsofdata
inthevariablestorage.AlldataneededforPOST,suchasBIOSsetupsettings,chipsetorplatform
configurationdata,arestoredinaseparateUEFIvariablestorage.
Solution:EnterThinkPadTabletSetupaftertheerrormessageisdisplayed.Adialogaskstheuserfor
confirmationtocleanupthestorage.Iftheuserselects“Yes”,alldatathatwerecreatedbytheoperating
systemorapplicationsaredeletedexceptglobalvariablesdefinedbytheUnifiedExtensibleFirmware
InterfaceSpecification.Iftheuserselects“No” ,alldataiskept,buttheoperatingsystemorapplications
willnotbeabletocreate,modify,ordeletedatainthestorage.
Ifthiserrorhappensataservicecenter,Lenovoauthorizedservicepersonnelwillcleanupthenon-volatile
systemUEFIvariablestorageusingtheabovesolution.
92ThinkPadHelixUserGuide
 Loading...