

Page 1

Lenovo
User Guide
V1.0
E46
User Guide
V1.0
Page 2

Notes
•
Before using this information and the product it supports, be sure to read Important safety
information and Notices in the User Guide attached with the computer first.
Some instructions in this guide may assume that you are using Windows
•
other Windows operating system, some operations may be slightly different. If you are using
other operating systems, some operations may not apply to you, but it won’t substantially affect
your use of this computer.
•
The features described in this guide are common to most models. Some features may not be
available on your computer and/or your computer may include features that are not described in
this user guide.
This manual is for your reference only.
For more information, please see the User Guide attached with the computer.
®
7. If you are using
First Edition (Jan. 2010)
© Copyright Lenovo 2010.
LENOVO products, data, computer software, and services have been developed exclusively at private expense
and are sold to governmental entities as commercial items as defined by 48 C.F.R. 2.101 with limited and restricted
rights to use, reproduction and disclosure. LIMITED AND RESTRICTED RIGHTS NOTICE: If products, data,
computer software, or services are delivered pursuant a General Services Administration “GSA” contract, use,
reproduction, or disclosure is subject to restrictions set forth in Contract No. GS-35F-05925.
Page 3

Contents
Chapter 1. Getting to know your
computer ....................................... 1
Top view........................................ 1
Left-side view ............................... 4
Right-side view.............................6
Front view ..................................... 7
Rear view.......................................8
Bottom view .................................. 9
Chapter 2. Learning the basics .... 11
First use........................................11
Using the touchpad....................14
Using the keyboard....................15
Special buttons............................18
System status indicators............20
Securing your computer............ 21
Connecting external devices..... 23
Chapter 3. Using the Internet .... 27
Wired connection .......................27
Wireless connection ................... 29
Index ............................................ 31
i
Page 4

Contents
ii
Page 5
Chapter 1. Getting to know your computer
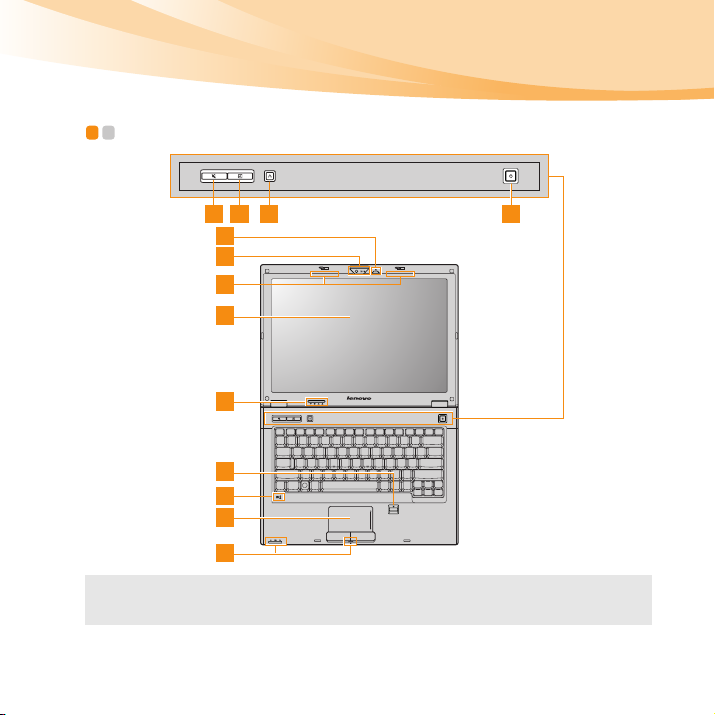
Top view - - - - - - - - - - - - - - - - - - - - - - - - - - - - - - - - - - - - - - - - - - - - - - - - - - - - - - - - - - - - - - - - - - - - - - - - - - - - - - - - - - - - - - - - - - -
4 5 3 1
7
6
8
9
2
10
12
11
2
Note: The illustrations in this manual may differ from the actual product. Please refer to
the actual product.
1
Page 6

Chapter 1. Getting to know your computer
Attention:
Do NOT open the display panel beyond 180 degree. When closing the display
•
panel, be careful NOT to leave pens or any other objects in between the display
panel and the keyboard. Otherwise, the display panel may be damaged.
Power button
System status
Press this button to turn on the computer.
For details, see “System status indicators” on page 20.
indicators
OneKey Rescue
System button
Note: For details, see "OneKey Rescue System" in the User Guide attached with the
computer.
Mute button
Custom button
Integrated
Press this button to open OneKey Rescue System (If
OneKey Rescue System has been preinstalled) when the
computer is powered off.
Use this button to mute/unmute the computer.
Press this button to set and launch a self defined program,
file or a Web site.
Use the camera for video communication.
camera (specific
models only)
Keyboard light
The keyboard light illuminates the keyborad in the dark.
(specific models
only)
Wireless LAN
antennas
The built-in antennas ensure optimal reception of wireless
communication radio.
(specific models
only)
2
Page 7

Chapter 1. Getting to know your computer
Computer
The LCD display provides brilliant visual output.
display
Fingerprint
10
reader (specific
With the fingerprint reader you can register fingerprints
and use them as passwords to secure your computer.
models only)
11
Touchpad
Note: For details, see “Using the touchpad” on page 14.
Built-in
12
microphone
The touchpad functions as a conventional mouse.
The built-in microphone (with noise reduction) can be used
for video conferencing, voice narration, or simple audio
recordings.
3
Page 8
Chapter 1. Getting to know your computer
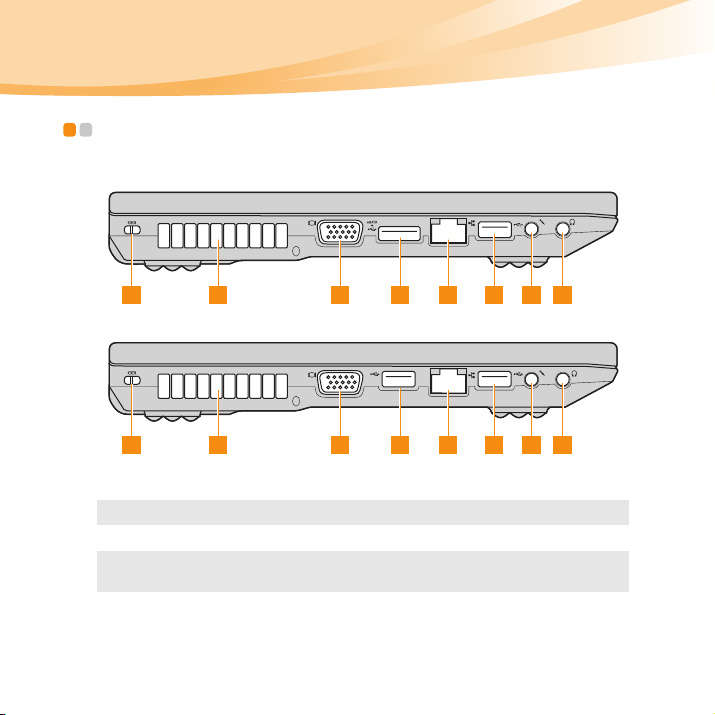
Left-side view - - - - - - - - - - - - - - - - - - - - - - - - - - - - - - - - - - - - - - - - - - - - - - - - - - - - - - - - - - - - - - - - - - - - - - - - - - - - - -
E46A/E46G
1 2 3 4 7 8
65
E46L
1 2 3 6 5 6 7 8
Kensington slot
Note: For details, see “Attaching a security lock (not supplied)” on page 21.
Fan louvers
Note: Make sure that none of the fan louvers are blocked or else overheating of the
computer may occur.
VGA por t
Attach a security lock (not supplied) here.
Dissipate internal heat.
Connects to external display devices.
4
Page 9

Chapter 1. Getting to know your computer
eSATA/USB
Connects to eSATA or USB devices.
combo port
Note: For details, see “Connecting a universal serial bus (USB) device” on page 26.
RJ-45 port
Note: For details, see “Wired connection” on page 27.
USB port
Note: For details, see “Connecting a universal serial bus (USB) device” on page 26.
Microphone jack
Headphone jack
Attention:
Connects to an Ethernet network.
Connects to USB devices.
Connects to an external microphone.
Connects to an external headphone.
• Listening to music at high volume over extended periods of time
may damage your hearing.
5
Page 10
Chapter 1. Getting to know your computer
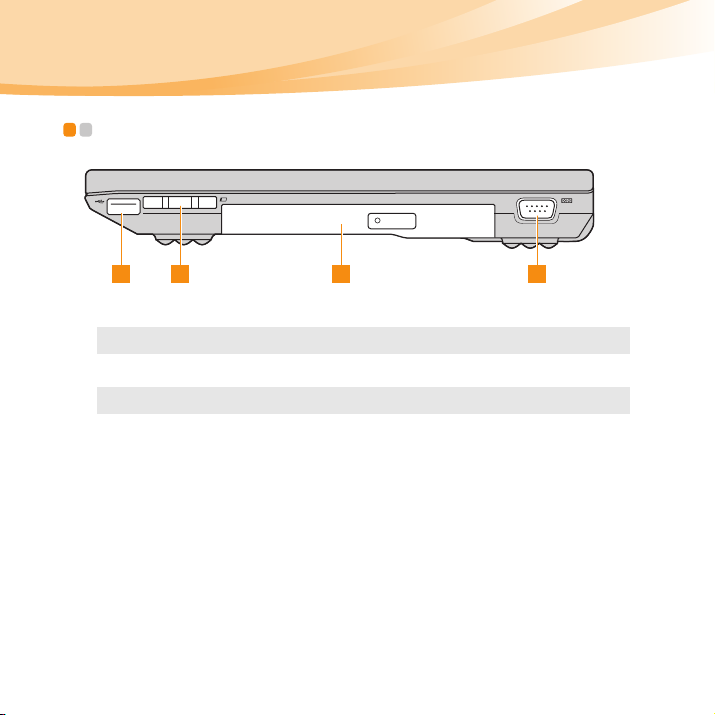
Right-side view - - - - - - - - - - - - - - - - - - - - - - - - - - - - - - - - - - - - - - - - - - - - - - - - - - - - - - - - - - - - - - - - - - - - - - - - - -
1 2 3 4
USB port
Note: For details, see “Connecting a universal serial bus (USB) device” on page 26.
ExpressCard® slot
Note: For details, see “Inserting an ExpressCard/34 device” on page 25.
Optical drive
(specific models
only)
Serial port
Connects to USB devices.
Insert ExpressCard device here.
Your computer comes with an optical drive, such as a CD/
DVD drive.
Connects to devices with serial port.
6
Page 11
Chapter 1. Getting to know your computer
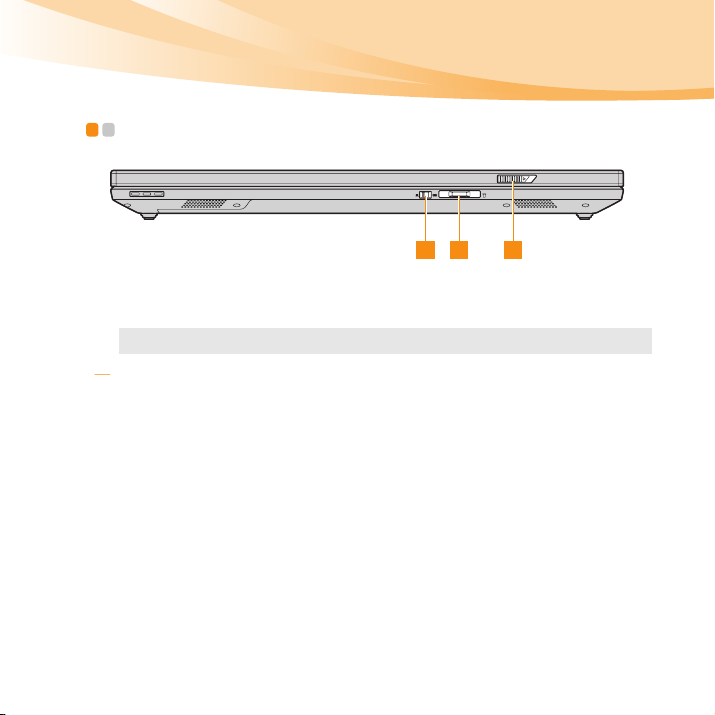
Front view - - - - - - - - - - - - - - - - - - - - - - - - - - - - - - - - - - - - - - - - - - - - - - - - - - - - - - - - - - - - - - - - - - - - - - - - - - - - - - - - - - - - - - -
13 2
Display latch
Memory card slot
Note: For details, see “Using memory cards (not supplied)” on page 23.
Integrated
wireless device
switch
Release this latch to open the display.
Insert memory cards (not supplied) here.
Use this switch to turn on/off the wireless radio of all
wireless devices on your computer.
7
Page 12
Chapter 1. Getting to know your computer
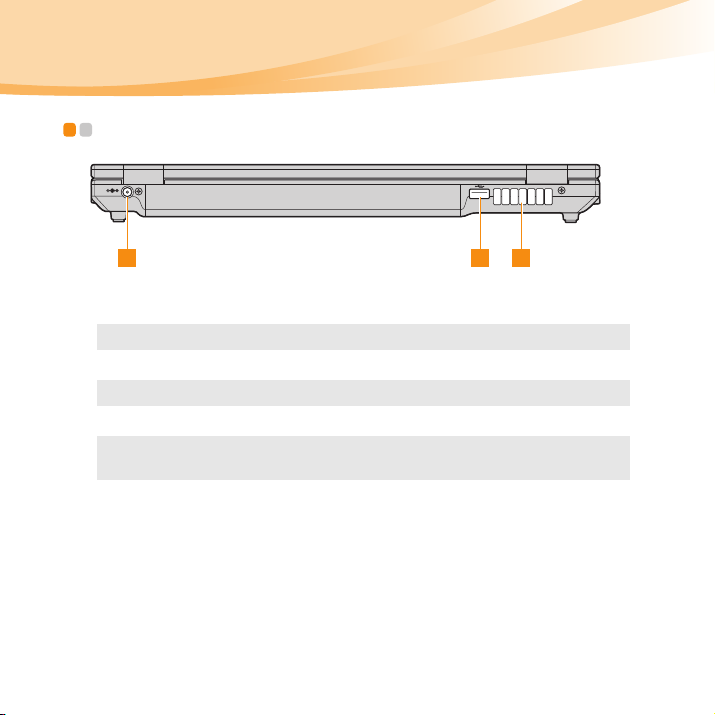
Rear view - - - - - - - - - - - - - - - - - - - - - - - - - - - - - - - - - - - - - - - - - - - - - - - - - - - - - - - - - - - - - - - - - - - - - - - - - - - - - - - - - - - - - - - - -
1 2 3
AC power
adapter jack
Note: For details, see the User Guide attached with the computer.
USB port
Note: For details, see “Connecting a universal serial bus (USB) device” on page 26.
Fan louvers
Note: Make sure that none of the fan louvers are blocked or else overheating of the
computer may occur.
Connect the AC adapter here.
Connects to USB devices.
Dissipate internal heat.
8
Page 13

Chapter 1. Getting to know your computer
Bottom view - - - - - - - - - - - - - - - - - - - - - - - - - - - - - - - - - - - - - - - - - - - - - - - - - - - - - - - - - - - - - - - - - - - - - - - - - - - - - - - - - -
2
4 7 75
6 13
9
Page 14

Chapter 1. Getting to know your computer
Hard disk
drive(HDD)
compartment
Battery latch spring loaded
Battery pack
Mini PCI
ExpressCard slot
compartment
Battery latch manual
Central
Processing Unit
(CPU)/Memory
(RAM)
compartment
Speakers
10
Houses the computer’s hard disk drive.
The spring-loaded battery latch keeps the battery pack
secured in place.
For details, see the User Guide attached with the computer.
Houses the computer’s wireless module.
The manual battery latch is used to keep the battery pack
secured in place.
House the computer's CPU and memory.
The speakers provide rich and powerful sound.
Page 15

Chapter 2. Learning the basics
Chapter 2. Learning the basics
First use
Read the manuals
Read the supplied manuals before using your computer.
Connect to the power
The supplied battery pack is not fully charged at purchase.
To charge the battery and begin using your computer, insert the battery
pack and connect the computer to an electrical outlet. The battery is
automatically charged while the computer is running on AC power.
Install the battery pack
Refer to the supplied User Guide attached with the computer to install the
battery pack.
Connect the computer to an electrical outlet
1
2
3
- - - - - - - - - - - - - - - - - - - - - - - - - - - - - - - - - - - - - - - - - - - - - - - - - - - - - - - - - - - - - - - - - - - - - - - - - - - - - - - - - - - - - - - - - - - - - - -
Connect the power cord to the AC adapter.
Connect the AC adapter to the AC power adapter jack of the computer
firmly.
Plug the power cord into an electrical outlet.
11
Page 16

Chapter 2. Learning the basics
Turn on the computer
Press the power button to turn on the computer.
Configure the operating system
You may need to configure the operation system when it is first used. The
configuration process may include the procedures below.
• Accepting the end user license agreement
• Configuring the Internet connection
• Registering the operating system
• Creating a user account
Putting your computer into standby/sleep state or shutting it
down
When you finish working with your computer, you can put it into
standby/sleep state or shut it down.
Putting your computer into standby/sleep state
If you will be away from your computer for only a short time, put the
computer into standby/sleep state.
When the computer is in standby/sleep state, you can quickly wake it to
resume use, and bypass the startup process.
12
Page 17

Chapter 2. Learning the basics
To put the computer into standby state, do one of the following.
•Click start and select Stand By from the Turn Off Computer menu.
•Press Fn + F1.
Note: Wait until the power indicator light starts blinking (indicating that the
computer is in standby state) before you move your computer. Moving your
computer while the hard disk is spinning can damage the hard disk, causing
loss of data.
To wake the computer, do one of the following.
• Press the power button.
• Press any key on the keyboard.
Shutting down your computer
If you are not going to use your computer for a day or two, shut it down.
To shut down your computer, click start and select Tu rn Of f from the Tu r n
Off Computer menu.
13
Page 18

Chapter 2. Learning the basics
Using the touchpad - - - - - - - - - - - - - - - - - - - - - - - - - - - - - - - - - - - - - - - - - - - - - - - - - - - - - - - - - - - - - - - - - - - - -
1
Touchpad
Left click button
Right click button
Note: You can enable/disable the touchpad using Fn+F8.
The touchpad may be disabled when manipulated with two fingers together.
32
To move the cursor on the screen, slide your fingertip
over the pad in the direction in which you want the
cursor to move.
The function corresponds to that of the left mouse
button on a conventional mouse.
The function corresponds to that of the right mouse
button on a conventional mouse.
14
Page 19

Chapter 2. Learning the basics
Using the keyboard - - - - - - - - - - - - - - - - - - - - - - - - - - - - - - - - - - - - - - - - - - - - - - - - - - - - - - - - - - - - - - - - - - - - - -
Your computer has a numeric keypad and function keys incorporated in its
standard keyboard.
Numeric keypad
The keyboard has keys that, when enabled, work as a 10-key numeric
keypad.
To enable or disable the numeric keypad, press Fn+Insert.
Note: The indicator will light on if the numeric keypad is enabled.
15
Page 20

Chapter 2. Learning the basics
Function key combinations
Through the use of the function keys, you can change operational features
instantly. To use this function, press and hold Fn ; then press one of the
function keys .
2
1
16
Page 21

Chapter 2. Learning the basics
The following describes the features of each function key.
Fn + Esc:
Fn + F1: Enter standby/sleep mode.
Fn + F2: Turn on/off the backlight for the LCD screen.
Fn + F3: Shift to other connected display devices.
Fn + F4: Open the interface for display resolution settings.
Fn + F5:
Fn + F8: Enable/Disable the touchpad.
Fn + F9: Start/Pause playback of Windows Media Player.
Fn + F10: Stop playback of Windows Media Player.
Fn + F11: Skip to the previous track.
Fn + F12: Skip to the next track.
Fn + Insert Enable/Disable the numeric keypad.
Fn + Delete Enable/Disable the Scroll Lock.
Fn + PrtSc: Activate the system request.
Fn + Pause Activate the break function.
Fn + ↑/↓ :
Fn + ←/→ :
Turn on/off the keyboard light. (specific models
only)
Open the interface for integrated wireless devices
settings (enable/disable).
Increase/Decrease display brightness.
Decrease/Increase volume level.
17
Page 22

Chapter 2. Learning the basics
Special buttons - - - - - - - - - - - - - - - - - - - - - - - - - - - - - - - - - - - - - - - - - - - - - - - - - - - - - - - - - - - - - - - - - - - - - - - - - - - - - -
18
Page 23

Chapter 2. Learning the basics
Mute button
Mute/Unmute the computer.
Custom button
Under Windows operating systems, press this button to launch a selfdefined program, file or a Web site.
Note: To re-define the Custom button, select Self-defined program setting
(start → All Programs → Lenovo → Energy Management → Self-defined
program setting).
OneKey Rescue System button
• When the computer is powered-off, press this button to enter the
OneKey Rescue System if Lenovo OneKey Rescue System has been
preinstalled.
• Under Windows operating systems, press this button to start Lenovo
OneKey Recovery.
Note:
For details, see "OneKey Rescue System" in the User Guide attached with the
computer.
19
Page 24

Chapter 2. Learning the basics
System status indicators - - - - - - - - - - - - - - - - - - - - - - - - - - - - - - - - - - - - - - - - - - - - - - - - - -
These indicators inform you of the computer status.
Wireless communication
1 2 3 4
5 6 7 8
indicator
Bluetooth indicator
Num lock indicator
Caps lock indicator
Power status indicator
Battery status indicator
Hard disk drive indicator
Touchpad indicator
20
Page 25

Chapter 2. Learning the basics
Securing your computer - - - - - - - - - - - - - - - - - - - - - - - - - - - - - - - - - - - - - - - - - - - - - - - - - - - - - - - - - - -
This section provides information about how to help protect your
computer from theft and unauthorized use.
Attaching a security lock (not supplied)
You can attach a security lock to your computer to help prevent it from
being removed without your permission. For details on installing the
security lock, please refer to the instructions shipped with the security lock
that you have purchased.
Refer to the “Right-side view” on page 6 for the location of the Kensington
slot.
Notes:
• Before purchasing any security product, verify that it is compatible with this
type of security keyhole.
• You are responsible for evaluating, selecting, and implementing the locking
devices and security features. Lenovo offers no comment, judgement, or
warranty regarding the function, quality or performance of locking devices and
security features.
21
Page 26

Chapter 2. Learning the basics
Using passwords
Using passwords helps prevent your computer from being used by others.
Once you set a password and enable it, a prompt appears on the screen
each time you power on the computer. Enter your password at the prompt.
The computer cannot be used unless you enter the correct password.
Note: This password can be from one to seven alphanumeric characters in any
combination.
For details about how to set the password, see the help to the right of the
screen in BIOS setup utility.
Note: To enter BIOS setup utility, press F2 when the Lenovo logo appears on the
screen while the computer is starting up.
Fingerprint reader
With the fingerprint reader, in addition to registering fingerprint
information and using it as a password for Windows operating system or
Web site logon, you can also launch applications quickly and encrypt
private data with your fingerprint to secure your computer.
For more details on fingerprint reader, see the Help file of your software.
22
Page 27

Chapter 2. Learning the basics
Connecting external devices - - - - - - - - - - - - - - - - - - - - - - - - - - - - - - - - - - - - - - - - - -
Your computer has a wide range of built-in features and connection
capabilities.
Using memory cards (not supplied)
Your computer supports the following types of memory cards:
• Secure Digital (SD) card
• Secure Digital High Capacity (SDHC) card
• MultiMediaCard (MMC)
• Memory Stick (MS)
• Memory Stick PRO (MS PRO)
• xD picture (xD) card
• xD picture type card
Notes:
• Insert ONLY one card in the slot at a time.
• This card reader does not support SDIO devices (e.g., SDIO Bluetooth, etc.).
23
Page 28

Chapter 2. Learning the basics
Inserting a memory card
1
Push the dummy card until you hear a click. Gently pull the dummy
card out of the memory card slot.
Note: The dummy card is used for preventing dust and small particles from
entering the inside of your computer when the memory card slot is not in use.
Retain the dummy card for future use.
2
Push the card directly into the memory card slot until it reaches the
end.
Removing a memory card
1
Push the memory card until you hear a click. Gently pull the memory
card out of the memory card slot.
2
Insert the dummy card to the memory card slot.
Note: Before removing the memory card, unable it by Windows Safely Remove
Hardware utility to avoid data corruption.
Connecting an ExpressCard device
Your computer comes with an ExpressCard/34 slot used for connecting
ExpressCard devices.
Note: Only use the ExpressCard/34 devices.
24
Page 29

Chapter 2. Learning the basics
Inserting an ExpressCard/34 device
1
Push the dummy card until you hear a click. Gently pull the dummy
card out of the ExpressCard slot.
2
Slide the ExpressCard device in with the front label facing upward
until it clicks into place.
Removing an ExpressCard/34 device
1
Push the ExpressCard device until you hear a click.
2
Gently pull the ExpressCard device out of the ExpressCard slot.
Notes:
• Before removing the ExpressCard/34 device, unable it by Windows Safely
Remove Hardware utility.
• The dummy card is used for preventing dust and small particles from entering
the inside of your computer when the ExpressCard slot is not in use. Retain the
dummy card for future use.
25
Page 30

Chapter 2. Learning the basics
Connecting a universal serial bus (USB) device
Your computer comes with three USB ports compatible with USB devices.
Note: When using a high power consumption USB device such as USB ODD, use
the external device’s power adapter. Otherwise, the device may not be
recognized, or system shut down may result.
Connecting a Bluetooth enabled device (specific models only)
If your computer has an integrated Bluetooth adapter card, it can connect to
and transfer data wirelessly to other Bluetooth enabled devices, such as
notebook computers, PDAs and cell phones. You can transfer data between
these devices without cables at up to 10 meters range in open space.
Enabling Bluetooth communications on your computer
1
Slide the integrated wireless device switch to .
2
Press Fn + F5 to make configuration.
Note: When you do not need to use the Bluetooth function, turn it off to save battery
power.
26
Page 31

Chapter 3. Using the Internet
Chapter 3. Using the Internet
As a global network, the Internet connects computers worldwide,
providing services such as e-mailing, information searching, electronic
commerce, Web browsing and entertainment.
You can connect the computer to the Internet in the following ways:
Wired connection: uses physical wiring to connect.
Wireless network technology: connect without wiring.
Wired connection - - - - - - - - - - - - - - - - - - - - - - - - - - - - - - - - - - - - - - - - - - - - - - - - - - - - - - - - - - - - - - - - - - - - -
Wired connection is a reliable and safe way to connect the computer to the
Internet. Generally, the following two accessing methods are widely used.
Cable Cable Internet services use a cable modem connected to
DSL DSL is a family of related technologies that bring
the residential cable TV line.
high-speed network access to homes and small
businesses over ordinary telephone lines.
27
Page 32

Chapter 3. Using the Internet
Hardware connection:
Cable DSL
TV cable
Telephone line
Splitter *
Cable modem *
* Not supplied.
Note: The above diagrams are for reference only. Actual connection method may
vary.
DSL modem *
Splitter *
Software configuration
Consult your Internet Service Provider (ISP) for details on how to configure
your computer.
28
Page 33

Chapter 3. Using the Internet
Wireless connection - - - - - - - - - - - - - - - - - - - - - - - - - - - - - - - - - - - - - - - - - - - - - - - - - - - - - - - - - - - - - - - - - - - -
Wireless connection provides mobile access to the Internet, allowing you to
stay online anywhere the wireless signal covers.
Divided by the signal scales, wireless connection to the Internet can be built
based on the following standards.
Wi-Fi Wi-Fi networks cover a small physical area, like a home,
WiMAX WiMAX networks connect several Wireless LAN systems
Mobile Broadband The Mobile Broadband network provides Internet access
Note: Your computer may not support all wireless connection methods.
office, or small group of buildings. An access point is
necessary for the connection.
to cover a metropolitan area, providing high-speed
broadband access without the need for cables.
to computers, cell phones and other devices over a large
geographic area. Mobile networks are used for data
transmission, and access is usually provided by a mobile
network operator. A Mobile Broadband SIM card is
necessary for the connection.
29
Page 34

Chapter 3. Using the Internet
Using Wi-Fi/WiMax (specific models only)
Enabling wireless connection
To enable wireless communications, do the following:
1
Slide the integrated wireless device switch to .
2
Press Fn + F5 to make configuration.
Hardware connection
Access point *
Wi-Fi/WiMax networ k
* Not supplied
Software configuration
Consult your Internet Service Provider (ISP) and search Windows Help and
Support Center for details on how to configure your computer.
30
Page 35

Index
B
Bluetooth
Connecting ................................ 26
C
Camera ...........................................2, 17
Card reader ........................................ 23
F
Function key combinations...............16
K
Kensington slot .................................... 4
Keyboard
Using ......................................... 15
M
Microphone
Built-in......................................... 3
N
Numeric Keypad................................15
O
OneKey Rescue System button ...........2
P
Password
Using .........................................22
Power button........................................2
S
Security...............................................21
T
Touch pad........................................... 14
31
Page 36

Index
U
USB port....................................... 5, 6, 8
W
Wireless LAN
Antennas..................................... 2
32
Page 37

If your product is not working correctly,
DO NOT RETURN IT TO THE STORE.
For technical assistance, contact a Lenovo support specialist 24 hours a day by calling toll free 1-877-4 LENOVO
(1-877-453-6686).
Additionally, you can find support information and updates
on the Lenovo Web site located at
http://consumersupport.lenovo.com.
* Only for the users from the United States.
Page 38

New World. New Thinking.
www.lenovo.com
TM
©Lenovo China 2010
P/N: 147003151
Printed in China
 Loading...