

Page 1
Version 1.0 2009.7
User Guide
Lenovo
IdeaCentre D400 Series
31038690B
31038690B_D400_UG_FM_EN_V1.0.ind1 1 2009.7.8 4:29:23 PM
Page 2
Important Safety Information
Before using this manual, it is important that you read and understand all of the
related safety information for this product. Refer to the Safety and Warranty Guide
that you received with this product for the latest safety information. Reading and
understanding this safety information reduces the risk of personal injury or damage
to your product.
Danger: Be aware of extremely hazardous or lethal situations.
Attention: Be aware of possible damage to programs, devices, or data.
Note: Pay attention to this important information.
© Copyright Lenovo 2009.
31038690B_D400_UG_EN_V1.0.indd 1 2009.7.8 4:27:47 PM
Page 3

31038690B_D400_UG_EN_V1.0.indd 2 2009.7.8 4:27:47 PM
Page 4

1
Contents
Contents
Important Safety Information
Introduction ................................................................................. 1
Chapter 1
Instruction for using Home Server hardware ....... 4
Front view ......................................................................................4
Front panel LED indicators .............................................................5
Using the one-touch USB backup feature ......................................8
Rear view .......................................................................................9
LAN related LEDs on the rear side ...............................................10
Connect the power cord ..............................................................11
Connect to the home network .....................................................11
Lenovo Home Server Recovery DVD ...........................................11
Client Software Installer CD ..........................................................12
Computer Restore CD .................................................................12
Chapter 2 Installing the software .......................................... 13
Install the Windows Home Server Connector on the client
computer ...............................................................................13
Install the Lenovo Home Server EasyAccess utility .......................24
Install the LightsOut client utility ...................................................30
Chapter 3 Restoring a home computer ................................ 34
Chapter 4
Server Recovery .................................................... 35
Chapter 5
Windows Home Server Console .......................... 40
The Windows Home Server Console window ..............................41
Computers and Backup ...............................................................41
User Accounts .............................................................................42
31038690B_D400_UG_EN_V1.0.indd 1 2009.7.8 4:27:48 PM
Page 5

2
Contents
Shared Folders ............................................................................42
Server Storage .............................................................................43
LightsOut .....................................................................................43
Network Health ............................................................................44
Chapter 6 Settings .................................................................. 45
Remote Access ...........................................................................45
Chapter 7 Configuring the hard disk drive ........................... 47
Adding a hard disk drive ..............................................................47
Replacing the hard disk drive .......................................................52
Chapter 8 Troubleshooting .................................................... 57
Post error code for the system state LED indicator ......................58
31038690B_D400_UG_EN_V1.0.indd 2 2009.7.8 4:27:48 PM
Page 6

1
User Guide
Introduction
Home Server is a data storage and digital media content server for families and
SOHO Small Businesses with multiple computers and multimedia devices on a
home network who want to enjoy their digital experiences when and where they
want.
Home Server enables you to access easily and more securely your files and
computers from inside and outside your family or SOHO Small Business. You can
use it to store your important photos, videos, music and files in a central location
for access anytime and anywhere.
Specifications for Home Server
• Processor
Intel® Atom™ 230
• Drive storage
Up to four 3.5-inch hot-swappable hard disk drive (HDD)
SATA 2 or above edition as primary drive.
• Memory
Up to 2 GB DDR2 MHz unbuffered SDRAM
• Ethernet
High performance (10/100/1000) Gigabit Ethernet port
• I/O ports
USB 2.0 ports (1 front and 4 rear), Gigabit Ethernet port, eSATA port, recovery/
reset button
• Power
100-127/200-240V, 3.5V, 50/60 Hz
• Server operating system (OS) support
Windows Home Server
• Client computer OS support
Windows Vista 32-bit and 64-bit Edition
31038690B_D400_UG_EN_V1.0.indd 1 2009.7.8 4:27:48 PM
Page 7

2
User Guide
Windows XP 32-bit and 64-bit Edition
Client computer installation
• Up to 10 home computers can install and use the Windows Home Server
Connector software which enables automatic backup and access to shared
folders on the home server.
Do not support Wireless
• You must use an Ethernet cable to connect your Home Server to your
broadband router or home computer. Wireless connecting your Home Server
to your broadband router or home computer is not supported.
• Can not setup a shared network printer with your Home Server.
Recommended environment for client computer
For best results, your computer should meet the following hardware and software
requirements:
• Processor
1 GHz Pentium 3, Pentium 4, AMD x64, or newer processor
• System memory
512 MB or above
• Supported operating systems for home computers
The following operating systems for home computers support Windows Home
Server:
• Windows Vista Home Basic
• Windows Vista Home N (EU only)
• Windows Vista Home Premium
• Windows Vista Business
• Windows Vista Business N (EU only)
• Windows Vista Enterprise
• Windows Vista Ultimate
• Windows XP Home with Service Pack 2 (SP2)
• Windows XP Professional with SP2
• Windows XP Media Center Edition 2005 with SP2 and Rollup 2
• Windows XP Media Center Edition 2004/2005 with SP2
• Windows XP Tablet Edition with SP2
31038690B_D400_UG_EN_V1.0.indd 2 2009.7.8 4:27:48 PM
Page 8

3
User Guide
• Internet connection
• 1000 Mbps Gigabit Ethernet connection
• Broadband connection (DSL only)
• Broadband router (DHCP enabled)
31038690B_D400_UG_EN_V1.0.indd 3 2009.7.8 4:27:48 PM
Page 9
4
User Guide
Chapter
Instruction for using Home Server
hardware
Attention: Do not open the rear cover of your Home Server chassis at
any time. If you are unable to resolve a problem on your own, contact the
Lenovo Customer Service.
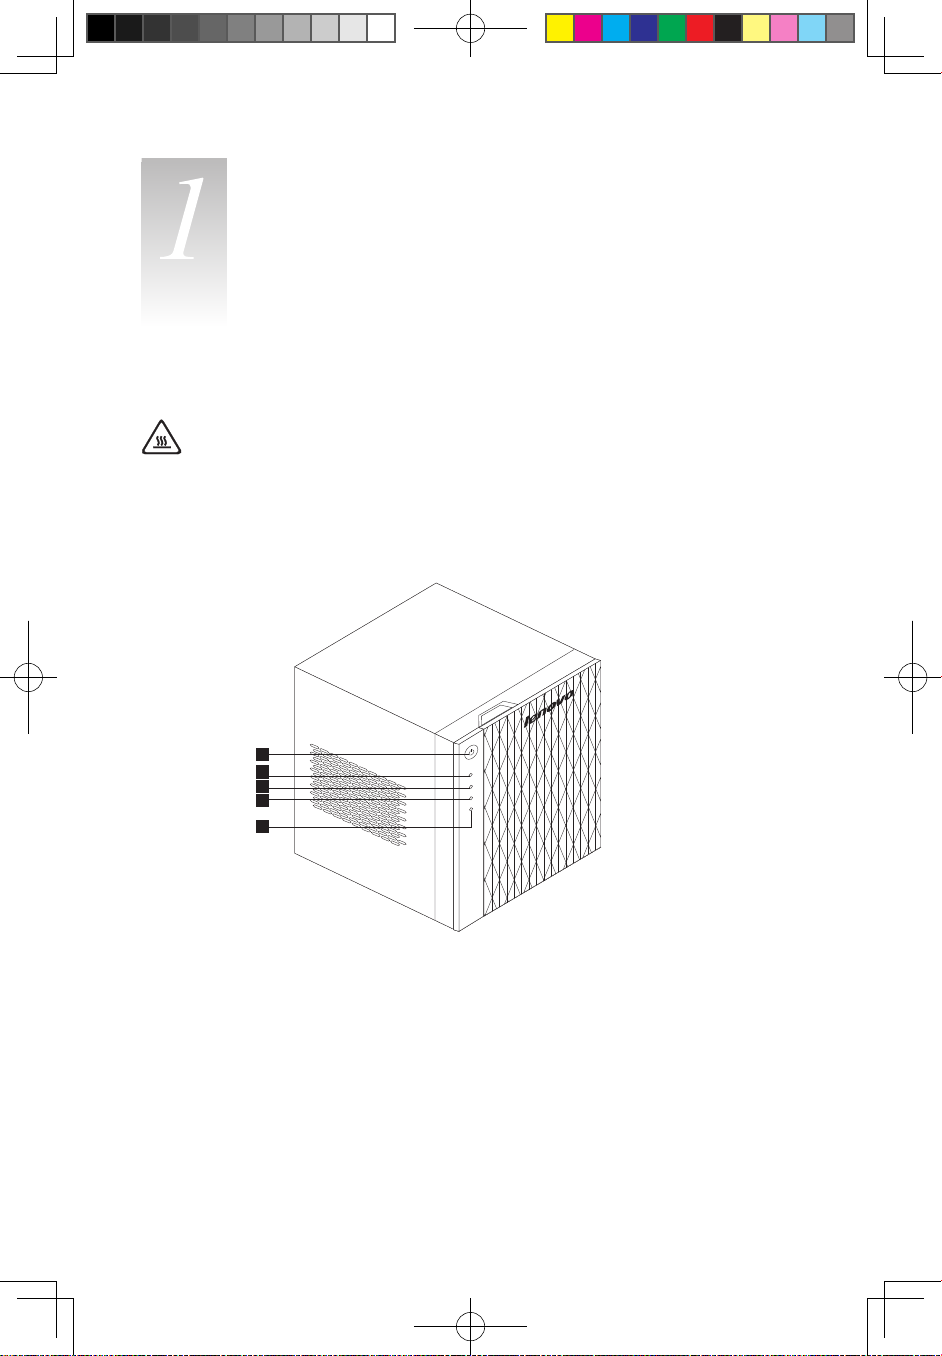
Front view
1
2
3
4
5
31038690B_D400_UG_EN_V1.0.indd 4 2009.7.8 4:27:50 PM
Page 10
5
User Guide
1
2
3
4
5
6
8
9
10
7
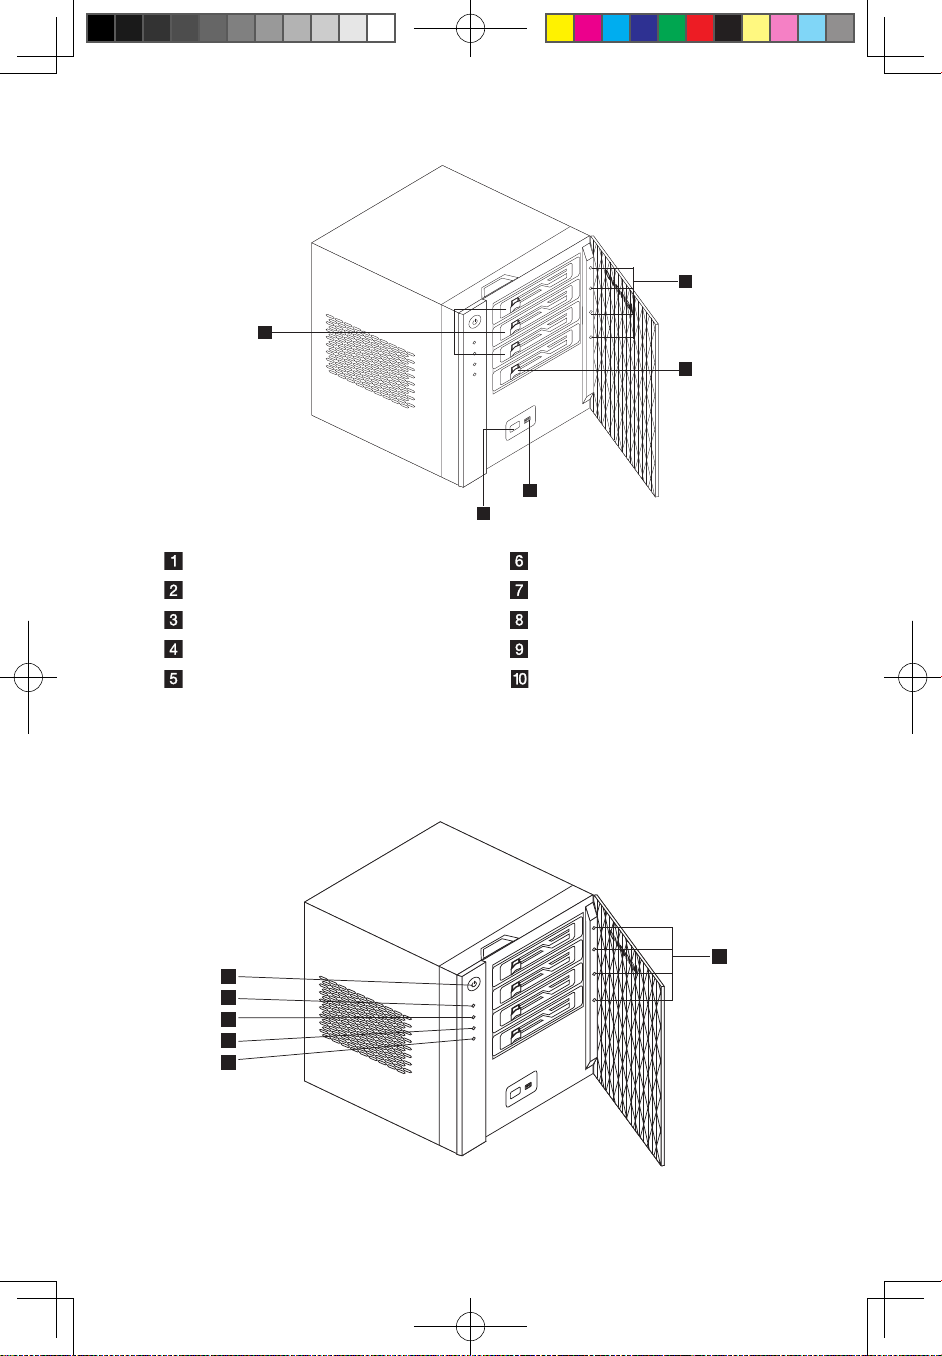
Power button Individual HDD status indicator
Network indicator System hard drive
Hard disk drive (HDD) status indicator USB connector
System status indicator USB backup button
USB backup indicator Hot-swappable HDDs (3)
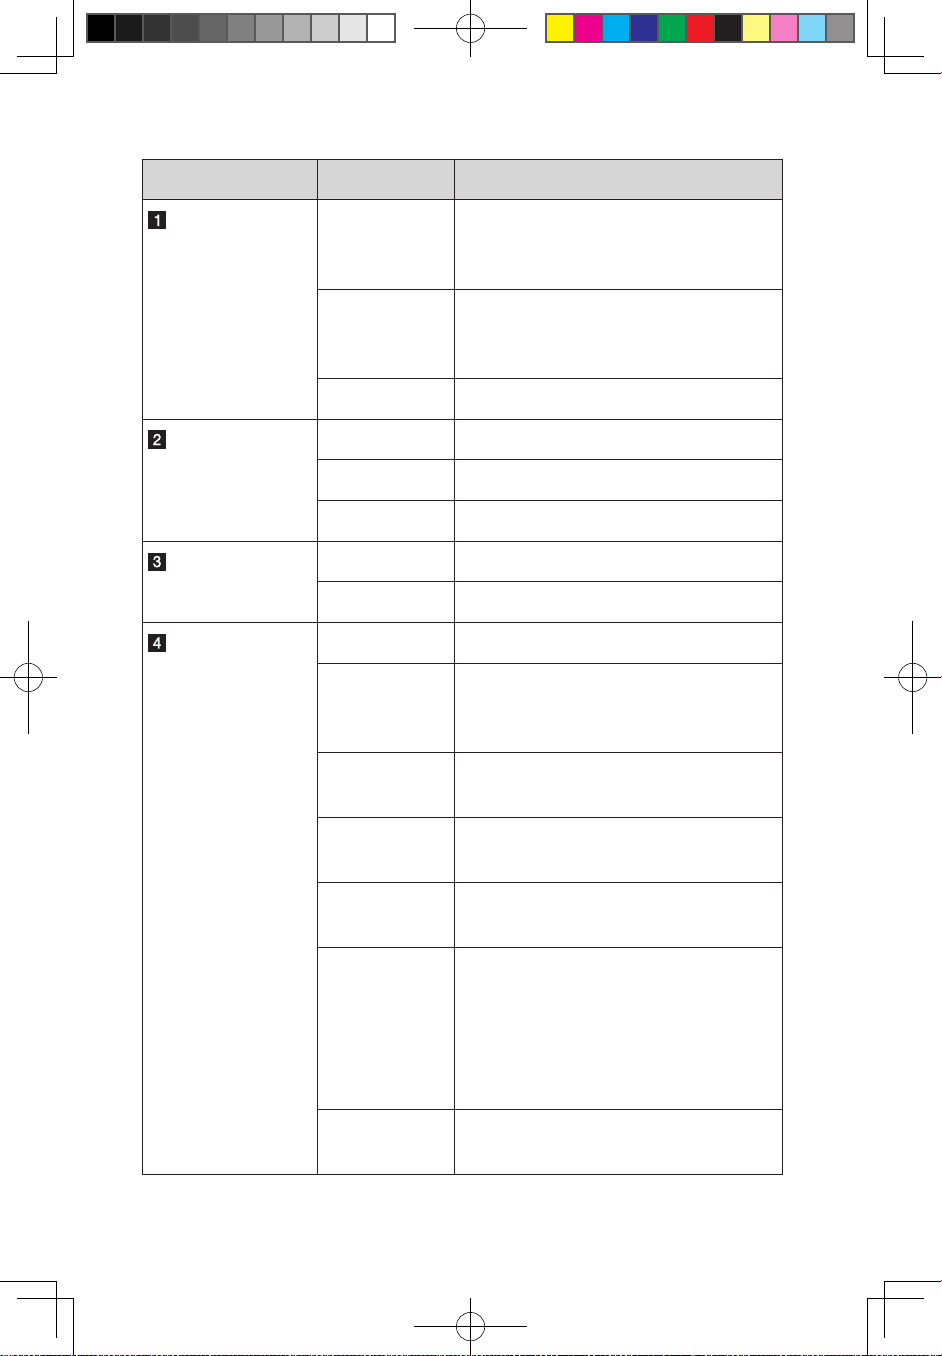
Front panel LED indicators
The LED indicators mounted on the front panel provide information about the
status of the system, its hard drives, and its network connection.
1
2
3
4
5
6
31038690B_D400_UG_EN_V1.0.indd 5 2009.7.8 4:27:53 PM
Page 11
6
User Guide
LED indicator Color status Description
Power button
LED
(Single color)
Blue ON The system is connected to the power
supply and is turned on and ready for
use.
Blue blink The system is booting.
The system is in S3 sleep mode
(suspend to memory).
OFF Power OFF
Network LED
(Single color)
Blue ON The network is connected.
Blue blink The network is active.
OFF The network is disconnected.
HDD access LED
(Single color)
Blue blink Disk access
OFF No access
System status LED
(Dual color)
Purple ON The system stays on initial mode.
Blue blink The operating system is in the process
of booting or in the process of shutting
down.
Blue ON The operating system has booted
(running/normal operation).
Red blink Boot from internal Windows PE for
system recovery/reset
Blue and purple
blink
Boot from USB (Reserved for BIOS
update while boot block is active.)
Red ON When the system is booting:
System failure: See POST error code
System status Red ON with HDD LEDs.
When the system is running:
Go to Health dialogue box to check what
events are triggered or happened.
Red blink When the system has booted:
HDD LED 0~3 Red blinking
31038690B_D400_UG_EN_V1.0.indd 6 2009.7.8 4:27:54 PM
Page 12
7
User Guide
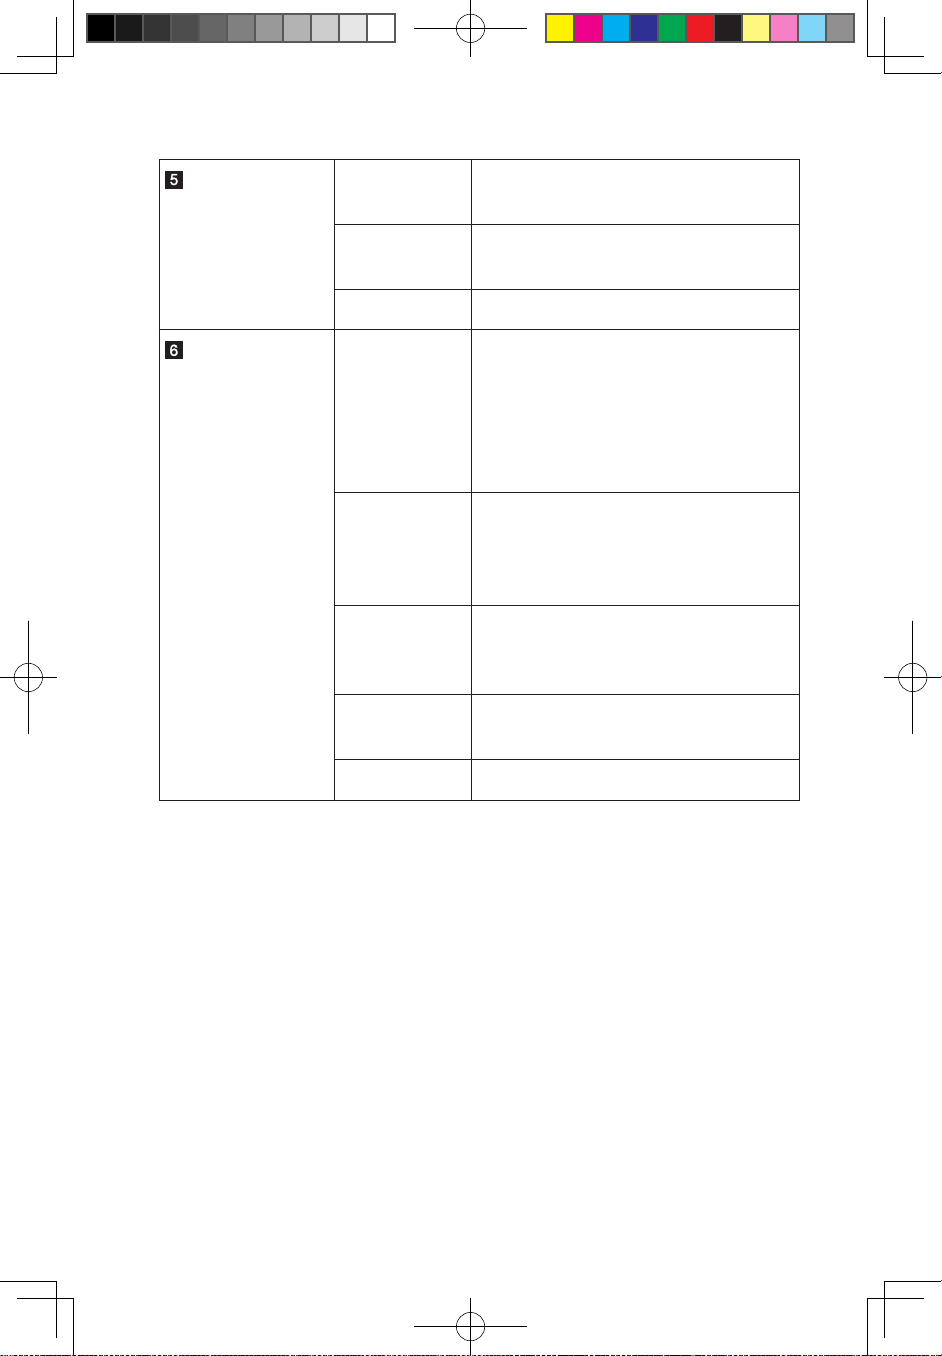
USB backup LED
(Single color)
Blue ON The USB is connected.
The backup is complete.
Blue blink The system is backing up files from a
USB storage device.
OFF The USB storage device is not mounted.
Individual HDD
status LED
(Two colors + one
mixed color)
Purple ON A disk was mounted and has not been
manually added into the Windows Home
Server HDD volume.
Or, a disk was mounted and has been
manually removed from the Windows
Home Server HDD volume.
Purple blink A disk was mounted and is in the
process of being manually added/
removed into the Windows Home Server
HDD volume.
Blue ON The disk was mounted and the disk has
been manually added into the Windows
Home Server HDD volume.
Red blink A disk was failure with system status
LED RED ON.
OFF The disk was un-mounted.
31038690B_D400_UG_EN_V1.0.indd 7 2009.7.8 4:27:54 PM
Page 13
8
User Guide
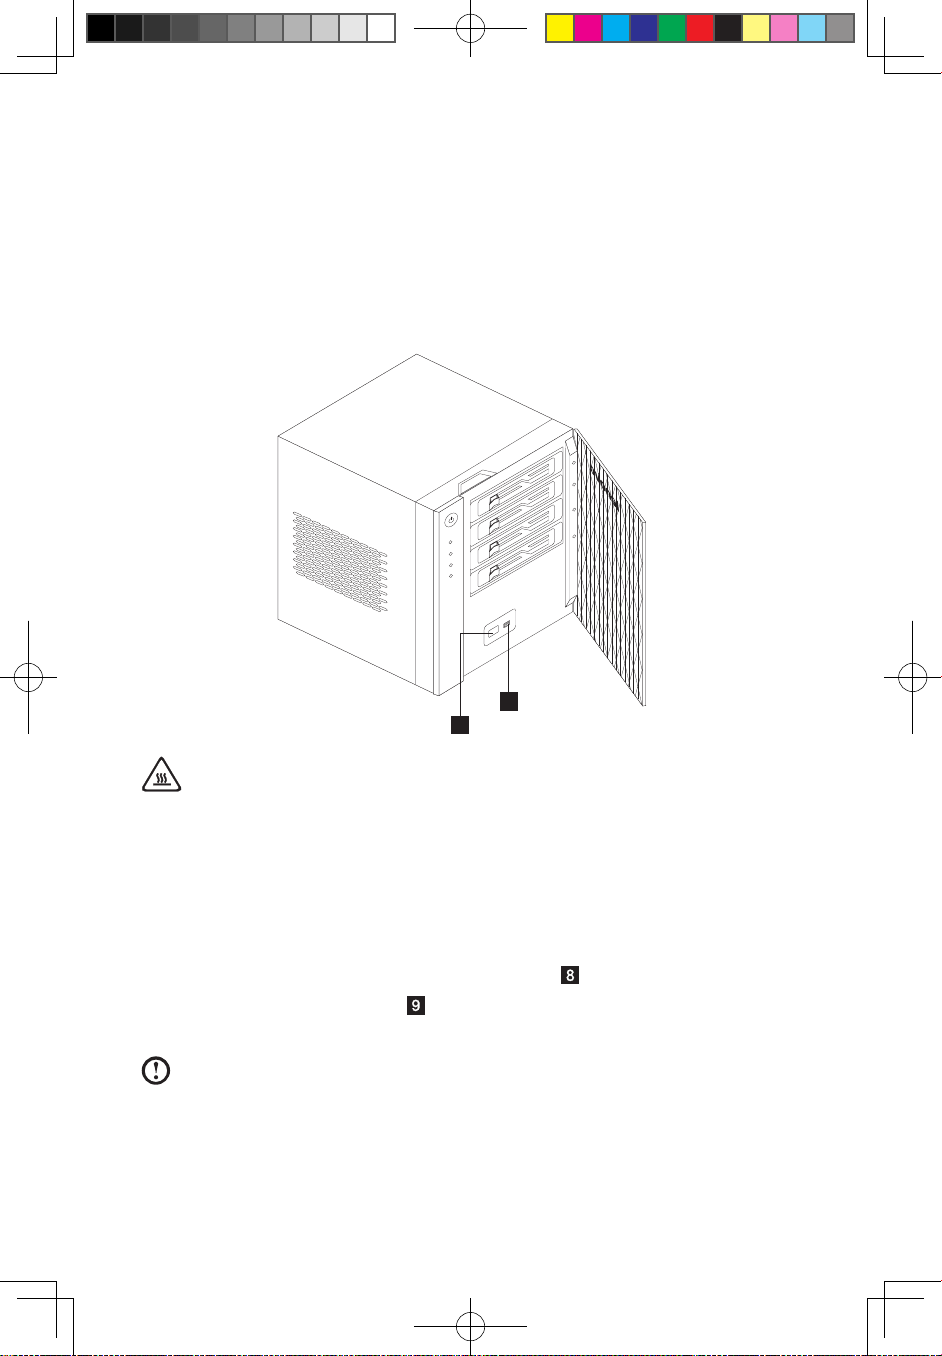
Using the one-touch USB backup feature
The USB backup button on the front panel allows you to back up the data from a USB
storage device to the Home Server. Windows Home Server first copies all files into
the Public shared folder, and then classifies the files according to their media type into
the corresponding shared folders, namely Music, Videos and Photos. When Windows
Home Server cannot determine the file type, the file is automatically stored in the Other
folder.
9
8
Attention:
• Only the front USB port supports the backup feature.
• The data backup feature supports only standard USB flash disks, USB
hard disks and USB card readers free of internal Hub.
(Note: “standard” refers to media that do not require specific drivers
and can be recognized directly by Microsoft Windows Home Server.)
1. Plug the USB device into the front USB connector
.
2. Press the USB backup button
. The USB backup indicator blinks blue.
3. All files on the USB storage device are copied into the Public shared folder.
Note: During the copy process, Windows Home Server checks the file
properties including time, size and file name to verify whether the same
file or a file of the same name already exists in the folder. If there is a
conflicting file name, the data will be copied and the file name will be
assigned a serial number. If the file of exactly the same properties already
31038690B_D400_UG_EN_V1.0.indd 8 2009.7.8 4:27:56 PM
Page 14
9
User Guide
exists in the Public shared folder, the file will be filtered out of the copy
process.
4. Afterwards, Windows Home Server automatically copies and classifies the
newly copied files according to their file type.
5. You can find files of different types in their corresponding shared folders (Music,
Videos and Photos). Files other than music, videos and photos are found in the
Other folder.
6. When the backup process is complete, the USB backup indicator turns solid
blue.
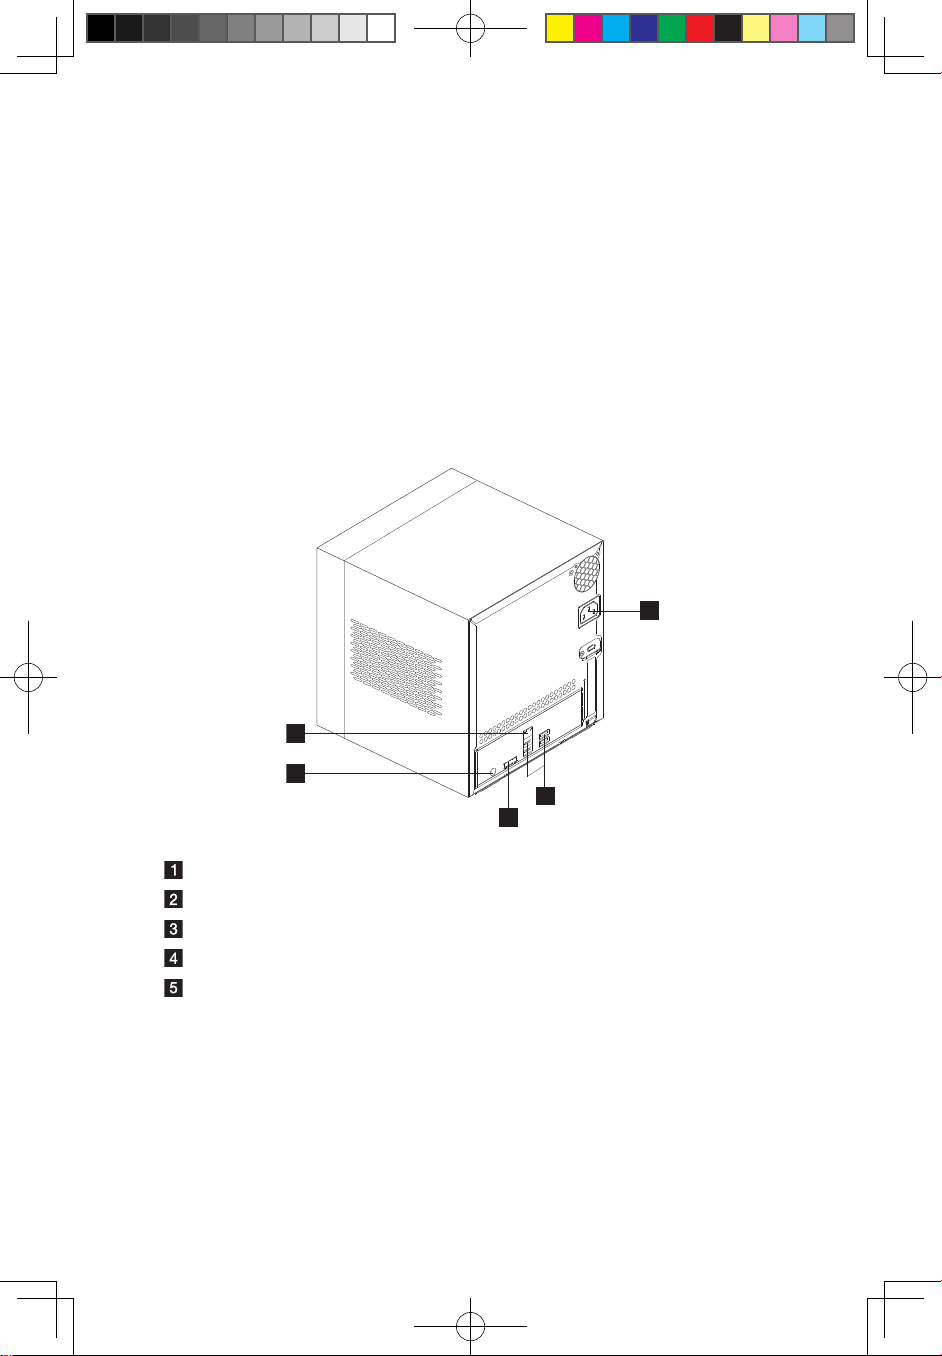
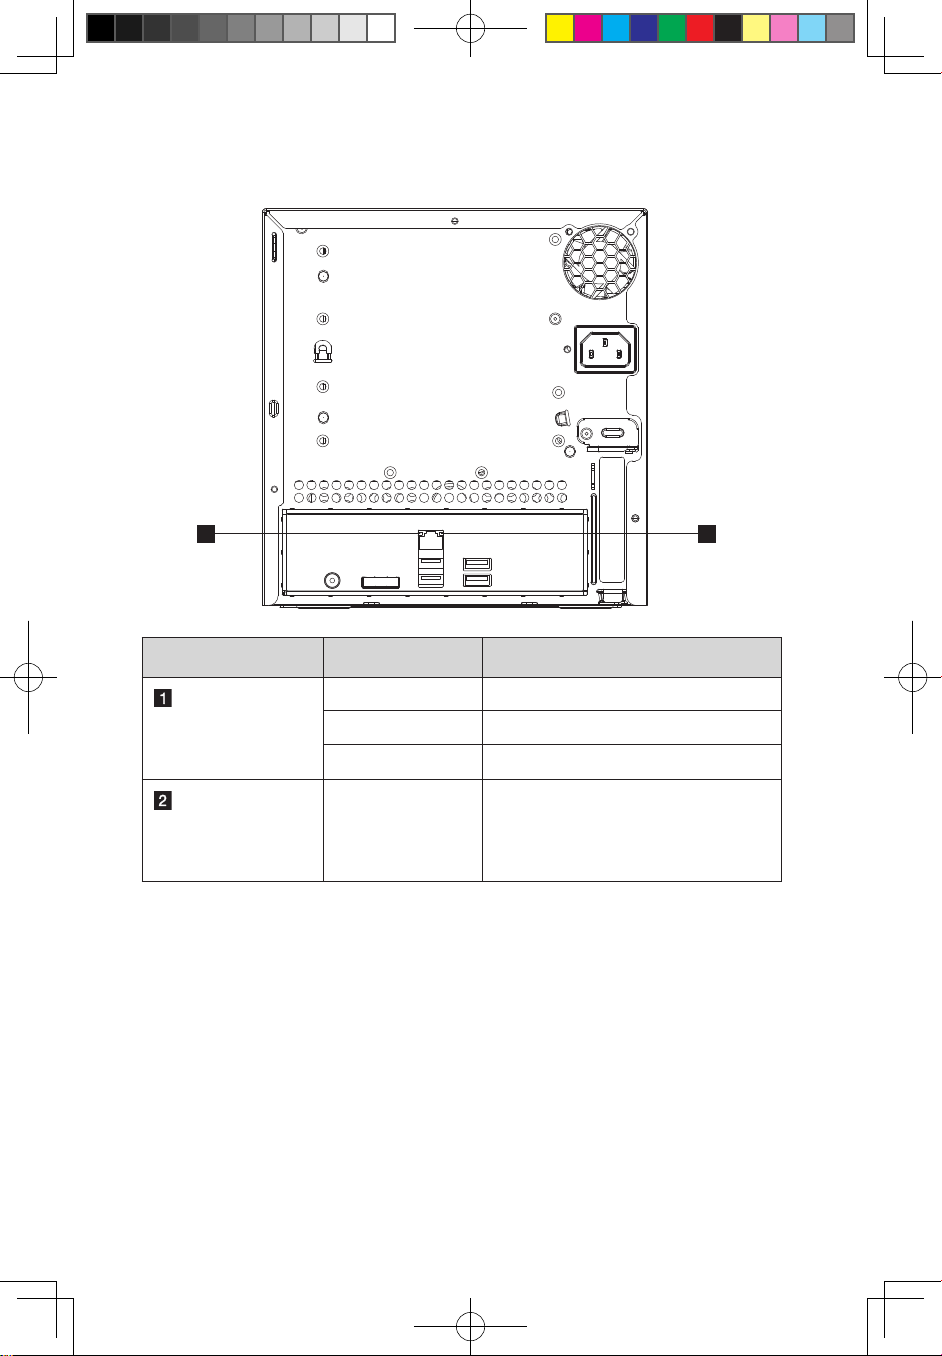
Rear view
1
2
3
4
5
Ethernet connector
Recovery/reset button
eSATA connector
USB connector
Power connector
31038690B_D400_UG_EN_V1.0.indd 9 2009.7.8 4:27:58 PM
Page 15
10
User Guide
LAN related LEDs on the rear side
1 2
LED indicator Color status Description
LAN SPEED-LED
(Rear side, RJ45)
(Dual color)
Amber ON 1000 Mbit/s
Green ON 100 Mbit/s
OFF 10 Mbit/s or Disconnected
LAN ACTIVE-LED
(Rear side, RJ45)
(Single color)
Green blink Access
31038690B_D400_UG_EN_V1.0.indd 10 2009.7.8 4:28:00 PM
Page 16
11
User Guide
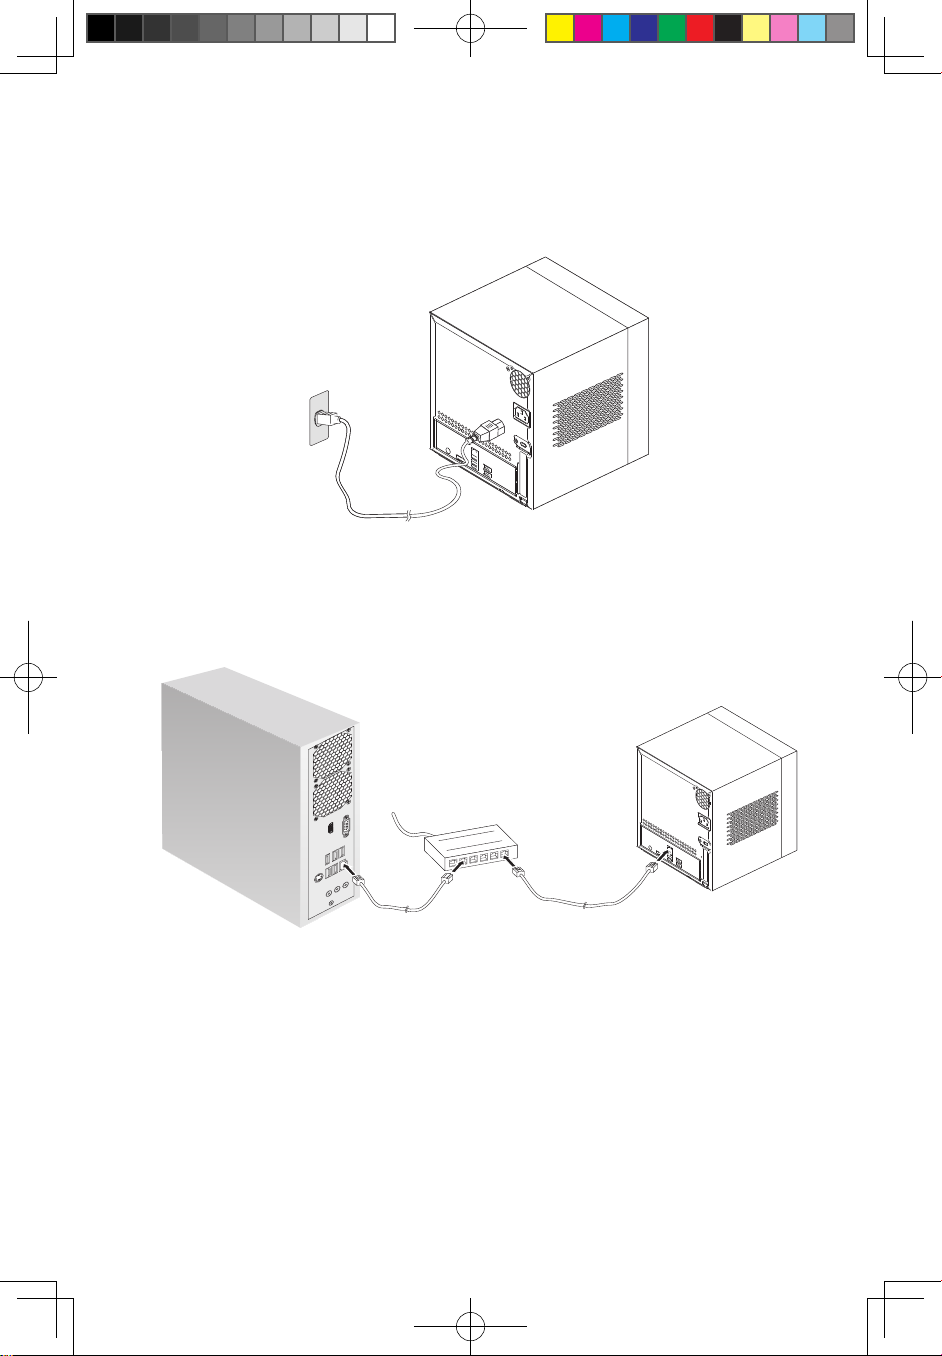
Connect the power cord
Plug the power cord into the power connector and the other end of the power
cord into an electrical outlet.
Connect to the home network
Connect one end of the Ethernet cable to the Home Server and the other end to
an available Ethernet port on your router.
Lenovo Home Server Recovery DVD
The Lenovo Home Server Recovery DVD will lead you through the steps to recover
your Windows Home Server system. You can also restore your Windows Home
Server to the original factory configuration.
31038690B_D400_UG_EN_V1.0.indd 11 2009.7.8 4:28:04 PM
Page 17

12
User Guide
Client Software Installer CD
The Client Software Installer CD will lead you through the steps to install the
Windows Home Server Connector on the computers you want to connect to your
home server. It will also install the LightsOut client utility.
Computer Restore CD
The Computer Restore CD will lead you through the steps to recover your home
computer system from a backup that is located on your home server. You need
to back up the data from your home computer before recovering the computer
system.
31038690B_D400_UG_EN_V1.0.indd 12 2009.7.8 4:28:05 PM
Page 18
13
User Guide
Installing the software
Chapter
Install the Windows Home Server Connector on the
client computer
After setting up your Home Server, you must install the Windows Home Server
Connector on your computer.
Note:
• Before installing the Windows Home Server Connector on the client
computer, make sure the HDD indicator on the front panel lights is blue.
• Prior to installing the Windows Home Server Connector, make sure you
have administrator privileges. Refer to Windows Help for more details on
changing your user account settings.
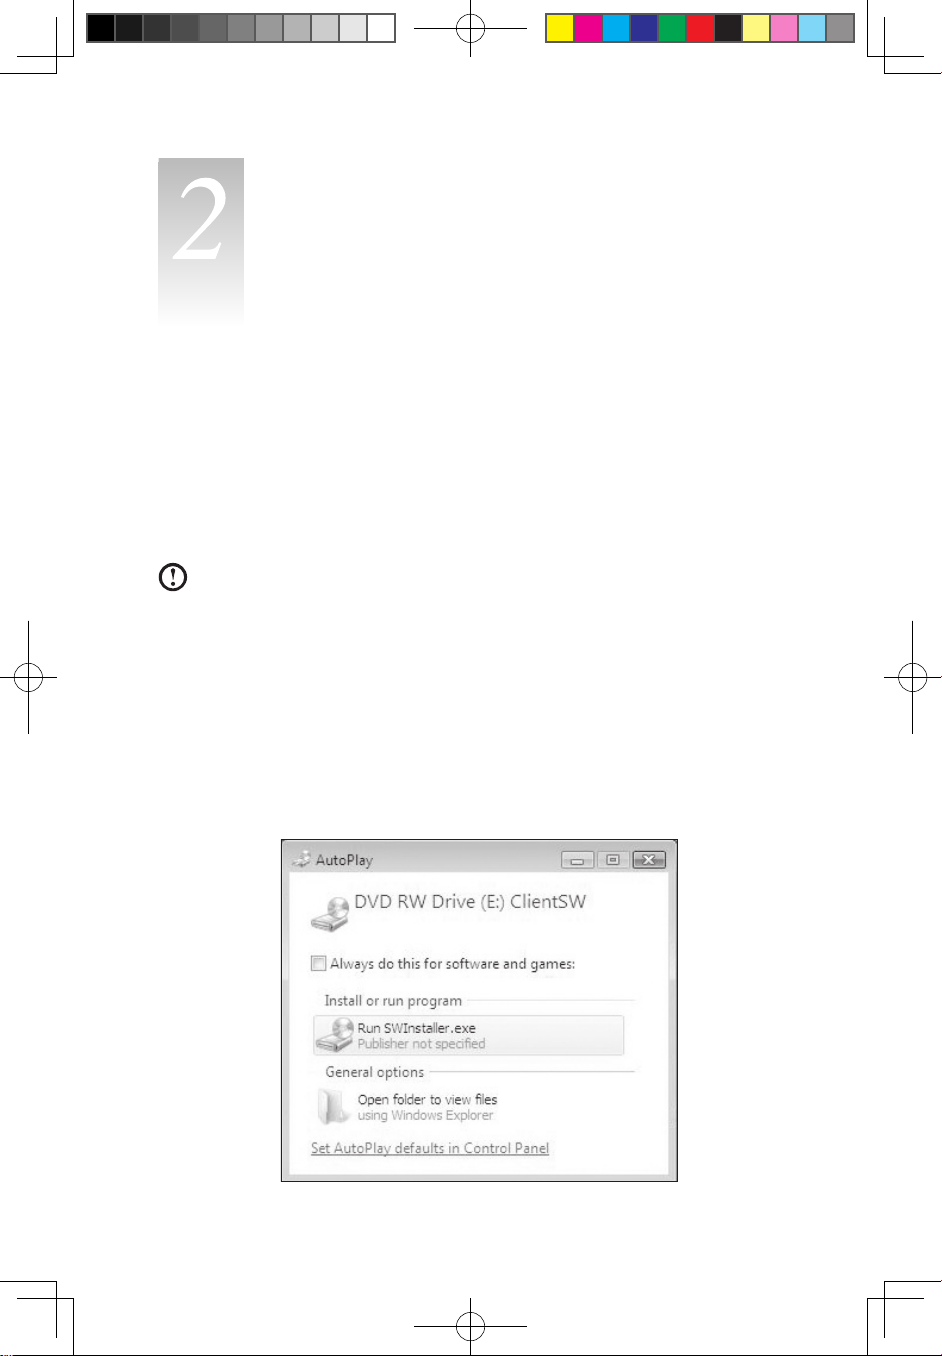
1. Place the Windows Home Server Connector
Client Software Installer
CD in the optical drive of the home computer. Single-click on the
Run SWINstaller.exe file to begin installation.
31038690B_D400_UG_EN_V1.0.indd 13 2009.7.8 4:28:05 PM
Page 19
14
User Guide
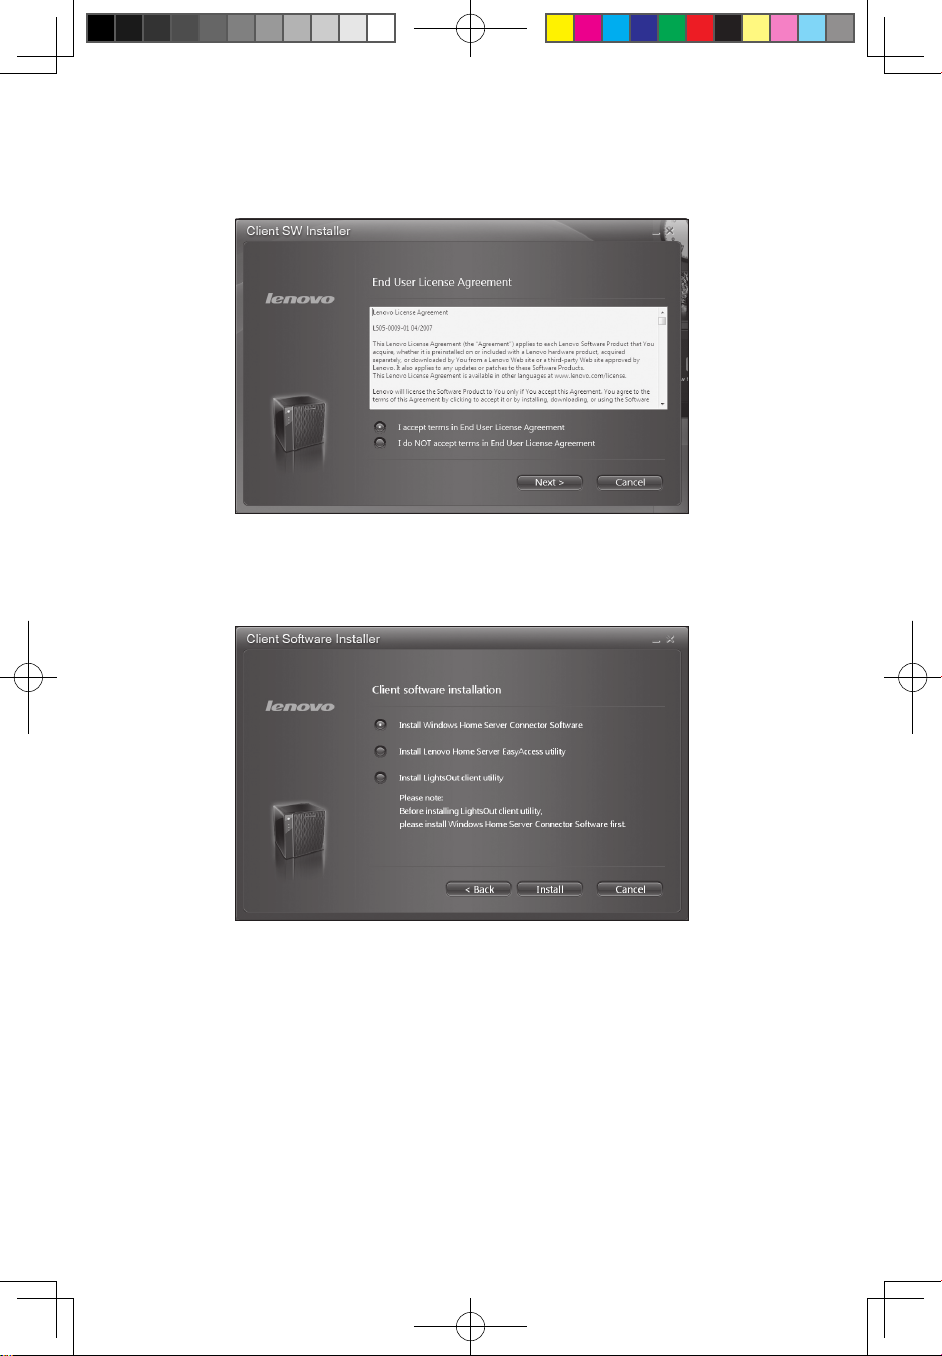
2. The End User License Agreement window appears. Select the “I accept terms
in End User license Agreement” option button, and then click Next.
3. Select the “Install Windows Home Server Connector SW” option button if you
want to install SW for the Connector.
4. Click
Install to begin the installation process.
31038690B_D400_UG_EN_V1.0.indd 14 2009.7.8 4:28:06 PM
Page 20
15
User Guide
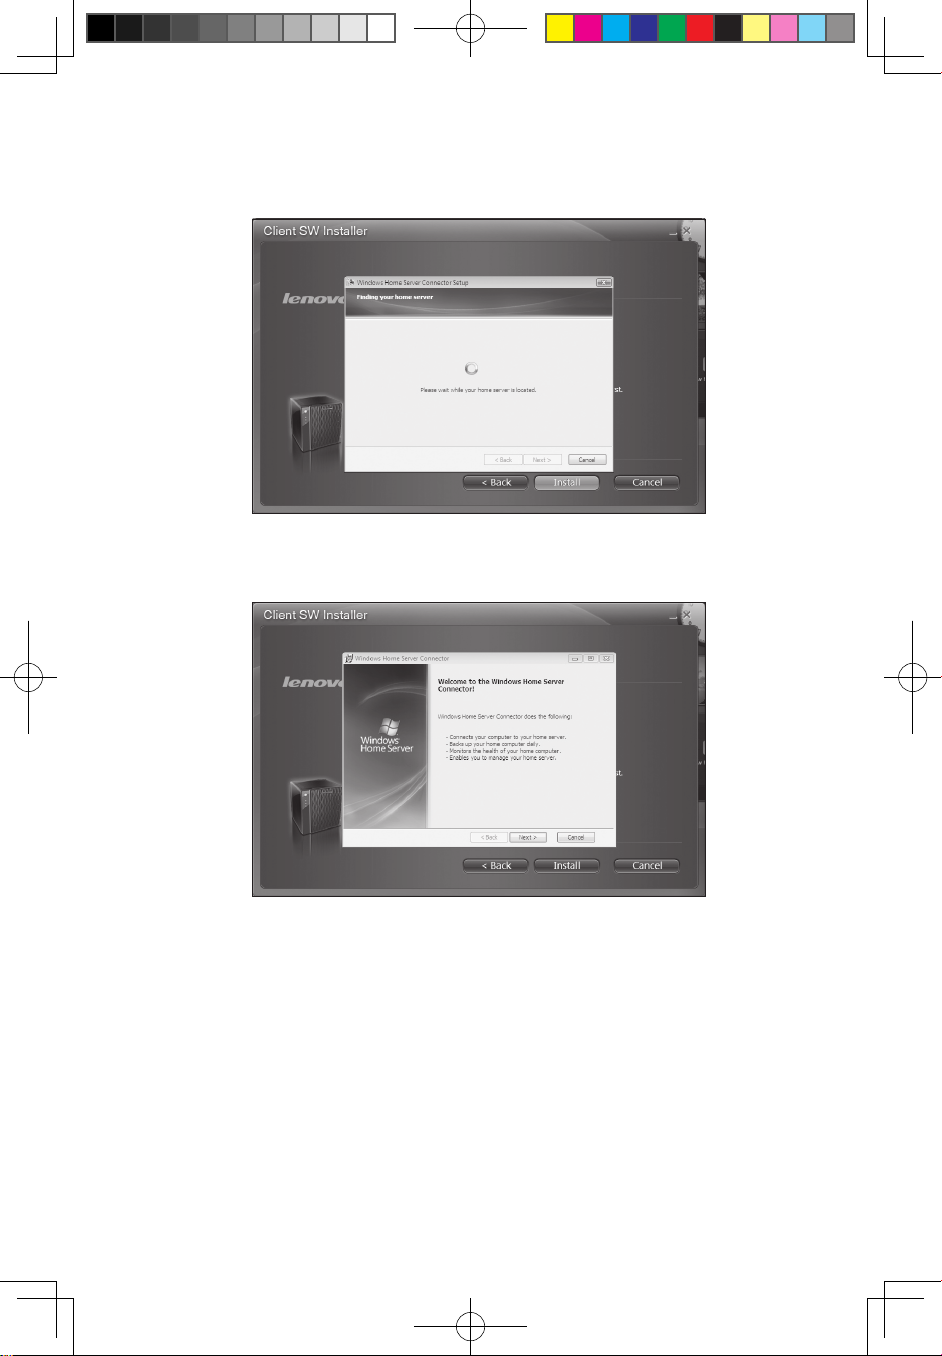
5. The Windows Home Server Connector installation starts to find and connect to
your Home Server.
6. Once the server is found, the Welcome window appears.
7. Click
Next.
31038690B_D400_UG_EN_V1.0.indd 15 2009.7.8 4:28:06 PM
Page 21

16
User Guide
8. Click Next. The Installing Windows Home Server Connector window appears.
9. Select the "Let me download and install the updates myself" option button if
you don't want to download the updates for the Connector.
10. Click
Next.
Note: Selecting the first option “Download the updates from my home
server and install them automatically” will spend a lot of time to download
the updates for the Connector and the windows appeared will be different
with below steps instruction.
11. Select the “Yes, wake up this computer if it is in sleep or hibernate mode and
back it up” option button if you want Windows Home Server to wake up your
sleeping computer to back it up.
31038690B_D400_UG_EN_V1.0.indd 16 2009.7.8 4:28:07 PM
Page 22

17
User Guide
12. Click Next.
13. Click Next to perform the initial configuration of Windows Home Server.
Note: The initial configuration of Windows Home Server is performed only
once on the home computer.
31038690B_D400_UG_EN_V1.0.indd 17 2009.7.8 4:28:07 PM
Page 23

18
User Guide
14. Click the Next arrow. The Windows Home Server initialization begins. This
process could take several hours depending on your hardware.
15. Once the initialization is complete, click the Next arrow.
16. Enter a name for your Home Server.
The name of your Home Server can contain a maximum of 15 characters
(including letters, numbers or hyphens) with no spaces.
31038690B_D400_UG_EN_V1.0.indd 18 2009.7.8 4:28:07 PM
Page 24

19
User Guide
17. Click the Next arrow.
18. Enter a strong Windows Home Server administrator password, confirmation
password, and password hint. This is the password that you can use to
manage your Home Server from the Windows Home Server Console.
The password must be at least 7 characters and must contain at least three of
the following four categories:
• Uppercase letters
• Lowercase letters
• Numbers
• Symbols (such as !, @, #, etc.)
19. Click the
Next arrow.
31038690B_D400_UG_EN_V1.0.indd 19 2009.7.8 4:28:08 PM
Page 25

20
User Guide
20. Select the “On (recommended)” option button if you want to use Windows
Update to automatically download and install updates for Windows Home
Server, and then click the Next arrow.
21. Choose if you want to participate in the Customer Experience Improvement
Program, and then click the Next arrow.
31038690B_D400_UG_EN_V1.0.indd 20 2009.7.8 4:28:08 PM
Page 26

21
User Guide
22. Choose if you want to participate in the Windows Error Reporting program, and
then click the Next arrow.
23. Click the Next arrow to automatically download and install available Windows
Home Server updates. This could take some time to complete but does not
require additional information from you.
Attention: Do not restart or turn off your Home Server during the update
process.
24. Once installation is complete the Windows Home Server windows displays.
31038690B_D400_UG_EN_V1.0.indd 21 2009.7.8 4:28:09 PM
Page 27

22
User Guide
25. Click the Next arrow. The Windows Home Server log in window displays. You
can now manage the Home Server through the remote admin console.
26. Enter the administrator password, and then click the Next arrow. The Setting
Password dialog box appears.
31038690B_D400_UG_EN_V1.0.indd 22 2009.7.8 4:28:09 PM
Page 28

23
User Guide
27. Enter the administrator password to start the hardware health and performance
monitor service, then click OK.
28. The Windows Home Server Console window appears.
The Windows Home Server icon also appears in the system task tray and the
Shared Folders desktop shortcut appears on your desktop.
The Windows Home Server icon displays the current health and status of the
Home Server as well as all the computers connected to your home network. Rightclicking on the icon allows access to the Windows Home Server.
You can also use Shared Folders to store and organize files on the Windows Home
Server.
31038690B_D400_UG_EN_V1.0.indd 23 2009.7.8 4:28:10 PM
Page 29

24
User Guide
Install the Lenovo Home Server EasyAccess utility
1. Select the “Install Lenovo Home Server EasyAccess utility” option button.
2. Click
Install to begin the installation process.
3. The Windows Home Server EasyAccess installation starts to find and connect
to your Home Server.
4. Once the server is found, the Welcome window appears.
5. Click
Next.
31038690B_D400_UG_EN_V1.0.indd 24 2009.7.8 4:28:10 PM
Page 30

25
User Guide
6. The License Agreement window appears. Select the “I accept the terms in the
license agreement” option button, and then click Next.
7. Click Next to install in this folder, or click Change to install in a different folder.
8. Select a setup type:
• Complete
All program features will be installed. (Requires the most disk space.)
• Custom
Choose which program features you want installed and where they will be
installed. Recommended for advanced users.
31038690B_D400_UG_EN_V1.0.indd 25 2009.7.8 4:28:10 PM
Page 31

26
User Guide
9. After selecting the setup type, click Next.
10. Click Install to begin the installation.
31038690B_D400_UG_EN_V1.0.indd 26 2009.7.8 4:28:11 PM
Page 32

27
User Guide
11. Wait while the InstallShield Wizard installs Lenovo Home Server EasyAccess.
This may take several minutes.
12. Once the InstallShield Wizard is completed, click Finish.
31038690B_D400_UG_EN_V1.0.indd 27 2009.7.8 4:28:11 PM
Page 33

28
User Guide
13. When the Connect to Lenovo Home Server window appears, click Connect.
14. Enter your password to connect to the Lenovo Home Server.
31038690B_D400_UG_EN_V1.0.indd 28 2009.7.8 4:28:11 PM
Page 34

29
User Guide
15. After connecting to the home server, the network drive ATPSERVER
(ADMINISTRATOR) will become visible.
16. Right-click the ATPSERVER (ADMINISTRATOR) icon and select the Start the
console option to launch the Windows Home Server Console program.
31038690B_D400_UG_EN_V1.0.indd 29 2009.7.8 4:28:12 PM
Page 35

30
User Guide
17. Right-click a file icon from Local Disk, and select Upload to ATPSERVER. You
may upload the file from your home computer to your home server through this
network drive.
Install the LightsOut client utility
1. Select the “Install LightsOut client utility” option button.
2. Click
Install to begin the installation process.
31038690B_D400_UG_EN_V1.0.indd 30 2009.7.8 4:28:12 PM
Page 36

31
User Guide
3. The InstallAware Wizard windows appears.
4. Select your preference language from the pop-up “Select Setup Language”
dialog box, and then click OK.
Note: Select the same language as the client PC system when installing
this software.
5. Once the language is selected, the Welcome window appears.
31038690B_D400_UG_EN_V1.0.indd 31 2009.7.8 4:28:12 PM
Page 37

32
User Guide
6. Click Next.
7. Wait for the installation process.
31038690B_D400_UG_EN_V1.0.indd 32 2009.7.8 4:28:13 PM
Page 38

33
User Guide
8. Click Finish.
31038690B_D400_UG_EN_V1.0.indd 33 2009.7.8 4:28:13 PM
Page 39

34
User Guide
Restoring a home computer
You can easily restore any of your home computers to a previous point in
time with a backup stored on your home server. You can do this by using the
Computer Recovery CD. This CD can be used to restore all of the files on your
home computer from a backup, including the Windows operating system and
applications.
To restore a home computer:
Important: You need the Windows Home Server administrator password to
restore a home computer.
1.Place the Computer Recovery CD in the CD drive of the computer that you
want to restore.
2. Restart the computer and boot from CD.
3. Follow the instructions in the Restore Computer Wizard to restore the hard
drives on your home computer.
Note: Your home computer must be connected to the home network
with an Ethernet network cable before you begin the restore. Wireless
connection is not supported.
If the drivers did not load or the NIC (network interface card) driver cannot be
found during computer recovery, you can click “Where can I find drivers for my
hardware?” to bring up an online help file for detailed instructions on how to find
and load drivers.
Go to http://www.microsoft.com/windows/products/winfamily/
windowshomeserver/support.mspx for more information.
Chapter
31038690B_D400_UG_EN_V1.0.indd 34 2009.7.8 4:28:13 PM
Page 40

35
User Guide
Server Recovery
Server Recovery will lead you through the steps to recover your Windows Home
Server system. You can also return your Windows Home Server to the original
factory configuration.
1. Place the Server Recovery disc in the optical drive of the home computer.
Single-click on the Run Recovery.exe file to begin the installation.
2. The Welcome window appears. Click Next.
Chapter
31038690B_D400_UG_EN_V1.0.indd 35 2009.7.8 4:28:14 PM
Page 41

36
User Guide
3. The End User License Agreement window appears. Select the “I accept terms
in End User License Agreement” option button, and then click Next.
Note: Before you proceed with Server Recovery, make sure to perform the
following steps:
(1) Remove Windows Home Server Connector software from your client computer.
(2) Turn off Windows Home Server by holding down the power button for several
seconds.
(3) Push with a sharp object into the pinhole on the back of the Windows Home
Server device, and then press the power button to boot up the system.
31038690B_D400_UG_EN_V1.0.indd 36 2009.7.8 4:28:16 PM
Page 42

37
User Guide
4. Click Next.
5. Click Next.
31038690B_D400_UG_EN_V1.0.indd 37 2009.7.8 4:28:16 PM
Page 43

38
User Guide
6. Select a Recovery mode:
• Server Recovery: (recommended)
This option will help you to recover your system from system failure.
Note: System settings and user accounts will be lost. Data recovery will be
attempted.
• Factory Reset:
Factory Reset will restore system back to the factory configuration.
Note: System settings, user accounts and data will be erased.
7. Click Next.
31038690B_D400_UG_EN_V1.0.indd 38 2009.7.8 4:28:17 PM
Page 44

39
User Guide
8. Click Next.
9. Reboot the Windows Home Server to finish the recovery process.
31038690B_D400_UG_EN_V1.0.indd 39 2009.7.8 4:28:17 PM
Page 45

40
User Guide
Chapter
Windows Home Server Console
The Windows Home Server Console is a tool that provides remote management of
your Home Server and allows you to monitor and back up computers on the home
network. It allows you to remotely administer your Home Server from anywhere
on the home network. Once logged in, you can monitor the health of your Home
Server and the connected computers on the network, create backup schedules
connected to the computers, back up computers, manage user accounts and
shared folders on the server.
Windows Home Server Console provides access to the following tabs:
• Computers and Backup
• User Accounts
• Shared Folders
• Server Storage
• LightsOut
• Network Health
To learn more about configuring Windows Home Server, click Help on the console
to open the Windows Home Server Console Help.
Or, go to http://www.microsoft.com/windowshomeserver for more information.
31038690B_D400_UG_EN_V1.0.indd 40 2009.7.8 4:28:17 PM
Page 46

41
User Guide
The Windows Home Server Console window
Computers and Backup
You can use the Computers & Backup tab on the Windows Home Server Console
to view the home computers connected to the Home Server and monitor the
health status of the home computers and administer backups. After you install
the Windows Home Server Connector on each of your home computers, they are
automatically backed up each night to your Home Server.
31038690B_D400_UG_EN_V1.0.indd 41 2009.7.8 4:28:18 PM
Page 47

42
User Guide
User Accounts
You can use the User Accounts tab on the Windows Home Server Console
to create a personal user account, enable a guest account, and maintain user
accounts on the Home Server.
Shared Folders
You can use the Shared Folders tab on the Windows Home Server Console to
add, open, remove, and view shared folders on the Home Server. With Shared
Folders you can centrally store files on your Home Server so that you can share
with other people on your home network.
31038690B_D400_UG_EN_V1.0.indd 42 2009.7.8 4:28:18 PM
Page 48

43
User Guide
Server Storage
The Server Storage tab on the Windows Home Server Console displays all the
hard drives installed on your Home Server. You can use Server Storage to view,
add, repair, and remove hard drives from the Home Server.
LightsOut
• LightsOut is a power management add-in software that allows you to set your
Home Server into suspend mode or wake the system at a chosen time with the
aid of a calendar event.
31038690B_D400_UG_EN_V1.0.indd 43 2009.7.8 4:28:19 PM
Page 49

44
User Guide
• Click Settings.
• Select “which settings should I use?” from the pop-up window to learn more
information about LightsOut.
Network Health
The Network Health tab displays health notifications from your Home Server and
your home computers. You can view the health of your entire network from one
convenient location so that you can take the necessary actions to correct any
problems.
31038690B_D400_UG_EN_V1.0.indd 44 2009.7.8 4:28:19 PM
Page 50

45
User Guide
Chapter
Settings
The Settings button on the upper right hand corner of the Windows Home Server
Console window allows you to configure your home server settings. The Settings
window provides a variety of administrative options.
In the Settings window you can configure the settings for the following categories:
• General
• Backup
• Passwords
• Media Sharing
• Remote Access
• Add-ins
• Hardware Health and Performance Monitor
• IP Configuration
• LightsOut
• Settings for iTunes Server
• Resources
For more information, refer to Windows Home Server Settings in the Windows
Home Server Console Help.
Remote Access
The Remote Access settings page helps you configure everything you need to
access the Windows Home Server home page from the Internet. To get remote
access up and running, you must turn on Web Site Connectivity, configure your
router, configure a domain name for your home server, and set the Windows Home
Server home page.
31038690B_D400_UG_EN_V1.0.indd 45 2009.7.8 4:28:19 PM
Page 51

46
User Guide
Note:
• Verifying that your router supports UPnP standards
This step verifies that your router supports the UPnP standard and that the
UPnP setting is turned on for your router. Support for the UPnP standard is
required for Windows Home Server to automatically configure your router.
• The following issues may cause this problem:
ÿ
You router is not turned on or is not connected to your network.
ÿ
The UPnP setting for your router is turned off.
ÿ
Your router does not support the UPnP standard.
• The following actions may fix this problem:
ÿ
Turn on your router and ensure your home server is connected directly
to it.
ÿ
Turn on the UPnP setting for your router.
If your router does support the UPnP standard, you can turn on the
UPnP setting. Click Configure Router to connect to the configuration
Web page for your router. For more information, see the documentation
for your router. After you turn on the UPnP setting, click Refresh on
the Router Configuration Details page to run the configuration tests
again.
ÿ
Purchase a new router that supports the UPnP standard.
You can purchase a new router if your router does not support the
UPnP standard and you do not want to manually configure your router.
31038690B_D400_UG_EN_V1.0.indd 46 2009.7.8 4:28:20 PM
Page 52

Chapter
Configuring the hard disk drive
Adding a hard disk drive
The system supports up to four 3.5-inch hot-swappable SATA hard disk drives.
Warning:
• The first hard drive, located at the bottom of the HDD bay, is not hotswappable.
• Use only hard drives provided by Lenovo.
Caution: Hard drives are formatted before they are added to the server storage.
Make sure that you back up any important files that are on the hard drive
before you add the drive to server storage. Formatting a hard drive deletes all
files on the hard drive.
1. Install the new HDD to the Home Server.
(1) Open the door of the Home Server.
31038690B_D400_UG_EN_V1.0.indd 47 2009.7.8 4:28:21 PM
Page 53

48
User Guide
(2) Remove the HDD carrier by pressing the HDD carrier latch.
(3) Pull the lever and slide the HDD carrier from the chassis.
(4) Insert the new drive into the two sides of the carrier, aligning the pins with the
HDD’s mounting holes.
31038690B_D400_UG_EN_V1.0.indd 48 2009.7.8 4:28:22 PM
Page 54

49
User Guide
(5) With the lever still extended, slide the carrier all the way into the drive bay.
Do not push the lever until it begins to close by itself.
(6) Use the lever to push the carrier until it docks into place, then close the lever.
(7) Close the door of the Home Server.
2. Add the hard drive to the server storage in the Windows Home
Server Console.
(1) Double-click the Windows Home Server icon in the system tray.
31038690B_D400_UG_EN_V1.0.indd 49 2009.7.8 4:28:23 PM
Page 55

50
User Guide
(2) Log on to the Windows Home Server Console.
(3) Click the
Server Storage tab.
(4) Select the newly installed hard drive (either internal or external), then click Add
to run the Add a Hard Drive Wizard.
(5) Click
Next.
31038690B_D400_UG_EN_V1.0.indd 50 2009.7.8 4:28:24 PM
Page 56

51
User Guide
(6) Click Next.
(7) Select from the following options:
• Add this hard drive to your server storage to increase the storage capacity
of your home server. This option gives you more space to store home
computer backups and more space for your shared folders.
• Use this hard drive to back up files that are stored on your home server. This
option allows you to back up all your home server shared folders.
(8) You can refer to the Windows Home Server Console Help for detailed
instructions.
Attention: When you add a hard drive to your server storage, you commit
it to be part of your total server-storage space. Do not disconnect the
hard drive to use it for other purposes. If you want to use the hard
drive for other purposes, you should first select the hard drive and click
Remove.
31038690B_D400_UG_EN_V1.0.indd 51 2009.7.8 4:28:25 PM
Page 57

52
User Guide
Replacing the hard disk drive
Caution: Always remove the hard drive from the Windows Home Server Console
before removing an HDD from the Home Server. You will lose all the files on the
hard drive if you physically disconnect the HDD from your Home Server without
running the Remove a Hard Drive Wizard. The system will also not be able to
find the hard drive in order to connect it again.
Attention: Do not open the rear cover of your Home Server chassis at
any time. If you are unable to resolve the problem on your own, contact
the Lenovo Customer Service.
1. Safely remove a hard drive from the Windows Home Server
Console.
(1) Double-click the Windows Home Server icon in the system tray.
(2) Log on to the Windows Home Server Console.
(3) Click the Server Storage tab.
31038690B_D400_UG_EN_V1.0.indd 52 2009.7.8 4:28:25 PM
Page 58

53
User Guide
(4) Select the hard drive you want to remove, then click Remove to run the
Remove a Hard Drive Wizard.
(5) Click Next.
(6) Click
Finish.
(7) The HDD indicator of the selected drive lights purple.
2. Remove the HDD from the Home Server.
Note: Before removing the HDD, make sure the HDD indicator on the front
panel lights is purple.
(1) Open the door of the Home Server.
31038690B_D400_UG_EN_V1.0.indd 53 2009.7.8 4:28:26 PM
Page 59

54
User Guide
(2) Remove the HDD carrier by pressing the HDD carrier latch.
(3) Pull the lever and slide the HDD carrier from the chassis.
31038690B_D400_UG_EN_V1.0.indd 54 2009.7.8 4:28:27 PM
Page 60

55
User Guide
3. Remove the HDD from the carrier.
(1) Gently pry open the left side rail , as shown.
(2) Remove the drive from the carrier
.
1
1
2
4. Install the new HDD into the carrier.
(1) Insert the new drive into the right side of the carrier, aligning the pins with the
HDD’s mounting holes .
(2) Slightly bend the left side rail and insert the pins into the HDD’s mounting holes
.
1
1
2
2
31038690B_D400_UG_EN_V1.0.indd 55 2009.7.8 4:28:28 PM
Page 61

56
User Guide
(3) With the lever still extended, slide the carrier all the way into the drive bay. Do
not push the lever until it begins to close by itself.
(4) Use the lever to push the carrier until it docks into place, then close the lever.
31038690B_D400_UG_EN_V1.0.indd 56 2009.7.8 4:28:30 PM
Page 62

57
User Guide
This chapter describes possible situations that may arise while using your Home
Server.
Note: If you are unable to resolve the problem on your own, contact the
Lenovo Customer Service.
First steps checklist
• Is there AC power available at the wall outlet?
• Are the power supplies plugged in? Check the AC cable(s) on the back of the
chassis and at the AC source.
• Are all cables correctly connected and secured?
• Are all peripheral devices installed correctly?
• Are all device drivers properly installed?
• Did you press the system power button on the front panel to turn the system on
(the power indicator should be lit)?
• Is the system power cord properly connected to the system and plugged into
an outlet for 100-127 V or 200-240 V?
If you are having problems setting up Windows Home Server, make
sure you do the following:
• Plug in and power on your Home Server.
• Connect your Home Server with a wired network connection to your broadband
router or to a switch that is connected to your broadband router.
If you are having problems setting up the Windows Home Server
Connector software on your home computers, make sure you check
the following:
• Connect your home computer to your home network (using either a wired or a
Chapter
Troubleshooting
31038690B_D400_UG_EN_V1.0.indd 57 2009.7.8 4:28:30 PM
Page 63

58
User Guide
wireless connection), and make sure the home computer is on the same logical
network as Windows Home Server.
• Make sure any firewall software on your home computer is not blocking access
to Windows Home Server.
• If your computer is part of a corporate network (for example, a corporate
laptop), check with the corporate network administrator about the IPsec policy.
This may block access from the corporate computer to Windows Home Server.
Note: Go to http://www.lenovo.com/homeserver for the software upgrade.
Post error code for the system state LED indicator
When the HDD state LED blinks in red, this indicates that the system state is error.
The post error code description is as followed.
Bit 3
○
Bit 2
○
Bit 1
○
Bit 0
○
●
The black circle indicates that the LED is blinking red.
Error code
Bit 3
○ ○ ○ ○ ○ ○
Bit 2
○ ○ ○ ● ● ●
Bit 1
○ ● ● ○ ○ ●
Bit 0
● ○ ● ○ ● ○
1 2 3 4 5 6
31038690B_D400_UG_EN_V1.0.indd 58 2009.7.8 4:28:31 PM
Page 64

59
User Guide
Error code description
1 SATA controller failure
2 USB controller failure
3 LAN controller failure
4 FAN failure
5 Memory failure
6 Boot device not found
31038690B_D400_UG_EN_V1.0.indd 59 2009.7.8 4:28:31 PM
Page 65

60
User Guide
31038690B_D400_UG_EN_V1.0.indd 60 2009.7.8 4:28:31 PM
 Loading...