

Lenovo 90MV007VGE User Manual

User Guide
IdeaCentre 3 (7L, 05)

Read this first
Before using this documentation and the product it supports, ensure that you read and understand the
following:
• Appendix A “Important safety information” on page 79
• Safety and Warranty Guide
• Setup Guide
First Edition (February 2020)
© Copyright Lenovo 2020.
LIMITED AND RESTRICTED RIGHTS NOTICE: If data or software is delivered pursuant to a General Services
Administration “GSA” contract, use, reproduction, or disclosure is subject to restrictions set forth in Contract No. GS35F-05925.

Contents
About this documentation . . . . . . . . iii
Chapter 1. Meet your computer. . . . . 1
Front . . . . . . . . . . . . . . . . . . . . 1
Rear . . . . . . . . . . . . . . . . . . . . 5
Features and specifications . . . . . . . . . . . 8
Statement on USB transfer rate . . . . . . . . 8
Chapter 2. Get started with your
computer . . . . . . . . . . . . . . . . 11
Get started with Windows 10 . . . . . . . . . 11
Windows account . . . . . . . . . . . . 11
Windows user interface . . . . . . . . . . 12
Connect to networks. . . . . . . . . . . . . 13
Connect to the wired Ethernet . . . . . . . 13
Connect to Wi-Fi networks. . . . . . . . . 13
Use Lenovo Vantage . . . . . . . . . . . . . 13
Use multimedia . . . . . . . . . . . . . . . 14
Use audio . . . . . . . . . . . . . . . 14
Chapter 3. Explore your computer . . 15
Manage power . . . . . . . . . . . . . . . 15
Set power button behaviors . . . . . . . . 15
Set the power plan . . . . . . . . . . . . 15
Transfer data . . . . . . . . . . . . . . . . 15
Connect to a Bluetooth-enabled device . . . 15
Use the optical drive . . . . . . . . . . . 16
Use a media card . . . . . . . . . . . . 16
Lock the computer . . . . . . . . . . . . . 17
Purchase accessories . . . . . . . . . . . . 18
Chapter 4. Troubleshooting,
diagnostics, and recovery . . . . . . . 19
Basic procedure for resolving computer
problems . . . . . . . . . . . . . . . . . 19
Troubleshooting . . . . . . . . . . . . . . 19
Startup problems . . . . . . . . . . . . 20
Audio problems . . . . . . . . . . . . . 21
Network problems . . . . . . . . . . . . 21
Performance problems . . . . . . . . . . 24
Storage drive problems . . . . . . . . . . 25
CD or DVD problems . . . . . . . . . . . 25
Serial connector problems. . . . . . . . . 26
Software problems. . . . . . . . . . . . 26
Recovery . . . . . . . . . . . . . . . . . 26
Restore system files and settings to an earlier
point . . . . . . . . . . . . . . . . . 27
Restore your files from a backup . . . . . . 27
Reset your computer . . . . . . . . . . . 27
Use advanced options . . . . . . . . . . 27
Windows automatic recovery. . . . . . . . 27
Create and use a recovery USB device . . . . 27
Update the device driver
. . . . . . . . . 28
Chapter 5. CRU replacement . . . . . 29
What are CRUs . . . . . . . . . . . . . . . 29
Replace a CRU . . . . . . . . . . . . . . . 30
IdeaCentre 3 07ADA05 . . . . . . . . . . 30
IdeaCentre 3 07IMB05 . . . . . . . . . . 51
Chapter 6. Help and support . . . . . 75
Self-help resources . . . . . . . . . . . . . 75
Call Lenovo . . . . . . . . . . . . . . . . 76
Before you contact Lenovo . . . . . . . . 76
Lenovo Customer Support Center . . . . . . 76
Purchase additional services. . . . . . . . . . 77
Appendix A. Important safety
information . . . . . . . . . . . . . . . 79
Appendix B. Accessibility and
ergonomic information . . . . . . . . 93
Appendix C. Supplemental
information about the Ubuntu operating
system . . . . . . . . . . . . . . . . . 97
Appendix D. Compliance
information . . . . . . . . . . . . . . . 99
Appendix E. Notices and
trademarks . . . . . . . . . . . . . . . 111
© Copyright Lenovo 2020 i

ii User Guide

About this documentation
• Illustrations in this documentation might look different from your product.
• Depending on the model, some optional accessories, features, and software programs might not be
available on your computer.
• Depending on the version of operating systems and programs, some user interface instructions might not
be applicable to your computer.
• Documentation content is subject to change without notice. Lenovo makes constant improvements on the
documentation of your computer, including this User Guide. To get the latest documentation, go to:
https://pcsupport.lenovo.com
• Microsoft® makes periodic feature changes to the Windows® operating system through Windows Update.
As a result, some information in this documentation might become outdated. Refer to Microsoft resources
for the latest information.
• This documentation applies to the following product models:
Model name
IdeaCentre 3 07ADA05 90MV, 90NT 90NT
IdeaCentre
3 07IMB05 90NB, 90NS 90NS
Machine Type (MT) Machine Type (MT) for Energy Star
© Copyright Lenovo 2020 iii

iv User Guide
Chapter 1. Meet your computer
Front
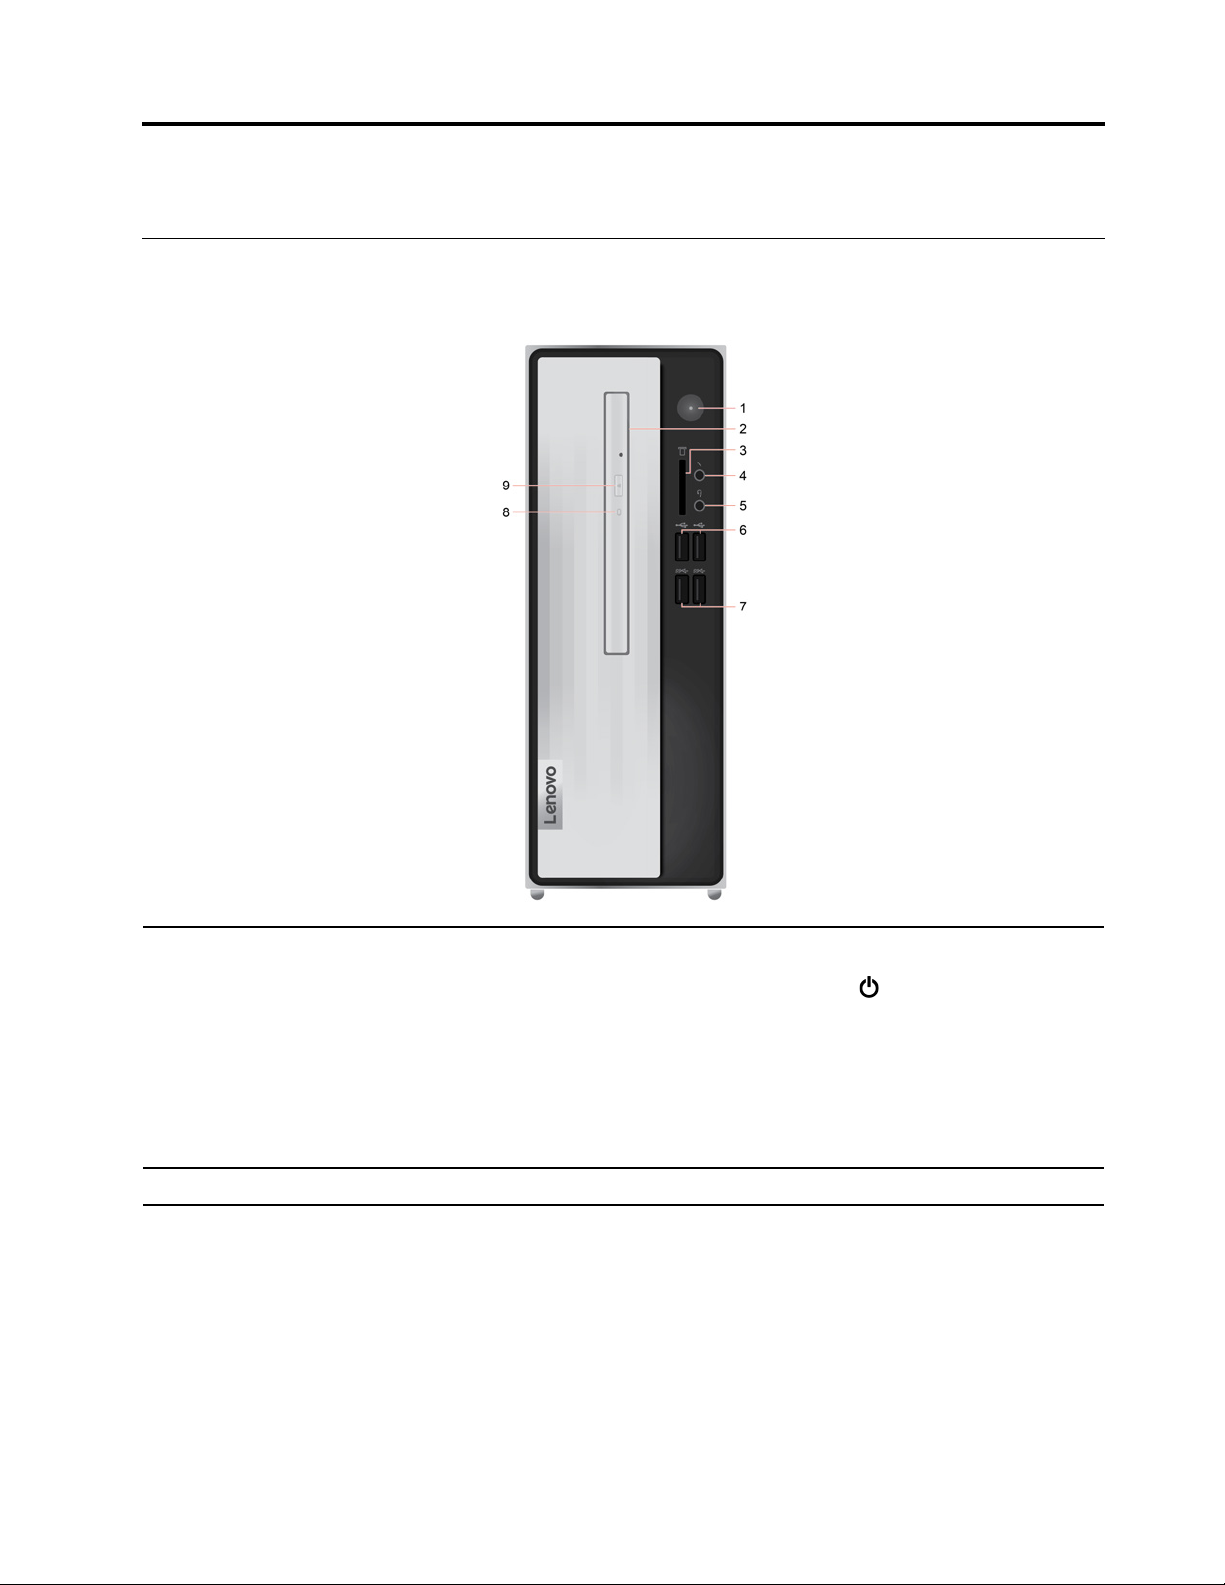
IdeaCentre 3 07ADA05
Press to turn on the computer.
To turn off the computer, open the Start menu, click
Shut down.
1. Power button
2. Optical drive* Read data from or write data to an optical disc (CD/DVD).
© Copyright Lenovo 2020 1
The indicator in the power button shows the system status of your computer.
• On: the computer is on.
• Off: the computer is off or in hibernation mode.
• Blinking: the computer is in sleep mode.
Power, and then select

Supported cards:
• Secure Digital (SD) card
• Secure Digital eXtended-Capacity (SDXC) UHS-1 card
• Secure Digital High-Capacity (SDHC) UHS-1 card
3. 7 in 1 card reader slot*
4. Microphone connector Connect a microphone.
• Multi-Media card plus
• Multi-Media card
• Memory Stick card
• Memory Stick_Pro card
Note: Your computer does not support the content protection for recordable
media (CPRM) feature for the SD card.
5. Headset connector
6. USB 2.0 connectors (2)
7. USB 3.2 connectors Gen 1 (2)
8. Optical drive activity indicator* This indicator is on when the optical drive is in use.
9. Optical drive eject/close
button*
Connect a headset or headphones to your computer.
Connect USB-compatible devices, such as a USB keyboard, USB mouse, USB
storage device, or USB printer.
Connect USB-compatible devices, such as a USB keyboard, USB mouse, USB
storage device, or USB printer.
Eject or close the optical drive tray.
* for selected models
2
User Guide
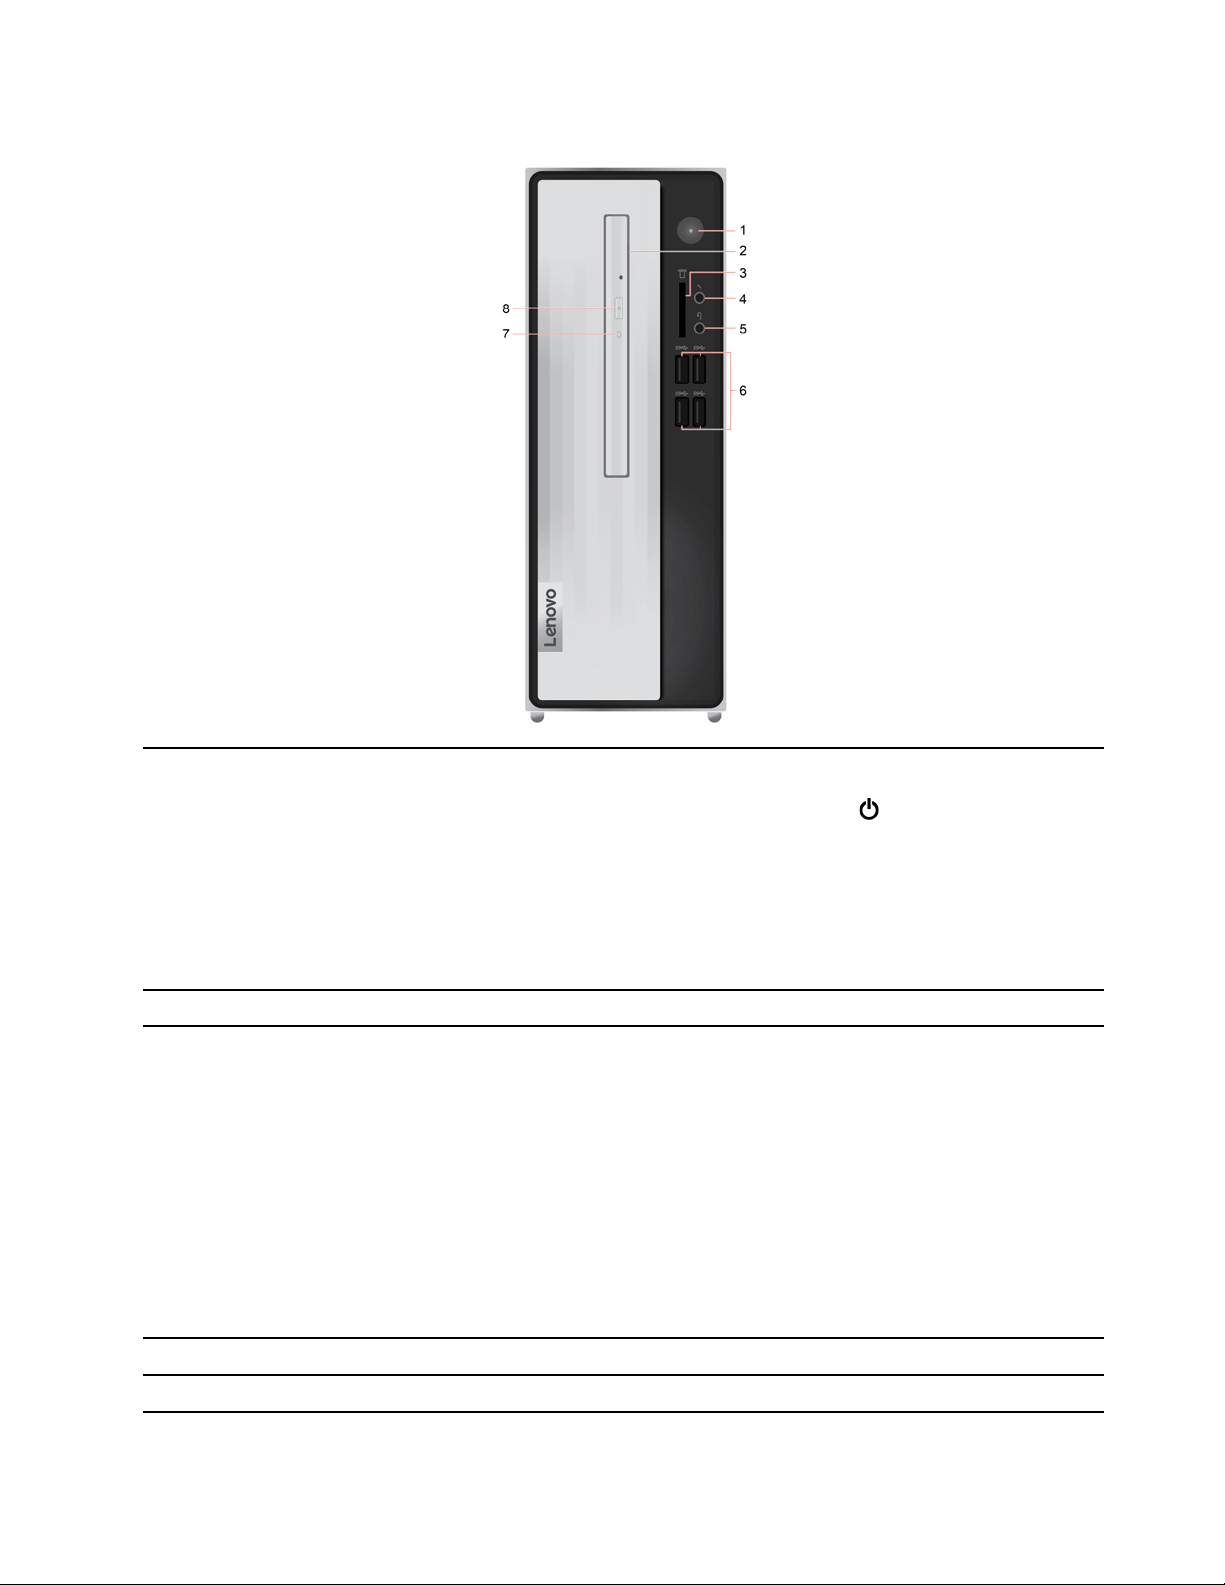
IdeaCentre 3 07IMB05
Press to turn on the computer.
To turn off the computer, open the Start menu, click
Shut down.
1. Power button
2. Optical drive* Read data from or write data to an optical disc (CD/DVD).
3. 7 in 1 card reader slot*
The indicator in the power button shows the system status of your computer.
• On: the computer is on.
• Off: the computer is off or in hibernation mode.
• Blinking: the computer is in sleep mode.
Supported cards:
• Secure Digital (SD) card
• Secure Digital eXtended-Capacity (SDXC) UHS-1 card
• Secure Digital High-Capacity (SDHC) UHS-1 card
• Multi-Media card plus
• Multi-Media card
• Memory Stick card
• Memory Stick_Pro card
Note: Your computer does not support the content protection for recordable
media (CPRM) feature for the SD card.
Power, and then select
4. Microphone connector Connect a microphone.
5. Headset connector
Connect a headset or headphones to your computer.
Chapter 1. Meet your computer 3

6. USB 3.2 connectors Gen 1 (4)
7. Optical drive activity indicator* This indicator is on when the optical drive is in use.
Connect USB-compatible devices, such as a USB keyboard, USB mouse, USB
storage device, or USB printer.
8. Optical drive eject/close
button*
* for selected models
Eject or close the optical drive tray.
4
User Guide
Rear
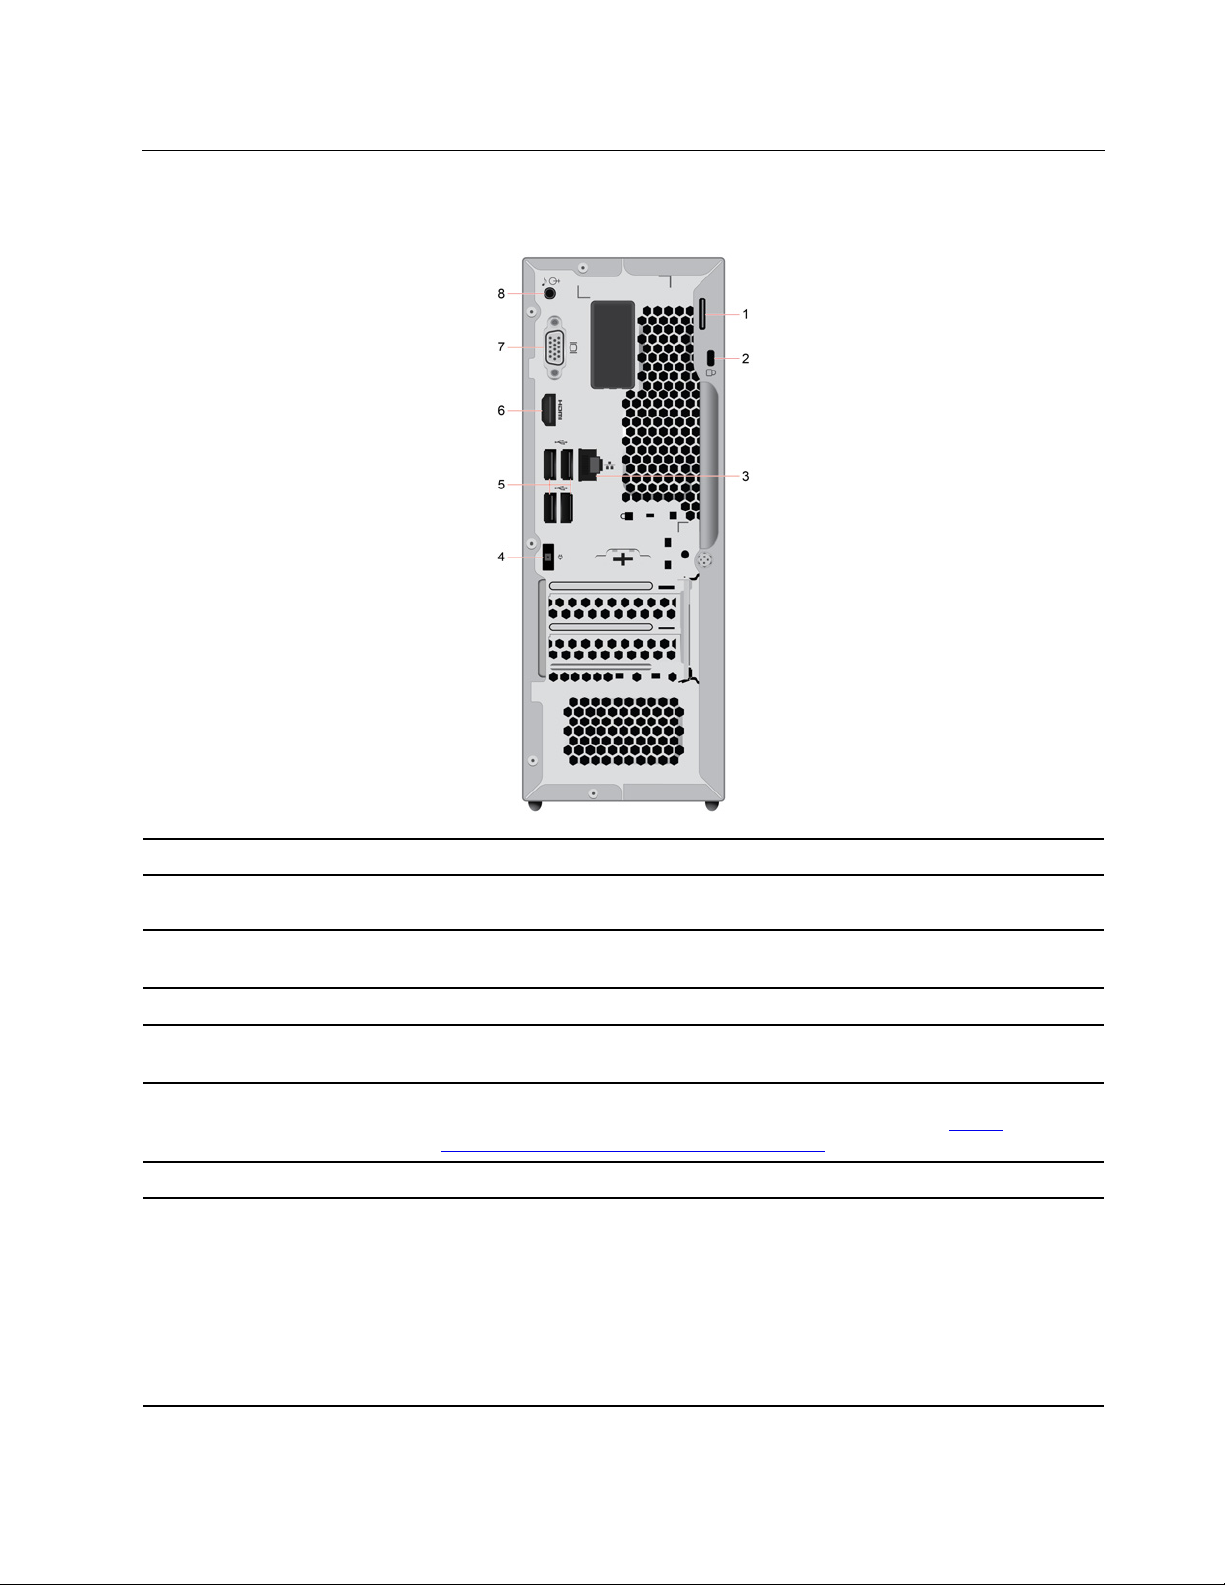
IdeaCentre 3 07ADA05
1. Padlock loop Lock the computer cover through a padlock.
2. Security-lock slot
3. Ethernet connector
4. Power adapter connector Connect the power adapter to your computer for power supply.
5. USB 2.0 connectors (4)
6. HDMI™ 1.4 out connector
7. VGA-out connector
8. Audio line-out connector
Lock your computer to a desk, table, or other fixtures through a Kensington-style
cable lock.
Connect to a local area network (LAN). When the indicator is on, the computer is
connected to a LAN. When the indicator is blinking, data is being transferred.
Connect USB-compatible devices, such as a USB keyboard, USB mouse, USB
storage device, or USB printer.
Send audio and video signals from the computer to another audio or video device,
such as a high-performance monitor. For more information, see
www.hdmi.org/manufacturer/hdmi_1_4/index.aspx
Send video signals from the computer to another video device, such as a monitor.
Send audio signals from the computer to external devices, such as powered
stereo speakers, headphones, or multimedia keyboards. To connect a stereo
system or other external recording device, connect a cable between the audio
line-in connector of the device and the audio line-out connector of the computer.
Note: If your computer has both an audio line-out connector and a headset or
headphone connector, always use the headset or headphone connector for
earphones, headphones, or a headset. The headphone connector does not
support headset microphones.
.
https://
Chapter 1. Meet your computer 5
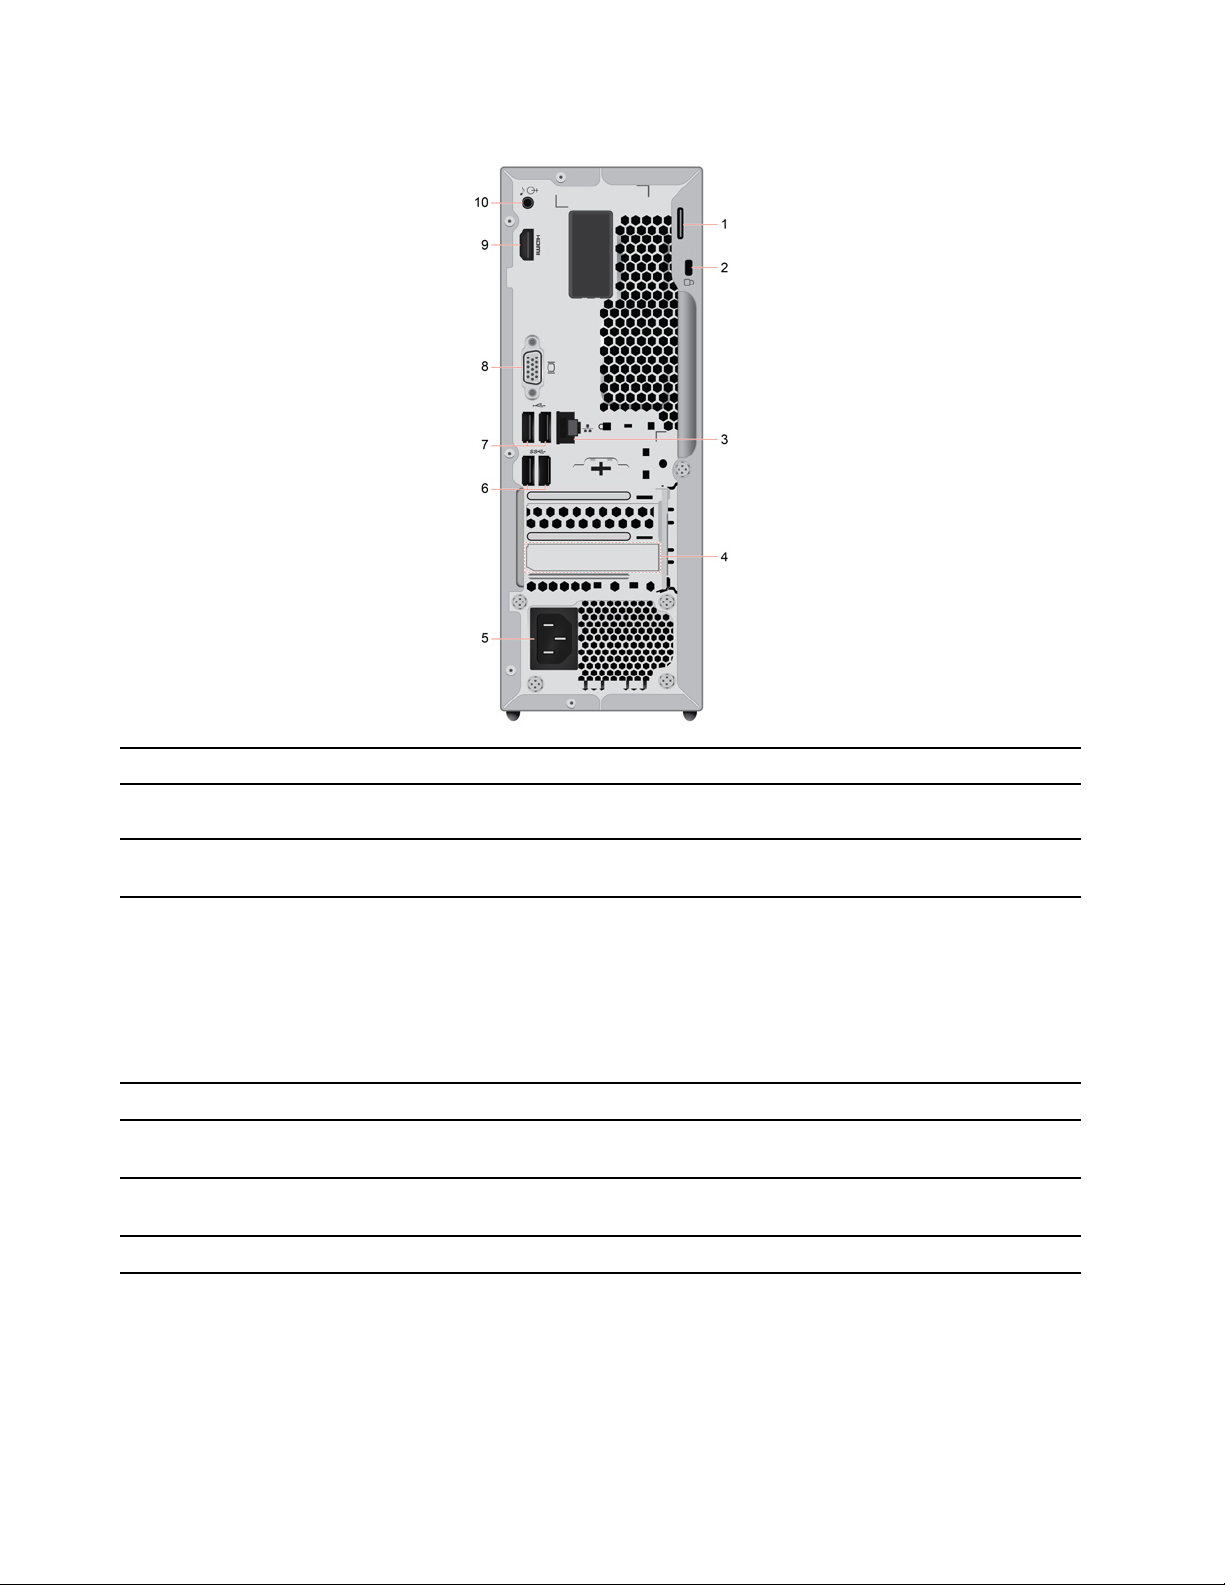
IdeaCentre 3 07IMB05
1. Padlock loop Lock the computer cover through a padlock.
2. Security-lock slot
3. Ethernet connector
4. PCI-Express card area*
5. Power cord connector
6. USB 3.2 connectors Gen 1 (2)
7. USB 2.0 connectors (2)
8. VGA-out connector
Lock your computer to a desk, table, or other fixtures through a Kensington-style
cable lock.
Connect to a local area network (LAN). When the indicator is on, the computer is
connected to a LAN. When the indicator is blinking, data is being transferred.
Install PCI-Express card into this area to improve the operating performance of
the computer. Depending on the computer model, the connectors in this area
vary.
Note: A discrete graphics card can be installed in the appropriate Peripheral
Component Interconnect Express (PCIe) card slot. If such a card is installed, be
sure to use the connectors on the card instead of the corresponding connectors
on the computer.
Connect the power cord to your computer for power supply.
Connect USB-compatible devices, such as a USB keyboard, USB mouse, USB
storage device, or USB printer.
Connect USB-compatible devices, such as a USB keyboard, USB mouse, USB
storage device, or USB printer.
Send video signals from the computer to another video device, such as a monitor.
6 User Guide

9. HDMI™ 1.4 out connector
10. Audio line-out connector
* for selected models
Send audio and video signals from the computer to another audio or video device,
such as a high-performance monitor. For more information, see
www.hdmi.org/manufacturer/hdmi_1_4/index.aspx
.
https://
Send audio signals from the computer to external devices, such as powered
stereo speakers, headphones, or multimedia keyboards. To connect a stereo
system or other external recording device, connect a cable between the audio
line-in connector of the device and the audio line-out connector of the computer.
Note: If your computer has both an audio line-out connector and a headset or
headphone connector, always use the headset or headphone connector for
earphones, headphones, or a headset. The headphone connector does not
support headset microphones.
Chapter 1. Meet your computer 7

Features and specifications
1. Right-click the Start button to open the Start context menu.
Hardware configuration
2. Click Device Manager. Type the administrator password or provide
confirmation if prompted.
ac power adapter
Power supply
Adaptability for power supply
Microprocessor
Memory
Storage device
IdeaCentre 3 07ADA05 model
• 90 W
IdeaCentre 3 07IMB05 model
• 180 W
• 260 W
• Mainland China: 220 V±22 V, 50 Hz±1 Hz
• Adaptive voltage positioning: 90 V to 264 V, 50/60 Hz
To view the microprocessor information of your computer, right-click the Start
button and then click System.
• IdeaCentre 3 07ADA05 model
– Double data rate 4 (DDR4) small outline dual in-line memory module
(SODIMM)
• IdeaCentre 3 07IMB05 model
– Double data rate 4 (DDR4) unbuffered dual in-line memory module (UDIMM)
To view the storage drive capacity of your computer, right-click the Start button
to open the Start context menu and then click Disk Management.
Note: The storage drive capacity indicated by the system is less than the nominal
capacity.
• 7 in 1 card reader slot*
Expansion
Network features
• Memory slots
• Optical drive*
• Bluetooth
• Ethernet LAN
• Wireless LAN
* for selected models
Statement on USB transfer rate
Depending on many factors such as the processing capability of the host and peripheral devices, file
attributes, and other factors related to system configuration and operating environments, the actual transfer
rate using the various USB connectors on this device will vary and will be slower than the data rate listed
below for each corresponding device.
8
User Guide

USB device Data rate (Gbit/s)
3.1 Gen 1/3.2 Gen 1
Gen 2/3.2 Gen 2
3.1
Gen 2 × 2
3.2
5
10
20
Chapter 1. Meet your computer 9

10 User Guide

Chapter 2. Get started with your computer
Get started with Windows 10
Learn the basics of Windows 10 and start working with it right away. For more information about Windows
10, see the Windows help information.
Windows account
A user account is required to use the Windows operating system. It can either be a Windows user account or
a Microsoft account.
Windows user account
When you start Windows for the first time, you are prompted to create a Windows user account. This first
account you created is of the “Administrator” type. With an Administrator account, you can create additional
user accounts or change account types by doing the following:
1. Open the Start menu and select Settings ➙ Accounts ➙ Family & other users.
2. Follow the on-screen instructions.
Microsoft account
You can also log in to the Windows operating system with a Microsoft account.
To create a Microsoft account, go to the Microsoft sign-up page at
screen instructions.
With a Microsoft account, you can:
• Enjoy one-time signing in if you are using other Microsoft services, such as OneDrive, Skype, and Outlook.
com.
• Sync personalized settings across other Windows-based devices.
https://signup.live.com and follow the on-
© Copyright Lenovo 2020 11
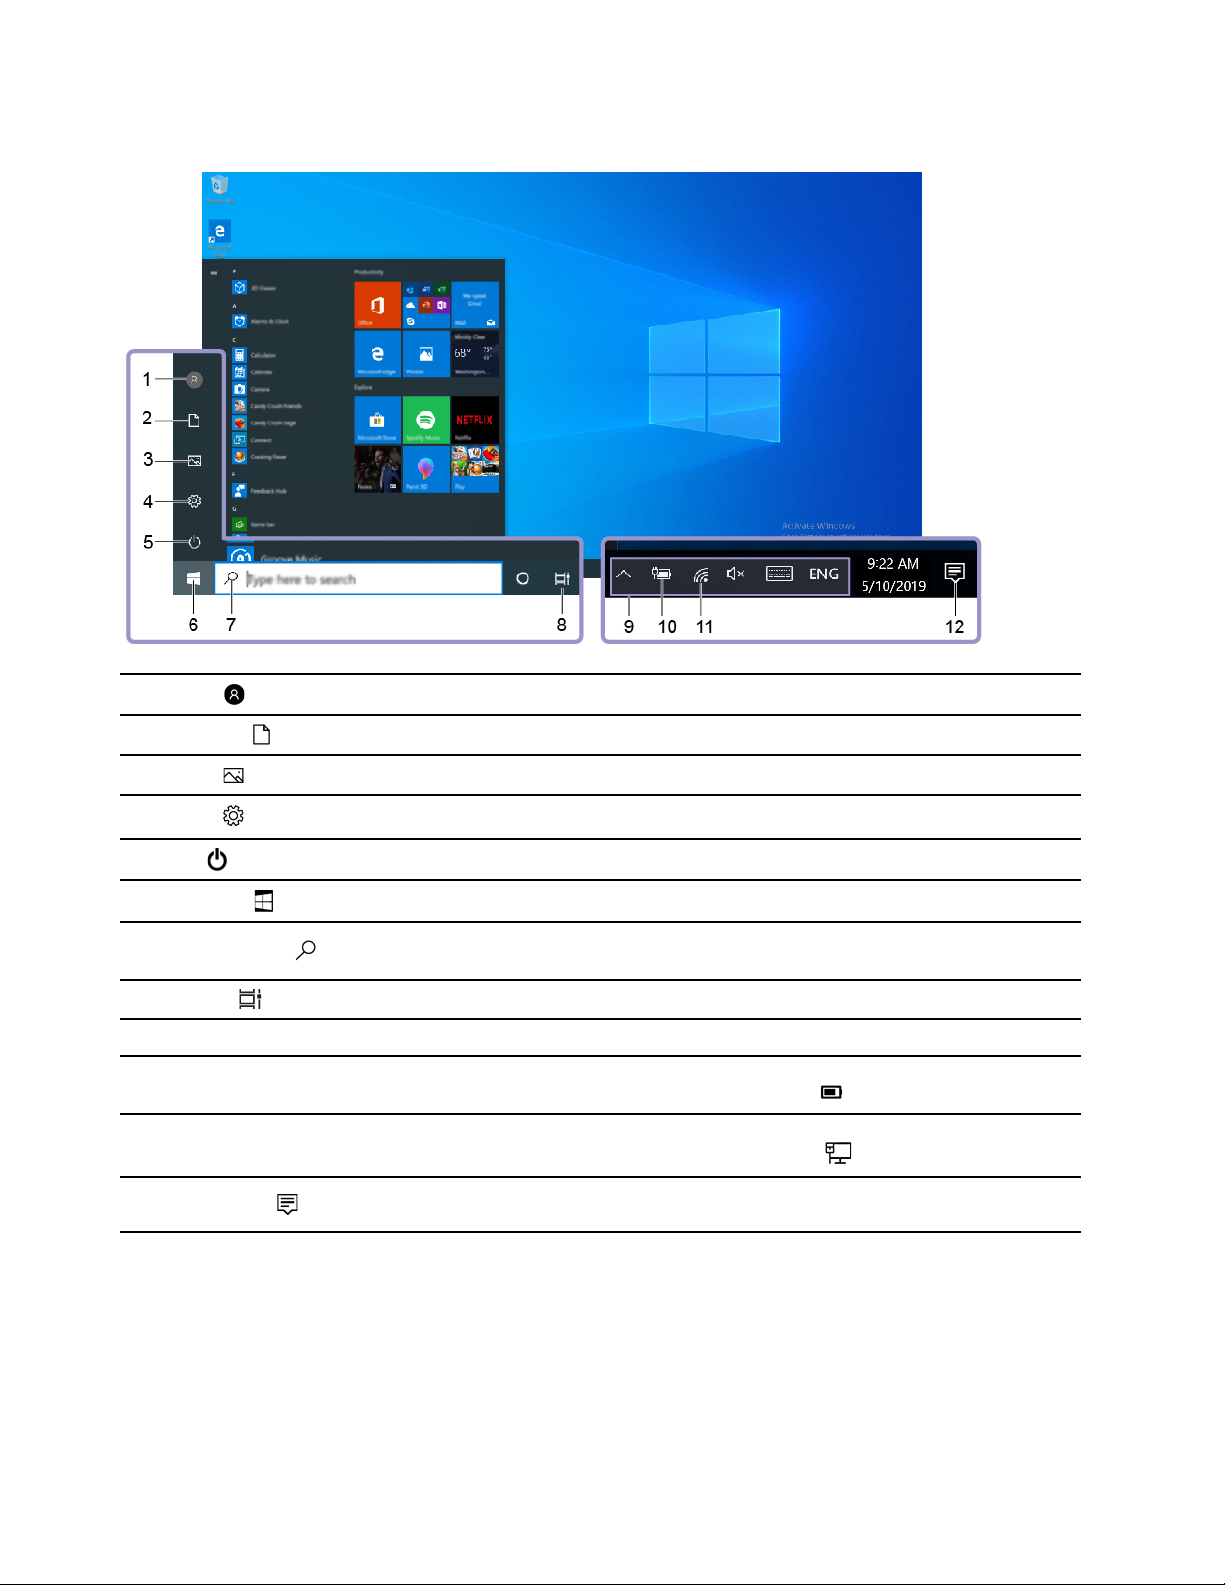
Windows user interface
1. Account
2. Documents
3. Pictures
4. Settings
5. Power
6. Start button
7. Windows Search
8. Task View
9. Windows notification area
10. Battery status icon
11. Network icon
12. Action center
Change account settings, lock the computer, or sign out from the current account.
Open the Documents folder, a default folder to save your received files.
Open the Pictures folder, a default folder to save your received pictures.
Launch Settings.
Shut down, restart, or put the computer into sleep mode.
Open the Start menu.
Type what you are looking for in the search box and get search results from your
computer and the Web.
Display all opened apps and switch among them.
Display notifications and status of some features.
Display power status and change battery or power settings. When your computer
is not connected to ac power, the icon changes to
Connect to an available wireless network and display the network status. When
connected to a wired network, the icon changes to
Display the latest notifications from apps and provide quick access to some
features.
Open the Start menu
• Click the Start button.
• Press the Windows logo key on the keyboard.
.
.
Open the Start context menu
Right-click the Start button.
12
User Guide

Access Control Panel
• Open the Start menu and click Windows System ➙ Control Panel.
• Use Windows Search.
Launch an app
• Open the Start menu and select the app you want to launch.
• Use Windows Search.
Connect to networks
Your computer helps you connect to the world through a wired or wireless network.
Connect to the wired Ethernet
Connect your computer to a local network through the Ethernet connector on your computer with an
Ethernet cable.
Connect to Wi-Fi networks
1. Click the network icon in the Windows notification area. A list of available wireless networks is displayed.
2. Select a network available for connection. Provide required information, if needed.
Use Lenovo Vantage
The preinstalled Lenovo Vantage is a customized one-stop solution to help you maintain your computer with
automated updates and fixes, configure hardware settings, and get personalized support.
Access Lenovo Vantage
Open the Start menu and click Lenovo Vantage
To download the latest version of Lenovo Vantage, go to Microsoft Store and search by the app name.
Key features
Lenovo Vantage enables you to:
• Know the device status easily and customize device settings.
• Download and install UEFI BIOS, firmware and driver updates to keep your computer up-to-date.
• Monitor your computer health, and secure your computer against outside threats.
• Look up warranty status (online).
• Access User Guide and helpful articles.
. You also can type Lenovo Vantage in the search box.
Notes:
• The available features vary depending on the computer model.
• Lenovo Vantage makes periodic updates of the features to keep improving your experience with your
computer. The description of features might be different from that on your actual user interface.
Chapter 2. Get started with your computer 13

Use multimedia
Use your computer for business or entertainment with the devices (such as a camera, a monitor, or
speakers).
Use audio
To enhance the audio experience, connect speakers, headphones, or a headset to the audio connector.
Adjust the volume
1. Click the volume icon in the Windows notification area on the taskbar.
2. Follow the on-screen instructions to adjust the volume. Click the speaker icon to mute the audio.
Change the sound settings
1. Go to Control Panel and view by category.
2. Click Hardware and Sound ➙ Sound.
3. Change the settings as you prefer.
14
User Guide

Chapter 3. Explore your computer
Manage power
Use the information in this section to achieve the best balance between performance and power efficiency.
Set power button behaviors
You can define what the power button does according to your preference. For example, by pressing the
power button, you can turn off the computer or put the computer to sleep or hibernation mode.
To change what the power button does:
1. Go to Control Panel and view by large icons or small icons.
2. Click Power Options ➙ Choose what the power buttons do.
3. Change the settings as you prefer.
Set the power plan
For ENERGY STAR® compliant computers, the following power plan takes effect when your computers have
been idle for a specified duration:
Table 1. Default power plan (when plugged into ac power)
• Turn off the display: After 10 minutes
• Put the computer to sleep: After 25 minutes
To awaken the computer from Sleep mode, press any key on your keyboard.
To reset the power plan to achieve the best balance between performance and power saving:
1. Go to Control Panel and view by large icons or small icons.
2. Click Power Options, and then choose or customize a power plan of your preference.
Transfer data
Quickly share your files using the built-in Bluetooth technology among devices with the same features. You
also can install a disc or media card to transfer data.
Connect to a Bluetooth-enabled device
You can connect all types of Bluetooth-enabled devices to your computer, such as a keyboard, a mouse, a
smartphone, or speakers. To ensure that the connection is successful, place the devices 10 meters (33 feet),
at most, from the computer.
1. Turn on Bluetooth on the computer.
a. Open the Start menu, and then click Settings ➙ Devices ➙ Bluetooth & other devices.
b. Turn on the Bluetooth switch.
2. Click Add Bluetooth or other device ➙ Bluetooth.
3. Select a Bluetooth device, and then follow the on-screen instructions.
© Copyright Lenovo 2020 15

Your Bluetooth device and computer will automatically connect the next time if the two devices are in range
of each other with Bluetooth turned on. You can use Bluetooth for data transfer or remote control and
communication.
Use the optical drive
If your computer has an optical drive, read the following information.
Know the type of your optical drive
1. Right-click the Start button to open the Start context menu.
2. Click Device Manager. Type the administrator password or provide confirmation, if prompted.
Install or remove a disc
1. With the computer on, press the eject/close button on the optical drive. The tray slides out of the drive.
2. Insert a disc into the tray or remove a disc from the tray, and then press the eject/close button again to
close the tray.
Note: If the tray does not slide out of the drive when you press the eject/close button, turn off the computer.
Then, insert a straightened paper clip into the emergency-eject hole adjacent to the eject/close button. Use
the emergency eject only in an emergency.
Record a disc
1. Insert a recordable disc into the optical drive that supports recording.
2. Do one of the following:
• Open the Start menu, and then click Settings ➙ Devices ➙ AutoPlay. Select or turn on Use
AutoPlay for all media and devices.
• Open Windows Media Player.
• Double-click the ISO file.
3. Follow the on-screen instructions.
Use a media card
If your computer has a 7 in 1 card reader slot, read the following information.
Install a media card
1. Locate the 7 in 1 card reader slot.
2. Ensure that the metal contacts on the card are facing the ones in the card slot. Insert the card firmly into
the card slot until it is secured in place.
Remove a media card
Attention: Before removing a media card, eject the card from the Windows operating system first.
Otherwise, data on the card might get corrupted or lost.
1. Click the triangular icon in the Windows notification area to show hidden icons. Then, right-click the
Safely Remove Hardware and Eject Media icon.
2. Select the corresponding item to eject the card from the Windows operating system.
3. Press the card and remove it from your computer. Store the card safely for future use.
16
User Guide

Lock the computer
Note: You are responsible for evaluating, selecting, and implementing the locking device and security
feature. Lenovo makes no comments, judgments, or warranties about the function, quality, or performance
of the locking device and security feature. You can purchase computer locks from Lenovo.
Padlock
Locking the computer cover through a padlock prevents unauthorized access to the inside of your computer.
Kensington-style cable lock
Lock your computer to a desk, table, or other fixtures through a Kensington-style cable lock.
Chapter 3. Explore your computer 17

Purchase accessories
Lenovo has a number of hardware accessories and upgrades to help expand the capabilities of your
computer. Options include memory modules, storage devices, network cards, power adapters, keyboards,
mice, and more.
To shop at Lenovo, go to
https://www.lenovo.com/accessories.
18
User Guide

Chapter 4. Troubleshooting, diagnostics, and recovery
This chapter provides solutions to resolve computer problems. Use the basic procedure as a starting point
for resolving computer problems.
Basic procedure for resolving computer problems
Prerequisite
Before you start, read Appendix A “Important safety information” on page 79 and print the following
instructions.
1. Check that:
a. The cables for all connected devices are connected correctly and securely.
b. All components have been reassembled correctly.
c. All connected devices that require ac power are connected to properly grounded and working
electrical outlets.
d. All connected devices are enabled in UEFI BIOS.
2. Use an antivirus program to see if the computer has been infected by a virus. If the program detects a
virus, remove the virus.
3. Go to “Troubleshooting” on page 19 and follow the instructions for the type of problem you are
experiencing.
4. Recover your operating system. See “Recovery” on page 26.
5. If the problem persists, contact Lenovo. See Chapter 6 “Help and support” on page 75.
Troubleshooting
Use the troubleshooting information to find solutions to problems that have definite symptoms.
© Copyright Lenovo 2020 19

Startup problems
Problem Solution
The
computer does not start up when you
press the power button.
The operating system does not start up from
the correct storage drive or fails to start up
The computer beeps multiple times before
the operating system starts up.
• Ensure
• If the computer has a secondary power switch on the rear of the
• The power indicator on the front of the computer is on.
• The computer voltage matches the voltage available at the
• Ensure that all storage drive signal cables and power cables are
• Ensure that the storage drive the computer starts up from is listed
• In
• If
Ensure that no keys are stuck.
that the power cord is correctly connected to the rear of the
computer and to a working electrical outlet.
computer, ensure that it is switched on.
electrical outlet for your country or region.
connected correctly.
as the first startup device in UEFI BIOS.
rare cases, the storage drive with the operating system might get
corrupted or damaged. In such cases, you might need to replace
the storage drive.
the computer is installed with an Optane memory:
– Ensure that the Optane memory is not removed.
– Ensure that the Optane memory is not damaged. Check the
Optane memory using diagnostic tools.
20 User Guide

Audio problems
Problem Solution
• If you are using powered external speakers that have an On/Off
control, ensure that:
– The On/Off control is set to the On position.
– The speaker power cable is connected to a properly grounded,
• If your external speakers have a volume control, ensure that the
volume is not set too low.
• Click the volume icon in the Windows notification area on the
taskbar. Check the speaker and volume settings. Do not mute the
speaker or set the volume at a very low level.
• If your computer has a front audio panel, ensure that the volume is
not set too low.
The
audio cannot be heard on the Windows
operating system.
• Ensure that your external speakers (and headphones, if used) are
connected to the correct audio connector on the computer. Most
speaker cables are color-coded to match the audio connector.
Note: When external-speaker or headphone cables are connected
to the audio connector, the internal speaker, if present, is disabled.
In most cases, if an audio adapter is installed in one of the
expansion slots, the audio function built into the system board is
disabled. Therefore, you must use the audio connectors on the
audio adapter.
• Ensure that the program you are running is designed for use in the
Microsoft Windows operating system. If the program is designed to
run in DOS, the program does not use the Windows sound feature.
The program must be configured to use SoundBlaster Pro or
SoundBlaster emulation.
• Ensure that the audio device drivers are correctly installed.
functional ac electrical outlet.
The sound does not come from the headset
or headphones.
The sound comes from one of the external
speakers.
Select the headset or headphones as the default audio output device
in advanced sound settings.
• Ensure that the speaker cable is inserted completely into the
connector on the computer.
• Ensure that the cable that connects the left speaker to the right
speaker is securely connected.
• Ensure that the balance settings are set correctly.
1. Right-click the volume icon in the Windows notification area
2. Click the speaker icon on top of the volume control, and then
Network problems
Note: The Wi-Fi and Bluetooth features are optional.
on the taskbar. Then, click Open Volume Mixer and select the
desired speaker.
click the Levels tab.
Chapter 4. Troubleshooting, diagnostics, and recovery 21

Problem Solution
• Connect the cable from the Ethernet connector to the RJ45
connector of the hub.
• Enable the Ethernet LAN feature in UEFI BIOS.
• Enable the Ethernet LAN adapter.
1. Go to Control Panel and view by large icons or small icons.
2. Click Network and Sharing Center ➙ Change adapter
The
computer cannot connect to an Ethernet
LAN.
When a Gigabit Ethernet model computer is
used at a speed of 1000 Mbps, the Ethernet
LAN connection fails or errors occur.
The Wake On LAN (WOL) feature does not
work.
3. Right-click the Ethernet LAN adapter icon and click Enable.
• Update or reinstall the Ethernet LAN driver.
• Install all networking software that is necessary for your network
environment. Check with your LAN administrator for the necessary
networking software.
• Set the same duplex for the switch port and the adapter. If you
configured the adapter for full duplex, ensure that the switch port is
also configured for full duplex. Setting a wrong duplex mode might
degrade performance, cause data loss, or result in lost
connections.
Connect the network cable to the Ethernet connector using Category
5 wiring and a 100 BASE-T hub/switch (not 100 BASE-X).
Enable the Wake On LAN feature in UEFI BIOS.
settings.
The Wi-Fi feature does not work.
• Enable the Wi-Fi feature in UEFI BIOS.
• Enable all Wi-Fi devices.
1. Right-click the Start button to open the Start context menu.
2. Click Device Manager. Type the administrator password or
provide confirmation, if prompted.
3. Expand Network adapters to display all network devices.
4. Right-click each Wi-Fi device, and then click Enable device.
• Enable the Wi-Fi feature in Windows Settings.
1. Open the Start menu.
2. Click Settings ➙ Network & Internet ➙ Wi-Fi.
3. Enable the Wi-Fi feature.
• Update
or reinstall the Wi-Fi driver.
22 User Guide

Problem Solution
• Enable the Bluetooth feature in UEFI BIOS.
• Enable all Bluetooth devices.
1. Right-click the Start button to open the Start context menu.
2. Click Device Manager. Type the administrator password or
3. Expand Bluetooth to display all Bluetooth devices. Right-click
The Bluetooth feature does not work.
4. Expand Network adapters to display all network devices.
• Turn on the Bluetooth radio.
1. Open the Start menu.
2. Click Settings ➙ Devices ➙ Bluetooth & other devices.
3. Turn on the Bluetooth switch to enable the Bluetooth feature.
• Update or reinstall the Bluetooth driver.
provide confirmation if prompted.
each Bluetooth device, and then click Enable device.
Right-click each Bluetooth device, and then click Enable
device.
Sound does not come from the Bluetooth
headset or headphones.
Select the Bluetooth headset or headphones as the default audio
output device in advanced sound settings.
Chapter 4. Troubleshooting, diagnostics, and recovery 23

Performance problems
Problem Solution
Note: Depending on the volume of the storage drives and amount of
data stored on the storage drives, the disk-defragmentation process
might take up to several hours.
1. Close any open programs and windows.
2. Open
Excessive
storage drives.
The free storage drive space is insufficient.
fragmented files exist on the
3. Click Windows System ➙ File Explorer ➙ This PC.
4. Right-click your C drive and then click Properties.
5. Click the Tools tab.
6. Click Optimize. Select the drive as desired, and then click
7. Follow the on-screen instructions.
• Clean out your Inbox, Sent Items, and Deleted Items folders from
your e-mail application.
• Clean up your C drive.
1. Open the Start menu.
2. Click Windows System ➙ File Explorer ➙ This PC.
3. Right-click your C drive and then click Properties.
4. Check the amount of free space, and then click Disk Cleanup.
5. A list of unnecessary file categories is displayed. Select the
• Disable
programs.
1. Go to Control Panel and view by large icons or small icons.
2. Click Programs and Features.
3. Do one of the following:
the Start menu.
Optimize.
category you want to delete, and then click OK.
some Windows features or remove some unnecessary
– To disable some Windows features, click Turn Windows
features on or off. Follow the on-screen instructions.
– To remove some unnecessary programs, select the
program you want to remove, and then click Uninstall/
Change or Uninstall.
The free memory space is insufficient.
24 User Guide
• Right-click a blank area on the taskbar and open Task Manager.
Then, end some tasks you are not performing.
• Install additional memory modules.
 Loading...