

Lenovo 81UH000JUK User Manual
Lenovo Legion Y740 Series
User Guide

Read this first
Before using this documentation and the product it supports, ensure that you read and understand the
following:
• Appendix A “Important safety information” on page 31
• Safety and Warranty Guide
• Setup Guide
First Edition (November 2018)
© Copyright Lenovo 2018.
LIMITED AND RESTRICTED RIGHTS NOTICE: If data or software is delivered pursuant to a General Services
Administration “GSA” contract, use, reproduction, or disclosure is subject to restrictions set forth in Contract No. GS35F-05925.

Contents
About this documentation . . . . . . . . iii
Chapter 1. Meet your computer. . . . . 1
Front . . . . . . . . . . . . . . . . . . . . 1
Left . . . . . . . . . . . . . . . . . . . . 3
Right . . . . . . . . . . . . . . . . . . . . 4
Rear . . . . . . . . . . . . . . . . . . . . 5
Bottom . . . . . . . . . . . . . . . . . . . 6
Features and specifications . . . . . . . . . . . 7
Chapter 2. Get started with your
computer . . . . . . . . . . . . . . . . . 9
Get started with Windows 10 . . . . . . . . . . 9
Windows account . . . . . . . . . . . . . 9
Windows user interface . . . . . . . . . . 10
Windows label . . . . . . . . . . . . . 11
Connect to networks. . . . . . . . . . . . . 11
Connect to wired networks . . . . . . . . 11
Connect to Wi-Fi networks. . . . . . . . . 11
Use Lenovo Vantage . . . . . . . . . . . . . 12
Interact with your computer . . . . . . . . . . 12
Hotkeys . . . . . . . . . . . . . . . . 13
Hidden keys . . . . . . . . . . . . . . 14
Use multimedia . . . . . . . . . . . . . . . 14
Use audio . . . . . . . . . . . . . . . 14
Use the camera . . . . . . . . . . . . . 14
Connect to an external display . . . . . . . 15
Chapter 3. Explore your computer . . 17
Manage power . . . . . . . . . . . . . . . 17
Check the battery status . . . . . . . . . 17
Charge the battery . . . . . . . . . . . . 17
Check the battery temperature . . . . . . . 17
Maximize the battery life . . . . . . . . . 17
Set power button behaviors . . . . . . . . 17
Set the power plan . . . . . . . . . . . . 18
Transfer data . . . . . . . . . . . . . . . . 18
Connect a Bluetooth-enabled device. . . . . 18
Airplane mode . . . . . . . . . . . . . . . 18
Chapter 4. Secure your computer
and information . . . . . . . . . . . . 19
Lock the computer . . . . . . . . . . . . . 19
Use passwords . . . . . . . . . . . . . . . 19
Password types . . . . . . . . . . . . . 19
Set administrator password . . . . . . . . 20
Change or remove administrator password . . 20
Set user password . . . . . . . . . . . . 20
Enable power-on password . . . . . . . . 21
Set hard disk password . . . . . . . . . . 21
Change or remove hard disk password . . . . 21
Use firewalls and antivirus programs. . . . . . . 22
Chapter 5. Configure advanced
settings. . . . . . . . . . . . . . . . . 23
UEFI/BIOS . . . . . . . . . . . . . . . . . 23
What is UEFI/BIOS setup utility . . . . . . . 23
Start the UEFI/BIOS setup utility . . . . . . 23
Navigate in the BIOS interface . . . . . . . 23
Change the startup sequence . . . . . . . 23
Set the system date and time. . . . . . . . 24
Change hotkey mode. . . . . . . . . . . 24
Enable/Disable always-on . . . . . . . . . 24
Update UEFI/BIOS . . . . . . . . . . . . 24
Recovery information . . . . . . . . . . . . 24
Reset your computer . . . . . . . . . . . 25
Use advanced options . . . . . . . . . . 25
Windows automatic recovery. . . . . . . . 25
Create and use a recovery USB device . . . . 25
Chapter 6. Help and support . . . . . 27
Frequently asked questions . . . . . . . . . . 27
Self-help resources . . . . . . . . . . . . . 28
Call Lenovo . . . . . . . . . . . . . . . . 29
Before you contact Lenovo . . . . . . . . 29
Lenovo Customer Support Center . . . . . . 29
Purchase additional services. . . . . . . . . . 30
Appendix A. Important safety
information . . . . . . . . . . . . . . . 31
Appendix B. Accessibility and
ergonomic information . . . . . . . . 45
Appendix C. Compliance
information . . . . . . . . . . . . . . . 49
Appendix D. Notices and
trademarks . . . . . . . . . . . . . . . 61
© Copyright Lenovo 2018 i

ii Lenovo Legion Y740 Series User Guide

About this documentation
• Illustrations in this documentation might look different from your product.
• Depending on the model, some optional accessories, features, and software programs might not be
available on your computer.
• Depending on the version of operating systems, some user interface instructions might not be applicable
to your computer.
• Documentation content is subject to change without notice. Lenovo makes constant improvements on the
documentation of your computer, including this User Guide. To get the latest documentation, go to
support.lenovo.com
• Microsoft
®
makes periodic feature changes to the Windows® operating system through Windows Update.
.
As a result, some information in this documentation might become outdated. Refer to Microsoft resources
for the latest information.
https://
© Copyright Lenovo 2018 iii

iv Lenovo Legion Y740 Series User Guide
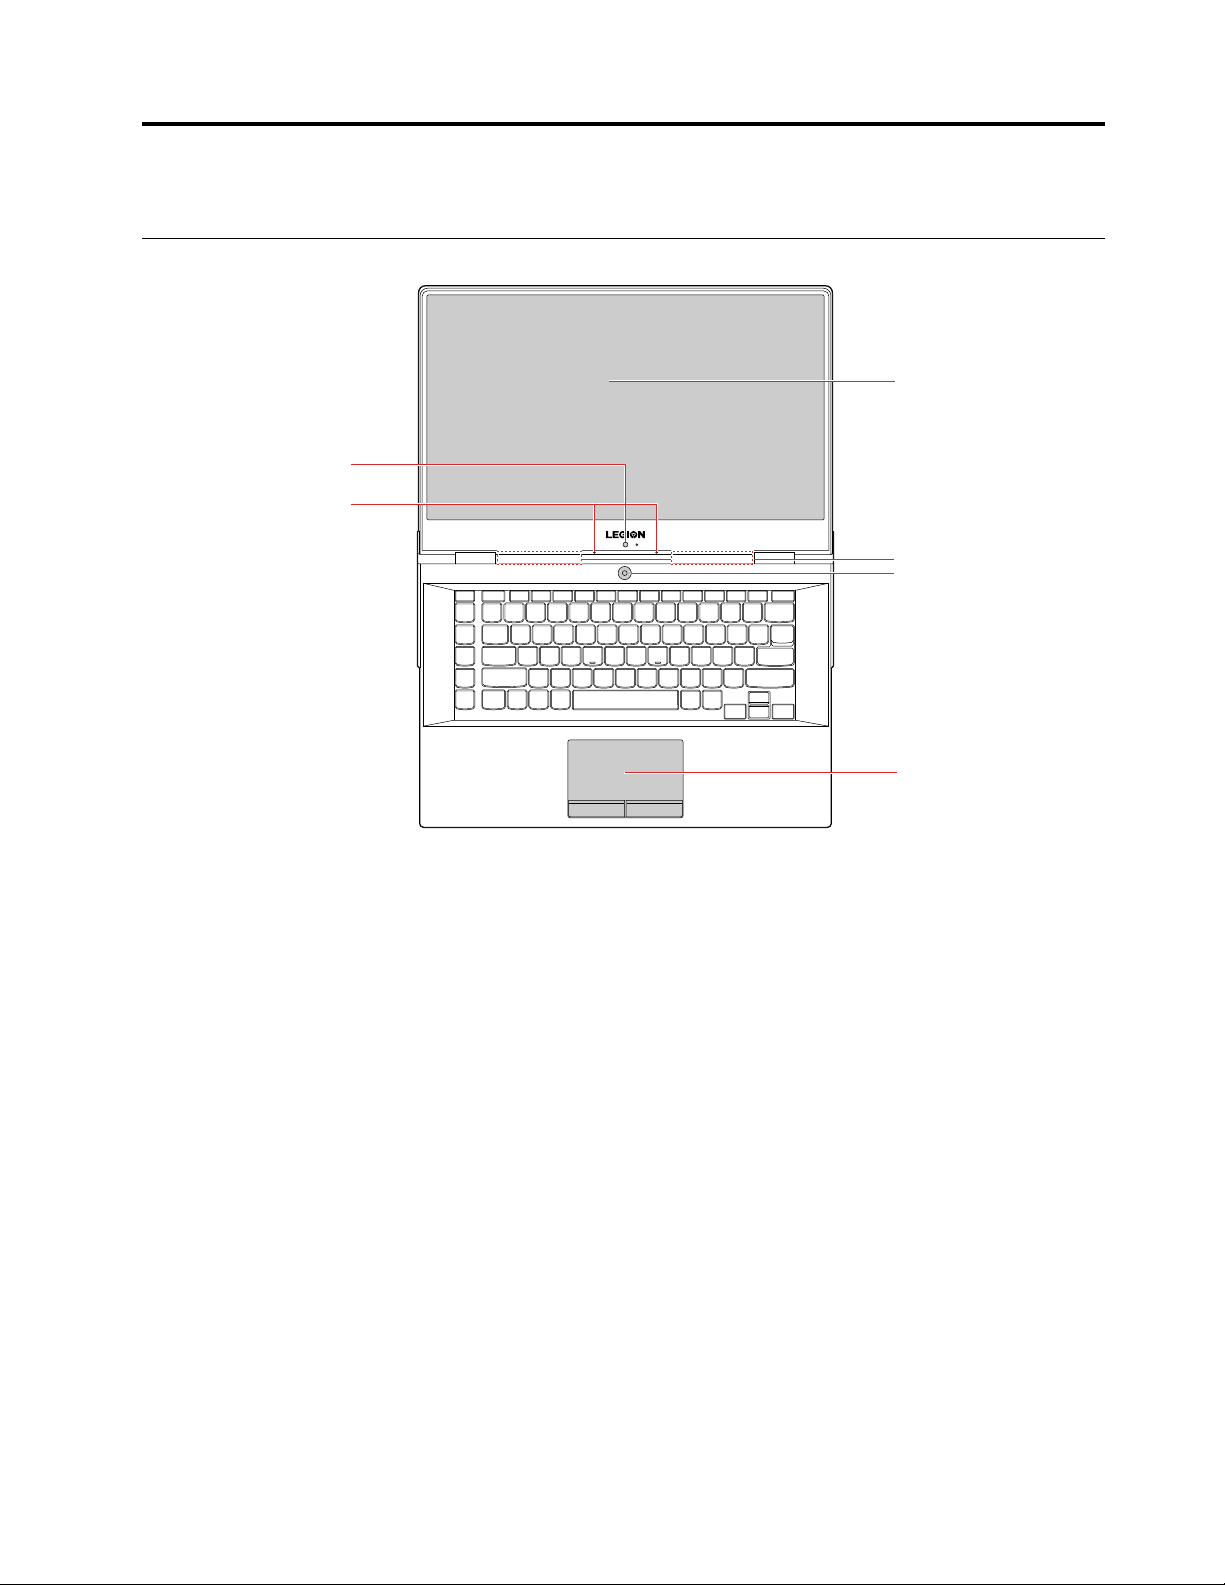
Chapter 1. Meet your computer
1
3
4
5
7
2
Front
Figure 1. Lenovo Legion Y740–15 Series – front view
© Copyright Lenovo 2018 1
1
2
3
4
5
6
7
Figure 2. Lenovo Legion Y740–17 Series – front view
Take pictures or record videos by clicking Camera from the Start menu. The indicator
next to the camera is on when the camera is in use.
1. Camera
2. Microphones Capture or record sound and voice.
3. Computer display Provides brilliant visual output.
If you use other apps that support photographing, video chatting, and video
conference, the camera starts automatically when you enable the camera-required
feature from the app.
4. Wireless LAN/Bluetooth
antennas
5. Power button
6. Numeric keypad Quickly input numbers.
Send and receive radio waves for the wireless LAN/Bluetooth module.
Note: The antennas are not visible from the outside of the computer.
Press to turn on the computer or put the computer to sleep mode.
To turn off the computer, open the Start menu, click
down.
Power, and then select Shut
The indicator on the power button shows the system status of your computer.
• Solid blue: The computer is on.
• Slow blinking blue: The computer is in sleep mode.
• Off: The computer is off or in hibernation mode.
7. Touchpad Performs finger touch and all the functions of a traditional mouse.
2 Lenovo Legion Y740 Series User Guide
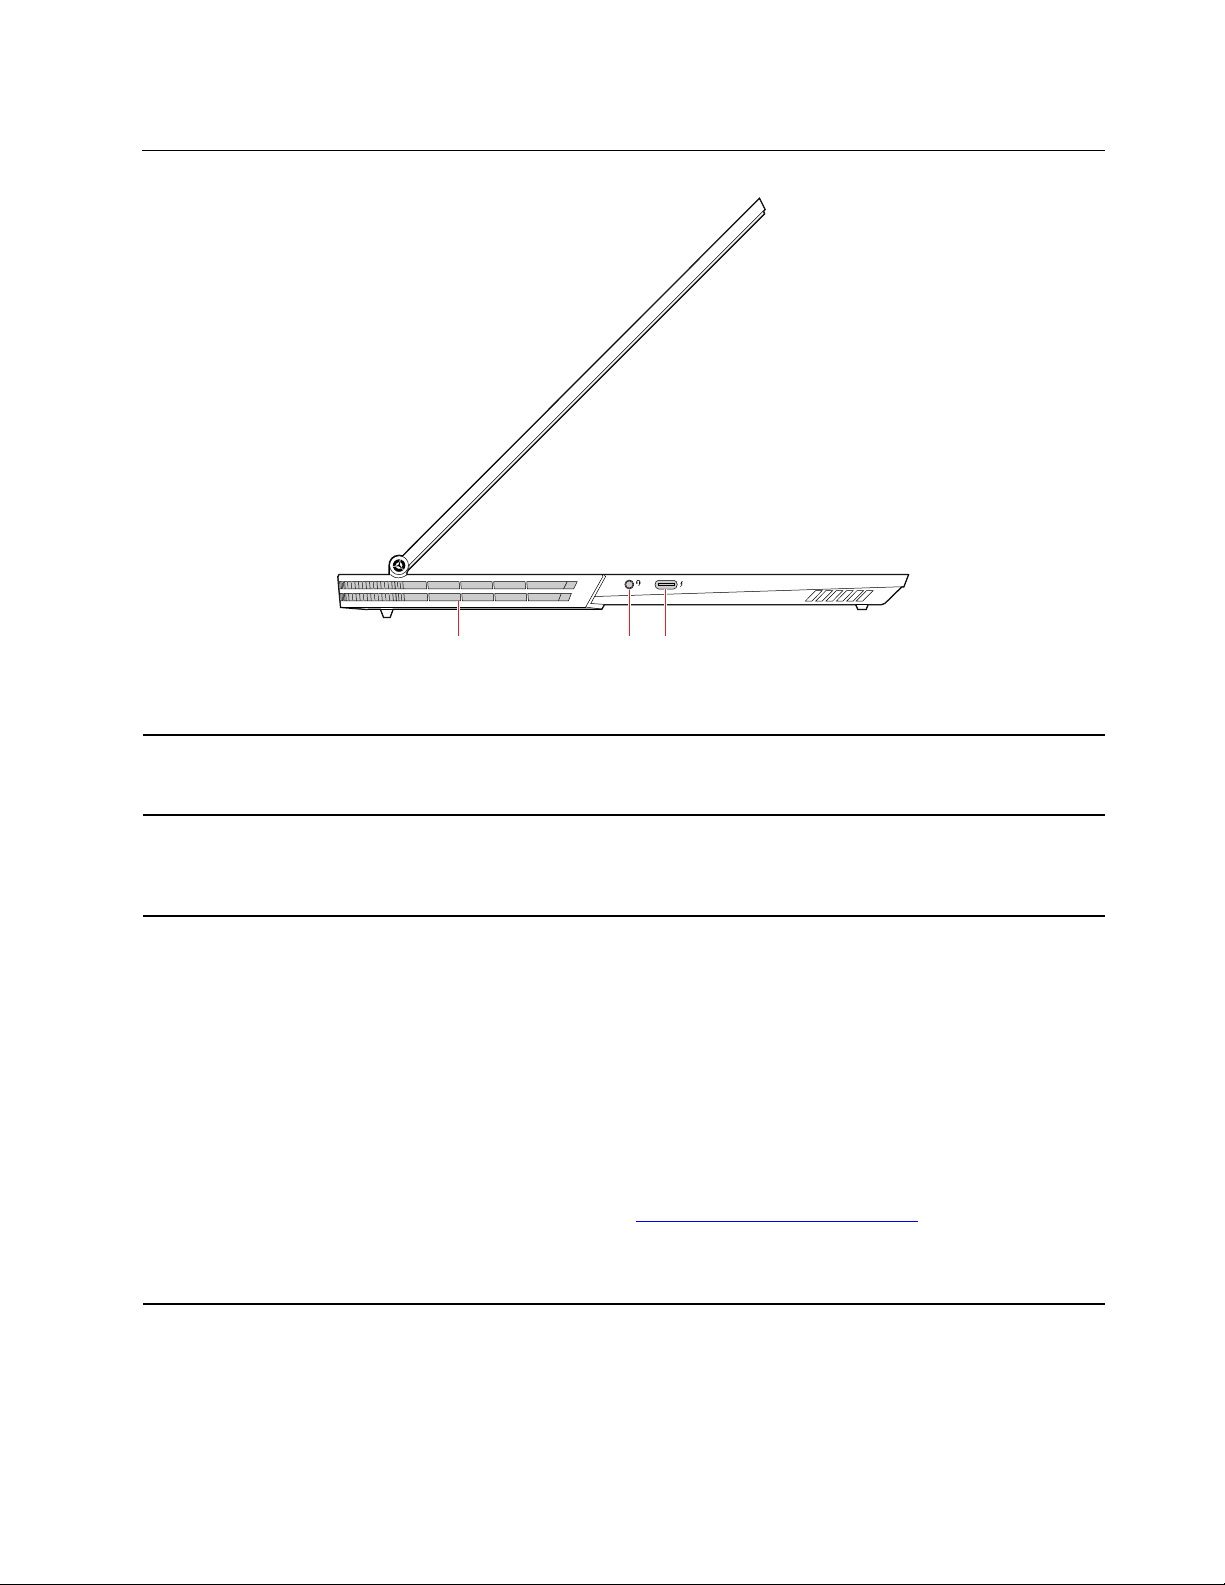
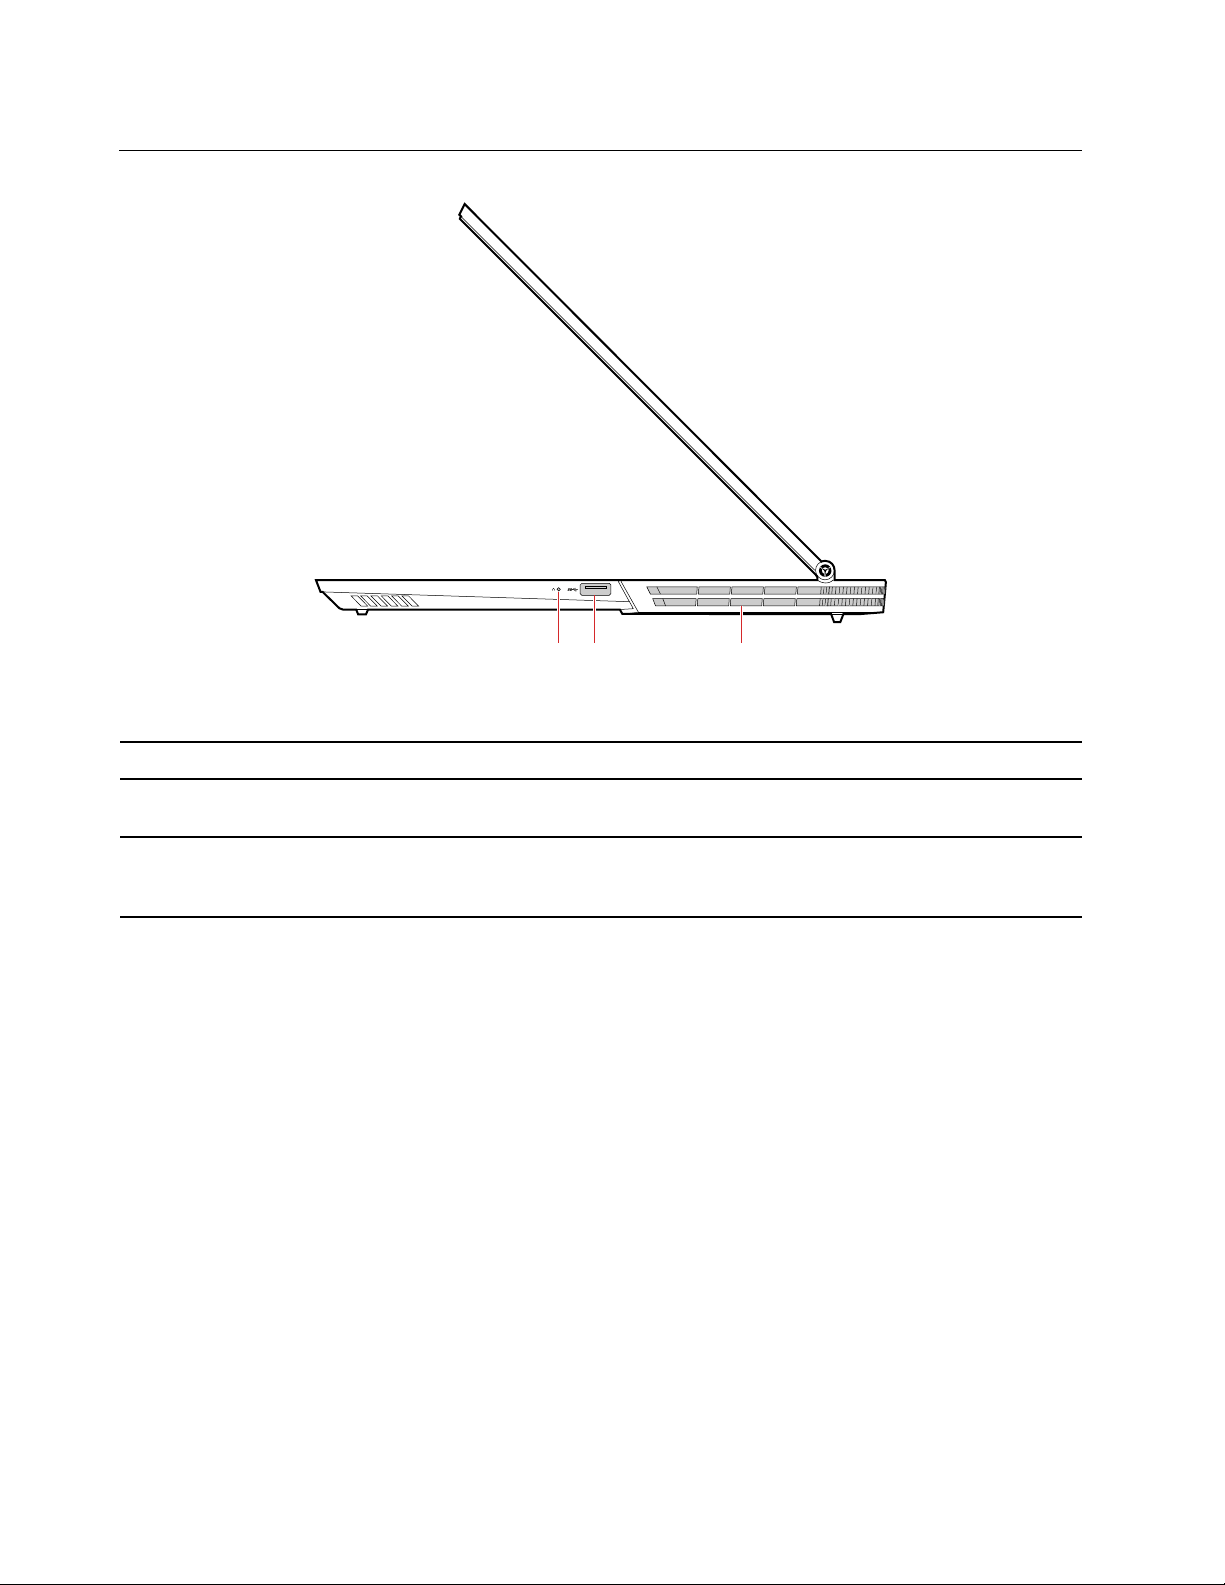
Left
1 2 3
Figure 3. Lenovo Legion Y740–15/17 Series – left view
1. Ventilation slots (outlet) Maintain the outgoing airflow to dissipate internal heat.
2. Audio connector
3. Thunderbolt 3 connector
(USB-C compatible)
Note: Do not block the ventilation slots. Otherwise, the computer might overheat.
Connects headphones or a headset with a 3.5-mm (0.14-inches), 4-pole plug to listen
to the sound from the computer.
Note: The conventional microphone is not supported.
• Charges USB-C compatible devices with the output voltage and current of 5 V and
3 A.
• Charges USB-compatible devices when your computer is off, in sleep mode, or in
hibernation mode. To enable the Always On USB feature on your computer, see
“Enable/Disable always-on” on page 24.
• Transfers data at Thunderbolt 3 speed, up to 40 Gbps.
• Connects to an external display.
– USB-C to VGA: 1900 × 1200 pixels, 60 Hz
– USB-C to DP: 3840 × 2160 pixels, 60 Hz
• Connects to USB-C accessories to expand computer functionality. To purchase
USB-C accessories, go to
Note:
When the battery power is below 10%, the connected USB-C accessories might not
work correctly.
https://www.lenovo.com/accessories.
Chapter 1. Meet your computer 3
Right
1 2 3
Figure 4. Lenovo Legion Y740–15/17 Series – right view
1. Novo button
2. USB 3.1 connector Gen 1
3. Ventilation slots (outlet)
When the computer is off, press this button to go to Novo button menu.
Connects USB-compatible devices, such as a USB keyboard, USB mouse, USB
storage device, or USB printer.
Maintain the outgoing airflow to dissipate internal heat.
Note: Do not block the ventilation slots. Otherwise, the computer might overheat.
4 Lenovo Legion Y740 Series User Guide
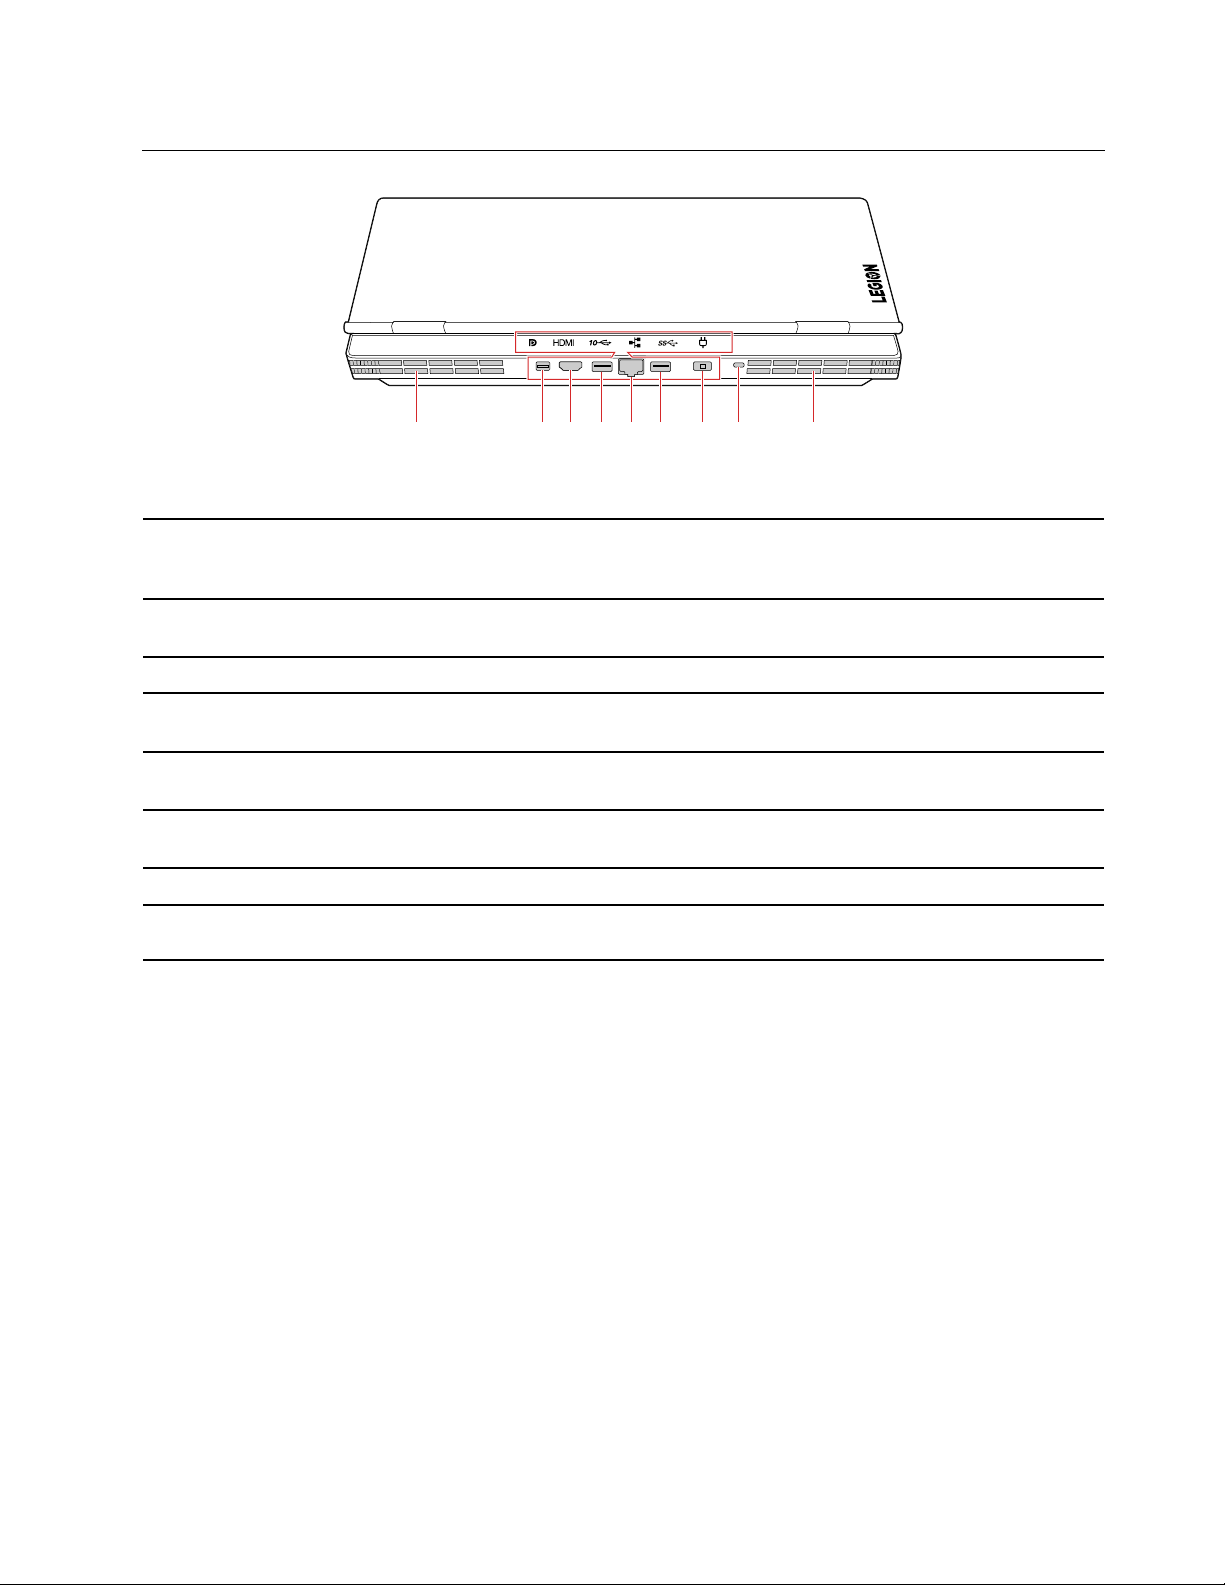
Rear
1 2 3 4 5 6 7 8 1
Figure 5. Lenovo Legion Y740–15/17 Series – rear view
Maintain the outgoing airflow to dissipate internal heat.
1. Ventilation slots (outlet)
Note: Do not block the ventilation slots. Otherwise, the computer might overheat.
2. Mini DisplayPort
connector
®
Connects to a compatible projector, external monitor, or high-definition television
(HDTV).
3. HDMI™ connector
4. USB 3.1 connector Gen 2
5. Ethernet connector
6. USB 3.1 connector Gen 1
7. Power connector
8. Mini security-lock slot
Connects to a compatible digital audio device or video monitor, such as an HDTV.
Connects USB-compatible devices, such as a USB keyboard, USB mouse, USB
storage device, or USB printer.
Connects to a local area network (LAN). When the green indicator is on, the computer
is connected to a LAN. When the yellow indicator blinks, data is being transmitted.
Connects USB-compatible devices, such as a USB keyboard, USB mouse, USB
storage device, or USB printer.
Connects to ac power through an ac power adapter.
Lock your computer to a desk, table, or other fixtures through a compatible security
cable lock.
Chapter 1. Meet your computer 5
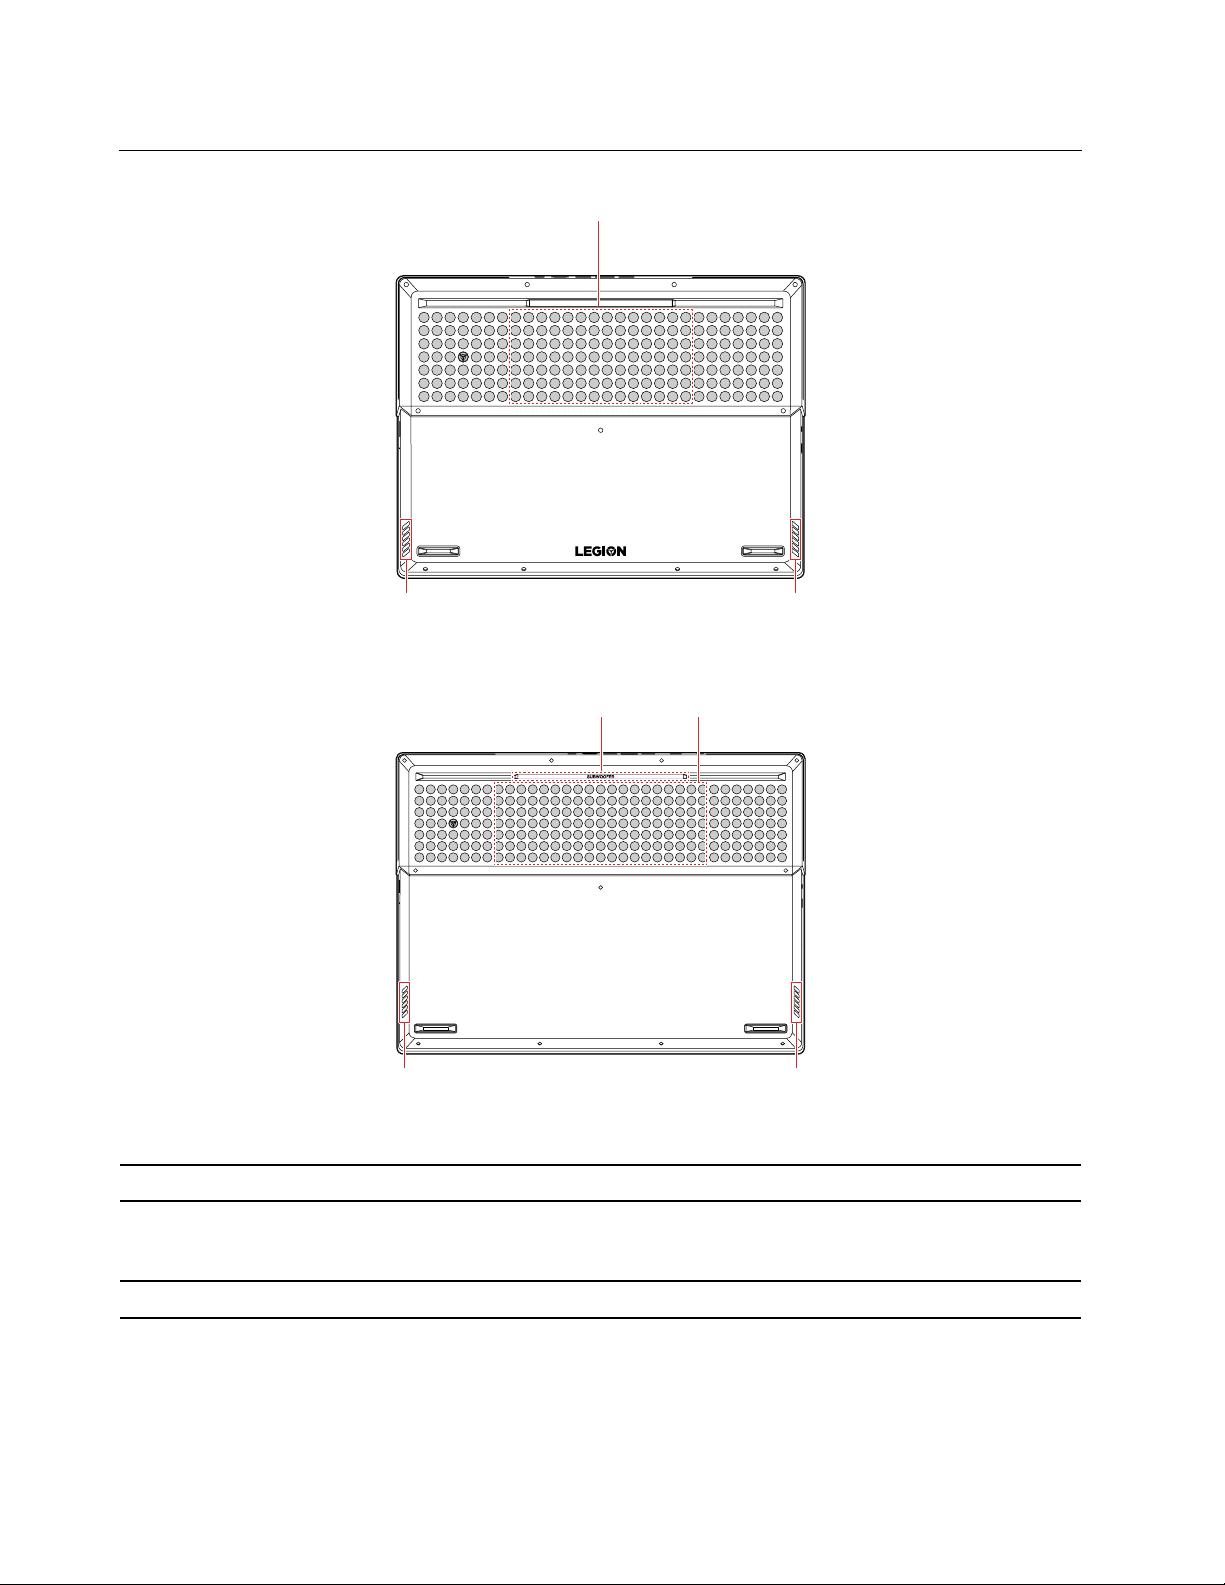
Bottom
2
3 3
1 2
3 3
Figure 6. Lenovo Legion Y740–15 Series – bottom view
Figure 7. Lenovo Legion Y740–17 Series – bottom view
1. Subwoofer
2. Ventilation slots (inlet)
3. Speakers
Dedicated for the reproduction of low‐pitched audio frequencies.
Maintain the incoming airflow to dissipate internal heat.
Note: Do not block the ventilation slots. Otherwise, the computer might overheat.
Produce sound.
6 Lenovo Legion Y740 Series User Guide

Features and specifications
• Lenovo Legion Y740-15ICH/Legion Y740-15ICHg
– Width: 361.42 mm (14.22 inches)
– Depth: 265 mm (10.43 inches)
Dimensions
– Thickness: 23.85 mm (0.94 inches)
• Lenovo Legion Y740-17ICH/Legion Y740-17ICHg
– Width: 412.60 mm (16.24 inches)
– Depth: 304.90 mm (12.00 inches)
– Thickness: 25.45 mm (1.00 inch)
Power source (ac power
adapter)
Battery pack
Microprocessor
Memory Double data rate 4 (DDR4) small outline dual in-line memory module (SODIMM)
Storage device
Display
• Sine-wave input at 50 Hz to 60 Hz
• Input rating of the ac power adapter: 100 V to 240 V ac, 50 Hz to 60 Hz
• Lenovo Legion Y740-15ICH/Legion Y740-15ICHg
– 57 Wh
– 3 Cells
or
– 76 Wh
– 4 Cells
• Lenovo Legion Y740-17ICH/Legion Y740-17ICHg
– 76 Wh
– 4 Cells
To view the microprocessor information of your computer, right-click the Start button
and then click System.
• 2.5-inch form factor, 7-mm (0.28-inch) height hard disk drive
• M.2 solid-state drive
®
• Intel
• Display size:
• Display resolution: 1920 x 1080 pixels
Optane™ memory*
– Lenovo Legion Y740-15ICH/Legion Y740-15ICHg: 396.24 mm (15.6 inches)
– Lenovo Legion Y740-17ICH/Legion Y740-17ICHg: 439.42 mm (17.3 inches)
Keyboard
• Function keys
• Numeric keypad(available only on Legion Y740-17ICH/Legion Y740-17ICHg)
• Six-row keyboard (with backlight)
Chapter 1. Meet your computer 7

Connectors and slots
• ac power connector
• Audio connector
• Ethernet connector
• Two USB 3.1 connectors Gen 1
• USB 3.1 connectors Gen 2
• Thunderbolt 3 connector (USB-C compatible)
• HDMI connector
• Mini DisplayPort connector
Security features
Wireless features
Others
• Password
• Mini security-lock slot
• Bluetooth
• Wireless LAN
• Camera
• Microphones
* for selected models
Note: The battery capacity is the typical or average capacity as measured in a specific test environment.
Capacities measured in other environments may differ but are no lower than the rated capacity (see product
label).
8
Lenovo Legion Y740 Series User Guide

Chapter 2. Get started with your computer
Get started with Windows 10
Learn the basics of Windows 10 and start working with it right away. For more information about Windows
10, see the Windows help information.
Windows account
To use the Windows operating system, a user account is required. It can either be a Windows user account,
or a Microsoft account.
Windows user account
When you start Windows for the first time, you are prompted to create a Windows user account. This first
account you created is of the “Administrator” type. With an Administrator account, you can create additional
user accounts or change account types by doing the following:
1. Open the Start menu and select Settings ➙ Accounts ➙ other people.
2. Follow the on-screen instructions.
Microsoft account
You can also log in to the Windows operating system with a Microsoft account.
To create a Microsoft account, go to the Microsoft sign-up page at
screen instructions.
With a Microsoft account, you can:
• Enjoy one-time signing in if you are using other Microsoft services, such as OneDrive, Skype, and Outlook.
com.
• Sync personalized settings across other Windows-based devices.
https://signup.live.com/ and follow the on-
© Copyright Lenovo 2018 9
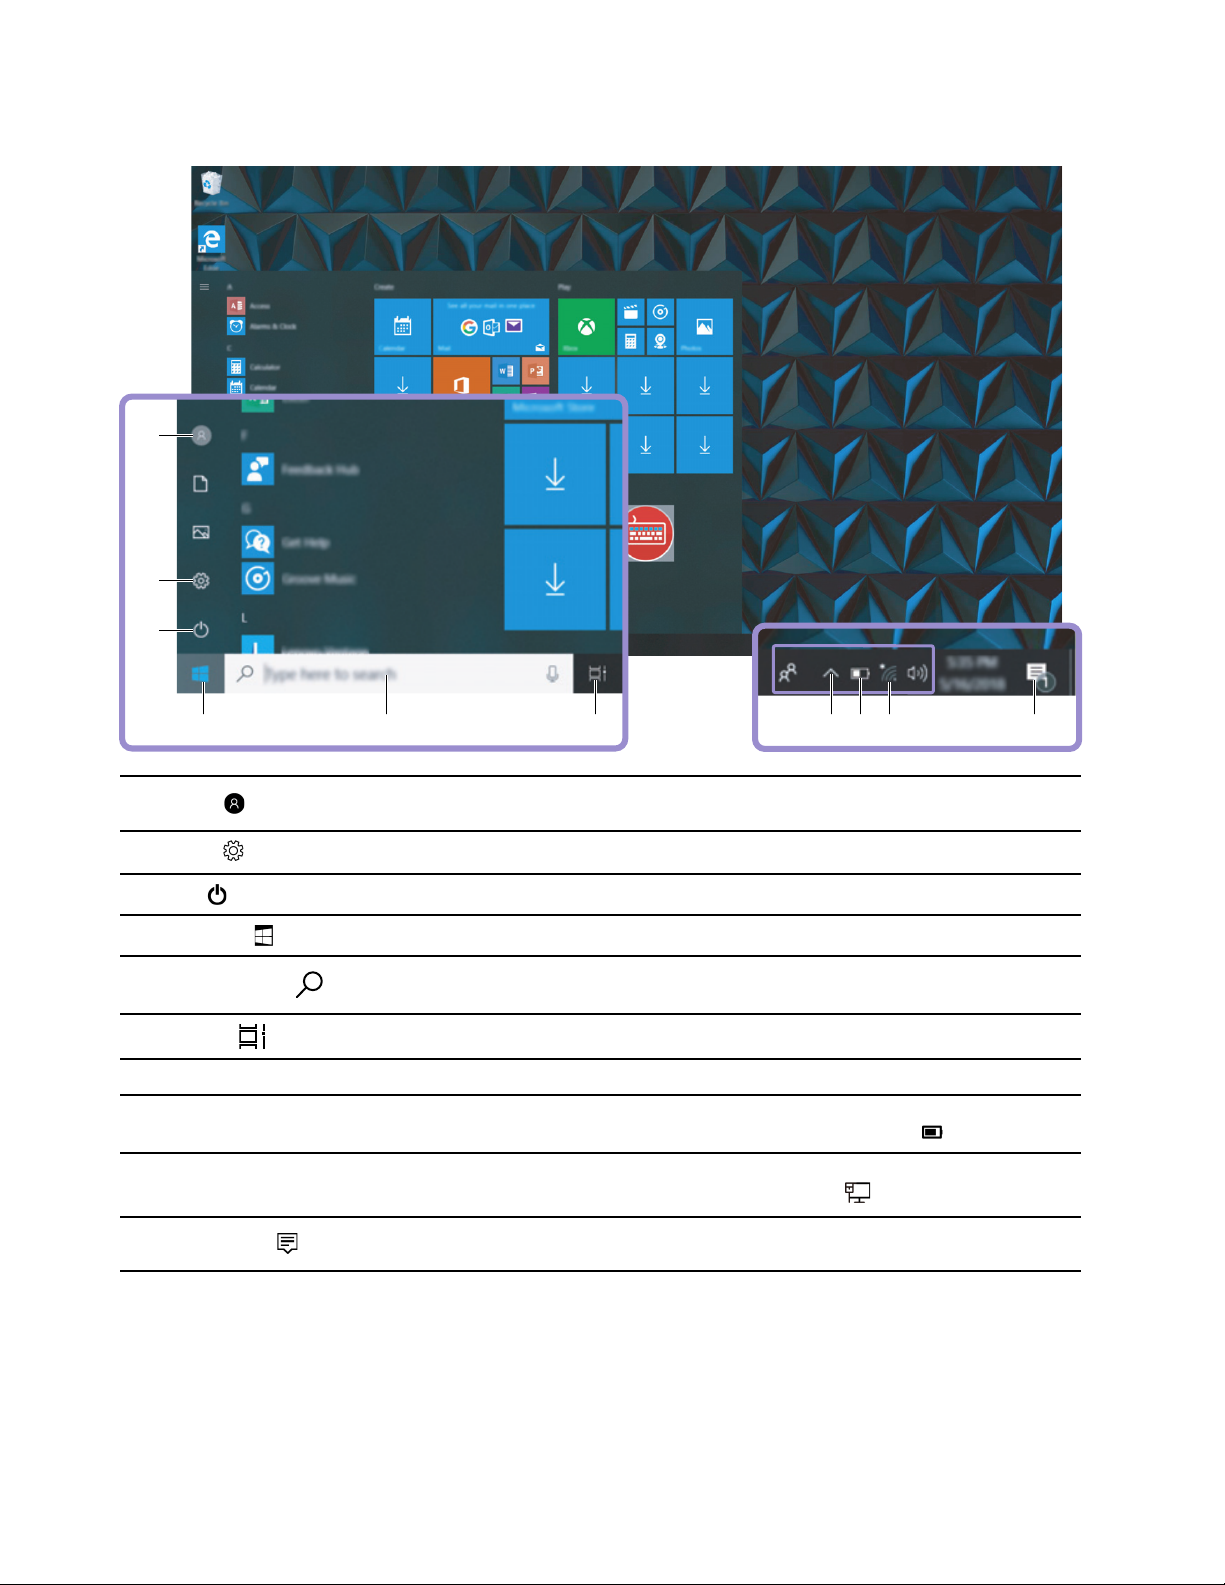
Windows user interface
1
2
3
4 5 6 1087 9
1. Account
2. Settings
3. Power
4. Start button
5. Windows Search
6. Task View
7. Windows notification area
8. Battery status icon
9. Network icon
10. Action center
Change account settings, lock the computer, or sign out from the current
account.
Launch Settings.
Shut down, restart, or put the computer into sleep.
Open the Start menu.
Type what you are looking for in the search box and get search results from
your computer and the Web.
Display all opened apps and switch among them.
Display notifications and status of some features.
Display power status and change battery or power settings. When your
computer is not connected to ac power, the icon changes to
Connect to an available wireless network and display the network status. When
connected to a wired network, the icon changes to
Display the latest notifications from apps and provide quick access to some
features.
.
.
Open the Start menu
• Click the Start button.
• Press the Windows logo key on the keyboard.
10
Lenovo Legion Y740 Series User Guide

Access Control Panel
• Open the Start menu and click Windows System ➙ Control Panel.
• Use Windows Search.
Launch an app
• Open the Start menu and select the app you want to launch.
• Use Windows Search.
Windows label
Your computer might have a Windows 10 Genuine Microsoft label affixed to its cover depending on the
following factors:
• Your geographic location
• Edition of Windows 10 that is preinstalled
Go to
https://www.microsoft.com/en-us/howtotell/Hardware.aspx for illustrations of the various types of
Genuine Microsoft labels.
• In the People’s Republic of China, the Genuine Microsoft label is required on all computer models
preinstalled with any version of Windows 10.
• In other countries and regions, the Genuine Microsoft label is required only on computer models licensed
for Windows 10 Pro.
The absence of a Genuine Microsoft label does not indicate that the preinstalled Windows version is not
genuine. For details on how to tell whether your preinstalled Windows product is genuine, refer to the
information provided by Microsoft at
There are no external, visual indicators of the Product ID or Windows version for which the computer is
licensed. Instead, the Product ID is recorded in the computer firmware. Whenever a Windows 10 product is
installed, the installation program checks the computer firmware for a valid, matching Product ID to complete
the activation.
In some cases, an earlier Windows version might be preinstalled under the terms of the Windows 10 Pro
license downgrade rights.
https://www.microsoft.com/en-us/howtotell/default.aspx.
Connect to networks
Your computer helps you connect to the world through a wired or wireless network.
Connect to wired networks
If your computer includes an Ethernet (RJ-45) connector, you can use an Ethernet cable to connect your
computer to a wired network.
Connect to Wi-Fi networks
1. Click the network icon in the Windows notification area. A list of available wireless networks is displayed.
2. Select a network to connect. Provide required information if needed.
Chapter 2. Get started with your computer 11

Use Lenovo Vantage
The preinstalled Lenovo Vantage is a customized one-stop solution to help you maintain your computer with
automated updates and fixes, configure hardware settings, and get personalized support.
Access Lenovo Vantage
Open the Start menu and click Lenovo Vantage. You also can type Lenovo Vantage in the search box.
To download the latest version of Lenovo Vantage, go to Microsoft Store and search by the app name.
Key features
Lenovo Vantage makes periodic updates of the features to keep improving your experience with your
computer.
Note: The available features vary depending on the computer model.
• System Update
Download and install firmware and driver updates to keep your computer up-to-date. You can configure
the options to install updates automatically when available.
• Hardware Settings
Configure intelligent settings of the following hardware to make your computer smarter to use:
– Always On USB
– Battery
– Camera
– Computer display
– Keyboard
– Microphone
– Speakers
– Touchpad
• Health & Support
Monitor your computer health and get personalized support of your computer. You can:
– Scan the computer hardware.
– Look up computer warranty status (online).
– Access User Guide.
– Read tips and tricks articles customized for your computer.
• Lenovo Wi-Fi Security
Protect your computer from malicious Wi-Fi networks.
Interact with your computer
Your computer provides you various ways to navigate the screen.
12
Lenovo Legion Y740 Series User Guide
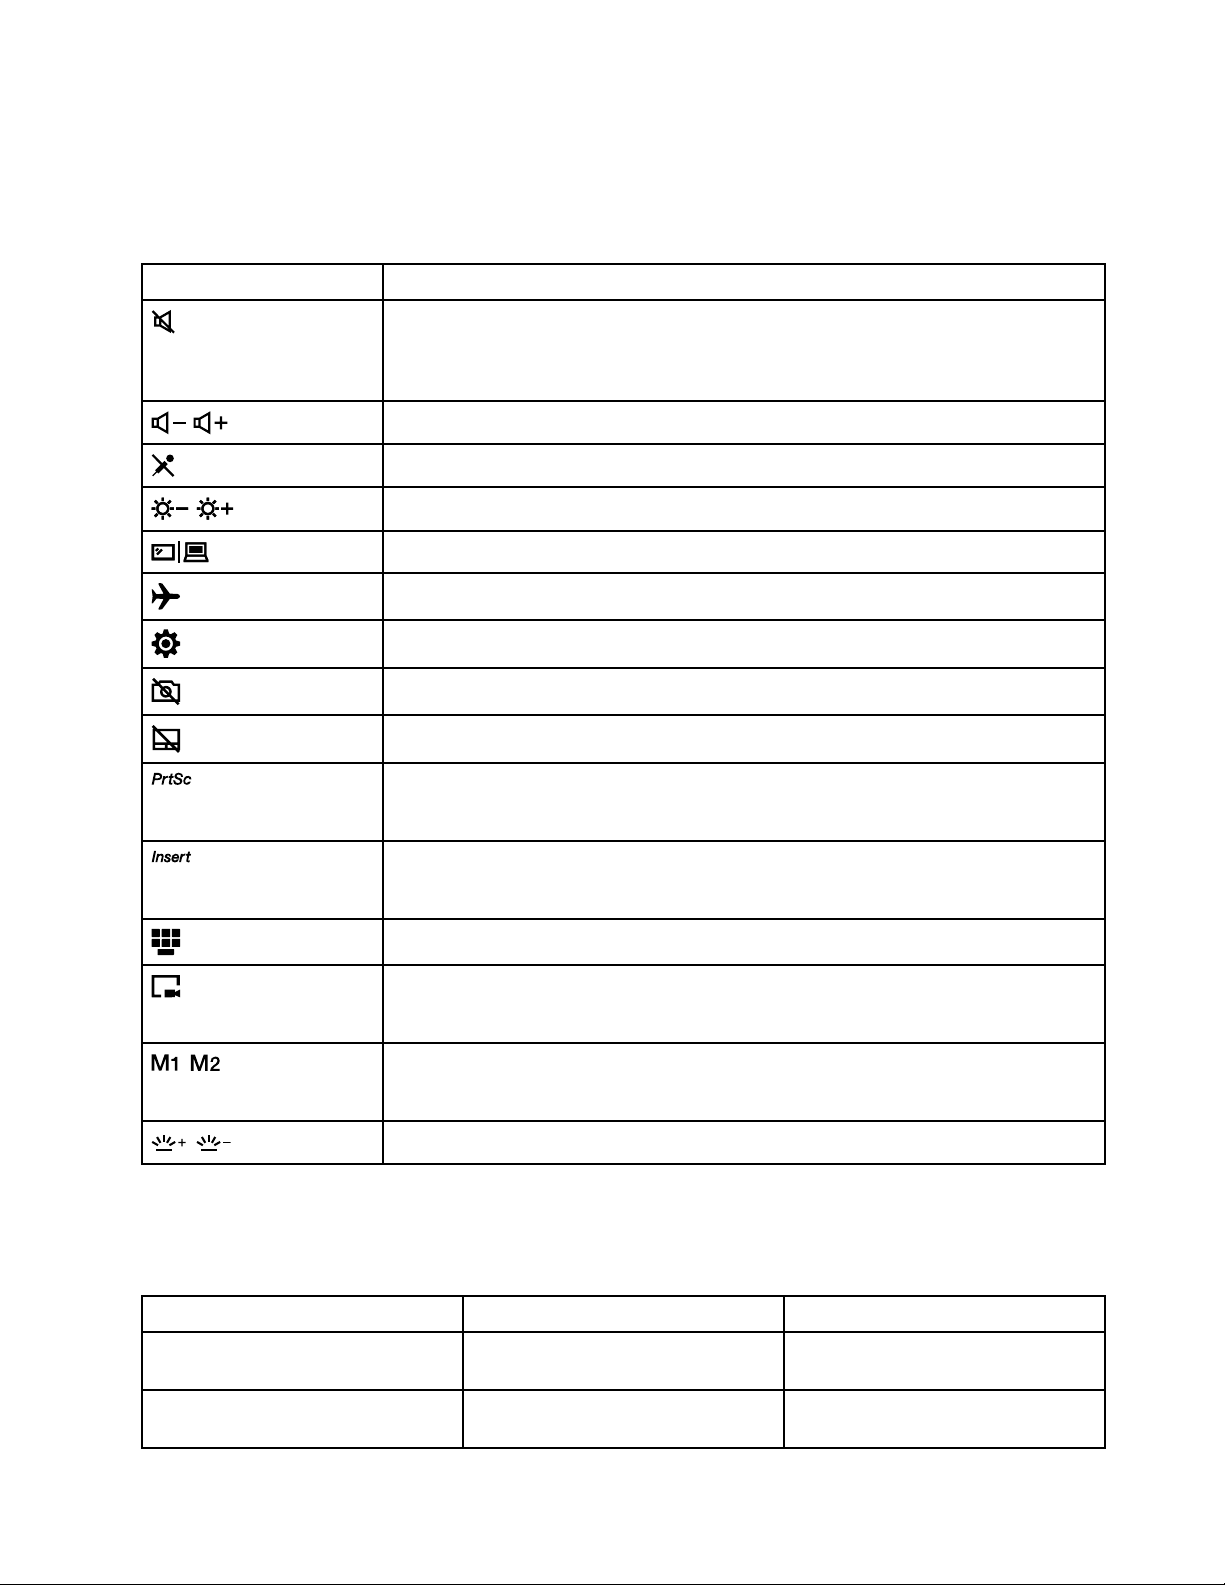
Hotkeys
/
/
/
/
Some keys on the keyboard are printed with icons. These keys are called hotkeys and can be pressed alone
or in combination with the Fn key to access certain Windows functions or settings quickly. The functions of
hotkeys are symbolized by the icons printed on them.
Hotkey Function
Mutes/Unmutes the computer.
If you mute the computer and turn off your computer, the speakers remain muted when
you turn on your computer.
Decreases/Increases volume.
Enables/Disables the microphones.
Decreases/Increases the screen brightness.
Switches display devices.
Turns on/off airplane mode.
Starts the Settings app.
Enables/Disables the camera.
Enables/Disables the touchpad.
Enables/Disables the print screen function.
Note:
This hotkey is available only on Legion Y740-15 series.
Switches between insert mode and overtype mode.
Note:
This hotkey is available only on Legion Y740-17 series.
Starts Magic Y Key program.
Starts/Ends screen recording.
Note:
This function is available only when you are playing games.
You can customize the function of the two keys in Magic Y Key program.
Note:
These two keys are available only on Legion Y740-15 series.
Increases/Decreases the keyboard backlight.
Hotkey mode
Some hotkeys share keys with functions keys (F1 to F12). The hotkey mode is a UEFI/BIOS setting that
changes how hotkeys (or function keys) are used.
Hotkey mode setting How to use hotkeys How to use function keys
Disabled Hold down the Fn key and press one
of the hotkeys.
Enabled Press the hotkeys directly. Hold down the Fn key and press one
Press the function keys directly.
of the function keys.
Chapter 2. Get started with your computer 13

Note: Hotkeys that do not share keys with function keys are not affected by the hotkey mode setting. They
should always be used with the Fn key.
Hidden keys
Some numeric and character keys on your keyboard can be used with the Fn key to enable certain settings.
These keys are called hidden keys.
Hidden keys Function
Fn + 4 Enters sleep mode.
Fn + B Activates the break function.
Fn + P Activates the pause function.
Fn + K Enables/disables scroll lock.
Fn + S Activates system request.
Fn + Q Adjusts fans speed.(Normal-Fast)
Use multimedia
Use your computer for business or entertainment with the built-in components (camera, speakers, and audio
features) or connected external devices (an external projector, monitor, and HDTV).
Use audio
To enhance your listening experience, connect speakers, headphones, or a headset with a 3.5-mm (0.14inches), 4-pole plug to the audio connector.
Change the sound settings
1. Go to Control Panel and view by category.
2. Click Hardware and Sound ➙ Sound.
3. Change the settings as you prefer.
Use the camera
You can use the built-in camera to take photos or record videos. The indicator next to the camera turns on
when the camera is activated.
To take photos or record a video:
1. Open the Start menu and click Camera.
2. To take a photo, click the camera icon. If you want to record video, click the video icon to switch to
video mode.
If you use other programs that provide features such as photographing, video capturing, and video
conference, the camera starts automatically when you enable the camera-required feature.
To configure the camera settings, open the Start menu and then click Lenovo Vantage ➙ Hardware
Settings ➙ Audio/Visual. Locate the Camera section and then follow the on-screen instructions to
configure the camera settings.
14
Lenovo Legion Y740 Series User Guide

Connect to an external display
Connect your computer to a projector or a monitor to give presentations or expand your workspace.
Connect a wired display
1. Connect the external display to an appropriate video connector on your computer, such as the HDMI
connector or Mini DisplayPort connector.
2. Connect the external display to an electrical outlet.
3. Turn on the external display.
If your computer cannot detect the external display, right-click a blank area on the desktop, and then click
Display settings ➙ Detect.
Supported resolution
Your computer supports the following video resolution, if the external display also supports that resolution.
Connect the external display to Supported resolution
the USB-C connector or the Mini DisplayPort connector Up to 3840 x 2160 pixels / 60 Hz
the HDMI connector
Up to 3840 x 2160 pixels / 30 Hz
Connect a wireless display (for computers and external displays supporting Miracast®)
• Open the Start menu, and then click Settings ➙ Devices ➙ Connected devices ➙ Add a device.
• Click the action center icon
in the Windows notification area and click Connect. Select the wireless
display and follow the on-screen instructions.
Set the display mode
Press
and then select a display mode of your preference.
• PC screen only: Displays the video output only on your computer screen.
Note: Depending on the situation, you might see Disconnect, PC screen only, Computer only, or
Disconnect projector.
• Duplicate: Displays the same video output on both your computer screen and an external display.
• Extend: Extends the video output from your computer display to an external display. You can drag and
move items between the two displays.
• Second screen only: Displays the video output only on an external display.
Note: Depending on the situation, you might see Projector only or Second screen only.
®
If you show programs using DirectDraw or Direct3D
in full-screen mode, only the main display shows the
video output.
Change display settings
1. Right-click a blank area on the desktop and select Display settings.
2. Select the display that you want to configure.
3. Change display settings of your preference.
You can change the settings for both the computer display and the external display. For example, you can
define which one is the main display and which one is the secondary display. You also can change the
resolution and orientation.
Chapter 2. Get started with your computer 15
 Loading...