

Page 1
Lenovo Chromebook 2nd Gen Series
User Guide
Page 2

Page 3

Lenovo Chromebook 2nd Gen Series User
Guide
Page 4
About this documentation
• Illustrations in this documentation might look different from your product.
• Depending on the model, some optional accessories, features, and software programs might not be
available on your computer.
• Documentation content is subject to change without notice. Lenovo makes constant improvement on the
documentation of your computer, including this User Guide. To get the latest documentation, go to
support.lenovo.com
.
https://
• This documentation applies to the following product models.
Model name Machine type
Lenovo 100e Chromebook 2nd Gen
Lenovo 300e Chromebook 2nd Gen
Lenovo 500e Chromebook 2nd Gen 81MC
Lenovo 100e Chromebook 2nd Gen MTK 81QB
Lenovo 300e Chromebook 2nd Gen MTK 81QC
81MA
81MB
First edition (December 2018)
© Copyright Lenovo 2018.
LIMITED AND RESTRICTED RIGHTS NOTICE: If data or software is delivered pursuant to a General Services
Administration “GSA” contract, use, reproduction, or disclosure is subject to restrictions set forth in Contract No.GS35F-05925.
Page 5

Contents
Chapter 1. Important safety
information . . . . . . . . . . . . . . . . 1
Read this first. . . . . . . . . . . . . . . . . 1
Conditions that require immediate action . . . . . . 1
Service and upgrades . . . . . . . . . . . . . 2
Power cords and power adapters . . . . . . . . . 3
Plugs and outlets . . . . . . . . . . . . . . . 4
Power supply statement . . . . . . . . . . . . 4
Electrical current safety information . . . . . . . . 5
Non-rechargeable coin-cell battery notice . . . . . 6
Built-in rechargeable battery notice . . . . . . . . 6
Removable rechargeable battery notice . . . . . . 6
Heat and product ventilation . . . . . . . . . . . 7
Liquid crystal display (LCD) notice . . . . . . . . 7
Extension cords and related devices. . . . . . . . 8
Using headphones or earphones . . . . . . . . . 8
Plastic bag notice . . . . . . . . . . . . . . . 8
Glass parts notice . . . . . . . . . . . . . . . 8
Safety instructions for teachers, parents and adult
supervisors . . . . . . . . . . . . . . . . . 8
Chapter 2. Meet your
Chromebook . . . . . . . . . . . . . . 11
Front view . . . . . . . . . . . . . . . . . 11
Webcam lights . . . . . . . . . . . . . 13
Webcams . . . . . . . . . . . . . . . 13
Microphones . . . . . . . . . . . . . . 13
Wireless antennas . . . . . . . . . . . . 13
Screen . . . . . . . . . . . . . . . . 13
Power key . . . . . . . . . . . . . . . 13
Keyboard . . . . . . . . . . . . . . . 13
Speakers . . . . . . . . . . . . . . . 13
Touchpad . . . . . . . . . . . . . . . 13
Left view . . . . . . . . . . . . . . . . . 14
dc-in light . . . . . . . . . . . . . . . 14
dc-in / USB-C connector . . . . . . . . . 14
USB 3.0 (Type-A) connector . . . . . . . . 14
MicroSD card slot . . . . . . . . . . . . 14
Combo audio connector . . . . . . . . . 15
Right view . . . . . . . . . . . . . . . . . 16
Stylus . . . . . . . . . . . . . . . . . 16
Volume buttons . . . . . . . . . . . . . 16
Power button . . . . . . . . . . . . . . 16
Power light . . . . . . . . . . . . . . . 16
USB 3.0 (Type-A) connector . . . . . . . . 16
USB-C connector . . . . . . . . . . . . 17
Security-lock slot . . . . . . . . . . . . 17
Features and specifications . . . . . . . . . . 18
Operating environment . . . . . . . . . . . . 20
Chapter 3. Get started with your
Chromebook . . . . . . . . . . . . . . 21
Charge your Chromebook. . . . . . . . . . . 21
User interface . . . . . . . . . . . . . . . 22
Get to know your Chromebook modes . . . . . 23
Connect to Wi-Fi . . . . . . . . . . . . . . 23
Connect to Bluetooth devices . . . . . . . . . 24
Set the power plan . . . . . . . . . . . . . 24
Chapter 4. Navigate the screen . . . . 25
Use the multi-touch screen . . . . . . . . . . 25
Use the special keys . . . . . . . . . . . . . 26
Use the touchpad . . . . . . . . . . . . . . 26
Chapter 5. Use multimedia . . . . . . 29
Use the webcams . . . . . . . . . . . . . . 29
Use audio . . . . . . . . . . . . . . . . . 29
Connect to an external display . . . . . . . . . 29
Chapter 6. Account, login, and
logout . . . . . . . . . . . . . . . . . 31
Types of user account for logging into Chrome . . 31
Become your Chromebook’s owner . . . . . . . 31
Sign in with another Google account . . . . . . 32
Browse as a guest . . . . . . . . . . . . . . 32
Create a supervised account. . . . . . . . . . 32
Lock your Chromebook. . . . . . . . . . . . 33
Sign out . . . . . . . . . . . . . . . . . . 33
Give other Google Accounts permission to use
your Chromebook . . . . . . . . . . . . . . 33
Check a Chromebook’s owner . . . . . . . . . 34
Disable guest browsing mode . . . . . . . . . 34
Reset your Chromebook . . . . . . . . . . . 34
Shut down your Chromebook . . . . . . . . . 34
Get help from Google . . . . . . . . . . . . 34
Chapter 7. Manage files and
folders . . . . . . . . . . . . . . . . . 35
What is Google Drive . . . . . . . . . . . . . 35
Your local storage space . . . . . . . . . . . 35
Files app . . . . . . . . . . . . . . . . . 35
Create folders using the Files app . . . . . . . . 35
Delete unused files . . . . . . . . . . . . . 35
Check the amount of available storage . . . . . . 36
Chapter 8. Language settings. . . . . 37
Change display language . . . . . . . . . . . 37
© Copyright Lenovo 2018 iii
Page 6

Add an input method . . . . . . . . . . . . . 37
Switch among input methods . . . . . . . . . 37
Chapter 9. Add and manage apps. . . 39
What is Chrome Web Store . . . . . . . . . . 39
Add apps or extensions. . . . . . . . . . . . 39
Install Android apps . . . . . . . . . . . . . 39
Pin apps to shelf . . . . . . . . . . . . . . 40
Pin Web pages to shelf . . . . . . . . . . . . 40
Ergonomic information . . . . . . . . . . 41
Basic maintenance tips . . . . . . . . . . . . 42
Cleaning your computer . . . . . . . . . . . 42
Appendix A. Compliance
information . . . . . . . . . . . . . . . 45
Appendix B. Lenovo help and
support . . . . . . . . . . . . . . . . . 53
Chapter 10. Accessibility,
ergonomic, and maintenance
information . . . . . . . . . . . . . . . 41
Accessibility and comfort . . . . . . . . . . . 41
Appendix C. Lenovo Limited
Warranty . . . . . . . . . . . . . . . . 55
Trademarks . . . . . . . . . . . . . . . . lxiii
iv Lenovo Chromebook 2nd Gen Series User Guide
Page 7

Chapter 1. Important safety information
Read this first
This information can help you safely use your personal computer. Follow and retain all information included
with your computer. The information in this document does not alter the terms of your purchase agreement
or the Appendix C “Lenovo Limited Warranty” on page 55.
Customer safety is important. Our products are developed to be safe and effective. However, personal
computers are electronic devices. Power cords, power adapters, and other features can create potential
safety risks that can result in physical injury or property damage, especially if misused. To reduce these risks,
follow the instructions included with your product, observe all warnings on the product and in the operating
instructions, and review the information included in this document carefully. By carefully following the
information contained in this document and provided with your product, you can help protect yourself from
hazards and create a safer computer work environment.
Note: This information includes references to power adapters and batteries. In addition to notebook
computers, some products (such as speakers and monitors) ship with external power adapters. If you have
such a product, this information applies to your product. In addition, computer products contain a coin-sized
internal battery that provides power to the system clock even when the computer is unplugged, so the
battery safety information applies to all computer products.
Conditions that require immediate action
Products can become damaged due to misuse or neglect. Some product damage is serious enough that the
product should not be used again until it has been inspected and, if necessary, repaired by an authorized
servicer.
As with any electronic device, pay close attention to the product when it is turned on. On very rare
occasions, you might notice an odor or see a puff of smoke or sparks vent from your product. Or you might
hear sounds like popping, cracking, or hissing. These conditions might merely mean that an internal
electronic component has failed in a safe and controlled manner. Or, they might indicate a potential safety
issue. However, do not take risks or attempt to diagnose the situation yourself. Contact the Customer
Support Center for further guidance. For a list of Service and Support phone numbers, go to
www.lenovo.com/support/phone
Frequently inspect your computer and its components for damage or wear or signs of danger. If you have
any question about the condition of a component, do not use the product. Contact the Customer Support
Center or the product manufacturer for instructions on how to inspect the product and have it repaired, if
necessary.
In the unlikely event that you notice any of the following conditions, or if you have any safety concerns with
your product, stop using the product and unplug it from the power source and telecommunication lines until
you can speak to the Customer Support Center for further guidance.
• Power cords, plugs, power adapters, extension cords, surge protectors, or power supplies that are
cracked, broken, or damaged.
• Signs of overheating, smoke, sparks, or fire.
• Damage to a battery (such as cracks, dents, or creases), discharge from a battery, or a buildup of foreign
substances on the battery.
• A cracking, hissing, or popping sound, or strong odor that comes from the product.
.
http://
© Copyright Lenovo 2018 1
Page 8

• Signs that liquid has been spilled or an object has fallen onto the computer product, the power cord, or
power adapter.
• The computer product, power cord, or power adapter has been exposed to water.
• The product has been dropped or damaged in any way.
• The product does not operate normally when you follow the operating instructions.
Note: If you notice these conditions with a product (such as an extension cord) that is not manufactured for
or by Lenovo, stop using that product until you can contact the product manufacturer for further instructions,
or until you get a suitable replacement.
Service and upgrades
Do not attempt to service a product yourself unless instructed to do so by the Customer Support Center or
your documentation. Only use a Service Provider who is approved to repair your particular product.
Note: Some computer parts can be upgraded or replaced by the customer. Upgrades typically are referred
to as options. Replacement parts approved for customer installation are referred to as Customer
Replaceable Units, or CRUs. Lenovo provides documentation with instructions when it is appropriate for
customers to install options or replace CRUs. You must closely follow all instructions when installing or
replacing parts. The Off state of a power indicator does not necessarily mean that voltage levels inside a
product are zero. Before you remove the covers from a product equipped with a power cord, always make
sure that the power is turned off and that the product is unplugged from any power source. If you have any
questions or concerns, contact the Customer Support Center.
Although there are no moving parts in your computer after the power cord has been disconnected, the
following warnings are required for your safety.
CAUTION:
Hazardous moving parts. Keep fingers and other body parts away.
CAUTION:
Before you open the computer cover, turn off the computer and wait several minutes until the
computer is cool.
2
Lenovo Chromebook 2nd Gen Series User Guide
Page 9
Power cords and power adapters
DANGER
Use only the power cords and power adapters supplied by the product manufacturer.
The power cords shall be safety approved. For Germany, it shall be H05VV-F, 3G, 0.75 mm
2
, or
better. For other countries, the suitable types shall be used accordingly.
Never wrap a power cord around a power adapter or other object. Doing so can stress the cord in
ways that can cause the cord to fray, crack, or crimp. This can present a safety hazard.
Always route power cords so that they will not be walked on, tripped over, or pinched by objects.
Protect power cords and power adapters from liquids. For instance, do not leave your power cord
or power adapter near sinks, tubs, toilets, or on floors that are cleaned with liquid cleansers. Liquids
can cause a short circuit, particularly if the power cord or power adapter has been stressed by
misuse. Liquids also can cause gradual corrosion of power cord terminals and/or the connector
terminals on a power adapter, which can eventually result in overheating.
Ensure that all power cord connectors are securely and completely plugged into receptacles.
Do not use any power adapter that shows corrosion at the ac input pins or shows signs of
overheating (such as deformed plastic) at the ac input pins or anywhere on the power adapter.
Do not use any power cords where the electrical contacts on either end show signs of corrosion or
overheating or where the power cord appears to have been damaged in any way.
To prevent possible overheating, do not cover the power adapter with clothing or other objects
when the power adapter is plugged into an electrical outlet.
Chapter 1. Important safety information 3
Page 10
Plugs and outlets
DANGER
If a receptacle (power outlet) that you intend to use with your computer equipment appears to be
damaged or corroded, do not use the outlet until it is replaced by a qualified electrician.
Do not bend or modify the plug. If the plug is damaged, contact the manufacturer to obtain a
replacement.
Do not share an electrical outlet with other home or commercial appliances that draw large
amounts of electricity; otherwise, unstable voltage might damage your computer, data, or attached
devices.
Some products are equipped with a three-pronged plug. This plug fits only into a grounded
electrical outlet. This is a safety feature. Do not defeat this safety feature by trying to insert it into a
non-grounded outlet. If you cannot insert the plug into the outlet, contact an electrician for an
approved outlet adapter or to replace the outlet with one that enables this safety feature. Never
overload an electrical outlet. The overall system load should not exceed 80 percent of the branch
circuit rating. Consult an electrician for more information if you have questions about power loads
and branch circuit ratings.
Be sure that the power outlet you are using is properly wired, easily accessible, and located close to
the equipment. Do not fully extend power cords in a way that will stress the cords.
Be sure that the power outlet provides the correct voltage and current for the product you are
installing.
Carefully connect and disconnect the equipment from the electrical outlet.
Power supply statement
DANGER
Never remove the cover on a power supply or any part that has the following label attached.
Hazardous voltage, current, and energy levels are present inside any component that has this label
attached. There are no serviceable parts inside these components. If you suspect a problem with
one of these parts, contact a service technician.
4
Lenovo Chromebook 2nd Gen Series User Guide
Page 11
Electrical current safety information
DANGER
Electric current from power, telephone, and communication cables is hazardous. To avoid a shock
hazard:
• Do not use your computer during a lightning storm.
• Do not connect or disconnect any cables or perform installation, maintenance, or reconfiguration of this product during an electrical storm.
• Connect all power cords to a properly wired and grounded electrical outlet.
• Connect to properly wired outlets any equipment that will be attached to this product.
• Whenever possible, use one hand only to connect or disconnect signal cables.
• Never turn on any equipment when there is evidence of fire, water, or structural damage.
• Disconnect the attached power cords, battery pack, and all the cables before you open the
device covers, unless instructed otherwise in the installation and configuration procedures.
• Do not use your computer until all internal parts enclosures are fastened into place. Never use
the computer when internal parts and circuits are exposed.
DANGER
Connect and disconnect cables as described in the following procedures when installing, moving,
or opening covers on this product or attached devices.
To connect:
1. Turn everything OFF.
2. First, attach all cables to devices.
3. Attach signal cables to connectors.
4. Attach power cords to outlets.
5. Turn devices ON.
To disconnect:
1. Turn everything OFF.
2. First, remove power cords from outlets.
3. Remove signal cables from connectors.
4. Remove all cables from devices.
The power cord must be disconnected from the wall outlet or receptacle before installing all other
electrical cables connected to the computer.
The power cord may be reconnected to the wall outlet or receptacle only after all other electrical
cables have been connected to the computer.
Chapter 1. Important safety information 5
Page 12
DANGER
During electrical storms, do not perform any replacement and do not connect the telephone cable
to or disconnect it from the telephone outlet on the wall.
Non-rechargeable coin-cell battery notice
DANGER
If the coin-cell battery is incorrectly replaced, there is danger of an explosion. The battery contains
a small amount of harmful substance.
Do not heat to more than 100 °C (212 °F).
The following statement applies to users in the state of California, U.S.A.
Products containing manganese dioxide lithium coin-cell batteries may contain perchlorate.
Perchlorate Material - special handling may apply, see
www.dtsc.ca.gov/hazardouswaste/perchlorate.
Built-in rechargeable battery notice
DANGER
Do not attempt to replace the built-in rechargeable battery. Replacement of the battery must be
done by a Lenovo-authorized repair facility or technician.
Only recharge the battery strictly according to instructions included in the product documentation.
Removable rechargeable battery notice
DANGER
Only recharge the battery strictly according to instructions included in the product documentation.
If the battery is incorrectly replaced, there is danger of an explosion. The battery contains a small
amount of harmful substances.
6
Lenovo Chromebook 2nd Gen Series User Guide
Page 13
Heat and product ventilation
DANGER
Computers, ac power adapters, and many accessories can generate heat when turned on and when
batteries are charging. Notebook computers can generate a significant amount of heat due to their
compact size. Always follow these basic precautions:
• When your computer is turned on or the battery is charging, the base, the palm rest, and some
other parts may become hot. Avoid keeping your hands, your lap, or any other part of your body
in contact with a hot section of the computer for any extended length of time. When you use the
keyboard, avoid keeping your palms on the palm rest for a prolonged period of time. Your
computer generates some heat during normal operation. The amount of heat depends on the
amount of system activity and the battery charge level. Extended contact with your body, even
through clothing, could cause discomfort or even a skin burn. Periodically take breaks from using
the keyboard by lifting your hands from the palm rest; and be careful not to use the keyboard for
any extended length of time.
• Do not operate your computer or charge the battery near flammable materials or in explosive
environments.
• Ventilation slots, fans and/or heat sinks are provided with the product for safety, comfort, and
reliable operation. These features might inadvertently become blocked by placing the product on
a bed, sofa, carpet, or other flexible surface. Never block, cover, or disable these features.
• When the ac power adapter is connected to an electrical outlet and your computer, it generates
heat. Do not place the adapter in contact with any part of your body while using it. Never use the
ac power adapter to warm your body. Extended contact with your body, even through clothing,
may cause a skin burn.
For your safety, always follow these basic precautions with your computer:
• Keep the cover closed whenever the computer is plugged in.
• Regularly inspect the outside of the computer for dust accumulation.
• Remove dust from vents and any perforations in the bezel. More frequent cleaning might be
required for computers in dusty or high-traffic areas.
• Do not restrict or block any ventilation openings.
• Do not operate your computer inside furniture, as this might increase the risk of overheating.
• Airflow temperatures into the computer should not exceed 35°C (95°F).
Liquid crystal display (LCD) notice
CAUTION:
The liquid crystal display (LCD) is made of glass and rough handling or dropping the computer can
cause the LCD to break. If the LCD breaks and the internal fluid gets into your eyes or on your hands,
immediately wash the affected areas with water for at least 15 minutes; if any symptoms are present
after washing, get medical care.
Note: For products with mercury-containing fluorescent lamps (for example, non-LED), the fluorescent lamp
in the liquid crystal display (LCD) contains mercury; dispose of according to local, state, or federal laws.
Chapter 1. Important safety information 7
Page 14
Extension cords and related devices
Ensure that extension cords, surge protectors, uninterruptible power supplies, and power strips that you use
are rated to handle the electrical requirements of the product. Never overload these devices. If power strips
are used, the load should not exceed the power strip input rating. Consult an electrician for more information
if you have questions about power loads, power requirements, and input ratings.
Using headphones or earphones
CAUTION:
Excessive sound pressure from earphones and headphones can cause hearing loss. Adjustment of
the equalizer to maximum increases the earphone and headphone output voltage and the sound
pressure level. Therefore, to protect your hearing, adjust the equalizer to an appropriate level.
Excessive use of headphones or earphones for a long period of time at high volume can be dangerous if the
output of the headphone or earphone connectors do not comply with specifications of EN 50332-2. The
headphone output connector of your computer complies with EN 50332-2 Sub clause 7. This specification
limits the computer’s maximum wide band true RMS output voltage to 150 mV. To help protect against
hearing loss, ensure that the headphones or earphones you use also comply with EN 50332-2 (Clause 7
limits) for a wide band characteristic voltage of 75 mV. Using headphones that do not comply with EN 503322 can be dangerous due to excessive sound pressure levels.
If your Lenovo computer came with headphones or earphones in the package, as a set, the combination of
the headphones or earphones and the computer already complies with the specifications of EN 50332-1. If
different headphones or earphones are used, ensure that they comply with EN 50332-1 (Clause 6.5
Limitation Values). Using headphones that do not comply with EN 50332-1 can be dangerous due to
excessive sound pressure levels.
Plastic bag notice
DANGER
Plastic bags can be dangerous. Keep plastic bags away from babies and children to avoid danger of
suffocation.
Glass parts notice
CAUTION:
Some parts of your product may be made of glass. This glass could break if the product is dropped on
a hard surface or receives a substantial impact. If glass breaks, do not touch or attempt to remove it.
Stop using your product until the glass is replaced by trained service personnel.
Safety instructions for teachers, parents and adult supervisors
This Chromebook computer is intended for use as a child development tool primarily by children, 6 years of
age or above. There must be supervision by an adult. It is a must to have a thorough explanation to children
on safe and proper handling of the computer, battery pack, and ac power adapter.
8
Lenovo Chromebook 2nd Gen Series User Guide
Page 15
DANGER
Warning: Chocking Hazard — Small parts. Not suitable for children under age 3.
• For ITE with power supplies not intended to be handled by children: As with all electrical products,
precautions should be observed handling and use to prevent electric shock. The ac power adapter should
not be handled by children.
• The computer should not be placed on the bare skin (lap) of the child for long periods. The computer
should be placed on a flat surface, like desktop, if your child intends to use it for more than a few minutes.
• The computer (including the ac power adapter and the battery pack, as applicable) should not be left in
the rain or subjected to exposure to water. If cleaning is necessary do not immerse it in water; wipe clean
with damp cloth.
• The computer (including the ac power adapter and the battery pack, as applicable) should not be
dropped, crushed (stepped on) or otherwise abused.
• An adult should caution his or her child about the potential trip hazard as posed by the cable between a
power source and the computer. An adult should inspect the computer (including the ac power adapter
and the battery pack, as applicable) periodically for damage. Similarly, if a child notices damaged/broken
parts, this should be reported to the teacher/parents/adult supervisors immediately. Damaged parts may
be replaced through service provided by Lenovo.
DANGER
ELECTRICALLY OPERATED PRODUCT. Not recommended for children under 3 years of age (or
other intended age range). As with all electrical products, precautions should be observed during
handling and use of electrical products to reduce the risk of electric shock.
Chapter 1. Important safety information 9
Page 16

10 Lenovo Chromebook 2nd Gen Series User Guide
Page 17
Chapter 2. Meet your Chromebook
2 31
12
11
11
5
4
10
9
Front view
Figure 1. Lenovo 100e Chromebook 2nd Gen — front view
© Copyright Lenovo 2018 11
Page 18
21 3
7 86
11 1112
5
4
10
Figure 2. Lenovo 300e/500e Chromebook 2nd Gen — front view
1. Front webcam light 2. Front webcam
3. Microphone
5. Screen
7. WorldFacing webcam light* 8. Microphone*
9. Power key 10. Keyboard
11. Speakers
* for selected models
Note: Lenovo 300e/500e Chromebook 2nd Gen display supports the multi-touch function.
12
Lenovo Chromebook 2nd Gen Series User Guide
4. Wireless antennas (invisible from the outside)
6. WorldFacing webcam*
12. Touchpad
Page 19

Webcam lights
You computer might have two webcam lights, the front camera light and the WorldFacing webcam light.
When you activate one webcam, the corresponding webcam light is on. The webcam light is on when the
corresponding webcam is in use. The lights next to the webcams indicate which webcam is activated.
Webcams
The built-in webcams can be used for video calling or videoconferencing.
Note: If your computer supports both the front webcam and the Worldfacing webcam, only one of the two
webcams can be activated each time. To switch between webcams, start the Camera app and click the
Toggle camera icon
.
Microphones
The built-in microphones can be used for voice recording, audio communication, or videoconferencing.
Note: For some models, you might need to install additional apps before using the microphone.
Wireless antennas
If your computer includes a radio transmitter, wireless antennas are built into the computer for sending and
receiving radio. The antennas are usually not visible from the outside of the computer.
Screen
The screen can be used to display text, graphics, and videos.
Note: Lenovo 300e/500e Chromebook 2nd Gen supports the multi-touch function. You can use your finger
or the included stylus for interaction with the computer. For details about the multi-touch function, see “Use
the multi-touch screen” on page 25.
Power key
When you open the LCD cover, the Chromebook automatically starts. If it does not work, press the power
key. The power key also can be used to put the computer to sleep mode or wake up the computer.
Keyboard
Your Chromebook keyboard works just like a conventional keyboard but with a few dedicated shortcut keys
for quick access to certain settings. In addition to the dedicated shortcut keys, Chromebook also supports
shortcut keys using the ctrl, alt, or shift key.
Note: For details about shortcut keys, see “Use the special keys” on page 26.
Speakers
Speakers are used to produce sound.
Touchpad
The touchpad supports the single-click function. Move your finger on the touchpad to move the cursor, and
tap or click on the touchpad to start apps.
Note: For details about how to use the touchpad, see “Use the touchpad ” on page 26.
Chapter 2. Meet your Chromebook 13
Page 20
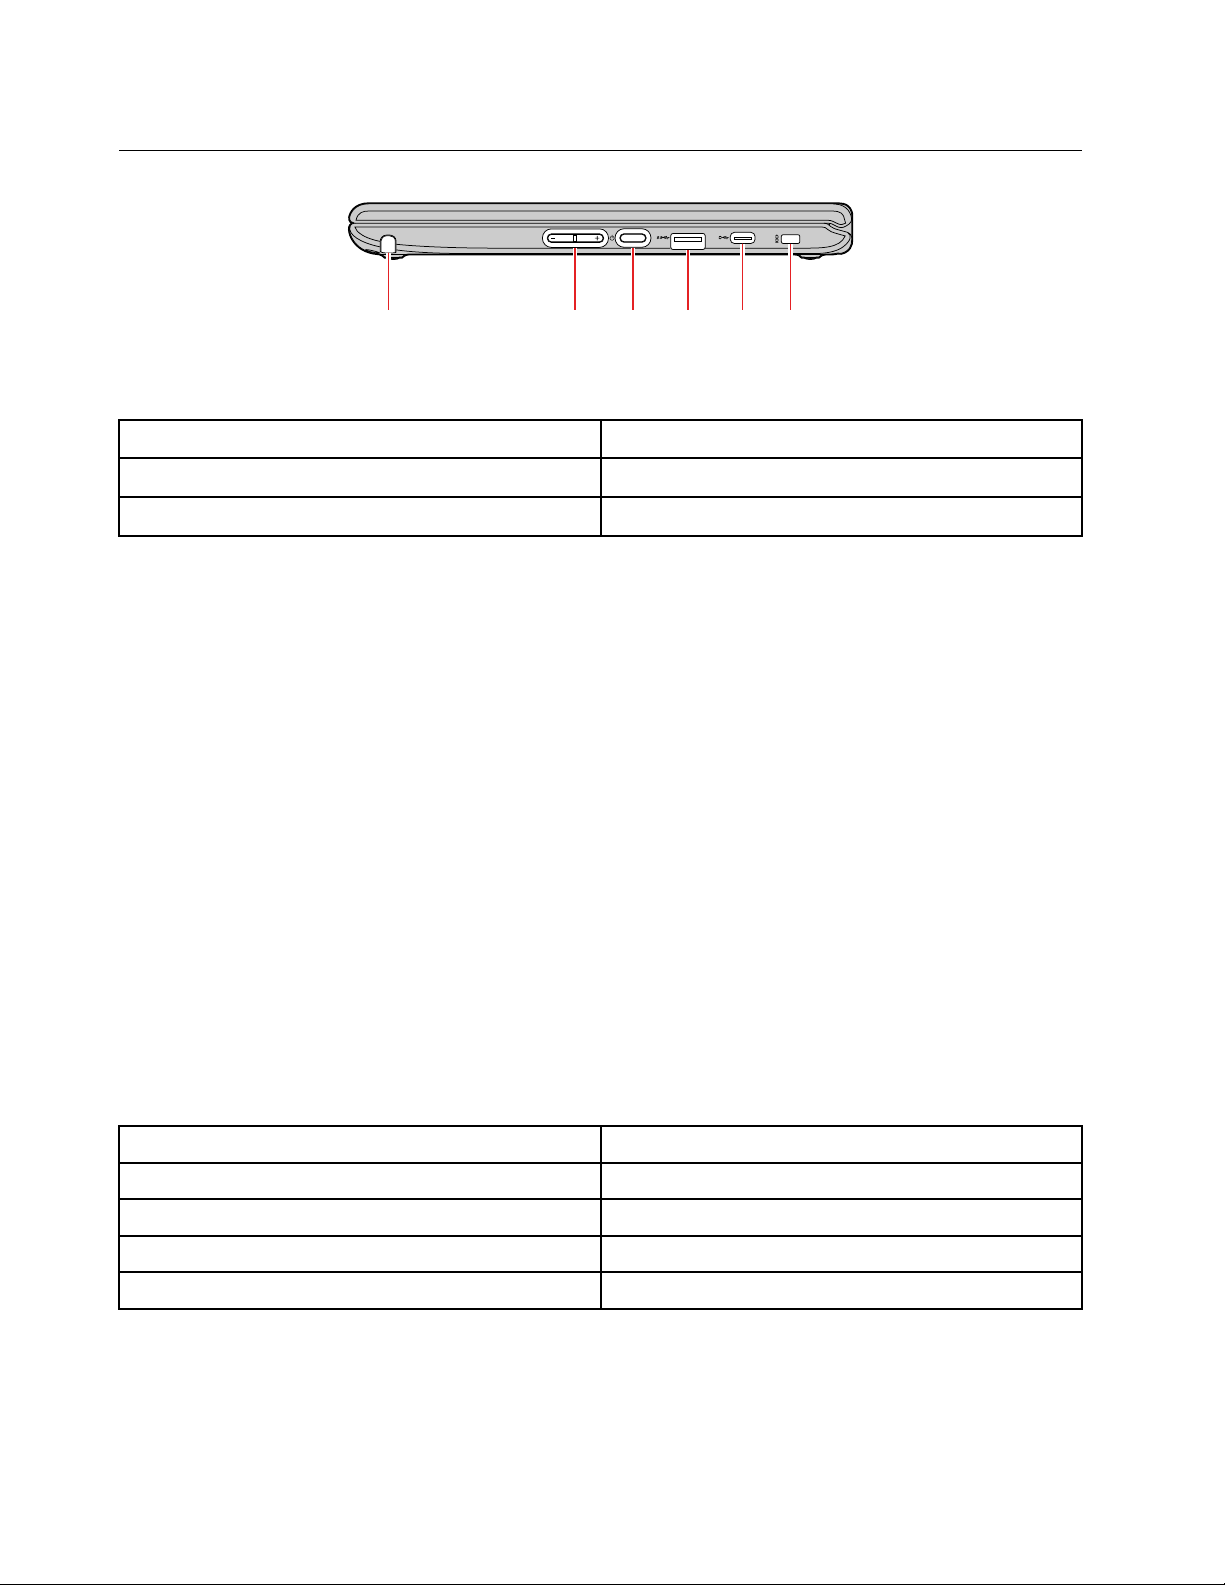
Left view
1 2 3 4 5
Figure 3. Lenovo 100e/300e/500e Chromebook 2nd Gen — left view
1. dc-in light
3. USB 3.0 (Type-A) connector 4. MicroSD slot
5. Combo audio connector
2. dc-in / USB-C connector
dc-in light
The dc-in light shows the power and battery status of your computer.
Table 1. dc-in light status and the corresponding power and battery status
Light status Power status Battery status
on (red) plugged in
on (amber)
on (green) plugged in having been fully charged for more
off unplugged discharging
plugged in
• being charged
• remaining power less than 2%
• being charged
• remaining power 2% and 100%
than 5 minutes
dc-in / USB-C connector
Plug in the included ac power adapter to charge the internal battery and provide power to the Chromebook.
Note: While not used by the ac power adapter, the connector can also be used to connect external devices
with a USB-C plug. See “USB-C connector” on page 17.
USB 3.0 (Type-A) connector
The USB 3.0 (Type-A) connector is used for connecting external devices. It is compatible with USB 3.0
(Type-A) plugs.
MicroSD card slot
Insert a microSD card here to expand the Chromebook’s local storage capacity.
Insert a microSD card
Step 1. Insert a microSD card into the slot and gently push it until it touches the end.
14
Lenovo Chromebook 2nd Gen Series User Guide
Page 21

Note: Make sure the metal contacts of the microSD card face downwards when inserting it into the
slot.
Step 2. Firmly push in the card until you hear a “click” sound.
Note: When properly inserted, the entire body of the microSD card should be located in the slot
and is not easily moved.
Remove a microSD card
Do not remove a microSD card until the data transfer between the computer and the microSD card has
finished.
Step 1. On the left pane of the Files app, click the eject button
Step 2. Firmly push in the card until you hear a “click” sound.
Step 3. Slowly remove the card from your Chromebook.
(next to SD Card).
Combo audio connector
The combo audio connector supports headphones or headsets with a 3.5 mm TRRS plug. It does not
support standalone microphones nor headsets with a separate plug for microphone.
Chapter 2. Meet your Chromebook 15
Page 22
Right view
4 5 6321
Figure 4. Lenovo 100e/300e/500e Chromebook 2nd Gen — right view
1. Stylus*
3. Power button and power light*
5. USB-C connector 6. Security-lock slot
* for selected models
2. Volume buttons*
4. USB 3.0 (Type-A) connector
Stylus
Use it to take notes, take screenshots, and enjoy art apps.
Note: You may need to install additional apps such as Google Keep for better use of the stylus. When not in
use, put it back into its slot.
Volume buttons
Use these two buttons to adjust volume. They are especially useful when your Chromebook is used in tablet
mode.
Power button
When you open the LCD cover, the Chromebook automatically starts. If it does not work, press the power
button. The power button can also be used to sleep or wake your Chromebook.
Power light
The Chromebook’s power status is reflected by the status of its power light.
Table 2. Power light status and the corresponding Chromebook power status
Light status Power status
on (white)
blink (white) plugged in and in sleep mode
off unplugged and in sleep mode
off powered off
powered on
USB 3.0 (Type-A) connector
The USB 3.0 (Type-A) connector is used for connecting external devices. It is compatible with USB 3.0
(Type-A) plugs.
16
Lenovo Chromebook 2nd Gen Series User Guide
Page 23

USB-C connector
This connector can be used as follows.
• Charge your computer.
• Charge USB-C compatible devices with the output voltage and current of 5 V and 3 A.
• Transfer data at USB 3.1 speed, up to 5 Gbps.
• Connect to an external display.
– USB-C to VGA: 4096 × 2160 pixels, 60 Hz
– USB-C to DP: 4096 × 2160 pixels, 60 Hz
• Connect to USB-C accessories to expand computer functionality. To purchase USB-C accessories, go to
https://www.lenovo.com/accessories.
Note: When the battery power is below 10%, the connected USB-C accessories might not work correctly.
Security-lock slot
Lock your computer to a desk, table, or other fixtures through a compatible security cable lock.
Note: You are responsible for evaluating, selecting, and implementing the locking device and security
feature. Lenovo makes no comments, judgments, or warranties about the function, quality, or performance
of the locking device and security feature. Cable locks for your product are available from Lenovo at
www.lenovoquickpick.com/
.
https://
Chapter 2. Meet your Chromebook 17
Page 24

Features and specifications
Specifications might change without notice. Some specifications are model-specific and might not apply to
the model that you purchased.
• Multi-touch screen*
Display
• Resolution: 1366 x 768 pixels
• Size: 294.64 mm (11.6 inches)
Memory
Storage device
Connectors and slots
Wireless features
Security
• Type: LPDDR4, on-board memory
• Capacity: 4 GB or 8 GB
• Type: eMMC 5.1
• Capacity:
– Lenovo 100e Chromebook 2nd Gen: 16 GB or 32 GB
– Lenovo 300e Chromebook 2nd Gen: 32 GB
– Lenovo 500e Chromebook 2nd Gen: 32 GB, 64 GB, or 128 GB
Note: The capacity of the storage device displayed in the operating system typically is
lower than the nominal capacity.
• Two USB-C connectors
• Two USB 3.0 (Type-A) connectors
• Audio connector
• MicroSD card slot
• Stylus slot*
• Bluetooth
• Wireless LAN
• Security-lock slot
• Webcams
Others
Size
Weight
Battery pack
ac power adapter
• Microphones
• Speakers
• Lenovo 100e Chromebook 2nd Gen: appr. 290 mm x 204 mm x 19.9 mm (11.4 inches x
8.03 inches x 0.78 inches)
• Lenovo 300e/500e Chromebook 2nd Gen: appr. 290 mm x 204 mm x 20.35 mm (11.4
inches x 8.03 inches x 0.80 inches)
• Lenovo 100e Chromebook 2nd Gen: appr.1.25 kg (2.76 lb)
• Lenovo 300e/500e Chromebook 2nd Gen: appr.1.35 kg (2.98 lb)
• 3 cells
• 42 Wh
• Input: 100 V to 240 V, 50 Hz to 60 Hz
• Output: 15 V
• Power: 45 W
18 Lenovo Chromebook 2nd Gen Series User Guide
Page 25

* for selected models
Note: The battery capacity is the typical or average capacity as measured in a specific test environment.
Capacities measured in other environments may differ but are no lower than the rated capacity (see product
label).
Chapter 2. Meet your Chromebook 19
Page 26

Operating environment
Maximum altitude
3048 m (10,000 ft) (without pressurization)
Temperature
Operating 5 ℃ – 35 ℃ (41 ℉ – 95 ℉)
Storage 5 ℃ – 43 ℃ (41 ℉ – 109 ℉)
Note: When charging the battery pack, the environment temperature must be at least 0 ℃ (32 ℉).
Relative humidity
Operating 8% – 95% at wet-bulb temperature 23 ℃ (73 ℉)
Storage 5% – 95% at wet-bulb temperature 27 ℃ (81 ℉)
If possible, place your computer in a well-ventilated and dry area without direct exposure to sunshine.
20
Lenovo Chromebook 2nd Gen Series User Guide
Page 27

Chapter 3. Get started with your Chromebook
1
2a 2b
3
Charge your Chromebook
Both USB-C connectors on your Chromebook work as power connectors. Plug in the ac power adapter to
charge the built-in battery and provide power to your Chromebook.
Connect to ac power
CAUTION:
All plugs must be firmly and securely inserted into receptacles.
1. Connect the power cord to the ac power adapter.
2. Plug the power adapter into one of the USB-C connectors of the Chromebook.
3. Plug the power cord into a properly grounded electrical outlet.
© Copyright Lenovo 2018 21
Page 28

User interface
1. Wallpaper Your wallpaper might look different. To change the wallpaper, right-click an
empty area of your desktop, and select Set wallpaper.
2. Search box and the App
Launcher
3. Launcher button
4. Shelf Pin your frequently used apps or Web pages to the shelf for easy access.
5. System tray Manage network connections, updates, and settings. By default, the time,
• Type the name of your device, app, or Web page in the search box.
• Click any app shown in the App Launcher to open the app quickly.
Open the search box and the App Launcher.
network connection status, and battery status are displayed.
22 Lenovo Chromebook 2nd Gen Series User Guide
Page 29

Get to know your Chromebook modes
Lenovo 300e/500e Chromebook 2nd Gen display can be rotated up to 360 degrees.
Attention:
• Do not rotate the computer display with too much force, or apply too much force to the upper-right or
upper-left corner of the computer display. Otherwise, the display or hinges might get damaged.
• The keyboard and the pointing devices are automatically disabled in stand mode, tent mode, and tablet
mode. Use the touch screen to control your Chromebook instead.
Lenovo 300e/500e Chromebook 2nd Gen supports the following four modes. You can switch among
different modes as you prefer.
Notebook mode
Tent mode
Stand mode
Tablet mode
Connect to Wi-Fi
1. Click the system tray.
2. Click the network icon and turn on the wireless feature.
3. Select an available network to connect. Provide required information if needed.
Chapter 3. Get started with your Chromebook 23
Page 30

Connect to Bluetooth devices
Your Chromebook supports the Bluetooth feature. You can connect your Chromebook to a Bluetooth
keyboard, mouse, speakers, or other Bluetooth devices.
Note: The Bluetooth devices must be with a short distance, usually 10 meters (33 feet) from the
Chromebook.
1. Click the system tray, and then click the Bluetooth icon.
2. If the Bluetooth feature is off, turn on the Bluetooth switch.
3. Select a Bluetooth device, and then follow the on-screen instructions.
Set the power plan
For ENERGY STAR® compliant computers, the following power plan takes effect when your computers have
been idle for a specified duration:
Table 3. Default power plan (when plugged into ac power)
• Turn off the display: After seven minutes
• Put Chromebook into sleep: After 30 minutes
To change the power settings:
1. Click the system tray, and then click the settings icon
2. Under Device item, click Power.
3. Follow the on-screen instructions to change the settings as you prefer.
.
To wake up your Chromebook from sleep mode, press the power button or any key on the keyboard.
24
Lenovo Chromebook 2nd Gen Series User Guide
Page 31

Chapter 4. Navigate the screen
Use the multi-touch screen
Lenovo 300e/500e Chromebook 2nd Gen supports the multi-touch function. Some gestures might not be
available depending on the app you use.
Tap
Open an app or perform an
action on an open app, such as
Copy, Save, and Delete,
depending on the app.
Slide
Scroll through items, such as
lists, pages, and photos.
Move two fingers closer
together
Zoom out.
Swipe up from the bottom
Unfold the APP Launcher.
Tap and hold
Open a shortcut menu.
Drag an item to the location you
want
Move an object.
Move two fingers farther apart
Zoom in.
Tap with two fingers
Open a shortcut menu.
Tips
• Turn off the computer before cleaning the multi-touch screen.
• Use a dry, soft, and lint-free cloth or a piece of absorbent cotton to remove fingerprints or dust from the
multi-touch screen. Do not apply solvents to the cloth.
• The multi-touch screen is a glass panel covered with a plastic film. Do not apply pressure or place any
metallic object on the screen, which might damage the touch panel or cause it to malfunction.
• Do not use fingernails, gloved fingers, or inanimate objects for input on the screen.
• Regularly calibrate the accuracy of the finger input to avoid a discrepancy.
© Copyright Lenovo 2018 25
Page 32

Use the special keys
Your Chromebook keyboard works just like a conventional keyboard, with a few special keys.
Go to the previous page you just visited.
Go to the next page.
Reload your current page.
Display the current full page.
Show all windows in overview mode.
Decrease the screen brightness.
Increase the screen brightness.
Mute sound.
Decrease the volume.
Increase the volume.
Lock the computer screen.*
Turn on the computer, put it to sleep mode, or wake it up.*
* for selected models
Your Chromebook also supports some key combinations.
ctrl +
alt +
+ L
ctrl + alt + ? View all the keyboard shortcuts.
Take a screenshot.
Turn on or turn off the Caps Lock function.
Lock the computer screen.
To change the keyboard settings:
1. Click the system tray, and then click the settings icon
.
2. Under Device item, click Keyboard.
3. Follow the on-screen instruction to change the settings as you prefer.
Use the touchpad
The entire touchpad surface is sensitive to finger touch and movement. You can use the touchpad to perform
all the pointing, clicking, and scrolling functions of a traditional mouse.
Notes:
• When using two or more fingers, ensure that you position your fingers slightly apart.
• Some gestures are only available when you are using certain apps.
• If the touchpad surface is stained with oil, turn off the computer first. Then, gently wipe the touchpad
surface with a soft and lint-free cloth moistened with lukewarm water or computer cleaner.
26
Lenovo Chromebook 2nd Gen Series User Guide
Page 33

Use the touchpad gestures
Tap
Tap anywhere on the touchpad
with one finger to select or open
an item.
Two-finger scroll
Put two fingers on the touchpad
and move them in the vertical or
horizontal direction. This action
enables you to scroll through the
document, Web site, or apps.
Two-finger tap
Tap anywhere on the touchpad
with two fingers to display a
shortcut menu.
Swipe three fingers up or down
Put three fingers on the touchpad
and move them up or down to see
all your open windows.
To change the settings:
1. Click the system tray, and then click the settings icon
.
2. Under Device item, Click Touchpad.
3. Follow the on-screen instructions to change the settings as you prefer.
Notes:
• If enable tap-to-click is turned on, you can tap or press the touchpad to achieve the clicking function
of a traditional mouse.
• If enable tap-to-click is turned off, you can only press the touchpad to achieve the clicking function
of a traditional mouse.
Chapter 4. Navigate the screen 27
Page 34

28 Lenovo Chromebook 2nd Gen Series User Guide
Page 35

Chapter 5. Use multimedia
Use the webcams
You can use the built-in webcams to take photos or record videos. If your computer supports both front
webcam and Worldfacing webcam, only one of the two webcams can be activated each time. The webcam
light is on when the corresponding webcam is in use.
To take photos with the webcam:
1. Click the Launcher button, and then click
2. Click Camera.
Note: If you want to switch between webcams, click the Toggle camera icon
3. Click the red camera icon. If you want to record video, click the video icon to switch to video mode.
to display the full APP Launcher.
.
Use audio
You can connect headphones or a headset with a 3.5-mm (0.14-inch) and 4-pole plug to the audio connector
to listen to the sound from your Chromebook.
To play a saved audio or video file:
1. Click the Launcher button, and then click
2. Select Files.
3. Double-click a file to open it in the media player.
To adjust the volume, click the system tray, and then adjust the volume bar.
to display the full APP Launcher.
Connect to an external display
With an appropriate USB-C cable connected, you can use either of the two USB-C connectors to connect
your Chromebook to an external display. If you need conversion cables, go to
accessories
.
https://www.lenovo.com/
To connect your Chromebook to a projector or a monitor to give presentations or expand your workspace:
1. Connect the external display to either of the two USB-C connectors on your Chromebook.
2. Connect the external display to an electrical outlet.
3. Turn on the external display.
To change the display settings:
1. Click the system tray, and then click the settings icon
2. Under Device item, click Displays.
3. Follow the on-screen instructions to change the display settings as you prefer.
© Copyright Lenovo 2018 29
.
Page 36

30 Lenovo Chromebook 2nd Gen Series User Guide
Page 37

Chapter 6. Account, login, and logout
Types of user account for logging into Chrome
There are three types of user accounts you may use to log into Chrome.
Types of user account Description
Google Account
A user account that has access to a variety of
Google Web services, including Gmail, Google
Drive, and Google Docs. Typically a Google
Account is created when you apply for a Gmail
account. A Google Account can be used to log into
any Chrome-based device unless the account is
restricted by the device’s owner. For details, refer to
“Give other Google Accounts permission to use
your Chromebook” on page 33.
The first Google Account logged into a Chromebased device becomes the device’s owner.
Note: If you don’t have a Google Account, you can
create one at
NewAccount
http://www.google.com/accounts/
.
Guest account
A special account for logging into Chrome. A Guest
user has limited privilege and may only be used for
temporary sharing of a Chrome-based device.
Note: Guest login may be disabled by a device’s
owner. For details, refer to “Disable guest browsing
mode” on page 34.
Supervised account
A special account created by a Google Account
(manager) logged into a Chrome-based device. A
supervised account is device-specific and cannot
be used to log into other Chrome-based device.
The manager of a supervised user can review and
control a supervised user’s use of the Internet.
Become your Chromebook’s owner
When starting your Chromebook for the first time, you need to set the operating system language and
keyboard, the Internet connection, and sign in with your Google Account. The user of the first Google
Account signed into a Chromebook becomes the device’s owner.
Note: The owner of a Chromebook has permissions to enable (or disable) Guest account login and restrict
login of certain Google Accounts.
© Copyright Lenovo 2018 31
Page 38

Step 1. Start your Chromebook.
Step 2. Select your local language and keyboard when prompted.
Step 3. Set up connection to your wireless router (or a wireless LAN) that has Internet access.
Note: This step cannot be skipped. You must have an Internet connection when starting your
Chromebook for the first time.
Step 4. Sign in with your Google Account. If you don’t have a Google Account, select Create a Google
Account and follow the on-screen instructions to create one.
You’re now your Chromebook’s owner. To verify this, refer to “Check a Chromebook’s owner” on page 34.
Sign in with another Google account
As the device owner, you may share your Chromebook with other people. They can use their Google
Accounts to sign in and use your Chromebook.
Step 1. Start the Chromebook.
Step 2. On the login screen, click Add person.
Step 3. Type the Google Account user name and password to sign in.
Note: You need to connect the Chromebook to the Internet before you sign in with the Google
account for the first time.
If you cannot sign in with your Google account, your account may be restricted by the Chromebook owner.
For details, refer to “Give other Google Accounts permission to use your Chromebook” on page 33.
Browse as a guest
You may share your Chromebook with people who do not have a Google Account. They can use your
Chromebook with a special guest account.
Note: Some operations such as installing apps are disabled if you log in as a guest.
Step 1. Start the Chromebook.
Step 2. On the login screen, click Browse as Guest.
Note: If you cannot sign in, guest browsing may be disabled by the Chromebook owner.
Create a supervised account
You may need to create a supervised account for your child to use your Chromebook. As the manager of a
supervised account, you have the ability to review and control their use of the Internet.
Step 1. Start the Chromebook.
Step 2. On the login screen, click the ... icon and then click Add supervised user.
Note: You can only create a supervised account when your Chromebook is connected to the
Internet.
Step 3. Select the manager of the supervised user and provide your password.
Step 4. Create the name and password for the supervised user.
To change restriction settings for the supervised user, go to
32
Lenovo Chromebook 2nd Gen Series User Guide
http://www.chrome.com/manage.
Page 39

Lock your Chromebook
If you need to temporarily leave your Chromebook, lock it so others cannot tamper with your settings or files.
Step 1. Click the system tray.
Step 2. Click the lock icon.
Note: As a shortcut, you can also press and hold the lock key on your keyboard to lock your Chromebook.
Sign out
If you or others need to sign in with another account, sign out of current login session.
Step 1. Click the system tray.
Step 2. Click Sign out.
Give other Google Accounts permission to use your Chromebook
By default, anyone with a valid Google Account can sign in to a Chromebook. However, as a Chromebook
owner, you can give permission to allow certain accounts to sign in.
Step 1. Start the Chromebook.
Step 2. Sign in with the owner’s Google Account.
Note: If you’re not sure who is the Chromebook’s owner, refer to “Check a Chromebook’s owner”
on page 34.
Step 3. Click the system tray, and then click the settings icon
Step 4. Under People item, click Manage other people.
Step 5. Check Restrict sign-in to the following users and click Add person to add the Google Accounts
that you want to give permission.
.
Chapter 6. Account, login, and logout 33
Page 40

Check a Chromebook’s owner
Typically, the user of the first Google Account signed in is set as a Chromebook’s owner. However, if you’re
not sure whether you’re the owner, you can follow the steps below to check a Chromebook’s owner.
Step 1. Sign in with your Google Account.
Step 2. Click the system tray, and then click the settings icon
Step 3. Under People item, click Manage other people.
• If you’re not the owner of the Chromebook, you will get a warning message that the settings may only be
modified by the device owner.
• If you are the owner of the Chromebook, your user name will display.
.
Disable guest browsing mode
As a Chromebook’s owner, you can prevent guests browsing your computer for security.
Step 1. Start the Chromebook.
Step 2. Click the system tray, and then click the settings icon
Step 3. Under People item, click Manage other people.
Step 4. De-select Enable Guest browsing.
.
Reset your Chromebook
If you need to transfer ownership of your Chromebook or if you experienced problems with the operating
system, you might need to reset your Chromebook.
Important: After resetting your Chromebook, user data for all accounts stored locally will be deleted. Back
up important data to Google Drive or external storage devices before resetting your Chromebook.
Step 1. Click the system tray, and then click the settings icon
Step 2. Click Advanced.
Step 3. Under Reset Settings item, click Powerwash and then click Restart.
.
Shut down your Chromebook
When you finish working with your Chromebook, shut it down to save power.
Step 1. Click the system tray.
Step 2. Click the Shut down button
.
Get help from Google
After signing in to your Chromebook, click Get Help from the App Launcher. The Get Help app provides
comprehensive instructions on using a Chromebook.
In addition, Google provides an online community for Chromebook users. If you're interested, go to
chromebook.com/community
34
Lenovo Chromebook 2nd Gen Series User Guide
.
http://
Page 41

Chapter 7. Manage files and folders
What is Google Drive
Google Drive is a server-based file storage and sharing service provided by Google. By creating a Google
Account, you get an initial free storage space where you can save files of various formats. From your
Chromebook, you can use the Google Drive app or the Files app to create and manage files on your online
storage space.
Note: The Google Drive client software is available for Windows®, Android™, OSX and iOS. If you have
devices running those operating systems, you can download and install Google Drive on these devices.
Google Drive provides a convenient way of sharing files between devices. You can also find your files online
by visiting: http://drive.google.com.
Your local storage space
Each Google Account signed in to a Chromebook is assigned a local storage space, in a folder named
Downloads. Each Google Account has its own Downloads. You can only view and edit files in your own
Downloads folder.
Files app
Your Chromebook has a Files app for you to manage files and folders on your local storage device, a
connected external storage device, or Google Drive. The Files app can be started from the App Launcher.
Create folders using the Files app
You can create folders and sub-folders for better management of files.
Step 1. Start the Files app from the App Launcher.
Step 2. On the left pane, select a storage space where you want to save files.
Note: A storage space may reside on your local storage device, a connected external storage
device, or Google Drive.
Step 3. Click the More actions icon
in the upper right corner and then click New folder.
Delete unused files
In some cases, you may need to delete unused files to free storage space.
Step 1. Start the Files app from the App Launcher.
Step 2. On the left pane, select the storage space and then navigate to the folder where unused files are
stored.
Step 3. Select unused files and then click the delete button
in the upper right corner.
© Copyright Lenovo 2018 35
Page 42

Check the amount of available storage
If you have failed saving a large-size file, you may need to check the amount of available storage and then
decide if you need to delete unused files to free more storage.
Step 1. Start the Files app from the App Launcher.
Step 2. On the left pane, select a storage space.
Step 3. Click the More actions icon
in the upper right corner. The amount of available storage is displayed.
36
Lenovo Chromebook 2nd Gen Series User Guide
Page 43

Chapter 8. Language settings
Change display language
When starting your Chromebook for the first time, you’re prompted to select the display language. This
setting can be changed at a later time if you need to use a different language.
Step 1. Sign in to your Chromebook with your Google Account.
Step 2. Click the system tray, and then click the settings icon
Step 3. Click Advanced.
.
Step 4. Under Languages and input item, click Language, and then click the More actions icon
the language that you want to use; select the Display Chrome OS in this language check box.
Note: If the language you want to use isn’t shown in the list, click Add languages.
You need to sign out and then sign in for the changes to take effect.
Note: Each signed-in user may set their own display language.
Add an input method
You may need to add an input method to type text in a particular language.
Step 1. Sign in to your Chromebook with your Google Account.
Step 2. Click the system tray, and then click the settings icon
Step 3. Click Advanced.
Step 4. Under Languages and input item, select Input method ➙ Manage input methods.
Step 5. Select the check box preceding the input method you want to add.
Switch among input methods
If you have added input methods, you may need to switch among them.
next to
Step 1. Click the system tray, and then click the settings icon
Step 2. Click Advanced.
Step 3. Under Languages and input item, select Input method. The list of available input methods is
displayed. If you don’t find your desired input method in the list, refer to “Add an input method” on
page 37.
Step 4. Click the name of your desired input method.
Notes: As a shortcut, use key combinations to switch among input methods.
• Ctrl + Shift + Space to switch among available input methods.
• Ctrl + Space to switch to your previous input method.
© Copyright Lenovo 2018 37
Page 44

38 Lenovo Chromebook 2nd Gen Series User Guide
Page 45

Chapter 9. Add and manage apps
You can add features and functions to your Chromebooks by downloading apps from the Web Store or the
Play Store.
Table 4. Comparison of available resources between the Web Store and the Play Store
Web Store Play Store
Extensions
Themes
Apps
Games
Note: You cannot download and install apps if you’re signing in as Guest.
Apps
Games
Movies
Books
What is Chrome Web Store
Chrome™ Web Store is a Web resource that provides apps and extensions dedicated for your Chromebook
and the Chrome browser.
Note: Extensions are add-on features for the Chrome browser. Most of the apps and extension available on
the Chrome Web Store are free but some may require payment.
You can access the Chrome Web Store by either of the following ways:
• Click the Web Store icon from the App Launcher.
• Visit
Apps and extensions downloaded from the Web Store run completely within the Chrome browser.
http://chrome.google.com/webstore directly using the Chrome browser.
Add apps or extensions
Step 1. Click the Launcher button, and then click to display the full APP Launcher.
Step 2. Click Web Store.
Step 3. Within the store, find your app or extension by typing keywords or searching the list by category.
Step 4. Click the add icon and then click Add to Chrome.
Most of the apps from the Web Store are Web based and do not require installation. The added apps are
pinned to the App Launcher and extensions to the right of the Chrome’s address bar.
Note: If you sign in to different Chromebooks with the same Google Account, apps you added on one
Chromebook are synchronized on other Chromebooks.
Install Android apps
You can download and install Android apps on your Chromebook using the Google Play™ Store.
Step 1. Start Play Store from the App Launcher.
Step 2. Select the app that you want to install and then click INSTALL.
© Copyright Lenovo 2018 39
Page 46

Note: Not all apps in the Play Store are free of charge. Some apps require the purchase for
downloading or full-function using.
The installed Android apps are accessible from the App Launcher.
Pin apps to shelf
Apps pinned to shelf are accessible from the center of bottom in the Chrome desktop.
Step 1. Locate the app icon in the App Launcher.
Step 2. Press and hold the app icon, and then select Pin to shelf on the context menu.
To unpin an app, press and hold the app icon on the shelf, then select Unpin on the context menu.
Pin Web pages to shelf
If you need to visit a Web page frequently, you can pin the Web page to shelf for easy access.
Step 1. Start the Chrome browser and go to your favorite Web page.
Step 2. With the Web page open, select the Customize and control Google Chrome icon
corner.
Step 3. Select More tools ➙ Create shortcut ➙ Create.
To unpin the Web page, press and hold the app icon on the shelf, and then select Unpin on the context
menu.
in the upper right
40
Lenovo Chromebook 2nd Gen Series User Guide
Page 47

Chapter 10. Accessibility, ergonomic, and maintenance information
Accessibility and comfort
Good ergonomic practice is important to get the most from your personal computer and to avoid discomfort.
Arrange your workplace and the equipment you use to suit your individual needs and the kind of work that
you perform. In addition, use healthy work habits to maximize your performance and comfort while using
your computer.
Lenovo is committed to providing the latest information and technology to our customers with disabilities.
Refer to our accessibility information which outlines our efforts in this area.
Ergonomic information
Working in the virtual office might mean adapting to frequent changes in your environment. Following some
simple rules will make things easier and bring you the maximum benefits of your computer. Keeping in mind
such basics as good lighting and proper seating, for example, can help you improve your performance and
achieve greater comfort.
This example shows someone in a conventional setting. Even when not in such a setting, you can follow
many of these tips. Develop good habits, and they will serve you well.
Figure 5. Illustration of proper seating and computer positioning
General posture
Make minor modifications in your working posture to deter the onset of discomfort caused by long periods of
working in the same position. Frequent, short breaks from your work also help to prevent minor discomfort
associated with your working posture.
Display
Position the display to maintain a comfortable viewing distance of 510-760 mm (20-30 inch). Avoid glare or
reflections on the display from overhead lighting or outside sources of light. Keep the display screen clean
and set the brightness to levels that enable you to see the screen clearly. Press the corresponding hotkeys
on the keyboard to adjust display brightness.
Head position
Keep your head and neck in a comfortable and neutral (vertical or upright) position.
© Copyright Lenovo 2018 41
Page 48

Chair
Use a chair that gives you good back support and seat height adjustment. Use chair adjustments to best suit
your desired posture.
Arm and hand position
If available, use chair arm rests or an area on your working surface to provide weight support for your arms.
Keep your forearms, wrists, and hands in a relaxed and neutral (horizontal) position. Type with a soft touch
without pounding the keys.
Leg position
Keep your thighs parallel to the floor and your feet flat on the floor or on a footrest.
What if you are traveling?
It might not be possible to observe the best ergonomic practices when you are using your computer while on
the move or in a casual setting. Regardless of the setting, try to observe as many of the tips as possible.
Sitting properly and using adequate lighting, for example, will help you maintain desirable levels of comfort
and performance.
Questions about vision?
The visual display screens of Lenovo notebook computers are designed to meet the highest standards and
to provide you with clear, crisp images and large, bright displays that are easy to see, yet easy on the eyes.
Of course, any concentrated and sustained visual activity can be tiring. If you have questions on eye fatigue
or visual discomfort, consult a vision care specialist for advice.
Basic maintenance tips
• Keep your computer away from magnets, activated cellular phones, electrical appliances, or speakers
(more than 13 cm or 5 inches).
• Avoid subjecting your computer to extreme temperatures (below 5 ℃/41 ℉ or above 35 ℃/95 ℉).
• Avoid placing any objects (including paper) between the display and the keyboard or the palm rest.
• Do not turn your computer over when the ac power adapter is plugged in, otherwise, it could break the
adapter plug.
• Before moving your computer, be sure to remove any media, turn off attached devices, and disconnect
cords and cables.
• When picking up your open notebook computer, hold it by the bottom. Do not pick up or hold your
notebook computer by the display.
• Avoid directly exposing your computer and peripherals to the air from an appliance that can produce
negative ions. Wherever possible, ground your computer to facilitate safe electrostatic discharge.
Cleaning your computer
It is a good practice to clean your computer periodically to protect the surfaces and ensure trouble-free
operation.
Cleaning the computer cover
Wipe it with a lint-free cloth dampened in mild soap and water. Avoid applying liquids directly to the cover.
Cleaning the keyboard
Wipe the keys one by one with a lint-free cloth dampened in mild soap and water. If you wipe several keys at
a time, the cloth might hook onto an adjacent key and possibly damage it. Avoid spraying cleaner directly
42
Lenovo Chromebook 2nd Gen Series User Guide
Page 49

onto the keyboard. To remove any crumbs or dust from beneath the keys, you can use a camera blower with
a brush or use cool air from a hair dryer.
Cleaning the computer screen
Scratches, oil, dust, chemicals, and ultraviolet light can affect the performance of your computer screen. Use
a dry, soft lint-free cloth to wipe the screen gently. If you see a scratch-like mark on your screen, it might be a
stain. Wipe or dust the stain gently with a soft, dry cloth. If the stain remains, moisten a soft, lint-free cloth
with water or eyeglass cleaner, but do not apply liquids directly to your computer screen. Ensure that the
computer screen is dry before closing it.
Chapter 10. Accessibility, ergonomic, and maintenance information 43
Page 50

44 Lenovo Chromebook 2nd Gen Series User Guide
Page 51

Appendix A. Compliance information
Lenovo compliance information Web sites
The latest electronic compliance and environmental information are available from the Lenovo compliance
information Web sites.
• To view compliance information, go to
• To download environmental declarations, go to http://www.lenovo.com/ecodeclaration
http://www.lenovo.com/compliance
Environmental and recycling information
General recycling information
Lenovo encourages owners of information technology (IT) equipment to responsibly recycle their equipment
when it is no longer needed. Lenovo offers a variety of programs and services to assist equipment owners in
recycling their IT products. For information about recycling Lenovo products, go to
recycling
.
http://www.lenovo.com/
Recycling information for China
《废弃电器电子产品处理管理条例》提示性说明
联想鼓励拥有联想品牌产品的用户不再需要此类产品时,遵守国家废弃电器电子产品回收处理相关法律法规,
将其交给当地具有国家认可的回收处理资质的厂商进行回收处理。更多回收服务信息,请点击进入
support.lenovo.com.cn/activity/551.htm
。
http://
Japan recycling statements
Collecting and recycling a disused Lenovo computer or monitor
If you are a company employee and need to dispose of a Lenovo computer or monitor that is the property of
the company, you must do so in accordance with the Law for Promotion of Effective Utilization of Resources.
Computers and monitors are categorized as industrial waste and should be properly disposed of by an
industrial waste disposal contractor certified by a local government. In accordance with the Law for
Promotion of Effective Utilization of Resources, Lenovo Japan provides, through its PC Collecting and
Recycling Services, for the collecting, reuse, and recycling of disused computers and monitors. For details,
visit the Lenovo Web site at
http://www.lenovo.com/recycling/japan.
Pursuant to the Law for Promotion of Effective Utilization of Resources, the collecting and recycling of homeused computers and monitors by the manufacturer was begun on October 1, 2003. This service is provided
free of charge for home-used computers sold after October 1, 2003. For details, go to
www.lenovo.com/recycling/japan
Disposing of Lenovo computer components
Some Lenovo computer products sold in Japan may have components that contain heavy metals or other
environmental sensitive substances. To properly dispose of disused components, such as a printed circuit
board or drive, use the methods described above for collecting and recycling a disused computer or monitor.
© Copyright Lenovo 2018 45
.
http://
Page 52

Disposing of disused lithium batteries from Lenovo computers
A button-shaped lithium battery is installed inside your Lenovo computer to provide power to the computer
clock while the computer is off or disconnected from the main power source. If you need to replace it with a
new one, contact your place of purchase or contact Lenovo for service. If you need to dispose of a disused
lithium battery, insulate it with vinyl tape, contact your place of purchase or an industrial-waste-disposal
operator, and follow their instructions.
Disposal of a lithium battery must comply with local ordinances and regulations.
Disposing of a disused battery from Lenovo notebook computers
Your Lenovo notebook computer has a lithium ion battery or a nickel metal hydride battery. If you are a
company employee who uses a Lenovo notebook computer and need to dispose of a battery, contact the
proper person in Lenovo sales, service, or marketing, and follow that person's instructions. You also can
refer to the instructions at
If you use a Lenovo notebook computer at home and need to dispose of a battery, you must comply with
local ordinances and regulations. You also can refer to the instructions at
environment/recycle/battery/
https://www.lenovo.com/jp/ja/environment/recycle/battery/.
https://www.lenovo.com/jp/ja/
.
Brazil recycling information
Descarte de um Produto Lenovo Fora de Uso
Equipamentos elétricos e eletrônicos não devem ser descartados em lixo comum, mas enviados à pontos de
coleta, autorizados pelo fabricante do produto para que sejam encaminhados e processados por empresas
especializadas no manuseio de resíduos industriais, devidamente certificadas pelos orgãos ambientais, de
acordo com a legislação local.
A Lenovo possui um canal específico para auxiliá-lo no descarte desses produtos. Caso você possua um
produto Lenovo em situação de descarte, ligue para o nosso SAC ou encaminhe um e-mail para:
reciclar@lenovo.com, informando o modelo, número de série e cidade, a fim de enviarmos as instruções
para o correto descarte do seu produto Lenovo.
Battery recycling information for the European Union
Note: This mark applies only to countries within the European Union (EU).
Batteries or packaging for batteries are labeled in accordance with European Directive 2006/66/EC
concerning batteries and accumulators and waste batteries and accumulators. The Directive determines the
framework for the return and recycling of used batteries and accumulators as applicable throughout the
European Union. This label is applied to various batteries to indicate that the battery is not to be thrown
away, but rather reclaimed upon end of life per this Directive.
46
Lenovo Chromebook 2nd Gen Series User Guide
Page 53

In accordance with the European Directive 2006/66/EC, batteries and accumulators are labeled to indicate
that they are to be collected separately and recycled at end of life. The label on the battery may also include
a chemical symbol for the metal concerned in the battery (Pb for lead, Hg for mercury, and Cd for cadmium).
Users of batteries and accumulators must not dispose of batteries and accumulators as unsorted municipal
waste, but use the collection framework available to customers for the return, recycling, and treatment of
batteries and accumulators. Customer participation is important to minimize any potential effects of batteries
and accumulators on the environment and human health due to the potential presence of hazardous
substances.
Before placing electrical and electronic equipment (EEE) in the waste collection stream or in waste collection
facilities, the end user of equipment containing batteries and/or accumulators must remove those batteries
and accumulators for separate collection.
Disposing of lithium batteries and battery packs from Lenovo products
A coin-cell type lithium battery might be installed inside your Lenovo product. You can find details about the
battery in the product documentation. If the battery needs to be replaced, contact your place of purchase or
contact Lenovo for service. If you need to dispose of a lithium battery, insulate it with vinyl tape, contact your
place of purchase or a waste-disposal operator, and follow their instructions.
Disposing of battery packs from Lenovo products
Your Lenovo device might contain a lithium ion battery pack or a nickel metal hydride battery pack. You can
find details on the battery pack in the product documentation. If you need to dispose of a battery pack,
insulate it with vinyl tape, contact Lenovo sales, service, or your place of purchase, or a waste-disposal
operator, and follow their instructions. You also can refer to the instructions provided in the user guide for
your product.
For proper collection and treatment, go to
http://www.lenovo.com/lenovo/environment.
Important WEEE information
The WEEE marking on Lenovo products applies to countries with WEEE and e-waste regulations (for
example, the European WEEE Directive, India E-Waste Management Rules). Appliances are labeled in
accordance with local regulations concerning waste electrical and electronic equipment (WEEE). These
regulations determine the framework for the return and recycling of used appliances as applicable within
each geography. This label is applied to various products to indicate that the product is not to be thrown
away, but rather put in the established collection systems for reclaiming these end of life products.
Users of electrical and electronic equipment (EEE) with the WEEE marking must not dispose of end of life
EEE as unsorted municipal waste, but use the collection framework available to them for the return, recycle,
and recovery of WEEE and to minimize any potential effects of EEE on the environment and human health
due to the presence of hazardous substances. Lenovo electrical and electronic equipment (EEE) may contain
parts and components, which at end-of-life might qualify as hazardous waste.
Appendix A. Compliance information 47
Page 54

EEE and waste electrical and electronic equipment (WEEE) can be delivered free of charge to the place of
sale or any distributor that sells electrical and electronic equipment of the same nature and function as the
used EEE or WEEE.
For additional WEEE information go to
http://www.lenovo.com/recycling.
WEEE information for Hungary
A magyar törvények értelmében, a 197/2014 (VIII.1.) kormányrendelet 12. szakaszának (1)-(5) cikkében
foglaltak szerint Lenovo mint gyártó állja a keletkező költségeket.
China RoHS
为满足中国电子电器产品有害物质限制相关的法律法规和其他要求,联想公司对本产品中有害物质按部件分
类,声明如下。
部件名称 铅(Pb) 汞(Hg) 镉(Cd) 六价铬(CR
(VI))
印刷电路
板组件*
硬盘 X ○ ○ ○ ○ ○
LCD面板
(LED背
光源)
键盘 X ○ ○ ○ ○ ○
内存 X ○ ○ ○ ○ ○
电池 X ○ ○ ○ ○ ○
电源适配
器
底壳、顶
壳和扬声
器
X ○ ○ ○ ○ ○
X ○ ○ ○ ○ ○
X ○ ○ ○ ○ ○
X ○ ○ ○ ○ ○
多溴联苯
(PBB)
多溴二苯醚
(PBDE)
在中华人民共和国境内销售的电子信息产品必须带有此“环保使用期限”(EPuP)标志。圆圈内的数字
标示正常使用状态下产品的环保使用期限。
Note: 本表格依据SJ/T 11364的规定编制。某些型号的产品可能不包含表中的部分部件。
○:表示该有害物质在该部件所有均质材料中的含量均在GB/T 26572规定的限量要求以下。
X:表示该有害物质至少在该部件的某一均质材料中的含量超出GB/T 26572规定的限量要求。标记”X“的部
件,皆因全球技术发展水平限制而无法实现有害物质的替代。
*:印刷电路板组件包括印刷电路板及其零部件、电容和连接器等。
India RoHS
RoHS compliant as per E-waste (Management) Rules.
48
Lenovo Chromebook 2nd Gen Series User Guide
Page 55

European Union RoHS
This Lenovo product, with included parts (cables, cords, and so on) meets the requirements of Directive
2011/65/EU on the restriction of the use of certain hazardous substances in electrical and electronic
equipment (“RoHS recast” or “RoHS 2”).
For more information about Lenovo worldwide compliance on RoHS, go to: www.lenovo.com/rohscommunication.
TCO certification
To obtain the TCO certification information for your computer, go to:
https://www.lenovo.com/tco-cert
ENERGY STAR information
Figure 6. ENERGY STAR mark
ENERGY STAR® is a joint program of the U.S. Environmental Protection Agency and the U.S. Department of
Energy aimed at saving money and protecting the environment through energy efficient products and
practices.
Lenovo is proud to offer our customers products with the ENERGY STAR qualified designation. Lenovo
computers of machine type(s) 81MA, 81MB, 81MC, 81QB, and 81QC, if the ENERGY STAR mark is affixed,
have been designed and tested to conform to the ENERGY STAR program requirements for computers.
By using ENERGY STAR qualified products and taking advantage of the power management features of your
computer, you can help reduce the consumption of electricity. Reduced electrical consumption can
contribute to potential financial savings, a cleaner environment, and the reduction of greenhouse gas
emissions.
For more information about ENERGY STAR, go to:
Lenovo encourages you to make efficient use of energy an integral part of your day-to-day operations. To
help in this endeavor, your Chromebook has preset the following power-management features to take effect
when your computer has been inactive for a specified length of time:
Table 5. Power-saving settings
Plugged in Unplugged
Dim the display 7 minutes 5 minutes
Turn off display backlight 8 minutes 6 minutes
http://www.energystar.gov.
Put Chromebook into sleep mode
To wake your Chromebook from sleep mode, press the Power button or any key on the keyboard.
30 minutes 10 minutes
Appendix A. Compliance information 49
Page 56

Electromagnetic compatibility notices
Federal Communications Commission Declaration of Conformity
The following information applies to product(s) 81MA, 81MB, 81MC, 81QB, and 81QC.
This equipment has been tested and found to comply with the limits for a Class B digital device, pursuant to
Part 15 of the FCC Rules. These limits are designed to provide reasonable protection against harmful
interference in a residential installation. This equipment generates, uses, and can radiate radio frequency
energy and, if not installed and used in accordance with the instructions, may cause harmful interference to
radio communications. However, there is no guarantee that interference will not occur in a particular
installation. If this equipment does cause harmful interference to radio or television reception, which can be
determined by turning the equipment off and on, the user is encouraged to try to correct the interference by
one or more of the following measures:
• Reorient or relocate the receiving antenna.
• Increase the separation between the equipment and receiver.
• Connect the equipment into an outlet on a circuit different from that to which the receiver is connected.
• Consult an authorized dealer or service representative for help.
Lenovo is not responsible for any radio or television interference caused by using other than specified or
recommended cables and connectors or by unauthorized changes or modifications to this equipment.
Unauthorized changes or modifications could void the user's authority to operate the equipment.
This device complies with Part 15 of the FCC Rules. Operation is subject to the following two conditions: (1)
this device may not cause harmful interference, and (2) this device must accept any interference received,
including interference that may cause undesired operation.
Responsible party:
Lenovo (United States) Incorporated
1009 Think Place - Building One
Morrisville, NC 27560
Phone Number: 919-294-5900
Industry Canada compliance statement
CAN ICES-3(B)/NMB-3(B)
German Class B compliance statement
Hinweis für Geräte der Klasse B EU Richtlinie zur Elektromagnetischen Verträglichkeit
Dieses Produkt entspricht den Schutzanforderungen der EU Richtlinie 2014/30/EU zur Angleichung der
Rechtsvorschriften über die elektromagnetische Verträglichkeit in den EU-Mitgliedsstaaten, und hält die
Grenzwerte der Klasse B der Norm gemäß Richtlinie ein.
Um dieses sicherzustellen, sind die Geräte wie in den Handbüchern beschrieben zu installieren und zu
betreiben. Des Weiteren dürfen auch nur von Lenovo empfohlene Kabel angeschlossen werden. Lenovo
übernimmt keine Verantwortung für die Einhaltung der Schutzanforderungen, wenn das Produkt ohne
50
Lenovo Chromebook 2nd Gen Series User Guide
Page 57

Zustimmung von Lenovo verändert wurde bzw. wenn Erweiterungskomponenten von Fremdherstellern ohne
Empfehlung von Lenovo gesteckt/eingebaut werden.
Deutschland:
Einhaltung des Gesetzes über die elektromagnetische Verträglichkeit von Betriebsmitteln
Dieses Produkt entspricht dem ″Gesetz über die elektromagnetische Verträglichkeit von Betriebsmitteln″
EMVG (früher ″Gesetz über die elektromagnetische Verträglichkeit von Geräten″). Dies ist die Umsetzung der
EMV EU Richtlinie 2014/30/EU in der Bundesrepublik Deutschland.
Zulassungsbescheinigung laut dem Deutschen Gesetz über die elektromagnetische Verträglichkeit von
Betriebsmitteln EMVG vom 20. Juli 2007 (früher Gesetz über die elektromagnetische Verträglichkeit von
Geräten), bzw. der EMV EU Richtlinie 2014/30/EU für Geräte der Klasse B.
Dieses Gerät ist berechtigt, in Übereinstimmung mit dem Deutschen EMVG das EG-Konformitätszeichen CE - zu führen. Verantwortlich für die Konformitätserklärung nach Paragraf 5 des EMVG ist die Lenovo
(Deutschland) GmbH, Meitnerstr. 9, D-70563 Stuttgart.
Informationen in Hinsicht EMVG Paragraf 4 Abs. (1) 4:
Das Gerät erfüllt die Schutzanforderungen nach EN 55024 und EN 55022 Klasse B.
Declaration of conformity to EU directives
EU Contact: Lenovo (Slovakia), Landererova 12, 811 09 Bratislava, Slovakia
Models without a radio device
This product is in conformity with the protection requirements of EU Council EMC Directive 2014/30/EU on
the approximation of the laws of the Member States relating to electromagnetic compatibility.
Models with a radio device
This product is in conformity with all the requirements and essential norms that apply to EU Council Radio
Equipment Directive 2014/53/EU on the approximation of the laws of the Member States relating to radio
equipment. The full text of the system EU declaration of conformity and the EU wireless module declarations
are available at following Internet addresses:
• For notebook computers:
• For tablets: http://www.lenovo.com/eu-doc-tablets
Lenovo cannot accept responsibility for any failure to satisfy the protection requirements resulting from a
non-recommended modification of the product, including the installation of option cards from other
manufacturers. This product has been tested and found to comply with the limits for Class B equipment
according to European Standards harmonized in the Directives in compliance. The limits for Class B
equipment were derived for typical residential environments to provide reasonable protection against
interference with licensed communication devices.
http://www.lenovo.com/eu-doc-notebooks
Japan VCCI Class B compliance statement
この装置は、クラスB情報技術装置です。この装置は、家庭環境で使用することを目 的としていますが、こ
の装置がラジオやテレビジョン受信機に近接して使用されると、受信障害を引き起こすことがあります。
Appendix A. Compliance information 51
Page 58

取扱説明書に従って正しい取り扱いをして下さい。 VCCI-B
Other compliance notices
Brazil audio caution statement
Ouvir sons com mais de 85 decibéis por longos períodos pode provocar danos ao sistema auditivo.
Export classification notice
This product is subject to the United States Export Administration Regulations (EAR) and has an Export
Classification Control Number (ECCN) of 5A992.c. It can be re-exported except to any of the embargoed
countries in the EAR E1 country list.
Taiwan precautionary vision statement
警語:使用過度恐傷害視力
注意事項:
• 使用30分鐘請休息10分鐘
• 2歲以下幼兒不看螢幕,2歲以上每天看螢幕不要超過1小時
Limited and restricted rights notice
If data or software is delivered pursuant a General Services Administration “GSA” contract, use,
reproduction, or disclosure is subject to restrictions set forth in Contract No. GS-35F-05925.
52
Lenovo Chromebook 2nd Gen Series User Guide
Page 59

Appendix B. Lenovo help and support
Lenovo support Web site
Technical support information is available on the Lenovo support Web site at http://www.lenovo.com/support.
Call Lenovo customer support center
If you have tried to correct the problem yourself but still need help, during the warranty period, you can get
help and information by telephone through the customer support center.
Before calling customer support
Ensure that you have downloaded the most current drivers and system updates and recorded information
about your computer before you call. When calling for technical assistance, have the following information
available.
• Machine type and model
• Serial number of your computer
• Description of the problem
• Exact wording of any error messages
• Hardware and software configuration information
Services supported by Lenovo customer support center
The following services are available during the warranty period.
• Problem determination - Trained personnel are available to assist you with determining if you have a
hardware problem and deciding what action is necessary to fix the problem.
• Lenovo hardware repair - If the problem is determined to be caused by Lenovo hardware under warranty,
trained service personnel are available to provide the applicable level of service.
• Engineering change management - Occasionally, there might be changes that are required after a product
has been sold. Lenovo or your reseller, if authorized by Lenovo, will make selected Engineering Changes
(ECs) that apply to your hardware available.
Services not supported by Lenovo customer support center
• Replacement or use of parts not manufactured for or by Lenovo or non-warranted parts
• Identification of software problem sources
• Configuration of UEFI BIOS as part of an installation or upgrade
• Changes, modifications, or upgrades to device drivers
• Installation and maintenance of network operating systems (NOS)
• Installation and maintenance of programs
Support phone numbers
For the Lenovo support phone number for your country or region, go to http://www.lenovo.com/support/
phone
.
© Copyright Lenovo 2018 53
Page 60

Note: Phone numbers are subject to change without notice. If the number for your country or region is not
provided, contact your Lenovo reseller or Lenovo marketing representative.
54
Lenovo Chromebook 2nd Gen Series User Guide
Page 61

Appendix C. Lenovo Limited Warranty
L505-0010-02 08/2011
This Lenovo Limited Warranty consists of the following parts:
• Part 1 – General Terms
• Part 2 – Country-specific Terms
• Part 3 – Warranty Service Information
The terms of Part 2 replace or modify terms of Part 1 as specified for a particular country.
Part 1 - General Terms
This Lenovo Limited Warranty applies only to Lenovo hardware products you purchased for your own use
and not for resale.
This Lenovo Limited Warranty is available in other languages at
What this Warranty Covers
Lenovo warrants that each Lenovo hardware product that you purchase is free from defects in materials and
workmanship under normal use during the warranty period. The warranty period for the product starts on the
original date of purchase as shown on your sales receipt or invoice or as may be otherwise specified by
Lenovo. The warranty period and type of warranty service that apply to your product are as specified in "Part
3 - Warranty Service Information" below. This warranty only applies to products in the country or region of
purchase.
THIS WARRANTY IS YOUR EXCLUSIVE WARRANTY AND REPLACES ALL OTHER WARRANTIES OR
CONDITIONS, EXPRESS OR IMPLIED, INCLUDING, BUT NOT LIMITED TO, ANY IMPLIED WARRANTIES
OR CONDITIONS OF MERCHANTABILITY OR FITNESS FOR A PARTICULAR PURPOSE. AS SOME STATES
OR JURISDICTIONS DO NOT ALLOW THE EXCLUSION OF EXPRESS OR IMPLIED WARRANTIES, THE
ABOVE EXCLUSION MAY NOT APPLY TO YOU. IN THAT EVENT, SUCH WARRANTIES APPLY ONLY TO
THE EXTENT AND FOR SUCH DURATION AS REQUIRED BY LAW AND ARE LIMITED IN DURATION TO
THE WARRANTY PERIOD. AS SOME STATES OR JURISDICTIONS DO NOT ALLOW LIMITATIONS ON THE
DURATION OF AN IMPLIED WARRANTY, THE ABOVE LIMITATION ON DURATION MAY NOT APPLY TO
YOU.
How to Obtain Warranty Service
If the product does not function as warranted during the warranty period, you may obtain warranty service by
contacting Lenovo or a Lenovo approved Service Provider. A list of approved Service Providers and their
telephone numbers is available at:
www.lenovo.com/support/phone.
www.lenovo.com/warranty.
Warranty service may not be available in all locations and may differ from location to location. Charges may
apply outside a Service Provider's normal service area. Contact a local Service Provider for information
specific to your location.
Customer Responsibilities for Warranty Service
Before warranty service is provided, you must take the following steps:
• follow the service request procedures specified by the Service Provider
• back up or secure all programs and data contained in the product
© Copyright Lenovo 2018 55
Page 62

• provide the Service Provider with all system keys or passwords
• provide the Service Provider with sufficient, free, and safe access to your facilities to perform service
• remove all data, including confidential information, proprietary information and personal information, from
the product or, if you are unable to remove any such information, modify the information to prevent its
access by other party or so that it is not personal data under applicable law. The Service Provider shall not
be responsible for the loss or disclosure of any data, including confidential information, proprietary
information, or personal information, on a product returned or accessed for warranty service
• remove all features, parts, options, alterations, and attachments not covered by the warranty
• If you are not the owner of a product or part, obtain authorization from the owner for the Service Provider
to provide warranty service
What Your Service Provider Will Do to Correct Problems
When you contact a Service Provider, you must follow the specified problem determination and resolution
procedures.
The Service Provider will attempt to diagnose and resolve your problem by telephone, e-mail or remote
assistance. The Service Provider may direct you to download and install designated software updates.
Some problems may be resolved with a replacement part that you install yourself called a "Customer
Replaceable Unit" or "CRU." If so, the Service Provider will ship the CRU to you for you to install.
If your problem cannot be resolved over the telephone, through the application of software updates or the
installation of a CRU, the Service Provider will arrange for service under the type of warranty service
designated for the product under "Part 3 - Warranty Service Information" below.
If the Service Provider determines that it is unable to repair your product, the Service Provider will replace it
with one that is at least functionally equivalent.
If the Service Provider determines that it is unable to either repair or replace your product, your sole remedy
under this Limited Warranty is to return the product to your place of purchase or to Lenovo for a refund of
your purchase price.
Replacement Products and Parts
When warranty service involves the replacement of a product or part, the replaced product or part becomes
Lenovo's property and the replacement product or part becomes your property. Only unaltered Lenovo
products and parts are eligible for replacement. The replacement product or part provided by Lenovo may
not be new, but it will be in good working order and at least functionally equivalent to the original product or
part. The replacement product or part shall be warranted for the balance of the period remaining on the
original product.
Use of Personal Contact Information
If you obtain service under this warranty, you authorize Lenovo to store, use and process information about
your warranty service and your contact information, including name, phone numbers, address, and e-mail
address. Lenovo may use this information to perform service under this warranty. We may contact you to
inquire about your satisfaction with our warranty service or to notify you about any product recalls or safety
issues. In accomplishing these purposes, you authorize Lenovo to transfer your information to any country
where we do business and to provide it to entities on our behalf. We may also disclose it where required by
law. Lenovo's privacy policy is available at
www.lenovo.com.
What This Warranty Does not Cover
This warranty does not cover the following:
• uninterrupted or error-free operation of a product
56
Lenovo Chromebook 2nd Gen Series User Guide
Page 63

• loss of, or damage to, your data by a product
• any software programs, whether provided by the product or installed subsequently
• failure or damage resulting from misuse, abuse, accident, modification, unsuitable physical or operating
environment, natural disasters, power surges, improper maintenance, or use not in accordance with
product information materials
• damage caused by non-authorized service provider
• failure of, or damage caused by, any third party products, including those that Lenovo may provide or
integrate into the Lenovo product at your request
• any technical or other support, such as assistance with "how-to" questions and those regarding product
set-up and installation
• products or parts with an altered identification label or from which the identification label has been
removed
Limitation of Liability
Lenovo is responsible for loss or damage to your product only while it is in the Service Provider's possession
or in transit, if the Service Provider is responsible for the transportation.
Neither Lenovo nor the Service Provider is responsible for loss or disclosure of any data, including
confidential information, proprietary information, or personal information, contained in a product.
UNDER NO CIRCUMSTANCES, AND NOTWITHSTANDING THE FAILURE OF ESSENTIAL PURPOSE OF
ANY REMEDY SET FORTH HEREIN, SHALL LENOVO, ITS AFFILIATES, SUPPLIERS, RESELLERS, OR
SERVICE PROVIDERS BE LIABLE FOR ANY OF THE FOLLOWING EVEN IF INFORMED OF THEIR
POSSIBILITY AND REGARDLESS OF WHETHER THE CLAIM IS BASED IN CONTRACT, WARRANTY,
NEGLIGENCE, STRICT LIABILITY OR OTHER THEORY OF LIABILITY: 1) THIRD PARTY CLAIMS AGAINST
YOU FOR DAMAGES; 2) LOSS, DAMAGE OR DISCLOSURE OF YOUR DATA; 3) SPECIAL, INCIDENTAL,
PUNITIVE, INDIRECT OR CONSEQUENTIAL DAMAGES, INCLUDING BUT NOT LIMITED TO LOST
PROFITS, BUSINESS REVENUE, GOODWILL OR ANTICIPATED SAVINGS. IN NO CASE SHALL THE TOTAL
LIABILITY OF LENOVO, ITS AFFILIATES, SUPPLIERS, RESELLERS OR SERVICE PROVIDERS FOR
DAMAGES FROM ANY CAUSE EXCEED THE AMOUNT OF ACTUAL DIRECT DAMAGES, NOT TO EXCEED
THE AMOUNT PAID FOR THE PRODUCT.
THE FOREGOING LIMITATIONS DO NOT APPLY TO DAMAGES FOR BODILY INJURY (INCLUDING
DEATH), DAMAGE TO REAL PROPERTY OR DAMAGE TO TANGIBLE PERSONAL PROPERTY FOR WHICH
LENOVO IS LIABLE UNDER LAW.
AS SOME STATES OR JURISDICTIONS DO NOT ALLOW THE EXCLUSION OR LIMITATION OF
INCIDENTAL OR CONSEQUENTIAL DAMAGES, THE ABOVE LIMITATION OR EXCLUSION MAY NOT
APPLY TO YOU.
Your Other Rights
THIS WARRANTY GIVES YOU SPECIFIC LEGAL RIGHTS. YOU MAY HAVE OTHER RIGHTS ACCORDING
TO THE APPLICABLE LAWS OF YOUR STATE OR JURISDICTION. YOU MAY ALSO HAVE OTHER RIGHTS
UNDER A WRITTEN AGREEMENT WITH LENOVO. NOTHING IN THIS WARRANTY AFFECTS STATUTORY
RIGHTS, INCLUDING RIGHTS OF CONSUMERS UNDER LAWS OR REGULATIONS GOVERNING THE SALE
OF CONSUMER GOODS THAT CANNOT BE WAIVED OR LIMITED BY CONTRACT.
Part 2 – Country-specific Terms
Australia
Appendix C. Lenovo Limited Warranty 57
Page 64

"Lenovo" means Lenovo (Australia & New Zealand) Pty Limited ABN 70 112 394 411. Address: Level 10,
North Tower, 1-5 Railway Street, Chatswood, NSW, 2067. Telephone: +61 2 8003 8200. Email: lensyd_
au@lenovo.com
The following replaces the same section in Part 1:
What this Warranty Covers
Lenovo warrants that each hardware product that you purchase is free from defects in materials and
workmanship under normal use and conditions during the warranty period. If the product fails due to a
covered defect during the warranty period, Lenovo will provide you a remedy under this Limited Warranty.
The warranty period for the product starts on the original date of purchase specified on your sales receipt or
invoice unless Lenovo informs you otherwise in writing. The warranty period and type of warranty service that
apply to your product are set forth below in Part 3 - Warranty Service Information.
THE BENEFITS GIVEN BY THIS WARRANTY ARE IN ADDITION TO YOUR RIGHTS AND REMEDIES AT
LAW, INCLUDING THOSE UNDER THE AUSTRALIAN CONSUMER LAW.
The following replaces the same section in Part 1:
Replacement Products and Parts
When warranty service involves the replacement of a product or part, the replaced product or part becomes
Lenovo’s property and the replacement product or part becomes your property. Only unaltered Lenovo
products and parts are eligible for replacement. The replacement product or part provided by Lenovo may
not be new, but it will be in good working order and at least functionally equivalent to the original product or
part. The replacement product or part shall be warranted for the balance of the period remaining on the
original product. Products and parts presented for repair may be replaced by refurbished products or parts
of the same type rather than being repaired. Refurbished parts may be used to repair the product; and repair
of the product may result in loss of data, if the product is capable of retaining user-generated data.
The following is added to the same section in Part 1:
Use of Personal Contact Information
Lenovo will not be able to perform our service under this warranty if you refuse to provide your information or
do not wish us to transfer your information to our agent or contractor. You have the right to access your
personal contact information and request correction of any errors in it pursuant to the Privacy Act 1988 by
contacting Lenovo.
The following replaces the same section in Part 1:
Limitation of Liability
Lenovo is responsible for loss or damage to your product only while it is in the Service Provider's possession
or in transit, if the Service Provider is responsible for the transportation.
Neither Lenovo nor the Service Provider is responsible for loss or disclosure of any data, including
confidential information, proprietary information, or personal information, contained in a product.
TO THE EXTENT PERMITTED BY LAW, UNDER NO CIRCUMSTANCES AND NOTWITHSTANDING THE
FAILURE OF ESSENTIAL PURPOSE OF ANY REMEDY SET FORTH HEREIN, SHALL LENOVO, ITS
AFFILIATES, SUPPLIERS, RESELLERS, OR SERVICE PROVIDERS BE LIABLE FOR ANY OF THE
FOLLOWING EVEN IF INFORMED OF THEIR POSSIBILITY AND REGARDLESS OF WHETHER THE CLAIM
IS BASED IN CONTRACT, WARRANTY, NEGLIGENCE, STRICT LIABILITY OR OTHER THEORY OF
LIABILITY: 1) THIRD PARTY CLAIMS AGAINST YOU FOR DAMAGES; 2) LOSS, DAMAGE OR DISCLOSURE
OF YOUR DATA; 3) SPECIAL, INCIDENTAL, PUNITIVE, INDIRECT OR CONSEQUENTIAL DAMAGES,
INCLUDING BUT NOT LIMITED TO LOST PROFITS, BUSINESS REVENUE, GOODWILL OR ANTICIPATED
58
Lenovo Chromebook 2nd Gen Series User Guide
Page 65

SAVINGS. IN NO CASE SHALL THE TOTAL LIABILITY OF LENOVO, ITS AFFILIATESS, SUPPLIERS,
RESELLERS OR SERVICE PROVIDERS FOR DAMAGES FROM ANY CAUSE EXCEED THE AMOUNT OF
ACTUAL DIRECT DAMAGES, NOT TO EXCEED THE AMOUNT PAID FOR THE PRODUCT.
THE FOREGOING LIMITATIONS DO NOT APPLY TO DAMAGES FOR BODILY INJURY (INCLUDING
DEATH), DAMAGE TO REAL PROPERTY OR DAMAGE TO TANGIBLE PERSONAL PROPERTY FOR WHICH
LENOVO IS LIABLE UNDER LAW.
The following replaces the same section in Part 1:
Your Other Rights
THIS WARRANTY GIVES YOU SPECIFIC LEGAL RIGHTS. YOU ALSO HAVE OTHER RIGHTS AT LAW,
INCLUDING UNDER THE AUSTRALIAN CONSUMER LAW. NOTHING IN THIS WARRANTY AFFECTS
STATUTORY RIGHTS OR RIGHTS AT LAW, INCLUDING RIGHTS THAT CANNOT BE WAIVED OR LIMITED
BY CONTRACT.
For example, our products come with guarantees that cannot be excluded under the Australian Consumer
Law. You are entitled to a replacement or refund for a major failure and compensation for any other
reasonably foreseeable loss or damage. You are also entitled to have the products repaired or replaced if the
products fail to be of acceptable quality and the failure does not amount to a major failure.
New Zealand
The following is added to the same section in Part 1:
Use of Personal Information
Lenovo will not be able to perform our service under this warranty if you refuse to provide your information or
do not wish us to transfer your information to our agent or contractor. You have the right to access your
personal information and request correction of any errors in it pursuant to the Privacy Act 1993 by contacting
Lenovo (Australia & New Zealand) Pty Limited ABN 70 112 394 411. Address: Level 10, North Tower, 1-5
Railway Street, Chatswood, NSW, 2067. Telephone: 61 2 8003 8200. Email: lensyd_au@lenovo.com
Bangladesh, Cambodia, India, Indonesia, Nepal, Philippines, Vietnam and Sri Lanka
The following is added to Part 1:
Dispute Resolution
Disputes arising out of or in connection with this warranty shall be finally settled by arbitration held in
Singapore. This warranty shall be governed, construed and enforced in accordance with the laws of
Singapore, without regard to conflict of laws. If you acquired the product in India, disputes arising out of or in
connection with this warranty shall be finally settled by arbitration held in Bangalore, India. Arbitration in
Singapore shall be held in accordance with the Arbitration Rules of Singapore International Arbitration Center
("SIAC Rules") then in effect. Arbitration in India shall be held in accordance with the laws of India then in
effect. The arbitration award shall be final and binding on the parties without appeal. Any award shall be in
writing and set forth the findings of fact and the conclusions of law. All arbitration proceedings, including all
documents presented in such proceedings shall be conducted in the English language. The English language
version of this warranty prevails over any other language version in such proceedings.
European Economic Area (EEA)
The following is added to Part 1:
Customers in the EEA may contact Lenovo at the following address: EMEA Service Organization, Lenovo
(International) B.V., Floor 2, Einsteinova 21, 851 01, Bratislava, Slovakia. Service under this warranty for
Appendix C. Lenovo Limited Warranty 59
Page 66

Lenovo hardware products purchased in EEA countries may be obtained in any EEA country in which the
product has been announced and made available by Lenovo.
Russia
The following is added to Part 1:
Product Service Life
The product service life is four (4) years from the original date of purchase.
Part 3 - Warranty Service Information
Product Type
81MA, 81MB, 81MC,
81QB, and 81QC
Country or Region of
Purchase
Australia, New Zealand,
Finland, France, Germany,
Ireland, Netherlands,
Norway, Sweden,
Switzerland, United
Kingdom, Denmark,
Belgium, Italy, Spain,
Poland, Czech Republic,
Romania, Portugal, Israel
Argentina, Chile, Columbia,
Peru, India, Singapore,
Indonesia
United Arab Emirates,
South Africa
United States, Canada,
Japan
Mexico 1, 3, 4
Warranty Period Type of Warranty Service
• Parts and labor - 1 year
• Battery pack - 1 year
1, 3
1, 4
4
1, 3, 5
If required, the Service Provider will provide repair or exchange service depending on the type of warranty
service specified for your product and the available service. Scheduling of service will depend upon the time
of your call, parts availability, and other factors.
Types of Warranty Service
1. Customer Replaceable Unit (“CRU”) Service
Under CRU Service, the Service Provider will ship CRUs to you at its cost for installation by you. CRU
information and replacement instructions are shipped with your product and are available from Lenovo at any
time upon request. CRUs that are easily installed by you are called “Self-service CRUs.” “Optional-service
CRUs” are CRUs that may require some technical skill and tools. Installation of Self service CRUs is your
responsibility. You may request that a Service Provider install Optional-service CRUs under one of the other
types of warranty service designated for your product. An optional service offering may be available for
purchase from a Service Provider or Lenovo under which Self-service CRUs would be installed for you. You
may find a list of CRUs and their designation in the publication that was shipped with your product or at
www.lenovo.com/CRUs. The requirement to return a defective CRU, if any, will be specified in the instructions
shipped with a replacement CRU. When return is required: 1) return instructions, a prepaid return shipping
label, and a container will be included with the replacement CRU; and 2) you may be charged for the
60
Lenovo Chromebook 2nd Gen Series User Guide
Page 67

replacement CRU if the Service Provider does not receive the defective CRU from you within thirty (30) days
of your receipt of the replacement CRU.
2. On-site Service
Under On-Site Service, a Service Provider will either repair or exchange the product at your location. You
must provide a suitable working area to allow disassembly and reassembly of the product. Some repairs may
need to be completed at a service center. If so, the Service Provider will send the product to the service
center at its expense.
3. Courier or Depot Service
Under Courier or Depot Service, your product will be repaired or exchanged at a designated service center,
with shipping at the expense of the Service Provider. You are responsible for disconnecting the product and
packing it in a shipping container provided to you to return your product to a designated service center. A
courier will pick up your product and deliver it to the designated service center. The service center will return
the product to you at its expense.
4. Customer Carry-In Service
Under Customer Carry-In Service, your product will be repaired or exchanged after you deliver it to a
designated service center at your risk and expense. After the product has been repaired or exchanged, it will
be made available to you for collection. If you fail to collect the product, the Service Provider may dispose of
the product as it sees fit, with no liability to you.
5. Mail-In Service
Under Mail-In Service, your product will be repaired or exchanged at a designated service center after you
deliver it at your risk and expense. After the product has been repaired or exchanged, it will be returned to
you at Lenovo's risk and expense, unless the Service Provider specifies otherwise.
6. Customer Two-Way Mail-In Service
Under Customer Two-Way Mail-In Service, your product will be repaired or exchanged after you deliver it to
a designated service center at your risk and expense. After the product has been repaired or exchanged, it
will be made available to you for return shipping at your risk and expense. If you fail to arrange return
shipment, the Service Provider may dispose of the product as it sees fit, with no liability to you.
7. Product Exchange Service
Under Product Exchange Service, Lenovo will ship a replacement product to your location. You are
responsible for its installation and verification of its operation. The replacement product becomes your
property in exchange for the failed product, which becomes the property of Lenovo. You must pack the
failed product in the shipping carton in which you received the replacement product and return it to Lenovo.
Transportation charges, both ways, shall be at Lenovo’s expense. If you fail to use the carton in which the
replacement product was received, you may be responsible for any damage to the failed product occurring
during shipment. You may be charged for the replacement product if Lenovo does not receive the failed
product within thirty (30) days of your receipt of the replacement product.
Appendix C. Lenovo Limited Warranty 61
Page 68

62 Lenovo Chromebook 2nd Gen Series User Guide
Page 69

Trademarks
Lenovo and the “Lenovo” logo are trademarks or registered trademarks of Lenovo in the United States, other
countries, or both.
Google, Chrome, Chromebook, Gmail, Google Play, and Android are trademarks or registered trademarks of
Google Inc.
USB-C is a trademark of USB Implementers Forum.
Other company, products, or service names may be trademarks or service marks of others.
Page 70

Page 71

Page 72

 Loading...