

Lenovo ThinkServer TS150, 70LU, 70LV, 70LX, 70UB User Manual And Hardware Maintenance Manual
...
ThinkServer TS150
User Guide and Hardware Maintenance
Manual
Machine Types: 70LU, 70LV, 70LW, 70LX, 70UA, 70UB, 70UC, and
70UD

Welcome
Before using your server and this document, be sure to read the Read Me First that comes with your server.
Lenovo makes constant improvement on the documentation of your server. To get all the latest documents,
go to:
http://www.lenovo.com/UserManuals
Note: Your server might look slightly different from illustrations in this document. To show the main parts
clearly, some of the illustrations do not show all components.
Seventh Edition (October 2018)
© Copyright Lenovo 2015, 2018.
LIMITED AND RESTRICTED RIGHTS NOTICE: If data or software is delivered pursuant to a General Services
Administration (GSA) contract, use, reproduction, or disclosure is subject to restrictions set forth in Contract No. GS-35F-
05925.

Contents
Read this first: safety information . . . . iii
Products that are not assessed. . . . . . . . . . ix
Safety inspection guide. . . . . . . . . . . . . x
Grounding requirements . . . . . . . . . . . . x
Chapter 1. General information . . . . . 1
Introduction . . . . . . . . . . . . . . . . . 1
Server documentation . . . . . . . . . . . . . 2
Chapter 2. Server setup road map . . . 5
Server setup procedure. . . . . . . . . . . . . 5
Turning on the server. . . . . . . . . . . . . . 5
Turning off the server. . . . . . . . . . . . . . 5
Chapter 3. Product overview . . . . . . 7
In the box . . . . . . . . . . . . . . . . . . 7
Features and specifications of your server . . . . . 7
Operating environment . . . . . . . . . . . . . 9
Software programs . . . . . . . . . . . . . . 9
ThinkServer EasyStartup . . . . . . . . . 10
ThinkServer EasyUpdate Firmware Updater . . 10
Lenovo ThinkServer Diagnostics . . . . . . 10
Lenovo ThinkServer Power Planner . . . . . 10
Lenovo XClarity Essentials OneCLI . . . . . 10
Component locations . . . . . . . . . . . . 11
Machine type, model, and serial number
label . . . . . . . . . . . . . . . . . 11
Front view of the server . . . . . . . . . . 11
Rear view of the server . . . . . . . . . . 12
Server locks . . . . . . . . . . . . . . 14
Server components . . . . . . . . . . . 16
RAID card . . . . . . . . . . . . . . . 18
System board components . . . . . . . . 19
System board jumper. . . . . . . . . . . 22
Chapter 4. Configuring the server. . . 25
Using the Setup Utility program . . . . . . . . 25
Starting the Setup Utility program . . . . . . 25
Setup Utility program interface . . . . . . . 25
Using passwords . . . . . . . . . . . . 28
Selecting a startup device . . . . . . . . . 29
Configuring the TPM function . . . . . . . 30
Exiting the Setup Utility program . . . . . . 30
Updating or recovering the BIOS . . . . . . 30
Using the ThinkServer EasyStartup program . . . 31
Features of the ThinkServer EasyStartup
program . . . . . . . . . . . . . . . . 32
Starting the ThinkServer EasyStartup
program . . . . . . . . . . . . . . . . 32
Configuring RAID . . . . . . . . . . . . . . 33
About RAID. . . . . . . . . . . . . . . 33
RAID for your server . . . . . . . . . . . 34
Configuring onboard SATA software RAID . . 35
Configuring advanced SATA or SAS hardware
RAID . . . . . . . . . . . . . . . . . 37
Chapter 5. Replacing hardware . . . . 39
Purchasing ThinkServer options . . . . . . . . 39
Getting familiar with important guidelines. . . . . 39
Precautions . . . . . . . . . . . . . . 39
Handling static-sensitive devices . . . . . . 40
System reliability guidelines . . . . . . . . 40
Preparing your server and removing the server
cover . . . . . . . . . . . . . . . . . . . 41
Removing and installing hardware . . . . . . . 42
Front bezel . . . . . . . . . . . . . . . 42
Internal drives. . . . . . . . . . . . . . 44
Memory module . . . . . . . . . . . . . 69
PCIe card . . . . . . . . . . . . . . . 71
Lenovo ThinkServer RAID 520i upgrade key . . 74
Front USB assembly . . . . . . . . . . . 75
Thermal sensor . . . . . . . . . . . . . 77
SD module . . . . . . . . . . . . . . . 78
Front fan assembly. . . . . . . . . . . . 80
Rear fan assembly . . . . . . . . . . . . 82
Intrusion switch . . . . . . . . . . . . . 84
Power supply assembly . . . . . . . . . . 85
Coin-cell battery. . . . . . . . . . . . . 87
For service technician only: replacing the heat
sink and fan assembly . . . . . . . . . . 89
For service technician only: replacing the
CPU . . . . . . . . . . . . . . . . . 91
For service technician only: replacing the
system board . . . . . . . . . . . . . . 93
Completing the parts replacement . . . . . . . 96
Chapter 6. Troubleshooting and
diagnostics. . . . . . . . . . . . . . . 99
Troubleshooting procedure . . . . . . . . . . 99
Basic troubleshooting tables. . . . . . . . . . 99
Lenovo ThinkServer EasyStartup program
problems . . . . . . . . . . . . . . . 100
Optical drive problems . . . . . . . . . . 101
Storage drive problems . . . . . . . . . . 102
Memory module problems. . . . . . . . . 102
© Copyright Lenovo 2015, 2018 i

USB device problems . . . . . . . . . . 103
Chapter 7. Getting information, help,
and service . . . . . . . . . . . . . . . 105
Information resources . . . . . . . . . . . . 105
Using the documentation . . . . . . . . . 105
ThinkServer Web site . . . . . . . . . . . 105
Lenovo Support Web site . . . . . . . . . 105
Help and service . . . . . . . . . . . . . . 105
Before you call . . . . . . . . . . . . . 105
Calling for service . . . . . . . . . . . . 106
Using other services . . . . . . . . . . . 106
Purchasing additional services . . . . . . . 107
Appendix A. Regulatory
information . . . . . . . . . . . . . . . 109
Export classification notice . . . . . . . . . . 109
Electronic emission notices . . . . . . . . . . 109
Federal Communications Commission (FCC)
Supplier’s Declaration of Conformity (SDoC) -
United States . . . . . . . . . . . . . . 109
Japanese electromagnetic compatibility
statements . . . . . . . . . . . . . . . 111
Eurasian compliance mark . . . . . . . . . . 112
Battery recycling information for Taiwan . . . . . 114
Battery recycling information for the European
Union . . . . . . . . . . . . . . . . . . . 115
Battery recycling information for the United States
and Canada . . . . . . . . . . . . . . . . 116
Requirement for batteries containing
perchlorate . . . . . . . . . . . . . . . . 116
Appendix C. Restriction of
Hazardous Substances (RoHS)
Directive . . . . . . . . . . . . . . . . 117
China RoHS . . . . . . . . . . . . . . . . 117
European Union RoHS . . . . . . . . . . . . 118
India RoHS . . . . . . . . . . . . . . . . 118
Ukraine RoHS . . . . . . . . . . . . . . . 118
Taiwan BSMI RoHS declaration . . . . . . . . 119
Appendix D. Addition statements . . . 121
Important notes. . . . . . . . . . . . . . . 121
Particulate contamination . . . . . . . . . . . 121
German Ordinance for Work gloss statement . . . 122
Appendix E. Notices . . . . . . . . . . 123
Trademarks . . . . . . . . . . . . . . . . 124
Appendix B. WEEE and recycling
information . . . . . . . . . . . . . . . 113
Important WEEE information. . . . . . . . . . 113
Recycling information for Japan . . . . . . . . 113
Recycling information for Brazil. . . . . . . . . 114
Appendix F. Abbreviations and
acronyms. . . . . . . . . . . . . . . . 125
Index . . . . . . . . . . . . . . . . . . 127
ii ThinkServer TS150 User Guide and Hardware Maintenance Manual

Read this first: safety information
ﺓءﺍﺮﻗ ﻦﻣ ﺪﻛﺄﺗ ،ﺞﺘﻨﻤﻟﺍ ﻡﺍﺪﺨﺘﺳﺍ ﻞﺒﻗSafety Informa!on
)ﺔﻣﻼﺴﻟﺍ ﺕﺎﻣﻮﻠﻌﻣ ( ﻊﻗﻮﻣ ﻲﻓ ﺎﻬﻤﻬﻓﻭ ﺕﺎﻐﻠﻟﺍ ﺓﺩﺪﻌﺘﻤﻟﺍ
Lenovo
ﺐﻳﻮﻟﺍ ﻰﻠﻋ.
רצומב שומישה ינפל, ךמסמה תא ןיבהלו אורקל ודיפקהSafety Informa!on
)
תוחיטב אשונב עדימ
(
תופשב עיפומה
לש טנרטניאה רתאב תוברLenovo.
Note: Before using the product, be sure to read and understand the multilingual Safety Information on the
Lenovo Web site at:
https://support.lenovo.com/documents/LNVO-DOCS
Antes de usar o produto, certifique-se de ler e entender as Safety Information (Informações sobre segurança)
multilíngues no site da Lenovo.
Преди да използвате продукта, прочетете и разберете многоезичната Safety Information (Информация
за безопасност) на уебсайта на Lenovo.
Prije korištenja našeg proizvoda svakako s razumijevanjem pročitajte višejezični dokument Safety
Information (Informacije o sigurnosti) na web-mjestu tvrtke Lenovo.
Před použitím tohoto produktu si nezapomeňte přečíst vícejazyčný dokument Safety Information
(Bezpečnostní informace) na webu společnosti Lenovo.
Før du bruger produktet, skal du sørge for at læse og forstå Safety Information (sikkerhedsforskrifter), der
findes på flere sprog, på Lenovos websted.
Lue monikielinen Safety Information (Turvaohjeet) -julkaisu Lenovon verkkosivustosta ennen tuotteen
käyttöä.
Avant d'utiliser ce produit, prenez connaissance des Safety Information (Informations relatives à la sécurité)
multilingues sur le site Web Lenovo.
Πριν χρησιμοποιήσετε το προϊόν, φροντίστε να διαβάσετε και να κατανοήσετε τις Safety Information
(Πληροφορίες ασφαλείας) στο δικτυακό τόπο της Lenovo.
Vor Verwendung des Produkts sollten Sie die mehrsprachigen Safety Information (Sicherheitsinformationen)
auf der Lenovo Website lesen und verstehen.
A termék használata előtt olvassa át, és ismerje meg a Lenovo webhelyén több nyelven is elérhető Safety
Information(Biztonsági tájékoztató) című dokumentumot.
Prima di utilizzare il prodotto, accertarsi di leggere e comprendere la documentazione multilingua Safety
Information(Informazioni sulla sicurezza) sul sito Web Lenovo.
製品をご使用になる前に、Lenovo Web サイトに掲載されているマルチリンガルの Safety Information (安全
上の注意) を読んで理解してください。
제품을 사용하기 전에 Lenovo 웹 사이트의 다국어 Safety Information (안전 정보)를 주의 깊게 읽어보십시오.
Zorg dat u alle Safety Information (veiligheidsvoorschriften) op de website van Lenovo hebt gelezen en
begrepen voordat u het product gebruikt.
© Copyright Lenovo 2015, 2018 iii

Przed skorzystaniem z produktu należy zapoznać się z wielojęzycznym dokumentem Safety Information
ก
่
ีน์ฑณัภติลผ้ชในอ
้
โปรดอ
่
กจใา้ขเมาวคาํทะลแนา
ั
บ
Safety Informa!on
( ยัภดอลปมาวคลูมอ้ข ) หลายภาษา
์ตซไบ็วเนบ
Lenovo
(Informacje dotyczące bezpieczeństwa), dostępnym w serwisie internetowym Lenovo.
Antes de utilizar o produto, certifique-se de que lê e compreende a documentação multilingue Safety
Information (Informações sobre Segurança) no sítio da Web da Lenovo.
Înainte de a utiliza produsul, citiţi şi înţelegeţi Safety Information (informaţiile de siguranţă) în mai multe limbi
de pe site-ul web Lenovo.
Før du bruker produktet, må du lese og forstå den flerspråklige Safety Information (sikkerhetsinformasjonen)
på nettstedet til Lenovo.
Перед использованием продукта обязательно ознакомьтесь с разделом Safety Information
(Информация по технике безопасности), представленным на нескольких языках на веб-сайте Lenovo.
在使用产品之前,请务必先阅读和了解 Lenovo Web 站点上的多语言 Safety Information《安全信息》。
Pre korišćenja proizvoda, obavezno pažljivo i sa razumevanjem pročitajte višejezične Safety Information
(Bezbednosne informacije) na veb lokaciji kompanije Lenovo.
Skôr než produkt začnete používať, prečítajte si viacjazyčné Safety Information (Bezpečnostné informácie) na
webovej lokalite spoločnosti Lenovo.
Pred uporabo izdelka poskrbite, da boste prebrali in razumeli razdelek Safety Information (Varnostne
informacije), ki je na spletnem mestu Lenovo na voljo v več jezikih.
Antes de usar el producto, asegúrese de leer y entender la sección Safety Information (Información de
seguridad) multilingüe del sitio web de Lenovo.
Innan du använder den här produkten är det viktigt att du har läst och förstått den flerspråkiga Safety
Information (säkerhetsinformationen) på Lenovos webbplats.
使用本產品之前,請務必先閱讀及瞭解 Lenovo 網站上多國語言版本的Safety Information(安全資訊)。
Ürünü kullanmadan önce, Lenovo web sitesindeki Safety Information (Güvenlik Bilgileri) belgesini (birden çok
dilde yayınlanmaktadır) mutlaka okuyun.
Перш ніж використовувати продукт, обов'язково прочитайте Safety Information (інструкції з техніки
безпеки), доступні різними мовами на веб-сайті Lenovo.
Important: Ensure that you read and understand all caution and danger statements in this document before
you perform the procedures. Read and understand any additional safety information that is included with the
server or optional device before you install, remove, or replace the device.
Statement 1
DANGER
iv
ThinkServer TS150 User Guide and Hardware Maintenance Manual
Electrical current from power, telephone, and communication cables is hazardous.
To avoid a shock hazard:
• Do not connect or disconnect any cables or perform installation, maintenance, or reconfiguration of this
product during an electrical storm.
• Connect all power cords to a properly wired and grounded electrical outlet.
• Ensure that all power cord connectors are securely and completely plugged into receptacles.
• Connect to properly wired outlets any equipment that will be attached to this product.
• When possible, use one hand only to connect or disconnect signal cables.
• Never turn on any equipment when there is evidence of fire, water, or structural damage.
• Disconnect the attached power cords, telecommunications systems, networks, and modems before you
open the device covers, unless instructed otherwise in the installation and configuration procedures.
• Connect and disconnect cables as described in the following table when installing, moving, or opening
covers on this product or attached devices.
To connect: To disconnect:
1. Turn everything OFF.
2. First, attach all cables to devices.
3. Attach signal cables to connectors.
4. Attach power cords to outlets.
5. Turn devices ON.
1. Turn everything OFF.
2. First, remove power cords from outlets.
3. Remove signal cables from connectors.
4. Remove all cables from devices.
Statement 2
DANGER
Danger of explosion if battery is incorrectly replaced.
When replacing the lithium coin cell battery, use only the same or an equivalent type that is
recommended by the manufacturer. The battery contains lithium and can explode if not properly
used, handled, or disposed of.
Do not:
• Throw or immerse into water
• Heat to more than 100°C (212°F)
• Repair or disassemble
Dispose of the battery as required by local ordinances or regulations.
Statement 3
CAUTION:
When laser products (such as CD-ROMs, DVD drives, fiber optic devices, or transmitters) are
installed, note the following:
• Do not remove the covers. Removing the covers of the laser product could result in exposure to
hazardous laser radiation. There are no serviceable parts inside the device.
© Copyright Lenovo 2015, 2018 v
• Use of controls or adjustments or performance of procedures other than those specified herein
might result in hazardous radiation exposure.
DANGER
Some laser products contain an embedded Class 3A or Class 3B laser diode. Note the following:
Laser radiation when open. Do not stare into the beam, do not view directly with optical
instruments, and avoid direct exposure to the beam.
Statement 4
≥ 18 kg (39.7 lb) ≥ 32 kg (70.5 lb) ≥ 55 kg (121.2 lb)
< 32 kg (70.5 lb) < 55 kg (121.2 lb) < 100 kg (220.5 lb)
CAUTION:
Use safe practices when lifting.
Statement 5
CAUTION:
The power control button on the device and the power switch on the power supply do not turn off the
electrical current supplied to the device. The device also might have more than one power cord. To
remove all electrical current from the device, ensure that all power cords are disconnected from the
power source.
Statement 6
CAUTION:
If you install a strain-relief bracket option over the end of the power cord that is connected to the
device, you must connect the other end of the power cord to a power source that is easily accessible
in case it needs to be disconnected.
vi
ThinkServer TS150 User Guide and Hardware Maintenance Manual

Statement 7
CAUTION:
If the device has doors, ensure that you remove or secure the doors before moving or lifting the device
to protect against personal injury. The doors will not support the weight of the device.
Statement 8
CAUTION:
Never remove the cover on a power supply or any part that has the following label attached.
Hazardous voltage, current, and energy levels are present inside any component that has this label
attached. There are no serviceable parts inside these components. If you suspect a problem with one
of these parts, contact a service technician.
Statement 9
CAUTION:
Disconnect the hot-swap fan cables before removing the fan from the device to protect against
personal injury.
Statement 10
CAUTION:
The following label indicates a sharp-edge hazard.
Statement 11
CAUTION:
The following label indicates a potential heat hazard.
© Copyright Lenovo 2015, 2018 vii
Statement 12
DANGER
Overloading a branch circuit is a potential fire hazard and a shock hazard under certain conditions. To avoid
these hazards, ensure that your system electrical requirements do not exceed branch current ratings at the
installation site.
Statement 13
CAUTION:
Ensure that the rack is secured properly to avoid tipping when the server unit is extended on the rails.
Statement 14
CAUTION:
Some accessory or option board outputs exceed Class 2 or limited power source limits. You must
install the appropriate interconnecting cabling in accordance with your local electrical code
requirements.
Statement 15
CAUTION:
The power-control button on the device may put the device in standby mode instead of turning off the
device. In addition, the device might have multiple connections to dc power. To remove all electrical
current from the device, ensure that all connections to dc power are disconnected at the dc power
input terminals.
Statement 16
CAUTION:
To reduce the risk of electric shock or energy hazards:
• This equipment must be installed by trained service personnel in a restricted-access location, as
defined by your local electrical code and the latest edition of IEC 60950.
• The branch circuit overcurrent protection must be rated in accordance with local electrical code
requirements.
• Use 1.3 mm
2
or 16 American Wire Gauge (AWG) copper conductor only, not exceeding 3 meters in
length.
viii
ThinkServer TS150 User Guide and Hardware Maintenance Manual
• Torque the wiring-terminal screws to 1.4 newton-meters or 12 inch-pounds.
• Provide a readily available, approved and rated disconnect device in the field wiring.
Statement 17
CAUTION:
This product contains a Class 1M laser. Do not view directly with optical instruments.
Statement 18
CAUTION:
Do not place any object on top of rack-mounted products.
Statement 19
CAUTION:
Hazardous moving parts. Keep fingers and other body parts away.
Statement 20
CAUTION:
A lithium ion battery is provided. To avoid possible explosion, do not burn the battery. Replace the
battery only with the Lenovo-approved part. Recycle or discard the battery as instructed by local
regulations.
Products that are not assessed
Typical products that are not assessed include but not limited to the following:
• Server and IT-rack components (for example, uninterruptible power supplies and current distribution
systems)
• Devices in IT rooms (for example, bulk storage units and network products)
© Copyright Lenovo 2015, 2018 ix

• Industrial low-voltage switchgear
Safety inspection guide
The purpose of this inspection guide is to assist you in identifying potentially unsafe conditions. As each
machine was designed and built, required safety items were installed to protect users and service
technicians from injury. This guide addresses only those items. You should use good judgment to identify
potential safety hazards due to attachment of non-ThinkServer features or options not covered by this
inspection guide.
If any unsafe conditions are present, you must determine how serious the apparent hazard could be and
whether you can continue without first correcting the problem.
Consider these conditions and the safety hazards they present:
• Electrical hazards, especially primary power (primary voltage on the frame can cause serious or fatal
electrical shock)
• Explosive hazards, such as a damaged Cathode Ray Tube (CRT) monitor or a bulging capacitor
• Mechanical hazards, such as loose or missing hardware
To determine whether there are any potentially unsafe conditions, use the following checklist at the
beginning of every service task. Begin the checks with the power off, and the power cords disconnected.
Checklist:
1. Check exterior covers for damage (loose, broken, or sharp edges).
2. Power off the server. Disconnect the power cords.
3. Check the power cord for:
a. A third-wire ground connector in good condition. Use a meter to measure third-wire ground
continuity for 0.1 ohm or less between the external ground pin and the frame ground.
b. The power cord should be the authorized type specified for your server. Go to:
http://www.lenovo.com/serviceparts-lookup
c. Insulation must not be frayed or worn.
4. Check for cracked or bulging batteries.
5. Remove the cover.
6. Check for any obvious non-ThinkServer alterations. Use good judgment as to the safety of any nonThinkServer alterations.
7. Check inside the unit for any obvious unsafe conditions, such as metal filings, contamination, water or
other liquids, or signs of fire or smoke damage.
8. Check for worn, frayed, or pinched cables.
9. Check that the power-supply cover fasteners (screws or rivets) have not been removed or tampered
with.
Grounding requirements
Electrical grounding of the server is required for operator safety and correct system function. Proper
grounding of the electrical outlet can be verified by a certified electrician.
x
ThinkServer TS150 User Guide and Hardware Maintenance Manual
Chapter 1. General information
This chapter contains the following items:
• “Introduction” on page 1
• “Server documentation” on page 2
Introduction
The following table lists important information about your server and where to obtain the information.
Information Where to obtain
Lenovo Limited Warranty
(LLW)
The LLW contains the warranty terms that apply to the product you purchased from
®
Lenovo
http://www.lenovo.com/warranty/llw_02
If you cannot obtain the LLW from the Lenovo Web site, contact your local Lenovo
office or reseller to obtain a printed version of the LLW, free of charge.
. The LLW is available at:
Worldwide Lenovo Support
telephone list
Most up-to-date information
about the server
Latest technical information,
documentation, device
drivers, and other updates
Instructions on how to
register your server with
Lenovo
Product information label Record information about your server in the following table. You will need the
Telephone numbers are subject to change without notice. The most up-to-date
telephone list for Lenovo Support is always available at:
http://www.lenovo.com/support/phone
If the telephone number for your country or region is not listed, contact your Lenovo
reseller or Lenovo marketing representative.
http://www.lenovo.com/thinkserver
http://www.lenovo.com/support
Follow the instructions at:
http://www.lenovo.com/register
When you register your server, information is entered into a database, which enables
Lenovo to contact you in case of a recall or other severe problem. After you register
your server with Lenovo, you will receive quicker service when you call Lenovo for
help. In addition, some locations offer extended privileges and services to registered
users.
information if you ever need to have your server serviced. The product information
label is attached on the chassis. See “Machine type, model, and serial number label”
on page 11.
Product name
Machine type and model (MT-M)
Serial number (S/N)
© Copyright Lenovo 2015, 2018 1
______________________________________________
______________________________________________
______________________________________________

Date of purchase
______________________________________________
Server documentation
This topic provides a general description of each document for your server and instructions on how to obtain
all the documents.
Printed documents
Your server package contains the following printed documents:
• Read Me First
This is a multilingual document. It illustrates safety symbols and instructs you to read the complete safety,
warranty, and support information provided on the Lenovo Web site before using the server. This
document also tells you how to find the most up-to-date information on the Lenovo Support Web site. In
addition, recycling, environmental, and legal notices are all included.
• A letter to customers
This is a multilingual letter to customers, which tells customers that Lenovo is undertaking a paperless
electronic documentation initiative to protect environment. This letter also provides information about how
to contact Lenovo if you require a printed version of any electronic documents.
Electronic documents
• You can find the following electronic documents at
https://support.lenovo.com/documents/LNVO-DOCS:
– Safety Information
This is a multilingual document that includes all the safety statements for your product. Ensure that you
read and understand these safety statements before using the product.
– Lenovo Limited Warranty
This document includes the Lenovo terms and warranty statements.
– Lenovo License Agreement
This document includes the terms and conditions of the Lenovo License Agreement.
• You can find the following electronic documents from the Lenovo Support Web site. Go to
www.lenovo.com/support
, click Documentation, and follow the instructions on the screen to find the
http://
document you need.
– Safety, Warranty, and Support Information
This is a multilingual document that includes all the safety statements for your product in more than 30
languages. Ensure that you read and understand all the safety statements before using the product.
This document also includes the Lenovo warranty statement, Customer Replaceable Units (CRUs)
information, and information about how to contact the Lenovo Customer Support Center.
– User Guide and Hardware Maintenance Manual
This document provides detailed information to help you get familiar with your server and help you use,
configure, and maintain your server.
– MegaRAID SAS Software User Guide (English only)
This document provides information about Redundant Array of Independent Disks (RAID) and how to
use the utility programs to configure, monitor, and maintain your server RAID and related devices.
2
ThinkServer TS150 User Guide and Hardware Maintenance Manual

Note: Refer to this document for hardware RAID information if the server has a required RAID card
installed. See RAID card. For information about onboard software RAID, see Configuring onboard
SATA software RAID.
– Other documents
You might find other documents for the Host Bus Adapter (HBA), Ethernet card, or other optional parts.
Chapter 1. General information 3

4 ThinkServer TS150 User Guide and Hardware Maintenance Manual

Chapter 2. Server setup road map
This chapter provides a general road map to guide you through setting up your server.
The server setup procedure varies depending on the configuration of the server when it was delivered. In
some cases, the server is fully configured and you just need to connect the server to the network and an ac
power source, and then you can turn on the server. In other cases, the server needs to have hardware
devices installed, requires hardware and firmware configuration, and requires an operating system to be
installed.
Server setup procedure
The following list is a general procedure for setting up your server:
1. Unpack the server package. See “In the box” on page 7.
2. Install any required hardware or server options. See the related topics in Chapter 5 “Replacing
hardware” on page 39.
3. Connect the Ethernet cables and power cords to the server. See “Rear view of the server” on page 12 to
locate the connectors.
4. Turn on the server to verify operation. See “Turning on the server” on page 5.
5. Review the Basic Input Output System (BIOS) settings and customize as needed. See “Using the Setup
Utility program” on page 25.
6. Configure RAID and install the operating system and device drivers. See “Using the ThinkServer
EasyStartup program” on page 31 and “Configuring RAID” on page 33.
7. Install any additional drivers required for added features. Refer to the instructions that come with the
hardware option.
8. Configure Ethernet settings in the operating system by referring to the operating system help. Skip this
step if the operating system was installed using the Lenovo ThinkServer Deployment Manager program.
9. Check for firmware updates. To check and update the firmware, do the following:
a. Go to
b. If needed, use the Firmware Updater program to update your system firmware. See “ThinkServer
10. Install management applications and any other applications. Refer to the documentation that comes
with the applications that you want to install.
http://www.lenovo.com/drivers and follow the instructions on the Web page to check for the
latest level of firmware, such as the BIOS updates and device drivers.
EasyUpdate Firmware Updater” on page 10.
Turning on the server
After you finish unpacking and setting up the server, connect it to an ac power source. Press the power
button on the front panel to turn on the server. See “Front view of the server” on page 11.
Turning off the server
CAUTION:
The power control button on the device and the power button on the power supply do not turn off the
electrical current supplied to the device. The device also might have more than one power cord. To
remove all electrical current from the device, ensure that all power cords are disconnected from the
power source.
© Copyright Lenovo 2015, 2018 5

The server can be turned off in one of the following ways:
• Turn off the server from the operating system if your operating system supports this feature. After an
orderly shutdown of the operating system, the server turns off automatically. For instructions on how to
shut down your specific operating system, refer to the related documentation or help system for the
operating system.
• Press the power button on the front panel to start an orderly shutdown of the operating system and turn
off the server, if your operating system supports this feature.
• If your server stops responding and you cannot turn it off, press and hold the power button on the front
panel for four seconds or more. If you still cannot turn off the server, disconnect all power cords from the
server.
• The server might turn off as an automatic response to a critical system failure.
6
ThinkServer TS150 User Guide and Hardware Maintenance Manual

Chapter 3. Product overview
This chapter contains the following items:
• “In the box” on page 7
• “Features and specifications of your server” on page 7
• “Operating environment” on page 9
• “Software programs” on page 9
• “Component locations” on page 11
In the box
Your shipping box contains the following items:
• Server
• Material box, including items such as power cords (available on some models), keyboard, mouse and
printed documentation
Features and specifications of your server
This topic lists the features and specifications of your server, such as dimension and weight; hardware
configurations; and reliability, availability, and serviceability (RAS) features. The RAS features include security
features and basic system management features. The RAS features help you to ensure the integrity of the
data stored on the server, the availability of the server when you need it, and the ease with which you can
diagnose and correct problems.
Dimension and weight Dimension:
Width: 175 mm (14.76 inches)
Height: 375 mm (6.89 inches)
Depth: 431 mm (16.97 inches)
Weight:
Maximum product weight without package: 12.5 kg (27.6 lb)
Maximum product weight with package: 14.5 kg (32.0 lb)
Electrical input
Central Processing Unit
(CPU)
• Input voltage:
Low range: 100–127 V ac
High range: 200–240 V ac
• Input frequency: 50 Hz or 60 Hz
Your server comes with one of the following CPUs (internal cache size varies by
model type):
®
• Intel
• Intel Core
• Intel Pentium
• Intel Celeron
Xeon
®
TM
®
®
© Copyright Lenovo 2015, 2018 7

Memory Your server provides four memory slots. Each slot supports 4 GB, 8 GB, and 16 GB
double data rate 4 (DDR4) memory modules. For more information, see “Memory
module installation rules” on page 69.
Power supply The server might come with one of the following power supply configurations:
• 250-watt power supply (80 PLUS Bronze)
• 400-watt power supply (80 PLUS Platinum)
Note: To support a discrete graphic adapter, a 400-watt power supply must be
installed.
System Fan Your server comes with the following fans to provide proper system cooling and
airflow:
• One front system fan
• One heat sink and fan assembly
• One rear system fan
• Up to two hard-disk-drive (HDD) fans (available on some models)
Internal drives The internal drives supported by your server vary by model.
• Internal storage drive
– Up to five 2.5-inch SATA hard disk drives (HDDs) or solid-state drives (SSDs)
– Up to four 3.5-inch SATA HDDs
– Up to four 2.5-inch HDD/SSD and 3.5-inch HDD mixed configuration
• Optical drive
– Up to two SATA optical drives
– One slim SATA optical drive (available on some models)
• RDX tape drive
Your server supports one RDX tape drive. If your server is installed with a
Windows Server operating system, you can use the Windows Backup program to
back up the data stored on RDX media. For detailed information, refer to the user
guide of the tape drive. The user guide is available for download at:
http://www.lenovo.com/UserManuals
For more information about the internal drives or drive bays, see “Internal drives” on
page 44.
Expansion slots
The server has four Peripheral Component Interconnect Express (PCIe) expansion
slots on the system board. For detailed information, see “System board
components” on page 19.
Input/Output (I/O) features
• One serial connector
• One Video Graphics Array (VGA) monitor connector
• One DisplayPort
®
connector
• One RJ-45 Ethernet connector
• Eight USB 3.0 connectors (two on the front panel and six on the rear panel)
• Three audio connectors (audio line-in connector, audio line-out connector, and
microphone connector)
To locate the connectors, refer to the related topics in “Component locations” on
page 11.
Video subsystem
The server provides VGA and DisplayPort connectors for connecting video devices.
The two connectors are functional only when the CPU in your server comes with an
integrated graphics controller.
8 ThinkServer TS150 User Guide and Hardware Maintenance Manual

Ethernet connectivity There is one RJ-45 Ethernet connector on the rear panel with 10 megabits per
second (Mbps), 100 Mbps, or 1000 Mbps network connectivity. For more
information, see “Rear view of the server” on page 12.
Security features
Basic system management
features
• Administrator password and user password to help protect unauthorized access
to the server (see “Using passwords” on page 28)
• ThinkServer Trusted Platform Module (TPM), which is an integrated security chip,
to help enhance server security
• Remote monitoring or control by an administrator to provide protection or help
• Intrusion switch that informs you through an event in the system event log (SEL)
when the server cover is not properly installed or closed
• Ability to store the power-on self-test (POST) hardware test results
• BIOS Setup Utility program
The BIOS Setup Utility program helps you view the server information and
configure the server in the pre-operating system environment. See “Using the
Setup Utility program” on page 25.
• Preboot Execution Environment (PXE)
The Intel PXE technology enables you to boot your computers, load an operating
system, or deploy executable images from a remote server by using a network
interface. The operation can be done independently of local data storage devices
(such as hard disk drives) or operating systems.
• Redundant Array of Independent Disks (RAID)
Your server supports onboard SATA software RAID. If a required RAID card is
installed, your server also supports advanced SATA/SAS hardware RAID
configurations. For detailed information, see “Configuring RAID” on page 33.
• Software programs
For more information about the software programs, see “Software programs” on
page 9.
Operating environment
The following table provides information about the operating environment for your server.
Table 1. Operating environment specifications
Air temperature (operating) from 10°C to 35°C (50°F to 95°F)
Air temperature (storage) from -40°C to 60°C (-40°F to 140°F) in original shipping package
Humidity (operating) from 8% to 80% (non-condensing)
Humidity (storage) from 10% to 90% (non-condensing)
Altitude from 0 to 3048 m (0 to 10 000 ft) in an unpressurized environment
Note: When the altitude exceeds 3000 m (10 000 ft), the defined maximum dry-
bulb temperature for operation becomes a dependent variable. The temperature
value decreases by 1°C (1.8°F) per 300 m (984 ft) as the altitude increases.
Software programs
This topic provides information about the software programs that you can use to set up, use, and maintain
the server.
Chapter 3. Product overview 9

To download the software programs, go to the Lenovo Support Web site at http://www.lenovo.com/support
and follow the instructions on the Web page.
For detailed information about a program, refer to the help system or user guide of the program.
ThinkServer EasyStartup
The ThinkServer EasyStartup program simplifies the process of configuring RAID and installing supported
operating systems and device drivers on your server. You can download the ISO image for the ThinkServer
EasyStartup program from the Lenovo Support Web site and burn it into a disc or a USB flash drive. For
detailed information, see “Using the ThinkServer EasyStartup program” on page 31.
ThinkServer EasyUpdate Firmware Updater
The ThinkServer EasyUpdate Firmware Updater program (hereinafter referred to as Firmware Updater)
enables you to maintain your server firmware up-to-date and helps you avoid unnecessary server outages.
Firmware Updater is provided on the Lenovo Support Web site.
To update your system firmware using Firmware Updater, do the following:
Note: Before distributing firmware updates to a server, ensure that your server can restart successfully
without encountering hardware problems.
1. Go to
2. Download the ISO image for Firmware Updater and the TXT file that contains installation instructions.
3. Use any CD or DVD burning software to create a bootable disc with the ISO image.
4. Print the TXT file and follow the instructions to use Firmware Updater to update your system firmware.
http://www.lenovo.com/drivers and follow the instructions on the Web page to locate the program.
Lenovo ThinkServer Diagnostics
The Lenovo ThinkServer Diagnostics program enables you to diagnose server problems offline, perform
some diagnostic tests, and collect system information. Examples of the system information include basic
operating-system information, hardware information, SEL, RAID log, and so on. Depending on the model,
your server might come with one of the following diagnostic program editions:
• Lenovo ThinkServer Diagnostics Embedded Edition
• Lenovo ThinkServer Diagnostics Standalone Edition
For more information about Lenovo ThinkServer Diagnostics, go to
http://support.lenovo.com/us/en/lenovodiagnosticsolutions/downloads. Locate the Lenovo ThinkServer
Diagnostics section at the bottom of the Web page. Then, click the desired link for more information.
Lenovo ThinkServer Power Planner
The Lenovo ThinkServer Power Planner program provides information about the power consumption and
electric current calculation based on the different configurations of servers and other devices. The program
also helps to plan servers and devices deployment in an efficient way.
Lenovo XClarity Essentials OneCLI
Lenovo XClarity Essentials OneCLI consists of individual application modules that utilize a command-line
interface (CLI) to help you manage servers. These application modules can help you to configure the server,
collect service data for the server, update firmware and device drivers, and perform power-management
functions on the server. Lenovo XClarity Essentials OneCLI also enables you to get inventory information for
some ThinkServer servers.
10
ThinkServer TS150 User Guide and Hardware Maintenance Manual
For more information about Lenovo XClarity Essentials OneCLI, go to:
MT-M XXXX -XXX
S/N XXXXXXX
https://support.lenovo.com/solutions/HT116433?LinkTrack=Solr
Component locations
This topic provides information to help you locate your server components.
Machine type, model, and serial number label
When you contact Lenovo for help, the machine type, model, and serial number information helps support
technicians to identify your server and provide faster service.
The following illustration is a sample of the machine type, model, and serial number label on the server.
Figure 1. Machine type, model, and serial number label
Front view of the server
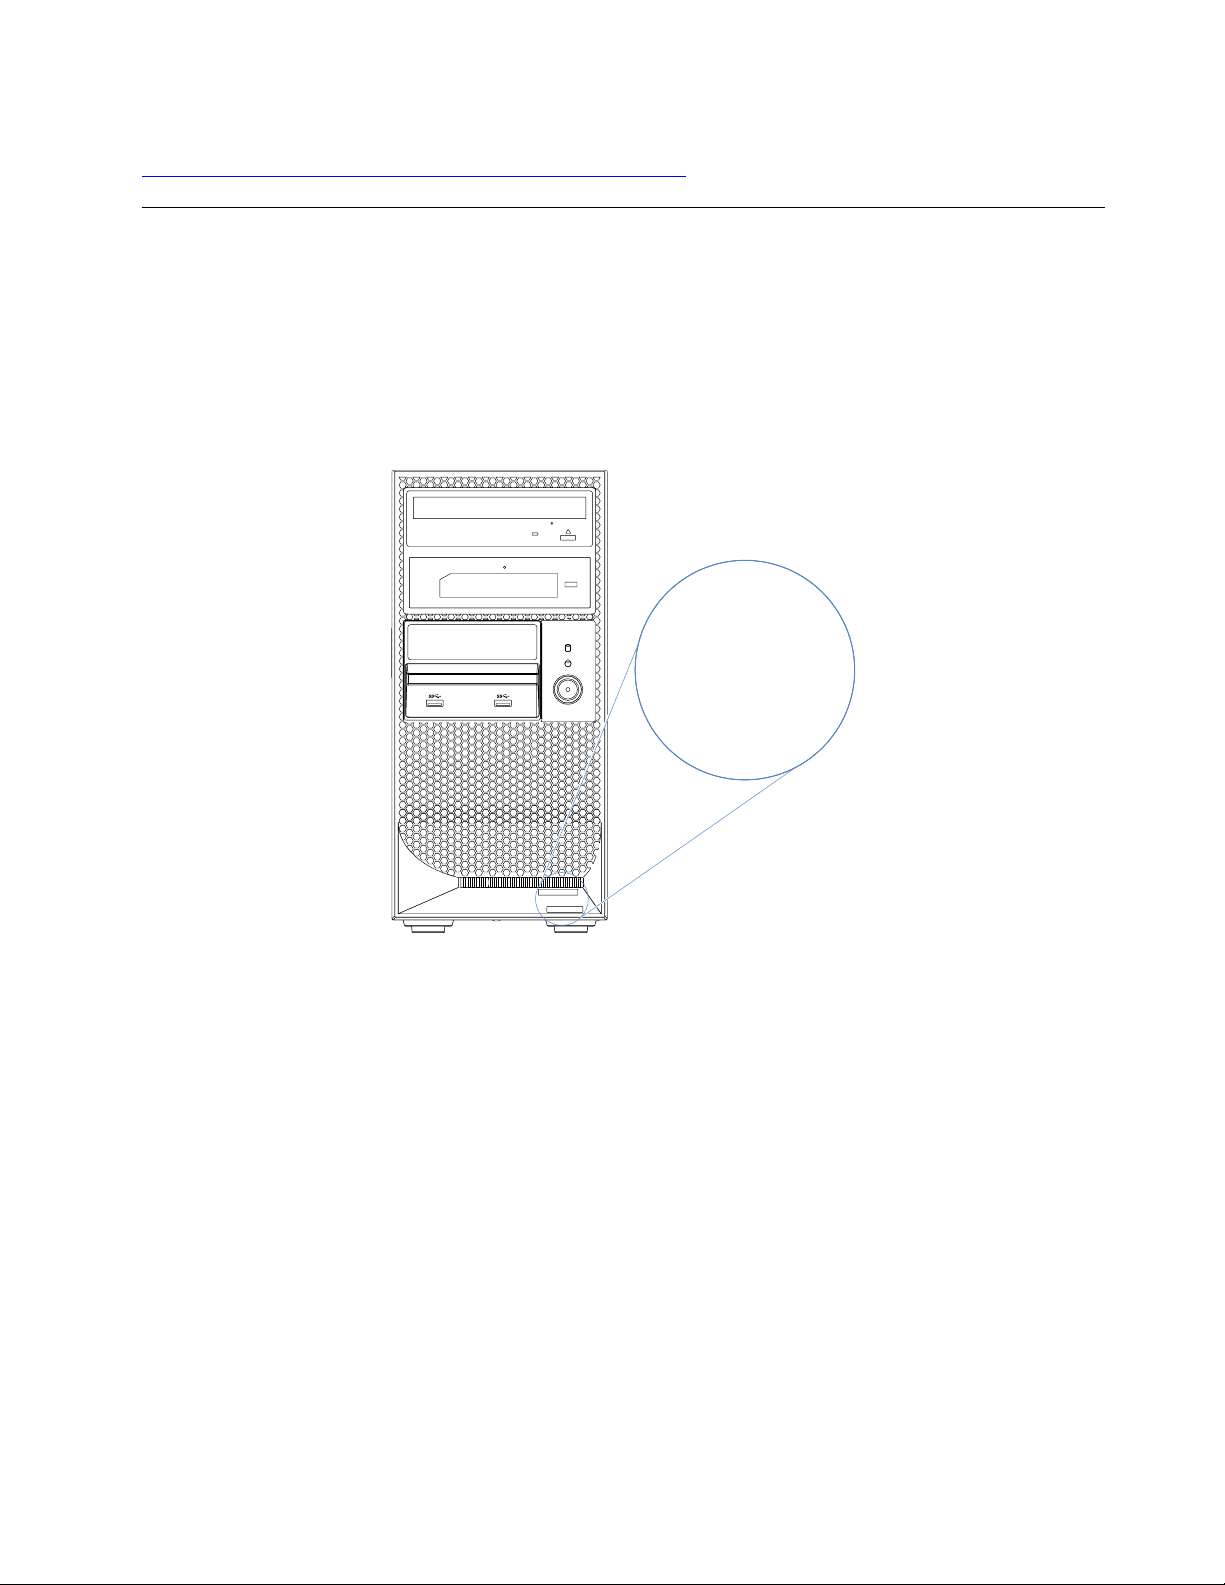
The front view of the server varies by model. Depending on the model, your server might look slightly
different from the illustration in this topic.
Chapter 3. Product overview 11
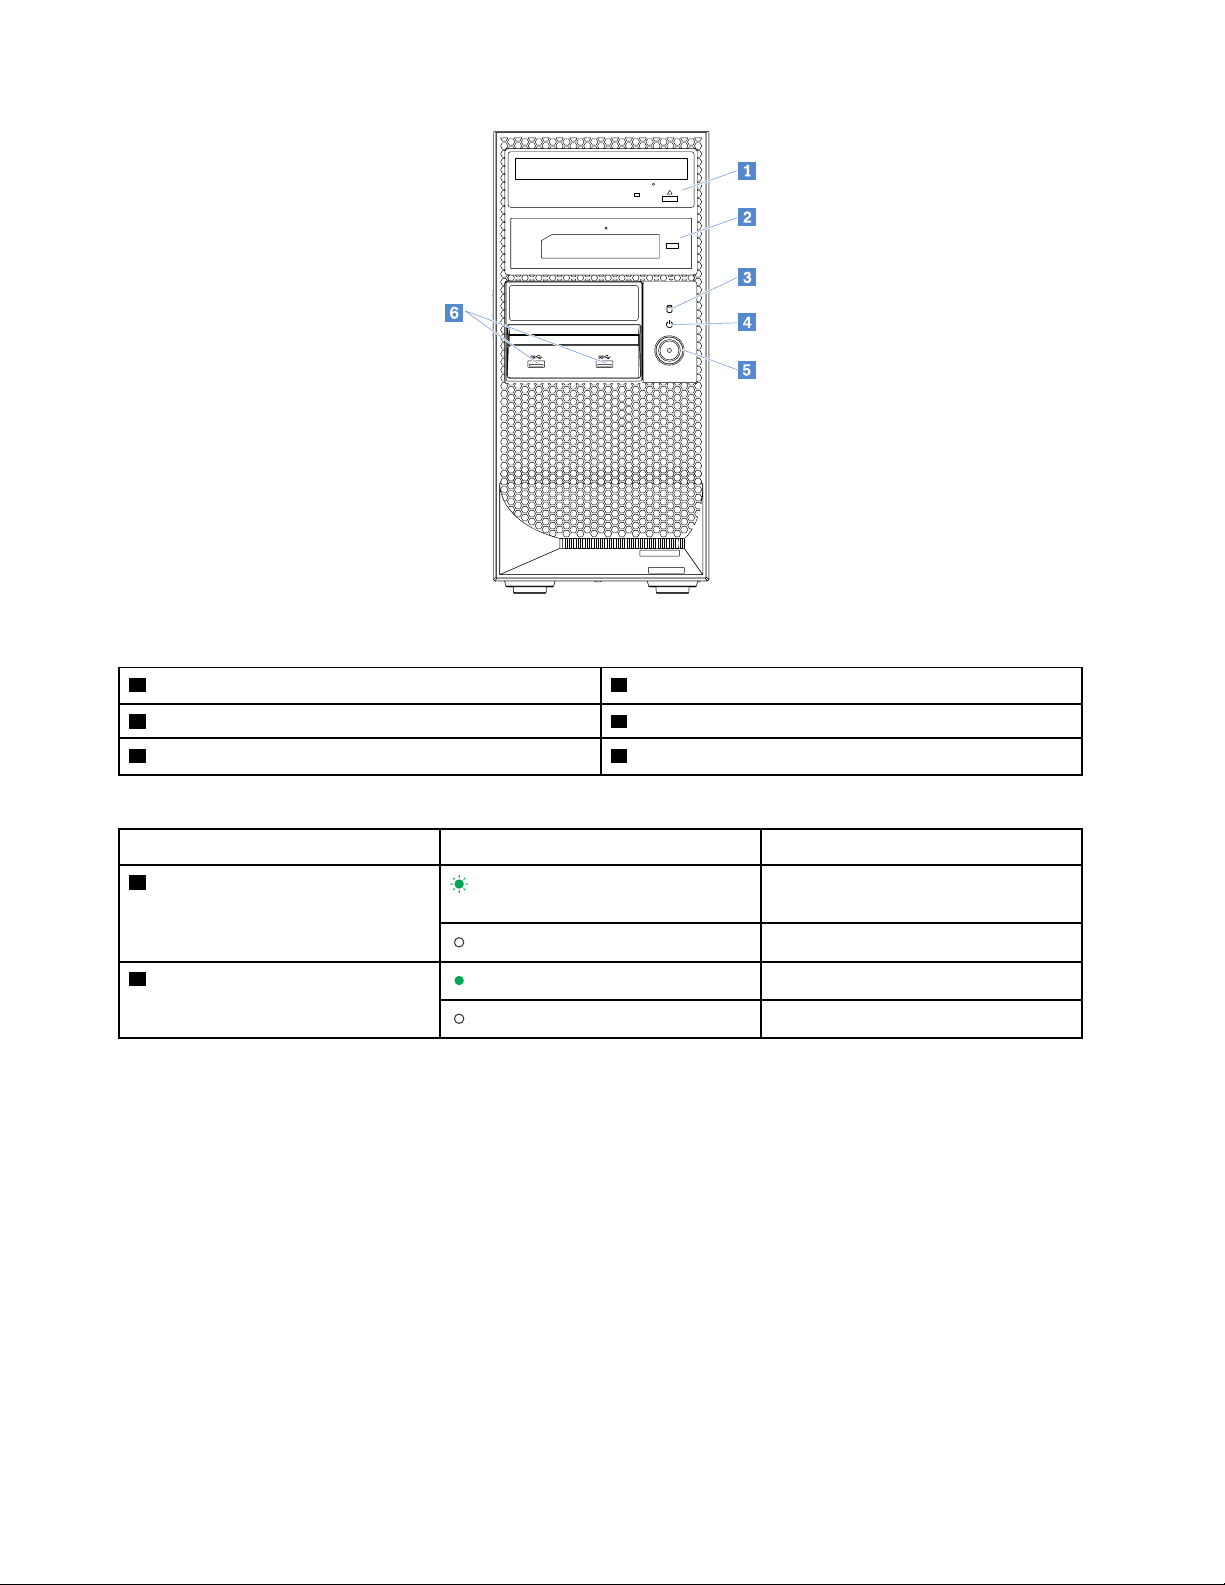
Figure 2. Front view of the server
1 Optical drive (available on some models) 2 RDX tape drive (available on some models)
3 HDD status LED 4 Power status LED
5 Power button
Table 2. LED status
LED
3 HDD status LED
4 Power status LED
Status
Blinking green
Off
Green
Off
6 USB 3.0 connectors (2)
Description
Storage drives are active and data is
being transferred.
Storage drives are not in use.
The system is powered on.
The system is powered off.
Note: The HDD status LED is functional only when the storage drives are connected to the SATA connectors
on the system board.
Rear view of the server
This topic provides information to help you locate the connectors and components on the rear of your server.
Some connectors on the rear of your server are color-coded to help you determine where to connect cables
to your server.
12
ThinkServer TS150 User Guide and Hardware Maintenance Manual
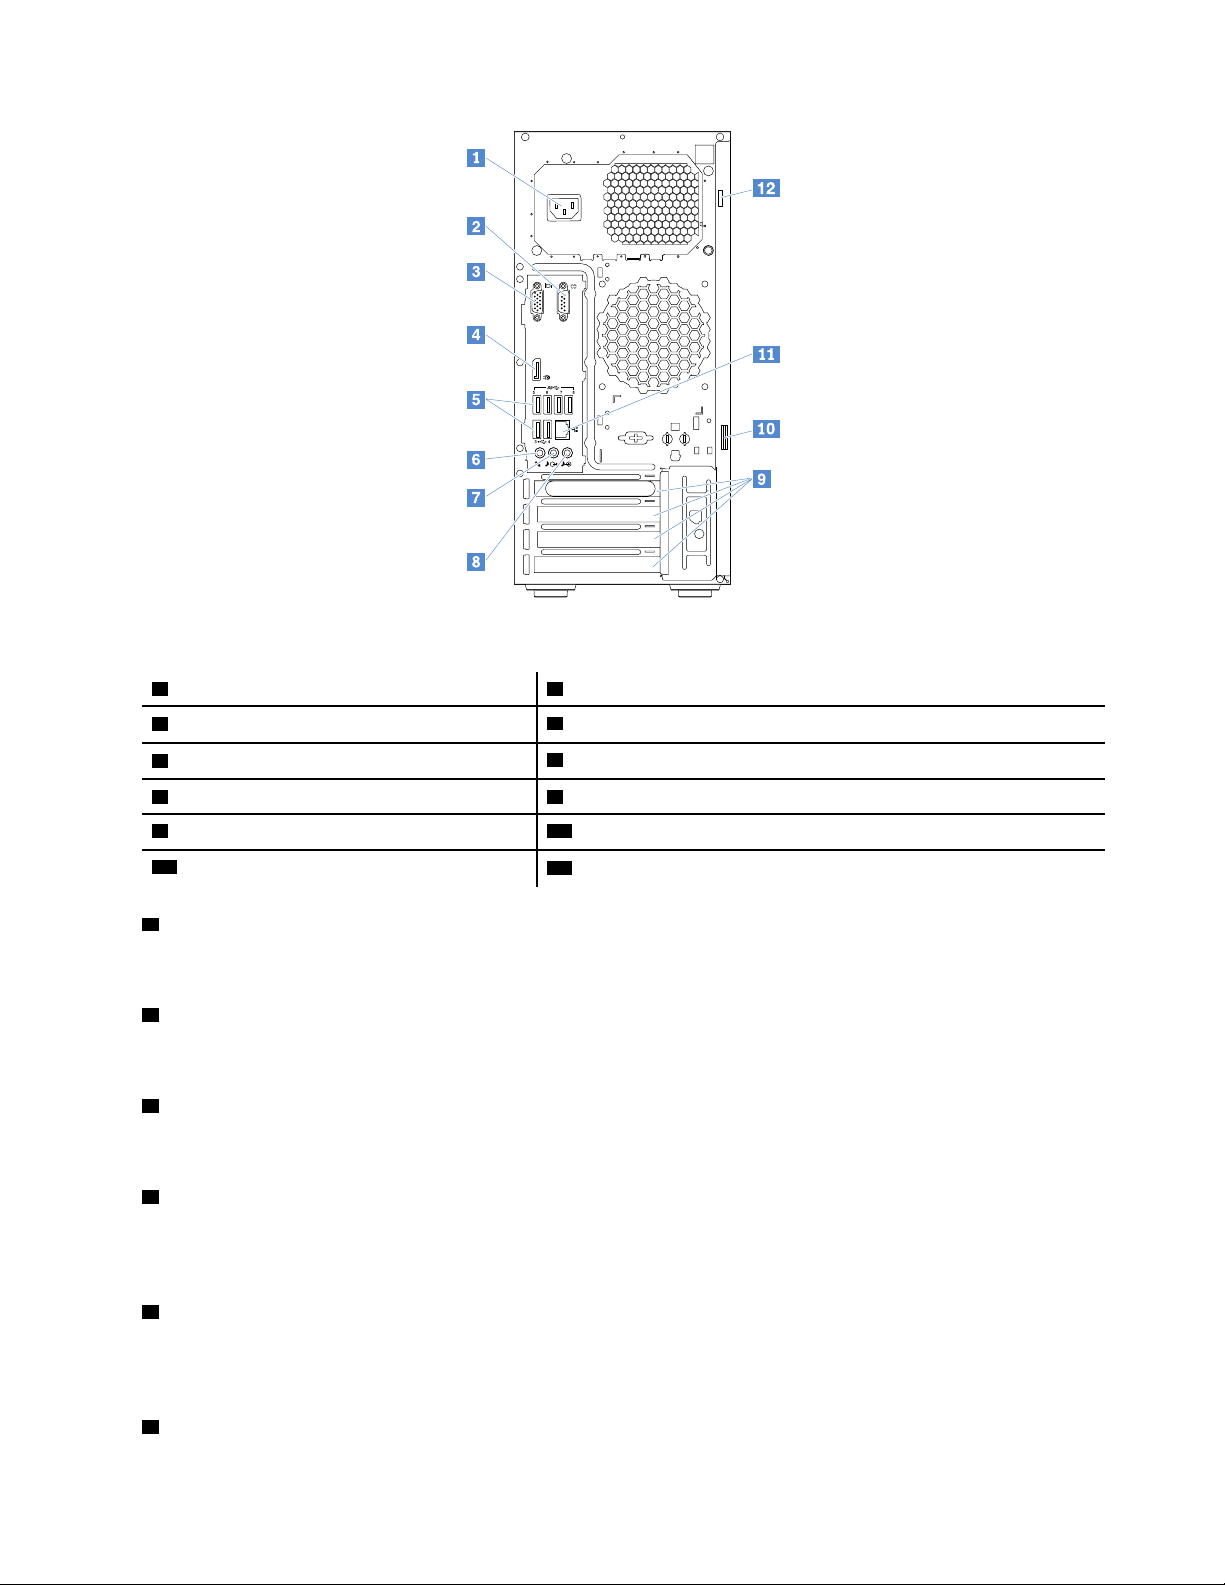
Figure 3. Rear view of the server
1 Power cord connector
3 VGA connector (DB-15)
5 USB 3.0 connectors (6)
7 Audio line-out connector 8 Audio line-in connector
9 PCIe slots
11 Ethernet connector
1 Power cord connector
2 Serial connector
4 DisplayPort connector
6 Microphone connector
10 Padlock loop
12 Security-lock slot
Used to connect the power cord.
2 Serial connector
Used to connect a device that uses a 9-pin serial connector.
3 VGA connector (DB-15)
Used to connect a VGA-compatible video device, such as a VGA monitor.
4 DisplayPort connector
Used to connect a high-performance monitor, a direct-drive monitor, or other devices that use a DisplayPort
connector.
5 USB 3.0 connectors (6)
Used to connect a USB device, such as a USB keyboard, mouse, scanner, or printer. If you have more than
eight USB devices, you can purchase a USB hub, which you can use to connect additional USB devices.
6 Microphone connector
Chapter 3. Product overview 13
Used to connect a microphone to your server when you want to record sound or if you use speechrecognition software.
7 Audio line-out connector
Used to send audio signals from the server to external devices, such as stereo speakers, headphones,
multimedia keyboards, and so on.
8 Audio line-in connector
Used to receive audio signals from an external audio device, such as a stereo system.
9 PCIe slots
Used to install expansion cards, such as a graphics card, a RAID adapter, or an Ethernet card. For more
information, see “System board components” on page 19.
10 Padlock loop
Used to attach a padlock.
11 Ethernet connector
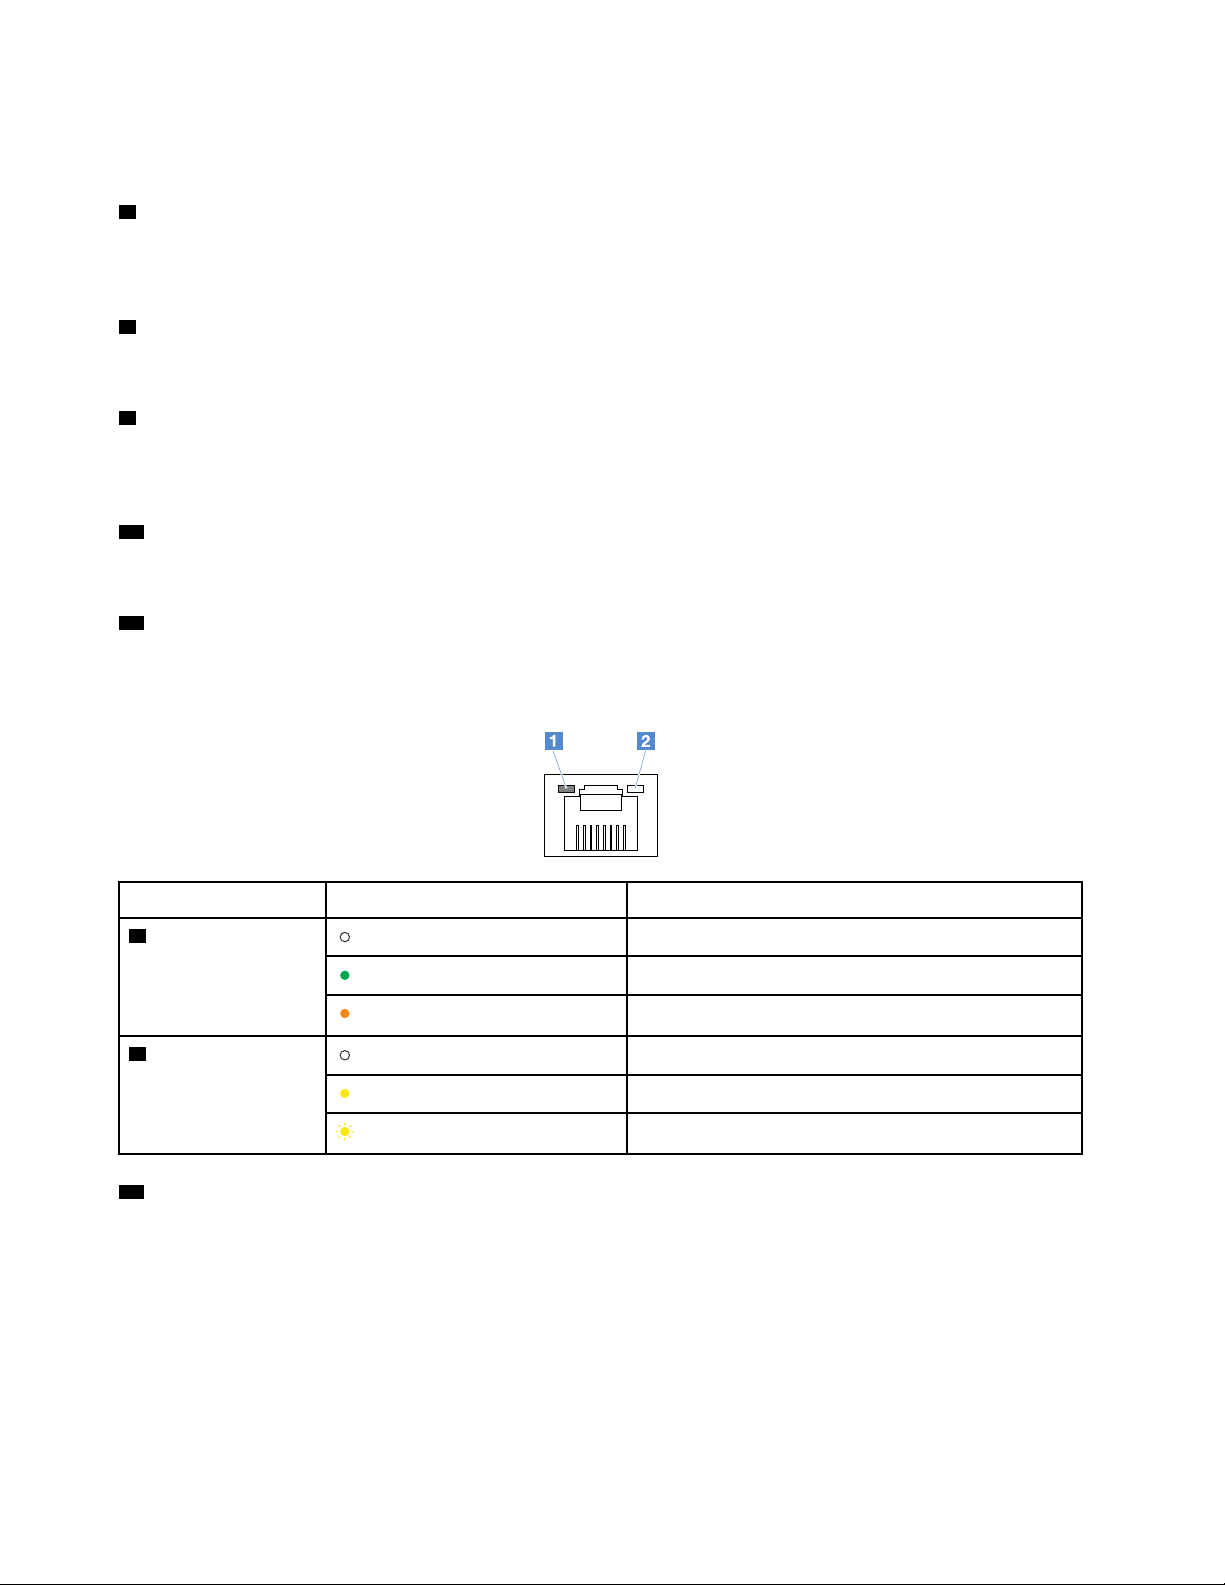
Used to connect an Ethernet cable for a local area network (LAN). The Ethernet connector has two status
LEDs to help you identify the Ethernet connectivity, activity, and connection speed.
Ethernet status LED
1 Connection speed
2 Link and activity
12 Security-lock slot
Status
Off
Green
Orange
Off
Yellow
Blinking yellow
The connection speed is 10 Mbps.
The connection speed is 100 Mbps.
The connection speed is 1000 Mbps.
The server is disconnected from a LAN.
The server is connected to a LAN.
The LAN is connected and active.
Description
Used to attach a cable lock.
Server locks
Locking the server cover prevents unauthorized access to the inside of your server.
Note: Depending on the model, your server might look slightly different from the illustrations in this topic.
14
ThinkServer TS150 User Guide and Hardware Maintenance Manual
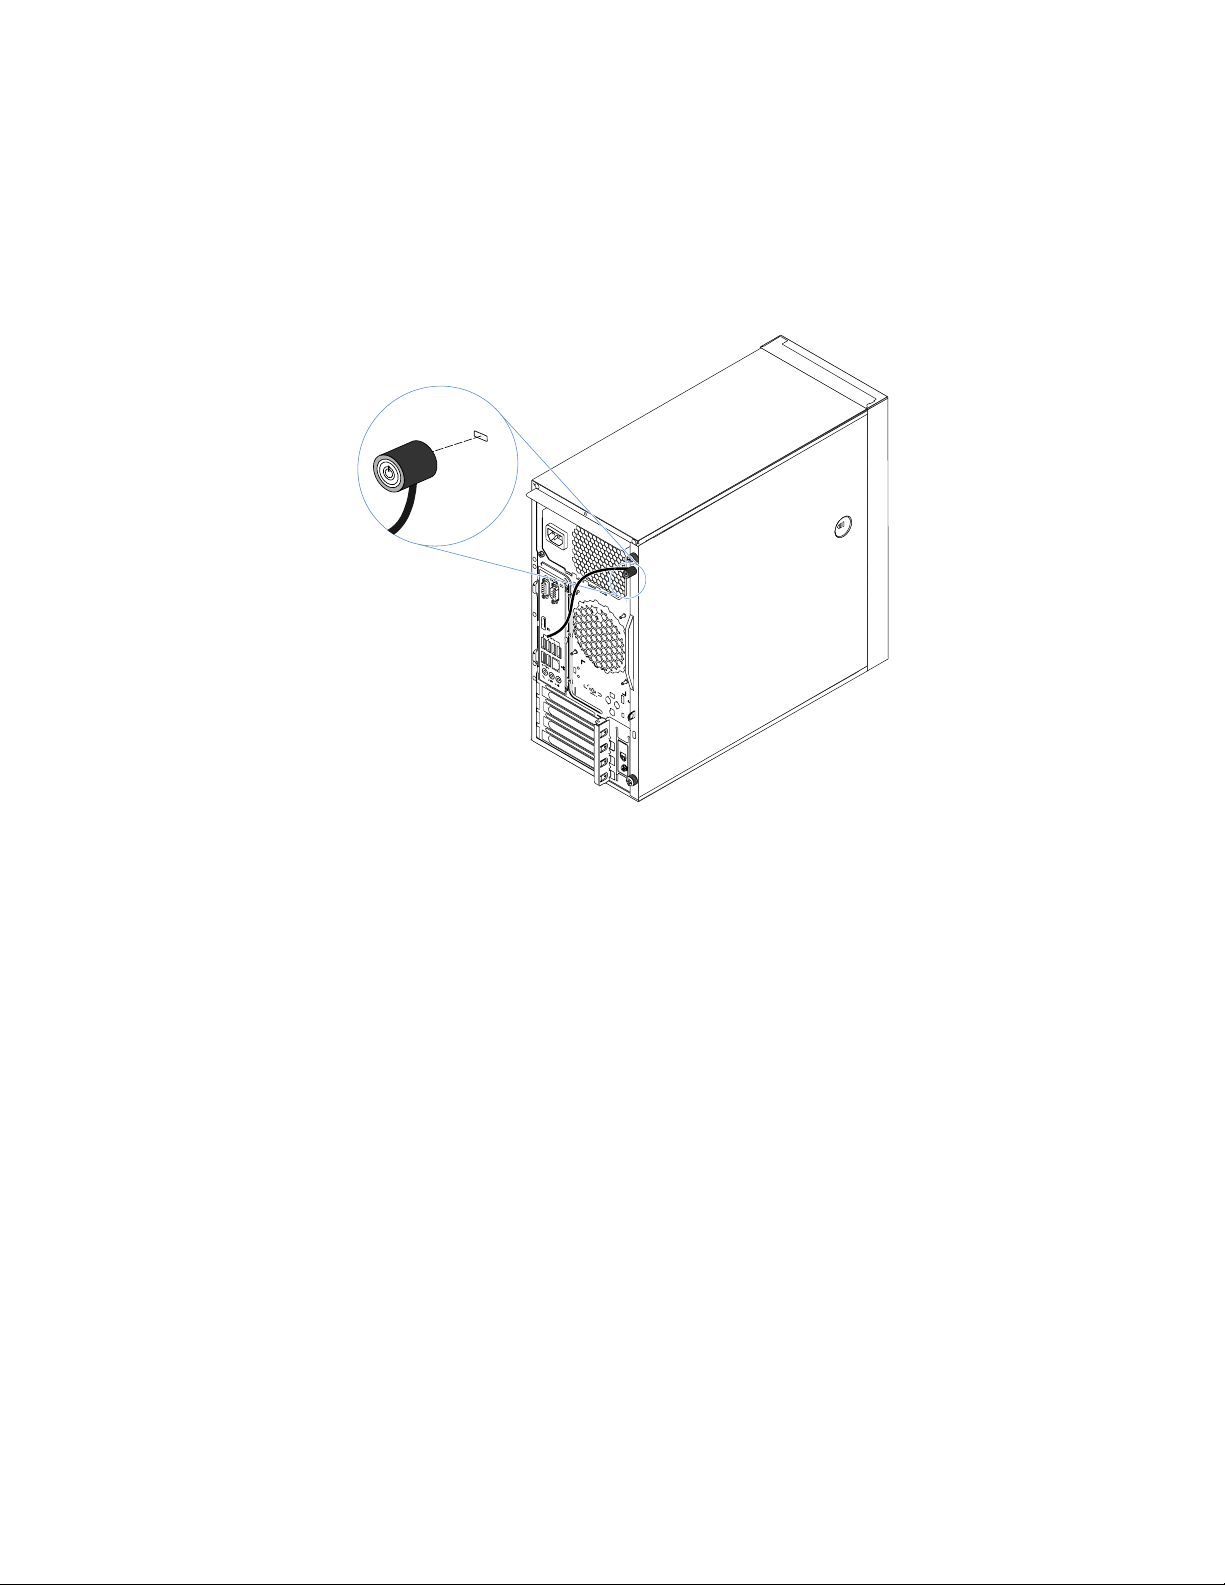
Kensington-style cable lock
®
You can use a Kensington-style cable lock to secure your server to a desk, table, or other non-permanent
fixture. The cable lock attaches to the security-lock slot at the rear of your server and is operated with a key
or combination depending on the type selected. The cable lock also locks the buttons used to remove the
server cover. This is the same type of lock used with many notebook computers. You can order an integrated
cable lock directly from Lenovo by searching for Kensington at:
http://www.lenovo.com/support
Figure 4. Kensington-style cable lock
Padlock
Your server comes with a padlock loop. When a padlock is installed, the server cover cannot be removed.
Chapter 3. Product overview 15

®
Figure 5. Padlock
Server components
Note: Depending on the model, your server might look slightly different from the illustration in this topic.
16
ThinkServer TS150 User Guide and Hardware Maintenance Manual
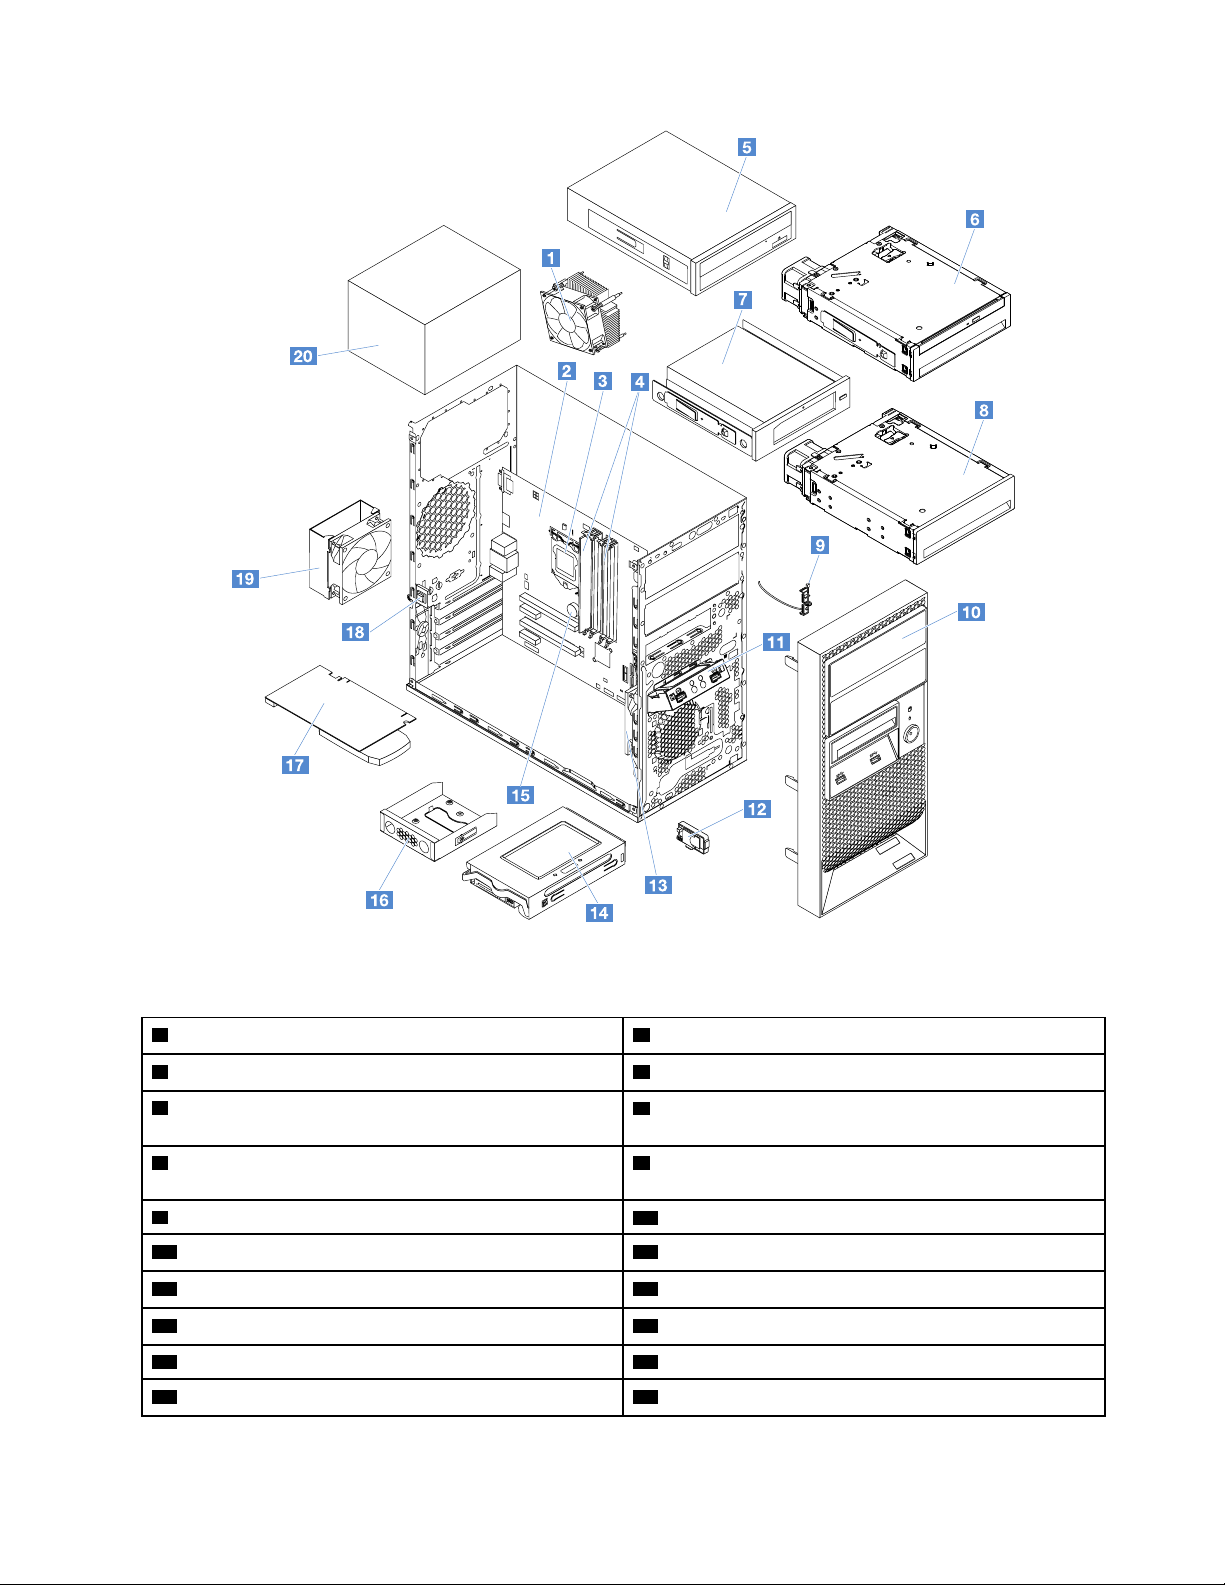
Figure 6. Server components
1 Heat sink and fan assembly
3 CPU
5 Optical drive*
7 RDX tape drive*
9 Thermal sensor
11 Front USB assembly
13 Front fan assembly
15 Coin-cell battery
17 PCIe card*
19 Rear fan assembly
3
1
1
2
2
2
1
1
2
3
2 System board
4 Memory modules
3
1
6 ThinkServer TS150 3.5" HDD to 5.25" Tray Convertor
with Slim ODD Kit*
2
8 ThinkServer TS150 3.5" HDD to 5.25" Tray Convertor
2
Kit*
10 Front bezel
12 Secure digital (SD) module*
14 Hard disk drive or solid-state drive
16 ThinkServer TS150 FDD to 2.5'' HDD Convertor Kit*
18 Intrusion switch*
20 Power supply assembly
2
2
1
2
1
2
Chapter 3. Product overview 17

Notes:
1 2 3
• * Available on some models
1
•
Self-service CRUs: Parts to be installed or replaced by customer themselves.
2
•
Optional CRUs: Parts can be installed or replaced by customers or technicians under certain terms of
the applicable warranty service type for your country or region.
3
Non-CRUs: Parts must be installed or replaced only by trained service technicians.
•
Before servicing a Lenovo product, ensure that you read and understand Read this first: safety information.
Use only parts provided by Lenovo for replacement. For a complete listing of FRU information, such as FRU
part numbers and supported server models, go to:
http://www.lenovo.com/serviceparts-lookup
RAID card
You can install an add-on RAID card into your server to provide advanced SATA/SAS hardware RAID
functions. Your server supports the Lenovo ThinkServer RAID 520i PCIe Adapter.
The following illustration shows the connectors on the Lenovo ThinkServer RAID 520i PCIe Adapter.
Figure 7. Lenovo ThinkServer RAID 520i PCIe Adapter
Connector Description
1 Connector 0 Used to connect the 1-to-4 mini-SAS signal cable.
2 Connector 1 Used to connect the 1-to-1 mini-SAS signal cable.
3 J3 connector
Used to install a ThinkServer RAID 520i upgrade key. See “Lenovo ThinkServer RAID 520i upgrade
key” on page 74.
Connecting cables to the RAID 520i PCIe adapter
• If your server has no more than four storage drives installed, do the following:
1. Connect one end of the 1-to-4 mini-SAS signal cable to connector 0 on the adapter.
2. Connect the four connectors on the other end of the cable to the storage drives by referring to the
18
following illustration and table.
ThinkServer TS150 User Guide and Hardware Maintenance Manual
 Loading...