

Lenovo IdeaPad Y710, IdeaPad Y710 4054, 59013334 User Manual

Includes:
User Guide V1.0
Lenovo
IdeaPad Y710
• Important safety information
• Tips for taking care of your computer
• Function and features
• Service and troubleshooting
• Warranty information

First Edition (November 2007)
Before using this information and the product it supports, be sure to read the following:
• Safety and Warranty Guide included in the package with this publication.
• Appendix D. Notices on page 84.
• Regulatory Notice included in the package with this publication.
Note
U.S. GOVERNMENT USERS – RESTRICTED RIGHTS: Our products and/or services are provided with
RESTRICTED RIGHTS. Use, duplication or disclosure by the Government is subject to the GSA ADP
Schedule contract with Lenovo, if any, or the standard terms of this commercial license, or if the agency is
unable to accept this Program under these terms, then we provide this Program under the provisions set
forth in Commercial Computer Software–Restricted Rights at FAR 52.227-19, when applicable, or under
Rights in Data-General, FAR 52.227.14 (Alternate III).
© Copyright Lenovo 2007. All rights reserved.
• OneKey Recovery User Guide included in the package with this publication.

i
Lenovo IdeaPad Y710
V1.0
Read This First .................................. ii
Chapter 1. Getting to Know
Your Computer.................................. 1
Top View................................................. 1
Left-side View ........................................ 3
Right-side View...................................... 5
Bottom View........................................... 7
Front View .............................................. 9
Rear View.............................................. 11
Chapter 2.
Using Your Computer ..................... 12
Putting your computer to Sleep or
Shutting It Down ................................. 12
Adjusting the display .......................... 13
Using the Touch Pad ........................... 14
Using the Keyboard............................. 15
Special keys and buttons ....................17
System status indicators ..................... 23
Using the optical drive........................ 25
Using memory cards ........................... 27
Using the TV function
(Specific models only) ......................... 28
Using the Shuttle Center..................... 28
Using the Integrated Camera............. 32
Using the HaloLighting ...................... 34
Using the Internet ................................ 35
Securing your computer ..................... 37
Installing Device Drivers .................... 44
Removing 2nd Hard Disk Drive........ 44
Using battery and AC adapter........... 46
Chapter 3.
Using external devices ................... 50
Connecting a Universal Serial Bus
(USB) device ......................................... 50
Connecting an IEEE 1394 device ....... 51
Connecting a PC card device ............. 52
Connecting an external display ......... 53
Connecting a computer....................... 54
Connecting a headphone and
audio device ......................................... 55
Connecting an external
microphone........................................... 56
Connecting a Bluetooth device .......... 56
Chapter 4. Troubleshooting............57
Frequently Asked Questions ..............57
Troubleshooting ...................................58
Chapter 5.
Getting Help and Service ................65
Getting Help and Service....................65
Getting Help on the Web ....................65
Calling the Customer
Support Center......................................66
Getting Help around the World.........67
Chapter 6. Safety, Use, and
Care Information..............................68
Caring Your Computer........................68
Accessibility and Comfort...................73
Maintenance ..........................................75
Appendix A.
Warranty Information ......................77
Warranty Information .........................77
Lenovo Warranty Service
Telephone Numbers ............................79
Appendix B. Customer
Replaceable Units (CRUs) .............. 80
Appendix C. Features and
Specifications ..................................81
Features..................................................81
Specifications ........................................83
Appendix D. Notices........................84
Notices ...................................................84
Wireless related information ..............86
Electronic Emissions Notices ..............88
Lenovo product service
information for Taiwan .......................90
WEEE and Recycling Statements.......90
EU WEEE Statements ..........................91
Japan Recycling Statements................91
Notice for Users in the U.S.A..............92
Notice on Deleting Data from
Your Hard Disk ....................................93
Trademarks ...........................................94
Index ................................................. 95
Contents
ii
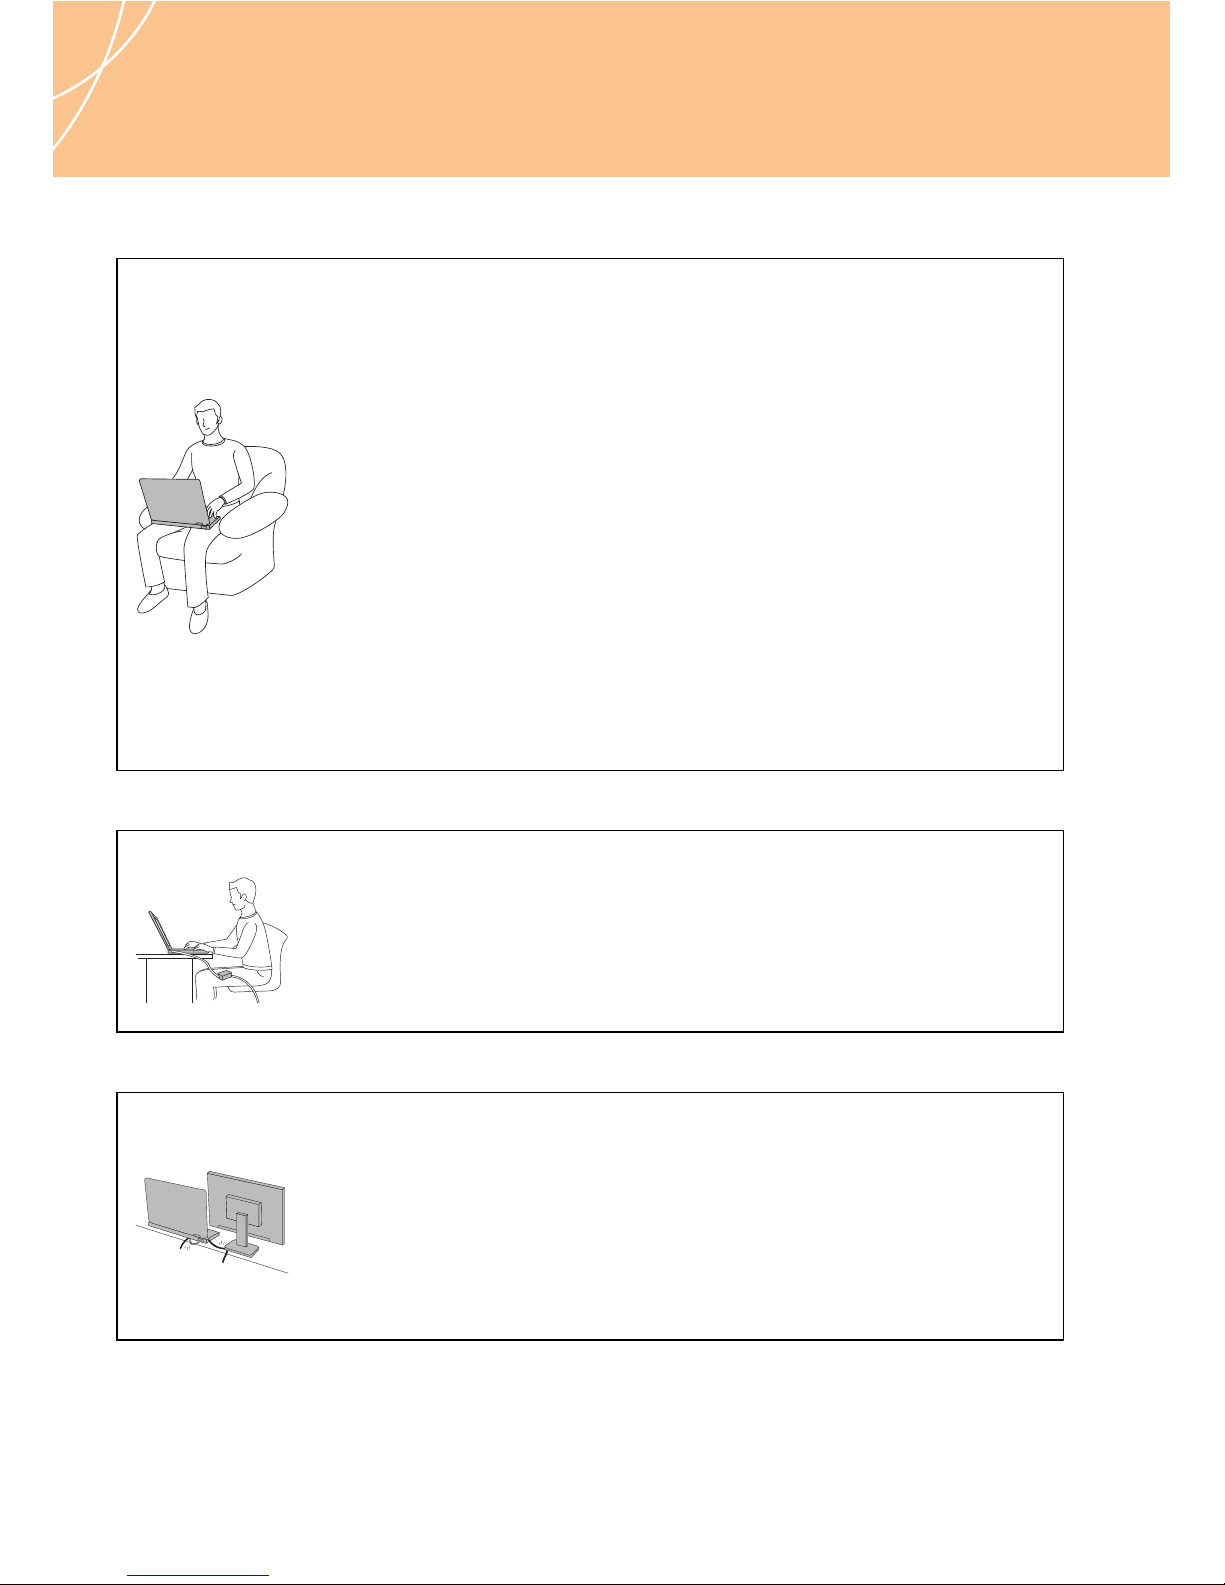
Read This First
When your computer is turned on or the battery is charging,
the base, the palm rest, and some other parts may become
hot. Avoid keeping your hands, your lap, or any other part of
your body in contact with a hot section of the computer for
any extended length of time. When you use the keyboard,
avoid keeping your palms on the palm rest for a prolonged
period of time.
Your computer generates some heat during normal
operation. The amount of heat depends on the amount of
system activity and the battery charge level. Extended contact
with your body, even through clothing, could cause
discomfort or even a skin burn. Periodically take breaks from
using the keyboard by lifting your hands from the palm rest;
and be careful not to use the keyboard for any extended
length of time.
When the AC adapter of your computer is connected to an
electrical outlet, it generates heat. Do not place the adapter in
contact with any part of your body while using it. Never use
the AC adapter to warm your body. Extended contact with
your body, even through clothing, may cause a skin burn.
Route the cables of an AC adapter, a mouse, a keyboard, a
printer, or any other electronic device, or communication
lines, so that they cannot be walked on, tripped over, pinched
by your computer or other objects, or in any way subjected to
treatment that could disturb the operation of your computer.
Applying strong force to the cables may damage or break
them.
Read This First
iii
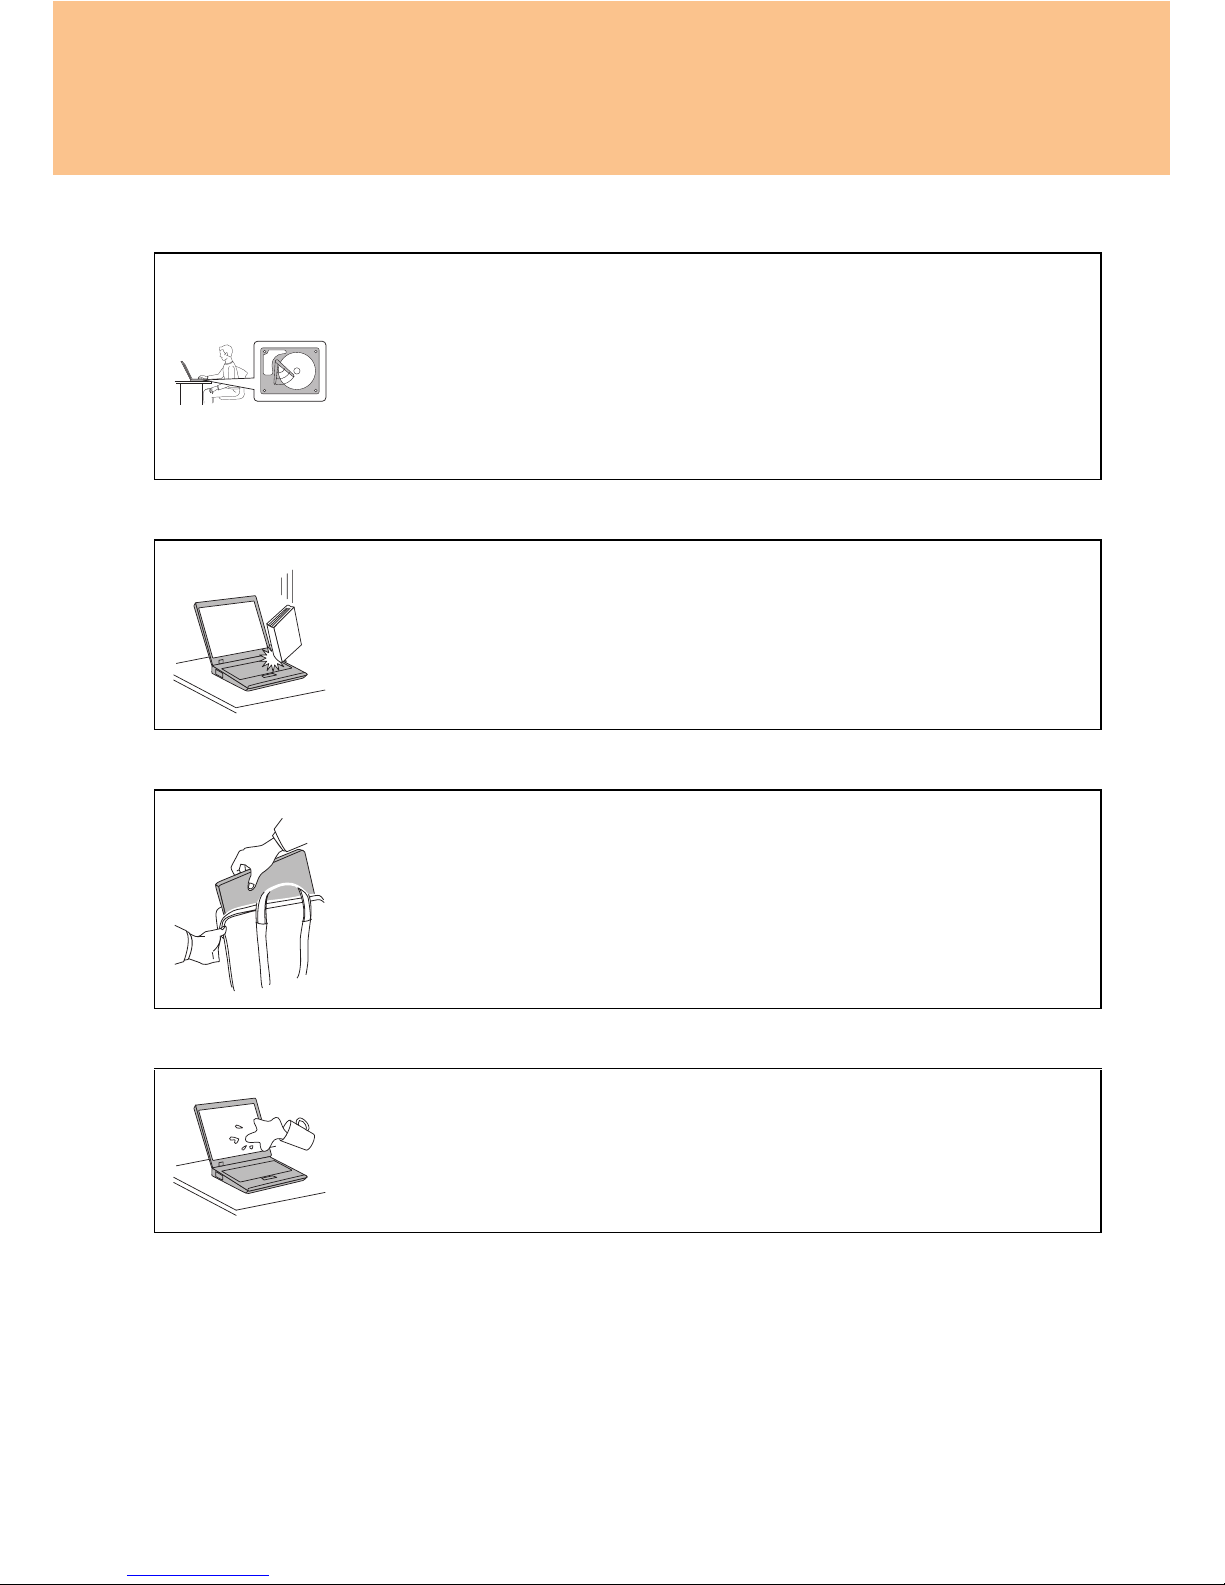
Before moving your computer, do one of the following: turn
it off or press Fn + F1 to put it in sleep mode.
Before moving the computer, make sure that the power on
indicator is off. This will help to prevent damage to the hard
disk drive, and possible loss of data.
Do not drop, bump, scratch, twist, hit, vibrate, push, or place
heavy objects on your computer, display, or external devices.
Use a quality carrying case that provides adequate cushion
and protection. Do not pack your computer in a tightly
packed suitcase or bag.
Place liquids away from your computer to avoid spills, and
keep your computer away from water to avoid the danger of
electrical shock.
1
Chapter 1. Getting to Know Your Computer
Top View - - - - - - - - - - - - - - - - - - - - - - - - - - - - - - - - - - - - - - - - - - - - - - - - - - - - - - - - - - - - - - - - - - - - - - - - - - - - -
Integrated camera
The integrated built-in camera allows picture taking or video recording, and
can be used with video conferencing and other interactive applications.
For details see “Using the Integrated Camera” on page 32.
Wireless LAN antennas
A diversity antenna system is built into the display for optimal reception, enabling
wireless communication wherever you are.
-
.
/

Chapter 1. Getting to Know Your Computer
2
Computer display
The color display with TFT technology provides clear and brilliant text and
graphics.
Note:
Polymethyl methacrylate (PMMA) film is used on specific models, which has
excellent strength and transparency.
Touch inductive panel and Multi-media buttons
Control buttons integrated for convenient Multi-media playing.
For details on “Touch inductive panel and multi-media buttons”, see page 17.
Novo button
When the computer is turned off, this button functions as a OneKey Recovery key;
use with caution.
For details on “Novo button”, see page 22.
Power button
Use the Power button to turn on the computer. The Power button also can be
programmed to shut down the computer or put it into sleep or hibernation.
For details on “Putting your computer to Sleep or Shutting It Down”, see page 12.
Speakers
Built-in speakers for rich powerful sound.
Keyboard
The keyboard provides full-sized keys.
For details on “Using the Keyboard”, see page 15.
Lenovo game zone (Specific models only)
For details, see “Lenovo game zone” on page 19.
17 numeric keys (Specific models only)
For details, see “17 numeric keys” on page 21.
Array Microphone (built-in)
The built-in microphone (with noise reduction) can be used for video
conferencing, voice narration, or simple audio recordings.
Touch pad
For details on “Using the Touch Pad”, see page 14.
-
.
/
3
Chapter 1. Getting to Know Your Computer
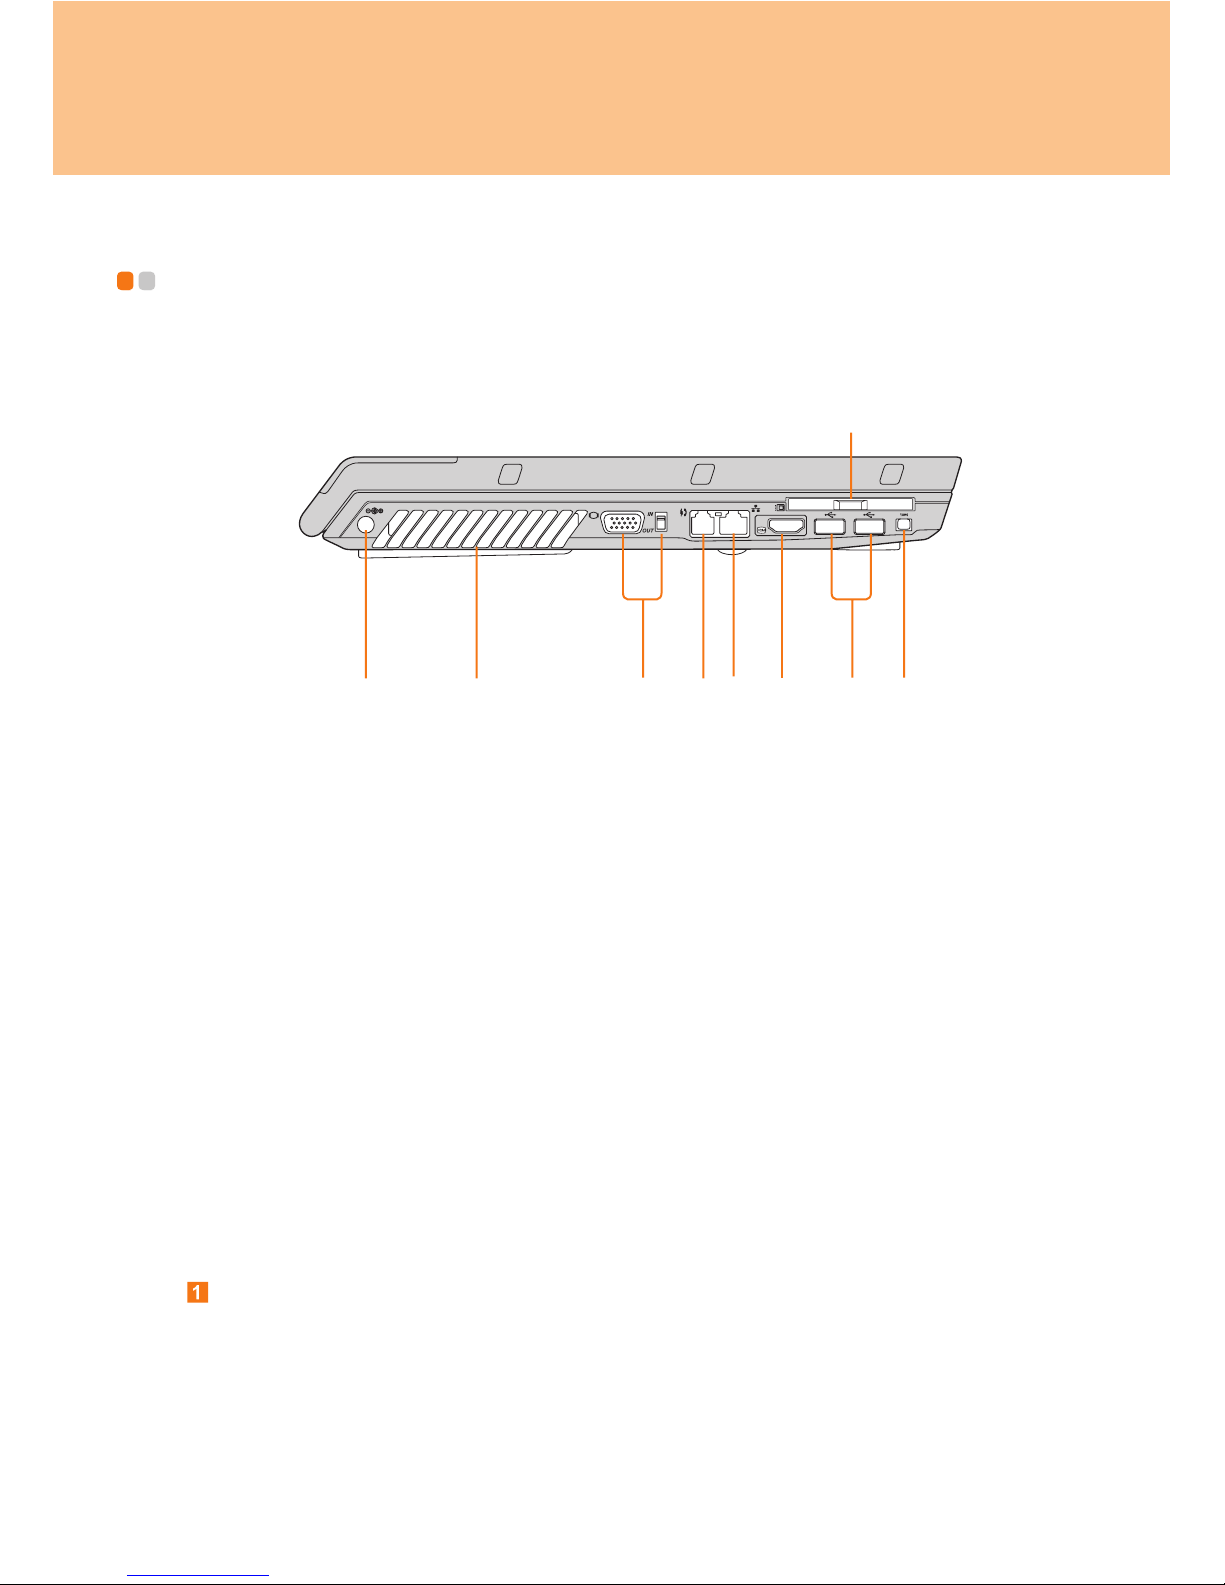
Left-side View - - - - - - - - - - - - - - - - - - - - - - - - - - - - - - - - - - - - - - - - - - - - - - - - - - - - - - - - - - - - - - - - - -
AC power adapter jack
Connect the power adapter here to supply power to the computer and charge the
internal battery.
Note:
To prevent damage to the computer and battery pack, use the supplied AC adapter
only.

Chapter 1. Getting to Know Your Computer
4
Fan louvers
The fan louvers allow warm air to exit the computer.
Important:
Make sure that paper, books, clothing, cables or other objects do not block any of
the fan louvers or else overheating of the computer may occur.
VGA port
Use this port to connect external display and other computer.
For details on connecting external display, see “Connecting an external display” on
page 53.
For details on connecting other computers, see “Connecting a computer” on
page 54.
Modem Port
Use this port for dial up access to an internet service provider (ISP).
For details, see “Using the Internet” on page 35.
LAN port
Use this port to connect the computer to a high-speed DSL/cable modem
connection and local network.
For details, see “Using the Internet” on page 35.
HDMI connector (Specific models only)
Use this connector to connect HDMI devices.
For details, see “Connecting a DVI monitor” on page 54.
PCI Express card (new card) slot
Use this slot to install a PCI Express card (new card).
For details, see “Connecting a PC card device” on page 52.
USB 2.0 port
Use this slot to connect USB 2.0 or USB 1.1 devices, such as a keyboard, mouse,
camera, hard disk drive, printer, and scanner.
For details, see “Connecting a Universal Serial Bus (USB) device” on page 50.
IEEE 1394 connector
Use this slot to connect IEEE 1394 devices, such as digital video cameras and
external hard disk drives.
For details, see “Connecting an IEEE 1394 device” on page 51.
5
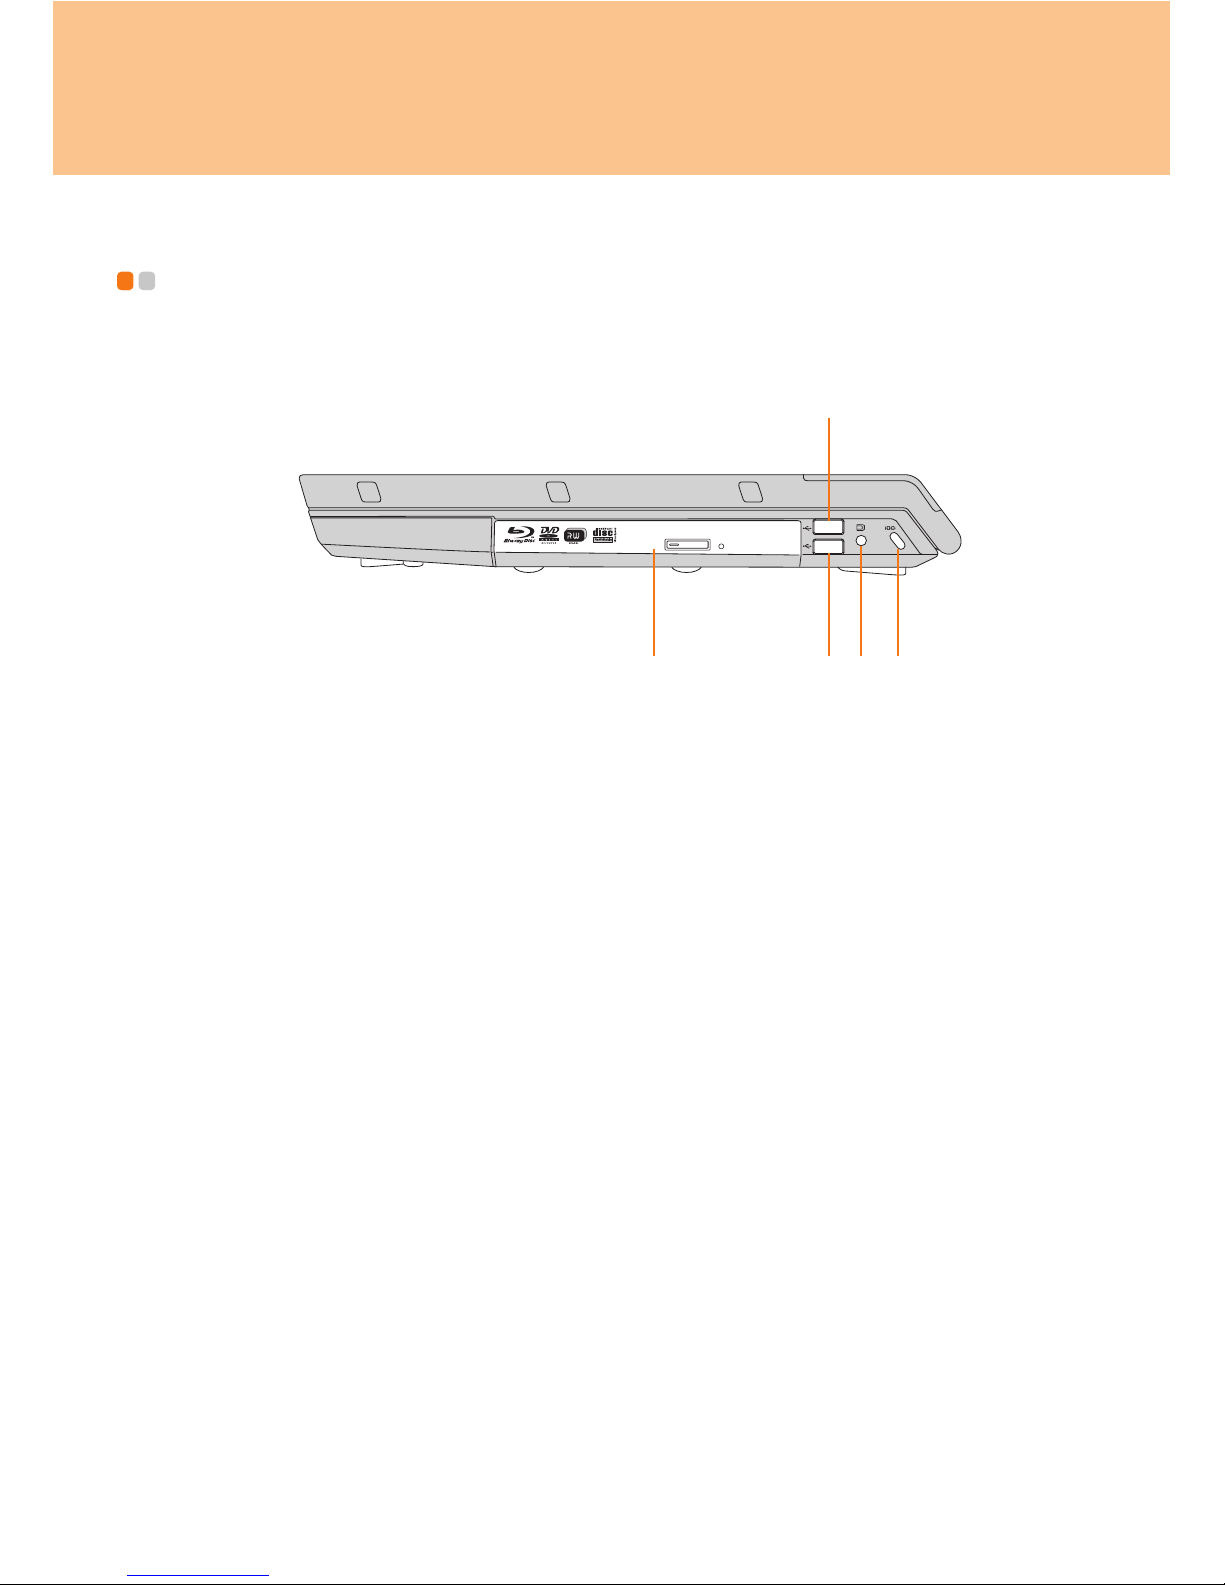
Chapter 1. Getting to Know Your Computer
Right-side View - - - - - - - - - - - - - - - - - - - - - - - - - - - - - - - - - - - - - - - - - - - - - - - - - - - - - - - - - - - - - -
TV

Chapter 1. Getting to Know Your Computer
6
Optical drive
Your computer comes with an optical device, such as a DVD/CD recordable drive
or a Blu-ray/DVD/CD drive.
For details, see “Using the optical drive” on page 25.
USB 2.0 port
The Universal Serial Bus is compatible with USB 2.0 or USB 1.1 devices such as a
keyboard, mouse, camera, hard disk drive, printer and scanner. USB allows devices
to be connected and disconnected without rebooting the computer (hot swapping),
and to allow specific classes of hardware to be used without requiring individual
device drivers to be installed.
TV-in jack (Specific models only)
Use this jack to connect with TV signal cable through the provided TV adapter
(Analog input supported).
For details, see “Using the TV function (Specific models only)” on page 28.
Security keyhole
Your computer comes with a security keyhole. You can purchase a security cable
and lock to fit this keyhole.
Note:
Before purchasing any security product, verify that it is compatible with this type
of security keyhole.
7
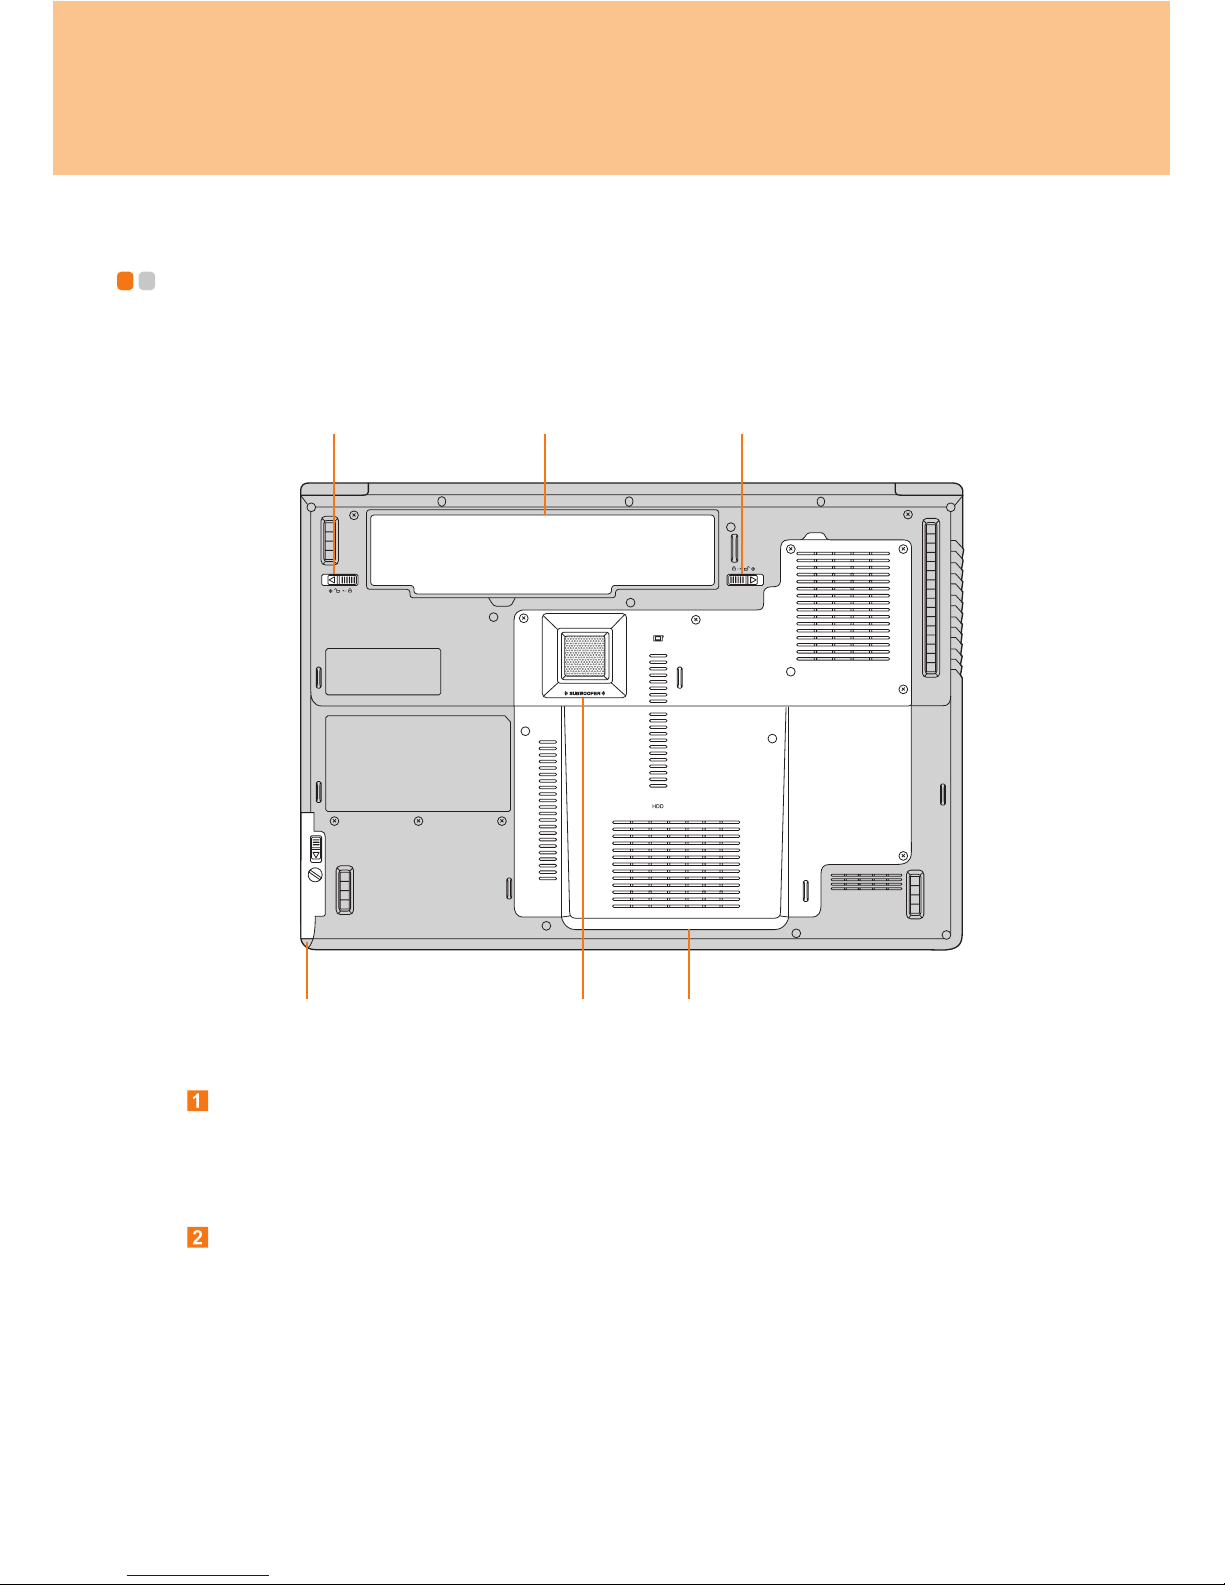
Chapter 1. Getting to Know Your Computer
Bottom View - - - - - - - - - - - - - - - - - - - - - - - - - - - - - - - - - - - - - - - - - - - - - - - - - - - - - - - - - - - - - - - - - - - - -
Battery latch - manual
The manual battery latch is used to keep the battery pack secured. Move the
manual battery latch to the unlocked position to insert or remove the battery pack.
Move the manual latch to the locked position after inserting the battery pack.
Battery pack
The battery pack provides power for the computer when no AC power source is
available. If the AC adapter is connected to the computer, the battery pack is
automatically charged. For details on “Using battery and AC adapter”, see page 46.
Battery latch - spring loaded
The spring-loaded battery latch keeps the battery pack secured in place. When you
insert a battery pack, this latch automatically secures the battery in place. To
remove the battery, hold this latch in the unlocked position.

Chapter 1. Getting to Know Your Computer
8
2nd Hard Disk Drive
The 2nd Hard Disk Drive are secured in a compartment. To remove the 2nd Hard
Disk Drive, see “Removing 2nd Hard Disk Drive” on page 44.
Subwoofer
The multimedia subwoofer features a super bass effect while you are watching
movies or enjoying music.
Central Processor Unit (CPU)/ Memory (RAM)/ Wireless LAN Card Hard Disk
Drive/ TV card (Specific models only) compartment
Central Processor Unit (CPU)
The CPU compartment provides space for the CPU and the radiator.
Important:
Do not replace the CPU yourself! Visit an authorized service center or retailer
for replacing.
Memory (RAM) compartment
The memory compartment provides expansion capabilities for additional
memory. The BIOS automatically detects the amount of memory in the system
and configures CMOS accordingly during the Power-On Self-Test (POST)
process. There is no hardware or software (including BIOS) setup required after
the memory is installed.
Note:
(1) Only purchase expansion modules from authorized retailers of this computer
to ensure maximum compatibility and reliability.
(2) If you only insert one memory card in the compartment, plug it into the slot
near the mainboard.
Wireless LAN Card compartment
The Lenovo wireless network card are secured in a compartment.
Hard Disk Drive/ TV card
The hard disk drive and TV-card are secured in a compartment.
Important:
Do not disassemble or replace the hard disk drive by yourself! If you do need to,
ask a Lenovo authorized service center or dealer to disassemble or replace it.
9
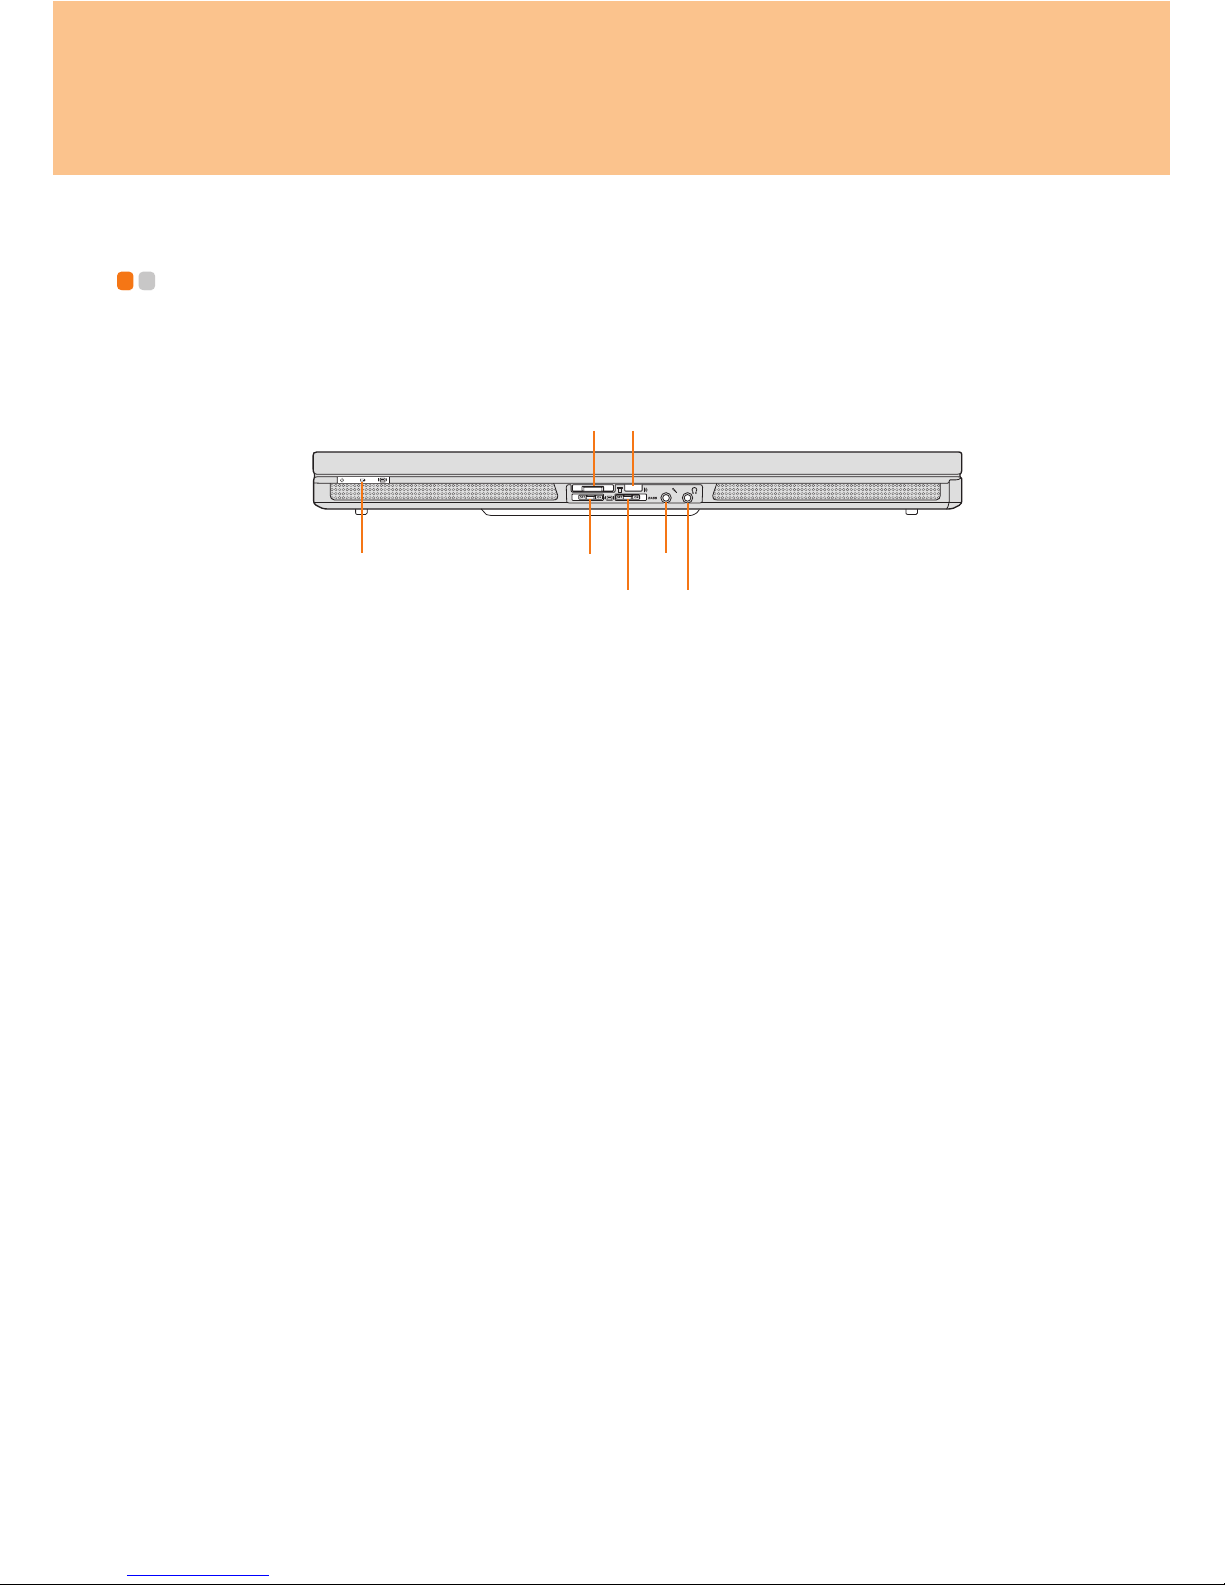
Chapter 1. Getting to Know Your Computer
Front View - - - - - - - - - - - - - - - - - - - - - - - - - - - - - - - - - - - - - - - - - - - - - - - - - - - - - - - - - - - - - - - - - - - - - - - - -

Chapter 1. Getting to Know Your Computer
10
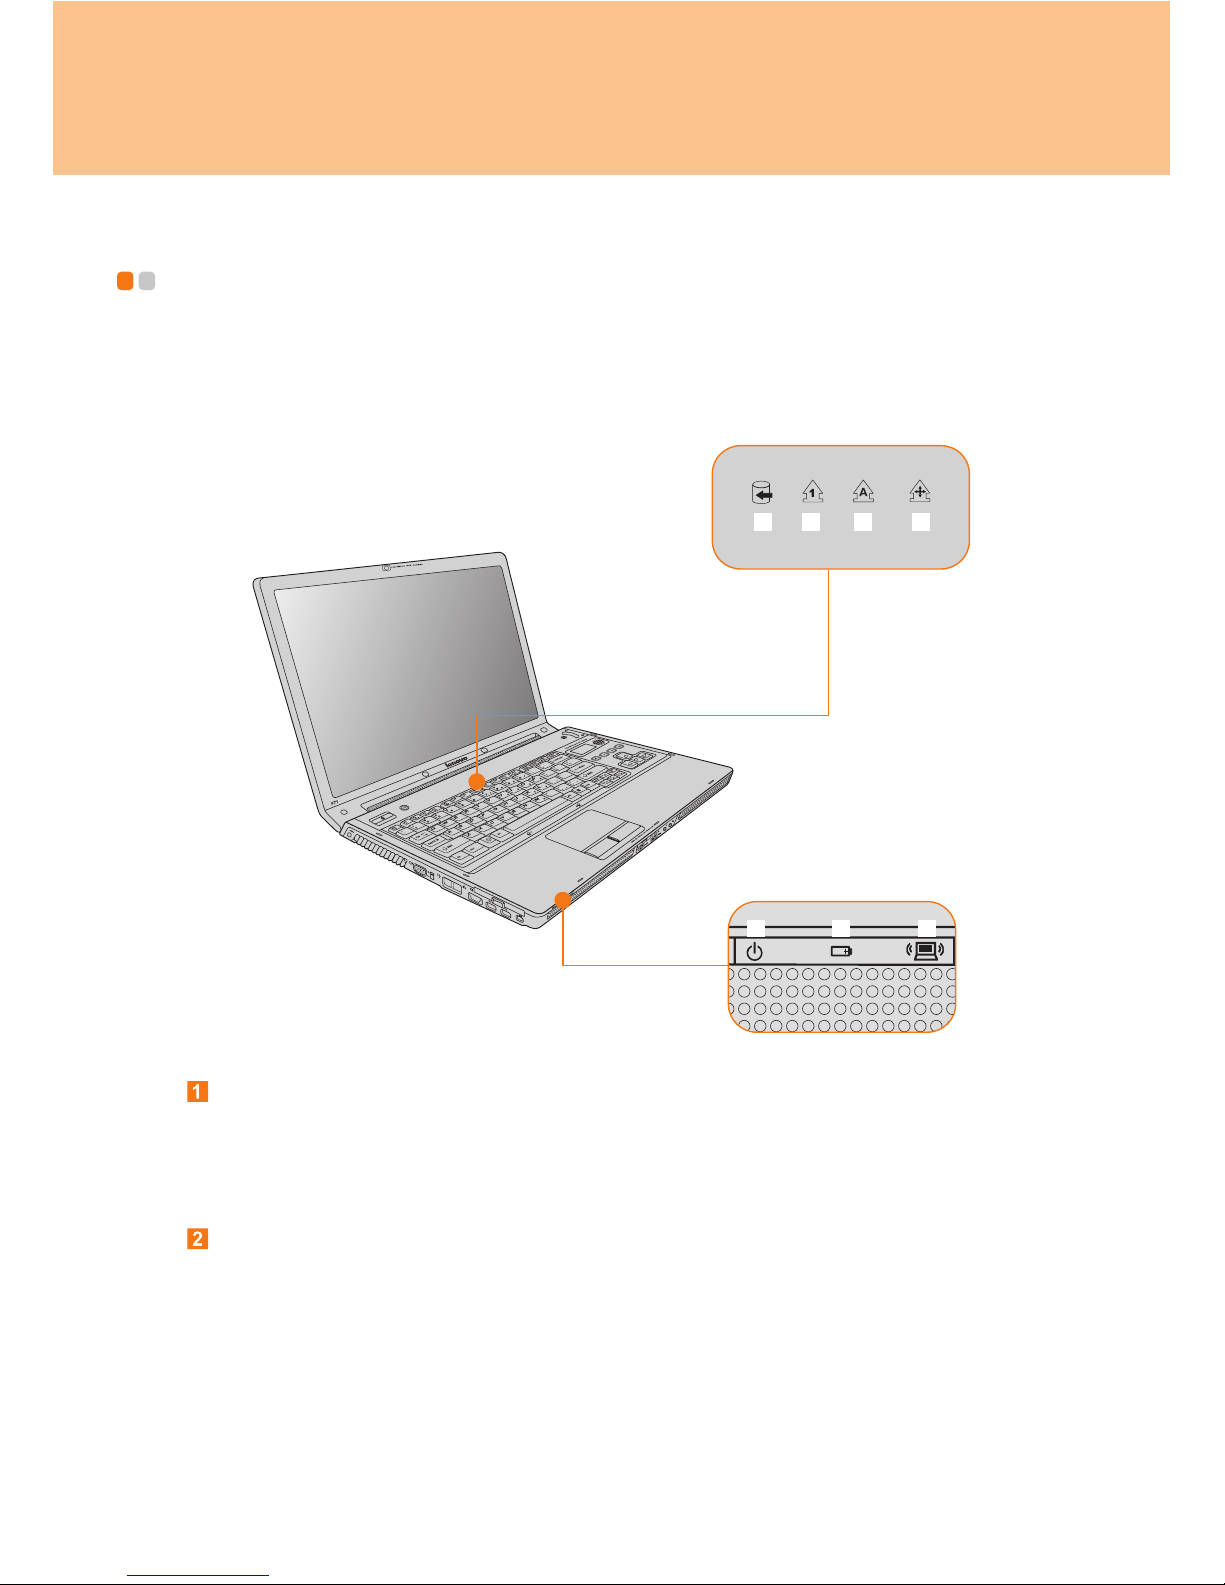
System status indicators
For details, see “System status indicators” on page 23.
Multi-media reader slot
Use this slot to insert memory card, such as an SD Card, a Multi-media Card, a
Memory Stick, an xD-Picture Card, an SD pro card or a Memory Stick Pro card.
For details, see “Using memory cards” on page 27.
CIR port
For use with a Lenovo remote control. You can use the remote control to operate
Lenovo Shuttle Center.
For details, see “Using the Shuttle Center” on page 28.
Wireless device switch
Use this switch to simultaneously turn on or turn off Wireless LAN and Bluetooth
devices.
BASS switch
Use this switch to boost the bass sound.
Microphone jack (external)
Use this jack to connect an external microphone for video conferencing, voice
narrations, or simple audio recordings.
For details, see “Connecting an external microphone” on page 56.
Headphone/SPDIF jack (external)
Use this jack to connect headphones or other audio devices, such as speakers and
SPDIF devices.
For details, see “Connecting a headphone and audio device” on page 55.
11
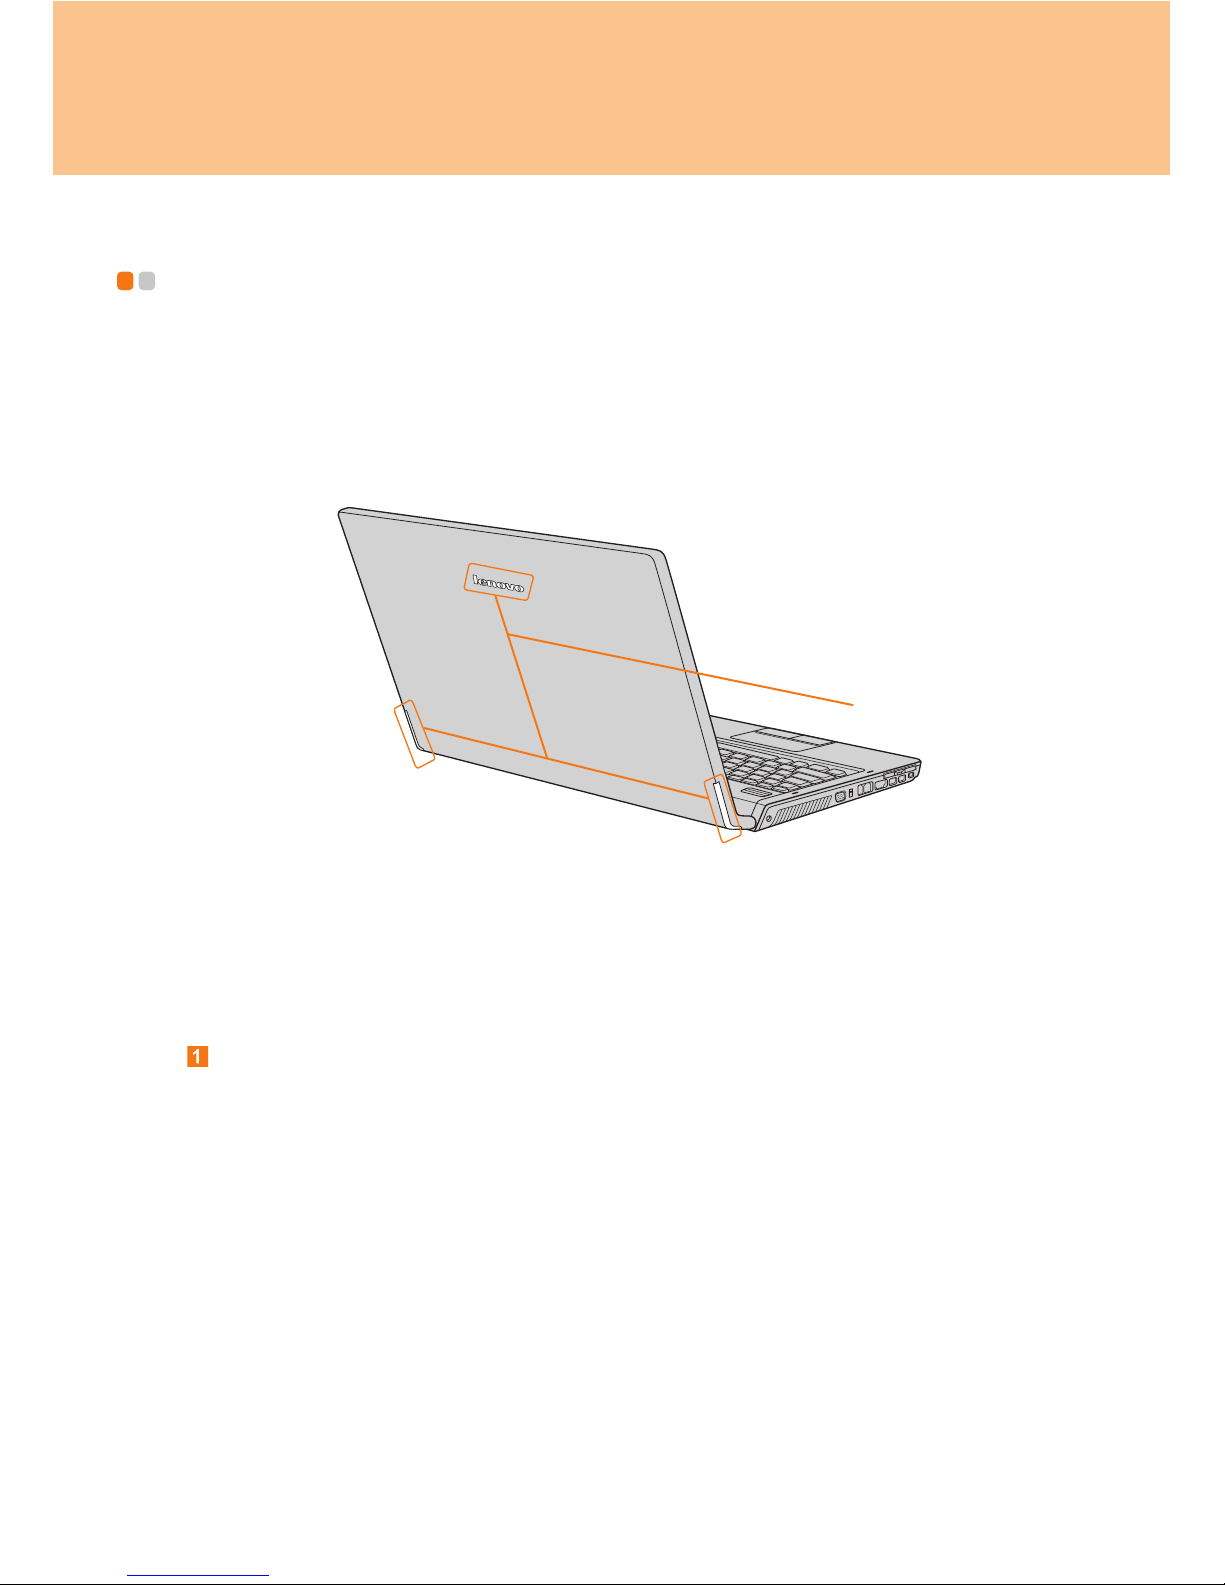
Chapter 1. Getting to Know Your Computer
Rear View - - - - - - - - - - - - - - - - - - - - - - - - - - - - - - - - - - - - - - - - - - - - - - - - - - - - - - - - - - - - - - - - - - - - - - - - - - -
Background Lighting
For details, see “HaloLighting” on page 34.

12
Chapter 2. Using Your Computer
Putting your computer to Sleep or Shutting
It Down - - - - - - - - - - - - - - - - - - - - - - - - - - - - - - - - - - - - - - - - - - - - - - - - - - - - - - - - - - - - - - - - - - - - - - - - - - - - - - - -
When you finish working with your computer, you can put it to sleep or shut it down.
Putting your computer to Sleep
If you will be away from your computer for only a short time, put the computer to sleep.
When the computer is in sleep, you can quickly wake it and bypass the startup process.
To put the computer to sleep, do one of the following.
Click Start and select Sleep from the Start menu.
Press Fn + F1.
Warning:
Wait until the power indicator light starts blinking (indicating that the computer is in
sleep) before you move your computer. Moving your computer while the hard disk is
spinning can damage the hard disk, causing loss of data.
To wake the computer, do one of the following.
Press the power button.
Press any key.
Shutting Down Your computer
If you are not going to use your computer for a day or two, shut it down.
To shut down your computer, click Start and select Shut down from the Start menu.

13
Chapter 2. Using Your Computer
Adjusting the display - - - - - - - - - - - - - - - - - - - - - - - - - - - - - - - - - - - - - - - - - - - - - - - - -
After you begin working with your computer, you might need to adjust your display to
achieve its optimum performance.
Adjusting the brightness
You can increase or decrease the brightness on your display.
To adjust the brightness on your display, press Fn + up/down arrow.
Switching between wide screen and normal screen
You can change the aspect ratio on your display.
To switch between wide screen and normal mode, press Fn + F4.
Chapter 2. Using Your Computer
14
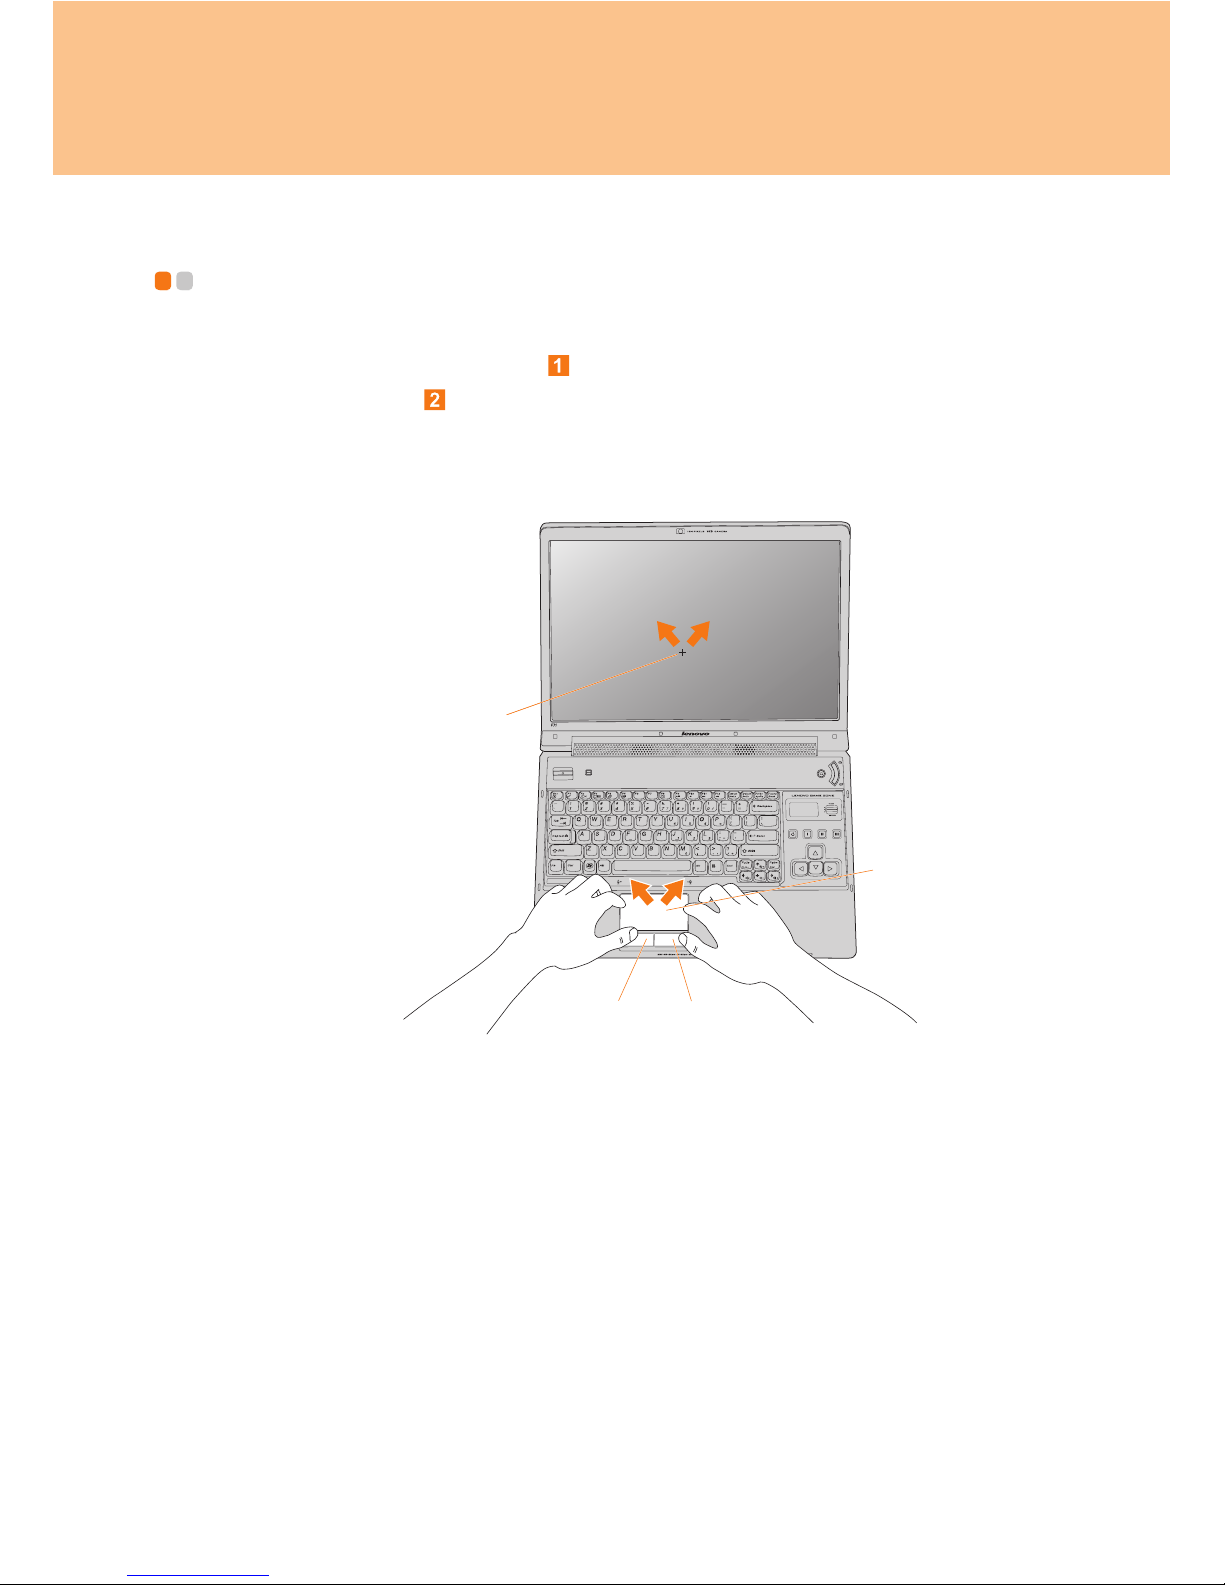
Using the Touch Pad - - - - - - - - - - - - - - - - - - - - - - - - - - - - - - - - - - - - - - - - - - - - - - - - - -
The touch pad consists of a pad and two click buttons at the bottom of the keyboard.
To move the cursor on the screen, slide your fingertip over the pad in the direction in
which you want the cursor to move. The functions of the left and right click
buttons correspond to those of the left and right mouse buttons on a conventional
mouse.
Note:
You can also attach and use a USB mouse through the USB connector.
For details, see “Connecting a Universal Serial Bus (USB) device” on page 50.
$
'&
%
15
Chapter 2. Using Your Computer
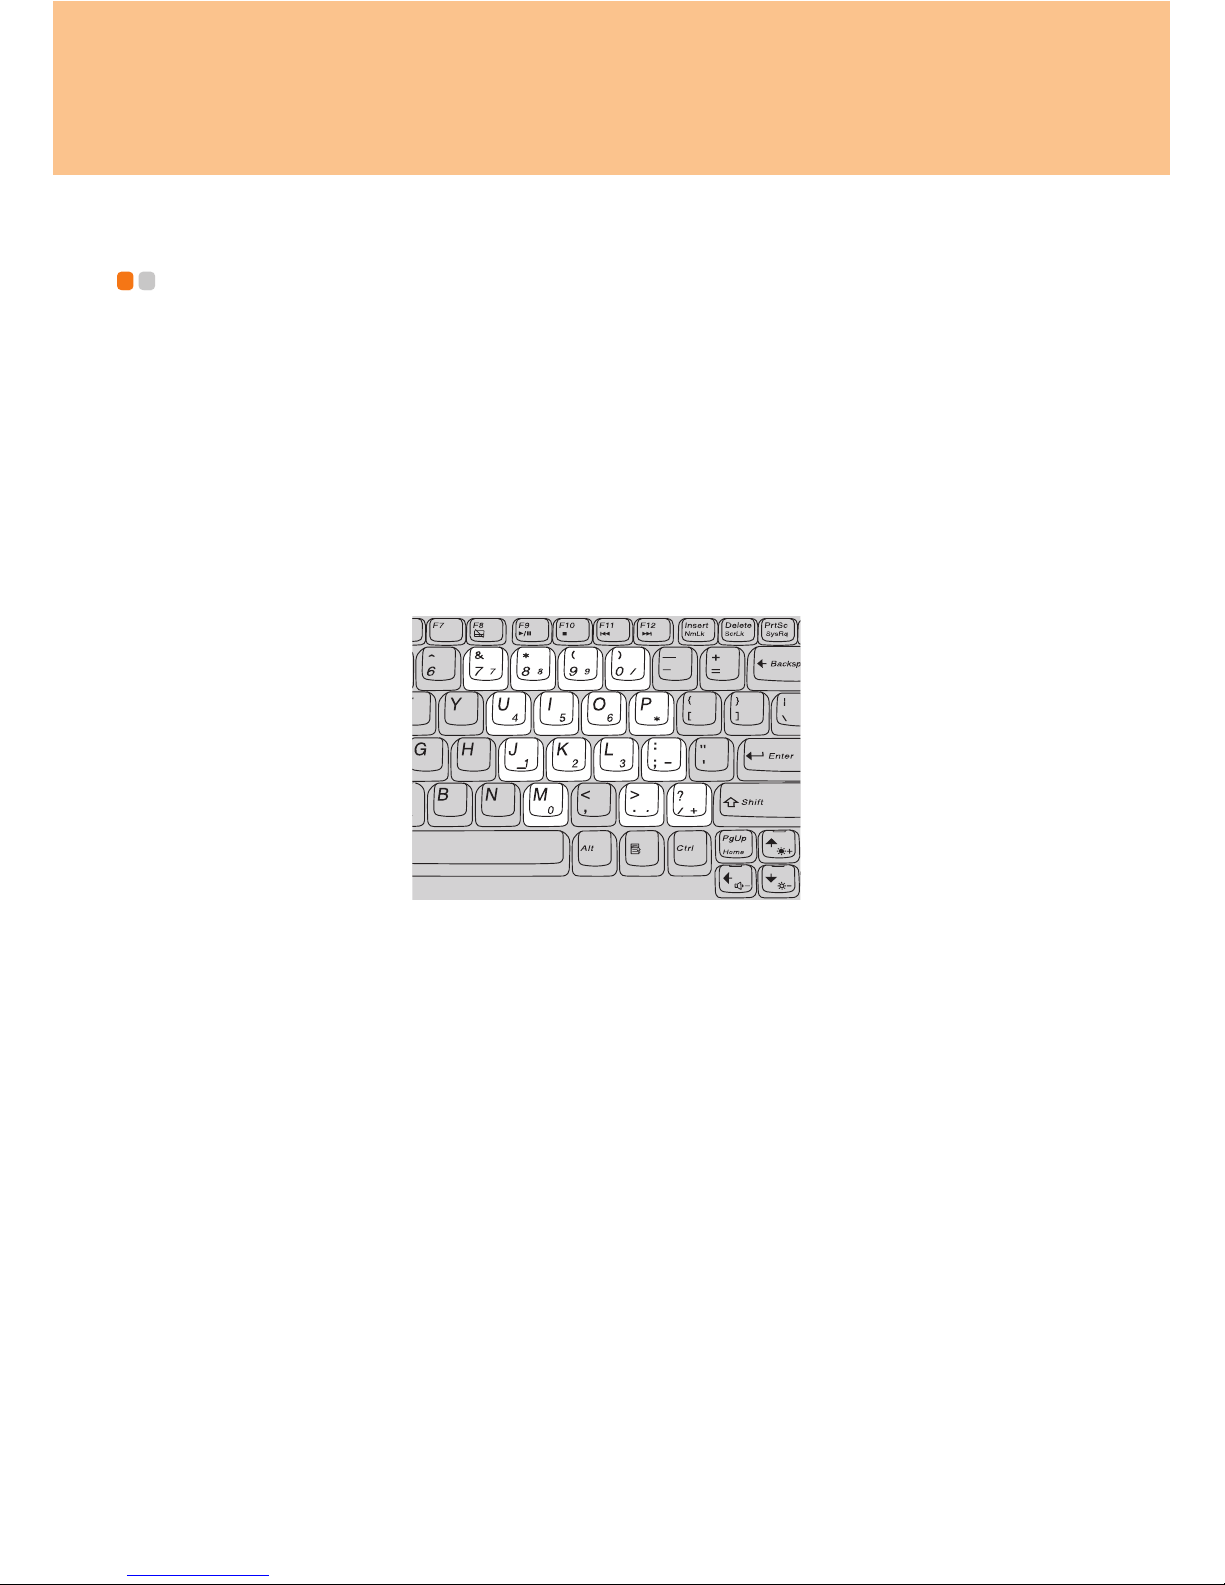
Using the Keyboard - - - - - - - - - - - - - - - - - - - - - - - - - - - - - - - - - - - - - - - - - - - - - - - - - - - - -
Your computer has a numeric keypad and function keys incorporated in the standard
keyboard.
Numeric Keypad
The keyboard has keys that, when enabled, work as a 10-key numeric keypad.
To enable or disable the numeric keypad, press Fn+Insert/NmLk.
Note:
For models with 17 numeric keys, this function is disabled. To enable this function, select
Enable in Internal NumLock under BIOS Setup Utility.
Chapter 2. Using Your Computer
16
Function Key Combinations
Through the use of the function keys, you can change operational features instantly. To
use this function, press and hold the Fn key ; then press one of the function keys .
The following describes the features of each function key.
Fn + Esc: Turn on/off the integrated camera.
Fn + F1: Put your computer in sleep mode.
Fn + F2: Turn off the LCD screen (any subsequent operation will turn the LCD screen
back on).
Fn + F3: Shift to other connected display devices.
Fn + F4: Switch between wide screen and normal mode.
Fn + F5: Enable/disable the built-in wireless device feature.
Fn + F8: Enable/disable the touch pad.
Fn + F9: Play/pause Media Player playback.
Fn + F10: Stop Media Player playback.
Fn + F11: Skip to the previous track.
Fn + F12: Skip to the next track.
Fn + Insert/NmLk: Enable/disable the Numeric keypad.
Note:
For models with 17 numeric keys, this function is disabled. To enable this function, select
Enable in Internal NumLock under BIOS Setup Utility.
Fn + Delete/ScrLk: Enable/disable Scroll Lock.
Fn + P
rtSc/SysRq: System request.
Fn + Pause/Break:
Pause to view the system information during start-up.
Fn + up/down arrow: Increase/decrease display brightness.
Fn + right/left arrow: Increase/decrease computer volume.
$
%
17
Chapter 2. Using Your Computer
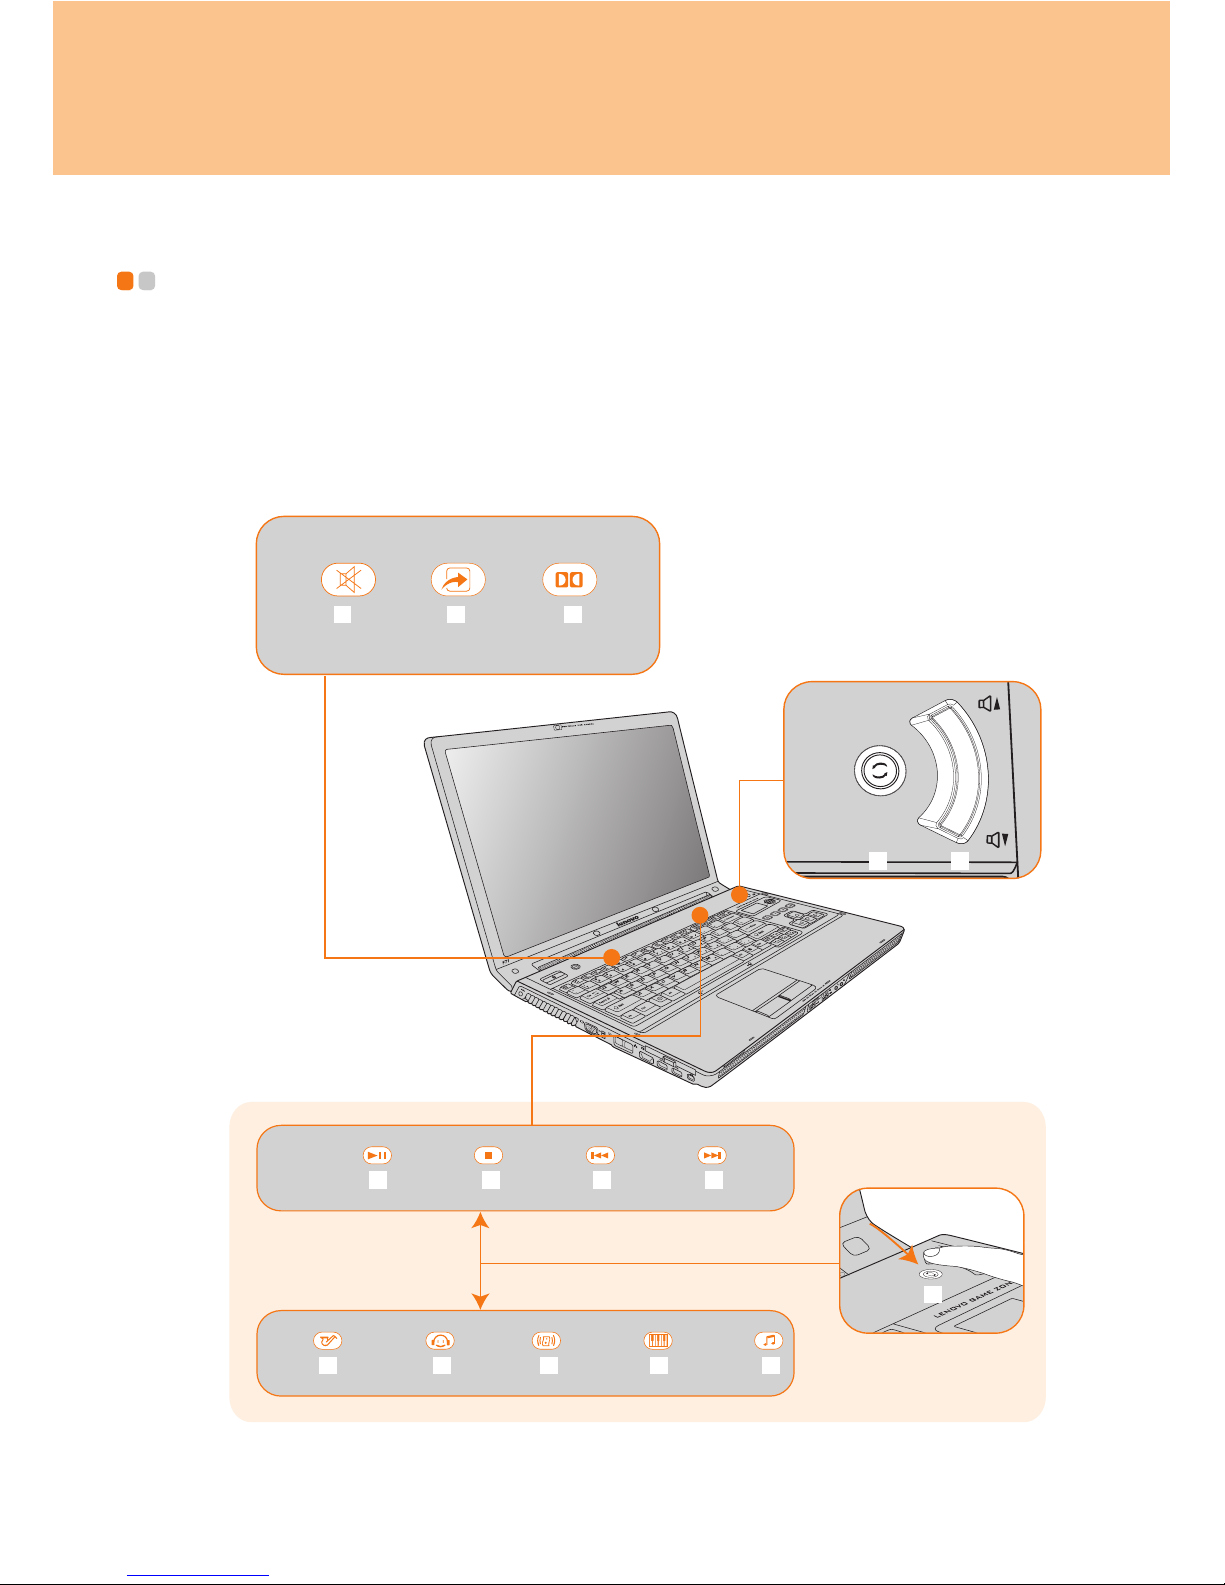
Special keys and buttons - - - - - - - - - - - - - - - - - - - - - - - - - - - - - - - - - - - - - - - -
Your computer has several special keys and buttons.
Touch inductive panel and multi-media buttons
0
0
1
- . /

Chapter 2. Using Your Computer
18
Touch inductive panel ( ~ )
Mute/unmute the sound.
Open user define utility.
Open Dolby function setup screen.
Multi-media control buttons*
Play / Pause
Stop
Previous track
Next track
Equalizer buttons*
Jazz
Pop
Dance
Classical
Normal
Multi-media buttons ( ~ )
Switch between Multi-media control buttons and Equalizer buttons.
Change volume.
* Press the to switch between Multi-media control buttons ( ~ ) and
Equalizer buttons ( ~ ).
/
-
.
/
0
1
0
1
0
/
19
Chapter 2. Using Your Computer
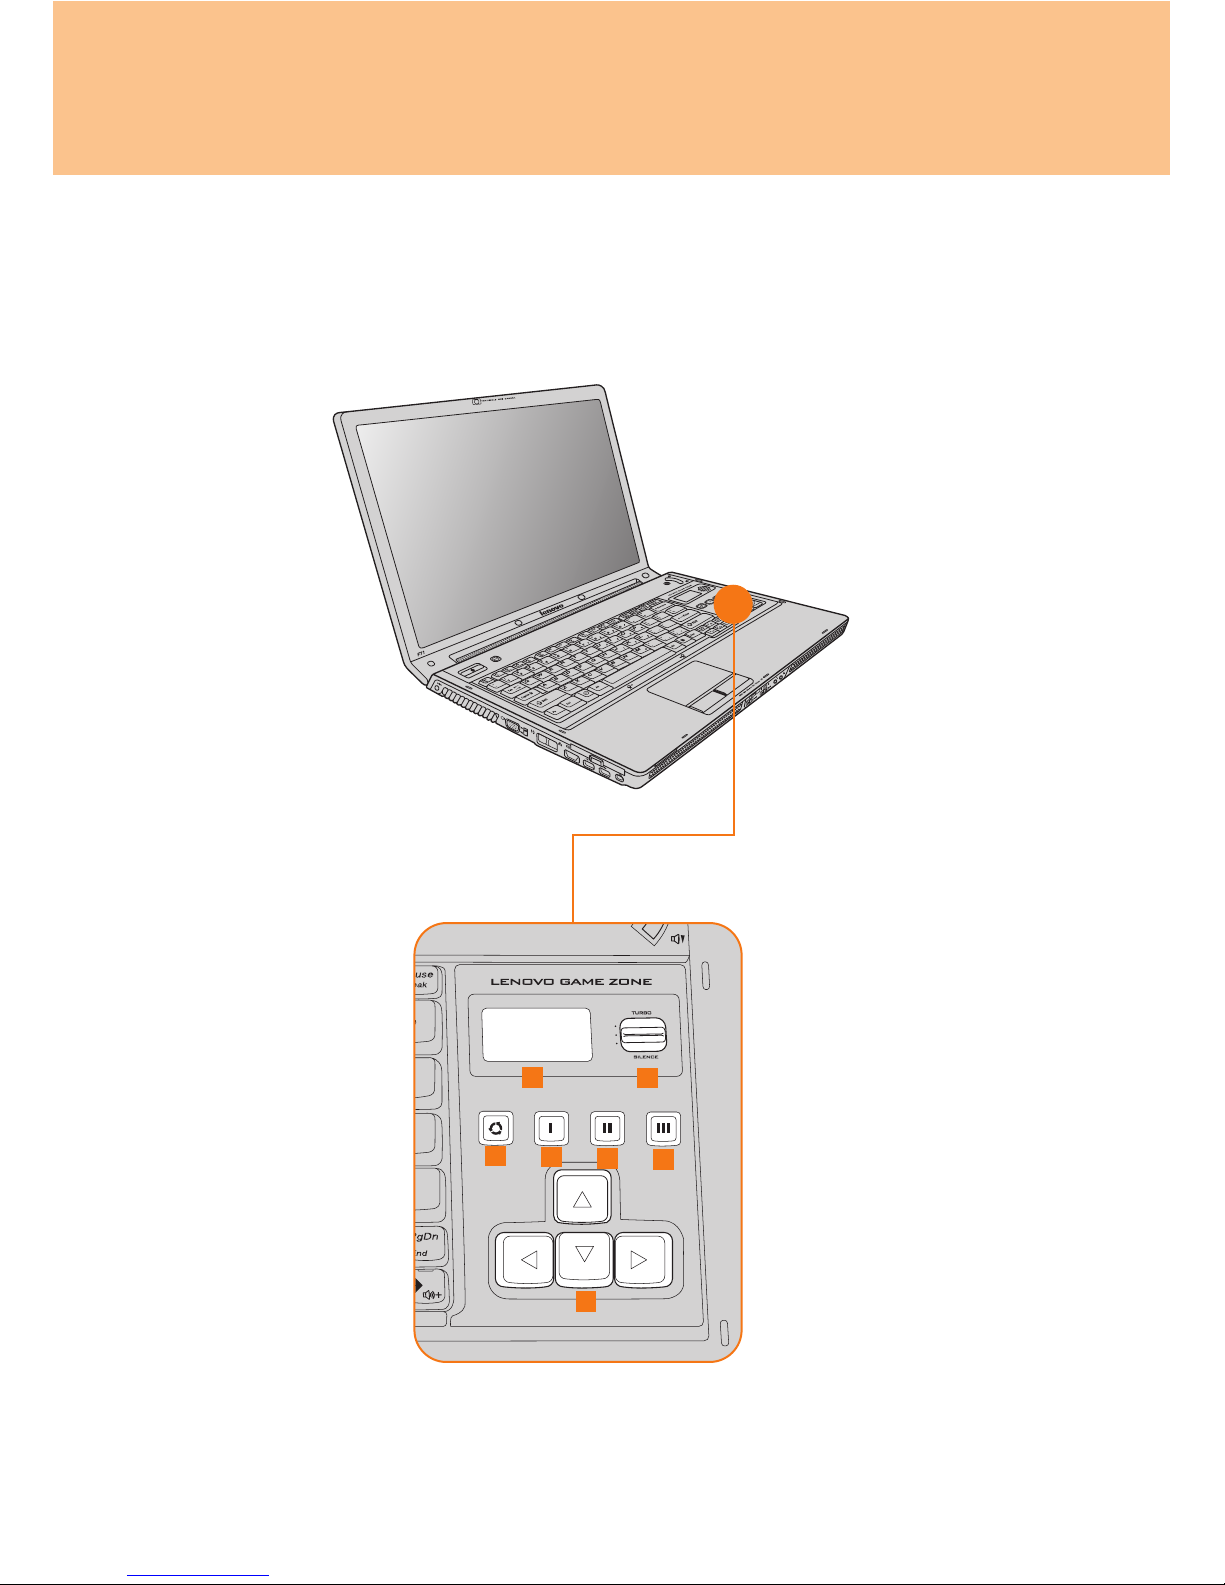
Lenovo game zone (Specific models only)
1
2
3
4
5
6
7

Chapter 2. Using Your Computer
20
Displays system date/time/week, CPU, system temp., fan speed, battery capacity,
media play EQ, and Email information.
Switches the CPU mode: SILENCE/NORMAL/TURBO.
Note:
The CPU mode is available only for certain CPU, such as Intel Pentium Extreme
Edition CPU. If your computer is equipped with a normal frequency CPU, TURBO
mode will be disabled and it will work underclock in SILENCE mode.
Switch modes for .
Open user define utility.
Open user define utility.
Open user define utility.
Change directions.
21
Chapter 2. Using Your Computer
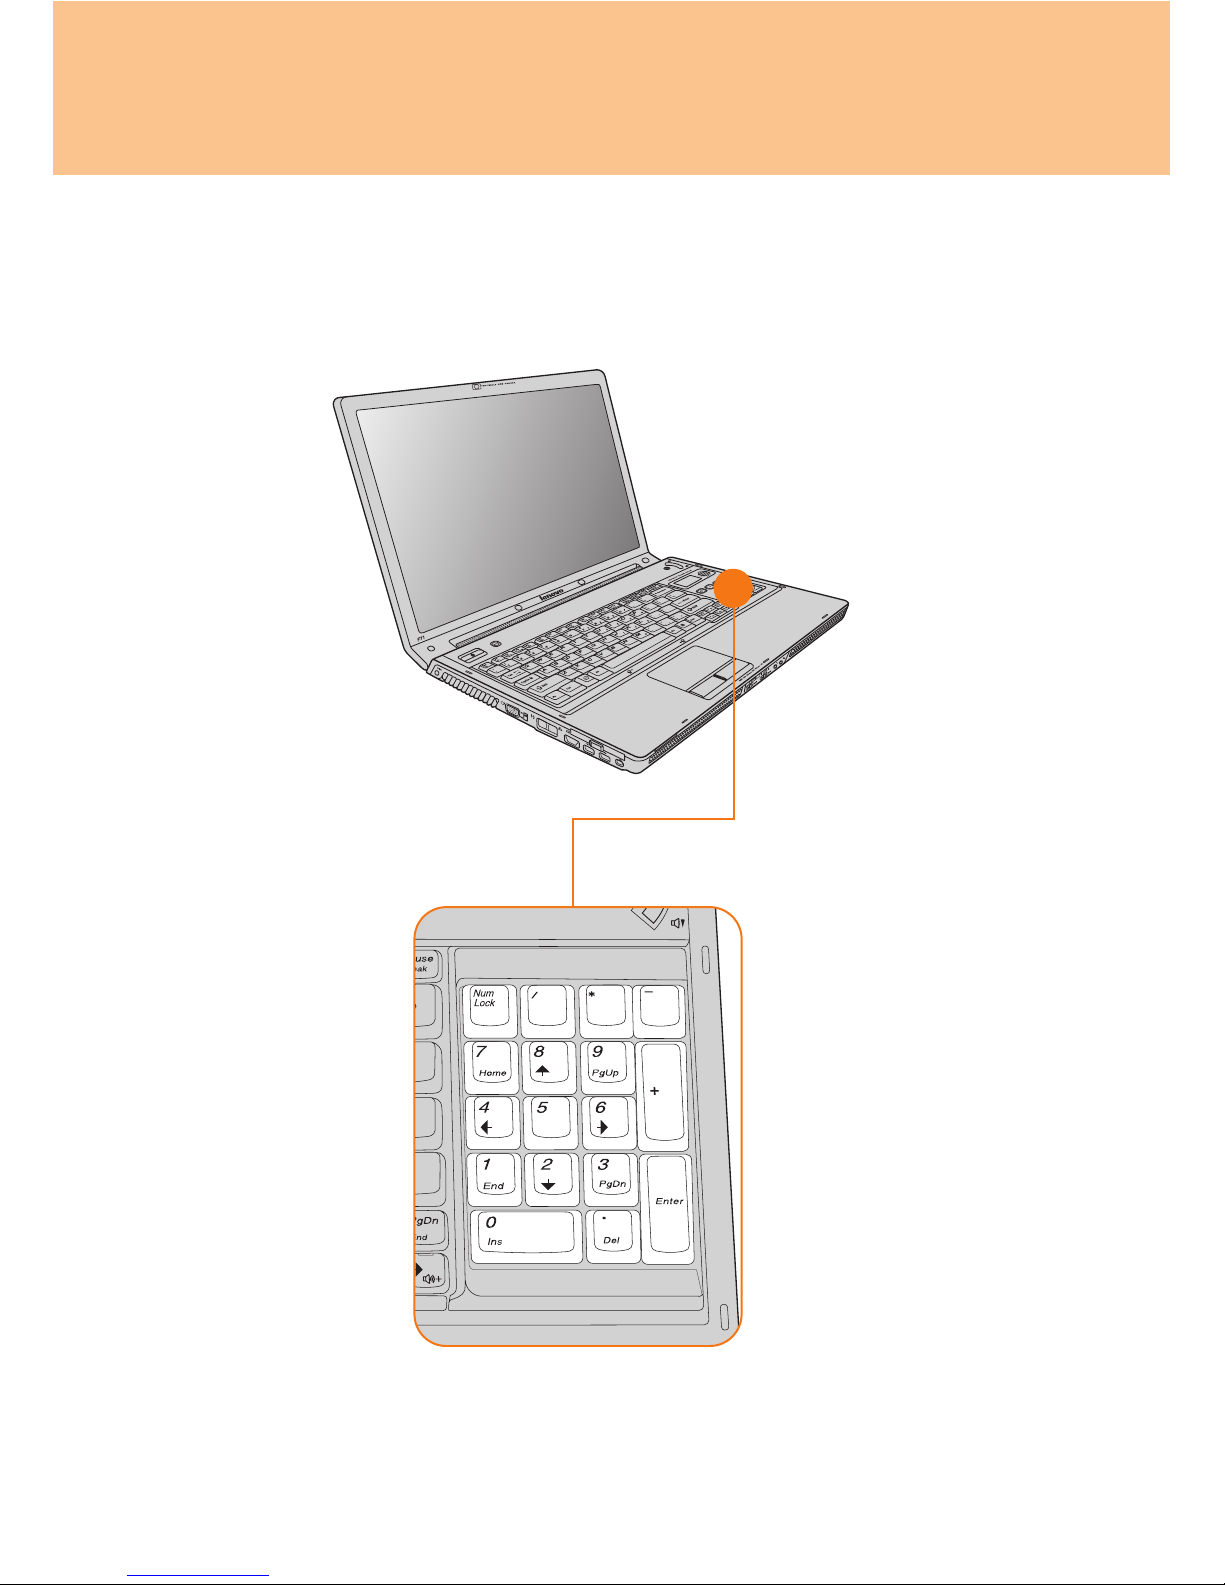
17 Numeric Keys (Specific models only)

Chapter 2. Using Your Computer
22
Novo button
The Novo button functions as OneKey Recovery key; use with caution. Press the Novo
button to enter the main interface of OneKey Recovery while the power is off.
Important:
Do not remove the 2nd Hard Disk Drive before or after the OneKey Recovery backup
process.
Do not exchange the master and slave HDD or perform the OneKey Recovery function
after changing the master HDD as a data HDD, otherwise the system data will be
erased.
When adding 2nd Hard Disk Drive, make sure to insert the 2nd Hard Disk Drive after
completing the backup process, restoration, or quick backup.
Attention:
When you press NOVO key to turn on the computer, please ensure that your computer
is not connected with other peripherals (such as USB storage device, etc.), otherwise the
system may not operate properly.
Once done, the system can no longer return to its previous state. All data on the primary
hard disk partition (usually drive C) will subsequently be lost. Make sure all important
files on the primary hard disk partition have been backed up onto another hard disk or
USB hard disk drive before this operation.
For details, see OneKey Recovery User Guide.
Note:
When your computer is running Windows Vista™, and if you have the EnergyCut program
installed, you can shift the power schemes by pressing the Novo button.
23
Chapter 2. Using Your Computer
System status indicators - - - - - - - - - - - - - - - - - - - - - - - - - - - - - - - - - - - - - - - - -
The system status indicators show the current status of your computer.
Your computer has system status indicators as follows:
Drive in use
Blue/Flashing Blue: Data is being read from or written to the hard disk or optical
disc drive. When this indicator is on, do not put the computer
into sleep mode or turn off the computer.
Num Lock
Blue: Number Lock function is activated. Number Lock function allows some of the
keyboard letters to act as numbers for easier numeric input.
Note:
For models with 17 numeric keys, this function is disabled. To enable this function, select
Enable in Internal NumLock under BIOS Setup Utility.

Chapter 2. Using Your Computer
24
Caps Lock
Blue: The Capital Lock function is activated. The Capital Lock function allows
typing in all upper case letters (such as A, B, C). When the Caps Lock light is
off, lower case letters are entered.
Scroll Lock
Blue: The Scroll Lock function is activated. The Scroll Lock function allows some of
the keyboard letters to act as direction keys to allow for easier navigation
when only part of the keyboard is required.
Power Indicator
Blue: System is powered on.
Blinking Blue: System is in sleep mode.
OFF: System is powered off or in hibernation mode.
Battery Status Indicator
Blue: Power is being supplied by an AC adapter and the battery is fully charged
(95% or more).
Blinking Blue: Battery is charging.
OFF: Power is being supplied by battery, or the computer is only powered by an
AC adapter and without a battery pack.
Blinking Amber: Power is being supplied by battery and battery is low (8% or
lower).
Wireless Device Indicator
Blue: Bluetooth is enabled.
Amber*: Wireless LAN is enabled and connected.
Amber/Flashing Blue: Bluetooth and Wireless LAN are both enabled.
* Depending on the wireless LAN card, these actions may differ.

25
Chapter 2. Using Your Computer
Using the optical drive - - - - - - - - - - - - - - - - - - - - - - - - - - - - - - - - - - - - - - - - - - - - - - -
Your computer comes with an optical device, such as a DVD/CD recordable drive or a
Blu-ray/DVD/CD recordable drive. For this model, there are two kinds of optical
drives: Slot-in type and Tray type.
Inserting a disc
Slot-in type
Keep the disk flat, gently insert the disc into the slot. The drive will begin reading
data from the disc.
Tray type
1 Press the Eject button to open the drive tray.
2 Place the disc on the tray, then gently push the drive tray back in. The drive
will begin reading the data from the disc.
Attention:
* The slot-in type cannot read 8 cm discs. Never insert 8 cm discs into this kind of
optical drive.
** It is normal to hear the CD spinning in the optical drive while data is being read.
Ejecting a disc
Slot-in type
Press the Eject button. Keep the disk flat, gently remove the disc from the slot.
Tray type
1 Press the Eject button to open the drive tray.
2 Remove the disc from the tray, then gently push the drive tray back in.
 Loading...