

Lenovo 2120-HB1, L2060, 4426-HB1, 4426-HC1, 4426-HD1 User Manual

L2060 Wide LCD Monitor
User’s Guide

Product numbers
First Edition (
April 2009 )
© Copyright Lenovo 2009.
LENOVO products, data, computer software, and services have been developed exclusively at private expense and are
sold to governmental entities as commercial items as defined by 48 C.F.R. 2.101 with limited and restricted rights to
use, reproduction and disclosure.
LIMITED AND RESTRICTED RIGHTS NOTICE: If products, data, computer software, or services are delivered
pursuant a General Services Administration "GSA" contract, use, reproduction, or disclosure is subject to restrictions
set forth in Contract No. GS-35F-05925.
4426-HB1
4426-HC1
4426-HD1
2120-HB1

Contents ii
Contents
Safety information . . . . . . . . . . . . . . . . . . . . . . . . . . . . . . . . . . . . . . . . . . . . . . . . . . . . . . . . . . . . .iii
Chapter1. Getting started . . . . . . . . . . . . . . . . . . . . . . . . . . . . . . . . . . . . . . . . . . . . . . . . . . . . . .1-1
Shipping contents . . . . . . . . . . . . . . . . . . . . . . . . . . . . . . . . . . . . . . . . . . . . . . . . . . . . . . . . . . . . . . . . . . . . . . . . . . . . . . . . . . . . . . . 1-1
Attaching the base and handling your monitor . . . . . . . . . . . . . . . . . . . . . . . . . . . . . . . . . . . . . . . . . . . . . . . . . . . . . . . . . . . . . . 1-1
Product overview . . . . . . . . . . . . . .. . . . . . . . . . . . . . . . . . . . . . . . . . . . . . . . . . . . . . . . . . . . . . . . . . . . . . . . . . . . . . . . . . . . . . . . . 1-2
Adjusting the tilt . . . . . . . . . . . . . . . . . . . . . . . . . . . . . . . . . . . . . . . . . . . . . . . . . . . . . . . . . . . . . . . . . . . . . . . . . . . . . . . . . . . . . 1-2
Monitor controls . . . . . . . . . . . . . . . . . . . . . . . . . . . . . . . . . . . . . . . . . . . . . . . . . . . . . . . . . . . . . . . . . . . . . . . . . . . . . . . . . . . . . . 1-2
Cable lock slot . . . . . . . . . . . . . . . . . . . . . . . . . . . . . . . . . . . . . . . . . . . . . . . . . . . . . . . . . . . . . . . . . . . . . . . . . . . . . . . . . . . . . . . 1-3
Setting up your monitor . . . . . . . . . . . . . . . . . . . . . . . . . . . . . . . . . . . . . . . . . . . . . . . . . . . . . . . . . . . . . . . . . . . . . . . . . . . . . . . . . . 1-3
Connecting and turning on your monitor . . . . . . . . . . . . . . . . . . . . . . . . . . . . . . . . . . . . . . . . . . . . . . . . . . . . . . . . . . . . . . . . 1-3
Chapter 2. Adjusting and using your monitor . . . . . . . . . . . . . . . . . . . . . . . . . . . . . . . . . . . . .2-1
Comfort and accessibility . . . . . . . . . . . . . . . . . . . . . . . . . . . . . . . . . . . . . . . . . . . . . . . . . . . . . . . . . . . . . . . . . . . . . . . . . . . . . . . . 2-1
Arranging your work area . . . . . . . . . . . . . . . . . . . . . . . . . . . . . . . . . . . . . . . . . . . . . . . . . . . . . . . . . . . . . . . . . . . . . . . . . . . . . 2-1
Positioning your monitor . . . . . . . . . . . . . . . . . . . . . . . . . . . . . . . . . . . . . . . . . . . . . . . . . . . . . . . . . . . . . . . . . . . . . . . . . . . . . . . 2-1
Quick tips for healthy work habits . . . . . . . . . . . . . . . . . . . . . . . . . . . . . . . . . . . . . . . . . . . . . . . . . . . . . . . . . . . . . . . . . . . . . . 2-2
Adjusting your monitor image . . . . . . . . . . . . . . . . . . . . . . . . . . . . . . . . . . . . . . . . . . . . . . . . . . . . . . . . . . . . . . . . . . . . . . . . . . . . 2-3
Using the direct access controls . . . . . . . . . . . . . . . . . . . . . . . . . . . . . . . . . . . . . . . . . . . . . . . . . . . . . . . . . . . . . . . . . . . . . . . . . 2-3
Using the On-Screen Display (OSD) controls . . . . . . . . . . . . . . . . . . . . . . . . . . . . . . . . . . . . . . . . . . . . . . . . . . . . . . . . . . . . . 2-4
Selecting a supported display mode . . . . . . . . . . . . . . . . . . . . . . . . . . . . . . . . . . . . . . . . . . . . . . . . . . . . . . . . . . . . . . . . . . . . . . . 2-7
Understanding power management . . . . . . . . . . . . . . . . . . . . . . . . . . . . . . . . . . . . . . . . . . . . . . . . . . . . . . . . . . . . . . . . . . . . . . . 2-8
Caring for your monitor . . . . . . . . . . . . . . . . . . . . . . . . . . . . . . . . . . . . . . . . . . . . . . . . . . . . . . . . . . . . . . . . . . . . . . . . . . . . . . . . . 2-9
Detaching the monitor stand . . . . . . . . . . . . . . . . . . . . . . . . . . . . . . . . . . . . . . . . . . . . . . . . . . . . . . . . . . . . . . . . . . . . . . . . . . . . . . 2-9
Chapter 3. Reference information . . . . . . . . . . . . . . . . . . . . . . . . . . . . . . . . . . . . . . . . . . . . . . .3-1
Monitor specifications . . . . . . . . . . . . . . . . . . . . . . . . . . . . . . . . . . . . . . . . . . . . . . . . . . . . . . . . . . . . . . . . . . . . . . . . . . . . . . . . . . . . 3-1
Troubleshooting . . . . . . . . . . . . . . . . . . . . . . . . . . . . . . . . . . . . . . . . . . . . . . . . . . . . . . . . . . . . . . . . . . . . . . . . . . . . . . . . . . . . . . . . . 3-3
Manual image setup. . . . . . . . . . . . . . . . . . . . . . . . . . . . . . . . . . . . . . . . . . . . . . . . . . . . . . . . . . . . . . . . . . . . . . . . . . . . . . . . . . . 3-4
Manually installing the monitor driver. . . . . . . . . . . . . . . . . . . . . . . . . . . . . . . . . . . . . . . . . . . . . . . . . . . . . . . . . . . . . . . . . . . 3-5
Installing the monitor driver in Windows Vista . . . . . . . . . . . . . . . . . . . . . . . . . . . . . . . . . . . . . . . . . . . . . . . . . . . . . . . .. 3-5
Installing the monitor driver in Windows XP . . . . . . . . . . . . . . . . . . . . . . . . . . . . . . . . . . . . . . . . . . . . . . . . . . . . . . . . . . ..3-6
Appendix A. Service and Support . . . . . . . . . . . . . . . . . . . . . . . . . . . . . . . . . . . . . . . . . . . . . . A-1
Appendix B. Notices . . . . . . . . . . . . . . . . . . . . . . . . . . . . . . . . . . . . . . . . . . . . . . . . . . . . . . . . . B-1
Trademarks . . . . . . . . . . . . . . . . . . . . . . . . . . . . . . . . . . . . . . . . . . . . . . . . . . . . . . . . . . . . . . . . . . . . . . . . . . . . . . . . . . . . . . . . . . . . . B-2
Service information
. . . . . . . . . . . . . . . . . . . . . . . . . . . . . . . . . . . . . . . . . . . . . . . . . . . . . . . . . . . . . . . . . . . . . . . . . . . . . . . . . . .
3-7
. . . . . . . . . . . . . . . . . . . . . . . . . . . . . . . . . . . . . . . . . . . . . . . . . . . . . . . . . . . . . . . . . . . . . . . . . . . . . .A-1
Registering your option
Online technical support . . . . . . . . . . . . . . . . . . . . . . . . . . . . . . . . . . . . . . . . . . . . . . . . . . . . . . . . . . . . . . . . . . . . . . . . . . . . . . A-1
. . .
. . . . . . . . . . . . . . . . . . . . . . . . . . . . . . . . . . . . . . . . . . . . . . . . . . . . . . . . . . . . . . . . . . . . . . . . . . .A-1
Telephone technical support
. . . .
. . . .
. . . .
Product numbers
. . . . . . . . . . . . . . . . . . . . . . . . . . . . . . . . . . . . . . . . . . . . . . . . . . . . . . . . . . . . . . . . . . . . . . . . . . . . . . . . . . .
3-7
Customer responsibilities
. . . . . . . . . . . . . . . . . . . . . . . . . . . . . . . . . . . . . . . . . . . . . . . . . . . . . . . . . . . . . . . . . . . . . . . . . . . .
3-7
Service parts
. . . . .. . . . . . . . . . . . . . . . . . . . . . . . . . . . . . . . . . . . . . . . . . . . . . . . . . . . . . . . . . . . . . . . . . . . . . . . . . . . . . . . .
3-8
iii
Safety information
Before installing this product, read the Safety Information.
Antes de instalar este produto, leia as Informações de Segurança.
Pred instalací tohoto produktu si prectete prírucku bezpecnostních instrukcí.
Læs sikkerhedsforskrifterne, før du installerer dette produkt.
Ennen kuin asennat tämän tuotteen, lue turvaohjeet kohdasta Safety Information.
Avant d’installer ce produit, lisez les consignes de sécurité.
Vor der Installation dieses Produkts die Sicherheitshinweise lesen.
Prima di installare questo prodotto, leggere le Informazioni sulla Sicurezza.
Lees voordat u dit product installeert eerst de veiligheidsvoorschriften.
Les sikkerhetsinformasjonen (Safety Information) før du installerer dette produktet.
Antes de instalar este produto, leia as Informações sobre Segurança.
Antes de instalar este producto lea la información de seguridad.
Läs säkerhetsinformationen innan du installerar den här produkten.
Safety information
© Copyright Lenovo 2009. © 1-1
Chapter 1. Getting started
This User’s Guide contains detailed information on your LCD Monitor. For a
quick overview, please see the Setup Poster that was shipped with your monitor.
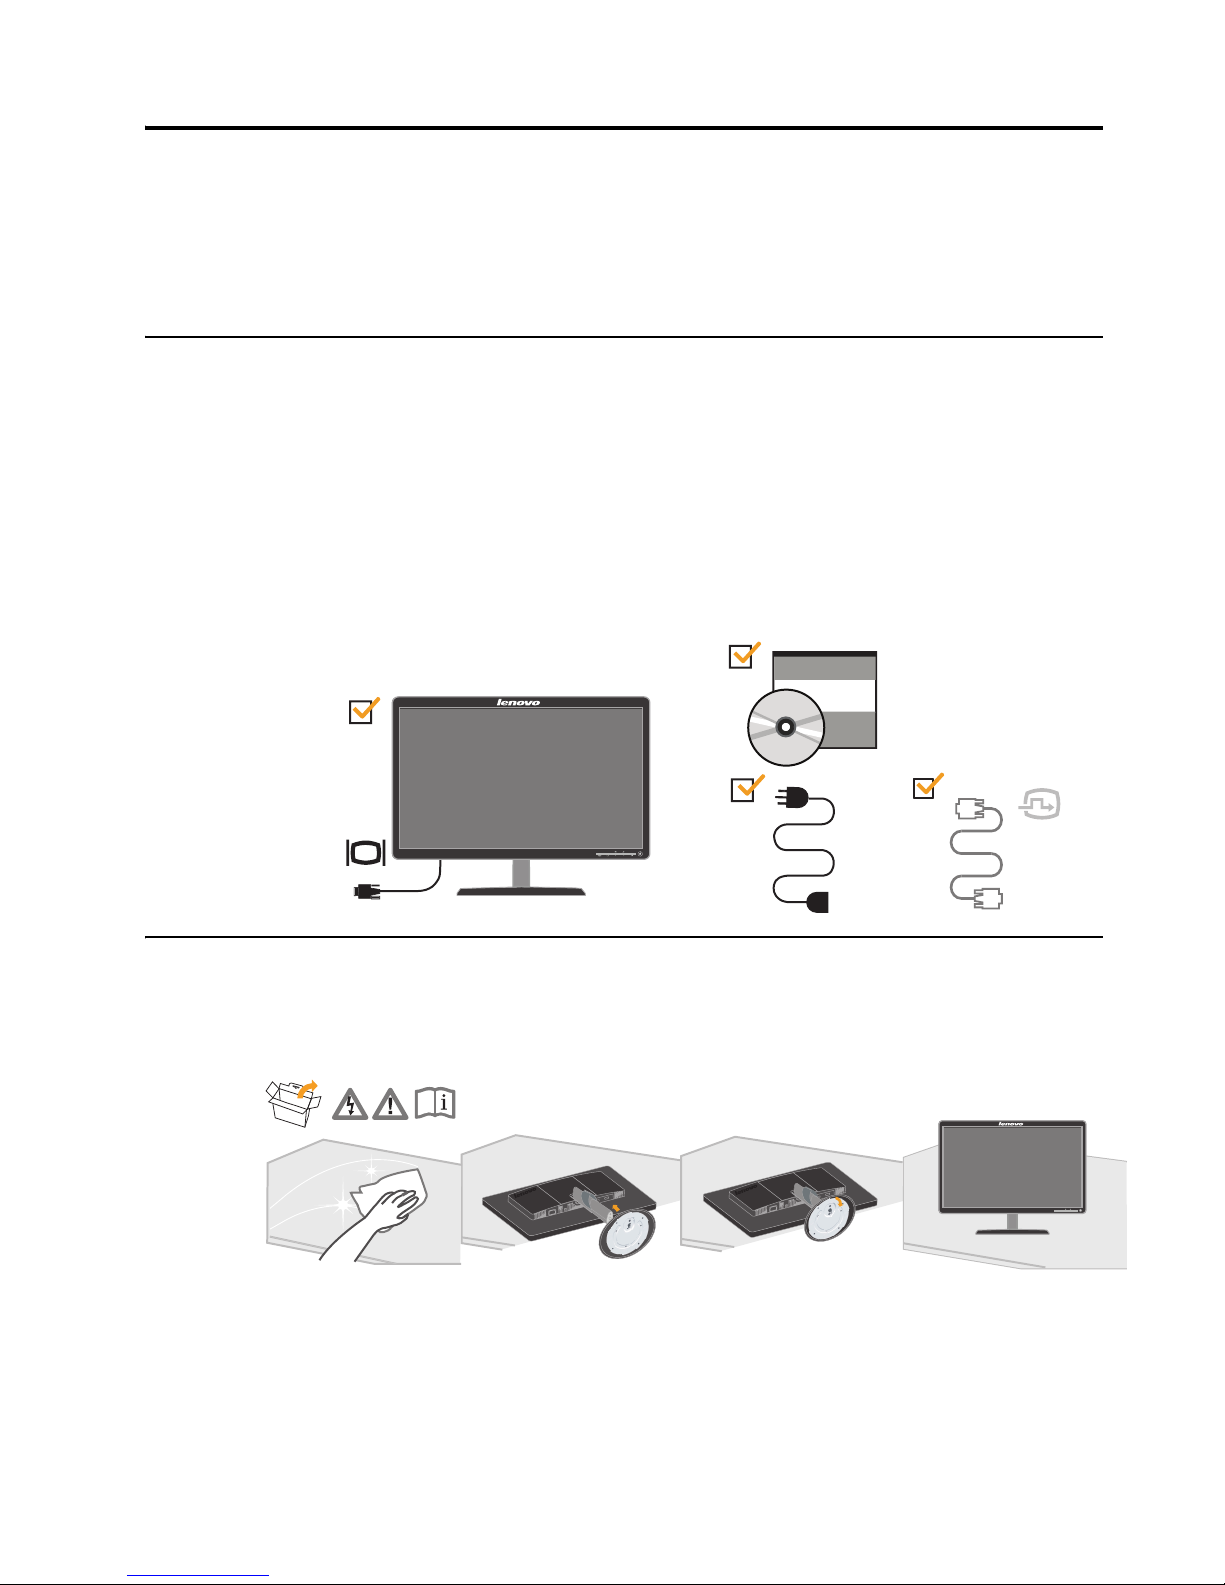
The product package should include the following items:
• Setup Poster
• Reference and Driver CD
•LCD Monitor
•Power Cord
• Analog Interface Cable - Attached to monitor
(exclude China mainland market)
Attaching the base and handling your monitor
To set up your monitor, please see the illustrations below.
Note: Do not touch the monitor within the screen area. The screen area is glass and
can be damaged by rough handling or excessive pressure.
Note: To attach a VESA mount, please see "Detaching the monitor stand" on page 2-9.
Shipping contents
•D
igital
Interface Cabl e
1.Carefully lays the monitor on a flat surface.
2.Assemble the base with the monitor's stand.
3.Tighten the screws clockwise at the bottom of the base.
• MonitorSafety,Troubleshooting,andWarrantyGuide
Product overview
This section will provide information on adjusting monitor positions, setting user
controls.
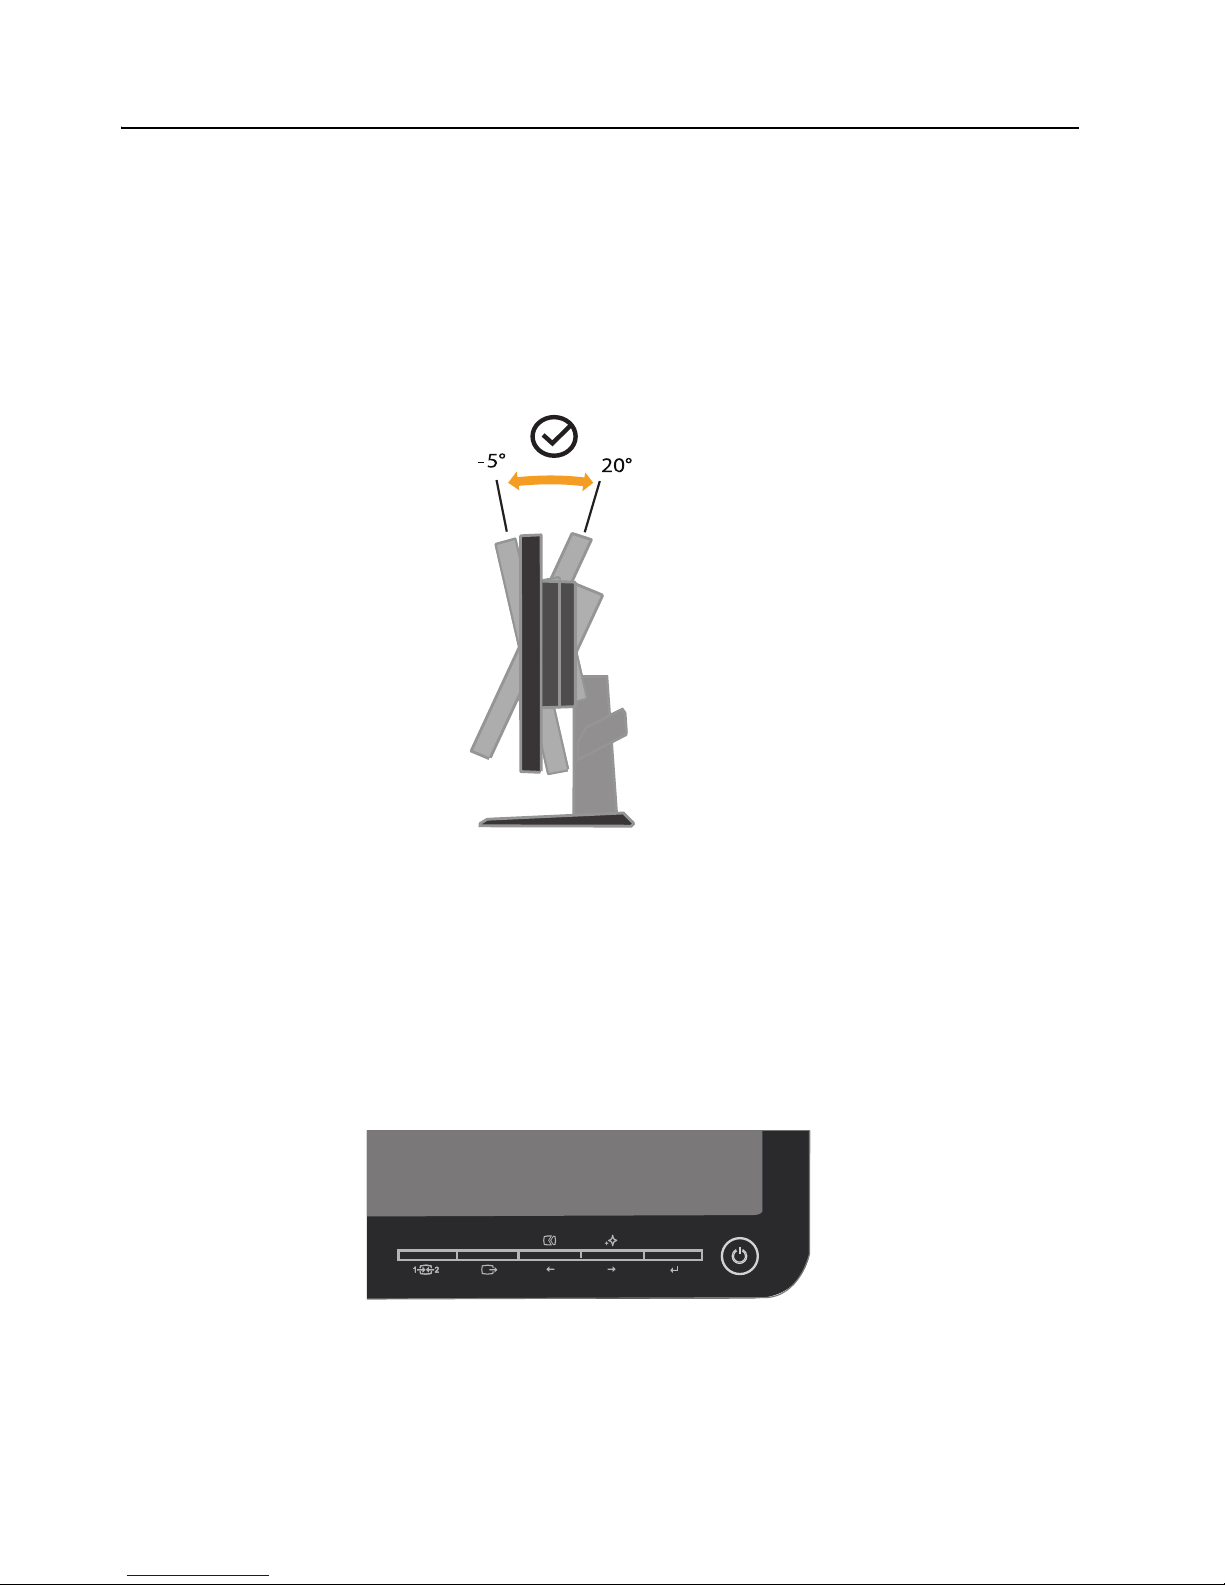
Adjusting the tilt
The illustration below shows the tilt range of the monitor. For more information,
please see “Positioning your monitor” on page 2-1.
Monitor controls
Your monitor has controls on the front which are used to adjust the display.
For information on how to use these controls, please see “Adjusting your monitor
image” on page 2-3.
Chapter 1. 1-2
Chapter 1. 1-3
Setting up your monitor
This section provides information on how to set up your monitor.
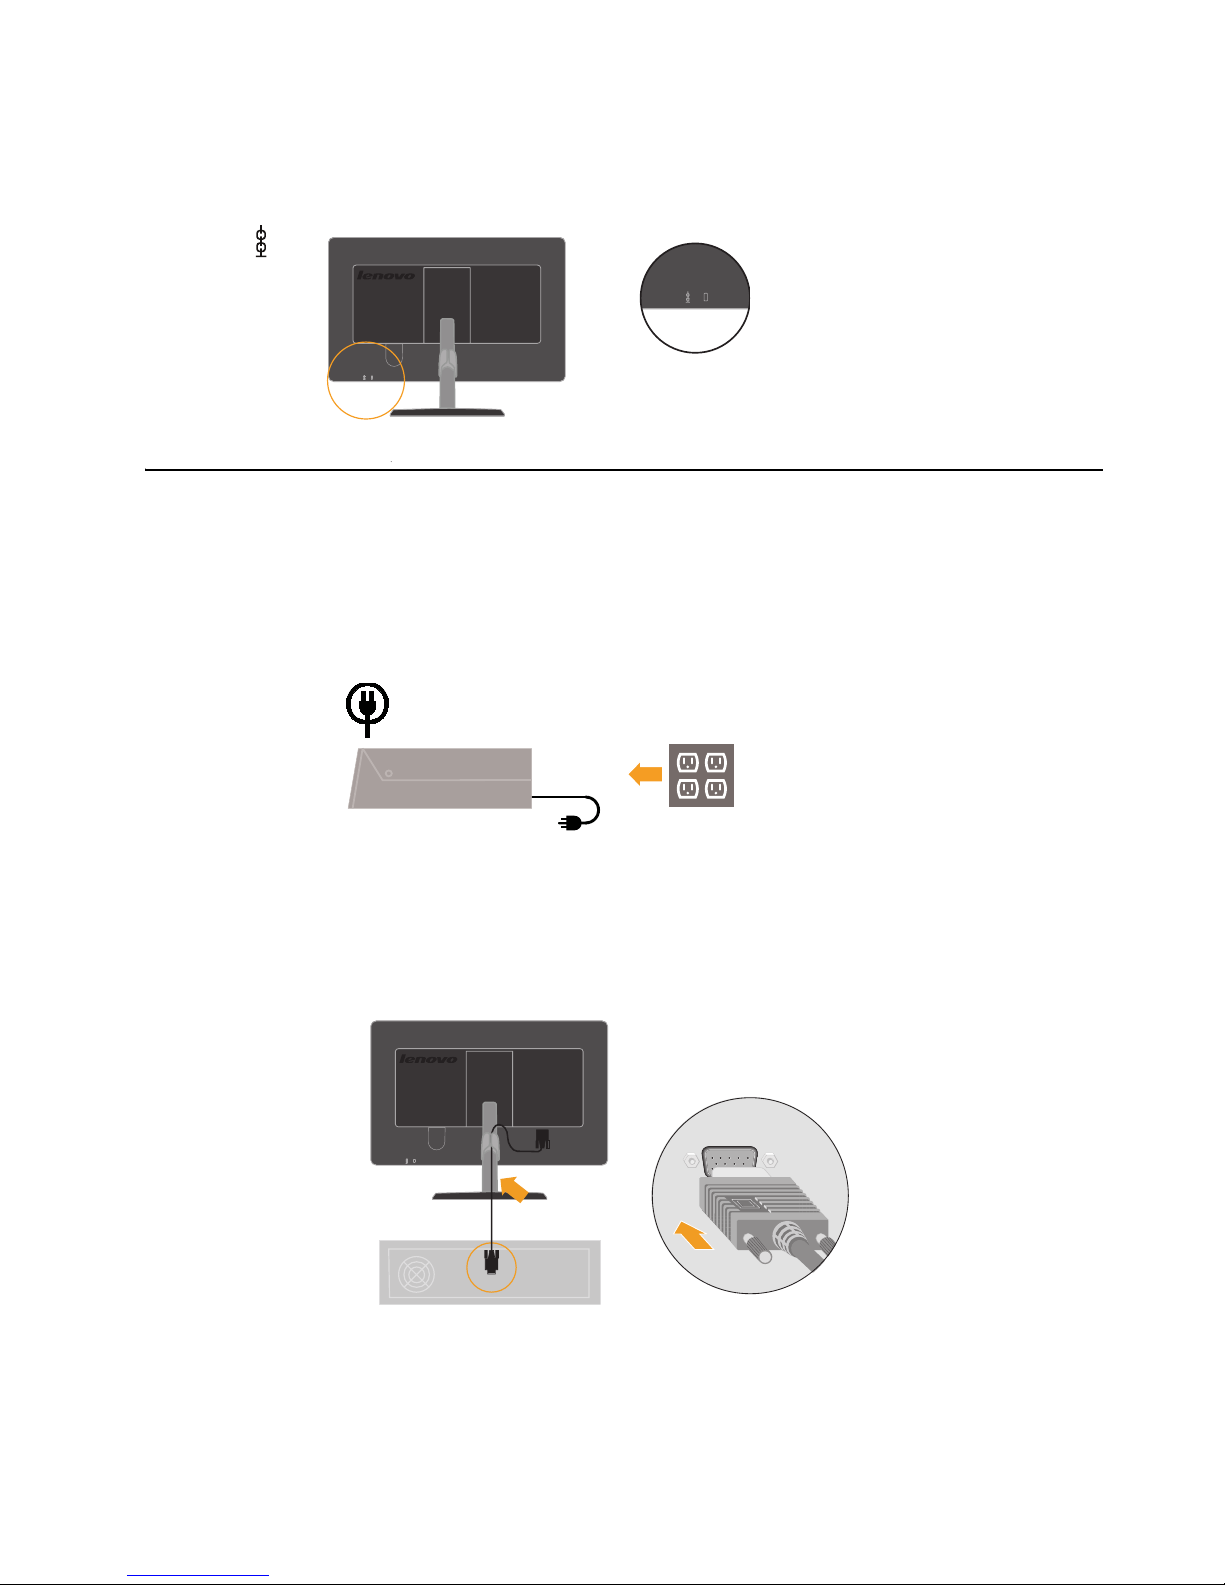
Connecting and turning on your monitor
1. Power off your computer and all attached devices, and unplug the computer
power cord.
2. Connect the analog signal cable to the video port on the back of the computer.
Note: One end of the signal cable is already pre-attached to your monitor.
Cable lock slot
Your monitor is equipped with a cable lock slot located on the rear of your monitor (in
the lower position). Please see the instructions that come with the cable lock to learn
how to using it.
Note: Be sure to read the Safety information located in the Monitor Safety,
Troubleshooting, and Warranty Guide before
carrying out this procedure.
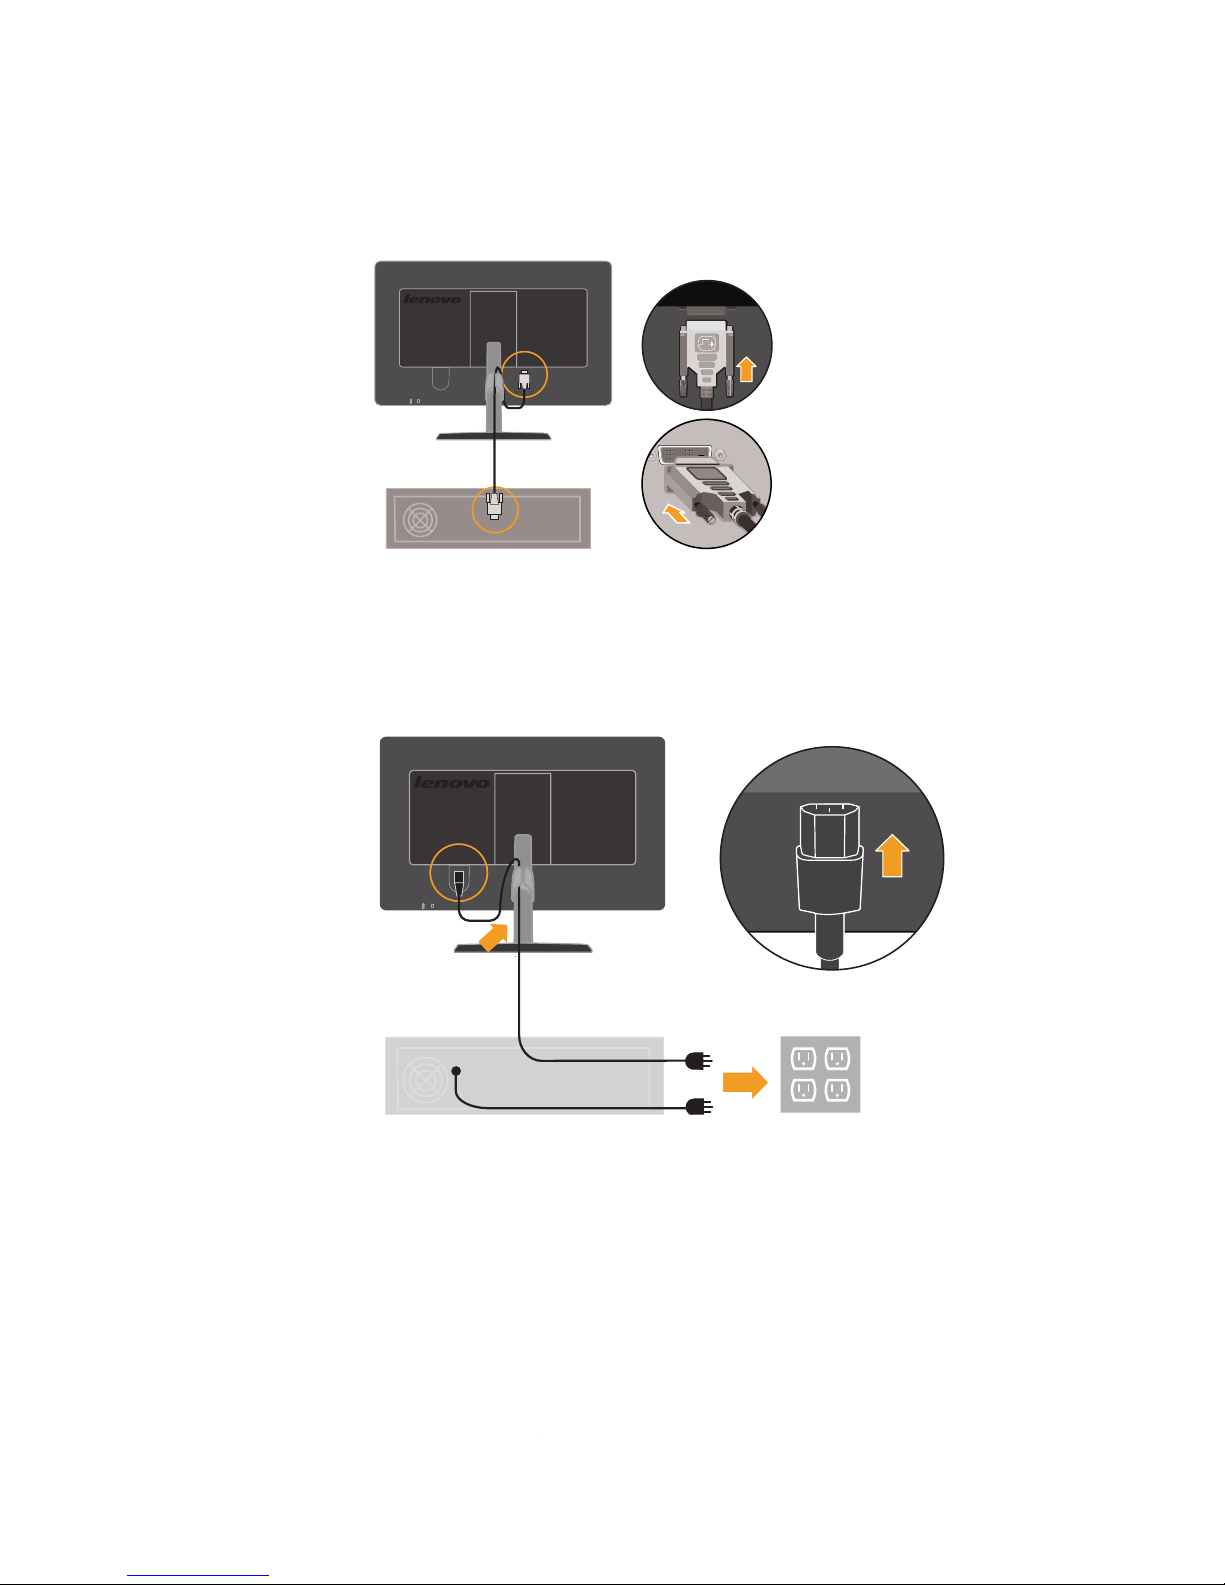
Connect the digital cable to the DVI connector of the monitor and the other end
on the back of the computer.
Insert the power cord into the monitor, then plug the monitor power cord and the
computer cord into grounded electrical outlets.
3.
4.
Chapter 1. 1-4
Chapter 1. 1-5
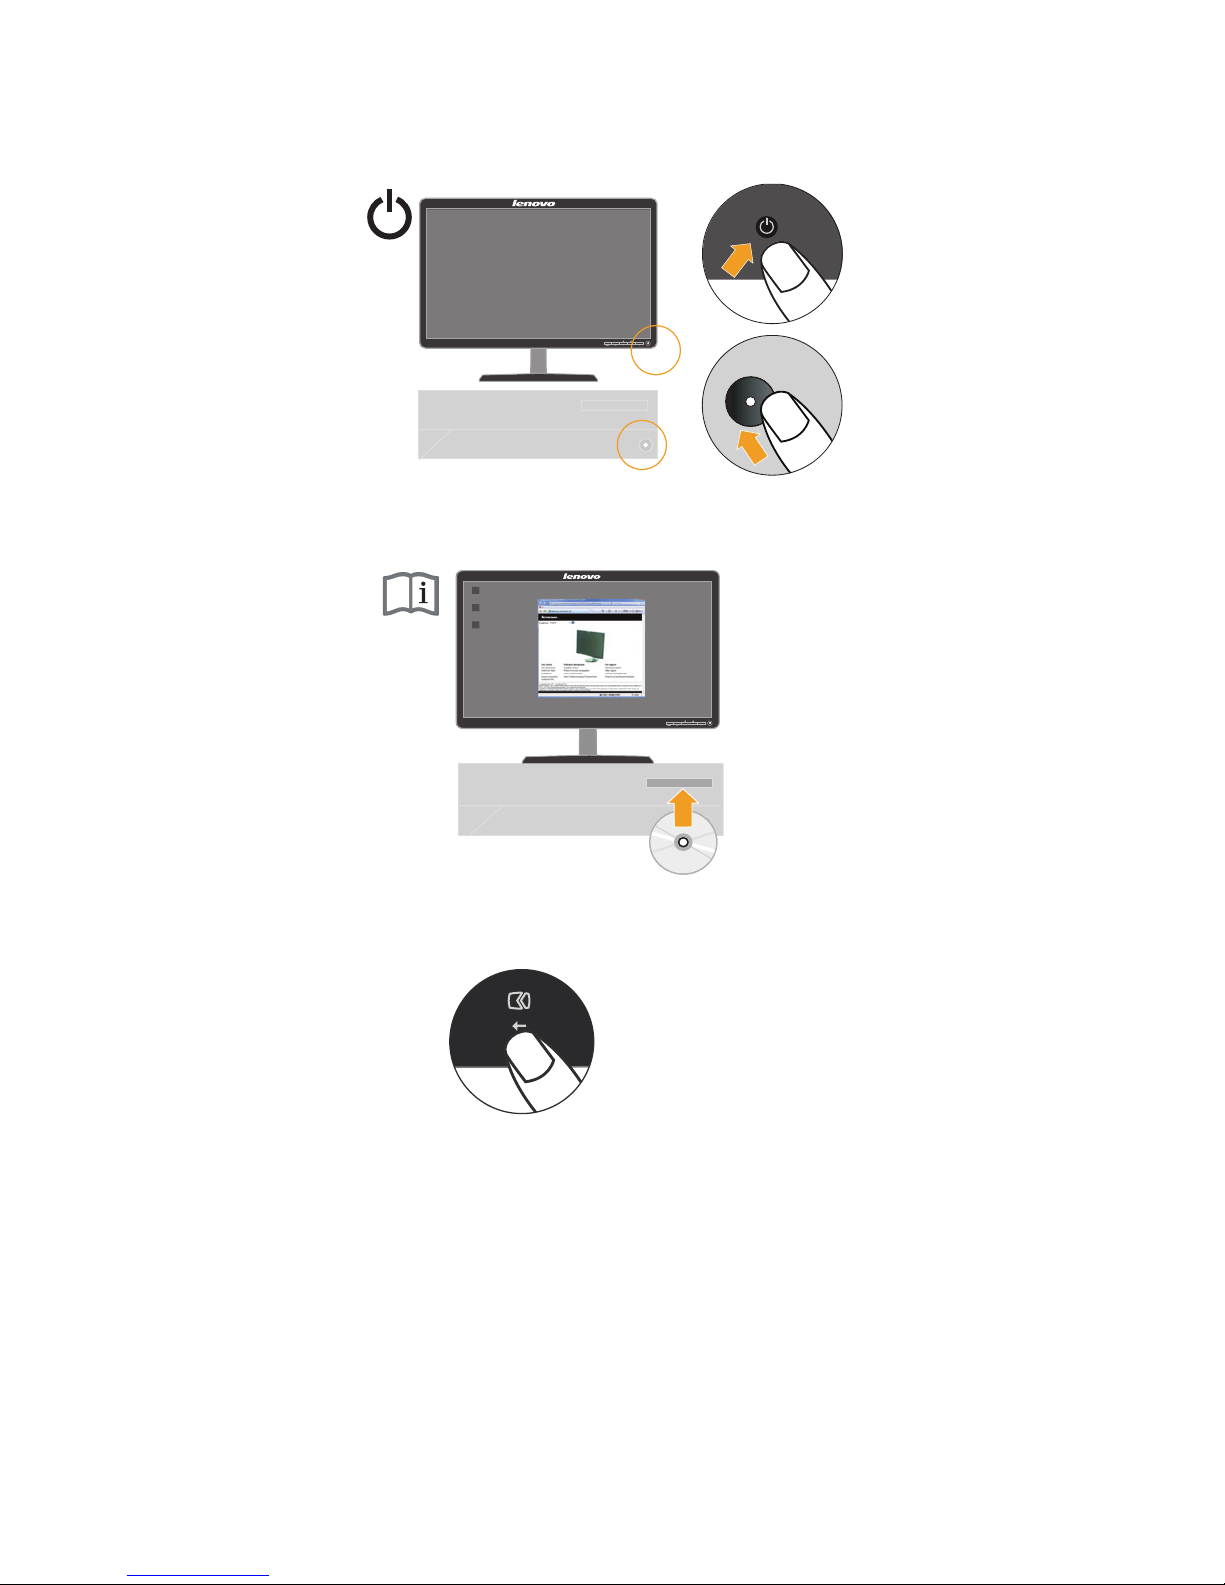
To install the monitor driver, insert the
Reference and Driver CD
, click Install
driver, and follow the on-screen instructions.
To optimize your monitor image, press the Automatic Image Setup key.
Automatic image setup requires that the monitor is warmed up for at least 15
minutes. This is not required for normal operation.
Note: If automatic image setup does not establish the image that you prefer, perform
manual image setup. See “Manual image setup” on page 3-4 .
Power on the monitor and the computer.
5.
6.
7.

© Copyright Lenovo 2009. © 2-1
Chapter 2. Adjusting and using your monitor
This section will give you information on adjusting and using your monitor.
Comfort and accessibility
Good ergonomic practice is important to get the most from your personal computer
and to avoid discomfort. Arrange your workplace and the equipment you use to suit
your individual needs and the kind of work that you perform. In addition, use
healthy work habits to maximize your performance and comfort while using your
computer. For more detailed information on any of these topics, visit the Healthy
Computing Web site at: http://
www.lenovo.com/healthycomputing/.
Arranging your work area
Use a work surface of appropriate height and available working area to allow you to
work in comfort.
Organize your work area to match the way you use materials and equipment. Keep
your work area clean and clear for the materials that you typically use and place the
items that you use most frequently, such as the computer mouse or telephone, within
the easiest reach.
Equipment layout and setup play a large role in your working posture. The following
topics describe how to optimize equipment setup to achieve and maintain good
working posture.
Positioning your monitor
Position and adjust your computer monitor for comfortable viewing by considering
the following items:
• Viewing distance: Optimal viewing distances for monitors range from
approximately 510mm to 760mm (20 in to 30 in) and can vary depending on
ambient light and time of day. You can achieve different viewing distances by
repositioning your monitor or by modifying your posture or chair position. Use a
viewing distance that is most comfortable for you.
• Monitor height: Position the monitor so your head and neck are in a comfortable
and neutral (vertical, or upright) position. If your monitor does not have height
adjustments, you might have to place books or other sturdy objects under the
base of the monitor to achieve the desired height. A general guideline is to
position the monitor such that the top of the screen is at or slightly below your
eye-height when you are comfortably seated. However, be sure to optimize your
monitor height so the line of site between your eyes and the center the monitor
suits your preferences for visual distance and comfortable viewing when your eye
muscles are in a relaxed state.
• Tilt: Adjust the tilt of your monitor to optimize the appearance of the screen
content and to accommodate your preferred head and neck posture.
• General location: Position your monitor to avoid glare or reflections on the screen
from overhead lighting or nearby windows.
The following are some other tips for comfortable viewing of your monitor:
• Use adequate lighting for the type of work you are performing.
 Loading...