

Lenovo 43N3424, ThinkStation 450GB 15K rpm User Manual
ThinkStation Serial Attached
SCSI Hard Disk Drive
User Guide

http://www.lenovo.com/safety
Note: Before installing the product, be sure to read the warranty information in Appendix
C “Lenovo Limited Warranty” on page 11.
Thrid Edition (December 2014)
© Copyright Lenovo 2013, 2014.
LIMITED AND RESTRICTED RIGHTS NOTICE: If data or software is delivered
pursuant a General Services Administration “GSA” contract, use, reproduction, or
disclosure is subject to restrictions set forth in Contract No. GS-35F-05925.

Contents
Chapter 1. About the ThinkStation Serial Attached SCSI (SAS) hard disk
drive . . . . . . . . . . . . . . . . . . . . . . . .1
Product description . . . . . . . . . . . . . . . . . . . .1
Installation planning. . . . . . . . . . . . . . . . . . . .2
Installation requirements . . . . . . . . . . . . . . . . .2
Partition planning . . . . . . . . . . . . . . . . . . .4
Installing the drive . . . . . . . . . . . . . . . . . . . .4
Step 1. Opening your computer . . . . . . . . . . . . . . .4
Step 2. Unpacking the drive . . . . . . . . . . . . . . . .4
Step 3. Mounting the drive in the bay . . . . . . . . . . . . .5
Step 4. Attaching the cables to the drive . . . . . . . . . . . .6
Step 5. Completing the installation of the drive . . . . . . . . . .7
Preparing the drive for use . . . . . . . . . . . . . . . . .7
Partitioning and formatting your drive . . . . . . . . . . . . .8
Chapter
2. Troubleshooting . . . . . . . . . . . . . . . . 113
Appendix A. PCIe-to-SAS host bus adapter quick installation
instructions . . . . . . . . . . . . . . . . . . . . 115
Appendix B. Service and Support . . . . . . . . . . . . . 117
Registering your option . . . . . . . . . . . . . . . . . 117
Online technical support . . . . . . . . . . . . . . . . . 117
Telephone technical support . . . . . . . . . . . . . . . . 117
Appendix C. Lenovo Limited Warranty . . . . . . . . . . . 119
Warranty information . . . . . . . . . . . . . . . . . . 126
Lenovo Limited Warranty - Customer
Notice . . . . . . . . . . . . . 128
Appendix E. Notices . . . . . . . . . . . . . . . . . . 143
iii
© Copyright Lenovo 2013, 2014
Appendix D. Electronic emission notices. . . . . . . . . . . .139

Recycling information . . . . . . . . . . . . . . . . . . . 143
Trademarks . . . . . . . . . . . . . . . . . . . . . . 145
Appendix F. Restriction of Hazardous Substances Directive
(RoHS) . . . . . . . . .
. 147
Appendix G. İthalatçı – İmalatçı / Üretici Firma Bilgileri ve Diğer
Bilgiler . . . . . . . . . . . . . . . . . . . . . . .
.
149
Appendix H. Servis İstasyonları ve Yedek Parça Malzemelerinin Temin
Edileceği Adresler . . . . . . . . . . . . . . . . . . .
15
1
iv ThinkStation Serial Attached SCSI Hard Disk Drive User Guide
Chapter 1. About the ThinkStation Serial Attached SCSI
(SAS) hard disk drive
This section provides information on the ThinkStation® Serial Attached SCSI
(SAS) hard disk drive.
Product description
The SAS hard disk drive can only be installed in computers with at least one
of the following configurations:
v a SAS-compatible backplane with bays designed to accommodate SAS hard
disk drives
v a PCI Express (PCIe)-to-SAS host bus adapter
The SAS hard disk drive connects to a SAS-compatible interface which
supports SAS hard disk drives in a single drive per cable configuration. There
are no jumper settings required for master or slave settings.
© Copyright Lenovo 2013, 2014
1
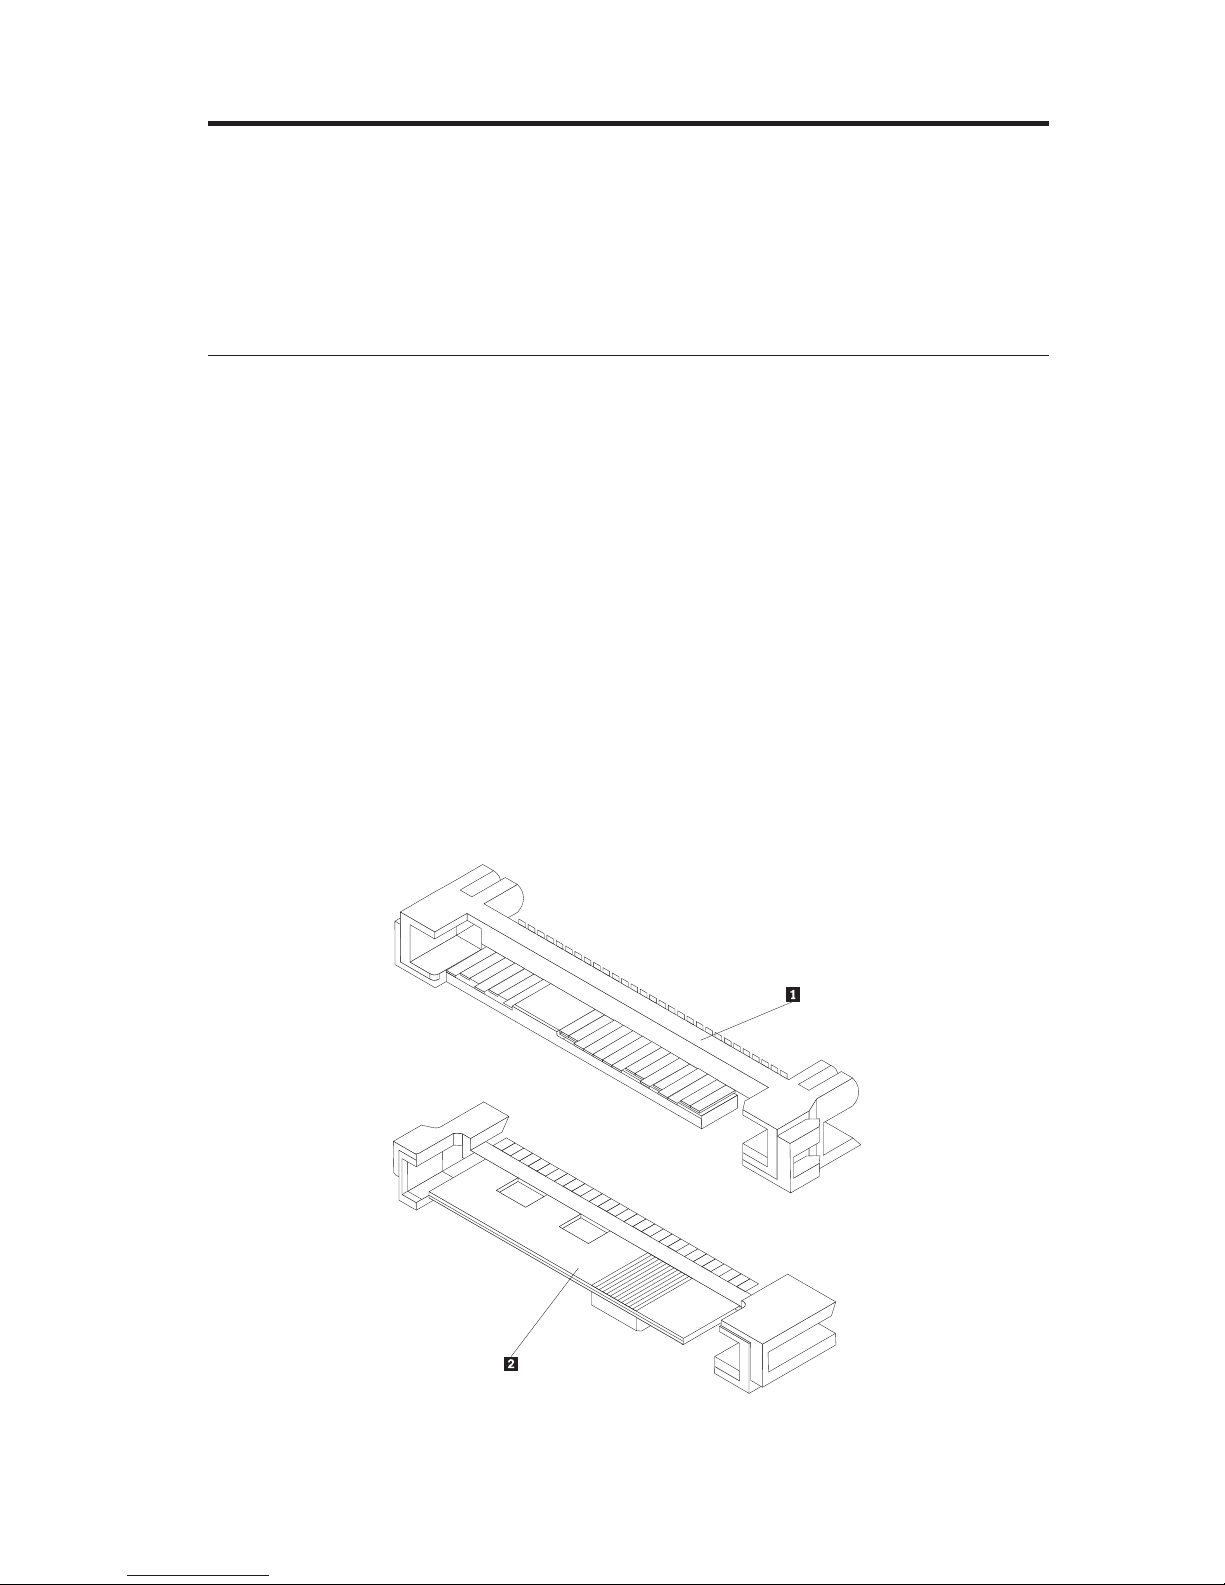
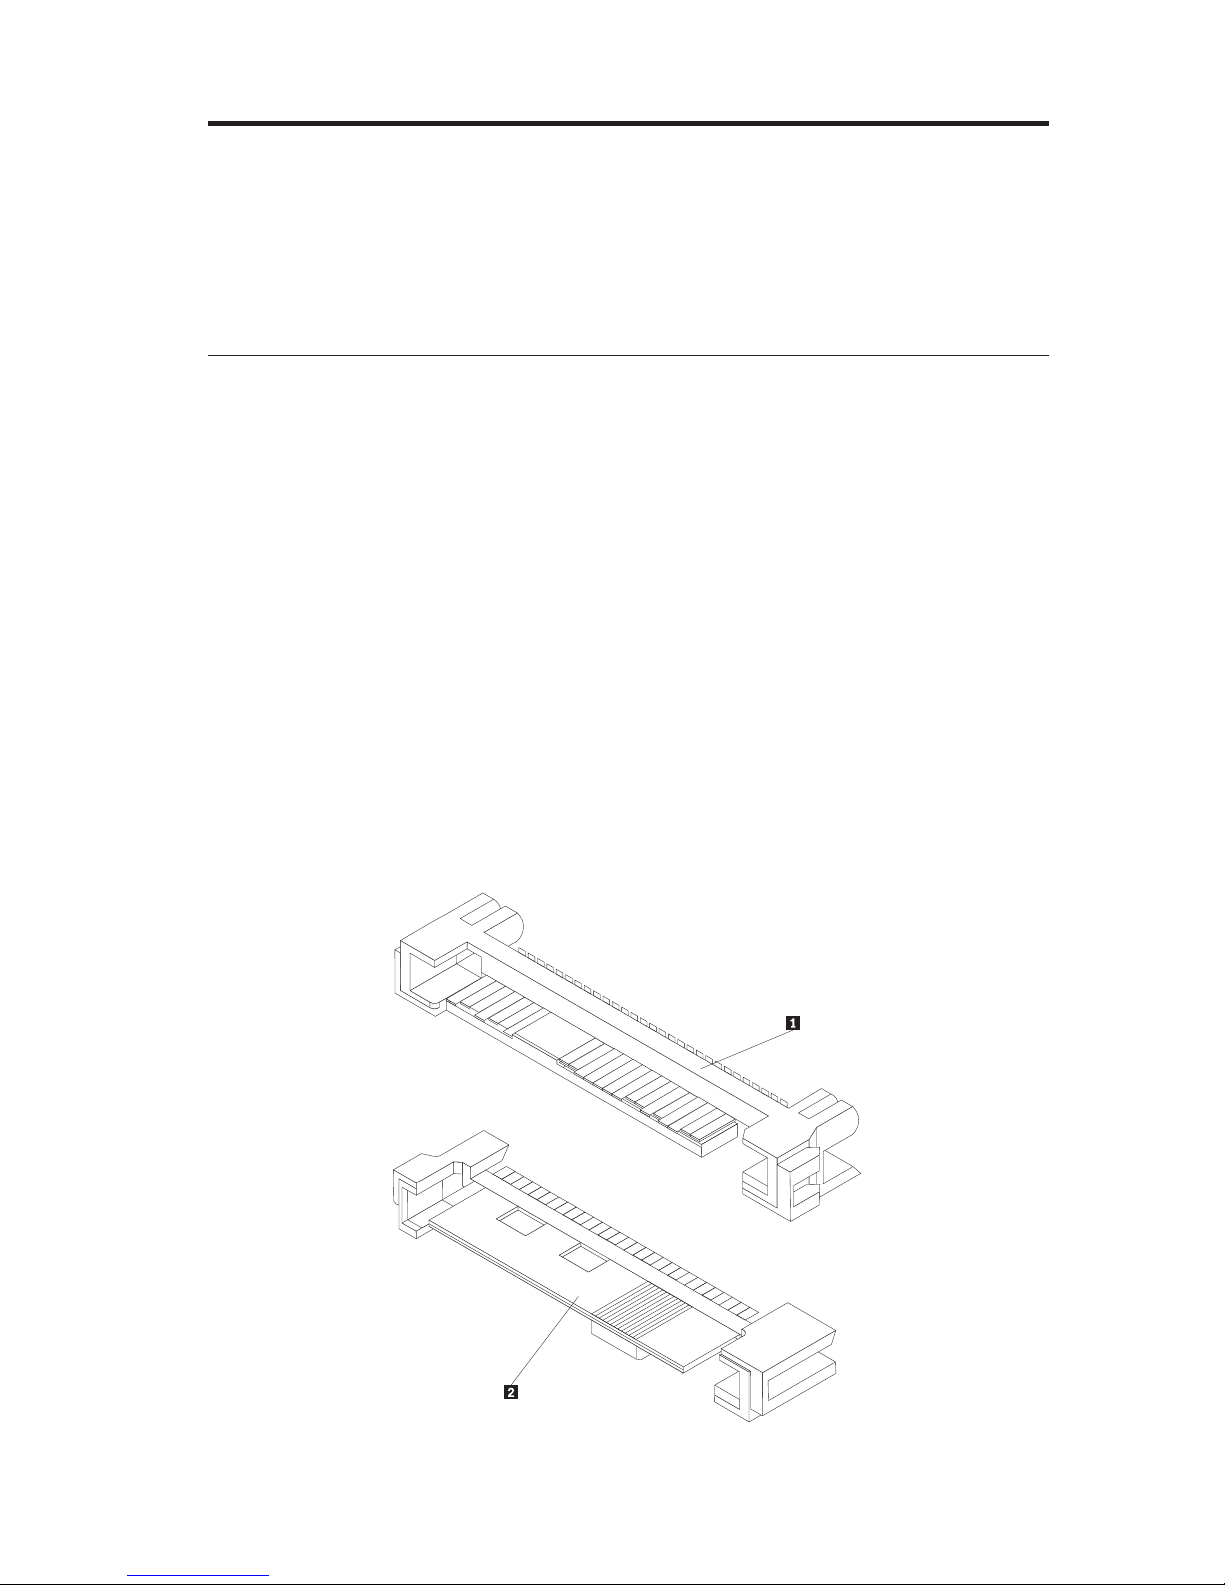
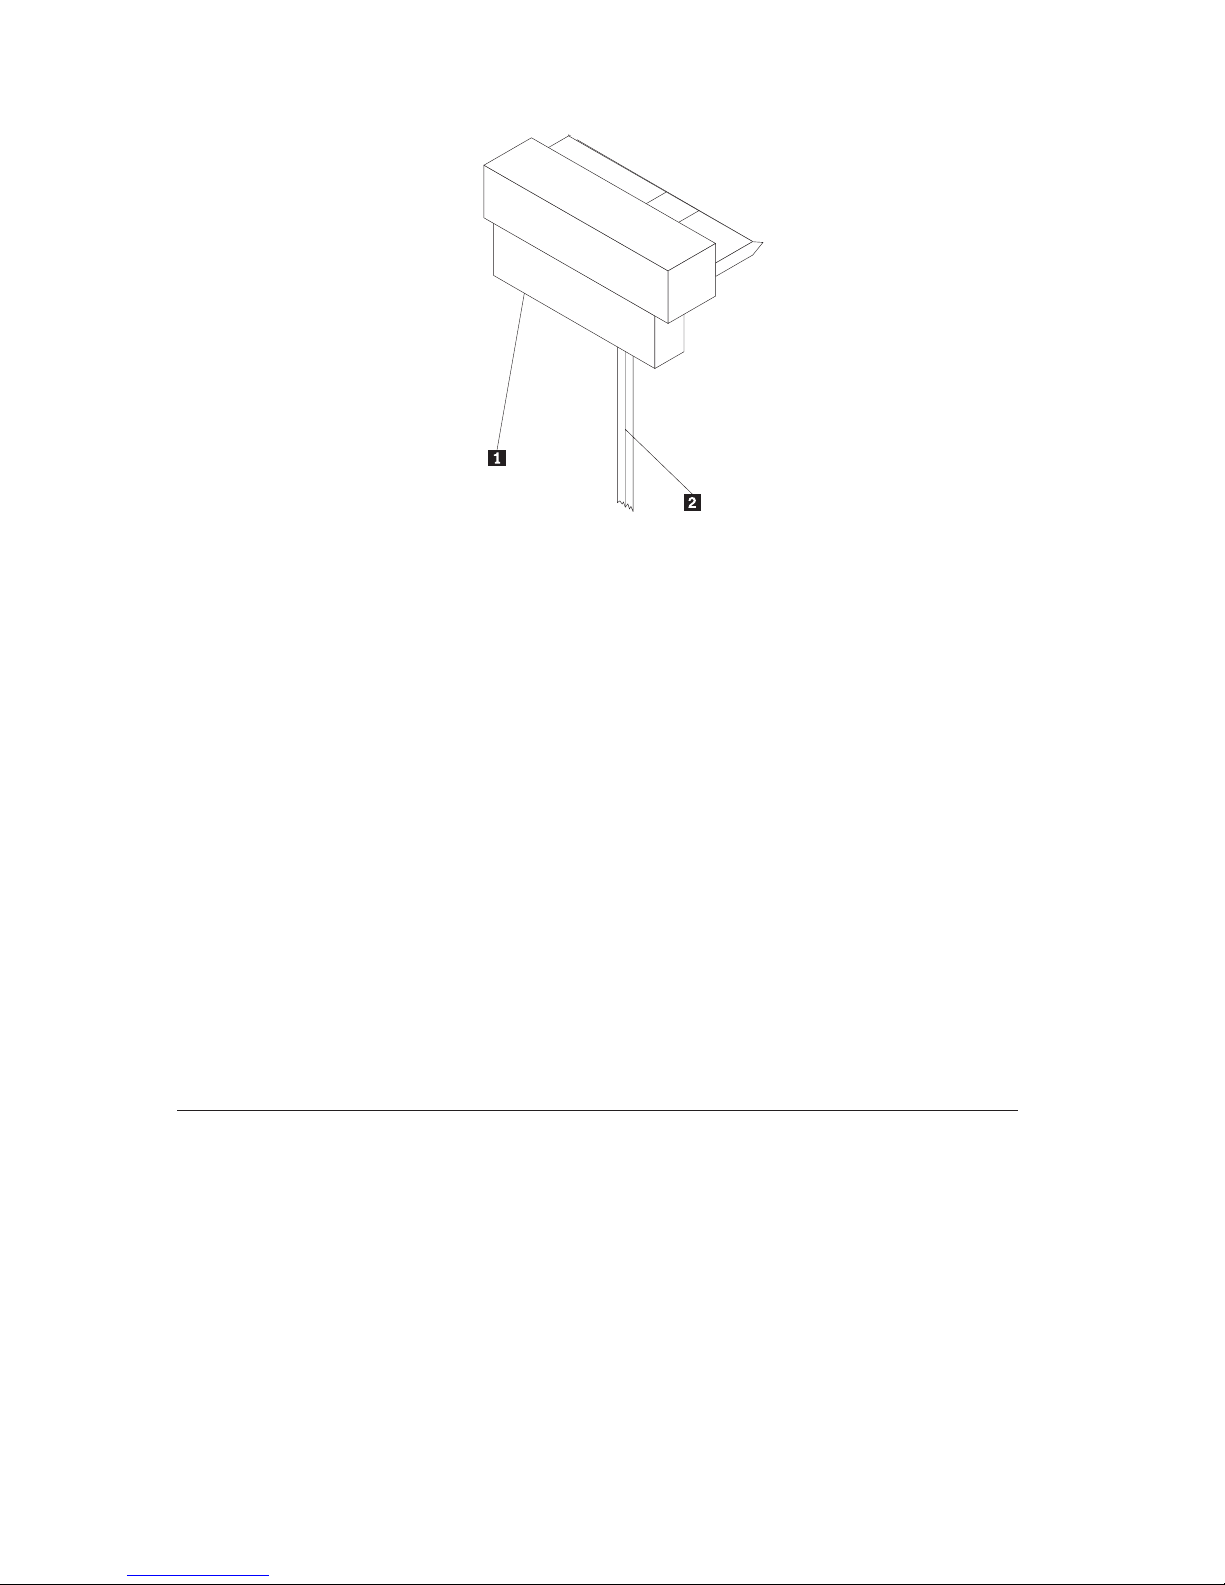
The SAS hard disk drive uses 29-pin SAS interface connectors. The top surface
1 and the bottom surface 2 of the connector are displayed in the diagram
below. The cables included in the option package enable you to connect the
power port and the signal port of the SAS hard disk drive as Serial ATA
(SATA) hard disk drives.

Your hard disk drive can be configured in one of the following ways:
v As single drive
– Be installed as the only hard disk drive in a computer
– Replace a hard disk drive
v As one of multiple drives to operate with other installed hard disk drives
Notes:
1. SAS hard disk drives can not operate with SATA hard disk drives.
2. Make sure that all the other hard disk drives in your computer are SAS
hard disk drives.
The SAS and SATA drives can not operate together as they have different
spinning speeds, which cause the two drives to place different rotational
vibration forces on the chassis. If a SATA drive of 7200 RPM and a SAS
drive of 15000 RPM are installed in the same chassis, the two different
forces on the chassis could cause performance degradation and
additional acoustic noise.
In addition to this User’s Guide, your option package contains:
v Serial Attached SCSI hard disk drive
v Drive handling flyer
v Safety information manual
v Two SAS cables
Contact your place of purchase if parts are missing or damaged. Be sure to
retain your proof of purchase. It may be required to receive warranty service.
Installation planning
This section contains detailed information to help you plan your SAS hard disk
drive installation.
Installation requirements
To install the SAS hard disk drive, you must have:
v Documentation
The documentation that came with your computer and operating system.
v SAS compatible port
Your computer must have a SAS compatible port on system board or a
PCIe-to-SAS host bus adapter. If you are not sure about your port, see the
documentation that came with your computer. Generally, the ThinkStation
D10 series computer systems have SAS compatible ports on the system
board. The ThinkStation S10 series computer systems need a PCIe-to-SAS
host bus adapter to support SAS hard disk drives.
2 ThinkStation Serial Attached SCSI Hard Disk Drive User Guide
v
For PCIe-to-SAS host bus adapter installation instructions, see Appendix A,
“PCIe-to-SAS host bus adapter quick installation instructions,” on page 115 or
refer to the documentation that comes with your PCIe-to-SAS host bus
adapter.
SAS hard disk drive cable
You will be required to use one of the following 29-pin SAS connecting
cables included in your option package to connect the SAS hard disk drive
to the power and signal ports:
– Straight connecting cable
– Right angle connecting cable
Chapter 1. About the ThinkStation Serial Attached SCSI (SAS) hard disk drive 3
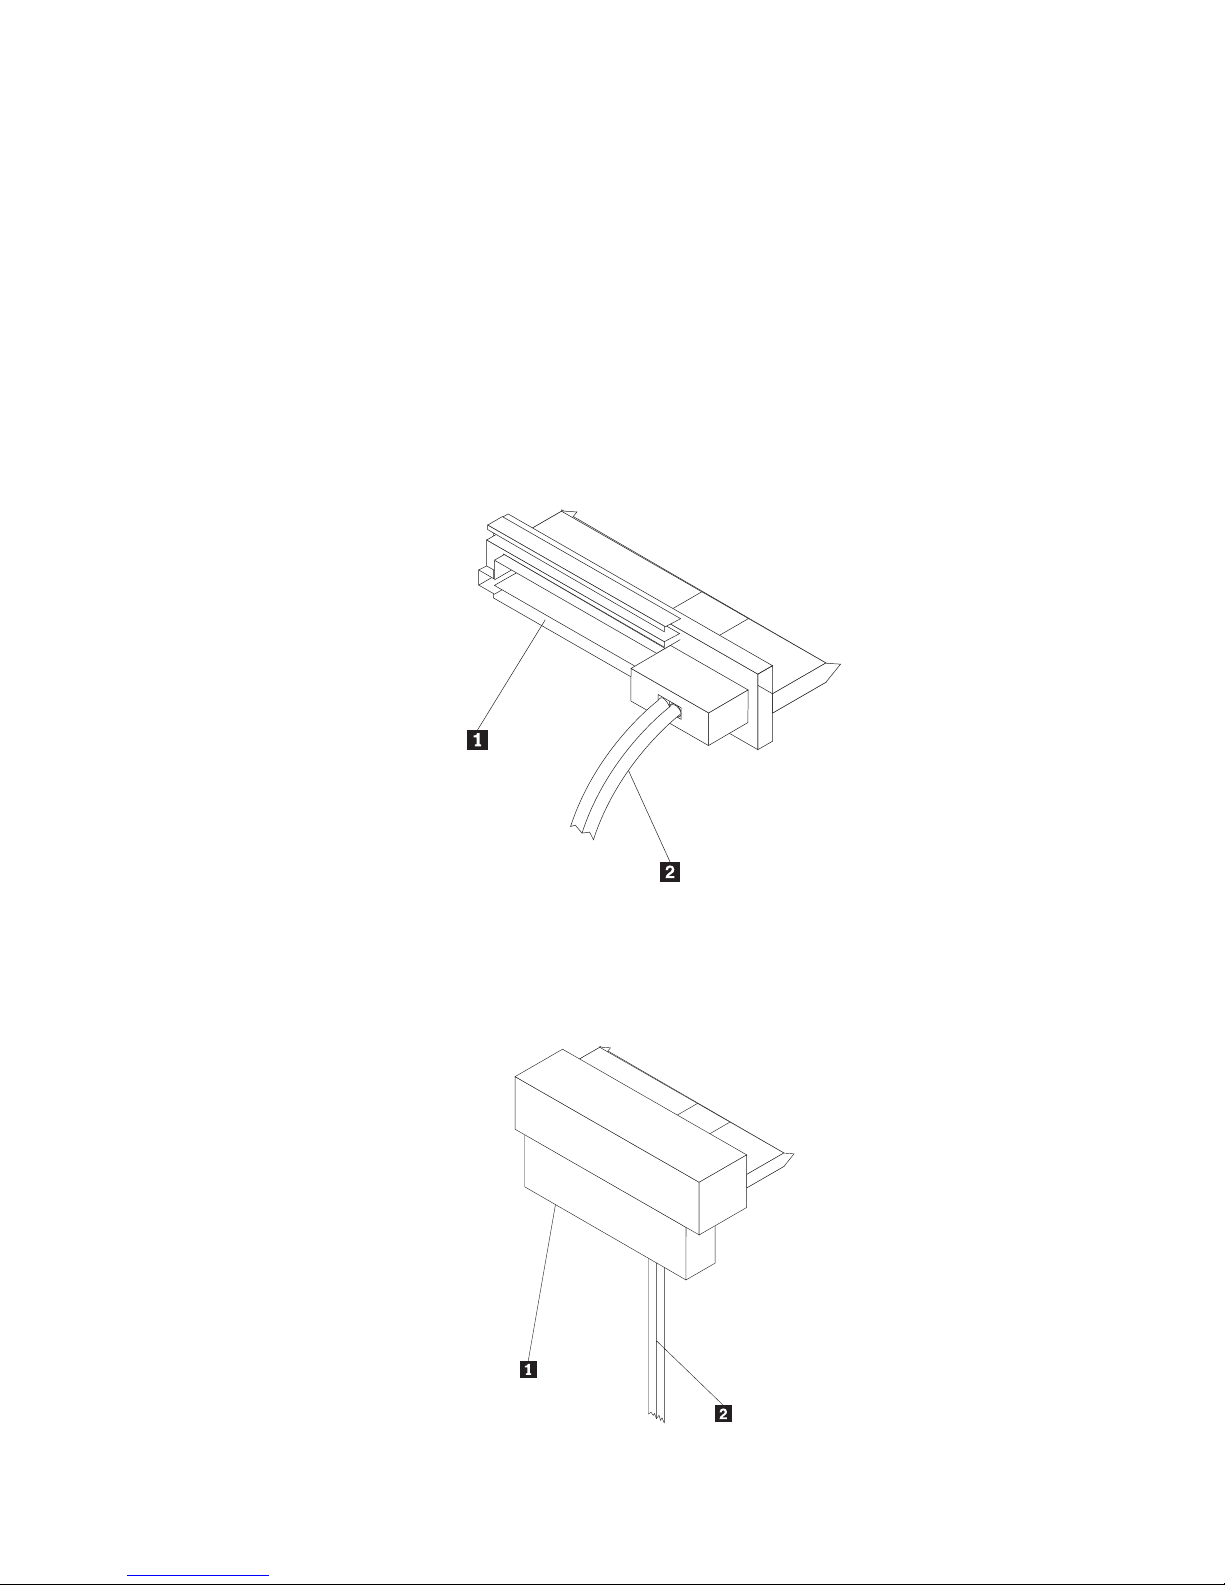
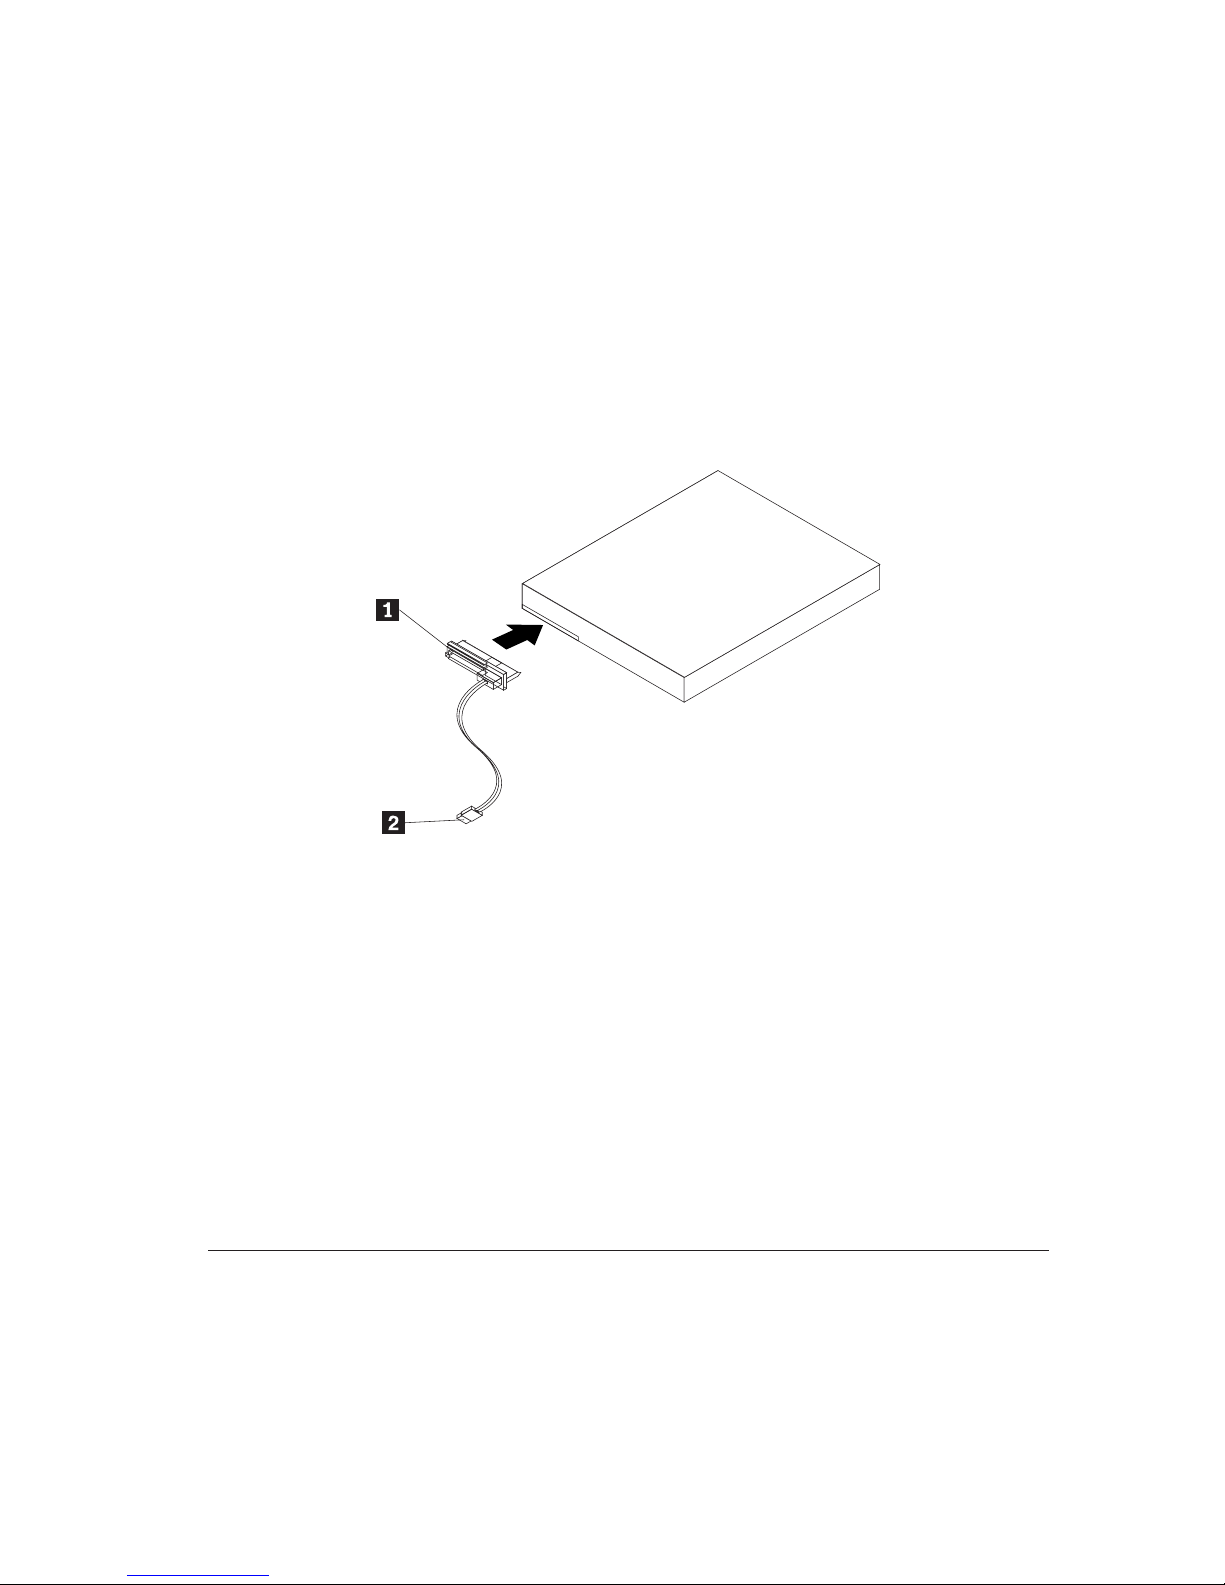
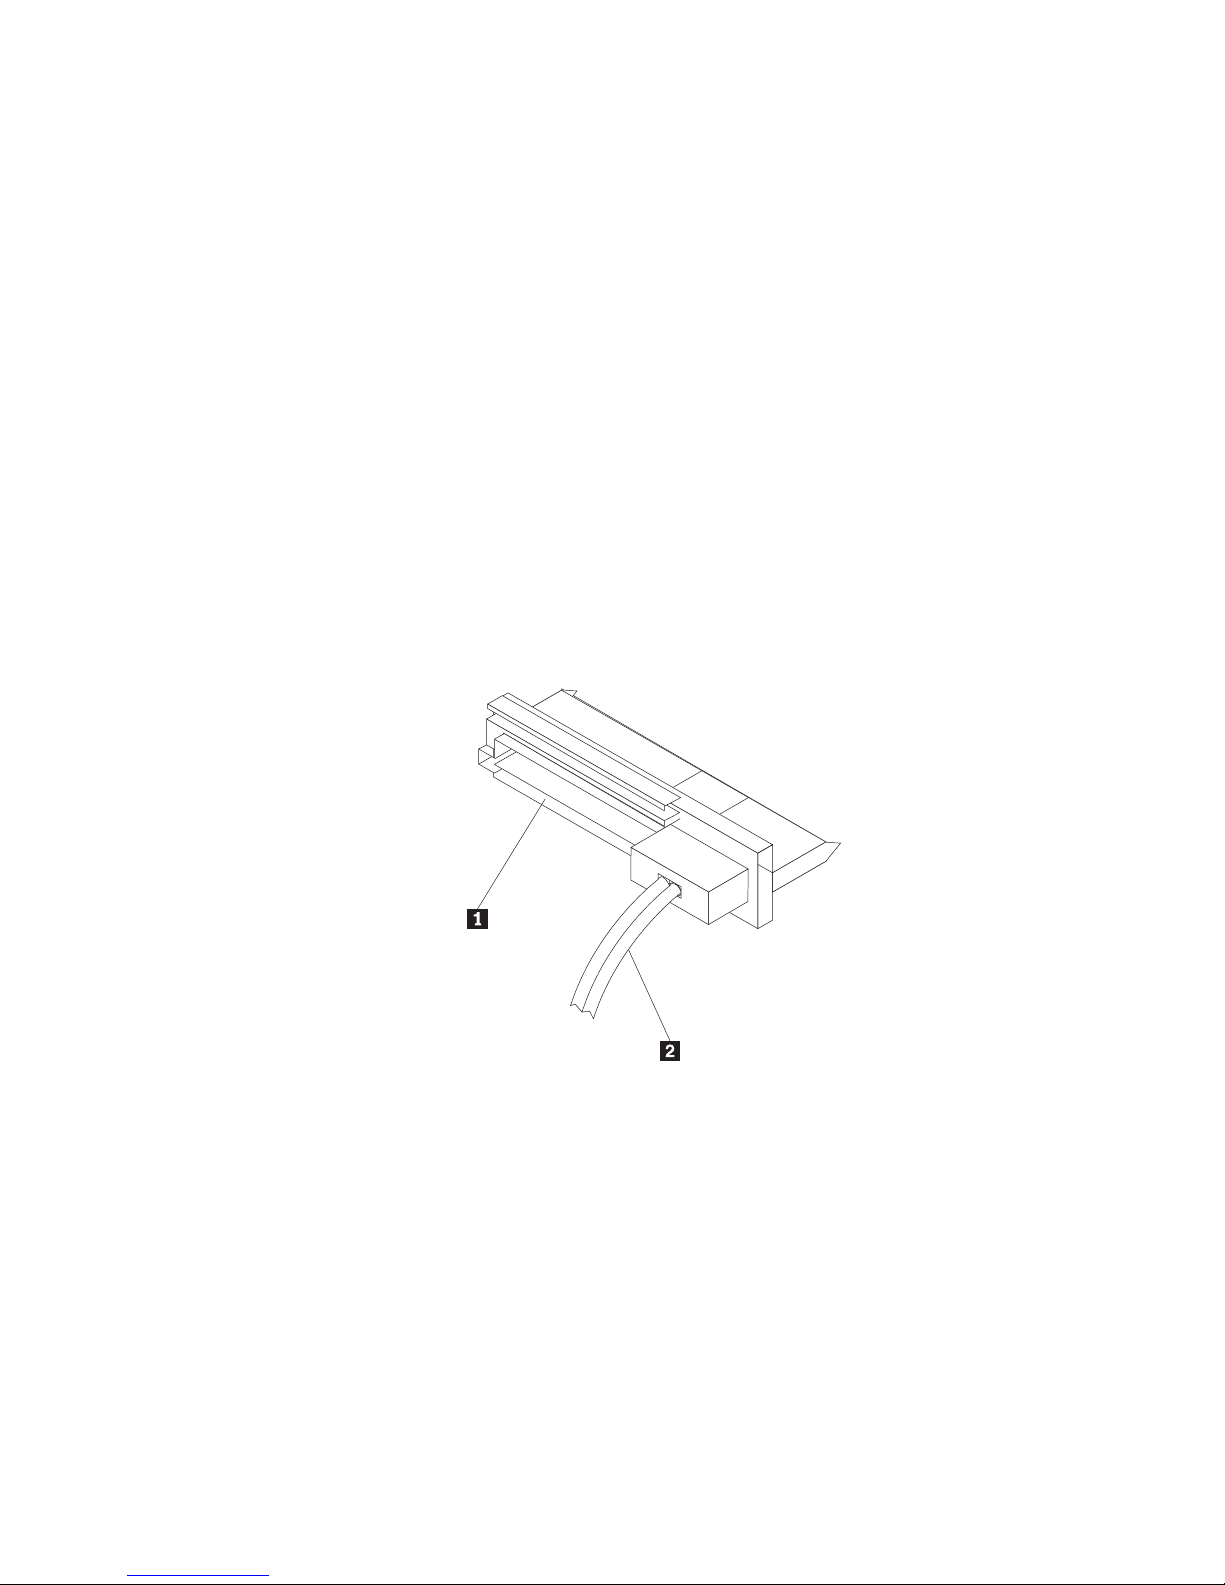
The straight cable is for the ThinkStation D10 series computer systems.
The power port 1 and the signal cable 2 are displayed in the diagram
below.
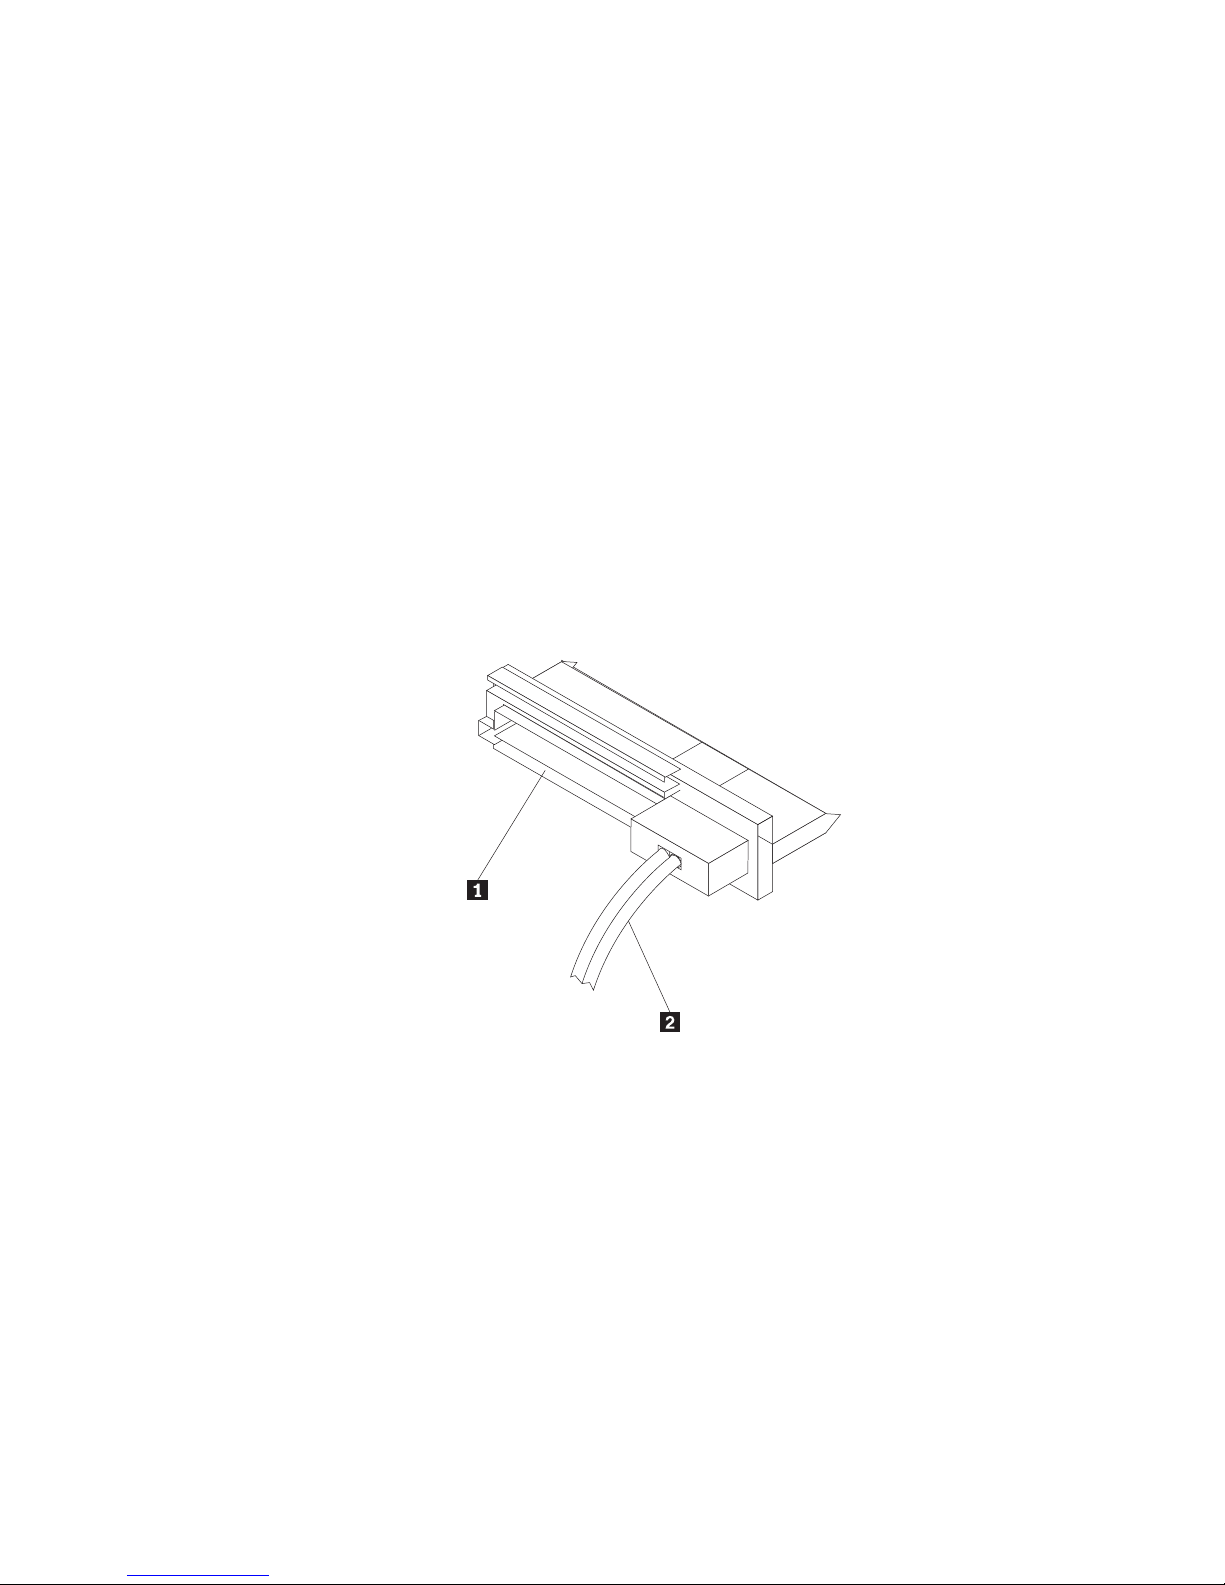
The right angle connecting cable is for the ThinkStation S10 series
computer systems. The power port 1 and the signal cable 2 are
displayed in the diagram below.

Partition planning
The two kinds of file systems used by the Microsoft® operating system are
NTFS and FAT32. Microsoft Windows
®
XP can support both of these file
systems, but Microsoft Windows Vista
®
can only support NTFS.
Note: NTFS is recommended to be used to partition any new drives.
To determine which file system you are using, do the following:
1. Right-click an exiting drive under My Computer.
2. Select Properties. The file system will be displayed in the General tab.
For more information on partitioning your drive, see “Partitioning and
formatting your drive” on page 8.
Installing the drive
You must install your new drive in the computer before using your operating
system to partition and format your new drive.
The instructions in this section are general guidelines that apply to most
computers. For specific information on installing a hard disk drive in your
computer, see the documentation that came with your computer.
Step 1. Opening your computer
Before opening your computer, complete the following steps:
1. Turn off the computer.
2. Unplug the power cable from the power outlet of your computer and all
other attached devices and cables.
It is now safe to open your computer. For specific information about opening
your computer, see the documentation that came with your computer.
Step 2. Unpacking the drive
Use the following procedure to unpack and handle the drive. To prevent
damage and static-electricity discharge, keep handling to a minimum.
1. Do not open the antistatic bag until you are ready to install the drive. Static
electricity can damage the drive and other computer components.
2. Touch the inner conductive surface of the antistatic bag containing the
drive and your hand to an unpainted metal surface on the computer for
two seconds. This drains static electricity from the bag and from your body.
3. Before handling the drive, ground yourself by touching an unpainted
surface on the computer. Ground yourself again after leaving and returning
to your work area.
ThinkStation Serial Attached SCSI Hard Disk Drive User Guide 4
4. Always handle the drive by its edges. Do not touch any exposed printed
circuitry, components, or connector pins.
5. While installing the drive, avoid all unnecessary handling. Rough handling
can damage the heads, rotating disks, and bearings inside the drive
housing.
6. If you must put the drive down, place the antistatic bag on a flat, padded
surface and place the drive on the bag with the component side facing up.
Note: If you want to install the drive in a 5.25-inch bay, you will need to
purchase a universal bay conversion kit which is available at many local
computer supply stores.
Step 3. Mounting the drive in the bay
You can mount the drive horizontally or vertically based on the location of the
bay in your chassis. The ThinkStation D10 and S10 series computer systems
provide plastic brackets for you to mount your hard disk drives. Alternatively,
you can mount your hard disk drive using screws in a bay without a bracket.
The screws should be commercially available at your local computer retailer.
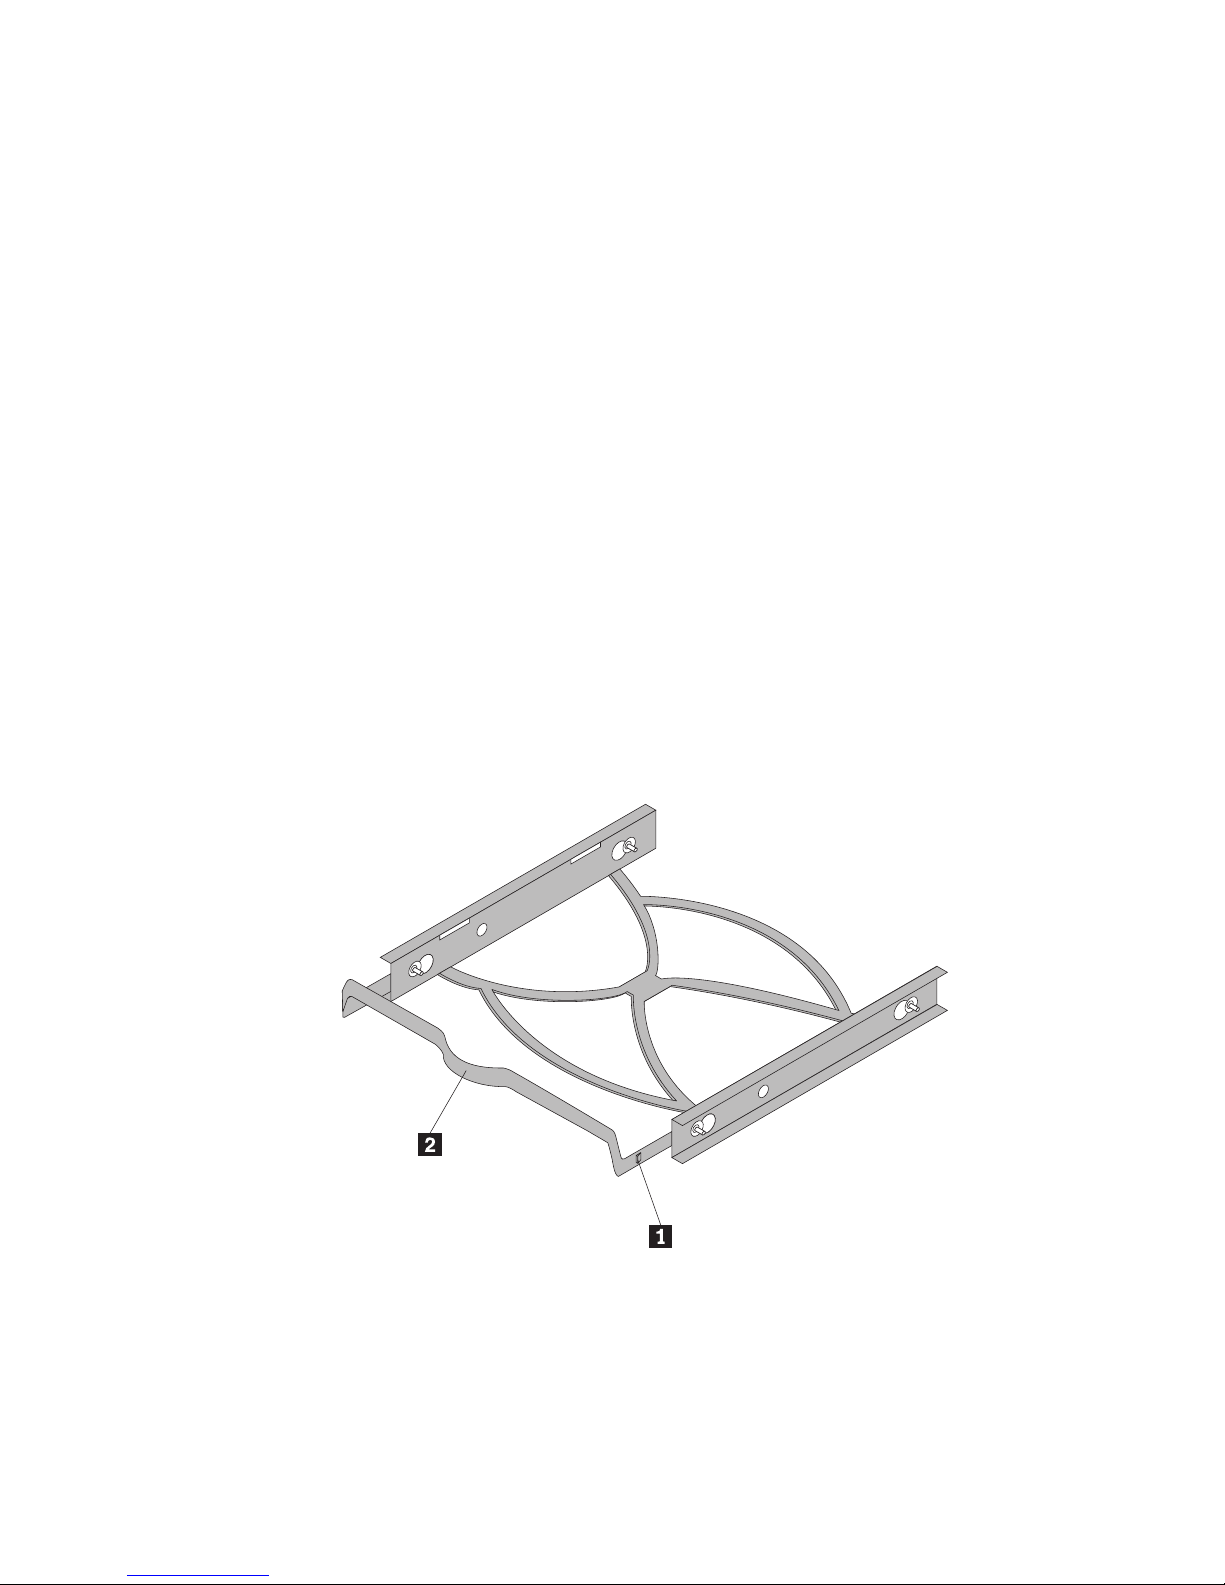
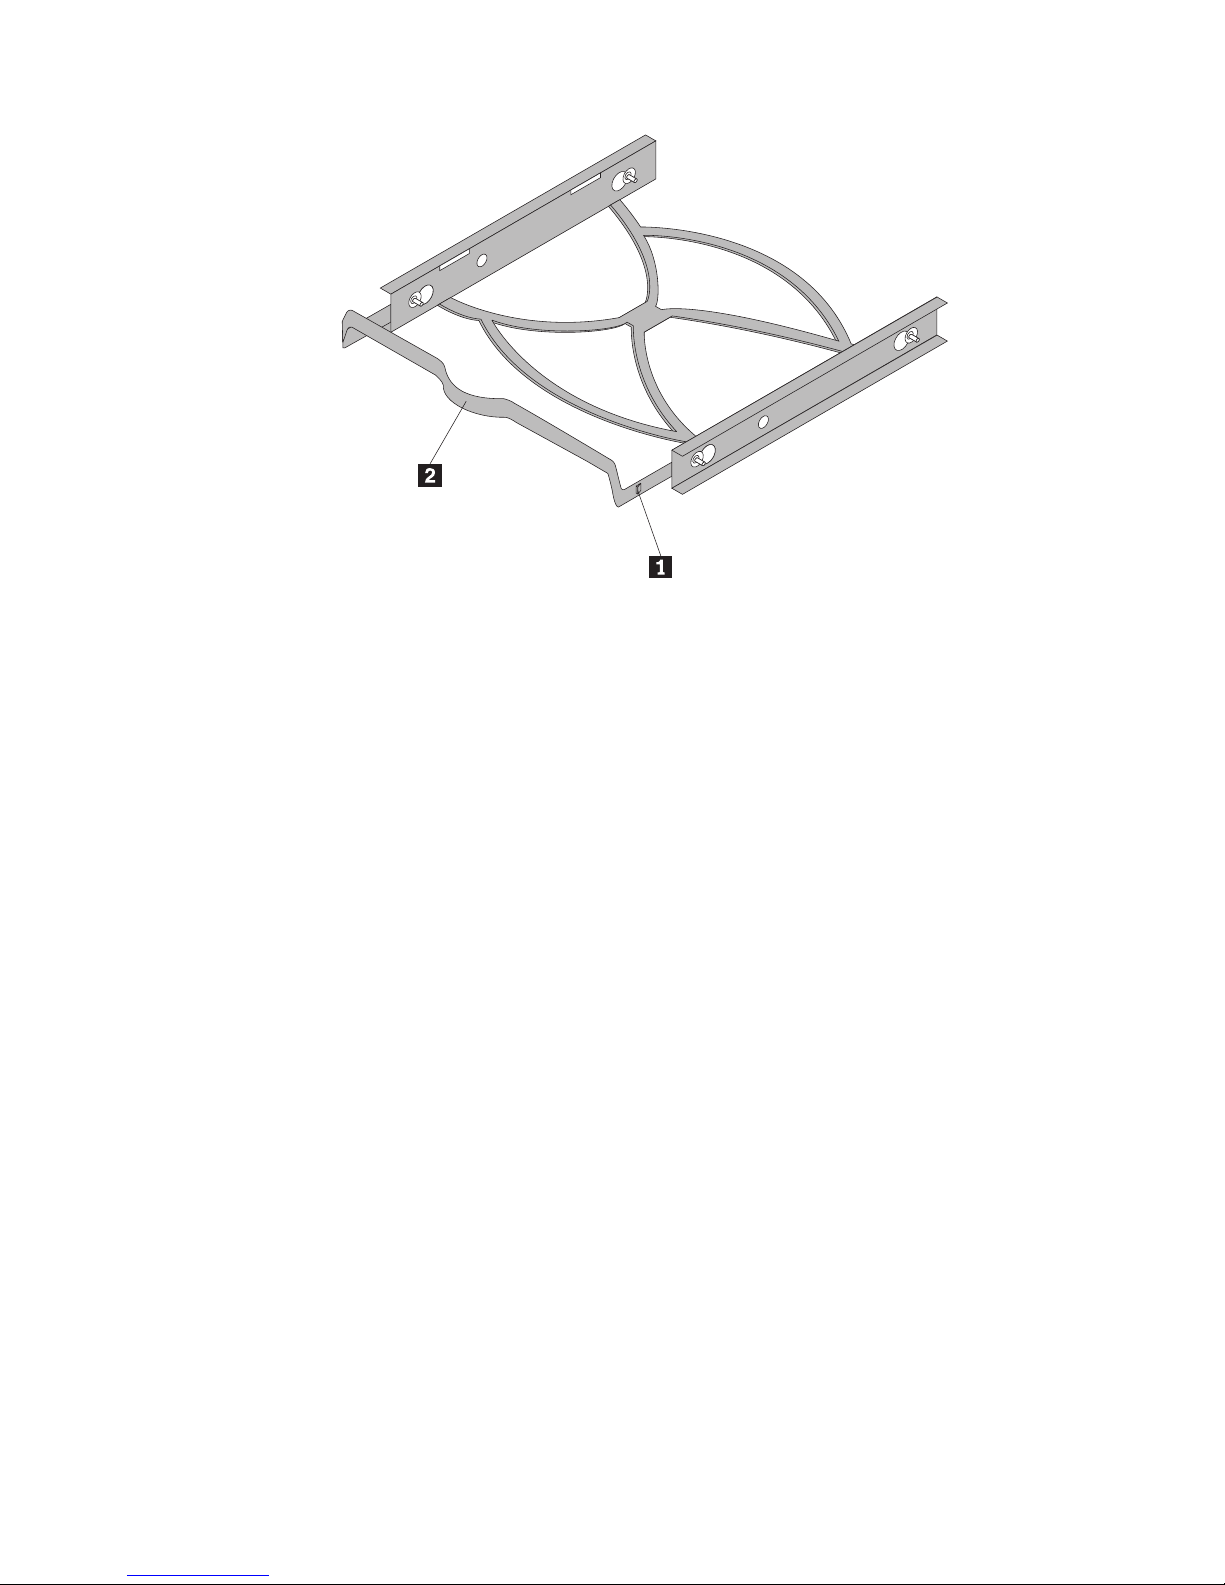
To mount the drive using the bracket:
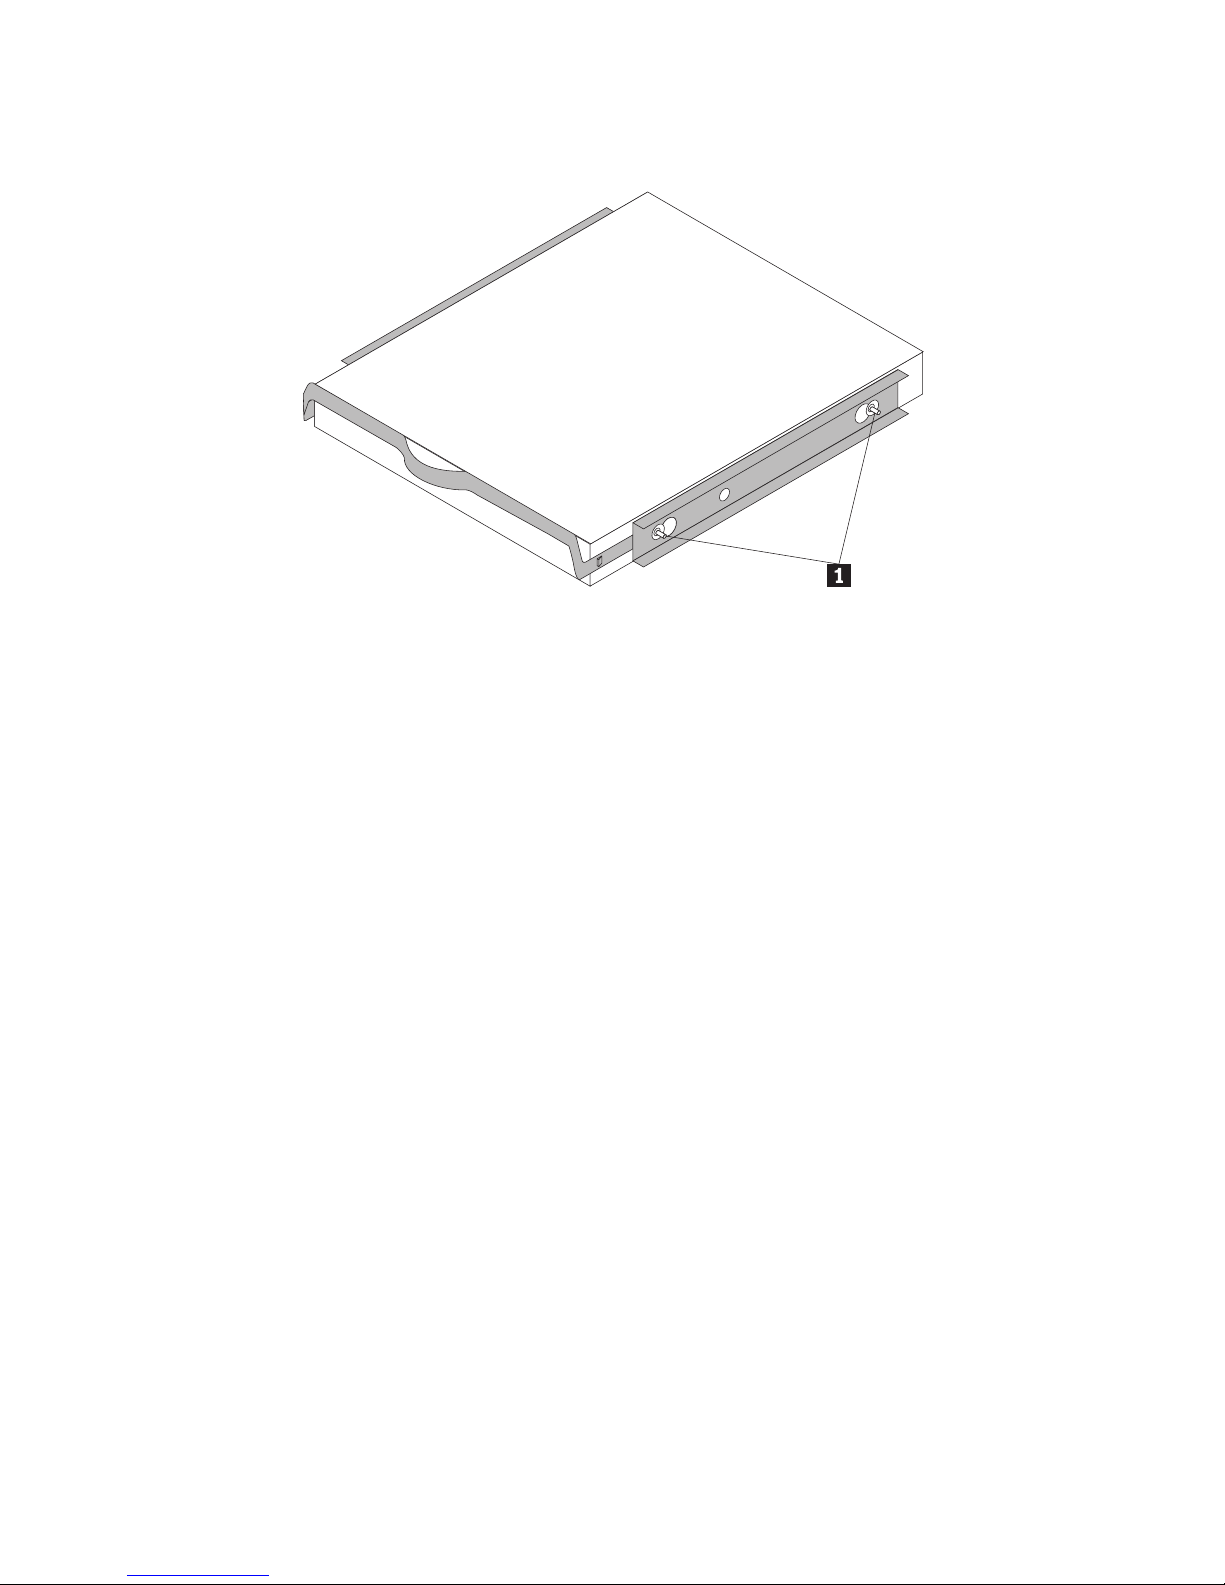
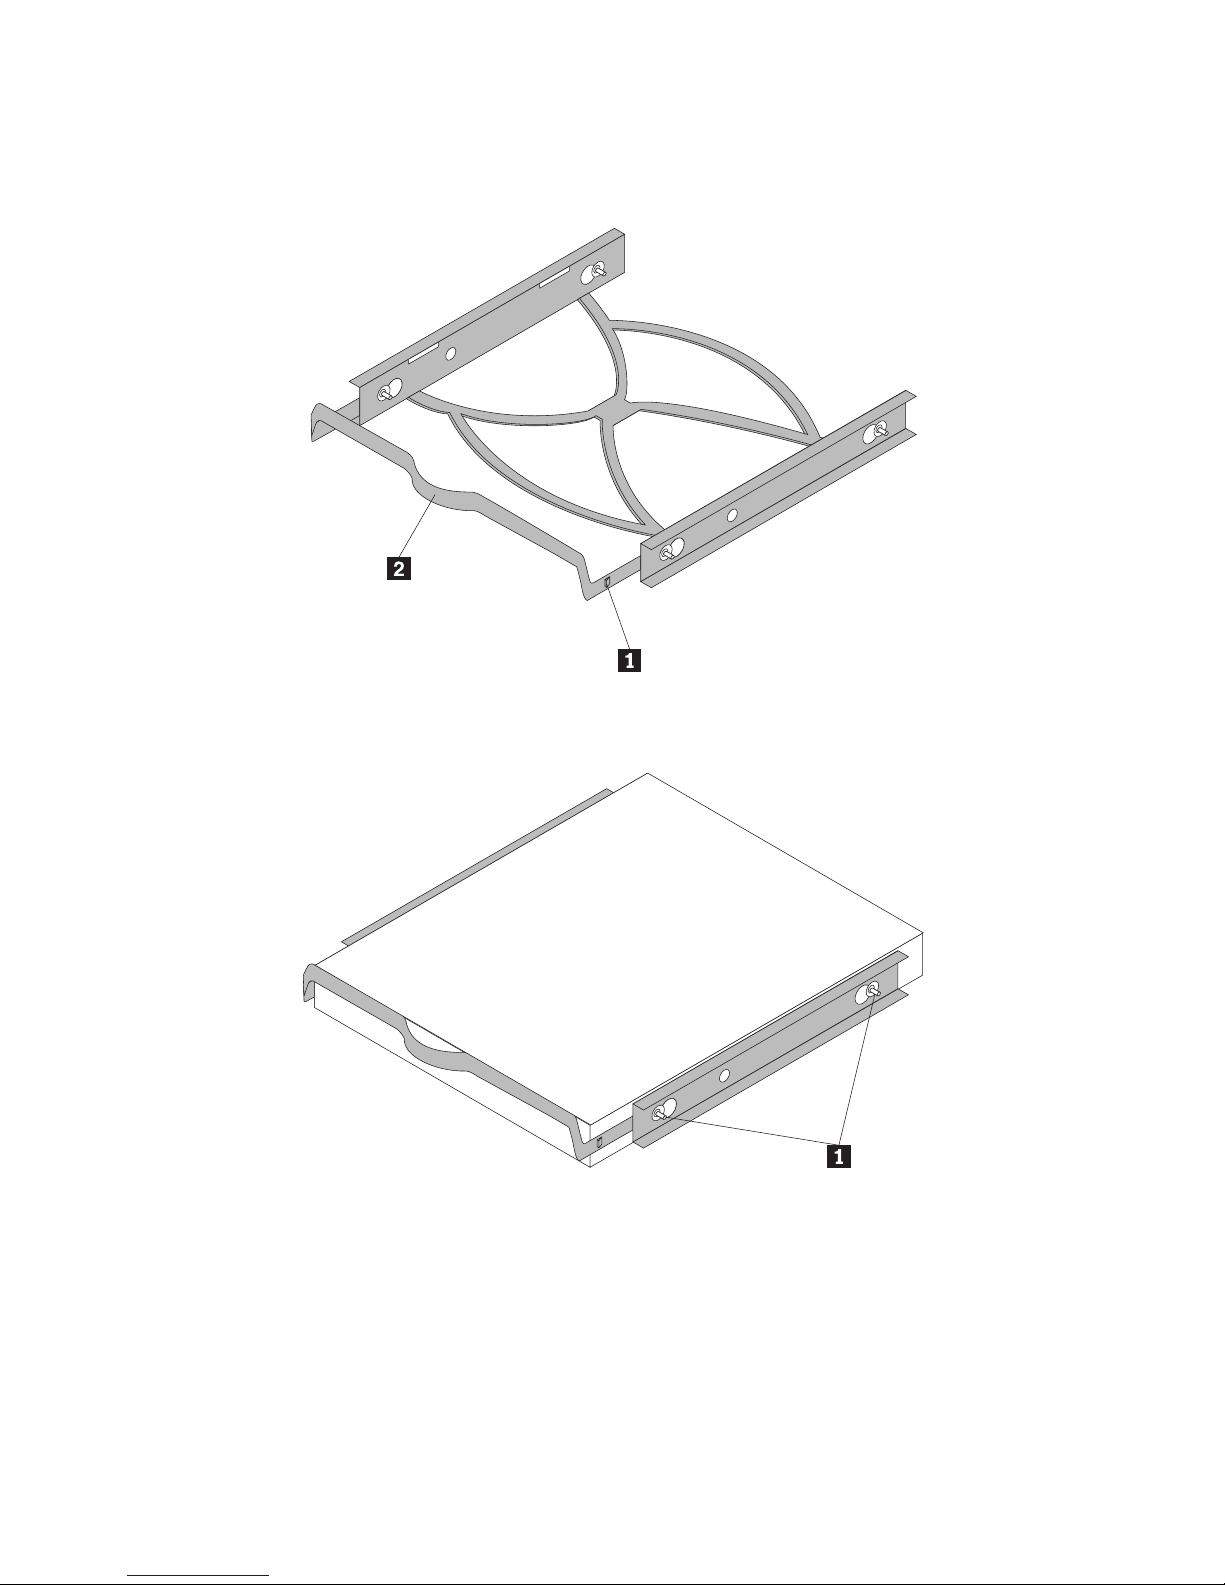
1. Pull the bracket out of the bay by pressing the snaps (1) and pulling the
handle (2).
Chapter 1. About the ThinkStation Serial Attached SCSI (SAS) hard disk drive 5
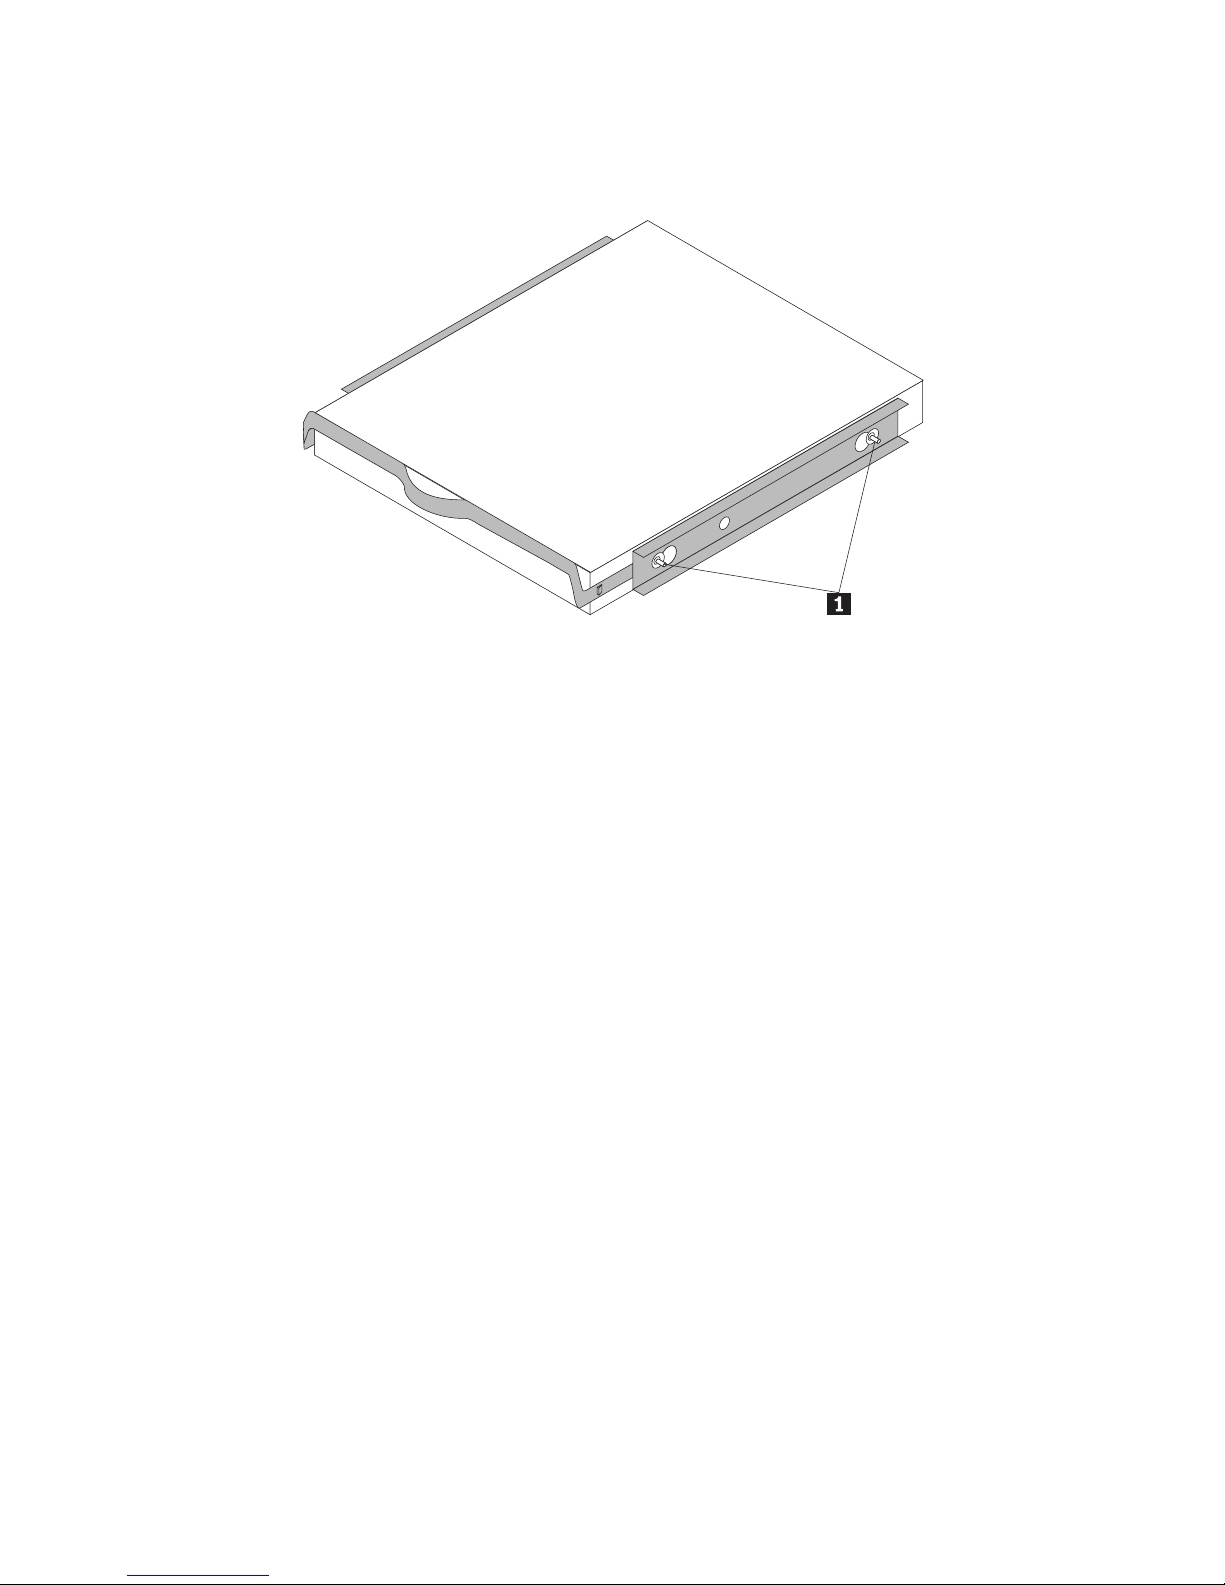
2. Install the drive to the bracket, and make sure the four mounting pins (1)
have already been aligned in the drive screw holes and secured tightly.
3. If you are adding your new drive to a system with an existing hard disk
drive, position the new drive adjacent to and in the same direction of the
existing hard disk drive so that you will not have to twist the interface
cable when you connect the drive.
4. Slide the drive with bracket into the bay until the two snaps of the bracket
are locked in the bay.
To mount the drive using screws:
1. Slide the drive into the bay.
2. If you will add your new drive to a system with an existing drive, position
the new drive adjacent to and oriented in the same direction as the existing
hard drive so that you will not have to twist the interface cable when you
connect the drive.
3. Align the drive-bay screw holes with the threaded holes in the drive
housing or expansion brackets.
4. Hand thread the screws to lightly secure the drive in the bay. For some
installations, it might be necessary to use the screw holes on the bottom
(circuit board side) of the drive.
5. Check the drive alignment and tighten the screws. Do not over tighten.
Step 4. Attaching the cables to the drive
Use the following procedure to attach the cables.
1. Select the right 29-pin cable for your computer (straight cable for the
ThinkStation D10 series computer systems and right angle cable for the
ThinkStation S10 series computer systems).
2. Attach the 29-pin cable to your SAS hard disk drive interface connector.
ThinkStation Serial Attached SCSI Hard Disk Drive User Guide 6
3. Attach the other end (7 pin signal port D2J) to the SAS compatible port. For
the ThinkStation D10 series computer systems, the five blue SATA/SAS
ports on the system board can support SAS hard disk drive. For the
ThinkStation S10 series computer systems, you need a PCIe-to-SAS host bus
adapter. If you are not sure about your port or computer model, see the
documentation that came with your computer.
4.
Step 5. Completing the installation of the drive
To complete the installation of the drive:
1. Verify that the hard disk drive is securely mounted and the cables are
firmly attached.
2. Verify that the cables do not interfere with the computer cover and do not
block the power supply fan blades or air flow paths.
3. Replace the computer cover.
4. Reconnect all devices. Make sure that the keyboard, mouse, and monitor
cables are firmly connected.
5. Reconnect all AC power cords.
Preparing the drive for use
When you restart your computer, the configuration setup information screen
displays because you changed the hardware in your computer. Some
computers require you to make configuration choices the first time you restart
after installing a new device. If the screen does not display, see your computer
documentation for information about how to access it. For most computers,
Chapter 1. About the ThinkStation Serial Attached SCSI (SAS) hard disk drive 7
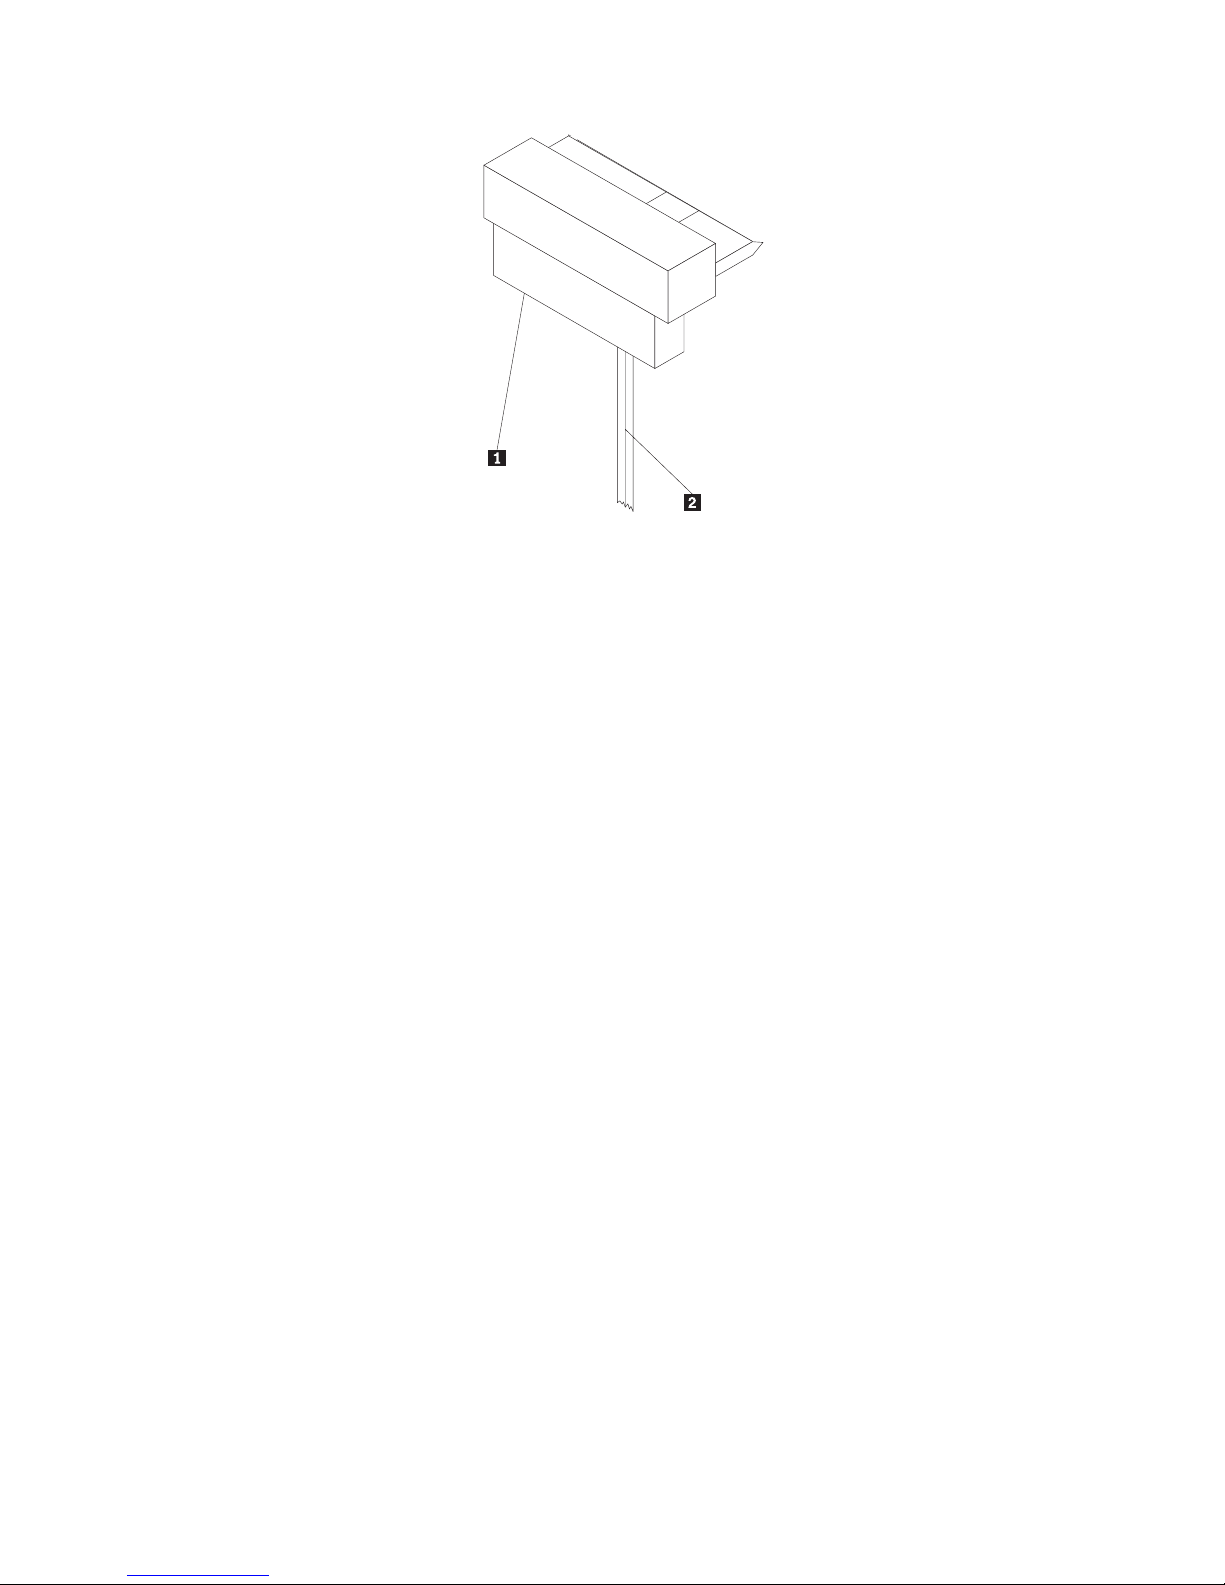
Find an unused 15-pin SA TA power connector coming from the computer
power supply and attach it to the power port 1 on the connecting cable.
The power connector is keyed so that it attaches one way only. Do not force
it. If the connector does not attach using reasonable pressure, recheck the
orientation of the cable connector to the drive connector and try again.

you can see the configuration information during computer startup by pressing
F1 when the configuration graphic displays in the upper right corner of your
screen.
Check your configuration setup information for one of the following:
v If the configuration setup program reports the size of your new drive as
what you expected, save your changes, close the configuration program, and
continue with “Partitioning and formatting your drive” on page 8.
v If your computer seems to stop responding or if it does not restart
successfully, go to Chapter 2, “Troubleshooting,” on page 113.
Partitioning and formatting your drive
If you are adding your drive to a computer that has Windows XP or Windows
Vista installed on an existing drive, follow the instructions below to partition
and format your new SAS drive.
Note: Under Windows XP, a minimum of Service Pack 1a (SP1a) is required
for the hard disk drive to access capacities greater than 137 GB.
1. Turn on your computer.
2. Click Start.
3. Right-click My Computer.
4. Click Manage. The Computer Management window opens.
5. From the left side menu, click Disk Management.
6. Click the new drive located in the lower right side of the screen.
7. From the menu bar, click Action > All Tasks > New Partition.
8. The New Partition window opens. Follow the on-screen instructions to
partition the drive.
9. After clicking Finish in the on-screen instructions, the format will begin.
Note: If you are installing the drive in a computer that has no hard disk
drive, follow the instructions below to partition and format the new hard disk
drive for Windows XP or Windows Vista operating system using NTFS:
1. Insert the first Windows XP or Windows Vista installation diskette (Setup
Disk #1) in the diskette drive or insert the Windows XP or Windows Vista
installation CD or DVD into your CD-ROM or DVD-ROM drive.
2. Restart your computer.
3. Use the instructions in the Windows XP or Windows Vista user’s guide to
partition and format your drive.
ThinkStation Serial Attached SCSI Hard Disk Drive User Guide 8

Capítulo 1. Sobre a Unidade de Disco Rígido SAS
(Serial Attached SCSI) ThinkStation
Esta seção fornece informações sobre a unidade de disco rígido SAS (Serial
Attached SCSI) ThinkStation
®
.
Descrição do Produto
A unidade de disco rígido SAS só pode ser instalada em computadores com
pelo menos uma das seguintes configurações:
v Um painel traseiro compatível com SAS com compartimentos desenvolvidos
para acomodar unidades de disco rígido SAS
v Um adaptador de barramento de host PCIe (PCI Express)-para-SAS
A unidade de disco rígido SAS se conecta a uma interface compatível com SAS
que suporta unidades de disco rígido SAS em uma única unidade por
configuração de cabo. Não há configurações de jumper necessárias para
configurações principais ou secundárias.
© Copyright Lenovo 2013, 2014
9
A unidade de disco rígido SAS utiliza conectores de interface SAS de 29 pinos.
A superfície superior 1 e a superfície inferior 2 do conector são exibidas no
diagrama a seguir. Os cabos inclusos no pacote de opções permitem a conexão
da porta de alimentação e da porta de sinal da unidade de disco rígido SAS
como unidades de disco rígido SATA (Serial ATA).

Sua unidade de disco rígido pode ser configurada de uma das seguintes
maneiras:
v Como uma unidade única
– Ser instalada como a única unidade de disco rígido em um computador
– Para substituir uma unidade de disco rígido
v Como uma de várias unidades para operar com outras unidades de disco
rígido instaladas
Notas:
1. As unidades de disco rígido SAS não podem operar com unidades de
disco rígido SATA.
2. Certifique-se de que todas as outras unidades de disco rígido do
computador sejam SAS.
As unidades SAS e SATA não podem operar juntas, pois possuem
velocidades giratórias diferentes, o que faz as duas unidades aplicarem
forças de vibração rotacional diferentes no chassis. Se uma unidade SATA
de 7200 RPM e uma unidade SAS de 15000 RPM estiverem instaladas no
mesmo chassis, as duas forças diferentes no chassis podem causar
degradação do desempenho e ruído adicional.
Além deste Guia do Usuário, o pacote de opções contém:
v Unidade de disco rígido Serial Attached SCSI
v Alça de manipulação da unidade
v Manual de informações sobre segurança
v Dois cabos SAS
Entr
e em contato com o local de compra se as peças estiverem faltando ou com
defeito. Certifique-se de guardar o seu comprovante de compra. Ele pode ser
exigido para o recebimento do serviço de garantia.
Planejamento da Instalação
Esta seção contém informações detalhadas para ajudá-lo a planejar a instalação
da sua unidade de disco rígido SAS.
Requisitos de Instalação
Para instalar a unidade de disco rígido SAS, você deve ter:
v Documentação
A documentação que veio com o seu computador e sistema operacional.
v Porta Compatível com SAS
Seu computador deve ter uma porta compatível com SAS na placa-mãe ou
um adaptador de barramento de host PCIe para SAS. Se você não tem
certeza sobre a sua porta, consulte a documentação fornecida com o
10 ThinkStation Serial Attached SCSI Hard Disk Drive User Guide
v
computador. Geralmente, os sistemas de computador ThinkStation D10
series possuem portas compatíveis com SAS na placa-mãe. Os sistemas de
computador ThinkStation S10 series necessitam de um adaptador de
barramento de host PCI para SAS para suportar unidades de disco rígido
SAS.
Para obter instruções de instalação do adaptador de barramento de host
PCIe para SAS, consulte Apêndice A, “PCIe-to-SAS host bus adapter quick
installation
instructions”, na página 115 ou a documentação fornecida com o
adaptador de barramento de host PCIe para SAS.
Cabo da Unidade de Disco Rígido SAS
Será necessário utilizar um dos seguintes cabos de conexão SAS de 29 pinos
inclusos no pacote de opções para conexão da unidade de disco rígido SAS
nas portas de alimentação e de sinal:
– Cabo de Conexão Linear
– Cabo de Conexão de Ângulo Direito
Capítulo 1. Sobre a Unidade de Disco Rígido SAS (Serial Attached SCSI) ThinkStation 11
O cabo linear é para os sistemas de computador ThinkStation D10 series.
A porta de alimentação 1 e o cabo de sinal 2 são exibidos no
diagrama a seguir.
O cabo de conexão de ângulo direito é para os sistemas de computador
ThinkStation S10 series. A porta de alimentação 1 e o cabo de sinal 2
são exibidos no diagrama a seguir.
12 ThinkStation Serial Attached SCSI Hard Disk Drive User Guide

Planejamento de Partição
Os dois tipos de sistemas de arquivos utilizados pelo sistema operacional
Microsoft
®
são o NTFS e o FAT32. O Microsoft Windows® XP pode suportar
esses dois sistemas de arquivo, mas o Microsoft Windows Vista
®
pode suportar
apenas NTFS.
Nota: O NTFS é recomendado para ser utilizado para particionar quaisquer
unidades novas.
Para determinar qual sistema de arquivo está sendo utilizado, faça o seguinte:
1. Clique com o botão direito do mouse em uma unidade de saída em Meu
computador.
2. Selecione Propriedades. O sistema de arquivos será exibido na guia Geral.
Para obter mais informações sobre a partição da unidade, consulte
“Particionando
e Formatando a Unidade” na página 18.
Instalando a Unidade
Você deve instalar sua nova unidade no computador antes de utilizar o sistema
operacional para particioná-la e formatá-la.
As instruções desta seção são diretrizes gerais que se aplicam à maioria dos
computadores. Para obter informações específicas sobre a instalação de uma
unidade de disco rígido no seu computador, consulte a documentação que veio
com ele.
Etapa 1. Abrindo o Computador
Antes de abrir seu computador, conclua as seguintes etapas:
1. Desligue o computador.
2. Desconecte o cabo de alimentação da tomada de energia do seu
computador e de todos os dispositivos e cabos conectados.
Agora é seguro abrir o computador. Para obter informações específicas sobre a
abertura do computador, consulte a documentação fornecida com o
computador.
Etapa 2. Desempacotando a Unidade
Utilize o procedimento a seguir para desempacotar e manusear a unidade.
Para evitar danos e descarga de eletricidade estática, manuseie o mínimo
possível.
1. Não abra a embalagem antiestática até que esteja pronto para instalar a
unidade. A eletricidade estática pode danificar a unidade e outros
componentes do computador.
Capítulo 1. Sobre a Unidade de Disco Rígido SAS (Serial Attached SCSI) ThinkStation 13

2. Toque a superfície condutora interna da bolsa antiestática que contém a
unidade e uma superfície de metal do computador que não seja pintada
por dois segundos. Isso faz com que a eletricidade estática da embalagem e
de seu corpo seja drenada.
3. Antes de manusear a unidade, faça o seu aterramento tocando na superfície
sem tinta do computador. Faça o seu aterramento novamente depois de sair
e voltar para sua área de trabalho.
4. Sempre manuseie a unidade pelas bordas. Não toque qualquer circuito de
impressão exposto, componentes ou pinos conectores.
5. Ao instalar a unidade, evite todo o manuseio desnecessário. O manuseio
descuidado pode danificar os cabeçotes, os discos de rotação e os mancais
dentro do compartimento da unidade.
6. Se você precisar rebaixar a unidade, coloque a bolsa antiestática sobre uma
superfície plana e revestida e coloque a unidade na bolsa com o lado do
componente voltado para cima.
Nota: Se desejar instalar a unidade em um compartimento de 5,25 polegadas,
será necessário adquirir um kit de conversão de compartimento universal que
está disponível em muitas lojas de fornecimento de computadores locais.
Etapa 3. Montando a Unidade no Compartimento
É possível montar a unidade na horizontal ou na vertical com base no local do
compartimento em seu chassi. Os sistemas de computador ThinkStation D10 e
S10 series fornecem hastes plásticas para montagem das unidades de disco
rígido. Alternativamente, é possível montar sua unidade de disco rígido
utilizando parafusos em um compartimento sem uma haste. Os parafusos
devem estar disponíveis para compra no revendedor local de computador.
Para Montar a Unidade Utilizando a Haste:
1. Tire a haste do compartimento, pressionando os botões (1) e puxando a
alça (2).
14 ThinkStation Serial Attached SCSI Hard Disk Drive User Guide
Capítulo 1. Sobre a Unidade de Disco Rígido SAS (Serial Attached SCSI) ThinkStation 15
2. Instale a unidade na haste e certifique-se de que os quatro pinos de
montagem (1) estejam alinhados nos orifícios do parafuso da unidade e
apertados com segurança.
3. Se estiver incluindo sua nova unidade em um sistema com uma unidade de
disco rígido existente, coloque a nova unidade adjacente e na mesma
direção da unidade de disco rígido existente para não haver necessidade de
girar o cabo da interface ao conectar a unidade.
4. Deslize a unidade com a haste para dentro do compartimento até que os
dois botões da haste estejam travadas no compartimento.
Para Montar a Unidade Utilizando Parafusos:
1. Deslize a unidade para dentro do compartimento.
2. Se você for incluir a sua nova unidade em um sistema com uma unidade
existente, coloque a nova unidade adjacente e na mesma direção da
unidade de disco rígido existente para não haver necessidade de girar o
cabo de interface ao conectar a unidade.
3. Alinhe os orifícios dos parafusos do compartimento de unidade com os
orifícios encadeados no invólucro da unidade ou suportes de expansão.
4. Aperte os parafusos para segurarem levemente a unidade no
compartimento. Em algumas instalações, pode ser necessário utilizar os
orifícios dos parafusos na parte inferior (lado da placa de circuito) da
unidade.
5. Verifique o alinhamento da unidade e aperte os parafusos. Não aperte
excessivamente.
Etapa 4. Conectando os Cabos à Unidade
Utilize os procedimentos a seguir para conectar os cabos.
16 ThinkStation Serial Attached SCSI Hard Disk Drive User Guide

1. Selecione o cabo direito de 29 pinos para o seu computador (cabo linear
para os sistemas de computador ThinkStation D10 series e cabo de ângulo
direito dos sistemas de computador ThinkStation S10 series).
2. Conecte o cabo de 29 pinos ao conector de interface da unidade de disco
rígido SAS.
3. Conecte a outra extremidade (porta de sinal de 7 pinos 2) à porta
compatível com SAS. Para os sistemas de computador ThinkStation D10
series, as cinco portas azuis SATA/SAS na placa-mãe podem suportar
unidade de disco rígido SAS. Para os sistemas de computador ThinkStation
S10 series, é necessário um adaptador de barramento de host PCIe para
SAS. Se você não tem certeza sobre a porta ou modelo do computador,
consulte a documentação fornecida com o computador.
4.
Etapa 5. Concluindo a Instalação da Unidade
Para concluir a instalação da unidade:
1. Verifique se a unidade de disco rígido está firmemente montada e se os
cabos estão firmemente conectados.
2. Verifique se os cabos não interferem na tampa do computador e não
bloqueiam as lâminas do ventilador da fonte de alimentação ou os
caminhos do fluxo de ar.
3. Recoloque a tampa do computador.
4. Reconecte todos os dispositivos. Certifique-se de que o teclado, o mouse e
os cabos do monitor estão firmemente conectados.
5. Reconecte todos os cabos de alimentação AC.
Capítulo 1. Sobre a Unidade de Disco Rígido SAS (Serial Attached SCSI) ThinkStation 17
Localize um conector de alimentação SA TA de 15 pinos
que não seja usado
e que venha da fonte de alimentação do computador e conecte-o à porta de
alimentação 1 no cabo de conexão. O conector de alimentação é como
uma chave, só pode ser conectado de uma maneira. Não force. Se o
conector não conectar com uma pressão razoável, verifique novamente a
orientação do conector de cabo ao conector de unidade e tente novamente.

Preparando a Unidade para Utilização
Ao iniciar seu computador novamente, a tela de informações de instalação de
configuração é exibida porque você alterou o hardware no seu computador.
Alguns computadores requerem que você faça opções de configuração na
primeira vez que você inicia novamente após a instalação de um novo
dispositivo. Se a tela não for exibida, consulte a documentação do seu
computador para obter informações sobre como acessá-la. Na maioria dos
computadores, é possível visualizar informações de configuração durante a
inicialização do computador pressionando F1 quando o gráfico de configuração
for exibido no canto superior direito de sua tela.
Verifique as informações de instalação de configuração para um dos
procedimentos a seguir:
v Se o programa de instalação de configuração relatar o tamanho da sua nova
unidade como esperado, salve suas alterações, feche o programa de
configuração e continue com “Particionando e Formatando a Unidade” na
página
18.
v Se o computador parar de responder ou não iniciar novamente com êxito, vá
para o Capítulo 2, “Troubleshooting”, na página 113.
Particionando e Formatando a Unidade
Se estiver incluindo sua unidade em um computador que possui o Windows
XP ou Windows Vista instalado em uma unidade existente, siga as instruções
abaixo para particionar e formatar sua nova unidade SAS.
Nota: No Windows XP, é necessário um mínimo de SP1a (Service Pack 1a)
para a unidade de disco rígido para acessar capacidades acima de 137 GB.
1. Ligue o computador.
2. Clique em Iniciar.
3. Clique com o botão direito em Meu computador.
4. Clique em Gerenciar. A janela Gerenciamento do Computador é aberta.
5. No menu do lado esquerdo, clique em Gerenciamento de Disco.
6. Clique na nova unidade localizada no lado inferior direito da tela.
7. Na barra de menus, clique em Ação > Todas as Tarefas > Nova Partição.
8. A janela Nova Partição é aberta. Siga as instruções na tela para particionar
a unidade.
9. Depois de clicar em Concluir nas instruções na tela; a formatação será
iniciada.
Nota: Se você estiver instalando a unidade em um computador que não
possui unidade de disco rígido, siga as instruções a seguir para particionar e
18 ThinkStation Serial Attached SCSI Hard Disk Drive User Guide

formatar a nova unidade de disco rígido para os sistemas operacionais
Windows XP ou Windows Vista utilizando o NTFS:
1. Insira o primeiro disquete de instalação do Windows XP ou Windows Vista
(Disco de Configuração #1) na unidade de disquete ou insira o CD ou DVD
de instalação do Windows XP ou Windows Vista na unidade de CD-ROM
ou DVD-ROM.
2. Reinicie o computador.
3. Utilize as instruções do guia do usuário do Windows XP ou Windows Vista
para particionar e formatar sua unidade.
Capítulo 1. Sobre a Unidade de Disco Rígido SAS (Serial Attached SCSI) ThinkStation 19
Chapitre 1. A propos de l’unité de disque dur SAS
(Serial Attached SCSI) pour ThinkStation
La présente section propose des informations concernant l’unité de disque dur
SAS (Serial Attached SCSI) pour ThinkStation.
Description du produit
L’unité de disque dur SAS ne peut être installée que sur des ordinateurs
équipés d’au moins un des éléments de configuration suivants :
v un circuit électronique compatible avec la technologie, équipé de baies
conçues pour loger des unités de disque dur SAS
v un adaptateur de bus hôte PCIe-vers-SAS
L’unité de disque dur SAS se connecte à une interface compatible avec la
technologie qui prend en charge les unités de disque dur SAS dans une seule
unité par configuration de câble. Le cavalier ne nécessite aucun paramétrage
particulier pour les configurations maître ou esclave.
20 ThinkStation Serial Attached SCSI Hard Disk Drive User Guide
L’unité de disque dur SAS utilise des connecteurs d’interface SAS à 29 broches.
La surface supérieure 1 et la surface inférieure 2 du connecteur sont
illustrées dans le schéma ci-après. Les câbles fournis en option vous permettent
de connecter la prise d’alimentation et le port d’interface de l’unité de disque
dur SAS en tant qu’unités de disque dur SATA (Serial ATA).

Votre unité de disque dur peut être configurée de l’une des façons suivantes :
v en monounité
– en tant qu’unité de disque dur unique sur un ordinateur
– en remplacement d’une unité de disque dur
v en tant qu’une unité parmi d’autres unités de disque dur installées
Remarques :
1. Les unités de disque dur SAS ne peuvent pas fonctionner avec des unités
de disque dur SATA.
2. Vérifiez que toutes les autres unités de disque dur de votre ordinateur
correspondent à des unités de disque dur SAS.
Les unités SAS et SATA ne peuvent pas fonctionner ensemble car leur
vitesse de rotation est différente et les deux unités exercent différentes
forces de vibration liées à la rotation sur le boîtier. Si une unité SATA de
7200 tours par minute et une unité SAS de 15000 tours par minute sont
installées sur le même boîtier, les deux différentes forces exercées sur le
boîtier risquent de nuire aux performances et d’être plus bruyants.
Outr
e le présent guide d’utilisation, votre option est livrée avec les éléments
suivants :
v Unité de disque dur SAS (Serial Attached SCSI)
v Manuel expliquant comment manipuler l’unité
v Manuel relatif aux consignes de sécurité
v Deux câbles SAS
Pr
enez contact avec votre revendeur si des éléments manquent ou sont
endommagés. Conservez votre preuve d’achat ; elle peut vous être demandée
pour appliquer la garantie.
Planification de l’installation
La présente section contient des informations détaillées destinées à vous aider
à planifier l’installation de votre unité de disque dur SAS.
Eléments requis pour l’installation
Pour installer l’unité de disque dur SAS, vous devez disposer des éléments
suivants :
v Documentation
Il s’agit de la documentation qui accompagne votre ordinateur et votre
système d’exploitation.
v Port compatible avec la technologie SAS
Votre ordinateur doit être équipé d’un port compatible avec la technologie
SAS sur la carte mère ou d’un adaptateur de bus hôte PCIe-vers-SAS. Si
Chapitre 1. A propos de l’unité de disque dur SAS (Serial Attached SCSI) pour ThinkStation 21
v
vous avez des doutes sur la nature de votre port, reportez-vous à la
documentation qui accompagne votre ordinateur. Généralement, les systèmes
informatiques ThinkStation D10 Series sont équipés de ports compatibles
avec la technologie SAS sur la carte mère. Les systèmes informatiques
ThinkStation S10 Series ont besoin d’un adaptateur de bus hôte
PCIe-vers-SAS pour prendre en charge des unités de disque dur SAS.
Pour obtenir des instructions d’installation de l’adaptateur de bus hôte
PCIe-vers-SAS, consultez Annexe A, «PCIe-to-SAS host bus adapter quick
installation
instructions», à la page 115 ou la documentation accompagnant
l’adaptateur de bus hôte PCIe-vers-SAS.
Câble d’unité de disque dur SAS
Vous devrez utiliser un des câbles de connexion à 29 broches suivants, livrés
avec l’option, pour connecter l’unité de disque dur SAS à la prise
d’alimentation et au port d’interface :
– Câble de connexion droit
– Câble de connexion à angle droit
22 ThinkStation Serial Attached SCSI Hard Disk Drive User Guide
Le câble de connexion droit est conçu pour les systèmes informatiques
ThinkStation D10 Series. La prise d’alimentation 1 et le cordon
d’interface 2 sont affichés dans le schéma ci-après.
Le câble à angle droit est conçu pour les systèmes informatiques
ThinkStation S10 Series. La prise d’alimentation 1 et le cordon
d’interface 2 sont affichés dans le schéma ci-dessous.
Planification du partitionnement
Les deux types de systèmes de fichiers utilisés par le système d’exploitation
Microsoft sont NTFS et FAT32. Microsoft Windows XP prend en charge ces
deux systèmes de fichier, mais Microsoft Windows Vista ne prend en charge
que NTFS.
Remarque : Il est recommandé d’utiliser NTFS pour partitionner n’importe
quels lecteurs.
Pour déterminer le fichier système que vous utilisez, procédez comme suit :
1. Cliquez avec le bouton droit de la souris sur une unité de sortie sous Poste
de travail.
2. Sélectionnez Propriétés. Le système de fichiers sera affiché dans l’onglet
Général.
Pour plus d’informations sur le partitionnement de votre unité, voir
«Partitionnement
et formatage de l’unité», à la page 28.
Installation de l’unité
Vous devez installer votre nouvelle unité avant d’utiliser avant de la formater
et partitionner à l’aide du système d’exploitation.
Les instructions fournies dans cette section sont générales et conviennent à la
plupart des ordinateurs. Des informations spécifiques concernant l’installation
d’une unité de disque dur sur votre ordinateur figurent dans la documentation
accompagnant ce dernier.
Chapitre 1. A propos de l’unité de disque dur SAS (Serial Attached SCSI) pour ThinkStation 23

Etape 1. Ouverture de l’ordinateur
Avant d’ouvrir l’ordinateur, procédez comme suit :
1. Mettez l’ordinateur hors tension.
2. Débranchez le câble d’alimentation de la prise d’alimentation de votre
ordinateur ainsi que tous les autres périphériques et câbles.
Il peut être dangereux d’ouvrir votre ordinateur. Des informations spécifiques
concernant l’ouverture de l’ordinateur figurent dans la documentation fournie
avec ce dernier.
Etape 2. Déballage de l’unité
Procédez comme indiqué ci-après pour déballer et manipuler l’unité. Afin
d’éviter tout dommage et des décharges d’électricité statique, manipulez au
minimum les éléments.
1. N’ouvrez pas la pochette antistatique tant que vous n’êtes pas prêt à
installer l’unité. L’électricité statique peut endommager l’unité et les autres
composants de l’ordinateur.
2. Mettez la pochette antistatique et votre main en contact avec une surface
métallique non peinte pendant au moins deux secondes. (Cette opération
élimine l’électricité statique de la pochette et de votre corps.)
3. Avant de manipuler l’unité, touchez une surface non peinte de l’ordinateur
afin de vous décharger de l’électricité statique. Recommencez cette
opération en quittant et en retournant à votre espace de travail.
4. Tenez toujours l’unité par les côtés. Evitez de toucher ses circuits imprimés,
ses composants ou les broches du connecteur.
5. Lors de l’installation de l’unité, évitez toute manipulation inutile. Toute
mauvaise manipulation peut endommager les têtes, les disques rotatifs et
les roulements dans le logement de l’unité.
6. Si vous devez poser l’unité, posez-la par dessus la pochette antistatique, sur
une surface plane et souple, par exemple un magazine
Remarque : Si vous souhaitez installer l’unité dans une baie de 5,25 pouces,
vous devez vous procurer un kit de conversion de baie universel disponible
auprès d’un grand nombre de distributeurs locaux.
Etape 3. Montage de l’unité dans la baie
Vous pouvez monter l’unité horizontalement ou verticalement selon
l’emplacement de la baie dans votre boîtier. Les systèmes informatiques
ThinkStation D10 Series et S10 Series sont équipés de crochets en plastique
facilitant le montage de vos unités de disque dur. Vous pouvez également
monter votre unité de disque dur à l’aide de vis dans une baie sans crochet.
Ces vis doivent être disponibles à la vente dans le magasin de matériel
informatique le plus près de chez vous.
24 ThinkStation Serial Attached SCSI Hard Disk Drive User Guide
Pour monter l’unité en utilisant les crochets :
1. Tirez le crochet hors de la baie en appuyant sur les ergots (1) et en tirant
sur la poignée (2).
2. Installez l’unité sur le crochet et vérifiez que les quatre goujons de montage
(1) sont alignés dans les trous de vissage et bien serrés.
3. Si vous ajoutez votre nouvelle unité sur un système déjà doté d’une unité
de disque dur, assurez-vous que la nouvelle unité est positionnée de façon
adjacente à l’unité existante et orientée dans le même sens, afin de ne pas
avoir à tordre le câble d’interface lors de la connexion de l’unité.
4. Faites glisser l’unité avec les crochets dans la baie jusqu’à ce que les deux
ergots du crochet soient verrouillés dans la baie.
Pour monter l’unité avec des vis :
1. Faites glisser l’unité dans la baie.
Chapitre 1. A propos de l’unité de disque dur SAS (Serial Attached SCSI) pour ThinkStation 25

2. Si vous prévoyez d’ajouter votre nouvelle unité sur un système déjà doté
d’une unité de disque dur, assurez-vous que la nouvelle unité est
positionnée de façon adjacente à l’unité existante et orientée dans le même
sens, afin de ne pas avoir à tordre le câble d’interface lors de la connexion
de l’unité.
3. Alignez les orifices de vissage de la baie sur les orifices taraudés du boîtier
de l’unité ou des pattes de fixation.
4. Serrez légèrement les vis pour assurer leur position. Sur certaines
installations, il est parfois nécessaire d’utiliser les orifices de vissage situés à
l’arrière (côté carte à circuits) de l’unité.
5. Vérifiez que l’alignement est correct, puis serrez les vis, mais ne serrez pas
trop fort.
Etape 4. Connexion des câbles à l’unité
Procédez comme indiqué ci-après pour connecter les câbles.
1. Sélectionnez le bon câble à 29 broches (câble droit pour les systèmes
informatiques ThinkStation D10 Series et câble à angle droit pour les
systèmes ThinkStation S10 Series).
2. Attachez le câble à 29 broches à votre connecteur d’interface d’unité de
disque dur SAS.
3. Attachez l’autre extrémité (port d’interface à 7 broches
2) au port
compatible avec la technologie SAS. Pour les systèmes informatiques
ThinkStation D10 Series, les cinq ports SATA/SAS bleus de la carte mère
acceptent les unités de disque dur SAS. Pour les systèmes informatiques
ThinkStation S10 Series, vous avez besoin d’un adaptateur de bus hôte
PCIe-vers-SAS. Si vous avez des doutes sur la nature de votre port ou le
modèle de votre ordinateur, reportez-vous à la documentation qui
accompagne votre ordinateur.
4.
26 ThinkStation Serial Attached SCSI Hard Disk Drive User Guide
Repérez un connecteur d’alimentation SATA à 15 broches inutilisé et relié
au boîtier d’alimentation de l’ordinateur et branchez-le sur la prise
d’alimentation 1 du câble d’alimentation. Le connecteur d’alimentation ne
peut être branché que dans un seul sens. Ne le branchez pas de force. Si
vous ne parvenez pas à brancher le connecteur d’une simple pression,
vérifiez le sens d’insertion du connecteur de câble sur l’unité, puis
renouvelez l’opération.
 Loading...