

Lenovo 43R2018 - ThinkPad 160 GB External Hard Drive, 41N8378 User Manual

Lenovo USB 2.0 Portable
80GB/ 120GB Hard Drive
User’ s Guide

Note: Before using this information and the product it supports, read the information
in Appendix A, “Service and Support,” on page A-1 and Appendix B, “Lenovo Limited
Warranty,” on page B-1.
First Edition (March 2007)
© Copyright Lenovo 2007.
Portions © Copyright International Business Machines Corporation 2005.
All rights reserved.
U.S. GOVERNMENT USERS – RESTRICTED RIGHTS: Our products and/or services are
provided with RESTRICTED RIGHTS. Use, duplication or disclosure by the Government
is subject to the GSA ADP Schedule contract with Lenovo Group Limited, if any, or the
standard terms of this commercial license, or if the agency is unable to accept this
Program under these terms, then we provide this Program under the provisions set forth
in Commercial Computer Software–Restricted Rights at FAR 52.227-19, when applicable,
or under Rights in Data-General, FAR 52.227.14 (Alternate III).

Contents
Preface ........................v
Hardware User’s Guide
.................1-1
Product description
...................1-1
Hardware and software requirements
.............1-1
Before you begin the installation
...............1-1
Installing the drive. . . . . . . . . . . . . . . . . . . . 1-3
Disconnecting the drive from your computer
...........1-4
Detaching the system from a docking station or media bay
.....1-4
Maintaining the drive. . . . . . . . . . . . . . . . . . . 1-4
Appendix A. Service and Support . . . . . . . . . . . . . . A-1
Registering your option
..................A-1
Online technical support
.................A-1
Telephone technical support
................A-1
Appendix B. Lenovo Limited Warranty
............B-1
Warranty information. . . . . . . . . . . . . . . . . . . B-5
Guarantee supplement for Mexico
..............B-7
Lenovo Limited Warranty - Customer Notice . . . . . . . . . . . B-8
Appendix C. Notices
..................C-1
Recycling information
..................C-3
Trademarks
......................C-3
Electronic emission notices
.................C-4
Federal Communications Commission (FCC) Declaration of Conformity C-4
Important information for product recycling and the European
Directive 2002/96/EC. . . . . . . . . . . . . . . . . C-8
© Lenovo 2007. Portions © IBM Corp. 2005. iii

iv Lenovo USB 2.0 Portable 80GB/120GB Hard Drive User ’s Guide

Preface
This manual provides information on the Lenovo 2.0 Portable 80GB/120GB
Hard Drive. This manual is written for the installer and user of this equipment
and contains the following information:
v
“Hardware User’s Guide” contains instructions for installing and using the
80GB/120GB Hard Disk Drive.
v
Appendix A, “Service and Support,” on page A-1 provides service and
support information.
v
Appendix B, “Lenovo Limited Warranty,” on page B-1 provides warranty
information.
v
Appendix C, “Notices,” on page C-1 contains trademarks and legal notices.
© Lenovo 2007. Portions © IBM Corp. 2005. v

vi Lenovo USB 2.0 Portable 80GB/120GB Hard Drive User ’s Guide

Hardware User’s Guide
This chapter contains instructions for installing and using the Lenovo USB 2.0
Portable 80GB/120GB Hard Drive.
Note:
Before you install and use the Lenovo USB 2.0 Portable 80GB/120GB
Hard Drive, be sure to read “Before you begin the installatio
n.”
Product description
The Lenovo USB 2.0 Portable 80GB/120GB Hard Drive is a portable,
lightweight, high-speed USB hard disk drive that is compatible with the USB
2.0 standard which enables data transfers that are up to 80 times faster than
through USB 1.1 connections. The drive can be used with mobile or desktop
computers and is also compatible with USB 1.0 and USB 1.1 connections. After
you install the drive, it operates as a plug-and-play device and is
hot-swappable; that is, you can connect and disconnect the drive while the
computer is running. See “Disconnecting the drive from your computer” on
page 1-4.
The option package includes:
v
Lenovo USB 2.0 Portable 80GB/120GB Hard Drive
v
Primary USB cable (USB ″A″ to ″mini B″ connection)
v
Auxiliary power cable
v
User’s Guide
v
Carrying case
Hardware and software requirements
You must have the following hardware installed on your computer:
v
Minimum 200MHz Intel
™
Pentium®microprocessor
v
64 MB Random Access Memory (RAM)
v
USB 1.1 or 2.0 ports
Your
computer must have Microsoft
®
Windows®Vista™, Microsoft Windows
XP or Microsoft Windows 2000 Professional installed to use the Lenovo USB
2.0 Portable 80GB/120GB Hard Drive.
Before you begin the installation
Be sure to review the following information before installing and using the
Lenovo USB 2.0 Portable 80GB/120GB Hard Drive.
© Lenovo 2007. Portions © IBM Corp. 2005. 1-1

Attention
Only use the cables that come with this option. You might damage the
drive if you use a cable not included with the option package. Do not
attach an AC adapter to this device.
v To avoid damaging your USB Hard Drive, handle with care. When
transporting the drive or when it is not in use, place it in the carrying case
that comes with the option. For more information on correctly handling your
USB Hard Drive, see “Maintaining the drive” on page 1-4.
v
The primary USB cable must be connected to a USB high power port. If you
experience problems, try connecting the primary USB cable to another USB
port.
v
When using your USB Hard Drive on a mobile computer with a USB 2.0
PCMCIA card, the primary USB cable must be inserted into the PCMCIA
card high power port. You must also connect the auxiliary power cable to
the USB port to provide adequate power.
Attention
Lenovo does not support this product with a third party disk-utility that
reorders or sorts the partition table.
1-2 Lenovo USB 2.0 Portable 80GB/120GB Hard Drive User ’s Guide
Installing the drive
This section provides instructions for installing the drive.
To install the drive, complete the following procedure:
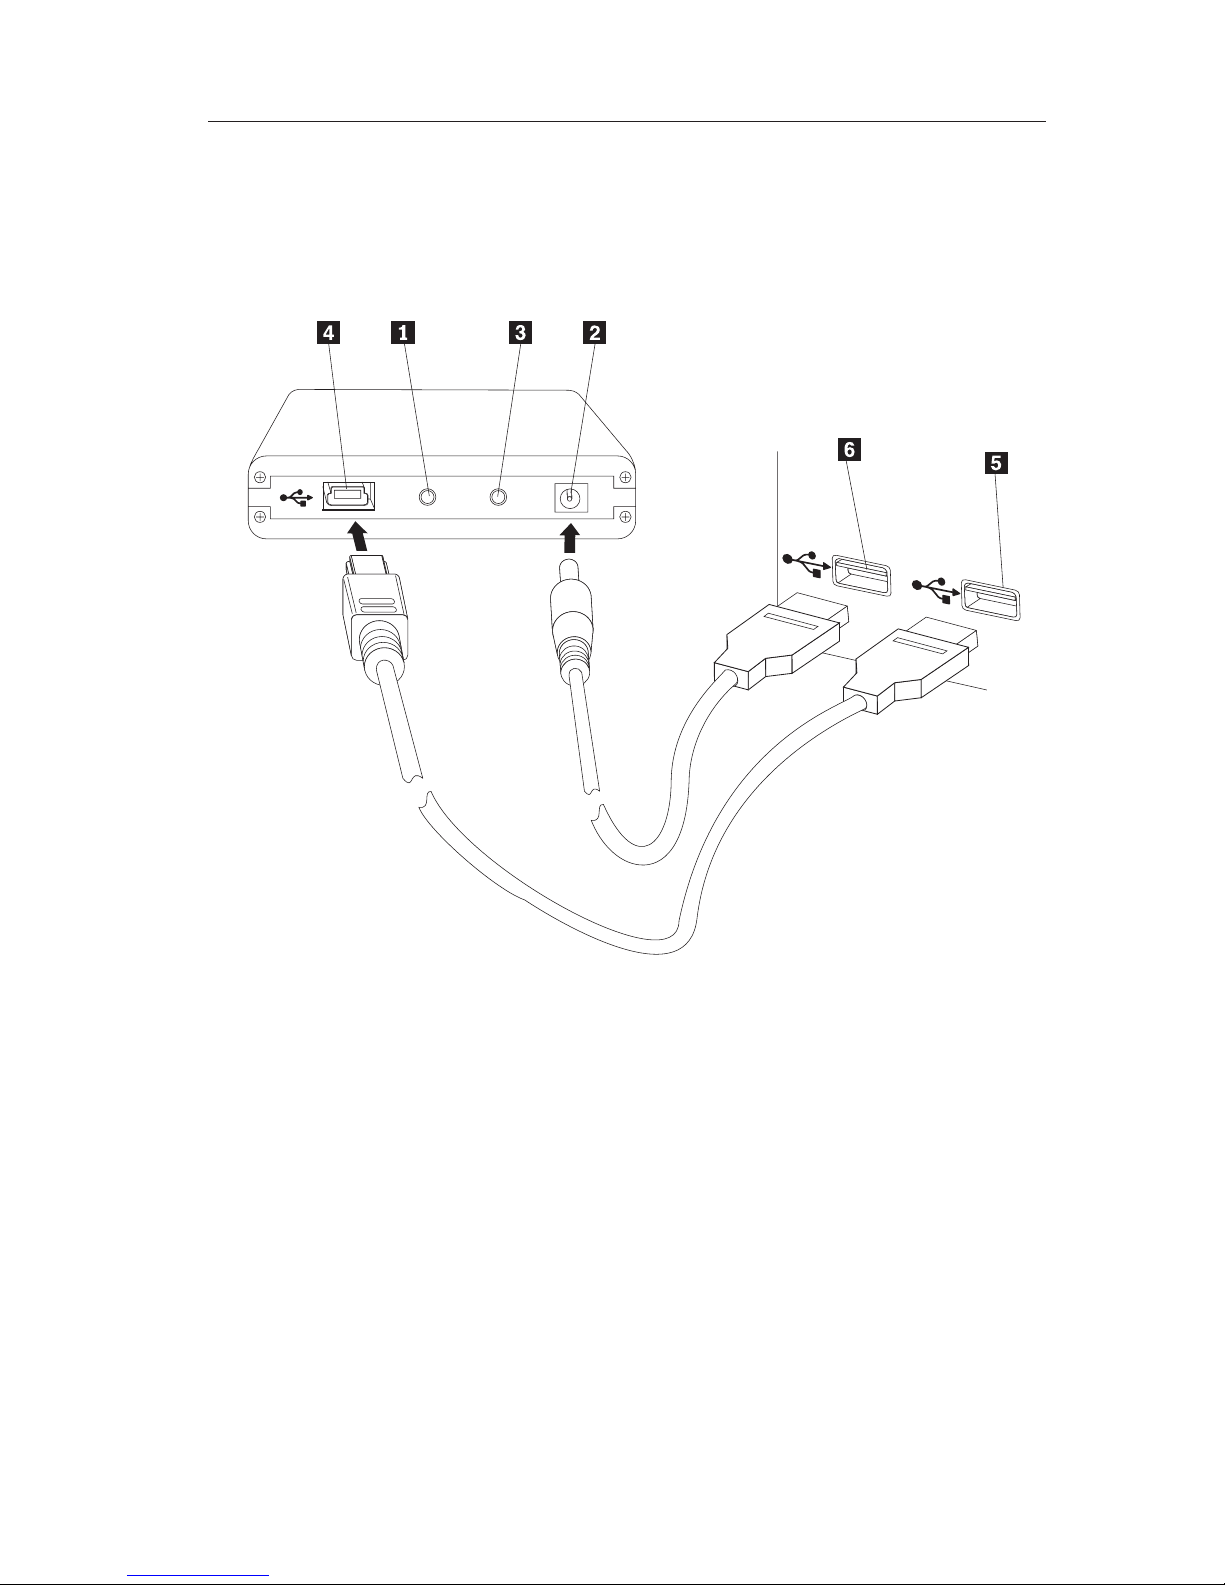
1.
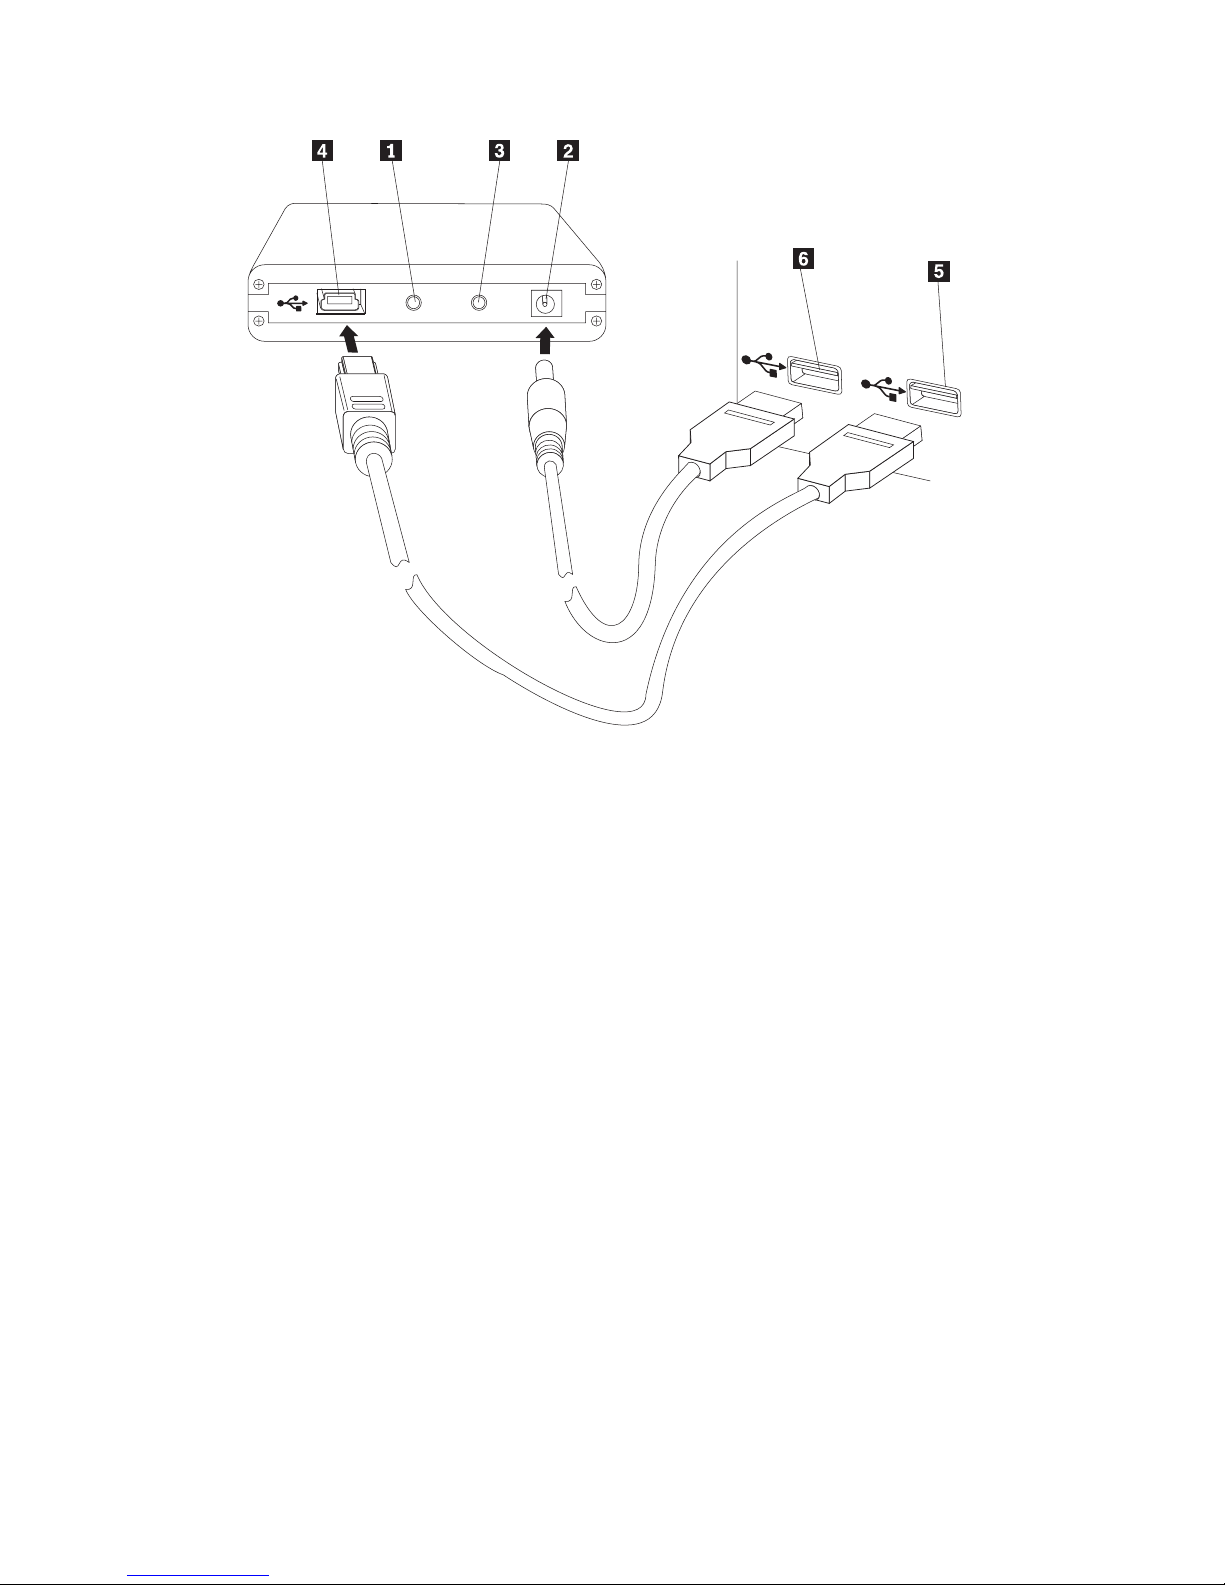
Attach the primary USB cable to the USB port 4.
1 Drive activity LED
2 Auxiliary power port
3 Power LED
4 USB port
5 Primary USB cable
6 Auxiliary power cable
2. Connect the other end of the primary USB cable 5 to an available USB
port on your computer.
3.
Attach the auxiliary power cable to the auxiliary power port 2 on the
drive.
4.
Attach the other end of the auxiliary power cable 6 to an available USB
port on your computer.
Hardware User ’s Guide 1-3

Only use the cables that come with this option. You might damage the
drive if you use a cable not included with the option package. Do not
attach an ac adapter to this device.
5.
Open My Computer and double-click the icon that is associated with the
USB Hard Drive.
Your drive is ready to use and no additional software install is required. To
disable the autolaunch, click Do not show this again in the lower-left hand
corner of the browser window, disconnect the drive, and then reconnect the
drive.
Disconnecting the drive from your computer
To disconnect the drive, complete the following procedure.
1.
Click the Safely Remove Hardware icon in the system tray.
2.
Click the USB Mass Storage Device icon to stop the device.
3.
Disconnect the cables.
Detaching the system from a docking station or media bay
When the USB HDD is attached to the USB ports on a docking station or
Method 1
Use the Undock Computer function from the Start Menu in Windows.
Method 2
On a ThinkPad computer, hit Fn + F9 to access the Easy Eject Action menu,
then Eject ThinkPad PC from Dock. It is recommended to wait at least two
minutes following writing data to the USB HDD before starting the eject
process. If the ejection process fails to complete with a message stating that the
system is unable to stop the device, then click the Safely Remove Hardware
icon in the system tray prior to using Fn + F9 again.
Maintaining the drive
Use the following maintenance guidelines for your drive.
v
Do not drop or shock the drive.
v
Do not operate or store the drive near strong magnetic fields.
v
Do not expose the drive to liquids, extreme temperatures, or humidity.
v
Do not use any power cables or adapters that are not included in this option
package.
1-4 Lenovo USB 2.0 Portable 80GB/120GB Hard Drive User ’s Guide

Description du produit
L’unité de disque dur portable Lenovo 80 Go/120 Go USB 2.0 est une unité de
disque dur USB à grande vitesse, légère et portable, compatible avec la norme
USB 2.0 qui permet des transferts de données jusqu’à 80 fois plus rapides
qu’avec les connexions USB 1.1. Cette unité peut être utilisée aussi bien avec
les portables qu’avec les ordinateurs de bureau, et elle est également
compatible avec les connexions USB 1.0 et USB 1.1. Une fois que vous avez
installé l’unité, elle fonctionne comme un périphérique prêt à l’emploi et elle
est remplaçable à chaud, ce qui signifie que vous pouvez la connecter et la
déconnecter pendant que l’ordinateur est en cours de fonctionnement. Voir
«Déconnexion de l’unité de l’ordinateur», à la page 1-8.
Le coffret de l’option contient les éléments suivants :
v
Unité de disque dur portable Lenovo 80 Go/120 GO USB 2.0
v
Câble USB principal (pour la connexion entre USB ″A″ et ″mini B″)
v
Cordon d’alimentation auxiliaire
v
Le présent Guide d’utilisation
v
Housse de transport
Configuration matérielle et logicielle requise
Votre ordinateur doit présenter la configuration matérielle suivante :
v
Microprocesseur Intel Pentium 200 Mhz au minimum
v
64 Mo de mémoire RAM
v
Ports USB 1.1 ou 2.0
Votre
ordinateur doit être doté de Microsoft Windows Vista
™
, Microsoft
Windows XP ou Microsoft Windows 2000 Professionnel pour utiliser cette unité
de disque dur.
© Lenovo 2007. Portions © IBM Corp. 2005. 1-5
Guide d’utilisation du matériel
Le présent chapitre contient les instructions d’installation et d’utilisation de
l’unité de disque dur portable Lenovo 80 Go/120 Go USB 2.0.
Remarque :
Avant d’installer et d’utiliser cette unité de disque dur, veuillez
prendre connaissance des informations contenues dans la section
«Avant de démarrer l’installation», à la page 1-6.
Avant de démarrer l’installation
Veuillez lire attentivement les informations suivantes avant d’installer et
d’utiliser l’unité de disque dur portable Lenovo 80 Go/120 Go Go USB 2.0.
Attention
Utilisez exclusivement les câbles fournis avec cette option. Vous risquez
d’endommager l’unité si vous utilisez un câble qui n’est pas inclus dans
le coffret de l’option. Ne connectez pas d’adaptateur en courant alternatif
à ce périphérique.
v Pour éviter d’endommager votre unité de disque dur USB, manipulez-la
avec précaution. Lorsque vous transportez l’unité ou lorsque vous ne
l’utilisez pas, placez-la dans la housse de transport fournie avec l’option.
Pour plus d’informations sur la manipulation correcte de l’unité de disque
dur USB, voir «Maintenance de l’unité», à la page 1-9.
v
Le câble USB principal doit être connecté à un port USB de grande
puissance. Si vous rencontrez des difficultés, essayez de connecter le câble
USB principal à un autre port USB.
v
Lorsque vous utilisez votre unité de disque dur USB dans un ordinateur
portable doté d’une carte PCMCIA USB 2.0, le câble USB principal doit être
inséré dans le port de grande puissance de la carte PCMCIA. Vous devez
également connecter le cordon d’alimentation auxiliaire au port USB afin de
fournir l’alimentation requise.
Attention
Lenovo n’offre aucun support pour ce produit s’il est utilisé avec un
utilitaire tiers qui réorganise ou trie la table de partitions.
1-6 Lenovo USB 2.0 Portable 80GB/120GB Hard Drive User ’s Guide

Installation de l’unité
Cette section fournit les instructions d’installation de l’unité.
Pour installer l’unité, procédez comme suit :
1.
Connectez le câble USB principal au port USB 4.
1 Voyant d’activité de l’unité
2 Prise d’alimentation auxiliaire
3 Voyant d’alimentation
4 Port USB
5 Câble USB principal
6 Cordon d’alimentation auxiliaire
2. Branchez l’autre extrémité du câble USB principal 5 sur un port USB
disponible de votre ordinateur.
3.
Branchez le cordon d’alimentation auxiliaire sur la prise d’alimentation
auxiliaire 2 de l’unité.
Guide d’utilisation du matériel 1-7

4. Branchez l’autre extrémité du cordon d’alimentation auxiliaire 6 sur un
port USB disponible de votre ordinateur.
Utilisez exclusivement les câbles fournis avec cette option. Vous risquez
d’endommager l’unité si vous utilisez un câble qui n’est pas inclus dans le
coffret de l’option. Ne connectez pas d’adaptateur en courant alternatif à ce
périphérique.
5.
Ouvrez l’icône Poste de travail et cliquez deux fois sur l’icône associée au
disque dur USB.
Votre unité est prête à être utilisée et aucun autre logiciel ne doit être installé.
Pour désactiver la fonction de lancement automatique, cliquez sur Ne plus
afficher dans l’angle inférieur gauche de la fenêtre du navigateur, déconnectez,
puis reconnectez l’unité.
Déconnexion de l’unité de l’ordinateur
Pour déconnecter l’unité, procédez comme suit.
1.
Cliquez sur l’icône Supprimer le périphérique en toute sécurité de la barre
d’état système.
2.
Cliquez sur l’icône Périphérique de stockage de masse USB pour arrêter
l’unité.
3.
Déconnectez les câbles.
Déconnexion du système d’une station d’accueil ou d’une
baie d’unité de stockage
Lorsque l’unité de disque dur USB est connectée aux ports USB sur une station
d’accueil ou une baie d’unité de stockage, vous devez effectuer certaines
opérations pour exécuter un retrait complet de la station d’accueil et éviter
toute perte de données. Veuillez choisir l’une des méthodes suivantes :
Méthode 1
Utilisez la fonction Retirer l’ordinateur du menu Démarrer de Windows.
Méthode 2
Sur un ordinateur ThinkPad, appuyez sur Fn + F9 pour accéder au menu Easy
Eject Action, puis sélectionnez Déconnecter le PC ThinkPad de la station
d’accueil. Il est recommandé de patienter pendant au moins deux minutes
après l’écriture des données sur l’unité de disque dur USB avant de lancer le
processus d’éjection. Si le processus d’éjection échoue et qu’un message
indique que le système ne peut pas arrêter le périphérique, cliquez sur l’icône
Retrait du matériel en toute sécurité dans la barre d’état système avant
d’utiliser à nouveau les touches Fn + F9.
1-8 Lenovo USB 2.0 Portable 80GB/120GB Hard Drive User ’s Guide

Maintenance de l’unité
Respectez les règles de maintenance de l’unité suivantes :
v
Ne laissez pas tomber l’unité et ne la secouez pas.
v
N’utilisez pas et ne rangez pas l’unité à proximité de forts champs
magnétiques.
v
N’exposez pas l’unité à des liquides, à des températures extrêmes, ni à
l’humidité.
v
N’utilisez pas de cordons d’alimentation ou d’adaptateurs non inclus dans le
coffret de l’option.
Guide d’utilisation du matériel 1-9

Guida per l’utente hardware
Questo capitolo contiene le informazioni per l’installazione e l’utilizzo
dell’unità disco fisso portatile USB 2.0 80GB/120GB della Lenovo.
Nota:
Prima di installare e utilizzare l’unità disco fisso portatile USB 2.0
80GB/120GB della Lenovo, leggere le informazioni contenute nella
sezione “Prima di iniziare l’installazion
e.”
Descrizione del prodotto
L’unità disco fisso portatile USB 2.0 80GB/120GB della Lenovo è un’unità
disco fisso portatile, leggera e USB ad alta velocità compatibile con lo standard
USB 2.0 che permette trasferimenti di dati fino a 80 volte più veloci delle
connessioni USB 1.1. L’unità può essere utilizzata con elaboratori portatili o
desktop ed è anche compatibile con le connessioni USB 1.0 e USB 1.1. Una
volta installata l’unità, essa funziona come un’unità plug and play e non è
sostituibile a sistema acceso; ossia, è possibile collegare e scollegare l’unità
durante l’esecuzione dell’elaboratore. Consultare la sezione “Scollegamento
dell’unità dall’elaboratore” a pagina 1-13.
Il pacchetto di opzioni include:
v
Unità disco fisso portatile USB 2.0 80GB/120GB della Lenovo
v
Cavo USB primario (Connessione USB ″A″ a ″mini B″)
v
Cavo di alimentazione ausiliario
v
Guida per l’utente
v
Custodia per il trasporto
Requisiti hardware e software
E’ necessario disporre dei seguenti componenti hardware installati
sull’elaboratore:
v
Minimo Microprocessore Intel Pentium da 200 MHz
v
64 MB di RAM (Random Access Memory)
v
Porte USB 1.1 o 2.0
Il
computer deve disporre di Microsoft Windows Vista
™
, Microsoft Windows
XP or Microsoft Windows 2000 Professional installper utilizzare l’unità disco
fisso portatile USB 2.0 80GB/120GB della Lenovo.
Prima di iniziare l’installazione
Assicurarsi di rivedere le seguenti informazioni prima di installare e utilizzare
l’unità disco fisso portatile USB 2.0 Portable 80GB/120GB della Lenovo.
1-10 © Lenovo 2007. Portions © IBM Corp. 2005.
Attenzione
Utilizzare solo i cavi forniti con questa opzione. L’utilizzo di cavi diversi
da quelli forniti in questo pacchetto di opzioni, potrebbe danneggiare
l’unità. Non collegare un adattatore CA a questa unità.
v Per evitare di danneggiare l’unità disco fisso USB, gestire con cautela.
Durante il trasporto dell’unità oppure quando non è in uso, posizionarla
nella custodia per il trasporto, fornita con l’opzione. Per ulteriori
informazioni sulla corretta gestione dell’unità disco fisso USB, consultare la
sezione “Manutenzione dell’unità” a pagina
1-14.
v E’ necessario che il cavo USB primario sia collegato ad una porta di elevata
alimentazione USB. Tentare di collegare il cavo USB primario ad un’altra
porta USB.
v
Durante l’utilizzo dell’unità disco fisso USB di un elaboratore portatile con
una scheda PCMCIA USB 2.0, è necessario che il cavo USB primario sia
inserito in una porta ad elevata alimentazione per scheda PCMCIA. E’ anche
necessario collegare il cavo di alimentazione ausiliario alla porta USB, per
fornire un’adeguata alimentazione.
Attenzione
Lenovo non supporta questo prodotto con un programma di terze parti
che ordina o riordina la tabella delle partizioni.
Unità disco fisso portatile USB 2.0 80GB/120GB della Lenovo Guida per l’utente 1-11

Installazione dell’unità
Questa sezione fornisce istruzioni per l’installazione dell’unità.
Per installare l’unità, completare la seguente procedura:
1 LED attività dell’unità
2 Porta di alimentazione ausiliaria
3 LED di stato
4 Porta USB
5 Cavo USB primario
6 Cavo di alimentazione ausiliario
2. Collegare l’altra estremità del cavo USB 5 ad una porta USB disponibile
sul computer.
3.
Collegare il cavo di alimentazione ausiliario alla porta di alimentazione
ausiliaria 2 dell’unità.
4.
Collegare l’altra estremità del cavo di alimentazione ausiliario 6 ad una
porta USB disponibile sul computer.
1-12 Guida per l’utente hardware

Utilizzare solo i cavi forniti con questa opzione. L’utilizzo di cavi diversi da
quelli forniti in questo pacchetto di opzioni, potrebbe danneggiare l’unità.
Non collegare un adattatore CA a questa unità.
5.
Aprire Risorse del computer e fare doppio clic sull’icona associata con
l’unità disco fisso USB.
L’unità è pronta per l’uso e non viene richiesta alcuna installazione aggiuntiva
del software. Per disabilitare l’avvio automatico, fare clic su Non visualizzare
di nuovo nell’angolo sinistro inferiore della finestra del browser, scollegare
l’unità e ricollegarla.
Scollegamento dell’unità dall’elaboratore
Per scollegare l’unità, completare la seguente procedura.
1.
Fare clic su sull’icona Safely Remove Hardware nella barra delle
applicazioni.
2.
Fare clic sull’icona Periferica archiviazione di massa USB per interrompere
l’unità.
3.
Scollegare i cavi.
Staccare il sistema da una docking station o vano di
supporto
Quando l’HDD USB è collegato alle porte USB su un alloggiamento di
espansione o su un vano di supporto, è necessario intraprendere alcune azioni
per una completa rimozione e prevenzione di possibile perdita di dati. Si prega
di completare uno dei seguenti metodi:
Metodo 1
Usare la funzione Rimuovi computer dal menu Start in Windows.
Metodo 2
Su un computer ThinkPad, premere Fn + F9 per accedere al menu azioni Easy
Eject, quindi Espelli il PC ThinkPad dall’alloggiamento di espansione.Si
raccomanda di attendere almeno due minuti in seguito alla scrittura dei dati
all’HDD USB prima di iniziare il processo di rimozione. Se il processo di
rimozione dovesse completarsi in modo non corretto con un messaggio
indicante che il sistema non è in grado di arrestare la periferica fare clic
sull’icona Rimozione sicura dell’hardware sulla barra delle applicazioni prima
di utilizzare di nuovo Fn + F9.
Unità disco fisso portatile USB 2.0 80GB/120GB della Lenovo Guida per l’utente 1-13

Manutenzione dell’unità
Utilizzare le seguenti istruzioni sulla manutenzione dell’unità.
v
Non lasciare cadere o urtare l’unità.
v
Non operare o conservare l’unità presso forti campi magnetici.
v
Non esporre l’unità a liquidi, temperature estreme o umidità.
v
Non utilizzare i cavi di alimentazione o adattatori che non sono compresi in
questo pacchetto di opzione.
1-14 Guida per l’utente hardware

Hardwarebenutzerhandbuch
Dieses Kapitel enthält Anweisungen zur Installation und zur Verwendung des
tragbaren Lenovo USB 2.0-Festplattenlaufwerks mit 80 GB/120 GB.
Anmerkung:
Vor der Installation und Verwendung des tragbaren Lenovo USB
2.0-Festplattenlaufwerks mit 80 GB/120 GB sollten Sie den
Abschnitt „Vorbereitung der Installation” auf Seite
1-16 lesen.
Produktbeschreibung
Das tragbare Lenovo USB 2.0-Festplattenlaufwerk mit 80 GB/120 GB ist ein
USB-Festplattenlaufwerk mit hohen Übertragungsgeschwindigkeiten und geringem Gewicht, das mit dem USB 2.0-Standard kompatibel ist. Dieser Standard
ermöglicht bis zu 80-mal schnellere Datenübertragungen als der USB 1.1-Standard. Das Laufwerk kann mit tragbaren Computern oder mit Desktop-Computern
verwendet werden und ist auch mit USB 1.0- und USB 1.1-Verbindungen
kompatibel. Nach der Installation kann das Laufwerk als Plug-and-Play-Einheit
verwendet werden und ist Hot-Swap-fähig, d. h. Sie können das Laufwerk bei
laufendem Betrieb anschließen oder entfernen. Weitere Informationen hierzu
finden Sie im Abschnitt „Laufwerk vom Computer entfernen” auf Seite
1-18.
Im Lieferumfang der Zusatzeinrichtung sind folgende Komponenten enthalten:
v
Tragbares Lenovo USB 2.0-Festplattenlaufwerk mit 80 GB/120 GB
v
Primäres USB-Kabel (USB-Verbindung von ″A″ zu ″Mini B″)
v
Zusatznetzkabel
v
Benutzerhandbuch
v
Transportbehälter
Hardware- und Softwarevoraussetzungen
Im Computer muss die folgende Hardware installiert sein:
v
Mindestens ein Intel Pentium Mikroprozessor mit 200 MHz
v
64 MB RAM-Speicher (Random Access Memory)
v
USB 1.1- oder USB 2.0-Anschluss
Für die Verwendung des tragbaren Lenovo USB 2.0-Festplattenlaufwerks mit
80 GB/120 GB muss auf dem Computer Microsoft Windows Vista
™
, Microsoft
Windows XP oder Microsoft Windows 2000 Professional installiert sein.
© Lenovo 2007. In Teilen © IBM Corp. 2005. 1-15
Vorbereitung der Installation
Lesen Sie die folgenden Informationen, bevor Sie das tragbare Lenovo USB 2.0-
Festplattenlaufwerk mit 80 GB/120 GB installieren und verwenden.
Achtung
Verwenden Sie nur die im Lieferumfang der Zusatzeinrichtung enthaltenen Kabel. Andernfalls könnte das Laufwerk beschädigt werden. Schließen
Sie kein Netzteil an diese Einheit an.
v Achten Sie auf eine vorsichtige Handhabung des USB-Festplattenlaufwerks,
um Beschädigungen zu vermeiden. Legen Sie das Laufwerk in den im Lieferumfang enthaltenen Transportbehälter, wenn Sie das Laufwerk transportieren oder nicht verwenden. Weitere Informationen zur richtigen Handhabung des USB-Festplattenlaufwerks erhalten Sie im Abschnitt „Handhabung
des Laufwerks” auf Seite
1-18.
v Sie müssen das primäre USB-Kabel an einen USB-Hauptstromanschluss
anschließen. Wenn dabei Fehler auftreten, versuchen Sie, die Fehler zu beheben, indem Sie das primäre USB-Kabel an einen anderen USB-Anschluss
anschließen.
v
Wenn Sie das USB-Festplattenlaufwerk auf einem tragbaren Computer mit
einer USB 2.0-PCMCIA-Karte installieren, müssen Sie das primäre USB-Kabel in den Hauptstromanschluss der PCMCIA-Karte einstecken. Außerdem
müssen Sie das Zusatznetzkabel in den USB-Anschluss einstecken, um eine
ausreichende Stromzufuhr zu gewährleisten.
Achtung
Lenovo gewährt bei diesem Produkt keine Unterstützung für Plattendienstprogramme
von Fremdherstellern, die die Partitionstabelle
umordnen oder sortieren.
Laufwerk installieren
Dieser Abschnitt enthält Anweisungen zur Installation des Laufwerks.
Gehen Sie wie folgt vor, um das Laufwerk zu installieren:
1.
Schließen Sie wie in der Abbildung dargestellt das primäre USB-Kabel an
den USB-Anschluss 4 an.
1-16 Lenovo USB 2.0 Portable 80GB/120GB Hard Drive User’s Guide
1 Laufwerkbetriebsanzeige
2 Zusatznetzanschluss
3 Betriebsanzeige
4 USB-Anschluss
5 Primäres USB-Kabel
6 Zusatznetzkabel
2. Schließen Sie das andere Ende des primären USB-Kabels 5 an einen freien
USB-Anschluss des Computers an.
3.
Schließen Sie das Zusatznetzkabel an den Zusatznetzanschluss 2 am
Laufwerk an.
4.
Schließen Sie das andere Ende des Zusatznetzkabels 6 an einen freien
USB-Anschluss des Computers an.
Verwenden Sie nur die im Lieferumfang der Zusatzeinrichtung enthaltenen
Kabel. Andernfalls könnte das Laufwerk beschädigt werden. Schließen Sie
kein Netzteil an diese Einheit an.
5.
Öffnen Sie den Arbeitsplatz, und klicken Sie doppelt auf das Symbol, das
mit dem USB-Festplattenlaufwerk verknüpft ist.
Das Laufwerk kann nun verwendet werden. Es muss keine weitere Software
installiert werden. Soll das automatische Starten inaktiviert werden, müssen Sie
in der unteren linken Ecke des Browserfensters auf Do not show this again
klicken, das Laufwerk entfernen und wieder anschließen.
Hardwarebenutzerhandbuch 1-17

Laufwerk vom Computer entfernen
Gehen Sie wie folgt vor, um das Laufwerk zu entfernen:
1.
Klicken Sie in der Symbolleiste auf das Symbol zum sicheren Entfernen von
Hardware.
2.
Klicken Sie auf das Symbol für USB-Massenspeichereinheiten, um die Ein-
heit
zu beenden.
3.
Ziehen Sie die Kabel ab.
System von einer Andockstation oder einer Datenträgerposition entfernen
Wenn das USB-Festplattenlaufwerk an die USB-Anschlüsse einer Andockstation
oder einer Datenträgerposition angeschlossen ist, muss eine Reihe von Schritten ausgeführt werden, um die vollständige Entfernung des Systems sicherzustellen und einen eventuellen Datenverlust zu vermeiden. Verwenden Sie
hierzu eine der folgenden Methoden:
Methode 1
Wählen Sie im Windows-Startmenü die Funktion zum Abdocken des Computers.
Methode 2
Drücken Sie bei einem ThinkPad die Tastenkombination Fn + F9, um das
Aktionsmenü des Dienstprogramms ″Easy Eject″ zu öffnen, und wählen Sie
anschließend die Option zum Entfernen des ThinkPads von der Andockstation
aus. Es wird empfohlen, dass Sie nach dem Schreiben von Daten auf das USBFestplattenlaufwerk
mindestens zwei Minuten warten, bevor Sie mit dem
Entfernungsvorgang beginnen. Wenn der Entfernungsvorgang nicht abgeschlossen werden kann und eine Nachricht angezeigt wird, dass das System
die Einheit nicht beenden kann, klicken Sie in der Taskleiste auf das Symbol
zum sicheren Entfernen von Hardware, bevor Sie erneut die Tastenkombination Fn + F9 verwenden.
Handhabung des Laufwerks
Folgen Sie den folgenden Richtlinien zur Handhabung des Laufwerks.
v
Lassen Sie das Laufwerk nicht fallen, und setzen Sie es keinen Erschütterun-
gen
aus.
v
Vermeiden Sie die Verwendung oder die Aufbewahrung des Laufwerks in
der Nähe von starken magnetischen Feldern.
v Schützen Sie das Laufwerk vor Flüssigkeiten, starken Temperaturschwan-
kungen oder Feuchtigkeit.
v
Verwenden Sie keine Netzkabel oder Adapter, die nicht im Lieferumfang der
Zusatzeinrichtung enthalten sind.
1-18 Lenovo USB 2.0 Portable 80GB/120GB Hard Drive User’s Guide

Guía del usuario de hardware
Este capítulo contiene instrucciones para instalar y utilizar la unidad de disco
duro portátil USB 2.0 de 80 GB/120 GB de Lenovo.
Nota:
Antes de instalar y utilizar la unidad de disco duro portátil USB 2.0 de
80 GB/120 GB de Lenovo, no olvide de leer el apartado “Antes de
empezar la instalació
n.”
Descripción del producto
La unidad de disco duro portátil USB 2.0 de 80 GB/120 GB de Lenovo es una
unidad de disco duro USB de gran velocidad, ligera y portátil, compatible con
la normativa USB 2.0 que permite transferencias de datos hasta 80 veces más
rápidas que si se realizaran a través de conexiones USB 1.1. La unidad se
puede utilizar con sistemas de sobremesa o portátiles y también es compatible
con conexiones USB 1.0 y USB 1.1. Después de instalar la unidad, ésta funciona
como un dispositivo del tipo Conectar y Listo de intercambio dinámico; es
decir, puede conectar y desconectar la unidad mientras el sistema está en
ejecución. Consulte el apartado “Desconexión de la unidad desde el sistema”
en la página
1-22.
El paquete de la opción incluye:
v
Unidad de disco duro portátil USB 2.0 de 80 GB/120 GB de Lenovo
v
Cable USB principal (conexión USB ″A″ a ″mini B″)
v
Cable de alimentación auxiliar
v
Guía del usuario
v
Estuche
Requisitos de hardware y software
Debe tener instalado el hardware siguiente en la máquina:
v
Microprocesador Intel Pentium con un mínimo de 200 MHz
v
64 MB de RAM (memoria de acceso aleatorio
v
Puertos USB 1.1 o 2.0
El
sistema debe tener instalado Microsoft Windows Vista
™
, Microsoft Windows
XP o Microsoft Windows 2000 Professional para utilizar la unidad de disco
duro portátil USB 2.0 de 80 GB/120 GB de Lenovo.
Antes de empezar la instalación
No olvide consultar la información siguiente antes de instalar y utilizar la
unidad de disco duro portátil USB 2.0 de 80 GB/120 GB de Lenovo.
© Lenovo 2007. Partes del © IBM Corp. 2005. 1-19

Atención
Utilice solamente los cables que se suministran con esta opción. Podría
dañar la unidad si utilizara un cable no incluido en el paquete de la
opción. No conecte un adaptador CA a este dispositivo.
v Para evitar dañar la unidad de disco duro USB, manipúlela con cuidado.
Cuando transporte la unidad o cuando no la esté utilizando, colóquela en el
estuche que viene con la opción. Para obtener más información sobre la
correcta manipulación de la unidad de disco duro USB, consulte el apartado
“Mantenimiento de la unidad” en la página
1-22.
v
El cable USB principal se ha de conectar a un puerto USB de gran potencia.
Si detecta problemas, intente conectar el cable USB principal a otro puerto
USB.
v
Cuando utilice la unidad de disco duro USB en un sistema portátil con una
tarjeta PCMCIA USB 2.0, el cable USB principal deberá insertarse en el
puerto de gran potencia de la tarjeta PCMCIA. También deberá conectar el
cable de alimentación auxiliar al puerto USB para obtener la energía
correcta.
Atención
Lenovo no da soporte a este producto con un programa de utilidad de
discos de otra empresa que reorganiza o clasifica la tabla de partición.
1-20 Lenovo USB 2.0 Portable 80GB/120GB Hard Drive User ’s Guide

Instalación de la unidad
Este apartado proporciona instrucciones para instalar la unidad.
Para instalar la unidad, lleve a cabo el procedimiento siguiente:
1.
Conecte el cable USB principal al puerto USB 4.
1 LED de actividad de la unidad
2 Puerto de alimentación auxiliar
3 LED de alimentación
4 Puerto USB
5 Cable USB principal
6 Cable de alimentación auxiliar
2. Conecte el otro extremo del cable USB principal 5 a un puerto USB
disponible en el sistema.
3.
Conecte el cable de alimentación auxiliar al puerto de alimentación auxiliar
2 de la unidad.
4.
Conecte el otro extremo del cable de alimentación auxiliar 6 a un puerto
USB disponible en el sistema.
Guía del usuario de hardware 1-21

Utilice solamente los cables que se suministran con esta opción. Podría
dañar la unidad si utilizara un cable no incluido en el paquete de la opción.
No conecte un adaptador CA a este dispositivo.
5.
Abra Mi PC y efectúe una doble pulsación sobre el icono que está asociado
a la unidad de disco duro USB.
La unidad está lista para su uso y no es necesario hacer ninguna instalación
adicional de software. Para inhabilitar el inicio automático, pulse Do not show
this again en la esquina inferior izquierda de la ventana del navegador,
desconecte la unidad y vuélvala a conectar.
Desconexión de la unidad desde el sistema
Para desconectar la unidad, realice el siguiente procedimiento.
1.
Pulse el icono Safely Remove Hardware en la bandeja del sistema.
2.
Pulse el icono USB Mass Storage Device para detener el dispositivo.
3.
Desconecte los cables.
Desconexión del sistema de una estación de acoplamiento o
bahía de soporte
Cuando el USB HDD está conectado a los puertos USB de una estación de
acoplamiento o bahía de soporte, es necesario tomar medidas para garantizar
una expulsión completa y evitar la posible pérdida de daños. Realice uno de
los siguientes métodos:
Método 1
Utilice la función Expulsar sistema del menú Inicio de Windows.
Método 2
En un sistema ThinkPad, pulse Fn + F9 para acceder al menú Easy Eject Action
menu y, a continuación, Eject ThinkPad PC from Dock. Es recomendable
esperar un mínimo de dos minutos después de grabar datos en el USB HDD
antes de iniciar el proceso de expulsión. Si el proceso de expulsión no se
finaliza correctamente con un mensaje que indica que el sistema no puede
detener el dispositivo, pulse el icono Safely Remove Hardware de la bandeja
del sistema antes de volver a utilizar Fn + F9.
Mantenimiento de la unidad
Utilice las directrices de mantenimiento siguientes para su unidad.
v
No deje caer ni golpee la unidad.
v
No utilice ni guarde la unidad cerca de campos magnéticos potentes.
v
No exponga la unidad a líquidos, temperaturas extremas o humedad.
1-22 Lenovo USB 2.0 Portable 80GB/120GB Hard Drive User ’s Guide

v No utilice cables de alimentación o adaptadores distintos de los que
encontrará en el paquete de esta opción.
Guía del usuario de hardware 1-23

Guia do Usuário do Hardware
Este capítulo contém instruções de instalação e utilização da Unidade de Disco
Rígido Lenovo USB 2.0 Portable 80GB/120GB.
Nota:
Antes de instalar e utilizar a Unidade de Disco Rígido Lenovo USB 2.0
Portable 80GB/120GB, certifique-se de ter lido “Antes de Iniciar a
Instalaçã
o.”
Descrição do Produto
A Unidade de Disco Rígido Lenovo USB 2.0 Portable 80GB/120GB é uma
unidade de disco rígido USB de alta velocidade, leve e portátil, compatível
com o padrão USB 2.0, que permite transferências de dados até 80 vezes mais
rápidas que transferências por conexões USB 1.1. A unidade pode ser utilizada
em computadores móveis ou desktop e também é compatível com conexões
USB 1.0 e USB 1.1. Depois de instalada, a unidade opera como um dispositivo
plug-and-play e tem capacidade de troca a quente, isto é, ela pode ser
conectada e desconectada enquanto o computador está em execução. Consulte
“Desconectando a Unidade do Computador” na página
1-27.
O pacote opcional inclui:
v
Unidade de Disco Rígido Lenovo USB 2.0 Portable 80GB/120GB
v
Cabo USB principal (USB ″A″ para conexão ″mini B″)
v
Cabo de alimentação auxiliar
v
Guia do Usuário
v
A Caixa de Transporte
Requisitos de Hardware e Software
É preciso ter o hardware a seguir instalado no computador:
v
Microprocessador Intel Pentium de no mínimo 200 MHz
v
64 MB de RAM
v
Portas USB 1.1 ou 2.0
Seu
computador deve ter o Microsoft Windows Vista
™
, o Microsoft Windows
XP ou o Microsoft Windows 2000 Professional instalado para utilizar a
Unidade de Disco Rígido Lenovo USB 2.0 Portable 80GB/120GB.
Antes de Iniciar a Instalação
Certifique-se de revisar as seguintes informações antes de instalar e utilizar a
Unidade de Disco Rígido Lenovo USB 2.0 Portable 80GB/120GB.
1-24 © Lenovo 2007. Partes © IBM Corp. 2005.
 Loading...