

Page 1

ThinkCentre
UserGuide
MachineTypes:3261,3263,3264,3267,3273,3856,4004,and4156
Page 2

Note:Beforeusingthisinformationandtheproductitsupports,besuretoreadandunderstandthe
“Importantsafetyinformation”onpagevandAppendixA“Notices”onpage121.
ThirdEdition(September2012)
©CopyrightLenovo2012.
LIMITEDANDRESTRICTEDRIGHTSNOTICE:IfdataorsoftwareisdeliveredpursuantaGeneralServicesAdministration
“GSA”contract,use,reproduction,ordisclosureissubjecttorestrictionssetforthinContractNo.GS-35F-05925.
Page 3

Contents
Importantsafetyinformation......v
Serviceandupgrades.............v
Staticelectricityprevention...........v
Powercordsandpoweradapters........vi
Extensioncordsandrelateddevices.......vi
Plugsandoutlets..............vii
Externaldevices..............vii
Generalbatterynotice............vii
Rechargeablebatterynotice.........viii
Heatandproductventilation.........viii
Operatingenvironment............ix
Modemsafetyinformation...........ix
Lasercompliancestatement..........x
Powersupplystatement............x
Cleaningandmaintenance...........x
Additionalimportantinformation.........x
Chapter1.Productoverview......1
Features..................1
Specications................4
Lenovoprograms..............4
AccessingLenovoprogramsontheWindows
7operatingsystem............4
AccessingLenovoprogramsontheWindows
8operatingsystem............6
AnintroductiontoLenovoprograms.....6
Locations..................8
Locatingconnectors,controls,andindicators
onthefrontofyourcomputer........9
Locatingconnectorsontherearofyour
computer...............10
Locatingcomponents..........11
Locatingpartsonthesystemboard....12
Machinetypeandmodellabel.......13
Chapter2.Usingyourcomputer...15
Frequentlyaskedquestions.........15
AccessingControlPanelontheWindows8
operatingsystem..............15
Usingthekeyboard.............16
UsingWindowsshortcutkeys.......16
UsingtheblueThinkVantagebutton....16
Usingangerprintreader........16
Usingthewheelmouse...........17
Adjustingaudio..............17
Aboutyourcomputeraudio........17
Settingthevolumefromthedesktop....17
SettingthevolumefromControlPanel...18
UsingCDsandDVDs............18
HandlingandstoringCDandDVDmedia..18
PlayingaCDorDVD..........19
RecordingaCDorDVD.........19
Chapter3.Y ouandyourcomputer..21
Accessibilityandcomfort..........21
Arrangingyourworkspace........21
Comfort...............21
Glareandlighting............22
Aircirculation.............22
Electricaloutletsandcablelengths.....22
Registeringyourcomputer..........23
Movingyourcomputertoanothercountryor
region..................23
Voltage-selectionswitch.........23
Replacementpowercords........24
Chapter4.Security..........25
Securityfeatures..............25
Attachinganintegratedcablelock.......26
Usingpasswords..............26
BIOSpasswords............26
Windowspasswords..........27
Conguringthengerprintreader.......27
Usingandunderstandingrewalls.......27
Protectingdataagainstviruses........27
Chapter5.Installingorreplacing
hardware...............29
Handlingstatic-sensitivedevices.......29
Installingorreplacinghardware........29
Installingexternaloptions........29
Installingorremovingtheverticalstand...30
InstallingorremovingtheVESAmount
bracket................31
Removingthecomputercover.......33
Installingorreplacingamemorymodule...35
Replacingtheopticaldrive........37
Replacingthesecondaryharddiskdrive...42
Replacingthebattery..........48
Replacingtheacpoweradapter......49
Replacingtheacpoweradapterbracket...51
Replacingthepowerswitchboard.....53
Replacingtheheatsink.........55
Replacingthemicroprocessor.......58
Replacingtheharddiskdrivebracket....60
©CopyrightLenovo2012
i
Page 4

ReplacingtheWiFicardmodule......64
InstallingorremovingtherearWiFiantenna.66
InstallingorremovingtworearWiFi
antennas...............67
Replacingthesystemfan.........69
Replacingtheinternalspeaker.......72
Replacingthekeyboardormouse.....74
Completingthepartsreplacement.....75
Chapter6.Recoveryinformation...79
RecoveryinformationfortheWindows7operating
system..................79
Creatingandusingrecoverymedia.....79
Performingbackupandrecoveryoperations.80
UsingtheRescueandRecoveryworkspace.81
Creatingandusingarescuemedium....82
Reinstallingpreinstalledapplicationsand
devicedrivers.............83
Reinstallingsoftwareprograms......84
Reinstallingdevicedrivers........84
Solvingrecoveryproblems........84
RecoveryinformationfortheWindows8operating
system..................85
Chapter7.UsingtheSetupUtility
program................87
StartingtheSetupUtilityprogram.......87
Viewingandchangingsettings........87
Usingpasswords..............87
Passwordconsiderations.........88
Power-OnPassword..........88
AdministratorPassword.........88
HardDiskPassword...........88
Setting,changing,anddeletingapassword.88
Erasinglostorforgottenpasswords(clearing
CMOS)................89
Enablingordisablingadevice........89
Selectingastartupdevice..........90
Selectingatemporarystartupdevice....90
Selectingorchangingthestartupdevice
sequence...............90
EnablingErPcompliancemode........90
ExitingtheSetupUtilityprogram.......91
Chapter8.Updatingsystem
programs...............93
Usingsystemprograms...........93
Updating(ashing)theBIOSfromadisc....93
Updating(ashing)theBIOSfromyouroperating
system..................94
RecoveringfromaPOST/BIOSupdatefailure..94
Keepingyourcomputercurrent........95
Gettingthelatestdevicedriversforyour
computer...............95
Updatingyouroperatingsystem......95
UsingSystemUpdate..........96
Cleaningandmaintenance..........96
Basics................96
Cleaningyourcomputer.........97
Goodmaintenancepractices.......98
Movingyourcomputer...........98
Chapter10.T roubleshootingand
diagnostics..............99
Basictroubleshooting............99
Troubleshootingprocedure..........100
Troubleshooting..............100
Audioproblems............101
CDproblems.............102
DVDproblems.............103
Intermittentproblems..........105
Keyboard,mouse,orpointingdevice
problems...............105
Monitorproblems............107
Networkingproblems..........108
Optionproblems............111
Performanceandlockupproblems.....112
Printerproblems............113
Serialportproblems...........114
Softwareproblems...........114
USBproblems.............115
LenovoSolutionCenter...........116
Chapter11.Gettinginformation,help,
andservice.............117
Informationresources............117
LenovoThinkVantageTools........117
LenovoWelcome............117
HelpandSupport............117
SafetyandWarranty...........117
LenovoWebsite............117
LenovoSupportWebsite.........118
Helpandservice..............118
Usingthedocumentationanddiagnostic
program...............118
Callingforservice............118
Usingotherservices..........119
Purchasingadditionalservices......119
AppendixA.Notices.........121
Trademarks................122
Chapter9.Preventingproblems...95
iiThinkCentreUserGuide
Page 5

AppendixB.Regulatory
information.............123
Exportclassicationnotice..........123
Electronicemissionsnotices.........123
FederalCommunicationsCommission
DeclarationofConformity........123
Additionalregulatoryinformation.......125
AppendixC.WEEEandrecycling
information.............127
ImportantWEEEinformation.........127
Recyclinginformation............127
RecyclinginformationforBrazil........128
BatteryrecyclinginformationforTaiwan.....128
BatteryrecyclinginformationfortheEuropean
Union..................129
AppendixD.RestrictionofHazardous
SubstancesDirective(RoHS)....131
ChinaRoHS................131
TurkishRoHS...............131
UkraineRoHS...............131
IndiaRoHS................132
AppendixE.ENERGYSTARmodel
information.............133
Index.................135
©CopyrightLenovo2012
iii
Page 6

ivThinkCentreUserGuide
Page 7
Importantsafetyinformation
CAUTION:
Beforeusingthismanual,besuretoreadandunderstandalltherelatedsafetyinformationforthis
product.RefertotheinformationinthissectionandthesafetyinformationintheSafety,Warranty,and
SetupGuidethatyoureceivedwiththisproduct.Readingandunderstandingthissafetyinformation
reducestheriskofpersonalinjuryanddamagetoyourproduct.
IfyounolongerhaveacopyoftheSafety,Warranty,andSetupGuide,youcanobtainaPortableDocument
Format(PDF)versionfromtheLenovo
SupportWebsitealsoprovidestheSafety,Warranty,andSetupGuideandthisUserGuideinadditional
languages.
®
SupportWebsiteathttp://www.lenovo.com/support.TheLenovo
Serviceandupgrades
DonotattempttoserviceaproductyourselfunlessinstructedtodosobytheCustomerSupportCenteror
yourdocumentation.OnlyuseaServiceProviderwhoisapprovedtorepairyourparticularproduct.
Note:Somecomputerpartscanbeupgradedorreplacedbythecustomer.Upgradestypicallyare
referredtoasoptions.ReplacementpartsapprovedforcustomerinstallationarereferredtoasCustomer
ReplaceableUnits,orCRUs.Lenovoprovidesdocumentationwithinstructionswhenitisappropriatefor
customerstoinstalloptionsorreplaceCRUs.Youmustcloselyfollowallinstructionswheninstallingor
replacingparts.TheOffstateofapowerindicatordoesnotnecessarilymeanthatvoltagelevelsinsidea
productarezero.Beforeyouremovethecoversfromaproductequippedwithapowercord,alwaysmake
surethatthepoweristurnedoffandthattheproductisunpluggedfromanypowersource.Formore
informationonCRUs,refertoChapter5“Installingorreplacinghardware”onpage29
questionsorconcerns,contacttheCustomerSupportCenter.
Althoughtherearenomovingpartsinyourcomputerafterthepowercordhasbeendisconnected,the
followingwarningsarerequiredforyoursafety.
CAUTION:
.Ifyouhaveany
Hazardousmovingparts.Keepngersandotherbodypartsaway.
CAUTION:
BeforereplacinganyCRUs,turnoffthecomputerandwaitthreetoveminutestoletthecomputer
coolbeforeopeningthecover.
Staticelectricityprevention
Staticelectricity,althoughharmlesstoyou,canseriouslydamagecomputercomponentsandoptions.
Improperhandlingofstatic-sensitivepartscancausedamagetothepart.Whenyouunpackanoption
©CopyrightLenovo2012
v
Page 8

orCRU,donotopenthestatic-protectivepackagecontainingthepartuntiltheinstructionsdirectyou
toinstallit.
WhenyouhandleoptionsorCRUs,orperformanyworkinsidethecomputer,takethefollowingprecautions
toavoidstatic-electricitydamage:
•Limityourmovement.Movementcancausestaticelectricitytobuilduparoundyou.
•Alwayshandlecomponentscarefully.Handleadapters,memorymodules,andothercircuitboardsbythe
edges.Nevertouchexposedcircuitry.
•Preventothersfromtouchingcomponents.
•Whenyouinstallastatic-sensitiveoptionorCRU,touchthestatic-protectivepackagecontainingthe
parttoametalexpansion-slotcoverorotherunpaintedmetalsurfaceonthecomputerforatleasttwo
seconds.Thisreducesstaticelectricityinthepackageandyourbody.
•Whenpossible,removethestatic-sensitivepartfromthestatic-protectivepackagingandinstallthepart
withoutsettingitdown.Whenthisisnotpossible,placethestatic-protectivepackagingonasmooth,
levelsurfaceandplacethepartonit.
•Donotplacethepartonthecomputercoverorothermetalsurface.
Powercordsandpoweradapters
Useonlythepowercordsandpoweradapterssuppliedbytheproductmanufacturer.
Thepowercordsshallbesafetyapproved.ForGermany,itshallbeH05VV-F ,3G,0.75mm
othercountries,thesuitabletypesshallbeusedaccordingly.
Neverwrapapowercordaroundapoweradapterorotherobject.Doingsocanstressthecordinwaysthat
cancausethecordtofray,crack,orcrimp.Thiscanpresentasafetyhazard.
Alwaysroutepowercordssothattheywillnotbewalkedon,trippedover,orpinchedbyobjects.
Protectpowercordandpoweradaptersfromliquids.Forinstance,donotleaveyourpowercordorpower
adapternearsinks,tubs,toilets,oronoorsthatarecleanedwithliquidcleansers.Liquidscancausea
shortcircuit,particularlyifthepowercordorpoweradapterhasbeenstressedbymisuse.Liquidsalsocan
causegradualcorrosionofpowercordterminalsand/ortheconnectorterminalsonapoweradapter,
whichcaneventuallyresultinoverheating.
Alwaysconnectpowercordsandsignalcablesinthecorrectorderandensurethatallpowercord
connectorsaresecurelyandcompletelypluggedintoreceptacles.
Donotuseanypoweradapterthatshowscorrosionattheacinputpinsorshowssignsofoverheating(such
asdeformedplastic)attheacinputoranywhereonthepoweradapter.
Donotuseanypowercordswheretheelectricalcontactsoneitherendshowsignsofcorrosionor
overheatingorwherethepowercordappearstohavebeendamagedinanyway.
Topreventpossibleoverheating,donotcoverthepoweradapterwithclothingorotherobjectswhenthe
poweradapterispluggedintoanelectricaloutlet.
2
,orbetter.For
Extensioncordsandrelateddevices
Ensurethatextensioncords,surgeprotectors,uninterruptiblepowersupplies,andpowerstripsthatyouuse
areratedtohandletheelectricalrequirementsoftheproduct.Neveroverloadthesedevices.Ifpowerstrips
viThinkCentreUserGuide
Page 9

areused,theloadshouldnotexceedthepowerstripinputrating.Consultanelectricianformoreinformation
ifyouhavequestionsaboutpowerloads,powerrequirements,andinputratings.
Plugsandoutlets
Ifareceptacle(poweroutlet)thatyouintendtousewithyourcomputerequipmentappearstobedamaged
orcorroded,donotusetheoutletuntilitisreplacedbyaqualiedelectrician.
Donotbendormodifytheplug.Iftheplugisdamaged,contactthemanufacturertoobtainareplacement.
Donotshareanelectricaloutletwithotherhomeorcommercialappliancesthatdrawlargeamountsof
electricity;otherwise,unstablevoltagemightdamageyourcomputer,data,orattacheddevices.
Someproductsareequippedwithathree-prongedplug.Thisplugtsonlyintoagroundedelectricaloutlet.
Thisisasafetyfeature.Donotdefeatthissafetyfeaturebytryingtoinsertitintoanon-groundedoutlet.If
youcannotinserttheplugintotheoutlet,contactanelectricianforanapprovedoutletadapterortoreplace
theoutletwithonethatenablesthissafetyfeature.Neveroverloadanelectricaloutlet.Theoverallsystem
loadshouldnotexceed80percentofthebranchcircuitrating.Consultanelectricianformoreinformation
ifyouhavequestionsaboutpowerloadsandbranchcircuitratings.
Besurethatthepoweroutletyouareusingisproperlywired,easilyaccessible,andlocatedclosetothe
equipment.Donotfullyextendpowercordsinawaythatwillstressthecords.
Besurethatthepoweroutletprovidesthecorrectvoltageandcurrentfortheproductyouareinstalling.
Carefullyconnectanddisconnecttheequipmentfromtheelectricaloutlet.
Externaldevices
DonotconnectordisconnectanyexternaldevicecablesotherthanUniversalSerialBus(USB)and1394
cableswhilethecomputerpowerison;otherwise,youmightdamageyourcomputer.Toavoidpossible
damagetoattacheddevices,waitatleastvesecondsafterthecomputerisshutdowntodisconnect
externaldevices.
Generalbatterynotice
DANGER
PersonalcomputersmanufacturedbyLenovomightcontainacoincellbatteryandarechargeable
batterypacktothesystem.BatteriessuppliedbyLenovoforusewithyourproducthavebeen
testedforcompatibilityandshouldonlybereplacedwithapprovedparts.
Neverattempttoopenorserviceanybattery.Donotcrush,puncture,orincineratebatteriesor
shortcircuitthemetalcontacts.Donotexposethebatterytowaterorotherliquids.Onlyrecharge
thebatterypackstrictlyaccordingtoinstructionsincludedintheproductdocumentation.
Batteryabuseormishandlingcancausethebatterytooverheat,whichcancausegassesorame
to“vent”fromthebatterypackorcoincell.Ifyourbatteryisdamaged,orifyounoticeany
dischargefromyourbatteryorthebuildupofforeignmaterialsonthebatteryleads,stopusingthe
batteryandobtainareplacementfromthebatterymanufacturer.
Batteriescandegradewhentheyareleftunusedforlongperiodsoftime.Forsomerechargeable
batteries(particularlyLithiumIonbatteries),leavingabatteryunusedinadischargedstatecould
©CopyrightLenovo2012
vii
Page 10

increasetheriskofabatteryshortcircuit,whichcouldshortenthelifeofthebatteryandalsocan
poseasafetyhazard.DonotletrechargeableLithium-Ionbatteriescompletelydischargeorstore
thesebatteriesinadischargedstate.
Rechargeablebatterynotice
DANGER
Donotattempttodisassembleormodifythebatterypack.Attemptingtodosocancausean
explosion,orliquidleakagefromthebatterypack.Abatterypackotherthantheonespeciedby
Lenovo,oradisassembledormodiedbatterypackisnotcoveredbythewarranty.
Iftherechargeablebatterypackisincorrectlyreplaced,thereisdangerofanexplosion.Thebattery
packcontainsasmallamountofharmfulsubstances.T oavoidpossibleinjury:
•ReplaceonlywithabatteryofthetyperecommendedbyLenovo.
•Keepthebatterypackawayfromre.
•Donotexposeittowaterorrain.
•Donotattempttodisassembleit.
•Donotshort-circuitit.
•Keepitawayfromchildren.
•Donotdropthebatterypack.
Donotputthebatterypackintrashthatisdisposedofinlandlls.Whendisposingofthebattery,
complywithlocalordinancesorregulations.
Thebatterypackshouldbestoredatroomtemperature,chargedtoapproximately30to50%
ofcapacity.Werecommendthatbatterypackbechargedaboutonceperyeartoprevent
overdischarge.
Heatandproductventilation
Computers,poweradapters,andmanyaccessoriescangenerateheatwhenturnedonandwhenbatteries
arecharging.Alwaysfollowthesebasicprecautions:
•Donotleaveyourcomputer,poweradapter,oraccessoriesincontactwithyourlaporanypartofyour
bodyforanextendedperiodwhentheproductsarefunctioningorwhenthebatteryischarging.Y our
computer,poweradapter,andmanyaccessoriesproducesomeheatduringnormaloperation.Extended
contactwiththebodycouldcausediscomfortor,potentially,askinburn.
•Donotchargethebatteryoroperateyourcomputer,poweradapter,oraccessoriesnearammable
materialsorinexplosiveenvironments.
•Ventilationslots,fans,andheatsinksareprovidedwiththeproductforsafety,comfort,andreliable
operation.Thesefeaturesmightinadvertentlybecomeblockedbyplacingtheproductonabed,sofa,
carpet,orotherexiblesurface.Neverblock,cover,ordisablethesefeatures.
Inspectyourdesktopcomputerfordustaccumulationatleastonceeverythreemonths.Beforeinspecting
yourcomputer,turnoffthepowerandunplugthecomputer'spowercordfromtheelectricaloutlet;then
removeanydustfromventsandperforationsinthebezel.Ifyounoticeexternaldustaccumulation,then
examineandremovedustfromtheinsideofthecomputerincludingheatsinkinletns,powersupplyvents,
andfans.Alwaysturnoffandunplugthecomputerbeforeopeningthecover.Ifpossible,avoidoperating
viiiThinkCentreUserGuide
Page 11

yourcomputerwithintwofeetofhigh-trafcareas.Ifyoumustoperateyourcomputerinornearahigh-trafc
area,inspectand,ifnecessary,cleanyourcomputermorefrequently.
Foryoursafetyandtomaintainoptimumcomputerperformance,alwaysfollowthesebasicprecautions
withyourdesktopcomputer:
•Keepthecoverclosedwheneverthecomputerispluggedin.
•Regularlyinspecttheoutsideofthecomputerfordustaccumulation.
•Removedustfromventsandanyperforationsinthebezel.Morefrequentcleaningsmightberequiredfor
computersindustyorhigh-trafcareas.
•Donotrestrictorblockanyventilationopenings.
•Donotstoreoroperateyourcomputerinsidefurniture,asthismightincreasetheriskofoverheating.
•Airowtemperaturesintothecomputershouldnotexceed35°C(95°F).
•Donotinstallairltrationdevices.Theymayinterferewithpropercooling.
Operatingenvironment
Theoptimalenvironmentinwhichtouseyourcomputeris10°C-35°C(50°F-95°F)withhumidityranging
between35%and80%.Ifyourcomputerisstoredortransportedintemperatureslessthan10°C(50°F),
allowthecoldcomputertoriseslowlytoanoptimaloperatingtemperatureof10°C-35°C(50°F-95°F)before
use.Thisprocesscouldtaketwohoursinextremeconditions.Failuretoallowyourcomputertorisetoan
optimaloperatingtemperaturebeforeusecouldresultinirreparabledamagetoyourcomputer.
Ifpossible,placeyourcomputerinawell-ventilatedanddryareawithoutdirectexposuretosunshine.
Keepelectricalappliancessuchasanelectricfan,radio,high-poweredspeakers,airconditioner,and
microwaveovenawayfromyourcomputerbecausethestrongmagneticeldsgeneratedbythese
appliancescandamagethemonitoranddataontheharddiskdrive.
Donotplaceanybeveragesontopoforbesidethecomputerorotherattacheddevices.Ifliquidisspilledon
orinthecomputeroranattacheddevice,ashortcircuitorotherdamagemightoccur.
Donoteatorsmokeoveryourkeyboard.Particlesthatfallintoyourkeyboardcancausedamage.
Modemsafetyinformation
CAUTION:
Toreducetheriskofre,useonlyNo.26AWGorlarger(forexample,No.24AWG)telecommunication
linecordlistedbyUnderwritersLaboratories(UL)orcertiedbytheCanadianStandardsAssociation
(CSA).
Toreducetheriskofre,electricalshock,orinjurywhenusingtelephoneequipment,alwaysfollowbasic
safetyprecautions,suchas:
•Neverinstalltelephonewiringduringalightningstorm.
•Neverinstalltelephonejacksinwetlocationsunlessthejackisspecicallydesignedforwetlocations.
•Nevertouchuninsulatedtelephonewiresorterminalsunlessthetelephonelinehasbeendisconnectedat
thenetworkinterface.
•Usecautionwheninstallingormodifyingtelephonelines.
•Avoidusingatelephone(otherthanacordlesstype)duringanelectricalstorm.Theremaybearemote
riskofelectricshockfromlightning.
•Donotusethetelephonetoreportagasleakinthevicinityoftheleak.
©CopyrightLenovo2012
ix
Page 12
Lasercompliancestatement
CAUTION:
Whenlaserproducts(suchasCD-ROMs,DVDdrives,beropticdevices,ortransmitters)are
installed,notethefollowing:
•Donotremovethecovers.Removingthecoversofthelaserproductcouldresultinexposureto
hazardouslaserradiation.Therearenoserviceablepartsinsidethedevice.
•Useofcontrolsoradjustmentsorperformanceofproceduresotherthanthosespeciedherein
mightresultinhazardousradiationexposure.
DANGER
SomelaserproductscontainanembeddedClass3AorClass3Blaserdiode.Notethefollowing.
Laserradiationwhenopen.Donotstareintothebeam,donotviewdirectlywithoptical
instruments,andavoiddirectexposuretothebeam.
Powersupplystatement
Neverremovethecoveronapowersupplyoranypartthathasthefollowinglabelattached.
Hazardousvoltage,current,andenergylevelsarepresentinsideanycomponentthathasthislabelattached.
Therearenoserviceablepartsinsidethesecomponents.Ifyoususpectaproblemwithoneoftheseparts,
contactaservicetechnician.
Cleaningandmaintenance
Keepyourcomputerandworkspaceclean.Shutdownthecomputerandthendisconnectthepower
cordbeforecleaningthecomputer.Donotsprayanyliquiddetergentdirectlyonthecomputeroruse
anydetergentcontainingammablematerialtocleanthecomputer.Spraythedetergentonasoftcloth
andthenwipethecomputersurfaces.
Additionalimportantinformation
CAUTION:
Donotputanyobjectontopofthecomputerortheopticaldrivebox.
xThinkCentreUserGuide
Page 13

©CopyrightLenovo2012
xi
Page 14

xiiThinkCentreUserGuide
Page 15

Chapter1.Productoverview
Thischapterprovidesinformationaboutthecomputerfeatures,specications,softwareprogramsprovided
byLenovo,andlocationsofconnectors,components,partsonthesystemboard,andinternaldrives.
Features
Thissectionintroducesthecomputerfeatures.Theinformationcoversavarietyofmodels.
Toviewtheinformationaboutyourspecicmodel,dooneofthefollowing:
•GointotheSetupUtilityprogrambyfollowingtheinstructionsinChapter7“UsingtheSetupUtility
program”onpage87.Then,selectMain➙SystemSummarytoviewtheinformation.
•OntheMicrosoft
®
Windows
toviewtheinformation.
•OntheWindows8operatingsystem,moveyourcursortothetop-rightorbottom-rightcornerofthe
screentodisplaythecharms.ThenclickSettings➙PCinfotoviewtheinformation.
Microprocessor
Yourcomputercomeswithoneofthefollowingmicroprocessors(internalcachesizevariesbymodeltype):
•Intel
®
Core™i3microprocessor
•IntelCorei5microprocessor
•IntelCeleron
•IntelPentium
®
microprocessor
®
microprocessor
®
7operationsystem,clickStart,right-clickComputer,andselectProperties
Memory
Yourcomputersupportsuptotwodoubledatarate3smalloutlinedualinlinememorymodules(DDR3
SODIMMs).
Drives
•Externalopticaldrive:DVD-ROMorDVD-R(optional)
•SerialAdvancedTechnologyAttachment(SATA)harddiskdrive
•Solid-statedrive(optional)
Videosubsystem
•IntegratedgraphicsforaVideoGraphicsArray(VGA)connectorandaDisplayPortconnector
Audiosubsystem
•Integratedhigh-denition(HD)audio
•Microphoneconnectorandheadphoneconnectoronthefrontpanel
•Internalspeaker
Connectivity
•100/1000MbpsintegratedEthernetcontroller
•WiFicardmodule(optional)
©CopyrightLenovo2012
1
Page 16

•WiFiwithBluetoothmodule(optional)
Systemmanagementfeatures
•Abilitytostorepower-onself-test(POST)hardwaretestresults
•DesktopManagementInterface(DMI)
DesktopManagementInterfaceprovidesacommonpathforuserstoaccessinformationaboutall
aspectsofacomputer,includingprocessortype,installationdate,attachedprintersandotherperipherals,
powersources,andmaintenancehistory.
•ErPcompliancemode
Theenergy-relatedproductsdirective(ErP)compliancemodereducestheconsumptionofelectricity
whenyourcomputerisinstandbyoroffmode.Formoreinformation,see“EnablingErPcompliance
mode”onpage90
.
•PrebootExecutionEnvironment(PXE)
ThePrebootExecutionEnvironmentisanenvironmenttostartcomputersusinganetworkinterface
independentofdatastoragedevices(suchastheharddiskdrive)orinstalledoperatingsystems.
•SystemManagement(SM)BasicInput/OutputSystem(BIOS)andSMsoftware
TheSMBIOSspecicationdenesdatastructuresandaccessmethodsinaBIOSthatallowsauseror
applicationtostoreandretrieveinformationspecicaboutthecomputerinquestion.
•WakeonLAN
WakeonLANisanEthernetcomputernetworkingstandardthatallowsacomputertobeturnedon
orwokenupbyanetworkmessage.Themessageisusuallysentbyaprogramrunningonanother
computeronthesamelocalareanetwork.
Input/Output(I/O)features
•FiveUniversalSerialBus(USB)2.0connectors(twoonthefrontpanelandthreeontherearpanel)
•OneDisplayPortconnector
•OneEthernetconnector
•Oneoptionalport(forinstallingaserialport,aUSB2.0connector,oranoptionalWiFicardmodule
antenna)
•OneVGAmonitorconnector
•Twoaudioconnectorsonthefrontpanel(microphoneconnectorandheadphoneconnector)
Formoreinformation,see“Locatingconnectors,controls,andindicatorsonthefrontofyourcomputer”on
page9and“Locatingconnectorsontherearofyourcomputer”onpage10.
Expansion
•Oneharddiskdrivebay
•OneminiPCIExpresscardslot
Poweradapter
Yourcomputercomeswitha65-wattacpoweradapter.
Securityfeatures
•ComputraceAgentsoftwareembeddedinrmware
•Coverpresenceswitch(alsocalledintrusionswitch)
•Abilitytoenableordisableadevice
2ThinkCentreUserGuide
Page 17

•AbilitytoenableanddisableUSBconnectorsindividually
•Keyboardwithngerprintreader(shippedwithsomemodels)
•Power-onpassword(POP),administratorpassword,andharddiskdrivepasswordtodeterunauthorized
useofyourcomputer
•Startupsequencecontrol
•Startupwithoutkeyboardormouse
•Supportforanintegratedcablelock(Kensingtonlock)
Formoreinformation,seeChapter4“Security”onpage25.
Preinstalledsoftwareprograms
Yourcomputerispreinstalledwithsoftwareprogramstohelpyouworkmoreeasilyandsecurely.Formore
information,see“Lenovoprograms”onpage4
.
Preinstalledoperatingsystem
Yourcomputerispreinstalledwithoneofthefollowingoperatingsystems:
•MicrosoftWindows7operatingsystem
•MicrosoftWindows8operatingsystem
Operatingsystem(s),certiedortestedforcompatibility
•Linux
®
•MicrosoftWindowsXPProfessionalSP3
1
(variesbymodeltype)
1.Theoperatingsystem(s)listedherearebeingcertiedortestedforcompatibilityatthetimethispublicationgoesto
press.AdditionaloperatingsystemsmightbeidentiedbyLenovoascompatiblewithyourcomputerfollowingthe
publicationofthismanual.Thislistissubjecttochange.Todetermineifanoperatingsystemhasbeencertiedor
testedforcompatibility,checktheWebsiteoftheoperatingsystemvendor.
Chapter1.Productoverview3
Page 18

Specications
Thissectionliststhephysicalspecicationsforyourcomputer.
Dimensions
Width:179mm(7.05inches)
Height:34.5mm(1.36inches)
Depth:182mm(7.17inches)
Weight
Maximumcongurationasshipped:4.86kg(10.71lb)(withpackage)
Maximumcongurationasshipped:4.14kg(9.13lb)(withoutpackage)
Environment
•Airtemperature:
Operating:10°Cto35°C(50°Fto95°F)
Storage:-40°Cto60°C(-40°Fto140°F)inoriginalshippingpackage
Storage:-10°Cto60°C(14°Fto140°F)withoutpackage
•Humidity:
Operating:20%to80%(non-condensing)
Storage:20%to90%(non-condensing)
•Altitude:
Operating:-50to10000ft(-15.2to3048m)
Storage:-50to35000ft(-15.2to10668m)
Electricalinput
Theacpoweradapterinputvoltage:100to240Vac
Inputfrequencyrange:50to60Hz
Lenovoprograms
YourcomputercomeswithLenovoprogramstohelpyouworkmoreeasilyandsecurely.Dependingon
theWindowsoperatingsystempreinstalled,theprogramsmightvary.
AccessingLenovoprogramsontheWindows7operatingsystem
OntheWindows7operatingsystem,youcanaccessLenovoprogramsfromeithertheLenovo
ThinkVantage
AccessingLenovoprogramsfromtheLenovoThinkVantageT oolsprogram
ToaccessLenovoprogramsfromtheLenovoThinkVantageT oolsprogram,clickStart➙AllPrograms➙
LenovoThinkVantageT ools.Thendouble-clickaprogramicontoaccesstheprogram.
Note:IfaprogramiconintheLenovoThinkVantageToolsprogramnavigationwindowisdimmed,it
indicatesthatyouneedtoinstalltheprogrammanually.Toinstalltheprogrammanually,double-clickthe
programicon.Then,followtheinstructionsonthescreen.Whentheinstallationprocesscompletes,the
programiconwillbeactivated.
4ThinkCentreUserGuide
®
ToolsprogramorfromControlPanel.
Page 19

Table1.ProgramsintheLenovoThinkVantageT oolsprogram
ProgramIconname
CommunicationsUtilityWebConferencing
FingerprintSoftware
LenovoSolutionCenterSystemHealthandDiagnostics
PasswordManagerPasswordVault
PowerManager
RecoveryMediaFactoryRecoveryDisks
RescueandRecovery
SimpleTapSimpleTap
SystemUpdate
ViewManagementUtility
®
FingerprintReader
PowerControls
EnhancedBackupandRestore
UpdateandDrivers
ScreenLayout
Note:Dependingonyourcomputermodel,someoftheprogramsmightnotbeavailable.
AccessingLenovoprogramsfromControlPanel
ToaccessLenovoprogramsfromControlPanel,clickStart➙ControlPanel.Thendependingonthe
programyouwanttoaccess,clickthecorrespondingsectionandthenclickthecorrespondinggreentext.
Note:IfyoudonotndtheprogramyouneedinControlPanel,opentheLenovoThinkVantageTools
programnavigationwindowanddouble-clickthedimmedicontoinstalltheprogramyouneed.Then,
followtheinstructionsonthescreen.Whentheinstallationprocesscompletes,theprogramiconwillbe
activated,andyoucanndtheprograminControlPanel.
TheprogramsandthecorrespondingsectionsandgreentextsinControlPanelarelistedinthefollowing
table.
Table2.ProgramsinControlPanel
Program
CommunicationsUtilityHardwareandSoundLenovo-WebConferencing
FingerprintSoftwareSystemandSecurity
LenovoSolutionCenterSystemandSecurityLenovo-SystemHealthand
PasswordManager
PowerManager
RecoveryMedia
RescueandRecovery
SimpleTap
SystemUpdateSystemandSecurity
ViewManagementUtility
ControlPanelsectionGreentextinControlPanel
Lenovo-FingerprintReader
HardwareandSound
Diagnostics
SystemandSecurity
UserAccountsandFamilySafety
HardwareandSound
SystemandSecurity
SystemandSecurity
SystemandSecurity
Programs
SystemandSecurity
Lenovo-PasswordVault
Lenovo-PowerControls
Lenovo-FactoryRecoveryDisks
Lenovo-EnhancedBackupand
Restore
Lenovo-SimpleTap
Lenovo-UpdateandDrivers
LenovoViewManagementUtility
Chapter1.Productoverview5
Page 20

Note:Dependingonyourcomputermodel,someoftheprogramsmightnotbeavailable.
AccessingLenovoprogramsontheWindows8operatingsystem
IfyourcomputerispreinstalledwiththeWindows8operatingsystem,youcanaccessLenovoprogramsby
doingeitherofthefollowing:
•ClicktheLenovoQuickLaunchiconfromthetaskbar.Alistofprogramsisdisplayed.Double-clicka
Lenovoprogramtolaunchit.Ifadesiredprogramisnotinthelist,clicktheplusicon+.
•PresstheWindowskeytogototheStartscreen.ClickaLenovoprogramtolaunchit.Ifyoucannotnd
theprogramyouneed,movethepointertothebottom-rightcornerofthescreentodisplaythecharms.
ThenclicktheSearchcharmtosearchforthedesiredprogram.
YourcomputersupportsthefollowingLenovoprograms:
•FingerprintSoftware
•LenovoCompanion
•LenovoSettings
•LenovoSolutionCenter
•LenovoQuickLaunch
•LenovoSupport
•PasswordManager
•SystemUpdate
AnintroductiontoLenovoprograms
ThistopicprovidesabriefintroductiontosomeLenovoprograms.
Note:Dependingonyourcomputermodel,someoftheprogramsmightnotbeavailable.
•CommunicationsUtility
TheCommunicationsUtilityprogramprovidesacentrallocationforintegratedcameraandmicrophone
settings.ItcontrolsadvancedsettingsfortheintegratedmicrophoneandcameratooptimizeWeb
conferencingandVoiceoverIP(VOIP)experience.
•FingerprintSoftware
Theintegratedngerprintreaderprovidedonsomekeyboardsenablesyoutoenrollyourngerprint
andassociateitwithyourpower-onpassword,harddiskpassword,andWindowspassword.Asa
result,ngerprintauthenticationcanreplacepasswordsandenablesimpleandsecureuseraccess.A
ngerprintreaderkeyboardisavailablewithselectcomputersorcanbepurchasedforcomputersthat
supportthisoption.
•LenovoCloudStorage
TheLenovoCloudStorageprogramisacloudstoragesolutionthatenablesyoutostoreyourles,such
asdocumentsandpictures,onaserver.YoucanaccessthestoredlesthroughtheInternetfrom
differentdevicessuchaspersonalcomputers,smartphones,ortablets.Formoreinformationaboutthe
LenovoCloudStorageprogram,gotohttp://www.lenovo.com/cloud.
•LenovoCompanion
ThroughtheLenovoCompanionprogram,youcangettheinformationabouttheaccessoriesforyour
computer,viewbolgsandarticlesaboutyourcomputer,andcheckforotherrecommendedprograms.
6ThinkCentreUserGuide
Page 21

LenovoSettings
•
UsetheLenovoSettingsprogramtoenhanceyourcomputingexperiencebyturningyourcomputerintoa
portablehotspot,conguringcameraandaudiosettings,optimizingyourpowerplansettings,and
creatingandmanagingmultiplenetworkproles.
•LenovoSolution Center
TheLenovoSolutionCenterprogramenablesyoutotroubleshootandresolvecomputerproblems.It
combinesdiagnostictests,systeminformationcollection,securitystatus,andsupportinformation,along
withhintsandtipsformaximumsystemperformance.
•
LenovoQuickLaunch
TheLenovoQuickLaunchprogramprovidesyouwithquickaccesstoprogramsinstalledonyour
computer,includingLenovoprograms,Microsoftprograms,andotherthirdpartyprograms.
•LenovoSuppor t
TheLenovoSupportprogramenablesyoutoregisteryourcomputerwithLenovo,checkthecomputer
healthconditionandbatterystatus,downloadandviewusermanualsforyourcomputer,getthewarranty
informationofyourcomputer,andexplorehelpandsupportinformation.
•LenovoThinkVantageTools
TheLenovoThinkVantageToolsprogramguidesyoutoahostofinformationsourcesandprovideseasy
accesstovarioustoolstohelpyouworkmoreeasilyandsecurely.
•LenovoWelcome
TheLenovoWelcomeprogramintroducesyoutosomeinnovativebuilt-infeaturesofLenovoandguides
youthroughafewimportantsetuptaskstohelpyoumakethemostofyourcomputer.
•PasswordManager
ThePasswordManagerprogramautomaticallycapturesandllsinauthenticationinformationfor
WindowsprogramsandWebsites.
•PowerManager
ThePowerManagerprogramprovidesconvenient,exible,andcompletepowermanagementforyour
computer.Itenablesyoutoadjustyourcomputerpowersettingstoachievethebestbalancebetween
performanceandpowersaving.
•RecoveryMedia
TheRecoveryMediaprogramenablesyoutorestorethecontentsoftheharddiskdrivetothefactory
defaultsettings.
•RescueandRecovery
TheRescueandRecoveryprogramisaone-buttonrecoveryandrestoresolutionthatincludesasetof
self-recoverytoolstohelpyoudiagnosecomputerproblems,gethelp,andrecoverfromsystemcrashes,
evenifyoucannotstarttheWindowsoperatingsystem.
•SimpleT ap
TheSimpleTapprogramprovidesyouwithaquickwaytocustomizesomebasiccomputersettingssuch
asmutingthespeakers,adjustingthevolume,lockingthecomputeroperatingsystem,launchinga
program,openingaWebpage,openingale,andsoon.YoualsocanusetheSimpleTapprogramto
accesstheLenovoAppShop,fromwhichyoucandownloadvariousapplicationsandcomputersoftware.
TostarttheSimpleTapprograminaquickway,doanyofthefollowing:
–ClicktheredSimpleTaplaunchpointonthedesktop.Theredlaunchpointisavailableonthedesktop
afteryouhavelaunchedtheSimpleTapprogramforthersttime.
–PresstheblueThinkVantagebuttonifyourkeyboardhasone.
Note:TheSimpleTapprogramisonlyavailableoncertainmodelspreinstalledwiththeWindows7
operatingsystem.IfyourWindows7modelisnotpreinstalledwiththeSimpleTapprogram,youcan
downloaditfromhttp://www.lenovo.com/support.
Chapter1.Productoverview7
Page 22

•SystemUpdate
TheSystemUpdateprogramhelpsyoukeepthesoftwareonyourcomputerup-to-datebydownloading
andinstallingsoftwareupdatepackages(Lenovoprograms,devicedrivers,UEFIBIOSupdates,and
otherthirdpartyprograms).
•ViewManagementUtility
TheViewManagementUtilityprogramenablesyoutoeasilyorganizeyouropenwindows.Itdividesyour
screenintomultiplepartsandthenresizesandpositionsopenwindowsintodifferentpartstomakethe
bestuseofyourdesktop.Theprogramalsoisabletoworkacrossmultiplemonitorstoimproveyour
productivity.
Locations
Thissectionprovidesinformationtohelpyoulocatetheconnectorsonthefrontandrearofyourcomputer,
partsonthesystemboard,andcomponentsandinternaldrivesinyourcomputer.
8ThinkCentreUserGuide
Page 23
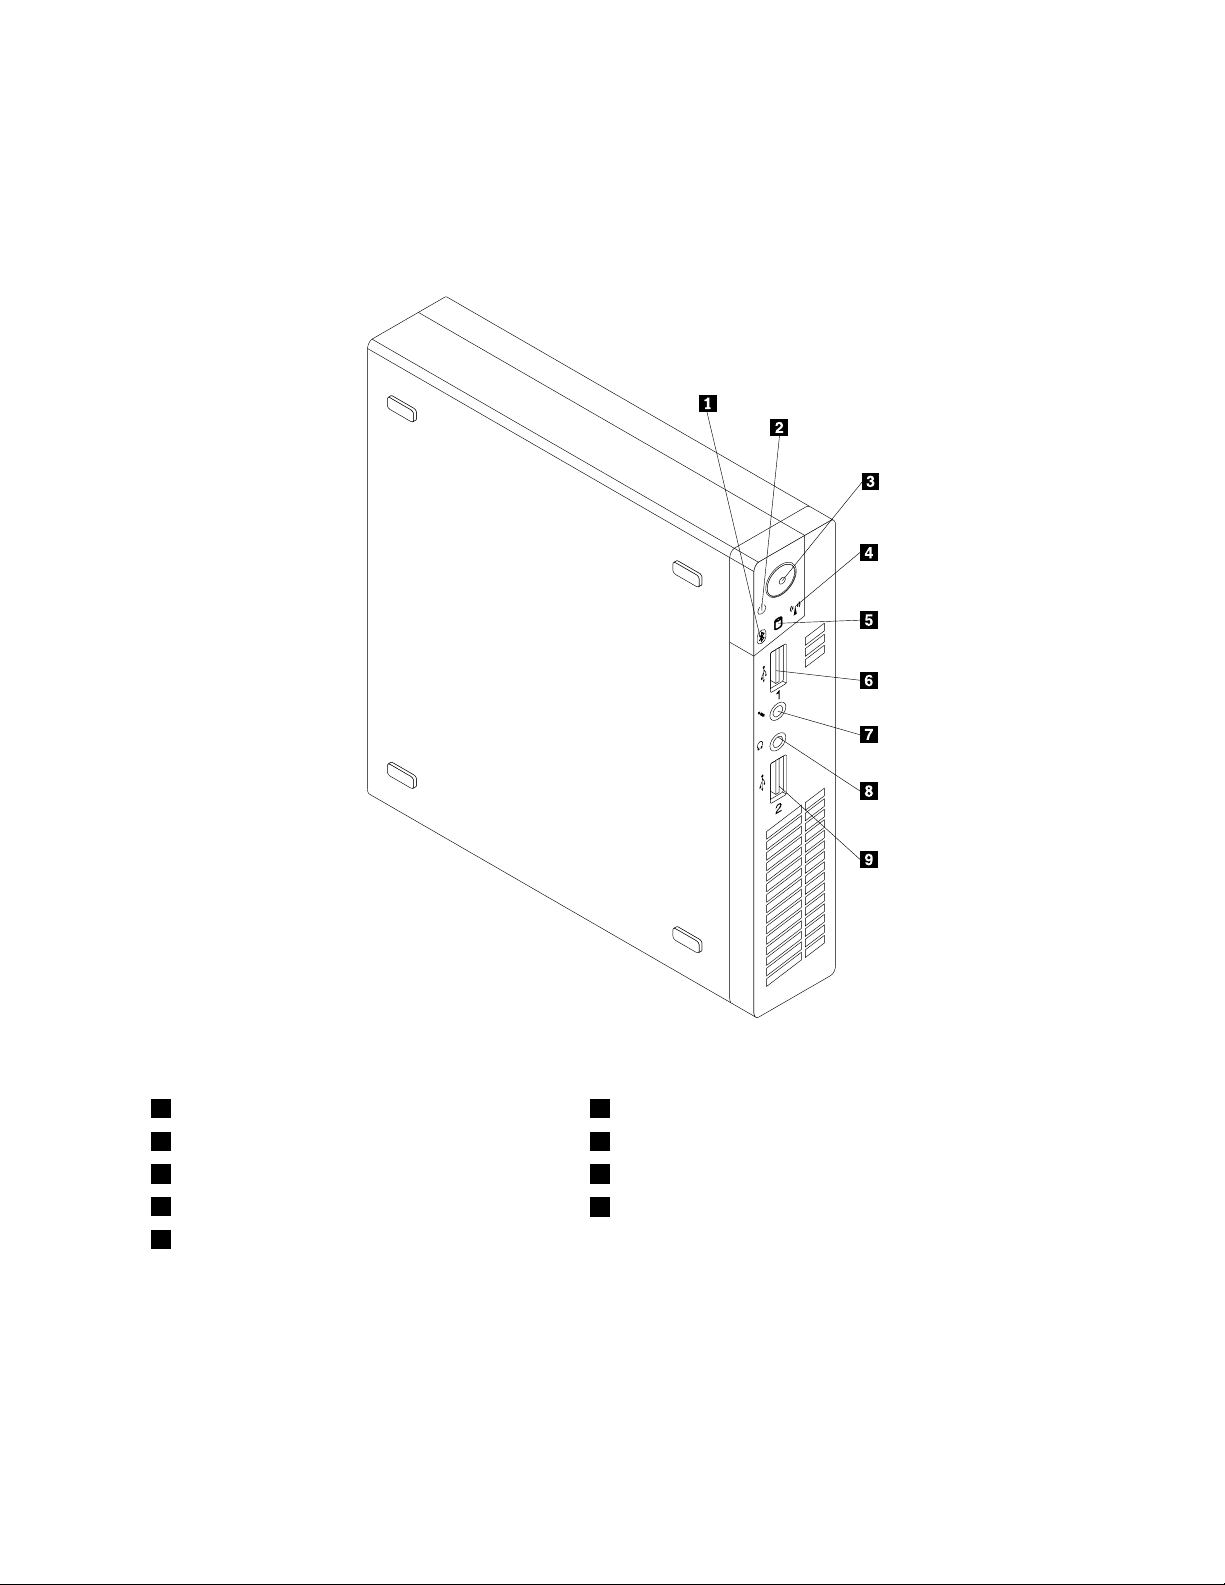
Locatingconnectors,controls,andindicatorsonthefrontofyour computer
Figure1“Frontconnector,control,andindicatorlocations”onpage9showsthelocationsoftheconnectors,
controls,andindicatorsonthefrontofyourcomputer.
Figure1.Frontconnector,control,andindicatorlocations
1Bluetoothactivityindicator
2Powerindicator7Microphoneconnector
3Powerswitch8Headphoneconnector
4Wirelessactivityindicator
5Harddiskdriveactivityindicator
6USB2.0connector(USBport1)
9USB2.0connector(USBport2)
Chapter1.Productoverview9
Page 24
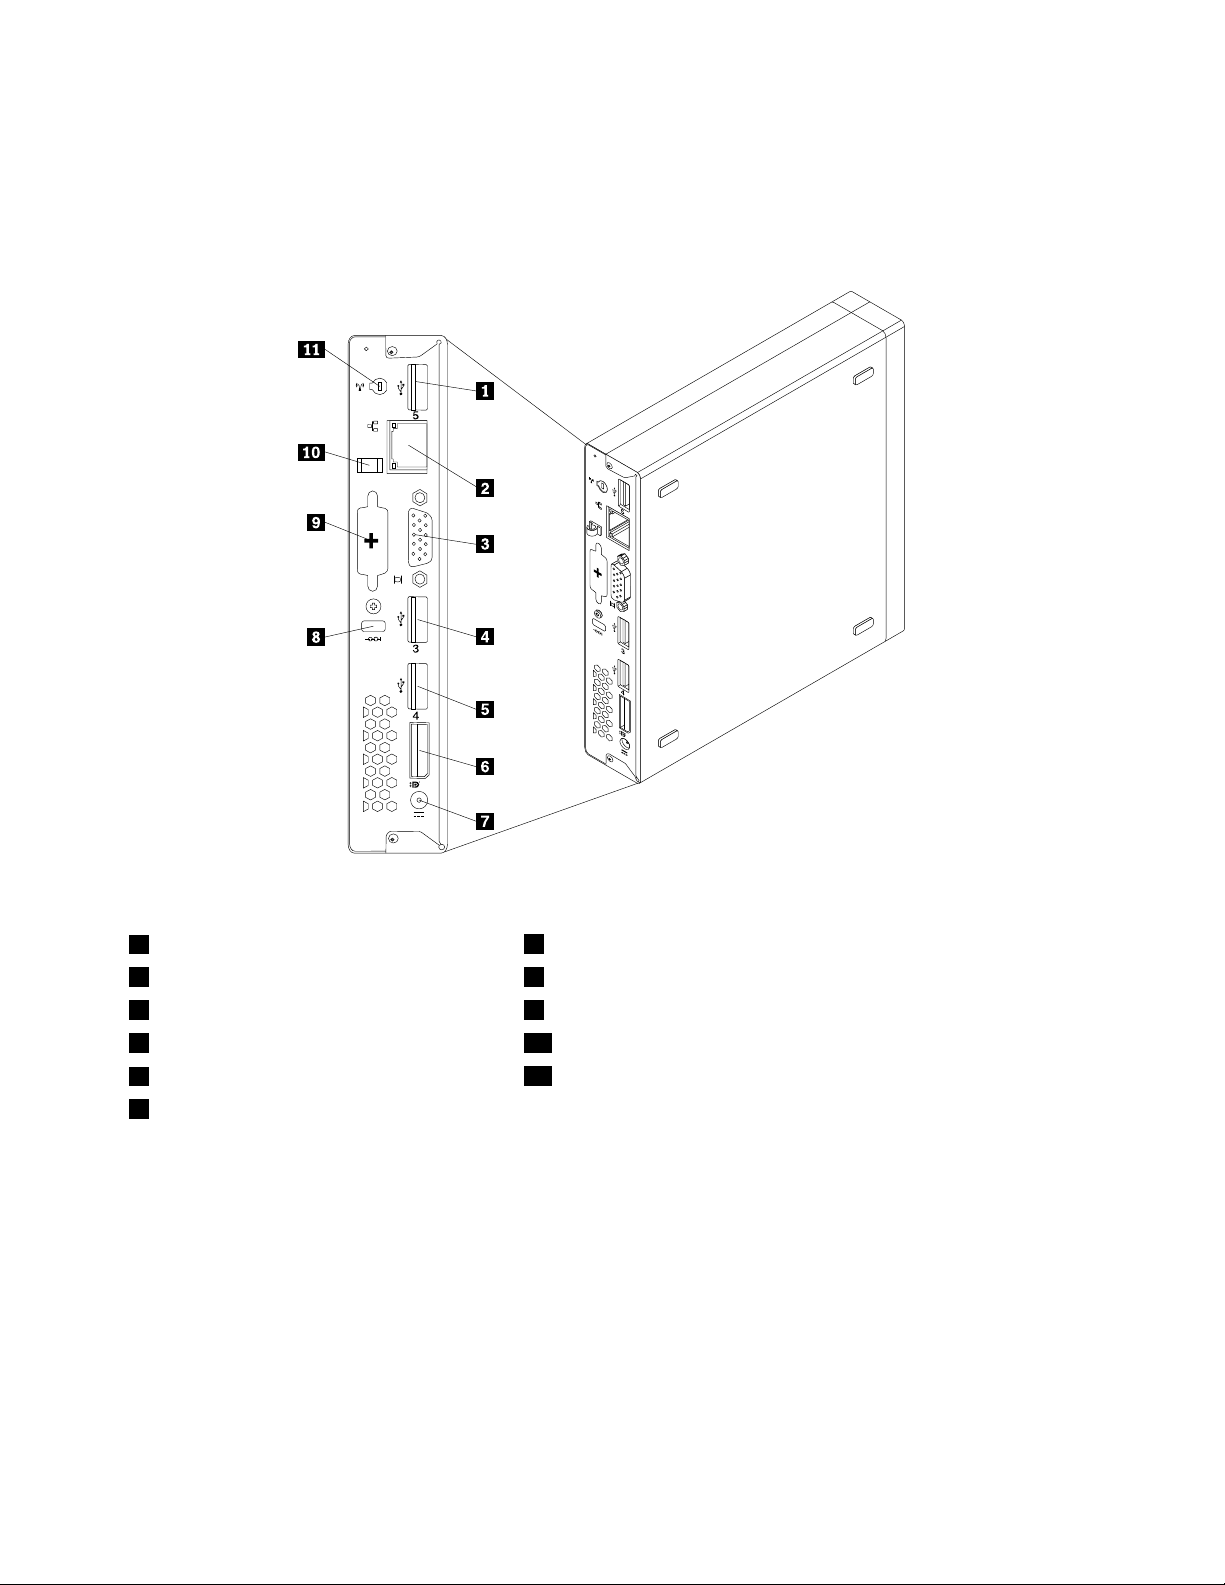
Locatingconnectorsontherearofyourcomputer
Figure2“Rearconnectorlocations”onpage10showsthelocationsoftheconnectorsontherearofyour
computer.Someconnectorsontherearofyourcomputerarecolor-codedtohelpyoudeterminewhereto
connectthecablesonyourcomputer.
Figure2.Rearconnectorlocations
1USB2.0connector(USBport5)
2Ethernetconnector8Integratedcablelockslot
3VGAmonitorconnector9Optionalport
4USB2.0connector(USBport3)
5USB2.0connector(USBport4)
6DisplayPortconnector
7acpoweradapterconnector
10acpoweradaptercableloop
11WiFicardmoduleantennaslot
ConnectorDescription
DisplayPortconnector
Usedtoattachahigh-performancemonitor,adirect-drivemonitor,orotherdevices
thatuseaDisplayPortconnector.
Ethernetconnector
UsedtoattachanEthernetcableforalocalareanetwork(LAN).
Note:TooperatethecomputerwithinFCCClassBlimits,useaCategory5Ethernet
cable.
OptionalportUsedtoinstallaserialport,aUSB2.0connector,oranoptionalWiFicardmodule
antenna.
USB2.0connectorUsethisconnectortoattachadevicethatrequiresaUSB2.0connection,suchasa
keyboard,amouse,ascanner,aprinter,orapersonaldigitalassistant(PDA).
VGAmonitorconnectorUsedtoattachaVGAmonitororotherdevicesthatuseaVGAmonitorconnector.
10ThinkCentreUserGuide
Page 25
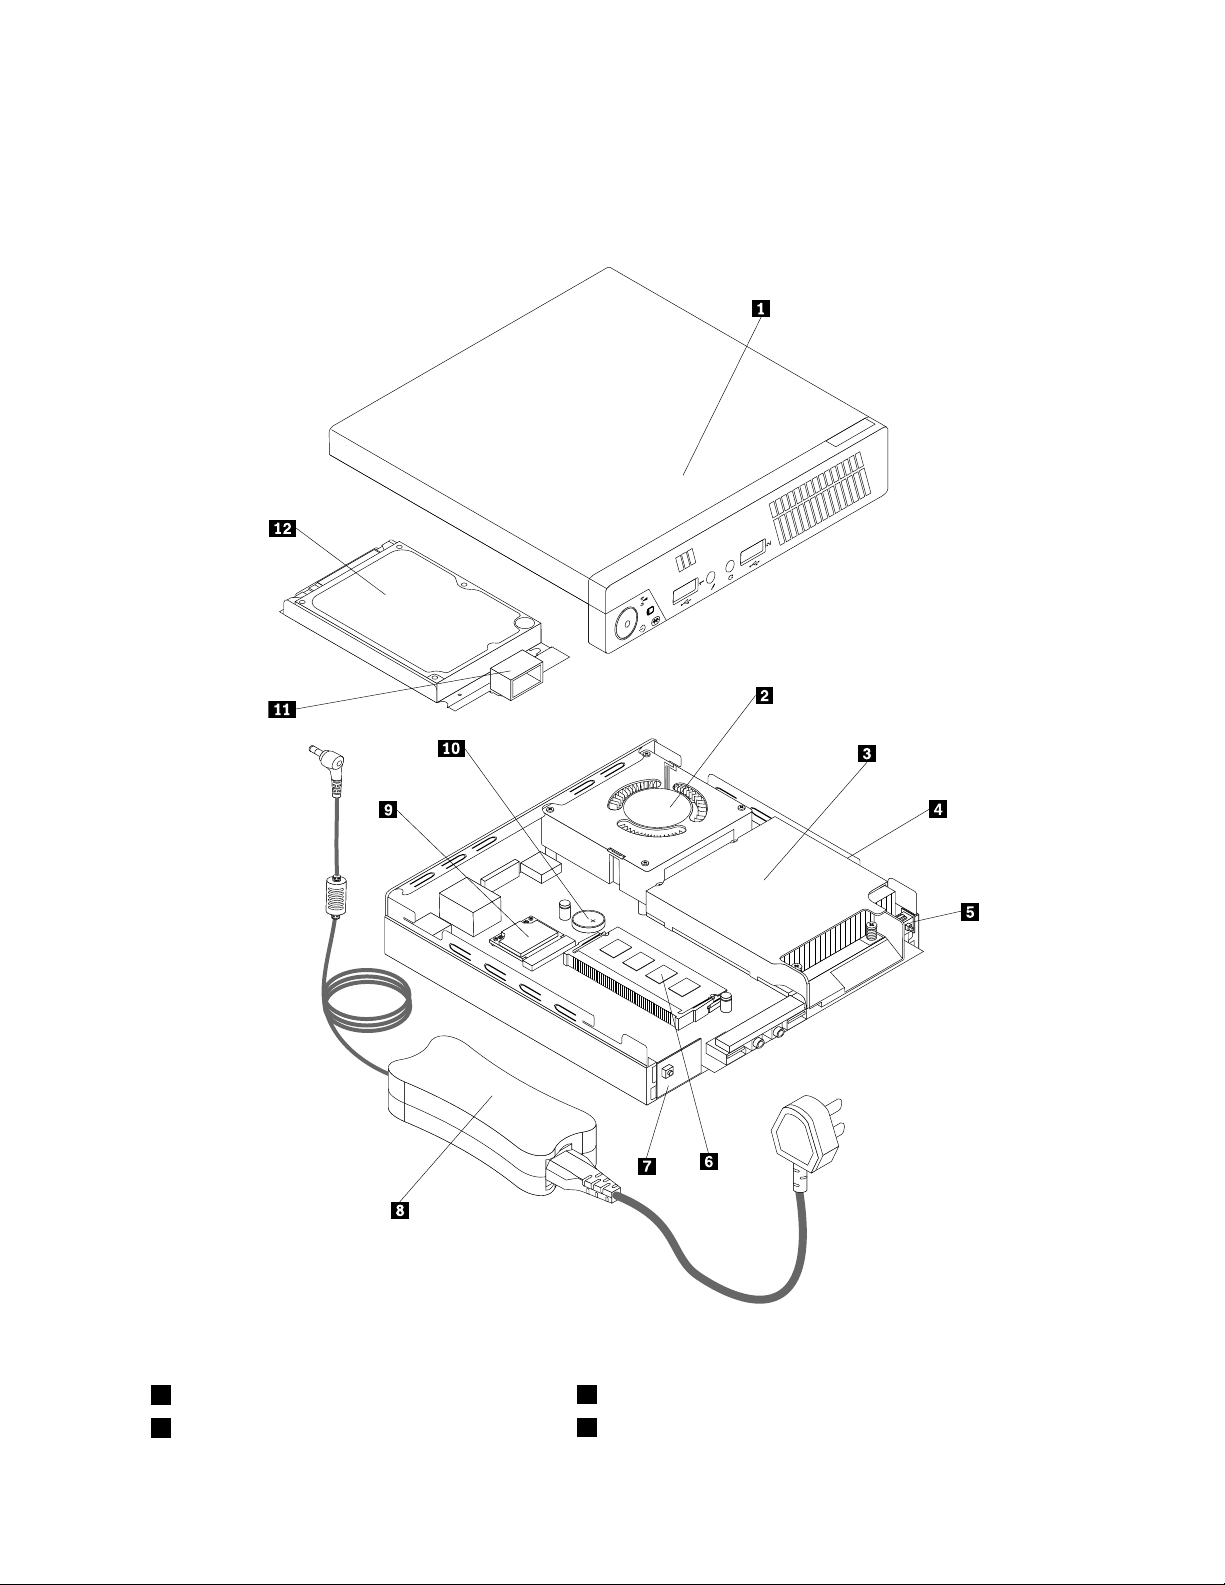
Locatingcomponents
Figure3“Componentlocations”onpage11showsthelocationsofthevariouscomponentsinyour
computer.T oremovethecomputercover,see“Removingthecomputercover”onpage33.
Figure3.Componentlocations
1Computercover
2Systemfan
7Powerswitchboard
8acpoweradapter
Chapter1.Productoverview11
Page 26
3Heatsink9WiFicardmodule
4Microprocessor10Battery
5Coverpresenceswitch(Intrusionswitch)
6Memorymodule(s)
11Internalspeaker
12Harddiskdriveorsolid-statedrive
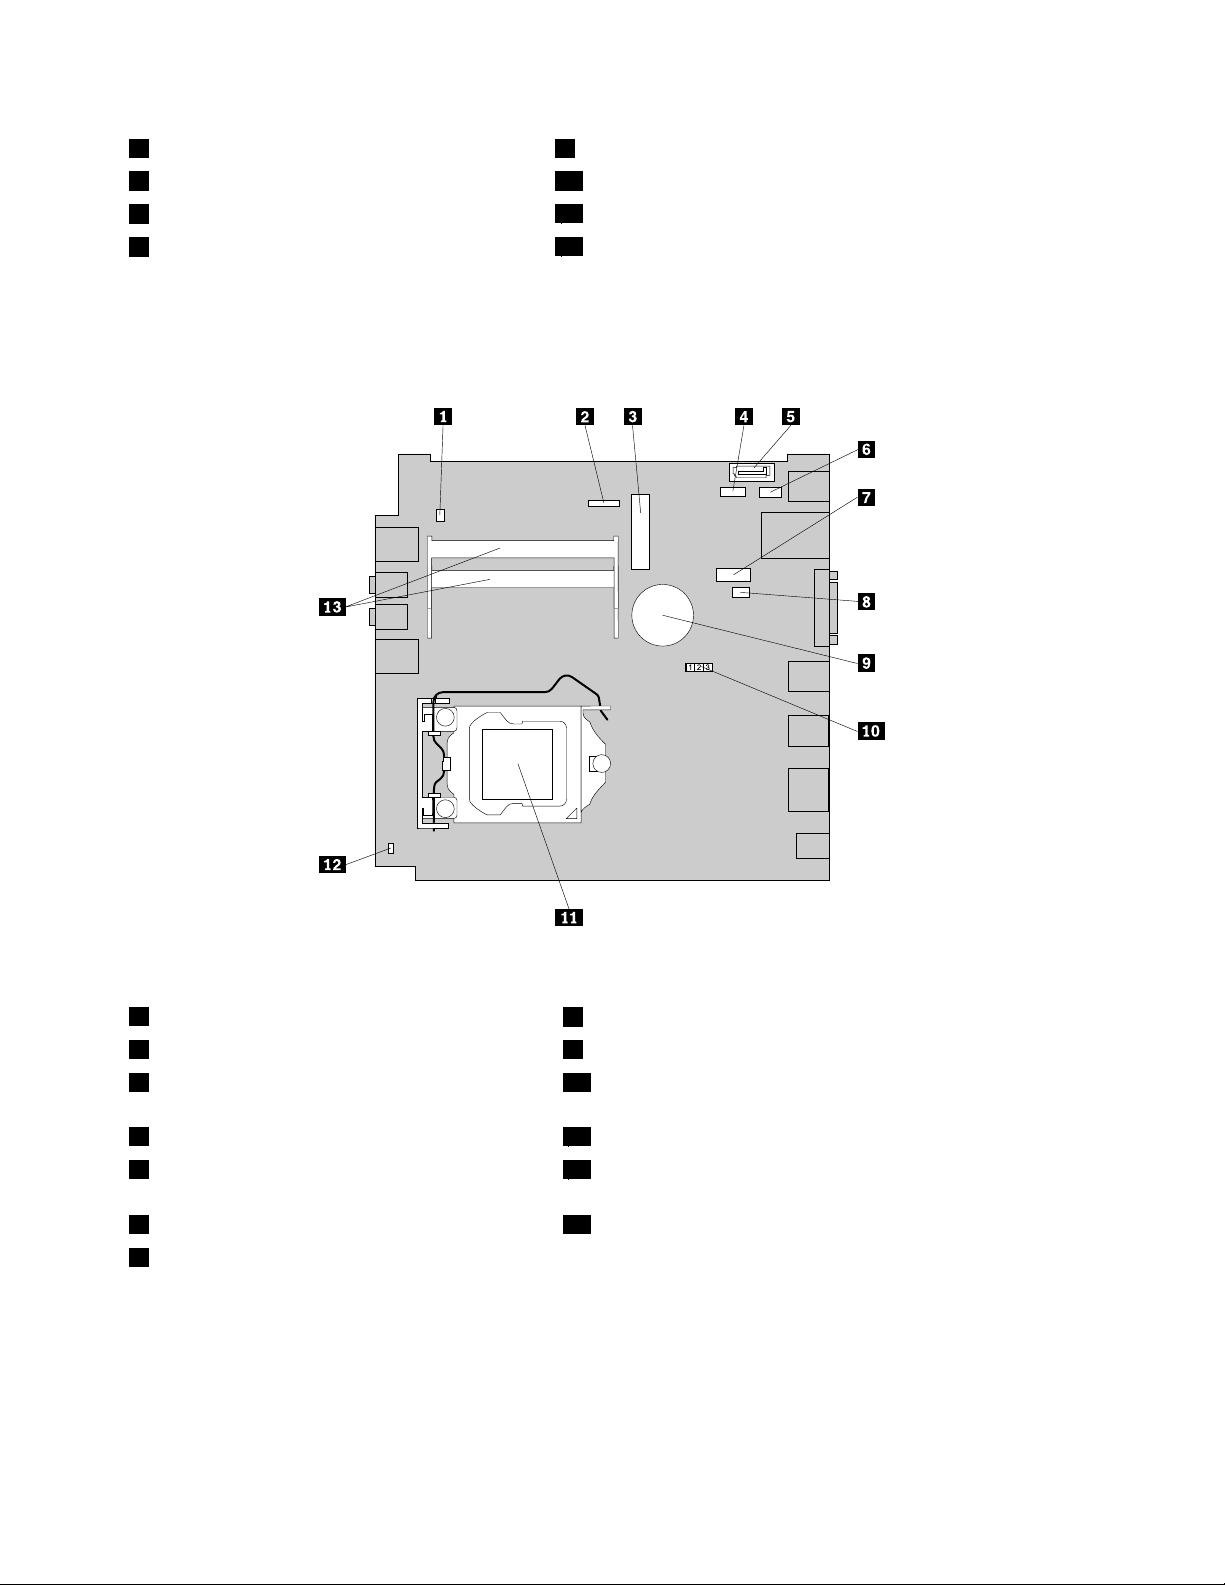
Locatingpartsonthesystemboard
Figure4“Systemboardpartlocations”onpage12showsthelocationsofthepartsonthesystemboard.
Figure4.Systemboardpartlocations
1Internalspeakerconnector
2Powerswitchboardcableconnector9Battery
3MiniPCIExpresscardslot10ClearCMOS(ComplementaryMetalOxideSemiconductor)
8Systemfanconnector
/Recoveryjumper
4Harddiskdrivepowerconnector11Microprocessor
5SATAconnector12Coverpresenceswitchconnector(Intrusionswitch
connector)
6OptionalUSBconnector13Memoryslots(2)
7Serial(COM1)connector
12ThinkCentreUserGuide
Page 27
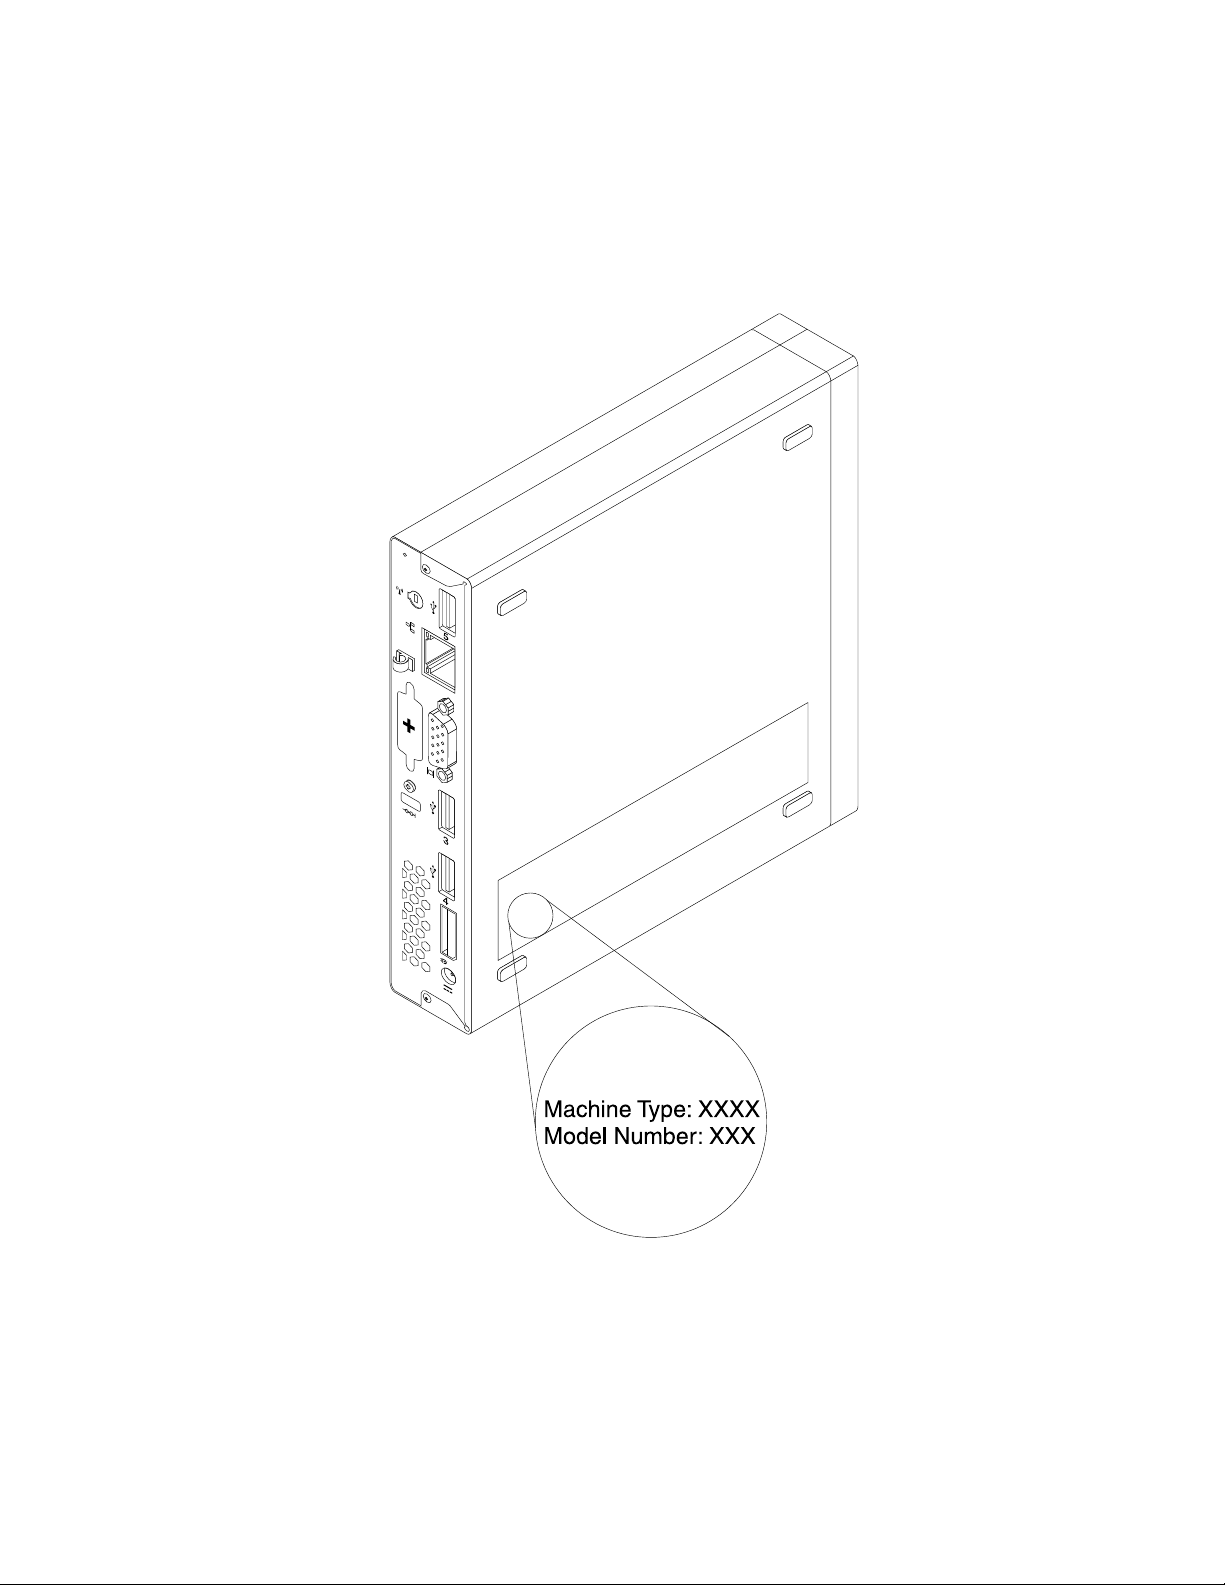
Machinetypeandmodellabel
Themachinetypeandmodellabelidentiesyourcomputer.WhenyoucontactLenovoforhelp,themachine
typeandmodelinformationhelpssupporttechnicianstoidentifyyourcomputerandprovidefasterservice.
Thefollowingisasampleofthemachinetypeandmodellabel.
Figure5.Machinetypeandmodellabel
Chapter1.Productoverview13
Page 28

14ThinkCentreUserGuide
Page 29

Chapter2.Usingyourcomputer
Thischapterprovidesinformationonusingsomeofthecomputercomponents.
Frequentlyaskedquestions
Thefollowingareafewtipsthatwillhelpyouoptimizetheuseofyourcomputer.
CanIgetmyuserguideinanotherlanguage?
TheuserguideisavailableinvariouslanguagesontheLenovoSupportWebsiteat:
http://www.lenovo.com/ThinkCentreUserGuides
Wherearemyrecoverydiscs?
Lenovoprovidesaprogramthatenablesyoutocreaterecoverydiscs.Fordetailsaboutcreatingrecovery
discs,see“Creatingrecoverymedia”onpage80.
Additionally,incaseofaharddiskfailure,youcanorderProductRecoverydiscsfromtheLenovoCustomer
SupportCenter.ForinformationaboutcontactingtheCustomerSupportCenter,seeChapter11“Getting
information,help,andservice”onpage117.BeforeusingtheProductRecoverydiscs,refertothe
documentationthatcomeswiththediscs.
Attention:AProductRecoverydiscpackagemightcontainmultiplediscs.Makesureyouhaveallofthe
discsreadybeforestartingtherecoveryprocess.Duringtherecoveryprocess,youmightbeprompted
tochangediscs.
WherecanIndhelpabouttheWindowsoperatingsystem?
TheWindowsHelpandSupportinformationsystemprovidesyouwithdetailedinformationaboutusingthe
Windowsoperatingsystemtohelpyougetthemostofyourcomputer.ToaccesstheWindowsHelpand
Supportinformationsystem,dooneofthefollowing:
•OntheWindows7operatingsystem,clickStart➙HelpandSupport.
•OntheWindows8operatingsystem,moveyourcursortothetop-rightorbottom-rightcornerofthe
screentodisplaythecharms.ThenclickSettings➙Help.
AccessingControlPanelontheWindows8operatingsystem
OntheWindowsoperatingsystem,youcanviewandchangecomputersettingsthroughControlPanel.To
accessControlPanelontheWindows8operatingsystem,dooneofthefollowing:
•Fromthedesktop
1.Movethecursortothetop-rightorbottom-rightcornerofthescreentodisplaythecharms.
2.ClickSettings.
3.ClickControlPanel.
•FromtheStartscreen
1.Movethecursortothetop-rightorbottom-rightcornerofthescreentodisplaythecharms.
2.ClickSearch.
3.OntheAppsscreen,scrolltotherightside,andclickControlPanelintheWindowsSystemsection.
©CopyrightLenovo2012
15
Page 30

Usingthekeyboard
Dependingonyourmodel,yourcomputercomeswitheitherastandardkeyboardorangerprintreader
keyboard.TheMicrosoftWindowsshortcutkeysareprovidedonbothkeyboardtypes.
Thissectionprovidesinformationaboutthefollowingtopics:
•“UsingWindowsshortcutkeys”onpage16
•“UsingtheblueThinkVantagebutton”onpage16
•“Usingangerprintreader”onpage16
UsingWindowsshortcutkeys
Boththestandardkeyboardandthengerprintreaderkeyboardprovidethreekeysyoucanusewithyour
MicrosoftWindowsoperatingsystem.
•ThetwoWindowslogokeysarelocatedbesidetheAltkeyoneithersideofthespacebar.Theyfeature
theWindowslogo.OntheWindows7operatingsystem,presstheWindowskeytoopentheStartmenu.
OntheWindows8operatingsystem,presstheWindowskeytoswitchbetweenthecurrentworkspace
andtheStartscreen.ThestyleoftheWindowslogovariesdependingonthekeyboardtype.
•Thecontext-menukeyislocatednexttotheCtrlkeyontherightsideoftheSpacebar.Pressingthe
context-menukeyopensthecontextmenufortheactiveprogram,icon,orobject.
Note:YoucanusethemouseortheUpandDownarrowkeystohighlightmenuselections.Y oucanclose
theStartmenuorthecontextmenubyclickingthemouseorpressingEsc.
UsingtheblueThinkVantagebutton
SomekeyboardshaveablueThinkVantagebuttonthatyoucanusetoopenacomprehensiveon-boardhelp
andinformationcenterfromLenovo.PressingtheblueThinkVantagebuttonopenstheSimpleTapprogram
ontheWindows7operatingsystemortheLenovoPCDeviceExperienceprogramontheWindows8
operatingsystem.
Usingangerprintreader
Somecomputersmightcomewithakeyboardthathasangerprintreader.Formoreinformationaboutthe
ngerprintreader,see“AnintroductiontoLenovoprograms”onpage6.
ToopentheThinkVantageFingerprintSoftwareprogramandusethengerprintreader,see“Lenovo
programs”onpage4.
Followtheinstructionsonthescreen.Foradditionalinformation,refertotheThinkVantageFingerprint
Softwarehelpsystem.
16ThinkCentreUserGuide
Page 31

Usingthewheelmouse
Thewheelmousehasthefollowingcontrols:
1PrimarymousebuttonUsethisbuttontoselectorstartaprogramormenuitem.
2Wheel
3Secondarymousebutton
Youcanswitchthefunctionoftheprimaryandsecondarymousebuttonsandchangeotherdefaultbehavior
throughthemousepropertiesfunctionintheWindowsControlPanel.
Usethewheeltocontrolthescrollingactionofthemouse.Thedirectioninwhichyou
rotatethewheelcontrolsthedirectionofthescrollingaction.
Usethisbuttontodisplayamenufortheactiveprogram,icon,orobject.
Adjustingaudio
Soundisanimportantpartofthecomputerexperience.Yourcomputerhasadigitalaudiocontrollerbuilt
intothesystemboard.Somemodelsalsohaveahigh-performanceaudioadapterinstalledinoneofthePCI
cardslots.
Aboutyourcomputeraudio
Ifafactory-installed,high-performanceaudioadapterisinstalledinyourcomputer,thesystem-board
audioconnectorsontherearofthecomputeraretypicallydisabled;usetheconnectorsprovidedonthe
audioadapter.
Eachaudiosolutionprovidesatleastthreeaudioconnectors:audioline-inconnector,audioline-out
connector,andMicrophoneconnector.Onsomemodels,afourthconnectorisprovidedfortheattachment
ofunpoweredstereospeakers(speakersthatdonotrequireanacpowersource).Theaudioadapter
providesyouwiththeabilitytorecordandplaybacksoundandmusic,aswellastoenjoysoundwith
multimediaapplicationsandworkwithspeech-recognitionsoftware.
Optionally,youcanconnectasetofpoweredstereospeakerstotheaudioline-outconnectortoenjoy
bettersoundwithmultimediaapplications.
Settingthevolumefromthedesktop
Thedesktopvolumecontrolisaccessiblethroughthevolumeiconinthetaskbar,whichislocatedatthe
bottom-rightcorneroftheWindowsdesktop.Clickthevolumeiconandmovethesliderupordownto
controlthevolume,orclicktheMuteicontoturntheaudiooff.Ifthevolumeiconisnotinthetaskbar,see
“Addingthevolumeicontothetaskbar”onpage17
.
Addingthevolumeicontothetaskbar
ToaddthevolumeicontothetaskbarontheWindows7operatingsystem,dothefollowing:
Chapter2.Usingyourcomputer17
Page 32

1.FromtheWindowsdesktop,clickStart➙ControlPanel➙AppearanceandPersonalization.
2.IntheT askbarandStartMenusection,clickCustomizeiconsonthetaskbar.
3.ClickT urnsystemiconsonoroffandchangethevolumebehaviorsfromOfftoOn.
4.ClickOKtosavethenewsettings.
ToaddthevolumeicontothetaskbarontheWindows8operatingsystem,dothefollowing:
1.OpenControlPanel,andclickAppearanceandPersonalization.
2.IntheTaskbarsection,clickCustomizeiconsonthetaskbar.
3.ClickT urnsystemiconsonoroffandchangethevolumebehaviorsfromOfftoOn.
4.ClickOKtosavethenewsettings.
SettingthevolumefromControlPanel
YoucansetthecomputervolumefromControlPanel.T osetthecomputervolumefromControlPanel,
dothefollowing:
1.OntheWindows7operatingsystem,clickStart➙ControlPanel➙HardwareandSound.Onthe
Windows8operatingsystem,openControlPanel,andclickHardwareandSound.
2.IntheSoundsection,clickAdjustsystemvolume.
3.Movetheslidersupordowntoraiseorlowerthevolumeofyourcomputer.
UsingCDsandDVDs
YourcomputermighthaveaDVDROMdriveorrecordableDVDdriveinstalled.DVDdrivesuse
industry-standard,12cm(4.75-inch)CDmediaorDVDmedia.IfyourcomputercomeswithaDVDdrive,
thedrivecanreadDVD-ROMdiscs,DVD-Rdiscs,DVD-RAMdiscs,DVD-RWdiscs,andalltypesofCDs,
suchasCD-ROMdiscs,CD-RWdiscs,CD-Rdiscs,andaudioCDs.IfyouhavearecordableDVDdrive,
itcanalsorecordonDVD-Rdiscs,DVD-RWdiscs,typeIIDVD-RAMdiscs,CD-RWstandardandhigh
speeddiscs,andCD-Rdiscs.
FollowtheseguidelineswhenusingtheDVDdrive:
•Donotplacethecomputerinalocationwherethedriveisexposedtothefollowing:
–Hightemperature
–Highhumidity
–Excessivedust
–Excessivevibrationorsuddenshock
–Aninclinedsurface
–Directsunlight
•DonotinsertanyobjectotherthanaCDorDVDintothedrive.
•Beforemovingthecomputer,removetheCDorDVDfromthedrive.
HandlingandstoringCDandDVDmedia
CDandDVDmediaaredurableandreliable,buttheydorequiresomecareandspecialhandling.When
handlingandstoringaCDorDVD,followtheseguidelines:
•Holdthediscbyitsedges.Donottouchthesurfaceofthesidethatisnotlabeled.
•Toremovedustorngerprints,wipethediscwithaclean,softclothfromthecentertotheoutside.Wiping
thediscinacirculardirectionmightcauselossofdata.
18ThinkCentreUserGuide
Page 33

•Donotwriteorstickpaperonthedisc.
•Donotscratchormarkthedisc.
•Donotplaceorstorethediscindirectsunlight.
•Donotusebenzene,thinners,orothercleanerstocleanthedisc.
•Donotdroporbendthedisc.
•Donotinsertdamageddiscsintothedrive.Warped,scratched,ordirtydiscscandamagethedrive.
PlayingaCDorDVD
IfyourcomputercomeswithaDVDdrive,youcanlistentoaudioCDsorwatchDVDmovies.Toplaya
CDorDVD,dothefollowing:
1.PresstheEject/LoadbuttonontheDVDdrivetoopenthetray.
2.Withthetrayfullyextended,inserttheCDorDVDintothetray.SomeDVDdriveshaveasnaphubinthe
centerofthetray.Ifyourdrivehasasnaphub,supportthetraywithonehandandthenpushonthe
centeroftheCDorDVDuntilitsnapsintoplace.
3.PresstheEject/Loadbuttonagainorgentlypushthetrayforwardtoclosethetray.TheCDorDVD
playerprogramstartsautomatically.Foradditionalinformation,refertotheCDorDVDplayerprogram
helpsystem.
ToremoveaCDorDVDfromtheDVDdrive,dothefollowing:
1.Withthecomputeron,presstheEject/Loadbutton.Whenthetrayslidesoutautomatically,carefully
removethedisc.
2.ClosethetraybypressingtheEject/Loadbuttonorbygentlypushingthetrayforward.
Note:IfthetraydoesnotslideoutofthedrivewhenyoupresstheEject/Loadbutton,insertastraightened
paperclipintotheemergency-ejectholelocatedonthefrontoftheDVDdrive.Besurethedriveispowered
offwhenusingtheemergencyeject.UsetheEject/Loadbuttoninsteadoftheemergencyejectexcept
inanemergency.
RecordingaCDorDVD
IfyourcomputercomeswitharecordableDVDdrive,youcanusethedrivetorecordCDsorDVDs.
TorecordaCDorDVD,dooneofthefollowing:
•OntheWindows7operatingsystem,youhaveeithertheCorelDVDMovieFactoryLenovoEditionprogram
orthePower2Goprograminstalledonyourcomputer.
–ToruntheCorelDVDMovieFactoryLenovoEditionprogram,clickStart➙AllPrograms➙Corel
DVDMovieFactoryLenovoEdition➙CorelDVDMovieFactoryLenovoEdition.Followthe
instructionsonthescreen.
–TorunthePower2Goprogram,clickStart➙AllPrograms➙PowerDVDCreate➙Power2Go.
Followtheinstructionsonthescreen.
•OntheWindows8operatingsystem,runthePower2Goprogrambydoingthefollowing:
1.Movethecursortothetop-rightorbottom-rightcornerofthescreentodisplaythecharms.Then
clickSearchandtypePower2Go.
2.ClickPower2Gointheleftpaneltoopentheprogram.
3.Followtheinstructionsonthescreen.
YoualsocanuseWindowsMedia
andSupport”onpage117.
®
PlayertorecordCDsanddataDVDs.Formoreinformation,see“Help
Chapter2.Usingyourcomputer19
Page 34

20ThinkCentreUserGuide
Page 35

Chapter3.Youandyourcomputer
Thischapterprovidesinformationaboutaccessibility,comfort,andrelocatingyourcomputertoother
countriesorregions.
Accessibilityandcomfort
Goodergonomicpracticeisimportanttogetthemostfromyourpersonalcomputerandtoavoiddiscomfort.
Arrangeyourworkplaceandtheequipmentyouusetosuityourindividualneedsandthekindofwork
thatyouperform.Inaddition,usehealthyworkhabitstomaximizeyourperformanceandcomfortwhile
usingyourcomputer.
Thefollowingtopicsprovideinformationaboutarrangingyourworkarea,settingupyourcomputer
equipment,andestablishinghealthyworkhabits.
Lenovoiscommittedtoprovidingpeoplewithdisabilitiesgreateraccesstoinformationandtechnology.
Asaresult,thefollowinginformationprovideswaystohelpusersthathavehearing,vision,andmobility
limitationsgetthemostoutoftheircomputerexperience.
Assistivetechnologiesenableuserstoaccessinformationinthemostappropriateway.Someofthese
technologiesarealreadyprovidedinyouroperatingsystem,otherscanbepurchasedthroughvendors,or
accessedthroughtheWorldWideWeb:
http://www.lenovo.com/healthycomputing
Arrangingyourworkspace
Togetthemostfromyourcomputer,arrangeboththeequipmentyouuseandyourworkareatosuityour
needsandthekindofworkyoudo.Yourcomfortisofforemostimportance,butlightsources,aircirculation,
andthelocationofelectricaloutletscanalsoaffectthewayyouarrangeyourworkspace.
Comfort
Althoughnosingleworkingpositionisidealforeveryone,hereareafewguidelinestohelpyounda
positionthatsuitsyoubest.
Sittinginthesamepositionforalongtimecancausefatigue.Thebackrestandseatofyourchairshould
adjustindependentlyandprovidegoodsupport.Theseatshouldhaveacurvedfronttorelievepressureon
thethighs.Adjusttheseatsothatyourthighsareparalleltotheoorandyourfeetareeitheratonthe
oororonafootrest.
Whenusingthekeyboard,keepyourforearmsparalleltotheoorandyourwristsinacomfortableposition.
Usealighttouchonthekeyboardandyourhandsandngersrelaxed.Changetheangleofthekeyboard
formaximumcomfortbyadjustingthepositionofthekeyboardfeet.
©CopyrightLenovo2012
21
Page 36

Adjustthemonitorsothetopofthescreenisat,orslightlybelow,eyelevel.Placethemonitorata
comfortableviewingdistance,usually51to61cm(20to24inches),andpositionitsoyoucanviewit
withouthavingtotwistyourbody.Also,positionotherequipmentyouuseregularly,suchasthetelephoneor
amouse,withineasyreach.
Glareandlighting
Positionthemonitortominimizeglareandreectionsfromoverheadlights,windows,andotherlightsources.
Reectedlightfromshinysurfacescancauseannoyingreectionsonyourmonitorscreen.Placethe
monitoratrightanglestowindowsandotherlightsources,whenpossible.Reduceoverheadlighting,if
necessary,byturningofflightsorusinglowerwattagebulbs.Ifyouinstallthemonitornearawindow,use
curtainsorblindstoblockthesunlight.Y oucanadjustthebrightnessandcontrastcontrolsonthemonitor
astheroomlightingchangesthroughouttheday.
Whereitisimpossibletoavoidreectionsortoadjustthelighting,anantiglarelterplacedoverthescreen
mightbehelpful.However,theseltersmightaffecttheclarityoftheimageonthescreen;trythemonlyafter
youhaveexhaustedothermethodsofreducingglare.
Dustbuildupcompoundsproblemsassociatedwithglare.Remembertocleanyourmonitorscreen
periodicallyusingasoftclothasdirectedinyourmonitordocumentation.
Aircirculation
Yourcomputerandmonitorproduceheat.Thecomputerhasafanthatpullsinfreshairandforcesouthot
air.Themonitorletshotairescapethroughvents.Blockingtheairventscancauseoverheating,whichmight
resultinamalfunctionordamage.Placethecomputerandmonitorsothatnothingblockstheairvents;
usually,51mm(2inches)ofairspaceissufcient.Also,makesuretheventedairisnotblowingonpeople.
Electricaloutletsandcablelengths
Thelocationofelectricaloutlets,thelengthofpowercordsandcablesthatconnecttothemonitor,printer,
andotherdevicesmightdeterminethenalplacementofyourcomputer.
Whenarrangingyourworkspace:
•Avoidtheuseofextensioncords.Whenpossible,plugthecomputerpowercorddirectlyintoanelectrical
outlet.
•Keeppowercordsandcablesneatlyroutedawayfromwalkwaysandotherareaswheretheymight
getkickedaccidentally.
Formoreinformationaboutpowercords,see“Powercordsandpoweradapters”onpagevi
22ThinkCentreUserGuide
.
Page 37

Registeringyourcomputer
Whenyouregisteryourcomputer,informationisenteredintoadatabase,whichenablesLenovotocontact
youincaseofarecallorothersevereproblem.AfteryouregisteryourcomputerwithLenovo,youwillreceive
quickerservicewhenyoucallLenovoforhelp.Inaddition,somelocationsofferextendedprivilegesand
servicestoregisteredusers.
ToregisteryourcomputerwithLenovo,dooneofthefollowing:
•Gotohttp://www.lenovo.com/registerandfollowtheinstructionsonthescreentoregisteryourcomputer.
•ConnectyourcomputertotheInternetandregisteryourcomputerthroughapreinstalledregistration
program:
–ForWindows7:ThepreinstalledLenovoProductRegistrationprogramlaunchesautomaticallyafteryou
haveusedyourcomputerforatime.Followtheinstructionsonthescreentoregisteryourcomputer.
–ForWindows8:OpentheLenovoSupportprogram.ThenclickRegistrationandfollowtheinstructions
onthescreentoregisteryourcomputer.
Movingyourcomputertoanothercountryorregion
Whenyoumoveyourcomputertoanothercountryorregion,youmusttakelocalelectricalstandardsinto
consideration.Thissectionprovidesinformationonthefollowing:
•“Voltage-selectionswitch”onpage23
•“Replacementpowercords”onpage24
Voltage-selectionswitch
Somecomputersareequippedwithavoltage-selectionswitchlocatednearthepower-cordconnection
pointonthecomputerandsomecomputersdonothaveavoltage-selectionswitch.Beforeyouinstall
yourcomputerorrelocateyourcomputertoanothercountryorregion,youmustbecertainthatyouhave
matchedyourcomputertothevoltageavailableatyourelectricaloutlet.
CAUTION:
Youmustknowthevoltageoftheelectricalconnection(outlet)whereyourcomputerwillbe
connected.Ifyoudonotknowthevoltage,contactyourlocalelectriccompanyorrefertoofcial
Websitesorotherliteraturefortravelerstothecountryorregionwhereyouarelocated.
Ifyourcomputerhasavoltage-selectionswitch,youmustsettheswitchtomatchthevoltageavailableat
yourelectricaloutlet.Settingthevoltage-selectionswitchincorrectlywillcausethecomputertomalfunction
andmightcausepermanentdamagetothecomputer.Donotconnectthecomputertoanelectrical
outletuntilyouhaveveriedthatthevoltage-selectionswitchsettingmatchesthevoltageavailableatthe
electricaloutlets.
Ifyourcomputerdoesnothaveavoltage-selectionswitch,inspectthevoltage-ratinglabelonthebottomof
thecomputerandnotethefollowing:
•Ifthevoltage-ratinglabelshowsarangeofeither“100-127V”or“200-240V,”youmustensurethatthe
voltageprovidedattheelectricaloutletmatchesthevoltageratingonthecomputerlabel.Ifitdoes
notmatch,donotattempttoconnectthecomputertotheelectricaloutlet,unlessanexternaldevice
suchasavoltage-convertingtransformerisused.
•Ifthevoltage-ratinglabelshowsadualrangeof“100-127V”and“200-240V,”thissigniesthatthe
computerissuitableforworldwideoperationandthecomputerwillautomaticallyadjusttothevoltageat
theelectricaloutletregardlessofthecountryorregionwherethecomputerisbeingconnected.
Chapter3.Youandyourcomputer23
Page 38

Replacementpowercords
Ifyourelocateyourcomputertoacountryorregionthatusesanelectricaloutletstyledifferentfromthe
typeyouarecurrentlyusing,youwillhavetopurchaseeitherelectricalplugadaptersornewpowercords.
YoucanorderpowercordsdirectlyfromLenovo.
Forpowercordinformationandpartnumbers,goto:
http://www.lenovo.com/powercordnotice
24ThinkCentreUserGuide
Page 39

Chapter4.Security
Thischapterprovidesinformationabouthowtoprotectyourcomputerfromtheftandunauthorizeduse.
Securityfeatures
Thefollowingsecurityfeaturesareavailableonyourcomputer:
•ComputraceAgentsoftwareembeddedinrmware
TheComputraceAgentsoftwareisanITassetmanagementandcomputertheftrecoverysolution.
Thesoftwaredetectsifchangeshavebeenmadeonthecomputer,suchashardware,software,or
thecomputercall-inlocation.
Note:YoumighthavetopurchaseasubscriptiontoactivatetheComputraceAgentsoftware.
•Coverpresenceswitch(alsocalledintrusionswitch)
Thecoverpresenceswitchpreventsyourcomputerfromloggingintotheoperatingsystemwhenthe
computercoverisnotproperlyinstalledorclosed.Toenablethecoverpresenceswitchconnector
onthesystemboard,tothefollowing:
1.StarttheSetupUtilityprogram.See“StartingtheSetupUtilityprogram”onpage87.
2.SettheAdministratorPassword.See“Setting,changing,anddeletingapassword”onpage88.
3.FromtheSecuritysubmenu,selectChassisIntrusionDetection➙Enabled.Thecoverpresence
switchconnectoronthesystemboardisenabled.
Whenthecoverpresenceswitchdetectsthatyourcomputercoverisnotproperlyinstalledorclosed
whenyouturnonthecomputer,anerrormessagewillbedisplayed.Tobypasstheerrormessageand
logintotheoperatingsystem,dothefollowing:
1.Properlyinstallorcloseyourcomputercover.See“Completingthepartsreplacement”onpage75.
2.PressF1toentertheSetupUtilityprogram.ThenpressF10tosaveandexittheSetupUtility
program.Theerrormessagewillnotbedisplayedagain.
•AbilitytoenableanddisabledevicesandUSBconnectors
Formoreinformation,see“Enablingordisablingadevice”onpage89
•Integratedngerprintreader(availableonsomemodels)
Dependingonthemodelsofyourcomputer,thekeyboardmayhaveanintegratedngerprintreader.
ByenrollingyourngerprintandassociatingitwithaPower-onPassword,aHardDiskPassword,or
bothpasswordsbeforehand,youcanstartthecomputer,logontothesystem,andentertheSetup
Utilityprogrambyswipingyourngeroverthereader,withouttypingapassword.Thusngerprint
authenticationcanreplacepasswordsandenablesimpleandsecureuseraccess.
•Startupsequencecontrol
Formoreinformation,see“Selectingorchangingthestartupdevicesequence”onpage90
•Startupwithoutkeyboardormouse
Yourcomputerisabletologintotheoperatingsystemwithoutkeyboardormouseconnected.
.
.
©CopyrightLenovo2012
25
Page 40

Attachinganintegratedcablelock
Anintegratedcablelock,sometimesreferredtoastheKensingtonlock,canbeusedtosecureyour
computertoadesk,table,orothernon-permanentxture.Thecablelockattachestotheintegratedcable
lockslotattherearofyourcomputerandisoperatedwithakey.Thecablelockalsolocksthebuttonsused
toopenthecomputercover.Thisisthesametypeoflockusedwithmanynotebookcomputers.Youcan
orderanintegratedcablelockdirectlyfromLenovobysearchingforKensingtonat:
http://www.lenovo.com/support
Figure6.Integratedcablelock
Usingpasswords
YoucansetavarietyofpasswordsthroughtheMicrosoftWindowsoperatingsystemandthroughtheBIOS
ofyourcomputertohelpdeterunauthorizeduseofyourcomputer.
BIOSpasswords
YoucanusetheBIOSSetupUtilityprogramtosetpasswordstopreventunauthorizedaccesstoyour
computeranddata.Thefollowingtypesofpasswordsareavailable:
•Power-OnPassword:WhenaPower-OnPasswordisset,youarepromptedtotypeavalidpassword
eachtimethecomputeristurnedon.Thecomputercannotbeuseduntilthevalidpasswordistyped
in.Formoreinformation,see“Power-OnPassword”onpage88
•HardDiskPassword:SettingaHardDiskPasswordpreventsunauthorizedaccesstothedataonthehard
diskdrive.WhenaHardDiskPasswordisset,youarepromptedtotypeavalidpasswordeachtimeyou
trytoaccesstheharddiskdrive.Formoreinformation,see“HardDiskPassword”onpage88.
•AdministratorPassword:SettinganAdministratorPassworddetersunauthorizedusersfromchanging
congurationsettings.Ifyouareresponsibleformaintainingthecongurationsettingsofseveral
26ThinkCentreUserGuide
.
Page 41

computers,youmightwanttosetanAdministratorPassword.Formoreinformation,see“Administrator
Password”onpage88.
Youdonothavetosetanypasswordstouseyourcomputer.However,usingpasswordsimproves
computingsecurity.
Windowspasswords
DependingonyourversionoftheWindowsoperatingsystem,youcanusepasswordsforavarietyof
features,includingcontrollingloginaccess,accesstosharedresources,networkaccess,andindividualuser
settings.Formoreinformation,see“HelpandSupport”onpage117
.
Conguringthengerprintreader
Ifyourkeyboardhasangerprintreader,youcancongurethengerprintreaderintheSetupUtilityprogram.
TheFingerprintSetupsubmenuundertheSecuritymenuoftheSetupUtilityprogramprovidesthe
followingoptions:
•PrebootAuthentication:enablesordisablesthengerprintauthenticationforaccessingtheBIOS.
•EraseFingerprintData:clearsthengerprintdatastoredinangerprintreader.
Tocongurethengerprintreader,dothefollowing:
1.StarttheSetupUtilityprogram.See“StartingtheSetupUtilityprogram”onpage87.
2.FromtheSetupUtilityprogrammainmenu,selectSecurity➙FingerprintSetup,andpressEnter.
TheFingerprintSetupwindowopens.
3.SelectPrebootAuthenticationorEraseFingerprintDataasdesired,andpressEnter.
4.SelectthedesiredsettingsandpressEnter.
5.PressF10tosavechangesandexittheSetupUtilityprogram.PressEnterwhenpromptedtoconrm
theexit.
Usingandunderstandingrewalls
Arewallcanbehardware,software,oracombinationofbothdependingonthelevelofsecurityrequired.
Firewallsworkonasetofrulestodeterminewhichinboundandoutboundconnectionsareauthorized.If
yourcomputerispreintalledwitharewallprogram,ithelpsprotectagainstcomputerInternetsecurity
threats,unauthorizedaccess,intrusions,andInternetattacks.Italsoprotectsyourprivacy.Formore
informationabouthowtousetherewallprogram,refertothehelpsystemofyourrewallprogram.
TheWindowsoperatingsystempreinstalledonyourcomputerprovidestheWindowsFirewall.Fordetailson
usingtheWindowsFirewall,referto“HelpandSupport”onpage117
.
Protectingdataagainstviruses
Yourcomputerispreinstalledwithanantivirusprogramtohelpyouguardagainst,detect,andeliminate
viruses.
Lenovoprovidesafullversionofantivirussoftwareonyourcomputerwithafree30-daysubscription.After
30days,youmustrenewthelicensetocontinuereceivingtheantivirussoftwareupdates.
Note:Virusdenitionlesmustbekeptup-to-datetoguardagainstnewviruses.
Chapter4.Security27
Page 42

Formoreinformationabouthowtouseyourantivirussoftware,refertothehelpsystemofyourantivirus
software.
28ThinkCentreUserGuide
Page 43

Chapter5.Installingorreplacinghardware
Thischapterprovidesinstructionsonhowtoinstallorreplacehardwareforyourcomputer.
Handlingstatic-sensitivedevices
Donotopenthestatic-protectivepackagecontainingthenewpartuntilthedefectiveparthasbeenremoved
fromthecomputerandyouarereadytoinstallthenewpart.Staticelectricity,althoughharmlesstoyou,can
seriouslydamagecomputercomponentsandparts.
Whenyouhandlepartsandothercomputercomponents,taketheseprecautionstoavoidstatic-electricity
damage:
•Limityourmovement.Movementcancausestaticelectricitytobuilduparoundyou.
•Alwayshandlepartsandothercomputercomponentscarefully.HandlePCIcards,memorymodules,
systemboards,andmicroprocessorsbytheedges.Nevertouchanyexposedcircuitry.
•Preventothersfromtouchingthepartsandothercomputercomponents.
•Beforeyoureplaceanewpart,touchthestatic-protectivepackagecontainingtheparttoametal
expansion-slotcoverorotherunpaintedmetalsurfaceonthecomputerforatleasttwoseconds.This
reducesstaticelectricityfromthepackageandyourbody.
•Whenpossible,removethenewpartfromthestatic-protectivepackaging,andinstallitdirectlyinthe
computerwithoutsettingthepartdown.Whenthisisnotpossible,placethestatic-protectivepackage
thatthepartcameinonasmooth,levelsurfaceandplacethepartonit.
•Donotplacethepartonthecomputercoverorothermetalsurface.
Installingorreplacinghardware
Thissectionprovidesinstructionsonhowtoinstallorreplacehardwareforyourcomputer.Y oucanexpand
thecapabilitiesofyourcomputerandmaintainyourcomputerbyinstallingorreplacinghardware.
Attention:
Donotopenyourcomputerorattemptanyrepairbeforereadingandunderstandingthe“Importantsafetyinformation”
onpagev.
Notes:
1.UseonlycomputerpartsprovidedbyLenovo.
2.Wheninstallingorreplacinganoption,usetheappropriateinstructionsinthissectionalongwiththe
instructionsthatcomewiththeoption.
Installingexternaloptions
Youcanconnectexternaloptionstoyourcomputer,suchasexternalspeakers,aprinter,orascanner.For
someexternaloptions,youmustinstalladditionalsoftwareinadditiontomakingthephysicalconnection.
Wheninstallinganexternaloption,see“Locatingconnectors,controls,andindicatorsonthefrontofyour
computer”onpage9and“Locatingconnectorsontherearofyourcomputer”onpage10toidentifythe
requiredconnector.Then,usetheinstructionsthatcomewiththeoptiontohelpyoumaketheconnection
andinstallanysoftwareordevicedriversthatarerequiredfortheoption.
©CopyrightLenovo2012
29
Page 44

Installingorremovingtheverticalstand
Attention:
Donotopenyourcomputerorattemptanyrepairbeforereadingandunderstandingthe“Importantsafetyinformation”
onpagev
Thissectionprovidesinstructionsonhowtoinstallorremovetheverticalstand.
Note:Theverticalstandisonlyavailableonsomemodels.
Toinstallorremovetheverticalstand,dothefollowing:
1.T urnoffthecomputer.
2.Aligntherearofthecomputerwiththerearoftheverticalstandandpositionthecomputeronthe
.
verticalstandasshown.
Figure7.Installingtheverticalstand
30ThinkCentreUserGuide
Page 45

3.T oremovetheverticalstand,liftthecomputertoremoveitfromtheverticalstand.
Figure8.Removingthecomputerfromtheverticalstand
InstallingorremovingtheVESAmountbracket
Attention:
Donotopenyourcomputerorattemptanyrepairbeforereadingandunderstandingthe“Importantsafetyinformation”
onpagev.
ThissectionprovidesinstructionsonhowtoinstallorremovetheVESA(VideoElectronicsStandards
Association)mountbracket.
Note:TheVESAmountbracketisonlyavailableonsomemodels.
ToinstallorremovetheVESAmountbracket,dothefollowing:
1.T urnoffthecomputeranddisconnectallpowercordsfromelectricaloutlets.
Chapter5.Installingorreplacinghardware31
Page 46

2.T oinstalltheVESAmountbracket,slidethecomputerintotheVESAmountbracket.
Figure9.InstallingtheVESAmountbracket
3.InstallthetwoscrewstosecuretheVESAmountbrackettothecomputer.
Figure10.InstallingthescrewsthatsecuretheVESAmountbracket
32ThinkCentreUserGuide
Page 47

4.T oremovetheVESAmountbracketfromthecomputer,removethetwoscrewsthatsecuretheVESA
mountbrackettothecomputer.
Figure11.RemovingthescrewsthatsecuretheVESAmountbracket
5.SlidethecomputerfromthefrontoftheVESAmountbrackettoremovetheVESAmountbracket
fromthecomputer.
Figure12.RemovingtheVESAmountbracket
Whattodonext:
•Toworkwithanotherpieceofhardware,gototheappropriatesection.
•Tocompletetheinstallationorreplacement,goto“Completingthepartsreplacement”onpage75.
Removingthecomputercover
Attention:
Donotopenyourcomputerorattemptanyrepairbeforereadingandunderstandingthe“Importantsafetyinformation”
onpagev.
Chapter5.Installingorreplacinghardware33
Page 48

Thissectionprovidesinstructionsonhowtoremovethecomputercover.
CAUTION:
Turnoffthecomputerandwaitthreetoveminutestoletthecomputercoolbeforeremovingthe
computercover .
Toremovethecomputercover,dothefollowing:
1.Removeanymediafromthedrivesandturnoffallattacheddevicesandthecomputer.
2.Disconnectallpowercordsfromelectricaloutlets.
3.Disconnectthepowercords,Input/Outputcables,andanyothercablesthatareconnectedtothe
computer.See“Locatingconnectors,controls,andindicatorsonthefrontofyourcomputer”onpage9
and“Locatingconnectorsontherearofyourcomputer”onpage10.
4.Removeanylockingdevicethatsecuresthecomputercover,suchasanintegratedcablelock.See
“Attachinganintegratedcablelock”onpage26.
5.Removethescrewthatsecuresthecomputercover.
Figure13.Removingthecomputercoverscrew
34ThinkCentreUserGuide
Page 49

6.Slidethecomputercovertothefrontofthecomputerasmallamount.Liftthecomputercoverto
removeitfromthecomputer.
Figure14.Removingthecomputercover
Installingorreplacingamemorymodule
Attention:
Donotopenyourcomputerorattemptanyrepairbeforereadingandunderstandingthe“Importantsafetyinformation”
onpagev.
Thissectionprovidesinstructionsonhowtoinstallorreplaceamemorymodule.
Chapter5.Installingorreplacinghardware35
Page 50

YourcomputerhastwoslotsforinstallingorreplacingDDR3SODIMMsthatprovideuptoamaximumof
16GBsystemmemory.Wheninstallingorreplacingamemorymodule,use2GB,4GB,or8GBDDR3
SODIMMsinanycombinationuptoamaximumof16GB.
Toinstallorreplaceamemorymodule,dothefollowing:
1.T urnoffthecomputeranddisconnectallpowercordsfromelectricaloutlets.
2.Removethecomputercover.See“Removingthecomputercover”onpage33.
3.Locatethememoryslots.See“Locatingpartsonthesystemboard”onpage12.
4.Removetheharddiskdrivebrackettogetyouraccesstothememoryslots.See“Replacingthehard
diskdrivebracket”onpage60.
5.Ifyouarereplacinganoldmemorymodule,opentheretainingclipsandgentlypullthememorymodule
outofthememoryslot.
Figure15.Removingthememorymodule
6.Insertthenotchedend2ofthenewmemorymoduleintotheslot1.Pressthememorymodule
rmlyandpivotthememorymoduleuntilitsnapsintoplace.Makesurethatthememorymoduleis
securedintheslotanddoesnotmoveeasily.
Figure16.Installingamemorymodule
7.Reinstalltheharddiskdrivebracket.See“Replacingtheharddiskdrivebracket”onpage60.
Whattodonext:
•Toworkwithanotherpieceofhardware,gototheappropriatesection.
36ThinkCentreUserGuide
Page 51

•Tocompletetheinstallationorreplacement,goto“Completingthepartsreplacement”onpage75.
Replacingtheopticaldrive
Attention:
Donotopenyourcomputerorattemptanyrepairbeforereadingandunderstandingthe“Importantsafetyinformation”
onpagev.
Thissectionprovidesinstructionsonhowtoreplacetheopticaldrive.
Note:Theopticaldriveisonlyavailableonsomemodels.
Toreplacetheopticaldrive,dothefollowing:
1.T urnoffthecomputeranddisconnectallpowercordsfromelectricaloutlets.
2.DisconnecttheopticaldrivecablefromtheUSBconnectoronthecomputer.
3.RemovethescrewthatsecurestheopticaldriveboxontheVESAmountbracketandthenslidethe
opticaldriveboxtoremoveitfromtheVESAmountbracket.
Figure17.Removingtheopticaldrivebox
Chapter5.Installingorreplacinghardware37
Page 52

4.Removethescrewthatsecurestheopticaldriveintheopticaldrivebox.Usethescrewdrivertoslide
theopticaldriveforwardandthenremovetheopticaldrivefromtheopticaldrivebox.
Figure18.Removingtheopticaldrivefromtheopticaldrivebox
5.Removethetwoscrewsthatsecuretheopticaldrivemetalplateandthenremovethemetalplate
fromtheopticaldrive.
Figure19.Removingtheopticaldrivemetalplate
38ThinkCentreUserGuide
Page 53

6.Alignthetwoscrewholesintheopticaldrivemetalplatewiththecorrespondingholesinthenewoptical
driveandtheninstallthetwoscrewstosecurethemetalplateonthenewopticaldrive.
Figure20.Installingtheopticaldrivemetalplate
7.Slidethenewopticaldriveintotheopticaldriveboxuntilitsnapsintoposition.
Figure21.Installingtheopticaldriveintotheopticaldrivebox
Chapter5.Installingorreplacinghardware39
Page 54

8.Installthescrewthatsecurestheopticaldriveintheopticaldrivebox.
Figure22.Installingthescrewthatsecurestheopticaldrive
40ThinkCentreUserGuide
Page 55

9.AlignthescrewholesintheopticaldriveboxwiththetwoscrewsontheVESAmountbracketandthen
slidetheopticaldriveboxtoinstallitontheVESAmountbracket.
Figure23.Installingtheopticaldrivebox
Chapter5.Installingorreplacinghardware41
Page 56

10.InstallthescrewthatsecurestheopticaldriveboxontheVESAmountbracket.
Figure24.Installingthescrewthatsecurestheopticaldrivebox
11.ConnecttheopticaldrivecabletoaUSBconnectoronthecomputer.See“Locatingconnectorsonthe
rearofyourcomputer”onpage10.
Whattodonext:
•Toworkwithanotherpieceofhardware,gototheappropriatesection.
•Tocompletetheinstallationorreplacement,goto“Completingthepartsreplacement”onpage75.
Replacingthesecondaryharddiskdrive
Attention:
Donotopenyourcomputerorattemptanyrepairbeforereadingandunderstandingthe“Importantsafetyinformation”
onpagev.
Thissectionprovidesinstructionsonhowtoreplacethesecondaryharddiskdrive.
Note:Thesecondaryharddiskdriveisonlyavailableonsomemodels.
Toreplacethesecondaryharddiskdrive,dothefollowing:
1.T urnoffthecomputeranddisconnectallpowercordsfromelectricaloutlets.
2.DisconnectthesecondaryharddiskdrivecablefromtheUSBconnectoronthecomputer.
42ThinkCentreUserGuide
Page 57

3.RemovethescrewthatsecurestheopticaldriveboxontheVESAmountbracketandthenslidethe
opticaldriveboxtoremoveitfromtheVESAmountbracket.
Figure25.Removingtheopticaldrivebox
4.Slidethereleasebuttonontheopticaldriveboxandthenremovethesecondaryharddiskdriveadapter
fromtheopticaldrivebox.
Figure26.Removingthesecondaryharddiskdriveadapterfromtheopticaldrivebox
Chapter5.Installingorreplacinghardware43
Page 58

5.Flexthesidesoftheharddiskdriveadapterbracketandthenpivottheharddiskdriveadapterto
removetheadapterfromtheadapterbracket.
Figure27.Removingtheharddiskdriveadapterfromtheadapterbracket
6.T oremovetheharddiskdrivefromtheadapter,lifttheadapterretaininglatch.Slidetheharddiskdrive
towardstheretaininglatchandthenlifttheharddiskdriveoutoftheadapter.
Figure28.Removingthesecondaryharddiskdrivefromtheadapter
44ThinkCentreUserGuide
Page 59

7.Installanewharddiskdriveintotheadapter.Lowertheadapterretaininglatchuntilitsnapsintoposition.
Figure29.Installinganewharddiskdriveintotheadapter
8.Positiontheadapterintotheadapterbracketandthenpivottheadapterdownwarduntilitsnapsinto
position.
Figure30.Installingtheharddiskdriveadapterintotheadapterbracket
Chapter5.Installingorreplacinghardware45
Page 60

9.Slidetheadapterbracketintotheopticaldriveboxuntilitsnapsintoposition.
Figure31.Installingtheadapterbracketintotheopticaldrivebox
46ThinkCentreUserGuide
Page 61

10.AlignthescrewholesintheopticaldriveboxwiththetwoscrewsontheVESAmountbracketandthen
slidetheopticaldriveboxtoinstallitontheVESAmountbracket.
Figure32.Installingtheopticaldrivebox
Chapter5.Installingorreplacinghardware47
Page 62

11.InstallthescrewthatsecurestheopticaldriveboxontheVESAmountbracket.
Figure33.Installingthescrewthatsecurestheopticaldrivebox
12.ConnectthesecondaryharddiskdrivecabletoaUSBconnectoronthecomputer.See“Locating
connectorsontherearofyourcomputer”onpage10.
Whattodonext:
•Toworkwithanotherpieceofhardware,gototheappropriatesection.
•Tocompletetheinstallationorreplacement,goto“Completingthepartsreplacement”onpage75.
Replacingthebattery
Attention:
Donotopenyourcomputerorattemptanyrepairbeforereadingandunderstandingthe“Importantsafetyinformation”
onpagev.
Yourcomputerhasaspecialtypeofmemorythatmaintainsthedate,time,andsettingsforbuilt-infeatures,
suchasparallel-portassignments(conguration).Abatterykeepsthisinformationactivewhenyouturn
offthecomputer.
Thebatterynormallyrequiresnochargingormaintenancethroughoutitslife;however,nobatterylasts
forever.Ifthebatteryfails,thedate,time,andcongurationinformation(includingpasswords)arelost.An
errormessageisdisplayedwhenyouturnonthecomputer.
Refertothe“Lithiumbatterynotice”intheSafety,Warranty,andSetupGuideforinformationaboutreplacing
anddisposingofthebattery.
Toreplacethebattery,dothefollowing:
1.T urnoffthecomputeranddisconnectallpowercordsfromelectricaloutlets.
2.Removethecomputercover.See“Removingthecomputercover”onpage33.
48ThinkCentreUserGuide
Page 63

3.Locatethebattery.See“Locatingpartsonthesystemboard”onpage12.
4.Removetheoldbattery.
Figure34.Removingtheoldbattery
5.Installanewbattery.
Figure35.Installinganewbattery
6.Reinstallthecomputercoverandconnectthecables.See“Completingthepartsreplacement”on
page75.
Note:Whenthecomputeristurnedonforthersttimeafterreplacingthebattery,anerrormessage
mightbedisplayed.Thisisnormalafterreplacingthebattery.
7.T urnonthecomputerandallattacheddevices.
8.UsetheSetupUtilityprogramtosetthedate,time,andanypasswords.SeeChapter7“UsingtheSetup
Utilityprogram”onpage87
.
Whattodonext:
•Toworkwithanotherpieceofhardware,gototheappropriatesection.
•Tocompletetheinstallationorreplacement,goto“Completingthepartsreplacement”onpage75.
Replacingtheacpoweradapter
Attention:
Donotopenyourcomputerorattemptanyrepairbeforereadingandunderstandingthe“Importantsafetyinformation”
onpagev.
Thissectionprovidesinstructionsonhowtoreplacetheacpoweradapter.
Toreplacetheacpoweradapter,dothefollowing:
1.T urnoffthecomputeranddisconnectallpowercordsfromelectricaloutlets.
Chapter5.Installingorreplacinghardware49
Page 64

2.Removethepowercordfromtheacpoweradaptercableloopattherearofthecomputerandthen
disconnecttheacpoweradapterfromtheacpoweradapterconnector.See“Locatingconnectorson
therearofyourcomputer”onpage10.
Figure36.Disconnectingtheacpoweradapter
50ThinkCentreUserGuide
Page 65

3.Connectthenewacpoweradaptertotheacpoweradapterconnectorattherearofyourcomputer
andanworkableelectricaloutlet.Securethepowercordintothepoweradaptercableloopattherear
ofthecomputerasshown.
Figure37.Connectingthenewacpoweradapter
Whattodonext:
•Toworkwithanotherpieceofhardware,gototheappropriatesection.
•Tocompletetheinstallationorreplacement,goto“Completingthepartsreplacement”onpage75.
Replacingtheacpoweradapterbracket
Attention:
Donotopenyourcomputerorattemptanyrepairbeforereadingandunderstandingthe“Importantsafetyinformation”
onpagev.
Thissectionprovidesinstructionsonhowtoreplacetheacpoweradapterbracket.
Note:Theacpoweradapterbracketisonlyavailableonsomemodels.
Toreplacetheacpoweradapterbracket,dothefollowing:
1.T urnoffthecomputeranddisconnectallpowercordsfromelectricaloutlets.
Chapter5.Installingorreplacinghardware51
Page 66

2.Pressthemetaltab1andthenslidetheacpoweradapterbrackettoremoveitfromtheVESAmount
bracket.
Figure38.Removingtheacpoweradapterbracket
3.T oinstalltheacpoweradapterbrackettotheVESAmountbracket,alignthetwotabsontheacpower
adapterbracketwiththeslotsintheVESAmountbracket,andthenslidetheacpoweradapterbracket
toinstallitontheVESAmountbracket.
Figure39.Installingtheacpoweradapterbracket
52ThinkCentreUserGuide
Page 67

Whattodonext:
•Toworkwithanotherpieceofhardware,gototheappropriatesection.
•Tocompletetheinstallationorreplacement,goto“Completingthepartsreplacement”onpage75.
Replacingthepowerswitchboard
Attention:
Donotopenyourcomputerorattemptanyrepairbeforereadingandunderstandingthe“Importantsafetyinformation”
onpagev.
Thissectionprovidesinstructionsonhowtoreplacethepowerswitchboard.
Toreplacethepowerswitchboard,dothefollowing:
1.T urnoffthecomputeranddisconnectallpowercordsfromelectricaloutlets.
2.Removethecomputercover.See“Removingthecomputercover”onpage33.
3.Locatethepowerswitchboard.See“Locatingcomponents”onpage11.
4.Removetheharddiskdrivefromthecomputer.See“Replacingtheharddiskdrivebracket”onpage60.
5.Disconnectthepowerswitchboardcablefromthecorrespondingconnectoronthesystemboard.See
“Locatingpartsonthesystemboard”onpage12.
6.Removethepowerswitchboardcablefromthecabletieinthecomputer.
7.Removethescrewthatsecuresthepowerswitchboardtothecomputer.
Figure40.Removingthescrewthatsecuresthepowerswitchboard
Chapter5.Installingorreplacinghardware53
Page 68

8.Removethepowerswitchboardfromthecomputer.
Figure41.Removingthepowerswitchboard
9.Alignthehole1inthenewpowerswitchboardwiththecorrespondingtab2onthecomputerand
positionthenewpowerswitchboardinthecomputer.
Figure42.Installingthepowerswitchboard
54ThinkCentreUserGuide
Page 69

10.Installthescrewtosecurethenewpowerswitchboardinthecomputer.
Figure43.Installingthescrewthatsecuresthepowerswitchboard
11.Connectthepowerswitchboardcabletothepowerswitchboardcableconnectoronthesystemboard.
See“Locatingpartsonthesystemboard”onpage12.
12.Securethenewpowerswitchboardcableintothecabletieinthecomputer.
13.Installtheharddiskdriveintothecomputer.See“Replacingtheharddiskdrivebracket”onpage60.
Whattodonext:
•Toworkwithanotherpieceofhardware,gototheappropriatesection.
•Tocompletetheinstallationorreplacement,goto“Completingthepartsreplacement”onpage75.
Replacingtheheatsink
Attention:
Donotopenyourcomputerorattemptanyrepairbeforereadingandunderstandingthe“Importantsafetyinformation”
onpagev.
Thissectionprovidesinstructionsonhowtoreplacetheheatsink.
CAUTION:
Theheatsinkandfanassemblymightbeveryhot.Turnoffthecomputerandwaitthreetove
minutestoletthecomputercoolbeforeremovingthecomputercover.
Toreplacetheheatsink,dothefollowing:
1.T urnoffthecomputeranddisconnectallpowercordsfromelectricaloutlets.
2.Removethecomputercover.See“Removingthecomputercover”onpage33.
3.Locatetheheatsinkonthesystemboard.See“Locatingcomponents”onpage11.
Chapter5.Installingorreplacinghardware55
Page 70
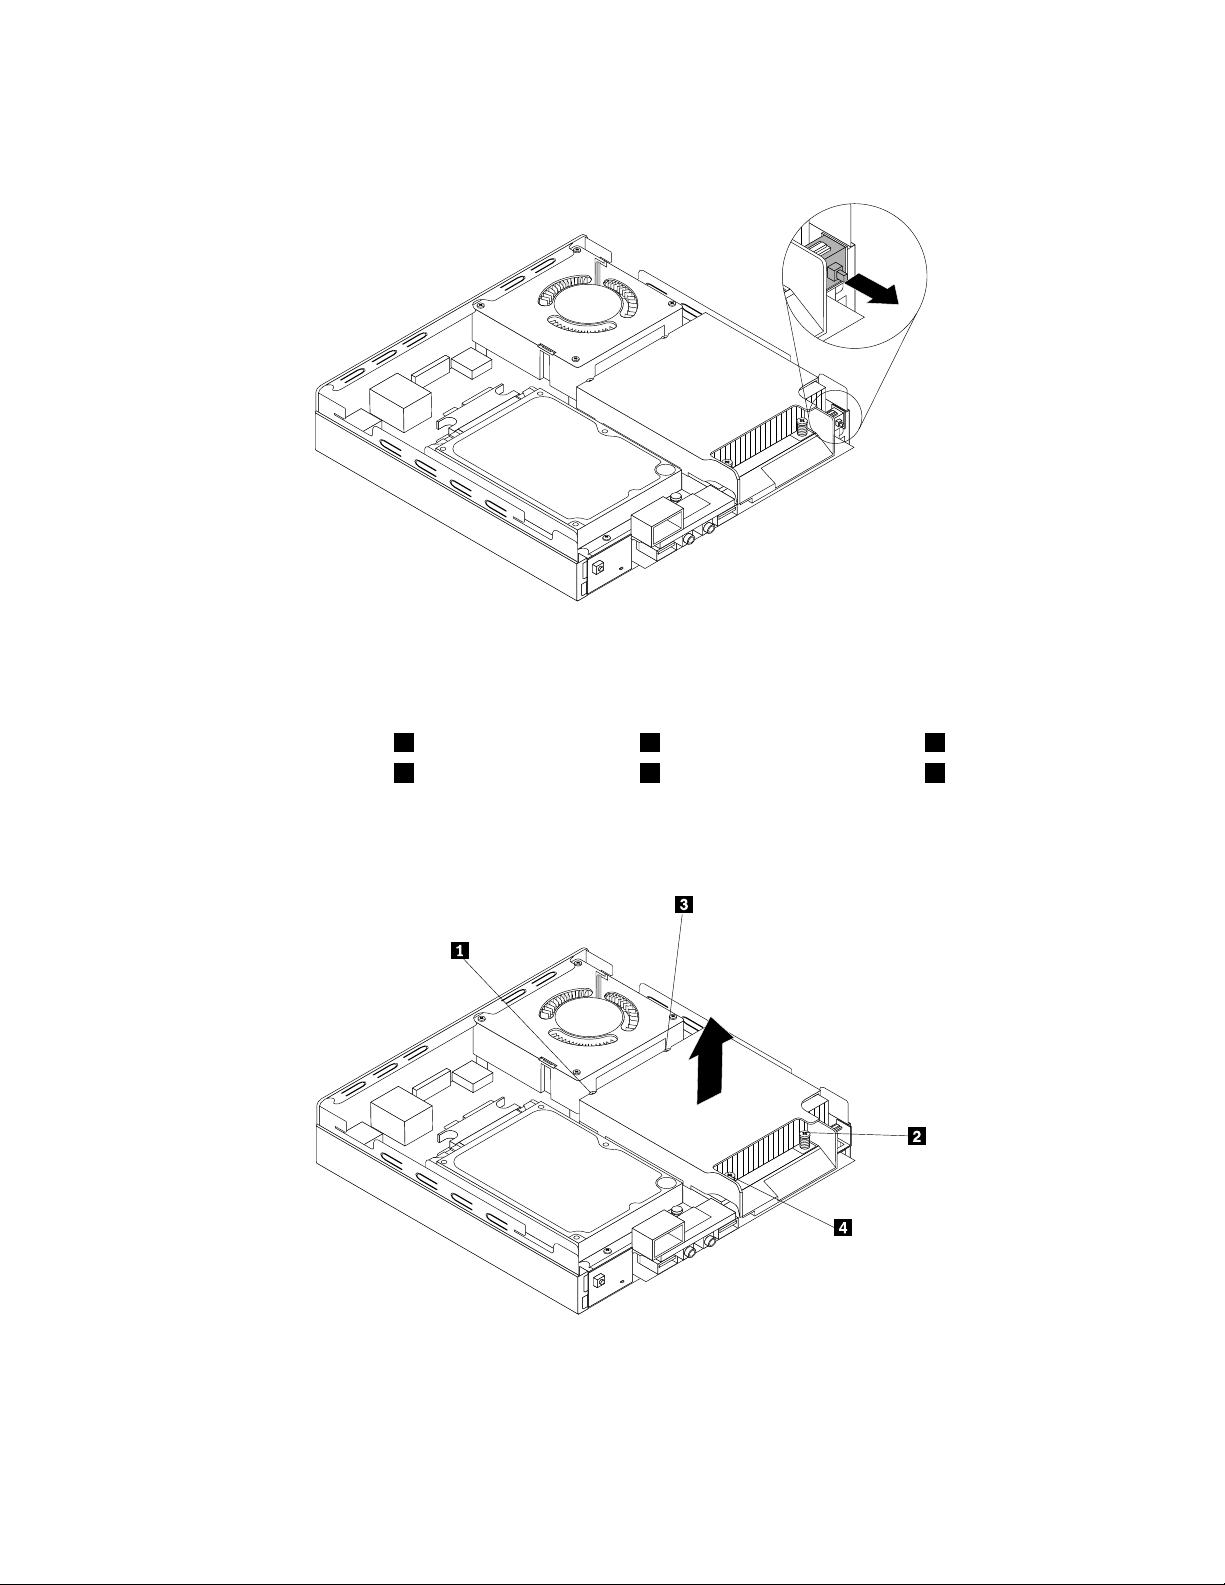
4.Pulltheintrusionswitchtoremoveitfromtheheatsinkbracket.
Figure44.Removingtheintrusionswitch
5.Followthissequencetoremovethefourscrewsthatsecuretheheatsinkandfanassemblytothe
systemboard:
a.Partiallyremovescrew1,thenfullyremovescrew2,andthenfullyremovescrew1.
b.Partiallyremovescrew3,thenfullyremovescrew4,andthenfullyremovescrew3.
Note:Carefullyremovethefourscrewsfromthesystemboardtoavoidanypossibledamagetothe
systemboard.Thefourscrewscannotberemovedfromtheheatsinkandfanassembly.
Figure45.Removingtheheatsink
6.Liftthefailingheatsinkoffthesystemboard.
Notes:
56ThinkCentreUserGuide
Page 71

a.Youmighthavetogentlytwisttheheatsinkandfanassemblytofreeitfromthemicroprocessor.
b.Donottouchthethermalgreasewhilehandlingtheheatsinkandfanassembly.
7.Positionthenewheatsinkandfanassemblyonthesystemboardsothatthefourscrewsarealigned
withtheholesinthesystemboard.
Figure46.Installingtheheatsink
8.Followthissequencetoinstallthefourscrewstosecurethenewheatsinkandfanassembly.Do
notover-tightenthescrews.
a.Partiallytightenscrew1,thenfullytightenscrew2,andthenfullytightenscrew1.
b.Partiallytightenscrew3,thenfullytightenscrew4,andthenfullytightenscrew3.
9.Attachtheintrusionswitchtotheheatsinkbracket.
Figure47.Installingtheintrusionswitch
Chapter5.Installingorreplacinghardware57
Page 72

Whattodonext:
•Toworkwithanotherpieceofhardware,gototheappropriatesection.
•Tocompletetheinstallationorreplacement,goto“Completingthepartsreplacement”onpage75.
Replacingthemicroprocessor
Attention:
Donotopenyourcomputerorattemptanyrepairbeforereadingandunderstandingthe“Importantsafetyinformation”
onpagev.
Thissectionprovidesinstructionsonhowtoreplacethemicroprocessor.
CAUTION:
Theheatsinkandmicroprocessormightbeveryhot.T urnoffthecomputerandwaitthreetove
minutestoletthecomputercoolbeforeremovingthecomputercover.
Toreplacethemicroprocessor,dothefollowing:
1.T urnoffthecomputeranddisconnectallpowercordsfromelectricaloutlets.
2.Removethecomputercover.See“Removingthecomputercover”onpage33.
3.Removetheheatsink.See“Replacingtheheatsink”onpage55.
Note:Placetheheatsinkonitssidesothatthethermalgreaseonthebottomofitdoesnotgetin
contactwithanything.
4.Liftthesmallhandle1andopentheretainer2toaccessthemicroprocessor3.
Figure48.Accessingthemicroprocessor
58ThinkCentreUserGuide
Page 73

5.Liftthemicroprocessorstraightupandoutofthemicroprocessorsocket.
Figure49.Removingthemicroprocessor
Notes:
a.Yourmicroprocessorandsocketmightlookdifferentfromtheoneillustrated.
b.Notetheorientationofthemicroprocessorinthesocket.Youcaneitherlookforthesmalltriangle1
ononecornerofthemicroprocessorornotetheorientationofthenotches2onthemicroprocessor.
Thisisimportantwheninstallingthenewmicroprocessoronthesystemboard.
c.Touchonlytheedgesofthemicroprocessor.Donottouchthegoldcontactsonthebottom.
d.Donotdropanythingontothemicroprocessorsocketwhileitisexposed.Thesocketpinsmustbe
keptascleanaspossible.
6.Makesurethatthesmallhandleisintheraisedpositionandthemicroprocessorretainerisfullyopen.
7.Removetheprotectivecoverthatprotectsthegoldcontactsofthenewmicroprocessor.
8.Holdthenewmicroprocessorbyitssidesandalignthesmalltriangleononecornerofthenew
microprocessorwiththecorrespondingsmalltriangleononecornerofthemicroprocessorsocket.
Chapter5.Installingorreplacinghardware59
Page 74

9.Lowerthenewmicroprocessorstraightdownintothemicroprocessorsocketonthesystemboard.
Figure50.Installingthemicroprocessor
10.Closethemicroprocessorretainerandlockitintopositionwiththesmallhandletosecurethenew
microprocessorinthesocket.
11.Reinstalltheheatsink.See“Replacingtheheatsink”onpage55.
Whattodonext:
•Toworkwithanotherpieceofhardware,gototheappropriatesection.
•Tocompletethereplacement,goto“Completingthepartsreplacement”onpage75.
Replacingtheharddiskdrivebracket
Attention:
Donotopenyourcomputerorattemptanyrepairbeforereadingandunderstandingthe“Importantsafetyinformation”
onpagev.
Thissectionprovidesinstructionsonhowtoreplacetheharddiskdrivebracket.
Toreplacetheharddiskdrivebracket,dothefollowing:
1.T urnoffthecomputeranddisconnectallpowercordsfromelectricaloutlets.
2.Removethecomputercover.See“Removingthecomputercover”onpage33.
3.Locatetheharddiskdrive.See“Locatingcomponents”onpage11.
4.Disconnectthesignalcableandthepowercablefromtheharddiskdrive.
60ThinkCentreUserGuide
Page 75

5.Removethetwoscrews1thatsecuretheharddiskdrivebracketonthesystemboard.
Figure51.Removingthescrewsthatsecuretheharddiskdrivebracket
Chapter5.Installingorreplacinghardware61
Page 76

6.Slidetheharddiskdrivebrackettowardtheheatsinkandthenlifttheharddiskdrivebrackettoremove
itfromthecomputer.
Figure52.Removingtheharddiskdrivebracket
62ThinkCentreUserGuide
Page 77

7.T oinstalltheharddiskdrivebracketintothecomputer,positiontheharddiskdrivebracketonthe
systemboardsothatthetwoholesintheharddiskdrivebracketarealignedwiththestandoffsonthe
systemboard.Slidetheharddiskdrivebracketasshownuntilthetwoscrewholesarealignedwiththe
correspondingscrewpostsonthesystemboard.
Figure53.Installingtheharddiskdrivebracket
8.Installthetwoscrews1thatsecuretheharddiskdrivebracket.
Figure54.Installingthetwoscrewsthatsecuretheharddiskdrivebracket
9.Connectthesignalcableandthepowercabletotheharddiskdrive.
Whattodonext:
•Toworkwithanotherpieceofhardware,gototheappropriatesection.
Chapter5.Installingorreplacinghardware63
Page 78

•Tocompletetheinstallationorreplacement,goto“Completingthepartsreplacement”onpage75.
ReplacingtheWiFicardmodule
Attention:
Donotopenyourcomputerorattemptanyrepairbeforereadingandunderstandingthe“Importantsafetyinformation”
onpagev.
ThissectionprovidesinstructionsonhowtoreplacetheWiFicardmodule.
Note:TheWiFicardmoduleisonlyavailableinsomemodels.
ToreplacetheWiFicardmodule,dothefollowing:
1.T urnoffthecomputeranddisconnectallpowercordsfromelectricaloutlets.
2.Removethecomputercover.See“Removingthecomputercover”onpage33.
3.Removetheharddiskdrivebracket.See“Replacingtheharddiskdrivebracket”onpage60.
4.LocatetheWiFicardmoduleonthesystemboard.See“Locatingcomponents”onpage11.
5.DisconnecttheWiFiantennacablefromtheWiFicardmoduleandremovethetwoscrewsthatsecure
theWiFicardmoduletothesystemboard.
Figure55.RemovingtheWiFicardmodulecableandscrews
Note:Dependingonyourcomputermodel,theWiFicardmodulethatcomeswithyourcomputer
mighthavetwocables.
Figure56.RemovingtheWiFicardmodulecablesandscrews
64ThinkCentreUserGuide
Page 79

6.PulltheWiFicardmoduletoremoveitoutoftheminiPCIExpressslot.
Figure57.RemovingtheWiFicardmodule
7.InsertthenewWiFicardmoduleintotheminiPCIExpressslot.PivottheWiFicardmoduledownward
andtheninstallthetwoscrewstosecuretheWiFicardmodule.ConnecttheWiFiantennacableto
theWiFicardmodule.
Figure58.InstallingtheWiFicardmodule
Note:Dependingonyourcomputermodel,theWiFicardmodulethatcomeswithyourcomputer
mighthavetwocables.
Figure59.InstallingtheWiFicardmodule
8.Installtheharddiskdrivebracket.See“Replacingtheharddiskdrivebracket”onpage60.
Chapter5.Installingorreplacinghardware65
Page 80

Whattodonext:
•Toworkwithanotherpieceofhardware,gototheappropriatesection.
•Tocompletetheinstallationorreplacement,goto“Completingthepartsreplacement”onpage75.
InstallingorremovingtherearWiFiantenna
Attention:
Donotopenyourcomputerorattemptanyrepairbeforereadingandunderstandingthe“Importantsafetyinformation”
onpagev.
ThissectionprovidesinstructionsonhowtoinstallorremovetherearWiFiantenna.
Notes:
•Therearantennaisonlyavailableonsomemodels.
•Dependingonyourcomputermodel,theWiFicardmodulethatcomeswithyourcomputermightwork
withoneortworearantennas.Formoreinformationabouttworearantennas,see“Installingorremoving
tworearWiFiantennas”onpage67.
InstallingtherearWiFiantenna
ToinstalltherearWiFiantenna,dothefollowing:
1.T urnoffthecomputeranddisconnectallpowercordsfromelectricaloutlets.
2.InstalltherearWiFiantennatotherearWiFiantennacableconnectorattachedontherearofthe
computer.
3.Adjusttheangleoftherearantennatolowertheriskofbreakingtheantennabyaccident.
Figure60.InstallingtherearWiFiantenna
Whattodonext:
•Toworkwithanotherpieceofhardware,gototheappropriatesection.
•Tocompletetheinstallationorreplacement,goto“Completingthepartsreplacement”onpage75.
66ThinkCentreUserGuide
Page 81

RemovingtherearWiFiantenna
ToremovetherearWiFiantenna,dothefollowing:
1.T urnoffthecomputeranddisconnectallpowercordsfromelectricaloutlets.
2.StraightentherearWiFiantennasothatitcanbemoreeasilytwisted.
3.HoldthethickerendoftherearWiFiantennaandunscrewtheWiFiantennafromtherearofthe
computer.
Figure61.RemovingtherearWiFiantenna
Whattodonext:
•Toworkwithanotherpieceofhardware,gototheappropriatesection.
•Tocompletetheinstallationorreplacement,goto“Completingthepartsreplacement”onpage75.
InstallingorremovingtworearWiFiantennas
Attention:
Donotopenyourcomputerorattemptanyrepairbeforereadingandunderstandingthe“Importantsafetyinformation”
onpagev.
ThissectionprovidesinstructionsonhowtoinstallorremovetworearWiFiantennas.
Notes:
•Therearantennasareonlyavailableonsomemodels.
•Dependingonyourcomputermodel,theWiFicardmodulethatcomeswithyourcomputermightwork
withoneortworearantennas.Formoreinformationaboutonerearantenna,see“Installingorremoving
therearWiFiantenna”onpage66
InstallingtherearWiFiantennas
Note:Dependingonyourcomputermodel,theWiFicardmodulethatcomeswithyourcomputermight
workwithoneortworearantennas.Ifyoureceivetworearantennas,installbothofthemtotherearofyour
computer.
.
ToinstalltherearWiFiantennas,dothefollowing:
Chapter5.Installingorreplacinghardware67
Page 82

1.T urnoffthecomputeranddisconnectallpowercordsfromelectricaloutlets.
2.InstallthetworearWiFiantennastotherearWiFiantennacableconnectorsattachedontherear
ofthecomputer.
3.Adjusttheangleoftherearantennastolowertheriskofbreakingtheantennabyaccident.
Figure62.InstallingtherearWiFiantennas
Whattodonext:
•Toworkwithanotherpieceofhardware,gototheappropriatesection.
•Tocompletetheinstallationorreplacement,goto“Completingthepartsreplacement”onpage75.
RemovingtherearWiFiantennas
ToremovetherearWiFiantennas,dothefollowing:
1.T urnoffthecomputeranddisconnectallpowercordsfromelectricaloutlets.
2.StraightentherearWiFiantennassothatitcanbemoreeasilytwisted.
68ThinkCentreUserGuide
Page 83

3.HoldthethickerendoftherearWiFiantennasandunscrewtheWiFiantennasfromtherearofthe
computer.
Figure63.RemovingtherearWiFiantennas
Whattodonext:
•Toworkwithanotherpieceofhardware,gototheappropriatesection.
•Tocompletetheinstallationorreplacement,goto“Completingthepartsreplacement”onpage75.
Replacingthesystemfan
Attention:
Donotopenyourcomputerorattemptanyrepairbeforereadingandunderstandingthe“Importantsafetyinformation”
onpagev.
Thissectionprovidesinstructionsonhowtoreplacethesystemfan.
Toreplacethesystemfan,dothefollowing:
1.T urnoffthecomputeranddisconnectallpowercordsfromelectricaloutlets.
2.Removethecomputercover.See“Removingthecomputercover”onpage33.
3.Locatethesystemfaninthecomputer.See“Locatingcomponents”onpage11.
4.Removetheheatsinkforeasieraccesstothesystemfan.See“Replacingtheheatsink”onpage55.
5.Disconnectthesystemfancablefromthesystemboard.See“Locatingpartsonthesystemboard”
onpage12.
Chapter5.Installingorreplacinghardware69
Page 84

6.Removethefourscrewsthatsecurethesystemfantothesystemboard.
Figure64.Removingthescrewsthatsecurethesystemfan
7.Liftthefailingsystemfanoffthesystemboard.
Figure65.Removingthesystemfan
70ThinkCentreUserGuide
Page 85

8.Positionthenewsystemfanonthesystemboardsothatthefourscrewsarealignedwiththescrew
postsonthesystemboard.
Figure66.Installingthesystemfan
9.Installthefourscrewsthatsecurethesystemfan.
Figure67.Installingthescrewsthatsecurethesystemfan
Chapter5.Installingorreplacinghardware71
Page 86

10.Connectthesystemfancabletothesystemfanconnectoronthesystemboard.See“Locatingpartson
thesystemboard”onpage12.
11.Reinstalltheheatsink.See“Replacingtheheatsink”onpage55.
Whattodonext:
•Toworkwithanotherpieceofhardware,gototheappropriatesection.
•Tocompletetheinstallationorreplacement,goto“Completingthepartsreplacement”onpage75
.
Replacingtheinternalspeaker
Attention:
Donotopenyourcomputerorattemptanyrepairbeforereadingandunderstandingthe“Importantsafetyinformation”
onpagev.
Thissectionprovidesinstructionsonhowtoreplacetheinternalspeaker.
Note:Theinternalspeakerisonlyavailableinsomemodels.
Toreplacetheinternalspeaker,dothefollowing:
1.T urnoffthecomputeranddisconnectallpowercordsfromelectricaloutlets.
2.Removethecomputercover.See“Removingthecomputercover”onpage33.
3.Locatetheinternalspeakerinthecomputer.See“Locatingpartsonthesystemboard”onpage12.
4.Removetheharddiskdrivebracket.See“Replacingtheharddiskdrivebracket”onpage60.
5.Disconnecttheinternalspeakercablefromthesystemboard.See“Locatingpartsonthesystem
board”onpage12.
72ThinkCentreUserGuide
Page 87
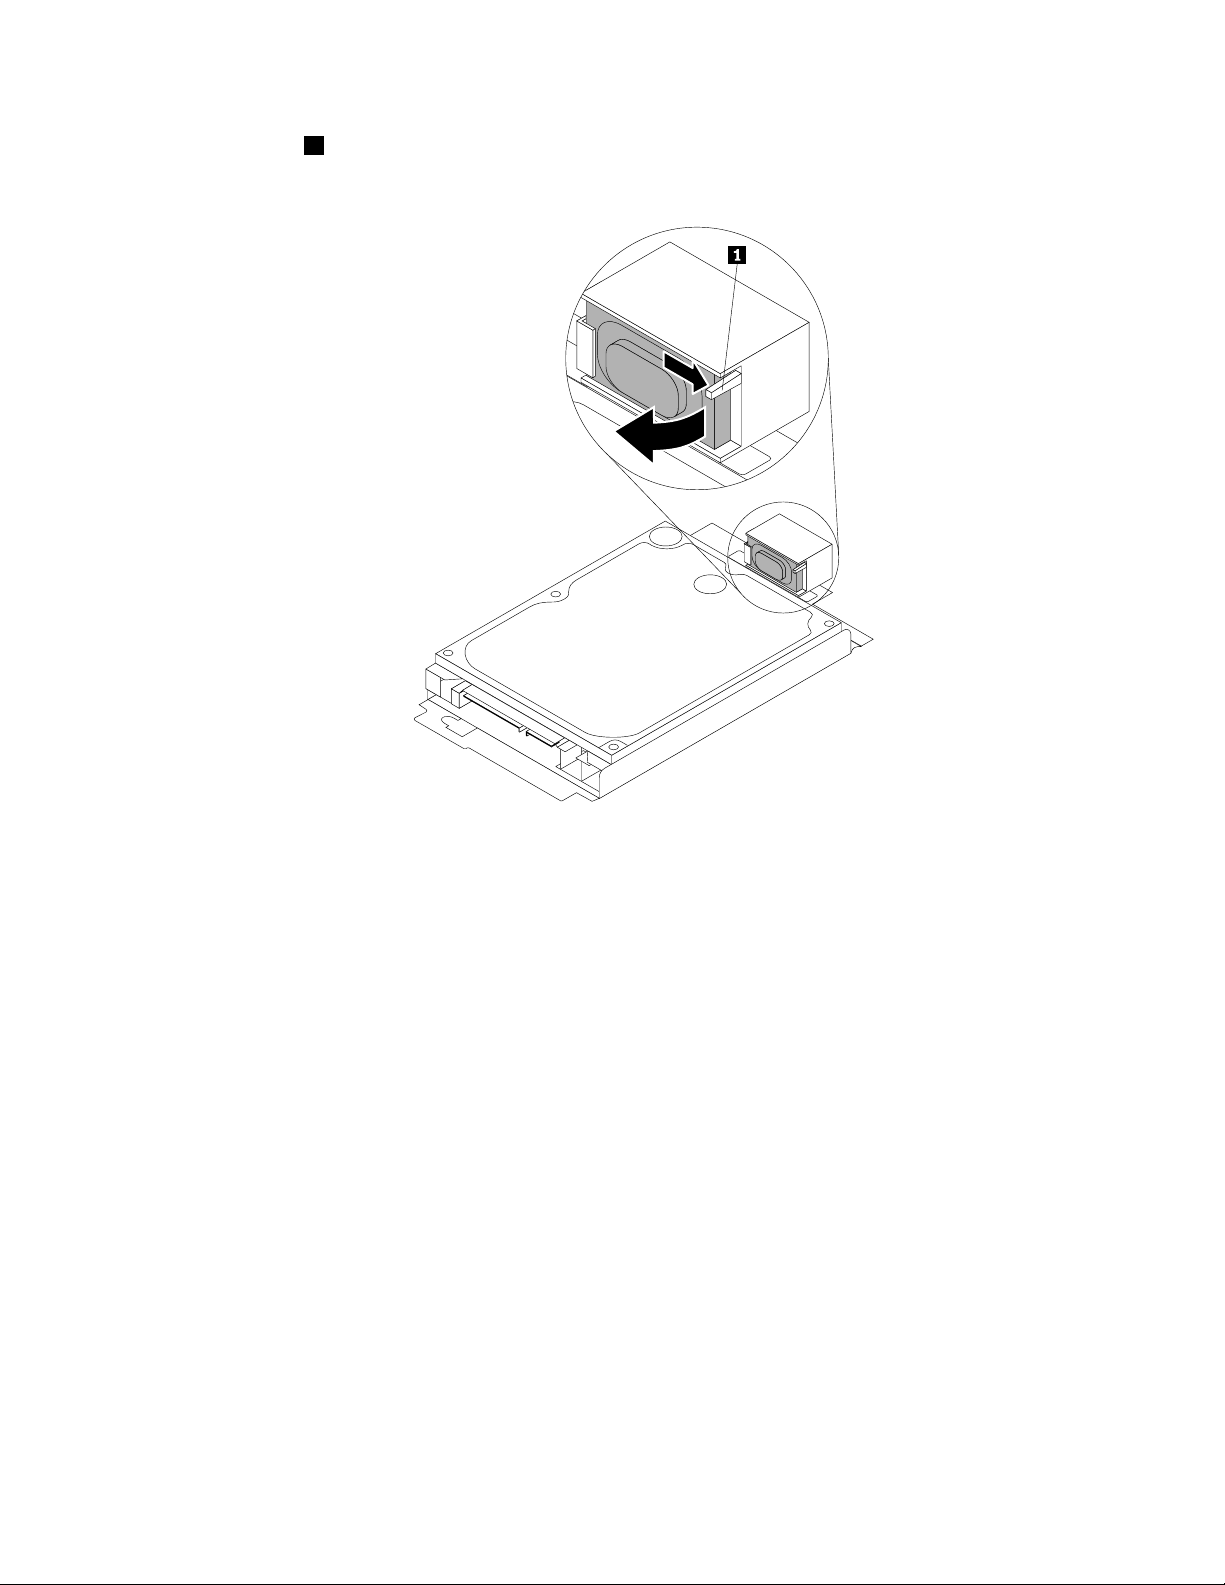
6.Pressthetab1thatsecurestheinternalspeakerandthenpivottheinternalspeakeroutwardasshown
tocompletelyremovetheinternalspeakerfromtheinternalspeakerholder.
Figure68.Removingtheinternalspeaker
Chapter5.Installingorreplacinghardware73
Page 88

7.Positionthenewinternalspeakerintotheinternalspeakerholderandthenpivottheinternalspeaker
inwarduntilitissecuredinplace.
Figure69.Installinganewinternalspeaker
8.Connecttheinternalspeakercabletothesystemboard.See“Locatingpartsonthesystemboard”
onpage12.
9.Installtheharddiskdrivebracketonthesystemboard.See“Replacingtheharddiskdrivebracket”
onpage60.
Whattodonext:
•Toworkwithanotherpieceofhardware,gototheappropriatesection.
•Tocompletetheinstallationorreplacement,goto“Completingthepartsreplacement”onpage75.
Replacingthekeyboardormouse
Attention:
Donotopenyourcomputerorattemptanyrepairbeforereadingandunderstandingthe“Importantsafetyinformation”
onpagev
Thissectionprovidesinstructionsonhowtoreplacethekeyboardormouse.
Toreplacethekeyboardormouse,dothefollowing:
1.Disconnecttheoldkeyboardcableormousecablefromthecomputer.
.
74ThinkCentreUserGuide
Page 89

2.ConnectanewkeyboardormousetooneoftheUSBconnectorsonthecomputer.Dependingonwhere
youwanttoconnectthenewkeyboardormouse,see“Locatingconnectors,controls,andindicatorson
thefrontofyourcomputer”onpage9or“Locatingconnectorsontherearofyourcomputer”onpage10.
Figure70.ConnectingtheUSBkeyboardormouse
Whattodonext:
•Toworkwithanotherpieceofhardware,gototheappropriatesection.
•Tocompletetheinstallationorreplacement,goto“Completingthepartsreplacement”onpage75.
Completingthepartsreplacement
Aftercompletingtheinstallationorreplacementforallparts,youneedtoreinstallthecomputercoverand
reconnectcables.Dependingonthepartsyouinstalledorreplaced,youmightneedtoconrmtheupdated
informationintheSetupUtilityprogram.RefertoChapter7“UsingtheSetupUtilityprogram”onpage87.
Toreinstallthecomputercoverandreconnectcablestoyourcomputer,dothefollowing:
1.Ensurethatallcomponentshavebeenreassembledcorrectlyandthatnotoolsorloosescrewsareleft
insideyourcomputer.See“Locatingcomponents”onpage11forthelocationsofvariouscomponents
inyourcomputer.
2.Beforereinstallingthecomputercover,ensurethatthecablesareroutedcorrectly.Keepcablesclearof
thehingesandsidesofthecomputerchassistoavoidinterferencewithreinstallingthecomputercover.
Chapter5.Installingorreplacinghardware75
Page 90

3.Positionthecomputercoveronthechassisandthenpushthecovertotherearofthecomputeruntil
itsnapsintoposition.
Figure71.Installingthecomputercover
76ThinkCentreUserGuide
Page 91

4.Installthescrewtosecurethecomputercover.
Figure72.Installingthecomputercoverscrew
5.Ifthereisanintegratedcablelockavailable,lockthecomputer.See“Attachinganintegratedcable
lock”onpage26
.
6.Reconnecttheexternalcablesandpowercordstothecomputer.See“Locatingconnectorsonthe
rearofyourcomputer”onpage10.
7.T oupdateyourconguration,refertoChapter7“UsingtheSetupUtilityprogram”onpage87.
Note:Inmostareasoftheworld,LenovorequiresthereturnofthedefectiveCustomerReplaceableUnit
(CRU).InformationaboutthiswillcomewiththeCRUorwillcomeafewdaysaftertheCRUarrives.
Obtainingdevicedrivers
Youcanobtaindevicedriversforoperatingsystemsthatarenotpreinstalledat
http://www.lenovo.com/support.Installationinstructionsareprovidedinreadmeleswiththedevice-driver
les.
Chapter5.Installingorreplacinghardware77
Page 92

78ThinkCentreUserGuide
Page 93

Chapter6.Recoveryinformation
ThischapterprovidesinformationabouttherecoverysolutionsprovidedbyLenovo.
•“RecoveryinformationfortheWindows7operatingsystem”onpage79
•“RecoveryinformationfortheWindows8operatingsystem”onpage85
RecoveryinformationfortheWindows7operatingsystem
ThischapterprovidesinformationabouttherecoverysolutionsprovidedbyLenovo.
Thischaptercontainsthefollowingtopics:
•Creatingandusingrecoverymedia
•Performingbackupandrecoveryoperations
•UsingtheRescueandRecoveryworkspace
•Creatingandusingarescuemedium
•Installingorreinstallingdevicedrivers
•Solvingrecoveryproblems
Notes:
1.TherecoveryinformationinthischapteronlyappliestothecomputersthathavetheRescueand
RecoveryprogramortheProductRecoveryprograminstalled.IftheEnhancedBackupandRestore
iconintheLenovoThinkVantageToolsprogramisdimmed,itindicatesthatyouneedtoinstall
theRescueandRecoveryprogrammanuallybeforeenablingitsfeatures.T oinstalltheRescueand
Recoveryprogram,dothefollowing:
a.ClickStart➙AllPrograms➙LenovoThinkVantageT ools,anddouble-clickEnhancedBackup
andRestore.
b.Followtheinstructionsonthescreen.
c.Whentheinstallationprocesscompletes,theEnhancedBackupandRestoreiconisactivated.
2.Thereareavarietyofmethodstochoosefromwhenconsideringhowtorecoverintheeventofa
software-orhardware-relatedproblem.Somemethodsvarydependingonthetypeofoperatingsystem
thatisinstalled.
3.Theproductontherecoverymediamaybeusedonlyforthefollowingpurposes:
•Restoretheproductpreinstalledonyourcomputer
•Reinstalltheproduct
•ModifytheproductusingtheAdditionalFiles
Creatingandusingrecoverymedia
Youcanuserecoverymediatorestoretheharddiskdrivetothefactorydefaultstate.Recoverymediaare
usefulifyoutransferthecomputertoanotherarea,sellthecomputer,recyclethecomputer,orputthe
computerinanoperationalstateafterallothermethodsofrecoveryhavefailed.Asaprecautionarymeasure,
itisimportanttocreaterecoverymediaasearlyaspossible.
Note:Therecoveryoperationsyoucanperformusingrecoverymediavarydependingontheoperating
systemfromwhichtherecoverymediawerecreated.Therecoverymediamightcontainabootmedium
andadatamedium.Y ourMicrosoftWindowslicensepermitsyoutocreateonlyonedatamedium,soitis
importantthatyoustoretherecoverymediainasafeplaceafteryouhavemadethem.
©CopyrightLenovo2012
79
Page 94

Creatingrecoverymedia
Thissectionprovidesinstructionsonhowtocreaterecoverymedia.
Note:OntheWindows7operatingsystem,youcancreaterecoverymediausingdiscsorexternalUSB
storagedevices.
TocreaterecoverymediaontheWindows7operatingsystem,clickStart➙AllPrograms➙Lenovo
ThinkVantageT ools➙FactoryRecoveryDisks.Then,followtheinstructionsonthescreen.
Usingrecoverymedia
Thissectionprovidesinstructionsonhowtouserecoverymedia.
OntheWindows7operatingsystem,youcanuserecoverymediatorestorethecontentsoftheharddisk
drivetothefactorydefaultstate.Also,youcanuserecoverymediatoputthecomputerinanoperational
stateafterallothermethodsofharddiskdriverecoveryhavefailed.
Attention:Whenyouuserecoverymediatorestorethecontentsoftheharddisktothefactorydefaultstate,
allthelescurrentlyontheharddiskdrivewillbedeletedandreplacedbythefactorydefaultles.
TouserecoverymediaontheWindows7operatingsystem,dothefollowing:
1.Dependingonthetypeofyourrecoverymedia,connectthebootmedium(memorykeyorotherUSB
storagedevice)tothecomputer,orinsertthebootdiscintotheopticaldrive.
2.RepeatedlypressandreleasetheF12keywhenturningonthecomputer.WhentheStartupDevice
Menuwindowopens,releasetheF12key.
3.SelectthedesiredstartupdeviceandpressEnter.Therestoreprocessbegins.
4.Followtheinstructionsonthescreentocompletetheoperation.
Note:Afterrestoringyourcomputerharddiskdrivetothefactorydefaultstate,youmighthavetoreinstall
devicedriversforsomedevices.See“Reinstallingdevicedrivers”onpage84.
Performingbackupandrecoveryoperations
TheRescueandRecoveryprogramenablesyoutobackupallyourharddiskdrivecontentsincludingthe
operatingsystem,datales,softwareprograms,andpersonalsettings.Youcandesignatewherethe
RescueandRecoveryprogramstoresthebackup:
•Inaprotectedareaofyourharddiskdrive
•Onthesecondaryharddiskdriveifasecondaryharddiskdriveisinstalledinyourcomputer
•OnanattachedexternalUSBharddiskdrive
•Onanetworkdrive
•Onrecordablediscs(arecordableopticaldriveisrequiredforthisoption)
Afteryouhavebackedupthecontentsoftheharddiskdrive,youcanrestorethecompletecontentsofthe
harddiskdrive,restoreselectedlesonly,orrestoretheWindowsoperatingsystemandapplicationsonly
whilekeepingtheotherdataonyourharddiskdrive.
Performingabackupoperation
ThissectionprovidesinstructionsonhowtoperformabackupoperationusingtheRescueandRecovery
program.
ToperformabackupoperationusingtheRescueandRecoveryprogramontheWindows7operating
system,dothefollowing:
80ThinkCentreUserGuide
Page 95

1.FromtheWindowsdesktop,clickStart➙AllPrograms➙LenovoThinkVantageTools➙Enhanced
BackupandRestore.TheRescueandRecoveryprogramopens.
2.IntheRescueandRecoverymainwindow,clicktheLaunchadvancedRescueandRecoveryarrow.
3.ClickBackupyourharddriveandselectbackupoperationoptions.Then,followtheinstructionson
thescreentocompletethebackupoperation.
Performingarecoveryoperation
ThissectionprovidesinstructionsonhowtoperformarecoveryoperationusingtheRescueandRecovery
program.
ToperformarecoveryoperationusingtheRescueandRecoveryprogramontheWindows7operating
system,dothefollowing:
1.FromtheWindowsdesktop,clickStart➙AllPrograms➙LenovoThinkVantageTools➙Enhanced
BackupandRestore.TheRescueandRecoveryprogramopens.
2.IntheRescueandRecoverymainwindow,clicktheLaunchadvancedRescueandRecoveryarrow.
3.ClicktheRestoreyoursystemfromabackupicon.
4.Followtheinstructionsonthescreentocompletetherecoveryoperation.
FormoreinformationaboutperformingarecoveryoperationfromtheRescueandRecoveryworkspace,see
“UsingtheRescueandRecoveryworkspace”onpage81
.
UsingtheRescueandRecoveryworkspace
TheRescueandRecoveryworkspaceresidesinaprotected,hiddenareaofyourharddiskdrivethat
operatesindependentlyfromtheWindowsoperatingsystem.Thisenablesyoutoperformrecovery
operationsevenifyoucannotstarttheWindowsoperatingsystem.Y oucanperformthefollowingrecovery
operationsfromtheRescueandRecoveryworkspace:
•Rescuelesfromyourharddiskdriveorfromabackup:TheRescueandRecoveryworkspaceenables
youtolocatelesonyourharddiskdriveandtransferthemtoanetworkdriveorotherrecordablemedia,
suchasaUSBdeviceoradisc.Thissolutionisavailableevenifyoudidnotbackupyourlesorif
changesweremadetothelessinceyourlastbackupoperation.Y oucanalsorescueindividuallesfrom
aRescueandRecoverybackuplocatedonyourlocalharddiskdrive,aUSBdevice,oranetworkdrive.
•RestoreyourharddiskdrivefromaRescueandRecoverybackup:Ifyouhavebackedupyourharddisk
driveusingtheRescueandRecoveryprogram,youcanrestoretheharddiskdrivefromaRescueand
Recoverybackup,evenifyoucannotstarttheWindowsoperatingsystem.
•Restoreyourharddiskdrivetothefactorydefaultstate:TheRescueandRecoveryworkspaceenables
youtorestorethecompletecontentsofyourharddiskdrivetothefactorydefaultstate.Ifyouhave
multiplepartitionsonyourharddiskdrive,youhavetheoptiontorestoretheC:partitionandleavethe
otherpartitionsintact.BecausetheRescueandRecoveryworkspaceoperatesindependentlyfrom
theWindowsoperatingsystem,youcanrestoretheharddiskdrivetothefactorydefaultstateevenif
youcannotstarttheWindowsoperatingsystem.
Attention:IfyourestoretheharddiskdrivefromaRescueandRecoverybackuporrestoretheharddisk
drivetothefactorydefaultsettings,alllesontheprimaryharddiskdrivepartition(usuallydriveC:)willbe
deletedintherecoveryprocess.Ifpossible,makecopiesofimportantles.Ifyouareunabletostartthe
Windowsoperatingsystem,youcanusetherescuelesfeatureoftheRescueandRecoveryworkspaceto
copylesfromyourharddiskdrivetoothermedia.
TostarttheRescueandRecoveryworkspace,dothefollowing:
1.Makesurethecomputeristurnedoff.
Chapter6.Recoveryinformation81
Page 96

2.T urnonyourcomputer.Whenyouseethelogoscreen,pressEnter,andthenpressF11toenterthe
RescueandRecoveryworkspace.
3.IfyouhavesetaRescueandRecoverypassword,typeyourpasswordwhenprompted.TheRescue
andRecoveryworkspaceopensafterashortdelay.
Note:IftheRescueandRecoveryworkspacefailstoopen,see“Solvingrecoveryproblems”onpage84.
4.Dooneofthefollowing:
•Torescuelesfromyourharddiskdrive,clickRescuelesandfollowtheinstructionsonthescreen.
•TorestoreyourharddiskdrivefromaRescueandRecoverybackuportorestoreyourharddiskdrive
tothefactorydefaultsettings,clickFullRestoreandfollowtheinstructionsonthescreen.
FormoreinformationaboutthefeaturesoftheRescueandRecoveryworkspace,clickHelp.
Note:Afterrestoringyourharddiskdrivetothefactorydefaultstate,youmighthavetoreinstalldevice
driversforsomedevices.See“Reinstallingdevicedrivers”onpage84.
Creatingandusingarescuemedium
Witharescuemedium,suchasadiscoraUSBharddiskdrive,youcanrecoverthecomputerfromfailures
thatpreventyoufromgainingaccesstotheRescueandRecoveryworkspaceonyourharddiskdrive.
Notes:
1.Therecoveryoperationsyoucanperformusingarescuemediumvarydependingontheoperating
system.
2.Therescuedisccanbestartedinalltypesofopticaldrives.
Creatingarescuemedium
Thissectionprovidesinstructionsonhowtocreatearescuemedium.
TocreatearescuemediumontheWindows7operatingsystem,dothefollowing:
1.FromtheWindowsdesktop,clickStart➙AllPrograms➙LenovoThinkVantageTools➙Enhanced
BackupandRestore.TheRescueandRecoveryprogramopens.
2.IntheRescueandRecoverymainwindow,clicktheLaunchadvancedRescueandRecoveryarrow.
3.ClicktheCreateRescueMediaicon.TheCreateRescueandRecoveryMediawindowopens.
4.IntheRescueMediaarea,selectthetypeoftherescuemediumyouwanttocreate.Y oucancreatea
rescuemediumusingadisc,aUSBharddiskdrive,orasecondaryinternalharddiskdrive.
5.ClickOKandfollowtheinstructionsonthescreentocreatearescuemedium.
Usingarescuemedium
Thissectionprovidesinstructionsonhowtousetherescuemediumyouhavecreated.
•Ifyouhavecreatedarescuemediumusingadisc,usethefollowinginstructionstousetherescuemedium:
1.T urnoffyourcomputer.
2.RepeatedlypressandreleasetheF12keywhenturningonthecomputer.WhentheStartupDevice
Menuwindowopens,releasetheF12key.
3.IntheStartupDeviceMenuwindow,selectthedesiredopticaldriveastherstbootdevice.Then,
inserttherescuediscintotheopticaldriveandpressEnter.Therescuemediumstarts.
•IfyouhavecreatedarescuemediumusingaUSBharddiskdrive,usethefollowinginstructionsto
usetherescuemedium:
1.AttachtheUSBharddiskdrivetooneoftheUSBconnectorsonyourcomputer.
82ThinkCentreUserGuide
Page 97

2.RepeatedlypressandreleasetheF12keywhenturningonthecomputer.WhentheStartupDevice
Menuwindowopens,releasetheF12key.
3.IntheStartupDeviceMenuwindow,selecttheUSBharddiskdriveastherstbootdeviceand
pressEnter.Therescuemediumstarts.
Whentherescuemediumstarts,theRescueandRecoveryworkspaceopens.Thehelpinformationfor
eachfeatureisavailablefromtheRescueandRecoveryworkspace.Followtheinstructionstocomplete
therecoveryprocess.
Reinstallingpreinstalledapplicationsanddevicedrivers
Yourcomputerhasprovisionsthatenableyoutoreinstallselectedfactory-installedapplicationsanddevice
drivers.
Reinstallingpreinstalledapplications
Thissectionprovidesinstructionsonhowtoreinstallpreinstalledapplications.
ToreinstalltheselectedapplicationspreinstalledonyourLenovocomputer,dothefollowing:
1.T urnonthecomputer.
2.GototheC:\SWTOOLSdirectory.
3.Opentheappsfolder.Withintheappsfolder,thereareseveralsubfoldersnamedforvariousapplications
installedinyourcomputer.
4.Opentheappropriateapplicationsubfolder.
5.Intheapplicationsubfolder,lookforaSETUP.EXEleorotherappropriateEXElesforsetup.
Double-clicktheleandfollowtheinstructionsonthescreentocompletetheinstallation.
Reinstallingpreinstalleddevicedrivers
Thissectionprovidesinstructionsonhowtoreinstallpreinstalleddevicedrivers.
Attention:Whenyoureinstalldevicedrivers,youarechangingthecurrentcongurationofyourcomputer.
Reinstalldevicedriversonlywhenitisnecessarytocorrectaproblemwithyourcomputer.
Toreinstallthedevicedriverforafactory-installeddevice,dothefollowing:
1.T urnonthecomputer.
2.GototheC:\SWTOOLSdirectory.
3.OpentheDRIVERSfolder.WithintheDRIVERSfolder,thereareseveralsubfoldersnamedforvarious
devicesinstalledinyourcomputer,suchasAUDIOorVIDEO.
4.Opentheappropriatedevicesubfolder.
5.Dooneofthefollowing:
•Inthedevicesubfolder,lookforaSETUP.exele.Double-clicktheleandfollowtheinstructionson
thescreentocompletetheinstallation.
•Inthedevicesubfolder,lookforaREADME.txtleoralewiththe.txtextension.Thislemightbe
namedaftertheoperatingsystem,suchasWIN98.txt.TheTXTlecontainsinformationabouthowto
installthedevicedriver.Followtheinstructionstocompletetheinstallation.
•Ifthedevicesubfoldercontainsalewiththe.infextensionandyouwanttoinstallthedevice
driverusingtheINFle,refertoyourWindowsHelpandSupportinformationsystemfordetailed
informationabouthowtoinstallthedevicedriver.
Note:Ifyouneedupdateddevicedrivers,see“Gettingthelatestdevicedriversforyourcomputer”on
page95formoreinformation.
Chapter6.Recoveryinformation83
Page 98

Reinstallingsoftwareprograms
Ifasoftwareprogramyouinstalledonyourcomputerisnotworkingcorrectly,youmightneedtoremove
andreinstallit.Reinstallingoverwritestheexistingprogramslesandusuallyxesanyproblemsthat
youmighthavehadwiththatprogram.
Toremoveaprograminyoursystem,seeMicrosoftWindowshelpsystemfordetailedinformation.
Toreinstalltheprogram,dooneofthefollowing:
Note:Themethodofreinstallingaprogramvariesfromprogramtoprogram.Refertothedocumentation
providedwiththeprogramtoseeifyourprogramhasspecialinstallationinstructions.
•Toreinstallmostcommerciallyavailableprogramsinyoursystem,seeMicrosoftWindowshelpsystem
formoreinformation.
•ToreinstallselectedapplicationprogramsthatcamepreinstalledfromLenovo,dothefollowing:
1.T urnonthecomputer.
2.GototheC:\SWTOOLSdirectory.
3.OpentheAPPSfolder.WithintheAPPSfolder,thereareseveralsubfoldersnamedforvarious
applicationsinstalledinyourcomputer.
4.Opentheappropriateapplicationsubfolder.
5.Intheapplicationsubfolder,lookforaSETUP .EXEleorotherappropriateEXElesforsetup.
Double-clicktheleandfollowtheinstructionsonthescreentocompletetheinstallation.
Reinstallingdevicedrivers
Toreinstalladevicedriverforanoptionyouinstalled,refertothedocumentationthatcomeswiththeoption.
Whenyoureinstalldevicedrivers,youarechangingthecurrentcongurationofyourcomputer.Reinstall
devicedriversonlywhenitisnecessarytocorrectaproblemwithyourcomputer.
Formoreinformationaboutreinstallingdevicedriversthatcamewithyourcomputer,see“Reinstalling
preinstalledapplicationsanddevicedrivers”onpage83
.
Solvingrecoveryproblems
IfyouareunabletoaccesstheRescueandRecoveryworkspaceortheWindowsenvironment,doone
ofthefollowing:
•UsearescuemediumtostarttheRescueandRecoveryworkspace.See“Creatingandusingarescue
medium”onpage82.
•Userecoverymediaifallothermethodsofrecoveryhavefailedandyouneedtorestoretheharddisk
drivetothefactorydefaultsettings.See“Creatingandusingrecoverymedia”onpage79
Note:IfyouareunabletoaccesstheRescueandRecoveryworkspaceortheWindowsenvironmentfrom
arescuemediumorrecoverymedia,youmightnothavetherescuedevice(aninternalharddiskdrive,a
disc,aUSBharddiskdrive,orotherexternaldevices)setastherstbootdeviceinthestartupdevice
sequence.Youmustrstmakesurethatyourrescuedeviceissetastherstbootdeviceinthestartup
devicesequenceintheSetupUtilityprogram.See“Selectingastartupdevice”onpage90
informationabouttemporarilyorpermanentlychangingthestartupdevicesequence.Formoreinformation
abouttheSetupUtilityprogram,seeChapter7“UsingtheSetupUtilityprogram”onpage87.
.
fordetailed
Itisimportanttocreatearescuemediumandasetofrecoverymediaasearlyaspossibleandstorethem
inasafeplaceforfutureuse.
84ThinkCentreUserGuide
Page 99

RecoveryinformationfortheWindows8operatingsystem
Thissectionprovidesinformationabouttherecoverysolutionsprovidedoncomputerspreinstalledwiththe
Windows8operatingsystem.
Refreshingyourcomputer
Ifyourcomputerdoesnotperformwellandtheproblemmightbecausedbyarecentlyinstalledprogram,
youcanrefreshyourcomputerwithoutlosingyourpersonallesorchangingyoursettings.
Attention:Ifyourefreshyourcomputer,theprogramsthatcamewithyourcomputerandtheprogramsthat
youinstalledfromWindowsStorewillbereinstalled,butallotherprogramswillberemoved.
Torefreshyourcomputer,dothefollowing:
1.Movethecursortothetop-rightorbottom-rightcornerofthescreentodisplaythecharms.Click
Settings➙ChangePCsettings➙General.
2.IntheRefreshyourPCwithoutaffectingyourlessection,clickGetstarted.
Resettingyourcomputertothefactorydefaultsettings
Youcanresetyourcomputertothefactorydefaultsettings.Resettingthecomputerwillreinstallthe
operatingsystem,andreinstallalltheprogramsandsettingsthatcamewithyourcomputer.
Attention:Ifyouresetyourcomputer,allyourpersonallesandsettingswillbedeleted.Toavoiddataloss,
makeabackupcopyofallthedatathatyouwanttokeep.
Toresetyourcomputer,dothefollowing:
1.Movethecursortothetop-rightorbottom-rightcornerofthescreentodisplaythecharms.Click
Settings➙ChangePCsettings➙General.
2.IntheRemoveeverythingandreinstallWindowssection,clickGetstarted.
Advancedstartupoptions
AdvancedstartupoptionsenableyoutochangethestartupsettingsofyourWindowsoperatingsystem,
startthecomputerfromanexternaldevice,orrestoretheWindowsoperatingsystemfromasystemimage.
Tousetheadvancedstartupoptions,dothefollowing:
1.Movethecursortothetop-rightorbottom-rightcornerofthescreentodisplaythecharms.Click
Settings➙ChangePCsettings➙General.
2.IntheAdvancedstartupsection,clickRestartnow➙T roubleshoot➙Advancedoptions.
3.Restartyourcomputerfollowingtheinstructionsonthescreen.
FormoredetailsabouttherecoverysolutionsprovidedoncomputerspreinstalledwiththeWindows8
operatingsystem,refertothehelpinformationsystemoftheWindows8operatingsystem.
Chapter6.Recoveryinformation85
Page 100

86ThinkCentreUserGuide
 Loading...