

Page 1
Lenovo 3000 Y310
User Guide
Includes:
• Important safety information
• Tips for taking care of your computer
• Function and features
• Service and troubleshooting
• Warranty information
Please read Read This First before operation of your computer
Note
Lenovo 3000Y310 UG.book Page 1 Friday, September 14, 2007 4:24 PM
Page 2
First Edition (August 2007)
© Copyright Lenovo 2007. All rights reserved.
U.S. GOVERNMENT USERS – RESTRICTED RIGHTS: Our products and/or services are provided with
RESTRICTED RIGHTS. Use, duplication or disclosure by the Government is subject to the GSA ADP Schedule
contract with Lenovo Group Limited, if any, or the standard terms of this commercial license, or if the agency is
unable to accept this Program under these terms, then we provide this Program under the provisions set forth in
Commercial Computer Software–Restricted Rights at FAR 52.227-19, when applicable, or under Rights in DataGeneral, FAR 52.227.14 (Alternate III).
Before using this information and the product it supports, be sure to read the following:
• Safety and Warranty Guide included in the package with this publication.
• Wireless related information in “Appendix D, Notices,” on page 65.
• Regulatory Notice included in the package with this publication.
Note
Lenovo 3000Y310 UG.book Page 2 Friday, September 14, 2007 4:24 PM
Page 3
iii
Contents
Read This First . . . . . . . . . . . . . . . . . . . . . . .v
Chapter 1. Finding Information . . . . . . . . . .1
This Guide and Other Publications . . . . . . . . . . 1
Chapter 2. Caring for Your Computer . . . . .3
Important Tips . . . . . . . . . . . . . . . . . . . . . . . . . . . 3
Be Careful about Where and
How You Work . . . . . . . . . . . . . . . . . . . . . . . 3
Be Gentle with Your Computer . . . . . . . . . . 4
Carry Your Computer Properly . . . . . . . . . . 4
Handle Storage Media and
Drives Properly . . . . . . . . . . . . . . . . . . . . . . . 5
Take Care in Setting Passwords . . . . . . . . . 5
Other Important Tips . . . . . . . . . . . . . . . . . . 5
Cleaning the Cover of Your Computer . . . 6
Cleaning Your Computer Keyboard . . . . . . 6
Cleaning Your Computer Display . . . . . . . . 7
Chapter 3. Getting Started . . . . . . . . . . . . . .9
Knowing the Parts . . . . . . . . . . . . . . . . . . . . . . . 10
Top View . . . . . . . . . . . . . . . . . . . . . . . . . . . . 10
Right-side View . . . . . . . . . . . . . . . . . . . . . . 13
Left-side View . . . . . . . . . . . . . . . . . . . . . . . 15
Bottom View . . . . . . . . . . . . . . . . . . . . . . . . . 17
Front View . . . . . . . . . . . . . . . . . . . . . . . . . . 19
Accessibility and Comfort . . . . . . . . . . . . . . . . 20
Basics . . . . . . . . . . . . . . . . . . . . . . . . . . . . . . . . . . 22
Special Keys and Buttons . . . . . . . . . . . . . . 22
Using the Touch Pad . . . . . . . . . . . . . . . . . . 24
Status Indicators . . . . . . . . . . . . . . . . . . . . . . 25
Preventing Problems . . . . . . . . . . . . . . . . . . 27
Learn How to Achieve All Day
Computing . . . . . . . . . . . . . . . . . . . . . . . . . . . . . 30
Your Computer Batteries . . . . . . . . . . . . . . 30
Checking Battery Status . . . . . . . . . . . . . . . 30
Using the AC Adapter . . . . . . . . . . . . . . . . 30
Charging the Battery . . . . . . . . . . . . . . . . . . 31
Handling the Battery . . . . . . . . . . . . . . . . . . 31
Integrated Camera . . . . . . . . . . . . . . . . . . . . . . . 32
Security . . . . . . . . . . . . . . . . . . . . . . . . . . . . . . . . 32
Attaching a Mechanical Lock . . . . . . . . . . . 32
Using Passwords . . . . . . . . . . . . . . . . . . . . . 33
Chapter 4. Solving Computer
Problems . . . . . . . . . . . . . . . . . . . . . . . . . . . 37
Frequently Asked Questions . . . . . . . . . . . . . .38
Troubleshooting . . . . . . . . . . . . . . . . . . . . . . . . .39
Display Problems . . . . . . . . . . . . . . . . . . . . . 39
A Password Problem . . . . . . . . . . . . . . . . . . 40
Keyboard Problems . . . . . . . . . . . . . . . . . . . 40
Sleep or Hibernation Problems . . . . . . . . . 41
Computer Screen Problems . . . . . . . . . . . .42
Battery Problems . . . . . . . . . . . . . . . . . . . . . 43
A Hard Disk Drive Problem . . . . . . . . . . . .44
A Startup Problem . . . . . . . . . . . . . . . . . . . . 44
Other Problems . . . . . . . . . . . . . . . . . . . . . . .44
Chapter 5. Upgrading and Replacing
Devices . . . . . . . . . . . . . . . . . . . . . . . . . . . . 45
Replacing the Battery . . . . . . . . . . . . . . . . . . . . . 45
Replacing Memory . . . . . . . . . . . . . . . . . . . . . . . 46
Chapter 6. Getting Help and Service . . . . 51
Getting Help and Service . . . . . . . . . . . . . . . . .51
Getting Help on the Web . . . . . . . . . . . . . . . . . .51
Calling the Customer Support Center . . . . . . . 51
Getting Help around the World . . . . . . . . . . . .53
Appendix A. Warranty Information . . . . . . 55
Warranty Information . . . . . . . . . . . . . . . . . . . . 55
Types of Warranty Service . . . . . . . . . . . . .56
Lenovo Warranty Service Telephone
Numbers. . . . . . . . . . . . . . . . . . . . . . . . . . . . . . . . 57
Warranty Service Telephone Numbers . . . 57
Appendix B. Customer Replaceable Units
(CRUs) . . . . . . . . . . . . . . . . . . . . . . . . . . . . . 59
Appendix C. Features and
Specifications . . . . . . . . . . . . . . . . . . . . . . . 61
Features . . . . . . . . . . . . . . . . . . . . . . . . . . . . . . . . 61
Specifications . . . . . . . . . . . . . . . . . . . . . . . . . . . . 63
Lenovo 3000Y310 UG.book Page iii Friday, September 14, 2007 4:24 PM
Page 4
iv
Lenovo 3000 Y310 User Guide
Appendix D. Notices . . . . . . . . . . . . . . . . . . 65
Notices . . . . . . . . . . . . . . . . . . . . . . . . . . . . . . . . . 65
Television output notice . . . . . . . . . . . . . . . 66
Wireless Related Information . . . . . . . . . . . . . . 67
Wireless Interoperability . . . . . . . . . . . . . . 67
Usage Environment and Your Health . . . 68
Electronic Emissions Notices . . . . . . . . . . . . . . 69
Federal Communications Commission (FCC)
Statement . . . . . . . . . . . . . . . . . . . . . . . . . . . . 69
Industry Canada Class B Emission
Compliance Statement . . . . . . . . . . . . . . . . 70
Avis de conformité à la réglementation
d’Industrie Canada . . . . . . . . . . . . . . . . . . . 70
European Union EMC Directive
Conformance Statement . . . . . . . . . . . . . . . 70
Japanese VCCI Class B Statement . . . . . . . 70
Lenovo product service information for
Taiwan . . . . . . . . . . . . . . . . . . . . . . . . . . . . . . . . . 71
WEEE and Recycling Statements . . . . . . . . . . . 71
General Recycling Statement . . . . . . . . . . . 71
EU WEEE Statements . . . . . . . . . . . . . . . . . . . . 71
Japan Recycling Statements . . . . . . . . . . . . . . . 72
Collecting and Recycling a Disused Lenovo
Computer or Monitor . . . . . . . . . . . . . . . . . 72
Disposing of a Lenovo Computer
Components . . . . . . . . . . . . . . . . . . . . . . . . . 72
Disposing a Disused Battery Pack from
Lenovo Notebook Computers . . . . . . . . . . 72
Notice for Users in the U.S.A. . . . . . . . . . . . . . 73
Notice on Deleting Data from Your Hard
Disk . . . . . . . . . . . . . . . . . . . . . . . . . . . . . . . . . . . 73
Trademarks . . . . . . . . . . . . . . . . . . . . . . . . . . . . . 75
Index . . . . . . . . . . . . . . . . . . . . . . . . . . . . . . 77
Lenovo 3000Y310 UG.book Page iv Friday, September 14, 2007 4:24 PM
Page 5
v
© Copyright Lenovo 2007
Read This First
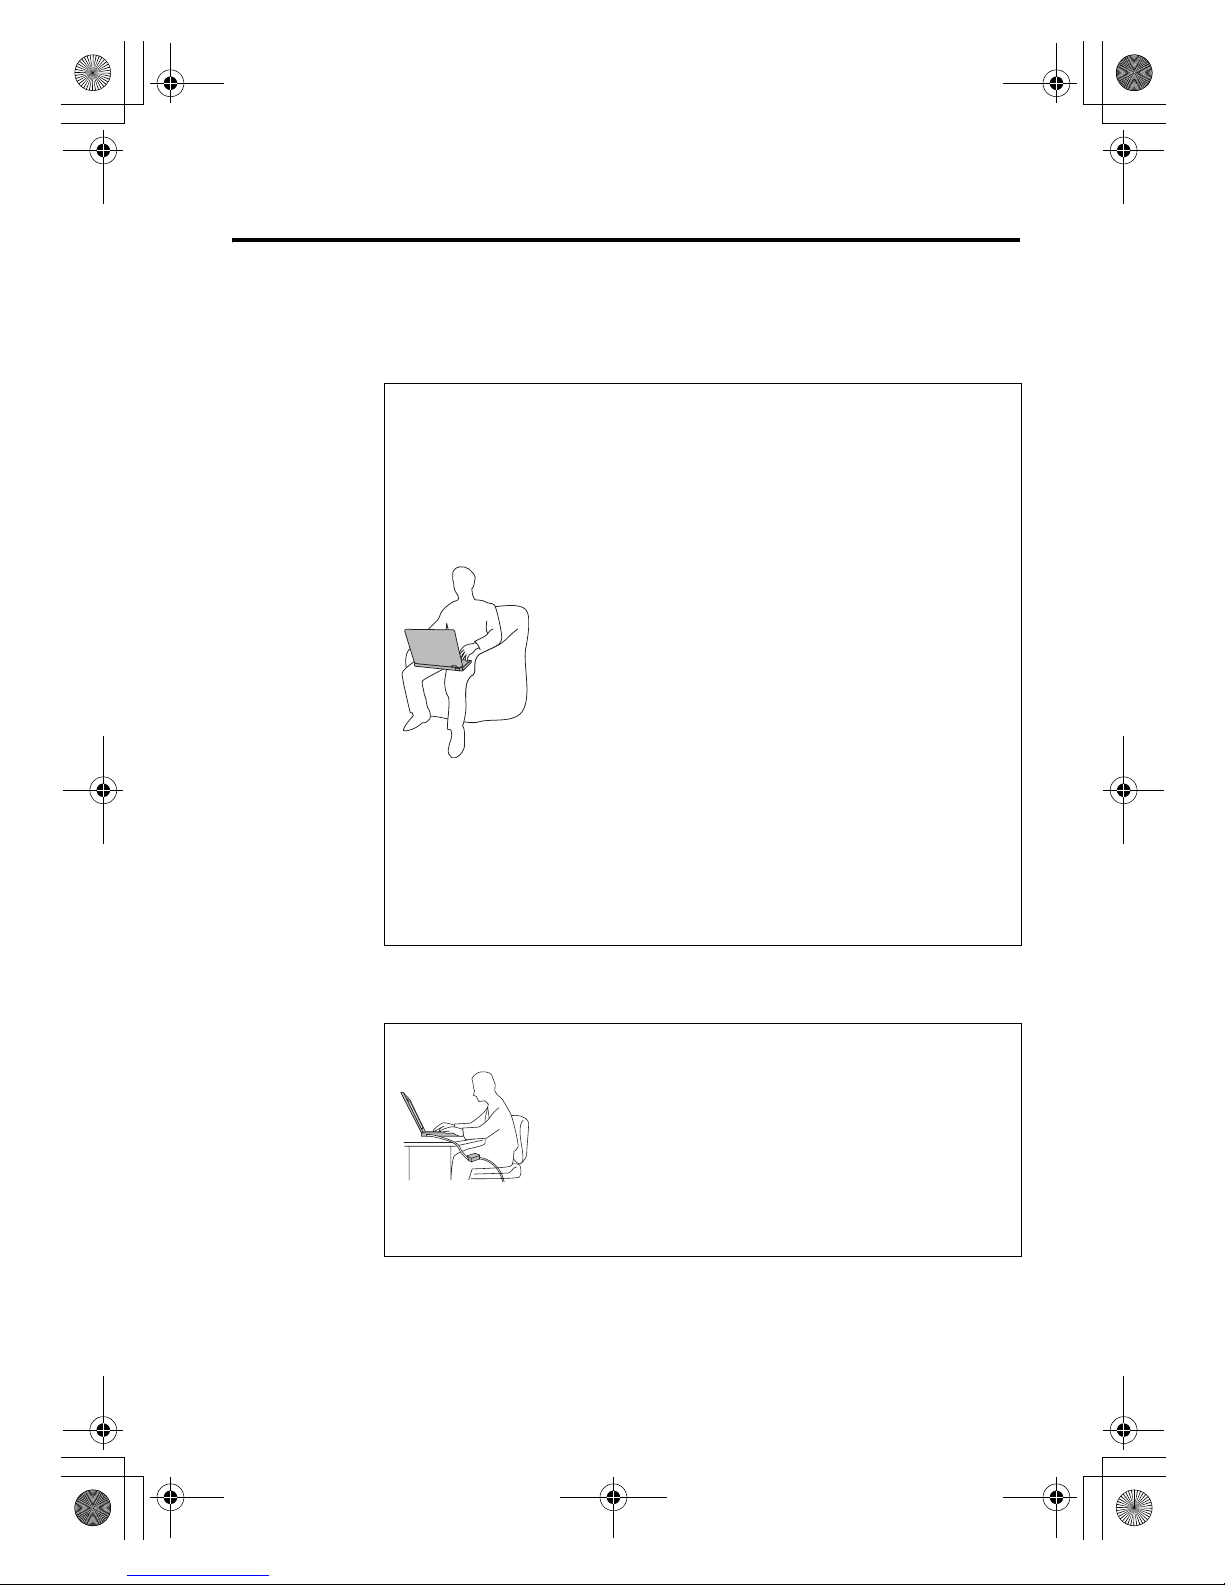
When your computer is turned on or the
battery is charging, the base, the palm rest,
and some other parts may become hot. Avoid
keeping your hands, your lap, or any other
part of your body in contact with a hot
section of the computer for any extended
length of time. When you use the keyboard,
avoid keeping your palms on the palm rest
for a prolonged period of time.
Your computer generates some heat during
normal operation. The amount of heat
depends on the amount of system activity
and the battery charge level. Extended
contact with your body, even through
clothing, could cause discomfort or even a
skin burn. Periodically take breaks from
using the keyboard by lifting your hands
from the palm rest; and be careful not to use
the keyboard for any extended length of
time.
When the AC adapter is connected to an
electrical outlet and your computer, it
generates heat. Do not place the adapter in
contact with any part of your body while
using it. Never use the AC adapter to warm
your body. Extended contact with your body,
even through clothing, may cause a skin
burn.
Lenovo 3000Y310 UG.book Page v Friday, September 14, 2007 4:24 PM
Page 6
vi
Lenovo 3000 Y310 User Guide
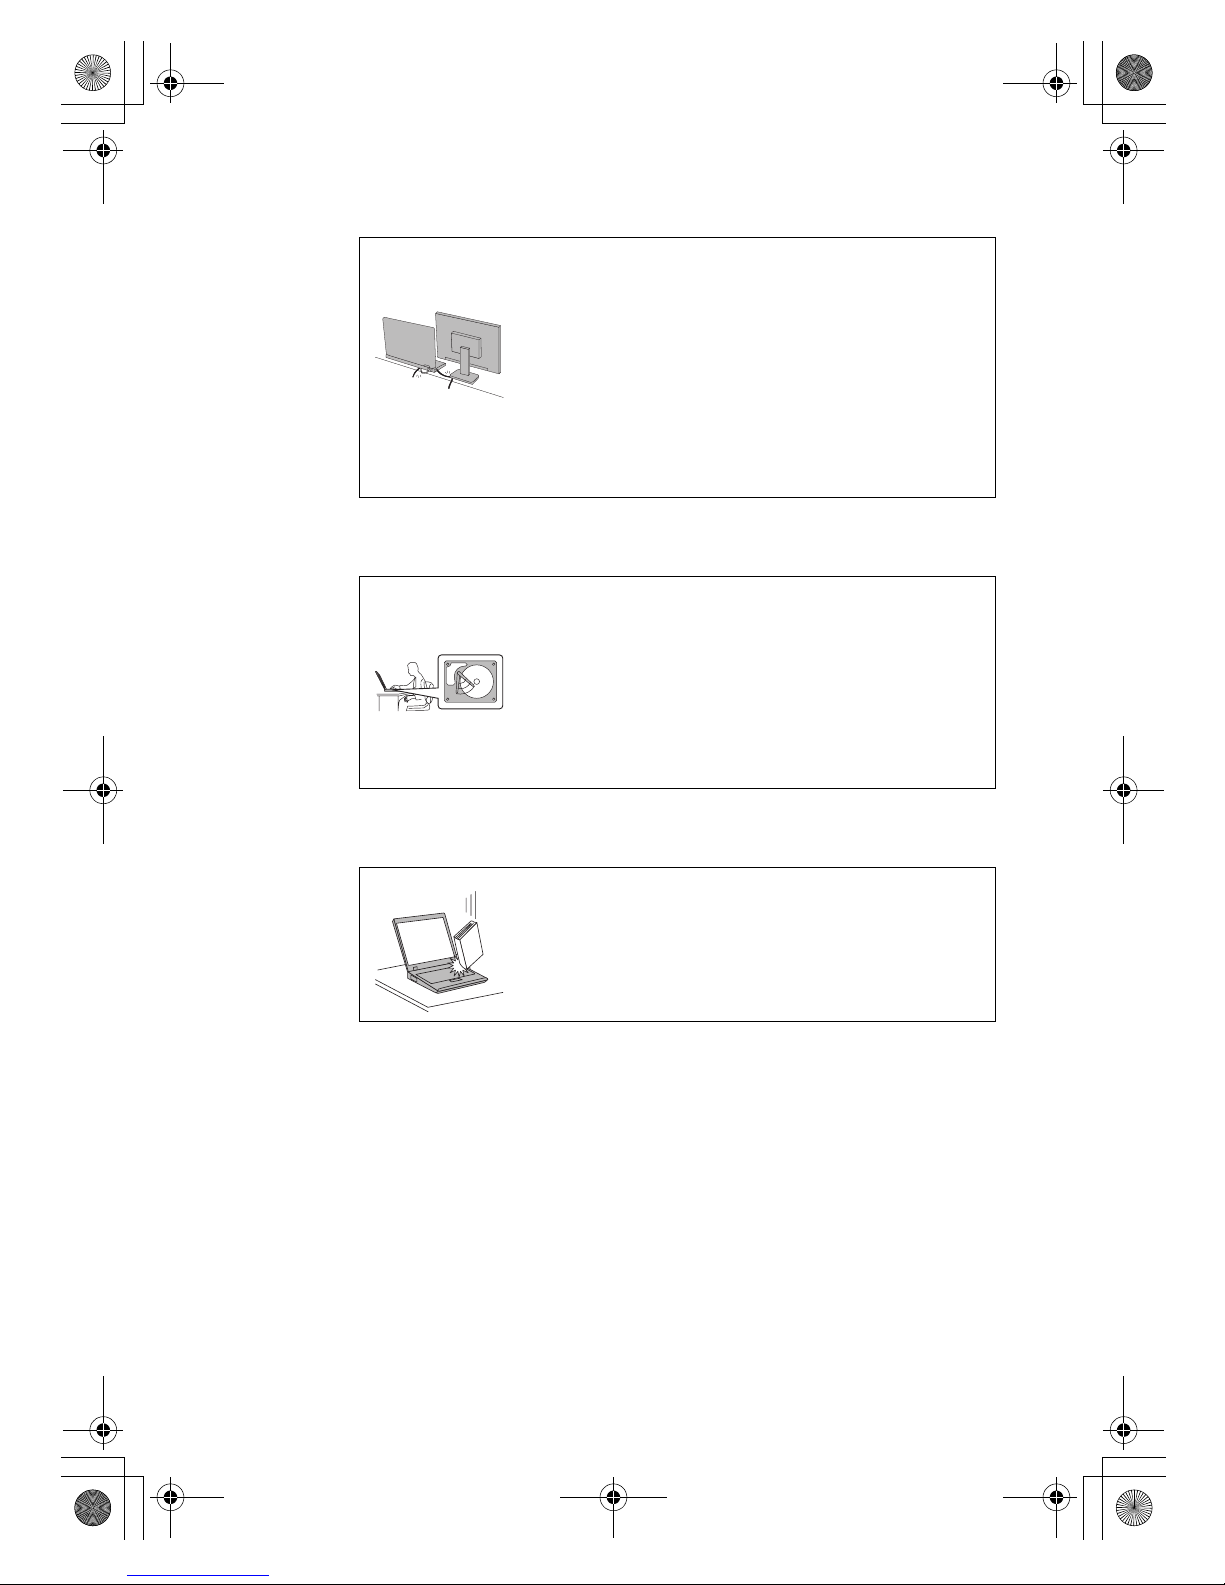
Route the cables of an AC adapter, a mouse, a
keyboard, a printer, or any other electronic
device, or communication lines, so that they
cannot be walked on, tripped over, pinched
by your computer or other objects, or in any
way subjected to treatment that could disturb
the operation of your computer. Applying
strong force to the cables may damage or
break them.
Before moving your computer, do one of the
following: turn it off or press Fn + F1 to put it
in sleep mode or hibernation mode.
Before moving the computer, make sure that
the power on indicator is off. This will help to
prevent damage to the hard disk drive, and
possible loss of data.
Do not drop, bump, scratch, twist, hit,
vibrate, push, or place heavy objects on your
computer, display, or external devices.
Lenovo 3000Y310 UG.book Page vi Friday, September 14, 2007 4:24 PM
Page 7
Read This First
vii
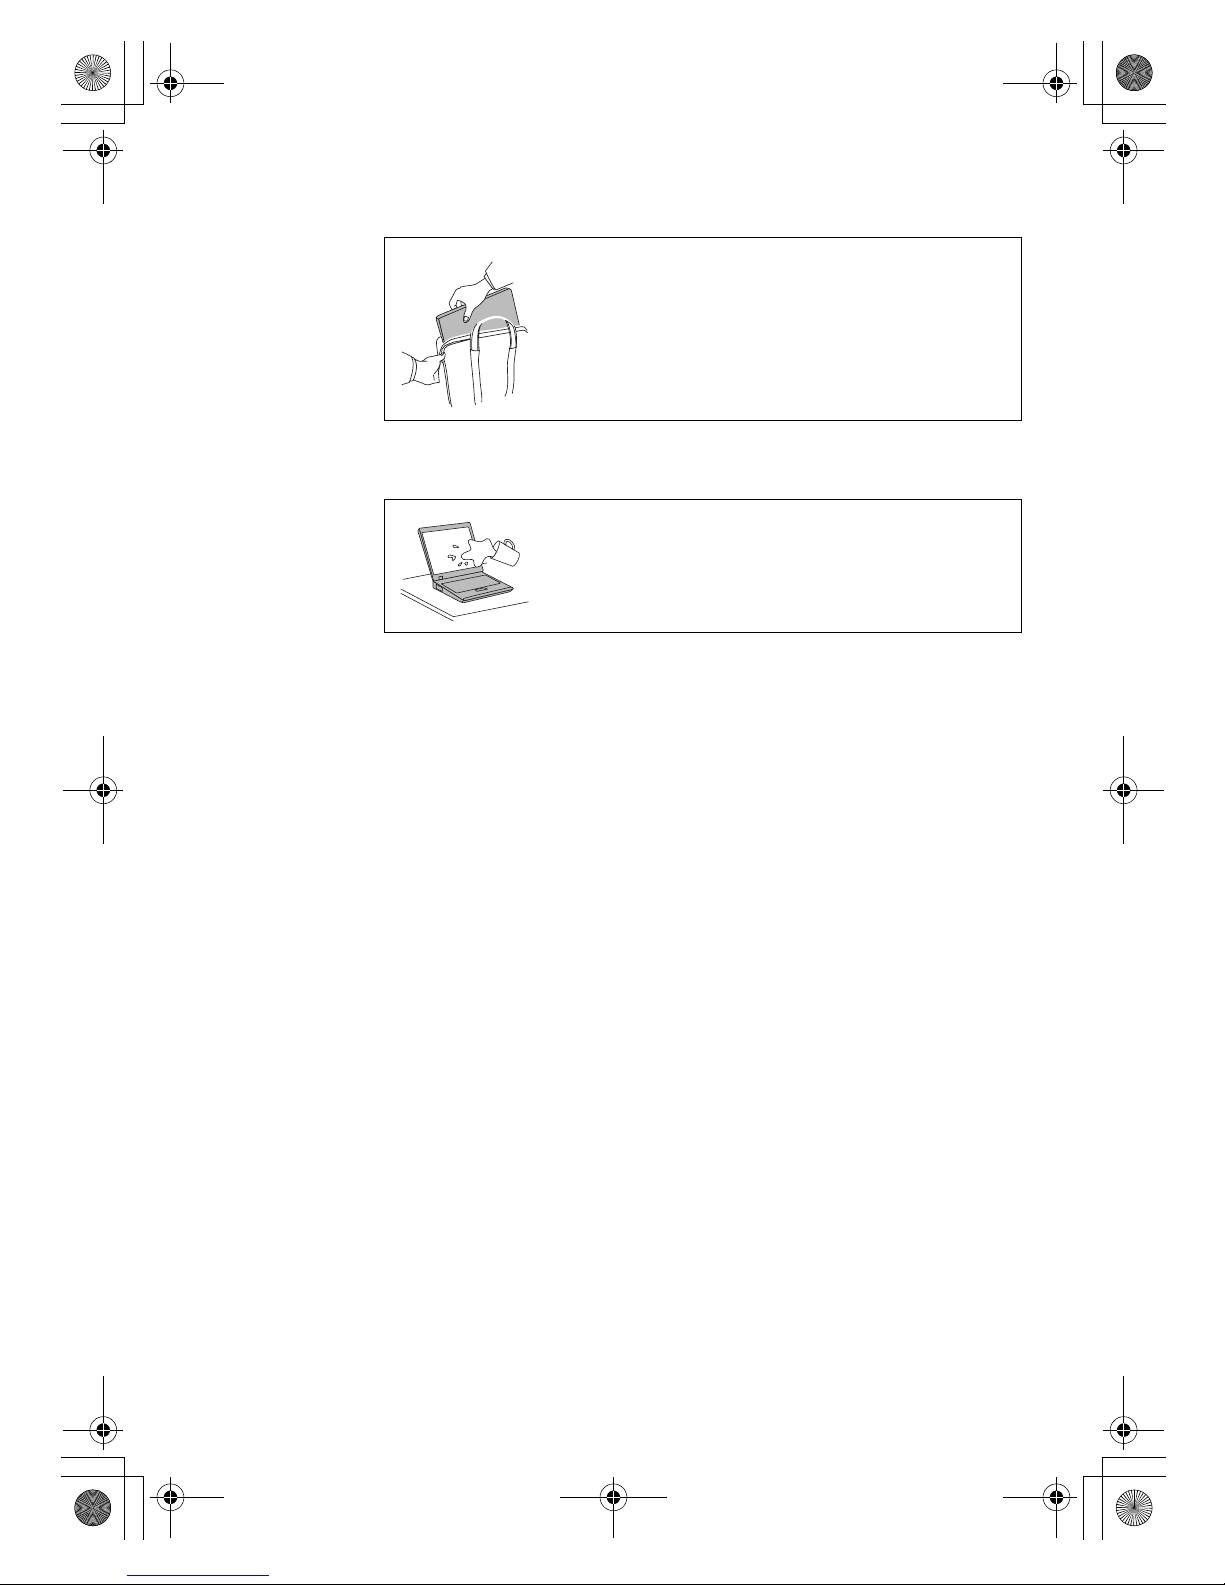
Use a quality carrying case that provides
adequate cushion and protection. Do not
pack your computer in a tightly packed
suitcase or bag.
Place liquids away from your computer to
avoid spills, and keep your computer away
from water to avoid the danger of electrical
shock.
Lenovo 3000Y310 UG.book Page vii Friday, September 14, 2007 4:24 PM
Page 8
viii
Lenovo 3000 Y310 User Guide
Lenovo 3000Y310 UG.book Page viii Friday, September 14, 2007 4:24 PM
Page 9
1
© Copyright Lenovo 2007
Chapter 1. Finding Information
This Guide and Other Publications
Setup Instructions
helps you to unpack your computer and get started. It includes a
few tips for first-time users, and introduces software preinstalled
by Lenovo™.
This User Guide
provides information about caring for your computer, function
and features instruction, basic troubleshooting information,
upgrading and replacing devices instruction, help and service
information, and warranty information for your computer.
Safety and Warranty Guide
includes general safety instructions and complete Lenovo Limited
War ra nt y.
Regulatory Notice
supplements this Guide. Read it before you use the wireless
features of your computer. Your computer complies with the radio
frequency and safety standards of any country or region in which
it has been approved for wireless use. You are requested to install
and use your computer in strict accordance with the local RF
regulations.
Lenovo 3000Y310 UG.book Page 1 Friday, September 14, 2007 4:24 PM
Page 10
Finding Information
2
Lenovo 3000 Y310 User Guide
Lenovo 3000Y310 UG.book Page 2 Friday, September 14, 2007 4:24 PM
Page 11
3
© Copyright Lenovo 2007
Chapter 2. Caring for Your Computer
Though your computer is designed to function reliably in normal work
environments, you need to use common sense in handling it. By
following these important tips, you will get the most use and enjoyment
out of your computer.
Important Tips
Be Careful about Where and How You Work
• Do not leave the base of your computer, or any other part that becomes
hot during operation, in contact with your lap or any part of your body
for an extended period when the computer is functioning or when the
battery is charging. Your computer dissipates some heat during normal
operation. This heat is a function of the level of system activity and
battery charge level. Extended contact with your body, even through
clothing, could cause discomfort or, eventually, a skin burn.
• When the AC adapter is connected to an electrical outlet and your
computer, it generates heat. Do not place the adapter in contact with any
part of your body while using it. Never use the AC adapter to warm
your body. Extended contact with your body, even through clothing,
may cause a skin burn.
• Route the cables of an AC adapter, a mouse, a keyboard, a printer, or any
other electronic devices, or communication lines, so that they cannot be
walked on, tripped over, pinched by your computer or other objects, or
in any way subjected to treatment that could disturb the operation of
your computer. Applying strong force to the cables may damage or
break them.
• Place liquids away from your computer to avoid spills, and keep your
computer away from water (to avoid the danger of electrical shock).
• Store packing materials safely out of the reach of children to prevent the
risk of suffocation from plastic bags.
• Keep your computer away from magnets, activated cellular phones,
electrical appliances, or speakers (without 13 cm or 5 in).
• Avoid subjecting your computer to extreme temperatures (below 0°C/
32°F or above 45°C/113°F).
Lenovo 3000Y310 UG.book Page 3 Friday, September 14, 2007 4:24 PM
Page 12
Caring for Your Computer
4
Lenovo 3000 Y310 User Guide
• Some appliances, such as certain portable desktop fans or air purifiers,
can produce negative ions. If a computer is close to such an appliance,
and is exposed for an extended time to air containing negative ions, it
may become electrostatically charged. Such a charge may be discharged
through your hands when you touch the keyboard or other parts of the
computer, or through connectors on I/O devices connected to it. Even
though this kind of electrostatic discharge (ESD) is the opposite of a
discharge from your body or clothing to the computer, it poses the same
risk of a computer malfunction.
Your computer is designed and manufactured to minimize any effects of
electrostatic charge. An electrostatic charge above a certain limit,
however, can increase the risk of ESD. Therefore, when using the
computer close to an appliance that can produce negative ions, give
special attention to the following:
– Avoid directly exposing your computer to the air from an appliance
that can produce negative ions.
– Keep your computer and peripherals as far as possible from such an
appliance.
– Wherever possible, ground your computer to facilitate safe
electrostatic discharge.
Note: Not all such appliances cause a significant electrostatic charge.
Be Gentle with Your Computer
• Avoid placing any objects (including paper) between the display and the
keyboard or under the keyboard.
• Do not drop, bump, scratch, twist, hit, vibrate, push, or place heavy
objects on your computer, display, or external devices.
Carry Your Computer Properly
• Before moving your computer, be sure to remove any media, turn off
attached devices, and disconnect cords and cables.
• Be sure your computer is in sleep or hibernation mode, or turned off,
before moving it. This will prevent damage to the hard disk drive and
data loss.
• When picking up your open computer, hold it by the bottom. Do not
pick up or hold your computer by the display.
• Use a quality carrying case that provides adequate cushion and
protection. Do not pack your computer in a tightly packed suitcase or
bag.
Lenovo 3000Y310 UG.book Page 4 Friday, September 14, 2007 4:24 PM
Page 13

Caring for Your Computer
Chapter 2. Caring for Your Computer
5
Handle Storage Media and Drives Properly
• If your computer comes with an optical drive, do not touch the surface of
a disc or the lens on the tray.
• Wait until you hear the CD or DVD click into the center pivot of an
optical drive before closing the tray.
• When installing your hard disk, follow the instructions shipped with
your hardware, and apply pressure only where needed on the device.
Take Care in Setting Passwords
• Remember your passwords. If you forget a supervisor or hard disk
password, Lenovo authorized service providers will not reset it, and you
might have to replace your system board or hard disk drive.
Other Important Tips
• Your computer modem might use only an analog telephone network, or
public-switched telephone network (PSTN). Do not connect the modem
to a PBX (private branch exchange) or any other digital telephone
extension line because this could damage your modem. Analog phone
lines are often used in homes, while digital phone lines are often used in
hotels or office buildings. If you are not sure which kind of phone line
you are using, contact your telephone company.
• Your computer might have both an Ethernet connector and a modem
connector. If so, be sure to connect your communication cable to the
correct one, so your connector is not damaged.
• Register your Lenovo products with Lenovo (refer to the Web page:
http://www.Lenovo.com/register). This can help authorities return
your computer to you if it is lost or stolen. Registering your computer
also enables Lenovo to notify you about possible technical information
and upgrades.
• Only an authorized Lenovo repair technician should disassemble and
repair your computer.
• Do not modify or tape the latches to keep the display open or closed.
• Take care not to turn your computer over while the AC adapter is
plugged in. This could break the adapter plug.
• Turn off your computer if you are replacing a device, or else verify that
the device is warm- or hot-swappable.
Lenovo 3000Y310 UG.book Page 5 Friday, September 14, 2007 4:24 PM
Page 14
Caring for Your Computer
6
Lenovo 3000 Y310 User Guide
• Before you install any of the following devices, touch a metal table or a
grounded metal object. This action reduces any static electricity from
your body. The static electricity could damage the device.
– ExpressCard
– Memory Card, such as SD Card, Memory Stick, MultiMediaCard,
xD-Picture Card, and Memory Stick Pro card.
–Memory module
– PCI Express Card
• When transferring data to or from a Flash Media Card, such as an SD
card, do not put your computer in sleep or hibernation mode before the
data transfer is complete. To do so might cause damage to your data.
Cleaning the Cover of Your Computer
Occasionally clean your computer as follows:
1. Prepare a mixture of a gentle kitchen-use detergent (one that does not
contain abrasive powder or strong chemicals such as acid or alkaline).
Use 5 parts water to 1 part detergent.
2. Absorb the diluted detergent into a sponge.
3. Squeeze excess liquid from the sponge.
4. Wipe the cover with the sponge, using a circular motion and taking care
not to let any excess liquid drip.
5. Wipe the surface to remove the detergent.
6. Rinse the sponge with clean running water.
7. Wipe the cover with the clean sponge.
8. Wipe the surface again with a dry, soft lint-free cloth.
9. Wait for the surface to dry completely and remove any cloth fibers from
the computer surface.
Cleaning Your Computer Keyboard
1. Absorb some isopropyl rubbing alcohol on a soft, dust-free cloth.
2. Wipe each keytop surface with the cloth. Wipe the keys one by one; if
you wipe several keys at a time, the cloth may hook onto an adjacent
key and possibly damage it. Make sure that no liquid drips onto or
between the keys.
3. Allow to dry.
4. To remove any crumbs and dust from beneath the keys, you can use a
camera blower with a brush or cool air from a hair drier.
Note: Avoi d sp r ayi n g cl e an e r directly on the display or the keyboard.
Lenovo 3000Y310 UG.book Page 6 Friday, September 14, 2007 4:24 PM
Page 15
Caring for Your Computer
Chapter 2. Caring for Your Computer
7
Cleaning Your Computer Display
1. Gently wipe the display with a dry, soft lint-free cloth. If you see a
scratchlike mark on your display, it might be a stain transferred from
the keyboard when the cover was pressed from the outside.
2. Wipe or dust the stain gently with a soft, dry cloth.
3. If the stain remains, moisten a soft, lint-free cloth with water or a 50-50
mixture of isopropyl alcohol and water that does not contain impurities.
4. Wring out as much of the liquid as you can.
5. Wipe the display again; do not let any liquid drip into the computer.
6. Be sure to dry the display before closing it.
Lenovo 3000Y310 UG.book Page 7 Friday, September 14, 2007 4:24 PM
Page 16
Caring for Your Computer
8
Lenovo 3000 Y310 User Guide
Lenovo 3000Y310 UG.book Page 8 Friday, September 14, 2007 4:24 PM
Page 17
9
© Copyright Lenovo 2007
Chapter 3. Getting Started
* External views illustrated in this manual may slightly differ from the actual products.
Knowing the Parts . . . . . . . . . . . . . . . . . . . . . . . 10
Top View . . . . . . . . . . . . . . . . . . . . . . . . . . . . 10
Right-side View. . . . . . . . . . . . . . . . . . . . . . . 13
Left-side View . . . . . . . . . . . . . . . . . . . . . . . . 15
Bottom View . . . . . . . . . . . . . . . . . . . . . . . . . 17
Front View . . . . . . . . . . . . . . . . . . . . . . . . . . . 19
Accessibility and Comfort . . . . . . . . . . . . . . . . . 20
Basics. . . . . . . . . . . . . . . . . . . . . . . . . . . . . . . . . . . 22
Special Keys and Buttons. . . . . . . . . . . . . . . 22
Using the Touch Pad . . . . . . . . . . . . . . . . . . 24
Status Indicators . . . . . . . . . . . . . . . . . . . . . . 25
Preventing Problems . . . . . . . . . . . . . . . . . . 27
Learn How to Achieve All Day Computing . . .30
Your Computer Batteries . . . . . . . . . . . . . . .30
Checking Battery Status . . . . . . . . . . . . . . . .30
Using the AC Adapter . . . . . . . . . . . . . . . . .30
Charging the Battery . . . . . . . . . . . . . . . . . . .31
Handling the Battery. . . . . . . . . . . . . . . . . . .31
Integrated Camera. . . . . . . . . . . . . . . . . . . . . . . . 32
Security . . . . . . . . . . . . . . . . . . . . . . . . . . . . . . . . .32
Attaching a Mechanical Lock. . . . . . . . . . . . 32
Using Passwords . . . . . . . . . . . . . . . . . . . . . .33
Lenovo 3000Y310 UG.book Page 9 Friday, September 14, 2007 4:24 PM
Page 18
Getting Started
10
Lenovo 3000 Y310 User Guide
Knowing the Parts
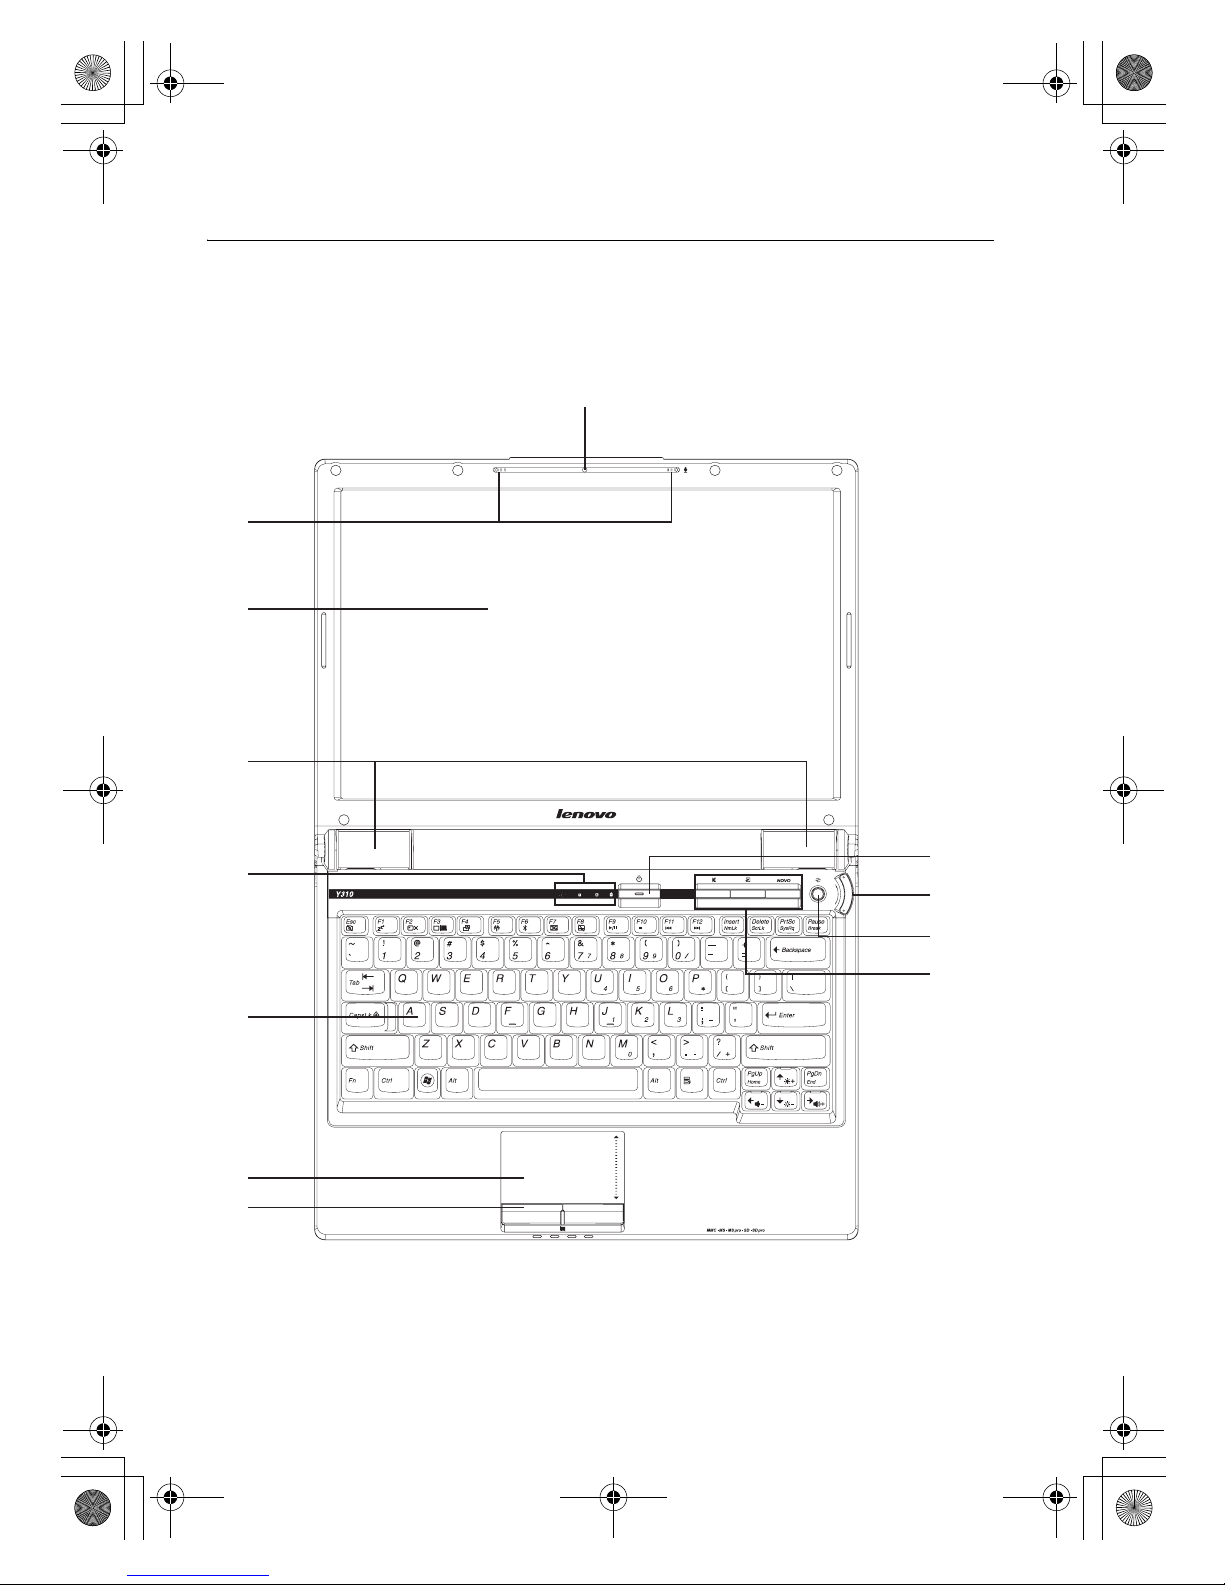
Top View
Lenovo 3000 Y310
a
i
k
l
j
b
c
d
e
f
h
g
Lenovo 3000Y310 UG.book Page 10 Friday, September 14, 2007 4:24 PM
Page 19
Getting Started
Chapter 3. Getting Started
11
a Integrated camera
The integrated built-in camera allows picture taking or video
recording, and can be used with video conferencing and other
interactive applications.
Note: The camera can only be used when it is turned on. Press Fn +
Esc to turn on or off the camera.
b Array microphone (built-in)
The built-in array microphone brings you a better recording quality
with more accuracy and resolution. It can be used for video
conferencing, voice narration, or simple audio recordings.
c Computer display
The computer display functions the same as a desktop monitor. The
high-resolution, thin-film transistor (TFT) display provides clear and
brilliant text and graphics.
d Internal speaker
The multimedia stereo speakers provide a true and powerful effect
while you are watching movies or enjoying music.
e System-status indicators
For details on “System-status Indicators”, see page 25.
f Keyboard
The keyboard provides full-sized keys with comfortable travel. For
details on “Function Key Combinations”, see page 23.
g Touch pad
Move your fingertip across the touch pad to move the cursor. The blue
indicator between the left and right buttons on the touch pad indicates
whether the touch pad is activated.
h Touch pad button
The two buttons of the touch pad function as the left and right buttons
of the mouse.
i Power button
Use the power button to turn on the computer. To turn off your
computer, use the Start menu shutdown options. The power button
also can be programmed to shut down the computer or put it into
sleep or hibernation.
If your computer stops responding, and you cannot turn it off, press
and hold the power button for 4 seconds or more. If the system is still
not reset, remove the AC adapter and the battery.
j Volume button
This button enables you to quickly and conveniently turn up or turn
down the sound of your computer.
Lenovo 3000Y310 UG.book Page 11 Friday, September 14, 2007 4:24 PM
Page 20
Getting Started
12
Lenovo 3000 Y310 User Guide
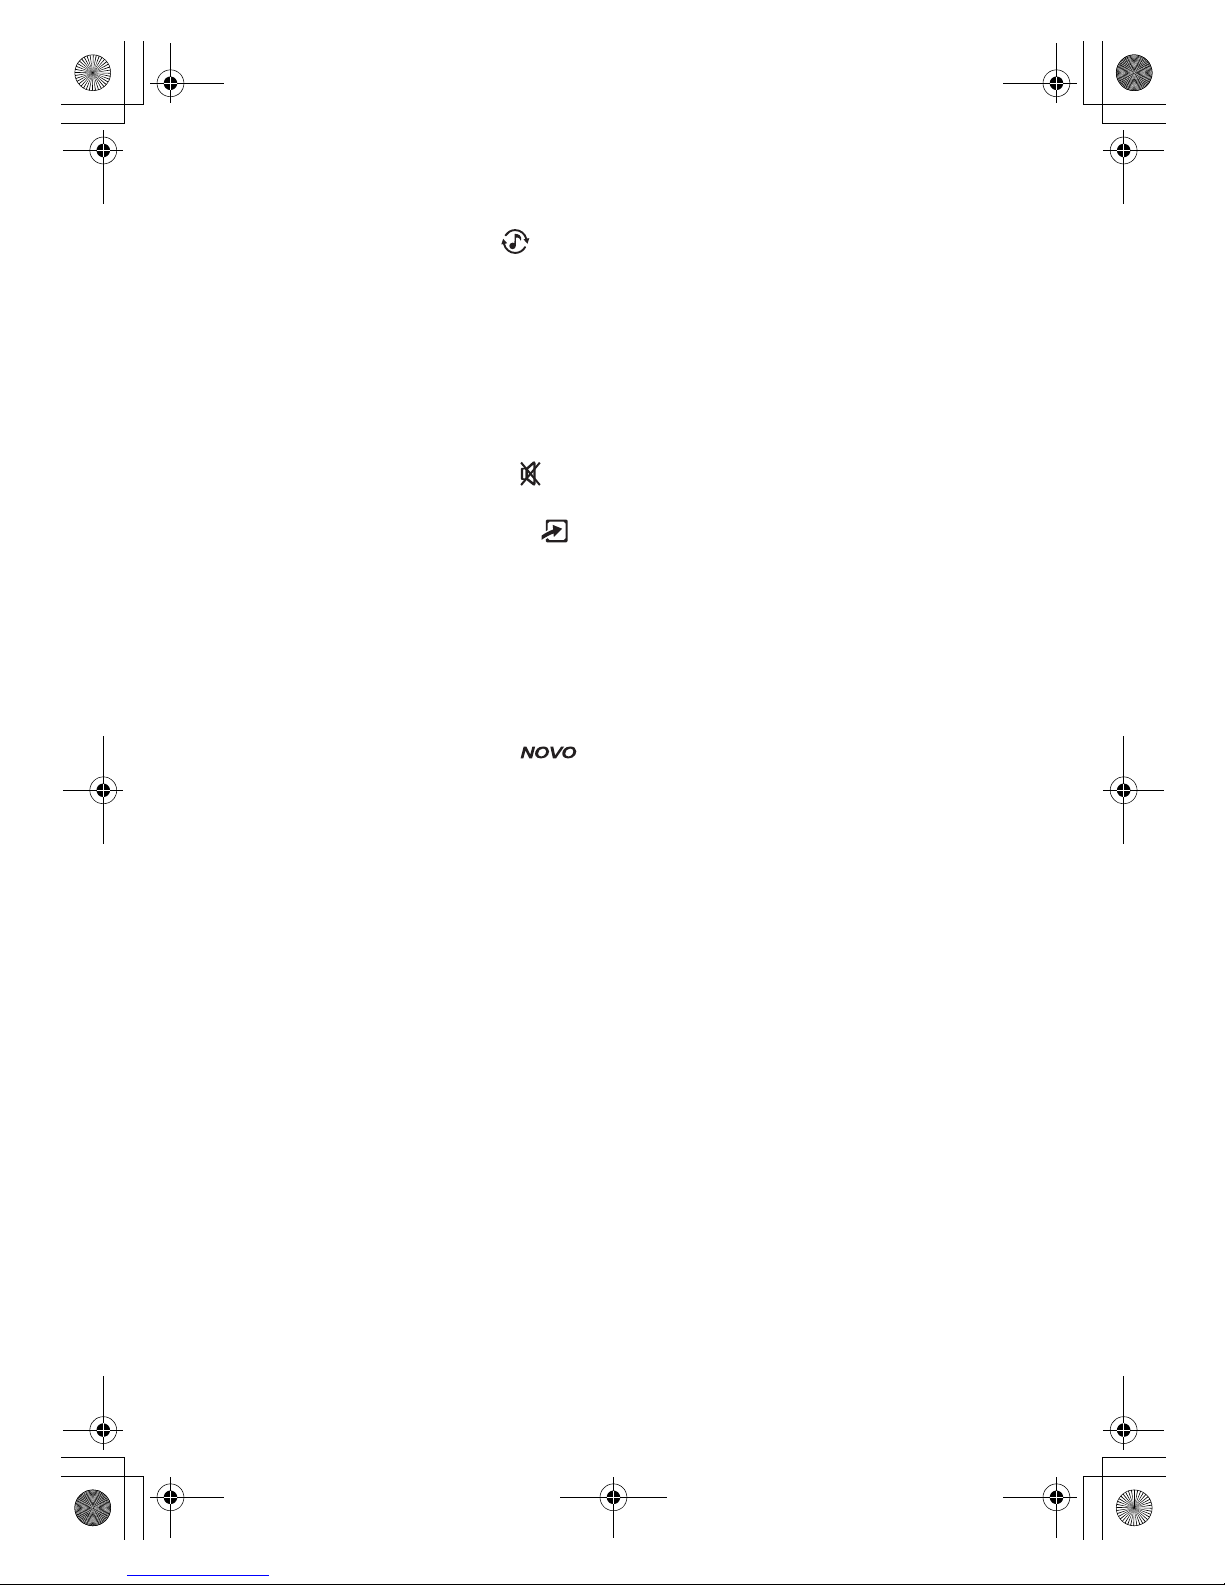
k EQ button
There are five modes of EQ. Press this button to switch between these
modes.
(1) None: Set the system output sound to the default setting.
(2) Rock: Set the system output sound to rock music mode.
(3) Pop: Set the system output sound to pop music mode.
(4) Dance: Set the system output sound to dancing mode.
(5) Class: Set the system output sound to classical mode.
l Instant buttons
Mute button
Press this button to turn on or off the sound.
Custom button
With the preinstalled software, once you press the button, a dialog
window appers to allow you to define the button with the applications
listed, so that you can recall the application instantly by pressing this
custom button.
Note: You need to install the driver of EnergyCut to realize this
function. See page 29.
Once Easycapture is installed, this button is customized with
Easycapture automatically.
Novo button
This button functions as a reset button; use with caution. Press the
Novo button to enter the main interface of OneKey Recovery while the
power is off. You can use OneKey Recovery to restore the primary
hard disk partition (usually drive C) back to the factory default
configuration, including the operating system and the software on it.
Attention: Once done, the system can no longer return to its
previous state. All data on the primary hard disk
partition (usually drive C) will subsequently be lost. So
make sure all important files on the primary hard disk
partition have been backed up onto another hard disk or
USB hard disk drive before this operation.
For details, see “OneKey Recovery4.65 User Guide”.
When your computer is running Windows Vista™, and if you have the
EnergyCut program installed, you can shift the power schemes by
pressing the Novo button.
Note: If your computer is in hibernation, you may not enter the
OneKey Recovery by pressing the Novo button. Press the
Power button to enter the operation system, shut down your
computer first to use the Novo button.
Lenovo 3000Y310 UG.book Page 12 Friday, September 14, 2007 4:24 PM
Page 21
Getting Started
Chapter 3. Getting Started
13
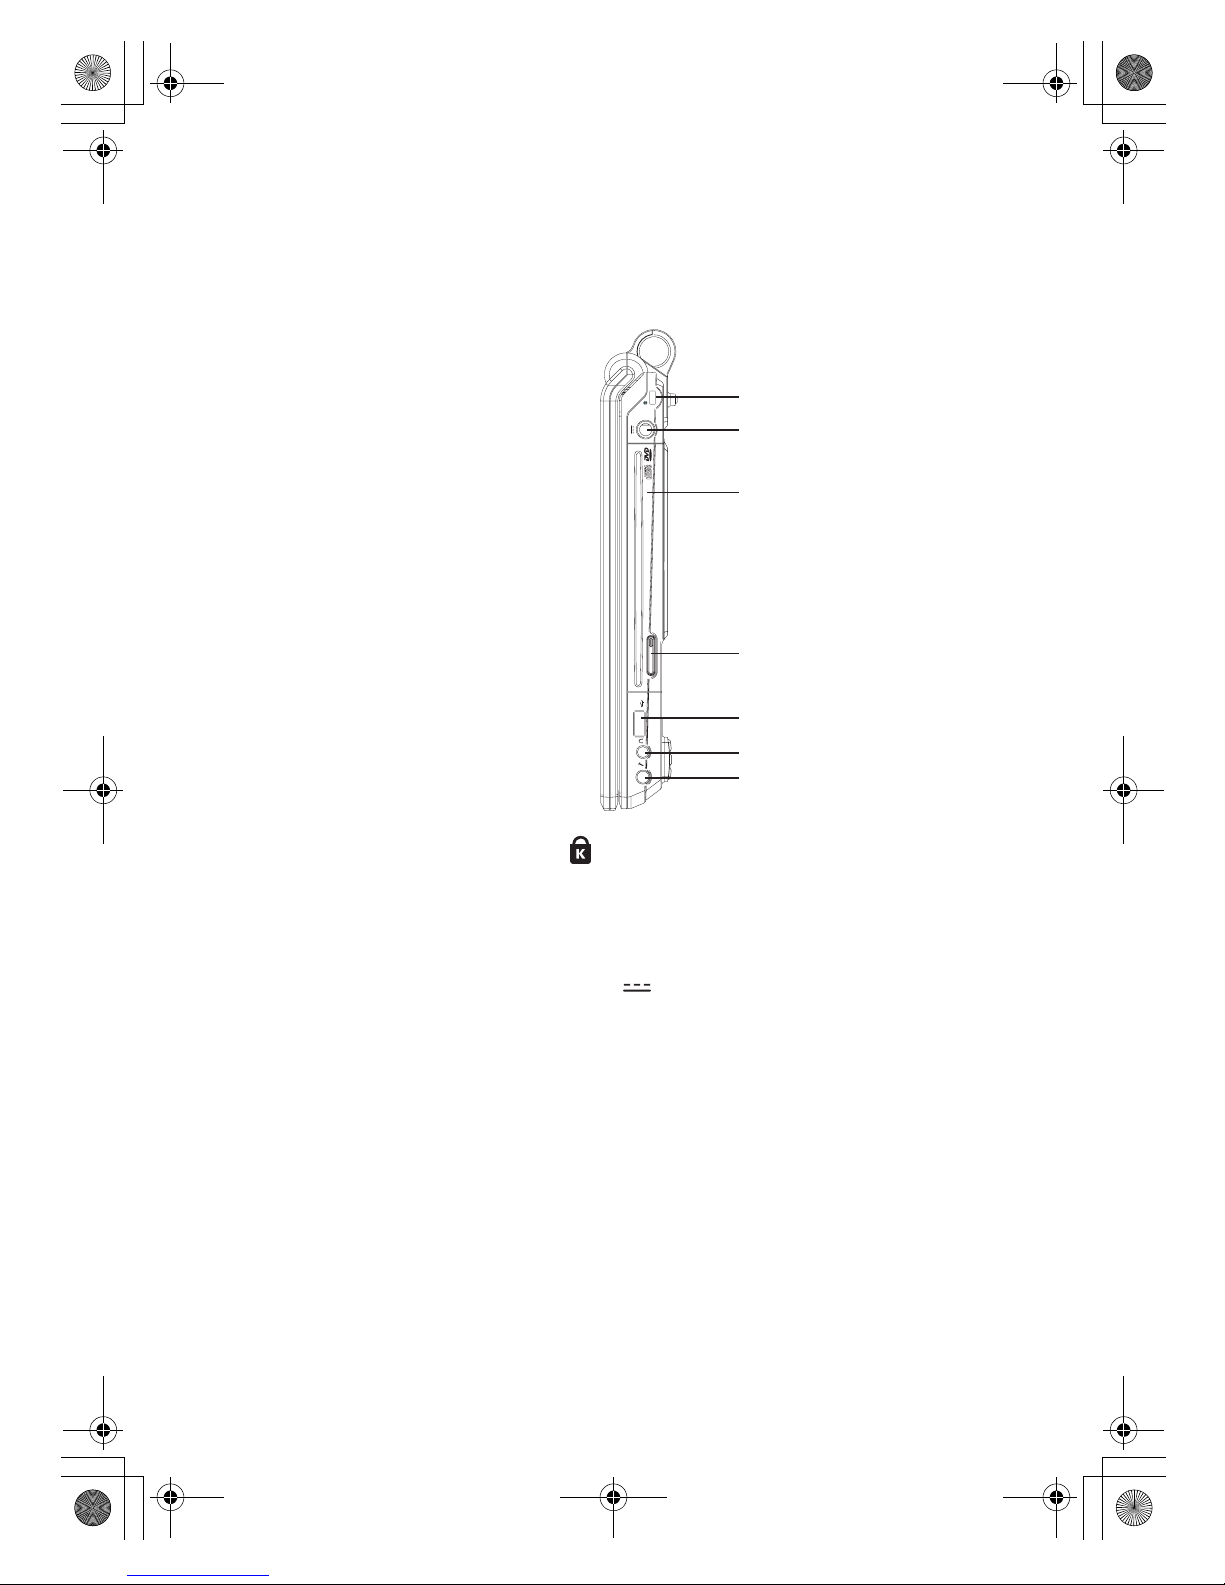
Right-side View
Refer to the diagram below to identify the components on this side of the
computer.
a Security keyhole
Your computer comes with a security keyhole. You can purchase a
security cable and lock to fit this keyhole.
Hint: Before purchasing any security product, verify that it is
compatible with this type of security keyhole.
b AC power adapter jack
Connect the power adapter here to supply power to the computer and
charge the internal battery.
Note: To prevent damage to the computer and battery pack, use the
supplied AC adapter only.
c Optical drive (types vary by model)
Your computer comes with an optical device, such as a CD-ROM drive
or a DVD/CD recordable drive drive.
For this model, there are two kinds of optical drives:
(1) Slot-in type: Provides a convenient and quick way to insert and
remove discs. Keep the disk flat and gently insert the disc into the
slot. The drive will begin reading data from the disc. To remove a
disc, press the Eject button
a
b
c
d
e
f
g
Lenovo 3000Y310 UG.book Page 13 Friday, September 14, 2007 4:24 PM
Page 22
Getting Started
14
Lenovo 3000 Y310 User Guide
(2) Tray type: Press the Eject button to open the drive tray, place the
disc on the tray, then gently push the drive tray back in. The drive
will begin reading the data from the disc. To remove a disc, press the
Eject button to open the tray and then remove the disc from the tray.
Attention: 1) The slot-in type cannot read 8 cm discs. Never insert
8 cm discs into this kind of optical drive.
2) It is normal to hear the CD spinning in the optical
drive while data is being read.
d Drive eject button
(1) For slot-in type drive, press this button to eject the disc from the
drive.
(2) For tray type, press this button to eject the drive tray.
e USB 2.0 port (right side)
The Universal Serial Bus is compatible with USB 2.0 or USB 1.1 devices
such as a keyboard, mouse, camera, hard disk drive, printer and
scanner.
USB allows devices to be connected and disconnected without
rebooting the computer (hot swapping), and allows specific classes of
hardware to be used without requiring individual device drivers to be
installed.
f External headphone jack
The headphone jack is used to connect headphones or a speaker. Using
this jack will automatically disable the built-in speaker of the computer.
g External microphone jack
The microphone jack can be used to connect an external microphone for
video conferencing, voice narrations or simple audio recordings.
Lenovo 3000Y310 UG.book Page 14 Friday, September 14, 2007 4:24 PM
Page 23
Getting Started
Chapter 3. Getting Started
15
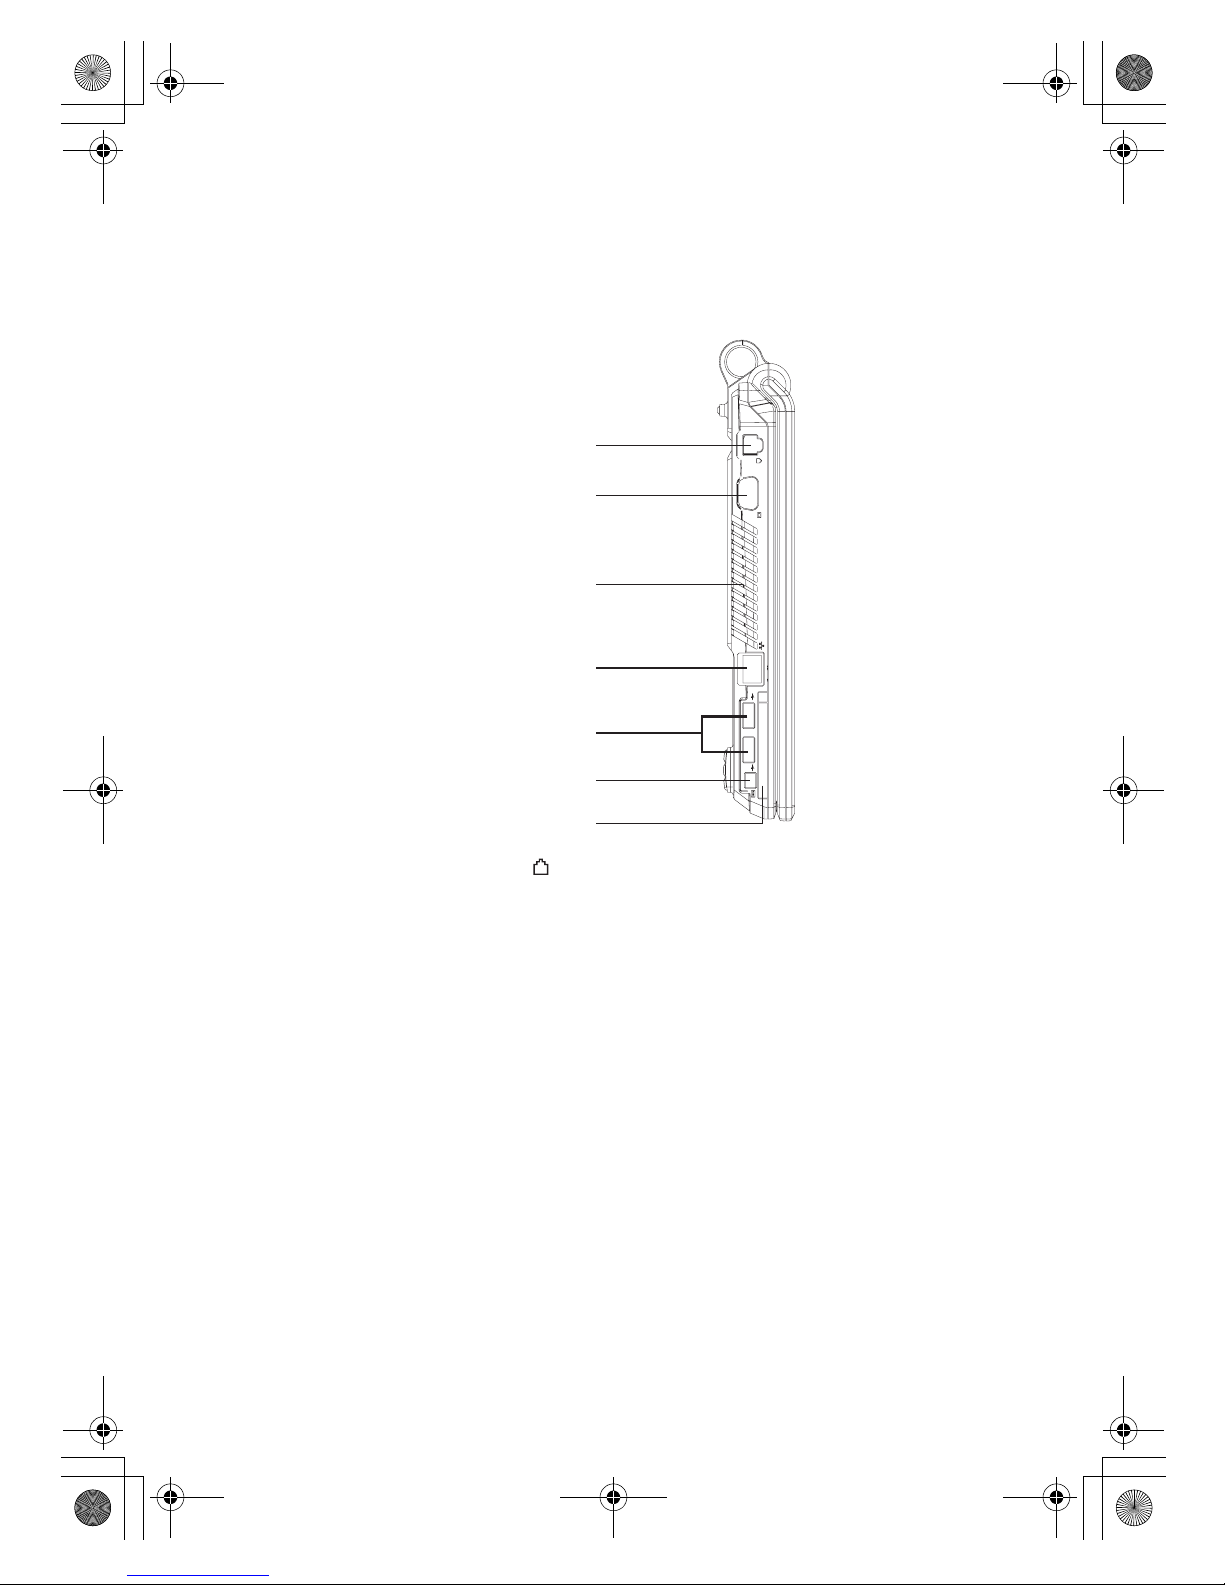
Left-side View
Refer to the diagram below to identify the components on this side of the
computer.
a Modem port
The modem port supports a standard telephone cable with an RJ-11
connector, and allows dial up access to an internet service provider
(ISP).
Important: Do not connect the modem port to a digital circuit cable,
or else the current in the digital circuit may damage the
modem.
b VGA port
Connect an external monitor or projector via this port.
c Fan louvers
The fan louvers allow cool air to enter and warm air to exit the
computer.
Important: Make sure that paper, books, clothing, cables or other
objects do not block any of the fan louvers or else
overheating of the computer may occur.
a
b
c
d
e
f
g
Lenovo 3000Y310 UG.book Page 15 Friday, September 14, 2007 4:24 PM
Page 24
Getting Started
16
Lenovo 3000 Y310 User Guide
d LAN port
The LAN port supports a standard RJ-45 connector, and allows you to
connect the computer to a local network.
Attention: Because the voltage of a telephone connection is higher
than that of a network, do not attempt to connect a
telephone cable to the LAN port or else a short circuit of
the computer might occur.
e USB 2.0 port (left side)
The Universal Serial Bus is compatible with USB 2.0 or USB 1.1 devices
such as a keyboard, mouse, camera, hard disk drive, printer and
scanner.
USB allows devices to be connected and disconnected without
rebooting the computer (hot swapping), and allows specific classes of
hardware to be used without requiring individual device drivers to be
installed.
f IEEE 1394 connector
The IEEE 1394 connector is used for connecting devices that are
compatible with the IEEE 1394 interface, such as digital video cameras
and external hard disk drives.
g PCI Express card slot
Use this slot to install a new PCI Express card.
Lenovo 3000Y310 UG.book Page 16 Friday, September 14, 2007 4:24 PM
Page 25
Getting Started
Chapter 3. Getting Started
17
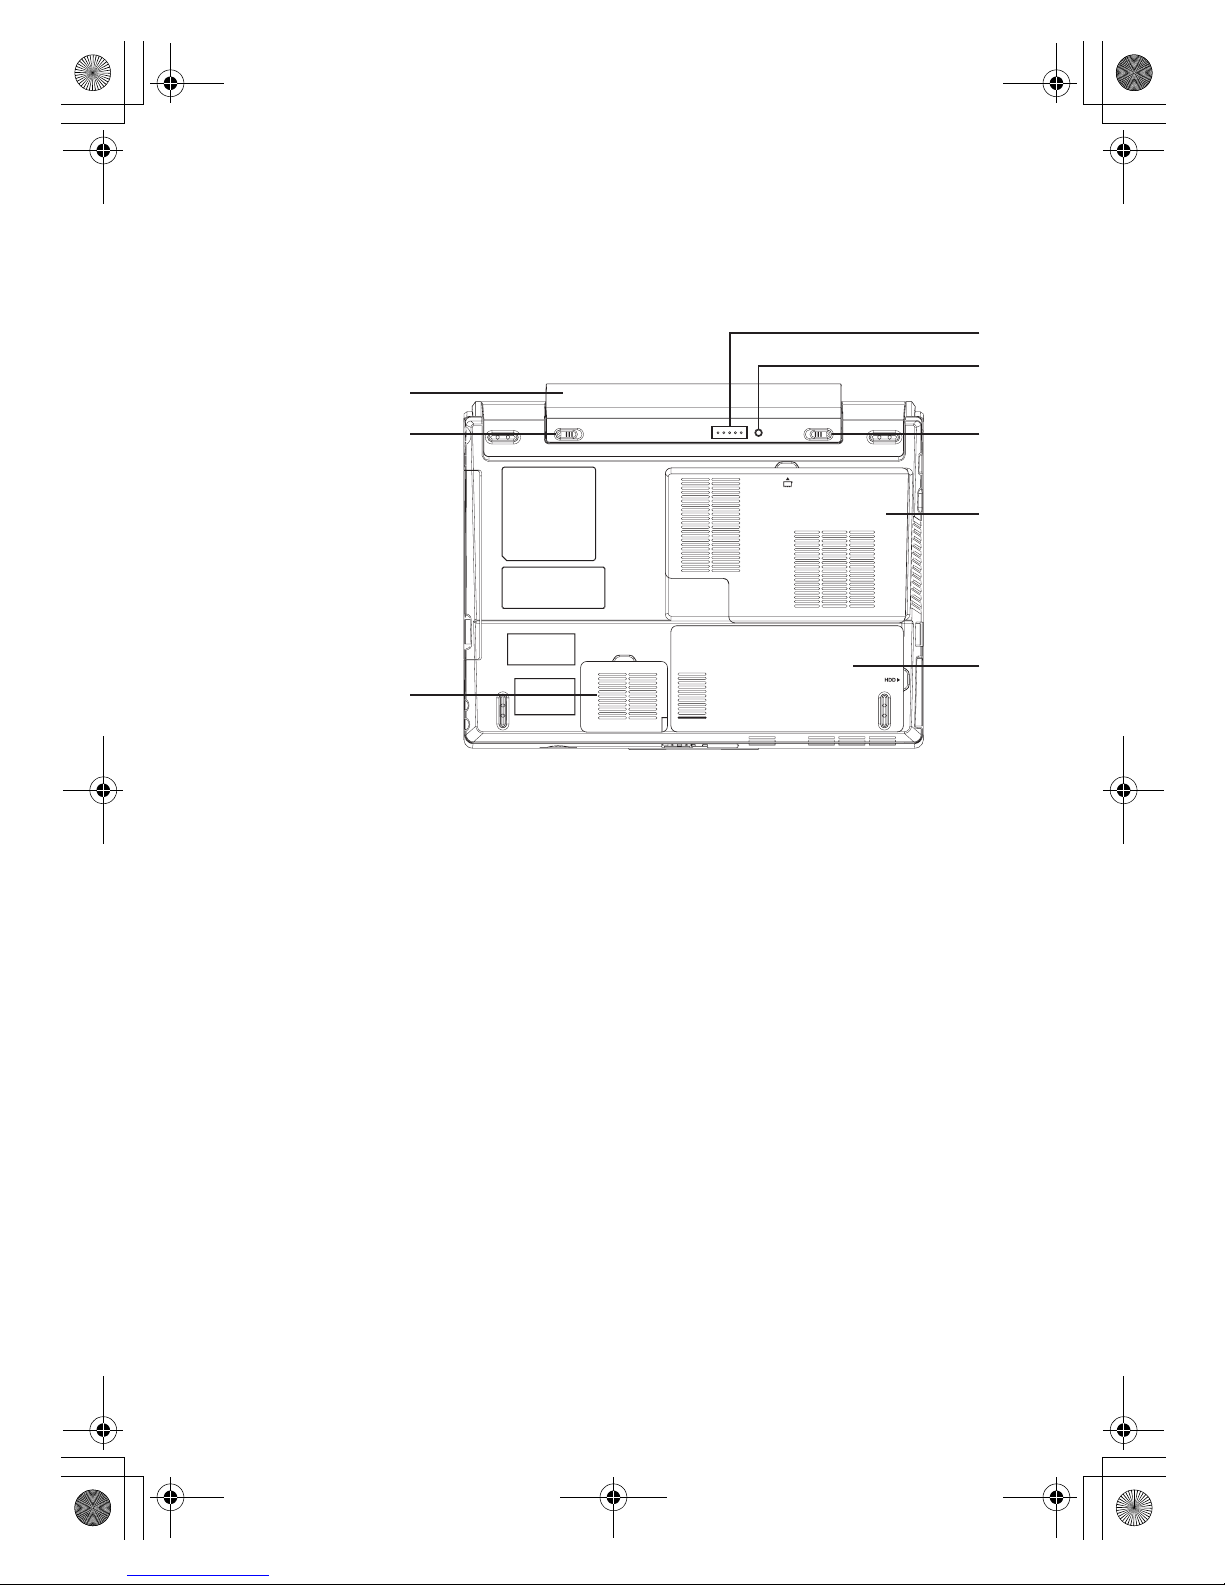
Bottom View
Refer to the diagram below to identify the components on this side of the
computer.
a Battery pack
The battery pack provides power to the computer when the AC adapter
is not connected and it is automatically charged when connected to an
AC power source.
b Battery latch - manual
The manual battery latch is used to keep the battery pack secured. Move
the manual battery latch to the unlocked position to insert or remove
the battery pack. Move the manual latch to the locked position after
inserting the battery pack.
c PCI-E compartment
A MINIPCI-E card is secured in the compartment
d Battery indicators
The indicator signifies the battery status when press the indicator
button. The more of the remain power is the more of the indicators is lit.
Note: The indicators turn off in 3 seconds
e Indicator button
Press this button to light the Battery Indicators.
a
b
c
d
e
f
g
h
Lenovo 3000Y310 UG.book Page 17 Friday, September 14, 2007 4:24 PM
Page 26
Getting Started
18
Lenovo 3000 Y310 User Guide
f Battery latch - spring loaded
The spring-loaded battery latch keeps the battery pack secured in place.
When you insert a battery pack, this latch automatically secures the
battery in place. To remove the battery, hold this latch in the unlocked
position.
g Central Processor Unit (CPU)/Memory (RAM) Compartment
The Central Processor Unit (CPU)/Memory (RAM) Compartment
provides expansion capabilities for additional memory and space for
the CPU and the radiator.
Note: (1) Only purchase expansion modules from authorized
retailers of this computer to ensure maximum compatibility
and reliability.
(2) If you only insert one memory card in the compartment,
plug it into the slot near the mainboard.
Important: Do not replace the CPU yourself! Visit an authorized
service center or retailer for replacing.
h Hard Disk Drive/Wireless LAN Card compartment
The hard disk drive and wireless network card are secured in a
compartment.
Important: Do not disassemble or replace the hard disk drive or
Wireless LAN card yourself! If you do need to, ask a
Lenovo authorized service center or dealer to disassemble
or replace it.
Lenovo 3000Y310 UG.book Page 18 Friday, September 14, 2007 4:24 PM
Page 27
Getting Started
Chapter 3. Getting Started
19
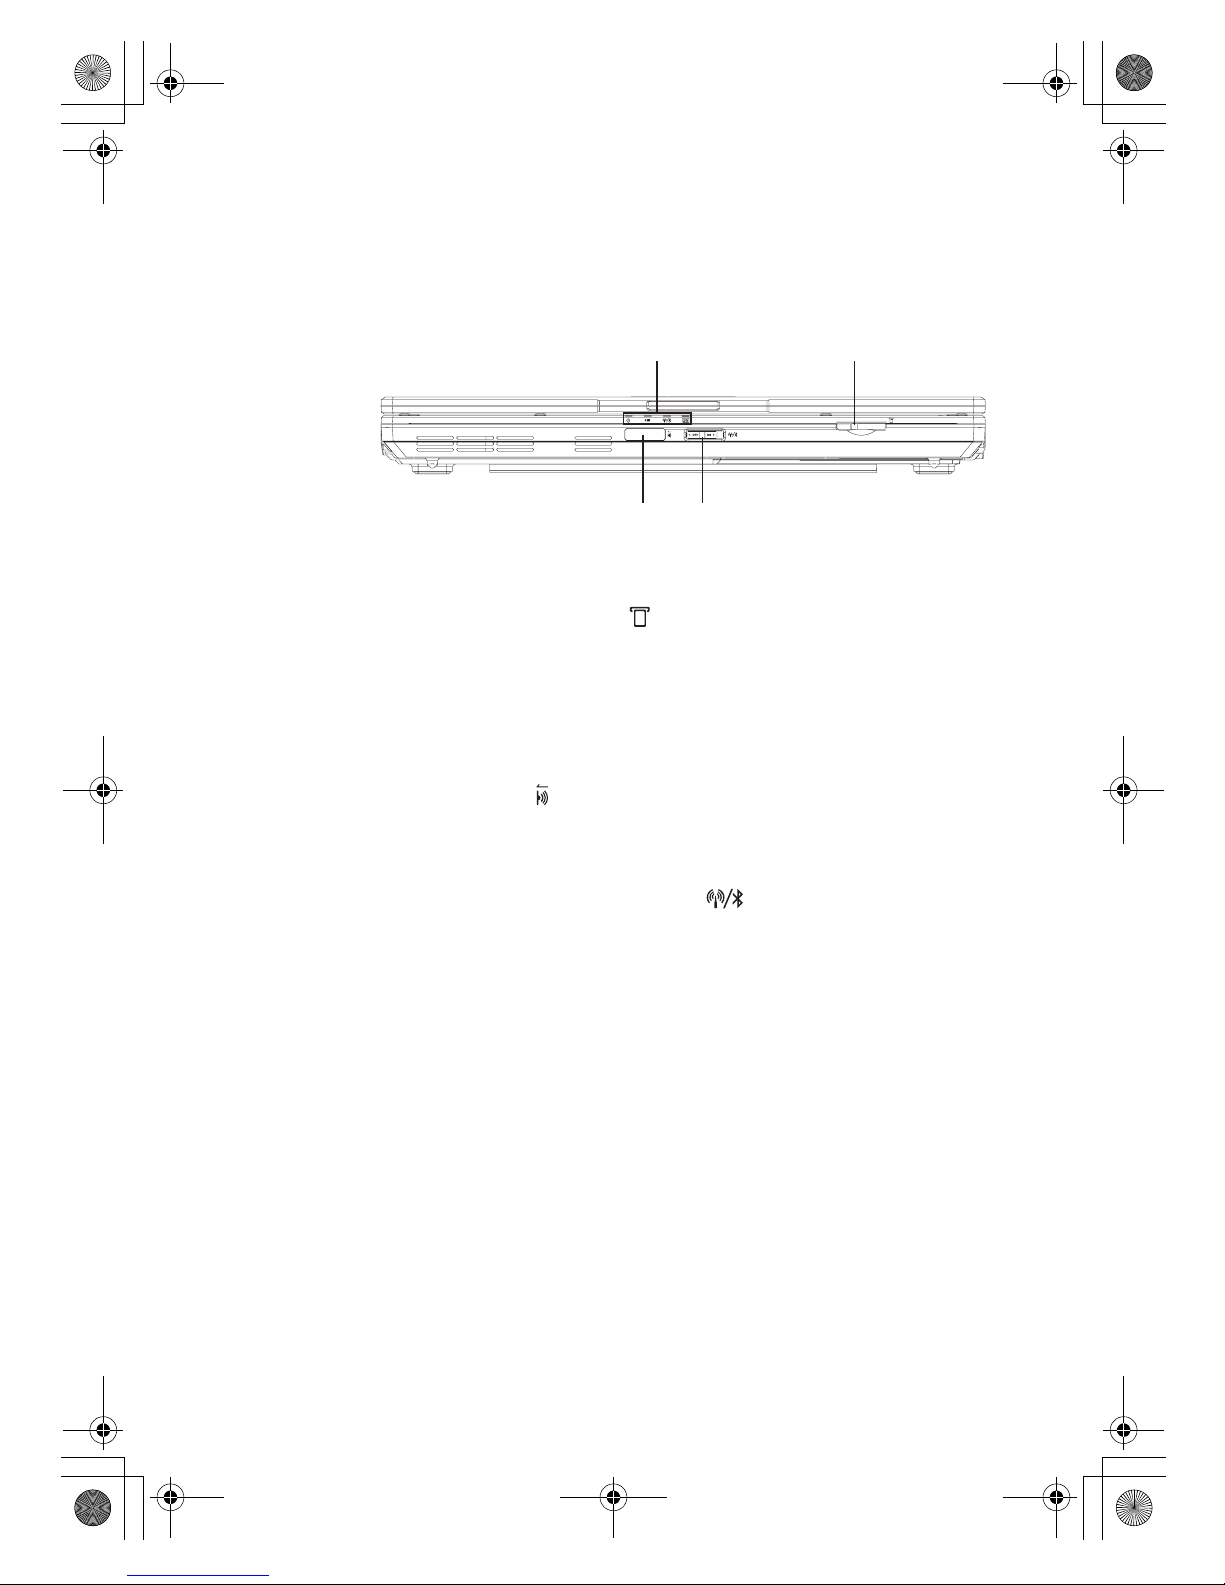
Front View
Refer to the diagram below to identify the components on this side of the
computer.
a Power-status indicator
For details on “Power-status Indicator”, see page 26.
b Multi-media reader slot
You can insert an SD card, a Multi-media Card, a Memory Stick, a
Memory Stick Pro card, an SD Pro card or an xD-Picutre Card into the
Multimedia Reader.
Note: Only use the memory card listed above; for detail information
about the usage, read the instructions shipped with the memory
card.
c Infrared port
For use with a remote control (optional). You can use the remote control
to operate the playback of multimedia files. For details of the remote
control operation, see the instructions supplied with it.
d Wireless LAN/Bluetooth* switch
This switch turns on or off Wireless LAN and Bluetooth devices
simultaneously. When you do not need to use the Wireless LAN and
Bluetooth function, turn it off to extend battery power.
* Bluetooth is optional.
a
b
c
d
Lenovo 3000Y310 UG.book Page 19 Friday, September 14, 2007 4:24 PM
Page 28
Getting Started
20
Lenovo 3000 Y310 User Guide
Accessibility and Comfort
Because your computer enables you to work in so many places, it is
important that you remain attentive to good posture, good lighting, and
proper seating. By keeping these considerations in mind, you can improve
performance and achieve greater comfort. Lenovo is committed to
providing the latest information and technology to our customers with
disabilities.
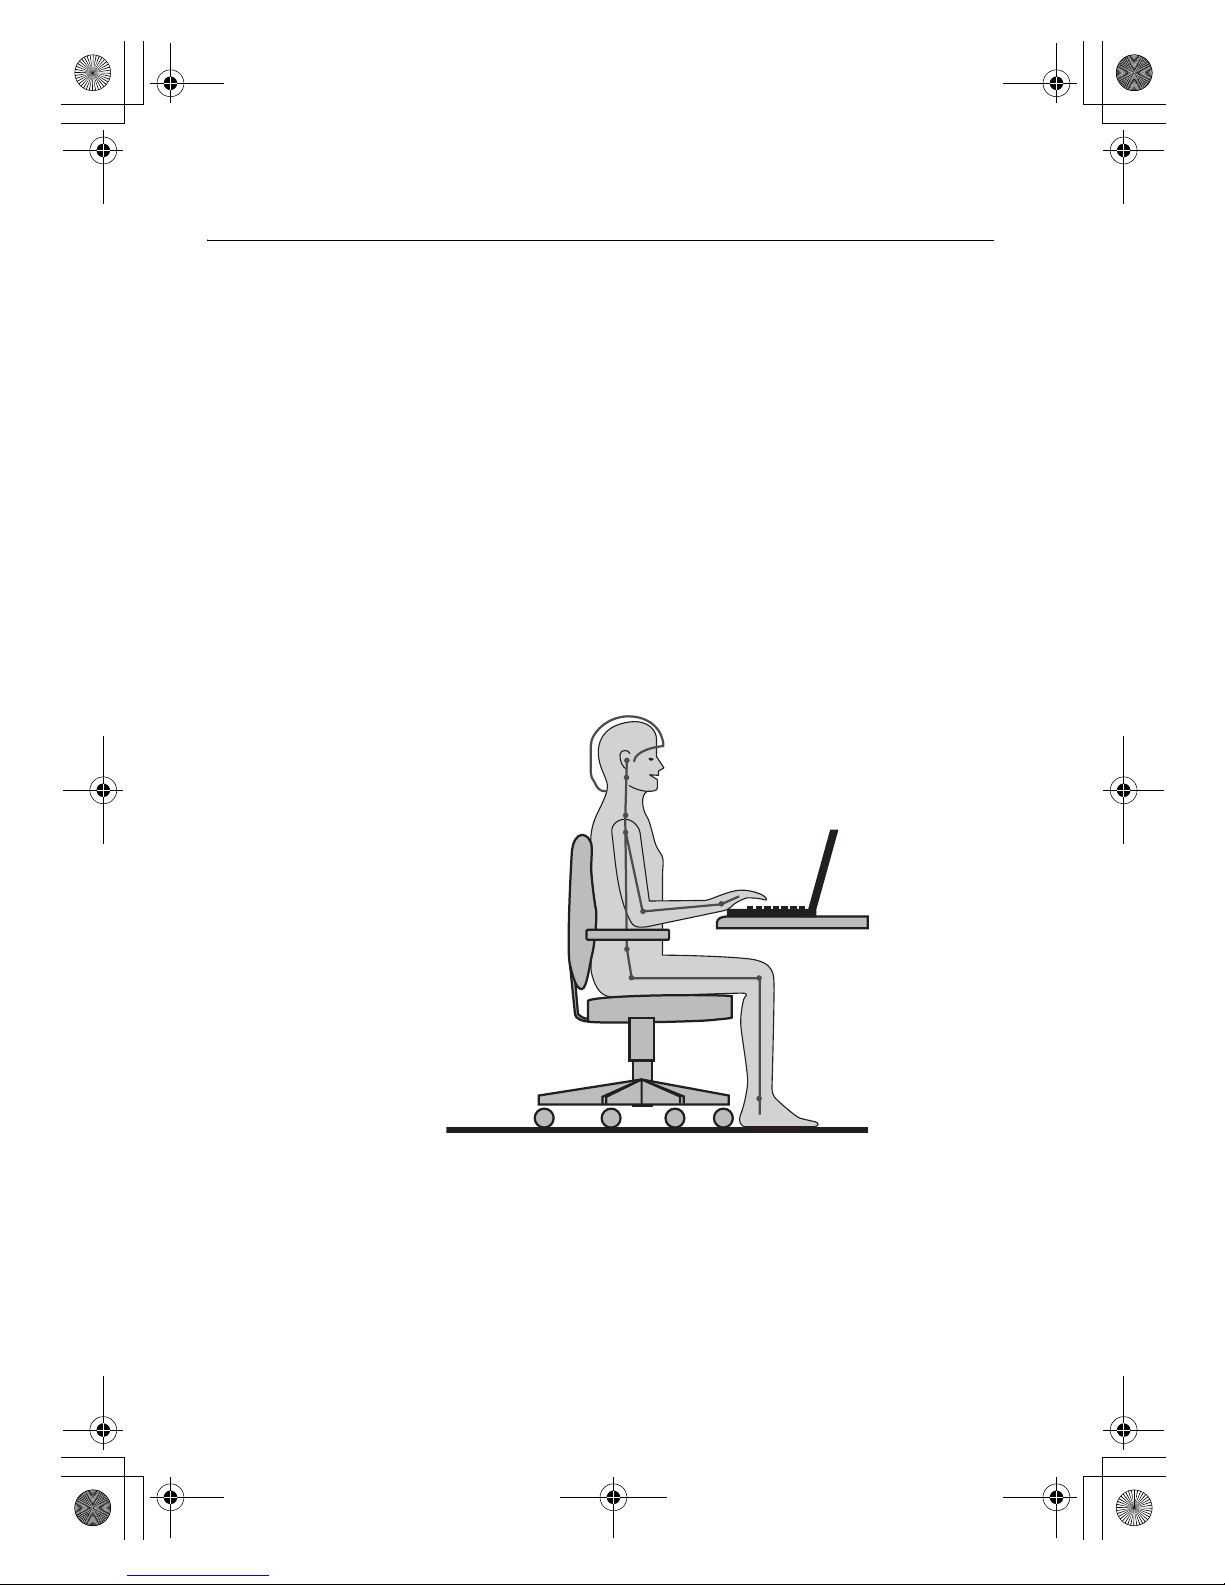
Ergonomic Information
Working in the virtual office may mean adapting to frequent changes in
your environment. Following some simple rules will make things easier
and bring you the maximum benefits of your computer. Keeping in mind
such basics as good lighting and proper seating, for example, can help you
improve your performance and achieve greater comfort.
Note: This example shows someone in a conventional setting. Even if you
work in a casual, less conventional setting, many of the tips in this
section still apply. Develop good habits, and they will serve you
well.
Lenovo 3000Y310 UG.book Page 20 Friday, September 14, 2007 4:24 PM
Page 29
Getting Started
Chapter 3. Getting Started
21
General Posture: Below are some general recommendations for assuming a
healthy working posture. It is best to periodically make minor
modifications in your working posture to deter the onset of discomfort
caused by long periods of working in the same position. Frequent, short
breaks from your work will also help to prevent any minor discomfort
associated with your working posture.
Display: Position the display to maintain a comfortable viewing distance of
510-760 mm (20-30 in). Avoid glare or reflections on the display from
overhead lighting or outside sources of light. Keep the display screen clean
and set the brightness to levels that enable you to see the screen clearly.
Press Fn + up/down arrow key to adjust display brightness.
Head Position: Keep your head and neck in a comfortable and neutral
(vertical, or upright) position.
Chair: Use a chair that gives you good back support and seat height
adjustment. Use chair adjustments to best suit your desired posture.
Arm and Hand Position: If available, utilize chair arm rests or an area on
your working surface to provide weight support for your arms. Keep your
forearms, wrists, and hands in a relaxed and neutral (horizontal) position.
Type with a soft touch without pounding the keys.
Leg Position: Keep your thighs parallel to the floor and your feet flat on the
floor or on a footrest.
What If You Are Traveling?
It may not be possible to observe the best ergonomic practices when you are
using your computer while on the move or in a casual setting. Regardless of
the setting, try to observe as many of the tips as possible. Sitting properly
and using adequate lighting, for example, will help you maintain desirable
levels of comfort and performance.
Questions about Vision?
Your computer’s visual display screen is designed to meet the highest
standards and to provide you with clear, crisp images and large, bright
displays that are easy to see, yet easy on the eyes. Of course, any
concentrated and sustained visual activity can be tiring. If you have
questions on eye fatigue or visual discomfort, consult a vision care
specialist for advice.
Lenovo 3000Y310 UG.book Page 21 Friday, September 14, 2007 4:24 PM
Page 30
Getting Started
22
Lenovo 3000 Y310 User Guide
Basics
Your computer is powerful and is loaded with features and applications.
Special Keys and Buttons
Your computer has several special keys and buttons. For details, refer to the
following descriptions.
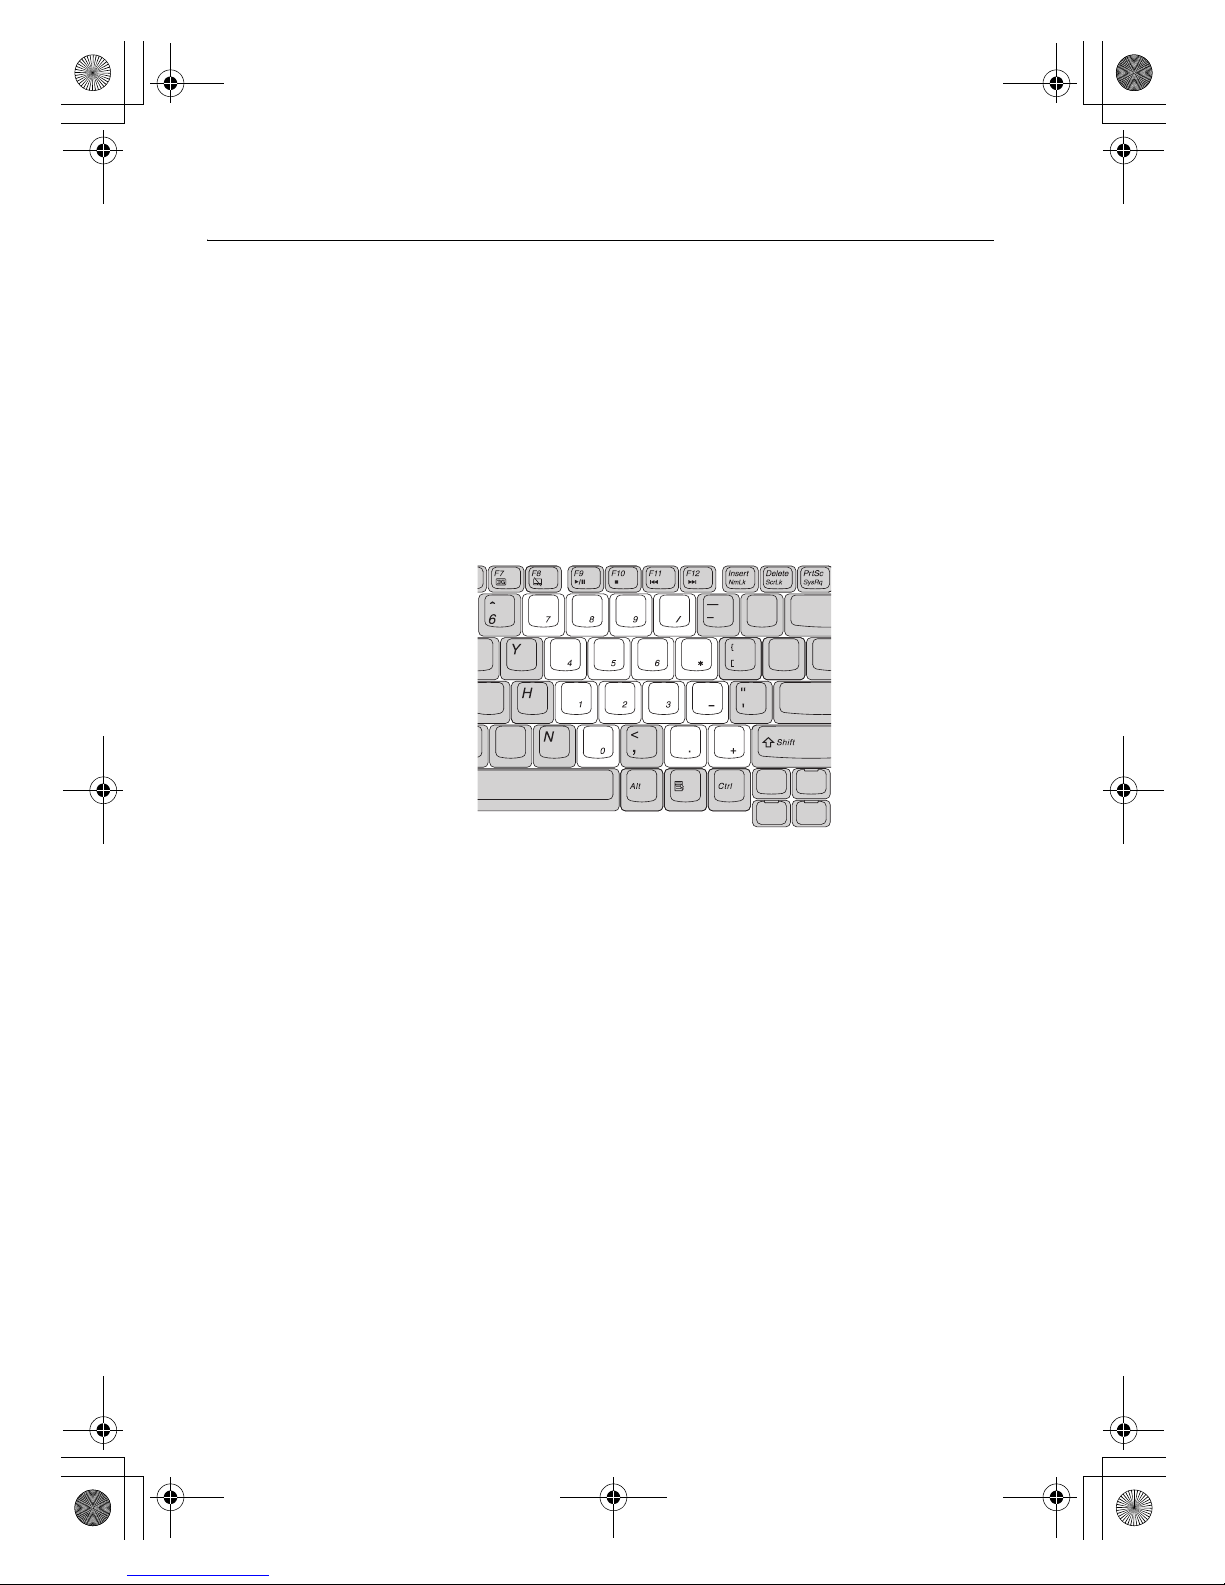
Numeric Keypad
The keyboard has keys that, when enabled, work as a 10-key numeric
keypad.
To enable or disable the numeric keypad, press Fn + Insert/NmLk.
Lenovo 3000Y310 UG.book Page 22 Friday, September 14, 2007 4:24 PM
Page 31
Getting Started
Chapter 3. Getting Started
23
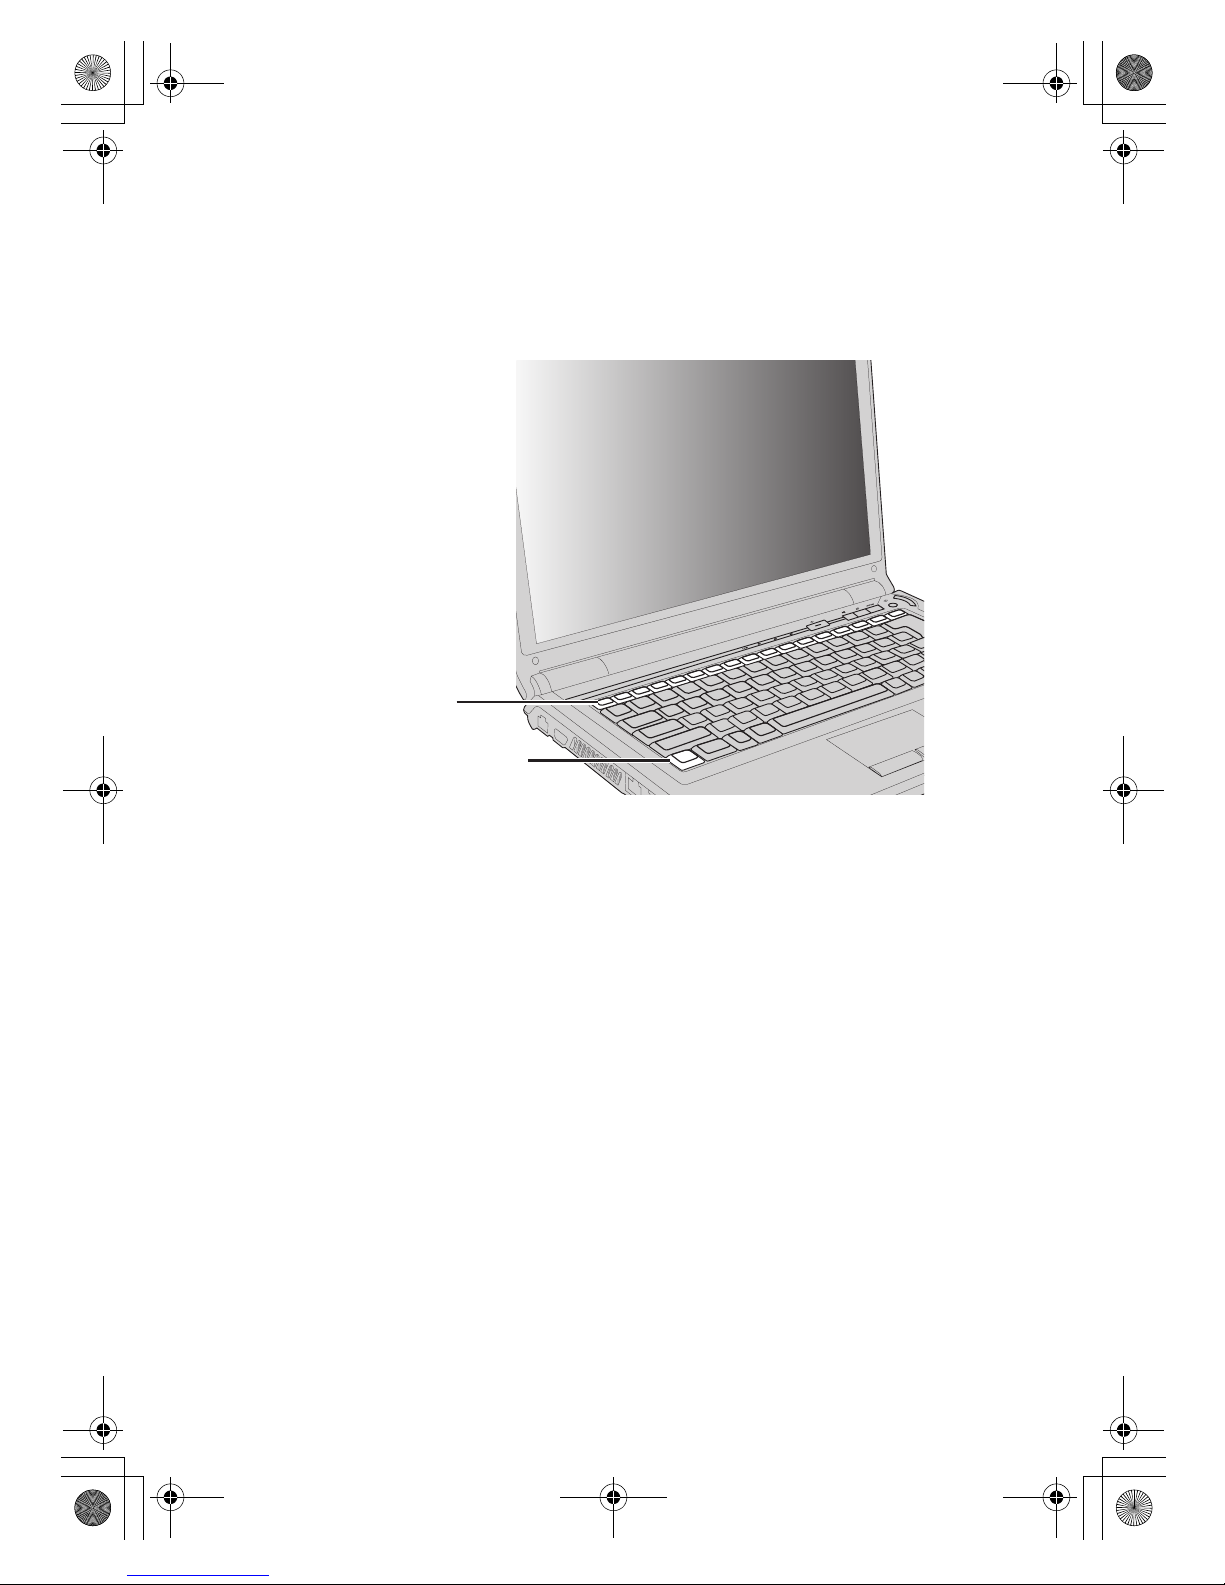
Function Key Combinations
Through the use of the function keys, you can change operational features
instantly. To use this function, press and hold the Fn key a; then press one
of the function keys b.
The following describes the features of each function key.
Fn + Esc: Turn on/off the integrated camera.
Fn + F1: Put your computer in sleep mode.
Fn + F2: Turn off the LCD screen (any subsequent operation will turn the
LCD screen back on).
Fn + F3: Shift to other connected display devices.
Fn + F4: Switch between wide screen and normal mode.
Fn + F5: Enable/disable the built-in wireless networking feature.
Fn + F6: Enable/disable the bluetooth features.
Fn + F8: Enable/disable the touch pad.
Fn + F9: Enable/pause Media Player playback.
Fn + F10: Stop Media Player playback.
Fn + F11: Skip to the previous track.
Fn + F12: Skip to the next track.
a
b
Lenovo 3000Y310 UG.book Page 23 Friday, September 14, 2007 4:24 PM
Page 32
Getting Started
24
Lenovo 3000 Y310 User Guide
Fn + Insert/NmLk: Enable/disable the Numeric keypad.
Fn + Delete/ScrLk: Enable/disable Scroll Lock.
Fn + Pause/Break: Pause to view the system information during start-up.
Fn + up/down arrow key: Increase/decrease display brightness.
Fn + right/left arrow key: Increase/decrease computer volume.
Volume and Mute Buttons
You can adjust the sound level of the built-in speakers by using the
following two buttons:
• Mute button
• Volume button
If you mute the sound and then turn off your computer, the sound will
remain muted when you turn on your computer again. To turn on the
sound, press the Mute button.
When you press the volume button, you can quickly and conveniently
adjust the sound from your computer.
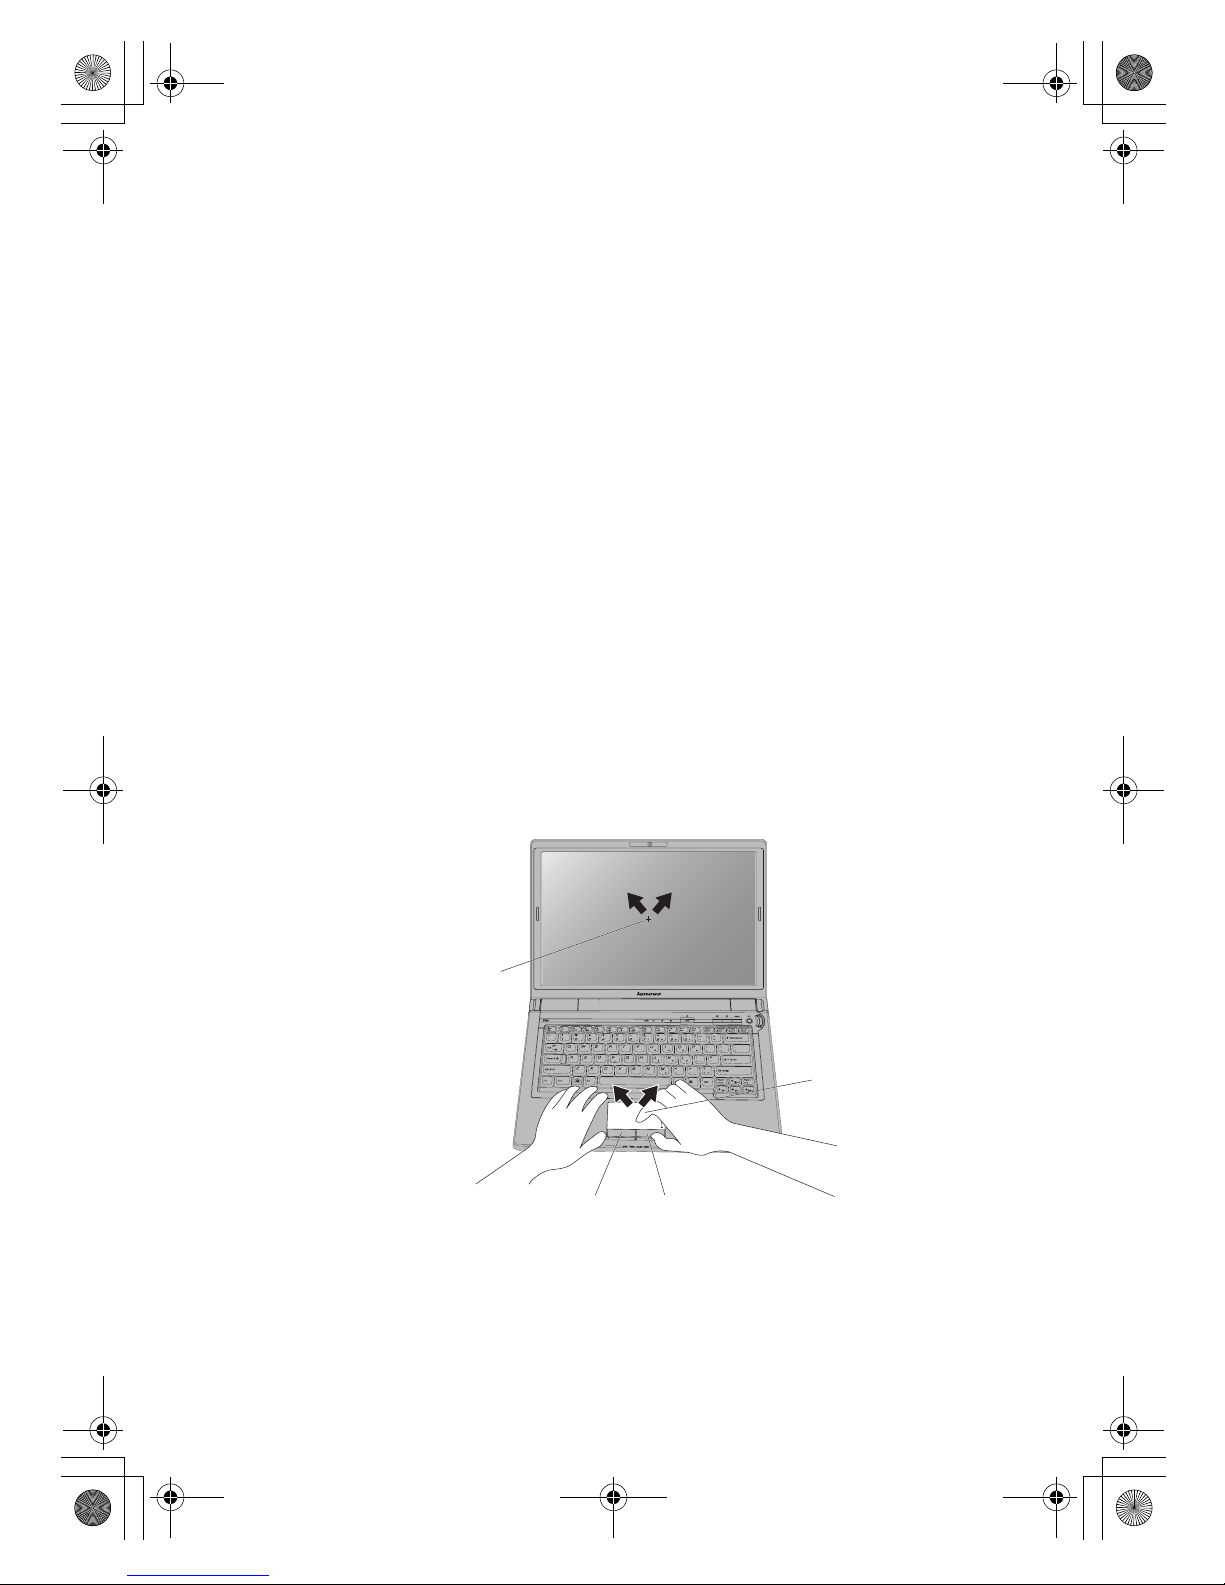
Using the Touch Pad
The touch pad consists of a pad a and two click buttons at the bottom of
the keyboard. To move the pointer d on the screen, slide your fingertip
over the pad in the direction in which you want the pointer to move. The
functions of the left c and right b click buttons correspond to those of the
left and right mouse buttons on a conventional mouse.
The blue indicator is lit when the touch pad is activated, when the touch
pad is disabled with Fn + F8, the indicator will be off.
Note: To move the point, you can also attach and use a USB mouse
through the USB connector.
a
b
c
d
Lenovo 3000Y310 UG.book Page 24 Friday, September 14, 2007 4:24 PM
Page 33
Getting Started
Chapter 3. Getting Started
25
Status Indicators
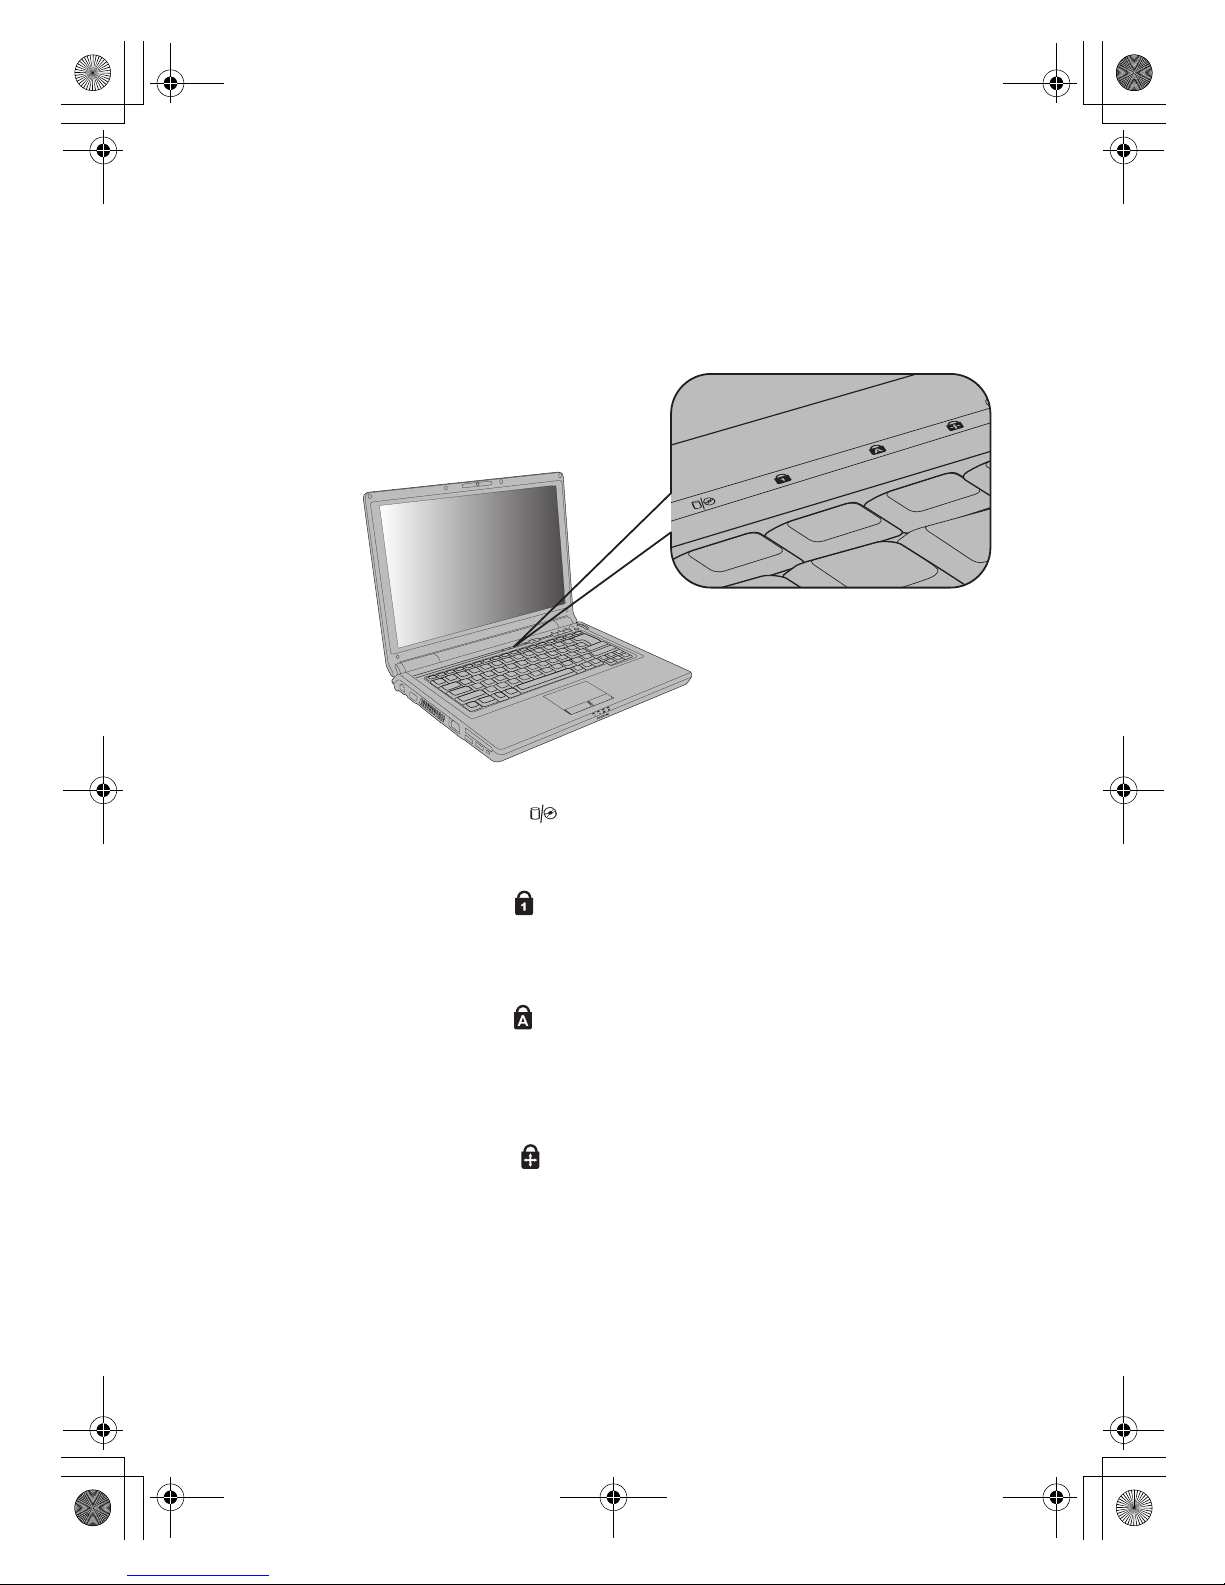
The status indicators show the current status of your computer.
System-status Indicators
Your computer has system-status indicators as follows:
a Drive in use
Indicates data is being read from or written to the hard disk drive or
optical disc drive when this indicator is lit.
b Num Lock
Indicates that number lock function is activated when the blue indicator
is lit. Number lock function allows some of the keyboard letters to act as
numbers for easier numeric input.
c Caps Lock
Indicate that the Capital Lock function is activated when the blue
indicator is lit. The Capital Lock function allows typing in all upper case
letters (such as A, B, C). When the Caps Lock light is Off, lower case
letters are typed.
d Scroll Lock
Indicate that the Scroll Lock function is activated when the blue
indicator is lit. The Scroll Lock function allows some of the keyboard
letters to act as direction keys to allow for easier navigation when only
part of the keyboard is required.
a
b
c
d
Lenovo 3000Y310 UG.book Page 25 Friday, September 14, 2007 4:24 PM
Page 34
Getting Started
26
Lenovo 3000 Y310 User Guide
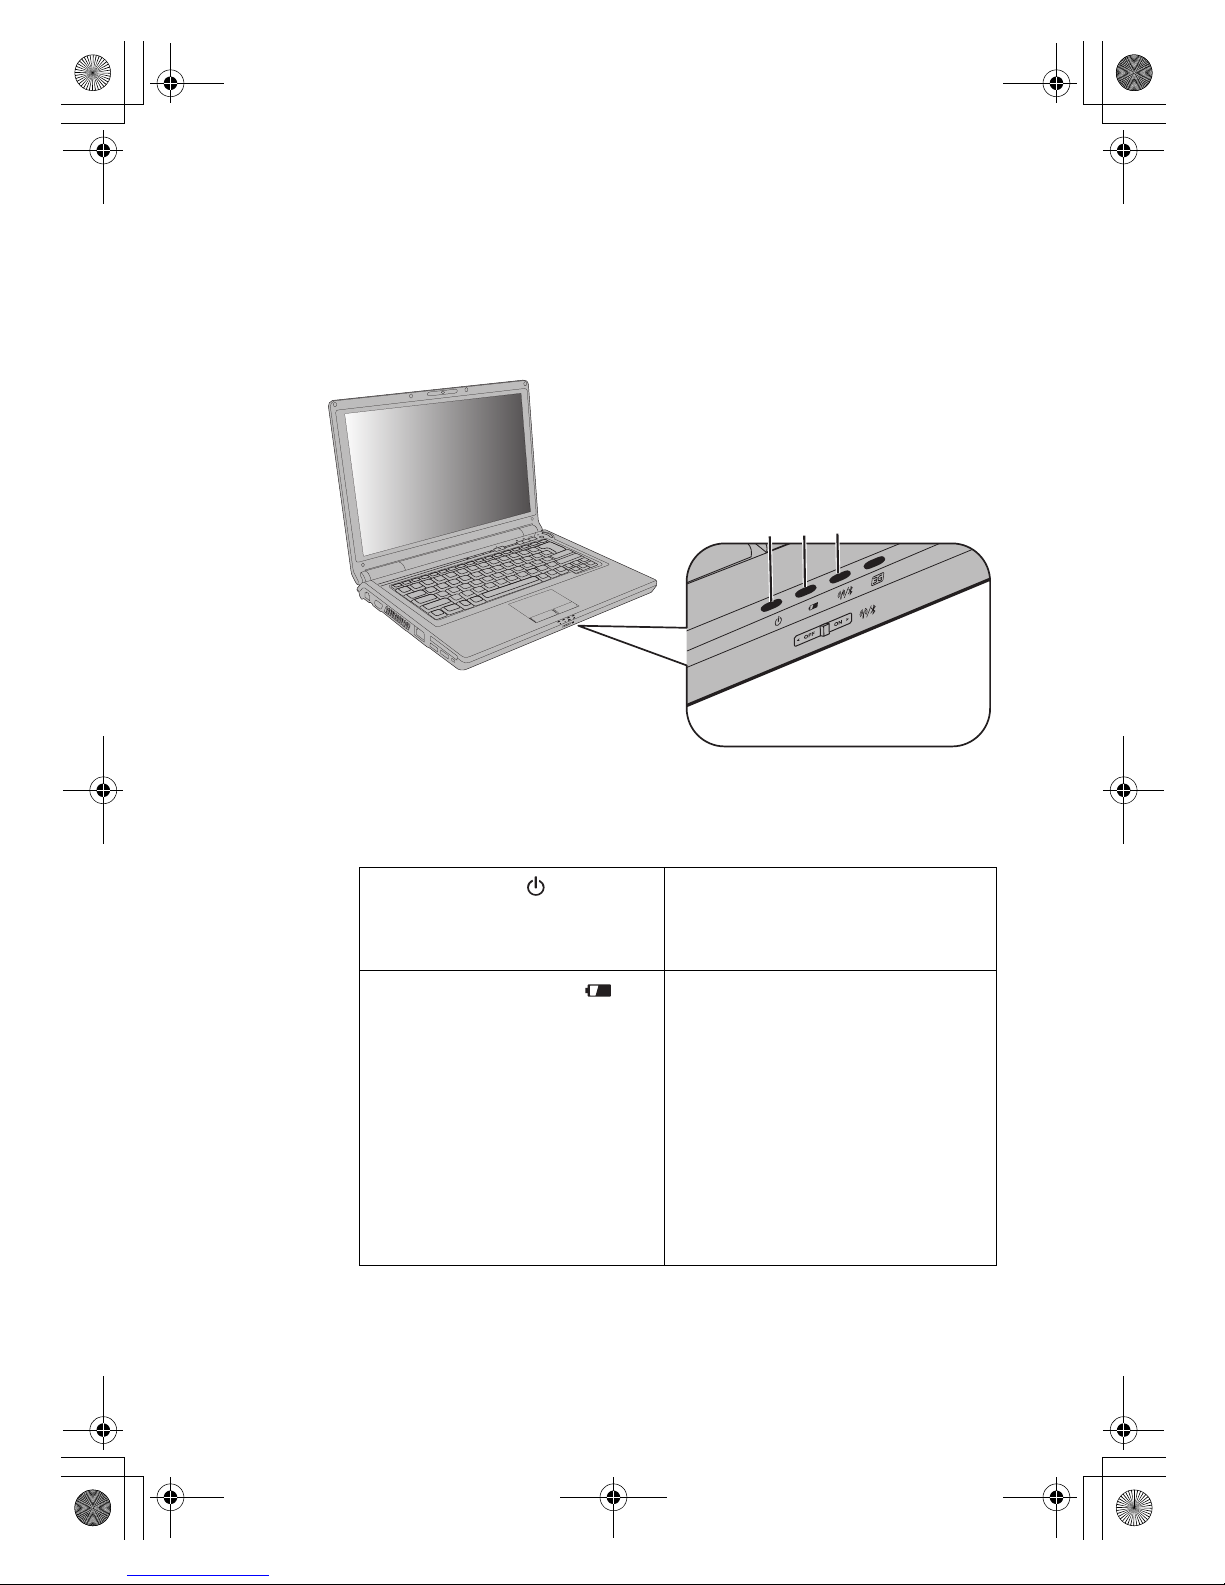
Power-status Indicator
The computer has status indicators that show the mode (sleep/hibernation,
or normal), and the status of the battery as follows:
Lenovo 3000 Y310
If your computer is shipped with a wireless feature and a Bluetooth feature,
you can use the following four indicators:
a
Power Indicator Blue:
System is powered on.
Blinking Blue:
System is in sleep mode.
b Battery Status Indicator Blue:
Power is being supplied by an AC
adapter and the battery is fully
charged (95% or more).
Blinking Blue:
Battery is charging.
OFF:
Power is supplying by battery or the
computer is only powered by an AC
adapter and without a battery pack.
Amber:
Power is supplying by battery and
battery is low (8% or lower).
abc
Lenovo 3000Y310 UG.book Page 26 Friday, September 14, 2007 4:24 PM
Page 35
Getting Started
Chapter 3. Getting Started
27
Preventing Problems
An important part of owning your computer is maintenance. With proper
care, you can avoid common problems. The following sections provide
information that can help you to keep your computer running smoothly.
General Tips for Preventing Problems
1. Check the capacity of your hard disk drive from time to time. If the
hard disk drive gets too full, Windows will slow down and might
produce errors.
Note: Click Start -> Computer. Then right-click the desired drive,
and a menu for the drive is displayed. To check the capacity of
the drive, click Properties.
2. Empty your recycle bin on a regular basis.
3. Use Diskeeper Lite or the Microsoft Disk Defragmenter on your hard
disk drive on a regular basis to improve data seek and read time. To
start the Disk Defragmenter, click Start -> All Programs ->
Accessories -> System Tools -> Disk Defragmenter.
4. To free up disk space, uninstall unused application programs.
Note: You might also want to look for application program
duplication or overlapping versions.
5. Clean out your Inbox, Sent, and Trash folders from your e-mail client
program.
6. At least once a week, make a point to back up your data. If critical data
is present, it is a good idea to perform a daily backup. Lenovo has
many backup options available for your computer. CD-RW drives and
CD-RW/DVD drives are available for most computers and are easily
installed.
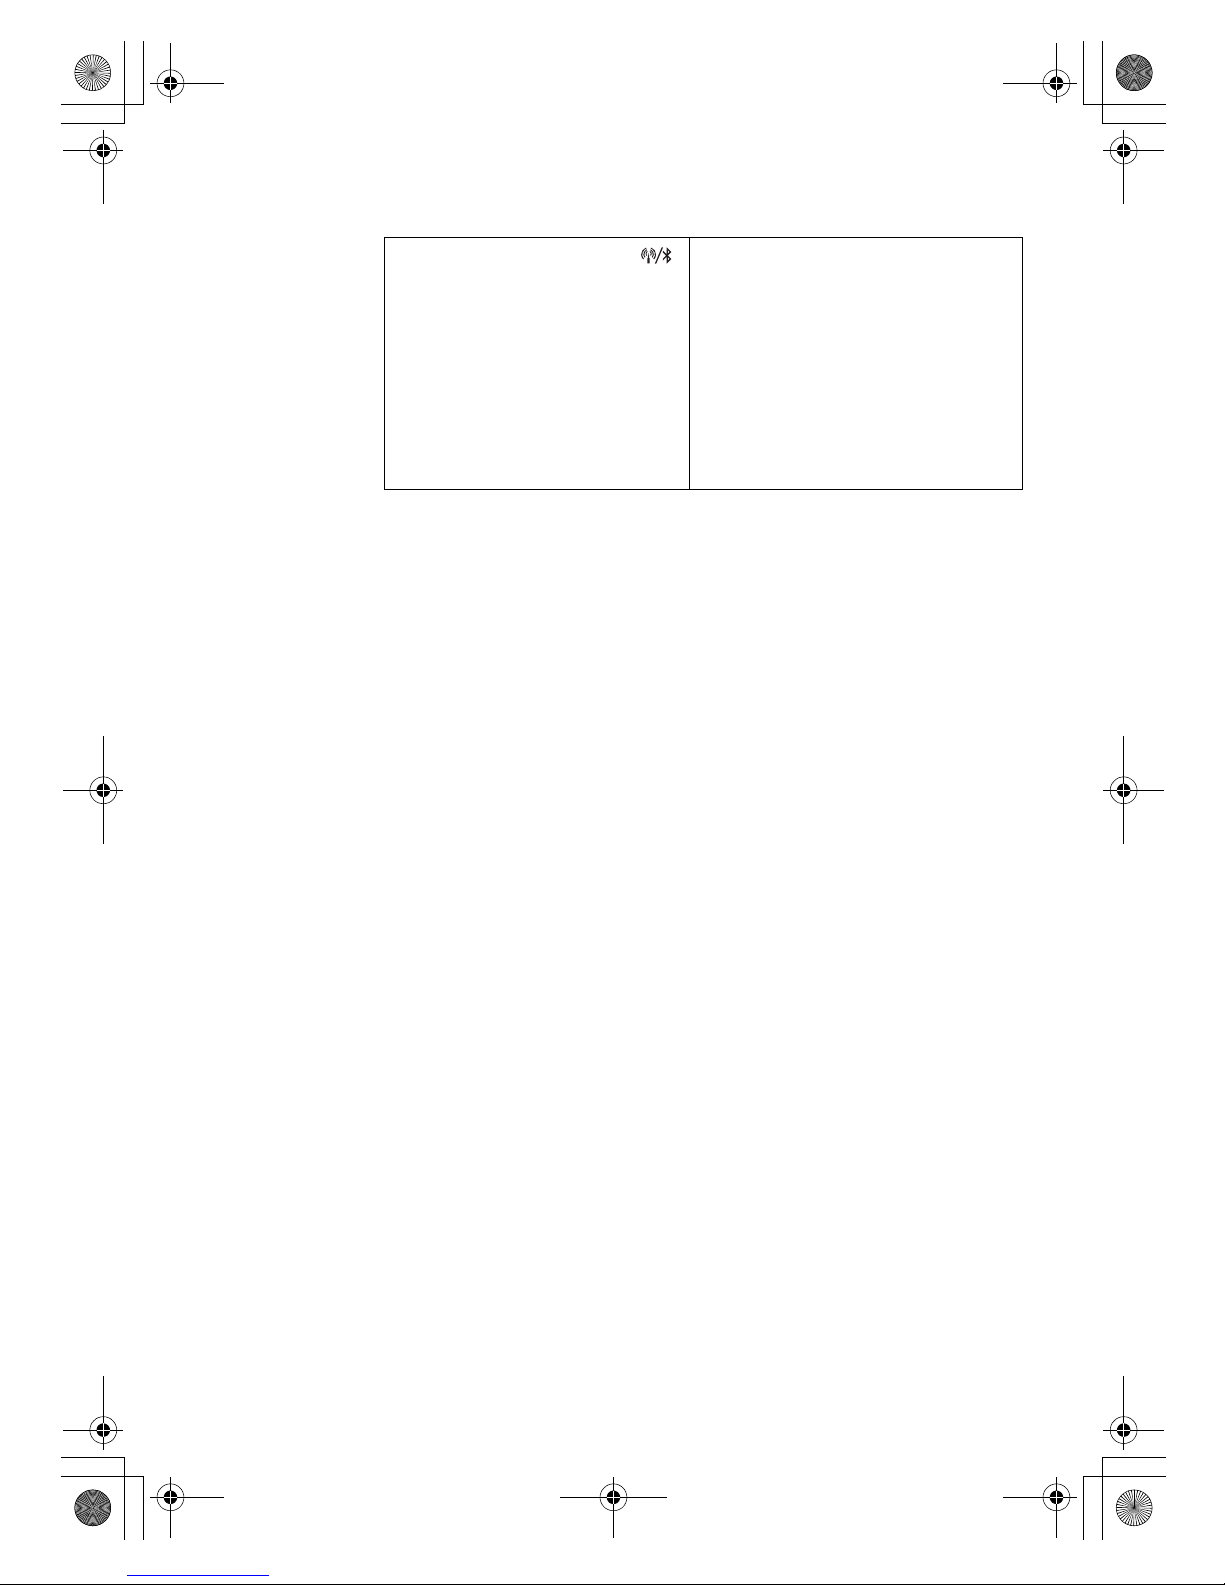
c
Wireless/Bluetooth Indicator
Amber:
Bluetooth is enabled.
Blue:
Wireless LAN is enabled and
connected.
Flashing Blue:
Wireless LAN is enabled and
transfering data.
Purple:
Bluetooth and Wireless LAN are both
enabled.
Lenovo 3000Y310 UG.book Page 27 Friday, September 14, 2007 4:24 PM
Page 36
Getting Started
28
Lenovo 3000 Y310 User Guide
7. Use or schedule System Restore to take a system snapshot
periodically.
Note: Always take a system snapshot before installing new drivers,
updating software, or installing new software.
8. Update device drivers and BIOS when needed.
9. Profile your machine at http://www.Lenovo.com/support to keep up
to date with current drivers and revisions.
10. Keep up to date on device drivers on other non-Lenovo hardware. You
might want to read the device driver information release notes prior to
updating for compatibility or known issues.
11. Keep a log book. Entries might include major hardware or software
changes, driver updates, minor issues you have experienced and how
you resolved them.
12. If you ever need to run a recovery operation on your computer to
return the contents of the hard disk to the factory-installed state, the
following tips might help along the way:
• Remove all external devices such as the printer, keyboard, and
so on.
• Make sure that the battery is charged and that you have the AC
power adapter connected.
• Boot into the BIOS and load the default settings
• Turn off the computer and start the recovery process.
• If your computer uses discs as the recovery media, do not
remove the disc from the drive until you are prompted to do so.
13. If required, you can find your country's Customer Support Center at
the following Web address:
http://www.lenovo.com/support/troubleshooting/. When calling
the Customer Support Center, please make sure you have your
machine type, model, and serial number available and the computer is
in front of you. Also, if the machine is producing error codes, it is
helpful to have the error screen on or the message written down.
Device drivers are programs that contain instructions for the operating
system about how to operate or “drive” a certain piece of hardware. Each
hardware component on your computer has its own specific driver. If you
add a new component, the operating system needs to be instructed on how
to operate that piece of hardware. After you install the driver, the operating
system can recognize the hardware component and understand how to use
it.
Note: Because drivers are programs, like any other file on your computer,
they are susceptible to corruption and might not perform properly if
corruption occurs.
Lenovo 3000Y310 UG.book Page 28 Friday, September 14, 2007 4:24 PM
Page 37
Getting Started
Chapter 3. Getting Started
29
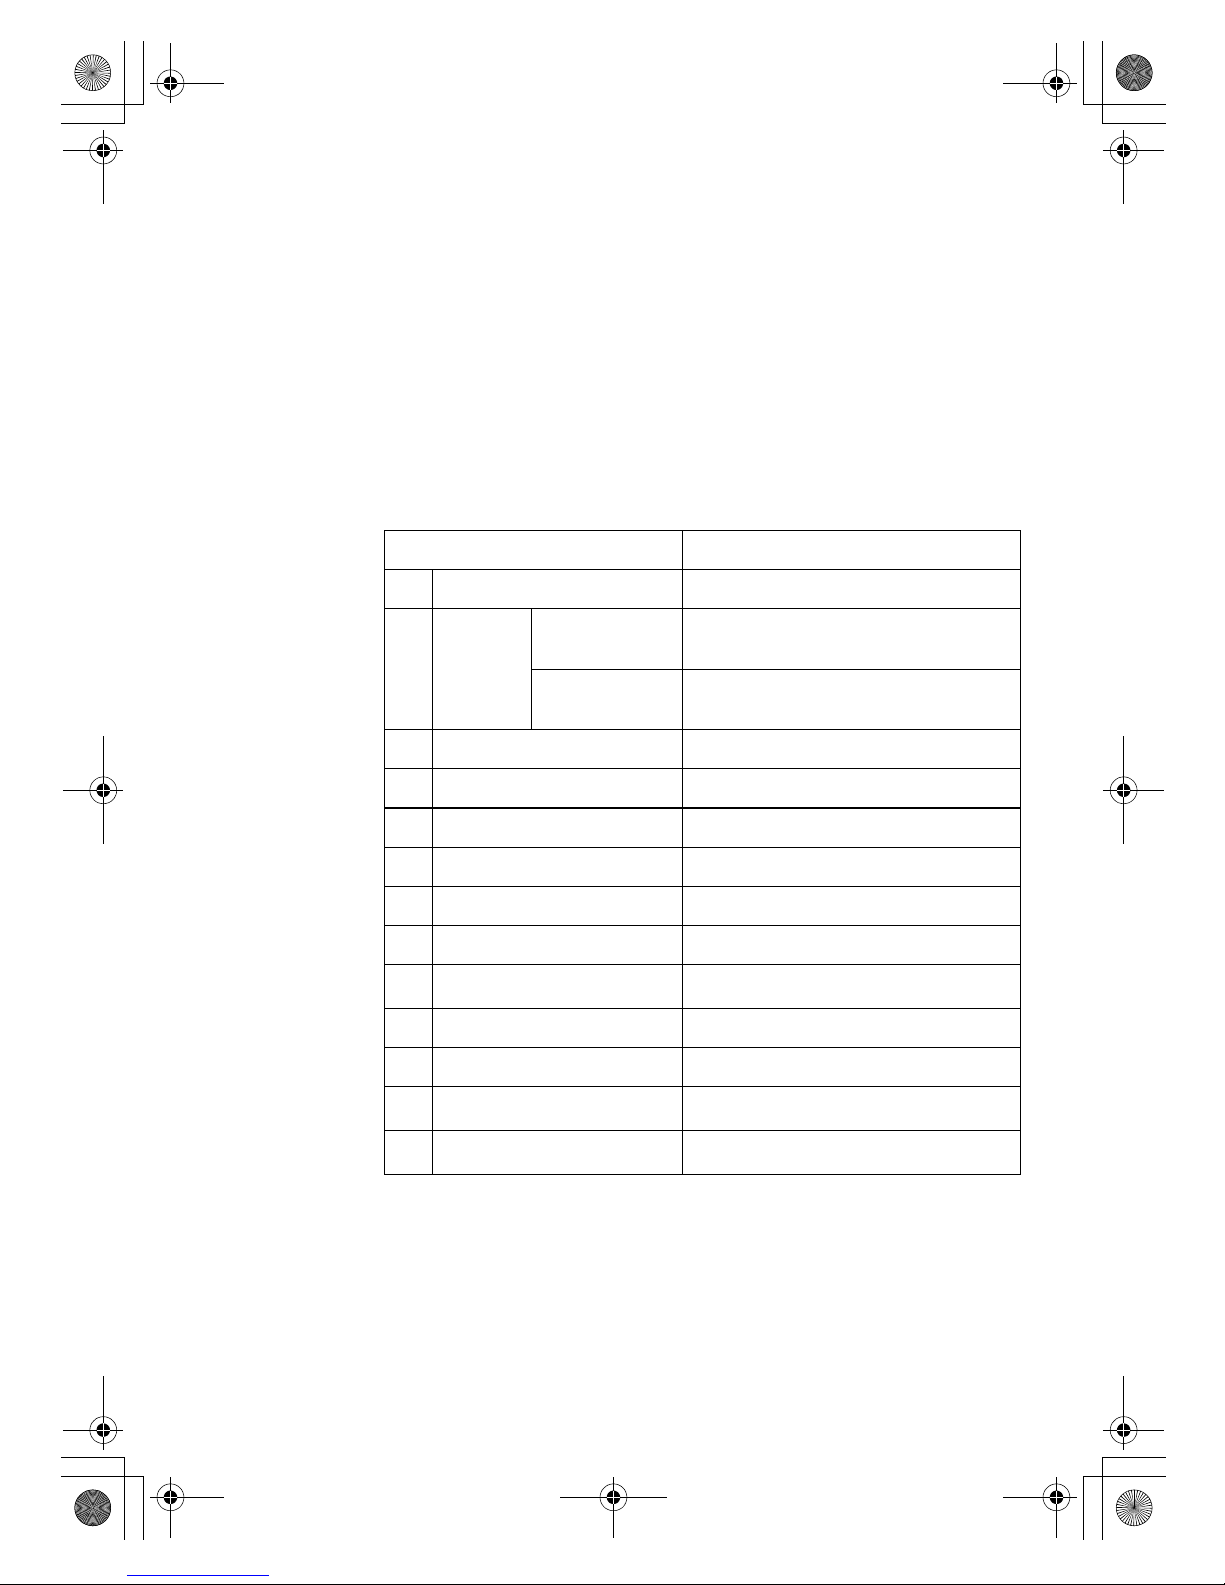
Installing Device Drivers
A compatible device driver is a requirement to ensure correct operation and
performance of each component in your computer. Lenovo provide all
drivers that you need in a driver CD. Follow the following steps to install
drivers on your computer. (Assuming the CD-ROM is “E:” Disk and current
OS is Windows Vista™)
Notes:
• Adhere to the following sequences, otherwise might compromise the
system’s stability and audio or video effect, even cause you to reinstall
the operating system.
• Most installations require a reboot to update the driver.
*1 Enable the Bluetooth device before you install the driver. (by pressing
[Fn] + [F6])
*2 Without these two drivers, you can not use the Function key
combinations and the EQ button.
Sequence of installation Path of drivers
1 Chipset E:\Vista\Chipset\Setup.exe
2
Graphics
Card
For Integrated
Graphics Card
E:\Vista\VGA\Intel VGA\Setup.exe
For Discrete
Graphics Card
E:\Vista\VGA\Nvidia VGA\Setup.exe
3 Sound Card E:\Vista\Audio\Setup.exe
4 Modem E:\Vista\Modem\ssetup.exe
5 LAN Card E:\Vista\LAN\DrvInst\IA32\Setup.exe
6 Touch Pad E:\Vista\TouchPad\Setup.exe
7 Wireless LAN Card E:\Vista\WirelessLan\Autorun.exe
8 Card Reader E:\Vista\CardReader\setup.exe
9
EnergyCut *
2
E:\Vista\EnergyCut\Setup.exe
10 Camera E:\Vista\Camera\Setup.exe
11 CIR E:\Vista\CIR\Setup.exe
12
EQI *
2
E:\Vista\EQI\Setup.exe
13
Bluetooth *
1
E:\Vista\Bluetooth\setup.exe
Lenovo 3000Y310 UG.book Page 29 Friday, September 14, 2007 4:24 PM
Page 38
Getting Started
30
Lenovo 3000 Y310 User Guide
Learn How to Achieve All Day Computing
When you need to use your computer away from electrical outlets, you
depend on battery power to keep your computer running. Different
computer components consume power at different rates. The more you use
the power-intensive components, the faster you consume battery power.
Your Computer Batteries
Your computer batteries enable you to do more, save more, and spend more
time unplugged. Mobility has revolutionized business by enabling you to
take your work where ever you go. With your computer batteries, you will
be able to work longer without being tied to an electrical outlet.
Checking Battery Status
You can determine the percentage of battery power remaining by using
Windows Power options.
To display the battery icon in the taskbar, do as follows:
1. Right -click the taskbar, and then click Properties.
2. Click the Notification Area tab.
3. Under System icons, select the Power check box.
The rate at which you use battery power determines how long you can use
the battery of your computer between charges. Because each computer user
has different habits and needs, it is difficult to predict how long a battery
charge will last. There are two main factors:
• How much energy is stored in the battery when you begin to work.
• The way you use your computer: for example, how often you access the
hard disk drive, and how bright you make the computer display.
Using the AC Adapter
The power to run your computer can come either from the lithium-ion
(Li-ion) battery pack provided with it, or from AC power through the AC
adapter. While you use AC power, the battery charges automatically.
The AC adapter that comes with your computer has two basic components:
1. The transformer pack that converts AC power for use with the
computer.
2. The power cord that plugs into the AC outlet and into the transformer
pack.
Attention: Using an improper power cord could cause severe damage to
your computer.
To use the AC adapter, do the following. Be sure to take these steps in the
order in which they are given here.
1. Connect the power cord to the transformer pack.
2. Plug the power cord into an electrical outlet.
Lenovo 3000Y310 UG.book Page 30 Friday, September 14, 2007 4:24 PM
Page 39
Getting Started
Chapter 3. Getting Started
31
3. Connect the AC adapter to the AC power adapter jack of the computer.
You can check the status of your battery at any time by looking at the
battery meter at the bottom of your display.
Notes:
• When the AC adapter is not in use, disconnect it from the electrical
outlet.
• Do not wrap the power cord tightly around the AC power
transformer pack when it is connected to the transformer.
• You can charge the battery when the AC adapter is connected to the
computer and the battery is installed. You need to charge it in any of
the following conditions:
• When you purchase a new battery
• If the battery status indicator starts blinking
• If the battery has not been used for a long time
Before you charge the battery, make sure that its temperature is at least
10 degrees Celsius (50 degrees Fahrenheit).
Charging the Battery
When you check the battery status and find that the percentage of power
remaining is low or when the power alarm alerts you that remaining power
is low, you need to charge your battery or replace it with a charged battery.
If an AC outlet is convenient, first, connect the power cord to the
transformer pack; second, plug the power cord into an electrical outlet; and
then connect the AC adapter to the power jack of the computer.
The charging time is affected by the physical environment. The battery
status indicator lets you know that the battery is charging, and also notifies
you when the battery is fully charged.
Note: To increase the life of the battery, the computer does not start
recharging the battery if the remaining power is greater than
95 percent.
Handling the Battery
Danger: Do not attempt to disassemble or modify the battery pack.
Attempting to do so can cause an explosion, or liquid leakage
from the battery pack.
A battery pack other than the one specified by Lenovo, or a disassembled or
modified battery pack is not covered by the warranty.
Danger: If the rechargeable battery pack is incorrectly replaced, there is
danger of an explosion. The battery pack contains a small
amount of harmful substances. To avoid possible injury:
• Replace only with a battery of the type recommended by Lenovo.
Lenovo 3000Y310 UG.book Page 31 Friday, September 14, 2007 4:24 PM
Page 40
Getting Started
32
Lenovo 3000 Y310 User Guide
• Keep the battery pack away from fire.
• Do not expose it to water or rain.
• Do not attempt to disassemble it.
• Do not short-circuit it.
• Keep it away from children.
Danger: Do not put the battery pack in trash that is disposed of in
landfills. When disposing of the battery, comply with local
ordinances or regulations and your company’s safety standards.
Danger: There is a danger of an explosion if the backup battery is
incorrectly stored. The lithium battery contains lithium and can
explode if it is not properly handled, or disposed of. Replace
only with a battery of the same type. To avoid possible injury or
death, Do not: (1) throw or immerse into water, (2) allow it to
heat to more than 100 degrees C (212 degrees F), or (3) attempt
to repair or disassemble it. Dispose of it as required by local
ordinances or regulations and your company’s safety standards.
Integrated Camera
With the built-in camera, you can take photos or movies and use with
various applications, such as EasyCapture, MSN
or Yahoo! Messenger, and
so on.
Note: If you use Windows Vista, you need to install a separate third party
dedicated application, because Vista does not include a program for
taking pictures or movies with the integrated camera.
Security
This section provides information about how to help protect your computer
from theft and unauthorized use.
Attaching a Mechanical Lock
You can attach a mechanical lock to your computer to help prevent it from
being removed without your permission.
Attach a mechanical lock to the keyhole of the computer; then secure the
chain on the lock to a stationary object. Refer to the instructions shipped
with the mechanical lock.
Refer to the Right-side view on page 13 for the location of the security
keyhole.
Note: You are responsible for evaluating, selecting, and implementing the
locking devices and security features. Lenovo makes no comments,
judgments, or warranties about the function, quality, or
performance of locking devices and security features.
Lenovo 3000Y310 UG.book Page 32 Friday, September 14, 2007 4:24 PM
Page 41
Getting Started
Chapter 3. Getting Started
33
Using Passwords
Using passwords helps prevent your computer from being used by others.
Once you set a password and enable it, a prompt appears on the screen each
time you power on the computer. Enter your password at the prompt. You
cannot use the computer unless you type the correct password.
Make sure that only authorized individuals access your computer.
Establishing different kinds of passwords requires that other possible users
know the proper passwords in order to access your computer or your data.
As many as three passwords might be needed for your computer: the
Supervisor password, the User Password, and the hard-disk drive (HDD)
password. When passwords are set, only the Supervisor password entitles
you full control of the computer.
Note:
If you set passwords through the BIOS Setup Utility and you put your
computer into sleep mode by pressing Fn + F1, the following describes
the behavior of the computer when you bring it out of sleep mode:
• You are prompted to type the Windows log-on password rather
than the User password to resume operation.
• If an HDD password is assigned to any hard disk drive, the hard
disk drive is unlocked automatically when you resume operation.
Set the Password
You can set a password to help protecting your computer against access by
unauthorized users.
To Set a Supervisor Password:
1. Power on your Notebook, press F2 when the BIOS Setup Utility screen
opens.
2. Select Security using the cursor directional keys.
3. Select Set supervisor Password, and press the Enter key. The Set
supervisor Password window opens.
4. Set your password, which can be from one to eight alphanumeric
characters in any combination. Type it in the Enter New Password
field.
5. Press the Enter key once to move to the Confirm New Password field.
Retype the password you just entered to verify it.
6. Commit your password to memory, and press the Enter key.
7. To enable the password for power-on, select Password on boot, and
press the Enter key. Select Enabled and press the Enter key.
8. Press F10 to exit.
9. Select Yes in the Setup Confirmation window.
Note: If the password has been forgotten and cannot be made available to
the servicer, there is no service procedure to reset the password. The
system board must be replaced for a scheduled fee.
Lenovo 3000Y310 UG.book Page 33 Friday, September 14, 2007 4:24 PM
Page 42
Getting Started
34
Lenovo 3000 Y310 User Guide
If you set a password and enable it, the password prompt appears on the
screen whenever you turn on the computer. You must enter the correct
password to start the computer.
If the Password on boot is disabled in step 7, no password is needed to
power-on your Notebook, but you still need the password to enter BIOS
Setup Utility.
To Set a User Password
1. In the BIOS Setup Utility screen, select Security using the cursor
directional keys.
2. Select Set User Password, and press the Enter key. The Set User
Password window opens.
3. Set your password, which can be from one to eight alphanumeric
characters in any combination. Type it in the Enter New Password
field.
4. Press the Enter key once to move to the Confirm New Password field.
Retype the password you just entered to verify it.
5. Commit your password to memory, and press the Enter key.
6. Press F10 to exit.
7. Select Yes in the Setup Confirmation window
Note: User password can be only set when a supervisor password is set.
User password can be also used for the power-on password.
If you enter BIOS Setup Utility with the User password, only a small
part of the settings can be used.
To Set a Hard Disk Password
1. In the BIOS Setup Utility screen, select Security using the cursor
directional keys.
2. Select Set HDD Password, and press the Enter key. The Set HDD
Password window opens.
3. Set your password, which can be from one to eight alphanumeric
characters in any combination. Type it in the Enter New Password
field.
4. Press the Enter key once to move to the Confirm New Password field.
Retype the password you just entered to verify it.
5. Commit your password to memory, and press the Enter key.
6. Press F10 to exit.
7. Select Yes in the Setup Confirmation window
Note: If the password has been forgotten and cannot be made available to
the servicer, there is no service procedure to reset the password. The
hard disk must be replaced for a scheduled fee.
If you set a HDD password the password prompt appears on the
screen whenever you turn on the computer. You must enter the
correct password to start the computer.
Lenovo 3000Y310 UG.book Page 34 Friday, September 14, 2007 4:24 PM
Page 43
Getting Started
Chapter 3. Getting Started
35
Changing or Removing the Password
To change the password, do the following:
1. In the Enter Current Password field, type your current password.
2. In the Enter New Password field, type a new password; then retype it to
verify.
To remove the password, do the following:
1. In the Enter Current Password field, type your current password.
2. Leave the Enter New Password field blank, and then press the Enter
key twice.
Note: The User password will be removed if the Supervisor password is
removed
Lenovo 3000Y310 UG.book Page 35 Friday, September 14, 2007 4:24 PM
Page 44
Getting Started
36
Lenovo 3000 Y310 User Guide
Lenovo 3000Y310 UG.book Page 36 Friday, September 14, 2007 4:24 PM
Page 45
37
© Copyright Lenovo 2007
Chapter 4. Solving Computer Problems
Frequently Asked Questions. . . . . . . . . . . . . . . 38
Troubleshooting . . . . . . . . . . . . . . . . . . . . . . . . . 39
Display Problems . . . . . . . . . . . . . . . . . . . . . 39
A Password Problem . . . . . . . . . . . . . . . . . . 40
Keyboard Problems . . . . . . . . . . . . . . . . . . . 40
Sleep or Hibernation Problems. . . . . . . . . . 41
Computer Screen Problems . . . . . . . . . . . . . 42
Battery Problems . . . . . . . . . . . . . . . . . . . . . .43
A Hard Disk Drive Problem . . . . . . . . . . . .44
A Startup Problem. . . . . . . . . . . . . . . . . . . . . 44
Other Problems . . . . . . . . . . . . . . . . . . . . . . .44
Lenovo 3000Y310 UG.book Page 37 Friday, September 14, 2007 4:24 PM
Page 46
Solving Computer Problems
38
Lenovo 3000 Y310 User Guide
Frequently Asked Questions
This section lists frequently asked questions and tells where you can find
detailed answers. For details about each publication included in the
package with your computer, see “This Guide and Other Publications” on
page 1.
What safety precautions should I follow when using my computer?
See the separate Safety and Warranty Guide for detailed information
about safety.
How can I prevent problems with my computer?
See “Read This First” on page v, and also “Chapter 2. Caring for
Your Computer” on page 3 of this guide. More tips can be found in
Chapter 3.
What are the main hardware features of my new computer?
More information can be found in Chapter 3.
Where can I find the detailed specifications for my computer?
See http://www.Lenovo.com/support.
I need to upgrade a device or I need to replace one of the following: the
hard disk drive, memory, or the keyboard.
See “Appendix B. Customer Replaceable Units (CRUs),” on
page 59 of this guide.
My computer is not operating properly.
Study the relevant information in Chapter 3.
Where are the recovery discs?
Your computer did not come with a recovery disc or Windows
disc. For an explanation of the alternative recovery methods
offered by Lenovo, see “OneKey Recovery4.65 User Guide”.
How can I contact the Customer Support Center?
See “Chapter 6. Getting Help and Service,” on page 51 of this
Guide. For the phone numbers of the Customer Support Center
nearest to you, see “Warranty Service Telephone Numbers” on
page 57.
Where can I find warranty information?
See the separate Safety and Warranty Guide for detailed warranty
information. For the warranty applicable to your computer,
including the warranty period and type of warranty service, see
“Appendix A. Warranty Information,” on page 55.
Lenovo 3000Y310 UG.book Page 38 Friday, September 14, 2007 4:24 PM
Page 47
Solving Computer Problems
Chapter 4. Solving Computer Problems
39
Troubleshooting
If you do not find your problem here, see Chapter 3. The following section
only describes problems that might prevent you from accessing the
comprehensive information in Chapter 3.
Display Problems
Problem: When I turn on the computer, nothing appears on the screen
and the computer does not beep while starting up.
Note: If you are not sure whether you heard any beeps, turn
off the computer; then turn it on again, and listen again. If you
are using an external monitor, see “Computer Screen
Problems” on page 42.
Solution: If a password is set, press any key to display the password
prompt; then type the correct password and press Enter.
If the password prompt does not appear, the brightness level
might be set to minimum brightness. Adjust the brightness
level by pressing Fn + ↑.
If the screen still remains blank, make sure that:
• The battery is installed correctly.
• The AC adapter is connected to the computer and the
power cord is plugged into a working electrical outlet.
• The computer power is on. (Press the power button again
for confirmation.)
If these items are properly set, and the screen remains blank,
have the computer serviced.
Problem: When I turn on the computer, nothing appears on the screen,
but I hear two or more beeps.
Solution: Make sure that the memory card is installed correctly. If it is,
but the screen is still blank, and you hear five beeps, have the
computer serviced.
Problem: When I turn on the computer, only a white cursor appears on
a blank screen.
Solution: Restore backed-up files to your Windows environment or the
entire contents of your hard disk to the original factory
contents using OneKey Recovery. If you still see only the
cursor on the screen, have the computer serviced.
Lenovo 3000Y310 UG.book Page 39 Friday, September 14, 2007 4:24 PM
Page 48
Solving Computer Problems
40
Lenovo 3000 Y310 User Guide
A Password Problem
Keyboard Problems
Problem: My screen goes blank while the computer is on.
Solution: Your screen saver or power management may be enabled. Do
one of the following to exit from the screen saver or to resume
from sleep or hibernation mode:
• Touch the touch pad.
• Press a key.
• Press the power button.
Problem: I forgot my password.
Solution: • If you forgot your user password, you must take your
computer to a Lenovo authorized servicer or a marketing
representative to have the password canceled.
• If you forgot your HDD password, Lenovo authorized
servicer cannot reset your password or recover data from
the hard disk. You must take your computer to a Lenovo
authorized servicer or a marketing representative to have
the hard disk drive replaced. Proof of purchase is required,
and a fee will be charged for parts and service.
• If you forgot your supervisor password, Lenovo
authorized servicers cannot reset your password. You
must take your computer to a Lenovo authorized servicer
or a marketing representative to have the system board
replaced. Proof of purchase is required, and a fee will be
charged for parts and service.
Problem: A number appears when you type a letter.
Solution: The numeric lock function is on. To disable it, press Fn +
Insert.
Problem: All or some of the keys on the external numeric keypad do not
work.
Solution: Make sure that the external numeric keypad is correctly
connected to the computer.
Lenovo 3000Y310 UG.book Page 40 Friday, September 14, 2007 4:24 PM
Page 49
Solving Computer Problems
Chapter 4. Solving Computer Problems
41
Sleep or Hibernation Problems
Problem: The computer enters sleep mode unexpectedly.
Solution: If the processor overheats, the computer automatically enters
sleep mode to allow the computer to cool and to protect the
processor and other internal components. Check the settings
for sleep mode.
Problem: The computer enters sleep mode (the sleep indicator turns on)
immediately after Power-on self-test (POST).
Solution: Make sure that:
• The battery is charged.
• The operating temperature is within the acceptable range.
See “Specifications” on page 63.
If the battery is charged and the temperature is within range,
have the computer serviced.
Problem: The critical low-battery error message appears, and the
computer immediately turns off.
Solution: The battery power is getting low. Connect the AC adapter to
the computer, or replace the battery with a fully charged one.
Problem: The computer does not return from sleep mode, or the sleep
indicator stays on and the computer does not work.
Solution: If the computer does not return from sleep mode, it may have
entered sleep or hibernation mode automatically because the
battery is depleted. Check the sleep indicator.
• If the sleep indicator is on, your computer is in sleep
mode. Connect the AC adapter to the computer; then
press any key or the power button.
• If the sleep indicator is off, your computer is in sleep/
hibernation mode or power-off state. Connect the AC
adapter to the computer; then press the power button to
resume operation.
If the system still does not return from sleep mode, your
system has stopped responding, and you cannot turn off the
computer; reset the computer. Reset the computer. Unsaved
data may be lost. To reset the computer, press and hold the
power button for 4 seconds or more. If the computer is still
not reset, remove the AC adapter and the battery.
Lenovo 3000Y310 UG.book Page 41 Friday, September 14, 2007 4:24 PM
Page 50
Solving Computer Problems
42
Lenovo 3000 Y310 User Guide
Computer Screen Problems
Problem: The screen is blank.
Solution: Do the following:
• If you are using the AC adapter, or using the battery, and
the battery status indicator is on (is green), press Fn + ↑ to
make the screen brighter.
• If the Power indicator is in blinking blue, press any key or
the power button to resume from the sleep mode.
• If you still have the problem, do the Solution in the
following problem “The screen is unreadable or
distorted.”
Problem: The screen is unreadable or distorted.
Solution: Make sure that:
• The display device driver is installed correctly.
• The screen resolution and color quality are correctly set.
• The monitor type is correct.
To check these settings, do as follows:
1. Right-click on the desktop, and click Personalize.
2. Click Display Settings and check whether the screen
resolution and color quality are correctly set.
3. Click Advanced Settings.
4. Click the Adapter tab.
5. Make sure that the correct device driver name is shown in
the adapter information window.
Note: The device driver name depends on the video chip
that has been installed on your computer.
6. Click the Properties button. If you are prompted for an
administrator password or confirmation, type the
password or provide confirmation. Check the “Device
status” box and make sure the device is working
properly. If not, click the Troubleshoot button.
7. Click the Monitor tab.
8. Make sure the information is correct.
9. Click the Properties button. If not, click the Troubleshoot
button.
Problem: Incorrect characters appear on the screen.
Solution: Did you install the operating system or application program
correctly? If they are installed and configured correctly, have
the computer serviced.
Lenovo 3000Y310 UG.book Page 42 Friday, September 14, 2007 4:24 PM
Page 51
Solving Computer Problems
Chapter 4. Solving Computer Problems
43
Battery Problems
Problem: Missing, discolored, or bright dots appear on the screen every
time you turn on your computer.
Solution: This is an intrinsic characteristic of the TFT technology. Your
computer’s display contains multiple thin-film transistors
(TFTs). A small number of missing, discolored, or bright dots
on the screen might exist all the time.
Problem: A message, “Unable to create overlay window,” appears
when you try to start DVD playback.
-or-
You get poor or no playback while running video playback,
DVD playback, or game applications.
Solution: Do either of the following:
• If you are using 32-bit color mode, change the color depth
to 16-bit mode.
• If you are using a desktop size of 1280×1024 or larger,
reduce the desktop size and the color depth.
Problem: The battery cannot be fully charged by the power-off method
in the standard charge time for your computer.
Solution: For details, see “Checking Battery Status” in Chapter 3.
Problem: Your computer shuts down before the battery status indicator
shows empty,
-or-
Your computer operates after the battery status indicator
shows empty.
Solution: Discharge and recharge the battery.
Problem: The operating time for a fully charged battery is short.
Solution: For details, see “Handling the Battery” in Chapter 3.
Problem: The computer does not operate with a fully charged battery.
Solution: The surge protector in the battery might be active. Turn off the
computer for one minute to reset the protector; then turn on
the computer again.
Problem: The battery does not charge.
Solution: For details, see “Handling the Battery” in Chapter 3.
Lenovo 3000Y310 UG.book Page 43 Friday, September 14, 2007 4:24 PM
Page 52
Solving Computer Problems
44
Lenovo 3000 Y310 User Guide
A Hard Disk Drive Problem
A Startup Problem
Other Problems
Problem: The hard disk drive does not work.
Solution: In the Boot menu in BIOS Setup Utility, make sure that the
hard disk drive is included in the Boot Sequence correctly.
Problem: The Microsoft Windows operating system will not start.
Solution: Use the OneKey Recovery to help solve or identify your
problem. For details about OneKey Recovery, see “OneKey
Recovery4.65 User Guide”.
Problem: Your computer does not respond.
Solution: • To turn off your computer, press and hold the power
button for 4 seconds or more. If the computer still does not
respond, remove the AC adapter and the battery.
• Your computer might lock when it enters sleep mode
during a communication operation. Disable the sleep
timer when you are working on the network.
Problem: The computer does not start from a device you want.
Solution: See the Startup menu of the BIOS Setup Utility. Make sure
that the startup sequence in the BIOS Setup Utility is set so
that the computer starts from the device you want.
Also make sure that the device from which the computer
starts is enabled. In the startup menu in the BIOS Setup
Utility, make sure that the device is included in the “Boot
priority order” list. If it is included in the “Excluded from
boot order” list, it is disabled. Select the entry for it in the list
and press the x key. This moves the entry to the “Boot priority
order” list.
Lenovo 3000Y310 UG.book Page 44 Friday, September 14, 2007 4:24 PM
Page 53
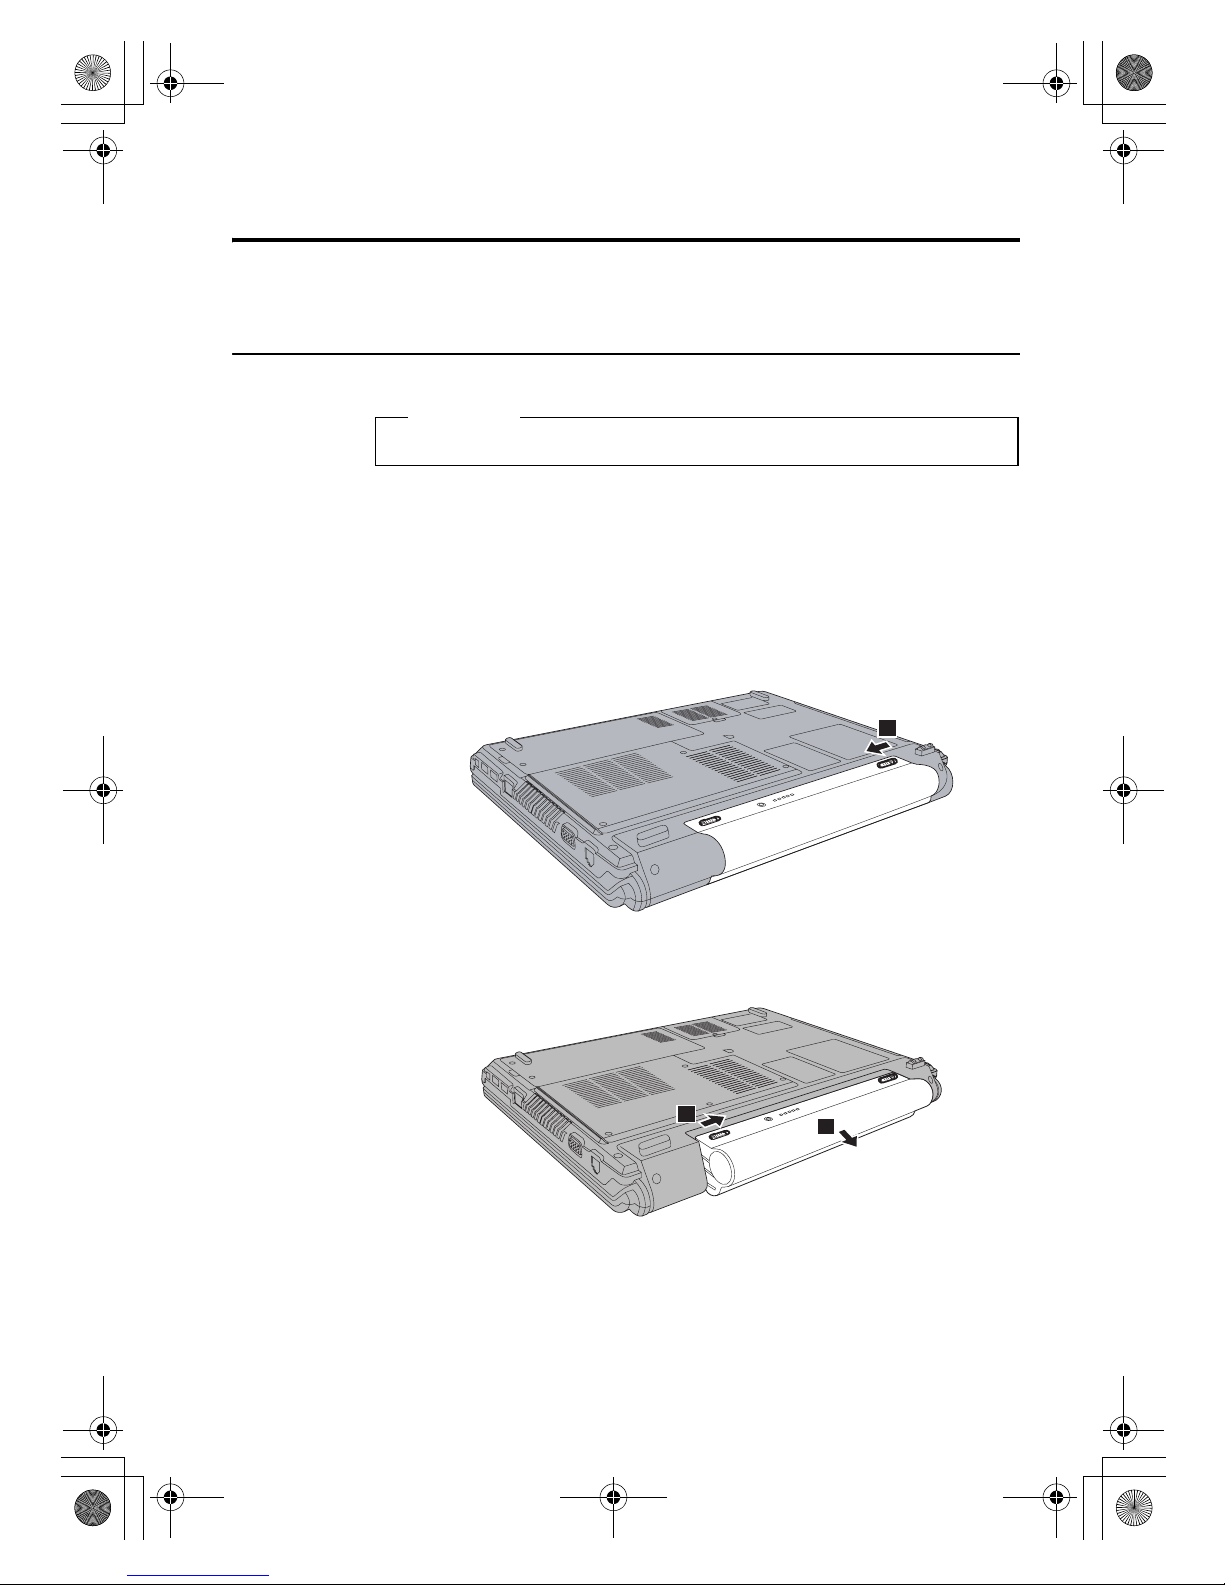
45
© Copyright Lenovo 2007
Chapter 5. Upgrading and Replacing Devices
Replacing the Battery
1. Turn off the computer, or enter hibernation mode. Then disconnect the
AC adapter and all cables from the computer.
Note: If you are using an ExpressCard, the computer might not be able
to enter hibernation mode. If this happens, turn off the
computer.
2. Close the computer display, and turn the computer over.
3. Unlock the battery latch a by sliding it to the unlocked position.
4. Unlock the battery latch b by sliding it to the unlocked position. While
holding the latch b in the unlocked position, remove the battery c.
Read Safety and Warranty Guide before replacing the battery.
Important
1
3
2
Lenovo 3000Y310 UG.book Page 45 Friday, September 14, 2007 4:24 PM
Page 54
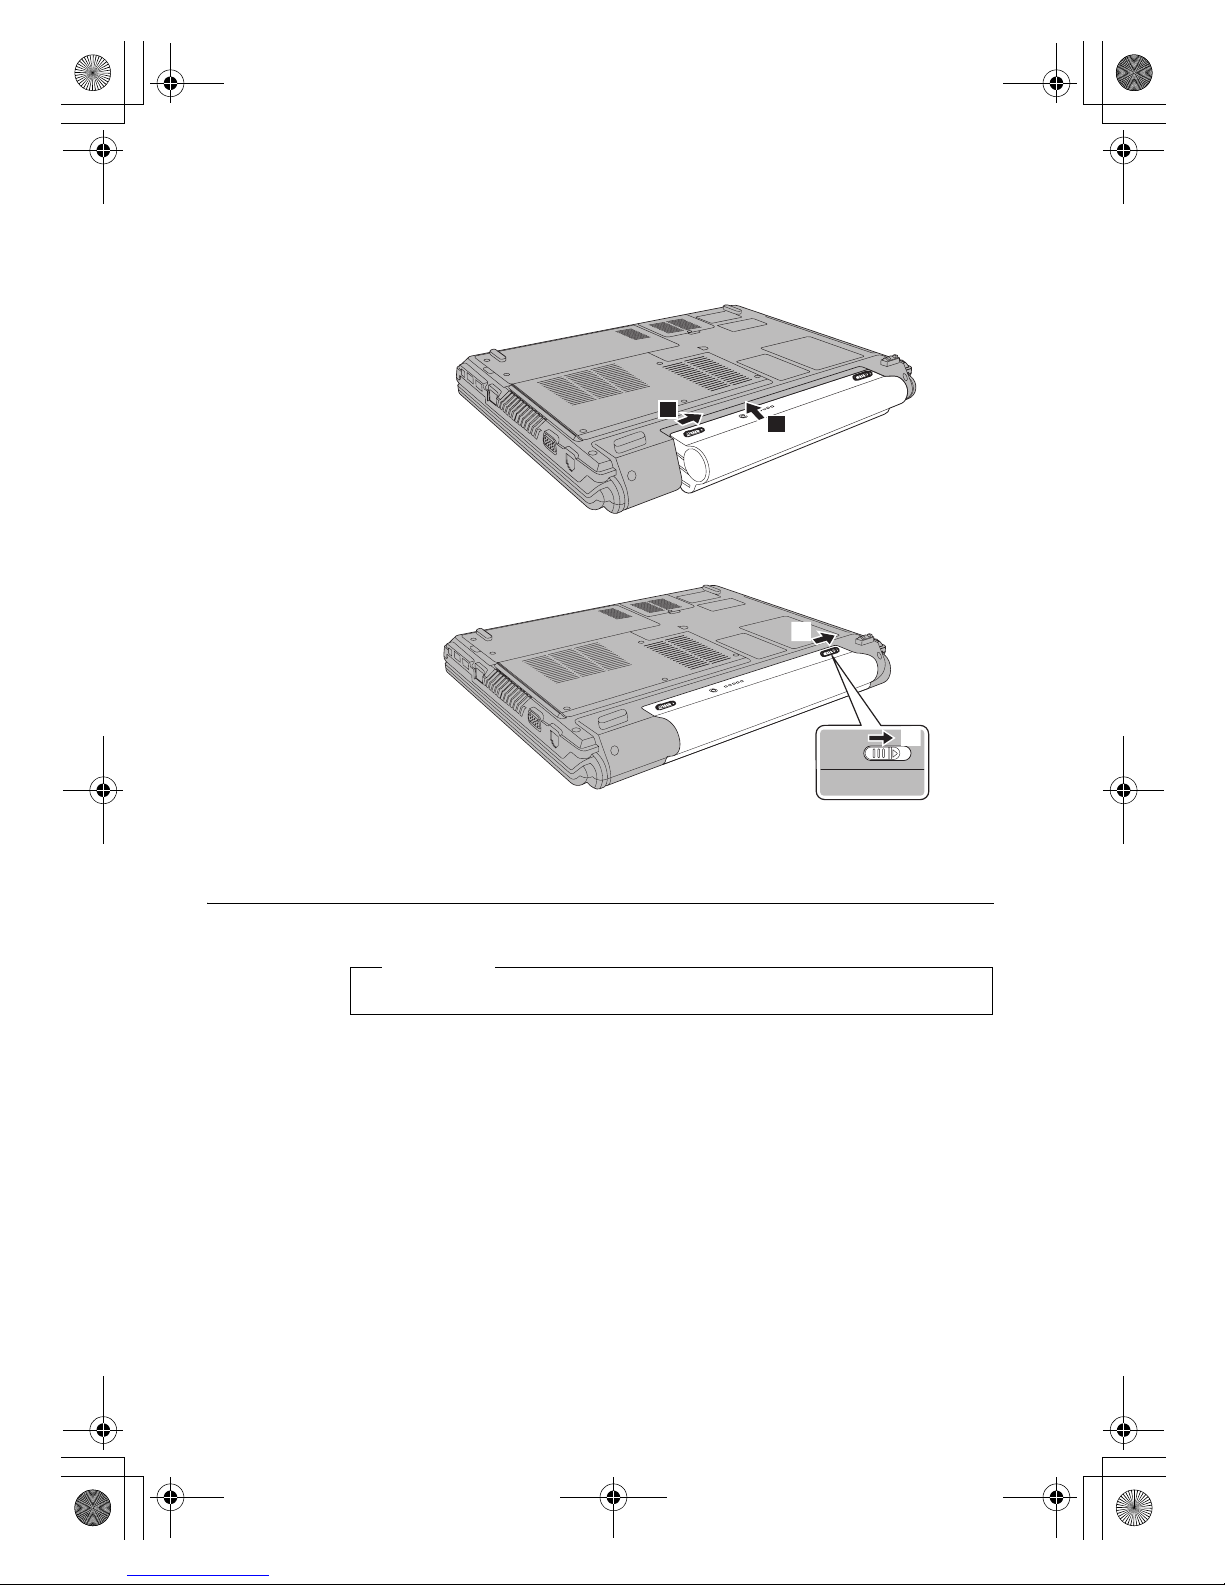
Replacing the Battery
46
Lenovo 3000 Y310 User Guide
5. Slide the battery latch b to the unlocked position and install a fully
charged battery a.
6. Slide the battery latch a to the locked position b.
7. Turn the computer over again. Connect the AC adapter and cables to
the computer.
Replacing Memory
Increasing memory capacity is an effective way to make programs run
faster. You can increase the amount of memory in your computer by
installing a PC2-5300 (DDR II 667) SO-DIMM, available as an option, in the
memory slot of your computer. SO-DIMMs with different capacities are
available.
Note: Use only the memory types supported by your computer. If you
incorrectly install the optional memory or install an unsupported
memory type, a warning beep sounds when you try to start the
computer.
1
2
b
a
Read Safety and Warranty Guide before replacing memory.
Important
Lenovo 3000Y310 UG.book Page 46 Friday, September 14, 2007 4:24 PM
Page 55
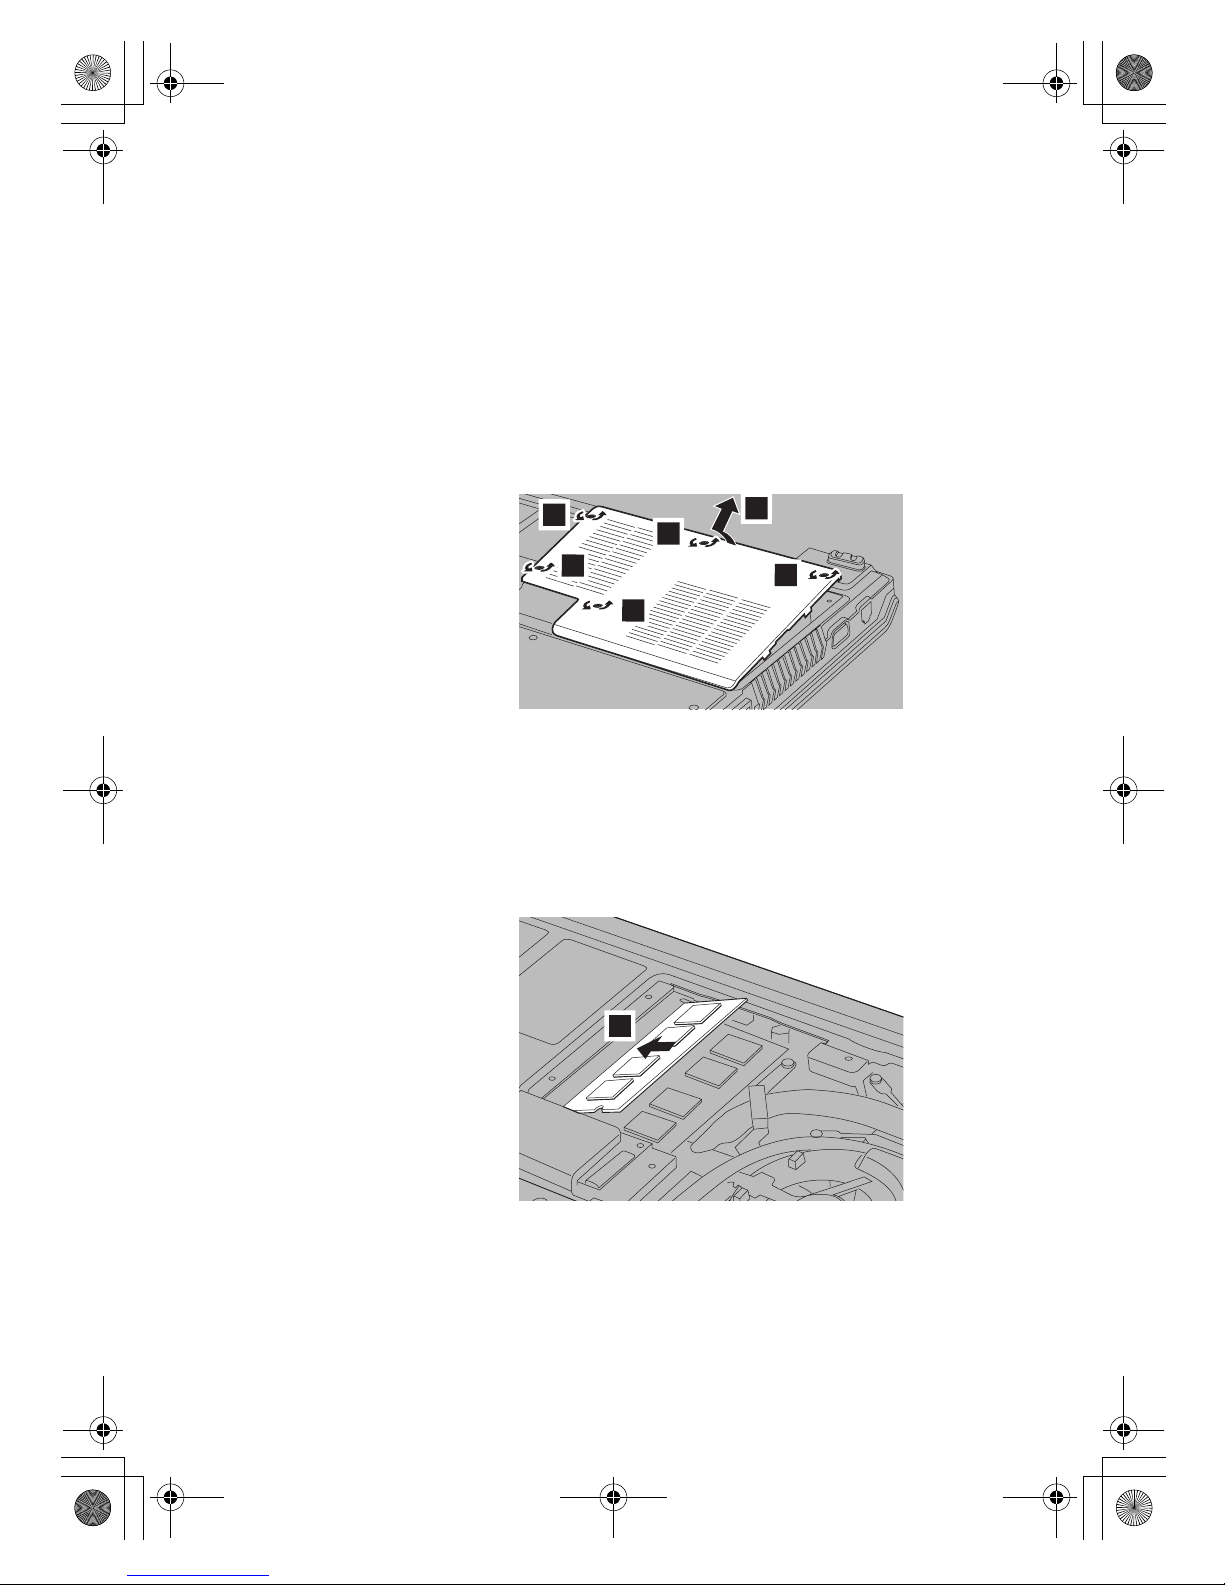
Replacing Memory
Chapter 5. Upgrading and Replacing Devices
47
To install an SO-DIMM, do the following:
1. Touch a metal table or a grounded metal object. This action reduces any
static electricity in your body, that could damage the SO-DIMM. Do not
touch the contact edge of the SO-DIMM.
2. Turn off the computer; then disconnect the ac adapter and all cables
from the computer.
3. Close the computer display, and turn the computer over.
4. Remove the battery.
5. Unfasten the five screws a on the cover and remove the cover b.
6. Find the notch on the contact edge side of the SO-DIMM.
Attention: To avoid damaging the SO-DIMM, do not touch its contact edge.
7. With the notched end of the SO-DIMM toward the contact edge side of
the socket, insert the SO-DIMM into the socket at an angle of about
20 degrees, then press it in firmly a.
2
1
1
1
1
1
1
Lenovo 3000Y310 UG.book Page 47 Friday, September 14, 2007 4:24 PM
Page 56
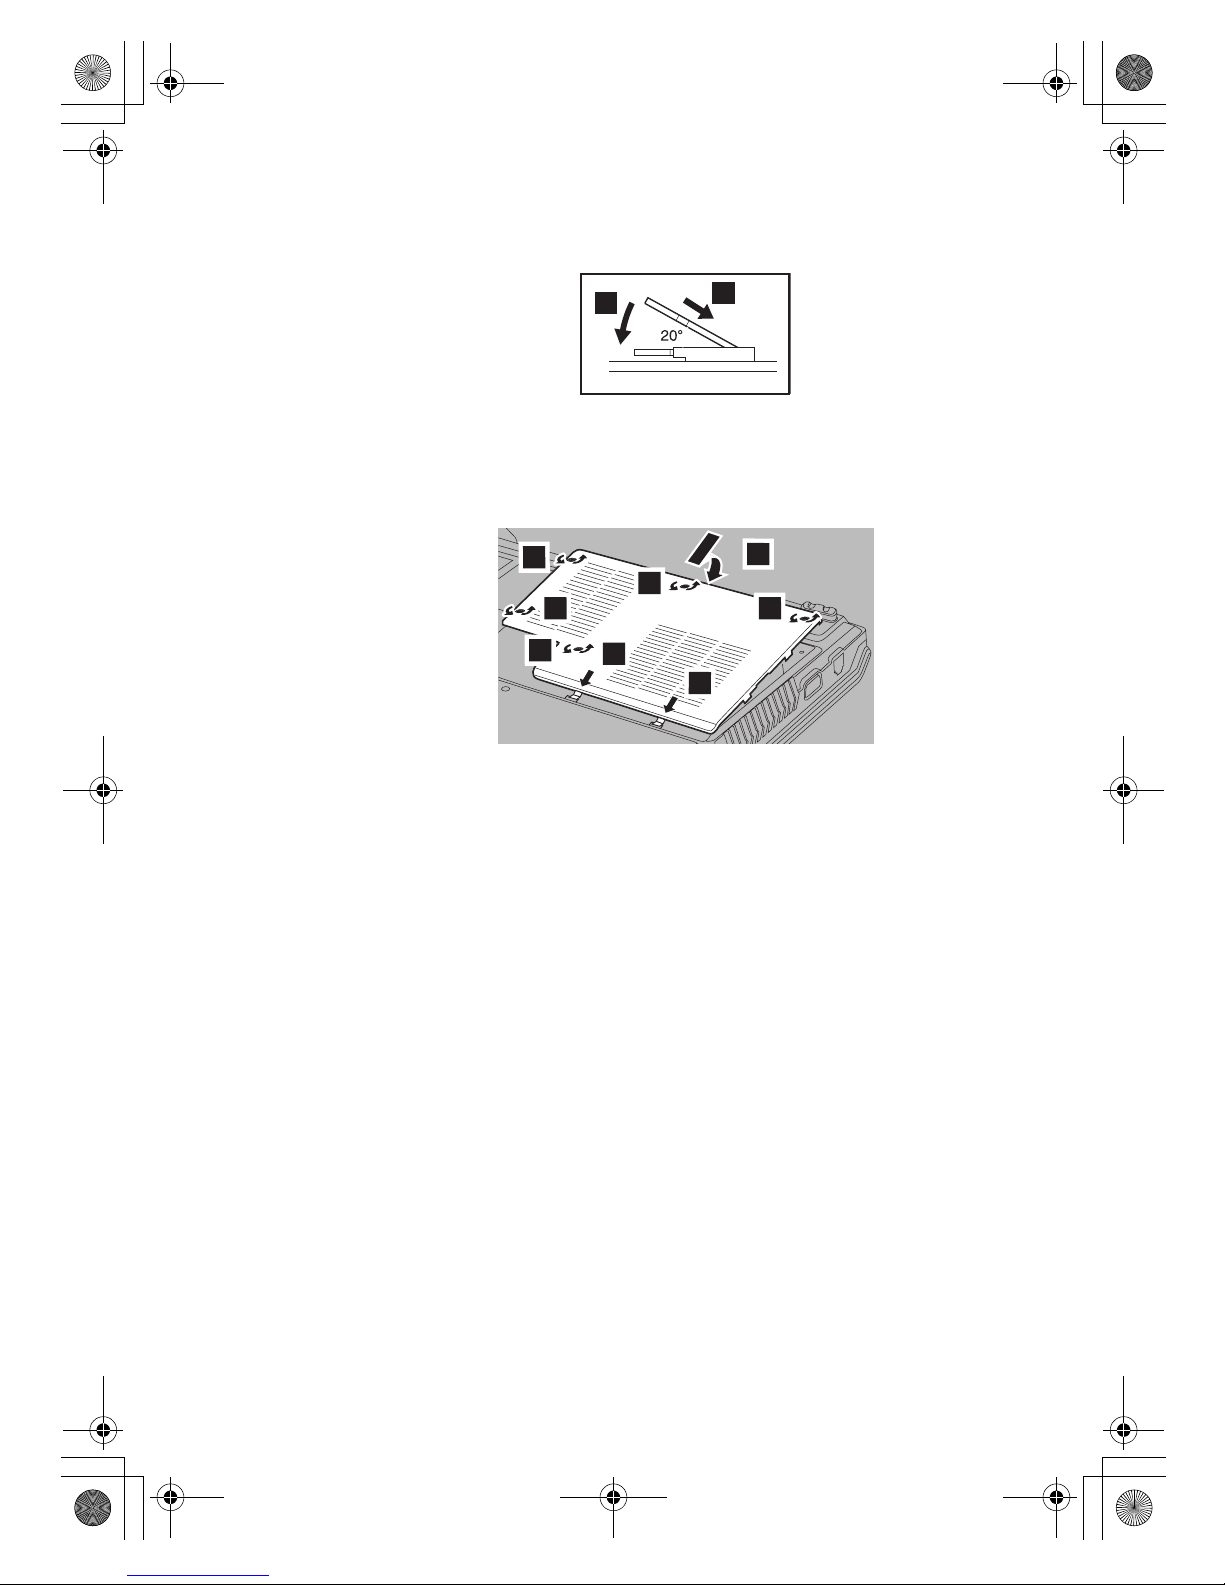
Replacing Memory
48
Lenovo 3000 Y310 User Guide
8. Push the SO-DIMM down until it snaps into place.
9. Make sure that the memory module is firmly fixed in the slot and does
not move easily.
10. Reinstall the cover of the memory slot by inserting the tabs into the slots
first a, and closing the cover b. Then tighten the five screws c.
Attention: When you have added the SO-DIMM, do not use your computer
until you have closed the memory slot cover. Never use the
computer with the cover open.
11. Reinstall the battery.
12. Turn the computer over again, and reconnect the ac adapter and cables
to the computer.
1
2
2
1
1
1
3
3
3
3
3
Lenovo 3000Y310 UG.book Page 48 Friday, September 14, 2007 4:24 PM
Page 57
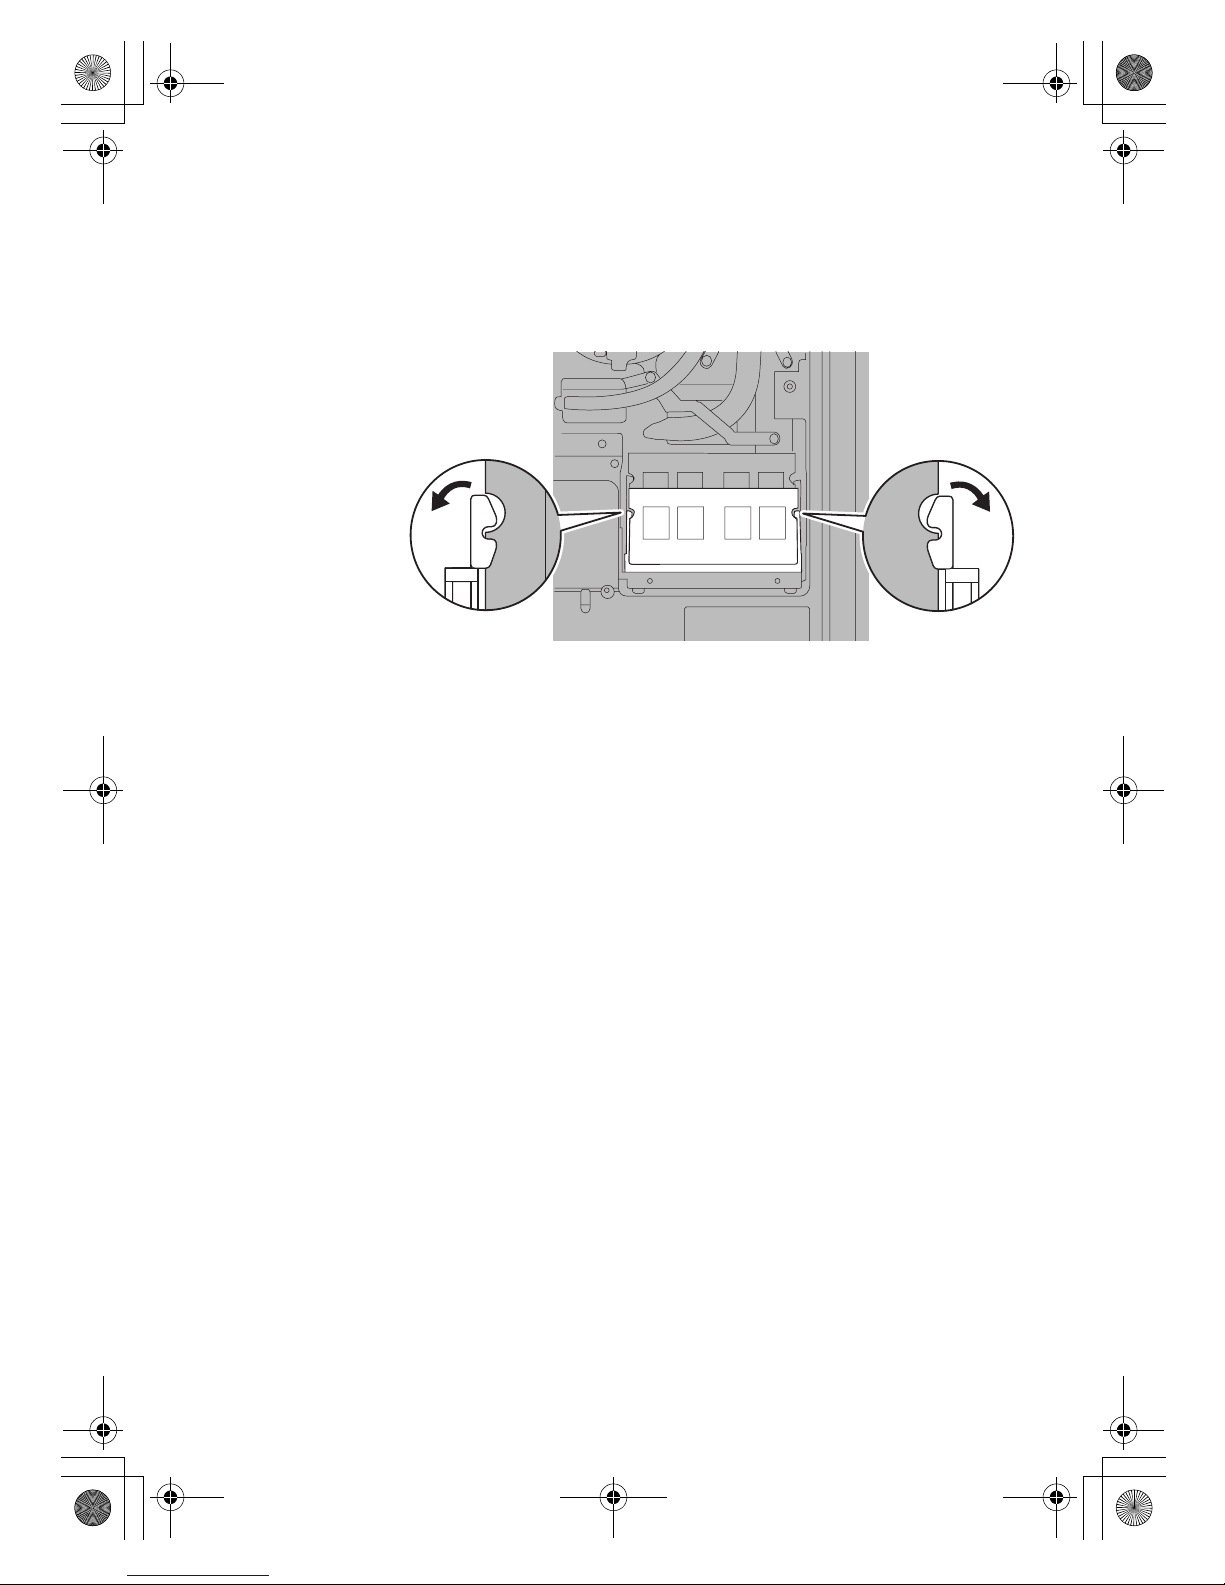
Replacing Memory
Chapter 5. Upgrading and Replacing Devices
49
If you want to replace a new SO-DIMM, remove the origin SO-DIMM by
releasing the two latches on both edges of the socket at the same time, pull
out the SO-DIMM from the socket, and then install the new SO-DIMM
follow the steps above.
Attention: If only one SO-DIMM is installed, plug it into the SO-DIMM
socket which is closer to the mainboard.
To make sure that the SO-DIMM is installed correctly, do as follows:
1. Turn t h e co m put e r on .
2. While the initial screen is displayed, press F2. The BIOS Utility screen
opens. The Total Memory item on the Main menu shows the amount of
memory you can utilize.
Lenovo 3000Y310 UG.book Page 49 Friday, September 14, 2007 4:24 PM
Page 58
Replacing Memory
50
Lenovo 3000 Y310 User Guide
Lenovo 3000Y310 UG.book Page 50 Friday, September 14, 2007 4:24 PM
Page 59
51
© Copyright Lenovo 2007
Chapter 6. Getting Help and Service
Getting Help and Service
If you need help, service, technical assistance, or just want more
information about Lenovo computers, you will find a wide variety of
sources available from Lenovo to assist you. This section contains
information about where to go for additional information about Lenovo
computers, what to do if you experience a problem with your computer,
and whom to call for service should it be necessary.
Microsoft Service Packs are the latest software source for Windows product
updates. They are available by means of a Web download (connection
charges may apply) or from a disc. For more specific information and links,
go to the Microsoft Web site at http://www.microsoft.com. Lenovo offers
Up and Running technical assistance with installation of, or questions
related to, Service Packs for your Lenovo-preinstalled Microsoft Windows
product.
Getting Help on the Web
The Lenovo Web site on the World Wide Web has up-to-date information
about Lenovo computers and support. The address for the Lenovo home
page is http://www.Lenovo.com.
You can find support information for your Lenovo 3000 computer at
http://www.Lenovo.com/support. Research this Web site to learn how to
solve problems, find new ways to use your computer, and learn about
options that can make working with your Lenovo computer even easier.
Calling the Customer Support Center
If you have tried to correct the problem yourself and still need help, during
the warranty period, you can get help and information by telephone
through the Customer Support Center. The following services are available
during the warranty period:
• Problem determination - Trained personnel are available to assist you
with determining if you have a hardware problem and deciding what
action is necessary to fix the problem.
• Lenovo hardware repair - If the problem is determined to be caused by
Lenovo hardware under warranty, trained service personnel are
available to provide the applicable level of service.
Lenovo 3000Y310 UG.book Page 51 Friday, September 14, 2007 4:24 PM
Page 60
Getting Help and Service
52
Lenovo 3000 Y310 User Guide
• Engineering change management - Occasionally, there might be changes
that are required after a product has been sold. Lenovo or your reseller, if
authorized by Lenovo, will make selected Engineering Changes (ECs)
available that apply to your hardware.
The following items are not covered:
• Replacement or use of parts not manufactured for or by Lenovo or non
warranted parts
• Identification of software problem sources
• Configuration of BIOS as part of an installation or upgrade
• Changes, modifications, or upgrades to device drivers
• Installation and maintenance of network operating systems (NOS)
• Installation and maintenance of application programs
To determine if your Lenovo hardware product is under warranty and
when the warranty expires, go to http://www.Lenovo.com/support, and
click Warranty, then follow the instructions on the screen.
Refer to your Lenovo hardware warranty for a full explanation of Lenovo
warranty terms. Be sure to retain your proof of purchase to obtain warranty
service.
If possible, be near your computer when you make your call in case the
technical assistance representative needs to help you resolve a computer
problem. Please ensure that you have downloaded the most current drivers
and system updates, and recorded information before you call. When
calling for technical assistance, please have the following information
available:
• Machine Type and Model
• Serial numbers of your computer, monitor, and other components, or
your proof of purchase
• Description of the problem
• Hardware and software configuration information for your system
The telephone numbers for your Customer Support Center location are
located in Appendix A. Warranty Information.
Note: Telephone numbers are subject to change without notice. For the
latest list of Customer Support Center telephone numbers and
hours of operation, visit the Support Web site at
http://www.Lenovo.com/. If the number for your country or
region is not listed, contact your Lenovo reseller or Lenovo
marketing representative.
Lenovo 3000Y310 UG.book Page 52 Friday, September 14, 2007 4:24 PM
Page 61
Getting Help and Service
Chapter 7. Getting Help and Service
53
Getting Help around the World
If you travel with your computer or relocate it to a country where your
Lenovo machine type is sold, your computer might be eligible for
International Warranty Service, which automatically entitles you to obtain
warranty service throughout the warranty period. Service will be
performed by service providers authorized to perform warranty service.
Service methods and procedures vary by country, and some services might
not be available in all countries. International Warranty Service is delivered
through the method of service (such as depot, carry-in, or on-site service)
that is provided in the servicing country. Service centers in certain countries
might not be able to service all models of a particular machine type. In some
countries, fees and restrictions might apply at the time of service.
To determine whether your computer is eligible for International Warranty
Service and to view a list of the countries where service is available, go to
http://www.Lenovo.com/support, click Warranty, and follow the
instructions on the screen.
Lenovo 3000Y310 UG.book Page 53 Friday, September 14, 2007 4:24 PM
Page 62
Getting Help and Service
54
Lenovo 3000 Y310 User Guide
Lenovo 3000Y310 UG.book Page 54 Friday, September 14, 2007 4:24 PM
Page 63
55
© Copyright Lenovo 2007
Appendix A. Warranty Information
This Appendix provides information regarding the warranty period and
type of warranty service applicable to your Lenovo hardware product in
your country or region. For the terms and conditions of the Statement of
Limited Warranty that applies to your Machine, see Chapter 3, Warranty
Information in the Safety and Warranty Guide included with your Machine.
Warranty Information
If required, your Service Provider will provide repair or exchange service
depending on the type of warranty service specified for your product and
the available service. Scheduling of service will depend upon the time of
your call, parts availability, and other factors.
A warranty period of 3 years on parts and 1 year on labor means that
Lenovo provides warranty service without charge for:
a. parts and labor during the first year of the warranty period (or a longer
period as required by law); and
b. parts only, on an exchange basis, in the second and third years of the
warranty period. Your Service Provider will charge you for any labor
provided in performance of the repair or replacement(s) in the second
and third year of warranty period.
Product or
Machine
Typ e
Country or Region of
Purchase
War r anty Period
Type of
War rant y
Service
Notebook:
7756
India, Indonesia,
Malaysia, Singapore,
Thailand,
Philippines, Vietnam,
China (Hong Kong
S.A.R.),
China (Macau S.A.R.)
Parts and Labor 1 year
Battery pack - 1 year
1, 4
1, 4
United States of
America
1, 3
South Africa 1, 3 or 4
Lenovo 3000Y310 UG.book Page 55 Friday, September 14, 2007 4:24 PM
Page 64
56
Lenovo 3000 Y310 User Guide
Types of Warranty Service
1. Customer Replaceable Unit (“CRU”) Service
Under CRU Service, your Service Provider will ship CRUs to you for you to
install. Most CRUs are easy to install whereas others may require some
technical skill and tools. CRU information and replacement instructions are
shipped with your product and are available from Lenovo at any time upon
request. You may request that a Service Provider install some CRUs under
one of the other types of warranty service designated for your product.
Installation of external CRUs (such as mice, keyboards, or monitors) is your
responsibility. Lenovo specifies in the materials shipped with a replacement
CRU whether the defective CRU must be returned. When return is
required, 1) return instructions, a prepaid return shipping label, and a
container are included with the replacement CRU, and 2) you may be
charged for the replacement CRU if your Service Provider does not receive
the defective CRU within thirty (30) days of your receipt of the replacement.
2. On-site Service
Under On-site Service, your Service Provider will either repair or exchange
the product at your location. You must provide a suitable working area to
allow disassembly and reassembly of the Lenovo product. For some
products, certain repairs may require your Service Provider to send the
product to a designated service center.
3. Courier or Depot Service
Under Courier or Depot Service, your product will be repaired or
exchanged at a designated service center, with shipping arranged by your
Service Provider. You are responsible for disconnecting the product. A
shipping container will be provided to you for you to return your product
to a designated service center. A courier will pick up your product and
deliver it to the designated service center. Following its repair or exchange,
the service center will arrange the return delivery of the product to you.
4. Customer Carry-In or Mail-In Service
Under Customer Carry-In or Mail-In Service, your product will be repaired
or exchanged at a designated service center, with delivery or shipping
arranged by you. You are responsible to deliver or mail, as your Service
Provider specifies, (prepaid unless specified otherwise) the product
suitably packaged to a designated location. After the product has been
repaired or exchanged, it will be made available for your collection. Failure
to collect the product may result in your Service Provider disposing of the
product as it sees fit. For Mail-in Service, the product will be returned to
you at Lenovo’s expense, unless your Service Provider specifies otherwise.
Lenovo 3000Y310 UG.book Page 56 Friday, September 14, 2007 4:24 PM
Page 65
Appendix A. Warranty Information
57
Lenovo Warranty Service Telephone Numbers.
Warranty Service Telephone Numbers
The phone numbers provided below are correct as of the time of printing
and are subject to change without notice. For the latest warranty service
contact telephone number in a country please contact Lenovo, or your
reseller in your country
• Singapore 800 6012 047
• Malaysia 1800 18 2388
• Thailand 1800 06 0087
• Indonesia 001 803 0601 2003
• Philippines 1800 111 00724
• Vietnam 1800 1528
• India Toll free 1800 113324
Alternate No. 011-26388288
SMS 9900173324
• Hong Kong (852) 2825-6580
• Macau (853) 2871-5399
• United States 1-877-453-6686
Additionally, you can find support information, and updates, including
service phone numbers for unlisted countries on the Lenovo Web site
located at: http://www.lenovo.com.
Lenovo 3000Y310 UG.book Page 57 Friday, September 14, 2007 4:24 PM
Page 66
58
Lenovo 3000 Y310 User Guide
Lenovo 3000Y310 UG.book Page 58 Friday, September 14, 2007 4:24 PM
Page 67
59
© Copyright Lenovo 2007
Appendix B. Customer Replaceable Units (CRUs)
Customer Replaceable Units (CRUs) are computer parts that can be
upgraded or replaced by the customer. There are two types of CRUs:
internal and external. External CRUs are easy to install, whereas internal
CRUs require some technical skills and in some cases might require tools
such as a screwdriver. However, both internal and external CRUs are safe
for removal by the customer.
Customers are responsible for replacing all external CRUs. Internal CRUs
can be removed and installed by customers or by a Lenovo service
technician during the warranty period.
Your computer contains the following types of external CRUs:
• External CRUs (pluggable): These CRUs unplug from the computer.
Examples of these types of CRUs include the AC adapter and power
cord.
• External CRUs with latches: These CRUs include a latch to help you
remove and replace the part. Examples of these types of CRUs include
the notebook main battery, an optical drive, a hard-disk drive, and an
extended battery.
Your computer contains the following types of internal CRUs:
• Internal CRUs (located behind an access panel): These CRUs are
isolated parts within the computer that are concealed by an access panel
that is typically secured by either one or two screws. Once the access
panel is removed, only the specific CRU is visible. Examples of these
types of CRUs include memory modules and hard disk drives.
• Internal CRUs (located within the product): These CRUs are accessible
only by opening the computer’s outer case. Examples of these CRUs
include PCI Express Mini Cards and the integrated keyboard.
Lenovo 3000Y310 UG.book Page 59 Friday, September 14, 2007 4:24 PM
Page 68
60
Lenovo 3000 Y310 User Guide
Lenovo 3000Y310 UG.book Page 60 Friday, September 14, 2007 4:24 PM
Page 69
61
© Copyright Lenovo 2007
Appendix C. Features and Specifications
Features
Processor
• See the system properties of you computer. You can do this as follows:
Click Start, right-click Computer, then from the pull down menu select
Properties.
Memory
• Double data rate (DDR) synchronous dynamic random access memory
(DRAM) II
Storage device
• 2.5-inch hard disk drive
Display
The color display uses TFT technology:
• Size: 13.3 inch
•Resolution:
– LCD: 1280-by-800
•Brightness control
• Integrated camera (on some models)
Keyboard
• 84-key
•Touch pad
•Fn key function
• Volume control buttons
• Instant on button
Lenovo 3000Y310 UG.book Page 61 Friday, September 14, 2007 4:24 PM
Page 70
Features
62
Lenovo 3000 Y310 User Guide
Interface
• External-monitor connector
• Stereo headphone jack
• Microphone jack
• 3 Universal Serial Bus (USB) connectors
• RJ11 telephone connector
• RJ45 Ethernet connector
• IEEE 1394 connector
ExpressCard slot
• ExpressCard
Optical drive
• CD-ROM, DVD-ROM, CD-RW/DVD ROM or CD-RW/DVD Recordable
depending on the model.
Wireless features
• Integrated wireless LAN
• Bluetooth (on some models)
• Wireless radio switch
Digital media reader
• 6-in-1 (SD card, Multi-media Card, Memory Stick, Memory Stick Pro
card, SD Pro card, xD-Picutre Card) digital media slot
Lenovo 3000Y310 UG.book Page 62 Friday, September 14, 2007 4:24 PM
Page 71
Specifications
Appendix C. Features and specifications
63
Specifications
Size
• Width: 317.2 mm
• Depth: 239.3 mm
• Height: 33.1 to 36.2 mm
Environment
• Maximum altitude without pressurization: 3048 m (10000 ft)
•Temperature
– At altitudes up to 2438 m (8000 ft)
– Operating with no optical disc in the drive: 5° to 35°C (41° to 95°F)
– Operating with an optical disc in the drive: 10° to 35°C (50° to 95°F)
– Non-operating: 5° to 43°C (41° to 109°F)
– At altitudes above 2438 m (8000 ft)
– Maximum operating temperature, 31.3°C (88° F)
Note: When you charge the battery pack, its temperature must be at
least 10°C (50°F).
• Relative humidity:
– Operating with no optical disc in the drive: 8% to 95%
– Operating with an optical disc in the drive: 8% to 80%
Heat output
• 65 W (with integrated graphics card) maximum/90 W (with discrete
graphics card) maximum
Power source (AC adapter)
• Sine-wave input at 50 to 60 Hz
• Input rating of the AC adapter: 100-240 V AC, 50 to 60 Hz
Battery pack
• Lithium-ion (Li-Ion) battery pack
– Nominal voltage: 10.8 V DC
– Capacity: 5.2 AH
Battery life
• For percentage of battery power remaining, see Power Meter on the task
tray.
Lenovo 3000Y310 UG.book Page 63 Friday, September 14, 2007 4:24 PM
Page 72
Specifications
64
Lenovo 3000 Y310 User Guide
Lenovo 3000Y310 UG.book Page 64 Friday, September 14, 2007 4:24 PM
Page 73
65
© Copyright Lenovo 2007
Appendix D. Notices
Notices
Lenovo may not offer the products, services, or features discussed in this
document in all countries. Consult your local Lenovo representative for
information on the products and services currently available in your area.
Any reference to a Lenovo product, program, or service is not intended to
state or imply that only that Lenovo product, program, or service may be
used. Any functionally equivalent product, program, or service that does
not infringe any Lenovo intellectual property right may be used instead.
However, it is the user’s responsibility to evaluate and verify the operation
of any other product, program, or service.
Lenovo may have patents or pending patent applications covering subject
matter described in this document. The furnishing of this document does
not give you any license to these patents. You can send license inquiries, in
writing, to:
Lenovo (United States), Inc.
1009 Think Place - Building One
Morrisville, NC 27560
U.S.A.
Attention: Lenovo Director of Licensing
Lenovo PROVIDES THIS PUBLICATION “AS IS” WITHOUT WARRANTY
OF ANY KIND, EITHER EXPRESS OR IMPLIED, INCLUDING, BUT NOT
LIMITED TO, THE IMPLIED WARRANTIES OF NON-INFRINGEMENT,
MERCHANTABILITY OR FITNESS FOR A PARTICULAR PURPOSE.
Some jurisdictions do not allow disclaimer of express or implied warranties
in certain transactions, therefore, this statement may not apply to you.
This information could include technical inaccuracies or typographical
errors. Changes are periodically made to the information herein; these
changes will be incorporated in new editions of the publication. Lenovo
may make improvements and/or changes in the product(s) and/or the
program(s) described in this publication at any time without notice.
The products described in this document are not intended for use in
implantation or other life support applications where malfunction may
result in injury or death to persons. The information contained in this
document does not affect or change Lenovo product specifications or
warranties. Nothing in this document shall operate as an express or implied
license or indemnity under the intellectual property rights of Lenovo or
third parties. All information contained in this document was obtained in
specific environments and is presented as an illustration. The result
obtained in other operating environments may vary.
Lenovo 3000Y310 UG.book Page 65 Friday, September 14, 2007 4:24 PM
Page 74
66
Lenovo 3000 Y310 User Guide
Lenovo may use or distribute any of the information you supply in any way
it believes appropriate without incurring any obligation to you.
Any references in this publication to non-Lenovo Web sites are provided for
convenience only and do not in any manner serve as an endorsement of
those Web sites. The materials at those Web sites are not part of the
materials for this Lenovo product, and use of those Web sites is at your own
risk.
Any performance data contained herein was determined in a controlled
environment. Therefore, the result obtained in other operating
environments may vary significantly. Some measurements may have been
made on development-level systems and there is no guarantee that these
measurements will be the same on generally available systems.
Furthermore, some measurements may have been estimated through
extrapolation. Actual results may vary. Users of this document should
verify the applicable data for their specific environment.
Television output notice
The following notice applies to models that have the factory-installed
television-output feature.
This product incorporates copyright protection technology that is protected
by U.S. patents and other intellectual property rights. Use of this copyright
protection technology must be authorized by Macrovision, and is intended
for home and other limited viewing uses only unless otherwise authorized
by Macrovision. Reverse engineering or disassembly is prohibited.
Lenovo 3000Y310 UG.book Page 66 Friday, September 14, 2007 4:24 PM
Page 75
Appendix D. Notices
67
Wireless Related Information
Wireless Interoperability
Wireless LAN PCI Express Mini Card is designed to be interoperable with
any wireless LAN product that is based on Direct Sequence Spread
Spectrum (DSSS), Complementary Code Keying (CCK), and/or Orthogonal
Frequency Division Multiplexing (OFDM) radio technology, and is
compliant to:
• The IEEE 802.11a/b/g Standard on Wireless LANs, as defined and
approved by the Institute of Electrical and Electronics Engineers.
• The Wireless Fidelity (WiFi) certification as defined by the Wi-Fi
Alliance.
Bluetooth Daughter Card is designed to be interoperable with any Bluetooth
product that is compliant to Bluetooth Specification 2.0 + EDR as defined by
the Bluetooth SIG. Following profiles are supported by Bluetooth Daughter
Card:
• Generic Access
• Service Discovery
•Serial Port
• Dial-up Networking
•FAX
• LAN Access using PPP
•Personal Area Network
• Generic Object Exchange
• Generic Object Push
• File Transfer
• Synchronization
•Audio Gateway
• Headset
•Printer
• Human Interface Devices (Keyboard/Mouse)
• Basic Image
•Handsfree
•AV
Lenovo 3000Y310 UG.book Page 67 Friday, September 14, 2007 4:24 PM
Page 76
68
Lenovo 3000 Y310 User Guide
Usage Environment and Your Health
Wireless LAN PCI Express Mini Card and Bluetooth Daughter Card emit
radio frequency electromagnetic energy like other radio devices. However,
the level of energy emitted is far much less than the electromagnetic energy
emitted by wireless devices like for example mobile phones.
Because Wireless LAN PCI Express Mini Card and Bluetooth Daughter Card
operate within the guidelines found in radio frequency safety standards
and recommendations, Lenovo believes the integrated wireless cards are
safe for use by consumers. These standards and recommendations reflect
the consensus of the scientific community and result from deliberations of
panels and committees of scientists who continually review and interpret
the extensive research literature.
In some situation or environment, the use of Wireless LAN PCI Express
Mini Card or Bluetooth Daughter Card may be restricted by the proprietor of
the building or responsible representatives of the organization. These
situations may for example include:
• Using the integrated wireless cards on board of airplanes, or in hospitals
• In any other environment where the risk of interference to other devices
or services is perceived or identified as harmful.
If you are uncertain of the policy that applies on the use of wireless devices
in a specific organization (e.g. airport or hospital), you are encouraged to
ask for authorization to use Wireless LAN PCI Express Mini Card or
Bluetooth Daughter Card prior to turning on the computer.
Lenovo 3000Y310 UG.book Page 68 Friday, September 14, 2007 4:24 PM
Page 77
Appendix D. Notices
69
Electronic Emissions Notices
The following information refers to Lenovo 3000 Y310, machine type 7756.
Federal Communications Commission (FCC) Statement
This equipment has been tested and found to comply with the limits for a
Class B digital device, pursuant to Part 15 of the FCC Rules. These limits are
designed to provide reasonable protection against harmful interference in a
residential installation. This equipment generates, used, and can radiate
radio frequency energy and, if not installed and used in accordance with the
instructions, may cause harmful interference to radio communications.
However, there is no guarantee the interference will not occur in a
particular installation. If this equipment does cause harmful interference to
radio or television reception, which can be determined by turning the
equipment off and on, the user is encouraged to try to correct the
interference by one or more of the following measures:
• Reorient or relocate the receiving antenna.
• Increase the separation between the equipment and receiver.
• Connect the equipment into an outlet on a circuit different from that to
which the receiver is connected.
• Consult an authorized dealer or service representative for help.
Properly shielded and grounded cables and connectors must be used in
order to meet FCC emission limits. Proper cables and connectors are
available from Lenovo authorized dealers. Lenovo is not responsible for
any radio or television interference caused by using other than
recommended cables or connectors or by unauthorized changes or
modifications to this equipment. Unauthorized changes or modifications
could void the user’s authority to operate the equipment.
This device complies with Part 15 of the FCC Rules. Operation is subject to
the following two conditions: (1) this device may not cause harmful
interference, and (2) this device must accept any interference received,
including interference that may cause undesired operation.
Responsible party:
Lenovo (United States) Incorporated
1009 Think Place - Building One
Morrisville, NC 27650
U.S.A.
Telephone: (919) 294-5900
Lenovo 3000Y310 UG.book Page 69 Friday, September 14, 2007 4:24 PM
Page 78
70
Lenovo 3000 Y310 User Guide
Industry Canada Class B Emission Compliance Statement
This Class B digital apparatus complies with Canadian ICES-003.
Avis de conformité à la réglementation d’Industrie Canada
Cet appareil numérique de la classe B est conforme à la norme NMB-003 du
Canada.
European Union EMC Directive Conformance Statement
This product is in conformity with the protection requirements of EU
Council Directive 2004/108/EC on the approximation of the laws of the
Member States relating to electromagnetic compatibility. Lenovo cannot
accept responsibility for any failure to satisfy the protection requirements
resulting from a nonrecommended modification of the product, including
the fitting of non-Lenovo option cards.
This product has been tested and found to comply with the limits for Class
B Information Technology Equipment according to CISPR 22/European
Standard EN 55022. The limits for Class B equipment were derived for
typical residential environments to provide reasonable protection against
interference with licensed communication devices.
Properly shielded and grounded cables and connectors must be used in
order to reduce the potential for causing interference to radio and TV
communications and to other electrical or electronic equipment. Such cables
and connectors are available from Lenovo authorized dealers. Lenovo
cannot accept responsibility for any interference caused by using other than
recommended cables and connectors.
Japanese VCCI Class B Statement
Japanese compliance for products less than or equal to 20A per phase.
Lenovo 3000Y310 UG.book Page 70 Friday, September 14, 2007 4:24 PM
Page 79
Appendix D. Notices
71
Lenovo product service information for Taiwan
WEEE and Recycling Statements
General Recycling Statement
Lenovo encourages owners of information technology (IT) equipment to
responsibly recycle their equipment when it is no longer needed. Lenovo
offers a variety of programs and services to assist equipment owners in
recycling their IT products. Information on product recycling offerings can
be found on Lenovo’s Internet site at
http://www.pc.ibm.com/ww/Lenovo/about/environment
EU WEEE Statements
The Waste Electrical and Electronic Equipment (WEEE) mark applies only
to countries within the European Union (EU) and Norway. Appliances are
labeled in accordance with European Directive 2002/96/EC concerning
waste electrical and electronic equipment (WEEE). The Directive
determines the framework for the return and recycling of used appliances
as applicable throughout the European Union. This label is applied to
various products to indicate that the product is not to be thrown away, but
rather reclaimed upon end of life per this Directive.
Users of electrical and electronic equipment (EEE) with the WEEE marking
per Annex IV of the WEEE Directive must not dispose of end of life EEE as
unsorted municipal waste, but use the collection framework available to
them for the return, recycle, recovery of WEEE and minimize any potential
effects of EEE on the environment and human health due to the presence of
hazardous substances. For additional WEEE information go to:
http://www.Lenovo.com/Lenovo/environment.
Lenovo 3000Y310 UG.book Page 71 Friday, September 14, 2007 4:24 PM
Page 80
72
Lenovo 3000 Y310 User Guide
Japan Recycling Statements
Collecting and Recycling a Disused Lenovo Computer or Monitor
If you are a company employee and need to dispose of a Lenovo computer
or monitor that is the property of the company, you must do so in
accordance with the Law for Promotion of Effective Utilization of
Resources. Computers and monitors are categorized as industrial waste and
should be properly disposed of by an industrial waste disposal contractor
certified by a local government. In accordance with the Law for Promotion
of Effective Utilization of Resources, Lenovo Japan provides, through its PC
Collecting and Recycling Services, for the collecting, reuse, and recycling of
disused computers and monitors. For details, visit the Lenovo Web site at
www.ibm.com/jp/pc/service/recycle/pcrecycle
http://www.ibm.com/jp/pc/service/recycle/pcrecycle
Pursuant to the Law for Promotion of Effective Utilization of Resources, the
collecting and recycling of home-used computers and monitors by the
manufacturer was begun on October 1, 2003. This service is provided free of
charge for home-used computers sold after October 1, 2003. For details, visit
the Lenovo Web site at www.ibm.com/jp/pc/service/recycle/personal
http://www.ibm.com/jp/pc/service/recycle/personal
Disposing of a Lenovo Computer Components
Some Lenovo computer products sold in Japan may have components that
contain heavy metals or other environmental sensitive substances. To
properly dispose of disused components, such as a printed circuit board or
drive, use the methods described above for collecting and recycling a
disused computer or monitor.
Disposing a Disused Battery Pack from Lenovo Notebook Computers
Your Lenovo notebook computer has a lithium ion battery pack or a nickel
metal hydride battery pack. If you are a company employee who uses a
Lenovo notebook computer and need to dispose of a battery pack, contact
the proper person in Lenovo sales, service, or marketing, and follow that
person’s instructions. You also can refer to the instructions at
www.ibm.com/jp/pc/environment/recycle/battery
http://www.ibm.com/jp/pc/environment/recycle/battery
If you use a Lenovo notebook computer at home and need to dispose of a
battery pack, you must comply with local ordinances and regulations. You
also can refer to the instructions at
www.ibm.com/jp/pc/environment/recycle/battery
http://www.ibm.com/jp/pc/environment/recycle/battery
Lenovo 3000Y310 UG.book Page 72 Friday, September 14, 2007 4:24 PM
Page 81
Appendix D. Notices
73
Notice for Users in the U.S.A.
California Perchlorate Information:
Products containing CR (manganese dioxide) lithium coin cell batteries
may contain perchlorate.
Perchlorate Material — special handling may apply.
See http://www.dtsc.ca.gov/hazardouswaste/perchlorate.
Notice on Deleting Data from Your Hard Disk
As computers spread into every corner of life, they process more and more
information. The data on your computer, some of it sensitive, is stored on a
storage device called the hard disk. Before you dispose of, sell, or hand over
your computer, you need to delete that data.
Handing your computer over to someone else without deleting the loaded
software, such as operating systems and application software, may even
violate License Agreements. You are advised to check the terms and
conditions of those Agreements.
Deleting the data from the hard disk is not easy.
There are methods that seem to delete the data:
• Move the data to the recycle bin, and then choose the Empty recycle bin
command.
• Use the Delete command.
• Format your hard disk, using the software for initializing it.
• Using the preinstalled recovery program, bring the hard disk back to
factory-ship state.
These operations, however, only change the file allocation of the data; they
do not delete the data itself. In other words, the data retrieval processing is
disabled under an operating system such as Windows. The data is still
there, even though it seems to be lost. Thus, it is sometimes possible to read
the data by use of special software for data recovery. There is a risk that
people of bad faith may read and misuse the critical data on hard disks for
unexpected purposes.
To prevent the leakage of data, it becomes very important that you take
responsibility for deleting all the data from the hard disk when you dispose
of, sell, or hand over your computer. You can destroy the data physically by
smashing the hard disk with a hammer, or magnetically by means of strong
magnetic power, thus making the data unreadable. But we recommend that
you make use of the software (payware) or service (pay service) specifically
developed for the purpose.
Lenovo 3000Y310 UG.book Page 73 Friday, September 14, 2007 4:24 PM
Page 82
74
Lenovo 3000 Y310 User Guide
© Copyright Lenovo 2007. All rights reserved. U.S. GOVERNMENT
USERS - RESTRICTED RIGHTS: Our products and/or services are
provided with RESTRICTED RIGHTS. Use, duplication or disclosure by the
Government is subject to the GSA ADP Schedule contract with Lenovo
Group Limited, if any, or the standard terms of this commercial license, or if
the agency is unable to accept this Program under these terms, then we
provide this Program under the provisions set forth in Commercial
Computer Software-Restricted Rights at FAR 52.227-19, when applicable, or
under Rights in Data-General, FAR 52.227.14 (Alternate III).
Lenovo may not offer the products, services, or features discussed in this
document in all countries. Consult your local Lenovo representative for
information on the products and services currently available in your area.
Any reference to a Lenovo product, program, or service is not intended to
state or imply that only that Lenovo product, program, or service may be
used. Any functionally equivalent product, program, or service that does
not infringe any Lenovo intellectual property right may be used instead.
However, it is the user’s responsibility to evaluate and verify the operation
of any other product, program, or service.
Lenovo may have patents or pending patent applications covering subject
matter described in this document. The furnishing of this document does
not give you any license to these patents. You can send license inquiries, in
writing, to:
Lenovo (United States), Inc.
500 Park Offices Drive, Hwy. 54
Research Triangle Park, NC 27709
U.S.A.
Attention: Lenovo Director of Licensing
Lenovo GROUP LTD. PROVIDES THIS PUBLICATION “AS IS” WITHOUT
WARRANTY OF ANY KIND, EITHER EXPRESS OR IMPLIED,
INCLUDING, BUT NOT LIMITED TO, THE IMPLIED WARRANTIES OF
NON-INFRINGEMENT, MERCHANTABILITY OR FITNESS FOR A
PARTICULAR PURPOSE. Some jurisdictions do not allow disclaimer of
express or implied warranties in certain transactions, therefore, this
statement may not apply to you.
This information could include technical inaccuracies or typographical
errors. Changes are periodically made to the information herein; these
changes will be incorporated in new editions of the publication. Lenovo
may make improvements and/or changes in the product(s) and/or the
program(s) described in this publication at any time without notice.
Lenovo 3000Y310 UG.book Page 74 Friday, September 14, 2007 4:24 PM
Page 83
Appendix D. Notices
75
The products described in this document are not intended for use in
implantation or other life support applications where malfunction may
result in injury or death to persons. The information contained in this
document does not affect or change Lenovo product specifications or
warranties. Nothing in this document shall operate as an express or implied
license or indemnity under the intellectual property rights of Lenovo or
third parties. All information contained in this document was obtained in
specific environments and is presented as an illustration. The result
obtained in other operating environments may vary.
Lenovo may use or distribute any of the information you supply in any way
it believes appropriate without incurring any obligation to you.
Any references in this publication to non-Lenovo Web sites are provided for
convenience only and do not in any manner serve as an endorsement of
those Web sites. The materials at those Web sites are not part of the
materials for this Lenovo product, and use of those Web sites is at your own
risk.
Any performance data contained herein was determined in a controlled
environment. Therefore, the result obtained in other operating
environments may vary significantly. Some measurements may have been
made on development-level systems and there is no guarantee that these
measurements will be the same on generally available systems.
Furthermore, some measurements may have been estimated through
extrapolation. Actual results may vary. Users of this document should
verify the applicable data for their specific environment.
Trademarks
The following terms are trademarks of Lenovo in the United States, other
countries, or both:
Lenovo
The following terms are trademarks of International Business Machines
Corporation in the United States, other countries, or both:
IBM (used under license)
Lotus
Domino
Lotus Notes
Notes
SmartSuite
Passport Advantage
Microsoft, Windows, Windows Vista and MSN are trademarks of Microsoft
Corporation in the United States, other countries, or both.
Other company, product, or service names may be trademarks or service
marks of others.
All other trademarks and registered trademarks are trademarks or
registered trademarks of their respective holders. In this manual, ™ and ®
marks are not specified.
Lenovo 3000Y310 UG.book Page 75 Friday, September 14, 2007 4:24 PM
Page 84
76
Lenovo 3000 Y310 User Guide
Lenovo 3000Y310 UG.book Page 76 Friday, September 14, 2007 4:24 PM
Page 85
77
© Copyright Lenovo 2007
Index
A
AC power adapter jack 13
B
Basics 22
Battery
Charging 31
Bluetooth 19, 23, 27
C
Calling the Customer Support
Center
51
Camera 11, 12, 23, 32
Caring for Your Computer 3
Carry your Computer Properly
4
Cleaning
Computer Cover
6
Computer Display 7
Computer Keyboard 6
Customer Replaceable Unit
(CRU) parts list
59
D
Drivers 29
E
EQ button 12
F
FCC Statement 69
Features 61
Finding Information 1
Frequently Asked Questions 38
Function Key Combinations 23
H
Hard Disk Drive Problems 44
Headphone Jack 14
Help
Customer Support Center
51
on the Web 51
Help and Service 51
Hibernation Mode Problems 41
I
Important Tips 3
Indicators 25
K
Keyboard
Cleaning 6
Problems 40
Knowing the Parts 10
M
Microphone Jack 14
Multi-media Reader Slot 19
N
New card slot 16
Notice
Electronic Emissions
67, 69
EU Environmental 70
for US Users 73
Novo button 12
O
Optical drive 13
P
Password
Problems
40
Using 33
Preventing Problems 27
Problem Solving 37
Problems
Battery 43
Computer Screen 42
Hard Disk Drive 44
Hibernation Mode 41
Keyboard 40
Password 40
Sleep Mode 41
Startup 44
Troubleshooting 39
R
Read This First v
Regulatory Notice 1
S
Security 32
Setup Instructions 1
Sleep Mode
Problems 41
Solving Problems 37
Speaker 11
Startup Problem 44
Storage Media
Handling
5
T
Tips, Important 3
Touch pad 11, 24
Trademarks 75
Troubleshooting 39
U
USB port 14, 16
V
VGA port 15
Volume button 11
W
Warranty Information 55
Web
Help
51
Wireless LAN 19, 23, 27
Lenovo 3000Y310 UG.book Page 77 Friday, September 14, 2007 4:24 PM
Page 86
Part Number: 147001666
Printed in China
Lenovo 3000Y310 UG.book Page 78 Friday, September 14, 2007 4:24 PM
 Loading...