

Lenovo 3000 V100 0763, 3000 V100 Supplementary Manual

Lenovo 3000 V100
Service
and Troubleshooting Guid e
Includes:
v Introduction to other sources of information
v Important tips for taking care of your computer
v Diagnostics and troubleshooting
v Recovery options
v Help and service
v Warranty information for your computer


Lenovo 3000 V100
Service
and Troubleshooting Guid e

Note
Before using this information and the product it supports, be sure to read the following:
v Safety and Warranty Guide included in the package with this publication.
v Appendix D, “Wireless related information,” on page 51 and Appendix E, “Notices,” on page 53.
v Lenovo 3000 Regulatory Notice included in the package with this publication.
First Edition (March 2006)
© Copyright Lenovo 2006. All rights reserved.
U.S. GOVERNMENT USERS – RESTRICTED RIGHTS: Our products and/or services are provided with RESTRICTED
RIGHTS. Use, duplication or disclosure by the Government is subject to the GSA ADP Schedule contract with Lenovo
Group Limited, if any, or the standard terms of this commercial license, or if the agency is unable to accept this
Program under these terms, then we provide this Program under the provisions set forth in Commercial Computer
Software–Restricted Rights at FAR 52.227-19, when applicable, or under Rights in Data-General, FAR 52.227.14
(Alternate III).

Contents
Read first . . . . . . . . . . . . .v
Chapter 1. Finding information . . . . .1
This guide and other publications . . . . .1
Finding information with the Lenovo Care
button . . . . . . . . . . . . . .2
Chapter 2. Caring for your computer . . .3
Chapter 3. Solving computer problems . .7
Frequently asked questions . . . . . . .8
Diagnosing problems . . . . . . . . .9
Troubleshooting . . . . . . . . . . .9
Error messages . . . . . . . . . .9
Errors without messages . . . . . . .12
A password problem . . . . . . . .13
A power switch problem . . . . . . .14
Keyboard problems . . . . . . . .14
A pointing device problem . . . . . .14
Standby or hibernation problems . . . .14
Computer screen problems . . . . . .17
Battery problems . . . . . . . . .18
Hard disk drive problems . . . . . .20
A startup problem . . . . . . . . .20
A fingerprint authentication problem . . .21
Other problems . . . . . . . . . .21
Chapter 4. Recovery options . . . . . .25
Introducing Rescue and Recovery . . . . .25
Restoring factory contents . . . . . . .25
Recovering data . . . . . . . . . . .26
Chapter 5. Upgrading and replacing
devices . . . . . . . . . . . . .27
Replacing the battery . . . . . . . . .27
Upgrading the hard disk drive . . . . . .28
Replacing memory . . . . . . . . . .31
Chapter 6. Getting help and service . . .35
Getting help and service . . . . . . . .35
Getting help on the Web . . . . . . . .35
Calling the Customer Support Center . . .35
Getting help around the world . . . . . .37
Appendix A. Warranty information . . . .39
Warranty Information . . . . . . . . .39
Warranty Period . . . . . . . . .39
Types of Warranty Service . . . . . .39
Worldwide telephone list . . . . . . .41
Appendix B. Customer Replaceable Units
(CRUs) . . . . . . . . . . . . .45
Appendix C. Overview of your computer 47
Your computer at a glance . . . . . . .47
Features . . . . . . . . . . . . .49
Specifications . . . . . . . . . . .50
Appendix D. Wireless related information 51
Wireless interoperability . . . . . . . .51
Usage environment and your health . . . .51
Appendix E. Notices . . . . . . . . .53
Notices . . . . . . . . . . . . . .53
Television output notice . . . . . . .54
Electronic emissions notices . . . . . . .54
Federal Communications Commission
(FCC) Statement . . . . . . . . .54
Industry Canada Class B emission
compliance statement . . . . . . . .55
Avis de conformité à la réglementation
d’Industrie Canada . . . . . . . . .55
European Union EMC Directive
conformance statement . . . . . . .55
Environmental notices for Japan . . . . .56
Important information for the European
Directive 2002/96/EC . . . . . . . . .57
IBM Lotus Software Offer . . . . . . .58
Trademarks . . . . . . . . . . . .60
Index . . . . . . . . . . . . . .63
© Copyright Lenovo 2006 iii

iv Lenovo 3000 V100 Service and Troubleshooting Guide
Read first
To prevent damage to the hard disk and subsequent data loss, before moving
your computer, press Fn+F4 to put it in standby mode or turn it off. Make
sure that the standby status indicator is on (is green) before moving the
computer.
Do not drop, bump, scratch, twist, hit, vibrate, push or place heavy objects
on your computer, display, or external devices.
Use a quality carrying case that provides adequate cushion and protection.
Do not pack your computer in a tightly packed suitcase or bag.
Place liquids away from your computer to avoid spills, and keep your
computer away from water to avoid the danger of electrical shock.
Avoid leaving the base of your computer in contact with your lap or any part
of your body for an extended period when the computer is turned on or
when the battery is charging.
© Copyright Lenovo 2006 v

vi Lenovo 3000 V100 Service and Troubleshooting Guide

Chapter 1. Finding information
This guide and other publications
Setup Instructions
helps you to unpack your computer and get started. It includes a few
tips for first-time users, and introduces software preinstalled by
Lenovo.
This Service and Troubleshooting Guide
provides information about caring for your computer, basic
troubleshooting information, some recovery procedures, help and
service information, and warranty information for your computer. The
troubleshooting information in this Guide applies only to problems
that might prevent you from accessing the comprehensive help and
information portal, called Lenovo Care™, preloaded on your
computer.
Access Help
is a comprehensive online manual that provides answers to most of
your questions about your computer, helps you to configure
preloaded features and tools, or solve problems. To open Access Help,
click Start, move the pointer to All Programs; then to Lenovo Care.
Click Access Help.
Lenovo Care
provides an easy access to software tools and key Lenovo sites,
eliminating the need to carry other reference manuals around. To open
Lenovo Care, press the Lenovo Care button on your keyboard. For
more information about using the Lenovo Care button, see “Finding
information with the Lenovo Care button” on page 2.
Safety and Warranty Guide
includes general safety instructions and complete Lenovo Statement of
Limited Warranty.
Regulatory Notice
supplements this Guide. Read it before you use the wireless features
of your computer. Your computer complies with the radio frequency
and safety standards of any country or region in which it has been
approved for wireless use. Yo u are requested to install and use your
computer in strict accordance with the local RF regulations.
© Copyright Lenovo 2006 1

Finding information with the Lenovo Care button
The Lenovo Care button can help you in many situations when your
computer is working normally, and even when it is not. Press the Lenovo
Care button to open the Lenovo Care and get access to informative
illustrations and easy-to-follow instructions for getting started and staying
productive.
You can also use the Lenovo Care button to interrupt the startup sequence of
your computer and start the ThinkVantage
™
Rescue and Recovery
™
workspace, which runs independently of the Windows operating system and
is hidden from it.
2 Lenovo 3000 V100 Service and Troubleshooting Guide

Chapter 2. Caring for your computer
Though your computer is designed to function reliably in normal work
environments, you need to use common sense in handling it. By following
these important tips, you will get the most use and enjoyment out of your
computer.
Important tips:
Be careful about where and how you work
v Do not leave the base of your computer in contact with your lap or any
part of your body for an extended period when the computer is functioning
or when the battery is charging. Your computer dissipates some heat during
normal operation. This heat is a function of the level of system activity and
battery charge level. Extended contact with your body, even through
clothing, could cause discomfort or, eventually, a skin burn.
v Place liquids away from your computer to avoid spills, and keep your
computer away from water (to avoid the danger of electrical shock).
v Store packing materials safely out of the reach of children to prevent the
risk of suffocation from plastic bags.
v Keep your computer away from magnets, activated cellular phones,
electrical appliances, or speakers (within 13 cm/5 in).
v Avoid subjecting your computer to extreme temperatures (below 5°C/41°F
or above 35°C/95°F).
Be
gentle with your computer
v Avoid placing any objects (including paper) between the display and the
keyboard or under the keyboard.
v Do not drop, bump, scratch, twist, hit, vibrate, push, or place heavy objects
on your computer, display, or external devices.
v Your computer display is designed to be opened and used at an angle
slightly greater than 90 degrees. Do not open the display beyond 135
degrees, as this might damage the computer hinge.
Carry
your computer properly
v Before moving your computer, be sure to remove any media, turn off
attached devices, and disconnect cords and cables.
v Be sure your computer is in standby or hibernation mode, or turned off,
before moving it. This will prevent damage to the hard disk drive and data
loss.
© Copyright Lenovo 2006 3

v When picking up your open computer, hold it by the bottom. Do not pick
up or hold your computer by the display.
v Use a quality carrying case that provides adequate cushion and protection.
Do not pack your computer in a tightly packed suitcase or bag.
Handle storage media and drives properly
v If your computer comes with an optical drive such as CD, DVD, or
CD-RW/DVD drive, do not touch the surface of a disc or the lens on the
tray.
v Wait until you hear the CD or DVD click into the center pivot of an optical
drive such as CD, DVD, or CD-RW/DVD drive before closing the tray.
v When installing your hard disk, diskette, CD, DVD, or CD-RW/DVD drive,
follow the instructions shipped with your hardware, and apply pressure
only where needed on the device.
Take
care in setting passwords
v Remember your passwords. If you forget a supervisor or hard disk
password, Lenovo authorized service provider will not reset it, and you
might have to replace your system board or hard disk drive.
Other
important tips
v Your computer modem might use only an analog telephone network, or
public-switched telephone network (PSTN). Do not connect the modem to a
PBX (private branch exchange) or any other digital telephone extension line
because this could damage your modem. Analog phone lines are often used
in homes, while digital phone lines are often used in hotels or office
buildings. If you are not sure which kind of phone line you are using,
contact your telephone company.
v Your computer might have both an Ethernet connector and a modem
connector. If so, be sure to connect your communication cable to the correct
one, so your connector is not damaged.
v Register your Lenovo products with Lenovo (refer to the Web page:
www.lenovo.com/register). This can help authorities return your computer
to you if it is lost or stolen. Registering your computer also enables Lenovo
to notify you about possible technical information and upgrades.
v Only an authorized Lenovo notebook repair technician should disassemble
and repair your computer.
v Do not modify or tape the latches to keep the display open or closed.
v Take care not to turn your computer over while the ac adapter is plugged
in. This could break the adapter plug.
v Store your external and removable hard disk, diskette, CD, DVD, and
CD-RW/DVD drives in the appropriate containers or packaging when they
are not being used.
Caring for your computer
4 Lenovo 3000 V100 Service and Troubleshooting Guide

v Before you install any of the following devices, touch a metal table or a
grounded metal object. This action reduces any static electricity from your
body. The static electricity could damage the device.
– ExpressCard
– Memory Card, such as SD Card, Memory Stick, MultiMediaCard, and
xD-Picture Card
– Memory module
– PCI Express Mini Card
Cleaning
the cover of your computer
Occasionally clean your computer as follows:
1. Prepare a mixture of a gentle kitchen-use detergent (one that does not
contain abrasive powder or strong chemicals such as acid or alkaline). Use
5 parts water to 1 part detergent.
2. Absorb the diluted detergent into a sponge.
3. Squeeze excess liquid from the sponge.
4. Wipe the cover with the sponge, using a circular motion and taking care
not to let any excess liquid drip.
5. Wipe the surface to remove the detergent.
6. Rinse the sponge with clean running water.
7. Wipe the cover with the clean sponge.
8. Wipe the surface again with a dry, soft lint-free cloth.
9. Wait for the surface to dry completely and remove any cloth fibers from
the computer surface.
Cleaning
your computer keyboard
1. Absorb some isopropyl rubbing alcohol on a soft, dust-free cloth.
2. Wipe each keytop surface with the cloth. Wipe the keys one by one; if you
wipe several keys at a time, the cloth may hook onto an adjacent key and
possibly damage it. Make sure that no liquid drips onto or between the
keys.
3. Allow to dry.
4. To remove any crumbs and dust from beneath the keys, you can use a
camera blower with a brush or cool air from a hair drier.
Note: Avoid spraying cleaner directly on the display or the keyboard.
Cleaning
your computer display
Caring for your computer
Chapter 2. Caring for your computer 5

1. Gently wipe the display with a dry, soft lint-free cloth. If you see a
scratchlike mark on your display, it might be a stain transferred from the
keyboard when the cover was pressed from the outside.
2. Wipe or dust the stain gently with a soft, dry cloth.
3. If the stain remains, moisten a soft, lint-free cloth with water or a 50-50
mixture of isopropyl alcohol and water that does not contain impurities.
4. Wring out as much of the liquid as you can.
5. Wipe the display again; do not let any liquid drip into the computer.
6. Be sure to dry the display before closing it.
Care
for the fingerprint reader
The following actions could damage the fingerprint reader or cause it not to
work properly:
v Scratching the surface of the reader with a hard, pointed object.
v Scraping the surface of the reader with your nail or anything hard.
v Using or touching the reader with a dirty finger.
If
you notice any of the following conditions, gently clean the surface of the
reader with a dry, soft, lint-free cloth:
v The surface of the reader is dirty or stained.
v The surface of the reader is wet.
v The reader often fails to enroll or authenticate your fingerprint.
Caring for your computer
6 Lenovo 3000 V100 Service and Troubleshooting Guide

Chapter 3. Solving computer problems
Frequently asked questions . . . . . . .8
Diagnosing problems . . . . . . . . .9
Troubleshooting . . . . . . . . . . .9
Error messages . . . . . . . . . .9
Errors without messages . . . . . . .12
A password problem . . . . . . . .13
A power switch problem . . . . . . .14
Keyboard problems . . . . . . . .14
A pointing device problem . . . . . .14
Standby or hibernation problems . . . .14
Computer screen problems . . . . . .17
Battery problems . . . . . . . . .18
Hard disk drive problems . . . . . .20
A startup problem . . . . . . . . .20
A fingerprint authentication problem . . .21
Other problems . . . . . . . . . .21
© Copyright Lenovo 2006 7

Frequently asked questions
This section lists frequently asked questions and tells where you can find
detailed answers. For details about each publication included in the package
with your computer, see “This guide and other publications” on page 1.
What safety precautions should I follow when using my computer?
See the separate Safety and Warranty Guide for detailed
information about safety.
How can I prevent problems with my computer?
See “Read first” on page v, and also Chapter 2, “Caring for your
computer,” on page 3 of this Guide. More tips can be found in
the Preventing problems section of the Access Help.
What are the main hardware features of my new computer?
See the “Lenovo 3000 tour” section of the Access Help.
Where can I find the detailed specifications for my machine?
See www.lenovo.com/support
I need to upgrade a device or I need to replace one of the following:
the hard disk drive, memory, or the keyboard.
Refer to the Appendix B, “Customer Replaceable Units (CRUs),”
on page 45 section of this Guide for the list of Customer
Replaceable Units and the location of the instructions for
removing or replacing components.
My computer is not operating properly.
Study the “Problem solving ” section of the Access Help. This
Guide describes only problems that might prevent you from
getting access to the online help system.
8 Lenovo 3000 V100 Service and Troubleshooting Guide

Diagnosing problems
If you have a problem with your computer, you can test it by using
PC-Doctor
®
for Windows. To run PC-Doctor for Windows, do as follows:
1. Click Start.
2. Move the pointer to All Programs and then to PC-Doctor for Windows.
3. Click PC-Doctor.
For more information about PC-Doctor for Windows, see the Help for the
program.
Attention
Running any tests may take up to several minutes or longer. Make sure
you have time to run the entire test; do not interrupt the test while it is
running.
If you are preparing to contact the Customer Support Center, be sure to print
the test log so that you can rapidly provide information to the help technician.
Troubleshooting
If you do not find your problem here, refer to Access Help, your on-board
help system. The following section only describes problems that might
prevent you from accessing this help system.
Error messages
System BIOS defines error messages to tell users what failure the system has
detected and what should be done during POST. Some error messages could
be related to a hardware device. Others may indicate a problem with a device
configuration. The following is a list of the messages that the BIOS has
defined and can display.
How can I contact the Customer Support Center?
See Chapter 6, “Getting help and service,” on page 35 of this Guide.
For the phone numbers of the Customer Support Center nearest to
you, see “Worldwide telephone list” on page 41.
Where can I find warranty information?
See the separate Safety and Warranty Guide for detailed warranty
information. For the warranty applicable to your computer, including
the warranty period and type of warranty service, see “Warranty
Information” on page 39.
Solving computer problems
Chapter 3. Solving computer problems 9
However, if your system displays one of the messages marked below with an
asterisk (*), write down the message and contact your marketing
representative. If your system fails after you make changes in the Setup
menus, reset the computer, enter Setup again and load Setup defaults or
correct the error.
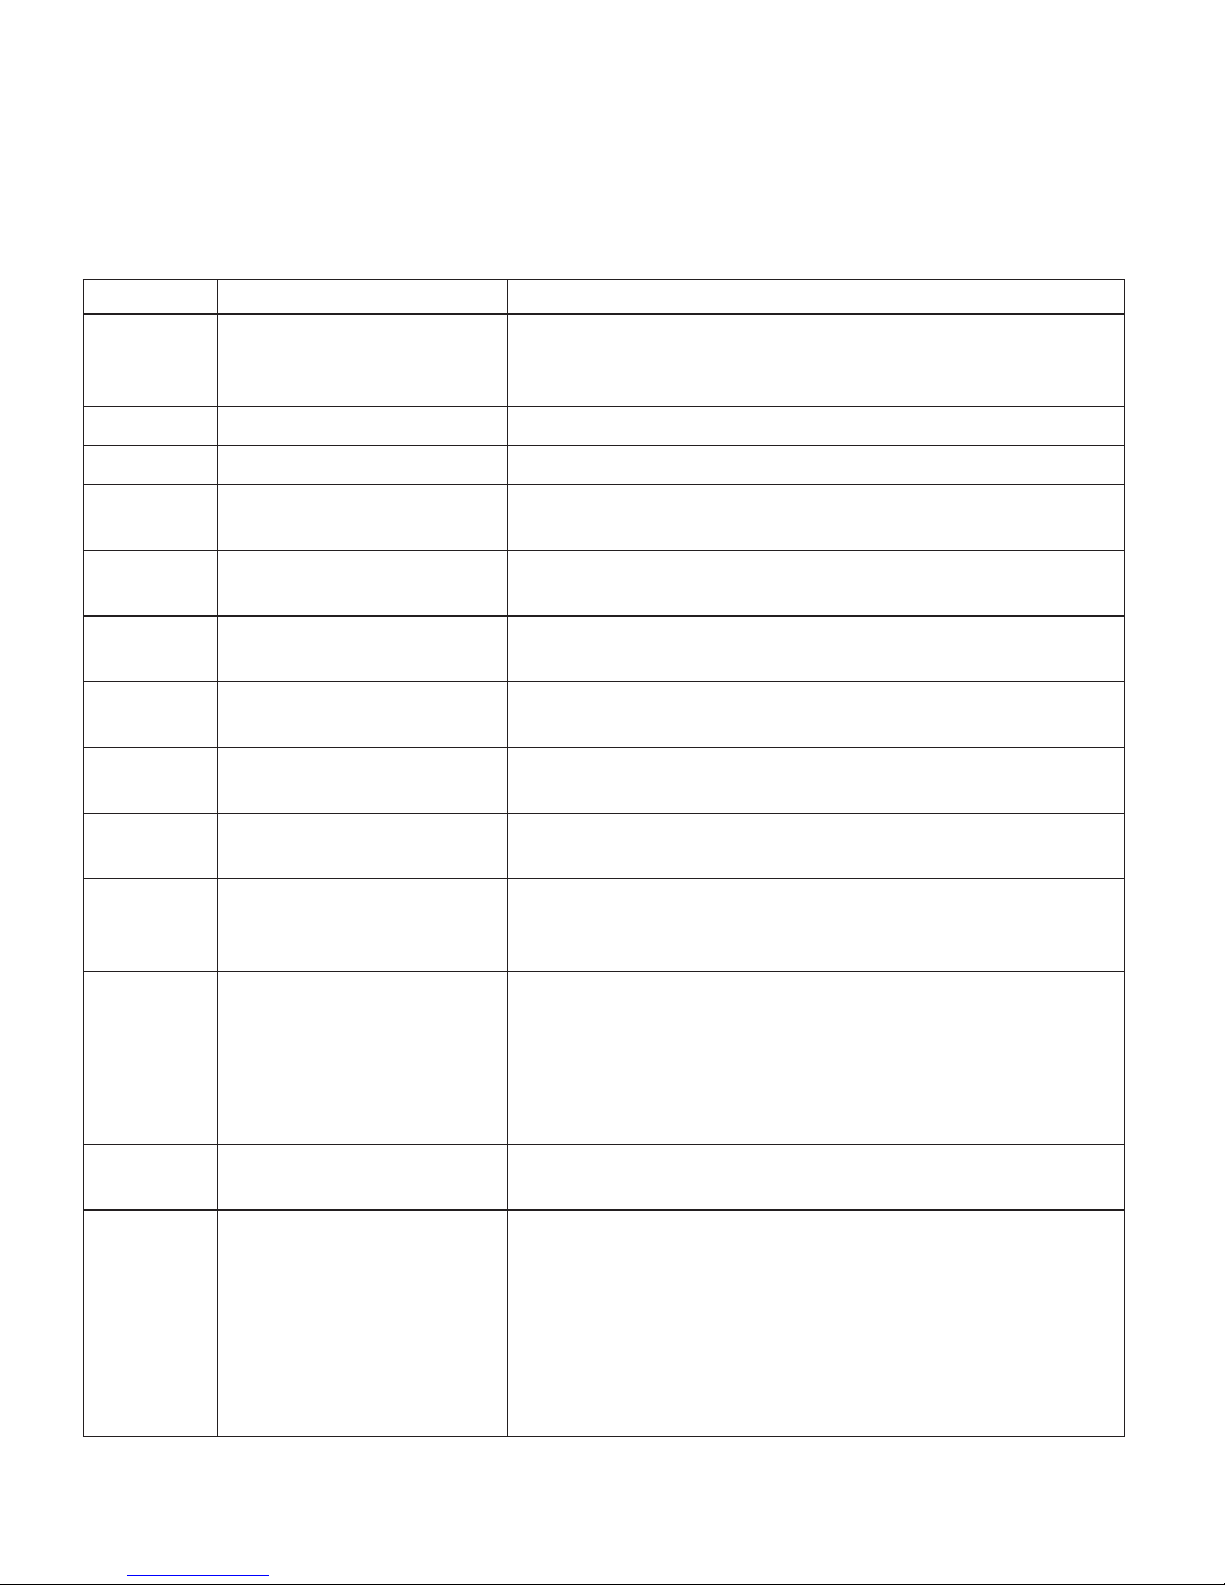
Code Message Description
0200 Failure Fixed Disk Fixed disk is not working or not configured properly. Check
to see if fixed disk is attached properly. Run Setup. Find out
if the fixed-disk type is correctly identified.
0210 Stuck key Stuck key on keyboard.
0211 Keyboard error Keyboard not working.
0212* Keyboard Controller Failed Keyboard controller failed test. May require replacing
keyboard controller.
0213 Keyboard locked - Unlock
key switch
Unlock the system to proceed.
0220 Monitor type does not
match CMOS - Run SETUP
Monitor type not correctly identified in Setup.
0230* Shadow Ram Failed at
offset: nnnn
Shadow RAM failed at offset nnnn of the 64k block at which
the error was detected.
0231* System RAM Failed at
offset: nnnn
System RAM failed at offset nnnn of in the 64k block at
which the error was detected.
0232* Extended RAM Failed at
offset: nnnn
Extended memory not working or not configured properly
at offset nnnn.
0250 System battery is dead -
Replace and run SETUP
The CMOS clock battery indicator shows the battery is dead.
Replace the battery and run Setup to re-configure the
system.
0251 System CMOS checksum
bad - Default configuration
use
System CMOS has been corrupted or modified incorrectly,
perhaps by an application program that changes data stored
in CMOS. The BIOS installed Default Setup Values. If you
do not want these values, enter Setup and enter your own
values. If the error persists, check the system battery or
contact your marketing representative.
0271 Check date and time
settings
BIOS found date or time out of range and reset the Real
-Time Clock. May require setting legal date (1991-2099).
0280 Previous boot incomplete -
Default configuration used
Previous POST did not complete successfully. POST loads
default values and offers to run Setup. If the failure was
caused by incorrect values and they are not corrected, the
next boot will likely fail. On systems with control of wait
states, improper Setup settings can also terminate POST and
cause this error on the next boot. Run Setup and verify that
the wait-state configuration is correct. This error is cleared
the next time the system is booted.
Solving computer problems
10 Lenovo 3000 V100 Service and Troubleshooting Guide
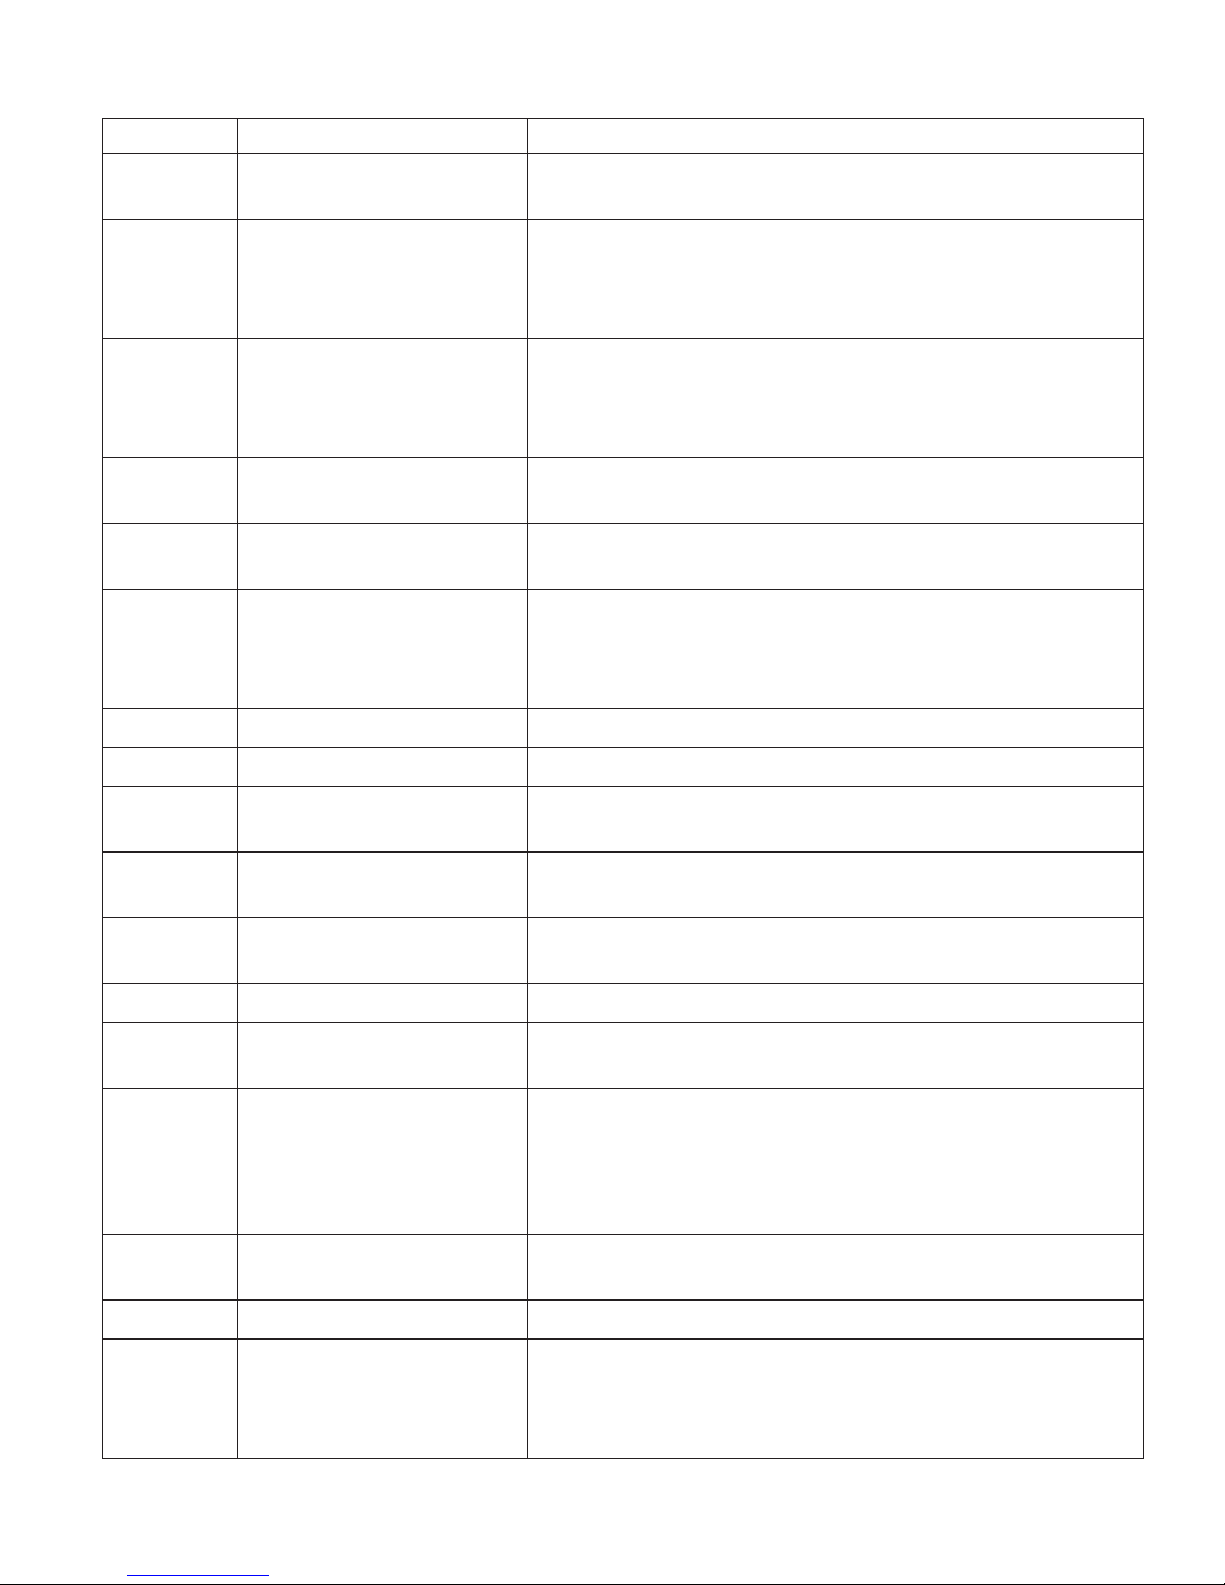
Code Message Description
0281 Memory Size found by
POST differed from CMOS
Memory size found by POST differed from CMOS.
02D0 System cache error - Cache
disabled
RAM cache failed and BIOS disabled the cache. On older
boards, check the cache jumpers. Yo u may have to replace
the cache. See your dealer. A disabled cache slows system
performance considerably.
02B0
02B1
Diskette drive A error
Diskette drive B error
Drive A: or B: is present but fails the BIOS POST diskette
tests. Check to see that the drive is defined with the proper
diskette type in Setup and that the diskette drive is attached
correctly.
02B2 Incorrect Drive A type -
run SETUP
Type of floppy drive A: not correctly identified in Setup.
02B3 Incorrect Drive B type - run
SETUP
Type of floppy drive B: not correctly identified in Setup.
02D0 System cache error - Cache
disabled
RAM cache failed and BIOS disabled the cache. On older
boards, check the cache jumpers. Yo u may have to replace
the cache. See your dealer. A disabled cache slows system
performance considerably.
02F0 CPU ID CPU socket number for Multi-Processor error.
02F4* EISA CMOS not writable ServerBIOS2 test error: Cannot write to EISA CMOS.
02F5* DMA Test Failed ServerBIOS2 test error: Cannot write to extended DMA
(Direct Memory Access) registers.
02F6* Software NMI Failed ServerBIOS2 test error: Cannot generate software NMI
(Non-Maskable Interrupt).
02F7* Fail - Safe Timer NMI
Failed
ServerBIOS2 test error: Fail-Safe Timer takes too long.
N/A Device Address Conflict Address conflict for specified device.
N/A Allocation Error for :
device
Run ISA or EISA Configuration Utility to resolve resource
conflict for the specified device.
N/A* Failing Bits: nnnn The hex number nnnn is a map of the bits at the RAM
address which failed the memory test. Each 1 (one) in the
map indicates a failed bit. See errors 230, 231, or 232 above
for offset address of the failure in System, Extended, or
Shadow memory.
N/A Invalid System
Configuration Data
Problem with NVRAM (CMOS) data.
N/A I/O device IRQ conflict I/O device IRQ conflict error.
N/A One or more I2O Block
Storage Devices were
excluded from the Setup
Boot menu
There was not enough room in the IPL table to display all
installed I2O block-storage devices.
Solving computer problems
Chapter 3. Solving computer problems 11

Code Message Description
N/A Operating system not
found
Verify the following:
The hard disk drive is correctly installed. A startable diskette
is in the diskette drive.
If
you still see the same error message, check the boot
sequence using BIOS Utility.
N/A* Parity Check 1 nnnn Parity error found in the system bus. BIOS attempts to
locate the address and display i on the screen. If it cannot
locate the address, it displays ????. Parity is a method for
checking errors in binary data. A parity error indicates that
some data has been corrupted.
N/A* Parity Check 2 nn Parity error found in the I/O bus. BIOS attempts to locate
the address and display it on the screen. If it cannot locate
the address, it displays ????.
N/A Press F1 to resume, F2 to
Setup, F3 for previous
Displayed after any recoverable error message. Press F1 to
start the boot process or F2 to enter Setup and change the
settings. Press F3 to display the previous screen (usually an
initialization error of an Option ROM, i.e., an add-on card).
Write down and follow the information shown on the
screen.
Errors without messages
Problem:
When I turn on the machine, nothing appears on the screen and the
machine does not beep while starting up.
Note:
v If you are not sure whether you heard any beeps, turn off the
computer; then turn it on again, and listen again.
v If you are using an external monitor, refer to “Computer screen
problems” on page 17
Solution:
→ If a user password is set, press any key to display the user password
prompt, and then type the correct password and press Enter.
If the user password prompt does not appear, the brightness level
might be set to minimum brightness. Adjust the brightness level by
pressing Fn+F11.
If the screen still remains blank, make sure that:
– The battery is installed correctly.
– The ac adapter is connected to the computer and the power cord is
plugged into a working electrical outlet.
Solving computer problems
12 Lenovo 3000 V100 Service and Troubleshooting Guide

– The computer power is on. (Turn on the power switch again for
confirmation.)
If the screen remains blank even though these items are properly set,
have the computer serviced.
Problem:
When I turn on the machine, nothing appears on the screen, but I hear
two or more beeps.
Solution:
→ Make sure that the memory card is installed correctly. If it is, but the
screen is still blank, and you hear five beeps, have the computer
serviced.
Problem:
My screen goes blank while the computer is on.
Solution:
→ Your screen saver or power management may be enabled. Touch the
touch pad, or press any key to exit the screen saver, or press the power
switch to resume from standby or hibernation mode.
A password problem
Problem:
I forgot my password.
Solution:
→ If you forgot your power-on password, you must take your computer
to a Lenovo authorized servicer or a marketing representative to have
the password canceled.
→ If you forgot your HDD password, Lenovo authorized servicer can
not reset your password or recover data from the hard disk. Yo u must
take your computer to a Lenovo authorized servicer or a marketing
representative to have the hard disk drive replaced. Proof of purchase
is required, and a fee will be charged for parts and service.
→ If you forget your supervisor password, Lenovo authorized servicer
cannot reset your password. Yo u must take your computer to a Lenovo
authorized servicer or a marketing representative to have the system
board replaced. Proof of purchase is required, and a fee will be charged
for parts and service.
Solving computer problems
Chapter 3. Solving computer problems 13

A power switch problem
Problem:
The system does not respond, and you cannot turn off the computer.
Solution:
→ Turn off the computer by pressing and holding the power switch for
4 seconds or more. If the computer is still not reset, remove the ac
adapter and the battery.
Keyboard problems
Problem:
A number appears when you type a letter.
Solution:
→ The numeric lock function is on. To disable it, press and hold Fn;
then press NmLk.
Problem:
All or some keys on the external numeric keypad do not work.
Solution:
→ Make sure that the external numeric keypad is correctly connected to
the computer.
A pointing device problem
Problem:
The mouse or the pointing device does not work.
Solution:
→ Make sure that the mouse or pointing device cable is securely
connected to the USB port.
Note:
For more information, see the manual supplied with the mouse
or pointing device.
Standby or hibernation problems
Problem:
The computer enters standby mode unexpectedly.
Solution:
→ If the processor overheats, the computer automatically enters standby
mode to allow the computer to cool and to protect the processor and
other internal components. Check the settings for standby mode. Also
refer to the Power-saving modes section in Access Help for more
information.
Solving computer problems
14 Lenovo 3000 V100 Service and Troubleshooting Guide

Problem:
The computer enters standby mode (the standby indicator turns on)
immediately after Power-on self-test (POST) (the standby indicator light
turns on).
Solution:
→ Make sure that:
– The battery is charged.
– The operating temperature is within the acceptable range. Refer to
“Specifications” on page 50.
If these items are correct, have the computer serviced.
Problem:
The "critical low-battery error" message appears, and the computer
immediately turns off.
Solution:
→ The battery power is getting low. Connect the ac adapter to the
computer, or replace the battery with a fully charged one.
Problem:
When returning from standby mode by pressing any key or the power
button, the computer display remains blank.
Solution:
→ Check whether an external monitor has been disconnected while the
computer was in standby mode. Do not disconnect the external
monitor while the computer is in standby mode or hibernation mode. If
no external monitor is attached when the computer resumes, the
computer display remains blank and output is not displayed. This
restriction does not depend on the resolution value. Press Fn+F7 to
bring up the computer display.
Note:
If you are using the Fn+F7 key combination to apply a presentation
scheme, you will need to press Fn+F7 at least three times in three
seconds to bring up the computer display.
Solving computer problems
Chapter 3. Solving computer problems 15
 Loading...