

Lenovo 3000 Q Series User Manual

User Manual of Lenovo PC
www.lenovo.com/in

2
家悦 K系列用户手册
3
家悦 K系列用户手册
Declaration
Please find above the notes on trademarks or registered trademarks of Lenovo and its partners.
Other registered trademarks mentioned in this manual belong to the corresponding corporations,
respectively.
This manual is under the protection of the Copyright Law.
All rights are reserved, and any reprint is subject to legal penalty.
No part of this manual can be photocopied, reproduced or translated into other languages without prior
consent of Lenovo international.
The names or logos of some corporations mentioned in this manual are only for purposes of
announcement of trademark rights. It does not necessarily mean that the product contains the relevant
software or hardware.
Please refer to the description on the packing list for detailed configuration of the product.
Lenovo is a trademark of Lenovo international.
Microsoft is the registered trademark of
Microsoft.
Microsoft WindowsXP is the WindowsXPregistered trademark of Microsoft Corporation.
Intel is the registered trademark of Intel.
AMD, the AMD logo, AMD Athlon and AMD
Opteron are trademarks or registered
trademarks of Advanced Micro Devices, Inc.
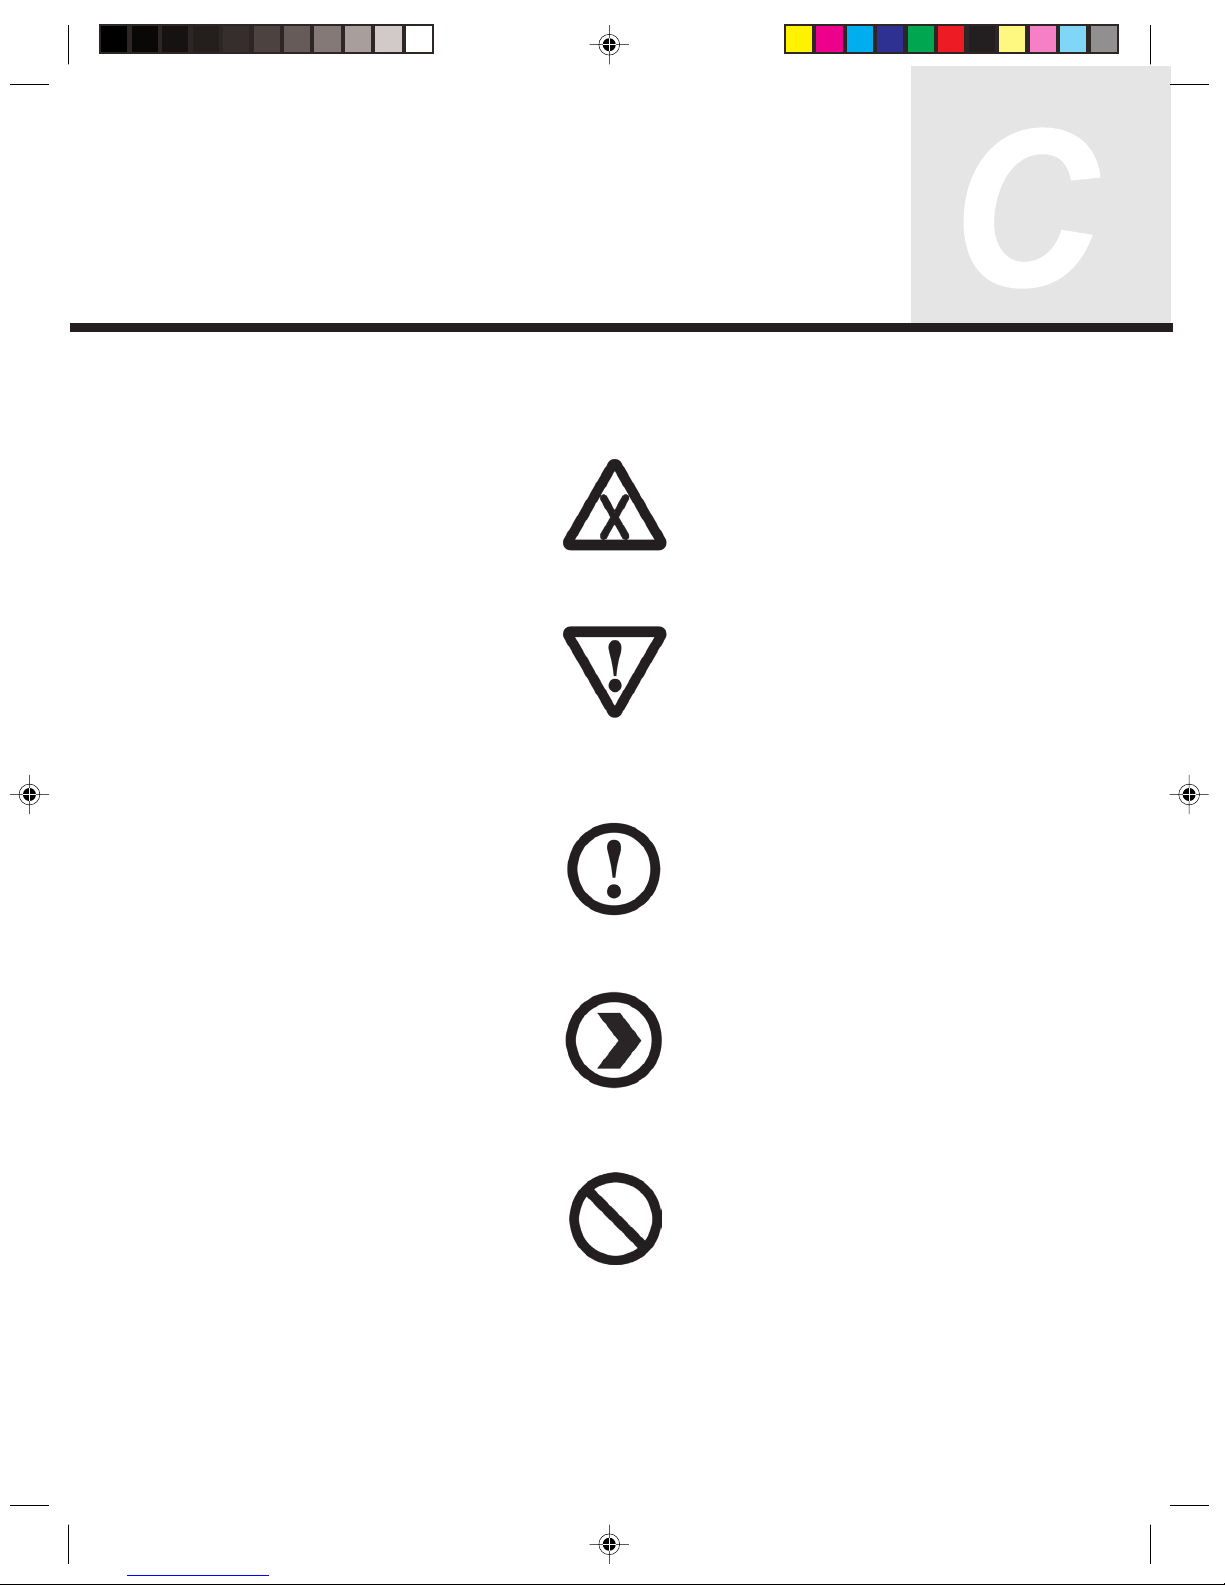
Explanation of Symbols
Warning: Caution, moderately dangerous
Note: Caution, minimal danger
Recommendation: Helpful instructions
Danger: Caution, extremely dangerous
Forbidden: Dangerous operation


1
Table of Contents
Table of Contents
Declaration
Statement
Explanation of Symbols
Chapter 1 Computer Hardware Connections ................................... 1
1.1 Front View of the Chassis ..............................................................2
1.2 Rear view of the Chassis ............................................................... 4
1.2.1 Audio configuration (only with Windows XP) ................................. 6
1.3 Connecting speaker ..................................................................... 10
1.4 Helpful tips on the installation ......................................................10
1.5 Connecting and using the flying shuttle box ................................ 11
1.5.1 Used with internet chat talking device ......................................... 11
1.5.2 Using the USB connectors, headphone, microphone connectors
on the flying shuttle box ............................................................... 12
1.5.3 Using the flying shuttle box .......................................................... 12
1.6 Keyboard ...................................................................................... 15
1.7 Using Quiet Mode ........................................................................15
1.8 Connecting CCD Camera ............................................................16
1.9 The remote control ....................................................................... 17
Chapter 2 System Installation.......................................................... 21
2.1 Driver and Application Auto-installation ....................................... 22
2.2 Using the OneKey Recovery function .......................................... 25
Chapter 3 The introduction on usage of software ......................... 33
3.1 Digital Media Plateform ................................................................ 34
3.1.1 TV ................................................................................................. 34

2
Table of Contents
3.1.2 Update Media Library................................................................... 39
3.1.3 Video ............................................................................................ 40
3.1.4 Pictures......................................................................................... 44
3.1.5 Music ............................................................................................ 47
3.1.6 System settings ............................................................................ 49
3.2 Burning CD................................................................................... 51
3.3 Norton...........................................................................................61
Chapter 4 Safety In Use.................................................................... 69
4.1 System Restore............................................................................70
4.2 Disk Cleanup ................................................................................ 73
4.3 Hard disk error checking and repairing........................................ 74
4.4 Disk Defragment ..........................................................................75
4.5 Daily Care..................................................................................... 76
Chapter 5 Troubleshooting .............................................................. 77
5.1 Display.......................................................................................... 78
5.2 Sound ........................................................................................... 78
5.3 Desktop Icons............................................................................... 80
5.4 Software Problems....................................................................... 82
5.4.1 End Programs .............................................................................. 82
5.4.2 Add or remove programs ............................................................. 82
5.5 CD-ROM Drive and hard disk drive .............................................83
5.6 Special Notes on Models ............................................................. 84
Appendix
1
2
3
4
5
Note:
Please carefully read through this chapter. It
contains information on the various external connectors
on your computer, connecting components, and helpful
tips.
This chapter provides the following information:
Hardware configuration of the computer
Helpful tips on components connection and usage
Note:
Not all models have all these features, Please
refer to your system.
1
1
Lenovo 3000 Q Series User Manual
Computer Hardware Connections
Chapter 1
2
Lenovo 3000 Q Series User Manual
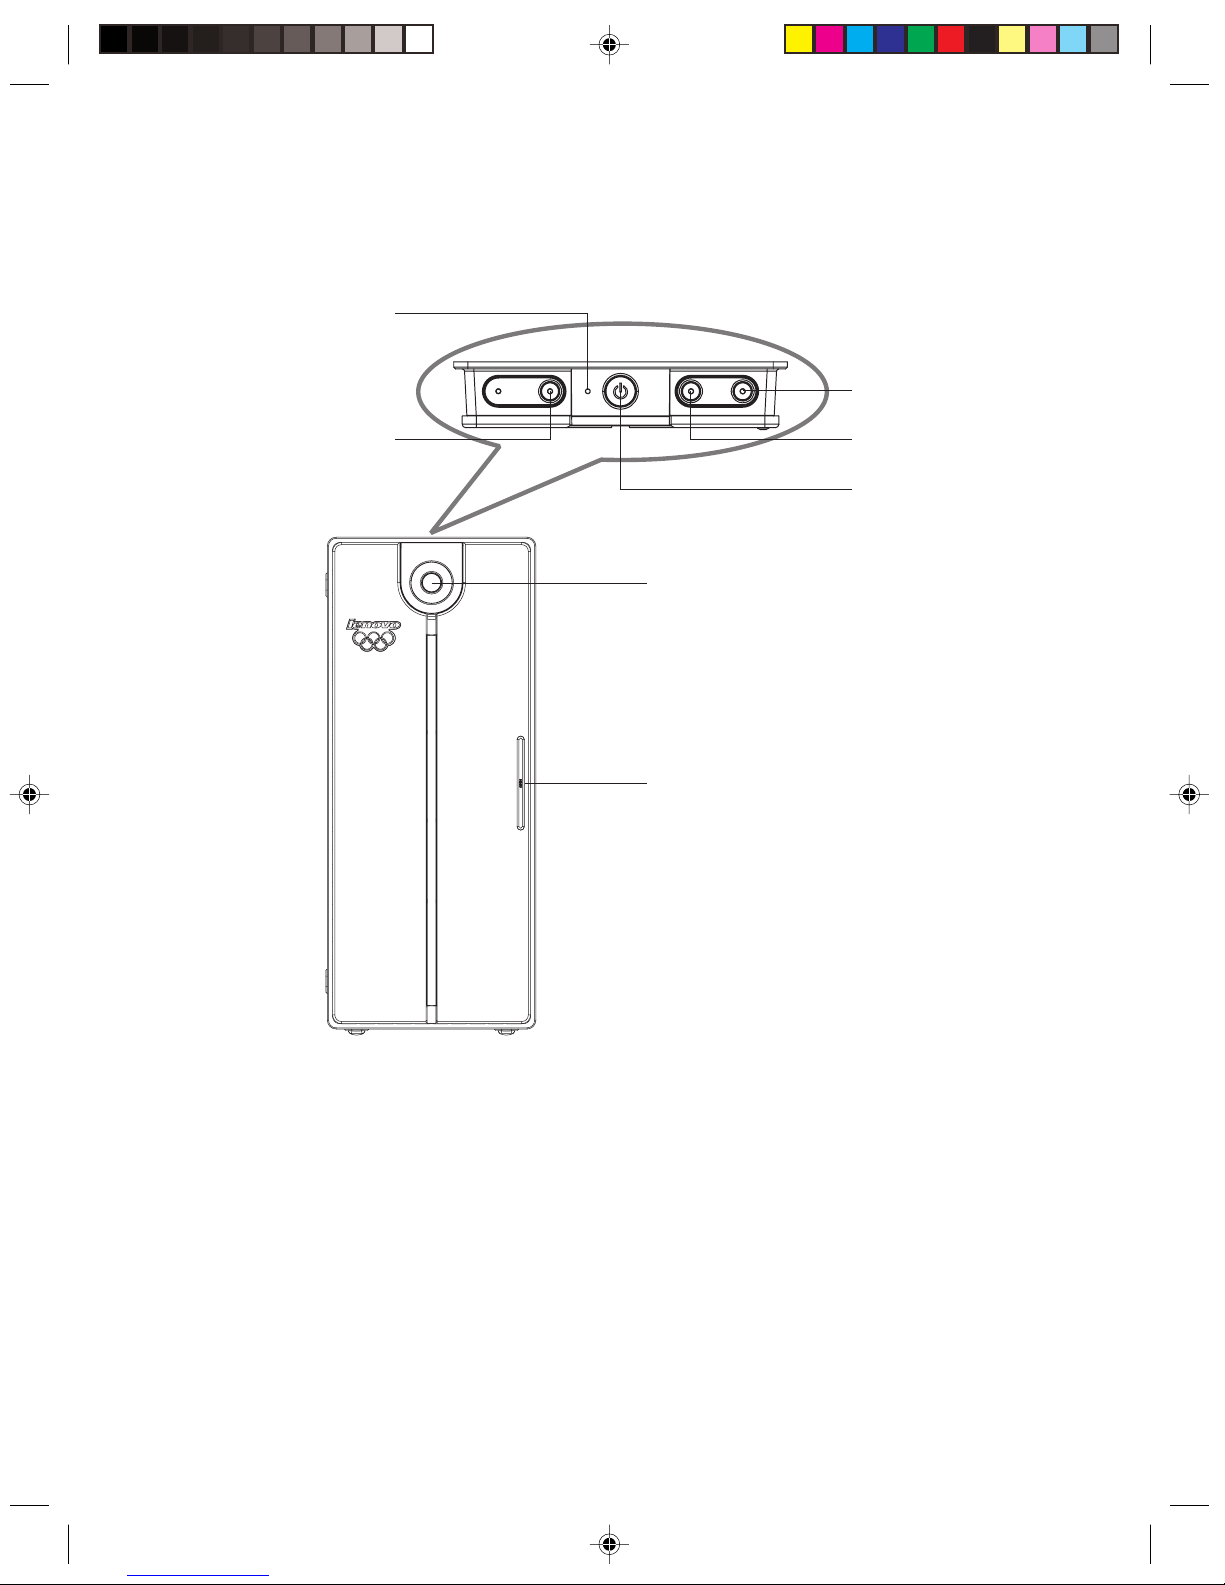
1.1 Front View of the Chassis
Button and function key usage on the front panel of the chassis.
Quiet mode
Hard disk drive indicator
OneKey Recovery
Reset
Power button
Front digital baffleplate
Digital mode
Power button: By pressing this key, you can start up or shut down the computer.
Reset: By pressing this key, you shall force the computer to restart. Please use caution when using this key.
All unsaved data will be lost.
OneKey Recovery: For models that have the OneKey Recovery function, pressing this key, while the
system power is off will start OneKey Recovery.
Quiet mode: Pressing this key, while in Windows, will reduce the computer’s noise.
Hard disk drive indicator: This indicates the read/write operations of the hard disk.
Digital mode: Pressing this key, will enable the Digital Media platform function.
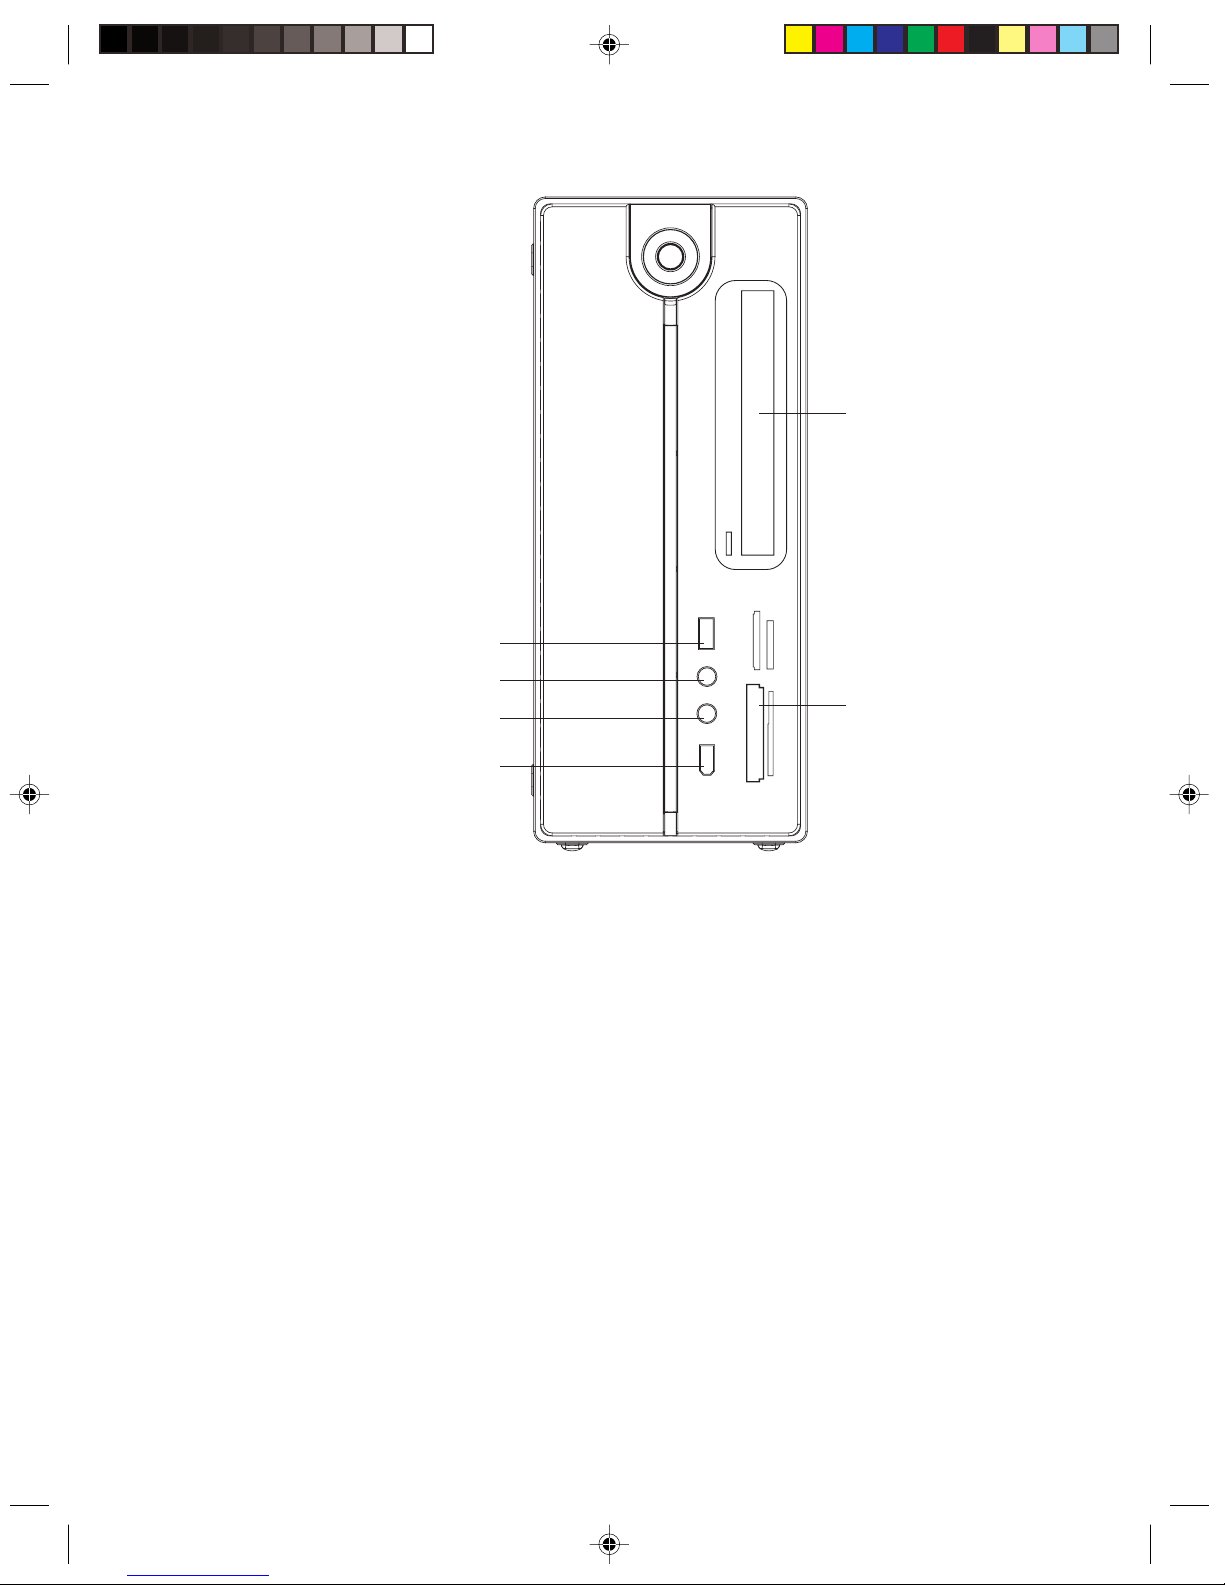
Front digital baffleplate: Behind the front digital baffleplate, you will see the front digital connectors , as
shown in the figure below:
3
Lenovo 3000 Q Series User Manual
MS/Pro/Duo
CF/MD
SM
MMC/SD
Optical drives
USB connectors
Speaker/headphone connector
Microphone connector
1394 connector
Media card reader
USB connectors: Used to connect USB devices.
Speaker/headphone connector: Used to connect speakers or headphones,
Microphone connector: Used to connect a microphone.
Media card reader: Used to read storage cards of MS,MS PRO,MS Duo,SD,MMC,SM,CF and MD etc.
(Some models are not equipped with memory card reader)
1394 connector: Used to connect 1394 devices. (Some models are not equipped with this connector)
4
Lenovo 3000 Q Series User Manual
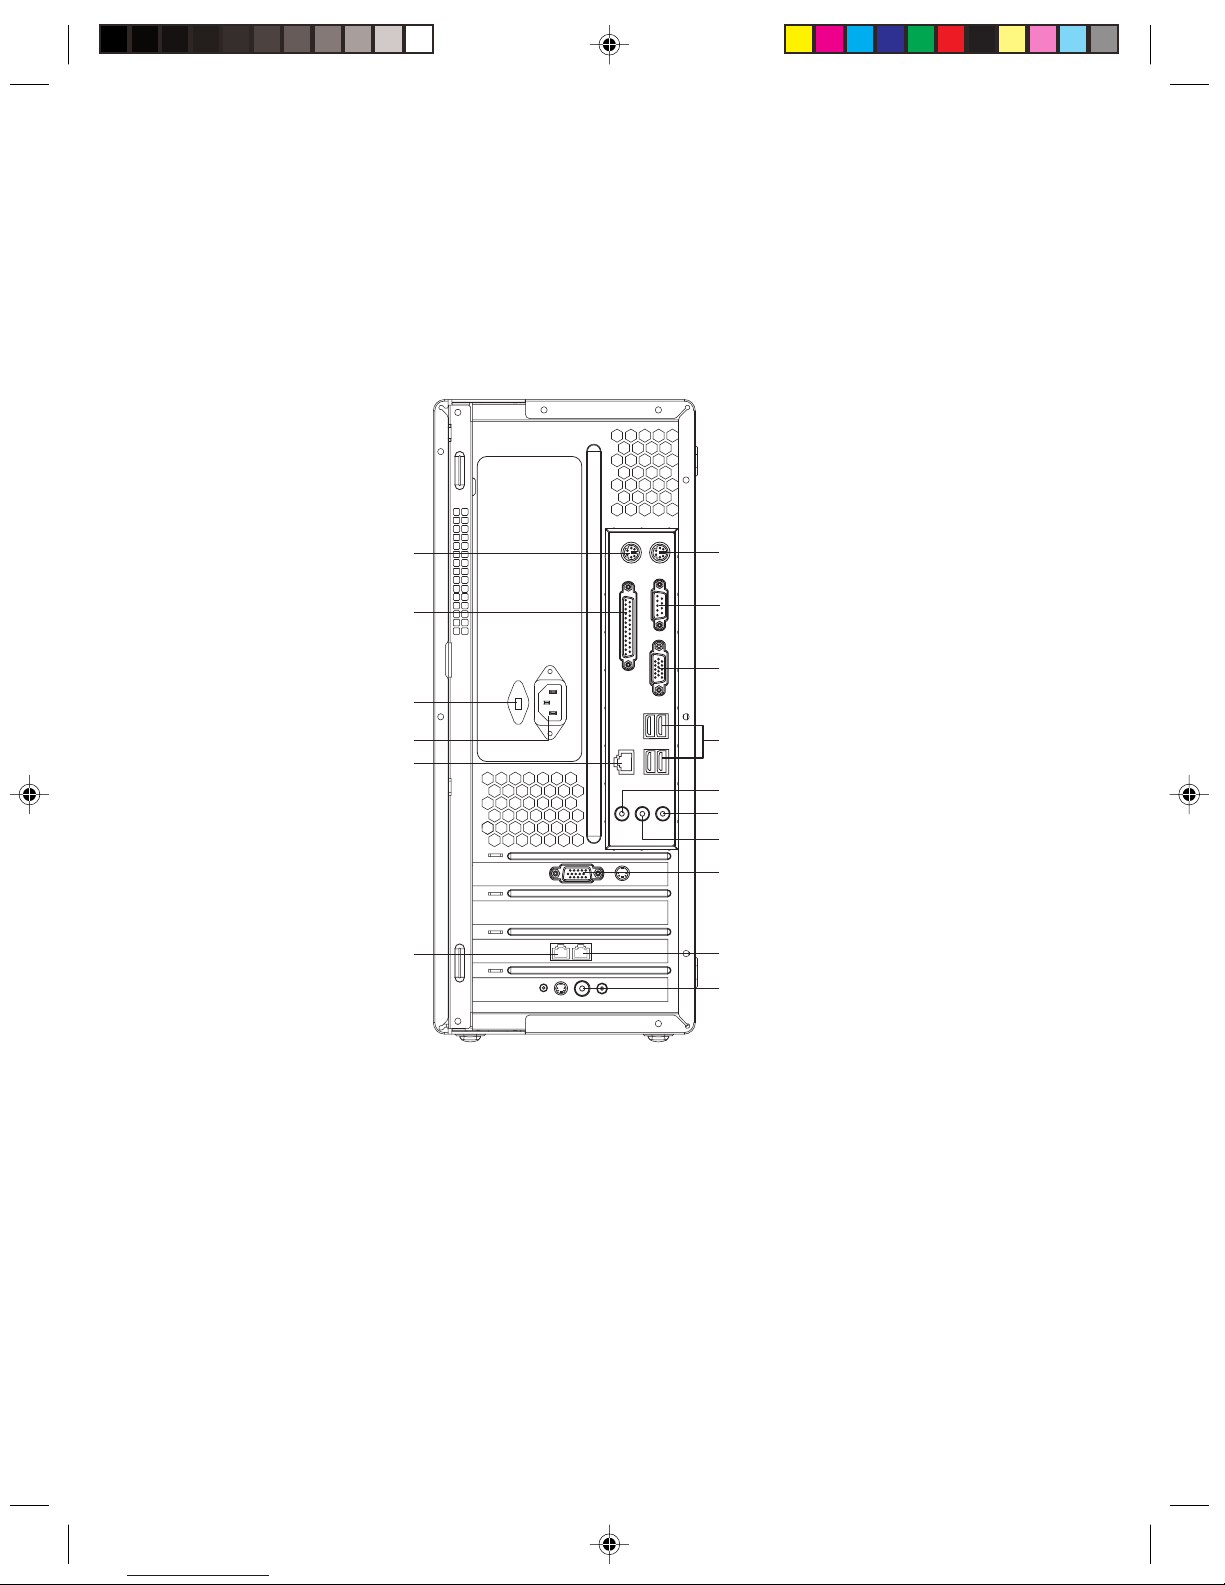
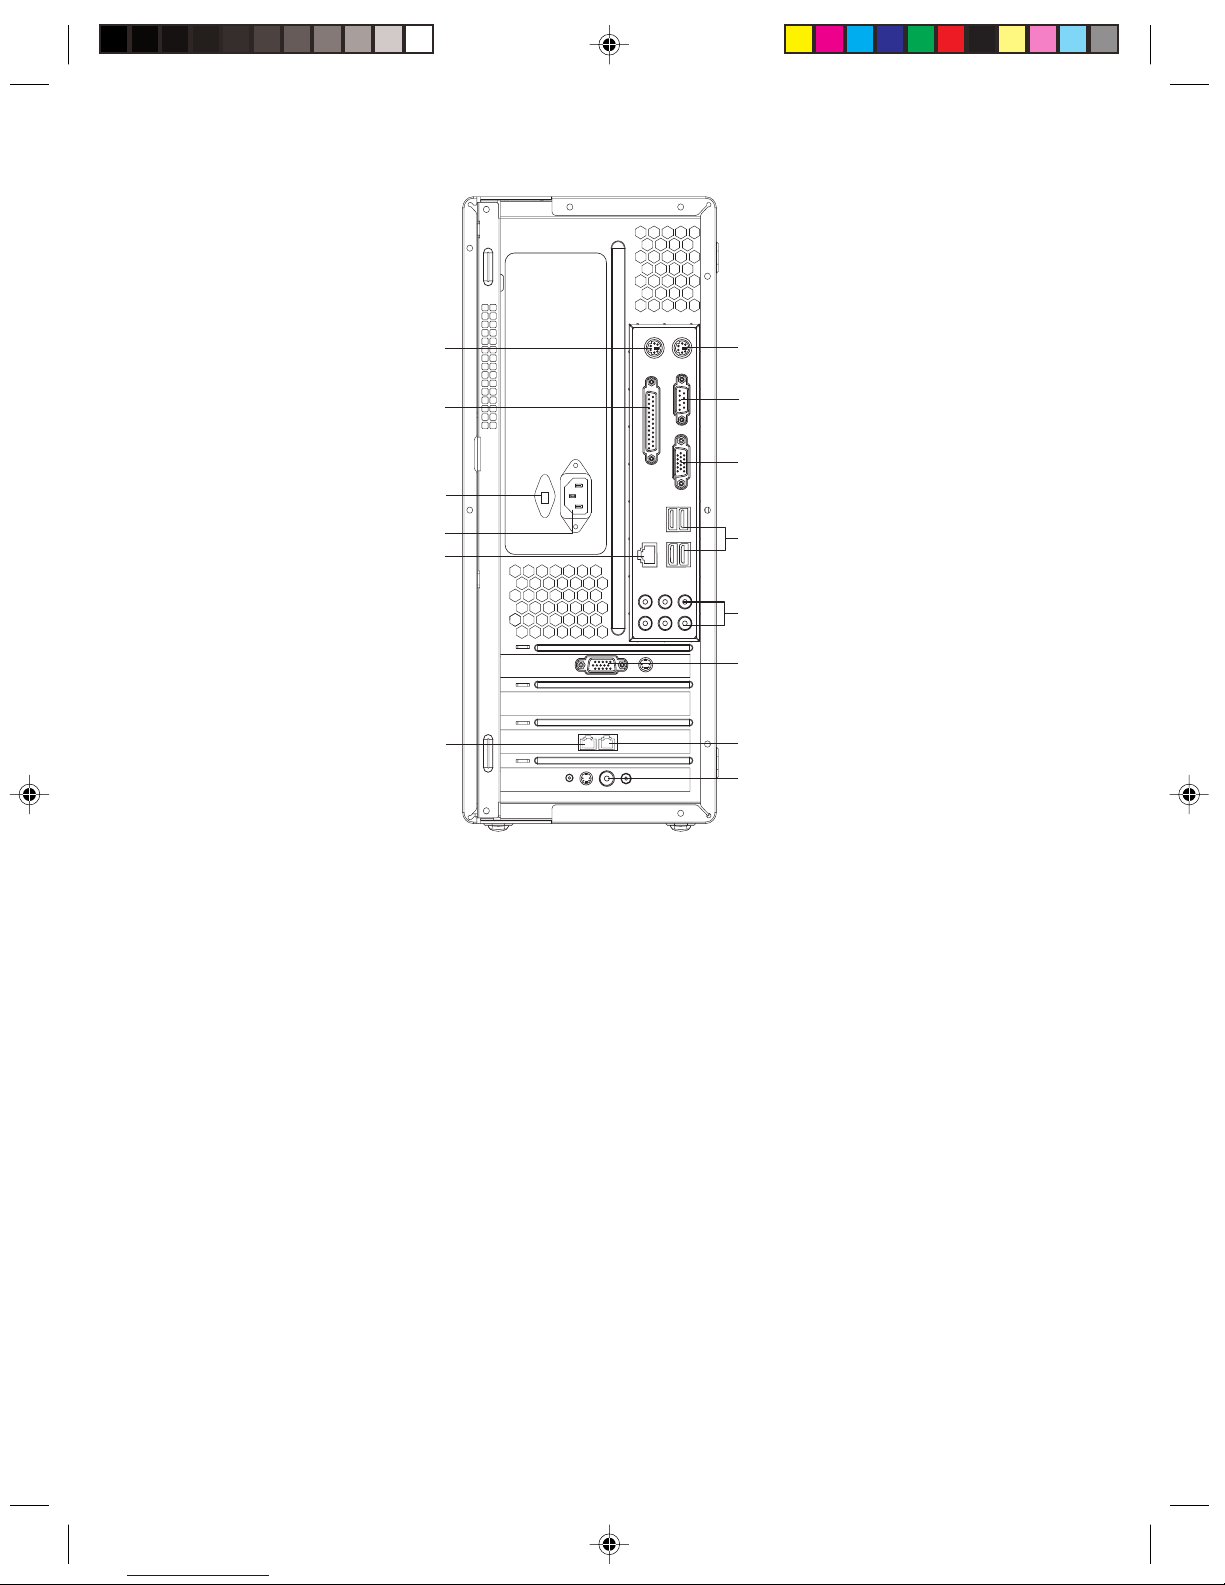
1.2 Rear view of the Chassis
IO connector usage on the rear panel of the chassis
The rear panel connectors are shown in the figure below. Some models are not equipped with all the
connectors. Please refer to your system,
power connector
LCD power connector
Standard keyboard connector
Standard mouse connector
Parallel connector
Serial connector
VGA monitor connector
USB connectors
Ethernet connector
Audio line in connector
External Graphics Card Connector
TV antenna connector
Speaker/headphones connector
Microphone connector
Telephone
Modem
5
Lenovo 3000 Q Series User Manual
power connector
LCD power connector
Standard keyboard connector
Standard mouse connector
Parallel connector
Serial connector
VGA monitor connector
USB connectors
Ethernet connector
External Graphics Card Connector
TV antenna connector
7.1 Audio connector
Telephone
Modem
power connector: Used to supply power to the computer.
LCD power connector: Used to supply power to the LCD monitor that is supplied with the computer.
Standard mouse connector: Used to connect a mouse with a PS/2 type of connector.
Standard keyboard connector: Used to connect a keyboard with a PS/2 type of connector.
Serial connector: Used to connect serial devices. (COM port)
Parallel connector: Used to connect parallel devices. (LPT port)
VGA monitor connector: Used to connect the signal cable of the monitor.(VGA) (Some models have this
connector, some models have a External display card connector. See below.)
USB connectors: Used to connect USB devices.
Ethernet connector: Used to connect to LAN or wide band web devices.
External Graphics Card Connector: Used to connect the signal cable of the monitor.(VGA) (Some models
have this connector, some models have a VGA display connector. See above.)
If the External display card has a S-video connector, it can be used to connect to a television to display
the computer screen.
TV antenna connector: Used to connect to a TV antenna. (some models equipped with TV cards have this
connector)
Modem: Used to attach your computer to a telephone line for modem use.(some models equipped with this
connector)
Telephone: Used to attach a telephone line to your computer for modem use. (some models equipped with
this connector)
7.1 Audio connector: See the following section Audio Configuration for 7.1 use.

6
Lenovo 3000 Q Series User Manual
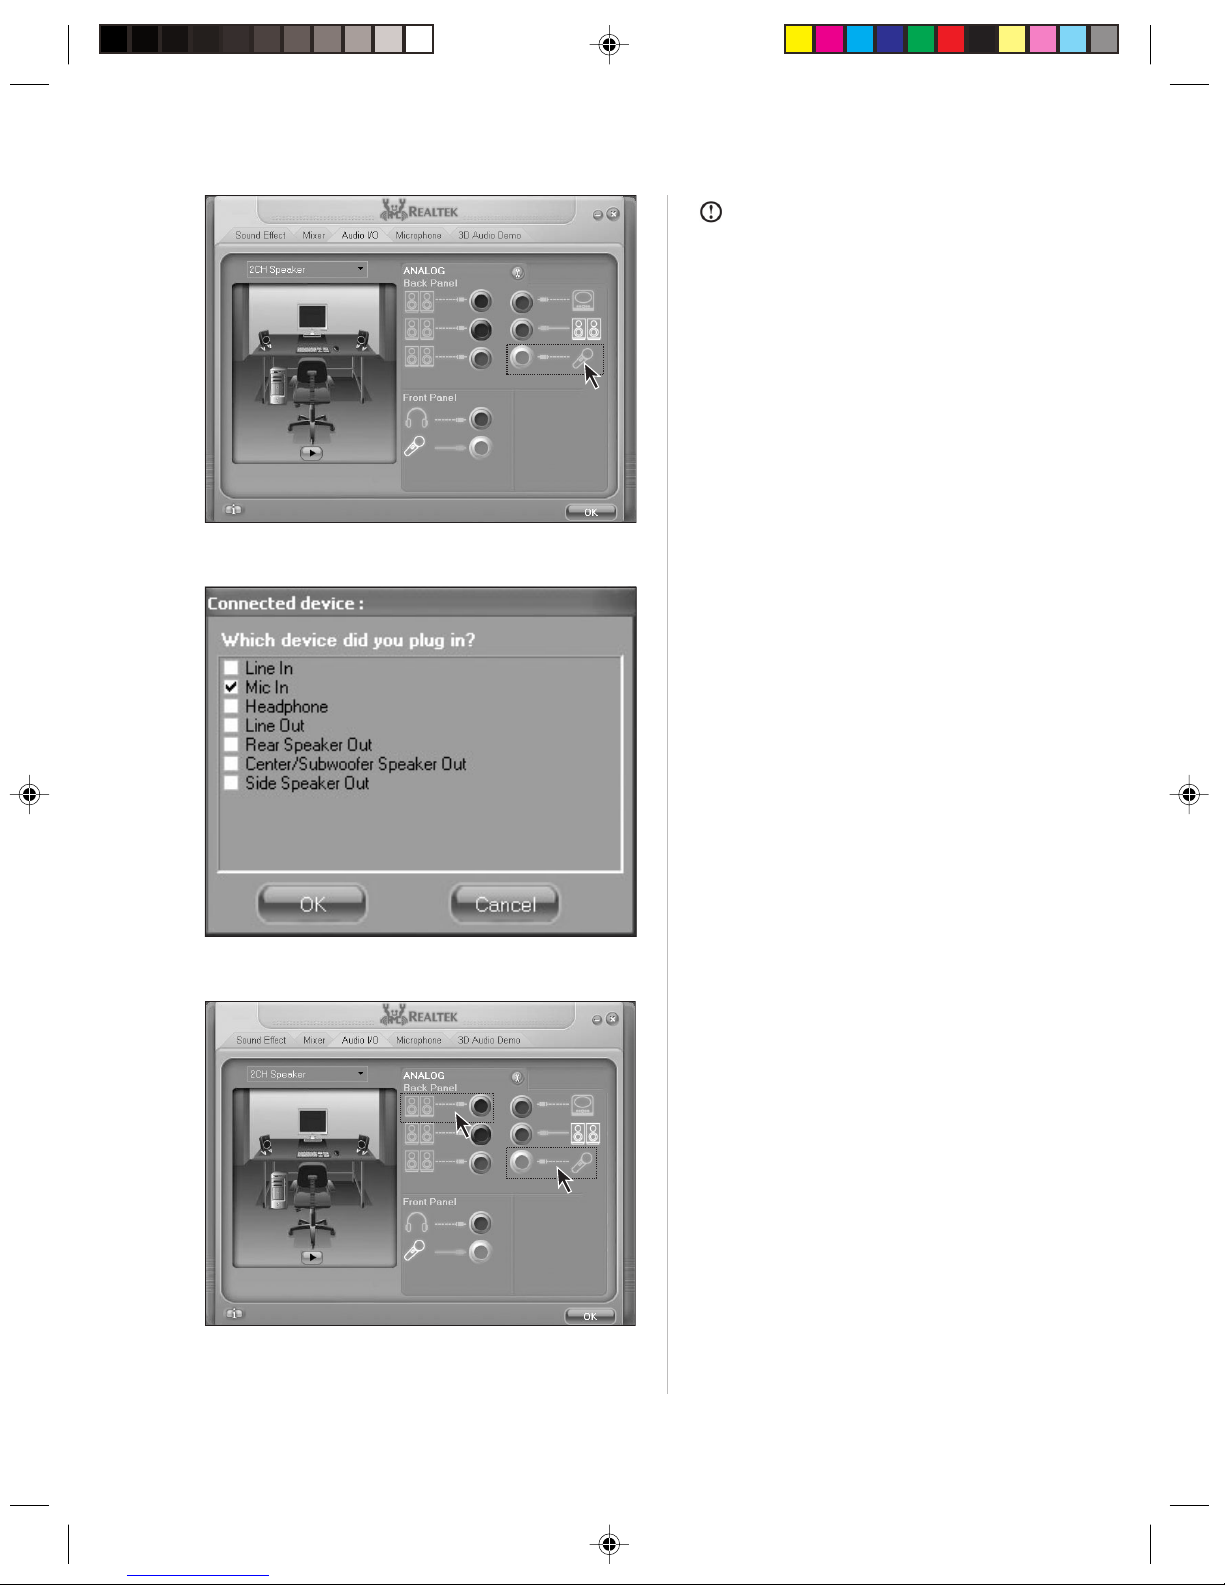
1.2.1 Audio configuration (only with Windows XP)
To set up audio:
7.1 Audio connectors
7.1 Audio connectors: audio input,
microphone, line out, rear speaker output,
central/ heavy bass output, side speaker
output.
Step 1
Right click the audio configuration icon on
the bottom-right corner of the screen.
Step 2
Select
“Sound Manager”
on the audio
configuration menu as shown in the figure.

7
Lenovo 3000 Q Series User Manual
Step 1
Select 2CH speaker as shown in the figure.
And then connect the audio input cable of
the speaker to the black connector.
Step 3
Open the interface as shown in the figure.
The sound effects and mixed audio
demonstrations etc. of the sound card can
be configured in this interface. Open “Audio
I/O” and you can configure the input and
output of the sound card.
Step 4
The audio connectors shown in the figure
match the I/O connectors on the rear panel.
Configuration for the factory configuration of 2.0 speakers:

8
Lenovo 3000 Q Series User Manual
Step 2
Select “Line out” on the dialog box, as
shown in the figure.
When connecting other audio devices, plug
the audio cables into the respective I/O
connectors on the rear panel. Once a
connector is connected a dialog box will
pop up , as shown the figure. Select the
device name according to the type device
connected.
You can test if the connections and
configurations are correct by clicking the
sound box icons in the corresponding
location in the left figure.
9
Lenovo 3000 Q Series User Manual
Note:
When connecting a device, one thing
should be paid attention—be sure to plug
microphone into the place as shown in the
figure.
If you don’t plug a microphone into the
microphone connector and select
“Microphone” in the popped up window as
shown in the figure.
An error prompt shall come up as shown in
the figure. Plugging a microphone into the
front microphone connector shall not cause
the prompt dialog box to come up.
10
Lenovo 3000 Q Series User Manual
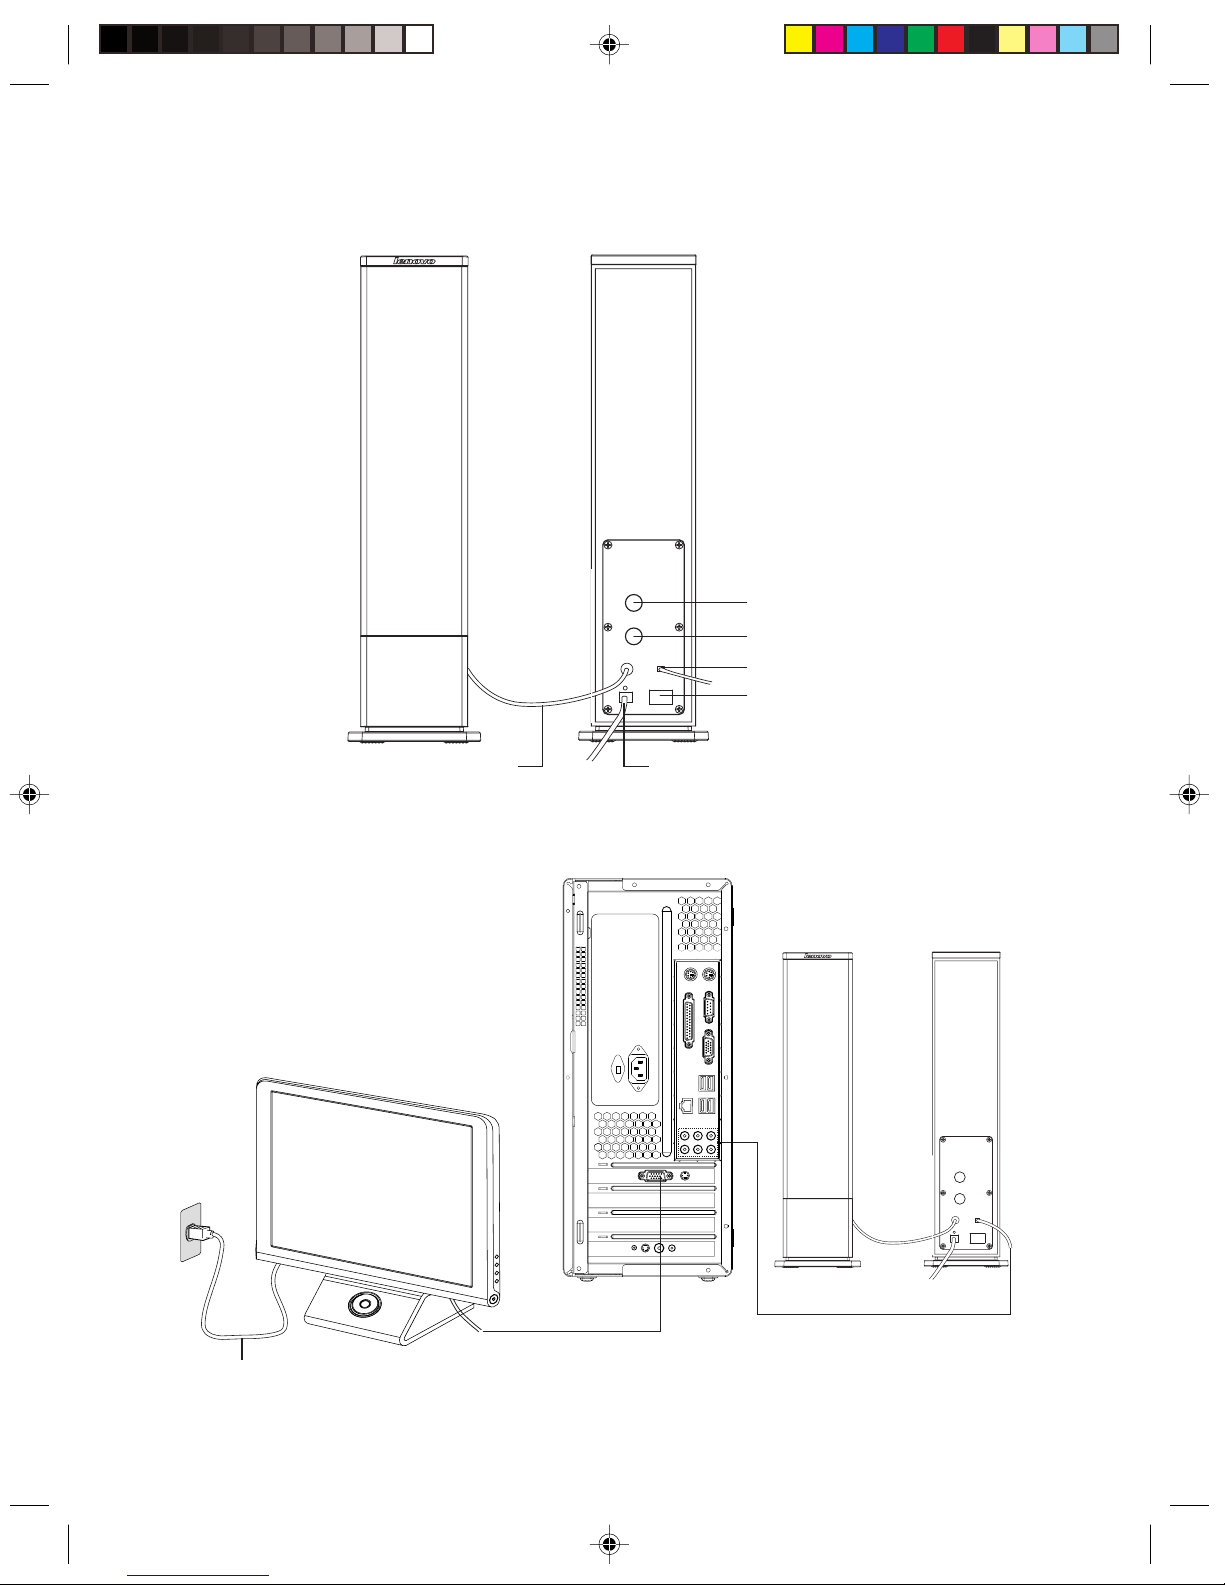
1.3 Connecting speaker
Volume adjustment
Bourdon effection
the connection of main and sub speaker power cord
Connect to Speaker/Headphone
Power switch
1.4 Helpful tips on the installation
Monitor power cord
Line in cable
Monitor signal cable
11
Lenovo 3000 Q Series User Manual
Please Note:
1. To avoid electromagnetic disturbance in the monitor don’t place the speakers too close to the
monitor.
2. Please tighten the screws on the monitor signal cable.
3. If the model you bought is not equipped with the independent display card, please connect the
monitor cable to the connector of the VGA display connector.
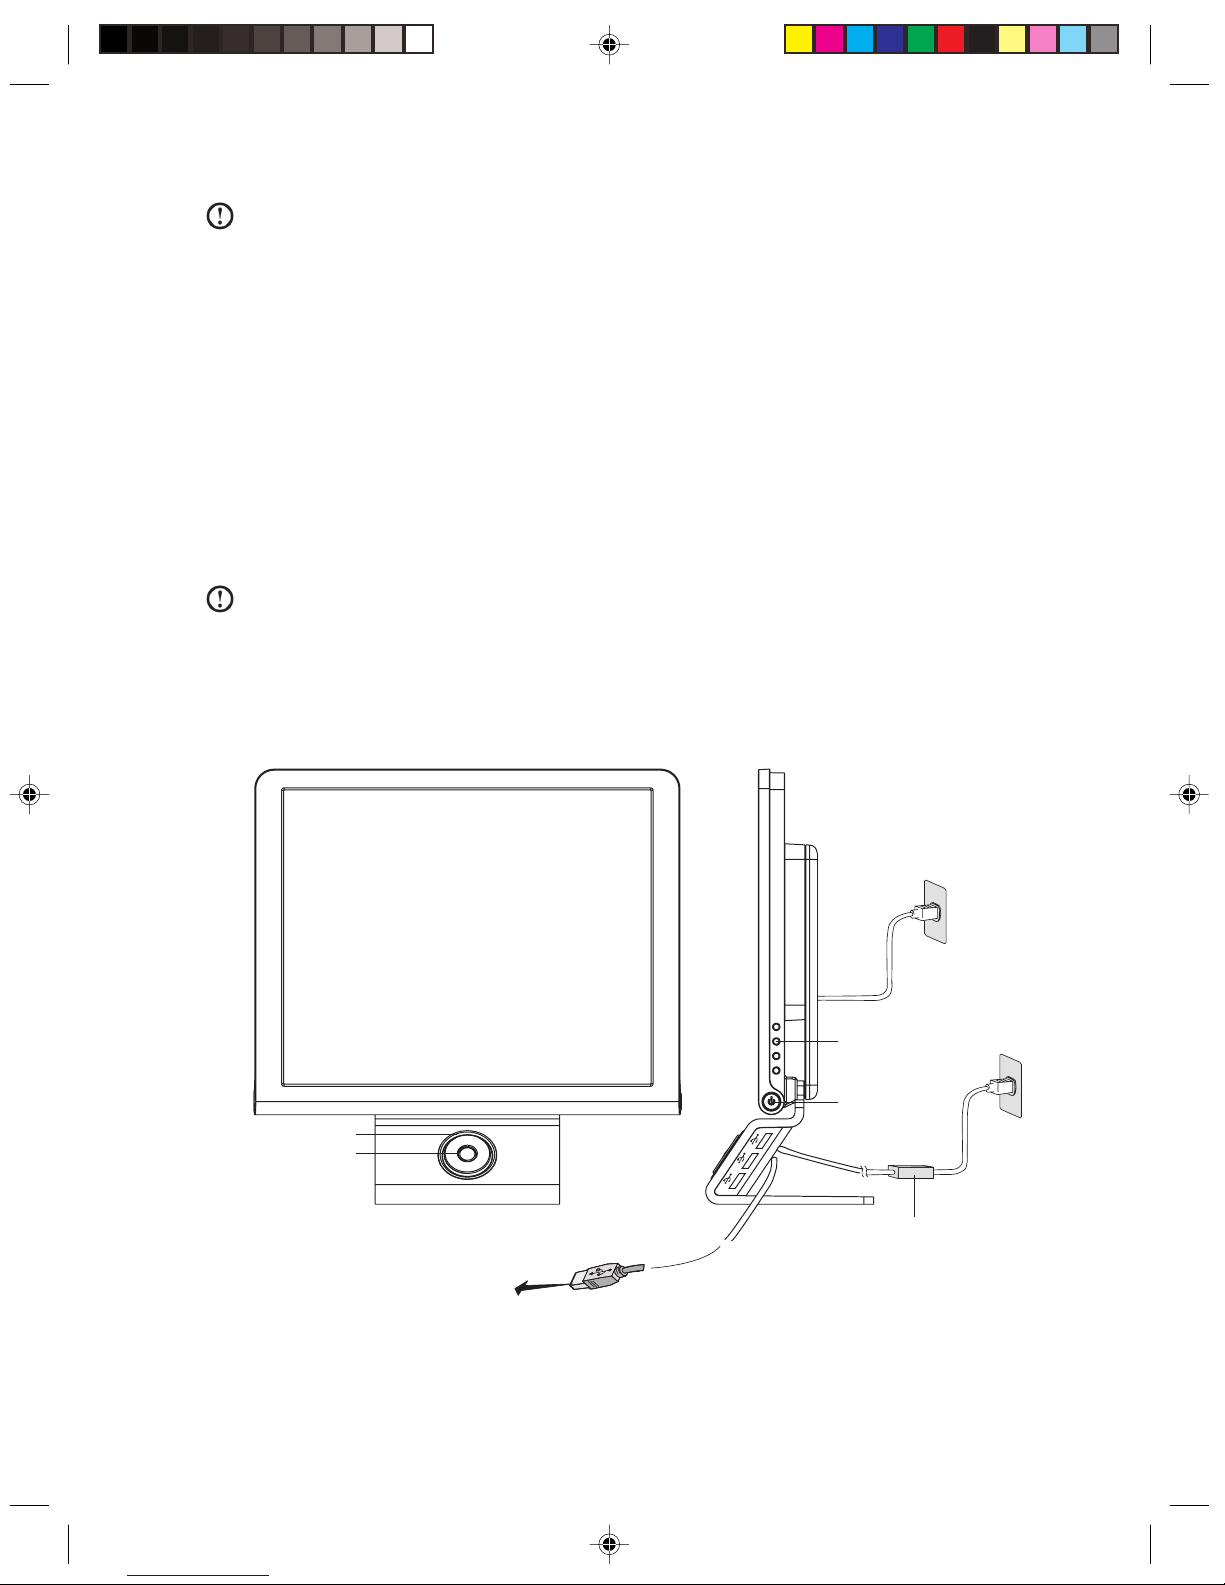
1.5 Connecting and using the flying shuttle box
1.5.1 Used with internet chat talking device
The built-in speaker and microphone on the monitor base enable you to directly communicate with others by
voice when using internet chat software.
Please Note:
1. Please use the USB cable, that is packaged with the monitor, to connect the flying shuttle box to
the computer as shown in the following figure.
2. You must use the power adapter and power cord , that is packaged with the monitor to connect
them to the power supply as shown in the following figure.
3. Use the switch on the back of the flying shuttle box to power it on.
Connect to the USB of the computer
Built-in Speaker
Flying shuttle box
The monitor adjustment
The monitor
power switch
Adapter
12
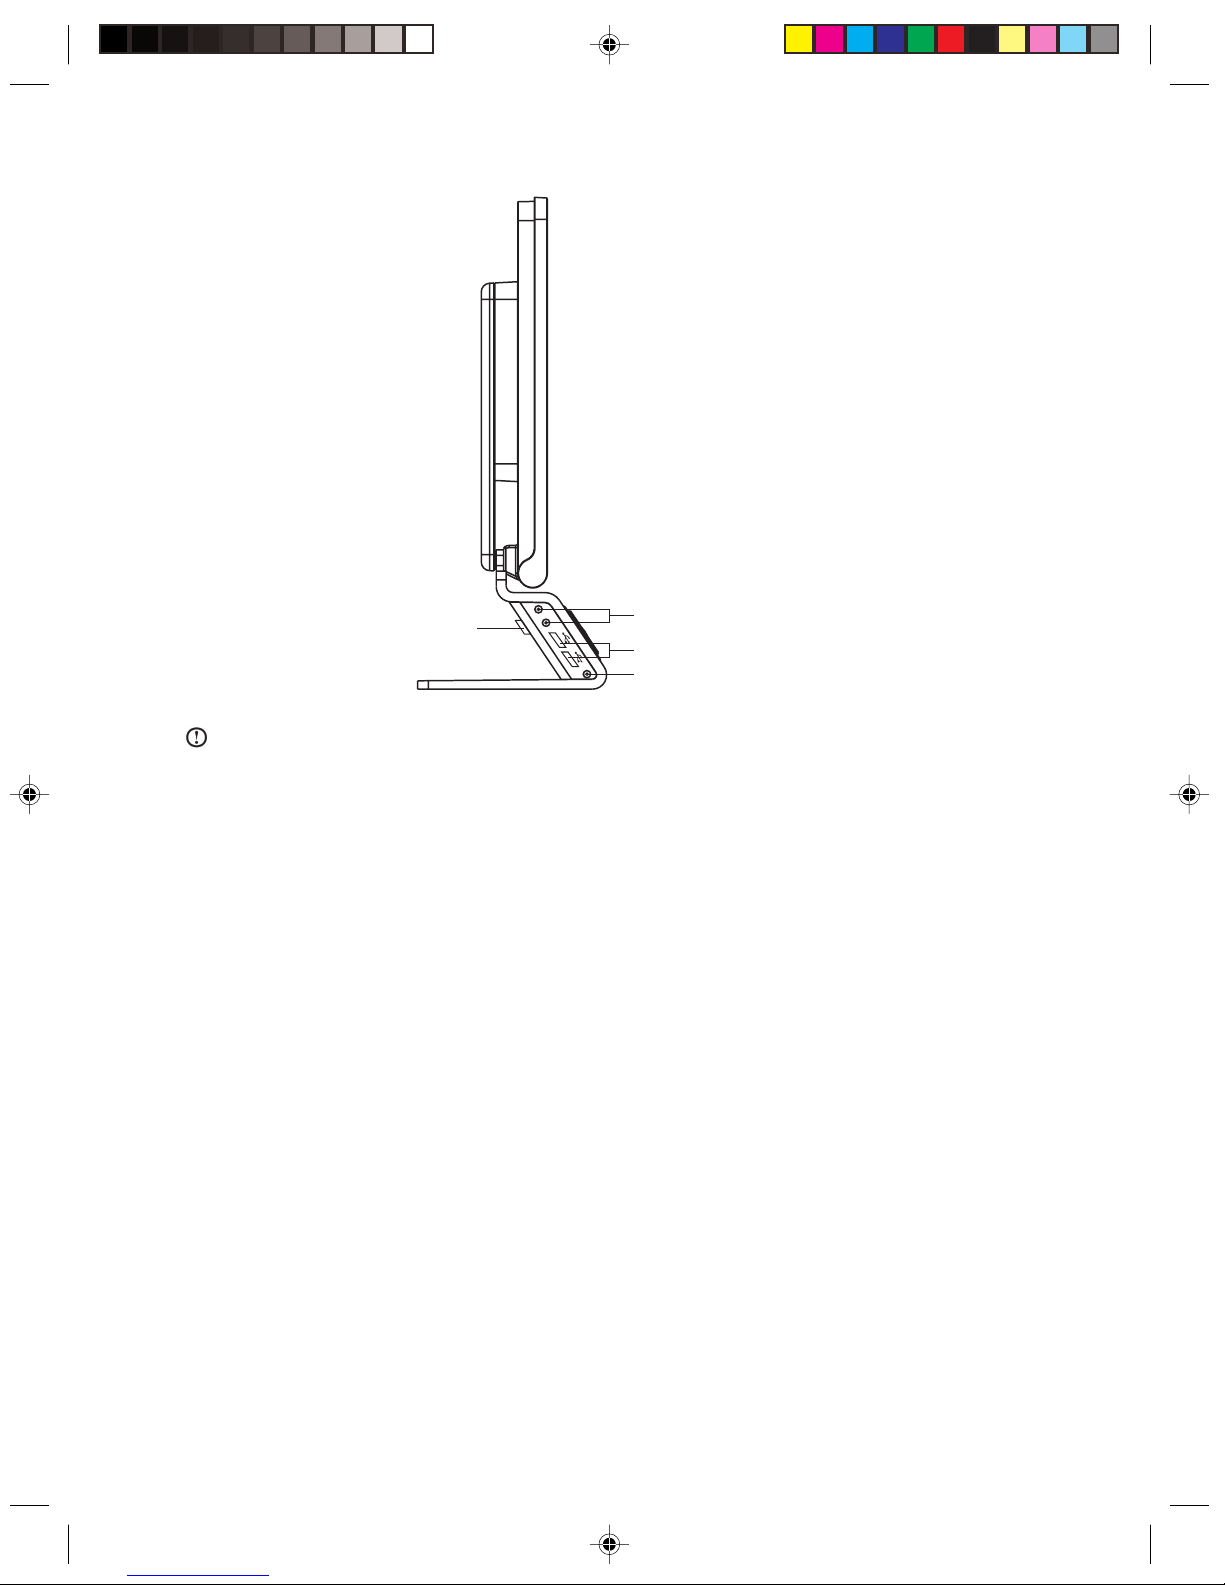
Lenovo 3000 Q Series User Manual
Headphone, Microphone connector
USB HUB
Build in microphone
Flying shuttle box switch
Note:
To ensure proper operation please ensure that the LCD monitor and the flying shuttle box are properly
plugged to the power and the flying shuttle box switch is turned on.
1.5.2 Using the USB connectors, headphone, microphone connectors on the
flying shuttle box
1. Connect to the USB connector on the rear panel connector of the computer with USB cable.
2. Connect the power adapter and plug the switch to the power on.
3. The USB connectors on the flying shuttle box have limited power. Please do not use high power USB
devices like USB hard disks in all the ports at the same time.
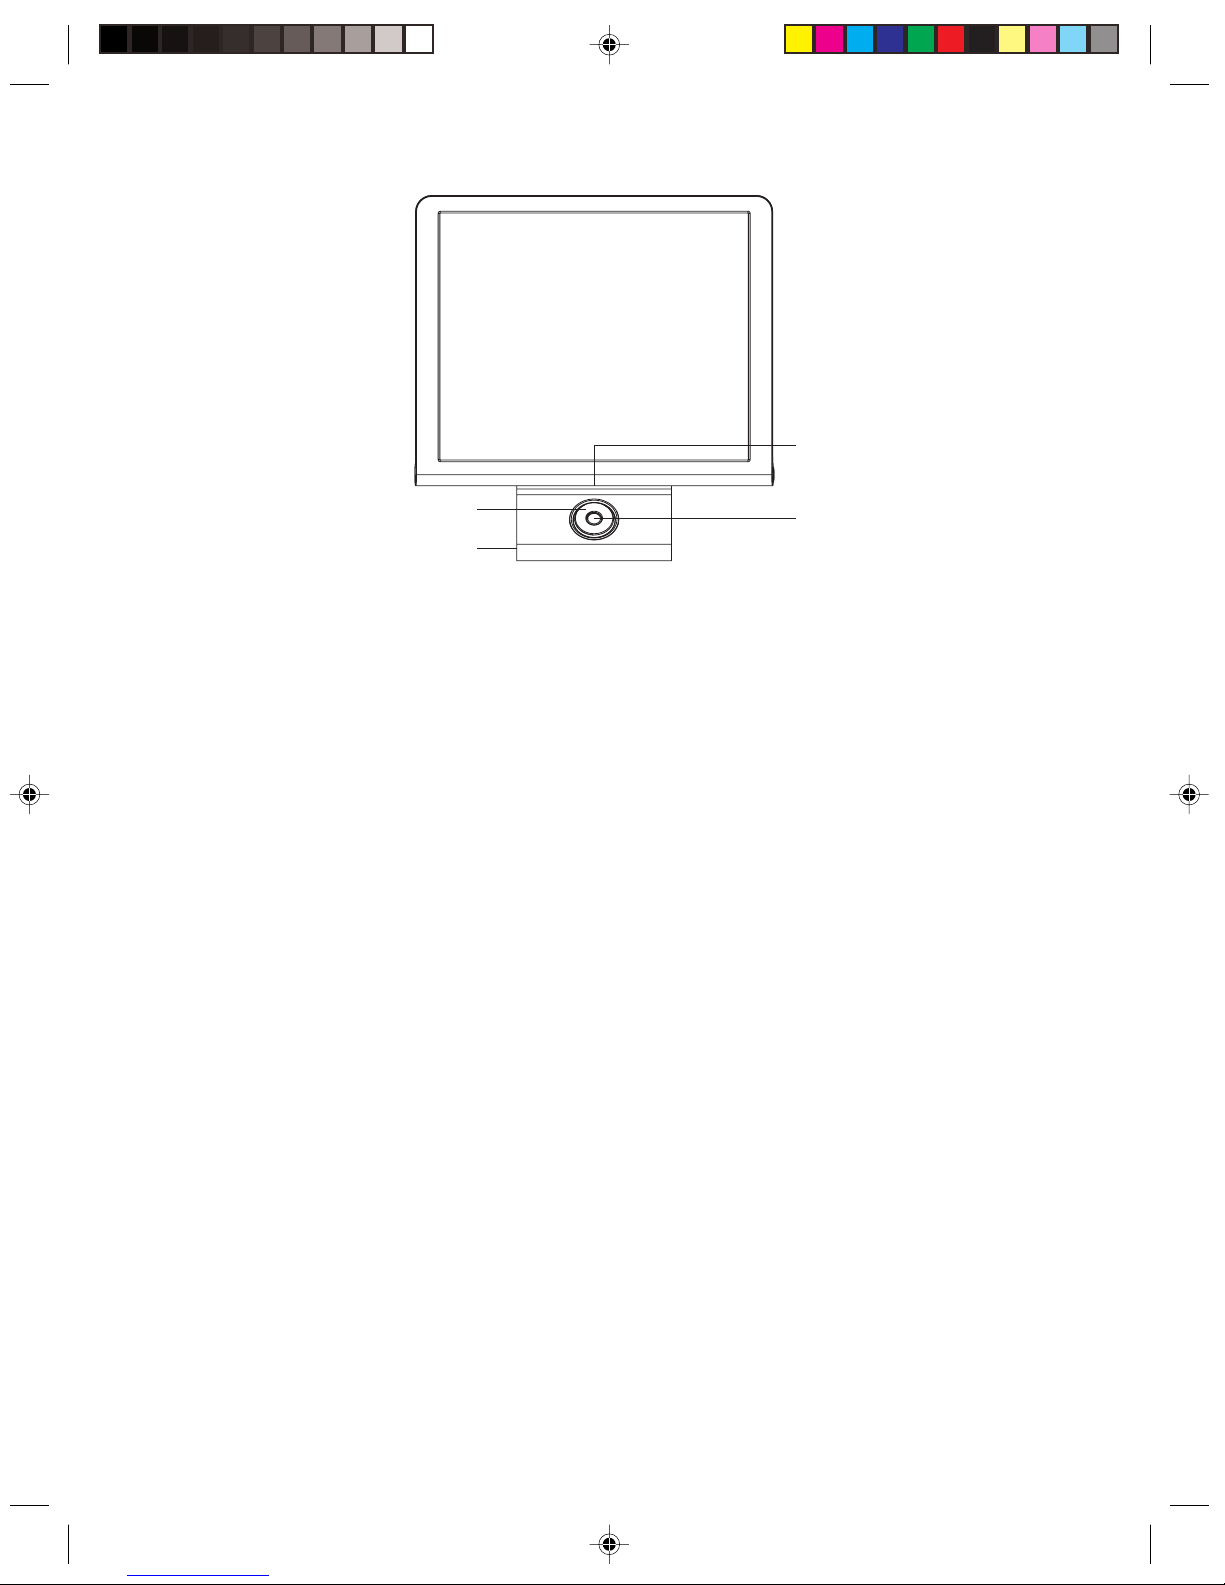
1.5.3 Using the flying shuttle box
Models configured with LCD monitors have a flying shuttle box beneath the monitor that can used to start
Windows programs. After the system has booted and the Lenovo Navigator program has started this
function is available.
13
Lenovo 3000 Q Series User Manual
Built-in Speaker
Menu button
Rotary case
Built-in microphone
Usage of the flying shuttle box:
The Lenovo Navigator program runs only on Windows XP.
The middle key: Open/ close Lenovo Navigator program. When the Digital Media Platform has started, the
middle key is used as the Return key. When the Digital Media Platform has not started, holding down the
middle key for 5 seconds will cause the system to go into the standby. Pressing any key on the shuttle will
wake up the system.
Turning the rotary case: turning the shuttle selects the Digital Media Platform functions.
Pressing down the rotary case: Enters into the selected item of the Digital Media Platform Function.
After starting up the Digital Media Platform:
Turning the rotary case: moves the option focus.
Pressing down the rotary case: confirms the option.
When playing photograph, music and video files:
Turning the rotary case: switches the playing files. When watching TV it switches the channels.
Pressing down the rotary case: Starts or pauses the video, photograph or music files.
Built-in Speaker: If start up a internet chat software, conversations are heard through the built-in speaker.
Built-in Microphone: If start up a internet chat software, your voice is sent out through the built-in
microphone.
14
Lenovo 3000 Q Series User Manual
flying shuttle box
Turning the rotary case will make the yellow
option bar move between each of the
choices in the menu. When the desired
menu item is highlighted pressing the rotary
case once will activate the function.
flying shuttle box
Turning the rotary case will make the yellow
option bar move between each of the
choices in the menu. When the desired
menu item is highlighted pressing the rotary
case once will jump to the folder that
contains the files. Turn the rotary case again
and the focus moves between files. Press
down the rotary case and the selected file
shall be played.
flying shuttle box
After the shuttle drivers has been installed,
pressing the middle key of the shuttle will
start the Lenovo Navigator program. The
Lenovo Navigator runs only on Windows XP.
flying shuttle box
After starting up,and as shown in the figure,
the program dial shall come up on the lower
side of the screen, Turning the shuttle shall
cause each software icon to rotate into
focus.
When the desired software icon is in focus,
pressing “rotary case” once shall start
software.
The usage is as follows:
15
Lenovo 3000 Q Series User Manual
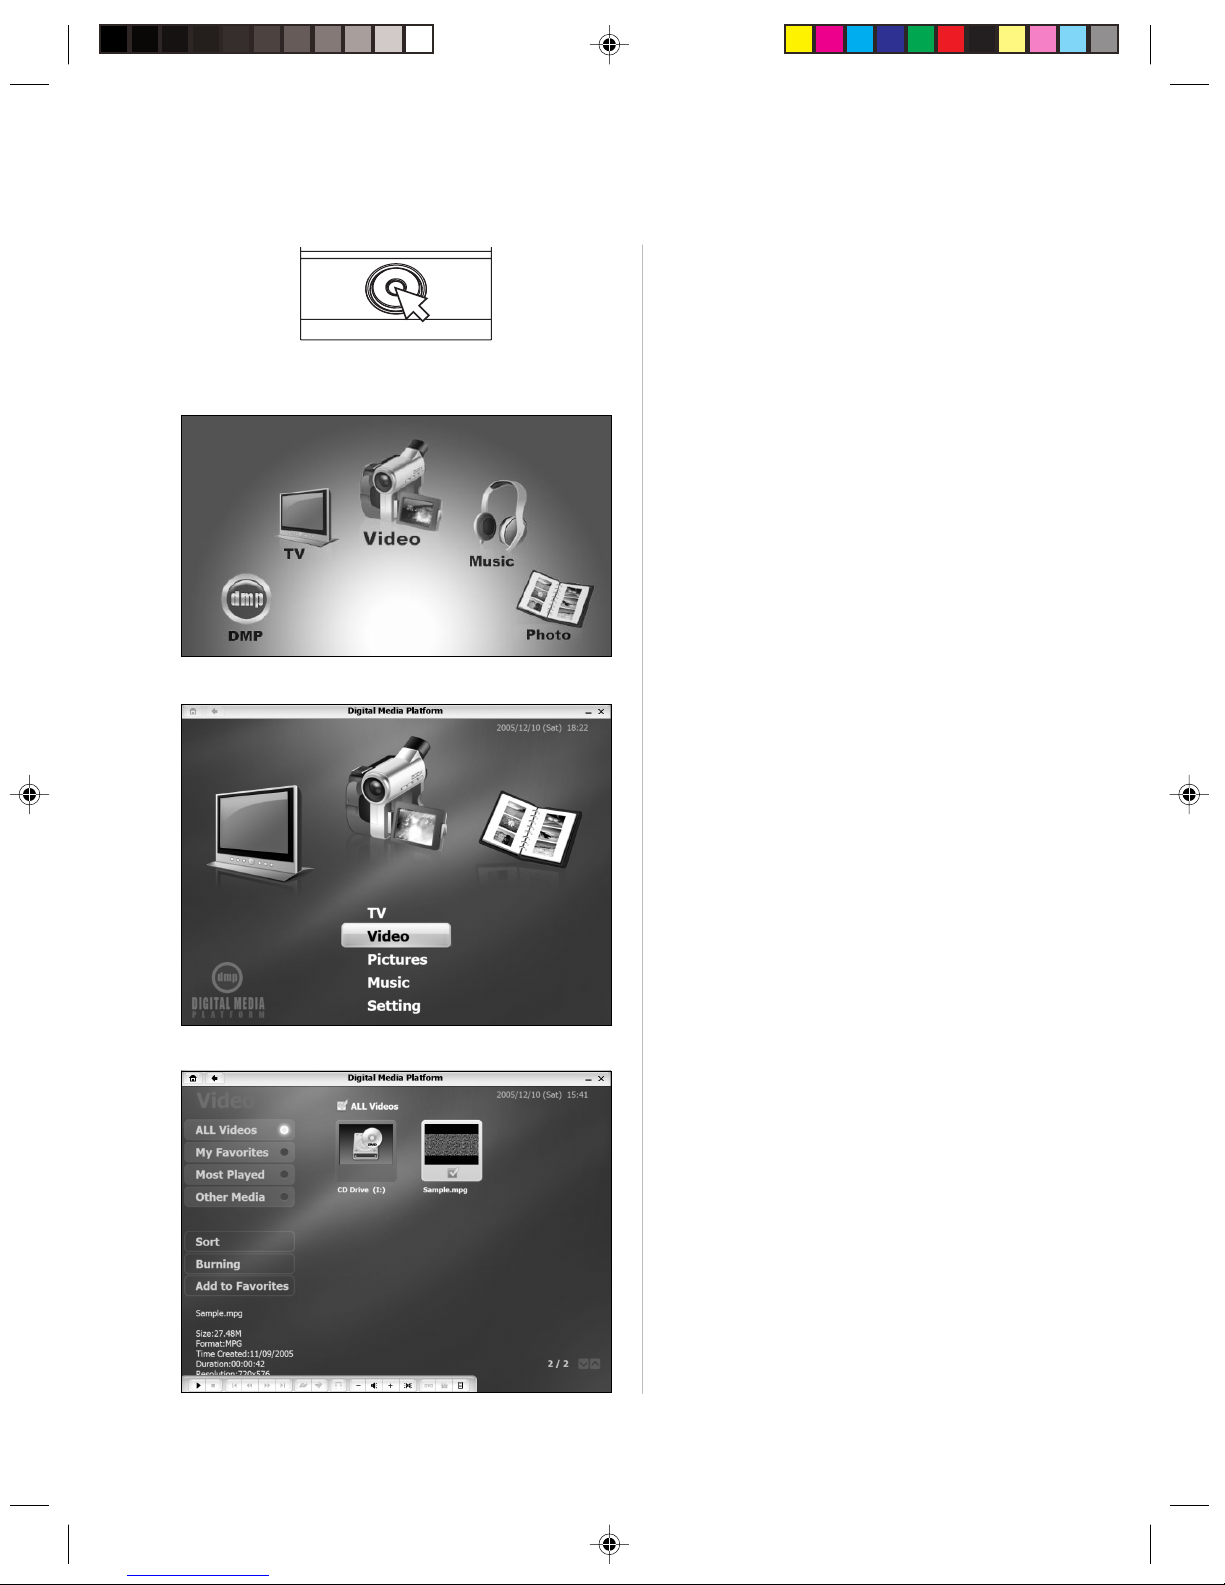
1.6 Keyboard
1.7 Using Quiet Mode
Quiet Mode causes the CPU and fans to slow down, which reduces the noise you will hear from the
machine. It is suitable for use during word processing, web surfing and other activities that do not require
high CPU resources. Activities like Gaming require high CPU resources and are not suitable for Quiet Mode
operation.
After the system boots Windows XP, pressing the “Quiet mode” key on the front panel will cause the system
to enter “Quiet Mode”, and the Quiet mode indicator light will turn blue. Press the Quiet Mode key again to
exit the Quiet mode.
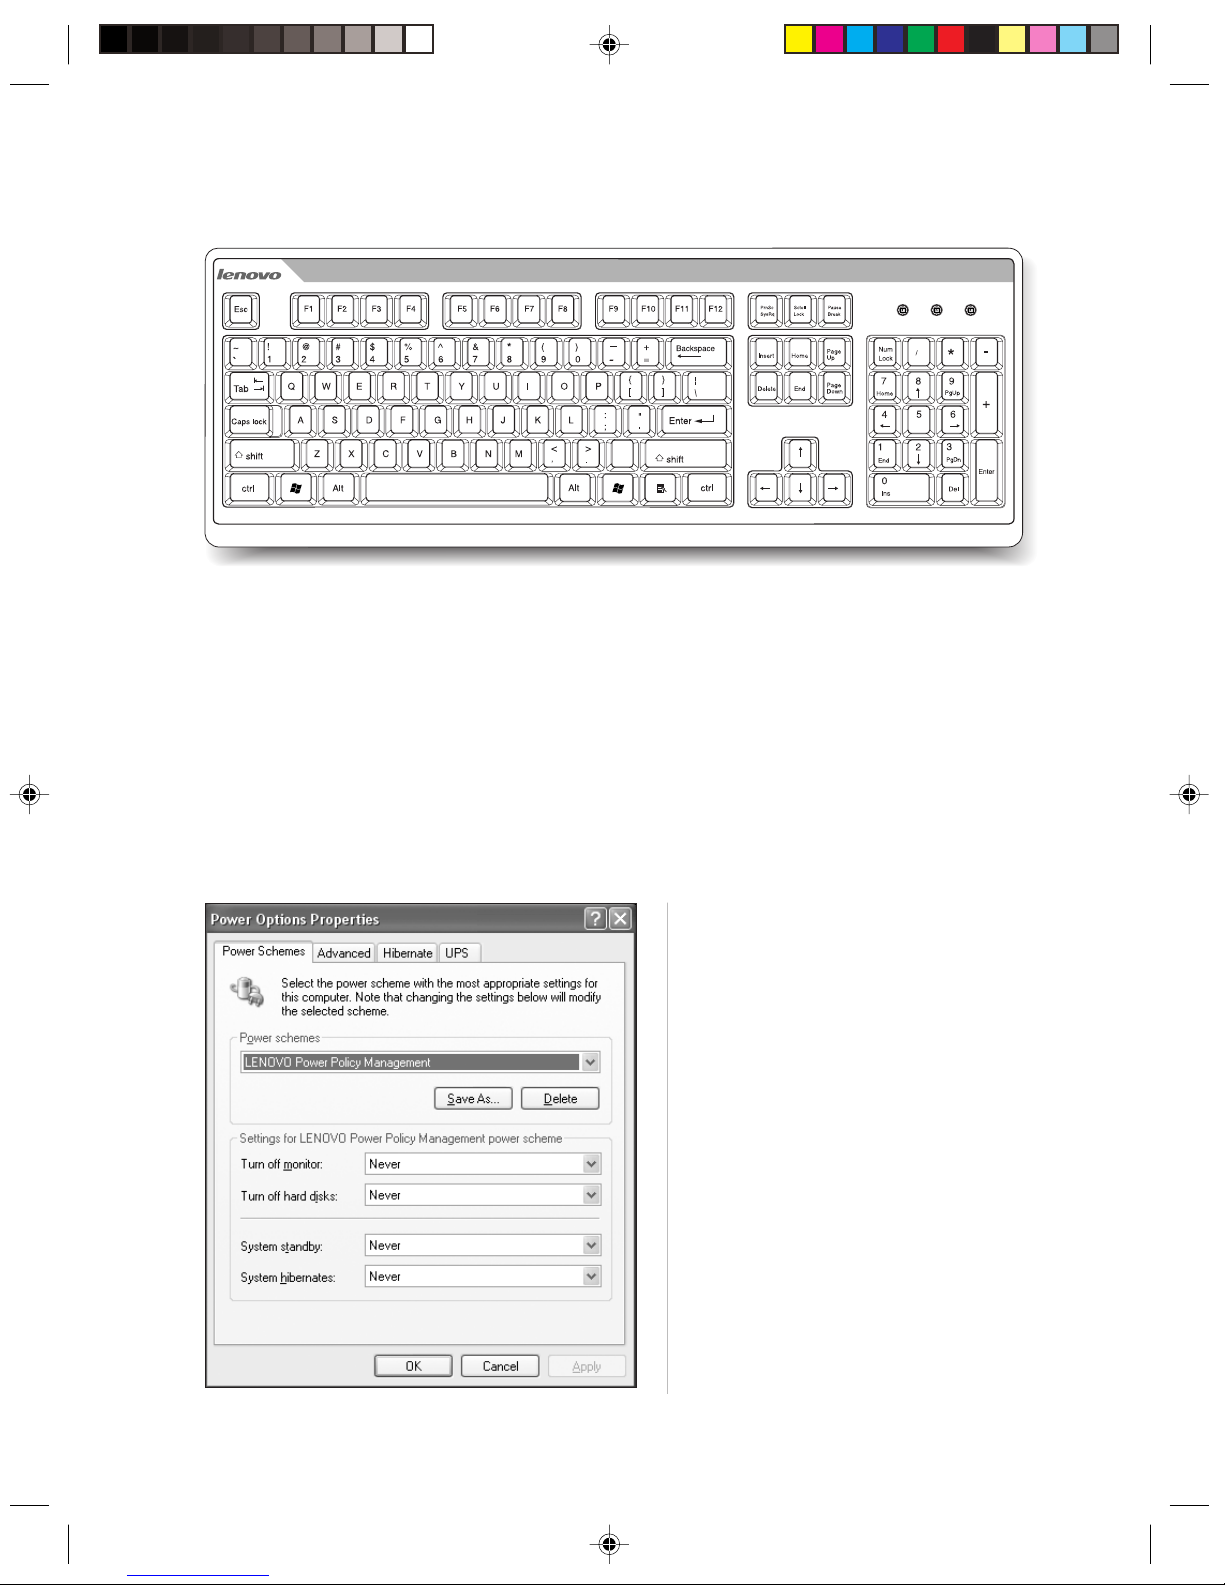
Attentions for Quiet mode:
In “Control Panel” → “Power Options” →
“Power Schemes”, select “Lenovo Power
Management”. After selecting this option, do
not change again, otherwise you shall not
be able to enter the Quiet mode. Where the
“Turn off monitor” “Turn off hard disk” and
“System Standby” etc. can be changed by
users.
16
Lenovo 3000 Q Series User Manual
The conditions for the system to enter the Quiet mode:
1. If you use software that needs high CPU resources for a long time, or use a third-party software to adjust
CPU frequency, the system shall automatically return from the Quiet mode to the normal mode.
2. If you start the “Quiet mode” in Windows XP, please be sure to exit the “Quiet mode” before shutting down
the computer.
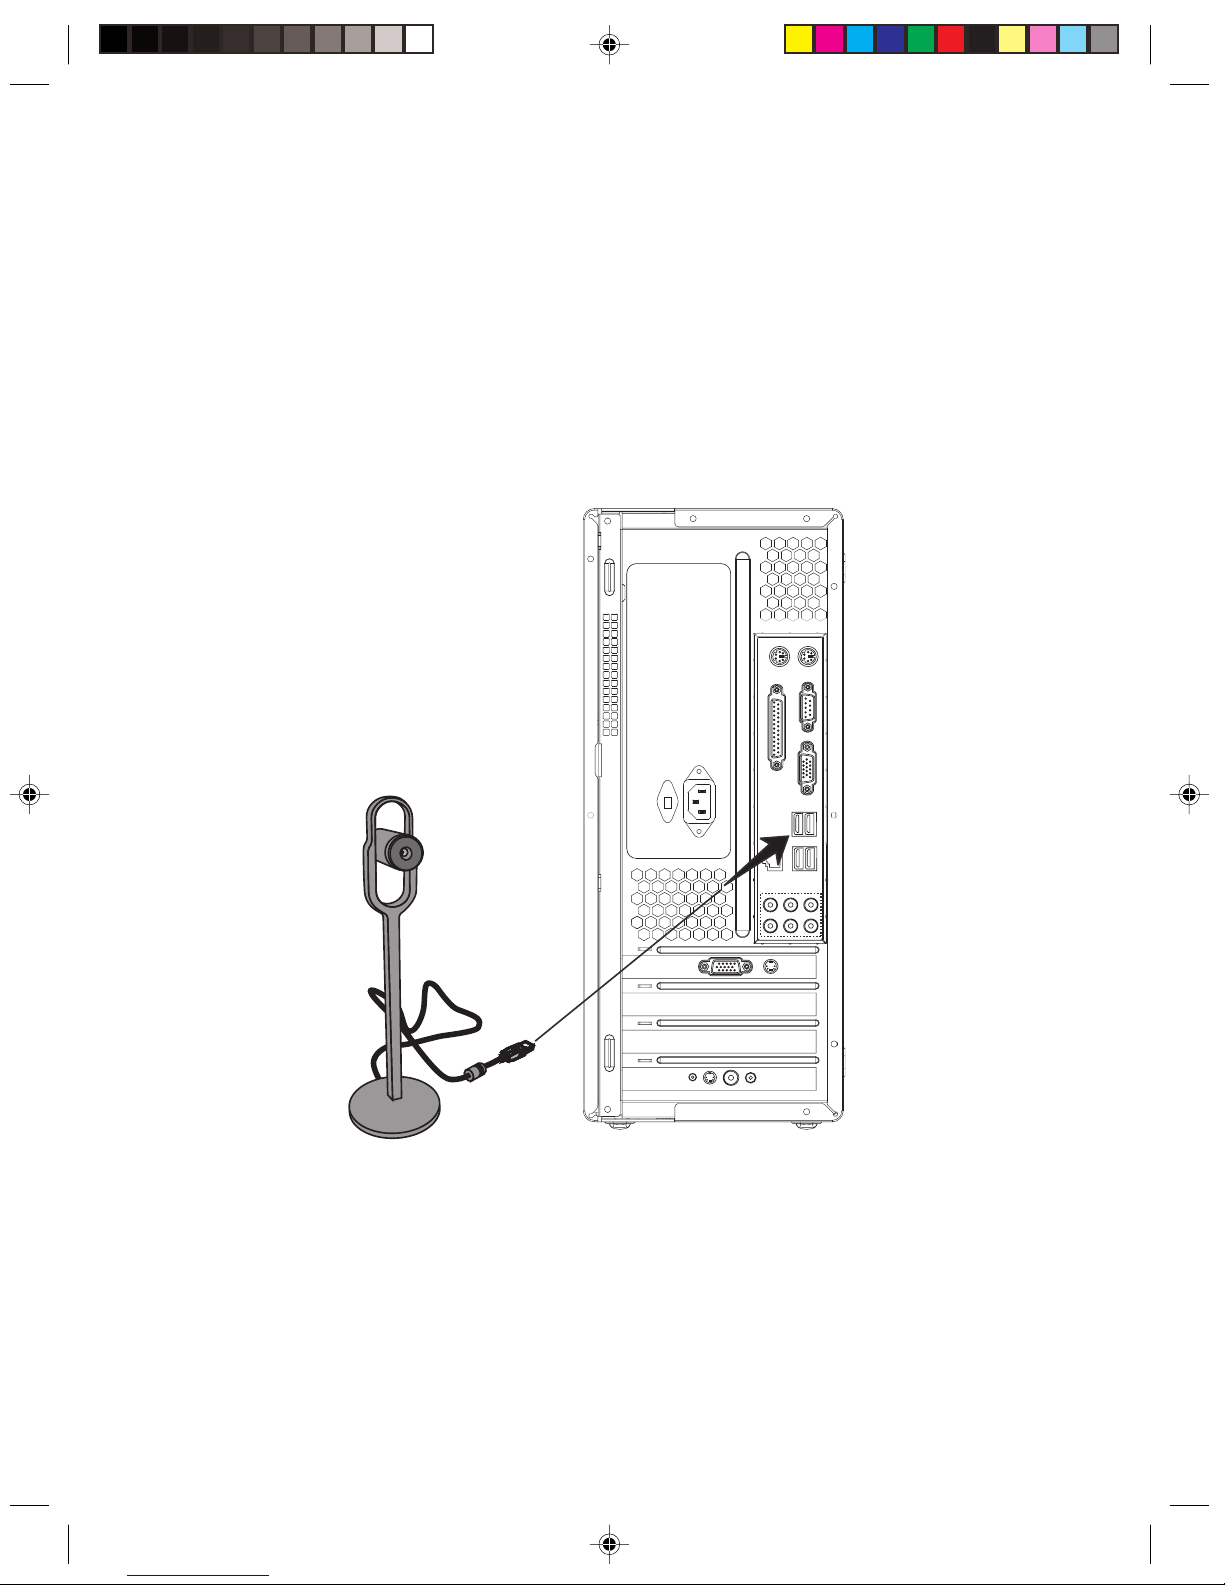
1.8 Connecting CCD Camera
For models that are equipped with cameras, we suggest you connect CCD camera to the USB connector on
the computer with a USB cable, as shown in the following figure. For the detailed instructions, please see the
manual that comes with the camera.
17
Lenovo 3000 Q Series User Manual
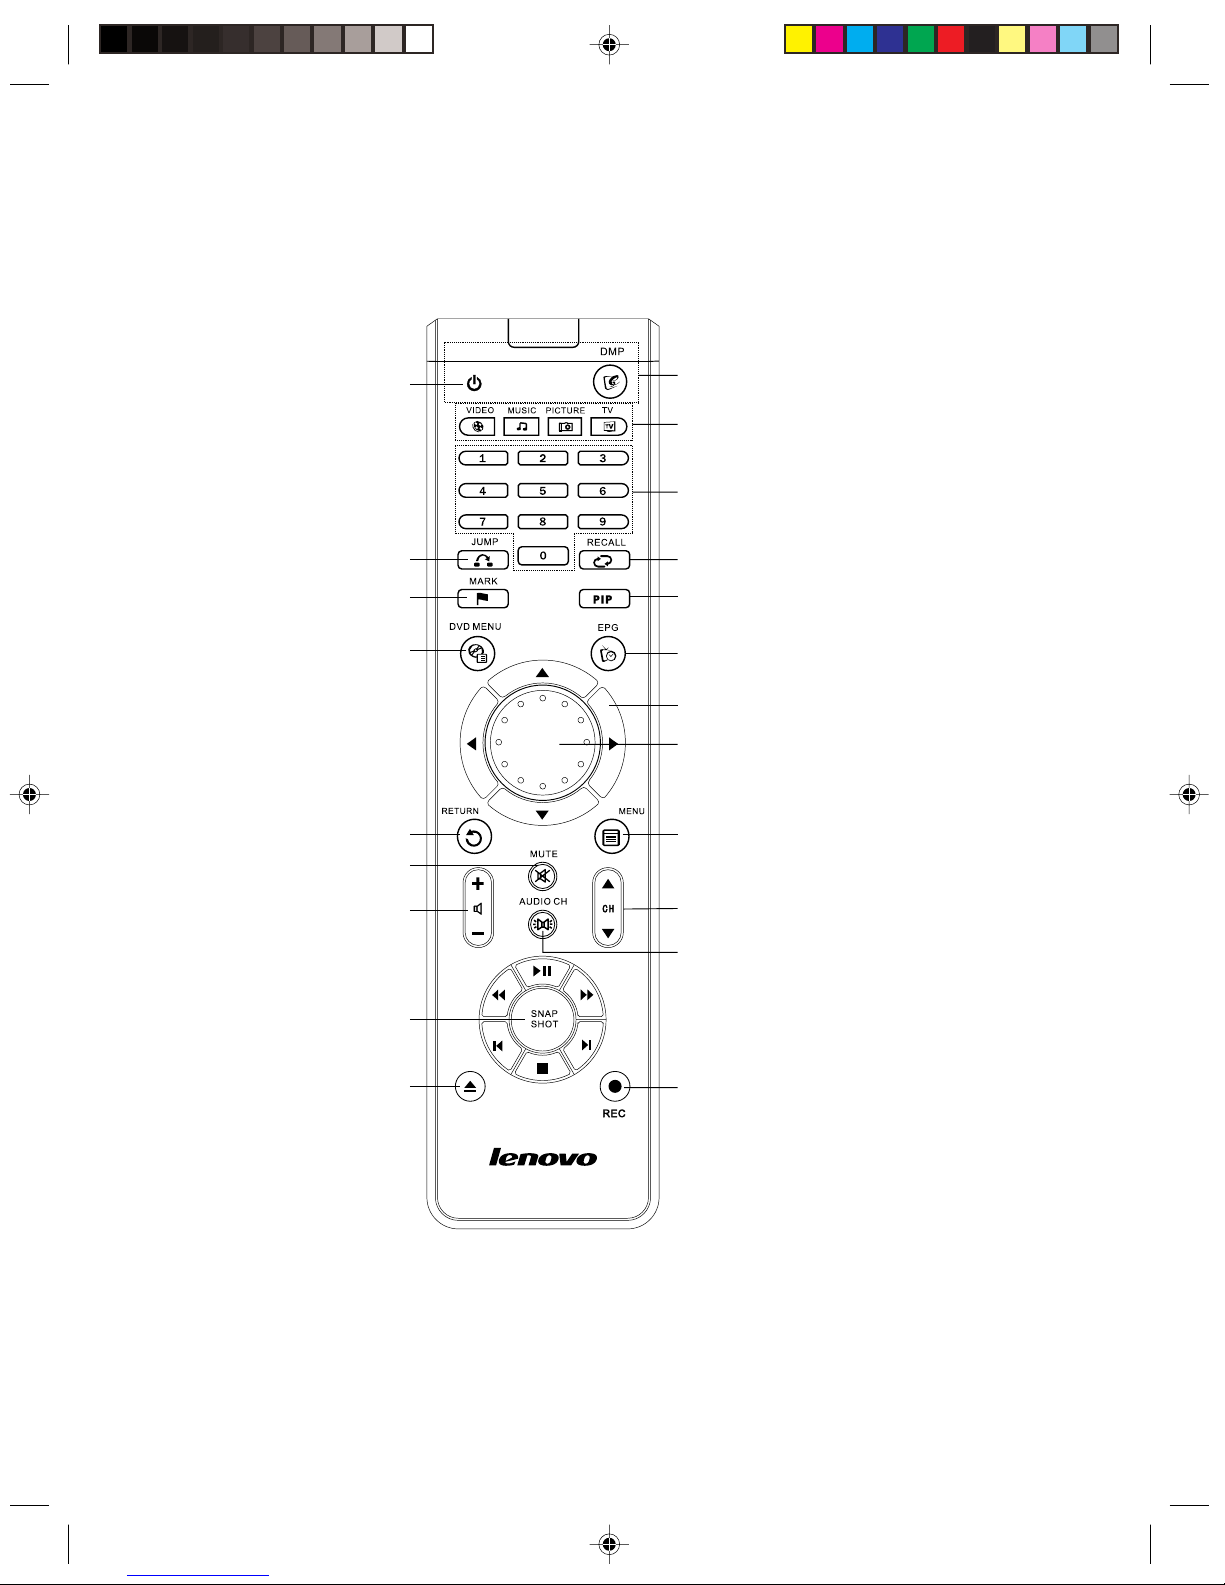
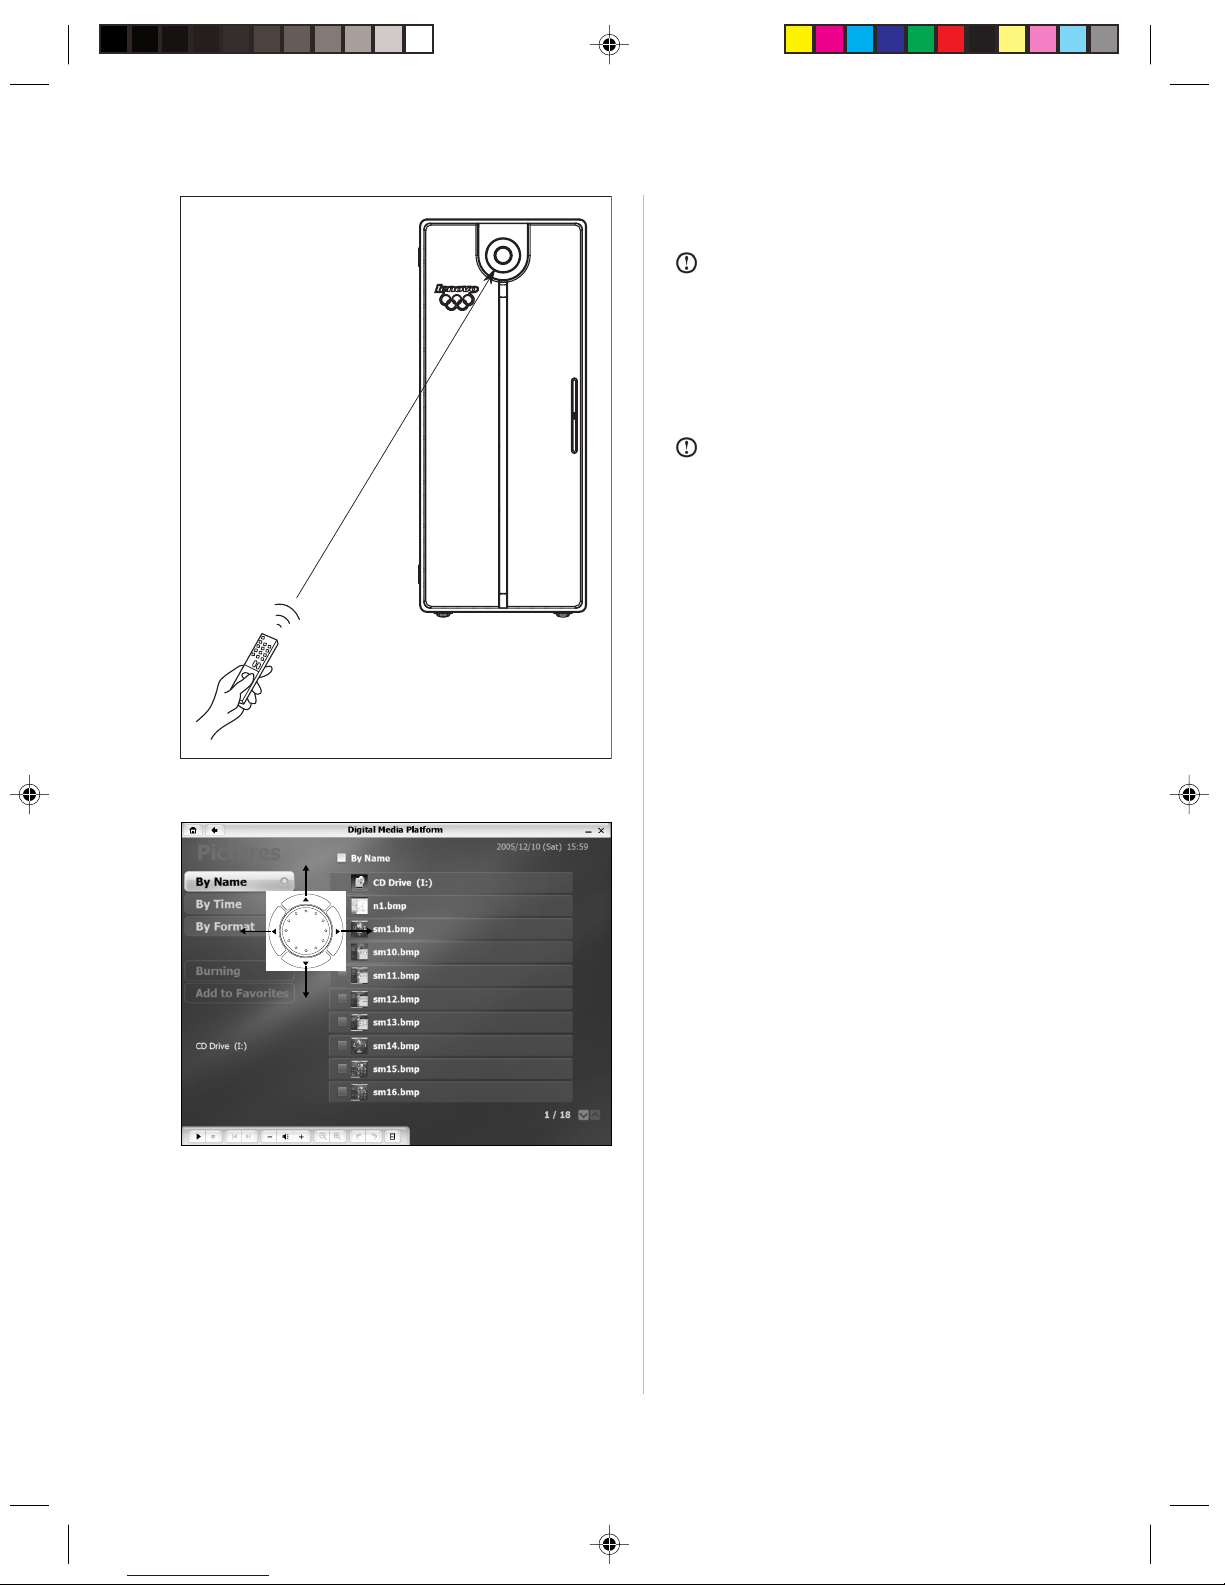
1.9 The remote control
The remote control should be associated with the remote control receiver on the chassis,Please adjust the
degree to get the best wireless connection.
Mark: check mark
DVD Menu
Switch to DVD Main Menu
Jump
Return
Return to previous menu
Mute
Volume adjust
Play Control
Snap shot
Play/Pause
Fast Backward/Fast Forward
Prev Chapter/Next Chapter
Stop
Open/Close optical drive
Windows mode
Windows startup key
Digital Media Platform
Digital Media Platform startup key
Video Music Picture TV
Four entertainment function switch key. Press anykey,
can enter into the relevant function
Number
TV channel number key and number input key
The channel recall /reread
Circumrotate center key: Roll the menu option
Press center key:confirm the option
Invalid Key
Switch channel/Switch play speed
Volume Balance: Switch to left, right and double track
Press once, Switch to one mode
Record the program
Direction Key: Move the focus
Invalid Key
Menu: display the OSD Menu
18
Lenovo 3000 Q Series User Manual
Remote control usage —
Direction key
In the Digital Media Platform, the focus will
move along with the dial turning.
Press Up or Down direction key, the focus
will move up or down.
Press Left or Right direction key, the focus
will move to the left or right.
Remote control usage
Note:
To use the remote control, point it at
the remote sensor on the PC please!
Use the remote control at a maximum
distance of 10m from the remote sensor
and at a maximum of 30degrees off center
of the remote sensor.
Note:
the remote control effect is affected
by the chassis position, entironment
(including the temperature, sunlight and
etc.) and the battery volume .

19
Lenovo 3000 Q Series User Manual
Remote control usage — Return
key
If you want quit function, press the Return
key.
Remote control usage — Menu
key
Press Up or Down direction key, you can
select which option to be adjusted.
After confirming the option, press Right
direction key, to choose parameters.
Press Up or Down direction key, you can
select which parameter to be adjusted.
Press Left or Right direction key to adjust
the parameter value.
Remote control usage — Menu
key
In the Digital Media Platform, press the
Menu key, the setup menu will appear. We
can set the playing parameter in the menu.

20
Lenovo 3000 Q Series User Manual

1
2
3
4
5
2
This chapter provides the following:
1.Driver and Application Auto-installation
2.OneKey Recovery
By using the OneKey Recovery function, it will restore your C partition back to the
orginal factory default or to the most recent backup saved. All data in the C partition
will then be erased. Other partitions in the hard disk will not change.
Note:
Your C partition must use the FAT32 partition
format to successfully use the OneKey Recovery
function.
System Installation
Chapter 2
21
Lenovo 3000 Q Series User Manual
 Loading...