

Lenovo 2U Installation Instructions Manual
Rack installation instructions
Review the documentation that comes with the rack cabinet for safety and cabling information. Before
you install the server in a rack cabinet, review the following guidelines:
v Two or more people are required to install devices 2U or larger in a rack cabinet.
v One or more people are required to install devices 1U or larger in a rack cabinet.
v Make sure that the room air temperature is below 40°C (104°F).
v Do not block any air vents; usually 15 cm (6 in.) of space provides proper airflow.
v Do not leave open spaces above or below an installed server in your rack cabinet. To help prevent
damage to server components, always install a blank filler panel to cover the open space and to help
ensure proper air circulation.
v Install the server only in a rack cabinet with perforated doors.
v Plan the device installation starting from the bottom of the rack cabinet.
v Install the heaviest device in the bottom of the rack cabinet.
v Always install the tip plates on the rack.
v Do not extend more than one device out of the rack cabinet at the same time.
v Remove the rack doors and side panels to provide easier access during installation.
v Connect the server to a properly grounded outlet.
v Do not overload the power outlet when you install multiple devices in the rack cabinet.
v Install the server in a rack that meets the following requirements:
– Minimum depth of 70 mm (2.76 in.) between the front mounting flange and inside of the front door.
– Minimum depth of 157 mm (6.18 in.) between the rear mounting flange and inside of the rear door.
Use safe practices when lifting.
≥18 kg (39.7 lb)
Do not place any objects on top of
rack-mounted devices.
Notes:
1. When you install a 2U server, be sure to install the rails in the bottom U of the 2U area in the rack.
2. Cage nuts and clip nuts may be required to install the server in a rack cabinet.
3. Your server might look different from the servers that are illustrated, and some parts of the rack
installation kit might not be used.
≥32 kg (70.5 lb) ≥55 kg (121.2 lb)
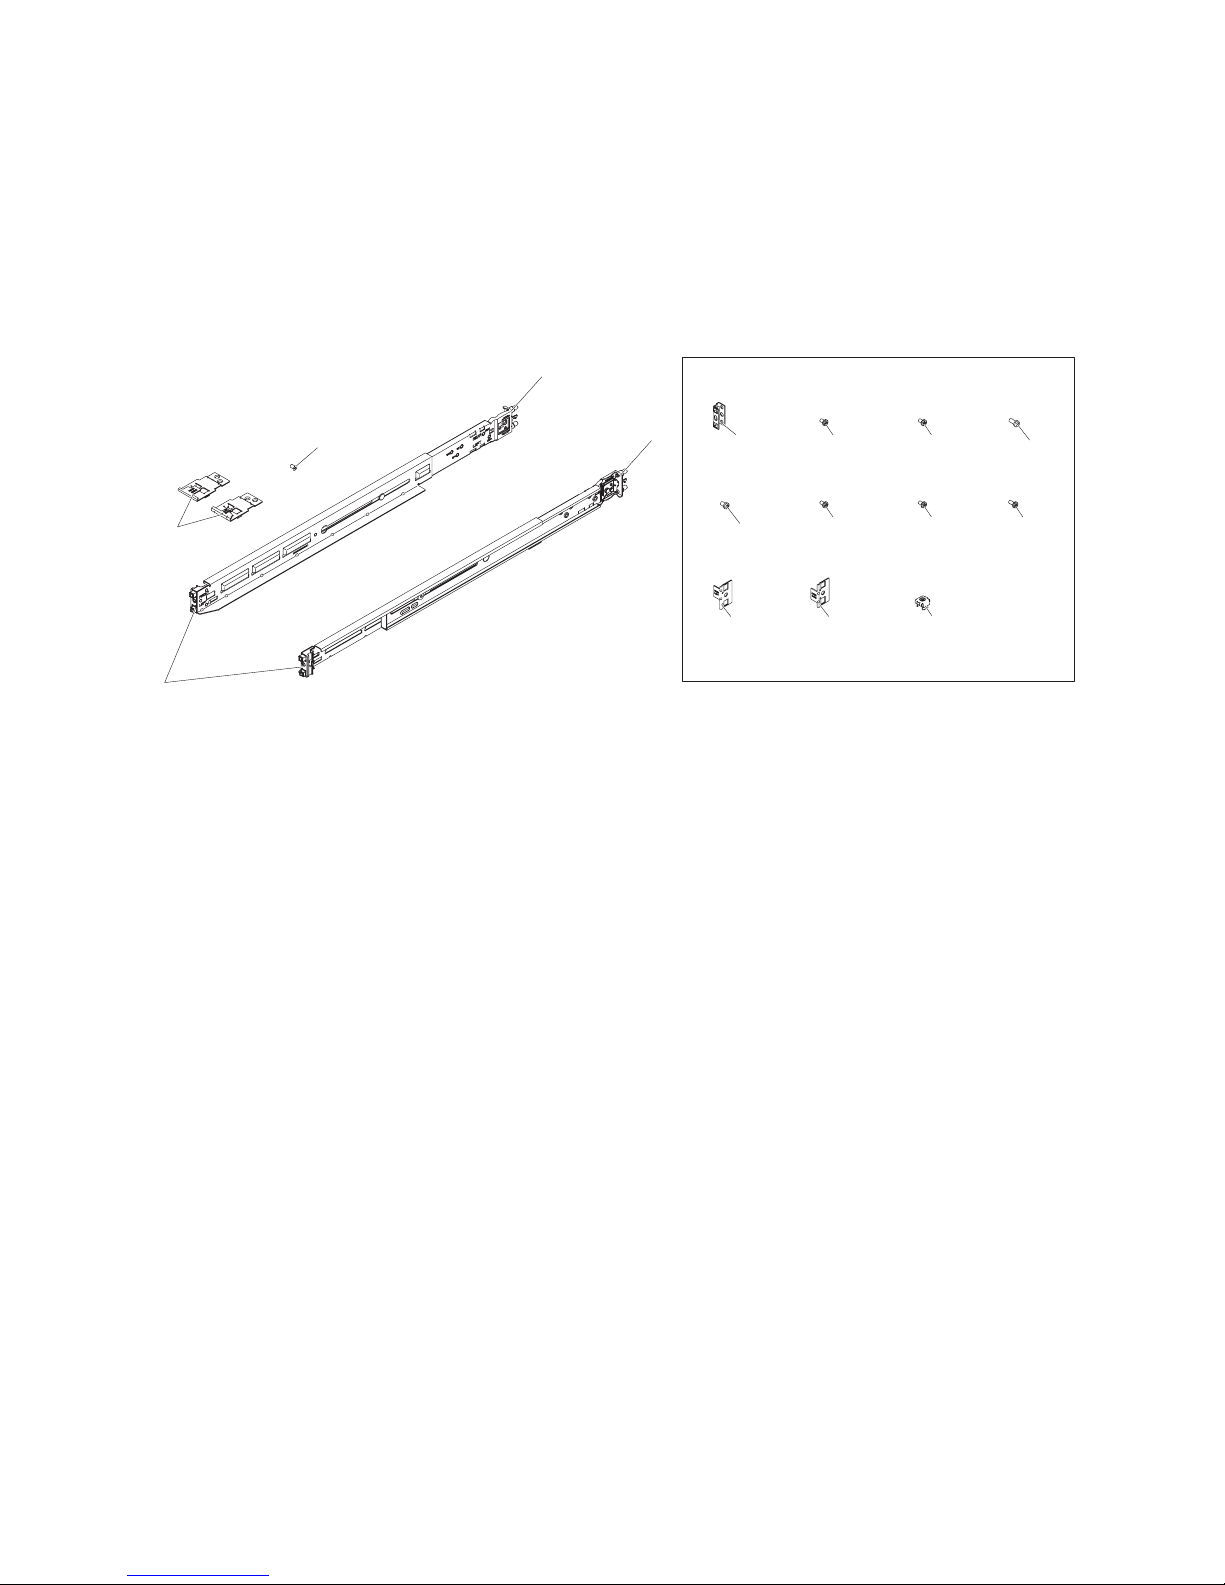
The following illustration shows the items that you need to install the server in the rack cabinet. If any
items are missing or damaged, contact your place of purchase.
Notes:
1. Some items come with the server, not in the rack installation kit.
2. You will need the components in the screw kit option to install the rails in a rack with threaded holes.
3. For the 1U server, if the rails in your rack installation kit came with shipping screws, remove them
before you begin the following installation procedure.
Shipping
brackets
Front of rails
Countersunk head
10-32 screws
for shipping brackets
(2)
(left)
(right)
Adapters
(4)
M4 screws
(L8)(8)
2U shipping
bracket
(left)
For racks with threaded-holes
10-32 screws
(4)
M5 screws
(2)
2U shipping
bracket
(right)
12-24 screws
(2)
M6 screws
(2)
Cage nuts
(2)
M4 screws
(L12)(2)
10-32 screws
(L12)(2)
2
Installing a 2U server into the rack
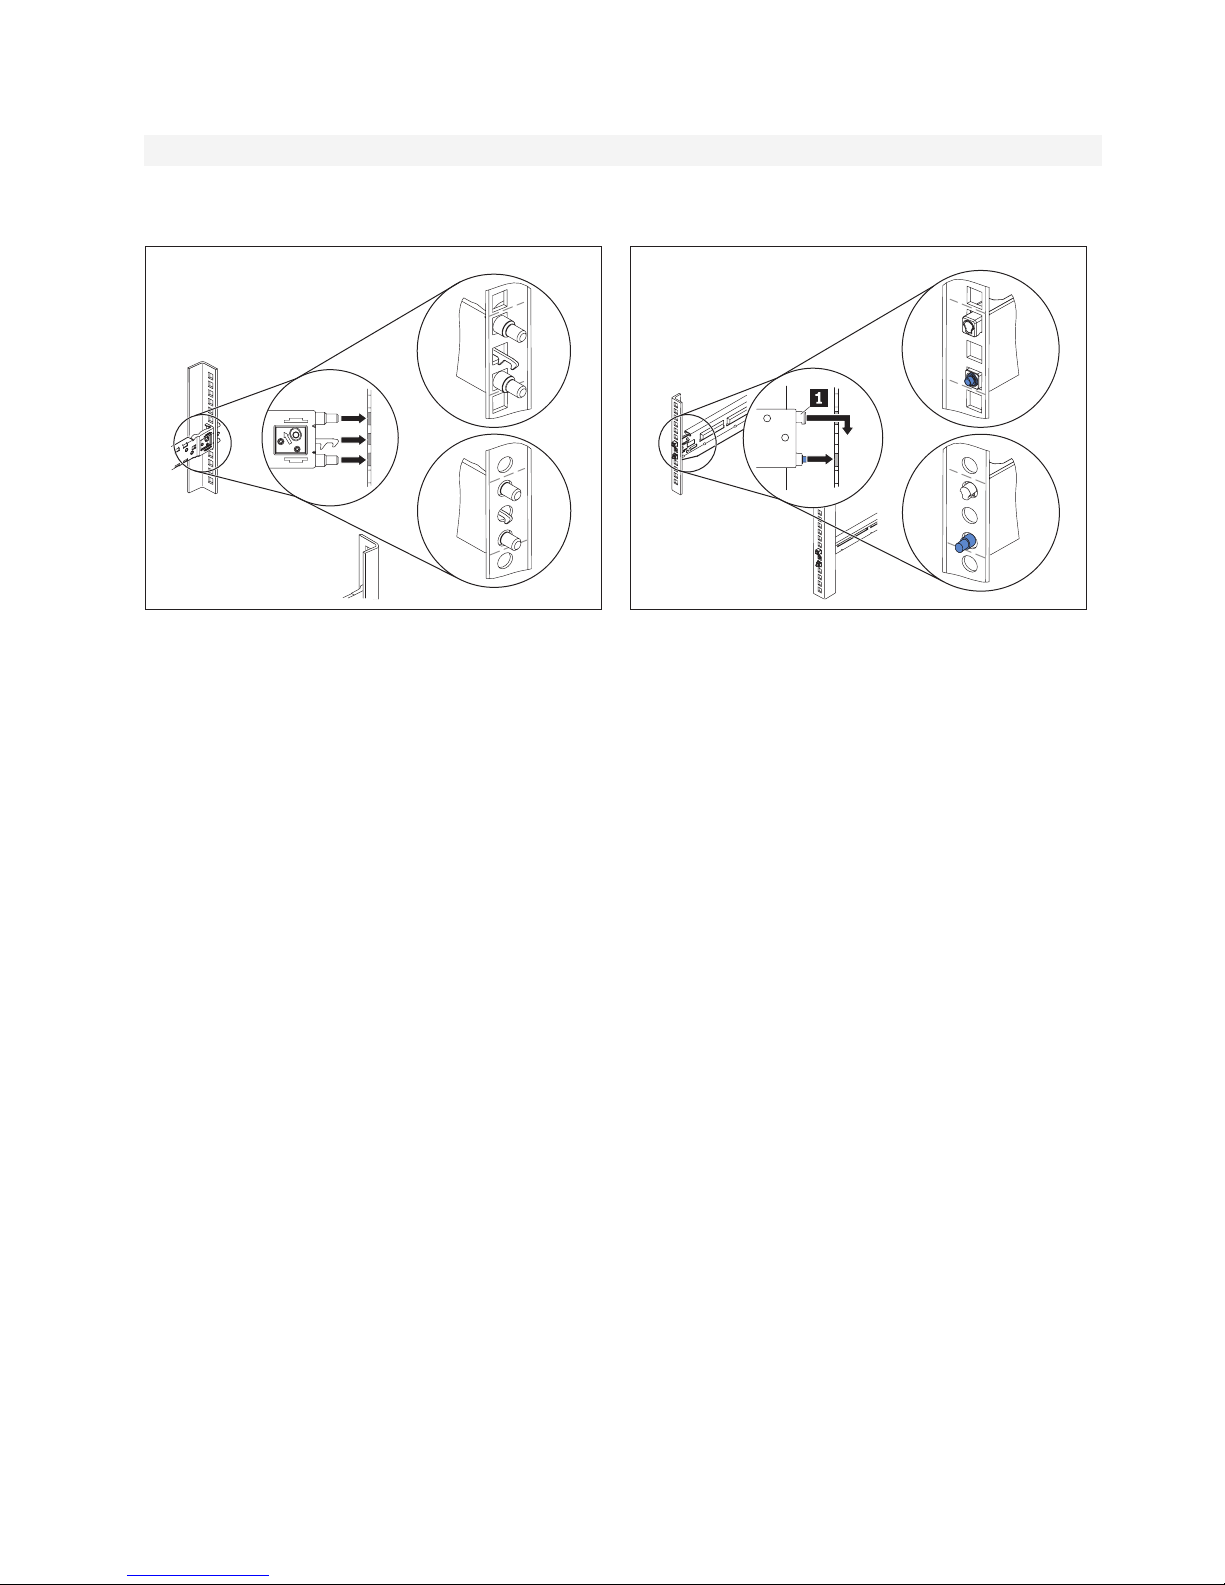
For rack with square-shaped or circle-shaped holes
Square-shaped holes
1
Rack Rear
Circle-shaped holes
Installing the rear end of the rails in a rack with
non-threaded holes.
Note: The non-threaded holes on the rack will
either be square-shaped or circle-shaped.
Choose one of the rails for installation. By facing
the front side of the racks, line up the pins on the
rear of the rail with either the square-shaped or
circle-shaped holes on the rear of the rack. Push the
rail so that the pins go into the holes and latches
into place.
Square-shaped holes
2
Rack Front
Circle-shaped holes
Installing the front end of the rails in a rack with
non-threaded holes.
Pull the rail forward and insert the pins 1 on the
front of the rail into either the square-shaped or
circle-shaped holes on the front of the rack. Drop
the rail down until it latches into place.
Repeat steps 1 and 2 to install the other rail. Make
sure that each rail is securely engaged in the rack.
Go to step 3.
3
For rack with threaded-holes
1
Before installing the rails in rack with threaded
holes, first install the adapters on the front and
rear side of the rails.
Choose one of the rails for installation. Line up the
pins on the front of the rail with the two
circle-shaped holes of the adapter 1. Push the
adapter so that the pins go into the holes and the
front adapter latches on the rail.
Align the 10-32 (L8) screw 2 with the middle hole
of both the adapter and rail, then install the 10-32
(L8) screw.
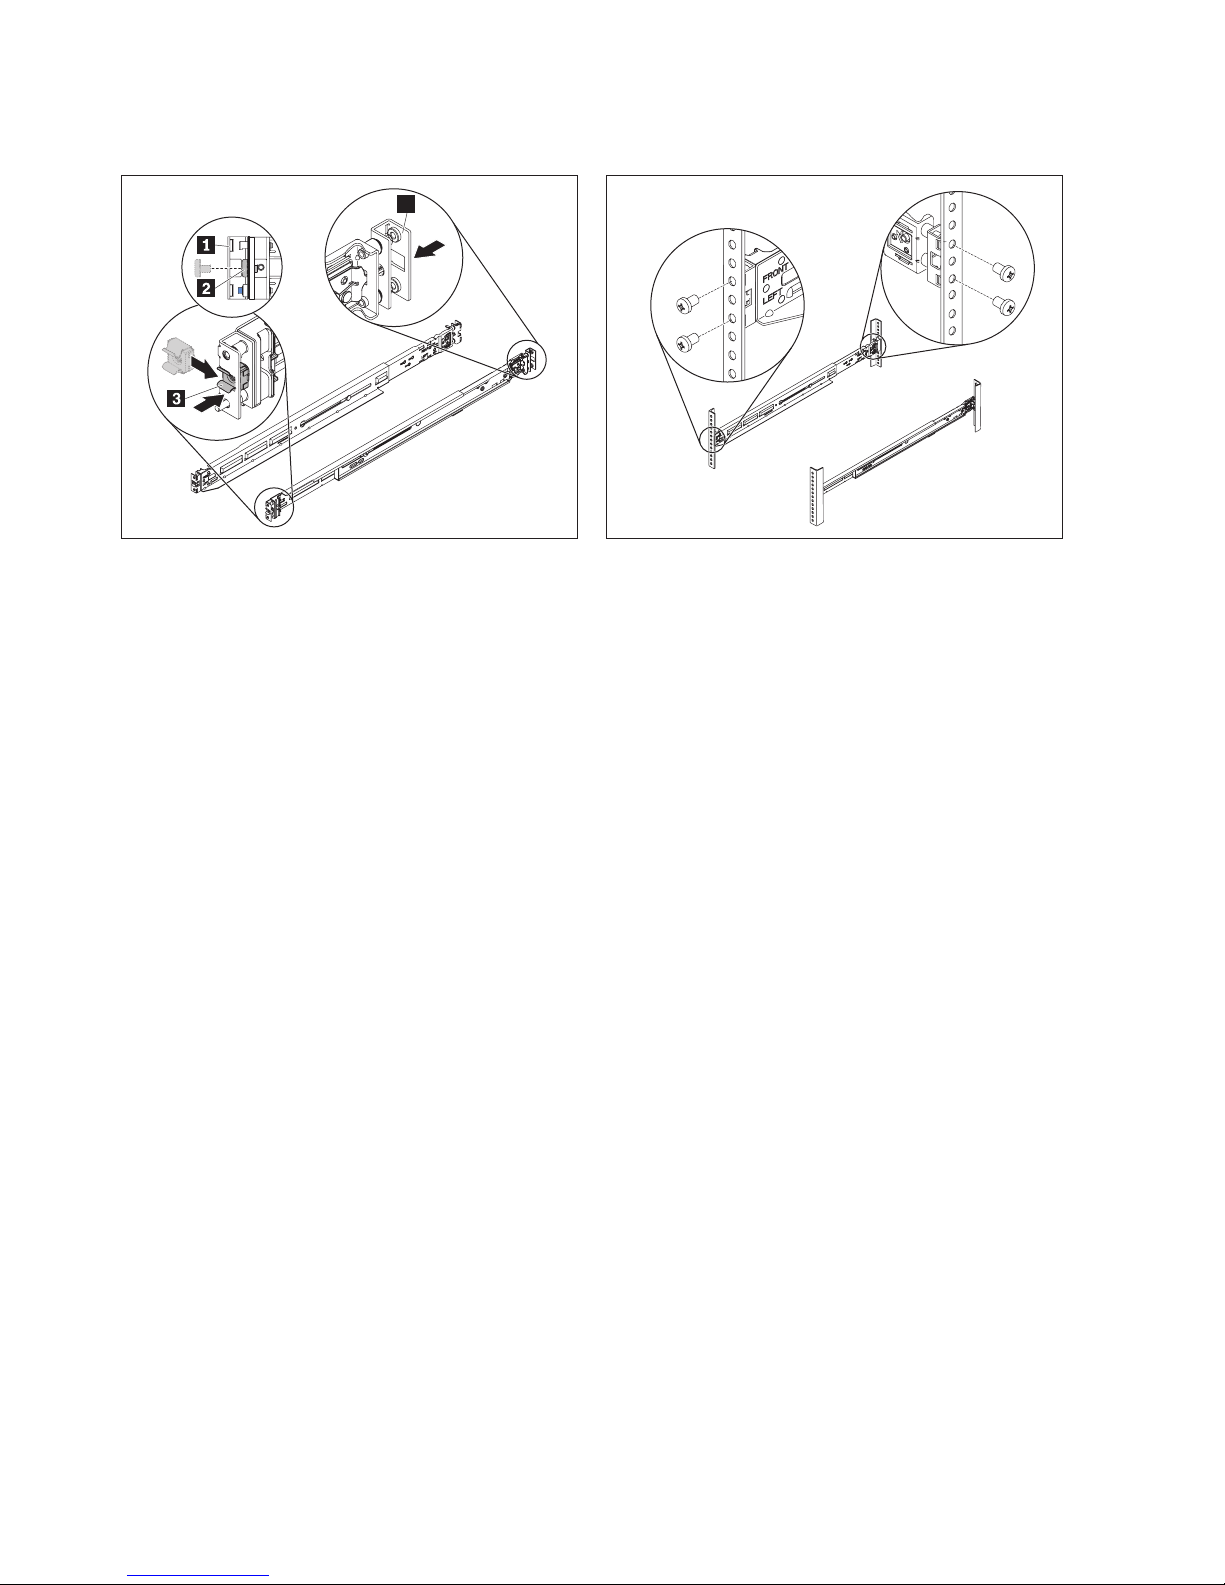
4
2
Installing the rails in a rack with threaded holes.
Align the pins on the rear of the rail and attached
adapter with the holes on the rear of the rack; then
install the M4 (L8) screws to secure the rail to the
rear of the rack. Repeat this step for the front of the
rail.
Repeat steps 1 and 2 to install the other rail. Make
sure that each rail is securely installed in the rack.
Go to step 3.
Slide the cage nut 3 into the adapter. You may
need to slightly squeeze the cage nut in order to do
so.
Note: For racks that have 10-32 thread, the 10-32
cage nut is not required.
Line up the pins on the rear of the rail with the
three circle-shaped holes on the adapter. Push the
adapter 4 so that the pins go into the holes and
the adapter latches on the rail.
4
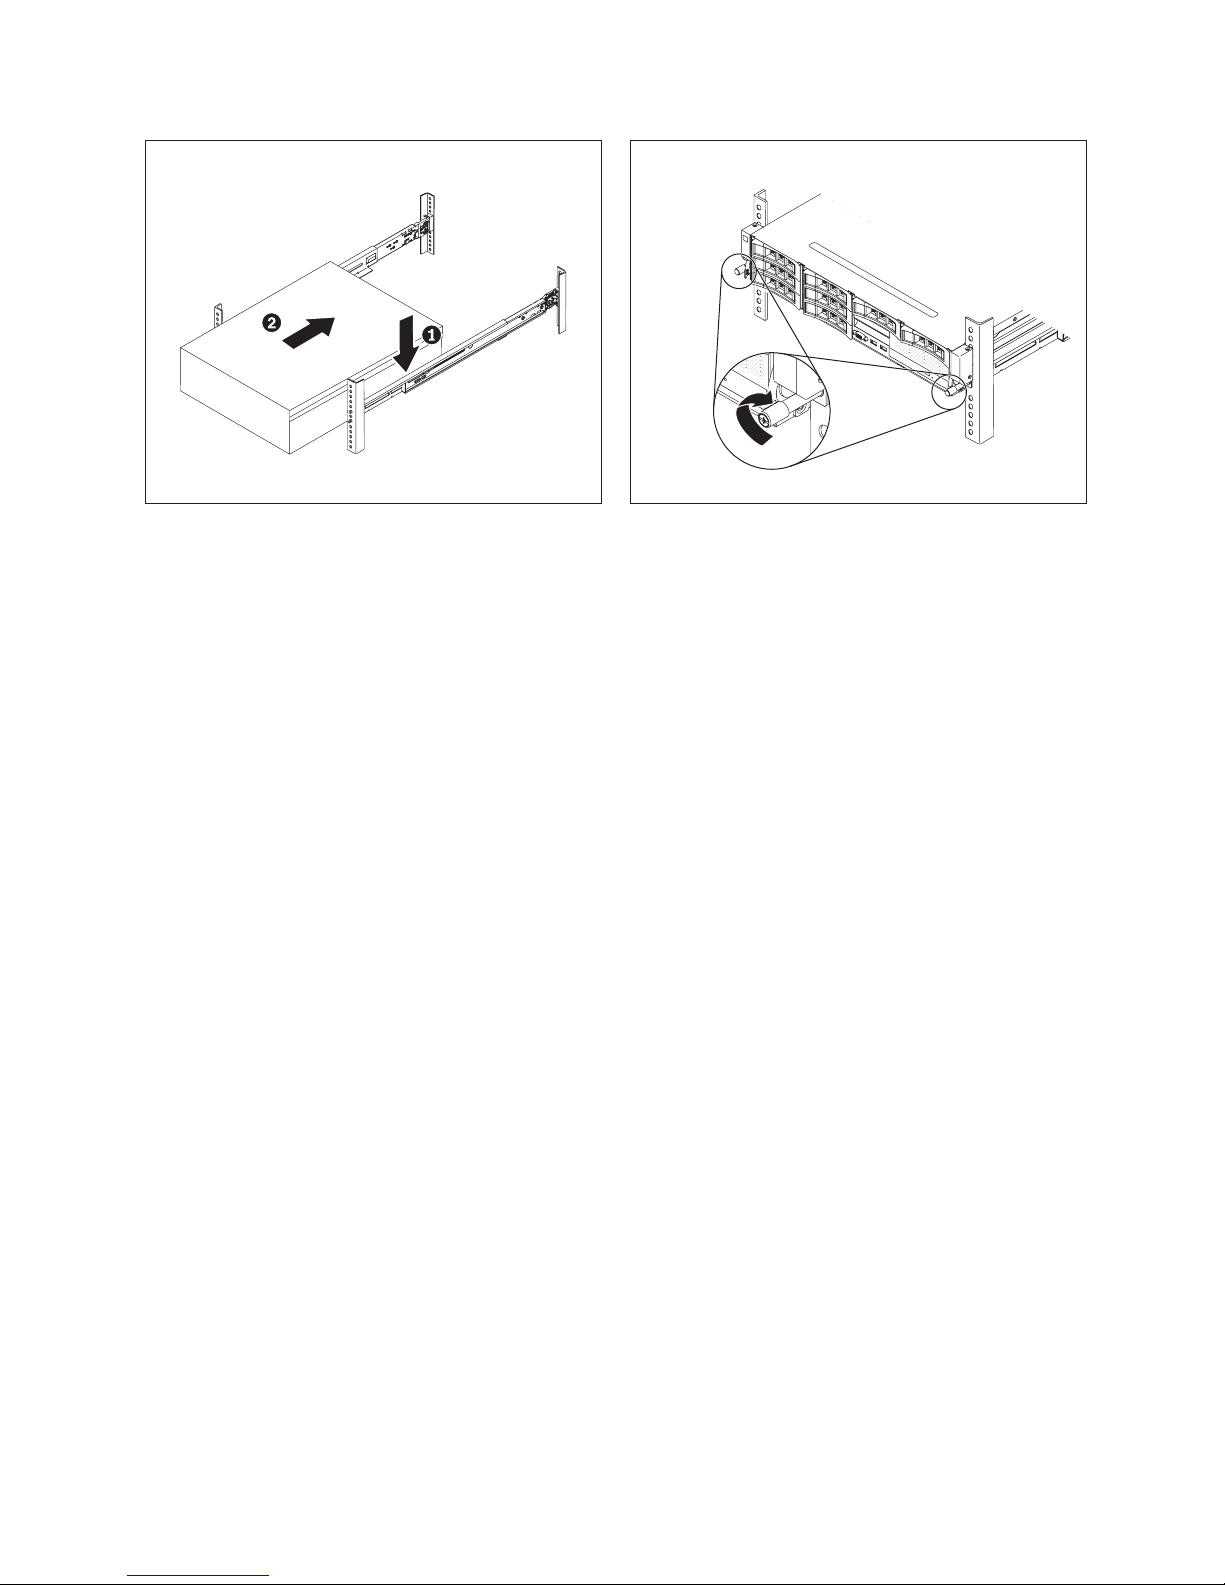
3 4
Installing the server on the rails.
Carefully hold the server and tilt it into position
over the rails, and then slowly lower the rear of the
server on the rails 1. Make sure that the server
sits on the rails securely and push the server 2 all
the way into the rack.
Tightening the front thumbscrews.
When you move the rack cabinet, or if you install
the rack cabinet in a vibration-prone area, tighten
the two thumbscrews on the front of the server to
secure the server in the rack cabinet.
5
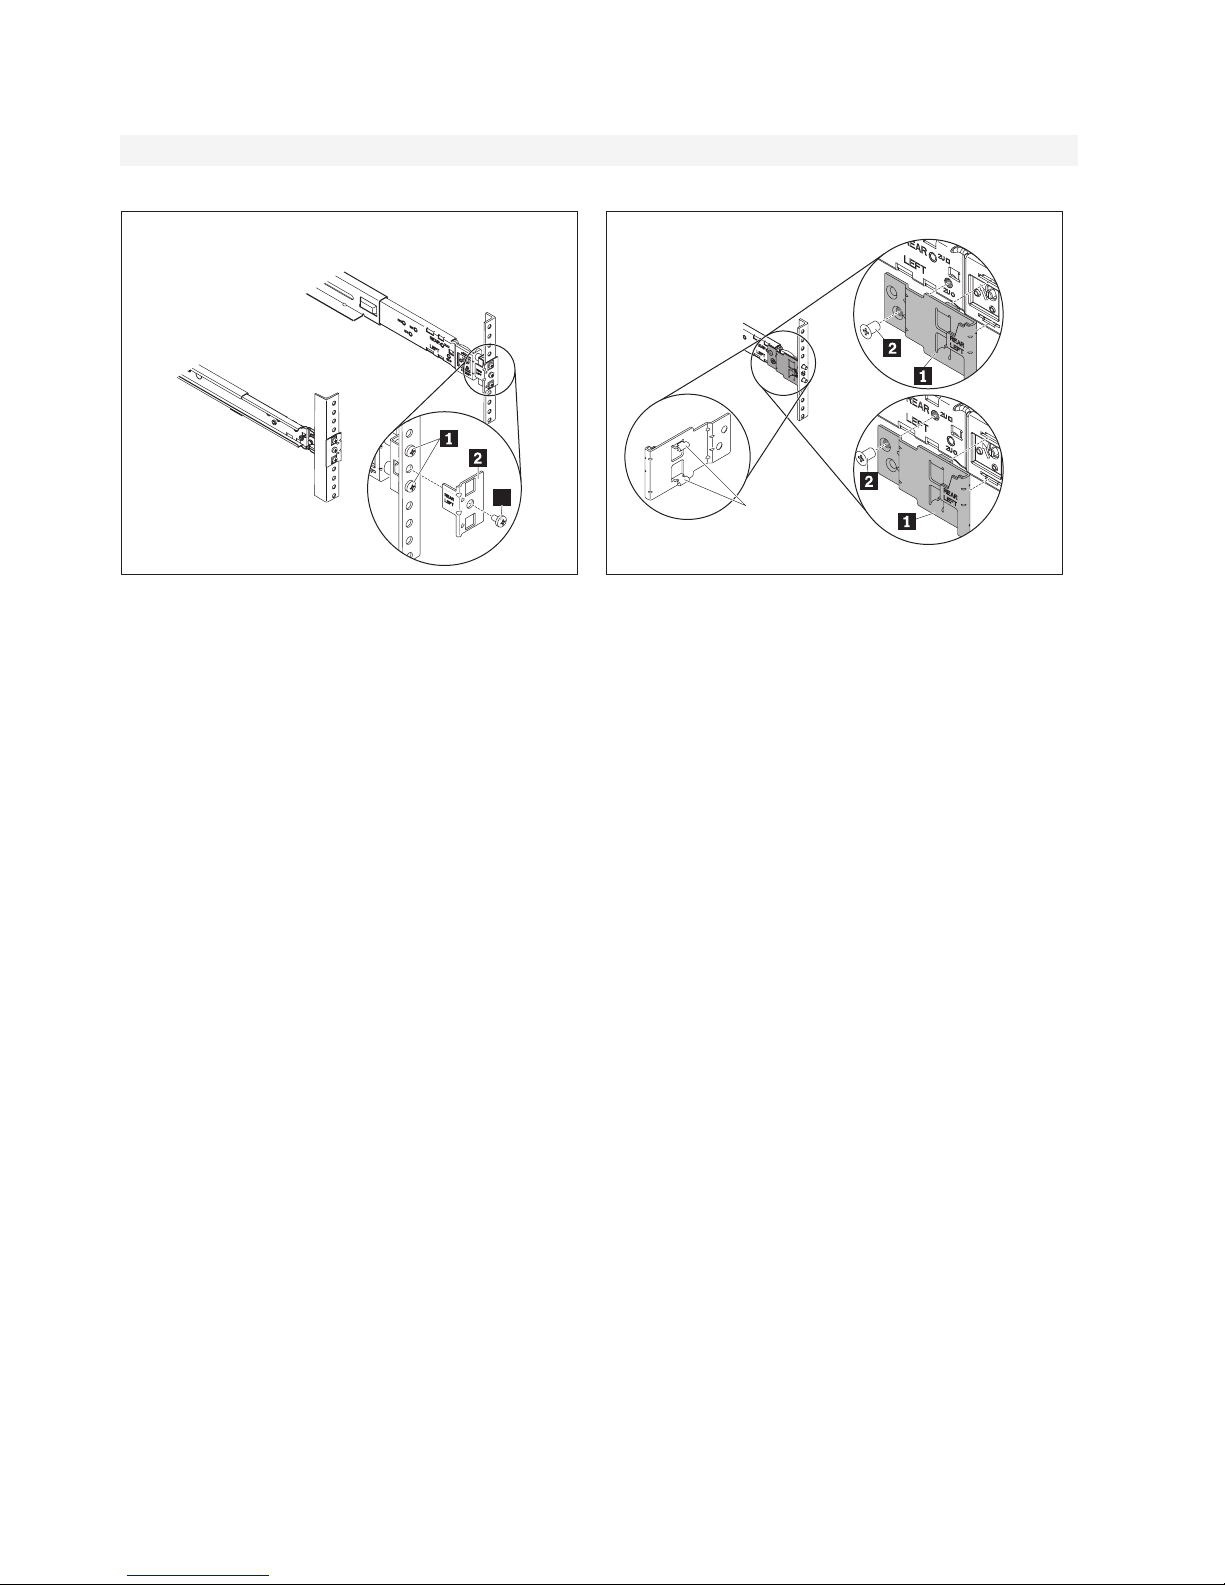
Installing shipping brackets to 2U server for shipping
Threaded-hole rack
1
Rack Rear
Securing the server in the rack with threaded
holes for shipping.
Note: If you have installed the server in a rack with
threaded holes, you must remove the server from
the rack before installing the shipping brackets.
For servers installed in the rack with threaded
holes, install the two M4 screws 1 to fasten the
rear of the rail to the rack. Align the holes on the
shipping bracket 2 marked "Left" to the rear of
the left rail; then, install the screw 3 to secure the
shipping bracket to the rack. When installing this
screw, make sure the thread in the hole matches the
specific screw that is needed.
Install the other shipping bracket to the rear of the
right rail.
3
Square-hole or
2
circle-hole rack
Rack Rear
Shipping
bracket
hooks
Securing the server in the rack with non-threaded
holes for shipping.
Note: The non-threaded holes will either be
square-shaped or circle-shaped.
For servers installed in the rack with non-threaded
holes, install the shipping bracket 1 marked "Left"
to the side of the left rail. Before installing, check
the non-threaded holes on the rack to see whether it
is square-shaped or circle-shaped. Afterwards, align
the shipping bracket to the corresponding hole on
the left side of the rail marked "2U". After knowing
which hole to align with, insert the shipping
bracket hooks into the holes of the rail. Upon
insertion, there should be no gap between the
shipping bracket and rail. Meanwhile, you will
notice the holes on the shipping bracket and rail are
not entirely aligned yet. For full alignment, shift the
shipping bracket to either the square-shaped or
circle-shaped icon. Finally, install the screw 2 to
secure the shipping bracket to the rack. Refer to the
following illustration for further details.
Circle-shaped holes
A
B
Square-shaped holes
6
Install the other shipping bracket to the rear of the
right rail.
 Loading...