

Lenovo 20NUS03R00 User Manual

L390, L390 Yoga, S2 4th Gen, and S2 Yoga
4th Gen
User Guide

Read this first
Before using this documentation and the product it supports, ensure that you read and understand the
following:
• Appendix A “Important safety information” on page 65
• Safety and Warranty Guide
• Setup Guide
First Edition (December 2018)
© Copyright Lenovo 2018.
LIMITED AND RESTRICTED RIGHTS NOTICE: If data or software is delivered pursuant to a General Services
Administration “GSA” contract, use, reproduction, or disclosure is subject to restrictions set forth in Contract No. GS35F-05925.

Contents
About this documentation . . . . . . . . iii
Chapter 1. Meet your computer. . . . . 1
Front . . . . . . . . . . . . . . . . . . . . 1
Base . . . . . . . . . . . . . . . . . . . . 3
Left . . . . . . . . . . . . . . . . . . . . 4
Right . . . . . . . . . . . . . . . . . . . . 6
Bottom . . . . . . . . . . . . . . . . . . . 8
Features. . . . . . . . . . . . . . . . . . . 9
Specifications . . . . . . . . . . . . . . . 10
Chapter 2. Get started with your
computer . . . . . . . . . . . . . . . . 11
Get started with Windows 10 . . . . . . . . . 11
Windows account . . . . . . . . . . . . 11
Windows user interface . . . . . . . . . . 12
Windows label . . . . . . . . . . . . . 13
Connect to networks. . . . . . . . . . . . . 13
Connect to the wired Ethernet . . . . . . . 13
Connect to Wi-Fi . . . . . . . . . . . . 13
Use Lenovo Vantage . . . . . . . . . . . . . 14
Interact with your computer . . . . . . . . . . 15
Use the keyboard shortcuts . . . . . . . . 16
Use the TrackPoint pointing device . . . . . 17
Use the trackpad . . . . . . . . . . . . 19
Use the multi-touch screen . . . . . . . . 20
Use multimedia . . . . . . . . . . . . . . . 22
Use audio . . . . . . . . . . . . . . . 22
Using the conventional camera . . . . . . . 22
Connect to an external display . . . . . . . 22
Get to know YOGA modes . . . . . . . . . . 24
Use ThinkPad Pen Pro (for selected models) . . . 25
Chapter 3. Explore your computer . . 27
Manage power . . . . . . . . . . . . . . . 27
Check the battery status . . . . . . . . . 27
Charge the battery . . . . . . . . . . . . 27
Check the battery temperature . . . . . . . 27
Maximize the battery life . . . . . . . . . 27
Set power button behaviors . . . . . . . . 27
Set the power plan . . . . . . . . . . . . 28
Transfer data . . . . . . . . . . . . . . . . 28
Set up a Bluetooth connection . . . . . . . 28
Set up a NFC connection . . . . . . . . . 28
Use a microSD card . . . . . . . . . . . 29
Airplane mode . . . . . . . . . . . . . . . 29
Chapter 4. Accessories . . . . . . . . 31
Purchase options . . . . . . . . . . . . . . 31
Chapter 5. Secure your computer
and information . . . . . . . . . . . . 33
Lock the computer . . . . . . . . . . . . . 33
Use passwords . . . . . . . . . . . . . . . 33
Password types . . . . . . . . . . . . . 33
Set, change, and remove a password . . . . 34
Use fingerprint authentication (for selected
models) . . . . . . . . . . . . . . . . . . 35
Use face authentication (for selected models) . . . 35
Use firewalls and antivirus programs. . . . . . . 36
Chapter 6. Configure advanced
settings. . . . . . . . . . . . . . . . . 37
UEFI BIOS . . . . . . . . . . . . . . . . . 37
What is UEFI BIOS . . . . . . . . . . . . 37
Enter the BIOS menu . . . . . . . . . . . 37
Navigate in the BIOS interface . . . . . . . 37
Change the startup sequence . . . . . . . 37
Set the system date and time. . . . . . . . 38
Update UEFI BIOS . . . . . . . . . . . . 38
Recovery information . . . . . . . . . . . . 38
Restore system files and settings to an earlier
point . . . . . . . . . . . . . . . . . 38
Restore your files from a backup . . . . . . 38
Reset your computer . . . . . . . . . . . 38
Use advanced options . . . . . . . . . . 39
Windows automatic recovery. . . . . . . . 39
Create and use a recovery USB device . . . . 39
Install Windows 10 and drivers . . . . . . . . . 40
Chapter 7. CRU replacement . . . . . 43
What are CRUs . . . . . . . . . . . . . . . 43
Disable Fast Startup and the built-in battery. . . . 43
Replace a CRU . . . . . . . . . . . . . . . 44
Keyboard . . . . . . . . . . . . . . . 44
Base cover assembly . . . . . . . . . . . 48
Memory module . . . . . . . . . . . . . 50
M.2 solid-state drive . . . . . . . . . . . 52
Coin-cell battery. . . . . . . . . . . . . 56
Chapter 8. Help and support . . . . . 59
FAQ . . . . . . . . . . . . . . . . . . . 59
Error messages . . . . . . . . . . . . . . . 60
Beep errors . . . . . . . . . . . . . . . . 61
Self-help resources . . . . . . . . . . . . . 62
© Copyright Lenovo 2018 i

Call Lenovo . . . . . . . . . . . . . . . . 63
Before you contact Lenovo . . . . . . . . 63
Lenovo Customer Support Center . . . . . . 63
Purchase additional services. . . . . . . . . . 64
Appendix A. Important safety
information . . . . . . . . . . . . . . . 65
Safety notices . . . . . . . . . . . . . . . 65
Important information about using your
computer . . . . . . . . . . . . . . . . . 65
Conditions that require immediate action . . . . . 67
Service and upgrades . . . . . . . . . . . . 68
Power cords and power adapters . . . . . . . . 69
Extension cords and related devices. . . . . . . 69
Plugs and outlets . . . . . . . . . . . . . . 70
Power supply statement . . . . . . . . . . . 70
External devices . . . . . . . . . . . . . . 70
General battery notice . . . . . . . . . . . . 71
Notice for built-in rechargeable battery. . . . . . 71
Lithium coin-cell battery notice . . . . . . . . . 71
Heat and product ventilation . . . . . . . . . . 73
Electrical current safety information . . . . . . . 74
Liquid crystal display (LCD) notice . . . . . . . 75
Use headphones or earphones . . . . . . . . . 75
Choking hazard notice . . . . . . . . . . . . 75
Plastic bag notice . . . . . . . . . . . . . . 75
Glass parts notice . . . . . . . . . . . . . . 76
Static electricity prevention . . . . . . . . . . 76
Operating environment . . . . . . . . . . . . 76
Cleaning and maintenance . . . . . . . . . . 77
Appendix B. Accessibility and
ergonomic information . . . . . . . . 79
Accessibility information . . . . . . . . . . . 79
Ergonomic information . . . . . . . . . . . . 81
Appendix C. Supplemental
information about the Ubuntu operating
system . . . . . . . . . . . . . . . . . 83
Appendix D. Compliance
information . . . . . . . . . . . . . . . 85
Radio frequency compliance statements . . . . . 85
Wireless-related information . . . . . . . . 85
European Union — compliance with the Radio
Equipment Directive . . . . . . . . . . . 86
Brazil . . . . . . . . . . . . . . . . . 86
Mexico . . . . . . . . . . . . . . . . 87
Singapore . . . . . . . . . . . . . . . 87
Korea . . . . . . . . . . . . . . . . . 87
Environmental information of countries and
regions . . . . . . . . . . . . . . . . . . 87
Recycling and environmental information . . . 87
Important WEEE information . . . . . . . . 87
Japan recycling statements . . . . . . . . 88
Recycling information for Brazil . . . . . . . 89
Battery recycling information for the European
Union . . . . . . . . . . . . . . . . . 89
Recycling information for China . . . . . . . 90
Battery recycling information for Taiwan . . . 90
Battery recycling information for the United
States and Canada. . . . . . . . . . . . 90
Restriction of Hazardous Substances (RoHS)
Directive of countries and regions . . . . . . 91
Electromagnetic emission notices. . . . . . . . 93
Federal Communications Commission (FCC)
Supplier’s Declaration of Conformity . . . . . 93
FCC ID and IC Certification information. . . . 94
Industry Canada compliance statement . . . 94
European Union conformity . . . . . . . . 94
German Class B compliance statement. . . . 95
Japan VCCI Class B compliance statement . . 95
Japan compliance statement for products
which connect to the power mains with rated
current less than or equal to 20 A per phase . . 95
Japan notice for ac power cord . . . . . . . 95
Other compliance information . . . . . . . . . 95
Certification-related information . . . . . . 95
Regulatory labels . . . . . . . . . . . . 96
TCO certification . . . . . . . . . . . . 96
Export classification notice . . . . . . . . 96
Lenovo product service information for
Taiwan . . . . . . . . . . . . . . . . 96
Taiwan precautionary vision statement . . . . 96
Eurasian compliance mark. . . . . . . . . 96
Brazil audio notice . . . . . . . . . . . . 97
ENERGY STAR model information. . . . . . 97
Appendix E. Notices and
trademarks . . . . . . . . . . . . . . . 99
ii L390, L390 Yoga, S2 4th Gen, and S2 Yoga 4th Gen User Guide

About this documentation
• Illustrations in this documentation might look different from your product.
• Depending on the model, some optional accessories, features, and software programs might not be
available on your computer.
• Depending on the version of operating systems, some user interface instructions might not be applicable
to your computer.
• Documentation content is subject to change without notice. Lenovo makes constant improvements on the
documentation of your computer, including this User Guide. To get the latest documentation, go to
support.lenovo.com
• Microsoft
®
makes periodic feature changes to the Windows® operating system through Windows Update.
.
As a result, some information in this documentation might become outdated. Refer to Microsoft resources
for the latest information.
https://
© Copyright Lenovo 2018 iii

iv L390, L390 Yoga, S2 4th Gen, and S2 Yoga 4th Gen User Guide
Chapter 1. Meet your computer
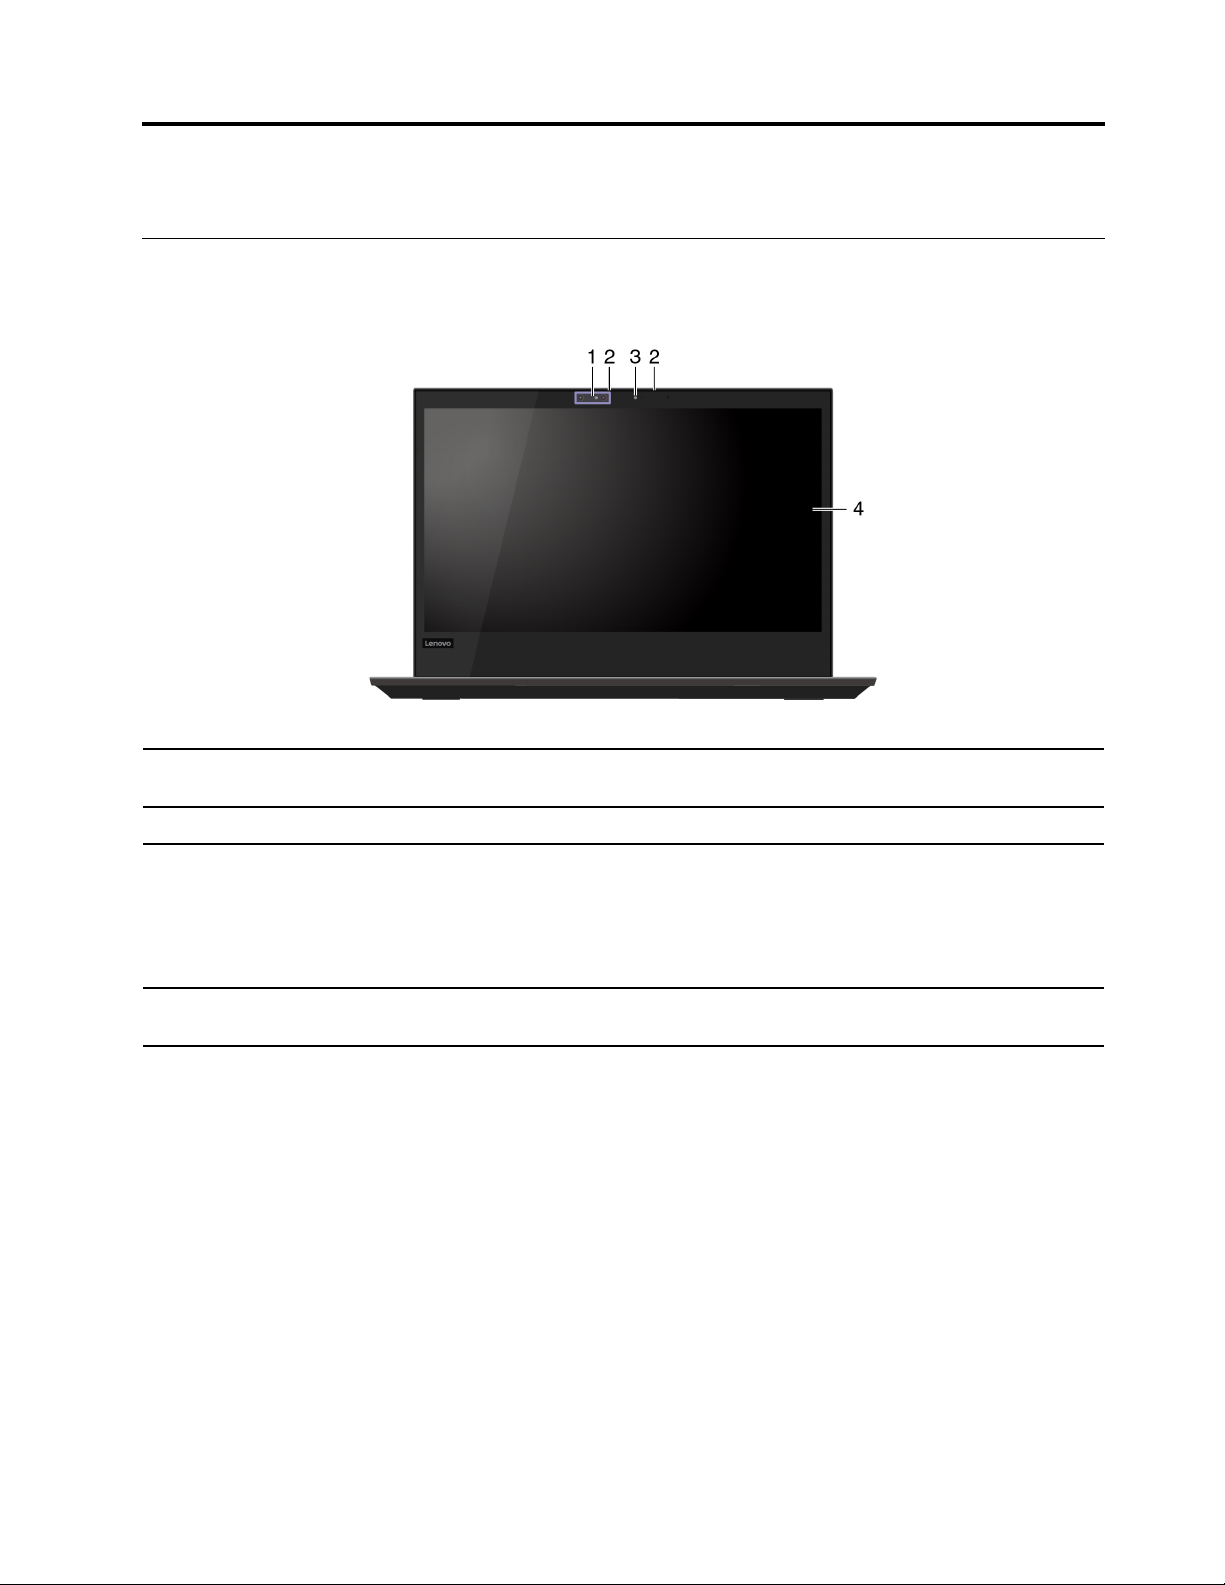
Front
Front (for ThinkPad L390 Yoga™ and ThinkPad S2 Yoga 4th Gen computers)
1. Infrared camera*
2. Microphones Capture or record sound and voice.
3. Front camera
4. Multi-touch screen*
Log in to your computer with face authentication. See “Use face authentication (for
selected models)” on page 35.
Take pictures or record videos by clicking Camera from the Start menu. The camera
indicator nearby is on when in use.
If you use other apps that support photographing, video chatting, and video
conference, the camera starts automatically when you enable the camera-required
feature from the app.
Enable you to use your computer with simple touch gestures. See “Use the multi-touch
screen” on page 20.
* for selected models
© Copyright Lenovo 2018 1

Front (for ThinkPad L390 and ThinkPad S2 4th Gen computers)
Take pictures or record videos by clicking Camera from the Start menu. The camera
indicator nearby is on when in use.
1. Front camera
If you use other apps that support photographing, video chatting, and video
conference, the camera starts automatically when you enable the camera-required
feature from the app.
2. Microphones Capture or record sound and voice.
3. Multi-touch screen*
Enable you to use your computer with simple touch gestures. See “Use the multi-touch
screen” on page 20.
* for selected models
2
L390, L390 Yoga, S2 4th Gen, and S2 Yoga 4th Gen User Guide
Base
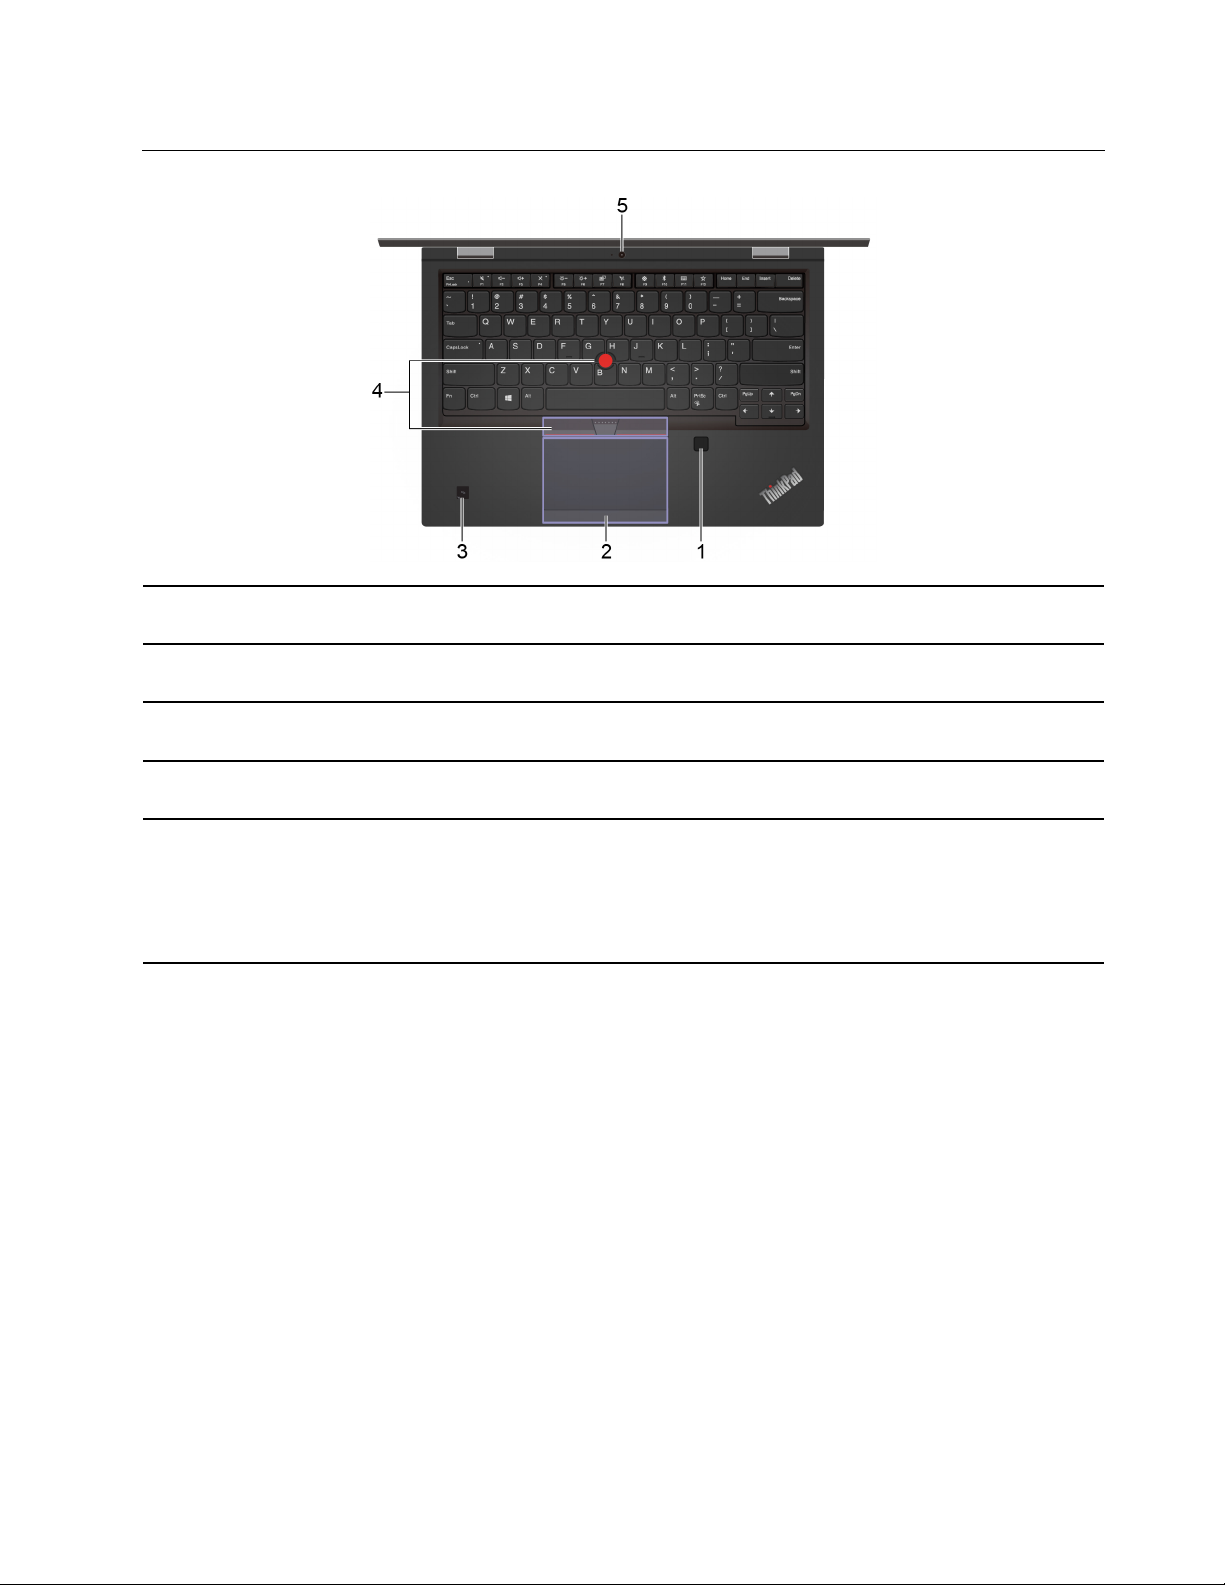
1. Fingerprint reader*
2. Trackpad
3. NFC mark*
4. TrackPoint
device
5. Rear camera*
®
pointing
* for selected models
Log in to your computer with enrolled fingerprints. See “Use fingerprint authentication
(for selected models)” on page 35.
Perform finger touch and all the functions of a traditional mouse. See “Use the
trackpad” on page 19.
Your computer supports NFC (near field communication). You can share information
with another NFC-enabled device. See “Set up a NFC connection” on page 28.
Perform all the functions of a traditional mouse. See “Use the TrackPoint pointing
device” on page 17.
Take pictures or record videos by clicking Camera from the Start menu. The camera
indicator nearby is on when in use.
If you use other apps that support photographing, video chatting, and video
conference, the camera starts automatically when you enable the camera-required
feature from the app.
Chapter 1. Meet your computer 3
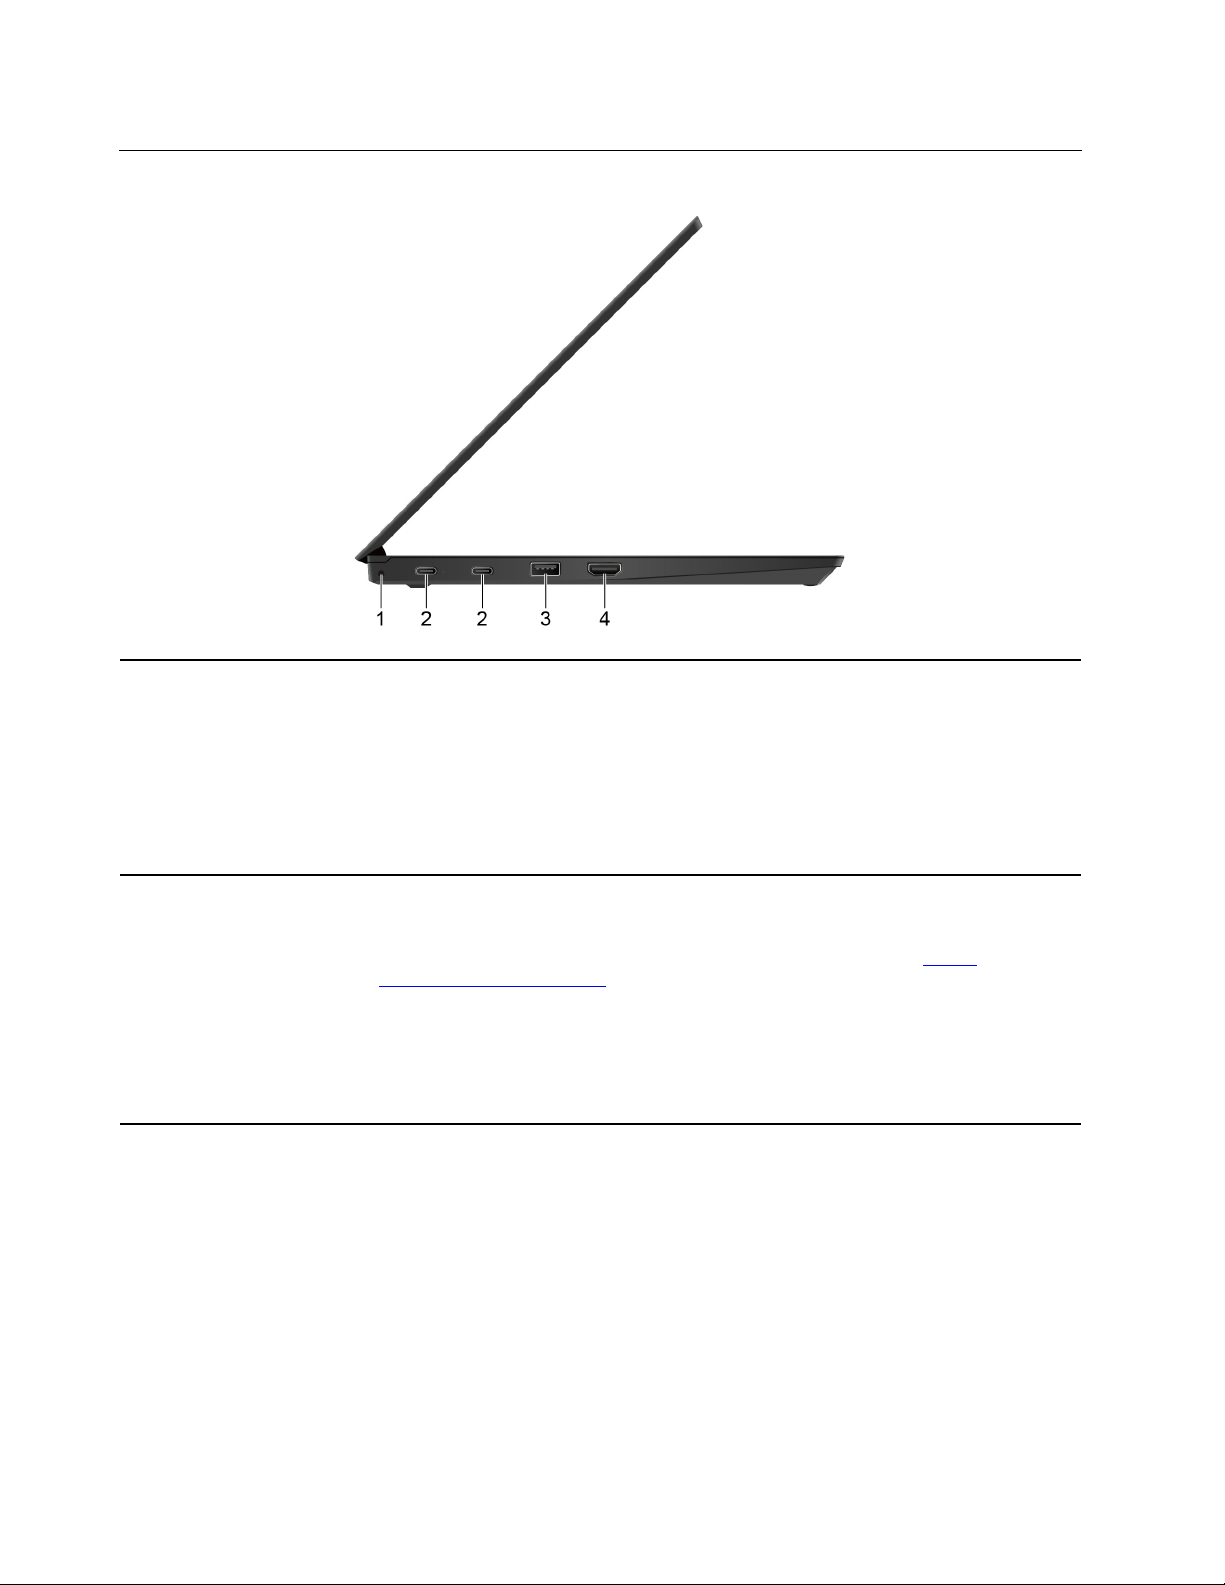
Left
1. Pen tether hole The ThinkPad Pen Pro (an electronic pen) might be shipped with some computer
models. To protect your pen from theft or loss, use a tether to tie the pen through the
pen tether hole.
Notes:
1. The tether does not come with your computer or the ThinkPad Pen Pro.
2. Do not hang the computer with the tether.
For more information, see “Use ThinkPad Pen Pro (for selected models)” on page 25.
2. USB-C™ connector Use the connector to transfer data (USB 3.1 Gen 1, 5 Gbps), charge your device (5 V /
3 A), connect to external displays (USB-C to VGA: 1900 x 1200 pixels / 60 Hz, USB-C
to DP: 3840 x 2160 pixels / 60 Hz), or connect to USB-C accessories to help expand
your computer functionality. To purchase USB-C accessories, go to
www.lenovo.com/accessories
Note: When the battery power is below 10%, the connected USB-C accessories
might not work correctly.
This connector also works as the power connector. Use the shipped USB-C power
adapter and power cord to connect the computer to ac power.
.
https://
4 L390, L390 Yoga, S2 4th Gen, and S2 Yoga 4th Gen User Guide

3. Always On USB 3.1
connector Gen 1
With the Always On USB feature enabled, the Always On USB 3.1 connector Gen 1 can
charge a USB-compatible device when the computer is on, off, in sleep mode, or in
hibernation mode.
Notes:
• By default, Always On USB is enabled and Charge in Battery Mode is disabled in
UEFI BIOS.
• When the computer is off or in hibernation mode, and Charge in Battery Mode is
disabled in UEFI BIOS, ensure that you have connected the computer to ac power.
To enable the Always On USB feature, do the following:
1. Enter the BIOS menu. See “Enter the BIOS menu” on page 37.
2. Click Config ➙ USB ➙ Always On USB to enable the Always On USB feature.
4. HDMI™ connector
Connect to a compatible digital audio device or video monitor, such as an HDTV.
Chapter 1. Meet your computer 5
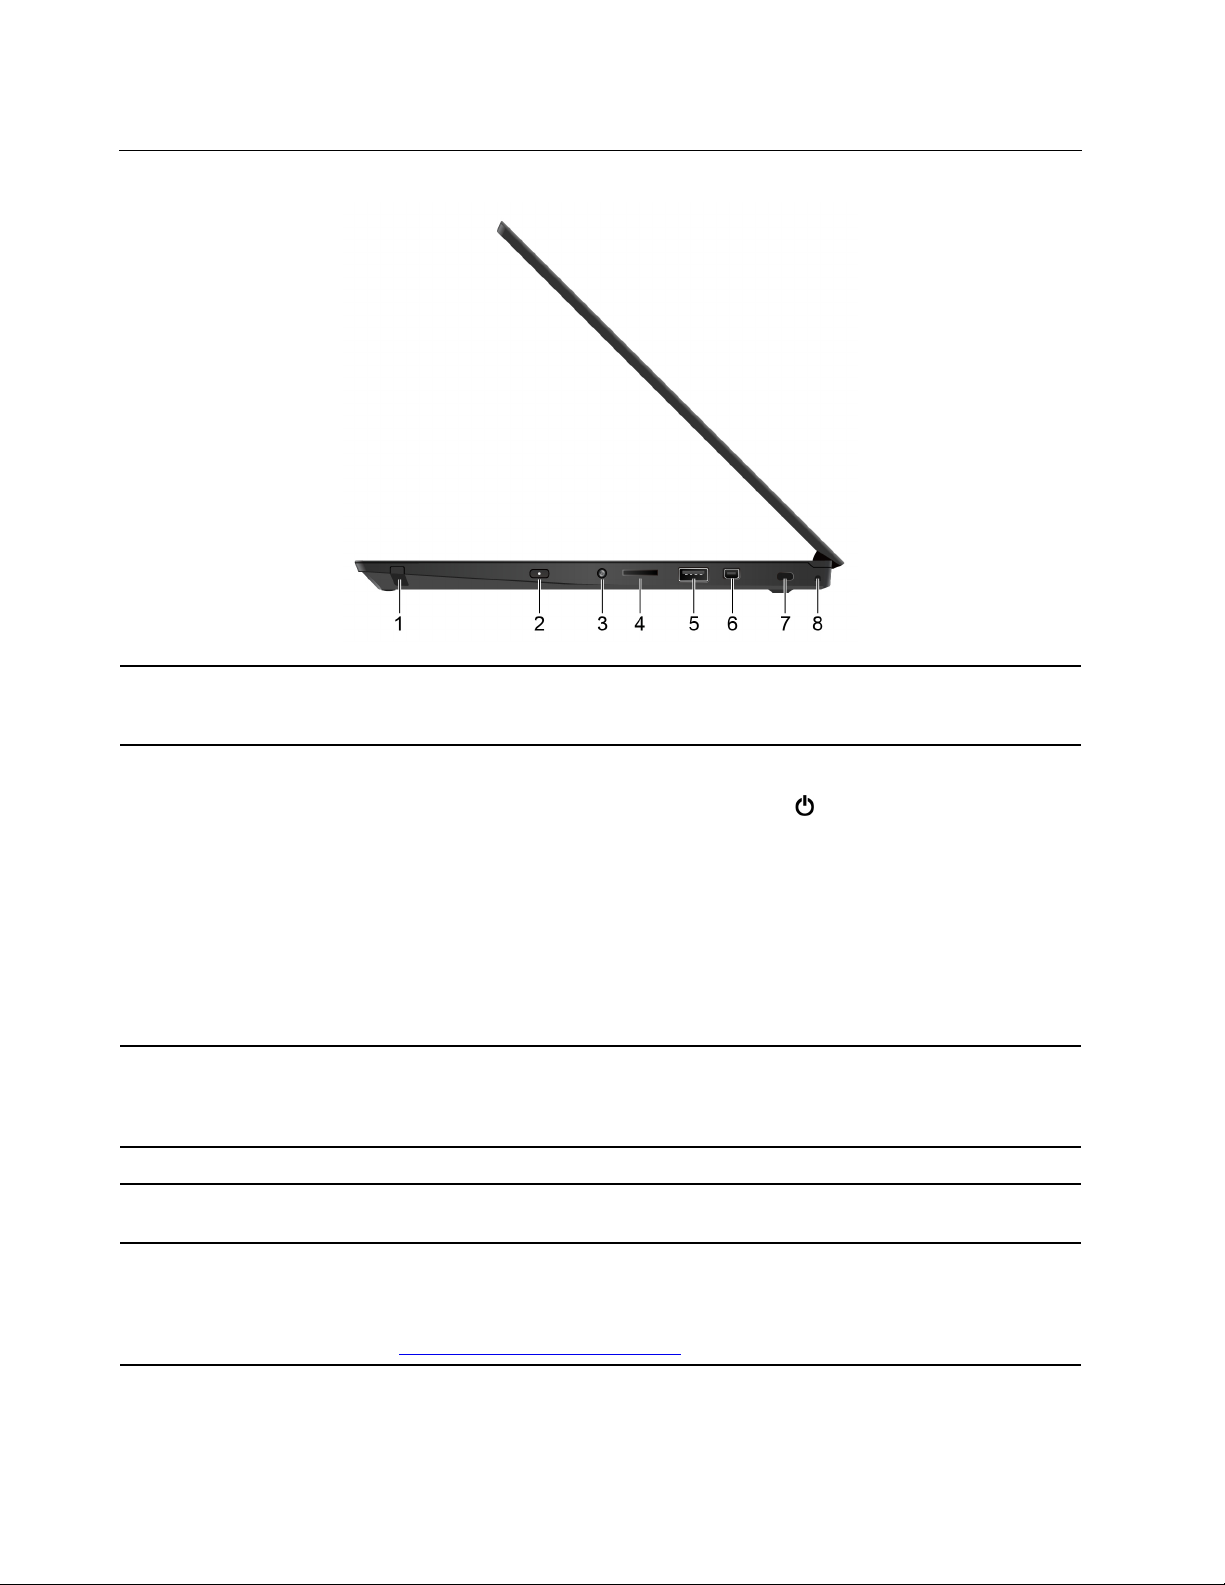
Right
1. Pen slot
The ThinkPad Pen Pro (an electronic pen) might be shipped with some computer
models. Use the pen slot to store the pen. See “Use ThinkPad Pen Pro (for selected
models)” on page 25.
2. Power button
3. Audio connector
4. MicroSD card slot
5. USB 3.1 connector Gen 1
6. Mini Ethernet connector
Press to turn on the computer or put the computer to sleep mode.
To turn off the computer, open the Start menu, click
down.
The indicator in the power button shows the system status of your computer.
• Blinking for three times: The computer is initially connected to power.
• On: The computer is on.
• Off: The computer is off or in hibernation mode.
• Blinking rapidly: The computer is entering sleep or hibernation mode.
• Blinking slowly: The computer is in sleep mode.
Connect headphones or a headset with a 3.5-mm (0.14-inch), 4-pole plug to listen to
the sound from the computer.
Note: The conventional microphone is not supported.
Insert a microSD card for data access or storage.
Connect USB-compatible devices, such as a USB keyboard, USB mouse, USB
storage device, or USB printer.
Connect your computer to a local network through the mini Ethernet connector on your
computer with an Ethernet cable. To attach an Ethernet cable to your computer, you
need an Ethernet extension adapter. The Ethernet extension adapter is available as an
option and shipped with some computer models. You can purchase one from Lenovo
at
https://www.lenovo.com/accessories.
Power, and then select Shut
6 L390, L390 Yoga, S2 4th Gen, and S2 Yoga 4th Gen User Guide

7. Security-lock slot
Lock your computer to a desk, table, or other fixtures through a compatible security
cable lock. See “Lock the computer” on page 33.
8. Pen tether hole The ThinkPad Pen Pro (an electronic pen) might be shipped with some computer
models. To protect your pen from theft or loss, use a tether to tie the pen through the
pen tether hole.
Notes:
1. The tether does not come with your computer or the ThinkPad Pen Pro.
2. Do not hang the computer with the tether.
For more information, see “Use ThinkPad Pen Pro (for selected models)” on page 25.
Chapter 1. Meet your computer 7
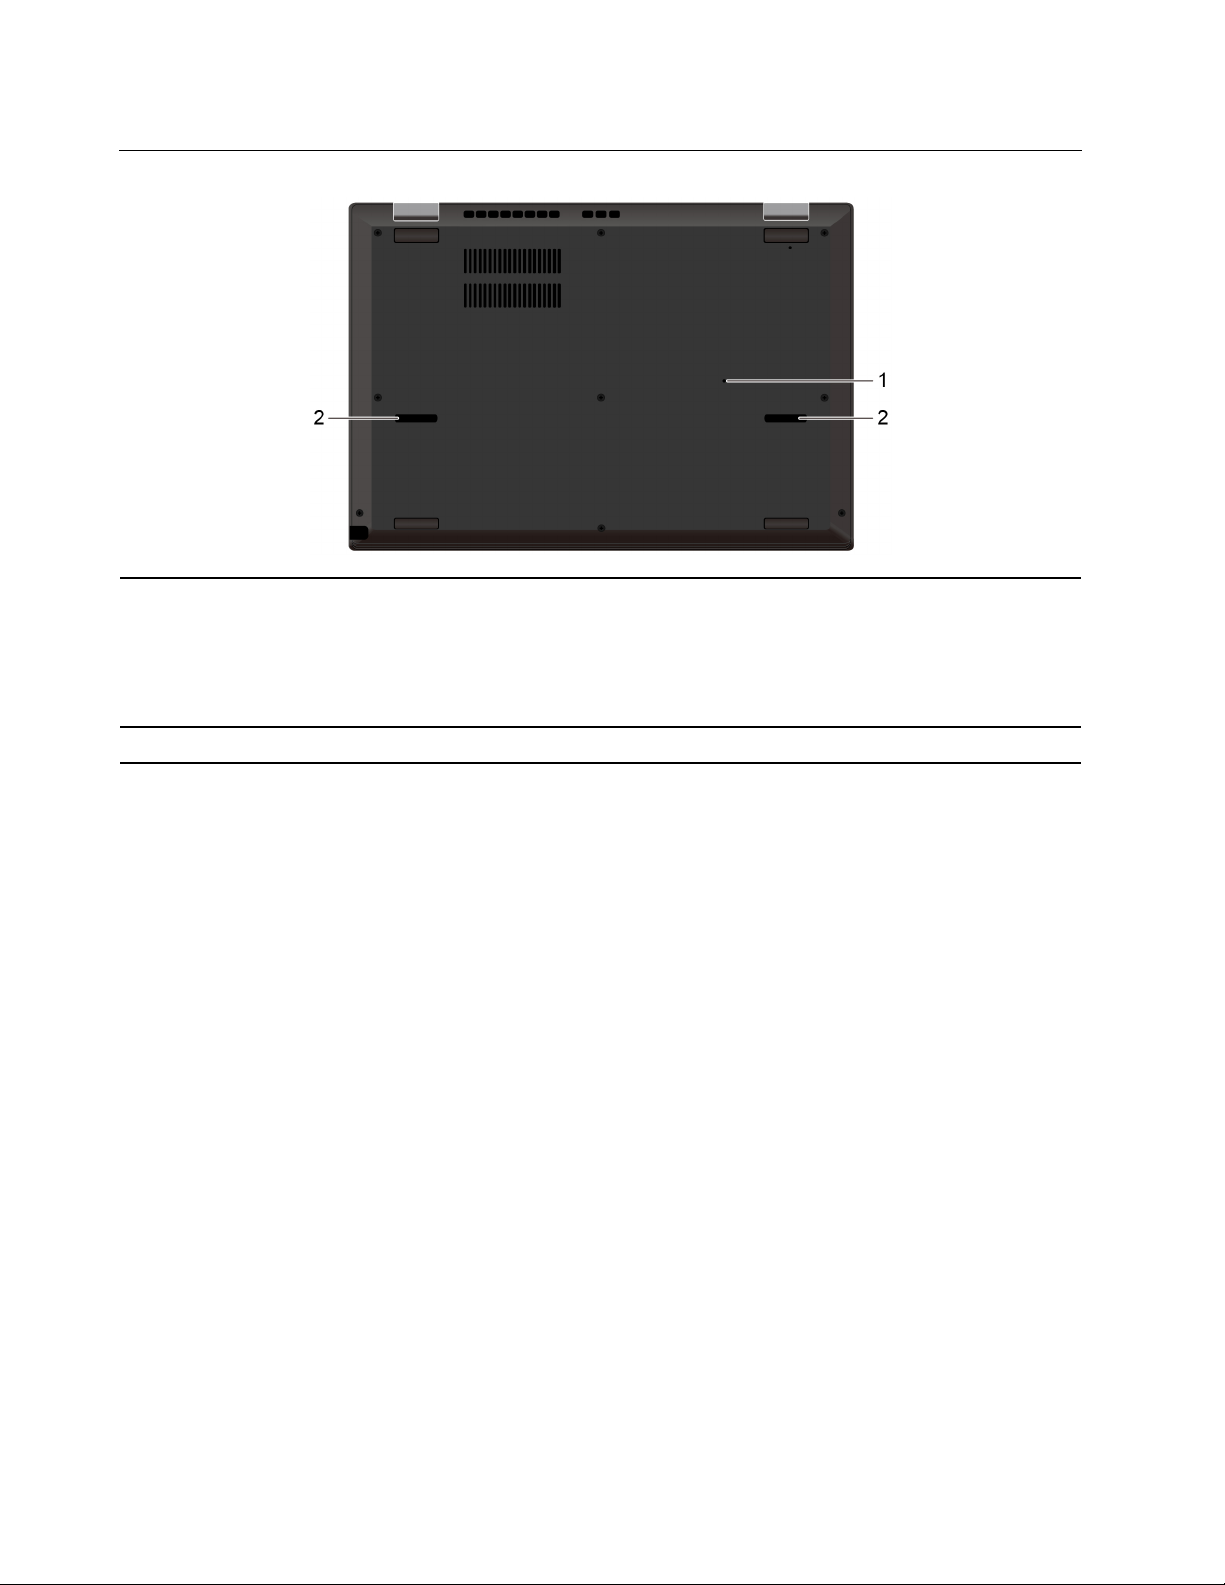
Bottom
If the computer stops responding and you cannot turn it off by pressing the power
button, reset your computer:
1. Emergency-reset hole
2. Speakers Play sound.
1. Disconnect your computer from ac power.
2. Insert a straightened paper clip into the hole to cut off power supply temporarily.
3. Connect your computer to ac power and then turn on your computer.
8 L390, L390 Yoga, S2 4th Gen, and S2 Yoga 4th Gen User Guide

Features
Microprocessor
Memory
Storage device
Display
Keyboard
Connectors and slots
To view the microprocessor information of your computer, right-click the Start button
and then click System.
Double data rate 4 (DDR4) small outline dual in-line memory module (SODIMM), up to
32 GB
• M.2 solid-state drive
• Brightness control
• Color display with Thin Film Transistor (TFT) technology
• Color display with In-Plane Switching (IPS) or Twisted Nematic (TN) technology
• Display size: 337.82 mm (13.3 inches)
• Display resolution: 1920 x 1080 pixels or 1366 x 768 pixels
• Multi-touch technology*
• Function keys
• Six-row keyboard (traditional or backlight)
• Trackpad
• TrackPoint pointing device
• Always On USB 3.1 connector Gen 1
• Audio connector
• HDMI connector
• MicroSD card slot
• Mini Ethernet connector
• Pen slot
• Two USB-C connectors
• USB 3.1 connector Gen 1
Security features
Wireless features
Others
* for selected models
• Face authentication*
• Fingerprint reader*
• Password
• Security-lock slot
• Trusted Platform Module (TPM)*
• Bluetooth
• Wireless LAN
• Front camera
• Infrared camera*
• Microphones
• Rear camera*
Chapter 1. Meet your computer 9

Specifications
Size
• Width: 321.8 mm (12.7 inches)
• Depth: 224.2 mm (8.83 inches)
• Thickness: 18.8 mm (0.74 inches)
Maximum heat output
(depending on the model)
Power source (ac power
adapter)
• 45 W (154 Btu/hr)
• 65 W (222 Btu/hr)
• Sine-wave input at 50 Hz to 60 Hz
• Input rating of the ac power adapter: 100 V to 240 V ac, 50 Hz to 60 Hz
10 L390, L390 Yoga, S2 4th Gen, and S2 Yoga 4th Gen User Guide

Chapter 2. Get started with your computer
Get started with Windows 10
Learn the basics of Windows 10 and start working with it right away. For more information about Windows
10, see the Windows help information.
Windows account
To use the Windows operating system, a user account is required. It can either be a Windows user account,
or a Microsoft account.
Windows user account
When you start Windows for the first time, you are prompted to create a Windows user account. This first
account you created is of the “Administrator” type. With an Administrator account, you can create additional
user accounts or change account types by doing the following:
1. Open the Start menu and select Settings ➙ Accounts ➙ Family & other people.
2. Follow the on-screen instructions.
Microsoft account
You can also log in to the Windows operating system with a Microsoft account.
To create a Microsoft account, go to the Microsoft sign-up page at
screen instructions.
With a Microsoft account, you can:
• Enjoy one-time signing in if you are using other Microsoft services, such as OneDrive, Skype, and Outlook.
com.
• Sync personalized settings across other Windows-based devices.
https://signup.live.com/ and follow the on-
© Copyright Lenovo 2018 11
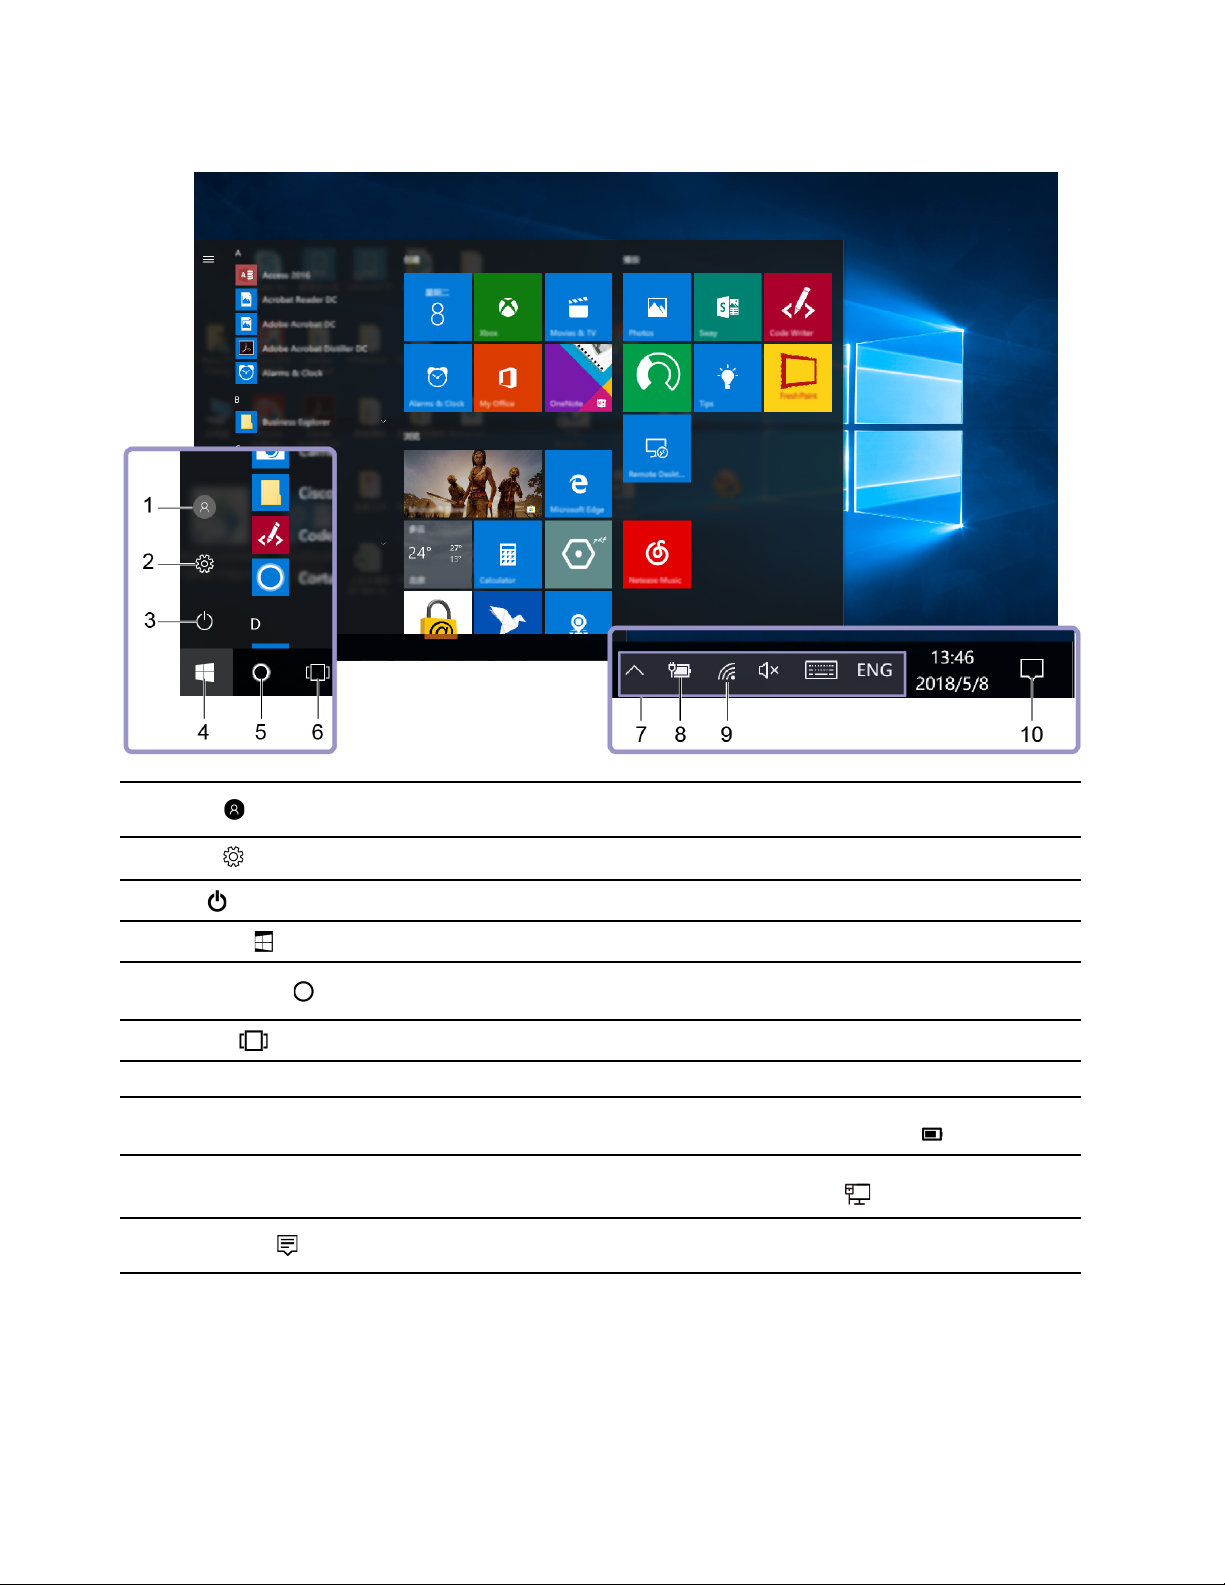
Windows user interface
1. Account
2. Settings
3. Power
4. Start button
5. Windows search
6. Task View
7. Windows notification area
8. Battery status icon
9. Network icon
10. Action center
Change account settings, lock the computer, or sign out from the current
account.
Launch Settings.
Shut down, restart, or put the computer into sleep.
Open the Start menu.
Type what you are looking for in the search box and get search results from
your computer and the Web.
Display all opened apps and switch among them.
Display notifications and status of some features.
Display power status and change battery or power settings. When your
computer is not connected to ac power, the icon changes to
Connect to an available wireless network and display the network status. When
connected to a wired network, the icon changes to
Display the latest notifications from apps and provide quick access to some
features.
Open the Start menu
• Click the Start button.
• Press the Windows logo key on the keyboard.
.
.
12
L390, L390 Yoga, S2 4th Gen, and S2 Yoga 4th Gen User Guide

Access Control Panel
• Open the Start menu and click Windows System ➙ Control Panel.
• Use Windows search.
Launch an app
• Open the Start menu and select the app you want to launch.
• Use Windows search.
Windows label
Your computer might have a Windows 10 Genuine Microsoft label affixed to its cover depending on the
following factors:
• Your geographic location
• Edition of Windows 10 that is preinstalled
Go to
https://www.microsoft.com/en-us/howtotell/Hardware.aspx for illustrations of the various types of
Genuine Microsoft labels.
• In the People’s Republic of China, the Genuine Microsoft label is required on all computer models
preinstalled with any version of Windows 10.
• In other countries and regions, the Genuine Microsoft label is required only on computer models licensed
for Windows 10 Pro.
The absence of a Genuine Microsoft label does not indicate that the preinstalled Windows version is not
genuine. For details on how to tell whether your preinstalled Windows product is genuine, refer to the
information provided by Microsoft at:
https://www.microsoft.com/en-us/howtotell/default.aspx
There are no external, visual indicators of the Product ID or Windows version for which the computer is
licensed. Instead, the Product ID is recorded in the computer firmware. Whenever a Windows 10 product is
installed, the installation program checks the computer firmware for a valid, matching Product ID to complete
the activation.
In some cases, an earlier Windows version might be preinstalled under the terms of the Windows 10 Pro
license downgrade rights.
Connect to networks
Your computer helps you connect to the world through a wired or wireless network.
Connect to the wired Ethernet
Connect your computer to a local network through the mini Ethernet connector on your computer with an
Ethernet cable.
To attach an Ethernet cable to your computer, you need an Ethernet extension adapter. The Ethernet
extension adapter is available as an option and shipped with some computer models. You can purchase one
from Lenovo at
https://www.lenovo.com/accessories.
Connect to Wi-Fi
1. Click the network icon in the Windows notification area. A list of available wireless networks is displayed.
Chapter 2. Get started with your computer 13

2. Select a network to connect. Provide required information if needed.
Use Lenovo Vantage
The preinstalled Lenovo Vantage is a customized one-stop solution to help you maintain your computer with
automated updates and fixes, configure hardware settings, and get personalized support.
Access Lenovo Vantage
Open the Start menu and click Lenovo Vantage. You also can type Lenovo Vantage in the search box.
To download the latest version of Lenovo Vantage, go to Microsoft Store and search by the app name.
Key features
Lenovo Vantage makes periodic updates of the features to keep improving your experience with your
computer.
Note: The available features vary depending on the computer model.
• System Update
Download and install firmware and driver updates to keep your computer up-to-date. You can configure
the options to install updates automatically when available.
• Hardware Settings
Configure intelligent settings of the following hardware to make your computer smarter to use:
– Always On USB
– Battery
– Camera
– Computer display
– Keyboard
– Microphone
– Speakers
– Trackpad
– Trackpoint
• Health & Support
Monitor your computer health and get personalized support of your computer. You can:
– Scan the computer hardware and diagnose hardware problems.
– Look up computer warranty status (online).
– Access User Guide.
– Read tips and tricks articles customized for your computer.
• Lenovo Wi-Fi Security
Protect your computer from malicious Wi-Fi networks.
14
L390, L390 Yoga, S2 4th Gen, and S2 Yoga 4th Gen User Guide

Interact with your computer
Your computer provides you various ways to navigate the screen.
Chapter 2. Get started with your computer 15
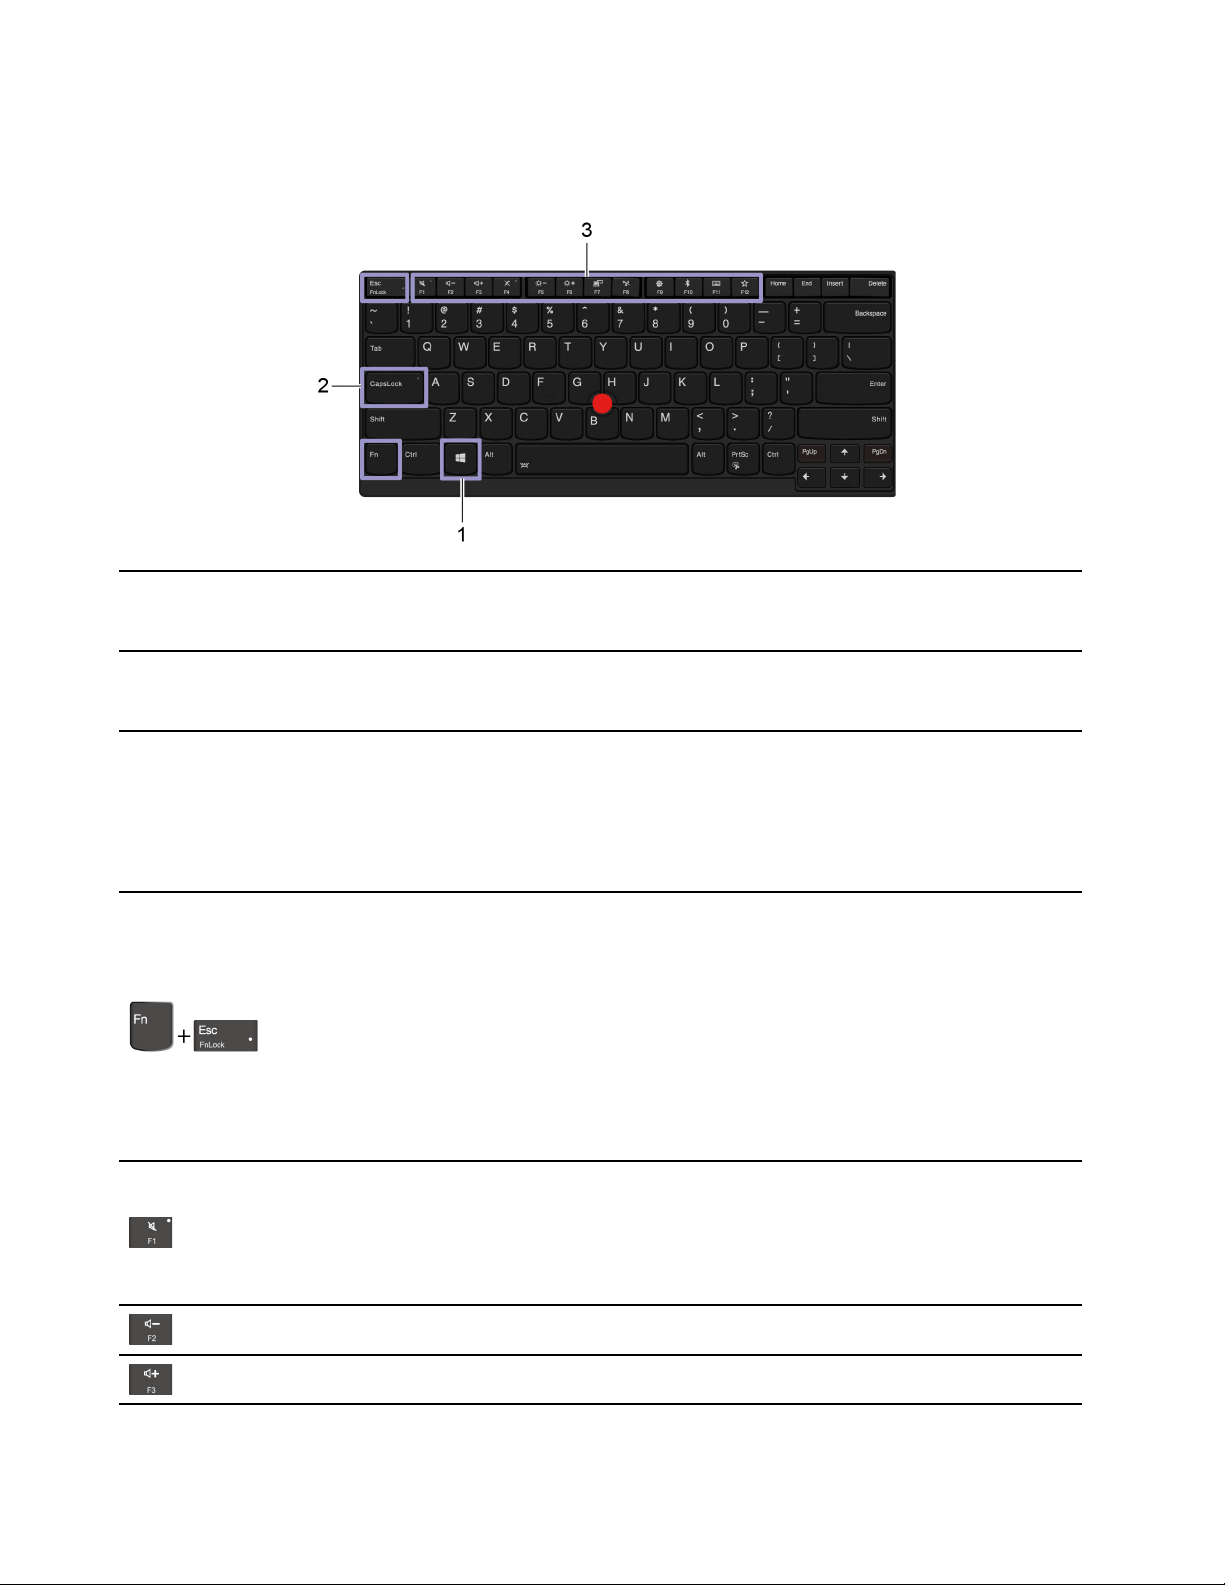
Use the keyboard shortcuts
The special keys on the keyboard help you work more easily and effectively.
Open the Start menu.
1. Windows logo key
For information about using this key with other keys, see the Windows help information.
Switch the letter case between the upper case and lower case.
2. Caps Lock key
When the key indicator is on, you can type uppercase letters.
3. F1–F12 function
keys
Invoke the special function printed as an icon on each key or standard function.
To choose whether to invoke the special function or standard function:
1. Go to Control Panel and view by Large icons or Small icons.
2. Click Keyboard or Lenovo - Keyboard Manager and select the option of your
preference.
Switch the function of the F1–F12 keys between the standard function and special function
printed as an icon on each key.
When the Fn Lock indicator is on:
• Press F1-F12 to use the standard function.
• Press Fn+F1-F12 to use the special function.
When the Fn Lock indicator is off:
• Press Fn+F1-F12 to use the standard function.
• Press F1-F12 to use the special function.
Mute or unmute the speakers.
When the key indicator is on, the speakers are muted.
If you mute the speakers and turn off your computer, the speakers remain muted when you
turn on your computer.
Decrease the speaker volume.
Increase the speaker volume.
16 L390, L390 Yoga, S2 4th Gen, and S2 Yoga 4th Gen User Guide
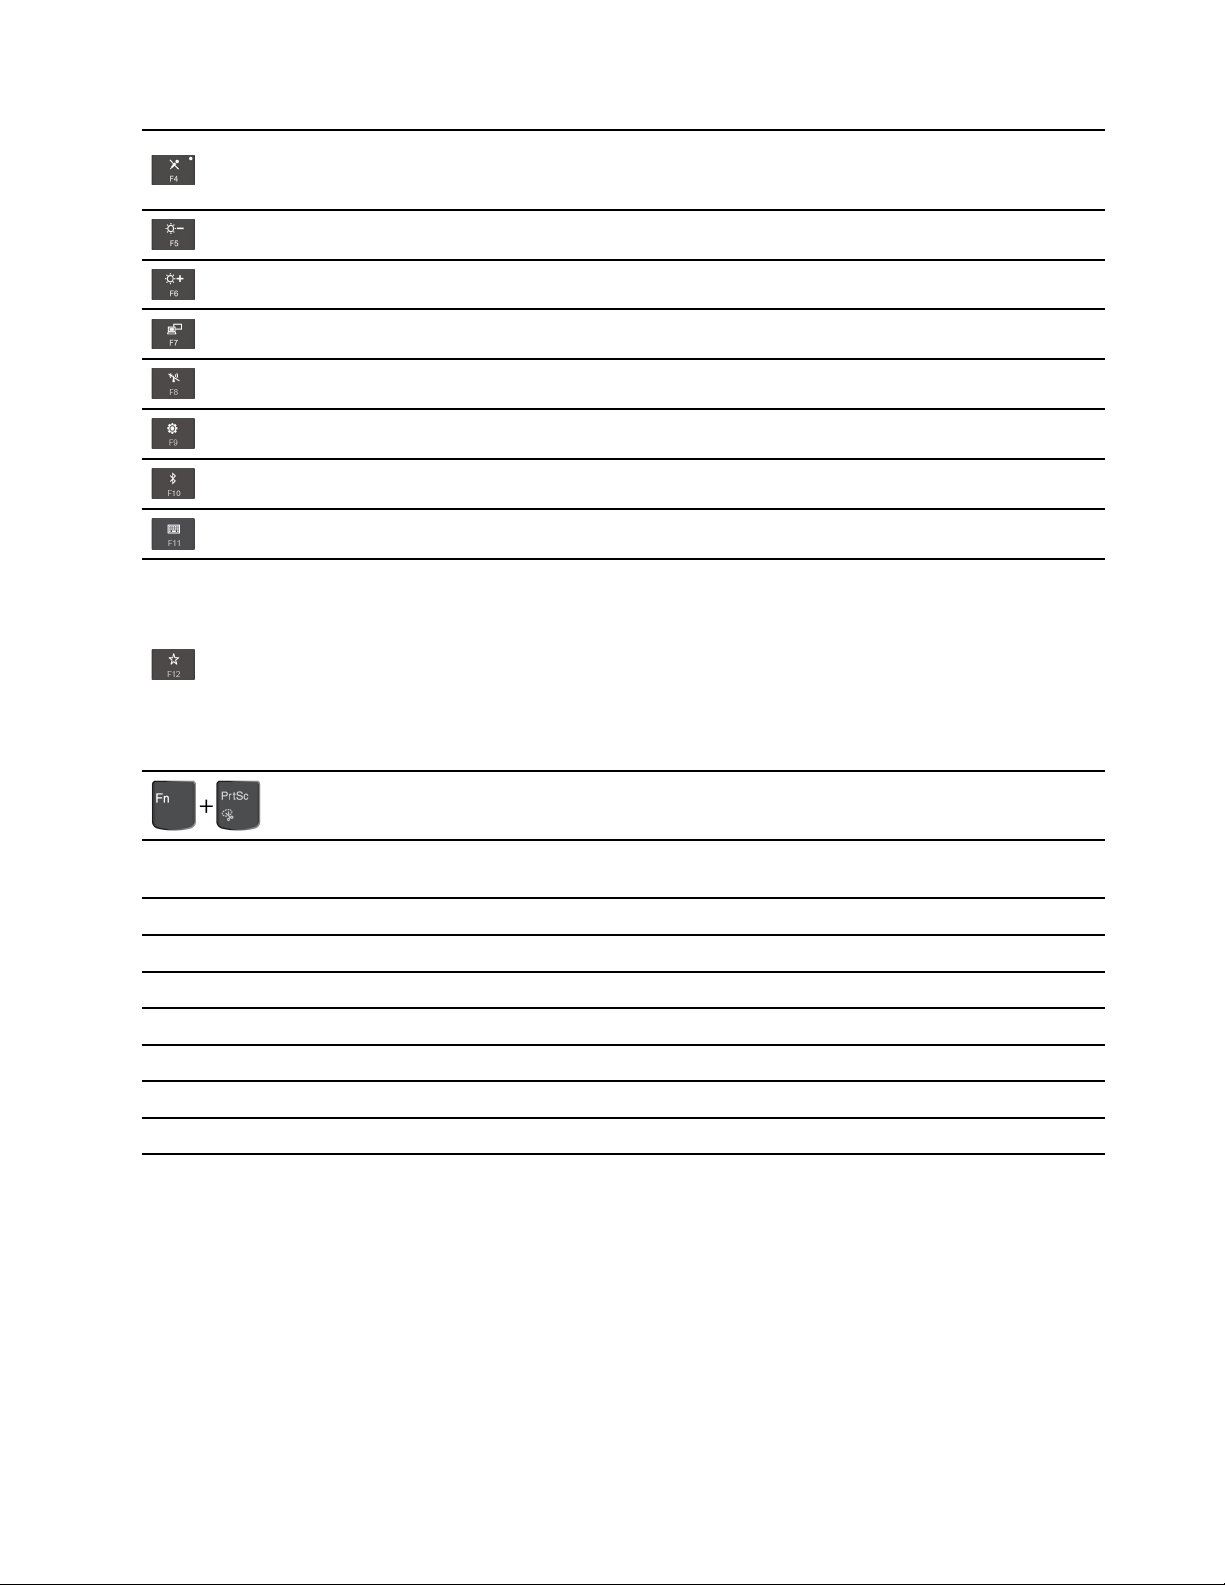
Mute or unmute the microphones.
When the key indicator is on, the microphones are muted.
Darken the computer display.
Brighten the computer display.
Manage external displays.
Enable or disable the built-in wireless features.
Open the Settings window.
Enable or disable the built-in Bluetooth features.
Open a keyboard setting page.
Invoke the function defined by yourself:
1. Open the Start menu and click Lenovo Vantage.
2. Click Hardware Settings and then click Input.
3. Locate the Keyboard: User-defined Key section and follow the on-screen instructions to
complete the setting.
On this setting page, you can also define different functions for the key combinations with
F12, such as Shift+F12, Alt+F12, or Ctrl+F12.
Open the Snipping Tool program.
Fn+Spacebar
Fn+B
Fn+K
Fn+P
Fn+S
Fn+4
Fn+Left arrow key Equal the Home key.
Fn+Right arrow key Equal the End key.
Switch between different keyboard backlight statuses if your computer supports keyboard
backlight.
Equal the Break key on a conventional external keyboard.
Equal the ScrLK or Scroll Lock key on a conventional external keyboard.
Equal the Pause key on a conventional external keyboard.
Equal the SysRq key on a conventional external keyboard.
Put the computer to sleep mode. To wake up the computer, press Fn or the power button.
Use the TrackPoint pointing device
The TrackPoint pointing device enables you to perform all the functions of a traditional mouse, such as
pointing, clicking, and scrolling.
Chapter 2. Get started with your computer 17
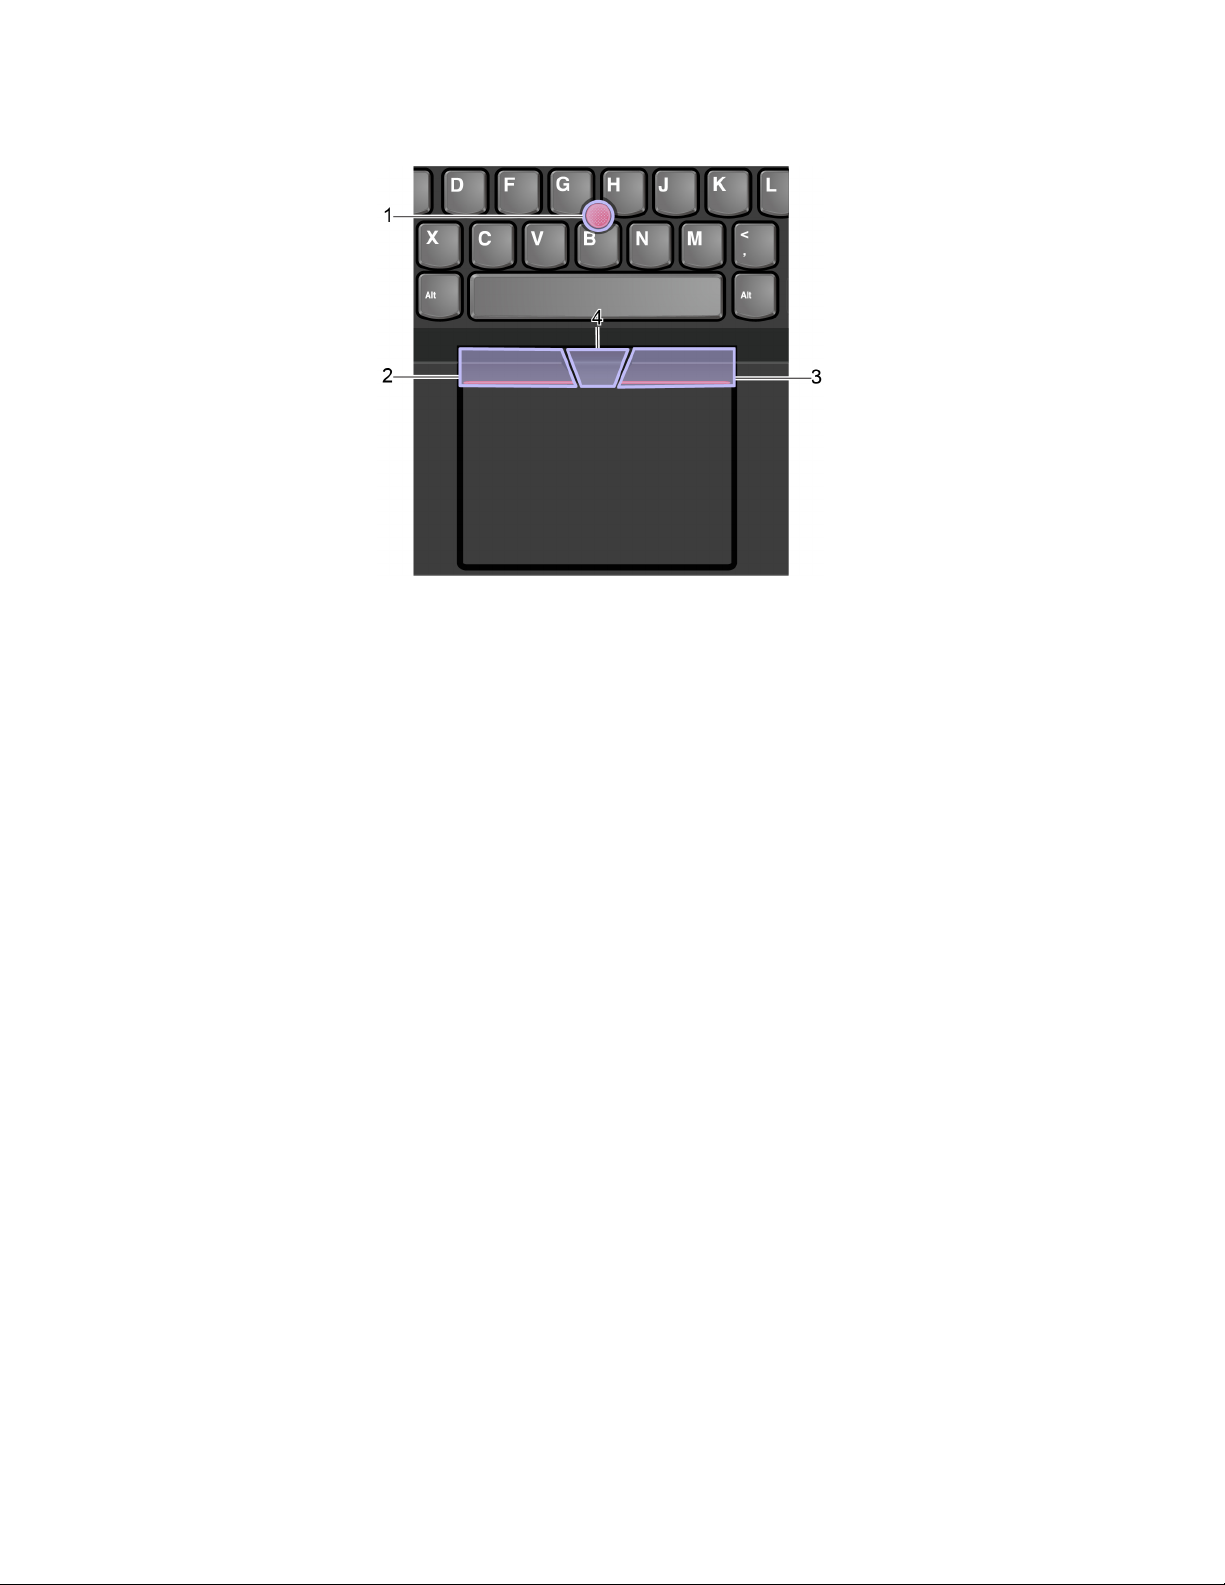
Use the TrackPoint pointing device
1. Pointing stick
Use your index finger or middle finger to apply pressure to the pointing-stick nonslip cap in any direction
parallel to the keyboard. The pointer on the screen moves accordingly but the pointing stick itself does not
move. The higher the pressure applied, the faster the pointer moves.
2. Left-click button
Press to select or open an item.
3. Right-click button
Press to display a shortcut menu.
4. Scroll bar
Press and hold the dotted scroll bar while applying pressure to the pointing stick in the vertical or horizontal
direction. Then, you can scroll through the document, Web site, or apps.
Disable the TrackPoint pointing device
The TrackPoint pointing device is active by default. To disable the device:
1. Go to Control Panel and view by Large icons or Small icons.
2. Click Mouse. Then, follow the on-screen instructions to complete the setting.
18
L390, L390 Yoga, S2 4th Gen, and S2 Yoga 4th Gen User Guide
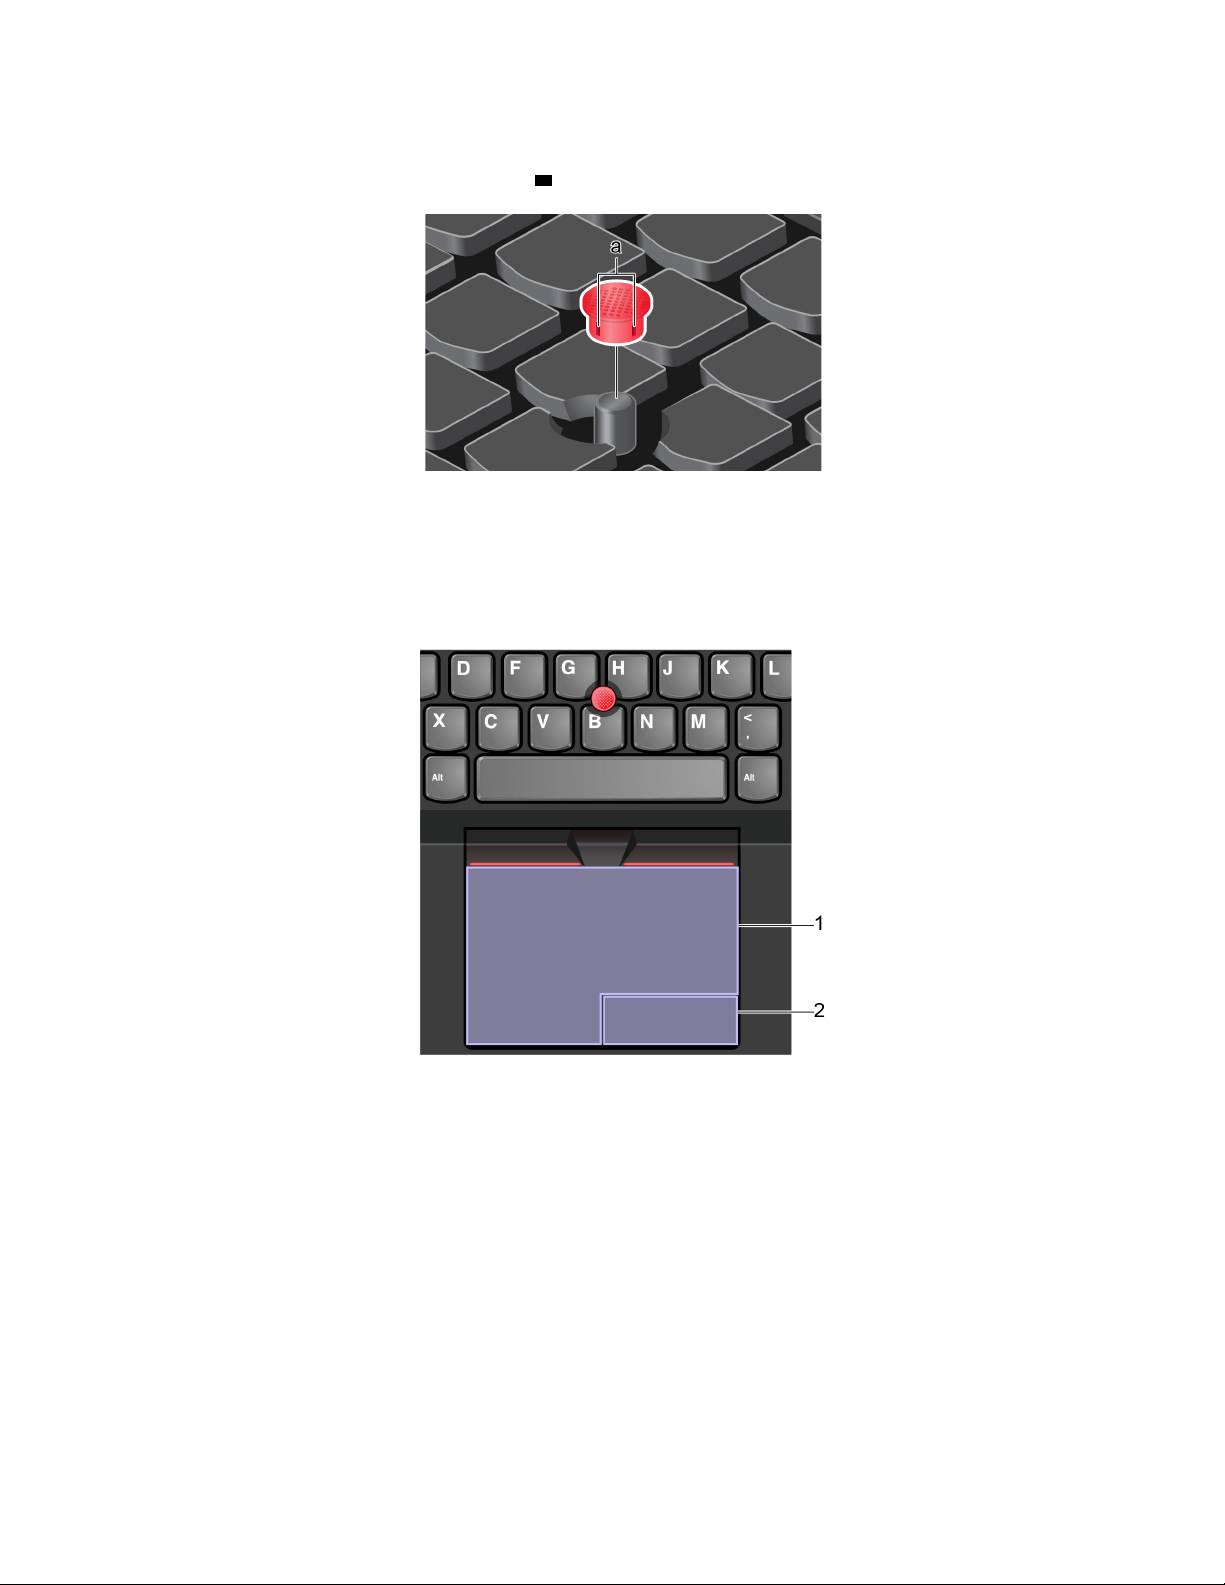
Replace the pointing-stick nonslip cap
Note: Ensure that the new cap has grooves
a .
Use the trackpad
The entire trackpad surface is sensitive to finger touch and movement. You can use the trackpad to perform
all the pointing, clicking, and scrolling functions of a traditional mouse.
Use the trackpad
1. Left-click zone
Press to select or open an item.
You also can tap anywhere on the surface of the trackpad with one finger to perform the left-click action.
2. Right-click zone
Press to display a shortcut menu.
You also can tap anywhere on the surface of the trackpad with two fingers to perform the right-click action.
Chapter 2. Get started with your computer 19
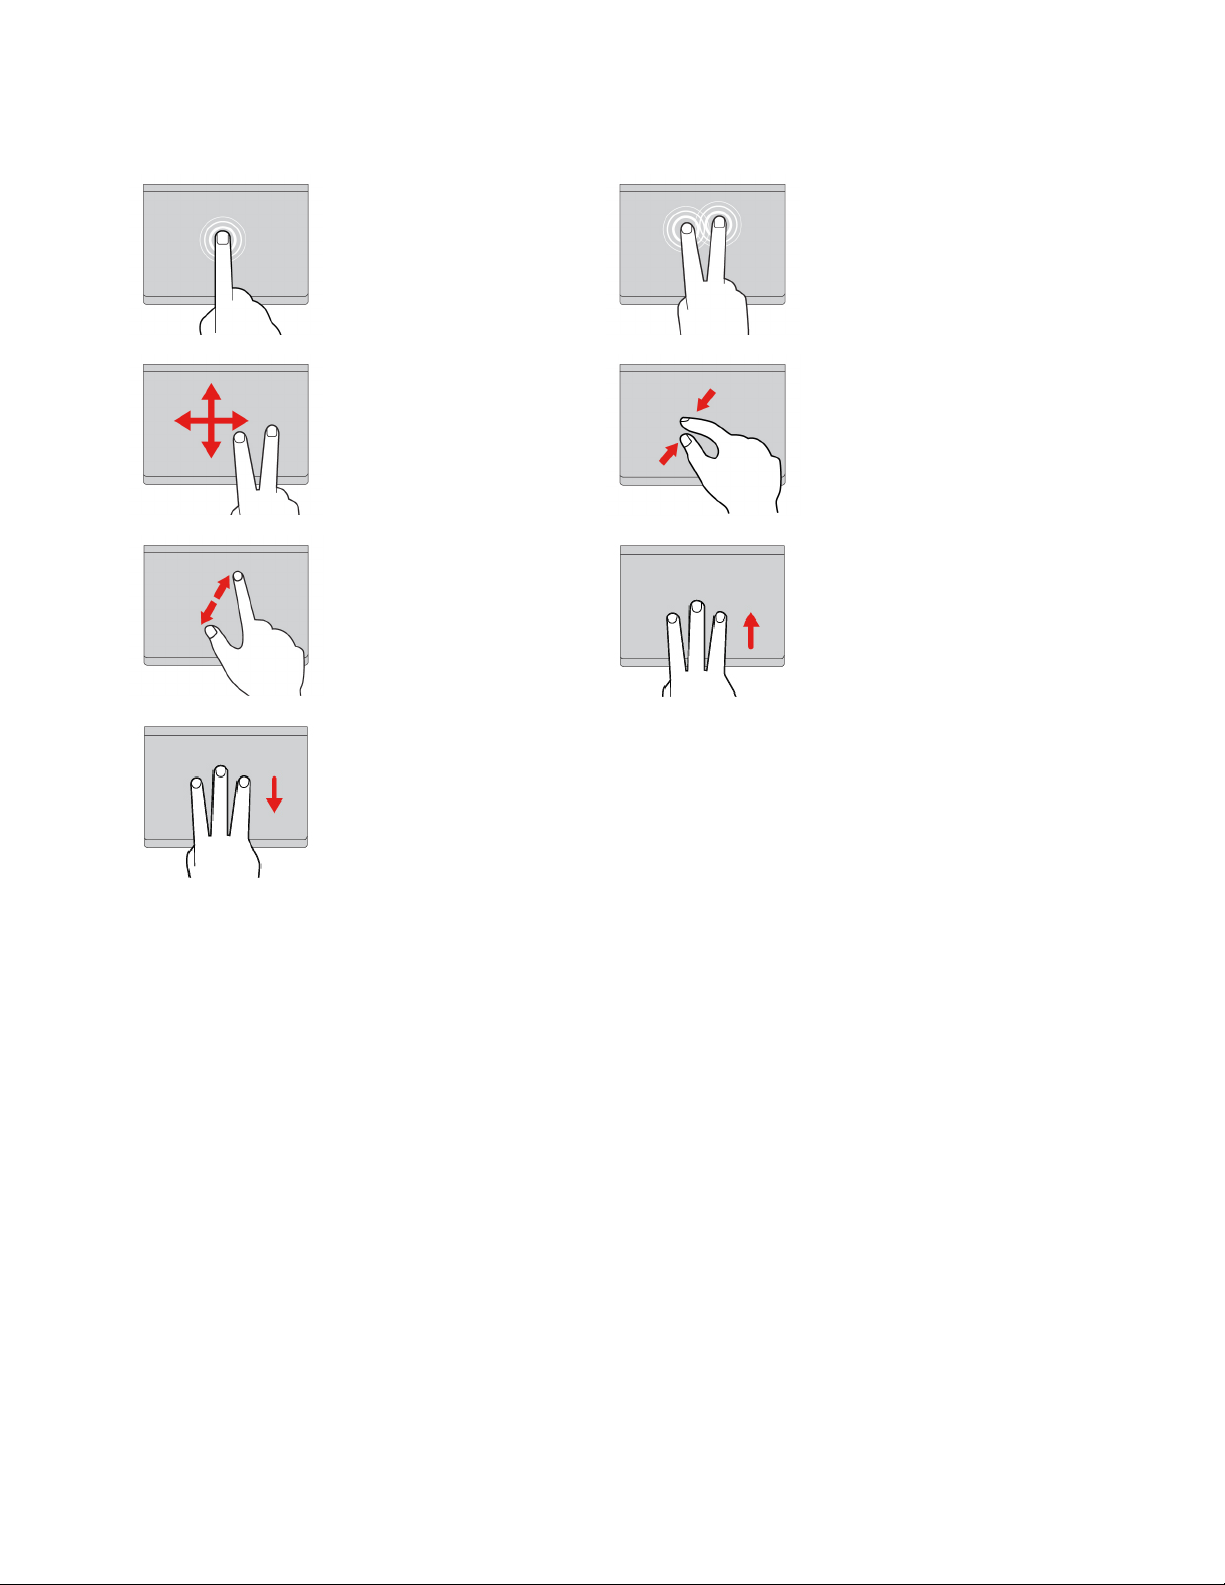
Use the touch gestures
Tap
Tap anywhere on the trackpad
with one finger to select or open
an item.
Two-finger scroll
Put two fingers on the trackpad
and move them in the vertical or
horizontal direction. This action
enables you to scroll through the
document, Web site, or apps.
Two-finger zoom in
Put two fingers on the trackpad
and move them farther apart to
zoom in.
Swipe three fingers down
Two-finger tap
Tap anywhere on the trackpad with
two fingers to display a shortcut
menu.
Two-finger zoom out
Put two fingers on the trackpad
and move them closer together to
zoom out.
Swipe three fingers up
Put three fingers on the trackpad
and move them up to open the task
view to see all your open windows.
Put three fingers on the trackpad
and move them down to show
the desktop.
Notes:
• When using two or more fingers, ensure that you position your fingers slightly apart.
• Some gestures are not available if the last action was done from the TrackPoint pointing device.
• Some gestures are only available when you are using certain apps.
• If the trackpad surface is stained with oil, turn off the computer first. Then, gently wipe the trackpad
surface with a soft and lint-free cloth moistened with lukewarm water or computer cleaner.
For more gestures, see the help information of the pointing device.
Disable the trackpad
The trackpad is active by default. To disable the device:
1. Go to Control Panel and view by Large icons or Small icons.
2. Click Mouse. Then, follow the on-screen instructions to complete the setting.
Use the multi-touch screen
If your computer display supports the multi-touch function, you can navigate the screen with simple touch
gestures.
Note: Some gestures might not be available depending on the app you use.
20
L390, L390 Yoga, S2 4th Gen, and S2 Yoga 4th Gen User Guide
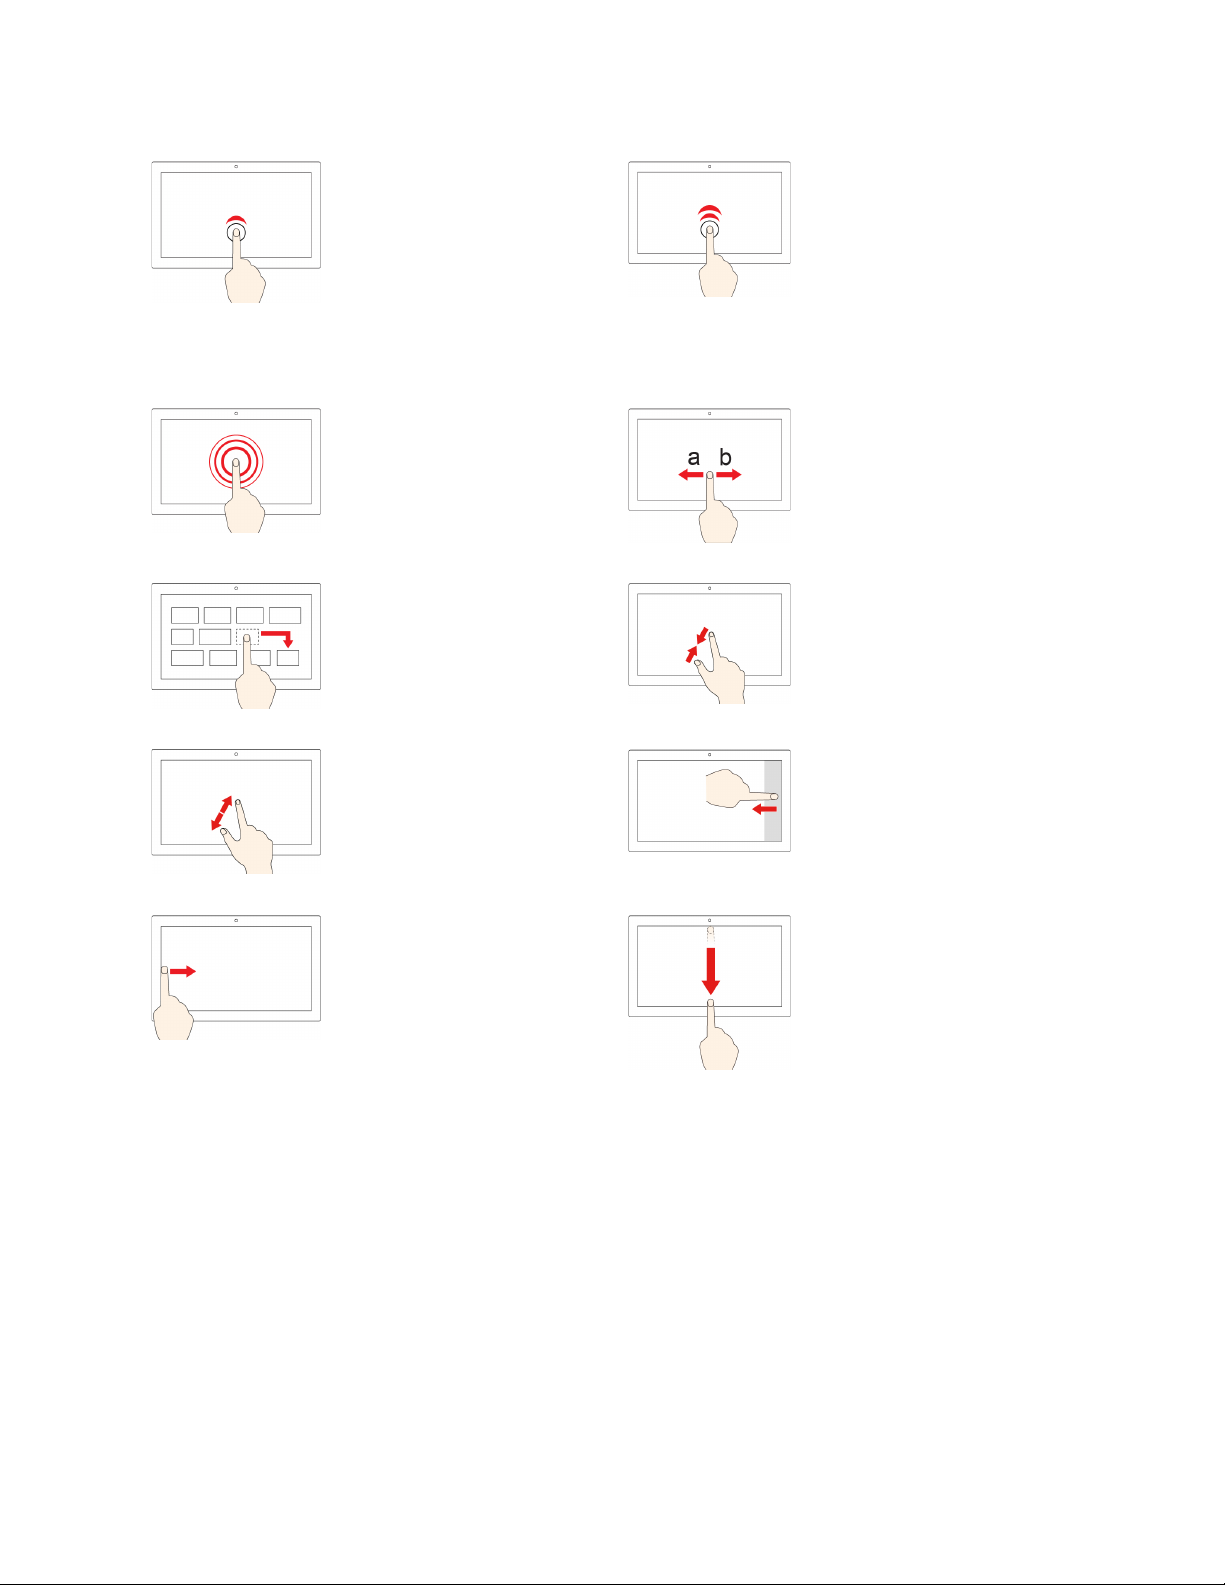
Tap once
Tap twice quickly
• From the Start menu: Open an
app or item.
• From the desktop: Select an
app or item.
• In an open app: Perform an
action such as Copy, Save,
and Delete, depending on the
app.
Tap and hold
Open a shortcut menu.
Drag an item to the location
you want
Move an object.
Move two fingers farther apart
Open an app or item from the
desktop.
Slide
Scroll through items, such as lists,
pages, and photos.
Move two fingers closer together
Zoom out.
Swipe in from the right edge
Zoom in.
Swipe in from the left edge
View all your open windows in
task view.
Open the action center to see your
notifications and quick actions.
• Swipe downwards shortly
from the top edge (for fullscreened app or when your
computer is in the tablet
mode)
Show a hidden title bar.
• Swipe in from the top edge to
the bottom edge (when your
computer is in the tablet
mode)
Close the current app.
Tips
• Turn off the computer before cleaning the multi-touch screen.
• Use a dry, soft, and lint-free cloth or a piece of absorbent cotton to remove fingerprints or dust from the
multi-touch screen. Do not apply solvents to the cloth.
• The multi-touch screen is a glass panel covered with a plastic film. Do not apply pressure or place any
metallic object on the screen, which might damage the touch panel or cause it to malfunction.
• Do not use fingernails, gloved fingers, or inanimate objects for input on the screen.
• Regularly calibrate the accuracy of the finger input to avoid a discrepancy.
Chapter 2. Get started with your computer 21

Use multimedia
Use your computer for business or entertainment with the built-in components (camera, speakers, and audio
features) or connected external devices (an external projector, monitor, and HDTV).
Use audio
To enhance your listening experience, connect speakers, headphones, or a headset with a 3.5-mm (0.14inch), 4-pole plug to the audio connector.
Adjust the volume
Press
Change the sound settings
1. Go to Control Panel and view by category.
2. Click Hardware and Sound ➙ Sound.
3. Change the settings as you prefer.
Protect your hearing
Smart audio helps protect against hearing loss. The feature limits the computer’s maximum volume to 130
mV when a headset or headphone is connected. To change the setting:
1. Go to Control Panel and view by Large icons.
2. Click SmartAudio. In the window displayed, click the Disable Headphone Limiter icon. Then, follow
the on-screen instructions.
to increase the volume or press to decrease the volume.
Using the conventional camera
You can use the conventional camera (front camera and rear camera) to take photos or record videos. The
indicator next to the camera turns on when the camera is I use.
To take photos or record a video:
1. Open the Start menu and click Camera.
2. To take a photo, click the camera icon. If you want to record video, click the video icon to switch to
video mode.
If you use other programs that provide features such as photographing, video capturing, and video
conference, the camera starts automatically when you enable the camera-required feature.
To configure the camera settings:
1. Open the Start menu and click Lenovo Vantage ➙ Hardware Settings ➙ Audio/Visual.
2. Locate the Camera section and then follow the on-screen instructions.
Connect to an external display
Connect your computer to a projector or a monitor to give presentations or expand your workspace.
Connect to a wired display
1. Connect the external display to an appropriate video connector on your computer, such as the HDMI
connector or USB-C connector.
22
L390, L390 Yoga, S2 4th Gen, and S2 Yoga 4th Gen User Guide

2. Connect the external display to an electrical outlet.
3. Turn on the external display.
If your computer cannot detect the external display, right-click a blank area on the desktop, and then click
Display settings ➙ Detect.
Supported resolution
The following table lists the supported maximum resolution of the external display.
Connect the external display to Supported resolution
the USB-C connector
the HDMI connector
Up to 4096 x 2160 pixels / 60 Hz
Up to 3840 x 2160 pixels / 30 Hz
Connect to a wireless display
To use a wireless display, ensure that both your computer and the external display support the Miracast
®
feature.
• Open the Start menu, and then click Settings ➙ Devices ➙ Bluetooth & other devices ➙ Add
Bluetooth or other device. In the Add a device window, click Wireless display or dock. Then, follow the
instructions on the screen.
• Click the action center icon
in the Windows notification area and click Connect. Select the wireless
display and follow the on-screen instructions.
Set the display mode
Press
or and then select a display mode of your preference.
• PC screen only: Displays the video output only on your computer screen.
Note: Depending on the situation, you might see Disconnect, PC screen only, Computer only, or
Disconnect projector.
• Duplicate: Displays the same video output on both your computer screen and an external display.
• Extend: Extends the video output from your computer display to an external display. You can drag and
move items between the two displays.
• Second screen only: Displays the video output only on an external display.
Note: Depending on the situation, you might see Projector only or Second screen only.
If you show programs using DirectDraw or Direct3D
®
in full-screen mode, only the main display shows the
video output.
Change display settings
1. Right-click a blank area on the desktop and select Display settings.
2. Select the display that you want to configure.
3. Change display settings of your preference.
You can change the settings for both the computer display and the external display. For example, you can
define which one is the main display and which one is the secondary display. You also can change the
resolution and orientation.
Chapter 2. Get started with your computer 23
Note: If you set a higher resolution for the computer display than the external display, only part of the screen
can be displayed on the external display.
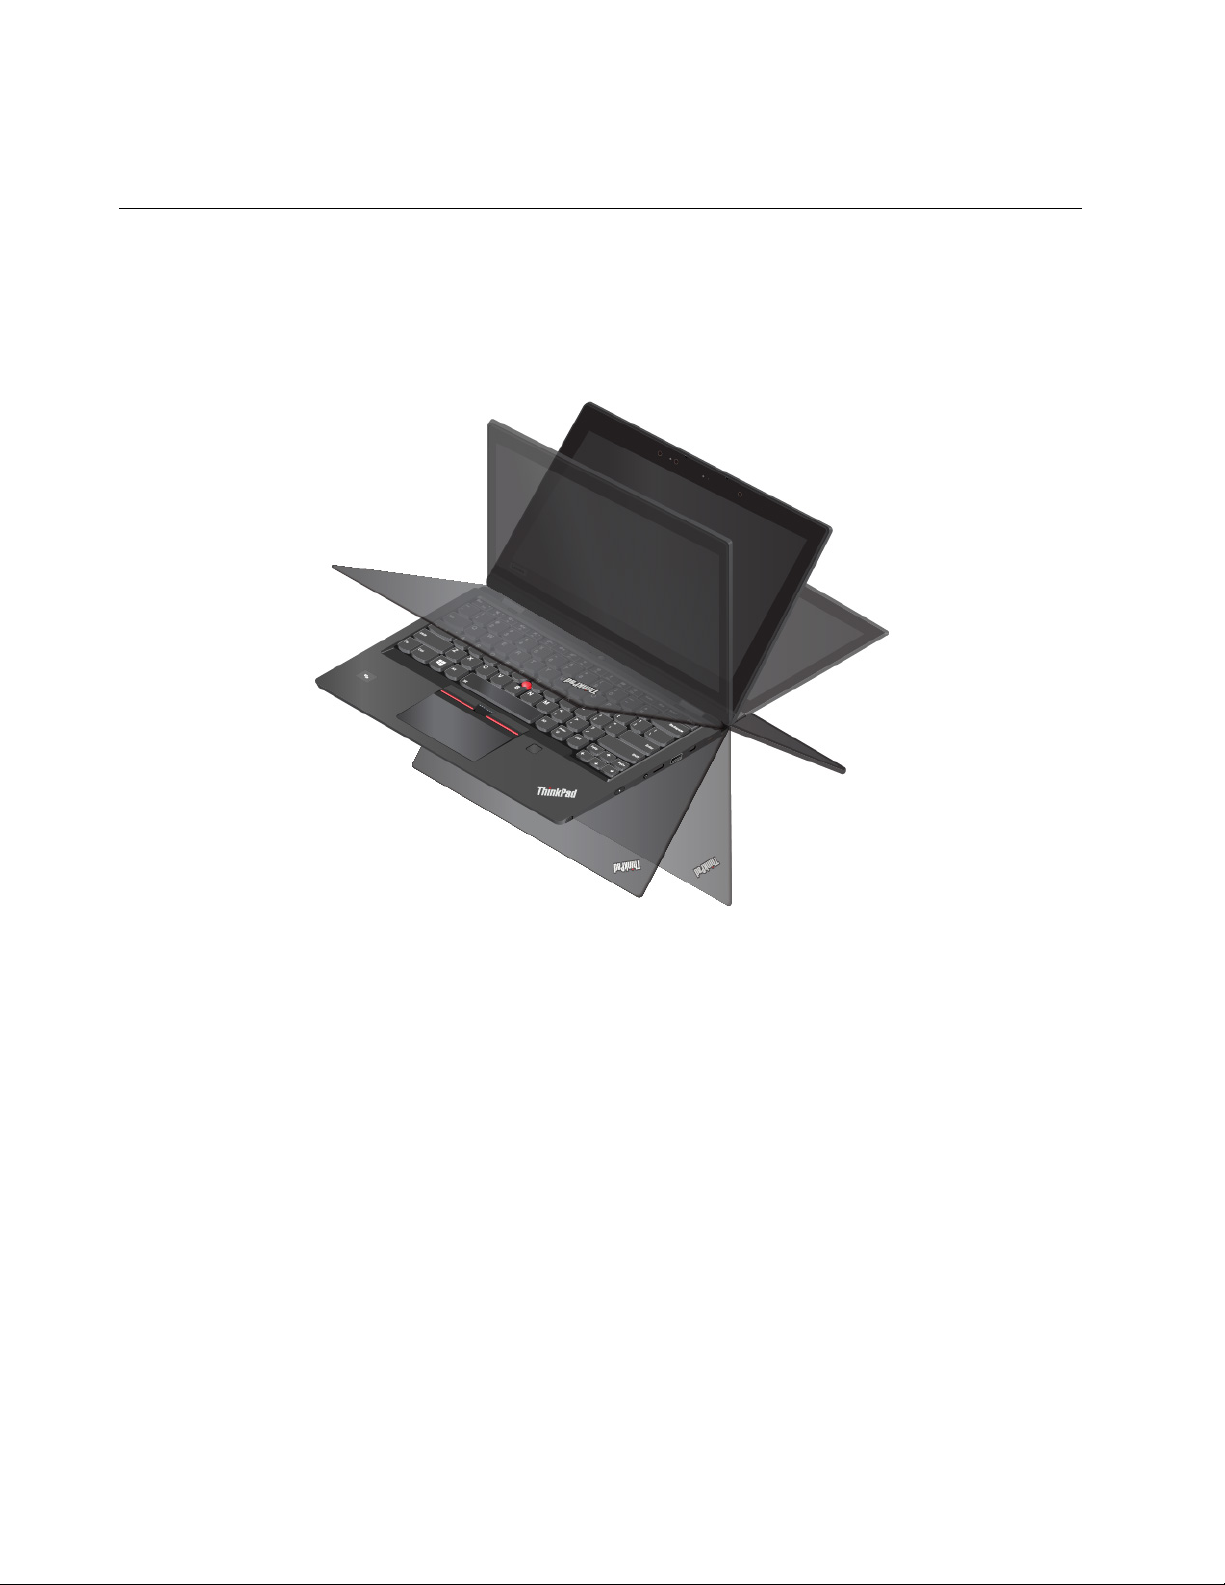
Get to know YOGA modes
Your computer display can be rotated to any angle up to 360 degrees.
Attention: Do not rotate the computer display with too much force, or apply too much force to the upperright or upper-left corner of the computer display. Otherwise the computer display or hinges might get
damaged.
Your computer features the following four YOGA modes. You can switch among different modes according
to your preference.
Note: The keyboard and the pointing devices are automatically disabled in the stand mode, tent mode, and
tablet mode. Use the touch screen to control your computer instead.
24
L390, L390 Yoga, S2 4th Gen, and S2 Yoga 4th Gen User Guide
 Loading...